feathers trip
TRANSCRIPT
8/9/2019 Feathers Trip
http://slidepdf.com/reader/full/feathers-trip 1/7
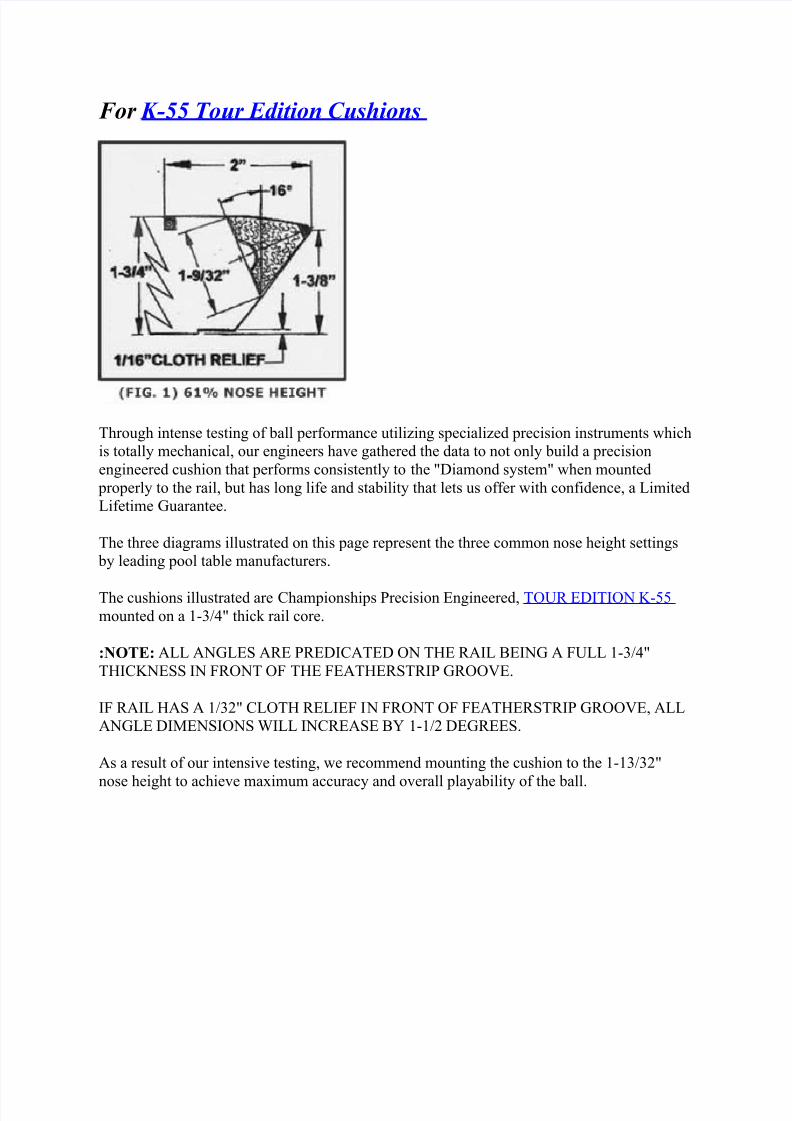
For K-55 Tour Edition Cushions
Through intense testing of ball performance utilizing specialized precision instruments whichis totally mechanical, our engineers have gathered the data to not only build a precisionengineered cushion that performs consistently to the "Diamond system" when mounted
properly to the rail, but has long life and stability that lets us offer with confidence, a LimitedLifetime Guarantee.
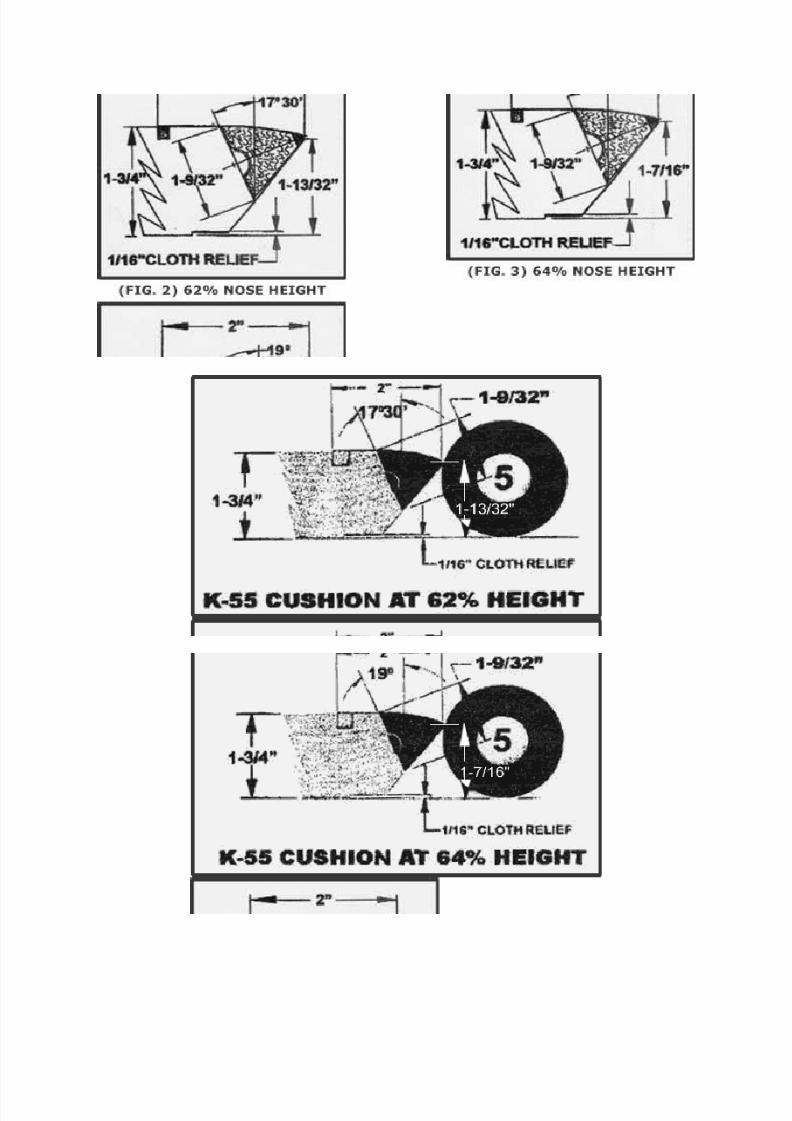
The three diagrams illustrated on this page represent the three common nose height settings by leading pool table manufacturers.
The cushions illustrated are Championships Precision Engineered, TOUR EDITION K-55mounted on a 1-3/4" thick rail core.
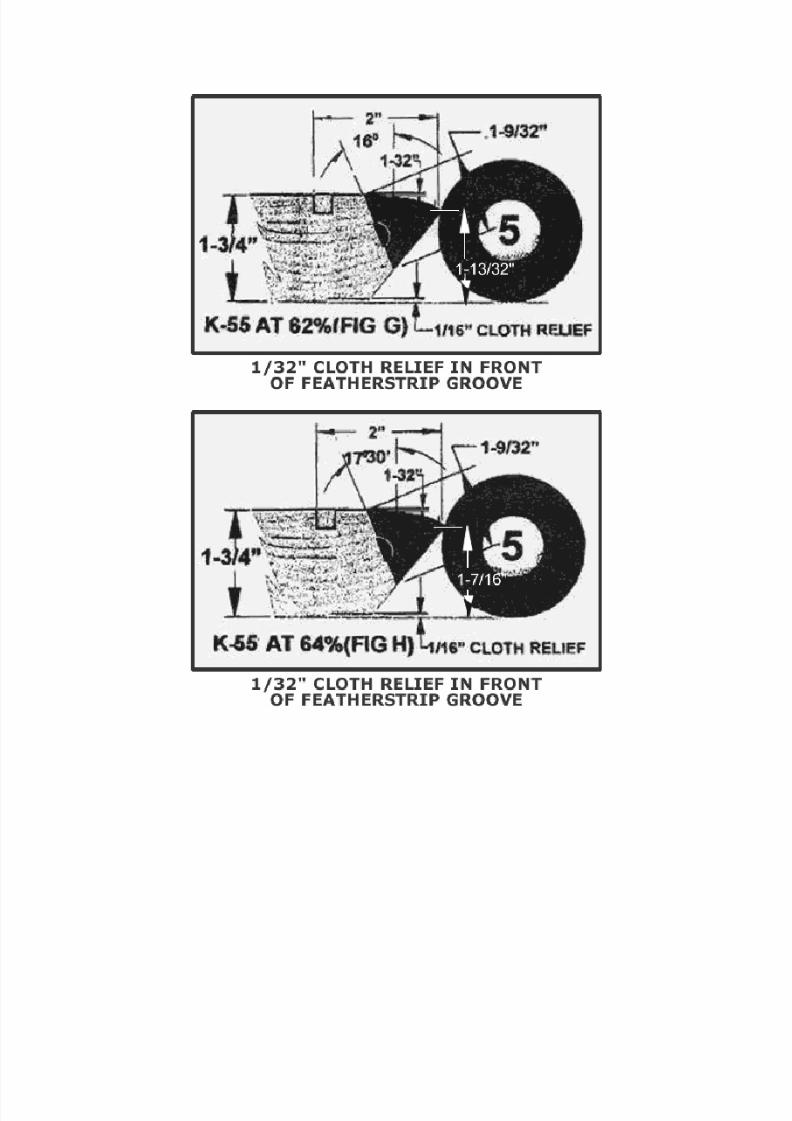
:NOTE: ALL ANGLES ARE PREDICATED ON THE RAIL BEING A FULL 1-3/4"THICKNESS IN FRONT OF THE FEATHERSTRIP GROOVE.
IF RAIL HAS A 1/32" CLOTH RELIEF IN FRONT OF FEATHERSTRIP GROOVE, ALLANGLE DIMENSIONS WILL INCREASE BY 1-1/2 DEGREES.
As a result of our intensive testing, we recommend mounting the cushion to the 1-13/32"
nose height to achieve maximum accuracy and overall playability of the ball.
8/9/2019 Feathers Trip
http://slidepdf.com/reader/full/feathers-trip 2/7
8/9/2019 Feathers Trip
http://slidepdf.com/reader/full/feathers-trip 3/7
8/9/2019 Feathers Trip
http://slidepdf.com/reader/full/feathers-trip 4/7
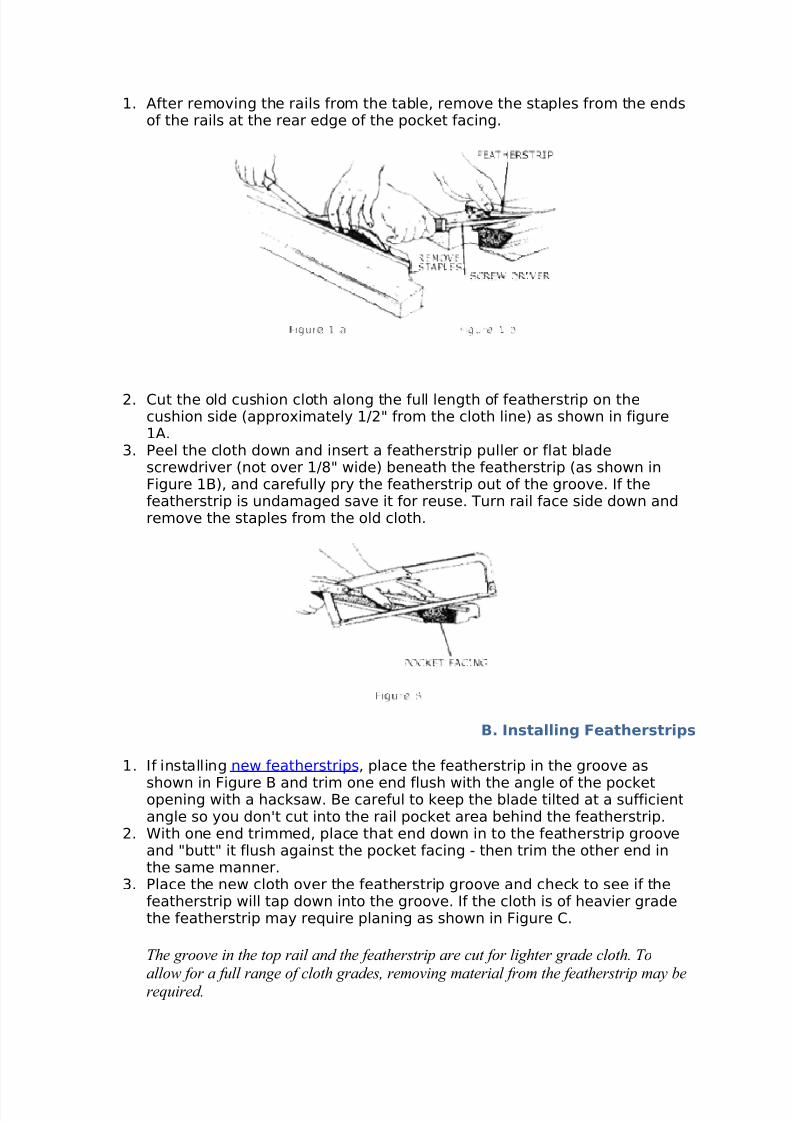
1. After removing the rails from the table, remove the staples from the endsof the rails at the rear edge of the pocket facing.
2. Cut the old cushion cloth along the full length of featherstrip on thecushion side (approximately 1/2" from the cloth line) as shown in figure1A.
3. Peel the cloth down and insert a featherstrip puller or flat bladescrewdriver (not over 1/8" wide) beneath the featherstrip (as shown inFigure 1B), and carefully pry the featherstrip out of the groove. If thefeatherstrip is undamaged save it for reuse. Turn rail face side down andremove the staples from the old cloth.
B. Installing Featherstrips
1. If installing new featherstrips , place the featherstrip in the groove as
shown in Figure B and trim one end flush with the angle of the pocketopening with a hacksaw. Be careful to keep the blade tilted at a sufficientangle so you don't cut into the rail pocket area behind the featherstrip.
2. With one end trimmed, place that end down in to the featherstrip grooveand "butt" it flush against the pocket facing - then trim the other end inthe same manner.
3. Place the new cloth over the featherstrip groove and check to see if thefeatherstrip will tap down into the groove. If the cloth is of heavier gradethe featherstrip may require planing as shown in Figure C.
The groove in the top rail and the featherstrip are cut for lighter grade cloth. Toallow for a full range of cloth grades, removing material from the featherstrip may berequired.

8/9/2019 Feathers Trip
http://slidepdf.com/reader/full/feathers-trip 5/7
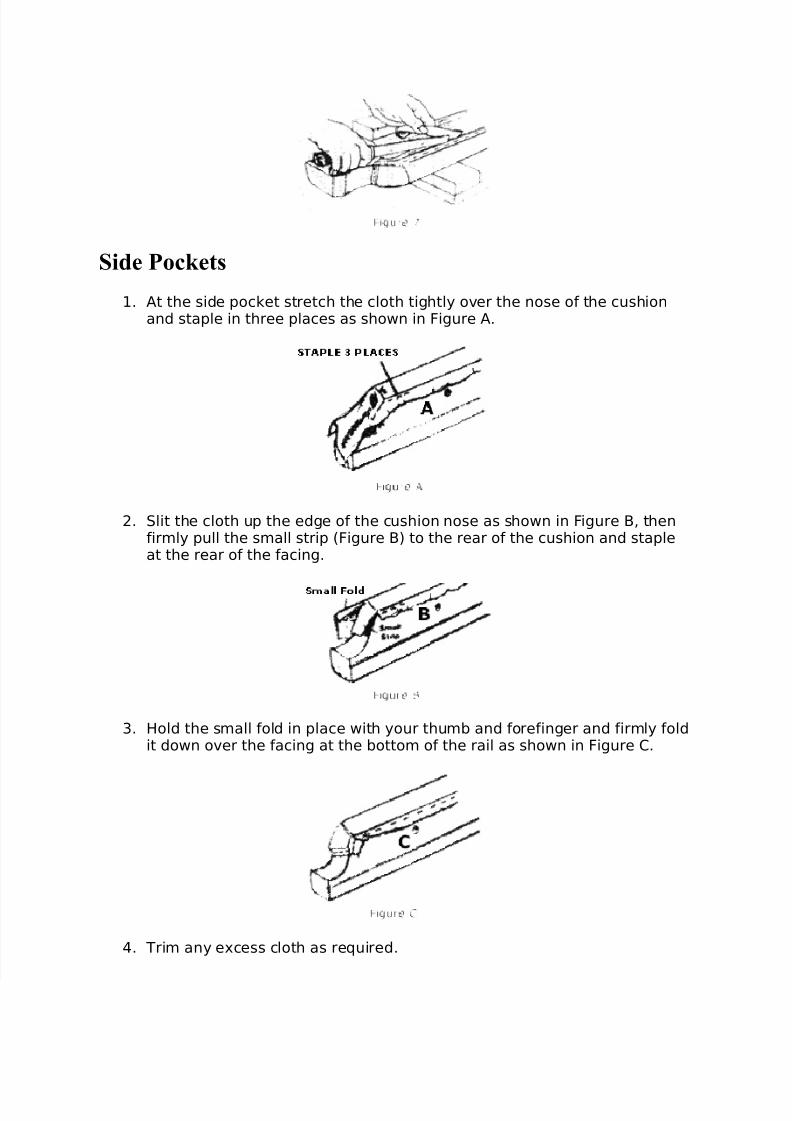
C. Attaching the Cloth - Pocket Tables
Corner Pockets
1. Place the new cloth on the rail with the nap side down. With the nap of thecloth from the left to the right on the end rails, or from designated head tofoot of the table on side rails. The cloth should have an equal amount of
overhang at both ends of the rail and extend 1/2" over the featherstripgroove on the cushion side as shown in Figure 1.
2. Except for approximately 3" at the end of the rail, tap the featherstripdown with the tapping block and hammer as shown in Figure 2.
3. At each end of the rails pull the cloth toward the rubber cushion anadditional 3/4" then tap the remainder of the featherstrip down (Figure 2).
4. Trim the cloth on the cushion side of the featherstrip along the total lengthof the featherstrip as shown in Figure 3.
8/9/2019 Feathers Trip
http://slidepdf.com/reader/full/feathers-trip 6/7
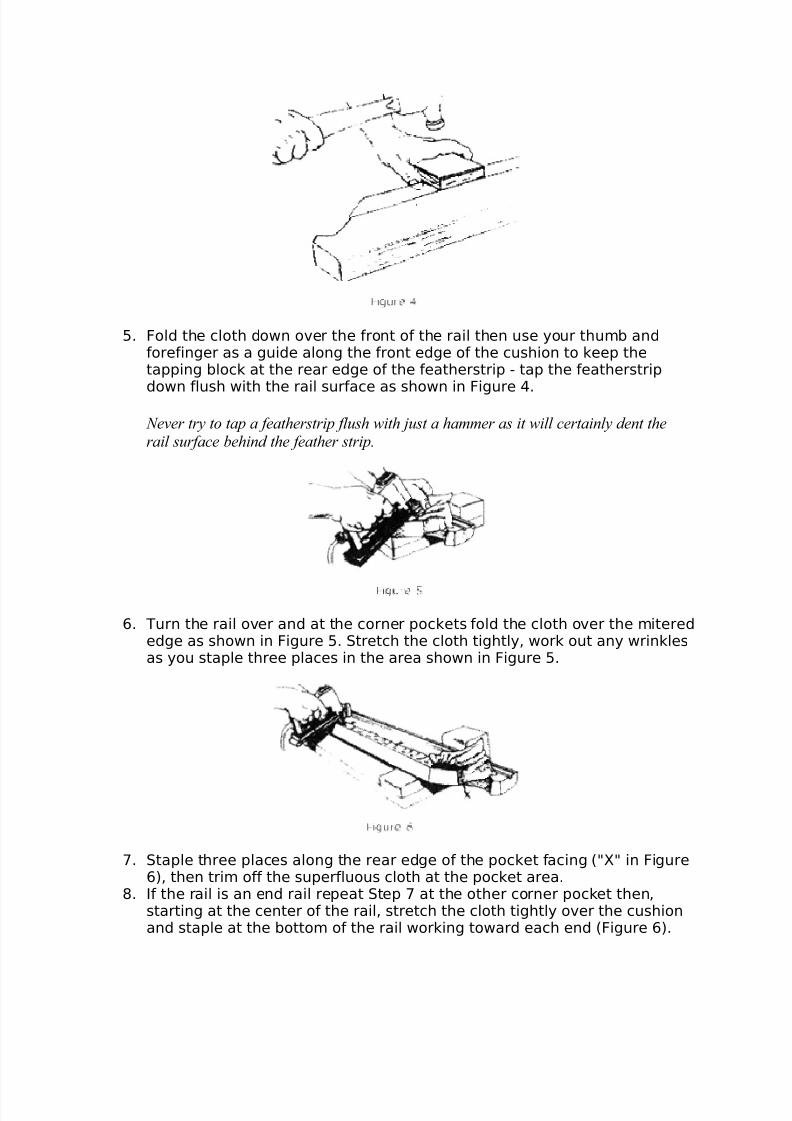
5. Fold the cloth down over the front of the rail then use your thumb andforefinger as a guide along the front edge of the cushion to keep thetapping block at the rear edge of the featherstrip - tap the featherstrip
down flush with the rail surface as shown in Figure 4.
Never try to tap a featherstrip flush with just a hammer as it will certainly dent therail surface behind the feather strip.
6. Turn the rail over and at the corner pockets fold the cloth over the miterededge as shown in Figure 5. Stretch the cloth tightly, work out any wrinklesas you staple three places in the area shown in Figure 5.
7. Staple three places along the rear edge of the pocket facing ("X" in Figure6), then trim off the superfluous cloth at the pocket area.
8. If the rail is an end rail repeat Step 7 at the other corner pocket then,starting at the center of the rail, stretch the cloth tightly over the cushionand staple at the bottom of the rail working toward each end (Figure 6).
8/9/2019 Feathers Trip
http://slidepdf.com/reader/full/feathers-trip 7/7