f10 interactive electronic form · f10 interactive electronic form ... pop-up useful in selecting...
TRANSCRIPT

Health and Safety Executive
F10 Interactive Electronic Form
First Time User Guidance
General navigation of the form 1. The form is made up of 4 web pages. 2. To help you complete the form, the fields marked with an asterisk identify the information requirements of Schedule 1 of The Construction (Design & Management) Regulations 2007. The system, however, allows you to part complete the form should all the information not immediately be available. The system provides a facility to update the information submitted as and when certain information becomes available. The minimum system requirements, before a notification can be sent to HSE, are listed in Annex 1.
3. The KS button at the top right hand corner of the first screen provides access to a list of keyboard shortcuts that you can use as an alternative to the mouse. 4. The first ? button at the top right hand corner of the first screen provides access to the General Form Help and the second ? informs you of any business rules that may apply when completing the first page. An ? beside a field provides access to the field level help and further expands on any non standard business scenarios that may apply for that particular field.
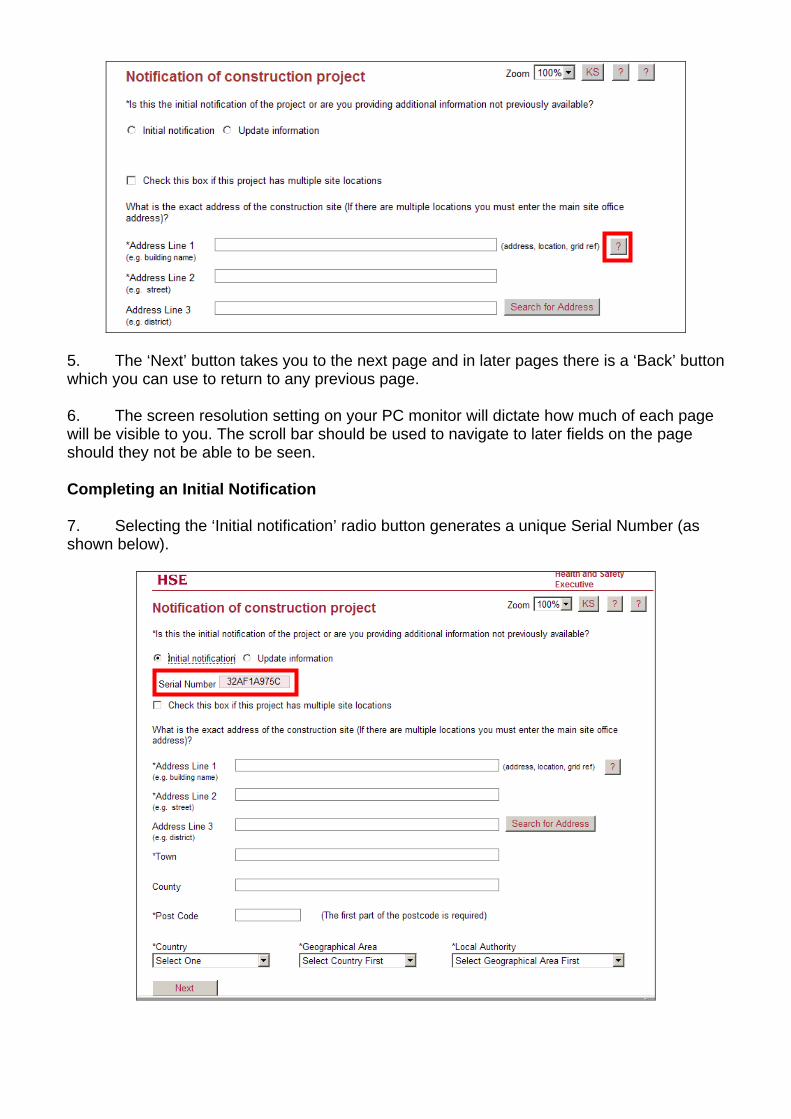
5. The ‘Next’ button takes you to the next page and in later pages there is a ‘Back’ button which you can use to return to any previous page. 6. The screen resolution setting on your PC monitor will dictate how much of each page will be visible to you. The scroll bar should be used to navigate to later fields on the page should they not be able to be seen. Completing an Initial Notification 7. Selecting the ‘Initial notification’ radio button generates a unique Serial Number (as shown below).

Site Address 8. Please note that the ‘Search for Address’ button provides you with a link to the ‘Quick Address System’ which you can use to search for, and automatically populate, the site details. Please note that you must have an entry in either Address Line 1 or Address Line 2.
9. In the example below, I have clicked the ‘Search for Address’ button which has taken me into the ‘Quick Address System’, I’ve entered part of a post code and then clicked the ‘Search Again’ button (but you could enter the Street or any other information and then click on the ‘Search Again’ button – this is particularly useful if you don’t know the postcode).

10. The ‘Quick Address System’ has displayed all the addresses starting with the post code of L20 7H.
11. The one I want is Redgrave Court. If you highlight the address and then click on the ‘Select Highlighted Address’, the details will automatically populate into the F10 Form.

12. You don’t have to use the ‘Quick Address System’. The alternative is to enter the details directly into the required fields. 13. For projects involving tunnelling, pipeline works etc, you will need to refer to the on-line guidance to help you complete this section of the form. Selecting a Local Authority for the Construction Site 14. To help you determine which Local Authority to select, we’ve provided a method to enable you to narrow down your search. You must first select the Country.
15. Then select the relevant geographical area within that country.

16. Then select the relevant Local Authority within that geographical area.
17. In this instance, I want England, Merseyside and Sefton.
18. Page 1 is now complete and you can move on to Page 2 by clicking on the ‘Next’ button.

Project details 19. Page 2 requires you to provide details of the project itself – what is involved, the duration of the works, numbers of contractors on-site etc.
20. The first required field is a brief description of the project. You will need to select an entry that best reflects the primary works that will be undertaken at the site. A full list of the options available can be found in Annex 2.

21. The second required field asks for a description of the construction work involved. This is a free text field in which you can provide more details. For example, if you have indicated on the first page that the work will be undertaken at multiple sites, then a list of those sites can be provided in this field. 22. The remaining fields should be self explanatory. You may, however, find the calendar pop-up useful in selecting the planned date for the construction phase. Please see below.
23. Click on the calendar pop-up and select the required date.
24. When entering details of the planned duration you should only notify HSE of a project that is likely to last longer than 30 days. Any day on which construction work is carried out (including holidays and weekends) should be counted, even if the work on that day is of short duration. You must enter one or more weeks in the duration field.

25. When entering details in ‘the planned number of contractors on the site’ field, please indicate the maximum planned number of contractors that could potentially be on site at any one time. Enter a maximum of 99 contractors even where the number of contractors is greater than this. 26. When you have completed page 2 you can click on the ‘Next’ button to access page 3. This page requires you to enter the details of all the Duty Holders involved with the project.
27. A notification cannot be saved unless the details of the CDM Coordinator have been provided, including the coordinator’s name and email address. We need this information in order to confirm that the completed form has been received in HSE. The email will also verify the details you require to recall the form should you wish to make any later amendments. The ‘Search for Address’ button operates in exactly the same way as described earlier in paragraphs 9 to 11. 28. Once the CDM coordinator details have been entered, you can click on ‘Save’. The details will then transfer to the Duty Holder table at the bottom of the page.

29. You can then select another Role and provide the appropriate details. As each Duty Holder details are saved, the Duty Holder table will populate with the name and role of that individual or company.
30. If you want to edit the Duty Holder details, you need to highlight the entry in the Duty Holder table and click on the ‘Edit’ button.

31. When you have finished entering all the Duty Holder information, you can click on the ‘Next’ button to access the 4th and final page.
32. You must select one of the ‘Declaration’ check boxes and enter the notifier’s name. The Date field will automatically populate when you select one of the check boxes.

33. Before submitting the form to HSE, you can print and/or save the form to your hard disc (or any other storage area). To do this, click on the ‘Print/Save form details’ button.
34. This will then present ALL the data entered on the form into a more use friendly format in a separate pop-up window. Please note that for security reasons, the serial number of the notification is not displayed on this copy.

35. At this point, using standard windows options, you can print and/or save the file but, be careful to select the windows options for the pop-up window and not the form.
36. If you wish to save the file locally, we advise printing the form to an Adobe PDF file by clicking File, Print and choosing the Adobe PDF (or similar PDF printing format)

NB: If you wish to save/print in a larger font size, save the summary as an HTML page, open the file and click File, Edit with Microsoft Office Word (or other word processing package you have available). This will give you word processing functionality.
37. You’re now ready to submit the form to HSE. This is simply achieved by pressing the ‘Submit’ button.

38. Please be patient – processing the form will take a few seconds. When the process is complete, you will receive the following pop up window.
39. This will prompt a message to be sent to the email account entered for the CDM Coordinator which will be entitled as follows:-
40. The email acknowledgment will contain the following information i.e. confirmation of the construction site address and the serial number of the notification/email address details that will be required to update the initial notification at any later date.

Providing additional information 41. To provide additional information, you need to be armed with the serial number of the initial (or subsequent) notification and the CDM Coordinator’s email address. You then need to access the form and select the ‘Update information’ radio button. This is will present the two fields you need to enter before you can retrieve the notification.
42. Enter the serial number and email address and click on the ‘Retrieve Details’ button. 43. This will return the details of the original notification and you can navigate through the form updating each page as necessary. The principles and rules to complete the form when you supply updated information are the same as for an initial notification. 44. Before submitting an amended notification to HSE, please note that the declaration on page 4 will need to be completed again. 45. Once the amended notification has been submitted, you will receive a further ‘on screen’ acknowledgement as well as an email confirmation of receipt. Client Declaration 46. On the printed/saved copy of the form you submit, we have provided some text to enable you (as the CDM Coordinator) to acquire the Client’s signature. This is for your own purposes only – HSE does not require you to send this information to HSE.

Annex 1 - Minimum System Requirements
Field Name Status PAGE 1 Initial/Additional radio button Mandatory Address Line 1 Address Line 2
Conditional Mandatory – you must have an entry in Address Line 1 or Address Line 2
Town Mandatory Post Code Postcode 1 is mandatory and
Postcode 2 is optional Country Mandatory Geographical Area Mandatory Local Authority Mandatory PAGE 2 Type of Project Mandatory Brief Description of Project Mandatory Planned date for the start of
the construction phase Mandatory
Planned duration of the construction phase
Mandatory
PAGE 3 Name Mandatory for all known Duty
Holders Email Address Mandatory for CDM
Coordinator in order to verify acceptance of notification
Address Line 1 Address Line 2
Conditional Mandatory – you must have an entry in either Address Line 1 or Address Line 2
Town Mandatory Post Code Postcode 1 is mandatory and
Postcode 2 is optional Country Mandatory PAGE 4 Declaration At least one check box must
be selected Name Mandatory

Annex 2 - Brief Description of Project
Asbestos Building Services Civil Engineering - New Build - Bridge Civil Engineering - New Build - Road Civil Engineering - New Build - Waterway Civil Engineering - New Build - Docks Civil Engineering - Repair - Bridge Civil Engineering - Repair - Road Civil Engineering - Repair - Waterway Civil Engineering - Repair - Docks Civil Engineering - Other Demolition/Dismantling - House Demolition/Dismantling - Factory Demolition/Dismantling - Chimney Demolition/Dismantling - Other New Build - Commercial Premises - Shop New Build - Commercial Premises - Warehouse New Build - Commercial Premises - Factory New Build - Commercial Premises - Other New Build - Residential Premises - Houses 0-5 New Build - Residential Premises - Houses 5-10 New Build - Residential Premises - Houses 10-20 New Build - Residential Premises - > 20 New Build - Residential Premises - Flats 0-5 Storey New Build - Residential Premises - Flats 5-10 Storey New Build - Residential Premises - Flats 10-20 Storey New Build - Residential Premises - > 20 Storey New Build - Residential Premises - Other New Build - Other Utilities Work Painting & Decorating Refurbishment (incl. Repair & Redecoration) - Commercial Refurbishment (incl. Repair & Redecoration) - Residential Refurbishment (incl. Repair & Redecoration) - Other Road and path Maint. Mechanical & Electrical (M&E) - Installation Mechanical & Electrical (M&E) - Repair Railway Related Construction Work - Demolition/Dismantling Railway Related Construction Work - New Build Railway Related Construction Work - Repair Roofwork Repair - Residential Roofwork Repair - Commercial Roofwork Repair - Other Groundworks - Piling Groundworks - Tunnelling Groundworks - Underpinning Groundworks - Other Site investigation Telecommunications towers Tunnel Water Project Other - Please state details