ez320 mobile printer - zebra technologies · media black bar sensor ... thank you for choosing our...
TRANSCRIPT

Mobile PrinterEZ320™
Zebra Technologies Corporation475 Half Day Road, Suite 500Lincolnshire, IL 60069Phone: 1.847.634.6700 or 1.800.423.0442Fax: 1.847.913.8766
P1027984-001January, 2011

2
EZ320 User Guide
continued
Table of Contents
Proprietary Statements ............................................................................................4Document Conventions ...........................................................................................6Introduction to the EZ320 .......................................................................................7Unpacking and Inspection ............................................................... 7Reporting Damage ........................................................................... 7
Getting Ready to Print ........................................................................................... 10Battery ............................................................................................. 10
Installing and Removing the Battery ..........................................................10EZ320 Single Bay Charger ..................................................................................... 14
Charger Safety .............................................................................................15Loading the Media (80 mm) ........................................................... 1660 mm Roll of Media ...................................................................... 18Media Black Bar Sensor ................................................................ 18Operator Controls .......................................................................... 19Verify the Printer Is Working ......................................................... 21
Printing a Configuration Label ....................................................................21Connecting the Printer ................................................................... 21
Wireless Communications with Bluetooth™ ..............................................23Bluetooth Networking Overview ................................................................23About Bluetooth Security ...........................................................................23
Carrying the Printer ................................................................................................25Belt Strap .....................................................................................................25Nylon Soft Case ...........................................................................................26
Preventive Maintenance ....................................................................................... 27Extending Battery Life ................................................................... 27General Cleaning Instructions ....................................................... 28
Troubleshooting ...................................................................................................... 30Interpreting Indicators ................................................................... 30Troubleshooting Topics ................................................................. 30Resetting an EZ320 Printer ............................................................ 32
Determining Your Printer Version ...............................................................32Troubleshooting Tests ................................................................... 33
Printing a Configuration Label ....................................................................33Communications Diagnostics .....................................................................33Calling Technical Support ...........................................................................34
Specifications ............................................................................................................ 38Printing Specifications ...............................................................................38Memory and Communications Specifications, EZ320 ..............................38Media Specifications ...................................................................................39Font and Bar Code Specifications for EZ320 .............................................40USB Communications Port .........................................................................43Physical, Environmental and Electrical Specifications ..............................43EZ320 Accessories .....................................................................................45
Appendix A ................................................................................................................ 45Interface Cables ...........................................................................................45USB Cable ....................................................................................................45More Interface Cables ................................................................................45
Appendix B................................................................................................................. 45

3
EZ320 User Guide
Maintenance Supplies .................................................................................45Appendix C ................................................................................................................46
Media Supplies ............................................................................................46EZ320 Media ................................................................................................46
Appendix D ................................................................................................................ 47Product Support ..........................................................................................47Product Support Contacts ..........................................................................48
Appendix E ................................................................................................................. 49Product Documentation ..............................................................................49
Index ............................................................................................................................. 50Patent Numbers ....................................................................................................... 51

4
EZ320 User Guide
Proprietary Statements
This manual contains proprietary information of Zebra Technologies Corporation. It is intended solely for the information and use of parties operating and maintaining the equip-ment described herein. Such proprietary information may not be used, reproduced, or dis-closed to any other parties for any other purpose without the expressed written permission of Zebra Technologies Corporation.Product ImprovementsSince continuous product improvement is a policy of Zebra Technologies Corporation, all specifications and signs are subject to change without notice.
NCC WarningAccording to “Administrative Regulations on Low Power Radio Waves Radiated Devices” Without permission granted by the NCC, any company, enterprise, or user is not allowed to change frequency, enhance transmitting power or alter original characteristic as well as performance to an approved low power radio-frequency devices. The low power radio-frequency devices shall not influence aircraft security and interfere legal communications; If found, the user shall cease operating immediately until no interference is achieved. The said legal communications means radio communications is operated in compliance with the Telecommunications Act.The low power radio-frequency devices must be susceptible with the interference from le-gal communications or ISM radio wave radiated devices.
“經型式認證合格之低功率射頻電機,非經許可,公司、商號或使用者均不得擅自變更頻率、加大功率或變更原設計
之特性及功能。低功率射頻電機之使用不得影響飛航安全及干擾合法通信;經發現有干擾現象時,應立即停用,並改
善至無干擾時方得繼續使用。前項合法通信,指依電信法規定作業之無線電通信。低功率射頻電機須忍受合法通信
工業、科學 醫療用電波輻射性電機設備之干擾”
Changes or modifications to this unit not expressly approved by Zebra Technologies Corpo-ration could void the user’s authority to operate this equipment.
Agency Approvals and Regulatory Information • Design certified by TUV • China SRRC • EN60950: 2006 Safety Standard • Taiwan NCC • China CCC Liability DisclaimerInasmuch as every effort has been made to supply accurate information in this manual, Zebra Technologies Corporation is not liable for any erroneous information or omissions. Zebra Technologies Corporation reserves the right to correct any such errors and disclaims liability resulting therefrom.No Liability for Consequential DamageIn no event shall Zebra Technologies Corporation or anyone else involved in the creation, production, or delivery of the accompanying product (including hardware and software) be liable for any damages whatsoever (including, without limitation, damages for loss of business profits, business interruption, loss of business information, or other pecuniary loss) arising out of the use of or the results of use of or inability to use such product, even if Zebra Technologies Corporation has been advised of the possibility of such damages. Because some states do not allow the exclusion of liability for consequential or incidental damages, the above limitation may not apply to you.
continued

5
EZ320 User Guide
CopyrightsThe copyrights in this manual and the label print engine described therein are owned by Zebra Technologies Corporation. Unauthorized reproduction of this manual or the software in the label print engine may result in imprisonment of up to one year and fines of up to $10,000 (17 U.S.C.506). Copyright violators may be subject to civil liability.This product may contain ZPL®, ZPL II®, and ZebraLinktm programs; Element Energy Equal-izer® Circuit; E3®; and AGFA fonts. Software © ZIH Corp. All rights reserved worldwide.ZebraLink and all product names and numbers are trademarks, and Zebra, the Zebra logo, ZPL, ZPL II, Element Energy Equalizer Circuit, and E3 Circuit are registered trademarks of ZIH Corp. All rights reserved worldwide.
Monotype®, Intellifont® and UFST® are trademarks of Monotype Imaging, Inc. registered in the United States Patent and Trademark Office and may be registered in certain jurisdic-tions. AndyTM , CG PalacioTM, CG Century SchoolbookTM, CG TriumvirateTM, CG TimesTM, Monotype KaiTM, Monotype MinchoTM and Monotype SungTM are trademarks of Monotype Imaging, Inc. and may be registered in some jurisdictions. HY Gothic HangulTM is a trademark of Hanyang Systems, Inc.AngsanaTM is a trademark of Unity Progress Company (UPC) Limited.Andale®, Arial®, Book Antiqua®, Corsiva®, Gill Sans®, Sorts® and Times New Roman® are trademarks of The Monotype Corporation registered in the United States Patent and Trade-mark Office and may be registered in certain jurisdictions.Century Gothic™, Bookman Old StyleTM and Century SchoolbookTM are trademarks of The Monotype Corporation and may be registered in certain jurisdictions. HGPGothicB is a trademark of the Ricoh company, Ltd. and may be registered in some ju-risdictions.UniversTM is a trademark of Heidelberger Druckmaschinen AG, which may be registered in certain jurisdictions, exclusively licensed through Linotype Library GmbH, a wholly owned subsidiary of Heidelberger Druckmaschinen AG.Futura® is a trademark of Bauer Types SA registered in the United States Patent and Trade-mark Office and may be registered in some jurisdictions.TrueType® is a trademark of Apple Computer, Inc. registered in the United States Patent and Trademark Office and may be registered in certain jurisdictions.All other product names are the property of their respective owners.
All other brand names, product names, or trademarks belong to their respective holders.©2010 ZIH Corp.

6
EZ320 User Guide
Document Conventions
The following conventions are used throughout this docu-ment to convey certain information:
If you are viewing this guide online, click the underlined text to jump to a related Web site. Click on italic text (not under-lined) to jump to that location in this manual.
Cautions, Important, and Note
Caution • Warns you of the potential for electrostatic discharge.
Caution • Warns you of a potential electric shock situation.
Caution • Warns you of a situation where excessive heat could cause a burn
Caution • Advises you that failure to take or avoid a specific action could result in physical harm to you.
Caution • Advises you that failure to take or avoid a specific action could result in physical harm to the hardware.
Important • Advises you of information that is essential to complete a task.
Note • Indicates neutral or positive information that emphasizes or supplements important points of the main text.

7
EZ320 User Guide
Introduction to the EZ320
Thank you for choosing our Zebra® EZ320™ Mobile Printer. This rug-ged printer is sure to become a productive and efficient addition to your workplace thanks to its innovative design. Because it is made by Zebra Technologies, you’re assured of world-class support for all of your bar code printers, software, and supplies.
• This user’s guide gives you the information you will need to operate the EZ320 printer.
• The EZ320 printer uses the CPCL programming language. To create and print labels using the CPCL language, refer to the Mobile Printing Systems CPCL Programming Guide and our ZebraDesigner™ Pro and Zebra Set-up Utilities programs which are all available at www.zebra.com.
Unpacking and InspectionInspect the printer for possible shipping damage:• Check all exterior surfaces for damage.• Open the media cover (refer to “Loading the Media” in
the Getting Ready to Print section) and inspect the media compartment for damage.
In case shipping is required, save the carton and all packing material.Reporting Damage
If you discover shipping damage:• Immediately notify and file a damage report with the ship-
ping company. Zebra Technologies Corporation is not re-sponsible for any damage incurred during shipment of the printer and will not cover the repair of this damage under its warranty policy.
• Keep the carton and all packing material for inspection.• Notify your authorized Zebra re-seller.

8
EZ320 User Guide
7
2
1213
9
11
1
8
1. Paper Feed Button 2. Error Status Indicator 3. Bluetooth Indicator 4. Charge Indicator 5. Battery Status Indicator 6. Power Button 7. Platen 8. Printhead 9. Media/Black Bar Sensor 10. Tear Bar 11. Media Cover 12. USB Port13. Battery Charging Receptacle
Figure 1: EZ320 Overview
5
4
63
10

9
EZ320 User Guide
14. Media Cover Tab15. Belt Strap Opening 16. Battery Pack
16
15
14
EZ320 Overview (cont.)

10
EZ320 User Guide
Getting Ready to Print
BatteryInstalling and Removing the Battery
Important • Batteries are shipped partially charged. Remove any protective packaging from new battery packs prior to use.
1. Insert the battery into the printer as shown in Figure 2 using the outline of the battery to match the outline of the battery com-partment.
2. Rock the battery into the printer as shown until it locks in place.When the battery is first installed, and the printer is turned on, the
battery status indicators will light up to indicate if the battery is fully charged (see “Charging the Battery” below and “Operator Controls”).
You must charge the batteries fully before using them for the first time.
Figure 2: Installing the Battery
Insert the front edge of the battery in the battery compartment and lock the clip in place.

11
EZ320 User Guide
Press in on the locking clip to disengage the battery.
Lift up on the battery in the direction shown and remove from the battery compartment.
Figure 3: Removing the Battery

12
EZ320 User Guide
When the battery is first installed, the printer power and charge indicators should indicate the battery is not fully charged (see “Charging the Battery” below and “Operator Controls”).
You must charge the battery fully before using the printer for the first time.
Charging the BatteryPreparing the Power Supply
Before charging the battery for the first time, you must pre-pare the Power Supply. Refer to Figure 4 below:
Figure 4: Preparing the Power Supply
continued
1. Remove the power sup-ply from its box. Remove and discard the shipping ring from the mains recep-tacle cavity.
Shipping RingRemove and discard
2. Verify that the mains adapter shipped with your Printer is the correct one for your region.
Mains Adapter3. The mains adapter will be pre-installed into the Power Supply by hooking the top edge into the mains recep-tacle cavity, and rotating it until it snaps into place.
China/Taiwan-220 VAC

13
EZ320 User Guide
Charging the battery
Refer to Figure 5. 1. Plug the Charger Power Supply into the appropriate A.C.
wall receptacle. Then insert the charge cable into the printer’s charger jack.
2. The printer’s charger indicator will indicate the status of the charger as follows:
• An amber light indicates the battery is charging, and that the battery is less than 90% charged.
• A green light indicates the battery is fully charged. The battery is ready for use.
Approximate Charge Times :
Batteries are fully charged after 2.5 hours from the low-bat-tery shut-off state. Partially discharged batteries will take less time to charge.
NOTES: Use of the printer while charging will increase charge times. Charge times are for completely discharged batteries.
As a safety feature the battery will stop charging after 4.5 hours regardless of the battery’s charge state.
Charger Jack12 VDC
Figure 5: Charging the Battery
EZ320 Charger Power Supply p/n AT17947-1100-240 VAC 50-60 Hz 0.6A Input; 12 VDC 1.25 A output Plug into AC receptacle

14
EZ320 User Guide
The Single Bay Charger is a charging system for use with the lithium-ion battery used in the EZ320 printer. The charger uses a 2 blade AC connector on the back of the charger that plugs into the wall outlet and will fully charge the battery in an aver-age time of 2.5 hours.
Charging Status Indicators
The Single Bay Charger features two LED indicators, one green and one amber, which provide battery status to the user as described in the table below.
DC Power Input Battery Status Charging Indicator
Full Indicator
n/a Battery Not Present OFF OFF
Present Fully Charged OFF Green
Present Charging Amber OFF
The amber LED will have battery charge icon next to
it to indicate that this is the charging status indicator. Likewise, the word “OK” will indicate that the green LED is the fully charged status indicator.
EZ320 Single Bay Charger
EZ320 Battery
Figure 6: Docking Battery in Single Bay Charger

15
EZ320 User Guide
Battery Safety
Caution • Avoid accidental short circuiting of any battery. Allowing battery terminals to contact conductive material will create a short circuit which could cause burns and other injuries or could start a fire.
Important • Always dispose of used batteries properly. Refer to Appendix D for more battery recycling information.
Caution • Use of any charger not approved specifically by Zebra for use with its batteries could cause damage to the battery pack or the printer and will void the warranty.
Read carefully and always observe the safety guidelines for Li-Ion batteries provided with each Battery Pack.
Charger Safety
Do not place the Single Bay Charger in locations where liquids or metallic objects may be dropped into the charging bay.
16
EZ320 User Guide
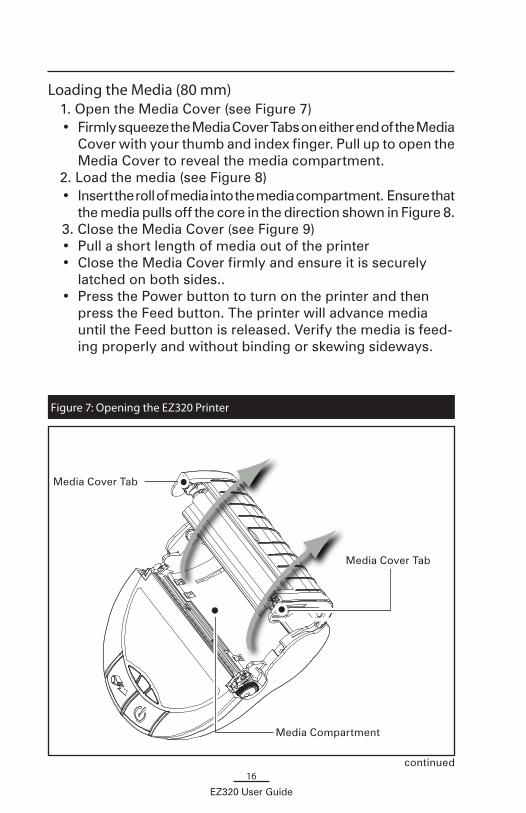
Loading the Media (80 mm)1. Open the Media Cover (see Figure 7) • Firmly squeeze the Media Cover Tabs on either end of the Media
Cover with your thumb and index finger. Pull up to open the Media Cover to reveal the media compartment.
2. Load the media (see Figure 8)• Insert the roll of media into the media compartment. Ensure that
the media pulls off the core in the direction shown in Figure 8. 3. Close the Media Cover (see Figure 9) • Pull a short length of media out of the printer• Close the Media Cover firmly and ensure it is securely
latched on both sides..• Press the Power button to turn on the printer and then
press the Feed button. The printer will advance media until the Feed button is released. Verify the media is feed-ing properly and without binding or skewing sideways.
Figure 7: Opening the EZ320 Printer
continued
Media Compartment
Media Cover Tab
Media Cover Tab

17
EZ320 User Guide
1
2
Feed Button
Figure 8: Installing Media
Media Roll
Note direction media pulls off the roll.
Media Cover
Pull a short length of me-dia out of the printer
Figure 9: Closing the Media Cover
Ensure both sides of the media cover are securely latched when closed.

18
EZ320 User Guide
60 mm Roll of MediaThe EZ320 printer also supports a 60 mm roll of media
which requires the installation of two plastic media spac-ers. The media spacers are available through optional kit p/n P1031604. Contact Zebra Technologies for more information.
Media Black Bar Sensor The EZ320 media black bar sensor default position for stan-
dard 80mm media is located on the right side of the media compartment when looking at the printer from the front (as shown below). There is also an alternate position for 80mm media on the left side and two (2) positions for 60mm media (one on the right side and one on the left). In all cases only one sensor position will be populated at a time. Which sensor po-sition is populated is dependant on the size of the media and location of the black bar on the media. Descriptions of all four (4) positions are detailed below.
Used with 80 mm paper, black bar on left.
Used with 60 mm paper, black bar on left.
Used with 60 mm paper, black bar on right. Default position
used with 80 mm paper, black bar on right (sensor not visible).
Figure 10: Black Bar Sensor Positions

19
EZ320 User Guide
Operator ControlsEZ320 printer controls are detailed in Figure 11 on the fol-
lowing page.The printer has two control buttons and four multipurpose
indicators.The Power Button turns the printer on and off.
The Feed Button advances a length of media until it is released.
The Green/Amber indicator to the left of the Power Button indicates the status of the printer’s built-in charger:
• The indicator is off indicates the battery is not being charged.
• If the indicator is amber the battery is being charged.• If the indicator is green, the battery is fully charged.
The Blue Bluetooth Indicator between the Power and Feed but-tons has two states:
• A solid blue indicator means Bluetooth is connected and paired with no data transfer activity.
• A rapidly blinking blue light indicates a transfer of data.
The Amber Indicator to the right of the Feed button (Fig. 11) is an error indicator.
• An unlit indicator means there is no error condition and the printer can be used.
• A blinking (and beeping) indicator could mean one of three conditions exist, which will inhibit printer operation: 1. There is no media loaded. 2. The media cover is open. 3. If both the above conditions are met and the error light is
still flashing, there could be no firmware loaded in the printer, or the firmware could have become corrupted.
The Three Green LED’s just above the product I.D. label is a battery status indicator.
• Three LED’s lit represents 100% charge.• Two LED’s lit represents 66% charge.

20
EZ320 User Guide
• One LED lit represents 33% charge. This LED will be clos-est to the minus sign on the battery status icon and will blink and beep to alert the user of a low battery condi-tion.
Figure 11: EZ320 Printer Controls
Power ButtonPress until power/battery lights turn on, then release. (Power on takes approx. 0.75 sec.) Press again to turn unit off.
Feed ButtonPress to advance the media. Re-lease to stop.
Battery Status IndicatorThree green LED’s indicate battery’s level of charge (i.e. 33%, 66%, 100%). LED closest to minus sign will blink green at low battery warning and beeper will sound.
Charge Indicator (Green/Amber)
Solid green indicates a fully charged battery. Solid amber in-dicates the battery is charging.
Error Status Indicator (Amber)When off Indicates normal operation. Blinking amber LED indicates either no media or that the media compartment is open and beeper will sound.
Bluetooth Indicator (Blue)Solid blue indicates connected. Rapid blinking blue indicates data is being trans-ferred.

21
EZ320 User Guide
Verify the Printer Is WorkingBefore you connect the printer to your computer or portable data
terminal, make sure that the printer is in proper working order. You can do this by printing a configuration label using the “two key reset” method. If you can’t get this label to print, refer to “Troubleshooting”.Printing a Configuration Label
1. Turn the printer off. Load the media compartment with journal media (media with no black bars printed on the back)
2. Press and hold the Feed Button.3. Press and hold the Power button and keep the Feed button
pressed. 4. When the printer turns on and printing starts, release the Power
button and then release the Feed button. The unit will print a line of interlocking “x” characters to
ensure all elements of the print head are working, print out the version of software loaded in the printer and then print two re-ports.
The first report indicates model, ROM version, serial num-ber, etc. The second report prints approximately 10 seconds after the first report and prints out more detailed information on the printer’s configuration and parameter settings. If no second report appears, there is no application loaded. (See the Troubleshooting Section for sample printouts and a further discussion on how to use the configuration label as a diagnos-tic tool.)
Connecting the PrinterThe printer must establish communications with a host ter-
minal which sends the data to be printed. Communications occur in two basic ways:
• Via a cable using the USB 2.0 protocol. USB drivers are includ-ed in the Zebra DesignerDriver which can be downloaded from www.zebra.com.
• By means of a Bluetooth short range radio link.

22
EZ320 User Guide
Cable Communication
Caution • The printer should be turned off before connecting or disconnecting the communications cable.
The mini USB Type B connector on the cable plugs into the printer. The connectors are keyed to assure correct alignment; do not try to force the cable if it does not plug in. The standard USB Type A end of the cable must be plugged into the USB port on a computer as shown in Figure 12. The EZ320 utilizes the USB Open HCI interface driver allowing it to communicate with Windows® based devices.
USB drivers are included in the Zebra Designer Driver which can be downloaded from the Zebra Web site. Other terminals or communications devices may require the installation of special drivers to use the USB connection. Consult the manu-facturer for further details.
Figure 12: Communications with a P.C.
USB Communications Cable to ComputerRefer to Appendix A for details.
Communications Port

23
EZ320 User Guide
Wireless Communications with Bluetooth™Bluetooth is a worldwide standard for the exchange of data be-
tween two devices via radio frequencies. Bluetooth radios are rela-tively low powered to help prevent interference with other devices running at similar radio frequencies. The range of a Bluetooth device is approximately 10 meters (32 feet). Both the printer and the device it communicates with must follow the Bluetooth standard.
Bluetooth Networking Overview Each Bluetooth enabled EZ320 printer is identified by a
unique Bluetooth Device Address (BDA) loaded into the print-er when manufactured. The printer BDA can be obtained from the diagnostic report (see page 35). In order to exchange data, two Bluetooth enabled devices must establish a connection.
Bluetooth software is always running in the background, ready to respond to connection requests. One device (known as the master) must request a connection with another. The second device (the slave) then accepts or rejects the connec-tion. A Bluetooth enabled EZ320 printer will act as a slave creating a Wireless Personal Area Network (WPAN) with the terminal sometimes referred to as a “piconet.”.
About Bluetooth SecurityThe Bluetooth radio in this printer complies with the Bluetooth
specification 2.0 + EDR and therefore supports security modes 1, 2, and 3. The end user can select the security mode at which the printer will operate by configuring this parameter using Zebra Setup Utility (ZSU).
• Security Mode 1 is non-secure. Authentication and encryp-tion functionality are bypassed. The printer is shipped with default Security Mode 1.
• Security Mode 2 is a secure mode that requires authen-tication and encryption. This is considered a service level-enforced security where security procedures are initiated after the LinkManager Protocol (LMP) is es-tablished. This is the host controller (radio module) responsibility and happens at the lower layers of com-munication including radio and baseband.

24
EZ320 User Guide
• Security Mode 3 is the more secure method supported, also called link level-enforced security. A device initiates security procedures before a physical link is fully estab-lished. Security Mode 3 mandates authentication and encryption for all connections to and from the device. In Security Mode 3, the printer is not discoverable.
• Security Mode 4 is supported only by Bluetooth v2.1 + EDR. The EZ320 printer complies with Bluetooth v2.0 so it does not support Security Mode 4.
Certain Bluetooth parameters in the printer can be config-ured using Zebra Setup Utility (ZSU). ZSU can be downloaded free of charge from Zebra.com.
The Bluetooth settings that are configurable in the print-er are: Authentication (ON/OFF), PIN (up to 16 digits), Discoverable (ON/OFF), Security Mode (1, 2, or 3 depending on the BT specification supported) and Friendly Name.
The printer default settings can be obtained from the diag-nostic report (see page 35). The default “friendly name” of the printer is set as the printer’s serial number. The friendly name can be configured to any value by using ZSU. The EZ320 de-fault Bluetooth Authentication is setpin and requires a PIN to be entered. The default PIN is 1234.

25
EZ320 User Guide
Carrying the Printer
Belt StrapRefer to Figure 13 below for instructions on how to secure
the belt strap to the printer and belt.
continued
Belt
Belt
1) Insert the non-looped end of the belt strap through the slot in the bot-tom front of the printer.
2) Secure the non-looped end to oth-er end of the belt strap using the two Velcro pads.
3) Slide the looped end of the strap over the belt as shown.
4) The printer should hang freely from the belt as shown.
Figure 13: Using the Belt Strap

26
EZ320 User Guide
Nylon Soft CaseThe EZ320 printer also has the option of being used with a
Nylon Soft Case (not included) which allows the user greater portability. The case loops onto a user’s belt and provides ac-cess to the printer’s paper path and printer controls. Use of the soft case is illustrated in Figure 14 below.
Figure 14: Using the Optional Soft Case
Belt
1) Slide the EZ320 printer into the soft case so that the paper exit path lines up with the opening on the case.
2) The belt is fed through the belt loop on the back of the soft case to secure in place.

27
EZ320 User Guide
Preventive Maintenance
Extending Battery Life• Always observe the safety precautions in the Lithium-
Ion Battery Technical Bulletin included with each Battery Pack.
• Never expose the battery to direct sunlight or tempera-tures over 60° C (140° F).
• Do not charge the battery when the temperature exceeds 45° C (113° F).
• Always use a Zebra power supply designed specifical-ly for the EZ320 printers. Use of any other kind of power supply may damage the battery.
• Use the correct media for your printing requirements. An authorized Zebra re-seller can help you determine the op-timum media for your application.
• If you print the same text or graphic on every label, con-sider using a pre-printed label.
• Choose the correct print darkness, and print speed for your media.
NOTE: The Tone setting can be modified via a Set/Get/Do command. Please refer to the CPCL Programming Manual at www.zebra.com/manuals for details.
• Remember that any rechargeable battery will lose its ability to maintain a charge over time. It can only be re-charged a finite number of times before it must be re-placed. Always dispose of batteries properly.
• If you print while charging the battery, charge times will be prolonged. Extensive printing while charging could deplete the battery enough to cause the low battery warning indicator to turn on. You should suspend printing at that time and allow the battery to re-charge completely.
continued

28
EZ320 User Guide
General Cleaning Instructions
Caution • To avoid possible personal injury or damage to the printer, never insert any pointed or sharp objects into the printer.
Always turn the printer off before performing any cleaning procedures.
Use care when working near the tear bar. The edges are very sharp.
Caution • The printhead can be very hot after prolonged printing. Allow it to cool off before attempting any cleaning procedures.
Only use the cleaning pen or a cotton swab saturated with alcohol for cleaning the printhead.
Caution • Use only cleaning agents specified in the following tables. Zebra Technologies Corporation will not be responsible for damage caused by any other cleaning materials used on this printer.
Area Method Interval
Printhead
Use a Zebra cleaning pen or a 70% Isopropyl alcohol solution on a cotton swab to clean the print elements from end to end (the print elements are located in the thin gray line on the printhead).
After every five rolls of media (or more often, if needed)
Platen
Rotate the platen roller and clean it thoroughly with a Zebra cleaning pen or a 70% Isopropyl alcohol solution and a cotton swab.
Tear bar
Clean thoroughly with a Zebra cleaning pen or a 70% Isopropyl alcohol solution and a cotton swab.
Exterior Water dampened cloth As needed
Media Compartment
Interior Brush/air blow.After every five rolls of media (or more often, if needed)
Media/Black Bar Sensor
EZ320 Cleaning Instructions

29
EZ320 User Guide
continued
Figure 15: EZ320 Cleaning
Note • Twelve packs of approved cleaning pens are available from Zebra as p/n AN11209-1.
Caution • To avoid possible personal injury or damage to the Printer, never insert any pointed or sharp objects into the Printer.
Media Compartment
Tear Bar
Media/Black Bar Sensor
Printhead Elements
Platen Surface
30
EZ320 User Guide
Troubleshooting
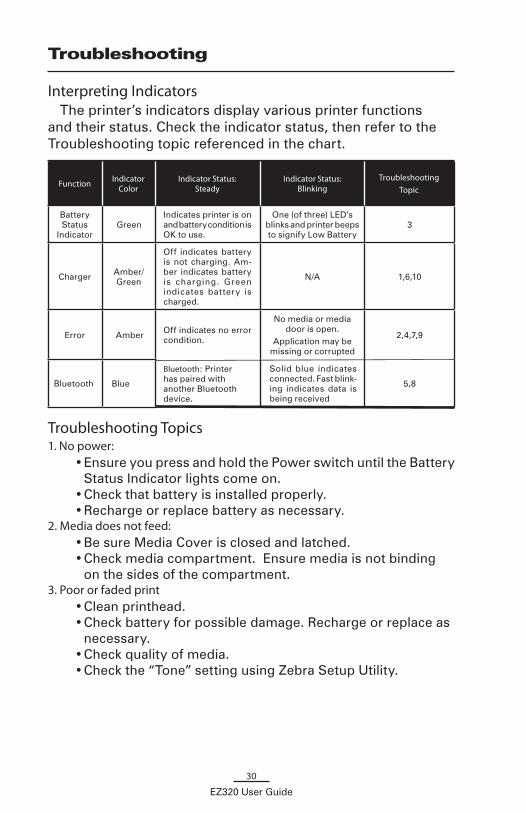
Interpreting IndicatorsThe printer’s indicators display various printer functions
and their status. Check the indicator status, then refer to the Troubleshooting topic referenced in the chart.
Function Indicator Color
Indicator Status: Steady
Indicator Status: Blinking
TroubleshootingTopic
Battery Status
IndicatorGreen
Indicates printer is on and battery condition is OK to use.
One (of three) LED’s blinks and printer beeps to signify Low Battery
3
Charger Amber/Green
Off indicates battery is not charging. Am-ber indicates battery is charging. Green indicates battery is charged.
N/A 1,6,10
Error Amber Off indicates no error condition.
No media or media door is open.
Application may be missing or corrupted
2,4,7,9
Bluetooth Blue
Bluetooth: Printer has paired with another Bluetooth device.
Solid blue indicates connected. Fast blink-ing indicates data is being received
5,8
Troubleshooting Topics1. No power:
• Ensure you press and hold the Power switch until the Battery Status Indicator lights come on.
• Check that battery is installed properly.• Recharge or replace battery as necessary.
2. Media does not feed: • Be sure Media Cover is closed and latched.• Check media compartment. Ensure media is not binding
on the sides of the compartment.3. Poor or faded print
• Clean printhead.• Check battery for possible damage. Recharge or replace as
necessary.• Check quality of media.• Check the “Tone” setting using Zebra Setup Utility.

31
EZ320 User Guide
4. Partial or missing print:• Check media alignment.• Clean printhead.• Ensure Media Cover is properly closed and latched.
5. No print:• Replace battery.• Check cable to terminal.• (Bluetooth units only) Re-Pair Bluetooth connection with
Master device.6. Reduced battery life:
• Check battery date code — if battery is one to two years old, short life may be due to normal aging.
• Recharge or replace battery.7. Flashing Amber indicator:
• Check that media is loaded and that printhead is closed and securely latched.
• If media is present and latch is closed, indicates that no application is present or application is corrupted. Program must be re-loaded.
8. Communication Error:• (Bluetooth units only) Check that media is loaded, head is
closed and blue communication link light is on.•(USB) Replace cable to terminal.
9. Label Jam:• Open media cover.• Use Isopropyl alcohol to clean printer in area of jammed
label.10. Battery Pack Is Hard to Install
• Do not force the battery into place. • Verify you are seating the battery properly in the battery
compartment.
32
EZ320 User Guide
Resetting an EZ320 Printer If the printer has locked up and is not responding to any operator inputs or
external commands from a connected terminal, you can perform a forced reset as follows:
1. Press and hold the power button for 5 seconds and then release.
The printer will power down. 2. Re-start the Printer as usual. Any pending data in the printer will
have been deleted and must be re-sent.
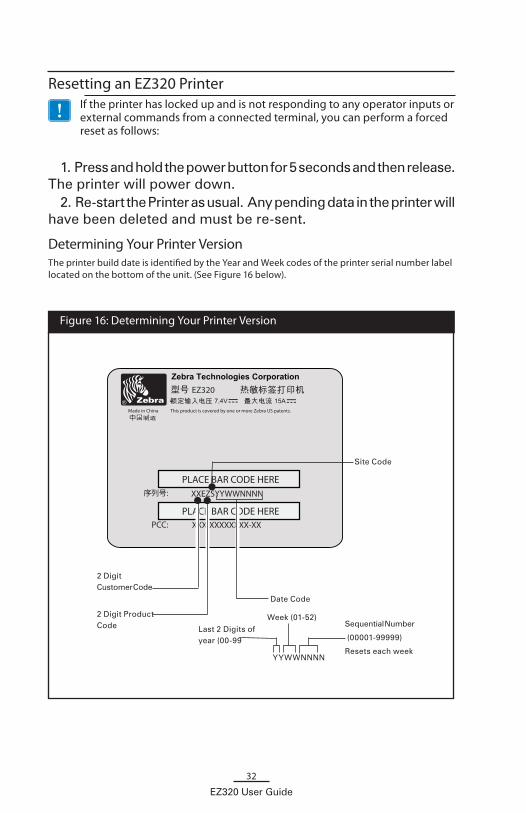
Determining Your Printer VersionThe printer build date is identified by the Year and Week codes of the printer serial number label located on the bottom of the unit. (See Figure 16 below).
Zebra Technologies Corporation EZ320
7,4V 15AThis product is covered by one or more Zebra US patents.Made in China
中
PLACE BAR CODE HERE
PLACE BAR CODE HERE
序列号: XXEZSYYWWNNNN
XXX-XXXXXXXX-XXPCC:
Figure 16: Determining Your Printer Version
2 Digit Product Code
2 Digit Customer Code
Site Code
Date Code
YYWWNNNN
Week (01-52)Last 2 Digits of year (00-99
Sequential Number
(00001-99999)
Resets each week

33
EZ320 User Guide
Troubleshooting TestsPrinting a Configuration Label
To print out a listing of the printer’s current configuration fol-low these steps:
1. Turn the printer off. Load the media compartment with journal media (media with no black bars printed on the back)
2. Press and hold the Feed Button.3. Press and hold the Power button and keep the Feed button
pressed. 4. When the printer turns on, release the Power button, and
once printing starts, release the Feed button. Refer to Figures 17a, 17b, and 17c for a sample configuration
printout.
Communications DiagnosticsIf there is a problem transferring data between the computer and
the printer, try putting the printer in the Communications Diagnostics Mode. The printer will print the ASCII characters and their text repre-sentation (or the period ‘.’, if not a printable character) for any data re-ceived from the host computer
To enter Communications Diagnostics Mode:1. Print a configuration label as described above. 2. At the end of 2nd diagnostics report, the printer will print: “Press
FEED key to enter Diagnostics mode”.3. Press the FEED key. The printer will print: “Entering Diagnostics
mode”.
Note • If the FEED key is not pressed within 3 seconds, the printer will print “Diagnostics mode not entered” and will resume normal operation.
4. At this point, the printer is in Diagnostics mode and will print the ASCII hex codes of any data sent to it, and their text representa-tion (or “.” if not a printable character).
Additionally, a file with a “.dmp” extension containing the ASCII in-formation will be created and stored in the printer’s memory.

34
EZ320 User Guide
To terminate the Communications Diagnostics Mode and re-turn the printer to normal operations:
1. Turn the printer OFF.2. Wait 5 seconds.3. Turn the printer ON.
Calling Technical SupportIf the printer fails to print the configuration label, or you en-
counter problems not covered in the Troubleshooting Guide, contact Zebra Technical Support. Technical Support addresses and phone numbers for your area can be found in Appendix D of this manual. You will need to supply the following informa-tion:
• Model number and type (e.g. EZ320)• Unit serial number (Found on the large label on the back
of the printer, also found in the configuration label print-out. Refer to Figure 17a.)
• Product Configuration Code (PCC) (15 digit number found on the label on the back of the unit)

35
EZ320 User Guide
Unit Serial Number
Application Number
Print Head Test
This example has a Bluetooth™ radio installed.
Figure 17a: Configuration Label Example

36
EZ320 User Guide
continued
Flash Memory Size
Maximum Label Size
Figure17b: Configuration Label Example (continued)
Bluetooth radio parameters

37
EZ320 User Guide
Figure 17c: Configuration Label Example (continued)
Amount of Memory Available
Resident Fonts
38
EZ320 User Guide
Specifications
Note.- Printer specifications are subject to change without notice.
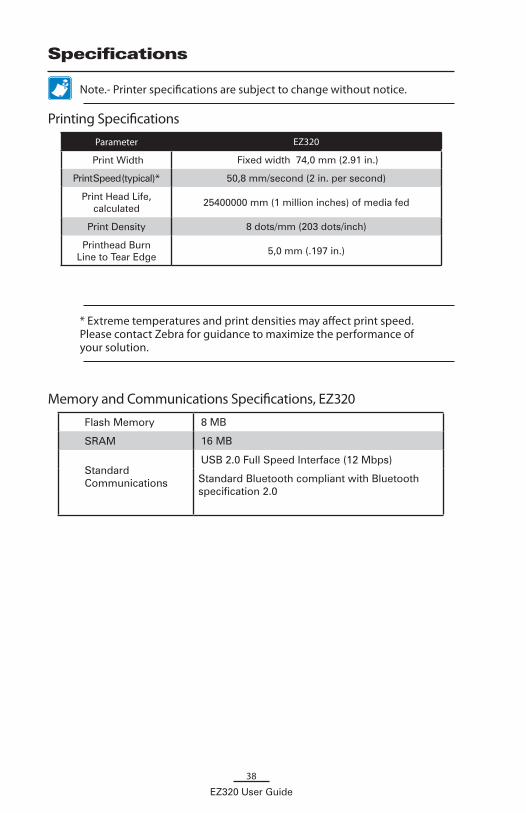
Printing Specifications Parameter EZ320
Print Width Fixed width 74,0 mm (2.91 in.)
Print Speed (typical)* 50,8 mm/second (2 in. per second)
Print Head Life, calculated
25400000 mm (1 million inches) of media fed
Print Density 8 dots/mm (203 dots/inch)
Printhead Burn Line to Tear Edge
5,0 mm (.197 in.)
* Extreme temperatures and print densities may affect print speed. Please contact Zebra for guidance to maximize the performance of your solution.
Memory and Communications Specifications, EZ320
Flash Memory 8 MB
SRAM 16 MB
Standard Communications
USB 2.0 Full Speed Interface (12 Mbps)
Standard Bluetooth compliant with Bluetooth specification 2.0

39
EZ320 User Guide
Media SpecificationsParameter EZ320
Width80,0 mm ±1 mm
(3.15 in. ± 0.03 in.)
Max. Printable
Area
Width
Length
74,0 mm (2.91 in.)
14,5 mm (.57 in.) min. to 813 mm (32 in.) max
Media Thickness 0.060 mm to 0.1143 mm (.0023 in to .0045 in)
Max. Media Roll dia. 42,0 mm (1.65 in.) O.D.
Label Inner Core Diameter
10,2 to 19,0 mm (0.40 to 0.75 in.)
Black Mark Dimensions
The reflective media black marks should extend from the right side of the roll on the front side of the media.Minimum mark width: 7 mm (0.28 in.) perpendicular to edge of media, starting from the right edge of the roll when looking at the print side of the media.Mark length: 3,0-11,0 mm (0.12 - 0.43 in.) parallel to edge of the roll. (See illustration below).
7,0 mm (0.28”)
3,0 mm-11,0 mm (0.12”-0.43”)
minimum
Black Mark Dimensions)

40
EZ320 User Guide
Font and Bar Code Specifications for EZ320
Linear & 2-D Bar Bar Codes Available
Codabar (NW-7)
UCC/EAN 128
UCC composite A/B/C
Code 39
Code 93
Code 128
EAN 8, 13, 2 and 5 digit extensions
EAN-8 composite
EAN 13 composite
lnterleaved 2 of 5
MSI/Plessey
FIM/POSTNET
Intelligent Mail Barcode
UPC-A, 2 and 5 digit extensions
UPC-E, 2 and 5 digit extensions
UPC-A composite
UPC-E composite
QR Code
MaxiCode
PDF 417
GS1 DataBar (RSS-14)
GS1 DataBar (RSS-14) expanded
GS1 DataBar (RSS-14) truncated
GS1 DataBar (RSS-14) limited
GS1 DataBar (RSS-14) stacked
GS1 DataBar (RSS-14) stacked omnidirectional
Aztec
Rotation Angles 0°, 90°, 180°, and 270°
continued

41
EZ320 User Guide
Fonts Available
GBUNSG24.CPF Simplified Chinese 24x24GBUNSG16.CPF Simplified Chinese 16x16CTUNMK24.CPF Traditional Chinese 24x24
Note: GB-18030 and BIG5 both support ASCII character sets.
The default EZ320 Encoding is GB-18030. To print Traditional Chinese, use ENCODING BIG5 command. See below for font and encoding selection as well as examples.
Pre-loaded Fonts
1. GBUNSG24.CPF• Description: Simplified Chinese 24x24• Encoding Command: GB18030 (default)• Example (Label Mode):
! 0 200 200 300 1 ENCODING GB18030 TEXT GBUNSG24.CPF 0 10 50 add text here. . . PRINT
• Example (Line-print Mode): ! U1 ENCODING GB18030 ! U1 SETLP GBUNSG24.CPF 0 24 add text here, line 1 add text here, line 2
2. GBUNSG16.CPF• Description: Simplified Chinese 16x16• Encoding Command: GB18030 (default)• Example (Label Mode):
! 0 200 200 300 1 ENCODING GB18030 TEXT GBUNSG16.CPF 0 10 50 add text here. . . PRINT
• Example (Line-print Mode): ! U1 ENCODING GB18030 ! U1 SETLP GBUNSG16.CPF 0 24 add text here, line 1 add text here, line 2

42
EZ320 User Guide
3. CTUNMK24.CPF• Description: Traditional Chinese 24x24• Encoding Command: BIG5• Example (Label Mode):
! 0 200 200 300 1 ENCODING BIG5 TEXT CTUNMK24.CPF 0 10 50 add text here. . . PRINT
• Example (Line-print Mode) ! U1 ENCODING BIG5 ! U1 SETLP CTUNMK24.CPF 0 24 add text here, line 1 add text here, line 2
*SimSun is provided under license from Ascender Corporation. SimSun is copyright ZHONGYI Electronic and Microsoft Corporation.

43
EZ320 User Guide
Physical, Environmental and Electrical SpecificationsParameter EZ320
Weight w/ battery,
excluding media295g. (.65 lbs.)
Temperature
Operating : -10° to 50° C (14° to 122° F)
Charging: 0° to 40° C (32° to 104° F)
Storage w/o battery: -25° to 60° C (-4° to 140° F)
Storage w/ battery: -25° to 45°C (-4° to 113° F)
Relative Humidity
Operating: 10% to 90% (non-condensing)
Storage: 10% to 90% (non-condensing)
Battery Lithium-Ion 2S-1P, 7.4 VDC (nominal); 1150 mAHr.
Printer Input Power
12.0 VDC ±10%; 2A max
Ingression Protection (IP)
Rating42
5 1
Figure 18: USB Communications Port
USB Communications Port
Pin# Signal Name Type Description
1 VBUS - USB Bus Power
2 USB - bi-directional I/O signals
3 USB + bi-directional I/O signals
4 USB_ID - Identifies A/B connector
5 Return - Ground

44
EZ320 User Guide
2.55"
5.54"
4.32"100.8 mm(3.97 in.)
125 mm
(4.92 in.)
48 mm(1.89 in.)
Figure 19: EZ320 Overall Dimensions
125 mm
(4.92”)
(1.89”) 48 mm
100.8 mm (3.97”)

45
EZ320 User Guide
EZ320 Accessories
Description
Adjustable belt strap p/n P1033361 (included)
Protective carrying case P1033362 (optional)
AC Adapter AT17947-1 (included)
Extra battery packs (p/n P1026078)
Single bay battery charger (optional)
Refer to Appendix A for information on Data I/O Cables For more details on available accessories, contact your authorized
Zebra re-seller.

46
EZ320 User Guide Appendices
Appendix A
Interface Cables
- GND
- D+
- D-
- VBUS
- VBUS
- D-- D+
- NC
- GND
USB CablePart Number AT17010-1; USB A to USB Mini B Cable
MORE INTERFACE CABLES
Contact the Factory or your Zebra Sales Representative for more information on interface cables to most major manufacturer’s data terminals.
You may also visit the Zebra Web site at http://www.zebra.com for a listing of interface cables for all series of Zebra mobile printers
Appendix B
Maintenance SuppliesIn addition to using quality media provided by Zebra, it is recom-
mended that the printer be cleaned as prescribed in the maintenance section. The following items are available for this purpose:
• Cleaning Pen (12 pack), Reorder No. AN11209-1• Cleaning Pads (10 pack), Reorder No. AN11207-1

47
EZ320 User Guide Appendices
Appendix C
Media SuppliesPlease make sure that the media supplies used in the EZ320
conform to the specifications listed below for the printer. The different media types outlined in the following table
were tested and verified to work properly in the EZ320.
EZ320 Media
Description Weight Width Thickness Roll OD Core OD
Non-topcoated direct thermal receipt paper
60g/m2 80 mm +/- 1 mm 0.058 mm 40 mm 12.7 mm
Non-topcoated direct thermal receipt paper
100g/m2 80 mm +/- 1 mm 0.086 mm 40 mm 12.7 mm
Non-topcoated direct ther-mal receipt paper, black bar
100g/m2 80 mm +/- 1 mm 0.086 mm 40 mm 12.7 mm
Topcoated direct thermal receipt paper
80g/m2 80 mm +/- 1 mm 0.081 mm 40 mm 12.7 mm
Direct thermal polypropyl-ene receipt, perforations
80g/m2 80 mm +/- 1 mm 0.081 mm 40 mm 12.7 mm
Non-topcoated direct ther-mal receipt paper, black bar
100g/m2 60 mm +/- 1 mm 0.086 mm 40 mm 12.7 mm
Direct thermal polypropyl-ene receipt, non-perforated
80g/m2 60 mm +/- 1 mm 0.081 mm 40 mm 12.7 mm

48
EZ320 User Guide Appendices
Appendix D
Product Support When calling with a specific problem regarding your
printer, please have the following information on hand:• Model number/type (e.g. EZ320)• Unit serial number• Product Configuration Code (PCC)For Product Support Contacts, see the table on the next
page or contact your local re-seller.
Zebra Technologies Corporation
EZ3207,4V
15A
This product is covered by one or more Zebra US patents.
Made in China中
PLACE BAR CODE HEREPLACE BAR CODE HERE
序列号:XXEZSYYWWNNNN
XXX-XXXXXXXX-XX
PCC:
EZ320 Serial Number Label
Serial Number Bar Code
PCC Bar Code

49
EZ320 User Guide Appendices
In the Asia Pacific region contact
Regional Headquarters Technical Support Customer Service
Zebra Technologies Asia Pacific, LLC120 Robinson Road#06-01 Parakou BuildingSingapore 068913T: +65 6858 0722F: +65 6885 0838
T: +65 6858 0722F: +65 6885 0838E: [email protected]
For printers, parts, media, and ribbon, please call your distributor, or contact us.T: +65 6858 0722F: +65 6885 0837
Regional Office Technical Support Customer Service
Beijing China Regional OfficeRoom 2103/2105Global Trade Center Tower A36 North Third Ring Road EastDongcheng DistrictBeijing 100013, P.R. ChinaT: +86 10 5825 7428F: +86 10 5825 7429
T: +65 6858 0722F: +65 6885 0838E: [email protected]
For printers, parts, media, and ribbon, please call your distributor, or contact us.T: +65 6858 0722F: +65 6885 0837
Guangzhou China Regional OfficeRoom 3318, 33/F Office TowerChina shine Plaza, 9 Linhexi RoadTianhe District, Guangzhou 510610, P.R.C.T: +86 20 3810 7798F: +86 20 3810 7783
T: +65 6858 0722F: +65 6885 0838E: [email protected]
For printers, parts, media, and ribbon, please call your distributor, or contact us.T: +65 6858 0722F: +65 6885 0837
Shanghai China OfficeRoom 2308-2312Plaza66 Tower21366 Nanjing Road(w)Shanghai 200040, P.R. ChinaT: +86 21 5175 8558F” +86 21 6288 8393
T: +65 6858 0722F: +65 6885 0838E: [email protected]
For printers, parts, media, and ribbon, please call your distributor, or contact us.T: +65 6858 0722F: +65 6885 0837
Product Support Contacts

50
EZ320 User Guide Appendices
continued
Appendix E
Product Documentation
Please refer to Zebra’s web site (see below) at www.zebra.com.cn/products for finding specific product documentation and software downloads for the EZ320 printer.

51
EZ320 User Guide
Index
AAccessories
Belt strap 25Soft case 26list of 45
BBattery, charging 12Battery, installing 10Battery life, tips for ex-tending 27Battery, removing 11Bluetooth Device Address (BDA) 23Bluetooth™ Networking Overview 23
CCleaning
general instructions 29Communications
USBConnector signals 43
with a cable 22Communications diagnos-tics 33Configuration Label
printing 34
DDamage, shipping 7
MManual
CPCL Programming 7Media
loading 80 mm 1660 mm 18black bar sensors 18
OOperator Controls 19
PProgramming language
CPCL 7
SSafety Precautions
placement of charger 15Single Bay Charger 14Specifications
Font/bar Code 40Media 39Memory/communications 38Physical 43printing 38
TTechnical Support, contacting 34Troubleshooting
Communications Diagnostics Mode 33control panel indicators 30
Troubleshooting tests 33printing a configuration label 21,33
EZ320 configuration label example 35,36,37
Troubleshooting Topics 31
WWireless communications
Bluetooth™ radio 23

52
EZ320 User Guide
Mobile PrinterEZ320™
Zebra Technologies Corporation475 Half Day Road, Suite 500Lincolnshire, IL 60069Phone: 1.847.634.6700 or 1.800.423.0442Fax: 1.847.913.8766
Patent Numbers
D275,286
D347,021
D389,178
D430,199
D433,702
D549,768
3,964,673
4,019,676
4,044,946
4,360,798
4,369,361
4,387,297
4,460,120
4,496,831
4,593,186
4,607,156
4,673,805
4,736,095
4,758,717
4,816,660
4,845,350
4,896,026
4,897,532
4,923,281
4,933,538
4,992,717
5,015,833
5,017,765
5,021,641
5,029,183
5,047,617
5,103,461
5,113,445
5,140,144
5,132,709
5,142,550
5,149,950
5,157,687
5,168,148
5,168,149
5,180,904
5,229,591
5,230,088
5,235,167
5,243,655
5,247,162
5,250,791
5,250,792
5,262,627
5,267,800
5,280,163
5,280,164
5,280,498
5,304,786
5,304,788
5,321,246
5,335,170
5,364,133
5,367,151
5,372,439
5,373,148
5,378,882
5,396,053
5,396,055
5,399,846
5,408,081
5,410,139
5,410,140
5,412,198
5,415,482
5,418,812
5,420,411
5,436,440
5,444,231
5,449,891
5,449,893
5,468,949
5,479,000
5,479,002
5,479,441
5,486,057
5,503,483
5,504,322
5,528,621
5,532,469
5,543,610
5,545,889
5,552,592
5,570,123
5,578,810
5,589,680
5,612,531
5,642,666
5,657,066
5,768,991
5,790,162
5,791,796
5,806,993
5,813,343
5,816,718
5,820,279
5,848,848
5,860,753
5,872,585
5,874,980
5,909,233
5,976,720
5,978,004
5,995,128
5,997,193
6,004,053
6,010,257
6,020,906
6,034,708
6,036,383
6,057,870
6,068,415
6,068,415
6,095,704
6,109,801
6,123,471
6,147,767
6,151,037
6,201,255 B1
6,231,253 B1
6,261,009
6,261,013
6,267,521
6,270,072 B1
6,285,845 B1
6,292,595
6,296,032
6,364,550
6,379,058 B1
6,409,401 B1
6,411,397 B1
6,428,227 B2
6,530,705
6,540,122
6,607,316
6,609,844
6,874,958
6,899,477
This product and/or its use may be covered by one or more of the following US patents and corresponding international patents worldwide

Mobile PrinterEZ320™
Zebra Technologies Corporation475 Half Day Road, Suite 500Lincolnshire, IL 60069Phone: 1.847.634.6700 or 1.800.423.0442Fax: 1.847.913.8766