exaggeration of facial features in...
TRANSCRIPT

Exaggeration of Facial Features in Caricaturing
Wan Chi Luo, Pin Chou Liu, Ming Ouhyoung Department of Computer Science and Information Engineering,
National Taiwan University, Taipei, 106, Taiwan. E-Mail: {maggie, toby}@cmlab.csie.ntu.edu.tw, [email protected]
(a) (b) (c)
Figure 1: (a): Input picture captured by digital camera. (b) Output picture without exaggeration. (c) Output picture with our exaggeration rules for big nose and big mouth.
Abstract
A new NPR system is proposed in this paper to generate a
facial caricature from a 2–D picture. In human perception, we recognize a person by seeing his feature parts and the outline of his face. Our system can exaggerate the feature parts and still keep the overall impression. First, we must have the information about the outlines of the facial features to determine the characteristics of the features. Because the facial features are too complicated, we obtain the information of the features manually. We can simulate the actual outlines of facial features by knowing only some key points. After obtaining those key points of facial features, we can decide which facial feature should be exaggerated based on rules. Finally our system renders a new pictorial in a non–photorealistic rendering (NPR) system using bold edges and large regions of constant shade.
Keywords: caricature, non–photorealistic rendering, tone–shading
1 Introduction
Most of non-photorealistic rendering (NPR) techniques
are driven by human perception that often concentrates on actual proportion and size. The general differences between real and NPR pictures are the pencil style of the outlines and the color distribution of the picture (e.g., [2, 3, 4, 5, 6, 7]). However, pictures that contain exaggerated features are sometimes more attractive to people. In general, “caricature” is a style of drawing a pictorial in which the subject’s distinctive features are deliberately exaggerated to produce a comic or funny effect. Exaggeration causes the ratio of the subject to change, and allows the people who see the subjects to have a deeper impression. Our system is implemented in NPR ways, furthermore, our system uses tone-shading rendering to color the pictures, making the pictures more interesting.
Our system focuses on drawing human faces. The most distinctive part of human faces is that everyone’s face is unique. This way, we can identify who someone is by looking at his face and his special features. We can detect some obvious features from a person’s looks, as evidenced by our association of a big nose with the movie star Jacky Chan and a big mouth with another movie star Julia Roberts. In addition, we sometimes determine whether two people are similar to each other by observing if they have the same feature parts.
A human face is so complex that face recognition is quite
difficult. Therefore, our system has to find out the features’ information by manually marking the feature points. Marking those points is very easy because users only need to indicate a few key points in the input picture. From those key points, our system can simulate the outlines of features by connecting the key points in the form of a Bezier curve. Then, our system generates the output by applying our exaggeration rules and coloring in tone-shading. It deserves to be mentioned that users can interact with our system to adjust the degree of exaggeration.
A common usage of various styles of caricaturing is seen in political comics. Drawing those politicians or movie stars with deliberate exaggeration together with funny conversation always makes people laugh. Our system has advantages in helping people who are not good at drawing to generate funny caricatures in a short time, or helping artists to quickly generate basic caricatures, which can be refined afterward.
In the remainder of this paper, we describe our method of exaggeration in Section 2 and the details of our system implementation in Section 3.
2 Facial Exaggerations
In order to be able to identify who is in the pictorial in which the face’s distinctive features are deliberately exaggerated, the whole ratio of the objective face cannot be changed. For example, a round face cannot be exaggerated to a thin face, and the ratio of the center of the eye to the rest of the face cannot be changed.
So, we can only exaggerate features without destroying the whole ratio of the face. If we feel that the eyes are big, we can exaggerate them by using the inner corner of the eye as the central point and increasing the size proportionally. If we feel that the nose is big, we can exaggerate it by using the bottom of the nose as the central point and increasing the size proportionally. In an extreme case, the adjusted nose becomes so big that it covers part of the mouth.
2.1 Rules for the Face
There are some features of our face, such as the forehead, cheekbone, jaw, and whole shape… etc. There are three rules for the face:
Rule 1: If someone’s forehead is taller / shorter, we increase / decrease the distance between the hairline and the brow.
Rule 2: If someone’s cheekbone is bigger / smaller, we move the control points of the cheekbone to change the curvature of the cheekbone and emphasize the characteristic.
Rule 3: If someone has long jaw, we lengthen the jaw.
2.2 Rules for the Eyes
There are two characteristics of our eyes, the size and the shape. These two characteristics are independent from each other. There are two rules for the eyes:
Rule 1: If the eyes are bigger or smaller, we change the size of them by keeping the distance between the inner corners of the two eyes the same.
Rule 2: If the eyes are like some kind of shape, we enlarge the angle between the eye and the horizontal line by keeping the positions of the eyes’ inner corners the same
2.3 Rules for the Nose
There are several characteristics of our nose, such as size and shape, etc. There are three rules for the nose:
Rule 1: If the nose is big, we enlarge the size of the nose by using the bottom of the nose as the central point. Enlarging the size may cause the nose to cover part of the mouth.
Rule 2: If the nose is hook-nosed, we make the nose tip lower and keep the other parts of nose the same. On the contrary, if the nose is snub-nosed, we make the nose tip higher.
Rule 3: If the nose is high-bridged, we can bend the bridge of the nose to emphasize this characteristic.
2.4 Rules for the Mouth
Our mouth consists of two lips, the upper lip and the lower lip. Therefore, we can consider three characteristics: the shape of the whole mouth, the thickness of the upper lip, and the thickness of lower lip. It is easier to emphasize the thickness of the upper and lower lips rather than the shape of the whole mouth. We have to consider two directions, horizontal and vertical, independently to emphasize the shape. Therefore, there are two rules for the mouth:
Rule 1: If the lips are thick or thin, we emphasize the thickness of the upper and lower lips independently.
Rule 2: If the mouth is big or small, we exaggerate the shape of the mouth by considering two directions, horizontal and vertical, independently.

3 System Implementation
Figure 2. System flow chart
3.1 Input Picture
Our system needs a digital picture of a human face as its input file. While we are taking that picture, the model’s face must be turned toward his right side about forty-five degrees. The reason is that the features are more three-D at this angle, especially the nose, and so will make exaggerated features pop up. If the model’s face faces us directly, we won’t know whether his or her nose is snub-nosed or not, whether his or her cheekbone is prominent or not, etc.
3.2 Manually Marking
In fetching the information of facial features, such as the shape and the position, we manually mark key points on the input picture. We separate those facial features into seven parts: the right brow, the left brow, the right eye, the left eye, the nose, the mouth, and the rest of face. The outline of each part is composed of several key points. For instance, we need seventeen key points to constitute the outline of a face and we need eleven key points to constitute the outline of a mouth.
Take a right eye for example. After a user manually marks the twelve key points of the eye, our system can draw the outline of a right eye by connecting them in the form of a Bezier curve. An example of the key points of a right eye is shown in Figure 3. Each pair of neighboring points constructs a Bezier curve. We have found the basic rules of every individual Bezier curve so that the result is close to the actual outline no matter what kind of right eyes are simulated.
We choose the way of connecting key points instead of tracing along the actual outline. The reason is that it is faster and easier to manipulate later. When we want to change the shape of the right eye, we only need to recalculate those key points’ locations and apply the same functions of the Bezier curve. But if we choose to trace along the actual outline, every time we want to change the shape, we have to recalculate the whole function of the Bezier curve. It will take a lot of time and is too complicated.
Figure 3. Left: Original pictures. Right: Marked with key points (yellow, blue) and control points (red).
Input Picture
Manually Marking
Decide Exaggerated Facial Features
Result
Exaggeration
Layer Rendering

Figure 4. Left: Original pictures. Right: Marked with key points (yellow, blue) and control points (red).
3.3 Facial Features Drawing
We have mentioned that each pair of neighboring points has its own function of the Bezier curve. These functions are very simple but their result can simulate those actual outlines very closely. We know that a curve is completely defined by four points – known as control points – p0, p1, p2 and p3. Because p0 is the starting point and p1 is the end point, we set the pair of points as p0 and p3. We separate the interval between p0 and p3 into 3x3 equal parts so that p1 and p2 are always at the boundaries depending on different circumstances. An example of the control points of a right eye is shown in Figure 4.
3.4 Hair Drawing
Drawing hair is one of the important parts of our system because a face without hair is not natural. Users can indicate four points to let our system know where the hair is. Those four points are respectively responsible for the locations of upper–right, upper–left, lower–right, and lower–left. Beginning with those four points, we find black hair by the bread-first search (BFS) algorithm. If the color value difference between the next pixel and the current pixel is over a threshold, we mark that next pixel as the hair boundary.
3.5 Tone–Shading
The purpose of coloration is to emphasize the three–D effect. We don’t color the face depending on the input
Figure 5 .Hair drawing algorithm
B
B
B
B
B
B

Figure 6. The Tone-Shading Method.
picture, but rather color it according to our own rules. We divide the range of color into four parts. The first part is the base face color that is about ninety percent white, five percent yellow, and five percent orange. The second and third parts are heavier in orange and yellow, which are often used to display shadow. The fourth color has more white, which is often used to display reflected light. Shadows that we draw often occur in six regions. The first is between the eyes and the nose. The second is underneath the nose. The third is under the cheekbone. The fourth is upon the mouth. The fifth is along the outline of the face. The sixth is under the lower lip. An example is shown in Figure 6.
3.6 Layer Rendering
After exaggerating the features, some features may overlap the others. In order to avoid those abnormal results, our system implements layer rendering. We separate the features into seven layers, shown in Figure 7. In the order
from the bottom layer to the top layer, they are “face layer”, “shadow layer”, “mouth layer”, “nose layer”, “eye layer”, “reflect light layer” and “hair layer” respectively. Then we render the layers in the same order.
4 Conclusion and Future Works
Future research can bring improvements to the part of facial features exaggeration. For example, the outline of a face can be exaggerated more sharply. We can add more characteristics that can be exaggerated. We also hope that we can draw wavier hair so that the result can be closer to the style of the original artist, the manga style. Furthermore, we would also like to merge a talking head system into our system, and let our system to make some interesting animations. The most important thing is to make our system available for public use on Internet.
5 Results
As depicted in the beginning of this paper, we see the comparison of an original picture, a picture without exaggeration and a picture with exaggeration. The following figure shows more rendering results.
6 Acknowledgements
This project is partially funded by the National Science Council (NSC, Taiwan) under the grant number NSC90-2622-E-002-008.
7 References [1] Gooch, B., AND Gooch, A. Non-Photorealistic Rendering. 2001. AK Peters Ltd, Publishers.
[2] Cassidy J. Curtis, Sean E. Anderson, Kurt W. Fleischer, and David H. Salesin. Computer-Generated Watercolor. Proc.
Reflection Light Third Part Second Part First Part
Shadow Layer
Face Layer
Mouth Layer Nose
Layer Eye Layer Reflect
Light Layer
Hair Layer
Bottom
Top Result
Figure 7. Layer Rendering: Drawing the layers from bottom to top.

SIGGRAPH '97, pages 421--430, August 1997. Los Angeles, USA.
[3] Peter Litwinowicz. Processing Images and Video for an Impressionistic Effect. Proc. SIGGRAPH '97, pages 407--414, August 1997. Los Angeles, USA.
[4] L. Markosian, M. Kowalski, S. Trychin, and J. Hughes. Real-Time Non-Photorealistic Rendering. Proc. SIGGRAPH '97, pages 415--420, August 1997. Los Angeles, USA.
[5] Barbara J. Meier. Painterly Rendering for Animation.
Proc. SIGGRAPH '96, pages 477--484, August 1996. New Orleans, USA.
[6] Mike Salisbury, Michael T. Wong, John F. Hughes, and David H. Salesin. Orientable Textures for Image-Based Pen-and-Ink Illustration. Proc. SIGGRAPH '97, pages 401--406, August 1997. Los Angeles, USA.
[7] Georges Winkenbach and David H. Salesin. Computer Generated Pen-and-Ink Illustration. Proc. SIGGRAPH '94, pages 91--100, July 1994. Orlando, USA.
(a) (b) (c) Figure 8: (a): Input picture captured by digital camera. (b) Output picture without exaggeration. (c) Output picture with big eyes and thin lips.
(a) (b) (c) Figure 9: (a): Input picture captured by digital camera. (b) Output picture without exaggeration. (c) Output picture with small eyes, high-bridged nose, big nose and big mouth.
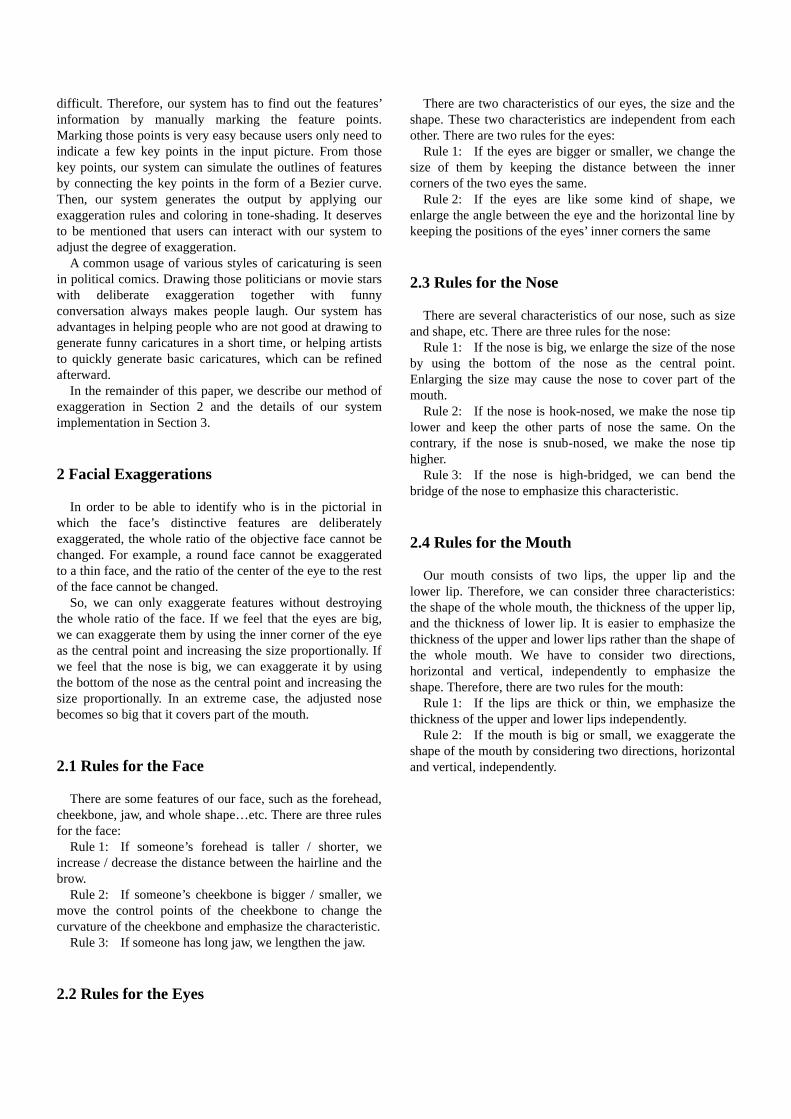
(a) (b) (c) Figure 10: (a): Input picture captured by digital camera. (b) Output picture without exaggeration. (c) Output picture with big eyes, big nose and big mouth.
(a) (b) (c) Figure 11: (a): Input picture captured by digital camera. (b) Output picture without exaggeration. (c) Output picture with big nose and big mouth.
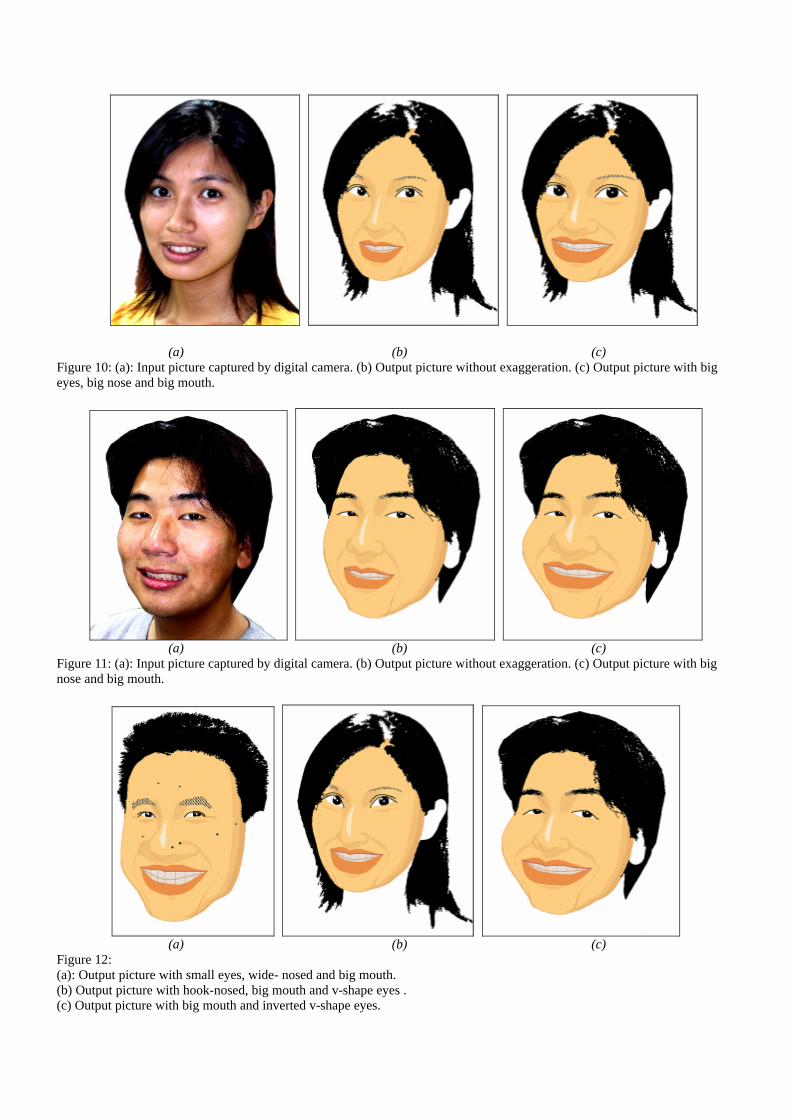
(a) (b) (c) Figure 12: (a): Output picture with small eyes, wide- nosed and big mouth. (b) Output picture with hook-nosed, big mouth and v-shape eyes . (c) Output picture with big mouth and inverted v-shape eyes.