e*way intelligent adapter for jacada …...contents e*way intelligent adapter for jacada...
TRANSCRIPT

e*Way Intelligent Adapter for Jacada Enterprise/AccessUser’s Guide
Release 5.0.5 for Schema Run-time Environment (SRE)
Java Version
SeeBeyond Proprietary and Confidential

The information contained in this document is subject to change and is updated periodically to reflect changes to the applicable software. Although every effort has been made to ensure the accuracy of this document, SeeBeyond Technology Corporation (SeeBeyond) assumes no responsibility for any errors that may appear herein. The software described in this document is furnished under a License Agreement and may be used or copied only in accordance with the terms of such License Agreement. Printing, copying, or reproducing this document in any fashion is prohibited except in accordance with the License Agreement. The contents of this document are designated as being confidential and proprietary; are considered to be trade secrets of SeeBeyond; and may be used only in accordance with the License Agreement, as protected and enforceable by law. SeeBeyond assumes no responsibility for the use or reliability of its software on platforms that are not supported by SeeBeyond.
SeeBeyond, e*Gate, e*Way, and e*Xchange are the registered trademarks of SeeBeyond Technology Corporation in the United States and/or select foreign countries. The SeeBeyond logo, SeeBeyond Integrated Composite Application Network Suite, eGate, eWay, eInsight, eVision, eXchange, eView, eIndex, eTL, ePortal, eBAM, and e*Insight are trademarks of SeeBeyond Technology Corporation. The absence of a trademark from this list does not constitute a waiver of SeeBeyond Technology Corporation's intellectual property rights concerning that trademark. This document may contain references to other company, brand, and product names. These company, brand, and product names are used herein for identification purposes only and may be the trademarks of their respective owners.
© 2005 SeeBeyond Technology Corporation. All Rights Reserved. This work is protected as an unpublished work under the copyright laws.
This work is confidential and proprietary information of SeeBeyond and must be maintained in strict confidence.
Version 20050506130921.
e*Way Intelligent Adapter for Jacada Enterprise/AccessUser’s Guide 2 SeeBeyond Proprietary and Confidential

Contents
Contents
Chapter 1
Introduction 6Overview 6
Jacada Services 7Anatomy of a Service ETD 8Intended Reader 10
Supported Operating Systems 11
System Requirements 11External System Requirements 11
Chapter 2
Installation 12Windows Installation 12
Pre-installation 12Installation Procedure 12
UNIX 13Pre-installation 13Installation Procedure 13
Files/Directories Created by the Installation 14
Chapter 3
Multi-Mode e*Way Configuration 15Multi-Mode e*Way 15
Multi-Mode e*Way Configuration Parameters 15JVM Settings 15JVM Settings 16
JNI DLL Absolute Pathname 16CLASSPATH Prepend 17CLASSPATH Override 17CLASSPATH Append From Environment Variable 17Initial Heap Size 18Maximum Heap Size 18Maximum Stack Size for Native Threads 18Maximum Stack Size for JVM Threads 18Disable JIT 18
e*Way Intelligent Adapter for Jacada Enterprise/AccessUser’s Guide 3 SeeBeyond Proprietary and Confidential

Contents
Remote Debugging port number 19Suspend option for debugging 19Auxiliary JVM Configuration File 19
.General Settings 19Rollback Wait Interval 20Standard IQ FIFO 20
Chapter 4
e*Way Connection Configuration 21Configuring e*Way Connections 21
Connector 22Type 22Class 22Property.Tag 22
EnvironmentManager 22Host 23Port 23ClientName 23
ServiceConnection 23Timeout 23InitialDelay 24Slope 24MaxRetries 24ConnectPerInvoke 24
JC3Debug 24Level 25File 25
Chapter 5
Implementation 26Sample Implementation Components 26
Step One–Installing the Jacada Enterprise/Access Integrator 27Step Two–Installing the Jacada Enterprise/Access e*Way and Creating a Schema 27
Importing the Sample Schema 28Step Three–Creating and Configuring the e*Ways 28Step Four–Create the e*Way Connection 32Step Five–Creating Event Types 33
Creating an Event Type from the Custom ETD Wizard 33Creating an Event Type Using the Jacada ETD Wizard 35Creating an Event Type from an Existing XSC 36
Step Six–Intelligent Queues 37Step Seven–Collaboration Rules 37The Collaboration Rules Editor 41Step Eight–Collaborations 48
Execute the Schema 52
e*Way Intelligent Adapter for Jacada Enterprise/AccessUser’s Guide 4 SeeBeyond Proprietary and Confidential

Contents
Chapter 6
Java Methods 53The JDK Classes 53The Jacada Classes 53The SeeBeyond Classes 53
The JacadaEAiJC3Builder Class 54Methods of the JacadaEAiJC3Builder Class 54JacadaEAiJC3Builder 54setPrintDebug 55getPrintDebug 55compile 55setJC3Debug 58connect 58close 59getListOfServices 59getListOfMethods 60setService 60main 61
The JacadaEAiJC3Connector Class 61Methods of the JacadaEAiJC3Connector Class 62JacadaEAiJC3Connector 62open 63close 63isOpen 64getProperties 64getServiceConnection 65getEnvironmentManagerConnection 65
Chapter 7
Frequently Asked Questions 66Jacada e*Way Questions 66
Index 68
e*Way Intelligent Adapter for Jacada Enterprise/AccessUser’s Guide 5 SeeBeyond Proprietary and Confidential

Chapter 1
Introduction
The e*Way Intelligent Adapter for Jacada Enterprise/Access provides automatic data interchange with Enterprise Access applications running on external systems for which APIs are not readily available. This document describes how to install and configure the Jacada Enterprise/Access e*Way.
1.1 OverviewThe Jacada Enterprise/Access e*Way provides data translation and manipulation of a binary stream intended to interact with a person, in the form of a monitor screen and keyboard, and matches the data content to the screen order.
Entering information into the application requires transmission of a serial data stream that emulates keyboard entry in response to screen prompts. This transmission requires specific knowledge of the nature of each data element as it relates to the screen position. This process is referred to as screen scraping.
The Jacada Integrator application appears to read data from a user’s monitor during the “screen scraping” process. In a typical application, (for example, a medical-records database), data is displayed on the user’s monitor, while the user interacts with the application using a keyboard. Each data element (for example, a patient name, an ID number, or a service charge code) is displayed on the user’s monitor in a known position. The “screen scraper” intercepts the data stream that sends information to the monitor. It then uses the monitor-position information to locate and capture the data being sent to the monitor from the data stream. Although the data is not literally read from or displayed onto the screen, the result is the same.
Data flow between e*Gate, the Jacada Enterprise/Access e*Way, and the external system performs in the following manner.
Figure 1 Data Flow
e*GateJacada
Enterprise/Accesse*Way
External System
MetaMessage Send
ReceiveEvents
e*Way Intelligent Adapter for Jacada Enterprise/AccessUser’s Guide 6 SeeBeyond Proprietary and Confidential

Chapter 1 Section 1.1Introduction Overview
e*Gate initiates the session with the external system after creating a Meta Data Structure (Event) and sending it to the e*Way as a trigger. This Event contains all the information necessary for the e*Way to communicate with the external system. This information can be used to initiate, respond to, or validate the data interchange.
The Jacada Enterprise/Access e*Way provides an invoke function that takes in methods and parameters which in turn enable interaction with the E/A service object.
The E/A runtime environment acts as middleware between a client and the legacy system. It facilitates client connections and resource accesses as well as providing an objected-oriented interface for the client to run applications and gather data from legacy systems. The following diagram shows the relationships between the SeeBeyond products, the Jacada products, and the legacy systems.
Figure 2 The Jacada Runtime Environment.
1.1.1. Jacada ServicesThe business objects, called Services, encapsulate the legacy business processes. Each Service has a number of methods. A method can be called to perform some business process; it may or may not require input arguments and have output results. By interfacing with a Service to perform processes, the user is unaware of the events that occur between the E/A runtime environment and the legacy systems.
The SeeBeyond Jacada Enterprise/Access e*Way (e*Way Connection) uses the JClient3 API to access these Services. Moreover, the SeeBeyond Service ETD Builder allows the user to interrogate the E/A runtime environment for a Service's metadata and construct a SeeBeyond ETD representation of that Service. The builder constructs both an .xsc file and the Java classes. The .xsc file is used by the Java Collaboration Editor for displaying the Service so that the Service can be used with ease during the construction of a Java collaboration. An example of a Service ETD, displayed in SeeBeyond's ETD Editor, is shown in Figure 3.
EAiJClient3Con. PT.
e*Gate
ServiceETD
Builder
EnterpriseAccess2000
Services
LegacyData
MainframeApplication
Runtime
Build Time JClient3 API
JClient3 API
ServiceETDs
e*Way Intelligent Adapter for Jacada Enterprise/AccessUser’s Guide 7 SeeBeyond Proprietary and Confidential
Chapter 1 Section 1.1Introduction Overview
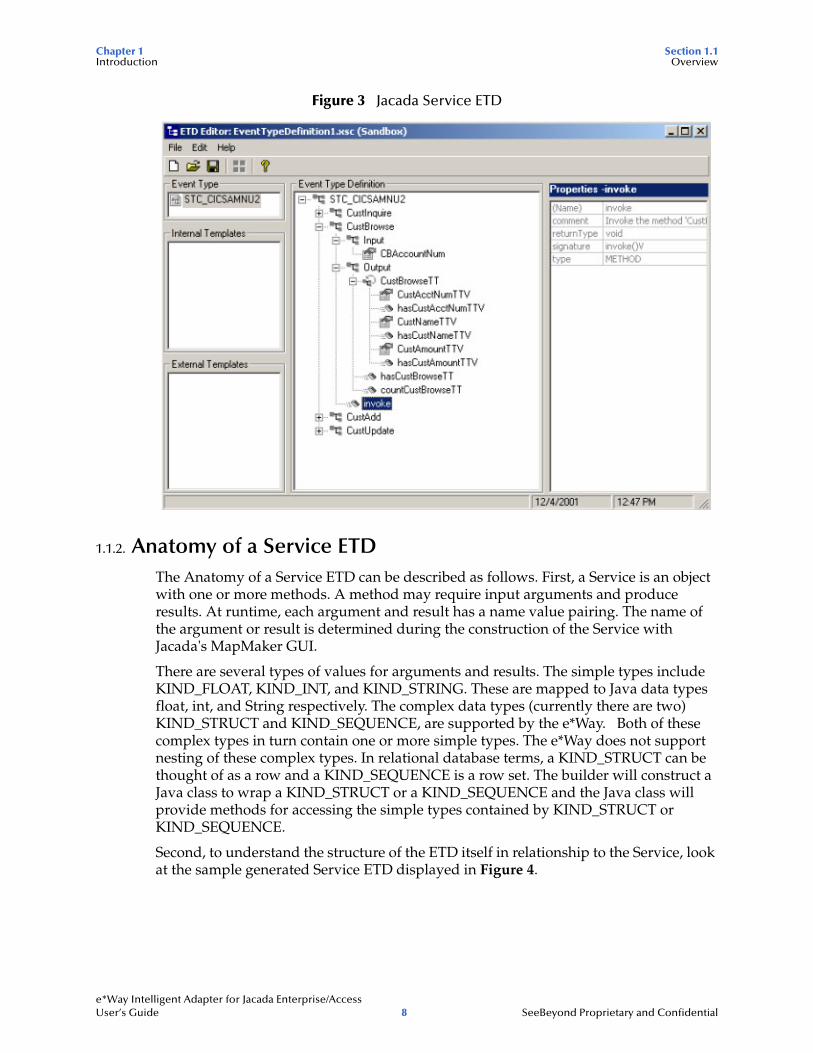
Figure 3 Jacada Service ETD
1.1.2. Anatomy of a Service ETD The Anatomy of a Service ETD can be described as follows. First, a Service is an object with one or more methods. A method may require input arguments and produce results. At runtime, each argument and result has a name value pairing. The name of the argument or result is determined during the construction of the Service with Jacada's MapMaker GUI.
There are several types of values for arguments and results. The simple types include KIND_FLOAT, KIND_INT, and KIND_STRING. These are mapped to Java data types float, int, and String respectively. The complex data types (currently there are two) KIND_STRUCT and KIND_SEQUENCE, are supported by the e*Way. Both of these complex types in turn contain one or more simple types. The e*Way does not support nesting of these complex types. In relational database terms, a KIND_STRUCT can be thought of as a row and a KIND_SEQUENCE is a row set. The builder will construct a Java class to wrap a KIND_STRUCT or a KIND_SEQUENCE and the Java class will provide methods for accessing the simple types contained by KIND_STRUCT or KIND_SEQUENCE.
Second, to understand the structure of the ETD itself in relationship to the Service, look at the sample generated Service ETD displayed in Figure 4.
e*Way Intelligent Adapter for Jacada Enterprise/AccessUser’s Guide 8 SeeBeyond Proprietary and Confidential

Chapter 1 Section 1.1Introduction Overview
Figure 4 Sample Generated Service ETD
The root node for the ETD is the Service root node which has the same name as that of the Service. As shown in the example, the Service called STC_CICSAMNU2 is the name of the root node of the ETD. The builder constructs a Java class to represent a Service. The methods of a Service are child nodes of the Service node. In turn, the builder constructs a Java class for each method; an instance of a Service class will contain an instance of each Service method as its attribute. The picture shows that this service has four methods; CustInquire, CustBrowse, CustAdd, and CustUpdate. Each of these methods allows a user to execute a CICS AMNU transaction to manage a customer database.
Each Service method node has two child nodes called Input and Output. The Input node contains the child nodes that map to the required input arguments for a Service method. Here we see that the method CustInquire requires a String as an input (the customer account number). The Output node contains the results for the method after invoking the method. CustInquire has an output that is a KIND_STRUCT. As discussed previously, a KIND_STRUCT or KIND_SEQUENCE data type is wrapped by a Java class. Thus, the KIND_STRUCT data type in the ETD is a child node of the Output node.
A KIND_STRUCT or KIND_SEQUENCE contains simple types as illustrated by the following picture. A KIND_SEQUENCE is a little more complex in that it is represented as a collection of row results. As shown in Figure 5, a KIND_SEQUENCE has a repeating symbol next to its node to show the user that it may contain 0 or more row results (see Figure 5).
e*Way Intelligent Adapter for Jacada Enterprise/AccessUser’s Guide 9 SeeBeyond Proprietary and Confidential

Chapter 1 Section 1.1Introduction Overview
Figure 5 Sample Generated Service ETD
In addition, a "count" method is available to the user to determine how many rows are available in the result. For example, the CustBrowse method returns a KIND_SEQUENCE called CustBrowseTT. A Java method called countCustBrowseTT will be generated and exposed in the ETD.
Notice that each output in the ETD has a corresponding "has" method. This method can be used to determine whether result is returned for the particular output. Taking the CustBrowse method as an example, we see that there is a method called "hasCustBrowseTT" in the Output node. The user can use this method to determine whether data is returned for one or more of CustBrowseTT members. In addition, each member of the sequence has a corresponding "has" method to determine whether data is available for that member. For example, "hasCustAmountTTV" can be used to find out whether a value for CustAmountTTV was returned for this customer. If the method invocation does not return a particular result and the user tries to retrieve that result, a CollabDataException will be thrown. No default values will be returned.
Overall, the ETD is constructed in such a way as to preserve the natural hierarchical structure of a Service. The Service ETD is therefor, intuitive and simple to use.
1.1.3. Intended ReaderThe reader of this guide is presumed to be a developer or system administrator with responsibility for maintaining the e*Gate system, to have a high level of experience in Windows operations and administration, and to be thoroughly familiar with Jacada Enterprise/Access Integrator applications and Windows-style GUI operations.
e*Way Intelligent Adapter for Jacada Enterprise/AccessUser’s Guide 10 SeeBeyond Proprietary and Confidential

Chapter 1 Section 1.2Introduction Supported Operating Systems
1.2 Supported Operating SystemsThe Jacada Enterprise/Access e*Way is available on the following operating systems:
Windows 2000, Windows XP, and Windows Server 2003
HP-UX 11.0 and 11i (PA-RISC)
IBM AIX 5.1L and 5.2
Sun Solaris 8 and 9
Note: Open and review the Readme.txt for the Jacada E/A e*Way for any additional information or requirements, prior to installation. The Readme.txt is located on the Installation CD_ROM at setup\addons\ewcntea.
1.3 System RequirementsTo use the Jacada Enterprise/Access e*Way, you need the following:
The Jacada Enterprise/Access e*Way uses the JClient3 classes contained in jclient3.jar. This jar file must be copied from the lib directory of the Jacada Integrator server or client and copied to egate\client\ThirdParty\jacada\classes and egate\server\registry\repository\default\ThirdParty\jacada\classes before the builder or the e*Way can be used.
An e*Gate Participating Host.
A TCP/IP network connection.
Additional disk space for e*Way executable, configuration, library, and script files. The disk space is required on both the Participating and the Registry Host. Additional disk space is required to process and queue the data that this e*Way processes; the amount necessary varies based on the type and size of the data being processed, and any external applications performing the processing.
The client components of Jacada Enterprise/Access Integrator have their own requirements; see that system’s documentation for more details.
1.3.1. External System RequirementsThe Java-enabled Jacada Enterprise/Access e*Way requires the following installed on the participating host:
Jacada Enterprise/Access Integrator Version 3.5 or 4.0. Version 4.0 requires PTF 7 plus Patch 3 from Jacada.
Note: Jacada Integrator 4.0 is only supported for features which are compatible with version 3.5. New features for version 4.0 are not currently supported.
e*Way Intelligent Adapter for Jacada Enterprise/AccessUser’s Guide 11 SeeBeyond Proprietary and Confidential

Chapter 2
Installation
This chapter describes the procedures for installing the Jacada Enterprise/Access e*Way.
“Windows Installation” on page 12
“UNIX” on page 13
“Files Created by the Installation” on page 14
2.1 Windows Installation
2.1.1. Pre-installationExit all Windows programs before running the setup program, including any antivirus applications.
You must have Administrator privileges to install this e*Way.
2.1.2. Installation ProcedureTo install the Jacada Enterprise/Access e*Way on a Windows system
1 Log in as an Administrator to the workstation on which you are installing the e*Way.
2 Insert the e*Way installation CD-ROM into the CD-ROM drive.
3 If the CD-ROM drive’s Autorun feature is enabled, the setup application launches automatically; skip ahead to step 4. Otherwise, use the Windows Explorer or the Control Panel’s Add/Remove Applications feature to launch the file setup.exe on the CD-ROM drive.
4 The InstallShield setup application launches. Follow the installation instructions until you come to the Please choose the product to install dialog box.
5 Select e*Gate Integrator, then click Next.
6 Follow the on-screen instructions until you come to the second Please choose the product to install dialog box.
7 Clear the check boxes for all selections except Add-ons, and then click Next.
e*Way Intelligent Adapter for Jacada Enterprise/AccessUser’s Guide 12 SeeBeyond Proprietary and Confidential

Chapter 2 Section 2.2Installation UNIX
8 Follow the on-screen instructions until you come to the Select Components dialog box.
9 Highlight (but do not check) e*Ways, and then click the Change button. The SelectSub-components dialog box appears.
10 Select the Jacada Enterprise/Access e*Way. Click the continue button to return to the Select Components dialog box, then click Next.
11 Follow the rest of the on-screen instructions to install the Java-enabled Jacada Enterprise/Access e*Way. Be sure to install the e*Way files in the suggested client installation directory. The installation utility detects and suggests the appropriate installation directory. Unless you are directed to do so by SeeBeyond support personnel, do not change the suggested installation directory setting.
Note: Once you have installed and configured this e*Way, you must incorporate it into a schema by defining and associating the appropriate Collaborations, Collaboration Rules, IQs, and Event Types before this e*Way can perform its intended functions. For more information about any of these procedures, please see the online Help.
For more information about configuring e*Ways or how to use the e*Way Editor, see the e*Gate Integrator User’s Guide.
2.2 UNIX
2.2.1. Pre-installationYou do not require root privileges to install this e*Way. Log in under the user name that you wish to own the e*Way files. Be sure that this user has sufficient privileges to create files in the e*Gate directory tree.
2.2.2. Installation ProcedureTo install the Jacada Enterprise/Access e*Way on a UNIX system
1 Log in on the workstation containing the CD-ROM drive, and insert the CD-ROM into the drive.
2 If necessary, mount the CD-ROM drive.
3 At the shell prompt, type
cd /cdrom
4 Start the installation script by typing
setup.sh
5 A menu of options will appear. Select the Install e*Way option. Then, follow the additional on-screen directions.
e*Way Intelligent Adapter for Jacada Enterprise/AccessUser’s Guide 13 SeeBeyond Proprietary and Confidential

Chapter 2 Section 2.3Installation Files/Directories Created by the Installation
Note: Be sure to install the e*Way files in the suggested client installation directory. The installation utility detects and suggests the appropriate installation directory. Unless you are directed to do so by SeeBeyond support personnel, do not change the suggested “installation directory” setting.
6 After installation is complete, exit the installation utility and launch the Schema Designer.
Note: Once you have installed and configured this e*Way, you must incorporate it into a schema by defining and associating the appropriate Collaborations, Collaboration Rules, IQs, and Event Types before this e*Way can perform its intended functions. For more information about any of these procedures, please see the online Help system.
For more information about configuring e*Ways or how to use the e*Way Editor, see the e*Gate Integrator User’s Guide.
2.3 Files/Directories Created by the InstallationThe Java-enabled Jacada Enterprise/Access e*Way installation process will install the following files, see the table “Files Created by the Installation” on page 14, within the e*Gate directory tree. Files will be installed within the egate\client tree on the Participating Host and committed to the default schema on the Registry Host.
Table 1 Files Created by the Installation
e*Gate Directory File(s)
\classes\ stcjcs.jarstcjc3conn.jarstcjc3svcbldr.jarstcutil.jarstcexception.jar
configs\jacadaeaijc3\ jacadaeaijc3.def
etd\ jc3svcwizard.ctljacadaeaijc3.ctl
bin\java\ jcscomp.jarstcjintegra.jar
ThirdParty\gnu-getopt\classes\ gnu-getopt.jar
ThirdParty\xml\Apache\classes\ xerces.jar
e*Way Intelligent Adapter for Jacada Enterprise/AccessUser’s Guide 14 SeeBeyond Proprietary and Confidential

Chapter 3
Multi-Mode e*Way Configuration
This chapter describes how to configure the Multi-Mode e*Way.
3.1 Multi-Mode e*WayMulti-Mode e*Way properties are set using the Schema Designer.
To create and configure a New Multi-Mode e*Way:
1 Select the Navigator’s Components tab.
2 Open the host and control broker on which you want to create the e*Way.
3 On the Palette, click on the Create a New e*Way button.
4 The New e*Way Component window opens. Enter the name of the new e*Way, then click OK.
5 Right-click the new e*Way and select Properties edit its properties.
6 When the e*Way Properties window opens, click on the Find button beneath the Executable File field, and select an executable file. For the purposes of the sample select stceway.exe (stceway.exe is located in the “bin\” directory).
7 Under the Configuration File field, click on the New button. When the Settings page opens, set the configuration parameters for this configuration file.
8 After selecting the desired parameters, save the configuration file. Close the .cfg file and select OK to close the e*Way Properties Window.
Multi-Mode e*Way Configuration Parameters
The Multi-Mode e*Way configuration parameters are arranged in the following sections:
JVM Settings on page 15
.General Settings on page 19
3.1.1. JVM SettingsThe JVM Settings control basic Java Virtual Machine settings.
JNI DLL Absolute Pathname on page 16
e*Way Intelligent Adapter for Jacada Enterprise/AccessUser’s Guide 15 SeeBeyond Proprietary and Confidential

Chapter 3 Section 3.1Multi-Mode e*Way Configuration Multi-Mode e*Way
CLASSPATH Prepend on page 17
CLASSPATH Override on page 17
CLASSPATH Append From Environment Variable on page 17
Initial Heap Size on page 18
Maximum Heap Size on page 18
Maximum Stack Size for Native Threads on page 18
Maximum Stack Size for JVM Threads on page 18
Disable JIT on page 18
Remote Debugging port number on page 19
Suspend option for debugging on page 19
Auxiliary JVM Configuration File on page 19
3.1.2. JVM SettingsThe JVM Settings control basic Java Virtual Machine settings.
JNI DLL Absolute Pathname
Description
Specifies the absolute pathname to where the JNI DLL installed by the Java 2 SDK 1.3.1_02 is located on the Participating Host.
Required Values
A valid pathname.
Additional Information
The JNI dll name varies on different O/S platforms:
The value assigned can contain a reference to an environment variable, by enclosing the variable name within a pair of % symbols. For example:
%MY_JNIDLL%
Such variables can be used when multiple Participating Hosts are used on different platforms.
OS Java 2 JNI DLL Name
Windows jvm.dll
Solaris libjvm.so
HP-UX libjvm.sl
AIX libjvm.a
e*Way Intelligent Adapter for Jacada Enterprise/AccessUser’s Guide 16 SeeBeyond Proprietary and Confidential

Chapter 3 Section 3.1Multi-Mode e*Way Configuration Multi-Mode e*Way
To ensure that the JNI DLL loads successfully, the Dynamic Load Library search path environment variable must be set appropriately to include all the directories under the Java 2 SDK (or JDK) installation directory that contain shared libraries (UNIX) or DLLs.
CLASSPATH Prepend
Description
Specifies the paths to be prepended to the CLASSPATH environment variable for the JVM.
Required Values
An absolute path or an environmental variable. This parameter is optional.
Additional Information
If left unset, no paths are prepended to the CLASSPATH environment variable.
Existing environment variables may be referenced in this parameter by enclosing the variable name in a pair of % signs. For example:
%MY_PRECLASSPATH%
CLASSPATH Override
Description
Specifies the complete CLASSPATH variable to be used by the JVM. This parameter is optional. If left unset, an appropriate CLASSPATH environment variable (consisting of required e*Gate components concatenated with the system version of CLASSPATH) is set.
Note: All necessary JAR and ZIP files needed by both e*Gate and the JVM must be included. It is advised that the CLASSPATH Prepend parameter be used.
Required Values
An absolute path or an environmental variable. This parameter is optional.
Additional Information
Existing environment variables may be referenced in this parameter by enclosing the variable name in a pair of % signs. For example:
%MY_CLASSPATH%
CLASSPATH Append From Environment Variable
Description
Specifies whether the path is appended for the CLASSPATH environmental variable to jar and zip files needed by the JVM.
e*Way Intelligent Adapter for Jacada Enterprise/AccessUser’s Guide 17 SeeBeyond Proprietary and Confidential

Chapter 3 Section 3.1Multi-Mode e*Way Configuration Multi-Mode e*Way
Required Values
YES or NO. The configured default is YES.
Initial Heap Size
Description
Specifies the value for the initial heap size in bytes. If set to 0 (zero), the preferred value for the initial heap size of the JVM is used.
Required Values
An integer between 0 and 2147483647. This parameter is optional.
Maximum Heap Size
Description
Specifies the value of the maximum heap size in bytes. If set to 0 (zero), the preferred value for the maximum heap size of the JVM is used.
Required Values
An integer between 0 and 2147483647. This parameter is optional.
Maximum Stack Size for Native Threads
Description
Specifies the value of the maximum stack size in bytes for native threads. If set to 0 (zero), the default value is used.
Required Values
An integer between 0 and 2147483647. This parameter is optional.
Maximum Stack Size for JVM Threads
Description
Specifies the value of the maximum stack size in bytes for JVM threads. If set to 0 (zero), the preferred value for the maximum heap size of the JVM is used.
Required Values
An integer between 0 and 2147483647. This parameter is optional.
Disable JIT
Description
Specifies whether the Just-In-Time (JIT) compiler is disabled.
e*Way Intelligent Adapter for Jacada Enterprise/AccessUser’s Guide 18 SeeBeyond Proprietary and Confidential

Chapter 3 Section 3.1Multi-Mode e*Way Configuration Multi-Mode e*Way
Required Values
YES or NO.
Note: This parameter is not supported for Java Release 1.
Remote Debugging port number
Description
Specifies the port number by which the e*Gate Java Debugger can connect with the JVM to allow remote debugging.
Required Values
An unused port number in the range 2000 through 65535. If not specified, the e*Gate Java Debugger is not able to connect to this e*Way.
Suspend option for debugging
Description
Allows you to specify that the e*Way should do no processing until an e*Gate Java Debugger has successfully connected to it.
Required Values
YES or No. YES suspends e*Way processing until a Debugger connects to it. NO enables e*Way processing immediately upon startup.
Auxiliary JVM Configuration File
Description
Specifies an auxiliary JVM configuration file for additional parameters.
Required Values
The location of the auxiliary JVM configuration file
3.1.3. .General SettingsFor more information on the General Settings configuration parameters see the e*Gate Integrator User's Guide. The General Settings section contains the following parameters:
Rollback Wait Interval on page 20
Standard IQ FIFO on page 20
e*Way Intelligent Adapter for Jacada Enterprise/AccessUser’s Guide 19 SeeBeyond Proprietary and Confidential

Chapter 3 Section 3.1Multi-Mode e*Way Configuration Multi-Mode e*Way
Rollback Wait Interval
Description
Specifies the time interval to wait before rolling back the transaction.
Required Values
A number within the range of 0 to 99999999, representing the time interval in milliseconds.
Standard IQ FIFO
Description
Specifies whether the highest priority messages from all STC_Standard IQs will be delivered in the first-in-first-out (FIFO) order.
Required Values
Select YES or NO. YES indicates that the e*Way will retrieve messages from all STC_Standard IQs in the first-in-first-out (FIFO) order. NO indicates that this feature is disabled. NO is the configured default.
e*Way Intelligent Adapter for Jacada Enterprise/AccessUser’s Guide 20 SeeBeyond Proprietary and Confidential

Chapter 4
e*Way Connection Configuration
This chapter describes how to configure the e*Way Connection using the JacadaEAi/JClient3 e*Way Connection type.
4.1 Configuring e*Way Connectionse*Way Connections are set using the Schema Designer.
To create and configure e*Way Connections:
1 In the Schema Designer’s Component editor, select the e*Way Connections folder.
2 On the palette, click the Create a New e*Way Connection button.
3 The New e*Way Connection Component dialog box opens, enter a name for the new e*Way Connection. Click OK.
4 Double-click on the new e*Way Connection. For this example, the connection has been defined as ec_Jacada
5 The e*Way Connection Properties dialog box opens.
6 From the e*Way Connection Type drop-down box, select JacadaEAi/JClient3.
7 Enter the Event Type “get” interval in the dialog box provided. The configured default is 10000 milliseconds.
8 From the e*Way Connection Configuration File, click New to create a new Configuration File for this e*Way Connection. (To use an existing file, click Find.)
9 The e*Way Connection Edit Settings window opens. Make any necessary changes to the Jacada Enterprise/Access e*Way Connection parameters.
10 Go to File, Save to save settings.
11 Click on File, Promote to Run Time.
Note: If changes are made to an existing e*Way Connection file, any e*Ways using the revised e*Way Connection must be restarted.
The Jacada Enterprise/Access e*Way Connection configuration parameters are organized into the following sections:
Connector on page 22
e*Way Intelligent Adapter for Jacada Enterprise/AccessUser’s Guide 21 SeeBeyond Proprietary and Confidential

Chapter 4 Section 4.1e*Way Connection Configuration Configuring e*Way Connections
EnvironmentManager on page 22
ServiceConnection on page 23
JC3Debug on page 24
4.1.1. ConnectorThis section contains a set of top level parameters:
type
class
Property.Tag
Type
Description
Specifies the connector type.
Required Values
String-set. The value is always defaulted to Jacada EAi JClient3 for Jacada EAi JClient3 connections.
Class
Description
Specifies the class name of the Jacada EAi JClient3 connector object.
Required Values
String-set. A valid package name. The default is com.stc.eways.cics.jacadaeaijc3.runtime.JacadaEAiJC3Connector.
Property.Tag
Description
Specifies the data source identity. This parameter is required by the current EBobConnectorFactory.
Required Values
String-set. A valid data source package name.
4.1.2. EnvironmentManagerThis section contains a set of top level parameters:
Host
Port
ClientName
e*Way Intelligent Adapter for Jacada Enterprise/AccessUser’s Guide 22 SeeBeyond Proprietary and Confidential

Chapter 4 Section 4.1e*Way Connection Configuration Configuring e*Way Connections
Host
Description
Specifies the name or IP address of the host on which the EA Environment
Manager is running.
Required Values
String-set. A valid host name or IP address. This parameter is mandatory
Port
Description
Specifies the port at which the EA Environment Manager listening for client connections.
Required Values
Integer-set. An integer ranging from 1 to 65535. This parameter is mandatory. The configured default is 30001.
ClientName
Description
Specifies the client name for the Environment Manager.
Required Values
String-set. A valid client name. This parameter is optional.
4.1.3. ServiceConnectionThis section contains the following parameters:
Timeout
InitialDelay
Slope
MaxRetries
ConnectPerInvoke
Timeout
Description
Specifies the timeout value to be used for a service connection. The timeout value is set in seconds. If timeout is not set, then the default timeout, set by EA, will be used.
Required Values
Integer-set. The determined number of seconds to timeout. This parameter is optional.
e*Way Intelligent Adapter for Jacada Enterprise/AccessUser’s Guide 23 SeeBeyond Proprietary and Confidential

Chapter 4 Section 4.1e*Way Connection Configuration Configuring e*Way Connections
InitialDelay
Description
Specifies the initial delay between service connection retries. The InitialDelay value is set in seconds. If the initial delay is not set, then the default initial delay, set by EA, will be used.
Required Values
Integer-set. The determined number of seconds for the initial delay. This parameter is optional.
Slope
Description
Specifies the rate for the delay between service connection retries. The Slope value is set in seconds. If the slope is not set, then the default slope, set by EA, will be used.
Required Values
Integer-set. The number of seconds to increase the delay between service connection retries. This parameter is optional..
MaxRetries
Description
Specifies the maximum number of times to retry service connections. If the maximum retries is not set, then the default maximum retries set by EA will be used.
Required Values
Integer-set. A valid number. This parameter is optional.
ConnectPerInvoke
Description
Specifies whether to force a recondition attempt to a service every time a method is invoked. If this parameter is set to FALSE, then once a connection to the service has been established the connection is kept for subsequent method invocations. An attempt to reconnect only happens if the connection to the service is lost (is not alive). If this parameter is set to TRUE, then a new connection to a service is established prior to a method invocation and closed after a method invocation.
Required Values
String-set. TRUE or FALSE. FALSE is the configured default.
4.1.4. JC3DebugThis section contains a set of top level parameters:
Level
e*Way Intelligent Adapter for Jacada Enterprise/AccessUser’s Guide 24 SeeBeyond Proprietary and Confidential

Chapter 4 Section 4.1e*Way Connection Configuration Configuring e*Way Connections
File
Level
Description
Specifies the level of debugging that the debug feature of the JClient3 will use. If NONE is selected, then a DebugController will not be used. Otherwise, the level of debugging ranges from 0 to 3. 0 being minimum and 3 being maximum. If debugging is turned on, debug messages will be logged to the file specified by the File parameter (below). If debugging is turned on and the log file is not specified by the File parameter, then a default file jacadaeai.log will be created in the logs directory under eGate client.
Required Values
Select one of five options, 0 to 3 and NONE. NONE is the configured default.
File
Description
Specify the full path to the debug file. Sets the file name to use for logging JClient3 debug messages. See the Level parameter in this section.
Required Values
A valid output path and file name.
e*Way Intelligent Adapter for Jacada Enterprise/AccessUser’s Guide 25 SeeBeyond Proprietary and Confidential

Chapter 5
Implementation
This chapter contains basic information for implementing the Java-enabled Jacada Enterprise/Access e*Way in a production environment. Examples are given for creating and configuring the necessary components for a Jacada Enterprise/Access schema. A sample schema is included on the Installation CD-ROM for the implementation of the e*Way. For more information on creating and configuring e*Way components see the e*Gate Integrator User’s Guide.
5.1 Sample Implementation ComponentsThe Java-enabled Jacada Enterprise/Access e*Way is an application specific e*Way which allows e*Gate to connect with Jacada Integrator applications. When the Jacada Enterprise/Access e*Way is installed along with the e*Gate Integrator, schema’s can be created and configured using the e*Gate Schema Designer. A schema is an organization scheme that contains the parameters of all the components that control, route, and transform data as it moves through e*Gate in a predefined system configuration.
The following pages contain a sample implementation which serves to explain how the components for a Jacada Enterprise/Access e*Way schema are created. The Host and Control Broker are automatically created and configured during the e*Gate installation. The default name for each is the name of the host on which you are installing the e*Gate Schema Designer GUI. To complete the sample implementation of the Java-enabled Jacada Enterprise/Access e*Way requires the following:
Install the Jacada Enterprise/Access Integrator: On the e*Gate Server, copy jclient3.jar from the lib directory of the Jacada Integrator Server or Client and copy it to egate\server\ThirdParty\jacada\classes and egate\client\ThirdParty\jacada\classes.
Install the Jacada Enterprise/Access e*Way: The Jacada Enterprise/Access e*Way is installed as an Add-on to the E*Gate integrator system. For directions on installing the Jacada Enterprise/Access e*Way from CD-ROM on your specific operating system, see Installation on page 12.
Create the e*Ways: e*Ways connect with external systems to poll or send data. They also transform and route data. Multi-Mode e*Ways are used to run Java Collaborations that utilize e*Way Connections to send and receive Events to and from multiple external systems.
e*Way Intelligent Adapter for Jacada Enterprise/AccessUser’s Guide 26 SeeBeyond Proprietary and Confidential

Chapter 5 Section 5.1Implementation Sample Implementation Components
Configure the e*Way Connections: An e*Way Connection is the encoding of access information for a specific external connection. The e*Way Connection configuration file contains the parameters necessary for communicating with Jacada Enterprise/Access Integrator.
Create Event Types: Each packet of data within e*Gate is referred to as an Event. Event Types are data labels that allow e*Gate to process and route specific Events differently. Data is not routed in e*Gate without an Event Type.
Create Intelligent Queues: Non-volatile storage for data traveling through the e*Gate system is provided by creating Intelligent Queues (IQs). The IQ Manager oversees the activities of the individual storage locations. The exact behavior of each IQ is determined by the IQ Service configuration.
Create Collaboration Rules: Collaboration Rules determine how input Event Types are modified to the format of specific output Event Types. A Collaboration Rule defines what type of data is received, how it will be transformed and what type of data will be published.
Create Collaborations: A Collaboration is a message bus in e*Gate that specifies the name and source of the incoming Event Types, the Collaboration Rules that will be applied to the Event, and the name, destination and expiration date of the outgoing Event Types. A Collaboration designates the Subscriber, which “listens” for Events of a known type from a given source, and the Publisher, which distributes the transformed Event to a specified recipient.
5.1.1. Step One–Installing the Jacada Enterprise/Access Integrator Step one in creating the Jacada Enterprise/Access e*Way is to install and configure the Jacada Enterprise/Access Integrator. It is assumed that the reader is experienced in the use of the Jacada Integrator.
5.1.2. Step Two–Installing the Jacada Enterprise/Access e*Way and Creating a Schema
Step two is to install the Jacada Enterprise/Access e*Way on the e*Gate server. For directions on installing the Jacada Enterprise/Access e*Way on your specific operating system, see Installation on page 12. Also see Supported Operating Systems on page 11.
Note: Copy jclient3.jar from the lib directory of the Jacada Integrator Server or Client and copy it to egate\server\registry\repository\default\ThirdParty\jacada\classes and egate\client\ThirdParty\jacada\classes.
Once the Jacada Enterprise/Access e*Way is installed, a new schema must be created. While it is possible to use the default schema for the sample implementation, it is recommended that you create a separate schema for testing purposes. After you install the Jacada Enterprise/Access e*Way, do the following:
1 Start the e*Gate Schema Designer GUI.
e*Way Intelligent Adapter for Jacada Enterprise/AccessUser’s Guide 27 SeeBeyond Proprietary and Confidential

Chapter 5 Section 5.1Implementation Sample Implementation Components
2 When the Schema Designer prompts you to log in, select the host that you specified during installation and enter your password.
3 You will then be prompted to select a schema. Click on New.
4 Enter a name for the new Schema. In this case, for the sample implementation, enter JacadaSample, or any appropriate name. Click Open to create a new schema or to import the sample schema do the following:
Importing the Sample Schema
A sample schema, sample .xml file and Readme file are included on the installation CD-ROMs at ...\samples\ewcntea.
1 After completing steps 1 through 4 above, select Create from export and locate the JacadaSample.zip on the CD-ROM.
Note: A new sample schema has been added for Jacada Integrator 4.0 that is similar to the JacadaSample schema. If you are using Jacada Integrator 4.0, import the 40JacadaSample.
2 Click Open. The e*Gate Schema Designer opens to the Jacada sample schema.
3 To complete the Jacada sample schema implementation follow the directions in the Readme.txt file included with the sample. This includes details on how to compile and deploy the banking service (GetLoanTrans-Out.xml included with the sample) and use the Jacada MapPlayer to play the bankplay map.
After importing the sample schema and following the directions included in the Readme.txt file the sample schema is complete. The following steps are included to demonstrate how the components of the sample schema are created.
5.1.3. Step Three–Creating and Configuring the e*WaysStep three is to create the e*Ways. e*Ways are used components for transporting and transforming data. They always interface with at least one external system, and Multi-Mode e*Ways can use e*Way Connections to interface with many external systems. For the sample implementation three e*Ways are required.
Inbound_eWay
Outbound_eWay
Multi-Mode_eWay
The following sections provide instructions for creating each e*Way.
Inbound e*Way
1 Select the Navigator's Components tab.
2 Open the host on which you want to create the e*Ways.
3 Select the Control Broker that will manage the new e*Ways.
4 On the palette, click the Create a New e*Way button.
e*Way Intelligent Adapter for Jacada Enterprise/AccessUser’s Guide 28 SeeBeyond Proprietary and Confidential

Chapter 5 Section 5.1Implementation Sample Implementation Components
5 Enter the name of the new e*Way. In this case, ewFeeder. Click OK.
6 Right-click ewFeeder, and select Properties to edit its properties.
7 When the e*Way Properties window opens, click on the Find button beneath the Executable File field and select stcewfile.exe as the executable file.
Figure 6 e*Way Properties Dialog Box
8 Under the Configuration File field, click on the New button. The Edit Settings dialog box opens. Set the following for this configuration file.
Table 2 Configuration Parameters for the Inbound e*Way
Parameter Value
General Settings (unless otherwise stated, leave settings as default)
AllowIncoming YES
AllowOutgoing NO
PerformanceTesting NO
Outbound Settings Use default
Poller Inbound Settings
PollDirectory C:\INDATA (input file folder)
InputFileExtension *.xml (input file extension)
PollMilliseconds 1000 (default)
Remove EOL YES
e*Way Intelligent Adapter for Jacada Enterprise/AccessUser’s Guide 29 SeeBeyond Proprietary and Confidential

Chapter 5 Section 5.1Implementation Sample Implementation Components
9 After selecting the desired parameters, save the configuration file (ewFeeder.cfg) and Promote to Run Time. Close the .cfg file.
10 Use the Startup, Advanced, and Security tabs to modify the default settings for each e*Way you configure.
A Use the Startup tab to specify whether the e*Way starts automatically, or restarts after abnormal termination or due to scheduling and so forth.
B Use the Advanced tab to specify or view the activity and error logging levels as well as the Event threshold information.
C Use Security to view or set privilege assignments.
11 Select OK to close the e*Way Properties window.
Outbound e*Way
1 Select the Navigator's Components tab.
2 Open the host on which you want to create the e*Ways.
3 Select the Control Broker that will manage the new e*Ways.
4 On the palette, click the Create a New e*Way button.
5 Enter the name of the new e*Way, (in this case, ewEater), then click OK.
6 Select ewEater, then right-click and select Properties to edit its properties.
7 When the e*Way Properties window opens, click the Find button beneath the Executable File field, and select stcewfile.exe as the executable file.
8 Under the Configuration File field, click the New button. When the Settings page opens, set the following for this configuration file:
:
MultipleRecordsPerFile NO
MaxBytesPerLine 4096 (default)
BytesPerLineIsFixed NO
File Records Per eGate Event 1 (default)
Performance Testing Default
Table 3 Configuration Parameters for the Outbound e*Way
Parameter Value
General Settings (unless otherwise stated, leave settings as default)
AllowIncoming NO
AllowOutgoing YES
PerformanceTesting NO
Outbound Settings
OutputDirectory C:\DATA (use appropriate drive)
Table 2 Configuration Parameters for the Inbound e*Way
Parameter Value
e*Way Intelligent Adapter for Jacada Enterprise/AccessUser’s Guide 30 SeeBeyond Proprietary and Confidential

Chapter 5 Section 5.1Implementation Sample Implementation Components
9 Save the .cfg file (MQOut.cfg), and promote to run time.
10 Click OK to close e*Way Properties window.
Multi-Mode e*Way
1 Select the Navigator's Components tab.
2 Open the host on which you want to create the e*Way.
3 Select the Control Broker that will manage the new e*Way.
4 On the palette, click the Create a New e*Way button.
5 Enter the name of the new e*Way (in this case, ewJacadaIntegrator), then click OK.
6 Right-click the new e*Way and select Properties to edit its properties.
7 When the e*Way Properties window opens, click the Find button beneath the Executable File field, and select stceway.exe as the executable file.
8 To edit the JVM Settings, select New under Configuration file.
See “Multi-Mode e*Way Configuration” on page 15 for details on the parameters associated with the Multi-Mode e*Way.
9 Save the .cfg file (ewJacadaIntegrator.cfg).
10 In the e*Way Properties window, use the Startup, Advanced, and Security tabs to modify the default settings for each.
D Use the Startup tab to specify whether the e*Way starts automatically, restarts after abnormal termination or due to scheduling, etc.
E Use the Advanced tab to specify or view the activity and error logging levels, as well as the Event threshold information.
F Use Security to view or set privilege assignments.
11 Go to File and click Promote to Run Time.
12 Click OK to close e*Way Properties window.
OutputFileName banking%d.xml
MultipleRecordsPerFile YES
MaxRecordsPerFile 10000
AddEOL YES (add end-of-line character)
Poller Inbound Settings Default
Performance Testing Default
Table 3 Configuration Parameters for the Outbound e*Way
Parameter Value
e*Way Intelligent Adapter for Jacada Enterprise/AccessUser’s Guide 31 SeeBeyond Proprietary and Confidential

Chapter 5 Section 5.1Implementation Sample Implementation Components
5.1.4. Step Four–Create the e*Way Connection Step four is to create and configure the e*Way Connection. The e*Way Connection configuration file contains the settings necessary for communicating with Jacada Enterprise/Access Integrator and specifying the Jacada Queue Manager.
To create and configure a New e*Way Connection
1 Select the e*Way Connection folder on the e*Gate Navigator.
2 On the palette, click the Create a New e*Way Connection button.
3 Enter the name of the e*Way Connection, then click OK. (For the purpose of this sample, the e*Way Connection is defined as “conJacadaIntegrator”.)
4 Double-click the new e*Way Connection to edit its properties. The e*Way Connection Properties dialog box opens.
Figure 7 e*Way Connection Properties
5 In the e*Way Connection Type field, select JacadaEAi/JClient3 from the drop-down list box.
6 Enter the Event Type “get” interval in the dialog box provided. 10000 milliseconds is the configured default. The “get interval is the intervening period at which, when subscribed to, the e*Way connection is polled.
7 Under e*Way Connection Configuration File, click the New button.
8 The e*Way Connection editor opens, select the necessary parameters. For more information on the Jacada Enterprise/Access e*Way Connection Type parameters, see Configuring e*Way Connections on page 21.
9 Save the conJacadaIntegrator.cfg file
e*Way Intelligent Adapter for Jacada Enterprise/AccessUser’s Guide 32 SeeBeyond Proprietary and Confidential

Chapter 5 Section 5.1Implementation Sample Implementation Components
10 From the File menu select Promote to Run Time to move the file to the e*Way’s run time environment.
5.1.5. Step Five–Creating Event Types Step five is to create the Event Types. An Event Type is a class of Events with a common data structure. The e*Gate system packages data within Events and categorizes them into Event Types. What these Events have in common defines the Event Type and comprises the ETD.
Creating an Event Type from the Custom ETD Wizard
The following procedures show how to create an ETD (Event Type Definition) using the Custom ETD Wizard.
1 Highlight the Event Types folder on the Components tab of the e*Gate Navigator.
2 On the palette, click the Create a New Event Type button.
3 Enter the name of the Event, then click OK. For the purpose of this sample the Event Type is defined as BankingInput .
4 Double-click the new Event Type to edit its properties. The Event Type Properties dialog box opens.
5 Under the Event Type Definition field, click the New button. The ETD Editor opens.
6 Select New from the File menu. The New Event Type Definition window opens.
7 Select the Custom ETD Wizard from the New Event Type Window.
Figure 8 Event Type Definition Wizards
8 When the Custom ETD Wizard opens enter the Root Node Name (BankingInput for this sample) and the Package Name (test.jacada.banking for this sample) where all of the Java source files will be generated. Click Next and Finish to close the Custom e*Way Wizard.
9 Right click BankingInput in the Event Type Definition pane, and select Add Field, as Child Node. Repeat this to create Field1 and Field2.
e*Way Intelligent Adapter for Jacada Enterprise/AccessUser’s Guide 33 SeeBeyond Proprietary and Confidential

Chapter 5 Section 5.1Implementation Sample Implementation Components
10 Triple-click on Field1, and rename it MethodToInvoke.
11 Triple-click on Field2, and rename it InputData.
12 Click on the Global Delimiters button on the tool bar. When the Global Delimiters dialog box open enter “/” for the endDelim (end delimiter). Click OK to close the dialog box.
13 From the File menu select Compile And Save. Save the file as BankingInput.xsc. If the file fails to compile, errors are displayed in the Compile message box in the Editor. If the file compiles without error the title bar displays the name of the .xsc file and (Sandbox).
Figure 9 Event Type Definition Editor
14 To move the file from the “Sandbox” to the runtime environment, select Promote to Run Time from the File menu.
15 Close the ETD Editor.
e*Way Intelligent Adapter for Jacada Enterprise/AccessUser’s Guide 34 SeeBeyond Proprietary and Confidential

Chapter 5 Section 5.1Implementation Sample Implementation Components
Creating an Event Type Using the Jacada ETD Wizard
The following procedures show how to create an ETD (Event Type Definition) using the JacadaWizard ETD Wizard.
1 Highlight the Event Types folder on the Components tab of the e*Gate Navigator.
2 On the palette, click the Create a New Event Type button.
3 Enter the name of the Event, then click OK. For the purpose of this sample the Event Type is defined as BankingService.
4 Double-click the new Event Type to edit its properties. The Event Type Properties dialog box opens.
5 Under the Event Type Definition field, click the New button. The ETD Editor opens.
6 Select New from the File menu. The New Event Type Definition window opens.
Figure 10 Event Type Definition Wizards
7 Select the JACADAWizard ETD wizard.
8 When the JACADAWizard opens enter the host name (the name of the machine running the Jacada Server) and port number (the number of the port the server is running on) to connect to Jacada.
9 Select Enable Debug and enter the path for the Debug File to enable the Debug option.
10 Specify the Package Name or service to be used to create the .xsc file. (For this sample, use test.jacada.banking as the package name.)
11 Select a Jacada service that will be used to create the .xsc file (for the sample select banking as the service) and click OK.
e*Way Intelligent Adapter for Jacada Enterprise/AccessUser’s Guide 35 SeeBeyond Proprietary and Confidential

Chapter 5 Section 5.1Implementation Sample Implementation Components
Figure 11 Event Type Definition Editor
12 From the File menu, click Save. Save the .xsc file as BankingService.xsc.
13 From the File menu, click Promote to Run Time to move the file to the run time environment.
14 Close the ETD Editor.
Creating an Event Type from an Existing XSC
The following procedures show how to create an Event Type using an existing .xsc file.
1 Select the Event Types folder on the Components tab of the e*Gate Navigator.
2 On the palette, click the Create a New Event Type button.
3 Enter the name of the Event Type in the New Event Type Component window, then click OK. (For this sample, the Event Type is defined as “BankingOutput.”)
4 Double-click the new Event Type to edit its properties. The Event Type Properties dialog box opens.
5 Click the Find button under the Event Type Definition field.
6 Browse to and select BankingOutput.xsc.
7 Click OK to close the Event Type Properties dialog box.
e*Way Intelligent Adapter for Jacada Enterprise/AccessUser’s Guide 36 SeeBeyond Proprietary and Confidential

Chapter 5 Section 5.1Implementation Sample Implementation Components
5.1.6. Step Six–Intelligent QueuesStep Six in configuring the Jacada Enterprise/Access e*Way is to create the IQs. IQs manage the exchange of information between components within the e*Gate system, providing non-volatile storage for data as it passes from one component to another. IQs use IQ Services to transport data. IQ Services provide the mechanism for moving Events between IQs, handling the low-level implementation of data exchange (such as system calls to initialize or reorganize a database).
To create and modify an Intelligent Queue for the Jacada Enterprise/Access e*Way
1 Select the Navigator's Components tab.
2 Open the host on which you want to create the IQ.
3 Open a Control Broker.
4 Select an IQ Manager.
5 On the palette, click the Create a New IQ button.
6 Enter the name of the new IQ, then click OK. (For this case, iqFeeder.)
7 Double-click the new IQ to edit its properties.
8 On the General tab, specify the Service and the Event Type Get Interval.
From the service field, select STC_Standard. The Stc_Standard IQ Service provides sufficient functionality for most applications. If specialized services are required, custom IQ Service DLLs may be created.
The default Event Type Get Interval of 100 Milliseconds is satisfactory for the purposes of this initial implementation.
9 On the Advanced tab, make sure that Simple publish/subscribe is checked under the IQ behavior section.
10 Click OK to close the IQ Properties window
11 For this purpose of this implementation, repeat steps 1 through 10 to create an additional IQ (iqEater).
5.1.7. Step Seven–Collaboration RulesStep seven in creating the Jacada Enterprise/Access e*Way is to create the Collaboration Rules that will extract and process selected information from the source Event Type defined earlier, according to its associated Collaboration Service. The Default Editor can be set to either Monk or Java. From the Schema Designer Task Bar, select Options and click Default Editor. Make sure that the default is set to Java.
Creating Pass Through Collaboration Rules
1 Select the Navigator's Components tab in the e*Gate Schema Designer.
2 In the Navigator, select the Collaboration Rules folder.
3 On the palette, click the Create New Collaboration Rules button.
e*Way Intelligent Adapter for Jacada Enterprise/AccessUser’s Guide 37 SeeBeyond Proprietary and Confidential

Chapter 5 Section 5.1Implementation Sample Implementation Components
4 Enter the name of the new Collaboration Rule Component, then click OK (in this case, use crInputPassThru).
5 Double-click the new Collaboration Rules Component. The Collaboration Rules Properties window opens.
6 Select Pass Through from the Service field drop-down box (see Figure 12).
Figure 12 Pass Through Collaboration Properties
7 Click on the Subscriptions tab. Select BankingInput under Available Input Event Types, and click the right arrow to move it to Selected Input Event Types. The box under Triggering Event should be checked.
Figure 13 Pass Through Collaboration Properties, Publications Tab
e*Way Intelligent Adapter for Jacada Enterprise/AccessUser’s Guide 38 SeeBeyond Proprietary and Confidential

Chapter 5 Section 5.1Implementation Sample Implementation Components
8 Go to the Publications tab. Select BankingInput under Available Output Event Types, and click the right arrow to move it to Selected Output Event Types. The Radio button under Default will be enabled.
9 Click OK to close the Collaboration Rules, Pass Properties window.
10 For the purpose of this sample repeat steps 1-9 above substituting crOutputPassThru as the name in step 4, and BankingOutput as the Available Input and Output Event Types in steps 7 and 8.
Creating Java Collaboration Rules
1 Select the Navigator's Components tab in the e*Gate Schema Designer.
2 In the Navigator, select the Collaboration Rules folder.
3 On the palette, click the Create New Collaboration Rules button.
4 Enter the name of the new Collaboration Rule, then click OK (for this case, use crBankingInvokeMethod).
5 Double-click the new Collaboration Rules Component to edit its properties. The Collaboration Rules Properties window opens.
6 The Service field defaults to Java. The Collaboration Mapping tab is enabled, and the Subscriptions and Publications tabs are disabled.
Figure 14 Collaboration Rules - Java Properties
7 In the Initialization string field, enter any required initialization string for the collaboration.
8 Select the Collaboration Mapping tab.
9 Using the Add Instance button, create instances to coincide with the Event Types.
For this sample, do the following:
e*Way Intelligent Adapter for Jacada Enterprise/AccessUser’s Guide 39 SeeBeyond Proprietary and Confidential

Chapter 5 Section 5.1Implementation Sample Implementation Components
10 In the Instance Name column, enter BankingOutput for the instance name.
11 Click Find, navigate to etd\BankingOutput.xsc, double-click to select. BankingOutput.xsc is added to the ETD column of the instance row.
12 In the Mode column, select Out from the drop–down menu available.
13 The Trigger column value is N/A.
14 The Manual Publish column is clear.
15 Repeat steps 9–13 using the following values:
Instance Name — BankingService
ETD — Banking.xsc
Mode — Out
Manual Publish — unselected
16 Repeat steps 9–13 once more using the following values:
Instance Name — BankingInput
ETD — BankingInput.xsc
Mode — In
Trigger — selected
Note: At least one of the ETD instances used by the Collaboration must be checked as the trigger. For specific information on creating and configuring Collaboration Rules, see the e*Gate Integrator User’s Guide.
Figure 15 Collaboration Rules - Collaboration Mapping Properties
17 Select the General tab. Under the Collaboration Rule field, select New. The Collaboration Rules Editor opens.
e*Way Intelligent Adapter for Jacada Enterprise/AccessUser’s Guide 40 SeeBeyond Proprietary and Confidential

Chapter 5 Section 5.1Implementation Sample Implementation Components
18 Expand to full size for optimum viewing, expanding the Source and Destination Events as well.
5.1.8. The Collaboration Rules EditorPart two of step seven is to define the business logic using the Collaboration Rules Editor. The Java Collaboration Rules Editor is the GUI used to create and modify Java Collaboration Rules. A Java Collaboration Rule is created by designating one or more source Events and one or more destination Events and then setting up rules governing the relationship between fields in the Event instances.
The crBankingInvokeMethod.class that comes as part of the sample schema is an extensive set of collaboration rules. To view the various business rules go to the Business rules window and highlight a rule. Code for the specific rule is displayed in the Rule Properties, Rules window. For detailed information on creating Collaboration Rules using the Java Collaboration Rules Editor see the e*Gate Integrator User’s Guide.
Figure 16 Collaboration Rules — Collaboration Rules Editor
For the purpose of demonstrating how the sample’s Collaboration Rules were generated, the following partial implementation describes how to create a number of
e*Way Intelligent Adapter for Jacada Enterprise/AccessUser’s Guide 41 SeeBeyond Proprietary and Confidential

Chapter 5 Section 5.1Implementation Sample Implementation Components
the collaboration rules, starting with line 9 under retboolean in the Business Rules pane.
1 Beginning at the Else check to see if request to invoke another method, assuming that this line is selected, click on the if button on the toolbar. An if expression is added to the Business Rules pane.
Figure 17 Collaboration Rules — Business Rules Pane
2 Place the curser in the If Properties, Condition window and type ''GetCustInfo''equalsIgnoreCase().
3 From the Source Events pane drag and drop MethodToInvoke into the parenthesis in the If Properties, Condition window. When prompted for type of function to insert for this node select get. The code in the Condition window should appear as follows:
"GetChecking".equalsIgnoreCase(getBankingInput().getMethodToInvoke())
4 Type If request to invoke the GetCustInfo method in the If Properties, Description field. The description is added to the rule in the Business Rules pane. (This line checks to see if the customer has data.)
5 Select the then expression in the Business Rules pane. Type Then invoke the GetCustInfo in the Then Properties, Description field. The description is added to the rule in the Business Rules pane.
6 Click the var button (variable) on the toolbar. a variable is added to the Business Rules pane.
e*Way Intelligent Adapter for Jacada Enterprise/AccessUser’s Guide 42 SeeBeyond Proprietary and Confidential

Chapter 5 Section 5.1Implementation Sample Implementation Components
Figure 18 Collaboration Rules Editor - Variable Properties
7 Type Template index in the Variable Properties, Description field. Also, type nIndex in the Name field, select int as the type and enter 0 as the Initial Value (see Figure 18).
8 From the Source Events pane drag and drop InputData to ssn (under GetCustInfo, Input) in the Destination Events. The new rule is added to the Business Rules pane. A line is displayed between the two events and the associated code is displayed in the Rule Properties, Rule window.
e*Way Intelligent Adapter for Jacada Enterprise/AccessUser’s Guide 43 SeeBeyond Proprietary and Confidential

Chapter 5 Section 5.1Implementation Sample Implementation Components
Figure 19 Collaboration Rules Editor
9 In the Description field type First, set the social security number for GetCustInfo input.
10 Click the rule button on the toolbar. A rule expression appears.
11 Type the following in the Rule Properties, Rule window:
EGate.traceln(EGate.TRACE_EWAY, EGate.TRACE_EVENT_INFORMATION, "Invoking the Init method.");
12 In the Description field type EGate trace invoke GetCustInfo.
13 Click the rule button on the toolbar again.
14 From the Destination Events pane, Drag and drop the invoke method (under BankingService, GetCustInfo, Output), into the Rule Properties, Rule window (seeFigure 20).
e*Way Intelligent Adapter for Jacada Enterprise/AccessUser’s Guide 44 SeeBeyond Proprietary and Confidential

Chapter 5 Section 5.1Implementation Sample Implementation Components
Figure 20 Collaboration Rules Editor
15 In the Description field type Invoke GetCustInfo().
16 Click the rule button on the toolbar to add another rule expression.
17 Type the following in the Rule Properties, Rule window:
EGate.traceln(EGate.TRACE_EWAY, EGate.TRACE_EVENT_INFORMATION, "Successfully invoked GetCustInfo.");
18 In the Description field type EGate trace invoke GetCustInfo successful.
19 Click the if button again to add another if expression.
20 From the Destination Events pane, Drag and drop the hascustom_table method (under BankingService, GetCustInfo, Output), into the If Properties, Condition window. The associated code appears in the Condition window.
21 In the Description field type If custom_table has data. (This line checks to see if the custom table contains data. If there is data present it continues to the next step.)
22 Select the then expression in the Business Rules pane. Type Then iterate through each row and populate XML in the Then Properties, Description field. The description is added to the rule in the Business Rules pane.
23 Click the rule button on the toolbar to add another rule expression.
24 Type the following in the Rule Properties, Rule window:
EGate.traceln(EGate.TRACE_EWAY, EGate.TRACE_EVENT_INFORMATION, "custom_table row count : " +
e*Way Intelligent Adapter for Jacada Enterprise/AccessUser’s Guide 45 SeeBeyond Proprietary and Confidential

Chapter 5 Section 5.1Implementation Sample Implementation Components
getBankingService().getGetCustInfo().getOutput().countcustom_table());
25 In the Description field type EGate trace custom_table row count.
26 Click the rule button again to add another rule expression.
27 Drag and drop Name (under BankingOutput, Template) from the Destination pane into the Rule Properties, Rule window. When prompted for type of function to insert for this node select set.
28 The Select Repetition Instance dialog box appears. Enter nIndex in the Template field.
29 Place the curser in the last set of parenthesis and type in “custom_table”. (This line sets the output template name to customer info template.)
30 In the Description field type Get data from custom_table and populate output XML.
Figure 21 Collaboration Rules Editor
31 Click the for button on the toolbar to add a for loop. When prompted as to whether to create the rule as a sibling or child, select Sibling.
32 In the For Properties pane, Description field, type For each row in custom_table, create row output for XML. In the Counter Initialization field, type int i=0.
e*Way Intelligent Adapter for Jacada Enterprise/AccessUser’s Guide 46 SeeBeyond Proprietary and Confidential

Chapter 5 Section 5.1Implementation Sample Implementation Components
33 Type i < in the Condition field, then drag and drop the countcustom_table method from the Destination Events pane to the Condition field. The code in the Condition field appears as follows:
i < getBankingService().getGetCustInfo().getOutput().countcustom_table()
34 In the Counter Update field, type i++.
35 Click the if button on the toolbar to add an if expression.
36 From the Destination Events pane, Drag and drop the hasacct method (under BankingService, GetCustInfo, Output, custom_table), into the If Properties, Condition window.
37 The Select Repetition Instance dialog box appears. Enter i in the custom_table field and click OK.
38 In the Description field type If have acct in result. (Checks to see if the account has any data. If it does it is copied to the output.)
39 Select the then expression and type Then get acct in the Then Properties, Description field.
40 Click the rule button again to add another rule expression.
41 From the Destination Events pane, drag Name (under BankingOutput, Template, Data, Row, Column) to the Rule Properties, Rule window. When prompted for type of function to insert for this node select set.
42 The Select Repetition Instance dialog box appears. Enter nIndex in the Template field, i in the Row field and 0 in the column field. Click OK.
43 Place the curser in the last set of parenthesis and type ''acct''.
44 In the Description field type Set acct column name for current row.
45 Click the rule button again to add another rule expression.
46 From the Destination Events pane, drag Value (under BankingOutput, Template, Data, Row, Column) to the Rule Properties, Rule window. When prompted for type of function to insert for this node select set.
47 The Select Repetition Instance dialog box appears. Enter nIndex in the Template field, i in the Row field and 0 in the column field. Click OK.
48 Drag and drop acct (under BankingOutput, BankingService, GetCustInfo, Output, custom_table) into the curser in the last set of parenthesis in the Rule Properties, Rule window. When prompted for type of function to insert for this node select get.
49 The Select Repetition Instance dialog box appears. Enter i in the custom_table field and click OK.
50 The code in the Rule window appears as follows:
getBankingOutput().getTemplate(nIndex).getData().getRow(i).getColumn(0).setValue(getBankingService().getGetCustInfo().getOutput().getcustom_table(i).getacct())
51 In the Description field type Set acct column value for current row.
e*Way Intelligent Adapter for Jacada Enterprise/AccessUser’s Guide 47 SeeBeyond Proprietary and Confidential

Chapter 5 Section 5.1Implementation Sample Implementation Components
Figure 22 Collaboration Rules Editor
52 When all the business logic has been defined, the code can be compiled by selecting Compile from the File menu. When the Save menu opens, provide a name for the .xpr file. If the code compiles successfully, the message Compile Completed appears. If the outcome is unsuccessful, a Java Compiler error message appears at the bottom of the editor in a watch window.
53 Once the compilation is complete, click File, Promote to move the file to the run time environment. Close the Collaboration Rules Editor.
54 Click OK to close the Properties dialog box.
55 For detailed information on creating Collaboration Rules using the Java Collaboration Rules Editor see the e*Gate Integrator User’s Guide.
5.1.9. Step Eight–CollaborationsStep eight in creating the Jacada Enterprise/Access e*Way is to create the Collaborations. Collaborations are the components that receive and process Event Types, then forward the output to other e*Gate components or an external component. Collaborations consist of the Subscriber, which “listens” for Events of a known type, and the Publisher, which distributes the transformed Event to a specified recipient.
e*Way Intelligent Adapter for Jacada Enterprise/AccessUser’s Guide 48 SeeBeyond Proprietary and Confidential

Chapter 5 Section 5.1Implementation Sample Implementation Components
Creating the Inbound_eWay Collaboration
1 In the e*Gate Schema Designer, select the Navigator's Components tab.
2 Open the host on which you want to create the Collaboration.
3 Select a Control Broker.
4 Select the ewFeeder e*Way to assign the Collaboration.
5 On the palette, click the Create a New Collaboration button.
6 Enter the name of the new Collaboration, then click OK. (in this case, “coFeeder”.)
7 Double-click the new Collaboration to edit its properties.
8 From the Collaboration Rules list, select the Collaboration Rules file that you created previously. (For the sample, “crInputPassThru”.)
9 In the Subscriptions area, click Add to define the input Event Types to which this Collaboration will subscribe.
A From the Event Type list, select the Event Type that you previously defined BankingInput.
B Select the Source from the Source list. In this case, it should be <External>.
10 In the Publications area, click Add to define the output Event Types that this Collaboration will publish.
A From the Event Types list, select the Event Type that you previously defined BankingInput.
B Select the publication Destination from the Destination list. In this case, it should be iqFeeder.
C The Priority column will default to 5 (which is fine for this sample).
Figure 23 Collaboration - Inbound e*Way Properties
11 Click OK to close the Collaboration Properties window.
e*Way Intelligent Adapter for Jacada Enterprise/AccessUser’s Guide 49 SeeBeyond Proprietary and Confidential

Chapter 5 Section 5.1Implementation Sample Implementation Components
Creating the Outbound_eWay Collaboration
1 In the e*Gate Schema Designer, select the Navigator's Components tab.
2 Open the host on which you want to create the Collaboration.
3 Select a Control Broker.
4 Select the ewEater e*Way to assign the Collaboration.
5 On the palette, click the Create a New Collaboration button.
6 Enter the name of the new Collaboration, then click OK. (in this case, “coEater”.)
7 Double-click the new Collaboration to edit its properties.
8 From the Collaboration Rules list, select the Collaboration Rules file that you created previously. (For the sample, “crOutputPassThru”.)
9 In the Subscriptions area, click Add to define the input Event Types to which this Collaboration will subscribe.
A From the Event Type list, select the Event Type that you previously defined BankingOutput.
B Select the Source from the Source list. In this case, it should be colInvokeBankingMethod.
10 In the Publications area, click Add to define the output Event Types that this Collaboration will publish.
A From the Event Types list, select the Event Type that you previously defined BankingOutput.
B Select the publication Destination from the Destination list. In this case, it should be <EXTERNAL>.
C The Priority column will default to 5 (which is fine for this sample).
11 Click OK to close the Collaboration Properties window.
Creating the Multi Mode e*Way Collaborations
1 To create the ColInvokeBankingMethod Collaboration, Select the ewJacadaIntegrator e*Way to assign a Collaboration.
2 On the palette, click the Create a New Collaboration button.
3 Enter the name of the new Collaboration, then click OK. (For the sample, “colInvokeBankingMethod”.)
4 Double-click the new Collaboration to edit its properties.
5 From the Collaboration Rules field drop down list box, select the Collaboration Rules file that you created previously. For the sample use crBankingInvokeMethod.
6 In the Subscriptions field, click Add to define the input Event Types to which this Collaboration will subscribe.
A From the Instance Name list, select the Instance Name that you previously defined BankingInput.
e*Way Intelligent Adapter for Jacada Enterprise/AccessUser’s Guide 50 SeeBeyond Proprietary and Confidential

Chapter 5 Section 5.1Implementation Sample Implementation Components
B From the Event Type list, select the Event Type previously defined BankingInput.
C Select the Source from the Source list. In this case, it should be colFeeder.
7 In the Publications area, click Add to define the output Event Types that this Collaboration will publish.
A From the Instance Name list, select the Instance Name previously defined as BankingService.
B From the Event Types list, select the Event Type that you previously defined BankingService.
C Select the Destination from the Destination list. In this case select conJacadaIntegrator.
D The Priority column will default to 5.
8 In the Publications area, click Add to define the output Event Types that this Collaboration will publish.
A From the Instance Name list, select the Instance Name previously defined as BankingOutput.
B From the Event Types list, select the Event Type that you previously defined BankingOutput.
C Select the Destination from the Destination list. In this case select iqEater.
D The Priority column will default to 5 (which is fine for this sample).
Figure 24 Collaboration Properties - MQ_cr_out
9 Click OK to close the Properties window.
e*Way Intelligent Adapter for Jacada Enterprise/AccessUser’s Guide 51 SeeBeyond Proprietary and Confidential

Chapter 5 Section 5.2Implementation Execute the Schema
5.2 Execute the SchemaTo execute the schema, do the following:
1 Go to the command line prompt, and enter the following:
stccb -rh hostname -rs schemaname -un username -up user password -ln hostname_cb
Substitute hostname, schemaname, username and user password as appropriate.
2 Exit from the command line prompt, and start the Schema Manager GUI.
3 When prompted, specify the hostname which contains the Control Broker you started in Step 1 above.
4 Select the schema.
5 After you verify that the Control Broker is connected (the message in the Control tab of the console will indicate command succeeded and status as up), highlight the IQ Manager, hostname_igmgr, then right-click and select Start.
6 Highlight each of the e*Ways, right-click the mouse, and select Start.
e*Way Intelligent Adapter for Jacada Enterprise/AccessUser’s Guide 52 SeeBeyond Proprietary and Confidential

Chapter 6
Java Methods
The Jacada Enterprise/Access e*Way’s Java Methods fall into the following categories.
The JDK Classes
SeeBeyond's Jacada Enterprise/Access e*Way uses JDK (SDK) 1.3.1_02 which is installed as part of the e*Gate Enterprise Integrator installation.
The Jacada Classes
SeeBeyond's Jacada Enterprise/Access e*Way uses the JClient3 classes provided as part of the E/A installation. The jar file containing these classes is jclient3.jar. This jar file must be copied to eGate\client\ThirdParty\jacadaeaijc3\classes before the builder or the e*Way can be used.
The SeeBeyond Classes
Builder Class
The builder is used to construct the Service ETD. Only one class implements the builder. This class is called JacadaEAiJC3Builder.class and is in the jar file named stcjc3svcbldr.jar. This jar file gets installed when the e*Way is installed (add-on).
The Service Wizard (GUI) is also installed as part of the e*Way. The Wizard guides a user in a step-by-step process of generating an ETD for a Service. The Wizard provides GUI interfaces for querying the following information : Environment Manager host and port, package name, debugging options, and the Service name. The Wizard will then provide that information to the builder to construct the Service ETD.
Runtime Class
What we referred to as the runtime is the implementation of the e*Way Connection for Jacada EAi. JacadaEAiJC3Connector.class implements the EbobConnector interface to provide connectivity with the Environment Manager on an E/A system. The Environment Manager is a process on an E/A system whose tasks include facilitating client connections. The connector class is in the jar file named stcjc3conn.jar. This jar file also gets installed when the e*Way is installed (add-on).
Miscellaneous Classes
This e*Way also makes use of open source third party tools. These are GNU GetOpt and Apache Xerces. The classes for these tools are also installed as part of the e*Way installation (add-on).
e*Way Intelligent Adapter for Jacada Enterprise/AccessUser’s Guide 53 SeeBeyond Proprietary and Confidential

Chapter 6 Section 6.1Java Methods The JacadaEAiJC3Builder Class
These Java methods have been added to make it easier to set information in the e*Way ETD Editor and to get information from it. These methods are contained in classes:
The JacadaEAiJC3Builder Class on page 54
The JacadaEAiJC3Connector Class on page 61
6.1 The JacadaEAiJC3Builder ClassThis class extends the JCSCompiler to provide a Jacada EAi Service builder. This class uses the Jacada EAi JClient3 APIs to query the metadata for a particular service. Using the metadata of a service, this class will produce the corresponding XSC file and the Java classes for that service.
java.lang.Objectcom.stc.compilers.Compiler
com.stc.jcs.JCSCompiler com.stc.eways.jacadaeaijc3.builder.JacadaEAiJC3Builder
public class JacadaEAiJC3Builder
Extends com.stc.jcs.JCSCompiler.
Methods of the JacadaEAiJC3Builder Class
These methods are described in detail on the following pages:
JacadaEAiJC3Builder
Description
Constructor. Constructs a JacadaEAiJC3Builder
Syntax
public JacadaEAiJC3Builder()
Parameters
None.
Return Values
None.
JacadaEAiJC3Builder on page 54 connect on page 58
setPrintDebug on page 55 close on page 59
getPrintDebug on page 55 getListOfServices on page 59
compile on page 55 getListOfMethods on page 60
setJC3Debug on page 58 main on page 61
e*Way Intelligent Adapter for Jacada Enterprise/AccessUser’s Guide 54 SeeBeyond Proprietary and Confidential

Chapter 6 Section 6.1Java Methods The JacadaEAiJC3Builder Class
Throws
None.
setPrintDebug
Description
Sets the print debug flag.
Syntax
public void setPrintDebug(boolean printDebug)
Parameters
Return Values
None.
Throws
None.
getPrintDebug
Description
Gets the print debug flag.
Syntax
public void getPrintDebug()
Parameters
None
Return Values
boolean.The current value of the print debug flag.
Throws
None.
compile
Description
Creates the necessary files to process a Jacada EAi Service data.
Name Type Description
printDebug boolean Boolean flag to indicate print debug to System.err.
e*Way Intelligent Adapter for Jacada Enterprise/AccessUser’s Guide 55 SeeBeyond Proprietary and Confidential

Chapter 6 Section 6.1Java Methods The JacadaEAiJC3Builder Class
Creates the necessary files to process a Jacada EAi Service data. Must be connected to an Environment Manager first before invoking this method.
Syntax
public void compile(java.lang.String inEnvmgrHost, int inEnvmgrPort, java.lang.String inServiceName, java.lang.String xscfname, java.lang.String pkg, boolean debug, java.lang.String debugFile, int secTimeout, int secSlope, int secInitDelay, int maxRetries)
public void compile(java.lang.String inEnvmgrHost, int inEnvmgrPort, java.lang.String inServiceName, java.lang.String xscfname, java.lang.String pkg, boolean debug, java.lang.String debugFile)
public void compile(java.lang.String inServiceName, java.lang.String xscfname, java.lang.String pkg)
Parameters
Name Type Description
inEnvmgrHost java.lang.String The host name or IP address on which the Environment Manager is running.
inEnvmgrPort integer The port at which the Environment Manager is listening for connections.
inServiceName java.lang.String The name of the service for which the ETD is to be constructed.
xscfname java.lang.String Full path name of the e*Gate .xsc file to generate.
pkg java.lang.String The Package name for the ETD to be constructed.
debug boolean The flag to turn on print debugging.
debugFile java.lang.String The file used to write JClient3 debug messages. If null is provided and debug is set to true, then a default egate\client\logs\jacadabuilder.log file will be used. If debug is set to false, then this parameter will not be used.
e*Way Intelligent Adapter for Jacada Enterprise/AccessUser’s Guide 56 SeeBeyond Proprietary and Confidential

Chapter 6 Section 6.1Java Methods The JacadaEAiJC3Builder Class
secTimeout integer Timeout value to be used for a service connection (in seconds).
secSlope integer The rate at which to increase delay between service connection retries (in seconds).
secInitDelay integer The the initial delay between service connection retries (in seconds).
maxRetries integer The maximum number of times to retry service connections.
Name Type Description
inEnvmgrHost java.lang.String The host name or IP address on which the Environment Manager is running.
inEnvmgrPort integer The port at which the Environment Manager is listening for connections.
inServiceName java.lang.String The name of the service for which the ETD is to be constructed.
xscfname java.lang.String Full path name of the e*Gate .xsc file to generate.
pkg java.lang.String The Package name for the ETD to be constructed.
debug boolean The flag to turn on print debugging.
debugFile java.lang.String The file used to write JClient3 debug messages. If null is provided and debug is set to true, then a default egate\client\logs\jacadabuilder.log file will be used. If debug is set to false, then this parameter will not be used.
Name Type Description
inServiceName java.lang.String The name of the service for which the ETD is to be constructed.
xscfname java.lang.String Full path name of the e*Gate .xsc file to generate.
pkg java.lang.String The Package name for the ETD to be constructed.
Name Type Description
e*Way Intelligent Adapter for Jacada Enterprise/AccessUser’s Guide 57 SeeBeyond Proprietary and Confidential

Chapter 6 Section 6.1Java Methods The JacadaEAiJC3Builder Class
Return Values
None.
Throws
com.stc.jcs.JCSExceptionThrown upon error.
setJC3Debug
Description
Turn on debugging on the JClient3 API. To turn JClient 3 debugging, this method must be called prior to connect.
Syntax
public void setJC3Debug(java.lang.String debugFile)
Parameters
Return Values
None.
Throws
com.stc.jcs.JCSExceptionThrown upon error.
connect
Description
Connect to the EAi Environment Manager.Syntax
public boolean connect(java.lang.String inEnvmgrHost, int inEnvmgrPort)
Name Type Description
debugFile java.lang.String The file used to write JClient3 debug messages. If this is set to null, then a default file "jacadabuilder.log" will be created in egate\client\logs in an e*Gate environment or in the current working directory if no e*Gate environment.
e*Way Intelligent Adapter for Jacada Enterprise/AccessUser’s Guide 58 SeeBeyond Proprietary and Confidential

Chapter 6 Section 6.1Java Methods The JacadaEAiJC3Builder Class
Parameters
Return Values
booleanTrue if connect is successful. False otherwise.
Throws
None.
close
Description
Close the connection to the EAi Environment Manager.Syntax
public boolean close()
Parameters
None
Return Values
booleanTrue if close is successful. False otherwise.
Throws
None.
getListOfServices
Description
Get a list of supported Services for a connection to an Environment Manager. (See connect(java.lang.String, int))
Syntax
public java.lang.String[] getListOfServices()
Parameters
None.
Name Type Description
inEnvmgrHost java.lang.String The host name or IP address on which the Environment Manager is running.
inEnvmgrPort integer The port at which the Environment Manager is listening for connections.
e*Way Intelligent Adapter for Jacada Enterprise/AccessUser’s Guide 59 SeeBeyond Proprietary and Confidential

Chapter 6 Section 6.1Java Methods The JacadaEAiJC3Builder Class
Return Values
java.lang.String[]An array of Service names supported on the connected Environment Manager. Null if no services are supported.
Throws
com.stc.jcs.JCSException Thrown upon error.
getListOfMethods
Description
Get a list of supported Methods for a Service. (See connect(java.lang.String, int), getListOfServices( ), and setService(java.lang.String, serviceName))
Syntax
public java.lang.String[] getListOfMethods()
public java.lang.String[] getListOfMethods(java.lang.String service)
Parameters
Return Values
java.lang.String[]An array of method names supported on a given Service. Null will be returned if no methods are supported on a given Service.
Throws
com.stc.jcs.JCSExceptionThrown upon error.
setService
Description
Set the Name of the Service to use. (See getListOfMethods(java.lang.String))
Syntax
public void setService(java.lang.String serviceName)
Name Type Description
service java.lang.String The PackedDecimal object to be converted.
e*Way Intelligent Adapter for Jacada Enterprise/AccessUser’s Guide 60 SeeBeyond Proprietary and Confidential

Chapter 6 Section 6.2Java Methods The JacadaEAiJC3Connector Class
Parameters
Return Values
None.
Throws
None
main
Description
Resets the data content of an ETD.
Syntax
public static void main(java.lang.String[] args)
Parameters
Return Values
static void
Throws
None.
6.2 The JacadaEAiJC3Connector ClassThis class implements the EBobConnector interface in order to provide a connector object for the Jacada EAi ETDs. This class provides the properties set for the e*Way Connection, and facilitates the connections to the Environment Manager as well as the services managed by the Environment Manager.java.lang.Object
com.stc.eways.jacadaeaijc3.runtime.JacadaEAiJC3Connector
public class JacadaEAiJC3ConnectorThe JacadaEAiJC3Connector Class extends java.lang.Object and implements com.stc.jcsre.EBobConnector
Name Type Description
serviceName java.lang.String The name of the Service.
Name Type Description
args java.lang.String[]
e*Way Intelligent Adapter for Jacada Enterprise/AccessUser’s Guide 61 SeeBeyond Proprietary and Confidential

Chapter 6 Section 6.2Java Methods The JacadaEAiJC3Connector Class
Methods of the JacadaEAiJC3Connector Class
These methods are described in detail on the following pages:
JacadaEAiJC3Connector
Description
Constructor. Constructs a JacadaEAiJC3Connector.Syntax
public JacadaEAiJC3Connector(java.util.Properties props)
public JacadaEAiJC3Connector(java.lang.String host, java.lang.String port, java.lang.String clientID, java.lang.String debugLevel, java.lang.String debugFile)
Parameters
Return Values
None.
Throws
None.
JacadaEAiJC3Connector on page 62 getProperties on page 64
open on page 63 getServiceConnection on page 65
close on page 63 getEnvironmentManagerConnection on page 65
isOpen on page 64
Name Type Description
props java.util.Properties A Properties object.
Name Type Description
host java.lang.String Environment Manager host. Mandatory.
port java.lang.String Environment Manager port. Mandatory.
clientID java.lang.String Client ID to use for Environment Manager monitor. Optional.
debugLevel java.lang.String The E/A debug level to use for debugging the JClient3 api. Optional. Valid values are "NONE","0","1","2","3".
debugFile java.lang.String Environment Manager host. Optional.
e*Way Intelligent Adapter for Jacada Enterprise/AccessUser’s Guide 62 SeeBeyond Proprietary and Confidential

Chapter 6 Section 6.2Java Methods The JacadaEAiJC3Connector Class
open
Description
Opens the connector for accessing the external system. Specified by open in interface com.stc.jcsre.EBobConnector. (Also see com.stc.jcsre.EbobConnector)
Syntax
public void open(boolean intoEgate)
Parameters
Return Values
None.
Throws
com.stc.jcsre.EBobConnectionExceptionThrown when connection problems occur.
close
Description
Closes the connector for accessing the external system and releases resources. Specified by close in interface com.stc.jcsre.EBobConnector. (Also see com.stc.jcsre.EbobConnector)
Syntax
public void close()
Parameters
None.
Return Values
None.
Name Type Description
host java.lang.String Environment Manager host. Mandatory.
port java.lang.String Environment Manager port. Mandatory.
clientID java.lang.String Client ID to use for Environment Manager monitor. Optional.
debugLevel java.lang.String The E/A debug level to use for debugging the JClient3 api. Optional. Valid values are "NONE","0","1","2","3".
debugFile java.lang.String Environment Manager host. Optional.
e*Way Intelligent Adapter for Jacada Enterprise/AccessUser’s Guide 63 SeeBeyond Proprietary and Confidential

Chapter 6 Section 6.2Java Methods The JacadaEAiJC3Connector Class
Throws
com.stc.jcsre.EBobConnectionException Thrown when connection problems occur.
isOpen
Description
Verifies that the connector to the external system is still available. Specified by isOpen in interface com.stc.jcsre.EBobConnector. (Also see com.stc.jcsre.EbobConnector)
Syntax
public boolean isOpen()
Parameters
None.
Return Values
boolean.True if the connector is still open and available; False otherwise.
Throws
com.stc.jcsre.EBobConnectionException Thrown when connection problems occur.
getProperties
Description
Retrieves the connection properties (stored by the constructor) used by the connector to access the external. Specified by getProperties in interface com.stc.jcsre.EBobConnector. (Also see com.stc.jcsre.EbobConnector)
Syntax
public java.util.Properties getProperties()
Parameters
None.
Return Values
java.util.PropertiesConnection properties of the external system.
Throws
None.
e*Way Intelligent Adapter for Jacada Enterprise/AccessUser’s Guide 64 SeeBeyond Proprietary and Confidential

Chapter 6 Section 6.2Java Methods The JacadaEAiJC3Connector Class
getServiceConnection
Description
Get a connection to a service.Syntax
public com.cnt.ea.jclient3.ServiceConnection getServiceConnection(java.lang.String serviceName)
Parameters
Return Values
com.cnt.ea.jclient3.ServiceConnection A ServiceConnection object for a connection with the service that was specified.
Throws
com.stc.jcsre.EBobConnectionException Thrown upon failure to open a connection to the service.
getEnvironmentManagerConnection
Description
Returns the Environment Manager connection object. If not connected to the Environment Manager, then null is returned.
Syntax
public com.cnt.ea.jclient3.EnvironmentManagerConnection getEnvironmentManagerConnection()
Parameters
None.
Return Values
com.cnt.ea.jclient3.EnvironmentManagerConnectionConnection properties of the external system.
Throws
None.
Name Type Description
serviceName java.lang.String The name of the Service to which a connection is to be opened.
e*Way Intelligent Adapter for Jacada Enterprise/AccessUser’s Guide 65 SeeBeyond Proprietary and Confidential

Chapter 7
Frequently Asked Questions
The FAQ chapter lists common questions and answers in regard to running the Jacada Integrator and the Jacada Enterprise/Access e*Way in a production environment.
7.1 Jacada e*Way Questions1 Will the e*Way work if one or more screens of the application have changed on
the backend host?
No. The e*Way will not work without properly changing the Jacada Service to which the e*Way is connecting. Use the Jacada Enterprise/Access 2000 MapMaker tool to record a new trail for the modified screens and update the Service map with the appropriate changes. See the Jacada Enterprise/Access 2000 Tutorial (ea_tut.pdf) for details.
2 If there were changes made to the Jacada Service, will it require changes to the e*Way?
The answer depends on what changes the changes were made. There are three scenarios:
A If there were changes to the existing service method(s), such as changes to the number of input arguments, then the e*Way will not work. The service ETD must be rebuilt using the Jacada Service Wizard. The Java Collaboration Rule will also require changes to use the modified service method(s).
B If there were no changes to the existing service method(s), then the e*Way will not be affected by the changes. The e*Way will run without problems.
C If new method(s) were added to the service, then the e*Way will not be affected by the addition of the new methods. However, to use the new methods, the service ETD must be rebuilt using the Jacada Service Wizard. Likewise, to use the new service methods, change the Java Collaboration Rule.
3 Why can't the Jacada Service Wizard and the e*Way find the jclient3.jar file?
We do not ship the e*Way with the jclient3.jar file. This JAR file contains the Java client APIs for accessing Jacada Services. To get the jclient3.jar, install either the client or a full install of Jacada Enterprise/Access. The file is located in <EARoot>\lib, where <EARoot> is the full path to the directory where Enterprise/Access is installed. Copy the jclient3.jar file to <eGateRoot>\client\ThirdParty\jacada\classes and
e*Way Intelligent Adapter for Jacada Enterprise/AccessUser’s Guide 66 SeeBeyond Proprietary and Confidential

Chapter 7 Section 7.1Frequently Asked Questions Jacada e*Way Questions
<eGateRoot>\server\registry\repository\default\ThirdParty\jacada\classes, where <eGateRoot> is the full path to the directory where e*Gate is installed. If those directories do not exist, then create them first and then copy the jclient3.jar file to those locations. The Jacada Service Wizard and the e*Way should now run correctly.
4 Are multiple output templates supported?
Yes. The Jacada Service Wizard generates an ETD Element for each template. A data template is generated as a record and a table template is generated as a collection of records.
e*Way Intelligent Adapter for Jacada Enterprise/AccessUser’s Guide 67 SeeBeyond Proprietary and Confidential

Index
Index
CClasspath Override 17Classpath Prepend 17collaboration rules 37collaborations 48
for the Multi-Mode e*Way 50creating a new schema 27
Ddirectories
created by installation 14Disable JIT 18
Ee*Way Connection 32
configuration 21parameters
Connector 22e*Ways
creating and configuring 28Inbound e*Way 28Multi-Mode e*Way 31Outbound e*Way 30
EACIw32.DLL 11event types 33external system requirements 11
Ffiles
created by installation 14
IInitial Heap Size 18installation
directories created by 14files created by 14
intelligent queues 37
JJacada Classes 53JacadaEAiJC3Builder Class 54
methodsclose 59compile 56connect 58getListOfMethods 60getListOfServices 59getPrintDebug 55JacadaEAiJC3Builder 54main 61setJC3Debug 58setPrintDebug 55setService 60
JacadaEAiJC3Connector Classmethods 61
close 63getEnvironmentManagerConnection 65getProperties 64getServiceConnection 65isOpen 64JacadaEAiJC3Connector 62open 63
jclient3.jar 66JDK Classes 53JNI DLL Absolute Pathname 16JVM settings 15, 16
MMaximum Heap Size 18Multi-Mode e*Way 15
configuration 15configuration parameters
Auxiliary JVM Configuration File 19CLASSPATH Append From Environment
Variable 17CLASSPATH Override 17CLASSPATH Prepend 17Disable JIT 18Maximum Heap Size 18Maximum Stack Size for JVM Threads 18Maximum Stack Size for Native Threads 18Remote Debugging port number 19Suspend option for debugging 19
parameters 15, 16
Pparameters
ConnectorClass 22
e*Way Intelligent Adapter for Jacada Enterprise/AccessUser’s Guide 68 SeeBeyond Proprietary and Confidential

Index
Property.Tag 22Type 22
EnvironmentManagerClientName 23Host 23Port 23
JC3Debug 24File 25Level 25
Multi-Mode e*WayCLASSPATH prepend 17Initial Heap Size 18JNI DLL absolute pathname 16JVM settings 15, 16Maximum Heap Size 18
ServiceConnection 23ConnectPerInvoke 24InitialDelay 24MaxRetries 24Slope 24Timeout 23
pre-installationUNIX 13
Ssample schema 52SeeBeyond Classes 53
Builder Class 53Miscellaneous Classes 53Runtime Class 53
supported operating systems 11
UUNIX
pre-installation 13
WWindows
installation 12
e*Way Intelligent Adapter for Jacada Enterprise/AccessUser’s Guide 69 SeeBeyond Proprietary and Confidential