european computer driving licence module 4 – spreadsheets chapter 4.8 – cell referencing
TRANSCRIPT

European Computer Driving Licence
Module 4 – Spreadsheets
Chapter 4.8 – Cell Referencing
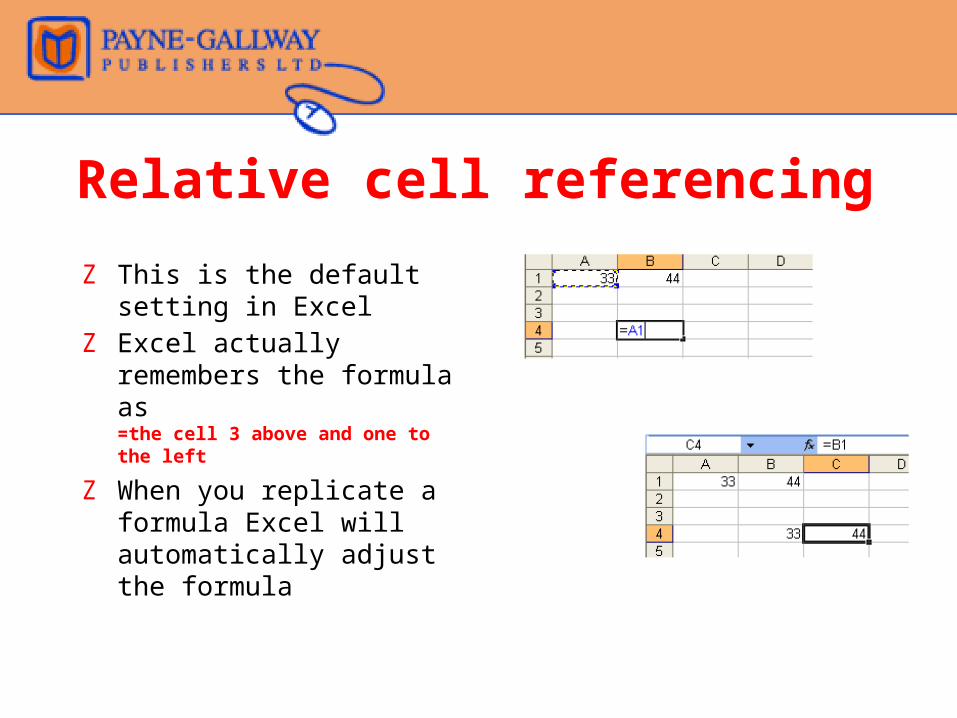
Relative cell referencing
Z This is the default setting in Excel
Z Excel actually remembers the formula as =the cell 3 above and one to the left
Z When you replicate a formula Excel will automatically adjust the formula
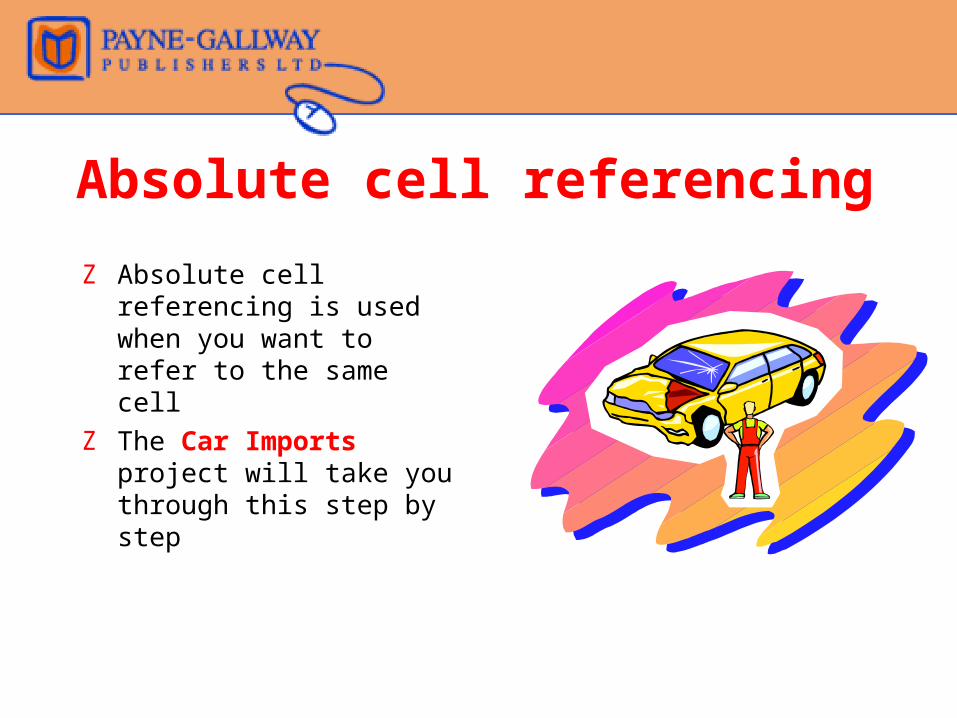
Absolute cell referencing
Z Absolute cell referencing is used when you want to refer to the same cell
Z The Car Imports project will take you through this step by step
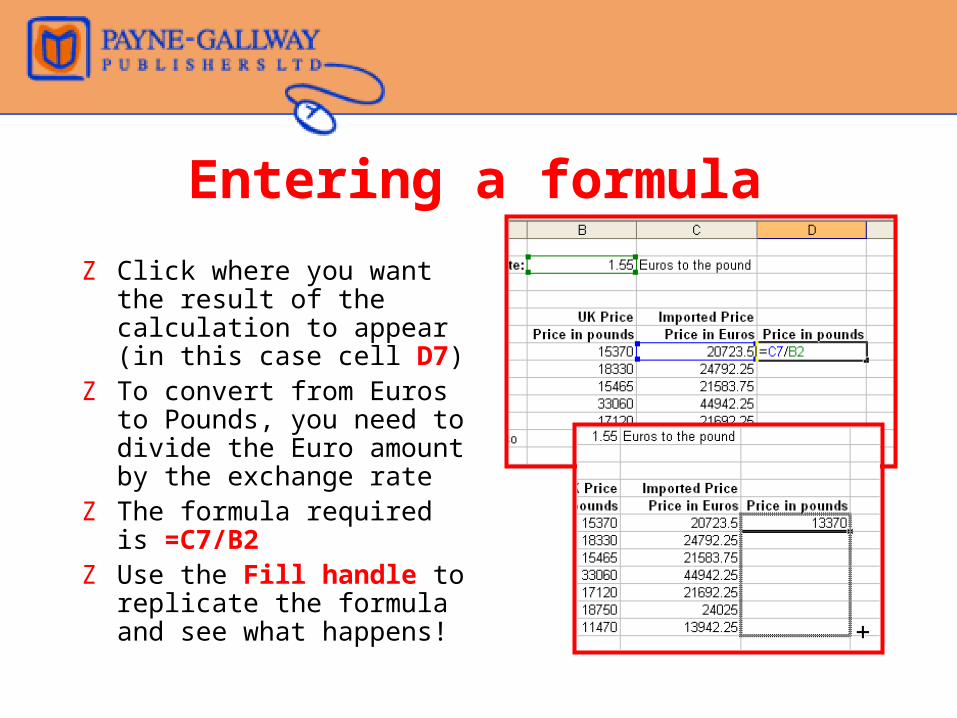
Entering a formula
Z Click where you want the result of the calculation to appear (in this case cell D7)
Z To convert from Euros to Pounds, you need to divide the Euro amount by the exchange rate
Z The formula required is =C7/B2
Z Use the Fill handle to replicate the formula and see what happens!
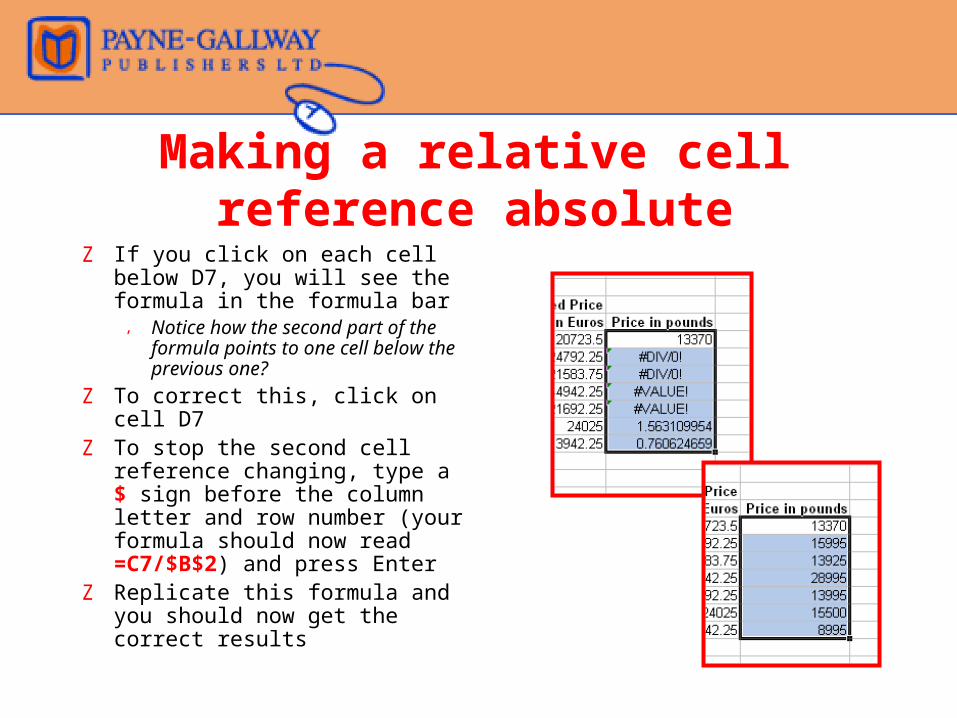
Making a relative cell reference absolute
Z If you click on each cell below D7, you will see the formula in the formula bar, Notice how the second part of
the formula points to one cell below the previous one?
Z To correct this, click on cell D7Z To stop the second cell
reference changing, type a $ sign before the column letter and row number (your formula should now read =C7/$B$2) and press Enter
Z Replicate this formula and you should now get the correct results
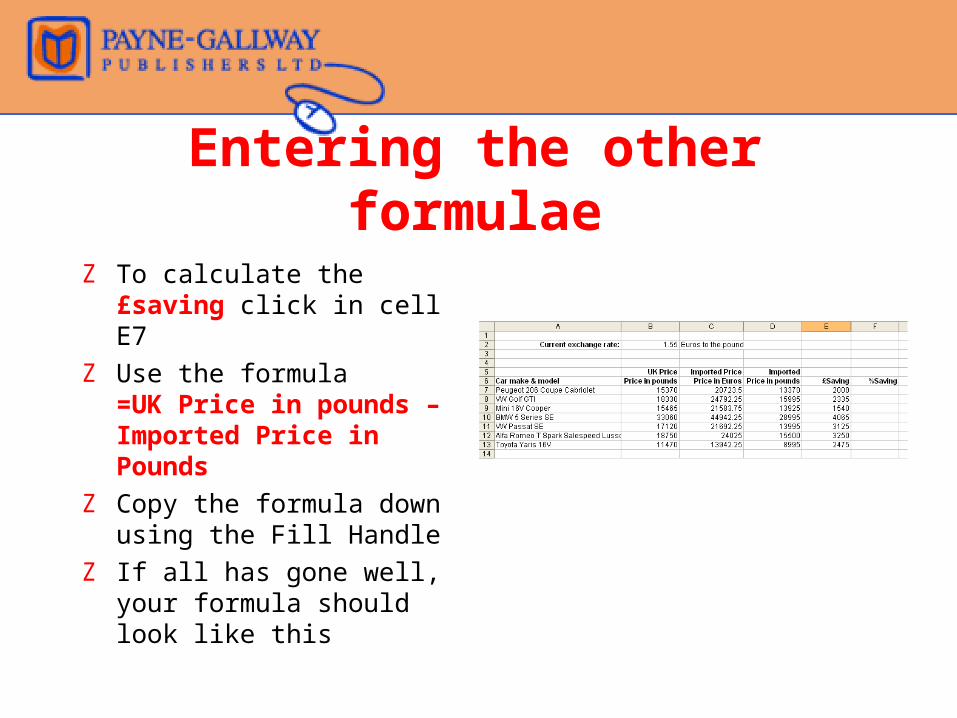
Entering the other formulae
Z To calculate the £saving click in cell E7
Z Use the formula =UK Price in pounds – Imported Price in Pounds
Z Copy the formula down using the Fill Handle
Z If all has gone well, your formula should look like this
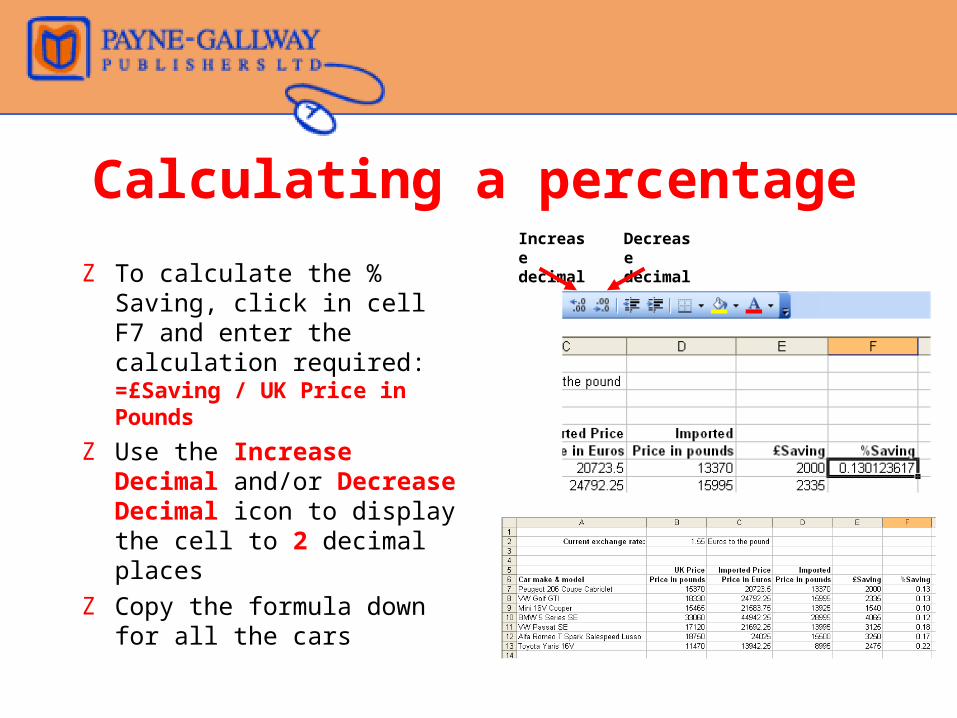
Calculating a percentage
Z To calculate the % Saving, click in cell F7 and enter the calculation required:=£Saving / UK Price in Pounds
Z Use the Increase Decimal and/or Decrease Decimal icon to display the cell to 2 decimal places
Z Copy the formula down for all the cars
Increase decimal
Decrease decimal
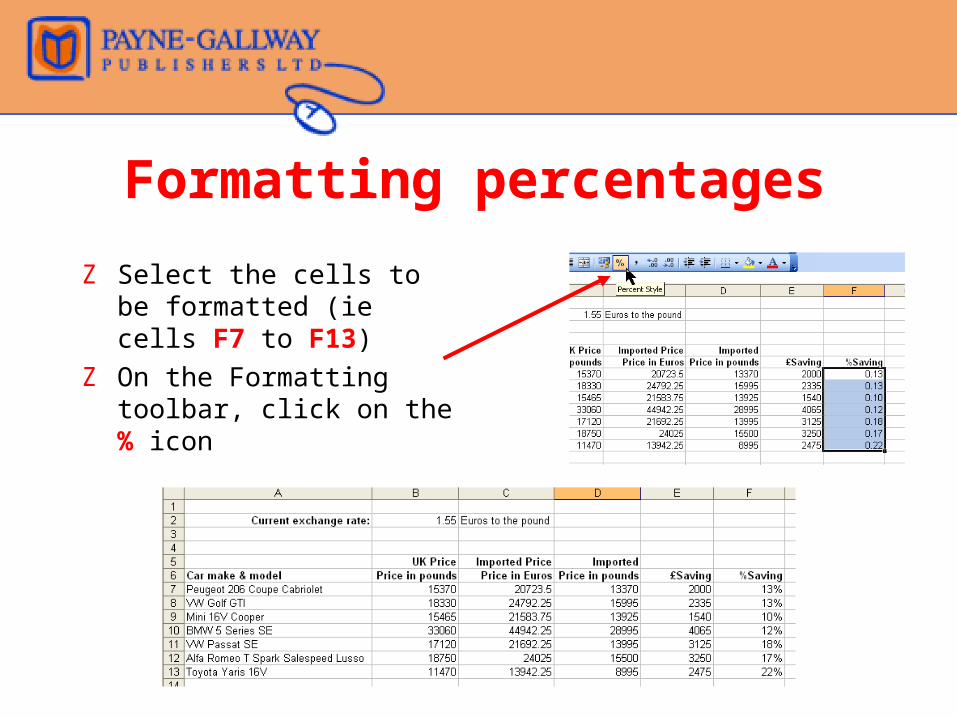
Formatting percentages
Z Select the cells to be formatted (ie cells F7 to F13)
Z On the Formatting toolbar, click on the % icon
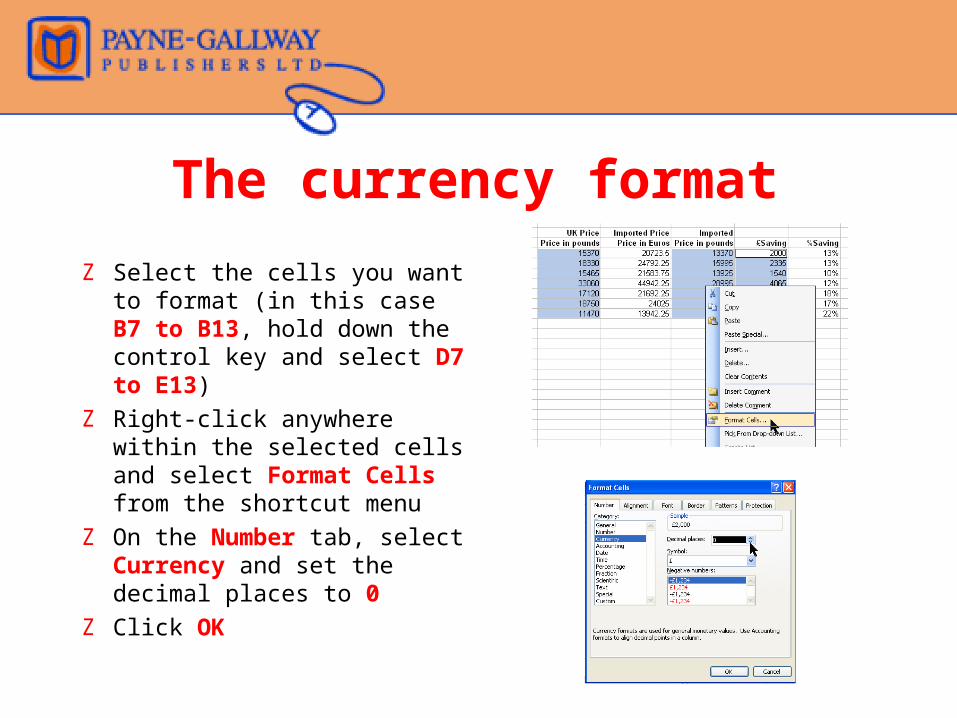
The currency format
Z Select the cells you want to format (in this case B7 to B13, hold down the control key and select D7 to E13)
Z Right-click anywhere within the selected cells and select Format Cells from the shortcut menu
Z On the Number tab, select Currency and set the decimal places to 0
Z Click OK
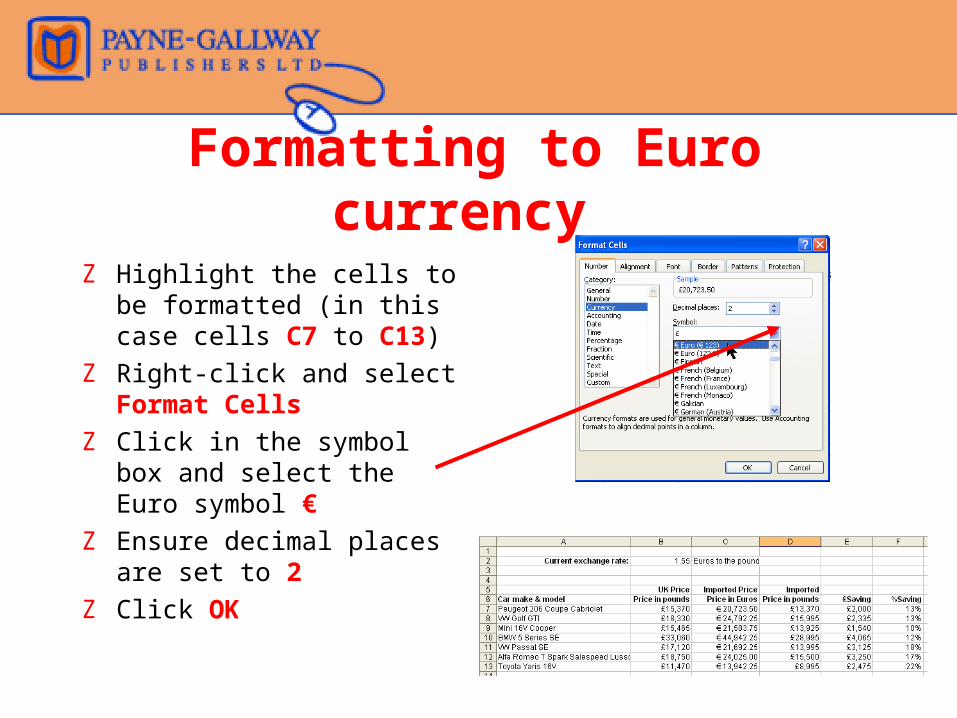
Formatting to Euro currency
Z Highlight the cells to be formatted (in this case cells C7 to C13)
Z Right-click and select Format Cells
Z Click in the symbol box and select the Euro symbol €
Z Ensure decimal places are set to 2
Z Click OK
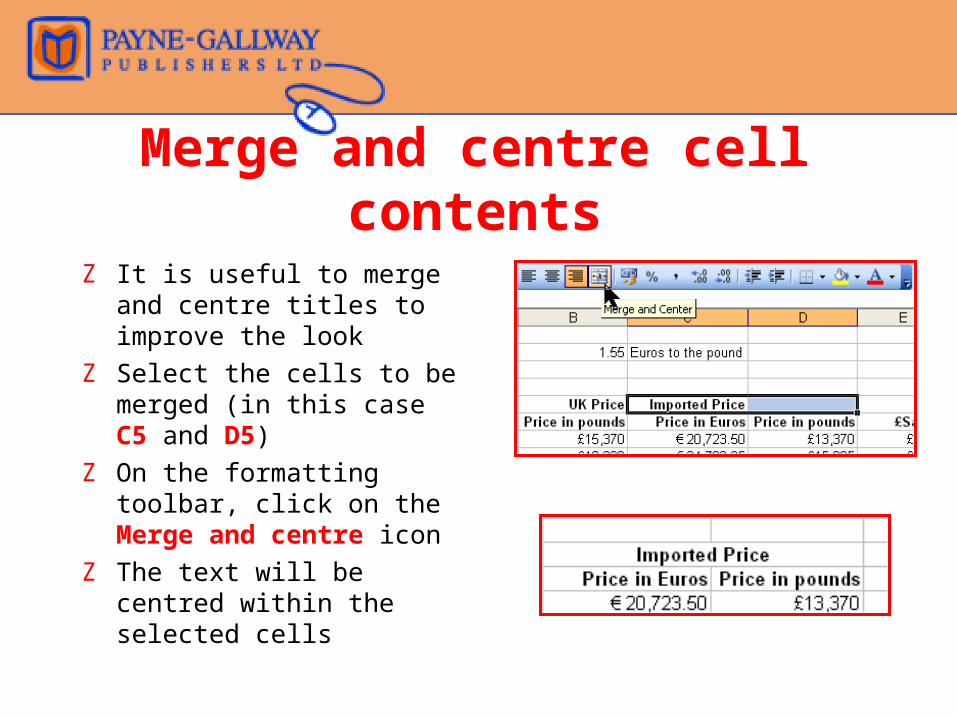
Merge and centre cell contents
Z It is useful to merge and centre titles to improve the look
Z Select the cells to be merged (in this case C5 and D5)
Z On the formatting toolbar, click on the Merge and centre icon
Z The text will be centred within the selected cells
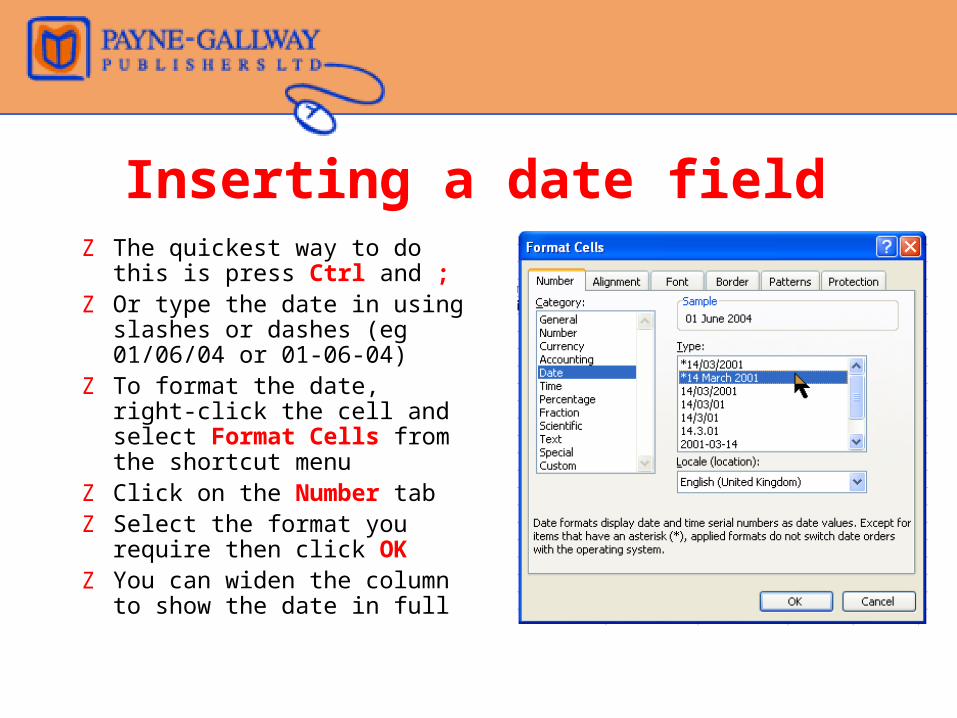
Inserting a date fieldZ The quickest way to do this is
press Ctrl and ; Z Or type the date in using
slashes or dashes (eg 01/06/04 or 01-06-04)
Z To format the date, right-click the cell and select Format Cells from the shortcut menu
Z Click on the Number tabZ Select the format you require
then click OKZ You can widen the column to
show the date in full
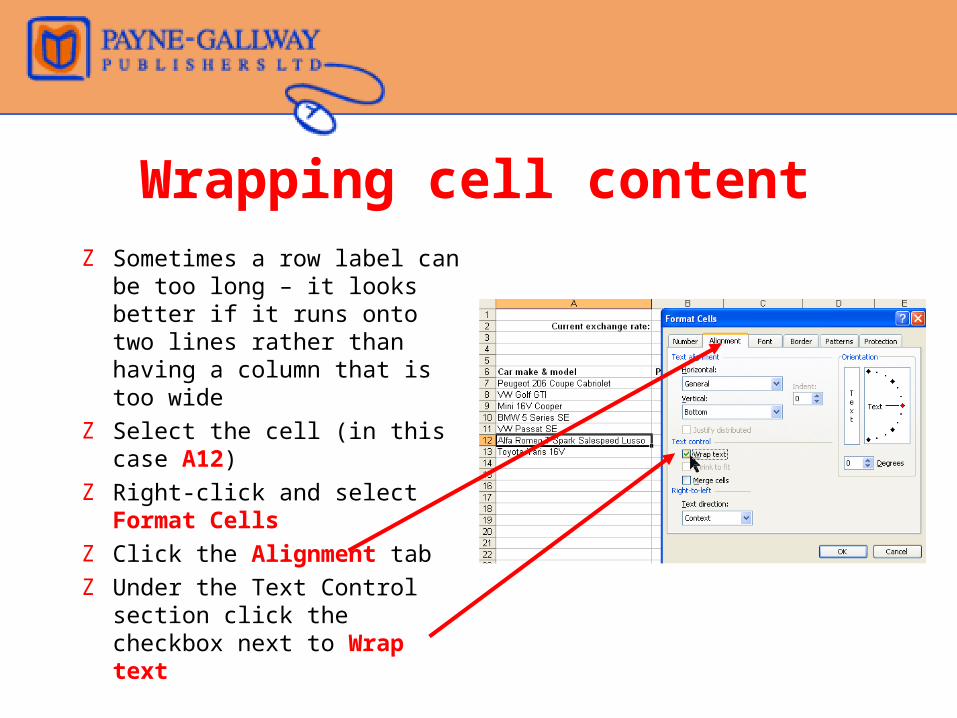
Wrapping cell contentZ Sometimes a row label can
be too long – it looks better if it runs onto two lines rather than having a column that is too wide
Z Select the cell (in this case A12)
Z Right-click and select Format Cells
Z Click the Alignment tabZ Under the Text Control
section click the checkbox next to Wrap text
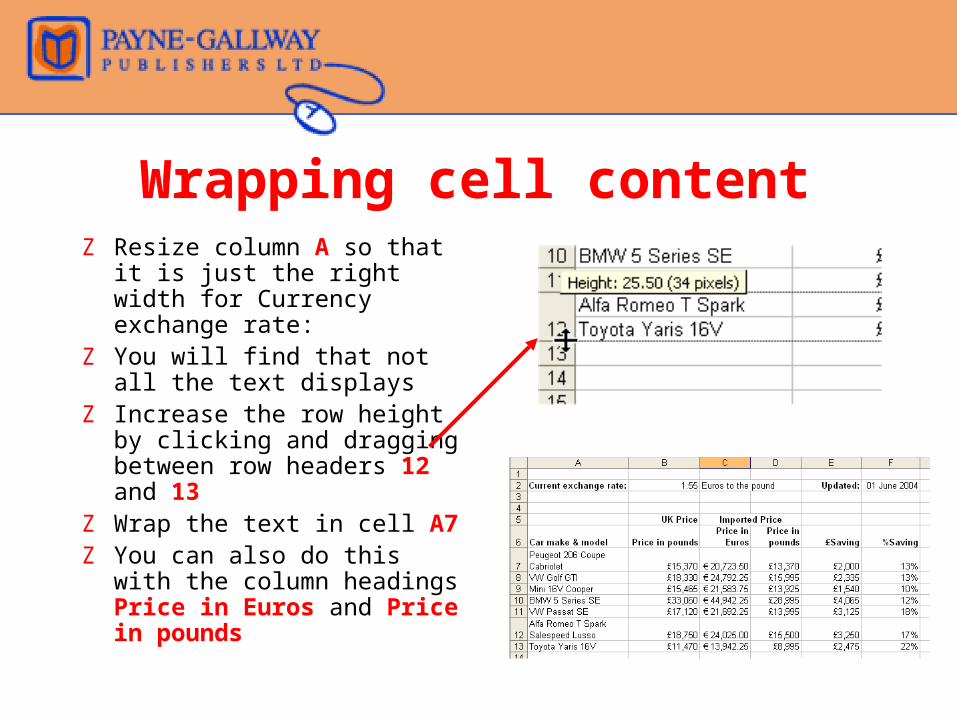
Wrapping cell contentZ Resize column A so that it is
just the right width for Currency exchange rate:
Z You will find that not all the text displays
Z Increase the row height by clicking and dragging between row headers 12 and 13
Z Wrap the text in cell A7Z You can also do this with the
column headings Price in Euros and Price in pounds
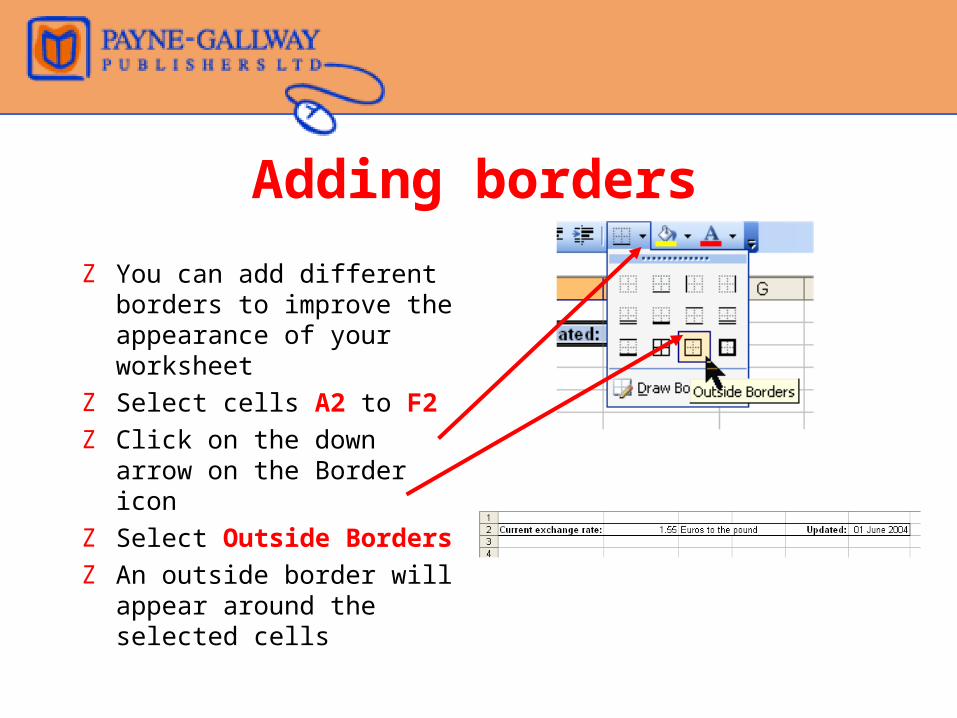
Adding borders
Z You can add different borders to improve the appearance of your worksheet
Z Select cells A2 to F2Z Click on the down arrow on
the Border iconZ Select Outside BordersZ An outside border will appear
around the selected cells
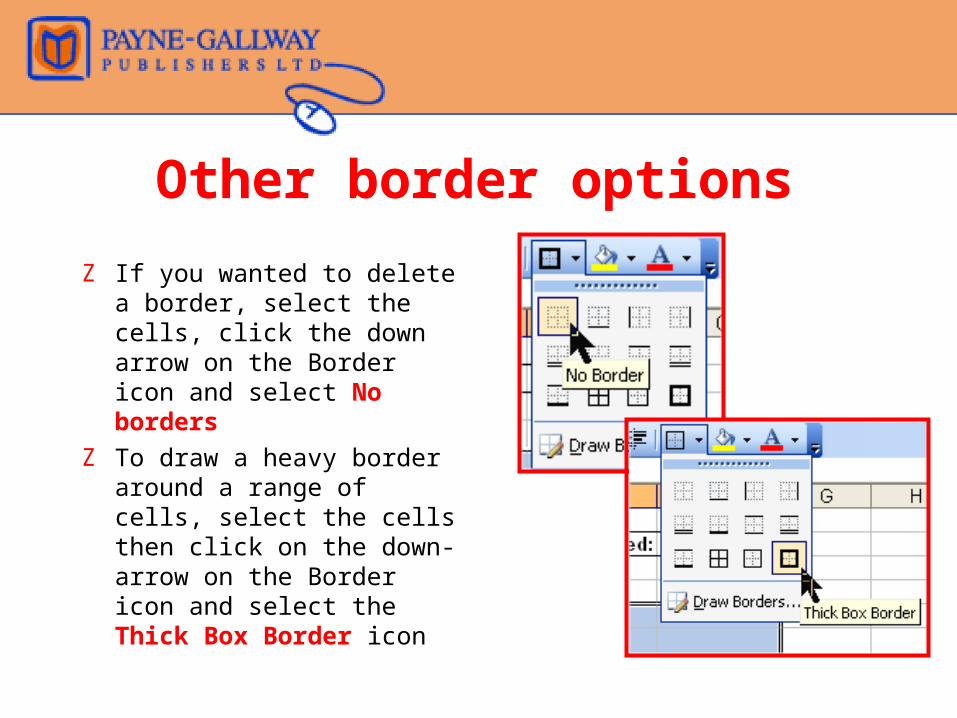
Other border options
Z If you wanted to delete a border, select the cells, click the down arrow on the Border icon and select No borders
Z To draw a heavy border around a range of cells, select the cells then click on the down-arrow on the Border icon and select the Thick Box Border icon
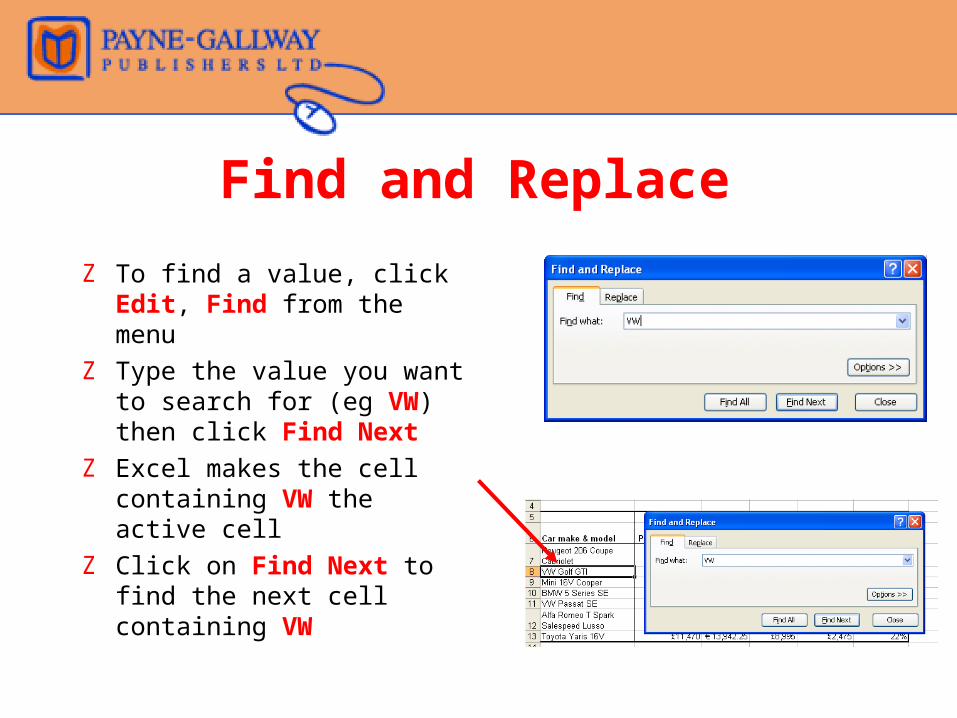
Find and Replace
Z To find a value, click Edit, Find from the menu
Z Type the value you want to search for (eg VW) then click Find Next
Z Excel makes the cell containing VW the active cell
Z Click on Find Next to find the next cell containing VW
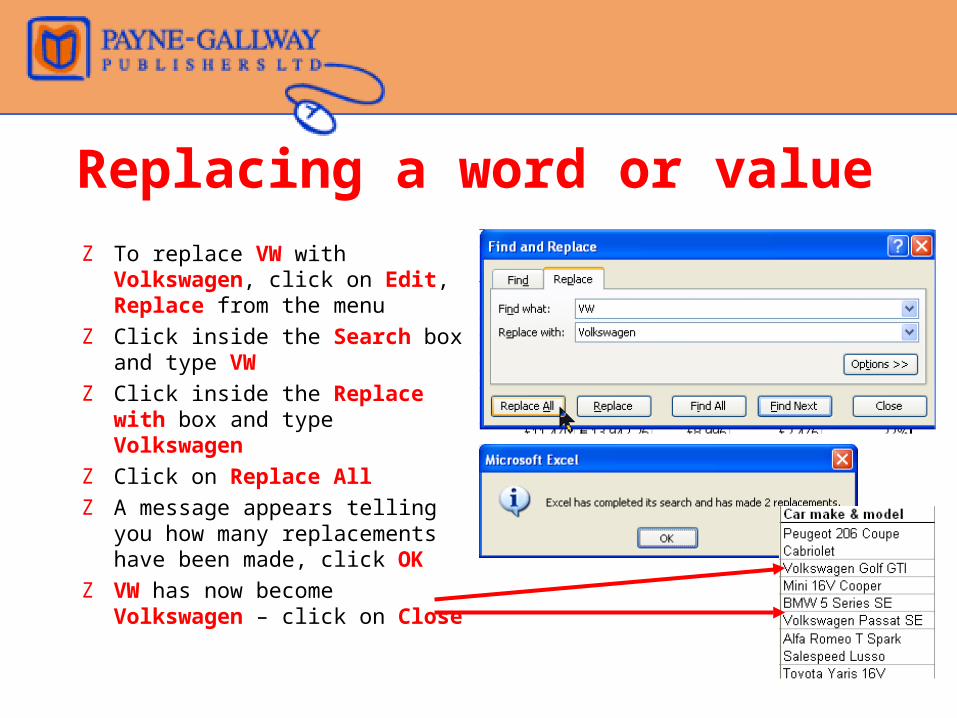
Replacing a word or value
Z To replace VW with Volkswagen, click on Edit, Replace from the menu
Z Click inside the Search box and type VW
Z Click inside the Replace with box and type Volkswagen
Z Click on Replace All Z A message appears telling you
how many replacements have been made, click OK
Z VW has now become Volkswagen – click on Close
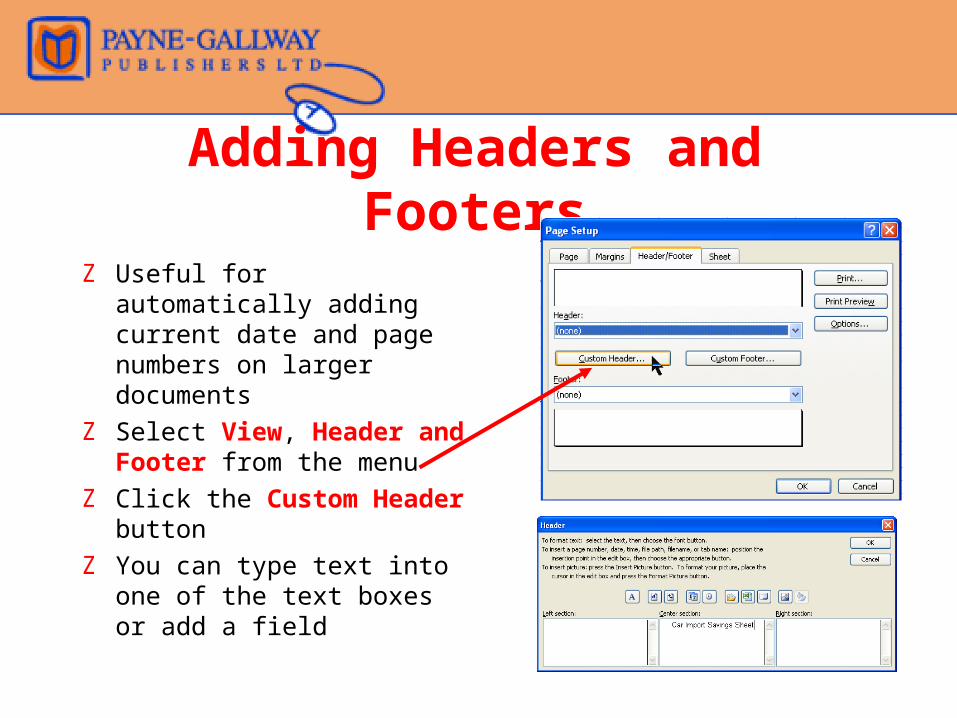
Adding Headers and Footers
Z Useful for automatically adding current date and page numbers on larger documents
Z Select View, Header and Footer from the menu
Z Click the Custom Header button
Z You can type text into one of the text boxes or add a field
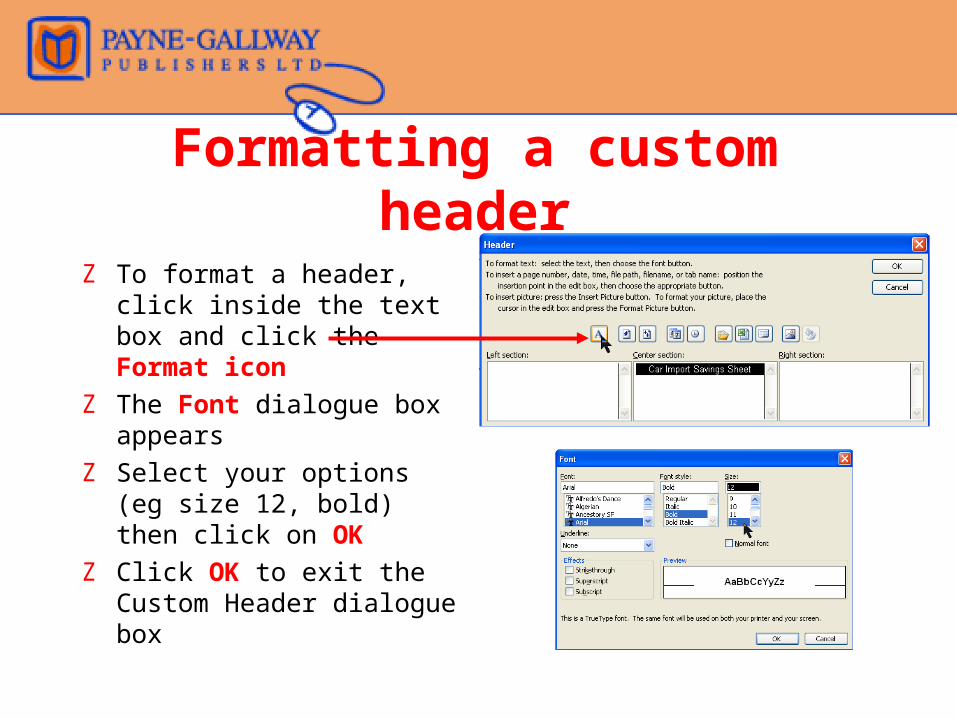
Formatting a custom header
Z To format a header, click inside the text box and click the Format icon
Z The Font dialogue box appears
Z Select your options (eg size 12, bold) then click on OK
Z Click OK to exit the Custom Header dialogue box
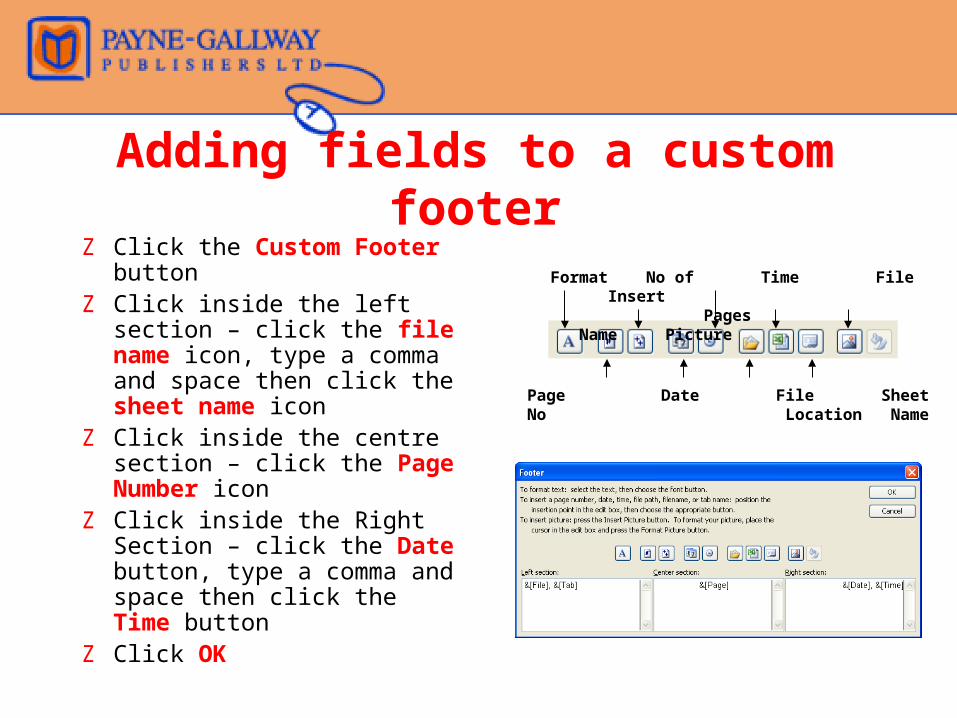
Adding fields to a custom footerZ Click the Custom Footer
buttonZ Click inside the left section –
click the file name icon, type a comma and space then click the sheet name icon
Z Click inside the centre section – click the Page Number icon
Z Click inside the Right Section – click the Date button, type a comma and space then click the Time button
Z Click OK
Format No of Time File Insert Pages Name Picture
Page Date File Sheet No Location Name
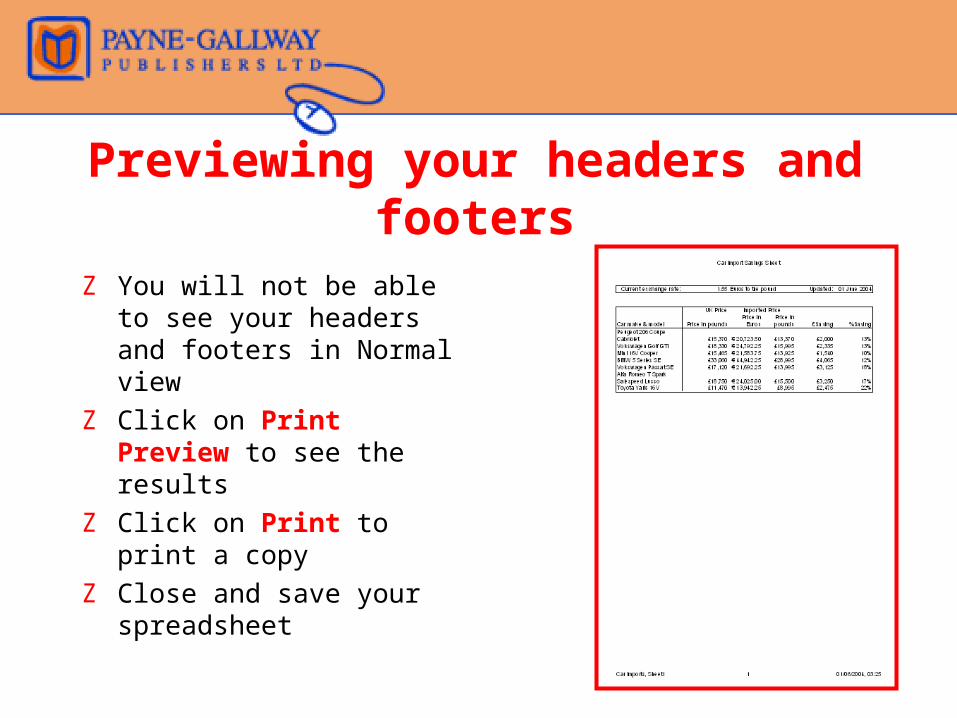
Previewing your headers and footers
Z You will not be able to see your headers and footers in Normal view
Z Click on Print Preview to see the results
Z Click on Print to print a copyZ Close and save your
spreadsheet