empower your futurecommcorp.org/.../2019/02/bog-eyf-curriculum-guide.pdfdraft commonwealth...
TRANSCRIPT

DRAFT
Commonwealth Corporation
Empower Your Future: Bridging the Opportunity Gap Career Readiness Curriculum Guide
The Massachusetts Department of Youth Services Bridging the
Opportunity Gap Orientation Career Readiness Guide

DRAFT

DRAFT
Table of Contents
Part I
Bridging the Opportunity Gap Overview .............................................................................. 1 Setting up the Environment ............................................................................................... 6 TOPIC 1: Orientation Workshop 1: Welcome ...................................................................................................... 7 Facilitators Resources 1:1 .................................................................................................. 9 TOPIC 2: Career Interests and Goal Setting Workshop 1: Career Interests and Goal Setting .................................................................. 13 Facilitators Resource 2:1 ................................................................................................... 15 Participant Handouts 2:1 .................................................................................................. 16 TOPIC 3: Workplace Etiquette Workshop 1: Workplace Habits and Dress Code .................................................................. 21 Participant Handouts 3:1 .................................................................................................. 24 Workshop 2: Workplace Communication ............................................................................ 27 Participant Handouts 3:2 .................................................................................................. 28 Facilitators Resource 3:2 ................................................................................................... 37 Workshop 3: Workplace Skills ............................................................................................ 38 Participant Handouts 3:3 .................................................................................................. 39 TOPIC 4: Job Search Workshop 1: Conducting a Job Search ............................................................................... 42 Participant Handouts 4:1 .................................................................................................. 46 Workshop 2: Job Applications ........................................................................................... 51 Facilitators Resource 4:2 ................................................................................................... 53 Participant Handouts 4:2 .................................................................................................. 54 TOPIC 5: Job Interviews Workshop 1: Preparing for Job Interviews .......................................................................... 61 Participant Handouts 5:1 .................................................................................................. 63 Workshop 2: Job Interview Tips and Questions ................................................................... 65 Participant Handouts 5:2 .................................................................................................. 66 Workshop 3: Mock Job Interviews ..................................................................................... 72 Facilitators Resource 5:3 ................................................................................................... 75
PART II
TOPIC 5: Job Interviews Workshop 4: Thank you Letters ......................................................................................... 77 Participant Handouts 5:4 .................................................................................................. 78

DRAFT
TOPIC 6: Job Success Workshop 1: Motivation and Initiative ................................................................................ 81 Participant Handouts 6:1 .................................................................................................. 83 Workshop 2: Time Management ........................................................................................ 87 Participant Handouts 6:2 .................................................................................................. 89 Workshop 3: Positive Working Relationships ..................................................................... 114 Participant Handouts 6:3 ................................................................................................ 116 Workshop 4: Workplace Safety ........................................................................................ 120 Participant Handouts 6:4 ................................................................................................ 122 Facilitator Resources 6:4 ................................................................................................. 128 TOPIC 7: Preparing Your Career Portfolio Workshop 1: Creating an Elevator Speech ........................................................................ 132 Participant Handouts 7:1 ................................................................................................ 134 Workshop 2: Building a Network/References .................................................................... 136 Participant Handouts 7:2 ................................................................................................ 138 Workshop 3: Resumes (Day 1) ........................................................................................ 141 Participant Handouts 7:3:1 ............................................................................................. 143 Facilitators Resource 7:3:1 .............................................................................................. 145 Workshop 3: Resumes (Day 2) ........................................................................................ 148 Participant Handouts 7:3:2 ............................................................................................. 150 Workshop 3: Resumes (Day 3) ........................................................................................ 157 Participants Handouts 7:3:3 ............................................................................................ 158 Workshop 4: Cover Letters (Day 1) .................................................................................. 159 Facilitator Resource 7:4:1 ............................................................................................... 161 Participant Handouts 7:4:1 ............................................................................................. 162 Workshop 4: Cover Letters (Day 2) .................................................................................. 164 TOPIC 8: Job Retention Workshop 1: Positive Work Habits ................................................................................... 166 Participant Handouts 8:1 ................................................................................................ 169 Workshop 2: Communication ........................................................................................... 173 Participant Handouts 8:2 ................................................................................................ 175 Workshop 3: Coping ....................................................................................................... 180 Participant Handouts 8:3 ................................................................................................ 182 Facilitators Resource 8:3 ................................................................................................. 183 TOPIC 9: Personal Finance and Budgeting Workshop 1: Why and How to Use a Bank ....................................................................... 186 Participant Handouts 9:1 ................................................................................................ 187 Workshop 2: Checking Accounts and Credit Cards ............................................................. 191 Participant Handouts 9:2 ................................................................................................ 193 Workshop 3: Budgeting .................................................................................................. 203 Participant Handouts 9:3 ................................................................................................ 205

DRAFT
Bridging the Opportunity Gap | Career Readiness Curriculum Guide Page 1
Overview
BOG overview
The Bridging the Opportunity Gap (BOG) initiative provides funding for workforce development
training that supports the success of youth committed to the Department of Youth Services
(DYS). DYS is the juvenile justice agency for the Commonwealth of Massachusetts, and the
agency’s mission is to make communities safer by improving the life outcomes for youth in their
care. Through Commonwealth Corporation’s contractual partnership with DYS, the BOG initiative
was introduced in 2006 through funds from the Massachusetts State Legislature and has
supported innovative transition and re-entry programming for youth ever since.
Purpose of Curriculum
This curriculum guide is intended for those agencies providing services to youth in a BOG
program. This curriculum guide provides the workshops to be covered, activities and estimated
times, materials and resources, and facilitation steps. Be aware of the estimated times and
adjust them accordingly based on your participant size, timeframe of your workshops, and the
learning needs of your group.
Completing the career readiness components will prepare youth to be successful in jobs, learn
from their experience, and work on their BOG Student Career Portfolio. By the end of the
program, each youth will complete a BOG Student Career Portfolio that includes:
A resume;
two cover letters;
one sample thank you note;
copies of certifications and/or training certificates;
two reference letters (preferably from employers and program staff);
a listing of vocational competencies earned (if applicable);
one writing sample;
a completed job application; and
a sample employment e-mail inquiry.
Part I: Orientation
During orientation participants will have the opportunity to learn about your organization, the
BOG program, and start building skills to prepare them to enter into work. The following
workshops are required during the orientation training:
o program expectations (including a review of the agency’s Guidelines or Code of
Conduct for youth and staff, program criteria, attendance requirements, and
accessing an “assent of ward” if the youth will be “aging out” prior to the end of
the program):

DRAFT
Bridging the Opportunity Gap | Career Readiness Curriculum Guide Page 2
o development or review of a career interest inventory;
o setting career and workforce short and long term goals;
o documentation for employment (I-9, work permits, W-4 forms, etc.);
o workplace habits and dress code; and
o initial work on the BOG Career Portfolio:
Writing Sample (Topic 3 Workshop 3);
Email Inquiry (Topic 4 Workshop 1);
Job Application (Topic 4 Workshop 2);
Part II: On-going Career Readiness Training
The on-going career readiness sessions should provide youth with an opportunity to come
together as a group and discuss employment progress and challenges. The purpose of these
sessions is to provide youth with an opportunity to increase their skills training, discuss their
work, training, and/or leadership experience, and complete the additional items of their BOG
Student Career Portfolio:
BOG Student Career Portfolio completed during these sessions:
a resume (Topic # Workshop #);
two cover letters (Topic # Workshop #);
one sample thank you note (Topic # Workshop #);
The remaining items that youth should include in their portfolio are the following:
copies of certifications and/or training certificates;
two reference letters (preferably from employers and program staff);
a listing of vocational competencies earned (if applicable);
Portfolio Tips
As you move through the curriculum with the participants it is recommended to provide youth
with folders in order to keep all the materials they work on during career readiness training. It is
ideal to hand out the folders during the first meeting and have participants write their name on it
or decorate it to make it unique. It is suggested that you collect the folders and hold on to
them for the duration of the program. Hand out the folders at every meeting so participants can
look at their previous work completed in meetings and add to the folder. All of the documents in
the folder will aid in the development of the career portfolio.
Another suggestion is to keep a flash drive with a folder for each participant in order to save all
the electronic versions of their career portfolio pieces. It is recommended that the program
keeps this information in a locked space on one flash drive until the end of the program because

DRAFT
Bridging the Opportunity Gap | Career Readiness Curriculum Guide Page 3
youth may come in and out of programs. As individual youth complete their career portfolios you
should give each individual their portfolio saved on their unique flash drive.
It is also recommended to provide the participants with presentation folders so program staff
can teach the participants how to print their documents on quality paper and construct their
portfolio for presentation. Each participant will have a professional looking hard copy to bring on
interviews and the flash drive with the materials to print for future need.
Getting to know Your Participants
Understanding the phases of the Department of Youth Services (DYS) system and the Empower
Your Future initiative will help BOG facilitators be more aware of the career readiness
experiences that youth have prior to their arrival at your BOG program. The DYS Continuum of
Care consists of multiple phases including detention residential programs, assessment residential
programs, treatment residential programs (hardware secure and staff secure), community, and
revocation residential programs. The Empower Your Future curriculum is comprised of a series
of guides created for use in each phase of the continuum of care to guide youth’s
education/career development. The curriculum is delivered 3 days a week in while the student is
in residential programming. The curriculum is project and activity-based and is intended to help
participants not only acquire the knowledge and skills necessary for career development and
employability, but also to help support a positive outlook and attitude for their future. The
broader Empower Your Future initiative is comprised of the curriculum as well as activities to
develop the voice of DYS youth in their treatment, transition, and discharge plans. Planning for a
youth’s discharge begins upon their entry into the system and the Empower Your Future
initiative helps youth to be active participants in this process.
EYF Across the DYS Continuum of Care
The following graphic displays the progression of phases across the continuum of care:
• EYF in Detention: When youth enter the system they are placed in a detention facility. In
detention the EYF curriculum is focused to help students learn how to advocate for
themselves by explaining their absence from work or school because many youth return
back to the community.

DRAFT
Bridging the Opportunity Gap | Career Readiness Curriculum Guide Page 4
• EYF in Assessment: If a youth is committed to DYS they are moved to an Assessment
facility. EYF Assessment consists of 10 lessons with two goals including to start the
career exploration journey and to determine an appropriate educational pathway to
obtain a high school credential (HiSET or HS diploma). Students complete a Career
Decision Making system (CDM) assessment to help guide their initial career exploration.
While in Assessment an appropriate Treatment facility is determined for the youth.
• EYF in Treatment: This curriculum works to deepen the career exploration started in
Assessment by guiding students to research specifics about preparation required for their
career of interest, create realistic goals to transition back to the community and have
successful futures. MassCIS (masscis.intocareers.org) is the primary career resource used
in the treatment curriculum.
Each unit of EYF in Treatment ends with a presentation. In treatment the youth are
working towards a final project. Youth present their EYF projects during their monthly
treatment team meetings in order to have voice in shaping their Community Services
Treatment Plan.
• EYF in the Community: This curriculum guide provides youth with the opportunity to turn
their plans established at previous phases of the continuum of care into action. This
guide helps youth become more job ready and continues career development by gaining
actual work experience and/or participating vocational training, and through the
development of the BOG Student Career Portfolio.
• EYF in Revocation: This curriculum resource is currently being piloted in DYS Revocation
programs across the state. Through this curriculum students will use EYF resources to
work on personalized revocation goals in order to make a successful transition back to
the community and continue to take steps towards their long term education and/or
career goals.
EYF helps youth make gains within the classroom but in order to fully link EYF to discharge
planning it needs to be connected across all services provided by DYS (BOG is funded through
Commonwealth Corporation’s contractual relationship with DYS and therefore an additional DYS
service). Our goal is to integrate EYF across programs with adults collaborating together to help
youth establish and make progress towards their goals. One example of how we do this is by
creating career and educational pathways that allow the youth to continue working on their
goals and creating new ones in the community through BOG.
Collecting Past Career Readiness Work
To better connect to the career readiness work previously completed by the student it is
important to collect and review past EYF final projects that youth have completed. Collecting the
final projects can occur as a part of the youth referral process, CommCorp provides a referral
form in the appendix of the Grantee Handbook that includes questions to ask DYS in order to
collect this information. Some examples of past work may include a youth’s EYF Assessment

DRAFT
Bridging the Opportunity Gap | Career Readiness Curriculum Guide Page 5
final Project (which includes results from the Career Decision Making tool) and the EYF
Treatment final project or other work completed from the treatment program.
You will need to work with DYS in order to obtain referrals. In many circumstances you will
work the District Manager. The District Manager in your area will know how to obtain the
previous career readiness work.
Collecting previous work completed by the youth will help you build off their previous experience
and expand their career readiness skill development. In addition, this information will allow you
to use the information to build relationships with the youth and refer to their identified interests
to continue their learning. If you are providing subsidized employment, this information can also
assist you in setting up appropriate work experience opportunities that match their interests.

DRAFT
Bridging the Opportunity Gap | Career Readiness Curriculum Guide Page 6
Setting up the Environment
A warm and welcoming environment can create a sense of safety for participants as well as
allow trust to develop. It’s always helpful to greet the participants with a smile and in a cheerful
manner. If possible you will want to have snacks available for participants and set the décor in
the room to be inviting to youth as much as your space allows.
Part of setting up the environment is to open and close each meeting with consistency and allow
youth voice in the process. Listed below are materials and some facilitation steps to follow to
open and close each meeting:
Materials Needed:
Flip Chart Paper or White Board Markers Agenda Youth Sign In Sheet
Folders for Youth Participants Youth Time Sheets Youth Pay Check and or Gift Card Log
Open
1. Set the room in a circle so that everyone can see each other. The circle will allow people
to stay alert and engaged and open to share.
2. Always have the agenda printed in a visible place (white board or flip chart paper).
3. Always have the group agreements* in a visible place (white board or flip chart paper).
4. Welcome everyone in the room and have them grab snacks and direct them to the sign
in sheet.
5. Ask for a volunteer to read the meeting agreements* and ask if anyone would like to add
anything new.
6. Have everyone do a quick check-in on how they are feeling that day. Doing a quick
check-in can give you a good sense of where people are at that day and who may or may
not need extra support. You can have them do this by using words, thumb
up/sideways/down, or relating it to a color, etc.
Once participants begin work or training experience add:
7. Begin every meeting with an update from their work experience, training/vocational,
and/or leadership training. Have the participants describe where they are working or
training, the duties they perform, what they learned since the last meeting, and any
challenges they faced. Allow time for participant feedback and facilitator feedback.
Close
1. Have participants share what worked well for them and what did not. This process will
allow you to incorporate changes for the next meeting.
2. Have participants hand in their individual folders with their work in it for you to keep and
hand out at every meeting.
3. Have participants fill out meeting time sheets.
4. If participant paychecks or gift card are distributed during Career Readiness have youth
sign the paycheck or gift card log book.
5. Have participants sign out on the meeting sign out sheet.

DRAFT
Bridging the Opportunity Gap | Career Readiness Curriculum Guide Page 7
*group agreements will be explained in further detail in Workshop
Topic 1: Orientation
Length of Topic: 1 hour, 1 workshop
Workshop 1: Welcome
Outcomes Learning Objectives
Create meeting agreements Understand the program expectations and
policies.
Identify expectations Get to know the other program participants.
Make commitments Know what documentation is needed for
employment
Materials:
Facilitator Resource 1-1: Sample Code of Conduct/Program Agreements (Sample included but hand out
the form submitted with your grant proposal) Facilitator Resource 1-1: More Engaging Reading Strategy- Jigsaw Reading Guidelines
Facilitator Resource 1-1: Sample Group Agreements
I-9 Form (http://www.uscis.gov/files/form/i-9.pdf) Work permit (http://www.mass.gov/lwd/docs/dos/youth-employment/youth-application.pdf
Flip Chart Paper Two-Pocket folders for participants
Activities and Facilitation Steps
1. Welcome and Introductions – 10 minutes
Have everyone introduce themselves by name along with one of the opening questions listed
below:
o What is your greatest strength?
o What is one thing you hope to learn today (or in this program)?
o What is the ideal job (or career) for you?
o What are three words you would use to describe yourself?
2. Program Agreement/code of conduct – 15 minutes
Describe the program to everyone including:
o the length of the program;
o how often meetings take place;
o what they have to accomplish before being placed at a work site;
o when they can expect to be placed at a worksite;
o what the meetings will look like before, during, and after completing a work experience;
what the participants will learn;
o what products they will come out of the program with (i.e., portfolio, certifications, etc.);
and how much they will be paid.
Ask participants if they have any questions and allow time for questions/answers. After hearing
about the program ask the youth if they are all still interested in participating.
Take out the code of conduct/program agreement that outlines expectations, policies, and
consequences for participation.
o Refer to Facilitator Resource 1-1 Sample Code of Conduct/Program Agreement

DRAFT
Bridging the Opportunity Gap | Career Readiness Curriculum Guide Page 8
o Actual Code of Conduct/Program Agreement should have been created with grant
proposal
Explain to participants that they will divide up the program agreement/code of conduct and read
them using a reading technique known as Jigsaw Reading in which they will become experts on
certain sections of the reading and have to report out to others. Have participants partner up or form small groups to read assigned section of the program agreement/code of conduct using the
Jigsaw Reading technique. o Refer to Facilitator Resource 1-1: More Engaging Reading Strategy- Jigsaw Reading
Guidelines
Take turns sharing out each section program agreement/code of conduct using the so that
everyone can hears the expectations. Give time for questions/answers. Have participants sign
and turn in. Offer the participants a copy for their records.
Hand out participants folders and have them put their names on them and decorate.
Collect signed agreement/code of conduct
3. Group Agreements – 10 minutes
Let the participants know that just like program agreements you would like to create group
agreements. Group agreements guide how everyone interacts with one another during the
meetings that everyone can agree to and also hold each other accountable to.
o Ask the participants for suggestions and write them down on flip chart paper. If the
participants have missed something that is important, ask if you can add to the list and if
they agree.
o Refer to Facilitator Resource 1-1: Sample Group Agreements for additional suggestions
Once the list is finalized, let everyone know that you will review before every meeting and that the
list can be updated as you meet.
4. Workplace documentation – 15 minutes
Ask participants if they know what documentation they need for work. Confirm and/or add
anything the participants missed. Review why documentation is needed and the forms that
employers have employees fill out.
Pass out the I-9. Ask the participants if they know what this form is for. Confirm and/or add to
their knowledge using the resource link above in Materials section that describes the I-9.
o I-9 can be printed using the link above in materials section
Have everyone fill out the I-9 and circle around to help individual participants if needed.
Ask participants if they know what a work permit is and if they need one. Review what they are,
who needs them, and laws for youth workers (you will find this included with the link provided
above in the Materials section).
Have the participants fill out the workers permit form, but inform them that you will collect it and
hold on to it until the time comes for them to begin work. In the meantime, inform the
participants that they should contact their local school department to find out where the work
permit application should be submitted for approval.
o Work permit can be printed using the link above in Materials section
Collect the signed forms
5. Closing – 10 minutes
Process check
Collect folders
Have participants fill out time sheets and sign out

DRAFT
Bridging the Opportunity Gap | Career Readiness Curriculum Guide Page 9
Commonwealth Corporation Program Agreement Requirement for Youth Programming
Through grant funding, Commonwealth Corporation provides youth in DYS custody innovative and high
quality programming which supports Positive Youth Development by building pro-social behaviors,
supporting and enhancing education, developing employability skills, and providing innovative and high quality career development.
In order to be considered for DYS youth programming, prospective grantees must explicitly define,
acknowledge, and enforce program agreements that outline expectations for youth, volunteers, and
employees participating in, or working for the program. Other policies that should be in place at the
agency and support this agreement include transportation, ethics standards, internet/media use and cell phone use. Before an employee or volunteer can be considered for employment in any programs
funded by Commonwealth Corporation they must have completed a comprehensive application including contact information, experience, and references, completed and passed an approved
background check including but not limited to a Criminal Offender Registry Inquiry (CORI),
successfully participated in an employee and/or volunteer training.
Beyond the specified application requirements, prospective grantees must also submit a written account of Program Agreements inclusive of youth, volunteers and employee expectations to Commonwealth
Corporation for consideration.
Program Agreements should provide an overview of the principles, values, standards, or rules of behavior
for youth, volunteers, and employees. If your agency does not have an explicit, written set of Program Agreements, please develop one using the suggested language below. The following language serves a
minimum standard for the development of your organizations Program Agreements. Program Agreements will be signed and counter-signed by a supervisor in order to be considered a valid and enforceable
document.
Suggested language and Elements of Program Agreements-
(Name of agency) is a youth-serving, community based organization dedicated to providing a range of
services to young people. In order to ensure that the youth program is a positive and enjoyable experience for all participants, it is necessary to establish and apply agreed upon standards of behavior. In
listing the following expectations, we cannot anticipate every eventuality, and therefore any behavior
which is inconsistent with maintaining a positive and safe atmosphere, will be deemed as a breach of the Program Agreements.
[In the area below each Program Agreement we suggest that your organization provide a detailed list that further describes the agreement. The list should be written in a way that describes what people should do to support the agreement rather than a list of rules or things that people should not do. For example: will use language free of profanity]
1. Program staff, volunteers and youth will be considerate of others well-being, and be respectful to
self, others, and property
2. Program staff, volunteers and youth will maintain an environment that promotes safety
Facilitator Resource 1-1 Sample Code of Conduct/Program Agreement

DRAFT
Bridging the Opportunity Gap | Career Readiness Curriculum Guide Page 10
3. Staff, volunteers and youth will dress appropriately
4. Staff, volunteers, and youth will use computers, internet, and technology appropriately and for program purposes only
5. Staff, volunteers and youth will maintain confidentiality of all information shared as a result of participation in [insert program name here]
Employees, volunteers, and youth will maintain appropriate professional and personal boundaries at all
times. Personal contact should not occur outside of the program hours of operation. Any violations or
suspected violation of the Program Agreements are to be reported to program supervisors.
I have read and I understand the Program Agreements. I agree to abide by the agreements described
above and understand that I may be removed as a participant, volunteer or staff member if I violate any
of these agreements.
Signature
Date
Witness (signature of supervising manager)
Date

DRAFT
Bridging the Opportunity Gap | Career Readiness Curriculum Guide Page 11
JIGSAW READING GUIDELINES
When facilitating we often share resources with youth and ask them take turns reading the materials. This
reading strategy known as round robin reading has been proving to be an ineffective way to engage
participants in reading comprehension. The following guidelines provide the facilitator with steps to the
Jigsaw Reading Activity that is a more effective way to engage student in the reading to better understand
the content and take more control of their own learning.
Jigsaw Reading Activity
1. Divide participants into small, heterogeneous groups.
2. Each group should select one person to be the leader and group member roles.
3. Divide the articles between the groups and assign each group member one segment to
read.
4. Distribute recording sheets to group members so they can take notes.
5. Give the group members time to read their segments.
6. Form “expert groups” and have the “expert groups” discuss the main points of their segment.
7. Have participants move back into their jigsaw groups and present their segments.
8. Other group members should ask clarifying questions for deeper understanding.
9. Reconvene as a whole group to discuss findings and clarify any questions.
FACILITATORS RESOURCE 1-1: MORE ENGAGING READING STRATEGY

DRAFT
Bridging the Opportunity Gap | Career Readiness Curriculum Guide Page 12
Meeting agreements are mutually agreed upon between program participants and staff to guide the
interactions of the group. Sometimes when participants are asked what they would like they may need
some examples to get them started in their thinking process. Following are some standard meeting
agreements:
One person speaks at a time
Turn off cell phones
Confidentiality – what is shared in this group stays here and what happens outside of this group
stays outside
Respect – Listen carefully without judgment
Setting meeting agreements allow everyone to hold people accountable to interact to the terms agreed
upon. Facilitators can refer back to the agreements as well as the participants and new ones can be
added at any time.
FACILITATORS RESOURCE 1-1: Sample Group Agreements

DRAFT
Bridging the Opportunity Gap | Career Readiness Curriculum Guide Page 13
TOPIC 2: Career Interest and Goal Setting
Length of Topic: 1 hour, 1 workshop
Workshop 1: Career Interest and Goal Setting
Outcomes Learning Objectives
Identify career interests Understand personality type and careers that
match or understand their interests and
occupations that match
Identify short-term goals Understand the difference between short-term
and long-term goals Understand the importance of planning,
preparation and practice in reaching goals
Materials:
Group Agreements
Facilitator Resource 2-1: Goals Definition Sheet
Participant Handout 2-1: Interest Inventory Holland career interest (http://www.truity.com/test/holland-code-career-test)
Four type personality survey (http://www.truity.com/test/type-finder-personality-test) Participant Handout 2-1: Short Term Goal Worksheet
Activities and Facilitation Steps
1. Welcome and Introductions – 10 minutes
Have everyone come in and have a snack
Review meeting agreements and agenda
Quick check-in (You may want to do another round of introductions so everyone has the
opportunity to learn names)
2. Career Interest Inventory – 20 minutes
Ask participants if they have done a career interest inventory before. There is a good chance that
many may have completed one in their previous Empower Your Future classes, such as a Career
Decision Making System-Revised (CDM-R) and/ or O*NET profiler.
o Ask for willing participants to share the results of their completed career interest
inventory.
Let the group know that they will be completing an interest inventory so that they can determine:
o If the inventory matches up with what they think they are interested in;
o (for those who do not know what they are interested in) the inventory can give them a
few ideas about possible interests; and
o (for others who have completed an inventory before) the inventory can help them
determine if their interests have changed over time.
Choose between the interest inventory (Participant Handout 2-1), Holland career interest
(computer based), or the four type personality survey (computer based).
o Depending on the size or learning style of your group, you may want to split the
group and have one group do the paper career interest inventory and the rest of the
group a computer based inventory.
Walk around and give guidance to those who need it.
When the participants have finished, have them share their results.
o To add to the discussion ask if they believe the results are a good match for them
o Ask them to describe what career they have identified to explore.

DRAFT
Bridging the Opportunity Gap | Career Readiness Curriculum Guide Page 14
3. Short-Term Goal Sheet – 20 minutes
Now that they have identified a career to explore, explain to them that it is important to come up
with short term goals to guide them in exploring their career. There is a good chance that many
participants may have created short and/or long term goals in their previous Empower Your
Future classes, through unit projects such as the Life is a RollerCoaster project (EYF Treatment
Unit 9) and the Possible Selves tree (EYF Treatment Unit 3) and their final projects (in both EYF
Assessment and Treatment). You can discuss their previous goals in order to introduce the
creation of new goals.
Explain the difference between long term and short term goals. Have the definition of SMART
goals written large on newsprint where you can hang it up and explain them to the group.
Encourage any participants who feel comfortable to share a time they have set and achieved a
short-term goal (completed an assignment on time, practiced a sport every day to improve, etc.),
and how it fits as a SMART goal.
o See examples on Facilitator Resource 2-1: Goals Definition Sheet for Facilitators
Hand out short term goal sheet and explain how to fill out the form. Walk around to help
individual participants.
When participants have finished ask the group if anyone is willing to share what career they are
interested in or what goal they set.
4. Closing – 10 minutes
Process check
Have participants put materials from the day in their folders and collect folders
Have participants fill out time sheets and sign out

DRAFT
Bridging the Opportunity Gap | Career Readiness Curriculum Guide Page 15
Short Term Goal – a short term goal is something a person would like to achieve in the near future.
Short term goals can be used to reach a long term goal.
Long Term Goal - a long term goal is something a person would like to accomplish in the future that can
take up to a year or even a few years to reach. They take time and planning
SMART goal – Using the SMART method can help clarify short term goals because they are specific,
measurable, action oriented, realistic, and time-bound.
S – Specific (and simple)
M – Measurable (how will we know when you’ve achieved it)
A – Action Oriented (what action will you do in achieving this goal) R – Realistic (by your own efforts; goals that you do not need someone else’s actions in order to
achieve) T – Time bound (when will you complete it by)
Examples:
Goal: Research how to become a chef
Apply SMART method: Research how to become a chef (specific) by searching online (action) for 1 hour (measurable) by October 31st (time bound). Ask yourself, is this realistic?
Goal: To get an after school job at a restaurant
Apply SMART method: To find an after school job at a restaurant (specific) by filling out applications (action) at 5 local restaurants (measurable) by November 15th (time-bound).
Facilitator notes:
Review goal definitions with participants.
Write out SMART goals with definitions on flip chart paper and hang them up while doing exercise so that participants can look to it for guidance while setting their goals.
FACILITATORS RESOURCE 2-1: Goals Definition Sheet

DRAFT
Bridging the Opportunity Gap | Career Readiness Curriculum Guide Page 16
Participant Handout 2-1: Interest Inventory

DRAFT
Bridging the Opportunity Gap | Career Readiness Curriculum Guide Page 17

DRAFT
Bridging the Opportunity Gap | Career Readiness Curriculum Guide Page 18

DRAFT
Bridging the Opportunity Gap | Career Readiness Curriculum Guide Page 19

DRAFT
Bridging the Opportunity Gap | Career Readiness Curriculum Guide Page 20
Name: Date:
Goals are things that you want to achieve for yourself. Setting goals helps you look at how you can start
taking steps toward reaching them. You may have a long term goal, such as working in a particular
career field. Think about the short term goals that you may need to work on in order to reach your long
term goal. Short term goals can take a few weeks or months to achieve compared to long term goals that
may take up to a year or more.
Directions: Answer the questions below by responding in writing to each one
What career field(s) interests you at this time?
What can you be doing now to move toward the career fields/areas noted above?
What career or school related goals do you have for yourself right now?
Pick one goal you can reasonably accomplish in two weeks
Goal:
I’m going to (what)
By (when)
State why this is a worthwhile goal:
Participant Handout 2-1: Short Term Goal Sheet

DRAFT
Bridging the Opportunity Gap | Career Readiness Curriculum Guide Page 21
Topic 3: Workplace Etiquette
Length of Topic: 3 hours, 3 workshops
Workshop 1: Workplace habits and dress Code
Outcomes Learning Objectives
Identify workplace habits that lead to success
Understand how to make a good impression at
work
Identify dress codes for the workplace Understand that how you dress can impact
how you are perceived at work
Materials:
Group Agreements
Participant Handout 3-1: Twenty Tips to Help you Make a Great Impression Participant Handout 3-1: What to Wear, What not to Wear
Participant Handout 3-1: Dressing for Work Tip Sheet
Flip Chart Paper, Markers
Activities and Facilitation Steps
1. Welcome and Introductions – 10 minutes
Have everyone come in and take a snack
Review meeting agreements and agenda
Quick check in
2. Workplace Habits – 20 minutes
Introduce the workshop of workplace habits. Let participants know that there are different workplace
habits that can lead to success in the workplace.
Pair up participants and give each pair a piece of flip chart paper and a marker.
Have each pair come up with 5 qualities, characteristics, and/or strategies they believe would help
them be successful at work.
o Have them write the 5 qualities, characteristics, and/or strategies they come up with on the
flip chart paper.
o Tell them they will have 10 minutes to complete this.
Have each pair (one pair at a time) hang their flip chart paper on the wall and present the 5 qualities,
characteristics, and/or strategies they are willing to use to achieve success at work.
After each group has presented, hand out the Twenty Tips to Help you Make a Great Impression
(Participant Handout 3-1 Twenty Tips).
Have a discussion about each tip (let them know that you will be talking about tip #2 in the next
activity) and the similarities between their lists (if any), which tip they think will be easy for them, will
take some work but will be doable for them, and which ones will be challenging for them to follow.
3. Dressing for Work – 20 minutes
Move into a discussion about how clothing can have an impact on an interview, hiring decisions, and
perceptions at the workplace.
Hand out What to Wear or not to Wear (Participant Handout 3-1 What to Wear or not to Wear).

DRAFT
Bridging the Opportunity Gap | Career Readiness Curriculum Guide Page 22
o Have participants write down if they think they should or should not wear a particular outfit
and why. Tell them it is important to point out why they would or would not wear what is
portrayed in the images.
o Give them up to 10 minutes to complete.
Have a discussion about what they wrote down and the reasons and add to their knowledge
o Move into a short conversation on how you dress for the interview may be different from how
you dress on the job. But, that how you dress on the job is different than how you might
dress with your friends.
Hand out Dressing for Work Tip Sheet using the Jigsaw Reading Strategy.
a. Refer to Facilitator Resource 1-1: More Engaging Reading Strategy- Jigsaw Reading Guidelines
Have a quick conversation if they missed anything or why certain things are important.
4. Closing – 10 minutes
Process check
Have participants put materials from the day in their folders and collect folders
Have participants fill out time sheets and sign out

DRAFT
Bridging the Opportunity Gap | Career Readiness Curriculum Guide Page 23
1. Have a positive attitude
2. Dress professionally/Blend in with your co-workers
3. Show your team spirit (Share your recognition with your team, at least initially)
4. Learn your co-workers’ names
5. Ask questions/Ask for help
6. Take notes (You will not remember everything, and it does not leave a great impression to
ask questions about something you have already been taught/told)
7. Be a self-starter; take the initiative to ask for more work
8. Learn everything about your new employer, even things that don’t have to do with your position
9. Work full days “Come in early, stay a little later”
10. Avoid office politics and gossip
11. Keep personal business on company t ime to a minimum (emergencies only)
12. Take advantage of after-hours act iv i t ies (Be on your best behavior — you are still with co-workers and/or your supervisor)
13. Listen more, Talk less (This is your time to listen and learn. If you do well, you will have
a chance to make suggestions)
14. Track your accomplishments
15. Show appreciation
16. Find a mentor (This might not happen in your first few days, but start thinking about
it early on and observing to see who might make a great mentor)
17. Get and stay organized/Set goals (Get an organizer or planner to keep track of your
work, your schedule, meetings, deadlines, etc.)
18. Keep your boss informed — of everything (Meet regularly and make sure she/he knows
you are a self-starter and hard-worker. Do not complain)
19. Meet and network with key people
20. Don’t worry about being perfect (Remember to relax, keep your mind open, get to know your team members and do your work — and you should go far in making a lasting
impression and reputation)
Adapted f r o m Your First Days Working at a New Job: 20 Tips to Help You Make a Great Impression by Randall S. Hansen, Ph.D., and Katharine Hansen,
PARTICIPANT HANDOUT 3-1 TWENTY TIPS TO HELP YOU MAKE A GREAT IMPRESSION

DRAFT
Bridging the Opportunity Gap | Career Readiness Curriculum Guide Page 24
Ph.D. http://www.quintcareers.com/first_days_working.html
Directions: in the box below the picture, state the reasons why you should wear or not wear particular clothing to an interview
Participant Handout 3-1 What to Wear and What not to Wear?

DRAFT
Bridging the Opportunity Gap | Career Readiness Curriculum Guide Page 25
Directions: in the box below the picture, state the reasons why you should wear or not wear particular clothing to an interview
Participant Handout 3-1 What to Wear and What not to Wear?

DRAFT
Bridging the Opportunity Gap | Career Readiness Curriculum Guide Page 26
Determining what to wear to work can be difficult for many people, including adults. What you wear to work
represents who you are as an individual. Unfortunately, your coworkers and boss will form an impression of you
and judge you based on what you wear. You should always ask what the dress code is when you are hired.
Some employers will tell you casual is okay. But, that doesn’t mean the same casual clothes you would wear
when you are hanging out with your friends. Below are some tips to follow:
You want to blend in with the rest of your co-workers. When you go to the interview try to look around to
see how the employees are dressed.
Dress modestly (no plunging necklines, no T-Shirts with graphics, no ripped jeans, no flip-flops, cover any
tattoos, remove piercings, stay with neutral colors)
If you are allowed to wear shorts make sure they come no more than 2” above the knee. Girls should not
wear short-shorts or mini-skirts. Follow the same rule for skirts as you would for shorts.
Avoid wearing tight fitted clothing.
Do not wear clothing that is see-through.
Make sure your clothes are wrinkle free and clean.
Keep accessories to a minimum and cover up all tattoos and piercings. You should not wear big-hoop
earrings or flashy bracelets, and you want to avoid big chain necklaces. Remember tip # 2, dress
modestly.
Avoid heavy perfume or cologne.
Do not wear sweat pants or yoga pants (avoid any kind of work-out clothes)
Casual Dress
Typically casual dress can include clean, neat jeans (if your supervisor approves wearing jeans), khakis, T-Shirts
(no graphics), collared shirt, or button down shirts. Sneakers can be okay as long as they are clean. Do not wear
flip-flops. Do not wear tank tops or camisoles to work. If allowed to wear sleeveless shirts make sure they are a
loose fit and not the type you can wear as an under garment. Again, you will need to look around at the
employees to get a sense of what fits in with your work environment.
Business Casual Dress
Typically this includes dress pants (or skirts) and a nice top such as a collared shirt or button down shirt. In some
cases khaki’s fit into this category as well. Usually jeans are not worn in a business casual environment. Dress
shoes (no sneakers) and girls can wear heels as long as they are no higher than 1.5”. Again, it is important that
you look around to see what other employees are wearing in the environment so you can blend in.
Participant Handout 3-1 TIPS FOR DRESSING FOR WORK

DRAFT
Bridging the Opportunity Gap | Career Readiness Curriculum Guide Page 27
Topic 3: Workplace Etiquette
Workshop 2: Workplace Communication
Outcomes Learning Objectives
Identify their own communication style Understand there are different communication
styles
Show effective communication through role
plays
Understand the importance of communication
skills at work
Materials:
Group Agreements Participant Handout 3-2 Communication Style Assessment or http://www.newlineideas.com/communication-
style-quiz.html
Participant Handout 3-2: Communication Style Definitions Participant Handout 3-2: Communication Role Plays
Facilitators Resource 3-2: Communication Style Discussion Questions
Activities and Facilitation Steps
1. Welcome and Introductions – 10 minutes
Have everyone come in and take a snack
Review meeting agreements and agenda
Quick check in
2. Communication Style Assessment – 20 minutes
Introduce the topic of communication in the workplace. Let participants know that they all have a
particular communication style and learning more about that can help adjust to the expectation of
communicating in the workplace.
Hand out Participant Handout 3-2 Communication Style Assessment or have group complete the online
assessment (link provided above). When participants are done have a discussion about their findings.
Break up the group based on their communication style, have read their communication style on the
Participant Handout 3-2: Communication Style Definitions, and brainstorm what qualities are an asset and
what qualities they might have to work on to help them communicate more effectively in the workplace. Have the groups share out definitions and brainstorm
3. Communication Role Plays – 20 minutes
Break into groups and hand out a role play to each group (Participant Handout 3-2 Communication Role
Plays) and inform them that they will act out the scene and the audience will identify the communication styles portrayed; how the situation was handled; and how it should be handled differently.
Have participants act out scene, allow feedback after each one, and make sure to add to the conversation.
Discuss communication styles using Facilitators Resource 3-2: Communication Style Discussion Questions
to help guide the conversation Congratulate everyone on a job well done.
4. Closing – 10 minutes
Process check
Have participants put materials from the day in their folders and collect folders

DRAFT
Bridging the Opportunity Gap | Career Readiness Curriculum Guide Page 28
Have participants fill out time sheets and sign out
It is important to understand how your communication style is interpreted by others to avoid miscommunication
and misunderstandings.
Directions: Place a check mark next each statement that best describes you. Add up the total check marks in
each category. The one with the highest number of checks is your communication style.
Aggressive Communication __ You choose and make decisions for others.
__ You are brutally honest.
__ You are direct and forceful.
__ You are self-enhancing and derogatory.
__ You’ll participate in a win-lose situation only if you’ll win.
__ You demand your own way.
__ You feel righteous, superior, controlling – later possibly feeling guilt.
__ Others feel humiliated, defensive, resentful and hurt around you.
__ Others view you in the exchange as angry, vengeful, distrustful and fearful.
__ The outcome is usually that your goal is achieved at the expense of others. Your rights are upheld but
others are violated.
__ Your underlying belief system is that you have to put others down to protect yourself.
Total:
Passive Communication __ You allow others to choose and make decisions for you.
__ You are emotionally dishonest.
__ You are indirect and self-denying.
__ You are inhibited.
__ If you get your own way, it is by chance.
__ You feel anxious, ignored, helpless, manipulated, angry at yourself and/or others.
__ Others feel guilty or superior and frustrated with you.
__ Others view you in the exchange as a pushover and that you don’t know what you want or how you stand
on an issue.
__ The outcome is that others achieve their goals at your expense. Your rights are violated.
__ Your underlying belief is that you should never make someone uncomfortable or displeased except
yourself.
Total:
PARTICIPANT HANDOUT 3-2: COMMUNICATION STYLE ASSESSMENT

DRAFT
Bridging the Opportunity Gap | Career Readiness Curriculum Guide Page 29
Passive-Aggressive Communication
__ You manipulate others to choose your way.
__ You appear honest but underlying comments confuse.
__ You tend towards indirectness with the air of being direct.
__ You are self-enhancing but not straight forward about it.
__ In win-lose situations you will make the opponent look bad or manipulate it so you win.
__ If you don’t get your way you’ll make snide comments or pout and be the victim.
__ You feel confused, unclear on how to feel, you’re angry but not sure why. Later you possibly feel guilty.
__ Others feel confused, frustrated, not sure who you are or what you stand for or what to expect next.
__ Others view you in the exchange as someone they need to protect themselves from and fear being
manipulated and controlled.
__ The outcome is that the goal is avoided or ignored as it cause such confusion or the outcome is the same
as with an aggressive or passive style.
__ Your underlying belief is that you need to fight to be heard and respected. If that means you need to
manipulate, be passive or aggressive, so be it.
Total:
Assertive Communication
__ You choose and make decisions for you.
__ You are sensitive and caring with your honesty.
__ You are direct.
__ You are self-respecting, self-expressive and straight forward.
__ You convert win-lose situations to win-win ones.
__ You are willing to compromise and negotiate.
__ You feel confident, self-respecting, goal-oriented, valued. Later you may feel a sense of accomplishment.
__ Others feel valued and respected.
__ Others view you with respect, trust and understand where you stand.
__ The outcome is determined by above-board negotiation. Your rights and others are respected.
__ Your underlying belief is that you have a responsibility to protect your own rights. You respect others but
not necessarily their behavior.
Total:
The goal is to communicate with assertion and avoid an aggressive, passive-aggressive or passive style of
communication in the workplace.

DRAFT
Bridging the Opportunity Gap | Career Readiness Curriculum Guide Page 30
Assertive
Thoughts: Assertive behavior is accompanied by thoughts of self-confidence and a belief that all individuals have rights. Individuals who behave assertively believe that their desires
should not be denied or pursued at the expense of others.
Emotions: Individuals behaving assertively are even-tempered. Any anger or frustration they feel is recognized and directed with control at the behavior or situation that produced it, not at
other people.
Nonverbal-Behavior: Assertive nonverbal behavior consists of an upright, comfortable posture; direct eye
contact; and appropriate tone of voice.
Verbal-Behavior: Assertive verbal behavior is clear, direct, and concise. Individuals speak in the first person
and express themselves in an assertive manner. Their speech directly expresses their
views while leaving an opening for alternative points of view.
Passive
Thoughts: Individuals who behave passively believe that they should not speak their minds, either because they do not have confidence in themselves or they do not want to disturb the
relationship. They do not wish to disagree, and they believe that they are inadequate. Passive individuals have concluded that others have rights but they do not.
Emotions: Passive behavior entails hiding one’s feelings from others. Feelings of victimization and
depression are common. Resentment and anger held inside may eventually build to a breaking point, at which time the passive person may become aggressive.
Nonverbal-Behavior: The nonverbal passive style consists of slumped posture, downcast eyes, nervous gestures, and similar behaviors.
Verbal-Behavior: The passive style of behavior is expressed with many qualifiers such as, “I am probably
wrong, but … ” or “If you wouldn’t mind … ” A weak voice or stilted speech may be used.
Passive verbal behavior puts down the speaker by belittling his or her opinion.
Passive Aggressive
Thoughts: Passive aggressive behavior is accompanied by hostile thoughts that may turn into
expressed anger. They may agree but then not follow through on something.
Emotions: Passive aggressive behavior can be accompanied by hostility, anger, and tension. They
may smile on the outside but it does not match how they are feeling on the inside.
PARTICIPANT HANDOUT 3-2: COMMUNICATION STYLE DEFINITIONS

DRAFT
Bridging the Opportunity Gap | Career Readiness Curriculum Guide Page 31
Nonverbal-Behavior: Rigid posture and glaring eye contact are characteristic of passive aggressive behavior. The nonverbal behavior is controlled and icy as opposed to the more physical, openly
aggressive behavior such as, crossed arms, angry looks, sighs, and tight facial
expressions.
Verbal-Behavior: Passive aggressive behavior includes insults and threats, but they are aimed indirectly at
others. Full and direct expression of anger is suppressed, but indirect anger is evident.
Gossip and even sabotage are likely.
Aggressive
Thoughts: People who behave aggressively believe that they have rights, but others do not. They
think that they should always be in control and that they are never wrong. They worry about themselves, but are not afraid of hurting others.
Emotions: The feelings accompanying openly aggressive behavior are those of anger, hostility, and
resentment. Individuals who behave aggressively feel that the world is against them. They are under stress and feel frustrated.
Nonverbal-Behavior: Aggressive behavior is usually accompanied by a fighting stance. Individuals glare at others, maintain rigid and tense posture, and point and shake their fists.
Verbal-Behavior: Individuals behaving aggressively speak in a loud and haughty tone of voice. They use
insults and derogatory comments. Verbal abuse is common.

DRAFT
Bridging the Opportunity Gap | Career Readiness Curriculum Guide Page 32
Role Play 1: Scenario: Jade has her first job mowing lawns. She works for her best friend’s brother who
owns a landscaping company. She’s had the job for about three weeks and really feels like she’s
getting into the groove. In fact, it’s the perfect job for her: she loves being outside and
appreciates the fact that she can work on her own and even listen to her MP3 player! Jade arrives early at Mr. Z.’s house (her first customer of the day) and gets ready to begin mowing
Mr. Z.: You’re finally here!
Jade: Hi, Mr. Z. Yes, I’m here to mow your lawn.
Mr. Z.: Well, you didn’t do a very good job last week.
Jade: I wasn’t the person who mowed your lawn, but I’d like hear why you were unhappy with the job.
Mr. Z.: It was just a mess!
Jade: Can you please be more specific? What exactly didn’t you like? In what way was it a mess?
Mr. Z: Well, it looked just awful.
Jade: Mr. Z, I really want to make sure that whatever upset you last time doesn’t happen again. If you will tell
me exactly what you want done differently in the future, it will really help me to be sure your lawn is
mowed just the way you like it.
Mr. Z.: Well, the cut grass was left on the lawn, and the edges weren’t straight.
Jade: Okay, let me be sure I understand. Besides mowing, you want us to be sure to rake up, remove the cut
grass, and be more careful to straighten the edging.
Mr. Z.: Yes, that is exactly what I expect!
Jade: Thanks, Mr. Z. I’ll be sure to do those things today, and I will let the boss know that’s what you you’d like done from now on.
Mr. Z.: Thank you very much.
PARTICIPANT HANDOUT 3-2: COMMUNICATION ROLE PLAYS

DRAFT
Bridging the Opportunity Gap | Career Readiness Curriculum Guide Page 33
Role Play #2: Scenario: Will works in a dental office and winds up rushing to get to work every day after
school. His job tasks include filing, making photocopies, stuffing envelopes, and answering the telephone. Ms. T, the office manager, has asked to speak with Will about his time sheet.
Ms. T.: Hello, Will. I would like to talk with you.
Will: Okay
Ms. T.: Will, I’ve been watching your time sheet this week and I’m quite concerned.
Will: Why, what did I do?
Ms. T.: You’re not getting here on time.
Will: I have school and I get here as soon as I can. I’m not that late.
Ms. T.: Well, look at your time today. You were supposed to be here at 3:15 this afternoon and it’s now
3:30 and you just walked in. We need to be able to depend on you to be here at the time you’re
scheduled to work.
Will: What do you want me to do? I get here as soon as I can.
Ms. T.: Will, if you can’t get here when you are scheduled we will have to take corrective action.
Will: I’m sorry, Ms. T., do you think we could change my schedule to start at 3:30. I could stay later.
Ms. T.: Well, I suppose we can try that. Are you absolutely sure that you can make it here every day by
3:30?
Will: Yes, Ms. T.
Ms. T.: Okay, Will, we will try this out for you.
PARTICIPANT HANDOUT 3-2: COMMUNICATION ROLE PLAYS

DRAFT
Bridging the Opportunity Gap | Career Readiness Curriculum Guide Page 34
Role Play #3: Scenario: Trudy and Martin are getting ready for a meeting to talk about an event they are
helping to plan. Two other people are in the meeting room waiting for Trudy and Martin.
Trudy: (irritated) Where is Martin? He should be here on time!
Martin: (flustered) Sorry I’m late I thought we were in meeting room 3.
Trudy: Oh perhaps I forgot to tell you about the room change. Now can everyone take out the agenda?
Martin: I don’t have one.
Trudy: No! I have one here for you.
Martin: Why wasn’t I emailed the agenda?
Trudy: I just thought I’d bring it for you.
Martin: But I see you have me speaking about the performances for the event as item two, I needed to prepare
for that.
Trudy: Surely you know the performances scheduled enough to speak about it without notes.
Martin: I don’t like to be put on the spot.
Trudy: Well, shall we have Josh speak about it then, I am sure he is prepared.
Martin: No I’ll do it.
Trudy: See that wasn’t so hard was it? I would like Josh to speak to how much time each performer has though
because he is able to communicate things so succinctly.
Martin: But….
Trudy: What?
Martin: Oh, it doesn’t matter.
PARTICIPANT HANDOUT 3-2: COMMUNICATION ROLE PLAYS

DRAFT
Bridging the Opportunity Gap | Career Readiness Curriculum Guide Page 35
Role Play #4: Scenario: Two employees will role play a situation to determine whose job it is to restock the
condiments at the coffee bar. The manager has to intervene.
Jarrod: It wasn’t my job! It was Steffy’s job! The policy around here is that the new employee restocks cream and
sugar station. She’s the newest employee. It’s her job!
Steffy: I don’t get to work until 10:00. By the time I get here, the station should already be stocked. Otherwise,
customers won’t have the stuff they need for their coffee.
Jarrod: You’re just trying to get out of doing your job.
Steffy: No! You get here at 7:00. You should already have it done by the time I get here.
Jarrod: You’re the newest employee.
Steffy: What’s your problem?
Jarrod: What’s your problem?
Steffy: I do my job.
Jarrod: But you’re the newest employee. It’s your job to restock.
Steffy: But you get here earlier. I am only trying to think about our customers.
Jarrod: Are you just trying to get out of your job? You’re impossible.
Steffy: No, you are!
Manager: Okay, okay! What’s the problem? Steffy, continue restocking the condiment station. Jarrod, go ring up
the customers.
Manager: Steffy, Jarrod is right. The new person stocks the cream and sugar station.
Steffy: So you mean Jarrod shouldn’t have to do this anymore?
Jarrod: Told you!
Manager: Jarrod! On the other hand, that rule was made when everyone came to work at the same time.
However, since Steffy doesn’t come into work until later in the day, the customers have a right to have a fully
stocked station.
Jarrod: So Steffy doesn’t have to do this job either?
Steffy: No, I get it! Whoever comes in earliest should restock the station from the night before.
Jarrod: Okay, so I don’t have to restock the station all day? Just replenish from the night before. Steffy should
then do it when she comes in – and then throughout her shift?
PARTICIPANT HANDOUT 3-2: COMMUNICATION ROLE PLAYS

DRAFT
Bridging the Opportunity Gap | Career Readiness Curriculum Guide Page 36
Manager: Exactly! Also, I would like you two to start treating each other with a little respect. It’s good to have a
sense of humor. What happened to yours? Every customer and employee that comes in here deserves to be treated
with courtesy. Okay? And, by the way, the customer is always right and always comes first.

DRAFT
Bridging the Opportunity Gap | Career Readiness Curriculum Guide Page 37
1. What style(s) of communication did you observe during the role play?
2. What are some advantages of the different styles?
3. How might someone be perceived based on their communication style?
4. Which style would you say you tend to use?
FACILITATORS RESOURCE 3-2: COMMUNICATION STYLE DISCUSSION QUESTIONS

DRAFT
Bridging the Opportunity Gap | Career Readiness Curriculum Guide Page 38
Topic 3: Workplace Etiquette
Workshop 3: Workplace Skills
Outcomes Learning Objectives
Obtain or strengthen knowledge of skills that
will help them in seeking employment
Increase their understanding of the range of
skills sought by employers
Develop a list of their personal skills they have
or need to learn for their career interest
Explore how they can apply their
understanding of their skills and interests
Be able to write how they use their skills and
how they are an asset to an employer
Understand the importance of knowing how to
discuss the skills they bring to the workplace
Materials:
Group Agreements
Participant Handout 3-3: Skills Today’s Employers Expect
Lined Paper for writing prompt
Activities and Facilitation Steps
1. Welcome and Introductions – 10 minutes
Have everyone come in and take a snack
Review meeting agreements and agenda
2. Workplace Skills – 15 minutes
Introduce the topic of skills in the workplace. Let participants know that everyone has skills they
bring to a job. Discuss skills in the following three categories:
o Individual Skills: being on time and organized and other skills
o Job skills: Skills that are learned on the job or through training
o Transferable skills: Skills that carry over to other jobs.
Hand out Participant Handout 3-3: Skills Today’s Employers Expect, explain the instructions and
have participants rate themselves on each of the skills listed.
When participants are done have a discussion about what they found out.
3. Writing Prompt “Why Should an Employer Hire You” – 25 minutes
Now that they have identified their skills, hand out the lined paper and put the writing prompt on
flip chart paper or a white board.
Explain to the participants they should write about the skills they have and how they use them to
explain to an employer why they should hire them. When they are done with the writing prompt, have participants pair up and switch papers to get
feedback from each other.
Have participants type up their writing sample to include in their portfolios, if they do not finish
begin with this next session.
o Introduce youth to BOG Student Career Portfolio items o Explain that today you will work one item (the writing sample)
o The rest of the portfolio will be completed during future workshops
4. Closing – 10 minutes
Process check
Have participants put materials from the day in their folders and collect folders
Have participants fill out time sheets and sign out

DRAFT
Bridging the Opportunity Gap | Career Readiness Curriculum Guide Page 39
This list of skills was compiled by the Colorado Department of Education. Four hundred companies were surveyed as
to the specific skills they wanted their employees to have.
Directions: Put an X if you have the skill, put an L if you are learning the skill, and put a W if you are weak in that
skill.
Reading and Comprehension Skills
Read for details and specific information
Interpret pictorial information such as
graphs, charts, diagrams, and maps
Use source materials and do research
Follow intent of written instructions
Interpret ideas and concept
Read accurately within a given time
Mathematical Skills Handle basic calculations — add, subtract,
multiply, divide Estimate quantities needed on the job Calculate costs Use values from charts, diagrams, manuals,
and tables Construct diagrams, charts, records Research and use statistics Use formulas — at least Algebra I Use 10 key calculator to complete above tasks Computer Skills Become aware of computer functions Input data into computers Access data from computers Perform simple programming Perform word processing
Manual/Perceptual Skills
Construct, assemble materials
Use job-specific hand tools
Develop visual presentations
Use keyboard skills
Operate job-specific power equipment Writing Skills
Write legibly
Complete forms accurately
Write sentences in STANDARD ENGLISH
Organize, select, relate ideas
Produce reports and summaries
Identify and correct errors in writing-edit Communication Skills
Give clear, oral instructions/directions
Explain activities and ideas clearly
Report accurately on what others have
said
Stay on the Workshop in job-related conversations
Present information effectively
Speak clearly
Use appropriate vocabulary/grammar
Follow intent of oral instructions
Participant Handout 3-3 Skills Today’s Employers Expect

DRAFT
Bridging the Opportunity Gap | Career Readiness Curriculum Guide Page 40
Interpersonal Skills Function cooperatively with co-workers Function cooperatively with a team
member Adhere to company policies and
regulations Cooperate with clients/customers Exhibit openness and flexibility Seek clarification of instructions Exercise patience and tolerance Accept const ruct ive supervision Exhibit leadership Understand supervisory authority
and worker responsibility
Problem Solving/Critical Reasoning Skills
Determine work activities — what needs
to be done and when
Job Retention and Career Development Skills Participate in training Pursue education outside the job Become aware of company operations Learn about employee
benefits and responsibilities Suggest and/or make workplace improvements Accept additional responsibilities Maintain consistent effort Make efficient use of new technology Work with a positive attitude
towards job and co-workers
Adapt to different job assignments
Maintain acceptable appearance
Keep work area clean and organized
Exhibit interest in future career
development
Use appropriate procedures
Obtain resources
Conduct work in appropriate
sequence
Recognize the effects of
changing the quantity and
quality of materials
Collect and organize information
Analyze and synthesize
information
Identify alternative
approaches — different
ways of doing the job
Review progress periodically
Evaluate for accuracy and
completeness
Correct deficiencies and
problems
Summarize and draw reasonable
conclusions
Deliver completed work on time
Devise new ideas and better work methods
Indicate interest in future career
development
Be punctual
Avoid missing work Think about it:

DRAFT
Bridging the Opportunity Gap | Career Readiness Curriculum Guide Page 41
Circle five of your strong skills.
Circle five skills you’ll improve through practice.
Look at the ten skills you circled. Even strong
skills can be improved.
Where and how can you strengthen all ten of
these skills? Adapted f r o m Merging Two Worlds, 20

DRAFT
Bridging the Opportunity Gap | Career Readiness Curriculum Guide Page 42
Topic 4: Job Search
Length of topic: 2 hour, 2 workshops
Workshop 1: Conducting a Job Search
Outcomes Learning Objectives
Obtain or strengthen knowledge and skills that
will help them to search for a job, including
understanding and deciphering job postings
Explore a variety of resources available for job
seekers
Complete an email inquiry to add to their
portfolio
Explore several different ways to inquire about
job openings
Materials:
Group Agreements Participant Handout 4-1: Top Ten Places to Look for A Job
Participant Handout 4-1: Abbreviations Used in Help Wanted Ads
Local newspapers with current job postings Local internet options (also, try Craigslist)
Participant Handout 4-1: How to Make an E-mail Employment Inquiry Participant Handout 4-1: Sample E-Mail Employment Inquiry
Participant Handout 4-1: Mock E-Mail Employment Inquiry Template
Activities and Facilitation Steps
1. Welcome and Introductions – 10 minutes
Have everyone come in and take a snack
Review meeting agreements and agenda
Quick check in
2. Job Search – 20 minutes
Introduce the workshop of job searching. Remind participants to look over the skills they identified last
week as they look through the various job openings so they can find a good match.
Ask participants about places they might go to look for a job. Ask for a volunteer to write the list on a flip
chart or white board.
Hand out Participant Handout 4-1: Top Ten Places to Look for A Job and have them compare with their
list. Let them know they will be able to look at current job openings through the newspaper you have available
or they can use the internet to perform their search. Guide them through the various resources in your
area they can look on line if they are not aware.
Hand out Participant Handout 4-1: Abbreviations Used in Help Wanted Ads for them to review as they do
their search. When they are done with the Job Search have them pair up and share how their skills are a match for the
job openings they found.
3. Email Inquiry – 20 minutes
Inform participants that in many cases, an email inquiry into a job opening is appropriate. Talk about the
importance of setting up a professional email address that starts with their first initial and last name and
they can use Gmail or Yahoo to set something up. (If you have time and want to help them set up an email address you can do this too)

DRAFT
Bridging the Opportunity Gap | Career Readiness Curriculum Guide Page 43
Hand out Participant Handout 4-1: How to Make an E-mail Employment Inquiry. Read it using Jigsaw
Reading Strategy. o Refer to Facilitator Resource 1-1: More Engaging Reading Strategy- Jigsaw Reading Guidelines
Pass out the Participant Handout 4-1: Sample E-Mail Employment Inquiry and Participant Handout 4-1:
Mock E-Mail Employment Inquiry Template and have them write their own. They can use the information
from the job postings. If there is time have them type the inquiry to include in their portfolio. Otherwise, have them type it at
the beginning of next session.
4. Closing – 10 minutes
Process check
Have participants put materials from the day in their folders and collect folders
Have participants fill out time sheets and sign out

DRAFT
Bridging the Opportunity Gap | Career Readiness Curriculum Guide Page 44
1. Personal contacts
Tell everyone you know you’re job hunting. Tell them what work you can do, ask that they ask their friends and employer if they know of job openings. Include neighbors, family, friends, former employers,
teachers, and coaches. Don’t forget the receptionist at your mother’s doctor’s office or your friend’s daughter’s teacher. Tell everyone. 2. Bulletin Boards
Bulletin Boards at schools, supermarkets and community centers. Most towns have Adult Education/GED
preparation centers, community centers such as the YMCA, or technical schools such as ITT. Also, check
for bulletin boards at the library, day-care centers, neighborhood businesses, churches and shelters.
Special associations, labor unions, employers also post job openings. 3. Employment agencies
Private agencies: charge a fee; Nonprofit agencies: church affiliated (Salvation Army) or
community (Goodwill)
State agencies: they’re free. There’s a huge amount of help at state agencies, everything from job
listings to help writing your resume. There’s access to computers and the internet. It’s all free. Job
coaches wi l l often even take your job application and match your qualifications with jobs available
statewide. State career centers offices also have job leads. Additionally, job counselors at state offices
can recommend Federal offices or programs that are available to you. Check: there is usually a couple
of locations right on the bus route. CONTACT: http://www.ajb.dni.us. This website is run by the
(Federal) Department of Labor which posts approximately 1 million job openings around the country.
Also, www.dol.gov for a Job Search Guide. 4. Newspaper classified ads
Sunday is usually the best day, but these openings go fast, so look every day and call immediately to
find out what you have to do to apply. Don’t limit yourself to local papers; some papers may have ads
for jobs that also apply to your local area. Papers are available free, at the library or employment
agencies, for example. 5. Temp agencies
Temporary employment agencies are hired by employers to find workers. The service is free to you.
Temporary jobs sometimes lead to permanent jobs. 6. Local news
Read the newspaper’s business section. Save ads or articles that interest you. Look for companies that
are expanding or moving into your area. Watch for job fair ads. 7. Volunteer
You may gain firsthand knowledge, meet potential employers and help others at the same time.
Anthony has a good job as a landscaper. He loves animals and volunteers every Saturday morning at
the ASPCA animal shelter. The veterinarian who works there is starting his own practice and has asked
Anthony to be one of his full-time assistants. Anthony is flattered and seriously considering accepting
the job offer. 8. Job fairs/Employers Many employers join together at a conference center or auditorium. You can find out information
about their companies, fill out a job application and sometimes have a mini job interview. 9. Community Colleges/Career Planning Centers
The Community College placement office is uniquely positioned to help an individual member of the
community (that’s you) — use his talents to benefit him and others.
Participant Handout 4-1: Top Ten Places to Look for a Job

DRAFT
Bridging the Opportunity Gap | Career Readiness Curriculum Guide Page 45
10. Job Hot Line/Job websites
Each hot line and website has its own features. Some specialize in particular occupations, for example,
so start your search using a keyword. Posting your resume on a website can be risky business, so call
the Better Business Bureau or Consumer Protection Agency to check for complaints against a site before
you post.
P.S. Ask other people. Look for people who work at a job you think you’d like. Ask them how they got
started. Adapted f r o m Merging Two Worlds, 2003

DRAFT
Bridging the Opportunity Gap | Career Readiness Curriculum Guide Page 46
a/c
air conditioning
lic.
license
Am morning mach. machine
appt. appointment maint. maintenance
asst. assistant manuf. manufacturing
avail. available mech. mechanic,
mechanical
ben. benefits M-F Monday through Friday
bus. business mo. month
cert. certified, certificate msg. message
co. company nec. necessary
const. construction ofc. office
dept. department pd. paid
elec. electric pm afternoon or evening
EOE Equal Opportunity Employer pos. position
etc. and so on pref. preferred
eve. evening P/T part-time
exp. experience ref. references
exp’d. experienced req. required
F/T full-time sal. salary
gd. good sec. secretary
grad. graduate temp. temporary
hosp. hospital typ. typing
hr. hour w/ with
immed. immediate wk. week
incl. including WP word processing
info. information yr. year
Participant Handout 4-1: Abbreviations Used in Help Wanted Ads

DRAFT
Bridging the Opportunity Gap | Career Readiness Curriculum Guide Page 47
YOUR FIRST CONTACT TO AN EMPLOYER:
• For a first contact, e-mail employers only when an employer specifically invites or instructs
you to do so — with instructions on the employer’s web site, a job ad, a verbal
conversation, other reliable advice, etc.
• Don’t send an e-mail randomly to someone saying “I’m not sure if you’re the correct person, but I
figured you could forward this...” Don’t figure. If you write to the wrong person, s/he has no
reason to respond or forward. Do your research, and say WHY you’re writing to the person (“you
were listed as the contact for the XYZ job fair”). Otherwise, you may be safer sending a resume
and cover letter via hard copy.
HOW TO SEND IT/E-MAIL BUSINESS ETIQUETTE:
• Your e-mail alias, your subject line, and your content all have to be clear and appear appropriate to your recipient.
Failure to do this can get your e-mail ignored and/or deleted as junk or spam.
• “Hotdogdude@hotmail” or “[email protected]” is not appropriate. That is an
excellent way never to be taken seriously or viewed as professional — or end up in a
junk/spam f i l te r .
YOUR SUBJECT LINE:
• Clear and meaningful to the recipient, as in: “Application for manufacturing position 84G11” or
“Follow-up to our meeting of February 21 at Career Point job fair.”
• A blank subject line is unacceptable. You’ve given the recipient a good reason to ignore or delete
your e-mail.
• Be judicious about graphics and fonts. Large graphics (and moving graphics are worse) clog up memory
in people’s in-boxes.
Don’t do it. Same applies to backgrounds. Better safe than sorry. Fonts should be professional looking
and easy to read.
• After your name, put all current contact information — phone numbers, address, and e-mail again.
FINAL CAUTIONS & CONSIDERATIONS:
• Be aware that e-mail is a form of written communication and it creates a written record.
• Don’t let the speed and ease of sending e-mail blind you to the fact that you will be
judged on what you say and how you say it.
• Email, like other written correspondence, doesn’t reveal your tone of voice. Choose your words carefully.
• A well-written e-mail can quickly impress an employer (and the reverse is true).
Participant Handout 4-1: How To Make an Email Employment Inquiry

DRAFT
Bridging the Opportunity Gap | Career Readiness Curriculum Guide Page 48
• Don’t forget to use the spell-check feature.
STEPS TO WRITING AN E-MAIL EMPLOYMENT INQUIRY:
• Try to get as specific as possible, if you don’t have a specific person’s e-mail, try the general
department for which you would be applying, and write “To Whom It May Concern”.
• Introduce yourself and mention where your information came from regarding the job (My name
is ,
and we spoke at XYZ Job Fair on June 11 regarding the opening at your business.)
• Name a few skills, interests, and/or experiences you have had that would make you a good match
for the job
(I have previously worked for ABC Catering, and I love to help prepare and serve food for
special events).
• Explain you would like to know more about the position, and what the next steps in applying would be.
• Always thank the person you are writing to for their time, and sign off: Sincerely, .
• Don’t forget to put your specific contact information below you name.
• Don’t forget to spell check. Adapted f r o m Virginia Tech. Career Services — www.career.vt.edu

DRAFT
Bridging the Opportunity Gap | Career Readiness Curriculum Guide Page 49
From: [email protected]
Date: September 6, 2013
Subject: Business Administrator Position
Dear Mr. Smith:
I am interested in applying for the position of business administrator for your company, ABC Company. I saw
the position advertised on your website, www.abccompany.org. I know that I am an ideal candidate for the
position. Please see my attached cover letter and résumé. I look forward to setting up a time where we can
further discuss my qualifications.
Sincerely,
Mr. Alan Banks
1234 Main Street
Westborough, MA 01581
508-697-0000
Participant Handout 4-1: Mock E-mail Employment Inquiry

DRAFT
Bridging the Opportunity Gap | Career Readiness Curriculum Guide Page 50
To:
From:
Date:
Subject:
Participant Handout 4-1: Mock E-mail Employment Inquiry

DRAFT
Bridging the Opportunity Gap | Career Readiness Curriculum Guide Page 51
Topic 4: Job Search
Workshop 2: Job Applications
Outcomes Learning Objectives
Complete a Sample job application Understand the importance of a well written
job application for obtaining employment
Have the knowledge and skills to successfully
complete job applications
Materials:
Group Agreements Facilitators Resource 4-2: Criminal Record
Participant Handout 4-2: A Job Seeker’s Guide to Successfully Completing Job Applications
Participant Handout 4-2: Application Guidelines Participant Handout 4-2: Blank Application
Activities and Facilitation Steps
1. Welcome and Introductions – 10 minutes
Have everyone come in and take a snack
Review meeting agreements and agenda
Quick check in
2. What you need to know before filling out job applications – 15 minutes
Introduce the workshop.
o Have a discussion about what participants already know about properly filling out job
applications.
o Refer to the Facilitators Resource 4-2: How Youth Should Respond to Inquiries about Criminal
Record to add to the discussion and offer guidance.
o Emphasize that a job application is more than a piece of paper but a chance to make a good
impression on a potential employer.
o Have a discussion that includes how to dress when going to pick up an application as it could
be an opportunity to meet the manager.
o Express the importance of going into the place of business alone, even if they plan to take the
application with them and fill it out later, as it presents a good first impression.
Hand out Participant Handout 4-2: A Job Seeker’s Guide to Successfully Completing Job Applications.
Have participants partner up or form small groups to read handout using Jigsaw Reading strategy.
o Refer to Facilitator Resource 1-1: More Engaging Reading Strategy- Jigsaw Reading Guidelines Hand out and review the Participant Handout 4-2: Application Guidelines
3. Job Applications – 25 minutes
Hand out Participant Handout 4-2: Blank Application (or one from a local employer or potential
subsidized employer) and have them fill it out. o If participants do not have pertinent information needed to fill out sections, inform them they
can use the computers to look up addresses and phone numbers. o Walk around and assist individuals who need it and ask questions about where they can get
information. Once everyone is done, pair them up and have them exchange the applications for peer review.
DRAFT
Bridging the Opportunity Gap | Career Readiness Curriculum Guide Page 52
Allow time for any corrections.
Have participants type the application to include in their portfolios. If they still need to obtain
information allow them to fill in missing information next session
4. Closing – 10 minutes
Process check
Have participants put materials from the day in their folders and collect folders
Have participants fill out time sheets and sign out

DRAFT
Bridging the Opportunity Gap | Career Readiness Curriculum Guide Page 53
HOW SHOULD YOUTH RESPOND TO INQUIRIES ABOUT CRIMINAL RECORD
The Ban the Box law makes it illegal for employers to ask about convictions on job applications in
Massachusetts. If a youth sees this on an application they should report it to the MASS Law Reform at
617-357-0700
Even though an employer is not allowed to inquire about convictions on an application they may later
on in the hiring process during an interview. In most cases youth committed to DYS have been
adjudicated delinquent and can answer “no” regarding any convictions.
The employer must notify and ask permission to obtain a CORI (Criminal Offender Record
Information). Juvenile records do not appear on a CORI if they are adjudicated delinquent.
IMPORTANT NOTE: There are few employers that can access juvenile records such as:
o The Department of Early Education and Childcare
o Summer Camp and Day Camp operators
A Juvenile court case will only appear on a CORI if it was transferred to superior court and tried as an
adult case.
The laws are unclear how youthful offender charges appear or who may have access to the
information. It is best to advise youth to speak with their lawyer or case worker.
Information taken from: http://www.youthadvocacydepartment.org/about/aboutyad.html and
http://www.masslegalhelp.org/cori/applying-for-jobs
FACILITATORS RESOURCE 4-2: CRIMINAL RECORD

DRAFT
Bridging the Opportunity Gap | Career Readiness Curriculum Guide Page 54
New to job-hunting? This article is designed to provide you with the critical information you need to
successfully complete a job application. Should filling out an application be a stressful event? No. If
you have a resume, you should have just about all the information you need. If you don’t have a
resume, now might be the time to create one. When are job applications used by employers? For many part-time, entry-level blue collar jobs,
employers use applications to screen potential employees; they use the information from the applications
to determine who they are going to call for a job interview. For other types of jobs, applications are
s i m p l y the paperwork the Human Resources department requires of all job applicants; employers
often ask you to complete an application after they have invited you for an interview. Why do employers use job applications? Many employers use applications as a way of standardizing
the information they obtain from all job-seekers, including some things that you would not normally put
on your resume. Your goal is to complete the application as completely and honestly as you can — all
the time remembering that the application is a key marketing tool for you in the job-hunting process.
Remember that some employers will use your application as a basis for deciding whether to call you for
an interview. So, armed with this knowledge, here are the ins and outs of completing job applications.
Arrive prepared with the information you need. Be sure to bring your resume, social
security card, driver’s license or state ID. You probably will also need addresses and phone
numbers of previous employers, as well as starting and ending salaries for each previous job.
I t ’ s always better if have too much information than not enough.
Read and follow instructions carefully. Always take a few minutes to review the entire
application. Some applications ask for information differently — and all have specific spaces
in which you are expected to answer questions. Think of the application as your first test in
following instructions.
Complete the application as neatly as possible. Remember how important handwriting was
in school? Neatness and legibility count; the application is a reflection of you. Consider typing it if you have access to a typewriter. If completing it by hand, be sure to use only a blue or black pen
— and consider us i ng an erasable pen or taking some “white-out” to fix minor mistakes. Don’t fold, bend, or otherwise mar the application.
Tailor your answers to the job you are seeking. Just as with your resume and cover
letter, you want to focus your education and experience to the job at hand. Give details of
skills and accomplishments, and avoid framing your experiences in terms of mere duties and
responsibilities. Show why you are more qualified than other applicants for the position.
Include experience from all sources, including previous jobs, school, clubs and organizations,
and volunteer work. If you’re having trouble identifying some of your skills, read our article
about transferable skills.
Don’t leave any blanks. One of the reasons employers have you complete an application
is because they want the same information from all job applicants. However, if there are
questions that do not apply to you, simply respond with “not applicable,” or “n/a.” Do not
write “see resume” when completing the application (but you can certainly attach your
resume to the application).
PARTICIPANT HANDOUT 4-2 A Job Seeker’s Guide to Successfully Completing Job Applications

DRAFT
Bridging the Opportunity Gap | Career Readiness Curriculum Guide Page 55
Don’t provide any negative information . As with any job search correspondence,
never offer negative information. Your goal with the application is to get an interview.
Providing negative information (such as being fired from a job) just gives the employer a
reason not to interview you.
Always answer questions truthfully. The fastest way for an application to hit the trash
can is to have a lie on it, but that doesn’t mean you need to give complete answers either.
For example, many applications ask your reason for leaving your last job. If you were fired or
downsized, you should try to be as positive as possible and leave longer explanations for
the interview; some experts recommend writing “job ended” as the reason you left your last
job.
Do not put specific salary requirements. It is way too early in the job-seeking process to
allow yourself to be identified by a specific salary request. You don’t want to give employers too much information too soon. In addition, employers often use this question as a screening device —
and you don’t want to be eliminated from consideration based on your answer. It’s best to say “open” or “negotiable.” can find lots more information about all aspects of salary and benefits by
going to our Salary Negotiation Tutorial.
Provide references. Employers want to see that there are people who will provide
objective information about you to them. Pick your references carefully — and make
sure you ask if they are willing to be a reference for you before you list them. Where
do you get references? From past employers, to teachers, to family friends. Most
young job-seekers have a mix of professional and character references, while more
experienced job- seekers focus on professional references who can speak of your
skills and accomplishments.
Keep your application consistent with your resume. Make sure all
dates, names, titles, etc., on your application coincide with the information on
your resume. Don’t worry if the application is based on chronological
employment while you have a functional resume. Don’t know the difference
between the two types of resumes? You might want to visit one of our Resume
Tutorials.
Proofread your application before submitting it. Once you’ve completed the
application, sit back and take a moment to thoroughly proofread the document,
checking for all errors — especially typos and misspellings.
One final word. Be prepared for all kinds of job applications, from simple one-page applications
to multi-page applications; and some will be clean and crisp copies while others will appear to be
photocopied a few too many times. Regardless, take your time and do the best you can, always keeping in the back of your mind the goal of the application — getting you an interview.
If you have not heard from the employer within a week of submitting your application, you should
follow-up with the employer. There’s truth to the “squeaky wheel” cliché. Ask for an interview — and
ask to have your application kept on file. by Randall S. Hansen, Ph.D.

DRAFT
Bridging the Opportunity Gap | Career Readiness Curriculum Guide Page 56
Do not write on the application until you read the entire instructions, including fine print.
Always fill out the application in black or blue pen.
Do not use abbreviations, except for Mr/s and state: MA
Do not leave anything blank. If there is a question that does not apply to you, draw a neat line in the
space
Spelling and grammar is important; however, job duties can be verb phrases.
Date: If the space is blank write out the date (example, October 15, 2013). If the space has / / then use
numbers 01/01/1990.
HINT: Write the date last. Make sure that it is the date that you are handing in the application.
Social Security Number:
Paper Application: Given-At-Hire. Online: Need to enter it
Address: Make sure to include all information: 288 Lyman Street, Westborough, MA 01288
Email address: Make sure that any address that you provide is professional.
Position Applied for: Specify a Position. Do not write ANY.
Days/Hours: Label Monday 3:30 pm – 9:00 pm
Employment: May include BOG job and volunteer work but should NOT include community service.
If no previous experience, do not leave blank. Write N/A on the first row ONLY.
References: Make sure your references know that you are using their contact information, and get their
approval BEFORE you turn in the application.
Signature: Cursive.
PARTICIPANT HANDOUT 4-2: Application Guidelines

DRAFT
Bridging the Opportunity Gap | Career Readiness Curriculum Guide Page 57
PLEASE PRINT ALL INFORMATION
REQUESTED EXCEPT SIGNATURE
APPLICATION FOR EMPLOYMENT
PLEASE COMPLETE PAGES 1-5. DATE _________________________
Name _________________________________________________________________________ Last First Middle Maiden
Present address _________________________________________________________________ Number Street City State Zip
How long ______________ Social Security No. _______ – _____ –
_________
Telephone ( )
If under 18, please list age _________________
Position applied for (1) ______________
and salary desired (2) ______________ (Be specific)
Days/hours available to work No Pref ____ Thur _____
Mon ______ Fri _______ Tue _______ Sat ______
Wed ______ Sun ______
How many hours can you work weekly? ____________ Can you work nights? ______________
Employment desired FULL-TIME ONLY PART-TIME ONLY FULL- OR PART-TIME
When available for work? _______
______________________________________________________________________________
TYPE OF SCHOOL NAME OF
SCHOOL
LOCATION
(Complete
mailing address)
NUMBER OF YEARS
COMPLETED
MAJOR &
DEGREE & DATE
RECEIVED
High School
College
Bus. or Trade School
Professional
School
DO YOU HAVE A DRIVER’S LICENSE? Yes No
What is your means of transportation to work? _________________________________________
Driver’s license number ____________________ State of issue _______ Operator Commercial (CDL)
Chauffeur
Expiration date ______________
PARTICIPANT HANDOUT 4-2: BLANK APPLICATION
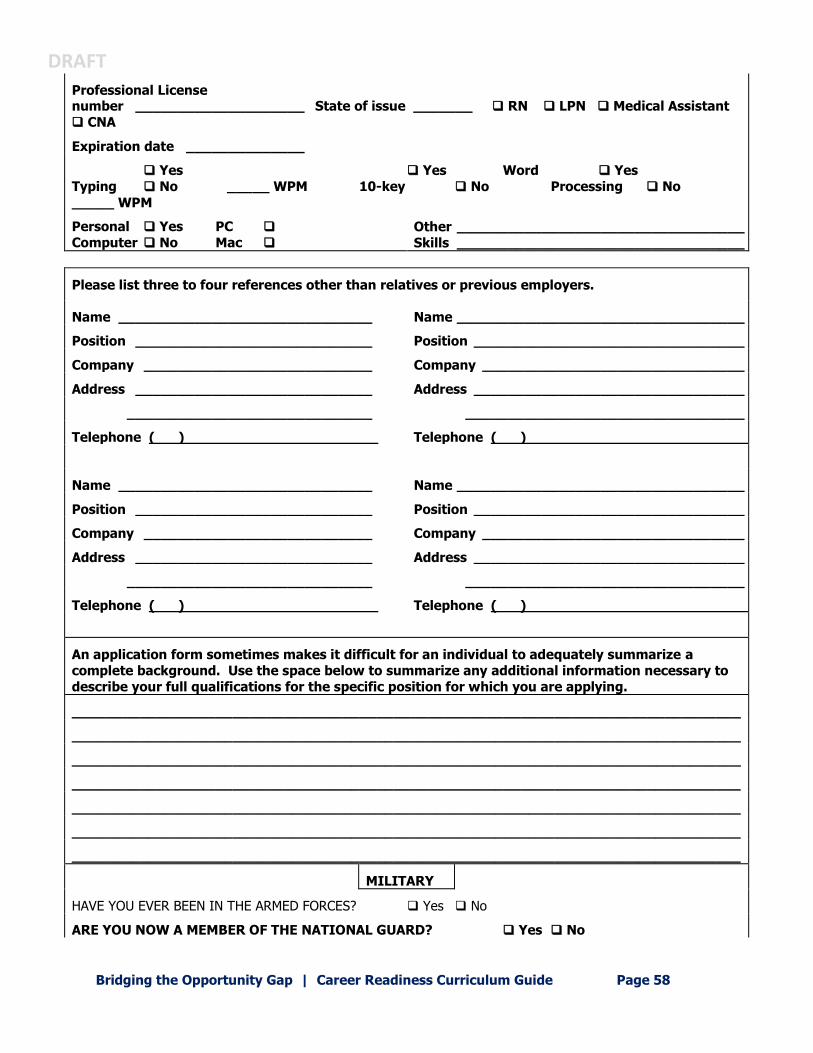
DRAFT
Bridging the Opportunity Gap | Career Readiness Curriculum Guide Page 58
Professional License number ____________________ State of issue _______ RN LPN Medical Assistant
CNA
Expiration date ______________
Yes Yes Word Yes
Typing No _____ WPM 10-key No Processing No
_____ WPM
Personal Yes PC
Computer No Mac Other __________________________________
Skills __________________________________
Please list three to four references other than relatives or previous employers.
Name ______________________________ Name __________________________________
Position ____________________________ Position ________________________________
Company ___________________________ Company _______________________________
Address ____________________________ Address ________________________________
_____________________________ _________________________________
Telephone ( ) Telephone ( )
An application form sometimes makes it difficult for an individual to adequately summarize a
complete background. Use the space below to summarize any additional information necessary to
describe your full qualifications for the specific position for which you are applying.
_______________________________________________________________________________
_______________________________________________________________________________
_______________________________________________________________________________
_______________________________________________________________________________
_______________________________________________________________________________
_______________________________________________________________________________
_______________________________________________________________________________
MILITARY
HAVE YOU EVER BEEN IN THE ARMED FORCES? Yes No
ARE YOU NOW A MEMBER OF THE NATIONAL GUARD? Yes No

DRAFT
Bridging the Opportunity Gap | Career Readiness Curriculum Guide Page 59
Specialty _________________________ Date Entered ___________ Discharge Date ________
Work
Experience
Please list your work experience for the past five years beginning with your most recent
job held.
If you were self-employed, give firm name. Attach additional sheets if necessary.
Name of employer
Address
Name of last
supervisor
Employment
dates
Pay or salary
City, State, Zip Code Phone number
From
To
Start
Final
Your last job title
Reason for leaving (be specific)
List the jobs you held, duties performed, skills used or learned, advancements or promotions while you worked at this company.
Name of employer Address
Name of last supervisor
Employment dates
Pay or salary
City, State, Zip Code
Phone number From
To
Start
Final
Your Last Job Title
Reason for leaving (be specific)
List the jobs you held, duties performed, skills used or learned, advancements or promotions while
you worked at this company.
Work experience
Please list your work experience for the past five years beginning with your most recent job held.
If you were self-employed, give firm name. Attach additional sheets if necessary.
Name of employer Address
Name of last supervisor
Employment dates
Pay or salary
City, State, Zip Code
Phone number From
To
Start
Final

DRAFT
Bridging the Opportunity Gap | Career Readiness Curriculum Guide Page 60
Your last job title
Reason for leaving (be specific)
List the jobs you held, duties performed, skills used or learned, advancements or promotions while you worked at this company.
Name of employer Address
Name of last supervisor
Employment dates
Pay or salary
City, State, Zip Code
Phone number From
To
Start
Final
Your last job title
Reason for leaving (be specific)
List the jobs you held, duties performed, skills used or learned, advancements or promotions while
you worked at this company.
May we contact your present employer? Yes No
Did you complete this application yourself Yes No
If not, who did? _________________________________________________________________

DRAFT
Bridging the Opportunity Gap | Career Readiness Curriculum Guide Page 61
Topic 5: Job Interviews
Length of Topic: 3 hour, 3 workshops
Workshop 1: Preparing for Job Interviews
Outcomes Learning Objectives
Have the knowledge and skills to prepare for
and successfully complete a job interview
Understand the structure and expectations of a
professional job interview
Materials:
Group Agreements Participant Handout 5-1: To Do or Not To Do: That is the Question
Videos: Tips for Teens: http://video.about.com/jobsearch/Job-Interview-Tips-for-Teens.htm
Interview attire: http://video.about.com/jobsearch/Teen-Job-Interview-Attire.htm
Interview taboos: http://www.youtube.com/watch?v=YtBD-SnwwiU
Participant Handout 5-1: Employer Profile
Activities and Facilitation Steps
1. Welcome and Introductions – 10 minutes
Have everyone come in and have a snack
Review meeting agreements and agenda
Quick check in
2. To Do or Not To Do: That is the Question – 10 minutes
Introduce the workshop of job interviews. Have a discussion about what participants think they
should do in order to prepare for an interview.
Hand out Participant Handout 5-1: To Do or Not To Do: That is the Question. Have participants
complete the hand out.
Have a discussion about their answers and clarify any misunderstandings and elaborate on what
they should or shouldn’t do in interviews based on your professional and personal experience.
3. Videos – 10 minutes
Show the videos that review tips for teenagers as well as appropriate interview clothes.
o You can remind them that you covered this earlier during the workshop how to dress for
work. Have a small discussion.
Show the video on interview taboos. This video covers mistakes people make during interviews.
o They may think it’s silly but inform them that people really do things like they saw in the video. Talk about the importance of the interview and the impression they can have on
a potential employer.
4. Employer Profile – 10 minutes
Have participants look up information on an employer that they might be interested in working
for. It could also be the employer where they will be doing their subsidized work experience. o Talk about the importance of researching a company prior to an interview.
o Inform participants that they will use this information for mock interviews they will participate in.
Hand out Participant Handout 5-1: Employer Profile and have participants fill out.

DRAFT
Bridging the Opportunity Gap | Career Readiness Curriculum Guide Page 62
5. Pair Share – 10 minutes
Get the participants into pairs
Have them choose a speaker and a listener
Have the speaker inform the listener what they learned about the company
Have the listener repeat back in their own words what they heard by having them start with “I
heard you say…”
Have them switch
6. Closing – 10 minutes
Process check
Have participants put materials from the day in their folders and collect folders
Have participants fill out time sheets and sign out

DRAFT
Bridging the Opportunity Gap | Career Readiness Curriculum Guide Page 63
NAME ___________________________________ DATE _________________
Decide if the following statement is something that you should do, or something that you should not do. If you
say no, suggest the correct way to respond to the scenario.
You are going on an interview at a small business. Your interview is at 9:00 A.M.
YES NO Enter the building talking on your cell phone.
YES NO Walk into the business office at 8:55 A.M.
YES NO Greet the Administrative Assistant with a friendly smile, a handshake, and tell him or her
your name with your reason for being there.
YES NO Sit in the chair in the lobby and stare at the ceiling until you are called.
YES NO Prior to that day, research the company online and read current news.
YES NO Go to the interview in jeans and a button down shirt.
YES NO Wear cologne to the interview.
YES NO Bring multiple copies of your résumé and cover letter with you.
YES NO Talk to the employer as if you were talking to a friend.
YES NO Sit up straight.
YES NO Stare at the person talking to you the entire time.
YES NO When asked why you want to work there, tell them the truth: MONEY!
YES NO Make sure to keep all your answers short, like 10 words or less.
YES NO Be prepared to tell the employer a weakness that you have that is related to the job.
YES NO It’s what you say, not how you say it.
YES NO A good way to practice is to stand in front of a mirror and watch yourself.
Participant Handout 5-1: To Do or Not To Do: That is the Question

DRAFT
Bridging the Opportunity Gap | Career Readiness Curriculum Guide Page 64
Name:
Company Name:
Location of Company:
Please describe the company/business or organization that you are interested in (i.e. what they
do, services/supports/goods that they provide).
Please describe the mission and values of the business, or other important things that make this
an attractive employer.
Participant Handout 5-1: Employer Profile

DRAFT
Bridging the Opportunity Gap | Career Readiness Curriculum Guide Page 65
Topic 5: Job Interviews
Workshop 2: Job Interview Tips and Questions
Outcomes Learning Objectives
Have the knowledge and skills to prepare for
and successfully complete a job interview
Understand the structure and expectations of a
professional job interview
Materials:
Group Agreements Participant Handout 5-2: Interview Tips
Participant Handout 5-2: Questions that May Be Asked by the Interviewers
Participant Handout 5-2: Answers to Questions that May be Asked by the Interviewers
Activities and Facilitation Steps
1. Welcome and Introductions – 10 minutes
Have everyone come in and take a snack
Review meeting agreements and agenda
Quick check in
2. Interview Tips – 10 minutes
Taking from where you left off ask them what they think they need to do to prepare for interviews.
Tell them to think about the videos they watched last week.
Hand out Participant Handout 5-2: Interview Tips read using the Jigsaw Reading strategy.
o Refer to Facilitator Resource 1-1: More Engaging Reading Strategy- Jigsaw Reading Guidelines
3. Review Interview Questions – 15 minutes
Move into a discussion about what type of interview questions participants think they should be
prepared for.
Hand out Participant Handout 5-2: Questions that May be Asked by the Interviewers. Give
participants time to read them over and think about their responses. When they are done have a discussion about what type of answers they gave.
Hand out Participant Handout 5-2: Answers to Questions that May be Asked by the Interviewers and
review. Ask them to think about how they might change their responses.
4. Interview Practice – 20 minutes
Have the participants get into pairs ask one person to be the interviewer and the other the interviewee
using the handout. Have them practice including the introduction and handshake.
Walk around and give feedback as they are doing this and remind them to switch roles
5. Closing – 5 minutes
Process check
Have participants put materials from the day in their folders and collect folders.
Time Sheets and Sign out.
Remind participants to dress as if they were going to an interview for next meeting session.
size of the group you may use the next two meetings to complete the mock interviews.

DRAFT
Bridging the Opportunity Gap | Career Readiness Curriculum Guide Page 66
BEFORE AN INTERVIEW
Be Prepared:
Know exactly where you need to go for the interview and what date you’re available to start.
If possible, drive by the location of your interview at least a day before your interview.
Bring copies of your résumé and your cover letter. Review what is written on both so that you can
refer to what you wrote and so that you can answer questions.
Know your information. Bring a sample application with you, or note cards that you can use to make
sure that you have complete contact names, addresses, and phone numbers for previous employers
as well as other professional and personal references.
Understand: exactly what the company does that you are applying to. Go online and research the
company, both on the company website and any recent newspaper articles.
Ask around. Find out if anyone you know works for or has previously worked for that company.
• Practice: be ready to answer questions about yourself and your qualifications.
Review the top teen interview questions and your appropriate answers.
• Show up early, ideally 10 to 15 minutes before your scheduled interview time.
Leave your cell phone behind. If you need to carry it, make sure that you turn it off
(Not on vibrate) before you enter the building to avoid distractions.
Be Aware:
Another cell phone warning: When you are job hunting you should make sure that your outgoing
message and your ring back tone are appropriate. Your outgoing message should be spoken
professionally and should simply include your name and a request for the person's name and contact
information along with a short message.
Some employers require written tests or drug screenings.
Examples of pre-employment testing include: spelling and grammar tests, basic math tests, customer service
evaluations, self-evaluations.
Fresh breath matters - don’t smoke in your car on the way to the interview
Also, be careful what you eat and drink before your interview. Coffee and onions may leave a distinct smell on
your breath. Drinks mixed with berries may stain your teeth, lips, and gums.
Some people have serious allergic reactions to some smells.
Therefore, avoid wearing cologne or perfume to your job interview.
Participant Handout 5-2: Interview Tips

DRAFT
Bridging the Opportunity Gap | Career Readiness Curriculum Guide Page 67
DURING AN INTERVIEW
Be Professional:
• Treat everyone equally from CEO to Manager to Receptionist.
Many companies ask the receptionist for their opinion on candidates before they make a final decision.
• Greet everyone with a professional handshake and good eye contact.
Your handshake says a lot about you. Make sure that you give each person that you interact with at the
interview site a firm handshake. Smile, introduce yourself and give your reason for being there.
Speak Clearly:
• Elaborate - Don’t use one word answers.
Employers want you to be able to defend your answers and cite examples
so that they can gain a better understanding of your work style.
• Don’t blabber - Keep answers short and to the point.
• Don’t use slang or vulgarity.
Maintain Good Body Language:
• Listen attentively – Make eye contact with the person that is speaking to you.
When answering questions, make sure that the interview team can hear you and understand what you
are saying. Slowly look around the table and give each individual eye contact.
• Don’t slouch in chair or let eyes wander.
AFTER AN INTERVIEW
Follow Up:
• Thank everyone and shake hands with interviewer.
• Ask interviewer when decision will be made and when you should follow up.
• Send a thank you note right away to interviewer – Short and to the point.
Adapted/condensed from: “45 Proven Job Interview Techniques for Landing Your Next job.” Education-portal.com. 11 April 2011. Web.

DRAFT
Bridging the Opportunity Gap | Career Readiness Curriculum Guide Page 68
There are standard questions that you should anticipate prior to any interview. Practice your responses ahead
of time. Listen carefully to the questions asked and impress the interviewer with your careful and complete
responses.
Before Going to the Interview: Remember the importance of your physical appearance:
First impressions are important and your physical appearance can speak volumes. Make sure you are clean,
neat, and professionally dressed for the interview. Take care to make your appearance flattering and
professionally appealing. Give a solid handshake and introduce yourself.
Tell me about yourself.
Why are you interested in joining our company?
What courses did you particularly enjoy?
What qualifications do you have for this job?
Where do you see yourself in five years?
Participant Handout 5-2: Questions that May Be Asked by the Interviewers
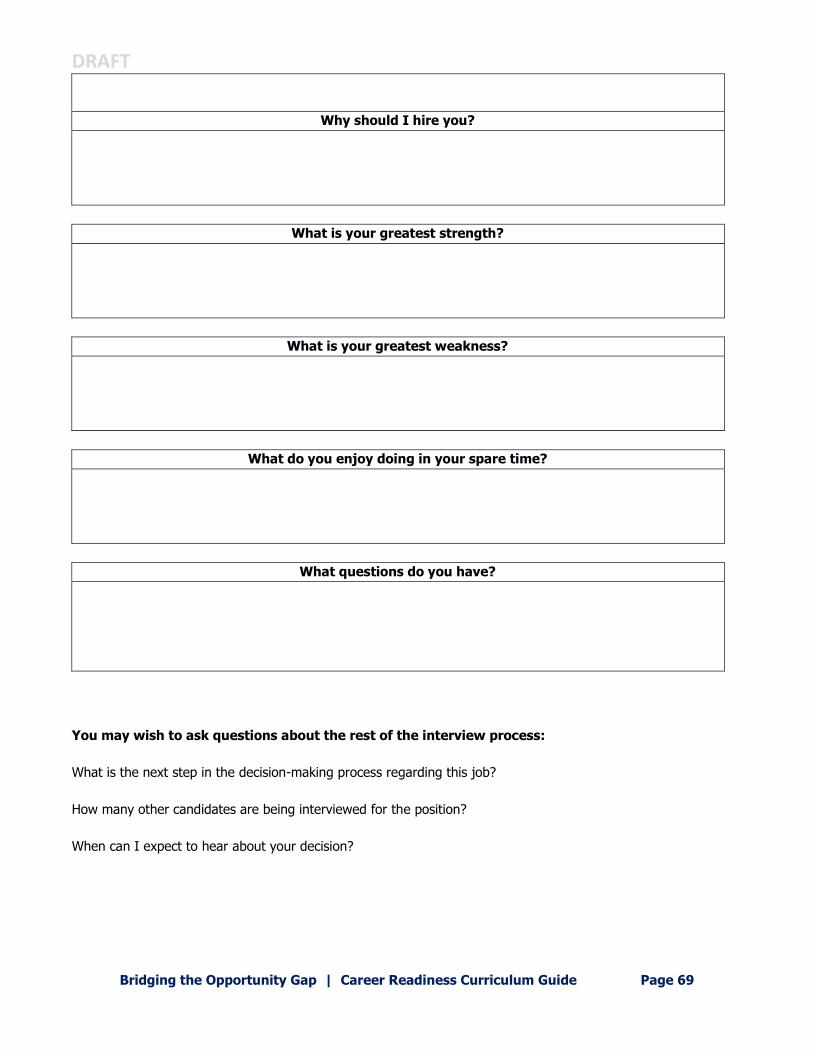
DRAFT
Bridging the Opportunity Gap | Career Readiness Curriculum Guide Page 69
Why should I hire you?
What is your greatest strength?
What is your greatest weakness?
What do you enjoy doing in your spare time?
What questions do you have?
You may wish to ask questions about the rest of the interview process:
What is the next step in the decision-making process regarding this job?
How many other candidates are being interviewed for the position?
When can I expect to hear about your decision?

DRAFT
Bridging the Opportunity Gap | Career Readiness Curriculum Guide Page 70
Adapted from Merging Two Worlds, 2003
Tell me about yourself.
The interviewer isn’t looking for a recounting of your whole life’s history. He/she is generally seeking to
discover what you consider your greatest asset for this particular job. You should talk about work and
educational experiences which prove you can do the job, and recount your strongest skills.
Why are you interested in joining our company?
Demonstrate that you have researched the company. Show how your career goals relate to the company.
Suggest how you might work toward the resolution of problems. Indicate your enthusiasm about this
particular company and its products.
What courses did you particularly enjoy?
Choose a course that you can speak about with passion. Make sure to tie the course to the job by identifying
transferrable skills that you learned in the class.
What qualifications do you have for this job?
Make sure to read the job advertisement thoroughly before you go to the job interview. Also, reread the cover
letter that you submitted for the job.
Where do you see yourself in five years?
Ignore your personal life completely. The company wants you to state that you are looking to stay in the
career field, and that the job that they have to offer can help you build to your larger dream. If you cannot
answer this question, honestly tell the employer that five years from now is a long time but you can let them
know where you see yourself in one year.
Why should I hire you?
The employer wants you to state that you have the skills and the abilities to complete the job, and that you
are willing to learn more skills and gain additional abilities that the company can teach you.
What is your greatest strength?
This is your time to explain the skills and experience that you have in relationship to the job position. Provide
solid examples that back up what you are saying and prove your worth.
What is your greatest weakness?
State something that may be helpful to the profession, but not something that is vital to you performing the
job. Also, make sure to add how you are working to improve your weakness, and/or what you are doing to
work around that weakness.
What do you enjoy doing in your spare time?
This can be a trick question. Do not provide too much information, but answer with a hobby that you have a
passion for and that shows that you are a well-rounded individual.
What questions do you have?
Participant Handout 5-2: Answers to Questions that May Be Asked by the Interviewers

DRAFT
Bridging the Opportunity Gap | Career Readiness Curriculum Guide Page 71
Be prepared - this question always arises. Always ask at least one question. Bring along a written list of
questions and ask the ones which were not covered in the interview. Ask to whom would you report and about
the other people with whom you would be working, or about an initiative you saw online.
Topic 5: Job Interviews
Workshop 3: Mock Job Interview
Outcomes Learning Objectives
Have the knowledge and skills to prepare for
and successfully complete a job interview
Understand the structure and expectations of a
professional job interview
Materials:
Group Agreements Facilitator’s Resource 5-3: Interview Rubric
Activities and Facilitation Steps
1. Welcome and Introductions – 10 minutes
Have everyone come in and take a snack
Review meeting agreements and agenda
If you brought in people to interview the young people make sure to do introductions and have people
check in
2. Mock Interviews – 40 minutes
Depending on the size of your group you can complete mock interviews using one of two options:
o Option 1: have the youth conduct their interviews in front of the group so that everyone can
provide feedback.
o Option 2: break into groups and have the facilitator(s) walk around to give feedback.
You may need to choose 5 questions for the interview to save on time, depending on the size of your
group and how many interviewers you have present.
The interviewer should use the Facilitator’s Resource 5-3: Interview Rubric in order to give the young
people feedback on their interview skills.
3. Closing – 5 minutes
Process check
Have participants put materials from the day in their folders and collect folders
Have participants fill out time sheets and sign out

Bridging the Opportunity Gap | Career Readiness Curriculum Guide Page 95
Applicant Name: ____________________________________
Interviewer Name: __________________________________
Criteria:
Personal appearance 1 2 3 4
Grooming, dress, and neatness
Opened interview 1 2 3 4
Greeted the interviewer with a smile and handshake
Body language 1 2 3 4
Good posture, engaged, attentive
Thoughtfulness/Reflectiveness 1 2 3 4
Can describe impact (positive or negative) of prior experiences
Verbal communication/Responses to questions 1 2 3 4
Expressed clear, complete, concise and logical ideas
Self-confidence/Comfort level 1 2 3 4
Maintained positive attitude; established rapport with interviewer; can articulate effectively personal strengths and
areas of improvement; demonstrated interest and enthusiasm throughout interview
Listening Skills 1 2 3 4
Meaningful response to each question
Closed Interview 1 2 3 4
Thanked interviewer, and provided handshake
Overall Strengths:
Improvement Areas:
Key:
1 – needs improvement
2 – meets basic req.
3 – proficient
4 – above and beyond
FACILITATORS RESOURCE 5-3: INTERVIEW RUBRIC

Bridging the Opportunity Gap | Career Readiness Curriculum Guide Page 96
Bridging the Opportunity Gap Career Readiness Training Curriculum Guide
Part II: Work Readiness Sessions

Bridging the Opportunity Gap | Career Readiness Curriculum Guide Page 97
Topic 5: Job Interviews
Workshop 4: Thank You Letters
Outcomes Learning Objectives
Create a sample thank you letter for their
Youth Career Portfolio Be familiar with using a business letter format
for professional communications
Understand the meaning and contents of a
post interview thank you letter
Materials:
Group Agreements
Lined Paper Participant Handout 5-4: Finishing Touch – Writing a “Thank You” letter
Participant Handout 5-4: Important “Thank You” Tips
Participant Handout 5-4: Sample Thank you Letter
Activities and Facilitation Steps
1. Welcome– 5 minutes Have everyone come in and have a snack
Review group agreements and agenda
2. Large Group Discussion – 10 minutes Begin with a small discussion to get a sense of what participants already know about thank you letters.
Inform participants that “business letters” are the way to professionally communicate with potential
employers.
Distribute Participant Handout 5-4: Finishing Touch – Writing a “Thank You” letter, and have them read
and compare to what they already knew.
3. Writing Draft Thank You Letter – 25 minutes
Let participants know that they will draft a thank you letter based on their mock interviews the previous
week. Review and hand out Participant Handout 5-4: Important “Thank You” Tips and hand out lined paper for
participants to hand write a draft.
Hand out Participant Handout 5-4: Sample Thank you Letter for a guide and give participants 15 minutes
to write. o When participants are done writing, have them get into pairs, and have them review and comment
on their partner’s letter. o Remind them to be constructive in their feedback.
4. Typing the Thank You Letter – 15 minutes Have participants type their thank you letters in Microsoft Word. You can provide a template, have them
choose a template, or follow the sample provided.
Have participants keep a copy for their portfolio and send a copy to the volunteers that helped out with
the mock interviews during the last workshop of orientation.
5. Closing – 5 minutes
Process check
Have participants put materials from the day in their folders and collect folders
Have participants fill out time sheets and sign out

Bridging the Opportunity Gap | Career Readiness Curriculum Guide Page 98
Taking the time to write a thank you note after every interview could set you apart — in a positive way —
from other people who have applied for the same position!
Thank You Letter...
Demonstrates to the employer that you are genuinely interested in the position for which
you’ve interviewed. The interviewer knows that your time is valuable and that it takes
time and effort to construct a well-written thank you letter.
Shows that you have good “follow-through.” In other words, it gives the interviewer the
impression that you are committed to “finishing what you start.”
Demonstrates that you’re willing to work. Although everyone should write a thank you
letter after they interview for a job, many people don’t. Writing a thank you letter to a
prospective employer shows that you’re willing to “go the extra mile.”
Allows you to “sell yourself” one last time before the interviewer makes a hiring
decision. In a thank you letter, you have an opportunity to tell the interviewer again
why you’re the person for the job.
Makes the interviewer feel special. Everyone likes to be thanked. While helping the
interviewer feeling good about himself or herself is not the point of the thank you letter,
making the interviewer feel special is likely to encourage h im or her to have positive
feelings about you.
Should I send a typed or hand-written letter? For the most part, this decision is up to you. The most important thing is that you thank the interviewer in writing, so choose one of the two. The “safest”
approach is to type a thank you letter, in the format of a business letter. This option is considered more “safe” because a potential employer might view a handwritten thank you note as too casual.
Some things to consider when deciding whether to send a handwritten or typed letter:
What type of job did you interview for? If the job is in a business setting (such as an accounting
clerk), it may be more appropriate to send the interviewer a typed thank you letter. If the job is
in a more casual setting (such as a store or in a non-traditional field), you might opt to
handwrite the thank you note.
Do you have neat handwriting? If you have terrible handwriting, no matter what job you’re
interviewing for, you should type your thank you letter.
What type of interview did you have? Did you feel like you “connected” to the interviewer? Did
the interview have a casual tone? If you felt very comfortable with the interviewer, a handwritten
thank you note might add a nice personal touch. If you felt some distance between the
interviewer and you, or if you thought that the interview was formal, a typed thank you letter is
probably a better choice.
Adapted from Brockton Community Re-entry Center, Brockton, MA
Participant Handout 5-4: Finishing Touch — Writing A “Thank You” Letter

Bridging the Opportunity Gap | Career Readiness Curriculum Guide Page 99
Regardless of which type of thank you letter you write, you should send the letter within
three days of the interview, but preferably the day of the interview. You never know when
the interviewer is going to make a hiring decision, so you should send the thank you letter
as soon as possible.
Make sure you spell the interviewer’s name correctly and, if you use the interviewer’s job
title in your letter, make sure his or her title is correct.
In the thank you letter, try to mention something you discussed during your interview. This
might be a specific aspect of the job that you think you would really enjoy or be good at
(and why) or job experience/training you’ve had that relates closely to the job.
The thank you letter is also an opportunity to discuss skills you may have that are related
to the job but that you did not have a chance to discuss during the interview.
Just like with the cover letter, the thank you letter should be short and to-the-point — no
longer than three paragraphs.
Carefully *proofread*every thank you letter. After you’ve carefully proofread the letter, have
someone you trust carefully proofread the letter. If the job requires someone who is detail-oriented and you have typos, spelling or grammatical errors in your thank you letter, the
interviewer may think you’re not the best candidate for the job.
If you do choose to send a handwritten thank you note, select a plain style note card for
your note — nothing too fancy or decorative.
See sample thank you letter on the next page
Participant Handout 5-4: Important “Thank You” Tips

Bridging the Opportunity Gap | Career Readiness Curriculum Guide Page 100
Adapted from Brockton Community Re-entry Center, Brockton, MA
Participant Handout 5-4: Sample Thank You Letter
Terri S. Jones
109 Brick Road
Boston, MA 02122
May 31, 2000
Delia Correale
Administrative Manager All-Star Graphics, Inc.
24 Westgate Drive, Suite 307
Boston, MA 02215
Dear Ms. Correale:
Thank you for taking time out of your schedule today to talk with
me about the Accounting Clerk position. I was impressed with the
company, and after our discussion about the job responsibilities, I
am excited about the prospect of working for All-Star Graphics.
During our interview, it became clear that you are seeking an
Accounting Clerk with strong computer skills and math abilities. I
feel that my Job Corps training has prepared me well for this
position. At Job Corps. I studied Excel and Microsoft Word for over
six months.
In addition, my experience as a cashier at Stop & Shop helped me
to develop and use my math and customer service skills.
I look forward to hearing from you soon. Please feel free to
contact me by phone at (617) 399-4387 or by e-mail at
[email protected] if I can provide any further information. Thank
you again for your time and consideration.
Sincerely,
(Your handwritten signature)
Don’t forget to sign the letter!
Terri S. Jones

Bridging the Opportunity Gap | Career Readiness Curriculum Guide Page 101
Topic 6: Job Success
Length of Topic: 4 hours, 4 workshops
Workshop 1: Motivation and Initiative
Outcomes Learning Objectives
Complete a handout on self-motivation as a
self-reflection exercise
Develop a list of things they could do at
different jobs to demonstrate initiative
Understand what it means to take initiative
Understand the importance of taking initiative at work
Understand how motivation is connected to
taking initiative
Materials:
Group Agreements
Five dice and small prize
Participant Handout 6-1: Self-Motivation Participant Handout 6-1: Exercise: Taking Initiative
Participant Handout 6-1: Taking Initiative at Work
Activities and Facilitation Steps
1. Welcome– 5 minutes
Have everyone come in and have a snack
Review group agreements and agenda
2. Roll the Dice – 10 minutes
Ask for a volunteer to come to the front of the room.
o Hold out the dice, but hand just one to the volunteer. Avoid encouraging them to take other
dice.
o Tell the volunteer to throw six ‘sixes’ in thirty seconds to win a small prize. ( I f you have colored
dice, let them know they need to get 12 ‘greens’ to win the prize.)
o Keep the other dice in your hand throughout the exercise.
o Let them know when they have twenty seconds left and count down the last ten seconds out
loud. (If there is time, you could ask for another volunteer and give them a chance to try.)
Discussion and points to consider
o Ask the group what they learned from the exercise. Keep these talking points in mind:
o The chance of getting the six ‘sixes’ increases with the number of throws.
o Did the person s t a r t throwing faster in the last ten seconds? (If more than one person tried,
did the second person roll faster throughout the activity? Why do you think this might be?)
o Too often in life we don’t ‘throw quickly’ until there is a crisis or a deadline. Why wait until the
night before a test to study?
o Why wait until June to try to get a summer job? Why wait until the day of a job interview to
try to find something to wear?
o The thrower could have asked for more dice. Explain that you would have given the volunteer more dice if s h e /he had asked. The more dice being thrown, the greater the chance of
getting the ‘sixes’. o How often do we make things more difficult because we don’t ask for help or additional
resources? What is the chance of getting what you want/need if you ask for it? What is the chance if you don’t ask?

Bridging the Opportunity Gap | Career Readiness Curriculum Guide Page 102
o Someone with average skills can easily outperform a more skillful employee i f he/she
targets their effort more effectively and uses their time more efficiently. Success is not
always about skills — determination, motivation, work ethic, initiative and attitude are key
components to success.
3. Self- Motivation – 15 minutes
Open with the following quote:
** “Employees who take initiative greatly enhance their chances for recognition, learning,
advancement, pay raises, and bonuses — and have a more meaningful and exciting time at
work.” ~ Bob Nelson (From http://www.inc.com/articles/1999/09/16417.html# retrieved
April 15, 2010)
o Ask participants what they think of the quote.
Ask participants what they think it means to take initiative.
o Read the definition of initiative: without prompting or direction from others: on one’s own (from www.thefreedictionary.com)
Review and hand out Participant Handout 6-1: Self-Motivation for participants to fill out individually.
Have a short discussion and share responses.
4. Taking the Initiative Exercise – 10 minutes Break participants in small groups of 4.
Hand out the Participant Handout 6-1: Exercise: Taking Initiative and assign one of the discussion
questions to the group.
o Have the groups read the scenario and discuss their assigned question o Have the smaller groups share out to larger group
5. Taking the Initiative at Work– 15 minutes
Keep participants in their small groups
Hand out Participant Handout 6-1: Taking Initiative at Work and assign the group three of the jobs listed
on the handout to work on.
Have groups share to larger group and add any additional ideas
o Remind participants that taking the initiative is important, but they must also remember that some ideas should be discussed with a supervisor before employees start working on them (as
discussed in the example with Margaret).
6. Closing – 5 minutes
Process check
Have participants put materials from the day in their folders and collect folders
Have participants fill out time sheets and sign out
**Adapted from http://www.businessballs.com/freeteambuildingactivities.htm#team-building-games-exercises-activities retrieved April 12 2010

Bridging the Opportunity Gap | Career Readiness Curriculum Guide Page 103
Taking the Initiative:
1. Why is self-motivation important?
2. What motivates you?
3. Who is responsible for motivating you in the workplace? Your supervisor? Your peers? Yourself? Why?
4. What happens if you don’t take responsibility for motivating yourself?
5. Can you think of any situation in which you would take on extra work, even if you were not getting
compensated for it? Why or why not?
Participant Handout 6-1: Self-Motivation

Bridging the Opportunity Gap | Career Readiness Curriculum Guide Page 104
Professional
Training Systems, Inc. Page 49-50East Baltimore Pipeline Job Readiness Training Curriculum
Scenario: Read the following scenario. Discuss it in your small group.
Margaret just got hired as a clerk in a medical laboratory. She is an extremely hard worker and is
eager to prove herself to her new employer. After only a few weeks on the job, she comes up with what she thinks is a better and more efficient way to process customer accounts. To impress
her boss, she comes in early one morning to implement her plan. Margaret’s boss arrives at work and is upset to find the office in a mess as she attempts to put her plan into action.
Discussion Questions:
1. Do you think that what Margaret did was wrong? Why or why not?
2. What could she have done differently?
3. How do you know your limitations at work?
4. How does this scenario demonstrate the importance of knowing the difference
between taking the initiative and knowing your limitations?
Participant Handout 6-1: Exercise: Taking Initiative

Bridging the Opportunity Gap | Career Readiness Curriculum Guide Page 105
Professional Training Systems, Inc. Page 51East Baltimore Pipeline Job Readiness Training Curriculum
1. Fast food restaurant
2. Summer camp
3. Office
4. Retail store
5. Ice cream parlor
6. Coffee shop
7. Book store
8. Grocery store
Participant Handout 6-1: Taking the Initiative at Work

Bridging the Opportunity Gap | Career Readiness Curriculum Guide Page 106
9. Auto-mechanic shop

Bridging the Opportunity Gap | Career Readiness Curriculum Guide Page 107
Topic 6: Job Success
Workshop 2: Time Management
Outcomes
Learning Objectives
Create a plan for getting to scheduled appointments, work, and/or school on time
Learn to plan, organize and prioritize to reach his/her goals
Understand that you can’t really manage time; you can only manage yourself and your
use of time
Understand how setting goals, planning,
organizing, and prioritizing can help you use
your time more efficiently
Understand different time management
personality types
Materials:
Group Agreements Flip Chart Paper
Markers
Participant Handout 6-2: Time Management Personality Types Participant Handout 6-2: Ten Tips for Time Management
Participant Handout 6-2: Be on Time Checklist
Activities and Facilitation Steps
1. Welcome– 5 minutes
Have everyone come in and have a snack
Review group agreements and agenda
2. Time Management Personality Types – 15 minutes
Hand out and read Participant Handout 6-2: Time Management Personality Types as a group.
Ask participants to identify the personality type that BEST describes them.
Have them group up by the identified personality types and discuss:
o The biggest challenge for time management for their type and;
o How they can address and overcome this challenge
Have them report back to larger group
3. Ten Tips for Time Management – 20 minutes
Break participants into small groups.
Hand each group a piece of flip chart paper and markers.
Have each group create a list of their top ten tips for time management and write them on the flip chart
paper. o When participants are done have them present their lists to the larger group.
Hand out Participant Handout 6-2: Ten Tips for Time Management and review and compare with their
lists.
o Discuss similarities o What tips seem the most useful? Which ones might be difficult to follow and why?
o Remind them of the importance of time management at work
4. Be on Time Checklist – 15 minutes Ask participants to think of something important they have to be on time for in the next two weeks.
o For example, an interview, school, career readiness training, doctors appointment

Bridging the Opportunity Gap | Career Readiness Curriculum Guide Page 108
Hand out Participant Handout 6-2: Be on Time Checklist and have them write the event they identified on
the line and fill out the sheet. When they are finished discuss the benefits of planning in advance to be on time.
5. Closing – 5 minutes
Process check
Have participants put materials from the day in their folders and collect folders
Have participants fill out time sheets and sign out

Bridging the Opportunity Gap | Career Readiness Curriculum Guide Page 109
Are You Sabotaging Your Time Management Efforts? By Susan Ward, About.com Guide
The key to time management is knowing ourselves, as we can’t actually “manage” time; all we
can manage is our own behavior.
For many of us, this is more than enough of a challenge. While we claim that effective time management is a top priority and that we just have to get more organized, our actions don’t match our stated desires. I’ve
invented these time management personality “types” to describe patterns of behavior that sabotage many people’s attempts at time management.
Which of the following time management “types” are you? While intended as fun, this time management
exercise may provide you with some clues for more effective time management.
The Fireman – For you, every event is a crisis. You’re so busy putting out fires that you have no time to deal with anything else— especially the boring, mundane things such as time management. Tasks
pile up around you while you rush from fire to fire all day.
Typically seen — Running to car.
The Over-Committer– Your problem is you can’t say ‘No’. All anyone has to do is ask, and you’ll
chair another committee, take on another project, or organize yet another community event. You’re
so busy you
don’t even have time to write down all the things you do!
Typically seen — Hiding in rest room.
The Aquarian– There is such a thing as being too “laid-back” — especially when it starts
interfering with your ability to finish tasks or bother to return phone calls. Getting to things when you
get to them isn’t time management; it’s simple task avoidance.
Typically seen — Hanging out with feet on desk.
The Chatty Kathy – Born to socialize, you have astounding oral communication skills and can’t
resist exercising them at every opportunity. Every interaction becomes a long drawn out conversation
— especially if there’s an unpleasant task dawning that you’d like to put off.
Typically seen — Talking on cell phone.
The Perfectionist – You have a compulsion to cross all the “t’s” and dot all the “I’s,”
preferably with elaborate whorls and curlicues. Exactitude is your watchword, and you feel that
no rushed job can be a good job. Finishing tasks to your satisfaction is such a problem; you
need more time zones, not just more time.
Typically seen — Hunched over latest project.
Hopefully none of these time management personality profiles is a photograph of you! But perhaps these
Participant Handout 6-2: Time Management Personality Types

Bridging the Opportunity Gap | Career Readiness Curriculum Guide Page 110
descriptions will provoke some thought about the different ways we manage or mismanage time, and some
clues about how we might change our behaviors to make our time management efforts more successful.

Bridging the Opportunity Gap | Career Readiness Curriculum Guide Page 111
From http://sbinfocanada.about.com/cs/timemanagement/a/timetypes.htm April 14, 2010
1. Make a to-do list, and then prioritize your list. Don’t prioritize your schedule, schedule your
priorities.
2. Dare to break the to-do list. Be flexible as things change. Adjust your list as
needed; the list is just a guide to help you use your time more efficiently.
3. Don’t wait until things become urgent. Take care of things when you have
time. Figure out a way to avoid living crisis to crisis.
4. Focus on your goals. Use your time to work towards your goals.
5. Identify where you waste time and figure out how you can spend that time more efficiently.
6. Know when to quit. If something is not working, don’t be afraid to make a new plan.
7. Don’t waste time holding on to or worrying about things you can’t
change. Use your time to change what you can.
8. Learn to be okay with the outcome if you delegate. Choose carefully who you delegate to, and check in to make sure progress is being made and the work is getting done, but understand
that not everyone will do things the way you would do it.
9. Learn to say ‘no’ to things that are not a priority.
10. Take time for you. Y o u can’t work efficiently if you are not taking care of yourself.
Adapted from http://www.alltipsandtricks.com/all-for-time-and-time-for-all-the-10-commandments-of-time-management/ April 14, 2010
Participant Handout 6-2: Ten Tips of Time Management

Bridging the Opportunity Gap | Career Readiness Curriculum Guide Page 112
Think of something that it is important for you to be on time for in the next two weeks. Write it on the line:
Things I need to do before leaving home: Eat Shower/bath Brush teeth/floss/use mouthwash Hair Make-up Iron Get dressed Assist other people (younger siblings, grandmother, dad, etc…) Chores (wash dishes, make bed, take out garbage, etc…) Get everything together that I need
This will all take approximately minutes
I know where to go.
Yes
No — How am I going to find out?
I am getting there by:
Car (Consider traffic and whether your car has gas.)
Bus/Subway (Get to the bus stop early, and take a bus that is scheduled to arrive to
your destination with extra time to spare.)
Taxi (Make sure the taxi will be there with enough time to get to your destination
early and that you have enough money to pay for the trip.)
Another person is driving, (Make sure the person driving you is responsible and will
get you where you need to be on time, if not early.)
Walking (Have you walked there before? How long did it take?)
Transportation will take approximately __minutes.
Participant Handout 6-2: Be On Time Checklist
Bridging the Opportunity Gap | Career Readiness Curriculum Guide Page 113
Total time it wil l take for me to get ready and travel there: __
Time I need to be there:
I wil l need to leave by:
Add an extra 10-15 minutes to your estimated time to allow for unexpected circumstances
(weather, accidents, something at home, bus running late, etc.)
Adapted from http://www.workshopsinc.com/manual/Ch3H1.html April 14, 2 0 1 0

Bridging the Opportunity Gap | Career Readiness Curriculum Guide Page 114
Topic 6: Job Success
Workshop 3: Positive Working Relationships
Outcomes
Learning Objectives
Complete a positive behavior exercise
Participate in a group exercise and a team
challenge to practice developing positive working relationships
Understand how to develop and maintain positive working relationships
Understand the importance of positive behavior in producing positive effects
Understand how to give and receive feedback
in a professional way
Materials:
Group Agreements Flip Chart Paper
Stickers Markers
Participant Handout 6-3: Developing and Maintaining Good Working Relationships
Participant Handout 6-3: Positive Behavior Exercise Participant Handout 6-3: Giving and Receiving Feedback Scenario
Participant handout 6-3: Feedback
Activities and Facilitation Steps
Facilitator Pre-Planning Steps
Have ready on Flip Chart Paper to post some questions for the groups to discuss during the Positive
Behavior Exercise:
o Discuss your responses to the different behaviors with your group. o How do these behaviors relate to developing and maintaining positive working relationships?
o How do these behaviors connect to customer service and building working relationships with customers?
o Why is this important?
o Are positive behaviors always recognized? Do they always produce positive effects? o Look back at the handout, and think about how you would feel or respond to:
someone who rarely smiles and is generally unhappy, only gives in order to get
something, never says thank you, blames others for everything, etc.
o Are negative behaviors more likely to produce negative effects? Why or Why not? o Over time, which behaviors will most likely produce positive effects?
Have ready on Flip Chart Paper the following definition of feedback:
The communication of information to an employee/co-worker/supervisor with the goal of
reinforcing positive behaviors while also enabling adjustments for future behaviors to be made as necessary to improve work performance. (Adapted from
http://www.businessdictionary.com/definition/feedback.html & http://dictionary.bnet.com/definition/Feedback.html)
1. Welcome– 5 minutes
Have everyone come in and have a snack
Review group agreements and agenda
2. Developing and Maintaining Good Working Relationships – 15 minutes
Explain to participants that even if they would rather work alone, being able to develop and maintain
positive working relationships is very important.
Bridging the Opportunity Gap | Career Readiness Curriculum Guide Page 115
Ask participants why this is so important at work. Discuss the importance of working well with others.
Ask participants to brainstorm ways to develop and maintain positive working relationships. o Capture what they say on flipchart.
o Once they have added all of their ideas to the list, give everyone five stickers and ask them to vote on the five ideas that they feel are the most important by putting a sticker next to it on the
flipchart. o Once everyone has voted, circle the top ten ideas (determined by stickers).
Hand out Participant Handout 6-3: Developing and Maintaining Good Working Relationships
o Check with the group to see if there are any important ideas missing from the handout or
from the list they created. o Have participants circle the things they currently do
3. Positive Behavior Exercise – 15 minutes
Discuss how we can perhaps understand better the effects of our own positive behavior (or that of a
group or entire corporation/business/organization) by considering how we personally respond to the
positive behavior of others.
Hand out Participant Handout 6-3: Positive Behavior Exercise and have participants complete.
o A f t e r a b o u t five minutes, divide participants into small groups to discuss their answers.
o Post the discussion questions you prepared on Flip Chart paper for them to consider as they
discuss in their group.
Explain to participants the idea: Millions of people believe strongly that goodness and positivity are more
likely to be rewarded in life than selfishness and negativity. And almost without exception, successful,
happy people seem to exhibit and aspire to positive behaviors. The exercise should confirm how
positively we each respond to positive behavior (and negatively to negative behavior)
4. Giving and Receiving Feedback – 20 minutes Ask participants what feedback at work is.
o Hang definition on prepared flip chart and review definition
Ask for four volunteers to act out a role play scenario and hand out Participant Handout 6-3: Giving and
Receiving Feedback Scenario o You will need 2 people to act it out.
o Split the group in half and have one group observe as person 3 in scenario and the other half
observe as person 4 in the scenario When they are finished allow time to review questions answered from the observers.
Hand out Participant handout 6-3: Feedback and discuss what tips were observed and how you might use
these tips.
5. Closing – 5 minutes
Process check
Have participants put materials from the day in their folders and collect folders
Have participants fill out time sheets and sign out

Bridging the Opportunity Gap | Career Readiness Curriculum Guide Page 116
To Form New Relationships:
• Introduce yourself, so you know the person’s name.
• Say hello and be friendly
• Get to know the person before you ask personal questions or tell personal things about yourself
• Respect people’s personal space
To Improve Relationships With Co-Workers or Team Members:
• Spend time talking during breaks and after work.
• Never hang around when you are off and that person is still working
• Be proactive in your communication
• Follow through on what you promise
• Make every effort to resolve conflicts quickly and completely
• When people share information in confidence, keep it confidential! Be loyal to your team or
work group
To Improve Your Relationship with Your Supervisor:
• Keep your Word
• Be Flexible
• Take Initiative
• Stay Focused on Your Work
• Communicate E f f e c t i v e l y and Regularly
• Take Responsibility for Mistakes
• Learn to Work Independently
• Demonstrate Appropriate Behaviors
• Show Respect
• Do your Best
• Maintain Professional Boundaries
• Be Positive
• Say Thanks for Recognition
Adapted F r o m Professional Training Systems, Inc. East Baltimore Pipeline Job Readiness Training Curriculum Page 134
Participant Handout 6-3: Developing and Maintaining Good Working Relationships

Bridging the Opportunity Gap | Career Readiness Curriculum Guide Page 117
Complete the chart by thinking about and writing how you feel about and respond to someone who behaves in the following ways:
1. Smiles a lot and is generally happy
2. Gives to others and wants nothing in
return
3. Thanks others
4. Helps others
5. Listens to others without judging
6. Takes the blame or responsibility for faults
7. Gives others credit for successes
8. Absorbs negative behavior from others with tolerance and understanding
http://www.businessballs.com/freeteambuildingactivities.htm#team-building-games-exercises-activities
Participant Handout 6-3: POSITIVE BEHAVIOR EXERCISE

Bridging the Opportunity Gap | Career Readiness Curriculum Guide Page 118
Person 1: An employee at a retail store rarely shows up for sales team meetings, where the weekly schedules and sales are
discussed. You need to tell him/her that the meetings are every Monday at 4:30, and since he/she is part of the
sales team, his/her presence at the meetings is crucial in order to keep everyone informed about what’s going on.
Tell Person 2 that his presence at the meetings is important and why. Emphasis this even after Person 2 gives you
an initial response.
Person 2:
You have not been coming to meetings because you know you are getting the work done and another team
member (a friend) updates you on the schedule and sales, so what’s the big deal? You show up for your shifts
and update customers on the sales and promote them. You are listening to the feedback, but you want to tell this
person that the sales team should have more faith in your abilities.
Person 3:
Observe Person 1 who is providing feedback.
What do you like about the way in which the feedback is given? (Body language, eye contact, gestures,
facial expressions, tone, etc.)
What do you dislike about the way in which the feedback is given?
What do you like/dislike about what is being said – ie. Words used?
How effective is the feedback?
How is it being received?
How might you give this feedback if you were Person 1?
Person 4:
Observe Person 2 who is receiving the feedback.
Does this person appear to be listening to what is being said?
Does s/he look happy about receiving feedback?
Do you notice any defensive mannerisms – body language, eye contact, gestures, facial expressions, tone,
etc.?
Is Person 2 responding appropriately?
How might you receive this feedback if you were Person 2?
Adapted from: http://www.sfu.ca/studentlife/leadership/pdfs/Leadership%20Summint%20Feedback%20workshop.pdf
Participant Handout 6-3: Giving and Receiving Feedback Scenario

Bridging the Opportunity Gap | Career Readiness Curriculum Guide Page 119
GIVING FEEDBACK
DO’s 1. Describe the person’s behavior that bothers you. “It bothers me when you finish my sentences for me.” 2. Talk to the person as soon as things come up. Don’t wait until things are likely to have been forgotten. 3. Use “I” statements. Own your feelings. “I feel bad when you finish my sentences for me.” 4. Check for clarity. “Do you understand what I mean when I say that?” 5. Give consequences i f behavior continues. “If you keep interrupting me, I most likely won’t want to
spend t ime talking with you in the future.”
6. Only bring up behaviors that the person can do something about. 7. Be ready to listen to the other person’s point of view.
DONT’S
1. Don’t accuse the person. “You always interrupt me.”
2. Don’t bring in third parties. “John also says that you interrupt a lot.”
3. Don’t take for granted that the person understands what you are saying.
4. Don’t give vague consequences. “That kind of behavior is going to get you in trouble.”
5. Don’t bring up behaviors that the person can’t help. “The way you breathe really bothers me.”
6. Don’t deny the other person’s feelings.
RECEIVING FEEDBACK Tips on receiving feedback...
1. Listen to the feedback without getting defensive. 2. Do not blindly accept what you are told as the ultimate truth. 3. Paraphrase the feedback to make sure that you understand correctly what is being said to you. 4. Remember that all feedback is helpful, because it gives you a chance to see how others view your work.
5. Follow through on the areas of improvement that are discussed.
Adapted From Professional Training Systems, Inc. East Baltimore Pipeline Job Readiness Training Curriculum Page 159-160
Participant Handout 6-3: FEEDBACK
Bridging the Opportunity Gap | Career Readiness Curriculum Guide Page 120
Topic 6: Job Success
Workshop 4: Workplace Safety
Outcomes
Learning Objectives
Identify potential hazards in various workplace settings
Know where to go to find more information about his/her rights and workplace safety
information
Understand workplace hazards and some things he/she can do to stay safe at work
Understand workplace safety laws, child labor laws and her/his rights on the job
Materials:
Group Agreements Lined Paper
Participant Handout 6-4: Safety IQ Quiz
Facilitators Resource 6-4: Safety Quiz Answers Participant Handout 6-4: Workplace Scenes
Facilitators Resource 6-4: Hazards on the Job examples for Facilitators Participant Handout 6-4: Workplace Safety/MA Child Labor Laws Scavenger Hunt Facilitators Resource 6-4: WORKPLACE SAFETY/CHILD LABOR LAWS ANSWERS FOR FACILITATORS
Activities and Facilitation Steps
1. Welcome– 5 minutes
Have everyone come in and have a snack
Review group agreements and agenda
2. Safety quiz – 10 minutes
In order to get a sense of what participants already know about workplace safety tell them you are going
to begin by having them complete a short safety quiz. Hand out Participant Handout 6-4: Safety IQ Quiz and have participants complete.
Have the Facilitators Resource 6-4: Safety Quiz Answers sheet ready to have discussion with the group
when they are finished.
3. Workplace Hazards – 20 minutes
Explain that one reason workers get hurt on the job is because there are hazards (dangers) on
the job.
There are three main categories of hazards — safety hazards, chemica l hazards, and biological
hazards.
o But those categories do not cover all job hazards. Ask participants if they can think of examples
of safety hazards? Chemical hazards? Biological hazards? Other health hazards? (Some
examples are included below.)
Safety hazards: knives, hot grease, hot surfaces, slippery floors, etc.
Chemical hazards: dusts, gases, vapors, acids, asbestos, lead, etc. Biological hazards: living organisms, viruses, molds, used needles, etc
Other health hazards: noise, radiation, repetitive movements, heat or cold, stress, harassment
(http://www.cdc.gov/niosh/talkingsafety/states/ma/) o Refer to Facilitators Resource 6-4: Hazards on the Job examples for Facilitators for other examples
Break participants up into 4 small groups.
o Give each group one of the workplace scenes from Participant Handout 6-4: Workplace Scenes,
with enough copies for each member of the group.

Bridging the Opportunity Gap | Career Readiness Curriculum Guide Page 121
o Have them identify as many hazards in the picture as they can, as well as offer suggestions to address the safety concern.
4. Workplace Safety/Ma Child Labor Laws Scavenger Hunt – 20 minutes Divide the participants into groups of 2-3 (or one group per available computer).
o Hand out one Participant Handout 6-4: Workplace Safety/MA Child Labor Laws Scavenger
Hunt to each participant and one extra for each group.
o Explain that they will have ten minutes to complete the scavenger hunt and put all of their
answers on the group sheet. Groups can work together or split up the work.
o After ten minutes, collect the group sheets and if you choose to, award pr izes to the
winning group.
Discuss the correct answers and where people went to find the information.
o Refer to Facilitators Resource 6-4: WORKPLACE SAFETY/CHILD LABOR LAWS ANSWERS FOR
FACILITATORS
5. Closing – 5 minutes
Process check
Have participants put materials from the day in their folders and collect folders
Have participants fill out time sheets and sign out

Bridging the Opportunity Gap | Career Readiness Curriculum Guide Page 122
Work together in your group to answer these questions. Guessing is OK. You won’t be graded on your
answers. Pick one person in your group to report your answers to the group later.
✔ Check the correct answer.
1. The law says your employer must give you training about health and safety hazards on your job.
❏True ❏ False ❏ Don’t know
2. The law sets limits on how late you may work on a school night if you are under 16.
❏True ❏ False ❏ Don’t know
3. If you are 16 years old, you are allowed to drive a car on public streets as part of your job.
❏True ❏ False ❏ Don’t know
4. If you’re injured on the job, your employer must pay for your medical care.
❏True ❏ False ❏Don’t know
5. How many teens get seriously injured on the job in the U.S.?
❏ One per day ❏ One per hour ❏ One every 7 minutes ❏Don’t know
Participant Handout 6-4: SAFETY QUIZ

Bridging the Opportunity Gap | Career Readiness Curriculum Guide Page 123
1. True: You should get training before you start work. The training should cover how to do
your job safely. Training about hazardous chemicals and other health and safety hazards at
your job is required by OSHA (the Occupational and Safety Health Administration), the
agency that enforces workplace health and safety laws.
2. True: The federal law says if you are 14 or 15, you can only work until 7pm on a school
night. Some states also have restrictions on how late you can work if you are 16 or 17. Child
labor laws protect teens from working too late, too early or too long.
3. False: Teens who are 16 may not drive a car or truck on public streets as part of their jobs.
Federal law permits teens who are 17 to drive in very limited situations. Some states do not
allow anyone under 18 to drive on the job. Child labor laws protect teens from doing
dangerous work.
4. True: If you get hurt on the job, the law says your employer must provide worker’s
compensation benefits. These include medical care for your injury.
5. One every 7 minutes: Overall, 84,000 teens are hurt each year badly enough to go to
a hospital emergency room. Only one-third of work-related injuries are seen in emergency
rooms, so i t is likely that 250,000 teens suffer work-related injuries each year. This number
is fairly close to the number of teens (ages 15-17) who go to emergency rooms each year
for all motor vehicle accidents, including vehicle occupants, pedestrians, bicyclists, and
motorcyclists (320, 000 teens). About 64 teens (17 and under) die each year from job
injuries. About 90 who are 18 or 19 die. Teens are often injured on the job due to unsafe
equipment or stressful conditions. They also may not receive enough safety training or
supervision.
Facilitators Resource 6-4: Safety Quiz Answers for Facilitators

Bridging the Opportunity Gap | Career Readiness Curriculum Guide Page 124
Pa
rtic
ipa
nt
Ha
nd
ou
t 6
-4:
Wo
rkp
lace
Sce
ne
s
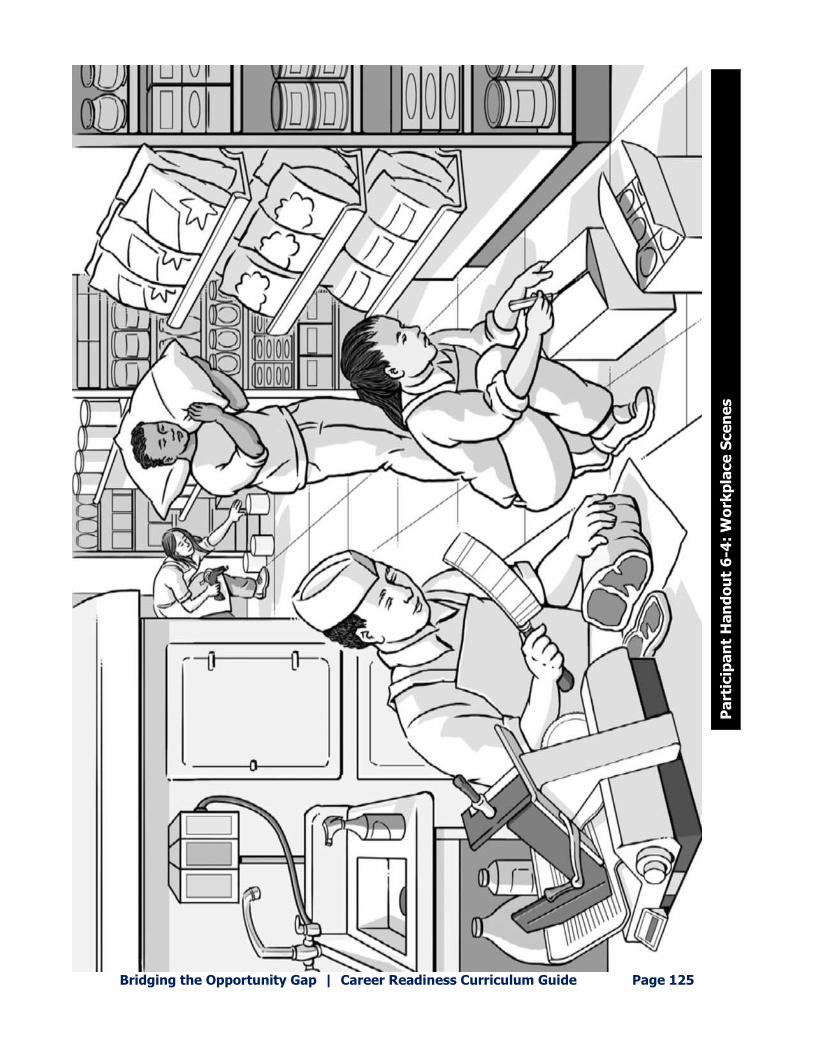
Bridging the Opportunity Gap | Career Readiness Curriculum Guide Page 125
Pa
rtic
ipa
nt
Ha
nd
ou
t 6
-4:
Wo
rkp
lace
Sce
ne
s

Bridging the Opportunity Gap | Career Readiness Curriculum Guide Page 126
Pa
rtic
ipa
nt
Ha
nd
ou
t 6
-4:
Wo
rkp
lace
Sce
ne
s

Bridging the Opportunity Gap | Career Readiness Curriculum Guide Page 127
Pa
rtic
ipa
nt
Ha
nd
ou
t 6
-4:
Wo
rkp
lace
Sce
ne
s

Bridging the Opportunity Gap | Career Readiness Curriculum Guide Page 128
Examples:
• Fast food: hot grill, fire, cooking grease, heavy lifting, cleaning chemicals, stress, steam, hot
oven, knives, slippery floor, pressure to work fast
• Grocery Store: heavy lifting, meat slicer, repetitive motion, standing a lot, box cutter,
cleaning chemicals, bending or reaching, stress
• Office: repetitive use of the keyboard, awkward posture, stress, cluttered workplace, copier and other chemicals
• Gas station: gasoline, heat or cold, stress, other chemicals, tools and equipment, violence
Ways to deal with hazards at work:
• Personal Protective Equipment (PPE)
• Work Policies/Practices
• Remove the Hazard (not always possible)
Facilitator Resource 6-4: Hazards on the Job examples for Facilitators

Bridging the Opportunity Gap | Career Readiness Curriculum Guide Page 129
1. How many hours per week can a 14 year old work while school is in session?
2. What is the maximum number of hours a 15 year old can work on a school day?
3. What is the maximum number of hours a 16 year old can work in one day?
4. What is the maximum number of days a 17 year old can work in a week?
5. What is the latest that a 14 year old can work on a school day? In the summer?
6. How old do you have to be to work in a freezer or meat cooler?
7. How old do you have to be to operate, clean or repair power-driven bakery machines?
8. How old do you have to be to work on ladders or scaffolds?
9. How old do you have to be to work in amusement places (such as a pool or billiard room or bowling alley)?
10. How old do you have to be to work in roofing or on or about a roof?
11. What is minimum wage in Massachusetts?
12. How many hours do you have to work in a week to qualify for overtime pay?
13. What does Worker’s Compensation pay for?
14. What is the name of the agency that handles complaints about workplace safety?
Participant Handout 6-4: WORK SAFETY/MA CHILD LABOR LAWS SCAVENGER HUNT

Bridging the Opportunity Gap | Career Readiness Curriculum Guide Page 130
15. What is one health and safety protection your employer must provide?

Bridging the Opportunity Gap | Career Readiness Curriculum Guide Page 131
1. How many hours per week can a 14 year old work while school is in session? 18 2. What is the maximum number of hours a 15 year old can work on a school day? 3
3. What is the maximum number of hours a 16 year old can work in one day? 9
4. What is the maximum number of days a 17 year old can work in a week? 6
5. What is the latest that a 14 year old can work on a school day? 7 pm
In the summer? 9 pm 6. How old do you have to be to work in a freezer or meat cooler? at least 16
7. How old do you have to be to operate, c lean or repair power-driven bakery machines? at least 18
8. How old do you have to be to work on ladders or scaffolds? at least 16 (if more than 30 ft above
ground or water the answer is at least 18) 9. How old do you have to be to work in amusement places (such as a pool or billiard room or bowling
alley)? at least 16 10. How old do you have to be to work in roofing or on or about a roof? at least 18
11. What is minimum wage in Mass? $8.00/hr
12. How many hours do you have to work in a week to qualify for overtime pay? Over 40
13. What does Worker’s Compensation pay for? Medical expenses and lost wages
14. What is the name of the agency that handles complaints about workplace safety? OSHA
15. What is one health and safety protection your employer must provide? Safety training, PPE (personal
protective equipment)
Facilitators Resource 6-4: Workplace Safety/Child Labor Laws Answers for Facilitators
Bridging the Opportunity Gap | Career Readiness Curriculum Guide Page 132
Topic 7: Preparing Your Career Portfolio
Length of Topic: 7 hours, 4 workshops
Workshop 1: Creating an Elevator Speech
Outcomes Learning Objectives
Create an elevator speech
Practice their elevator speech with at least
three people
Understand what an elevator speech is
Understand when to use an elevator speech
Understand what employers are looking for when they ask for a writing sample
Materials:
Group Agreements Flip Chart Paper
Flip Chart markers
Participant Handout 7-1: Elevator Speech Examples Participant Handout 7-1: Creating an Elevator Speech
Lined Paper
Activities and Facilitation Steps
Facilitator Pre-Planning Steps:
Have the following prepared on chart paper:
An elevator speech is a short (15-30 second, 150 word) sound bite that succinctly and memorably
introduces you. It spotlights your uniqueness. It focuses on the benefits you provide. And it is
delivered effortlessly... A great elevator speech makes a lasting first impression, showcases your
professionalism and allows you to position yourself. ~ Dale Kurrow
http://www.dalekurow.com/elevator
1. Welcome– 5 minutes
Have everyone come in and have a snack
Review group agreements and agenda
2. Opening Activity – 10 minutes
Ask the young people to think about someone famous (so that other people will know that person as
well) they admire. o Give everyone two minutes to write down the person’s name, what he/she does, what her/his
strengths are and why someone would want to hire him/her.
o Have everyone introduce themselves as that person to the group.
3. What is an Elevator Speech? 15 minutes Hang the flip chart paper you prepared earlier with the definition.
Ask participants if they have ever heard of an elevator speech.
o Ask them to explain what they think an elevator speech is.
o Share the flipchart with the elevator speech description and ask for a volunteer to read it out
loud.
o Discuss with participants what should be included in an elevator speech and capture what they
say on flip chart (or have one of the participants capture what they say on flipchart).
o Discuss when an elevator speech should be used (career fairs and formal networking
opportunities, casual networking opportunities, to answer college and job interview “ tell me

Bridging the Opportunity Gap | Career Readiness Curriculum Guide Page 133
about yourself ” questions, when requesting an application, informational interviews, voicemail
for potential employers, etc.).
4. Creating an Elevator Speech – 25 minutes Explain to participants that they will create their own elevator speech that highlights their individual
strengths. Hand out Participant Handout 7-1: Elevator Speech Examples and review them with the
group.
Hand out Participant Handout 7-1: Creating an Elevator Speech and have participants fill out.
o Give them about 10 minutes to fill out the handout and then have them write their elevator
speech on the space provided on the sample handout. o Have blank lined paper available if they need more paper.
When they have finished writing their elevator speech, split the group in half to form two lines and have
them sit or stand across from one another.
o Have them practice their speech with the person across from them. Allow each person to give the other feedback.
o One person will stay in their original spot while everyone else rotates to the left or right to be paired with a new participant.
o Have them repeat their speech and rotate until they have heard from everyone in the group.
When they are finished this exercise come back together in a large group to discuss what they learned from doing this exercise:
o How it felt to use an elevator speech
o What stood out from hearing others
5. Closing – 5 minutes
Process check
Have participants put materials from the day in their folders and collect folders
Have participants fill out time sheets and sign out

Bridging the Opportunity Gap | Career Readiness Curriculum Guide Page 134
from http://www.expressionsofexcellence.com/sample_elevator.html
For A Lawyer for Non-Profits
“I’m saving the people who are saving the world! (She pauses and smiles). I’m Alice Anderson, a
lawyer for non-profits. My company, Anderson Non-Profit Strategies, based in the San Francisco
Bay Area, specializes in helping non-profits keep their fund-raising legal. For more information e-
mail me: alice@anpslaw.” For The Self-Employed
“Hi, I teach people how manners make money & politeness promotes profits in the market place. I
teach etiquette to youth and adults. I’m Carolyn Millet, and it’s my pleasure to meet you!” For Trainers
“I turn conflict into agreement. I’m Robbie Gordon of the Conflict Resolution Institute. My workshops
& coaching reduce your conflict. We teach people how to understand, discuss and resolve conflict
so they can live happier lives. Let us replace the conflict in your life.” For An Insurance Agent
“I’m a money man with a plan: I make sure the money keeps flowing when your income stops.
(Pause). Somewhere along the line, for one reason or another, you will no longer be working. My
plans insure that individuals and their families are prepared for that day when it comes. (Another
pause). Let’s review your plan to make sure the money flows unabated. I’m Mark Eckhout with MML
Investors Services.” “My firm takes over where Walt Disney left off. I’m Chal Daniels, and I will show you how to make
your dreams come true. What is something you have always dreamt of doing? (Pauses and listens
intently.) I can help you make your wish come true. Here is my card, call me, I’d love to work with
you. I give you my assurance our insurance can help you dream big dreams.” BOG Participant (Create your elevator speech here):
Participant Handout 7-1: Elevator Speech Examples

Bridging the Opportunity Gap | Career Readiness Curriculum Guide Page 135
An elevator speech is a short (15-30 second, 150-word) sound bite that succinctly and memorably
introduces you.
It spotlights your uniqueness. I t focuses on the benefits you provide. And it is delivered effortlessly... A
great elevator speech makes a lasting first impression, showcases your professionalism and allows you to
position yourself.
~ D a l e Kurow http://www.dalekurow.com/elevator Answer the following questions:
Who are you?
How can you grab the listener’s attention?
What are your key strengths?
What positive adjectives describe you?
What will you bring to an employer? What can/do you do?
What do you want to get out of the elevator speech? Why are you telling this person about
yourself? What is your request for action? (Talk to them about potential opportunities, ask
for a card, ask for advice, get an application, etc.)
Possible requests for action:
from http://www.quintcareers.com/job-search_elevator_speech.html
At a career fair: “I’d like to take your business card, as well as leave my networking card and
resume. Would i t b e possible for me to get a spot on your company’s interview schedule?
In a networking situation: “What advice do you have for me? Can you suggest any employers I
should be contacting?”
Cold-calling an employer: “When can we set up a meeting to discuss how I can help your
company?”
Telephone or e-mail situations: “May I send you my resume?” (For in-person situations, you should
always have resumes handy).
Participant Handout 7-1: Creating an Elevator Speech

Bridging the Opportunity Gap | Career Readiness Curriculum Guide Page 136
Topic 7: Preparing Your Career Portfolio
Workshop 2: Building a Network/References
Outcomes Learning Objectives
Complete a reference list as an addendum to their resume
Have up-to-date contact information on a network of adults in their life that they can
contact for career guidance
Contact two potential references and
request a letter of reference for their Youth Career Portfolio
Understand the importance of having a
network of caring adults that can be
utilized as references to potential
employers, as well as being a source of
career guidance
Materials:
Group Agreements
Participant Handout 7-2: Who Could be in my Personal Network Participant Handout 7-2: References Worksheet
Participant Handout 7-2: Sample Reference Sheet
Phone Books
Activities and Facilitation Steps
1. Welcome– 5 minutes
Have everyone come in and have a snack
Review group agreements and agenda
2. Building a Network – 15 minutes
Ask participants what they think a “personal network” might be in terms of finding a job and working
on other transition activities.
o Define a “personal network” as a group of caring adults that know you as a person, and
want to help support your success as a young adult in the community.
o Explain that a network can be very valuable, because o f the insight, experience, contacts,
and knowledge a caring adult can give a young person.
o Being new at finding a job, housing, education, and other steps toward independence can
be confusing, and having a supportive adult “on your side” can make a huge difference.
Ask participants if they have heard the term “references” (in relation to employment) and what t he y
t h i n k that might mean.
o C l a r i f y a n s w e r s and explain that people from your personal network can serve as
references to speak to potential employers on your skills and positive traits. Explain that
employers may ask for written references, or may want to speak to the referring person on
the phone.
Hand out Participant Handout 7-2: Who Could be in my Personal Network and help participants
brainstorm other types of people who may be a personal network member and potential job
reference, and have them write their answers down in the blank spaces.
o Also remind them that, if possible, it is good to let someone know you would like to list them as a reference, so that they are prepared to talk to employers about y o u r s k i l l , values, etc.

Bridging the Opportunity Gap | Career Readiness Curriculum Guide Page 137
3. Personal References – 20 minutes
Hand out Participant Handout 7-2: References Worksheet and let participants know that they can look up
missing information in the phone book or online.
o Discuss with participants that most employers ask for three references.
o If program staff at your agency (including yourself) is comfortable serving as a reference please
let participants know and provide proper contact information.
4. Typing References – 15 minutes Hand out Participant Handout 7-2: Sample Reference Sheet and have participants type up their references
following the sample
5. Closing – 5 minutes
Process check
Have participants put materials from the day in their folders and collect folders
Have participants fill out time sheets and sign out

Bridging the Opportunity Gap | Career Readiness Curriculum Guide Page 138
Guidance Counselors
Trainers
Clergy
Clinician
Staff from Camp or Community
Teachers
Past Employers
Neighbors
Education and Career Counselor
When asking someone from your network to be an Employment Reference:
Teachers, trainers, and coaches are all very good references. They know about your
education and training. They can report on your attendance.
Clergy often deal with personal aspects of your life, not work related areas. However, they
know a positive side of you and are respected in the community.
A reference should be someone who can tell an employer what kind of worker you are.
It is best to ask people ahead of time, if they would feel comfortable giving you a good
reference. Be sure to let them know the positions for which you applied.
References need to be updated. Addresses, phone numbers, and job titles often change.
You should use your references’ business addresses and phone n u m b e r s i f possible.
It is best to use references who are working, rather than unemployed.
The people who are your references need to have good telephone c o m m u n i c a t i o n
s k i l l s . They also need to have telephone numbers where they can be reached dur ing
“business hours.” Most employers contact references by telephone during the day.
Participant Handout 7-2: Who Could be in my Personal Network

Bridging the Opportunity Gap | Career Readiness Curriculum Guide Page 139
Adapted from Merging Two Worlds, 2003
Your Name
Your Street Address
Your City, State, Zip Code
Your Telephone Number ( )
Fill in the spaces below with information on three people you will use for references.
Reference’s Name, Job T i t le , and Name of Business
Business Address
City State Zip Code
( )
Telephone Number
Reference’s Name, Job T i t le , and Name o f Bus iness
Business Address
City State Zip Code
( )
Telephone Number
Reference’s Name, Job T i t le , and Name o f Bus iness
Business Address
City State Zip Code
( )
Telephone Number
Participant Handout 7-2: References Worksheet

Bridging the Opportunity Gap | Career Readiness Curriculum Guide Page 140
John B. Harding
123 Washington Avenue
Homewood, I l l i no i s 12345
(123) 456-7890
REFERENCE SHEET
PROFESSIONAL REFERENCES
Jan Miles, Operations Manager
Shorewood Manufacturing, Inc.
123 East Muncie
Avenue Shorewood,
Illinois 12345
(123) 456-7890; [email protected]
Carl J. Walker, Director of Human Resources
Ace Hospital Supplies, Inc.
789 Tanaka Circle
Freeport, Illinois
12345
(111) 111-3333;
William T. Gannon, Shop Supervisor
Rail Cars Express
900 Smithton Street
Seaside, Ca l i fo rn ia
12345
(111) 111-4444; [email protected]
Participant Handout 7-2: Sample Reference Sheet

Bridging the Opportunity Gap | Career Readiness Curriculum Guide Page 141
Topic 7: Preparing Your Career Portfolio
Workshop 3: Resumes (Day 1)
Outcomes
Learning Objectives
Have a complete, typed resume for their
paper and electronic Youth Career Portfolio
Understand the purpose and importance of
an up-to-date, formatted, and typed resume, in terms of positively representing their skills
Materials:
Group Agreements
Flip Chart Paper Participant Handout 7-3-1: Understanding a Resume
Participant Handout 7-3-1: Tips for Resume Writing Facilitators Resource 7-3-1: Hints and Tips for Working with Youth on Resumes
Participant Handout 7-3-1: Action Words for Resume Writers
Participant Handout 7-3-1: Resume Worksheet
Activities and Facilitation Steps
1. Welcome– 5 minutes
Have everyone come in and have a snack
Review group agreements and agenda
2. Understanding a Resume – 15 minutes
Ask participants what they already know about a resume including sections.
o Keep track by writing their ideas on a flip chart Hand out Participant Handout 7-3-1: Understanding a Resume and review and compare with what
participants already came up with.
Discuss the importance and purpose of a resume.
o Resumes are used to promote job candidates.
o Encourage the participants to think about education, skills and accomplishments they can include on their resumes
Hand out Participant Handout 7-3-1: Tips for Resume Writing and review with the participants.
o Refer to Facilitators Resource 7-3-1: Hints and Tips for Working with Youth on Resumes to add to the discussion.
3. Action Verbs – 15 minutes Explain the use of action verbs to the participants.
o Emphasize how to use action verbs when describing skills.
o Discuss how to use past tense for previous work and present tense for anything current. Hand out Participant Handout 7-3-1: Action Words for Resume Writers
o Have participants circle the verbs they have used and help them with any definitions.
o When they finish tell them to pick three and use in a sentence using the verb to describe their
skills or past work experience.
o Ask for everyone to share one with the larger group.
4. Resume Worksheet – 20 minutes
Explain to participants that you are handing out a worksheet for them to record information they will
include on their resumes.

Bridging the Opportunity Gap | Career Readiness Curriculum Guide Page 142
o Hand out Participant Handout 7-3-1: Resume Worksheet
o Inform participants that if they need to look up addresses they can use available computers.
o If they need to obtain additional information that such as contact names tell them to bring in
any missing information for next meeting to include their resume
5. Closing – 5 minutes
Process check
Have participants put materials from the day in their folders and collect folders
Have participants fill out time sheets and sign out
Bridging the Opportunity Gap | Career Readiness Curriculum Guide Page 143
PURPOSE OF A RESUME
Marketing tool to sell your experience and qualifications to potential employers.
Summarize and highlight relevant accomplishments and skills that match the employer’s current
hiring needs.
SECTIONS OF A
RESUME
Contact information: Name, Address , Phone Number, and Professional E-mail Address.
Education: In reverse chronological order (most recent first), list the institution you
attended and type of education you received along with dates attended and city and
state where attended.
Experience: In reverse chronological order (most recent first), list the employers, city and
state where you worked, dates of employment, position held, responsibilities on the job,
accomplishments made, and skills developed or utilized. Remember to use action words.
Activities: List activities you are involved in with dates (month/year), name of program or
organization you participated on. Activit ies may include athletics, clubs, community
service, and many more.
Achievements: Any awards and recognitions received with dates, name o f i n s t i t u t i o n that honored you and title of honor.
References: Name, Company, Address, and Phone Number of three individuals that are not
relatives and know your abilities and speak highly of you.
Participant Handout 7-3-1: Understanding a Resume

Bridging the Opportunity Gap | Career Readiness Curriculum Guide Page 144
Adapted from Youth Options Unlimited, Boston, MA
1. Limit the resume to one or two pages. It is better to have one page than one and a
half. A half page looks like the person ran out of information.
2. Be consistent. If you do it for one, you should do it for all. If you give your high school’s
zip code,then you must give all zip codes.
3. Avoid using slang words.
4. Use simple words that say what you want to say.
5. Use action words.
6. Show accomplishments and problem solving skills, not just duties. Show that you can do the
work required for the job.
7. Be honest.
8. Make it perfect. Check for spelling and other mistakes. Use a good copier or have the resume
printed.
9. State information in a positive way. List strongest skills and best work experience.
10. Do not include personal information such as date of birth, height, weight, etc.
11. Include a cover letter when sending the resume.
12. Balance your resume on the page. Use a standard font no smaller than 10 point and no larger
than 12 point, such as Times New Roman or Calibri
13. Include volunteer work, hobbies, and awards i f they show experiences or skills.
14. Use action words ending with “ed” for past jobs. Use action words ending with “ing” for present jobs.
15. Choose a high quality, 8 1/2 x 11-inch white or ivory paper. Use between 20- and 24-
pound 100 percent cotton fiber paper and a good duplicating (copying) process.
Commercial copy services usually produce good copies at low cost, and have quality
paper at a per sheet price. Check the telephone yellow Pages under “Copying and
Duplicating Services” or search the web for copying services in your area.
Participant Handout 7-3-1: Tips for Resume Writing
Bridging the Opportunity Gap | Career Readiness Curriculum Guide Page 145
Adapted from Merging Two Worlds 2003
It is better for a resume to be basic, correct and easy to read than complicated, hard to read and
with errors.
When you sit down with someone to work on their resume, talk about what makes a good resume
before they create theirs — then they won’t be surprised when you edit for mistakes.
Don’t forget to praise — always point out 1 or 2 things that you really like and are impressed about
in their resume — and start out on a positive foot.
Instead of correcting every mistake as they go along, wait until they have a f i r s t draft, and
hopefully, a sense of accomplishment — then make edits as necessary.
When making edits, make sure that you explain the “why.” Give them the choice to make changes and
corrections. Categorize your edits into several categories — spelling, verb tense, format etc. — then
ask them which of these are most important to correct and work through talking about why each of these is important.
Put on your “employer hat” and explain to them what you are looking for and how it felt to read
through their resume — what stood out to you the most, what would you have like to have seen.
Sometimes employers receive so many resumes that they are looking for reasons to narrow down the
pool of applicants — correcting simple errors is a way to avoid this fate for your resume.
Explain that, when composing a resume on the computer, they can easily copy a resume into a new
document and make small changes with little effort.
Remember that our job is to help youth present themselves in the best light possible — never encouraging misrepresentation — but creativity!
When struggling with someone who does not want to put the time into a resume talk with them about:
– the impression they are trying to make on an employer
– if it is worth it to spend time writing a sloppy resume i f i t probably won’t win them the
job or the minimal extra time it will take them to have a good resume that gives them a
better chance of getting a job
Facilitators Resource 7-3-1: Hints and Tips for Working with Youth on Resumes

Bridging the Opportunity Gap | Career Readiness Curriculum Guide Page 146
Adapted from Youth Options Unlimited, Boston, MA
Directions: Circle the words below that describe what you have done in jobs, school, sports,
community groups, etc. you have had. You may want to use some of these ACTION words on your
resume. Ask and instructor or look up words you are not sure of.
achieved acquainted activated adapted adjusted administered advertised
advised advocated aided altered analyzed approved arranged assembled
assisted assumed attached attained authorized balanced built calculated
catered classified coached collected combined communicated compared
completed computed condensed constructed consulted controlled converted
coordinated counseled created decorated delivered demonstrated designated
designed detected determined developed devised diagnosed directed disclosed
discontinued dispatched displayed distributed documented economized edited
educated eliminated employed encouraged endorsed engineered established
estimated evaluated examined exchanged executed expanded experimented
familiarized filmed formulated generated governed guaranteed guarded guided
Hosted illustrated improved increased informed initiated inspected instructed
interviewed interpreted introduced invented inventoried investigated lectured
located maintained managed measured merged minimized mixed modernized
modified motivated notified observed obtained operated organized originated
planned prescribed processed procured produced provided publicized published
recommended recorded reduced refinished regulated remodeled removed
renovated reorganized repaired replaced reported researched restored
scheduled screened selected simplified solved stabilized stocked suggested
supervised surpassed tailored taught tested trained transferred transformed
transported treated unified updated utilized
Participant Handout 7-3-1: Action Words for Resume Writers

Bridging the Opportunity Gap | Career Readiness Curriculum Guide Page 147
Contact Information
Name
Address
City State Zip
Phone Number Alternate Phone Number E-mail
Employment Goal
What is your objective or job target?
What industry do you want to work in? (Construction, finance, maintenance and repair, hotel/hospitality, human
services, healthcare, education, etc)
Skills
List all your skills (if you speak another language tha t is also a skill) and your strengths. For computer
skills include software that you know. (Example: Microsoft Word, Exce l , Internet Applications, etc)
Job Readiness Level Education Information
Name of your school
Town/location of your school
Year you will be graduating
Awards
List all awards that you have ever received. If you were involved in sports also list any medals you
may have won. (E.g.: perfect attendance, gold in 100 m hurdles)
Participant Handout 7-3-1: Resume Worksheet

Bridging the Opportunity Gap | Career Readiness Curriculum Guide Page 148
Certificates L i s t an y certifications you have ever received. (E.g.: CPR, First Aid, Workplace Readiness, etc.)
L i s t an y participant activities or internships here:
Work History and Volunteer Experience List your work history and/or volunteer history starting with your most recent job/volunteer work.
Start End Name of Company, Your Title/Position
City and State
Describe what you did on the job (action words)
Start End Name of Company, Your Title/Position
City and State
Describe what you did on the job (action words)
Start End Name of Company, Your Title/Position
City and State
Describe what you did on the job (action words)
Bridging the Opportunity Gap | Career Readiness Curriculum Guide Page 149
Topic 7: Preparing Your Career Portfolio
Workshop 3: Resumes (Day 2)
Outcomes
Learning Objectives
Have a complete, typed resume for their
paper and electronic Participant Career Portfolios
Understand the purpose and importance of
an up-to-date, formatted, and typed resume, in terms of positively representing their skills
Materials:
Group Agreements Flip Chart Paper
Participant Handout 7-3-2: Skills Based Resume with Instructions
Participant Handout 7-3-2: Chronological Resume with Instructions Participant Handout 7-3-2: Chronological Resume Template and Sample Resume
Participant Handout 7-3-2: Skills Based Resume Template and Sample Resume
Activities and Facilitation Steps
1. Welcome– 5 minutes
Have everyone come in and have a snack
Review group agreements and agenda
2. Resume Types – 10 minutes
Let participants know they will use the information from last week to start their resume.
Discuss the difference between a skills based and chronological resume.
o Skills based may be a better fit for a participant with limited work/volunteer experience
while a chronological resume may be a better fit for a participant with more work/volunteer experience
Hand out the Participant Handout 7-3-2: Skills Based Resumes with Instructions and Participant
Handout 7-3-2: Chronological Resumes with Instruction Instructions and to continue to discuss the difference between chronological and skills based.
Ask participants to decide what resume type fits better for them
3. Draft Resume – 40 minutes Hand out sample resumes and resume template for either skills based resume or
chronological resume to guide the completion of the first draft of their resume.
o Participant Handouts 7-3-2 Chronological Resume Template and Sample Resume or o Participant Handouts 7-3-2 Skills Based Resume Template and Sample Resume
Be sure to walk around and be available to help participants
o Encourage participants to take their time and reassure them you’ll help with the final
editing.
4. Closing – 5 minutes
Process check
Have participants put materials from the day in their folders and collect folders
Have participants fill out time sheets and sign out

Bridging the Opportunity Gap | Career Readiness Curriculum Guide Page 150
Resume Instructions Instructions are in parenthesis and in italics above each section followed by examples
(List your personal information at the top)
Carlos Hernandez
104 Main Street Brockton, MA. 02301
508-555-5555
Job Objective (Explain in 1-2 sentences what job you are hoping to attain and specific reason why you want the job) Sample: Seeking a position as a food server. Desire a position with the opportunity to perform customer service.
Skills and Abilities (Use this portion to tell about your skills and abilities that make you a good candidate for the position you are applying for. Make sure to explain each skill thoroughly and support each with evidence. Types of skills that may be listed are: computer skills, communications, hard work, customer relations, attention to detail, creativity, and many others) Sample: Hardworking: Have worked outside of school with uncle on landscaping. In the summers of 2009 and
2010 I worked with my uncle mowing lawns and pulling weeds. These jobs were challenging but I worked hard and accomplished the task at hand.
Customer Relations: As a landscaper I would communicate with clients often. I would answer their
questions quickly and correctly in a respectful manner. My ability and experience speaking with
clients will benefit me as a food server.
(Notice the hanging indentation of each skill/ability as well as the space in between each skill) Education
(List your current level of education) Brockton High School, Brockton, MA. 02301
Candidate for Diploma: June 2013
Currently in Junior Year
Activities and Awards (List all extra-curricular activities and awards received)
Varsity Football Player: Brockton High School. Brockton, MA. 2010-2011.
Started at Linebacker for two seasons. Also saw time at Tight End and Full Back. Led the team in tackles and sacks as a junior.
Awards: Defensive Player of the Year 2011. All Conference Line Backer 2011.
Volunteer: Christ Church: Brockton, MA
Helped improve landscaping of the church yard by raking leaves, mowing the grass, and pulling
weeds.
Certifications (List any Certification you may possess including First Aid/CPR, ServSafe, and many more)
First Aid/CPR Certified. American Red Cross. September 2011
Participant Handout 7-3-2: Skills Based Resume with Instructions

Bridging the Opportunity Gap | Career Readiness Curriculum Guide Page 151
Domenique Cortez
154 Brigham Street, Apt. 3
Billings, MA 02239
(617) 949-6672
EDUCATION:
Westover Job Corps, Graduated February 2000
Chicopee, MA
• Earned GED Certificate
• Successfully completed training in Accounting
Merimac High School, 1995 – 1998
Billings, MA
SKILLS:
Computer: Microsoft Word, Microsoft Excel, internet
Other: Fluent in Spanish
EXPERIENCE:
Waitress March 1998 – April 1999
Friendly’s Restaurant Merrimac, MA
• Waited on tables during busy evening hours at family restaurant
• Assisted in training new wait staff
• Acted as hostess when needed
• Earned “Waitress of the Month” award (December 1998)
Cashier July 1997 – February 1998
Town Variety Store Merrimac, MA
• Provided customer service in a convenience store
• Assisted in scheduling employees
• Monitored store inventory
OTHER ACTIVITIES:
Job Corps: Student Government Association President, WICS Council Member,
Tutored elementary school children while attending Job Corps
Other: Merrimac track team (1995 – 1996)
REFERENCES AVAILABLE UPON REQUEST.
You should include high school (even if you did not earn your diploma from your high school), Job Corps (even if you did not complete your program), and any other school you attended. You can list this at the bottom so your skills and experience are highlighted.
In today’s job market, computer Skills and the ability to speak languages other than English Are two of the most valuable types of skills. Take some time to think about other skills you have that might be useful in a job setting (for example, customer service skills).
Participant Handout 7-3-2: Chronological Resume with Instructions
This section is important for job seekers who have not held many jobs. It shows that while you have not had a lot of JOB experience, you have had some experiences that gave you a chance to develop skills that will be useful in the job market.
Be ready to provide the names of two or three people who would
recommend you for a job. Remember not to use family.
Think about ALL the job-related experiences you have had. This might include jobs you’ve held, informal jobs (such as baby-sitting), and/or volunteer work. Don’t lie or brag on your resume, but DO mention your accomplishments and promotions.

Bridging the Opportunity Gap | Career Readiness Curriculum Guide Page 152
[Your Name] [Street Address, City, ST ZIP Code] [phone] [e-mail]
Objective [Describe your career goal or ideal job.]
Skills
Experience [Job Title]
[Dates of employment] [Company Name], [City, ST]
[Job responsibility/achievement]
[Job responsibility/achievement]
[Job responsibility/achievement]
[Job Title]
[Dates of employment] [Company Name], [City, ST]
[Job responsibility/achievement]
[Job responsibility/achievement]
[Job responsibility/achievement]
[Job Title]
[Dates of employment] [Company Name], [City, ST]
[Job responsibility/achievement]
[Job responsibility/achievement]
[Job responsibility/achievement]
[Job Title]
[Dates of employment] [Company Name], [City, ST]
[Job responsibility/achievement]
[Job responsibility/achievement]
[Job responsibility/achievement]
Education [School Name], [City, ST]
[Dates of attendance]
[Degree obtained]
[Special award/accomplishment or degree minor]
Interests [Briefly list interests that may pertain to the type of job you want.]
References References are available on request.
Participant Handout 7-3-2 Chronological Resume Template

Bridging the Opportunity Gap | Career Readiness Curriculum Guide Page 153
Michael White 123 Washington St, Springfield MA
413-987-6543
michael_white
@gmail.com
SUMMARY OF QUALIFICATIONS
• Motivated, responsible, hard worker
• Excellent communication and organizational skills
• Initiative-taker and problem-solver
• Team player with strong customer service skills
EDUCATION
Earned GED, Smith Community Center May 2010
Springfield Central High School 2007-2009
TRAINING
Massachusetts Career Development Institute Nov. 2009-May 2010
Culinary Arts Program
• Learned the basics of food preparation and kitchen management
• Followed directions and worked on a team to prepare and serve food
• Adapted to different job assignments and completed all tasks
EXPERIENCE
St Patrick’s Soup Kitchen June 2010-present
Kitchen Crew Volunteer
• Help to prepare meals for people in need
• Maintain a clean working environment: wash dishes and mop as needed
• Serve meals and provide excellent customer service
CERTIFICATION
Earned ServSafe Certificate Jan. 2010
Earned OSHA Certificate April 2010
Participant Handout 7-3-2: Chronological Resume Sample

Bridging the Opportunity Gap | Career Readiness Curriculum Guide Page 154
[Your Name]
[City, ST Zip Code]
[phone], [e-mail]
Objective:
Skills
[Relevant skill] [Relevant skill]
[Relevant skill] [Relevant skill]
[Relevant skill] [Relevant skill]
[Relevant skill] [Relevant skill]
Professional Accomplishments [Field or Area of Accomplishment]
[Achievement] [Achievement] [Achievement] [Achievement]
[Field or Area of Accomplishment]
[Achievement] [Achievement] [Achievement] [Achievement]
[Field or Area of Accomplishment]
[Achievement] [Achievement] [Achievement] [Achievement]
Work History
[Job title] [Company Name], [City, ST] [dates of employment]
[Job title] [Company Name], [City, ST] [dates of employment]
[Job title] [Company Name], [City, ST] [dates of employment]
[Job title] [Company Name], [City, ST] [dates of employment]
Education
[Degree] [School Name], [City, ST] [date of graduation]
Participant Handout 7-3-2 Skills Based Resume Template

Bridging the Opportunity Gap | Career Readiness Curriculum Guide Page 155
References
References are available upon request.
J A N M O S S I E R
1140 Franklin Boulevard Boise, ID 83720
Home Phone: 208.555.3773 Message Phone: 208.555.2224 E-mail: [email protected]
OBJECTIVE A technician assistant position in computer manufacturing.
SUMMARY OF SKILLS
Able to solve and repair electronic equipment. Contribute to teams and create good work relationships. Energetic, hardworking, willing to learn. Basic understanding of computers.
EXPERIENCE
ELECTRICAL SKILLS
Built a TV scrambler from a circuit board in electronics class.
Rewired lamps, repaired plumbing and appliances in home maintenance projects.
Operated power tools (saws, drills, sanders) to cut and help frame buildings.
BUSINESS SKILLS
Tracked and priced inventory with team to improve product availability to customers in grocery store.
Greeted customers and helped them to find hard-to-locate items.
Cashiered and calculated cash flow at the end of each shift.
COMPUTER SKILLS
Set up and entered personal budget on Excel, using IBM computer.
EMPLOYMENT HISTORY
Participant Handout 7-3-2: Skills Based Resume Sample
Bridging the Opportunity Gap | Career Readiness Curriculum Guide Page 156
Stock Clerk/Cashier, Sunny’s Market 2004-Present
Construction Helper, The Builder’s Group Summers 2001-2003
EDUCATION
Roosevelt High School, Boise ID 2004
Related courses: drafting, basic electronics, management

Bridging the Opportunity Gap | Career Readiness Curriculum Guide Page 157
Topic 7: Preparing Your Career Portfolio
Workshop 3: Resumes (Day 3)
Outcomes
Learning Objectives
Have a complete, typed resume for their
paper and electronic Youth Career Portfolios
Understand the purpose and importance of
an up-to-date, formatted, and typed resume, in terms of positively representing their skills
Materials:
Group Agreements Flip Chart Paper
Participant Handout 7-3-3: Evaluating Your Resume
Activities and Facilitation Steps
1. Welcome– 5 minutes
Have everyone come in and have a snack
Review group agreements and agenda
2. Finish Draft, Edit, and Finalize Resume – 50 minutes
Have participants finish their first draft of their skills based or chronological resume that they
started during the previous workshop
When participants finish their first draft have them pair up and evaluate each other’s resume using
Participant Handout 7-3-3: Evaluating Your Resume
o After peer editing, the facilitator can also provide participants with feedback on their
resume
Participants should finalize their resume using a word processor such as Microsoft Word. Final
copies should be printed and saved electronically for the Youth Career Portfolio.
o Explain the type of paper (resume ) they will use to print their resumes
o Tell participants that they will get an electronic copy included in their career portfolio as
well as a hard copy,
3. Closing – 5 minutes
Process check
Have participants put materials from the day in their folders and collect folders
Have participants fill out time sheets and sign out
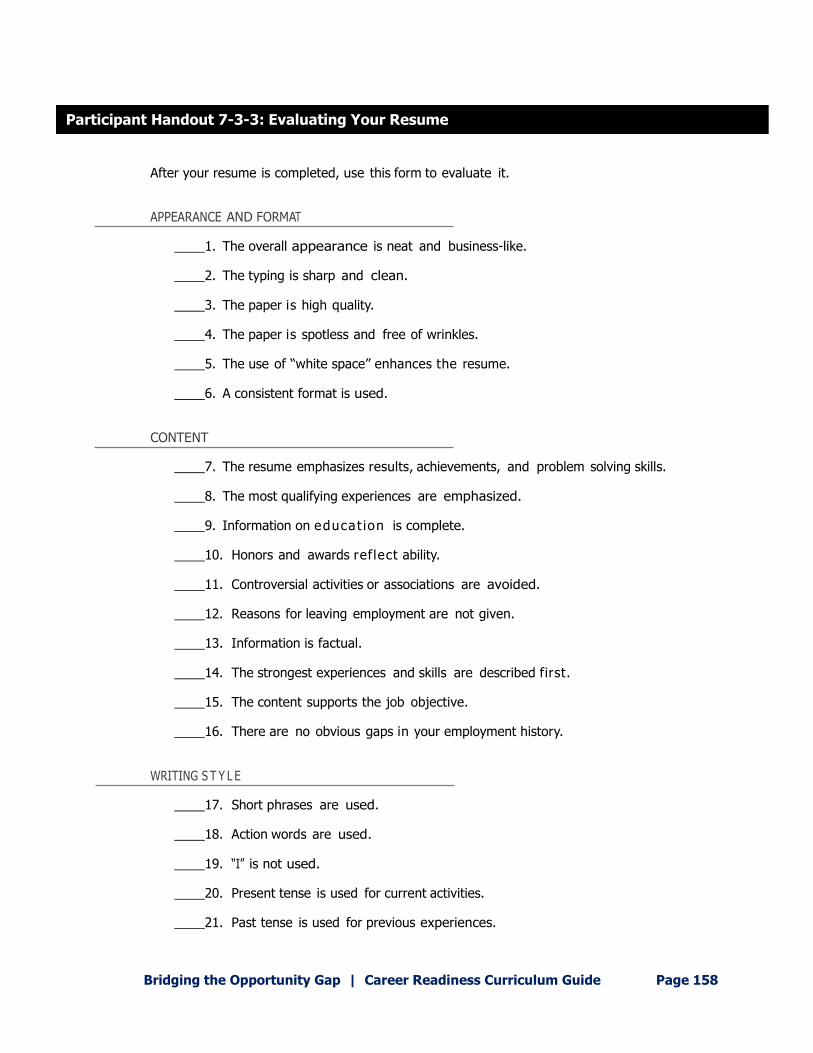
Bridging the Opportunity Gap | Career Readiness Curriculum Guide Page 158
After your resume is completed, use this form to evaluate it.
APPEARANCE AND FORMAT
1. The overall appearance is neat and business-like.
2. The typing is sharp and clean.
3. The paper is high quality.
4. The paper is spotless and free of wrinkles.
5. The use of “white space” enhances the resume.
6. A consistent format is used.
CONTENT
7. The resume emphasizes results, achievements, and problem solving skills.
8. The most qualifying experiences are emphasized.
9. Information on educat ion is complete.
10. Honors and awards reflect ability.
11. Controversial activities or associations are avoided.
12. Reasons for leaving employment are not given.
13. Information is factual.
14. The strongest experiences and skills are described first.
15. The content supports the job objective.
16. There are no obvious gaps in your employment history.
WRITING S T Y L E
17. Short phrases are used.
18. Action words are used.
19. “I” is not used.
20. Present tense is used for current activities.
21. Past tense is used for previous experiences.
Participant Handout 7-3-3: Evaluating Your Resume

Bridging the Opportunity Gap | Career Readiness Curriculum Guide Page 159
Topic 7: Preparing Your Career Portfolio
Workshop 4: Cover Letter (Day 1)
Outcomes Learning Objectives
Create a sample cover letter for their Youth
Career Portfolio
Understand the meaning and contents of a
cover letter Be familiar with using a business letter format
for professional communications
Materials:
Group Agreements
Chart Paper or White Board
Facilitator Resource 7-4-1: Why Write a Cover Letter Participant Handout 7-4-1: Writing a Cover Letter
Participant Handout 7-4-1: Cover Letter Format Guidelines Participant Handout 7-4-1: Sample Cover Letter
Computers with word processor (required) and Internet access (optional)
Activity and Facilitation Steps
5. Welcome and Introductions – 10 minutes
Have everyone come in and have a snack
Review group agreements and agenda
Quick check in
6. Large Group Discussion – 15 minutes Ask the group “Why is it important to write a cover letter”?
o Record responses on Chart Paper or a White Board
o After participants share some insights explain that “business letters” are the way to professionally communicate with potential employers
o Ask participants to share other reasons to provide a cover letter. o Use the Facilitator Resource 7-4-1: Why Write a Cover Letter to add answers that participants
did not already provide to answer the question
Explain to participants that the purpose of a cover letter is for potential employees to introduce
themselves and their skills, and is often read before the resume. Employers also use cover letters to screen potential employees. If the cover letter is not informative and well organized, the employer
may not read the resume. o Emphasize the importance of getting across the why the employer would want to hire you in
particular in a cover letter
Have participants read Participant Handout 7-4-1: Writing a Cover Letter individually or in pairs
Discuss the Top 5 things to remember about cover letters
7. Writing a Draft- 20 minutes
Ask participants to review their resume and reflect on their skills and experience from their work or
vocational training experience Explain that participants will be writing cover letters to two future potential employers that they would
like to work for following the BOG program
Depending on the size of your group and computer availability you have the option of sharing
information about proper formatting using paper handouts or the MassCIS website or a combination of the two. Facilitation Steps for both options are listed below:

Bridging the Opportunity Gap | Career Readiness Curriculum Guide Page 160
o Option 1 Paper Handouts: Give out Participant Handout 7-4-1: Cover Letter Format Guidelines and Participant Handout 7-4-1: Sample Cover Letter for participants to use as guides. Have
participants prepare a handwritten cover letter to a possible job opening.
o Option 2 Computer Research: Have participants log on to MassCIS (www.masscis.intocareers.org). Under the “Employment” tab, select “Job Search”. In the
new window have participant’s select “Applications & Resumes” tab to the left and then select “Cover Letters”. This section includes an introduction to cover letters, an explanation
of proper formatting and content for each section of the cover letter, and includes an
“Example Cover Letter”. Participants can use this guide to prepare a handwritten or initial (typed) draft of a cover letter to a possible job opening
When they are done with their first draft, participants can proofread their work, and have the
facilitator read over it too. Remind participants to be fair and constructive in their edits of themselves
8. Start Final Draft of Cover Letter – 10 minutes
Have participants open a cover letter template on Microsoft Word or a blank Microsoft Word
document. o The “Resume cover letter for entry level position” in Microsoft Work templates is a good
template for participants writing cover letters for entry level jobs Remind participants to write the first cover letter with a particular job in mind
Write the first cover letter using first draft as a guide and referencing relevant skills and experience for
the position
If time permits- Ask participants to print out their completed cover letter for their Youth Career
Portfolio and save a copy to their electronic portfolio
9. Closing – 5 minutes
Process check- explain that there will be time in the next workshop to complete cover letter
Have participants put materials from the day in their folders and collect folders
Have participants fill out time sheets and sign out

Bridging the Opportunity Gap | Career Readiness Curriculum Guide Page 161
It’s one of the most important tools when looking for a job.
Demonstrates that you can organize your thoughts and express yourself
(the letter makes sense, and has a beginning, middle, and end) States what your experience and qualifications are briefly (your resume will be more
detailed) Exhibits your level of professionalism (follows the standard business letter format, using
appropriate language, etc.) Provides clues to your personality (answers the employers question, “what type of an
employee will this person be?”) Displays how oriented you are to detail (l ike correct ing typos and
spelling mistakes, getting names and addresses correct on the letters,
etc.)
Facilitator Resource 7-4-1 Why Write a Cover Letter?

Bridging the Opportunity Gap | Career Readiness Curriculum Guide Page 162
A cover letter is a letter that job seekers send along with a resume. It is also called an “application
letter.” The cover letter goes i n f r o n t of the resume. This letter has several functions:
It tells what position you are applying for
It summarizes why you are a strong candidate for the job
It requests an interview for the position you’re applying for
It tells the employer how to contact you if he/she wants to schedule an interview
It thanks the employer for considering you for the job
Top 5 things to remember about cover letters
1. Your cover letter may be the FIRST IMPRESSION you make on the employer, so
it’s important that the letter is:
Neat (typed or printed from a computer)
Professional
Grammatically correct, and
Free of typos and spe l l ing errors (have someone you trust
proofread your letters — such as a parent, a friend, a mentor, a Job
Corps counselor, etc.)
2. If possible, the cover letter should be addressed to a specific person — “Dear Mr.
(last name):” or “Dear Ms. (last name).” Since this is a formal business letter, you
should not address the person by his/her f i rst name. If you do not know the name
of the person who will be reviewing the resumes, you have two choices:
Call the organization to try to find out the person’s name
Address the letter to “Dear Sir or Madam:”
The greeting should be followed by a colon (:).
3. The cover letter should be short and to-the-point . Generally, cover letters should be
two to four paragraphs in length, but never longer than one page (front only).
4. In your cover letter, tell the employer what YOU can offer the business or organization (like
skills, dependability, commitment, and/or experience, etc.), not what the business or
organization can offer YOU!
5. For the structure of the letter, follow a standard business letter. The guidelines and a sample
cover let ter (see attached) will give you a good idea of how to set up the letter.
Participant Handout 7-4-1 Writing a Cover Letter

Bridging the Opportunity Gap | Career Readiness Curriculum Guide Page 163
Your Street address
Your City, state, and zip code
Today’s date
Name of the person to whom you’re writing (if it’s available)
Job title of the person to whom you’re writing (if it’s available)
Organization/Company name
Organization/Company street address
Organization/Company city, state, and zip code
Dear Mr. OR Ms. (last name):
Paragraph #1: Tell the employer which job you’re applying for and how you found out about the job (i.e. the newspaper, career center, etc.)
Paragraph #2: State briefly why you’re interested in the job. Also, if you know what the
job requirements are, explain your qualifications for the job. Your qualifications might
include your training at the site you are currently working at, previous work experience,
and/or other skills you have (l i k e s p e a k i n g a second language, etc.). Focus on
how hiring you could benefit the organization — NOT how the organization can benefit
you. Refer the employer to your resume for more details.
Paragraph #3: Request an interview and give the employer the information he/she,
will need to reach you (i.e. phone number, e-mail address, pager number). Tell the
employer that, you will follow up by phone if you do not hear from him/her within one
week. Thank the employer for taking the time to consider you for the position.
Sincerely,
(Your handwritten signature)
Don’t forget to sign the letter!
Your full name
Enclosure
Whenever you are including other documents with a business letter, write “Enclosure.”
Participant Handout 7-4-1 Cover Letter Format Guidelines
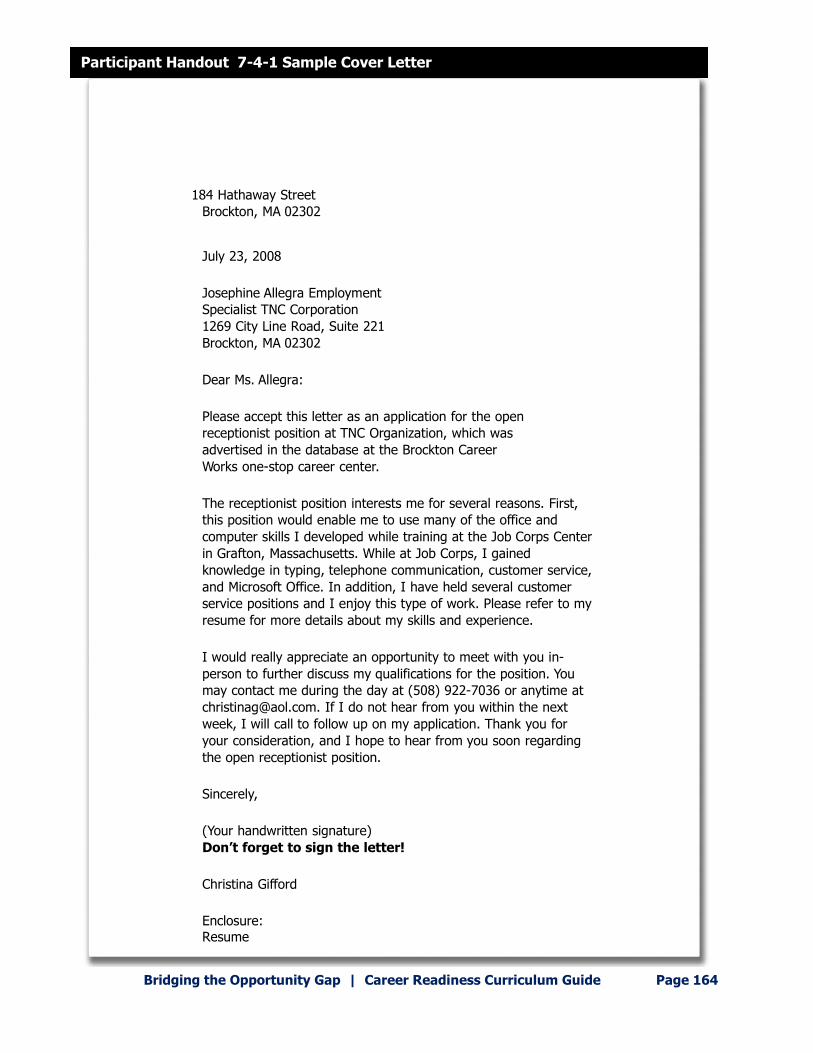
Bridging the Opportunity Gap | Career Readiness Curriculum Guide Page 164
184 Hathaway Street
Brockton, MA 02302
July 23, 2008
Josephine Allegra Employment
Specialist TNC Corporation
1269 City Line Road, Suite 221
Brockton, MA 02302
Dear Ms. Allegra:
Please accept this letter as an application for the open
receptionist position at TNC Organization, which was
advertised in the database at the Brockton Career
Works one-stop career center.
The receptionist position interests me for several reasons. First,
this position would enable me to use many of the office and
computer skills I developed while training at the Job Corps Center
in Grafton, Massachusetts. While at Job Corps, I gained
knowledge in typing, telephone communication, customer service,
and Microsoft Office. In addition, I have held several customer
service positions and I enjoy this type of work. Please refer to my
resume for more details about my skills and experience.
I would really appreciate an opportunity to meet with you in-
person to further discuss my qualifications for the position. You
may contact me during the day at (508) 922-7036 or anytime at
[email protected]. If I do not hear from you within the next
week, I will call to follow up on my application. Thank you for
your consideration, and I hope to hear from you soon regarding
the open receptionist position.
Sincerely,
(Your handwritten signature)
Don’t forget to sign the letter!
Christina Gifford
Enclosure:
Resume
Participant Handout 7-4-1 Sample Cover Letter

Bridging the Opportunity Gap | Career Readiness Curriculum Guide Page 165
Topic 7: Preparing Your Career Portfolio Workshop 4: Cover Letters (Day 2)
Outcomes Learning Objectives
Create a sample cover letter for their Youth
Career Portfolio
Complete two finalized professional cover
letters Be familiar with using a business letter format
for professional communications
Materials:
Group Agreements Participant Handout 7-4-2: Sample Cover Letter
Participant Handout 7-4-2: Cover Letter Format Guidelines Computers with word processor (required) and Internet access (optional)
Activity and Facilitation Steps
1. Welcome and Introductions – 10 minutes
Have everyone come in and have a snack
Review group agreements and agenda
Quick check in
2. Complete first cover letter – 10 minutes
Have participants complete the first cover that they started in the previous workshop
When complete ask participants to print out their completed cover letter for their Youth Career
Portfolio and save a copy to their electronic portfolio
3. Complete second cover letter- 25 minutes
Explain that the Youth Career Portfolio requires them to complete two cover letters
Participants can either write two standard cover letters to different employers or you may want to
have them do a cover letter introducing their career portfolio and what they learned through the
career readiness trainings and subsidized employment experience When complete ask participants to print out their completed cover letter for their Youth Career
Portfolio and save a copy to their electronic portfolio
4. Closing – 10 minutes
Process check
Have participants put materials from the day in their folders and collect folders
Have participants fill out time sheets and sign out

Bridging the Opportunity Gap | Career Readiness Curriculum Guide Page 166
Topic 8: Job Retention
Length of Topic: 3 hours, 3 workshops
Workshop 1: Positive Work Habits
Outcomes Learning Objectives Understand the importance of performing
professionally on job-site including successfully
managing employment expectations
Understand and practice workplace
expectations
Materials:
Group Agreements Participant Handout 8-1 Keep the Job
Participant Handout 8-1 Keep that Job Self-Check Sheet Participant Handout 8-1 Is that a Good Reason?
Participant Handout 8-1 Identifying your Work-Related Problems Facilitator Resource 8-1 Issues with Work (cut into individual strips)
Scissors and hat
Computers with word processor (required) and Internet access (optional)
Activity and Facilitation Steps
1. Welcome and Introductions – 5 minutes
Have everyone come in and have a snack
Review group agreements and agenda
Quick check in
2. Large Group Discussion – 20 minutes
Hand out Participant Handout 8-1: Keep that Job to participants and ask them to write and share their
ideas on ways to keep a job
o Examples could include: being on time, having reliable transportation, responding well to
suggestions, etc.
Have participants reflect on their current work or vocational experience and compare their experience
to the 10 habits outlined on Participant Handout 8-1: Keep that Job Self-Check Sheet.
Discuss participant reflections
o Explain to participants that when they are on the job a good way to clarify work expectations
and responsibilities is to ask their supervisor
o Inform participants that if they do not ask questions when they are unsure, they run the risk
of making a mistake on the job
3. Identifying Problems Activity- 20 Minutes
Ask participants to name some of the reasons why it is important to show up for work when scheduled
Hand out the Participant Handout 8-1: Is that a Good Reason? to participants and have them vote on
each one
o If comfortable, participants who wish can volunteer their reasoning behind their vote
o Remind them that though they think they might have a good reason for missing work, it is
their responsibility to show up as scheduled unless there is an emergency or they have pre-

Bridging the Opportunity Gap | Career Readiness Curriculum Guide Page 167
arranged time off. When an emergency occurs employees should notify employers as soon as
possible
Handout Participant Handout 8-1 Identifying your Work-Related Problems
Have participants draw the individually cut strips from the Facilitator Resource 10-1 Issue with Work
from a hat/box/etc. After drawing a strip have the participant volunteers read phrases aloud (or
facilitator can read them).
o Ask participant to write the issue in the left column of their sheets and their own idea of a
possible strategy or solution in the right hand column
o If comfortable, volunteers can share their strategies and/or the class can brainstorm more
ideas as well
4. MassCIS Research- 10 minutes
Explain that MassCIS is a website with a wealth of information on getting and maintaining a job.
Have participants log on to MassCIS (www.masscis.intocareers.org). Under the “Employment” tab,
select “Job Success”. Have them explore the resources available on good job habits, working with
your supervisor/coworkers, improving yourself, etc.
5. Closing- 5 minutes
Process check
Have participants put materials from the day in their folders and collect folders
Have participants fill out time sheets and sign out

Bridging the Opportunity Gap | Career Readiness Curriculum Guide Page 168
List ways to keep the job. Check the KEEP THE JOB SELF CHECK SHEET.
Add ideas to complete your web.
How to keep the job
Participant Handout 8-1 Keep the Job

Bridging the Opportunity Gap | Career Readiness Curriculum Guide Page 169
1. Be on time.
Use an alarm clock.
Set an alarm on your phone. Plan for reliable transportation.
Take traffic into account. Prepare for work (your clothes, food, etc.) the night before.
Try to get a good amount of sleep.
2. Follow company rules. Follow safety rules.
Ask for a copy of company rules. Make sure you know how/where to document hours (time-sheet, punch clock, etc.) so you
get paid properly and on time! Take time off only when really needed — many absences
cou ld make you lose your job. If you are going to be late or are not going to make it to work, call your supervisor as soon
as possible to let them know. Too many of these occurrences could cause you to lose your job.
3. Do your job well.
Have a positive attitude. Learn from others.
Be open to feedback from supervisor.
4. Wear clothes appropriate for the job.
Follow the same rules as for a job interview.
If a uniform is required, make sure it is clean.
5. Cooperate and compromise with your co-workers. Don’t argue or fight.
Try to see the opposing person’s side.
Get help from a supervisor when you feel stuck, rather than making things worse.
6. Don’t use drugs or alcohol.
7. Get along with your supervisor.
Ask questions. Offer help/volunteer to take on
tasks. Listen and act upon
suggestions.
8. Be honest.
9. Keep professional and personal lives separate.
Don’t gossip. Don’ t take or make personal calls. Don’t text.
Turn off your cell phone!
10. If you aren’t sure what to do or how to do it, ask your supervisor.
Participant Handout 8-1 Keep the Job Self Check Sheet

Bridging the Opportunity Gap | Career Readiness Curriculum Guide Page 170
There are good and bad reasons to be absent from work. Review the following list and decide which
are adequate (ok/acceptable) reasons for missing work. Put a check next to which reasons y o u
t h i n k would be accepted by your supervisor.
I have a meeting with my lawyer.
I sprained my ankle and must keep it raised.
I ran out of gas.
I need to get a new pair of glasses today.
My house was robbed last night.
I have to visit my sick friend.
I have a hangover.
I have a headache and don’t feel like coming in.
My child is ill, and I must stay home with him/her.
My car isn’t working, and I don’t have a ride.
I had a car accident on the way to work.
There’s been a death in my family.
I have to baby-sit for my sister’s children.
I had a fight with my boyfriend/girlfriend and I’m too angry to work.
Participant Handout 8-1 Is that a Good Reason?

Bridging the Opportunity Gap | Career Readiness Curriculum Guide Page 171
When starting a new job, it is important to be prepared and have a great attitude. In the
space provided below, l ist the issues and problems that you may have at your new job.
Also think of tasks you need to do before starting the job, such as arranging transportation.
For each issue or problem, list a solution. For each task, l ist the steps you need to take to
complete the task. For example, an issue could be that you do not have c h i l d c a r e . A
solution could be to look into nearby child care facilities and ask friends and family members if
they can watch your children on certain days. Try to be specific when listing your solutions or
steps so that it is clear what you need to do.
Problem, issue, or task
Solution or steps to be taken
Participant Handout 8-1 Identifying your work-related problems

Bridging the Opportunity Gap | Career Readiness Curriculum Guide Page 172
No Car. How will I get to work?
|My infant daughter is sick today and doesn’t have day-care.
I want time off to go to my cousin’s wedding.
I can’t seem to get up in the mornings to make it to work on time.
My supervisor says I need to wear a collared shirt every day, and I only have two.
My girlfriend wants me to call her when I am at work.
My supervisor asked me to run a certain machine, but I am not sure how to do it.
Facilitator Resource 8-1 Issues at Work

Bridging the Opportunity Gap | Career Readiness Curriculum Guide Page 173
Topic 8: Job Retention
Workshop 2: Communication
Outcomes Learning Objectives
Identify and understand workplace
communication expectations
Understand and demonstrate professional
workplace communication skills including effective strategies to address potential
workplace conflicts
Materials:
Group Agreements Participant Handout 8-2: Personal Life vs. Work Life
Participant Handout 8-2: Speaking and Listening
Participant Handout 8-2: Non-Verbal Communication Participant Handout 8-2: Tips for Managing Conflict
Participant Handout 8-2: Strategies for Handling Conflicts – Producing “I” Messages
Activity and Facilitation Steps
1. Welcome and Introductions – 5 minutes
Have everyone come in and have a snack
Review group agreements and agenda
Quick check in
2. Discussion- Communication at Work – 15 minutes
Introduce general rules for communicating at work
o Explain to participants that it is important to “treat others as you would like to be treated”
in the workplace. It is also important to be respectful, polite, clear, and open to feedback
from supervisors and co-workers
o In addition, it is generally expected for co-workers to greet each other and to have a
pleasant demeanor with each other and customers, even when they “don’t feel like it”
Discuss how different perspectives and behaviors are required for both personal and work life
using the Participant Handout 8-2: Personal Life vs. Work Life.
o Emphasize to the group that when new on the job, asking questions is the fastest way to
learn and understand their responsibilities and the workplace rules
o Also, it is sometimes tough to hear critical feedback, but it is a necessary part of having a
job
3. Discussion- Non-Verbal Communication – 10 minutes
Ask participants to identify ways to communicate without speaking (non-verbal communication)
o Talk about body language, attentive listening, facial expressions, etc.
o Reinforce that people send out messages all the time, even when they are not talking
(e.g. body language)
o Pass out Participant Handout 8-2: Speaking and Listening and Participant Handout 8-2:
Non-Verbal Communication

Bridging the Opportunity Gap | Career Readiness Curriculum Guide Page 174
o Have participants read the story about Ruben on the Participant Handout 8-2: Non-Verbal
Communication
o Participants can share or write down their answers to the discussion questions in spaces
provided
4. Discussion/Writing/Reflection – 10 minutes
Hand out Participant Handout 8-2: Tips for Managing Conflict and ask participants to share which,
if any, of the tips have worked for them in the past, and what other strategies they may have to
effectively manage conflict. o Ask participants to circle the tips on the handout that they will try in the future, and to
write down an additional one in the space provided
5. Role Play Activity – 15 minutes
Depending on the comfort level of the class, participants may role-play the workplace scenarios
outlined on Participant Handout 8-2: Strategies for Handling Conflict: Practicing I Messages
o Have them practice resolving conflict using the “I Messages” outlined on handout
o Acknowledge that there is no perfect system or strategy for avoiding conflict in every
situation, but it is good to try and come to a peaceful resolution
As an alternative, ask participants to write their answers on the sheet, and ask volunteers to share
6. Closing- 5 minutes
Process check
Have participants put materials from the day in their folders and collect folders
Have participants fill out time sheets and sign out

Bridging the Opportunity Gap | Career Readiness Curriculum Guide Page 175
Adapted f r o m www.lehigvalleycareerlink.com
Participant Handout 8-2 Personal Life vs. Work Life

Bridging the Opportunity Gap | Career Readiness Curriculum Guide Page 176
When communicating both the speaker and the listener are responsible for making sure a message is
understood.
Listening Tips:
DOs
DON’Ts
Look at the speaker
Rush, interrupt, or finish sentences for the speaker
Pay attention
Think about what you’re going to say while the other person is speaking
Ask questions
Stop listening because you disagree with the speaker
Repeat what is said in your own words
Walk away unless you understand what has been said
Participant Handout 8-2 Listening and Speaking Tips

Bridging the Opportunity Gap | Career Readiness Curriculum Guide Page 177
Your attitude toward your job will be judged in part by your nonverbal communication. Here are some
do’s and don’ts:
DO make eye contact
DO assume a pleasant facial expression
DO sit up straight and lean forward slightly.
DON’T slouch
DON’T put your feet up
DON’T smack or crack chewing gum
DON’T sigh loudly
DON’T check your phone for messages or texts Think About It
Ruben, a teacher’s aide, was attending a staff meeting at the child-care center. The director had
been speaking for fifteen minutes about the center’s plan to reorganize the play areas. Ruben was
interested about the plan and was eager to get to work, but he felt the director was wasting
time explaining and justifying every step of the plan.
Ruben slouched lower in his seat and put one foot up on an empty chair. He examined his
fingernails and began cleaning them with a nail file he had on his key chain. As the director
continued talking, he looked at his watch, raised his eyebrows, and sighed loudly.
What nonverbal signals did Ruben send?
_____________________________________________________________________________________
_____________________________________________________________________________________
How do you think the director interpreted his nonverbal signals? _____________________________________________________________________________________
_____________________________________________________________________________________
_____________________________________________________________________________________
Did Ruben’s nonverbal communication really reflect how he felt about the project? Explain.
____________________________________________________________________________________
____________________________________________________________________________________
How might Ruben have non-verbally communicated a more positive attitude during the meeting? _____________________________________________________________________________________
Participant Handout 8-2 Non-Verbal Communication
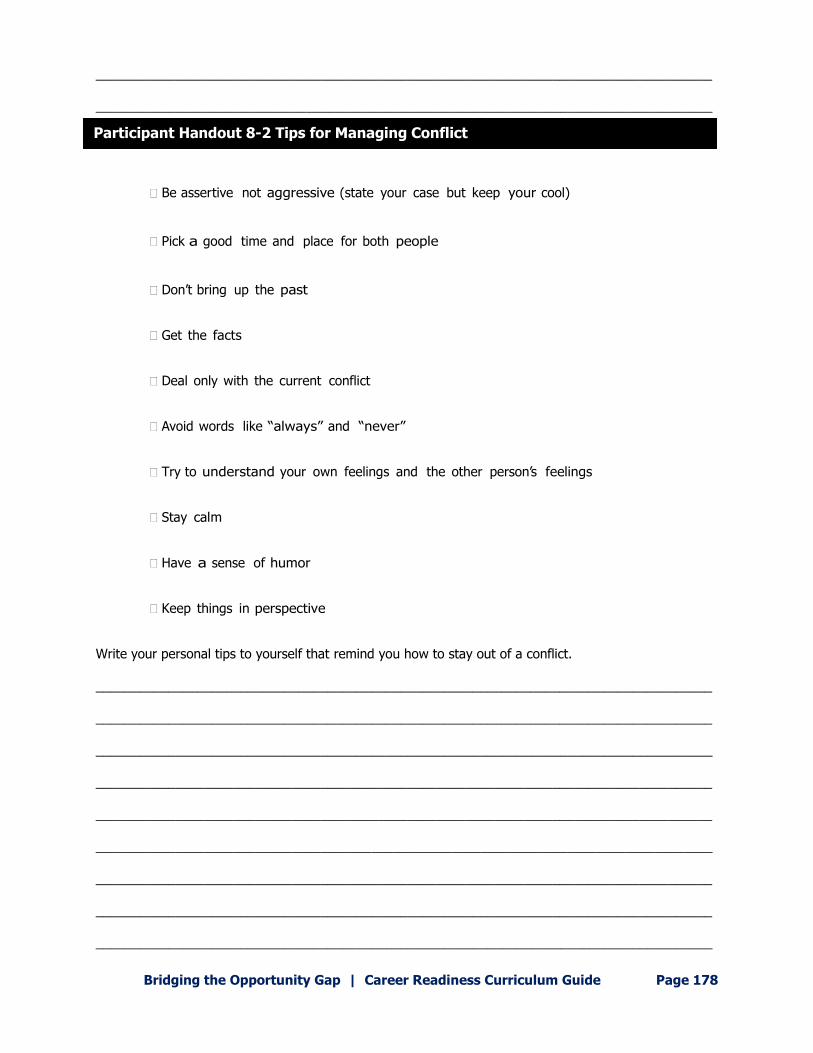
Bridging the Opportunity Gap | Career Readiness Curriculum Guide Page 178
_____________________________________________________________________________________
_____________________________________________________________________________________
Adapted from Merging Two Worlds, 2003
Be assertive not aggressive (state your case but keep your cool)
Pick a good time and place for both people
Don’t bring up the past Get the facts Deal only with the current conflict Avoid words like “always” and “never” Try to understand your own feelings and the other person’s feelings Stay calm Have a sense of humor Keep things in perspective
Write your personal tips to yourself that remind you how to stay out of a conflict.
_____________________________________________________________________________________
_____________________________________________________________________________________
_____________________________________________________________________________________
_____________________________________________________________________________________
_____________________________________________________________________________________
_____________________________________________________________________________________
_____________________________________________________________________________________
_____________________________________________________________________________________
_____________________________________________________________________________________
Participant Handout 8-2 Tips for Managing Conflict

Bridging the Opportunity Gap | Career Readiness Curriculum Guide Page 179
Adapted f r o m Merging Two Worlds, 2003
Here are some work situations that might easily become conflicts. See if you can come up with an I
Message for each. Be assertive, which means express how you might feel and what you t h i n k
without starting a fight:
1. Your Co-worker, Jason, did not show up for work. When you try to reach him, he is not
home. Later you find out that he mis-read the schedule and didn’t think he was supposed
to work.
I feel when you
I would appreciate 2. Jean starts a rumor about you that gets back to your boss. You have to prove it was wrong. When you I feel
I want
3.
3. Your boss calls you by a nickname that you do not like.
I feel
when you
I would like
4. Y ou r j o b requires you to work in teams. Sarah does not do her fair share making the rest of the team work harder to make up for her.
When you I feel
I’d appreciate
5. Jennifer often uses the phone during work hours even though it is against business policy, and it is
noisy and distracting you from your work.
When you I feel
I’d appreciate
Participant Handout 8-2 Strategies for Handling Conflicts – Practicing “I” Messages

Bridging the Opportunity Gap | Career Readiness Curriculum Guide Page 180
Topic 8: Job Retention
Workshop 3: Coping
Outcomes Learning Objectives Identify their personal stress triggers and
practice the use of effective coping strategies to
help manage stress on the job
Explore and understand effective
communication and self-care tactics that can
be used to deal with difficult situations
Materials:
Group Agreements Participant Handout 8-3: Stress and You
Participant Handout 8-3: Tips for Reducing Stress
Facilitator Resource 8-3: Role-Plays for Coping at Work
Activity and Facilitation Steps
1. Welcome and Introductions – 5 minutes
Have everyone come in and have a snack
Review group agreements and agenda
Quick check in
2. Large Group Discussion –15 minutes
Introduce triggers; Explain to participants that at work, as well as other areas of their life, they
may encounter people and situations that are stressful to deal with, and may test their coping and communication skills. And, if this person/event causes difficulty often, they may be seen as a
“trigger” or starting place that “turns on” feelings of stress, anger, or anxiety for the participant Discuss- if comfortable, have participants share examples of their “triggers,” (a certain class,
driving in traffic, being told you made a mistake, etc.)
o Ask them to discuss the ways in which they have coped with these triggers in the past
o Facilitator can give examples such as: walk away from the situation, get help from another person, seeing things from the other’s point of view, compromising, deep breaths
to stay calm, agree to disagree, etc. o In addition to dealing directly with the person/situation, ask participants to discuss ways
in which they can “work off the stress” when they are away from the triggering person or event. Ask the group to explain how they feel when becoming stressed, in their body and
mind, and how they might feel after using a healthy choice to cope
3. Writing/Reflection/Discussion—15 minutes
After reviewing the Participant Handout 8-3: Stress and You, ask participants to fill out handout
and ask those who are comfortable to share some of their responses
o Emphasize that there are verbal and non-verbal ways to respond to people, that can send powerful messages
Hand out Participant Handout 8-3: Tips for Reducing Stress, and ask participants to circle the
ideas that work for them or the ideas they would like to try In addition, see how many other ideas participants can generate about safe/healthy ways to
relieve stress. Participants may flip over their handout to write down any other ideas they have
or have heard from others that appeal to them

Bridging the Opportunity Gap | Career Readiness Curriculum Guide Page 181
4. Role Play – 20 minutes
If participants are comfortable, ask part ic ipants to pair together and choose three role-plays
from the Facilitator Resource 8-3: Role-Plays for Coping at Work. o When selecting a role play it is important to recognize the dynamics in the
group and select a role play that will be appropriate for all participants.
Next, have them (by themselves) choose what they may do/say for each scenario, choosing
a coping strategy from the list on Participant Handout 8-3: Stress and You or others they may
have
Ask participants to then share and compare ideas with their partners
Alternative Options: if pair work is not a good option, the instructor can lead the activity as a
group, or modify it by having participants complete the activity independently, writing their
strategies down rather than sharing aloud The activity can be extended by having participants imagine the dialogue from the “other side”
(the person with whom the subject in the role-plays is having a problem with) and what they
might say in response
5. Closing- 5 minutes
Process check
Have participants put materials from the day in their folders and collect folders
Have participants fill out time sheets and sign out

Bridging the Opportunity Gap | Career Readiness Curriculum Guide Page 182
Directions: Think about your past stressful events. List three stressful events for each category. Then
answer the discussion questions.
FAMILY
_________________________________________________________________________
_________________________________________________________________________
WORK/SCHOOL
_________________________________________________________________________
_________________________________________________________________________
FRIENDS/RELATIONSHIPS
_________________________________________________________________________
_________________________________________________________________________
What physical and emotional signs of stress did you have?
_________________________________________________________________________
Time to Cope: What have you tried in the past to cope with this person/situation?
Did it work? Why or why not?
Possible New Coping Strategies:
Choose my battles Take care of myself
Limit contact Avoid holding a grudge
Resist instigating (“ S t i r r ing up trouble”) Be clear and fair in your position
Detach with kindness Take a breather/break from it
No put-downs Use “I” statements instead of accusations
Accept reality (some things are hard to change) Have patience
See things from “the other’s side” Give the other person choices/a “way out”
Ask a neutral person to mediate (help you resolve/compromise)
Adapted from Merging Two Worlds, 2003
Participant Handout 8-3 Stress and You

Bridging the Opportunity Gap | Career Readiness Curriculum Guide Page 183
In today’s world most people can’t avoid stress. They can learn to behave in ways that lessen the
effects of stress. The following factors can help keep stress at a minimum.
Read the list. Put an X beside the statements that apply to you.
1. Eat at least one hot, balanced meal a day.
2. Get 7 to 8 hours of sleep at least 4 nights a week.
3. Give and receive affection regularly.
4. Have at least one relative within 50 miles that I can rely on.
5. Exercise at least twice a week.
6. Get strength from my spiritual beliefs.
7. Have a network of friends.
8. Have more than one friend to confide in.
9. In good health.
10. Regularly attend club or social activities.
11. Able to speak openly about my feelings.
12. Regularly talk about problems at home with the people I live with.
13. Do something for fun at least once a week.
14. Able to manage my time effectively.
15. Drink fewer than three cups of coffee or high caffeine drinks a day.
16. Take some quiet time for myself during the day.
17. A positive thinker.
18. Aware that support groups can help people work through a common problem.
19. A ssertive and able to stand up for myself.
20. Aware that keeping a journal of stressful events can help me become aware of how I
handle
stress.
21. Aware that picturing myself in a wonderful setting can be a temporary way to relieve stress.
Participant Handout 8-3 Tips for Reducing Stress

Bridging the Opportunity Gap | Career Readiness Curriculum Guide Page 184
Healthy/Safe Activities to Reduce Stress:
walking running
listening to music
playing music
playing basketball
reading a book
dancing
playing a computer game
riding a bike
calling a friend
writing a letter
playing football
attending a free concert
taking a nature hike
learning a new hobby
taking a hot shower or bath lighting a candle
taking deep breaths visualization
drawing or painting
learning a new sport relaxation CDs
taking in a local play or some local sports
cooking or baking something
Adapted from Merging Two Worlds, 2003
WHICH ONES DO YOU DO?
WHICH ONES WOULD YOU LIKE TO TRY?

Bridging the Opportunity Gap | Career Readiness Curriculum Guide Page 185
You are in the break room, and a co-worker makes a racist slur (insult) about another co-worker.
What could you do?
Someone at work vandalized some of your personal property. You think you know who did it.
How do you approach that person/the situation?
You and a co-worker are in charge of “cashing out” for the night. Your Co-worker often makes
mistakes while tallying the money, and you both have gotten blamed in the past. What could
you say?
You usually pick up your co-worker and ride to work together. However, he’s been late the last
three days, and you’ve had to wait for him to get ready, thus getting to work late. He/s late
again today, what do you do?
You wo r ked very hard to finish a task at work. However, when your supervisor comes by,
your co-worker (who did next to nothing) accepts all the praise and credit for herself. What do
you say to her? To your supervisor?
Your supervisor constantly asks for your input on small/everyday decisions, but then shoots your
suggestions down, and does the opposite. What could you do?
Your co-worker loves to talk and has great stories. You really like this person, and they make you
laugh every day. However, you notice neither of you getting enough work done when you’re
talking. What steps could you take?
Y o u a r e unsure of how to do a task at work. You ask a co-worker for help. They help you,
but are being rude and sarcastic doing it. They hint that they think you are stupid. What do
you do?
Facilitator Resource 8-3 Role-Plays for Coping at Work

Bridging the Opportunity Gap | Career Readiness Curriculum Guide Page 186
Topic 9: Personal Finance and Budgeting
Length of Topic: 3 hours, 3 workshops
Workshop 1: Why and How to Use a Bank
Outcomes Learning Objectives Understand the types of bank accounts available
to them and receive updated information on
local banks
Understand the benefits, procedures, and
potential pitfalls of bank accounts.
Materials:
Group Agreements Chart Paper
Participant Handout 9-1 Fast Facts about Financial Services Fees Participant Handout 9-1 7 Signs of Smart Debit Card Use
Participant Handout 9-1 Local Bank Information
Computers with internet access
Activity and Facilitation Steps
1. Welcome and Introductions – 5 minutes Have everyone come in and have a snack
Review group agreements and agenda
o Note that lessons regarding budgeting exist in the EYF curriculum currently being used in
Detention, Treatment, and Revocation programs. This lesson is an opportunity to continue the
learning started in the residential programs and strengthen application of knowledge through
access to actual current research in their community
o When prompting discussions please ask participants about their previous knowledge and
learnings regarding budgeting
Quick check in
2. Large Group Discussion – 25 minutes
Discuss the benefits of banking:
o Make a chart on the board or a piece of chart paper titled “Where Should I put my Money?” Write “Options” (choices) down the side, and “Advantages” (what is good about an
item) across the top Under “Advantages” write (at the top o f co lumns ) Convenient (easy to get),
Safe/Insured, and Interest (money earned)
o Ask participants to list some things that they think people do with money after they receive it
(from a paycheck, gift, etc.), and write them down under options. Some suggestions they
might say could be — spend it right away, hide it away at home, cash a check at a check -
cashing business, or put it in a bank account. After each suggestion, ask participants (if
comfortable, or instructor if not) to put a check mark in whichever of the “Advantages”
columns the method matches
o Suggest that a bank account is probably the smartest and safest place to put money
Discuss the challenges with other options such as having cash on your person or at
home could get lost or stolen, spending it all leaves you broke, and check cashing
stores take a big “cut” (percentage) out of your check with charges

Bridging the Opportunity Gap | Career Readiness Curriculum Guide Page 187
Additionally, if money is in a bank, there is “interest” (money gained over time by
having it in a bank account) being made, and therefore you are making your
money work for you
Discuss steps to opening an account:
o Explain to participants that as long as they have identification and cash or a check to
deposit, bank accounts are relatively easy to open
o Most banks expect a lot of questions from new customers, so please speak up when
meeting someone at the bank to open an account—it is their job to help customers
o Savings and checking accounts are the two main type of accounts – one that is just
available for withdrawal in cash form, and one where you can withdraw cash, write checks,
and make debit purchases with (see next workshop for more on checking accounts)
Hand out Participant Handout 9-1 Fast Facts about Financial Service Fee
o Tell participants that although bank accounts are a secure and smart way to keep your
money, a precaution when opening an account is to understand that there may be fees to
have an account
o Ask participants to circle the facts from the handout that pertain to savings accounts or
saving/checking
o Explain the facts to the group, emphasizing that different banks have different fees,
interest rates, etc. and therefore it is important to “do your research” on different banks
Discuss debit cards:
o Explain that a debit card works like a credit card –using a card instead of cash—except,
when you use a debit card, the purchase amount is deducted from your bank account, so
you can only spend what money is there. Users decide on a PIN number (code) to type in
when a debit card is being used
o Inform the participants that many stores, gas stations, restaurants, and other business will
accept debit cards. Also, most banks let you use your debit card to get money from your
account out of ATMs (Automated Teller Machines)
o Hand out Participant Handout 9-1 7 Signs of Smart Debit Card Use and remind participants
that it is not foolproof against theft and fraud
3. Computer Research – 25 minutes
Ask participants to log onto the internet and find the websites for two or three banks in their community
o For this activity, it may be helpful for participants to have another window open on the computer with a financial terms glossary in it — refer to www.moneyandstuff.info/glossary
For each bank, have the participants fill out the chart on Participant Handout 9-1 Local Banking Info,
noting location, types of accounts for young people, fees, and interest rate. After comparing the options,
each participant should pick the bank that would work best for them While on sites, participants can also learn about online banking, direct deposit of paychecks, and other
features
4. Closing—5 minutes
Process check
Have participants put materials from the day in their folders and collect folders
Have participants fill out time sheets and sign out

Bridging the Opportunity Gap | Career Readiness Curriculum Guide Page 188
Participant Handout 9-1 Fast Facts about Financial Services Fees

Bridging the Opportunity Gap | Career Readiness Curriculum Guide Page 189
Adapted from NEFE High School Financial Planning Curriculum
Participant Handout 9-1: 7 Signs of Smart Debit Card Use

Bridging the Opportunity Gap | Career Readiness Curriculum Guide Page 190
NAME
LOCATION
ACCOUNTS
FEES
INTEREST
Bank 1:
Bank 2:
Bank 3:
Participant Handout 9-1: Local Bank Information

Bridging the Opportunity Gap | Career Readiness Curriculum Guide Page 191
Topic 9: Personal Finance and Budgeting
Workshop 2: Checking Accounts and Credit Cards
Outcomes Learning Objectives
Be able to correctly write a sample check, keep
a register of checks written, and track
deposits/withdrawals Compare various credit cards, and understand it
is important to look for a plan that if a good
match for their income and spending.
Understand the procedures, advantages, and
precautions of having a checking account and a
credit card.
Materials:
Group Agreements Chart Paper
Participant Handout 9-2 Make a Promise with a Check Participant Handout 9-2 Sample Blank Checks
Participant Handout 9-2 Sample Checkbook Register Exercise Participant Handouts 9-2 Credit Cards: Do the Math – 1, 2, 3
Participant Handout 9-2 Credit Card Basics
Computers with Internet
Activity and Facilitation Steps
1. Welcome and Introductions – 5 minutes
Have everyone come in and have a snack
Review group agreements and agenda
Quick check in
2. Large Group Discussion Checking Accounts – 20 minutes
Discuss why a checking account is useful
o Write “Cash”, “Check”, “Debit Card”, and “Credit Card” on a piece of chart paper.
o Name some purchases and expenses, and ask participants to name which method is best to
use to pay for them. Record in appropriate column
o Engage participants in a discussion of how a checking account could be helpful to them as
young adults—for example, safety of not carrying a lot of cash around, being able to write
checks for bills and other financial transactions, and keeping track of their spending, which will
be helpful when building a budget
Explore how checking works by reading the top portion of Participant Handout 9-2 Make a Promise
with a Check and answer specific question they may have
o Remind participants that checking accounts allow you to have a debit card, which is
convenient for face-to-face transactions and allows one to get cash from an ATM
o Many banks require people under 17 or 18 to open an account with an adult as a cosigner
Explain cautions related to checking accounts- not every business or person will accept checks, and
often you are asked to show identification that must match the name on the check
o Also it is very important to keep track of balances and not “bounce” checks – banks may
charge you, and whomever you were paying may charge you extra too or no longer allow the
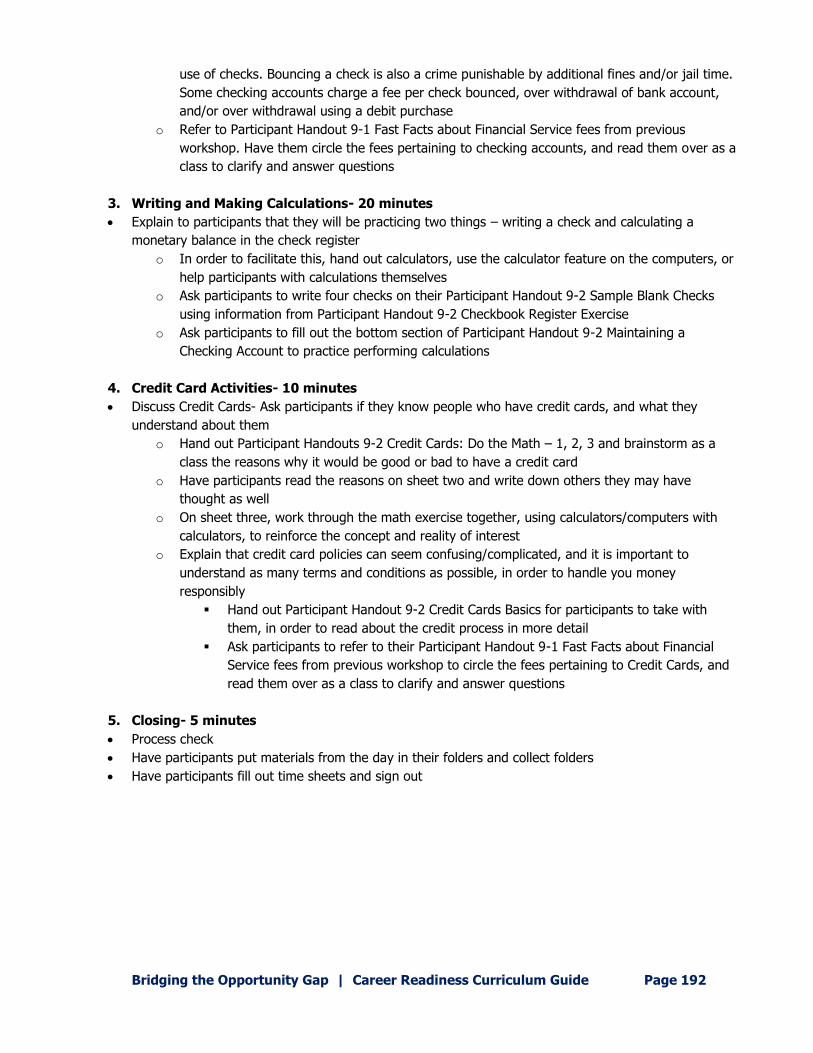
Bridging the Opportunity Gap | Career Readiness Curriculum Guide Page 192
use of checks. Bouncing a check is also a crime punishable by additional fines and/or jail time.
Some checking accounts charge a fee per check bounced, over withdrawal of bank account,
and/or over withdrawal using a debit purchase
o Refer to Participant Handout 9-1 Fast Facts about Financial Service fees from previous
workshop. Have them circle the fees pertaining to checking accounts, and read them over as a
class to clarify and answer questions
3. Writing and Making Calculations- 20 minutes
Explain to participants that they will be practicing two things – writing a check and calculating a
monetary balance in the check register
o In order to facilitate this, hand out calculators, use the calculator feature on the computers, or
help participants with calculations themselves
o Ask participants to write four checks on their Participant Handout 9-2 Sample Blank Checks
using information from Participant Handout 9-2 Checkbook Register Exercise
o Ask participants to fill out the bottom section of Participant Handout 9-2 Maintaining a
Checking Account to practice performing calculations
4. Credit Card Activities- 10 minutes
Discuss Credit Cards- Ask participants if they know people who have credit cards, and what they
understand about them
o Hand out Participant Handouts 9-2 Credit Cards: Do the Math – 1, 2, 3 and brainstorm as a
class the reasons why it would be good or bad to have a credit card
o Have participants read the reasons on sheet two and write down others they may have
thought as well
o On sheet three, work through the math exercise together, using calculators/computers with
calculators, to reinforce the concept and reality of interest
o Explain that credit card policies can seem confusing/complicated, and it is important to
understand as many terms and conditions as possible, in order to handle you money
responsibly
Hand out Participant Handout 9-2 Credit Cards Basics for participants to take with
them, in order to read about the credit process in more detail
Ask participants to refer to their Participant Handout 9-1 Fast Facts about Financial
Service fees from previous workshop to circle the fees pertaining to Credit Cards, and
read them over as a class to clarify and answer questions
5. Closing- 5 minutes
Process check
Have participants put materials from the day in their folders and collect folders
Have participants fill out time sheets and sign out

Bridging the Opportunity Gap | Career Readiness Curriculum Guide Page 193
A check is a promise to pay someone money. When you get a check from someone, it means that they
are promising to pay you. When someone gives you a check you take it to the bank. The bank knows that
a check is a promise, and gives you the amount of money that’s written on the check. When you give a
check to someone, they take it to their bank. Their bank gives them the amount of money you promised to
pay.
A checking account is money that you keep at the bank. Y o u c a n o p e n a checking account and
deposit money just like you do with your savings account. When someone goes to the bank with a check
that you’ve given them, the bank uses your money from your checking account to pay them.
You must always have enough money in your account to pay for the checks that you write. If you give
someone a check, and the bank doesn’t have any of your money to pay for it, you’re breaking your
promise. When you break your promise to pay, the bank will bounce your check, and charge your account
a fee.
Bouncing a check means that the bank will not give any money to the person you gave the check to.
You’l l sti l l owe money to the person you promised to pay, and they probably won’t be too happy that
you broke your promise.
You must be very careful when you write a check because a check represents your money. Below is a
picture of a check with all of the different parts numbered along with an explanation of its functions.
1. Name & address: This is your name and address, and this tells the bank you’re the person making
the promise.
2. Check Number: This number helps you keep track of whom you paid. You use this number
to make a list of all the checks you write.
3. Date: Write the date here. This tells the bank when you promised to pay this money. I t
a l s o helps you remember when you paid someone.
4. Pay to the Order of: Write the name of the person you are promising. This is how the bank knows
whom to pay.
5. Numeric Amount: Write how much money you are promising to pay. Write it in numbers, for example: $20.00. Write your numbers clearly, so that the bank teller knows exactly how much you’ve promised
to pay. 6. Written Amount: Write out how much you are promising to pay. For example: twenty dollars. This is
for safety, so that no one can change the amount of money you are promising to pay. When dealing
Participant Handout 9-2: Make a Promise with a Check

Bridging the Opportunity Gap | Career Readiness Curriculum Guide Page 194
with cents, the number is written as a fraction over one hundred or one dollar. For example, 20 cents would be written as 20/100.
7. Bank Name: This is the name of the bank where you keep your money.
8. Memo Section: Allows you to write a note about the purpose of the check. 9. Router number: Allows banks to quickly transfer money from one institution to another.
10. Signature Line: Indicates that you promise to fulf i l l your obligation.

Bridging the Opportunity Gap | Career Readiness Curriculum Guide Page 195
Participant Handout 9-2: Sample Blank Checks

Bridging the Opportunity Gap | Career Readiness Curriculum Guide Page 196
When you have a checking account, you need to keep track of all of the deposits you make and all of the
checks you write. Each book of checks comes with a checkbook register, which is like a record book. You
will use this register to keep track of the money in your checking account.
When you deposit money in your account, write down in the checkbook register:
The date
Where the money came from (for example : paycheck, birthday gift)
How much money you deposited
Before you write a check or take money out of your account, write down in the checkbook register:
The check number
Who you’re writing the check to
The amount of money
Remember, every time that you add money to or take money from your account, you need to record
the information in the checkbook register. Then:
Add or subtract that amount of money from the previous balance to find out how much money is left in your account. This will be your current balance.
Sample Checkbook Register
Look at the sample checkbook register for three checks and other recent deposits and cash
withdrawals made during the month of January 2005. Do you see that the shaded (gray) rows show
your current balance at any given time? You use the white row’s to record information about
payments or deposits each day and then add or subtract them from your balance.
Check Number
Date
Description of Transactio
n
Payment/ Debit
Fee
Deposit/ Credit Amount
Balance
1-1-05 Deposit 470.50 470 50
Paycheck
(12/15-12/31) 1,215 72
1-6-05 Cash 100.00 100 00
1,115 72
101 1-12-05 Sears Dept. Store 75.00 75 00
(Clothing) 1,040 72
102 1-22-05 Tower Records 85.72 85 72
(CD player) 955 00
1-23-05 Cash 75.00 75 00
880 00
103 1-24-05 Cortez Apartments 510.00 510 00
(Rent) 370 00
Participant Handout 9-2 Sample Checkbook Register Exercise

Bridging the Opportunity Gap | Career Readiness Curriculum Guide Page 197
Does this decision show what I value?
Does it help me reach a goal important to me? Can I live with the consequence?
List the good and bad of credit cards:
GOOD:
BAD:
Discuss your answers and compare them to the reasons listed on Credit Cards: Do the Math.
STOP AND
THINK
Participant Handout 9-2: Credit Cards: Do the Math -- 1

Bridging the Opportunity Gap | Career Readiness Curriculum Guide Page 198
Adapted from Merging Two Worlds, 2003
Good and Bad
Good:
Convenience
Using a credit card builds your credit history
In some cases, you must have a credit card to:
Hold a reservation Rent a car
Book airline reservations
Bad:
Interest charges
Late charges
Penalty for exceeding credit limit
Fee for cash advance
Annual fee
Participant Handout 9-2: Credit Cards: Do the Math -- 2

Bridging the Opportunity Gap | Career Readiness Curriculum Guide Page 199
Adapted from Merging Two Worlds, 2003
On January 1st, you charge $305.00 for stereo equipment. Your credit card charges 17%
interest on the unpaid balance.*
What do you think your unpaid balance will be on the first bill after the grace period?
Do the math:
$305.00 x .17 (17%) = $51.85...
Y o u r n e w unpaid balance is $305.00 + $51.85 = $356.85 Month #1, you owe $356.85
Let’s say your minimum payment is $35.00. To get the bill under $305.00,
you decide to pay $56.85 ($356.85 – $56.85 = $300.00).
Do the math:
$300.00 x .17 (don’t forget that 17%) = $51.00
Y o u r n e w unpaid balance isn’t $300.00, but $351.00
Month #2, you owe $351.00
Some cards may be a better deal than this. But, before you buy, especially “with plastic,” ask
yourself two questions: Do I need it? Can I afford it? (If you wouldn’t lie to a friend, don’t lie to
yourself.)
*If it’s 17% APR, must translate to daily periodic rate, and then calculate interest.
STOP AND
THINK
Participant Handout 9-2: Credit Cards: Do the Math -- 3

Bridging the Opportunity Gap | Career Readiness Curriculum Guide Page 200
Adapted from Merging Two Worlds, 2003
A credit card can be a very useful personal financial tool. It gives you some flexibility about when you make your purchases and when you pay for them. Plus, you get a single convenient listing of your charges
once a month. Interested in getting a card? Here is some information to help you be an informed and
responsible credit card customer. What Are Credit Cards and How Do They Work?
A credit card essentially authorizes you to borrow money up to a certain limit. Y ou b o r r ow the money
when you use your card to make purchases or take out cash advances. You can repay what you borrow
right away or pay over a longer period of time. I f y o u r e p a y what you owe over time, in most cases you will be charged interest on the unpaid balance. If you repay the entire debt within a specified time
period, there are usually no interest charges.
What to Do When a Credit Card Is Lost or Stolen
If you lose your credit card, or realize it has been stolen, take these two steps:
Immediately call the company that issued you the card. Most companies have toll-free numbers
and 24-hour service to deal with such emergencies. Make a note of the person you spoke to.
It’s a good idea to follow up your phone call with a letter to the card company. Include your
account n u m b e r , when you noticed your card was missing, and the date and time you first
reported the lost card, and the name of the representative you spoke to.
Once you report the loss or theft to the bank, you are not liable f or unauthorized charges. If a
thief uses the card before you report it missing, the most you would owe is $50.
(http://www.consumer.ftc.gov/articles/0213-lost-or-stolen-credit-atm-and-debit-cards)
Getting credit is one situation where reading the fine print can really pay off. Crucial information
about interest rates, repayment terms, and conditions unique to the card should be included
with the credit card application. You receive this information again when you receive your credit
card. Plus, a summary may be printed on your monthly credit card statement. Key Credit Card Terminology
Here’s what to look for: Annual percentage rate (APR): The interest rate charged on unpaid debt stated as a yearly
percentage rate. A single card may have multiple APRs. For example, purchases, cash advances,
and balance transfers may all have different APRs. Also, a card may have an introductory APR that
converts to a regular APR after a specific length of time.
Balance: The total of what you owe.
Balance transfer: When you pay off all or part of what you owe on one credit card by transferring
the amount to another credit card.
Credit limit: The maximum amount a credit card company will allow you to borrow on a single
credit card at any one time. Sometimes called a “credit line.”
Finance charge: The cost of using the credit card; comprised of interest costs and other fees.
Grace period: If you have paid off your previous balance on your card, this is the period of time
Participant Handout 9-2: Credit Card Basics
Bridging the Opportunity Gap | Career Readiness Curriculum Guide Page 201
you have to pay for purchases before interest charges apply. There is usually no grace period for
cash advance o r balance transfers.
Cash advance: An on-the-spot cash loan charged to your card. Banks provide printed checks you
can use for this purpose or you can use your card at an ATM. Cash advances may have fees,
higher interest rates, and no grace period
Balance transfer fee: A charge for transferring the balance (or portion of a balance) from one
credit card to another.
Annual fee: Fee some cards charge once a year.
Other fees: Charges associated w i th specific actions such paying late, getting a cash advance,
exceeding your credit limit, or paying online or by phone.
Who Can Get a Credit Card?
When a bank considers whether to offer you a credit card, they try to evaluate the type of customer
you will be, specifically: Are you likely to pay back what you owe on time? If you already have
credit cards or loans, a credit card provider can learn more about how you’ve managed your
accounts in the past by viewing your credit report and credit score. (Your credit report shows your
repayment history and your credit score is a number that is calculated based on the information in
your history.) Many credit card issuers believe that a person’s past credit history serves as the best
indicator of the type of borrower they will be in the future.
If you are a participant applying for your first credit card, you probably don’t have a credit history or credit score. Some banks that offer college participants credit cards will waive the requirement to have a
credit history and credit score. In some cases, they may look at other factors, such as a history of on time payment of rent or utilities, your income, and your assets (savings and things you own, like a car).
They will also look at your age because you must be 18 or 19 years old to obtain a credit card,
depending upon the state you live in.
Although you might not have a credit history or credit score yet, you will begin to build one after you
obtain your first credit card. The most popular credit scoring formula is called the FICO formula,
produced by the Fair Isaac Corporation. It calculates credit scores based on the following five
factors: payment history ( on-time vs. late payments), amounts owed, length of your credit history,
number of requests for your credit history, and mix of credit types, such as credit cards and
installment loans (where you pay a fixed amount per month for a fixed term). What to Consider When Choosing a Credit Card
Think about how you will use the card. Will you pay the balance every month? Remember, charges can add up quickly — and so can interest and fees. Are you financing a longer-term
debt? The size of the interest rate can make a big difference in how much you pay in the end. Compare the terms and conditions. Shop around for the plan that fits you. Make sure you read —
and keep —the fine print.
Find out if interest rates or other terms will change. Read through the credit card offer to see if
charges such as annual fees and interest rates are subject to change at any point.
Understand the difference between fixed and variable rates. Fixed means the interest rate will not
change. Variable means the rate can increase or decrease based on changes in an underlying interest rate index.
Consider customer service. Check whether the card provider offers customer services via telephone
and internet. These services can include access to account information, online bill payment, ability to update personal information, and problem resolution. Be sure you understand any fees charged
for these services.

Bridging the Opportunity Gap | Career Readiness Curriculum Guide Page 202
Understanding Your Credit Card Statement
You will receive a billing statement from the bank each month. Look it over carefully. I t l i s ts deta i ls of
your activity during the account billing cycle, such as purchases and payments. (The billing cycle is typically a one-month period.) The statement should also include information about the terms and
conditions of your card, including how interest is calculated and where to call with billing questions.
Your statement contains a lot of information. Here’s what to look for:
Previous Balance. The amount you owed at the end of the previous billing cycle.
New Balance. This is the amount you need to pay to avoid further finance charges. It represents
the total of your previous balance, any new purchases, cash advances, and other transactions —
minus any payments and credits. Account Activity. List of all transactions (purchases, cash advances, payments, credits, and fees)
that occurred since your last statement.
Minimum Payment Due. The smallest amount you must pay by the due date. If you make the
minimum payment, you typically will be charged interest on your unpaid balance and all new charges until the entire debt is paid off. If you do not pay the minimum by the due date, you will
likely be charged a late fee.
Credit Available. The amount of credit remaining on your card after your balance and your current
charges are subtracted from your total credit limit. Payment Due Date. The date your payment must be received.
Finance Charge. The cost of using the credit card for that month, comprised of interest costs and
other fees. Check your statement each month to make sure all the information is accurate. Also
check the payment due date, interest rate and credit limit, as these can change.
Paying Your Credit Card Bill
There are several things to consider when you make your credit card payments.
Your payment size. You have to pay at least the minimum payment each month. You can pay
this amount or a larger amount, or even pay off the whole balance. Keep in mind that you
will be charged interest on the unpaid balance, and think about what makes the most sense
for you.
Your credit limit. It is important that you not go over this limit. If you do, you will likely be
charged a fee.
On-time payment. Know when your payment is due. If your payment is not received by the
due date, you are likely to be charged a late fee. In addition, your interest rate may
increase, and your account will be considered “past due” and may be reported as delinquent
to the credit reporting agencies. If you mail your payment, send it at least a week ahead of
the due date, just to be safe. If you pay online, check the payment cutoff time so you know
which day your payment will be applied.
Method of payment. Many credit cards allow you to pay by mail, phone, or online. Be sure you
understand any fees charged for these options.
Getting Credit Smart
Opening your f irst credit card accounts can be exciting. Learning how to use them responsibly is
essential. By taking the time to learn about how credit cards work, you are already on the right path
to making smart choices about using credit.

Bridging the Opportunity Gap | Career Readiness Curriculum Guide Page 203
Topic 9: Personal Finance and Budgeting
Workshop 3: Budgeting
Outcomes Learning Objectives Have the skills and knowledge to discern
between wants and needs when creating a
budget Know and understand how to create a budget
Explore ways to save money
Understand the meaning of a budget and
explore ways to budget effectively
Materials:
Group Agreements
Chart Paper
Participant Handout 9-3 Wants and Needs Participant Handout 9-3 Personal Budget
Participant Handout 9-3 Stretch Your Budget
Activity and Facilitation Steps
1. Welcome and Introductions – 5 minutes
Have everyone come in and have a snack
Review group agreements and agenda
Quick check in
2. Large Group Discussion Needs vs Wants – 20 minutes
Hand out Participant Handout 9-3 Wants and Needs
Ask participants to discuss which items listed are needs vs. wants
On chart paper, write down a group generated list of what typically goes into a monthly budget
o Have participants contribute reasons why it is important to take care of needs first
3. Writing/Reflection – 15 minutes
Hand out Participant Handout 9-3 Personal Budget and Participant Handout 9-3 Stretch Your Budget
Remind participants of the list of possible monthly budget items they have generated. Ask them to
make an estimated list of their monthly expenses, using the tool on Participant Handout 9-3 Personal
Budget. Help participants with estimation amounts
Next, on the Participant Handout 9-3 Stretch Your Budget, have participants read the tips and add
their own
As a group share the budget tips, and supplement lists with other ideas
4. MassCIS: Reality Check Activity – 20 minutes
Explain to participants that they will be using the MassCIS website to conduct a Reality Check to better
understand what makes up a monthly budget. This website will help them see realistically what
different “lifestyles” will cost per month, and what occupations can cover those expenses
o Note: Participants may have taken Reality Check while in Treatment as it is featured in Unit 6
in the EYF Treatment curriculum

Bridging the Opportunity Gap | Career Readiness Curriculum Guide Page 204
o If a participant has already completed the Reality Check, ask them to either review their
previously completed Reality Check by logging into to their account on MassCIS. Encourage
the participant to do another one to see if things have changed or have the participant help
others less familiar with the website complete the Reality Check.
To access Mass CIS for last activity follow these steps:
o Have participants Log in or o Click on Massachusetts Residents if they do not have a User Name and Password
Click on high school participants Scroll down to their city and enter their zip code
Once logged in
o Select the Assessments tab; and click on “Reality Check” under What Lifestyle can I afford heading
o Click “Get a Reality Check” and follow prompts to complete activity
Debrief about occupations that would fit desired lifestyle, hidden costs such as taxes and fees, and
other factors important to consider when planning a monthly budget
5. Closing—5 minutes
Process check
Have participants put materials from the day in their folders and collect folders
Have participants fill out time sheets and sign out

Bridging the Opportunity Gap | Career Readiness Curriculum Guide Page 205
Adapted from Merging Two Worlds, 2003
Participant Handout 9-3 Wants and Needs

Bridging the Opportunity Gap | Career Readiness Curriculum Guide Page 206

Bridging the Opportunity Gap | Career Readiness Curriculum Guide Page 207
Adapted from Merging Two Worlds, 2003
©1996 Wellness Reproductions 800/669-9208
Participant Handout 9-3 Stretch Your Budget