electromagnetic compatibility specification for electrical ... · electromagnetic compatibility...
TRANSCRIPT
Jaguar Land Rover Limited - Engineering Standard JLR-EMC-CS v1.0
Amendment 2
30th November 2013
Electromagnetic Compatibility Specification For Electrical/Electronic
Components and Subsystems
Foreword This engineering specification addresses Electromagnetic Compatibility (EMC) requirements for electrical/electronic (E/E) components and subsystems for Jaguar Land Rover (JLR). These requirements have been developed to assure compliance with present and anticipated regulations in addition to customer satisfaction regarding the EMC of vehicle E/E systems.
JLR-EMC-CS is applicable for all E/E components/subsystems intended for use on Jaguar Land Rover vehicle programs.
JLR-EMC-CS is available for download from www.jaguarlandrover.com/emc. Technical and/or editorial amendments to this specification will be made as required and without prior notification to the user. It is recommended that the user verify they have the latest version of the specification prior to application to their E/E component/subsystem along with the latest amendment (available for download from www.jaguarlandrover.com/emc.)
Date Version Revision
30-11-2013 v1.0 First release
12-12-2013 v1.0 Amendment 1
Correction - Addition of peak limit in RE 310 DB-01 Addition of ITS limit in RE 310 MS-20 Correction – RI 112 Para 1, start frequency corrected to 0.1 MHz in line with Figure 10-1 Correction – RI 112 Table 10-2, 0.1 to 1 MHz range included in line with Figure 10-1 Correction – CI 265 Table 18-1, note 1: 1 hour observed, 7 hours unobserved
13-01-2014 v1.0 Amendment 2
Correction – RE 310 frequency range ends at 5905 MHz Amendment – CE420 removal of voltage method Correction – RI 112 Figure 10-1, Band 1 Level 1 84 dBµA Correction – RI 112 start frequency of 0.1 MHz noted throughout Correction – RE 320 Figure 11-1, f = frequency in Hz Correction – RI 140 Figure 12-1, Frequency range corrected to 20 – 100 Hz Correction – RI 140 Figure 12-2, Key numbering restarted at 1 Correction – CI 250 clarification - both test configurations required (Figure 17-5a & b) Correction – CI 265 Table 18-1, Waveform A test duration 13 bursts Correction – CI 265 Figure 18-1, T1 & T2 min 2 ms and T1 & T2 max 4 ms removed Correction – CI 220 Annex C Figure C-7, tr = 1 µs - aligned with ISO 7637-2

Jaguar Land Rover Limited - Engineering Standard
JLR-EMC-CS v1.0 Amendment 2
© Copyright Jaguar Land Rover – All Rights Reserved Page 2 of 108 30th November 2013
Differences to EMC-CS-2010JLR V1.2
This document is similar to EMC-CS-2010JLR V1.2 published 28th June 2012 however there are important changes, additions and edits to most of the requirements (general and specific). As such, it is important that the requirements of JLR-EMC-CS v1.0 are thoroughly read and understood by all users. Major1 changes integrated in JLR-EMC-CS v1.0 are listed below for clarity:
Electrified and electric vehicles
• Inclusion of extra requirements for components used on the HV network in electrified and electric vehicles (Section 5.13)
Page 20
Requirements • Inclusion of RE 310 test requirement for brushed motors (Table 6-1) • New test requirement RE 320, magnetic field emissions (Table 6-1) • Clarification of terms (Table 6-1)
Page 21
RE 310 • Inclusion of RoW low frequency requirements R-01 through R-04 (Table 7-1) • Updated test requirements (Table 7-2 ) • Inclusion of mobile service test requirements (Table 7-2)
Page 22
CE 420
• Measurements on all harnesses (Table 8-1) • Measurement of RF currents on shields (Table 8-1) • Measurement of RF currents on conductors in shielded harnesses (Table 8-1) • Updated test requirements (Table 8-2) • Inclusion of DAB test requirements (Table 8-2)
Page 25
CE 410 • Updated test requirements (Table 9-1) Page 27 RI 112 • Updated test requirements (Table 10-1) Page 29 RI 114 • Updated test requirements (Table 10-3) Page 32 RE 320 • New test requirement Page 41
RI 140 • Updated test requirements (Table 12-1) • Test method in accordance with Defence Standard 59-411 Part 3 Issue 1
Amendment 1 DRS01.B Page 44
RI 130 RI 150
• Inclusion of shielded cable assemblies in default test configuration G.2 • Inclusion of unshielded requirement for shielded harnesses test configuration G.3 • Clarification of requirements for shielded test configuration G.5
Page 104
CI 220 • Introduction of multiple Load Dump tests at various Us voltage levels. Only
applicable to AX classified DUTs where Pulse G2 is applicable, and an active device (e.g. motor) is switched on to suppress the pulse.
Page 59
CI 265 • Reduction of test duration to 8 Hours (Table 18-1) Page 68
CI 270 • Jump start test level raised to 28 V to include 24V vehicle alternator output (Table 19-1)
Page 74
CI 280
• Number of discharges required increased to 10 (Table 20-1) • Inclusion of 330 Ω 330/150 pf ESD networks (Table 20-1) • Unpowered tests to ± 8 kV for DUT pins (Table 20-1) • Unpowered ± 30 kV test requirement for any components including pyrotechnic
equipment that are packaged or transported (at tier 1 or tier 2) in materials of differing triboelectric series values which may cause excessive static charge build up (Table 20-1)
• Update of direct discharge test requirements (Table 20-2) • Inclusion of indirect discharge tests (Table 20-3) in accordance with ISO
10605:2008 Annex F
Page 75
1 Major technical changes only. The specification shall be read fully to obtain a complete understanding of the requirements

Jaguar Land Rover Limited - Engineering Standard
JLR-EMC-CS v1.0 Amendment 2
© Copyright Jaguar Land Rover – All Rights Reserved Page 3 of 108 30th November 2013
Table of Contents Page
Foreword ............................................................................................................................................................................... 1 1.0 Scope.......................................................................................................................................................................... 7 2.0 References ................................................................................................................................................................. 9 3.0 Abbreviations, Acronyms, Definitions, & Symbols................................................................................................... 10 4.0 Common Test Requirements ................................................................................................................................... 14 5.0 Additional Requirements ......................................................................................................................................... 17 6.0 Requirement Applicability ....................................................................................................................................... 21 7.0 Radiated RF Emissions: RE 310 ................................................................................................................................ 22 8.0 Conducted RF Emissions: CE 420 ............................................................................................................................. 25 9.0 Conducted Transient Emissions: CE 410 .................................................................................................................. 27 10.0 RF Immunity: RI 112, RI 114, RI 115 ........................................................................................................................ 28 11.0 Magnetic Field Emissions: RE 320 ............................................................................................................................ 41 12.0 Magnetic Field Immunity: RI 140 ............................................................................................................................. 44 13.0 Coupled Immunity: RI 130 ....................................................................................................................................... 47 14.0 Coupled Immunity: RI 150 ....................................................................................................................................... 50 15.0 Immunity from Transient Disturbances: CI 220 ...................................................................................................... 55 16.0 Immunity from Power Cycling: CI 230 .................................................................................................................... 60 17.0 Immunity to Ground Voltage Offset: CI 250 ........................................................................................................... 63 18.0 Immunity to Low Voltage Transients: CI 265 .......................................................................................................... 68 19.0 Immunity to Voltage Overstress: CI 270 ................................................................................................................. 74 20.0 Electrostatic Discharge: CI 280 ................................................................................................................................ 75
(Normative): Field Calibration Procedure for ALSE Method Bands 6 and 7) ................................................... 81 Annex A (Normative): Modulation and Levelling Requirements for RI 112, RI 114 and RI 115 .................................. 84 Annex B (Normative): CI 220 Transient Waveform Descriptions ................................................................................... 86 Annex C (Normative): Transient Waveform Application ............................................................................................... 95 Annex D (Normative): Transient Test Generator ........................................................................................................... 97 Annex E (Normative): Load Simulator Requirements. ................................................................................................ 100 Annex F (Normative): RI 130, RI 150 Test Fixture and Application ............................................................................. 104 Annex G Test Requirements for CI 265 ........................................................................................................................ 106 Annex H
Updates .......................................................................................................................................................... 108 Annex I

Jaguar Land Rover Limited - Engineering Standard
JLR-EMC-CS v1.0 Amendment 2
© Copyright Jaguar Land Rover – All Rights Reserved Page 4 of 108 30th November 2013
List of Figures
Figure 7-1: RE 310 Test Antenna Cable Configuration (excludes Rod antenna < 30 MHz) ................................................ 24 Figure 7-2: RE 310 Test Setup (EU1, G1) DUTs with Selected Wiring in Engine Compartment ......................................... 24 Figure 8-1: Shielded harness test configuration ................................................................................................................ 26 Figure 10-1: RI 112 Requirements using Bulk Current Injection (BCI) ............................................................................... 29 Figure 10-2: RI 112 DUT Harness Configurations ............................................................................................................... 31 Figure 10-3: RI 114 ALSE Test Setup Bands 4 and 5 ........................................................................................................... 34 Figure 10-4: RI 114 ALSE Test Setup for Bands 6 and 7 ...................................................................................................... 35 Figure 10-5: RI 115 Test Setup ........................................................................................................................................... 37 Figure 10-6: RI 115 Setup for Calibration ........................................................................................................................... 38 Figure 10-7: RI 115 Antenna positioning for testing the harness ....................................................................................... 40 Figure 11-1: RE 320 Magnetic Field Emissions Requirements ........................................................................................... 41 Figure 11-2: RE 320 Magnetic Emissions Configuration .................................................................................................... 43 Figure 12-1: RI 140 Magnetic Field Immunity Requirements ............................................................................................ 44 Figure 12-2: RI 140 Magnetic Immunity Configuration...................................................................................................... 46 Figure 13-1: RI 130 Default Test Setup .............................................................................................................................. 48 Figure 14-1: RI 150 Coupled Immunity Requirements ....................................................................................................... 50 Figure 14-2: RI 150 Test Setup ........................................................................................................................................... 51 Figure 14-3: CI 210 Requirements ..................................................................................................................................... 52 Figure 14-4: CI 210 Test Setup ........................................................................................................................................... 53 Figure 14-5: CI 210 AC Stress Level (US) Superimposed on DUT Supply Voltage (UP) ........................................................ 54 Figure 15-1: CI 220 Test Setup for Devices with a Single Power Supply Circuit ................................................................. 56 Figure 15-2: CI 220 Test Setup for Devices with Two Power Supply Connections ............................................................. 57 Figure 15-3: CI 220 Test Setup for Devices with Control Circuits ...................................................................................... 57 Figure 15-4: CI 220 Test Setup Detail (Control Circuits with Remote External Pull-Up Resistor) ...................................... 58 Figure 15-5: CI 220 Test Setup for Application of Pulse G1 ............................................................................................... 58 Figure 15-6: CI 220 Test setup for Application of Pulse G2 ................................................................................................ 58 Figure 16-1: CI 230 Power Cycling Waveforms and Timing Sequence ............................................................................... 61 Figure 16-2: CI 230 Power Cycling Test Setup .................................................................................................................... 62 Figure 17-1: CI 250 Requirements (Continuous Disturbances) .......................................................................................... 63 Figure 17-2: CI 250 Transient Pulse Detail ......................................................................................................................... 64 Figure 17-3: CI 250 Transient Pulse Delay Detail ................................................................................................................ 64 Figure 17-4: CI 250 Requirements (Transient Disturbance Sequence) ............................................................................... 64 Figure 17-5: CI 250 Test Setup for Ground Offset of DUT .................................................................................................. 66 Figure 17-6: CI 250 Signal Source Requirements ................................................................................................................ 66 Figure 18-1: CI 265 FTBN Waveform Parameter Definition ................................................................................................ 69 Figure 18-2: CI 265 Random Crank Waveform B Parameter Definition ............................................................................. 70 Figure 18-3: CI 265 Ramp Down/Up Waveform C Parameter Definition ........................................................................... 71 Figure 18-4: CI 265 Waveform D (Single Voltage Dropout) ............................................................................................... 72 Figure 18-5: CI 265 Test Setup Detail for Waveform D ...................................................................................................... 72 Figure 20-1: CI 280 Test setup (Communication Bus Connection Requirements) ............................................................. 78

Jaguar Land Rover Limited - Engineering Standard
JLR-EMC-CS v1.0 Amendment 2
© Copyright Jaguar Land Rover – All Rights Reserved Page 5 of 108 30th November 2013
List of Figures Continued
Figure A-1: Field Probe (Type A) Positioning Requirements (RI 114, Bands 6 and 7) ........................................................ 82 Figure A-2: Field Probe (Type B) Positioning Requirements (RI 114, Bands 6 and 7) ........................................................ 83 Figure A-3: Receive Antenna Positioning Requirements (RI 114, Bands 6 and 7) .............................................................. 83 Figure B-1: RF Immunity Peak Conservation Profile ........................................................................................................... 84 Figure B-2: RF Immunity Generic Levelling/Dwell Process ................................................................................................. 85 Figure B-3: RF Immunity Example of Combined CW and AM Dwell .................................................................................. 85 Figure C-1: Simplified Automotive Circuit for Transient Immunity .................................................................................... 86 Figure C-2: CI 220 Pulse A1 Composite Waveform ............................................................................................................ 87 Figure C-3: CI 220 Pulse A2-1 Pulse Characteristics ........................................................................................................... 87 Figure C-4: CI 220 Pulse A2-2 Pulse Characteristics ........................................................................................................... 88 Figure C-5: CI 220 Pulse C Characteristics .......................................................................................................................... 89 Figure C-6: CI 220 Pulse E Characteristics .......................................................................................................................... 90 Figure C-7: CI 220 Pulse F1 Characteristics ........................................................................................................................ 90 Figure C-8: CI 220 Pulse F2 Pulse Characteristics ............................................................................................................... 91 Figure C-9: CI 220 Pulse G1 Characteristics ....................................................................................................................... 91 Figure C-10: CI 220 Pulse G2 Characteristics ..................................................................................................................... 92 Figure C-11: CI 220 Mode 2 Characteristics ....................................................................................................................... 93 Figure C-12: CI 220 Mode 3 Characteristics ....................................................................................................................... 94 Figure E-1: Transient Generator Circuit for RI 130 and CI 220 ........................................................................................... 97 Figure E-2: Transient Generator (External Connections) ................................................................................................... 98 Figure F-1: Load Simulator (Typical Design) ..................................................................................................................... 101 Figure F-2: Load Simulator CAN Interface Circuit Design Requirements ......................................................................... 102 Figure F-3: Load Simulator Test setup .............................................................................................................................. 103 Figure G-1: RI 130/150 Test Fixture (Top View) ............................................................................................................... 104 Figure G-2: RI 130/150 Test setup (default DUT wire location) ....................................................................................... 104 Figure G-3: RI 130/150 Test Setup (DUT with dedicated return wire or shielded harnesses) .......................................... 105 Figure G-4: RI 130/150 Test setup (configuration for a twisted wire pairs) ..................................................................... 105 Figure G-5: RI 130/150 Test setup (additional test configuration for shielded cables) .................................................... 105 Figure H-1: CI 265 Power supply rise and fall times for waveforms A, B and C ................................................................ 106 Figure H-2: CI 265 Test circuit to validate performance of power supply. ....................................................................... 106 Figure H-3: CI 265 Distribution of 1/x2 .............................................................................................................................. 107

Jaguar Land Rover Limited - Engineering Standard
JLR-EMC-CS v1.0 Amendment 2
© Copyright Jaguar Land Rover – All Rights Reserved Page 6 of 108 30th November 2013
List of Tables
Table 4-1: Permissible Tolerances ..................................................................................................................................... 16 Table 4-2: Environmental Test Conditions ......................................................................................................................... 16 Table 5-1: Step sizes and measurement times for all ranges ............................................................................................ 18 Table 6-1: Requirement Selection Matrix .......................................................................................................................... 21 Table 7-1: RE 310 Level 1 Requirements ............................................................................................................................ 22 Table 7-2: RE 310 Level 2 Requirements ............................................................................................................................ 23 Table 8-1: CE 420 Conducted Emissions Applicability........................................................................................................ 25 Table 8-2: CE 420 Conducted Emissions Requirements ..................................................................................................... 25 Table 9-1: CE 410 Conducted Transient Emissions Requirements ..................................................................................... 27 Table 10-1: RF Immunity Acceptance Criteria .................................................................................................................... 28 Table 10-2: RF Immunity Test Frequency Steps .................................................................................................................. 28 Table 10-3: RI 114 Requirements (200-3100 MHz) ............................................................................................................ 32 Table 10-4: RI 115 Requirements for hand portable transmitters..................................................................................... 36 Table 10-5: RI 115 Separation Distances and Antenna Positioning ................................................................................... 36 Table 11-1: RE 320 Test Frequency Requirements ............................................................................................................ 42 Table 12-1: RI 140 Test Frequency Requirements ............................................................................................................. 45 Table 13-1: RI 130 Coupled Immunity Requirements ........................................................................................................ 47 Table 14-1: RI 150 Test Frequency Requirements .............................................................................................................. 50 Table 14-2: CI 210 Test Frequency Requirements .............................................................................................................. 54 Table 15-1: CI 220 Transient Immunity Requirements ...................................................................................................... 55 Table 16-1: CI 230 Power Cycling Requirements ............................................................................................................... 60 Table 17-1: CI 250 Acceptance Criteria (Continuous and Transient Disturbances) ........................................................... 63 Table 17-2: CI 250 Delay Time Sequences 1 - 4 ................................................................................................................. 65 Table 17-3: CI 250 Test Frequency Requirements .............................................................................................................. 67 Table 18-1: CI 265 Applicability Requirements ................................................................................................................... 68 Table 19-1: CI 270 Requirements for Voltage Overstress .................................................................................................. 74 Table 20-1: CI 280 ESD Requirements: Unpowered (Packaging and Handling) ................................................................ 76 Table 20-2: CI 280 ESD Requirements: Powered (all component surfaces and remote IOs) ............................................. 77 Table 20-3: CI 280 ESD Requirements: Powered (indirect discharge) ............................................................................... 79
Table C-1: CI 220 Mode 1 Characteristics .......................................................................................................................... 93 Table E-1: CI 220 Transient Generator Switch Settings ..................................................................................................... 98 Table E-2: CI 220 Transient Generator (P&B Relay Specifications) .................................................................................... 99

Jaguar Land Rover Limited - Engineering Standard
JLR-EMC-CS v1.0 Amendment 2
© Copyright Jaguar Land Rover – All Rights Reserved Page 7 of 108 30th November 2013
1.0 Scope This engineering specification defines the Electromagnetic Compatibility (EMC) requirements, test methods and test procedures for Electrical/Electronic (E/E) components and subsystems used by Jaguar Land Rover (JLR). E/E components shall by design and test meet the requirements herein.
1.1 Purpose of the Specification
The purpose of this engineering specification is to ensure that good design practices are used to achieve vehicle level EMC. This specification presents EMC requirements and verification methods that have been developed for E/E components and subsystems independent of the vehicle. The purpose of component and subsystem testing is the pre-qualification of EMC at a time when representative vehicles are not yet available. This specification, and the test limits, levels and methods contained within, are intended to detect gross errors only. It is the supplier's responsibility to design a product which is fit for purpose. Products shall be designed to meet the requirements and not be developed by a method of repeated failure and retry until the verification method is passed. The supplier shall use their accumulated EMC knowledge and expertise in addition to the specific requirements set out herein to achieve EMC compliance in an efficient manner.
1.2 Vehicle Level Requirements
In addition to meeting the requirements specified herein, E/E components and subsystems, when installed in the vehicle, shall also comply with all relevant vehicle level EMC requirements. Additional component, subsystem, and vehicle level EMC requirements may be imposed by individual vehicle brands reflecting special conditions in their target markets. The component or subsystem supplier shall verify that any additional requirements, or modifications to the requirements detailed herein are included in the supplier's statement of work and the component/subsystem’s engineering specification.
1.3 Use of this Specification
The requirements and test methods in this engineering specification are based on international standards wherever possible. If international standards do not exist, military, and internal corporate standards are used. Under some circumstances, unique requirements and test methods are presented that experience has shown to better represent the vehicle electromagnetic environment. Refer to the definitions in Section 3.0 for clarification of terms. Should a conflict exist between this specification and any of the referenced documents, the requirements of this specification shall prevail. These requirements do not supersede any applicable regulatory requirements. Where such requirements exist, separate validation testing may be required.
This specification applies to all components and subsystems that reference EMC in their engineering specification. Components may be referred to in this specification as a component, device, module, motor, product or DUT (device under test). The following steps shall be taken by the JLR Component Owner and their supplier for assuring EMC compliance of their component or subsystem:
1. Provide the supplemental information needed to classify the E/E component/subsystem functional importance classification (see Section 5.1).
2. Identify which tests are applicable (refer to Section 6.0). 3. Identify operating modes and acceptance criteria specific to the component or subsystem. 4. Develop an EMC test plan (see JLR-EMC-CP at its latest issue). 5. Perform testing at a JLR approved test facility. 6. Submit the test results to the JLR EMC department. See Section 5.11 for reporting requirements. 7. EMC department reviews and assesses the test results.
It’s important to emphasise that the JLR Component Owner(s) and their supplier(s) are responsible for determining the operating modes and acceptance criteria for their component or subsystem (step 3). The JLR Component Owner is also responsible for verifying that the requirements detailed in this specification are met. The supplier is responsible for performing the verification testing in accordance with the requirements of this specification.

Jaguar Land Rover Limited - Engineering Standard
JLR-EMC-CS v1.0 Amendment 2
© Copyright Jaguar Land Rover – All Rights Reserved Page 8 of 108 30th November 2013
The JLR EMC department reserves the right to perform audit testing or witness supplier design verification (DV) on sample parts in order to verify compliance with this specification. Compliance to these EMC requirements shall be determined by the JLR EMC department after review of the test results submitted by the test laboratory. The supplier may not self-certify compliance to these specifications. See Section 5.11 for additional detail concerning this requirement.
If there is any doubt regarding the interpretation of this standard, the JLR EMC Department shall be consulted for clarification.
Where a requirement of this standard cannot be met in the short term, a deviation may be raised and subsequently agreed by the JLR EMC Department before JLR management approval. In this instance, a full development plan shall be submitted by the supplier detailing all planned modifications and testing needed to meet the requirements herein in the long term. Where the supplier has an alternative part which is judged by the JLR component owner and EMC Department to be acceptable against all of the contractual, timing, functional and performance requirements of the program, the supplier may offer that part to JLR instead but must provide evidence to demonstrate that the performance, reliability and robustness of the product will not be diminished.
Assumptions must not be made. If there are any open questions about the requirements (e.g. mode of operation, monitoring or fault condition), the component owner shall be consulted for clarification.
1.4 Additional Information
E/E component or subsystem testing to the requirements of this specification represents an empirical risk analysis of component/subsystem performance versus derived approximations to known environmental threats and customer satisfaction requirements. The development of this specification is based on extensive experience in achieving correlation to expected vehicle performance with a high level of predictability. However, EMC testing, by its nature, is subject to similar variation as mechanical testing. Because of coupling variability and measurement uncertainty, correlation between component/subsystem level performance and final performance in the complete vehicle cannot be exact. In order to maintain a competitive and quality product, vehicle EMC testing will be performed to evaluate overall integrated system performance. However, vehicle level analysis and testing is not a substitute for component/subsystem conformance to this specification.
Where transient, under-voltage, over-voltage and reverse battery tests are specified, modules shall be designed to meet the required functional performance detailed herein. These requirements shall be met not only when the specified test conditions are applied, but also when shorter test sequences, lesser transient durations and lesser transient voltage conditions are applied.
This specification does not include any information regarding component/subsystem design needed to meet the requirements presented herein. EMC design information may be found in a number of technical journals and textbooks.
Although every attempt has been made to assure the information contained herein is accurate, editorial updates and/or technical clarifications to requirement/test methods are made when noted. This information may be found at www.jaguarlandrover.com/emc. The user (i.e. suppliers, test laboratories) shall review this information prior to preparation of component EMC test plans and/or execution of testing.

Jaguar Land Rover Limited - Engineering Standard
JLR-EMC-CS v1.0 Amendment 2
© Copyright Jaguar Land Rover – All Rights Reserved Page 9 of 108 30th November 2013
2.0 References
2.1 International Documents
Only the latest approved standards are applicable unless otherwise specified.
CISPR 16-1-1 Specification for radio disturbance and immunity measuring apparatus and methods – Part 1: Radio disturbance and immunity measuring apparatus.
CISPR 25 3rd Ed Limits and methods of measurement of radio disturbance characteristics for the protection of receivers used on board vehicles.
IEC 61000-4-21 Electromagnetic Compatibility (EMC) – Part 4-21: Testing and measurement techniques – Reverberation chamber test methods
ISO 10605 Road vehicles – Test methods for electrical disturbances from electrostatic discharge
ISO 7637-2 Road vehicles – Electrical disturbance by conduction and coupling Part 2 – Vehicles with nominal 12 V or 24 V supply voltage – Electrical transient transmission by capacitive and inductive coupling via supply lines
ISO 11452-1 Road vehicles – Component test methods for electrical disturbances from narrowband radiated electromagnetic energy – Part 1: General and definitions
ISO 11452-2 Road vehicles – Electrical disturbances by narrowband radiated electromagnetic energy – Component test methods Part 2 – Absorber-lined shielded enclosure
ISO 11452-4 Road vehicles – Component test methods for electrical disturbances from narrowband radiated electromagnetic energy – Part 4: Bulk current injection (BCI)
ISO 11452-9 Road vehicles – Component test methods for electrical disturbances from narrowband radiated electromagnetic energy – Part 9: Portable Transmitters
United Nations ECE regulation 10 Uniform provisions concerning the approval of vehicles with regard to electromagnetic compatibility.
2.2 Military Standards
MIL-STD-461E United States Department of Defence Interface Standard, Requirements for the Control of Electromagnetic Interference Characteristics of Subsystems and Equipment
Defence Standard 59-411 Part 3 Issue 1 Amendment 1 Electromagnetic compatibility - Test Methods and Limits for Equipment and Sub Systems
2.3 Other Documents
JLR-EMC-CP EMC Processes
Jaguar Land Rover Limited - Engineering Standard
JLR-EMC-CS v1.0 Amendment 2
© Copyright Jaguar Land Rover – All Rights Reserved Page 10 of 108 30th November 2013
3.0 Abbreviations, Acronyms, Definitions, & Symbols Acceptance Criteria Defines the limits of variance in function performance of the device during exposure to an electromagnetic disturbance.
Active Electronic Module Electronic modules that function via use of digital or analogue circuitry including microprocessors, operational amplifiers, and memory devices.
ALSE Absorber-lined shielded enclosure. Also used in this document together with ISO or SAE to designate the test itself with reference to the method described in ISO 11452-1 or SAE J1113-21.
Annex Supplementary material attached to the end of a specification, often used to supply additional information that may be normative or informative in nature.
Approved Laboratory An EMC laboratory that meets the requirements for acceptance by JLR. Refer to www.jaguarlandrover.com/emc for more details on this program.
Artificial Network (AN) A device used to present a known impedance to the power line of the DUT.
Average Detection (AVG) A detection method that produces an output voltage of which is the average value of the envelope of an applied signal. The average value must be taken over a specified time interval.
BCI Bulk Current Injection. Method for coupling RF current into a harness.
Bonding Bonding refers to the conductive fixing of a DUT case, Artificial Network or load simulator case to the test ground plane.
Carry Over References a production level component designed to a current or previous EMC specification.
CBCI Common Mode BCI
CE Conducted Emissions
CISPR An acronyme for “Comité International Spécial des Perturbations Radioélectriques” (Special International Committee on Radio Interference).
CLD Centralised Load Dump
Component Reference for active electronic modules, electric motors, passive and inductive devices.
Control Circuits I/O circuits with direct or indirect connection to the vehicle battery not used as a power supply for DUT circuits e.g. ignition sense input.
Component, subsystem Engineering Specification Engineering specification for the component or subsystem documenting all performance requirements (mechanical, thermal, EMC, etc.).

Jaguar Land Rover Limited - Engineering Standard
JLR-EMC-CS v1.0 Amendment 2
© Copyright Jaguar Land Rover – All Rights Reserved Page 11 of 108 30th November 2013
D&R Design and Release
dBpT dB picotesla (160 dBpT = 1Gauss )
DFMEA Design Failure Mode and Effect Analysis is the application of the Failure Mode and Effects Analysis method specifically to product design.
Disturbance Any electrical transient or electromagnetic phenomenon that may affect the proper operation of an electrical or electronic device (see stimulus).
DBCI Differential Mode BCI
DUT Device(s) Under Test. Any electrical or electronic component, module, motor, filter, etc. being tested.
DV
Design Verification (components not constructed from production tooling).
E/E Electrical and/or Electronic
EMC Electromagnetic Compatibility
EMI Electromagnetic Interference
Effect A detectable change in DUT performance due to an applied stimulus.
EM Electronically Controlled Motor
ESA Electronic Sub-Assembly
ESD Electrostatic discharge
ESD – Air Discharge Test method whereby the electrode of the test generator is brought near the DUT and discharge is accomplished through an arc to the DUT.
ESD – Contact Discharge Test method whereby the electrode of the test generator is brought into contact with the DUT and the discharge is triggered by the discharge switch located on the generator.
EV Electric Vehicle
Fail-Safe Mode A predictable operating mode intended to minimize adverse effects by restricting or shutting down operation when a significant stimulus has made operation unreliable. Operation shall recover after the stimulus is removed without permanent loss of function or corruption of stored data or diagnostic information.
FSD Full Scale Deflection

Jaguar Land Rover Limited - Engineering Standard
JLR-EMC-CS v1.0 Amendment 2
© Copyright Jaguar Land Rover – All Rights Reserved Page 12 of 108 30th November 2013
FTBN Fast Transient Burst Noise
Function The intended operation of an electrical or electronic module for a specific purpose. The module can provide many different functions, which are, defined (functional group and acceptable performance) by the module specification.
Functional Importance Classifications Defines the importance of E/E component/subsystem functions with respect to safe vehicle operation.
• Class A: Any function that provides a convenience. • Class B: Any function that enhances, but is not essential to the operation and/or control of the vehicle. • Class C: Any immunity related function2, function that controls or affects the essential operation of the vehicle
or any function that could confuse the driver or other road users. Function Performance Status The performance of DUT functions, when subjected to a disturbance, is described by three performance status levels:
• Status I: The function shall operate as designed (or meet the limits specified in the EMC test plan) during and after exposure to a disturbance.
• Status II: The function may deviate from designed performance, to a specified level, during exposure to a disturbance but shall not affect safe operation of the vehicle, safety of its occupants and does not adversely affect customer satisfaction. The function may revert to a fail-safe mode of operation, but shall return to normal operation following removal of the disturbance either automatically or in line with the function's fail-safe recovery strategy. No effect on permanent or temporary memory is allowed. Status II performance, where applicable, is only permissible if the deviation in performance does not affect other related functions requiring Status I performance. A detailed definition of each function’s Status II deviation must be included in the EMC tests plan prior to testing and shall be agreed through the component owner (see Section 5.1). Any deviation shall be measureable against correct functionality and will be objective (e.g. function A may degrade by ≤ 10%) not subjective (e.g. function A may show signs of minor degradation). Status II deviations are covered within the EMC test plan template available from www.jaguarlandrover.com/emc. Agreement may require discussions with specialists within JLR such as the Electrical Technical Specialist or Functional Safety Technical Specialist for example.
• Status III: The function may deviate from designed performance during exposure to a disturbance but shall not affect safe operation of the vehicle or safety of its occupants. Operator action may be required to return the function to normal after the disturbance is removed (e.g. cycle ignition key, replace fuse). No effect on permanent type memory is allowed. Status III performance, where applicable, is only permissible if the deviation in performance does not affect other related functions requiring Status I performance.
• Status IV: The device shall not sustain damage, changes in I/O parametric values (resistance, capacitance, leakage current etc.) or a permanent reduction in functionality.
HEV Hybrid Electric Vehicle
HV High Voltage
Grounding Grounding refers to the connection of power returns. These may be local or remote as per Section 4.6
Inductive Device An electromechanical device that stores energy in a magnetic field. Examples include, but not limited to solenoids, relays, buzzers, and electromechanical horns.
2 Immunity Related Functions as defined in ECE Regulation No. 10, Section 2

Jaguar Land Rover Limited - Engineering Standard
JLR-EMC-CS v1.0 Amendment 2
© Copyright Jaguar Land Rover – All Rights Reserved Page 13 of 108 30th November 2013
Informative Additional (not normative) information intended to assist the understanding or use of the specification.
I/O Input and output. Also used in this document to designate the transient pulse testing on I/O-lines.
JLR Jaguar Land Rover Ltd
MBW Measurement System Bandwidth
Memory (temporary or permanent) Computer memory used for, but not limited to storage of software code, engine calibration data, drive personalization, radio pre-sets. Hardware for this includes ROM, RAM and FLASH memory devices.
N/A Not Applicable
Normal Operation In the context of functional performance status) A predictable and safe operating mode where the operator has full control.
Normative Provisions that are necessary (not informative) to meet requirements.
OBDII On-Board Diagnostics II
PCB Printed Circuit Board
Peak Detection (PK) A detection method that produces an output voltage of which is the peak value of an applied signal.
PRR Pulse Repetition Rate
PV Production Verification (component constructed using production tooling).
PWM Pulse Width Modulated or Modulation
Quasi-Peak Detection (QP) A detection method having specified electrical time constants which, when regularly repeated identical pulses are applied, produces an output voltage which is a fraction of the peak value of the pulses, the fraction increasing towards unity as the pulse repetition rate is increased.
RE Radiated Emission
RI Radiated Immunity
Regulated Power Supply A voltage regulated supply typically lower in magnitude than the vehicle's battery voltage (e.g., 5VDC, 3VDC). Regulated power is derived using active electronic devices including linear and switch-mode power supplies. Regulated power supplies are typically used to provide power to sensors.
RF Radio Frequency

Jaguar Land Rover Limited - Engineering Standard
JLR-EMC-CS v1.0 Amendment 2
© Copyright Jaguar Land Rover – All Rights Reserved Page 14 of 108 30th November 2013
RF Boundary An element of an EMC test setup that determines what part of the harness and/or peripherals is included in the RF environment and what is excluded. It may consist of, for example, ANs, filter feed-through pins, fibre optics, RF absorber coated wire and/or RF shielding. The RF boundary directly affects the resonant characteristics of the DUT cable harness during radiated immunity and emissions testing.
RoW Rest of World
Shall Denotes a requirement.
Single Shot Refers to the capture mode of a digitizing oscilloscope. A single shot represents a single capture of the voltage or current waveform over a defined sweep time setting.
Should Denotes a recommendation.
Substitution Method The substitution method is a technique for mapping out the power required to produce a target RF field, magnetic field, or current in absence of the DUT at a designated reference position. When the test object is introduced into the test chamber, this previously determined reference power is then used to produce the exposure field.
Switched Power Circuits Any circuit that is connected to the vehicle battery through a switch or relay.
4.0 Common Test Requirements
4.1 General
Attention shall be directed to the control of the RF boundary in both emission and immunity tests to reduce undesired interaction between the DUT, the Load Simulator and the electromagnetic environment. The test equipment, test setups and test procedures shall be documented as part of the test laboratory’s procedures. JLR reserves the right to inspect the lab procedures. Although testing generally involves only one physical component, subsystem testing involving multiple components (e.g. distributed audio components) is permissible. All DV and PV testing requires an EMC test plan in accordance with the requirements of JLR-EMC-CP at its latest issue. See Section 5.2 for additional details.
4.2 Testing to other specifications
Tests may be performed to other specifications which have equal or higher, requirements but a test deviation form (available from www.jaguarlandrover.com/emc) must be completed prior to testing.
4.3 Load Simulator
DUT operation shall be facilitated by use of a Load Simulator that is constructed to simulate the vehicle system. The Load Simulator, is a shielded enclosure that contains all external electrical interfaces (sensors, loads, etc.) normally seen by the DUT. Where possible actual electrical loads shall be used, however where actual loads may cause issues with the test results, dummy loads shall be used to accurately simulate the real world circuit load termination. The Load Simulator also serves as an RF boundary for the DUT cable harness in addition to serving as an interface to support and monitoring equipment required during testing. Detailed requirements for the Load Simulator are found in Annex F.

Jaguar Land Rover Limited - Engineering Standard
JLR-EMC-CS v1.0 Amendment 2
© Copyright Jaguar Land Rover – All Rights Reserved Page 15 of 108 30th November 2013
4.4 Artificial Networks
Unless otherwise stated in this specification:
The use and connection of Artificial Networks shall be in accordance to the Setup shown in Annex F. Artificial Network design and performance characteristics shall conform to CISPR 25, Edition 3. For tests that do not specify the use of artificial networks, the power supply shall be connected directly to the ground plane, Load simulator and DUT.
4.5 Interconnections
Unless otherwise stated within this specification: The electrical interconnections between the DUT and Load Simulator shall be facilitated using a standard test harness. The length of this harness shall be 1700 mm +300/- 0 mm unless otherwise stated within this specification. The harness shall contain wiring types (e.g. twisted wire pairs) that are used in the actual vehicle installation. Selected tests require shorter power/power return wiring between the DUT and measurement system. To avoid fabrication of multiple test harnesses, it is recommended that a single test harness be fabricated to facilitate removal of these selected circuits and to provide a method to reduce their physical length (e.g. in-line connector).
4.6 Grounding and Bonding
Unless otherwise stated within this specification:
The DUT shall be placed on an low relative permittivity material (εr ≤ 1,4), at (50 ± 5) mm above the ground plane. However, if the outer case of the DUT is metal and, when installed in the vehicle is electrically connected to the vehicle's sheet metal, the DUT shall be mounted and electrically connected to the ground plane during the test in a manner representative of the vehicle application. This configuration is only permitted if documented in the product engineering specification and is representative of the vehicle application. The DUT bonding configuration shall be documented in the EMC test plan and test report. Whilst bonding of the DUT is intended to simulate the vehicle installation, the test configuration requires prior approval by the JLR EMC department to ensure cross car line compatibility (i.e. that the worst-case DUT bonding configuration is tested or that testing with only 1 DUT bonding configuration is adequate). If the DUT’s power return is required to be locally grounded in the vehicle within 200 mm of the DUT (must be specified in the DUT engineering specification), the DUT power return shall be connected directly to the ground plane. Under these conditions, the Artificial Network connected to the DUT’s power return may be omitted. Whilst grounding of the DUT’s power return is intended to be as per the vehicle installation, the test configuration requires prior approval by the JLR EMC department to ensure cross car line compatibility (i.e. that the worst-case DUT grounding configuration is tested or that testing with only 1 DUT grounding configuration is adequate).
Where DUT bonding and local grounding is required it shall be facilitated via screws directly into the ground plane or representative braid connections dependent upon the bonding method used in the vehicle installation.
The Load Simulator and Artificial Networks shall be directly bonded to the ground plane used in the test setup.
The bond impedance shall be verified to be less than 2.5 mΩ using a 4 lead low-current low-ohm meter.
Use of conductive tapes for bonding is prohibited unless permitted by the JLR EMC department. Approval requires specific process steps by laboratory to demonstrate bonding impedance remains stable over the duration of testing.

Jaguar Land Rover Limited - Engineering Standard
JLR-EMC-CS v1.0 Amendment 2
© Copyright Jaguar Land Rover – All Rights Reserved Page 16 of 108 30th November 2013
4.7 Test Conditions
4.7.1 Dimensions
All dimensions in this document are in millimetres unless otherwise specified.
4.7.2 Tolerances.
Unless indicated otherwise, the tolerances specified in Table 4-1 are permissible.
Table 4-1: Permissible Tolerances3
Time interval, length* ± 10 %
Resistance, capacitance, inductance, impedance ± 10 %
Test parameters for RF field strength, Electrical or magnetic field strength, injected current, power, energy, transient voltage amplitude *
+10%
- 0%
Note: * Higher tolerance ratings shall be considered during the design phase of the component or subsystem
4.7.3 Environmental Test Conditions
Unless indicated otherwise, the climatic test conditions are defined in Table 4-2.
Table 4-2: Environmental Test Conditions
Temperature 23 ± 5.0 degrees C
Humidity 20 to 80% relative humidity (RH)
4.7.4 Power Supply
The power supply voltage shall be between 13 (+ 0.5/-1.0) volts unless otherwise stated within this specification. For regulated power sources (e.g. 5VDC) the supply voltage shall be maintained within ± 5 % of the nominal voltage level. A number of tests methods require the use of an automotive battery. When used, the battery voltage shall not fall below 12 volts during testing. The battery may be charged during testing, but for test methods RE 310, RE 320 and CE 420, only a linear power supply may be used for this purpose. If the power supply is located outside of the shielded enclosure, a bulkhead RF filter may be used to prevent stray RF signals from entering or leaving the shielded enclosure. The battery may be located on, or under the test bench. See Annex F regarding the standard test Setup for the Load Simulator, battery and Artificial Networks. For tests requiring a ground plane the battery negative terminal shall be connected to the ground plane unless otherwise stated herein.
4.8 Modes of operation
The DUT shall be tested in an applicable mode of operation which emphasises the EMC behaviour of the DUT for the applied test and exercises all functions of the DUT. Where a single test mode does not exercise all functions of the DUT, further modes of operation shall be tested. All modes shall be included in the EMC test plan and each shall include a description of the DUT functions covered by that mode of operation. Immunity test modes shall ensure that all DFMEA functions are tested. Mechanical and electrical loading of a system shall be defined in the EMC test plan. Radiated and conducted emissions tests shall be performed with low, medium and high duty cycles for PWM driven systems and with representative bus loads for components that include communication busses. If the DUT contains network functions (e.g. MOST, FLEXRAY, CAN, LIN), normal expected network traffic shall be simulated to represent that typical in the vehicle application. Details regarding specific network traffic messages, bus utilization etc., shall be documented in the EMC test plan.
3 Tolerances listed do not pertain to acceptance criteria for the DUT during testing.

Jaguar Land Rover Limited - Engineering Standard
JLR-EMC-CS v1.0 Amendment 2
© Copyright Jaguar Land Rover – All Rights Reserved Page 17 of 108 30th November 2013
4.8.1 Mechanical Load
The mechanical load applied to motors and solenoids during emissions and transient testing must be representative of that experienced when the component is operating on the vehicle. When testing pumps the correct flow rate and loading must be used. Where possible actual mechanical loads shall be used, however where actual loads may influence the test results, dummy loads shall be used to accurately simulate the real world mechanical load but this must be detailed in the EMC test plan and agreed with the JLR EMC Department.
4.8.2 Audio Systems
A 400 Hz audio signal shall be used instead of the typical 1 kHz signals to exercise the DUT during EMC testing. The EMC radiated immunity tests subject the DUT to a swept frequency RF signal with 1 kHz AM modulation. If the radio frequency signal is able to couple into any audio circuits, a 1 kHz tone will be heard on the audio system speakers. Where a 400 Hz signal is not used it must be detailed in the EMC test plan and agreed with the EMC Department.
5.0 Additional Requirements
5.1 Functional Importance Classification/Performance Requirements
This specification requires that all component and subsystem functions are classified according to their criticality in the overall operation of the vehicle (i.e. Functional Importance Classification). The JLR Product Development Component Owner(s) and their supplier(s) shall be responsible for developing these classifications and performance requirements.
Once functional classifications are established, the associated performance requirements shall be developed and documented in the component or subsystem’s engineering specification. These performance requirements serve as the basis for the component/subsystem acceptance criteria used during EMC testing.
All Status II deviations must be detailed within Section 3.4 of the component EMC Test Plan. Primarily the description provided must relate to the deviation in functionality of the DUT and must be explained in clear English. Secondly the deviation must detail any associated software, hardware or bus errors that will be observed.
5.2 EMC test plans
An EMC test plan shall be prepared and submitted to the JLR EMC department at least 40 working days prior to commencement of EMC testing. The purpose of this test plan is to develop and document well thought out procedures to verify that the component is robust to the anticipated electromagnetic environment that it must operate within. The EMC test plan also provides a mechanism for on-going enhancements and improvement to the test setup, which better correlates with vehicle level testing.
The EMC test plan shall be prepared in accordance with the outline shown in JLR-EMC-CP (at its latest issue), a template is available from www.jaguarlandrover.com/emc. JLR reserves the right to review and challenge all details of the EMC test plan including acceptance criteria for immunity testing and test modes/configurations for all tests. When the test plan is accepted by JLR, a unique test plan number will be assigned. This test plan number will serve as reference for subsequent test results. The test plan number along with signatures from all parties must be sort prior to commencement of testing otherwise the test results will be invalid. See JLR-EMC-CP for additional detail. Acceptance of the EMC test plan by JLR does not relinquish the supplier from responsibility if later reviews show deficiencies in the tests performed, test configurations and/or the acceptance criteria. The supplier shall work with the JLR EMC department to correct any deficiency and repeat testing if required by JLR.
It should be noted that a signed test plan does not absolve the supplier from applying appropriate tests in the correct manner. The process of signing test plans by JLR is intended only to detect gross errors. It is the supplier's responsibility to fully understand the product being supplied and to ensure that the testing being conducted is technically correct and adequate. The aim of EMC testing is to ensure that a product is fit for purpose within its intended EMC environment.
5.3 Deviations
For some DUT's, deviations from the standard test setup may be necessary to facilitate testing, or to better represent a vehicle configuration or method of integration into a vehicle. It is the component supplier’s responsibility to understand the specific EMC risks associated with the nature of their product and its integration into JLR vehicles and to recommend deviations or alternative test methods which may allow better mitigation of EMC issues.

Jaguar Land Rover Limited - Engineering Standard
JLR-EMC-CS v1.0 Amendment 2
© Copyright Jaguar Land Rover – All Rights Reserved Page 18 of 108 30th November 2013
Any deviations/recommendations must be reviewed and approved by the JLR EMC department prior to commencement of testing. Test setup deviations shall be documented in the EMC test plan and test report.
5.4 Sample Size
A minimum of two samples shall be tested. All applicable tests are performed on each of the samples unless approved by the JLR EMC Department. Where significant differences are observed between test results from the 2 samples (even in the instance where both samples meet the requirements), JLR withhold the right to request selective DUT sample testing to fully assess the variability. This shall be at the suppliers cost. In addition the supplier shall document the reasons for variability along with a development plan to reduce variability to an adequate level.
5.5 Sequence of Testing
ESD tests, both unpowered and powered (see Section 20.0) shall be performed prior to any other testing. All other tests may be performed in any order. Extra test samples are recommended in the event of damage due to ESD. However, full retesting will be required as the result of any corrective design actions required to mitigate any EMC issues found unless otherwise agreed with the JLR EMC Department.
5.6 Ambient or background noise
Prior to measurement of DUT RF emissions (RE 310 & CE 420), the ambient test levels (i.e. all equipment energised except DUT) shall be verified to be 6 dB or more below the specified limits. Where a power supply is used to trickle charge the battery during test, a representative load (power resistor) to draw DUT test current shall be applied to the test harness in place of the DUT during ambient measurements. Test setup ambient levels shall be at least 6dB below the specified limits otherwise testing shall not proceed until the associated test setup issues are resolved or test commencement is agreed with the JLR EMC Department.
5.7 Emissions test parameters
The following test parameters shall be used for RE 310 & CE 420 tests:
Table 5-1: Step sizes and measurement times for all ranges
PK AV QP
BW (kHz)
Maximum Frequency
Step
Minimum Measurement
Time (ms)
Maximum Frequency
Step
Minimum Measurement
Time (ms)
Maximum Frequency
Step
Minimum Measurement
Time (ms)
1 ≤ 0.5 x BW 50 ≤ 0.5 x BW 50 - -
9 ≤ 0.5 x BW 50 ≤ 0.5 x BW 50 ≤ 5 x BW 1000
120 ≤ 0.5 x BW 10 ≤ 0.5 x BW 10 ≤ 5 x BW 1000
1000 ≤ 0.5 x BW 50 ≤ 0.5 x BW 50 - - The minimum measurement time is applicable only for the measurement of emissions where the pulse repetition interval of the signal is shorter than the minimum measurement time. For the measurement of signals with a pulse repetition interval longer than the minimum measurement time and for the measurement of intermittent signals, the minimum measurement time shall be increased.
If the pulse repetition interval of the signal is known the stepped scan is performed with a measurement time that is longer than the reciprocal of the pulse repetition frequency of the signal.
If the duration of broadband emission is unknown, multiple scans with various measurement times using a “maximum hold” function are necessary to determine the spectrum envelope. Hence, for low repetition impulsive signals, repeated maxhold scans will be performed until the difference between the maxhold and clear/write display is minimised to < 2 dB. Where a difference of < 2 dB cannot be achieved, the measurement time shall be increased and the process repeated.
For further guidance on the measurement of the duration of disturbances and the determination of minimum measurement times see CISPR 16-2-1 and CISPR 16-2-3.

Jaguar Land Rover Limited - Engineering Standard
JLR-EMC-CS v1.0 Amendment 2
© Copyright Jaguar Land Rover – All Rights Reserved Page 19 of 108 30th November 2013
5.8 Fast Fourier Transform (FFT)
Measurement receivers using Fast Fourier Transform (FFT) techniques may be used, however its use will be clearly stated in the EMC test report. For FFT measurements, a minimum of 10 continuous maximum hold scans shall be performed. If changes are observed between the scans, further tests shall be performed in groups of 5 scans until no perceptible changes in measured levels across the frequency range are observed. A list of approved measurement systems may be found at www.jaguarlandrover.com/emc.
5.9 Quasi-Peak measurements
When assessing DUT4 performance to Quasi-Peak limits, the use of peak detection with the same measurement bandwidth is permitted as a quick pre-scan to increase testing efficiency. For all frequency points where the peak measurement is ≥ 3dB below the Quasi-Peak limit, no further testing is required. For all points which do not meet this requirement, a quasi-peak measurement shall be performed and assessed against the quasi-peak limit.
5.10 Test Laboratory Requirements
For a Lab to be considered 'approved' to deliver test results to JLR then the following criteria will need to be met:
a) The Lab must have accreditation to ISO 17025 b) The Lab must gain accreditation by an ILAC MRA signatory body5 to perform testing to the following
International Standards: i. ISO 11452-2 Radiated Immunity (Anechoic Chamber)
ii. ISO 11452-4 Bulk Current Injection iii. ISO 11452-9 Radiated Immunity from Portable Transmitters. (Important for testing to RI 115) iv. ISO 7637-2 Transient Immunity v. ISO 10605 Electrostatic Discharge
vi. IEC CISPR 25 Radiated Emissions vii. Def Stan 59-411 Magnetic Emissions and Magnetic Immunity
c) A facility report using the template on the JLR EMC website must be provided. Test Labs shall not test without an approved Test Plan number and signature from the JLR EMC Department.
Test Labs shall supply the results in accordance to criteria stated in JLR-EMC-CP.
JLR reserves the right to arrange for follow-up correlation tests and/or on site visits to evaluate the test methods presented herein. A laboratory which refuses such follow-up activities, or for which significant discrepancies are found is subject to having its recognition withdrawn.
5.11 Data Reporting & Data Review
Data reporting requirements, including processes for test report generation and submittal to the JLR EMC department are found in JLR-EMC-CP. All test data shall be reviewed by the JLR EMC department to verify compliance to the requirements herein. A JLR approved test summary shall be provided with each EMC test report submitted to the JLR EMC department to assist in this process. The latest JLR approved test summary template shall be used and can be found at www.jaguarlandrover.com/emc. Component/subsystem compliance shall be determined by the JLR EMC department.
4 Excludes DUTs which use spread spectrum clocking technology 5 ILAC MRA International Laboratory Accreditation Cooperation Mutual Recognition Arrangements is an international body of
which the likes of UKAS will be signatories

Jaguar Land Rover Limited - Engineering Standard
JLR-EMC-CS v1.0 Amendment 2
© Copyright Jaguar Land Rover – All Rights Reserved Page 20 of 108 30th November 2013
5.12 Revalidation
To assure that EMC requirements are continually met, additional EMC testing may be required if there are any circuit or PCB design changes (e.g. die shrinks, new PCB layout) in addition to any software changes. The process – or Management of Change (MoC) - presented in JLR-EMC-CP (at its latest issue) shall be used to determine what additional testing will be required. The JLR EMC department and the JLR Component Owner shall be notified if any of the design changes outlined in JLR-EMC-CP (at its latest issue) are planned. As part of any redesign activity, any component which – prior to redesign – did not meet the requirements detailed herein shall be submitted for revalidation to JLR-EMC-CS (at its latest issue) with a redesign plan which encompasses modifications to achieve compliance.
5.13 Components used on the HV network in Electrified & Electric Vehicles
When designing components for use on the HV network in electrified (hybrid or plug-in-hybrid) or electric vehicles, the following areas shall be considered.
The coupling factor between the high and low voltage sides of the system must be taken into account. Whilst emissions from an individual component may meet the requirements of this specification, when a number of components are assembled into a system, emissions from one component may transmit interference which is then conducted out through the low voltage lines of another component. The committee responsible for CISPR 25 is developing amendments to introduce new test configurations and coupling factor measurements which will then be included in this standard.
Coupling can also occur between electrical motors and metallic components in close proximity especially the vehicle drive-train. This must be taken into account in the component design and during the testing of components. Electric motors shall be tested in a vehicle representative manner, that includes key drive-train components (and representative ground connections to these), that enables representative loads to be applied to the motor. In addition motor shaft voltages shall be assessed and where necessary must be reduced to levels which will not cause vehicle level issues such as audio interference.
Conducted transients and RF within the shielded HV system shall also be assessed and controlled to avoid interoperability issues between HV components. This will involve both emissions and immunity testing of unshielded sections of the HV system. The committee responsible for ISO 11451 is developing new tests for HV immunity which will then be included in this standard.
Additional testing is required for suppliers of HV charging systems of all types.
Any supplier producing HV components for JLR must contact JLR EMC for the latest requirements prior to submitting a test plan.

Jaguar Land Rover Limited - Engineering Standard
JLR-EMC-CS v1.0 Amendment 2
© Copyright Jaguar Land Rover – All Rights Reserved Page 21 of 108 30th November 2013
6.0 Requirement Applicability Table 6-1 lists all EMC requirements detailed in this specification along with their applicability to E/E components. In some cases components may fall into multiple categories (e.g. active magnetic sensors powered from a regulator power supply). Under those conditions all applicable categories shall be considered.
Table 6-1: Requirement Selection Matrix
Requirement Type Test ID
Component Category
Pass
ive
Mod
ules
Indu
ctiv
e De
vice
s Electric Motors Active Electronic Modules
P R BM EM A AS AM AX AY AW
Requ
irem
ent A
pplie
s (
)
RF Emissions RE 310 CE 420
Conducted Transients CE 410
RF Immunity RI 112 RI 114 RI 115
Magnetic Field Emissions RE 320 3 3 3 3 3 Magnetic Field Immunity RI 140 2 2 2 2 2
Coupled Disturbances RI 130 RI 150
Continuous Disturbances CI 210 Transients CI 220 Power Cycling CI 230 Ground Offset CI 250 Low Voltage Transients CI 265 1 1 1 1 1 1 Voltage Overstress CI 270 ESD CI 280 2
Passive Modules: P: A passive electrical module consisting of only passive components including resistor, capacitor, inductor, blocking or clamping
diode, Light Emitting Diode (LED), thermistor. Requirement applicability may be waived all or in part if analysis, approved by JLR EMC demonstrates device robustness.
Inductive Devices: R: Relays, solenoids and horns.
Electric Motors: BM: A brush commutated dc electric motor. Motors that operate for less than 200 mS and are used as a latch function will be
categorized as an Inductive Device (R) EM: An electronically controlled electric motor
Active Electronic Modules: A: An electronic module that contains active electronic devices. Examples include analogue op amp circuits, switching power
supplies, microprocessor based controllers and displays. AS: A module operated from a regulated power supply located in another module. This is usually a sensor providing input
to a controller. AM: A module that contains magnetically sensitive elements or is connected to an external magnetically sensitive element. AX: A module that contains an electric or electronically controlled motor or other inductive device within its package or
controls an external inductive device including electric or electronically controlled motor(s). AY: A module that contains a magnetically controlled relay within its package. AW: A module with no external wiring (e.g. RKE key).
NOTE: 1 Applies only to components which use devices with internal memory or start-up (calibration) routines NOTE: 2 Applies if DUT contains magnetically sensitive devices NOTE: 3 Applies if a module and its associated harness is capable of generating magnetic fields (e.g. alternator, inverter, PWM source)

Jaguar Land Rover Limited - Engineering Standard
JLR-EMC-CS v1.0 Amendment 2
© Copyright Jaguar Land Rover – All Rights Reserved Page 22 of 108 30th November 2013
7.0 Radiated RF Emissions: RE 310 Applicable to the following component categories:
P R BM EM A AS AM AX AY AW Test Is Applicable
7.1 Requirement
Radiated emissions requirements cover the frequency range from 0.01 to 5905 MHz. Requirements are linked directly to specific RF service bands and legislative requirements.
7.2 Test Details
Tests shall be in accordance with the requirements of CISPR 25 Edition 3, ALSE method except where noted in this specification. Component operation during testing shall be documented in an EMC test plan prepared by the component/subsystem supplier and EMC test laboratory (see section 5.2).
The test parameters detailed in Table 5-1 shall be used.
The DUT and electronic hardware in the Load Simulator shall be powered from an automotive battery (see Section 4.7.4 for requirements).
Bonding and grounding of the DUT shall be as per Section 4.6. Test setup ambient levels shall be verified in accordance with Section 5.6.
For all test modes defined in the component EMC test plan and for all samples the following requirements apply:
a) Bands R-01 – R-04 - the DUT shall meet the peak detector limits (Table 7-1). b) Bands M-01 – M-03 - the DUT shall meet the average and quasi-peak6 detector limits (Table 7-1). c) Bands BS-01 – BS-05, DB-01 – DB-04 and MS-01 – MS-19 – the DUT shall meet all limits (Table 7-2).
Table 7-1: RE 310 Level 1 Requirements
Test ID Description
Frequency Range (MHz)
BW (kHz) PK (dBµV/m) BW
(kHz) AV (dBµV/m) BW (kHz) QP(1) (dBµV/m)
R-01
RoW requirements
0.01-0.15 1 95 - 23 Log (f/0.01) R-02 0.15-1 9 72 R-03 1-10 9 72 - 22 Log (f) R-04 10-30 9 50 M-01
ECE REG 10 Requirements
30-75
120
52- 25.13 Log(f/30)
120
62 - 25.13 Log(f/30)
M-02 75-400 42 + 15.13 Log(f/75) 52 + 15.13 Log(f/75)
M-03 400-1000 53 63
Note: f = Measurement Frequency (MHz) Note: 1 Peak pre-scan measurement may be used as per Section 5.9 Level 1 requirements are based on latest international standards
6 See Section 5.9

Jaguar Land Rover Limited - Engineering Standard
JLR-EMC-CS v1.0 Amendment 2
© Copyright Jaguar Land Rover – All Rights Reserved Page 23 of 108 30th November 2013
Table 7-2: RE 310 Level 2 Requirements
Test ID Description (Band) Frequency Range (MHz)
BW (kHz)
PK (dBµV/m)
BW (kHz)
AV (dBµV/m)
BW (kHz)
QP (dBµV/m)
Broadcast Services
BS-01 LW 0.15-0.28 9 36 9 43
BS-02 MW 0.53-1.7 9 12 9 30
BS-03 SW 1.7-30 9 12 9 24
BS-04 FM 1 75-91 9 18 9 12 120 24
BS-05 FM 2 86-109 9 18 9 12 120 24
Digital Broadcast Services
DB-01 DAB III and TV Band III 167-245 1000 32 1000 22 DB-02 TV Band IV/V 470-890 1000 38 1000 28 DB-03 DAB L Band 1447-1494 1000 46 1000 36 DB-04 SDARS 2320-2345 1000 46 1000 36
Mobile Services
MS-01 4m 65-88 9 18 9 12 120 24 MS-02 2m 140-176 9 18 9 12 120 24 MS-03 RKE & TPMS 1 310-320 9 20 9 14 MS-04 TETRA 380-424 9 25 9 19 MS-05 RKE & TPMS 2 425-439 9 25 9 19 MS-06 Police (Europe) 440-470 9 25 9 19 MS-07 RKE 868-870 9 30 9 24 MS-08 RKE 902-904 9 30 9 24 MS-09 4G 703-821 1000 46 1000 36 MS-10 GSM 850 859-895 120 32 120 12 MS-11 GSM 900 915-960 120 32 120 12 MS-12 GPS 1567-1583 9 10 MS-13 GLONASS GPS 1585-1616 9 10 MS-14 GSM 1800 1805-1880 120 34 120 14 MS-15 GSM 1900 1930-1995 120 34 120 14 MS-16 3G 1900-2170 1000 46 1000 36 MS-17 WiFi and Bluetooth 2400-2500 1000 46 1000 36 MS-18 4G 2496-2690 1000 46 1000 36 MS-19 WiFi 4915-5825 1000 56 1000 46 MS-20 ITS 5875 - 5905 1000 56 1000 46
Level 2 requirements are based on specific customer requirements.
7.2.1 Test Setup for Engine Control Circuits (Bands BS-01 & BS-02 only)
When testing engine control electronics that are packaged in the engine compartment, the test setup illustrated in Figure 7-2 may be used. This test setup shall not be used for any other module or subsystem.
The ignition and injector wires shall be removed from the main wire harness and located directly on the ground plane 100 mm behind (further away from the antenna) the main wire harness. RF shielding, as illustrated in Figure 7-2 shall be placed over the selected wiring. The RF shielding shall be electrically connected to the ground plane via direct connection (e.g. screws) or copper tape with conductive adhesive. Use of this test setup shall be documented in the EMC test plan and approved by the JLR EMC department prior to commencement of testing. Photos of the test setup shall be included in the test report.

Jaguar Land Rover Limited - Engineering Standard
JLR-EMC-CS v1.0 Amendment 2
© Copyright Jaguar Land Rover – All Rights Reserved Page 24 of 108 30th November 2013
Figure 7-1: RE 310 Test Antenna Cable Configuration (excludes Rod antenna < 30 MHz)
Biconical Antenna
Log Antenna
Scale: millimetres
Key:
1. Ferrite Cable Bead (Fair-Rite Type 43 or equivalent)
2. Preamplifier (if required) 3. Floor of ALSE
Rod Antenna Not Shown. Physical Dimensions conform to CISPR 25 3rd Edition Except where noted. Dimensions shown are in millimetres.
Figure 7-2: RE 310 Test Setup (EU1, G1) DUTs with Selected Wiring in Engine Compartment
Key
1. DUT 6. Ground Plane Bench
2. Insulated Support (εr≤ 1.4) 7. Cable Harness (1700 -0/+300 mm)
3. Load Simulator 8. Selected Wiring Removed from Cable Harness
4. Automotive Battery 9. RF Shield over Selected Wiring Removed from Cable Harness (aluminium foil)
5. Artificial Network
2
≤ 1501
≥ 1000
32
≤ 1501
≥ 1000
3
5 5
1
3
4≥ 100 mm
9
6 8
7
2
2
6
8 9
7
≥ 100 mm≥ 100 mm
8
9

Jaguar Land Rover Limited - Engineering Standard
JLR-EMC-CS v1.0 Amendment 2
© Copyright Jaguar Land Rover – All Rights Reserved Page 25 of 108 30th November 2013
8.0 Conducted RF Emissions: CE 420 Applicable to the following component categories:
P R BM EM A AS AM AX AY AW Test Is Applicable
8.1 Requirement
Testing is applicable to all harnesses including twisted and shielded wiring systems. For shielded wiring systems the shields shall be terminated as per vehicle installation at the LISN end of the harness, however this requires prior approval by the JLR EMC department to ensure cross car line compatibility (i.e. that the worst-case termination is tested or that testing with only 1 termination configuration is adequate). In certain instances testing of further shield termination configurations may be required. Shielded cable assemblies shall, in addition, be tested with the shield partially removed to allow measurements of conducted emissions on the inner conductors.
Table 8-1: CE 420 Conducted Emissions Applicability
Test ID Applicable Circuits Test method Test Details
CP-01 Power Circuits Power Return Circuits
CISPR 25 Current Probe Method
Measurement of conducted emissions on power and power return circuits shall be performed separately. Multiple circuits required to meet operating current demands may be combined and treated as a single conductor.
CP-02 Each harness CISPR 25 Current Probe Method
Measurement of conducted emissions or cable shield currents (for shielded cable assemblies). Performed on all component harness assemblies, harness by harness.
CP-03(1) Each shielded harness CISPR 25 Current Probe Method Modified (see Figure 8-1)
Test as per CP-02 however all power returns and shields shall be routed around the measurement probe. For shielded cables, the outer shield shall be removed at the measurements clamp locations and a separate wire shall be used to join the screen section but shall be routed outside of the measurement clamp (see Figure 8-1)
Note: 1 Test is applicable for all technologies however deviations may be provided on a case-by-case basis upon results and technical review
The test parameters detailed in Table 5-1 shall be used.
Conducted RF emissions shall not exceed the requirements listed in Table 8-2.
Table 8-2: CE 420 Conducted Emissions Requirements
RF Service (Band) Frequency Range (MHz)
Limits (Current Probe Method)
BW (kHz) Average (dBµA)
Quasi-Peak (dBµA)
Long Wave (LW) 0.15-0.28 30 37 9
Medium Wave (AM) 0.53-1.7 6 13 9
Short Wave (SW) 1.7-30 -1 6 9
FM 1 75-91 -22 -15 120
FM 2 86-109 -22 -15 120
DAB 167-242 -22 -15 120

Jaguar Land Rover Limited - Engineering Standard
JLR-EMC-CS v1.0 Amendment 2
© Copyright Jaguar Land Rover – All Rights Reserved Page 26 of 108 30th November 2013
8.2 Test Details
Tests shall be in accordance with the requirements of CISPR 25 (Edition 3), except where noted in this specification. The DUT and electronic hardware in the Load Simulator shall be powered from an automotive battery (see Section 4.7.4 for requirements). The battery negative terminal shall be connected to the ground plane.
Test setup ambient levels shall be verified in accordance with Section 5.6. Tests shall be repeated on all DUT test samples for all DUT operating mode(s) detailed in the component EMC test plan.
8.2.1 Current Probe Method (Test CP-01)
Bonding of the DUT shall be as per Section 4.6. No local DUT ground is permitted (i.e. the test procedure for testing DUTs with remote grounds shall be followed). Voltage measurements shall be performed successively on each positive power supply and power return relative to the ground plane.
8.2.2 Current Probe Method (Test CP-02 and CP-03)
Bonding and grounding of the DUT shall be as per Section 4.6. For test CP-02, the measurement probe shall be mounted around the complete harness (including all wires), at test positions 50 mm and 750 mm from the DUT. For test CP-03, test CP-02 shall be repeated however all power returns and shields shall be routed around the measurement probe as per the examples shown in Figure 8-1.
Figure 8-1: Shielded harness test configuration
Shielded harness test configuration Shielded harness test configuration with shielded sub-
harness and power return Key: 1. Measurement probe (current clamp) 3. Shielded sections of harness 2. Power returns and shields routed around probe 4. Sections of harness with shield removed
2
34
≥ 20mm
1 1
2
34
≥ 20mm

Jaguar Land Rover Limited - Engineering Standard
JLR-EMC-CS v1.0 Amendment 2
© Copyright Jaguar Land Rover – All Rights Reserved Page 27 of 108 30th November 2013
9.0 Conducted Transient Emissions: CE 410 Applicable to the following component categories:
P R BM EM A AS AM AX AY AW Test Is Applicable
9.1 Requirement
The component or sub system shall not generate transient voltages of magnitudes exceeding the requirements detailed in Table 9-1 on its power supply whilst inductive devices are being exercised. This is to avoid interference with electrical components which share a power supply with the DUT.
Table 9-1: CE 410 Conducted Transient Emissions Requirements
Applicability DUT Characteristic Limit Transient emissions on power supply lines
e.g. relays, electric motors, solenoid valves
≤ 2 ms > 2 ms
+ 75 V / - 80 V 20 V (and agreement with JLR EMC department)
9.2 Test Details
The DUT shall be tested in accordance with ISO 7637-2 using the test configuration for fast pulses, except where noted in this specification.
The DUT and electronic hardware in the Load Simulator shall be powered from an automotive battery (see Section 4.7.4 for requirements). The battery negative terminal shall be connected to the ground plane.
Tests shall be repeated on all DUT test samples for all DUT operating mode(s) detailed in the component EMC test plan.
Bonding of the DUT shall be as per Section 4.6.
The actual switch used for testing shall be specified in the EMC test report. If the DUT is an electric motor or actuator, it shall be tested in the “stall” condition unless analysis demonstrates this condition cannot occur. If the motor contains internal protection (e.g. PTC device) that would limit or interrupt current to the DUT during a stall condition, testing shall be performed with the maximum rated mechanical load on the motor/actuator.
Supply line transients shall be recorded and assessed against the requirements detailed in Table 9-1.
Testing shall be conducted for a) switch on, b) switch off and c) switching of connected loads.
All transient parameters (amplitude, rise time, fall time and duration) shall be recorded.
Although CE 410 requirements are validated at room temperature, the product shall be designed to meet the same requirements at -45 degrees C or the coldest ambient temperature specified in the product's engineering specification. This shall be varified by the supplier and may be included in the EMC test report. Where issues due to temperature variation are observed, this data will be requested by JLR for assessment.

Jaguar Land Rover Limited - Engineering Standard
JLR-EMC-CS v1.0 Amendment 2
© Copyright Jaguar Land Rover – All Rights Reserved Page 28 of 108 30th November 2013
10.0 RF Immunity: RI 112, RI 114, RI 115 Applicable to the following component categories:
P R BM EM A AS AM AX AY AW Test Is Applicable 7
Radiated immunity requirements cover the frequency range from 0.1 to 3100 MHz. Requirements are based on anticipated “off-vehicle” and “on-vehicle” RF sources (e.g. amateur radio, cellular phones).
Applicability of RF immunity to hand portable transmitters (RI 115) is limited to selected devices packaged inside the passenger or luggage compartments. See Section 10.5 for details.
10.1 Generic Requirement
Component functional performance shall meet the acceptance criteria detailed in Table 10-1. Due to the wide frequency coverage, multiple test methods are needed for performance verification. Level 1 and Level 2 requirements are dependent on those test methods.
The DUT operating mode(s) exercised during testing shall conform to that detailed in the EMC test plan.
Table 10-1: RF Immunity Acceptance Criteria
Requirement Level
Functional Performance Status
Class A Class B Class C 1 I (1) I I 2 II (1,2) II I
Note: 1 For audio, video and RF functions, some degradation in performance (e.g. distortion) is permitted, but shall be defined and quantified in the component/subsystem's engineering specification and EMC Test Plan.
Note: 2 For audio components, volume level (measured at speaker terminals) shall not increase by more than 50%.
10.2 Generic Test Procedures
RF Immunity testing shall be performed with linear frequency step sizes no greater than those listed in Table 10-2. Initially testing shall be performed using Level 2 requirements. If deviations are observed, the stress level shall be reduced until the DUT functions normally. The stress level shall then be increased until the deviation occurs. The stress level at this point shall be verified to meet the performance requirements detailed in Table 10-1. If the performance requirements are not met, the stress level shall be reported as the deviation threshold.
Table 10-2: RF Immunity Test Frequency Steps
Frequency Range (MHz)
Frequency Step Size (MHz)
0.1-1 0.05
1-30 0.5
30-200 2
200-400 5
400-1000 10
1000-3100 20
7 RI112 testing excluded for component category AW (however alternative method of test required)

Jaguar Land Rover Limited - Engineering Standard
JLR-EMC-CS v1.0 Amendment 2
© Copyright Jaguar Land Rover – All Rights Reserved Page 29 of 108 30th November 2013
10.3 RI 112 Specific Test Details
The device shall operate as specified in Table 10-1 when exposed to the RF current levels and modulation listed and illustrated in Figure 10-1. The currents are produced using the BCI test method.
Tests shall be repeated on all DUT test samples for all DUT operating mode(s) detailed in the component EMC test plan.
Testing is applicable to all shielded wiring systems including phantom fed antennas. For shielded wiring systems the shields shall be terminated as per vehicle installation at the LISN end of the harness, however this requires prior approval by the JLR EMC department to ensure cross car line compatibility (i.e. that the worst-case termination is tested or that testing with only 1 termination configuration is adequate). In certain instances testing of further shield termination configurations may be required.
RI 112 cannot be used for component category AW (no wire harness). Alternative methods using equivalent test levels shall be used (e.g. TEM cell), but only with prior authorization by the JLR EMC department. The test method used, including test setup detail shall be documented in the EMC test plan.
Figure 10-1: RI 112 Requirements using Bulk Current Injection (BCI)
Band Frequency Range
(MHz) Level 2 (dBµA)
Level 1 (dBµA)
Modulation
1 0.1-2.38 90 84
CW, AM 80% 2 2.38-15 106 – 20 log(15/f) 100 – 20 log(15/f)
3 15-88 106 100
4 88-400 106 – 10 log(f/88) 100 – 10 log(f/88)

Jaguar Land Rover Limited - Engineering Standard
JLR-EMC-CS v1.0 Amendment 2
© Copyright Jaguar Land Rover – All Rights Reserved Page 30 of 108 30th November 2013
Tests shall be in accordance with the BCI (substitution method) per (ISO 11452-4) except where noted in this specification.
The DUT and electronic hardware in the Load Simulator shall be powered from an automotive battery (see Section 4.7.4 for requirements). The battery negative terminal shall be connected to the ground plane.
Bonding of the DUT shall be as per Section 4.6. In the frequency range 0.1 MHz - 30 MHz all power return (i.e. ground) wires of the DUT wiring harness shall be terminated directly to the ground plane (DBCI) as illustrated in Figure 10-2a. The length of the termination wires shall be 200 ± 50 mm. No power return wiring shall be routed around the BCI injection probe. In cases where it is not representative to directly terminate power return wires to the ground plane, for example the return is part of a twisted pair or forms the outer shield in a shielded harness, then the DBCI configuration cannot be achieved. In this instance CBCI testing in the 0.1 MHz - 30 MHz shall be performed as return circuits will be routed through the BCI injection probe. In the frequency range 30 MHz - 400 MHz all wires of the DUT wiring harness shall be routed inside of the injection probe (CBCI) as illustrated in Figure 10-2b. If the DUT has multiple connectors, testing shall be repeated (0.1 – 400 MHz) with the injection probe placed around the individual harness associated with each individual DUT connector. Circuits contained in each harness shall be documented in the EMC test plan. The calibrated injection probe method (substitution method) according to ISO 11452-4 shall be used:
a) Use step frequencies and modulation as specified in Figure 10-1. b) In the frequency range from 0.1 to 30 MHz, testing shall be performed at two fixed injection probe positions
(150 mm, 450 mm). c) In the frequency range from 30 MHz to 400 MHz, testing shall be performed at two fixed injection probe
positions (450 mm, 750 mm). d) If deviations are observed, the induced current shall be reduced until the DUT functions normally. Then the
induced current shall be increased until the deviation occurs. This level shall be reported as the deviation threshold.
e) Repeat testing for each harness connected to the DUT. f) The DUT operating mode(s) exercised during testing shall conform to that detailed in the EMC test plan.
g) If a monitor probe is used during testing, it shall not be used to adjust the RF current detailed in Figure 10-1. The measured values are used for information only and may be included in the test report.
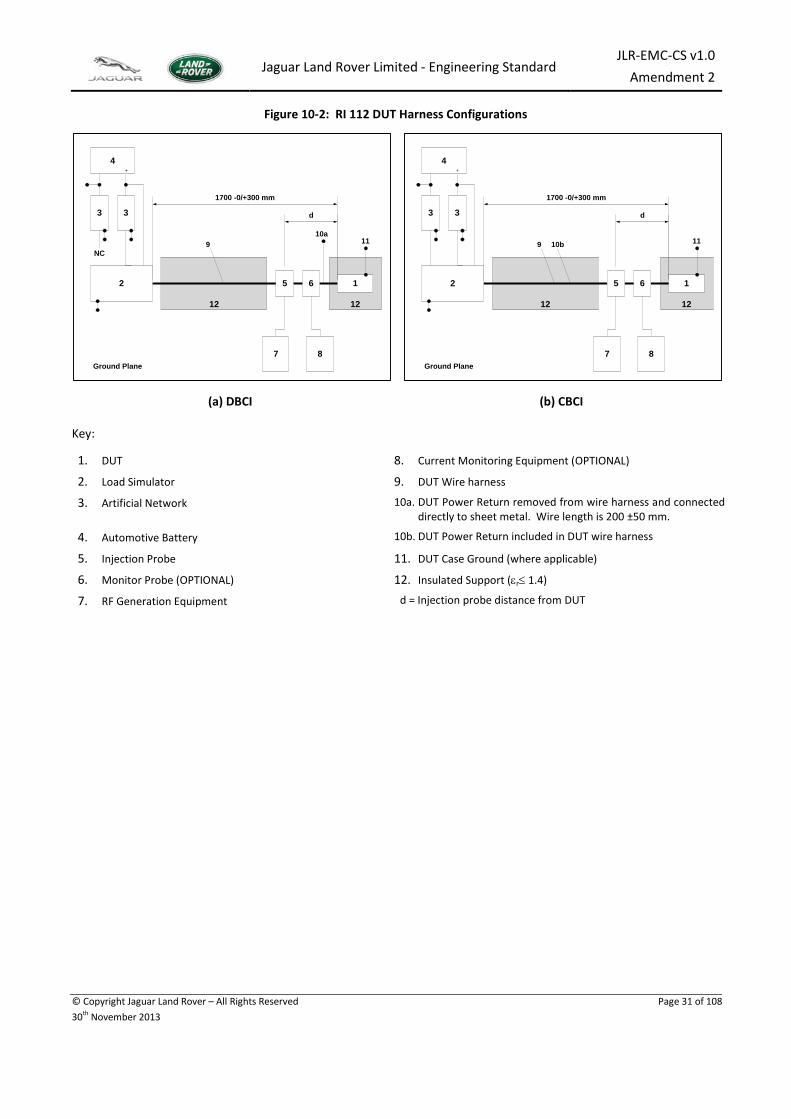
Jaguar Land Rover Limited - Engineering Standard
JLR-EMC-CS v1.0 Amendment 2
© Copyright Jaguar Land Rover – All Rights Reserved Page 31 of 108 30th November 2013
Figure 10-2: RI 112 DUT Harness Configurations
(a) DBCI (b) CBCI
Key:
1. DUT 8. Current Monitoring Equipment (OPTIONAL)
2. Load Simulator 9. DUT Wire harness
3. Artificial Network 10a. DUT Power Return removed from wire harness and connected directly to sheet metal. Wire length is 200 ±50 mm.
4. Automotive Battery 10b. DUT Power Return included in DUT wire harness
5. Injection Probe 11. DUT Case Ground (where applicable)
6. Monitor Probe (OPTIONAL) 12. Insulated Support (εr≤ 1.4)
7. RF Generation Equipment d = Injection probe distance from DUT
1212
2 1
3 3
4
7 8
5 6
+
NC
Ground Plane
1700 -0/+300 mm
d
10a119
1212
2 1
3 3
4
7 8
5 6
+
Ground Plane
1700 -0/+300 mm
d
10b 119

Jaguar Land Rover Limited - Engineering Standard
JLR-EMC-CS v1.0 Amendment 2
© Copyright Jaguar Land Rover – All Rights Reserved Page 32 of 108 30th November 2013
10.4 RI 114 Specific Test Details
The device shall operate as specified in Table 10-1 when exposed to RF electromagnetic fields as detailed in Table 10-3 when tested in accordance with ALSE Method (ISO 11452-2) except where noted in this specification.
Table 10-3: RI 114 Requirements (200-3100 MHz)
Band Frequency Range (MHz) Level 1 (V/m) Level 2 (V/m) Modulation
4 200-800
50 100
CW, AM 80%
400-470 Pulsed PRR= 18 Hz, PD= 28 ms
5 800-3000 70 CW, Pulsed PRR= 217 Hz, PD=0.57 ms
6 1200-1400 n/a
300 600
Pulsed PRR= 300 Hz, PD = 3 µs,
with only 50 pulses output every 1 second 7 2700-3100
Note: 600 V/m requirements are only applicable to selected components associated with supplemental restraints system including frontal crash sensors. Contact JLR EMC department for specific applicability
For frequencies ≤ 1000 MHz, the field-generating antenna shall be positioned in middle of the harness. For frequencies above 1000 MHz, the antenna shall be moved 750 mm parallel to the front edge of the ground plane towards the DUT. The centre of the antenna shall be pointed directly at the DUT instead of the centre of the wiring harness (See Figure 10-3). Calibration procedures shall be performed in accordance with ISO 11452-2. The RE 310 test harness shall be used to ensure consistency in the DUT and Load Simulator location. For both band 4/5 and 6/7 procedures, field characterization shall be performed at the Level 2 field strengths listed in Table 10-3. Field characterisation at lower field strengths with subsequent power scaling for higher field strengths is not permitted.
All modulation dwell times (i.e., time that RF is applied for per modulation type) shall be at least 2 seconds. Tests with both horizontal and vertical antenna polarizations shall be performed. At test frequencies ≥ 1000 MHz, the DUT shall be tested in a minimum of three (3) orthogonal orientations unless otherwise stated in the EMC test plan. If deviations are observed, the field shall be reduced until the DUT functions normally. The field shall then be increased until the deviation occurs. This level shall be reported as deviation threshold.
Tests shall be repeated on all DUT test samples for all DUT operating mode(s) detailed in the component EMC test plan.

Jaguar Land Rover Limited - Engineering Standard
JLR-EMC-CS v1.0 Amendment 2
© Copyright Jaguar Land Rover – All Rights Reserved Page 33 of 108 30th November 2013
10.4.1 ALSE method (Bands 4 and 5)
The DUT and electronic hardware in the Load Simulator shall be powered from an automotive battery (see Section 4.7.4 for requirements). The battery negative terminal shall be connected to the ground plane.
Bonding and grounding of the DUT shall be as per Section 4.6. For ALSE method (bands 4 and 5), the test configuration is illustrated in Figure 10-3.
The ground plane to chamber bonding and all minimum separation distances between the DUT, ground plane, antenna and chamber walls shall be as per ISO 11452-2.
10.4.2 ALSE method (Bands 6 and 7)
The DUT and electronic hardware in the Load Simulator shall be powered from an automotive battery (see Section 4.7.4 for requirements).
A ground plane shall not be used for ALSE method (bands 6 and 7). The battery may be located on, or under the test bench. Artificial Networks shall not be used. Bonding of the DUT shall be as per Section 4.6, however, when performing testing per RI114 ALSE, (Bands 6 and 7), a braided copper ground strap shall be used to connect the DUT case to the battery negative terminal. The strap shall be 1700 mm (+300/- 0 mm) with a width no greater than 13 mm. The strap shall be co-routed with the test harness. This method shall also be used if the DUT power returns require local grounding.
For ALSE method (bands 6 and 7), the test configuration is illustrated in Figure 10-4.
Minimum separation distances between the DUT, test bench, antenna and chamber walls shall be as per ISO 11452-2.
Refer to Annex A for field characterization procedures for Bands 6 and 7.
When performing testing in Bands 6 and 7, the forward power required to achieve the field strengths listed in Table 10-3 is greatly influenced by the transmit horn antenna selected. The antenna near field gain compression characteristics can significantly impact the actual power needed to achieve the required field strengths at 1 meter. Given this issue, selection of the antenna should not be based simply on the published antenna gain. Also, the high power levels needed to achieve the desired field strength have been shown to significantly impact the VSWR of some antennas.
When performing testing in Bands 6 and 7 using pulse modulation, CW shall not be used for levelling prior to application of pulsed modulation. The DUT and its cable harness, along with the Load Simulator shall lie on an insulated support 1000 mm (+/-50 mm) above the floor of the test chamber. The dielectric constant of the insulated support shall be less than 1.4.

Jaguar Land Rover Limited - Engineering Standard
JLR-EMC-CS v1.0 Amendment 2
© Copyright Jaguar Land Rover – All Rights Reserved Page 34 of 108 30th November 2013
Figure 10-3: RI 114 ALSE Test Setup Bands 4 and 5
Key:
1. DUT 2. Wire harness 3. Load Simulator 4. Automotive Battery
5. Ground plane (bonded to shielded enclosure)
6. Insulated support (εr≤ 1.4) 7. Artificial Network 8. Transmitting Antenna
7 7
1
3
4
100 mm ± 10 mm
5
2
6
1500
mm
± 7
5 m
m
200 mm ± 10 mm
8> 1000 MHz
1000 mm ± 10 mm
8≤ 1000 MHz

Jaguar Land Rover Limited - Engineering Standard
JLR-EMC-CS v1.0 Amendment 2
© Copyright Jaguar Land Rover – All Rights Reserved Page 35 of 108 30th November 2013
Figure 10-4: RI 114 ALSE Test Setup for Bands 6 and 7
Key:
1. DUT 2. Wire harness 3. Load Simulator
4. Automotive Battery
5. Dielectric Support ((εr ≤ 1.4) 6. Transmitting Antenna
1
3
5
2
1500
mm
± 7
5 m
m
100 mm ± 10 mm
6
1000 mm ± 10 mm
4

Jaguar Land Rover Limited - Engineering Standard
JLR-EMC-CS v1.0 Amendment 2
© Copyright Jaguar Land Rover – All Rights Reserved Page 36 of 108 30th November 2013
10.5 RI 115 Specific Test Details
Testing shall be in accordance with ISO 11452-9 except where noted in this specification.
The device shall operate as specified in Table 10-1 when exposed to RF electromagnetic fields as detailed in Table 10-4. RI 115 is based on the potential risk of modules being exposed to hand portable transmitters (e.g. cell phones). Specific applicability shall be agreed with the JLR EMC department prior to testing and documented in the test plan.
Table 10-4: RI 115 Requirements for hand portable transmitters
Band Frequency Band (MHz)
Test severity Net Power (Watts) Modulation type
Level 1 Level 2
8 360-480 4.5 9.0 PM, 18 Hz, 50%
9 800 -1000 7.0 14.0 PM, 217 Hz, 12.5%
10 1600-1950 1.5 3.0 PM, 217 Hz, 12.5%
11 1950-2200 0.75 1.5 PM, 217 Hz, 12.5%
12 2400 -2500 0.1 0.2 PM, 1600 Hz, 50%
13 2500-2700 0.25 0.5 PM, 217 Hz, 12.5%
Test severity levels are only valid for the antenna identified in this specification NET power delivered to the input port of the antenna, which is established while the antenna is 1m from any object
Verification of component performance shall use the test setup shown in Figure 10-5. References to wiring harness and LISN are not applicable in case of modules without wiring harness (e.g. remote entry key).
All tests shall be performed in an absorber lined shielded enclosure (ALSE), which conforms to ISO 11452-2.
This test procedure makes use of a small broadband antenna positioned above the DUT and its wiring harness to simulate electromagnetic fields generated by hand portable transmitters operating in close proximity. The result of near field immunity tests is strongly influenced by the antenna type used and for this reason only Schwarzbeck antenna SBA9113 with elements 420NJ shall be used for this test. The separation between the test antenna and the DUT surfaces and harnesses shall be either 5 mm or 50 mm depending on expected proximity to intentional storage locations and product type as detailed in Table 10-5 below. The test antenna is positioned in step sizes specified in in Table 10-5 to ensure all DUT surfaces are thoroughly exposed. The JLR EMC department shall be consulted with respect to antenna to DUT surface separation distance and positioning steps. This information shall be documented in the component level EMC test plan. Only one test antenna to DUT height shall be used for a given device.
Table 10-5: RI 115 Separation Distances and Antenna Positioning
DUT Surface or Harness description Antenna Distance from DUT
Antenna Positioning Steps
DUT surfaces and first 300mm of their harnesses (measured from DUT connector) which are likely to be packaged between 50 to 100 mm of intentional and/or unintentional locations where a hand portable transmitter may be located.
50 mm 100 mm
Keys and similar devices which may come in direct contact with hand portable transmitters and all other DUT surfaces and first 300mm of their harnesses which are likely to be packaged less than 50 mm from intentional storage locations.
5 mm 30 mm

Jaguar Land Rover Limited - Engineering Standard
JLR-EMC-CS v1.0 Amendment 2
© Copyright Jaguar Land Rover – All Rights Reserved Page 37 of 108 30th November 2013
The DUT and electronic hardware in the Load Simulator shall be powered from an automotive battery (see Section 4.7.4 for requirements). The test bench shall include a sufficiently large ground plane, such that the plane extends beyond the test Setup by at least 100 mm on all sides.
The distance between the test setup and all other conductive structures (such as the walls of the shielded enclosure) with the exception of the ground plane shall be ≥ 500 mm. The test antenna shall be mounted above the DUT and parallel to the ground plane. The DUT shall be positioned to ensure that the surface under test is facing the antenna.
Tests shall be repeated on all DUT test samples for all DUT operating mode(s) detailed in the component EMC test plan.
Bonding and grounding of the DUT shall be as per Section 4.6.
Figure 10-5: RI 115 Test Setup
Key:
1. DUT
2. Test harness
3. Load Simulator
4. Automotive Battery
5. Ground Plane
6. Dielectric Support (εr ≤ 1.4)
7. Artificial network
8. Test antenna (Schwarzbeck antenna SBA9113 with elements 420NJ )
9. Support Equipment
10. High quality double-shielded coaxial cable (cable can be no closer than 1000 mm to antenna elements. Place ferrite beads on cable (see Figure 10-6).
11. RF Generation Equipment (see Figure 10-6)
+_
+_
1700
-0/+
300
6
1
2
10
8
5
9
11
3
7
74
63 1
h
≥ 1000 mm
5
11

Jaguar Land Rover Limited - Engineering Standard
JLR-EMC-CS v1.0 Amendment 2
© Copyright Jaguar Land Rover – All Rights Reserved Page 38 of 108 30th November 2013
Prior to testing, calibration of test setup shall be performed using a similar procedure to that detailed in Annex B of ISO 11451-3-2006. During calibration, the antenna shall be positioned such that its radiating elements are a minimum distance of 500 mm from any absorber material and 1000 mm from any object such as the DUT, the ground plane, antenna cable, and the test enclosure wall. This setup is illustrated in Figure 10-6.
The net power levels specified in Table 10-4 are based on the measured forward and reverse power per the following equation:
65
45
1 2 3
> 500 mm
> 500 mm
> 1000 mm
> 1000 mm
Pcal, FWD Pcal, REFL
7

Jaguar Land Rover Limited - Engineering Standard
JLR-EMC-CS v1.0 Amendment 2
© Copyright Jaguar Land Rover – All Rights Reserved Page 39 of 108 30th November 2013
10.5.1 Antenna Positioning for Coupling to DUT
The usable test area of the broadband antenna is 100x100 mm when testing at a DUT-to-antenna separation of 50 mm. However, the footprint reduces to 30x30 mm when testing at 5 mm separation. It is therefore necessary to move the antenna in steps of 100 mm and 30 mm when testing at 50mm and 5mm respectively.
All surfaces of the DUT which are to be tested shall be partitioned to square cells of either 100x100, or 30x30 mm. The antenna shall be placed at a distance of 50 or 5 mm (specified in the test plan) and the centre of each cell shall be exposed to the centre and the elements of the antenna in two orthogonal orientations (four exposures in total). It is necessary to expose each cell to the centre and the elements of the antenna as E and H fields are in different places and move with test frequency.
The antenna shall be placed above the centre of each cell, and the DUT shall be exposed to specified disturbance listed in Table 10-4 using the test sequence detailed below:
a) Place the antenna in parallel with the DUT harness and aligned with the centre of the first cell and expose DUT to stress levels specified in Table 10-4.
b) Repeat step a) with antenna rotated 90 degrees
c) Align antenna with the centre of the next cell and repeat steps (a) and (b) until all cells have been exposed to 2 orthogonal orientation of the antenna.
Steps (d), (e) and (f) are NOT required when testing at 5mm distance.
d) Move the antenna back to the first cell. Align antenna element in the centre of the test cell (edges of the element aligned with the centre of the cell) and expose DUT to the stress levels specified in Table 10-4.

Jaguar Land Rover Limited - Engineering Standard
JLR-EMC-CS v1.0 Amendment 2
© Copyright Jaguar Land Rover – All Rights Reserved Page 40 of 108 30th November 2013
e) Repeat step d) with antenna rotated 90 degrees
f) Repeat steps (d) and (e) until all cells have been exposed. When testing DUTs with multiple cells, centres of
some cells will be exposed to the elements of the antenna while performing steps (a) to (c) to the adjacent cell. In such cases, it is not required to carry out steps (d) and (e) that would result in a duplicate test. If there is any doubt over effective exposure of cells to the elements of the antenna, steps (d) and (e) shall be performed.
g) Repeat steps a) through f) for each DUT surface defined in the EMC test plan. Testing requires rotation of the DUT such that the surface to be tested is parallel to the ground plane. Low permittivity material shall be used to support DUT so that the surface under test is facing up toward the antenna.
10.5.2 Antenna Positioning for Coupling to Harness
Position antenna central to the connector under test and parallel to harness. Align the centre of antenna with the outermost edge of the DUT connector. Expose DUT to test signals specified in Table 10-4. In cases where DUT has multiple connectors or connectors are wider than required cell width (30 or 100 mm) test shall be repeated multiple times.
If deviations are observed, the power shall be reduced until the DUT functions normally. The power shall then be increased until the deviation occurs. The power at this point shall be reported as deviation threshold.
Figure 10-7: RI 115 Antenna positioning for testing the harness
(a) Side view (b) Plan view
DUT connectorHarness connector
h

Jaguar Land Rover Limited - Engineering Standard
JLR-EMC-CS v1.0 Amendment 2
© Copyright Jaguar Land Rover – All Rights Reserved Page 41 of 108 30th November 2013
11.0 Magnetic Field Emissions: RE 320 Applicable to the following component categories:
P R BM EM A AS AM AX AY AW Test Is Applicable
11.1 Requirement
Magnetic field emissions requirements cover the frequency range 20 Hz to 150 kHz. Requirements are based on anticipated “on-vehicle” electromagnetic sources (e.g. alternators, inverters and PWM sources). The test is applicable to all modules and their associated harnesses that are capable of generating magnetic fields.
Figure 11-1: RE 320 Magnetic Field Emissions Requirements
Frequency (Hz) Limit (dBpT)
20 - 1000 160
1000 – 100000 160 – 40 x log (f/1000)
100000 – 150000 60
Note: f = frequency in Hz
40
60
80
100
120
140
160
180
1 10 100 1000 10000 100000 1000000
Mag
netic
Fie
ld (d
BpT)
Frequeny (Hz)

Jaguar Land Rover Limited - Engineering Standard
JLR-EMC-CS v1.0 Amendment 2
© Copyright Jaguar Land Rover – All Rights Reserved Page 42 of 108 30th November 2013
11.2 Test Details
Testing shall be in accordance with Defence Standard 59-411 Part 3 Issue 1 Amendment 1 DRE02.B except where noted in this specification.
Testing shall be performed at the frequencies listed in Table 11-1. Performance shall be verified against the requirements detailed in Figure 11-1.
Table 11-1: RE 320 Test Frequency Requirements
Test Frequency Range (Hz) Bandwidth (kHz) Frequency Step (kHz)
20 - 1000 0.01 0.05
> 1000 – 10000 0.1 0.5
> 10000 - 150000 1 5
No portion of the Load Simulator or ground plane shall be closer than 200 mm to the radiating loop. The DUT and electronic hardware in the Load Simulator shall be powered from an automotive battery (see Section 4.7.4 for requirements). The battery negative terminal shall be connected to the ground plane.
Grounding and bonding of the DUT and the magnetic source shall be as per Section 4.6. Where bonding is required it shall be facilitated using a bond strap due to the > 200 mm separation of the DUT or magnetic source from the test ground plane. A field-measuring device in the form of a multi-turn loop shall be placed 50 mm from each face of the EUT and its associated cables with connection to a suitable frequency selective voltage measurement device. The plane of the loop shall be parallel to the face of the test sample and a search made for the maximum emission level over the frequency range of test.
Measurements shall be made with the plane of the loop both parallel and at right angles to each face of the test sample and along the associated cable harnesses maintaining a 50 mm separation between the centre of the actual coil windings and the EUT. Particular attention should be given to the critical frequencies of the test sample (detailed in Table 2.1 of the DUT EMC test plan).
In the event of the unit under test exceeding the specified limit at 50 mm, testing shall continue at greater separation distances and the distance and position at which compliance is achieved shall be declared.
Tests shall be repeated on all DUT test samples for all DUT operating mode(s) detailed in the component EMC test plan.

Jaguar Land Rover Limited - Engineering Standard
JLR-EMC-CS v1.0 Amendment 2
© Copyright Jaguar Land Rover – All Rights Reserved Page 43 of 108 30th November 2013
Figure 11-2: RE 320 Magnetic Emissions Configuration
Configuration for Testing DUT only
Configuration for Testing DUT
with attached Magnetic Source
Key:
1. Loop antenna 2. Measurement Receiver 3. DUT 4. Load Simulator 5. Artificial Network 6. Ground Plane 7. Magnetic Source
64 531
2
50 mm
> 200 mm
64 531
2
7
50 mm
> 200 mm

Jaguar Land Rover Limited - Engineering Standard
JLR-EMC-CS v1.0 Amendment 2
© Copyright Jaguar Land Rover – All Rights Reserved Page 44 of 108 30th November 2013
12.0 Magnetic Field Immunity: RI 140 Applicable to the following component categories:
P R BM EM A AS AM AX AY AW Test Is Applicable
12.1 Requirement
Magnetic field immunity requirements cover the frequency range from 20 Hz to 150 kHz. Requirements are based on anticipated “off-vehicle” electromagnetic sources (e.g. AC power lines) in addition to “on-vehicle” sources (e.g. charging system, PWM sources). The test is applicable to all modules that contain magnetically sensitive elements or are connected to external magnetically sensitive elements.
The component including any attached magnetic sensors (if applicable) shall operate without deviation when exposed to the magnetic field levels detailed in Figure 11-1.
Figure 12-1: RI 140 Magnetic Field Immunity Requirements
Frequency (Hz) Level (dBpT rms) Functional Performance
Status Under bonnet & external Passenger Compartment Class A Class B Class C
20 – 100 180 170
I 100 – 10000 180 – 20 x log (f/100) 170 – 20 x log (f/100)
10000 – 150000 140 130
Note: f = frequency in Hz
120
130
140
150
160
170
180
190
1 10 100 1000 10000 100000 1000000
Mag
netic
Fie
ld (d
BpT)
Frequeny (Hz)
Under bonnet & external Passenger compartment

Jaguar Land Rover Limited - Engineering Standard
JLR-EMC-CS v1.0 Amendment 2
© Copyright Jaguar Land Rover – All Rights Reserved Page 45 of 108 30th November 2013
12.2 Test Details
Testing shall be in accordance with Defence Standard 59-411 Part 3 Issue 1 Amendment 1 DRS01.B except where noted in this specification.
The test setup shall be configured to facilitate direct exposure of the DUT, and any magnetic sensors that may be connected to the DUT, to the fields listed in Figure 11-1.
Testing shall be performed at the frequencies listed in Table 12-1.
Table 12-1: RI 140 Test Frequency Requirements
Test Frequency Range (Hz) Frequency Step (kHz) 20 - 1000 0.05
> 1000 – 10000 0.5 > 10000 - 150000 5
No portion of the Load Simulator or ground plane shall be closer than 200 mm to the radiating loop. The DUT and electronic hardware in the Load Simulator shall be powered from an automotive battery (see Section 4.7.4 for requirements). The battery negative terminal shall be connected to the ground plane.
Grounding and bonding of the DUT shall be as per Section 4.6. Where bonding is required it shall be facilitated using a bond strap due to the > 200 mm separation of the DUT or magnetic sensor from the test ground plane. Tests shall be repeated on all DUT test samples for all DUT operating mode(s) detailed in the component EMC test plan.
Prior to performing testing of the DUT, calibrate the radiation loop using procedures detailed in Defence Standard 59-411 Part 3 Issue 1 Amendment 1 Section 6.22.9 Partition each face of the DUT into 100 x 100 mm square areas and position the radiating loop face to the centre of each of these areas. If the DUT face is less than 100 x 100 mm, place the radiating loop in the centre of the DUT face. Separation between the face of the radiating loop and DUT surface shall be 50 mm. Orient the plane of the loop sensor parallel to the DUT faces and parallel to the axis of any connector. At each position, supply the loop with sufficient current to produce the corresponding magnetic field levels detailed in Figure 11-1 at each test frequency step listed in Table 12-1. Dwell time shall be at least 2 seconds. A longer dwell time may be necessary if DUT function response times are expected to be longer. This information shall be documented in the EMC test plan. If deviations are observed, the field shall be reduced until the DUT functions normally. Then the field shall be increased until the deviation occurs. This level shall be reported as the deviation threshold. If the DUT has magnetic sensors attached to it, separate tests shall be performed exposing only the sensor while verifying correct operation of the DUT (see Figure 12-2b).

Jaguar Land Rover Limited - Engineering Standard
JLR-EMC-CS v1.0 Amendment 2
© Copyright Jaguar Land Rover – All Rights Reserved Page 46 of 108 30th November 2013
Figure 12-2: RI 140 Magnetic Immunity Configuration
A: Configuration for Testing DUT only
B: Configuration for Testing DUT with attached Magnetic Sensors
Key:
1. Loop antenna 2. Current measurement device (ammeter or current probe) 3. Signal Source (power amplifier and matching unit) 4. Measurement Receiver 5. DUT 6. Load Simulator 7. Artificial Network 8. Ground Plane 9. Magnetic Sensor
86 751
2 3 4
50 mm
> 200 mm
86 751
2 3 4
9
50 mm
> 200 mm

Jaguar Land Rover Limited - Engineering Standard
JLR-EMC-CS v1.0 Amendment 2
© Copyright Jaguar Land Rover – All Rights Reserved Page 47 of 108 30th November 2013
13.0 Coupled Immunity: RI 130 Applicable to the following component categories:
P R BM EM A AS AM AX AY AW Test Is Applicable
These requirements are related to component immunity from wire-to-wire coupling of unintended transient disturbances. These disturbances originate from switching of inductive loads including solenoids and motors.
13.1 Requirement
The device shall operate without deviation when exposed to coupled transient electromagnetic disturbances created from switch contact arching and bounce. The requirements are detailed in Table 13-1. The source transient disturbance characteristics are identical to Modes 2 and 3; Pulses A2-1 and A2-2. See Annex C regarding details of these transient waveforms and the modes of application.
Table 13-1: RI 130 Coupled Immunity Requirements
Mode Pulse Functional Performance Status
Class A Class B Class C
2 A2-1
I A2-2
3 A2-1
A2-2
13.2 Test Details
Verification shall be performed using the basic test setup shown in Figure 13-1. The setup involves removal of individual wires from the DUT wire harness and placed in the test fixture for testing. Information regarding testing of twisted and/or shielded wires may be found in Annex G along with a basic description of the test fixture. Details regarding fabrication of the test fixture are found at www.jaguarlandrover.com/emc. Information regarding the transient pulse characteristics and the transient generator may be found in Annex C and Annex E respectively.
The DUT and electronic hardware in the Load Simulator shall be powered from an automotive battery (see Section 4.7.4 for requirements). The battery negative terminal shall be connected to the ground plane.
Bonding of the DUT shall be as per Section 4.6. The DUT power and power returns shall be connected to the battery/power supply via Artificial Networks (ANs). The ANs shall conform to CISPR 25. The ANs measurement ports shall be terminated with 50 ohms. The Transient Generator shall be powered from a vehicle battery (See Section 4.7.4 for requirements). The metal case of the transient generator shall be connected to the ground plane. See Annex E regarding details of the transient generator. The DUT and all parts of the test setup shall be a minimum of 100 mm from the edge of the ground plane. A digital sampling oscilloscope shall be used for test voltage/current verification. The oscilloscope shall have the following capabilities:
• A minimum capable sampling rate of 1 Giga-samples per second (single shot capability). • A minimum memory depth of 8 mega-samples for a single channel.
Voltage and current probes are required to facilitate verification of the transient disturbance. Requirements for these probes are found in Figure 13-1.

Jaguar Land Rover Limited - Engineering Standard
JLR-EMC-CS v1.0 Amendment 2
© Copyright Jaguar Land Rover – All Rights Reserved Page 48 of 108 30th November 2013
Figure 13-1: RI 130 Default Test Setup
Detail
Key:
1 DUT 2a DUT Circuit Wire to be tested 2b DUT Wire Harness 3 Load Simulator 4 Artificial Network 5 Automotive Battery or linear power supply (Powers DUT and Load Simulator) 6 Automotive Battery (Powers Transient Test Generator) 7 DUT Monitor/Support Equipment 8 Coupling Test Fixture 9 Transient Generator (see Annex E for details). Generator connected to Coupling test fixture via coaxial cable.
Case of generator connected to the ground plane. 10 Ground Plane 11 Digital Oscilloscope (≥1 GS/sec, ≥ 8 Mega sample) * 1:100 high impedance probe (C < 4 pF) per ISO 7637-2. Example: Agilent 10076A) ** Current Probe (> 10 MHz, 30 A) Example: Agilent N2783A
Tests shall be repeated on all DUT test samples for all DUT operating mode(s) detailed in the component EMC test plan: a) Configure the transient generator for Mode 3, Pulse A2-1 (see Annex E). Close SW0 to activate the transient
generator. Using the oscilloscope, capture at least one complete transient sequence (see Figure C-12). b) Verify magnitude of the negative transient voltage disturbance measured at the test point (see in Figure 13-1) is
greater than 300 volts. When completed, open SW0 to deactivate the transient generator. c) Repeat steps a) and b) with transient generator configured for Mode 3, Pulse A2-2. Verify that the peak-to-peak
transient current disturbance exceeds 20 amperes. d) Open SW0 to deactivate the transient generator. Configure the transient generator for Mode 2, Pulse A2-1. e) Activate the DUT and verify that it is functioning correctly. f) Place an individual DUT circuit wire or wire pairs (i.e. twisted wire pair) in the test fixture (see Annex G for
applicable circuit placement). g) Close SW0 to activate transient generator.
2b
1000 -0/+25
7
10
12a
> 200 mm8
***
11
66 _+
45 +_ 3
4
45 +_ 3
4
C DC D9
8
9
11

Jaguar Land Rover Limited - Engineering Standard
JLR-EMC-CS v1.0 Amendment 2
© Copyright Jaguar Land Rover – All Rights Reserved Page 49 of 108 30th November 2013
h) Expose the circuit wire(s) for 60sec. A longer dwell time may be necessary if DUT function response times are expected to be longer. This information shall be documented in the EMC test plan. Verify that DUT performance is not affected. (i.e. Status I)
i) Repeat step h) with the transient generator configured in the following modes:
• Mode 2, Pulse A2-2
• Mode 3, Pulse A2-1
• Mode 3, Pulse A2-2
j) Repeat steps d) through i) for each DUT circuit wire.

Jaguar Land Rover Limited - Engineering Standard
JLR-EMC-CS v1.0 Amendment 2
© Copyright Jaguar Land Rover – All Rights Reserved Page 50 of 108 30th November 2013
14.0 Coupled Immunity: RI 150 Applicable to the following component categories:
P R BM EM A AS AM AX AY AW Test Is Applicable
These requirements are related to component immunity from wire-to-wire coupling of unintended continuous disturbances. These disturbances originate from high current PWM sources and the vehicle’s charging and ignition system.
14.1 Requirement
The device shall operate without deviation (Status I) when exposed to sinusoidal electromagnetic disturbances detailed in Figure 14-1.
Figure 14-1: RI 150 Coupled Immunity Requirements
Frequency (kHz) Stress Level ( IP-P )
1 – 10 6
10 – 100 6 – 5.4 log (f/10)
Note: f = frequency in kHz
Table 14-1: RI 150 Test Frequency Requirements
Test Frequency Range (kHz) Frequency Step (kHz)
> 1 – 10 0.5
> 10 – 100 5
0
1
2
3
4
5
6
7
1 10 100
kHz
I P-P
(am
pers
)

Jaguar Land Rover Limited - Engineering Standard
JLR-EMC-CS v1.0 Amendment 2
© Copyright Jaguar Land Rover – All Rights Reserved Page 51 of 108 30th November 2013
14.2 Test Details
Verification shall be performed using the test Setup shown in Figure 14-2. Except where noted in Figure 13-2, the setup of the DUT, Load Simulator and test harness is identical to that used for RI 130.
Tests shall be repeated on all DUT test samples for all DUT operating mode(s) detailed in the component EMC test plan: a) Activate the DUT and verify that it is functioning correctly. b) Place an individual DUT circuit wire or wire pairs (i.e. twisted wire pair) in the test fixture (circuit placement
requirements are identical to RI130). b) At each test frequency increase the peak to peak current to the corresponding stress level listed in Figure 14-1.
Use the frequency steps listed in Table 14-1. • Dwell time shall be 10 seconds. A longer dwell time may be necessary if DUT function response times are
expected to be longer. This information shall be documented in the EMC test plan. c) Monitor DUT functions before, during, and after application of the stress levels in Figure 14-1 and verify that no
performance deviations occur (i.e. Status I).
Figure 14-2: RI 150 Test Setup
Detail
Key:
1 DUT 2a DUT Circuit Wire to be tested 2b DUT Wire Harness 3 Load Simulator 4 Artificial Network 5 Automotive Battery or linear power supply (Powers DUT and Load Simulator) 6 Signal Generator 7 DUT Monitor/Support Equipment 8 Coupling Test Fixture 9 Amplifier (1kHz – 100 kHz ) 10 Ground Plane 11 Digital Oscilloscope (≥1 GS/sec, ≥ 8 Mega sample) 12 Amplifier Load Resistance (e.g. 4 ohms) ** Current Probe (> 10 MHz, 30 A) Example: Agilent N2783A
2b
1000 -0/+25
7
10
12a
> 200 mm8
116
12
9
**
45 +_ 3
4
45 +_ 3
4
8
11
12
6
9

Jaguar Land Rover Limited - Engineering Standard
JLR-EMC-CS v1.0 Amendment 2
© Copyright Jaguar Land Rover – All Rights Reserved Page 52 of 108 30th November 2013
14.3 Immunity from Continuous Power Line Disturbances: CI 210
Applicable to the following component categories:
P R BM EM A AS AM AX AY AW Test Is Applicable
The device shall be immune from continuous disturbances that occur on the vehicle’s low voltage (i.e. 13.5 VDC) electrical distribution system.
14.4 Requirements
The devices shall operate in accordance to the requirements detailed in Figure 14-3.
Figure 14-3: CI 210 Requirements
Frequency Range (kHz) US ( VP-P ) Functional Performance Status
Class A Class B Class C 0.05 – 1 0.2
I 1 – 10 0.2f
10 – 100 2
Note: f = frequency in kHz
0
1
10
0.01 0.1 1 10 100
kHz
US
(VP-
P)
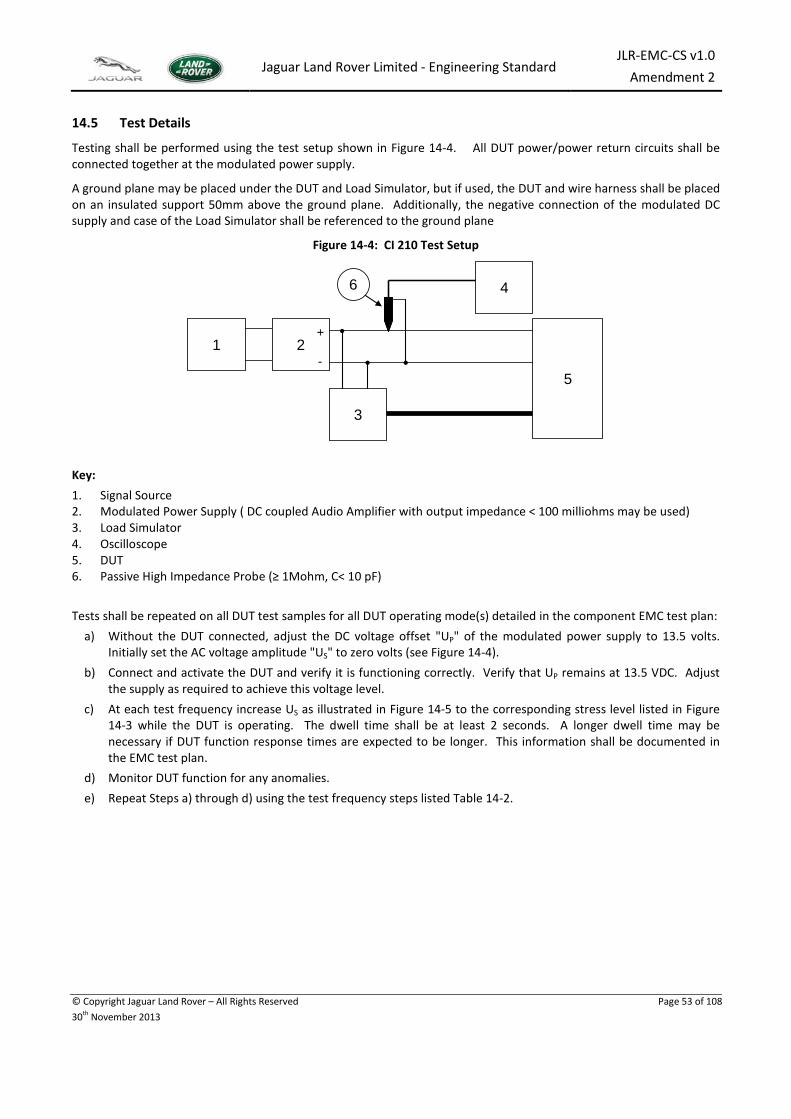
Jaguar Land Rover Limited - Engineering Standard
JLR-EMC-CS v1.0 Amendment 2
© Copyright Jaguar Land Rover – All Rights Reserved Page 53 of 108 30th November 2013
14.5 Test Details
Testing shall be performed using the test setup shown in Figure 14-4. All DUT power/power return circuits shall be connected together at the modulated power supply.
A ground plane may be placed under the DUT and Load Simulator, but if used, the DUT and wire harness shall be placed on an insulated support 50mm above the ground plane. Additionally, the negative connection of the modulated DC supply and case of the Load Simulator shall be referenced to the ground plane
Figure 14-4: CI 210 Test Setup
Key: 1. Signal Source 2. Modulated Power Supply ( DC coupled Audio Amplifier with output impedance < 100 milliohms may be used) 3. Load Simulator 4. Oscilloscope 5. DUT 6. Passive High Impedance Probe (≥ 1Mohm, C< 10 pF)
Tests shall be repeated on all DUT test samples for all DUT operating mode(s) detailed in the component EMC test plan: a) Without the DUT connected, adjust the DC voltage offset "UP" of the modulated power supply to 13.5 volts.
Initially set the AC voltage amplitude "US" to zero volts (see Figure 14-4). b) Connect and activate the DUT and verify it is functioning correctly. Verify that UP remains at 13.5 VDC. Adjust
the supply as required to achieve this voltage level. c) At each test frequency increase US as illustrated in Figure 14-5 to the corresponding stress level listed in Figure
14-3 while the DUT is operating. The dwell time shall be at least 2 seconds. A longer dwell time may be necessary if DUT function response times are expected to be longer. This information shall be documented in the EMC test plan.
d) Monitor DUT function for any anomalies. e) Repeat Steps a) through d) using the test frequency steps listed Table 14-2.
1 2
3
5
46
+
-

Jaguar Land Rover Limited - Engineering Standard
JLR-EMC-CS v1.0 Amendment 2
© Copyright Jaguar Land Rover – All Rights Reserved Page 54 of 108 30th November 2013
Figure 14-5: CI 210 AC Stress Level (US) Superimposed on DUT Supply Voltage (UP)
Table 14-2: CI 210 Test Frequency Requirements
Test Frequency Range (kHz) Frequency Step (kHz)
0.05 - 1 0.05
> 1 - 10 0.5
> 10 - 100 5
0
UP US

Jaguar Land Rover Limited - Engineering Standard
JLR-EMC-CS v1.0 Amendment 2
© Copyright Jaguar Land Rover – All Rights Reserved Page 55 of 108 30th November 2013
15.0 Immunity from Transient Disturbances: CI 220 Applicable to the following component categories:
P R BM EM A AS AM AX AY AW Test Is Applicable 8
These requirements are related to immunity from conducted transients on power and control circuits connected directly to the vehicle's battery or indirectly by a switch or load (e.g. pull-up resistor). If the component to be tested has several power supplies the test shall be performed on each power supply line separately (not applicable to regulated supplies). In addition, the tests shall be performed together on all power supplies lines at the same time (with the exception of regulated supplies).
15.1 Requirements
Specific applicability of these transients and component performance requirements are listed in Table 15-1. In addition to these requirements, the component shall not be affected (Status I) by transient voltages generated as a result of its own operation, including switching of inductive loads either internal or external to the device (i.e. Category AX).
Table 15-1: CI 220 Transient Immunity Requirements
Transient Pulse ( 1,2 ,3) Application ( 2 ) Transient
Mode ( 1 ,3 ) Duration Functional Performance Status
Class A Class B Class C
Pulse A1
Switched power supply circuits with maximum current < 5 amperes
Mode 1 120 sec II II II
Control Circuits Mode 2 20 sec II II II
Pulse A2-1 Switched power supply circuits with maximum current < 5 amperes
Mode 1 120 sec II II II
Pulse A2-1 Pulse A2-2 Control Circuits Mode 2
Mode 3 20 sec II II II
Pulse C-1 Pulse C-2
All power supply circuits & Control Circuits.
Mode 2 Mode 3 20 sec I I I
Pulse E Switched power supply circuits ≥ 5 amperes n/a 24 pulses
II II II
Control Circuits II II II
Pulse F1(4) All power supply circuits Mode 1 500 pulses I I I
Pulse F2 (4) All power supply circuits Mode 1 10 pulses II II II Pulse G1(5) Load Dump
All power supply circuits Control Circuits n/a 5 pulses III III II
Pulse G2 Central
Load Dump (5)
All power supply circuits Control Circuits n/a 5 pulses III III II
Note: 1 See Annex C-1 for transient pulse and mode description. Note: 2 See Annex D for requirements with respect to application of transient pulses. Note: 3 See Annex E for test generator requirements to produce transient pulses A1, A2, and C. Note: 4 Pulses F1, F2 only applicable for components required to demonstrate compliance to ESA requirements of
United Nations ECE regulation 10. Note: 5 Selection of Pulse G1 or G2 depends on whether vehicle application includes central load dump (CLD)
protection. Selection shall be approved by the JLR EMC group and documented in EMC test plan.
8 Requirement applicability may be waived all or in part if analysis, approved by JLR EMC demonstrates device robustness.

Jaguar Land Rover Limited - Engineering Standard
JLR-EMC-CS v1.0 Amendment 2
© Copyright Jaguar Land Rover – All Rights Reserved Page 56 of 108 30th November 2013
Testing shall be in accordance with ISO 7637-2 except where noted in this specification.
Tests shall be repeated on all DUT test samples for all DUT operating mode(s) detailed in the component EMC test plan. Test pulses A, B, and C shall be generated using the transient generator described in Annex E. Test pulses E, F and G shall be generated using a transient generator conforming to the requirements of ISO 7637-2. The test setup for application of Pulse G1 requires that a 0.5 ohm resistor be connected externally across the Test Pulse Generator. This modification is shown in Figure 15-5. Test pulse G2 shall be generated using the circuit illustrated in Figure 15-6. The diode bridge shall be designed to yield the open circuit voltage waveform shown in Figure C-10 of Annex C. The DUT and any electronic hardware in the Load Simulator shall be powered from a vehicle battery (see Section 4.7.4 for requirements). Artificial networks shall not be used as part of the test setup. The test harness connecting the DUT to the Load Simulator and transient pulse generator shall be ≤ 2000 mm in length. Individual ground circuits may be part of the cable harness or split out as illustrated in the setup figures below. If the DUT has multiple power (e.g. battery direct, ignition/run, relay) and/or Control Circuits, these circuits shall be configured to facilitate individual application of test pulses. The DUT and test harness shall be placed on an insulated support 50 mm above the ground plane. A device powered from an external, unregulated supply located in another module shall be tested as a system with the sourcing module or an equivalent power supply. Details of this setup shall be documented in the EMC test plan. Figure 15-1 illustrates the generic test setup for testing of a single DUT power supply circuit with a remote ground connection.
Figure 15-1: CI 220 Test Setup for Devices with a Single Power Supply Circuit
Denotes ConnectionTo Ground PlaneDenotes ConnectionTo Ground PlaneDenotes ConnectionTo Ground PlaneDenotes ConnectionTo Ground PlaneDenotes ConnectionTo Ground Plane
Insulator
Ground Plane
Test PulseGenerator
Ground Plane
Test PulseGenerator
DUTDUT
PowerSupply
+
-Battery
+-
TestFixture
TestFixture
TestFixture
TestFixture
TestFixture
TestFixture
TestFixture
TestFixture
TestFixture

Jaguar Land Rover Limited - Engineering Standard
JLR-EMC-CS v1.0 Amendment 2
© Copyright Jaguar Land Rover – All Rights Reserved Page 57 of 108 30th November 2013
Figure 15-2 illustrates the test setup for devices with two supply circuits.
Initial testing is performed with the untested power supply circuit (U1) connected directly to the battery. If the device has additional power supply circuits operating at the same voltage, those circuits should also be connected directly to the battery.
Each power supply is tested in turn.
A further test is then performed with all power supply circuits connected to the test generator.
Figure 15-2: CI 220 Test Setup for Devices with Two Power Supply Connections
Figure 15-3 illustrates the setup used for testing of Control Circuits. These circuits may be directly or indirectly connected to switched battery circuits. Figure 15-4 illustrates the special case where the control circuit is connected to the battery indirectly using a pull-up resistor located in another module.
Figure 15-3: CI 220 Test Setup for Devices with Control Circuits
Ground Plane
Insulator
Denotes ConnectionTo Ground PlaneDenotes ConnectionTo Ground PlaneDenotes ConnectionTo Ground PlaneDenotes ConnectionTo Ground PlaneDenotes ConnectionTo Ground PlaneDenotes ConnectionTo Ground PlaneDenotes ConnectionTo Ground PlaneDenotes ConnectionTo Ground PlaneDenotes ConnectionTo Ground Plane
Test PulseGeneratorTest PulseGeneratorTest PulseGenerator
TestFixture
Battery-+
DUT
U1
2U
DUT
U1
2U
DUT
U1
2U
DUT
U1
2UTest Pulse
Generator
Ground Plane
A
Denotes ConnectionTo Ground PlaneDenotes ConnectionTo Ground Plane
Ground Plane
Insulator
A
Denotes ConnectionTo Ground PlaneDenotes ConnectionTo Ground PlaneDenotes ConnectionTo Ground Plane
TestFixture
TestFixture
DUTDUT
A < 200 mm
Battery +-+-
Battery +-+-
Test PulseGeneratorTest PulseGeneratorTest PulseGeneratorTest PulseGeneratorTest PulseGeneratorTest PulseGeneratorTest PulseGeneratorTest PulseGenerator

Jaguar Land Rover Limited - Engineering Standard
JLR-EMC-CS v1.0 Amendment 2
© Copyright Jaguar Land Rover – All Rights Reserved Page 58 of 108 30th November 2013
Figure 15-4: CI 220 Test Setup Detail (Control Circuits with Remote External Pull-Up Resistor)
Figure 15-5: CI 220 Test Setup for Application of Pulse G1
R= 0.5 ohms
Figure 15-6: CI 220 Test setup for Application of Pulse G2
R= 0.5 ohms
"Z"
1. Zener diode: MR 2535L 2. Diode: 1N 5404
Diode configuration adjusted to yield voltage characteristics shown in Figure C-10 of Annex C.
A
Test
Ground Plane
InsulatorDenotes ConnectionTo Ground Plane
A < 200 mm
TestFixture
Ground PlaneDenotes ConnectionTo Ground Plane
A < 200 mm
Test PulseGenerator
DUT
RR Test FixtureDUTDUTTransient Pulse
Generator
RR Test FixtureDUTDUTTransient Pulse
GeneratorZ
1
2
1
2

Jaguar Land Rover Limited - Engineering Standard
JLR-EMC-CS v1.0 Amendment 2
© Copyright Jaguar Land Rover – All Rights Reserved Page 59 of 108 30th November 2013
Test pulses shall be applied to power supply and Control Circuits in accordance with the requirements detailed in Annex D and documented in the EMC test plan.
Prior to testing:
• For Pulses G1 adjust the transient generator to the voltage level listed in Figure C-9 of Annex C with the DUT and "R" disconnected (open circuit condition). Pulse measurement shall be facilitated using an oscilloscope and voltage probe meeting the requirements detailed in ISO 7637-2.
• For Pulse G2, adjust the transient generator to the voltage level listed in Figure C-10 of Annex C with the DUT and disconnected but with "R" connected. Pulse measurement shall be facilitated using an oscilloscope and voltage probe meeting the requirements detailed in ISO.
• For Pulses A and C, verify that the output of the transient test circuit (open circuit conditions) produces waveforms typical of those illustrated in Annex C.
Connect and activate the DUT. Verify that it is functioning correctly. Apply each test pulse listed in Table 15-1, except for Pulses G1 and G2, individually to each DUT battery or ignition circuit in addition to individual Control Circuits connected to battery or ignition circuits. Test pulses G1 and G2 are applied to all power and Control Circuits simultaneously.
Prior to application of either Pulse G1 or G2, connect the 0.5 ohm resistor across the Transient Pulse Generator output as illustrated in Figure 15-5. Verify the waveforms conform to the loaded waveform requirements listed in Figures C-9 and C-10 of Annex C prior to application of the waveforms to the DUT. For modules classified as ‘AX’ it should be noted that where Pulse G2 is applicable, and an active device (e.g. motor) is switched on to suppress the pulse, testing shall be repeated at Us voltage levels of 28 V, 26 V, 24V, 22V, 20V and 18V as detailed in Annex C. Us* is only applicable to components which contain discrete transient suppression components. Monitor DUT functions before, during, and after application of each series of test pulses for the time stated in Table 15-1.

Jaguar Land Rover Limited - Engineering Standard
JLR-EMC-CS v1.0 Amendment 2
© Copyright Jaguar Land Rover – All Rights Reserved Page 60 of 108 30th November 2013
16.0 Immunity from Power Cycling: CI 230 Applicable to the following component categories:
P R BM EM A AS AM AX AY AW Test Is Applicable
16.1 Requirements
The component shall be immune from voltage fluctuations, which occur during initial start of the vehicle’s engine under cold temperature conditions. This requirement is not representative of conditions where a warm engine is restarted. The voltage waveforms representing these fluctuations are illustrated in Figure 16-1. Specific application of these waveforms is dependent on the method used to connect the component’s power supply and control circuits. Application requirements for each waveform are listed in Table 16-1 along with the performance requirements for the component.
Table 16-1: CI 230 Power Cycling Requirements
Waveform (1) Application Duration Functional Performance Status (2)
Class A Class B Class C
A
Power & control circuits connected to battery via the IGN 1 (RUN) contact of the ignition switch. (i.e. circuits active in RUN but not START).
2 cycles separated by cooling
period
II B
Power & control circuits connected to battery via the IGN 2 (RUN/START) contact of the ignition switch (i.e. circuits active during RUN and START). Also includes connections to battery through a relay switch.
C
Power & control circuits connected to battery via the START contact of the ignition switch. (i.e. circuits active only during engine START).
D Power & control circuits connected directly to Battery
Note: 1 Waveforms applied simultaneously to all power supply and control circuits. Note: 2 Any degradation in performance shall not inhibit the ability of the vehicle to start.
Testing shall be performed using the test Setup shown in Figure 16-2.
The test harness connecting the DUT to the Load Simulator and transient pulse generator shall be < 2000 mm in length. Testing shall be performed at -40 +0 / - 5 degrees C or the coldest temperature specified in component's engineering specification. The temperature shall be documented in the EMC test plan. The DUT shall be placed on a dielectric support 50 mm above the metal floor of the thermal chamber. Tests shall be repeated on all DUT test samples for all DUT operating mode(s) detailed in the component EMC test plan.

Jaguar Land Rover Limited - Engineering Standard
JLR-EMC-CS v1.0 Amendment 2
© Copyright Jaguar Land Rover – All Rights Reserved Page 61 of 108 30th November 2013
Figure 16-1: CI 230 Power Cycling Waveforms and Timing Sequence
Key
T1 = 100 msec T8 = 11 sec T2 = 5 msec T9 = 325 msec T3 = 185 msec U1 = 5 V T4 =100 msec U2 = 7.0 V T5 = 50 msec U3 = 12.5 V T6 = 10 sec U4 = 13.5 V T7 = 500 msec U5 = 2 Vp-p @ 4 Hz
0 V
0 V
U3U4
U1
U2
U3U4
0 VU1
U2
U3U4
U5B
A
D
U1
U2
0 V
U5
U3U4
C
T1
T2
T3
T4
T4
T2
T6
T5
T7
U5
T1
T9
T8
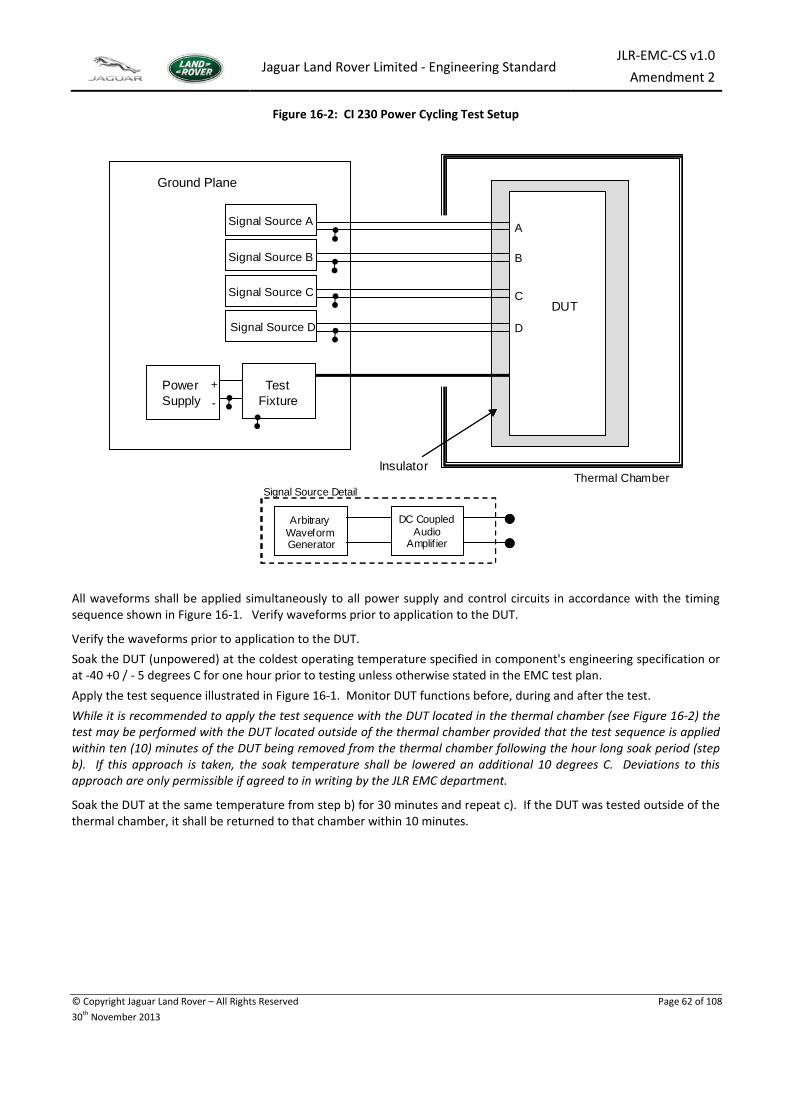
Jaguar Land Rover Limited - Engineering Standard
JLR-EMC-CS v1.0 Amendment 2
© Copyright Jaguar Land Rover – All Rights Reserved Page 62 of 108 30th November 2013
Figure 16-2: CI 230 Power Cycling Test Setup
All waveforms shall be applied simultaneously to all power supply and control circuits in accordance with the timing sequence shown in Figure 16-1. Verify waveforms prior to application to the DUT.
Verify the waveforms prior to application to the DUT. Soak the DUT (unpowered) at the coldest operating temperature specified in component's engineering specification or at -40 +0 / - 5 degrees C for one hour prior to testing unless otherwise stated in the EMC test plan. Apply the test sequence illustrated in Figure 16-1. Monitor DUT functions before, during and after the test. While it is recommended to apply the test sequence with the DUT located in the thermal chamber (see Figure 16-2) the test may be performed with the DUT located outside of the thermal chamber provided that the test sequence is applied within ten (10) minutes of the DUT being removed from the thermal chamber following the hour long soak period (step b). If this approach is taken, the soak temperature shall be lowered an additional 10 degrees C. Deviations to this approach are only permissible if agreed to in writing by the JLR EMC department.
Soak the DUT at the same temperature from step b) for 30 minutes and repeat c). If the DUT was tested outside of the thermal chamber, it shall be returned to that chamber within 10 minutes.
PowerSupply
+-
Thermal Chamber
TestFixture
Insulator
Signal Source A
Signal Source B
Signal Source C
Signal Source D
A
DUT
B
C
D
Arbitrary Waveform Generator
DC CoupledAudio
Amplif ier
Signal Source Detail
Ground Plane

Jaguar Land Rover Limited - Engineering Standard
JLR-EMC-CS v1.0 Amendment 2
© Copyright Jaguar Land Rover – All Rights Reserved Page 63 of 108 30th November 2013
17.0 Immunity to Ground Voltage Offset: CI 250 Applicable to the following component categories:
P R BM EM A AS AM AX AY AW Test Is Applicable
17.1 Requirements
Components shall be immune from AC ground offset voltages. Requirements include both continuous and transient disturbances. This requirement is not applicable to components with a dedicated power return back to another module (e.g. sensors).
Component functional performance shall meet the acceptance criteria detailed in Table 17-1. CI 250 requirements for continuous disturbances are detailed in Figure 17-1. CI 250 requirements for transient disturbances are detailed in Figure 17-2 through Figure 17-4. Transient disturbances consist of a damped sinusoidal pulse with a resonant frequency of 100 kHz. The pulse is applied using the delay sequence illustrated in Figure 17-4. Delay times for the four sequences are listed in Table 17-2.
Table 17-1: CI 250 Acceptance Criteria (Continuous and Transient Disturbances)
Functional Acceptance Criteria
Class A Class B Class C
I I I
Figure 17-1: CI 250 Requirements (Continuous Disturbances)
Frequency Range (kHz) US ( VP-P )
2 – 10 1+1.14log(f/10)
10 – 100 1 Note: f = frequency in kHz
0.0
0.2
0.4
0.6
0.8
1.0
1.2
1 10 100
kHz
US
(VP-
P)

Jaguar Land Rover Limited - Engineering Standard
JLR-EMC-CS v1.0 Amendment 2
© Copyright Jaguar Land Rover – All Rights Reserved Page 64 of 108 30th November 2013
Figure 17-2: CI 250 Transient Pulse Detail
F(Hz) = 100x103 (100 kHz) US = 5 volts ( peak to peak voltage = 2US )
Figure 17-3: CI 250 Transient Pulse Delay Detail
Figure 17-4: CI 250 Requirements (Transient Disturbance Sequence)
exp(-πft/10)sin(2πft)
1/f
US
2/f 3/f 10/f
0
- US
dn
See Pulse Detail
d1 d2 d3 d4 d5 d20. . . . ..
0
US
- US
.

Jaguar Land Rover Limited - Engineering Standard
JLR-EMC-CS v1.0 Amendment 2
© Copyright Jaguar Land Rover – All Rights Reserved Page 65 of 108 30th November 2013
Table 17-2: CI 250 Delay Time Sequences 1 - 4
Sequence 1
d1 0.1 ms d6 0.4 ms d11 0.2 ms d16 0.1 ms
d2 0.5 ms d7 0.3 ms d12 0.3 ms d17 0.1 ms
d3 0.2 ms d8 0.4 ms d13 0.6 ms d18 0.3 ms
d4 0.7 ms d9 0.6 ms d14 0.5 ms d19 0.4 ms
d5 0.5 ms d10 0.6 ms d15 0.3 ms d20 0.2 ms
Sequence 2
d1 0.2 ms d6 0.8 ms d11 0.4 ms d16 0.2 ms
d2 1.0 ms d7 0.6 ms d12 0.6 ms d17 0.2 ms
d3 0.4 ms d8 0.8 ms d13 1.2 ms d18 0.6 ms
d4 1.4 ms d9 1.2 ms d14 1.0 ms d19 0.8 ms
d5 1.0 ms d10 1.2 ms d15 0.6 ms d20 0.4 ms
Sequence 3
d1 0.5 ms d6 2.0 ms d11 1.0 ms d16 0.5 ms
d2 2.5 ms d7 1.5 ms d12 1.5 ms d17 0.5 ms
d3 1.0 ms d8 2.0 ms d13 3.0 ms d18 1.5 ms
d4 3.5 ms d9 3.0 ms d14 2.5ms d19 2.0 ms
d5 2.5 ms d10 3.0 ms d15 1.5 ms d20 1.0 ms
Sequence 4
d1 1 ms d6 4 ms d11 2 ms d16 1 ms
d2 5 ms d7 3 ms d12 3 ms d17 1 ms
d3 2 ms d8 4 ms d13 6 ms d18 3 ms
d4 7 ms d9 6 ms d14 5 ms d19 4 ms
d5 5 ms d10 6 ms d15 3 ms d20 2 ms
dn represents the delay between consecutive pulses
Testing shall be performed using the configuration shown in Figure 17-5a to assess component performance when the DUT ground return is offset. Upon completion of this test, and for all DUTs which have loads with local ground return connections (not routed back to the DUT with its associated power), tests shall be performed using the test configuration shown in Figure 17-5b to assess component performance when the ground is offset for each of the loads supplied by the DUT. The test configuration shall be documented in the EMC test plan.
Ground circuits not being tested shall be connected directly to the ground plane. Individual ground circuits may be part of the cable harness or split out as illustrated in the figures. If the DUT has multiple ground circuits, they shall be tested separately. The power supply negative terminal shall be connected to the ground plane The DUT and wire harness shall be placed on an insulated support 50 mm above the ground plane The source used for generation of the continuous and transient disturbances is shown in Figure 17-5
The signal source illustrated in Figure 17-6 includes two isolation transformers. The transformers are used to facilitate generation of the required disturbances into a 0.5 ohm load using most commercially available amplifiers. The transformers also facilitate DC isolation of amplifier from the DUT. Alternative configurations may be permitted if approved by the JLR EMC department.
The waveforms shall be applied to one ground circuit at a time unless analysis demonstrates that testing each circuit individually is unnecessary. The analysis shall be documented in the EMC test plan and approved by the JLR EMC department prior to commencement of testing.

Jaguar Land Rover Limited - Engineering Standard
JLR-EMC-CS v1.0 Amendment 2
© Copyright Jaguar Land Rover – All Rights Reserved Page 66 of 108 30th November 2013
Figure 17-5: CI 250 Test Setup for Ground Offset of DUT
a) b)
Key:
1. DUT 6. Artificial Network 2. Signal Source (see Figure 17-5) 7. Power Supply (13.5 VDC) 3. Ground Plane 8. Insulating Support 4. Load Simulator 9. 10X high impedance probe (1M ohm, C< 10 pF) 5. DUT External Load 10. Digital Oscilloscope (> 100 MS/s, > 6MB memory depth)
Figure 17-6: CI 250 Signal Source Requirements
Key:
1. Arbitrary Waveform Generator 3. Isolation Transformer (Use Solar 6220-1A or equivalent)
2. Amplifier (recommend AE Techron 7560 or equivalent)
4. 0.5 Ohm (250 watt) Non-Inductive Resistive Load (Dale NH-250 or equivalent)
43
5A
B
2
6
7
+
_
18
10
9433
5A
B
6
7
+
_
1
2
8
10
2:1
2:121 4
A
B
3
3≤ 150 mm
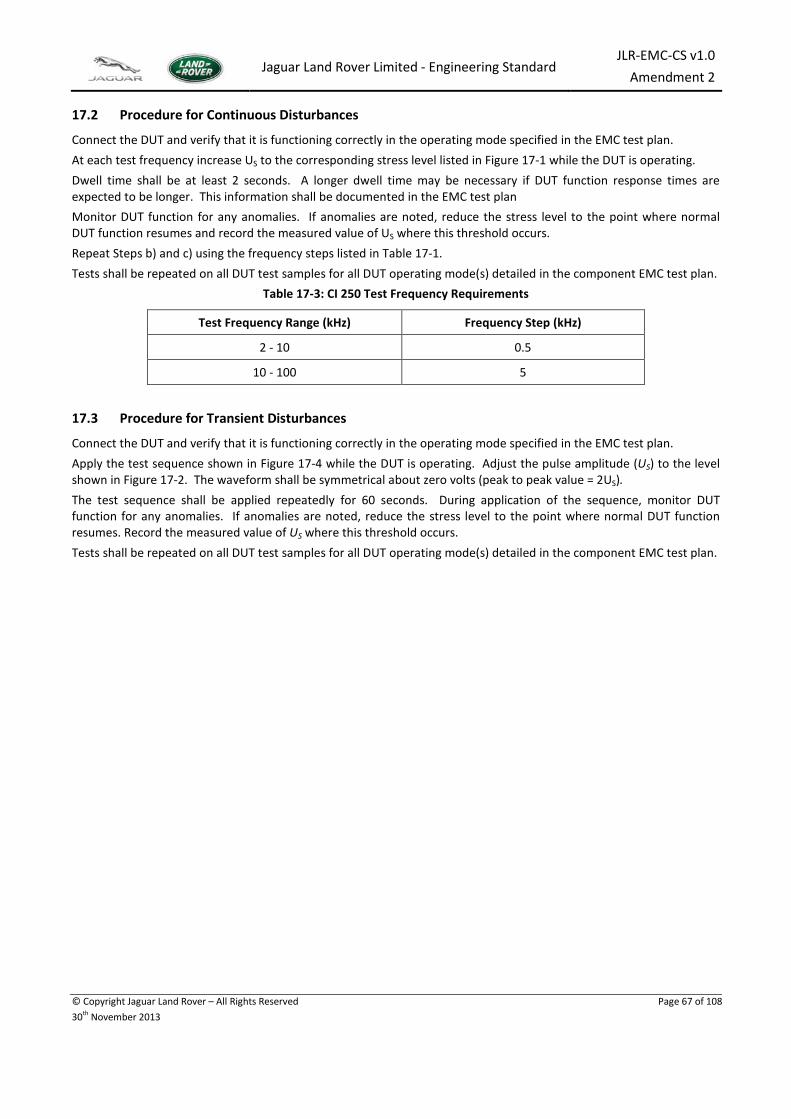
Jaguar Land Rover Limited - Engineering Standard
JLR-EMC-CS v1.0 Amendment 2
© Copyright Jaguar Land Rover – All Rights Reserved Page 67 of 108 30th November 2013
17.2 Procedure for Continuous Disturbances
Connect the DUT and verify that it is functioning correctly in the operating mode specified in the EMC test plan. At each test frequency increase US to the corresponding stress level listed in Figure 17-1 while the DUT is operating. Dwell time shall be at least 2 seconds. A longer dwell time may be necessary if DUT function response times are expected to be longer. This information shall be documented in the EMC test plan Monitor DUT function for any anomalies. If anomalies are noted, reduce the stress level to the point where normal DUT function resumes and record the measured value of US where this threshold occurs. Repeat Steps b) and c) using the frequency steps listed in Table 17-1. Tests shall be repeated on all DUT test samples for all DUT operating mode(s) detailed in the component EMC test plan.
Table 17-3: CI 250 Test Frequency Requirements
Test Frequency Range (kHz) Frequency Step (kHz)
2 - 10 0.5
10 - 100 5
17.3 Procedure for Transient Disturbances
Connect the DUT and verify that it is functioning correctly in the operating mode specified in the EMC test plan. Apply the test sequence shown in Figure 17-4 while the DUT is operating. Adjust the pulse amplitude (US) to the level shown in Figure 17-2. The waveform shall be symmetrical about zero volts (peak to peak value = 2US). The test sequence shall be applied repeatedly for 60 seconds. During application of the sequence, monitor DUT function for any anomalies. If anomalies are noted, reduce the stress level to the point where normal DUT function resumes. Record the measured value of US where this threshold occurs. Tests shall be repeated on all DUT test samples for all DUT operating mode(s) detailed in the component EMC test plan.

Jaguar Land Rover Limited - Engineering Standard
JLR-EMC-CS v1.0 Amendment 2
© Copyright Jaguar Land Rover – All Rights Reserved Page 68 of 108 30th November 2013
18.0 Immunity to Low Voltage Transients: CI 265 Applicable to the following component categories:
P R BM EM A AS AM AX AY AW Test Is Applicable
18.1 Requirements
The purpose of this test is the verification of the controlled recovery of hardware and software from random power interruptions and voltage dips. There shall be no unintended operation or change in functionality, software lock-up, memory corruption or false Diagnostic Trouble Code (DTC) logging.
Any unexplained changes in the content of EEROM shall be recorded, investigated and reported to JLR prior to submission of the EMC test report so that JLR acceptance/rejection of the observed behaviour can be included in the report.
Table 18-1: CI 265 Applicability Requirements
Requirement Application Test Duration Functional Performance Status
Class A Class B Class C Waveform A
Fast Transient Burst Noise (FTBN)
All Power Supply Circuits
13 separate bursts of 5 minute duration
II Waveform B Random Crank
All Power Supply Circuits 8 hours (1)
Waveform C Ramp Down/Up
All Power Supply Circuits Approx 18 Hours(2)
Waveform D Single Voltage Dropout
All Power Supply and Control Circuits
3 Cycles separated by 20 s I
Note: 1 1 hour observed, 7 hours unobserved for DUTs with memory or functions that can be recorded at the end of the test. Note: 2 Test duration is dependent on the settings of T1 and T5 (see note in key of Fig 18-3)

Jaguar Land Rover Limited - Engineering Standard
JLR-EMC-CS v1.0 Amendment 2
© Copyright Jaguar Land Rover – All Rights Reserved Page 69 of 108 30th November 2013
FTBN
Figure 18-1: CI 265 FTBN Waveform Parameter Definition
Key:
Switching Parameter Values Total Test Time 5 min
Power Supply Voltage 12 V T0 60 sec
T1 min =T2 min 2 ms T1 max=T2 max(1) 3,6,9,12,18,24,36,48,60,100,200,1000,20000 ms
Resolution 100 µs Distribution(2) 1/x2 distribution of pseudo random timing
(1) For each Tmax value, pseudo random sequences shall be generated using different seed values. The pseudo-random sequences generated must therefore be repeatable. A pre-recorded series of values for each of the 13 tests is available to download from www.jaguarlandrover.com/emc.
(2) See Annex H for description of 1/x2 implementation.
(3) An external Load as shown in Annex H should be applied in all cases unless otherwise approved by JLR's EMC department.
The test shall be repeated to ensure that each digital input/output is tested in the logic low and logic high condition.
The test plan shall state which combinations of input/output conditions are functionally plausible.
To T2 T1
On
Off

Jaguar Land Rover Limited - Engineering Standard
JLR-EMC-CS v1.0 Amendment 2
© Copyright Jaguar Land Rover – All Rights Reserved Page 70 of 108 30th November 2013
18.2 Crank Waveform
Figure 18-2: CI 265 Random Crank Waveform B Parameter Definition
T2B
U4 U3
U2 U1 0v
U6
U5
U5
U6
T10
T2A
U4 U3
U2 U1 0v U6
U5 T4A
T3
T4B
T5
T6 T7
T9
IGNITION ON IGNITION
OFF
U4 U3
U2 U1 0v
D (KL30)
C (KL50)
B (KL15)
KL15 is Ignition switched battery connection. KL50 is Starter connection. KL30 is direct battery connection.
Key:
Parameter Min Nom Max Minimum Resolution Units Total
Steps Comments
T1 N/A
T2A 10 s Can be extended for special
requirements where the boot-up time is longer e.g. CD Auto-changer.
T2B 5 ms T3 0 19999 1 ms 19999 T4A 15 ms
T4B 5 105 0.5 ms 200 T5 20 150 0.5 ms 260 T6 1 31 0.05 sec 600 T7 500 ms T8 N/A
T9 N/A This is defined by the time needed for results analysis e.g. DTC read and clear
operations.
T10 10 s Can be extended for special
requirements e.g. Airbag capacitor discharging
T11 100 ms End of crank sequence U1 1 8 0.05 V 140 U2 4 9 0.05 V 100 U3 10 14 0.05 V 80 U4 12 V U5 1 2 0.05 V 20 @ 4Hz U6 3 8 0.05 V 100
T11

Jaguar Land Rover Limited - Engineering Standard
JLR-EMC-CS v1.0 Amendment 2
© Copyright Jaguar Land Rover – All Rights Reserved Page 71 of 108 30th November 2013
T0 T1 T2 T3 T4 T5
U0
U1 U2 U3
0V
All pseudo random values to be generated using a uniform random distribution. The pseudo-random sequences generated must be repeatable.
These tests are designed to tease out software problems and hardware races. T10 should be repeated every cycle as it is there to allow the unit to complete a full re-set. However, if it can be shown that the DUT has completed this function in a shorter time, then T10 can be reduced.
Other ways to reduce test time is to consider U3 and U1. Again if it can be shown that the DUT is always fully operational at a certain value of U3, then the full value of 14V need not be used, and similarly if the DUT definitely stops working at some level above 0V, then this value can be used in the test.
The above criteria can also be carried across to Waveform C.
18.3 Ramp Waveform
Figure 18-3: CI 265 Ramp Down/Up Waveform C Parameter Definition
Key:
T0 = 10 s T5 = 60 s (1)
T1 = 60 s (1) U0 = 0 V
T2 = 30 s/V × (12 V - U2) U1 = 12 V
T3 = 1 s U2 = 10 V to 0 V in 0.05 V steps
T4 = 5 s/V × (12 V - U2) U3 = 12 V Note: (1) If it can be shown that the module is fully operational within a shorter time period, then these times can be reduced as
appropriate.
The module shall be designed to pass the tests in all modes of operation, e.g. on/off, open/closed and shall be tested to verify correct function in each significant mode.
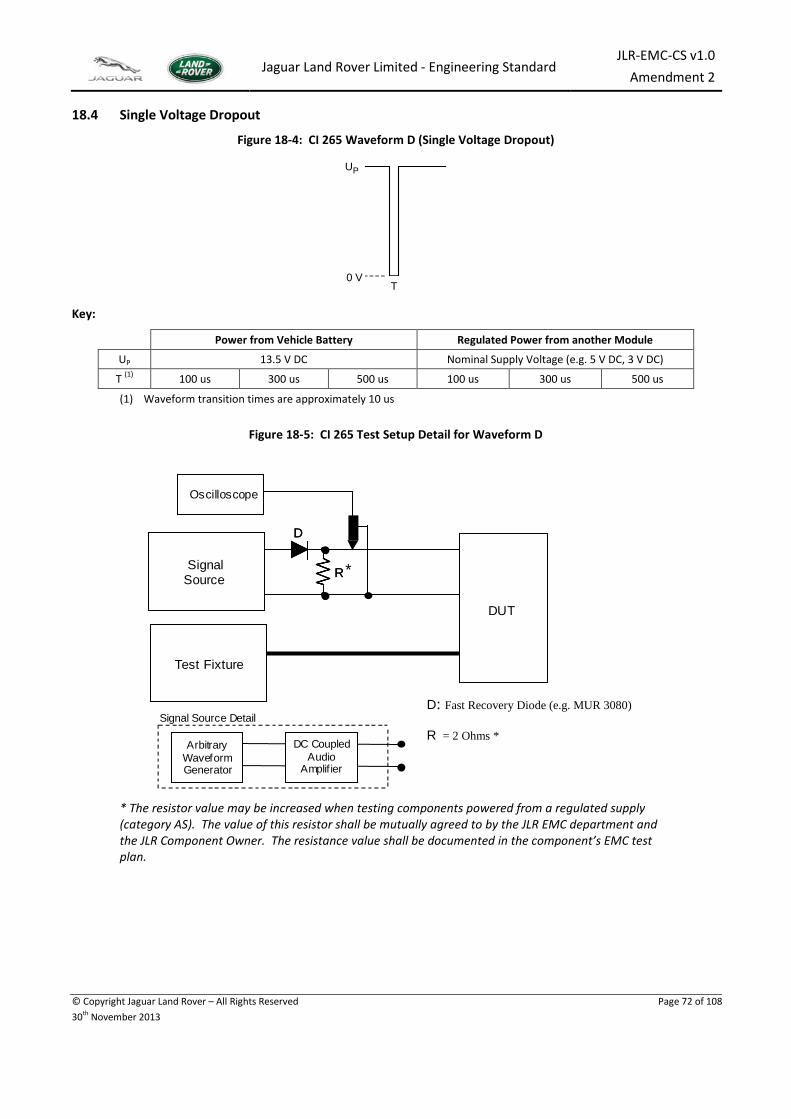
Jaguar Land Rover Limited - Engineering Standard
JLR-EMC-CS v1.0 Amendment 2
© Copyright Jaguar Land Rover – All Rights Reserved Page 72 of 108 30th November 2013
18.4 Single Voltage Dropout
Figure 18-4: CI 265 Waveform D (Single Voltage Dropout)
Key:
Power from Vehicle Battery Regulated Power from another Module
UP 13.5 V DC Nominal Supply Voltage (e.g. 5 V DC, 3 V DC)
T (1) 100 us 300 us 500 us 100 us 300 us 500 us
(1) Waveform transition times are approximately 10 us
Figure 18-5: CI 265 Test Setup Detail for Waveform D
* The resistor value may be increased when testing components powered from a regulated supply (category AS). The value of this resistor shall be mutually agreed to by the JLR EMC department and the JLR Component Owner. The resistance value shall be documented in the component’s EMC test plan.
UP
0 VT
RR
DD
Signal Source Detail
DC CoupledAudio
Amplif ier
Arbitrary Waveform Generator
Test FixtureTest Fixture
DUTDUTDUTDUT
Waveform Generator
SignalSource
OscilloscopeOscilloscope
*
D: Fast Recovery Diode (e.g. MUR 3080)
R = 2 Ohms *

Jaguar Land Rover Limited - Engineering Standard
JLR-EMC-CS v1.0 Amendment 2
© Copyright Jaguar Land Rover – All Rights Reserved Page 73 of 108 30th November 2013
Waveforms A, B and C shall be generated using the test circuit shown in Appendix I. The test harness connecting the DUT to the Test Fixture and transient pulse generator shall be ≤ 2000 mm in length.
Waveform D shall be applied using the test circuit shown in Figure 18-5. The DC level shall be set to 13.5 volts with the DUT disconnected.
Connect and activate the DUT. Verify that it is functioning correctly. Record any DTC that may be permanently logged. Apply each waveform listed in Table 18-1 to each DUT power circuit for the specified period.
For waveforms B and C it is permissible to reduce the test time by testing 2 samples in parallel providing that consideration is given to any capacitive or inductive issues. The procedure must be agreed with the supplier of the test equipment and documented in the test report.
Data reporting shall comprise:
• Description of the functions monitored. • Any unintended operation. • Any memory corruption. • Any false DTC logging.
Tests shall be repeated on all DUT test samples for all DUT operating mode(s) detailed in the component EMC test plan.

Jaguar Land Rover Limited - Engineering Standard
JLR-EMC-CS v1.0 Amendment 2
© Copyright Jaguar Land Rover – All Rights Reserved Page 74 of 108 30th November 2013
19.0 Immunity to Voltage Overstress: CI 270 Applicable to the following component categories:
P R BM EM A AS AM AX AY AW Test Is Applicable
19.1 Requirements
The component shall be immune from potential voltage overstress. This requirement is applicable to all power supply or control circuits, either switched to, or directly connected to battery. The requirement is also applicable to control circuits directly connected to switched battery connections or through an external pull-up resistor. Requirements are detailed in Table 19-1. This requirement may be waived if analysis shows that the component will meet the requirements in Table 19-1. However, the JLR EMC department shall review and concur on this analysis to avoid this testing.
Table 19-1: CI 270 Requirements for Voltage Overstress
Requirement Functional Performance Status Amplitude (V) Duration Class A Class B and C -14 (-0.7, +0) ≥ 60 sec III III 19 (+0.95, -0) ≥ 60 min III II
28 (+1, -0) ≥ 60 sec (1) III I/II (2)
Note: 1 Applicable to devices connected directly to battery or via the ignition switch. For devices connected only to the start circuit, the duration time may be reduced to 15 sec. Note: 2 Status I required for devices required for engine start (e.g.; PATS)
The DUT and any electronic hardware in the Load Simulator shall be powered from a DC power supply (see Section 4.7.4 for requirements). For these tests, the power supply shall have minimum short circuit capacity of 100 amperes.
A device that is reverse battery protected with a fused power circuit and a reverse biased diode in parallel with the device shall be tested in a configuration representative of the vehicle. Example: If a vehicle fuse is used to protect the device, testing shall be performed with the same fuse type. The fuse type shall be documented in the component engineering specification and the EMC test plan.
Testing shall follow the steps detailed below:
Apply –14 volts only to power circuits with direct battery connections. After 60 seconds, the same potential shall then be applied to the remaining switched power and control circuits for 60 seconds while maintaining the same potential on the direct battery connections. After completion of this test, apply normal +13.5 volts and verify that the DUT powers up and functions properly.
Repeat step with 28 volts.
Apply +19 volts to all power and control circuits.
All circuits shall be tested simultaneously.
Verify functionality per Table 19-1.
Tests shall be repeated on all DUT test samples for all DUT operating mode(s) detailed in the component EMC test plan.

Jaguar Land Rover Limited - Engineering Standard
JLR-EMC-CS v1.0 Amendment 2
© Copyright Jaguar Land Rover – All Rights Reserved Page 75 of 108 30th November 2013
20.0 Electrostatic Discharge: CI 280 Applicable to the following component categories:
P R BM EM A AS AM AX AY AW Test Is Applicable
20.1 Requirements
The component shall be immune from overstress due to Electrostatic Discharge (ESD).
** ESD Testing shall be performed prior to any other EMC validation testing **
When designing component or system and their associated packaging, consideration must be given to interfacing trim materials, assembly processing and packaging materials so as to minimise any triboelectric effects of static build up. This is to prevent unwanted damage to components, during shipment to the next assembly supplier for further assembly or directly to JLR's manufacturing facility. The component supplier must understand all parts of the assembly and packaging process their parts undergo to ensure adequate ESD protection is in place or can flag any areas of concern to the JLR EMC department prior to test.
Testing shall be performed in accordance with ISO 10605 except where noted in this specification. The test facility shall be maintained at an ambient temperature at (23 ±5) °C and a relative humidity from 20 % to 40 %.
The ESD simulator waveform verification shall comply with ISO 10605 with the following exceptions:
• Contact discharge rise time ≤ 1 ns • Air discharge rise time ≤ 20 ns
The RC time constant shall be verified by calculation using the exponentially decaying portion of the waveform after the leading edge and/or ringing.
Between individual discharges, any remaining charge shall be removed using a bleed-off resistor (approximately 1M ohm resistance) by touching the discharge point and the ground plane. This step is particularly critical for devices with decorative chrome trim.
Charge dissipation between tests for some modules (instrument panels, large plastic modules etc.) may require use of an ionizer. If used, the air ionizer shall be turned off and removed before each discharge is applied. Testing shall be performed sequentially starting with handling tests followed by powered (direct and indirect access) tests.
The component shall be immune to ESD events that occur during normal handling and assembly. These requirements are listed in Table 20-1.
After exposure to ESD events listed in Table 20-1, component I/O parametric values (e.g., resistance, capacitance, leakage current, etc.) shall remain within their specified tolerances. This shall be performed immediately following ESD testing. Parametric requirements shall be detailed in Section 3.4 of the component EMC test plan.
The component shall be immune to ESD events that can occur during normal operation (i.e. powered). These requirements are listed in Table 20-2 and Table 20-3. This includes components that can be directly accessed from within the passenger compartment or trunk, or by direct access through an open window from a person outside the vehicle (e.g. door locks, turn signal stalk). The requirement also covers components that are not directly accessible. Upon completion of each discharge sequence, parametric tests (pre-defined in EMC test plan by supplier) shall be performed to verify that the DUT meets the requirements detailed in Table 20-2 and Table 20-3. Component parametric testing shall be performed before commencement of any subsequent testing. Correct DUT operation shall be checked during and after the application of all pulses. Tests shall be repeated on all DUT test samples for all DUT operating mode(s) detailed in the component EMC test plan.

Jaguar Land Rover Limited - Engineering Standard
JLR-EMC-CS v1.0 Amendment 2
© Copyright Jaguar Land Rover – All Rights Reserved Page 76 of 108 30th November 2013
20.1.1 Unpowered Tests
Table 20-1: CI 280 ESD Requirements: Unpowered (Packaging and Handling)
Discharge Sequence Type of Discharge Details Test
Level Application Functional
Performance Status Class A Class B Class C
U-01 Contact discharge C = 150 pF, R = 330 Ω On each connector
pin(1) and all conductive surfaces
± 4 kV
A minimum of 10 discharges of each polarity with >
5s interval between each discharge
IV
U-02 Contact discharge C = 150 pF, R = 330 Ω ± 8 kV
U-03 Air discharge C = 330 pF, R = 330 Ω
On all accessible points and other
surfaces
± 8 kV
U-04 Air discharge C = 330 pF, R = 330 Ω ± 15 kV
U-05 Air discharge C = 330 pF, R = 330 Ω ± 25 kV(2)
U-06 Air discharge C = 330 pF, R = 330 Ω ± 30 kV(3)
Note: 1 A pin extension may be used for pin testing in contact mode. The extension shall be no longer than 25 mm. Note: 2 Applicable to pyrotechnic equipment. Note: 3 Applicable to any components including pyrotechnic equipment that are packaged or transported (at tier1 or tier 2) in
materials of differing triboelectric series values which may cause excessive static charge build up. Testing shall be in accordance with ISO 10605 except where noted in this specification.
When applying discharges to the DUT connector pins, All DUT power return terminals shall be connected to the ground plane via a grounding strap or wire with a maximum length of 200 mm. For components with multiple power return terminals which are not internally connected within the DUT, the logic return ground shall be connected to the ground plane and the remaining power return terminals shall be subjected to ESD pulses similar to all other I/O pins. For those devices which do not have a ground terminal (i.e. switches with internal LED’s that are low-side sensed and/or latched by a controller, etc.), attach the low-side output (that would normally be connected to a controller I/O) to the ground plane. Apply ±4 kV contact discharge (sequence U-01) to all DUT connector pins. If any connector body is non-metallic and the connector pins are recessed, an extension contact (< 25 mm) shall be installed to facilitate testing of the individual pins. If the connector body is metallic with recessed pins, extension contacts shall not be installed. Repeat for ±8 kV contact discharge (sequence U-02). All discharge points shall be specified in the EMC test plan. Apply air discharges according to the sequence shown in Table 20-1 on all exposed shafts, buttons, switches, and/or surfaces (including along all air gaps that exist between buttons, faceplates, etc.) that are a result of the design of the product. All discharge points shall be specified in the EMC test plan.

Jaguar Land Rover Limited - Engineering Standard
JLR-EMC-CS v1.0 Amendment 2
© Copyright Jaguar Land Rover – All Rights Reserved Page 77 of 108 30th November 2013
20.1.2 Direct Discharge - Powered Tests
Table 20-2: CI 280 ESD Requirements: Powered (all component surfaces and remote IOs)
Discharge Sequence Type of Discharge Details Test
Level Application Functional
Performance Status Class A Class B Class C
DP-01 Contact discharge C = 330 pF, R = 330 Ω Metallic parts of
equipment and remote inputs and outputs
± 4 kV(1)
A minimum of 10 discharges of each polarity with >
5s interval between each discharge
I DP-02 Contact discharge
C = 330 pF, R = 330 Ω ± 8 kV(1)
DP-03 Contact discharge C = 330 pF, R = 330 Ω ± 15 kV(1)
DP-04 Air discharge C = 330 pF, R = 330 Ω All parts of
equipment and remote inputs and
outputs
± 8 kV(1)
DP-05 Air discharge C = 330 pF, R = 330 Ω ± 15 kV(1)
II I (pyrotechnic equipment)
DP-06 Air discharge C = 330 pF, R = 330 Ω ± 25 kV(2)
Note: 1 Applicable to: • All directly and indirectly accessible parts of equipment and components (e.g. button or sensor inputs) including
equipment connected to the unit and accessible during maintenance and operation, as well as remote control, switches, displays, harness, connectors, sensors, fuses etc. Including equipment accessible from outside of the vehicle via access through windows, doors, tailgate or boot and bonnet (e.g. door locks, turn signal stalk, radio, sensors)
• Tests shall be performed using C = 150 pF & R = 330 Ω network for sequences DP-01, DP-02 & DP-04 only on all input/outputs that are connected to communication buses and regarded as accessible points (e.g. diagnostic plug, OBD plug).
• All equipment directly connected to the unit that may be subject to ESD indirectly by a charged source (e.g., wheel speed sensor, external temperature sensor, etc.)
Note: 2 Applicable to (in addition to discharge sequences DP-01 through DP-05): • Pyrotechnic equipment • Equipment accessible (whether normally touched or not) from outside the vehicle with no access to vehicle interior
(e.g. door locks, lights, proximity sensors etc).
Testing shall be in accordance with ISO 10605 except where noted in this specification.
The DUT and any electronic hardware in the Load Simulator shall be powered from an automotive battery (see Section 4.7.4 for requirements).
If the DUT has remote inputs that are accessible by the operator (e.g. switches) or communications bus circuits accessible via diagnostic connectors the associated circuit wires shall be split out of the main harness and terminated with representative switches and/or connectors. Wiring for communication bus circuits (e.g. CAN) shall be configured such that the wiring is routed and connected directly to DUT (illustrated in Figure 20-1). Details of these remote connections shall be documented in the EMC test plan and approved by the JLR EMC department prior to commencement of testing. Detailed characteristics of switches and connectors to be used for testing shall be included in the EMC test plan.
All tests shall be performed while the DUT is in operation using the voltage levels and ESD network values listed in Table 20-2. Where possible, testing shall be limited to one DUT operating mode (specified in the EMC test plan), however further testing shall be performed if the complexity of the DUT facilitates further test modes to verify correct operation. Monitoring instrumentation and methods to determine DUT performance during testing shall be documented in the test report. Monitoring of particular DUT functions must not disturb its operation. Also, steps should be taken to preclude potential damage of monitoring equipment during testing.
Perform contact and air discharge tests as detailed in Table 20-2 (sequence DP-01 through DP-05) to each exposed shaft, button, switch and/or surface of the DUT including air gaps that exist between buttons, faceplates, etc. that are a result of the design of the product. All discharge points shall be documented in the EMC test plan.

Jaguar Land Rover Limited - Engineering Standard
JLR-EMC-CS v1.0 Amendment 2
© Copyright Jaguar Land Rover – All Rights Reserved Page 78 of 108 30th November 2013
Perform air discharge tests as detailed in Table 20-2 (sequence P-06) on all pyrotechnic equipment or DUTs accessible whether normally touched or not) from outside the vehicle with no access to vehicle interior (e.g. door locks, lights, proximity sensors etc).
Figure 20-1: CI 280 Test setup (Communication Bus Connection Requirements)
Key
1. DUT 4. Diagnositic Wiring (e.g. CAN) wiring shown is twisted and same length as DUT harness.
2. Load Simulator 5. Other DUT circuits 3. Diagnositic Connector (e.g. OBDII)
3
1 2
4
5

Jaguar Land Rover Limited - Engineering Standard
JLR-EMC-CS v1.0 Amendment 2
© Copyright Jaguar Land Rover – All Rights Reserved Page 79 of 108 30th November 2013
20.1.3 Indirect Discharge - Powered Tests
Table 20-3: CI 280 ESD Requirements: Powered (indirect discharge)
Discharge Sequence Type of Discharge Details Test
Level Application Functional
Performance Status Class A Class B Class C
IP-01 Contact discharge C = 330 pF, R = 330 Ω
Discharge Islands
± 4 kV A minimum of 10 discharges of each polarity with >
5s interval between each discharge
I IP-02 Contact discharge C = 330 pF, R = 330 Ω ± 8 kV
IP-03 Contact discharge C = 330 pF, R = 330 Ω ± 15 kV
Powered tests shall be performed in accordance with the method detailed in ISO 10605:2008 Annex F.
The DUT and any electronic hardware in the Load Simulator shall be powered from an automotive battery (see Section 4.7.4 for requirements).
Ground connections to point 12 (local - via a strap) or 10 (remote - via the DUT wiring) of ISO 10605:2008, Figures F.2 and F.3, shall be in accordance with Section 4.6 herein.
Case bonding (where required – see Section 4.6) shall be direct to the ESD field coupling plane or point 12 of ISO 10605:2008, Figures F.2 and F.3.
If the DUT has remote inputs (e.g. switches) or communications bus circuits accessible via diagnostic connectors the associated circuit wires shall be split out of the main harness and terminated with representative switches and/or connectors. Wiring for communication bus circuits (e.g. CAN) shall be configured such that the wiring is routed and connected directly to DUT. Details of these remote connections shall be documented in the EMC test plan and approved by the JLR EMC department prior to commencement of testing. Detailed characteristics of switches and connectors to be used for testing shall be included in the EMC test plan.
All tests shall be performed while the DUT is in operation using the voltage levels and ESD network values listed in Table 20-3. Where possible, testing shall be limited to one DUT operating mode (specified in the EMC test plan), however further testing shall be performed if the complexity of the DUT facilitates further test modes to verify correct operation. Monitoring instrumentation and methods to determine DUT performance during testing shall be documented in the test report. Monitoring of particular DUT functions must not disturb its operation. Also, steps should be taken to preclude potential damage of monitoring equipment during testing.
Perform direct contact and air discharge tests as detailed in Table 20-3 (sequence IP-01 through IP-03) to each discharge island.

Jaguar Land Rover Limited - Engineering Standard
JLR-EMC-CS v1.0 Amendment 2
© Copyright Jaguar Land Rover – All Rights Reserved Page 80 of 108 30th November 2013
Page Intentionally Left Blank

Jaguar Land Rover Limited - Engineering Standard
JLR-EMC-CS v1.0 Amendment 2
© Copyright Jaguar Land Rover – All Rights Reserved Page 81 of 108 30th November 2013
(Normative): Field Calibration Procedure for ALSE Method Bands 6 and 7) Annex ADue to the need for accurate generation of the high field strengths for Bands 6 and 7, field characterization shall be facilitated using the procedures outlined in this annex. These procedures replace those detailed in ISO 11452-2. This characterization procedure allows for use of either CW E-field probes or a receive antenna (DRG horn). For Bands 4 and 5, the field characterization detailed in ISO 11452-2 shall be used. The procedure outlined in this annex shall not be used for field characterization of Bands 4 and 5.
A.1 CW E-field Probe Method
When using this method, the orientation of the CW E-field probe axes with respect to surface of the dielectric support and the transmit antenna are specifically defined. Figures A-1 and A-2 illustrate positioning for two common probe styles. For some probes, special consideration must be given to assure they are oriented correctly. In Figure A-2, the probe handle must be tilted upward with respect to the surface bench (typically 35 degrees) and rotated around the axis normal to the bench surface (typically 135 degrees) to achieve proper alignment of the probe. Actual positioning shall be determined, based on the probe's specifications. For either probe, its phase centre (probe axis origin) is 125 mm above the surface of the dielectric support, used during actual testing.
Calibration for vertical or horizontal polarization shall be relevant to the specific axis, not the vector resultant (e.g. Etotal). Example: For vertical polarization, the field calibration shall be relative to the vertically aligned field probe sensor (i.e. Z axis sensor). For horizontal polarization, the field calibration shall be relative to the horizontally aligned field probe sensor (i.e. X axis sensor). Using this method requires the field probe facilitate separate field axis readings. Field probes that produce only a vector summation of the measured field shall not be used.
Additional requirements include: • The phase centre of the field probe is positioned 125 mm above the surface of the dielectric support used
during actual testing.
• Peak forward power shall be the reference parameter for characterization of the field. This forward power shall be measured using either a peak envelope power (PEP) sensor (preferred method) or a spectrum analyser. A list of recommended power meters/sensors may be found at www.jaguarlandrover.com/emc. If a spectrum analyser is used, it shall be tuned to each individual frequency using zero span setting with a measurement bandwidth greater than 3 MHz.
• Pulse modulation characteristics shall conform to that illustrated in Figure B-1 in Annex B. • Characterization shall be performed using CW at the required field strengths in Table 10-3. Characterization at
lower field strengths with subsequent power scaling for higher field strengths is not permitted.
• The E-field probe used shall be capable of measuring electric fields listed in Table 10-3 (e.g. 300 / 600 V/m. • The E-field probe shall be specifically calibrated the following frequencies:
o 1.3 GHz o 2.9 GHz
A.2 Pulsed E-field Probe Method
Use of E-field probes capable of direct measurement of a pulsed fields is permissible only with prior written approval from the JLR EMC department. The probes shall meet the requirements detailed for CW field probes (section A.1) with the exception that measurement of CW fields is not required. Currently the only approved commercially available pulsed E-field probe is the Amplifier Research Model PL 7004.

Jaguar Land Rover Limited - Engineering Standard
JLR-EMC-CS v1.0 Amendment 2
© Copyright Jaguar Land Rover – All Rights Reserved Page 82 of 108 30th November 2013
A.3 Antenna Method
Figure A-6 illustrates the setup when using a receiving antenna for field characterization. This method may be used when using either CW or pulsed amplifiers. This method requires use of any of the following as the receive antenna:
• ETS Lindgren DRG 3115 • Antenna Research: DRG 118/A • Rohde & Schwarz: HF906
Use of alternative antennas shall be approved by the JLR EMC group. Additional requirements include: • The phase centre of the antenna is positioned 125 mm above the surface of the dielectric support used during
actual testing. • Peak forward power shall be the reference parameter for characterization of the field. This forward power
shall be measured using either a peak envelope power (PEP) sensor (preferred method) or a spectrum analyser. A list of recommended power meters/sensors may be found at www.jaguarlandrover.com/emc. If a spectrum analyser is used, it shall be tuned to each individual frequency using zero span setting with a measurement bandwidth greater than 3 MHz.
• Pulse modulation characteristics shall conform to that illustrated in Figure C-4. The maximum RMS forward power (Ppulse) used for pulsed modulation testing shall be the same as the CW calibration power (PCW_CAL) (i.e. PPULSE = PCW_CAL).
• Characterization shall be performed using the required field strengths in Table 10-3. Characterization at lower field strengths with subsequent power scaling for higher filed strengths is not permitted.
Figure A-1: Field Probe (Type A) Positioning Requirements (RI 114, Bands 6 and 7)
Surface of Dielectric Support
Z
Y
X
125 +10/ -0
Field Probe Orientation
Y
X
Dielectric Support
1000 ± 10
TransmitAntenna
DielectricSupport
1000 ± 10
Chamber Floor
250
min
TransmitAntenna
1000
±50
50 ±
5
125 +10/ -0
Z
Y
Top View Side View

Jaguar Land Rover Limited - Engineering Standard
JLR-EMC-CS v1.0 Amendment 2
© Copyright Jaguar Land Rover – All Rights Reserved Page 83 of 108 30th November 2013
Figure A-2: Field Probe (Type B) Positioning Requirements (RI 114, Bands 6 and 7)
Figure A-3: Receive Antenna Positioning Requirements (RI 114, Bands 6 and 7)
Surface of Dielectric Support
Z
Y
X
125 +10/ -0
Field Probe Orientation
Y
X
Θ Θ ~135 degrees see probe specifications for specific positioning
TransmitAntenna
1000 ± 101000 ± 10
Φ
Z
Y
250
min
TransmitAntenna
1000
±50
DielectricSupport
50 ±
5
1000 ± 10
125 +10/ -0
Chamber Floor
Dielectric Support
Top View Side View
Y
X
TransmitAntenna
1000 ± 10
Dielectric Support
DielectricSupport
250
min
TransmitAntenna
1000
±50
Z
Y
50 ±
5
1000 ± 10
125 +10/ -0
Chamber Floor
DielectricSupport
250
min
TransmitAntenna
1000
±50
Z
Y
50 ±
5
1000 ± 10
125 +10/ -0
Chamber Floor
Top View Side View

Jaguar Land Rover Limited - Engineering Standard
JLR-EMC-CS v1.0 Amendment 2
© Copyright Jaguar Land Rover – All Rights Reserved Page 84 of 108 30th November 2013
(Normative): Modulation and Levelling Requirements for RI 112, RI 114 and RI Annex B115
B.1 Peak Conservation Peak Conservation, per Annex B of ISO 11452-1 (2005) shall be used for application of AM and Peak modulation during radiated immunity testing (see section 10). Peak conservation is illustrated in Figure B-1. Peak conservation shall be verified via physical measurement as part of the EMC laboratory's calibration process.
Figure B-1: RF Immunity Peak Conservation Profile
UCAL = Stress Level (RMS) listed in Tables 11-1, 11-3, and 11-4
UPEAK = Peak Stress Level
B.2 Stress Levelling Process
During testing per RI 112, RI 114 and RI 115, there are a minimum of three distinct stages that occur at each test frequency as illustrated in Figure B-2.
Stage 1 consists of the levelling process to achieve the required stress level at each test frequency. Stage 1 is initiated by setting the signal generator output to produce a stress level > 10 dB below the required stress level (i.e. UCAL). Signal generator values are derived based on the stress level calibration. The levelling process is critical to assure that the required stress level is not exceeded by more than 1.0 dB. Two factors may affect this
1 Selection of the stress increment "A" (see Figure B2) The lab may elect to use a small, fixed stress increment value during the levelling process however consideration shall be given toward minimizing the levelling time while not exceeding the target stress level by more than 1 dB. Alternatively, the selected stress increment may variable depending on difference between the measured stress level and the target stress level. The total levelling time should not exceed 6 seconds.
2 RF signal source overshoot during step changes in its output to the RF amplifier. Overshoot may not exceed 1 dB of the target stress level. A number of hardware and software parameters may be employed to minimize overshoot. The test laboratory should avoid step changes in electromechanical attenuation during the levelling process, which can be a significant source of overshoot. Although not required, use of signal generators with electronic attenuation is recommended.
Stage 2 occurs when the required stress level has been achieved. The stress level shall remain constant for a minimum dwell time of 2 seconds unless longer times are documented in the DUT's EMC test plan. During this time, CW, AM, or Pulse modulation may be used. The laboratory may perform separate tests for each modulation type or cascade the modulation types at each frequency (recommended). This later approach is illustrated in Figure B-3. If this approach is taken, the laboratory shall take steps to differentiate DUT anomalies attributed to a specific modulation type.
CW AM PULSE
UPEAK UCAL

Jaguar Land Rover Limited - Engineering Standard
JLR-EMC-CS v1.0 Amendment 2
© Copyright Jaguar Land Rover – All Rights Reserved Page 85 of 108 30th November 2013
When the dwell time is completed, the required stress level shall be reduced by > 10 dB (Stage 3). At this time, the next test frequency is selected and the process described above is repeated. By default, the time duration of Stage 3 is affected only by the time it takes to move to the next frequency and initiate the levelling procedure (Stage 1). This is hardware and/or test software dependent.
Figure B-2: RF Immunity Generic Levelling/Dwell Process
Figure B-3: RF Immunity Example of Combined CW and AM Dwell
Key
Stage 1: Levelling Stage USTART: Initial Stress Level : >10 dB below UTARGET
Stage 2: Dwell Stage (default 2 secs) UTARGET: Target Stress Level
Stage 3: Stress Removed. Switch to next frequency (hardware/ software dependent) A: Stress Increment (may be fixed or variable)
t: time required to measure RF power (hardware\software dependent)
B: Post Dwell Level: > 10 dB below UTARGET of next test frequency
B.3 DUT Functional Deviation Threshold Procedure
Determination of DUT functional deviation (anomaly) threshold levels shall be accomplished using the following procedure:
1 Reduced stress level until the DUT functional deviation disappears, 2 Increase the stress level by steps not exceeding 1 dB, until the functional deviation reappears. 3 Record the stress level from step 2 as the functional threshold level
Stage1
AB
USTART
UCAL
t
Stage2
Stage3
CW
USTART
UCAL
AM
Stage3
Stage2
Stage1

Jaguar Land Rover Limited - Engineering Standard
JLR-EMC-CS v1.0 Amendment 2
© Copyright Jaguar Land Rover – All Rights Reserved Page 86 of 108 30th November 2013
(Normative): CI 220 Transient Waveform Descriptions Annex CCI220 transient immunity testing consists of both standard pulses as detailed in ISO 7637-2 in addition to non-standard pulses including those produced by electromechanical switching of an inductive load. These non-standard transient pulses have been included to produce transient waveforms that are absent in ISO 7637-2, but are prevalent in the vehicle’s electrical power distribution system. Non-standard transients created from this approach are highly affected by a number of factors including but not limited to resistive/capacitive loads sharing the same circuit as the inductive load. Although consecutive transients events produced in this manner are often not repeatable as compared to standard ISO test pulses, experience has shown that this random behaviour can produce anomalies that are frequently missed when using only the standard repetitive ISO pulses. This annex provides information about the characteristics of the CI 220 transient pulses detailed in this specification. This information shall also be considered during initial design of the component or subsystem.
C.1 Test Pulses A1, A2, C, E Figure C-1 illustrates a simplified automotive circuit consisting of an ignition switch used to activate or deactivate the inductive load (e.g. power door lock). LW represents the series wiring inductance between the battery, and ignition switch. The load inductance "L" is significantly greater than the series inductance of the wiring (typically 1 uH/meter).
Figure C-1: Simplified Automotive Circuit for Transient Immunity
Test Pulse A1 represents the voltage transient produced during switching of higher current (1 – 5 ampere) inductive loads that share the same circuit with the DUT. "Z" represents the impedance of the other electrical loads sharing the same circuit with the DUT and the inductive load. The value of "Z", which is set to 220 Ω, simulates minimally loaded circuits. Figure C-2 illustrates Pulse A1. The peak pulse voltage levels will vary between –250 to –300 volts.
Test Pulse A2 represents the voltage transient produced during switching of a lower current (< 1 ampere) inductive loads that shares the same circuit with the DUT. The characteristics of Pulse A2 can vary significantly depending on the impedance of the other loads sharing the same circuit as the DUT. Given this dependency, two separated conditions exist for Pulse A2. They are:
Pulse A2-1 Occurs when the circuit consists only of the DUT and the switched inductive load.
Pulse A2-2 Occurs when the circuit includes other electrical loads that share the same circuit as the DUT and the switched inductive load. The other electrical loads are predominately capacitive (e.g. wiper motor filter capacitor)
Figures C-3 and C-4 illustrate waveforms that typify Pulses A2-1 and A2-2. When external circuits effects are not considered, the transient (Pulse A2-1) is largely the result of contact arcing. The characteristics of this transient consist of a high frequency repetitive pulse with peak positive voltages levels between +100 to +300 volts and peak negative voltage levels are between –280 to –500 volts. Duration of individual pulses (see Figure C-3b) may vary between 100 nsec to 1 usec. The characteristics illustrated in Figure C-3 were measured when the contacts open, however similar
SW
LW
+_
BATT+_
BATT
LW << L
R
L
InductiveLoad
R
L
InductiveLoadC DUTDUT ZZDUTDUT
A1A2
Z = 220 Ω

Jaguar Land Rover Limited - Engineering Standard
JLR-EMC-CS v1.0 Amendment 2
© Copyright Jaguar Land Rover – All Rights Reserved Page 87 of 108 30th November 2013
transients can occur when the switch contact bounce during closure. A2-1 transients are also commonly referred to as "showering arc transients."
When the external circuit is predominately capacitive, the transient produced (Pulse A2-2) is significantly different than Pulse A2-1. When the switch contacts open, a damped sinusoidal transient (fres ~ 2kHz) is produced. When the switch contacts bounce during closure a higher frequency, damped sinusoidal transient (fres ~180kHz) is produced. During this phase, there is a corresponding current transient with a magnitude approximately 30 AP-P (see Figure C-4c). When attempting to measure Pulse A2-2, on an oscilloscope, it is recommended to trigger on the transient current.
Figure C-2: CI 220 Pulse A1 Composite Waveform
Figure C-3: CI 220 Pulse A2-1 Pulse Characteristics
a) Contact Break and Bounce
b) Contact Break and Bounce (Detail)
-300
-250
-200
-150
-100
-50
0
50
-2 -1 0 1 2 3
msec
Volts
-500
-400
-300
-200
-100
0
100
200
300
-50 0 50 100 150 200 250 300 350
usec
Volts
See Detail
-400
-300
-200
-100
0
100
200
300
0.0 0.5 1.0 1.5 2.0 2.5 3.0 3.5 4.0
usec
Volts

Jaguar Land Rover Limited - Engineering Standard
JLR-EMC-CS v1.0 Amendment 2
© Copyright Jaguar Land Rover – All Rights Reserved Page 88 of 108 30th November 2013
Figure C-4: CI 220 Pulse A2-2 Pulse Characteristics
a) Contact Break
b) Contact Bounce (Voltage)
c) Contact Bounce (Current)
Test Pulse C represents the voltage transient produced as a result of switch contact arching and contact bounce during switching of an inductive load. The transient characteristics are a function of the series wiring inductance and the current produced during arcing (switch contact break) or contact bounce. Pulse C is directly related to Pulse A2. Given this dependency, two separated conditions exist (Pulse C-1, C-2) corresponding to Pulses A2-1 and A2-2 respectively.
Pulse C-1 characteristics are illustrated in C-5b. The characteristics of this transient consist of a high frequency damped sinusoidal pulse (fres ~ 10 MHz) with peak positive and negative voltages levels approximately ±150 volts. Duration of the sinusoidal transient pulse is varies between 100 nsec to 1 usec.
Pulse C-2 characteristics are illustrated in C-5d. The characteristics of this transient consist of a lower frequency damped sinusoidal pulse (fres ~ 180 kHz) with peak positive and negative voltages levels approximately ±150 volts. Duration of the sinusoidal transient pulse is approximately 50 usec.
-300
-250
-200
-150
-100
-50
0
50
100
150
200
-1.0 -0.5 0.0 0.5 1.0 1.5 2.0 2.5 3.0
msec
Volts
-250
-200
-150
-100
-50
0
50
100
150
200
-150 -100 -50 0 50 100 150
usec
Volts
Contact Break
Contact Make
-250
-200
-150
-100
-50
0
50
100
150
200
-150 -100 -50 0 50 100 150
usec
Volts
Contact Make
5
10
15
20
0
-5
-20
-10
-30
-40
Am
pere
s

Jaguar Land Rover Limited - Engineering Standard
JLR-EMC-CS v1.0 Amendment 2
© Copyright Jaguar Land Rover – All Rights Reserved Page 89 of 108 30th November 2013
Figure C-5: CI 220 Pulse C Characteristics
a) Pulse A2-1
c) Pulse A2-2
b) Pulse C-1
d) Pulse C-2
Pulse E represents the voltage transient produced during switching of a higher current (> 5 ampere) inductive load that shares the same circuit with the DUT. The test pulse is equivalent to Test Pulse 1 detailed in ISO 7637-2. Pulse E is similar to Pulse A-1 except that it occurs when higher current loads (> 5 amperes) share the same circuit as the inductive load. The pulse can also occur on circuits with high capacitive loads (> 2uf). Pulse E characteristics are illustrated in Figure C-6.
C.2 Test Pulse F1 and F2
Pulse F1 simulates the interruption of a current through an inductance switched in series with the DUT. The test pulse is equivalent to Test Pulse 2a detailed in ISO 7637-2. Application of this test pulse is limited only for power supply circuits and only for components required to meet the ESA requirements of United Nations ECE regulation 10.
Pulse F2 simulates the interruption in current to brush commutated motor, which is low-side switched. The test pulse is equivalent to test pulse 2b detailed in ISO 7637-2. Application of this test pulse is limited only for power supply circuits and only for components required to meet the ESA requirements of United Nations ECE regulation 10.
-400
-300
-200
-100
0
100
200
300
0.0 0.5 1.0 1.5 2.0 2.5 3.0 3.5 4.0
usec
Volts
-250
-200
-150
-100
-50
0
50
100
150
200
-150 -100 -50 0 50 100 150
usec
Volts
Contact Break
Contact Make
-400
-300
-200
-100
0
100
200
300
0.0 0.5 1.0 1.5 2.0 2.5 3.0 3.5 4.0
usec
Volts
-250
-200
-150
-100
-50
0
50
100
150
200
-150 -100 -50 0 50 100 150
usec
Volts
Contact Make

Jaguar Land Rover Limited - Engineering Standard
JLR-EMC-CS v1.0 Amendment 2
© Copyright Jaguar Land Rover – All Rights Reserved Page 90 of 108 30th November 2013
Figure C-6: CI 220 Pulse E Characteristics
Pulse E - Parameters
Up 13.5 V
Us -100 V
tr 1 us
td 2 ms
t1 5 s
t2 200 ms
t3 ≤ 100 us
Ri 10 ohms
Waveform voltage begins and ends at Up
Parameters listed are for open circuit conditions.
Figure C-7: CI 220 Pulse F1 Characteristics
Pulse F1 - Parameters
Up 13.5 V
Us 37 V
tr 1 (-0.1 / +0) us
td 50 us
t1 0.2 - 5 s
Ri 2 ohms
Waveform voltage begins and ends at Up
Parameters listed are for open circuit conditions.
- - - - - - - - - - - - - - - - - - - - - - - - - - - - - - - - - - - - - - - - - - -
0V
t
UA
V
U
tr
t
1
t 3
s
2 t
td
10 %
90 %
UP
UP
US
V

Jaguar Land Rover Limited - Engineering Standard
JLR-EMC-CS v1.0 Amendment 2
© Copyright Jaguar Land Rover – All Rights Reserved Page 91 of 108 30th November 2013
Figure C-8: CI 220 Pulse F2 Pulse Characteristics
Pulse F2 - Parameters
Up 13.5 V
Us 10 V
tr 1 ± 0.5 ms
tf 1 ± 0.5 ms
t6 1 ± 0.5 ms
td 0.2 – 2 s
Ri < 0.5 ohms
Parameters listed are for open circuit conditions.
D.3 Test Pulses G1 and G2
Pulse G1 represents the transient produced due to sudden disconnection of the battery from the alternator. The test pulse is equivalent to Test Pulse 5a detailed in ISO 7637-2 (2004-06-15). Pulse G1 characteristics are illustrated in Figure C-9.
Pulse G2 represents a voltage clamped transient produced due to sudden disconnection of the battery from an alternator fitted with Central Load Dump (CLD) Protection. Pulse G2 characteristics are illustrated in Figure C-10.
Figure C-9: CI 220 Pulse G1 Characteristics
Pulse G1 - Parameters
Open Circuit Conditions Up 13.5 V
Us 60.V
tr 10 ( -5 /+0 ) ms
td 300 ms +/-20%
Ri 0.5 Ohms
Loaded Conditions ( RL = Ri )
Up 13.5 V
Us 30 V
tr 10 ( -5 /+0 ) ms
td 150 mS +/-20%
Ri 0.5 Ohms
Waveform voltage begins and ends at Up
All voltage values are with respect to 0 volts unless otherwise specified.
UP
US
0.1UP
0.9UP
tf
V
UP
V

Jaguar Land Rover Limited - Engineering Standard
JLR-EMC-CS v1.0 Amendment 2
© Copyright Jaguar Land Rover – All Rights Reserved Page 92 of 108 30th November 2013
Figure C-10: CI 220 Pulse G2 Characteristics
Pulse G2 Parameters
Up 13.5 V
Us
32 V
Repeat using 28 V, 26V, 24V, 22V, 20V and 18 V for component may switch on an active device (e.g. motor) to suppress the pulse
Us * 21.5 (-1/+0) V
tr 10 ( -5 /+0 ) ms
td 150 mS +/-20%
Ri 0.5 Ohms
All voltage values are with respect to 0 volts unless otherwise specified.
Voltage values listed are across a 0.5 ohm resistive load (see section 15.3).
a: Unsuppressed pulse b: Suppressed pulse
UP
V

Jaguar Land Rover Limited - Engineering Standard
JLR-EMC-CS v1.0 Amendment 2
© Copyright Jaguar Land Rover – All Rights Reserved Page 93 of 108 30th November 2013
C.4 Transient Application Mode
Application of transient pulses A1, A2 and C to the DUT are facilitated using three different operating modes.
Mode 1 represents a condition where the test pulse is applied at a fixed repetition rate as shown in Table C-1 below. Mode 1 is applicable for pulses A1 and A2 only when applied to DUT switched power supply circuits.
Table C-1: CI 220 Mode 1 Characteristics
Transient Pulse Pulse Repetition Rate (PRR) Duration
A1 0.2 Hz, 10% duty cycle 120 sec
A2-1
Mode 2 represents a condition where test pulses are applied using a pseudo- random timing sequence as illustrated in Figure C-11. Mode 2 is only used with test pulse A1 when applied to DUT inputs. The time "T" is 50 ms.
Mode 3 represents a condition where test pulses are applied using pseudo- random bursts as illustrated Figure C-12. The timing sequence is identical to that used for Mode 2. Mode 3 is used only with test pulses A2-1, A2-2, C-1, and C-2. The bust time "T" is 50ms.
Modes 2 and 3 is also used when performing testing per RI 130 (see section 13). Modes 1, 2 and 3 are produced by the transient generator circuit presented in Annex E.
Figure C-11: CI 220 Mode 2 Characteristics
T = 50 msec
Pulse Timing Sequence
Resulting Transient Sequence
T
7T
5T T
T 5T T
7T
T
2T T
3T
7T
T
T
7T
3T T
T 5T
T
T
T

Jaguar Land Rover Limited - Engineering Standard
JLR-EMC-CS v1.0 Amendment 2
© Copyright Jaguar Land Rover – All Rights Reserved Page 94 of 108 30th November 2013
Figure C-12: CI 220 Mode 3 Characteristics
T = 50 msec
Pulse Burst Timing Sequence
Resulting Transient Burst
T
7T
5T T
T 5T T
7T
T
2T T
3T
7T
T
T
7T
3T T
T 5T
T
T
T

Jaguar Land Rover Limited - Engineering Standard
JLR-EMC-CS v1.0 Amendment 2
© Copyright Jaguar Land Rover – All Rights Reserved Page 95 of 108 30th November 2013
(Normative): Transient Waveform Application Annex DApplications of Test pulses A, C, E and G are largely dependent on how the DUT is connected to the power distribution system. This annex provides basic information with respect to application for each transient test pulse. The figures presented represent typical configurations including the ignition switch, remote switch (SW2), inductive load, the DUT and external electronic loads "Z" connected at various points on the power distribution system. Proper application of transient pulses requires analysis of how the actual component (DUT) will be used. In many cases the actual device configuration will be some combination of the generic configurations presented.
Application of Pulse F1 nor F2 are limited to power supply circuits for components required to demonstrate compliance to the ESA requirements detailed in United Nations ECE regulation 10.
Configuration 1
DUT power circuit "A" shares the same circuit as the inductive load (e.g. window lift motor). The DUT and inductive load are switched via SW2. Transient pulses A1, A2 and E will be present at "A" if IGN SW remains closed and SW2 opens. Pulses C and G (load dump) will be present at "A" when IGN SW and SW2 are closed.
Pulse Application
Apply transient pulses A1, A2-1, A2-2, C1, C2, E, G1, G2 to DUT power connection "A".
Configuration 2
DUT power circuit "A" remains powered when inductive load is deactivated by SW2. The DUT has an input circuit "B" that is connected to circuit containing inductive load. Transient pulses A1, A2 and E will be present at "B" when SW2 opens. Pulse C will be present at "A" if IGN SW remains closed and SW2 opens or bounces Pulses C and G (load dump) will be present at "A" and "B" when IGN SW and SW2 are closed.
Pulse Application Apply transient pulse C-1, C-2, G1, G2 to DUT power connection "A".
Apply transient pulses A1, A2-1, A2-2, E to DUT input "B". Apply transient pulse C-1. C-2. G1, G2 to "A" and "B" simultaneously
+_
SW2
LW2
BATT
IGN SW
LW1
LW1 , LW2 << L
R
L
InductiveLoadDUTDUT
A
Z2Z2Z1Z1 Z3Z3
+_
SW2
LW2
BATT
IGN SW
LW1
LW1 , LW2 << L
R
L
InductiveLoadZ3Z3BZ2Z2 DUTDUT
A
Z1Z1

Jaguar Land Rover Limited - Engineering Standard
JLR-EMC-CS v1.0 Amendment 2
© Copyright Jaguar Land Rover – All Rights Reserved Page 96 of 108 30th November 2013
Configuration 3
DUT power circuit "A" shares same circuit as inductive load when SW2 is closed. The DUT and inductive load are switched via ignition switch or ignition relay. Transient pulses A1, A2 and E will be present at "A" if SW2 remains closed and IGN SW opens. Transient pulse C will be present at "A" if IGN SW remains closed and SW2 opens or bounces. Pulse C and G (load dump) will be present at "A" when IGN SW is closed.
Pulse Application Apply transient pulses A1, A2-1, A2-2, C-1, C-2, E, G1, G2 to DUT power connection "A"
Configuration 4
DUT power circuit "A" is directly connected to battery. DUT also has an input or secondary power circuit "B" that is connected to ignition switched circuits. Transient pulse C will be present at "A" if SW2 is closed and IGN SW opens or bounces. Transient pulses A1, A2 and E will be present at "B" if SW2 is closed and IGN SW opens. Pulse C will be present at "B" if IGN SW is closed and SW2 opens or bounces. Pulse C and G (load dump) will be present at "A" and "B" when IGN SW is closed.
Pulse Application Apply transient pulses C-1 and C2 to "A"
Apply transient pulses A1, A2-1, A2-2, C-1, C2 and E to "B"
Apply transient pulse C-1, C-2, G1, G2 to "A" and "B" simultaneously.
+_
SW2
LW2
BATT
IGN SW
LW1
LW1 , LW2 << L
R
L
InductiveLoadDUTDUT
A
Z3Z3Z2Z2Z1Z1
+_
SW2
LW2
BATT
IGN SW
LW1
LW1 , LW2 << L
R
L
InductiveLoadZ3Z3Z2Z2Z1Z1 DUTDUT
A
B

Jaguar Land Rover Limited - Engineering Standard
JLR-EMC-CS v1.0 Amendment 2
© Copyright Jaguar Land Rover – All Rights Reserved Page 97 of 108 30th November 2013
(Normative): Transient Test Generator Annex EThe test generator presented in this annex produces transients for the following test methods:
• RI 130 • CI 220 Pulses A1, A2, and C
Figure E-1 illustrates the transient generator circuit that will produce CI 220 transient pulses A1, A2, and C in Modes 1, 2 and 3. The circuit contains a few critical components that may not be substituted without permission from the JLR EMC department. These components are highlighted in the figures. Specific details about these test circuits including contact locations for critical components may be found at www.jaguarlandrover.com/emc. Selection of test pulses and operating modes is facilitated by simple switch settings. Table E-1 summarizes these switch configurations and associated test pulse/operating mode.
Figure E-1: Transient Generator Circuit for RI 130 and CI 220
Key
R1: 51 ohms, 25W L2: 100 mH inductor (Osborne Transformer Part Number 32416)*
R2: 220 ohms ± 5% , 2W D1: Zener Diode, 39 V, 5W (1N5366A)
R3: 33 ohms ± 5% , 10W Q1: NPN transistor (TIP 41)
R4: 6 ohms ± 5% , 50W SW0 – SW4: Single Throw Switch (10 contact rating)
C1: 100 nF ceramic capacitor, 400V RLY1: 12 volt AC Relay** Use normally closed (NC) contacts (Potter & Brumfield KUP-14A15-12)*
L1: 5 uH inductor (Osborn Transformer Part Number 8745) *
* Critical Component, no substitutions permitted without written authorization from the JLR EMC department. ** See Table E-1 for relay specifications
SW0
SW1
L1
R1Q1D1
RLY1
A
GEG
PulseA1, A2
PulseC
NC C
SW2 SW3
L2
R3
R4
R2 C1SW4
D
BNC Connectors
Ground to metal caseof Transient generator
B C
G G
Short C and D for CI 220Open C and D for RI 130

Jaguar Land Rover Limited - Engineering Standard
JLR-EMC-CS v1.0 Amendment 2
© Copyright Jaguar Land Rover – All Rights Reserved Page 98 of 108 30th November 2013
Figure E-2: Transient Generator (External Connections)
Table E-1: CI 220 Transient Generator Switch Settings
Pulse Mode * SW1 SW2 SW3 SW4
A1 1 Closed Closed Closed Closed
A2-1, C-1 1 Closed Open Open Open
A2-1, C-1 2 Closed Open Open Open
A2-2, C-2 2 Closed Open Closed Open
A2-1, C-1 3 Open Open Open Open
A2-2, C-2 3 Open Open Closed Open
* See Annex C for description of Mode operating conditions
The transient generator uses a Potter and Brumfield (P&B) 12 VAC relay. Specifications for this relay are listed in Table E-2. While the relay is readily available in North America, it may be difficult to locate in other parts of the world.
However, almost any 12 AC relay can be used for this performing testing per this specification. Before using alternative relays, voltage measurements shall be performed and compared to those waveforms illustrated in this annex. The results of these measurements shall be reviewed and approved by the JLR EMC department prior to using an alternative relay.
When using these relays for the purposes detailed in this specification, it is recommended that the relay be replaced after 100 hours of usage.
EG
ARB
EG
ARB
Mode 1
Mode 2, 3
Mode 1
Mode 2, 3
C D Short C and D for CI 220Open C and D for RI 130
+_
PS
A
G
Pulse C
PulseA1, A2Test Generator
Metal Enclosure
BNC Connectors
G
G
C
B
Connect test generator metalcase to test setup ground plane whenin use
SW1SW1 SW2SW2 SW3SW3 SW4SW4

Jaguar Land Rover Limited - Engineering Standard
JLR-EMC-CS v1.0 Amendment 2
© Copyright Jaguar Land Rover – All Rights Reserved Page 99 of 108 30th November 2013
Table E-2: CI 220 Transient Generator (P&B Relay Specifications)
Contact Arrangement: 3 Form C, 3PDT, 3 C/O
Contact Current Rating (Amps.): 10
Coil Magnetic System: Mono-stable
Coil Selection Criteria: Nominal Voltage
Actuating System: AC
Input Voltage (VAC): 12
Coil Suppression Diode: Without
Coil Resistance (Ω): 18
Coil Power, Nominal (VA): 2.70
Mounting Options: Plain Case
Termination Type: .187 x .020 Quick Connect Terminals
Enclosure: Enclosed
Contact Material: Silver Cadmium Oxide
Approved Standards: UL Recognized, CSA Certified

Jaguar Land Rover Limited - Engineering Standard
JLR-EMC-CS v1.0 Amendment 2
© Copyright Jaguar Land Rover – All Rights Reserved Page 100 of 108 30th November 2013
(Normative): Load Simulator Requirements. Annex FThe Load Simulator is a shielded enclosure that contains all external electrical interfaces (sensors, loads etc.) normally connected to the DUT. The Load Simulator also serves as an RF boundary for the DUT cable harness in addition to serving as an interface to support and monitoring equipment required during testing.
A typical Load Simulator is illustrated in Figure F-1. The circuits shown serve as examples of what can be contained within the Load Simulator. Actual circuit content is specific to the DUT's functionality. However, the following requirements shall be followed when designing the Load Simulator.
All interface circuits within the Load Simulator except CAN shall include a capacitance of 10 nF located between each interface circuit and the Load Simulator chassis unless actual electrical loads are used. Omission of the 10 nF capacitor shall be approved by the JLR EMC department prior to commencement of testing.. The 10 nF capacitance value represents the interface capacitance for most modules. If the Load Simulator contains a CAN interface (includes MS or HS CAN), the capacitance shall be 470 pf. The capacitors shall be package as close as possible to the Load Simulator/DUT harness interface connector. Figure F-1 illustrates location of these capacitors. It is recommended to use surface mount capacitors on a separate PCB mounted directly to the interface connectors. This minimizes lead inductance between the interface circuit and Load Simulator chassis. Filter pin connectors may be use, but only with prior approval of the JLR EMC department.
If the DUT contains CAN communications, the circuits illustrated in Figure F-2 shall be located within the Load Simulator. Configuration A shall be used for devices that contain internal CAN bus termination. Configuration B shall be used for devices that contain no termination.
Production intent components shall be used for the loads wherever possible. This is particularly critical for inductive and pulse width modulated (PWM) circuits. If actual loads are not available, simulated loads may be used, but shall accurately represent the impedance (resistance, capacitance and inductance) that is expected in a production vehicle. Simple resistive loads shall not be used unless approved by the JLR EMC department
If the DUT is powered from another electronic module (e.g. sensors), the module’s power supply shall be accurately simulated from within the Load Simulator. Other active devices may be contained within the Load Simulator, but appropriate steps shall be taken to prevent potential influences of RF energy on device operation.
In general, all inputs and outputs shall be referenced to power ground established at one point within the Load Simulator and connected to the Load Simulator metal chassis. The only exception to this for CI 250, where it is required to introduce a voltage offset between the ground plane and the loads contained in the Load Simulator. See Section 18-2 for additional detail.
Figure F-3 illustrates the Load Simulator in a typical test setup.
The Load Simulator chassis shall be electrically bonded to the test setup ground plane via direct connections (screws) and/or ground straps. Alternative bonding methods (e.g. copper tape with conductive adhesive) is not permitted.
DUT inputs requiring external signal sources are facilitated via the Load Simulator. Although fibre optic media is recommended for these connections, coaxial cables may be used to connect remote support equipment to the Load Simulator. However, if coaxial connections are used, all cabling shall be have ferrite beads installed on the cable at intervals not exceeding 150 mm. Use of ferrite beads other than the type detailed in Figure F-3 shall be reviewed and approved by the JLR EMC department as part of the laboratory recognition process (see http://www.jaguarlandrover.com/emc).
Fibre optic media shall be used to connect DUT outputs to remotely located monitoring equipment. The frequency bandwidth of the fibre optic media shall be selected to be compatible with the operating bandwidth of the monitored DUT signal, but limited to avoid unintentional RF energy from coupling to, and potentially affecting the test monitoring instrumentation. Use of non-optical interfaces to monitoring equipment is permitted only with prior approval by the JLR EMC department. Details concerning signal monitoring and support equipment interface shall be documented in the EMC test plan
All fibre optic media shall require prior verification to be immune to the RF stress levels detailed in Section 10.0 of this specification.

Jaguar Land Rover Limited - Engineering Standard
JLR-EMC-CS v1.0 Amendment 2
© Copyright Jaguar Land Rover – All Rights Reserved Page 101 of 108 30th November 2013
Wires connecting the battery to the artificial networks and Load Simulator shall have ferrite beads installed on the cable at intervals exceeding 150 mm.
Figure F-1: Load Simulator (Typical Design)
C = 10 nF Value is mandatory for all Load Simulator applications unless otherwise specified in product EMC specification. Deviation requires approval by JLR EMC department and noted in EMC test plan.
C* = 470 pF (CAN and LIN Interfaces Only)
+ -
CAN or LIN Termination
+ - + -
+ -
5VDC REG C
C
C
C
C
C
C
C*
C*
Load Simulator Power (+)
From DUT Support Equipment
To DUT Monitoring Equipment
To CAN Support

Jaguar Land Rover Limited - Engineering Standard
JLR-EMC-CS v1.0 Amendment 2
© Copyright Jaguar Land Rover – All Rights Reserved Page 102 of 108 30th November 2013
Figure F-2: Load Simulator CAN Interface Circuit Design Requirements
Configuration A
Devices with internal CAN Termination
Configuration B
Devices with no internal CAN Termination
60Ω
4.7nF
Z
Z
CAN HIGH
CAN LOW
60Ω
60Ω
60Ω
4.7nF
Z
Z
CAN HIGH
CAN LOW
60Ω
60Ω
4.7nF

Jaguar Land Rover Limited - Engineering Standard
JLR-EMC-CS v1.0 Amendment 2
© Copyright Jaguar Land Rover – All Rights Reserved Page 103 of 108 30th November 2013
Figure F-3: Load Simulator Test setup
Key
1. Ground Plane 2. Ferrite Bead (Fair-Rite Type 43 or equivalent)
Load Simulator Chassis connection to Signal Ground Reference
Signal Ground Reference
Ground Plane Electrical Connection
FO Fibre Optic Media S Support Equipment
M Monitor Equipment
AN
AN
+_+_
CANFO
CANFO
M M
S
S
FO
+
-
CANTermination
+
-+
-
+
-+
-
5VDCREG C
C
C
C
C
C
C
C*
C*
To DUT
FO< 150mm
1
2
< 200mm
CAN or LINTermination

Jaguar Land Rover Limited - Engineering Standard
JLR-EMC-CS v1.0 Amendment 2
© Copyright Jaguar Land Rover – All Rights Reserved Page 104 of 108 30th November 2013
(Normative): RI 130, RI 150 Test Fixture and Application Annex GG.1 - The test fixture used for RI 130 and RI 150 is illustrated in Figure G-1. The fixture consists of a wire support fixture mounted to an aluminium plate. The wire support fixture is constructed from Delrin® 570 NC000. Detailed constructions plans for this fixture may be found at www.jaguarlandrover.com/emc.
Figure G-1: RI 130/150 Test Fixture (Top View)
Key
Aluminium Plate Wire Support (Delrin® 570 NC000)
Type N Connector 14 AWG Copper Wire
The fixture contains a single copper wire ("source wire") that is connected to the signal source that generates the disturbances for RI 130/RI 150. G.2 - If the DUT contains discrete circuits, each wire is tested individually by locating the wire in the slot immediately above the source wire (Slot A). This is repeated for all circuits. This is illustrated in Figure G-2 below. This configuration shall also be used to test shielded antenna cables and any other full cable assemblies which cannot (requires detailed reason in EMC test plan) be tested as part of the configuration detailed in Figures H3 to Figures H5 herein.
Figure G-2: RI 130/150 Test setup (default DUT wire location)
1000 ± 0.5
1 2 All Dimensions in mm33 33
Side View
Top ViewWithout Lid
4
Slot A
Slot B
Slot CSourceWire
DUTLoadSimulator
Test Harness

Jaguar Land Rover Limited - Engineering Standard
JLR-EMC-CS v1.0 Amendment 2
© Copyright Jaguar Land Rover – All Rights Reserved Page 105 of 108 30th November 2013
G.3 - If the DUT contains circuit loads that have a dedicated signal return back to the DUT (a signal return not shared by any other circuit load), each wire of the circuit pair shall be placed in the separate slots (Slots A and B) located in the test fixture as illustrated in Figure G-3. This configuration shall also be used to test shielded circuits (excludes RF antenna cables) whereby all shields shall be removed for the 1m harness section located in the test fixture. All shielded sections of the harness external to the test fixture shall be connected using insulated wires routed in slot B. All unshielded internal circuits shall be placed in Slot A. Dedicated signal returns or shield wires shall always be located in Slot B unless specified in the EMC test plan.
Figure G-3: RI 130/150 Test Setup (DUT with dedicated return wire or shielded harnesses)
G.4 - If the DUT contains twisted pair circuits, each twisted wire pair shall be placed in Slot A as illustrated in Figure G-4. However it is required that the wire pair is untwisted for 150 mm. This is facilitated via the section located in the centre test fixture. The inclusion of this untwisted and unshielded section simulates the device connector or use of an in-line connector.
Figure G-4: RI 130/150 Test setup (configuration for a twisted wire pairs)
G.5 - If the DUT contains shielded circuits (excludes RF antenna cables and any shielded cables without in-line connections), all circuits (single, pairs or multiple wires) within the shield shall be placed in Slot A as illustrated in Figure G-5. However it is required that the circuits are unshielded for 150 mm (shielded sections shall be joined using insulated wire routed in slot B). This is facilitated via the section located in the centre test fixture. The setup is similar to that used for a twisted wire pair. This test is not required if DUT meets the shielded harness requirements of G.3 above.
Figure G-5: RI 130/150 Test setup (additional test configuration for shielded cables)
Slot A
Slot B
Slot CSourceWire
DUTLoadSimulator
Test Harness
Slot B
Slot C
Slot A
150
Slot B
Slot C
Slot A
150
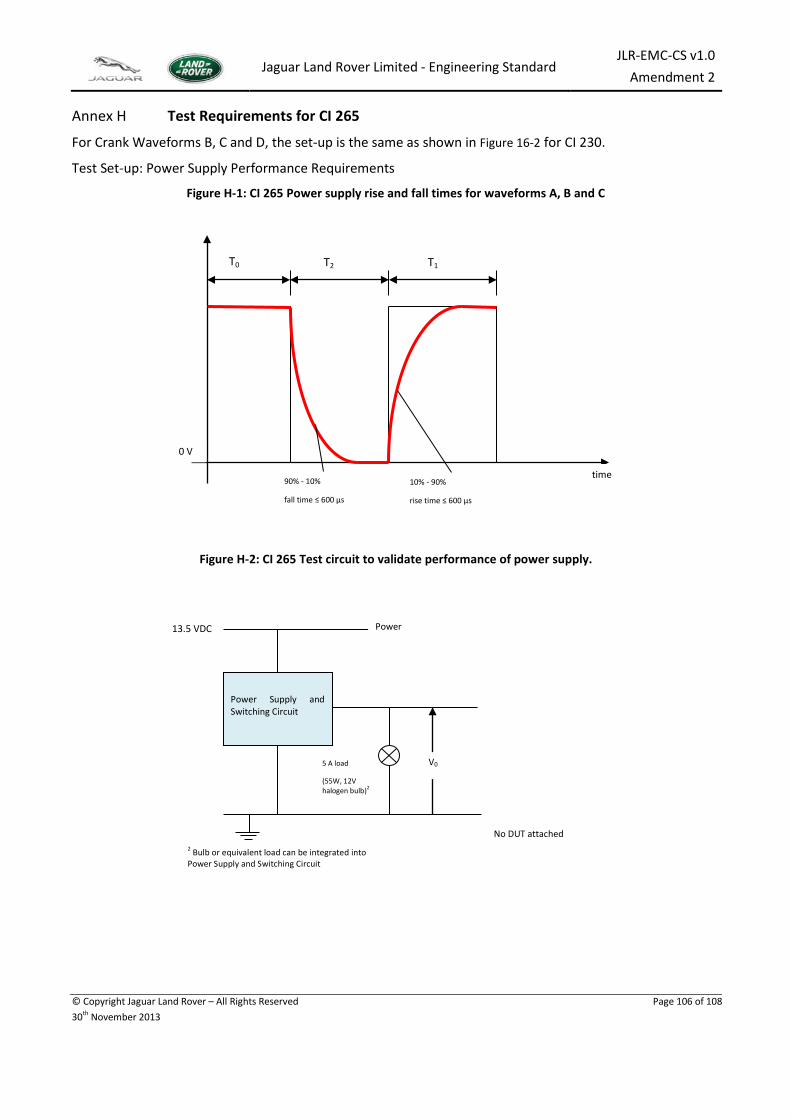
Jaguar Land Rover Limited - Engineering Standard
JLR-EMC-CS v1.0 Amendment 2
© Copyright Jaguar Land Rover – All Rights Reserved Page 106 of 108 30th November 2013
Test Requirements for CI 265 Annex H
For Crank Waveforms B, C and D, the set-up is the same as shown in Figure 16-2 for CI 230.
Test Set-up: Power Supply Performance Requirements
Figure H-1: CI 265 Power supply rise and fall times for waveforms A, B and C
Figure H-2: CI 265 Test circuit to validate performance of power supply.
time 90% - 10%
fall time ≤ 600 µs
10% - 90%
rise time ≤ 600 µs
T0 T2 T1
0 V
5 A load
(55W, 12V halogen bulb)2
Power Supply and Switching Circuit
V0
Power
No DUT attached 2 Bulb or equivalent load can be integrated into Power Supply and Switching Circuit
13.5 VDC

Jaguar Land Rover Limited - Engineering Standard
JLR-EMC-CS v1.0 Amendment 2
© Copyright Jaguar Land Rover – All Rights Reserved Page 107 of 108 30th November 2013
Low Voltage Test Equipment Software.
The Low Voltage Test equipment shall allow the user to be able to generate a selection of parameterised voltage profiles. The different types of profiles are associated with the different types of tests that will be conducted. These are:
1) Crank Waveform Test 2) Square Wave Test (contact bounce) 3) Ramp Waveform Test
Definition of 1/x2 distribution.
The 1/x2 distribution is designed to ensure that when the pseudo random time parameter values are generated, the majority of the values are skewed to be towards the minimum value. This will maximise the number of test cases for a given duration of testing time.
For a given random number x, where 0≤x<1, generated with uniform probability the following formula is applied to generate the required parameter values. Note that the required resolution must be taken in to account for the calculation and evidence must be provided to show it is possible to generate all valid parameter values.
For a parameter y,
y = 10-3/x2
where the value of y is rounded down to the nearest resolution step. The resolution must be of maximum step size of 10-3 and preferably 10-4.
Figure H-3: CI 265 Distribution of 1/x2
0.07 0.
10.
130.
160.
190.
220.
250.
280.
310.
340.
37 0.4
0.43
0.46
0.49
0.52
0.55
0.58
0.61
0.64
0.67 0.
70.
730.
760.
790.
820.
850.
880.
910.
940.
97 1
Para
met
er (p
)
x

Jaguar Land Rover Limited - Engineering Standard
JLR-EMC-CS v1.0 Amendment 2
© Copyright Jaguar Land Rover – All Rights Reserved Page 108 of 108 30th November 2013
Updates Annex I
The following is a list of the major changes incorporated into JLR-EMC-CS v1.0 from EMC-CS-2010JLR v1.2:
Electrified and electric vehicles
• Inclusion of extra requirements for components used on the HV network in electrified and electric vehicles in Section 5.13
Page 20
Requirements • Inclusion of RE 310 test requirement for brushed motors in Table 6-1 • New test requirement RE 320 (magnetic field emissions) in Table 6-1 • Clarification of terms in Table 6-1
Page 21
RE 310 • Inclusion of RoW low frequency requirements R-01 through R-04 in Table 7-1 • Updated test requirements in Table 7-2 • Inclusion of mobile service test requirements in Table 7-2
Page 22
CE 420
• Coverage of all harnesses in Table 8-1 • Coverage of RF currents on shields in Table 8-1 • Coverage of RF currents on internal conductors in shielded harnesses in Table 8-1 • Updated test requirements in Table 8-2 • Inclusion of DAB test requirements in Table 8-2
Page 25
CE 410 • Updated test requirements in Table 9-1 Page 27 RI 112 • Updated test requirements in Table 10-1 Page 29 RI 114 • Updated test requirements in Table 10-3 Page 32 RE 320 • New test requirement Page 41
RI 140 • Updated test requirements in Table 12-1 • Test method in accordance with Defence Standard 59-411 Part 3 Issue 1
Amendment 1 DRS01.B Page 44
RI 130 RI 150
• Inclusion of shielded cable assemblies in default test configuration G.2 • Inclusion of unshielded requirement for shielded harnesses test configuration G.3 • Clarification of requirements for shielded test configuration G.5
Page 104
CI 220 • Introduction of multiple Load Dump tests at various Us voltage levels. Only
applicable to AX classified DUTs where Pulse G2 is applicable, and an active device (e.g. motor) is switched on to suppress the pulse.
Page 59
CI 265 • Reduction of test duration to 8 Hours in Table 18-1 Page 68
CI 270 • Jump start test level raised to 28 V to include 24V vehicle alternator output in Table 19-1
Page 74
CI 280
• Number of discharges required increased to 10 in Table 20-1 • Inclusion of 330 Ω 330/150 pf ESD networks in Table 20-1 • Unpowered tests to ± 8 kV for DUT pins in Table 20-1 • Unpowered ± 30 kV test requirement for any components including pyrotechnic
equipment that are packaged or transported (at tier1 or tier 2) in materials of differing triboelectric series values which may cause excessive static charge build up in Table 20-1
• Update of direct discharge test requirements in Table 20-2 • Inclusion of indirect discharge tests (in Table 20-3) in accordance with ISO
10605:2008 Annex F
Page 75