electric assist bicycle user manual -...
TRANSCRIPT
Beyond fashion, better know you!
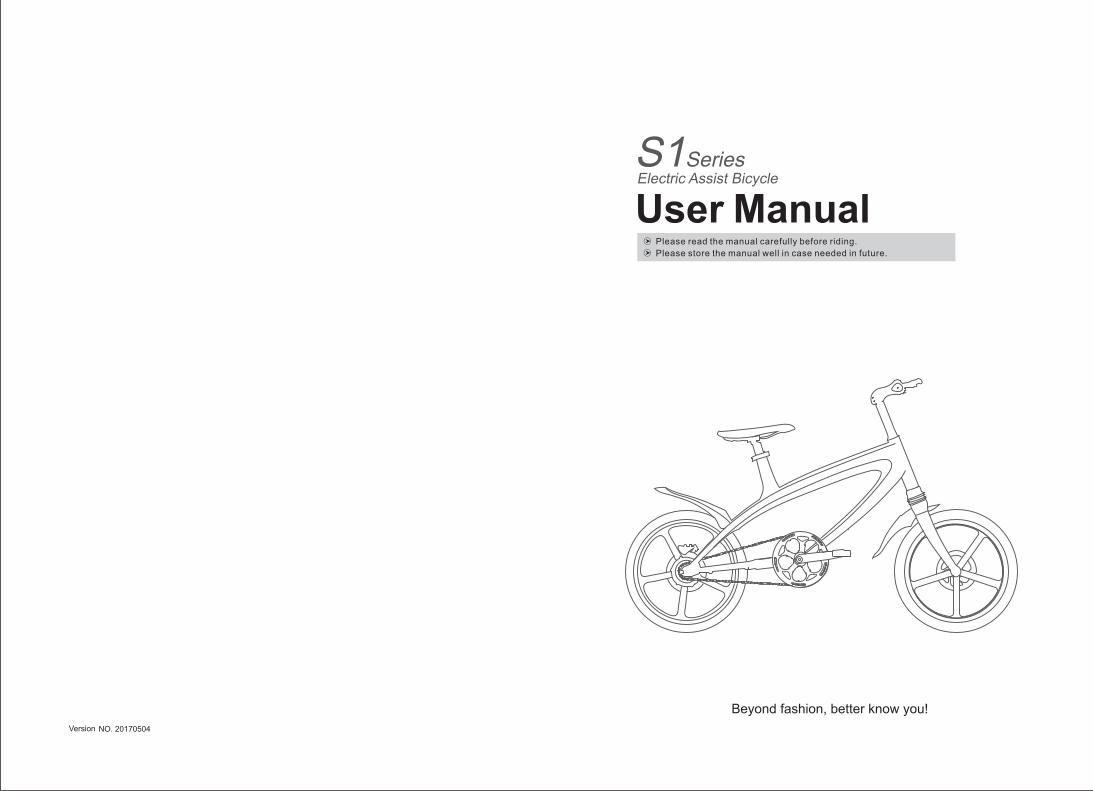
Version NO. 20170504
User ManualElectric Assist BicycleS1Series
Please read the manual carefully before riding.
Please store the manual well in case needed in future.
Thanks for purchasing our products.
To make sure that you can use the product in correct way,
please completely read the manual in patience before driving it.
This manual contains important safety use instructions.
About Manual
Catalogue
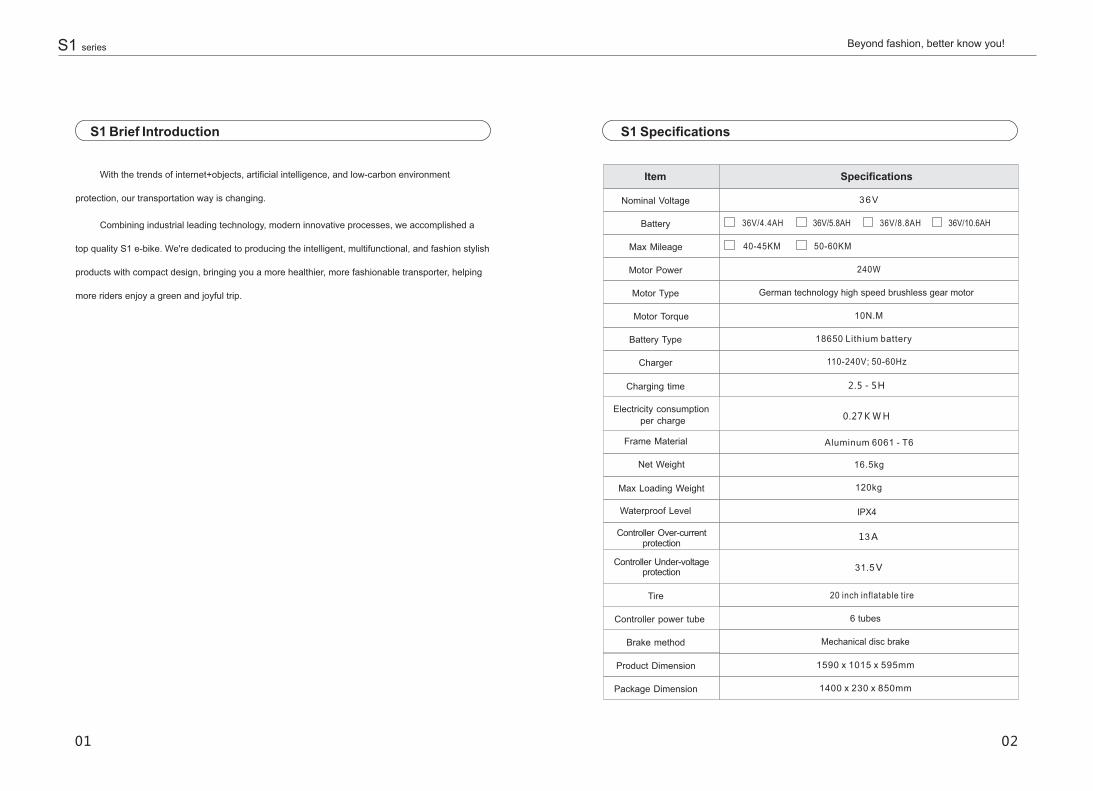
S1 Brief Introduction
S1 Specifications
Products Diagram
Meter Function
Meter Operation
Assemble Steps
How to connect Bluetooth Speaker
Safety Usage
S1 Daily Maintenance
Common Troubleshooting
After-sales service
Warranty Card
Warranty Record
01
02
03
04
05
06-09
10
11-13
14
15-16
17
18
19
Package including:
S1 bike x 1, charger x 1, tool kit x 1, pedal suit x 1, user manual x 1, warranty card x 1,
certificate x 1
Beyond fashion, better know you!S1 series
01
36V/4.4AH 36V/5.8AH
110-240V; 50-60Hz
240W
2.5-5H
40-45KM
Mechanical disc brake
13A
6 tubes
Item Specifications
02
S1 Brief Introduction S1 Specifications
1400 x 230 x 850mm
1590 x 1015 x 595mm
31.5V
With the trends of internet+objects, artificial intelligence, and low-carbon environment
protection, our transportation way is changing.
Combining industrial leading technology, modern innovative processes, we accomplished a
top quality S1 e-bike. We're dedicated to producing the intelligent, multifunctional, and fashion stylish
products with compact design, bringing you a more healthier, more fashionable transporter, helping
more riders enjoy a green and joyful trip.
36V/8.8AH 36V/10.6AH
50-60KM
18650 Lithium battery
10N.M
Aluminum 6061 - T6
German technology high speed brushless gear motor
120kg
0.27KWH
20 inch inflatable tire
IPX4
16.5kg
Battery
Charger
Motor Power
Charging time
Max Mileage
Electricity consumption
per charge
Brake method
Frame Material
Controller Over-current protection
Controller power tube
Controller Under-voltage protection
Package Dimension
Product Dimension
Battery Type
Motor Torque
Motor Type
Max Loading Weight
Tire
Waterproof Level
Net Weight
Nominal Voltage 36V
S1 series Beyond fashion, better know you!
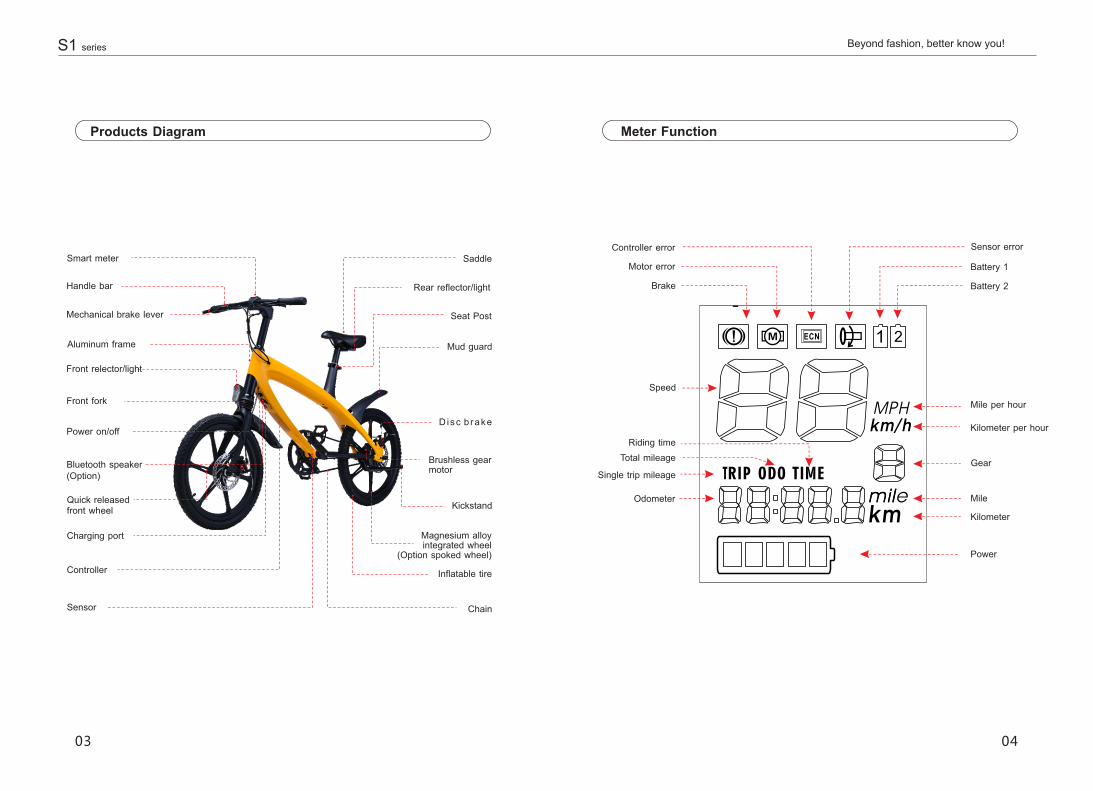
Products Diagram Meter Function
Brake
Motor error
Controller error
Battery 2
Sensor error
Battery 1
Power
Kilometer
Mile
Gear
Kilometer per hour
Mile per hour
Speed
Riding time
Total mileage
Single trip mileage
Odometer
Smart meter
Handle bar
Mechanical brake lever
Saddle
Rear reflector/light
Seat Post
Mud guard
D isc b rake
Brushless gear motor
Kickstand
Magnesium alloy integrated wheel
(Option spoked wheel)
Inflatable tire
Chain
Aluminum frame
Front relector/light
Front fork
Power on/off
Bluetooth speaker(Option)
Charging port
Controller
Sensor
Quick released front wheel
S1 series Beyond fashion, better know you!
03 04
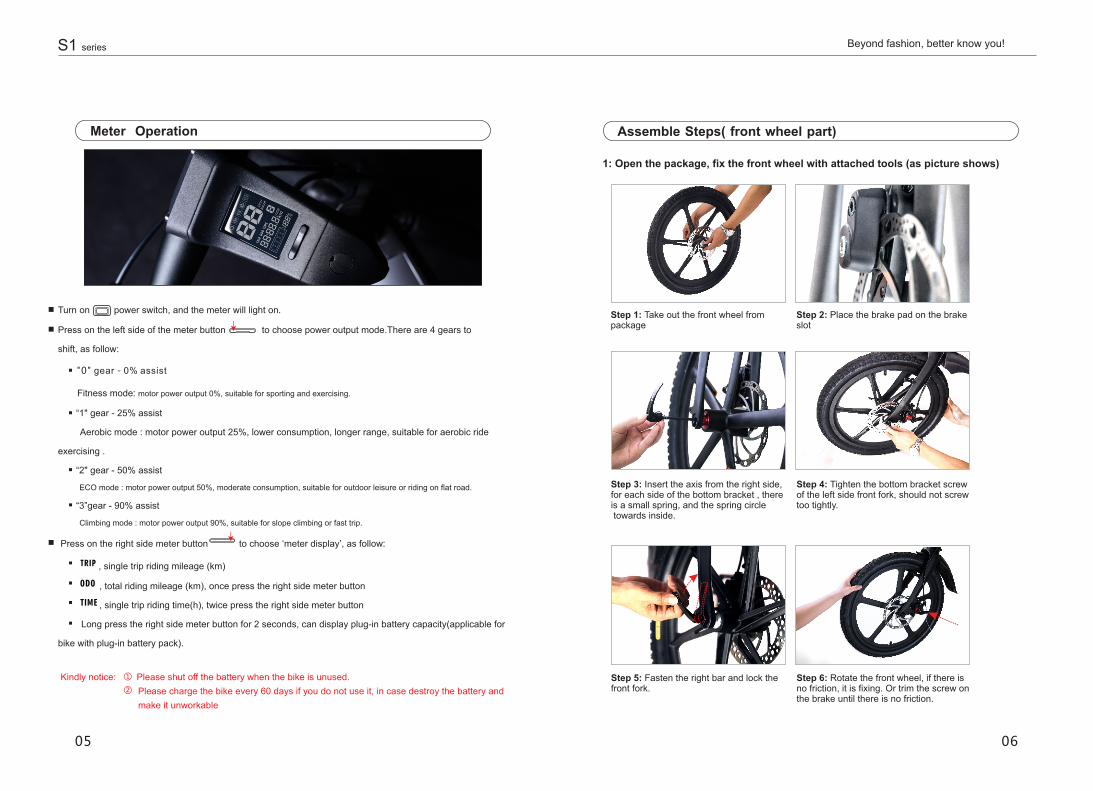
Meter Operation Assemble Steps( front wheel part)
Turn on power switch, and the meter will light on.
Press on the left side of the meter button to choose power output mode.There are 4 gears to
shift, as follow:
"0" gear - 0% assist
Fitness mode: motor power output 0%, suitable for sporting and exercising.
“1" gear - 25% assist
Aerobic mode : motor power output 25%, lower consumption, longer range, suitable for aerobic ride
exercising .
“2" gear - 50% assist
ECO mode : motor power output 50%, moderate consumption, suitable for outdoor leisure or riding on flat road.
“3”gear - 90% assist
Climbing mode : motor power output 90%, suitable for slope climbing or fast trip.
Press on the right side meter button to choose ‘meter display’, as follow:
, single trip riding mileage (km)
, total riding mileage (km), once press the right side meter button
, single trip riding time(h), twice press the right side meter button
Long press the right side meter button for 2 seconds, can display plug-in battery capacity(applicable for
bike with plug-in battery pack).
1: Open the package, fix the front wheel with attached tools (as picture shows)
Step 1: Take out the front wheel from package
Step 3: Insert the axis from the right side, for each side of the bottom bracket , there is a small spring, and the spring circle towards inside.
Step 5: Fasten the right bar and lock the front fork.
Step 2: Place the brake pad on the brake slot
①
②
Step 6: Rotate the front wheel, if there is no friction, it is fixing. Or trim the screw on the brake until there is no friction.
Step 4: Tighten the bottom bracket screw of the left side front fork, should not screw too tightly.
make it unworkable
Kindly notice: Please shut off the battery when the bike is unused.
Please charge the bike every 60 days if you do not use it, in case destroy the battery and
S1 series Beyond fashion, better know you!
05 06
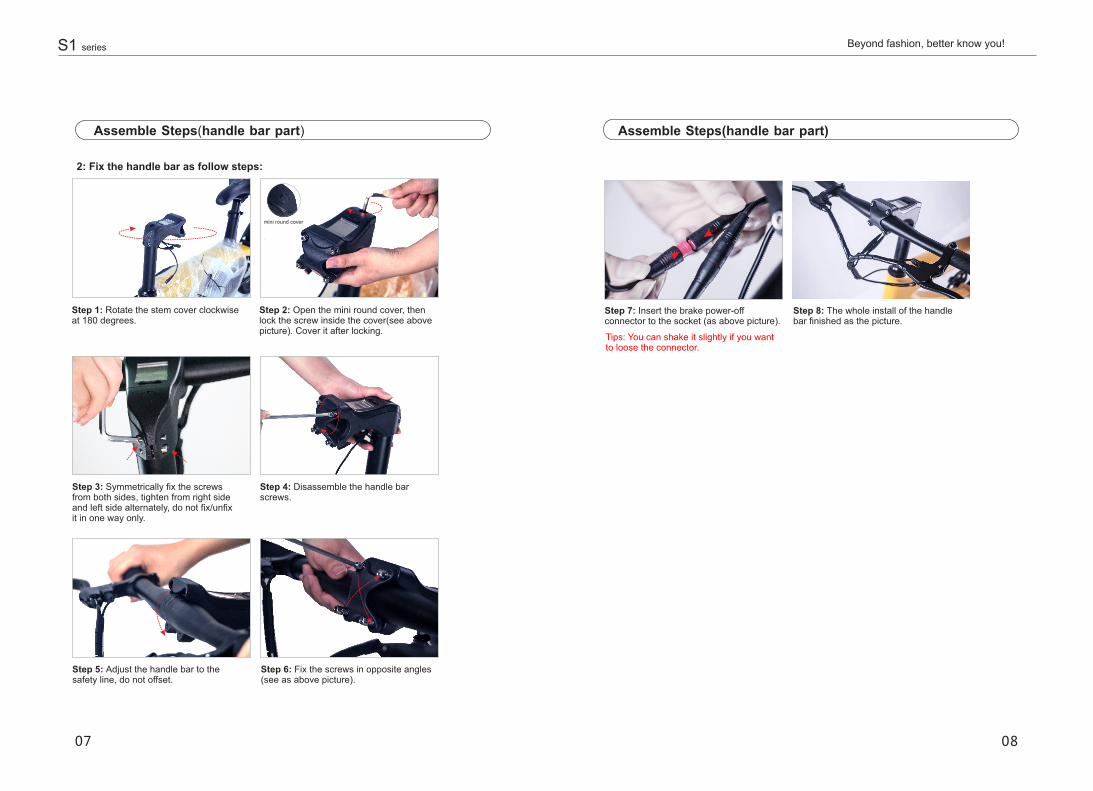
2: Fix the handle bar as follow steps:
Assemble Steps(handle bar part) Assemble Steps(handle bar part)
Step 2: Open the mini round cover, then lock the screw inside the cover(see above picture). Cover it after locking.
Step 1: Rotate the stem cover clockwiseat 180 degrees.
Step 7: Insert the brake power-off connector to the socket (as above picture).
Step 6: Fix the screws in opposite angles (see as above picture).
Step 8: The whole install of the handle bar finished as the picture.
Step 5: Adjust the handle bar to the safety line, do not offset.
Step 3: Symmetrically fix the screws from both sides, tighten from right side and left side alternately, do not fix/unfix it in one way only.
Step 4: Disassemble the handle bar screws.
Tips: You can shake it slightly if you want to loose the connector.
S1 series Beyond fashion, better know you!
07 08
mini round cover
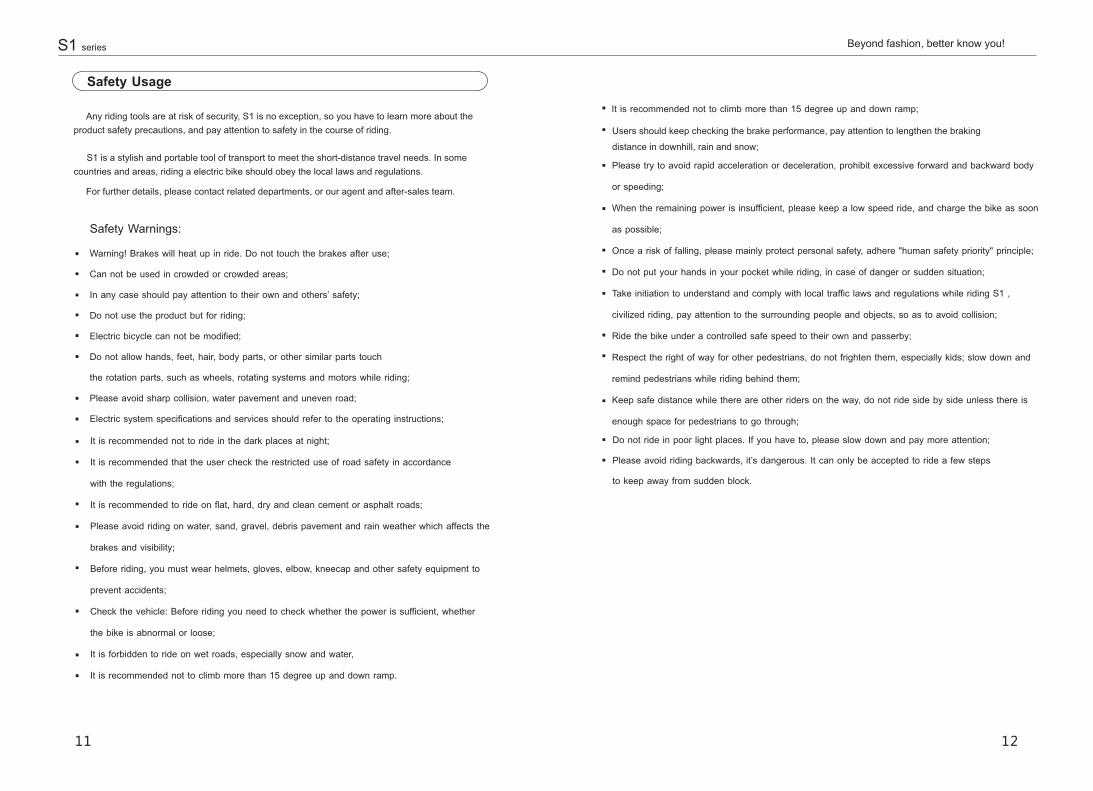
Connect Bluetooth Speaker(optional)
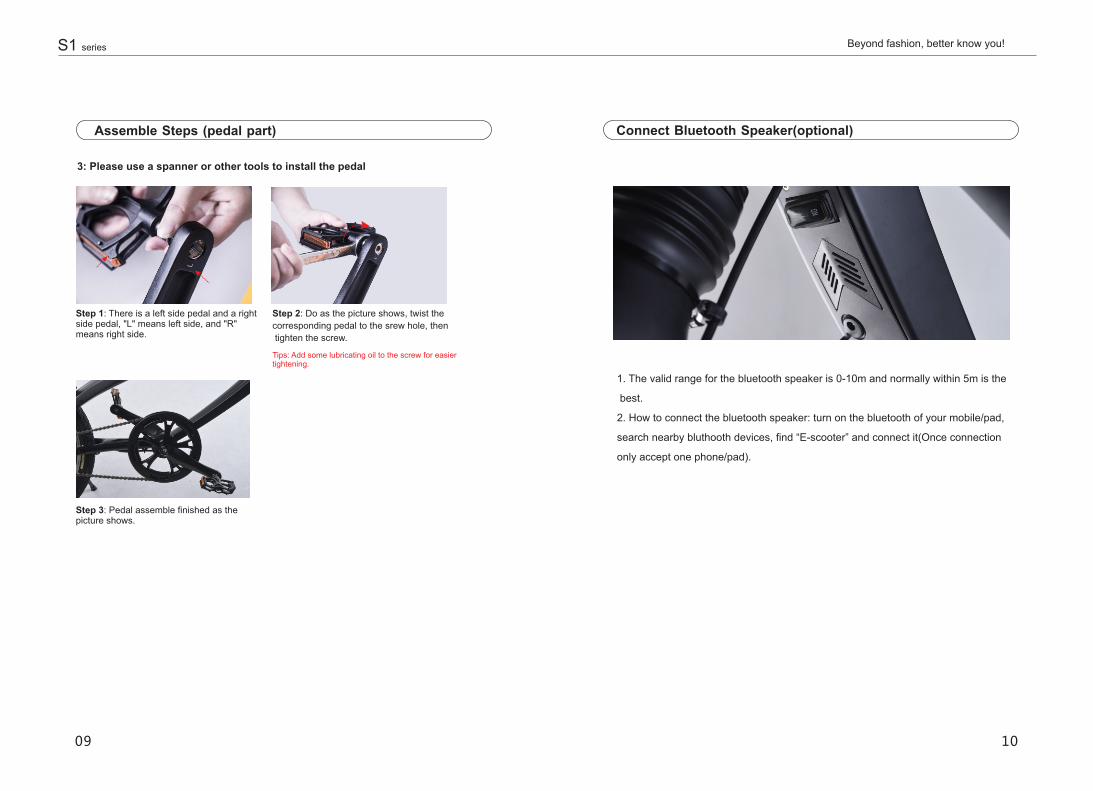
3: Please use a spanner or other tools to install the pedal
Assemble Steps (pedal part)
31. The valid range for the bluetooth speaker is 0-10m and normally within 5m is the
best.
2. How to connect the bluetooth speaker: turn on the bluetooth of your mobile/pad,
search nearby bluthooth devices, find “E-scooter” and connect it(Once connection
only accept one phone/pad).
S1 series Beyond fashion, better know you!
09 10
Step 2: Do as the picture shows, twist the
corresponding pedal to the srew hole, then
tighten the screw.
Step 3: Pedal assemble finished as the picture shows.
Step 1: There is a left side pedal and a right side pedal, "L" means left side, and "R" means right side.
Tips: Add some lubricating oil to the screw for easier tightening.
Safety Usage
Warning! Brakes will heat up in ride. Do not touch the brakes after use;
Can not be used in crowded or crowded areas;
In any case should pay attention to their own and others’ safety;
Do not use the product but for riding;
Electric bicycle can not be modified;
Do not allow hands, feet, hair, body parts, or other similar parts touch
the rotation parts, such as wheels, rotating systems and motors while riding;
Please avoid sharp collision, water pavement and uneven road;
Electric system specifications and services should refer to the operating instructions;
Safety Warnings:
It is recommended not to ride in the dark places at night;
It is recommended that the user check the restricted use of road safety in accordance
with the regulations;
It is recommended to ride on flat, hard, dry and clean cement or asphalt roads;
Please avoid riding on water, sand, gravel, debris pavement and rain weather which affects the
brakes and visibility;
Before riding, you must wear helmets, gloves, elbow, kneecap and other safety equipment to
prevent accidents;
Check the vehicle: Before riding you need to check whether the power is sufficient, whether
the bike is abnormal or loose;
It is forbidden to ride on wet roads, especially snow and water,
It is recommended not to climb more than 15 degree up and down ramp.
Please try to avoid rapid acceleration or deceleration, prohibit excessive forward and backward body
or speeding;
When the remaining power is insufficient, please keep a low speed ride, and charge the bike as soon
as possible;
Once a risk of falling, please mainly protect personal safety, adhere "human safety priority" principle;
Do not put your hands in your pocket while riding, in case of danger or sudden situation;
Take initiation to understand and comply with local traffic laws and regulations while riding S1 ,
civilized riding, pay attention to the surrounding people and objects, so as to avoid collision;
Ride the bike under a controlled safe speed to their own and passerby;
Respect the right of way for other pedestrians, do not frighten them, especially kids; slow down and
remind pedestrians while riding behind them;
Keep safe distance while there are other riders on the way, do not ride side by side unless there is
enough space for pedestrians to go through;
Do not ride in poor light places. If you have to, please slow down and pay more attention;
Please avoid riding backwards, it’s dangerous. It can only be accepted to ride a few steps
to keep away from sudden block.
Any riding tools are at risk of security, S1 is no exception, so you have to learn more about the
product safety precautions, and pay attention to safety in the course of riding.
S1 is a stylish and portable tool of transport to meet the short-distance travel needs. In some
countries and areas, riding a electric bike should obey the local laws and regulations.
Users should keep checking the brake performance, pay attention to lengthen the braking
distance in downhill, rain and snow;
For further details, please contact related departments, or our agent and after-sales team.
S1 series Beyond fashion, better know you!
12
It is recommended not to climb more than 15 degree up and down ramp;
11
Do not let others use your S1 unless the person has read the manual carefully;
Please do a good job of safety during driving, no matter when you ride,
please wear approved, in line with the first type, contains a cap and can protect
the back of the head helmets, while wearing such as gloves, eye protection
equipment, elbow pads and other protective equipment;
Do not ride when not on condition or unable to comply with the instructions and
warnings of the manual;
Do not ride on the influence of alcohol or medicine;
Please get off in time in the cases of less power, continuous alarm and speed
reduced, and charge timely to ensure safety;
Please check before riding, do not ride before troubleshooting of any loose
or damaged.
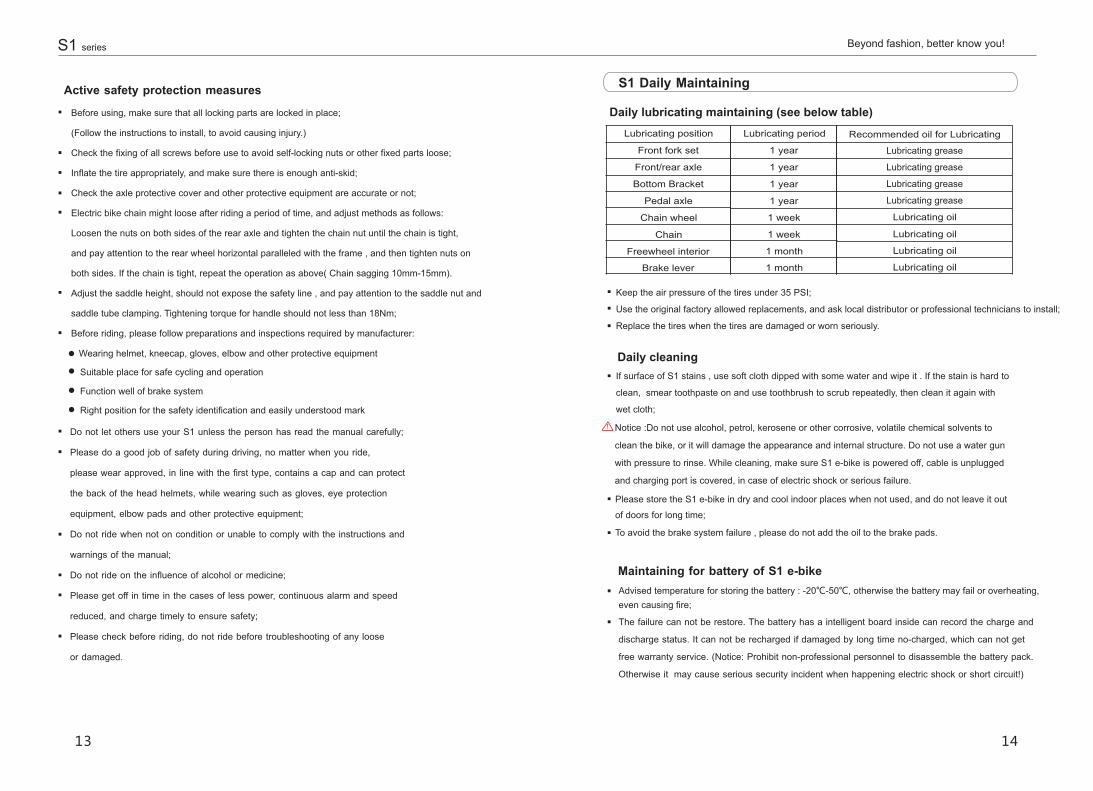
Keep the air pressure of the tires under 35 PSI;
Use the original factory allowed replacements, and ask local distributor or professional technicians to install;
Replace the tires when the tires are damaged or worn seriously.
If surface of S1 stains , use soft cloth dipped with some water and wipe it . If the stain is hard to
clean, smear toothpaste on and use toothbrush to scrub repeatedly, then clean it again with
wet cloth;
Notice :Do not use alcohol, petrol, kerosene or other corrosive, volatile chemical solvents to
clean the bike, or it will damage the appearance and internal structure. Do not use a water gun
with pressure to rinse. While cleaning, make sure S1 e-bike is powered off, cable is unplugged
and charging port is covered, in case of electric shock or serious failure.
Please store the S1 e-bike in dry and cool indoor places when not used, and do not leave it out
of doors for long time;
S1 Daily Maintaining
Maintaining for battery of S1 e-bike
The failure can not be restore. The battery has a intelligent board inside can record the charge and
discharge status. It can not be recharged if damaged by long time no-charged, which can not get
free warranty service. (Notice: Prohibit non-professional personnel to disassemble the battery pack.
Otherwise it may cause serious security incident when happening electric shock or short circuit!)
Daily lubricating maintaining (see below table)
Daily cleaning
Lubricating position Lubricating period Recommended oil for Lubricating
Front fork set 1 year
1 year
1 year
1 year
Lubricating grease
Lubricating grease
Lubricating grease
Lubricating grease
Front/rear axle
Bottom Bracket
Pedal axle
Chain wheel
Chain
Freewheel interior
Brake lever
1 week
1 week
1 month
1 month
Lubricating oil
Lubricating oil
Lubricating oil
Lubricating oil
To avoid the brake system failure , please do not add the oil to the brake pads.
Advised temperature for storing the battery : -20℃-50℃, otherwise the battery may fail or overheating,
even causing fire;
Suitable place for safe cycling and operation
Function well of brake system
Right position for the safety identification and easily understood mark
S1 series Beyond fashion, better know you!
13 14
Before using, make sure that all locking parts are locked in place;
(Follow the instructions to install, to avoid causing injury.)
Check the fixing of all screws before use to avoid self-locking nuts or other fixed parts loose;
Inflate the tire appropriately, and make sure there is enough anti-skid;
Check the axle protective cover and other protective equipment are accurate or not;
Electric bike chain might loose after riding a period of time, and adjust methods as follows:
Loosen the nuts on both sides of the rear axle and tighten the chain nut until the chain is tight,
and pay attention to the rear wheel horizontal paralleled with the frame , and then tighten nuts on
both sides. If the chain is tight, repeat the operation as above( Chain sagging 10mm-15mm).
Adjust the saddle height, should not expose the safety line , and pay attention to the saddle nut and
saddle tube clamping. Tightening torque for handle should not less than 18Nm;
Before riding, please follow preparations and inspections required by manufacturer:
Wearing helmet, kneecap, gloves, elbow and other protective equipment
Active safety protection measures
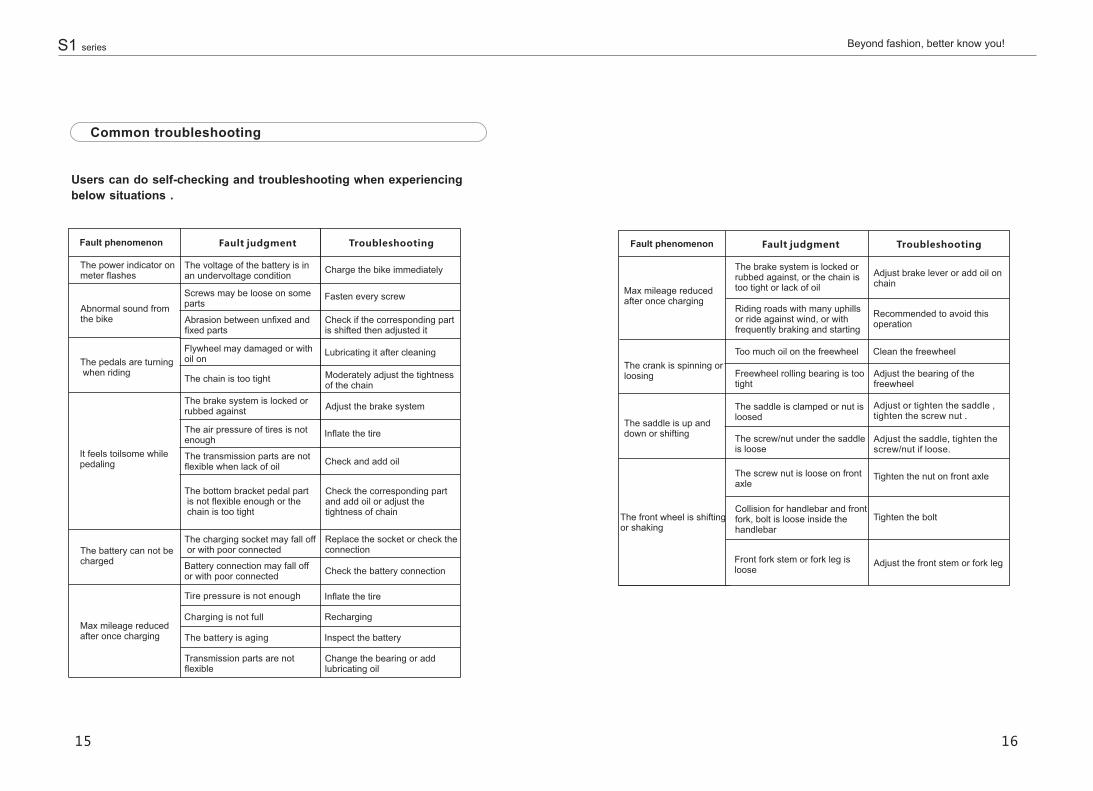
Common troubleshooting
Users can do self-checking and troubleshooting when experiencing
below situations .
Fault phenomenon Fault phenomenonFault judgment Fault judgmentTroubleshooting Troubleshooting
The power indicator on meter flashes
The pedals are turning when riding
Abnormal sound from the bike
The voltage of the battery is in an undervoltage condition
Screws may be loose on some parts
Abrasion between unfixed and fixed parts
Flywheel may damaged or with oil on
The chain is too tight
The brake system is locked or rubbed against
The air pressure of tires is not enough
The transmission parts are not flexible when lack of oil
The bottom bracket pedal part is not flexible enough or the chain is too tight
The charging socket may fall off or with poor connected
Battery connection may fall off or with poor connected
Tire pressure is not enough
Charging is not full
The battery is aging
Charge the bike immediately
Fasten every screw
Check if the corresponding part is shifted then adjusted it
Lubricating it after cleaning
Moderately adjust the tightness of the chain
Adjust the brake system
Inflate the tire
Check and add oil
Check the corresponding part and add oil or adjust the tightness of chain
Replace the socket or check the connection
Check the battery connection
Inflate the tire
Recharging
Inspect the battery
Transmission parts are not flexible
Change the bearing or add lubricating oil
It feels toilsome while pedaling
The battery can not be charged
Max mileage reduced after once charging
Max mileage reduced after once charging
Riding roads with many uphills or ride against wind, or with frequently braking and starting
The brake system is locked or rubbed against, or the chain is too tight or lack of oil
Adjust brake lever or add oil on chain
Recommended to avoid this operation
The crank is spinning or loosing
Too much oil on the freewheel Clean the freewheel
Freewheel rolling bearing is too tight
Adjust the bearing of the freewheel
The saddle is clamped or nut is loosed
The screw/nut under the saddle is loose
Adjust or tighten the saddle , tighten the screw nut .
Adjust the saddle, tighten the screw/nut if loose.
The saddle is up and down or shifting
The front wheel is shifting or shaking
The screw nut is loose on front axle
Collision for handlebar and front fork, bolt is loose inside the handlebar
Front fork stem or fork leg is loose
Tighten the nut on front axle
Tighten the bolt
Adjust the front stem or fork leg
S1 series Beyond fashion, better know you!
15 16
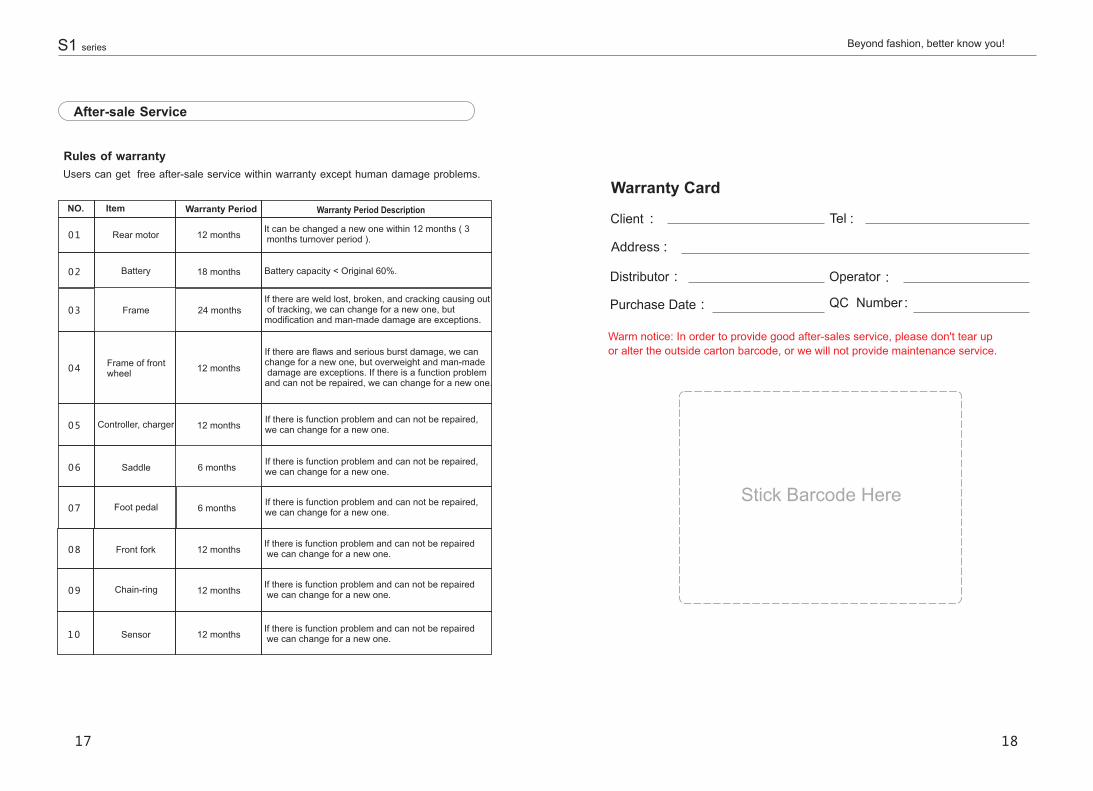
Warranty Card
Client
Distributor
Purchase Date QC Number
Operator
Tel
Address :
Stick Barcode Here
Warm notice: In order to provide good after-sales service, please don't tear up
or alter the outside carton barcode, or we will not provide maintenance service.
Rules of warranty
After-sale Service
Users can get free after-sale service within warranty except human damage problems.
02
01
03
04
05
06
07
08
09
10
NO. Item Warranty Period Warranty Period Description
Battery
Frame
Frame of front wheel
Controller, charger
Saddle
Rear motor
Front fork
Chain-ring
Sensor
12 months
12 months
12 months
12 months
12 months
6 months
6 months
12 months
18 months
24 months
It can be changed a new one within 12 months ( 3 months turnover period ).
Battery capacity < Original 60%.
If there are weld lost, broken, and cracking causing out of tracking, we can change for a new one, but modification and man-made damage are exceptions.
If there are flaws and serious burst damage, we can change for a new one, but overweight and man-made damage are exceptions. If there is a function problem and can not be repaired, we can change for a new one.
If there is function problem and can not be repaired, we can change for a new one.
If there is function problem and can not be repaired, we can change for a new one.
If there is function problem and can not be repaired, we can change for a new one.
If there is function problem and can not be repaired we can change for a new one.
If there is function problem and can not be repaired we can change for a new one.
If there is function problem and can not be repaired we can change for a new one.
Foot pedal
S1 series Beyond fashion, better know you!
17 18

Description of damage
Details of repairingTechnician stuff
Date
S1 series
19