eagle claw flashed mounts qmecm - quickmountpv.com · 1 2 installation instructions for eagle claw...
TRANSCRIPT
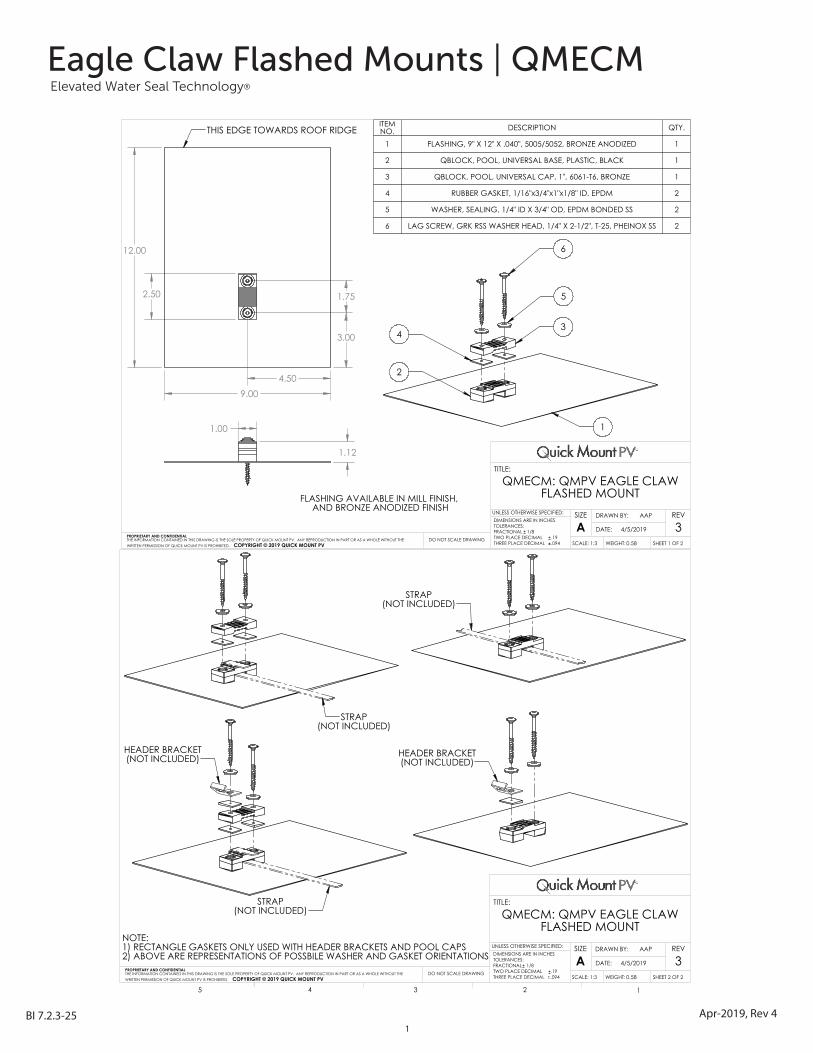
Eagle Claw Flashed Mounts | QMECMElevated Water Seal Technology®
6
5
2
4
1
3
1.12
1.00
FLASHING AVAILABLE IN MILL FINISH, AND BRONZE ANODIZED FINISH
3.00
1.75
4.50 9.00
12.00
2.50
THIS EDGE TOWARDS ROOF RIDGEITEM NO. DESCRIPTION QTY.
1 FLASHING, 9" X 12" X .040", 5005/5052, BRONZE ANODIZED 1
2 QBLOCK, POOL, UNIVERSAL BASE, PLASTIC, BLACK 1
3 QBLOCK, POOL, UNIVERSAL CAP, 1", 6061-T6, BRONZE 1
4 RUBBER GASKET, 1/16"x3/4"x1"x1/8" ID, EPDM 2
5 WASHER, SEALING, 1/4" ID X 3/4" OD, EPDM BONDED SS 2
6 LAG SCREW, GRK RSS WASHER HEAD, 1/4" X 2-1/2", T-25, PHEINOX SS 2
3DO NOT SCALE DRAWING
SHEET 1 OF 2
AAP
SCALE: 1:3 WEIGHT:
REV
ASIZE
TITLE:
DATE:
DRAWN BY:DIMENSIONS ARE IN INCHESTOLERANCES:FRACTIONAL 1/8TWO PLACE DECIMAL .19THREE PLACE DECIMAL .094
PROPRIETARY AND CONFIDENTIALTHE INFORMATION CONTAINED IN THIS DRAWING IS THE SOLE PROPERTY OF QUICK MOUNT PV. ANY REPRODUCTION IN PART OR AS A WHOLE WITHOUT THE WRITTEN PERMISSION OF QUICK MOUNT PV IS PROHIBITED. COPYRIGHT © 2019 QUICK MOUNT PV
5 4 3 2 1
UNLESS OTHERWISE SPECIFIED:
0.58
QMECM: QMPV EAGLE CLAW FLASHED MOUNT
4/5/2019
BI 7.2.3-25 Apr-2019, Rev 41
HEADER BRACKET(NOT INCLUDED)
STRAP(NOT INCLUDED)
NOTE:1) RECTANGLE GASKETS ONLY USED WITH HEADER BRACKETS AND POOL CAPS2) ABOVE ARE REPRESENTATIONS OF POSSBILE WASHER AND GASKET ORIENTATIONS
HEADER BRACKET(NOT INCLUDED)
STRAP(NOT INCLUDED)
STRAP(NOT INCLUDED)
3DO NOT SCALE DRAWING
SHEET 2 OF 2
AAP
SCALE: 1:3 WEIGHT:
REV
ASIZE
TITLE:
DATE:
DRAWN BY:DIMENSIONS ARE IN INCHESTOLERANCES:FRACTIONAL 1/8TWO PLACE DECIMAL .19THREE PLACE DECIMAL .094
PROPRIETARY AND CONFIDENTIALTHE INFORMATION CONTAINED IN THIS DRAWING IS THE SOLE PROPERTY OF QUICK MOUNT PV. ANY REPRODUCTION IN PART OR AS A WHOLE WITHOUT THE WRITTEN PERMISSION OF QUICK MOUNT PV IS PROHIBITED. COPYRIGHT © 2019 QUICK MOUNT PV
5 4 3 2 1
UNLESS OTHERWISE SPECIFIED:
0.58
QMECM: QMPV EAGLE CLAW FLASHED MOUNT
4/5/2019
21
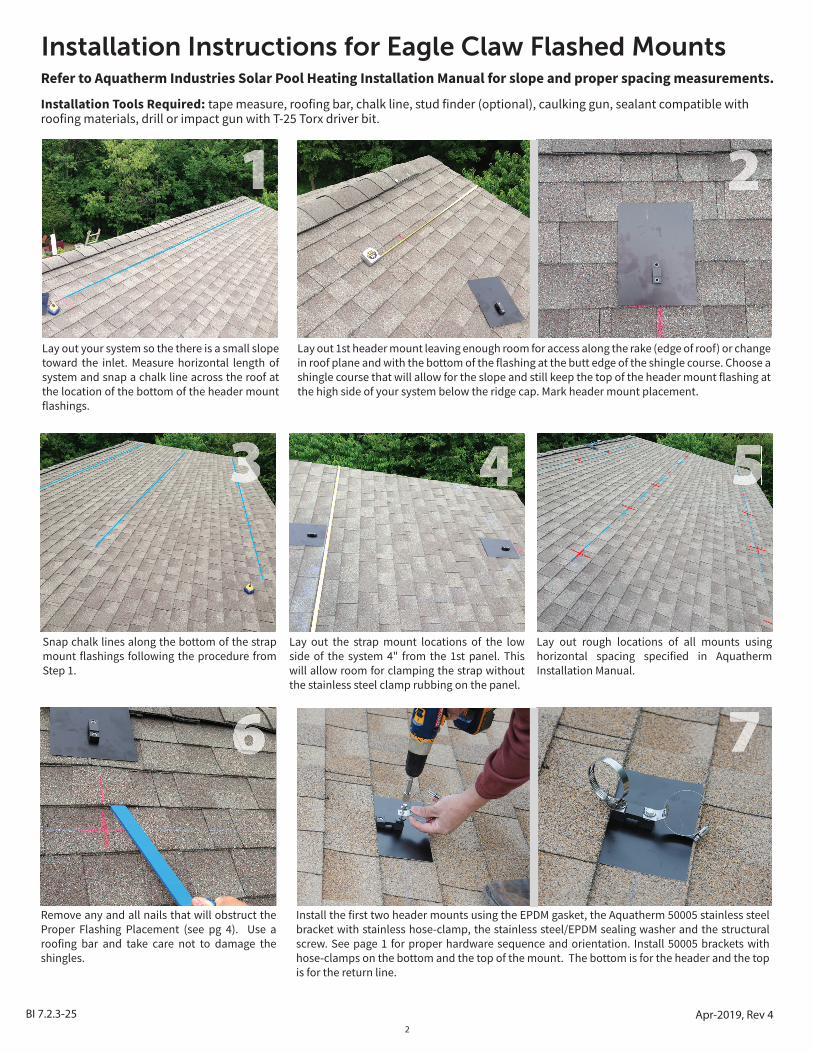
Installation Instructions for Eagle Claw Flashed Mounts
Installation Tools Required: tape measure, roofing bar, chalk line, stud finder (optional), caulking gun, sealant compatible with roofing materials, drill or impact gun with T-25 Torx driver bit.
BI 7.2.3-25 Apr-2019, Rev 4 BI 7.2.3-252 3
Lay out your system so the there is a small slope toward the inlet. Measure horizontal length of system and snap a chalk line across the roof at the location of the bottom of the header mount flashings.
Lay out 1st header mount leaving enough room for access along the rake (edge of roof) or change in roof plane and with the bottom of the flashing at the butt edge of the shingle course. Choose a shingle course that will allow for the slope and still keep the top of the header mount flashing at the high side of your system below the ridge cap. Mark header mount placement.
43
Snap chalk lines along the bottom of the strap mount flashings following the procedure from Step 1.
5
Lay out the strap mount locations of the low side of the system 4" from the 1st panel. This will allow room for clamping the strap without the stainless steel clamp rubbing on the panel.
Lay out rough locations of all mounts using horizontal spacing specified in Aquatherm Installation Manual.
76
Remove any and all nails that will obstruct the Proper Flashing Placement (see pg 4). Use a roofing bar and take care not to damage the shingles.
Install the first two header mounts using the EPDM gasket, the Aquatherm 50005 stainless steel bracket with stainless hose-clamp, the stainless steel/EPDM sealing washer and the structural screw. See page 1 for proper hardware sequence and orientation. Install 50005 brackets with hose-clamps on the bottom and the top of the mount. The bottom is for the header and the top is for the return line.
Refer to Aquatherm Industries Solar Pool Heating Installation Manual for slope and proper spacing measurements.
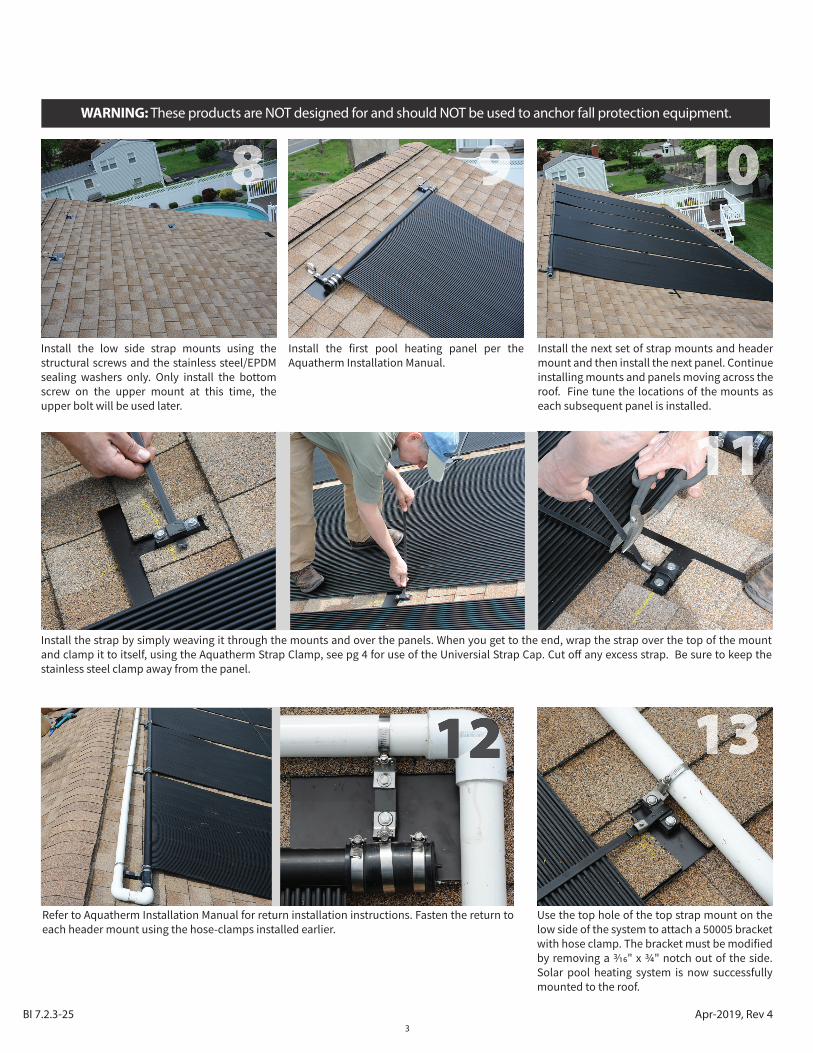
WARNING: These products are NOT designed for and should NOT be used to anchor fall protection equipment.
BI 7.2.3-25 Apr-2019, Rev 42 3
11
12 13
4
Install the next set of strap mounts and header mount and then install the next panel. Continue installing mounts and panels moving across the roof. Fine tune the locations of the mounts as each subsequent panel is installed.
Install the strap by simply weaving it through the mounts and over the panels. When you get to the end, wrap the strap over the top of the mount and clamp it to itself, using the Aquatherm Strap Clamp, see pg 4 for use of the Universial Strap Cap. Cut o� any excess strap. Be sure to keep the stainless steel clamp away from the panel.
Refer to Aquatherm Installation Manual for return installation instructions. Fasten the return to each header mount using the hose-clamps installed earlier.
Use the top hole of the top strap mount on the low side of the system to attach a 50005 bracket with hose clamp. The bracket must be modified by removing a 3/16" x ¾" notch out of the side. Solar pool heating system is now successfully mounted to the roof.
98 10
Install the low side strap mounts using the structural screws and the stainless steel/EPDM sealing washers only. Only install the bottom screw on the upper mount at this time, the upper bolt will be used later.
Install the first pool heating panel per the Aquatherm Installation Manual.

925-478-8269 | www.quickmountpv.com | [email protected] Mitchell Dr. | Walnut Creek, CA 94598
BI 7.2.3-25 Apr-2019, Rev 4
Additional Tips and Information for Installing Mounts: Refer to Aquatherm Industries Solar Pool Heating Installation Manual for the Eagle Claw Mounting System for measurements
and specifics about the Eagle Claw Mounting System.
See more information on removing nails for proper flashing placement here: http://www.quickmountpv.com/support/videos/QT-nail-removal.html
The mounts can be cut up into the shingle coursing and become virtually unnoticeable.
Use the Universal Strap Cap in step 13 to avoid notching the 50005 bracket.
Use the included 1/4" x 21/2" screw when roof thickness is one inch or less. If insulation or other layers increase roof thickness to greater than one inch, purchase a 1/4" GRK RSS Stainless Steel screw of an appropriate length. The appropriate length allows for full diameter thread engagement throughout the sheathing layer.
4 ©2019 by Quick Mount PV. All rights reserved.
Using the Universal Strap Caps
Moisture/debris accumulation can cause early shingle degradation.
Flashing positioned too low.Nails not removed.Keyway allows water entry. Remove nails.
1st course}2nd course}3rd course}¾"
INCORRECT Position Correct PositionNo shingle cutting required
Acceptable PositionIf shingle cutting is required, a ½" gap between block and shingle is recommended.
Proper Flashing Placement
1 2
Install the flashed mount with the universal strap cap, leaving about a 1/8" gap to allow for the installation of the strap. The 3/4" x 1" EPDM gaskets go between the cap and the mounting block. The stainless steel/EPDM sealing washers go on top of the block as shown in cutaway above. Thread (weave) the strap under the block and back around between the block and cap. Pull the strap tight and finish tightening the screw.
The universal strap cap works with standard stainless steel and woven fabric pool mounting straps. When using the stainless steel strap, orient the cap with the indicator lines upwards. When using the fabric strap orient the cap with the indicator lines downward.
Oriented for fabric strap
Oriented for SS strap
Proper Flashing Placement