e6000 link user documentation - pes2card · e6000 link 1/3 usb thank you for purchasing our passap...
TRANSCRIPT
● E6000 Link 1/3 USB Documentation �❍ Functions �❍ E6000 Transfer �❍ Starting E6000 Transfer �❍ Configuration �❍ User Interface
■ Menu ■ Browsing
■ Browse Cast On ■ Browse Pattern ■ Browse Technique ■ Browse Form ■ Drag & Drop ■ Open With
■ Full Picture ■ Print ■ Download
■ Download Cast On ■ Download Pattern ■ Download Technique ■ Download Form
■ About ■ Close
�❍ Create a Pattern ■ Paint ■ Notepad
�❍ Getting Started �❍ Messages
● Dialog Manager explained �❍ Introduction �❍ Buttons �❍ Fields �❍ Multiline fields �❍ Tablebox �❍ Tickbox �❍ Access Keys �❍ Scrollbar

�❍ Initial Focus en Tab Order �❍ Coloring
E6000 Link 1/3 USB
Thank you for purchasing our Passap E6000 Link 1/3 USB (EL1/3USB) product. This HTML Help file provides the documentation for the E6000 Link 1/3 product. The first part of this document provides information about the functionality of the EL1/3USB product. You can also find instructions on how to operate E6000 Transfer in the first part of this document. The second part of this document provides information about Dialog Manager, the package used to develop E6000 Transfer, the driver program of the EL1/3USB product.
Last Modification: November 15, 2016 © 2005,2016 Computerservice SSHS BV.
Functions
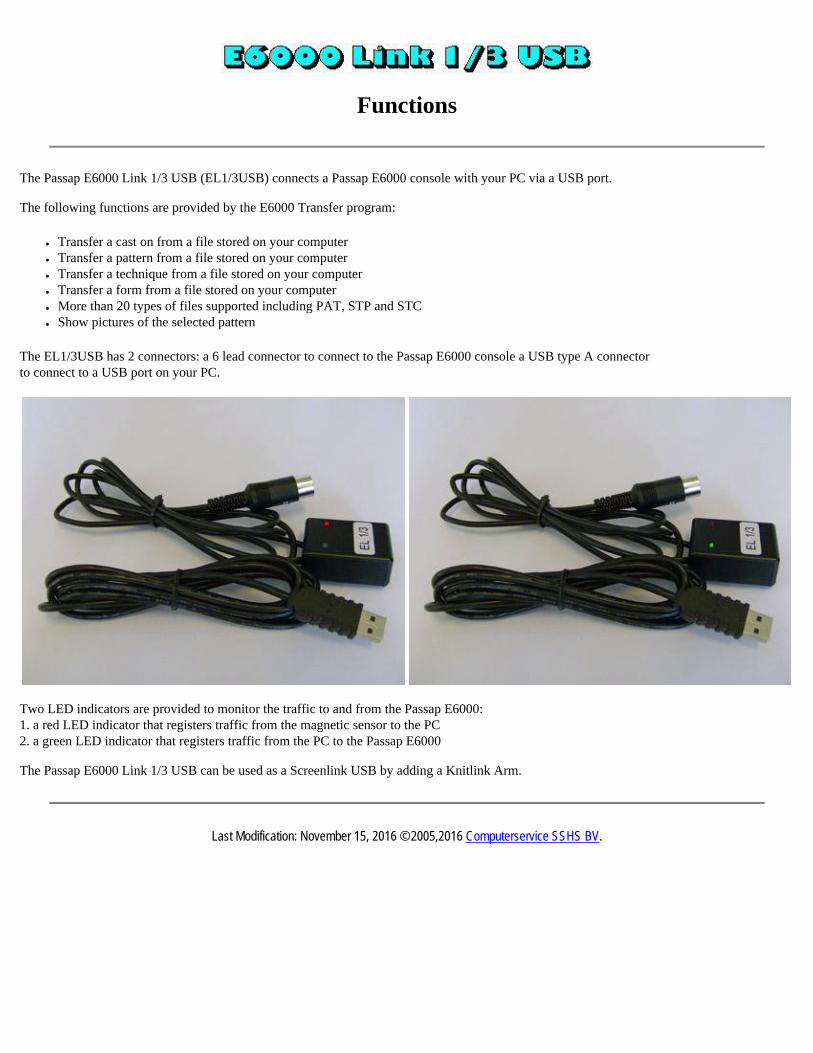
The Passap E6000 Link 1/3 USB (EL1/3USB) connects a Passap E6000 console with your PC via a USB port. The following functions are provided by the E6000 Transfer program:
● Transfer a cast on from a file stored on your computer ● Transfer a pattern from a file stored on your computer ● Transfer a technique from a file stored on your computer ● Transfer a form from a file stored on your computer ● More than 20 types of files supported including PAT, STP and STC ● Show pictures of the selected pattern
The EL1/3USB has 2 connectors: a 6 lead connector to connect to the Passap E6000 console a USB type A connector to connect to a USB port on your PC.
Two LED indicators are provided to monitor the traffic to and from the Passap E6000: 1. a red LED indicator that registers traffic from the magnetic sensor to the PC 2. a green LED indicator that registers traffic from the PC to the Passap E6000 The Passap E6000 Link 1/3 USB can be used as a Screenlink USB by adding a Knitlink Arm.
Last Modification: November 15, 2016 © 2005,2016 Computerservice SSHS BV.
E6000 Transfer
E6000 Transfer is the driver program for the Passap E6000 Link 1/3 USB. You can browse your computer for the pattern you want to knit with your Passap E6000. E6000 Transfer will show the pattern selected. DesignaKnit users can, via the IK (Interactive Knitting) option, knit interactive using the USB port on the computer. An RS232 port is no longer needed.
Last Modification: November 15, 2016 © 2005,2016 Computerservice SSHS BV.
Starting E6000 Transfer
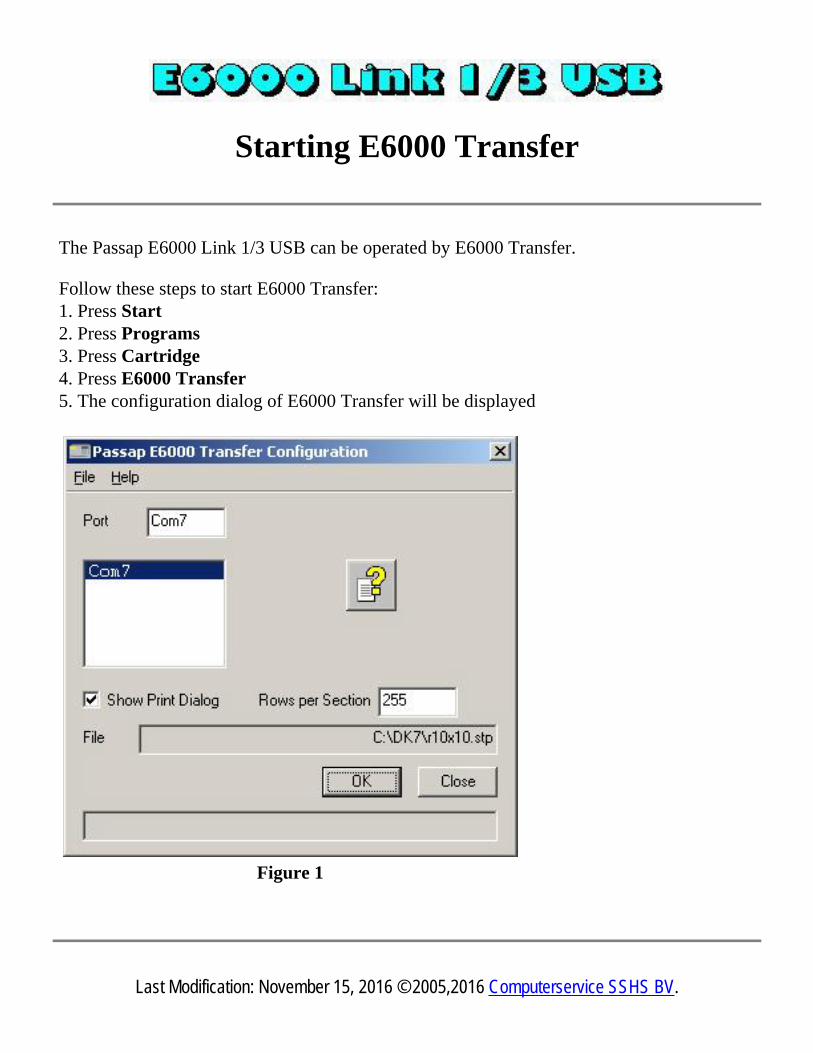
The Passap E6000 Link 1/3 USB can be operated by E6000 Transfer. Follow these steps to start E6000 Transfer: 1. Press Start 2. Press Programs 3. Press Cartridge 4. Press E6000 Transfer 5. The configuration dialog of E6000 Transfer will be displayed
Figure 1
Last Modification: November 15, 2016 © 2005,2016 Computerservice SSHS BV.

Configuration
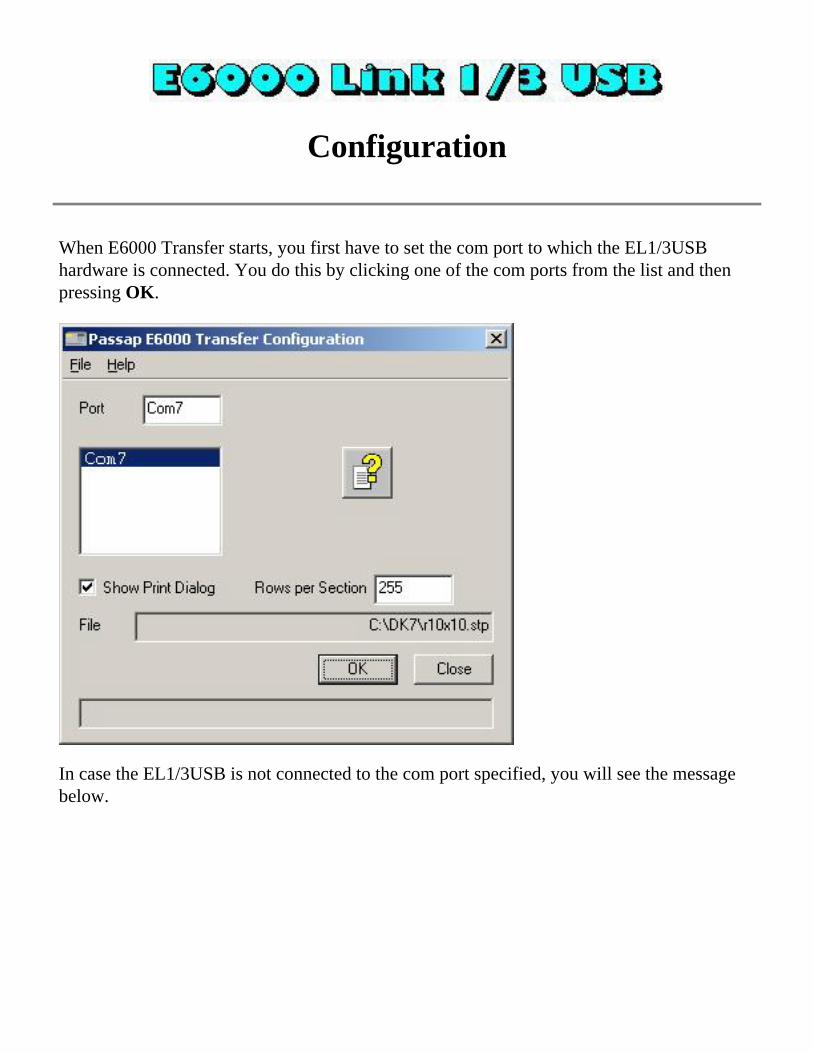
When E6000 Transfer starts, you first have to set the com port to which the EL1/3USB hardware is connected. You do this by clicking one of the com ports from the list and then pressing OK.
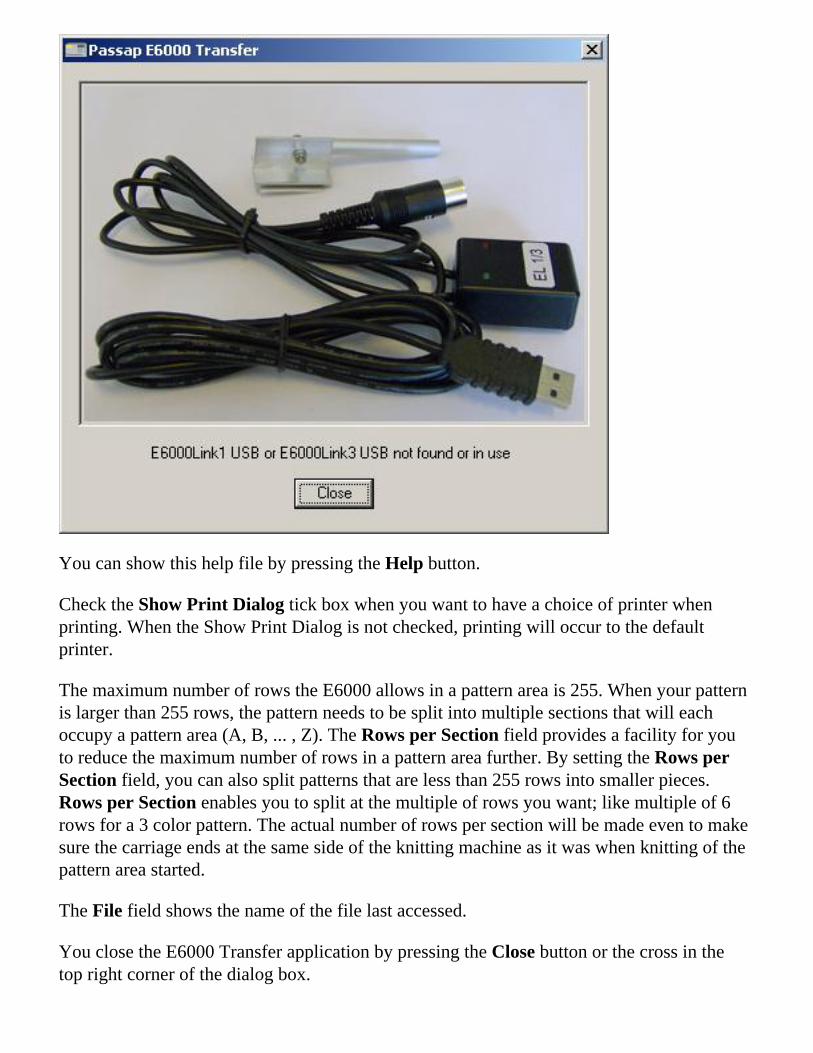
In case the EL1/3USB is not connected to the com port specified, you will see the message below.
You can show this help file by pressing the Help button. Check the Show Print Dialog tick box when you want to have a choice of printer when printing. When the Show Print Dialog is not checked, printing will occur to the default printer. The maximum number of rows the E6000 allows in a pattern area is 255. When your pattern is larger than 255 rows, the pattern needs to be split into multiple sections that will each occupy a pattern area (A, B, ... , Z). The Rows per Section field provides a facility for you to reduce the maximum number of rows in a pattern area further. By setting the Rows per Section field, you can also split patterns that are less than 255 rows into smaller pieces. Rows per Section enables you to split at the multiple of rows you want; like multiple of 6 rows for a 3 color pattern. The actual number of rows per section will be made even to make sure the carriage ends at the same side of the knitting machine as it was when knitting of the pattern area started. The File field shows the name of the file last accessed. You close the E6000 Transfer application by pressing the Close button or the cross in the top right corner of the dialog box.

If you press OK, the next dialog will be the User Interface dialog. The Status field shows messages to inform the user of progress or to give instructions.
Last Modification: July 15, 2017 © 2005,2016 Computerservice SSHS BV.
User Interface
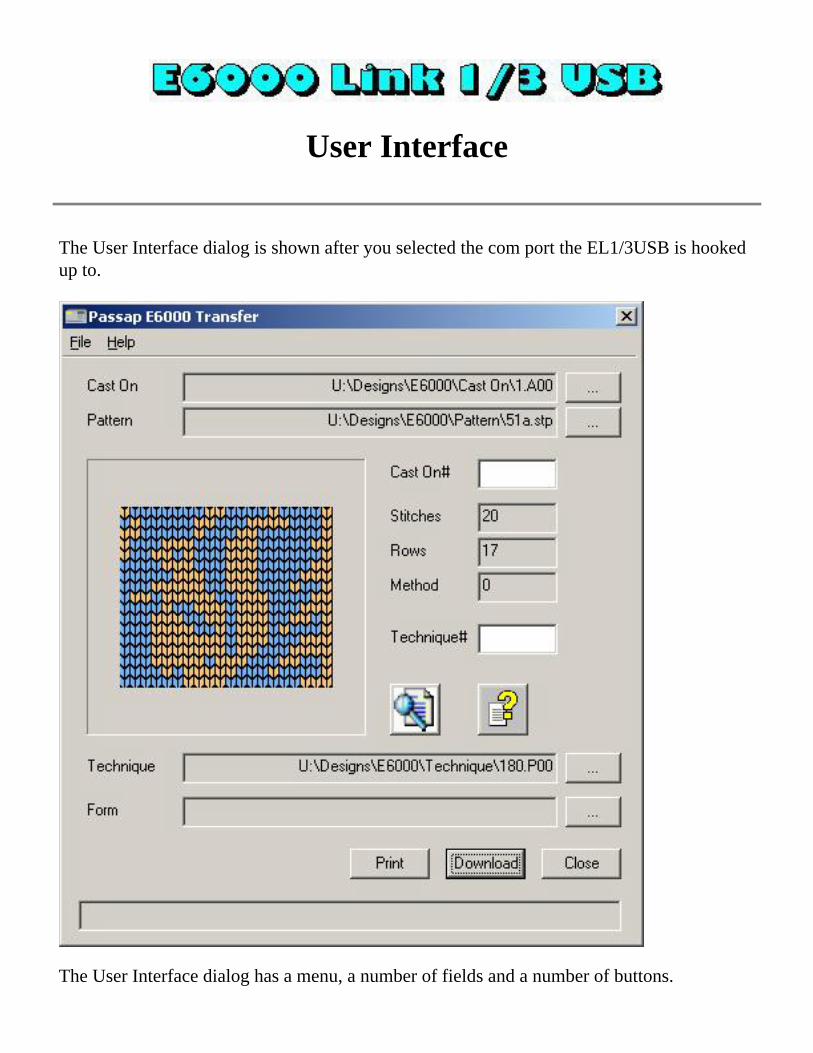
The User Interface dialog is shown after you selected the com port the EL1/3USB is hooked up to.
The User Interface dialog has a menu, a number of fields and a number of buttons.
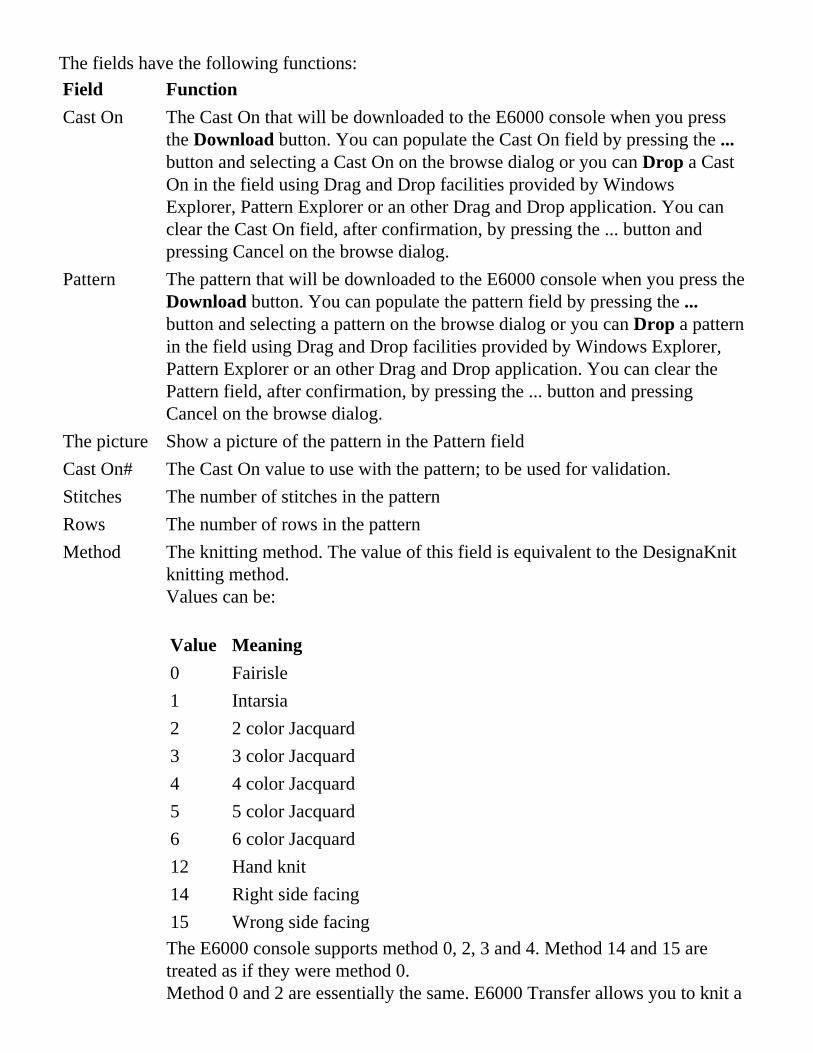
The fields have the following functions: Field FunctionCast On
The Cast On that will be downloaded to the E6000 console when you press the Download button. You can populate the Cast On field by pressing the ... button and selecting a Cast On on the browse dialog or you can Drop a Cast On in the field using Drag and Drop facilities provided by Windows Explorer, Pattern Explorer or an other Drag and Drop application. You can clear the Cast On field, after confirmation, by pressing the ... button and pressing Cancel on the browse dialog.
Pattern
The pattern that will be downloaded to the E6000 console when you press the Download button. You can populate the pattern field by pressing the ... button and selecting a pattern on the browse dialog or you can Drop a pattern in the field using Drag and Drop facilities provided by Windows Explorer, Pattern Explorer or an other Drag and Drop application. You can clear the Pattern field, after confirmation, by pressing the ... button and pressing Cancel on the browse dialog.
The picture Show a picture of the pattern in the Pattern fieldCast On# The Cast On value to use with the pattern; to be used for validation.Stitches The number of stitches in the patternRows The number of rows in the patternMethod
The knitting method. The value of this field is equivalent to the DesignaKnit knitting method. Values can be: Value Meaning0 Fairisle1 Intarsia2 2 color Jacquard3 3 color Jacquard4 4 color Jacquard5 5 color Jacquard6 6 color Jacquard12 Hand knit14 Right side facing15 Wrong side facingThe E6000 console supports method 0, 2, 3 and 4. Method 14 and 15 are treated as if they were method 0. Method 0 and 2 are essentially the same. E6000 Transfer allows you to knit a
method 0 pattern as 2 color Jacquard and a 2 color Jacquard as Fairisle. Technique# The technique value to use with the pattern; to be used for validation.Technique
The Technique that will be downloaded to the E6000 console when you press the Download button. You can populate the Technique field by pressing the ... button and selecting a Technique on the browse dialog or you can Drop a Technique in the field using Drag and Drop facilities provided by Windows Explorer, Pattern Explorer or an other Drag and Drop application. You can clear the Technique field, after confirmation, by pressing the ... button and pressing Cancel on the browse dialog.
Form
The Form that will be downloaded to the E6000 console when you press the Download button. You can populate the Form field by pressing the ... button and selecting a Form on the browse dialog or you can Drop a Form in the field using Drag and Drop facilities provided by Windows Explorer, Pattern Explorer or an other Drag and Drop application. You can clear the Form field, after confirmation, by pressing the ... button and pressing Cancel on the browse dialog.
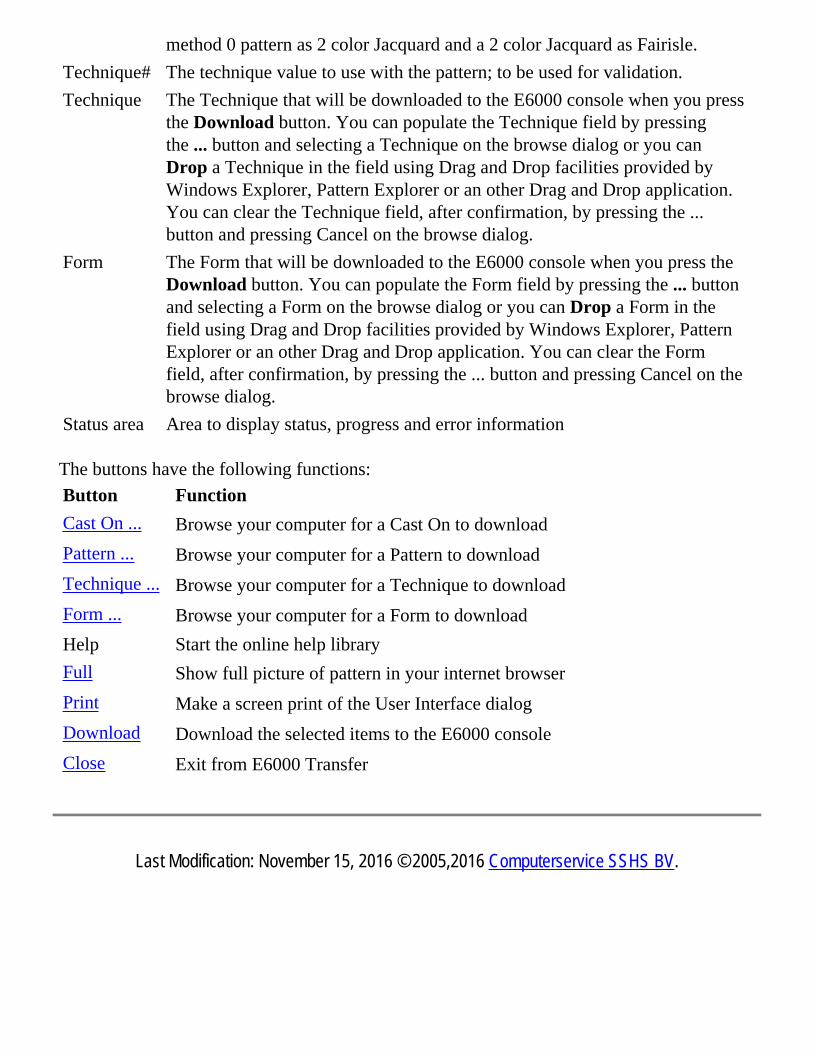
Status area Area to display status, progress and error information The buttons have the following functions: Button FunctionCast On ... Browse your computer for a Cast On to downloadPattern ... Browse your computer for a Pattern to downloadTechnique ... Browse your computer for a Technique to downloadForm ... Browse your computer for a Form to downloadHelp Start the online help libraryFull Show full picture of pattern in your internet browserPrint Make a screen print of the User Interface dialogDownload Download the selected items to the E6000 consoleClose Exit from E6000 Transfer
Last Modification: November 15, 2016 © 2005,2016 Computerservice SSHS BV.
Menu
On the Menu Bar you will find two items: the File Menu and the Help Menu. File Menu Exit to exit E6000 Transfer Help Menu Contents to display the main help topicsAbout E6000… to provide information about E6000 Transfer
Last Modification: November 15, 2016 © 2005,2016 Computerservice SSHS BV.
Browsing
Various alternatives are available to browse your computer for patterns. E6000 Transfer has multiple interfaces to accept patterns from:
● Browse Cast On on the E6000 Transfer dialog ● Browse Pattern on the E6000 Transfer dialog ● Browse Technique on the E6000 Transfer dialog ● Browse Form on the E6000 Transfer dialog ● Open With function of Explorer programs like Pattern Explorer, Windows
Explorer,... ● Drag and Drop of drag capable Explorer programs like Pattern Explorer, Windows
Explorer,...
Click on one of the links above for more information.
Last Modification: November 15, 2016 © 2005,2016 Computerservice SSHS BV.
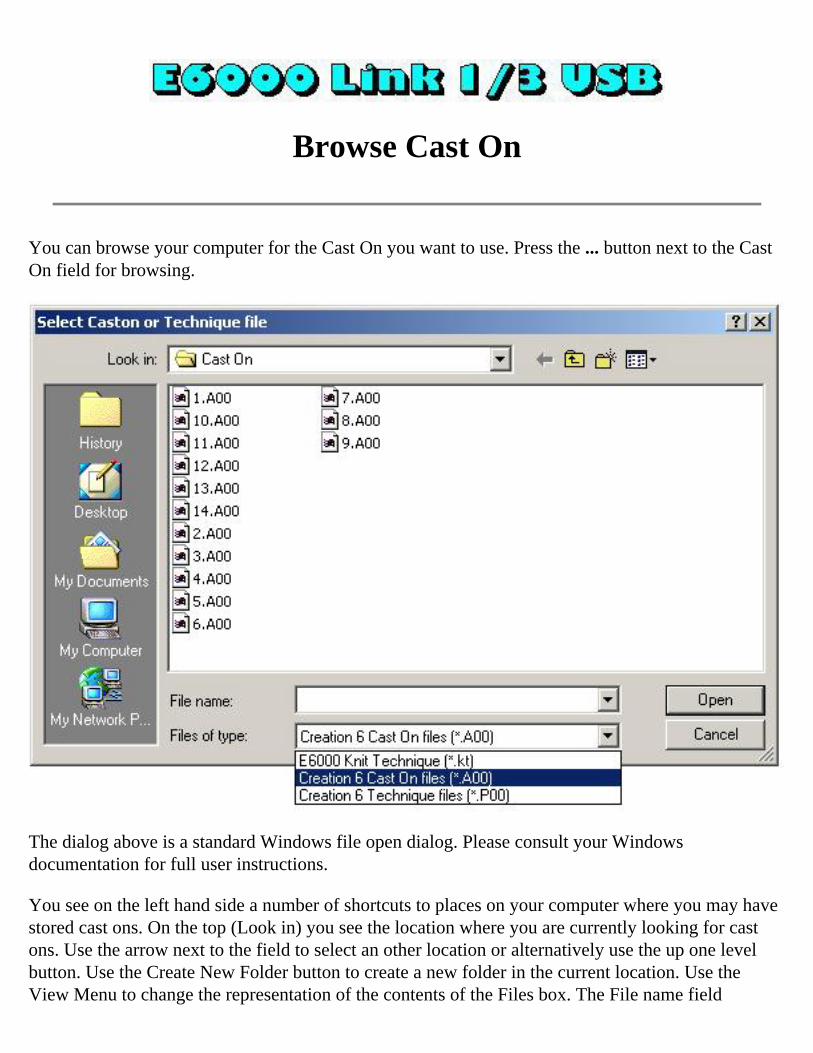
Browse Cast On
You can browse your computer for the Cast On you want to use. Press the ... button next to the Cast On field for browsing.
The dialog above is a standard Windows file open dialog. Please consult your Windows documentation for full user instructions. You see on the left hand side a number of shortcuts to places on your computer where you may have stored cast ons. On the top (Look in) you see the location where you are currently looking for cast ons. Use the arrow next to the field to select an other location or alternatively use the up one level button. Use the Create New Folder button to create a new folder in the current location. Use the View Menu to change the representation of the contents of the Files box. The File name field

contains the filter applied to the files in the folder. Use the arrow to drop down the list of files you opened earlier. The files of type field shows the currently applied filter. Use the arrow to change the filter. You select a file from the displayed list by clicking on it. The file will become blue and you can press Open to select the file as the Cast On file. Press Cancel if you want to stop the selection process. E6000 Transfer will support the following cast on file types: Extension Descriptionkt E6000 Knit TechniqueA00 Creation 6 Cast OnP00 Creation 6 Pattern
Last Modification: November 15, 2016 © 2005,2016 Computerservice SSHS BV.
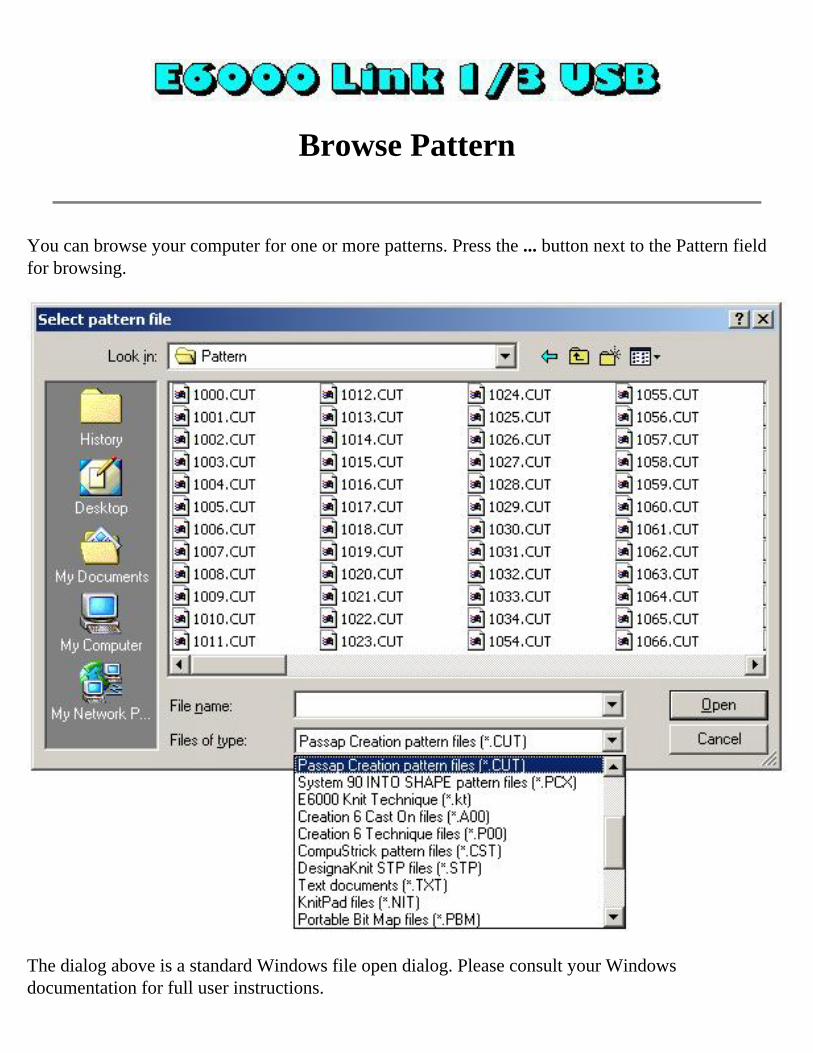
Browse Pattern
You can browse your computer for one or more patterns. Press the ... button next to the Pattern field for browsing.
The dialog above is a standard Windows file open dialog. Please consult your Windows documentation for full user instructions.

You see on the left hand side a number of shortcuts to places on your computer where you may have stored patterns. On the top (Look in) you see the location where you are currently looking for patterns. Use the arrow next to the field to select an other location or alternatively use the up one level button. Use the Create New Folder button to create a new folder in the current location. Use the View Menu to change the representation of the contents of the Files box. The File name field contains the filter applied to the files in the folder. Use the arrow to drop down the list of files you opened earlier. The files of type field shows the currently applied filter. Use the arrow to change the filter. You select a file from the displayed list by clicking on it. The file will become blue and you can press Open to select the file as the Pattern file. Press Cancel if you want to stop the selection process. E6000 Transfer will support the following file types: Extension DescriptionPAT DesignaKnit pattern fileBPT Brother PaTtern fileBMP Windows BitMaP fileCST CompuStrick pattern fileCUT Passap Creation pattern fileKT Passap E6000 Knitting Technique fileA00 Creation 6 Cast On fileP00 Creation 6 Technique filePCX System 90 INTO SHAPE pattern fileSTC Stitch Painter pattern fileSBR Stitch Painter brush fileDAT Silver Reed PC10 pattern fileSTP DesignaKnit pattern fileTXT Text documentNIT KnitPad pattern filePBM Portable Bit Map filePGM Portable Gray Map filePPM Portable Pixel Map fileKSW Knitt Styler pattern fileKSL Knitt Styler library pattern fileQPA DesignaKnit bitmap fileMT Singer 9000 pattern fileMTF System 90 INTO SHAPE pattern file

Last Modification: November 15, 2016 © 2005,2016 Computerservice SSHS BV.

Browse Technique
You can browse your computer for the Technique you want to use. Press the ... button next to the Technique field for browsing.
The dialog above is a standard Windows file open dialog. Please consult your Windows documentation for full user instructions. You see on the left hand side a number of shortcuts to places on your computer where you may have stored techniques. On the top (Look in) you see the location where you are currently looking for techniques. Use the arrow next to the field to select an other location or alternatively use the up one level button. Use the Create New Folder button to create a new folder in the current location. Use the View Menu to change the representation of the contents of the Files box. The File name field contains
the filter applied to the files in the folder. Use the arrow to drop down the list of files you opened earlier. The files of type field shows the currently applied filter. Use the arrow to change the filter. You select a file from the displayed list by clicking on it. The file will become blue and you can press Open to select the file as the Technique file. Press Cancel if you want to stop the selection process. E6000 Transfer will support the following technique file types: Extension Descriptionkt E6000 Knit TechniqueA00 Creation 6 Cast OnP00 Creation 6 Pattern
Last Modification: November 15, 2016 © 2005,2016 Computerservice SSHS BV.
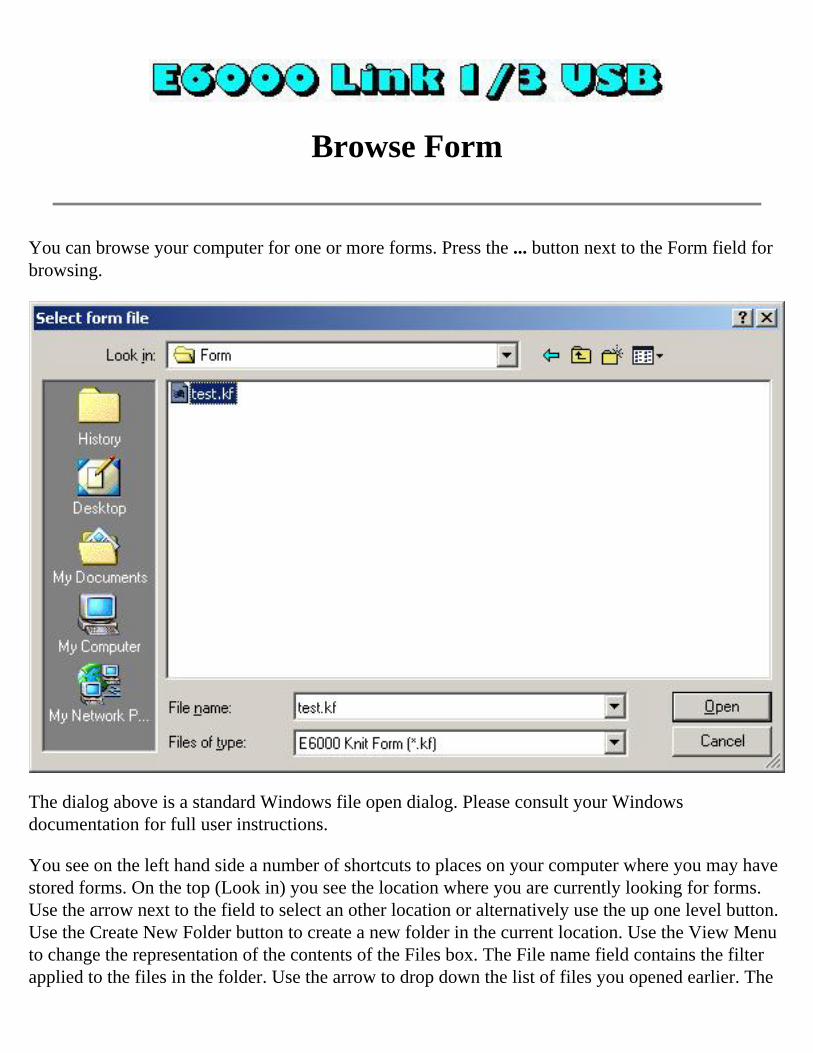
Browse Form
You can browse your computer for one or more forms. Press the ... button next to the Form field for browsing.
The dialog above is a standard Windows file open dialog. Please consult your Windows documentation for full user instructions. You see on the left hand side a number of shortcuts to places on your computer where you may have stored forms. On the top (Look in) you see the location where you are currently looking for forms. Use the arrow next to the field to select an other location or alternatively use the up one level button. Use the Create New Folder button to create a new folder in the current location. Use the View Menu to change the representation of the contents of the Files box. The File name field contains the filter applied to the files in the folder. Use the arrow to drop down the list of files you opened earlier. The
files of type field shows the currently applied filter. Use the arrow to change the filter. You select a file from the displayed list by clicking on it. The file will become blue and you can press Open to select the file as the Form file. Press Cancel if you want to stop the selection process. E6000 Transfer will support the following file types: Extension DescriptionKF E6000 form file
Last Modification: November 15, 2016 © 2005,2016 Computerservice SSHS BV.
Drag & Drop
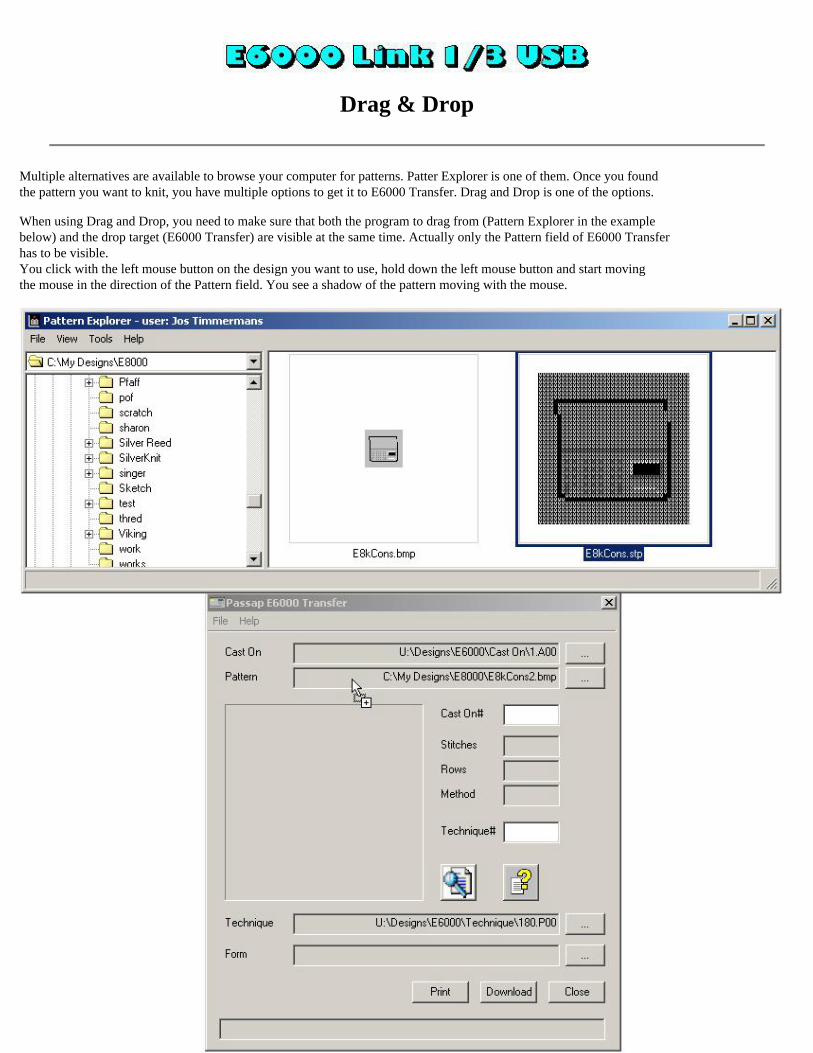
Multiple alternatives are available to browse your computer for patterns. Patter Explorer is one of them. Once you found the pattern you want to knit, you have multiple options to get it to E6000 Transfer. Drag and Drop is one of the options. When using Drag and Drop, you need to make sure that both the program to drag from (Pattern Explorer in the example below) and the drop target (E6000 Transfer) are visible at the same time. Actually only the Pattern field of E6000 Transfer has to be visible. You click with the left mouse button on the design you want to use, hold down the left mouse button and start moving the mouse in the direction of the Pattern field. You see a shadow of the pattern moving with the mouse.
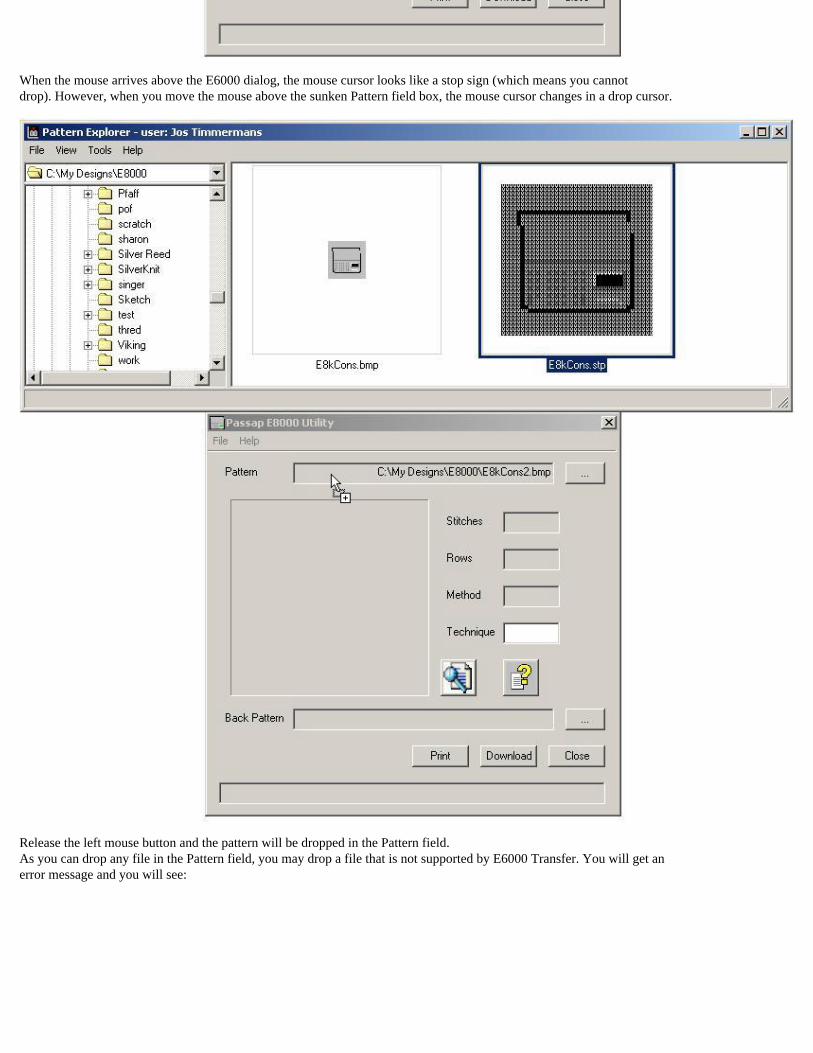
When the mouse arrives above the E6000 dialog, the mouse cursor looks like a stop sign (which means you cannot drop). However, when you move the mouse above the sunken Pattern field box, the mouse cursor changes in a drop cursor.
Release the left mouse button and the pattern will be dropped in the Pattern field. As you can drop any file in the Pattern field, you may drop a file that is not supported by E6000 Transfer. You will get an error message and you will see:
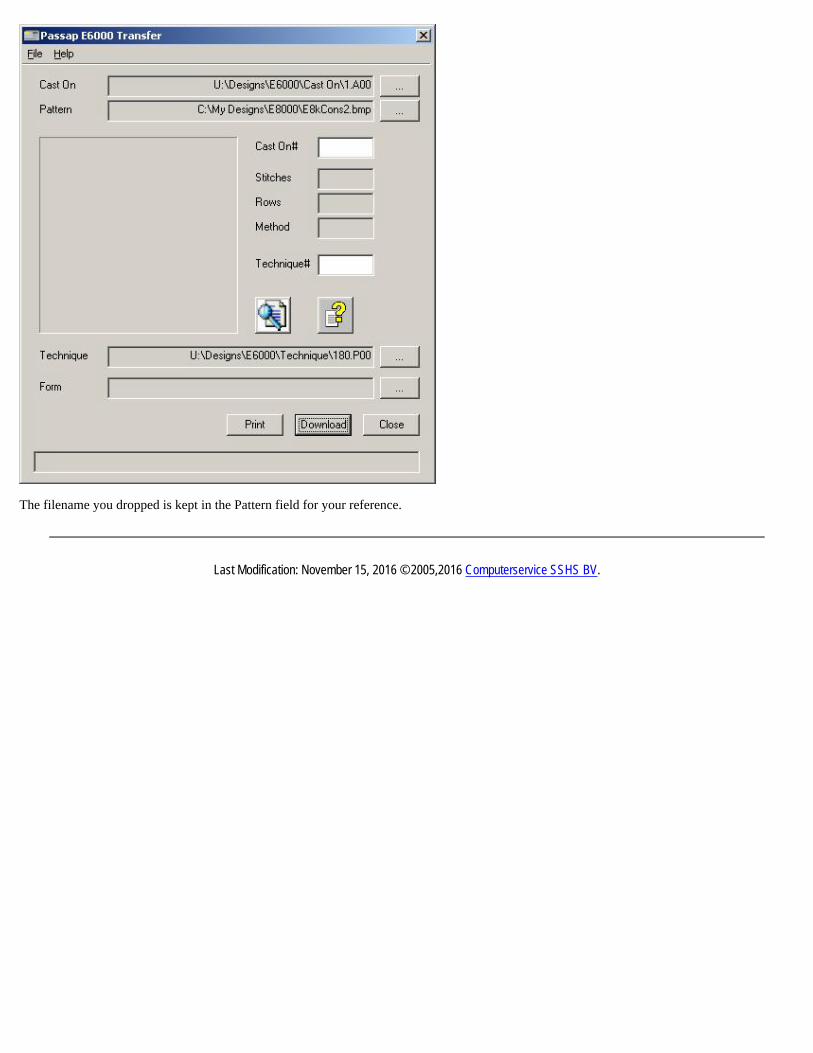
The filename you dropped is kept in the Pattern field for your reference.
Last Modification: November 15, 2016 © 2005,2016 Computerservice SSHS BV.
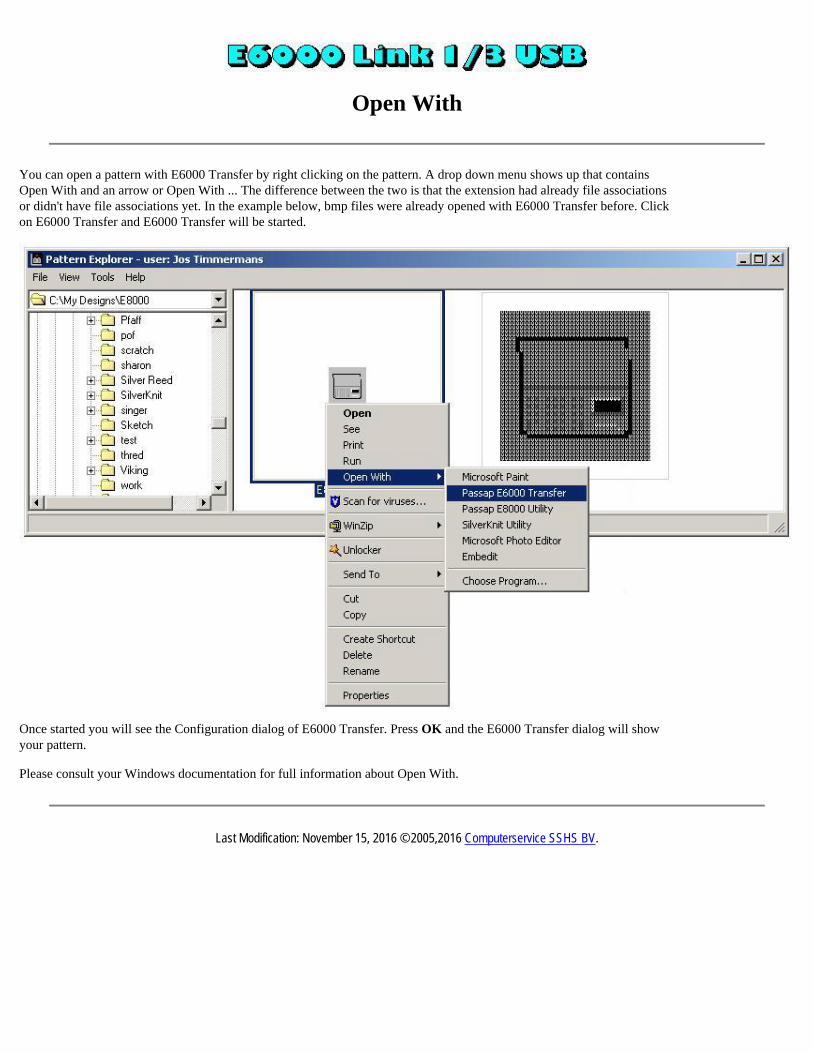
Open With
You can open a pattern with E6000 Transfer by right clicking on the pattern. A drop down menu shows up that contains Open With and an arrow or Open With ... The difference between the two is that the extension had already file associations or didn't have file associations yet. In the example below, bmp files were already opened with E6000 Transfer before. Click on E6000 Transfer and E6000 Transfer will be started.
Once started you will see the Configuration dialog of E6000 Transfer. Press OK and the E6000 Transfer dialog will show your pattern. Please consult your Windows documentation for full information about Open With.
Last Modification: November 15, 2016 © 2005,2016 Computerservice SSHS BV.
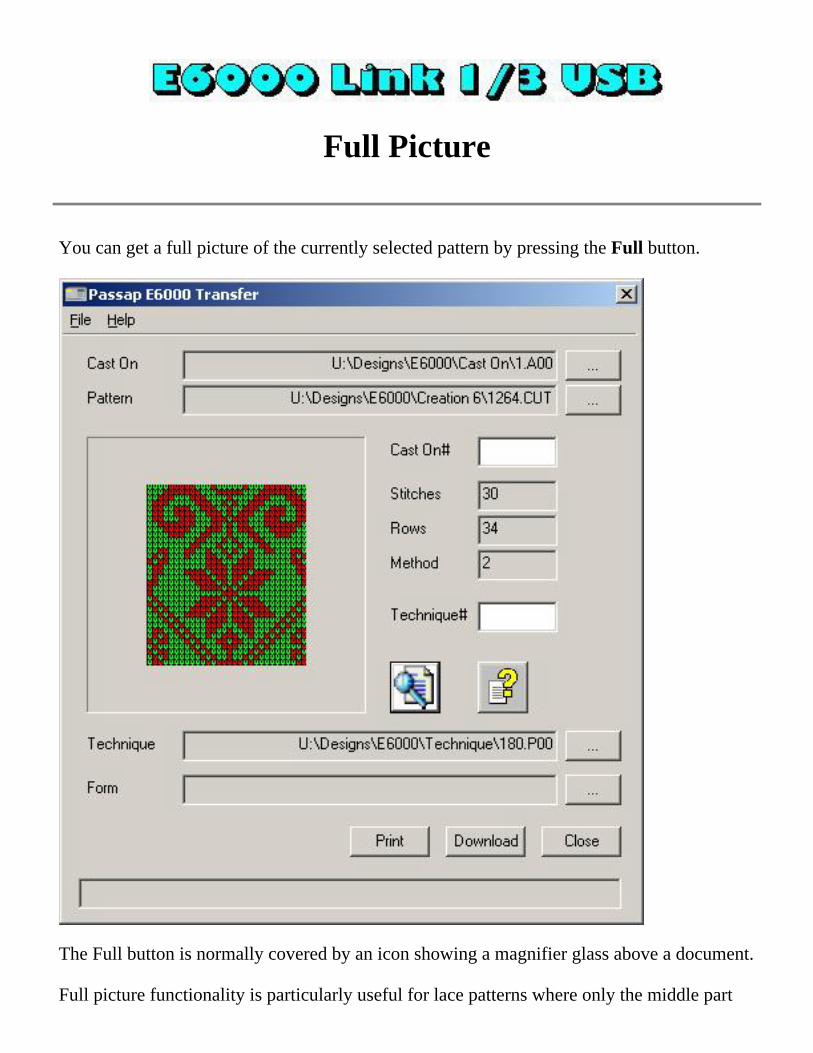
Full Picture
You can get a full picture of the currently selected pattern by pressing the Full button.
The Full button is normally covered by an icon showing a magnifier glass above a document. Full picture functionality is particularly useful for lace patterns where only the middle part
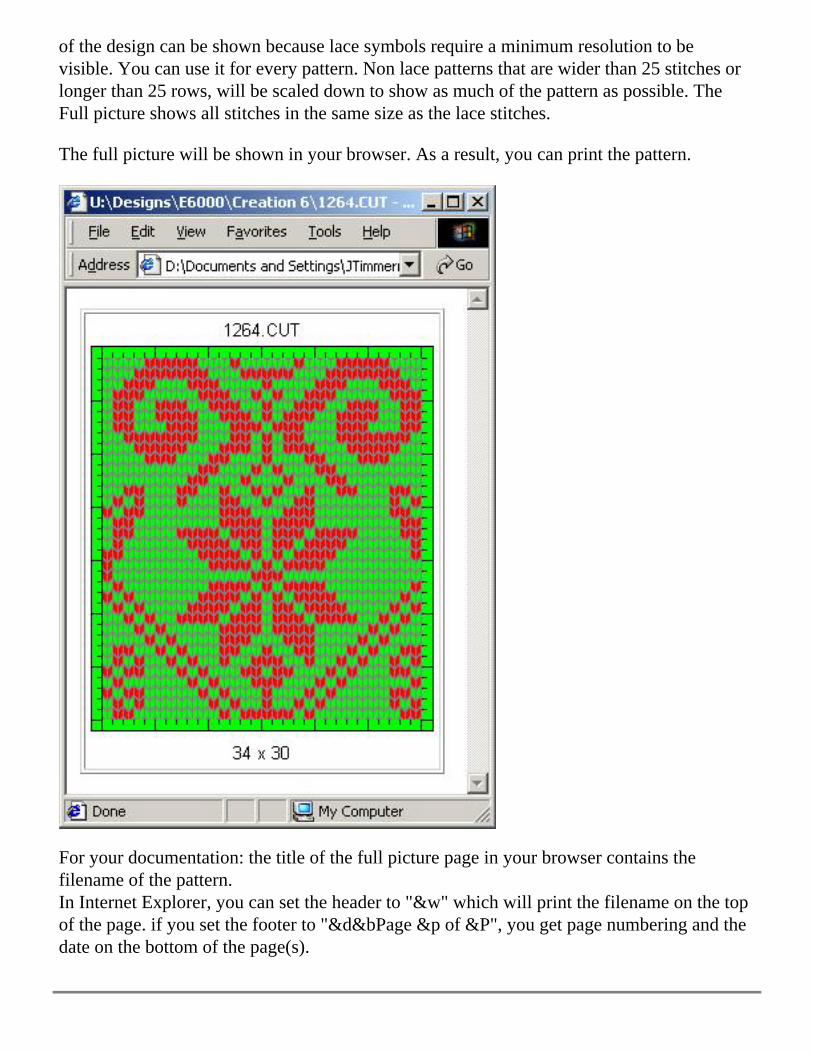
of the design can be shown because lace symbols require a minimum resolution to be visible. You can use it for every pattern. Non lace patterns that are wider than 25 stitches or longer than 25 rows, will be scaled down to show as much of the pattern as possible. The Full picture shows all stitches in the same size as the lace stitches. The full picture will be shown in your browser. As a result, you can print the pattern.
For your documentation: the title of the full picture page in your browser contains the filename of the pattern. In Internet Explorer, you can set the header to "&w" which will print the filename on the top of the page. if you set the footer to "&d&bPage &p of &P", you get page numbering and the date on the bottom of the page(s).

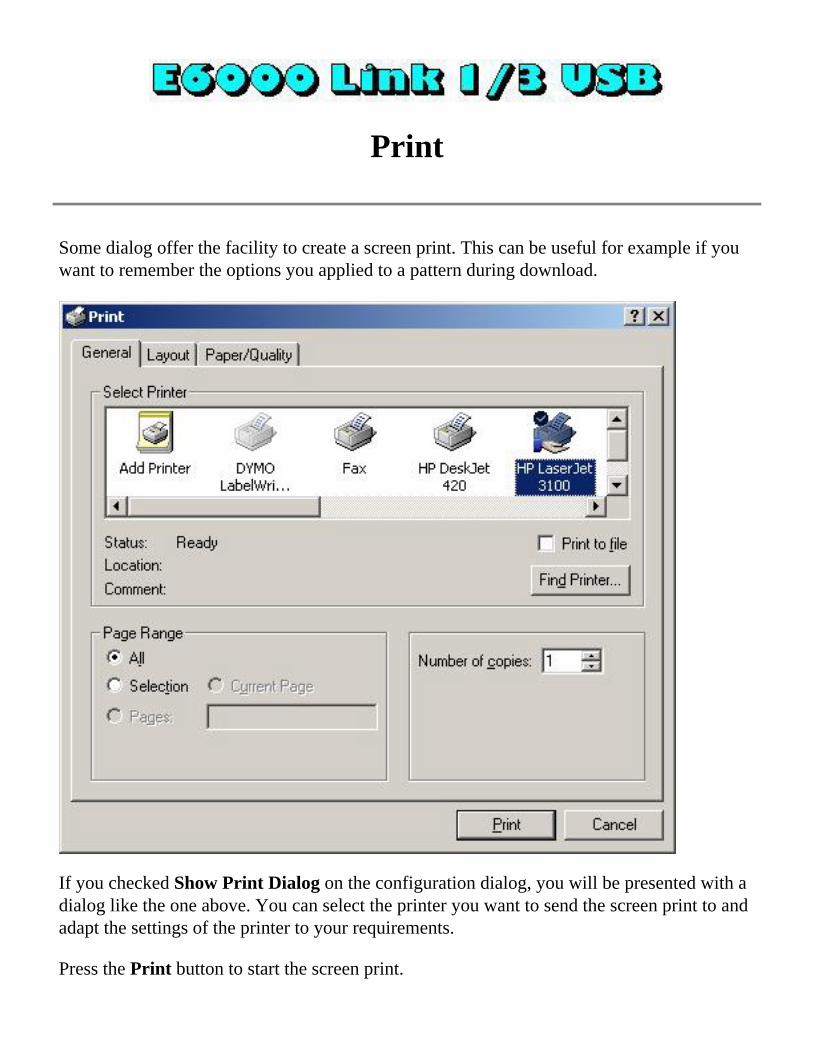
Some dialog offer the facility to create a screen print. This can be useful for example if you want to remember the options you applied to a pattern during download.
If you checked Show Print Dialog on the configuration dialog, you will be presented with a dialog like the one above. You can select the printer you want to send the screen print to and adapt the settings of the printer to your requirements. Press the Print button to start the screen print.

Last Modification: November 15, 2016 © 2005,2016 Computerservice SSHS BV.
Download
During the download you can download up to 4 items to your E6000 Console: 1. a Cast On file 2. a Pattern file 3. a Technique file 4. a Form file Above items are downloaded in that order. All four items are optional. Optional means here that even if you have filled in a filename for an item, you can still skip the item for downloading. An item without a filename is obviously automatically skipped without user intervention.
Last Modification: November 15, 2016 © 2005,2016 Computerservice SSHS BV.
Download Cast On
The first step in the download process is the download of the Cast On.
You have three choices: 1. Program the console, press OK to download the Cast On 2. Press Ignore to skip downloading the Cast On 3. Press Cancel to stop the download procedure During the download process you will be informed about the progress.

As Cast On files are normally rather small, the download will proceed real quick. When the transfer of the Cast On is completed, you see:
Press Close to continue with the next step in the download process.
Last Modification: November 15, 2016 © 2005,2016 Computerservice SSHS BV.

Download Pattern
The second step in the download process is the download of the Pattern. The download process assumes that you download your pattern to pattern area A (ST.PATT A). The majority of patterns will fit into pattern area A i.e. the number of rows of your pattern is smaller than 256. For patterns with more than 256 rows, see the multiple areas paragraph below.
You have three choices: 1. Program the console, press OK to download the pattern 2. Press Ignore to skip downloading the pattern 3. Press Cancel to stop the download procedure During the download process you will be informed about the progress.
As pattern files can be rather big, the download may take some time. When the transfer of the pattern is completed, you see:
Press Close to continue with the next step in the download process. Multiple area patterns The maximum number of rows you can store in a pattern area on the E6000 is 255. As a consequence, your pattern needs to be split into pieces with a row count less than 256. E6000 Transfer can split a pattern for you. It is assumed that you download your pattern to
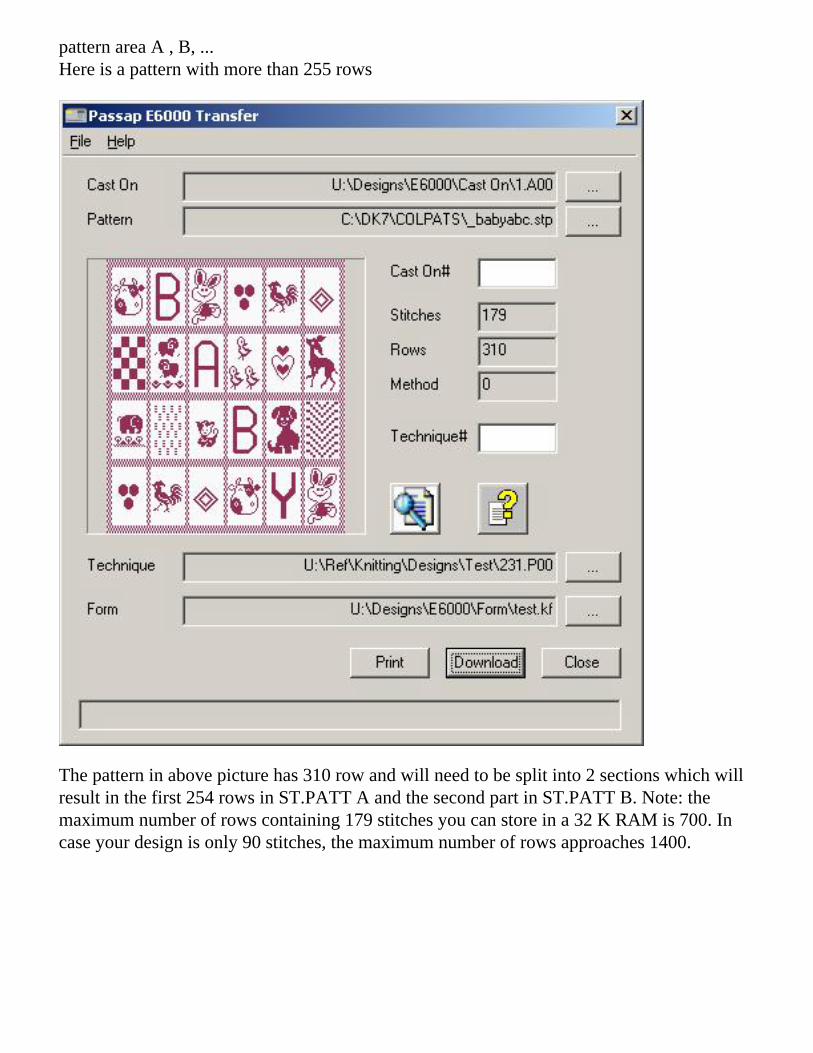
pattern area A , B, ... Here is a pattern with more than 255 rows
The pattern in above picture has 310 row and will need to be split into 2 sections which will result in the first 254 rows in ST.PATT A and the second part in ST.PATT B. Note: the maximum number of rows containing 179 stitches you can store in a 32 K RAM is 700. In case your design is only 90 stitches, the maximum number of rows approaches 1400.
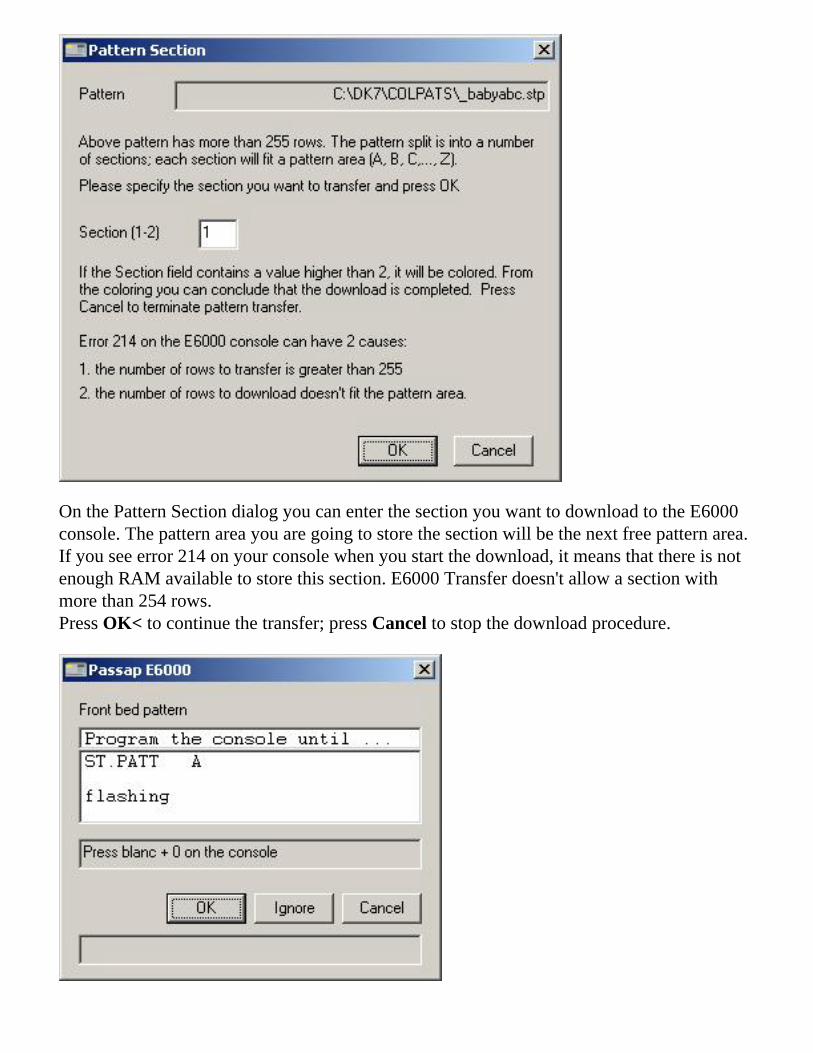
On the Pattern Section dialog you can enter the section you want to download to the E6000 console. The pattern area you are going to store the section will be the next free pattern area. If you see error 214 on your console when you start the download, it means that there is not enough RAM available to store this section. E6000 Transfer doesn't allow a section with more than 254 rows. Press OK< to continue the transfer; press Cancel to stop the download procedure.
Above you can see that E6000 Transfer assumes the first part goes into pattern area A. You have three choices: 1. Program the console, press OK to download the first section of the pattern 2. Press Ignore to skip downloading the pattern 3. Press Cancel to stop the download procedure During the download process you will be informed about the progress.
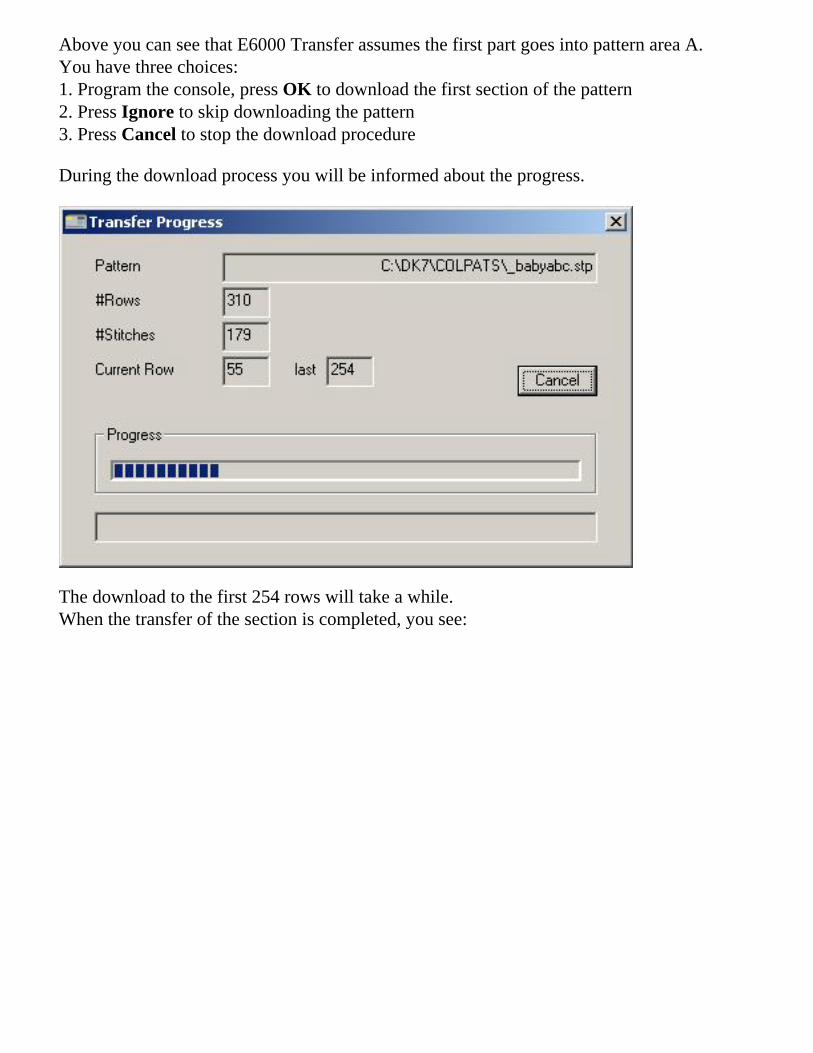
The download to the first 254 rows will take a while. When the transfer of the section is completed, you see:
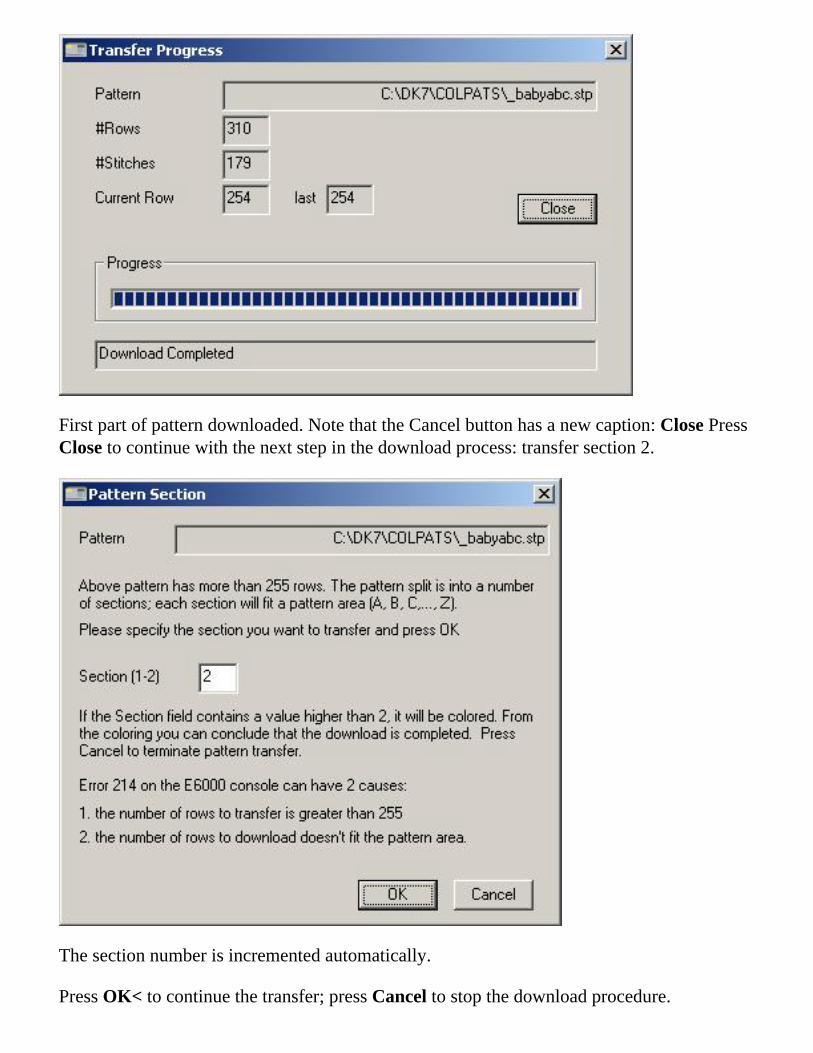
First part of pattern downloaded. Note that the Cancel button has a new caption: Close Press Close to continue with the next step in the download process: transfer section 2.
The section number is incremented automatically. Press OK< to continue the transfer; press Cancel to stop the download procedure.
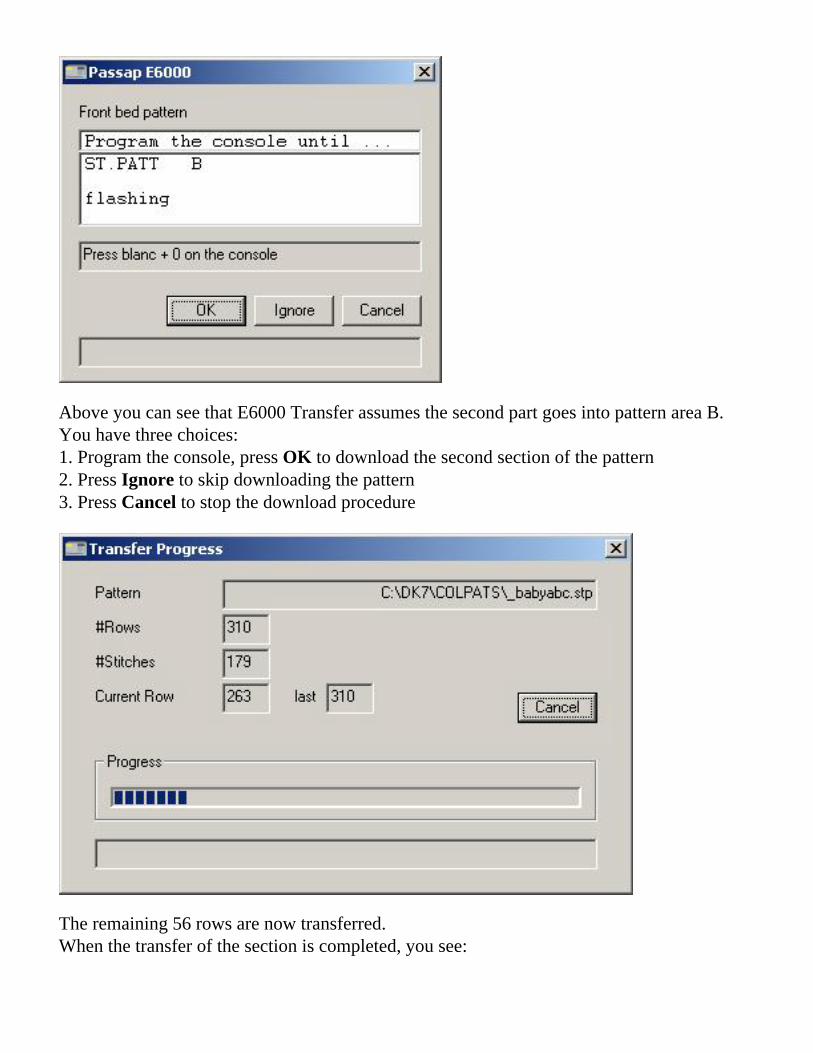
Above you can see that E6000 Transfer assumes the second part goes into pattern area B. You have three choices: 1. Program the console, press OK to download the second section of the pattern 2. Press Ignore to skip downloading the pattern 3. Press Cancel to stop the download procedure
The remaining 56 rows are now transferred. When the transfer of the section is completed, you see:
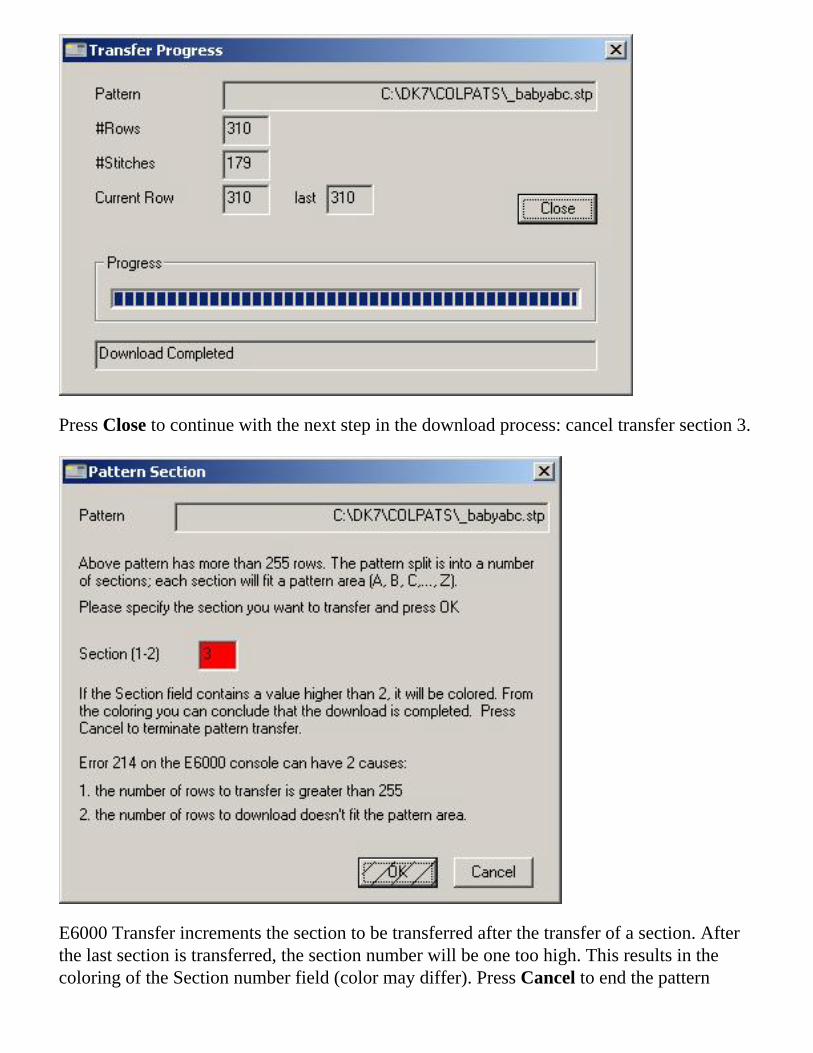
Press Close to continue with the next step in the download process: cancel transfer section 3.
E6000 Transfer increments the section to be transferred after the transfer of a section. After the last section is transferred, the section number will be one too high. This results in the coloring of the Section number field (color may differ). Press Cancel to end the pattern

transmission.
Last Modification: July 15, 2017 © 2005,2017 Computerservice SSHS BV.
Download Technique
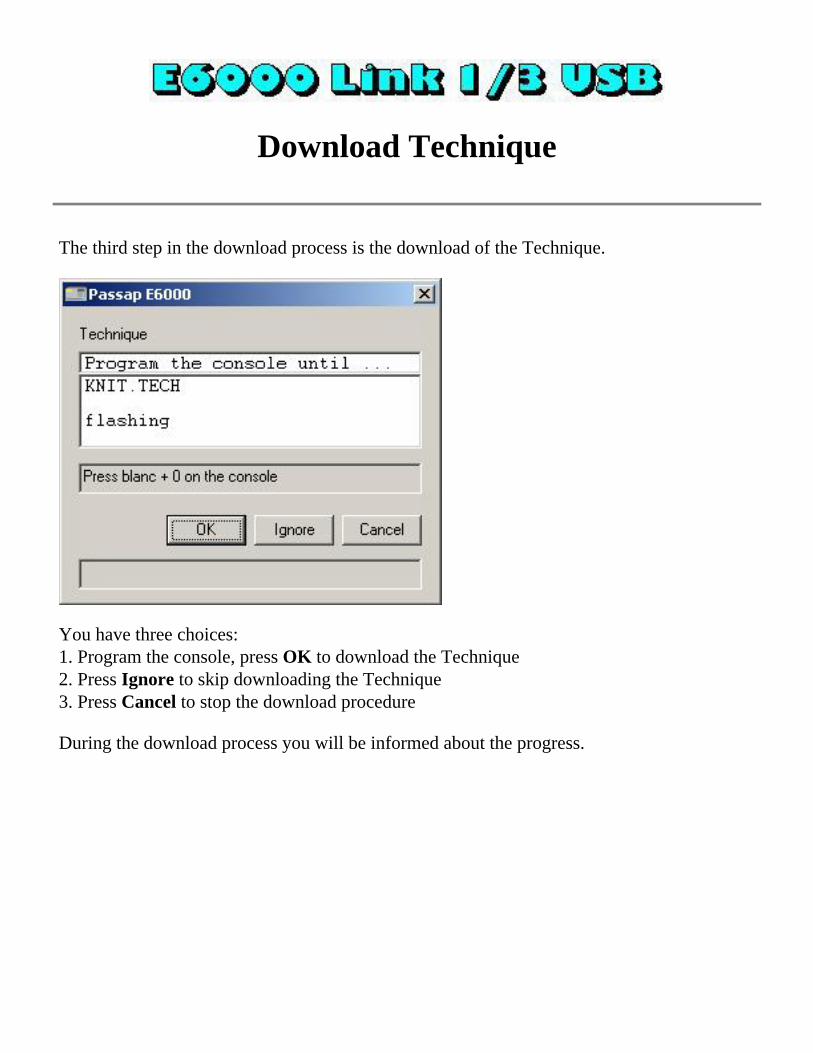
The third step in the download process is the download of the Technique.
You have three choices: 1. Program the console, press OK to download the Technique 2. Press Ignore to skip downloading the Technique 3. Press Cancel to stop the download procedure During the download process you will be informed about the progress.
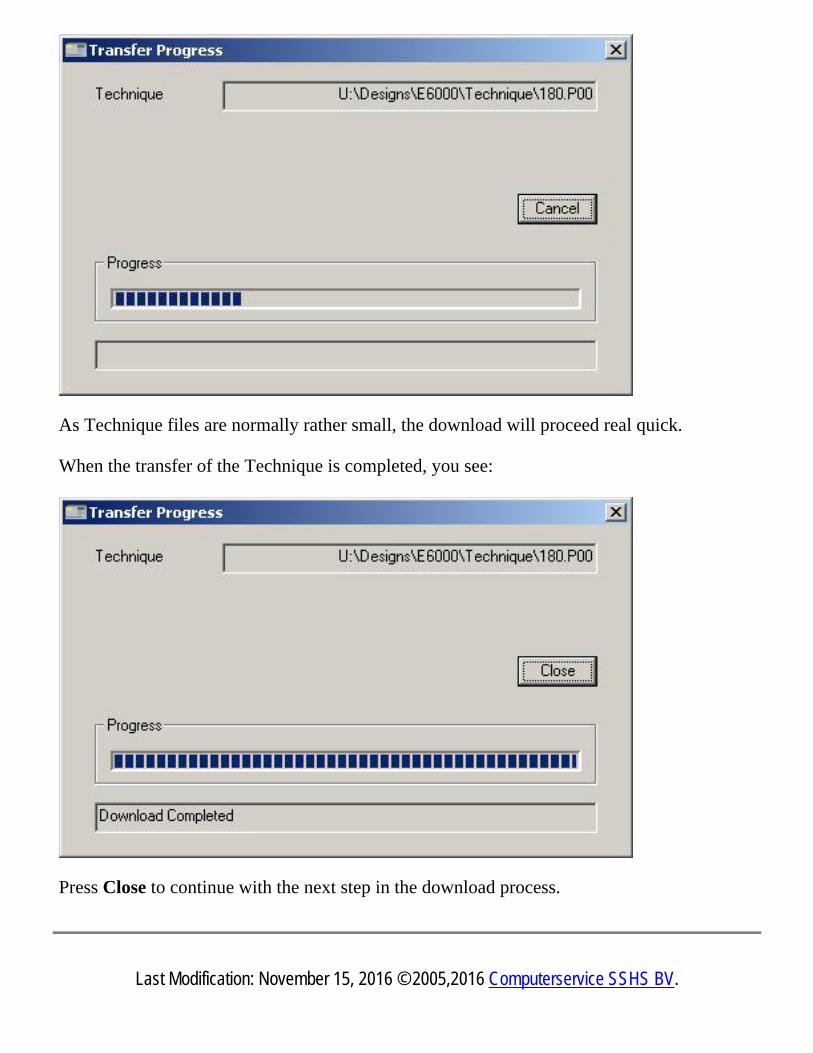
As Technique files are normally rather small, the download will proceed real quick. When the transfer of the Technique is completed, you see:
Press Close to continue with the next step in the download process.
Last Modification: November 15, 2016 © 2005,2016 Computerservice SSHS BV.

Download Form
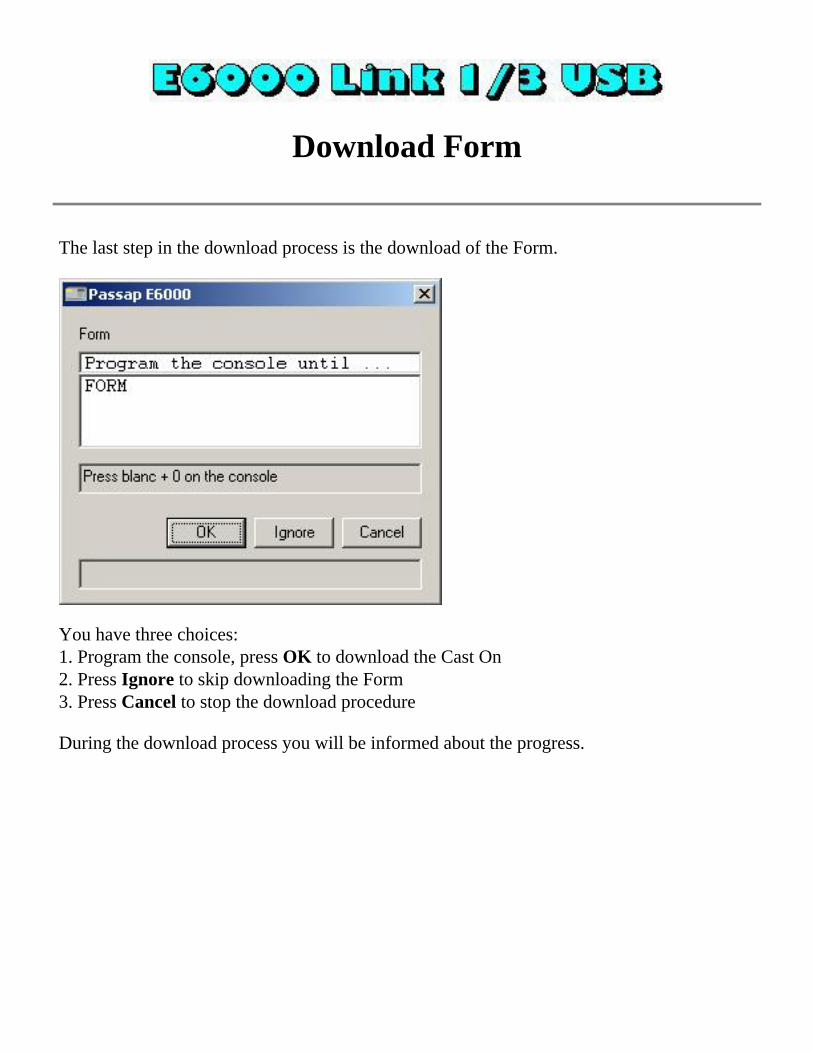
The last step in the download process is the download of the Form.
You have three choices: 1. Program the console, press OK to download the Cast On 2. Press Ignore to skip downloading the Form 3. Press Cancel to stop the download procedure During the download process you will be informed about the progress.

As Form files are normally rather small, the download will proceed real quick. When the transfer of the Form is completed, you see:
Press Close to return to the main dialog of E6000 Transfer.
Last Modification: November 15, 2016 © 2005,2016 Computerservice SSHS BV.

About
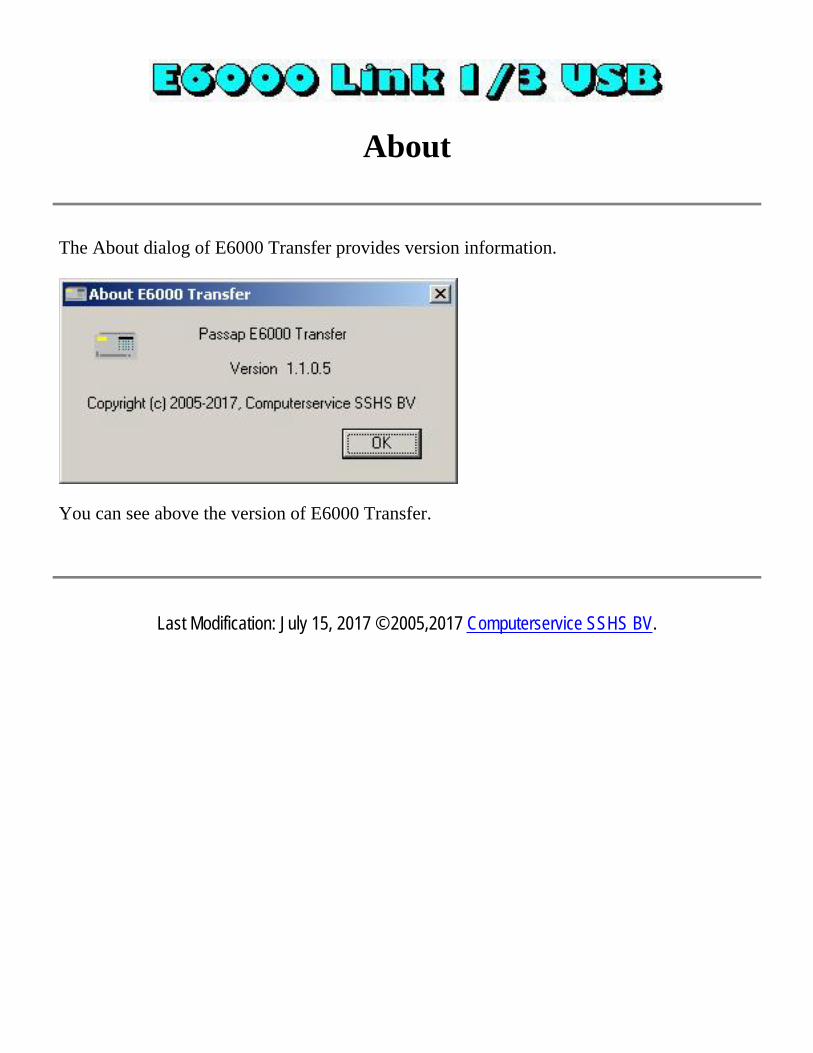
The About dialog of E6000 Transfer provides version information.
You can see above the version of E6000 Transfer.
Last Modification: July 15, 2017 © 2005,2017 Computerservice SSHS BV.

Close
Last Modification: November 15, 2016 © 2005,2016 Computerservice SSHS BV.
Create your own pattern
There are 2 ways to create a pattern: - Someone else has created the pattern and produced a diagram of the pattern - You have a picture or a photograph which needs digitizing E6000 Transfer accepts Windows BMP files for knitting. E6000 Transfer considers every dot in the bitmap as a stitch. As a result you can use any graphics program to produce a pattern. For relatively small diagrams you can use Microsoft Paint. For pictures and photographs you need a sophisticated package like Paint Shop Pro or Photoshop. If you need to enter a large diagram, it is easier and faster to scan the diagram and use a sophisticated graphics program that can do color reduction and resolution reduction. Both above programs can do the job and there are most certainly more packages for this job. E6000 Transfer also accepts text documents (TXT) for knitting. E6000 Transfer considers every character on a line as a stitch. If you adhere to a couple of simple rules, you can enter a pattern with any software that can produce files with extension TXT. Microsoft Notepad is the simplest of these. The plus of text documents is that you can also enter lace patterns.
Last Modification: November 15, 2016 © 2005,2016 Computerservice SSHS BV.
Paint
E6000 Transfer accepts Windows BMP files for knitting. E6000 Transfer considers every dot in the bitmap as a stitch. Patterns of size 25 by 25 or smaller can be entered without much effort very quickly with Microsoft Paint. The Duck25 is done with Microsoft Paint. Here are a few hints to make your life easy: 1. in Image, Attributes set Units to pixels. 2. in Image, Attributes set Width to the number of stitches. 3. in Image, Attributes set Height to the number of rows. 4. in View, Zoom set Zoom to 800% 5. in View, Zoom set Show Grid Now you can see the pixels (stitches) and can fill them with the pencil. If you copy a diagram from a magazine, you don't have to worry about color information as most of them are black and white. If you prefer two different colors, set the background to the main color and the pencil color to the contrast color. Don't worry to get the colors wrong way around. You can revert them on the E6000 with the arrow keys.
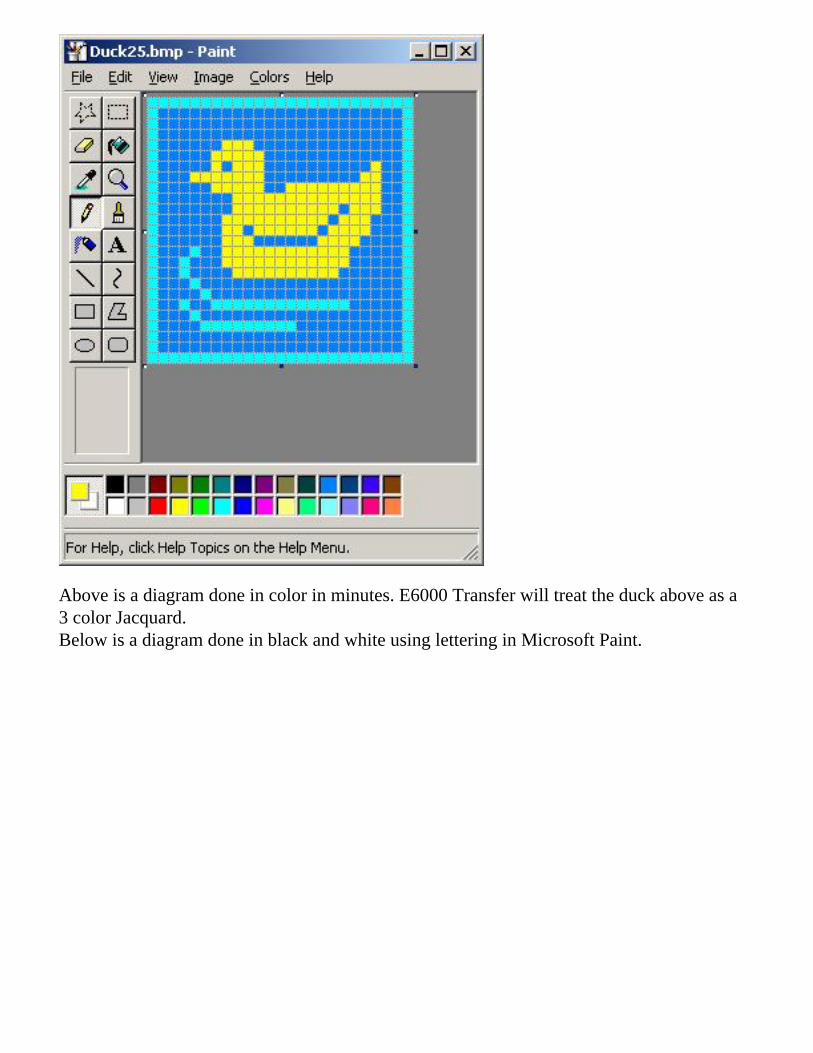
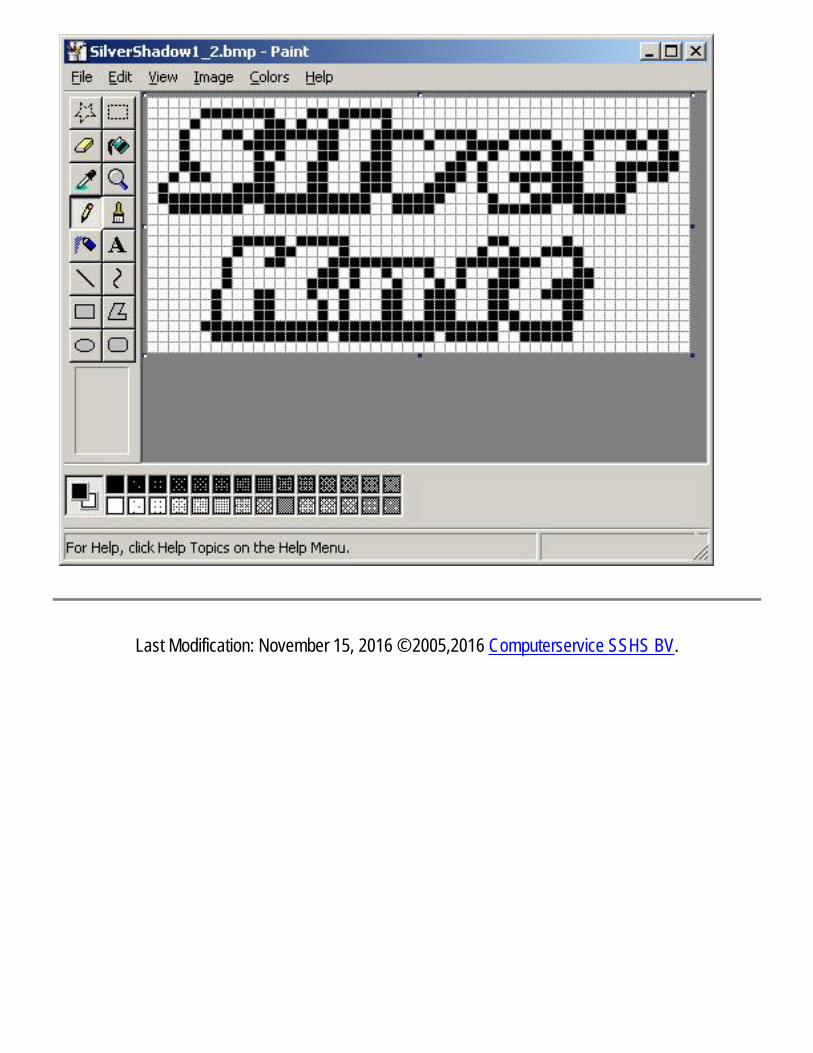
Above is a diagram done in color in minutes. E6000 Transfer will treat the duck above as a 3 color Jacquard. Below is a diagram done in black and white using lettering in Microsoft Paint.
Last Modification: November 15, 2016 © 2005,2016 Computerservice SSHS BV.
Notepad
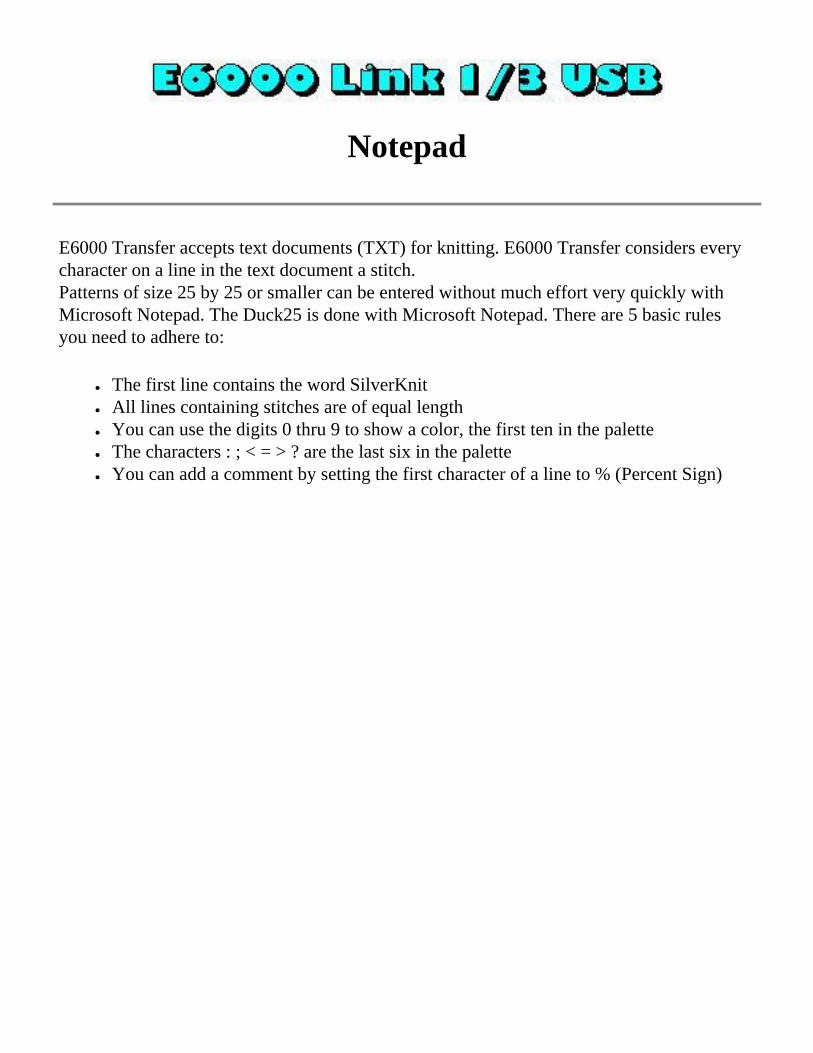
E6000 Transfer accepts text documents (TXT) for knitting. E6000 Transfer considers every character on a line in the text document a stitch. Patterns of size 25 by 25 or smaller can be entered without much effort very quickly with Microsoft Notepad. The Duck25 is done with Microsoft Notepad. There are 5 basic rules you need to adhere to:
● The first line contains the word SilverKnit ● All lines containing stitches are of equal length ● You can use the digits 0 thru 9 to show a color, the first ten in the palette ● The characters : ; < = > ? are the last six in the palette ● You can add a comment by setting the first character of a line to % (Percent Sign)
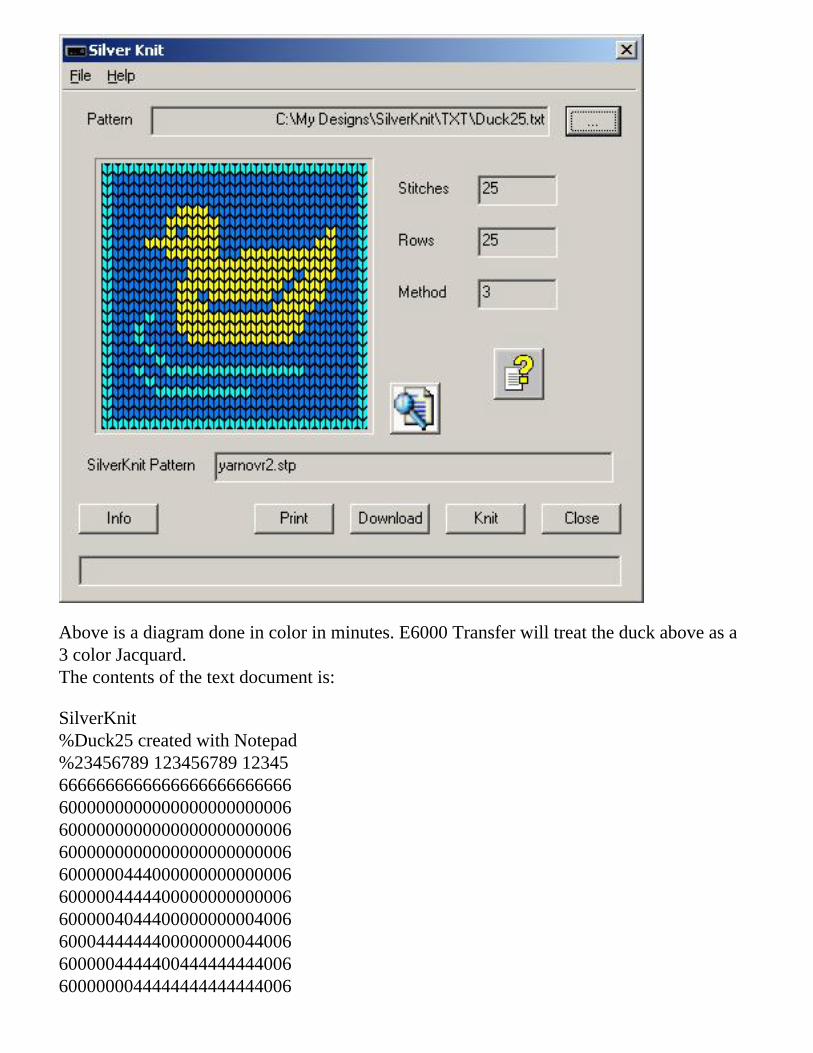
Above is a diagram done in color in minutes. E6000 Transfer will treat the duck above as a 3 color Jacquard. The contents of the text document is: SilverKnit %Duck25 created with Notepad %23456789 123456789 12345 6666666666666666666666666 6000000000000000000000006 6000000000000000000000006 6000000000000000000000006 6000000444000000000000006 6000004444400000000000006 6000004044400000000004006 6000444444400000000044006 6000004444400444444444006 6000000044444444444444006
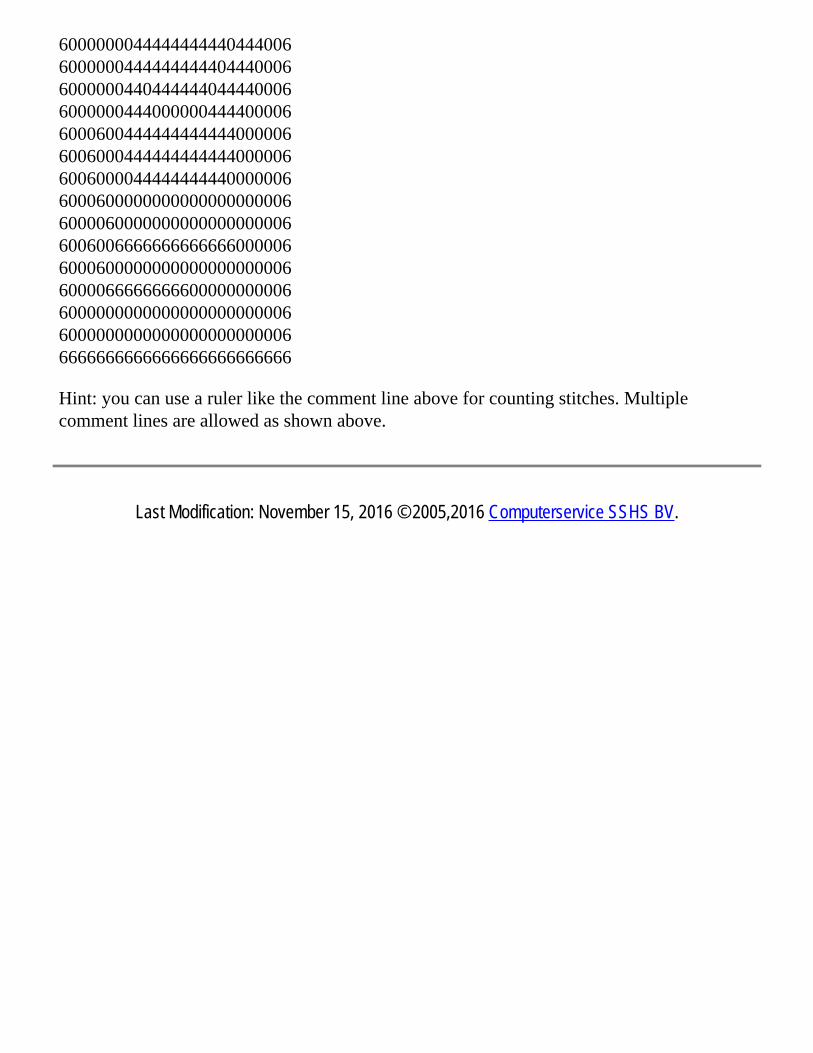
6000000044444444440444006 6000000444444444404440006 6000000440444444044440006 6000000444000000444400006 6000600444444444444000006 6006000444444444444000006 6006000044444444440000006 6000600000000000000000006 6000060000000000000000006 6006006666666666666000006 6000600000000000000000006 6000066666666600000000006 6000000000000000000000006 6000000000000000000000006 6666666666666666666666666 Hint: you can use a ruler like the comment line above for counting stitches. Multiple comment lines are allowed as shown above.
Last Modification: November 15, 2016 © 2005,2016 Computerservice SSHS BV.
Getting Started
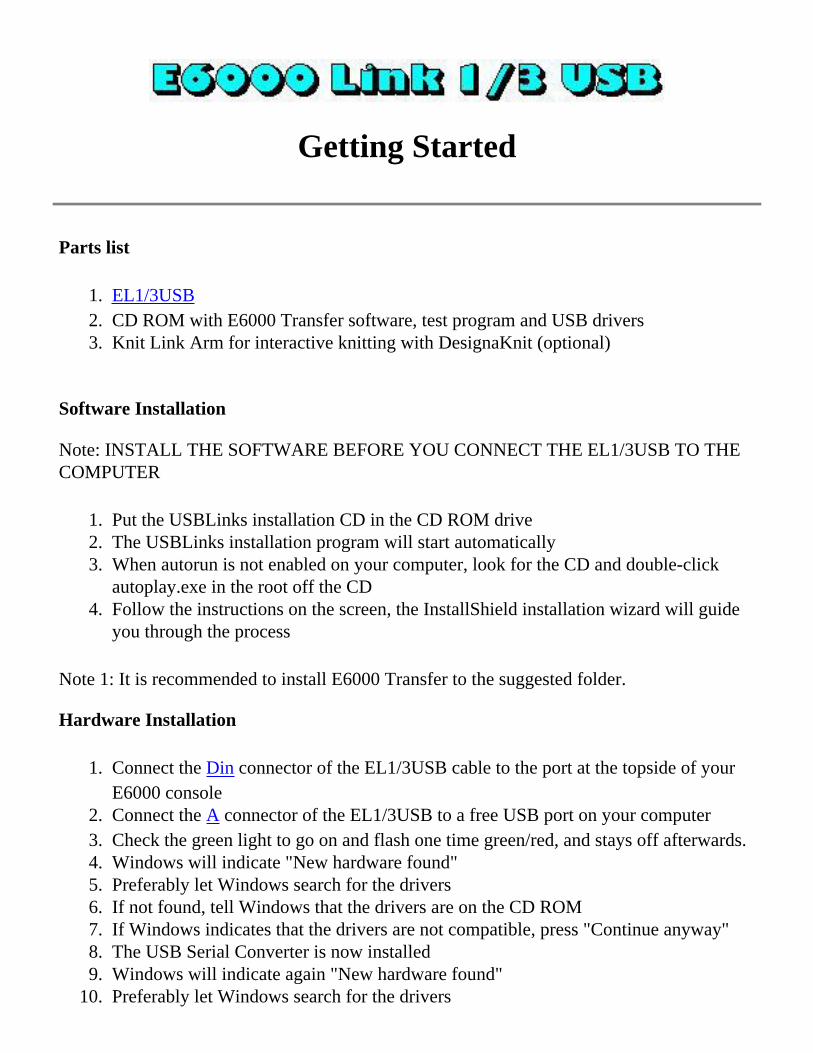
Parts list
1. EL1/3USB 2. CD ROM with E6000 Transfer software, test program and USB drivers 3. Knit Link Arm for interactive knitting with DesignaKnit (optional)
Software Installation Note: INSTALL THE SOFTWARE BEFORE YOU CONNECT THE EL1/3USB TO THE COMPUTER
1. Put the USBLinks installation CD in the CD ROM drive 2. The USBLinks installation program will start automatically 3. When autorun is not enabled on your computer, look for the CD and double-click
autoplay.exe in the root off the CD 4. Follow the instructions on the screen, the InstallShield installation wizard will guide
you through the process
Note 1: It is recommended to install E6000 Transfer to the suggested folder. Hardware Installation
1. Connect the Din connector of the EL1/3USB cable to the port at the topside of your E6000 console
2. Connect the A connector of the EL1/3USB to a free USB port on your computer 3. Check the green light to go on and flash one time green/red, and stays off afterwards. 4. Windows will indicate "New hardware found" 5. Preferably let Windows search for the drivers 6. If not found, tell Windows that the drivers are on the CD ROM 7. If Windows indicates that the drivers are not compatible, press "Continue anyway" 8. The USB Serial Converter is now installed 9. Windows will indicate again "New hardware found"
10. Preferably let Windows search for the drivers
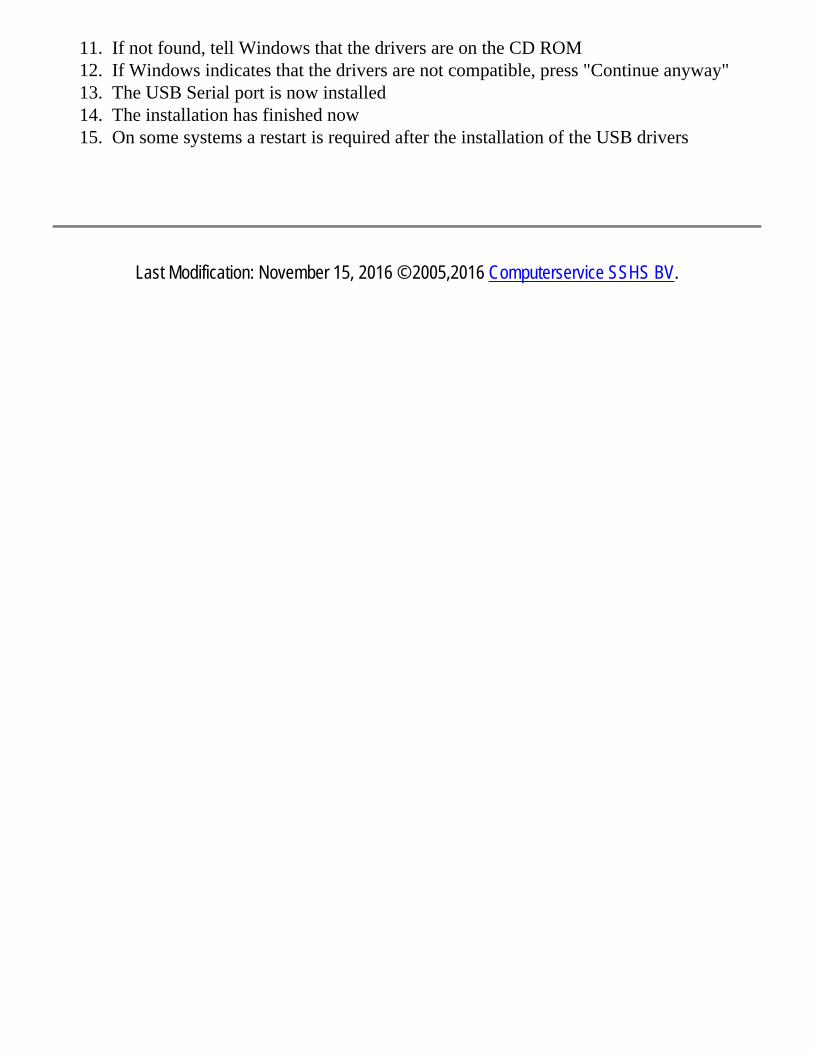
11. If not found, tell Windows that the drivers are on the CD ROM 12. If Windows indicates that the drivers are not compatible, press "Continue anyway" 13. The USB Serial port is now installed 14. The installation has finished now 15. On some systems a restart is required after the installation of the USB drivers
Last Modification: November 15, 2016 © 2005,2016 Computerservice SSHS BV.
Messages
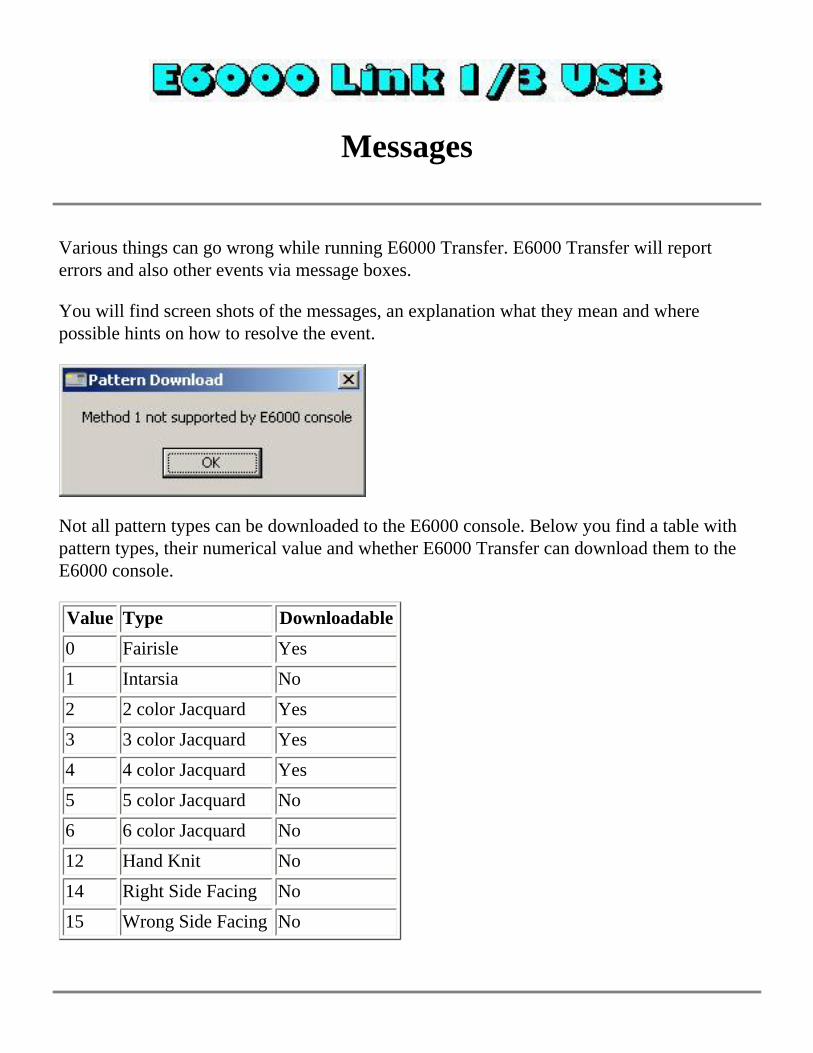
Various things can go wrong while running E6000 Transfer. E6000 Transfer will report errors and also other events via message boxes. You will find screen shots of the messages, an explanation what they mean and where possible hints on how to resolve the event.
Not all pattern types can be downloaded to the E6000 console. Below you find a table with pattern types, their numerical value and whether E6000 Transfer can download them to the E6000 console. Value Type Downloadable0 Fairisle Yes1 Intarsia No2 2 color Jacquard Yes3 3 color Jacquard Yes4 4 color Jacquard Yes5 5 color Jacquard No6 6 color Jacquard No12 Hand Knit No14 Right Side Facing No15 Wrong Side Facing No

Last Modification: November 15, 2016 © 2005,2016 Computerservice SSHS BV.
Dialog Manager
Dialog Manager is, as its name suggests, a package that manages dialogs. Dialog Manager makes the life of the Windows dialog programmer easier by taking away the boring Windows dialog hassle, enabling the programmer to concentrate on user functionality. Dialog Manager also provides additional functionality on top of the Windows dialog functionality. The visible additional features used in this application include:
● Hatched buttons: a button is dependent on the contents of one or more fields, where the fields don't meet the expectations of the button. The user can click a hatched button to find out which fields don't meet the expectation of the button.
● Field coloring: when a button has the focus, fields on which the button depends are colored to show the user that user action is required.
● Propagation: when a row in a table is selected, the fields in the row are propagated into individual fields.
Last Modification: December 10, 2004 © 1999-2004 Computerservice SSHS BV.
Dialog Manager - Introduction
A Dialog Manager application presents you with one or more dialogs. Getting Help For a Dialog. A dialog can contain:
● Buttons ● Single-line Fields ● Multi-line Fields ● TableBoxes ● TickBoxes
You can use the mouse or the keyboard to navigate a dialog. Access Keys Scroll Bar Initial Focus and Tab Order Coloring
Last Modification: December 10, 2004 © 1999-2004 Computerservice SSHS BV.
Dialog Manager - Buttons
A dialog normally contains an OK button, a Cancel button, and one or more action buttons. You can 'press' a button with a mouse click or with the keyboard:
● Pressing the Enter key is equivalent to pressing the default button, which is the button with a heavy dark border. The default button is the one that has the focus, or, if no button has the focus, the one set up as the default. The Dialog Manager makes the last button pressed the default.
● Pressing the spacebar is equivalent to pressing whichever button has a dotted rectangle around its text label.
● If a button's label contains an underlined character, pressing the Alt key together with that character's key is equivalent to pressing that button.
Last Modification: December 10, 2004 © 1999-2004 Computerservice SSHS BV.
Dialog Manager - Fields
A single-line field is for display or entry of a character string. When a Dialog first displays, a field in which you can enter text is usually empty, but in some cases it contains default text. When a field allows you to enter text, you can click to place the cursor within the existing text and use the keyboard to edit it. The Home key moves the cursor to the beginning of the string, and the End key moves it to the end. The Delete key deletes characters following the cursor, and the Backspace key deletes characters before the cursor. You can highlight text by dragging the cursor across it. The Delete key deletes highlighted text, and typing new text replaces highlighted text.
Last Modification: December 10, 2004 © 1999-2004 Computerservice SSHS BV.
Dialog Manager - Multi Line Fields
A multi-line field is for display or entry of a character string. When a Dialog first displays, a field in which you can enter text is usually empty, but in some cases it contains default text. When a field allows you to enter text, you can click to place the cursor within the existing text and use the keyboard to edit it. The Home key moves the cursor to the beginning of the string, and the End key moves it to the end. The Delete key deletes characters following the cursor, and the Backspace key deletes characters before the cursor. You can highlight text by dragging the cursor across it. The Delete key deletes highlighted text, and typing new text replaces highlighted text. Pressing Control+Enter moves the cursor to a new line.
Last Modification: December 10, 2004 © 1999-2004 Computerservice SSHS BV.
Dialog Manager - TableBox
A TableBox displays a list of items. Scroll through the list using the scroll bar, and select an item in one of these ways:
● double click on it ● click on it and press Enter ● use the arrow keys to highlight it, and press the spacebar
The colour of the table changes on mouse-up (when the focus changes) and on mouse-down (when the selection changes). You can deselect a row by pressing the Delete key.
Last Modification: December 10, 2004 © 1999-2004 Computerservice SSHS BV.
Dialog Manager - TickBox
A TickBox is used to enable or disable an option. The option is enabled when an X appears in the TickBox and disabled when the TickBox is empty.
Last Modification: December 10, 2004 © 1999-2004 Computerservice SSHS BV.
Dialog Manager - Access Keys
An access key lets you use the keyboard to activate a single-line field, multi-line field, Button, TickBox, or TableBox in a dialog. When a character in the item's label is underlined, you can activate the item by pressing Alt together with the key corresponding to that character.
Last Modification: July 20, 2004 (c) Copyright 2004, Jos Timmermans
Dialog Manager - Scrollbar
A scrollbar appears at the right or bottom edge of a TableBox or multi-line field when its contents are not completely visible. Each scroll bar contains two scroll arrows and a scroll box that enable you to scroll through the contents of the TableBox or field.
Last Modification: December 10, 2004 © 1999-2004 Computerservice SSHS BV.

Dialog Manager - Initial Focus and Tab Order
When a control is active, it is said to have the focus, which means that you can act on it. For example, if a field has the focus, you can type in it. You can use the Tab key to move the focus and activate controls in a dialog. The tab order is the order in which controls become active when you use Tab. Using Tab is particularly useful and natural for moving from one text field to another.
Last Modification: December 10, 2004 © 1999-2004 Computerservice SSHS BV.
Dialog Manager - Coloring
Coloring or hatching of fields, tables, or buttons occurs when some action is required before a button can be pressed. Read-only fields that are dependent on an unsatisfied button are hatched whenever the button is grayed.
Last Modification: December 10, 2004 © 1999-2004 Computerservice SSHS BV.
Dialog Manager - Get Help For a Dialog
When the Dialog Manager presents you with a dialog, you can get help by pressing F1. This displays a dialog where you can choose (when available):
● General displays this Help ● Forms displays Help for the application ● Field displays Help for the field that has the focus
You can also use the Forms key or Field key to go directly to the corresponding Help.
Last Modification: December 10, 2004 © 1999-2004 Computerservice SSHS BV.