e n g celestron binoculars l i s h - amazon s3 · celestron binoculars thank you for purchasing...
TRANSCRIPT
Celestron Binoculars
Thank you for purchasing Celestron binoculars and we hope you will have many years of pleasure with them. To maximize your enjoyment of the binoculars, please read these instructions on use and care before using them.
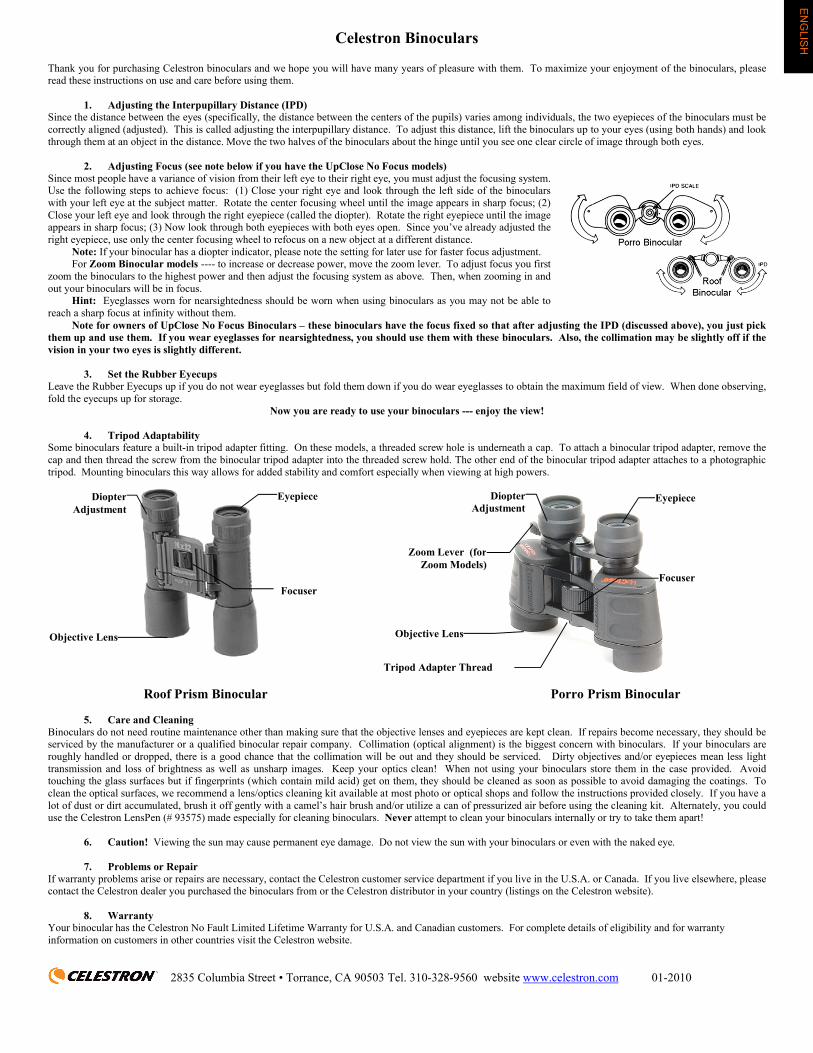
1. Adjusting the Interpupillary Distance (IPD)Since the distance between the eyes (specifically, the distance between the centers of the pupils) varies among individuals, the two eyepieces of the binoculars must be correctly aligned (adjusted). This is called adjusting the interpupillary distance. To adjust this distance, lift the binoculars up to your eyes (using both hands) and look through them at an object in the distance. Move the two halves of the binoculars about the hinge until you see one clear circle of image through both eyes.
2. Adjusting Focus (see note below if you have the UpClose No Focus models)Since most people have a variance of vision from their left eye to their right eye, you must adjust the focusing system.Use the following steps to achieve focus: (1) Close your right eye and look through the left side of the binocularswith your left eye at the subject matter. Rotate the center focusing wheel until the image appears in sharp focus; (2) Close your left eye and look through the right eyepiece (called the diopter). Rotate the right eyepiece until the image appears in sharp focus; (3) Now look through both eyepieces with both eyes open. Since you’ve already adjusted the right eyepiece, use only the center focusing wheel to refocus on a new object at a different distance.
Note: If your binocular has a diopter indicator, please note the setting for later use for faster focus adjustment.For Zoom Binocular models ---- to increase or decrease power, move the zoom lever. To adjust focus you first
zoom the binoculars to the highest power and then adjust the focusing system as above. Then, when zooming in and out your binoculars will be in focus.
Hint: Eyeglasses worn for nearsightedness should be worn when using binoculars as you may not be able to reach a sharp focus at infinity without them.
Note for owners of UpClose No Focus Binoculars – these binoculars have the focus fixed so that after adjusting the IPD (discussed above), you just pick them up and use them. If you wear eyeglasses for nearsightedness, you should use them with these binoculars. Also, the collimation may be slightly off if the vision in your two eyes is slightly different.
3. Set the Rubber EyecupsLeave the Rubber Eyecups up if you do not wear eyeglasses but fold them down if you do wear eyeglasses to obtain the maximum field of view. When done observing, fold the eyecups up for storage.
Now you are ready to use your binoculars --- enjoy the view!
4. Tripod AdaptabilitySome binoculars feature a built-in tripod adapter fitting. On these models, a threaded screw hole is underneath a cap. To attach a binocular tripod adapter, remove the cap and then thread the screw from the binocular tripod adapter into the threaded screw hold. The other end of the binocular tripod adapter attaches to a photographic tripod. Mounting binoculars this way allows for added stability and comfort especially when viewing at high powers.
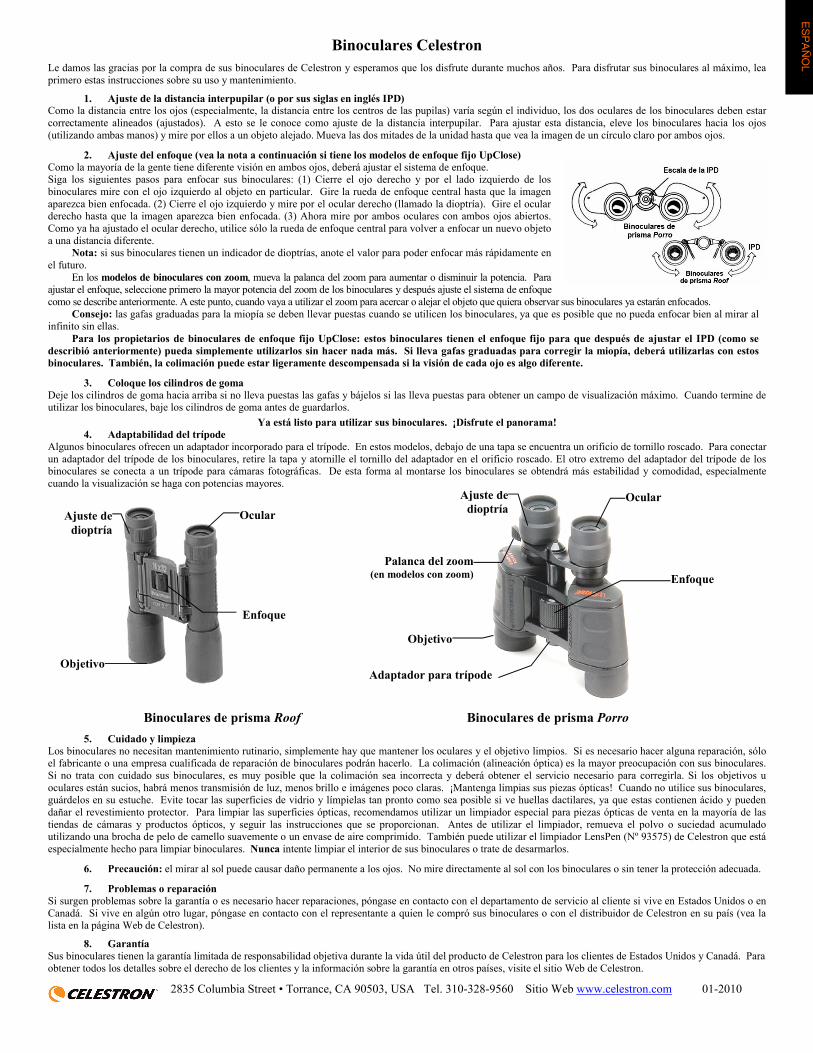
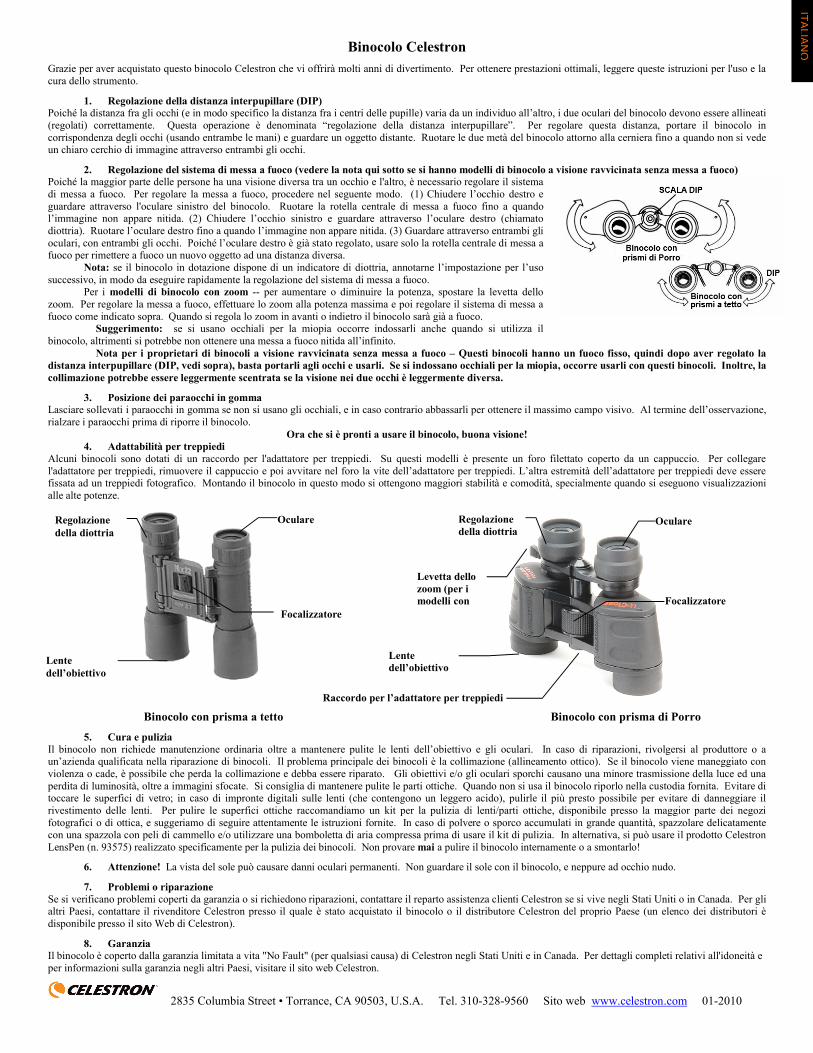
Roof Prism Binocular Porro Prism Binocular
5. Care and CleaningBinoculars do not need routine maintenance other than making sure that the objective lenses and eyepieces are kept clean. If repairs become necessary, they should be serviced by the manufacturer or a qualified binocular repair company. Collimation (optical alignment) is the biggest concern with binoculars. If your binoculars are roughly handled or dropped, there is a good chance that the collimation will be out and they should be serviced. Dirty objectives and/or eyepieces mean less light transmission and loss of brightness as well as unsharp images. Keep your optics clean! When not using your binoculars store them in the case provided. Avoid touching the glass surfaces but if fingerprints (which contain mild acid) get on them, they should be cleaned as soon as possible to avoid damaging the coatings. To clean the optical surfaces, we recommend a lens/optics cleaning kit available at most photo or optical shops and follow the instructions provided closely. If you have a lot of dust or dirt accumulated, brush it off gently with a camel’s hair brush and/or utilize a can of pressurized air before using the cleaning kit. Alternately, you could use the Celestron LensPen (# 93575) made especially for cleaning binoculars. Never attempt to clean your binoculars internally or try to take them apart!
6. Caution! Viewing the sun may cause permanent eye damage. Do not view the sun with your binoculars or even with the naked eye.
7. Problems or RepairIf warranty problems arise or repairs are necessary, contact the Celestron customer service department if you live in the U.S.A. or Canada. If you live elsewhere, please contact the Celestron dealer you purchased the binoculars from or the Celestron distributor in your country (listings on the Celestron website).
8. WarrantyYour binocular has the Celestron No Fault Limited Lifetime Warranty for U.S.A. and Canadian customers. For complete details of eligibility and for warranty information on customers in other countries visit the Celestron website.
2835 Columbia Street • Torrance, CA 90503 Tel. 310-328-9560 website www.celestron.com 01-2010
EyepieceDiopter Adjustment
Focuser
Objective Lens
Eyepiece
Objective Lens
Focuser
Zoom Lever (for Zoom Models)
Diopter Adjustment
Tripod Adapter Thread
EN
GLIS
H

Celestron-Ferngläser
Wir bedanken uns, dass Sie ein Celestron-Fernglas gewählt haben, und hoffen, dass Sie viele Jahre mit dem Fernglas zufrieden sein werden. Bitte lesen Sie die nachfolgenden Bedienungs- und Pflegeanweisungen, um Ihr Fernglas optimal zu nutzen.
1. Einstellen der Pupillendistanz (PD)Da der Abstand zwischen den beiden Augen (genauer gesagt: der Abstand zwischen den beiden Pupillenmitten) bei verschiedenen Personen unterschiedlich ist, müssen die beiden Okulare des Fernglases korrekt eingestellt werden. Dies wird als „Einstellen der Pupillendistanz“ bezeichnet. Halten Sie hierzu das Fernglas (mit beiden Händen) vor die Augen und betrachten Sie durch das Fernglas ein Objekt in der Ferne. Bewegen Sie die beiden Fernglashälften am Gelenk, bis Sie mit beiden Augen einen deutlichen Bildkreis sehen.
2. Scharfeinstellung (siehe Hinweis unten, wenn Sie ein UpClose No Focus-Modell haben)Da die meisten Personen unterschiedliche Sehstärken im linken und im rechten Auge haben, muss das Fokussiersystem eingestellt werden. Führen Sie diese Schritte zur Scharfeinstellung aus: (1) Schließen Sie das rechte Auge und schauen Sie durch die linke Fernglasseite, wobei das linke Auge ein bestimmtes Objekt betrachtet. Drehen Sie am Mitteltriebrad, bis das Bild scharf angezeigt wird. (2) Schließen Sie das linke Auge und schauen Sie durch das rechte Okular (Diopter genannt). Drehen Sie am rechten Okular, bis das Bild scharf angezeigt wird. (3) Schauen Sie jetzt mit geöffneten Augen durch beide Okulare. Da Sie bereits das rechte Okular eingestellt haben, verwenden Sie nur das Mitteltriebrad, um die Schärfe für ein neues Objekt bei einer anderen Entfernung neu einzustellen.
Hinweis: Wenn Ihr Fernglas eine Dioptrieanzeige hat, notieren Sie die Einstellung zur späteren Verwendung für eine schnellere Einstellung.
Bei Zoom-Ferngläsern bewegen Sie den Zoom-Hebel, um die Leistung zu erhöhen oder zu reduzieren. Zur Scharfeinstellung stellen Sie den Zoom des Fernglases zunächst auf die maximale Leistung ein. Stellen Sie anschließend das Fokussiersystem wie oben beschrieben ein. Das Fernglas wird dann beim Ein- und Auszoomen scharf eingestellt sein.
Tipp: Wenn Sie normalerweise eine Brille zur Korrektur von Kurzsichtigkeit tragen, sollten Sie die Brille beim Einsatz des Fernglases ebenfalls tragen. Andernfalls werden Sie u.U. keine Scharfeinstellung im Unendlich-Bereich erzielen.
Hinweis für Besitzer von UpClose No Focus-Ferngläsern: Diese Ferngläser haben eine feste Fokuseinstellung, d.h. sie können nach der Einstellung der Pupillendistanz (PD) (siehe Beschreibung oben) einfach verwendet werden. Wenn Sie eine Brille für Kurzsichtigkeit tragen, sollten Sie diese mit diesen Ferngläsern aufbehalten. Die Kollimation kann u.U. auch leicht abweichen, wenn die Sehkraft in Ihren beiden Augen etwas unterschiedlich ist.
3. Anpassen der Gummi-AugenmuschelnLassen Sie die Gummi-Augenmuscheln hochgeklappt, wenn Sie keine Brille tragen. Wenn Sie jedoch eine Brille tragen, stülpen Sie die Augenmuscheln um, um das Gesichtsfeld zu maximieren. Wenn Sie mit der Beobachtung fertig sind, klappen Sie die Augenmuscheln wieder hoch, um das Fernglas zu verstauen.
Das Fernglas ist jetzt einsatzbereit – genießen Sie die Aussicht!4. Stativanschluss
Manche Ferngläser verfügen über einen integrierten Stativadapteranschluss. Diese Modelle weisen ein Gewindeloch mit Abdeckung auf. Um einen Stativadapter am Fernglas zu befestigen, entfernen Sie die Abdeckung und schrauben Sie das eine Ende des Stativadapters in das Gewindeloch. Das andere Ende des Stativadapters wird an einem Kamerastativ befestigt. Das Fernglas ist insbesondere bei hohen Leistungen bei dieser Montierung stabiler und kann bequemer bedient werden.
Dachkantprismen-Fernglas Porroprismen-Fernglas
5. Pflege und ReinigungFerngläser müssen nicht regelmäßig gewartet werden. Sie müssen lediglich darauf achten, dass die Objektivlinsen und Okulare sauber bleiben. Falls das Fernglas repariert werden muss, sollte dies durch den Hersteller oder ein auf Fernglasreparaturen spezialisiertes Unternehmen erfolgen. Der größte Problembereich bei Ferngläsern ist die Kollimation (optische Justierung). Wenn das Fernglas unvorsichtig gehandhabt oder fallen gelassen wird, stimmt die Kollimation wahrscheinlich nicht mehr und muss neu justiert werden. Verschmutzte Objektive und/oder Okulare haben eine reduzierte Lichtdurchlässigkeit, einen Helligkeitsverlust und unscharfe Bilder zur Folge. Achten Sie auf eine saubere Optik! Bewahren Sie Ihr Fernglas bei Nichtgebrauch im bereitgestellten Behälter auf. Die Glasflächen möglichst nicht berühren! Entfernen Sie versehentliche Fingerabdrücke (die leicht säurehaltig sind) auf Glasflächen so schnell wie möglich, um die Vergütung nicht zu beschädigen. Wir empfehlen zum Reinigen der optischen Flächen ein Linsen-/Optikreinigungskit (in den meisten Foto- und Optikgeschäften erhältlich). Befolgen Sie die mitgelieferten Anweisungen. Wenn sich sehr viele Staub- oder Schmutzrückstände angesammelt haben, bürsten Sie die Rückstände zuerst vorsichtig mit einer Kamelhaarbürste ab und/oder blasen Sie sie mithilfe von Druckluft aus der Dose weg, bevor Sie das Reinigungskit verwenden. Sie können auch den speziellen Celestron LensPen-Stift (Bestell.-Nr. 93575) zum Reinigen von Ferngläsern verwenden. Versuchen Sie niemals, das Innere des Fernglases zu reinigen oder das Fernglas auseinander zu bauen!
6. Vorsicht! Sonnenbeobachtungen können Ihre Augen permanent beschädigen. Betrachten Sie die Sonne nicht durch das Fernglas oder mit dem bloßen Auge!
7. Probleme oder ReparaturenFalls Probleme im Rahmen der Garantie entstehen oder Reparaturen erforderlich sind, wenden Sie sich bitte an die Kundendienstabteilung von Celestron, wenn Sie in den USA oder in Kanada ansässig sind. Wenn Sie außerhalb der USA oder Kanada ansässig sind, wenden Sie sich bitte an den Celestron-Händler, von dem Sie das Fernglas erworben haben, oder an den Celestron-Distributor in Ihrem Land (siehe Celestron-Website).
8. GarantieUS- und kanadischen Kunden wird für das Fernglas die Celestron eingeschränkte „No Fault“-Garantie auf Lebenszeit gewährt. Umfassende Einzelheiten zur Qualifikation und Garantieinformationen für Kunden in anderen Ländern finden Sie auf der Celestron-Website.
2835 Columbia Street • Torrance, CA 90503, USA Tel. +1 310-328-9560 Website www.celestron.com 01-2010
OkularDioptrieeinstellung
Fokussierer
Objektivlinse
Okular
Objektivlinse
Fokussierer
Zoom-Hebel (für Zoom-Modelle)
Dioptrieeinstellung
Stativadapter-Gewinde
DE
UT
SC
H
Binoculares Celestron Le damos las gracias por la compra de sus binoculares de Celestron y esperamos que los disfrute durante muchos años. Para disfrutar sus binoculares al máximo, lea primero estas instrucciones sobre su uso y mantenimiento.
1. Ajuste de la distancia interpupilar (o por sus siglas en inglés IPD)Como la distancia entre los ojos (especialmente, la distancia entre los centros de las pupilas) varía según el individuo, los dos oculares de los binoculares deben estar correctamente alineados (ajustados). A esto se le conoce como ajuste de la distancia interpupilar. Para ajustar esta distancia, eleve los binoculares hacia los ojos (utilizando ambas manos) y mire por ellos a un objeto alejado. Mueva las dos mitades de la unidad hasta que vea la imagen de un círculo claro por ambos ojos.
2. Ajuste del enfoque (vea la nota a continuación si tiene los modelos de enfoque fijo UpClose)Como la mayoría de la gente tiene diferente visión en ambos ojos, deberá ajustar el sistema de enfoque.Siga los siguientes pasos para enfocar sus binoculares: (1) Cierre el ojo derecho y por el lado izquierdo de los binoculares mire con el ojo izquierdo al objeto en particular. Gire la rueda de enfoque central hasta que la imagen aparezca bien enfocada. (2) Cierre el ojo izquierdo y mire por el ocular derecho (llamado la dioptría). Gire el ocular derecho hasta que la imagen aparezca bien enfocada. (3) Ahora mire por ambos oculares con ambos ojos abiertos. Como ya ha ajustado el ocular derecho, utilice sólo la rueda de enfoque central para volver a enfocar un nuevo objeto a una distancia diferente.
Nota: si sus binoculares tienen un indicador de dioptrías, anote el valor para poder enfocar más rápidamente en el futuro.
En los modelos de binoculares con zoom, mueva la palanca del zoom para aumentar o disminuir la potencia. Para ajustar el enfoque, seleccione primero la mayor potencia del zoom de los binoculares y después ajuste el sistema de enfoque como se describe anteriormente. A este punto, cuando vaya a utilizar el zoom para acercar o alejar el objeto que quiera observar sus binoculares ya estarán enfocados.
Consejo: las gafas graduadas para la miopía se deben llevar puestas cuando se utilicen los binoculares, ya que es posible que no pueda enfocar bien al mirar al infinito sin ellas.
Para los propietarios de binoculares de enfoque fijo UpClose: estos binoculares tienen el enfoque fijo para que después de ajustar el IPD (como se describió anteriormente) pueda simplemente utilizarlos sin hacer nada más. Si lleva gafas graduadas para corregir la miopía, deberá utilizarlas con estos binoculares. También, la colimación puede estar ligeramente descompensada si la visión de cada ojo es algo diferente.
3. Coloque los cilindros de gomaDeje los cilindros de goma hacia arriba si no lleva puestas las gafas y bájelos si las lleva puestas para obtener un campo de visualización máximo. Cuando termine de utilizar los binoculares, baje los cilindros de goma antes de guardarlos.
Ya está listo para utilizar sus binoculares. ¡Disfrute el panorama!4. Adaptabilidad del trípode
Algunos binoculares ofrecen un adaptador incorporado para el trípode. En estos modelos, debajo de una tapa se encuentra un orificio de tornillo roscado. Para conectar un adaptador del trípode de los binoculares, retire la tapa y atornille el tornillo del adaptador en el orificio roscado. El otro extremo del adaptador del trípode de los binoculares se conecta a un trípode para cámaras fotográficas. De esta forma al montarse los binoculares se obtendrá más estabilidad y comodidad, especialmente cuando la visualización se haga con potencias mayores.
Binoculares de prisma Roof Binoculares de prisma Porro
5. Cuidado y limpiezaLos binoculares no necesitan mantenimiento rutinario, simplemente hay que mantener los oculares y el objetivo limpios. Si es necesario hacer alguna reparación, sólo el fabricante o una empresa cualificada de reparación de binoculares podrán hacerlo. La colimación (alineación óptica) es la mayor preocupación con sus binoculares. Si no trata con cuidado sus binoculares, es muy posible que la colimación sea incorrecta y deberá obtener el servicio necesario para corregirla. Si los objetivos u oculares están sucios, habrá menos transmisión de luz, menos brillo e imágenes poco claras. ¡Mantenga limpias sus piezas ópticas! Cuando no utilice sus binoculares, guárdelos en su estuche. Evite tocar las superficies de vidrio y límpielas tan pronto como sea posible si ve huellas dactilares, ya que estas contienen ácido y pueden dañar el revestimiento protector. Para limpiar las superficies ópticas, recomendamos utilizar un limpiador especial para piezas ópticas de venta en la mayoría de las tiendas de cámaras y productos ópticos, y seguir las instrucciones que se proporcionan. Antes de utilizar el limpiador, remueva el polvo o suciedad acumulado utilizando una brocha de pelo de camello suavemente o un envase de aire comprimido. También puede utilizar el limpiador LensPen (Nº 93575) de Celestron que está especialmente hecho para limpiar binoculares. Nunca intente limpiar el interior de sus binoculares o trate de desarmarlos.
6. Precaución: el mirar al sol puede causar daño permanente a los ojos. No mire directamente al sol con los binoculares o sin tener la protección adecuada.
7. Problemas o reparaciónSi surgen problemas sobre la garantía o es necesario hacer reparaciones, póngase en contacto con el departamento de servicio al cliente si vive en Estados Unidos o en Canadá. Si vive en algún otro lugar, póngase en contacto con el representante a quien le compró sus binoculares o con el distribuidor de Celestron en su país (vea la lista en la página Web de Celestron).
8. GarantíaSus binoculares tienen la garantía limitada de responsabilidad objetiva durante la vida útil del producto de Celestron para los clientes de Estados Unidos y Canadá. Para obtener todos los detalles sobre el derecho de los clientes y la información sobre la garantía en otros países, visite el sitio Web de Celestron.
2835 Columbia Street • Torrance, CA 90503, USA Tel. 310-328-9560 Sitio Web www.celestron.com 01-2010
OcularAjuste de dioptría
Enfoque
Objetivo
Ocular
Objetivo
Enfoque
Palanca del zoom(en modelos con zoom)
Ajuste de dioptría
Adaptador para trípode
ES
PA
ÑO
L

Jumelles Celestron
Nous vous remercions d’avoir fait l’acquisition de jumelles Celestron et nous espérons qu’elles vous procureront des années de satisfaction. Pour utiliser vos jumelles au mieux, veuillez préalablement lire ce mode d'emploi et ces consignes d’entretien.
1. Réglage de la distance interpupillaire (DIP)Étant donné que la distance entre les yeux (plus précisément, la distance entre le centre des deux pupilles) varie d'une personne à l'autre, il est nécessaire de parfaitement aligner (régler) les deux oculaires des jumelles. Cette distance est désignée sous le nom de distance interpupillaire. Pour la régler, mettez les jumelles devant vos yeux (en les tenant des deux mains) et regardez un objet éloigné avec. Déplacez les deux tubes droits des jumelles au niveau de la charnière jusqu’à ce que vous aperceviez un cercle d’image net avec les deux yeux.
2. Réglage de la mise au point (voir remarque ci-dessous pour les modèles autofocus UpClose)Étant donné que la plupart des gens n’ont pas la même vision d’un œil à l’autre, vous devez régler le système de mise au point. Procédez comme suit pour effectuer la mise au point : (1) Fermez l’œil droit et regardez l’image observée avec l’œil gauche à travers le tube gauche des jumelles. Tournez la molette centrale de mise au point jusqu’à ce que l’image soit parfaitement nette ; (2) Fermez l’œil gauche et regardez maintenant dans l’oculaire droit (pour le réglage de la dioptrie). Tournez l’oculaire droit jusqu’à ce que l’image soit parfaitement nette ; (3) Regardez maintenant dans les deux oculaires avec les deux yeux. L’oculaire droit venant d’être réglé, utilisez uniquement la molette centrale de mise au point pour refaire la mise au point sur un nouvel objet situé à une distance différente.
Remarque : Si vos jumelles sont dotées d'un indicateur de dioptrie, veuillez noter le réglage pour effectuer plus rapidement votre mise au point lors de toute utilisation ultérieure.
Pour les modèles de jumelles avec zoom ---- déplacez le levier du zoom pour augmenter ou diminuer la puissance. Pour régler la mise au point, réglez déjà les jumelles au grossissement maximum, puis ajustez le dispositif de mise au point comme indiqué ci-dessus. Ensuite, vous pourrez effectuer des zooms avant et arrière en obtenant une image nette.
Conseil utile : Si vous êtes myope, vous devez mettre vos lunettes lorsque vous utilisez les jumelles, sinon vous risquez de ne pouvoir parvenir à une mise au point nette à l’infini.
Remarque concernant les jumelles autofocus UpClose – ces jumelles sont équipées d’une mise au point fixe permettant de s’en servir directement aussitôt après avoir réglé la DIP (expliquée ci-dessus). Si vous êtes myope et que vous portez des lunettes, il est conseillé de les utiliser avec ces jumelles. Dans ce cas, la collimation peut être légèrement décalée si la vision de vos deux yeux est légèrement différente.
3. Installation des œilletons en caoutchoucLaissez les œilletons en caoutchouc en position relevée si vous ne portez pas de lunettes, mais abaissez-les dans le cas contraire pour obtenir un champ de vision maximum. Lorsque vous avez fini, repliez les œilletons avant de ranger vos jumelles.
Vous êtes maintenant prêt à utiliser vos jumelles --- profitez du spectacle !4. Adaptabilité du trépied
Certaines jumelles sont équipées d’un adaptateur intégré pour trépied. Ces modèles sont pourvus d’un orifice à vis fileté situé sous un cache. Pour fixer un adaptateur de trépied pour jumelles, retirez le cache et vissez la vis de l’adaptateur du trépied pour jumelles dans l’orifice fileté. L’autre extrémité de l’adaptateur du trépied pour jumelles se fixe sur un trépied photographique. En montant les jumelles de cette façon, on bénéficie d’une stabilité et d’un confort meilleurs, notamment pour observer avec des grossissements élevés.
Jumelles à prisme en toit Jumelles à prisme de Porro
5. Entretien et nettoyageLe seul entretien préconisé pour les jumelles consiste à vérifier la parfaite propreté des lentilles et des oculaires. Si des réparations sont nécessaires, elles devront être confiées au fabricant ou à une entreprise spécialisée dans la réparation de jumelles. La collimation (alignement optique) est le plus gros problème que l’on rencontre avec les jumelles. En cas de maniement brutal ou de chute des jumelles, la collimation sera vraisemblablement déréglée et les jumelles devront être réparées. Des objectifs et/ou oculaires sales entravent la transmission de lumière, atténuent la luminosité et donnent des images plus floues. Nettoyez régulièrement les éléments optiques ! Lorsque vous n’utilisez pas vos jumelles, rangez-les dans l’étui fourni à cet effet. Évitez de toucher les surfaces en verre et en cas de traces de doigts (qui sont légèrement acides), celles-ci devront être nettoyées au plus vite pour éviter d’endommager les revêtements. Pour nettoyer les surfaces optiques, nous recommandons d’utiliser un kit de nettoyage pour lentilles/éléments optiques en vente dans la plupart des magasins de photo ou chez votre opticien et de suivre fidèlement les instructions données. Si une grosse quantité de poussière ou de saleté s’est accumulée, époussetez-la délicatement avec une brosse à poils de chameau et/ou utilisez une bombe d'air pressurisé avant de vous servir du kit de nettoyage. Vous pouvez également utiliser le « LensPen » de Celestron (réf. 93575) qui est spécialement conçu pour le nettoyage des jumelles. N'essayez jamais de nettoyer l’intérieur de vos jumelles ni de les démonter !
6. Avertissement ! L’observation du soleil peut provoquer des lésions oculaires irréversibles. Ne regardez pas le soleil avec vos jumelles ou même à l’œil nu.
7. Problèmes ou réparationsEn cas de problèmes ou de réparations dans le cadre de la garantie, contactez le service client de Celestron si vous résidez aux États-Unis ou au Canada. Si vous habitez dans un autre pays, veuillez contacter le revendeur Celestron chez qui vous avez acheté vos jumelles ou le distributeur Celestron de votre pays (listes fournies sur le site web de Celestron).
8. GarantieLes jumelles Celestron bénéficient d’une garantie à vie limitée sans égard à la responsabilité pour les acheteurs résidant aux États-Unis et au Canada. Pour tout complément d’information sur l’application de la garantie et autres dispositions concernant les clients d’autres pays, consultez le site web de Celestron.
2835 Columbia Street • Torrance, CA 90503, USA Tél. 310-328-9560 Site web www.celestron.com 01-2010
OculaireRéglage de la dioptrie
Dispositif de mise au point
Objectif
Oculaire
Objectif
Dispositif de mise au point
Levier du zoom (pour modèles avec zoom)
Réglage de la dioptrie
Filetage de l’adaptateur de trépied
FR
AN
ÇA
IS
Binocolo Celestron
Grazie per aver acquistato questo binocolo Celestron che vi offrirà molti anni di divertimento. Per ottenere prestazioni ottimali, leggere queste istruzioni per l'uso e la cura dello strumento.
1. Regolazione della distanza interpupillare (DIP)Poiché la distanza fra gli occhi (e in modo specifico la distanza fra i centri delle pupille) varia da un individuo all’altro, i due oculari del binocolo devono essere allineati (regolati) correttamente. Questa operazione è denominata “regolazione della distanza interpupillare”. Per regolare questa distanza, portare il binocolo in corrispondenza degli occhi (usando entrambe le mani) e guardare un oggetto distante. Ruotare le due metà del binocolo attorno alla cerniera fino a quando non si vede un chiaro cerchio di immagine attraverso entrambi gli occhi.
2. Regolazione del sistema di messa a fuoco (vedere la nota qui sotto se si hanno modelli di binocolo a visione ravvicinata senza messa a fuoco)Poiché la maggior parte delle persone ha una visione diversa tra un occhio e l'altro, è necessario regolare il sistema di messa a fuoco. Per regolare la messa a fuoco, procedere nel seguente modo. (1) Chiudere l’occhio destro e guardare attraverso l'oculare sinistro del binocolo. Ruotare la rotella centrale di messa a fuoco fino a quando l’immagine non appare nitida. (2) Chiudere l’occhio sinistro e guardare attraverso l’oculare destro (chiamato diottria). Ruotare l’oculare destro fino a quando l’immagine non appare nitida. (3) Guardare attraverso entrambi gli oculari, con entrambi gli occhi. Poiché l’oculare destro è già stato regolato, usare solo la rotella centrale di messa a fuoco per rimettere a fuoco un nuovo oggetto ad una distanza diversa.
Nota: se il binocolo in dotazione dispone di un indicatore di diottria, annotarne l’impostazione per l’uso successivo, in modo da eseguire rapidamente la regolazione del sistema di messa a fuoco.
Per i modelli di binocolo con zoom -- per aumentare o diminuire la potenza, spostare la levetta dello zoom. Per regolare la messa a fuoco, effettuare lo zoom alla potenza massima e poi regolare il sistema di messa a fuoco come indicato sopra. Quando si regola lo zoom in avanti o indietro il binocolo sarà già a fuoco.
Suggerimento: se si usano occhiali per la miopia occorre indossarli anche quando si utilizza il binocolo, altrimenti si potrebbe non ottenere una messa a fuoco nitida all’infinito.
Nota per i proprietari di binocoli a visione ravvicinata senza messa a fuoco – Questi binocoli hanno un fuoco fisso, quindi dopo aver regolato la distanza interpupillare (DIP, vedi sopra), basta portarli agli occhi e usarli. Se si indossano occhiali per la miopia, occorre usarli con questi binocoli. Inoltre, la collimazione potrebbe essere leggermente scentrata se la visione nei due occhi è leggermente diversa.
3. Posizione dei paraocchi in gommaLasciare sollevati i paraocchi in gomma se non si usano gli occhiali, e in caso contrario abbassarli per ottenere il massimo campo visivo. Al termine dell’osservazione, rialzare i paraocchi prima di riporre il binocolo.
Ora che si è pronti a usare il binocolo, buona visione!4. Adattabilità per treppiedi
Alcuni binocoli sono dotati di un raccordo per l'adattatore per treppiedi. Su questi modelli è presente un foro filettato coperto da un cappuccio. Per collegare l'adattatore per treppiedi, rimuovere il cappuccio e poi avvitare nel foro la vite dell’adattatore per treppiedi. L’altra estremità dell’adattatore per treppiedi deve essere fissata ad un treppiedi fotografico. Montando il binocolo in questo modo si ottengono maggiori stabilità e comodità, specialmente quando si eseguono visualizzazioni alle alte potenze.
Binocolo con prisma a tetto Binocolo con prisma di Porro
5. Cura e puliziaIl binocolo non richiede manutenzione ordinaria oltre a mantenere pulite le lenti dell’obiettivo e gli oculari. In caso di riparazioni, rivolgersi al produttore o a un’azienda qualificata nella riparazione di binocoli. Il problema principale dei binocoli è la collimazione (allineamento ottico). Se il binocolo viene maneggiato con violenza o cade, è possibile che perda la collimazione e debba essere riparato. Gli obiettivi e/o gli oculari sporchi causano una minore trasmissione della luce ed una perdita di luminosità, oltre a immagini sfocate. Si consiglia di mantenere pulite le parti ottiche. Quando non si usa il binocolo riporlo nella custodia fornita. Evitare di toccare le superfici di vetro; in caso di impronte digitali sulle lenti (che contengono un leggero acido), pulirle il più presto possibile per evitare di danneggiare il rivestimento delle lenti. Per pulire le superfici ottiche raccomandiamo un kit per la pulizia di lenti/parti ottiche, disponibile presso la maggior parte dei negozi fotografici o di ottica, e suggeriamo di seguire attentamente le istruzioni fornite. In caso di polvere o sporco accumulati in grande quantità, spazzolare delicatamente con una spazzola con peli di cammello e/o utilizzare una bomboletta di aria compressa prima di usare il kit di pulizia. In alternativa, si può usare il prodotto Celestron LensPen (n. 93575) realizzato specificamente per la pulizia dei binocoli. Non provare mai a pulire il binocolo internamente o a smontarlo!
6. Attenzione! La vista del sole può causare danni oculari permanenti. Non guardare il sole con il binocolo, e neppure ad occhio nudo.
7. Problemi o riparazioneSe si verificano problemi coperti da garanzia o si richiedono riparazioni, contattare il reparto assistenza clienti Celestron se si vive negli Stati Uniti o in Canada. Per gli altri Paesi, contattare il rivenditore Celestron presso il quale è stato acquistato il binocolo o il distributore Celestron del proprio Paese (un elenco dei distributori è disponibile presso il sito Web di Celestron).
8. GaranziaIl binocolo è coperto dalla garanzia limitata a vita "No Fault" (per qualsiasi causa) di Celestron negli Stati Uniti e in Canada. Per dettagli completi relativi all'idoneità e per informazioni sulla garanzia negli altri Paesi, visitare il sito web Celestron.
2835 Columbia Street • Torrance, CA 90503, U.S.A. Tel. 310-328-9560 Sito web www.celestron.com 01-2010
OculareRegolazione della diottria
Focalizzatore
Lente dell’obiettivo
Oculare
Lente dell’obiettivo
Focalizzatore
Levetta dello zoom (per i modelli con
Regolazione della diottria
Raccordo per l’adattatore per treppiedi
ITA
LIAN
O