dry back luxury vinyl tile (lvt) - wood planks … · dry back luxury vinyl tile (lvt) - wood...
TRANSCRIPT

DRY BACK Luxury Vinyl Tile (LVT) - Wood Planks - Residential/Commercial Instructions 6/7/16
Dry Back Luxury Vinyl Tile (LVT) - Wood Planks Residential/Commercial Installation Instructions
LVT can be installed in every level of the home or business.
Ideal for cement and basement applications. INTRODUCTION and APPLICATION Luxury Vinyl Tile (LVT) is constructed of solid vinyl PVC with the look and feel of textured wood planks and is impervious to moisture. LVT is intended for interior direct glue applications only and can be installed in every level of the home or business. LVT is ideal for cement, basement and *commercial applications. These instructions are intended to provide guidance on the proper installation of these products. This product may be installed over radiant heated substrates as long as the maximum temperature of the substrate does not exceed 85°F. Please read, fully understand and adhere to these instructions before beginning the installation. Not following these instructions can negatively impact product performance. PVC/LVT materials can shrink, gap, edge curl or have adhesion/bonding problems when the directions are not followed regarding acclimation, storage, handling, temperatures, site conditions/preparation, installation and/or floor care. Note: Any deviations from these instructions are done at the installer’s own risk unless approved in writing. Should any situations arise that are not covered in these instructions please contact customer care for clarification (800-366-4204). JOBSITE CONDITIONS AND ACCLIMATION 1. Areas to receive floor covering shall be clean, fully enclosed, well-lighted, and weather-tight. 2. The building’s heating and air conditioning system must be fully operational for at least one week prior to floor installation. Portable or temporary heaters are not acceptable. 3. Interior temperature must be maintained at a minimum of 65°F (18°C) and a maximum of 85°F (29.4°C) for 48 hours before, during and 48 hours after completion. During the service life of the floor the temperature should never fall below 55°F (13°C) or shrinking/gapping and other product problems may occur.
MATERIAL HANDLING/STORAGE 1. Allow all flooring materials, adhesives and maintenance products to acclimate to room temperature a minimum of 48 hours before starting the installation. 2. Store cartons flat and squarely on top of one another, not leaning or on edge and no more than 4 cartons high. 3. Do not store cartons in cold rooms or directly on cold cement (below 55°) which can retard acclimation times. 4. Check that all material is the correct color/pattern and that all cartons are from the same batch and lot number. During assembly, mix and install planks from several different cartons to ensure best overall color/shade appearance. 5. Every effort is made to inspect materials during manufacturing and handling. It is the installer or end-user responsibility to inspect all material for defects and confirm that the correct color/pattern is received prior to installation. 6. Do not install material with visible defects. Completed installation implies acceptance of materials.
DRY BACK Luxury Vinyl Tile (LVT) - Wood Planks - Residential/Commercial Instructions 6/7/16
SUBFLOOR PREPARATION All substrates must be flat to within 1/8” in 6’, dry, clean, smooth, and free from contaminates such as, but not limited to: dust, grease, paint, varnish, wax, oils, solvents, residual adhesive, adhesive removers and similar chemical compounds, alkaline salts, salts, mold, mildew, and other foreign materials that might prevent adhesive bond (refer to the adhesive specifications). Wood subfloor systems- 1. Do not glue/install directly over unsuitable substrates such as, but not limited to: adhesive residue, exterior grade plywood, OSB, strip hardwood flooring, chemically treated wood, particle board, chipboard, flakeboard, fiber or cement board, masonite, pressboard, gypcrete or gypsum-based products. 2. To smooth over or eliminate telegraphing of the base floor or to cover over unsuitable substrates in wood subfloors, use APA grade plywood underlayment (thickness should be 1/4” solid core luan or 3/8” plywood) or similar panels warranted by the plywood manufacturer for this application. Concrete substrates- 1. Prepare and test per ASTM F 710, the Standard Practice for Preparing Concrete to Receive Resilient Flooring. Surface cracks, grooves, depressions and other irregularities must be filled or smoothed with latex cement patching compound recommended for filling or smoothing. Patching or underlayment compound must be moisture-, mildew-, and alkali-resistant, and, for commercial installations, provide a minimum of 3,000 psi compressive strength after 28 days. 2. Do not install this flooring over plywood underlayment attached to concrete. Do not install this flooring over expansion joints, crack isolation joints, or other moving joints in concrete slabs. Flooring material should be cut to either side of the joint and then covered with a “T” molding type transition. 3. DO NOT SAND, PATCH OR “SKIMCOAT” OVER EXISTING ADHESIVE RESIDUE. Do not use chemicals or solvent-based adhesive removers. These products leave residues within the substrate that can adversely affect the new adhesive bond or flooring. It may be
possible to hand-scrape most of the adhesive from the floor, encapsulate and smooth residual with an approved cement based patching compound. Follow the patching compound manufacturer’s instructions for proper procedures and any asbestos related warnings. Recommended Patches/Levelers- Cement Patching- Mapei Quickpatch, Bostik UltraFinish™, WebcreteR 95™ Total Surface Self-Leveling- Bostik SL-150™, Mapei Extreme Slab temperature- must be between 55°F and 95°F Slab flatness- Concrete surface must be flat to within 1/8” in 6’ 1. We will not accept responsibility for the following: Joint or texture telegraphing, tunneling or ridging over any underlayment joints. 2. Do not glue over polished or reflective concrete. Installing over existing resilient flooring- preparation 1. Existing resilient flooring should be maximum one layer thick. Do not install directly over asphalt tile, or asphalt-based adhesive, or any other adhesives. Do not install over loose-laid or perimeter-fastened floor covering. Do not install over self-stick tile, linoleum, or cushioned resilient flooring. 2. All existing resilient floors with surface irregularities, unevenness, or deep embossing must be covered with ¼” approved underlayment or overlaid with a cementitious latex embossing leveler. Otherwise, the existing resilient floor will need to be removed. 3. Warning: Do not sand, dry sweep, dry scrape, drill, saw, bead-blast or mechanically chip or pulverize existing resilient flooring, backing, lining felt or asphaltic “cut back” adhesives. These products may contain either asbestos fibers or crystalline silica. Avoid creating dust. Inhalation of such dust is a cancer and respiratory tract hazard. Smoking by individuals exposed to asbestos fibers greatly increases the risk of serious bodily harm. Unless positively certain the product is a non-asbestos containing material, you must presume that it contains asbestos. Regulations may require that the material be tested to determine asbestos content. Go to www.rfci.com for recommended work practices. 4. Mold and Mildew: For proper removal of mold and mildew you should refer to the U.S Environmental Protection Agency (EPA). Work should stop until the mold and mildew have been removed, and the moisture is corrected. www.epa.gov 5.Ceramic tile Terrazzo, Marble- Surface coatings, sealers or glazing must be completely removed. Floors must be overlaid with a cementitious latex leveler or patching compound designed for covering tile floors. The compound must be allowed to fully dry before installing the vinyl flooring. Bond tests should always be performed if porosity or suitability of substrate is in question.
CONCRETE MOISTURE TESTING It is the responsibility of the USER to moisture test all concrete substrates regardless of age or grade level to determine the acceptable limits of moisture applicable to the adhesive used. A concrete slab shall be cured a minimum of 90 days before running any moisture tests. If concrete moisture levels are not within the limits shown above, do not install the floor. 1. Follow the moisture testing and procedure guidelines of the adhesive manufacturer 2. There are only two accepted moisture test methods: The Relative Humidity (RH) test or the Calcium Chloride (CC) test 3. The use of moisture meters, plastic sheet tests and/or bond tests are not industry accepted quantitative test methods 4. Using the Relative Humidity (RH) test, follow the ASTM F 2170, Standard Refer to Bostik's LVT Lock, Mapei ECO 962, or Foam Products Quicklay spray specifications for RH Moisture test/limitations
5. Using the Calcium Chloride (CC) test, follow the ASTM F 1869 Standard (Moisture Vapor)

DRY BACK Luxury Vinyl Tile (LVT) - Wood Planks - Residential/Commercial Instructions 6/7/16
Refer to Bostik's LVT Lock, Mapei ECO 962, or Foam Products Quicklay spray specifications for CC Moisture test /limitations 6. For your protection, it is recommended to document and save the testing results Concrete floors shall be tested for pH prior to the installation of resilient flooring. Readings below 7.0 and in excess of 10.0 have been known to affect resilient flooring or adhesives, or both. PH Paper Test- Surface Alkalinity on Concrete Substrate Concrete by its very nature is a highly alkaline material. Under normal conditions this situation does not affect vinyl planks and adhesives. However, this does become a factor when concrete surface alkali salts build up, usually as the result of excessive moisture vapor transmission through the concrete slab. Moisture carries alkali salts from the interior of the slab to the surface, which are left behind when the moisture evaporates. Excessive alkali has been known to degrade adhesives and vinyl planks leading to poor adhesive bonding, appearance, maintenance difficulties, and in extreme cases, total floor failure. The most common test performed for excessive surface alkali is the pH Paper Test. Measures of alkalinity are usually expressed in terms of a pH number. The normally encountered pH scale ranges from 1 to 14 with 7 being neutral or ideal. Numbers moving downward from 7 indicate increasing acidity and numbers moving upward from 7 indicate increasing alkalinity. Readings of pH in excess of 10 have been known to affect vinyl planks and adhesives and are usually suggestive of excessive vapor/moisture transmission. Contact the adhesive company if the pH readings are questionable. Sealers and Curing Compounds Sealers and curing compounds used on concrete substrates may not be compatible with the adhesive and may interfere with the adhesion of the flooring material. Do not install LVT over these products. These products must be removed by a grinding/abrading
machine or similar. Consult with the adhesive company for remediation. A bond test shall be performed to determine if adhesion properties are acceptable. RECOMMENDED ADHESIVES Bostik LVT Lock - apply using a 3/32”x3/32”x3/32” square notched trowel, coverage est (128-216 sqft per gal) Mapei ECO 962 - apply using a 1/16”x 1/16”x 1/16” square notched trowel, coverage est (125-185 sqft per gal) Quicklay LVT Spray - an aerosol spray coverage est (140-150sqft per can)
Refer to adhesive documentation for application details, working time, cure time, use of rollers, dry time, adhesive removal/cleaning, coverage and so on. INSTALLATION Fully glue to approved, properly prepared flat substrates
• Do not install product with noticeable defects. • Do not install over sealed subfloors, solvent based primers, fillers. • Do not install on walls, ceilings, in boats, or any other moving vehicles.
• Do not install in sunrooms or rooms with excessive direct sunlight or excessive heat. • Do not install in wet areas like patios, saunas, steam, basement sump pumps, or exterior areas.
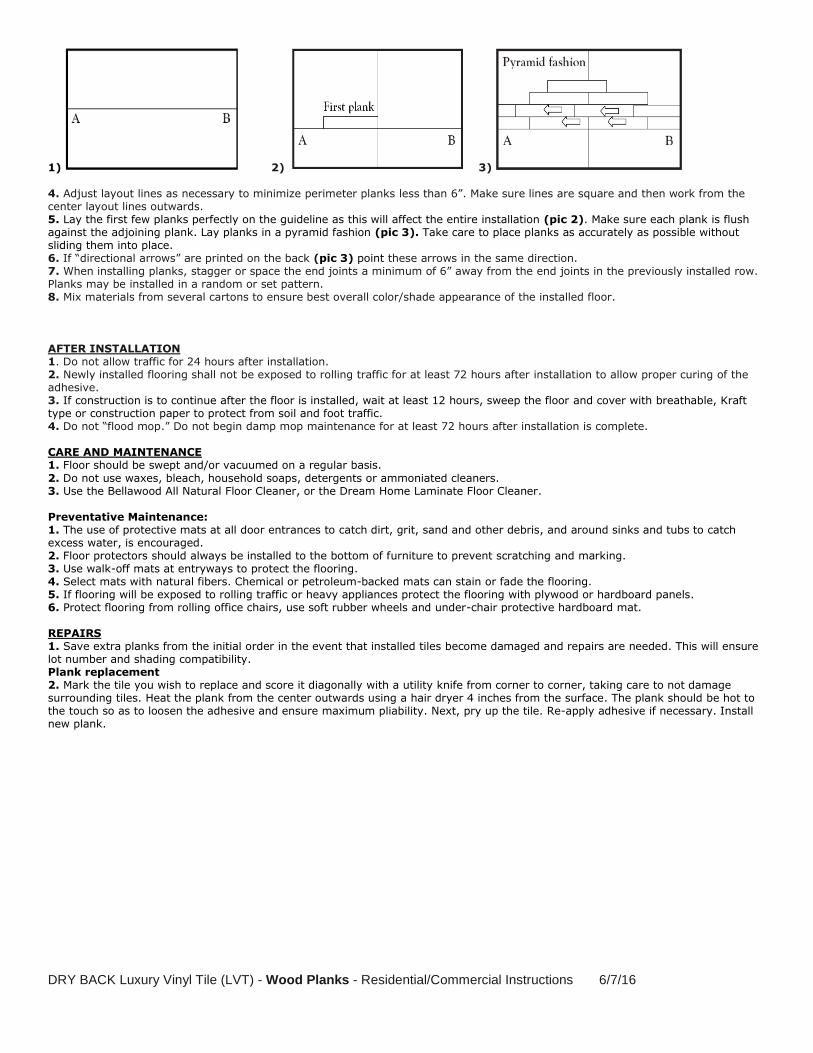
1. Prepare all tools before commencing work. To ensure straightness, LVT vinyl planks can be installed along the longest wall or in the center of a large room working outwards. Always leave approximately 1/8” expansion space at walls or other vertical obstructions. 2. Follow adhesive manufacturer instructions regarding the required spray pattern or trowel notch size, adhesive working time and rolling the floor. 3. Layout (pic 1, 2). Find the center of the floor by measuring and marking vertical & horizontal lines across the floor in the same traditional way as is done for other plank or ceramic tiles.
DRY BACK Luxury Vinyl Tile (LVT) - Wood Planks - Residential/Commercial Instructions 6/7/16
1) 2) 3)
4. Adjust layout lines as necessary to minimize perimeter planks less than 6”. Make sure lines are square and then work from the center layout lines outwards. 5. Lay the first few planks perfectly on the guideline as this will affect the entire installation (pic 2). Make sure each plank is flush against the adjoining plank. Lay planks in a pyramid fashion (pic 3). Take care to place planks as accurately as possible without sliding them into place. 6. If “directional arrows” are printed on the back (pic 3) point these arrows in the same direction. 7. When installing planks, stagger or space the end joints a minimum of 6” away from the end joints in the previously installed row. Planks may be installed in a random or set pattern. 8. Mix materials from several cartons to ensure best overall color/shade appearance of the installed floor. AFTER INSTALLATION 1. Do not allow traffic for 24 hours after installation. 2. Newly installed flooring shall not be exposed to rolling traffic for at least 72 hours after installation to allow proper curing of the adhesive. 3. If construction is to continue after the floor is installed, wait at least 12 hours, sweep the floor and cover with breathable, Kraft type or construction paper to protect from soil and foot traffic. 4. Do not “flood mop.” Do not begin damp mop maintenance for at least 72 hours after installation is complete. CARE AND MAINTENANCE 1. Floor should be swept and/or vacuumed on a regular basis.
2. Do not use waxes, bleach, household soaps, detergents or ammoniated cleaners. 3. Use the Bellawood All Natural Floor Cleaner, or the Dream Home Laminate Floor Cleaner. Preventative Maintenance: 1. The use of protective mats at all door entrances to catch dirt, grit, sand and other debris, and around sinks and tubs to catch excess water, is encouraged. 2. Floor protectors should always be installed to the bottom of furniture to prevent scratching and marking. 3. Use walk-off mats at entryways to protect the flooring. 4. Select mats with natural fibers. Chemical or petroleum-backed mats can stain or fade the flooring. 5. If flooring will be exposed to rolling traffic or heavy appliances protect the flooring with plywood or hardboard panels. 6. Protect flooring from rolling office chairs, use soft rubber wheels and under-chair protective hardboard mat. REPAIRS 1. Save extra planks from the initial order in the event that installed tiles become damaged and repairs are needed. This will ensure lot number and shading compatibility. Plank replacement 2. Mark the tile you wish to replace and score it diagonally with a utility knife from corner to corner, taking care to not damage surrounding tiles. Heat the plank from the center outwards using a hair dryer 4 inches from the surface. The plank should be hot to the touch so as to loosen the adhesive and ensure maximum pliability. Next, pry up the tile. Re-apply adhesive if necessary. Install new plank.

DRY BACK Luxury Vinyl Tile (LVT) - Wood Planks - Residential/Commercial Instructions 6/7/16
TRANSITIONS
STAIR NOSE