drupal 6 training - extension.iastate.edu 6 user... · 1 drupal 6 training this is a condensed...
TRANSCRIPT

1
DRUPAL 6 TRAINING
This is a condensed version of the step-by-step tutorials found online. The online
tutorials also include videos.
They can be accessed at:
http://www.extension.iastate.edu/it/drupal-6-tutorials
Or by going to: http://www.extension.iastate.edu/it and clicking on the “Tutorials” link in
the main menu and then clicking on “Drupal 6 Tutorials”.

2
TABLE OF CONTENTS
Logging In ....................................................................................................................................... 3
Setting Up Your Public Profile ..................................................................................................... 4
Using the Content Editor .......................................................................................................... 8-29
The Paste Button .......................................................................................................................... 8
The Table Button ......................................................................................................................... 9
The Horizontal Line Button ....................................................................................................... 11
Text Formatting Button ............................................................................................................. 12
The Quote and List Buttons ....................................................................................................... 13
The Link and Unlink Buttons .................................................................................................... 15
The Header Dropdown............................................................................................................... 17
The Format Removal Button ..................................................................................................... 19
The Image Properties Button ..................................................................................................... 20
The Bottom Bar ......................................................................................................................... 28
Creating an Announcement ........................................................................................................ 30
Creating a News Article ............................................................................................................... 35
Creating an Page .......................................................................................................................... 38
Add a Summary ......................................................................................................................... 39
Creating a Resource ..................................................................................................................... 40
Creating an Event ........................................................................................................................ 42
Creating a Webform .................................................................................................................... 45
Form Component Descriptions .................................................................................................. 47
Adding Images .............................................................................................................................. 50
Editing Your Image with the Content Editor ............................................................................. 52
Linking to Your Image .............................................................................................................. 55
Uploading Files ............................................................................................................................. 57
Linking to Your Document ........................................................................................................ 58
Embed a Video .............................................................................................................................. 60
Change URL Path Settings .......................................................................................................... 61
Creating Your Own URL Alias ................................................................................................. 61
Scheduling Content ...................................................................................................................... 63
Publish and Unpublish Content .................................................................................................. 64
Edit Content .................................................................................................................................. 65
Delete Content .............................................................................................................................. 66
Changing Who Can Log In ......................................................................................................... 68

3
LOGGING IN
Step 1: Go to your website
Step 2: In the footer, click on "Website Log In".
Step 3: Enter your NetID and password into the Single Sign-On for the Web screen.
Step 4: After logging in, you will be redirected to the Extension homepage.
Step 5: Navigate back to your website. You can tell you are logged in when you see the black bar at the top of the page.

4
VIEWING ALL SITE CONTENT
Step 1: In the Administration menu, hover over "Affiliated Content" and select "Affiliate Site List".
This will allow you to see the list of sites that you have access to.
NOTE: Make sure you are on the correct site before you access this screen. If you are not on the right site, your pages will not look correct, your links will not work and you might not be able to edit the page.
Step 2: Clicking on the Site name will take you to a list of content on that site. You can also navigate to the site by clicking the "view site" link to the right hand side of the list.

5
USING THE CONTENT EDITOR
The Body section is the main area of the page. You can use the tool bar to insert images, text, links, etc. This works very similar to Word, so some of the buttons might look familiar.
**WARNING: Some of the styling will look different while editing it than it does after you save.
Source
You may access the HTML code through the "Source" Button. If you are not familiar with HTML code or how to write it, we encourage you NOT to use this as it can break your page if you are unclear of how to do it correctly.
Paste
Use the Paste button to paste text from other software or websites. When you paste content into the body without using the paste button, you bring in a lot of unwanted formatting. By using the Paste button, all of this formatting is automatically stripped out.
Step 1: Click the paste button. A dialog box will appear.

6
Step 2: Place your cursor inside the dialog box and use your keyboard shortcuts (Control + V for windows or Command + V for Macs) to paste your content.
Step 3: Click ok and the text will be placed in the body of the page where your cursor was located.
Table
Step 1: Click the table button. A dialog box will appear.

7
You can enter the rows and columns that you want on your table using the fields on the top left corner. You can also use the header dropdown to make the top row and/or column into a header.
Adding a header is necessary for website accessibility. Screen Readers use headers to provide context about the table to users with visual impairments. Headers can also help users navigate the information in the table.
The caption and summary fields can also be used.
The caption is like a heading for the entire table. This helps users find a table and understand what it is about and decide if they want to decipher the information.
A summary conveys information about the organization of the data in a table and helps users navigate it. Summaries are only needed for complex tables and should not duplicate information present in the caption.

8
Captions are required for web accessibility rules. This helps screen reader users find, navigate and understand the information that is in the table.
You can also format the text within a table using the formatting options from the content editor.
If you need to edit the Table (add or remove rows or columns, etc) after it has already been created, right click within the table and select from the options in the menu.
Horizontal Line
If you need to separate your content, then you may want to use the horizontal line.
To use the horizontal line break, click on the button. The line break will be inserted into your body text where your cursor is.
If your horizontal line is on the last or the first line of your text editor, you can click on the line and it will move up or down appropriately.
Text Formatting Buttons
The basic text formatting options: bold, italic, underline and strike through are after the superscript and quote buttons.
To bold, italicize or strike through your text, select the text you want to format and click the correct button. To remove the formatting, highlight the offending text and click the bold, italics or strike through button again to remove the formatting.

9
Although the underline button is still currently active, it should not be used. According to web accessibility guidelines, only links should be underlined (and this is done automatically). Underlining other text that does not link anywhere confuses screen reader users and makes the content difficult to understand.
The Quote and List Buttons
The Quote and list buttons are next in the content editor toolbar.
The quote button can be used to separate text from the body.
Step 1: Highlight the text you wish to make a quote.
Step 2: Click the quote button. Your text will appear indented in the text editor.
If you need to offset a list from the rest of your content, you have two options: a bulleted list and a numbered list.
Step 1: Highlight the text you wish to make a list.
Step 2: Click the bulleted or numbered list button.
Step 3: You will need to add returns if you want text to be moved to the next bullet or number.
Alignment Buttons
If you want your text to be left, center or right aligned, you can use the alignment buttons.
Step 1: Highlight the text you wish to align.
Step 2: Click the correct button for the alignment you want.
Step 3: The text will move to the correct alignment.

10
The Link and Unlink Buttons
The content editor will automatically link web addresses and emails that are in the text body, so there is no need to use the link button on them. The link and unlink buttons are useful for linking text.
Step 1: To add a link to text, highlight the text and click on the link button; the first of the buttons.
Step 2: A dialog box will pop up. Enter your URL into the dialog box.
Step 3: Press "OK" and the text should be linked.
To unlink text in the body, highlight the part of the text that is linked and click the unlink button; the second of the buttons. The blue or purple text indicating a link should disappear.
NOTE: You should always unlink and relink text when changing the URL.

11
Linking to ISU Extension and Outreach store publications requires a permanent link. You can find the permanent link for a publication by going to the detail page of the publication on the store website. It is located underneath the Facebook like and share buttons.
Using the permanent link for the publication instead of the URL in the browser ensures that the link does not break even if the title or product number changes. You should NEVER download a publication and upload it to your own website.
If you link text, do not link non-descriptive text such as "Click Here" or "Read More". Make sure that the words that you link describe what the link is for or where it is taking you. This helps screen readers users help determine what the links are for.
Linking to Documents
Step 1: Highlight the text you want the link on.
Step 2: Click the Link Button.
Step 3: Click "Browse Server" in the dialog box to upload a document or link to an existing document.

12
Step 4: A dialog box will open showing all the files and images already uploaded to your site.
Step 5: To upload a new document, click "Upload" in the top left hand corner of the dialog box. Browse your computer for the file and click upload.
Step 6: To find a document already uploaded, scroll or search for the document in the list and click on it so that it is highlighted.
Step 7: To add the document as a link, click "Insert File"
Step 8: You will be taken back to the first dialog box with the URL of the document now added.
Step 9: Click "OK". The text that you highlighted should now be linked to the document.
Style Formatting
Sometimes, the content on your page has varying amounts of importance. If you have a title, for example, you want your users to be able to see it easily. While you could just bold the text, using headers is great for optimizing your webpage for search engines and web accessibility requirements.
The style formatting dropdown is found in between the link buttons and the image button.

13
Step 1: To make your text into a header, highlight the text and select the header size from the drop down.
**You should refrain from using the Heading 1 unless absolutely necessary. A Heading 1 is usually reserved for site titles and page titles.
Step 2: The header tag transforms the entire paragraph that is highlighted, even if it is partially highlighted. You can fix this by inserting a return after the text you want as a header. Then, highlight the rest of the paragraph and change the style back to Normal in the drop down box.
Headings are used by screen readers to give users a way of navigating through web pages and determining level of importance. This is why it is important to use headings instead of just using bold text. Try to go in order when using headings as well.
Undo and Redo Buttons
If you want to undo a change you just made, you can click the "Undo" button. You can click the "Redo" button to go forward.
Spell Check
You can use the spell check button to make sure that you haven't made in spelling errors before you save your page.

14
Step 1: Type out the body of your text.
Step 2: Before saving the page, click the spell check button.
Incorrect spelling will be highlighted in red in the spell check dialog box.
Indent Buttons
If you want to indent your text you can use the "Increase Indent" button, the second button. If you wish to decrease the indent (in cases where you have already indent text), use the "Decrease Indent" button, the first button.

15
Anchor Button
You can use the anchor button to link to a specific portion of your page. You can link any text, whether it lives on that page or on other pages on your site to the anchor. When clicked, the link allows a user to jump to that anchor in the page.
Step 1: Put your cursor where you would like an anchor. For example, if you have a long list of items on a page, you may put one next to each heading.
Step 2: Click the Anchor Button.
Step 3: In the Anchor Properties dialog box, name the anchor something descriptive.
Step 4: Click "OK". You will now see a small anchor image where your cursor was.
Step 5: Now create the text link to your anchor. Highlight the text that you want to be linked and click the link button in the toolbar.
Step 6: In the Link Dialog Box, select "Link to anchor in the text" as the Link Type.

16
Step 7: In the "Select an Anchor by Anchor Name" drop down box, find the name of your anchor and select it.

17
Step 8: Select "OK". Your highlighted text will now link to the anchor you created.
NOTE: If you want to link to an anchor on a different page, you will need to link to the URL of that page and add "#AnchorName" to the end of the link.
Page not looking right? Images not aligning right?
The default input format of Drupal 6 editors is "Filtered HTML". This helps to try and strip out any incorrect code, prevent malicious code and create links automatically. If your page is not looking the way you expect it to, try switching the input format to "Full HTML".
On every text area when editing, there is an option of choosing your input type. Try switching your input type to "Full HTML" if you are having problems with the way your page looks.

18
IMAGE FORMATTING
Step 1: Place the cursor in the content area where you want the image to appear.
Step 2: Click on the Image button.
Step 3: Click on "Browse Server" in the Image Properties dialog box to upload an image or to find an existing image.
Step 4: A dialog box will open showing all of the files and images already uploaded to your site.
Step 5: To upload a new image, click "Upload" in the top left hand corner of the dialog box. Browse your computer for the image and click upload.

19
Step 6: To find an image already uploaded, scroll or search for the image in the list and click on it so that it is highlighted.
Step 7: To add the image, click "Insert File".
Step 8: You will be taken back to the first dialog box with the URL of the image now added.
Step 9: Add the Alternate Text to the Image
Alternate text provides a textual alternative to non-text content, such as images. It serves several functions:
It is read by screen readers in place of images allowing the content and function of the image to be accessible to those with visual or certain cognitive disabilities.
It is displayed in place of the image in browsers if the image file is not loaded or when the user has chosen not to view images.
The key principle is that computers and screen readers cannot analyze an image and determine what it is without alternate text.
Alternate Text should:
Be accurate Be briefly and clearly expressed NOT be redundant NOT use the phrases "image of..." or "graphic of..." or "logo of..." to describe
the image.
20
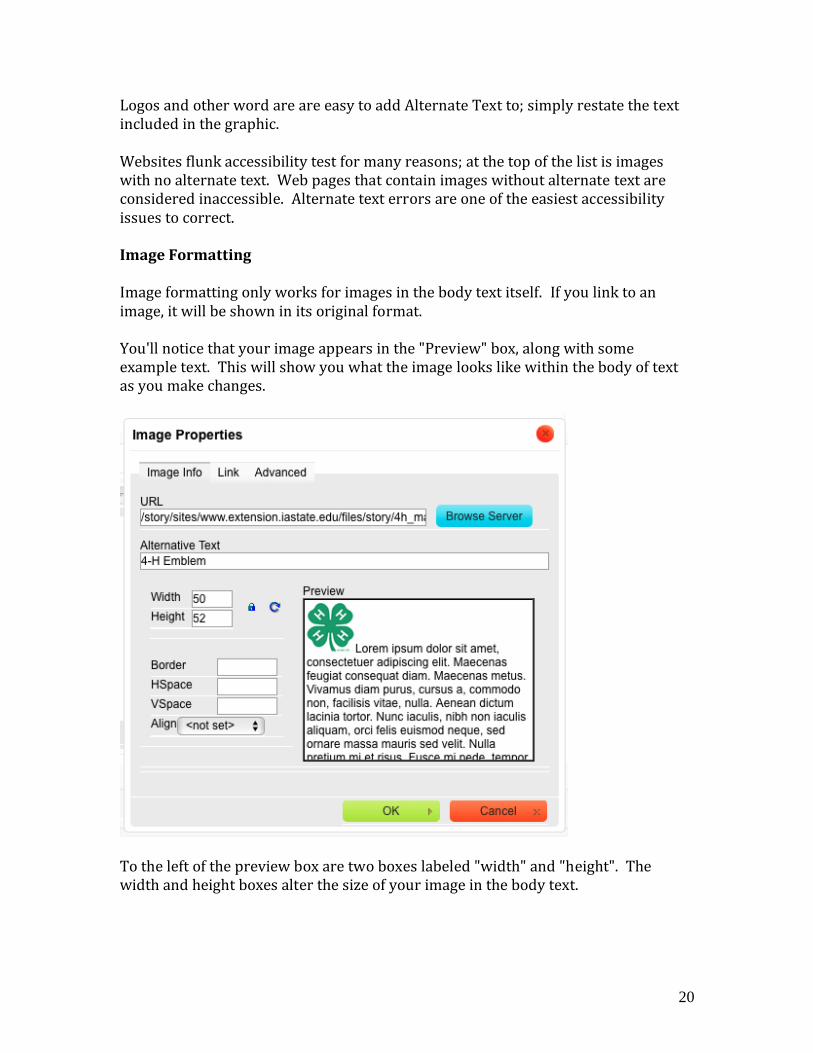
Logos and other word are are easy to add Alternate Text to; simply restate the text included in the graphic.
Websites flunk accessibility test for many reasons; at the top of the list is images with no alternate text. Web pages that contain images without alternate text are considered inaccessible. Alternate text errors are one of the easiest accessibility issues to correct.
Image Formatting
Image formatting only works for images in the body text itself. If you link to an image, it will be shown in its original format.
You'll notice that your image appears in the "Preview" box, along with some example text. This will show you what the image looks like within the body of text as you make changes.
To the left of the preview box are two boxes labeled "width" and "height". The width and height boxes alter the size of your image in the body text.

21
Next to these two boxes are two icons: a lock and a circular arrow.
When you are adjusting the size of your image, it is important to make sure the lock is in the "locked" position. This means that altering either the height or the width of your image will maintain a proportionate size. If the lock is in the "unlocked" position and you change the height or width, then your image will not maintain its aspect ratio and will likely look stretched or squished.
The circular arrow reverts the image to its original size. You should be wary of leaving images at original sizes unless you reduced the size before uploading. We recommend a size of no more than about 600px.
If the image is too large to be shown in its original size, you should resize the image using software on your computer before uploading it. If you upload an image in a large size (example: 3000px X 2300px) and resize it in the body to 100px X 75px, it doesn't change the size of the actual image you uploaded. Every time a site user views the page with that image uploaded, your website loads the original large file. Large images can make websites run slower.
Below the image width and height, you will find text boxes for HSpace (Horizontal Space) and VSpace (Vertical Space) or image padding.
Horizontal space controls the padding to the right and left of the image. Vertical Space controls the padding above and below the image. Image padding is white space added to the horizontal and/or vertical area around an image.
Most images look best with an HSpace and VSpace of 5.
Below HSpace and VSpace you can find a dropdown called "Align". This will affect the alignment of the image in your body text.

22
The default is not set, which does not make the body text flow around your image.
However, if you set the alignment to left or right, you will notice that the body text wraps around your image. If you align your image to the left or right, be sure to use some HSpace and VSpace or the text will crowd the image too closely.

23
The last function in the image properties box is the "Link" tab, which you can find at the top of the dialog box. This tab is an easy way to link your image to an URL.
Click the link tab. Next, copy the URL of the site you want to link your image to and paste it in the box. Details on linking within your site can be found in the Content Editor section under link and unlink buttons.
The other thing highlighted in this screenshot is the ability to change where your link will open. If you choose no options, your link will open in the same window/tab as the website. _blank sends the visitor to a new browser tab.
After you are done using the image properties box, click the "OK" button to save your changes. Be sure to double-check your changes to make sure that your image looks nice.
NOTE: If your image doesn't look right, edit your page again and change the input filter (underneath the body) from Filtered HTML to Full HTML.

24
UPLOADING FILES
Need to add a document to your content?
Uploading a File
Step 1: On the create/edit screen of your piece of content, place your cursor in the body content area where you want the file to be placed.
Step 2: Click the image properties button in the content editor toolbar.
Step 3: Click on "Browse Server" in the Image Properties dialog box to upload a file or to find an existing file.
Step 4: A dialog box will open showing all of the files and images already uploaded to your site.
25
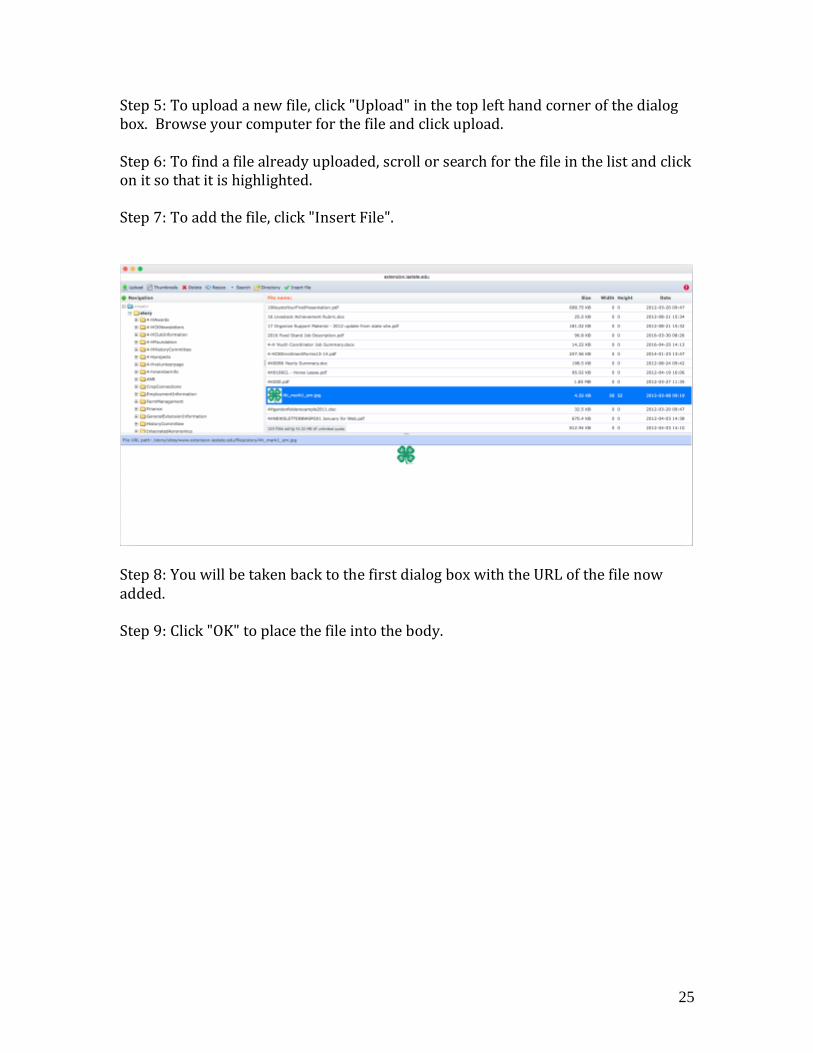
Step 5: To upload a new file, click "Upload" in the top left hand corner of the dialog box. Browse your computer for the file and click upload.
Step 6: To find a file already uploaded, scroll or search for the file in the list and click on it so that it is highlighted.
Step 7: To add the file, click "Insert File".
Step 8: You will be taken back to the first dialog box with the URL of the file now added.
Step 9: Click "OK" to place the file into the body.

26
EMBED A VIDEO
From YouTube
Find the video you want to embed on YouTube.
Step 1: Click the "Share" button beneath the video.
Step 2: Click "Embed"
Step 3: Copy the embed code.
Step 4: Go back to the page you want to add the video to on your site.
Step 5: Click "Source" in the content editor toolbar.
Step 6: Paste the code into the location that you want the video to show.
Step 7: Click source again to go back to the editor view.
From Vimeo
Find the video you want to embed on Vimeo.
Step 1: Click the "Share" button in the upper right corner of the video.

27
Step 2: In the dialog box, copy and paste the "Embed" code.
Step 3: Go back to the page you want to add the video to on your site.
Step 4: Click "Source" in the content editor toolbar.
Step 5: Paste the code into the location that you want the video to show.
Step 6: Click source again to go back to the editor view.
NOTE: If you are placing a video on your website; make sure that captions are enabled and are correct. Instructions are available for adding closed captioning to videos on YouTube and Vimeo on Extension IT’s website.

28
EDITING YOUR HOMEPAGE
Tips for Creating Effective Banners
When possible, use local photos to promote an event or program. It will make the page more of your own and help to grab your audience's attention.
Do not use clipart or illustrations. They make your site look dated and unprofessional.
Do not use an image that you found on Google. Most images have copyrights attached to them and are not available for use without the owner's permission.
Write catchy captions. Get users to click on them! Remember to tell them "What's in it for me?"
Limit the number of banner images to 5 or less. Banners are set to start on a random image to avoid the same image from
being seen all the time.
Creating a new Banner
Step 1: In the administration menu go to "Content Management" -> "Create Content" -> "Banner Slideshow".
Step 2: Enter a title. This is only to identify your banner. It will not be used on the homepage.

29
Step 3: Add a caption or call to action in the body. This will appear in the gray/black box over the image. Keep it short. Do not put links in this area.
Step 4: Upload the Banner Image. Browse to the photo and click Upload. The system will shrink and crop your image to the right size. Please reduce the size of the image before uploading if possible (size: 350px X 170px).
Step 5: Add the URL in the Banner_Link URL field. This is where the banner will link to when click on.
Step 6: Save.
Editing the Banner Slideshow
Each banner image is edited separately.
There are two ways to find the banners available on your site.
Go to: http://www.extension.iastate.edu/[countyname]/banner/ This page was created so that you can view all of the images and access their edit buttons.
You can also edit these pages through "Affiliated Content" in the administration menu. Click on your county name and find the Banner Slideshow content out of the content list.
Step 1: Click "Edit"
Step 2: Make appropriate changes.
Step 3: Click Save.
Unpublish a Banner
If you want to keep a banner, but don't want it to show in the slideshow, you may "unpublish" the banner.
Step 1: Locate the image as described above.
Step 2: Click "Edit"
Step 3: On the right, under "Publishing Options", uncheck the box "Published".
Step 4: Save.
Delete a Banner

30
Step 1: Navigate to the banner that you would like to delete.
Step 2: Click "Edit".
Step 3: On the right side of the edit page, there is a Delete button next to the save and preview buttons. Click Delete.
Step 4: You will be asked to confirm that you wish to permanently delete the banner. Click Delete again.
NOTE: Deleting a banner removes it entirely from your site and there is no way to get it back. If you're not sure if you should delete content, unpublish it instead.
Scheduling Publish Time
You can schedule when a new banner will get published or unpublished.
Step 1: On the Create/Edit screen, select "Scheduling Options" from the right hand side at the top.

31
Step 2: Enter the date and time in the format that is suggested in the green box when hovering. You can enter only a publish on or unpublish on date or both.
Step 3: Save.
Editing Welcome Message Next to Banner
Step 1: On the homepage, click "Edit" on the right hand side.
Step 2: Edit the Body field as desired.
Step 3: Save.
TIP: Keep the welcome as concise as possible.
Editing the Announcements Area
Step 1: On the homepage, click "Edit' on the right hand side.

32
Step 2: Edit the Homepage Area 1 field as desired.
Step 3: Save.
TIP: Only put critical long term information in the Announcements area. Use News for temporary information and the Sidebar Areas for permanent links.
Editing Homepage Area 2
This area is located below the County News. You can use this for additional content on your homepage that does not need to be at the top of the page.
Step 1: On the homepage, click "Edit" on the right hand side.
Step 2: Edit the Homepage Area 2 field as desired.
Step 3: Save.
Editing Sidebar Areas
Sidebar areas are for long term links or links to resources that warrant a presence on the homepage.
Step 1: On the homepage, click "Edit" on the right hand side.

33
Step 2: Edit the Sidebar Area 3 and Sidebar Area 4 fields as desired.
Step 3: OPTIONAL: To add a title to your box, select the appropriate text and change the style format to "Heading 6".
Step 4: Save.

34
CREATING A NEWS ARTICLE
Step 1: Go to Content Management -> Create Content -> County News Article
Step 2: Add a Title to the article. The title will become the URL to the news piece unless changed after saving.
Step 3: Add a "Teaser" for the article. This is a short introduction statement that leads the user to the full article. It will appear on the homepage and the topics pages.
Step 4: Add a thumbnail image if you have one. Avoid using clipart or illustrations. They make your site look dated and unprofessional.
Step 5: Add the content of the article to the Body field. See the content editor tutorials for details on editing.
Step 6: Select the Topic that the news article should go under from the available list under "Associated County Topic Page(s)". You may select more than one if appropriate.

35
Step 7: OPTIONAL: Add content to the Sidebar Area 4 if you would like to include additional resources or information on the news article page. To create a title for the Sidebar area, change part of the text to a Heading 6.
Step 8: Save.
Publishing News on Multiple Counties
You can post a News Article on any county that you have access to. Please do not post on additional counties unless what you are posting makes sense for that county.
Step 1: At the bottom of the Create/Edit News Article screen is a "Domain Access options" with available publishing options. By, default the county you are on will be selected. To publish to another county, hold down the Control key while selecting the additional counties you want to publish to. (Use the Command key if working on a Mac)

36
Step 2: Do not change the "Source Domain" selection.
Step 3: After selecting all of the desired counties, save the news article.
Publishing to the Homepage
News Articles show on the homepage by default. If you don't want a news article to show on the homepage, please follow the below instructions.
Step 1: On the Create/Edit screen, select Publishing Options from the right hand side at the top.

37
Step 2: Uncheck the "Promoted to front page" option.
Step 3: Save.
Scheduling Publish Time
You can schedule when a new page will get published or unpublished.
Step 1: On the Create/Edit screen, select "Scheduling Options" from the right hand side at the top.
Step 2: Enter the date and time in the format that is suggested in the green box when hovering. You can enter only a publish on, or unpublish on date or both.
Step 3: Save.
Unpublish News
If you want to keep a news article, but don't want it to show to site users, you may "unpublish" the page.
Step 1: Navigate to the news article.
Step 2: Click "Edit" in the right hand corner of the page.

38
Step 3: On the right, under "Publishing Options", uncheck the box "Published".
Step 4: Save.
Delete News
Step 1: Navigate to the news article.
Step 2: Click "Edit".
Step 3: On the right side of the edit page, there is a Delete button next to the save and preview buttons. Click Delete.
Step 4: You will be asked to confirm that you wish to permanently delete the news article. Click Delete again.
NOTE: Deleting a news article removes it entirely from your site and there is no way to get it back. If you're not sure if you should delete content, unpublish it instead.

39
EDITING YOUR ABOUT US PAGE
The about us page is a place to talk about how you are impacting your communities through Extension.
About Us Sidebar Boxes
The Connect Box shows automatically on all of the About Us pages.
Sidebar areas are for long term links or links to resources that warrant a presence on the about us page. These spaces are optional and do not have to have content in them.
Step 1: On the about us page, click "Edit" on the right hand side.
Step 2: Edit the Sidebar Area 3 or Sidebar Area 4 fields as desired.
Step 3: OPTIONAL: To add a title to your sidebar area, select the appropriate text and change the style format to "Heading 6".

40
Step 4: Save.
County Extension Council Page
The members of the County Extension Council are laid out in a table format under the About Us menu item.
To edit the county council page:
Step 1: Click "Edit" on the right hand side.
Step 2: Add or remove rows on the table by right clicking within the table, hovering over the rows item and selecting the correct option.
Step 3: Add the new members information to the newly created row.
Step 4: Change the members name to a Heading 3 in the formatting drop down box to make it look the same as everyone else’s.

41
CREATING A STAFF PAGE
Creating a New Staff Profile
Step 1: Go to "Content Management" -> "Create Content" -> "County Staff" in the administration menu.
Step 2: Fill in the appropriate fields for the staff member. The fields marked with the red asterisk are required fields.
Step 3: Mark the topics under "Associated County Topic Page(s)" that the staff member should appear under.

42
Step 4: Set the weight to change the order of the person on the staff listing page. The heavier the weight, the lower on the list.
Step 5: Save.
Unpublish a Staff Member
If you want to keep a staff profile, but don't want it to show on the site, you may "unpublish" it.
Step 1: Navigate to the staff members profile. You can click on "Staff" in the "About Us" main menu dropdown and then click on the person's name.
Step 2: Click "Edit" on the right hand side of the screen.
Step 3: On the right, under "Publishing Options", uncheck the box "Published".
Step 4: Save.
Editing or Deleting a Staff Member
Step 1: Navigate to the staff members profile. You can click on "Staff" in the "About Us" main menu dropdown and then click on the person's name.
Step 2: Click "Edit" on the right hand side of the screen.

43
Step 3: To edit the information, make changes to the appropriate fields and click save.
Step 4: To delete, click on the delete button next to the "Save" and "Preview" buttons on the right hand side of the edit screen.
Step 5: You will be asked to confirm that you wish to delete the staff member. Click "Delete" again to permanently delete the profile.
NOTE: Deleting a staff profile removes it entirely from your site and there is no way to get it back. If you're not sure if you should delete content, unpublish it instead.

44
Changing the Order of the Staff Listings
Each profile is assigned a weight that determines the order of the people on the staff listing page. The weight is ranked from lightest (-10) to heaviest (10).
If multiple people have the same weight, it will be ranked alphabetically by last name.
To change the order, edit the profile pages and adjust the weights until they are in correct order.

45
EDITING THE CONTACT US PAGE AND CONNECT WITH EXTENSION BOX
The contact us page stores the information for both the Contact Us page and the Connect with Extension box (the blue box on the homepage). You only need to update the information in one place and it will be updated across the site.
Editing your Contact Us Page
Step 1: Navigate to your contact us page: "About Us" -> "Contact Us" or click the "Map to xxx County Office" in the Connect with Extension box on the homepage.
Step 2: Click on "Edit Contact Us & Connect Box Information", located at the top of the page on the right hand side.
Step 3: Update and fields with the appropriate information. Most fields are self-explanatory, a few are explained in more detail below.
Body field - An extra area to put additional contact information if needed. This will show under the "Hotlines" link and before the "Statewide Directories"
Toll free Phone - this is optional
Email List - If you have an email list you would like to promote on the Contact Us page and the Connect Box, you may add them through the Contact Us page. Add a title (this will be the link name) and add the URL to the sign up form. This is also where you would put the link to your contact us webform.
NOTE: You should not put any staff member's individual email on the contact us page or the connect box. This encourages spamming attempts. Using a webform as a way for users to contact the office is much safer.

46
Social Media links - Social media links are defaulted to the main ISUEO accounts. However, you can change the title and link to point to your own Social media accounts if you have one.
Step 4: Save when you have made all of the changes needed. The Contact Us page and the Connect Box will both be updated with the new information.

47
EDITING 4-H PAGES
This page is considered a “Topics” page. Refer to the instructions for updating “Topics” pages.
It is intended to be the “homepage” for 4-H on your site. However, it also can share other information for youth such as babysitting classes. The url for this page is http://www.extension.iastate.edu/[countyname]/4h for simple marketing purposes.
Editing 4-H Pages
Step 1: Navigate to the 4-H page that needs to be edited.
Step 2: Click "Edit" on the right hand side of the page.
DO NOT CHANGE THE TITLE of these pages. It will change the URL and will break the link in the navigation.
Step 3: Add/Edit/Delete content from the "Body" section (See the content editor tutorials for additional instructions).
Step 4: OPTIONAL: Edit the "Sidebar Area 3" or "Sidebar Area 4" fields - if left empty these fields will not show.
Sidebar Area 3 = Publications box. Use this box to promote publications related to the page or topic. If linking to publications on the Extension store, make sure you link correctly (DO NOT download publications).
Sidebar Area 4 = Generic box. Use this box to link to related resources or external links.
Add a title by changing a short line of text to a Heading 6 format to create a heading for your box.

48
Step 5: Save.

49
EDITING TOPIC PAGES
The following pages are considered "Topics" pages:
[CountyName] 4-H & Youth Crops Environment Farm Management Livestock Yard & Garden/Horticulture Business & Industry Community Economic Development Finances Food, Nutrition and Health Home and Family
Editing a Topics Page
Step 1: Navigate to the Page that you want to edit.
Step 2: Click "Edit" on the right hand side of the page.
Step 3: To add local content under "Local Highlights", edit the Body of the page (refer to the content editor tutorials for additional instructions on using the content editor). This section is for local information or links that are not available in the news or statewide resources.
Step 3: OPTIONAL: Edit the Sidebar Area 3 or Sidebar Area 4 fields. If there is nothing in these fields, they won't show.
Sidebar Area 3 - Publications box. Use this box to promote publications related to the page or topic. If linking to publications on the Extension store, make sure you link correctly (DO NOT download publications).

50
Sidebar Area 4 - Generic Box. Use this box to link to related resources or external links.
Add a title heading in the sidebar areas by highlighting a short line of text and changing it to Heading 6.
Adding Statewide Resources
Step 1: To add a Statewide resource, you can search for the resource. Put your cursor in the blank field and type a keyword of the resource you want to add. For example, if you want to add "Organic Agriculture", you could type Organic.
Step 2: A drop down list of possible resources will populate. Click on the resource to add it to the field.
Step 3: To add more blank fields, click "Add another item".
Step 4: When you are adding Statewide Resources, click "Save".

51
CREATING A WEBPAGE
Use static web pages instead of a News Article if you want to house content that is considered permanent, such as a newsletter archive or local program information other than an event.
Link to these pages from the Body or Sidebar Areas on Topic pages, News or other internal pages.
Creating a Web Page
Step 1: Go to "Content Management" -> "Create Content" -> "Web Page" in the administration menu.
Step 2: Enter the page title in the Title field.
Step 3: Enter your content in the Body field (refer to the Content Editor tutorials for additional instructions).
Step 4: OPTIONAL: Edit the Sidebar Area 3 and Sidebar Area 4 fields (if nothing is in these fields, they won't show).
Sidebar Area 3 - Publications box. Use this box to promote publication related to the page or topic. If linking to publications on the Extension store, make sure you link correctly (DO NOT download publications).

52
Sidebar Area 4 - Generic Box. Use this box to link to related resources or external links.
Add a title heading in the sidebar areas by highlighting a short line of text and changing it to Heading 6.
Step 5: Save.
Step 6: Copy the URL of this page and add it to a Topics page, News or Sidebar area to help users find the information.
Deleting Pages
Step 1: Navigate to the page you would like to delete.
Step 2: Click Edit on the right hand side of the page.
Step 3: On the right side of the edit page, there is a Delete button next to the save and preview buttons. Click Delete.

53
Step 4: You will be asked to confirm that you wish to permanently delete the page. Click Delete again.
NOTE: Deleting a page removes it entirely from your site and there is no way to get it back. If you're not sure if you should delete content, unpublish it instead.
Unpublish Pages
Step 1: Navigate to the page you would like to unpublish.
Step 2: Click Edit on the right hand side of the page.
Step 3: On the right side of the edit page, click the + sign next to "Publishing Options". Uncheck the "Published" box.
Step 4: Save. Your page is not unpublished and can be published again at a later date.

54
CREATING A WEBFORM
Webforms are a powerful tool for making forms such as contact forms, surveys,
order forms, etc. that are highly customizable. In this tutorial we will walk through
all the aspects of creating a webform.
Creating a Webform
Step 1: Go to "Content Management" -> "Create Content" -> "Webform" in the administration menu.
Step 2: Give the form a title.
Step 3: Enter any content you want to appear above the form fields in the Body field (optional).
Step 4: OPTIONAL - Edit the Publications & Materials or How Extension Helps sidebar fields (if nothing is in these fields, they won't show).
Publications Box - Use this box to promote publications related to the page or topic. If linking to publications on the Extension store, make sure you link correctly (DO NOT download publications).
How Extension Helps Box - Use this box to promote how ISU Extension and Outreach is impacting Iowa.

55
Add a title to the sidebar boxes by highlighting a short line of text and changing the format to "Heading 6".
Step 5: Save. You must save before you will be able to add fields to the form.
Step 6: You will be redirected to the "Webform" tab after you save. You can begin adding fields by adding the label (new component name field) and selecting the type of field.
Description of Field Types:
Form Component | Date
The date field is exactly what it says it is. It allows your end user to enter a date of
their choosing, but you can customize the time zone, decide whether to show day,
month, and year options or to hide any of these options, edit the start and end dates
that users will be allowed to enter, and decide whether to enable the pop-up
calendar or allow users to enter a date in a textbox field.
Form Component | Email
The email component is where the end user can enter a valid email address. Using
this component your can select whether the form automatically enters the email
they are logged in with as the email in this form, select a default value that will
appear before the user enters their own email, select whether you wish to allow for
multiple emails to be entered into the same field, decide if every email entered
throughout the course of this form should be unique (meaning some cannot fill it
out multiple times with the same email), and enter a placeholder (example email
address), among other options.

56
Form Component | Fieldset
The fieldset allows you to group fields together. They can be arranged to be
collapsible or not, it's up to you. An important thing to remember with fieldsets it
that to actually have fields appear within it, you must drag components you wish to
group together under your fieldset component like the example with the Question
field set and Answer textbox below.
Form Component | File
The file component allows a user to upload a file. It is best practice to limit the file
size and file types (preferably images, PDFs, or Word Documents). For security
reasons, do not ask users to upload personal information on document form.
Form Component | Grid
The grid component provides an area where you can have multiple questions, or
allow users to provide a rating. This displays like a table.
Form Component | Hidden
The hidden component is probably one you will not need you use. It is not visible to
the end user and collects data that can be automatically generated.
Form Component | Markup
The markup component can be used for entering a new description or your own text
part way through the form. It's really not too useful in most cases.
Form Component | Number
The number component will only accept numeric values and can be displayed as a
textbox or as a list. You specify the numeric range.
Form Component | Page break
The page break component allows you to break up your webform into multiple
pages. The description you entered in the body section in the initial webform will
appear at the top of every page.
Form Component | Selection Options
The selection option component is for creating drop downs, radio buttons, and
checkboxes.
Form Component | Textarea
The textarea component allows the user to enter multiple lines of text into a box
(like writing a comment).

57
Form Component | Textfield
The textfield allows that user to enter one line of text, usually a few words and with
no formatting.
Form Component | Time
The time component is very similar to the date component, allowing the user to
enter a time value.
Step 7: Check the Mandatory box if you wish the field to be required.
Step 8: Click "Add".
Step 9: After clicking "Add", you will be taken to a page with additional options for your field. You can set a default value, add a description, require the field, make it unique, set a maximum length and set the width of the field. Click "Save Component" when you are finished.
Step 10: Continue adding fields to your webform until your webform is complete.
Step 11: Now you must configure the form to notify you of a submission. Go to the "Emails" tab underneath the webform tab on the right of the screen.
Step 12: Enter the email address that should receive notifications of webform submissions. This email address remains hidden and protected behind the webform.
TIP: Use mail lists for the email address to avoid having to update the form when a person leaves.
Step 13: Click Add.
Step 14: You will be able to change additional options for how the email gets sent.

58
OPTIONS: Subject, Email from Address and Email from Name - you can choose the default, enter your own or use a field from your form.
Step 15: Click "Save e-mail settings".
Step 16: If you would like to configure a confirmation page and other form settings, click the "Form Settings" tab underneath the webform tab on the right of the screen.
Step 17: Enter your confirmation message into the field. You can also set different settings such as the submission limit, access, etc. Leave everything under "Advanced Settings" as the default options.
Step 18: Click "Save configuration".
You can view your completed form by clicking on the "View" tab at the top.
If it says "unpublished", go to "Edit" -> "Publishing Options" and check the box "Published". Then Save.
Scheduling Publish Time
You can schedule when a new banner will get published or unpublished.
Step 1: On the Create/Edit screen, select "Scheduling Options" from the right hand side at the top.
Step 2: Enter the date and time in the format that is suggested in the green box when hovering. You can enter only a publish on or unpublish on date or both.
Step 3: Save.
Unpublish a Webform
Step 1: Navigate to the webform you would like to unpublish.

59
Step 2: Click "Edit" on the right hand side of the page.
Step 3: On the right side of the edit page, click on the + sign next to "Publishing Options". Uncheck the "Published" box.
Step 4: Save. Your webform is now unpublished and can be published again at a later date.
Delete a Webform
Step 1: Navigate to the webform you would like to delete.
Step 2: Click "Edit" on the right hand side of the page.
Step 3: On the right side of the edit page, there is a Delete button next to the save and preview buttons. Click Delete.

60
Step 4: You will be asked to confirm that you wish to permanently delete the webform. Click Delete again.
NOTE: Deleting a webform removes it entirely from your site and there is no way to get it back. If you're not sure if you should delete content, unpublish it instead.

61
CHANGING URL PATH SETTINGS
An automatic URL alias (the check box option for this is automatically selected), will use the title that you created for the specific page. So, if your page has a title of "People", your automatically generated URL alias will be www.extension.iastate.edu/yoursite/people.
To change the URL to a customized alias:
Step 1: On the Create/Edit screen, select "URL Path Settings" from the right hand side at the top.
Step 2: Uncheck the Automatic Alias box. This will now allow you access to the text box below.
Step 3: Enter your custom URL into the text box. Do not leave spaces in between words, use "-" instead.
Step 4: Save.
NOTE: Some of your pages, such as 4-H, events, etc have predefined URL path settings. If you change these URL's, the pages will no longer work correctly.