
The Inner Workings of
Oracle/Primavera P6
by Ron Winter, PSP
Fellow of AACE International
Copyright ©
April 4, 2016
1
ABSTRACT
Oracle® Primavera P6℠ scheduling software is noted for its diverse and extensive set
of features and range. The newer date fields and their calculation methods have
started intense discussions and caused some misunderstanding in the scheduling
community. The sheer number of different date fields can be a benefit or a curse to the
scheduler depending on mastery of how they should be used.
Every scheduler should clearly understand the software’s methods of calculation in
order to use this powerful tool at its full capacity. This paper will define the durations
used and describe the P6 date fields, their uses and the underlying calculations. P6
examples will be used to prove how the little-known method of calculating Critical Path
Method (CPM) dates of a schedule that has been progressed with status. This
presentation is based on an earlier paper presented in 2009 with new and updated
information and an entirely different emphasis.[1]
Introduction
Primavera Inc, (now Oracle/Primavera) has a long history of introducing Critical Path
Method (CPM) scheduling software beginning in 1983. In 1999, Primavera introduced
an entirely new CPM scheduling package designed for enterprise-wide project
management, the name of which seemed to change yearly over the next 16 years.
This new software’s name has gone from Primavera Enterprise to P3e, P3 Engineering
and Construction, P3e/c, Teamplay, Primavera, P6, Project Manager, Enterprise Project
Portfolio Manager (EPPM), Professional Project Manager (PPM), and P6 Professional.
For simplicity, this paper will refer to all of this software simply as, “P6.”
P6 handles dates fundamentally different from most other software packages including
Primavera’s earlier scheduling software product, Primavera Project Planner (P3.) This
fact may explain why many experienced P3 users have so much trouble learning to
properly use P6.
This confusion is partly due to the incorrect assumption that P3 must be an earlier
version of the current P6 software. Date fields with similar names in both P3 and P6
behave very differently in one than in the other. In addition, the plethora of new date
fields in P6 creates a steep learning curve to P6 mastery. A lack of documentation
regarding these features adds to the confusion.
2
Besides a fundamental shift in the way that dates are conceptualized, P6 has more
kinds of useable dates than practically any other software in existence. The majority of
P6 users are unaware of the underlying calculations for new date fields nor do they
understand their intended usage. This paper discusses the underlying calculations for
P6 date fields and their potential uses.
PART I – P6 Durations and Dates
It is essential to understand the underlying structural format of P6 software before
delving into its functions. Without such appreciation, errors can easily be made in the
execution. The basis of CPM is the accumulation of task durations following rules of
logic in order to calculate planned dates. Thus, the P6 user must be aware of the basis
and limitations behind the way P6 handles durations and dates.
P6 Durations
One of the greatest differences between P3 and P6 software is how they respectively deal with durations. Users of P3 had to decide upon the unit of measure before they created a new schedule. The P3 user must express all durations in units of months, weeks, days, or hours. After the schedule was created, the chosen unit of measure was forever fixed and indivisible. Most CPM software works in a similar manner. Most construction projects are scheduled in days. This unit of measure is normally appropriate for planning, estimating, and measurement. Appropriate unit granularity is enforced by an engineering assumption that all work begins at the beginning of the work day and all work finishes at the end of the work day. P3 had no provision for measuring durations less than the chosen unit of measure. If the schedule is measured in days, then partial days were not ‘allowed.’ The point to be made here is that the engineers who designed P3 were forced to consider significant accuracy. If a schedule is set to measure durations in units of days, then every mathematical calculation has to return a whole number of days. As an example, a 6-day activity statused as 30% complete would result in 4 days remaining, not the 4.2 days that the mathematical calculation would suggest. Engineers would say that if work is planed using whole days and measured it in whole days, then it is false accuracy to try to predict anything with better accuracy than a full day’s duration. Users of P6 face an entirely different philosophy about the measurement of duration and time. All dates are stored in the database as a complex number that describes dates as the date, hours, minutes, and even seconds. In other words, all P6 dates are actually a measure of time.

3
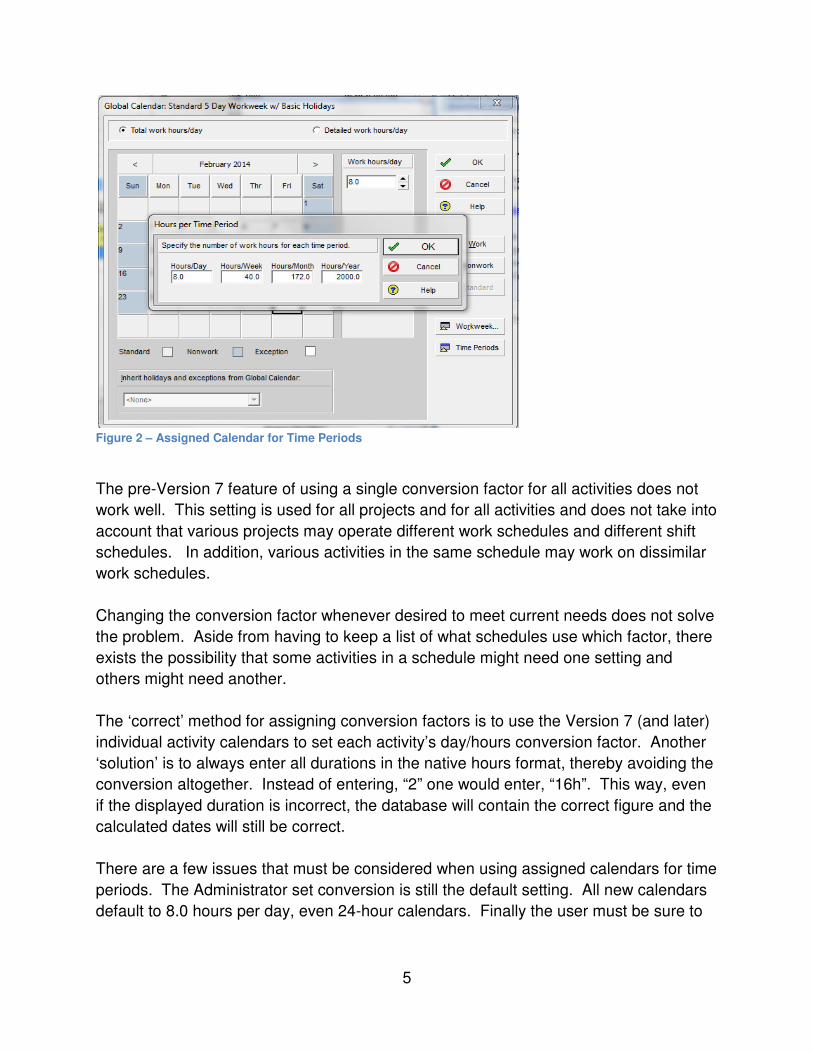
Users of P6 can approximate the look of a schedule calculated in days by setting their user preference to only display whole days without hours. When displaying durations, one can also have P6 round the current duration to the nearest whole number. This does not mean that the dates and durations are now being measured in whole days; only that the data is displayed that way. Because the engineers who designed P6 used a method of storage that allowed for fractional dates and fractional days (down to the minute or even second), they did not feel constrained the way the P3 engineers were. They were free to have durations down to the minute and compute early start and finish dates down to the minute, regardless of how the end result was displayed. This ‘ultra accuracy’ of date and time storage means that a P6 user can plan in units of days, enter only durations in whole units of days and still get calculated results that are expressed in hours, minutes, and seconds. P6 handles this conversion of input to storage in the database and back again into display with an ‘Hours per Time Period’ factor. There are four possible factors,
• Hours/ Day,
• Hours / Week,
• Hours / Month,
• Hours / Year. If the user’s display is set to display days, then any numerical entry is multiplied by the Hours / Day setting and that number is stored in the database in hours for that entry. Alternatively, one can override the default setting by entering the number followed by the measurement acronym. For example, entering “5w” (the “w” being a recognized ‘short-hand’ to tell P6 that the number is a measure of weeks) would cause P6 to multiply this number by the Hours / Week factor and store that number of hours in the database. If the default display is still set to days, then P6 would divide the number of hours stored in the database by the Hours / Day factor and display that number of days in the entry location the P6 user just used. P6 displays the “Hours per Time Period” settings in either the Admin Preference window
or the User Preference screen (for pre-Version 7 users) as shown in Figure 1.

4
Figure 1 – Admin and User Preferences for Time Periods
Before Version 7, if the Admin Preference option, “Allow users to specify the number of
work hours for each time period” is selected then each user can define their own
Hours/day conversion factor. This results in each user potentially displaying a different
duration, given the same hour number in the database and a different conversion factor.
If the Admin Preference option, “Allow users to specify the number of work hours for
each time period” is not selected, the Hours per Time Period settings defined in the
Admin Preferences are used for the conversion. These settings for which conversion
option was used are not exported with the schedule backup.
P6 Version 7 (and later) users have this admin setting changed to read, “Use assigned
calendar to specify the number of work hours for each time period.” The User
preference setting was ‘removed’ in Version 7 and was relocated to the individual
activity calendars as shown in Figure 2. A click on the calendar’s Time Period button
brings up the Hours per Time Period window. Instead of one User Preference figure,
each activity’s calendar contains the desired conversion factor. Theoretically, each
activity could have a unique conversion factor if enough calendars were created.
5
Figure 2 – Assigned Calendar for Time Periods
The pre-Version 7 feature of using a single conversion factor for all activities does not
work well. This setting is used for all projects and for all activities and does not take into
account that various projects may operate different work schedules and different shift
schedules. In addition, various activities in the same schedule may work on dissimilar
work schedules.
Changing the conversion factor whenever desired to meet current needs does not solve
the problem. Aside from having to keep a list of what schedules use which factor, there
exists the possibility that some activities in a schedule might need one setting and
others might need another.
The ‘correct’ method for assigning conversion factors is to use the Version 7 (and later)
individual activity calendars to set each activity’s day/hours conversion factor. Another
‘solution’ is to always enter all durations in the native hours format, thereby avoiding the
conversion altogether. Instead of entering, “2” one would enter, “16h”. This way, even
if the displayed duration is incorrect, the database will contain the correct figure and the
calculated dates will still be correct.
There are a few issues that must be considered when using assigned calendars for time
periods. The Administrator set conversion is still the default setting. All new calendars
default to 8.0 hours per day, even 24-hour calendars. Finally the user must be sure to
6
change calendars when workdays or working hours change. This may necessitate the
splitting of activities to reflect acceleration of the work.
Smallest Unit of Measurement
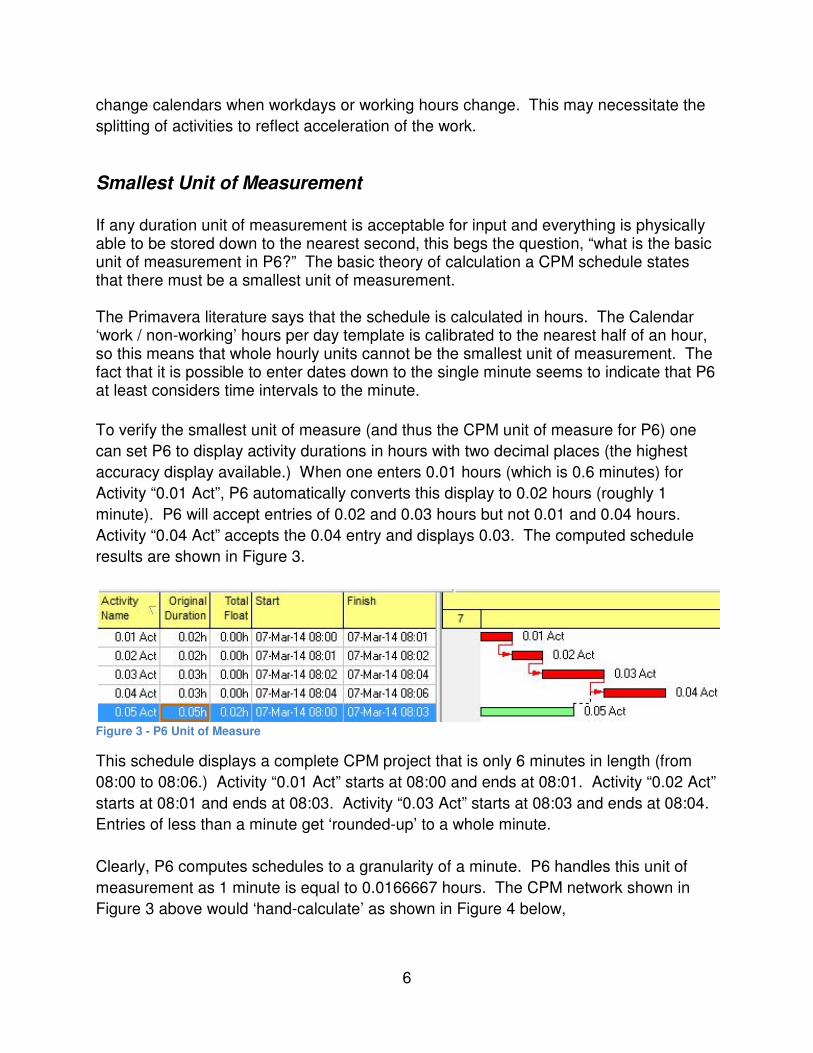
If any duration unit of measurement is acceptable for input and everything is physically able to be stored down to the nearest second, this begs the question, “what is the basic unit of measurement in P6?” The basic theory of calculation a CPM schedule states that there must be a smallest unit of measurement. The Primavera literature says that the schedule is calculated in hours. The Calendar ‘work / non-working’ hours per day template is calibrated to the nearest half of an hour, so this means that whole hourly units cannot be the smallest unit of measurement. The fact that it is possible to enter dates down to the single minute seems to indicate that P6 at least considers time intervals to the minute.
To verify the smallest unit of measure (and thus the CPM unit of measure for P6) one
can set P6 to display activity durations in hours with two decimal places (the highest
accuracy display available.) When one enters 0.01 hours (which is 0.6 minutes) for
Activity “0.01 Act”, P6 automatically converts this display to 0.02 hours (roughly 1
minute). P6 will accept entries of 0.02 and 0.03 hours but not 0.01 and 0.04 hours.
Activity “0.04 Act” accepts the 0.04 entry and displays 0.03. The computed schedule
results are shown in Figure 3.
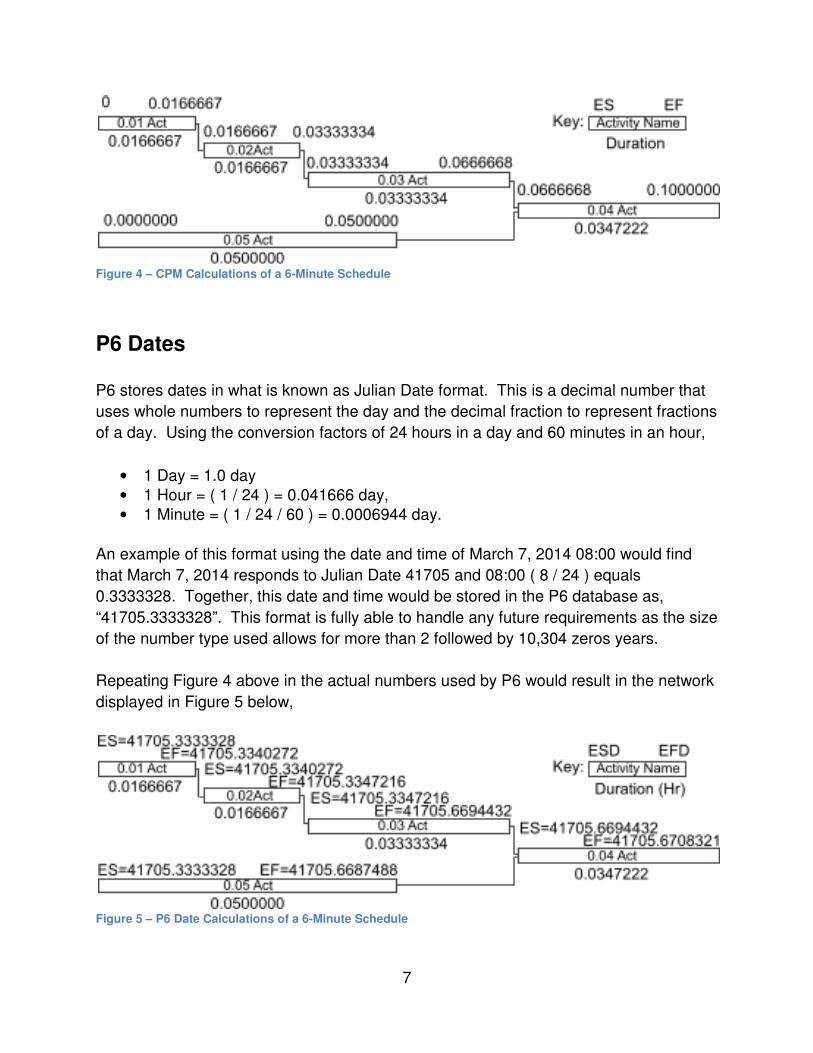
Figure 3 - P6 Unit of Measure
This schedule displays a complete CPM project that is only 6 minutes in length (from
08:00 to 08:06.) Activity “0.01 Act” starts at 08:00 and ends at 08:01. Activity “0.02 Act”
starts at 08:01 and ends at 08:03. Activity “0.03 Act” starts at 08:03 and ends at 08:04.
Entries of less than a minute get ‘rounded-up’ to a whole minute.
Clearly, P6 computes schedules to a granularity of a minute. P6 handles this unit of
measurement as 1 minute is equal to 0.0166667 hours. The CPM network shown in
Figure 3 above would ‘hand-calculate’ as shown in Figure 4 below,
7
Figure 4 – CPM Calculations of a 6-Minute Schedule
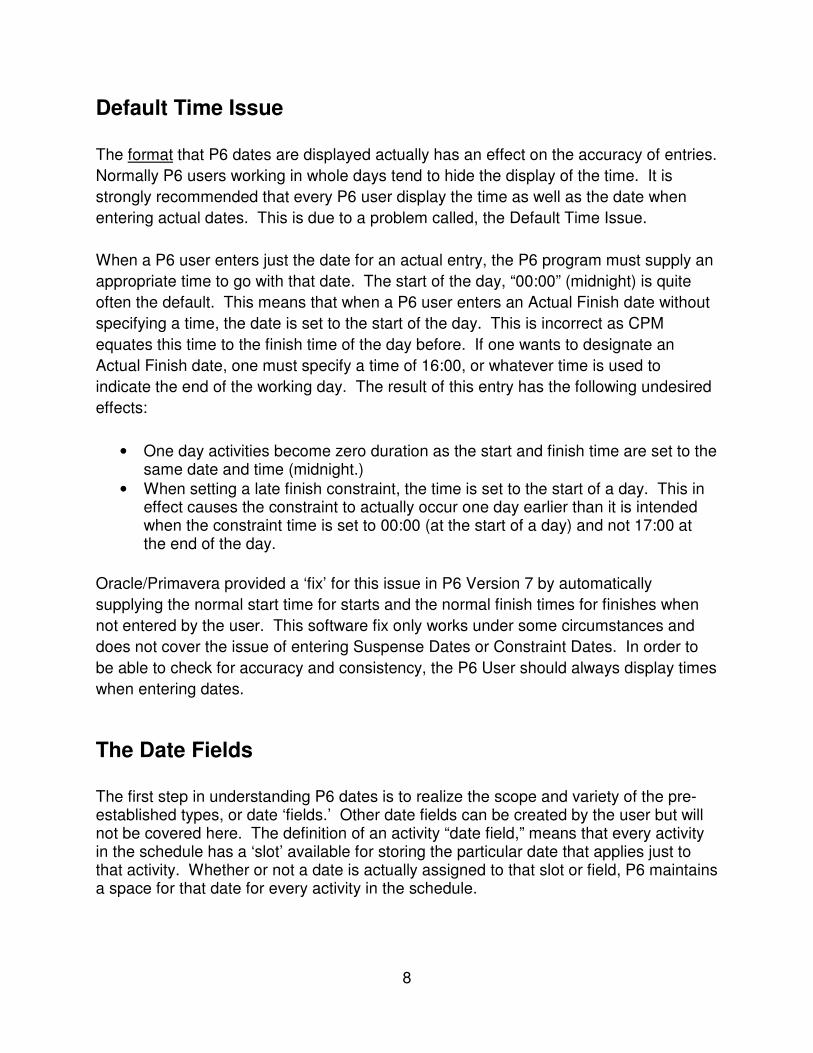
P6 Dates
P6 stores dates in what is known as Julian Date format. This is a decimal number that
uses whole numbers to represent the day and the decimal fraction to represent fractions
of a day. Using the conversion factors of 24 hours in a day and 60 minutes in an hour,
• 1 Day = 1.0 day
• 1 Hour = ( 1 / 24 ) = 0.041666 day,
• 1 Minute = ( 1 / 24 / 60 ) = 0.0006944 day.
An example of this format using the date and time of March 7, 2014 08:00 would find
that March 7, 2014 responds to Julian Date 41705 and 08:00 ( 8 / 24 ) equals
0.3333328. Together, this date and time would be stored in the P6 database as,
“41705.3333328”. This format is fully able to handle any future requirements as the size
of the number type used allows for more than 2 followed by 10,304 zeros years.
Repeating Figure 4 above in the actual numbers used by P6 would result in the network
displayed in Figure 5 below,
Figure 5 – P6 Date Calculations of a 6-Minute Schedule
8
Default Time Issue
The format that P6 dates are displayed actually has an effect on the accuracy of entries.
Normally P6 users working in whole days tend to hide the display of the time. It is
strongly recommended that every P6 user display the time as well as the date when
entering actual dates. This is due to a problem called, the Default Time Issue.
When a P6 user enters just the date for an actual entry, the P6 program must supply an
appropriate time to go with that date. The start of the day, “00:00” (midnight) is quite
often the default. This means that when a P6 user enters an Actual Finish date without
specifying a time, the date is set to the start of the day. This is incorrect as CPM
equates this time to the finish time of the day before. If one wants to designate an
Actual Finish date, one must specify a time of 16:00, or whatever time is used to
indicate the end of the working day. The result of this entry has the following undesired
effects:
• One day activities become zero duration as the start and finish time are set to the same date and time (midnight.)
• When setting a late finish constraint, the time is set to the start of a day. This in effect causes the constraint to actually occur one day earlier than it is intended when the constraint time is set to 00:00 (at the start of a day) and not 17:00 at the end of the day.
Oracle/Primavera provided a ‘fix’ for this issue in P6 Version 7 by automatically
supplying the normal start time for starts and the normal finish times for finishes when
not entered by the user. This software fix only works under some circumstances and
does not cover the issue of entering Suspense Dates or Constraint Dates. In order to
be able to check for accuracy and consistency, the P6 User should always display times
when entering dates.
The Date Fields
The first step in understanding P6 dates is to realize the scope and variety of the pre-established types, or date ‘fields.’ Other date fields can be created by the user but will not be covered here. The definition of an activity “date field,” means that every activity in the schedule has a ‘slot’ available for storing the particular date that applies just to that activity. Whether or not a date is actually assigned to that slot or field, P6 maintains a space for that date for every activity in the schedule.

9
One logical way of categorizing the date fields is by functional hierarchy. Date fields can
be categorized into 5 main groups:
1. Project and WBS Date Fields 2. Activity Date Fields 3. Resource Date Fields 4. Relationship Date Fields 5. Audit Record Date Fields
There are so many date fields defined in P6 that a resource-loaded schedule with 1,000
activities would most likely have at least 50,000 date fields set aside for use. A list of
the pre-established P6 date fields are shown below in Table 1.
Project & WBS Date Fields (per EPS field)
Anticipated Start Anticipated Finish
Actual Start Actual Finish
Planned Start Finish Date
Forecast Start Must Finish By
Activity Date Fields (per activity)
Start Finish
Early Start Early Finish
Planned Start Planned Finish
Remaining Early Start Remaining Early Finish
Remaining Late Start Remaining Late Finish
Actual Start Actual Finish
External Early Start External Late Finish
Baseline Start Dates Baseline Finish Dates
Variance BL1 Start Date Variance BL1 Finish Date
Primary & Secondary Constraint Dates Expected Finish Date
Resource Date Fields (per activity resource assignment)
Start Finish
Actual Start Actual Finish
Planned Start Planned Finish
Remaining Early Start Remaining Early Finish
Remaining Late Start Remaining Late Finish
Relationship Date Fields
Relationship Early Start Relationship Early Finish
Relationship Late Start Relationship Late Finish
Audit Date Fields (per record for Project/Activity/Step/Activity Code/ Relationship/Expense issues)

10
Date Created Date Last Updated
Date Deleted Table 1 - Date Fields in P6
Project and WBS Dates
Even though activity dates are the main focus of this paper, a brief introduction to Project & WBS dates is appropriate since some of them affect the activity-level calculations.
• Anticipated Start and the Anticipated Finish date fields are used during the project planning stage, and can be set at the Enterprise Project Structure (EPS), project, or WBS level. These dates are displayed at EPS level bars and columns when the schedule is just a placeholder and no activities are assigned. These dates remain as historical records when activities are added and the CPM calculates the start and finish times..
• Planned Start date field is the start date of the project. No early dates will be calculated before this date. This date will automatically be used as the Data Date until a new one is manually entered.
• Must Finish By date field is a date constraint placed on the project completion. Must Finish By date determines the late finish of the first activity in the backward pass.
• P6 documentation offers very little information about Forecast Start date. This date represents the start date of the resource leveling process on the backward pass. If resource leveling has not been used, this date will match the Planned Start Date.
• Finish Date is the latest early finish date calculated when P6 last scheduled the project.
• Actual Start is the actual start date of the project, and it is inherited from the first started activity.
• Similarly, Actual Finish date is inherited from the last completed activity in the schedule. This field will be blank until every activity has been statused as complete.
Activity Date Fields
P6 Activities have the largest share of the date fields in P6. Many of them are quite
unique to this software. The documentation supplied by Oracle/Primavera on these
unique fields is lacking in detail and functional observation.
11
Early Start/Finish and Late Start/Finish Dates
The Critical Path Method (CPM) is a procedure use to calculate projected dates from
activity remaining duration and precedence logic.[2] It is a curious fact that all who learn
to manually calculate a CPM schedule always use a schedule without existing status.
Unfortunately, no available publication [3] explains how to calculate the CPM when
activities have actual status. P6 appears to be unique in the transparency of displaying
all internal CPM date calculations. This transparency has caused some consternation
in the ‘World of Scheduling Experts’ who thought that they understood everything
possible about their craft.
Simply put; every activity in the schedule is considered when computing a CPM, even
those that have been statused as complete. Unless overridden by a constraint, all
activities without a predecessor are scheduled (with consideration to their calendars) to
begin on the current data date (early start) and their remaining durations are used to
compute their early finish. This rule even applies to completed activities with a
remaining duration of zero. Original durations have nothing to do with CPM date
calculations.
Immediate successors of the activities whose early dates were just evaluated are
considered in like kind with completed activities all ‘piling-up’ on the data date like a
stack of milestones. This process continues until one finally uncovers an activity with a
remaining duration greater than zero (i.e. an uncompleted activity.) From here on, the
calculations proceed as most CPM experts normally would appreciate. This process
allows one to consider the delaying effects of uncompleted work due to out-of-sequence
progress under the Retained Logic CPM calculation rule.
Once the CPM calculation is finished, P6 returns to the actual dates and generates a
Gantt Chart with bars showing a mixture of actual and calculated dates using the dates
found in the Start and Finish columns. The barchart does not faithfully display the
results of the CPM calculations, especially for bars before the data date that reflect the
actual, not calculated dates.
The above algorithm can be proven using P6. The P6 Early Start, Early Finish, Late
Start, and Late Finish (Early/Late Start/Finish) columns are presented differently from
their counterparts in Microsoft Project™ or P3. After the CPM calculations are
complete, Microsoft Project blanks out all calculated date entries for completed
activities. P3 actually deletes the calculated dates for completed activities from the
database and replaces those computed dates with the established actual dates. This

12
substitution has led scheduling experts to conclude that activities with actual dates were
not used in computing the current CPM schedule dates.
Beginning with their Version 5.0 software release, P6 took a third approach and boldly
displayed the calculated dates, even for completed activities. It only does this in the
Retained Logic CPM calculation mode. P6 treats the Progress Override and Actual
Dates calculation modes the same way as P3 does.
Figure 6 below shows a P6 schedule displaying the Actual Date columns as well as the
Early Start, Early Finish, Late Start, and Late Finish columns for activities that are
completed.
Figure 6 - Early/Late Start/Finish Dates
Notice in the above example that Activity 0277X-12 actually started on 03APR06 but
had an early start of 04DEC06. This early start date correlates to the 04DEC06 data
date used for that calculation. Also note that the late start of 11MAY07 indicates that
this completed activity has float! After all, Total Float is merely the subtraction of the
Early Start workday from the Late Start workday. Given the two calculated dates, one
can compute the float by subtraction.
If P6 can compute the Total Float for completed activities, then why does it not display
this value? The initial P6 Version 5.0 did calculate and display this float for completed
activities as well as uncompleted ones. Actually displaying float values for completed
activities was the ‘last straw’ for scheduling experts and evidently everyone complained.
Primavera quickly issued Version 5, Service Pack 1 to blank out the float column for
completed activities. Just like the moral of many science fiction movies back in the
1950’s, this was information that, “Man was not meant to know.”
The astute reader may ask, “If P6 can be used to display the float of completed
activities, then is this float the activity’s ‘As-Built Float’?” Unfortunately, computing the
As-Built Float of an activity is not that simple. [4]

13
Start/Finish Dates
Start and Finish dates work similar to the way they do in Microsoft Project. They
represent the early dates when activities have no progress, as displayed in Figure 7. If
there is no progress on the activity, then the Start date is equal to the early start and the
Finish date is equal to the early finish. The user can manually input a Start date but
schedule calculations will generally overwrite the user input.
Figure 7 – No Progress Activity - Start/Finish Date
When the activity is in progress, Start is equal to the actual start and Finish will remain
equal to early finish as shown in Figure 8. Again, the user can manually enter a Start
date and user input will overwrite actual date.
Figure 8 – Activity in Progress - Start/Finish Date
When the activity is complete, Start and Finish dates will be equal to the actual start and
finish dates. In this case, if a User manually enters a Start or Finish date, P6 will keep
the changed dates and actually overwrite the actual dates without notice!
Planned Start/Finish Dates
Of all the date fields available in P6, probably the most interesting and controversial
ones are the Planned dates (Planned Start and Planned Finish.) The majority of P6
users are unaware of the planned date calculations and how they are used. This is
understandable as only one reliable partial reference was found.[5]
Planned dates do not always display planned information. In some instances they are
used to display Budgeted and Current information as well.
Planned dates are initially generated from the calculated early dates. They match the
early dates exactly as long as the activity does not register an Actual Start, resource
leveling is not used, or the User does not manually update these fields. As the
14
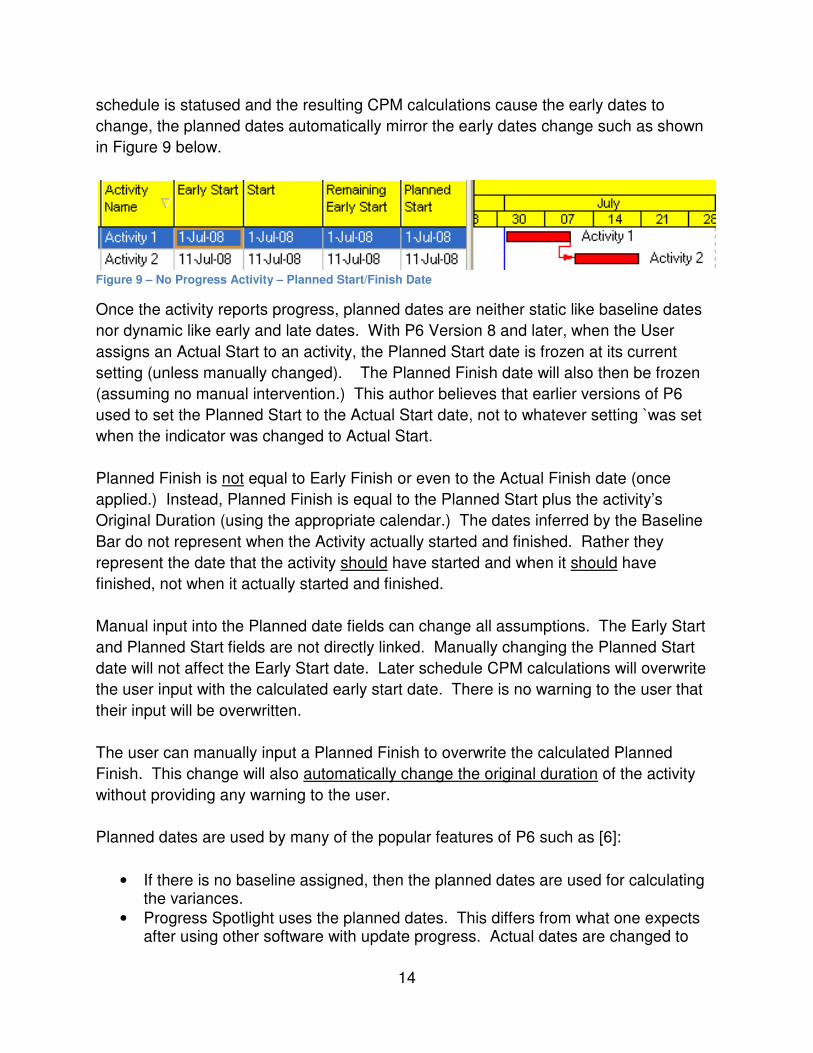
schedule is statused and the resulting CPM calculations cause the early dates to
change, the planned dates automatically mirror the early dates change such as shown
in Figure 9 below.
Figure 9 – No Progress Activity – Planned Start/Finish Date
Once the activity reports progress, planned dates are neither static like baseline dates
nor dynamic like early and late dates. With P6 Version 8 and later, when the User
assigns an Actual Start to an activity, the Planned Start date is frozen at its current
setting (unless manually changed). The Planned Finish date will also then be frozen
(assuming no manual intervention.) This author believes that earlier versions of P6
used to set the Planned Start to the Actual Start date, not to whatever setting `was set
when the indicator was changed to Actual Start.
Planned Finish is not equal to Early Finish or even to the Actual Finish date (once
applied.) Instead, Planned Finish is equal to the Planned Start plus the activity’s
Original Duration (using the appropriate calendar.) The dates inferred by the Baseline
Bar do not represent when the Activity actually started and finished. Rather they
represent the date that the activity should have started and when it should have
finished, not when it actually started and finished.
Manual input into the Planned date fields can change all assumptions. The Early Start
and Planned Start fields are not directly linked. Manually changing the Planned Start
date will not affect the Early Start date. Later schedule CPM calculations will overwrite
the user input with the calculated early start date. There is no warning to the user that
their input will be overwritten.
The user can manually input a Planned Finish to overwrite the calculated Planned
Finish. This change will also automatically change the original duration of the activity
without providing any warning to the user.
Planned dates are used by many of the popular features of P6 such as [6]:
• If there is no baseline assigned, then the planned dates are used for calculating the variances.
• Progress Spotlight uses the planned dates. This differs from what one expects after using other software with update progress. Actual dates are changed to

15
planned dates without any warning. To overcome this problem many schedulers run a Global Change to set the planned dates equal to the start and finish dates before running the automatic update feature.
• When a baseline has not been assigned, planned dates are used to display a Project or User Primary Baseline bar. Planned dates are represented as the bars for Baseline Schedule when nothing is selected in the Assign Baselines form. P6 users who have baseline schedules but forget to properly assign them end up with the current schedule’s planned dates for baseline schedule dates.
• Planned dates are also used in the Activity Usage Profile to show the budgeted values and as the baseline values when no baseline has been set. Once a baseline has been assigned, then baseline dates are used.
• Planned dates are also used in the Activity Usage Profile to show the earned value curves when no baseline has been assigned. Once a baseline has been set, then baseline values are used for displaying the earned value curves.
• The S-Curve graphic is generated from the Planned dates.
Planned dates are often accidentally used when sharing layouts created by other
people for other schedules. This occurs when the layout says to show Baseline Bars
but the receiving P6 User has not designated a Baseline (Baseline schedules do not
accompany an XER import.) In this case, Planned Dates are automatically used in its
place without warning.
“Layouts” are a formal package of settings used to define what is displayed on the
screen. To make communicating schedule issues easier, multiple users often share the
same settings, or “Layout.” Thus when one user assigns a Primary User Baseline and a
second user applies this layout but they have not assigned a User Baseline, then the
“Planned Dates” are used as a baseline.
The Intended use of Planned Dates
Planned Dates are primarily intended to be the source of baseline schedule dates.
When a baseline schedule is saved, whatever dates that were saved in the activity
Planned Dates fields will be the dates displayed when the Baseline Start and Baseline
Finish dates are displayed or listed. Unlike with MS Project, Baseline dates are not
stored independently in the database. Apparently, when opening a schedule, P6
references the schedule designated as the Baseline Schedule and displays the Planned
dates in the Baseline Date field of the schedule.
Planned dates have a highly complex, two-way interaction with other fields in the
schedule and even in other schedules assigned as Baselines. Before P6 Version 8,
changing a Planned Start date could change the activity’s actual start date. Since
Version 8, this is no longer true. Changing a Planned Finish date may result in
16
changing the activity’s remaining duration. Manual entries into these fields are therefore
strongly discouraged.
External Early Start and Late Finish Dates
Otherwise independent P6 schedules can be ‘linked’ by assigning a relationship from
one activity in one schedule to another activity in the second schedule. It is dangerous
to export a single schedule when schedules are linked to other schedules with such
relationships, as these relationships are then ‘lost’ in the exported file.
In cases like this where the inter-schedule relationships are lost, P6 does its best to
maintain proper timing by internally constraining the appropriate early/late dates of the
activities missing their inter-project relationships. These internal constraints are called,
“External Early Start” and “External Late Finish” constraints This causes the schedule
to mimic the effects of the relationship at the time of the export.
The imposed constraints will not show up under the task’s constraint boxes, as these
are internally imposed. The only indication of an imposed constraint will be an asterisk
printed to the right of the date in the Start or Finish column. These constraint dates will
only be visible if the External Dates columns are displayed.
Most people notice the results of external constraints when they have unexplained
extreme negative float values on isolated activities in the schedule. Others note this
when activities are unresponsive to ‘What-If’ analyses or schedule updates; ‘unwilling’ to
display the effects of changes to the system.
To stop P6 from automatically creating such external constraints, the option setting for,
“Ignore relationships to and from other projects” on the scheduling options tab should be
checked. P6 will then skip creating external dates during XER backups. The user can
also directly remove the external constraints entirely from the schedule by showing the
External Early Start and External Late Finish columns, deleting the external dates
shown, and then recalculating the schedule’s CPM dates. These constraints are not
listed in the standard constraints boxes on the activity tab.
Suspend and Resume Dates
The Suspend and Resume functions in P6 were added in Version 5. Many software
packages suspend an activity at the end of the working day. A P6 activity is suspended
17
on the exact minute and hour specified (which due to the Default Time Issue is usually
at the beginning of the specified day.)
P6 calculates an actual duration for all activities based on the amount of non-suspended
time. The amount of time that an activity’s progress is suspended is generally deducted
from the total duration. Units and costs are not spread over the period of suspension.
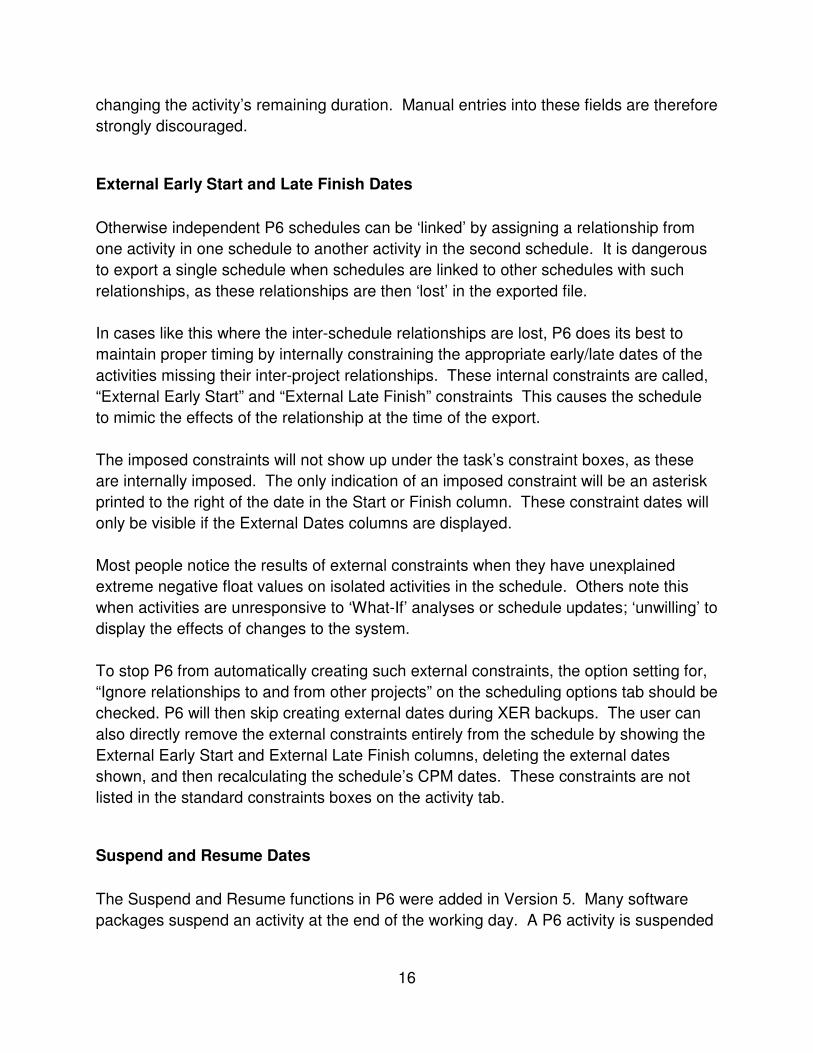
If the suspend/resume functionality is used, then the early start is set equal to the
resume date. The early finish is calculated using the resume date and the remaining
duration as shown in Figure 10 below.
Figure 10 – Suspend and Resume – Early Start/Finish Date
If the suspend date is entered without a resume date then P6 ignores the suspend date.
P6 sets the early start to the data date shown in Figure 11 below. In other words, P6
ignores the Suspend Date unless a Resume Date is also entered.
Figure 11 – Suspend without Resume - Early Start/Finish Date
Resource Dates
Resources assigned to an activity have almost as many dates assigned to them as do activities. There are several configuration settings that must be set for proper functioning of activity resources.
• Activity Type should be Fixed Duration if resourced or otherwise the resources will change the activity’s duration.
• Activities can be set to “Resource Driven”. In this case activity dates are computed using resource calendar.
• Resources can be set to “Driving Activity Dates”. In this case the activity will not be scheduled to begin until the resource begins.
• Entering an actual date for resource can update the activity’s dates. Resource actual dates must be within the time period of activity actual dates.

18
• The existence of resource actual dates will prevent the user from being able to remove activity actual starts when attempting to ‘de-status’ an activity. In addition to actuals in the Activity Resource Tab, actual expenses on the Activity Expenses Tab will prevent activity de-statusing. Finally, a third set of actuals to be found on the right-hand side of the Activity Status Tab can prevent activity de-statusing. These three independent fields must have no actuals before one can de-status the activity itself.
• Resource leveled schedules also strongly affect dates. P6 can be configured to automatically generate the resource dates but even then, there are instances where the scheduler must manually adjust resource dates in order to maintain proper functioning of the schedule. The resource date fields include,
• Planned Start and Finish Dates
• Actual Start and Finish Dates
• Start and Finish Dates
• Remaining Early Start and Finish Dates
• Remaining Late Start and Finish Dates
The first three sets of dates operate summarily to those corresponding dates for
activities. Only the Remaining dates are unique to resources.
Remaining Early Start/Finish Dates
Although the P6 documentation does not directly state this, the Remaining Early and Late Start/Finish dates appear to be the computed Early and Late Start/Finish dates adjusted for resource leveling. If resource leveling has not been run and no manual entry has been made to this field, then Remaining Early Start equals the Early Start Date as shown in Figure 12.
Figure 12 - Unprogressed Activity – Remaining Start/Finish Date
Like the Early Start Date, this date continues to track the earliest the activity can continue if the activity is statused as active. In P6 Version 7, the remaining fields were blanked out if an actual date was registered. In Version 8, they are now displayed just like the standard early and late Start/Finish dates as shown in Figure 13 below,

19
Figure 13 - Activity in Progress – Remaining Start/Finish Date
The default operation is to overwrite the Early Start Date with the resulting Remaining Early Start Date after the schedule has been resource leveled. There is a resource leveling option to preserve the scheduled early dates instead of overwriting them. In this case, one will be able to observe the earliest the activity could start or resume as well as the date that resource leveling picked to start the activity as shown in Figure 14.
Figure 14 - Resourced-Leveled Resume Dates
Once again, the reader is cautioned not to directly enter date information into these
calculated fields, even if this is allowed by P6. For instance, the user can manually
change the Remaining Early Finish date and this would automatically change the
Remaining Duration of the activity without warning.
Relationship Dates
When one considers that a relationship with a lag functions just like an activity with
duration, it is reasonable to assume that computed early and late start/finish dates could
be computed for relationships. If these dates can be computed, then one could also
compute the total float of a relationship. This float is not necessarily the same thing as
activity float. In fact, it would be considered the measurement of the controlling
relationship between two activities.
P6 places these relationship date fields under the heading, “Multiple Float Paths.” By
expanding this heading, one can display the following columns in the relationship tab,
• Relationship Early Start
• Relationship Early Finish
• Relationship Late Start
• Relationship Late Finish
• Relationship Total Float
20
These dates are not saved in the database. They are re-computed every time the user
opens a new schedule.
Audit Dates
In addition to the 4 main types of date field records, every record in the database
contains the three audit date fields listed above. P6 has storage set aside to hold a
unique date from every one of the above fields for every activity in the schedule. A
resource-loaded, 1,000 activity schedule could easily have 50,000 date fields set aside
in the database just for that one project!
Audit fields were added to practically every record in the P6 database beginning with
Version 5. Activities, relationships, activity resources, and even activity steps have
audit fields assigned to every transaction. Each individual record has the following date
information recorded,
• Date Created
• Date Last Updated
• Date Deleted
The P6 User ID of the person performing the above record transactions is also
recorded. Most of this information is not viewable by the P6 user. The audit dates
fields that are viewable include,
Record Type Label of Date Column
Project Date Added
Resources Assigned Date
Resource Assignments Assigned Date
Issues Identified Date
Risks Identified On
Task Resource Assigned Date
Activity Added Date
Activity Last Modified Date
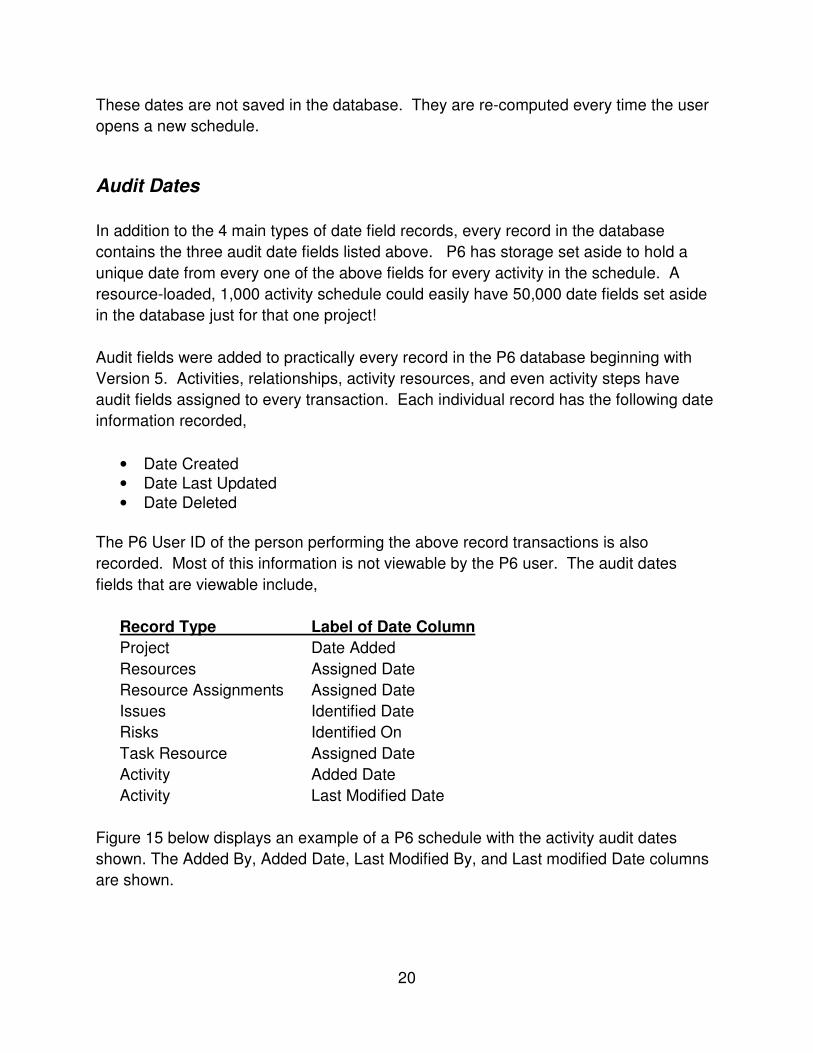
Figure 15 below displays an example of a P6 schedule with the activity audit dates
shown. The Added By, Added Date, Last Modified By, and Last modified Date columns
are shown.
21
Figure 15 – Activity Audit Dates
The blank Added Date fields are the result of showing audit information for Finish
Milestones. This is a P6 bug that is on the list of potential enhancements.
PART 2 - P6 Calculations
Oracle/Primavera P6 and EPPM software have many advanced CPM functions. This
paper will cover the basis for these functions and well as the options available. It will
also break down the functions of both the longest path calculation and the Multiple
Critical Paths function.
CPM Calculations
P6 uses a different CPM calculation formula than other software products such as P3.
With P3, the formula for calculating the Early Finish of an activity was Early Start +
Duration – 1 = Early Finish. P6 does not subtract the ‘1’ but later ‘rounds-up’ finish
times to the first non-working period when displaying the date.[7] This can give the
same end result, with a different day/hour being displayed. If 16:00 was the last
working hour of the day, P3 would indicate a completion of 16:00 whereas P6 would
indicate 17:00.
With P3, the data date was the beginning of the first available working time unit and the
activity finish was the end of the time unit. If the data date was 01AUG08, then the data

22
date was the beginning of that day. Similarly if an activity finished on the 01AUG08, it
was at the end of that day. Because unstarted daily activities begin in the morning and
always finish at the end of the day, the CPM calculation rule for the earliest start of the
successor activity requires one to add “1” to the work day number of the finish of the
predecessor when computing the start of the successor [3]. This is not the case with
P6. The example shown in Figure16 highlights this issue.
Figure 16 - Effects of Calendars
When both activities are on the same calendar, Activity 2 starts the day after Activity 1
finishes. As shown in the bottom section of Figure 16, Activity 1 is on a 9:00 to 17:00
calendar and Activity 2 is on an 8:00 to 16:00 calendar. In this case, Activity 2 starts the
same day Activity 1 finishes.
Another issue that former P3 users must deal with is the fundamental difference in
defining the correlation between time and duration. With P3, a 1-hour duration activity
might start at 08:00 and end at 08:59; that is, activities start at the beginning of a period
(in this case an hour) and end at the end of the time period.
P6 uses the format employed by Microsoft Project™ scheduling software. For P6, a 1-
hour activity might start at 08:00 and end at 09:00. By saying that the activity ends at
09:00, this really means that it ends at 08:59:59. With P6, one does not need to add “1”
to time difference calculations, nor is the addition of “1” necessary to compute the start
of successor activities when dealing with Finish-to-Start relationships.
How P6 Calculates the CPM
P6 calculates CPM dates on in-progress schedules differently than most people think.
There is no complex formula used to show retained logic with out-of-sequence activities.
The answer is so simple that it is difficult to convince some people of the correctness.
Luckily, P6 itself displays how it is done.

23
To use a physical example to explain the process, imagine the following four activities
shown in series in Figure 17. Out-of-sequence status has been entered but the CPM
has not as yet been recalculated.
Figure 17 - Out-of-sequence Progress before CPM Calculation
When P6 re-computes the schedule using the Retained Logic rule, it only looks at the
activity remaining durations and begins calculating the schedule from the data date
(02APR08 in this example.) For clarity, the hours and minutes are not shown. Figure
18 shows just how simple this process is,
Figure 18 – CPM Calculation
After the schedule has been recalculated, The Start and Finish columns are populated
from the Early Start and Early Finish columns unless there is an actual date, which
replaces the calculated date followed by the symbol, “A” for actual.
P6 then ‘fixes-up’ the barchart portion by plotting the Start and Finish column dates.
Everything to the left of the Data Date line is colored blue for actual. The program
colors everything to the right using green for early dates. If a gap exists between the
two, the area between the actual date bar and the new planned work is optionally drawn
in with ‘necking’ as shown below in Figure 19.
Figure 19 – Displaying CPM Calculation

24
Notice how the early start date for the third activity in Figure 19 is 08APR08; 6 days
later than the current data date. The Start date is listed as 17MAR08; the actual start
date.
Schedule Calculation Options
P6 has more schedule calculation options than most software packages and most of
them will affect the date calculations. The calculation options defined in the General
Tab shown in Figure 20 will be discussed.
Figure 20 - Schedule Calculation Options
The first schedule option on the General tab is whether or not to ignore relationships to
and from other projects. One can elect to have P6 ignore relationships that link to
activities located in different schedules. If this option is selected, P6 computes the
schedule without regard to any logical timing in any other dependent schedule. P6 does
not provide any indication of whether the current schedule actually has any inter-project
relationships. If this Option is selected, backups of this single schedule will also not
include any internal constraints (called, External Constraints.)
25
The “Make opened-end activities critical” option overrides ‘standard’ CPM calculation
rules and artificially constrains any activity without a successor to have their late dates
equal the early ones. The use of this option is discouraged as this creates additional
critical paths that normally do not effect project completion.
P6 recalculates the duration of activities with expected finish dates as the difference
between their actual or calculated early start dates and the assigned expected finish
date. Expected Finish constraints can be defined in the schedule but not considered
during the scheduling process. This CPM option is checked by default.
There is an option to have P6 automatically level the activities for resource availability
each time the project is scheduled. This can be a nearly ‘invisible’ operation, as
resource leveling reports (if produced) are not automatically displayed. Schedule
analysis should always begin their reviews by checking to see if this option is selected.
Be sure to also note that if the option to automatically schedule is also selected, the
schedule will be leveled every time the user moves from one activity to the next. This
can result in a noticeable time lag and slow down data entry.
Out-of-sequence progress is not uncommon in construction schedules. P6 includes
three different options for handling the computations for this condition.
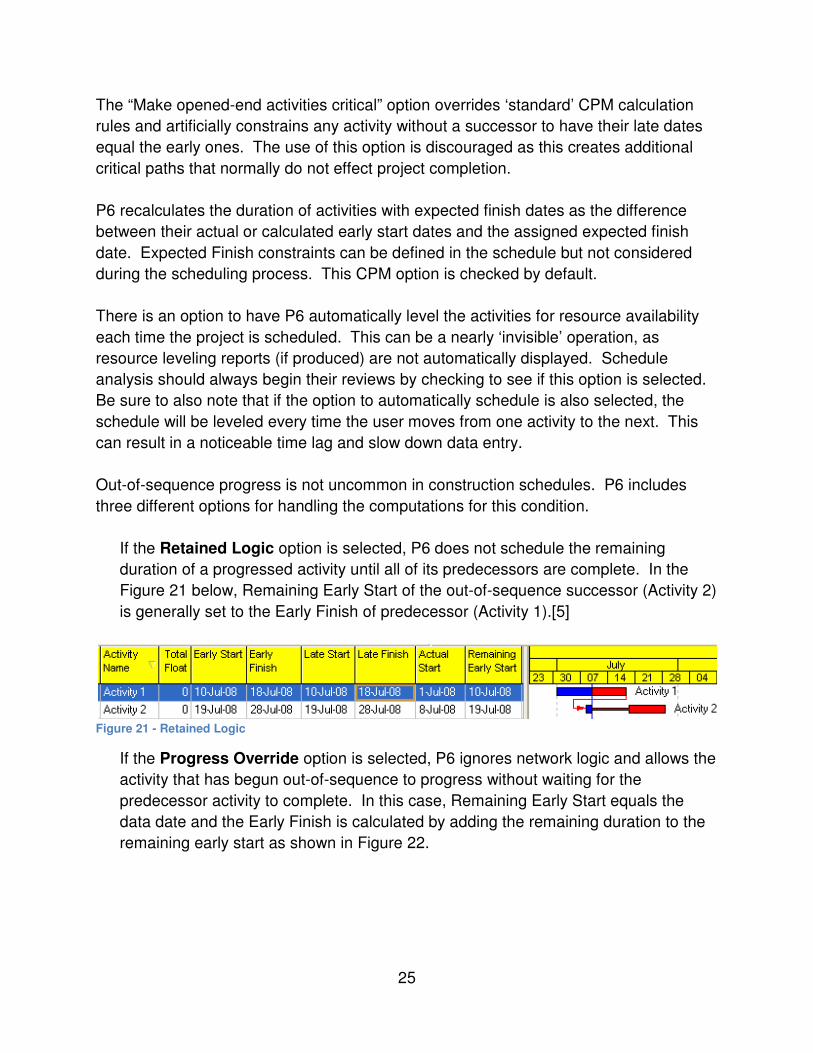
If the Retained Logic option is selected, P6 does not schedule the remaining
duration of a progressed activity until all of its predecessors are complete. In the
Figure 21 below, Remaining Early Start of the out-of-sequence successor (Activity 2)
is generally set to the Early Finish of predecessor (Activity 1).[5]
Figure 21 - Retained Logic
If the Progress Override option is selected, P6 ignores network logic and allows the
activity that has begun out-of-sequence to progress without waiting for the
predecessor activity to complete. In this case, Remaining Early Start equals the
data date and the Early Finish is calculated by adding the remaining duration to the
remaining early start as shown in Figure 22.

26
Figure 22 - Progress Override
It is important to note that not only did the out-of-sequence Activity 2 continue
progressing on the data date, but that Activity 1 is no longer a critical activity! Even
though P6 displays the relationship between the two activities on the screen in the
barchart and activity details, this relationship is completely ignored during Progress
Override CPM calculations and treated as if it had been deleted. Progress Override
is applied to every type of relationship other than the Finish-to-finish (FF)
relationship. In the example above, Activity 1 now does not have any successor
activities.
Introduced with Version 3.5, P6 has a calculation option called, “Actual Dates.” If the
Actual Dates option is selected, then the predecessor’s late finish is set to the time
unit before the actual start of the out-of-sequence successor. This assignment has
the potential of creating negative float without date constraints.
For Actual Dates calculations, the Early Start of the out of sequence successor
(Activity 2) is generally set to the Early Finish of predecessor (Activity 1) or +1 day,
as shown in Figure 23.
Figure 23 - Actual Dates
The Late Finish of the predecessor (Activity 1) is set to the day before the Actual
Start of the out-of-sequence successor (Activity 2). Activity 1 should have been
completed on 07JUL08 so that Activity 2 can start on 08JUL08. This logic is flawed
since Activity 2 already started; it is evident that Activity 1 finish was not necessary.
Although there are no date constraints imposed, the schedule calculates a negative
float for these isolated activities.
If Actual Dates option is selected, the Start to Start Lag calculation option is disabled
and Actual Start is always used as the beginning of the lag calculation.

27
In general, using Actual Dates option will cause the CPM to behave like Retained
Logic if the out-of-sequence activity has started but not finished and to behave like
the Progress Override option if the out-of-sequence activity has finished.
The next option is to allow the calculation of total float based on the finish date of each
project in a collection of schedules or on all opened schedules. P6 is frequently used in
a multi-schedule environment where a group of semi-independent schedules can be
opened together and run as a single network.
The, “Each Project” option allows each schedule to calculate their specific critical path
independently even if they were tied together in a network of relationships. This method
of calculation fails to identify the single critical path for a project of multiple schedules
while the other option allows for a single, common measurement. The problem with
offering two options is that aside from viewing the scheduling log (which may not be
available,) there is no indication as to which option was used for the definition of total
float when later reviewing the results of a CPM computation.
P6 users have four options when designating a calendar to calculate the lag between
predecessors and successors. This one setting is used for all relationships in the
schedule. The default setting used to be “the successor activity’s calendar” until
Version 4 of P6, when the “predecessor activity’s calendar” was used as the default.
The lag can be calculated based on
• Successor Activity Calendar
• Predecessor Activity Calendar;
• 24 Hour Calendar,
• Project Default Calendar (the calendar selected as Default for New Activities on the Defaults tab of Project Details).
Regardless of the relationship lag setting, P6 uses the successor’s calendar when
determining whether a Finish-to-Finish relationship is a part of the longest path. This
undocumented fact often causes the P6 longest path to be discontinuous if different
calendars are used.
Admin Tab Calculations
The next location that must be checked to make one schedule dates align with a copy of
the same schedule transmitted via an XER or XML file backup is on the Admin
Preferences screen in the Earned Value tab section. Figure 24 below shows a copy of
this screen,

28
Figure 24 – P6 Admin Settings / Earned Value Tab
Strangely, it is the Earned Value Calculation setting that determines what date values
are displayed from the associated Baseline Schedules. The default setting for P6 is to
display the Planned Dates from the Baseline schedule.
Most reviewers believe that they are looking at the actual dates when they are actually
looking al Planned dates. To ensure you have the Start and Finish Dates from a
Baseline are displayed as Baseline Bars and not the Planned Dates, make sure:
• Make Baseline Bars show actual, not Planned Dates. The Admin, Admin
Preferences, Earned Value tab should be set to either:
o At Completion values with current dates, or

29
o Budget Values with current dates (some versions use (Planned Values
with current dates.)
• A Baseline is set in the Project, Assign Baseline form and you are not displaying
a <Current Project> indicator for the Baseline Schedule name,
• Each User will must set their own Primary User Baseline when using a Layout
created by another person.
Project Tab Calculations
The last location that the reviewer of a schedule should check for schedule calculations
is the Calculations section of the Project Tab. This is a common problem as these
settings do not necessarily transfer to the computer receiving an XER or XML backup
file. Figure 25 below displays this tab,
Figure 25 – P6 Project Tab / Calculation
Check the Project window, Calculations tab setting, “Link Budget and At Completion for
not started activities” option to make sure that it matches the setting of the original
schedule. When checked, this ties each unstarted activity’s Original Duration to match
the activity’s Remaining Duration. Changing one automatically changes the other. Un-
checking this setting allows Remaining Duration to initially be equal to Original Duration
when created but free to be independently changed afterwards.
Longest Path Calculations
P6 software has the ability to calculate the longest logical path through a schedule
network. This list of activities represents the longest continuous string of activities that

30
must be completed in order to complete the project. One cannot shorten the length of a
project without shortening the duration or modifying the logic of activities on the longest
path.
The longest path is a superior method for identifying the schedule’s critical path over
using Total Float as the indicator. The Total Float method sometimes misses activities
and can become discontinuous due to activity calendar changes or start float being
different from finish float
The longest path calculation starts out just like the standard CPM calculation by
calculating the early start and early finish dates of every activity in the network. This is
called performing the forward pass. It then identifies the activity with the latest early
finish date. At this point, P6’s longest path process diverges from the standard CPM
backward pass procedure.
Instead of calculating the CPM backward pass, P6 traces a path backward through the
logic, following the controlling logic path. It does this by identifying which predecessor
activity has zero Free Float. All activities identified by this procedure are listed as being
on the longest path.
Figure 26 below shows a sample longest path calculation versus a Total Float critical
path. The milestone in red has a Finish On or Before constraint that results in a -2 Total
Float value. The Total Float Critical Path is shown in red. The longest path process
designates the activity, “Last Act” as the end of the longest path and traces the
controlling path backward (designated as a checkbox.) In the example below, the two
methods have only one activity in common, activity “Act 1”.
Figure 26 –Total Float versus Longest Path Calculations

31
Even though P3 software also designated a longest path, P6 uses a slightly different
technique to identify the controlling logic. P3 identified the controlling path logic while
calculating the forward pass and saved this information. P6’s ‘post calculation’ method
is inferior in that it can sometimes lose the path due to calendar changes as well as
following resource leveling.
The longest path method as implemented by P6 has other issues that can cause it to
become discontinuous. Even though it ignores any constraints that solely affect the
backward pass, forward pass constraints such as Start On, Start On or After, Finish On,
and Finish On or After can halt the backward controlling pass identification. Figure 27
below shows an example of a schedule where the longest path activities are identified
by a checkbox as well as coloring the bars red.
Figure 27 – Discontinuous Longest Path Calculation
The Activity P1N2260 had a Start On or After constraint that caused the activity to begin
later than it would have using CPM calculations alone. This caused the longest path to
stop its backward tracing several months short of the data date.
Multiple Float Path Calculations
The Advanced Tab of the Schedule Options window holds the settings for the Multiple
Critical Path function. The purpose of using the multiple critical paths function is to
identify and rank secondary critical paths. It does this by calculating the float of every
relationship in the schedule and then using this information to iteratively trace and label
all predecessors links.
The concept that relationships can have float different from the predecessor’s activity
float was first formally espoused in 2003.[8] The concept was later presented in a
different format in 2004 as Enhanced PDM [9]. Primavera used the concept of

32
Enhanced PDM to develop Multiple Critical Paths and introduced it in P6 Version 5 in
2005.
A relationship with a lag duration operates very summarily to an activity with duration.
Early and Late Start/Finish dates can be computed for each relationship and the
difference between the two would result in a total float calculation; this time for the
relationship and not for the activity. When an activity has multiple predecessors, then
each may have different relationship float that denotes the degree that the relationship
is controlling the start of the activity. Tracing paths ‘backward’ based on the next lowest
relationship float would provide for a listing of the various controlling paths in
diminishing order of criticality. Each path is labeled with an increasing path number,
beginning with “1”.
Figure 28 shows a relationship float CPM network example. Each relationship is
marked with an abbreviation of its relationship type (FS, FF, SS, SF) followed by a slash
and then the lag value. The FS/0 relationship between Act 1 and Act 4 is a Finish-to-
Start with zero lag.
Figure 28 – Relationship Float Example
The relationship can be better visualized if it the lag is replaced with a corresponding
activity. A relationship with zero lag would be depicted as a zero-duration milestone
with a diamond shape and the non-zero other lags as an activity rectangle with a length
equal to its duration. Figure 29 below shows the transformation with blue-colored
replacements.

33
Figure 29 – Relationship Lags Visualized
The blue ‘activities’ representing relationships can now have their CPM early and late
dates calculated and the total float (TF) and free float (FF) calculated from this. These
values are shown in blue in Figure 30 below,
Figure 30 – Relationship Float Computed
The Multiple Critical Paths function provides two different methods for tracing the paths
backward; Total Float Method and Free Float Method. The method using relationship
total float entails finding the latest, lowest relationship total float and following each
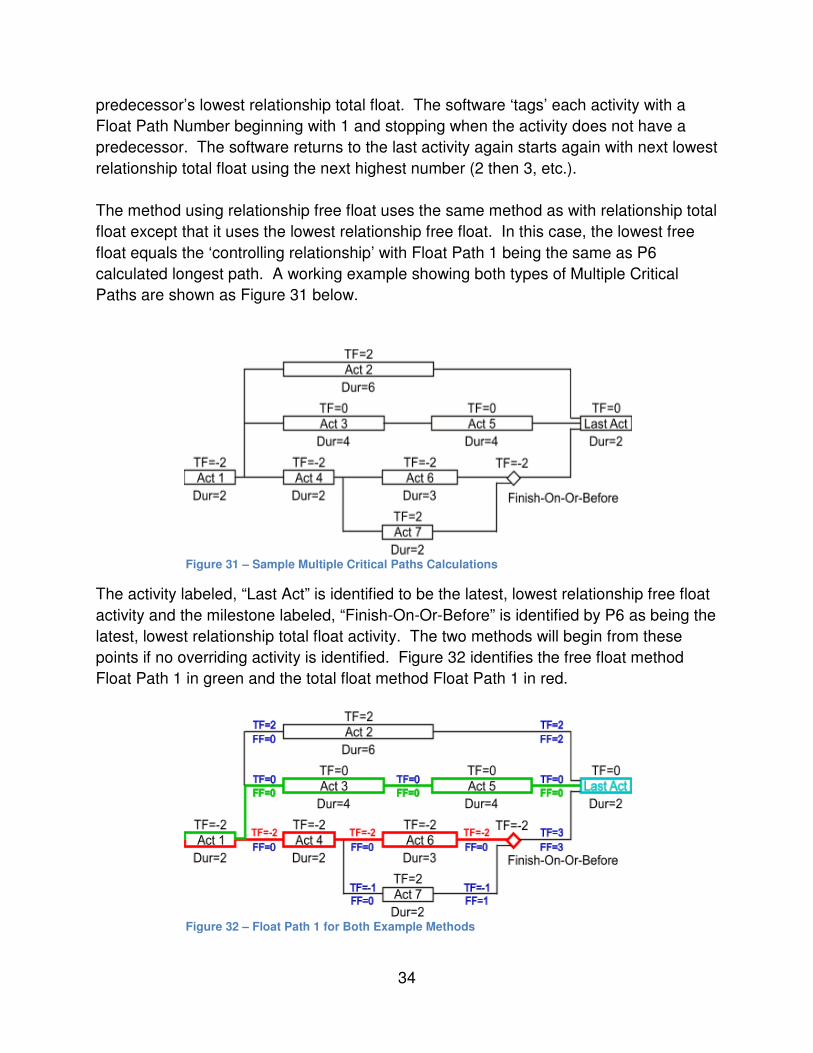
34
predecessor’s lowest relationship total float. The software ‘tags’ each activity with a
Float Path Number beginning with 1 and stopping when the activity does not have a
predecessor. The software returns to the last activity again starts again with next lowest
relationship total float using the next highest number (2 then 3, etc.).
The method using relationship free float uses the same method as with relationship total
float except that it uses the lowest relationship free float. In this case, the lowest free
float equals the ‘controlling relationship’ with Float Path 1 being the same as P6
calculated longest path. A working example showing both types of Multiple Critical
Paths are shown as Figure 31 below.
Figure 31 – Sample Multiple Critical Paths Calculations
The activity labeled, “Last Act” is identified to be the latest, lowest relationship free float
activity and the milestone labeled, “Finish-On-Or-Before” is identified by P6 as being the
latest, lowest relationship total float activity. The two methods will begin from these
points if no overriding activity is identified. Figure 32 identifies the free float method
Float Path 1 in green and the total float method Float Path 1 in red.
Figure 32 – Float Path 1 for Both Example Methods
35
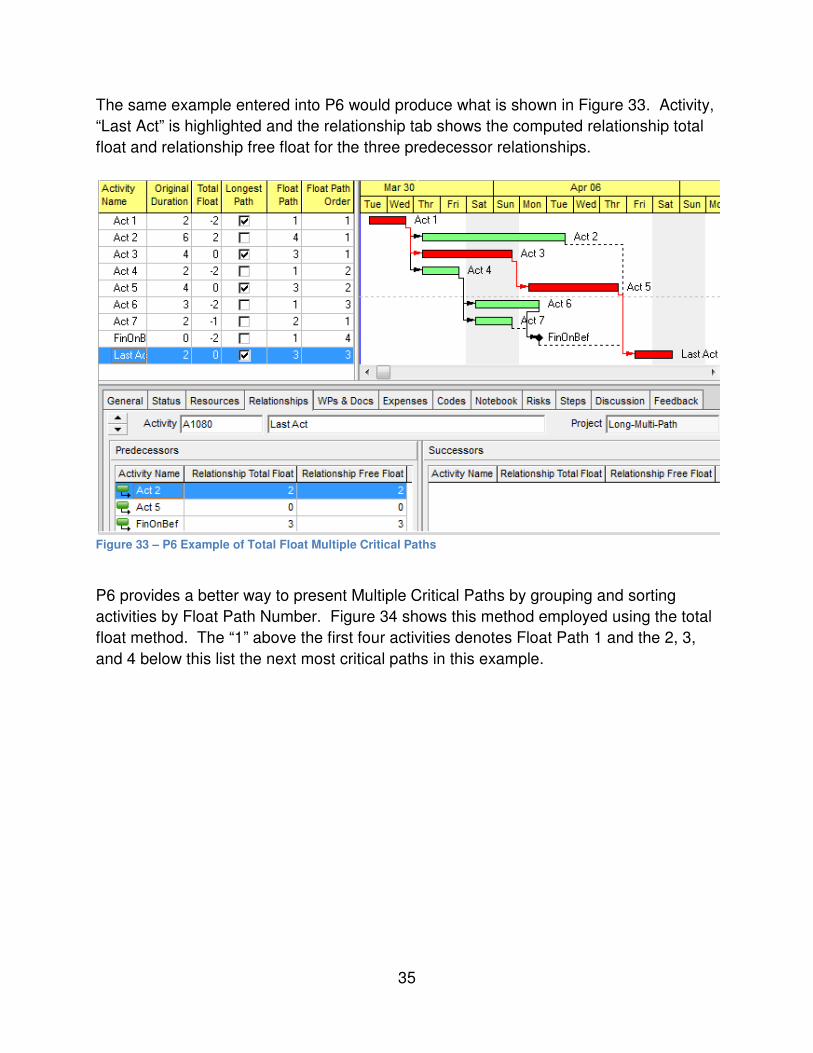
The same example entered into P6 would produce what is shown in Figure 33. Activity,
“Last Act” is highlighted and the relationship tab shows the computed relationship total
float and relationship free float for the three predecessor relationships.
Figure 33 – P6 Example of Total Float Multiple Critical Paths
P6 provides a better way to present Multiple Critical Paths by grouping and sorting
activities by Float Path Number. Figure 34 shows this method employed using the total
float method. The “1” above the first four activities denotes Float Path 1 and the 2, 3,
and 4 below this list the next most critical paths in this example.

36
Figure 1 – P6 Example of Grouping Total Float Multiple Critical Paths
P6 users used to seeing longest path designations may be more comfortable using the
relationship free float setting. Figure 35 below shows the same example after the
Multiple Critical Paths was computed using the free float setting. Notice how Float Path
1 also corresponds to the P6 longest path.
Figure 35 – P6 Example of Grouping Free Float Multiple Critical Paths
P6 users have the option of using relationship total float or relationship free float when
computing Multiple Critical Paths. The total float setting will reflect relationship float
while the free float setting will reflect the longest path.
37
It is ‘dangerous’ to leave the, “Display multiple critical paths ending with activity …”
blank as the software will them pick the ending activity. Normally users should
designate the substantial completion activity for the endpoint. One can also use this
entry to investigate the drivers to milestone completion by inserting the Activity ID of the
milestone.
The ability to specify the number of float paths to calculate does not seem very
important as this process is very quick on moderately large schedules and the storage
requirement is the same regardless of what number is used. Users can just leave this
entry blank to calculate all paths.
Summary
P6 is an incredibly complex and flexible scheduling software. The flexibility of P6 can
be a benefit but it is intimidating to a scheduler expecting other CPM software’s relative
simplicity. Every P6 scheduler should clearly understand the software’s method of
calculation to use this powerful tool at its full capacity. A brief summary of some of the
important points are listed below:
1) Each schedule is calculated and updated to the nearest minute. Without diligence
on the scheduler’s part, this can lead to situations where the successor activity
begins on the same date as the predecessor finishes.
2) If the durations are entered in time units other than hours, then they are
automatically converted to decimal hours using a single, set conversion factor.
Later these durations are re-converted back to days using the currently existing
conversion factor. For accuracy, many schedulers enter durations in hours, even
when scheduling in days.
3) Schedulers should always show time as well as dates when entering actual dates,
even when working in days. When times are not shown, earlier versions of P6
default to entering 00:00 in the time portion of the date field. Later versions ‘guess’
at the correct time for Actual Starts and Actual Finishes but not for other date
entries.
4) Early start, early finish, late start, and late finish dates are based upon computing
the entire schedule starting from the current data date. This means that completed
activities will show early and late start/finish dates that are not equal to their actual
start/finish dates.
5) Early start and finish dates are not blanked-out or replaced with actual dates when
actual dates exist and retained logic is used. This combinational behavior is
reserved for the P6 Start and Finish columns. Early start shows the newest
38
calculated early start date (using the current data date) even for activities with
actual dates.
6) Start and Finish dates are early dates, corrected for actual dates unless resource
leveling has been used.
7) Planned dates are used in place of Baseline dates when Baselines are not
assigned. This potentially affects earned value and variance calculations.
8) During export, the external relationships might be lost and an internal date
constraint placed in its stead.
9) By default, the standard Gantt chart display shows activity bars reflecting the start
dates, not the early dates.
10) It is very dangerous to manually enter date or duration information into calculated,
interconnected fields. P6 will generally adjust other portions of the calculation
input in response to such changes.
11) Retained Logic is the best CPM calculation method for estimating overall schedule
completion.
12) Progress Override allows for ‘automatic’ activity sequence rescheduling.
13) The Actual Dates calculation option best if actual dates in the future are allowed.
14) Multi-schedule programs can calculate a single critical path using Total Float.
15) Relationship calendars settings can cause discontinuous longest paths.
16) Longest Path is the best option for showing remaining work.
17) The lowest Total Float is the best method for showing milestone impacts.
18) The Multiple Critical Paths feature identifies and orders the near-critical paths.
References
No. Description
1 Winter and Evrenosoglu
2009
Much Ado about Dates - Understanding P6 Date Information
PS.15 - 2009 AACE International Transactions
AACE International, Morgantown, WV
2 O’Brien and Plotnick
2005
CPM in Construction Management, Sixth Edition
McGraw-Hill

39
3 Winter
2003
How to Befuddle a College Professor (Without Really Trying)
Cost Engineering Journal 45, 10 (2003): 8-10 AACE International, Morgantown, WV
4 Avalon
2014
Calculating the As-Built Critical Path
PS.1691 - 2014 AACE International Transactions
AACE International, Morgantown, WV
5 Harris
2008
Project Planning and Control using Primavera P6
Eastwood Harris Pty Ltd. 6 Harris
2008
From Planning Planet web blog, www.planningplanet.com
Building Works, Victoria , Australia 7 Winter
2004
Determining the Critical Path
PS.02 - 2004 AACE International Transactions
AACE International, Morgantown, WV
8 Winter
2014
Computing the Near-Longest Path
PS.11 - 2014 AACE International Transactions
AACE International, Morgantown, WV
9 Herold
2004
“Enhanced PMD”, Concepts and Benefits
PS.09 - 2014 AACE International Transactions
AACE International, Morgantown, WV

40
The Author
Ron Winter, PSP, FAACE is an independent CPM Scheduler and Owner of Ron Winter
Consulting LLC, the makers of Schedule Analyzer™ and PROJECT WATCH™
Software. He can be reached via the web at [email protected]


