
Teacher Activity
Teacher fellowship program 2006/COL/teacher activity
Cold Station
Ring The Alarm!
Station Electricity
Fruit Conductors
How Elevator Save Energy
Are You A suggish Snail Or A Turbon
Pressure
WaterCraft
No Sucker
PE
TR
O S A I N S

x
Introduction
These activities introduce the concept of atmospheric pressure and its application in our daily life.At the end of the activities, students should be able to understand principles of basic pressure and how a vacuum cleaner works.
1. NO SUCKER
What do we need?
What do we do?
1. Fill the plastic bottle with some drinking water.
Prepared by: Aziah Yahaya
Prepared by: Aziah Yahaya
PRESSURE
1 Knife/bladeAn empty plastic bottle Drinking water Some plasticine
2. Using a knife/blade, poke a hole in the bottle cap big enough for a straw.
Teacher fellowship program 2006/COL/Teacher Activity
PE
TR
O S A I N S
x

What’s happening?Water could not come through the straw. When you drink from an open glass of water, air pressure allows the water to travel up the straw. When you reduce the pressure inside your mouth (by suck-ing on the straw), the surrounding air pressure pushes down on the water and forces the liquid up the straw. When the bottle cap is sealed, there is no air pressure to help push the water up the straw to go into your mouth.
3. Put the straw into the water through the hole in the lid and seal up the space around the straw with some plasticine.
4. Try to suck through the straw. Did the water go into your mouth?
Prepared by: Aziah YahayaTeacher fellowship program 2006/COL/Teacher Activity
PE
TR
O S A I N S
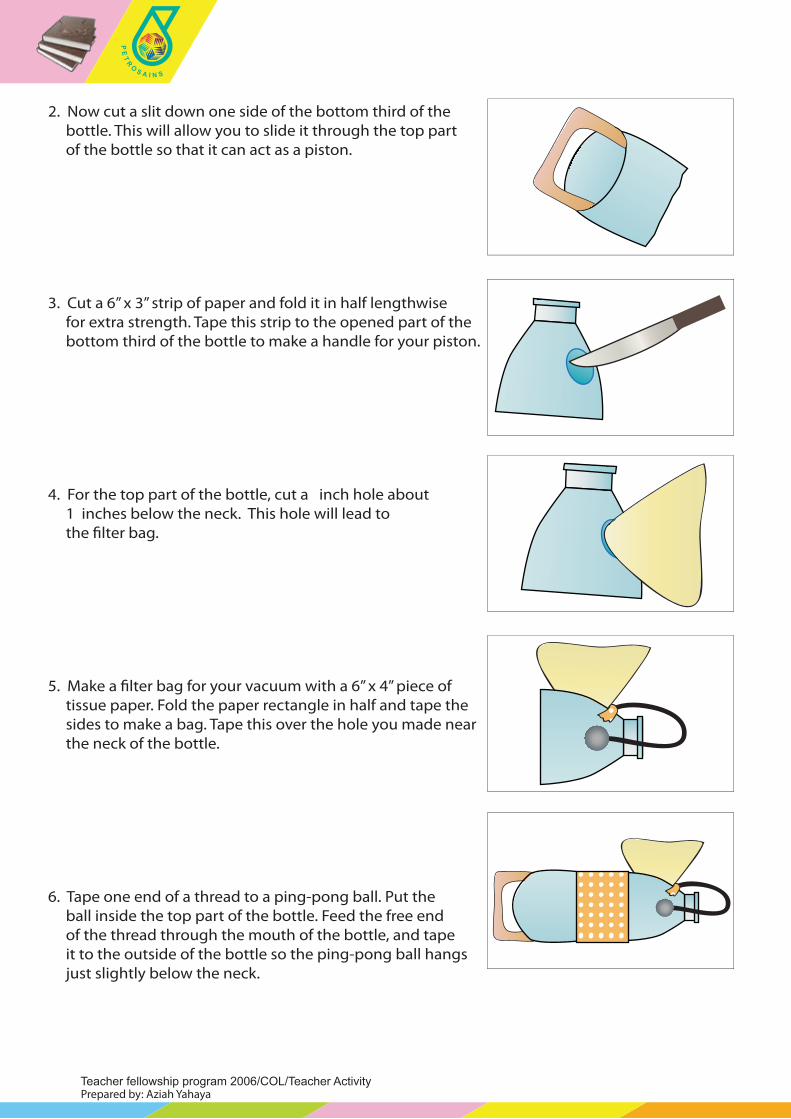
2. Now cut a slit down one side of the bottom third of the bottle. This will allow you to slide it through the top part of the bottle so that it can act as a piston.
3. Cut a 6” x 3” strip of paper and fold it in half lengthwise for extra strength. Tape this strip to the opened part of the bottom third of the bottle to make a handle for your piston.
4. For the top part of the bottle, cut a inch hole about 1 inches below the neck. This hole will lead to the �lter bag.
5. Make a �lter bag for your vacuum with a 6” x 4” piece of tissue paper. Fold the paper rectangle in half and tape the sides to make a bag. Tape this over the hole you made near the neck of the bottle.
6. Tape one end of a thread to a ping-pong ball. Put the ball inside the top part of the bottle. Feed the free end of the thread through the mouth of the bottle, and tape it to the outside of the bottle so the ping-pong ball hangs just slightly below the neck.
Prepared by: Aziah YahayaTeacher fellowship program 2006/COL/Teacher Activity
PE
TR
O S A I N S
IntroductionA vacuum cleaner is able to suck dirt o� carpet because high pressure air from the outside �ows towards the low pressure air inside. The higher pressure air outside the vacuum is sucked in to replace the lower pressure air, bringing dirt and dust with it to be caught in the �lter bag.
What do we do?
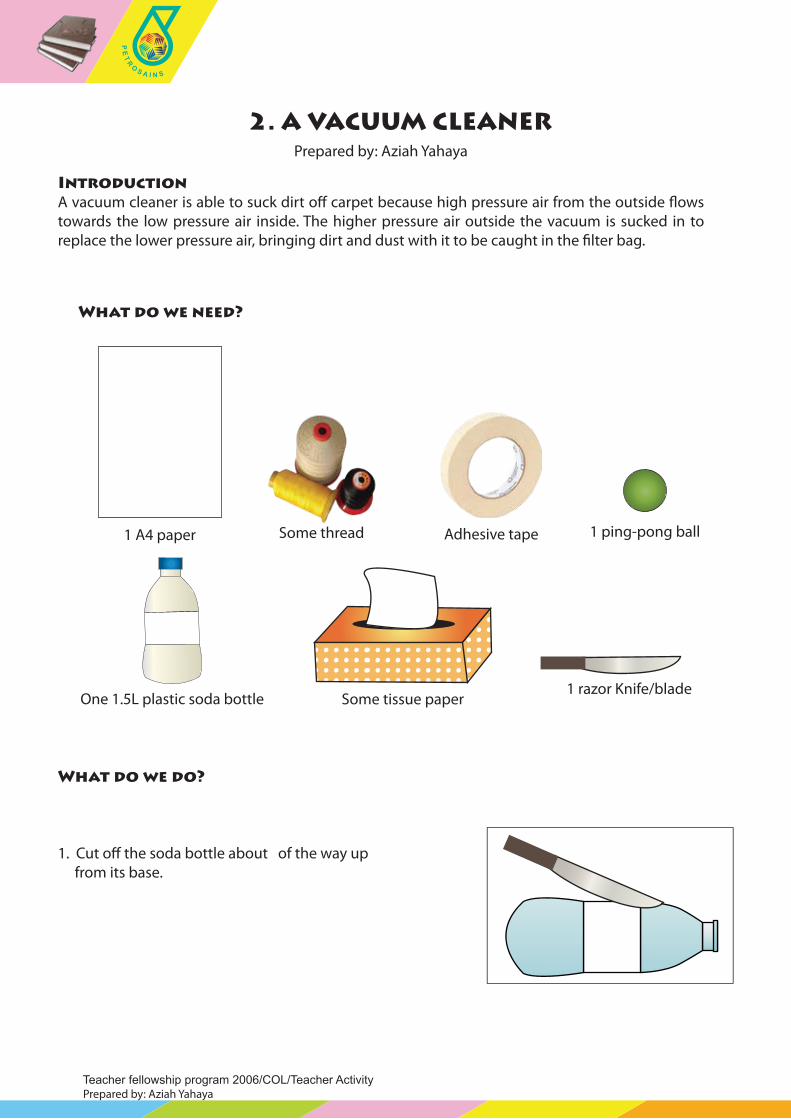
1. Cut o� the soda bottle about of the way up from its base.
Prepared by: Aziah Yahaya
Prepared by: Aziah Yahaya
2. A VACUUM CLEANER
1 razor Knife/blade
1 A4 paper Adhesive tape 1 ping-pong ball
Some tissue paper
Some thread
One 1.5L plastic soda bottle
What do we need?
Teacher fellowship program 2006/COL/Teacher Activity
PE
TR
O S A I N S

What’s happening?
Pulling the piston back decreases the air pressure inside the bottle, as there is bigger space for the same amount of air (volume of space increases). The lower pressure air inside the bottle creates suction, pulling in higher pressure air from outside in through the mouth of the bottle. As you push the piston, the air is compressed and pressure increases in the vacuum, so air �ows back out of the bottle. The ping-pong ball works as a valve.
The table below shows how the atmospheric pressure varies with altitude.
Fraction 1 atm Avg. altitude in meters
1 0
½ 5486.3
1/3 8375.8
1/10 16131.9
1/100 30900.9
1/1000 48467.2
1/10000 69463.6
1/100000 96281.6
The Earth’s atmospheric pressure varies broadly and these changes are important in
meteorology. The recorded atmospheric pressure during hurricane Wilma on 19th October
2005 was 33.2 kPa (882mbar or 66.8 cmHg).
Reference: http://en.wikipedia.org/wiki/Atmospheric_pressure (1/12/2006, 10:10 AM)
Curriculum Specifications Link
• Physics Form 4: Pressure (Atmospheric pressure)
Prepared by: Aziah YahayaTeacher fellowship program 2006/COL/Teacher Activity
PE
TR
O S A I N S
7. Push the bottom cut-o� part of the bottle into the upper part of bottle, and then pull it back sharply.

Prepared by: Chin Chee Keong
Sluggish Snail or charged Cheetah?
Two peopleA calculatorA meter ruler
IntroductionHow fast is your reaction?
What do we need?
What do we do?1. Hold the metre ruler with its zero reading pointing downwards.
2. Person A positions his/her thumb and index �ngers 8cm apart at chest level at a comfortable distance from the body.
3. Person B holds the metre ruler inbetween Person A’s �ngers.
3. Person B drops the ruler straight down suddenly.
4. Person A grabs the ruler upon its release and holds it.
5. Take the reading where the subject grabbed the ruler.
6. Repeat steps 1 to 5 thrice for an average reading.
7. Convert the distance into milliseconds using this formula:
8. Tabulate all data and look for e�ects on the re�ex time of subject of a di�erent age and sex.e.g.
1000480
×=dt
Teacher fellowship program 2006/COL/Teacher ActivityPrepared by: Chin Chee Keong
PE
TR
O S A I N S

or
Sex Reaction time (millisecond)
Female
Male
or
Physical activity Reaction time (millisecond)
Before push-ups
After 20 push-ups
What’s happening ?
Nervous responses to environmental stimuli are fast and only takes a small fraction of a
second to be completedThe body must react quickly to avoid painful or dangerous
stimuli. Various factors affect our reaction time.
Curriculum Specifications Link:
• Science Form 2: The World Through Our Senses
• Biology Form 5: Body Coordination System
Age range (years) Reaction time (millisecond)
26-30
31-35
36-40
Teacher fellowship program 2006/COL/Teacher ActivityPrepared by: Chin Chee Keong
PE
TR
O S A I N S
Prepared by: Chin Chee Keong
Prepared by: Chin Chee Keong
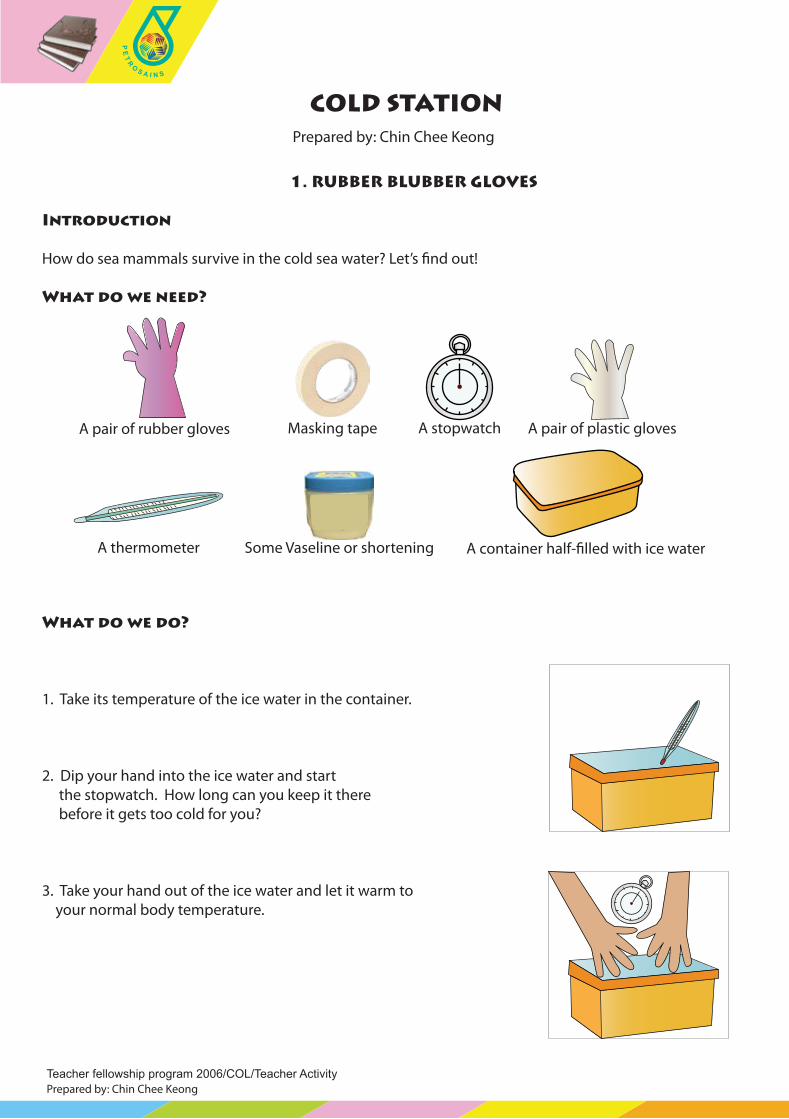
Masking tapeA pair of rubber gloves A stopwatch A pair of plastic gloves
Some Vaseline or shortening A container half-�lled with ice water
COLD STATION
1. RUBBER BLUBBER GLOVES
Introduction
How do sea mammals survive in the cold sea water? Let’s �nd out!
What do we need?
What do we do?
1. Take its temperature of the ice water in the container.
2. Dip your hand into the ice water and start the stopwatch. How long can you keep it there before it gets too cold for you?
3. Take your hand out of the ice water and let it warm to your normal body temperature.
Teacher fellowship program 2006/COL/Teacher Activity
PE
TR
O S A I N S
A thermometer
What’s happening?
Sea mammals like whales and seals have a thick layer of fat underneath their skin called blubber. The blubber keeps them warm. The layer of shortening on your right hand glove helps to reduce loss of heat from your hand to the ice water.
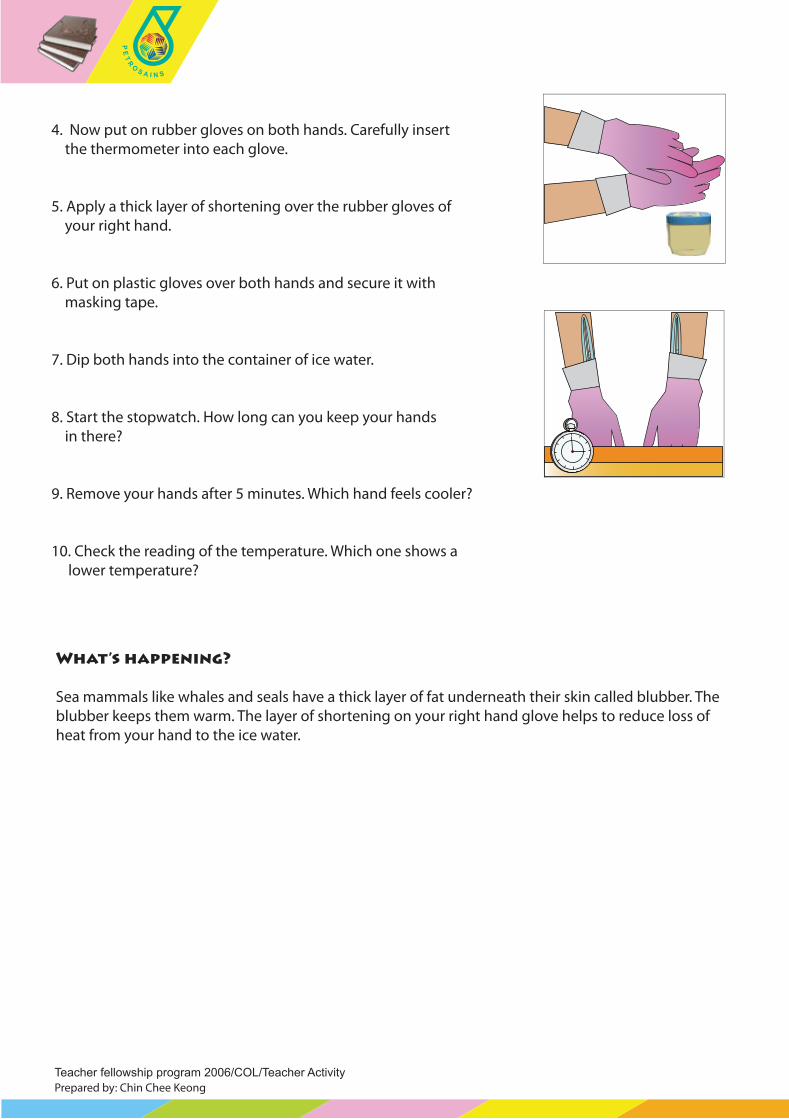
4. Now put on rubber gloves on both hands. Carefully insert the thermometer into each glove.
5. Apply a thick layer of shortening over the rubber gloves of your right hand.
6. Put on plastic gloves over both hands and secure it with masking tape.
7. Dip both hands into the container of ice water.
8. Start the stopwatch. How long can you keep your hands in there?
9. Remove your hands after 5 minutes. Which hand feels cooler?
10. Check the reading of the temperature. Which one shows a lower temperature?
Prepared by: Chin Chee KeongTeacher fellowship program 2006/COL/Teacher Activity
PE
TR
O S A I N S
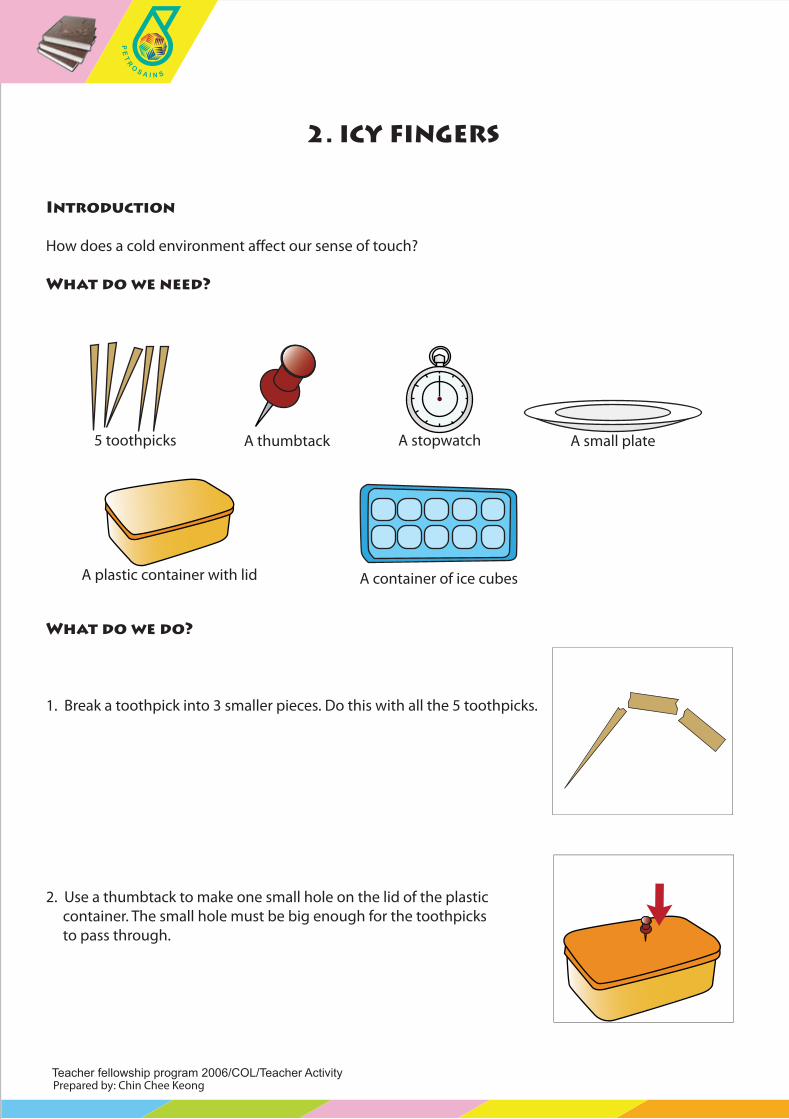
Introduction
How does a cold environment a�ect our sense of touch?
What do we need?
What do we do?
1. Break a toothpick into 3 smaller pieces. Do this with all the 5 toothpicks.
2. Use a thumbtack to make one small hole on the lid of the plastic container. The small hole must be big enough for the toothpicks to pass through.
Prepared by: Chin Chee Keong
2. ICY FINGERS
A stopwatch5 toothpicks A thumbtack A small plate
A plastic container with lid A container of ice cubes
Teacher fellowship program 2006/COL/Teacher Activity
PE
TR
O S A I N S

3. Start the stopwatch as you begin to pick up a small toothpick from the plate and insert it into the plastic container through the small hole. How long did you take to �nish inserting all the 15 pieces of toothpicks?
4. Now dip the same hand into a container of ice for 30 seconds. Dry your hand, pick up the broken toothpicks and insert them into the plastic container in the same manner. How long did you take to �nish inserting all the 15 peices?
What’s happening?
Our hand feels cold being in the container of ice cubes. When our body is cold, there will be less blood �ow to the skin. The skin becomes less sensitive, which dulls the sense of touch. That is why it is harder to pick up the toothpicks.
Curriculum Speci�cations Link• Science Form 1: Heat• Science Form 2: Sensory Organs • Physics Form 4: Heat
Prepared by: Chin Chee KeongTeacher fellowship program 2006/COL/Teacher Activity
PE
TR
O S A I N S

Prepared by: Bebe Zarjan bt Mirbas KhanTeacher fellowship program 2006/COL/Teacher Activity
Fruit Conductors
PE
TR
O S A I N S
Prepared by: Bebe Zarjan bt Mirbas Khan
Introduction
Can fruits become electrical conductors?
What do we need?
What do we do?
1. Connect one end of the black wire to a battery and the other end to a LED indicator.
2. Connect the red wire to the other battery terminal and its other end to a paper clip.
3. Using the metal wire, attach a paper clip to one of its ends.
4. Connect the other end of each black and red wire to a LED indicator.
5. Insert the tip of both paper clips into the fruit right down to the �eshy part and observe what happens.

What’s happening?
The liquid in the fruits will allow the current to pass through and the LED indicator will light up when the circuit is complete. The LED indicator will be brighter if the fruit has more acid in it.
Curriculum Speci�cations Link• Science Year 4: Investigating Materials - Conductor or Insulator? • Science Year 3: Electricity
WATCH OUT!Do not hold the paper clips at the end of the wires with wet hands as you might get electro-cuted.
Prepared by: Bebe Zarjan bt Mirbas KhanTeacher fellowship program 2006/COL/Teacher Activity
PE
TR
O S A I N S
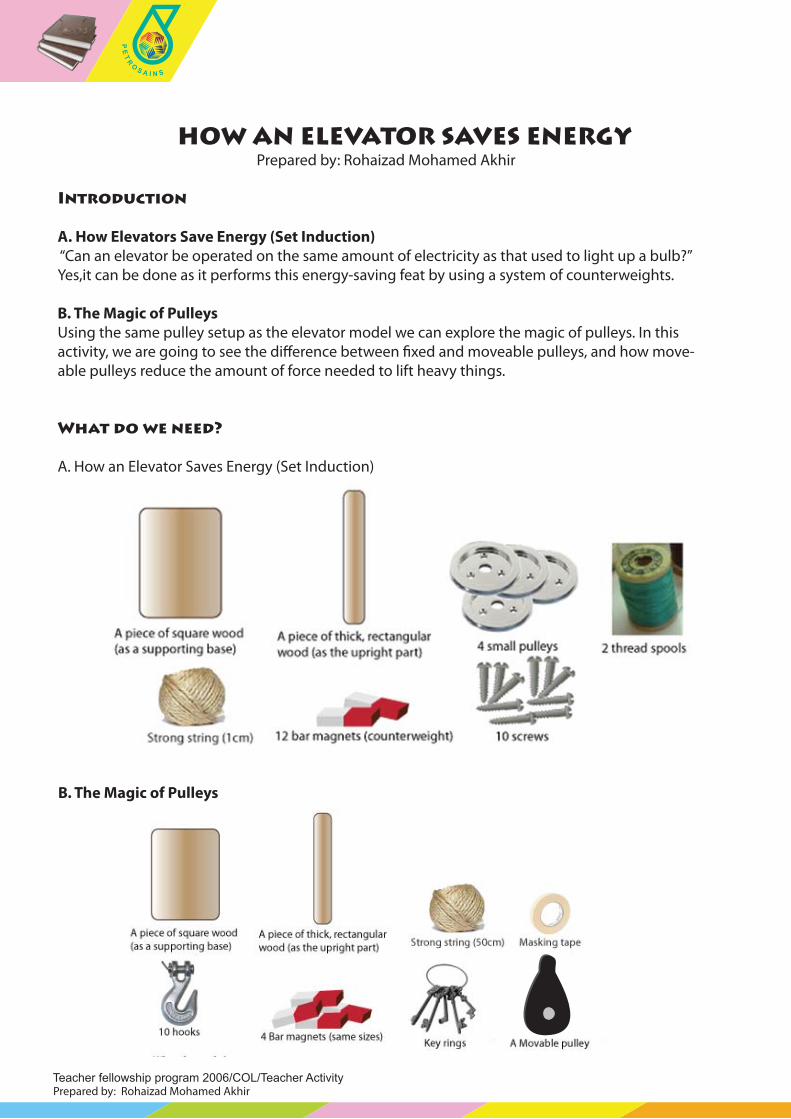
HOW AN ELEVATOR SAVES ENERGYPrepared by: Rohaizad Mohamed Akhir
Introduction
A. How Elevators Save Energy (Set Induction) “Can an elevator be operated on the same amount of electricity as that used to light up a bulb?” Yes,it can be done as it performs this energy-saving feat by using a system of counterweights.
B. The Magic of PulleysUsing the same pulley setup as the elevator model we can explore the magic of pulleys. In this activity, we are going to see the di�erence between �xed and moveable pulleys, and how move-able pulleys reduce the amount of force needed to lift heavy things.
What do we need?
A. How an Elevator Saves Energy (Set Induction)
Teacher fellowship program 2006/COL/Teacher ActivityPrepared by: Rohaizad Mohamed Akhir
PE
TR
O S A I N S
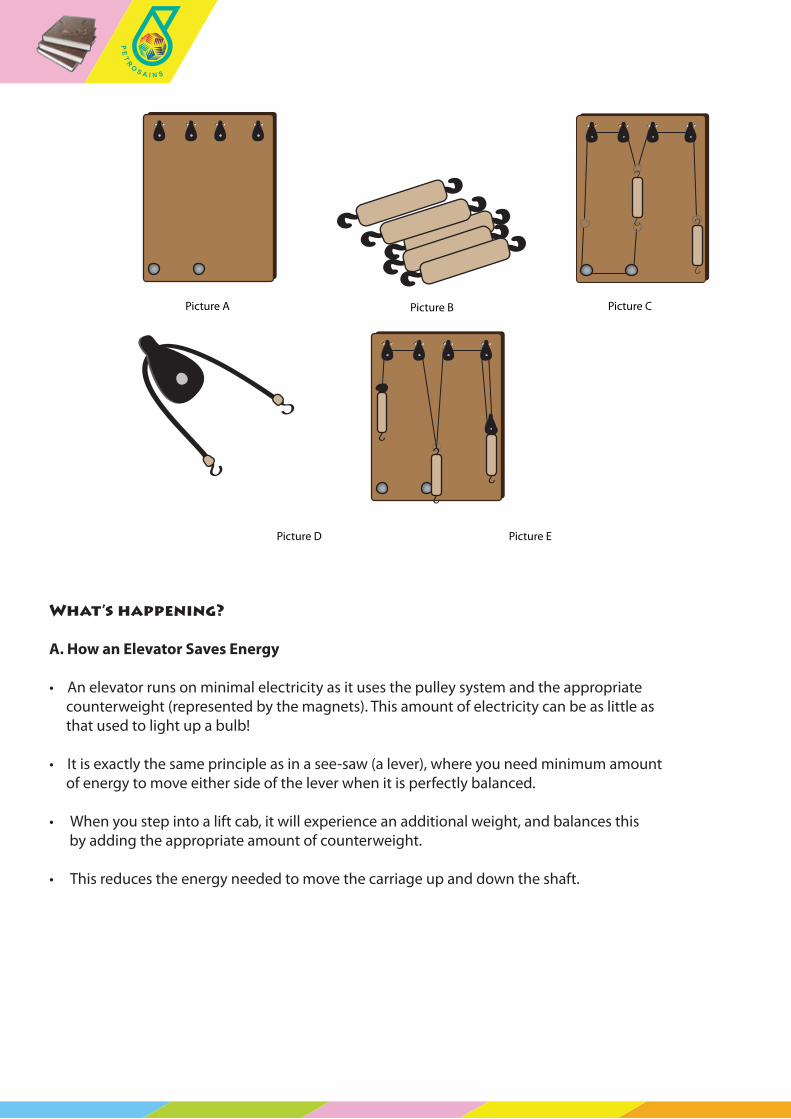
B. The Magic of Pulleys

5. For ease of dismantling, the string ends are connected to key rings and hooks. They will be used for both the elevator and pulley models.
6. Connect the strings to the elevator cab model and the counterweights, and adjust their lengths accordingly.
7. Add extra weight to the elevator by hooking on more magnets, and see how many magnets you need to balance the weight. Continue experimenting with di�erent weights.
8. After each balancing, try lifting the cab up and down by moving the counterweights. Does the cab seems heavier, or remains light?
9. Compare this model system with a see-saw model. How are they similar?
B. The Magic of Pulleys
1. Disconnect the elevator cab from the set.
2. Attach the �xed pulley system on the left side of the board, and see how many weights or magnets you need to pull up the load.
3. Make a moveable pulley system by pulling a string through the pulley, and attach a hook at each end of the string (Picture D).
4. Attach the moveable pulley system on the right hand side of the set (Picture E).
5. See how many weights you need to pull up the load.
6. Is there any di�erence between the �xed and moveable pulley systems?
What do we do?
A. How an Elevator Saves Energy 1. Using screws, attach pulleys and spools to the wood as in picture A.
2. Make a detachable elevator cab model using a magnet in a box.
3. Tape two bar magnets and hooks using masking tape (Picture B). Make another 5 sets of these counterweights.
4. Take 3 separate pieces of string; pull it through the pulleys and over the spools (Picture C).
Teacher fellowship program 2006/COL/Teacher ActivityPrepared by: Rohaizad Mohamed Akhir
PE
TR
O S A I N S
Teacher fellowship program 2006/COL/Teacher ActivityPrepared by: Rohaizad Mohamed Akhir
What’s happening?
A. How an Elevator Saves Energy
• An elevator runs on minimal electricity as it uses the pulley system and the appropriate counterweight (represented by the magnets). This amount of electricity can be as little as that used to light up a bulb!
• It is exactly the same principle as in a see-saw (a lever), where you need minimum amount of energy to move either side of the lever when it is perfectly balanced.
• When you step into a lift cab, it will experience an additional weight, and balances this by adding the appropriate amount of counterweight.
• This reduces the energy needed to move the carriage up and down the shaft.
PE
TR
O S A I N S
Picture A Picture C
Picture EPicture D
Picture B

Teacher fellowship program 2006/COL/Teacher ActivityPrepared by: Rohaizad Mohamed Akhir
PE
TR
O S A I N S
B. The Magic of Pulleys
• Pulleys are grooved wheels that are useful in assisting us in lifting heavy things.
• A fixed pulley system changes the direction of the force and makes it more comfortable for us to move a load, usually from raising a load to pulling it down.
• Moveable pulley system changes the amount of force needed. However we still need to perform the same amount of work as the distance of the pulling has increased.
Curriculum Speci�cations Link
• Primary Year 4: Investigating the Earth and the Universe - Gravity • Primary Year 6: Investigating Technology - Simple Machines (pulley, lever)

Teacher fellowship program 2006/COL/Teacher ActivityPrepared by: Bebe Zarjan bt Mirbas Khan
RING THE ALARM!
A school bag
Aluminium Foil
2 bar magnet
20 cm of metal wire
A big paper clip Connecting wires (20cm black, 20mcm red)
A 9V battery A buzzer
4 Crocodile Clips
A mounting board (size �ts the bottomof school bag)
Introduction
Can you burglar - proof your belongings?
What do we need?
What do we do?
1. Connect the buzzer, wires, battery, magnets and crocodile clips as shown in the schematic diagram of the circuit.
2. Place the circuit at the bottom of a school bag. Arrange the wires so that the two foil ends are near to each other but do not complete the circuit. 3. Ask a friend to carry the bag and observe what happens.
Prepared by: Bebe Zarjan bt Mirbas Khan
2 bar magnet
PE
TR
O S A I N S

What’s happening?Any movement of the bag will cause the magnet to attract the paper clip. This will complete the circuit and the buzzer will start to ring. A circuit is complete if there is current �owing through it.
Curriculum Speci�cations Link• Science Year 2: The Magic of Batteries • Science Year 3: Electricity • Science Year 4: Investigating Force and Energy
Ring...ring...
Ring
...rin
g...
Noise!!
Teacher fellowship program 2006/COL/Teacher ActivityPrepared by: Bebe Zarjan bt Mirbas Khan
PE
TR
O S A I N S
Buzzer
Paper Clip
Magnet
Aluminium Foil
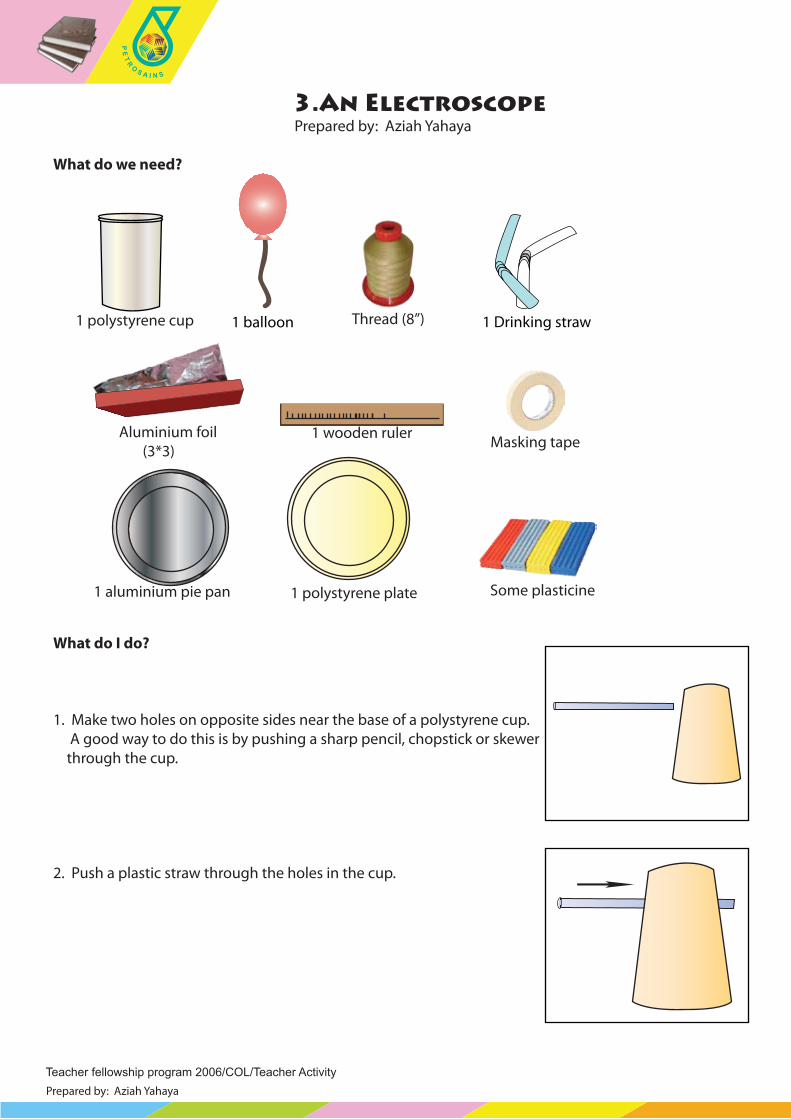
Prepared by: Aziah Yahaya
What do we need?
What do I do?
1. Make two holes on opposite sides near the base of a polystyrene cup. A good way to do this is by pushing a sharp pencil, chopstick or skewer through the cup.
2. Push a plastic straw through the holes in the cup.
3.An Electroscope
1 aluminium pie pan 1 polystyrene plate Some plasticine
Aluminium foil (3*3)
1 wooden ruler
1 balloon 1 Drinking straw
Masking tape
1 polystyrene cup Thread (8”)
Teacher fellowship program 2006/COL/Teacher ActivityPrepared by: Aziah Yahaya
PE
TR
O S A I N S

3. Stick four little balls of plasticine to the rim of the cup, each about half-inch in diameter.
4. Turn the cup upside down and stick it to the bottom of the aluminium pie pan using some plasticine. Make sure that the cup is right at the edge of the pan’s base so that the straw sticks out over the edge of the pan.
5. Cut a piece of thread about 8 inches long and tie a few knots in one end of the thread.
6. Cut a one inch square of aluminium foil. Use it to make a ball around the knots in the thread. The ball should be about the size of a marble. It should be just tight enough so it doesn’t fall o� the thread.
Teacher fellowship program 2006/COL/Teacher ActivityPrepared by: Aziah Yahaya
PE
TR
O S A I N S
Teacher fellowship program 2006/COL/Teacher ActivityPrepared by: Aziah Yahaya
PE
TR
O S A I N S
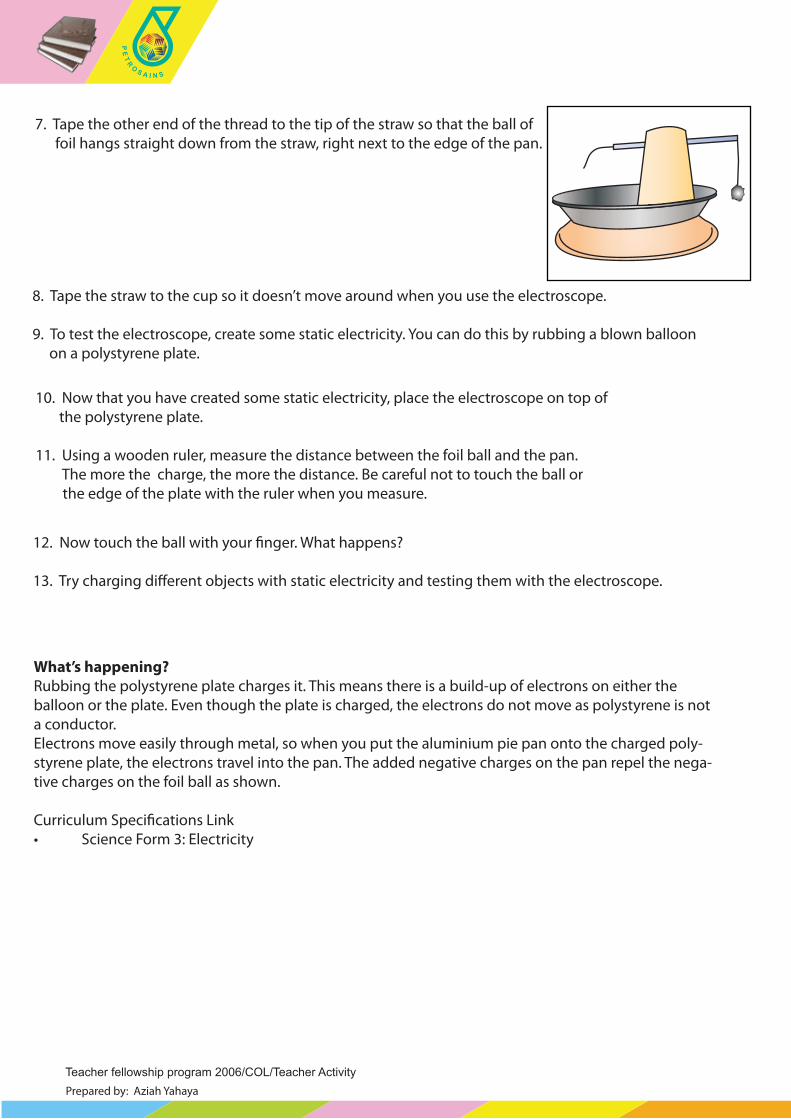
8. Tape the straw to the cup so it doesn’t move around when you use the electroscope.
9. To test the electroscope, create some static electricity. You can do this by rubbing a blown balloon on a polystyrene plate.
10. Now that you have created some static electricity, place the electroscope on top of the polystyrene plate.
11. Using a wooden ruler, measure the distance between the foil ball and the pan. The more the charge, the more the distance. Be careful not to touch the ball or the edge of the plate with the ruler when you measure.
12. Now touch the ball with your �nger. What happens?
13. Try charging di�erent objects with static electricity and testing them with the electroscope.
What’s happening?Rubbing the polystyrene plate charges it. This means there is a build-up of electrons on either the balloon or the plate. Even though the plate is charged, the electrons do not move as polystyrene is not a conductor.Electrons move easily through metal, so when you put the aluminium pie pan onto the charged poly-styrene plate, the electrons travel into the pan. The added negative charges on the pan repel the nega-tive charges on the foil ball as shown.
Curriculum Speci�cations Link• Science Form 3: Electricity
7. Tape the other end of the thread to the tip of the straw so that the ball of foil hangs straight down from the straw, right next to the edge of the pan.
Prepared by: Aziah Yahaya
What do we need?
What do we do?
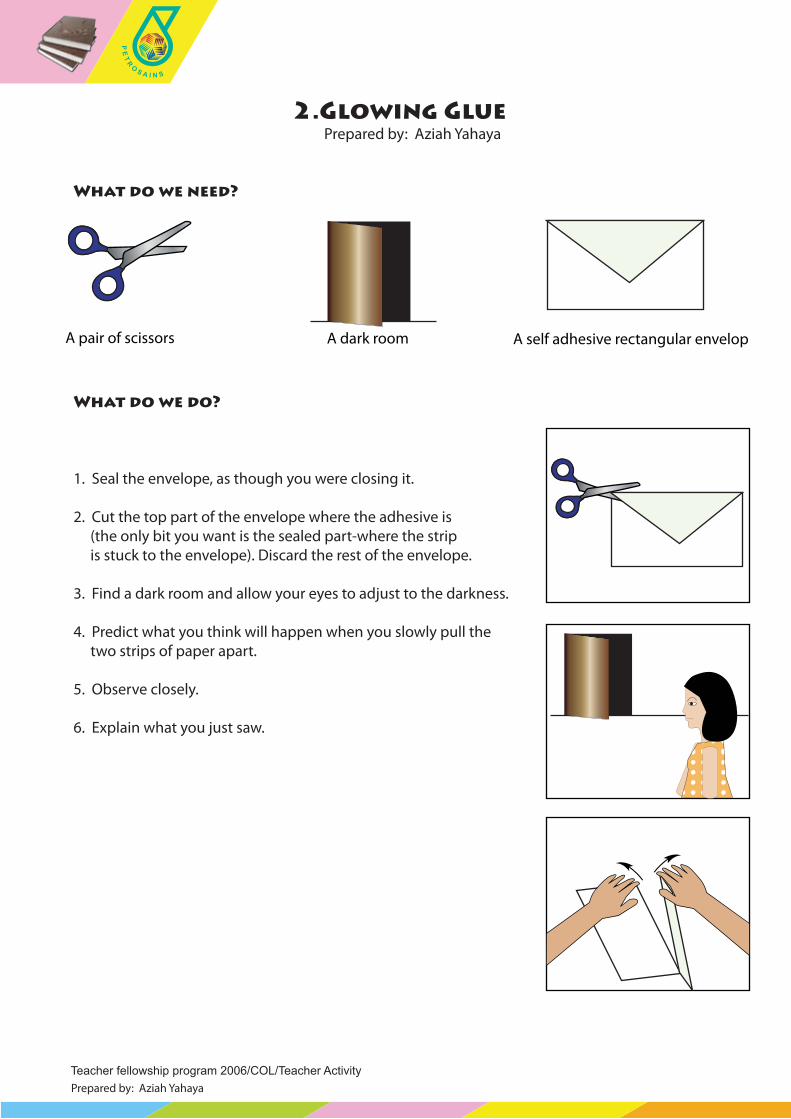
1. Seal the envelope, as though you were closing it.
2. Cut the top part of the envelope where the adhesive is (the only bit you want is the sealed part-where the strip is stuck to the envelope). Discard the rest of the envelope.
3. Find a dark room and allow your eyes to adjust to the darkness.
4. Predict what you think will happen when you slowly pull the two strips of paper apart.
5. Observe closely.
6. Explain what you just saw.
2.Glowing Glue
Teacher fellowship program 2006/COL/Teacher ActivityPrepared by: Aziah Yahaya
PE
TR
O S A I N S
A self adhesive rectangular envelopA dark roomA pair of scissors
Teacher fellowship program 2006/COL/Teacher ActivityPrepared by: Aziah Yahaya
PE
TR
O S A I N S
What’s happening?
A faint blue glow will appear from the place where the two strips are being pulled apart. The glue being pulled apart produces tiny sparks between the pieces of paper. All matter contains particles with an electric charge. Normally the number of positive and negative charges is the same, so they cancel each other out.
When you pull two strips of an envelope apart, some of the glue stays stuck to one side and some stays stuck to the other side. As the glue divides, the negatively charged particles (electrons) do not split evenly. Either one of the strips would have more electrons. This build-up of negative charge is enough to make a spark jump the tiny gap between the strips. This spark makes nitro-gen molecules in the air glow blue, producing the light you can see.

Prepared by: Aziah Yahaya
Introduction
Static electricity is the build-up of electrical charges in an object. It can be created by rubbing one object against another object. The rubbing produces friction which releases negative charges called electrons that accumulate to produce a static charge.
1. FLAKE(Y) MAGIC
What do we need?
What do we do?
1. Fill half of the bowl with cereal �akes.
2. Cover the bowl with a piece of plastic wrap. Secure the plastic wrap with tape, making sure that the plastic is pulled taut.
3. Rub your knuckles eight to ten times across the plastic wrap that covers the �akes.
4. Observe what happens to the cereal �akes in the bowl.
Static Electricity
Teacher fellowship program 2006/COL/Teacher Activity
1 shallow paper bowl
Corn FlakesCorn Flakes
Some cereal �akes Plastic wrap (at least 40cm 40cm)
Adhesive tape
Prepared by: Aziah Yahaya
PE
TR
O S A I N S

Teacher fellowship program 2006/COL/Teacher ActivityPrepared by: Aziah Yahaya
PE
TR
O S A I N S
What’s happening?
The �akes will begin to “jump up” and cling to the underside of the plastic wrap as if holding onto it with invisible, strong arms.
• As you rub your knuckles across the plastic wrap, millions of electrons leave your hand and ‘pile up’ on the surface of the wrap. This creates a strong negatively charged surface.
• Since like charges repel, the negatively charged plastic wrap pushes away electrons to the bottom of the bowl. The plastic wrap surface is now positively charged.
• Since unlike charges attract, the positively charged flakes move toward and cling to the already negatively charged plastic wrap.
Teacher fellowship program 2006/COL/Mini Show
IntroductionPupils learn about transformations of energy, from one form to another. Pupils also under-stand that inert objects also contain energy, as in this case an inert column of water and an inert (stretched) elastic material.
What do we need?
What Do We Do?
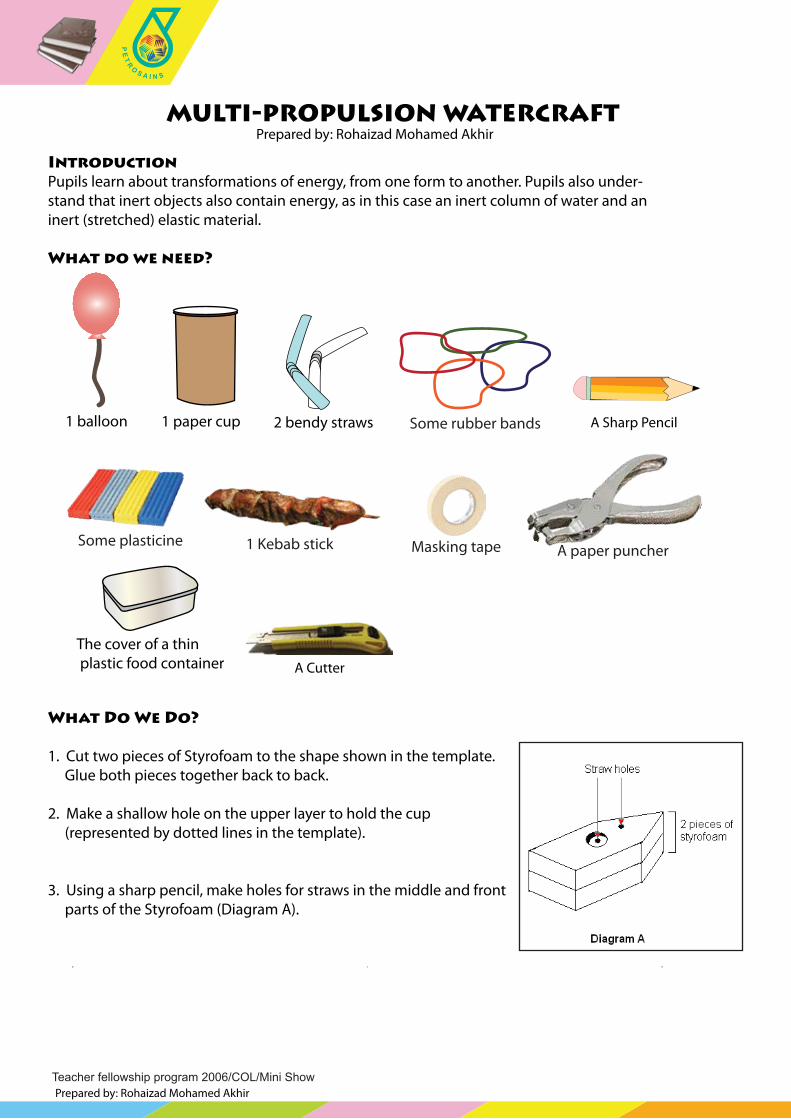
1. Cut two pieces of Styrofoam to the shape shown in the template. Glue both pieces together back to back.
2. Make a shallow hole on the upper layer to hold the cup (represented by dotted lines in the template).
3. Using a sharp pencil, make holes for straws in the middle and front parts of the Styrofoam (Diagram A).
MULTI-PROPULSION WATERCRAFT Prepared by: Rohaizad Mohamed Akhir
Masking tape
2 bendy straws A Sharp Pencil1 balloon
Some plasticineA paper puncher1 Kebab stick
Some rubber bands1 paper cup
The cover of a thin plastic food container A Cutter
Prepared by: Rohaizad Mohamed Akhir
PE
TR
O S A I N S

IMPORTANT: The centre hole has to be in a perfectly middle position; otherwise the watercraft will be imbalanced.
4. Push a straw through each hole and point the bottom part of the straws to the back of the boat. Secure with masking tape. (Diagram B).
5. Attach a balloon to the front straw and secure it in place with a rubber band.
6. Take the paper cup and make a hole at the bottom. Push the middle straw through the hole, and secure it in place with plasticine (Diagram C).
7. Break a kebab stick into two equal lengths. Push it through the back part of the Styrofoam boat (Diagram D).
8. Cut a small square out of the plastic cover. Using a paper puncher, make a hole on the two opposite sides of the square as shown below.
Teacher fellowship program 2006/COL/Mini Show Prepared by: Rohaizad Mohamed Akhir
PE
TR
O S A I N S

Teacher fellowship program 2006/COL/Mini Show Prepared by: Rohaizad Mohamed Akhir
What’s happening?
When you wind up the rubber band, it stretches and stores potential energy. As you let it go, it returns to its original shape and in doing so releases kinetic energy.When you put water into the cup, it has potential energy, and as gravity pulls it out through the straw, it will gain kinetic energy. The resulted water jet propels the boat forward.Blowing air into the balloon will stretch the balloon’s elastic wall, and it gains potential energy. As you release the air, potential energy is transformed into kinetic energy of moving air, and this moves the boat forward.
Curriculum Speci�cations Link• Primary level Year 4: Investigating The Earth and the Universe: Gravity • Primary level Year 4: Investigating the Material World (Elasticity) • Primary level Year 5: Investigating the Physical World (Forms of Energy)
PE
TR
O S A I N S
9. Pass two rubber bands through the holes in the square and loop them over the kebab sticks (Diagram E).
a. For elastic band propulsion: wind up the rubber band. Release it and see it unwinds and turn the plastic square.
b. For water jet propulsion: fill up the cup with water and see how the boat moves as the cup empties.c. For air jet propulsion: blow up the balloon (by blowing through the straw), release the boat and see how it moves.
*Reminder: Ensure that the middle straw is submerged in water when the boat is released.


![GAME SCHEDULE [ROBO SUMO CATEGORY] - … · Open GAME SCHEDULE [ROBO SUMO CATEGORY] “PETROSAINS ROBOTICS (RBTX) CHALLENGE 2018” GRAND FINAL, NATIONAL LEVEL Organized by PETROSAINS](https://cdn.vdocuments.site/doc/165x107/5c252a0209d3f2084e8b89bd/game-schedule-robo-sumo-category-open-game-schedule-robo-sumo-category.jpg)


