1
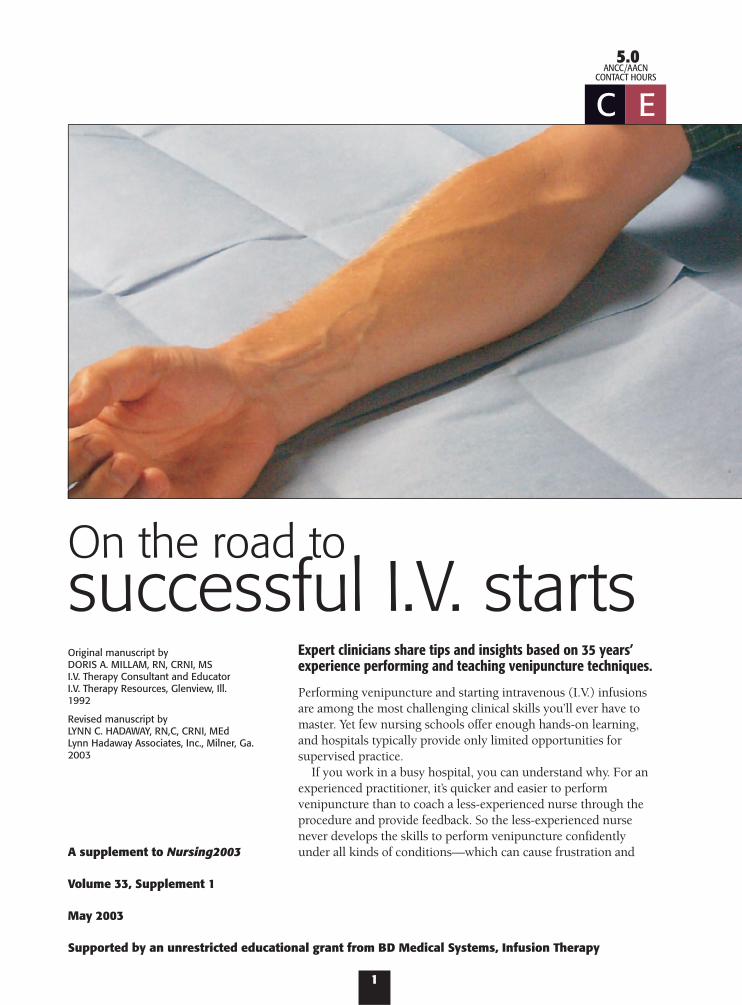
On the road to successful I.V. startsOriginal manuscript by DORIS A. MILLAM, RN, CRNI, MSI.V. Therapy Consultant and EducatorI.V. Therapy Resources, Glenview, Ill.1992
Revised manuscript by LYNN C. HADAWAY, RN,C, CRNI, MEdLynn Hadaway Associates, Inc., Milner, Ga.2003
A supplement to Nursing2003
Volume 33, Supplement 1
May 2003
Supported by an unrestricted educational grant from BD Medical Systems, Infusion Therapy
5.0ANCC/AACN
CONTACT HOURS
C E
Expert clinicians share tips and insights based on 35 years’experience performing and teaching venipuncture techniques.
Performing venipuncture and starting intravenous (I.V.) infusionsare among the most challenging clinical skills you’ll ever have tomaster. Yet few nursing schools offer enough hands-on learning,and hospitals typically provide only limited opportunities forsupervised practice.
If you work in a busy hospital, you can understand why. For anexperienced practitioner, it’s quicker and easier to performvenipuncture than to coach a less-experienced nurse through theprocedure and provide feedback. So the less-experienced nursenever develops the skills to perform venipuncture confidentlyunder all kinds of conditions—which can cause frustration and
2
needless pain for patients. If all this sounds familiar, this special guide will
help you increase your knowledge and critical think-ing. Use it along with other opportunities to learn.Courses via the Internet, traditional classroom instruc-tion, laboratory practice sessions using anatomic train-ing arms, and working with clinical preceptors canhelp build your confidence. To become truly profi-cient, however, you must perform many procedureson real patients.
The learning process will also involve practicing onall types of arm sites. Veins that are easily seen andpalpated won’t always be available, so you must learnto cannulate more difficult sites too. In the followingpages, we’ll show you how.
Your employer must determine that you’re compe-tent to perform these procedures before you workindependently. This process usually involves workingunder the supervision of a clinical preceptor or a moreexperienced colleague who likes to teach others.Check the processes outlined in the policies whereyou work to determine how you must demonstratecompetency and what procedures must be included.This may be limited to venipuncture but it couldinclude medication administration, use of electronicinfusion pumps, and blood administration. Begin byworking with patients who are well hydrated withoutchronic diseases or a history of many courses of infu-sion therapy.
As you work to improve your skills, you’re boundto have a few failures. If you make two unsuccessfulvenipuncture attempts, don’t persist on a patient. Callin the I.V. team (if available), a nurse who’s moreskilled at venipuncture, or an anesthesia provider forhelp.
Don’t let a few setbacks discourage you. With prac-tice, you can refine your venipuncture skills. Thencontinue using them to keep them current.
SELECTING A VEINWhen choosing an appropriate vein for venipuncture,you’ll consider many factors, including:• the patient’s medical history• his age, size, general condition, and level of physicalactivity• the condition of his veins• the type of I.V. fluid or medication to be infused• the expected duration of I.V. therapy• your skill at venipuncture.
If therapy is likely to continue beyond a week, con-tact the I.V. team or vascular access resource group toassess the patient for a midline catheter or peripherallyinserted central catheter (PICC). Consider the charac-teristics of the therapy, such as the osmolarity and pH,and the length of time therapy will be required. Shortperipheral catheters are indicated when the therapy
lasts 5 to 7 days, when the fluids and medicationshave a pH between 5 and 9, and when the osmolarityis less than 500 mOsm/liter.
If therapy is expected to last less than a week, you’llwant to start with the most distal location availableand move up as necessary. Use of hand veins, how-ever, requires a careful assessment of the therapy andother factors. You should also rotate from one extremi-ty to the other. By thinking out cannula placementahead of time, you can head off problems during ther-apy.
To learn more about the veins most commonly usedfor I.V. starts, see Mapping Out a Plan.
Exploring the optionsFor most adults, veins in the hand may be your firstchoice. Starting with the patient’s hand, preferably thenondominant one, leaves more proximal sites avail-able for subsequent venipunctures. But you shouldn’tuse hand veins in elderly patients who’ve lost subcuta-neous tissue surrounding the veins or in patientswho’ll be getting in and out of bed frequently or per-forming other activities with their hands. Infusion ofvesicant medications into hand veins is also con-traindicated. Vesicant medications cause tissue necro-sis, which could result in loss of hand function fromdamage to tendons and ligaments. Sites in the handrequire support on a handboard to reduce vein irrita-tion, but this can limit patient mobility.
Veins in the fingers and thumb may be easily visiblewhen a tourniquet is placed; however, they are proneto complications and can’t support a catheter for longperiods. They have a smaller diameter, which allowslittle or no blood flow around the catheter. Themotion of the finger can lead to phlebitis, infiltration,and subsequent tissue damage. If these veins are theonly sites you find, ask another nurse to assess yourpatient.
Most adults have many venipuncture sites on bothsides of the forearm. Using these veins is usually agood option for short-term I.V. therapy because handand arm mobility aren’t restricted. This is especiallytrue for patients in home care or those who are usingcrutches or a walker.
A patient’s weight can also be a factor in your choiceof forearm veins. In an obese patient, for example, youmay not be able to see veins in the forearm. You maybe able to palpate a healthy vein by knowing the typi-cal locations.
Veins in the antecubital fossa and above shouldn’tbe used routinely for insertion of peripheral catheters.These sites may limit the patient’s range of motion,interfere with blood sampling, and prevent the use ofthese veins for midline and PICC insertions.
Starting at a distal site and making subsequentvenipunctures proximal to the previous sites is crucial.
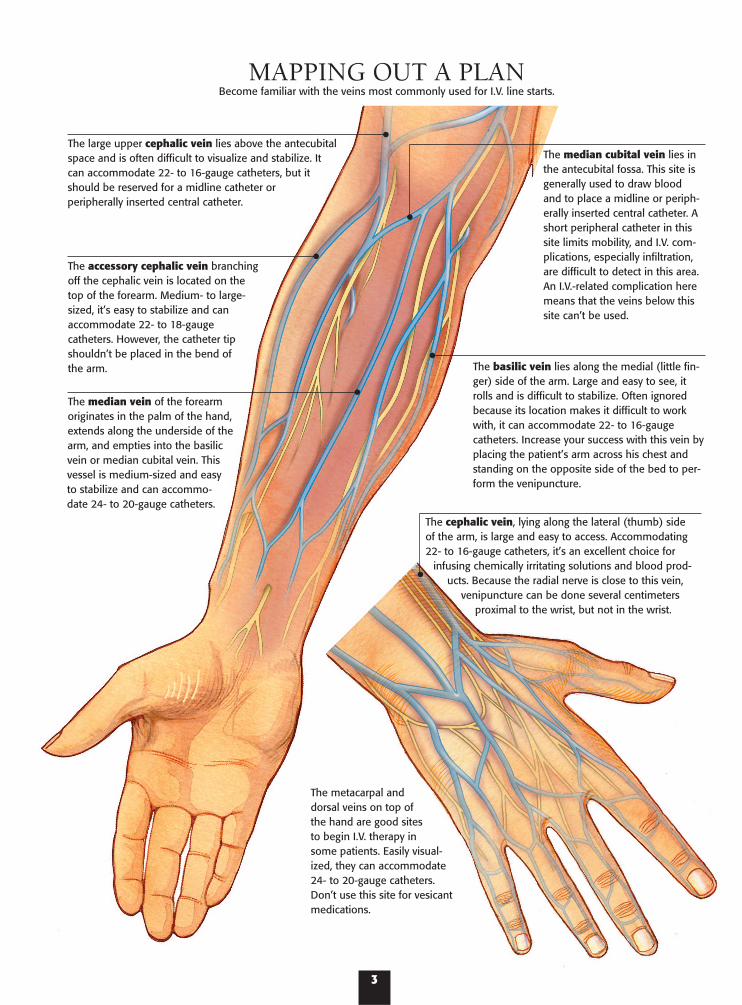
The large upper cephalic vein lies above the antecubitalspace and is often difficult to visualize and stabilize. Itcan accommodate 22- to 16-gauge catheters, but itshould be reserved for a midline catheter orperipherally inserted central catheter.
The accessory cephalic vein branchingoff the cephalic vein is located on thetop of the forearm. Medium- to large-sized, it’s easy to stabilize and canaccommodate 22- to 18-gaugecatheters. However, the catheter tipshouldn’t be placed in the bend ofthe arm.
The median vein of the forearmoriginates in the palm of the hand,extends along the underside of thearm, and empties into the basilicvein or median cubital vein. Thisvessel is medium-sized and easyto stabilize and can accommo-date 24- to 20-gauge catheters.
The median cubital vein lies inthe antecubital fossa. This site isgenerally used to draw bloodand to place a midline or periph-erally inserted central catheter. Ashort peripheral catheter in thissite limits mobility, and I.V. com-plications, especially infiltration,are difficult to detect in this area.An I.V.-related complication heremeans that the veins below thissite can’t be used.
The basilic vein lies along the medial (little fin-ger) side of the arm. Large and easy to see, itrolls and is difficult to stabilize. Often ignoredbecause its location makes it difficult to workwith, it can accommodate 22- to 16-gaugecatheters. Increase your success with this vein byplacing the patient’s arm across his chest andstanding on the opposite side of the bed to per-form the venipuncture.
The cephalic vein, lying along the lateral (thumb) sideof the arm, is large and easy to access. Accommodating22- to 16-gauge catheters, it’s an excellent choice for
infusing chemically irritating solutions and blood prod-ucts. Because the radial nerve is close to this vein,
venipuncture can be done several centimetersproximal to the wrist, but not in the wrist.
The metacarpal anddorsal veins on top ofthe hand are good sitesto begin I.V. therapy insome patients. Easily visual-ized, they can accommodate24- to 20-gauge catheters.Don’t use this site for vesicantmedications.
MAPPING OUT A PLANBecome familiar with the veins most commonly used for I.V. line starts.
3
When a complication develops at a proximal site, youwon’t be able to use veins distal to this site because thefluids and medication will infuse into the damagedsite, compounding the problem.
Avoid these sitesVeins in all aspects of the wrist shouldn’t be used forvenipuncture because of their close proximity tonerves. Besides the risk of causing pain, preventingmovement at these sites may be impossible, increasingthe risk of complications.
Although used in infants, veins of the legs, feet, andankles shouldn’t be used in adults. The superficial
veins of the lower extremity have many connectionswith the deep veins. Catheter complications can leadto thrombophlebitis, deep vein thrombosis, andembolism. If required during an emergent situation,the dorsum of the foot and the saphenous vein of theankle are sites of choice. You can stabilize a foot veinby asking the patient to point the foot toward the endof the bed, then use the same stretching techniqueyou’d use to stabilize a hand vein. Catheters in thelower extremity should be moved as soon as thepatient is stable.
Other sites to avoid include:• veins below a previous I.V. infiltration
4
In 2001, the decade-long movement toward products thateliminate needles from the system or protect you from acci-dental needle sticks culminated in passage of a federal lawmandating the use of devices with engineered safety mecha-nisms. The law, an amendment to the Occupational Safetyand Health Administration’s Bloodborne Pathogens Standard,requires facilities to involve health care professionals withdirect patient care responsibilities in the product evaluationprocess. Documentation of additional factors about injuriesmust also be tracked and analyzed.
Protection from bloodborne pathogens is based on threestrategies. First, and most effective, are engineering controlsthat alter a product’s design to remove or protect the sharp.There’s a definite learning curve when adapting to a safetydevice, so receiving adequate staff-development instructionfrom the manufacturer is crucial.
Over-the-needle catheters with engineered safety mecha-nisms are available from most catheter manufacturers. Safetymechanisms include those that are activated by the user(active) and those that occur automatically when the stylet isremoved (passive).
The remaining strategies for protection from bloodbornepathogens include work practice controls and personal pro-tective equipment. Work practice controls may not be effec-tive during emergent situations or when you’re tired fromworking overtime or you’re expected to work in unfamiliarsurroundings. Personal protective equipment puts a barrierbetween you and the patient’s blood or body fluids, but itcan’t protect you from penetrating injuries.
PATIENT SAFETYA growing body of information about medical and medicationerrors has shifted attention to patient safety. The JointCommission on Accreditation of Healthcare Organizations(JCAHO) recently began the practice of establishing annualpatient-safety goals. These goals will be published in July ofeach year; beginning in January of each year, surveyors willreview how each organization meets the goals. Patient identificationSeveral goals for 2003 involve infusion therapy. The first goal
is to improve the accuracy of patient identification when tak-ing blood samples or administering medication or bloodproducts. Two pieces of information should be used to identi-fy each patient. This can include name, a unique numberassigned to each patient, or the patient’s birthday, address, orphone number. Room number is not considered as an appro-priate piece of information.
The bar codes found on all grocery products will soon beshowing up on products used in health care, including med-ication and blood products. The patient’s armband will alsohave a bar code that you will scan with a handheld reader.The computer will then match this scan to the bar code onthe medication or blood product. If the computer can’t matchthe codes, an alarm will sound prompting you to investigatethe discrepancy. Technologic difficulties have prevented apply-ing bar codes to flexible I.V. bags; however, that is rapidlychanging. For bar coding to be effective, each unit dose ofeach medication must be labeled with a bar code and hospi-tals must invest in the bar code readers. Most experts believethis technology will greatly reduce the medication errors thatoccur during administration.
Other medication errors occur at the time of prescriptionand dispensing. Most prescribers are now entering ordersdirectly into a computer, eliminating problems with handwrit-ing and order interpretation. New technology in infusionpumps will allow for immediate comparison between theprescriber’s orders and pump settings. This technology caneven alert the pharmacy to rate changes, allowing the phar-macy staff to dispense another bag of fluids at the time need-ed. Better communicationThe second goal is to improve communication among patientcare providers. For infusion therapy, this means careful atten-tion to abbreviations, acronyms, and symbols used. Reportedmedication errors include confusion of the “@” symbol for anumeral and using volume alone to express a dose. Forinstance, an order for “octreotide infusion @5ML/H” was mis-read as 25 ml. Volume alone, such as “oxycodone 1 ml,”doesn’t provide adequate information when multiple drugconcentrations are available. In one case, a verbal order for
TRENDS IN I.V. THERAPYSafety First, for You and Your Patients

• veins below a phlebitic area• sclerosed or thrombosed veins• areas of skin inflammation, disease, bruising, orbreakdown• an arm affected by a radical mastectomy, edema,blood clot, or infection• an arm with an arteriovenous shunt or fistula.
Evaluating the vein you chooseA vein that’s suitable for venipuncture should feelround, firm, elastic, and engorged—not hard, bumpy,or flat. Inspect and palpate it for problems. Some veinsthat appear suitable at first glance feel small, hard, or
knotty on palpation. A vein sclerosed from previousI.V. therapy isn’t suitable for venipuncture.
To palpate a vein, place one or two fingertips (notthe less-sensitive thumb) over it and press lightly.Then release pressure to assess the vein’s elasticity and rebound filling. To increase the sensation in yourfingers, practice palpating veins on friends or co-workers. Always practice while wearing gloves, asgloves must be worn during venipuncture proceduresto reduce your exposure to blood. To acquire a highlydeveloped sense of touch, palpate before every cannu-lation—even if the vein looks easy to cannulate.
Although some veins feel and look suitable, they
5
“40 of K” was supposed to be 40 mEq of potassium chloride,but was given as 40 mg of vitamin K.
Establish and use appropriate abbreviations, includingthose abbreviations that are unacceptable. Posters with com-mon abbreviation mistakes can highlight problems and stepsshould be taken to ensure compliance of all staff. High-alert medicationsThe third goal is to improve the safety of high-alert medica-tions such as electrolytes, narcotics, and anticoagulants. Vialsof potassium chloride should be removed from all nursingunits and replaced with premixed fluid containers of potassi-um chloride. Opiates and narcotics on floor stock should belimited and a thorough check by two nurses should berequired for the drug, pump settings, and dose of patient-controlled analgesia pumps. Multidose containers of saline orheparin flush solution should be replaced with single-dosecontainers or prefilled syringes to eliminate confusionbetween these solutions and potassium chloride or insulin.
MORE PATIENT-SAFETY ISSUESThe final JCAHO goal relating to infusion therapy requiresimprovement of infusion pumps. All pumps being used musthave free-flow protection. The solution shouldn’t infuse whenthe pump cassette and tubing are removed from the pump.This will eliminate accidental overdoses of the fluid and med-ication being infused. Everyone, including unlicensed assistivepersonnel, must know about the risk of improper use ofpumps.
According to the Centers for Disease Control andPrevention (CDC) and other published studies, infection rateswith peripheral I.V. catheters is low, usually less than 1%, andthey are rarely associated with bloodstream infections.However, peripheral catheters represent the most frequentlyused group and even a small percentage of infections canequal large numbers of patients. The CDC’s Guidelines for thePrevention of Intravascular Catheter-Related Infections placesa strong emphasis on educating all health care workers andmonitoring for complications.
Other steps highlighted by the CDC include using chlorhex-idine gluconate for skin preparation, promptly removing acatheter that is no longer essential, wiping all injection portswith alcohol prior to use, and using only a sterile device toaccess an injection port.
HAND HYGIENEHand hygiene has also made a lot of news lately as a result ofthe new guideline released by the CDC. When your hands arevisibly contaminated with blood or body fluids, a vigorouswashing for at least 15 seconds is needed. However, alcohol-based hand rubs can be used when hands aren’t visibly dirty.Careful attention to hand hygiene carries the highest CDC rec-ommendation and should be performed before and after pal-pating catheter insertion sites, inserting or removing catheters,and accessing the system for any purpose. Gloves are requiredwhen performing most I.V. procedures, but this doesn’t alterthe need for adequate hand hygiene.
You should pay careful attention to the health of the skinon your hands. Contact dermatitis has been associated withfrequent hand washing, and broken skin on your hands cancarry more microorganisms than intact skin. Your employershould provide hand lotions or creams to minimize contactdermatitis. Creams and lotions can reduce the effectiveness ofsome antimicrobial soaps, so don’t bring creams or lotionsfrom home; use what your employer provides.
Keep your fingernails less than 1⁄4 inch long. Artificial nails ornail extenders shouldn’t be worn when caring for patients athigh risk, such as those in intensive care units. Check yourhospital’s policy about wearing these nails when performingI.V. procedures.
The culture of health care is changing to make safety a highpriority and the responsibility of everyone in the institution.Think about how you perform routine tasks with infusion ther-apy and how simple changes can improve the outcome formany of your patients.
SELECTED REFERENCES Boyce, J., and Pittet, D.: “Guideline for Hand Hygiene in Health-CareSettings. Recommendations of the Healthcare Infection Control Prac-tices Advisory Committee and the HICPAC/SHEA/APIC/IDSA Hand Hy-giene Task Force. Society for Healthcare Epidemiology of America/As-sociation for Professionals in Infection Control/Infectious DiseasesSociety of America,” Morbidity and Mortality Weekly Report. 51(RR-16):1-45, October 25, 2002.
Joint Commission on the Accreditation of Healthcare Organizations:2003 JCAHO National Patient Safety Goals: Practical Strategies andHelpful Solutions for Meeting These Goals. Chicago, Ill., Joint Com-mission on Accreditation of Healthcare Organizations, 2003.
O’Grady, N., et al.: “Guidelines for the Prevention of IntravascularCatheter-Related Infections,” Morbidity and Mortality Weekly Report.51(RR-10):1-29, August 9, 2002.
6
don’t take cannulation well because their lumens areirregular and narrowed from scarring. In that case,you’ll have trouble advancing the cannula smoothlyinto the vein. Or you may find that an apparently suit-able vein is too fragile and easily bruised. If bleedingthrough the vein wall occurs, the area will becomepuffy, bruised, and painful. Although you can’t alwaysforesee these problems, expect a patient who’s receivedseveral courses of I.V. therapy in recent months tohave fewer suitable veins.
Avoiding arteriesBecause they’re located deeper than veins, arteries arerarely damaged during venipuncture. In the antecu-bital fossa, however, where arteries and veins lie closetogether, the risk increases. Before performingvenipuncture at any site, palpate for arterial pulsation(which occurs even after a tourniquet has beenapplied properly) to locate nearby arteries. In somecases, you may also see pulsation. Note the vessel’scolor: Unlike a superficial vein, an artery won’t lookbluish.
Avoiding nervesNerves are located close to superficial veins in manylocations on the hand and arm, especially in the wristand antecubital fossa. Venipuncture shouldn’t be per-
formed on the palm side of the wrist. Even the largecephalic vein at the level of the wrist should be avoid-ed. Recent research has demonstrated that the superfi-cial branch of the radial nerve crosses the cephalicvein at least once and up to three times as it extendsfrom the wrist up the forearm.
To avoid all these possible intersections when usingthe cephalic vein, the venipuncture should be made 4to 5 inches above the level of the wrist. This may notbe possible in all patients, depending on the numberof available venous sites and the length of therapy.
When your patient complains of tingling, a pins-and-needles sensation, or numbness, a nerve may bedamaged. Immediately remove the catheter andchoose another venipuncture site. Don’t probe aroundafter piercing the skin or use a plunging or jabbingtechnique to insert the catheter.
SELECTING A CANNULAFederal legislation in 2001 amended the BloodbornePathogen Standard from the Occupational Safety andHealth Administration (OSHA), meaning thatcatheters with an engineered safety mechanism mustbe provided. After venipuncture, the stylet is a hollow-bore, blood-filled sharp. Needle-stick injury with thistype of device carries the highest risk of bloodbornedisease. Catheters with a safety mechanism greatlyreduce your chances of being stuck with a contami-nated needle.
Several brands of catheters are available with a vari-ety of different safety mechanisms. They may require alittle more practice for you to become proficient, butthe effort is worth the reduced chance of being exposedto human immunodeficiency virus, hepatitis, or otherbloodborne diseases.
An over-the-needle catheter and a winged (butter-fly) cannula with attached tubing are ideal choices for veins of the hand or forearm. Over-the-needlecatheters range from 3⁄4 inch to 11⁄4 inches; winged butterfly-style cannulas are between 3⁄4 inch and 1 inchlong. The diameters of these cannulas range from 16-to 24-gauge. With both types of devices, after insertionyou’ll withdraw the steel needle, leaving only a flexibleplastic catheter in the vein.
If you’re using an over-the-needle catheter, plan toattach short, small-diameter extension tubing. Thislets you loop the tubing and secure it away from theinsertion site. If the tubing gets pulled, this securedloop prevents catheter dislodgement and vein irrita-tion. For the winged butterfly device, this tubing isalready attached. Another advantage of having thisadditional piece of tubing is that you’ll change the tub-ing away from the insertion site, decreasing cannulamanipulations and the risk of contamination.
Avoid steel butterfly-type needles except for bolusinjections of one-time doses. An inflexible steel needle
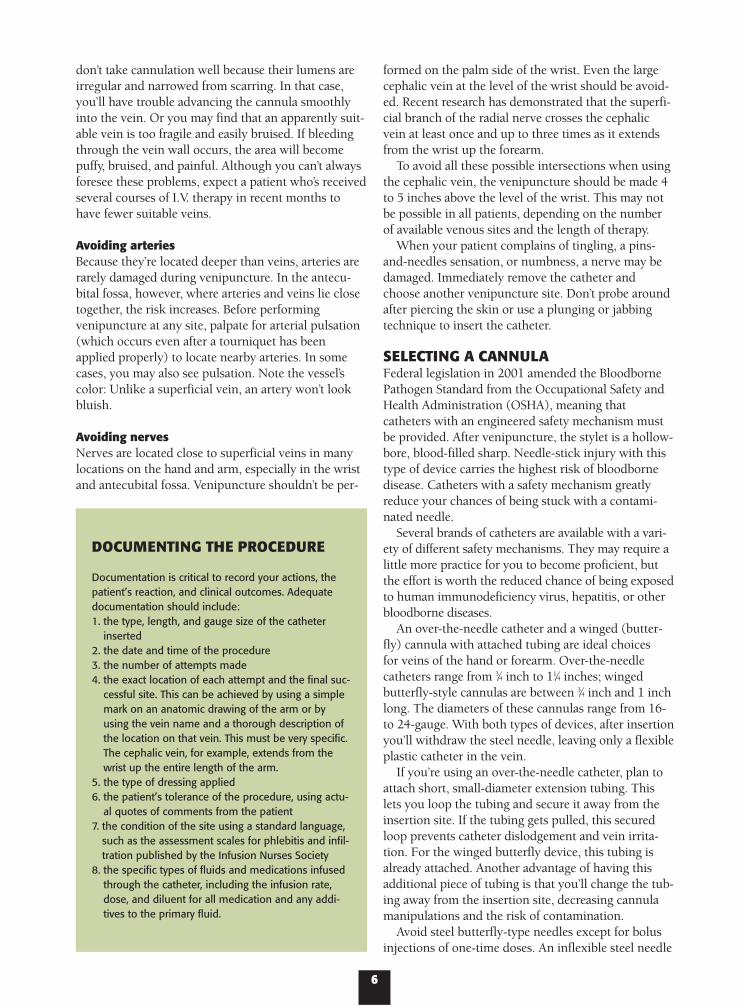
DOCUMENTING THE PROCEDURE
Documentation is critical to record your actions, thepatient’s reaction, and clinical outcomes. Adequatedocumentation should include:1. the type, length, and gauge size of the catheter
inserted2. the date and time of the procedure3. the number of attempts made 4. the exact location of each attempt and the final suc-
cessful site. This can be achieved by using a simplemark on an anatomic drawing of the arm or byusing the vein name and a thorough description ofthe location on that vein. This must be very specific.The cephalic vein, for example, extends from thewrist up the entire length of the arm.
5. the type of dressing applied6. the patient’s tolerance of the procedure, using actu-
al quotes of comments from the patient7. the condition of the site using a standard language,
such as the assessment scales for phlebitis and infil-tration published by the Infusion Nurses Society
8. the specific types of fluids and medications infusedthrough the catheter, including the infusion rate,dose, and diluent for all medication and any addi-tives to the primary fluid.
7
greatly increases the risk of vein injury and infiltra-tion. Never use these devices for any medication thatcauses tissue necrosis if it extravasates.
Intermediate and long-term therapy optionsA midline catheter (MLC) is a good choice when thetherapy will last between 1 and 4 weeks. An MLC isinserted via the basilic or cephalic veins of the antecu-bital fossa and advanced until the tip resides in the prox-imal portion of the upper arm, level with the axilla butdistal to the shoulder. Therapies suitable for infusionthrough an MLC include those with osmolarities lessthan 500 mOsm/liter and a pH range between 5 and 9.
A PICC is indicated when therapies will be neededfor 1 to 12 months. A PICC is inserted via the veins ofthe antecubital fossa or the upper arm, but the tipresides within the superior vena cava. Solutions withextremes of osmolarity and pH can be infused becausethe high blood flow around the catheter tip will rapid-ly dilute the infused solution.
Choosing the right sizeDepending on the vein used, the I.V. cannula shouldusually be 3⁄4 inch to 11⁄4 inches long. To reduce the riskof phlebitis, the catheter should be as small in diame-ter as possible so it takes up less space in the vein.This allows better blood flow around the catheter, less-ening the risk of phlebitis.
When selecting a catheter, consider the patient’scondition and the type of solution you’ll be runningthrough the catheter in the next 72 to 96 hours. Usingthe smallest-gauge catheter in the largest vein possiblewill reduce the mechanical and chemical irritation tothe vein wall. Keep these general guidelines in mind:• 24- to 22-gauge for children and elderly patients• 24- to 20-gauge for medical patients and postopera-tive surgical patients• 18-gauge for surgical patients and for rapid bloodadministration. Blood can be infused through smaller-gauge catheters, but the flow rate will be slower.• 16-gauge for trauma patients and those requiringlarge volumes of fluid rapidly.
Before inserting any needle or cannula, carefullyinspect it for imperfections, such as problems with thecatheter tip. Follow the manufacturer’s recommenda-tions about adjustments that you should or shouldn’tmake to the catheter prior to insertion.
SELECTED REFERENCESHandbook of Infusion Therapy, Springhouse, Pa., Springhouse Corp., 1998.
Hankins, J., et al. (editors). Infusion Therapy in Clinical Practice, 2nd edi-tion. Philadelphia, Pa., W.B. Saunders, 2001.
Intravenous Nurses Society. “Infusing Nursing Standards,” Journal of In-travenous Nursing. 23(6S):1-88, 2000.
Weinstein, S. Plumer’s Principles and Practice of Intravenous Therapy, 7thedition. Philadelphia, Pa., Lippincott Williams & Wilkins, 2001.
For more information about I.V. therapy, contact the Infusion Nurses Society, 220Norwood Park South, Norwood, MA 02062; or visit http://www.ins1.org.
TROUBLESHOOTING TIPS
Common reasons for problems during venipunctureinclude:• improper tourniquet placement—too high, too low,too tight, or too loose (causing insufficient engorge-ment)• failure to release the tourniquet promptly when thevein is sufficiently cannulated. Intravascular pressuremay cause bleeding outside the vein.• a tentative “stop and start” technique—often a prob-lem with beginners who lack confidence. A tentativeapproach can injure the vein, causing bruising.• inadequate vein stretching, allowing the stylet topush the vein aside• failure to recognize that the cannula has gonethrough the opposite vein wall (as indicated by dimin-ished blood return)• stopping too soon after insertion, so only the stylet—not the plastic catheter—enters the lumen. (Bloodreturn disappears when the stylet is removed becausethe catheter isn’t in the lumen.)• inserting the catheter too deep, below the vein. Thisis evident when the cannula won’t move freelybecause it’s imbedded in fascia or muscle. The patientmay also complain of severe discomfort and the riskof nerve injury is great.• failure to penetrate the vein wall because of improp-er insertion angle (too steep or not steep enough),causing the cannula to ride on top of or below thevein.
Hematoma formation and leaking from the inser-tion site are problems that might require you to stopthe venipuncture procedure. These problems occurmost commonly in the elderly, who have fragile veins,and in infants, who have very small ones. Vasospasm,another problem that can prevent catheter insertion, ismore common in younger patients who are anxiousabout the procedure.
If blood backflow stops when you remove thestylet, the catheter may have passed through theopposite wall of the vein. Other possible reasons for alack of backflow include severe vasospasm or anocclusion of the cannula with a fat plug or blood clot.In many cases, you can’t tell exactly what’s wrong. Asudden backflow of blood when you retract thecatheter indicates an additional puncture on the pos-terior vein wall. The catheter should be removed; otherwise, the infusing fluid could infiltrate from theadditional puncture site. Never try to reinsert thestylet—you’d shear the plastic catheter.
As you work to correct problems, don’t forget tocheck the patient and reassure him. Occasionally, aninexperienced nurse becomes so focused on the prob-lem in front of her that she doesn’t realize that thepatient is hyperventilating or becoming light-headedfrom anxiety or having a vasovagal reaction.
8
COLLECT THE FLUID container from floor stock orsupplied by the pharmacy. Compare the labels to theprescriber’s order to confirm accuracy of the fluid andmedications. If multiple medications are prescribed,check for compatibility before giving the medicationstogether.
Additional information can be gleaned from thepatient’s medical record. Check for allergies such asantiseptic agents (iodine, for example) or latex. A longhistory of hospitalizations is a clue that your patienthas had many I.V. catheters in the past, possiblydecreasing the number of available venous sites now.A history of vasovagal reactions indicates the patient isat risk for this same reaction during venipuncture.
Gather the equipment you’ll need and prime the I.V.tubing before you enter the patient’s room—especiallyif you’re relatively inexperienced. With privacy, you’llhave time to get organized, look over the equipment,and plan your approach without making the patientanxious.
If you’re working with a preceptor, devise a systemof communication so that the preceptor will knowwhen to step in and perform the procedure. This mayhappen if you don’t feel comfortable performing theprocedure because of the patient’s vein or skin condi-tion or his attitude toward the procedure.
When you enter the room, wash your hands orclean them with an alcohol-based hand rub and intro-duce yourself to the patient if you don’t already knowhim. Take a few minutes to explain the procedure.Encourage the patient to ask questions and answerthem with direct and complete information. Avoidusing words that might add to his apprehension, suchas “needle” or “stick.” Instead, you might say, “I’mgoing to put this soft plastic catheter in your arm todeliver your medication.” He may relax a little whenyou show him the equipment.
As you talk, be sure to touch his hand and arm reas-suringly. Note whether his skin is cool or clammy: Ifhe’s anxious, vasoconstriction could make veins hardto find.
Acknowledge his feelings with a comment like, “Ican see you’re a little nervous,” and do your best toput him at ease. If he’s never had an I.V. line before, forexample, you might need to assure him that he’ll beable to comfortably move and use his hand and armafter venipuncture.
If he’s nervous, chilly, hypotensive, or experiencingvasomotor changes, expect to spend a little extra timedilating and distending the vein before venipuncture.
Make sure you’re in a comfortable position by rais-ing the bed or by sitting next to the patient. Check the
lighting to ensure that you can see the vein, patientarmband, and fluid container labels. The patientshould be in a supine position with his arm support-ed. Patients are at an increased risk for vasovagal reac-tion if they’re sitting up during venipuncture. Assessthe patient’s nondominant arm first to allow freedomof the dominant hand.
Apply the tourniquet (see below) and assess hisveins. If they fill poorly, try these tips:• Position his arm below heart level or hang his armdown to encourage capillary filling.• Instruct the patient to open and close his fist severaltimes, but make sure his fist is relaxed during veni-puncture.• Gently rub or stroke his arm to warm the skin.• Cover his entire arm with warm packs for 5 to 10minutes to trigger vasodilation.
APPLYING A TOURNIQUETApply the tourniquet 5 to 6 inches above the intendedvenipuncture site. Peripheral veins in a well-hydratedpatient should distend within a few seconds. Venousdistension may take a longer period in elderly patientsor those with a history of numerous peripheralvenipunctures.
To apply the tourniquet as painlessly as possible,avoid pulling hair or pinching the skin. Pull thetourniquet tight enough to trap venous blood in thelower arm capillaries and veins without cutting offarterial flow. If you can’t feel a pulse below the tourni-quet (or if the patient complains of discomfort), it’stoo tight. As the occluded veins distend, the skinbelow the tourniquet will become darker from venouscongestion. Single-patient-use disposable tourniquetsare preferred because reusable tourniquets can be asource of cross-contamination.
If not discarded, tourniquets should be cleaned aftereach use. Be aware that tourniquets are also a sourceof latex contact, so assess for allergies.
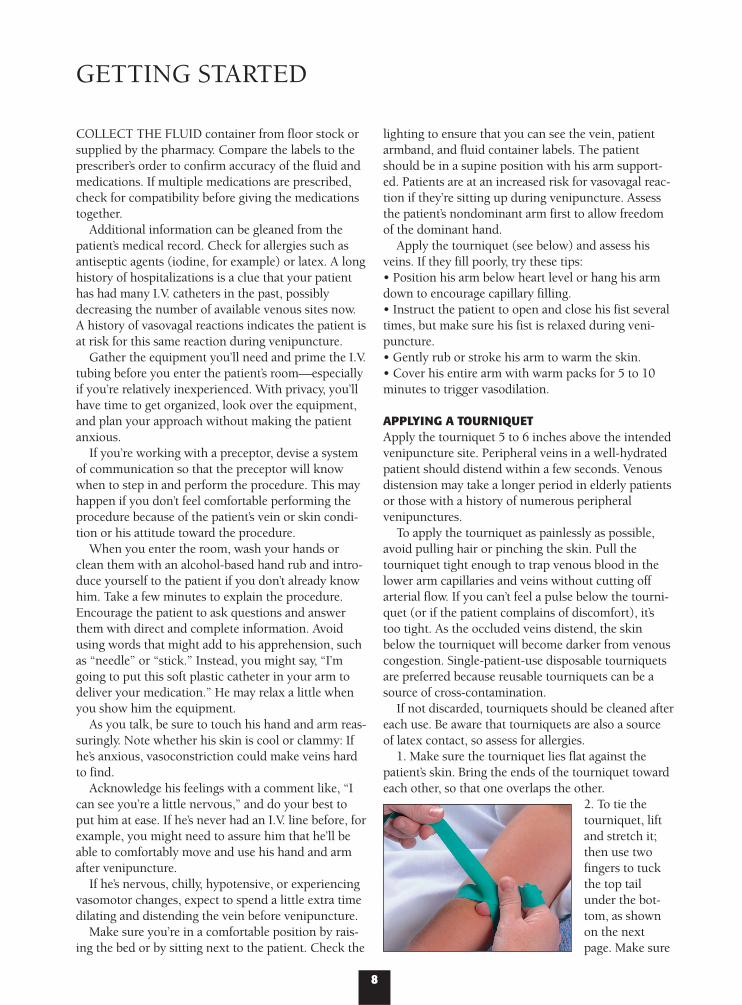
1. Make sure the tourniquet lies flat against thepatient’s skin. Bring the ends of the tourniquet towardeach other, so that one overlaps the other.
2. To tie thetourniquet, liftand stretch it;then use twofingers to tuckthe top tailunder the bot-tom, as shownon the nextpage. Make sure
GETTING STARTED

9
the tails pointaway from thevenipuncturesite.
3. Use thistechnique to sta-bilize the veins:Lift the tiedtourniquet andstretch the skinand underlyingtissue away from the venipuncture site. Then gentlylower the tourniquet. You may be able to retract sever-al inches of skin and tissue away from the site withthis maneuver, which is especially helpful with olderpatients (who have less collagen and elastin thanyounger patients) and patients who’ve lost a lot ofweight recently.
When the tourniquet is in place, ask the patient toclench his fist tightly several times. This encouragesthe veins—which are normally elliptic in shape—tobecome turgid and more rounded.
After identifying a desirable vein, you can encour-age it to enlarge with a light tap of your finger (hittingit too hard will cause vasoconstriction). The veinshould become as engorged as possible to create a big-ger target and provide stability. Gently palpate the vein(don’t stroke it) to see if it feels elastic and hasrebound resiliency. When you depress and release anengorged vein, it should spring back to a rounded,filled state.
If the vein won’t distend sufficiently, remove thetourniquet and let the vessels refill. Sometimes, veins fillbetter on the second try because of a rebound effect. Ifnecessary, use one or more of the techniques describedon the previous page to engorge the veins. (Apply warmpacks, for example.) Then reapply the tourniquet andstretch the skin as just described. Make sure the tourni-quet is tight enough to occlude the veins; a tourniquetthat’s too loose is a common reason for inadequate veindistension.
Note: Some clinicians prefer to use a blood pressurecuff instead of a tourniquet—especially for elderlypatients, whose fragile veins are more likely to rupturewhen engorged if a tourniquet is applied too tightly.Inflate the cuff, then deflate it to just below thepatient’s diastolic pressure to make the vein visiblewithout engorging it excessively.
PREPARING THE SITEOnce you’ve selected a vein, don gloves and prepare toclean the site. If the site is excessively hairy, youshould clip the hair as recommended by the InfusionNurses Society (INS). Never shave the site because ofthe potential for causing microabrasions. Always cleanvisibly dirty skin with soap and water.
Next, applyan approvedantimicrobialsolution.Chlorhexidinegluconate solu-tion is the pre-ferred agent,according to theCenters for Disease Control and Prevention; tinctureof iodine 2%, 10% povidone-iodine, 70% isopropylalcohol, and combination povidone-iodine/alcoholagents are also acceptable agents. Don’t use aqueousbenzalkonium-like compounds or hexachlorophene toprepare the site.
The procedure that you use to apply an antimicro-bial solution for site preparation is crucial to achieveeffectiveness. This process has now changed from acircular motion to a back and forth motion, whichincreases the friction and allows the antiseptic solu-tion to penetrate the lower layers of the epidermis.
Although the surface area for prepping depends onthe size of the extremity, in adult patients an area 2to 4 inches in diameter is generally accepted. Neverblot excess solution at the insertion site. Let the solu-tion air dry completely. Much of the solution’s germi-cidal actiontakes place dur-ing this time.Chlorhexidinegluconateachieves its anti-microbial actionwithin 30 sec-onds; povidone-iodine requires 2to 3 minutes toadequately kill the organisms on the skin. Neverapply 70% isopropyl alcohol after a 10% povidone-iodine prep because this may irritate the skin.
If a patient has a known allergy to iodine, the prep-ping solution of choice is chlorhexidine gluconate or70% isopropyl alcohol. When you use 70% isopropylalcohol, you should apply it with friction for a mini-mum of 30 seconds or until the final applicator isclean.
The INS recommends that you use single-unit con-tainers of antimicrobial solution. Be sure to discard thecontainers after use.
IMMOBILIZING THE VEINSuperficial veins have a tendency to roll because theylie in loose, superficial connective tissue. Preventrolling by maintaining the vein in a taut, distended,stable position. Because the wrist and hands are flexi-ble, hand veins are generally easier to immobilize than
10
arm veins. Hand veins may also be easier to cannulatebecause they’re usually surrounded with less fatty tis-sue. But remember, there’s a greater chance of nerveinjury in the hand and wrist area.
Use the following techniques to immobilize handand arm veins.
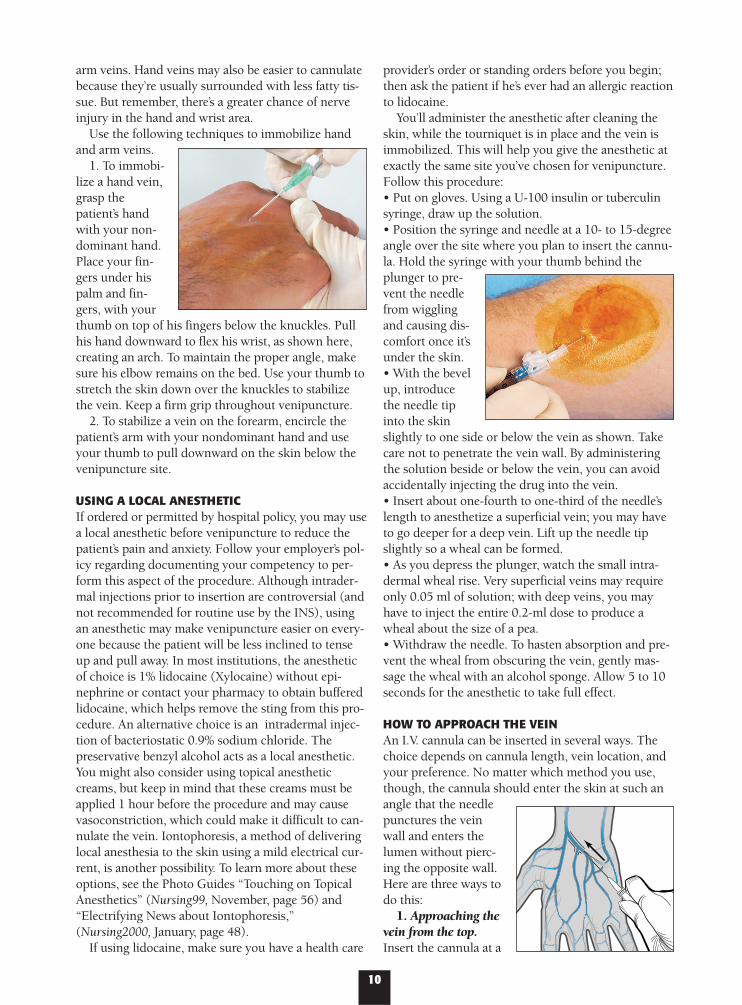
1. To immobi-lize a hand vein,grasp thepatient’s handwith your non-dominant hand.Place your fin-gers under hispalm and fin-gers, with yourthumb on top of his fingers below the knuckles. Pullhis hand downward to flex his wrist, as shown here,creating an arch. To maintain the proper angle, makesure his elbow remains on the bed. Use your thumb tostretch the skin down over the knuckles to stabilizethe vein. Keep a firm grip throughout venipuncture.
2. To stabilize a vein on the forearm, encircle thepatient’s arm with your nondominant hand and useyour thumb to pull downward on the skin below thevenipuncture site.
USING A LOCAL ANESTHETICIf ordered or permitted by hospital policy, you may usea local anesthetic before venipuncture to reduce thepatient’s pain and anxiety. Follow your employer’s pol-icy regarding documenting your competency to per-form this aspect of the procedure. Although intrader-mal injections prior to insertion are controversial (andnot recommended for routine use by the INS), usingan anesthetic may make venipuncture easier on every-one because the patient will be less inclined to tenseup and pull away. In most institutions, the anestheticof choice is 1% lidocaine (Xylocaine) without epi-nephrine or contact your pharmacy to obtain bufferedlidocaine, which helps remove the sting from this pro-cedure. An alternative choice is an intradermal injec-tion of bacteriostatic 0.9% sodium chloride. Thepreservative benzyl alcohol acts as a local anesthetic.You might also consider using topical anestheticcreams, but keep in mind that these creams must beapplied 1 hour before the procedure and may causevasoconstriction, which could make it difficult to can-nulate the vein. Iontophoresis, a method of deliveringlocal anesthesia to the skin using a mild electrical cur-rent, is another possibility. To learn more about theseoptions, see the Photo Guides “Touching on TopicalAnesthetics” (Nursing99, November, page 56) and“Electrifying News about Iontophoresis,”(Nursing2000, January, page 48).
If using lidocaine, make sure you have a health care
provider’s order or standing orders before you begin;then ask the patient if he’s ever had an allergic reactionto lidocaine.
You’ll administer the anesthetic after cleaning theskin, while the tourniquet is in place and the vein isimmobilized. This will help you give the anesthetic atexactly the same site you’ve chosen for venipuncture.Follow this procedure:• Put on gloves. Using a U-100 insulin or tuberculinsyringe, draw up the solution.• Position the syringe and needle at a 10- to 15-degreeangle over the site where you plan to insert the cannu-la. Hold the syringe with your thumb behind theplunger to pre-vent the needlefrom wigglingand causing dis-comfort once it’sunder the skin.• With the bevelup, introducethe needle tipinto the skinslightly to one side or below the vein as shown. Takecare not to penetrate the vein wall. By administeringthe solution beside or below the vein, you can avoidaccidentally injecting the drug into the vein.• Insert about one-fourth to one-third of the needle’slength to anesthetize a superficial vein; you may haveto go deeper for a deep vein. Lift up the needle tipslightly so a wheal can be formed.• As you depress the plunger, watch the small intra-dermal wheal rise. Very superficial veins may requireonly 0.05 ml of solution; with deep veins, you mayhave to inject the entire 0.2-ml dose to produce awheal about the size of a pea.• Withdraw the needle. To hasten absorption and pre-vent the wheal from obscuring the vein, gently mas-sage the wheal with an alcohol sponge. Allow 5 to 10seconds for the anesthetic to take full effect.
HOW TO APPROACH THE VEINAn I.V. cannula can be inserted in several ways. Thechoice depends on cannula length, vein location, andyour preference. No matter which method you use,though, the cannula should enter the skin at such anangle that the needlepunctures the veinwall and enters thelumen without pierc-ing the opposite wall.Here are three ways todo this:
1. Approaching thevein from the top.Insert the cannula at a
11
Adequate catheter securement is crucial to reducing com-plications and ensuring adequate dwell time of thecatheter. In the following photos, you’ll see how to secureand dress the catheter.
1. Tape placed under a transparent dressing should beclean, preferably strips of tape from an I.V. start kit. Itshouldn’t be taken from rolls of tape moved betweenpatient rooms, from other procedures, or from nurses’pockets.
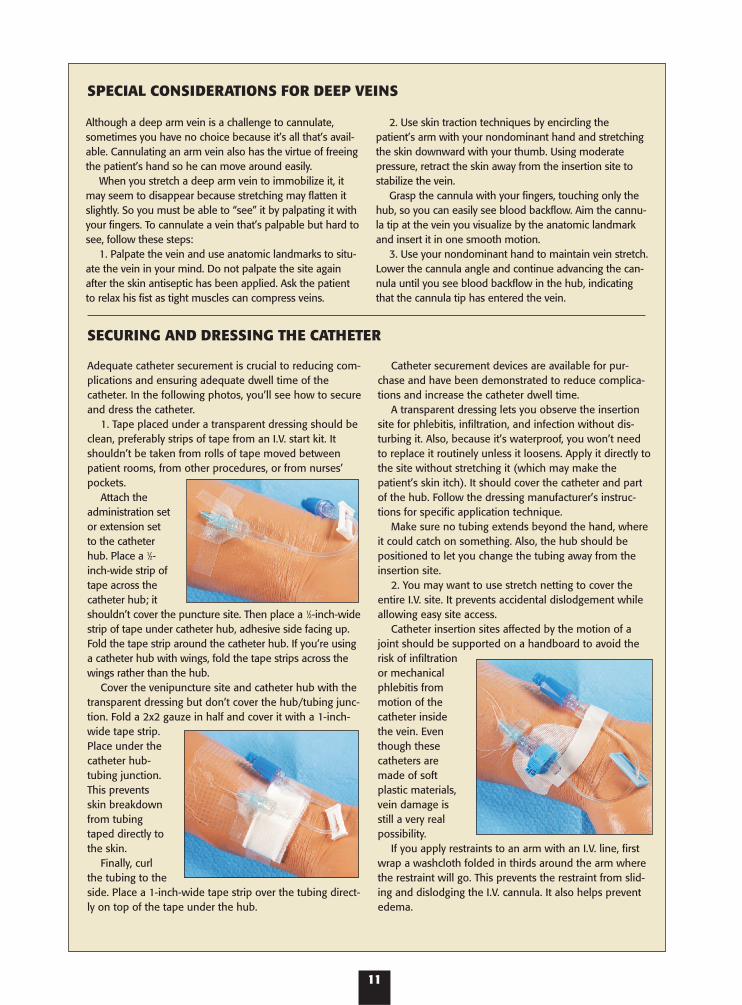
Attach theadministration setor extension setto the catheterhub. Place a 1⁄2-inch-wide strip oftape across thecatheter hub; itshouldn’t cover the puncture site. Then place a 1⁄2-inch-widestrip of tape under catheter hub, adhesive side facing up.Fold the tape strip around the catheter hub. If you’re usinga catheter hub with wings, fold the tape strips across thewings rather than the hub.
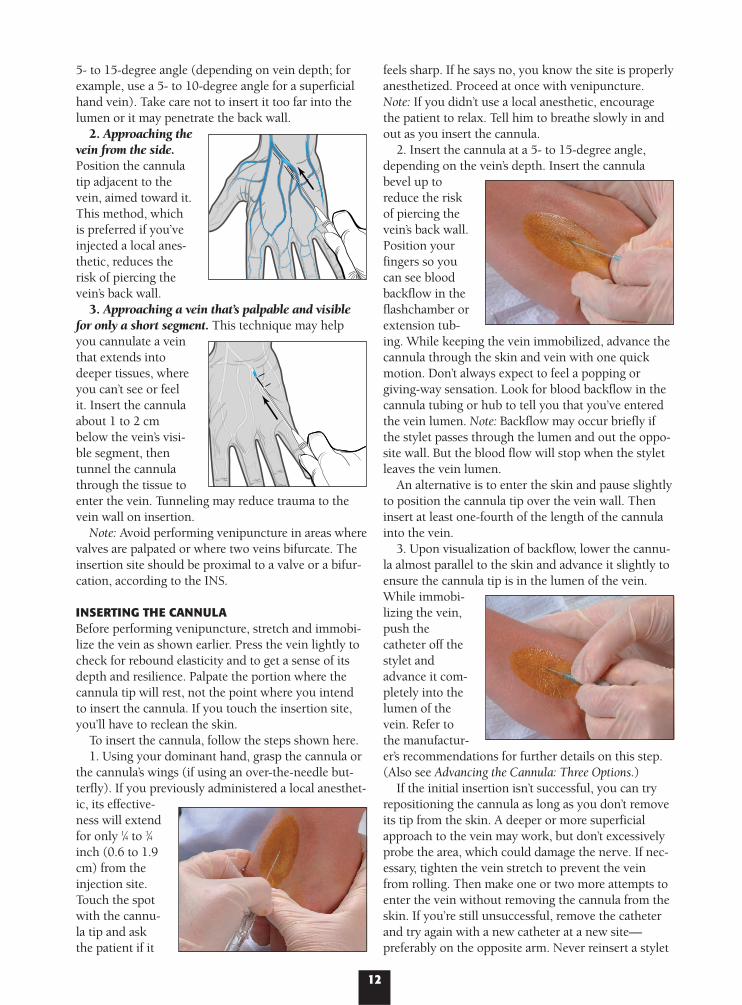
Cover the venipuncture site and catheter hub with thetransparent dressing but don’t cover the hub/tubing junc-tion. Fold a 2x2 gauze in half and cover it with a 1-inch-wide tape strip.Place under thecatheter hub-tubing junction.This preventsskin breakdownfrom tubingtaped directly tothe skin.
Finally, curlthe tubing to theside. Place a 1-inch-wide tape strip over the tubing direct-ly on top of the tape under the hub.
Catheter securement devices are available for pur-chase and have been demonstrated to reduce complica-tions and increase the catheter dwell time.
A transparent dressing lets you observe the insertionsite for phlebitis, infiltration, and infection without dis-turbing it. Also, because it’s waterproof, you won’t needto replace it routinely unless it loosens. Apply it directly tothe site without stretching it (which may make thepatient’s skin itch). It should cover the catheter and partof the hub. Follow the dressing manufacturer’s instruc-tions for specific application technique.
Make sure no tubing extends beyond the hand, whereit could catch on something. Also, the hub should bepositioned to let you change the tubing away from theinsertion site.
2. You may want to use stretch netting to cover theentire I.V. site. It prevents accidental dislodgement whileallowing easy site access.
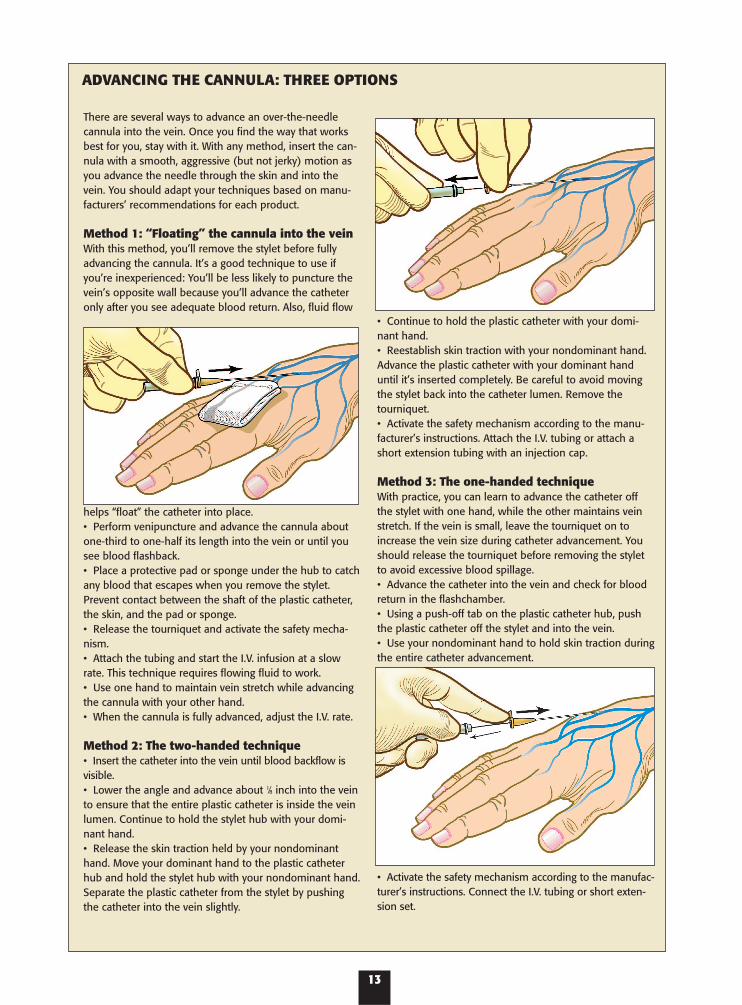
Catheter insertion sites affected by the motion of ajoint should be supported on a handboard to avoid therisk of infiltrationor mechanicalphlebitis frommotion of thecatheter insidethe vein. Eventhough thesecatheters aremade of softplastic materials,vein damage isstill a very realpossibility.
If you apply restraints to an arm with an I.V. line, firstwrap a washcloth folded in thirds around the arm wherethe restraint will go. This prevents the restraint from slid-ing and dislodging the I.V. cannula. It also helps preventedema.
Although a deep arm vein is a challenge to cannulate,sometimes you have no choice because it’s all that’s avail-able. Cannulating an arm vein also has the virtue of freeingthe patient’s hand so he can move around easily.
When you stretch a deep arm vein to immobilize it, itmay seem to disappear because stretching may flatten itslightly. So you must be able to “see” it by palpating it withyour fingers. To cannulate a vein that’s palpable but hard tosee, follow these steps:
1. Palpate the vein and use anatomic landmarks to situ-ate the vein in your mind. Do not palpate the site againafter the skin antiseptic has been applied. Ask the patientto relax his fist as tight muscles can compress veins.
2. Use skin traction techniques by encircling thepatient’s arm with your nondominant hand and stretchingthe skin downward with your thumb. Using moderatepressure, retract the skin away from the insertion site tostabilize the vein.
Grasp the cannula with your fingers, touching only thehub, so you can easily see blood backflow. Aim the cannu-la tip at the vein you visualize by the anatomic landmarkand insert it in one smooth motion.
3. Use your nondominant hand to maintain vein stretch.Lower the cannula angle and continue advancing the can-nula until you see blood backflow in the hub, indicatingthat the cannula tip has entered the vein.
SPECIAL CONSIDERATIONS FOR DEEP VEINS
SECURING AND DRESSING THE CATHETER
12
5- to 15-degree angle (depending on vein depth; forexample, use a 5- to 10-degree angle for a superficialhand vein). Take care not to insert it too far into thelumen or it may penetrate the back wall.
2. Approaching thevein from the side.Position the cannulatip adjacent to thevein, aimed toward it.This method, whichis preferred if you’veinjected a local anes-thetic, reduces therisk of piercing thevein’s back wall.
3. Approaching a vein that’s palpable and visiblefor only a short segment. This technique may helpyou cannulate a veinthat extends intodeeper tissues, whereyou can’t see or feelit. Insert the cannulaabout 1 to 2 cmbelow the vein’s visi-ble segment, thentunnel the cannulathrough the tissue toenter the vein. Tunneling may reduce trauma to thevein wall on insertion.
Note: Avoid performing venipuncture in areas wherevalves are palpated or where two veins bifurcate. Theinsertion site should be proximal to a valve or a bifur-cation, according to the INS.
INSERTING THE CANNULA Before performing venipuncture, stretch and immobi-lize the vein as shown earlier. Press the vein lightly tocheck for rebound elasticity and to get a sense of itsdepth and resilience. Palpate the portion where thecannula tip will rest, not the point where you intendto insert the cannula. If you touch the insertion site,you’ll have to reclean the skin.
To insert the cannula, follow the steps shown here.1. Using your dominant hand, grasp the cannula or
the cannula’s wings (if using an over-the-needle but-terfly). If you previously administered a local anesthet-ic, its effective-ness will extendfor only 1⁄4 to 3⁄4inch (0.6 to 1.9cm) from theinjection site.Touch the spotwith the cannu-la tip and askthe patient if it
feels sharp. If he says no, you know the site is properlyanesthetized. Proceed at once with venipuncture.Note: If you didn’t use a local anesthetic, encouragethe patient to relax. Tell him to breathe slowly in andout as you insert the cannula.
2. Insert the cannula at a 5- to 15-degree angle,depending on the vein’s depth. Insert the cannulabevel up toreduce the riskof piercing thevein’s back wall.Position yourfingers so youcan see bloodbackflow in theflashchamber orextension tub-ing. While keeping the vein immobilized, advance thecannula through the skin and vein with one quickmotion. Don’t always expect to feel a popping or giving-way sensation. Look for blood backflow in thecannula tubing or hub to tell you that you’ve enteredthe vein lumen. Note: Backflow may occur briefly ifthe stylet passes through the lumen and out the oppo-site wall. But the blood flow will stop when the styletleaves the vein lumen.
An alternative is to enter the skin and pause slightlyto position the cannula tip over the vein wall. Theninsert at least one-fourth of the length of the cannulainto the vein.
3. Upon visualization of backflow, lower the cannu-la almost parallel to the skin and advance it slightly toensure the cannula tip is in the lumen of the vein.While immobi-lizing the vein,push thecatheter off thestylet andadvance it com-pletely into thelumen of thevein. Refer tothe manufactur-er’s recommendations for further details on this step.(Also see Advancing the Cannula: Three Options.)
If the initial insertion isn’t successful, you can tryrepositioning the cannula as long as you don’t removeits tip from the skin. A deeper or more superficialapproach to the vein may work, but don’t excessivelyprobe the area, which could damage the nerve. If nec-essary, tighten the vein stretch to prevent the veinfrom rolling. Then make one or two more attempts toenter the vein without removing the cannula from theskin. If you’re still unsuccessful, remove the catheterand try again with a new catheter at a new site—preferably on the opposite arm. Never reinsert a stylet
13
There are several ways to advance an over-the-needlecannula into the vein. Once you find the way that worksbest for you, stay with it. With any method, insert the can-nula with a smooth, aggressive (but not jerky) motion asyou advance the needle through the skin and into thevein. You should adapt your techniques based on manu-facturers’ recommendations for each product.
Method 1: “Floating” the cannula into the veinWith this method, you’ll remove the stylet before fullyadvancing the cannula. It’s a good technique to use ifyou’re inexperienced: You’ll be less likely to puncture thevein’s opposite wall because you’ll advance the catheteronly after you see adequate blood return. Also, fluid flow
helps “float” the catheter into place.• Perform venipuncture and advance the cannula aboutone-third to one-half its length into the vein or until yousee blood flashback.• Place a protective pad or sponge under the hub to catchany blood that escapes when you remove the stylet.Prevent contact between the shaft of the plastic catheter,the skin, and the pad or sponge.• Release the tourniquet and activate the safety mecha-nism.• Attach the tubing and start the I.V. infusion at a slowrate. This technique requires flowing fluid to work.• Use one hand to maintain vein stretch while advancingthe cannula with your other hand.• When the cannula is fully advanced, adjust the I.V. rate.
Method 2: The two-handed technique• Insert the catheter into the vein until blood backflow isvisible.• Lower the angle and advance about 1⁄8 inch into the veinto ensure that the entire plastic catheter is inside the veinlumen. Continue to hold the stylet hub with your domi-nant hand. • Release the skin traction held by your nondominanthand. Move your dominant hand to the plastic catheterhub and hold the stylet hub with your nondominant hand.Separate the plastic catheter from the stylet by pushingthe catheter into the vein slightly.
• Continue to hold the plastic catheter with your domi-nant hand.• Reestablish skin traction with your nondominant hand.Advance the plastic catheter with your dominant handuntil it’s inserted completely. Be careful to avoid movingthe stylet back into the catheter lumen. Remove thetourniquet.• Activate the safety mechanism according to the manu-facturer’s instructions. Attach the I.V. tubing or attach ashort extension tubing with an injection cap.
Method 3: The one-handed techniqueWith practice, you can learn to advance the catheter offthe stylet with one hand, while the other maintains veinstretch. If the vein is small, leave the tourniquet on toincrease the vein size during catheter advancement. Youshould release the tourniquet before removing the styletto avoid excessive blood spillage.• Advance the catheter into the vein and check for bloodreturn in the flashchamber.• Using a push-off tab on the plastic catheter hub, pushthe plastic catheter off the stylet and into the vein.• Use your nondominant hand to hold skin traction duringthe entire catheter advancement.
• Activate the safety mechanism according to the manufac-turer’s instructions. Connect the I.V. tubing or short exten-sion set.
ADVANCING THE CANNULA: THREE OPTIONS
14
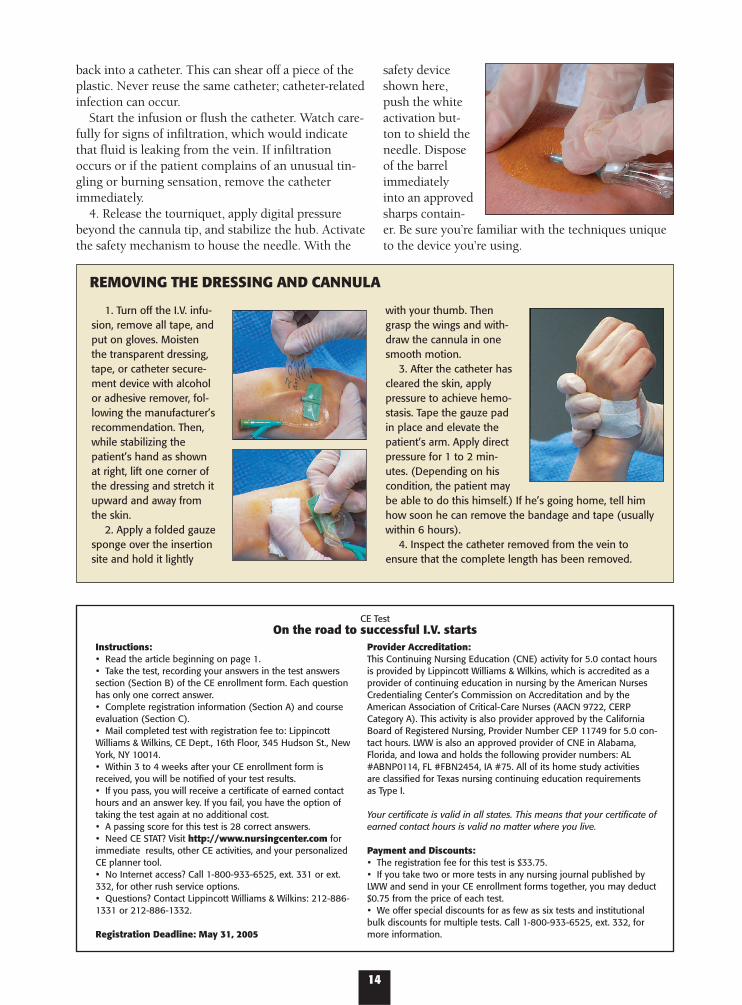
1. Turn off the I.V. infu-sion, remove all tape, andput on gloves. Moistenthe transparent dressing,tape, or catheter secure-ment device with alcoholor adhesive remover, fol-lowing the manufacturer’srecommendation. Then,while stabilizing thepatient’s hand as shownat right, lift one corner ofthe dressing and stretch itupward and away fromthe skin.
2. Apply a folded gauzesponge over the insertionsite and hold it lightly
with your thumb. Thengrasp the wings and with-draw the cannula in onesmooth motion.
3. After the catheter hascleared the skin, applypressure to achieve hemo-stasis. Tape the gauze padin place and elevate thepatient’s arm. Apply directpressure for 1 to 2 min-utes. (Depending on hiscondition, the patient maybe able to do this himself.) If he’s going home, tell himhow soon he can remove the bandage and tape (usuallywithin 6 hours).
4. Inspect the catheter removed from the vein toensure that the complete length has been removed.
REMOVING THE DRESSING AND CANNULA
back into a catheter. This can shear off a piece of theplastic. Never reuse the same catheter; catheter-relatedinfection can occur.
Start the infusion or flush the catheter. Watch care-fully for signs of infiltration, which would indicatethat fluid is leaking from the vein. If infiltrationoccurs or if the patient complains of an unusual tin-gling or burning sensation, remove the catheterimmediately.
4. Release the tourniquet, apply digital pressurebeyond the cannula tip, and stabilize the hub. Activatethe safety mechanism to house the needle. With the
safety deviceshown here,push the whiteactivation but-ton to shield theneedle. Disposeof the barrelimmediatelyinto an approvedsharps contain-er. Be sure you’re familiar with the techniques uniqueto the device you’re using.
CE TestOn the road to successful I.V. starts
Instructions:• Read the article beginning on page 1.• Take the test, recording your answers in the test answerssection (Section B) of the CE enrollment form. Each question has only one correct answer.• Complete registration information (Section A) and courseevaluation (Section C).• Mail completed test with registration fee to: LippincottWilliams & Wilkins, CE Dept., 16th Floor, 345 Hudson St., NewYork, NY 10014.• Within 3 to 4 weeks after your CE enrollment form isreceived, you will be notified of your test results.• If you pass, you will receive a certificate of earned contacthours and an answer key. If you fail, you have the option oftaking the test again at no additional cost.• A passing score for this test is 28 correct answers.• Need CE STAT? Visit http://www.nursingcenter.com forimmediate results, other CE activities, and your personalizedCE planner tool. • No Internet access? Call 1-800-933-6525, ext. 331 or ext.332, for other rush service options.• Questions? Contact Lippincott Williams & Wilkins: 212-886-1331 or 212-886-1332.
Registration Deadline: May 31, 2005
Provider Accreditation:This Continuing Nursing Education (CNE) activity for 5.0 contact hoursis provided by Lippincott Williams & Wilkins, which is accredited as aprovider of continuing education in nursing by the American NursesCredentialing Center’s Commission on Accreditation and by theAmerican Association of Critical-Care Nurses (AACN 9722, CERPCategory A). This activity is also provider approved by the CaliforniaBoard of Registered Nursing, Provider Number CEP 11749 for 5.0 con-tact hours. LWW is also an approved provider of CNE in Alabama,Florida, and Iowa and holds the following provider numbers: AL#ABNP0114, FL #FBN2454, IA #75. All of its home study activities are classified for Texas nursing continuing education requirements as Type I.
Your certificate is valid in all states. This means that your certificate ofearned contact hours is valid no matter where you live.
Payment and Discounts:• The registration fee for this test is $33.75.• If you take two or more tests in any nursing journal published byLWW and send in your CE enrollment forms together, you may deduct$0.75 from the price of each test.• We offer special discounts for as few as six tests and institutionalbulk discounts for multiple tests. Call 1-800-933-6525, ext. 332, formore information.
On the road to successful I.V. startsGeneral Purpose To enhance a participant’s understanding of venipuncture techniques. Learning Objectives After reading thearticle and taking this test, you should be able to: 1. List the steps in preparing for venipuncture. 2. Outline steps for successful I.V.cannula insertion. 3. Identify nursing interventions for postvenipuncture care.
1. To become truly proficient in venipuncturetechniques, you musta. attend instructional classes.b. perform many procedures on real patients.c. practice on anatomic training arms.d. work with clinical preceptors.
2. You should perform venipunctures initiallyon patients whoa. have chronic diseases.b. are well hydrated.c. have a history of many courses of infusion ther-
apy.d. are dehydrated.
3. The maximum number of unsuccessfulvenipuncture attempts before calling a moreskilled practitioner for help isa. two. c. four.b. three. d. five.
4. Assess a patient for an MLC or PICC if I.V.therapy is likely to continue beyonda. 3 days. c. 5 days.b. 4 days. d. 1 week.
5. Short peripheral catheters are indicatedwhena. therapy lasts more than 7 days.b. fluids have a pH between 5 and 9.c. fluids have an osmolarity of more than 500
mOsm/liter.d. medications have a pH of less than 5.
6. For venipuncture in most adults, start withveins in thea. wrist. c. hand.b. forearm. d. upper arm.
7. When initiating peripheral I.V. access,a. start with the most proximal site available.b. avoid rotating from one extremity to the other.c. start with the dominant arm.d. avoid routine use of veins in and above the
antecubital fossa.
8. The best option for emergent I.V. access inthe lower extremity is thea. calf.b. thigh.c. dorsum of the foot.d. popliteal space.
9. Which site should you avoid for venipunc-ture?a. veins above a previous I.V. infiltrationb. an extremity with an arteriovenous fistulac. veins in the forearmd. veins above a phlebitic area
10. A suitable vein for venipuncture feelsround, firm, elastic, and a. hard. c. bumpy.b. engorged. d. flat.
11. To avoid inadvertent arterial puncture,remember that
a. veins are located deeper than arteries.b. arterial pulsation disappears after proper
tourniquet application.c. arteries and veins lie close together in the ante-
cubital fossa.d. arteries are frequently damaged during
venipuncture.
12. Which intervention helps to preventnerve damage during venipuncture?a. Use a plunging or jabbing technique to insert
the catheter.b. Avoid venipuncture on the dorsal aspect of the
wrist.c. Immediately remove the cannula if you suspect
nerve damage.d. Perform venipuncture 1 to 2 inches above the
level of the wrist.
13. If your patient complains of tingling ornumbness during venipuncture, you mayhave damaged the a. nerve. c. ligament.b. tendon. d. artery.
14. Which statement about over-the-needlecatheters is correct?a. They shouldn’t be used to administer vesi-
cants.b. Use them only for one-time bolus injections.c. They greatly increase the risk of vein injury.d. They’re an ideal choice for hand or forearm
veins.
Nursing2003, May, On the road to successful I.V. starts✄ ✄
A. Registration Information:
Last name ____________________________ First name ________________________ MI _____
Address _______________________________________________________________________________
City _______________________________________ State _________________ ZIP ______________
Telephone ____________________ Fax ____________________ E-mail ____________________
Registration Deadline: May 31, 2005Contact hours: 5.0 Pharmacology hours: 0.0 Fee: $33.75
❑ LPN ❑ RN ❑ CNS ❑ NP ❑ CRNA ❑ CNM ❑ other ___________________
Job title __________________________________ Specialty _________________________________
Type of facility ____________________________________ Are you certified? ❑ Yes ❑ No
Certified by ___________________________________________________________________________
State of license (1) __________________________ License # ___________________________
State of license (2) __________________________ License # ___________________________
Social Security # _____________________________________________________________________❑ From time to time, we make our mailing list available to outside organizations to announce special offers.
Please check here if you do not wish us to release your name and address.
B. Test Answers: Darken one circle for your answer to each question.
a b c d1. ❍ ❍ ❍ ❍2. ❍ ❍ ❍ ❍3. ❍ ❍ ❍ ❍4. ❍ ❍ ❍ ❍5. ❍ ❍ ❍ ❍6. ❍ ❍ ❍ ❍7. ❍ ❍ ❍ ❍8. ❍ ❍ ❍ ❍
a b c d9. ❍ ❍ ❍ ❍
10. ❍ ❍ ❍ ❍11. ❍ ❍ ❍ ❍12. ❍ ❍ ❍ ❍13. ❍ ❍ ❍ ❍14. ❍ ❍ ❍ ❍15. ❍ ❍ ❍ ❍16. ❍ ❍ ❍ ❍
a b c d17. ❍ ❍ ❍ ❍18. ❍ ❍ ❍ ❍19. ❍ ❍ ❍ ❍20. ❍ ❍ ❍ ❍21. ❍ ❍ ❍ ❍22. ❍ ❍ ❍ ❍23. ❍ ❍ ❍ ❍24. ❍ ❍ ❍ ❍
a b c d25. ❍ ❍ ❍ ❍26. ❍ ❍ ❍ ❍27. ❍ ❍ ❍ ❍28. ❍ ❍ ❍ ❍29. ❍ ❍ ❍ ❍30. ❍ ❍ ❍ ❍31. ❍ ❍ ❍ ❍32. ❍ ❍ ❍ ❍
a b c d33. ❍ ❍ ❍ ❍34. ❍ ❍ ❍ ❍35. ❍ ❍ ❍ ❍36. ❍ ❍ ❍ ❍37. ❍ ❍ ❍ ❍38. ❍ ❍ ❍ ❍
C. Course Evaluation*1. Did this CE activity's learning objectives relate to its general purpose? ❑ Yes ❑ No2. Was the journal home study format an effective way to present the material? ❑ Yes ❑ No3. Was the content relevant to your nursing practice? ❑ Yes ❑ No4. How long did it take you to complete this CE activity?___ hours___minutes5. Suggestion for future topics __________________________________________________________
D. Two Easy Ways to Pay:❑ Check or money order enclosed (Payable to Lippincott Williams & Wilkins)❑ Charge my ❑ Mastercard ❑ Visa ❑ American Express
Card # _____________________________________________ Exp. date __________________
Signature _______________________________________________________________________
*In accordance with the Iowa Board of Nursing administrative rules governing grievances, a copy of your evaluation of the CE offering may be submitted directly to the Iowa Board of Nursing.
5.0 ANCC/AACN CONTACT HOURS
C E

15. Which statement about a PICC is correct?a. It’s indicated for therapies that will last 1 to 12
months.b. Its tip resides in the proximal portion of the
upper arm.c. It’s used only for therapies with osmolarities
less than 500 mOsm/liter.d. It’s used only for therapies with a pH range of
5 to 9.
16. Which catheter size is indicated for trau-ma patients and those requiring large, rapidfluid volumes?a. 22-gauge c. 18-gaugeb. 20-gauge d. 16-gauge
17. Placing the patient’s arm across his chestand standing on the opposite side of the bedcan increase your success of cannulating thea. basilic vein. c. cubital vein.b. metacarpal vein. d. dorsal hand veins.
18. Which is correct about the large uppercephalic vein?a. It’s easy to visualize.b. It can accommodate only 24- to 20-gauge
catheters.c. It should be reserved for an MLC or PICC.d. It’s easy to stabilize.
19. Which bloodborne pathogen protectionstrategy is most effective?a. engineering controlsb. work practice controlsc. personal protective equipmentd. annual patient-safety goals
20. According to the JCAHO, the most appro-priate information to identify patients whenadministering blood products isa. name and room number.b. birthday and room number.c. name and a unique patient number.d. home address and room number.
21. Which action carries the highest CDC rec-ommendation?a. skin preparation with chlorhexidine gluconateb. careful attention to hand hygienec. wiping all injection ports with alcohol prior to
used. prompt removal of nonessential catheters
22. According to the CDC, a. artificial nails shouldn’t be worn when caring
for high-risk patients.b. wearing gloves alters the need for adequate
hand hygiene.c. intact skin can carry more microorganisms
than broken skin.d. fingernails shouldn’t be longer than 1⁄2 inch.
23. If your patient’s vein fills poorly aftertourniquet application, try a. positioning his arm above heart level.b. gently rubbing his arm to warm the skin.
c. having him make a tight fist during venipunc-ture.
d. covering his entire arm with cool compressesfor 5 to 10 minutes.
24. Which statement about tourniquet appli-cation is correct?a. Apply the tourniquet 1 to 2 inches above the
intended venipuncture site.b. Venous distension may take longer in elderly
patients.c. Reusable multiple-patient-use tourniquets are
preferred.d. Peripheral veins in a well-hydrated patient
should distend in about 2 minutes.
25. According to the CDC, the preferredagent for preparing the venipuncture site isa. tincture of iodine 2%.b. chlorhexidine gluconate solution.c. 10% povidone-iodine.d. 70% isopropyl alcohol.
26. Always clean visibly dirty skin witha. soap and water.b. an aqueous benzalkonium-like compound.c. hexachlorophene.d. an alcohol-based hand rub.
27. Which statement about venipuncture sitepreparation is correct?a. Shave the site if it’s excessively hairy.b. Apply 70% isopropyl alcohol after a 10%
povidone-iodine prep.c. Apply an antimicrobial solution in a back-and-
forth motion.d. Blot excess antimicrobial solution at the inser-
tion site.
28. Which statement about upper extremityveins is correct?a. Keeping the vein in a taut, distended, stable
position will prevent rolling.b. Arm veins are easier to immobilize than hand
veins.c. There’s less risk of nerve injury in the hand and
wrist areas.d. Arm veins are easier to cannulate because
they’re surrounded with less fatty tissue.
29. Which statement about using local anes-thetics in venipuncture is correct?a. The anesthetic of choice is 1% lidocaine with
epinephrine.b. Topical anesthetic creams must be applied 15
minutes before venipuncture.c. The anesthetic should be administered beside
or below the vein.d. The anesthetic should be administered before
tourniquet application.
30. Which insertion technique is preferred ifyou’ve injected a local anesthetic?a. tunnelingb. approaching the vein from the topc. inserting the cannula distal to a valve
d. approaching the vein from the side
31. When inserting the cannula, a. use a 25- to 30-degree angle.b. look for blood backflow in the cannula tubing
or hub.c. insert the cannula bevel down.d. always expect to feel a popping or giving-way
sensation.
32. If the initial insertion isn’t successful,a. remove the cannula tip from the skin and
reposition it.b. remove the cannula and insert a new one in
another site.c. reinsert the stylet into the catheter and try
again.d. reuse the catheter for a second venipuncture.
33. A sudden backflow of blood when youretract the catheter indicatesa. severe vasospasm.b. posterior vein wall puncture.c. vein occlusion with a blood clot.d. hematoma formation.
34. To cannulate a vein that’s palpable buthard to see,a. palpate the site again after applying the skin
antiseptic.b. use a tentative “stop and start” technique.c. ask the patient to clench her fist as tightly as
possible.d. use anatomic landmarks to mentally locate
the vein.
35. To properly secure the catheter,a. use clean tape, preferably from your pocket.b. place a 1-inch-wide tape strip across the hub,
making sure it covers the puncture site.c. place a 1-inch-wide tape strip over the tubing
directly on top of the tape under the hub.d. make sure a short segment of tubing extends
beyond the hand.
36. Which statement about a transparentdressing is correct?a. It lets you observe the insertion site.b. It needs to be replaced routinely because it’s
not waterproof.c. It’s applied directly to the site while stretching it.d. It should cover the hub/tubing junction.
37. When preparing to remove the I.V. cannu-la, firsta. turn off the I.V. infusion.b. remove all tape.c. put on gloves.d. moisten the transparent dressing with alcohol.
38. Which technique is best for advancingthe cannula if you’re inexperienced?a. floating the cannula into the veinb. two-handed techniquec. one-handed techniqued. tunneling


