Introduction ............................................1
Sequence of Play ....................................2
Campaign Set-Up ..................................2
Start of Week ........................................10
Pre-Combat ..........................................11
Combat..................................................14
Post-Combat ........................................19
End of Week..........................................20
End of Campaign ..................................22
Optional Rules ......................................22
Credits ..................................................22
Sample Game ......................................23
• IntroductionYou are the commander of an American army combatgroup in WWII. You will take command in the hardestfought campaigns from 1942 North Africa to the finalassault into Germany in 1945!
Each of your Campaigns involve both operational andtactical decisions. At the start of a Campaign, you selectthe Units and Commanders to make up your Command.During each Week of the Campaign, you decide whichenemy Battalions to attack, which of your forces toallocate, and then resolve each battle using the tacticalbattlefield.
Your Commanders gain Experience with every battle, butthey also suffer Stress. Each Week, you must decide howhard to push your men to achieve Victory.
2
• Sequence of PlayThis rulebook is organized according to this Sequence ofPlay.
Campaign Set-UpSelect Campaign CardSelect Objective CardDraw Battalion CardsBuy UnitsSelect Commanders
Start of WeekSpecial Condition CardAssign Units
Pre-CombatEvent CardPlace Turn CounterPlace Terrain TilesPlace Friendly Units
Unit AdvancementPlace Enemy Units
Unit Advancement
CombatFast Move and AttackRoll for Enemy MoveEnemy ActionsSlow Move and AttackAdvance Turn Counter
Post-CombatEvent CardBattalion StatusRecord Commander StressRecord Commander Experience Points
End of WeekMove BattalionsOn LeaveAdjust Special Option PointsRepair/ReplacePriority R&R
End of CampaignCampaign Outcome
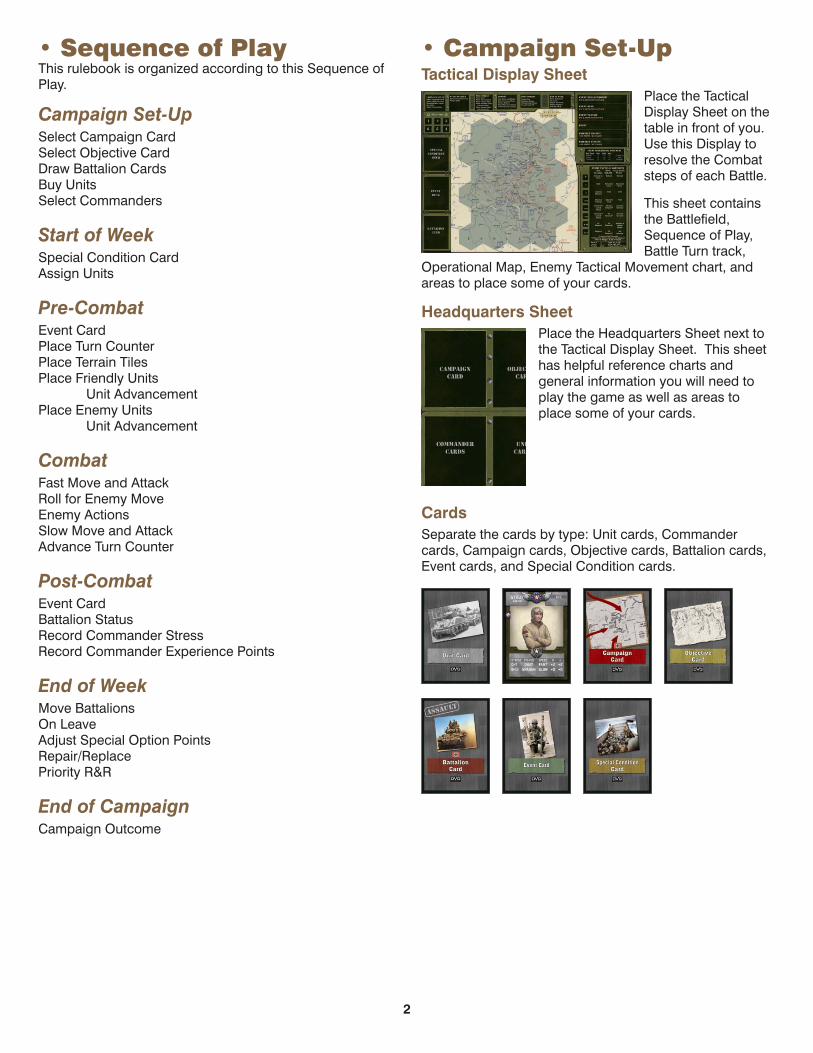
• Campaign Set-Up Tactical Display Sheet
Place the TacticalDisplay Sheet on thetable in front of you.Use this Display toresolve the Combatsteps of each Battle.
This sheet containsthe Battlefield,Sequence of Play,Battle Turn track,
Operational Map, Enemy Tactical Movement chart, andareas to place some of your cards.
Headquarters SheetPlace the Headquarters Sheet next tothe Tactical Display Sheet. This sheethas helpful reference charts andgeneral information you will need toplay the game as well as areas toplace some of your cards.
CardsSeparate the cards by type: Unit cards, Commandercards, Campaign cards, Objective cards, Battalion cards,Event cards, and Special Condition cards.
3
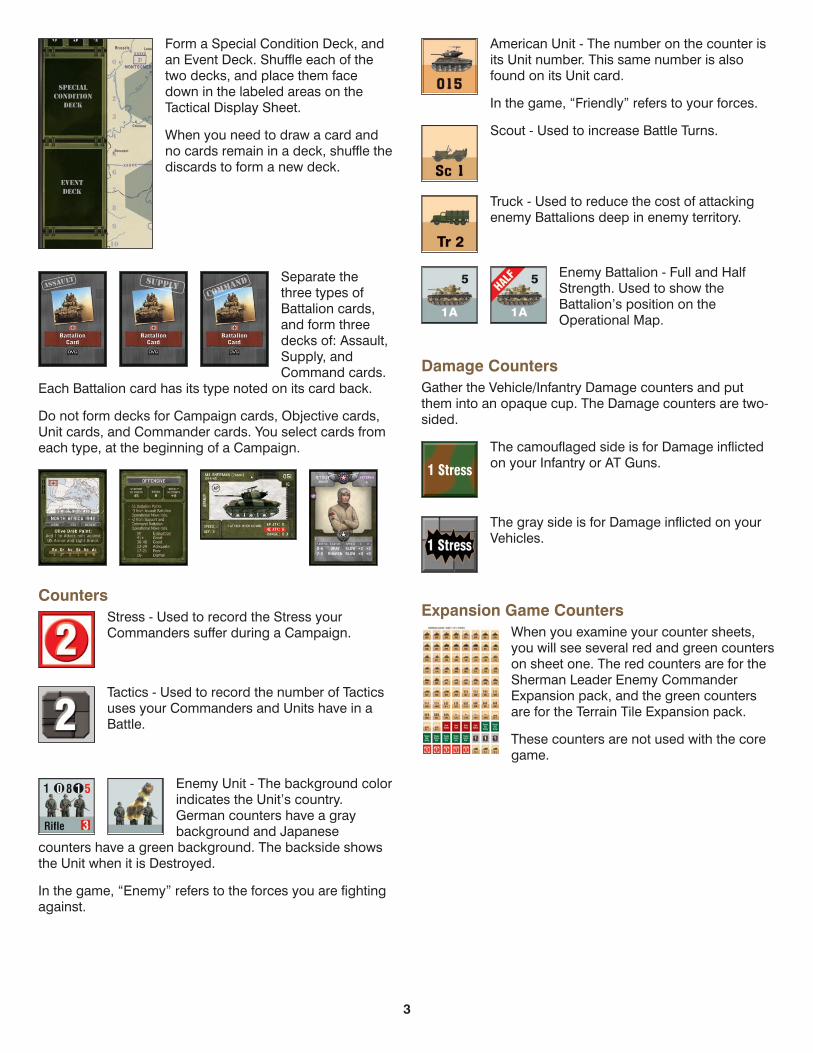
Form a Special Condition Deck, andan Event Deck. Shuffle each of thetwo decks, and place them facedown in the labeled areas on theTactical Display Sheet.
When you need to draw a card andno cards remain in a deck, shuffle thediscards to form a new deck.
Separate thethree types ofBattalion cards,and form threedecks of: Assault,Supply, andCommand cards.
Each Battalion card has its type noted on its card back.
Do not form decks for Campaign cards, Objective cards,Unit cards, and Commander cards. You select cards fromeach type, at the beginning of a Campaign.
CountersStress - Used to record the Stress yourCommanders suffer during a Campaign.
Tactics - Used to record the number of Tacticsuses your Commanders and Units have in aBattle.
Enemy Unit - The background colorindicates the Unit’s country.German counters have a graybackground and Japanese
counters have a green background. The backside showsthe Unit when it is Destroyed.
In the game, “Enemy” refers to the forces you are fightingagainst.
American Unit - The number on the counter isits Unit number. This same number is alsofound on its Unit card.
In the game, “Friendly” refers to your forces.
Scout - Used to increase Battle Turns.
Truck - Used to reduce the cost of attackingenemy Battalions deep in enemy territory.
Enemy Battalion - Full and HalfStrength. Used to show theBattalion’s position on theOperational Map.
Damage CountersGather the Vehicle/Infantry Damage counters and putthem into an opaque cup. The Damage counters are two-sided.
The camouflaged side is for Damage inflictedon your Infantry or AT Guns.
The gray side is for Damage inflicted on yourVehicles.
Expansion Game CountersWhen you examine your counter sheets,you will see several red and green counterson sheet one. The red counters are for theSherman Leader Enemy CommanderExpansion pack, and the green countersare for the Terrain Tile Expansion pack.
These counters are not used with the coregame.
4
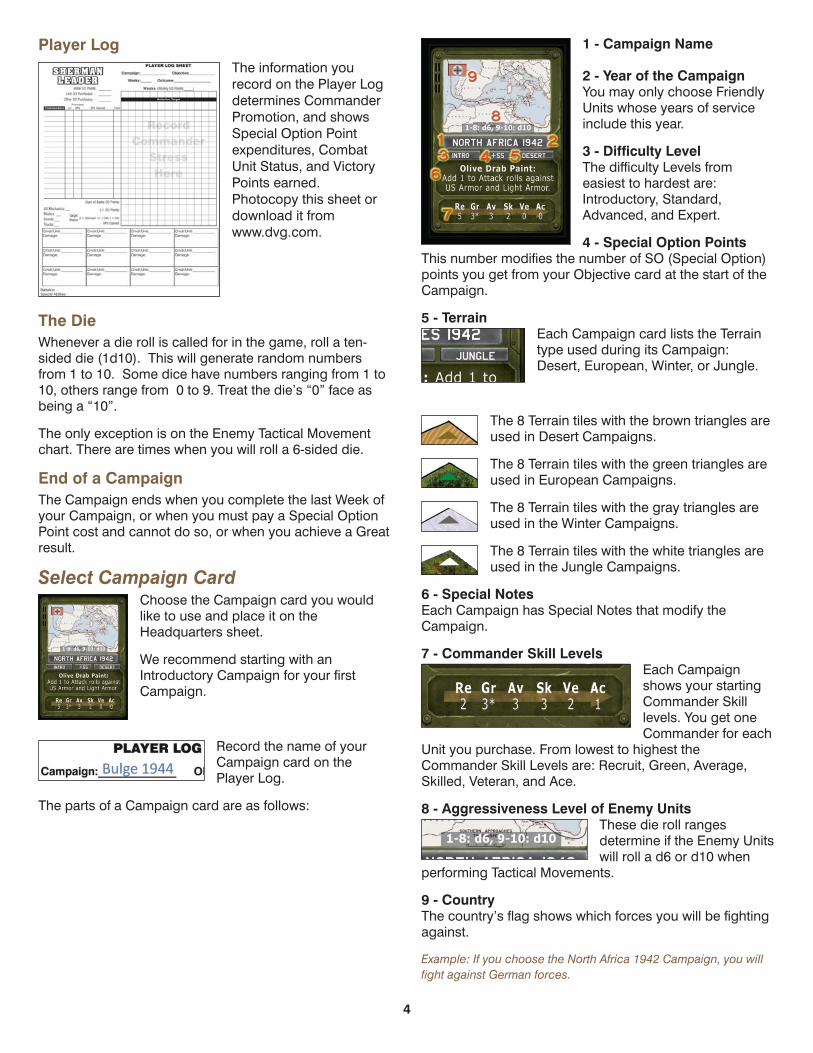
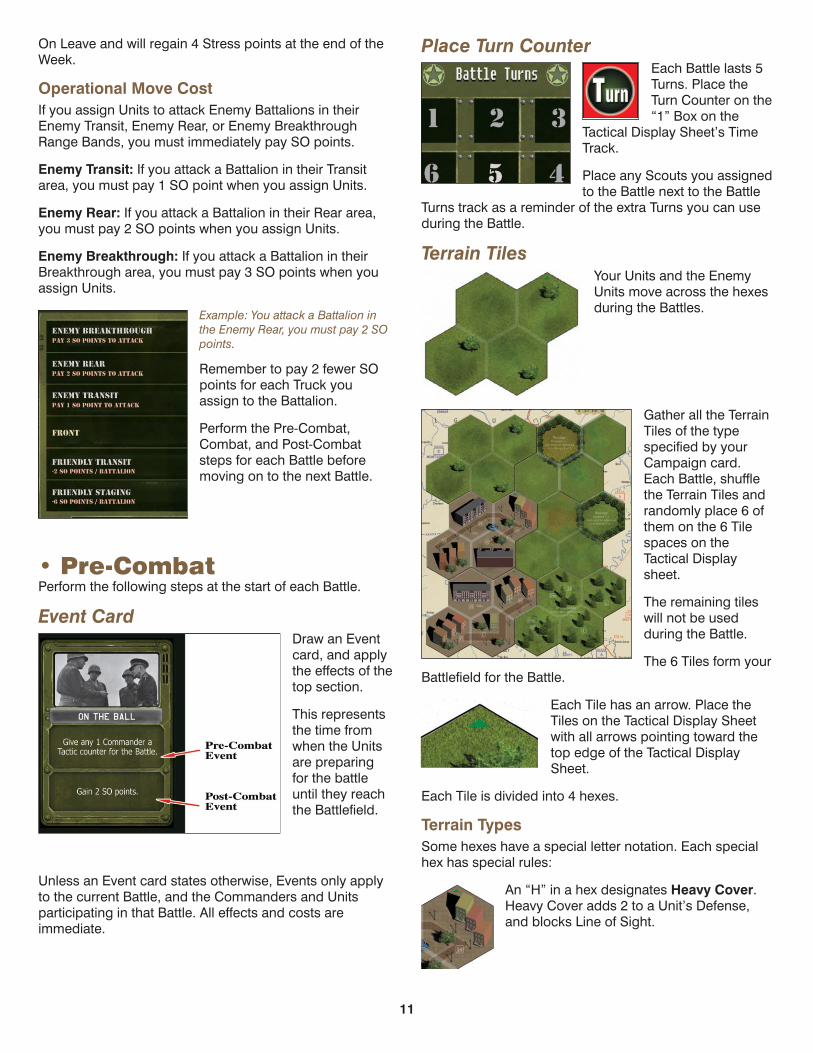
Player LogThe information yourecord on the Player Logdetermines CommanderPromotion, and showsSpecial Option Pointexpenditures, CombatUnit Status, and VictoryPoints earned.Photocopy this sheet ordownload it fromwww.dvg.com.
The DieWhenever a die roll is called for in the game, roll a ten-sided die (1d10). This will generate random numbersfrom 1 to 10. Some dice have numbers ranging from 1 to10, others range from 0 to 9. Treat the die’s “0” face asbeing a “10”.
The only exception is on the Enemy Tactical Movementchart. There are times when you will roll a 6-sided die.
End of a CampaignThe Campaign ends when you complete the last Week ofyour Campaign, or when you must pay a Special OptionPoint cost and cannot do so, or when you achieve a Greatresult.
Select Campaign CardChoose the Campaign card you wouldlike to use and place it on theHeadquarters sheet.
We recommend starting with anIntroductory Campaign for your firstCampaign.
Record the name of yourCampaign card on thePlayer Log.
The parts of a Campaign card are as follows:
1 - Campaign Name
2 - Year of the CampaignYou may only choose FriendlyUnits whose years of serviceinclude this year.
3 - Difficulty Level The difficulty Levels fromeasiest to hardest are:Introductory, Standard,Advanced, and Expert.
4 - Special Option PointsThis number modifies the number of SO (Special Option)points you get from your Objective card at the start of theCampaign.
5 - TerrainEach Campaign card lists the Terraintype used during its Campaign:Desert, European, Winter, or Jungle.
The 8 Terrain tiles with the brown triangles areused in Desert Campaigns.
The 8 Terrain tiles with the green triangles areused in European Campaigns.
The 8 Terrain tiles with the gray triangles areused in the Winter Campaigns.
The 8 Terrain tiles with the white triangles areused in the Jungle Campaigns.
6 - Special NotesEach Campaign has Special Notes that modify theCampaign.
7 - Commander Skill Levels Each Campaignshows your startingCommander Skilllevels. You get oneCommander for each
Unit you purchase. From lowest to highest theCommander Skill Levels are: Recruit, Green, Average,Skilled, Veteran, and Ace.
8 - Aggressiveness Level of Enemy UnitsThese die roll rangesdetermine if the Enemy Unitswill roll a d6 or d10 when
performing Tactical Movements.
9 - CountryThe country’s flag shows which forces you will be fightingagainst.
Example: If you choose the North Africa 1942 Campaign, you willfight against German forces.
5
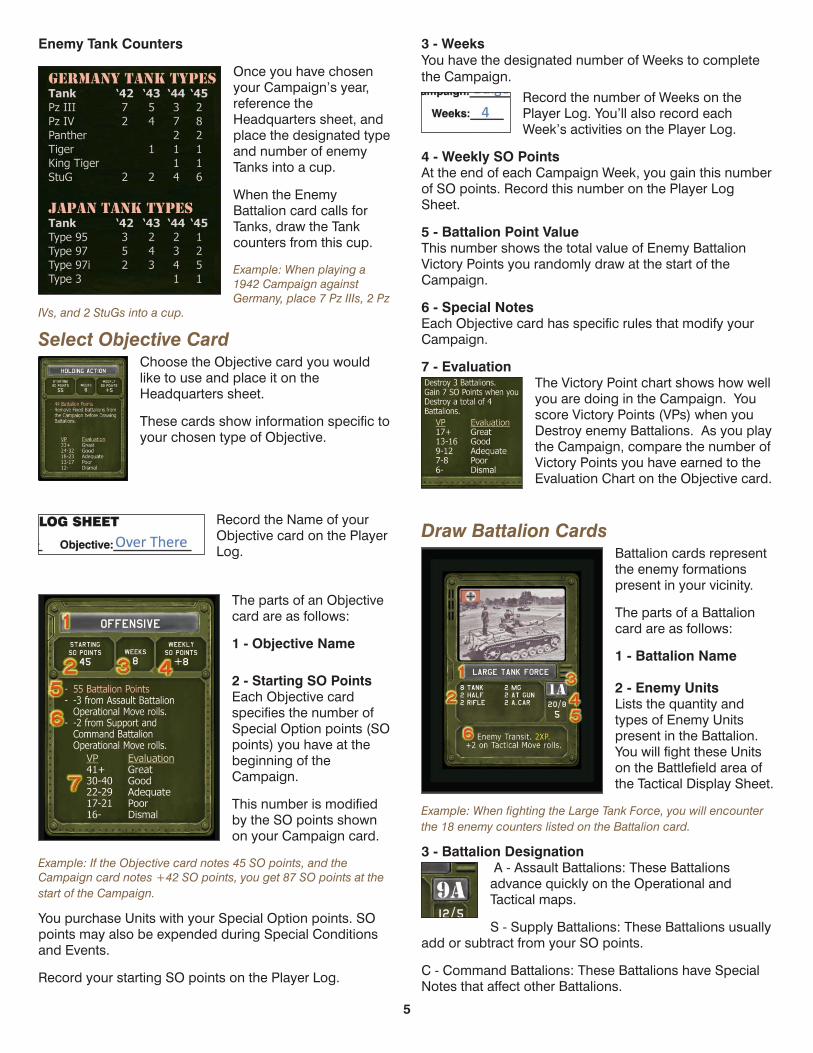
Enemy Tank Counters
Once you have chosenyour Campaign’s year,reference theHeadquarters sheet, andplace the designated typeand number of enemyTanks into a cup.
When the EnemyBattalion card calls forTanks, draw the Tankcounters from this cup.
Example: When playing a1942 Campaign againstGermany, place 7 Pz IIIs, 2 Pz
IVs, and 2 StuGs into a cup.
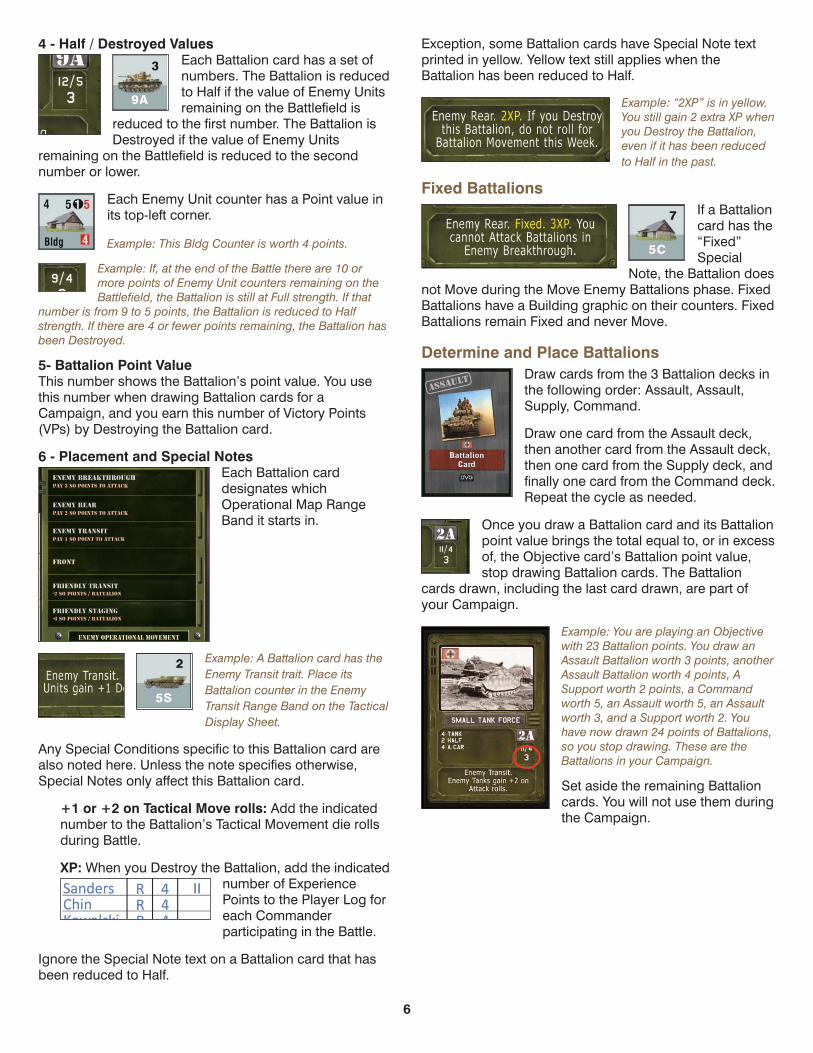
Select Objective CardChoose the Objective card you wouldlike to use and place it on theHeadquarters sheet.
These cards show information specific toyour chosen type of Objective.
Record the Name of yourObjective card on the PlayerLog.
The parts of an Objectivecard are as follows:
1 - Objective Name
2 - Starting SO PointsEach Objective cardspecifies the number ofSpecial Option points (SOpoints) you have at thebeginning of theCampaign.
This number is modifiedby the SO points shownon your Campaign card.
Example: If the Objective card notes 45 SO points, and theCampaign card notes +42 SO points, you get 87 SO points at thestart of the Campaign.
You purchase Units with your Special Option points. SOpoints may also be expended during Special Conditionsand Events.
Record your starting SO points on the Player Log.
3 - WeeksYou have the designated number of Weeks to completethe Campaign.
Record the number of Weeks on thePlayer Log. You’ll also record eachWeek’s activities on the Player Log.
4 - Weekly SO Points At the end of each Campaign Week, you gain this numberof SO points. Record this number on the Player LogSheet.
5 - Battalion Point ValueThis number shows the total value of Enemy BattalionVictory Points you randomly draw at the start of theCampaign.
6 - Special NotesEach Objective card has specific rules that modify yourCampaign.
7 - Evaluation The Victory Point chart shows how wellyou are doing in the Campaign. Youscore Victory Points (VPs) when youDestroy enemy Battalions. As you playthe Campaign, compare the number ofVictory Points you have earned to theEvaluation Chart on the Objective card.
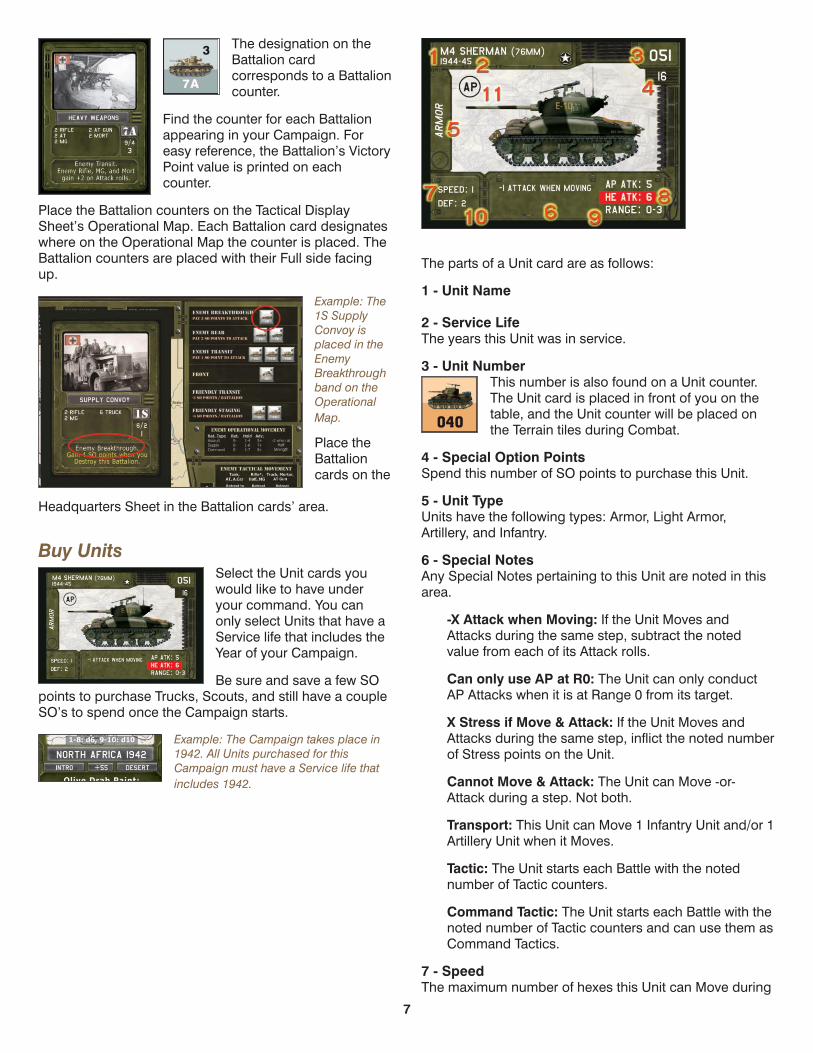
Draw Battalion CardsBattalion cards representthe enemy formationspresent in your vicinity.
The parts of a Battalioncard are as follows:
1 - Battalion Name
2 - Enemy UnitsLists the quantity andtypes of Enemy Unitspresent in the Battalion.You will fight these Unitson the Battlefield area ofthe Tactical Display Sheet.
Example: When fighting the Large Tank Force, you will encounterthe 18 enemy counters listed on the Battalion card.
3 - Battalion DesignationA - Assault Battalions: These Battalionsadvance quickly on the Operational andTactical maps.
S - Supply Battalions: These Battalions usuallyadd or subtract from your SO points.
C - Command Battalions: These Battalions have SpecialNotes that affect other Battalions.
6
4 - Half / Destroyed ValuesEach Battalion card has a set ofnumbers. The Battalion is reducedto Half if the value of Enemy Unitsremaining on the Battlefield is
reduced to the first number. The Battalion isDestroyed if the value of Enemy Units
remaining on the Battlefield is reduced to the secondnumber or lower.
Each Enemy Unit counter has a Point value inits top-left corner.
Example: This Bldg Counter is worth 4 points.
Example: If, at the end of the Battle there are 10 ormore points of Enemy Unit counters remaining on theBattlefield, the Battalion is still at Full strength. If that
number is from 9 to 5 points, the Battalion is reduced to Halfstrength. If there are 4 or fewer points remaining, the Battalion hasbeen Destroyed.
5- Battalion Point ValueThis number shows the Battalion’s point value. You usethis number when drawing Battalion cards for aCampaign, and you earn this number of Victory Points(VPs) by Destroying the Battalion card.
6 - Placement and Special NotesEach Battalion carddesignates whichOperational Map RangeBand it starts in.
Example: A Battalion card has theEnemy Transit trait. Place itsBattalion counter in the EnemyTransit Range Band on the TacticalDisplay Sheet.
Any Special Conditions specific to this Battalion card arealso noted here. Unless the note specifies otherwise,Special Notes only affect this Battalion card.
+1 or +2 on Tactical Move rolls: Add the indicatednumber to the Battalion’s Tactical Movement die rollsduring Battle.
XP: When you Destroy the Battalion, add the indicatednumber of ExperiencePoints to the Player Log foreach Commanderparticipating in the Battle.
Ignore the Special Note text on a Battalion card that hasbeen reduced to Half.
Exception, some Battalion cards have Special Note textprinted in yellow. Yellow text still applies when theBattalion has been reduced to Half.
Example: “2XP” is in yellow.You still gain 2 extra XP whenyou Destroy the Battalion,even if it has been reducedto Half in the past.
Fixed BattalionsIf a Battalioncard has the“Fixed”Special
Note, the Battalion doesnot Move during the Move Enemy Battalions phase. FixedBattalions have a Building graphic on their counters. FixedBattalions remain Fixed and never Move.
Determine and Place BattalionsDraw cards from the 3 Battalion decks inthe following order: Assault, Assault,Supply, Command.
Draw one card from the Assault deck,then another card from the Assault deck,then one card from the Supply deck, andfinally one card from the Command deck.Repeat the cycle as needed.
Once you draw a Battalion card and its Battalionpoint value brings the total equal to, or in excessof, the Objective card’s Battalion point value,stop drawing Battalion cards. The Battalion
cards drawn, including the last card drawn, are part ofyour Campaign.
Example: You are playing an Objectivewith 23 Battalion points. You draw anAssault Battalion worth 3 points, anotherAssault Battalion worth 4 points, ASupport worth 2 points, a Commandworth 5, an Assault worth 5, an Assaultworth 3, and a Support worth 2. Youhave now drawn 24 points of Battalions,so you stop drawing. These are theBattalions in your Campaign.
Set aside the remaining Battalioncards. You will not use them duringthe Campaign.
7
The designation on theBattalion cardcorresponds to a Battalioncounter.
Find the counter for each Battalionappearing in your Campaign. Foreasy reference, the Battalion’s VictoryPoint value is printed on eachcounter.
Place the Battalion counters on the Tactical DisplaySheet’s Operational Map. Each Battalion card designateswhere on the Operational Map the counter is placed. TheBattalion counters are placed with their Full side facingup.
Example: The1S SupplyConvoy isplaced in theEnemyBreakthroughband on theOperationalMap.
Place theBattalioncards on the
Headquarters Sheet in the Battalion cards’ area.
Buy UnitsSelect the Unit cards youwould like to have underyour command. You canonly select Units that have aService life that includes theYear of your Campaign.
Be sure and save a few SOpoints to purchase Trucks, Scouts, and still have a coupleSO’s to spend once the Campaign starts.
Example: The Campaign takes place in1942. All Units purchased for thisCampaign must have a Service life thatincludes 1942.
The parts of a Unit card are as follows:
1 - Unit Name
2 - Service LifeThe years this Unit was in service.
3 - Unit NumberThis number is also found on a Unit counter.The Unit card is placed in front of you on thetable, and the Unit counter will be placed onthe Terrain tiles during Combat.
4 - Special Option PointsSpend this number of SO points to purchase this Unit.
5 - Unit TypeUnits have the following types: Armor, Light Armor,Artillery, and Infantry.
6 - Special NotesAny Special Notes pertaining to this Unit are noted in thisarea.
-X Attack when Moving: If the Unit Moves andAttacks during the same step, subtract the notedvalue from each of its Attack rolls.
Can only use AP at R0: The Unit can only conductAP Attacks when it is at Range 0 from its target.
X Stress if Move & Attack: If the Unit Moves andAttacks during the same step, inflict the noted numberof Stress points on the Unit.
Cannot Move & Attack: The Unit can Move -or-Attack during a step. Not both.
Transport: This Unit can Move 1 Infantry Unit and/or 1Artillery Unit when it Moves.
Tactic: The Unit starts each Battle with the notednumber of Tactic counters.
Command Tactic: The Unit starts each Battle with thenoted number of Tactic counters and can use them asCommand Tactics.
7 - SpeedThe maximum number of hexes this Unit can Move during
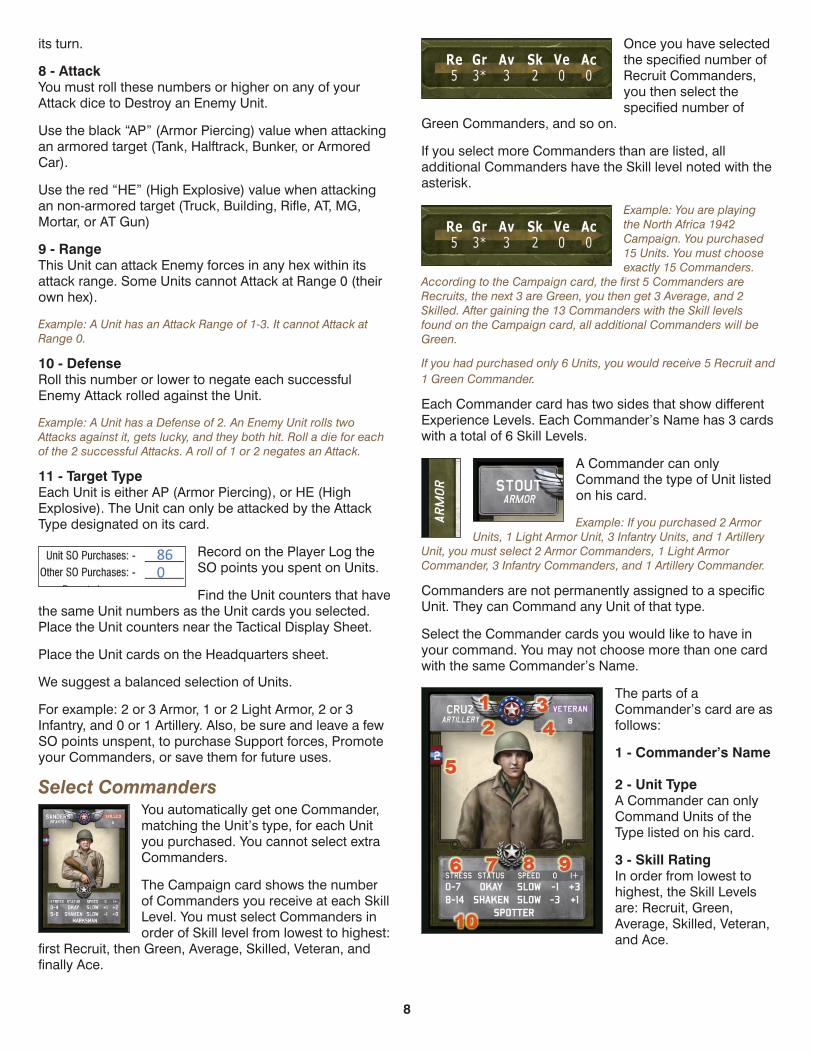
8
its turn.
8 - AttackYou must roll these numbers or higher on any of yourAttack dice to Destroy an Enemy Unit.
Use the black “AP” (Armor Piercing) value when attackingan armored target (Tank, Halftrack, Bunker, or ArmoredCar).
Use the red “HE” (High Explosive) value when attackingan non-armored target (Truck, Building, Rifle, AT, MG,Mortar, or AT Gun)
9 - RangeThis Unit can attack Enemy forces in any hex within itsattack range. Some Units cannot Attack at Range 0 (theirown hex).
Example: A Unit has an Attack Range of 1-3. It cannot Attack atRange 0.
10 - DefenseRoll this number or lower to negate each successfulEnemy Attack rolled against the Unit.
Example: A Unit has a Defense of 2. An Enemy Unit rolls twoAttacks against it, gets lucky, and they both hit. Roll a die for eachof the 2 successful Attacks. A roll of 1 or 2 negates an Attack.
11 - Target TypeEach Unit is either AP (Armor Piercing), or HE (HighExplosive). The Unit can only be attacked by the AttackType designated on its card.
Record on the Player Log theSO points you spent on Units.
Find the Unit counters that havethe same Unit numbers as the Unit cards you selected.Place the Unit counters near the Tactical Display Sheet.
Place the Unit cards on the Headquarters sheet.
We suggest a balanced selection of Units.
For example: 2 or 3 Armor, 1 or 2 Light Armor, 2 or 3Infantry, and 0 or 1 Artillery. Also, be sure and leave a fewSO points unspent, to purchase Support forces, Promoteyour Commanders, or save them for future uses.
Select CommandersYou automatically get one Commander,matching the Unit’s type, for each Unityou purchased. You cannot select extraCommanders.
The Campaign card shows the numberof Commanders you receive at each SkillLevel. You must select Commanders inorder of Skill level from lowest to highest:
first Recruit, then Green, Average, Skilled, Veteran, andfinally Ace.
Once you have selectedthe specified number ofRecruit Commanders,you then select thespecified number of
Green Commanders, and so on.
If you select more Commanders than are listed, alladditional Commanders have the Skill level noted with theasterisk.
Example: You are playingthe North Africa 1942Campaign. You purchased15 Units. You must chooseexactly 15 Commanders.
According to the Campaign card, the first 5 Commanders areRecruits, the next 3 are Green, you then get 3 Average, and 2Skilled. After gaining the 13 Commanders with the Skill levelsfound on the Campaign card, all additional Commanders will beGreen.
If you had purchased only 6 Units, you would receive 5 Recruit and1 Green Commander.
Each Commander card has two sides that show differentExperience Levels. Each Commander’s Name has 3 cardswith a total of 6 Skill Levels.
A Commander can onlyCommand the type of Unit listedon his card.
Example: If you purchased 2 ArmorUnits, 1 Light Armor Unit, 3 Infantry Units, and 1 Artillery
Unit, you must select 2 Armor Commanders, 1 Light ArmorCommander, 3 Infantry Commanders, and 1 Artillery Commander.
Commanders are not permanently assigned to a specificUnit. They can Command any Unit of that type.
Select the Commander cards you would like to have inyour command. You may not choose more than one cardwith the same Commander’s Name.
The parts of aCommander’s card are asfollows:
1 - Commander’s Name
2 - Unit TypeA Commander can onlyCommand Units of theType listed on his card.
3 - Skill RatingIn order from lowest tohighest, the Skill Levelsare: Recruit, Green,Average, Skilled, Veteran,and Ace.
9
4 - XP (Experience Points)The number of Experience Points the Commander mustearn to be Promoted to his next higher Skill Level.
5 - CoolCool removes Stress from the Commander after a Battle.
6 - StressCommanders suffer Stress just for participating in a Battle.Commanders can suffer additional Stress when attackedduring a Battle.
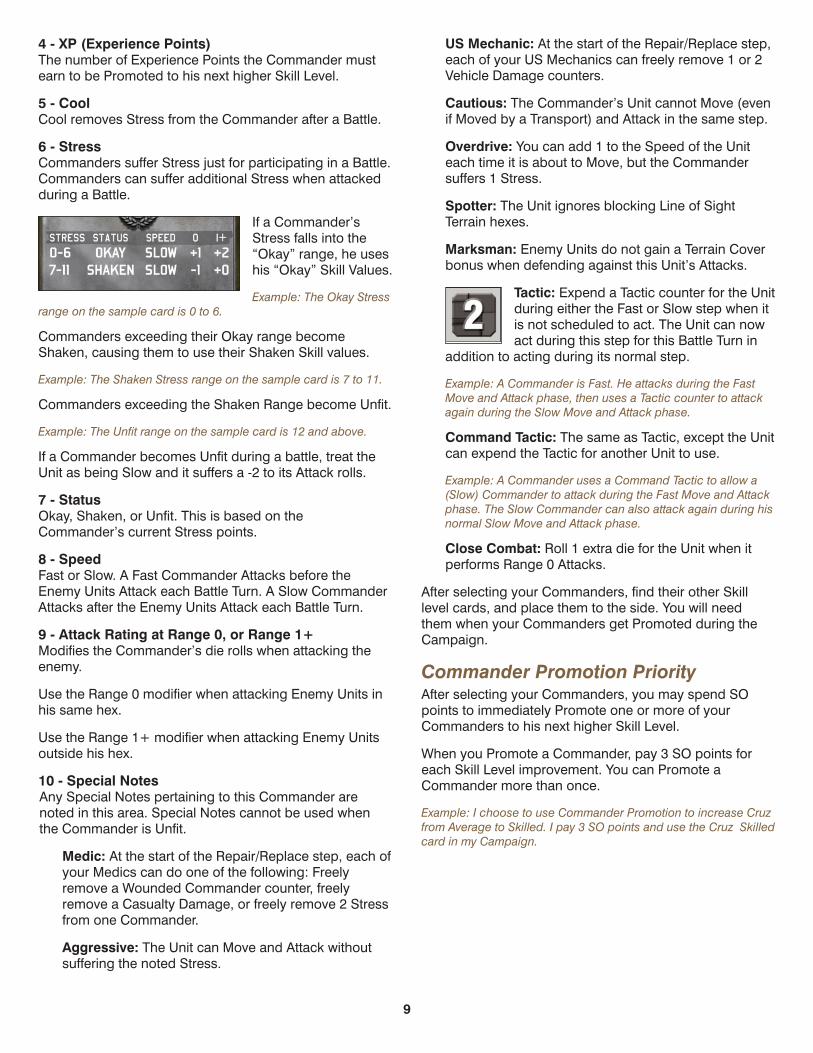
If a Commander’sStress falls into the“Okay” range, he useshis “Okay” Skill Values.
Example: The Okay Stressrange on the sample card is 0 to 6.
Commanders exceeding their Okay range becomeShaken, causing them to use their Shaken Skill values.
Example: The Shaken Stress range on the sample card is 7 to 11.
Commanders exceeding the Shaken Range become Unfit.
Example: The Unfit range on the sample card is 12 and above.
If a Commander becomes Unfit during a battle, treat theUnit as being Slow and it suffers a -2 to its Attack rolls.
7 - StatusOkay, Shaken, or Unfit. This is based on theCommander’s current Stress points.
8 - SpeedFast or Slow. A Fast Commander Attacks before theEnemy Units Attack each Battle Turn. A Slow CommanderAttacks after the Enemy Units Attack each Battle Turn.
9 - Attack Rating at Range 0, or Range 1+Modifies the Commander’s die rolls when attacking theenemy.
Use the Range 0 modifier when attacking Enemy Units inhis same hex.
Use the Range 1+ modifier when attacking Enemy Unitsoutside his hex.
10 - Special NotesAny Special Notes pertaining to this Commander arenoted in this area. Special Notes cannot be used whenthe Commander is Unfit.
Medic: At the start of the Repair/Replace step, each ofyour Medics can do one of the following: Freelyremove a Wounded Commander counter, freelyremove a Casualty Damage, or freely remove 2 Stressfrom one Commander.
Aggressive: The Unit can Move and Attack withoutsuffering the noted Stress.
US Mechanic: At the start of the Repair/Replace step,each of your US Mechanics can freely remove 1 or 2Vehicle Damage counters.
Cautious: The Commander’s Unit cannot Move (evenif Moved by a Transport) and Attack in the same step.
Overdrive: You can add 1 to the Speed of the Uniteach time it is about to Move, but the Commandersuffers 1 Stress.
Spotter: The Unit ignores blocking Line of SightTerrain hexes.
Marksman: Enemy Units do not gain a Terrain Coverbonus when defending against this Unit’s Attacks.
Tactic: Expend a Tactic counter for the Unitduring either the Fast or Slow step when itis not scheduled to act. The Unit can nowact during this step for this Battle Turn in
addition to acting during its normal step.
Example: A Commander is Fast. He attacks during the FastMove and Attack phase, then uses a Tactic counter to attackagain during the Slow Move and Attack phase.
Command Tactic: The same as Tactic, except the Unitcan expend the Tactic for another Unit to use.
Example: A Commander uses a Command Tactic to allow a(Slow) Commander to attack during the Fast Move and Attackphase. The Slow Commander can also attack again during hisnormal Slow Move and Attack phase.
Close Combat: Roll 1 extra die for the Unit when itperforms Range 0 Attacks.
After selecting your Commanders, find their other Skilllevel cards, and place them to the side. You will needthem when your Commanders get Promoted during theCampaign.
Commander Promotion PriorityAfter selecting your Commanders, you may spend SOpoints to immediately Promote one or more of yourCommanders to his next higher Skill Level.
When you Promote a Commander, pay 3 SO points foreach Skill Level improvement. You can Promote aCommander more than once.
Example: I choose to use Commander Promotion to increase Cruzfrom Average to Skilled. I pay 3 SO points and use the Cruz Skilledcard in my Campaign.
10
Record theCommanderNames, SkillLevels, XPsneeded forPromotion,and Coolpoints on thePlayer Log.
Record thenumber ofCommandersyou have withthe Medic or
US Mechanic Skills on the Player Log.
Trucks and ScoutsYou can also purchase support forces.
TrucksEach Truck counter costs 2 SO points. EachWeek, each Truck assigned to an EnemyBattalion in the Enemy Breakthrough, EnemyRear, or Enemy Transit Range Band subtracts 2
from your SO point cost to attack the Battalion.
You can use each Truck once each Week.
You can assign multiple Trucks to a single Battalion.
You may also purchase Trucks during the Repair/Replacestep each Week.
The counter mix does limit your purchases.
ScoutsEach Scout counter costs 1 SO point. EachScout assigned to an Enemy Battalion adds 1Battle Turn to the Battle.
You can use each Scout once each Week.
You can assign multiple Scouts to a single Battalion.
You may also purchase Scouts during the Repair/Replacestep each Week.
The counter mix does limit your purchases.
Enemy UnitsGather the Enemy Unit counters for your selectedCampaign.
Germany Japan
Place the Enemy Unit counters to the side of the Tactical
Display Sheet. You will use them during the Combat steps.
Set-Up CompleteRecord on the Player Log the number of SO points youspent on Trucks, Scouts, and Promotions.
Write the number of remainingSO points in the SO points boxof the first column.
This completes the Set-Up steps. You are now ready tostart your Campaign.
• Start of WeekPerform the following steps each Week of the Campaign.
Special Condition CardDraw a card from the Special Conditiondeck on the Tactical Display Sheet andfollow the card’s directions.
Unless the card text says otherwise, theSpecial Condition applies to all of theBattles fought during the Week, andtakes effect immediately. Any costs mustalso be paid immediately.
Assign UnitsEach Week, you will need to attack 1 to 3 EnemyBattalions to do well in the Campaign. Compare theVictory Points you will earn by Destroying each Battalionto the Evaluation chart on the Objective card to get anidea of which Enemy Battalions you need to Destroyduring the Campaign.
Choose which Battalions you will Attack during thisCampaign Week. Then, select the Units and Commandersthat will Attack each Battalion, and place their cardstogether for later use. Each Unit assigned to a Battle musthave a Commander of the same Type.
Example: To attack Battalion 9A, I assign: Rifle Team #902commanded by Reisner, Machine Gun Team #921 (Sanders),Mortar Team #931 (Kolchak), Experienced Anti-Tank Team #1111(Red Tree), M3 Scout Car #301 (Henders), M4 Sherman (75mm)#042 (Eandi), and M3 Halftrack #501 (Blair).
You may not assign Unfit or Wounded Commanders to aBattle. You may not assign Vehicles with Engine orSuspension Damage to a Battle.
Select the Battalion you would like to fight first for theWeek. Write the number of the Battalion you have chosento Attack on the Player Log in the Battalion Target box.Place the Battalion card you have chosen to attack in theBattalion card box on the Tactical Display Sheet.
On LeaveYou may choose to leave some Commanders out of theWeek’s Battles. These Commanders are assumed to be
11
On Leave and will regain 4 Stress points at the end of theWeek.
Operational Move CostIf you assign Units to attack Enemy Battalions in theirEnemy Transit, Enemy Rear, or Enemy BreakthroughRange Bands, you must immediately pay SO points.
Enemy Transit: If you attack a Battalion in their Transitarea, you must pay 1 SO point when you assign Units.
Enemy Rear: If you attack a Battalion in their Rear area,you must pay 2 SO points when you assign Units.
Enemy Breakthrough: If you attack a Battalion in theirBreakthrough area, you must pay 3 SO points when youassign Units.
Example: You attack a Battalion inthe Enemy Rear, you must pay 2 SOpoints.
Remember to pay 2 fewer SOpoints for each Truck youassign to the Battalion.
Perform the Pre-Combat,Combat, and Post-Combatsteps for each Battle beforemoving on to the next Battle.
• Pre-CombatPerform the following steps at the start of each Battle.
Event CardDraw an Eventcard, and applythe effects of thetop section.
This representsthe time fromwhen the Unitsare preparingfor the battleuntil they reachthe Battlefield.
Unless an Event card states otherwise, Events only applyto the current Battle, and the Commanders and Unitsparticipating in that Battle. All effects and costs areimmediate.
Place Turn CounterEach Battle lasts 5Turns. Place theTurn Counter on the“1” Box on the
Tactical Display Sheet’s TimeTrack.
Place any Scouts you assignedto the Battle next to the Battle
Turns track as a reminder of the extra Turns you can useduring the Battle.
Terrain TilesYour Units and the EnemyUnits move across the hexesduring the Battles.
Gather all the TerrainTiles of the typespecified by yourCampaign card.Each Battle, shufflethe Terrain Tiles andrandomly place 6 ofthem on the 6 Tilespaces on theTactical Displaysheet.
The remaining tileswill not be usedduring the Battle.
The 6 Tiles form yourBattlefield for the Battle.
Each Tile has an arrow. Place theTiles on the Tactical Display Sheetwith all arrows pointing toward thetop edge of the Tactical DisplaySheet.
Each Tile is divided into 4 hexes.
Terrain TypesSome hexes have a special letter notation. Each specialhex has special rules:
An “H” in a hex designates Heavy Cover.Heavy Cover adds 2 to a Unit’s Defense,and blocks Line of Sight.
12
An “L” in a Hex designates Light Cover,adds 1 to a Unit’s Defense, and Blocks Lineof Sight.
“W” in a Hex designates Water. Units maynot enter a Water hex. A Water Hex does notblock Line of Site.
A Bocage Hex (wooded area) adds 1 to aUnit’s Defense. A Unit in a Bocage Hex canonly be attacked from a range of 0 or 1.Bocage blocks Line of Sight.
An “Im” in a Hex designates ImpassableTerrain. AP Units (Armor, Light Armor, Tank,Halftrack, or Armored Car) may not enter anImpassable hex. Impassable hexes add 2 toa Unit’s Defense, and Block Line of Sight.
After laying out the Terrain tiles, verify that allnon-Impassable hexes can trace a path to all other non-Impassable hexes. If any hex cannot be entered, pick upthe tiles and layout a new set.
If all the hexes in the top or bottom rows containImpassable hexes, pick up the tiles and layout a new set.
If an Enemy AP Unit is to be placed in an Impassable hex,place it in the closest non-Impassable hex. If there is morethan one hex equally close, you choose the hex.
You cannot place your AP Units in Impassable hexes.
Place Friendly UnitsGather the Unit cards and counters, as well as theirCommanders, and place them next to the Tactical DisplaySheet. Place your Unit counters in any hexes in thebottom row.
You may issue each of your AT and MG Units 1 AdvanceOrder.
You may issue each of your Rifle Units 1 or 2 AdvanceOrders.
Treat these Advance Orders as normal movement Ordersfor purposes of Terrain and other game effects.
This graphicshows the 8Enemystarting hexesat the top ofthe map, aswell as the 4US startinghexes at thebottom of themap.
Place Enemy UnitsThe quantity and type of Enemy Units present are shownon the Battalion card, however their hex locations on theBattlefield are not known until you begin the battle.
Each Battalion card showsthe number and type ofEnemy Units you will engageduring the Battle.
Example: When engaging theLarge Tank Force, you willencounter 8 Tanks, 2 Halftracks,
2 Rifle Teams, 2 Machinegun Teams, 2 Anti-Tank Guns, and 2Armored Cars.
Gather the Enemy Unit counters forthe Battle. Enemy Units have twosides, an Active side and aDestroyed side.
Roll a die for each Enemy Unit to determine its hexplacement.
The Initial Enemy PlacementDiagram on the top of theTactical Display sheetrepresents the top 2 rows ofthe Battlefield.
Place the Enemy Unit counters on the Battlefield with theirActive sides up.
Example: I gather the 12Enemy Units for the FastAssault Force and roll a10 sided die for each. Thefirst die roll is a 3, so Iplace the first Enemy Unitin the third hex. Thesecond roll is a 7 so I
place the second Enemy Unit in the 6th hex, as indicated on theSheet. I continue rolling and placing until all the Enemy Units areplaced.
13
Enemy Infantry - Starting AdvancesAfter placing the Enemy Units:
Issue each of their AT and MG Units 1 Advance Order.
Issue each of their Rifle Units 2 Advance Orders.
Treat these Advance Orders as normal movement Ordersfor purposes of Terrain and other game effects.
Enemy Aggressiveness LevelAfter placing and advancing theEnemy Units, roll a die andconsult the Campaign card todetermine their Aggressiveness
level for the Battle. If you roll low, you will roll a 6 sided dieon the Enemy Tactical Movement chart. If you roll high,you will roll a 10 sided die.
Half BattalionsIf a Battalion is at Half Strength due to aprevious Battle, place only 1/2 of each Unittype listed on the Battalion card.
Example: If the Scout Force was atHalf Strength, I would only place: 1Tank, 1 Rifle Team, 1 Machine GunTeam, 1 Truck, and 1 Armored Car.
Enemy UnitsEach Enemy Unit Counter represents one vehicle,structure, or group of soldiers.
The specific values vary for each Nation.
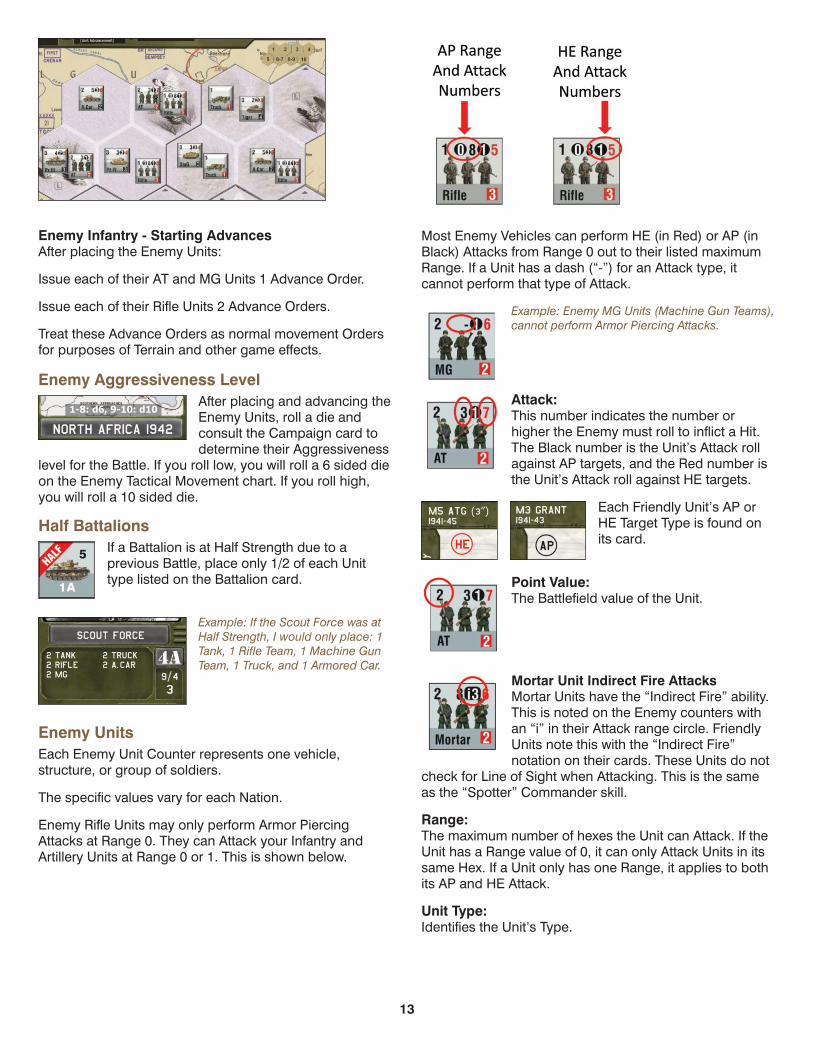
Enemy Rifle Units may only perform Armor PiercingAttacks at Range 0. They can Attack your Infantry andArtillery Units at Range 0 or 1. This is shown below.
Most Enemy Vehicles can perform HE (in Red) or AP (inBlack) Attacks from Range 0 out to their listed maximumRange. If a Unit has a dash (“-”) for an Attack type, itcannot perform that type of Attack.
Example: Enemy MG Units (Machine Gun Teams),cannot perform Armor Piercing Attacks.
Attack:This number indicates the number orhigher the Enemy must roll to inflict a Hit.The Black number is the Unit’s Attack rollagainst AP targets, and the Red number isthe Unit’s Attack roll against HE targets.
Each Friendly Unit’s AP orHE Target Type is found onits card.
Point Value:The Battlefield value of the Unit.
Mortar Unit Indirect Fire AttacksMortar Units have the “Indirect Fire” ability.This is noted on the Enemy counters withan “i” in their Attack range circle. FriendlyUnits note this with the “Indirect Fire”notation on their cards. These Units do not
check for Line of Sight when Attacking. This is the sameas the “Spotter” Commander skill.
Range:The maximum number of hexes the Unit can Attack. If theUnit has a Range value of 0, it can only Attack Units in itssame Hex. If a Unit only has one Range, it applies to bothits AP and HE Attack.
Unit Type:Identifies the Unit’s Type.
14
Defense:Roll this number or lower to negate eachsuccessful Attack rolled against the Unit.
Example: When Attacking a StuG, I roll 2 dice andscore 1 hit. I then roll a Defense die for the StuG. I rolla 5, the StuG does not negate my Attack, and IDestroy it.
• CombatDuring each Battle Turn, resolve the following steps. Usethe Turn counter to keep track of the current Turn.
Fast - Move and AttackCommanders with a Speed rating of Fast,Move and Attack before Enemy Actionseach turn. Commanders with a Speed ratingof Slow, Move and Attack after the EnemyActions each turn.
Resolve the movement and attack for each FastCommander before moving on to the next FastCommander. Once all Fast Commanders have acted,Move on to the Enemy Actions step.
Unit MovementA Unit’s Speed shows the maximumnumber of hexes it can Move each BattleStep. Moving into a hex counts as 1movement of a Unit’s Speed.
If the Commanderof an Infantry Unitchooses to bothMove and Attack,he suffers theindicated Stress.
Artillery Units cannot Move and Attack during the sameBattle Step.
Units with the Transport abilitycan freely pick up and Move anInfantry Unit, and/or Artillery inits same hex up to the
Transport’s Speed. The Transporting Unit, and Units beingTransported, must all start the step in the same hex. TheTransport can not drop off a Unit in a hex and keepmoving.
A Transported Unit can not Move before or after beingTransported, or be Transported again during the samestep.
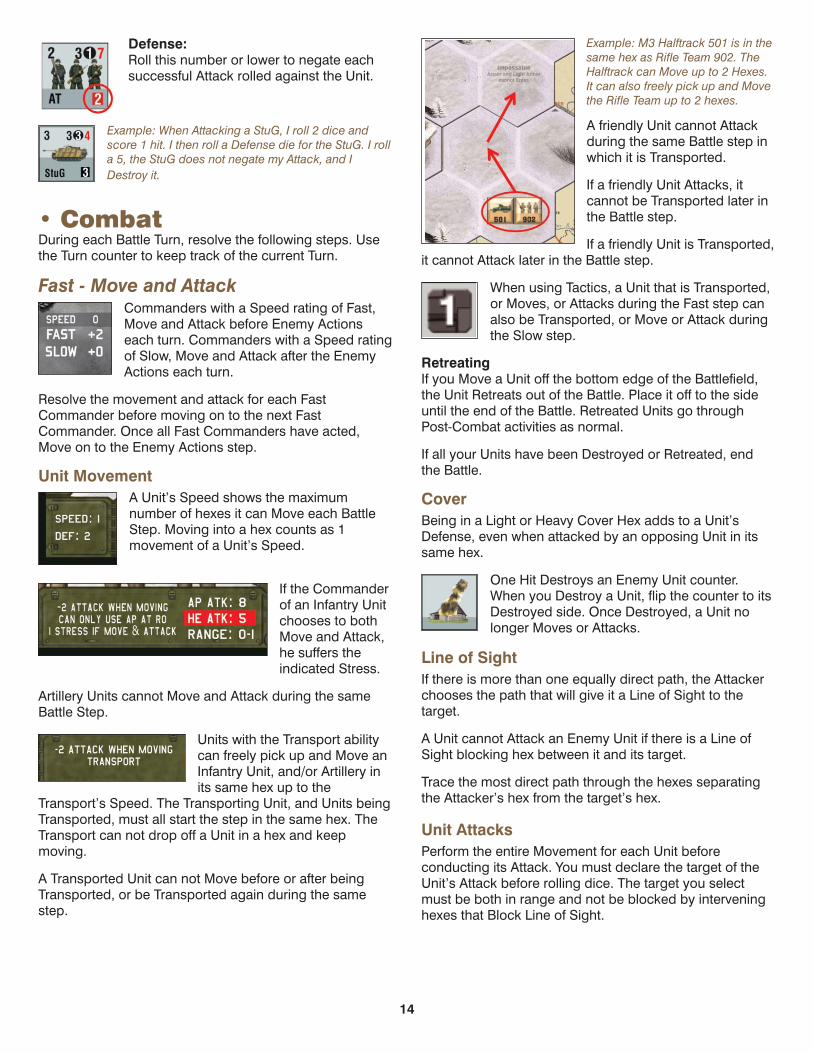
Example: M3 Halftrack 501 is in thesame hex as Rifle Team 902. TheHalftrack can Move up to 2 Hexes.It can also freely pick up and Movethe Rifle Team up to 2 hexes.
A friendly Unit cannot Attackduring the same Battle step inwhich it is Transported.
If a friendly Unit Attacks, itcannot be Transported later inthe Battle step.
If a friendly Unit is Transported,it cannot Attack later in the Battle step.
When using Tactics, a Unit that is Transported,or Moves, or Attacks during the Fast step canalso be Transported, or Move or Attack duringthe Slow step.
RetreatingIf you Move a Unit off the bottom edge of the Battlefield,the Unit Retreats out of the Battle. Place it off to the sideuntil the end of the Battle. Retreated Units go throughPost-Combat activities as normal.
If all your Units have been Destroyed or Retreated, endthe Battle.
CoverBeing in a Light or Heavy Cover Hex adds to a Unit’sDefense, even when attacked by an opposing Unit in itssame hex.
One Hit Destroys an Enemy Unit counter.When you Destroy a Unit, flip the counter to itsDestroyed side. Once Destroyed, a Unit nolonger Moves or Attacks.
Line of SightIf there is more than one equally direct path, the Attackerchooses the path that will give it a Line of Sight to thetarget.
A Unit cannot Attack an Enemy Unit if there is a Line ofSight blocking hex between it and its target.
Trace the most direct path through the hexes separatingthe Attacker’s hex from the target’s hex.
Unit AttacksPerform the entire Movement for each Unit beforeconducting its Attack. You must declare the target of theUnit’s Attack before rolling dice. The target you selectmust be both in range and not be blocked by interveninghexes that Block Line of Sight.
15
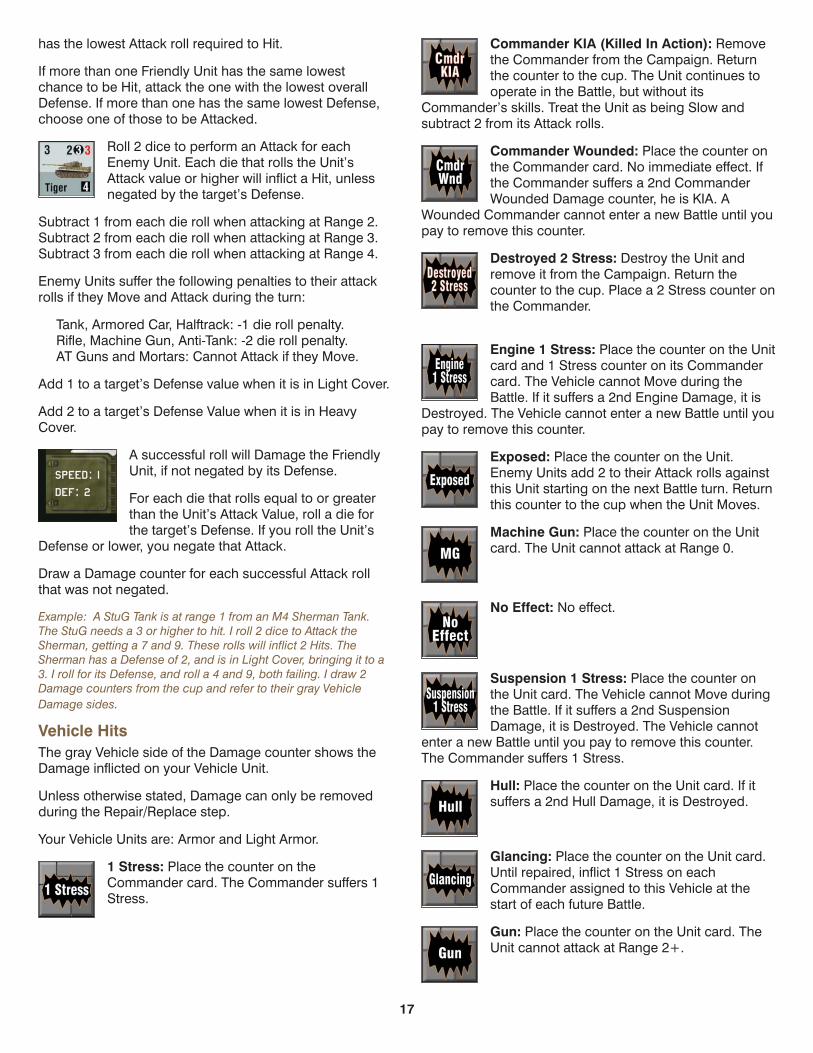
Roll 2 dice to perform anAttack for each of yourUnits. Each die that rollsthe Unit’s Attack value orhigher will inflict a Hit,unless negated by thetarget’s Defense roll.
Use your Armor Piercing (AP) value when attackingEnemy Tanks, Armored Cars, Bunkers, and Halftracks.
Use your High Explosive (HE) value when attacking allother Enemy Units.
Add or Subtract your Commander’s Skill atthat Range.
Subtract 1 from each die roll whenattacking at Range 2.
Subtract 2 from each die roll when attacking at Range 3.
Subtract 3 from each die roll when attacking at Range 4.
Each Unit also has an Attackpenalty to its die rolls if it Movedduring this step.
After determining the number ofpotential Hits scored by an Attack, roll for the EnemyUnit’s Defense.
Roll 1 die for each potential Hit. The target negates theAttack if the roll is equal to or less than the target’sDefense.
Example: You are attacking an Enemy Rifle Unit and are using yourUnit’s HE Attack value of 6. The Range is 1, and your Commandergives you +2 on your rolls. You need to roll a 4 or higher on eachdie to succeed. You roll a 1 (+2 = 3) and a 5 (+2 = 7) and inflict 1Hit.
The Rifle Unit has a Defense of 3 and is in HeavyCover (+2 = 5). You roll a 2 for its Defense, and it issuccessful. Your Attack fails.
A successful Attack roll will Destroy the target ifit is not negated by its Defense roll. When you Destroy aUnit, flip the counter to its Destroyed side. OnceDestroyed, a Unit no longer Moves or Attacks.
Enemy ActionsRoll once on the Enemy TacticalMovement chart to determine theMovement Orders for all enemyUnits at the start of each EnemyActions step.
Use the Tactical Move counter tomark the die roll as a reminder ofthe roll.
Move each Enemy Unit, thenresolve its attack, before goingon to the next Unit. You canresolve their actions in any order.
Each Enemy Unit type appears inone of the 3 Tactical Movement
columns. Cross-reference the die roll with each column todetermine how those Units Move. Buildings and Bunkersdo not appear in any of the columns, because Buildingsand Bunkers never Move.
Enemy Units follow these rules, even if there are friendlyUnits in their same hex.
Retreat: Move the Enemy Unit 1hex closer to the top edge of theBattlefield. If there is a choice ofhexes, Move the Unit into the hexwith the heaviest Cover.
If it is already in a top-most hex,Move it off the Battlefield, and treat
it as being Destroyed.
Retreat to Cover: Move the EnemyUnit into an adjacent hex that isboth 1 hex farther away from theclosest Friendly Unit -and- hasCover. If none of the adjacenthexes that are farther away fromthe closest Friendly Unit haveCover, the Unit does not Move. If
those hexes have different levels of Cover, Move the Unitto the hex with the heaviest Cover. If several applicablehexes have equally heavy Cover, you choose the hex toMove it to.
Adjacent Cover: Move the EnemyUnit into an adjacent hex that hasCover. If none of the adjacenthexes have Cover, the Unit doesnot Move. If those hexes havedifferent levels of Cover, Move theUnit to the hex with the heaviestCover. If several applicable hexes
have equally heavy Cover, you choose the hex to Move itto.
16
Advance to Cover: Move theEnemy Unit into an adjacent hexthat is both 1 hex closer to theclosest Friendly Unit (that is not inits hex) -and- has Cover. If none ofthe adjacent hexes have Cover, theUnit does not Move. If those hexeshave different levels of Cover, Move
the Unit to the hex with the heaviest Cover. If severalapplicable hexes have equally heavy Cover, you choosethe hex to Move it to.
Cautious Advance: Only Move theEnemy Unit into an adjacent hexthat is 1 hex closer to the closestFriendly Unit (that is not in its hex)if the Unit cannot be attacked in thenew hex. If the Unit can beattacked in the new hex, the Unitdoes not Move. If those hexes
have different levels of Cover, Move the Unit to the hexwith the heaviest Cover. If several applicable hexes haveequally heavy Cover, you choose the hex to Move it to.
HE Advance: Move the EnemyUnit 1 hex closer to the closestFriendly Unit (that is not in its hex)that is Attacked by HE type attacks.If no Friendly Units on the map canbe attacked with HE, the Unit doesnot Move. If those hexes havedifferent levels of Cover, Move the
Unit to the hex with the heaviest Cover. If severalapplicable hexes have equally heavy Cover, you choosethe hex to Move it to.
AP Advance: Move the EnemyUnit 1 hex closer to the closestFriendly Unit (that is not in its hex)that is Attacked by AP type attacks.If no Friendly Units on the map canbe attacked with AP, the Unit doesnot Move. If those hexes havedifferent levels of Cover, Move the
Unit to the hex with the heaviest Cover. If severalapplicable hexes have equally heavy Cover, you choosethe hex to Move it to.
Advance if cannot Attack: If theEnemy Unit cannot attack aFriendly Unit, Move the Enemy Unit1 hex closer to the closest FriendlyUnit. If those hexes have differentlevels of Cover, Move the Unit to thehex with the heaviest Cover. Ifseveral applicable hexes haveequally heavy Cover, you choose
the hex to Move it to. If the Unit can Attack, it does notMove.
Advance: Move the Enemy Unit 1 hex closer to the
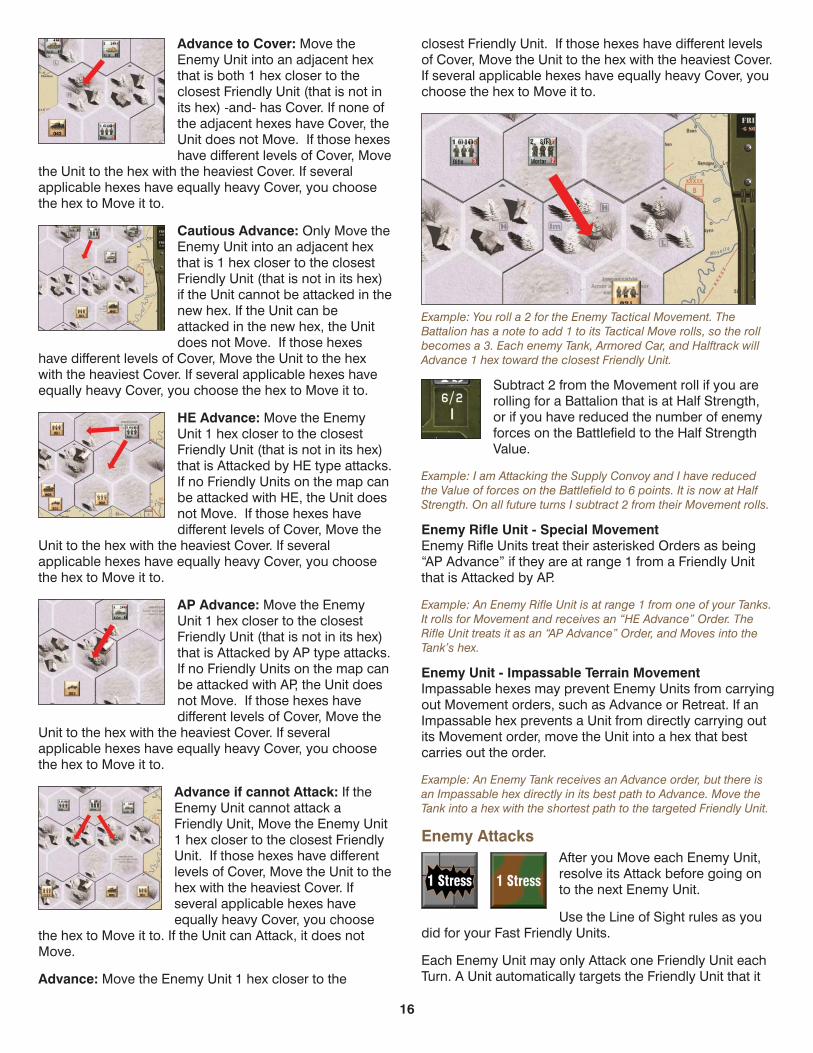
closest Friendly Unit. If those hexes have different levelsof Cover, Move the Unit to the hex with the heaviest Cover.If several applicable hexes have equally heavy Cover, youchoose the hex to Move it to.
Example: You roll a 2 for the Enemy Tactical Movement. TheBattalion has a note to add 1 to its Tactical Move rolls, so the rollbecomes a 3. Each enemy Tank, Armored Car, and Halftrack willAdvance 1 hex toward the closest Friendly Unit.
Subtract 2 from the Movement roll if you arerolling for a Battalion that is at Half Strength,or if you have reduced the number of enemyforces on the Battlefield to the Half StrengthValue.
Example: I am Attacking the Supply Convoy and I have reducedthe Value of forces on the Battlefield to 6 points. It is now at HalfStrength. On all future turns I subtract 2 from their Movement rolls.
Enemy Rifle Unit - Special MovementEnemy Rifle Units treat their asterisked Orders as being“AP Advance” if they are at range 1 from a Friendly Unitthat is Attacked by AP.
Example: An Enemy Rifle Unit is at range 1 from one of your Tanks.It rolls for Movement and receives an “HE Advance” Order. TheRifle Unit treats it as an “AP Advance” Order, and Moves into theTank’s hex.
Enemy Unit - Impassable Terrain MovementImpassable hexes may prevent Enemy Units from carryingout Movement orders, such as Advance or Retreat. If anImpassable hex prevents a Unit from directly carrying outits Movement order, move the Unit into a hex that bestcarries out the order.
Example: An Enemy Tank receives an Advance order, but there isan Impassable hex directly in its best path to Advance. Move theTank into a hex with the shortest path to the targeted Friendly Unit.
Enemy AttacksAfter you Move each Enemy Unit,resolve its Attack before going onto the next Enemy Unit.
Use the Line of Sight rules as youdid for your Fast Friendly Units.
Each Enemy Unit may only Attack one Friendly Unit eachTurn. A Unit automatically targets the Friendly Unit that it
17
has the lowest Attack roll required to Hit.
If more than one Friendly Unit has the same lowestchance to be Hit, attack the one with the lowest overallDefense. If more than one has the same lowest Defense,choose one of those to be Attacked.
Roll 2 dice to perform an Attack for eachEnemy Unit. Each die that rolls the Unit’sAttack value or higher will inflict a Hit, unlessnegated by the target’s Defense.
Subtract 1 from each die roll when attacking at Range 2.Subtract 2 from each die roll when attacking at Range 3.Subtract 3 from each die roll when attacking at Range 4.
Enemy Units suffer the following penalties to their attackrolls if they Move and Attack during the turn:
Tank, Armored Car, Halftrack: -1 die roll penalty.Rifle, Machine Gun, Anti-Tank: -2 die roll penalty.AT Guns and Mortars: Cannot Attack if they Move.
Add 1 to a target’s Defense value when it is in Light Cover.
Add 2 to a target’s Defense Value when it is in HeavyCover.
A successful roll will Damage the FriendlyUnit, if not negated by its Defense.
For each die that rolls equal to or greaterthan the Unit’s Attack Value, roll a die forthe target’s Defense. If you roll the Unit’s
Defense or lower, you negate that Attack.
Draw a Damage counter for each successful Attack rollthat was not negated.
Example: A StuG Tank is at range 1 from an M4 Sherman Tank.The StuG needs a 3 or higher to hit. I roll 2 dice to Attack theSherman, getting a 7 and 9. These rolls will inflict 2 Hits. TheSherman has a Defense of 2, and is in Light Cover, bringing it to a3. I roll for its Defense, and roll a 4 and 9, both failing. I draw 2Damage counters from the cup and refer to their gray VehicleDamage sides.
Vehicle HitsThe gray Vehicle side of the Damage counter shows theDamage inflicted on your Vehicle Unit.
Unless otherwise stated, Damage can only be removedduring the Repair/Replace step.
Your Vehicle Units are: Armor and Light Armor.
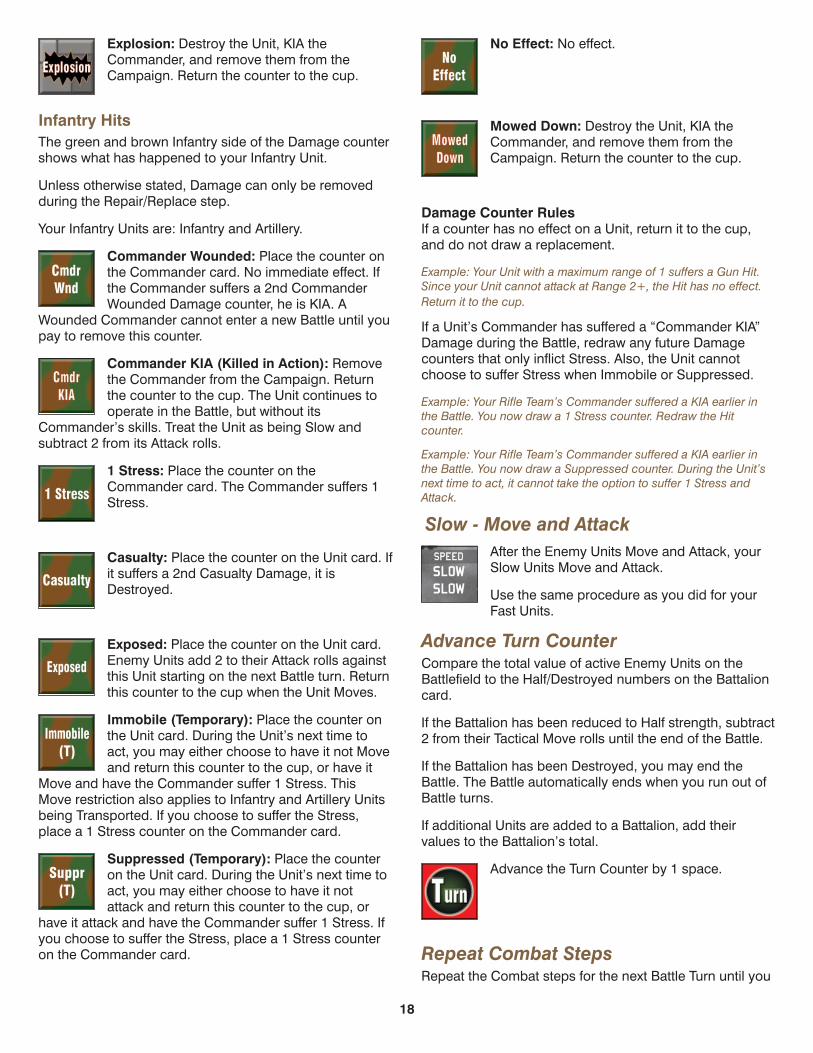
1 Stress: Place the counter on theCommander card. The Commander suffers 1Stress.
Commander KIA (Killed In Action): Removethe Commander from the Campaign. Returnthe counter to the cup. The Unit continues tooperate in the Battle, but without its
Commander’s skills. Treat the Unit as being Slow andsubtract 2 from its Attack rolls.
Commander Wounded: Place the counter onthe Commander card. No immediate effect. Ifthe Commander suffers a 2nd CommanderWounded Damage counter, he is KIA. A
Wounded Commander cannot enter a new Battle until youpay to remove this counter.
Destroyed 2 Stress: Destroy the Unit andremove it from the Campaign. Return thecounter to the cup. Place a 2 Stress counter onthe Commander.
Engine 1 Stress: Place the counter on the Unitcard and 1 Stress counter on its Commandercard. The Vehicle cannot Move during theBattle. If it suffers a 2nd Engine Damage, it is
Destroyed. The Vehicle cannot enter a new Battle until youpay to remove this counter.
Exposed: Place the counter on the Unit.Enemy Units add 2 to their Attack rolls againstthis Unit starting on the next Battle turn. Returnthis counter to the cup when the Unit Moves.
Machine Gun: Place the counter on the Unitcard. The Unit cannot attack at Range 0.
No Effect: No effect.
Suspension 1 Stress: Place the counter onthe Unit card. The Vehicle cannot Move duringthe Battle. If it suffers a 2nd SuspensionDamage, it is Destroyed. The Vehicle cannot
enter a new Battle until you pay to remove this counter.The Commander suffers 1 Stress.
Hull: Place the counter on the Unit card. If itsuffers a 2nd Hull Damage, it is Destroyed.
Glancing: Place the counter on the Unit card.Until repaired, inflict 1 Stress on eachCommander assigned to this Vehicle at thestart of each future Battle.
Gun: Place the counter on the Unit card. TheUnit cannot attack at Range 2+.
18
Explosion: Destroy the Unit, KIA theCommander, and remove them from theCampaign. Return the counter to the cup.
Infantry HitsThe green and brown Infantry side of the Damage countershows what has happened to your Infantry Unit.
Unless otherwise stated, Damage can only be removedduring the Repair/Replace step.
Your Infantry Units are: Infantry and Artillery.
Commander Wounded: Place the counter onthe Commander card. No immediate effect. Ifthe Commander suffers a 2nd CommanderWounded Damage counter, he is KIA. A
Wounded Commander cannot enter a new Battle until youpay to remove this counter.
Commander KIA (Killed in Action): Removethe Commander from the Campaign. Returnthe counter to the cup. The Unit continues tooperate in the Battle, but without its
Commander’s skills. Treat the Unit as being Slow andsubtract 2 from its Attack rolls.
1 Stress: Place the counter on theCommander card. The Commander suffers 1Stress.
Casualty: Place the counter on the Unit card. Ifit suffers a 2nd Casualty Damage, it isDestroyed.
Exposed: Place the counter on the Unit card.Enemy Units add 2 to their Attack rolls againstthis Unit starting on the next Battle turn. Returnthis counter to the cup when the Unit Moves.
Immobile (Temporary): Place the counter onthe Unit card. During the Unit’s next time toact, you may either choose to have it not Moveand return this counter to the cup, or have it
Move and have the Commander suffer 1 Stress. ThisMove restriction also applies to Infantry and Artillery Unitsbeing Transported. If you choose to suffer the Stress,place a 1 Stress counter on the Commander card.
Suppressed (Temporary): Place the counteron the Unit card. During the Unit’s next time toact, you may either choose to have it notattack and return this counter to the cup, or
have it attack and have the Commander suffer 1 Stress. Ifyou choose to suffer the Stress, place a 1 Stress counteron the Commander card.
No Effect: No effect.
Mowed Down: Destroy the Unit, KIA theCommander, and remove them from theCampaign. Return the counter to the cup.
Damage Counter RulesIf a counter has no effect on a Unit, return it to the cup,and do not draw a replacement.
Example: Your Unit with a maximum range of 1 suffers a Gun Hit.Since your Unit cannot attack at Range 2+, the Hit has no effect.Return it to the cup.
If a Unit’s Commander has suffered a “Commander KIA”Damage during the Battle, redraw any future Damagecounters that only inflict Stress. Also, the Unit cannotchoose to suffer Stress when Immobile or Suppressed.
Example: Your Rifle Team’s Commander suffered a KIA earlier inthe Battle. You now draw a 1 Stress counter. Redraw the Hitcounter.
Example: Your Rifle Team’s Commander suffered a KIA earlier inthe Battle. You now draw a Suppressed counter. During the Unit’snext time to act, it cannot take the option to suffer 1 Stress andAttack.
Slow - Move and AttackAfter the Enemy Units Move and Attack, yourSlow Units Move and Attack.
Use the same procedure as you did for yourFast Units.
Advance Turn CounterCompare the total value of active Enemy Units on theBattlefield to the Half/Destroyed numbers on the Battalioncard.
If the Battalion has been reduced to Half strength, subtract2 from their Tactical Move rolls until the end of the Battle.
If the Battalion has been Destroyed, you may end theBattle. The Battle automatically ends when you run out ofBattle turns.
If additional Units are added to a Battalion, add theirvalues to the Battalion’s total.
Advance the Turn Counter by 1 space.
Repeat Combat StepsRepeat the Combat steps for the next Battle Turn until you
19
have conducted 5 Battle Turns.
Gain 1 extra Turn for each Scout you assigned to theBattle.
Friendly LossesUnlike other Leader games, in Sherman Leader, you donot suffer Victory Point penalties for having your UnitsDestroyed and your Commanders Killed. Combat losseswere an expected occurrence during WWII.
• Post-CombatEvent Card
Draw an Event card and resolve theEvent in the bottom section.
Battalion StatusIf the Battalion was Destroyed during the Battle, removethe Battalion counter from the Operational Map and setthe Battalion card aside.
If the Battalion was reduced to Half, flip theBattalion Counter to its Half side and return theBattalion card to the Headquarters sheet.
If the Battalion is still at Full strength, return theBattalion card to the Headquarters sheet.
Ignore the Special Note text on a Battalion card that hasbeen reduced to Half. Exception, some Battalion cardshave Special Note text printed in yellow. Yellow text stillapplies when the Battalion has been reduced to Half.
If the Battalion was Destroyed duringthe Battle, record an “X” in the Statusand write the number of VictoryPoints (VPs) from the Battalion cardon the VPs Gained line.
If the Battalion was reduced to Half,record a “1/2” on the Battalion Status line, and gain half ofthe Victory Points for the Battalion, rounding down. If youlater Destroy the Battalion, gain its remaining VPs.
Example: You reduce 5 VP Battalion 1A to Half and gain 2 VPs. Youlater Destroy it and gain the remaining 3 VPs.
If you fail to reduce the Battalion to Half or Destroy theBattalion, place an “F” in the Battalion Status and record a0 (zero) on the VPs Gained line.
Record Unit and Commander DamageAt the end ofthe Battle,record eachUnit’s Numberand anylasting
Damage on the Player Log and return all Damagecounters to the cup. If the Damage is not Repaired at theend of the Week, find the Damage counters in the cup andplace them back on the Unit before it enters the nextBattle.
Record Commander StressInflict 2Stress oneachCommanderwhoparticipatedin the Battle.Add to these2 Stress anyStress theCommandersufferedduring theBattle due toDamage.
Reduce a Commander’s Stress points by his CoolSkill. This number was also written on the PlayerLog at the start of the Campaign.
Example: A Commander started a Battle with 3 Stress. Hesuffered 1 Stress due to Damage during the Battle, and 2 Stress forbeing in the Battle. He has a Cool of 2. He ends the Battle with 4Stress.
Record the current number of Stress points for eachCommander on the Player Log, in the column for thecurrent Battle.
Record Commander Experience Points(XPs)
XPs are awarded to allCommanders assigned tothe Battle. Give eachCommander whoparticipated in the Battle 1
Experience Point in the XPs Gained column on the PlayerLog.
If the Battalion was Destroyed, each Commanderassigned to the Battle gains 1 additional Experience Point.
20
Commanders canalso gain Experiencedue to Battalioncards, or Eventcards.
Promoting CommandersCheck forCommanderPromotions afterrecording allExperience Points.
Promote a Commander if his ExperiencePoint total is equal to or greater than theExperience Point number shown on his card.If a Commander is Promoted, exchange his
card for his next higher Commander Skill Level card andnote his new Experience Level on the Player Log.
Commanders Promote from: Recruit to Green, Green toAverage, Average to Skilled, Skilled to Veteran, andVeteran to Ace.
Example: Average Skill Level Stout just completed a successfulBattle, gaining 2 XPs. He previously earned 3 XPs. This brings hisnew total to 5. He Promotes from Average to Skilled.
If a Commander is Promoted, recheck his Stress pointstotal to determine if he is Okay, Shaken, or Unfit. Alsocheck to see if his Cool rating changed, and record hisnew Cool on the Player Log.
Once a Commander is Promoted, he loses the ExperiencePoints that gained him the Promotion. Record the newnumber of Experience Points he must earn to reach thenext Skill Level on the Player Log.
Example: Average Stout needs 1 more Experience Point toPromote to Skilled. He earns 2 Experience Points during thisBattle. 1 Point is added to his XPs to Promote him to Skilled, andthe last Experience Point is retained and counted toward hisPromotion to Veteran.
Next BattleIf there are more Battles scheduled for the Week, return tothe start of the Pre-Combat Step.
• End of WeekMove Battalions
Roll a die for eachsurviving EnemyBattalion and consultthe chart on theTactical Display Sheetin the Enemy
Operational Movement section.
Assault Battalions, Support Battalions, and CommandBattalions each have a row on the chart with the specificdie rolls needed to Advance, Hold, or Retreat.
The rolls determine if the Battalion Advances one RangeBand closer to your Friendly Staging Range Band, Holdsposition, or Retreats one Range Band toward the EnemyBreakthrough band. Battalions will not retreat behind theirEnemy Breakthrough Range Band or past the FriendlyStaging Range Band.
Never roll for Fixed Battalions. They alwaysremain in their starting Range Bands.
When you roll for the Operational movement ofHalf Strength Battalions, Subtract 2 from thedie roll.
Example: You roll for theenemy BattalionMovement. They have anAssault Battalion in theFront. You roll a die andget a 9. It Advances tothe Friendly Transit. Theyhave a Supply in theEnemy Transit, whichrolls a 4, and stays in theEnemy Transit. They alsoMove a Half StrengthAssault in the EnemyRear, it rolls a 2, -2 forbeing at Half, resulting ina roll of 0, which Retreatsit to the EnemyBreakthrough.
On LeaveAny Commander that does not participate in a Battleduring an entire Week recovers 4 Stress points. Do notmodify this number by the Commander’s Cool.
21
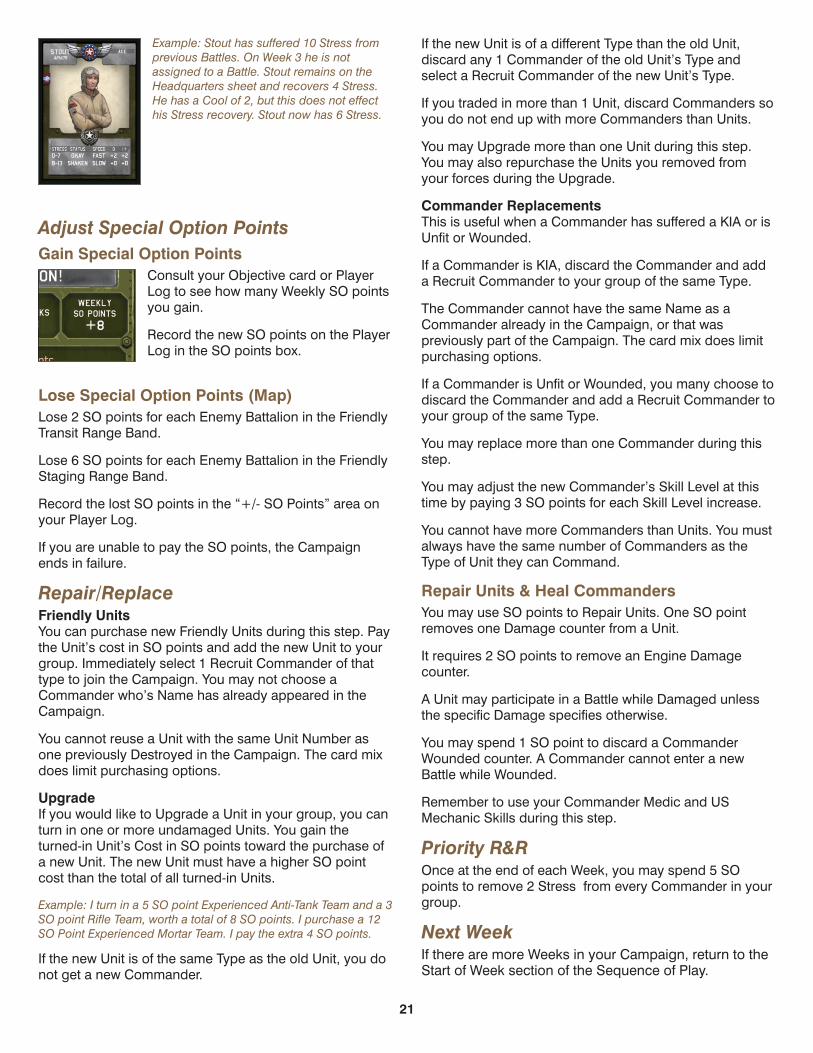
Example: Stout has suffered 10 Stress fromprevious Battles. On Week 3 he is notassigned to a Battle. Stout remains on theHeadquarters sheet and recovers 4 Stress.He has a Cool of 2, but this does not effecthis Stress recovery. Stout now has 6 Stress.
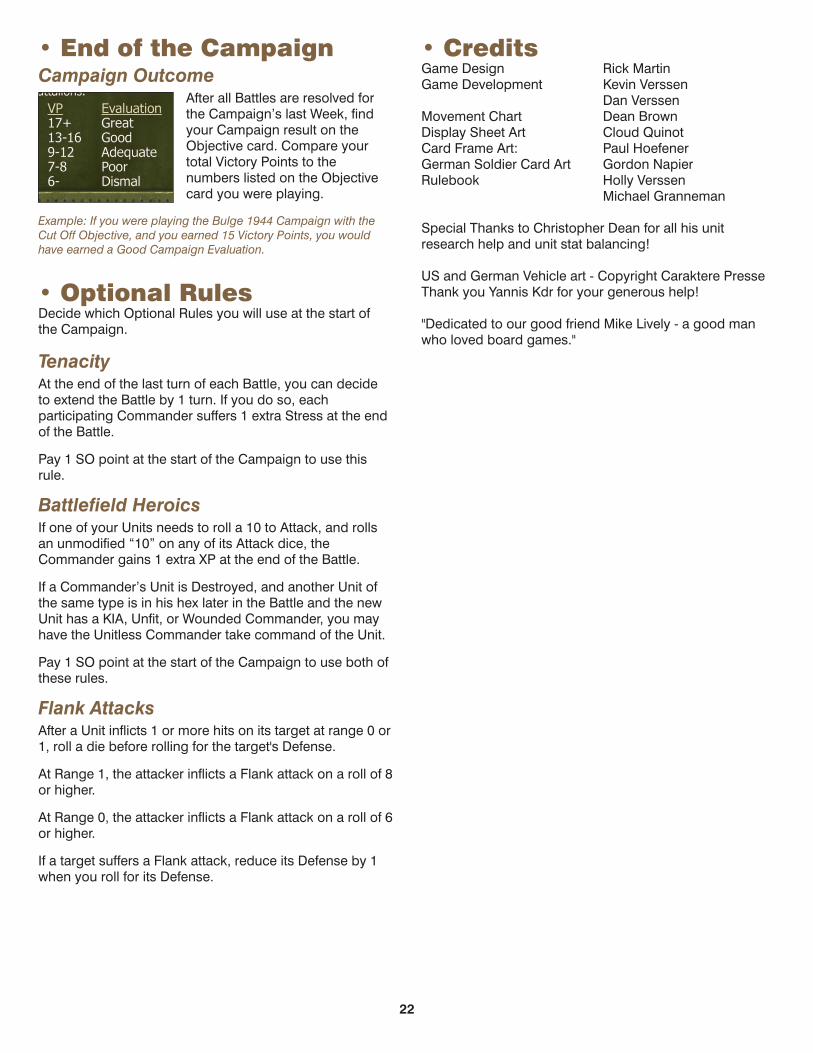
Adjust Special Option PointsGain Special Option Points
Consult your Objective card or PlayerLog to see how many Weekly SO pointsyou gain.
Record the new SO points on the PlayerLog in the SO points box.
Lose Special Option Points (Map)Lose 2 SO points for each Enemy Battalion in the FriendlyTransit Range Band.
Lose 6 SO points for each Enemy Battalion in the FriendlyStaging Range Band.
Record the lost SO points in the “+/- SO Points” area onyour Player Log.
If you are unable to pay the SO points, the Campaignends in failure.
Repair/ReplaceFriendly UnitsYou can purchase new Friendly Units during this step. Paythe Unit’s cost in SO points and add the new Unit to yourgroup. Immediately select 1 Recruit Commander of thattype to join the Campaign. You may not choose aCommander who’s Name has already appeared in theCampaign.
You cannot reuse a Unit with the same Unit Number asone previously Destroyed in the Campaign. The card mixdoes limit purchasing options.
UpgradeIf you would like to Upgrade a Unit in your group, you canturn in one or more undamaged Units. You gain theturned-in Unit’s Cost in SO points toward the purchase ofa new Unit. The new Unit must have a higher SO pointcost than the total of all turned-in Units.
Example: I turn in a 5 SO point Experienced Anti-Tank Team and a 3SO point Rifle Team, worth a total of 8 SO points. I purchase a 12SO Point Experienced Mortar Team. I pay the extra 4 SO points.
If the new Unit is of the same Type as the old Unit, you donot get a new Commander.
If the new Unit is of a different Type than the old Unit,discard any 1 Commander of the old Unit’s Type andselect a Recruit Commander of the new Unit’s Type.
If you traded in more than 1 Unit, discard Commanders soyou do not end up with more Commanders than Units.
You may Upgrade more than one Unit during this step.You may also repurchase the Units you removed fromyour forces during the Upgrade.
Commander ReplacementsThis is useful when a Commander has suffered a KIA or isUnfit or Wounded.
If a Commander is KIA, discard the Commander and adda Recruit Commander to your group of the same Type.
The Commander cannot have the same Name as aCommander already in the Campaign, or that waspreviously part of the Campaign. The card mix does limitpurchasing options.
If a Commander is Unfit or Wounded, you many choose todiscard the Commander and add a Recruit Commander toyour group of the same Type.
You may replace more than one Commander during thisstep.
You may adjust the new Commander’s Skill Level at thistime by paying 3 SO points for each Skill Level increase.
You cannot have more Commanders than Units. You mustalways have the same number of Commanders as theType of Unit they can Command.
Repair Units & Heal CommandersYou may use SO points to Repair Units. One SO pointremoves one Damage counter from a Unit.
It requires 2 SO points to remove an Engine Damagecounter.
A Unit may participate in a Battle while Damaged unlessthe specific Damage specifies otherwise.
You may spend 1 SO point to discard a CommanderWounded counter. A Commander cannot enter a newBattle while Wounded.
Remember to use your Commander Medic and USMechanic Skills during this step.
Priority R&ROnce at the end of each Week, you may spend 5 SOpoints to remove 2 Stress from every Commander in yourgroup.
Next WeekIf there are more Weeks in your Campaign, return to theStart of Week section of the Sequence of Play.
22
• End of the CampaignCampaign Outcome
After all Battles are resolved forthe Campaign’s last Week, findyour Campaign result on theObjective card. Compare yourtotal Victory Points to thenumbers listed on the Objectivecard you were playing.
Example: If you were playing the Bulge 1944 Campaign with theCut Off Objective, and you earned 15 Victory Points, you wouldhave earned a Good Campaign Evaluation.
• Optional RulesDecide which Optional Rules you will use at the start ofthe Campaign.
TenacityAt the end of the last turn of each Battle, you can decideto extend the Battle by 1 turn. If you do so, eachparticipating Commander suffers 1 extra Stress at the endof the Battle.
Pay 1 SO point at the start of the Campaign to use thisrule.
Battlefield HeroicsIf one of your Units needs to roll a 10 to Attack, and rollsan unmodified “10” on any of its Attack dice, theCommander gains 1 extra XP at the end of the Battle.
If a Commander’s Unit is Destroyed, and another Unit ofthe same type is in his hex later in the Battle and the newUnit has a KIA, Unfit, or Wounded Commander, you mayhave the Unitless Commander take command of the Unit.
Pay 1 SO point at the start of the Campaign to use both ofthese rules.
Flank AttacksAfter a Unit inflicts 1 or more hits on its target at range 0 or1, roll a die before rolling for the target's Defense.
At Range 1, the attacker inflicts a Flank attack on a roll of 8or higher.
At Range 0, the attacker inflicts a Flank attack on a roll of 6or higher.
If a target suffers a Flank attack, reduce its Defense by 1when you roll for its Defense.
• CreditsGame Design Rick MartinGame Development Kevin Verssen
Dan VerssenMovement Chart Dean BrownDisplay Sheet Art Cloud QuinotCard Frame Art: Paul HoefenerGerman Soldier Card Art Gordon NapierRulebook Holly Verssen
Michael Granneman
Special Thanks to Christopher Dean for all his unitresearch help and unit stat balancing!
US and German Vehicle art - Copyright Caraktere PresseThank you Yannis Kdr for your generous help!
"Dedicated to our good friend Mike Lively - a good manwho loved board games."
23
• Sample GameTo begin, I place the Tactical Display Sheet andHeadquarters Sheet in front of me on the table. I thenseparate the cards into piles: Campaigns, Objectives,Units, Commanders, Battalions, Events, and SpecialConditions. I shuffle the Event cards and SpecialCondition cards, and place each deck face down on theirnoted areas on the Tactical Display Sheet. I also separatethe Battalion cards into 3 piles: Assault, Supply, andCommand.
Set-UpFor this samplegame, I chooseto play the"Bulge 1944"Campaign withthe "Over There"Objective. Iplace these 2cards on theHeadquartersSheet. I Move
the remaining Campaign and Objective cards off to theside.
I reference theHeadquarters sheet for1944. I place all the tankslisted in the 1944 columninto a cup.
When the EnemyBattalion card calls forTanks, I will draw the tankcounters from this cup.
I need to draw Battalioncards until I get at least29 points of cards. I drawthe following Battalion
cards from their 3 piles: 2A (3 points), 10A (2 points), 2S(4 points), 1C (6 points), 4A (3 points), 11A (3 points), 1S(1 point), 6C (5 points), and 9A (3 points). This gives me atotal of 30 points.
I collect their Battalioncounters and place them onthe Operational Map: 4A and9A (Friendly Staging), 6C(Front), 2A, 11A, 10A(Enemy Transit), 1C, 2S(Enemy Rear), 1S (EnemyBreakthrough).
I now purchase my Unitsthat have a Service lifeincluding 1944. I can spend
up to 88 Special Option points. I get 45 points from theObjective card and 43 extra points from the Campaign
card. I purchase:
Rifle Team #902 (3 points), Machine Gun Team #921 (4points), Mortar Team #931 (10 points), Experienced Anti-Tank Team #1111 (5 points), M3 Scout Car #301 (8points), M4 Sherman (75mm) #042 (14 points), M3Halftrack #501 (5 points), and
Rifle Team #901 (3 points), M3 Halftrack #503 (5 points),M5 ATG #1132 (9 points), M3/M5 Stuart #005 (8 points),Experienced Mortar Team #1031 (12 points).
I spent 86 out of my 88 points, leaving me with 2 points tospend later.
The Campaign card lists the specific Skill Levels of my first17 Commanders. Because I purchased 12 Units, I get 12Commanders.
I then select my Commanders:
Recruits Sanders (Infantry)
Chin (Infantry)
Kowalski (Light Armor)
Jones (Infantry)
Green Reisner (Infantry)
Henders (Light Armor)
Cruz (Artillery)
Blair (Light Armor)
Average Kolchak (Infantry)
Red Tree (Infantry)
Eandi (Armor)
Tylutki (Armor)
Had I purchased 3 more Units, the Commanders wouldeach have been Skilled, and the next two would havebeen Veteran. Each Commander after the 17th would beGreen.
I do not perform any Priority Commander Promotions.
I record the Campaigncard, Commanders, andSO point information onthe Player Log Sheet. Atthe bottom of the Sheet,I record reminder notesfor the enemy BattalionSpecial Abilities that Imight need toreference. For example,Battalion 1C will add 1Enemy Rifle Unit toevery battle, until Idestroy 1C.
24
Week #1I now start the first Week of the Campaign.
I draw a Special Condition card, andget "Leadership." For each Battalion Idestroy this week, I will gain 1 SOpoint.
I now assign Units to the differentBattalions I want to Attack. I am tryingto get a Great Campaign Evaluation,and I only have 4 Weeks to do it. Imust earn on average 5-6 VictoryPoints each Week. With that in mind,
I attack: 9A (3 points) and 4A (3 points).
I am pushing my forces to engage both Battalions. I thinkthe 4A Battle might be a challenge.
To attack 9A, I assign:
Rifle Team #902 commanded byReisner, Machine Gun Team #921(Sanders), Mortar Team #931(Kolchak), Experienced Anti-TankTeam #1111 (Red Tree), M3 ScoutCar #301 (Henders), M4 Sherman(75mm) #042 (Eandi), M3 Halftrack#501 (Blair).
I then assign the remaining units andcommanders against 4A.
Clarification: A Commander is not permanently assignedto a Unit. Eandi, for example, does not always have tocommand Unit #042, but he does always have tocommand an Armor Unit.
Battle with 9AI start the battle by drawing an Eventcard, and get, "Vital Mission".
I place the Battle Turn counter on the"1" space.
I gather the 8 Winter Terrain Tiles(with dark gray triangles) as listed onthe "Bulge 1944" Campaign card,randomize them, and use the top 6 inthe stack. I place them on the 6Terrain Tile spaces on the Tactical
Display Sheet with their Dark Gray triangles pointing to thetop of the Sheet.
I now place my 7 Friendly Units in any hexes in the bottomrow. I place #042 in the bottom left hex and everyone elsein the Hex right next to it.
For my optional movement, I move #902, #921, and 1111into their front right hex.
Following the Initial Enemy Placement Diagram, I roll a die
for each of the 12 Enemy Units.
I roll for theEnemy Unitsand place themon the TacticalDisplay,including the 4tanks I drewfrom the cup,getting a Tiger,
a StuG, a Panzer III and a Panzer IV.
Due to Battalion 1C, I also placean additional Enemy Rifle unit.
The special note on 9A declaresthat this battle will last 1 fewer turn,so it will end at the end of 4 turns.
Movement AdjustmentI Move their 3 Enemy Rifle Units 2 hexes toward theclosest friendly units, and their 2 Anti-Tank Teams by 1 hextoward the closest friendly unit.
I roll an 8 for their Aggressiveness Level. This means I willroll a 10-sided die for their Movement each turn.
I now start the 1st Battle Turn.
Turn #1None of my Commanders are Fast, but I have a Tacticcounter on my Experienced Anti-Tank Team. I also have a

25
Command Tactic on my Scout Car. I choose not to useeither counter now.
I roll a 10 sided die for theEnemy Tactical movement,getting a 6. I add 2 to this(and all movement dierolls) due to the GermanOffensive notation on theCampaign card.
I start with the EnemyTanks, AT (Anti-TankTeams), and A.Cars(Armored Cars). Each willAdvance if they cannotperform an Attack.
Then I move to the Enemy Rifles, Halftracks, and MachineGuns. These forces move toward the nearest Unit that canbe targeted with a High Explosive attack.
Finally, the Enemy Trucks, Mortar Teams and AT GunsAdvance into an area with Cover. If they cannot move intoan area with Cover, they do not move.
I Advance the enemy PzIII into the Heavy Coverin front of it. His possibletargets are 902, 921 and1111. He is using an HEattack, and needs to rolla 5 or higher to hit eachof them, but he suffers apenalty of -1 to his rollbecause he moved, and-1 due to range. He mustroll a 7 or higher to hitany of those targets.
Since he has the samechance to hit all of them,he attacks the one withthe lowest defense.
902 has a defense of 3,921 has a defense of 2,and 1111 has a defense
of 3. They each gain +2 to their defense due to being inHeavy Cover. The Pz III targets counter 921.
He rolls two ten sided dice to attack. He rolls a 5 and a 9.The 9 Hits. Because 921 is suffering 1 successful attack,he rolls 1 die to defend himself. He must roll a 4 or lowerto negate the attack. He rolls a 5.
I draw 1 damage counter and reference its HEside. I draw a 1 Stress counter and place it on921’s Commander card (Sanders).
The Pz IV Advances into the Hex with the twoATs. He then follows the same Attack procedure as the Pz
III and Attacks 921. He needs to roll 6 or higher to Hit unit921. He rolls 5 and 7, hitting once. 921 must roll a 4 orlower, and gets a 2, negating the attack.
The Tiger Advances into the Hex with the Truck. He hasthe Range to Attack 921, but cannot Attack because he isblocked by the Heavy Cover in front of him.
The StuG cannot enter the Hex with the Impassablenotation. He moves into the Hex with Light Cover. He mustroll 7 or higher to hit 921 due to moving and range. Herolls a 9 and 8, hitting twice. 921 rolls two dice fordefenses getting a 1 and a 7.
He has stopped one hit and I draw for thesuccessful attack, getting a No Effect counter.
One of the ATs Advances into the Hex with thesingle Rifle. He also targets 921. He must roll a7 or higher, -1 because he moved. He rolls a 4and a 10 hitting once. 921’s defense roll is a 7,
failing. The damage counter is a Casualty. This has noimmediate effect, but if he suffers another casualty, 921will be destroyed.
The second AT Advances into the hex with the two Rifles.He rolls two attack dice, missing both.
One of the A. Cars moves into Light Cover. He cannotattack because the Cover is blocking his line of sight. Thesecond A. Car Advances by one Hex, but also cannotattack due to cover.
The first enemy Rifle unit Advances into the hex with myInfantry, targeting 921. Their attack value is 5, -2 becausethey moved, +2 because they are in the same Hex astheir target. They must roll a 5 or higher to hit. They roll a 2and 4, missing. The second enemy Rifle Advances into thesame Hex and rolls 4 and 9, hitting once. 921 rolls a 6 indefense, missing.
I draw a Suppress counter.
The third Rifle unit Advances and attacks,hitting both times. 921 fails to defend bothtimes.
I draw Exposed, and CommanderWounded.
Finally, the two trucks both had anAdvance to Cover order. The first
truck does not move, because their is no Cover in front ofhim. The second Truck Advances into the High Cover inthe same Hex as the Pz IV.
It is now my turn to Attack the enemy.
I start with 921. It has a Suppressed counter, so Sanderswill suffer 1 Stress if 921 Attacks this turn. I choose to havehim attack, so I remove the Suppress Damage counterand place a 1 Stress counter on Sanders.
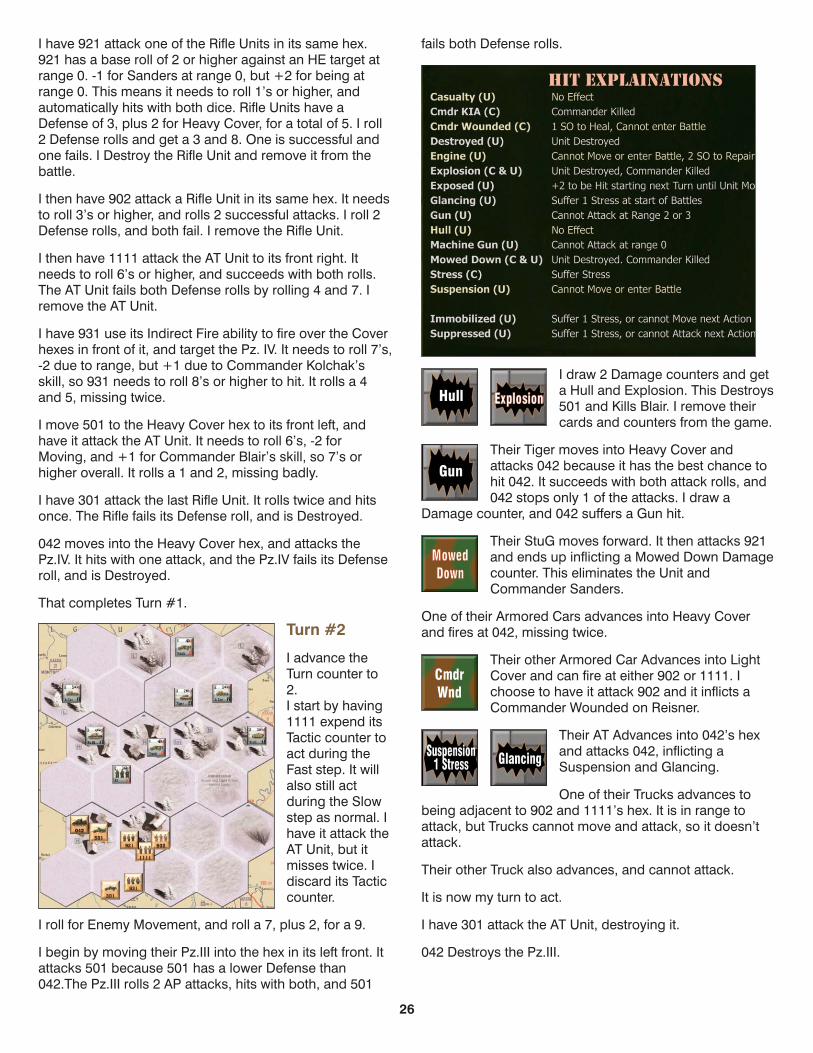
26
I have 921 attack one of the Rifle Units in its same hex.921 has a base roll of 2 or higher against an HE target atrange 0. -1 for Sanders at range 0, but +2 for being atrange 0. This means it needs to roll 1’s or higher, andautomatically hits with both dice. Rifle Units have aDefense of 3, plus 2 for Heavy Cover, for a total of 5. I roll2 Defense rolls and get a 3 and 8. One is successful andone fails. I Destroy the Rifle Unit and remove it from thebattle.
I then have 902 attack a Rifle Unit in its same hex. It needsto roll 3’s or higher, and rolls 2 successful attacks. I roll 2Defense rolls, and both fail. I remove the Rifle Unit.
I then have 1111 attack the AT Unit to its front right. Itneeds to roll 6’s or higher, and succeeds with both rolls.The AT Unit fails both Defense rolls by rolling 4 and 7. Iremove the AT Unit.
I have 931 use its Indirect Fire ability to fire over the Coverhexes in front of it, and target the Pz. IV. It needs to roll 7’s,-2 due to range, but +1 due to Commander Kolchak’sskill, so 931 needs to roll 8’s or higher to hit. It rolls a 4and 5, missing twice.
I move 501 to the Heavy Cover hex to its front left, andhave it attack the AT Unit. It needs to roll 6’s, -2 forMoving, and +1 for Commander Blair’s skill, so 7’s orhigher overall. It rolls a 1 and 2, missing badly.
I have 301 attack the last Rifle Unit. It rolls twice and hitsonce. The Rifle fails its Defense roll, and is Destroyed.
042 moves into the Heavy Cover hex, and attacks thePz.IV. It hits with one attack, and the Pz.IV fails its Defenseroll, and is Destroyed.
That completes Turn #1.
Turn #2
I advance theTurn counter to2.I start by having1111 expend itsTactic counter toact during theFast step. It willalso still actduring the Slowstep as normal. Ihave it attack theAT Unit, but itmisses twice. Idiscard its Tacticcounter.
I roll for Enemy Movement, and roll a 7, plus 2, for a 9.
I begin by moving their Pz.III into the hex in its left front. Itattacks 501 because 501 has a lower Defense than042.The Pz.III rolls 2 AP attacks, hits with both, and 501
fails both Defense rolls.
I draw 2 Damage counters and geta Hull and Explosion. This Destroys501 and Kills Blair. I remove theircards and counters from the game.
Their Tiger moves into Heavy Cover andattacks 042 because it has the best chance tohit 042. It succeeds with both attack rolls, and042 stops only 1 of the attacks. I draw a
Damage counter, and 042 suffers a Gun hit.
Their StuG moves forward. It then attacks 921and ends up inflicting a Mowed Down Damagecounter. This eliminates the Unit andCommander Sanders.
One of their Armored Cars advances into Heavy Coverand fires at 042, missing twice.
Their other Armored Car Advances into LightCover and can fire at either 902 or 1111. Ichoose to have it attack 902 and it inflicts aCommander Wounded on Reisner.
Their AT Advances into 042’s hexand attacks 042, inflicting aSuspension and Glancing.
One of their Trucks advances tobeing adjacent to 902 and 1111’s hex. It is in range toattack, but Trucks cannot move and attack, so it doesn’tattack.
Their other Truck also advances, and cannot attack.
It is now my turn to act.
I have 301 attack the AT Unit, destroying it.
042 Destroys the Pz.III.
27
This drops them to 12 points ofUnits in the battle, so they are nowat Half Strength.
902 attacks the Truck, Destroyingit.
931 attacks the left-most ArmoredCar, and Destroys it.
1111 has a range of 1. I do not move it, and it does notattack.
Turn #3I have 301 use its Command Tactic to allow931 to act now.
931 attacks and Destroys the StuG.
I roll for their Movement andthey roll a 3. They get +2 forthe Campaign card, butsuffer -2 for being at Half, sothe roll remains a 3. None ofthe enemy forces move.
Their Tiger fires at 042, hitting ittwice. Both Defense rolls fail, and042 suffers a Glancing and EngineDamage.
Their Armored Car fires at 902, missing twice.
Their Truck does not move or attack
This ends their turn.
I begin my turn.
931 fires at the Tiger, hitting it once, but the Tiger’sDefense negates the attack.
1111 moves toward the Tiger and attacks itfrom range 1. Red Tree suffers 2 Stressbecause he chose to both move and attack.One attack hits, and the Tiger’s Defense roll
fails. The Tiger is Destroyed!
This reduces their total Unit points to 3, which is lowenough to Destroy the Battalion. This ends the battle.
Post BattleI Draw an Event Card, gettingInspiring Leader. This lets us remove1 Stress from each Commander thatparticipated in the Mission. OnlyCommander Eandi currently hasStress. His two Stress gets reducedto one Stress.
Battalion StatusSince Battalion 9A was destroyed, Iremove the counter from the Enemy
Operational Movement area, and I discard the Battalioncard.
I record an X on my Player Log, and write in 4 VictoryPoints (3 for the Battalion and 1 for the Vital Mission Eventcard).
Each of my Commanders suffer 2 Stress from going intothe battle. I subtract their Cool rating.
Ending Stress: Reisner: 1 StressKolchak: 1 Stress
28
Red Tree: 2 StressHenders: 1 StressEandi: 2 Stress
They each gain 2 Experience Points, which is not enoughto promote any of them.
Unit/Commander DamageReisner - Commander WoundedSanders - KIA921 - DestroyedBlair - KIA501 Destroyed042 - Glancing, Glancing, Engine, Suspension, Gun
Next BattleI clean up the Battlefield Area of the Tactical Display,Shuffle and lay out a new configuration of Terrain Tiles.
I then resolve the battle against 4A.
It was a challenging battle, but Isucceeded in destroying Battalion4A, gaining 3 more Victory Points, atthe cost of Rifle Team #901 beingdestroyed. Luckily, 901’sCommander Chin survived. Severalother units sustained damage.
I end the week with 7 Victory Points. Irecord the Experience, Damage, and
Stress from the second battle on my Player Log.
I roll for their BattalionMovement. I do notroll for 6C, because itis Fixed. I roll a 6 for10A, which Advancesto the Front. I roll a 2for 2A, which Holds. Iroll a 7 for 11A whichAdvances. I roll a 5 for1C, which Holds. I rolla 3 for 2S, whichHolds. I roll a 10 for1S, which Advances.
Adjust Special OptionPointsI gain 7 SO points for
the Next week. I can immediately spend them to Repairmy damaged Units, or Replace my Commanders. I spend4 SO points to repair the Engine, Suspension and Gun on042.
I use Kolchak, my Medic, to remove the CommanderWounded counter from Reisner.
I’ll save the other 3 SO Points, adding them to the 2gained for the Special Condition card, and the 2 I alreadyhad.
This ends my first week of Battle.


