
Raw MaterialsRaw MaterialsRaw MaterialsRaw Materials
The Raw MaterialRaw MaterialRaw MaterialRaw Material section of WinWinWinWinFFFFashionashionashionashion allows you to manage the raw materials in a flexible and efficient manner. You will
be able to enter your raw materialsraw materialsraw materialsraw materials and manage your inventoryinventoryinventoryinventory and ordersordersordersorders in one screen. But first, you should familiarize
yourself with the section before entering any information.
· Click on the RRRRaw materialsaw materialsaw materialsaw materials button of the tool bar
· The raw materials list will appear on screen
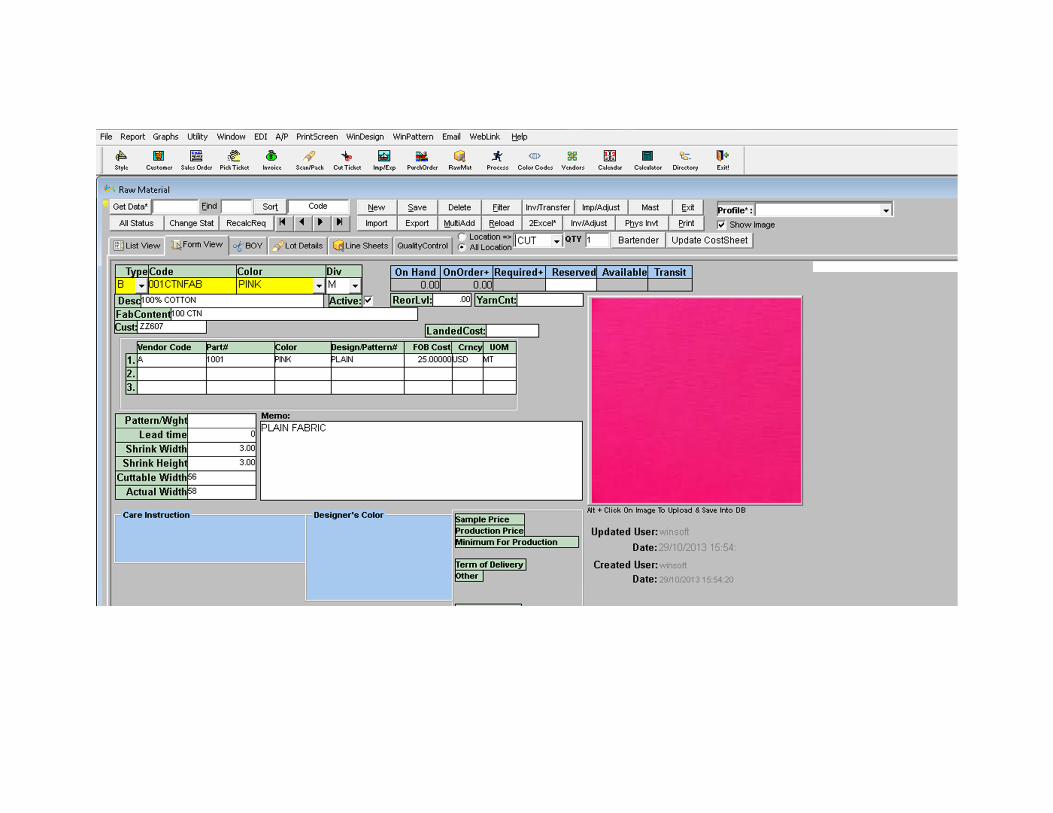
· To create a new raw materialraw materialraw materialraw material, click on the "NewNewNewNew" button
· You will now be in the Form view tabForm view tabForm view tabForm view tab
· Choose a Division (of your company) next to "DivDivDivDiv" if it applies
· Choose a raw material type next to "TypeTypeTypeType"
· Create a code for the raw materialcode for the raw materialcode for the raw materialcode for the raw material. For example stone washed denim could be named "stoneden".
· Choose master color ormaster color ormaster color ormaster color or "." next to the word "ColorColorColorColor"
· Next to "DescDescDescDesc" enter the description of the raw material. For example, you could put "Stone Washed Denim" for the
description.
· "ActiveActiveActiveActive" means you are currently using/buying the raw material. If you are no longer using the raw material but you
want to keep it on file, then uncheck the box. It will be on the "inactive part of the list" in the raw materials file.
· The reorder level or "ReorLvlReorLvlReorLvlReorLvl" is the quantity you usually order for this particular raw material. This box is just for
reference and will not bind you to that amount when creating purchase orders.
· If applicable, enter the fabric content in the box next to "FabContentFabContentFabContentFabContent". For example, the stone washed denim could have
a fabric content of "100% Cotton". You can also include the weight of the material or any other information in this box if
necessary (ex. 40 oz. 100% Cotton).
· Create a Vendor Code in the box under the title "VendorVendorVendorVendor CodeCodeCodeCode". You have the option to create up to 3 vendor codes (or
an abbreviated word for your vendor’s company name).
· Enter the vendors part/item numbervendors part/item numbervendors part/item numbervendors part/item number for the raw material in the box under "PartPartPartPart####". For example, you may call this
material "Stonedenim" but the vendor may call this material "1234denim". In this case, you would put "1234denim"
under the Part#.
· If applicable, enter the design or pattern number in the box under "Design/Pattern#Design/Pattern#Design/Pattern#Design/Pattern#". An example of a pattern may be
"plaid" or "paisley"
· Optional: Enter the vendors colorvendors colorvendors colorvendors color name under the box "ColorColorColorColor". If you are entering the master color, leave this box blank
until you multiadd or add colors. An example is the raw material is assigned the color "midnight" in Winfashion.
However, your vendor calls the same color "dark blue". In this case, the color under the vendor information would be
"dark blue".
· Enter a cost of the fabric under "FOB CostFOB CostFOB CostFOB Cost" by selecting Unit of Measure
· Select a SSSSymbol of Currencyymbol of Currencyymbol of Currencyymbol of Currency under "CrncyCrncyCrncyCrncy".
· Select a unit of measure under "UOMUOMUOMUOM". This means in the unit of measure you purchased the raw material. You can
create a variety of unit measure such as each, gross (multiplied by 144), dozen (multiplied by 12) and so forth. For
example, the stone washed denim has a UOM of yards because it is purchased by yards.
· A box appears under "MemoMemoMemoMemo" and any additional information may be entered there. This box does not appear in any
other part of Winfashion and is for reference only. The box holds an unlimited amount of information.
· Enter any other necessary information
· Click on the SaveSaveSaveSave button
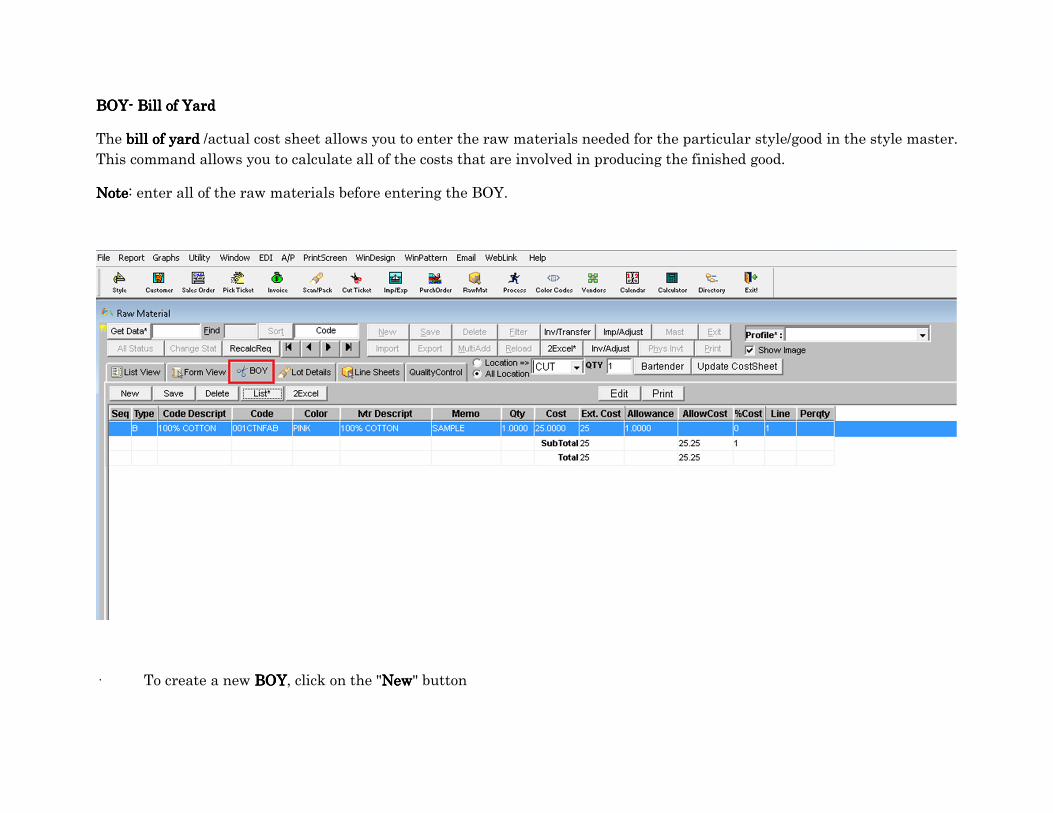
BOYBOYBOYBOY---- Bill of YardBill of YardBill of YardBill of Yard
The bill of yardbill of yardbill of yardbill of yard /actual cost sheet allows you to enter the raw materials needed for the particular style/good in the style master.
This command allows you to calculate all of the costs that are involved in producing the finished good.
NoteNoteNoteNote: enter all of the raw materials before entering the BOY.
· To create a new BOYBOYBOYBOY, click on the "NewNewNewNew" button
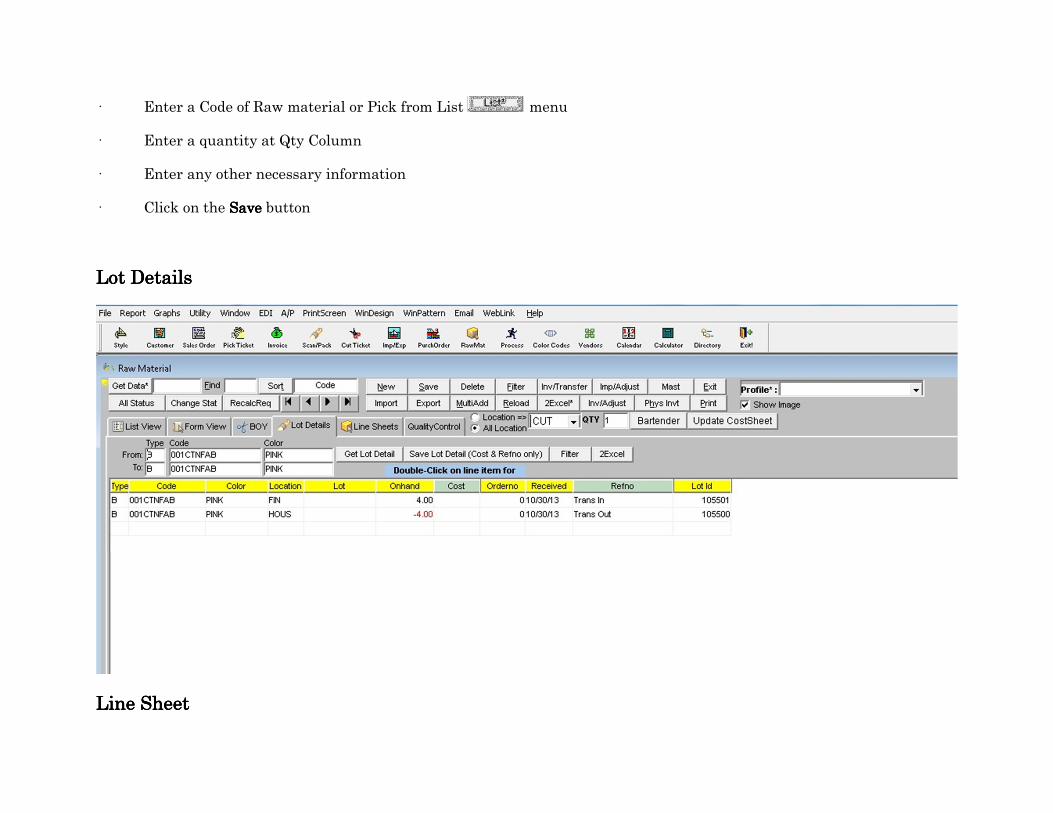
· Enter a Code of Raw material or Pick from List menu
· Enter a quantity at Qty Column
· Enter any other necessary information
· Click on the SaveSaveSaveSave button
Lot DetailsLot DetailsLot DetailsLot Details
LLLLiiiinnnne Sheete Sheete Sheete Sheet
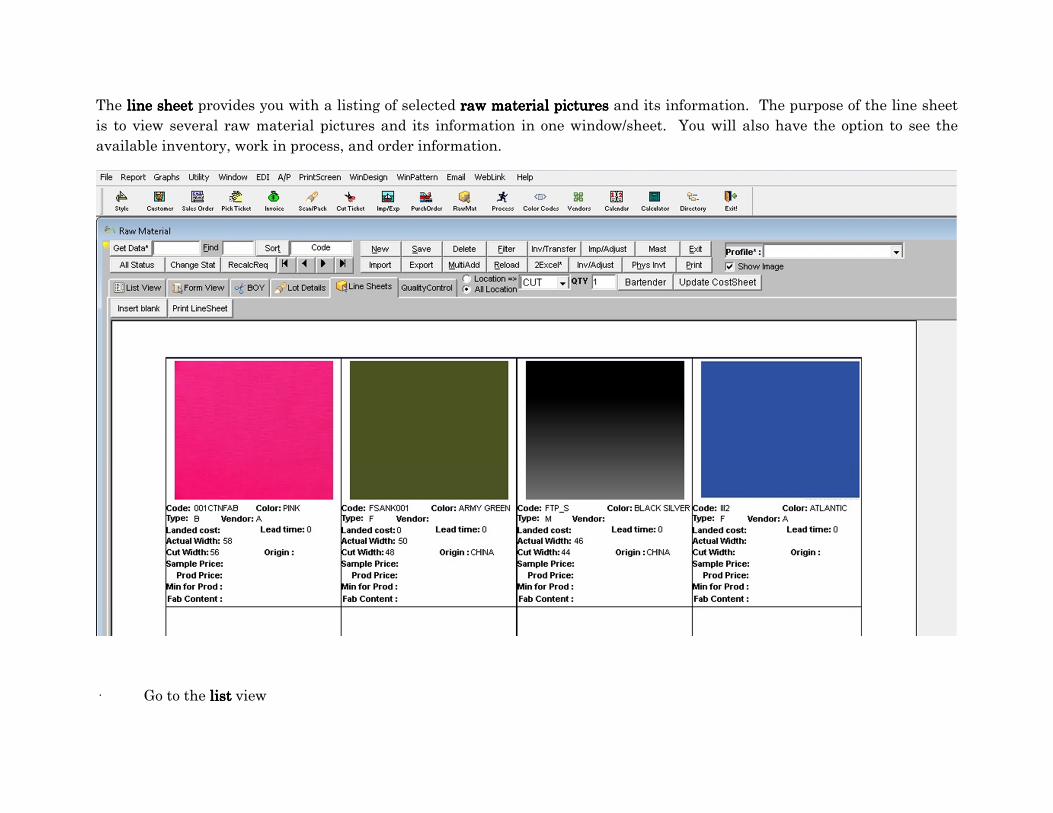
The line sheetline sheetline sheetline sheet provides you with a listing of selected raw material picturesraw material picturesraw material picturesraw material pictures and its information. The purpose of the line sheet
is to view several raw material pictures and its information in one window/sheet. You will also have the option to see the
available inventory, work in process, and order information.
· Go to the listlistlistlist view
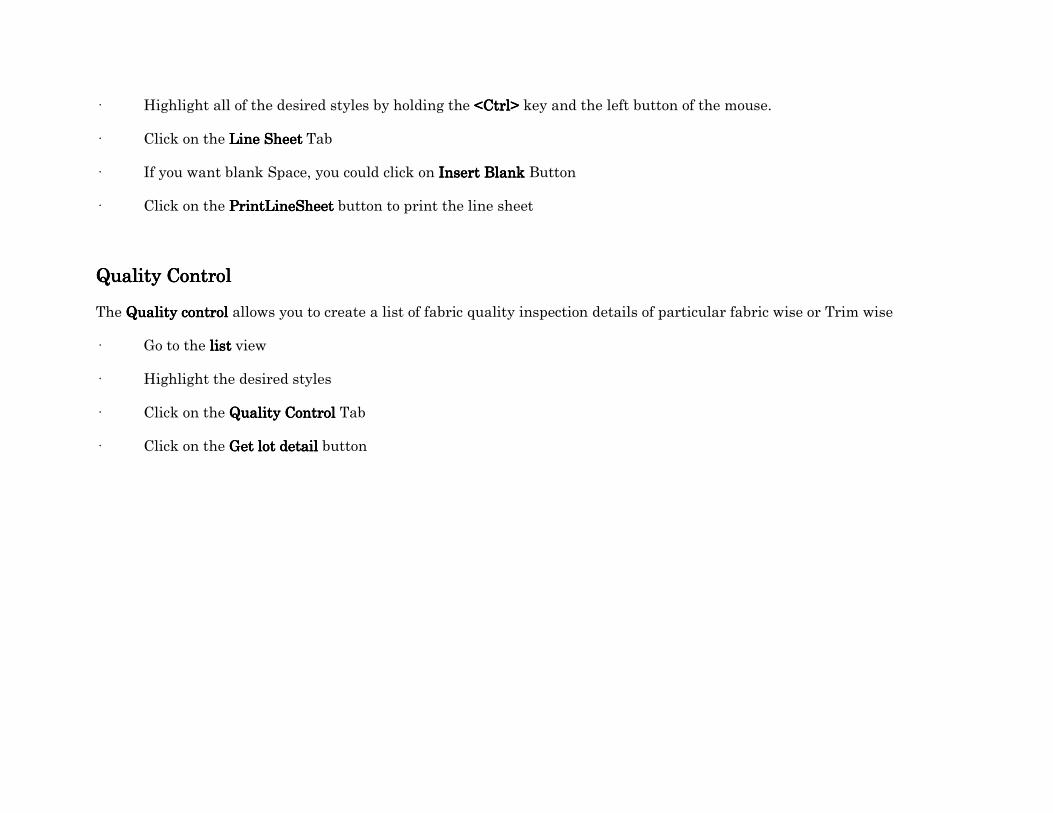
· Highlight all of the desired styles by holding the <Ctrl> <Ctrl> <Ctrl> <Ctrl> key and the left button of the mouse.
· Click on the Line SheetLine SheetLine SheetLine Sheet Tab
· If you want blank Space, you could click on Insert BlankInsert BlankInsert BlankInsert Blank Button
· Click on the PrintPrintPrintPrintLineSheetLineSheetLineSheetLineSheet button to print the line sheet
Quality Control Quality Control Quality Control Quality Control
The Quality Quality Quality Quality controlcontrolcontrolcontrol allows you to create a list of fabric quality inspection details of particular fabric wise or Trim wise
· Go to the listlistlistlist view
· Highlight the desired styles
· Click on the Quality Control Quality Control Quality Control Quality Control Tab
· Click on the Get lot Get lot Get lot Get lot detaildetaildetaildetail button
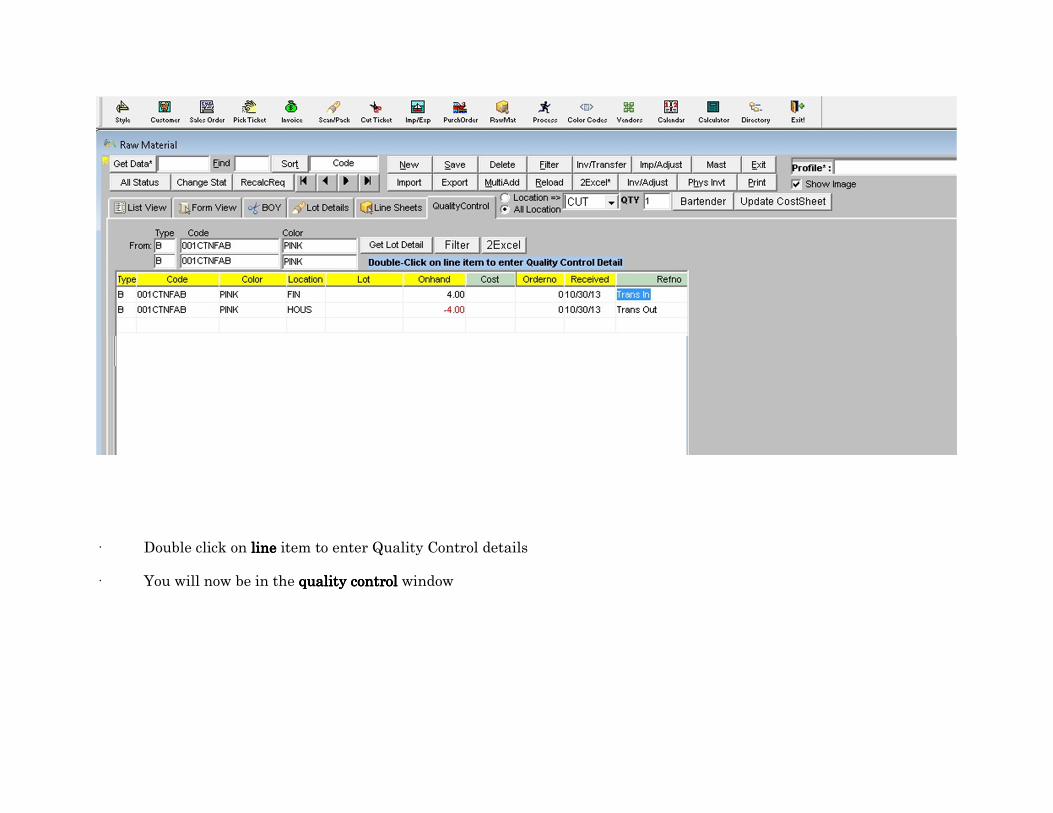
· Double click on linelinelineline item to enter Quality Control details
· You will now be in the quality control quality control quality control quality control window
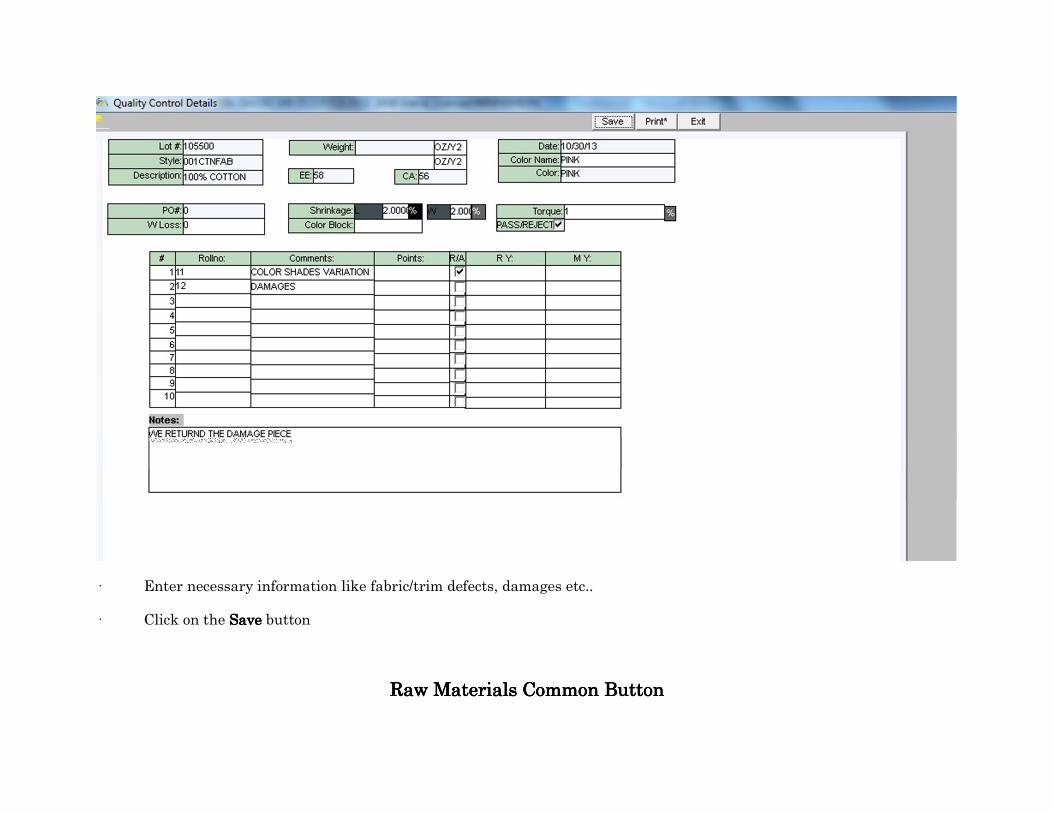
· Enter necessary information like fabric/trim defects, damages etc..
· Click on the SaveSaveSaveSave button
Raw Materials Raw Materials Raw Materials Raw Materials CommonCommonCommonCommon ButtonButtonButtonButton
Import ButtonImport ButtonImport ButtonImport Button
The ImportImportImportImport button is used to import Winfashion related information from a DOSDOSDOSDOS file \FASHIONFASHIONFASHIONFASHION\\\\IMPORT.DBFIMPORT.DBFIMPORT.DBFIMPORT.DBF (a database
file compatible to DBASE, FOXPRO, CLIPPER,DBASE, FOXPRO, CLIPPER,DBASE, FOXPRO, CLIPPER,DBASE, FOXPRO, CLIPPER, etc.).
To importimportimportimport text into WinFashion, copy the text from the desired .dbf.dbf.dbf.dbf file and paste it onto the clipboard.
NOTENOTENOTENOTE: You can only import text from a .dbf.dbf.dbf.dbf file, database compatible file, and a DOS file.
From the clipboard, you can import using the import buttonimport buttonimport buttonimport button on the screen.
Once you click on the import buttonimport buttonimport buttonimport button, a screen will prompt you to import from Windows.
Export ButtonExport ButtonExport ButtonExport Button
ExcelExcelExcelExcel
This command allows you to use EXCELEXCELEXCELEXCEL, a very powerful accounting software created by MICROSOFT™.MICROSOFT™.MICROSOFT™.MICROSOFT™. Some of the things
you could do with EXCEL are spreadsheet-manipulation, creation of supplementary reports (graph, changing icons, adding
headers, footers, etc.) and a lot more. For more information on EXCELEXCELEXCELEXCEL, consult an EXCELEXCELEXCELEXCEL manual and/or run it and see its on-
line help.
· HighlightHighlightHighlightHighlight the items to be exported
· To exportexportexportexport from WinFashion, click on the ExportExportExportExport button
· Select the file that you want to save your WinFashion information in.
· Enter a FileFileFileFile Name
· Save As Type: enter Excel with HeadersExcel with HeadersExcel with HeadersExcel with Headers
· Click on the SaveSaveSaveSave Button
At ExcelAt ExcelAt ExcelAt Excel
· Select FileFileFileFile
· Choose Open and select the saved file
· To Generate SubtotalsTo Generate SubtotalsTo Generate SubtotalsTo Generate Subtotals
· Go to SubtotalsSubtotalsSubtotalsSubtotals of the Menu Bar
· Select Data Subtotals
· Enter the ColumnColumnColumnColumn
· Enter SumSumSumSum at "Use FunctionUse FunctionUse FunctionUse Function"
· Check all items to be subtotaled at "Add Subtotal ToAdd Subtotal ToAdd Subtotal ToAdd Subtotal To:"
· Click on OKOKOKOK
MultiMultiMultiMulti----AddAddAddAdd
MultiAddMultiAddMultiAddMultiAdd allows you to add a color/colors from a list to a particular style/raw material.style/raw material.style/raw material.style/raw material.
Step 1. If you are not in the style or raw materialsstyle or raw materialsstyle or raw materialsstyle or raw materials window, click on the styles iconstyles iconstyles iconstyles icon for styles or the raw materials icon
for raw materials. Remember the style’s/raw material’s color prior to using MultiAddMultiAddMultiAddMultiAdd.
NoteNoteNoteNote: Keep in mind that once you have chosen the colors for the codecodecodecode tabletabletabletable, the computer will not allow you to savesavesavesave the same
style/raw material with the same color twice after clicking MultiAddMultiAddMultiAddMultiAdd. An error message will appear stating that there was an
attempt (duplicate error) to save the same style/raw material with the same color.
· Click MultiaddMultiaddMultiaddMultiadd to display a list of colorslist of colorslist of colorslist of colors. This list corresponds to all colors entered in the Colors code table
· From this list, all availableavailableavailableavailable colorscolorscolorscolors for the same style may be selected. Click on the row of the 1st available color. The
entire row will be highlighted. See the Important Tip below.
· To select more colorsselect more colorsselect more colorsselect more colors, simultaneously press <CtrlCtrlCtrlCtrl> and left-click the mousemousemousemouse on the far left vertical row of boxes on the
desired colors. Clicking on the row inside the table may reset all the highlighted/selected colors. To select more colors,
repeat this step. To cancel a color selection, left click with the mouse and hold <Ctrl> on the highlighted color.
· To select all highlighted colorsselect all highlighted colorsselect all highlighted colorsselect all highlighted colors and continue onto the next screen, click on the SelectSelectSelectSelect button
· If you do not want to make any selections at this time, click on the ExitExitExitExit button
· If there are no colors in the list, do the following:
a) ExitExitExitExit from the styles or raw materials window
b) Build the Colors code tableColors code tableColors code tableColors code table
c) Then start from Step 1Step 1Step 1Step 1 above
ImportantImportantImportantImportant TipTipTipTip: Prior to using MultiaddMultiaddMultiaddMultiadd, note the colors already listed for the desired style. You should not highlight/include
this color in your selection. If you include more than one of the same color(s), then an error messages will appear ("You have
attempted to save duplicates") while saving the entries.
Reload ButtonReload ButtonReload ButtonReload Button
Click the ReloadReloadReloadReload buttonbuttonbuttonbutton to refresh the information displayed on the current window (click ReloadReloadReloadReload). Use this button when you
want to refresh/renewrefresh/renewrefresh/renewrefresh/renew the information on the current window. This button is useful when you go to utility utility utility utility ���� recalculaterecalculaterecalculaterecalculate
among other areas of Winfashion.
Delete ButtonDelete ButtonDelete ButtonDelete Button
· The DeleteDeleteDeleteDelete button is used to delete a row/recordrow/recordrow/recordrow/record from the list, table, or line (click DeleteDeleteDeleteDelete).
· If you click DeleteDeleteDeleteDelete, the program will confirm deletion (click YesYesYesYes to do so and NoNoNoNo, otherwise).
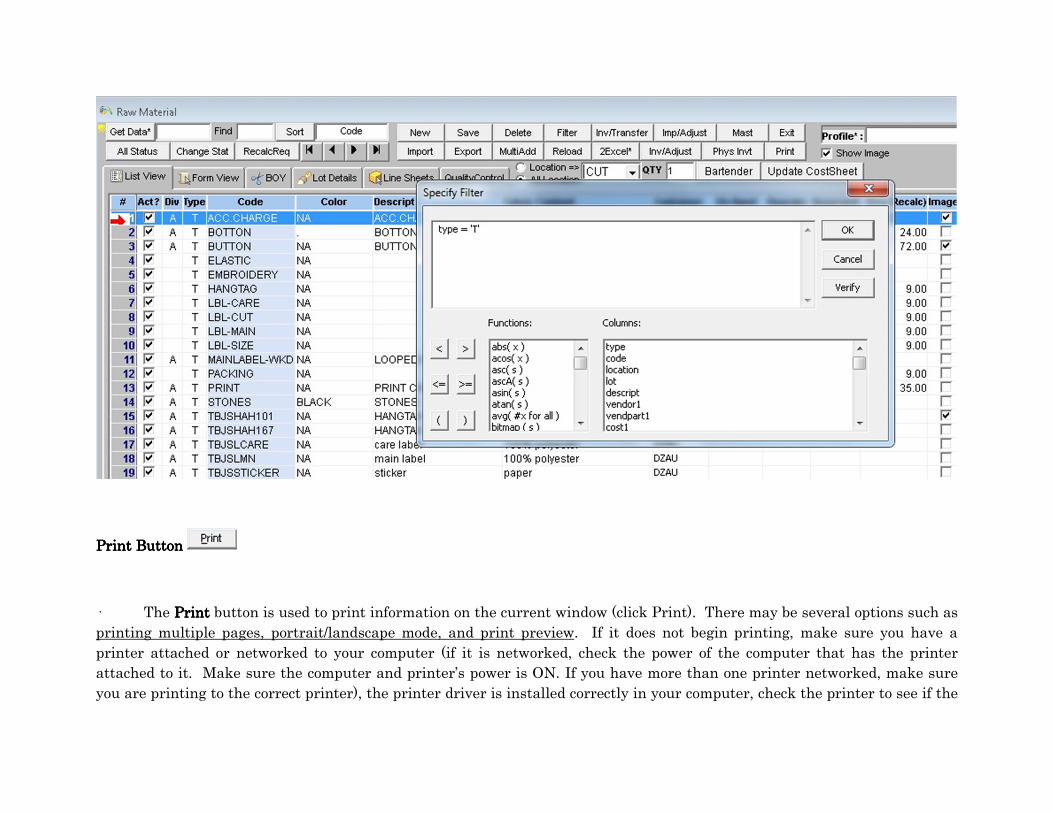
Filter ButtonFilter ButtonFilter ButtonFilter Button
The main function of the filter buttonfilter buttonfilter buttonfilter button is to separate certain information from the rest within a specific topic. It is especially
useful in the reports when you want to see specific information and not the rest of the report. For example, for the zip code
table, you might only wish to see all cities for the state of New York. Another example of the filter button is in a report, you
will see information from one date range to another based on sales order, customer, factor, and style information. But you just
want to see all of the sales orders that are factored. Therefore, you can filter the sales order with factors only.
· Click FilterFilterFilterFilter if you want to see rows of the list that meets a certain condition.
· The filter window prompts you to input a filter conditionfilter conditionfilter conditionfilter condition. The columns FunctionsFunctionsFunctionsFunctions (verb) and ColumnsColumnsColumnsColumns (noun) appear.
· TIP: Filter conditionTIP: Filter conditionTIP: Filter conditionTIP: Filter condition strings are casecasecasecase----sensitivesensitivesensitivesensitive which means that upper case strings are different as compared to their
lower case counterparts. For example, you want to filter one customer out of the whole list. In the customer listing, the
type code is "T" for Trims. Therefore you would enter [type=‘T’] also to filter. If you enter
[type=‘t’] (notice it is lower-case) the filter will not work.
· After typing filter conditionfilter conditionfilter conditionfilter condition, click OKOKOKOK to FilterFilterFilterFilter, CancelCancelCancelCancel to exit or VerifyVerifyVerifyVerify to check the validity of the filter condition.
Print ButtonPrint ButtonPrint ButtonPrint Button
· The PrintPrintPrintPrint button is used to print information on the current window (click Print). There may be several options such as
printing multiple pages, portrait/landscape mode, and print preview. If it does not begin printing, make sure you have a
printer attached or networked to your computer (if it is networked, check the power of the computer that has the printer
attached to it. Make sure the computer and printer’s power is ON. If you have more than one printer networked, make sure
you are printing to the correct printer), the printer driver is installed correctly in your computer, check the printer to see if the
power is on, check the printer to see if it is offline or if there are any errors. For more information, refer to the owner’s manual
that came with the printer.
Duplicate ButtonDuplicate ButtonDuplicate ButtonDuplicate Button
The Duplicate buttonDuplicate buttonDuplicate buttonDuplicate button is used to copy the current record or line to a new record or line (click DuplicatDuplicatDuplicatDuplicateeee).
Important TipImportant TipImportant TipImportant Tip: For some tables (ex. code tablecode tablecode tablecode table), Winfashion will give an error message if you do not change the main code
(primary key) for this duplicated record/row after clicking the Save button. For example, if you duplicate the color BLUE in
the colors code tablecolors code tablecolors code tablecolors code table and click SaveSaveSaveSave, an error message will appear (BLUE should not be in the list twice - click OKOKOKOK, type
another code or DeleteDeleteDeleteDelete the duplicated record).


