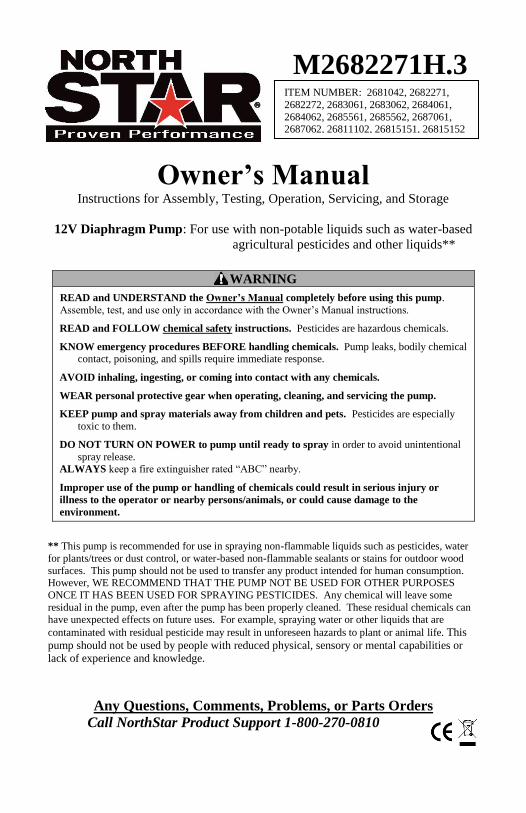
M2682271H.3
Owner’s Manual Instructions for Assembly, Testing, Operation, Servicing, and Storage
12V Diaphragm Pump: For use with non-potable liquids such as water-based
agricultural pesticides and other liquids**
WARNING
READ and UNDERSTAND the Owner’s Manual completely before using this pump.
Assemble, test, and use only in accordance with the Owner’s Manual instructions.
READ and FOLLOW chemical safety instructions. Pesticides are hazardous chemicals.
KNOW emergency procedures BEFORE handling chemicals. Pump leaks, bodily chemical contact, poisoning, and spills require immediate response.
AVOID inhaling, ingesting, or coming into contact with any chemicals.
WEAR personal protective gear when operating, cleaning, and servicing the pump.
KEEP pump and spray materials away from children and pets. Pesticides are especially
toxic to them.
DO NOT TURN ON POWER to pump until ready to spray in order to avoid unintentional
spray release. ALWAYS keep a fire extinguisher rated “ABC” nearby.
Improper use of the pump or handling of chemicals could result in serious injury or
illness to the operator or nearby persons/animals, or could cause damage to the
environment.
** This pump is recommended for use in spraying non-flammable liquids such as pesticides, water
for plants/trees or dust control, or water-based non-flammable sealants or stains for outdoor wood
surfaces. This pump should not be used to transfer any product intended for human consumption. However, WE RECOMMEND THAT THE PUMP NOT BE USED FOR OTHER PURPOSES
ONCE IT HAS BEEN USED FOR SPRAYING PESTICIDES. Any chemical will leave some
residual in the pump, even after the pump has been properly cleaned. These residual chemicals can
have unexpected effects on future uses. For example, spraying water or other liquids that are
contaminated with residual pesticide may result in unforeseen hazards to plant or animal life. This
pump should not be used by people with reduced physical, sensory or mental capabilities or
lack of experience and knowledge.
Any Questions, Comments, Problems, or Parts Orders
Call NorthStar Product Support 1-800-270-0810
ITEM NUMBER: 2681042, 2682271,
2682272, 2683061, 2683062, 2684061,
2684062, 2685561, 2685562, 2687061, 2687062, 26811102, 26815151, 26815152
SERIAL NUMBER: __________
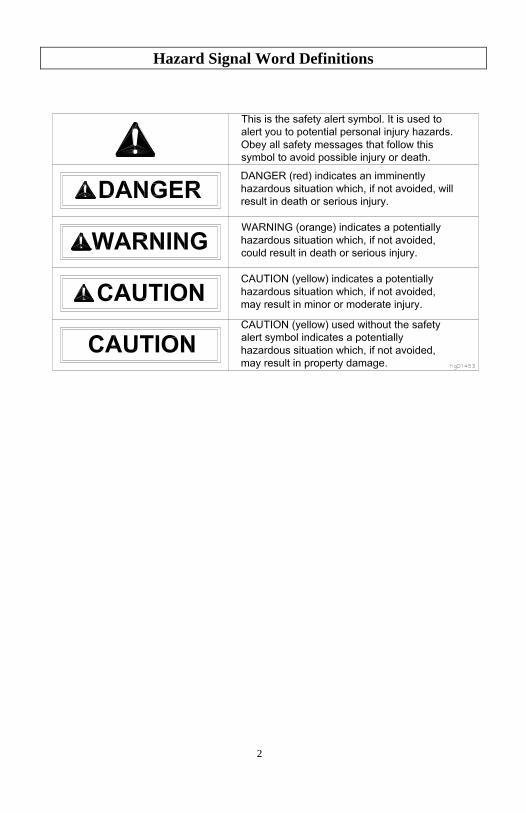
Hazard Signal Word Definitions
2
Table of Contents
3
Intended Use .................................................................................................................................... 4
Summary of Important Safety Information .................................................................................... 5
During Assembly
During Operation
General Chemical Safety
Chemical Applicator Safety
Chemical Accident Procedures
Warning Label Location .................................................................................................................. 7
Installation
Step One: Mounting ..................................................................................................................... 8
Step Two: Plumbing .................................................................................................................... 8
Step Three: Connect pump to vehicle battery .............................................................................. 9 Step Four: Check and test completed assembly ......................................................................... 11
Operation
Important Safety Information - Operation ............................................................................ 12
General Chemical Safety
Chemical Applicator Safety
Chemical Accident Procedures Preparing the Pump for Each Use .......................................................................................... 16
Using the Pump
Step One: Assess wind conditions and clear work area ....................................................... 17 Step Two: Operate the pump .............................................................................................. 17
Step Three: Clean pump and decontaminate after use ......................................................... 19
Storage ............................................................................................................................................. 20
Preparing for storage Removing from storage
Troubleshooting .............................................................................................................................. 21
Specifications ................................................................................................................................... 23
Accessories ....................................................................................................................................... 24
Parts Breakdown – Exploded View ............................................................................................... 25
Limited Warranty ........................................................................................................................... 35
Intended Use
4
The pump is intended for use in spraying agricultural pesticides and other non-flammable
liquids.
SPRAYING PESTICIDES:
Pesticides are hazardous chemicals that must be handled with caution as directed
throughout this manual and on the pesticide label. Pesticides are regulated by the United
States Environmental Protection Agency (EPA) and defined as:
Any substance or mixture of substances intended for preventing, destroying, repelling, or
mitigating any pest. Though often misunderstood to refer only to insecticides, the term
pesticide is a comprehensive term that applies to insecticides, herbicides, fungicides, and
various other substances used to control pests.
The pump is intended for use in spraying pesticides in liquid form only. The pump is
NOT intended for use in spraying pesticides in dry or aerosolized form, or for use with
fumigants.
SPRAYING OTHER LIQUIDS:
In addition to spraying pesticides, this pump may be used to spray other non-flammable
liquids. Example uses include: watering plants/trees or spraying water for dust control,
or applying water-based, non-flammable sealant or stain to outdoor wood surfaces.
However, WE RECOMMEND THAT THE PUMP NOT BE USED FOR OTHER
PURPOSES ONCE IT HAS ALREADY BEEN USED FOR SPRAYING
PESTICIDES. Any chemical will leave some residual in the pump, even after the pump
has been properly cleaned. These residual chemicals can have unexpected effects on
future uses. For example, spraying water or other liquids that are contaminated with
residual pesticide may result in unforeseen hazards to plant or animal life.
Contact NorthStar Product Support at 1-800-270-0810 for any questions
about the appropriate use of the pump and/or optional accessories.
Summary of Important Information
5
WARNING
Read and understand this owner’s manual completely before using the pump. Read each chemical label’s instructions before handling the chemical.
Improper use of the pump or handling of chemicals could result in serious injury or illness
for the operator or nearby persons/animals, or cause damage to the environment.
LISTED BELOW is a summary of safety information of particular importance. See individual
sections of this owner’s manual for more details.
------------------------------------ DURING ASSEMBLY-------------------------------
EXERCISE CAUTION when attaching remote switch to battery terminals. Follow the steps
listed in the Assembly section of this manual in exact sequence when connecting the pump to battery terminals. Caution must be exercised to avoid contact with battery acid and to prevent sparking.
CHECK and TEST completed assembly as directed in this manual. Serious injury could result from
chemical leaks if pump is improperly assembled.
DO NOT MODIFY pump design.
------------------------------------DURING OPERATION------------------------------
General Chemical Safety READ and FOLLOW each chemical label’s instructions and warnings.
AVOID inhaling, ingesting, or coming into contact with any chemicals.
KNOW applicable licensing and regulatory requirements for the chemical you plan to use.
KNOW emergency procedures before handling chemicals. Carefully review “Chemical Accident Procedures” listed below and later in this manual. Also see First Aid instructions on the chemical
label.
WEAR protective clothing, eye protection, and chemical resistant gloves when operating the pump. Wear additional protective gear, such as facemask or apron, as recommended on the chemical
label.
EXERCISE EXTRA CAUTION around children and pets. Pesticides are especially toxic to them.
Keep pump and spray materials away from them at all times.
DO NOT MIX OR POUR chemicals in an enclosed, unventilated area
DO NOT USE flammable or corrosive chemicals in the pump.
FLUSH the pump before switching chemicals in order to prevent dangerous chemical interactions.
STORE pesticides in a correctly labeled container and in a secure location.
MONITOR the health of operators frequently exposed to pesticides, as recommended by the chemical label or local/federal regulations.
Chemical Application Safety Before Spraying
INSPECT and PREPARE pump before each use as directed in this manual.
DO NOT TURN ON POWER to pump until ready to spray in order to avoid unintentional spray release.
DO NOT SPRAY when wind speed exceeds 4 MPH in order to minimize spray drift.
CLEAR work area of people/ pets and POST warning notices to restrict access for the period recommended on chemical label.
KEEP pump and spray materials away from children/pets. Pesticides can be especially toxic to
children and animals.
DO NOT ALLOW anyone younger than 16 to operate the pump since pesticides are especially toxic to children.
During Spraying
DO NOT OVER-APPLY pesticide. Apply at rate recommended by chemical manufacturer. Excess
pesticide can be dangerous to humans/animals, damage desirable plants, and contaminate soil and water sources.
Summary of Important Information
6
DO NOT EAT, DRINK, SMOKE, RUB YOUR EYES, or TOUCH YOUR BARE SKIN while
handling chemicals and spraying.
NEVER POINT A SPRAY GUN at people or animals.
EXERCISE EXTRA CAUTION when spraying near areas accessible to children and pets.
CLEAN up spills immediately per instructions on the chemical label.
TURN OFF power to pump, and RELIEVE system pressure before leaving pump unattended.
SEE Troubleshooting section of this manual before attempting any repairs. Wear personal protective equipment and follow safety instructions.
After Spraying
CLEAN pump immediately after use according to the directions provided in this manual.
DECONTAMINATE yourself after you are done spraying and have cleaned the pump. Wash all exposed areas of the body with soap and water, and remove and launder clothing.
DISPOSE OF or STORE remaining chemicals in secure storage with correctly marked container.
Chemical accident procedures
Immediate response is necessary in the event of pump leaks, bodily chemical contact, poisoning, or
spills. See instructions below:
Pump leak If the pump develops a leak, immediately stop spraying. Turn off power to the pump and follow directions below, as applicable.
Bodily
chemical
contact
Personal contamination can occur when chemicals splash, spill, or spray
directly onto a person.
1. Immediately follow First Aid instructions on chemical label.
General procedures can include:
a) Eyes – immediately flush with water. b) Skin – wash all contaminated skin surfaces with soap and water.
c) Clothing – remove contaminated clothing. Dispose of heavily
contaminated clothing per chemical label instructions.
2. Seek medical advice if instructed on the label or the victim experiences symptoms of harmful effects. Bring the chemical label for reference.
Poisoning by
ingestion or
inhalation
In case of poisoning from ingestion or inhalation:
If the victim has collapsed or is not breathing, call 911. Otherwise:
1. If you are the victim, immediately seek assistance from nearby personnel
because you may become incapacitated.
2. Immediately follow first aid instructions on chemical label. 3. Call a poison control center for further advice. In the U.S., call 1-800-222-
1222. Have the chemical label available for reference.
Chemical
spills
Chemical spills must be quickly contained and properly cleaned up.
Refer to the chemical label for any specific clean-up instructions.
General procedures include:
1. Controlling the spill by stopping the source of the spill. 2. Containing the spill so that it does not spread and get into water sources.
3. Cleaning up the spill immediately.
4. Seeking additional advice from: - Chemical manufacturer. See chemical label for contact information.
- State pesticide regulatory agency. In the U.S., call the National Pesticide
Info. Ctr. at 800-858-7378 for assistance in contacting your state’s agency.
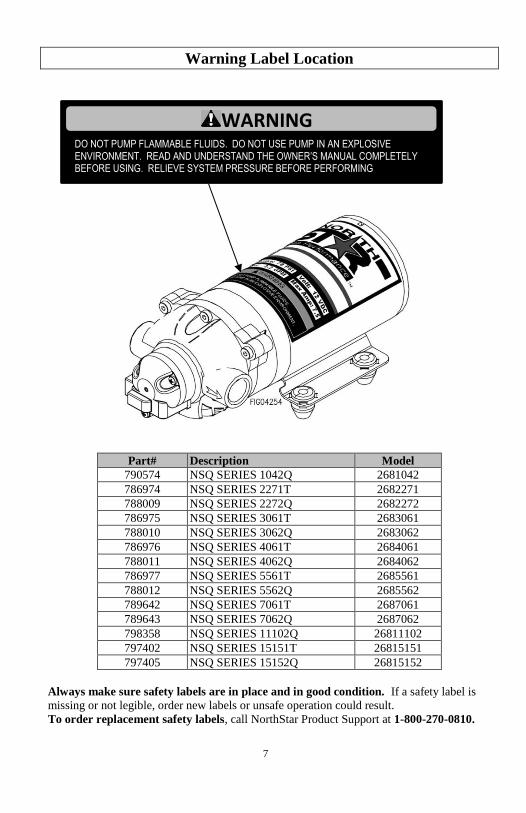
Warning Label Location
7
Always make sure safety labels are in place and in good condition. If a safety label is
missing or not legible, order new labels or unsafe operation could result.
To order replacement safety labels, call NorthStar Product Support at 1-800-270-0810.
Part# Description Model
790574 NSQ SERIES 1042Q 2681042
786974 NSQ SERIES 2271T 2682271
788009 NSQ SERIES 2272Q 2682272
786975 NSQ SERIES 3061T 2683061
788010 NSQ SERIES 3062Q 2683062
786976 NSQ SERIES 4061T 2684061
788011 NSQ SERIES 4062Q 2684062
786977 NSQ SERIES 5561T 2685561
788012 NSQ SERIES 5562Q 2685562
789642 NSQ SERIES 7061T 2687061
789643 NSQ SERIES 7062Q 2687062
798358 NSQ SERIES 11102Q 26811102
797402 NSQ SERIES 15151T 26815151
797405 NSQ SERIES 15152Q 26815152
DO NOT PUMP FLAMMABLE FLUIDS. DO NOT USE PUMP IN AN EXPLOSIVE ENVIRONMENT. READ AND UNDERSTAND THE OWNER’S MANUAL COMPLETELY BEFORE USING. RELIEVE SYSTEM PRESSURE BEFORE PERFORMING MAINTENANCE.
WARNING
Installation
8
Step One: Mounting
This NorthStar pump is self-priming.
The pump should be located in an area that is dry and provides adequate ventilation.
The pump may be mounted in any horizontal position. If mounting the pump vertically, the
pump head should be in the down position so that in the unlikely event of a leak, fluid will not
enter the motor.
Secure the rubber feet with #10 fasteners (1/4" fasteners for models 2687061 and 2687062). DO
NOT compress the feet, doing so will reduce their ability to isolate vibration/noise. (Note:
fasteners are not included.)
Step Two: Plumbing
See table below for port size and recommended hose sizes. o Remove shipping plugs from pump ports.
o Use plastic male NPT (Tapered pipe thread) fittings to connect flexible high-pressure tubing
to the NPT ported pumps.
o Use NorthStar quick connect fittings to connect flexible high pressure tubing to the quick
connect ported pumps. o To insert quick connect fittings, lubricate O-ring with water and twist fitting while inserting
into pump port.
Pump Model Ports Minimum inlet hose size Minimum outlet hose size
2681042 3/4" Quick Connect 3/8" (9.5mm) Inside diameter 3/8" (9.5mm) Inside diameter
2682271 3/8" Female NPT 1/2" (13mm) Inside diameter 3/8" (9.5mm) Inside diameter
2682272 3/4" Quick Connect 1/2" (13mm) Inside diameter 3/8" (9.5mm) Inside diameter
2683061 1/2" Female NPT 1/2" (13mm) Inside diameter 1/2" (13mm) Inside diameter
2683062 3/4" Quick Connect 1/2" (13mm) Inside diameter 1/2" (13mm) Inside diameter
2684061 1/2" Female NPT 1/2" (13mm) Inside diameter 1/2" (13mm) Inside diameter
2684062 3/4" Quick Connect 1/2" (13mm) Inside diameter 1/2" (13mm) Inside diameter
2685561 1/2" Female NPT 1/2" (13mm) Inside diameter 1/2" (13mm) Inside diameter
2685562 3/4" Quick Connect 1/2" (13mm) Inside diameter 1/2" (13mm) Inside diameter
2687061 1/2" Female NPT 3/4" (19mm) Inside diameter 3/4" (19mm) Inside diameter
2687062 3/4" Quick Connect 3/4" (19mm) Inside diameter 3/4" (19mm) Inside diameter
26811102 3/4" Quick Connect 3/8" (9.5mm) Inside diameter 3/8" (9.5mm) Inside diameter
26815151 3/8" Female NPT 3/8" (9.5mm) Inside diameter 3/8" (9.5mm) Inside diameter
26815152 3/4" Quick Connect 3/8" (9.5mm) Inside diameter 3/8" (9.5mm) Inside diameter
NOTE: NorthStar does not recommend the use of metal fittings or rigid pipe to plumb the inlet/outlet ports.
Standard plastic threaded fittings are available by calling NorthStar Product Support at 1-800-270-
0810.
In some cases, the ports may require a suitable thread sealer applied sparingly. DO NOT over-tighten; maximum torque is 45 in.-lb [5 N-m].
Tubing should be compatible with the spraying fluid. At least 18" [450mm] length is suggested
to minimize stress on the fitting/ports and reduce noise. Allow for the shortest possible tubing
route and avoid sharp bends that may kink over time.
Installation of a 50-mesh strainer is recommended to prevent foreign debris from entering the
system. Failures due to foreign debris are not covered under the warranty.
NOTE: Restrictions on the inlet may cause a loss in performance. Inlet pressure must not exceed 30 psi [2.1
bar]
If a check valve is installed in the plumbing, it must have a cracking pressure of no more than 2 psi [.14 bar].
CAUTION
DO NOT locate the motor near low temperature plastics or combustible material. The surface temperature of
the motor may exceed 250°F [121°C].
CAUTION Sealers and Teflon tape may act as lubricant causing cracked housings or stripped threads due to over
tightening. Care should be used when applying sealers; it may enter the pump inhibiting valve action, causing
no prime or no shut-off. Failures due to foreign debris are not covered under the warranty.
Installation (continued)
9
Step Three: Connect pump to battery or 12V supply
WARNING
Batteries are hazardous because they contain caustic acid, can emit explosive gases, and can
cause electric shock.
Caution must be exercised when making connections to a battery to avoid shock and contact with the acid, and to prevent any sparking that could lead to an explosion.
ALWAYS follow the safety instructions and steps listed below in exact sequence when
connecting the pump to the battery terminals.
1. Preparatory
safety
Preparatory safety steps:
ALWAYS use eye protection
NEVER smoke or work near sparks or other sources of ignition.
NEVER touch both battery terminals at the same time or with any non-insulated tools.
If battery acid contacts skin or clothing, flush immediately with water and neutralize with baking soda.
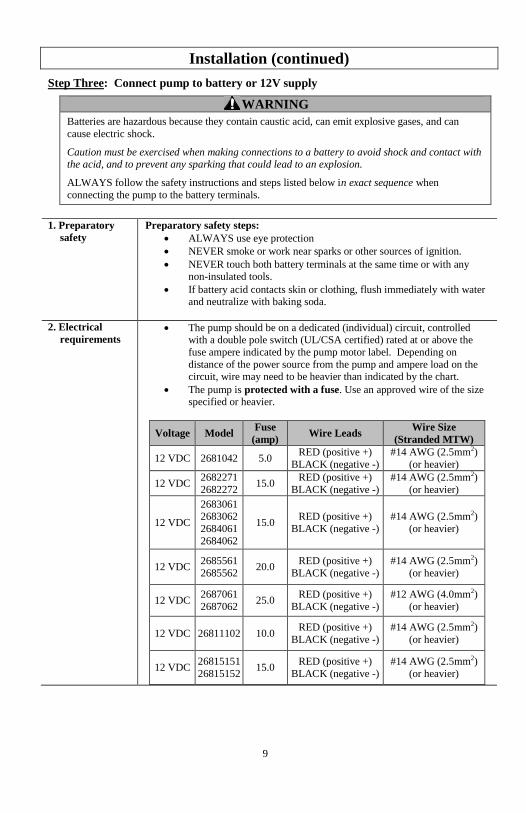
2. Electrical
requirements The pump should be on a dedicated (individual) circuit, controlled
with a double pole switch (UL/CSA certified) rated at or above the
fuse ampere indicated by the pump motor label. Depending on
distance of the power source from the pump and ampere load on the circuit, wire may need to be heavier than indicated by the chart.
The pump is protected with a fuse. Use an approved wire of the size specified or heavier.
Voltage Model Fuse
(amp) Wire Leads
Wire Size
(Stranded MTW)
12 VDC 2681042 5.0 RED (positive +)
BLACK (negative -)
#14 AWG (2.5mm2)
(or heavier)
12 VDC 2682271
2682272 15.0
RED (positive +)
BLACK (negative -)
#14 AWG (2.5mm2)
(or heavier)
12 VDC
2683061 2683062
2684061
2684062
15.0 RED (positive +)
BLACK (negative -)
#14 AWG (2.5mm2)
(or heavier)
12 VDC 2685561
2685562 20.0
RED (positive +)
BLACK (negative -)
#14 AWG (2.5mm2)
(or heavier)
12 VDC 2687061
2687062 25.0
RED (positive +)
BLACK (negative -)
#12 AWG (4.0mm2)
(or heavier)
12 VDC 26811102 10.0 RED (positive +)
BLACK (negative -)
#14 AWG (2.5mm2)
(or heavier)
12 VDC 26815151
26815152 15.0
RED (positive +)
BLACK (negative -)
#14 AWG (2.5mm2)
(or heavier)
Installation (continued)
10
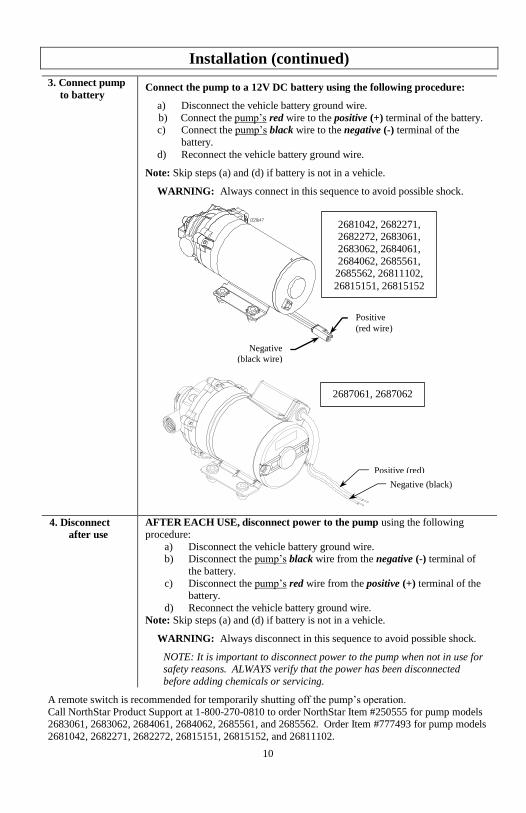
3. Connect pump
to battery
Connect the pump to a 12V DC battery using the following procedure:
a) Disconnect the vehicle battery ground wire.
b) Connect the pump’s red wire to the positive (+) terminal of the battery. c) Connect the pump’s black wire to the negative (-) terminal of the
battery.
d) Reconnect the vehicle battery ground wire.
Note: Skip steps (a) and (d) if battery is not in a vehicle.
WARNING: Always connect in this sequence to avoid possible shock.
4. Disconnect
after use
AFTER EACH USE, disconnect power to the pump using the following procedure:
a) Disconnect the vehicle battery ground wire. b) Disconnect the pump’s black wire from the negative (-) terminal of
the battery.
c) Disconnect the pump’s red wire from the positive (+) terminal of the battery.
d) Reconnect the vehicle battery ground wire.
Note: Skip steps (a) and (d) if battery is not in a vehicle.
WARNING: Always disconnect in this sequence to avoid possible shock.
NOTE: It is important to disconnect power to the pump when not in use for safety reasons. ALWAYS verify that the power has been disconnected
before adding chemicals or servicing.
A remote switch is recommended for temporarily shutting off the pump’s operation.
Call NorthStar Product Support at 1-800-270-0810 to order NorthStar Item #250555 for pump models 2683061, 2683062, 2684061, 2684062, 2685561, and 2685562. Order Item #777493 for pump models
2681042, 2682271, 2682272, 26815151, 26815152, and 26811102.
Positive (red)
Negative (black)
2687061, 2687062
Negative
(black wire)
Positive
(red wire)
2681042, 2682271, 2682272, 2683061,
2683062, 2684061,
2684062, 2685561, 2685562, 26811102,
26815151, 26815152
Installation (continued)
11
Step Four: Check and test completed assembly.
WARNING
Check and test completed assembly
Serious injury could result from chemical leaks if pump is improperly assembled or the design
of the pump is modified.
Follow the steps below to ensure the pump is properly assembled. Never modify the pump design.
1. Check
assembly
Check assembly to assure the pump is properly assembled and in safe
working condition:
2. Test with
water
Test the system for leaks with water:
a) Fill the tank with water.
b) The pump is an “on demand” pump. When turned on, the pump will prime itself, then turn off once reaching pressure. When the flow
continues, the pump will automatically re-start.
c) Check for leaks throughout the system. If a leak is detected, fix the leak and re-test the system with water.
Operation – Important Safety Information
12
Now that you have completed and tested your assembly, there is some important safety and health
information you need to know with regard to handling and spraying chemicals.
WARNING
Carefully read and make sure you understand the following safety information before using the pump.
General Chemical Safety:
WARNING
Pesticides are hazardous chemicals.
Heed the warnings below and follow all instructions carefully.
Improper handling of chemicals can result in serious injury or illness, or cause damage to the
environment.
Chemical label. ALWAYS READ and FOLLOW all chemical label instructions.
Licensing/regulation. Refer to any applicable licensing restrictions or state/federal regulations
with regard to the application of the particular chemical you plan to use.
Emergency procedures. Before handling chemicals, carefully review the “Chemical Accident
Procedures” listed later in this section, as well as the “Statement of Practical Treatment” on the chemical label.
Inhalation/contact. ALWAYS take precautions to avoid inhaling or coming into contact with the chemical.
Personal protective equipment. ALWAYS wear protective clothing, eye protection, and
chemical-resistant gloves when operating and cleaning the pump. Wear additional protective gear (such as facemask or apron) as recommended on the chemical label.
Children/pets. Pesticides can be especially toxic to children and animals. ALWAYS exercise extra caution around children. Keep pump and all spray materials away from children and
animals.
Ventilation. ALWAYS ensure there is adequate ventilation when mixing, pouring, or spraying.
Flammables. NEVER use any flammable chemicals in the pump.
Corrosives. DO NOT use corrosive chemicals in the pump. They can weaken the pump and its parts, resulting in leaks. Check with the chemical manufacturer to ensure chemical is
compatible with all components of the pump.
Chemical interaction. ALWAYS flush the pump before switching chemicals. Different
chemicals may interact dangerously with each other.
Chemical storage. ALWAYS store pesticides in a properly labeled container and in a secure
location per the manufacturer’s recommendations.
Health monitoring. Monitor the health of operators who are frequently exposed to pesticides, as recommended by the chemical label or local/federal regulations.
Operation – Important Safety Information (continued)
13
Chemical Application Safety:
WARNING
Caution must be used when spraying chemicals to avoid unsafe exposure to humans and the environment.
Heed the warnings below and follow all instructions carefully.
Before Spraying
Pump prep. ALWAYS inspect and prepare the pump before use according to the directions provided in this manual.
Keep pump off. Do not turn on power to the pump until ready to spray in order to avoid unintentional spray release.
Wind speed. NEVER spray when wind speed exceeds 4 MPH in order to minimize spray drift.
Clear area/post. ALWAYS keep the work area clear of people and pets. POST warning
notices to restrict access by the public for the period recommended on chemical label.
Operator age. You must be 16 years of age or older to operate this pump. Pesticides are
especially toxic to children.
During Spraying
Over-application. DO NOT over-apply pesticide. Apply at a rate recommended by chemical manufacturer. Excess pesticide can be dangerous to humans, damage desirable plants, and
contaminate soil and water sources.
Children/pets. ALWAYS exercise extra caution when spraying near areas accessible to
children and pets.
Eating/smoking. DO NOT eat, drink, smoke, rub your eyes, or touch any part of your bare skin
while handling chemicals and spraying.
Heat/flames. DO NOT spray near open flames or sources of heat.
Spills. ALWAYS clean up spills immediately per instructions on the chemical label.
Unattended. ALWAYS turn off power to pump, and relieve system pressure before leaving
pump unattended.
Troubleshooting. ALWAYS refer to the safety instructions in the Troubleshooting Section before attempting any repairs.
After Spraying
Clean pump. ALWAYS clean the pump immediately after use according to the directions
provided in this manual.
Decontaminate. ALWAYS decontaminate yourself immediately after you are finished
spraying and handling chemicals. Wash all exposed areas of the body with soap and water and remove and launder clothing.
Chemical disposal/storage. ALWAYS dispose of or store remaining chemicals properly as
recommended on the chemical label.
Operation – Important Safety Information (continued)
14
Chemical accident procedures:
WARNING
Before you use the pump, review the following information with regard to handling
accidents.
Chemical spills, pump leaks, personal contamination, and poisoning are accident situations which you may encounter.
All require an immediate response – See instructions below.
Pump leak In the event that the pump develops a leak while spraying chemicals, you
must immediately stop spraying.
Turn off power to the pump and follow the directions below, as
applicable.
Bodily chemical
contact
Personal contamination can occur when chemicals splash, spill, or spray
directly onto a person.
1. Follow the emergency first aid instructions on the chemical label listed in
the “First Aid” or “Statements of Practical Treatment” section.
General procedures include: a) Eyes – immediately flush with water or follow other directions as
specified on the chemical label. b) Skin – immediately wash all contaminated skin surfaces with soap
and water, or follow directions as specified on the chemical label.
c) Clothing – remove contaminated clothing immediately. Dispose of heavily contaminated clothing per the instructions on the chemical
label for safe chemical/container disposal.
2. Seek medical advice if instructed on the label, or if the victim experiences
symptoms of harmful effects such as burning, swelling, nausea, chest pain, difficulty breathing, dizziness or confusion. When seeking medical
advice, be sure to bring the chemical product label.
Poisoning by
ingestion or
inhalation
In case of poisoning from ingestion or inhalation:
IF THE VICTIM HAS COLLAPSED OR IS NOT BREATHING, CALL
911. Otherwise:
1. If you are the victim, immediately seek assistance from nearby personnel
because you may become incapacitated.
2. Follow the emergency first aid instructions on the chemical label in the
“First Aid” or “Statement of Practical Treatment” section.
3. Call a poison control center for further advice. In the U.S., call 1-800-
222-1222 to be automatically linked to the nearest certified poison
control center. Have the chemical label available for reference.
Chemical spills Chemical spills must be quickly contained and properly cleaned up.
Refer to the chemical label for any specific clean-up instructions with regard
to the chemical spilled.
Operation – Important Safety Information (continued)
15
General procedures include: 1. Control the spill by stopping the source of the spill. If the source of the
spill is a container leak, place the leaking container in a larger, watertight
container. Keep unprotected people away from the spill site. 2. Contain the spill so that it does not spread and get into water sources.
Use a shovel or other tool to make a dike around the spill with soil, sod,
or absorbent material. 3. Clean up the spill immediately -- Absorbent materials like ground
corncobs or pet litter should be spread on the spill area to soak up the
pesticide. The contaminated material should then shoveled into a leak-proof container. Do not flush the spill area with water until you receive
advice as directed below.
4. Seek additional advice from the chemical manufacturer and your state’s pesticide regulatory agency regarding decontamination of the spill site:
- Chemical manufacturer. The chemical label provides contact
information for the chemical manufacturer. - State pesticide regulatory agency. In the U.S., call the National
Pesticide Information Center at 1-800-858-7378 for assistance in
determining how to contact your state’s pesticide regulatory agency.
Operation – Preparing the Pump for Each Use
16
If the pump has been used previously, it must be prepared BEFORE EACH SUBSEQUENT USE.
WARNING
Read instructions below carefully for inspecting and preparing the pump.
Damaged or clogged equipment could result in leaks or uncontrolled spray.
Leaks could result in injury to the operator or bystanders from chemical exposure, or cause damage to the environment.
Important safety rules: Power off. Make sure all power is OFF before cleaning, inspecting, or servicing the pump.
Guards / shields. Make sure all guards and shields are replaced after servicing the pump.
Replacement parts. If a part needs replacement, only use parts that meet the manufacturer’s
specifications. Replacement parts that do not meet specifications may result in a safety
hazard or poor operation of the sprayer.
1. Ensure clean
system
Ensure the pump has been thoroughly flushed and drained of all
residual chemicals from prior uses.
2. Inspect &
repair
Inspect and test the sprayer thoroughly:
a) Inspect hoses/ lines for exposed mesh and holes. Replace all worn or damaged hoses/ lines.
b) Inspect fittings for cracks and leaks. Replace all damaged fittings
with original NorthStar parts. c) Partially fill system with plain water and spray to test for leaks.
Repair as needed.
IMPORTANT: After any repair work has been done, ALWAYS test for
leaks with water one final time before using.
Be certain the pump materials will be compatible with the chemical being pumped. NorthStar pumps are intended for intermittent or continuous duty when the proper operating criteria are met. If unsure of
the chemical compatibility with the NorthStar pump components or the motor’s intended design, please
call NorthStar Product Support at 1-800-270-0810 for assistance.
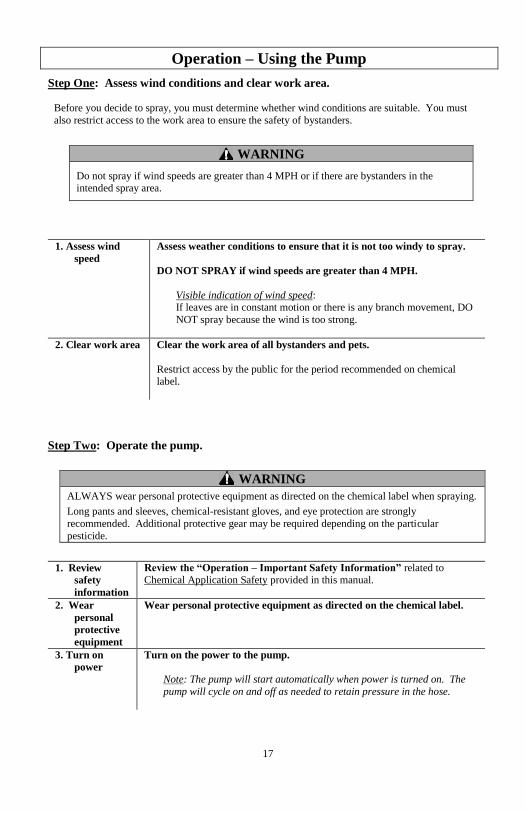
Operation – Using the Pump
17
Step One: Assess wind conditions and clear work area.
Before you decide to spray, you must determine whether wind conditions are suitable. You must
also restrict access to the work area to ensure the safety of bystanders.
WARNING
Do not spray if wind speeds are greater than 4 MPH or if there are bystanders in the intended spray area.
1. Assess wind
speed
Assess weather conditions to ensure that it is not too windy to spray.
DO NOT SPRAY if wind speeds are greater than 4 MPH.
Visible indication of wind speed: If leaves are in constant motion or there is any branch movement, DO
NOT spray because the wind is too strong.
2. Clear work area Clear the work area of all bystanders and pets.
Restrict access by the public for the period recommended on chemical label.
Step Two: Operate the pump.
WARNING
ALWAYS wear personal protective equipment as directed on the chemical label when spraying.
Long pants and sleeves, chemical-resistant gloves, and eye protection are strongly
recommended. Additional protective gear may be required depending on the particular
pesticide.
1. Review
safety
information
Review the “Operation – Important Safety Information” related to Chemical Application Safety provided in this manual.
2. Wear
personal
protective
equipment
Wear personal protective equipment as directed on the chemical label.
3. Turn on
power
Turn on the power to the pump.
Note: The pump will start automatically when power is turned on. The
pump will cycle on and off as needed to retain pressure in the hose.
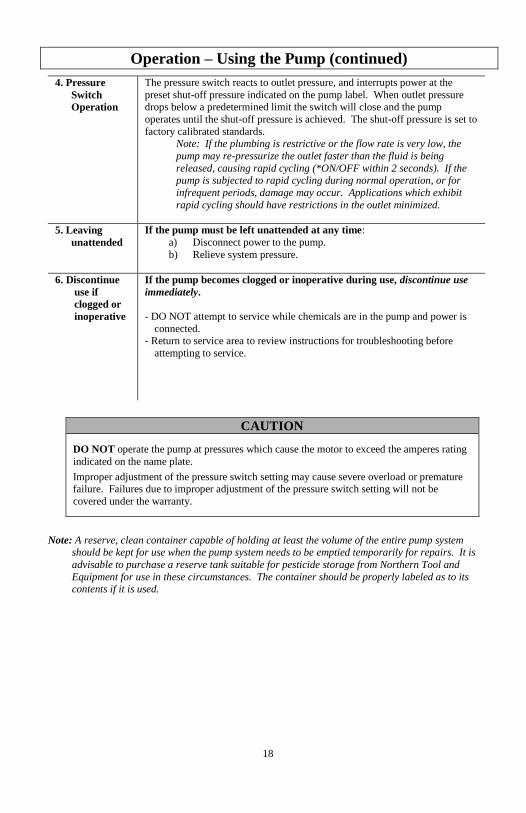
Operation – Using the Pump (continued)
18
4. Pressure
Switch
Operation
The pressure switch reacts to outlet pressure, and interrupts power at the
preset shut-off pressure indicated on the pump label. When outlet pressure drops below a predetermined limit the switch will close and the pump
operates until the shut-off pressure is achieved. The shut-off pressure is set to
factory calibrated standards. Note: If the plumbing is restrictive or the flow rate is very low, the
pump may re-pressurize the outlet faster than the fluid is being
released, causing rapid cycling (*ON/OFF within 2 seconds). If the pump is subjected to rapid cycling during normal operation, or for
infrequent periods, damage may occur. Applications which exhibit
rapid cycling should have restrictions in the outlet minimized.
5. Leaving
unattended
If the pump must be left unattended at any time:
a) Disconnect power to the pump.
b) Relieve system pressure.
6. Discontinue
use if
clogged or
inoperative
If the pump becomes clogged or inoperative during use, discontinue use
immediately.
- DO NOT attempt to service while chemicals are in the pump and power is
connected. - Return to service area to review instructions for troubleshooting before
attempting to service.
CAUTION
DO NOT operate the pump at pressures which cause the motor to exceed the amperes rating
indicated on the name plate.
Improper adjustment of the pressure switch setting may cause severe overload or premature failure. Failures due to improper adjustment of the pressure switch setting will not be
covered under the warranty.
Note: A reserve, clean container capable of holding at least the volume of the entire pump system
should be kept for use when the pump system needs to be emptied temporarily for repairs. It is
advisable to purchase a reserve tank suitable for pesticide storage from Northern Tool and
Equipment for use in these circumstances. The container should be properly labeled as to its contents if it is used.
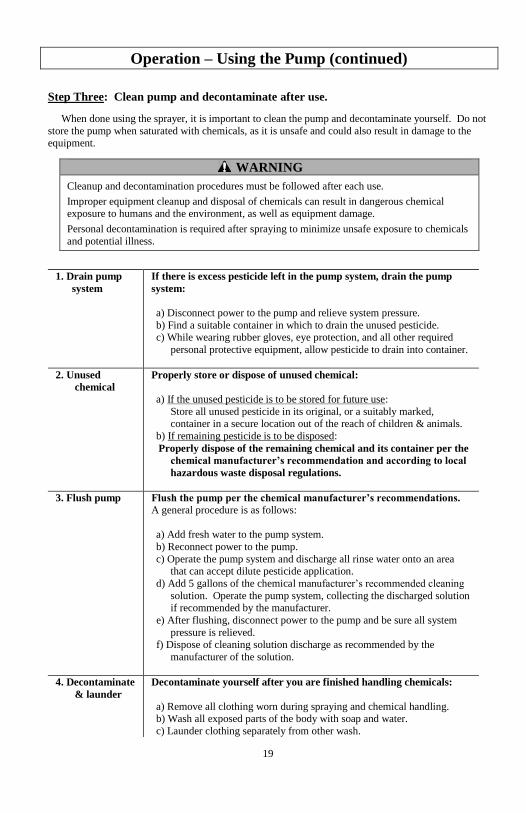
Operation – Using the Pump (continued)
19
Step Three: Clean pump and decontaminate after use.
When done using the sprayer, it is important to clean the pump and decontaminate yourself. Do not
store the pump when saturated with chemicals, as it is unsafe and could also result in damage to the equipment.
WARNING
Cleanup and decontamination procedures must be followed after each use.
Improper equipment cleanup and disposal of chemicals can result in dangerous chemical exposure to humans and the environment, as well as equipment damage.
Personal decontamination is required after spraying to minimize unsafe exposure to chemicals
and potential illness.
1. Drain pump
system
If there is excess pesticide left in the pump system, drain the pump
system:
a) Disconnect power to the pump and relieve system pressure.
b) Find a suitable container in which to drain the unused pesticide. c) While wearing rubber gloves, eye protection, and all other required
personal protective equipment, allow pesticide to drain into container.
2. Unused
chemical
Properly store or dispose of unused chemical:
a) If the unused pesticide is to be stored for future use:
Store all unused pesticide in its original, or a suitably marked, container in a secure location out of the reach of children & animals.
b) If remaining pesticide is to be disposed:
Properly dispose of the remaining chemical and its container per the
chemical manufacturer’s recommendation and according to local
hazardous waste disposal regulations.
3. Flush pump Flush the pump per the chemical manufacturer’s recommendations. A general procedure is as follows:
a) Add fresh water to the pump system.
b) Reconnect power to the pump.
c) Operate the pump system and discharge all rinse water onto an area that can accept dilute pesticide application.
d) Add 5 gallons of the chemical manufacturer’s recommended cleaning
solution. Operate the pump system, collecting the discharged solution if recommended by the manufacturer.
e) After flushing, disconnect power to the pump and be sure all system
pressure is relieved. f) Dispose of cleaning solution discharge as recommended by the
manufacturer of the solution.
4. Decontaminate
& launder
Decontaminate yourself after you are finished handling chemicals:
a) Remove all clothing worn during spraying and chemical handling. b) Wash all exposed parts of the body with soap and water.
c) Launder clothing separately from other wash.
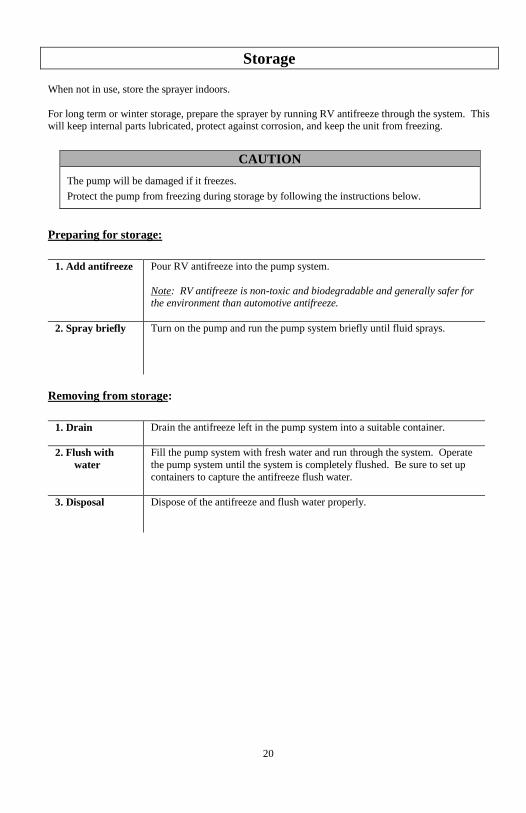
Storage
20
When not in use, store the sprayer indoors.
For long term or winter storage, prepare the sprayer by running RV antifreeze through the system. This will keep internal parts lubricated, protect against corrosion, and keep the unit from freezing.
CAUTION
The pump will be damaged if it freezes.
Protect the pump from freezing during storage by following the instructions below.
Preparing for storage:
1. Add antifreeze Pour RV antifreeze into the pump system.
Note: RV antifreeze is non-toxic and biodegradable and generally safer for the environment than automotive antifreeze.
2. Spray briefly Turn on the pump and run the pump system briefly until fluid sprays.
Removing from storage:
1. Drain Drain the antifreeze left in the pump system into a suitable container.
2. Flush with
water
Fill the pump system with fresh water and run through the system. Operate
the pump system until the system is completely flushed. Be sure to set up
containers to capture the antifreeze flush water.
3. Disposal Dispose of the antifreeze and flush water properly.
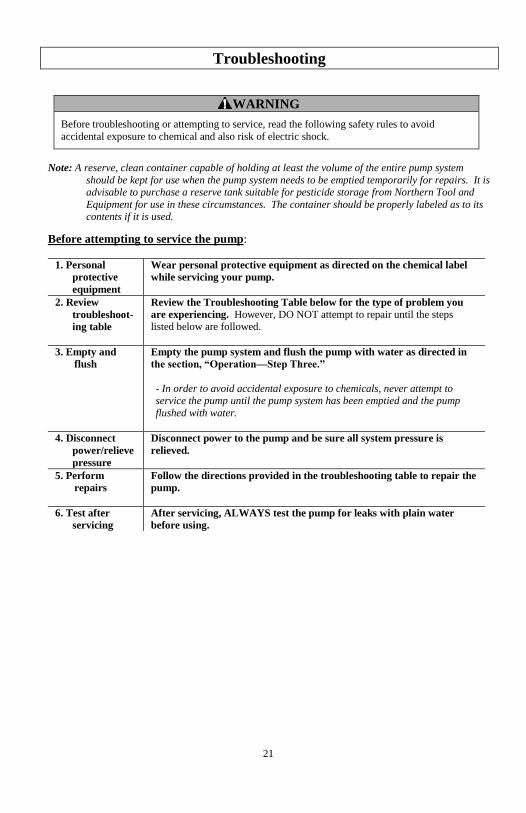
Troubleshooting
21
WARNING
Before troubleshooting or attempting to service, read the following safety rules to avoid
accidental exposure to chemical and also risk of electric shock.
Note: A reserve, clean container capable of holding at least the volume of the entire pump system
should be kept for use when the pump system needs to be emptied temporarily for repairs. It is advisable to purchase a reserve tank suitable for pesticide storage from Northern Tool and
Equipment for use in these circumstances. The container should be properly labeled as to its contents if it is used.
Before attempting to service the pump:
1. Personal
protective
equipment
Wear personal protective equipment as directed on the chemical label
while servicing your pump.
2. Review
troubleshoot-
ing table
Review the Troubleshooting Table below for the type of problem you
are experiencing. However, DO NOT attempt to repair until the steps listed below are followed.
3. Empty and
flush
Empty the pump system and flush the pump with water as directed in
the section, “Operation—Step Three.”
- In order to avoid accidental exposure to chemicals, never attempt to service the pump until the pump system has been emptied and the pump
flushed with water.
4. Disconnect
power/relieve
pressure
Disconnect power to the pump and be sure all system pressure is
relieved.
5. Perform
repairs
Follow the directions provided in the troubleshooting table to repair the
pump.
6. Test after
servicing
After servicing, ALWAYS test the pump for leaks with plain water
before using.
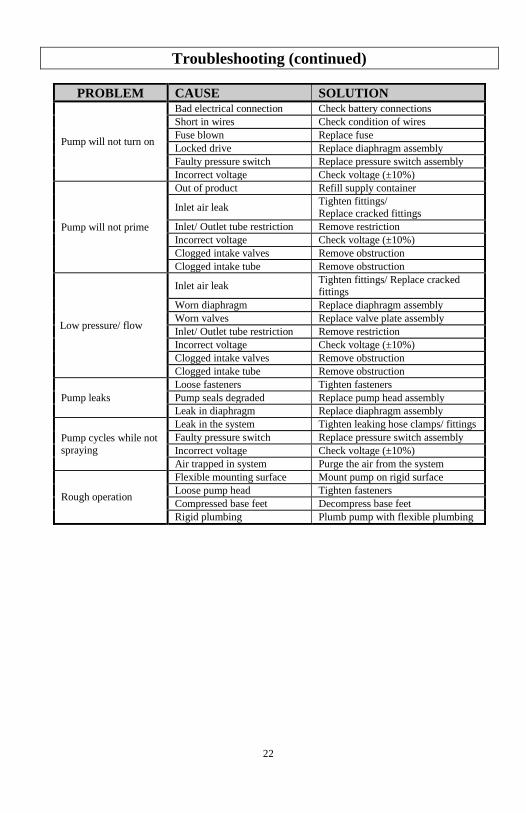
Troubleshooting (continued)
22
PROBLEM CAUSE SOLUTION
Pump will not turn on
Bad electrical connection Check battery connections
Short in wires Check condition of wires
Fuse blown Replace fuse
Locked drive Replace diaphragm assembly
Faulty pressure switch Replace pressure switch assembly
Incorrect voltage Check voltage (±10%)
Pump will not prime
Out of product Refill supply container
Inlet air leak Tighten fittings/
Replace cracked fittings
Inlet/ Outlet tube restriction Remove restriction
Incorrect voltage Check voltage (±10%)
Clogged intake valves Remove obstruction
Clogged intake tube Remove obstruction
Low pressure/ flow
Inlet air leak Tighten fittings/ Replace cracked fittings
Worn diaphragm Replace diaphragm assembly
Worn valves Replace valve plate assembly
Inlet/ Outlet tube restriction Remove restriction
Incorrect voltage Check voltage (±10%)
Clogged intake valves Remove obstruction
Clogged intake tube Remove obstruction
Pump leaks
Loose fasteners Tighten fasteners
Pump seals degraded Replace pump head assembly
Leak in diaphragm Replace diaphragm assembly
Pump cycles while not
spraying
Leak in the system Tighten leaking hose clamps/ fittings
Faulty pressure switch Replace pressure switch assembly
Incorrect voltage Check voltage (±10%)
Air trapped in system Purge the air from the system
Rough operation
Flexible mounting surface Mount pump on rigid surface
Loose pump head Tighten fasteners
Compressed base feet Decompress base feet
Rigid plumbing Plumb pump with flexible plumbing
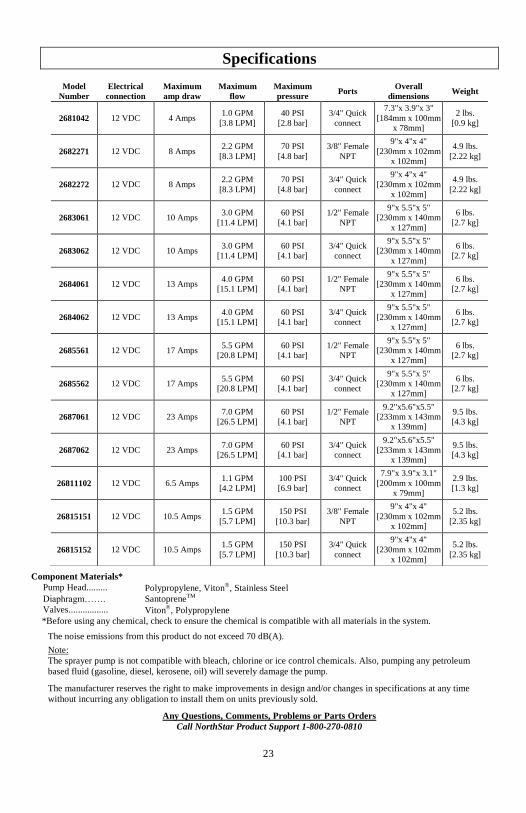
Specifications
23
Component Materials*
Pump Head......... Polypropylene, Viton, Stainless Steel
Diaphragm……. SantopreneTM
Valves................. Viton, Polypropylene
*Before using any chemical, check to ensure the chemical is compatible with all materials in the system.
The noise emissions from this product do not exceed 70 dB(A).
Note:
The sprayer pump is not compatible with bleach, chlorine or ice control chemicals. Also, pumping any petroleum
based fluid (gasoline, diesel, kerosene, oil) will severely damage the pump.
The manufacturer reserves the right to make improvements in design and/or changes in specifications at any time
without incurring any obligation to install them on units previously sold.
Any Questions, Comments, Problems or Parts Orders
Call NorthStar Product Support 1-800-270-0810
Model
Number
Electrical
connection
Maximum
amp draw
Maximum
flow
Maximum
pressure Ports
Overall
dimensions Weight
2681042 12 VDC 4 Amps 1.0 GPM
[3.8 LPM]
40 PSI
[2.8 bar]
3/4" Quick
connect
7.3"x 3.9"x 3"
[184mm x 100mm
x 78mm]
2 lbs.
[0.9 kg]
2682271 12 VDC 8 Amps 2.2 GPM
[8.3 LPM]
70 PSI
[4.8 bar]
3/8" Female
NPT
9"x 4"x 4"
[230mm x 102mm
x 102mm]
4.9 lbs.
[2.22 kg]
2682272 12 VDC 8 Amps 2.2 GPM
[8.3 LPM]
70 PSI
[4.8 bar]
3/4" Quick
connect
9"x 4"x 4"
[230mm x 102mm
x 102mm]
4.9 lbs.
[2.22 kg]
2683061 12 VDC 10 Amps 3.0 GPM
[11.4 LPM]
60 PSI
[4.1 bar]
1/2" Female
NPT
9"x 5.5"x 5"
[230mm x 140mm
x 127mm]
6 lbs.
[2.7 kg]
2683062 12 VDC 10 Amps 3.0 GPM
[11.4 LPM]
60 PSI
[4.1 bar]
3/4" Quick
connect
9"x 5.5"x 5"
[230mm x 140mm
x 127mm]
6 lbs.
[2.7 kg]
2684061 12 VDC 13 Amps 4.0 GPM
[15.1 LPM]
60 PSI
[4.1 bar]
1/2" Female
NPT
9"x 5.5"x 5"
[230mm x 140mm
x 127mm]
6 lbs.
[2.7 kg]
2684062 12 VDC 13 Amps 4.0 GPM
[15.1 LPM]
60 PSI
[4.1 bar]
3/4" Quick
connect
9"x 5.5"x 5"
[230mm x 140mm
x 127mm]
6 lbs.
[2.7 kg]
2685561 12 VDC 17 Amps 5.5 GPM
[20.8 LPM]
60 PSI
[4.1 bar]
1/2" Female
NPT
9"x 5.5"x 5"
[230mm x 140mm
x 127mm]
6 lbs.
[2.7 kg]
2685562 12 VDC 17 Amps 5.5 GPM
[20.8 LPM]
60 PSI
[4.1 bar]
3/4" Quick
connect
9"x 5.5"x 5"
[230mm x 140mm
x 127mm]
6 lbs.
[2.7 kg]
2687061 12 VDC 23 Amps 7.0 GPM
[26.5 LPM]
60 PSI
[4.1 bar]
1/2" Female
NPT
9.2"x5.6"x5.5"
[233mm x 143mm
x 139mm]
9.5 lbs.
[4.3 kg]
2687062 12 VDC 23 Amps 7.0 GPM
[26.5 LPM]
60 PSI
[4.1 bar]
3/4" Quick
connect
9.2"x5.6"x5.5"
[233mm x 143mm
x 139mm]
9.5 lbs.
[4.3 kg]
26811102 12 VDC 6.5 Amps 1.1 GPM
[4.2 LPM]
100 PSI
[6.9 bar]
3/4" Quick
connect
7.9"x 3.9"x 3.1"
[200mm x 100mm
x 79mm]
2.9 lbs.
[1.3 kg]
26815151 12 VDC 10.5 Amps 1.5 GPM
[5.7 LPM]
150 PSI
[10.3 bar]
3/8" Female
NPT
9"x 4"x 4"
[230mm x 102mm
x 102mm]
5.2 lbs.
[2.35 kg]
26815152 12 VDC 10.5 Amps 1.5 GPM
[5.7 LPM]
150 PSI
[10.3 bar]
3/4" Quick
connect
9"x 4"x 4"
[230mm x 102mm
x 102mm]
5.2 lbs.
[2.35 kg]
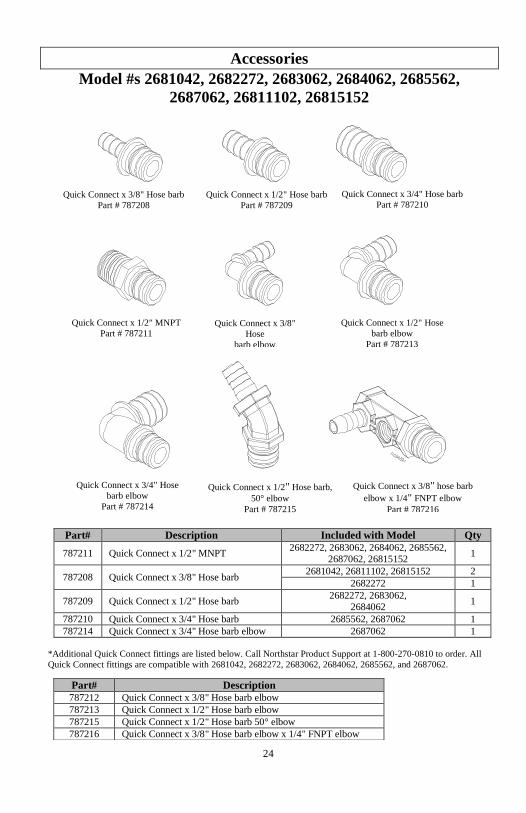
Accessories
24
Model #s 2681042, 2682272, 2683062, 2684062, 2685562,
2687062, 26811102, 26815152
Part# Description Included with Model Qty
787211 Quick Connect x 1/2" MNPT 2682272, 2683062, 2684062, 2685562,
2687062, 26815152 1
787208 Quick Connect x 3/8" Hose barb 2681042, 26811102, 26815152 2
2682272 1
787209 Quick Connect x 1/2" Hose barb 2682272, 2683062,
2684062 1
787210 Quick Connect x 3/4" Hose barb 2685562, 2687062 1
787214 Quick Connect x 3/4" Hose barb elbow 2687062 1
*Additional Quick Connect fittings are listed below. Call Northstar Product Support at 1-800-270-0810 to order. All
Quick Connect fittings are compatible with 2681042, 2682272, 2683062, 2684062, 2685562, and 2687062.
Part# Description
787212 Quick Connect x 3/8" Hose barb elbow
787213 Quick Connect x 1/2" Hose barb elbow
787215 Quick Connect x 1/2" Hose barb 50° elbow
787216 Quick Connect x 3/8" Hose barb elbow x 1/4" FNPT elbow
Quick Connect x 3/8" Hose barb
Part # 787208
Quick Connect x 1/2" Hose barb
Part # 787209
Quick Connect x 3/4" Hose barb
Part # 787210
Quick Connect x 1/2" MNPT
Part # 787211 Quick Connect x 3/8"
Hose
barb elbow
Part # 787212
Quick Connect x 1/2" Hose
barb elbow
Part # 787213
Quick Connect x 3/4" Hose
barb elbow
Part # 787214
Quick Connect x 1/2" Hose barb,
50° elbow
Part # 787215
Quick Connect x 3/8" hose barb
elbow x 1/4" FNPT elbow
Part # 787216
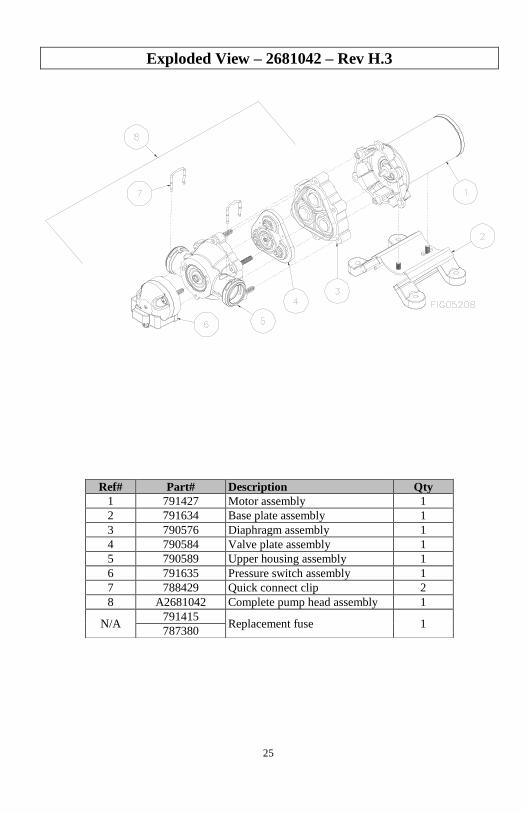
Exploded View – 2681042 – Rev H.3
25
Ref# Part# Description Qty
1 791427 Motor assembly 1
2 791634 Base plate assembly 1
3 790576 Diaphragm assembly 1
4 790584 Valve plate assembly 1
5 790589 Upper housing assembly 1
6 791635 Pressure switch assembly 1
7 788429 Quick connect clip 2
8 A2681042 Complete pump head assembly 1
N/A 791415
Replacement fuse 1 787380
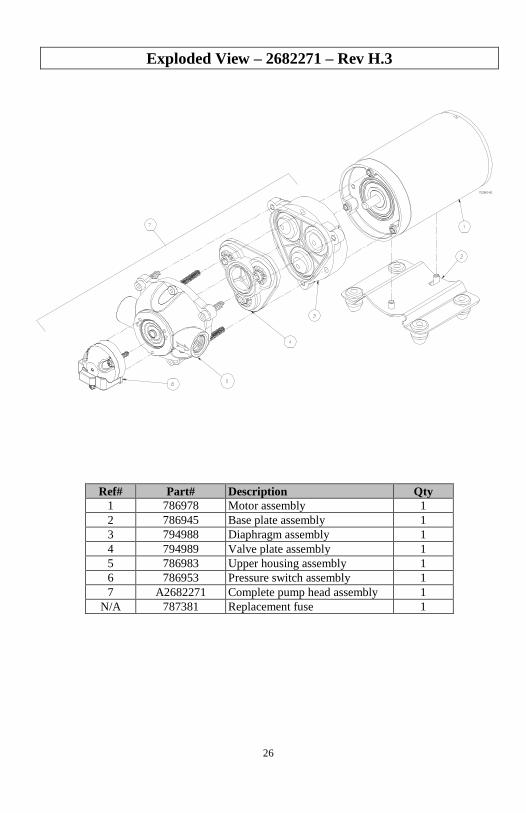
Exploded View – 2682271 – Rev H.3
26
Ref# Part# Description Qty
1 786978 Motor assembly 1
2 786945 Base plate assembly 1
3 794988 Diaphragm assembly 1
4 794989 Valve plate assembly 1
5 786983 Upper housing assembly 1
6 786953 Pressure switch assembly 1
7 A2682271 Complete pump head assembly 1
N/A 787381 Replacement fuse 1
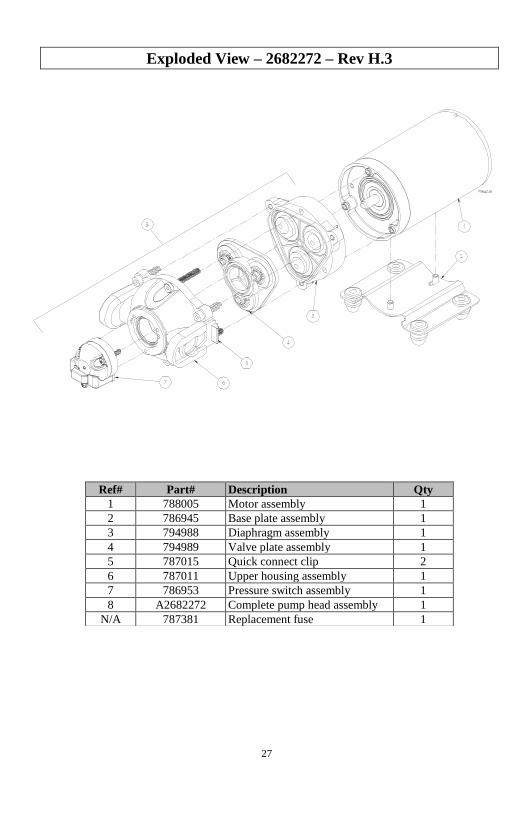
Exploded View – 2682272 – Rev H.3
27
Ref# Part# Description Qty
1 788005 Motor assembly 1
2 786945 Base plate assembly 1
3 794988 Diaphragm assembly 1
4 794989 Valve plate assembly 1
5 787015 Quick connect clip 2
6 787011 Upper housing assembly 1
7 786953 Pressure switch assembly 1
8 A2682272 Complete pump head assembly 1
N/A 787381 Replacement fuse 1
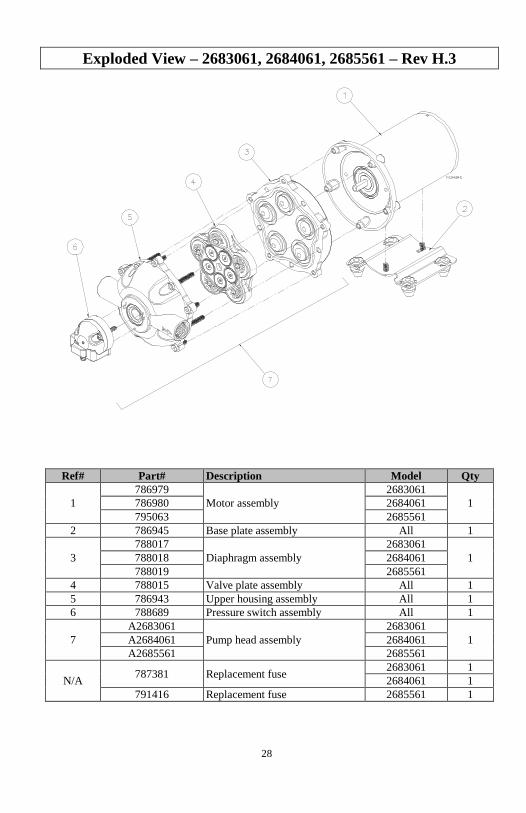
Exploded View – 2683061, 2684061, 2685561 – Rev H.3
28
Ref# Part# Description Model Qty
1
786979
Motor assembly
2683061
1 786980 2684061
795063 2685561
2 786945 Base plate assembly All 1
3
788017
Diaphragm assembly
2683061
1 788018 2684061
788019 2685561
4 788015 Valve plate assembly All 1
5 786943 Upper housing assembly All 1
6 788689 Pressure switch assembly All 1
7
A2683061
Pump head assembly
2683061
1 A2684061 2684061
A2685561 2685561
N/A 787381 Replacement fuse
2683061 1
2684061 1
791416 Replacement fuse 2685561 1
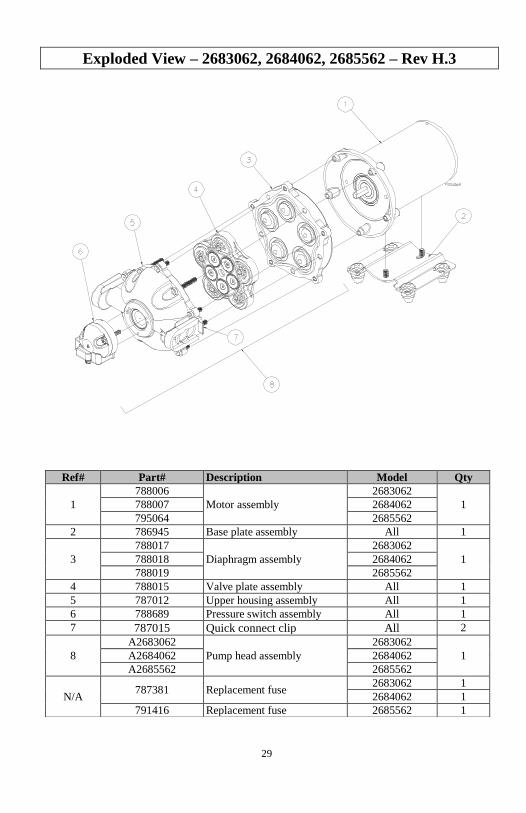
Exploded View – 2683062, 2684062, 2685562 – Rev H.3
29
Ref# Part# Description Model Qty
1
788006
Motor assembly
2683062
1 788007 2684062
795064 2685562
2 786945 Base plate assembly All 1
3
788017
Diaphragm assembly
2683062
1 788018 2684062
788019 2685562
4 788015 Valve plate assembly All 1
5 787012 Upper housing assembly All 1
6 788689 Pressure switch assembly All 1
7 787015 Quick connect clip All 2
8
A2683062
Pump head assembly
2683062
1 A2684062 2684062
A2685562 2685562
N/A 787381 Replacement fuse
2683062 1
2684062 1
791416 Replacement fuse 2685562 1
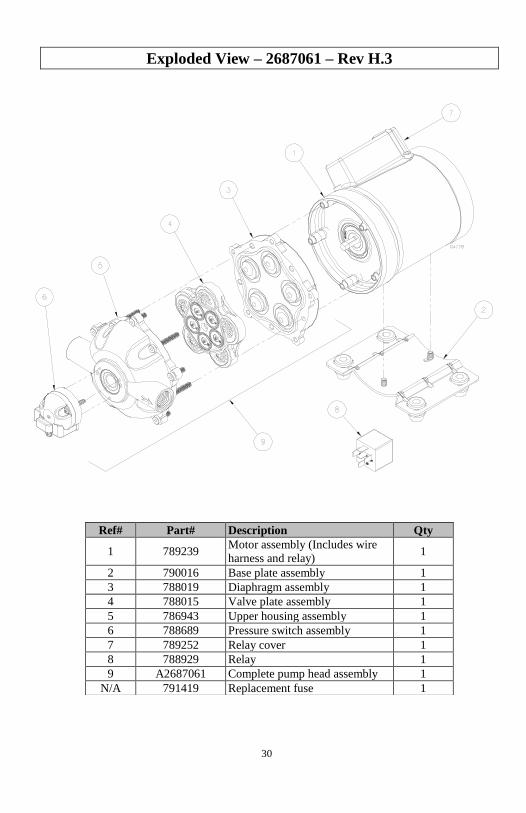
Exploded View – 2687061 – Rev H.3
30
Ref# Part# Description Qty
1 789239 Motor assembly (Includes wire
harness and relay) 1
2 790016 Base plate assembly 1
3 788019 Diaphragm assembly 1
4 788015 Valve plate assembly 1
5 786943 Upper housing assembly 1
6 788689 Pressure switch assembly 1
7 789252 Relay cover 1
8 788929 Relay 1
9 A2687061 Complete pump head assembly 1
N/A 791419 Replacement fuse 1
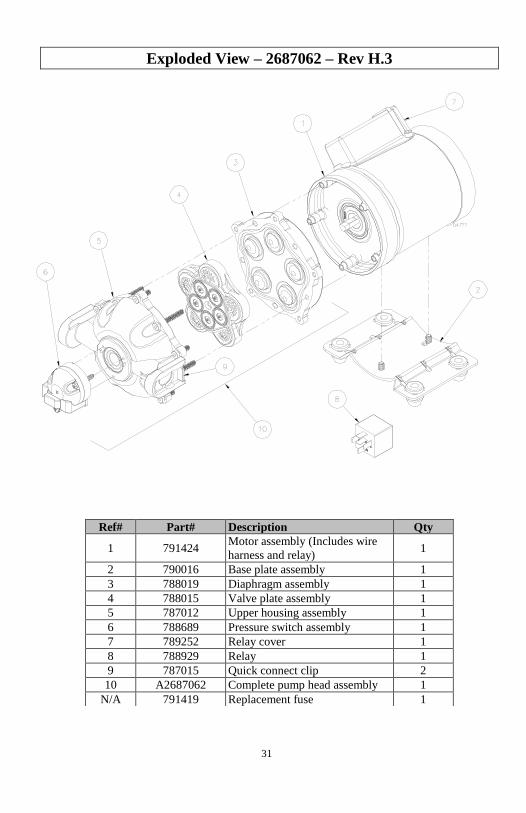
Exploded View – 2687062 – Rev H.3
31
Ref# Part# Description Qty
1 791424 Motor assembly (Includes wire
harness and relay) 1
2 790016 Base plate assembly 1
3 788019 Diaphragm assembly 1
4 788015 Valve plate assembly 1
5 787012 Upper housing assembly 1
6 788689 Pressure switch assembly 1
7 789252 Relay cover 1
8 788929 Relay 1
9 787015 Quick connect clip 2
10 A2687062 Complete pump head assembly 1
N/A 791419 Replacement fuse 1
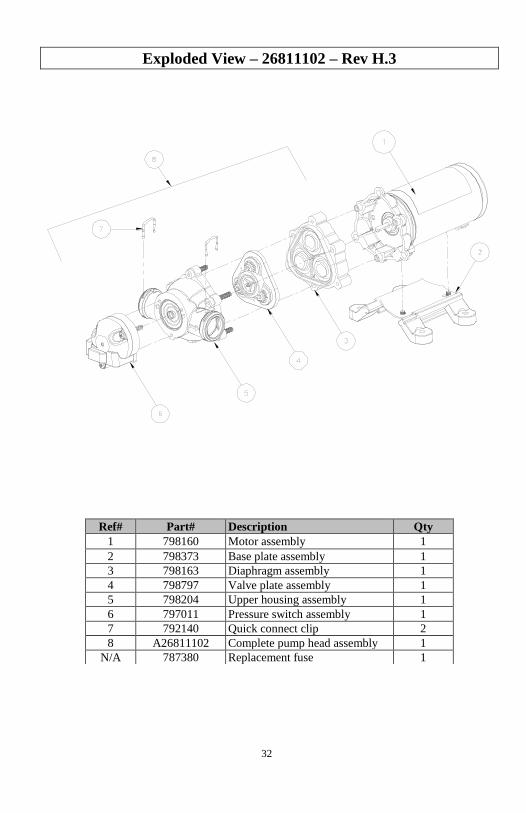
Exploded View – 26811102 – Rev H.3
32
Ref# Part# Description Qty
1 798160 Motor assembly 1
2 798373 Base plate assembly 1
3 798163 Diaphragm assembly 1
4 798797 Valve plate assembly 1
5 798204 Upper housing assembly 1
6 797011 Pressure switch assembly 1
7 792140 Quick connect clip 2
8 A26811102 Complete pump head assembly 1
N/A 787380 Replacement fuse 1
Exploded View – 26815151 – Rev H.3
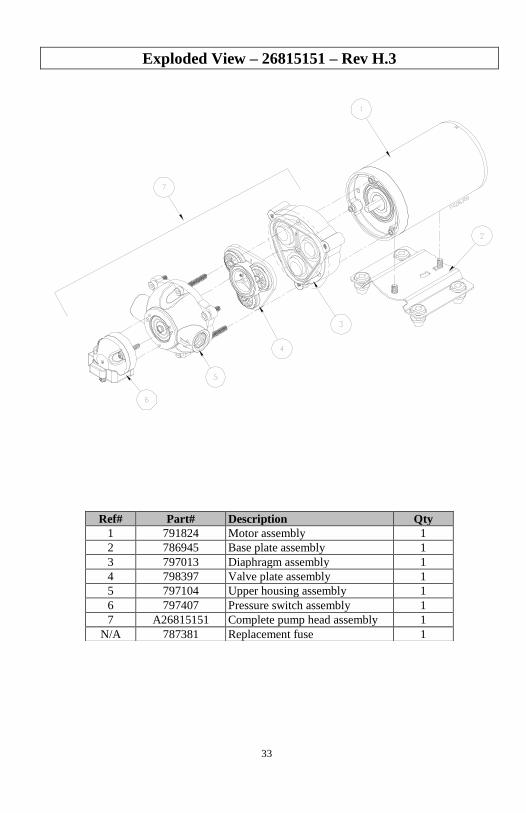
33
Ref# Part# Description Qty
1 791824 Motor assembly 1
2 786945 Base plate assembly 1
3 797013 Diaphragm assembly 1
4 798397 Valve plate assembly 1
5 797104 Upper housing assembly 1
6 797407 Pressure switch assembly 1
7 A26815151 Complete pump head assembly 1
N/A 787381 Replacement fuse 1
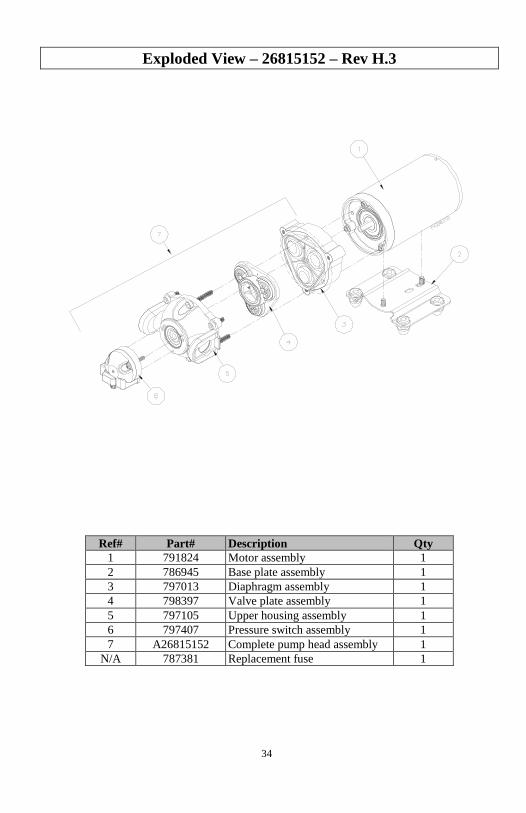
Exploded View – 26815152 – Rev H.3
34
Ref# Part# Description Qty
1 791824 Motor assembly 1
2 786945 Base plate assembly 1
3 797013 Diaphragm assembly 1
4 798397 Valve plate assembly 1
5 797105 Upper housing assembly 1
6 797407 Pressure switch assembly 1
7 A26815152 Complete pump head assembly 1
N/A 787381 Replacement fuse 1
Limited Warranty
35
Dear Valued Customer:
The NorthStar Product you just purchased is built with the finest material and craftsmanship. Use this
product properly and enjoy the benefits from its high performance. By purchasing a NorthStar product, you show a desire for quality and durability. Like all mechanical equipment this unit
requires a due amount of care. Treat this unit like the high quality piece of machinery it is. Neglect
and improper handling may impair its performance. Please thoroughly read the instructions and understand the operation before using your product.
Limited Warranty
NorthStar shall warranty any piece of equipment manufactured, or parts of equipment manufactured,
to be free from defects in material or workmanship for a period of 2 years for noncommercial/nonrental use and a period of 90 days for commercial/rental use from the date of
purchase by user.
NorthStar shall warranty any wear item, including, but not limited to, valves, seals, pump diaphragms,
hoses, and filter elements to be free from defects in material or workmanship for a period of 90 days
from the date of purchase by user. This warranty applies to the original purchaser of the equipment and is non-transferable. Verification of purchase is the responsibility of the buyer. Parts will be
replaced or repaired at no charge, except when the equipment has failed due to lack of proper
maintenance. Any misuse, abuse, alteration or improper installation or operations will void warranty. Determining whether a part is to be replaced or repaired is the sole decision of NorthStar.
NOTE: Some services performed by parties other than NorthStar may void warranty.
This warranty covers parts only. It will not provide for replacement of complete products due to
defective parts.
Components not manufactured by NorthStar are guaranteed by their manufacturer and can be
serviced at factory-authorized locations near you. Any costs incurred due to replacement or
repair of items outside of a NorthStar approved facility is the responsibility of the buyer and not
covered under warranty. NorthStar can supply you with the service center location in your
area.
This warranty specifically excludes the following; failure of parts due to damage caused by accident, fire, flood, windstorm, acts of God, applications not approved by NorthStar in writing, corrosion
caused by chemicals, use of replacement parts which do not conform to manufacturer’s specifications,
and damage caused by vandalism. Additional exclusions: loss of running time, inconvenience, loss of income, or loss of use, including any implied warranty of merchantability of fitness for a specific use.
Warranty does not cover items subject to normal wear such as tires, receptacles or any part subject to direct physical contact by the public. This warranty does not cover any personal injury or damage to
surrounding property caused by failure of any part.
This warranty is in lieu of any other warranty expressed or implied and NorthStar assumes no other
responsibility or liability outside that expressed within this warranty.
Please fill in the following information and have it on hand when you call in on a warranty claim.
Customer Number: ______________________________________________________________
Date of Purchase: _______________________________________________________________
NorthStar Serial Number: ________________________________________________________
Item Number: __________________________________________________________________
36
Northern Tool + Equipment Co., Inc.
Burnsville, MN 55306
NorthernTool.com
Made in China


