
ADOBE® EXTENSION MANAGER®
Help and tutorials
Februray 2013

Contents
Manage extensions 1........................................................................................................................................Downloading and installing extensions 2....................................................................................................................................
Managing extensions and sets 4................................................................................................................................................
Packaging and submitting extensions 6.....................................................................................................................................
Working from the command line 8..............................................................................................................................................
Manage extensions To learn more, view these recommended resources online.
Extension Manager Configuration File Referencearticle (May. 4, 2012)
Adobe Exchangearticle (Apr. 4, 2012)Download extensions
1
Downloading and installing extensions
To the top
Note:
To the top
To the top
About the Extension ManagerDownload extensionsInstall extensionsAbout signed extensionsMore topics
An extension is a piece of software that can be added to an Adobe application to enhance its capabilities. You can add extensions toDreamweaver , Flash , Fireworks , Photoshop , InDesign , InCopy , Illustrator , Adobe Premiere Pro , Contribute , and Prelude . Bridge isnot supported in CS6 or later.
About the Extension ManagerThe Extension Manager provides an easy and convenient way to install and delete extensions in Adobe applications, and to find information aboutextensions you installed. It also provides a convenient way to navigate to the Adobe Exchange site. You can find more extensions, get informationabout extensions, and rate extensions that you used.
The Extension Manager is automatically installed when you install your Adobe application.
The Extension Manager only displays extensions that were installed with the Extension Manager application or with Extension Managercommands from the command line. Extensions that are installed using a third-party installer or local changes made to your configuration files donot appear in the Extension Manager.
The Adobe Exchange website at www.adobe.com/go/exchange is a repository for many types of extensions. If you find a non-commercialextension you’re interested in, you can download and install it in an application using the Extension Manager. Some extensions on the Exchangeare commercial and cannot be downloaded immediately. The download link redirects you to the author’s website so you can obtain purchasinginformation.
Download extensionsYou can get more information about an extension, rate an extension you’ve used, or find more extensions on the Adobe Exchange.
1. Go to the Adobe Exchange by selecting File > Go to Adobe Exchange in the Extension Manager, or by enteringwww.adobe.com/go/exchange in your web browser.
2. Select an extension to start the download.3. Save the extension on your hard disk and note its location.
Install extensionsWhen installing extensions, make sure your version of Extension Manager matches the version of the products you are extending. For example,use Extension Manager CS6 to install extensions in Dreamweaver CS6. To manage extensions in earlier versions of the products, use the versionof Extension Manager installed with those products.
1. Double-click the extension file in Windows® Explorer (Windows) or in the Finder (Mac OS).2. Follow the onscreen instructions.3. If a warning appears for an unsigned extension, click the appropriate button. Not all unsigned extensions display a warning
before installing.
If the extension installs successfully, a description of the extension appears in the lower portion of the Extension Manager workspace.
Note the following:
For some types of extensions, the changes only take effect after you close and restart the application.
Some products, such as Adobe InDesign, include plug-ins that are required for the program to function properly. These plug-ins, and required extensions for other products, are locked when installed to prevent removing or disabling them. A Lock iconappears next to a required extension in the Extension Manager.
If an extension modifies a configuration file, such as menus.xml, Extension Manager creates a backup of the file (menus.xbk)before installing the extension. In the unlikely event that the extension damages the configuration file, you can restore it withthe backup file.
® ® ® ® ® ® ® ® ® ® ®
2
Twitter™ and Facebook posts are not covered under the terms of Creative Commons.
Legal Notices | Online Privacy Policy
Note:
To the top
To the top
Adobe recommends that you do not modify configuration files by hand. Incorrectly modifying them can cause significant portions of theproduct to fail and prevent the installation of other extensions. Modify configuration files only by using the Extension Manager.
About signed extensionsA digital signature identifies the publisher of the extension, and contains encrypted information that is unique to the signer and easily verified. Thedigital signature assures the user that the extension came from the publisher.
Digital signatures are verified with a digital certificate, which electronically establishes the publisher’s credentials. A digital certificate issued by acertificate authority certifies that a publisher and a particular extension are connected. This connection is similar to the way your driver’s licensephoto connects your identity with your personal details. Extensions signed by Adobe use a certificate issued by VeriSign. Extensions created bynon-Adobe developers can use a different trusted certificate to sign their extensions.
For information on how to sign an extension, see www.adobe.com/go/learn_em_signextension_en.
More topics
3
Managing extensions and sets
To the top
To the top
To the top
To the top
Launch the Extension Manager and update extensionsManage installed extensionsManage extension sets (CS6 or later)Obtain information about an extensionPreferences
The first time you launch the Extension Manager, you are given the choice of migrating previously installed extensions. If you select Yes, theExtension Manager migrates all compatible extensions. Once restarted, you can enable any previously installed extension by clicking the Enabledcheckbox next to it in the Extension Manager.
You can use Extension Manager to manage extensions developed for Dreamweaver, Flash, Fireworks, Photoshop, InDesign, InCopy, Illustrator,Adobe Premiere Pro, Prelude, and Contribute. Make sure your version of Extension Manager matches the version of the products you areextending. For example, use Extension Manager CS6 to manage extensions in Photoshop CS6. To manage extensions in earlier versions of theproducts, use the version of Extension Manager installed with those products.
Launch the Extension Manager and update extensionsIf you specified a preference setting to automatically check for updates to installed extensions, the Extension Manager checks for updates eachtime you launch the program. The Update icon—a rotating gear—indicates when a product is being checked. You can switch products during thecheck, but the Extension Manager eventually runs the check on each product. Information about an update appears in the Update tab.
1. Launch the Extension Manager from the Start menu in Windows or the Applications folder in Mac OS.
You can also launch the Extension Manager from Dreamweaver, Flash, Fireworks, or InDesign by selecting Help > ManageExtensions.
2. If an update to an extension is available, click the Update button next to the extension. Or, click the Update tab to viewinformation about the update. Then click Yes to download and install the update.
Manage installed extensionsIn the Extension Manager, do any of the following:
Sort installed extensions by clicking a column heading such as Name, Version, or Author.
Enable or disable an extension by selecting the Enabled checkbox next to the extension.
Note: If you installed large numbers of extensions, you can selectively enable and disable them to help manage theperformance of the application.
Remove an extension by selecting an application from the Products list, and then selecting the extension and clicking theRemove button. Removing an extension uninstalls it from the application.
Note: Do not manually remove disabled extensions from the Disabled folder. If you do, necessary changes to yourconfiguration files are not completed.
Manage extension sets (CS6 or later)Extension sets let you manage extensions as a collection rather than individually. Different extensions can be enabled or disabled in a set, and thesame extension can belong to many sets. You can rapidly enable and disable multiple extensions by simply switching sets.
To configure extension sets, select Tools > Manage Sets, then create, rename, or delete an extension set.To switch extension sets, select a different set from the pop-up menu on the upper right.
You can also export an extension set as an XML file and then import it on another computer.
To export a set, click the Export button and select one or more sets to export.To import a set, click the Import button and select the XML file.
Obtain information about an extension
4
Twitter™ and Facebook posts are not covered under the terms of Creative Commons.
Legal Notices | Online Privacy Policy
Description
Advanced
Update
To the top
Warnings
Updates
Select an installed extension listed in the Extension Manager and review the information in the bottom portion of theworkspace. The information appears in the following tabs.
Describes the extension and where to find it in your product. Developers provide this information when they create the extension.
Includes the path on your machine to all files installed with the extension. Path information is useful to verify that the extensioninstalled successfully, and to troubleshoot the installation or performance, if necessary. The path information is available only if the extension’sdeveloper enabled the attribute to show the files. The Advanced tab also includes signature and dependency information, if any.
Describes the available update for a selected extension, and provides an Update button to download and install the update. This tab isavailable only if your Update preference is set to automatically check for updates and the Extension Manager finds an update.
PreferencesPreferences include settings to warn you about extensions and notify you about updates to installed extensions. To access Preferences, chooseTools > Preferences.
Includes an option to display a warning when installing an unsigned ZXP extension. A signed extension includes information about theextension’s publisher. If Extension Manager can determine the extension’s publisher, the extension installs silently and you can view the signatureinformation in the Advanced tab. Otherwise, a warning appears and you can decide to continue to install or cancel the installation.Another option can display a warning message when administrative privilege is required when installing an extension.The last option lets the user choose to install a per-user extension for all users or only for the current user. If this option is not selected, ExtensionManager installs a per-user extension only for the current user, or performs the last choice saved.
Includes an option to receive automatic notifications when updates are available for your installed extensions. With this option selected,the Extension Manager checks for updates each time it launches. Each product is checked once.
For more information on signed extensions, see About signed extensions.
5
Packaging and submitting extensions
To the top
Ordinary extension
Creative Suite extension
Hybrid extension
MXI
ZXP
MXP
To the top
Note:
Note:
Types of extensions and file formatsPackage an extensionSubmit an extension
You can use the Adobe Extension Manager to package your own extensions before submitting them to Adobe for distribution on the AdobeExchange website. After packaging an extension, test it by using the Extension Manager to install it locally. Guidelines for writing and testing yourextensions can be found in Exchange Help on the Adobe Exchange website (www.adobe.com/go/exchange). After you have written and testedyour extension, you can package and submit it.
You can find more resources for creating extensions in Extending Dreamweaver Help, Extending Flash Help, and Extending Fireworks Help.
Types of extensions and file formatsThe Extension Manager supports the following types of extensions and file formats. For details about creating extension installation files, see theExtension Manager CS Configuration Reference, which you can download from the Adobe website at www.adobe.com/go/em_file_format.
Any extension that is not a Creative Suite extension. You can package ordinary extensions using the ZXP format.
A web service that you access directly from a Creative Suite application -- for example, from a panel in the Extensionmenu. Both Adobe and non-Adobe developers can create these extensions. Creative Suite extensions must include a certified signature from thepublisher. For example, CSXS_Adobe.zxp is a zip-based Creative Suite extension signed by Adobe.
Combines the action panels of Creative Suite extensions with tight integration in the product. For example, the floating panel inDreamweaver lets you preview pages in web browsers. Hybrid extensions include both ordinary extensions and Creative Suite extensions.
An XML file that specifies attributes of the extension, including the extension name, a description of the extension, version number, and type.The file also specifies each file included in the extension, including any custom icon you want to use. To specify a description of your extension,you can use HTML in your text or link to a local HTML file. You can also link to a remote HTML page when the user has an Internet connection.
A zip-based package format that can include a digital signature that identifies the extension’s publisher.
The traditional package format for extensions that Extension Manager supported. This format is deprecated in CS6. You can convert legacyMXP packages to ZXP by selecting Tools > Convert MXP extension to ZXP.
Package an extensionFollow these steps to package an ordinary or hybrid extension.
Extension Manager doesn’t support packaging Creative Suite extensions. These extensions can be created with the Creative Suite SDK.
1. Test your extension thoroughly.2. (Optional) Create an icon to display next to your extension in the Extension Manager. Make the icon a PNG or GIF measuring
24 pixels by 24 pixels.
If you don’t provide your own icon, the default icon is used.
3. Copy all of the files for your extension to a staging folder for ease of packaging.
The files can be at different levels of the folder hierarchy. Specify a path to each file relative to the installation file using the<file> tag in the extension installation file (MXI file—see the next step). However, it’s easier to track all the files if you don’ttry to package them directly from their installed locations in the Configuration folder.
4. Create an extension installation file (a filename ending in .mxi) for your extension.
5. In the Extension Manager, select File > Package ZXP Extension.
6. In the file-selection dialog box that appears, select your MXI file, and then click Open.
7. Select a location for the package file, give it a name ending in .zxp, and click Save.
The extension package filename must not contain spaces. It must also be valid on both Windows and Mac OSplatforms.
6
Twitter™ and Facebook posts are not covered under the terms of Creative Commons.
Legal Notices | Online Privacy Policy
To the top
The Extension Manager creates a package file containing compressed versions of all the files used by the extension, includingthe MXI file.
8. Install and test the extension to make sure that everything works as intended.
Submit an extension1. In the Extension Manager, select File > Submit Extension.
The Adobe Exchange submission page opens in your browser.
2. Follow the instructions on the page and proceed until you receive a confirmation message.
7
Working from the command line
To the top
-package
-install
-remove
-enable
-disable
-activate
-import
-convert
-locate
Extension Manager command-line basicsPackage an extension from the command lineInstall an extension from the command lineRemove an extension from the command lineEnable an extension from the command lineDisable an extension from the command lineLocate the point product in the Extension Manager workspaceConvert an MXP extension to a ZXP extension from the command line (CS6 and later)Activate an extension set from the command line (CS6 and later)Import a set configuration from the command line (CS6 and later)Execute commands through BridgeTalkReturn codes after executing commands
In CS4 and later, you can use the command line to perform various operations you would normally perform in the Extension Manager workspace.
Extension Manager command-line basicsYou can manage extensions from the command line, using certain syntax, commands, and attributes.
1. In Windows, open the command prompt by selecting Start > All Programs > Accessories > Command Prompt. In Mac OS,open Terminal by double-clicking its icon in the Applications/Utilities folder.
2. Navigate to the following folder:
Windows: C:\Program Files\Adobe\Adobe Extension Manager CSx\
Mac OS: /Applications/Adobe Extension Manager CSx/Adobe Extension ManagerCSx.app/Contents/MacOS
where CSx is the Extension Manager version number, such as CS6.
3. On the command line, enter the executable as follows (including the double quotes):Windows (CS5 and later): XManCommand.exe
Windows (CS4): "Adobe Extension Manager CS4.exe"
Mac OS: “./Adobe Extension Manager CSx”
where CSx is the Extension Manager version number, such as CS6.
4. After the executable, enter the desired command.
The following list describes the available commands:
Package an extension. Required attributes: mxi, and mxp (CS5.5 and earlier) or zxp.
Install an extension. Required attribute: mxp or zxp. Optional attributes: suppresseula (CS5.5 and later), forallusers(CS6 and later), and timeout (CS5 and later).
Remove an extension. Required attributes: product, extension. Optional attribute (CS5 and later): timeout.
Enable an extension. Required attributes: product, extension. Optional attribute (CS5 and later): timeout.
Disable an extension. Required attributes: product, extension. Optional attribute (CS5 and later): timeout.
(CS6 and later) Activate a set for a point product. Required attribute: product, set.
(CS6 and later) Import set configuration from a XML file. Required attribute: setcfg.
(CS6 and later) Convert mxp extension to zxp extension. Required attributes: mxp and zxp.
Locate the point product in the Extension Manager workspace. Required attribute: product.
8
-from
-EMBT
-suppress
-locale
-quit
mxi
mxp
zxp
product
extension
pcdentry
suppresseula
forallusers
lang
timeout
set
setcfg
To the top
To the top
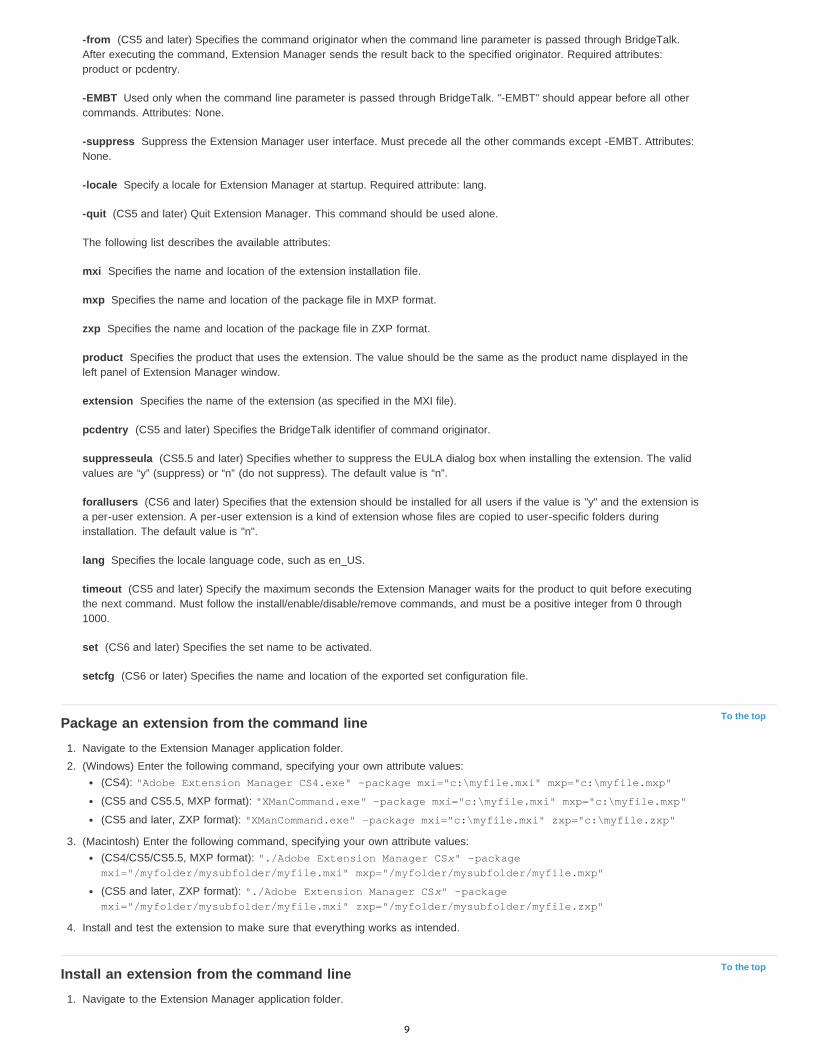
(CS5 and later) Specifies the command originator when the command line parameter is passed through BridgeTalk.After executing the command, Extension Manager sends the result back to the specified originator. Required attributes:product or pcdentry.
Used only when the command line parameter is passed through BridgeTalk. "-EMBT" should appear before all othercommands. Attributes: None.
Suppress the Extension Manager user interface. Must precede all the other commands except -EMBT. Attributes:None.
Specify a locale for Extension Manager at startup. Required attribute: lang.
(CS5 and later) Quit Extension Manager. This command should be used alone.
The following list describes the available attributes:
Specifies the name and location of the extension installation file.
Specifies the name and location of the package file in MXP format.
Specifies the name and location of the package file in ZXP format.
Specifies the product that uses the extension. The value should be the same as the product name displayed in theleft panel of Extension Manager window.
Specifies the name of the extension (as specified in the MXI file).
(CS5 and later) Specifies the BridgeTalk identifier of command originator.
(CS5.5 and later) Specifies whether to suppress the EULA dialog box when installing the extension. The validvalues are “y” (suppress) or “n” (do not suppress). The default value is “n”.
(CS6 and later) Specifies that the extension should be installed for all users if the value is "y" and the extension isa per-user extension. A per-user extension is a kind of extension whose files are copied to user-specific folders duringinstallation. The default value is "n".
Specifies the locale language code, such as en_US.
(CS5 and later) Specify the maximum seconds the Extension Manager waits for the product to quit before executingthe next command. Must follow the install/enable/disable/remove commands, and must be a positive integer from 0 through1000.
(CS6 and later) Specifies the set name to be activated.
(CS6 or later) Specifies the name and location of the exported set configuration file.
Package an extension from the command line1. Navigate to the Extension Manager application folder.2. (Windows) Enter the following command, specifying your own attribute values:
(CS4): "Adobe Extension Manager CS4.exe" -package mxi="c:\myfile.mxi" mxp="c:\myfile.mxp"
(CS5 and CS5.5, MXP format): "XManCommand.exe" -package mxi="c:\myfile.mxi" mxp="c:\myfile.mxp"
(CS5 and later, ZXP format): "XManCommand.exe" -package mxi="c:\myfile.mxi" zxp="c:\myfile.zxp"
3. (Macintosh) Enter the following command, specifying your own attribute values:(CS4/CS5/CS5.5, MXP format): "./Adobe Extension Manager CSx" -packagemxi="/myfolder/mysubfolder/myfile.mxi" mxp="/myfolder/mysubfolder/myfile.mxp"
(CS5 and later, ZXP format): "./Adobe Extension Manager CSx" -packagemxi="/myfolder/mysubfolder/myfile.mxi" zxp="/myfolder/mysubfolder/myfile.zxp"
4. Install and test the extension to make sure that everything works as intended.
Install an extension from the command line1. Navigate to the Extension Manager application folder.
9
To the top
To the top
To the top
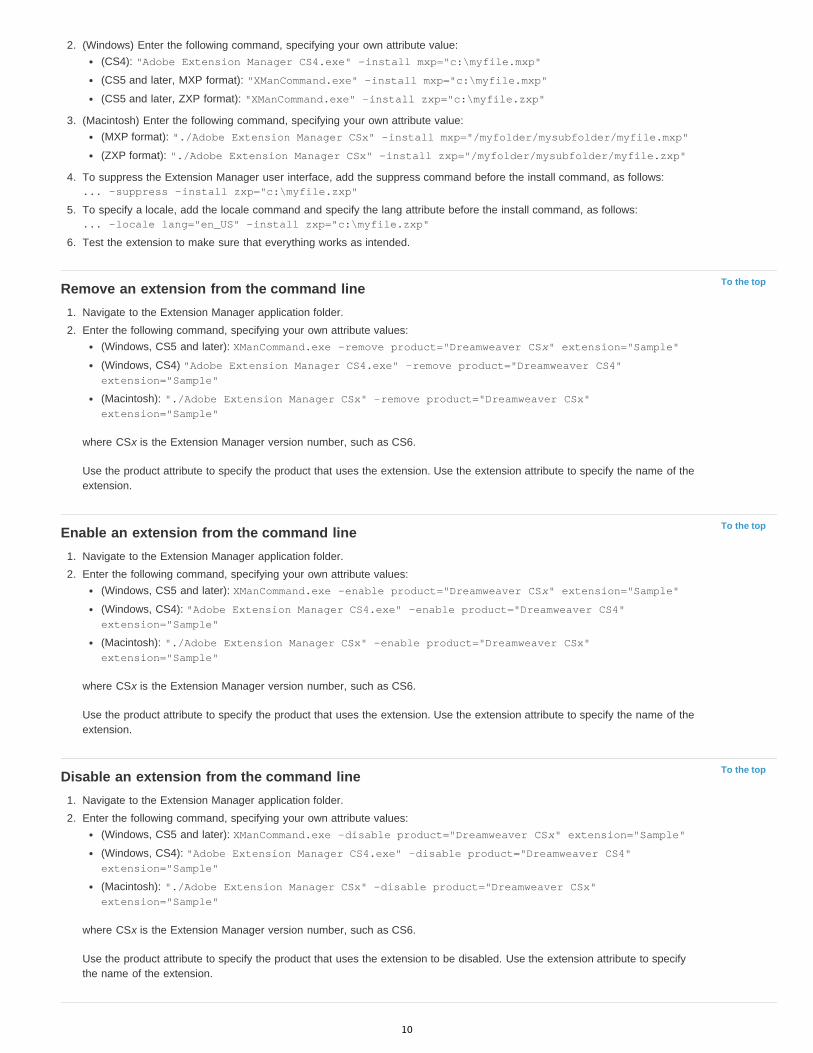
2. (Windows) Enter the following command, specifying your own attribute value:(CS4): "Adobe Extension Manager CS4.exe" -install mxp="c:\myfile.mxp"
(CS5 and later, MXP format): "XManCommand.exe" -install mxp="c:\myfile.mxp"
(CS5 and later, ZXP format): "XManCommand.exe" -install zxp="c:\myfile.zxp"
3. (Macintosh) Enter the following command, specifying your own attribute value:(MXP format): "./Adobe Extension Manager CSx" -install mxp="/myfolder/mysubfolder/myfile.mxp"
(ZXP format): "./Adobe Extension Manager CSx" -install zxp="/myfolder/mysubfolder/myfile.zxp"
4. To suppress the Extension Manager user interface, add the suppress command before the install command, as follows:... -suppress -install zxp="c:\myfile.zxp"
5. To specify a locale, add the locale command and specify the lang attribute before the install command, as follows:... -locale lang="en_US" -install zxp="c:\myfile.zxp"
6. Test the extension to make sure that everything works as intended.
Remove an extension from the command line1. Navigate to the Extension Manager application folder.2. Enter the following command, specifying your own attribute values:
(Windows, CS5 and later): XManCommand.exe -remove product="Dreamweaver CSx" extension="Sample"
(Windows, CS4) "Adobe Extension Manager CS4.exe" -remove product="Dreamweaver CS4"extension="Sample"
(Macintosh): "./Adobe Extension Manager CSx" -remove product="Dreamweaver CSx"extension="Sample"
where CSx is the Extension Manager version number, such as CS6.
Use the product attribute to specify the product that uses the extension. Use the extension attribute to specify the name of theextension.
Enable an extension from the command line1. Navigate to the Extension Manager application folder.2. Enter the following command, specifying your own attribute values:
(Windows, CS5 and later): XManCommand.exe -enable product="Dreamweaver CSx" extension="Sample"
(Windows, CS4): "Adobe Extension Manager CS4.exe" -enable product="Dreamweaver CS4"extension="Sample"
(Macintosh): "./Adobe Extension Manager CSx" -enable product="Dreamweaver CSx"extension="Sample"
where CSx is the Extension Manager version number, such as CS6.
Use the product attribute to specify the product that uses the extension. Use the extension attribute to specify the name of theextension.
Disable an extension from the command line1. Navigate to the Extension Manager application folder.2. Enter the following command, specifying your own attribute values:
(Windows, CS5 and later): XManCommand.exe -disable product="Dreamweaver CSx" extension="Sample"
(Windows, CS4): "Adobe Extension Manager CS4.exe" -disable product="Dreamweaver CS4"extension="Sample"
(Macintosh): "./Adobe Extension Manager CSx" -disable product="Dreamweaver CSx"extension="Sample"
where CSx is the Extension Manager version number, such as CS6.
Use the product attribute to specify the product that uses the extension to be disabled. Use the extension attribute to specifythe name of the extension.
10
To the top
To the top
To the top
To the top
To the top
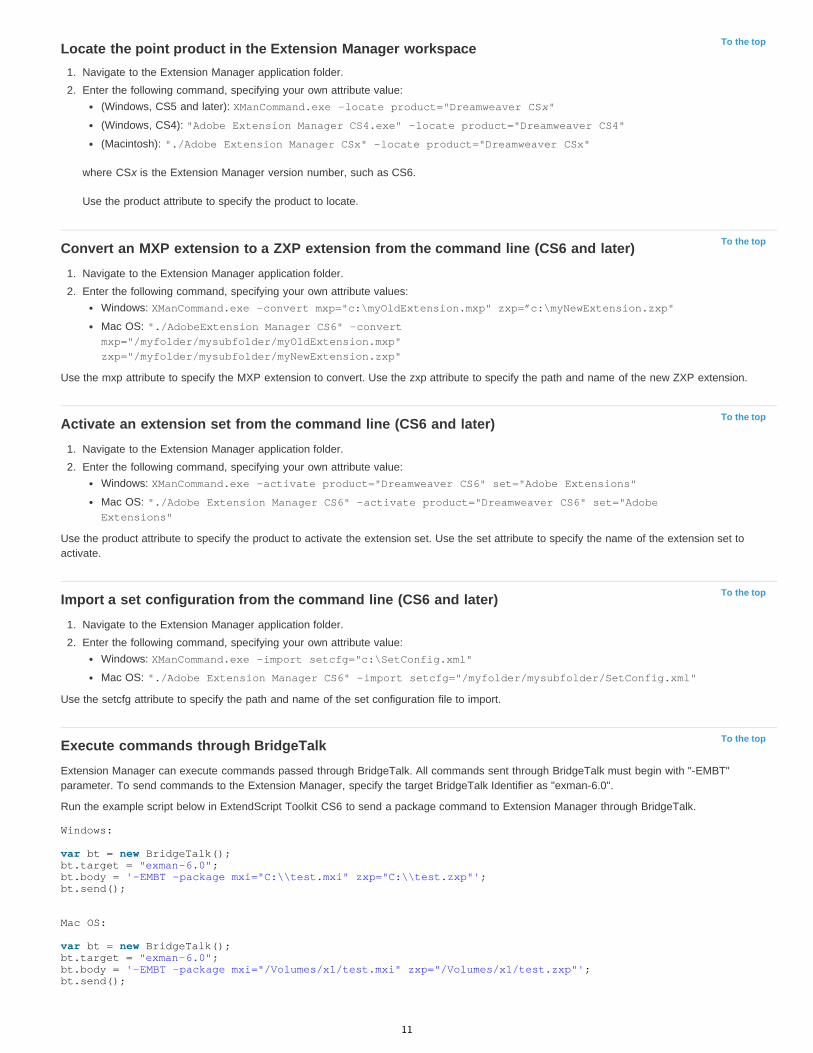
Locate the point product in the Extension Manager workspace1. Navigate to the Extension Manager application folder.2. Enter the following command, specifying your own attribute value:
(Windows, CS5 and later): XManCommand.exe -locate product="Dreamweaver CSx"
(Windows, CS4): "Adobe Extension Manager CS4.exe" -locate product="Dreamweaver CS4"
(Macintosh): "./Adobe Extension Manager CSx" -locate product="Dreamweaver CSx"
where CSx is the Extension Manager version number, such as CS6.
Use the product attribute to specify the product to locate.
Convert an MXP extension to a ZXP extension from the command line (CS6 and later)1. Navigate to the Extension Manager application folder.2. Enter the following command, specifying your own attribute values:
Windows: XManCommand.exe -convert mxp="c:\myOldExtension.mxp" zxp=”c:\myNewExtension.zxp"
Mac OS: "./AdobeExtension Manager CS6" -convertmxp="/myfolder/mysubfolder/myOldExtension.mxp"zxp="/myfolder/mysubfolder/myNewExtension.zxp"
Use the mxp attribute to specify the MXP extension to convert. Use the zxp attribute to specify the path and name of the new ZXP extension.
Activate an extension set from the command line (CS6 and later)1. Navigate to the Extension Manager application folder.2. Enter the following command, specifying your own attribute value:
Windows: XManCommand.exe -activate product="Dreamweaver CS6" set="Adobe Extensions"
Mac OS: "./Adobe Extension Manager CS6" -activate product="Dreamweaver CS6" set="AdobeExtensions"
Use the product attribute to specify the product to activate the extension set. Use the set attribute to specify the name of the extension set toactivate.
Import a set configuration from the command line (CS6 and later)1. Navigate to the Extension Manager application folder.2. Enter the following command, specifying your own attribute value:
Windows: XManCommand.exe -import setcfg="c:\SetConfig.xml"
Mac OS: "./Adobe Extension Manager CS6" -import setcfg="/myfolder/mysubfolder/SetConfig.xml"
Use the setcfg attribute to specify the path and name of the set configuration file to import.
Execute commands through BridgeTalkExtension Manager can execute commands passed through BridgeTalk. All commands sent through BridgeTalk must begin with "-EMBT"parameter. To send commands to the Extension Manager, specify the target BridgeTalk Identifier as "exman-6.0".
Run the example script below in ExtendScript Toolkit CS6 to send a package command to Extension Manager through BridgeTalk.
Windows: var bt = new BridgeTalk();bt.target = "exman-6.0";bt.body = '-EMBT -package mxi="C:\\test.mxi" zxp="C:\\test.zxp"';bt.send();
Mac OS: var bt = new BridgeTalk();bt.target = "exman-6.0";bt.body = '-EMBT -package mxi="/Volumes/x1/test.mxi" zxp="/Volumes/x1/test.zxp"';bt.send();
11
Twitter™ and Facebook posts are not covered under the terms of Creative Commons.
Legal Notices | Online Privacy Policy
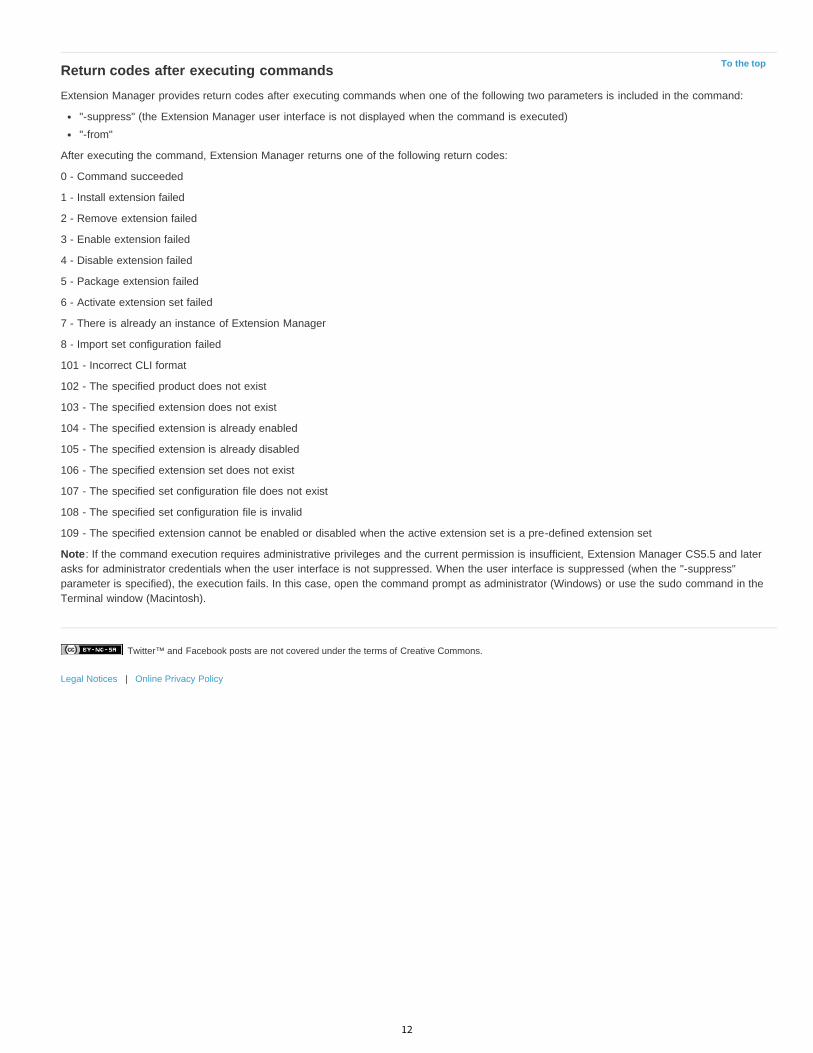
To the topReturn codes after executing commandsExtension Manager provides return codes after executing commands when one of the following two parameters is included in the command:
"-suppress" (the Extension Manager user interface is not displayed when the command is executed)"-from"
After executing the command, Extension Manager returns one of the following return codes:
0 - Command succeeded
1 - Install extension failed
2 - Remove extension failed
3 - Enable extension failed
4 - Disable extension failed
5 - Package extension failed
6 - Activate extension set failed
7 - There is already an instance of Extension Manager
8 - Import set configuration failed
101 - Incorrect CLI format
102 - The specified product does not exist
103 - The specified extension does not exist
104 - The specified extension is already enabled
105 - The specified extension is already disabled
106 - The specified extension set does not exist
107 - The specified set configuration file does not exist
108 - The specified set configuration file is invalid
109 - The specified extension cannot be enabled or disabled when the active extension set is a pre-defined extension set
Note: If the command execution requires administrative privileges and the current permission is insufficient, Extension Manager CS5.5 and laterasks for administrator credentials when the user interface is not suppressed. When the user interface is suppressed (when the "-suppress"parameter is specified), the execution fails. In this case, open the command prompt as administrator (Windows) or use the sudo command in theTerminal window (Macintosh).
12


