
Canadian Language Benchmarks 2000: ESL for Literacy Learners
Sample Tasks
Foundation and Phase I
Linda Johansson, Team Leader Kathy Angst, Brenda Beer
Wendy Rebeck, Nicole Sibilleau

2
WRITING TEAM
The members of the CLB ESL for Literacy Learners Sample Tasks Team were Kathy Angst, Brenda Beer, Wendy Rebeck, and Nicole Sibilleau.
Team Leader was Linda Johansson.
Acknowledgements
We would like to thank the following for their invaluable assistance on this project:
Joanne Pettis - Manitoba Labour and Immigration, Adult Language Training Branch, for her guidance and assistance throughout the working period.
Barbara Stanley and Bob Moore - for technical support..
Virginia Stevens – for expert editing support
Melissa Beer – for typing support.
We would also like to thank Margaret Pidlaski, Manitoba Labour, and Immigration, funder of the project and Pat Burgess and Diane Koreen, Winnipeg School Division No. 1, Adult ESL Centre of Winnipeg, for their on-going support.
And finally, we would like to thank our husbands, Bob Angst, Terry Beer, Gert Johansson, Ray Rebeck, Roger Sibilleau for their support throughout the project.

Foundation Phase 3
Table of Contents
Acknowledgements ............................................................................................................. 2
Introduction: ________________________________________________________ 5 Foundation Phase
Identify and Arrange Real Life Symbols ________________________________ 14
Copy Symbols or Pseudo Letters _____________________________________ 16
Match and Identify Letters / Same and Different Letters __________________ 18
Match Upper and Lower Case Letters _________________________________ 20
Copy & Write Letters / Change Lower To Upper Case ____________________ 22
Match Form Words _________________________________________________ 24
Match Pictures and Sight Words ______________________________________ 26
Match and Recognize Sight Words ____________________________________ 28
Copy Sight Words / Change Lower to Upper Case Letters ________________ 30
Write Word to Picture _______________________________________________ 32
Match Sentences to Pictures _________________________________________ 34
Fill in Initial Consonants and Copy Sight Words _________________________ 37
Read, Copy, and Order Sight Words ___________________________________ 39
Fill Out Forms / Complete and Copy Sentences__________________________ 41
Read and Write Personal Information __________________________________ 43
Read a Story and Fill Out Forms ______________________________________ 45
Read a Story and Copy Information ___________________________________ 47
Listen to and Read Short Instructions _________________________________ 49 Phase I
Match Personal Questions and Answers _______________________________ 51
Read a Simplified Flyer ______________________________________________ 53
Read a Story and Fill Out a Simplified Form _____________________________ 55
Read and Follow a Recipe ___________________________________________ 57
Read a Story and Write Sentence Answers _____________________________ 59
Read Time References ______________________________________________ 62
Read an Appointment Card __________________________________________ 64
Read a Simplified Medicine Label _____________________________________ 66
Read and Write about a Nurse ________________________________________ 68
Read a Work Schedule ______________________________________________ 70
Read an Advertisement for an Apartment ______________________________ 73

Foundation Phase 4
Read a Simplified Rent Receipt _______________________________________ 75
Read and Match Cards and Messages _________________________________ 77
Write a Thank You Message __________________________________________ 79
Choose and Copy Appropriate Thank You Message ______________________ 81
Read an Invitation __________________________________________________ 83
Read a Simplified Grocery Flyer ______________________________________ 86
Record and Present Information from a Simplified Flyer __________________ 88
Read about Feeling Homesick ________________________________________ 90
Read and Copy Information from a 5-Day Weather Forecast ______________ 92

Foundation Phase 5
Introduction:
This collection of sample tasks is meant to be a companion document to the CLB 2000: ESL for Literacy Learners. That book explains the term ESL Literacy and outlines the ESL Benchmarks for reading, writing and numeracy for learners who:
May have had little or no schooling in their native country or,
May have come from a country with a non-Roman alphabet.
For a full description of ESL Literacy learners and situations in which non-ESL Literacy learners may benefit from short-term or monitored placement in an ESL Literacy program, please see the CLB 2000: ESL for Literacy Learners.
These sample tasks are intended to provide guidance in moving toward a contextualized approach to literacy and language instruction. We hope that they will help the teachers to:
Identify the range of tasks within the CLB 2000: Benchmarks for Literacy Learners.
See the methodology used by some ESL literacy teachers. (There are certainly other methodologies.)
See that the development of schema is usually augmented for literacy learners.
Recognize the collaborative nature of these lessons.
Understand that opportunities for guided practice sometimes don’t lead to independent learning in the initial stage of a phase. In collaborative learning, the stronger learners support the other group members.
Use the sample task provided to make similar tasks for purposes of remediation or assessment.

Foundation Phase 6
Frequently Asked Questions
Our ESL literacy learners are not used to coming to school. They often present unique challenges that need to be overcome or overlooked in order to make progress in language and literacy learning.
What are the differences in an ESL Literacy class?
1. A slower pace: Usually ESL literacy learners’ oral language is considerably higher than their reading and writing. This strength is built on in an ESL Literacy class. Learners are encouraged to discuss issues and life situations. Throughout this discussion, the teacher would write key words on the board for reference and spelling. When the time comes to read or write, the pace slows down. More time is needed to work on discrete skills such as context clues, word attack, spelling, sentence structure, and punctuation. It’s important not to overload the learners. Care must be taken to ensure that the learners understand each step of the lesson so that they can leave feeling that they have accomplished or learned something.
2. More constant need for teacher encouragement: ESL Literacy learners often lack the confidence in their skills to complete something on their own. There needs to be a very clear, thorough teacher presentation and practice before learners are ready to work on the tasks. For this reason, a collaborative approach is also used.
3. Following directions can be a challenge: Even if learners can read the directions and say that they understand, it is important that teachers model the activity and work through several examples with them. Think-aloud protocols are helpful in this phase of the lesson.
4. Inconsistency of performance: Because these routines, skills and strategies are newly learned and not automatic yet, if the learner is having a bad day, everything the teacher has taught goes out the window. Experienced literacy teachers have learned to relax, not put any pressure on the learner, and to wait until the next day. However, if a learner is coming to school regularly, but is not progressing, teachers need to keep a logbook of observations. What kinds of mistakes are being made? Might the learner need to have a hearing or eyesight check? Are there family problems that the learner might want to talk about with a counsellor? Has the learner unresolved stress or trauma that is not being handled by a professional?
5. Need for organizational direction: Most literacy learners will need help to learn organizational skills such as putting papers in a binder according to date or skill area. Without some organization a learner can spend a long time looking for yesterday’s paper. Colour coding for sections or weeks may help.
6. Need for repetition and spiralling: There are several ways of reworking materials for learners. These are necessary for learners to get a feeling that they can read independently.
Learners can start a lesson by reading over past worksheets in pairs. This may take the first 5 -10 minutes of a class, but it provides an opportunity for the learner to review and/or redo yesterday’s material. The teacher moves around the class and helps learners with words that have been forgotten. Usually, there are a few.

Foundation Phase 7
Several different activities can be provided that reuse the same vocabulary in the four skills.
The same topic can be presented in a slightly different way a couple of weeks after the first lesson. Each time learners encounter these materials successfully, they will feel a little more confident. Some examples might include spiralling back to: filling in forms, writing thank you letters, reading notes from their children’s schools, cheque stubs, job ads, etc.
What are effective techniques for teaching ESL Literacy Learners?
Experienced ESL literacy teachers know that they need to tailor literacy instruction to meet the needs and goals of adult English language learners. There are many techniques that are effective in assisting these learners to improve their language and literacy learning. The following examples come from a variety of levels.
1. Create a climate that fosters self-esteem and interdependence. Our students come to classes at a time of life crisis or life change, often with added responsibilities and worries. It takes time to build a bond of closeness in the classroom. There are a number of ways to enhance the climate of the classroom, such as:
a. Hanging interesting pictures on the walls, having coffee available, and playing music in the morning, make the room a more appealing place to come.
b. Allowing new students time to sit and absorb English sounds and
meanings without the increased pressure of having to answer questions, will allow them to become more relaxed and willing to participate when they are ready.
c. Pairing a new student with someone who speaks his own language will
increase the comfort level of that student. The peer helper could translate (before the new student understands the teacher's accent), show him around the school facilities, explain procedures, and answer his questions.
d. Acceptance of each other’s differences can be enhanced by a teacher
recognizing the validity and significance of each individual and each culture, including her own. Building on a student’s strengths, such as asking questions that he will probably be able to answer, will increase his confidence and accelerate acceptance by the group. Stressing the positive and giving honest praise for progress, not just for a "correct" answer, are ways to make students feel valued and respected.
e. The way that the class is organized can also foster a good learning
climate. In an ESL Literacy class, short, clear, and consistent directives will aid understanding and avoid confusion. When introducing a new concept, teachers should begin with the concrete (e.g. real food) and

Foundation Phase 8
then move to the more abstract (pictures, words.) This will raise the student's confidence in his ability to comprehend and to learn.
f. By building a friendly climate in the classroom, a cohesiveness is
formed. This provides an opportunity to learn how to work independently and in groups, and how to be self-directing. The students can read in pairs, state their opinions about what they have read, and write collaboratively. The students should feel free to talk about their lives back home and share cultural customs (e.g. finding a husband/wife, coming of age, and family traditions). Teachers need to learn to facilitate discussion, not to control it. Through dialogue, students can build social relationships, model good oral and written language, and expand background knowledge.
2. Allow learners to take ownership of their learning by making sure that each topic
or lesson is relevant to them. When selecting teaching topics, the teacher should use a needs assessment to find out the current situation and immediate goals of the learner. Beginning with their lives is always a good place to start when introducing any new concept or building a schema for a language task. For example, if one learner is looking for a job, there could be stories about that. If another is having problems with a neighbour, perhaps it’s a good time to deal with this topic in a problem-posing manner.
3. Help learners to help themselves by teaching strategies and techniques that
good learners use to understand print texts of various types. Students who have had little experience in an educational setting in their native country often have limited strategies for language and literacy learning. For example: some students will be frustrated if, instead of following the interaction of ideas and examples about a certain word or concept, they try to translate each new word on their voiced computer dictionary. Many students just don't know what to do to learn a language. At the beginning stages, if a teacher uses a translator to explain the fundamental differences between the two languages, and some strategies to aid retention, it will be helpful. Some techniques in teaching learning strategies include encouraging learners to:
a. Expose themselves to as much English as possible. They can watch
TV, listen to tapes, reread the stories studied in class, make some Canadian friends, and speak to their neighbours.
b. Ensure that that they understand what the teacher is saying. If they
don’t, they need to ask for help. Questions can be taught and posted on the classroom walls for reference:
Can you repeat, please? Can you speak more slowly, please? What's this? What are these? How do you spell ______________? How do you write _____________? How do you say ______________? What's the past tense of _________?

Foundation Phase 9
c. Help the learners organize a way to remember the new material. This can be done with the help of graphic organizers, to help connect meaning to what is read through problem-solving, predicting, and other higher-level thinking skills.
4. Teach reading and writing within the context of an interactive, meaning-centred,
integrated skills curriculum. The lessons should be planned in a pre-, during, and post reading framework to build background knowledge, to practise reading skills within the reading text itself, and to engage in comprehension activities. (Grabe, l993) Sequence activities so that they move from the concrete to the abstract, from less challenging to more challenging (such as from a strong oral
understanding to a weaker written component), from realia or language experience activities to pictures or photos with text, to text alone.
When teaching a new story, begin by building schema for the topic. When the story has been mastered, then the lesson can move to word attack skills and spelling needs.
It is possible to use an interactive approach to deal with numerous life topics that originate from the learners’ needs and interests. Some difficult topics such as car thefts, family violence, a new medical card, and the TV guide, might be too difficult for the students to read on their own without a number of pre-reading activities to activate their prior knowledge. Each lesson includes various word attack, listening, or grammar activities. After that, each lesson requires that the student write one or two sentences or a small story to express his own knowledge or feelings on the topic. In this way, students can see that they learn about something relevant and also gain skills to make subsequent reading and writing more independent.
5. Allow learners an opportunity to work with the concepts and new skills to be gained
in a variety of procedures and activities. Learning processes that provide opportunities to practise skills are much more likely to result in the ability to apply knowledge to life. The learner can read over the material and think about it in different ways. They can make predictions, they can think about the strategies they used to find the meaning in the text, they can find the topic or main idea, they can state their opinions, they can do a search in the class for other learners’ opinions. By practising the new vocabulary, using different techniques within a contextualized series of activities and/or within a given topic or topics, the learning will be consolidated.
6. Include activities within the lesson that appeal to diverse learning styles. By
selecting a wide variety of techniques and strategies, teachers will be more successful in engaging their learners and fostering some guided style stretching. Learners who are comfortable learning in a variety of settings will find more opportunities to learn. Also, ESL learners, who are not used to sitting in a classroom, may suffer mental fatigue if the activities are not frequently changed. Some examples might include writing on the board, working with word cards, working in a group or with a volunteer, completing an information grid where the

Foundation Phase 10
learner collects data from classmates, language experience activities, listening to tapes, singing or chanting, or total physical response (TPR).
7. Teachers with adult ESL Literacy students need to be flexible, sympathetic, task
oriented, and focused on the students’ needs. There is no doubt about the fact that teachers need to be well prepared for each day of class. However, there have been numerous times that I have come to school with a lesson prepared, but ended up abandoning it when another topic became more relevant. Perhaps it was the first snowfall, and for some this would be the first experience ever with snow. Perhaps someone had a car accident. Students can be encouraged to tell their stories, share their pictures, and tell their favourite proverbs. If encouraged, students begin to examine the role of literacy in their lives and become active participants in providing themes that involve the use of natural language in meaningful contexts.
8. Learners’ stories provide a catalyst for discussion and comparison of experiences,
and for the development of mutual support for one another in striving for both linguistic and non-linguistic goals. The teacher must always be prepared with a lesson, but flexible and sensitive enough to recognize that literacy is life. For example: One day, a student came into class late. He looked upset, so of course we asked him what was the matter. He had been in a minor car accident and it had shaken him up. The classmates were concerned, so the lesson couldn’t go on as planned. Instead, we asked him questions and finally got the story out. We wrote what had happened onto the board. This became the lesson for the day with several others relating their accident stories. Instructions on how to drive in snowy conditions became the follow up activity for the next day. This was real language for them because it concerned a real issue.
Are the tasks in this collection authentic?
Learners express their needs and frustrations to us daily. It is difficult to come into a new country and have to function in a new language. When the learners haven’t been literate in their first language or have had to learn a new alphabet system, this difficulty is compounded. Our goal is to enable these learners to deal with their different needs for literacy in Canada. If learners can begin to read examples of what literacy is used for in the world outside of school, they may begin to read these materials on their own.
The CLB Benchmarks acknowledges that it is best to receive instruction in authentic, real-world examples of literacy, but the level at which our learners can cope with written material often makes this impossible. Good teaching always involves adapting instruction to the needs and skill levels of specific individuals or groups of students. What is needed in one case may be quite different from what is required in another. We have made a compromise in the literacy stream by using teacher-simplified materials so that the learners can:
a. Focus on one small part of a document b. Not be overwhelmed by the density of print c. Read materials successfully d. Use a step-by-step approach to reading real outside world text

Foundation Phase 11
In order to allow learners to see the connection between the real material and their teacher-adapted materials, we encourage teachers to have a copy of different authentic materials to show the connection. Sometimes at the end of the lesson, a copy of the ‘real’ text can be circulated or handed out. The learners can then highlight or circle parts of these materials that they can now recognize. In this way they understand that they are working toward being able to deal with authentic text.
Therefore, when looking over these sample tasks, please remember that learners may not need to read all of these types of texts. Teachers should find out that information by means of formal or informal needs assessments.
Students in ESL Literacy classes come from a variety of backgrounds, with different expectations of what they want to learn, and different preferred styles of learning. They come to classes in order to gain greater independence and mastery over their own lives in Canada. Our job as teachers is to help facilitate the ways and the means for them to succeed.
References CLB 2000: ESL for Literacy Learners. Centre for Canadian Language Benchmarks. Retrieved on March 21, 2004. http://www.language.ca/bench/literacy.html. Cunningham Florez, M. & Terrill, L. (2003). Working With Literacy-Level Adult English Language Learners. National Center for ESL Literacy Education. Retrieved on March 21, 2004. http://www.cal.org/ncle/digests/litQA.htm
Grabe, W. (1991). Current Developments in Second Language Reading Research. TESOL Quarterly, 25(3), 375-406. Jacobson, E., Degener, S. & Purcell-Gates, V. Creating Authentic Materials and Activities for the Adult Literacy Classroom: A Handbook for Practitioners. NCSLL National Centre for the Study of Adult Learning and Literacy. Retrieved on March 21, 2004. http://ncsall.gse.harvard.edu./teach.html#teach

Foundation Phase 12
Match Realia to Pictures
Skill Area: Pre-reading
Task: Name realia and
pictures
Purpose: Students will
Understand that real
objects can be
represented
pictorially on paper
Match realia to
pictures
Identify pictures by
pointing to pictures
as oral stimulus is
given
Name pictures
Materials: Realia of target
vocabulary, enlarged visuals
of pictures on the worksheet,
board, worksheets
Grouping: Whole class, small
groups, pairs
Learning Style: Visual,
auditory, kinesthetic
Time: 20 minutes
Note: Introduce pictures that correspond with real objects that
you can pick up or show, such as a book, table, etc. Gradually
introduce other vocabulary such as apple, book, chair, etc.,
according to the theme you are teaching. Enlarge the pictures on
the worksheet for the presentation of the lesson.
Method:
1. Pick up one of the objects, (e.g. book) and model the
structure: This is a book. Hold up the visual of the book
and model the same structure.
3. Hold up the real item and the picture together and repeat
the same structure to show that both the object and
picture have the same name. Have students repeat.
4. Place the visual on the board and then follow the same
process with the other realia and visuals. Each time a new
visual is introduced, go back and review the previous picture
names.
5. Name visuals and have student volunteers come up and point
to them.
6. Pass out the top part of the worksheet. Say the name of
one object and have the students point to the picture.
Circulate to check for understanding and continue with
other picture names.
Follow Up
Students can work in pairs. One student can name the
picture and the other student can point to the picture.
Students can cut out the boxes of pictures. They can place
them on the grid (second half of the worksheet) according
to the oral stimulus. E.g. Pick up the book. Put it in box # 1.
Students can play Picture Bingo or Tic/Tac/Toe to name
pictures.
Students can cut out pictures from catalogues according to
a theme and make collages or posters.
As students learn more vocabulary, they can sort pictures
according to themes. E.g. colours, clothing.

Foundation Phase 13
Point
1
2
3
4
5
6

Foundation Phase 14
Identify and Arrange Real Life Symbols
Skill Area: Pre-reading
Task: Identify real life
survival symbols
Purpose: Students will
Name visuals of real life
survival symbols
Arrange survival symbols
to show left-right and
top-down directionality
Materials: Enlarged visuals
of symbols on the
worksheets, board, overhead,
worksheets
Grouping: Whole group,
individuals
Learning Style: Visual,
auditory, kinesthetic
Time: 20 minutes
Note: Before attempting this task, students should go on a
walkabout of the building or neighbourhood to see real life survival
symbols. It would be a good idea for them to match the visuals
with the real life symbols at this time. Students at this level
should be presented with not more than 6 new pictures/symbols at
a time. Therefore, teachers should divide this worksheet in half
and teach the vocabulary in 2 different lessons.
Method:
1. Show students the visual of one of the survival symbols.
Say: No Smoking. Have all students repeat. Place the
visual on the board.
2. Continue with a second symbol. After oral practice, place
it beside the first symbol. Go back and name the first
and second symbols, showing left-right directionality.
3. Continue with the rest of the visuals. After naming the
4th symbol, place it under the first visual to form a new
line and show top-down directionality.
4. Pass out the symbols to six students. Draw a grid of 2
rows of 3 boxes on the board. Number the boxes.
5. Show box #1. Say: Number 1 is No Smoking. Ask a
student volunteer to come up and place the visual in the
box.
6. Continue to name the other symbols and arrange them in
numerical order to show left-right and top-down
directionality.
7. Pass out the top half of the worksheet. Review the names
of the symbols and have students cut out the boxes. E.g.
Touch box #3.
8. Pass out a grid of 6 boxes. Review the numbers in the
boxes.
9. Say: Pick up the picture of No Smoking. Put it in box #1.
Check for understanding. Continue with all pictures.
Review by asking, What’s #1, #3, etc.
Follow Up:
Make flashcards of survival symbols. Have students work
in pairs to name them.
Give each student one or more symbols. Go on a walkabout
to match pictures to realia and name the symbol.
Play games to review survival symbols. (Bingo, Memory)

Foundation Phase 15
Point.
1
2
3
4
5
6
H

Foundation Phase 16
Copy Symbols or Pseudo Letters
Skill Area: Pre-writing
Task: Understand the
concepts of left-right and
top-down directionality of
strokes in symbols or pseudo
letters
Purpose: Students will
Copy strokes on lined
paper beside a model
Materials: Teacher-made
worksheets, flashcards
Grouping: Whole group,
individuals
Learning Style: Visual,
kinesthetic
Time: 15 minutes
Note: Before students attempt this task on lined paper, they
need to practice drawing, tracing and copying strokes in
the air, on unlined chalkboard, unlined paper and on lined
chalkboard. They also need practice copying under the
model before copying beside the model. At first the
strokes will be large. With continued practice the strokes
should decrease in size.
Method:
1. Cut the worksheet in half so that student will be practicing
no more than 6 pseudo letters at one time. Pass out the
worksheet. Encourage students to place a strip of paper
under the first line so that their eyes are focussed on only
one pseudo letter at a time.
2. Have students copy the first pseudo letter beside the
model.
Check for:
left-right and top-down directionality of strokes
the position of the stroke on the line
the size of the pseudo letters.
3. Have students continue to make the same
pseudo letter on the next line and so on until they
complete the first line.
4. Continue with the other pseudo letters until the task is
complete.
5. Students at this level tire very easily. Limit
the practice to about 6 pseudo letters.
Follow Up:
Teacher holds up a flashcard of a symbol or pseudo letter
and student copies from the flashcard to lined paper.
Have students practice many different types of strokes
in symbols and pseudo letters before introducing letters.

Foundation Phase 17
Copy.
___ ___ ___ ___
___ ___ ___ ___
___ ___ ___ ___
___ ___ ___ ___
___ ___ ___ ___
___ ___ ___ ___
___ ___ ___ ___
___ ___ ___ ___
C ___ ___ ___ ___ U ___ ___ ___ ___
___ ___ ___ ___
Foundation Phase 18
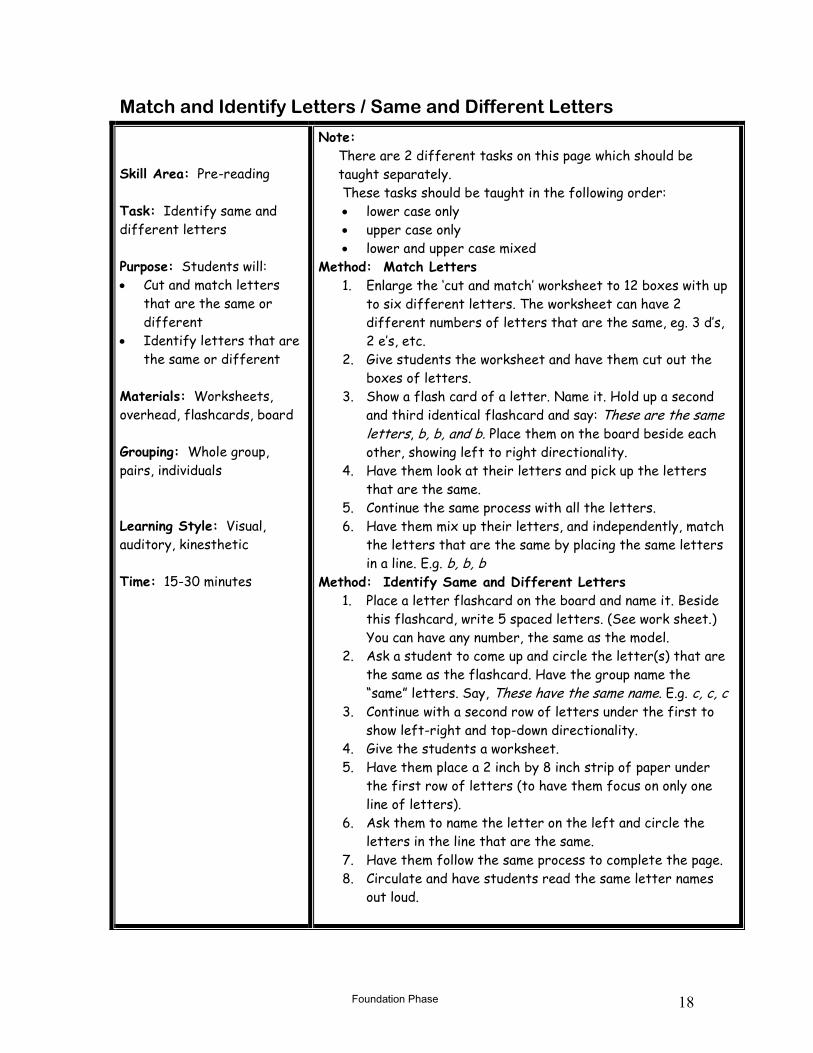
Match and Identify Letters / Same and Different Letters
Skill Area: Pre-reading
Task: Identify same and
different letters
Purpose: Students will:
Cut and match letters
that are the same or
different
Identify letters that are
the same or different
Materials: Worksheets,
overhead, flashcards, board
Grouping: Whole group,
pairs, individuals
Learning Style: Visual,
auditory, kinesthetic
Time: 15-30 minutes
Note:
There are 2 different tasks on this page which should be
taught separately.
These tasks should be taught in the following order:
lower case only
upper case only
lower and upper case mixed
Method: Match Letters
1. Enlarge the ‘cut and match’ worksheet to 12 boxes with up
to six different letters. The worksheet can have 2
different numbers of letters that are the same, eg. 3 d’s,
2 e’s, etc.
2. Give students the worksheet and have them cut out the
boxes of letters.
3. Show a flash card of a letter. Name it. Hold up a second
and third identical flashcard and say: These are the same
letters, b, b, and b. Place them on the board beside each
other, showing left to right directionality.
4. Have them look at their letters and pick up the letters
that are the same.
5. Continue the same process with all the letters.
6. Have them mix up their letters, and independently, match
the letters that are the same by placing the same letters
in a line. E.g. b, b, b
Method: Identify Same and Different Letters
1. Place a letter flashcard on the board and name it. Beside
this flashcard, write 5 spaced letters. (See work sheet.)
You can have any number, the same as the model.
2. Ask a student to come up and circle the letter(s) that are
the same as the flashcard. Have the group name the
“same” letters. Say, These have the same name. E.g. c, c, c
3. Continue with a second row of letters under the first to
show left-right and top-down directionality.
4. Give the students a worksheet.
5. Have them place a 2 inch by 8 inch strip of paper under
the first row of letters (to have them focus on only one
line of letters).
6. Ask them to name the letter on the left and circle the
letters in the line that are the same.
7. Have them follow the same process to complete the page.
8. Circulate and have students read the same letter names
out loud.

Foundation Phase 19
Cut and match.
d
g
e
g
d
e
Circle.
b
d b p o g
h
h n k b h
r
k r r f r
t
k f l i t

Foundation Phase 20
Match Upper and Lower Case Letters
Skill Area: Pre-reading
Task: Identify upper and
lower case letters
Purpose: Students will
Match upper and
lower case letters
Recognize upper and
lower case letters by
name
Name upper and
lower case letters
Materials: Flashcards,
worksheets, board
Grouping: Whole group,
individuals
Learning Style: Visual,
auditory
Time: 15 minutes
Note: There are 2 different tasks on this page that should be
taught separately. A cut and match activity of lower and
upper case letters should precede this task. The worksheet
for the first task should be enlarged to have about 8
letters in a line.
Match Upper and Lower Case Letters
Method:
1. Write a column of 8 small letters on the board. Name the
letters and have students repeat. (These should be the
same letters as those on the worksheet)
2. Write the corresponding capital letters in another column
a short distance from the first line. (Letters should not be
in the same order as the first line)
3. Have a student come up to the board. Tell him to match
small “f” and capital “F” by drawing a line. Continue the
same process with the other letters.
4. Hand out the worksheet. Instruct the students to draw a
line to match the small and capital letters
Identify Lower and Upper Case Letters By Name
Method:
1. Enlarge the worksheet to fit the page.
2. Pass out the worksheets. Call out a letter name (capital or
small) and ask the students to point to the corresponding
letter on their worksheets. Circulate and check.
3. Continue with the other letters. Have students practise
dictating the letter name or have them work in pairs.
Follow Up:
Have the students cut out the boxes of letters and place
them on a grid as the teacher/student calls out the letter.
Students can make a collage of capital and small letters of
different fonts by cutting letters out of magazines,
catalogues, or newspapers.
Have students go on a walkabout of the school/building to
recognize and name letters in signs, posters, etc.
Play Bingo or Memory games to reinforce upper and lower
case letter names.

Foundation Phase 21
Match.
f G
g A
a H
d F
h D
Point.
M e I
d
i
E
g
j
m
D G J
Foundation Phase 22
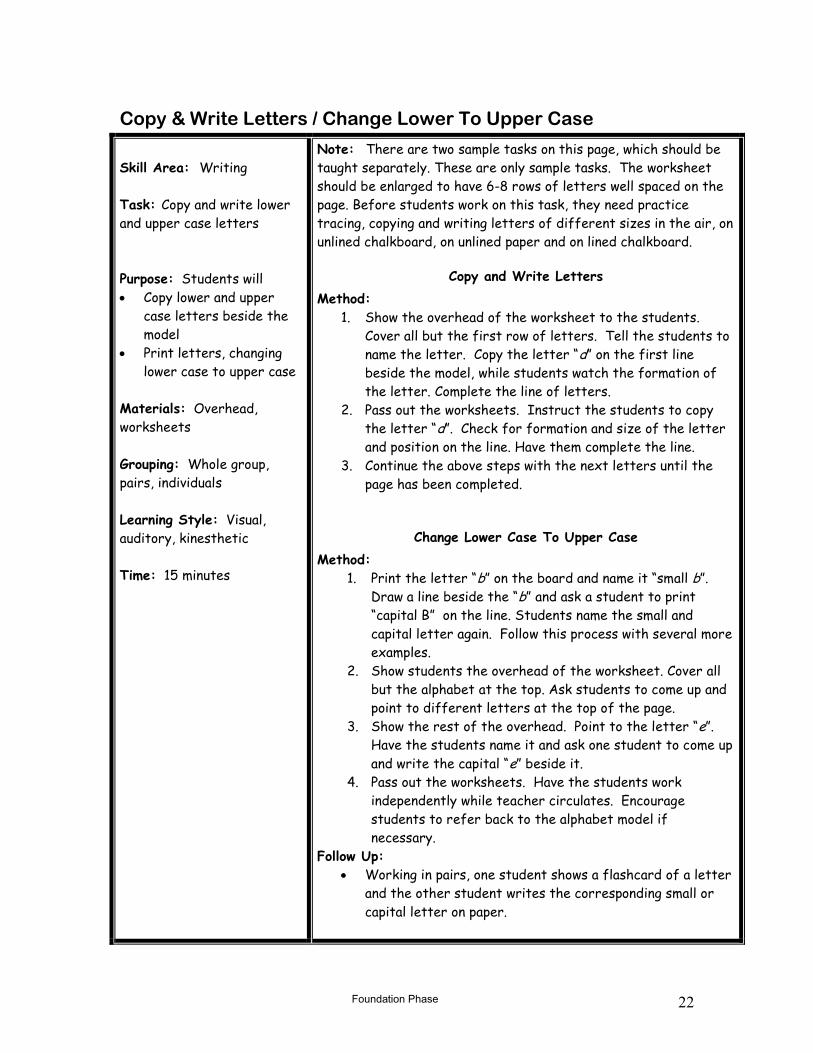
Copy & Write Letters / Change Lower To Upper Case
Skill Area: Writing
Task: Copy and write lower
and upper case letters
Purpose: Students will
Copy lower and upper
case letters beside the
model
Print letters, changing
lower case to upper case
Materials: Overhead,
worksheets
Grouping: Whole group,
pairs, individuals
Learning Style: Visual,
auditory, kinesthetic
Time: 15 minutes
Note: There are two sample tasks on this page, which should be
taught separately. These are only sample tasks. The worksheet
should be enlarged to have 6-8 rows of letters well spaced on the
page. Before students work on this task, they need practice
tracing, copying and writing letters of different sizes in the air, on
unlined chalkboard, on unlined paper and on lined chalkboard.
Copy and Write Letters
Method:
1. Show the overhead of the worksheet to the students.
Cover all but the first row of letters. Tell the students to
name the letter. Copy the letter “d” on the first line
beside the model, while students watch the formation of
the letter. Complete the line of letters.
2. Pass out the worksheets. Instruct the students to copy
the letter “d”. Check for formation and size of the letter
and position on the line. Have them complete the line.
3. Continue the above steps with the next letters until the
page has been completed.
Change Lower Case To Upper Case
Method:
1. Print the letter “b” on the board and name it “small b”.
Draw a line beside the “b” and ask a student to print
“capital B” on the line. Students name the small and
capital letter again. Follow this process with several more
examples.
2. Show students the overhead of the worksheet. Cover all
but the alphabet at the top. Ask students to come up and
point to different letters at the top of the page.
3. Show the rest of the overhead. Point to the letter “e”.
Have the students name it and ask one student to come up
and write the capital “e” beside it.
4. Pass out the worksheets. Have the students work
independently while teacher circulates. Encourage
students to refer back to the alphabet model if
necessary.
Follow Up:
Working in pairs, one student shows a flashcard of a letter
and the other student writes the corresponding small or
capital letter on paper.

Foundation Phase 23
Copy d ___ ___ ___ ___ R ___ ___ ___ ___ G ___ ___ ___ ___ p ___ ___ ___ ___
Aa Bb Cc Dd Ee Ff Gg Hh Ii Jj Kk Ll Mm Nn Oo Pp Qq Rr Ss Tt Uu Vv Ww Xx Yy Zz
Write.
Example:
b B
e __ f __ a __
m __ y __ h __
j __ i __ t __

Foundation Phase 24
Match Form Words
Skill Area: Reading
Task: Match words used on
forms
Purpose: Students will
match words used on forms
written in lower and upper
case
Materials: Flashcards,
overhead, worksheets, grid
of 12 boxes
Grouping: Whole group,
pairs, individuals
Learning Style: Visual,
auditory, kinesthetic
Time: 15 – 30 minutes
Note: There are 2 tasks on this page. Each should be taught
separately. Enlarge the tasks so that the Cut and Match
task has 12 boxes and the Match task has about 10 words
in each column. Before attempting these tasks, the
students should be able to recognize in print their own
name, address, and telephone number.
Cut and Match
Method:
1. Pass out the Cut and Match worksheets. Show a flashcard
with a lower case form word written on it. Read the word
and ask the students to point to the same word on their
worksheets. E.g. name. Ask the question: What’s your
name?, so that the students relate meaning to print.
2. Show the matching form word in upper case, read it and
have the students point to it. E.g. NAME.
3. Hold up and read both flashcards to show that they are
pronounced the same way.
4. Follow the same process with all the words.
5. Students cut out the boxes with the form words and
match lower case to upper case. Check that words are
held right side up.
Match Form Words
Method:
1. Make an overhead of the worksheet, or write 2 columns of
form words on the board. One line is written in lower case
and the other in upper case.
2. Read the first word in column 1 and then draw a line to its
match in the second column.
3. Continue with the next word, asking students to draw the
line to make the match. Complete the exercise.
4. Pass out the worksheets and have the students match the
form words , as the teacher circulates.
Follow Up:
Students can play the Memory Game to match form
words on flashcards.
Students can sort and match form words written on
flashcards in different fonts.

Foundation Phase 25
Cut and match.
NAME
telephone
address
ADDRESS
name
TELEPHONE
Match.
FULL NAME FAMILY
family last
LAST full name
number NUMBER

Foundation Phase 26
Match Pictures and Sight Words
Skill Area: Reading
Task: Understand that print
conveys meaning
Purpose: Students will
Match words to pictures
to get meaning from print
Develop a pool of sight
words
Materials: Enlarged pictures
of visuals found on the
worksheet, flashcards,
board, worksheets, grid of 12
boxes
Grouping: Whole class, pairs,
individual
Learning Style: Visual,
auditory, kinesthetic
Time: 15-30 minutes
Note: Enlarge the pictures so that they can be used in the
presentation part of the lesson with the whole group. Choose
vocabulary that is relevant and meaningful to the students and
that can be later used to build sentences and short stories. Make
large flashcards of the sight words, write on the lines so that
students can see the position of the letters on the line.
Interpreters may be needed to explain the concept of getting
meaning from print.
Method:
1. Review vocabulary orally. Hold up one picture. Label it. E.g.
man. Hold up the flashcard and repeat man. Repeat
process to show that the oral and written forms represent
the same word.
2. Print the word man on the board. Underline the first
letter. Produce the sound mmm and glide your hand under
the word as you read man. Have students read man.
3. Continue with the second picture and follow the same
process. Go back to the preceding pictures and words and
match again as a new one is introduced.
4. Pass out the worksheets. Have students cut out the
pictures and words. Show one picture and the
corresponding word and have the students match their
own.
5. Have students work in pairs or alone to match picture and
word. Have them keep these for future reference and
practice.
Follow Up:
Students can place the pictures or the words on a grid as
the oral stimulus is given. E.g. Put the picture “man” in box
#1. Put the word “man” in box #2.
Have the students play games (Memory, Bingo, Go Fish) to
practice the relationship between pictures and words.
Students can unscramble word puzzles to match pictures
and words.
Display pictures and words on collages/posters for future
reference.
Take photos of people and objects and label them on
charts/posters.

Foundation Phase 27
Cut and match.
family
man
boy
girl
baby
woman
4 5 6
1 2 3

Foundation Phase 28
Match and Recognize Sight Words
Skill Area: Reading
Task: Recognize sight word
vocabulary
Purpose: Students will
Match same sight words
Recognize and underline
words according to oral
stimulus
Materials: Flashcards,
pocket chart, board or
bulletin board, overhead,
worksheets
Grouping: Whole group,
pairs, individuals
Learning Style: Visual,
auditory, kinesthetic
Time: 30 minutes
Note: There are 2 tasks on this page.
Method: Match Same Sight Words
1. Give students multiple flashcards of the target
vocabulary. Show one flashcard. Place it on the board.
Make reference to the initial sound by underlining it.
Glide your finger under the word to “read it”. Have
students look at their cards and place the ones that are
the same beside the model, e.g. his his his. Model the
reading and have students repeat. Continue with all
words.
2. Introduce the worksheet on the overhead. Place a strip
of paper under the first line of words. Read the model
sight word on the left. Ask a student volunteer to come
up and underline the “same” words. Read the words out
loud with the students. Follow the same process with
other examples.
3. Pass out the worksheets. Give each student a strip of
paper to place under each line of words. Instruct
students to circle the words that are the same. Circulate
to check. At this stage, students will be “reading” from
memory.
Method: Recognize Sight Words
1. Write 3 target sight words on the board, one under the
other. Say one word and ask a student volunteer to come
up and underline it. Continue the process with other
words
2. Pass out the worksheets. Have students look at box #1.
Say one word and have students underline it. Check for
understanding. Follow the same process for the
remaining words. After a new word has been underlined,
go back and review the “reading” of the words in the
previous box(es).
3. In pairs or with volunteers, have the students read the
underlined words.
Follow Up:
Laminate cards with 3-4 sight words written on them. In
pairs, one student can read a word and the other can
underline it with a non-permanent marker.
Pass out multiple copies of some flashcards to students.
Say a word and have the student(s) who has/have the
word(s) show it. This exercise could also be put on tape.

Foundation Phase 29
Circle.
man
my man name man
school
student speak she school
his
his it his in
house
her house he his
Underline.
name
is
my
your
it
what
woman
student
teacher
school
apartment
classroom
country
speak
language
his
she
live
1. 2. 3.
4. 5. 6
.

Foundation Phase 30
Copy Sight Words / Change Lower to Upper Case Letters
Skill Area: Writing
Task: Demonstrate the
ability to copy words
Purpose: Students will
Write the missing letters
of known sight words
under the model
Copy complete sight
words under the model
Materials: Board, coloured
chalk, worksheets, lined
paper
Grouping: Whole group,
individuals
Learning Style: Visual,
auditory, kinesthetic
Time: 30 minutes
Note: Before students attempt this task, they need practice
copying and writing lower and upper case letters. There are 2
tasks on this page, which should be taught separately. Each task
should be enlarged to make a complete worksheet.
Method: Copy Sight Words
1. Print a target sight word on a line on the board and read it.
E.g. what. Write the same word again under the model,
leaving out some letters and replacing them with lines. E.g.
w_ _ t. With a different coloured chalk, fill in the missing
letters as you point to and copy those from the model
above. Write the complete word again under the model. Do
not focus too much attention to letter names, as this may
be difficult to undo when teaching phonetic decoding later.
2. Repeat this process, having students come up and write.
3. Pass out the worksheets. Instruct the students to fill in
the missing letters and copy the words. Circulate to check
for understanding of task, correct formation of letters,
position of letters on the line and spacing between letters.
Note: Students also need practice writing beside the
model as well as from a model. E.g. flash card or board.
Method: Change Lower Case to Upper Case Words
1. Pass out lined paper to the students. Write a lower case
letter on the board. Have the students write the
corresponding upper case letter. Practise with several
letters and then do the reverse (upper to lower). Have a
chart of the alphabet in upper and lower case letters for
the students to refer to.
2. Print a sight word on the board in lower case. Write the
word in upper case beside it. Read both words. Continue
with several examples, having the students write.
3. Pass out the worksheet. Instruct the students to write
the words in capital letters. Let students refer to the
alphabet model on the worksheet, if necessary.
Follow Up:
Laminate sight word flash cards. Have students change
from lower to upper case or vice-versa with permanent
marker or have them copy/write the word on lined paper.

Foundation Phase 31
Copy.
what school first
w_ _t _ch_ _l _ _rs_
_____ _______ ______
my teacher your
_y t_a_ _er _ _u_
____ _________ ______
Write. Example:
my MY
family ________ woman _________
your ________ it _________
she ________ school _________

Foundation Phase 32
Write Word to Picture
Skill Area: Reading and
Writing
Task: Identify and write
words to label pictures
Purpose: Students will
Recognize which word
from a word pool
corresponds to the
appropriate picture
Write the corresponding
word beside the picture
Materials: Enlarged visuals
found on the worksheet,
flashcards, overhead, board,
pocket chart, worksheets,
grid of boxes
Grouping: Whole group,
pairs, individuals
Learning Style: Visual,
auditory, kinesthetic
Time: 20-30 minutes
Note: In this task, the order of the words in the word pool and
the order of the pictures do not match. Before attempting this
task, students need practice labelling pictures where the order of
words and order of the pictures match. Also, the words for the
task on the worksheet all begin with different consonants. This is
the beginning of letter/sound correspondence. The next task
would be to have the students choose words from a pool where
more than one word begins with the same consonant.
Method:
1. Place the flashcards of the words from the worksheet
horizontally in the pocket chart or on the board.
2. Show one picture. Have a student volunteer to come up and
find the corresponding word. Read the word with the
student while stressing the initial consonant sound, and
showing that the picture and the print convey the same
meaning.
3. Continue with all the words. Repeat if necessary.
4. Pass out the worksheets. Ask the students: What’s picture
#1? When they respond, have them point to the word in
the boxed word pool. Check to see if students have chosen
the correct word.
5. Have students copy the word twice. Check for accuracy of
letter formation, position of letters on the line, and
spacing of letters in a word. Have the students complete
the page independently.
6. Have students work in pairs to read back the words they
have written.
Follow Up:
Play Bingo to reinforce word recognition. Teacher holds up
a picture and students find the word on the Bingo card.
Have the students make up their own Bingo cards by
copying 6 words from a pool of 12.
Have students cut out pictures of theme related words
from magazines and catalogues. They can mount them on
poster paper and copy the corresponding word underneath.

Foundation Phase 33
Read.
book house school apartment telephone pencil
Write.
1.
____________ _____________
2.
____________ _____________
3.
____________ _____________
4.
____________ _____________
5.
____________ ____________
6.
____________ _____________

Foundation Phase 34
Match Sentences to Pictures
Skill Area: Reading and Writing
Task: Match and write
sentences to pictures
Purpose: Students will
Match sentences to
pictures
Copy sentences under a
model
Materials: Enlarged visuals
of pictures on the worksheet,
sentence strips, board,
bulletin board or pocket
chart, worksheets
Grouping: Whole group,
pairs, individuals
Learning Style: Visual,
kinesthetic
Time: 30 minutes
Note: Students need to be able to read individual sight words
before attempting this task. Aural/oral practice of sentences
must also be practised. Before matching sentences as in this
exercise, students need practice reading sentences that are
written beside the corresponding picture.
Method:
1. Place enlarged visuals from worksheet in a vertical line in a
pocket chart, or on a chalkboard or bulletin board. Make a
second column of sentence strips as found on the
worksheet. Be sure the order differs from that of the
pictures and that these are placed a distance away from
the pictures. Draw a line under each sentence for copying.
2. Point to a picture and ask the appropriate question. E.g.
What is it/he/she? What are they? Have the students
respond in a complete sentence. Match the sentence to the
picture by drawing a line. Point to the picture and say: He
is a man. Point to the sentence and say: He is a man. Copy
the sentence under the model making reference to the
capital letter, word spacing and end punctuation.
3. Point to the second picture. Follow the same process, but
this time, have a student volunteer match the sentence to
picture. Continue with all pictures.
4. Pass out the worksheets. Have the students name the first
picture and point to the corresponding sentence. Check to
see that they have chosen the correct sentence.
5. Have them draw a line from the picture to the sentence
and then copy the sentence under the model. Check for
capital letters and spaces between words and end
punctuation. Have students read the sentences in pairs.
Follow Up:
Pass out sentence strips to individuals or pairs. Hold up a
picture, ask a question, and have the students look for the
corresponding sentence. Sentences can be written for any
theme you are teaching. Keep the sentences short.
(maximum 5 words)

Foundation Phase 35
Read, match and copy.
They are a family.
________________
She is a woman.
________________
It is a house.
________________
They are children.
________________
He is a man.

Foundation Phase 36
______________

Foundation Phase 37
Fill in Initial Consonants and Copy Sight Words
Skill Area: Reading and
Writing
Task: Recognize initial
consonant sounds in sight
words
Purpose: Students will
Recognize and fill in the
missing initial consonant
of known sight words
Copy sight words
Materials: Letter
flashcards, enlarged visuals
of pictures on the worksheet,
pocket chart, board,
worksheets
Grouping: Whole group,
individuals
Learning Style: Visual,
auditory, kinesthetic
Time: 30 minutes
Note: Enlarge the visuals for the presentation stage of the
lesson. This task involves choosing the appropriate initial
consonant sound from a pool of 6 letters. Initially you would teach
one sound at a time with many visuals and gradually compare
sounds as new ones are introduced. Students need to practice
recognizing and reading words as in the tasks that precede this
one, before attempting this task. Consider having interpreters
explain the concept of sound/letter correspondence in L1.
Method:
1. On the board, place flashcards of the 6 letters presented
on the worksheet. Show the students a visual. Write the
sight word of the picture under the picture but leave out
the initial consonant and write a line in its place.
2. Say the word, orally stressing the initial consonant sound.
Ask a student to pick up the first sound in the word and
place it on the line. Do not name the letter as this will
confuse the concept of sound/ letter correspondence.
3. Have a student volunteer come up and remove the
flashcard and write the letter in its place. Copy the word
one more time under the model. Have everyone read the
word.
4. Follow the same process with the other pictures.
5. Pass out the worksheets. Have students name the first
picture, write the missing letter and then copy the word.
Circulate to check for accuracy.
Follow Up:
Make collages/posters of pictures and words from
catalogues that begin with the same initial consonant. E.g.
pot, pan, pants.
Make charts of words students know orally or known sight
words that begin with that sound. E.g. Student names, days
of the week, numbers, clothing, etc.
Play letter Bingo. Bingo cards have initial consonants.
Teacher says a word/shows a visual and students cover the
first sound.
Prepare picture cards. Label the picture underneath,
leaving out the initial consonant and writing a line in its
place. Have students work in pairs to copy the word on
lined paper with the initial consonant written in.

Foundation Phase 38
Write and copy.
h p c d m j s b
_eans _us
1. _______ 2. ______
_oor _oat
3. ______ 4. ______
_and _oney
5. _______ 6. ______
_chool _encil
7.________ 8. _______

Foundation Phase 39
Read, Copy, and Order Sight Words
Skill Area: Reading and
Writing
Task: Copy and order sight
words
Purpose: Students will:
Read known sight words
out loud
Copy sight words from a
word pool
Order sight words to
make questions and
answers
Materials: Overhead of
enlarged worksheet,
worksheets, pocket chart,
board
Grouping: Whole group,
pairs, individuals
Learning Style: Visual,
auditory, kinesthetic
Time: 30 minutes
Note: There are 2 separate tasks on this page.
Read and Copy Sight Words Method:
1. Enlarge the worksheet and make an overhead. Point to the
words, one at a time and have the students read them.
2. Pass out the worksheets. Have pairs read words together.
3. Have the students point to #1 on the worksheet. Tell them
to write the word address on the line. Circulate to check
for understanding of task and accuracy.
4. Continue with the next 8 words. Review the reading of the
previous words each time a new word is dictated.
Order Sight Words
Method:
1. Drill flashcards of sight words found on the worksheet.
Pass out the flashcards to the students.
2. On the board, write the question, What is your name?
(Space the words) Have the students come up and place
the flashcards under the question to copy the model.
Have them all read it and add the punctuation.
3. Follow the same process with the answer. Have a student
complete the sentence. My name is _______ .
4. Repeat process, this time dictating the question or answer
and having the students order the words.
5. Continue the same process with other questions.
6. Pass out the top of the worksheet ( 12 boxes of words).
Have students cut out words and place right side up on
their desks. Dictate the question or answer and have the
students order words to make questions or answers.
Follow Up:
Use this method of ordering flashcards every time a new
question/answer structure occurs. Note: When first
teaching the pattern of words in questions and answers it
is a good idea to have the words that are repeated on one
colour of paper (blue) and the other words on white paper,
e.g. What is your name? My name is ___. (The bold words
would be written on blue paper as they are repeated in the
question and answer.)
Have student pairs each cut up 12 sight words. One
student reads a word. Both place this word on the grid or
12. They check and compare their sight words. Then a
second word is read by the other student.

Foundation Phase 40
Read.
is
name
telephone
My
What
first
address
last
full
family
number
your
Copy.
1. _______ 2. ________ 3. ________
4. _______ 5. ________ 6. ________
7. _______ 8. ________ 9. ________

Foundation Phase 41
Fill Out Forms / Complete and Copy Sentences
Skill Area: Reading and
Writing
Task: Fill out forms and copy
sentences
Purpose: Students will
Fill out a simple teacher-
made form
Complete and copy
personal information
statements
Materials: Board, overhead,
worksheets
Grouping: Whole group, pairs
individuals
Learning Style: Visual,
auditory
Time: 15 minutes
Note: There are two sample tasks on this page, which should be
taught separately. The worksheet should be enlarged so that each
task is well spaced on the worksheet. Use at least 18 point font at
the Foundations Level.
Fill Out a Simple Teacher-Made Form
Method:
1. In pairs have students read out loud personal information
words on flash cards.
2. Show the overhead of the form. Put a strip of paper
under the first line. Have the students read the first
word out loud. Ask a student volunteer to come up and
write his first name on the line. Follow the same process
with the rest of the form.
3. Pass out the worksheets. Have students work
independently to fill out the form. Check for accuracy.
4. In pairs have them read the forms out loud.
Complete and Copy Sentences Method:
1. Drill flashcards of known sight words from the worksheet
2. On the board write: My first name is ____. Ask a class
read the words and have a student volunteer to write his
name to complete the sentence. Then have the student
copy the complete sentence under the model.
3. Follow the same process with the other sentences.
4. Pass out the worksheets. Have students work in pairs or
independently to read and complete the sentences. Have
individuals read their complete sentences out loud.
Follow Up:
Prepare forms on laminated cards. Change the order of
the form words to make many different forms using the
same words. Have students fill out the forms using non-
permanent markers.
Prepare sentence strips like those found on this
worksheet. Pass them out to pairs who can read the
sentences out loud, answer orally, and then copy the
complete sentence adding their own personal information.

Foundation Phase 42
Read and write.
First Name __________________
Last Name __________________
Full Name __________________
Address __________________
Telephone Number __________________
Read and write.
1. My first name is ____________.
___ _____ ______ ___ ____________.
2. My last name is ____________.
___ _____ ______ ___ ____________.
3. My address is _______________.
___ _________ ___ _______________.
4. My telephone number is _________.
___ _______ _______ ___ ________.

Foundation Phase 43
Read and Write Personal Information
Skill Area: Reading and
Writing
Task: Read personal
questions and write answers
Purpose: Students will
Read and understand
personal information
questions
Write answers in
complete sentences
Materials: Flashcards,
overhead, board, worksheets
Grouping: Whole group, pairs
individuals
Learning Style: Visual,
auditory and kinesthetic
Time: 30 minutes
Note: Before attempting this task, students need to understand
the concept of question and answer. Interpreters may be needed
to explain this. They also need to have had aural/oral practice with
personal information questions and answers as well as practice
writing one word answers to personal information questions.
Method:
1. Write What is your name? on the board. Have students
read this out loud. Ask one student to answer orally.
2. Place the flashcards for the answer in random order
vertically on the board. Have the student order the
cards to read My name is. Have him complete the
sentence by writing his name. Remove the flashcards
and ask the student to write the answer on lines drawn
for each word.
3. Follow the same process with the other personal
information questions found on the worksheet.
4. Show the overhead of the worksheet. Put a strip of
paper under the first question and answer. Have the
students read question # 1. Circle is, first, and name in
the question. Read My and then complete the answer
with the your own name. Circle is , first, and name again
and show that these words are found in the question and
answer. (Interpreters may be needed to explain this
concept of word repetition in question and answer.)
5. Pass out the worksheets. Have the students read
question # 1 and write their answers. Circulate to check
for understanding and accuracy. Allow students to copy
information from ID cards.
6. Have the students read question # 2 together and then
follow the same steps as above.
Follow Up:
Store the flashcards used for the presentation part of
the lesson as well as some blank cards in envelopes. Label
these envelopes with the question to be practiced.
E.g. Name. Pass out the envelopes to pairs and ask
students to order the cards to make questions and
answers. Have them write their info on the blank cards.

Foundation Phase 44
Read and write.
1. What is your first name?
__My ______ _____ _____ ________.
2. What is your telephone number?
___ ________ ________ ___ _______.
3. What is your last name?
_____ _____ _____ _____ ________.
4. What is your address?
___ _______ ____ ________________.
5. What is your full name?
_____ _____ _____ ___ ___________.

Foundation Phase 45
Read a Story and Fill Out Forms
Skill Area: Reading and
Writing
Task: Read, understand and
fill out a form
Purpose: Students will
Read and understand a
short story
Fill out a simple form
with information from
the story
Materials: Overhead,
worksheets, flashcards
Grouping: Whole group,
individuals
Learning Style: Visual,
auditory
Time: 20-30 minutes
Note: When introducing short stories (2 to 3 sentences) at this
level, choose vocabulary that is familiar and relevant to the
students’ lives. Students need to learn that information on a form
is presented in one-word answers.
Method:
1. Show the overhead of the worksheet. Cover the form so
only the picture and the 2- line story are revealed. Ask
the students some introductory questions such as, What
do you see? Is this a man or a woman? etc.
2. Point out the name Sam Lock, by gliding your pen under
the name as you read it. Stress the initial consonant
sounds of the first and last name. Have the students
repeat Sam’s first, last and full names as you point to
the words.
3. Point to the picture again and say: This is a man. His
name is Sam Lock. Point to the words in the story and
read the same. Have the whole group and then
individuals read.
4. Point to words in the story at random and ask students
to read out loud. Check for accuracy of pronunciation.
5. Show the form. Have the students read, man and woman.
Ask: Is Sam a man or a woman? Have a student come up
and make a check in the appropriate box.
6. Continue to work through the form. Have the students
read the words and ask a student volunteer to write the
information about Sam on the lines.
7. Pass out the worksheets and have the students work
independently to fill out the form. Circulate to check
for comprehension of the task. Point to words on the
form and ask individuals to read out loud.
Follow Up:
Make flashcards of the words in the story. Have students
place the words in order to make the story.
Have students read word groups/families using story
vocabulary as a guide. E.g. man, pan, fan, can, etc.
Prepare other forms so that students have practice filling
out forms in a variety of ways. E.g. Students can write
beside the form word, under the form word, or above the
form word.

Foundation Phase 46
Read.
This is a man.
His name is Sam Lock.
Sam Lock
Read and write.
man woman
last name _________________
first name _________________
full name _________________

Foundation Phase 47
Read a Story and Copy Information
Skill Area: Reading and
Writing
Task: Read, understand and
record information from a
story
Purpose: Students will:
Read and understand a
short story
Copy information from a
story
Materials: Overhead,
worksheets
Grouping: Whole group,
pairs, individuals
Learning Style: Visual,
auditory, kinesthetic
Time: 30 minutes
Note: Stories at this level should be short in length with not
more than one new content word per line. For this exercise, cut
the worksheet in half so that students have ample practice
reading the story before copying missing information.
Method:
1. Present the overhead of the worksheet, showing only the
picture and the story. Say: This is a story about a woman.
2. Put a strip of paper under the first line. Have students
read it out loud. Ask: Who is this? pointing to the picture.
Drill the answer in a complete sentence, as in the story.
This is to show students the connection between oral
language and print. Point to words at random to drill sight
word reading as well as “memory” reading.
3. Continue with all the lines in the same way.
4. Pass out the top half of the page. In pairs, have students
read the story out loud as the teacher circulates.
5. Show the second half of the overhead. Have the students
read the first line out loud while filling in the missing
information. Ask a student volunteer to circle the missing
word in the story and then copy it on the line. All read.
6. Follow the same process with the remaining lines.
7. Pass out the worksheet. Have students circle the missing
word from the story and then write in the blank.
Follow Up:
Review sight words by saying words from the story and
having students point to, circle, or underline them.
Have students copy words from the story. Have them look
at the word and do a “sound search” by underlining the
letter(s) according to the oral stimulus. E.g. Write
the word, Canada. Underline the “K” sound.
Make a worksheet of words from the story with missing
initial consonants. Dictate the words and have the students
select the letter from a pool and write it in the blank.
Have students sort flashcards from the story according to
initial consonant sounds.
Have students cut the story into sentence strips. Ask
questions orally and have the students find the sentence
that answers the question.

Foundation Phase 48
Read.
This is Mai.
Her full name is Mai Lee.
She is from China.
She speaks Chinese.
She lives in Canada now.
Read and write.
This is ____________.
Her full name is ____________.
She is from ___________.
She speaks ___________.
She lives in _____________ now.

Foundation Phase 49
Listen to and Read Short Instructions
Skill Area: Reading and
Writing
Task: Listen to, read and
respond to short instructions
Purpose: Students will
Listen to short
instructions
Circle or write numbers,
symbols, letters, words
or personal information
Materials: Board, overhead,
worksheets
Grouping: Whole group,
pairs, individuals
Learning Style: Visual,
auditory
Time: 20-30 minutes
Note: Teachers can often involve students in this type of task to
review vocabulary on a topic and assess learning.
Method:
1. Draw a box on the board. In it write three numbers, as
in the first box on the worksheet. Say Look at the
numbers. Circle the number ___. Ask a student
volunteer to come up and circle the appropriate number.
Continue with 2 or 3 more examples as on the
worksheet, only using different vocabulary.
2. Pass out the worksheets. Have the students count the
number of boxes out loud. Say: Show me box #1.
Continue naming box numbers at random for students to
find.
3. Have students place a strip of paper under the first row
of boxes. Say: Look at box #1. Circle number 40.
Circulate to check comprehension of task. Give positive
reinforcement.
4. Show the overhead of the worksheet. Ask a student
volunteer to circle the correct response.
5. Tell students to look at and point to box #2. Say: Write
your first name. Circulate, check, and give immediate
feedback with the correct response on the overhead. Go
back and have students read the circled answers in
boxes #1 and #2.
6. Follow the same process with the remaining boxes. Have
students read the target vocabulary of previous boxes,
after each new box. Keep instructions short and
specific. The first few times you carry out this task,
limit the instructions to Circle and Write. Later,
increase the number of instructions to include underline,
cross out, draw a box around, etc.
Follow Up:
Students can work in pairs to read all the vocabulary items
on the page.
As students become more familiar with this task, let
individuals give the instructions. This will review oral
reading as well as recognition of vocabulary.

Foundation Phase 50
Listen.
Circle or write.
40
4
14
__________
her
his
he
___________
Tuesday
Thursday
Friday
b
d
p
2002
2004
2003
___________
man
woman
boy
___________
first
full
family

Phase I 51
Match Personal Questions and Answers
Skill Area: Reading and
Writing
Task: Read and understand
personal information
Purpose: Students will
Read and understand
personal information
Match questions and
answers
Materials: Overhead,
sentence strips, worksheets,
enlarged visuals of Tomas
and Maria, board
Grouping: Whole group,
pairs, individuals
Learning Style: Visual,
auditory, kinesthetic
Time: 30 minutes
Note: Before students are expected to match questions to
answers in complete sentences, they need practice matching
questions to short answers. They also need to be taught how to
look for patterns of words and structures in questions and
answers. Interpreters may be needed to explain this concept.
Method:
1. Place the enlarged visual of Tomas on the chalkboard.
Write the information from the worksheet under the
picture. Ask the students: What do you see? Elicit
answers to questions about name, address, and
telephone number.
2. Follow the same process for the picture of Maria and
then alternate between questions about Tomas and
Maria.
3. Pass out sentence strips of questions and answers. Ask
students to show which are the questions and which are
the answers (colour coding of strips and punctuation
should help).
4. Ask one student with a question card to read it and
place it on the board. Have the students look at their
cards. Have the person with the matching answer place
it beside the question strip. All read the question and
answer.
5. Circle words on the strips that are repeated in the
question and the answer. E.g. is, name, his. Also point out
the change in order of words from question to answer.
6. Follow the same process with the rest of the questions
and answers.
7. Pass out the worksheet. Have the students point to the
list of questions and answers. Have them draw a line to
match as in the example. Circulate to check for
comprehension of the task. Ask individuals to read out
loud and correct pronunciation errors. Have them re-
read in pairs.
Follow Up:
Keep these stories in envelopes. Add sentence strips of
questions and answers for students to match.
Put words found in questions and answers on flash cards.
Teacher asks the question and students can order the
flashcards to make questions and answers.

Phase I 52
Read.
Tomas Lado Maria Sanchez
667-2195 334-6582
425-831 Lipton Street 703 Smith Avenue
What is his full name? Her family name is Sanchez.
What is her telephone number? His full name is Tomas Lado.
What is her family name? Her address is 703 Smith Avenue.
What is her address? Her full name is Maria Sanchez.
What is her full name? Her telephone number is 334-6582.
What is his first name? His first name is Tomas.

Phase I 53
Read a Simplified Flyer
Skill Area: Numeracy,
Reading and Writing
Task: Find and copy
items and prices in a
simplified flyer
Purpose: Students will
Recognize and read
money symbols: $ .
Read the price
Pronounce money
values clearly and
accurately
Materials: Real flyer,
simplified flyer
worksheets and
overhead
Grouping: Whole group,
pairs, individuals
Learning Style: Visual,
auditory
Time: 1 hour
Method:
1. Show students a department store flyer. Explain
that they are going to learn how to read names
of clothing items and prices in a flyer. Ask:
What do you see?
2. Use the overhead to show and read the
simplified flyer to students, pointing to names
and prices.
3. Model and have the students repeat names and
prices. Explain that items are written in plural in
flyers. E.g. dresses
4. Ask questions orally and have students answer
together and then individually.
5. Circulate and correct while the students write
answers to questions in the worksheet.
6. Students practice in pairs asking the questions
and giving answers orally.
7. Students will learn about the importance of
accuracy in copying and pronouncing the prices
clearly.
8. Have an overhead of a chart to practise singular
and plural nouns. E.g. dress, dresses, shoe,
shoes. Fill in the chart together. Practise the
pronunciation of singular and plural.
Follow Up:
Have students practise with other teacher-
simplified flyers for food, household items and
furniture.
Students can practise prices by listening to the
teacher or a tape and circling prices.
Students can make their own flyers.

Phase I 54
HUGE SALE AT VALUE-MART ! STARTS THIS FRIDAY !
Dresses
$39.99
Ties
$14.99
Shoes $58.75
Pants
$41.95
1. What is the name of the store ?____________________
2. When is the sale ?_________________________________
ITEM PRICE
3. How much are the dresses ? ___________ _________
4. How much are the suits ? ______________ _________
5. How much are the ties ? _______________ _________
6. How much are the shoes ? _____________ _________
7. How much are the pants ? _____________ _________
Suits
$92.50

Phase I 55
Read a Story and Fill Out a Simplified Form
Skill Area: Reading and
Writing
Task: Read and present
formatted information
Purpose: Students will
Read and understand
a simple short story
Fill out simple
teacher-made form
Copy numbers and
words using correct
order
Materials: Flashcards,
overhead, worksheets
Grouping: Whole class,
individuals
Learning Style: Visual,
auditory
Time: 1 hour
Method:
1. Use flashcards to review personal information
form words. Teacher holds up card: name.
Students ask: What is your name? One student
answers. Etc.
2. Check for prior knowledge and introduce new
vocabulary as needed. E.g. age.
3. Introduce Jack’s story on an overhead including
the picture of Jack.
4. Read the story to the students. Check for
understanding by asking questions such as:
Where does he live?
5. Read the story again and have students repeat.
Point to the words reviewed on the flashcards:
E.g. married, single.
6. Ask the class questions to check for
understanding. E.g. What is Jack’s job?
7. Show the students the simplified form on the
overhead. Ask individual students to come up and
write the information on the form on the
overhead. Explain to students the importance of
copying the information onto a form clearly,
completely and accurately.
8. Hand out the worksheets. Circulate and correct
while the students fill in the information on the
form.
Follow Up:
Have the students complete a personalized
version of the story. E.g. My name is ______.
My address is _______.
Have the students then complete the same form
with their own information.
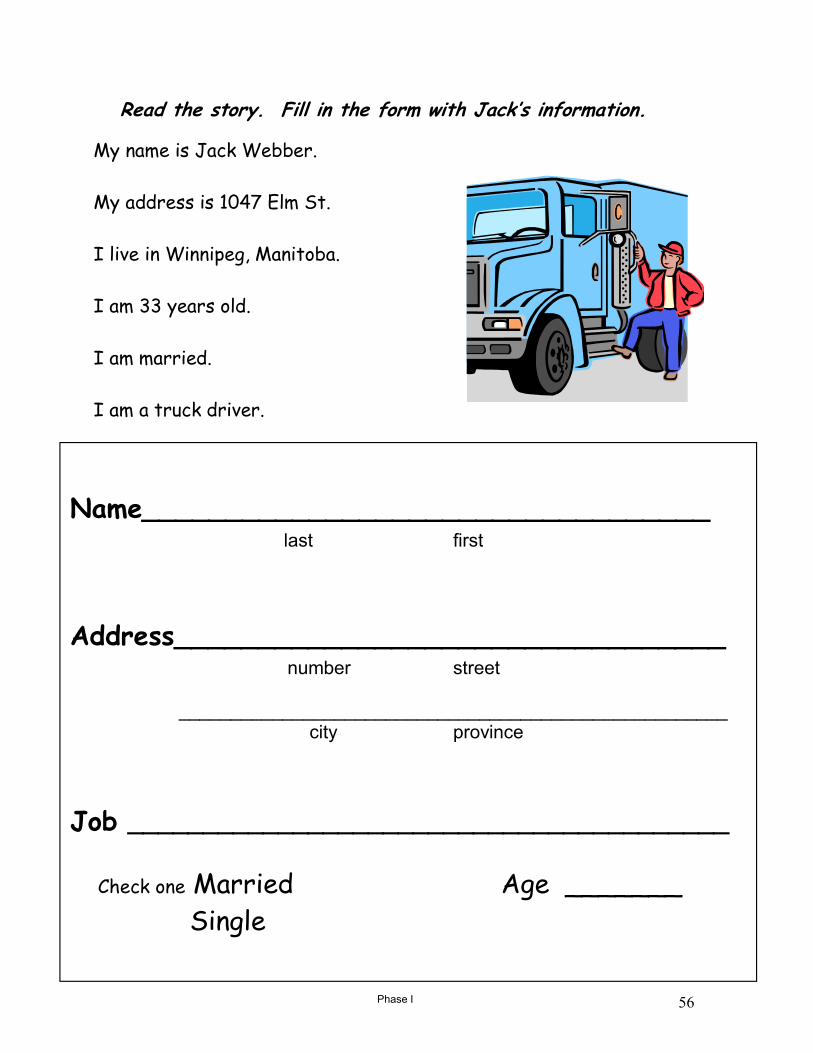
Phase I 56
Read the story. Fill in the form with Jack’s information.
My name is Jack Webber.
My address is 1047 Elm St.
I live in Winnipeg, Manitoba.
I am 33 years old.
I am married.
I am a truck driver.
Name__________________________________ last first
Address_________________________________ number street _____________________________________________________
city province
Job ________________________________________
Check one Married Age _______
Single

Phase I 57
Read and Follow a Recipe
Skill Area: Reading,
Writing and Numeracy
Task: Read and follow
information on a recipe
Purpose: Students will
Read and
understand
formatted
information
Understand
instructions
Use measuring
implements
Use vocabulary
related to
measurement
Materials: Recipe,
ingredients, measuring
cup, mixing spoons, baking
pan, oven, worksheets
Grouping: Whole class,
small groups, individuals
Learning Style: Visual,
auditory, kinesthetic
Time: 1 ½ hours
Method:
1. Introduce or review names of ingredients,
measurement amounts and implements.
2. Introduce baking vocabulary using realia or
demonstration.
3. Read and show the ingredients one by one. Have
the students repeat.
4. Give the students a copy of the recipe. Read the
instructions and demonstrate. Have the students
repeat the instructions step by step.
5. Reread the complete recipe two times and check
for understanding. Remind students that for a
recipe to be successful they must measure
accurately and follow the instructions exactly.
6. Break into smaller groups led by teacher and
volunteers. Have students take a turn following
the steps of the recipe to actually prepare the
ingredients for baking. Bake and enjoy!
7. While the recipe is baking. Read the steps on
four sentence strips. Explain the task of putting
the steps in order. Have the students
Put the instructions into sequence.
Read the instructions in the correct order.
Copy the steps in the correct order.
Follow Up:
Phonics Focus: Read the recipe again. Have
learners hunt for and circle words that
End with r sound: flour, sugar, pour, hour
End with t sound: last, mashed, white
End with p sound: cup, ship, ripe
End with ing sound: dressing, baking

Phase I 58
Banana Bread
2 cups flour
1 cup Miracle Whip salad dressing
1 cup mashed ripe banana
3/4 cup white sugar
2 tsp. baking soda
Heat oven to 350º.
Combine ingredients but add baking soda last.
Pour ingredients into a 9” x 5” loaf pan.
Bake for one hour.

Phase I 59
Read a Story and Write Sentence Answers
Skill Area: Reading and
Writing
Task: Read a story about
a cook
Purpose: Students will
Read and interpret a
story
Read about actions and
emotions
Read and orally answer
Wh-comprehension
questions
Answer questions in
complete sentences
using words or phrases
from the story
Materials: Worksheet,
board
Grouping: Whole class,
pairs, individuals
Learning Style: Visual,
auditory, kinesthetic
Time: ½ to ¾ hour
Method:
1. Introduce the story by drawing out the occupation
cook, asking what a cook does, asking if any students
are cooks by trade, etc.
2. This story could be taught first on the board by
putting up one sentence at a time and helping with
the reading, comprehension, and pronunciation.
Check for comprehension by asking questions
throughout the process.
3. The last line is complex because of the word but.
One way to teach this is to give other examples of
sentences where but is used in context. E.g.
I like Canada but I don’t like winter.
Some students may want to make up their own
sentences.
4. Pull out basic spelling conventions: such as Hong,
Kong, long, tong, wrong, and job, rob, Bob, cob, etc.
Students can write these on the back of the page.
Every story has some teachable phonics moments.
5. Reread the story together and then have the
students read in pairs. (This seems like a lot of
rereading but they need to do this.)
6. Now read the example together: Where is Jin from?
Have students underline or highlight the answer:
Hong Kong. The teacher demonstrates writing the
long answer by copying words from the question: Jin
is from Hong Kong.
7. Answer the rest of the questions together on the
board. Each time read the question together and
find the answer. Students highlight the answer.
Say the sentence (long) answer together. Then
students write the long answer together copying
words from the question. Teacher checks students’
sentences.
8. Students take turns writing the sentence answers on
the board.

Phase I 60
Name________________________________
__ last first
Address
________________________________ number street
________________________________ city province

Phase I 61
This is Jin.
He works from 4:30 to 9:30 Monday to Friday. He cuts vegetables and cooks Chinese food. He likes his job but he wants to work more hours.
Read the story. Answer the questions in sentences. 1. Where is Jin from? He is from Hong Kong. 2. Where does he work?
3. What does he do at work?
4. When does he start work?
5. How many hours does he work?
6. What does he want?

Phase I 62
Read Time References
Skill Areas: Reading,
Writing and Numeracy
Task: Read and
complete sentences
related to time
Purpose: Students will
Read and understand
information
Understand and use
vocabulary related to
time
Copy time references
to complete sentence
frames
Materials: Analogue
clock, overhead,
worksheets
Grouping: Whole group,
pairs, individuals
Learning Style: Visual,
auditory
Time: 1 hour
Method:
1. Introduce or review vocabulary related to time
e.g. 12:00 noon, using an analogue clock.
2. Use an overhead to review routines.
3. Put a sample question and answer on board:
E.g. What time do you get up in the morning?
Have individual students answer question orally.
4. Introduce Jin’s routine on an overhead. Read
example to students pointing out the correct
ending.
5. Ask the students to read and complete #1
orally. Indicate where to number the ending and
where to copy the ending.
6. Circulate and correct while the students
complete the worksheet.
7. Use the overhead to model the completed
sentences. Have the students repeat as a class
and then individually.
Follow Up:
Help students to re-write the sentences in the
first person. Change the word work to school.
Have them read their sentences to a partner.

Phase I 63
Jin finishes work at 9:30 in the evening. Number the endings. Complete the sentences . 1. Jin gets up at 8:15 _______________________________. 2. Jin eats lunch at twelve o’clock __________________. 3. He starts work at 4:30 _____________________________. 4. He gets home from work at 9:45 __________________. 5. He goes to bed at 12:00 __________________________.
****************************************** Endings : in the afternoon midnight in the morning noon in the evening
This is Jin.
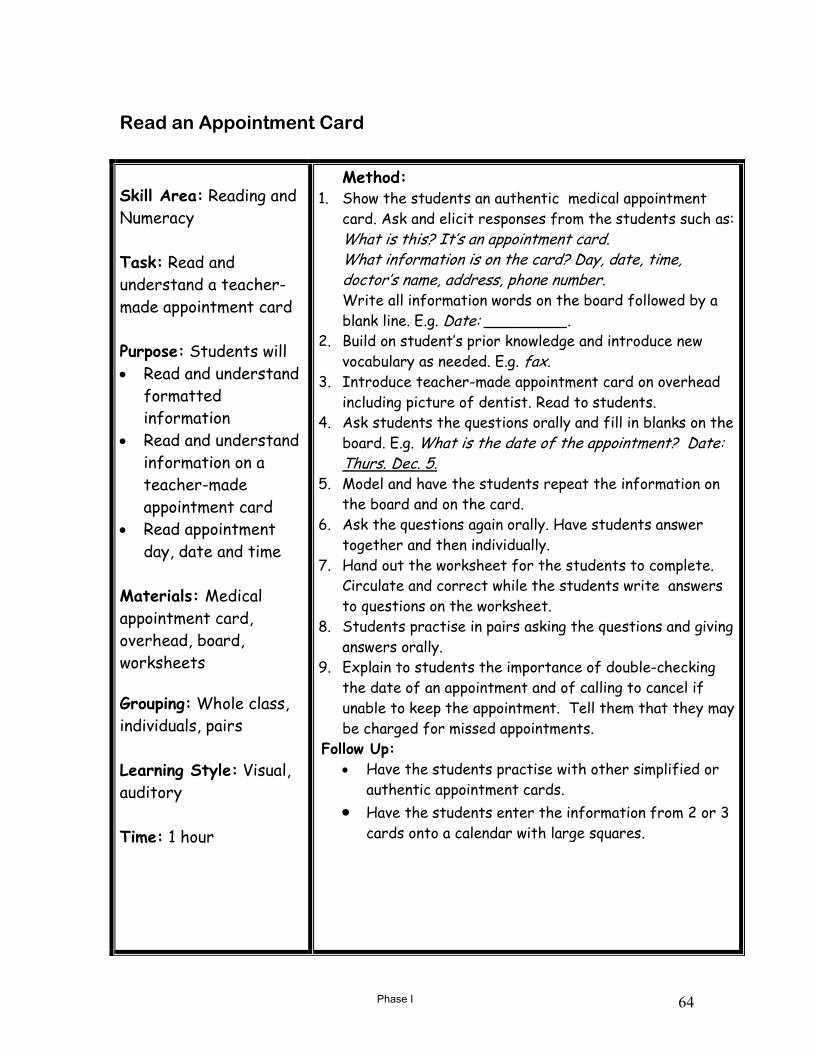
Phase I 64
Read an Appointment Card
Skill Area: Reading and
Numeracy
Task: Read and
understand a teacher-
made appointment card
Purpose: Students will
Read and understand
formatted
information
Read and understand
information on a
teacher-made
appointment card
Read appointment
day, date and time
Materials: Medical
appointment card,
overhead, board,
worksheets
Grouping: Whole class,
individuals, pairs
Learning Style: Visual,
auditory
Time: 1 hour
Method:
1. Show the students an authentic medical appointment
card. Ask and elicit responses from the students such as:
What is this? It’s an appointment card.
What information is on the card? Day, date, time,
doctor’s name, address, phone number.
Write all information words on the board followed by a
blank line. E.g. Date: _________.
2. Build on student’s prior knowledge and introduce new
vocabulary as needed. E.g. fax.
3. Introduce teacher-made appointment card on overhead
including picture of dentist. Read to students.
4. Ask students the questions orally and fill in blanks on the
board. E.g. What is the date of the appointment? Date:
Thurs. Dec. 5.
5. Model and have the students repeat the information on
the board and on the card.
6. Ask the questions again orally. Have students answer
together and then individually.
7. Hand out the worksheet for the students to complete.
Circulate and correct while the students write answers
to questions on the worksheet.
8. Students practise in pairs asking the questions and giving
answers orally.
9. Explain to students the importance of double-checking
the date of an appointment and of calling to cancel if
unable to keep the appointment. Tell them that they may
be charged for missed appointments.
Follow Up:
Have the students practise with other simplified or
authentic appointment cards.
Have the students enter the information from 2 or 3
cards onto a calendar with large squares.

Phase I 65
1. What is the dentist’s name? ____________________
2. What is the date of the appointment? ____________
3. What time is the appointment? _________________
4. What is the fax number? ______________________
5. What street is the dentist’s office on? ____________
6. What number do you call to change your appointment? _______________________________
Your Next Dentist Appointment
Mon. __________ ________ Tues. __________ ________ Wed. __________ ________ Thurs. ___Dec. 5_ __2:15___ Fri. __________ ________ DR. SABER AHMAD
466—955 Bay Avenue Toronto, ON M5F 2A2
Ph: 287-5791 Fax: 965-1789
Read the appointment card. Answer the questions below.

Phase I 66
Read a Simplified Medicine Label
Skill Area: Reading,
Writing and Numeracy
Task: Read and
understand directions
on a simplified medicine
label
Purpose: The students
will
Read and understand
formatted
information
Read and understand
directions on a
medicine label
Read and understand
measurement related
to time. E.g. 1 or 2
tablets every 4-6
hours
Materials: Medicine
bottle, tablets,
overhead, worksheets
Grouping: Whole class,
individuals, pairs
Learning Style: Visual,
auditory
Time: 1 hour
Method:
1. Hold up a prescription medicine bottle.
Ask and elicit responses from the students, such
as: What is this? It’s a medicine bottle.
What is on the bottle? It’s a label.
What information is on the label?
Directions. How many to take. When to take the
medicine. Build on students’ prior knowledge and
introduce new vocabulary as needed.
Write down words on the board to develop
a word pool.
2. Introduce simplified label on the overhead
including title, picture of Mai Ling and
bottle.
3. Show students the bottle and how many
tablets Mai Ling can take every 4-6 hours. Show
students how many tablets a child can take.
Note: Students will probably have difficulty
with the expression under 6. Write the
numbers 5, 4, 3, 2, 1 years old under the number
six.
4. Ask questions orally. Have students answer
together and then individually.
5. Hand out the worksheets. Circulate and
correct while the students write answers to
questions on the worksheet.
6. Students practise in pairs asking the questions
and giving answers orally.
7. Explain to students the importance of following
the directions exactly and not exceeding the
stated dosage.
Follow Up:
Have the students practise with other simplified
medicine labels.

Phase I 67
Mai Ling has a headache.
1. Why is Mai Ling taking a pill? ______________________
2. How many pills can she take? ______________________
3. When can she take one more tablet? ________________
4. Call a doctor if she gets a _____________________
5. Can she give a pill to her 4 year old son? _____________
Medicine Directions:
Adults: 1 or 2 tablets every
4 - 6 hours.
Children 6 - 12 years: 1 tablet
Do not give to children under 6.

Phase I 68
Read and Write about a Nurse
Skill Area: Reading,
and Writing
Task: To read
information and
understand information
text
Purpose: Students will
Practise reading for
meaning from text
Develop predicting
skills by activating
prior knowledge
Increase word
recognition skills
Read for specific
detail
Practise writing in
complete sentences
using words from the
story
Materials: Board,
worksheets
Grouping: Whole class,
individuals
Learning Style:
Auditory, visual,
kinesthetic
Time: 1 hour
Method:
1. Explain that today’s story is about a nurse. Then
have students predict what the story will be
about. Where do you think a nurse might work?
A hospital? A clinic? What does she do in her
job? Helps people? Draw out as much
information and vocabulary from the students
and write the words on the board. Give clues.
2. Go over any difficult vocabulary such as blood
pressure, temperature, and hospital. Pantomime
for words like blood pressure. Say and clap the
words in syllables. Look at the -sure and -ture
parts of the above words. Make sure students
can read and say them.
3. Hand out the worksheets. Students read the
story with a partner and highlight any words that
are new for them. (Highlight any words that they
are learning today.)
4. Then read through the instruction and questions
with the students. Talk about the answers but
students will not yet write the answers.
5. Students reread the story. Then teacher
dictates individual words and students circle.
6. Students take turns reading the question and
giving a sentence answer. Then all students
write the answer on their worksheets.
7. To reinforce, students can come to the board
and write the sentence answers.
Follow Up:
Students and teacher can decide on another
occupation. Following the model, write a story
about another person in a different occupation.
Teacher writes the story onto the board. The
students copy the story.

Phase I 69
My name is Pat Small. I am a nurse. I work in a hospital. I help sick people. I take their blood pressure. I take their temperature. I give them pills. I work with the nurses and doctors. I like my job.
1. What is Pat’s job?
___________________________________________________
2. Where does she work? ___________________________________________________
3. Who does Pat help? ___________________________________________________
4. Does she take blood pressure? ___________________________________________________
5. Does Pat like her job? ___________________________________________________
6. Who does she work with? ___________________________________________________
Write the answers in complete sentences.

Phase I 70
Read a Work Schedule
Skill Area: Reading,
Numeracy
Task: Read and
understand a day-timer
type calendar
Purpose: Students will
Read formatted
text for specific
information
Read a work
calendar
Recognize the
importance of
recording all
hours worked
Materials: Samples of
different kinds of
calendars, overhead of
work calendar,
worksheets
Grouping: Whole class,
pairs, and individuals
Learning Style:
Auditory, visual
Time: 30 min.
Method:
1. Show different kinds of calendars. Ask students
what differences they see in them. E.g. Some
calendars have a square for each day. Some
calendars have a page for each day. Some calendars
are really little computers.
2. Ask students if they write anything on their
calendars at home. Explain that Canadians often
write appointments or work hours on a calendar.
Discuss the rationale for this.
3. Look at the worksheet on the overhead. Ask: What
kind of information is recorded on this calendar?
How many days is this calendar for? Do you record
your activities on a calendar? Show the strategy of
putting a paper under the line to read across the
calendar. Read through the calendar together.
Check to see if they know what am and pm mean.
4. As the class reads through the calendar together,
ask all of the questions on the worksheet but not in
order. In this way they will be familiar with the
questions orally. Check to make sure that all
students understand before starting the worksheet.
5. After the students complete the worksheet
individually, have them reread the sheet in pairs.
Follow Up:
Provide a blank calendar for 1 week. Have students
fill in their appointments and school hours and/or
work shifts for the week. Students discuss each
other’s work. Teacher checks and provides
assistance when needed.

Phase I 71
Pat’s Work Calendar
Read this week’s calendar.
Answer the questions.

Phase I 72
1. How many days does Pat work this week? __________
2. When does she start work on Friday? ______________
3. How many hours does she work on Monday? _______
4. Does Pat work full time or part time? ______________
5. What time does she finish work on Thursday? _______
6. Does she work on Sunday evening? _______________
Sunday Work 7:00 am to 3:00 pm
Monday Work 7:00 am to 3:00 pm
Tuesday Day off
Wednesday Day off
Thursday Work 3:00 pm to 11:00 pm
Friday Work 3:00 pm to 11:00 pm
Saturday Day off

Phase I 73
Read an Advertisement for an Apartment
Skill Area: Reading,
Writing and Numeracy
Task: Read a simplified
apartment
advertisement for
specific information
Purpose: Students will
read to
Reinforce
discrimination
skills
To develop initial
scanning skills
To develop word
recognition
Materials: Overhead,
worksheets
Grouping: Whole group,
pairs, individuals
Learning Style: Visual,
auditory
Time: 1 hour
Method:
1. Ask students if they live in a house or an apartment.
Ask how they heard about their apartment or house.
Newcomers may have been taken to a variety of
apartments by their settlement counsellor or
relative. Explain that when they need to look for
their next home they may need to read apartment
ads to decide which available apartments they want
to view.
2. Brainstorm to find out what factors are important
to them when looking for an apartment. They may
suggest how much it costs, location, number of
bedrooms, available parking, etc. Write these on
the board.
3. Put the apartment ad on the overhead. Read
through the ad together. Then ask questions about
the important characteristics on the board. E.g.
Does the ad say where the apartment is? Does it
say how many bedrooms there are? etc. Check to
make sure that the students understand all parts of
the ad.
4. Hand out the worksheet. Read together the
information about Jack. Explain that all of the
questions relate to the ad on the sheet and not
their own apartments.
5. Check as the students complete the work and then
reinforce by reading the page in pairs.
Follow Up:
Have students write ads for their own
apartments using the format on the worksheet.
Teach the abbreviations for bedrooms, close,
parking, month etc. Have students rewrite their
own apartment ads. Teacher will check and
students correct. Students will read each
other’s ads.

Phase I 74
Apartment for Rent
3 bedrooms Close to bus and school
Parking Rent: $550 a month Call Ann at 475-2209
Jack is looking for an apartment for his family.
Read the sign and circle Yes or No.
1. This apartment has 4 bedrooms. Yes No
2. This apartment is close to a school. Yes No
3. He can park his car at this apartment. Yes No
4. The rent is $ 550 a week. Yes No
5. Jack can call Ann to ask questions. Yes No
6. The bus stop is far from the apartment. Yes No

Phase I 75
Read a Simplified Rent Receipt
Skill Area: Reading and
Numeracy
Task: Read and
understand a simplified
rent receipt
Purpose: Students will
Read and understand
formatted
information
Read and understand
vocabulary on
simplified forms
Read and understand
money value written
in numbers and words
Materials: Rent receipt
worksheets, overhead
Grouping: Whole class,
individuals, pairs
Learning Style: Visual,
auditory
Time: 1 hour
Method:
1. Show students an authentic rent receipt. Ask
students if they receive a receipt when they pay
the rent. Ask why a rent receipt is important,
(to provide proof that you paid). Check for prior
knowledge by asking students what information
is found on a rent receipt.
2. Use an overhead to show and read the rent
receipt to students. Point to date, name, rent
amount in numbers and words, address and
receipt number.
3. Model and have the students repeat information.
4. Ask questions orally. Have students answer
together and then individually.
5. Circulate and correct while the students write
answers to questions on the worksheet.
6. Students practise in pairs asking the questions
and giving answers orally.
7. Explain to students the importance of keeping
rent receipts for income tax purposes.
Follow Up:
Have students practise with other simplified
receipts for expenses such as daycare.

Phase I 76
September 1, 2005
Received from Jack Webber___________________________ ---------------------------Five hundred and fifty----------Dollars__ _____$550.00 chq. Address #4 – 1135 Taylor Avenue No. 20292
Read the rent receipt. Answer the questions. 1. What is the date of the receipt? _______________________ 2. Who is the receipt to? ______________________________ 3. How much is the receipt for? ________________________ 4. What is the address of the apartment? __________________ 5. What is the number of this receipt? ____________________ 6. Did Jack pay by cheque or in cash? ___________________

Phase I 77
Read and Match Cards and Messages
Skill Area: Reading
Task: Read and select
appropriate card.
Purpose: The students
will
Find the
appropriate card
for the occasion
and the person.
Learn new
vocabulary
related to
greeting cards.
E.g. sympathy
Pick out key
vocabulary from a
card.
Materials: Lots of
cards: birthday, thank
you, sympathy, and get
well, worksheets
Grouping: Whole group,
pairs and individuals
Learning Style: Visual,
auditory and kinesthetic
Time: ½ to ¾ hour
Method:
1. Hold up a number of slightly used greeting cards.
Ask and elicit responses from the students, such
as:
What are these? They are cards.
What do you do with them? (In Canada and in
native country?) You give/send them to other
people.
When do you send them? Maybe birthday,,, etc.
What different kinds of cards are there?
2. Build on students’ prior knowledge and introduce
new vocabulary as needed. Write down words on
the board to develop a word pool. Read the words
together.
3. Show individual cards to students. Ask students to
guess what kind of card it is: E.g. a birthday card, a
thank you card, a get well soon card, a sympathy
card. Ask how you know that it is a certain kind of
card. What do you look for?
4. Give each student or each pair of students a card.
Then go around the room. Ask students to say
what kind of card it is, and who you would send it
to. Other students can help if the student doesn’t
know.
5. Then have students circulate around the room and
ask other students: What do you have?
The other student says: I have a birthday card.
Then they exchange cards and interact with
someone else.
6. The teacher will also circulate with a card to
exchange and help any students who don’t
understand the activity.
7. Hand out the worksheets. Use an overhead. Draw
a line from the card to the matching sentences as
an example.
8. Students complete their worksheets individually.
9. Check to be sure the students understand

Phase I 78
Match the card to the sentence.
You want to say thank
you to your teacher.
Your friend is sick.
Your friend’s mother
died.
It is your daughter’s
birthday.
Happy
Birthday
To My
Daughter
Thank You Teacher
Get
Well
Soon
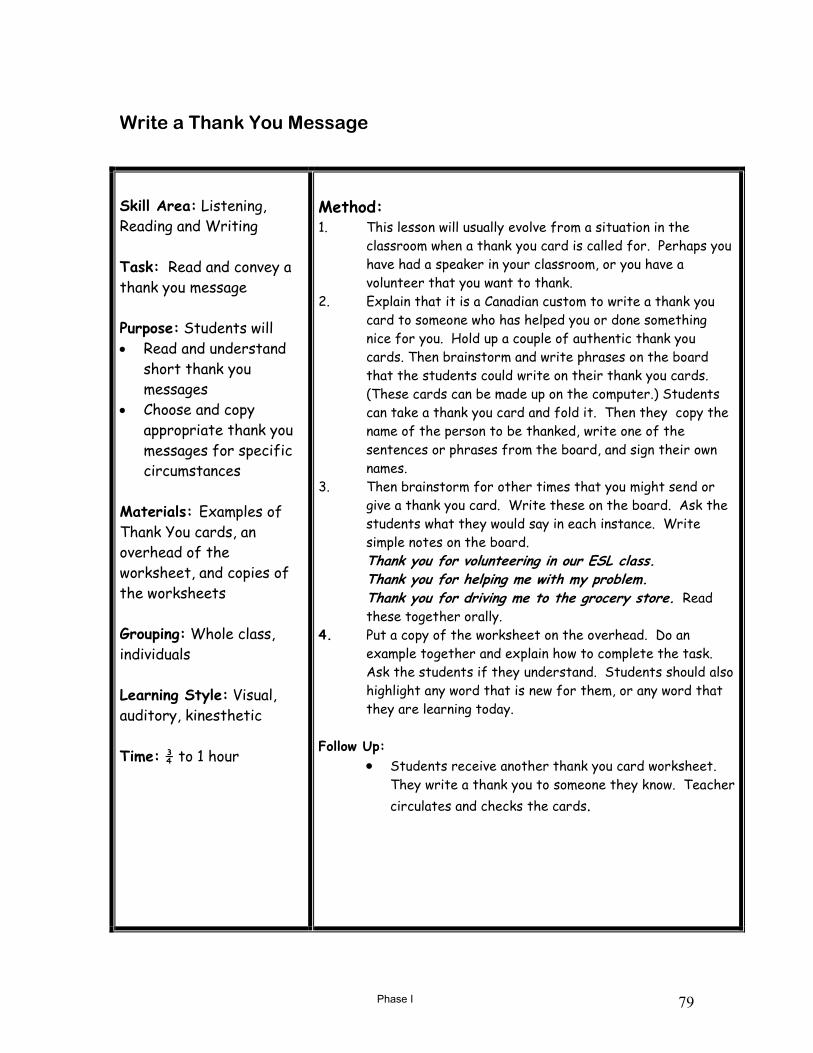
Phase I 79
Write a Thank You Message
Skill Area: Listening,
Reading and Writing
Task: Read and convey a
thank you message
Purpose: Students will
Read and understand
short thank you
messages
Choose and copy
appropriate thank you
messages for specific
circumstances
Materials: Examples of
Thank You cards, an
overhead of the
worksheet, and copies of
the worksheets
Grouping: Whole class,
individuals
Learning Style: Visual,
auditory, kinesthetic
Time: ¾ to 1 hour
Method: 1. This lesson will usually evolve from a situation in the
classroom when a thank you card is called for. Perhaps you
have had a speaker in your classroom, or you have a
volunteer that you want to thank.
2. Explain that it is a Canadian custom to write a thank you
card to someone who has helped you or done something
nice for you. Hold up a couple of authentic thank you
cards. Then brainstorm and write phrases on the board
that the students could write on their thank you cards.
(These cards can be made up on the computer.) Students
can take a thank you card and fold it. Then they copy the
name of the person to be thanked, write one of the
sentences or phrases from the board, and sign their own
names.
3. Then brainstorm for other times that you might send or
give a thank you card. Write these on the board. Ask the
students what they would say in each instance. Write
simple notes on the board.
Thank you for volunteering in our ESL class.
Thank you for helping me with my problem.
Thank you for driving me to the grocery store. Read
these together orally.
4. Put a copy of the worksheet on the overhead. Do an
example together and explain how to complete the task.
Ask the students if they understand. Students should also
highlight any word that is new for them, or any word that
they are learning today.
Follow Up:
Students receive another thank you card worksheet.
They write a thank you to someone they know. Teacher
circulates and checks the cards.

Phase I 80
____________________
___________

Phase I 81
Choose and Copy Appropriate Thank You Message
Skill Area: Reading and
Writing
Task: Choose and copy
appropriate social
message
Purpose: Students will
Read for
message-specific
information
Copy a message
accurately
Materials: Worksheets
Grouping: Whole group,
individuals
Learning Style: Visual,
auditory, kinesthetic
Time: 15 – 20 minutes
Method:
1. Review occasions when a thank you message
would be sent in Canada. Write these occasions
on the board.
2. Ask students to think of occasions when they
could have sent thank you cards: to a host
family, to a child’s teacher, to a neighbour, etc.
Ask what they would write. Introduce the
phrase
Thank you for…….
3. Use suggestions from students or ones different
from the worksheet. E.g. What would you write
to your host family after they took you to the
lake for the day. Thank you for the day at the
lake. We liked it very much.
4. Write all of the sentences that the students
suggest on the board.
5. Hand out the worksheet. Ask the students not
to write at this time. Go through the worksheet
together. Have students pick out the correct
choices. Students can then complete the
worksheet.
6. Students can then copy the other messages
discussed on the back of the worksheet.
Follow Up:
The same type of activity could be made up for
other types of occasions, such as birthday,
sympathy, and get well messages.
Tell students about the strategy of writing a
message first on scrap paper and then recopying it
on the card.

Phase I 82
Read each sentence. Copy a thank you message.
Thank You
A Thank You card
1. Your friend gave you flowers when you were sick.
_______Thank you very much for the flowers._______
2. Your friend helped you move to a new apartment.
_________________________________________
3. Your friend drives you to school everyday.
_________________________________________
4. You got a very nice gift for your baby.
__________________________________________
Thank you for driving me to school.
Thank you for the baby gift.
Thank you for helping me move to my new apartment.
Thank you very much for the flowers.

Phase I 83
Read an Invitation
Skill Area: Reading and
Writing
Task: Read and
understand a message
Purpose: Students will
Read and understand
information found on
the invitation
Complete a similar
invitation
Materials: Worksheets
and overhead
Grouping: Whole class,
individuals
Learning Style:
Auditory, visual
Time: ½ hour
Method:
1. Put the invitation on the overhead. Ask
students what they think it is. Model the
pronunciation.
2. Ask students when invitations are used. Are
they used in their native countries? Have
any of them had an invitation in Canada?
Discuss invitations to school functions,
weddings, parties, baby showers, etc.
3. Look at the invitation on the overhead. Look
for the answers to the wh- questions. Ask
why there is the phone number on the
bottom. Ask why people would want to know
if they are coming to the party or not.
4. Hand out the worksheet. Read and answer all
of the questions orally.
5. Students complete the worksheet.
Follow up:
Students can have a party and invite the
students from the next class, or they can
invite volunteers to come on a field trip.
Students make up invitations for the event.

Phase I 84
It’s a Birthday Party! For:BobbyWhere: 464 Ash Street
When:Saturday, February 15 Time:2:00 – 5:00 pmPlease call:237-4470

Phase I 85
Read and answer
the questions.
1. When is the party? ___________________________
2. Who is this party for? _________________________
3. Is this party for an adult or a child? ______________
4. What time is the party? _______________________
5. Is the party on Friday? ________________________

Phase I 86
Read a Simplified Grocery Flyer
Skill Area: Reading and
Numeracy
Task: Read for
information
Purpose: Students will
Read formatted text
for specific
information
Begin to understand
the genre of grocery
flyers
Students will read
the product name
and price from a
simplified flyer
Read and understand
different types of
measurement
Materials: Overhead,
simplified flyer,
worksheetsexamples of
food or food containers
Grouping: Whole class,
pairsindividuals
Learning Style:
Auditory, visual,
kinesthetic
Time: 1 hour
Method:
1. Show a couple of types of flyers from local grocery
stores. Ask:
If they know what these are called
If they get them delivered to their homes
If they read flyers before they go shopping
What information they can get from a flyer
2. Explain that we are looking at a simple flyer today so
we can learn about what to look for in a flyer.
3. Using an overhead of the flyer worksheet, read
through the flyer together. Ask about the new
vocabulary: loaf, litre, dozen, kg. Show a real carton
for milk, box of cookies, egg carton, etc.
4. Explain what the “/” means in
Potatoes $9.99/10 kg. Read all of the examples of
this type on the flyer together.
5. Cut out the pictures from some authentic flyers.
Students work in pairs. One student holds the flyer
with the answers. The other student picks up a
picture with no writing on it and asks, How much is
the fish? The other student answers, The fish is
$10.00 a kilo. They practise until both have had a
chance to ask and answer the questions.
6. Go on to the next task: Record Information from a
Simplified Flyer.
Follow Up:
Hand out copies of the current flyer from a local
grocery store. Ask the students to circle the name
of the store. Then say it together. Find the apples.
Circle the word apples. How much are the apples?
Etc. If some students are confident, they can give
an instruction.

Phase I 87
Prices good from Monday, February 3 to Saturday, February 8.
Flour $8.99 / 10 kg
Bread $1.59 a loaf
Potatoes $5.99 / 10 kg
Carrots $1.98 a bunch
Oranges $3.99 a bag
Oil $4.49 a litre
Eggs $1.89 doz
Skim Milk $2.19/2 litres
Bananas 69¢ lb
Fish $9.99 kg
Beef $12.99 kg
Chicken $1.59 kg
Open every day 8:00 am to 10:00 pm

Phase I 88
Record and Present Information from a Simplified Flyer
Skill Area: Reading,
Writing and Numeracy
Task: Record and
present information
from a grocer flyer
Purpose: Students will
Record information
from a simplified
grocery flyer
Present personal
information about
self and classmate
Materials: Simplified
flyer, worksheets, board
Grouping: Whole class,
pairs, individuals
Learning Style: Visual,
auditory
Time: 40 minutes
Note: This task is to be completed after the task:
Read a Simplified Grocery Flyer.
Method:
1. Reread the Simplified Grocery Flyer making
sure that the students understand the name
of the store, when the store is open, and the
times the store opens and closes.
2. Students are given a copy of the worksheet.
3. Review the information at the top of the
worksheet because the information that they
are to write can be a little tricky. It
indicates: Grocery Item, Price, and For.
Answer orally but ask the students not to
write yet.
4. Read the instructions and the two examples
together.
5. Students record the information from the
flyer onto the table format.
6. A table can be drawn on the board and
students can write their answers. Then the
answers can be reviewed orally.
7. On the back of the page write sentences
about the grocery items to reinforce
language taught in the previous lesson.
Students copy these sentence starters and
complete the sentences with their own
information.
I like ______________.
I don’t like __________.
I buy ______________.
I don’t buy __________.
8. Students work in pairs to collect information.
What do you buy? Etc. Then they record the
information. Ali likes oranges. Ali doesn’t
like milk. Etc.

Phase I 89
Day the store is closed: _________________________ Time the store opens in the morning: ______________
Copy the information from the flyer into the table.
Grocery Item Price For
Skim milk $2.19 2 litres
Oil $4.49 1 litre
1. Flour
2. Eggs
3. Fish
4. Bananas
5. Chicken
6. Potatoes
7. Beef
8. Carrots
9. Bread
10. Oranges

Phase I 90
Read about Feeling Homesick
Skill Area: Reading
Purpose: Students will
Read and interpret
written ideas and
feelings
Practise answering
yes/no questions
with do and who and
what type questions
Materials: Overhead,
board, worksheets
Grouping: Whole class,
pairs, individuals
Learning Style:
Auditory, visual
Time: 50 minutes
Note: Even though it is difficult to teach a story about the
emotion Homesick, because of the feelings it might stir up, it is
necessary for students to have the language to talk about how
they are feeling. Ideally, a story like this would come after a
variety of positive and negative emotions have been taught.
Having a story about homesick is important because students
realize that they are not alone in feeling this way.
Method:
1. This story could be presented after a student
has indicated that he is sad because he is
thinking about his country or his family etc. The
word homesick could then be supplied and
explained. The story could come the next day.
2. Begin with: This is a story about a woman who
does not always feel happy in Canada. Review
sometimes in context. Sometimes I feel happy.
Sometimes I feel sad. Sometimes I feel
homesick.
3. Read the story together. Make sure that they
understand all vocabulary. Look at the pictures.
Discuss: What is the woman thinking about? Will she
always be sad? Will she always be happy? What is
hard about life in Canada? What do you think about?
Do you have pictures of your family? Is it harder for
people who are in Canada alone without any family?
What things do you hope for in your future? What
can you do when you feel homesick? Students may
make suggestions such as: calling their friends in
Canada, playing sports, etc.
4. Make sentences with look at and think about.
Write these on the board. E.g. I look at a
picture of my mother. I think about her nice
smile and her good cooking. Then ask students to
divide these into: Who do you think about and
what do you think about?
5. Hand out worksheets. Have students read
through the story and answer questions in pairs.
6. Students complete the questions.

Phase I 91
Homesick Sometimes I am very homesick. I look at the pictures of my family and my country. I think about my family, my friends and my country. Sometimes I want to go back to my country.
Sometimes I am happy here. I go to school and study hard. I talk to my new friends in English. I think about my future. Sometimes I want to stay in Canada.
1. Do you sometimes feel homesick? ________________________ 2. Do you sometimes want to go back to your country? __________
3. Who do you think about? ________________________________
4. What do you think about? _______________________________
5. Do you sometimes feel happy in Canada? __________________
6. Do you have friends in Canada? __________________________
7. Do you have family in Canada? ___________________________

Phase I 92
Read and Copy Information from a 5-Day Weather Forecast
Skill Area: Reading,
Writing and Numeracy
Task: Read and
understand formatted
weather information on
the internet. Fill in the
information on a table and
respond to questions
Purpose: Students will
Read and understand
weather information in
a formatted text
Record weather
information from the
internet
Develop an
understanding of
Canadian weather
patterns
Materials: Overhead,
internet weather website,
worksheets
Grouping: Whole class,
pairs, individuals
Learning Style:
Auditory, visual,
kinesthetic
Time: 1 hour
Note: Forewarned is forearmed. It’s helpful to know the
5-day forecast. Students can plan their week better, if
they know what lies ahead.
Method:
1. Discuss the current weather conditions. (Go outside if
it’s nice or just check the window if not.)
2. Elicit information and write up key words. E.g. High,
Low, cloudy, temperature, current.
3. On the overhead, display the Weather Forecast
worksheet. (In advance fill in the blanks with the
weather conditions - but not of your city. Choose
another Canadian city to use as your example.)
4. Allow time for pairs of students to discuss this
information and try to glean information from it. (The
formatted text might be a challenge.)
5. Solicit input from the whole group. Circle information
as it is brought up in the discussion.
6. Read the information for each day of the forecast.
7. Read the questions and answers.
8. Teacher checks for comprehension by asking a few
oral questions.
9. Students are then given a blank Weather Forecast
sheet and proceed to the computers to fill out their
local 5-day forecast.
10. If unfamiliar with computers, students will require
teacher, volunteer or peer support.
11. Learners go to the web site highlighted. Either the
teacher will put this site in Favourites or the learners
will type the web address.
12. Teacher checks the students’ work and provides help
when needed.
Follow Up:
Plan an outing on one of the nicer days.

Phase I 93
Weather Forecast
for __________________ city
________day
________day
night
________day
________day
________day
________day
High _____
Low _____
High _____
Low ______
High _____
Low ______
High _____
Low ______
High _____
Low ______
1. Is it sunny or cloudy right now?
2. What is the current temperature?
3. What time did the sun rise today?
4. What time will the sun set today?
5. Do you like the weather right now?
http://weatheroffice.ec.gc.ca/canada_e.html


![2009222038 phase1[1]](https://cdn.vdocuments.site/doc/165x107/577d1fe31a28ab4e1e918ab5/2009222038-phase11.jpg)


