Enterprise Downloader User Manual
P/N 466-2243 • REV K • ISS 28JAN 2016

Copyright © 2016 UTC Climate Controls & Security. All rights reserved.
Disclaimer The information in this document is subject to change without notice. UTC CCS assumes no responsibility for inaccuracies or omissions and specifically disclaims any liabilities, losses, or risks, personal or otherwise, incurred as a consequence, directly or indirectly, of the use or application of any of the contents of this document.
This publication may contain examples of screen captures and reports used in daily operations. Examples may include fictitious names of individuals and companies. Any similarity to names and addresses of actual businesses or persons is entirely coincidental.
Trademarks and patents
Interlogix, Enterprise Downloader brand and logo are trademarks of United Technologies.
Other trademarks used in this document are the property of the respective owners.
Manufacturer UTC CCS Americas Corporation, Inc. 1275 Red Fox Rd., Arden Hills, MN 55112-6943, USA
Version This document applies to Enterprise Downloader version 5.0.
Contact information www.interlogix.com
Customer support www.interlogix.com/customer-support.

Enterprise Downloader User Manual 1
Content
Product overview .................................. ........................................ 2
New features ................................................................................... 2
Software requirements ............................. .................................... 2
Supported modems ......................................................................... 3
Getting started ................................... ............................................ 4
User interface (UI) ........................................................................... 4
CommServer ................................................................................. 12
JobServer ...................................................................................... 15
Operators and groups .............................. .................................. 19
Operators ...................................................................................... 19
Groups .......................................................................................... 20
Accounts .......................................... ............................................ 22
Print accounts ............................................................................... 25
Account differences ....................................................................... 25
Customers ..................................................................................... 27
Account extensions ....................................................................... 28
Bulk accounts ................................................................................ 30
Jobs .............................................. ................................................ 32
Jobs overview ............................................................................... 32
Job history ..................................................................................... 36
Tracking differences ...................................................................... 36
Templates ......................................... ........................................... 37
Panel templates ............................................................................ 37
Job templates ................................................................................ 39
Tools menu ........................................ .......................................... 42
Manage accounts .......................................................................... 42
Batch account processing ............................................................. 45
Interactive mode toolbar ................................................................ 47
Troubleshooting ................................... ....................................... 49
OEM codes ......................................... ......................................... 55
2 Enterprise Downloader User Manual
Product overview Enterprise Downloader is a modular, scalable software solution for remote programming of certain UTC CCS control panels. Enterprise Downloader maintains a database of account information and panel programming, and allows you to upload panel programming and download centrally prepared configurations to panels.
Enterprise Downloader has four components:
• User Interface (UI) . The user interface works with the database to maintain and display panel property settings and information. It links customers to accounts, allows you to create and schedule jobs, and displays the status of scheduled and completed jobs.
• JobServer. The JobServer continuously searches the database to identify communication jobs that are ready to run and dispatches them to a communication server for processing. The JobServer runs independently of the other system components, and can be run on any PC connected to the network with the Enterprise Downloader database. The JobServer manages both scheduled and unscheduled jobs.
• CommServer. CommServers will support up to four modems. CommServers interface with JobServers using Microsoft.NET services. CommServers are usually set up as a bank of servers to handle unattended incoming calls, and also on individual machines with the user interface to be used for call-out jobs specific for each user.
• Database. Microsoft SQL server database stores customer and data information. The SQL Express database is provided with installation if you don’t have full-blown SQL.
Enterprise 5.0 contains feature enhancements from the 4.6 release. We recommend that you upgrade if you require any of the new features.
New features • Added support for Advisor One panels.
• Support for remote TCP/IP panel communication with Advisor One via a “cloud” server.
• Support for remote panel firmware upgrades for Advisor One panels.
Enterprise Downloader User Manual 3
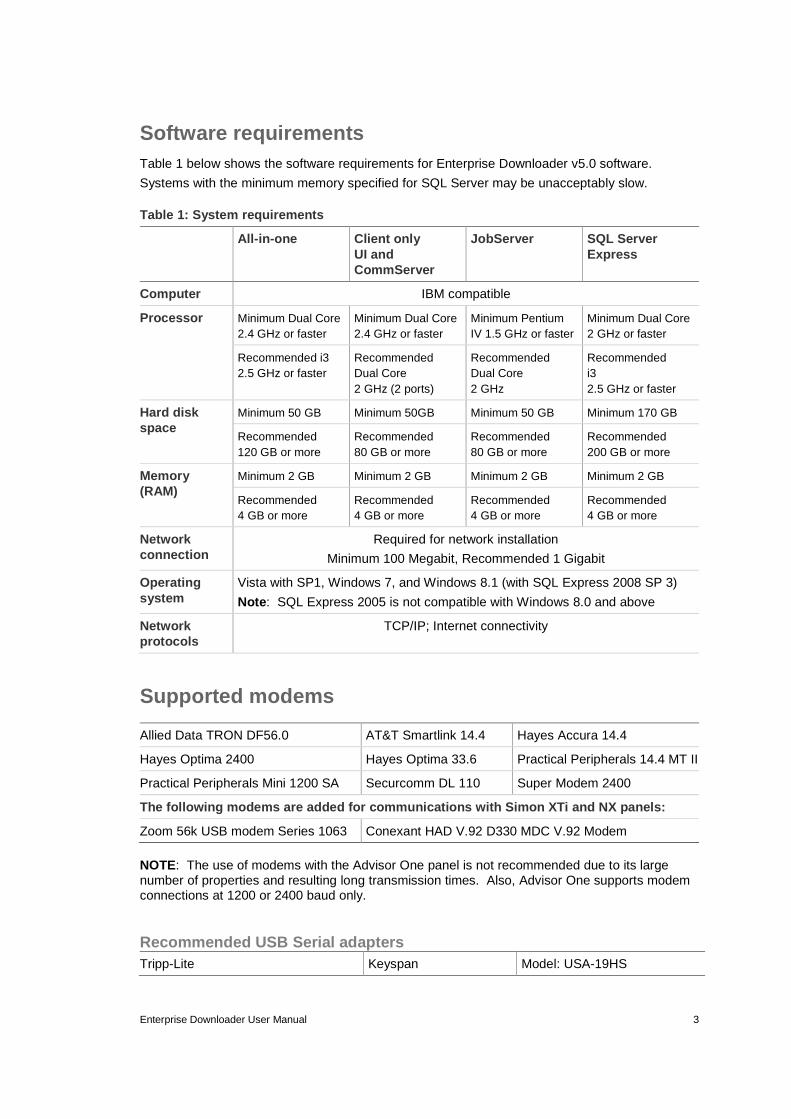
Software requirements Table 1 below shows the software requirements for Enterprise Downloader v5.0 software.
Systems with the minimum memory specified for SQL Server may be unacceptably slow.
Table 1: System requirements
All-in-one Client only UI and CommServer
JobServer SQL Server Express
Computer IBM compatible
Processor Minimum Dual Core 2.4 GHz or faster
Minimum Dual Core 2.4 GHz or faster
Minimum Pentium IV 1.5 GHz or faster
Minimum Dual Core 2 GHz or faster
Recommended i3 2.5 GHz or faster
Recommended Dual Core 2 GHz (2 ports)
Recommended Dual Core 2 GHz
Recommended i3 2.5 GHz or faster
Hard disk space
Minimum 50 GB Minimum 50GB Minimum 50 GB Minimum 170 GB
Recommended 120 GB or more
Recommended 80 GB or more
Recommended 80 GB or more
Recommended 200 GB or more
Memory (RAM)
Minimum 2 GB Minimum 2 GB Minimum 2 GB Minimum 2 GB
Recommended 4 GB or more
Recommended 4 GB or more
Recommended 4 GB or more
Recommended 4 GB or more
Network connection
Required for network installation
Minimum 100 Megabit, Recommended 1 Gigabit
Operating system
Vista with SP1, Windows 7, and Windows 8.1 (with SQL Express 2008 SP 3)
Note : SQL Express 2005 is not compatible with Windows 8.0 and above
Network protocols
TCP/IP; Internet connectivity
Supported modems
Allied Data TRON DF56.0 AT&T Smartlink 14.4 Hayes Accura 14.4
Hayes Optima 2400 Hayes Optima 33.6 Practical Peripherals 14.4 MT II
Practical Peripherals Mini 1200 SA Securcomm DL 110 Super Modem 2400
The following modems are added for communications w ith Simon XTi and NX panels:
Zoom 56k USB modem Series 1063 Conexant HAD V.92 D330 MDC V.92 Modem
NOTE: The use of modems with the Advisor One panel is not recommended due to its large number of properties and resulting long transmission times. Also, Advisor One supports modem connections at 1200 or 2400 baud only.
Recommended USB Serial adapters Tripp-Lite Keyspan Model: USA-19HS
4 Enterprise Downloader User Manual
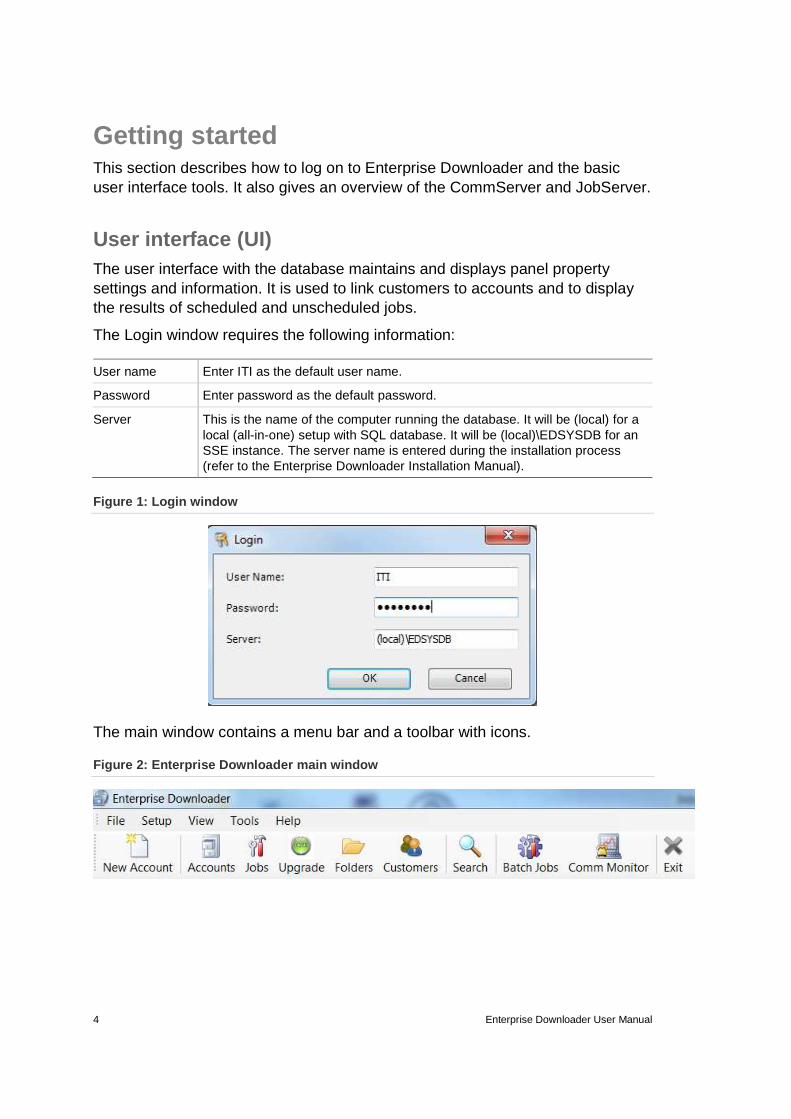
Getting started This section describes how to log on to Enterprise Downloader and the basic user interface tools. It also gives an overview of the CommServer and JobServer.
User interface (UI) The user interface with the database maintains and displays panel property settings and information. It is used to link customers to accounts and to display the results of scheduled and unscheduled jobs.
The Login window requires the following information:
User name Enter ITI as the default user name.
Password Enter password as the default password.
Server This is the name of the computer running the database. It will be (local) for a local (all-in-one) setup with SQL database. It will be (local)\EDSYSDB for an SSE instance. The server name is entered during the installation process (refer to the Enterprise Downloader Installation Manual).
Figure 1: Login window
The main window contains a menu bar and a toolbar with icons.
Figure 2: Enterprise Downloader main window

Enterprise Downloader User Manual 5
The menu bar includes the following options:
File
New > Account Configure new accounts.
Search Search for accounts, customers, or jobs using up to three search criteria. The resulting records are displayed in their respective summary windows.
Login Access the Login window
Exit Log off and exit the interface
Setup
Operator Configure users and groups.
Panel Templates Create panel templates with specific property values for use in creating new panels.
Job Templates Create job templates with specific job details for call-in and call-out jobs.
Account Extension Ctl+E
Create account extensions to organize large groups of accounts by central station phone number.
Account Creator Create bulk accounts and save them to the database.
Modem Settings Configure your modem to be used for Interactive Mode panel programming.
System Preferences Set system preferences.
View
Customer Summary Create, edit, and delete customers.
Account Summary Create, edit, and delete accounts.
Job Summary View the list of jobs. View, edit, and delete jobs.
Comm Monitor Monitor the activity of processing jobs.
Folder Summary Create and delete folders used to group and organize panel accounts.
Archived Accounts Summary
Use the Archived Accounts Summary window to view previously saved accounts that have been archived.
Tools
Manage Accounts
Archive Accounts Will remove the selected accounts from the account summary database view into a backup table. The accounts can be viewed and restored from the Archived Account Summary screen. Used to optimize database and remove accounts that have not been accessed for some time.
Assign to Folder Mark the account to be assigned to a particular folder.
6 Enterprise Downloader User Manual
Change Panel Type Change an account’s panel type from one panel to another. See “Change Panel Type” on page 44.
Import Account From XML Retrieve an archived account from an .xml format. See “Import Account from XML” on page 44.
Export Account to XML Archive to an .xml file. See “Export Account to XML” on page 44.
Compare Use to compare property values of two accounts of the same panel type.
Batch Account Processing
Batch Import Create a batch job with specific property values mapped from an Excel file for specific accounts.
Batch Jobs Schedule identical jobs (with corresponding download property values) for every account selected from the Account Summary page. See “Batch account processing” on page 45.
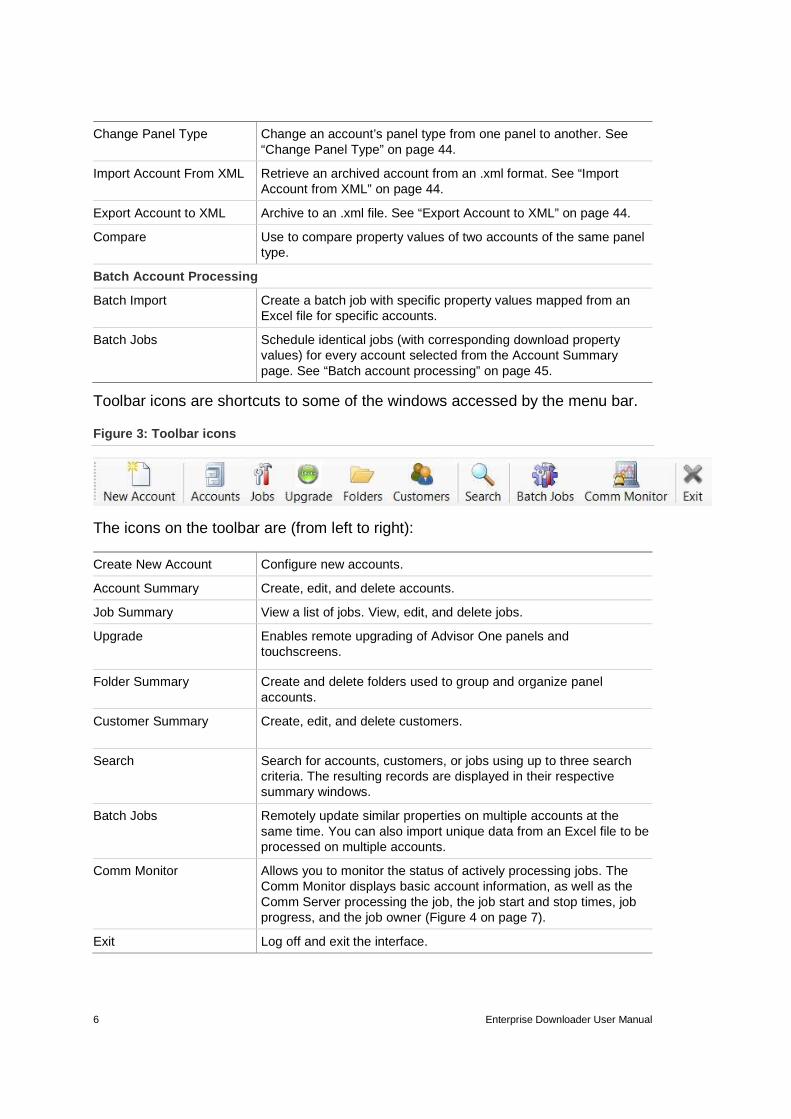
Toolbar icons are shortcuts to some of the windows accessed by the menu bar.
Figure 3: Toolbar icons
The icons on the toolbar are (from left to right):
Create New Account Configure new accounts.
Account Summary Create, edit, and delete accounts.
Job Summary View a list of jobs. View, edit, and delete jobs.
Upgrade Enables remote upgrading of Advisor One panels and touchscreens.
Folder Summary Create and delete folders used to group and organize panel accounts.
Customer Summary Create, edit, and delete customers.
Search Search for accounts, customers, or jobs using up to three search criteria. The resulting records are displayed in their respective summary windows.
Batch Jobs Remotely update similar properties on multiple accounts at the same time. You can also import unique data from an Excel file to be processed on multiple accounts.
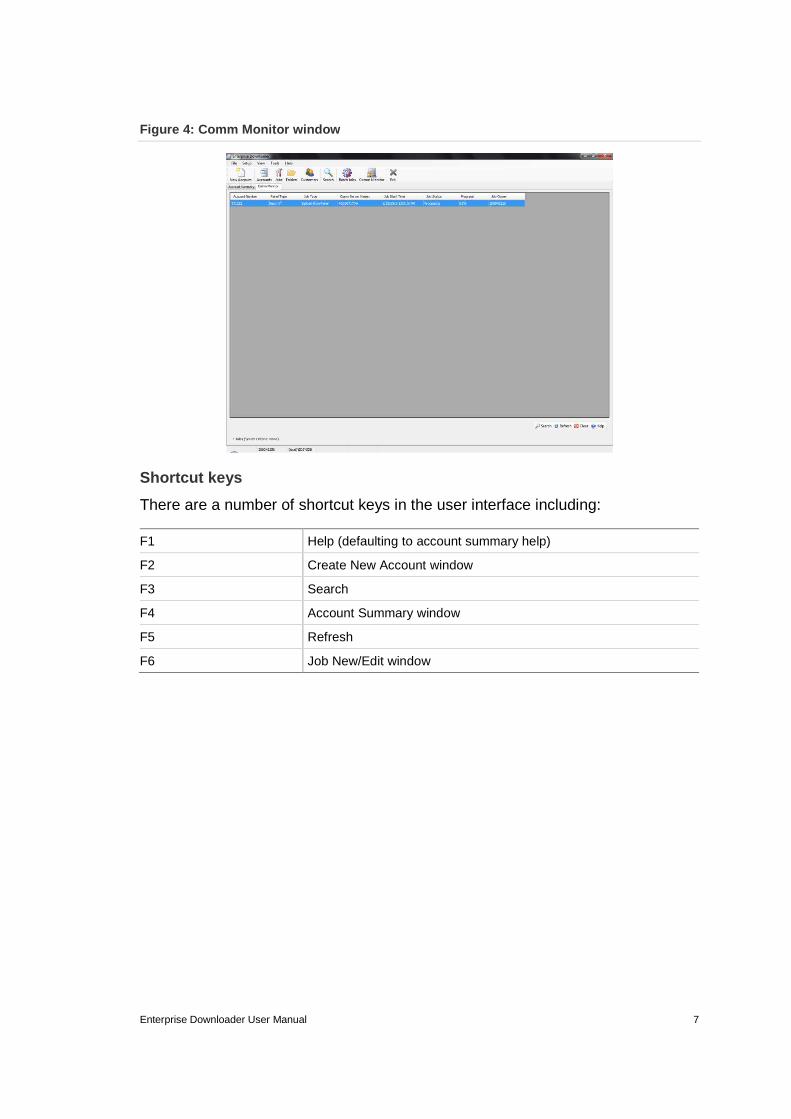
Comm Monitor Allows you to monitor the status of actively processing jobs. The Comm Monitor displays basic account information, as well as the Comm Server processing the job, the job start and stop times, job progress, and the job owner (Figure 4 on page 7).
Exit Log off and exit the interface.
Enterprise Downloader User Manual 7
Figure 4: Comm Monitor window
Shortcut keys
There are a number of shortcut keys in the user interface including:
F1 Help (defaulting to account summary help)
F2 Create New Account window
F3 Search
F4 Account Summary window
F5 Refresh
F6 Job New/Edit window
8 Enterprise Downloader User Manual
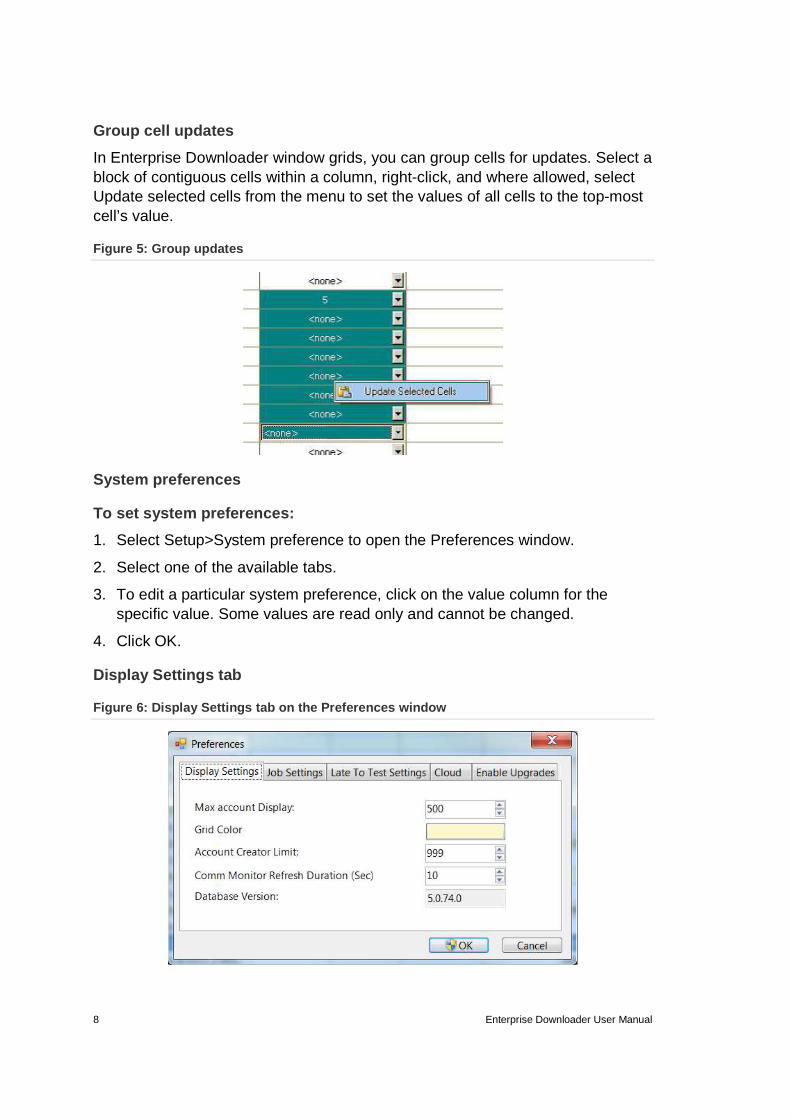
Group cell updates
In Enterprise Downloader window grids, you can group cells for updates. Select a block of contiguous cells within a column, right-click, and where allowed, select Update selected cells from the menu to set the values of all cells to the top-most cell’s value.
Figure 5: Group updates
System preferences
To set system preferences:
1. Select Setup>System preference to open the Preferences window.
2. Select one of the available tabs.
3. To edit a particular system preference, click on the value column for the specific value. Some values are read only and cannot be changed.
4. Click OK.
Display Settings tab
Figure 6: Display Settings tab on the Preferences w indow
Enterprise Downloader User Manual 9
The following options are available on the Display Settings tab:
Max Account Display Specifies the maximum number of accounts to display in the Account and Job Summary windows. Note that a larger setting my impact the speed at which the screen is updated.
Grid Color Allows you to configure different color schemes displayed in various pages throughout the user interface.
Account Creator Limit Represents the most accounts that can be created using the Create New Accounts window.
Comm Monitor Refresh Duration (Sec)
Setting in seconds that the Comm Monitor window will automatically refresh.
Database Version Displays the version of database for this UI.
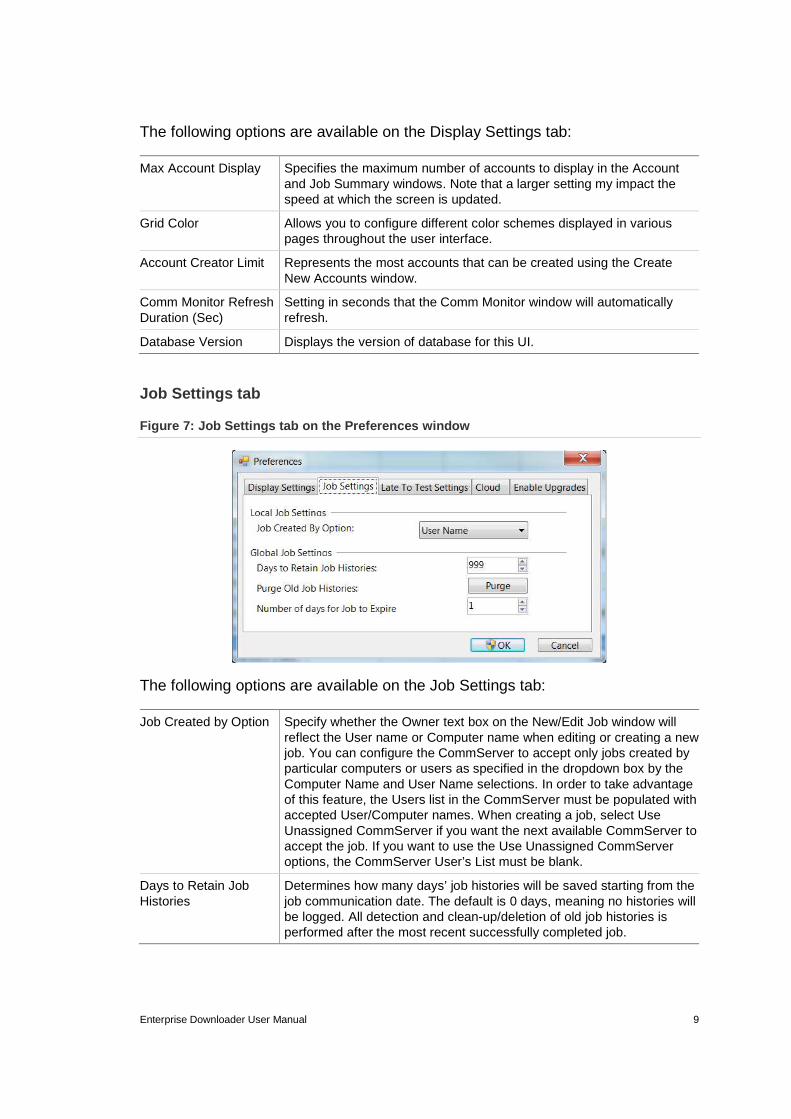
Job Settings tab
Figure 7: Job Settings tab on the Preferences windo w
The following options are available on the Job Settings tab:
Job Created by Option Specify whether the Owner text box on the New/Edit Job window will reflect the User name or Computer name when editing or creating a new job. You can configure the CommServer to accept only jobs created by particular computers or users as specified in the dropdown box by the Computer Name and User Name selections. In order to take advantage of this feature, the Users list in the CommServer must be populated with accepted User/Computer names. When creating a job, select Use Unassigned CommServer if you want the next available CommServer to accept the job. If you want to use the Use Unassigned CommServer options, the CommServer User’s List must be blank.
Days to Retain Job Histories
Determines how many days’ job histories will be saved starting from the job communication date. The default is 0 days, meaning no histories will be logged. All detection and clean-up/deletion of old job histories is performed after the most recent successfully completed job.

10 Enterprise Downloader User Manual
Purge Old Job Histories
Click Purge to delete old records from job history logging. Purging old job histories can clear up disk space.
Number of days for Job to Expire
This option allows you to configure the amount of days before a job will expire. It is useful when creating “wait for call-in” jobs that may not process for several days.
Late to Test Settings tab
Figure 8: Late to Test Settings tab on the Preferen ces window
The following options are available on the Late to Test Settings tab:
Enable Late to Test Verification
If enabled, it will highlight accounts in the Account Summary window that have properties out of range.
Verify Only If Fire/ Smoke Sensor Exists
Check this to highlight only panels with fire/smoke sensors.
Phone Test Frequency Determines how often a test should be done. If value uploaded is more than the value in the panel, the account will be flagged as late to test.
An account will be tested for late to test status after a job has successfully completed, and if at least one of the properties used to determine late to test status was part of that job. Typical properties include: auto phone test; phone test frequency; and supervisory time. Different panels may have different phone test properties.
If a panel is flagged as late to test, the status message Late to test fail will appear under the Panel Status column on the Account Summary window along with the exclamation icon.

Enterprise Downloader User Manual 11
Cloud tab
Figure 9: Cloud Settings tab on the Preferences win dow
The following options are available on the Cloud Settings tab:
Ping server The URL for the Ping server which allows remote “Cloud” TCPIP communication sessions with Advisor One panels. This option is currently only available in Interactive Mode.
Rest Server This URL is used internally for Ping server communications.
Firmware Server The URL for the firmware server containing the upgrade packages.
These values are used for remote TCPIP communication with Advisor One
panels. It is recommended to leave these at their default values.

12 Enterprise Downloader User Manual
Enable Upgrades tab
Figure 10: Enable Upgrades Settings tab on the Pref erences window
The following options are available on the Enable Upgrades Settings tab:
Enable concord 4 Smoke Trouble upgrade checkbox
Checking this box will automatically upgrade Concord 4 panels with support for 200 second smoke sensors.
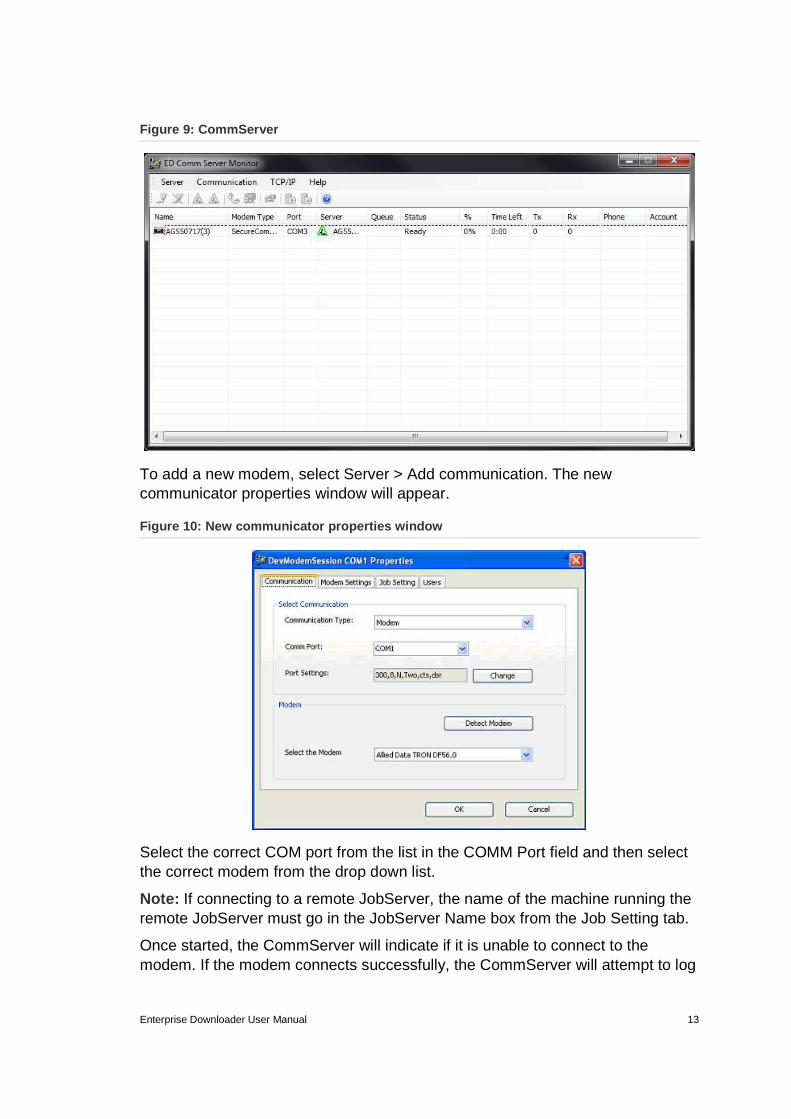
CommServer The CommServer allows you to configure specified modems to connect remotely to a control panel. It comes with a user interface you can use to create and maintain modems connected to the computer’s COM ports.
To start and configure CommServer, double-click the ED CommSvr icon on the desktop. The EDCommServer Monitor window appears.
Enterprise Downloader User Manual 13
Figure 9: CommServer
To add a new modem, select Server > Add communication. The new communicator properties window will appear.
Figure 10: New communicator properties window
Select the correct COM port from the list in the COMM Port field and then select the correct modem from the drop down list.
Note: If connecting to a remote JobServer, the name of the machine running the remote JobServer must go in the JobServer Name box from the Job Setting tab.
Once started, the CommServer will indicate if it is unable to connect to the modem. If the modem connects successfully, the CommServer will attempt to log
14 Enterprise Downloader User Manual
on to the specified JobServer. The triangle icon under the Server column on the menu bar will turn green if the CommServer is successful.
To log off a CommServer from a JobServer, select the modem and click the gray triangle icon.
To exit the CommServer, select Server > Exit, or click the red X (Close) in the upper right corner.
You can add operators (users) to the CommServer when you want to assign specific modems with specific operators to run jobs.
To assign a specific operator to a specific modem
Select the desired communication from the ED CommServer Monitor grid. Under the Communication menu, select Properties. Select the Users tab.
1. Enter the name in the Enter User Name text box which corresponds to the Job Owner name used to create jobs in the User Interface, and select Add. Repeat to add more users to this communication.
2. Click OK.
Once an operator is added to a CommServer, only assigned jobs (jobs created by an owner in the User’s list) will be processed by that CommServer. Call-out jobs will only go to this port if Use Unassigned CommServer is unchecked in the UI’s Job Edit window when the job is created.
If there are no names in the User’s list, all jobs must have the Use Unassigned CommServer option checked in the Job Edit window if the job is to be sent to that communication.
Note that the Job Owner value, indicated in the Job Edit window, is either the computer name or user name as determined by the Job Owner setting in System Preferences.
Enterprise Downloader User Manual 15
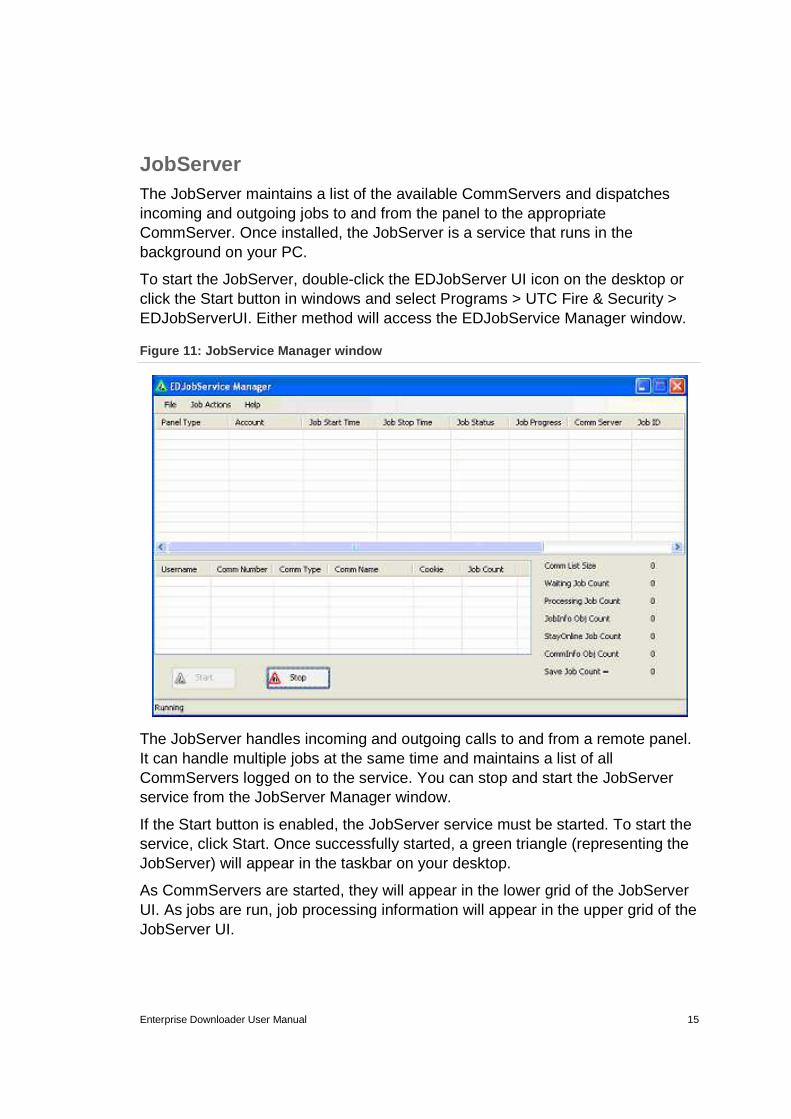
JobServer The JobServer maintains a list of the available CommServers and dispatches incoming and outgoing jobs to and from the panel to the appropriate CommServer. Once installed, the JobServer is a service that runs in the background on your PC.
To start the JobServer, double-click the EDJobServer UI icon on the desktop or click the Start button in windows and select Programs > UTC Fire & Security > EDJobServerUI. Either method will access the EDJobService Manager window.
Figure 11: JobService Manager window
The JobServer handles incoming and outgoing calls to and from a remote panel. It can handle multiple jobs at the same time and maintains a list of all CommServers logged on to the service. You can stop and start the JobServer service from the JobServer Manager window.
If the Start button is enabled, the JobServer service must be started. To start the service, click Start. Once successfully started, a green triangle (representing the JobServer) will appear in the taskbar on your desktop.
As CommServers are started, they will appear in the lower grid of the JobServer UI. As jobs are run, job processing information will appear in the upper grid of the JobServer UI.

16 Enterprise Downloader User Manual
To exit JobServer, right-click the JobServer icon (green triangle) and select Exit. Note that this just closes the JobServer user interface, but the service will still be running in the background.
JobServer options
To configure options in the JobServer, you can right-click on the JobServer icon on the toolbar and select Options, or you can select File > Options in the JobServer UI. Either method will access the JobServer Options window.
Figure 12: General Settings tab on the JobServer Op tions window
The following options are available on the General Settings tab:
Job Status Report Interval (%)
Currently not supported.
JobServer TCP Port The value in this field should remain 8855 unless you want to change the connection port to communicate with the CommServer. If this is changed, the CommServer will also have to be changed to match.
Enable Log File (US) This check box enables a log file to record debug messages sent by the JobServer. This file will be automatically backed up and stored as a backup when it reaches 10 MB.

Enterprise Downloader User Manual 17
On the Call-Out Database Settings tab, you can select the call-out database from the Available Databases dropdown list.
Figure 13: Call-Out Database Settings tab on the Jo bServer Options window
Use the Unscheduled Call-In Settings tab to configure the action of the JobServer when an unscheduled call comes in from a panel.
Figure 14: Unscheduled Call-In Settings tab on the JobServer Options window
18 Enterprise Downloader User Manual
The following options are available on the Unscheduled Call-In Settings tab:
Database for Call-In Job
Select the database from the dropdown list.
Folder for Call-In Job Save the incoming panel to a specified folder.
Call-In Job New Account
You can specify to upload the full panel, download the full panel, or do a custom job on the panel if the panel calling in is a new panel and not currently in the database. A custom job can be configured to upload or download a combination of any properties you want.
Call-In Job Existing Account
This is the same as Call-In Job New Account, except it specifies the job action to take when an account already exists in the database.
New Account Panel Template
The new Account Panel Template assigns a template to use when creating an account for the panel calling in if it isn’t already represented by an account in the database. See “Panel templates” on page 37 for a description of how to configure and assign the template to the custom template. If you select the Default ITI template, the defaulted values will populate the panel.
Panel Type and Default DL Code
The JobServer UI shows the default Downloader (DL) code for the panel. This value should match the value of the DL code of the panel calling in.
To change the value of the DL code:
1. Right-click the specific panel type.
2. Select Edit. Do not use the Add or Delete options.
3. The default DL code in the JobServer UI should match the DL code in the custom template in the Enterprise Downloader UI.
Enterprise Downloader User Manual 19
Operators and groups This section provides information on how to create, edit, and delete operators and groups.
Operators Operators are provided to allow users different operating privileges based on their login name and password. These privileges can be edited and assigned by operators that are created with administrative privileges.
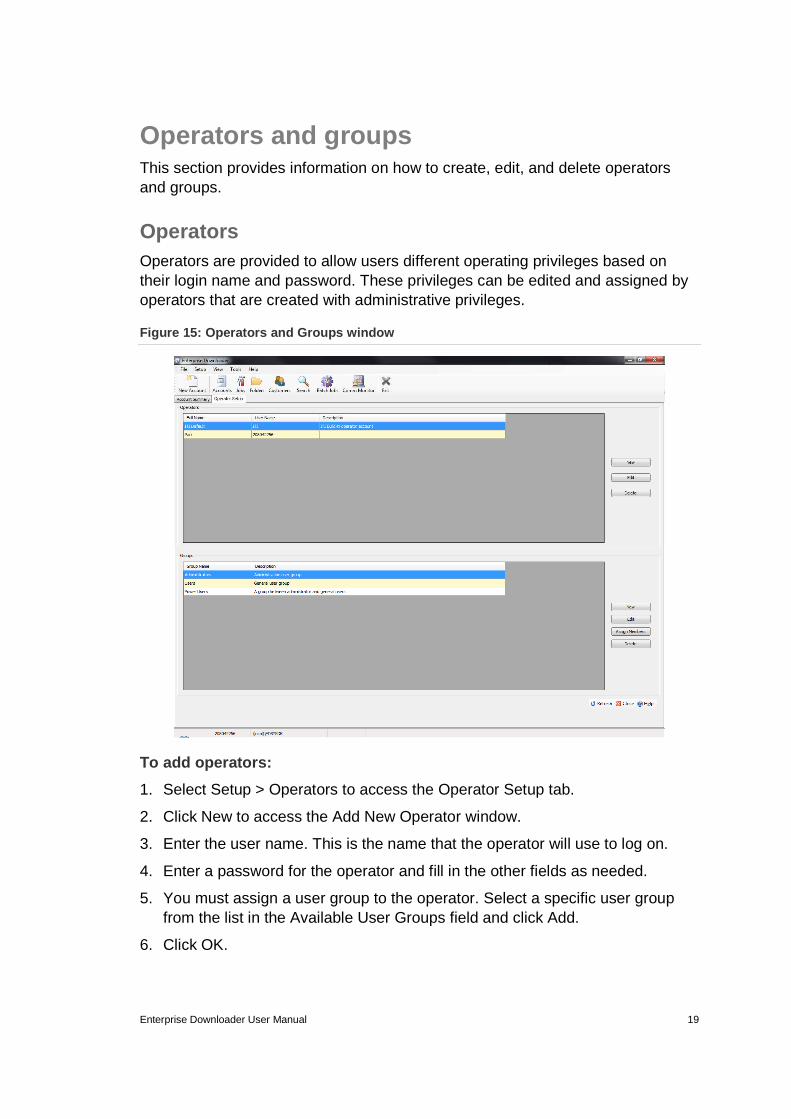
Figure 15: Operators and Groups window
To add operators:
1. Select Setup > Operators to access the Operator Setup tab.
2. Click New to access the Add New Operator window.
3. Enter the user name. This is the name that the operator will use to log on.
4. Enter a password for the operator and fill in the other fields as needed.
5. You must assign a user group to the operator. Select a specific user group from the list in the Available User Groups field and click Add.
6. Click OK.
20 Enterprise Downloader User Manual
To edit operators:
1. Select Setup > Operators.
2. Select the operator on the list and click Edit.
3. Change the required information for the operator.
4. Click OK.
To delete operators:
1. Select Setup > Operators.
2. Select the operator on the list and click Delete.
Groups Groups are classifications of user privileges and rights that can be assigned to operators.
To add groups:
1. Select Setup > Operators.
2. In the Groups field, click New.
3. Enter the name of the new group.
4. After creating the group, you must assign operating rights to that group. See Operating rights below.
5. Click OK.
Operating rights
System Access View, create, edit, and delete system settings. System settings pertains to operators, user groups, group rights, folders, customers, administration information, and account extensions. Only this group can change other users’ rights and delete system objects.
Account Access View, create, edit, and delete accounts.
Job Access View, create, edit, and delete jobs.
Template Access View, create, edit, and delete templates.
Arming/Disarming Remotely arm/disarm a panel.
Limited System Access View, create, and edit partial system settings. This pertains to folders, customers, and account extensions. These users cannot delete system items. They can only edit their own password, not their rights.
View Accounts View accounts only.
View Jobs View jobs only.
View Templates View templates only.
Enterprise Downloader User Manual 21
Property Restriction Restricts edit, view, and delete of security properties (Enterprise Downloader code, dealer code, and installer code).
Account Creator Access
Enable users to access account creator feature to create groups of accounts at once.
To edit groups:
1. Select Setup > Operators.
2. Select the group on the list and click Edit.
3. Change the required fields.
4. Click OK.
To delete groups:
1. Select Setup > Operators.
2. Select the group on the list and click Delete.
To assign operators to groups:
1. Select Setup > Operators.
2. Select the group on the list and click Assign members.
22 Enterprise Downloader User Manual
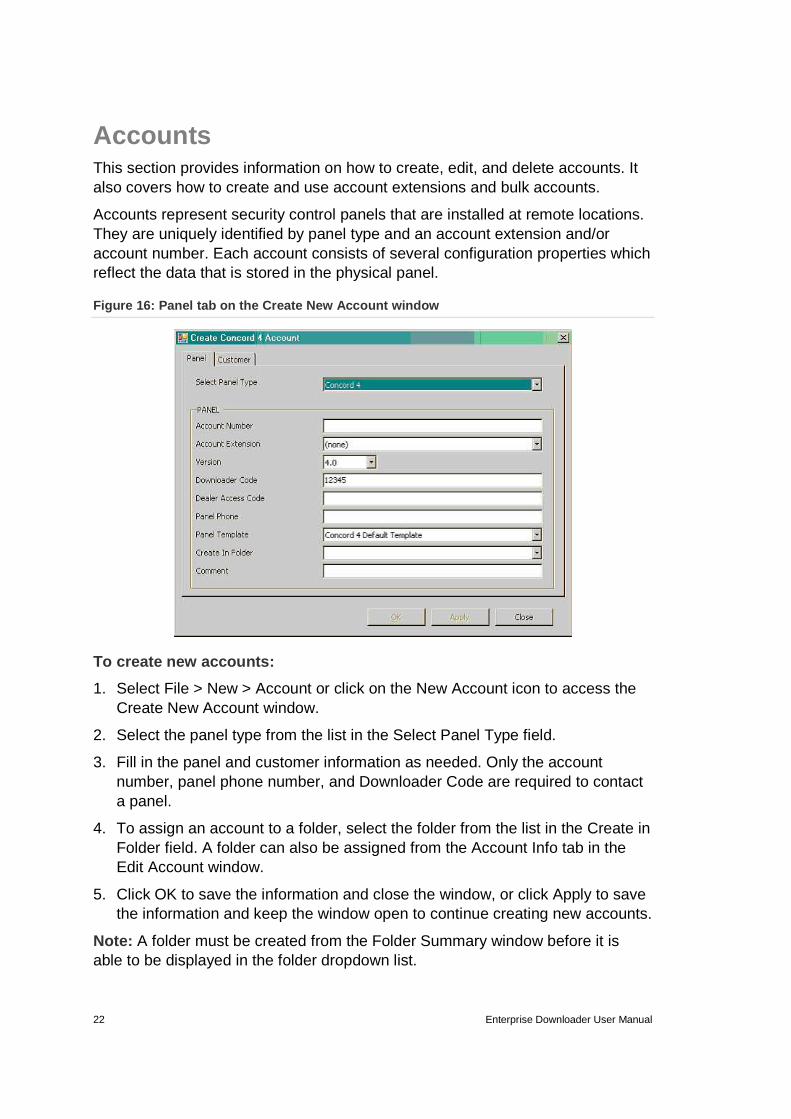
Accounts This section provides information on how to create, edit, and delete accounts. It also covers how to create and use account extensions and bulk accounts.
Accounts represent security control panels that are installed at remote locations. They are uniquely identified by panel type and an account extension and/or account number. Each account consists of several configuration properties which reflect the data that is stored in the physical panel.
Figure 16: Panel tab on the Create New Account wind ow
To create new accounts:
1. Select File > New > Account or click on the New Account icon to access the Create New Account window.
2. Select the panel type from the list in the Select Panel Type field.
3. Fill in the panel and customer information as needed. Only the account number, panel phone number, and Downloader Code are required to contact a panel.
4. To assign an account to a folder, select the folder from the list in the Create in Folder field. A folder can also be assigned from the Account Info tab in the Edit Account window.
5. Click OK to save the information and close the window, or click Apply to save the information and keep the window open to continue creating new accounts.
Note: A folder must be created from the Folder Summary window before it is able to be displayed in the folder dropdown list.
Enterprise Downloader User Manual 23
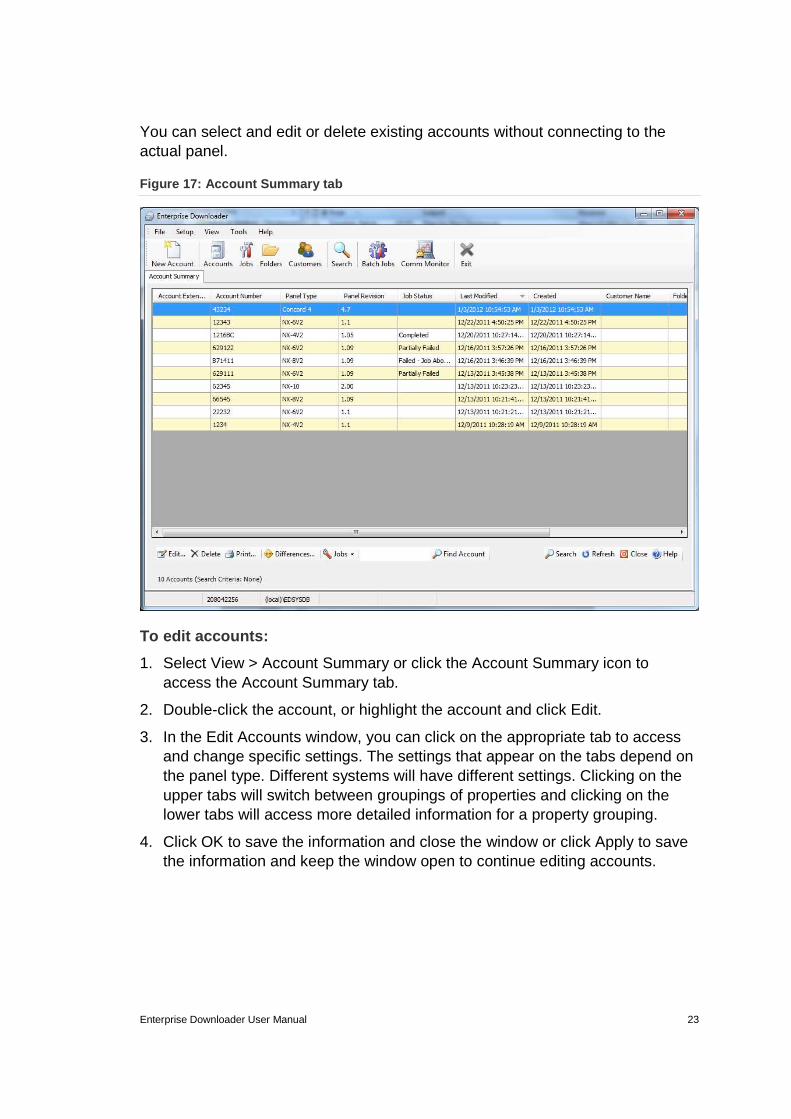
You can select and edit or delete existing accounts without connecting to the actual panel.
Figure 17: Account Summary tab
To edit accounts:
1. Select View > Account Summary or click the Account Summary icon to access the Account Summary tab.
2. Double-click the account, or highlight the account and click Edit.
3. In the Edit Accounts window, you can click on the appropriate tab to access and change specific settings. The settings that appear on the tabs depend on the panel type. Different systems will have different settings. Clicking on the upper tabs will switch between groupings of properties and clicking on the lower tabs will access more detailed information for a property grouping.
4. Click OK to save the information and close the window or click Apply to save the information and keep the window open to continue editing accounts.

24 Enterprise Downloader User Manual
Figure 18: Edit Accounts window
To delete an existing account:
1. Select View > Account Summary or click the Account Summary icon.
2. When the Accounts Summary tab appears, select a single account and click Delete. To delete blocks of accounts, highlight specific accounts with your mouse or hold down the control key and click on specific accounts.
3. When prompted, click OK to confirm the deletion.
Enterprise Downloader User Manual 25
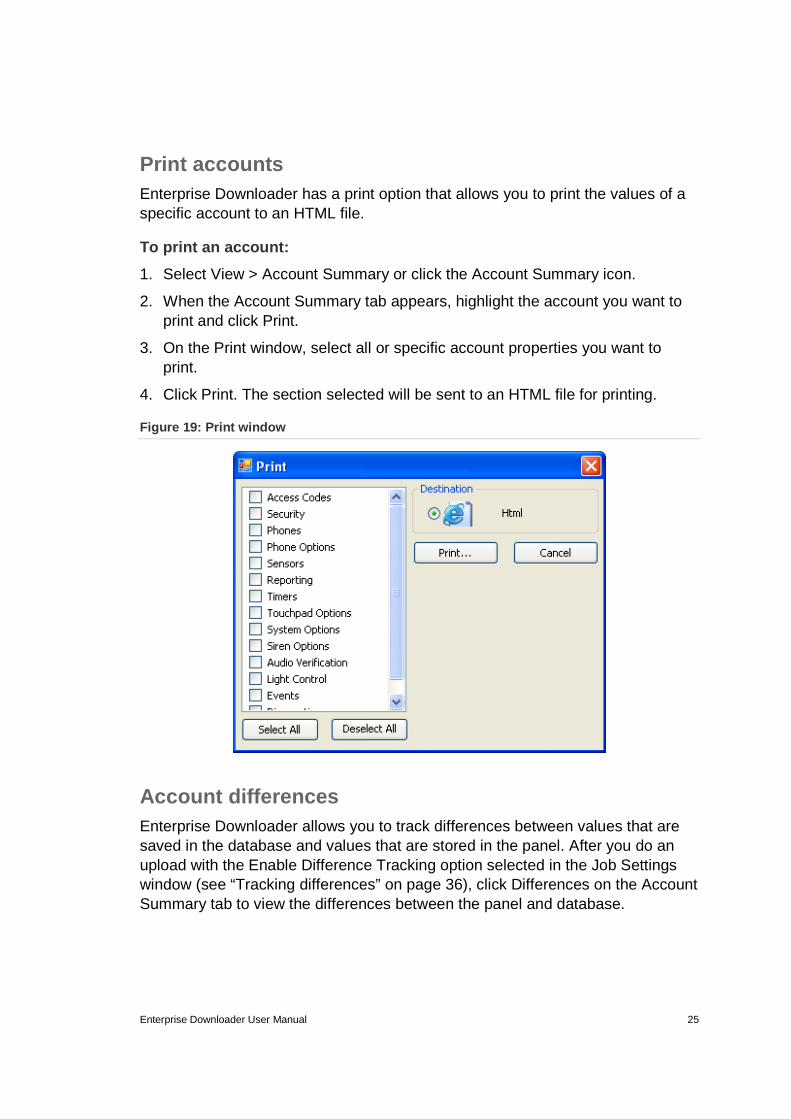
Print accounts Enterprise Downloader has a print option that allows you to print the values of a specific account to an HTML file.
To print an account:
1. Select View > Account Summary or click the Account Summary icon.
2. When the Account Summary tab appears, highlight the account you want to print and click Print.
3. On the Print window, select all or specific account properties you want to print.
4. Click Print. The section selected will be sent to an HTML file for printing.
Figure 19: Print window
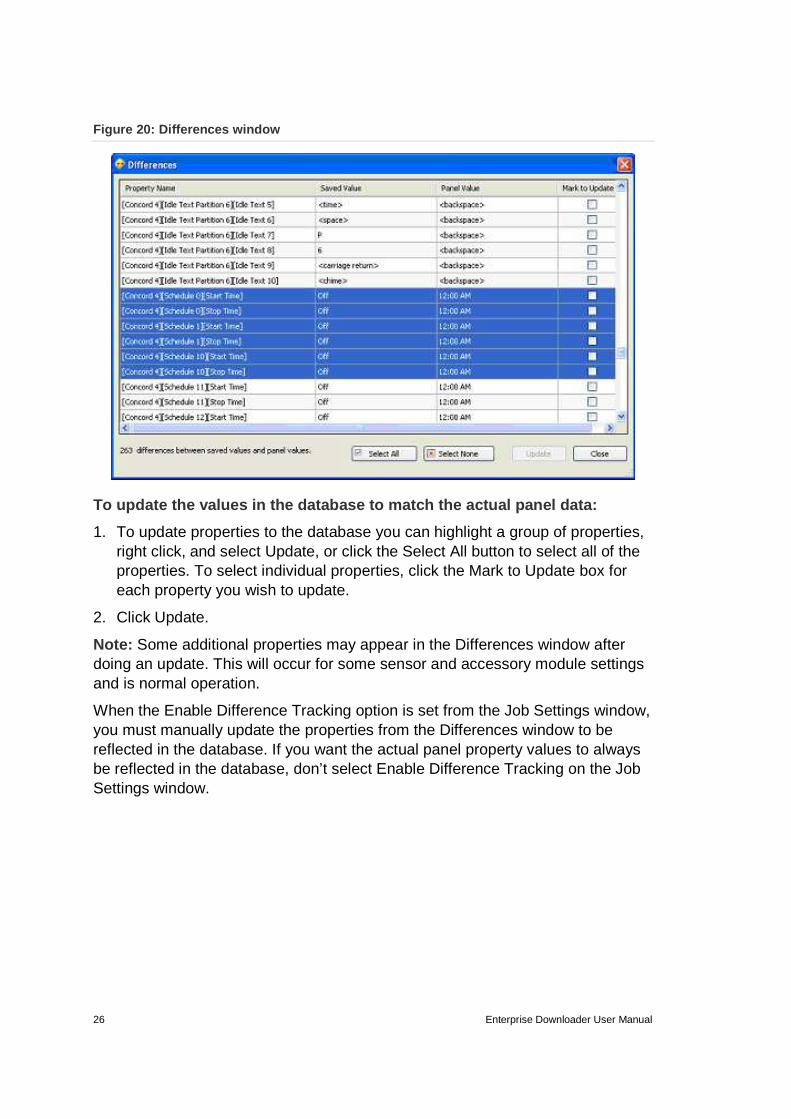
Account differences Enterprise Downloader allows you to track differences between values that are saved in the database and values that are stored in the panel. After you do an upload with the Enable Difference Tracking option selected in the Job Settings window (see “Tracking differences” on page 36), click Differences on the Account Summary tab to view the differences between the panel and database.
26 Enterprise Downloader User Manual
Figure 20: Differences window
To update the values in the database to match the a ctual panel data:
1. To update properties to the database you can highlight a group of properties, right click, and select Update, or click the Select All button to select all of the properties. To select individual properties, click the Mark to Update box for each property you wish to update.
2. Click Update.
Note: Some additional properties may appear in the Differences window after doing an update. This will occur for some sensor and accessory module settings and is normal operation.
When the Enable Difference Tracking option is set from the Job Settings window, you must manually update the properties from the Differences window to be reflected in the database. If you want the actual panel property values to always be reflected in the database, don’t select Enable Difference Tracking on the Job Settings window.
Enterprise Downloader User Manual 27
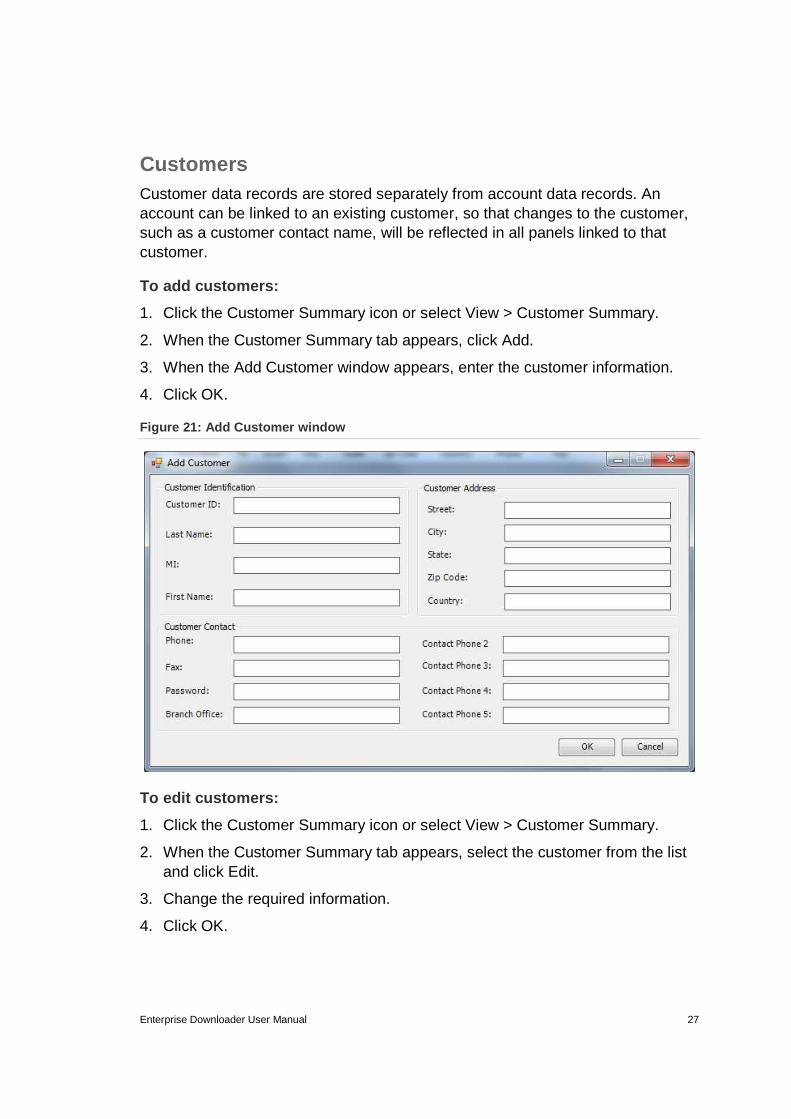
Customers Customer data records are stored separately from account data records. An account can be linked to an existing customer, so that changes to the customer, such as a customer contact name, will be reflected in all panels linked to that customer.
To add customers:
1. Click the Customer Summary icon or select View > Customer Summary.
2. When the Customer Summary tab appears, click Add.
3. When the Add Customer window appears, enter the customer information.
4. Click OK.
Figure 21: Add Customer window
To edit customers:
1. Click the Customer Summary icon or select View > Customer Summary.
2. When the Customer Summary tab appears, select the customer from the list and click Edit.
3. Change the required information.
4. Click OK.
28 Enterprise Downloader User Manual
To delete customers:
1. Click the Customer Summary icon or select View > Customer Summary.
2. When the Customer Summary tab appears, select the customer from the list and click Delete.
Note: When you delete a customer, you will also delete all accounts that are associated with that customer.
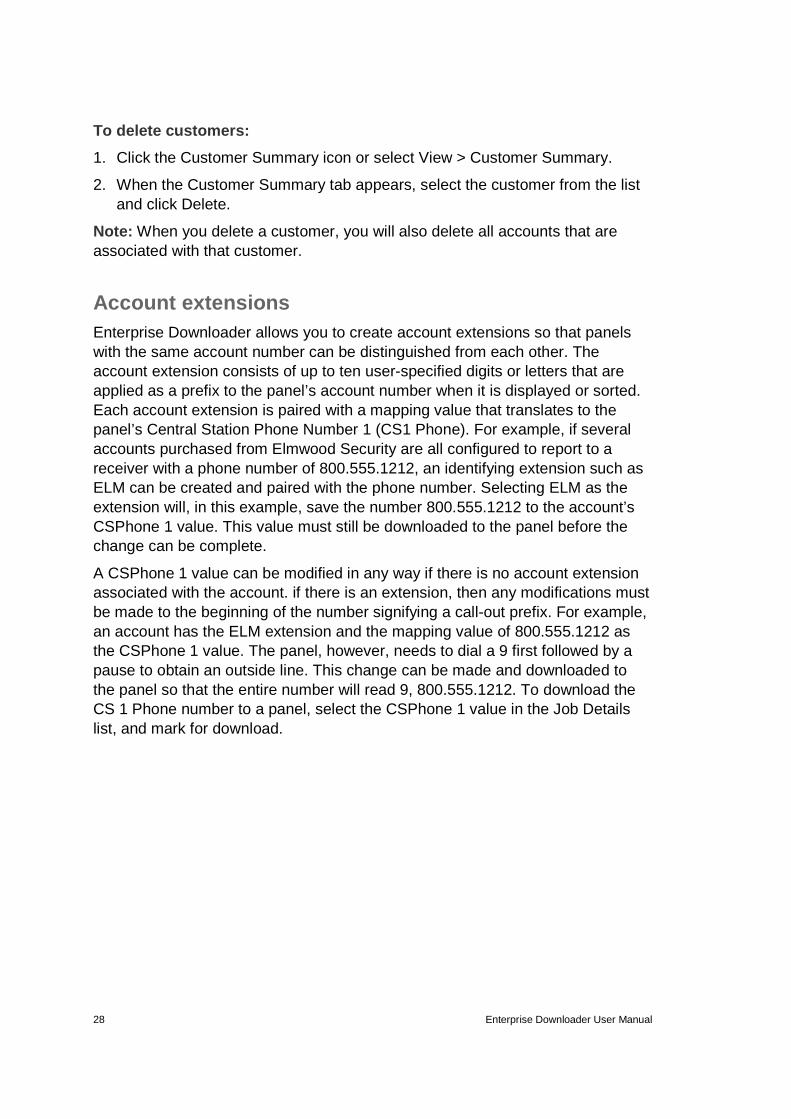
Account extensions Enterprise Downloader allows you to create account extensions so that panels with the same account number can be distinguished from each other. The account extension consists of up to ten user-specified digits or letters that are applied as a prefix to the panel’s account number when it is displayed or sorted. Each account extension is paired with a mapping value that translates to the panel’s Central Station Phone Number 1 (CS1 Phone). For example, if several accounts purchased from Elmwood Security are all configured to report to a receiver with a phone number of 800.555.1212, an identifying extension such as ELM can be created and paired with the phone number. Selecting ELM as the extension will, in this example, save the number 800.555.1212 to the account’s CSPhone 1 value. This value must still be downloaded to the panel before the change can be complete.
A CSPhone 1 value can be modified in any way if there is no account extension associated with the account. if there is an extension, then any modifications must be made to the beginning of the number signifying a call-out prefix. For example, an account has the ELM extension and the mapping value of 800.555.1212 as the CSPhone 1 value. The panel, however, needs to dial a 9 first followed by a pause to obtain an outside line. This change can be made and downloaded to the panel so that the entire number will read 9, 800.555.1212. To download the CS 1 Phone number to a panel, select the CSPhone 1 value in the Job Details list, and mark for download.
Enterprise Downloader User Manual 29
Figure 22: Account Extension tab
To create account extensions:
1. Select Setup > Account Extension.
2. When the Account Extension tab appears, click Add.
3. When the Add Account Extension window appears, enter the extension name or abbreviation in the Account Extension Field.
4. Enter the phone number of the extension in the Panel Extension Value field.
5. Enter a description or comment in the Description field.
6. Click OK.
To edit account extensions:
1. Select Setup > Account Extension.
2. When the Account Extension tab appears, select the account extension on the list and click Edit.
3. Change the data in the appropriate fields.
4. Click OK.
To delete account extensions:
1. Select Setup > Account Extension.
2. When the Account Extension tab appears, select the account extension on the list and click Delete.
30 Enterprise Downloader User Manual
Note: Deleting an extension will delete all the panels that are associated with that extension.
Find extension
To search for a specific mapping value, type the string into the search box and click find extension.
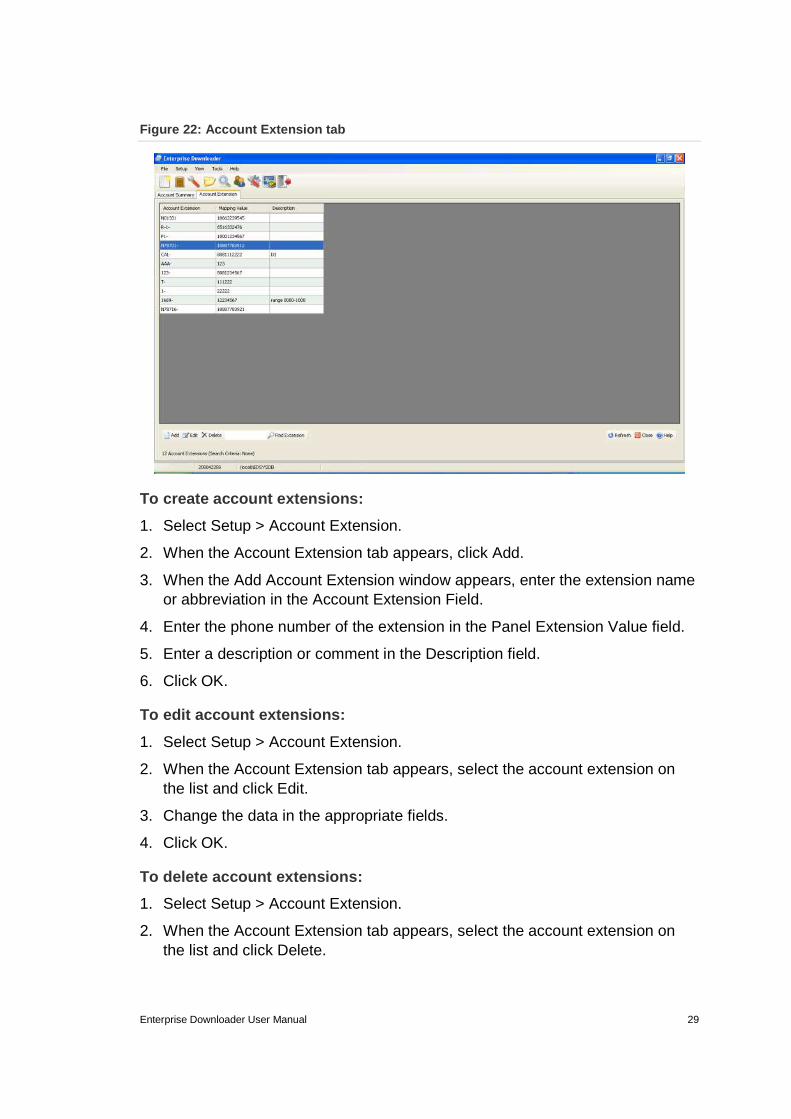
Bulk accounts Use the Account Creator window when you want to create a large batch of sequential account numbers in the database. You can specify the starting account number and the number of accounts to create. You can also specify the panel template to use and the account extension. Account numbers can be created in hexadecimal or decimal.
Figure 23: Account Creator window
To create bulk accounts:
1. Select Setup > Account Creator.
2. When the Account Creator window appears, select the panel template from the list in the Panel Template field.
3. Select the account extension (optional) from the list in the Account Extension field if needed.
Note: Account extensions must be previously created from the Account Extension window to be available in the dropdown list.
4. Enter the number of accounts to be created.
Enterprise Downloader User Manual 31
5. Enter the starting account number.
6. Select the Create Accounts in Hex box if you want the account number with hexadecimal values.
7. Click Run to generate the accounts.
8. Click Refresh to display the accounts in the Existing Account Number field.
Once the accounts are created, you must use the Edit Account window to view or edit the accounts.

32 Enterprise Downloader User Manual
Jobs This section provides an overview of what jobs are and instructions on creating and using jobs.
Jobs overview Enterprise Downloader communicates with a panel only when a job is created that instructs Enterprise Downloader to do so. Enterprise Downloader defines a job as the combination of the connection type with the load type:
Connection type (who is calling who)
Panel calls to Enterprise Downloader. Enterprise Downloader calls to the panel.
Load type (purpose of job)
Full upload, full download, or user specified.
Connection to panels can go in one of the following directions:
Call-in job Enterprise Downloader can accept calls from panels whether the call is expected or not.
Call-out job Enterprise Downloader can call individual panels.
Enterprise Downloader connects with a panel in order to:
Upload from a panel Enterprise Downloader reads selected information from a panel and saves it in the Enterprise Downloader account. An upload copies all settings, overwriting any previous loadable account information. Upload from a panel to get your previously installed panels into the Enterprise Downloader database.
Download to a panel Enterprise Downloader writes all loadable account information from Enterprise Downloader to the panel. It will overwrite all previous settings in the panel. For example, download to a panel to reload all of a panel’s settings when replacing a panel.
Note: Enterprise Downloader allows jobs to upload and download selected properties within the same job.
You can create jobs at any time and store them until the designated start time. For example, if an area code changes, you can schedule jobs to call out to the affected panels to change the area codes.
To create a job:
1. From the Account Summary window, click New/Edit in the Jobs field
2. When the Edit Job window appears, fill in the Edit Job fields (see below).
3. Select the Job Details tab. Select the action (Upload or Download) to perform on the desired properties. Use the tree view on the left hand pane to narrow
Enterprise Downloader User Manual 33
down property groups to specific properties belonging to that group or sub group.
4. Click OK to save the information and close the window, or click Apply to save the information and keep the window open to continue creating new jobs.
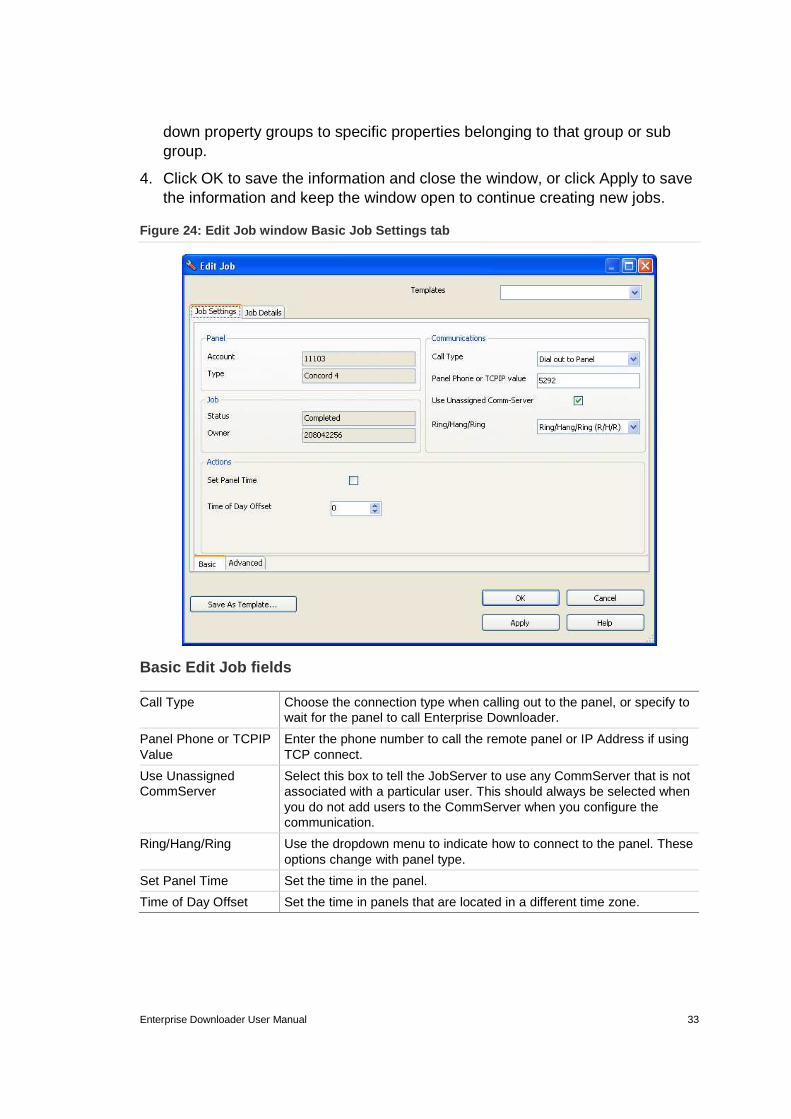
Figure 24: Edit Job window Basic Job Settings tab
Basic Edit Job fields Call Type Choose the connection type when calling out to the panel, or specify to
wait for the panel to call Enterprise Downloader.
Panel Phone or TCPIP Value
Enter the phone number to call the remote panel or IP Address if using TCP connect.
Use Unassigned CommServer
Select this box to tell the JobServer to use any CommServer that is not associated with a particular user. This should always be selected when you do not add users to the CommServer when you configure the communication.
Ring/Hang/Ring Use the dropdown menu to indicate how to connect to the panel. These options change with panel type.
Set Panel Time Set the time in the panel.
Time of Day Offset Set the time in panels that are located in a different time zone.
34 Enterprise Downloader User Manual
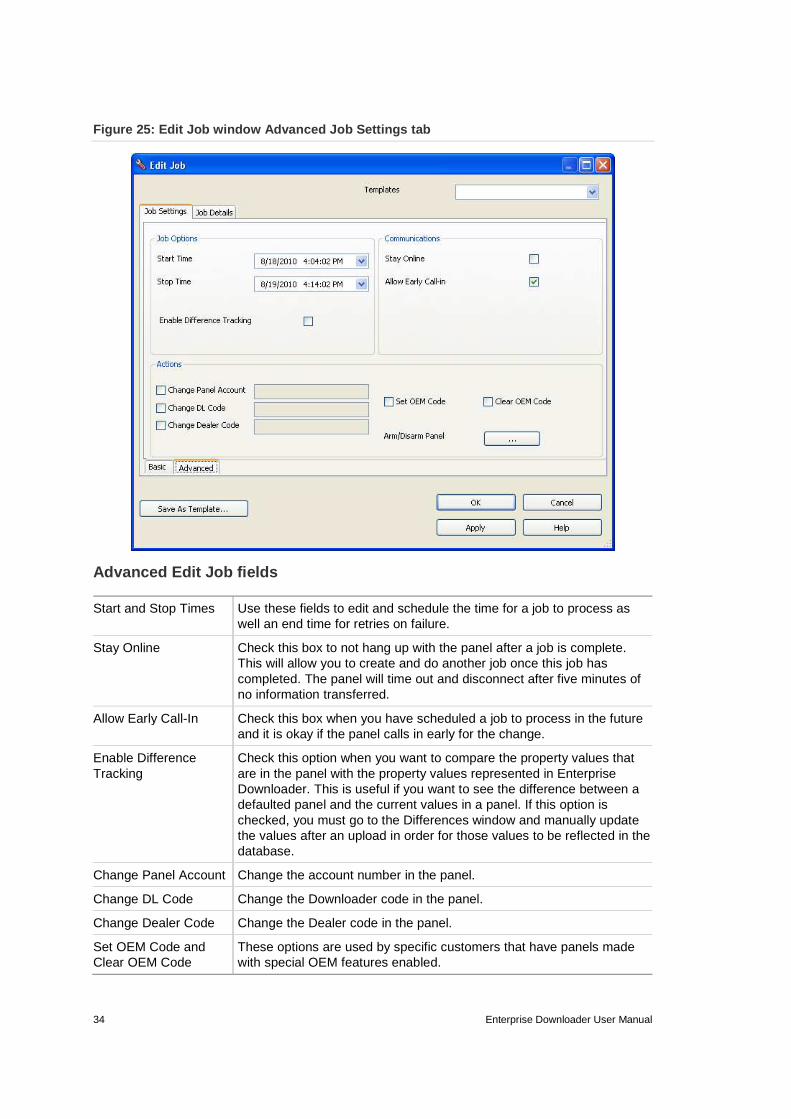
Figure 25: Edit Job window Advanced Job Settings ta b
Advanced Edit Job fields
Start and Stop Times Use these fields to edit and schedule the time for a job to process as well an end time for retries on failure.
Stay Online Check this box to not hang up with the panel after a job is complete. This will allow you to create and do another job once this job has completed. The panel will time out and disconnect after five minutes of no information transferred.
Allow Early Call-In Check this box when you have scheduled a job to process in the future and it is okay if the panel calls in early for the change.
Enable Difference Tracking
Check this option when you want to compare the property values that are in the panel with the property values represented in Enterprise Downloader. This is useful if you want to see the difference between a defaulted panel and the current values in a panel. If this option is checked, you must go to the Differences window and manually update the values after an upload in order for those values to be reflected in the database.
Change Panel Account Change the account number in the panel.
Change DL Code Change the Downloader code in the panel.
Change Dealer Code Change the Dealer code in the panel.
Set OEM Code and Clear OEM Code
These options are used by specific customers that have panels made with special OEM features enabled.
Enterprise Downloader User Manual 35
Arm/Disarm The arm/disarm function is currently only available for the Simon XT, Simon XT EMEA, Concord 4, and NX-8V2 panels. The zone bypass function is currently only available for the Simon XT EMEA. To arm/disarm, navigate to the Advanced sub tab on the Job Settings tab of the Job Edit window. Here you can arm/disarm the panel as well as bypass or unbypass any number of zones as part of a job. This function requires the user’s rights list to include the arming/disarming right.
Note: When arming and bypassing sensors using Enterprise Downloader, arming the panel must be the last action done in a job. If a sensor bypass is required, you must create a separate job after arming the panel to bypass particular sensors.
Note: When remotely attempting to arm a panel with the No Arm on Faults option on, if there are any faults, the panel may appear to arm, but will disarm after the time-out period.
To edit jobs:
1. Click the New/Edit button on the Account Summary window or the View/Edit button on the Jobs Summary window.
2. When the Edit Job window appears, change the appropriate fields.
3. Click OK to save the information and close the window, or click Apply to save the information and keep the window open to continue editing jobs.
To delete jobs:
1. In the menu bar, select View > Job Summary, or click the Job Summary icon on the toolbar. You can abort and cancel jobs from the CommServer and JobServer interfaces.
2. Select the job from the list that appears.
3. Click Delete.
Note: You cannot delete jobs that are in processing or callback mode.

36 Enterprise Downloader User Manual
Job history You can use Enterprise Downloader to track the history of property values downloaded to a panel. Note that only the downloaded property values of successfully completed jobs are saved to Job History.
To enable the job history option:
1. Select Setup > System Preferences.
2. Change the Days to Retain Job Histories field to a value other than 0. This represents the number of days to retain the property history values.
3. Click Apply.
Once the job history option is enabled and properties are downloaded to a panel, you can view the job history.
To view job history:
1. Select View > Account Summary or View > Job Summary.
2. Select the account from the list.
3. Click History.
Tracking differences Enterprise Downloader allows you to track the differences in property values between the actual data that is stored in the panel, and what the user interface contains in the database. Job tracking is enabled on a per-job basis. This means that you can specify whether or not to log differences on each specific job you run.
To enable difference tracking:
1. Select View/New/Edit from the Jobs drop down menu or hit F6.
2. Click the Advanced tab and then select Enable Difference Tracking.
3. Select a specific account from the Account Summary window and click Differences.
See “Account differences” on page 25 to update the value in the database to match the actual panel data.
Enterprise Downloader User Manual 37
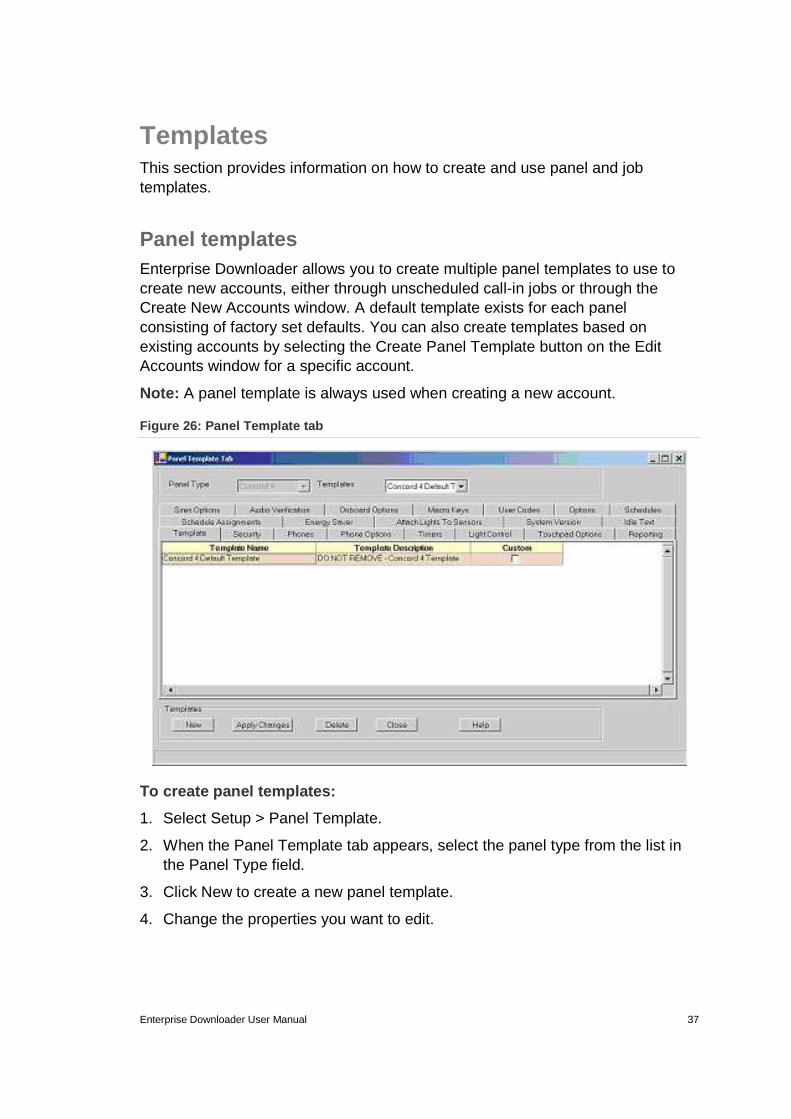
Templates This section provides information on how to create and use panel and job templates.
Panel templates Enterprise Downloader allows you to create multiple panel templates to use to create new accounts, either through unscheduled call-in jobs or through the Create New Accounts window. A default template exists for each panel consisting of factory set defaults. You can also create templates based on existing accounts by selecting the Create Panel Template button on the Edit Accounts window for a specific account.
Note: A panel template is always used when creating a new account.
Figure 26: Panel Template tab
To create panel templates:
1. Select Setup > Panel Template.
2. When the Panel Template tab appears, select the panel type from the list in the Panel Type field.
3. Click New to create a new panel template.
4. Change the properties you want to edit.

38 Enterprise Downloader User Manual
5. Click OK to save the information and close the window, or click Apply Changes to save the information and keep the window open to continue creating templates.
Note: You can also create a panel template when you are editing an account in the Edit Accounts window by clicking Create Panel Template and entering a name for the template to store.
To edit panel templates:
1. Select Setup > Panel Template.
2. Select the panel type you want to edit from the list in the Panel Type field.
3. Select the panel template you want to edit from the list in the Templates field.
4. Edit the required properties.
5. Click OK to save the information and close the window, or click Apply Change to save the information and keep the window open to continue editing panel templates.
To delete panel templates:
1. Select Setup > Panel Template.
2. Select the panel type of the template you want to delete from the Panel Template sub menu list.
3. Select the panel template you want to delete from the list in the Templates field.
4. Click Delete.
Note: You cannot edit or delete default templates.
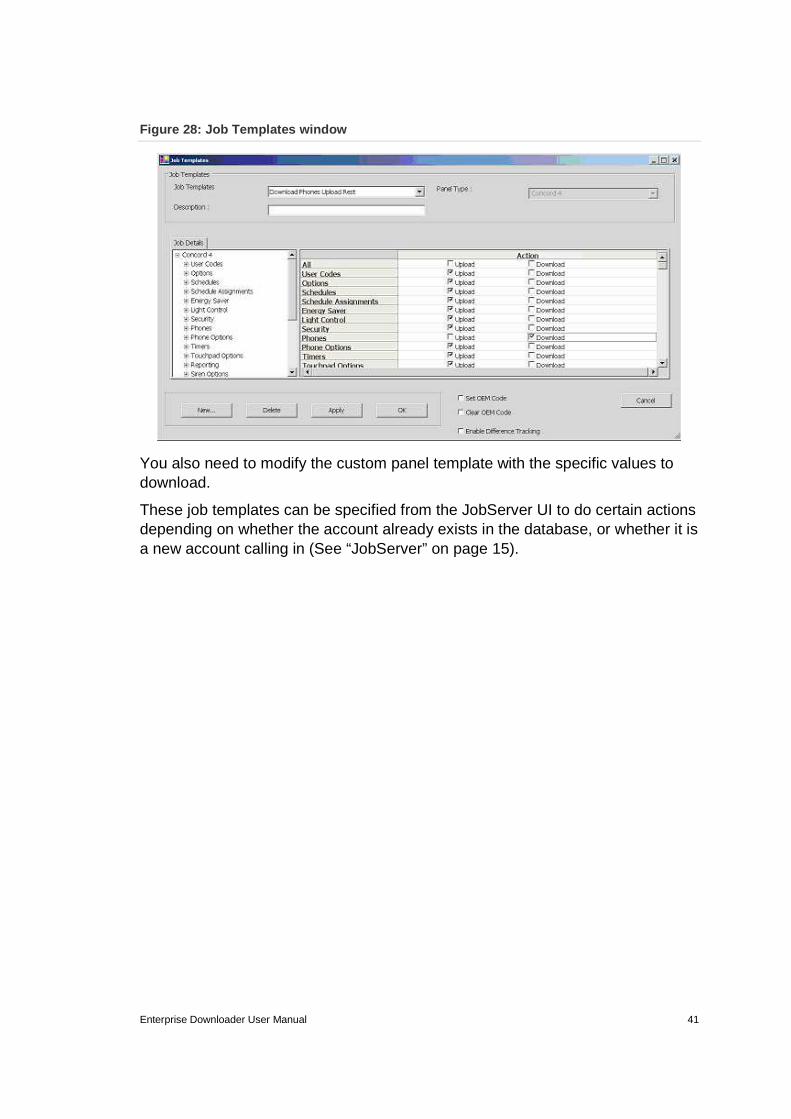
Custom panel templates
Custom job and panel templates can be configured in the Enterprise Downloader UI, and selected for unscheduled call-ins in the JobServer UI under File > Options > Unscheduled Call-in Settings. The selected job in the Call-in Job New Account box indicates the job which will be executed when the panel calls in for the first time. Often a full upload is desired in this situation. The selected template in the Call-in Job Existing Account box indicates the job which will be executed when the account for the panel calling in already exists in the database. The selected template in the New Account Panel Template box indicates the template used to write default account data to the database for panels calling in for the first time.
Enterprise Downloader User Manual 39
Note: An account can be created for a panel in the Enterprise Downloader UI without having contacted it, in which case the job template used for the call-in job would be the Call-in Job Existing Account template, and the template selected in the New Account Panel Template would not be used.
To assign a panel template as the custom template:
1. Select the template from the Panel Template tab.
2. Select the Custom box.
3. Click OK.
Remember, although you can have numerous panel templates, only one panel template can be specified as the custom panel template. If you assign a different template as the custom template, the previously assigned custom template will no longer be the custom template.
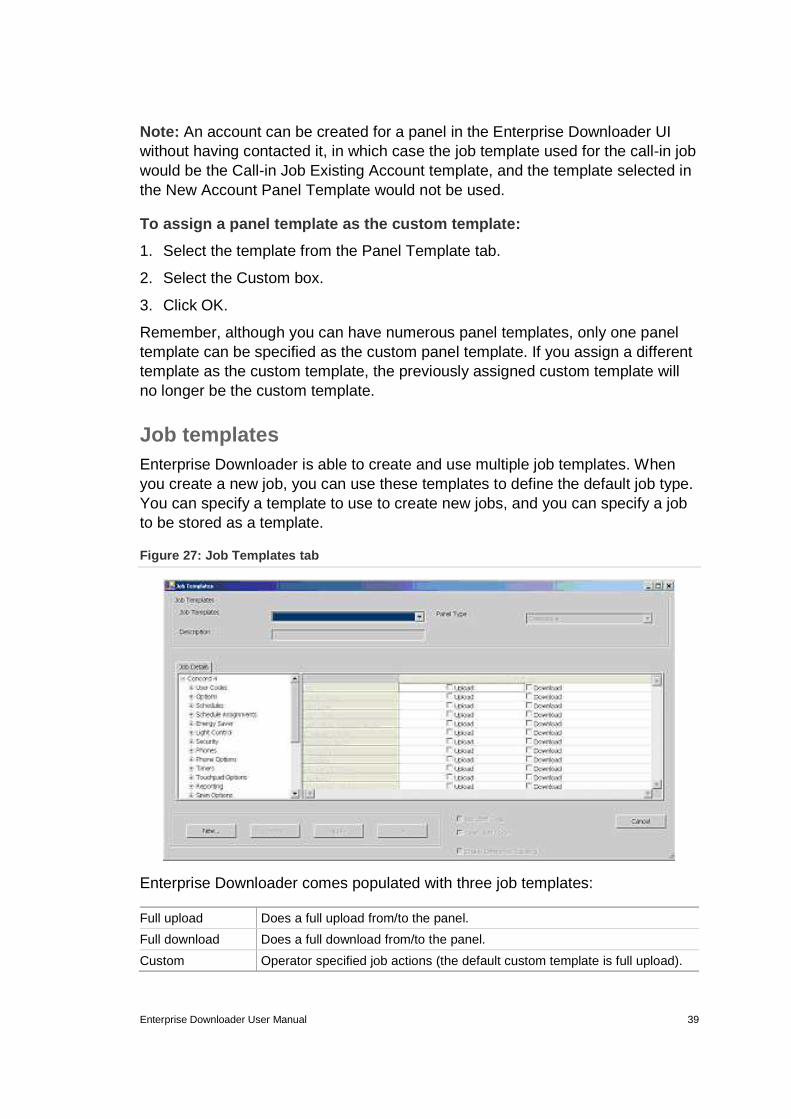
Job templates Enterprise Downloader is able to create and use multiple job templates. When you create a new job, you can use these templates to define the default job type. You can specify a template to use to create new jobs, and you can specify a job to be stored as a template.
Figure 27: Job Templates tab
Enterprise Downloader comes populated with three job templates: Full upload Does a full upload from/to the panel.
Full download Does a full download from/to the panel.
Custom Operator specified job actions (the default custom template is full upload).
40 Enterprise Downloader User Manual
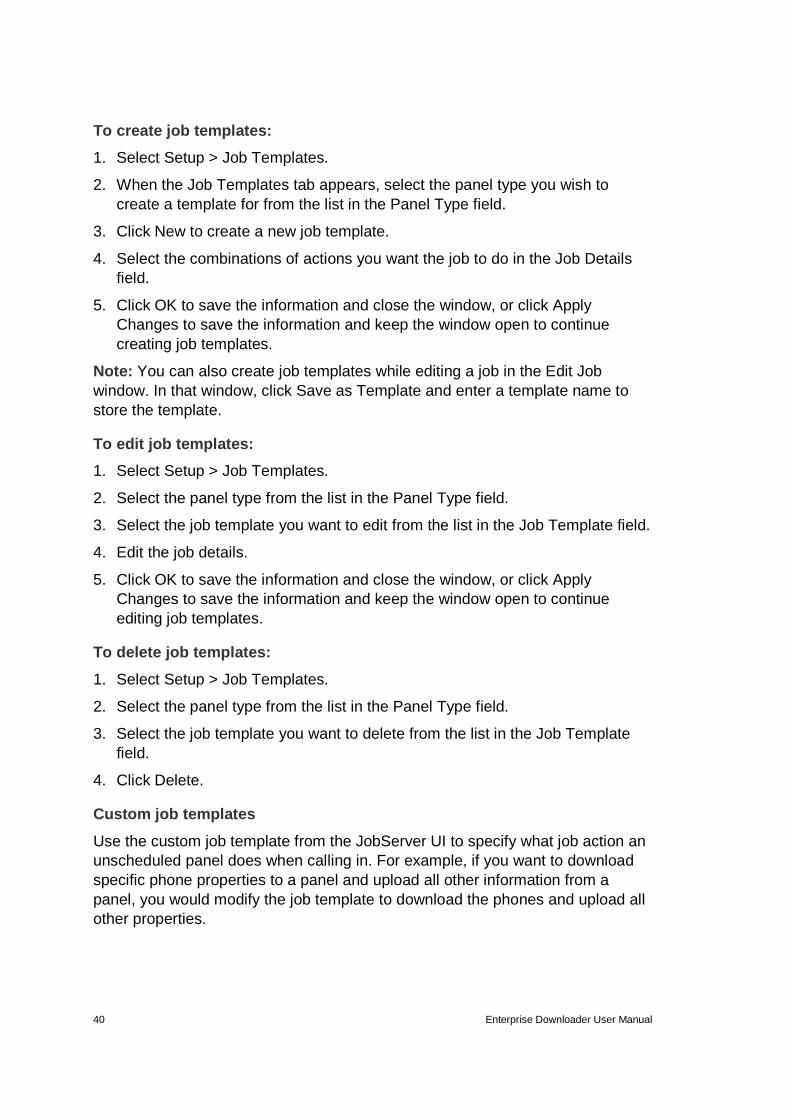
To create job templates:
1. Select Setup > Job Templates.
2. When the Job Templates tab appears, select the panel type you wish to create a template for from the list in the Panel Type field.
3. Click New to create a new job template.
4. Select the combinations of actions you want the job to do in the Job Details field.
5. Click OK to save the information and close the window, or click Apply Changes to save the information and keep the window open to continue creating job templates.
Note: You can also create job templates while editing a job in the Edit Job window. In that window, click Save as Template and enter a template name to store the template.
To edit job templates:
1. Select Setup > Job Templates.
2. Select the panel type from the list in the Panel Type field.
3. Select the job template you want to edit from the list in the Job Template field.
4. Edit the job details.
5. Click OK to save the information and close the window, or click Apply Changes to save the information and keep the window open to continue editing job templates.
To delete job templates:
1. Select Setup > Job Templates.
2. Select the panel type from the list in the Panel Type field.
3. Select the job template you want to delete from the list in the Job Template field.
4. Click Delete.
Custom job templates
Use the custom job template from the JobServer UI to specify what job action an unscheduled panel does when calling in. For example, if you want to download specific phone properties to a panel and upload all other information from a panel, you would modify the job template to download the phones and upload all other properties.
Enterprise Downloader User Manual 41
Figure 28: Job Templates window
You also need to modify the custom panel template with the specific values to download.
These job templates can be specified from the JobServer UI to do certain actions depending on whether the account already exists in the database, or whether it is a new account calling in (See “JobServer” on page 15).

42 Enterprise Downloader User Manual
Tools menu This section describes the options on the Tools menu.
Figure 29: Tools menu
Manage accounts
Figure 30: Manage Accounts options
Archive Accounts
This feature allows you to remove the selected accounts from the account summary database view into a backup table. These accounts can be viewed and restored from the Archived Account Summary screen. Use this feature to optimize the database and remove accounts that have not been accessed for some time.
Archiving accounts allows you to free up data space by zipping up your accounts and storing them as binary files in the database for future retrieval. Searching through active accounts will be easier, since there will be fewer accounts. Archived accounts can still be viewed and restored from the Archived Accounts Summary screen.
To archive accounts:
1. Navigate to the Account Summary screen.
2. Select the accounts you would like to archive.
3. Right-click one of the highlighted accounts and select Manage Accounts/Archive Accounts from the pop-up menu.
Enterprise Downloader User Manual 43
4. The dialog box will give you the option of deleting or retaining the account in the Accounts Summary list after archiving by selecting or deselecting the Delete Account after Archiving checkbox.
Actions available in the Archived Accounts Summary screen include:
• Restore • View • Delete • Search • Compare
To restore archived accounts:
1. Navigate to the Archived Accounts Summary screen.
2. Select the accounts you would like to restore.
3. Select the Restore button at the bottom of the page, or right-click one of the highlighted accounts and select Restore from the pop-up menu.
4. The dialog box will give you the option of deleting or retaining the archived account in the Archived Accounts Summary list after restoring by selecting or deselecting the Delete Archived Account after Restore checkbox. Many copies of the same account can be archived allowing you to store a history of changes (viewable by using the compare function).
Note: Once an account has been archived it can still be viewed, however, all jobs and job histories associated with it will be lost. Also, no changes can be made to an archived account, nor can any new jobs be scheduled until the account is restored.
To view archived accounts:
Double-click the account you would like to view, or select the account and click the View button at the bottom of the screen, or right-click the account and select View from the pop-up menu. The archived account will appear in the Edit Accounts screen, but editing will not be possible.
To delete archived accounts:
Select the accounts you would like to delete and select the Delete button at the bottom of the screen, or right-click the account and select Delete from the pop-up menu. Once an archived account is deleted, this action cannot be undone.
To search archived accounts:
Enter the account number, or a part of the account number in the quick search box at the bottom of the screen, or click the Search button. The Archived Accounts Summary screen will be defaulted, and you will be able to select up to three different search criteria.

44 Enterprise Downloader User Manual
To compare archived accounts:
Select exactly two accounts of the same panel type. Right-click either of the selected accounts and select Compare from the pop-up menu. The differences between the two panels will be displayed. This can be useful when comparing different snapshots of the same account.
Assign to Folder
This feature allows you to mark the account to be assigned to a particular file.
Change Panel Type
This feature allows you to convert an account’s panel type from one panel to another. Account information including account extension, account number, CSPhone 1 number, downloader code, dealer code, and panel phone number is preserved. All other panel information will be lost unless the panel types are compatible.
Note: At present, compatible panel types are Concord versions 3.0 and 4.0, Simon 3x and Simon XT.
To change the panel type:
1. Select Tools > Change Panel Type.
2. In the Change Panel Type window, use the dropdown lists to select the new panel type and version number.
3. Click OK when the correct information is showing.
Import Account from XML
To retrieve an archived account from a file in .xml format:
1. Select Tools > Import Account.
2. In the dialog box, navigate to the account to be retrieved and double-click the file or click Open to complete the import.
Export Account to XML
To archive an account to an .xml file:
1. Navigate to the Account Summary screen.
2. Select the account you want to export.
3. Right-click the account and select Manage Accounts > Export Account to XML…
4. Select the location in the File dialog box.
5. Click OK.
Enterprise Downloader User Manual 45
The account number will make up the default file name, but you can change it to any value.
Note: Exporting an account does not retain job information connected to that account. If an account is deleted after exporting, any job or history data related to that account will also be deleted and will not be retained.
Compare
You can compare the values stored in two different accounts as long as they are of the same panel type. To use this feature, select two accounts from the Account Summary screen and right-click Manage Accounts > Compare. This will display the panel property values that are different.
Batch account processing
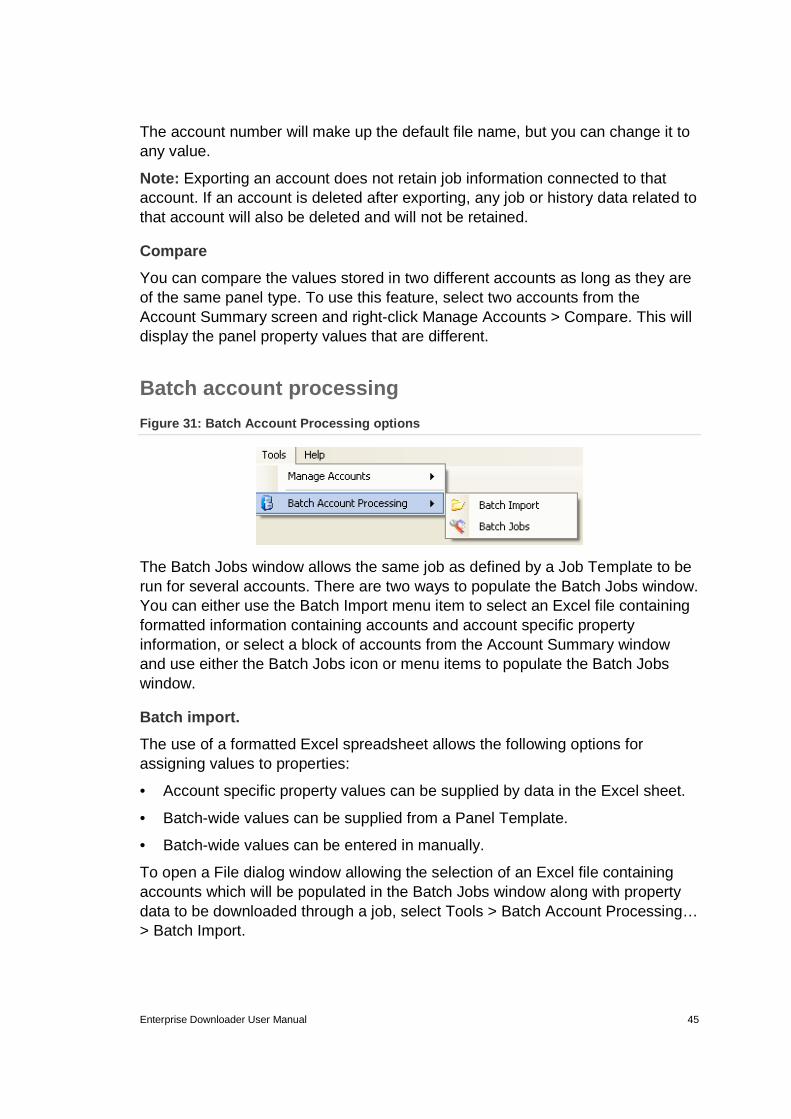
Figure 31: Batch Account Processing options
The Batch Jobs window allows the same job as defined by a Job Template to be run for several accounts. There are two ways to populate the Batch Jobs window. You can either use the Batch Import menu item to select an Excel file containing formatted information containing accounts and account specific property information, or select a block of accounts from the Account Summary window and use either the Batch Jobs icon or menu items to populate the Batch Jobs window.
Batch import.
The use of a formatted Excel spreadsheet allows the following options for assigning values to properties:
• Account specific property values can be supplied by data in the Excel sheet.
• Batch-wide values can be supplied from a Panel Template.
• Batch-wide values can be entered in manually.
To open a File dialog window allowing the selection of an Excel file containing accounts which will be populated in the Batch Jobs window along with property data to be downloaded through a job, select Tools > Batch Account Processing… > Batch Import.

46 Enterprise Downloader User Manual
Alternately you can press the Select Batch Import File button in the Batch Jobs window.
Only accounts for which a corresponding extension, account number, and panel type exist in both the database and the Excel spreadsheet will be loaded into the Batch Jobs window. Currently, there are three required columns in the Excel spreadsheet:
• Account Number • Panel type • Account Extension
These fields must be labeled Account, Panel Type, and Ext in the Excel spreadsheet. If the Folder column exists, when jobs are made the accounts will be assigned to the folder listed in the Folder column. This makes it easier to sort, organize, and verify the accounts for which batch jobs were created, as well as to check the status of their jobs. Any other fields in the Excel spreadsheet will be populated in the Data Options dropdown menu for property mapping.
The job’s details are defined by the selected Job Template and will be the same for all accounts listed in the upper grid. However, the property values to be downloaded can be individualized by using the Data Options dropdown menu.
Once the accounts have been loaded:
• Selecting Panel Type will filter the account list by the selected panel type and also determines the available selections in the panel and job template lists.
• Selecting a Job Template determines which properties are included in the job, and whether they are for upload or download.
• Selecting a Data Option field for a property allows assignment of individualized data for download on an account by account basis as specified in the Excel spreadsheet.
If a property value is to be the same for all accounts, selecting a Panel Template will populate the Value field with values from the respective Panel Template.
Alternately, the value can be entered manually. If a Data Option was previously selected, select a blank field in the Data Options field to allow the Value field to be enabled.
• View Log Details displays information on errors encountered in the loading of accounts from the Excel spreadsheet as well as any errors encountered during the execution of jobs. This file is automatically saved locally to disk in the UI application folder. The red icon in the lower right information pane will flash if there was recently logged information.
• Select the Do Jobs checkbox to determine which accounts to include in the batch jobs.
Enterprise Downloader User Manual 47
• Select Run Jobs to start the execution of jobs.
Batch jobs
To open selected accounts in the Batch Jobs window, select the group of accounts from the Account Summary window and select Tools > Batch Account Processing… > Batch Jobs, or use the Batch Jobs icon on the toolbar.
Running Batch Jobs selected from the Account Summary window is the same as for the Batch Import with the exception that the Data Options field will not be available.
Batch property update
The batch property update feature allows the update of a batch of properties for multiple accounts of a given panel type in the same way as running a batch job does, with the exception that no jobs are scheduled to be run for the updated accounts. To do a batch property update, follow the same steps for running a batch job (as described above), but instead of the Run button, use the Update Properties button on the toolbar instead.
Interactive mode toolbar Interactive mode allows you to connect directly to the panel to upload or download properties without being required to create a job first. This can be very efficient if you need to check the value of a property and/or make changes to the panel while remaining in the Panel Edit window.
Look for the Interactive Mode toolbar at the bottom of the Panel Edit window. The toolbar includes:
• Connect/Disconnect • Properties • Read Property • Write Property • Abort • Status Bar
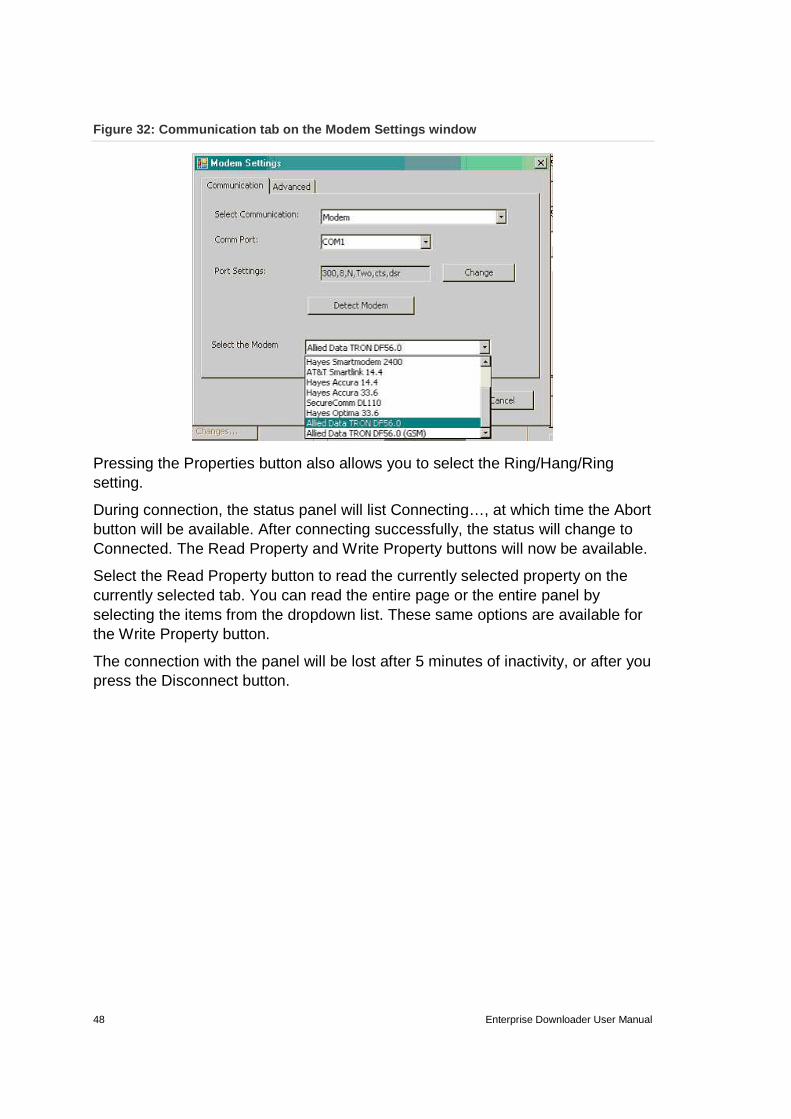
You can configure a selected communication mode by pressing the Properties button and selecting Modem Settings. After configuring the communication, select Detect Modem to confirm the configuration is correct. Select Connect to connect to the panel, assuming the correct panel phone number is listed in the account.
48 Enterprise Downloader User Manual
Figure 32: Communication tab on the Modem Settings window
Pressing the Properties button also allows you to select the Ring/Hang/Ring setting.
During connection, the status panel will list Connecting…, at which time the Abort button will be available. After connecting successfully, the status will change to Connected. The Read Property and Write Property buttons will now be available.
Select the Read Property button to read the currently selected property on the currently selected tab. You can read the entire page or the entire panel by selecting the items from the dropdown list. These same options are available for the Write Property button.
The connection with the panel will be lost after 5 minutes of inactivity, or after you press the Disconnect button.

Enterprise Downloader User Manual 49
Troubleshooting This section provides information to help you troubleshoot your Enterprise Downloader.
Why am I unable to log on to the JobServer?
Open CommServer Properties window and go to the Job Settings tab. Verify that the name of the JobServer is the correct machine name and click the Test Connection button to verify the connection.
Why can’t I log on to the database from the user in terface?
Check the server name. It should be similar to one of the following examples:
• (local) • Your computer name • (local)\EDSYSDB
What if I start a job and nothing happens?
Verify that the Use Unassigned CommServer option is checked if no users are entered in the CommServer UI.
Confirm Dial Out Type is set to Dial Out to Panel.
Make sure the phone number is the correct number and has not been left blank.
What should I do if the CommServer is unable to log on to the JobServer?
Make sure the JobServer service is started.
Verify that the JobServer name in the CommServer Properties window is correct.
Stop the JobServer service and restart it, then log on with CommServer.
Try to exit and restart CommServer.
Why isn’t the modem responding?
Verify that the modem is turned on, plugged into a phone line, and the type is correctly defined as the Right Com Port from the Profiles list.
Why did my job fail?
Verify that JobServer is logged on (green triangle).
Verify that the CommServer is communicating with the modem (no Xs in CommServer UI).

50 Enterprise Downloader User Manual
After a panel upload, why do the property values fa il to appear in the UI?
Make sure you do not have Enable Difference Tracking enabled in the Job window. If you do, you will have to go to the Differences window and update the values.
After a panel upload, the system may take a while to update the properties to the database. On slower machines, this may take some time to complete. Verify that the user interface indicates the job has completed on the Job Summary or Account Summary window.
Why do similar time values appear in the Difference s window when their values are the same?
Sometimes times will appear to be the same (for example, 10:00 AM for the Saved value and 10:00 AM for the Panel value). Even though the times are the same, sometimes the associated dates will not be the same. If updated, these values will no longer appear in the Differences window.
How do I blank out an output trigger for a SnapCard in a Concord panel?
In order to completely blank out an output trigger for a SnapCard in the panel, you must go to the Output Configuration window from the Onboard Options tab or go to the Output Responses window from the Accessory Modules tab and select the following options:
• Set the Output trigger to (255) Blank Trigger. • Enable the Siren Tracking and Trip Delay. • Set the Response Time to Sustained.
How do I change the access code length setting in a Simon panel?
Since the Access Code Length setting affects the security codes as well as the access codes, you must download all access codes and properties as well as all security properties when changing the value of the Access Code Length.
How do I back up my database if I’m using the MSDE version of the SQL database?
The best way to back up the MSDE database is to copy the database files to a backup location. Before copying these files, you will have to stop the SQL Server Service Manager. You can do this by double-clicking the SQL Service icon located in the system tray, then clicking the Stop button. Once the files are copied, it is important to restart the service.
The files are named: ED_Data.MDF, ED_Log.MDF, ITIED_Data.MDF, and ITIED_Log.LDF. These files should be under location C:\Program Files\ITI Enterprise Downloader\Database.
Enterprise Downloader User Manual 51
Also back up the files in location C:\Program Files\Microsoft SQL Server\MSSQL$EDMSDE2000.
How do I get Enterprise Downloader to handle unatte nded calls with an Enterprise Downloader (DL) Code in the panel that i s not the default value?
The Enterprise Downloader code is a five-digit security code set in the panel that will not allow remote connectivity to the panel if the code is not configured properly in Enterprise Downloader.
To get non-default DL codes to upload into Enterprise Downloader when performing an unattended call-in:
1. From the JobServer user interface, select File > Options. Go to the Unscheduled Call-in Settings tab. Under this tab, make sure the New Account Panel Template option is set to Custom, not Default ITI. Then right-click the specific default DL code number and select Edit to modify the number. After you change the number, click OK. You must change this number for each corresponding panel type.
Note: After you make any changes in the JobServer UI, you must stop and restart the service before the changes will go into effect.
2. To edit the corresponding panel templates in the Enterprise Downloader user interface, select Setup > Panel Template. From the panel type selected, make sure to check the appropriate template to be used for call-in data by clicking the Custom check box from the Template tab. Once you are editing the template flagged as Custom, click on the Security tab and edit the Enterprise Downloader Code value to match the value in the panel.
Once you have completed this procedure, the values linked with the panel template flagged as Custom, will be the values that get created and downloaded to the panel when a new panel calls in. The properties that get downloaded to the panel are determined by job actions that are defined in the Job template set to handle unattended call-ins.
How can I adjust the ring/hang/ring timing when cal ling a panel?
There are two settings in the CommServer user interface that will change the timing of how the ring/hang/ring setting will work. The R/H/R Time to First Ring option represents the number of seconds to wait after the call is initiated from the EDS software before hanging up and calling again. The Pause Between Calls setting determines how many seconds to wait after the first R/H/R dial attempt to call the panel again.
The R/H/R Time to First Ring setting should be extended if the Downloader is calling the panel and hanging up before the panel has a chance to receive the call. The R/H/R Time to First Ring setting should be shortened if the panel is
52 Enterprise Downloader User Manual
receiving more than two rings before hanging up and retrying on the ring/hang/ring setting.
How does the Use Unassigned CommServer setting work ?
The Use Unassigned CommServer setting in the Job window is used to determine which modem will be used for a particular call-out job. Unassigned means that there are no users assigned to it from the CommServer user interface screen. When the CommServer is initially configured, if no names are entered into the users list, the Use Unassigned CommServer option will have to be checked for all call-out jobs.
If a user name or computer name is entered into the users list when configuring the CommServer, the Use Unassigned CommServer option can be left unchecked.
Assigning user names to specific CommServer controls which modems are used for specific call-out jobs. This can help with modem load sharing as well as helping to debug errors that occur during call-out.
Note: The software will automatically detect if users have been assigned to the CommServer and check the setting automatically based on the user’s configuration.
Why do the jobs I create get stuck in “pending” mod e?
One of the following issues in the Edit Job window may be the cause of the problem:
• Is the Call Type set to Dial Out to Panel? • Is there a phone number in the Panel Dial Out Phone field? • Is the JobServer started? • Is the CommServer started? • Is the CommServer successfully configured with a modem and logged into
the JobServer? • Do you have an assigned user for the CommServer? If so, the Use
Unassigned CommServer check box must not be checked. If no CommServer user is assigned from the CommServer user interface, the check box must not be checked. If the assigned user in the CommServer user interface is the name of the computer, then the Job Created By option in the Preferences window of the user interface must be set to Computer Name.
What is the difference between MSDE and SQL Server Express?
SQL Server Express is the latest release from Microsoft that includes several enhancements over the MSDE engine and is compatible with Microsoft Vista. See Microsoft’s web site for detailed information on the differences.
Enterprise Downloader User Manual 53
Can I arm/disarm my panel with the EDS software?
You can remotely Arm /Disarm the Simon XT, Simon XT EMEA, Concord 4, and NX-8V2 panels.
Can I upload the entire contents of the Concord pan els using the interactive mode?
Yes, this capability was added in the EDS 4.3 release.
Can I use a USB cable to connect to the modem inste ad of a serial cable?
We have noticed that some USB cables do not work correctly with certain supported modems. We have verified that specific versions of the USB cable made by Keyspan (USA-19HS) will work with all supported modems. This can be purchased online through various vendors. Newer Simon XTi panels and NX panels will connect with all USB cables by changing the configuration to use 1 stop bit in the port setting screen in the CommServer.
What modems can I use to connect remotely to the pa nels over the phone line?
Connection to the Simon, Concord, and Allegro panels are limited to the defined modem set documented in the Supported modems on page 3. The Simon XTi and NX panels support a broader set of modems and the initialization strings can be manually added and configured in the CommServer Modem Settings tab. The updated modems may need to have “Stop Bits” set to 1. This can be modified from the CommServer>Properties>PortSettings>Change tab.
Why doesn’t the panel diagnostic information match the actual panel status?
When arming a panel remotely, the diagnostics will not reflect until you run another job to upload diagnostic data. It may not directly reflect the status of the panel if a recent arm/disarm was sent.
What happens if I remotely disarm a panel that is s ub-disarmed?
The software will keep the panel in sub-disarmed mode.
Can I remotely arm a Simon XT panel to Away (doors/ windows and motions)?
If you attempt to remotely arm a Simon XT panel to Away, it may drop the arming level down to Stay after the exit delay expires if you have the Auto Arm option turned on in the panel.
Can I copy sensor data from a Simon 3 panel to a Si mon XT panel?
Sensor group 28 is the only sensor data that will not copy over from a Simon 3 panel to a Simon XT panel.

54 Enterprise Downloader User Manual
Can I remotely download a sensor to an NX panel by typing in the TX ID number from the sensor’s box?
You can remotely download a sensor into an NX panel by leaving out the “0” from the TX ID number from the bar code information on the box.
What if I add a new module to my NX panel after it has already been uploaded in EDS?
If a new module is added in the field, performing a full upload of the existing module data is recommended.
Enterprise Downloader User Manual 55
OEM codes This section describes how Enterprise Downloader works with OEM codes shipped with panels.
Certain panels ship from the factory with a specific, nonblank OEM code. Full remote programming access to these panels requires that the standard Enterprise package be upgraded to register an OEM code that matches the code installed in the panels at the factory. The objective of service provider protection is to allow a monitoring center to:
• Have full upload/download access to their panels.
• Prevent any other monitoring center from having full access to their panels.
• Allow installers running standard upload/download software to change all panel parameters, except those that could redirect the panel to a new central station, or those that prevent the original monitoring center from connecting to the panel for upload/download.
A panel with no OEM code set can be processed by the standard Enterprise product. For these panels, the keys for access are the download code and the dealer code. Both must match for any job to be processed at all.
When a panel has an OEM code, it cannot be programmed remotely by the standard Enterprise product. The standard version of Enterprise will do partial processing on OEM code-protected panels. Parameters that cannot be uploaded or downloaded (even if Phone Lock is not set) are:
• CS Phone 1 • CS Phone 2 • DL Phone • Phone Lock • DL Access Code • Phone Mod 1 • Phone Mod 2 • Dealer Code/Utility Access Code 1 • Account Code
A standard version of Enterprise can be upgraded to do full processing on panels that are protected by specific OEM codes. This upgrade required the use of a license diskette, and the upgrade cannot be copied from system to system without the diskette. When Enterprise has been upgraded, it will process standard panels and do full processing of OEM code panels when the panel code matches the code registered with Enterprise during the upgrade.


