Download - Controversial Samisch King's Indian


The Controversial Samisch
King's Indian
Chris Ward
BATSFORD
First published 2004
Copyright © Chris Ward 2004
The right of Chris Ward to be identified as Author of this work has been asserted by him in accordance with the Copyright, Designs and Patents Act 1988.
ISBN 07134 8872 7
A CIP catalogue record for this book is available from the British Library.
All rights reserved. No part of this publication may be reproduced in any form or by any means without permission from the publisher.
Printed in Great Britain by Creative Print and Design (Wales), Ebbw Vale
for the publishers
B.T. Batsford Ltd, The Chrysalis Building Bramley Road, London, W I 0 6SP
www.chrysalisbooks.co.uk
An imprint of ChrysalifBooks Group plc
Distributed in the United States and Canada by Sterling Publishing Co., 387 Park Avenue South, New York, NY I 00 16, USA
A BATSFORD CHESS BOOK
Contents.
Page
Preface 5
Bibliography 6
Chapter 1: Introduction 7
Chapter 2: 6 i.e3 e5 7 d5 14
Chapter 3: 6 i.e3 e5 7 l2Jge2 56
Chapter 4: 6 i.e3 l2Jbd7 83
Chapter 5: Rare Black moves after 6 i.e3 and delaying ... 0-0 103
Chapter 6: The Panno 6 i.e3 l2Jc6 127
Chapter 7: 6 i.e3 c5!? 149
Chapter 8: 6l2Jge2 175
Chapter 9: 6 i.g5!? 193
Chapter 10: Odds and Ends 213
Index of Illustrative Games 221
Main Variations: Quick Reference Guide 222

To Green Man Sa/sa!

Preface
I've got to say that opening books are becoming so much harder to write these days. The sheer volume of games available in even the most obscure of lines is just mind boggling. Some readers don't want to be supplied with reams of variations and yet others will complain if they are not told what to do after this move or that move (however unlikely it may be to appear in an actual game). An author might smugly overturn the assessment of an older variation knowing only too well that a few years (months or weeks ! ?) down the road he himself/herself (yes I must apologise to any female readers for the frequent use of 'him' . I'm not sexist; I 'm just lazy and have a poor grasp of the English language ! ) could become a victim of some even more complete analysis.
Nevertheless, despite the amount of work involved, I was happy to produce a text on the 'King's Indian Siimisch' as it has been an opening close to my heart ever since my early chessplaying days as a junior. This book by no means covers every variation but it does include an awful lot of ideas. Possibly the only thing controversial about this book is the lines that didn't quite make the cut but you've got to admit that the title did grab your attention!
My selection of what to include and what to leave out does reflect modem trends but I did also want to stress that despite the wealth of theory available in this exciting King's Indian variant, there still remains plenty of room for innovative thought. Indeed even a cursory glance at chapter 10 would prove that.
Anyway, I won't keep you much longer. Although I don't think that I've ever read a chess book from beginning to end, that is exactly what I recommend the reader do here in order to absorb the various themes and ideas for both sides. Of course you will do what you will do but either way I hope that this book will at least provide some education and entertainment.
Thanks and good luck!
Chris Ward
Beckenham
September 2004

Bibliography
Chess Informant 1-89: Sahovski Informator
Nunn's Chess Openings; Everyman 1999 The Siimisch King's Indian; Joe Gallagher, B T Batsford 1995 King's Indian: Siimisch Variation; Kick Langeweg, Interchess BV
1995 ECO, Volumes A and E
Megabase 2004 Mega Corr 3 The Week in Chess
ChessPublishing.com
Chapter 1: Introduction
As I'm sure all readers are aware, the King's Indian Defence arises most commonly after the following sequence of moves:
1 d4
White sensibly places a pawn in the centre. l . .. liJf6
Black prevents the white e-pawn from immediately joining its compatriot in the middle of the board. Note that l . . .g6 2 e4 is more in the realms of an e-pawn opening - the 'Modern' or the 'Pirc' Defence where White has a choice of whether or not to deploy the c-pawn.
2 c4
White wants to dominate the centre but to try to force through e4 so soon via 2 ltJc3 is not the way. Of course Black could allow it by 2 . . . g6 3 e4 d6 but that is a transposition into the 'Pirc ' Defence and not necessarily what the second player wants. Experienced players will be aware of an interesting paradox here. As a defence to 1 e4, being employed by relatively few top players, the Pirc doesn't have the same standing as the 'KID' does against 1 d4. Indeed, faced with 1 e4 Black may prefer to employ the aggressive Sicilian Defence or match the opponent for space by l . . .e5. However invariably White Queen's Pawn players are uncomfortable transposing to e-pawn games. This may be because it doesn't suit their style or that it would require the learning of more opening theory. It is noticeable for example that after 1 d4 e6 many White players eschew 2 e4 which would allow 2 . . . d5 and a French Defence, favouring instead 2 c4 with a Queens Gambit Declined (2 . . . d5) or a Nimzo-Indian (2 . . . liJf6 3 ltJc3 .i.b4) as typical follow ups.
More relevant for this book is the frequently troublesome 1 d4 d6 but that is covered in detail in chapter 10. Backtracking then, 2 ltJc3 is essentially foiled by 2 . . . d5 which makes it an unpopular choice (particularly at higher level) as White struggles to get in e4 at all.
2 ••. g6
Facilitating the fianchetto of the king's bishop which characterizes Black's defence.
3 liJc3
Developing a piece and providing the support for future world domination. Well, okay, that's going a bit overboard but White's getting
8 Introduction
ready to put a third pawn in the centre (the c-pawn sort of counts ! ) . Note that some may be interested in the concept of 3 f3 instead which, although looking rather odd, has the advantage of preventing the more open 'Griinfeld' defence. It is likely to transpose into the main variations of the Samisch but there are also several other intriguing possibilities which are investigated in chapter 10. However, I would recommend that you work your way forward through the book so that by the time you get there you will understand the intricacies of the move orders and transpositions.
3 ... i.g7
Black will strike out at the White centre eventually but due to to personal taste he prefers it not to be with the immediate 3 . . . d5 . As mentioned above, the Griinfeld Defence tends to lead to an open type of game whereas the KID is generally associated with more closed positions.
4e4 Mission accomplished. White is now guaranteed a space advantage
lasting throughout the middlegame. 4 ... d6
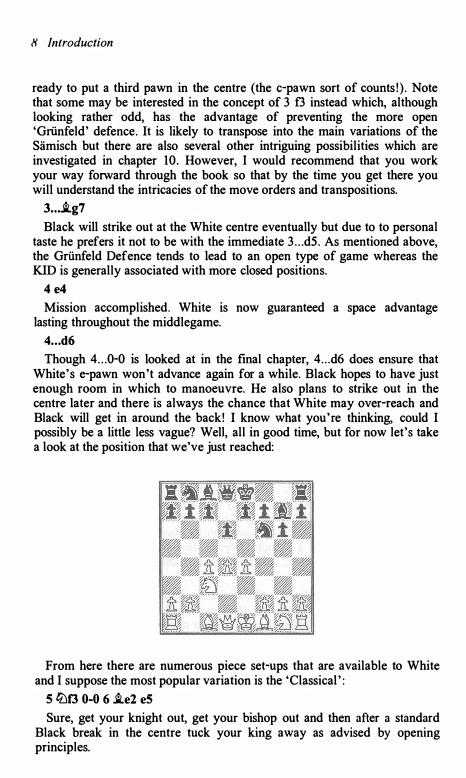
Though 4 . . . 0-0 is looked at in the final chapter, 4 . . . d6 does ensure that White's e-pawn won't advance again for a while. Black hopes to have just enough room in which to manoeuvre. He also plans to strike out in the centre later and there is always the chance that White may over-reach and Black will get in around the back! I know what you' re thinking, could I possibly be a little less vague? Well, all in good time, but for now let's take a look at the position that we've just reached:
From here there are numerous piece set-ups that are available to White and I suppose the most popular variation is the 'Classical ' :
5 lt:lf3 0-0 6 i.e2 e5 Sure, get your knight out, get your bishop out and then after a standard
Black break in the centre tuck your king away as advised by opening principles.
Introduction 9
However something like
7 0-0 lbc6 8 d5ll'le7 9ll'le1ll'ld7 10 .ie3 fS 1 1 f3 f4 12 .if2 gS
. . . could be considered as a main line. Let's take stock of the situation. White's fixed pawns lean toward the queenside and hence, logically, c4-c5 is the push that he should be trying to achieve next. He can play on the queenside, presumably hoping to infiltrate in that area of the board and perhaps winning material or promoting a pawn. Meanwhile back at the ranch Black's fixed pawns lean toward the kingside and White can expect the enemy g- and h-pawns to approach his king with plenty of fire power in their wake.
Now correct me if I'm wrong, but from White's point of view where is the fun in that? Alright maybe he can stave off Black's ' tactics ' and ultimately win positionally because of Black's bad King's Indian bishop (something we are going to see plenty of in the future!) . But maybe not! At this point I am presuming that you the reader (interested in or currently playing the Siimisch as White) have adopted my view that you don't want to be sitting around wondering whether or not you are going to be mated! I've lost track of the number of games where I've seen Black get his pawn down to g3, followed by sacrifices on g2 or h3 and the white king is done for. Such encounters are frequently illustrated in newspaper columns, texts on simple tactics and Eddy Gufeld books on his best King's Indian victories. Yep some poor sap is always the victim but no, that's not for me thanks very much!
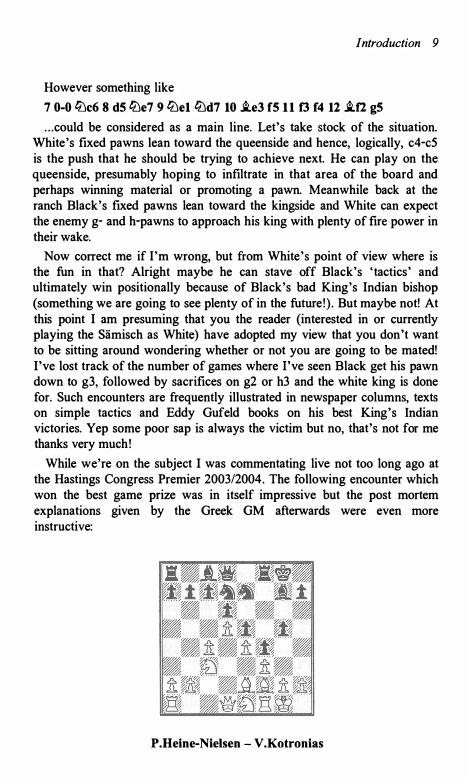
While we're on the subject I was commentating live not too long ago at the Hastings Congress Premier 2003/2004. The following encounter which won the best game prize was in itself impressive but the post mortem explanations given by the Greek GM afterwards were even more instructive:
P.Heine-Nielsen- V.Kotronias
I 0 Introduction
13 a4 a5 14 .!Dd3 b6 15 i..e1 .!Df6 16 .!Df2 h5 17 h3 �h8 18 .!Db5 .!Deg8 19 b4 l:lf7 20 bxa5 bxa5 21 c5 .ifS 22 cxd6 cxd6 23 l:lcl .!Dh6 24 l:tc4 .l:.g7 25 'ifc2 g4 26 i..xa5 'il'e8 27 h4 gxf3 28 i..xf3 i..g4 29 i.xg4 .!Dfxg4 30 i..b6 'il'e7 31 .!Dxg4 .!Dxg4 32 i..f2 f3 33 g3 .!De3 34 i..xe3 l:txg3+ 35 �f2 l:tg2+ 36 �xf3 l:Lxc2 37 l:txc2 'il'xh4 38 l:.g1 lba4 39 .!Dc3 l:Lc4 40 �e2 i..h6 41 i..b6 l:.xe4+ 0-1
Of course I haven't supplied you with the subtleties of 13 a4 (and how Black counteracts it) as relayed to me by Vasilios (who incidentally is the 'Good' of three Greek GM friends that were once labelled the 'Good, the bad and the ugly' ! ) . Actually I can't remember the entire explanation either but I do recall thinking that I was pleased that I hadn't been a part of that for all my chess playing years.
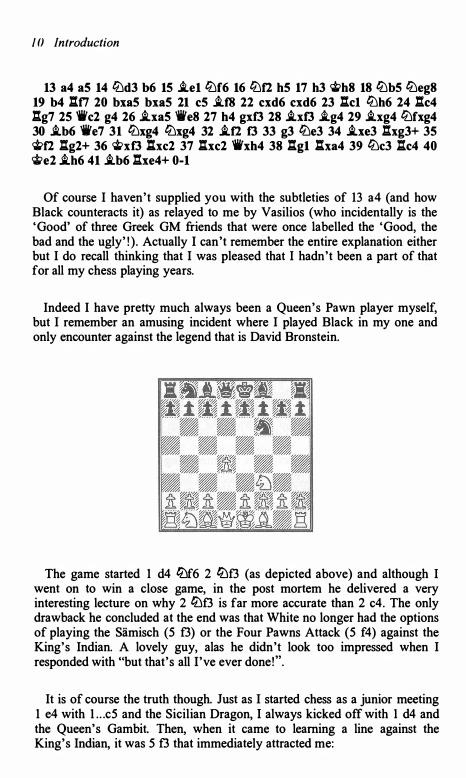
Indeed I have pretty much always been a Queen's Pawn player myself, but I remember an amusing incident where I played Black in my one and only encounter against the legend that is David Bronstein.
The game started 1 d4 .!Df6 2 .!Df3 (as depicted above) and although I went on to win a close game, in the post mortem he delivered a very interesting lecture on why 2 .!Df3 is far more accurate than 2 c4. The only drawback he concluded at the end was that White no longer had the options of playing the Samisch (5 f3) or the Four Pawns Attack (5 f4) against the King's Indian. A lovely guy, alas he didn't look too impressed when I responded with "but that's all I 've ever done!".
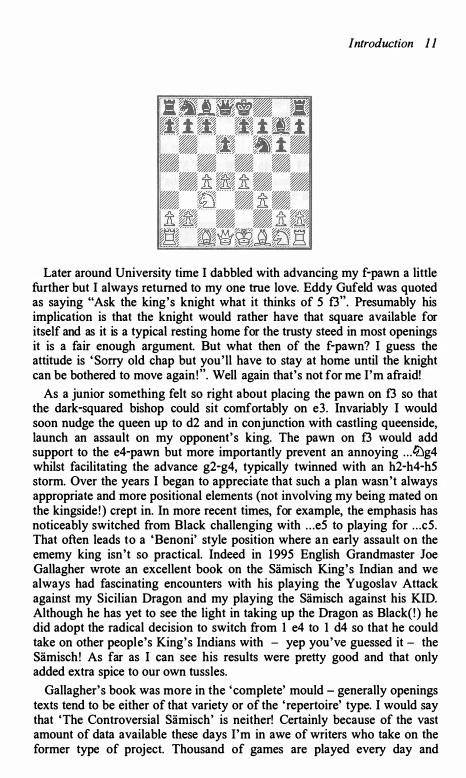
It is of course the truth though. Just as I started chess as a junior meeting 1 e4 with l . . .c5 and the Sicilian Dragon, I always kicked off with I d4 and the Queen's Gambit. Then, when it came to learning a line against the King's Indian, it was 5 f3 that immediately attracted me:
Introduction 1 1
Later around University time I dabbled with advancing my f-pawn a little further but I always returned to my one true love. Eddy Gufeld was quoted as saying "Ask the king's knight what it thinks of 5 f3". Presumably his implication is that the knight would rather have that square available for itself and as it is a typical resting home for the trusty steed in most openings it is a fair enough argument. But what then of the f-pawn? I guess the attitude is ' Sorry old chap but you'll have to stay at home until the knight can be bothered to move again! ". Well again that's not for me I'm afraid!
As a junior something felt so right about placing the pawn on f3 so that the dark-squared bishop could sit comfortably on e3. Invariably I would soon nudge the queen up to d2 and in conjunction with castling queenside, launch an assault on my opponent's king. The pawn on f3 would add support to the e4-pawn but more importantly prevent an annoying . . . lt:Jg4 whilst facilitating the advance g2-g4, typically twinned with an h2-h4-h5 storm. Over the years I began to appreciate that such a plan wasn't always appropriate and more positional elements (not involving my being mated on the kingside! ) crept in. In more recent times, for example, the emphasis has noticeably switched from Black challenging with . . . e5 to playing for . . . c5. That often leads to a 'Benoni' style position where an early assault on the ememy king isn't so practical. Indeed in 1995 English Grandmaster Joe Gallagher wrote an excellent book on the Siimisch King's Indian and we always had fascinating encounters with his playing the Yugoslav Attack against my Sicilian Dragon and my playing the Siimisch against his KID. Although he has yet to see the light in taking up the Dragon as Black( ! ) he did adopt the radical decision to switch from 1 e4 to 1 d4 so that he could take on other people's King's Indians with - yep you've guessed it - the Siimisch! As far as I can see his results were pretty good and that only added extra spice to our own tussles.
Gallagher's book was more in the 'complete' mould - generally openings texts tend to be either of that variety or of the 'repertoire' type. I would say that 'The Controversial Siimisch' is neither! Certainly because of the vast amount of data available these days I'm in awe of writers who take on the former type of project. Thousand of games are played every day and

12 Introduction
assessments of variations are constantly changing. For example, as a studious and allegedly talented (both questionable ! ) English junior I had handwritten notes (rather than a laptop) based on the New In Chess Keybook and Informator. Accordingly after
1 c4 lt::lf6 2 lt::lc3 g6 3 e4 d6 4 d4 i.g7 5 t3 0-0 6 i.e3, as seen in A.Karpov - J.Barle, Ljubljana 1975, the 'dubious' pawn sacrifice 6 .•. c5 7 dxc5 dxc5 8 'ii'xd8 l:lxd8 9 i.xcS
was pretty much refuted after: 9 ... lt::lc6 10 lt::ld5!? lt::lxd5 11 cxd5 i.xb2 (or 1 l . . .b6 ! ? 12 i.e3 i.xb2 1 3
l:tb1 i.c3+ 14 rJi>f2lt::la5 1 5 i.b5 e6 16lt::le2±) 12 I:tbl±
Yes, that is where my notes stopped with the belief that I too would hopefully convert just as the World Champion had done with something like:
12 ... i.c3+ 13 'it>fl b6 14 i.a3 lt::le5 15 lt::le2 i.d2 16 i.xe7 l:te8 17 i.f6 lt::ld3+ 18 'i!i>g3 i.d7 19 l:td1 i.el + 20 l:txe1lt::lxe1 21 lt::ld4! l1ac8 22 i.b5! i.xb5 23lt::lxb5 l:tcl 24 d6 1-0
These days 10 . . . lt::lxd5 wouldn't be given a second thought with 10 . . . lt::ld7 ! standard and Black usually generating at least enough play for the sacrificed pawn or two. The fact is that since I have been playing I have seen the gambit 6 . . . c5 annotated with a '? ' , a ' ? ! ' a ' ! ? ' and a ' ! '. The general consensus is that the latter is closer to the truth these days and hence the shift away from 6 . . . e5 and 6 . . . lt::lc6 - at least at the highest levels.
However, back to what this text is all about: I'm not here to prove to you why the Siimisch wins for White but as my own interest lies with the first player, it is obviously written with King's Indian bashing in mind! Clearly my predominant selection of White wins suggests that I haven't adopted an entirely unbiased approach( !) . Nevertheless whilst covering all the main variations of the Siimisch (but not every single line), I do suggest to Black players where their best chances may lie. By frequently referring to my own experiences, I wanted this book to trace the development of the opening
Introduction 13
over time, while tendering reasons for the shift in emphasis. I also wanted to throw in ideas that will be relevant to both parties and provide food for thought in the future. Reading over this introduction before sending the book to the publishers, I am happy that I have achieved that goal . I am however also hoping that this book will offer a little something for all levels of player - preferably with the exception of my future opponents !
Right, without further ado, let's get going . . .
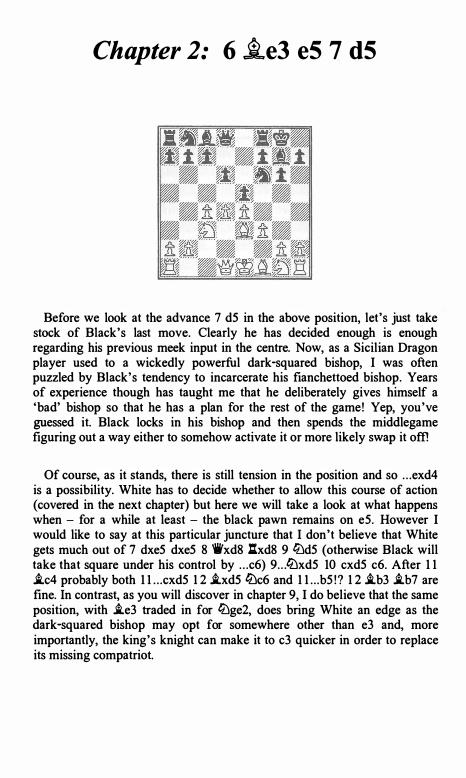
Chapter 2: 6 ..lte3 e5 7 d5
Before we look at the advance 7 d5 in the above position, let's just take stock of Black's last move. Clearly he has decided enough is enough regarding his previous meek input in the centre. Now, as a Sicilian Dragon player used to a wickedly powerful dark-squared bishop, I was often puzzled by Black's tendency to incarcerate his fianchettoed bishop. Years of experience though has taught me that he deliberately gives himself a 'bad' bishop so that he has a plan for the rest of the game! Yep, you've guessed it. Black locks in his bishop and then spends the middlegame figuring out a way either to somehow activate it or more likely swap it offl
Of course, as it stands, there is still tension in the position and so . . . exd4 is a possibility. White has to decide whether to allow this course of action (covered in the next chapter) but here we will take a look at what happens when - for a while at least - the black pawn remains on e5. However I would like to say at this particular juncture that I don't believe that White gets much out of 7 dxe5 dxe5 8 'ii'xd8 l:lxd8 9 lLld5 (otherwise Black will take that square under his control by . . . c6) 9 . . . ltlxd5 10 cxd5 c6. After 1 1 ..tc4 probably both 1 l . . .cxd5 1 2 ..txd5 ltlc6 and 1 l . . .b5 ! ? 1 2 ..tb3 ..tb7 are fine. In contrast, as you will discover in chapter 9, I do believe that the same position, with ..te3 traded in for ltlge2, does bring White an edge as the dark-squared bishop may opt for somewhere other than e3 and, more importantly, the king's knight can make it to c3 quicker in order to replace its missing compatriot.
Game] C. Ward - D.Agnos
Charlton Congress 1992
6 .i.e3 e5 7 d5 15
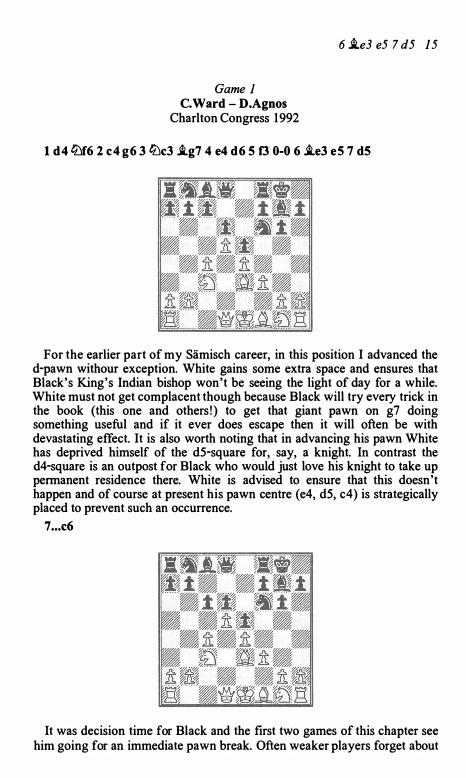
1 d4 liJf6 2 c4 g6 3 ltJc3 .tg7 4 e4 d6 5 f3 0-0 6 .te3 e5 7 d5
For the earlier part of my Samisch career, in this position I advanced the d-pawn withour exception. White gains some extra space and ensures that Black's King's Indian bishop won't be seeing the light of day for a while. White must not get complacent though because Black will try every trick in the book (this one and others ! ) to get that giant pawn on g7 doing something useful and if it ever does escape then it will often be with devastating effect. It is also worth noting that in advancing his pawn White has deprived himself of the d5-square for, say, a knight. In contrast the d4-square is an outpost for Black who would just love his knight to take up permanent residence there. White is advised to ensure that this doesn't happen and of course at present his pawn centre (e4, d5, c4) is strategically placed to prevent such an occurrence.
7 ... c6
It was decision time for Black and the first two games of this chapter see him going for an immediate pawn break. Often weaker players forget about
16 6 ii.e3 e5 7 d5
activating their rooks, instead assuming that their 5 points worth of firepower will simply make an appearance in the endgame. Of course this doesn't just happen of its own accord and one should always be on the look out for ways to create open and half-open files for these frequently forgotten major pieces. A 'pawn break' entails challenging an enemy fixed pawn and . . . f5 (after moving the knight) is the main alternative, seen a little later.
8 'iVd2
There is no doubt that the queen belongs on this square and if White intends castling queenside then why delay? Of course if he is contemplating 'going short' then 8 i.d3 (discussed further in the next game) is arguably more flexible. This does however have the drawback of minimizing White' s short term focus along the d-file and the bishop is rather in the firing line if 8 . . . b5!? occurs. After 9 'iVd2 Black should probably close things up on the queenside with 9 . . . b4 (incidentally one reason why 9 a3 has also previously been employed - by preventing the ' sealing' advance it does have the advantage that after, say, 9 . . . bxc4 10 i.xc4 c5 White is ready for a b2-b4 break) as 9 . . . bxc4 10 i.xc4 i.b7?! ( 10 . . . c5 is more circumspect with White retaining a slight edge) 1 1 tt:Jge2 cxd5 12 tt:Jxd5 tt:Jbd7 1 3 tt:Jec3 is a little too ambitious. White has a bind on the d5-outpost, thereby leaving the d6 pawn permanently backward. At the time my Grandmaster opponent's attempts to mix things up probably jangled my nerves but upon reflection 1 3 . . . l:tc8 14 b3 tt:Jb6 1 5 ttJxb6 axb6 16 l:td 1 b5 17 tt:Jxb5 d5 1 8 exd5 e4 19 f4 tt:Jg4 20 0-0 i.a6 2 1 a4 i.xb5 22 axb5 'ii'd6 23 i.d4 l:tfe8 24 i.xg7 �xg7 25 'iVd4+ �g8 26 h3 tt:Jh6 27 g4 'ii'd7 28 'iie3 l:ta8 29 f5 'ii'd6 30 'ti'xh6 'ti'g3+ 3 1 �h1 l:.a2 32 l:td2 lhd2 33 'ii'xd2 'ti'xh3+ 34 'ii'h2 'ii'xg4 35 fxg6 hxg6 36 d6 l:tf8 37 'iff4 'ii'h5+ 38 'iti>g2 g5 39 i.xt7+ 1 -0 C.Ward V.Kotronias, Stockholm 1988, was always looking good!
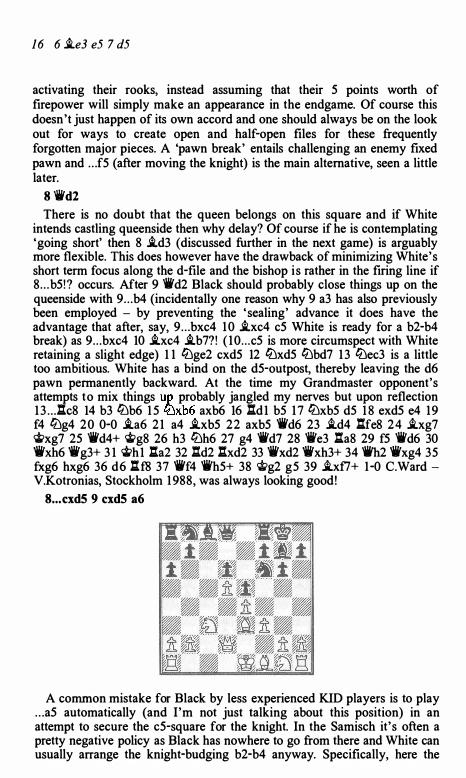
8 ... cxd5 9 cxd5 a6
A common mistake for Black by less experienced KID players is to play . . . aS automatically (and I'm not just talking about this position) in an attempt to secure the c5-square for the knight. In the Samisch it' s often a pretty negative policy as Black has nowhere to go from there and White can usually arrange the knight-budging b2-b4 anyway. Specifically, here the
6 i..e3 e5 7 d5 1 7
text both facilitates the advance . . . b7-b5 and prevents a white piece from parking itself on that same b5-square. Indeed I can recall once being told that 9 . . . lt:lbd7 is a mistake because of 10 lt:lb5 ! . Presumably then the idea is that 10 . . . lt:le8 (Upon 10 . . . lt:lc5 I would have to say that 1 1 l:[c l , threatening 12 lt:lxd6 and intending to meet l l . . .b6 with 12 b4, looks less risky than the immediate 1 1 b4 lt:lfxe4 ! ) 1 1 lt:lxa7 :xa7 12 i..xa7 b6 1 3 l:[c l doesn't see the bishop getting trapped although humans may be more worried about the black kingside play that comes with . . . f5 than say Fritz!
10 g4
The next game essentially takes a look at 9 . . . lt:lh5 instead of the 9 . . . a6 played here. Whilst preparing a kingside assault the text nips the black knight':> excursion in the bud.
10 ... 4Jbd7 11 0-0-0
The chances now are that White is serious about a kingside attack but at present it is far from kitchen sink stuff. As you will discover throughout this book White is more than capable of combining queenside castling with queenside play-and the c-file is an obvious channel for infiltration into the enemy position.
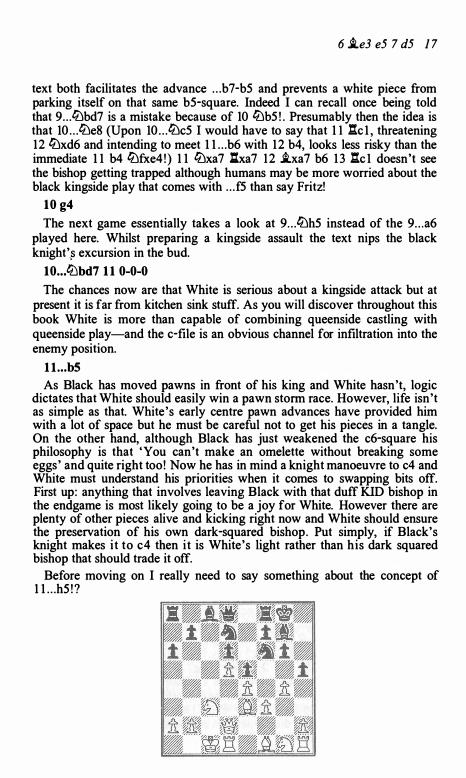
ll ... b5 As Black has moved pawns in front of his king and White hasn't, logic
dictates that White should easily win a pawn storm race. However, life isn't as simple as that. White's early centre pawn advances have provided him with a lot of space but he must be careful not to get his pieces in a tangle. On the other hand, although Black has just weakened the c6-square his philosophy is that 'You can't make an omelette without breaking some eggs' and quite right too! Now he has in mind a knight manoeuvre to c4 and White must understand his priorities when it comes to swapping bits off. First up: anything that involves leaving Black with that duff KID bishop in the endgame is most likely going to be a joy for White. However there are plenty of other pieces alive and kicking right now and White should ensure the preservation of his own dark-squared bishop. Put simply, if Black's knight makes it to c4 then it is White's light rather than his dark squared bishop that should trade it off.
Before moving on I really need to say something about the concept of l l . . .h5 ! ?
18 6 J..e3 e5 7 d5
More typically in the Slimisch this advance is employed to thwart White's own attempt to open up the h-file via h2-h4 (and obviously to h5 if allowed). Played now it appears to have the benefit of forcing White to make a decision - but that's not necessarily true. Generally speaking, he won't want to capture on h5 if Black can take back with the knight and keep both the g- and h-files blocked. I suppose this might be a consideration if he can get a knight to g3 but don't forget that Black would then be able to hop his own knight into f4 (a feature that will be seen a lot in this book). The advance 12 g5 is definitely a mistake as barring a highly improbable arranged piece sacrifice on h5 there is no way through to the black king. Note that without the white pawn on g3 the break f3-f4 not only has the drawback of allowing the KI bishop to spring to life after ... exf4 but also donates a beautiful outpost to an enemy steed on e5. Although White could respond with 12 h4, intending to keep blasting after 12 . . . hxg4 with 13 h5, there is of course no compulsion for Black to take. On the other hand 12 h3 ! ? maintains the tension and keeps the pressure on Black. If he ever trades on g4 he will effectively have done White's h2-h4-h5xg6 h-file-opening job for him! Of course he shouldn't do such a thing of his own accord but leave it to White to find a way to force the issue as in the following game:
1 2 . . . b5 1 3 'ittb 1 l:le8 (Often Black employs this move so that he can side-step the trade of bishops after J.h6 with . . . J.h8 . As White's bishop is far superior to its opposite number (for example here it also has an influence on the queenside), he should only seek such a trade in this sort of structure if mate is a realistic possibility. As the h-file is yet to be opened such a plan would be premature. 14 �g5 (It's possible even here for White to turn to the c-file and queenside play but with the text instead of 14 .l:i.c 1 he is looking to play gxh5 when . . . gxh5 would be the only available recapture) 14 . . . 'iib6 1 5 lLlce2 (With a similar logic to the main game, White wants to park this knight on g3 . Not only would it be away from Black's niggling attacks there but of course it would be exerting pressure on h5) 15 . . . hxg4 (It's no surprise that this ultimately ends in tears as White can work wonders with that h-file. Probably my advice to Black is that if you can drum something up on the queenside then it's better, from a practical point of view at least, to allow gxh5 and then hxg6. It's a pawn but at least the h- and g-files both remain semi-closed for a bit longer. 16 hxg4 liJh7 17 J.e3 'ii'd8 1 8 liJg3 (Now White i s going to have all the time in the world to arrange his h-file play and boy did I enjoy myselt1) 1 8 . . . liJdf8 19 liJh3 J.f6 20 i.d3 J.d7 2 1 .l:i.dg1 i.c8 22 liJf5 ! (Not strictly necessary but a theme worth employing if you can) 22 . . . g5 (Ugly but White had a threat as can be seen in the variation 22 . . . l:lb8 23 liJh6+ cj;g7 24 g5 �e7 25 f4 exf4 [or 25 . . . liJd7 26 f5 and note how here Black's bishop is not going to benefit from the opening of the c3-g7 diagonal and the e5-square wouldn't belong to a black knight after 26 J.d4+ f6 27 lLlxf4.] It's easier to talk about what White isn 't threatening and the b5-pawn is one thing! ) 23 'ii'h2 l:tb8 24 liJf2 i.g7 25 .l:i.g3 'ii'f6 26 .l:i.h3 'ii'g6 27 .l:i.h5
6 .i.e3 e5 7 d5 1 9
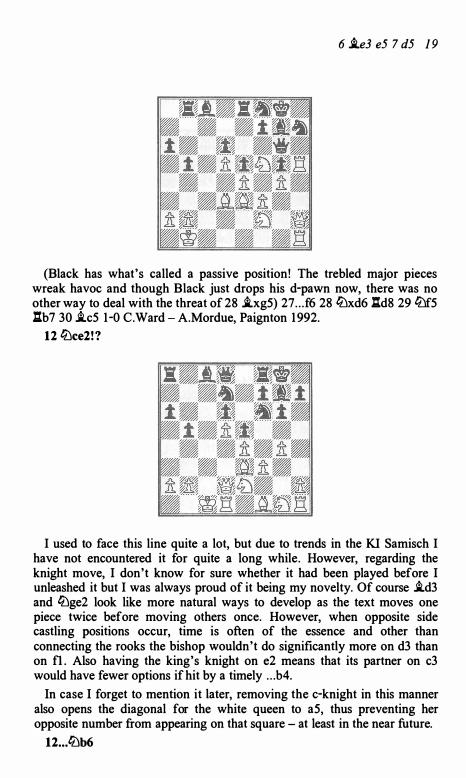
(Black has what's called a passive position! The trebled major pieces wreak havoc and though Black just drops his d-pawn now, there was no other way to deal with the threat of 28 .i.xg5) 27 . . . f6 28 lDxd6 .l::r.d8 29 lDf5 .l::r.b7 30 .i.c5 1 -0 C.Ward - A.Mordue, Paignton 1992.
12 lDce2! ?
I used to face this line quite a lot, but due to trends in the KI Samisch I have not encountered it for quite a long while. However, regarding the knight move, I don't know for sure whether it had been played before I unleashed it but I was always proud of it being my novelty. Of course .i.d3 and lDge2 look like more natural ways to develop as the text moves one piece twice before moving others once. However, when opposite side castling positions occur, time is often of the essence and other than connecting the rooks the bishop wouldn't do significantly more on d3 than on fl . Also having the king's knight on e2 means that its partner on c3 would have fewer options if hit by a timely . . . b4.
In case I forget to mention it later, removing the c-knight in this manner also opens the diagonal for the white queen to a5, thus preventing her opposite number from appearing on that square - at least in the near future.
12 ... lDb6
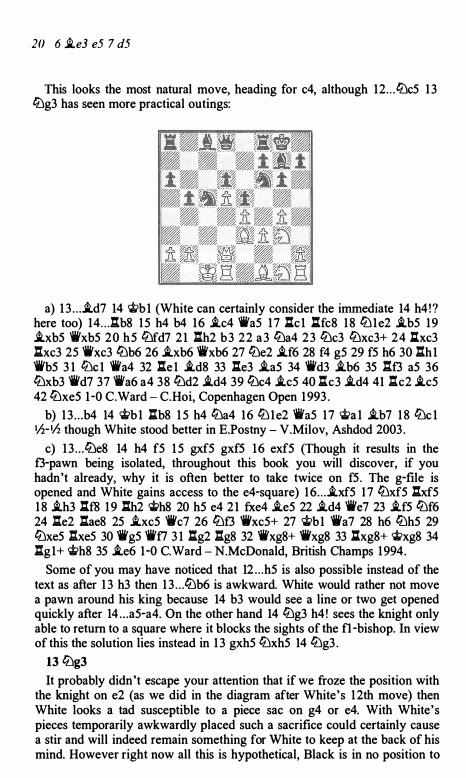
20 6 i..e3 e5 7 d5
This looks the most natural move, heading for c4, although 12 ... ltJc5 1 3 ltJg3 has seen more practical outings:
a) 1 3 . . . i..d7 14 'Oti>b 1 (White can certainly consider the immediate 14 h4 !? here too) 14 .. J1b8 1 5 h4 b4 16 i..c4 'ii'a5 17 l:tc1 l:tfc8 1 8 ltJ1e2 i..b5 19 i..xb5 'ii'xb5 20 h5 ltJfd7 2 1 l:1h2 b3 22 a3 ltJa4 23 ltJc3 ltJxc3+ 24 .U.xc3 l:txc3 25 'ii'xc3 ltJb6 26 i..xb6 'ilt'xb6 27 ltJe2 i..f6 28 f4 g5 29 f5 h6 30 l:1h1 'ii'b5 3 1 ltJc 1 'ii'a4 32 l:te 1 i..d8 33 l:1e3 i..a5 34 'ii'd3 i..b6 35 :Xf3 a5 36 ltJxb3 'ii'd7 37 'ii'a6 a4 38 ltJd2 ..td4 39 ltJc4 i..c5 40 :Xc3 i..d4 41 :Xc2 i..c5 42 ltJxe5 1 -0 C. Ward- C.Hoi, Copenhagen Open 1 993 .
b) 1 3 . . . b4 14 �b 1 .U.b8 1 5 h4 ltJa4 16 ltJ1e2 'ilt'a5 17 <li'a 1 i..b7 1 8 ltJc 1 •h-tlz though White stood better in E.Postny - V.Milov, Ashdod 2003 .
c) 1 3 . . . ltJe8 14 h4 f5 1 5 gxf5 gxf5 16 exf5 (Though it results in the f3-pawn being isolated, throughout this book you will discover, if you hadn't already, why it is often better to take twice on f5 . The g-file is opened and White gains access to the e4-square) 16 . . . i..xf5 17 ltJxf5 l:txf5 1 8 i..h3 llf8 1 9 llh2 �h8 20 h5 e4 2 1 fxe4 i..e5 22 i..d4 'ike7 23 i..f5 ltJf6 24 l:1e2 l:1ae8 25 i..xc5 'ifc7 26 ltJf3 'ifxc5+ 27 '1ti>b1 'i'a7 28 h6 ltJh5 29 ltJxe5 l:1xe5 30 'it'g5 'it't7 3 1 l:.g2 l:1g8 32 'it'xg8+ 'ifxg8 33 .l::.xg8+ <li>xg8 34 l:1g1+ �h8 35 i..e6 1 -0 C. Ward - N.McDonald, British Champs 1994.
Some of you may have noticed that 12 . . . h5 is also possible instead of the text as after 1 3 h3 then 1 3 . . . ltJb6 is awkward. White would rather not move a pawn around his king because 14 b3 would see a line or two get opened quickly after 14 . . . a5-a4. On the other hand 14 ltJg3 h4 ! sees the knight only able to return to a square where it blocks the sights of the fl-bishop. In view of this the solution lies instead in 1 3 gxh5 ltJxh5 14 ltJg3 .
13 ltJg3 It probably didn't escape your attention that if we froze the position with
the knight on e2 (as we did in the diagram after White's 1 2th move) then White looks a tad susceptible to a piece sac on g4 or e4. With White's pieces temporarily awkwardly placed such a sacrifice could certainly cause a stir and will indeed remain something for White to keep at the back of his mind. However right now all this is hypothetical, Black is in no position to

6 .i..e3 e5 7 d5 21
enter such complications and after White has removed the knight to g3 everything is under control - in that department at least.
13 ... a5
White could have had the g l -knight on g3 instead of the c3-one but there are two advantages in the road he has chosen to take. Black won't be able to gain tempi against the knight with . . . b4 and the g l -knight could possibly spring to h3 and g5 later. As White is careful not to move any pawns around his king (as mentioned before - for example refraining from b2-b3 which might allow Black's rooks access via . . . a4) a pawn storm is going to achieve little for Black. However his last move does offer a pawn which White is advised to decline. He needs to retain his light-squared bishop so as to zap Black's knight when it gets to c4 and expending tempi to give Black a half-open b-file isn't recommended.
14 �b1 tt'lc4 15 .i..xc4 bxc4
This has been a fairly natural sequence of moves and the ones that follow for both sides aren't necessarily the work of brain surgeons either!
16 l:tc1 .i..a6 17 h4 l:tb8 18 hS .l:tb4 19 tt'l1e2 'ifb8 20 tt'lc3 'ifb7 21 'iti>a1 l:tb8 22 l:th2
As it stands Black has done pretty much all he can with his available army - with one exception. As can be seen by his last move, White can continue to build up his attack whilst simultaneously defending b2.
22 ... tt'ld7 This is the exception I was talking about. Black could have just stood still
and, with nothing further to be done on the b-file, simply defended. Even back then, before he was a Grandmaster, Demetrios was never going to be one to play like that. Obviously the problem is that whilst the knight is a welcome addition to the attack, it will also be sorely missed as a defender.
23 l:tch1 'ii'c7 24 hxg6 hxg6
Though it would have meant an inferior pawn structure (more pawn islands etc. etc.) Black may have preferred to have recaptured with the f-pawn. With h7 no longer guarded, alas that wasn't an option.
22 6 i.e3 e5 7 d5
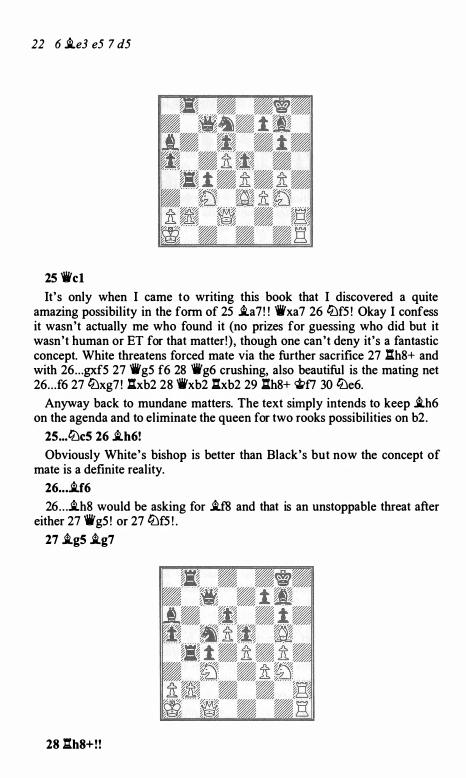
25 'ii'cl It's only when I came to writing this book that I discovered a quite
amazing possibility in the form of 25 i.a7 ! ! 'it'xa7 26 ltJf5 ! Okay I confess it wasn't actually me who found it (no prizes for guessing who did but it wasn't human or ET for that matter!) , though one can't deny it's a fantastic concept. White threatens forced mate via the further sacrifice 27 :lh8+ and with 26 . . . gxf5 27 'ii'g5 f6 28 'it'g6 crushing, also beautiful is the mating net 26 . . . f6 27 ltJxg7 ! .l:txb2 28 'ii'xb2 .l:txb2 29 :lh8+ cj;f7 30 ltJe6.
Anyway back to mundane matters. The text simply intends to keep i.h6 on the agenda and to eliminate the queen for two rooks possibilities on b2.
2S ... ltJcS 26 i.h6!
Obviously White's bishop is better than Black's but now the concept of mate is a definite reality.
26 .•• i.f6
26 . . . i.h8 would be asking for i.f8 and that is an unstoppable threat after either 27 'i'g5 ! or 27 ltJf5 ! .
27 i.gS i.g7
28:1h8+! !
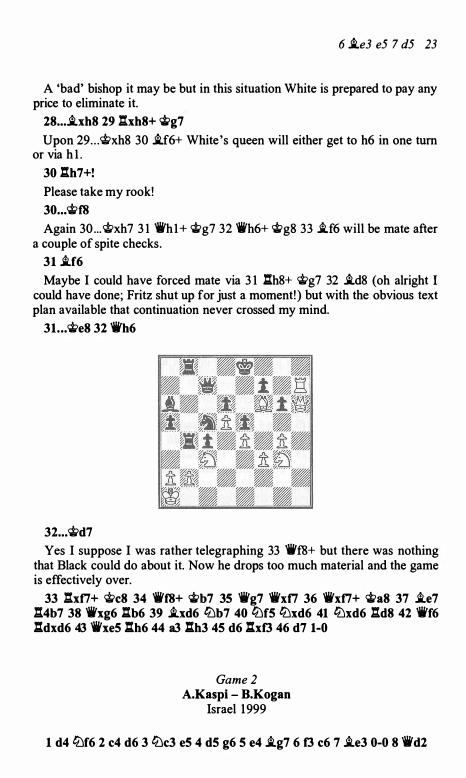
6 i.e3 e5 7 d5 23
A 'bad' bishop it may be but in this situation White is prepared to pay any price to eliminate it.
28 ... i.xh8 29 l:txh8+ �g7
Upon 29 . . . 'it>xh8 30 i.f6+ White 's queen will either get to h6 in one turn or via h l .
30 :h7+!
Please take my rook! 30 ... 'it>f8
Again 30 ... 'it>xh7 3 1 'ii'h1 + Wg7 32 'ii'h6+ Wg8 33 i.f6 will be mate after a couple of spite checks.
31 i.f6
Maybe I could have forced mate via 3 1 l:th8+ Wg7 32 i.d8 (oh alright I could have done; Fritz shut up for just a moment! ) but with the obvious text plan available that continuation never crossed my mind.
31. ..'it>e8 32 'ii'h6
32 ... 'it>d7
Yes I suppose I was rather telegraphing 33 'iff8+ but there was nothing that Black could do about it. Now he drops too much material and the game is effectively over.
33 l:txti+ Wc8 34 'ii'f8+ �b7 35 'ii'g7 'ii'xti 36 'ii'xti+ 'iii>a8 37 i.e7 l:t4b7 38 'ii'xg6 :b6 39 i.xd6 lt::lb7 40 ltlf5 lt::lxd6 41 lt::lxd6 l:td8 42 'ii'f6 l:tdxd6 43 'ii'xe5 l:th6 44 a3 l:th3 45 d6 l:txf3 46 d7 1-0
Game 2 A.Kaspi - B.Kogan
Israel 1999
1 d4ltlf6 2 c4 d6 3 ltlc3 e5 4 d5 g6 5 e4 i.g7 6 f3 c6 7 i.e3 0-0 8 'ili'd2
24 6 .ie3 e5 7 d5
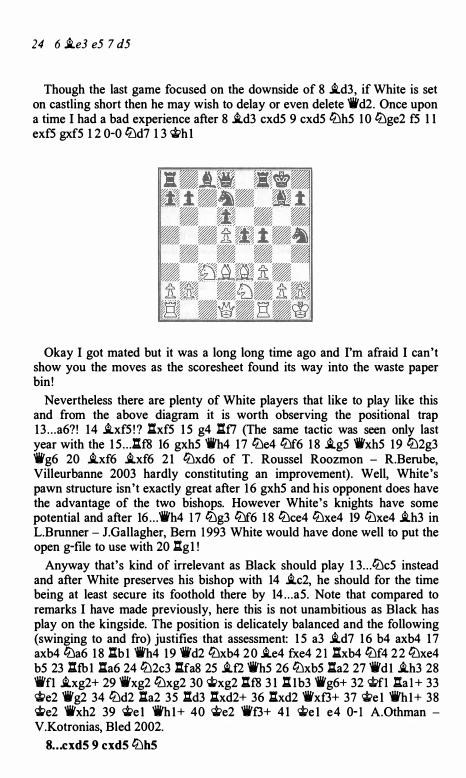
Though the last game focused on the downside of 8 .id3, if White is set on castling short then he may wish to delay or even delete 'ifd2. Once upon a time I had a bad experience after 8 .id3 cxd5 9 cxd5 lLlh5 I 0 l2Jge2 f5 I I exf5 gxf5 I 2 0-0 l2Jd7 1 3 �hi
Okay I got mated but it was a long long time ago and I'm afraid I can't show you the moves as the scoresheet found its way into the waste paper bin!
Nevertheless there are plenty of White players that like to play like this and from the above diagram it is worth observing the positional trap I3 . . . a6? ! I4 .ixf5 ! ? l:txf5 I 5 g4 l::t£7 (The same tactic was seen only last year with the I 5 . . . l:.f8 I6 gxh5 'ii'h4 I7lLle4lLlf6 I 8 .ig5 'ii'xh5 I9lLl2g3 'ii'g6 20 .ixf6 .ixf6 2 I l2Jxd6 of T. Roussel Roozmon - R.Berube, Villeurbanne 2003 hardly constituting an improvement). Well, White's pawn structure isn't exactly great after 16 gxh5 and his opponent does have the advantage of the two bishops. However White's knights have some potential and after I6 . . . 'ii'h4 I 7 l2Jg3 lLlf6 I 8 lLlce4 lLlxe4 I9 lLlxe4 .ih3 in L.Brunner - J.Gallagher, Bern I 993 White would have done well to put the open g-file to use with 20 l:tg1 !
Anyway that's kind of irrelevant as Black should play I 3 . . . l2Jc5 instead and after White preserves his bishop with 14 .ic2, he should for the time being at least secure its foothold there by I4 . . . a5. Note that compared to remarks I have made previously, here this is not unambitious as Black has play on the kingside. The position is delicately balanced and the following (swinging to and fro) justifies that assessment: I 5 a3 .id7 I 6 b4 axb4 I 7 axb4 l2Ja6 I 8 l:tb I 'i'h4 I9 'i'd2 lLlxb4 2 0 .ie4 fxe4 2 I l:txb4 lLlf4 2 2 lLlxe4 b5 23 .l:Ubi l:ta6 24lLl2c3 l:tfa8 25 .i£2 'i'h5 26lLlxb5 l:ta2 27 'ii'di .ih3 28 'i'fl .ixg2+ 29 'i'xg2lLlxg2 30 �xg2 :f8 3 I .l:. Ib3 'ii'g6+ 32 'it>fl l:tal+ 33 <itr'e2 'ii'g2 34 lLld2 .l:.a2 35 l:td3 l:txd2+ 36 l:.xd2 'ii'xf3+ 37 'iti>ei 'ii'hi + 38 <itr'e2 'ii'xh2 39 �ei 'iihi + 40 �e2 'ii'f3+ 4 I �ei e4 0- I A.Othman -V.Kotronias, Bled 2002.
8 . . . cxd5 9 cxd5 lLlh5
6 .i.e3 e5 7 d5 2 5
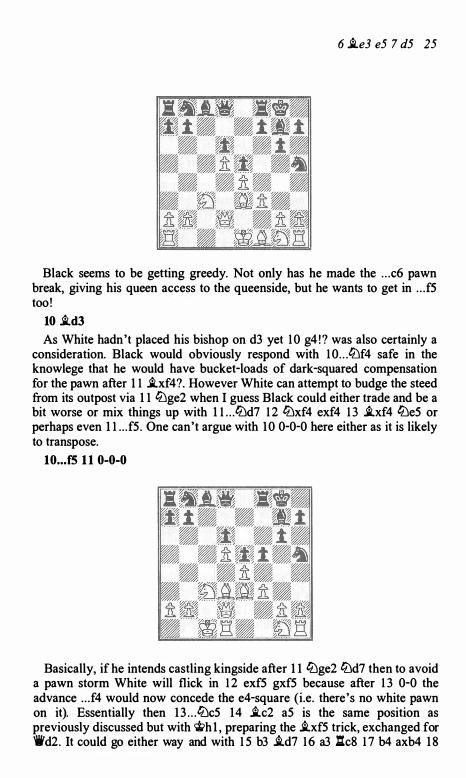
Black seems to be getting greedy. Not only has he made the . . . c6 pawn break, giving his queen access to the queenside, but he wants to get in . . . f5 too !
10 .i.d3 As White hadn't placed his bishop on d3 yet 1 0 g4 ! ? was also certainly a
consideration. Black would obviously respond with 1 0 . . . lt:\f4 safe in the knowlege that he would have bucket-loads of dark-squared compensation for the pawn after 1 1 .i.xf4?. However White can attempt to budge the steed from its outpost via 1 1 lt:\ge2 when I guess Black could either trade and be a bit worse or mix things up with 1 1 . . .lt:ld7 1 2 lt:lxf4 exf4 1 3 .i.xf4 lt:\e5 or perhaps even 1l . . .f5 . One can't argue with 1 0 0-0-0 here either as it is likely to transpose.
10 ... f5 1 1 0-0-0
Basically, if he intends castling kingside after 1 1lt:\ge2 lt:ld7 then to avoid a pawn storm White will flick in 1 2 exf5 gxf5 because after 1 3 0-0 the advance . . . f4 would now concede the e4-square (i.e. there's no white pawn on it). Essentially then 1 3 . . . lt:\c5 14 .i.c2 a5 is the same position as previously discussed but with <li>h1 , preparing the ..ixf5 trick, exchanged for 'iVd2. It could go either way and with 1 5 b3 ..id7 1 6 a3 l:tc8 1 7 b4 axb4 1 8
26 6 i.e3 e5 7 d5
axb4 lC!a6 19 l:tabl 'ii'e8 20 i.h6 'ii'g6 2 1 i.xg7 'iixg7 22 lC!a4 i.b5 23 l:tfdl i.xe2 24 'iixe2 lDf4 25 'ii'd2 b5 26 lC!b2 lC!xb4 27 g3 lC!a2 28 <ili>hl lDg6 29 l:tgl lC!c3 30 :al e4 3 1 f4 �h8 32 i.b3 l:tfe8 33 :gel e3 34 'iig2 'ii'd4 35 i.c2 lC!e7 36 i.d3 l:ta8 37 l:tacl l:ta2 38 g4 lC!cxd5 0- 1 M.Dlugy Z.Almasi, New York 1 993 that was Black's !
My advice to White is to stay away from that sort of thing. l l ... lDf6 First of all the reader needs to understand how poor positionally 1 1 . . . f4
would be here. With a black pawn on f4 White wouldn't be able to launch any sort of attack against the enemy king but the option of queenside play is still very much alive (observe how Black has effectively carried out White's c4-c5xd6 c-file-opening plan for him!) . On the other hand, Black can have no serious aspirations on the kingside as he is not only saddled with the duff KI bishop but also his knight on h5 is well out of play. However White must bear in mind the dangers of embarking on queenside action without first resolving the situation in the centre. Nevertheless even though the tension still remains there, just as in the main game he has the chance to go for g2-g4. Take a look at the following: ll. . .a6 12 lC!ge2 b5 13 exf5 gxf5 14 g4 ! fxg4 1 5 fxg4 i.xg4 16 :hg l i.xe2 17 'iixe2 lDf4 1 8 i.xf4 l:txf4 19 i.xh7+ �h8 20 i.c2 'ii'f6 2 1 l:tg6 'iih4 22 l:tdgl l:ta7 23 l:t6g5 'iib6 24 <ili>b 1 l:th4 25 'iif2 l:te7 26 'iif8+ 1 -0 Lu Zhaoya - R.Khusnutdinov, Oropesa del Mar 1999.
12 h3
Ideally Black would like to trade pawns on e4 in a situation where White is ultimately forced to recapture with his f-pawn. That would of course deny the first player access to that square for a knight and keep his bishop away from g6 and h7. Furthermore Black may have . . . lC!g4 in the air and could make something of the open f-file. However, even after the text that is not a threat as White has two minor pieces supporting e4. Upon reflection perhaps the rarely seen l l . . .lC!a6 ! ? is Black's best as it maintains more flexibility. Nevertheless I still prefer White.
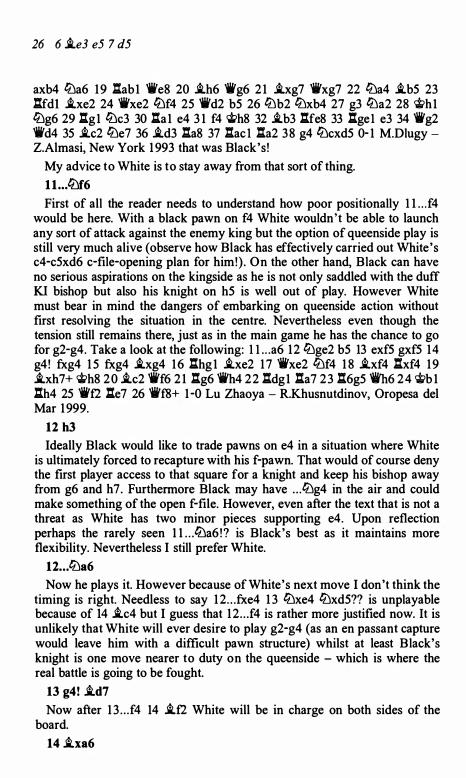
12 ... lC!a6 Now he plays it. However because of White's next move I don't think the
timing is right. Needless to say 1 2 . . . fxe4 1 3 lC!xe4 lC!xd5?? is unplayable because of 14 i.c4 but I guess that 1 2 . . . f4 is rather more justified now. It is unlikely that White will ever desire to play g2-g4 (as an en passant capture would leave him with a difficult pawn structure) whilst at least Black's knight is one move nearer to duty on the queenside - which is where the real battle is going to be fought.
13 g4! i.d7 Now after 1 3 . . . f4 14 i.f2 White will be in charge on both sides of the
board. 14 i.xa6
6 i.e3 e5 7 d5 2 7
The advantage for Black in having the knight on a6 i s that it can hassle White's light-squared bishop on both c5 and b4. This might become apparent after say 14 gxf5 gxf5 1 5 lt)ge2 lt)b4 1 6 il.b 1 l:tc8 1 7 a3 a5 ! ?
14 ... bxa6 15 gxf5 gxf5 16lt)ge2
White's plan now is simply to hold his centre together whilst trying to make inroads along the g-file.
16 •.. 'ii'e8 17 .:dg1 'ii'h5 18 f4!?
This pawn was attacked and although opening up the game typically favours bishops, the white knights are looking for a way in too.
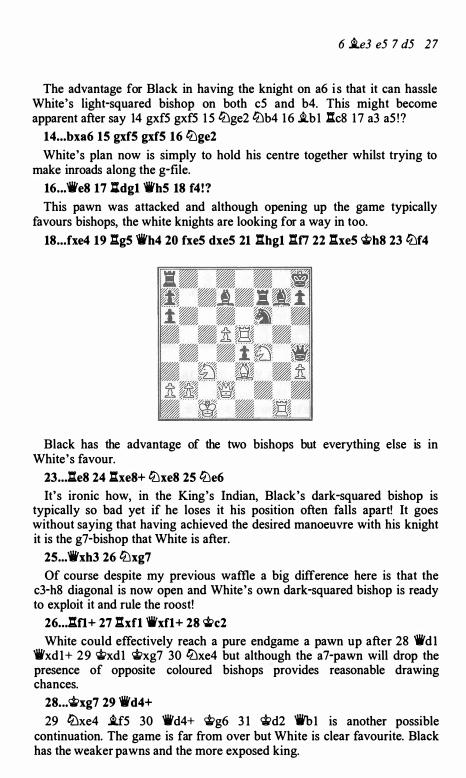
18 ... fxe4 19 l:tg5 'ii'h4 20 fxe5 dxe5 21 l:thg1 l:tti 22 l:txe5 �h8 23lt)f4
Black has the advantage of the two bishops but everything else is in White's favour.
23 ... l:te8 24 l:txe8+ lt)xe8 25 lt)e6
It's ironic how, in the King's Indian, Black's dark-squared bishop is typically so bad yet if he loses it his position often falls apart! It goes without saying that having achieved the desired manoeuvre with his knight it is the g7-bishop that White is after.
25 ..• 'ii'xh3 26lt)xg7
Of course despite my previous waffie a big difference here is that the c3-h8 diagonal is now open and White's own dark-squared bishop is ready to exploit it and rule the roost!
26 ... l:tfl + 27 l:txfl 'iVxfl + 28 �c2
White could effectively reach a pure endgame a pawn up after 28 'ii'd 1 'ii'xd1+ 29 �xd1 �xg7 30 lt)xe4 but although the a7-pawn will drop the presence of opposite coloured bishops provides reasonable drawing chances.
28 •.• �xg7 29 'ii'd4+
29 lt)xe4 i.f5 30 'ii'd4+ �g6 3 1 'ili>d2 'iVb 1 is another possible continuation. The game is far from over but White is clear favourite. Black has the weaker pawns and the more exposed king.
28 6 .i.e3 e5 7 d5
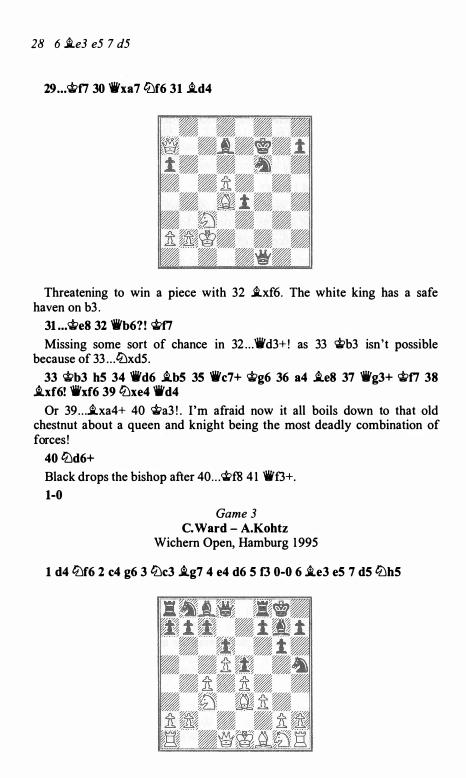
29 ... 'ifi>ti 30 'ii'xa7 tt:lf6 31 .i.d4
Threatening to win a piece with 32 .i.xf6. The white king has a safe haven on b3 .
31 ... 'ifi>e8 32 'ii'b6? ! 'iti>ti
Missing some sort of chance in 32 . . . 'ii'd3+ ! as 33 'iti>b3 isn't possible because of 33 . . . tt:lxd5.
33 'iti>b3 h5 34 'ii'd6 .i.b5 35 'ii'c7+ 'iti>g6 36 a4 .i.e8 37 'ii'g3+ 'iti>ti 38 .i.xf6! 'iVxf6 39 tt:lxe4 'iVd4
Or 39 . . . .i.xa4+ 40 <li>a3 ! . I'm afraid now it all boils down to that old chestnut about a queen and knight being the most deadly combination of forces !
40 tt:ld6+
Black drops the bishop after 40 . . . c;fo>f8 4 1 'iV£3+. 1-0
Game 3 C. Ward - A.Kohtz
Wichem Open, Hamburg 1 995
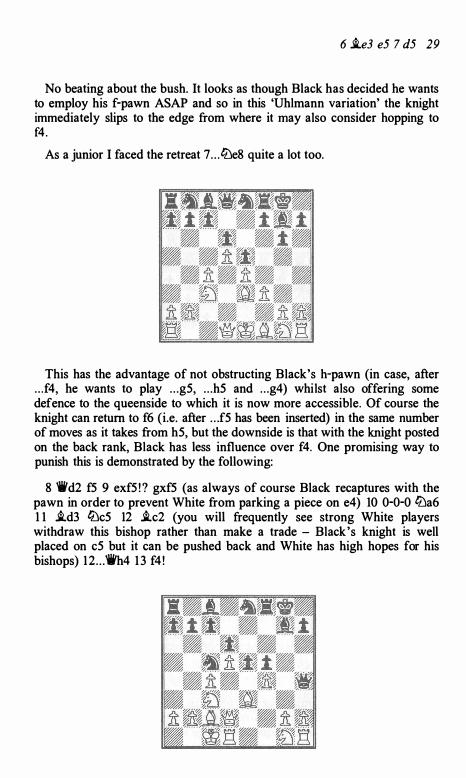
1 d4 tt:lf6 2 c4 g6 3 tt:lc3 .i.g7 4 e4 d6 5 f3 0-0 6 i.e3 e5 7 d5 tt:lh5
6 ii.e3 e5 7 d5 29
No beating about the bush. It looks as though Black has decided he wants to employ his f-pawn ASAP and so in this 'Uhlmann variation' the knight immediately slips to the edge from where it may also consider hopping to f4 .
As a junior I faced the retreat 7 . . . liJe8 quite a lot too.
This has the advantage of not obstructing Black's h-pawn (in case, after . . . f4, he wants to play . . . g5, . . . h5 and . . . g4) whilst also offering some defence to the queenside to which it is now more accessible. Of course the knight can return to f6 (i.e. after . . . f5 has been inserted) in the same number of moves as it takes from h5, but the downside is that with the knight posted on the back rank, Black has less influence over f4. One promising way to punish this is demonstrated by the following:
8 'ifd2 f5 9 exf5 ! ? gxf5 (as always of course Black recaptures with the pawn in order to prevent White from parking a piece on e4) 10 0-0-0 liJa6 1 1 ..id3 ltJc5 12 ..ic2 (you will frequently see strong White players withdraw this bishop rather than make a trade - Black's knight is well placed on c5 but it can be pushed back and White has high hopes for his bishops) 1 2 . . . 'ifh4 1 3 f4 !
30 6 i.e3 e5 7 d5
This otherwise thematic push would not be possible with a black knight on h5 . The standard idea is that Black doesn't want a supported passed pawn on e4 in the middlegame as it takes that square away from a piece. Black wouldn't have access to the e5-square whilst d4 will be very useful to White who in the long run could also strive for the undermining advance g2-g4. From here 1 3 . . . lLle4 14lLlxe4 fxe4 1 5lLle2 i.g4 16 fxe5 i.xe5 17 h3 i.xe2 1 8 'ii'xe2lLlg7 19 "iig4 "iixg4 20 hxg4 i.f4 2 1 �d2 .l:.f6 22 i.xe4 h6 23 l:ldfl .l:.af8 24 .l:.f3 i.xe3+ 25 �xe3 .l:.8f7 26 .l:.fu3 h5 1 -0 was the instructive encounter J. Timman - J.Diez del Corral, Luzem 1982.
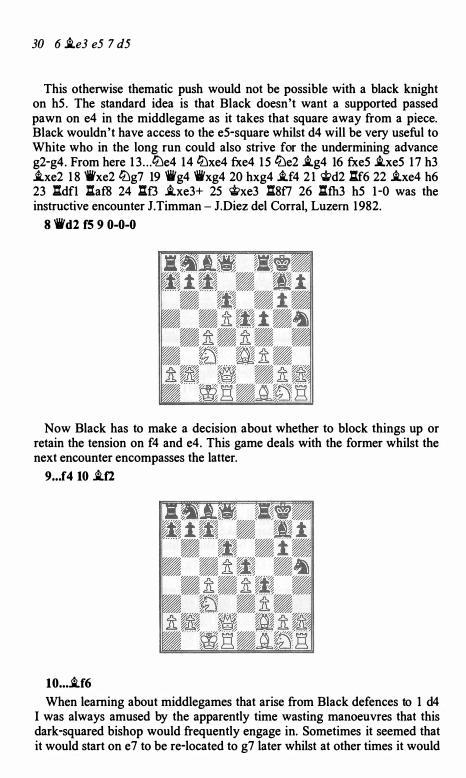
s 'ii'd2 rs 9 o-o-o
Now Black has to make a decision about whether to block things up or retain the tension on f4 and e4. This game deals with the former whilst the next encounter encompasses the latter.
9 ... f4 10 i.f2
10 • • • i.f6
When learning about middlegames that arise from Black defences to 1 d4 I was always amused by the apparently time wasting manoeuvres that this dark-squared bishop would frequently engage in. Sometimes it seemed that it would start on e7 to be re-located to g7 later whilst at other times it would
6 i.e3 e5 7 d5 3 1
begin life fianchettoed only for its owner to try and switch i t to e7 further down the line. It is the latter that appears to be the case here as on e7 it can hope to help hinder White's c4-c5 advance. Moreover Black now has the positional threat of swapping off this bishop via . . . i.h4 and White really needs to do something about that if he wants to maintain his advantage.
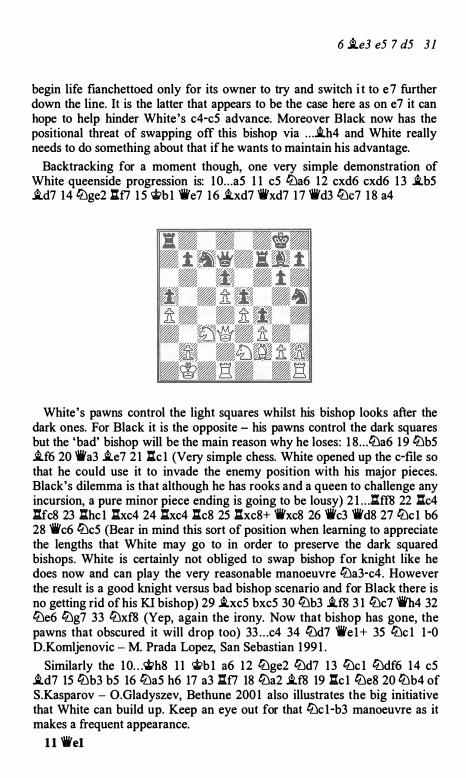
Backtracking for a moment though, one very simple demonstration of White queenside progression is: 1 0 . . . a5 1 1 c5 lt:Ja6 12 cxd6 cxd6 1 3 i.b5 i.d7 14 lt:Jge2 l:.f7 1 5 �b 1 'ike7 16 i.xd7 'ikxd7 1 7 'ikd3 lt:Jc7 1 8 a4
White's pawns control the light squares whilst his bishop looks after the dark ones. For Black it is the opposite - his pawns control the dark squares but the 'bad' bishop will be the main reason why he loses: 1 8 . . . lt:Ja6 19 lt:Jb5 i.f6 20 1i'a3 i.e7 2 1 l:.c 1 (Very simple chess. White opened up the c-file so that he could use it to invade the enemy position with his major pieces. Black's dilemma is that although he has rooks and a queen to challenge any incursion, a pure minor piece ending is going to be lousy) 2 1 . . .l::ff8 22 l:tc4 l:.fc8 23 l:thc 1 l:txc4 24 l:txc4 l:tc8 25 l:txc8+ 'ikxc8 26 1i'c3 'ikd8 27 lt:Jc 1 b6 28 'ikc6 lt:Jc5 (Bear in mind this sort of position when learning to appreciate the lengths that White may go to in order to preserve the dark squared bishops. White is certainly not obliged to swap bishop for knight like he does now and can play the very reasonable manoeuvre lt:Ja3-c4. However the result is a good knight versus bad bishop scenario and for Black there is no getting rid of his K.I bishop) 29 i.xc5 bxc5 30 lt:Jb3 i.f8 3 1 lt:Jc7 'ikh4 32 lt:Je6 lt:Jg7 33 lt:Jxf8 (Yep, again the irony. Now that bishop has gone, the pawns that obscured it will drop too) 33 . . . c4 34 lt:Jd7 'ike1+ 35 lt:Jc 1 1 -0 D.Komljenovic - M. Prada Lopez, San Sebastian 199 1 .
Similarly the 10 . . . <it>h8 1 1 �b 1 a6 1 2 lt:Jge2 lt:Jd7 1 3 lt:Jc 1 lt:Jdf6 14 c5 i.d7 15 lt:Jb3 b5 16 lt:Ja5 h6 17 a3 l::f7 18 lt:Ja2 i.f8 19 l:.c 1 lt:Je8 20 lt:Jb4 of S.Kasparov - O.Gladyszev, Bethune 200 1 also illustrates the big initiative that White can build up. Keep an eye out for that lt:Jc 1-b3 manoeuvre as it makes a frequent appearance.
1 1 'ikel
32 6 i.e3 e5 7 d5
This looks like an odd retreat but as I mentioned before White is really obliged to do something about Black's idea to trade the dark-squared bishop. The main alternative is 1 1 tbge2 i.h4 12 i.gl. Obviously it is annoying for White to have to block in his rook but after initiating a queenside pawn push he can bring it out later anyway. If allowed, White will play next c4-c5 with a typical continuation being 12 . . . tbd7 1 3 'it>b 1 a5. White will eventually create an open line or two on the queenside e.g. 14 tbb5 b6 15 tbec3 l:tf7 16 i.d3 tL!df6 17 a3 l:tg7 18 b4 axb4 19 axb4. In Y.Razuvaev - F.Bellia, Rome 1989 White did soon acquiesce to a trade of bishops via i.f2 but rather than detrimentally opening up his own king (a rare occurrence when Black doesn't have the space to transfer his pieces from one side of the board to the other), White was able to put the a-file to good use.
l l . . . i.e7 1l. . .tbd7, hindering c4-c5, could transpose but after 1l . . .a6 it seems as
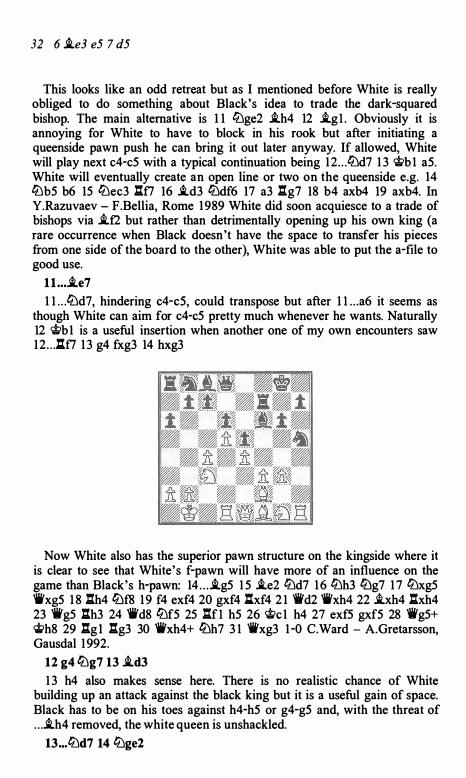
though White can aim for c4-c5 pretty much whenever he wants. Naturally 12 'it>b1 is a useful insertion when another one of my own encounters saw 12 . . . l1f7 1 3 g4 fxg3 14 hxg3
Now White also has the superior pawn structure on the kingside where it is clear to see that White's f-pawn will have more of an influence on the game than Black's h-pawn: 14 . . . i.g5 1 5 i.e2 tbd7 1 6 tbh3 tbg7 1 7 tbxg5 �xg5 1 8 l:th4 tbf8 19 f4 exf4 20 gxf4 l:hf4 2 1 'ili'd2 �xh4 22 i.xh4 l:txh4 23 'ili'g5 .:r.h3 24 �d8 tbf5 25 l:tfl h5 26 'it>c1 h4 27 exf5 gxf5 28 'ili'g5+ �h8 29 .l:.g 1 l:lg3 30 'ifxh4+ lDh7 3 1 'ili'xg3 1 -0 C.Ward - A.Gretarsson, Gausdal 1992.
12 g4 tbg7 13 i.d3
1 3 h4 also makes sense here. There is no realistic chance of White building up an attack against the black king but it is a useful gain of space. Black has to be on his toes against h4-h5 or g4-g5 and, with the threat of . . . i.h4 removed, the white queen is unshackled.
13 ... tbd7 14 tbge2
6 i..e3 e5 7 d5 33
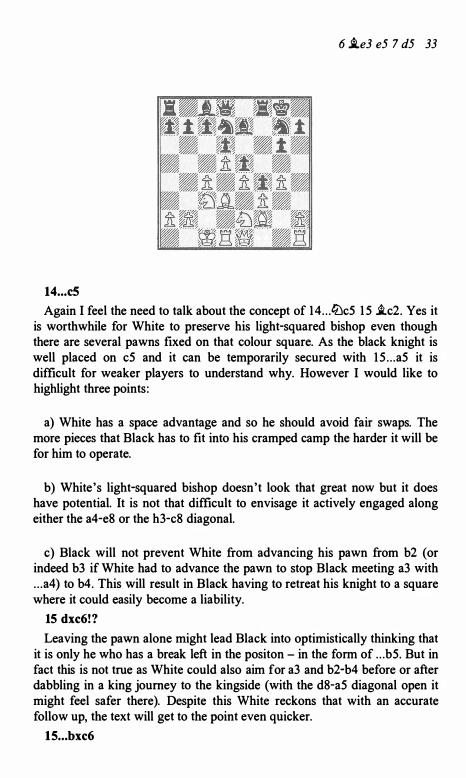
14 . . . c5
Again I feel the need to talk about the concept of 14 . . . lbc5 1 5 .i.c2. Yes it is worthwhile for White to preserve his light-squared bishop even though there are several pawns fixed on that colour square. As the black knight is well placed on c5 and it can be temporarily secured with 1 5 . . . a5 it is difficult for weaker players to understand why. However I would like to highlight three points :
a) White has a space advantage and so he should avoid fair swaps. The more pieces that Black has to fit into his cramped camp the harder it will be for him to operate.
b) White's light-squared bishop doesn't look that great now but it does have potential. It is not that difficult to envisage it actively engaged along either the a4-e8 or the h3-c8 diagonal.
c) Black will not prevent White from advancing his pawn from b2 (or indeed b3 if White had to advance the pawn to stop Black meeting a3 with . . . a4) to b4. This will result in Black having to retreat his knight to a square where it could easily become a liability.
15 dxc6!?
Leaving the pawn alone might lead Black into optimistically thinking that it is only he who has a break left in the positon - in the form of . . . b5. But in fact this is not true as White could also aim for a3 and b2-b4 before or after dabbling in a king journey to the kingside (with the d8-a5 diagonal open it might feel safer there). Despite this White reckons that with an accurate follow up, the text will get to the point even quicker.
15 . . . bxc6
34 6 �e3 e5 7 d5
16 cS!
The only move. Black would soon be better if he was allowed to play . . . c5 himself, with an obvious . . . tDe6-d4 manoeuvre suggesting itself.
16 ... dxc5
After 16 . . . tDxc5?? 1 7 �xc5 dxc5 1 8 �c4+ White would stand positionally better and, as White is about to net a queen, tactically better too!
17 �c4+ �h8 18 tDa4
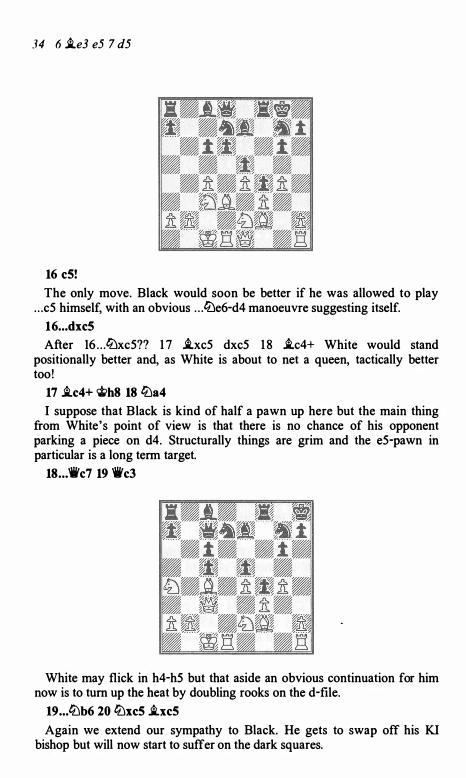
I suppose that Black is kind of half a pawn up here but the main thing from White's point of view is that there is no chance of his opponent parking a piece on d4. Structurally things are grim and the e5-pawn in particular is a long term target.
18 ... 'ii'c7 19 'ii'c3
White may flick in h4-h5 but that aside an obvious continuation for him now is to turn up the heat by doubling rooks on the d-file.
19 ... tDb6 20 tDxcS �xcS
Again we extend our sympathy to Black. He gets to swap off his KI bishop but will now start to suffer on the dark squares.
6 i.e3 e5 7 d5 35
21 i.xc5 �a4 22 �4 �xc5 23 'ii'xc5 �e6 24 i.xe6 i.xe6 25 :d6!
Invading the dark squares where some of the pawns lie! White's last move cuts off the black queen and a vital centre pawn is doomed.
25 ... i..xa2 26 'ii'xe5+ 'ii'g7
There is no choice as 26 . . . 'itg8? 27 :xg6+ drops the queen. 27 'ii'xg7+ �xg7 28 l:thd1 i.c4 29 l:td7+ 'itg8 30 �c3
Black has a bishop for a knight but all the other features in the position, including domination of the d-file, favour White.
30 ... a5 31 l:tc7 l:tac8 32 l:ta7 l:tfd8 33 l:txa5 l:txdl+ 34 �xd1
34 'itxd1 may have let in the enemy rook via 34 . . . l:td8+ but I guess that White is winning either way.
34 •.. i.e2 35 l:ta3 .l:.d8 36 �f2 'itg7 37 h4 l:td7 38 l:tc3 h6 39 �c2 c5 40 �h3 c4 41 �xf4 i.dl+ 42 'itcl i.b3 43 �d5 l:ta7 44 l:te3 �fi 45 �d2 .l:.al 46 .l:.e1 l:ta7 47 g5 hxg5 48 hxg5 .l:.a8 49 �c3 :th8 50 f4 'it>e6 51 l:tal l:th3+ 52 'it>b4 l:th2 53 l:ta6+ 'it>f7 54 f5 gxf5 55 exf5 c3 56 g6+ 'itf8 57 .l:.a8+ 'it>g7 58 .l:.a7+ 'ith8 59 �xb3 cxb2 60 �a2 1-0
Game 4 P.Haba - J.Pachow
Berlin 1 996
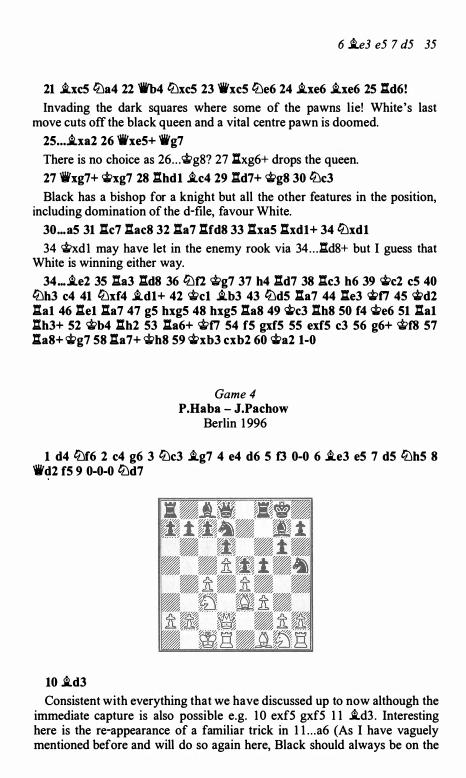
1 d4 �f6 2 c4 g6 3 �c3 i.g7 4 e4 d6 5 t3 0-0 6 i.e3 e5 7 d5 �h5 8 'ii'd2 f5 9 0-0-0 �d7
10 i.d3
Consistent with everything that we have discussed up to now although the immediate capture is also possible e.g. 1 0 exf5 gxf5 1 1 i.d3 . Interesting here is the re-appearance of a familiar trick in 1 l. . .a6 (As I have vaguely mentioned before and will do so again here, Black should always be on the
3 6 6 ..lle3 e5 7 d5
look out for the sequence 1 l . . .e4 12 fxe4 f4 which at the cost of a pawn takes away the e4-square from a white piece whilst providing Black with the e5-square for his knight and simultaneously activating his KI bishop. However after 1 3 ..ll£2 I wouldn't have thought that Black had enough as the h5-knight is too poorly placed) 1 2 ..llxf5 . This is not as powerful here as in the past since after 12 . . . .f:.xf5 13 g4 as well as simply just retreating the rook, Black has the option of 1 3 . . . .l:r.f4 ! ? 14 gxh5 .l:.xc4 when 1 5 b3 is fairly unclear. Black has the two bishops and the more solid pawn structure but White has the half-open g-file and some useful squares available to his pieces (particularly of course e4 for a knight) .
Another idea for White is to delay the deployment of the bishop in favour of 10 .!Dge2. It may seem odd to commit this knight (as later it may prefer the h3 square) to a square where it obstructs the light-squared bishop but I suppose the important thing is that White is still ready to recapture on e4 with a knight. A different concept then is 10 . . . .!Ddf6 1 1 exf5 gxf5 1 2 �b 1 'ii'e8 1 3 .!Dg3 which after 1 3 . . . .!Dxg3 (Not great from a structural point of view but the alternative 1 3 . . . f4 14 .!Dxh5 'ii'xh5 1 5 ..ll£2 would leave White favourite to control the e4-square) 14 hxg3 which after 14 . . . 'ii'g6 1 5 ..lld3 ..lld7 16 ..llg5 e4 17 ..llc2 .l:.ae8 led to a fairly random encounter in A.Zakharchenko - D.Shkuran, Kiev 2002.
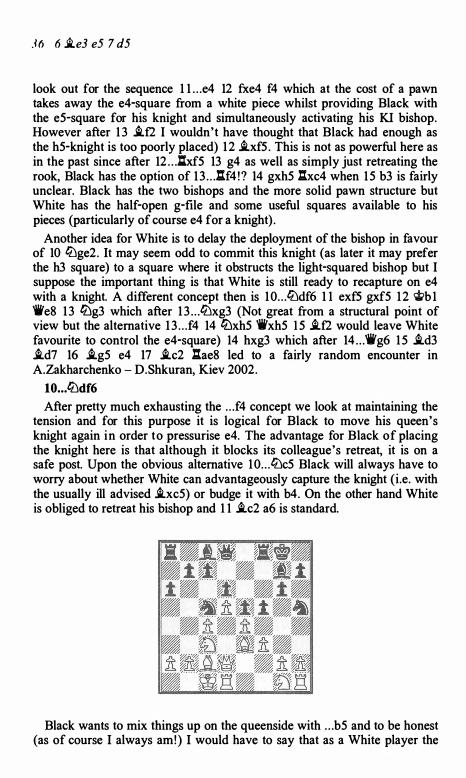
10 . . . .!Ddf6 After pretty much exhausting the . . . f4 concept we look at maintaining the
tension and for this purpose it is logical for Black to move his queen's knight again in order to pressurise e4. The advantage for Black of placing the knight here is that although it blocks its colleague's retreat, it is on a safe post. Upon the obvious alternative 10 . . . .!Dc5 Black will always have to worry about whether White can advantageously capture the knight (i.e. with the usually ill advised ..llxc5) or budge it with b4. On the other hand White is obliged to retreat his bishop and 1 1 ..llc2 a6 is standard.
Black wants to mix things up on the queenside with . . . b5 and to be honest (as of course I always am! ) I would have to say that as a White player the
6 i..e3 e5 7 d5 3 7
following type of variations are those that used to worry me the most, despite the generally favourable assessments given by theory:
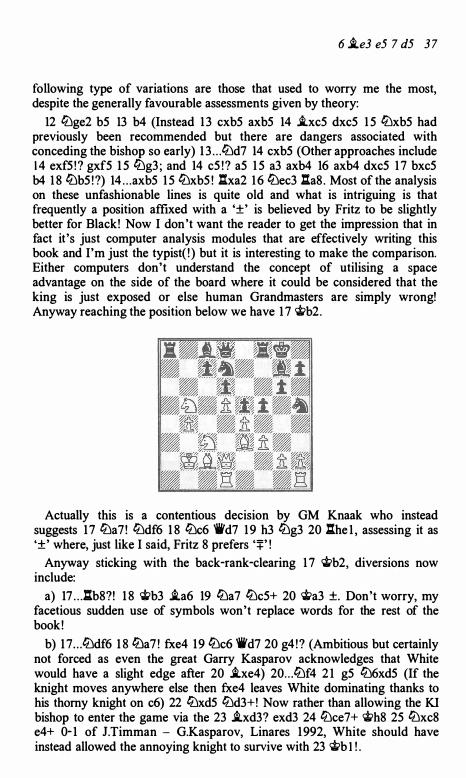
12 ti:)ge2 b5 13 b4 (Instead 1 3 cxb5 axb5 14 .txc5 dxc5 1 5 ti:)xb5 had previously been recommended but there are dangers associated with conceding the bishop so early) 1 3 . . . ti:)d7 14 cxb5 (Other approaches include 1 4 exf5 ! ? gxf5 1 5 ti:)g3 ; and 14 c5 ! ? a5 1 5 a3 axb4 16 axb4 dxc5 1 7 bxc5 b4 1 8 ti:)b5 ! ?) 14 . . . axb5 1 5 ti:)xb5 ! l:txa2 1 6 ti:)ec3 l:ta8 . Most of the analysis on these unfashionable lines is quite old and what is intriguing is that frequently a position affixed with a '±' is believed by Fritz to be slightly better for Black! Now I don't want the reader to get the impression that in fact it 's just computer analysis modules that are effectively writing this book and I'm just the typist( ! ) but it is interesting to make the comparison. Either computers don't understand the concept of utilising a space advantage on the side of the board where it could be considered that the king is just exposed or else human Grandmasters are simply wrong! Anyway reaching the position below we have 1 7 �b2 .
Actually this is a contentious decision by GM Knaak who instead suggests 17 ti:)a7 ! ti:)df6 1 8 ti:)c6 'ii'd7 1 9 h3 ti:)g3 20 l:the 1 , assessing it as '±' where, just like I said, Fritz 8 prefers '+' !
Anyway sticking with the back-rank-clearing 1 7 �b2, diversions now include:
a) 17 . . . .l:r.b8?! 1 8 �b3 i..a6 19 ti:)a7 ti:)c5+ 20 �a3 ±. Don't worry, my facetious sudden use of symbols won't replace words for the rest of the book!
b) 1 7 . . . ti:)df6 1 8 ti:)a7 ! fxe4 19 ti:)c6 'ii'd7 20 g4 ! ? (Ambitious but certainly not forced as even the great Garry Kasparov acknowledges that White would have a slight edge after 20 i..xe4) 20 . . . ti:)f4 2 1 g5 ti:)6xd5 (If the knight moves anywhere else then fxe4 leaves White dominating thanks to his thorny knight on c6) 22 ti:)xd5 ti:)d3+! Now rather than allowing the Kl bishop to enter the game via the 23 i..xd3? exd3 24 ti:)ce7+ �h8 25 ti:)xc8 e4+ 0- 1 of J.Timman - G.Kasparov, Linares 1992, White should have instead allowed the annoying knight to survive with 23 �b I ! .
/8 fl .id d 7 d5
c) l 7 . . . fxe4 1 8 fxe4 lbdf6 19 h3 l:lb8 20 'ito>b3 lbg3 2 1 lba7 when 2 l . . .lbxh1 22 lbc6 1i'e8 23 lbxb8 lbg3 24 lbc6 il.d7 25 b5 lLlfh5 26 i.d3 lbf4 27 i.c4 h5 28 .:.a1 rJi>h7 29 .l:f.a7 'ii'c8 30 h4 g5 3 1 hxg5 i.e8 32 Jl.f2 h4 33 i.xg3 hxg3 34 lbe7 ._,d8 35 lbf5 i.g6 36 �xg3 .l:tt7 37 �f5 Jl.xf5 38 exf5 'ii'xg5 39 b6 ._,d8 40 1i'a2 'ii'b8 4 1 1i'a6 e4 42 �b5 'ir'd8 43 bxc7 l:lxc7 44 .:xc7 ._,f6 45 1i'xd6 1 -0 R.Kasimdzhanov - D.Poldauf, Germany 1999 obviously saw things go according to plan for the new (well one of them at least! ) world champion but after 2 1 . . .c5 ! ?, one possible improvement, I'm not entirely convinced.
Not a million miles from these lines is the earlier deviation 1 2 b4 �d7 1 3 'itb 1 b5 14 cxb5 axb5 1 5 lLlxb5 �b6 16 'ii'c3 l:lt7 17 �e2 �f6 1 8 h3 il.a6 19 a4 fxe4 20 fxe4 �xe4 2 1 il.xe4 �xa4 22 'ii'c6 'ii'b8 23 �ec3 �xc3+ 24 �xc3 1i'xb4+ 25 'itc2 i.b7 26 .l:tb 1 1i'xb l+ 27 l:lxb 1 i.xc6 28 dxc6 'iti>f8 29 i.d5 l::te7 30 i.g5 :leeS 1 -0 K.Movsziszian - J. Lopez Perez, Villa de Albox 2002.
Again to my eyes far from 1 00% convincing but though, as you may have gathered, I'm still a little wary of the above lines, there is clearly one conclusion to be made. Results seem to indicate that it is easy to over-estimate the attacking chances that Black may have against the deceptively exposed White king and to under-estimate the danger to Black of White infiltrating with his pieces through the queenside.
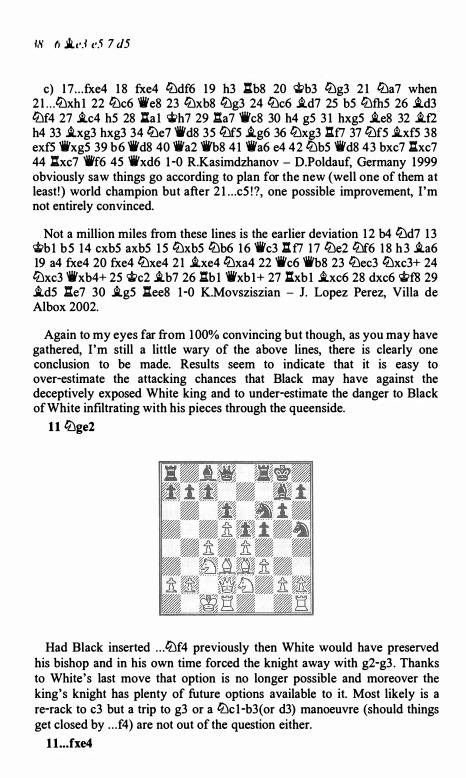
1 1 �ge2
Had Black inserted . . . �f4 previously then White would have preserved his bishop and in his own time forced the knight away with g2-g3 . Thanks to White's last move that option is no longer possible and moreover the king's knight has plenty of future options available to it. Most likely is a
re-rack to c3 but a trip to g3 or a �c1-b3(or d3) manoeuvre (should things get closed by . . . f4) are not out of the question either.
l l . . . fxe4
6 i.e3 e5 7 d5 3 9
This seems to play into White's hands a little but what else is Black to do? White's plan is to force the e4/f5 issue by preparing the challenging advance g2-g4.
Observe 1 l . . .�h8 12 �b1 ( 1 2 i.g5 'iie8 1 3 exf5 gxf5 14 'iic2 'iig6 1 5 h4 with g2-g4 next up as in P.Bazant - R.Biolek, Olomouc 1995 is not ridiculous either) 1 2 . . . i.d7 1 3 h3 f4 14 i.f2 l:tf7 1 5 c5 i.f8 16 cxd6 cxd6 1 7 i.b5 i.e7 1 8 lbc 1 'iib8 1 9 lbb3 . Seen in W.Browne - W.Uhlmann, Manila 1 976, White's space advantage on the queenside, twinned with the fact that he can swap off his own 'bad' bishop, means he has the edge although as a defensive resource Black can finally try to activate his bishop via a . . . i.d8-b6 manoeuvre.
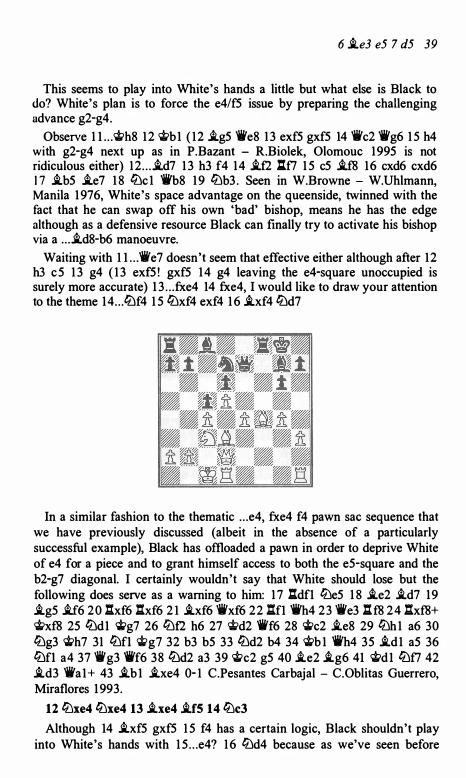
Waiting with 1 l . . .'iVe7 doesn't seem that effective either although after 12 h3 c5 1 3 g4 ( 1 3 exf5 ! gxf5 14 g4 leaving the e4-square unoccupied is surely more accurate) 1 3 . . . fxe4 14 fxe4, I would like to draw your attention to the theme 14 . . . lbf4 1 5 lbxf4 exf4 1 6 i.xf4 lbd7
In a similar fashion to the thematic . . . e4, fxe4 f4 pawn sac sequence that we have previously discussed (albeit in the absence of a particularly successful example), Black has offioaded a pawn in order to deprive White of e4 for a piece and to grant himself access to both the e5-square and the b2-g7 diagonal. I certainly wouldn't say that White should lose but the following does serve as a warning to him: 1 7 .l:.dfl lbe5 1 8 i.e2 i.d7 19 i.g5 i.f6 20 l:txf6 l:txf6 2 1 i.xf6 'iVxf6 22 l:tfl 'ii'h4 23 'iVe3 l:tf8 24 l:txf8+ �xf8 25 lbd1 1;g7 26 lbt2 h6 27 �d2 'iVf6 28 "'c2 i.e8 29 lbh1 a6 30 lbg3 �h7 31 lbfl �g7 32 b3 b5 33 lbd2 b4 34 �b 1 'i'h4 35 i.d1 a5 36 lbfl a4 37 'iVg3 'i'f6 38 lbd2 a3 39 �c2 g5 40 i.e2 i.g6 41 �d1 lbf7 42 i.d3 'iia 1+ 43 i.b 1 i.xe4 0- 1 C.Pesantes Carbajal - C.Oblitas Guerrero, Miraflores 1 993.
12 lbxe4 lbxe4 13 i.xe4 i.fS 14 lbc3
Although 14 i.xf5 gxf5 1 5 f4 has a certain logic, Black shouldn't play into White's hands with 1 5 . . . e4? 1 6 lbd4 because as we've seen before
411 () .td !'5 7 d5
White can use this square whereas e5 isn't available to Black. Also White could aim to get in the undermining g2-g4 so Black should instead retain the tension, with 1 5 . . . ltJf6 a very reasonable alternative.
14 ... tbf6 15 ..tg5
As you will see, this simple approach is very appealing.
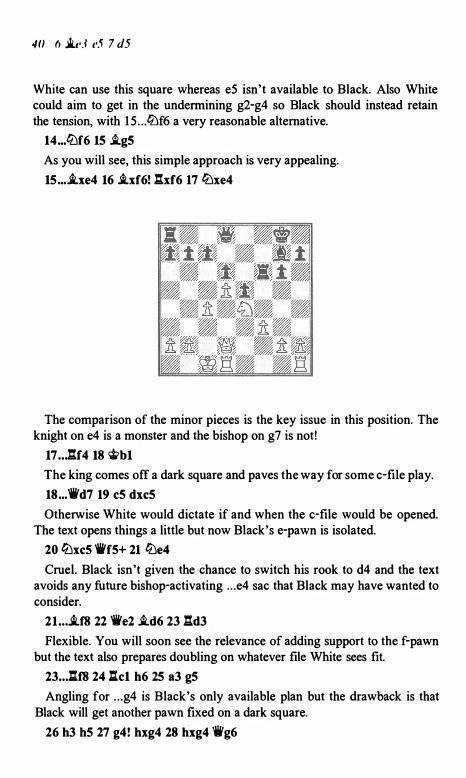
15 ... JLxe4 16 iLxf6! l:txf6 17 ltJxe4
The comparison of the minor pieces is the key issue in this position. The knight on e4 is a monster and the bishop on g7 is not!
17 ... l:tf4 18 �b1
The king comes off a dark square and paves the way for some c-file play.
18 ... 'ii'd7 19 c5 dxc5
Otherwise White would dictate if and when the c-file would be opened. The text opens things a little but now Black's e-pawn is isolated.
20 ltJxc5 'iff5+ 21 ltJe4
Cruel. Black isn't given the chance to switch his rook to d4 and the text avoids any future bishop-activating . . . e4 sac that Black may have wanted to consider.
21 . .. .tf8 22 'ii'e2 .i.d6 23 .l:1d3
Flexible. You will soon see the relevance of adding support to the f-pawn but the text also prepares doubling on whatever file White sees fit.
23 ... l:tf8 24 l:tc1 h6 25 a3 g5
Angling for . . . g4 is Black's only available plan but the drawback is that Black will get another pawn fixed on a dark square.
26 h3 h5 27 g4! hxg4 28 hxg4 tii'g6
6 i.e3 e5 7 d5 41
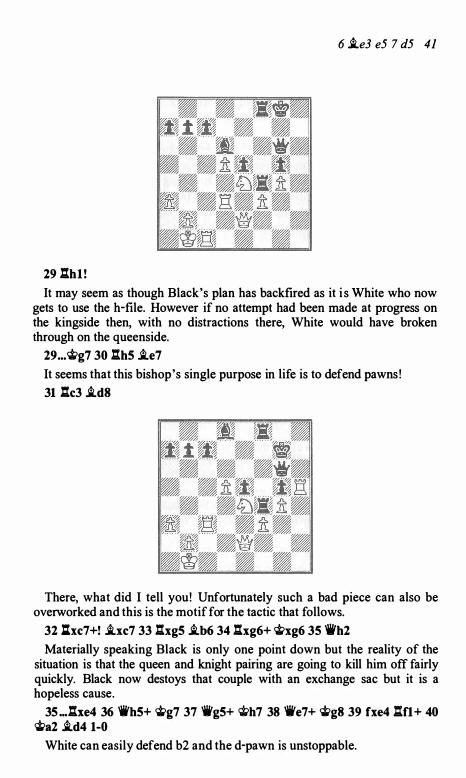
29 :h1 !
It may seem as though Black's plan has backfired as it i s White who now gets to use the h-file. However if no attempt had been made at progress on the kingside then, with no distractions there, White would have broken through on the queenside.
29 ... �g7 30 :hs i.e7
It seems that this bishop's single purpose in life is to defend pawns ! 31 :c3 i.d8
There, what did I tell you! Unfortunately such a bad piece can also be overworked and this is the motif for the tactic that follows.
32 l:hc7+! i.xc7 33 :xgS i.b6 34 :xg6+ �xg6 35 ,.h2
Materially speaking Black is only one point down but the reality of the situation is that the queen and knight pairing are going to kill him off fairly quickly. Black now destoys that couple with an exchange sac but it is a hopeless cause.
35 ... :xe4 36 'ii'hS+ �g7 37 'ii'gS+ Wh7 38 'ii'e7+ �g8 39 fxe4 :n + 40 �a2 i.d4 1-0
White can easily defend b2 and the d-pawn is unstoppable.
Game 5 M.Herbold - J.Mudrak
Litomysl, 2003
1 c4 li:lf6 2 li:lc3 g6 3 d4 .i.g7 4 e4 d6 5 f3 0-0 6 .i.e3 eS 7 dS li:lhS
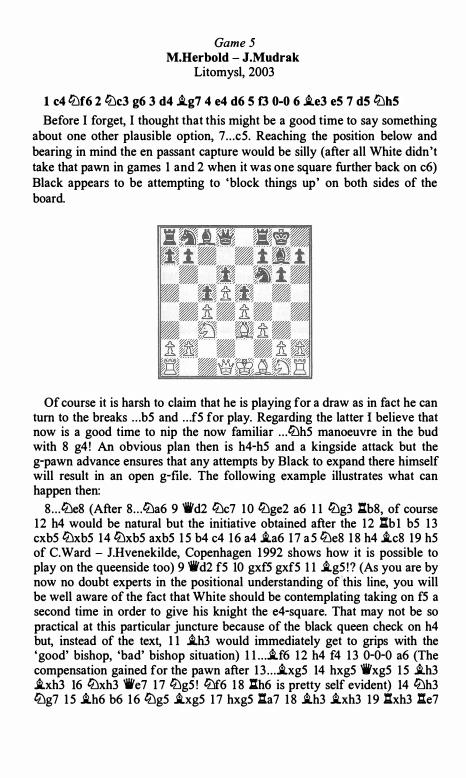
Before I forget, I thought that this might be a good time to say something about one other plausible option, 7 . . . c5. Reaching the position below and bearing in mind the en passant capture would be silly (after all White didn't take that pawn in games 1 and 2 when it was one square further back on c6) Black appears to be attempting to 'block things up' on both sides of the board.
Of course it is harsh to claim that he is playing for a draw as in fact he can turn to the breaks . . . b5 and . . . f5 for play. Regarding the latter I believe that now is a good time to nip the now familiar . . . li:lh5 manoeuvre in the bud with 8 g4 ! An obvious plan then is h4-h5 and a kingside attack but the g-pawn advance ensures that any attempts by Black to expand there himself will result in an open g-file. The following example illustrates what can happen then:
8 . . . li:le8 (After 8 . . . li:la6 9 'ii'd2 li:lc7 10 li:lge2 a6 1 1 li:lg3 l:tb8, of course 12 h4 would be natural but the initiative obtained after the 12 l:tb 1 b5 1 3 cxb5 li:lxb5 14 li:lxb5 axb5 1 5 b4 c4 16 a4 .i.a6 1 7 a5 li:le8 1 8 h4 .i.c8 19 h5 of C.Ward - J.Hvenekilde, Copenhagen 1992 shows how it is possible to play on the queenside too) 9 'ii'd2 f5 10 gxf5 gxf5 1 1 .i.g5 ! ? (As you are by now no doubt experts in the positional understanding of this line, you will be well aware of the fact that White should be contemplating taking on f5 a second time in order to give his knight the e4-square. That may not be so practical at this particular juncture because of the black queen check on h4 but, instead of the text, 1 1 .i.h3 would immediately get to grips with the 'good' bishop, 'bad' bishop situation) 1 1 . . ..i.f6 1 2 h4 f4 1 3 0-0-0 a6 (The compensation gained for the pawn after 1 3 . . . .i.xg5 14 hxg5 'ii'xg5 1 5 ..ih3 .i.xh3 16 li:lxh3 'ii'e7 1 7 li:lg5 ! li:lf6 1 8 .:.h6 is pretty self evident) 14 li:lh3 li:lg7 1 5 .i.h6 b6 16 li:lg5 .i.xg5 1 7 hxg5 l:ta7 1 8 .i.h3 .i.xh3 19 l:txh3 l:te7
6 i.e3 e5 7 d5 43
20 g6 l:tb7 2 1 l:tg1 hxg6 22 l:txg6 'ii'e8 23 'ii'g2 l:tf£7 24 l:.xd6 1 -0 A.Peter Z.Ballai, Hungary 200 1 .
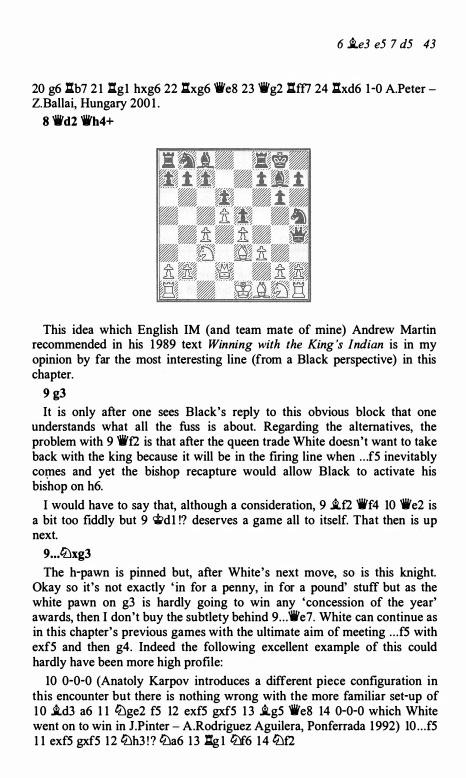
8 'ii' d2 'ii'h4+
This idea which English IM (and team mate of mine) Andrew Martin recommended in his 1 989 text Winning with the King 's Indian is in my opinion by far the most interesting line (from a Black perspective) in this chapter.
9 g3
It is only after one sees Black's reply to this obvious block that one understands what all the fuss is about. Regarding the alternatives, the problem with 9 'ii'f2 is that after the queen trade White doesn't want to take back with the king because it will be in the firing line when . . . f5 inevitably co�es and yet the bishop recapture would allow Black to activate his bishop on h6.
I would have to say that, although a consideration, 9 i.f2 'ii'f4 10 'ii'e2 is a bit too fiddly but 9 'it>d1 !? deserves a game all to itself. That then is up next.
9 ... ltJxg3
The h-pawn is pinned but, after White's next move, so is this knight. Okay so it's not exactly ' in for a penny, in for a pound' stuff but as the white pawn on g3 is hardly going to win any 'concession of the year' awards, then I don't buy the subtlety behind 9 . . . 'ii'e7. White can continue as in this chapter's previous games with the ultimate aim of meeting . . . f5 with exf5 and then g4. Indeed the following excellent example of this could hardly have been more high profile:
10 0-0-0 (Anatoly Karpov introduces a different piece configuration in this encounter but there is nothing wrong with the more familiar set-up of 1 0 i.d3 a6 1 1 ltJge2 f5 12 exf5 gxf5 1 3 i.g5 'ii'e8 14 0-0-0 which White went on to win in J.Pinter - A.Rodriguez Aguilera, Ponferrada 1992) 10 . . . f5 1 1 exf5 gxf5 12 ltJh3 ! ? ltJa6 1 3 l:tg 1 ltJf6 14 ltJt2
44 6 �e3 e5 7 d5
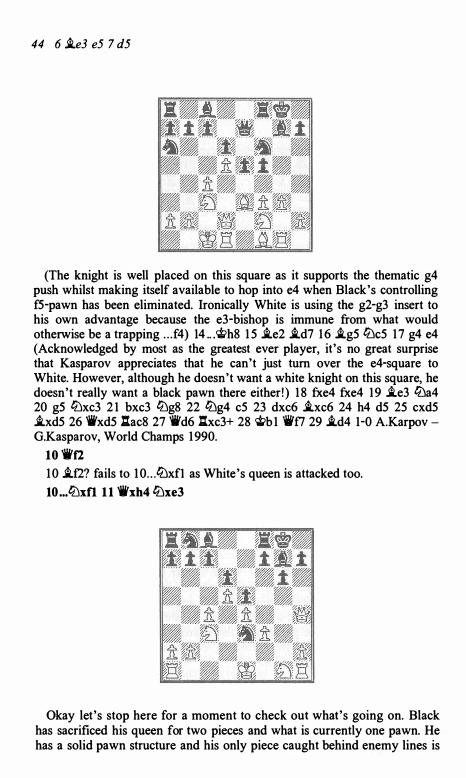
(The knight is well placed on this square as it supports the thematic g4 push whilst making itself available to hop into e4 when Black's controlling f5-pawn has been eliminated. Ironically White is using the g2-g3 insert to his own advantage because the e3-bishop is immune from what would otherwise be a trapping . . . f4) 14 .. .'ifi>h8 1 5 �e2 �d7 1 6 �g5 tZ'lc5 17 g4 e4 (Acknowledged by most as the greatest ever player, it's no great surprise that Kasparov appreciates that he can't just turn over the e4-square to White. However, although he doesn't want a white knight on this square, he doesn't really want a black pawn there either! ) 1 8 fxe4 fxe4 19 �e3 tZ'la4 20 g5 lZ'lxc3 2 1 bxc3 tZ'lg8 22 tZ'lg4 c5 23 dxc6 �xc6 24 h4 d5 25 cxd5 �xd5 26 'iixd5 l:tac8 27 'iid6 llxc3+ 28 �b 1 ikf7 29 �d4 1-0 A.Karpov G.Kasparov, World Champs 1 990.
10 'iif2 10 �fl? fails to 10 . . . lZ'lxfl as White's queen is attacked too. lO ... lZ'lxfl 1 1 'iixh4 tZ'lxe3
Okay let's stop here for a moment to check out what's going on. Black has sacrificed his queen for two pieces and what is currently one pawn. He has a solid pawn structure and his only piece caught behind enemy lines is
6 i.e3 e5 7 d5 45
causing a bit of trouble. Indeed the pawn count is going to rise to two because White must guard against the forks on c2 and g2.
In this line's earlier appearances White tended to play 12 <it'e2 but later it was concluded that the queen doesn't really get going on h4. Rather it was decided that White should seek to advance his h-pawn in order to give his opponent something to think about (i.e. an attack down the h-file !) .
12 'iifl lZ'lxc4 13 'ii'e2
Now for an example that should make White players sit up and take notice of this dangerous variation:
13 lZ'lb5 lZ'la6 14 b3 lZ'lb6 1 5 lZ'le2 i.d7 1 6 lZ'lbc3 f5 1 7 'iie3 c6 1 8 0-0-0 l:tac8 19 'it>b 1 l:tf6 20 h4 lZ'lc5 2 1 h5? ! fxe4 22 fxe4 cxd5 23 exd5 l:tcf8 24 l:tdg1 .:.n 25 'ii'd2 i.f5+ 26 �b2 l:td3 27 'ii'g5 e4 28 hxg6 hxg6 29 l:tg3? lZ'lxd5 30 l:txd3 lZ'lxd3+ 3 1 �a3 lZ'lxc3 32 lZ'lxc3 i..xc3 33 'ii'e7 i..b4+ 34 'it>a4 i.d7+ 0- 1 T.Studnicka - L.Klima, Pilsen-Lobzy 2003 . As soon as Black got in . . . e4 all of his pieces combined well to overpower White. Okay so 2 1 dxc6 looks a lot better but it should be clear that White under-estimates Black's chances at his peril .
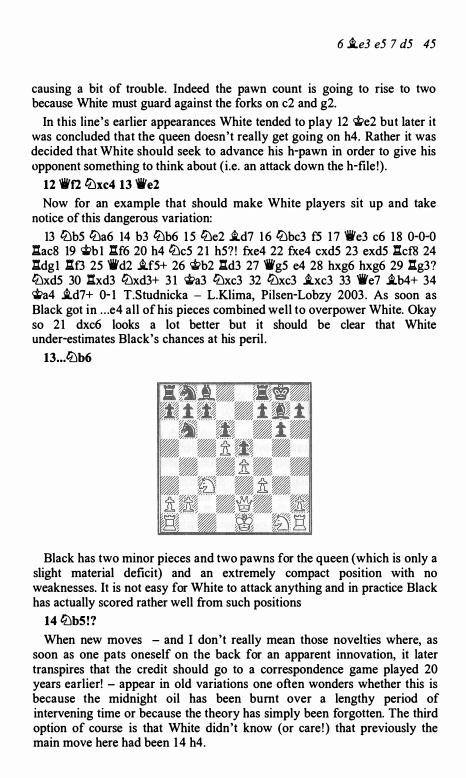
13 ... lZ'lb6
Black has two minor pieces and two pawns for the queen (which is only a slight material deficit) and an extremely compact position with no weaknesses. It is not easy for White to attack anything and in practice Black has actually scored rather well from such positions
14 lZ'lb5!?
When new moves - and I don't really mean those novelties where, as soon as one pats oneself on the back for an apparent innovation, it later transpires that the credit should go to a correspondence game played 20 years earlier! - appear in old variations one often wonders whether this is because the midnight oil has been burnt over a lengthy period of intervening time or because the theory has simply been forgotten. The third option of course is that White didn't know (or care ! ) that previously the main move here had been 14 h4.
46 6 .i.e3 e5 7 d5
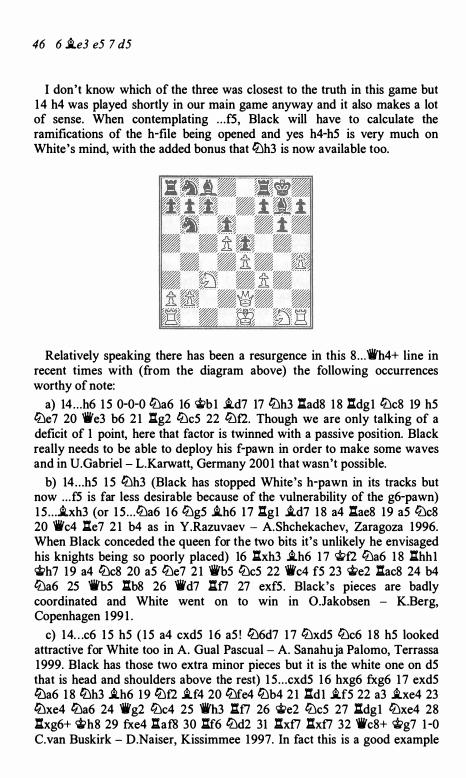
I don't know which of the three was closest to the truth in this game but 14 h4 was played shortly in our main game anyway and it also makes a lot of sense. When contemplating . . . f5, Black will have to calculate the ramifications of the h-file being opened and yes h4-h5 is very much on White's mind, with the added bonus that .!iJh3 is now available too.
Relatively speaking there has been a resurgence in this 8 . . . 'iii'h4+ line in recent times with (from the diagram above) the following occurrences worthy of note:
a) 14 . . . h6 1 5 0-0-0 ltJa6 16 'it>b 1 iLd7 17 ltJh3 l:.ad8 1 8 l:.dg1 ltJc8 19 h5 ltJe7 20 'i'e3 b6 2 1 .l:tg2 ltJc5 22 liJf2. Though we are only talking of a deficit of 1 point, here that factor is twinned with a passive position. Black really needs to be able to deploy his f-pawn in order to make some waves and in U.Gabriel - L.Karwatt, Germany 200 1 that wasn't possible.
b) 14 . . . h5 1 5 .!iJh3 (Black has stopped White's h-pawn in its tracks but now . . . f5 is far less desirable because of the vulnerability of the g6-pawn) 1 5 . . . .i.xh3 (or 1 5 . . . ltJa6 1 6 ltJg5 .i.h6 1 7 .l:tg 1 i.d7 1 8 a4 l:.ae8 19 a5 ltJc8 20 'iVc4 lte7 2 1 b4 as in Y.Razuvaev - A.Shchekachev, Zaragoza 1996. When Black conceded the queen for the two bits it's unlikely he envisaged his knights being so poorly placed) 16 l:.xh3 .i.h6 1 7 '.tif2 ltJa6 1 8 l:.hh 1 <Ji>h7 1 9 a4 ltJc8 20 a5 ltJe7 2 1 "ifb5 ltJc5 22 'it'c4 f5 23 'it>e2 l:.ac8 24 b4 ltJa6 25 'i'b5 l:.b8 26 'it'd7 11£7 27 exf5. Black's pieces are badly coordinated and White went on to win in O.Jakobsen - K.Berg, Copenhagen 1 99 1 .
c) 14 . . . c6 1 5 h5 ( 1 5 a4 cxd5 1 6 a5 ! liJ6d7 1 7 ltJxd5 ltJc6 1 8 h5 looked attractive for White too in A. Gual Pascual - A. Sanahuja Palomo, Terrassa 1999. Black has those two extra minor pieces but it is the white one on d5 that is head and shoulders above the rest) 1 5 . . . cxd5 1 6 hxg6 fxg6 1 7 exd5 ltJa6 1 8 .!iJh3 .i.h6 1 9 .!iJf2 .i.f4 20 liJfe4 .!iJb4 2 1 l:td1 .i.f5 22 a3 .i.xe4 23 ltJxe4 ltJa6 24 'it' g2 ltJc4 25 'iii'h3 l:.£7 26 'it>e2 ltJc5 2 7 ltdg 1 ltJxe4 28 l:.xg6+ '.tih8 29 fxe4 .l:[af8 30 :tf6 liJd2 31 l:tx£7 .l:[x£7 32 'ii'c8+ <JI>g7 1 -0 C.van Buskirk - D.Naiser, Kissimmee 1997. In fact this is a good example
6 .i.e3 e5 7 d5 47
of White still being able to coordinate his forces despite the presence of so many enemy pieces. Black resigned as 33 J:g1+ will force mate.
14 ... .!ba6
'Knights on the rim' may be dim but Black had to defend his c-pawn somehow.
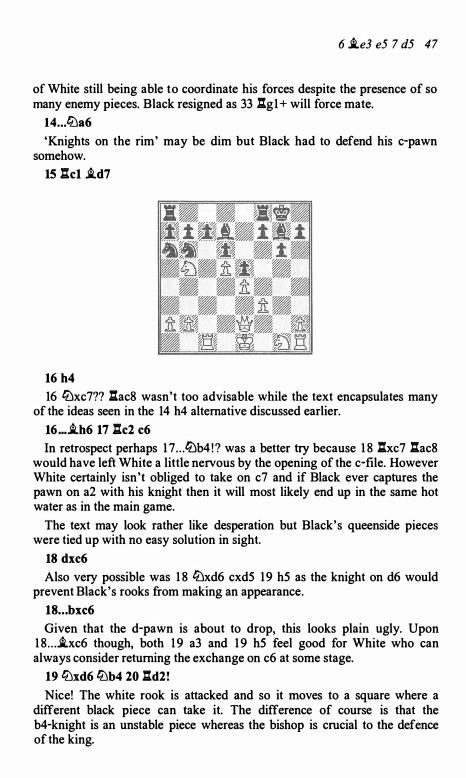
15 J:cl .i.d7
16 h4
16 .!bxc7?? J:ac8 wasn't too advisable while the text encapsulates many of the ideas seen in the 14 h4 alternative discussed earlier.
16 ... .i.h6 17 J:c2 c6
In retrospect perhaps 1 7 . . . .!bb4 ! ? was a better try because 1 8 l:txc 7 l:tac8 would have left White a little nervous by the opening of the c-file. However White certainly isn't obliged to take on c7 and if Black ever captures the pawn on a2 with his knight then it will most likely end up in the same hot water as in the main game.
The text may look rather like desperation but Black's queenside pieces were tied up with no easy solution in sight.
18 dxc6
Also very possible was 1 8 lDxd6 cxd5 1 9 h5 as the knight on d6 would prevent Black's rooks from making an appearance.
18 .. . bxc6
Given that the d-pawn is about to drop, this looks plain ugly. Upon 1 8 . . . .i.xc6 though, both 1 9 a3 and 1 9 h5 feel good for White who can always consider returning the exchange on c6 at some stage.
19 .!bxd6 .!bb4 20 l:td2!
Nice! The white rook is attacked and so it moves to a square where a different black piece can take it. The difference of course is that the b4-knight is an unstable piece whereas the bishop is crucial to the defence of the king.
48 6 J.e3 e5 7 d5
20 ... lt:Jxa2
Regarding the last note, 20 . . . J.xd2+ 21 'ii'xd2 a5 22 a3 lt:Ja6 23 h5 with 'ii'h6 in mind looks pretty crushing.
21 h5 'itg7
Black must do something about his bishop but again 2 1 . . .lt:Jcl 22 'ii'd1 J.xd2+ 23 'ii'xd2 lt:Jb3 24 'ii'h6 shows how Black suffers in its absence. 2 1 . . .J.f4 offers the most resistance but it 's not great!
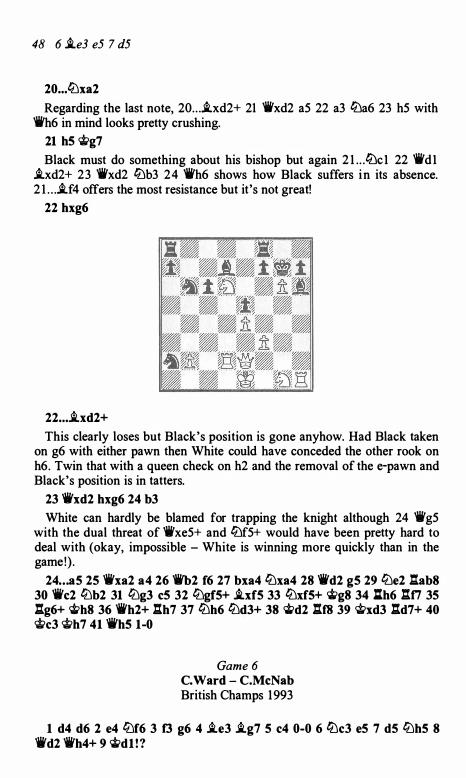
22 hxg6
22 ... J.xd2+
This clearly loses but Black's position is gone anyhow. Had Black taken on g6 with either pawn then White could have conceded the other rook on h6. Twin that with a queen check on h2 and the removal of the e-pawn and Black's position is in tatters.
23 'ii'xd2 hxg6 24 b3
White can hardly be blamed for trapping the knight although 24 'ii'g5 with the dual threat of 'ii'xe5+ and lt:Jf5+ would have been pretty hard to deal with (okay, impossible - White is winning more quickly than in the game!) .
24 . . . a5 25 'ii'xa2 a4 26 'ii'b2 f6 27 bxa4 lt:Jxa4 28 'ii'd2 g5 29 lt:Je2 l:r.ab8 30 'ii'c2 lt:Jb2 31 lt:Jg3 c5 32 lt:Jgf5+ J.xf5 33 lt:Jxf5+ �g8 34 lth6 l:tf7 35 l:tg6+ 'itth8 36 'ii'h2+ l:th7 37 lt:Jh6 lt:Jd3+ 38 �d2 l:tf8 39 'itxd3 l:td7+ 40 'itc3 'ith7 41 'ii'h5 1-0
Game 6 C. Ward - C.McNab British Champs 1993
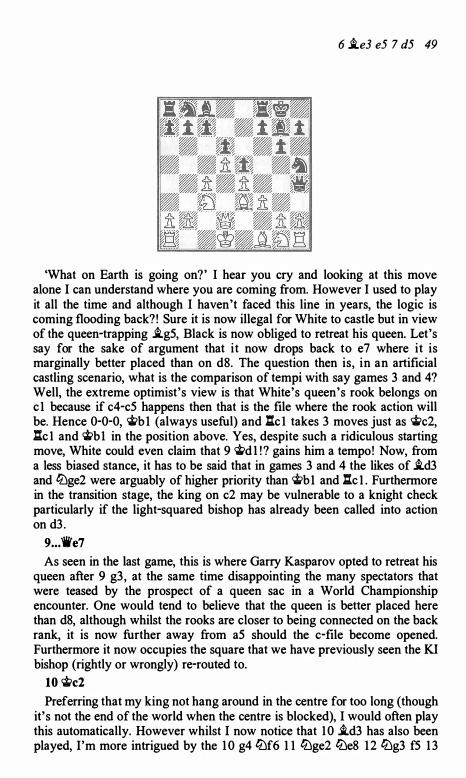
1 d4 d6 2 e4 lt:Jf6 3 f3 g6 4 J.e3 J.g7 5 c4 0-0 6 lt:Jc3 e5 7 d5 lt:Jh5 8 'i'd2 'ii'h4+ 9 �d1 ! ?
6 i.e3 e5 7 d5 49
'What on Earth is going on?' I hear you cry and looking at this move alone I can understand where you are coming from. However I used to play it all the time and although I haven't faced this line in years, the logic is coming flooding back? ! Sure it is now illegal for White to castle but in view of the queen-trapping i.g5, Black is now obliged to retreat his queen. Let's say for the sake of argument that it now drops back to e7 where it is marginally better placed than on d8. The question then is, in an artificial castling scenario, what is the comparison of tempi with say games 3 and 4? Well, the extreme optimist's view is that White's queen's rook belongs on c 1 because if c4-c5 happens then that is the file where the rook action will be. Hence 0-0-0, 'it>b 1 (always useful) and l:.c 1 takes 3 moves just as 'it>c2, l:tc 1 and �b 1 in the position above. Yes, despite such a ridiculous starting move, White could even claim that 9 'it>d 1 ! ? gains him a tempo! Now, from a less biased stance, it has to be said that in games 3 and 4 the likes of i.d3 and tt:'lge2 were arguably of higher priority than 'iii'b1 and l:tc l . Furthermore in the transition stage, the king on c2 may be vulnerable to a knight check particularly if the light-squared bishop has already been called into action on d3 .
9 . . . fke7
As seen in the last game, this is where Garry Kasparov opted to retreat his queen after 9 g3 , at the same time disappointing the many spectators that were teased by the prospect of a queen sac in a World Championship encounter. One would tend to believe that the queen is better placed here than d8, although whilst the rooks are closer to being connected on the back rank, it is now further away from a5 should the c-file become opened. Furthermore it now occupies the square that we have previously seen the KI bishop (rightly or wrongly) re-routed to.
10 'it>c2 Preferring that my king not hang around in the centre for too long (though
it' s not the end of the world when the centre is blocked), I would often play this automatically. However whilst I now notice that 1 0 i.d3 has also been played, I'm more intrigued by the 1 0 g4 tt:'lf6 1 1 tt:'lge2 tt:'le8 1 2 tt:'lg3 f5 1 3
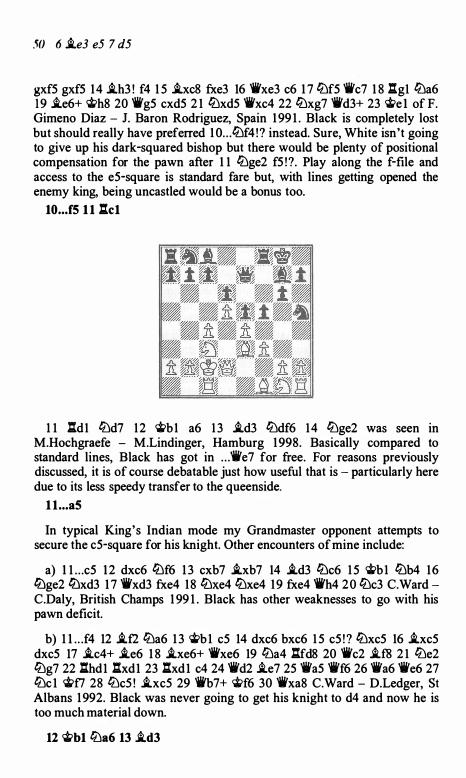
50 6 i.e3 e5 7 d5
gxf5 gxf5 I4 .i.h3 ! f4 I 5 .i.xc8 fxe3 I6 'ii'xe3 c6 I 7 tLlf5 'ii'c7 I 8 l:tgi tLla6 I9 i.e6+ �h8 20 'ii'g5 cxd5 2 I tLlxd5 'ii'xc4 22 tLlxg7 'ii'd3+ 23 �e i of F. Gimeno Diaz - J. Baron Rodriguez, Spain I 99 1 . Black is completely lost but should really have preferred I O . . . tLlf4 ! ? instead. Sure, White isn't going to give up his dark-squared bishop but there would be plenty of positional compensation for the pawn after I I tLlge2 f5 ! ?. Play along the f-file and access to the e5-square is standard fare but, with lines getting opened the enemy king, being uncastled would be a bonus too.
10 • • • f5 1 1 l:lcl
1 1 l:td I tLld7 I2 �b I a6 1 3 .i.d3 tLldf6 14 tLlge2 was seen in M.Hochgraefe - M.Lindinger, Hamburg I998. Basically compared to standard lines, Black has got in . . . 'ii'e7 for free. For reasons previously discussed, it is of course debatable just how useful that is - particularly here due to its less speedy transfer to the queenside.
l l . . . as
In typical King's Indian mode my Grandmaster opponent attempts to secure the c5-square for his knight. Other encounters of mine include:
a) I l . . .c5 I 2 dxc6 tLlf6 1 3 cxb7 .i.xb7 I4 .i.d3 tLlc6 1 5 �b1 tLlb4 I6 tLlge2 tLlxd3 I 7 'ii'xd3 fxe4 I8 tLlxe4 tLlxe4 I9 fxe4 'ii'h4 20 tLlc3 C. Ward -C.Daly, British Champs I 99 1 . Black has other weaknesses to go with his pawn deficit.
b) 1 l . . .f4 12 .i.f2 tLla6 1 3 �b 1 c5 14 dxc6 bxc6 1 5 c5 ! ? tLlxc5 I6 .i.xc5 dxc5 17 .i.c4+ .i.e6 1 8 .i.xe6+ 'ii'xe6 19 tLla4 l:tfd8 20 'ii' c2 .i.f8 2 1 tLle2 tLlg7 22 l:thd1 .l:txd1 23 l:txd1 c4 24 'ii'd2 .i.e7 25 'ii'a5 'ii'f6 26 'ii'a6 'ii'e6 27 tLlc 1 �f7 28 tLlc5 ! .i.xc5 29 'iib7+ 'it>f6 30 'ii'xa8 C.Ward - D.Ledger, St Albans 1992. Black was never going to get his knight to d4 and now he is too much material down.
12 �b1 tLla6 13 .i.d3
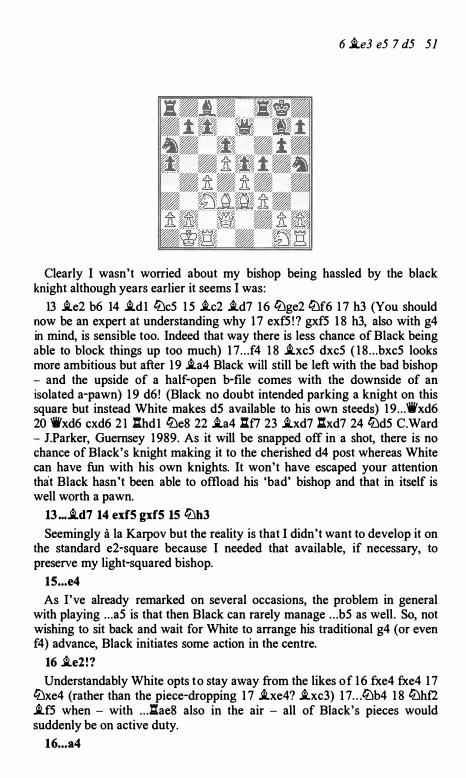
6 .i.e3 e5 7 d5 5 I
Clearly I wasn't worried about my bishop being hassled by the black knight although years earlier it seems I was:
13 i.e2 b6 14 i.d 1 lbc5 1 5 J.c2 J.d7 1 6 lbge2 lLlf6 1 7 h3 (You should now be an expert at understanding why 1 7 exf5 ! ? gxf5 1 8 h3, also with g4 in mind, is sensible too. Indeed that way there is less chance of Black being able to block things up too much) 1 7 . . . f4 1 8 .i.xc5 dxc5 ( 1 8 . . . bxc5 looks more ambitious but after 1 9 J.a4 Black will still be left with the bad bishop - and the upside of a half-open b-file comes with the downside of an isolated a-pawn) 1 9 d6 ! (Black no doubt intended parking a knight on this square but instead White makes d5 available to his own steeds) 1 9 . . . 1i'xd6 20 1i'xd6 cxd6 2 1 l:.hd1 lLle8 22 .i.a4 .l:.f7 23 .i.xd7 .l:.xd7 24 lLld5 C.Ward - J.Parker, Guernsey 1 989. As it will be snapped off in a shot, there is no chance of Black's knight making it to the cherished d4 post whereas White can have fun with his own knights. It won't have escaped your attention that Black hasn't been able to offioad his 'bad' bishop and that in itself is well worth a pawn.
13 ... .i.d7 14 exf5 gxf5 15 lLlh3
Seemingly a la Karpov but the reality is that I didn't want to develop it on the standard e2-square because I needed that available, if necessary, to preserve my light-squared bishop.
15 ... e4
As I've already remarked on several occasions, the problem in general with playing . . . a5 is that then Black can rarely manage . . . b5 as well . So, not wishing to sit back and wait for White to arrange his traditional g4 (or even f4) advance, Black initiates some action in the centre.
16 J.e2 !?
Understandably White opts to stay away from the likes of 1 6 fxe4 fxe4 1 7 lLlxe4 (rather than the piece-dropping 1 7 J.xe4? J.xc3) 1 7 . . . lbb4 1 8 lLlhf2 J.f5 when - with . . . .l:.ae8 also in the air - all of Black's pieces would suddenly be on active duty.
16 . • . a4
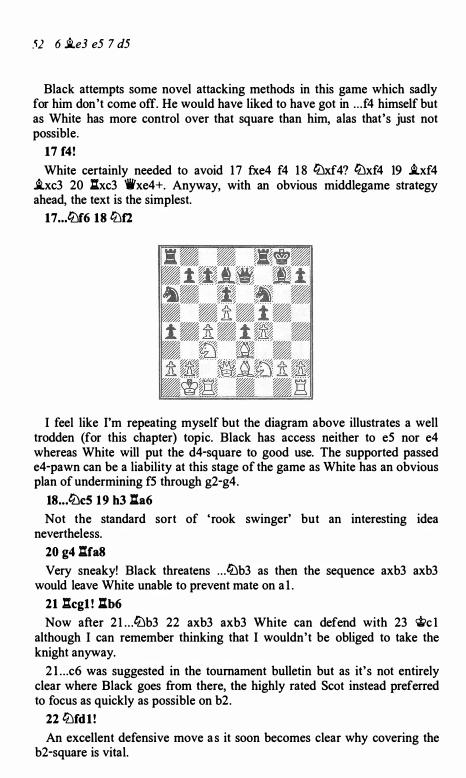
52 6 Ji.e3 e5 7 d5
Black attempts some novel attacking methods in this game which sadly for him don't come off. He would have liked to have got in . . . f4 himself but as White has more control over that square than him, alas that's just not possible.
17 f4!
White certainly needed to avoid 17 fxe4 f4 1 8 tbxf4? tbxf4 19 Ji.xf4 Ji.xc3 20 l:txc3 'ii'xe4+. Anyway, with an obvious middlegame strategy ahead, the text is the simplest.
17 ... ltJf6 18 tiJfl
I feel like I'm repeating myself but the diagram above illustrates a well trodden (for this chapter) topic. Black has access neither to e5 nor e4 whereas White will put the d4-square to good use. The supported passed e4-pawn can be a liability at this stage of the game as White has an obvious plan of undermining f5 through g2-g4.
18 .•. tbc5 19 h3 l:r.a6
Not the standard sort of 'rook swinger' but an interesting idea nevertheless.
20 g4 l:.fa8
Very sneaky! Black threatens . . . tbb3 as then the sequence axb3 axb3 would leave White unable to prevent mate on a l .
21 l:tcg1 ! l:r.b6
Now after 2 l . . .tbb3 22 axb3 axb3 White can defend with 23 �c l although I can remember thinking that I wouldn't be obliged to take the knight anyway.
2 l . . .c6 was suggested in the tournament bulletin but as it's not entirely clear where Black goes from there, the highly rated Scot instead preferred to focus as quickly as possible on b2.
22 tiJfd1 !
An excellent defensive move a s it soon becomes clear why covering the b2-square is vital.

6 i.e3 e5 7 d5 53
22 ... a3 23 b3
23 ... fxg4
Black appears to flounder now but whilst everything was geared toward the knight sac, the fact is that 23 . . . t2Jxb3 24 axb3 .l:.xb3+ (or 24 . . . a2+ 25 t2Jxa2 .l:.xb3+ 26 'it>c 1) 25 c;frla2 was doomed to failure because the d 1 -knight supported its c3 compatriot whilst guarding b2.
24 hxg4 t2Je8 25 �c2
Strictly speaking this isn't necessary but most humans would have been tempted by this reassuring move.
25 .. .'ii'f6 26 g5 "ilf7 27 tiJf2 i.a4
Looking at this we can conclude that any ideas Black had of progress have hit a brick wall. This then is the last roll of the dice.
28 tDxa4 .l:.xa4 29 t2Jg4!
Black may have calculated that White couldn't get away with accepting any of the offerings but unfortunately now his queenside pieces just look silly. Meanwhile White's kingside bits are about to land!
29 . • . l:tab4
30 tiJh6+ i.xh6 31 gxh6+ �fS
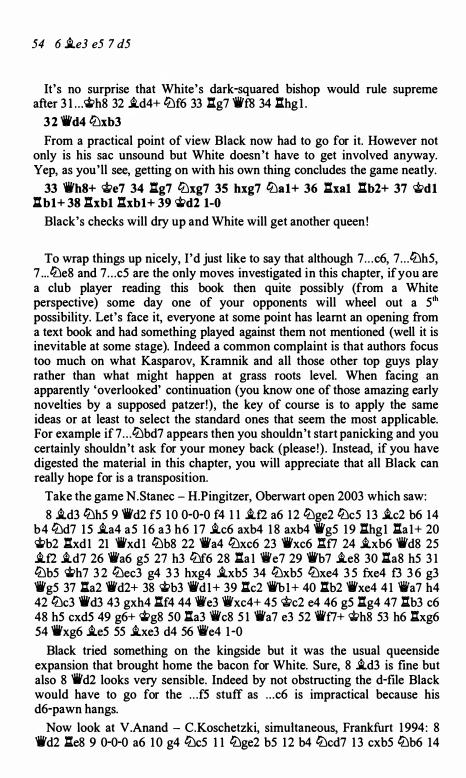
54 6 i.e3 e5 7 d5
It's no surprise that White's dark-squared bishop would rule supreme after 3 l . . .�h8 32 i.d4+ lllf6 33 l:.g7 'ii'f8 34 l:.hg l .
3 2 'ii'd4 tt:lxb3
From a practical point of view Black now had to go for it. However not only is his sac unsound but White doesn't have to get involved anyway. Yep, as you'll see, getting on with his own thing concludes the game neatly.
33 'ii'h8+ <l;e7 34 l:.g7 tt:lxg7 35 hxg7 lllal+ 36 l:.xal l:.b2+ 37 'iii>dl l:r.bl+ 38 l:.xbl l:.xbl+ 39 'it>d2 1-0
Black's checks will dry up and White will get another queen !
To wrap things up nicely, I 'd just like to say that although 7 . . . c6, 7 . . . lllh5, 7 . . . llle8 and 7 . . . c5 are the only moves investigated in this chapter, if you are a club player reading this book then quite possibly (from a White perspective) some day one of your opponents will wheel out a 51h possibility. Let's face it, everyone at some point has learnt an opening from a text book and had something played against them not mentioned (well it is inevitable at some stage). Indeed a common complaint is that authors focus too much on what Kasparov, Kramnik and all those other top guys play rather than what might happen at grass roots level. When facing an apparently 'overlooked' continuation (you know one of those amazing early novelties by a supposed patzer!) , the key of course is to apply the same ideas or at least to select the standard ones that seem the most applicable. For example if 7 . . . tt:lbd7 appears then you shouldn't start panicking and you certainly shouldn't ask for your money back (please !) . Instead, if you have digested the material in this chapter, you will appreciate that all Black can really hope for is a transposition.
Take the game N.Stanec - H.Pingitzer, Oberwart open 2003 which saw: 8 i.d3 lllh5 9 'ii'd2 f5 1 0 0-0-0 f4 1 1 i.f2 a6 12 tt:lge2 lllc5 1 3 i.c2 b6 14
b4 tt:ld7 1 5 i.a4 a5 1 6 a3 h6 1 7 i.c6 axb4 1 8 axb4 'ii'g5 1 9 l:.hgl l:.al+ 20 'it>b2 l:.xdl 21 'ii'xdl tt:lb8 22 'ii'a4 tt:lxc6 23 'ii'xc6 l:r.f7 24 i.xb6 'ii'd8 25 i.f2 i.d7 26 'iia6 g5 27 h3 tt:lf6 28 l:.a 1 'ilie7 29 'ii'b7 i.e8 30 l:.a8 h5 3 1 tt:lb5 �h7 3 2 tt:lec3 g4 3 3 hxg4 i.xb5 34 tt:lxb5 tt:lxe4 3 5 fxe4 f3 3 6 g3 'ii'g5 37 l:.a2 'ii'd2+ 38 'it>b3 'ii'dl+ 39 l:.c2 'ifhl+ 40 l:.b2 'ii'xe4 4 1 'il/a7 h4 42 lllc3 1Wd3 43 gxh4 l:tf4 44 'i!t'e3 'i!t'xc4+ 45 <i;c2 e4 46 g5 l:.g4 47 l:.b3 c6 48 h5 cxd5 49 g6+ �g8 50 l:.a3 'i!t'c8 5 1 'ii'a7 e3 52 'ilif7+ <i;h8 53 h6 l:.xg6 54 1Wxg6 i.e5 55 i.xe3 d4 56 'ilie4 1 -0
Black tried something on the kingside but it was the usual queenside expansion that brought home the bacon for White. Sure, 8 i.d3 is fine but also 8 'ii'd2 looks very sensible. Indeed by not obstructing the d-file Black would have to go for the . . . f5 stuff as . . . c6 is impractical because his d6-pawn hangs.
Now look at V.Anand - C.Koschetzki, simultaneous, Frankfurt 1 994 : 8 'ii'd2 l:te8 9 0-0-0 a6 10 g4 tt:lc5 1 1 tt:lge2 b5 12 b4 tt:lcd7 1 3 cxb5 tt:lb6 14
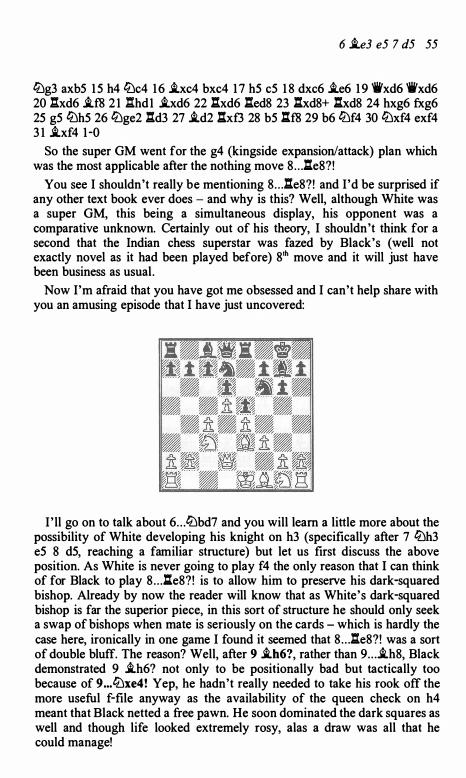
6 i.e3 e5 7 d5 55
tt:lg3 axb5 1 5 h4 tt:lc4 1 6 i.xc4 bxc4 1 7 h5 c5 1 8 dxc6 i.e6 1 9 'ii'xd6 'ii'xd6 20 l:.xd6 i.f8 2 1 l:.hd1 i.xd6 22 l:.xd6 l:.ed8 23 l:txd8+ l:txd8 24 hxg6 fxg6 25 g5 tt:lh5 26 tt:lge2 l:.d3 27 i.d2 l::txf3 28 b5 l:tf8 29 b6 ti:lf4 30 tt:lxf4 exf4 3 1 i.xf4 1 -0
So the super GM went for the g4 (kingside expansion/attack) plan which was the most applicable after the nothing move 8 . . . l:te8?!
You see I shouldn't really be mentioning 8 . . . l:te8?! and I'd be surprised if any other text book ever does - and why is this? Well, although White was a super GM, this being a simultaneous display, his opponent was a comparative unknown. Certainly out of his theory, I shouldn't think for a second that the Indian chess superstar was fazed by Black's (well not exactly novel as it had been played before) 8'h move and it will just have been business as usual.
Now I'm afraid that you have got me obsessed and I can't help share with you an amusing episode that I have just uncovered:
I ' ll go on to talk about 6 . . . tt:lbd7 and you will learn a little more about the possibility of White developing his knight on h3 (specifically after 7 tt:lh3 e5 8 d5, reaching a familiar structure) but let us first discuss the above position. As White is never going to play f4 the only reason that I can think of for Black to play 8 . . . l:te8?! is to allow him to preserve his dark-squared bishop. Already by now the reader will know that as White's dark-squared bishop is far the superior piece, in this sort of structure he should only seek a swap of bishops when mate is seriously on the cards - which is hardly the case here, ironically in one game I found it seemed that 8 . . . l:te8?! was a sort of double bluff. The reason? Well, after 9 i.h6?, rather than 9 . . . i.h8, Black demonstrated 9 i.h6? not only to be positionally bad but tactically too because of 9 ... tt:lxe4! Yep, he hadn't really needed to take his rook off the more useful f-file anyway as the availability of the queen check on h4 meant that Black netted a free pawn. He soon dominated the dark squares as well and though life looked extremely rosy, alas a draw was all that he could manage!

Chapter 3: 6 i..e3 e5 7 l2Jge2
Game 7: A.Karpov - P.Virostko
Internet simul, Cannes 1998
1 d4 tbf6 2 c4 g6 3 tbc3 �g7 4 e4 d6 5 f3 0-0 6 �e3 e5 7 tbge2
Rather than clarifying the situation with the natural advance 7 d5, this chapter deals with the situation where White maintains the tension in the centre.
7 ... tbc6
Of course, just because White has refrained from d4-d5 on one occasion, that doesn't mean he will dismiss it altogether. Indeed White often turns to it under what he considers to be favourable circumstances and the unfashionable text is just one of those occasions.
8 d5
Compared to the games in the last chapter, White has deployed his knight on e2 before the light-squared bishop has had a chance to come out. However the steed's presence on e2 prevents Black's knight from hopping into d4 and so Black's knight is now forced to transfer to an inferior post.
8 ... l2Je7 9 'ii'd2
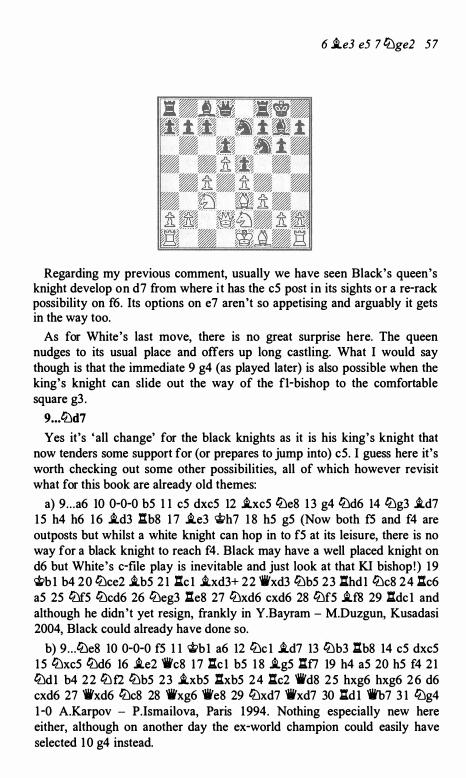
6 i..e3 e5 7 &£Jge2 5 7
Regarding my previous comment, usually we have seen Black's queen's knight develop on d7 from where it has the c5 post in its sights or a re-rack possibility on f6. Its options on e7 aren't so appetising and arguably it gets in the way too.
As for White's last move, there is no great surprise here. The queen nudges to its usual place and offers up long castling. What I would say though is that the immediate 9 g4 (as played later) is also possible when the king's knight can slide out the way of the fl-bishop to the comfortable square g3 .
9 . . . &£Jd7
Yes it's 'all change' for the black knights as it is his king's knight that now tenders some support for (or prepares to jump into) c5. I guess here it's worth checking out some other possibilities, all of which however revisit what for this book are already old themes:
a) 9 . . . a6 10 o-0-0 b5 1 1 c5 dxc5 12 i..xc5 &£Je8 1 3 g4 &£Jd6 14 &£Jg3 i..d7 1 5 h4 h6 1 6 i..d3 l:.b8 1 7 i..e3 �h7 1 8 h5 g5 (Now both f5 and f4 are outposts but whilst a white knight can hop in to f5 at its leisure, there is no way for a black knight to reach f4. Black may have a well placed knight on d6 but White's c-file play is inevitable and just look at that KI bishop ! ) 19 �b l b4 20 &£Jce2 i..b5 2 1 l:tc l i..xd3+ 22 'ii'xd3 &£Jb5 23 l:thdl &£Jc8 24 .:tc6 a5 25 &£Jf5 &£Jcd6 26 &£Jeg3 .:te8 27 &£Jxd6 cxd6 28 &£Jf5 i..f8 29 .:tdc l and although he didn't yet resign, frankly in Y.Bayram - M.Duzgun, Kusadasi 2004, Black could already have done so.
b) 9 . . . &£Je8 10 0-0-0 f5 1 1 �b l a6 12 &£Jc l i..d7 13 &£Jb3 l:.b8 14 c5 dxc5 1 5 &£Jxc5 &£Jd6 16 i..e2 'ii'c8 1 7 l:.c I b5 1 8 i..g5 l:.f7 19 h4 a5 20 h5 f4 2 1 &£Jdl b4 22 &£Jt2 &£Jb5 23 i..xb5 .:txb5 24 l:.c2 'ii'd8 25 hxg6 hxg6 26 d6 cxd6 27 'ii'xd6 &£Jc8 28 'ii'xg6 'ii'e8 29 &£Jxd7 'ifxd7 30 l:.d l 'ii'b7 3 1 &£Jg4 1 -0 A.Karpov - P.lsmailova, Paris 1 994. Nothing especially new here either, although on another day the ex-world champion could easily have selected 1 0 g4 instead.
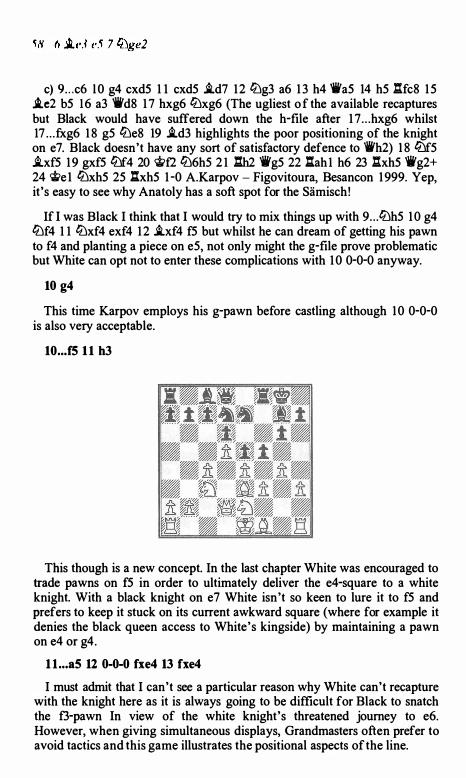
c) 9 . . . c6 l O g4 cxd5 1 1 cxd5 ..td7 12 ltJg3 a6 1 3 h4 'ii'a5 14 h5 .:lfc8 1 5 ..te2 b5 16 a3 'ii'd8 1 7 hxg6 ltJxg6 (The ugliest o f the available recaptures but Black would have suffered down the h-file after 1 7 . . . hxg6 whilst 17 . . . fxg6 1 8 g5 ltJe8 19 ..td3 highlights the poor positioning of the knight on e7. Black doesn't have any sort of satisfactory defence to ir'h2) 1 8 liJf5 ..txf5 1 9 gxf5 ltJf4 20 ..t.>f2 ltJ6h5 2 1 .:lh2 'iig5 22 l:tah1 h6 23 .:lxh5 'iig2+ 24 'ite 1 ltJxh5 25 l:txh5 1 -0 A.Karpov - Figovitoura, Besancon 1 999. Y ep, it's easy to see why Anatoly has a soft spot for the Siimisch!
If l was Black I think that I would try to mix things up with 9 . . . ltJh5 1 0 g4 ltJf4 1 1 ltJxf4 exf4 1 2 ..txf4 f5 but whilst he can dream of getting his pawn to f4 and planting a piece on e5, not only might the g-file prove problematic but White can opt not to enter these complications with 1 0 0-0-0 anyway.
10 g4
This time Karpov employs his g-pawn before castling although 10 0-0-0 is also very acceptable.
10 ... f5 1 1 h3
This though is a new concept. In the last chapter White was encouraged to trade pawns on f5 in order to ultimately deliver the e4-square to a white knight. With a black knight on e7 White isn't so keen to lure it to f5 and prefers to keep it stuck on its current awkward square (where for example it denies the black queen access to White's kingside) by maintaining a pawn on e4 or g4.
l l .. . a5 12 0-0-0 fxe4 13 fxe4
I must admit that I can't see a particular reason why White can't recapture with the knight here as it is always going to be difficult for Black to snatch the f3-pawn In view of the white knight's threatened journey to e6. However, when giving simultaneous displays, Grandmasters often prefer to avoid tactics and this game illustrates the positional aspects of the line.
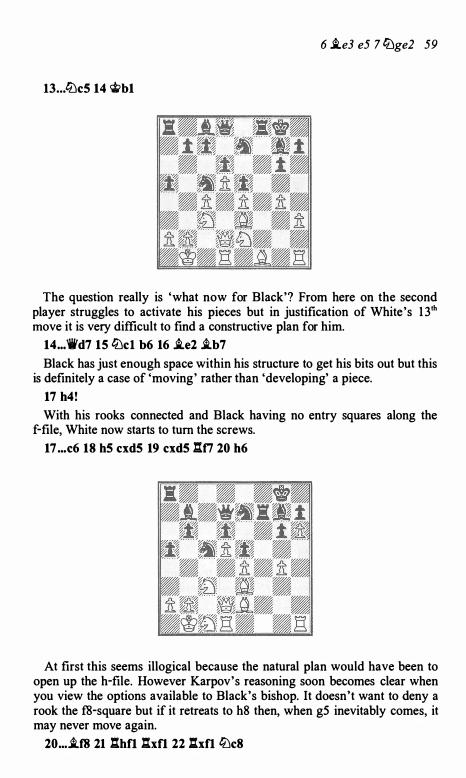
6 i..e3 e5 7 lt:Jge2 59
l3 • . . lt:Jc5 14 �b1
The question really is 'what now for Black'? From here on the second player struggles to activate his pieces but in justification of White's 1 3'h move it is very difficult to find a constructive plan for him.
14 ... 1i'd7 15 l"i::Jcl b6 16 i..e2 i.b7
Black has just enough space within his structure to get his bits out but this is definitely a case of 'moving' rather than 'developing' a piece.
17 h4!
With his rooks connected and Black having no entry squares along the f-file, White now starts to turn the screws.
17 ... c6 18 h5 cxd5 19 cxd5 .l:r.ti 20 h6
At first this seems illogical because the natural plan would have been to open up the h-file. However Karpov's reasoning soon becomes clear when you view the options available to Black's bishop. It doesn't want to deny a rook the f8-square but if it retreats to h8 then, when g5 inevitably comes, it may never move again.
20 ... i.f8 21 .l:r.hfl .l:r.xfl 22 l:txfl l"i::Jc8
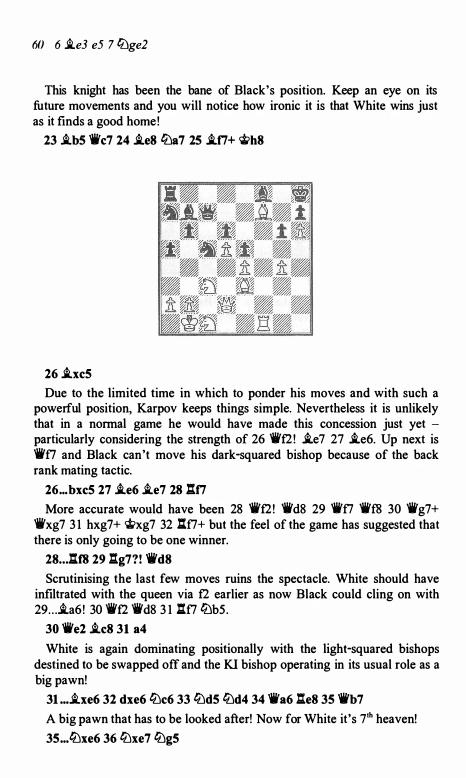
60 6 i..e3 e5 7 t'iJge2
This knight has been the bane of Black's position. Keep an eye on its future movements and you will notice how ironic it is that White wins just as it finds a good home!
23 .i.b5 'iVc7 24 i.e8 t'iJa7 25 i.ti+ �h8
26 ..ixc5
Due to the limited time in which to ponder his moves and with such a powerful position, Karpov keeps things simple. Nevertheless it is unlikely that in a normal game he would have made this concession just yet -particularly considering the strength of 26 1i'f2! i.e7 27 i.e6. Up next is 'iVf7 and Black can't move his dark-squared bishop because of the back rank mating tactic.
26 .•. bxc5 27 ..ie6 i.e7 28 l:tti
More accurate would have been 28 'ii'f2! 'ii'd8 29 'ii'f7 'ii'f8 30 'ii'g7+ 'ii'xg7 3 1 hxg7+ 'itixg7 32 l:f7+ but the feel of the game has suggested that there is only going to be one winner.
28 . . J1f8 29 l:1g7?! 'ii'd8
Scrutinising the last few moves ruins the spectacle. White should have infiltrated with the queen via f2 earlier as now Black could cling on with 29 . . . i.a6 ! 30 'iVf2 'iVd8 3 1 l:tf7 t'iJb5.
30 'ii'e2 i.c8 31 a4
White is again dominating positionally with the light-squared bishops destined to be swapped off and the K1 bishop operating in its usual role as a big pawn!
3l ... i.xe6 32 dxe6 t'iJc6 33 t'iJd5 t'iJd4 34 'iVa6 l:1e8 35 'ii'b7
A big pawn that has to be looked after! Now for White it's 7'h heaven!
35 ... t'iJxe6 36 t'iJxe7 t'iJg5
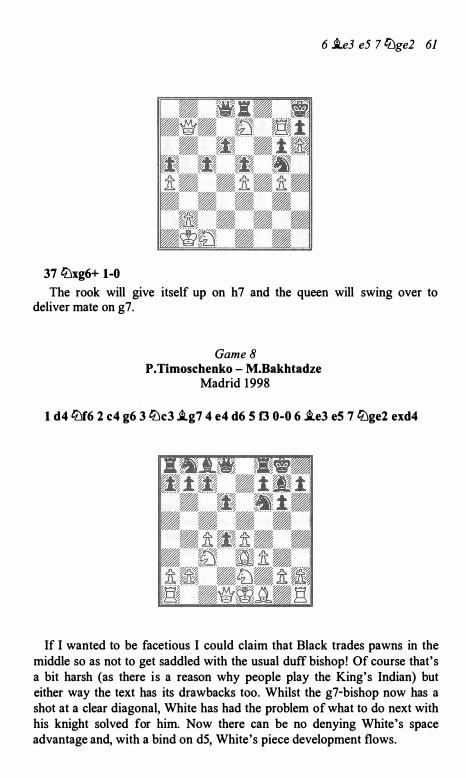
6 i.e3 e5 7 CiJge2 61
37 ltJxg6+ 1-0
The rook will give itself up on h7 and the queen will swing over to deliver mate on g7.
Game 8 P.Timoschenko - M.Bakhtadze
Madrid 1998
1 d4 CiJf6 2 c4 g6 3 CiJc3 i.g7 4 e4 d6 5 f3 0-0 6 i.e3 e5 7 ltJge2 exd4
If I wanted to be facetious I could claim that Black trades pawns in the middle so as not to get saddled with the usual duff bishop! Of course that's a bit harsh (as there is a reason why people play the King's Indian) but either way the text has its drawbacks too. Whilst the g7-bishop now has a shot at a clear diagonal, White has had the problem of what to do next with his knight solved for him. Now there can be no denying White's space advantage and, with a bind on d5, White's piece development flows.

62 6 i.e3 e5 7 tiJge2
8 tiJxd4
Although it is right and necessary for me to include this variation in this Siimisch book, in fact the above position could be reached via a number of different openings. Indeed I 've even had to investigate games starting 1 e4 e5 2 tiJf3 d6 3 d4 exd4 4 tiJxd4 tiJf6 5 f3 g6 6 c4 i.g7 7 tiJc3 0-0 8 i.e3 despite generally being able to stay away from 1 e4 e5 with either colour for most of my life !
Anyway, moving on, the bishop on f1 i s only too happy that the knight has gone from e2 but any other recapture on d4 is simply impractical. Both 8 i.xd4 and 8 'i!Vxd4 would have allowed Black to gain a tempo with 8 . . . tiJc6 (as neither piece would be pleased about being traded off for that knight) and given the discovered attack potential of the g7-bishop, the latter would be stupid anyway i.e. 8 . . . tiJg4 ! .
8 • • • c6
Arguably this is the most ambitious move as Black lays the foundations for challenging White's central bind with . . . d5 . The problem with 8 . . . tiJc6 is that White can exploit the d5-square at his leisure. A nice example of that is 9 'ii'd2 .l:.e8 (Upon 9 . . . a6 1 0 i.e2 lDe5 Black does have a plan of . . . c5 and . . . i.e6. Most accurate then is for White to ensure that he is ready to swoop down on what will be the tender point d6. Hence 1 1 0-0-0 ! ? is reasonable and 1 1 .l:.dl ! more restrained with 1 1 . . .c5?! 1 2 tiJb3 ! i.e6 1 3 'iVxd6 'iVxd6 14 .:txd6 leaving him comfortably on top e.g. 14 . . . i.xc4 1 5 tiJa5 i.xe2 16 �xe2 when White has a nicely centralised king for the endgame, domination of the d-file and black queenside pawns as blatant targets or 14 . . . tDxc4 1 5 i.xc4 i.xc4 1 6 tDxc5 (A pawn is a pawn) 1 0 i.e2 i.d7 1 1 0-0 a6 (Or 1 l . . .tiJxd4 1 2 i.xd4 i.c6 1 3 .l:.ad1 tiJd7 14 i.xg7 rJ;xg7 1 5 .l:.fe1 a5 1 6 i.fl 'iVf6 1 7 tDe2 'iVe5 1 8 tiJd4 'iti>g8 1 9 b3 'iVc5 20 'iti>h1 'ii'e5 2 1 g3 'ii'c5 22 i.g2 a4 23 b4 ! 'ifxc4 24 .l:.c l 'iVa6 25 i.fl 'ii'b6 26 b5 which in K.Bischoff - S.Pruefer, playchess.com 2003 saw White's typical space advantage turn into a material one) 1 2 .l:.ac l l:lb8 1 3 tiJb3 i.e6 14 tiJd5 i.xd5 1 5 cxd5 tiJe5 1 6 l:lfd1 h5 1 7 tiJa5 'iti>h7 1 8 i.g5 'ii'd7 1 9 'ii'c2 .l:.ec8 20 'iib3 c5 2 1 dxc6 bxc6 22 'iVa3 tDe8 23 'iti>h1 l:ta8 24 'ifa4 c5 25 'ifxd7 tiJxd7
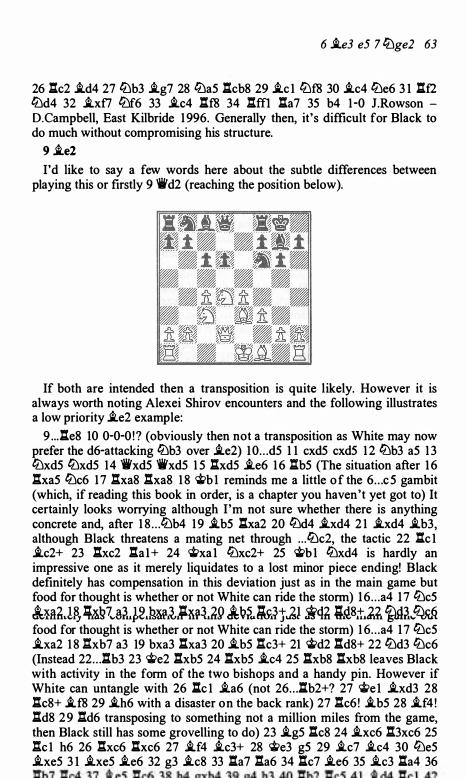
6 ii.e3 e5 7 ([Jge2 63
26 .l:r.c2 .i.d4 27 ([Jb3 1Lg7 28 ([Ja5 .l:r.cb8 29 1Lc 1 ({Jf8 30 1Lc4 ([Je6 3 1 .l:tf2 ([Jd4 32 .i.xf7 ({Jf6 33 1Lc4 .l:r.f8 34 .l:r.ffl .l:r.a7 35 b4 1 -0 J.Rowson -D.Campbell, East Kilbride 1 996. Generally then, it's difficult for Black to do much without compromising his structure.
9 1Le2 I'd like to say a few words here about the subtle differences between
playing this or firstly 9 'ir'd2 (reaching the position below).
If both are intended then a transposition is quite likely. However it is always worth noting Alexei Shirov encounters and the following illustrates a low priority 1Le2 example:
9 ... l:.e8 10 0-0-0 ! ? (obviously then not a transposition as White may now prefer the d6-attacking ([Jb3 over 1Le2) 10 . . . d5 1 1 cxd5 cxd5 1 2 (iJb3 a5 1 3 ([Jxd5 ([Jxd5 14 'fi'xd5 'ir'xd5 1 5 l:txd5 1Le6 1 6 l:tb5 (The situation after 1 6 .l:r.xa5 ([Jc6 1 7 .l:r.xa8 .l:r.xa8 1 8 'it>b 1 reminds me a little o f the 6 . . . c 5 gambit (which, if reading this book in order, is a chapter you haven't yet got to) It certainly looks worrying although I'm not sure whether there is anything concrete and, after 1 8 . . . ([Jb4 1 9 Ji.b5 :xa2 20 (iJd4 1Lxd4 2 1 1Lxd4 Ji.b3, although Black threatens a mating net through . . . ([Jc2, the tactic 22 llc 1 1Lc2+ 23 .l:r.xc2 .l:.a1+ 24 'it>xa1 ([Jxc2+ 25 'it>b 1 ([Jxd4 is hardly an impressive one as it merely liquidates to a lost minor piece ending! Black definitely has compensation in this deviation just as in the main game but food for thought is whether or not White can ride the storm) 16 . . . a4 17 ([Jc5 &JI1l�.l�lltitl&7 .. 8�.�2.h�tt.�,;M-�.69 dt9� .. ;s:Jt�1 Ji<l� i.c!8t,.f.t. ��--�<1 food for thought is whether or not White can ride the storm) 1 6 . . . a4 17 ([Jc5 .i.xa2 1 8 .l:r.xb7 a3 19 bxa3 .l:r.xa3 20 ..ltb5 .l:r.c3+ 21 �d2 .l:r.d8+ 22 ([Jd3 ([Jc6 (Instead 22 . . . .l:.b3 23 'it>e2 .l:.xb5 24 l:txb5 1Lc4 25 .l:txb8 .l:r.xb8 leaves Black with activity in the form of the two bishops and a handy pin. However if White can untangle with 26 .l:.c 1 1La6 (not 26 . . . l:tb2+? 27 �e1 1Lxd3 28 .l:r.c8+ Ji.f8 29 iLh6 with a disaster on the back rank) 27 .l:r.c6 ! Ji.b5 28 Ji.f4 ! .l:.d8 29 .l:r.d6 transposing to something not a million miles from the game, then Black still has some grovelling to do) 23 Ji.g5 .l:r.c8 24 1Lxc6 l:t3xc6 25 .l:r.c 1 h6 26 :!xc6 .l:r.xc6 27 Ji.f4 1Lc3+ 28 ..t>e3 g5 29 1Lc7 1Lc4 30 ([Je5 1Lxe5 3 1 1Lxe5 1Le6 32 g3 1Lc8 33 .l:ta7 :!a6 34 .l:r.c7 1Le6 35 iLc3 l:ta4 36
7 • �
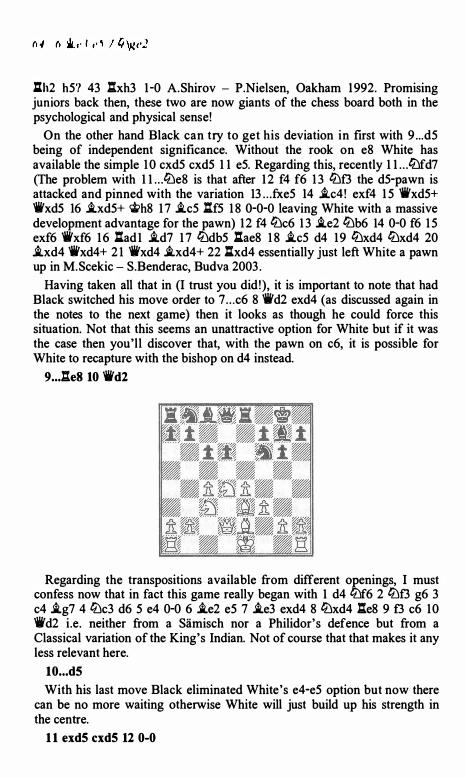
l:th2 h5? 43 l:txh3 I -0 A.Shirov - P.Nielsen, Oakham I992. Promising juniors back then, these two are now giants of the chess board both in the psychological and physical sense!
On the other hand Black can try to get his deviation in first with 9 . . . d5 being of independent significance. Without the rook on e8 White has available the simple 1 0 cxd5 cxd5 I I e5. Regarding this, recently I I . . . ltlfd7 (The problem with I I . . .lbe8 is that after I 2 f4 f6 1 3 lbf3 the d5-pawn is attacked and pinned with the variation 13 . . . fxe5 I4 �c4! exf4 I 5 ifxd5+ ifxd5 16 �xd5+ �h8 I 7 �c5 l:tf5 I 8 0-0-0 leaving White with a massive development advantage for the pawn) 12 f4 lbc6 1 3 �e2 lbb6 I4 0-0 f6 1 5 exf6 ifxf6 I 6 l:lad I �d7 I 7 lbdb5 l:tae8 1 8 �c5 d4 I9 lbxd4 lbxd4 20 �xd4 ifxd4+ 2 1 ifxd4 .1Lxd4+ 22 l:txd4 essentially just left White a pawn up in M.Scekic - S.Benderac, Budva 2003 .
Having taken all that in (I trust you did !), it is important to note that had Black switched his move order to 7 . . . c6 8 ifd2 exd4 (as discussed again in the notes to the next game) then it looks as though he could force this situation. Not that this seems an unattractive option for White but if it was the case then you'll discover that, with the pawn on c6, it is possible for White to recapture with the bishop on d4 instead.
9 • • • .l:.e8 10 1i'd2
Regarding the transpositions available from different openings, I must confess now that in fact this game really began with I d4 lbf6 2 lbf3 g6 3 c4 �g7 4 lbc3 d6 5 e4 0-0 6 �e2 e5 7 �e3 exd4 8 lbxd4 l:.e8 9 f3 c6 I 0 1i'd2 i.e. neither from a Samisch nor a Philidor's defence but from a Classical variation of the King's Indian. Not of course that that makes it any less relevant here.
10 ... d5
With his last move Black eliminated White's e4-e5 option but now there can be no more waiting otherwise White will just build up his strength in the centre.
1 1 exdS cxdS 12 0-0
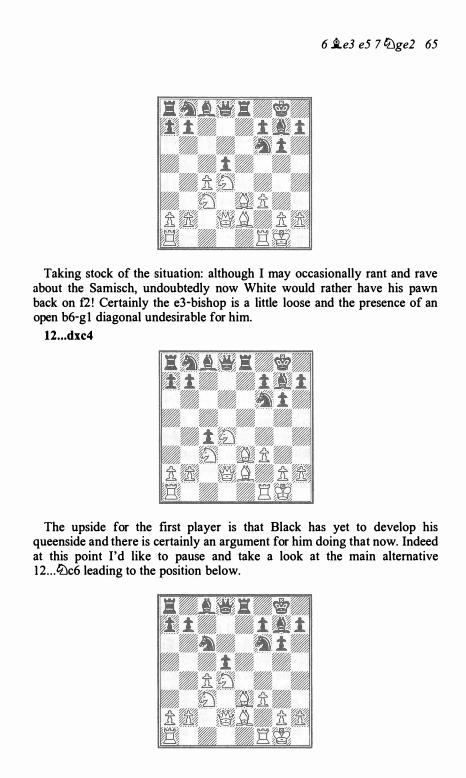
6 i.e3 e5 7 tlJge2 65
Taking stock of the situation: although I may occasionally rant and rave about the Samisch, undoubtedly now White would rather have his pawn back on f2! Certainly the e3-bishop is a little loose and the presence of an open b6-gl diagonal undesirable for him.
12 . . . dxc4
The upside for the first player is that Black has yet to develop his queenside and there is certainly an argument for him doing that now. Indeed at this point I'd like to pause and take a look at the main alternative 12 . . . tiJc6 leading to the position below.
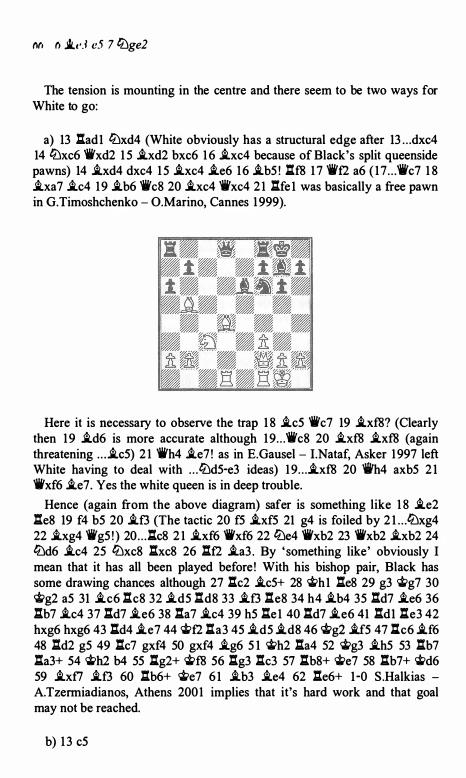
Ml n lLt•.l e5 7 ti'Jge2
The tension is mounting in the centre and there seem to be two ways for White to go:
a) 13 l:tadl ti'Jxd4 (White obviously has a structural edge after 13 . . . dxc4 14 ti'Jxc6 'ii'xd2 1 5 �xd2 bxc6 1 6 .ltxc4 because of Black's split queenside pawns) 14 �xd4 dxc4 1 5 .ltxc4 .lte6 16 .ltb5 ! l:tf8 1 7 'ii'f2 a6 ( 17 . . . 'ii'c7 1 8 �xa7 �c4 19 �b6 'ii'c8 20 �xc4 'ii'xc4 2 1 l:tfe l was basically a free pawn in G.Timoshchenko - O.Marino, Cannes 1 999).
Here it is necessary to observe the trap 1 8 �c5 'ii'c7 19 �xf8? (Clearly then 19 �d6 is more accurate although 19 . . . 'ii'c8 20 �xf8 �xf8 (again threatening . . . �c5) 2 1 'ii'h4 �e7 ! as in E.Gausel - I.Nataf, Asker 1 997 left White having to deal with . . . ti'Jd5-e3 ideas) 1 9 . . . �xf8 20 'ii'h4 axb5 2 1 'ifxf6 �e7. Yes the white queen is in deep trouble.
Hence (again from the above diagram) safer is something like 1 8 �e2 :es 19 f4 b5 20 �f3 (The tactic 20 f5 �xf5 21 g4 is foiled by 2 l . . .ti'Jxg4 22 �xg4 'iig5 ! ) 20 . . . l:tc8 2 1 �xf6 'ifxf6 22 ti'Je4 'ifxb2 23 'ifxb2 .ltxb2 24 ti'Jd6 �c4 25 ti'Jxc8 l:txc8 26 l:tf2 .lta3 . By ' something like' obviously I mean that it has all been played before ! With his bishop pair, Black has some drawing chances although 27 :c2 �c5+ 28 �hl l:te8 29 g3 �g7 30 q;g2 a5 31 �c6 l:tc8 32 �d5 l:td8 33 �f3 l:te8 34 h4 .ltb4 35 l:td7 �e6 36 l:tb7 .ltc4 37 :d7 �e6 38 l:ta7 �c4 39 h5 l:lel 40 l:.d7 �e6 41 l:.dl l:.e3 42 hxg6 hxg6 43 :d4 �e7 44 �f2 :a3 45 �d5 �d8 46 q;g2 �f5 47 l:c6 �f6 48 l:td2 g5 49 l:.c7 gxf4 50 gxf4 �g6 5 1 �h2 l:ta4 52 �g3 �h5 53 l:tb7 :a3+ 54 �h2 b4 55 l:g2+ �f8 56 :g3 :c3 57 :b8+ �e7 58 :b7+ �d6 59 .ltxfl .ltf3 60 l:tb6+ �e7 6 1 .ltb3 �e4 62 l:te6+ 1-0 S.Halkias -A.Tzermiadianos, Athens 2001 implies that it's hard work and that goal may not be reached.
b) 1 3 c5
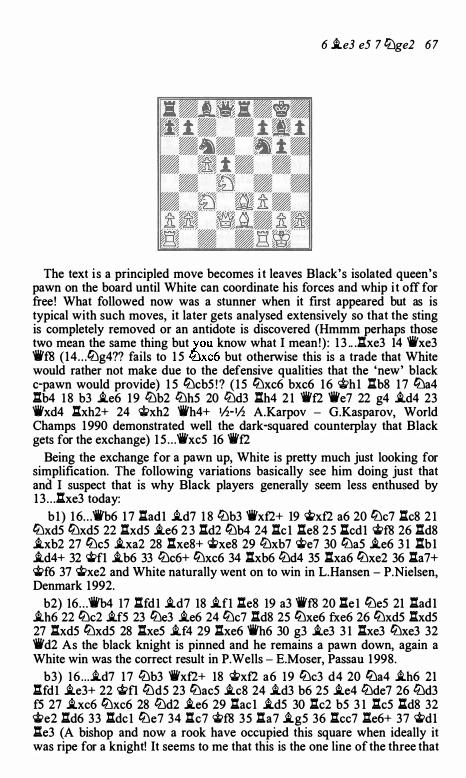
6 .i.e3 e5 7 li:Jge2 67
The text i s a principled move becomes i t leaves Black's isolated queen's pawn on the board until White can coordinate his forces and whip it off for free! What followed now was a stunner when it first appeared but as is typical with such moves, it later gets analysed extensively so that the sting is completely removed or an antidote is discovered (Hmmm perhaps those two mean the same thing but you know what I mean!) : 1 3 .. Jhe3 14 'ii'xe3 'ii'f8 (14 . . . 0.g4?? fails to 1 5 tt:Jxc6 but otherwise this is a trade that White would rather not make due to the defensive qualities that the 'new' black c-pawn would provide) 1 5 0.cb5 ! ? ( 1 5 0.xc6 bxc6 16 'ifi>h1 l:tb8 1 7 0.a4 l:tb4 1 8 b3 .i.e6 19 li:Jb2 li:Jh5 20 li:Jd3 l:th4 2 1 'iVt2 'ife7 22 g4 .i.d4 23 'ii'xd4 l:txh2+ 24 'iti>xh2 'ii'h4+ I_h- Ih A.Karpov - G.Kasparov, World Champs 1990 demonstrated well the dark-squared counterplay that Black gets for the exchange) 1 5 . . . 'ii'xc5 16 'ii't2
Being the exchange for a pawn up, White is pretty much just looking for simplification. The following variations basically see him doing just that and I suspect that is why Black players generally seem less enthused by 1 3 . . . l:txe3 today:
b 1 ) 16 . . . 'ii'b6 1 7 l:tad1 .i.d7 1 8 li:Jb3 'ii'xf2+ 19 �xf2 a6 20 0.c7 l:tc8 2 1 0.xd5 0.xd5 22 l:txd5 .i.e6 2 3 l:td2 0.b4 24 l:tc1 lte8 2 5 .r:tcd1 �f8 26 .l:.d8 .i.xb2 27 0.c5 .i.xa2 28 l:txe8+ �xe8 29 li:Jxb7 �e7 30 0.a5 .i.e6 3 1 ltb1 .i.d4+ 32 �fl .i.b6 33 li:Jc6+ 0.xc6 34 l:txb6 li:Jd4 35 l:txa6 0.xe2 36 l:ta7+ 'it>f6 37 'iPxe2 and White naturally went on to win in L.Hansen - P.Nielsen, Denmark 1992.
b2) 16 . . . 'ii'b4 17 .l:.fd1 .i.d7 18 .i.fl l:te8 19 a3 'ii'f8 20 .l:.e 1 0.e5 21 l:tad1 .i.h6 22 0.c2 .i.f5 23 0.e3 .i.e6 24 0.c7 .l:.d8 25 0.xe6 fxe6 26 0.xd5 l:txd5 27 l:txd5 0.xd5 28 l:txe5 .i.f4 29 l:txe6 'ii'h6 30 g3 .i.e3 3 1 l:txe3 0.xe3 32 'ii'd2 As the black knight is pinned and he remains a pawn down, again a White win was the correct result in P.Wells - E.Moser, Passau 1998.
b3) 16 . . . .i.d7 17 li:Jb3 'ii'xt2+ 18 �xf2 a6 19 0.c3 d4 20 0.a4 .i.h6 21 .l:lfd1 .i.e3+ 22 'iPfl li:Jd5 23 0.ac5 .i.c8 24 .i.d3 b6 25 .i.e4 li:Jde7 26 li:Jd3 f5 27 .i.xc6 0.xc6 28 li:Jd2 .i.e6 29 .l:.ac 1 .i.d5 30 l:tc2 b5 3 1 l:tc5 .r:td8 32 �e2 l:td6 33 .l:ldcl 0.e7 34 .l:.c7 'it>f8 35 .l:.a7 .i.g5 36 l:tcc7 l:te6+ 37 �d1 .l:le3 (A bishop and now a rook have occupied this square when ideally it was ripe for a knight! It seems to me that this is the one line of the three that
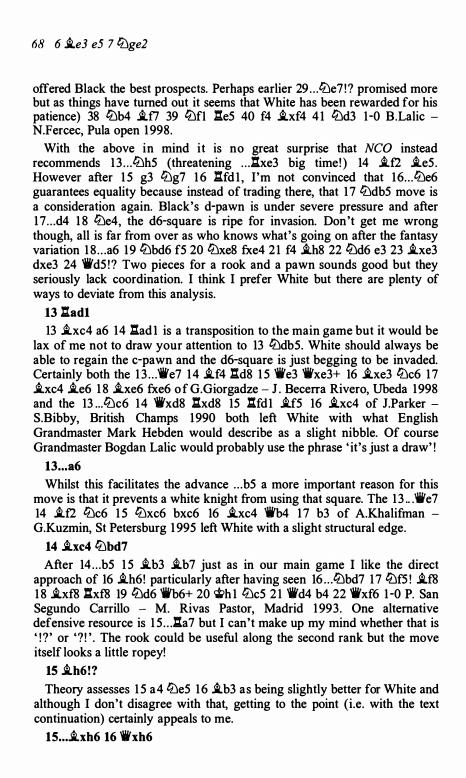
68 6 .ie3 e5 7 l:tJge2
offered Black the best prospects. Perhaps earlier 29 . . . l:tJe7 ! ? promised more but as things have turned out it seems that White has been rewarded for his patience) 38 tiJb4 i.fl 39 tiJfl .l:t.e5 40 f4 i.xf4 4 1 tiJd3 1 -0 B.Lalic -N.Fercec, Pula open 1 998.
With the above in mind it is no great surprise that NCO instead recommends 1 3 . . . l:tJh5 (threatening . . . .l:t.xe3 big time! ) 14 .tt2 .te5 . However after 1 5 g3 l:tJg7 1 6 l:f.fd 1 , I'm not convinced that 16 . . . l:tJe6 guarantees equality because instead of trading there, that 1 7 tiJdb5 move is a consideration again. Black's d-pawn is under severe pressure and after 1 7 . . . d4 1 8 l:tJe4, the d6-square is ripe for invasion. Don't get me wrong though, all is far from over as who knows what's going on after the fantasy variation 1 8 . . . a6 19 tiJbd6 f5 20 l:tJxe8 fxe4 2 1 f4 .th8 22 tiJd6 e3 23 .txe3 dxe3 24 'ii'd5 ! ? Two pieces for a rook and a pawn sounds good but they seriously lack coordination. I think I prefer White but there are plenty of ways to deviate from this analysis.
13 l:f.ad1 13 .txc4 a6 14 l:f.ad 1 is a transposition to the main game but it would be
lax of me not to draw your attention to 13 tiJdb5. White should always be able to regain the c-pawn and the d6-square is just begging to be invaded. Certainly both the 1 3 . . . 'it'e7 14 .if4 l:f.d8 1 5 'it'e3 'ii'xe3+ 16 i.xe3 l:tJc6 1 7 .txc4 .te6 1 8 .txe6 fxe6 o f G.Giorgadze - J . Becerra Rivero, Ubeda 1998 and the 13 .. . l:tJc6 14 'ii'xd8 .l:txd8 15 l:f.fd1 .tf5 16 i.xc4 of J.Parker -S.Bibby, British Champs 1990 both left White with what English Grandmaster Mark Hebden would describe as a slight nibble. Of course Grandmaster Bogdan Lalic would probably use the phrase ' it's just a draw' !
13 ... a6
Whilst this facilitates the advance . . . b5 a more important reason for this move is that it prevents a white knight from using that square. The 1 3 .. ."iVe7 14 .tt2 l:tJc6 1 5 l:tJxc6 bxc6 16 .ixc4 'it'b4 1 7 b3 of A.Khalifman -G.Kuzmin, St Petersburg 1 995 left White with a slight structural edge.
14 .txc4 tiJbd7
After 14 . . . b5 1 5 .ib3 .ib7 just as in our main game I like the direct approach of 16 .th6! particularly after having seen 16 . . . tiJbd7 1 7 tiJf5 ! i.f8 1 8 i.xf8 .l:txf8 19 tiJd6 'ii'b6+ 20 �h 1 l:tJc5 2 1 'ii'd4 b4 22 'ii'xf6 1 -0 P. San Segundo Carrillo - M. Rivas Pastor, Madrid 1 993. One alternative defensive resource is 1 5 . . . .l:ta7 but I can't make up my mind whether that is ' ! ? ' or '? ! ' . The rook could be useful along the second rank but the move itself looks a little ropey!
15 .th6!?
Theory assesses 1 5 a4 l:tJe5 1 6 .ib3 as being slightly better for White and although I don't disagree with that, getting to the point (i.e. with the text continuation) certainly appeals to me.
15 ... .txh6 16 'it'xh6
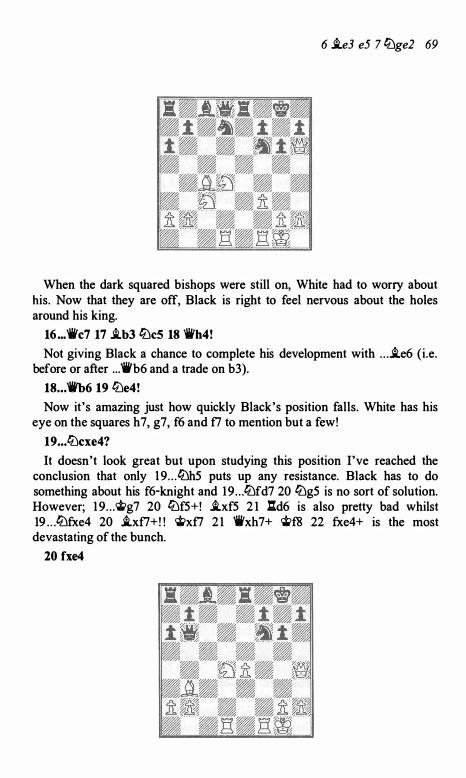
6 i.e3 e5 7 lt:Jge2 69
When the dark squared bishops were still on, White had to worry about his. Now that they are off, Black is right to feel nervous about the holes around his king.
16 ... "ii'c7 17 i.b3 lt:Jcs 18 'ifh4!
Not giving Black a chance to complete his development with . . . i.e6 (i.e. before or after .. . 'ifb6 and a trade on b3).
18 ... "ii'b6 19 lt:Je4!
Now it's amazing just how quickly Black's position falls. White has his eye on the squares h7, g7, f6 and f7 to mention but a few!
19 ... lt:Jcxe4?
It doesn't look great but upon studying this position I've reached the conclusion that only 1 9 . . . lt:Jh5 puts up any resistance. Black has to do something about his f6-knight and 19 . . . lt:Jfd7 20 lt:Jg5 is no sort of solution. However; 1 9 . . . �g7 20 lt:Jf5+! i.xf5 2 1 l:td6 is also pretty bad whilst 19 . . . lt:Jfxe4 20 i.xf7+! ! 'it>xf7 2 1 "ii'xh7+ 'it>f8 22 fxe4+ is the most devastating of the bunch.
20 fxe4
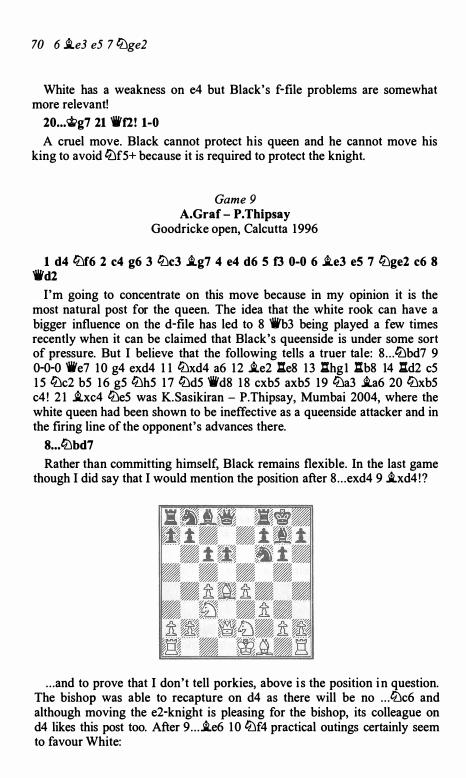
70 6 i.e3 e5 7 ltJge2
White has a weakness on e4 but Black's f-file problems are somewhat more relevant!
20 .. .'�g7 21 'iff2! 1-0
A cruel move. Black cannot protect his queen and he cannot move his king to avoid GiJf5+ because it is required to protect the knight.
Game 9 A.Graf - P.Thipsay
Goodricke open, Calcutta 1996
1 d4 GiJf6 2 c4 g6 3 lt:\c3 i.g7 4 e4 d6 5 f3 0-0 6 i.e3 e5 7 ltJge2 c6 8 'ifd2
I'm going to concentrate on this move because in my opinion it is the most natural post for the queen. The idea that the white rook can have a bigger influence on the d-file has led to 8 'ifb3 being played a few times recently when it can be claimed that Black's queenside is under some sort of pressure. But I believe that the following tells a truer tale: 8 . . . GiJbd7 9 0-0-0 'ife7 10 g4 exd4 1 1 ltJxd4 a6 12 i.e2 .l:te8 1 3 .l:thg1 .l:tb8 14 .l:td2 c5 1 5 ltJc2 b5 1 6 g5 ltJh5 1 7 ltJd5 'ii'd8 1 8 cxb5 axb5 19 ltJa3 i.a6 20 ltJxb5 c4 ! 2 1 i.xc4 ltJe5 was K.Sasikiran - P.Thipsay, Mumbai 2004, where the white queen had been shown to be ineffective as a queenside attacker and in the firing line of the opponent's advances there.
8 ... GiJbd7
Rather than committing himself, Black remains flexible. In the last game though I did say that I would mention the position after 8 . . . exd4 9 i.xd4 ! ?
. . . and to prove that I don't tell porkies, above i s the position in question. The bishop was able to recapture on d4 as there will be no . . . ltJc6 and although moving the e2-knight is pleasing for the bishop, its colleague on d4 likes this post too. After 9 . . . i.e6 10 ltJf4 practical outings certainly seem to favour White:
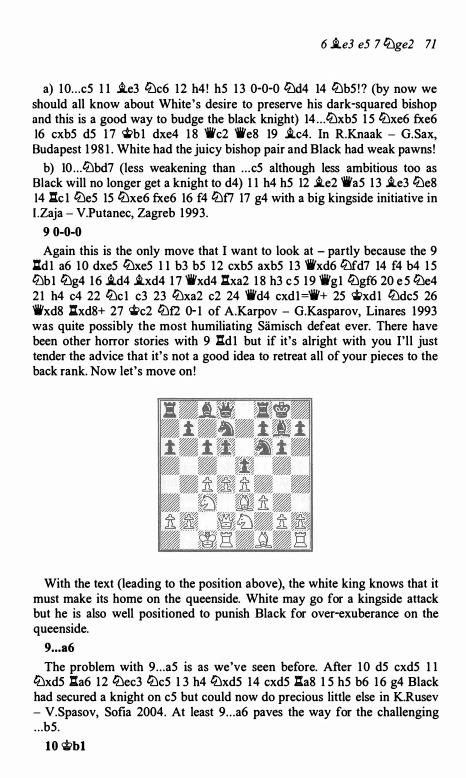
6 i.e3 e5 7 liJge2 71
a) 10 . . . c5 1 1 i.e3 liJc6 12 h4 ! h5 1 3 0-0-0 liJd4 14 liJb5 ! ? (by now we should all know about White's desire to preserve his dark-squared bishop and this is a good way to budge the black knight) 14 . . . liJxb5 1 5 liJxe6 fxe6 16 cxb5 d5 1 7 �b 1 dxe4 1 8 'ii'c2 'ii'e8 19 i.c4. In R.Knaak - G.Sax, Budapest 1 98 1 . White had the juicy bishop pair and Black had weak pawns!
b) 10 . . . liJbd7 (less weakening than . . . c5 although less ambitious too as Black will no longer get a knight to d4) 1 1 h4 h5 12 .te2 'ii'a5 1 3 .te3 liJe8 14 .l:tc 1 liJe5 15 liJxe6 fxe6 16 f4 liJfl 17 g4 with a big kingside initiative in I .Zaja - V.Putanec, Zagreb 1993.
9 0-0-0
Again this is the only move that I want to look at - partly because the 9 l:t.d1 a6 1 0 dxe5 liJxe5 1 1 b3 b5 1 2 cxb5 axb5 1 3 'ii'xd6 liJfd7 14 f4 b4 1 5 liJb 1 liJg4 16 .i.d4 .txd4 1 7 'ii'xd4 .l:txa2 1 8 h3 c 5 19 'ilk g 1 liJgf6 20 e 5 liJe4 2 1 h4 c4 22 liJc1 c3 23 liJxa2 c2 24 'ii'd4 cxd1='ii'+ 25 �xd1 liJdc5 26 'ii'xd8 l%.xd8+ 27 �c2 liJt2 Q- 1 of A.Karpov - G.Kasparov, Linares 1993 was quite possibly the most humiliating Siimisch defeat ever. There have been other horror stories with 9 l::.d 1 but if it's alright with you I'll just tender the advice that it' s not a good idea to retreat all of your pieces to the back rank. Now let's move on!
With the text (leading to the position above), the white king knows that it must make its home on the queenside. White may go for a kingside attack but he is also well positioned to punish Black for over-exuberance on the queenside.
9 . . . a6
The problem with 9 . . . a5 is as we've seen before. After 1 0 d5 cxd5 1 1 liJxd5 l::.a6 12 liJec3 liJc5 1 3 h4 liJxd5 14 cxd5 l::.a8 1 5 h5 b6 1 6 g4 Black had secured a knight on c5 but could now do precious little else in K.Rusev - V.Spasov, Sofia 2004. At least 9 . . . a6 paves the way for the challenging . . . b5.
10 'iii>bl

7 2 fJ i.e3 e5 7 lDge2
The attacking options of 1 0 i..h6 and 10 g4 certainly appeal but I really like this very useful quiet move. Now cl is available to another white piece whilst after a possible .. .'ii'a5, White would have in his armoury a lDd5 trick (something that will appear in later games) as the queen trade on d2 wouldn't be with check.
10 .. .'ii'e7? !
Moving the queen at this stage seems time wasting particularly when it walks into a standard white knight relocation: 1 0 .. .'ii'a5 l l lDcl ! ?
Considering some avenues now we have: a) l l . . .b5 1 2 lDb3 'ifb4 1 3 cxb5 c5 14 dxc5 dxc5 1 5 l?Jd5 \i'a4 16 l?Jc7
.Ua7 1 7 lDxa6 and Black's position was probably worse than his two pawns deficit would suggest in V.Topalov - D. Roiz Baztan, Aviles 1992.
b) l l . . .exd4 12 i..xd4 lDe5 13 c5 ! Following J. Gonzalez Rodriguez - J. Gamez Navas, San Feliu 2000 in trying to solve his queenside development problems, Black had walked into another one. The black d-pawn is of course overworked and in the event of 1 3 . . . ltd8?? 14 .txe5, also pinned!
c) l l . . .lte8 12 lDb3 'ii'c7 1 3 dxe5 dxe5 14 c5 !
Pictured above, this is the first time in the book that we have seen this pawn-fixing theme employed. Studying the 14 . . . l?Jf8 1 5 'ii'd6 lDe6 1 6 .tc4

6 1e3 e5 7 tl:Jge2 7 3
1f8 17 'ilxc7 tl:Jxc7 1 8 tl:Ja5 l::tb8 1 9 tl:Ja4 of E.Geller - I.Boleslavsky, Russian Champs 1 952 (in which White justifiably won) illustrates how useful the control of the squares d6 and b6 can be. Indeed, when playing both . . . a6 and . . . c6 Black must be aware of how positionally bad things can get for him if White gets a firm grip (even if he doesn't, the advance . . . b5 would be undesirable if it led to isolated a- and c-pawns).
Incidentally after 1 0 . . . 'ilc7, still applicable is 1 1 !De l when for example l l . . .exd4 12 i.xd4 tl:Je5?! can be countered not only by 1 3 f4 but by 1 3 c5 too. Frankly then, as featured in the next game, 10 . . . b5 is critical.
1 1 d5
Threatening 12 dxc6 (netting the d6-pawn) and halting l l . . .b5 for the same reason.
l l . . . c5
After l l . . .cxd5? ! White could recapture with the pawn (frequently the automatic choice in chapter 2) but 12 tl:Jxd5 tl:Jxd5 13 'ilxd5 is stronger. Yes there will be occasions when White has the opportunity · to turn the d5-square into an outpost and, with the d6-pawn suffering too, this is one of them!
12 g4
Black has sealed things up in the centre and now the battle must begin on the flanks. The text gets White's kingside attack rolling whilst facilitating the comfortable relocation of the knight on g3 .
12 . . . b5
There is no doubt in my mind that this is Black's best course of action since if White starts taking pawns over there then the second player will at least have a file or two to work on.
13 tl:Jg3!
Naturally White doesn't want to have to cope with an open a-file and besides he has his own plans to be getting on with. Note, as we've seen before, it is important that White's light-squared bishop covers c4 if there is
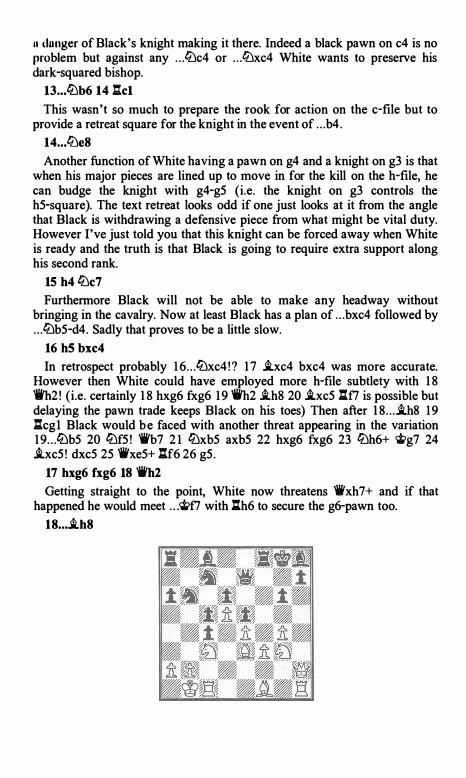
n dunger of Black's knight making it there. Indeed a black pawn on c4 is no problem but against any . . . ltJc4 or . . . ltJxc4 White wants to preserve his dark-squared bishop.
13 ..• liJb6 14 l:tc1
This wasn't so much to prepare the rook for action on the c-file but to provide a retreat square for the knight in the event of . . . b4.
14 ... ltJe8
Another function of White having a pawn on g4 and a knight on g3 is that when his major pieces are lined up to move in for the kill on the h-file, he can budge the knight with g4-g5 (i.e. the knight on g3 controls the h5-square). The text retreat looks odd if one just looks at it from the angle that Black is withdrawing a defensive piece from what might be vital duty. However I've just told you that this knight can be forced away when White is ready and the truth is that Black is going to require extra support along his second rank.
15 h4 lLlc7
Furthermore Black will not be able to make any headway without bringing in the cavalry. Now at least Black has a plan of . . . bxc4 followed by . . . liJb5-d4. Sadly that proves to be a little slow.
16 h5 bxc4
In retrospect probably 1 6 . . . lLlxc4 ! ? 1 7 i.xc4 bxc4 was more accurate. However then White could have employed more h-file subtlety with 1 8 'ifb2! (i.e. certainly 1 8 hxg6 fxg6 1 9 �2 i.h8 20 i.xc5 l:tf7 is possible but delaying the pawn trade keeps Black on his toes) Then after 1 8 . . . i.h8 1 9 l:tcg 1 Black would b e faced with another threat appearing in the variation 1 9 . . . lLlb5 20 lLlf5 ! 'iib7 2 1 lLlxb5 axb5 22 hxg6 fxg6 23 lLlh6+ �g7 24 i.xc5 ! dxc5 25 'ifxe5+ l:tf6 26 g5 .
17 hxg6 fxg6 18 'ifh2
Getting straight to the point, White now threatens 'iVxh7+ and if that happened he would meet . . .'i/;f7 with l:th6 to secure the g6-pawn too.
18 ... i.b8
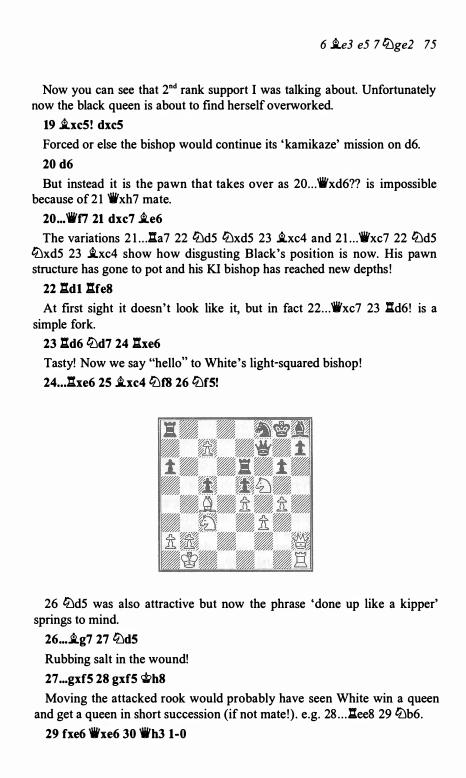
6 i.e3 e5 7 l?Jge2 7 5
Now you can see that 2"d rank support I was talking about. Unfortunately now the black queen is about to find herself overworked.
19 i.xc5! dxc5
Forced or else the bishop would continue its 'kamikaze' mission on d6.
20 d6
But instead it is the pawn that takes over as 20 . . . 'ii'xd6?? is impossible because of 2 1 'ii'xh7 mate.
20 ... 'ii'f7 21 dxc7 i.e6
The variations 2 1 . . ..l:.a7 22 l?Jd5 l?Jxd5 23 i.xc4 and 2 l . . .'ii'xc7 22 l?Jd5 l?Jxd5 23 i.xc4 show how disgusting Black's position is now. His pawn structure has gone to pot and his Kl bishop has reached new depths !
22 .l:.d1 .l:.fe8
At first sight it doesn't look like it, but in fact 22 . . . 'ii'xc7 23 .l:.d6! is a simple fork.
23 .l:.d6 l?Jd7 24 .l:.xe6
Tasty! Now we say "hello" to White's light-squared bishop!
24 ... J:txe6 25 i.xc4 l?Jf8 26 l?Jf5!
26 l?Jd5 was also attractive but now the phrase 'done up like a kipper' springs to mind.
26 .•. i.g7 27 l?Jd5
Rubbing salt in the wound!
27 ... gxf5 28 gxf5 'it>h8
Moving the attacked rook would probably have seen White win a queen and get a queen in short succession (if not mate !) . e.g. 28 . . . .l:.ee8 29 l?Jb6.
29 fxe6 'ii'xe6 30 'ii'h3 1-0
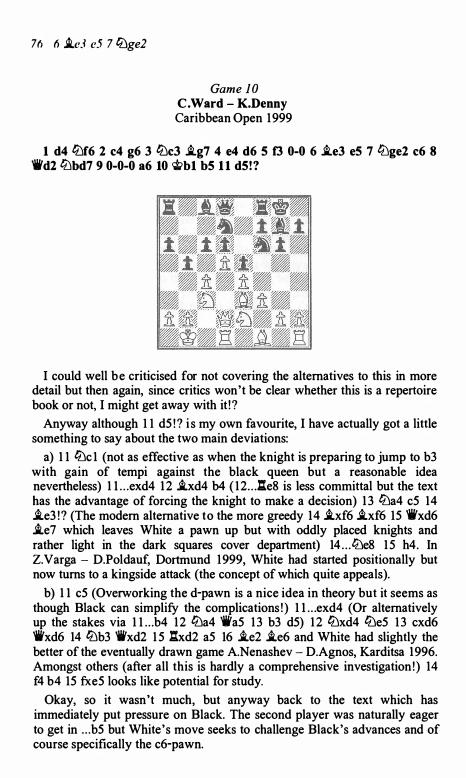
7fl (J i.e3 c5 7 li)ge2
Game JO C. Ward - K.Denny Caribbean Open 1999
1 d4 li)f6 2 c4 g6 3 li)cJ �g7 4 e4 d6 5 f3 0-0 6 �e3 e5 7 lt:lge2 c6 8 'ii'd2 lt:lbd7 9 0-0-0 a6 10 'iii>b1 b5 1 1 d5!?
I could well be criticised for not covering the alternatives to this in more detail but then again, since critics won't be clear whether this is a repertoire book or not, I might get away with it ! ?
Anyway although 1 1 d5 ! ? i s my own favourite, I have actually got a little something to say about the two main deviations:
a) 1 1 lt:lc 1 (not as effective as when the knight is preparing to jump to b3 with gain of tempi against the black queen but a reasonable idea nevertheless) 1 l . . .exd4 1 2 �xd4 b4 ( 12 . . . l:.e8 is less committal but the text has the advantage of forcing the knight to make a decision) 1 3 lt:la4 c5 14 �e3 ! ? (The modern alternative to the more greedy 14 �xf6 �xf6 15 'ii'xd6 �e7 which leaves White a pawn up but with oddly placed knights and rather light in the dark squares cover department) 14 . . . li)e8 1 5 h4. In Z.Varga - D.Poldauf, Dortmund 1999, White had started positionally but now turns to a kingside attack (the concept of which quite appeals).
b) 1 1 c5 (Overworking the d-pawn is a nice idea in theory but it seems as though Black can simplify the complications ! ) 1 l . . .exd4 (Or alternatively up the stakes via 1 l . . .b4 12 lt:la4 'ii'a5 1 3 b3 d5) 1 2 lt:lxd4 lt:le5 1 3 cxd6 'ii'xd6 14 lt:lb3 'ii'xd2 1 5 l::txd2 aS 16 �e2 �e6 and White had slightly the better of the eventually drawn game A.Nenashev - D.Agnos, Karditsa 1996. Amongst others (after all this is hardly a comprehensive investigation !) 14 f4 b4 15 fxe5 looks like potential for study.
Okay, so it wasn't much, but anyway back to the text which has immediately put pressure on Black. The second player was naturally eager to get in . . . b5 but White's move seeks to challenge Black's advances and of course specifically the c6-pawn.
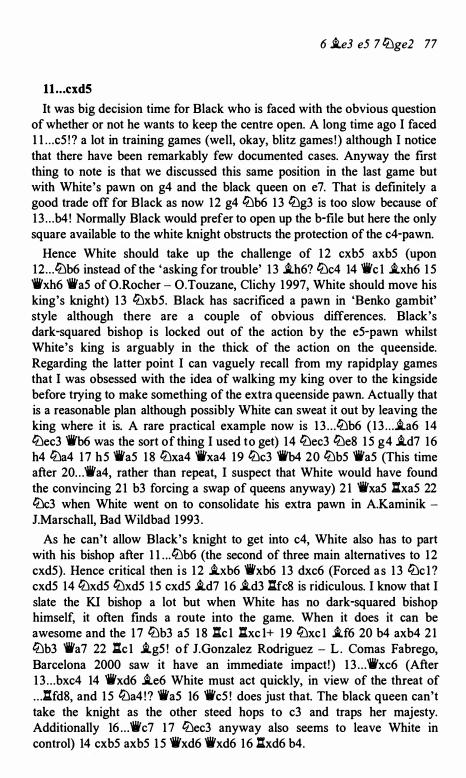
6 .i.e3 e5 7 ltJge2 77
ll . . . cxdS
It was big decision time for Black who is faced with the obvious question of whether or not he wants to keep the centre open. A long time ago I faced 1 l . . .c5 ! ? a lot in training games (well, okay, blitz games ! ) although I notice that there have been remarkably few documented cases. Anyway the first thing to note is that we discussed this same position in the last game but with White's pawn on g4 and the black queen on e7. That is definitely a good trade off for Black as now 12 g4 lt'Jb6 1 3 lt'Jg3 is too slow because of 1 3 . . . b4 ! Normally Black would prefer to open up the b-file but here the only square available to the white knight obstructs the protection of the c4-pawn.
Hence White should take up the challenge of 1 2 cxb5 axb5 (upon 12 . . . lt'Jb6 instead of the 'asking for trouble' 1 3 i..h6? lt'Jc4 14 'ili'c 1 i..xh6 1 5 'ii'xh6 tli'a5 of O.Rocher - O.Touzane, Clichy 1 997, White should move his king's knight) 1 3 lt'Jxb5. Black has sacrificed a pawn in 'Benko gambit' style although there are a couple of obvious differences. Black's dark-squared bishop is locked out of the action by the e5-pawn whilst White's king is arguably in the thick of the action on the queenside. Regarding the latter point I can vaguely recall from my rapidplay games that I was obsessed with the idea of walking my king over to the kingside before trying to make something of the extra queenside pawn. Actually that is a reasonable plan although possibly White can sweat it out by leaving the king where it is. A rare practical example now is 1 3 . . . lt'Jb6 ( 1 3 . . . .i.a6 14 lt'Jec3 'it'b6 was the sort of thing I used to get) 14 lt'Jec3 lt'Je8 1 5 g4 .i.d7 16 h4 lt'Ja4 1 7 h5 'il'a5 1 8 lt'Jxa4 'ii'xa4 19 lt'Jc3 'ii'b4 20 lt'Jb5 'ii'a5 (This time after 20 . . . 'ii'a4, rather than repeat, I suspect that White would have found the convincing 2 1 b3 forcing a swap of queens anyway) 2 1 'il'xa5 l:txa5 22 lt'Jc3 when White went on to consolidate his extra pawn in A.Kaminik -J.Marschall, Bad Wildbad 1993 .
As he can't allow Black's knight to get into c4, White also has to part with his bishop after 1 l . . .lt'Jb6 (the second of three main alternatives to 12 cxd5). Hence critical then i s 1 2 .i.xb6 tli'xb6 1 3 dxc6 (Forced a s 1 3 lt'Jc 1 ? cxd5 14 lt'Jxd5 lt'Jxd5 1 5 cxd5 .i.d7 16 .i.d3 l:tfc8 is ridiculous. I know that I slate the KI bishop a lot but when White has no dark-squared bishop himself, it often finds a route into the game. When it does it can be awesome and the 1 7 lt'Jb3 a5 1 8 l:tc 1 l:txc 1+ 1 9 lt'Jxc 1 i..f6 20 b4 axb4 2 1 lt'Jb3 'ii'a7 22 l:tc 1 i..g5 ! o f J.Gonzalez Rodriguez - L . Comas Fabrego, Barcelona 2000 saw it have an immediate impact! ) 1 3 . . . 'ii'xc6 (After 1 3 . . . bxc4 14 'ifxd6 .i.e6 White must act quickly, in view of the threat of . . . :fd8, and 1 5 lt'Ja4 ! ? 'ii'a5 16 'ii'c5 ! does just that. The black queen can't take the knight as the other steed hops to c3 and traps her majesty. Additionally 16 . . . tli'c7 1 7 lt'Jec3 anyway also seems to leave White in control) 14 cxb5 axb5 1 5 'ii'xd6 tli'xd6 16 l:txd6 b4.
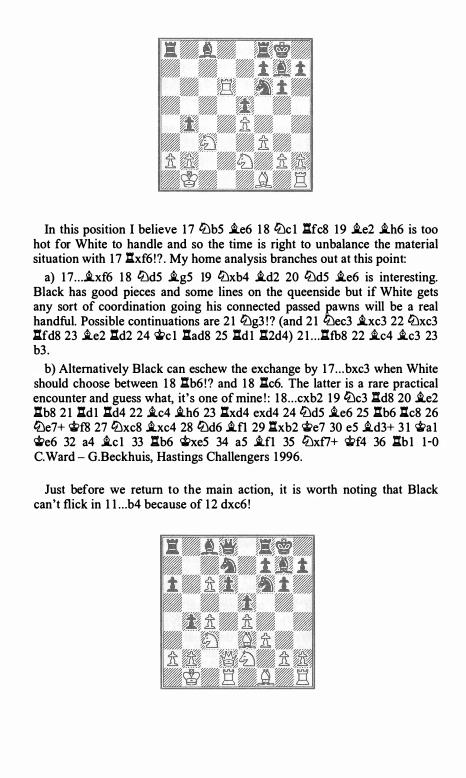
In this position I believe 1 7 lt'lb5 .te6 1 8 lt'lc 1 .l:.fc8 19 .te2 .th6 is too hot for White to handle and so the time is right to unbalance the material situation with 1 7 .l:.xf6 !? . My home analysis branches out at this point:
a) 1 7 . . . .txf6 1 8 lt'ld5 .tg5 19 lt'lxb4 .td2 20 lt'ld5 i.e6 is interesting. Black has good pieces and some lines on the queenside but if White gets any sort of coordination going his connected passed pawns will be a real handful. Possible continuations are 2 1 lt'lg3 ! ? (and 2 1 lt'lec3 .txc3 22 lt'lxc3 l:tfd8 23 .te2 .l:td2 24 �c 1 .l:.ad8 25 .l:.d 1 l:t2d4) 2 1 . . ..l:.fb8 22 .tc4 .tc3 23 b3 .
b) Alternatively Black can eschew the exchange by 1 7 . . . bxc3 when White should choose between 1 8 .l:.b6 ! ? and 1 8 .l:.c6. The latter is a rare practical encounter and guess what, it's one of mine ! : 1 8 . . . cxb2 1 9 li'lc3 .l:.d8 20 i.e2 .l:.b8 2 1 l:r.d1 l:td4 22 .tc4 .th6 23 l:txd4 exd4 24 lt'ld5 .te6 25 l:tb6 l:c8 26 lt'le7+ �f8 27 lt'lxc8 .txc4 28 lt'ld6 .tfl 29 .l:.xb2 �e7 30 e5 .td3+ 3 1 "'a1 �e6 32 a4 .tc l 33 .l:tb6 �xe5 34 a5 .tfl 35 lt'lxf7+ 'iti>f4 36 .l:.b 1 1 -0 C. Ward - G.Beckhuis, Hastings Challengers 1 996.
Just before we return to the main action, it is worth noting that Black can't flick in 1 1 . . .b4 because of 1 2 dxc6 !
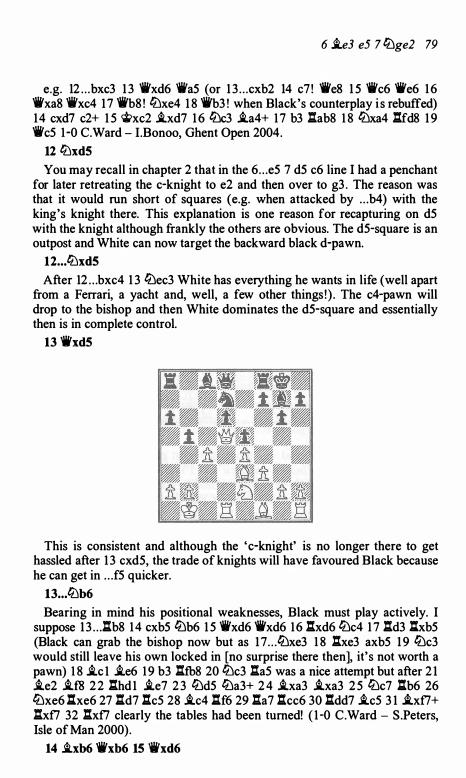
6 i.e3 e5 7 ti.Jge2 79
e.g. 12 . . . bxc3 1 3 'Wxd6 1i'a5 (or 1 3 . . . cxb2 14 c7 ! 'We8 1 5 'Wc6 -.e6 1 6 'Wxa8 'Wxc4 17 'Wb8 ! ti.Jxe4 1 8 'ii'b3 ! when Black's counterplay i s rebuffed) 14 cxd7 c2+ 1 5 �xc2 .ixd7 1 6 ti.Jc3 .ia4+ 1 7 b3 l:tab8 1 8 ti.Jxa4 l:tfd8 1 9 'Wc5 1 -0 C.Ward - I.Bonoo, Ghent Open 2004.
12 ti.Jxd5
You may recall in chapter 2 that in the 6 . . . e5 7 d5 c6 line I had a penchant for later retreating the c-knight to e2 and then over to g3 . The reason was that it would run short of squares (e.g. when attacked by . . . b4) with the king's knight there. This explanation is one reason for recapturing on d5 with the knight although frankly the others are obvious. The d5-square is an outpost and White can now target the backward black d-pawn.
12 . . . ti.Jxd5
After 12 . . . bxc4 1 3 ti.Jec3 White has everything he wants in life (well apart from a Ferrari, a yacht and, well, a few other things ! ) . The c4-pawn will drop to the bishop and then White dominates the d5-square and essentially then is in complete control.
13 1i'xd5
This is consistent and although the 'c-knight' is no longer there to get hassled after 1 3 cxd5, the trade of knights will have favoured Black because he can get in . . . f5 quicker.
13 . . . ti.Jb6
Bearing in mind his positional weaknesses, Black must play actively. I suppose 1 3 . . . l:tb8 14 cxb5 ti.Jb6 1 5 1i'xd6 'ifxd6 16 l:txd6 ti.Jc4 1 7 l:td3 l:xb5 (Black can grab the bishop now but as 1 7 . . . ti.Jxe3 1 8 l:txe3 axb5 1 9 ti.Jc3 would still leave his own locked in [no surprise there then], it's not worth a pawn) 1 8 i.c l i.e6 1 9 b3 l:tfb8 20 ti.Jc3 lta5 was a nice attempt but after 2 1 .ie2 .ifS 2 2 l:.hd1 i.e7 2 3 ti.Jd5 ti.Ja3+ 2 4 .ixa3 .ixa3 2 5 ti.Jc7 l:tb6 26 ti.Jxe6 l:xe6 27 l:td7 l:tc5 28 .ic4 ltf6 29 l:.a7 l:.cc6 30 l:.dd7 .ic5 3 1 ..ix£7+ l:.x£7 32 l:.x£7 clearly the tables had been turned! ( 1 -0 C.Ward - S.Peters, Isle of Man 2000).
14 .ixb6 'ii'xb6 15 ifxd6
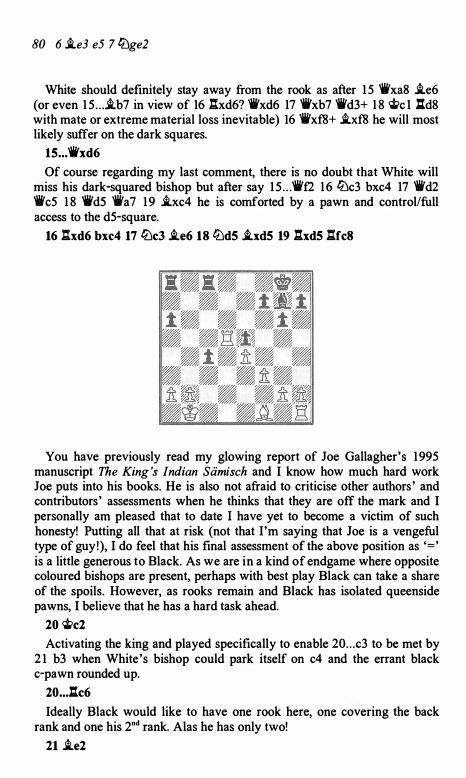
80 6 i.e3 e5 7 li:Jge2
White should definitely stay away from the rook as after 1 5 'ii'xa8 i.e6 (or even 1 5 . . . i.b7 in view of 16 �xd6? 'ii'xd6 17 'ii'xb7 'ii'd3+ 1 8 �c l .l:td8 with mate or extreme material loss inevitable) 16 'ii'xf8+ i.xf8 he will most likely suffer on the dark squares.
15 ... 'ii'xd6
Of course regarding my last comment, there is no doubt that White will miss his dark-squared bishop but after say 1 5 . . . 'ii'f2 1 6 li:Jc3 bxc4 17 'ii'd2 'ii'c5 1 8 'ii'd5 'ii'a7 1 9 i.xc4 he is comforted by a pawn and control/full access to the d5-square.
16 �xd6 bxc4 17 li:Jc3 i.e6 18 li:Jd5 i.xd5 19 �xd5 �fc8
You have previously read my glowing report of Joe Gallagher's 1995 manuscript The King 's Indian Siimisch and I know how much hard work Joe puts into his books. He is also not afraid to criticise other authors ' and contributors' assessments when he thinks that they are off the mark and I personally am pleased that to date I have yet to become a victim of such honesty! Putting all that at risk (not that I'm saying that Joe is a vengeful type of guy!), I do feel that his final assessment of the above position as '=' is a little generous to Black. As we are in a kind of endgame where opposite coloured bishops are present, perhaps with best play Black can take a share of the spoils. However, as rooks remain and Black has isolated queenside pawns, I believe that he has a hard task ahead.
20 �c2
Activating the king and played specifically to enable 20 . . . c3 to be met by 2 1 b3 when White's bishop could park itself on c4 and the errant black c-pawn rounded up.
20 ... llc6
Ideally Black would like to have one rook here, one covering the back rank and one his 2nd rank. Alas he has only two!
21 i.e2
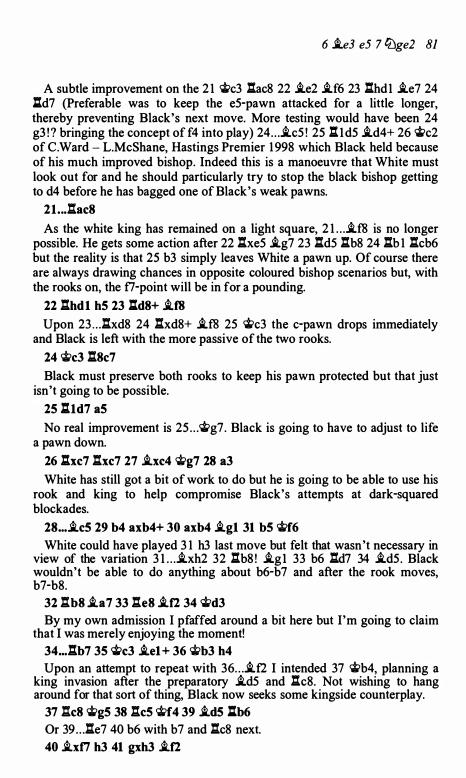
6 i.e3 e5 7 lt:Jge2 81
A subtle improvement on the 2 1 �c3 l:tac8 22 i.e2 i.f6 23 l:thdl i.e7 24 l:[d7 (Preferable was to keep the e5-pawn attacked for a little longer, thereby preventing Black's next move. More testing would have been 24 g3 ! ? bringing the concept of f4 into play) 24 . . . i.c5 ! 25 l:tld5 i.d4+ 26 �c2 of C.Ward - L.McShane, Hastings Premier 1 998 which Black held because of his much improved bishop. Indeed this is a manoeuvre that White must look out for and he should particularly try to stop the black bishop getting to d4 before he has bagged one of Black's weak pawns.
21 . .. l:tac8
As the white king has remained on a light square, 2 1 . . .i.f8 is no longer possible. He gets some action after 22 l:txe5 i.g7 23 l:td5 l:tb8 24 l:tb 1 l:tcb6 but the reality is that 25 b3 simply leaves White a pawn up. Of course there are always drawing chances in opposite coloured bishop scenarios but, with the rooks on, the f7-point will be in for a pounding.
22 .:thd1 h5 23 l:r.d8+ i.f8 Upon 23 . . . l:txd8 24 l:txd8+ i.f8 25 �c3 the c-pawn drops immediately
and Black is left with the more passive of the two rooks. 24 �c3 .:.8c7
Black must preserve both rooks to keep his pawn protected but that just isn't going to be possible.
25 .:.1d7 a5
No real improvement is 25 . . . �g7. Black is going to have to adjust to life a pawn down.
26 .:.xc7 l:txc7 27 i.xc4 'it>g7 28 a3
White has still got a bit of work to do but he is going to be able to use his rook and king to help compromise Black's attempts at dark-squared blockades.
28 •.• i.c5 29 b4 axb4+ 30 axb4 i.g1 31 b5 �f6 White could have played 3 1 h3 last move but felt that wasn't necessary in
view of the variation 3 l . . .i.xh2 32 l:tb8 ! i.gl 33 b6 ltd7 34 i.d5 . Black wouldn't be able to do anything about b6-b7 and after the rook moves, b7-b8.
32 l:tb8 i.a7 33 l:te8 i.f2 34 <i;d3 By my own admission I pfaffed around a bit here but I'm going to claim
that I was merely enjoying the moment! 34 •.. .:tb7 35 �c3 i.e1 + 36 'it>b3 h4 Upon an attempt to repeat with 36 . . . i.f2 I intended 37 �b4, planning a
king invasion after the preparatory i.d5 and l:tc8. Not wishing to hang around for that sort of thing, Black now seeks some kingside counterplay.
37 l:tc8 �g5 38 l:tc5 <i;f4 39 i.d5 ltb6 Or 39 . . . l:te7 40 b6 with b7 and l:tc8 next. 40 i.xf7 h3 41 gxh3 i.f2
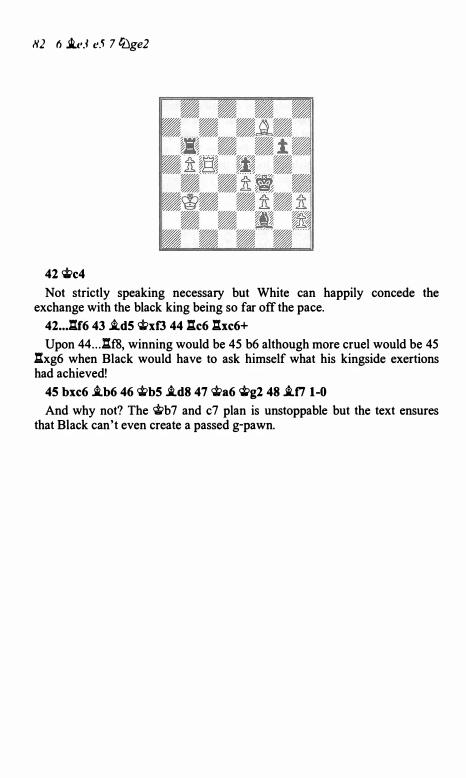
Hl fl i.l'3 e5 7 lC.ge2
42 �c4
Not strictly speaking necessary but White can happily concede the exchange with the black king being so far off the pace.
42 • • . .l:r.f6 43 J.d5 'iti>xf3 44 .l:tc6 .l:txc6+
Upon 44 . . . .l:r.f8, winning would be 45 b6 although more cruel would be 45 .l:r.xg6 when Black would have to ask himself what his kingside exertions had achieved!
45 bxc6 J.b6 46 'iti>b5 J.d8 47 'iti>a6 �g2 48 J.f7 1-0
And why not? The 'iti>b7 and c7 plan is unstoppable but the text ensures that Black can't even create a passed g-pawn.
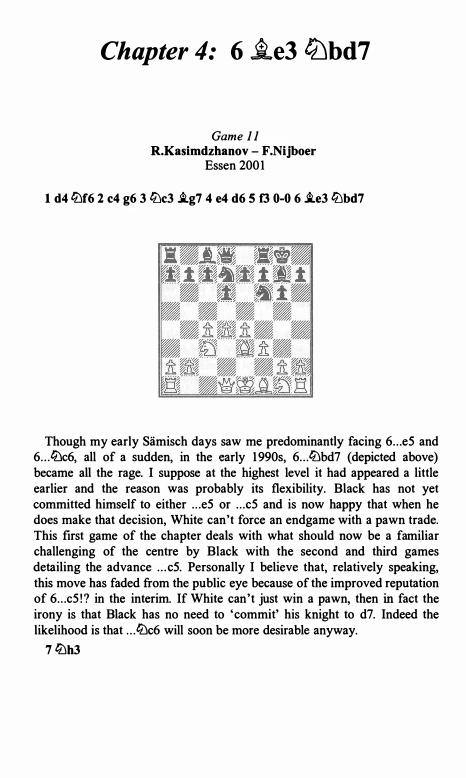
Chapter 4: 6 i..e3 lt.Jbd7
Game 1 1 R.Kasimdzhanov - F.Nijboer
Essen 2001
1 d4 lDf6 2 c4 g6 3 ltJc3 i.g7 4 e4 d6 5 f3 0-0 6 .te3 ltJbd7
Though my early Siimisch days saw me predominantly facing 6 . . . e5 and 6 . . . lbc6, all of a sudden, in the early 1 990s, 6 . . . ltJbd7 (depicted above) became all the rage. I suppose at the highest level it had appeared a little earlier and the reason was probably its flexibility. Black has not yet committed himself to either . . . e5 or . . . c5 and is now happy that when he does make that decision, White can't force an endgame with a pawn trade. This first game of the chapter deals with what should now be a familiar challenging of the centre by Black with the second and third games detailing the advance . . . c5. Personally I believe that, relatively speaking, this move has faded from the public eye because of the improved reputation of 6 . . . c5 ! ? in the interim. If White can't just win a pawn, then in fact the irony is that Black has no need to 'commit' his knight to d7. Indeed the likelihood is that . . . lDc6 will soon be more desirable anyway.
7 lDh3
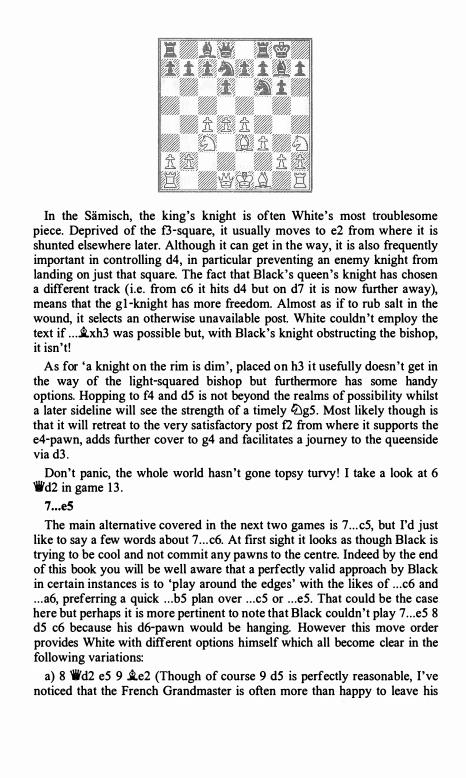
In the Samisch, the king's knight is often White's most troublesome piece. Deprived of the f3-square, it usually moves to e2 from where it is shunted elsewhere later. Although it can get in the way, it is also frequently important in controlling d4, in particular preventing an enemy knight from landing on just that square. The fact that Black's queen's knight has chosen a different track (i.e. from c6 it hits d4 but on d7 it is now further away), means that the gl -knight has more freedom. Almost as if to rub salt in the wound, it selects an otherwise unavailable post. White couldn't employ the text if . . . i.xh3 was possible but, with Black's knight obstructing the bishop, it isn't!
As for 'a knight on the rim is dim', placed on h3 it usefully doesn't get in the way of the light-squared bishop but furthermore has some handy options. Hopping to f4 and d5 is not beyond the realms of possibility whilst a later sideline will see the strength of a timely �g5 . Most likely though is that it will retreat to the very satisfactory post f2 from where it supports the e4-pawn, adds further cover to g4 and facilitates a journey to the queenside via d3 .
Don't panic, the whole world hasn't gone topsy turvy! I take a look at 6 'ii'd2 in game 1 3 .
7 . . . e5
The main alternative covered in the next two games is 7 . . . c5, but I'd just like to say a few words about 7 . . . c6. At first sight it looks as though Black is trying to be cool and not commit any pawns to the centre. Indeed by the end of this book you will be well aware that a perfectly valid approach by Black in certain instances is to 'play around the edges' with the likes of . . . c6 and . . . a6, preferring a quick . . . b5 plan over . . . c5 or . . . e5. That could be the case here but perhaps it is more pertinent to note that Black couldn't play 7 . . . e5 8 d5 c6 because his d6-pawn would be hanging. However this move order provides White with different options himself which all become clear in the following variations:
a) 8 'ii'd2 e5 9 i.e2 {Though of course 9 d5 is perfectly reasonable, I've noticed that the French Grandmaster is often more than happy to leave his
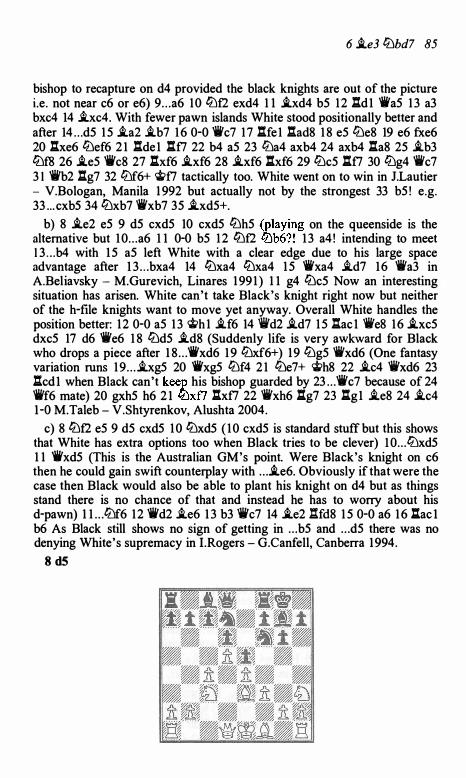
6 i.e3 l£Jbd7 85
bishop to recapture on d4 provided the black knights are out of the picture i .e. not near c6 or e6) 9 . . . a6 10 l{j£2 exd4 1 1 j_xd4 bS 12 .l:.d1 'iVaS 1 3 a3 bxc4 14 i.xc4. With fewer pawn islands White stood positionally better and after 14 . . . dS 1 S j_a2 iLb7 1 6 0-0 'ilc7 17 .l:tfe1 .l:tad8 1 8 eS l£Je8 19 e6 fxe6 20 l:txe6 l£Jef6 2 1 .l:tde 1 .l:tf7 22 b4 aS 23 l£Ja4 axb4 24 axb4 l:ta8 2S .i.b3 l£Jf8 26 .i.eS 'ii'c8 27 lhf6 j_xf6 28 iLxf6 .l:txf6 29 l£JcS .l:tf7 30 l£Jg4 'ilc7 3 1 'ilb2 l:tg7 32 l£Jf6+ �f7 tactically too. White went on to win in J.Lautier - V.Bologan, Manila 1 992 but actually not by the strongest 33 bS ! e.g. 33 . . . cxbS 34 l£Jxb7 'ilxb7 3S .i.xdS+.
b) 8 i.e2 eS 9 dS cxdS 10 cxdS l£JhS (playing on the queenside is the alternative but 1 0 . . . a6 1 1 0-0 bS 1 2 l{j£2 lbb6? ! 1 3 a4 ! intending to meet 1 3 . . . b4 with 1 S aS left White with a clear edge due to his large space advantage after 1 3 . . . bxa4 14 l£Jxa4 l£Jxa4 1 S 'ii'xa4 j_d7 16 'ii'a3 in A.Beliavsky - M.Gurevich, Linares 1 99 1 ) 1 1 g4 l£JcS Now an interesting situation has arisen. White can't take Black's knight right now but neither of the h-file knights want to move yet anyway. Overall White handles the position better: 1 2 0-0 aS 1 3 ..t>h 1 iLf6 14 'i!ld2 j_d7 1 S l:tac l 'ile8 16 .i.xcS dxcS 17 d6 'iVe6 1 8 l£JdS j_d8 (Suddenly life is very awkward for Black who drops a piece after 1 8 . . . 'ii'xd6 1 9 l£Jxf6+) 19 l£JgS 'ilxd6 (One fantasy variation runs 1 9 . . . i.xgS 20 'iVxgS l£Jf4 2 1 l£Je7+ �h8 22 iLc4 'ilxd6 23 l:tcd1 when Black can't keep his bishop guarded by 23 . . . 'iVc7 because of 24 'ilf6 mate) 20 gxhS h6 2 1 l£Jxf7 .l:txf7 22 'ilxh6 .l:tg7 23 .l:tgl .i.e8 24 iLc4 1 -0 M.Taleb - V.Shtyrenkov, Alushta 2004.
c) 8 l£Jf2 eS 9 dS cxdS 1 0 l£JxdS ( 1 0 cxdS is standard stuff but this shows that White has extra options too when Black tries to be clever) l O . . . l£JxdS 1 1 'ii'xdS (This is the Australian GM's point. Were Black's knight on c6 then he could gain swift counterplay with . . . j_e6. Obviously if that were the case then Black would also be able to plant his knight on d4 but as things stand there is no chance of that and instead he has to worry about his d-pawn) 1 1 . . .l£Jf6 12 'ild2 .i.e6 1 3 b3 ilc7 14 .i.e2 1Hd8 1 S 0-0 a6 1 6 .l:tac l b6 As Black still shows no sign of getting in . . . bS and . . . dS there was no denying White's supremacy in I.Rogers - G.Canfell, Canberra 1994.
8 d5
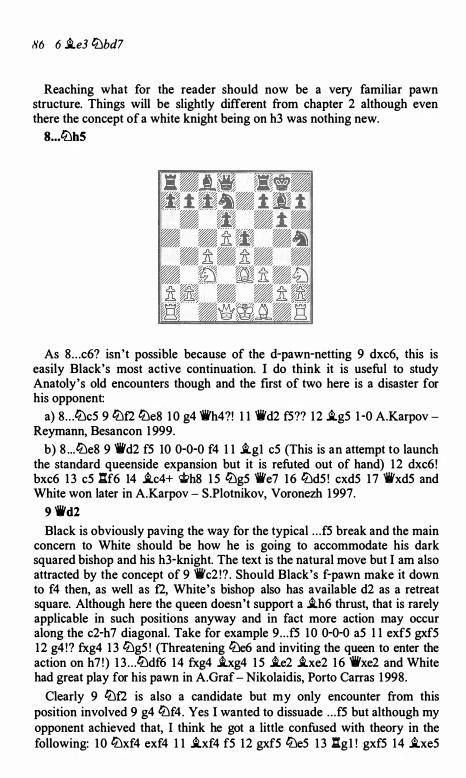
H6 6 i.e3 lt:Jbdl
Reaching what for the reader should now be a very familiar pawn structure. Things will be slightly different from chapter 2 although even there the concept of a white knight being on h3 was nothing new.
8 . . • l?JhS
As 8 . . . c6? isn't possible because of the cl-pawn-netting 9 dxc6, this is easily Black's most active continuation. I do think it is useful to study Anatoly's old encounters though and the first of two here is a disaster for his opponent:
a) 8 . . . l?Jc5 9 l?Jf2 l?Je8 1 0 g4 'ifh4?! 1 1 'ifd2 f5?? 12 i.g5 1 -0 A.Karpov Reymann, Besancon 1 999.
b) 8 . . . l?Je8 9 'ifd2 f5 10 0-0-0 f4 1 1 i.g1 c5 (This is an attempt to launch the standard queenside expansion but it is refuted out of hand) 1 2 dxc6 ! bxc6 1 3 c5 l:r.f6 14 i.c4+ 'ith8 1 5 l?Jg5 'ife7 16 l?Jd5 ! cxd5 1 7 'ifxd5 and White won later in A.Karpov - S.Plotnikov, Voronezh 1 997.
9 'ifd2 Black is obviously paving the way for the typical . . . f5 break and the main
concern to White should be how he is going to accommodate his dark squared bishop and his h3-knight. The text is the natural move but I am also attracted by the concept of 9 'ifc2 !? . Should Black's f-pawn make it down to f4 then, as well as f2, White's bishop also has available d2 as a retreat square. Although here the queen doesn't support a i.h6 thrust, that is rarely applicable in such positions anyway and in fact more action may occur along the c2-h7 diagonal. Take for example 9 . . . f5 1 0 0-0-0 a5 1 1 exf5 gxf5 12 g4 !? fxg4 1 3 l?Jg5 ! (Threatening l?Je6 and inviting the queen to enter the action on h7 ! ) 1 3 . . . l?Jdf6 14 fxg4 i.xg4 1 5 i.e2 i.xe2 1 6 'ifxe2 and White had great play for his pawn in A.Graf- Nikolaidis, Porto Carras 1 998.
Clearly 9 l?Jf2 is also a candidate but my only encounter from this position involved 9 g4 l?Jf4. Yes I wanted to dissuade . . . f5 but although my opponent achieved that, I think he got a little confused with theory in the following: 1 0 l?Jxf4 exf4 1 1 i.xf4 f5 12 gxf5 l?Je5 1 3 l:r.g1 ! gxf5 14 i.xe5
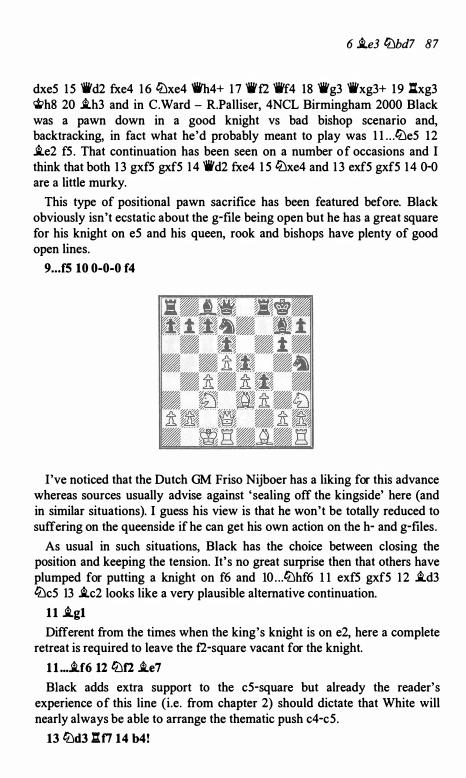
6 i.e3 CiJbd7 87
dxe5 1 5 _.d2 fxe4 1 6 C!Jxe4 �4+ 1 7 _.f2 _.f4 18 _.g3 _.xg3+ 19 l:xg3 <i>h8 20 i.h3 and in C.Ward - R.Palliser, 4NCL Birmingham 2000 Black was a pawn down in a good knight vs bad bishop scenario and, backtracking, in fact what he'd probably meant to play was 1 1 . . . CiJe5 12 i.e2 f5 . That continuation has been seen on a number of occasions and I think that both 1 3 gxf5 gxf5 14 _.d2 fxe4 1 5 C!Jxe4 and 1 3 exf5 gxf5 14 0-0 are a little murky.
This type of positional pawn sacrifice has been featured before. Black obviously isn't ecstatic about the g-file being open but he has a great square for his knight on e5 and his queen, rook and bishops have plenty of good open lines.
9 . . • f5 10 0-0-0 f4
I 've noticed that the Dutch GM Friso Nijboer has a liking for this advance whereas sources usually advise against ' sealing off the kingside' here (and in similar situations). I guess his view is that he won't be totally reduced to suffering on the queenside if he can get his own action on the h- and g-files.
As usual in such situations, Black has the choice between closing the position and keeping the tension. It's no great surprise then that others have plumped for putting a knight on f6 and lO . . . CiJhf6 l l exf5 gxf5 1 2 i.d3 C!Jc5 13 i.c2 looks like a very plausible alternative continuation.
l l i.g1
Different from the times when the king's knight is on e2, here a complete retreat is required to leave the f2-square vacant for the knight.
l l ... i.f6 12 CiJfl i.e7
Black adds extra support to the c5-square but already the reader's experience of this line (i.e. from chapter 2) should dictate that White will nearly always be able to arrange the thematic push c4-c5.
l3 CiJdJ :n 14 M!
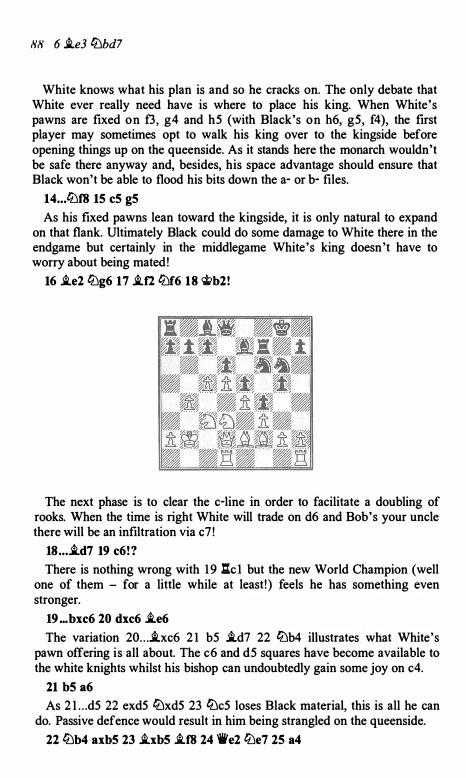
HH 6 �e3 ttJbd7
White knows what his plan is and so he cracks on. The only debate that White ever really need have is where to place his king. When White's pawns are fixed on f3, g4 and h5 (with Black's on h6, g5, f4), the first player may sometimes opt to walk his king over to the kingside before opening things up on the queenside. As it stands here the monarch wouldn't be safe there anyway and, besides, his space advantage should ensure that Black won't be able to flood his bits down the a- or b- files.
14 ... ttJf8 15 c5 g5
As his fixed pawns lean toward the kingside, it is only natural to expand on that flank. Ultimately Black could do some damage to White there in the endgame but certainly in the middlegame White's king doesn't have to worry about being mated !
16 �e2 ttJg6 17 �f2 ttJf6 18 'it>b2!
The next phase is to clear the c-line in order to facilitate a doubling of rooks. When the time is right White will trade on d6 and Bob's your uncle there will be an infiltration via c7 !
18 . . • �d7 19 c6! ?
There is nothing wrong with 1 9 :tc 1 but the new World Champion (well one of them - for a little while at least ! ) feels he has something even stronger.
19 ... bxc6 20 dxc6 �e6
The variation 20 . . . �xc6 2 1 b5 �d7 22 ttJb4 illustrates what White's pawn offering is all about. The c6 and d5 squares have become available to the white knights whilst his bishop can undoubtedly gain some joy on c4.
21 b5 a6
As 2 l . . .d5 22 exd5 ttJxd5 23 ttJc5 loses Black material, this is all he can do. Passive defence would result in him being strangled on the queenside.
22 ttJb4 axb5 23 �xb5 �f8 24 'ii'e2 ttJe7 25 a4
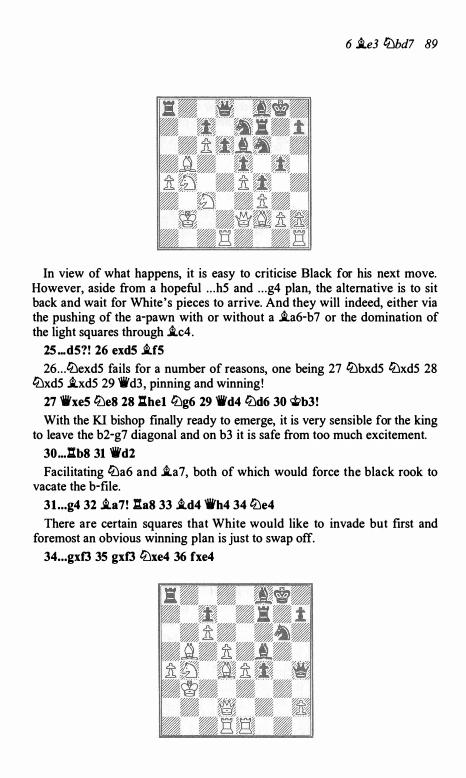
6 .i.e3 &Dbd7 89
In view of what happens, it is easy to criticise Black for his next move. However, aside from a hopeful . . . h5 and . . . g4 plan, the alternative is to sit back and wait for White's pieces to arrive. And they will indeed, either via the pushing of the a-pawn with or without a .ta6-b7 or the domination of the light squares through .i.c4.
25 ... d5?! 26 exd5 .i.f5
26 . . . &Dexd5 fails for a number of reasons, one being 27 &Dbxd5 &Dxd5 28 &Dxd5 .i.xd5 29 'ii'd3 , pinning and winning !
27 'ifxe5 &DeS 2S l:lhel &Dg6 29 'ifd4 &Dd6 30 'Otb3!
With the KI bishop finally ready to emerge, it is very sensible for the king to leave the b2-g7 diagonal and on b3 it is safe from too much excitement.
30 ..• l:lbS 31 'ii'd2
Facilitating &Da6 and .i.a7, both of which would force the black rook to vacate the b-file.
31 . .. g4 32 .ta7! :taS 33 .i.d4 'ifh4 34 &De4
There are certain squares that White would like to invade but first and foremost an obvious winning plan is just to swap off.
34 ... gxf3 35 gxf3 &Dxe4 36 fxe4
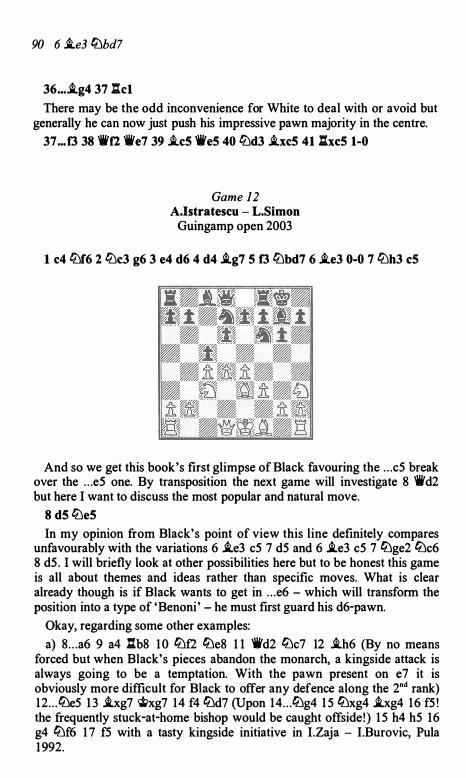
90 6 .ie3 0.bd7
36 ... .ig4 37 l:tc1
There may be the odd inconvenience for White to deal with or avoid but generally he can now just push his impressive pawn majority in the centre.
37 ... f3 38 'it'f2 'it'e7 39 .i.c5 'ii'e5 40 0.d3 .i.xc5 41 lhc5 1-0
Game 12 A.Istratescu - L.Simon
Guingamp open 2003
1 c4 0.f6 2 0.c3 g6 3 e4 d6 4 d4 .ig7 5 f3 0.bd7 6 .i.e3 0-0 7 0.h3 c5
And so we get this book's first glimpse of Black favouring the . . . c5 break over the . . . e5 one. By transposition the next game will investigate 8 'it'd2 but here I want to discuss the most popular and natural move.
8 d5 0.e5
In my opinion from Black's point of view this line definitely compares unfavourably with the variations 6 .ie3 c5 7 d5 and 6 .i.e3 c5 7 0.ge2 0.c6 8 d5 . I will briefly look at other possibilities here but to be honest this game is all about themes and ideas rather than specific moves. What is clear already though is if Black wants to get in . . . e6 - which will transform the position into a type of 'Benoni' - he must first guard his d6-pawn.
Okay, regarding some other examples: a) 8 . . . a6 9 a4 l:tb8 1 0 0.t2 0.e8 1 1 'ii'd2 0.c7 12 .ih6 (By no means
forced but when Black's pieces abandon the monarch, a kingside attack is always going to be a temptation. With the pawn present on e7 it is obviously more difficult for Black to offer any defence along the 2"d rank) 12 . . . 0.e5 1 3 .ixg7 �xg7 14 f4 0.d7 (Upon 14 . . . 0.g4 1 5 0.xg4 .i.xg4 16 f5 ! the frequently stuck-at-home bishop would be caught offside! ) 1 5 h4 h5 16 g4 0.f6 1 7 f5 with a tasty kingside initiative in I.Zaja - I.Burovic, Pula 1992.
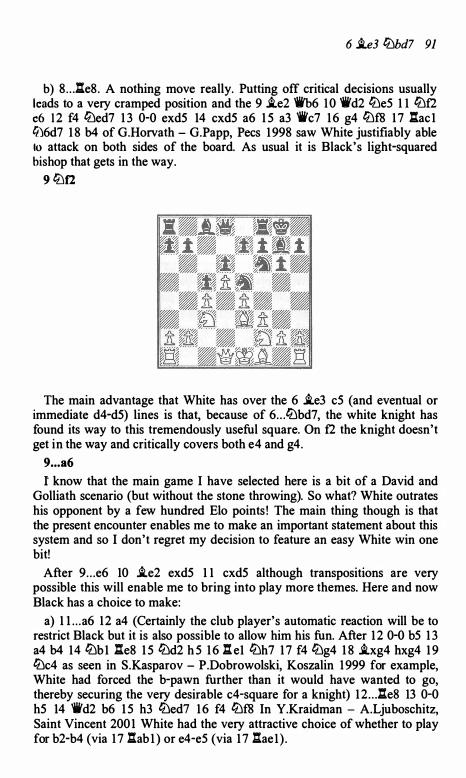
6 i.e3 l:iJbd7 91
b) 8 . . . l:e8. A nothing move really. Putting off critical decisions usually leads to a very cramped position and the 9 i.e2 �6 10 'ii'd2 l1Je5 I I l1Jt2 c6 1 2 f4 l1Jed7 1 3 0-0 exd5 I4 cxd5 a6 I 5 a3 'ii'c7 I 6 g4 l1Jf8 I 7 l:.acl lt16d7 I 8 b4 of G.Horvath - G.Papp, Pecs I 998 saw White justifiably able to attack on both sides of the board. As usual it is Black's light-squared bishop that gets in the way.
9 l:iJf2
The main advantage that White has over the 6 i.e3 c5 (and eventual or immediate d4-d5) lines is that, because of 6 . . . l1Jbd7, the white knight has found its way to this tremendously useful square. On f2 the knight doesn't get in the way and critically covers both e4 and g4.
9 . . . a6
I know that the main game I have selected here is a bit of a David and Golliath scenario (but without the stone throwing). So what? White outrates his opponent by a few hundred Elo points ! The main thing though is that the present encounter enables me to make an important statement about this system and so I don't regret my decision to feature an easy White win one bit!
After 9 . . . e6 10 i.e2 exd5 I I cxd5 although transpositions are very possible this will enable me to bring into play more themes. Here and now Black has a choice to make:
a) I l . . . a6 I2 a4 (Certainly the club player's automatic reaction will be to restrict Black but it is also possible to allow him his fun. After I 2 0-0 b5 1 3 a4 b4 I4 l:iJb I l:e8 I 5 l:iJd2 h 5 I 6 l: e I l:iJh 7 I 7 f4 l1Jg4 I 8 i.xg4 hxg4 I 9 l1Jc4 as seen in S.Kasparov - P.Dobrowolski, Koszalin 1 999 for example, White had forced the b-pawn further than it would have wanted to go, thereby securing the very desirable c4-square for a knight) I 2 . . . .:te8 13 0-0 h5 I4 'ii'd2 b6 I 5 h3 l1Jed7 I 6 f4 l1Jf8 In Y.Kraidman - A.Ljuboschitz, Saint Vincent 200I White had the very attractive choice of whether to play for b2-b4 (via 1 7 l:ab i ) or e4-e5 (via I 7 l:aei) .
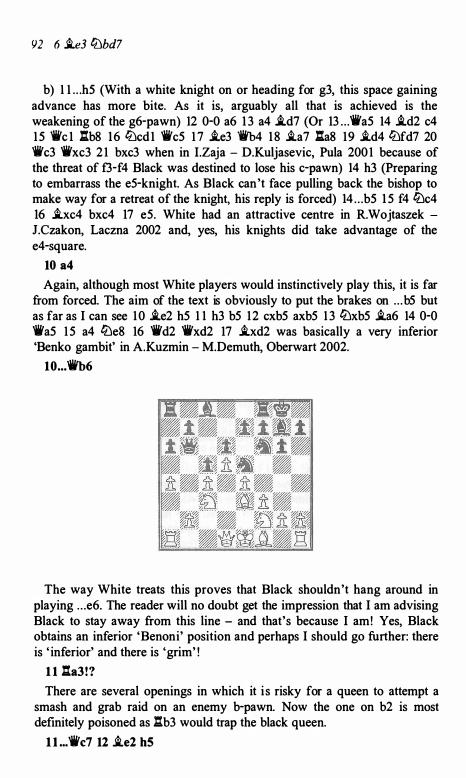
92 6 �e3 &i:Jbd7
b) l l . . .h5 (With a white knight on or heading for g3, this space gaining advance has more bite. As it is, arguably all that is achieved is the weakening of the g6-pawn) 12 0-0 a6 1 3 a4 �d7 (Or 13 . . . 'ii'a5 14 i.d2 c4 1 5 'if c 1 :b8 16 &i'Jcd 1 'if c5 1 7 i.e3 'ii'b4 1 8 �a 7 :as 19 �d4 &i'Jfd7 20 'ifc3 'ii'xc3 2 1 bxc3 when in I.Zaja - D.Kuljasevic, Pula 200 1 because of the threat of f3-f4 Black was destined to lose his c-pawn) 14 h3 (Preparing to embarrass the e5-knight. As Black can't face pulling back the bishop to make way for a retreat of the knight, his reply is forced) 14 . . . b5 1 5 f4 &Dc4 16 �xc4 bxc4 17 e5. White had an attractive centre in R.Wojtaszek J.Czakon, Laczna 2002 and, yes, his knights did take advantage of the e4-square.
10 a4
Again, although most White players would instinctively play this, it is far from forced. The aim of the text is obviously to put the brakes on . . . b5 but as far as I can see 1 0 �e2 h5 1 1 h3 b5 12 cxb5 axb5 1 3 &Dxb5 �a6 14 0-0 'ii'a5 1 5 a4 &De8 16 'ii'd2 'ii'xd2 17 i.xd2 was basically a very inferior 'Benko gambit' in A.Kuzmin - M.Demuth, Oberwart 2002.
10 . . . 'ifb6
The way White treats this proves that Black shouldn't hang around in playing . . . e6. The reader will no doubt get the impression that I am advising Black to stay away from this line - and that's because I am! Yes, Black obtains an inferior 'Benoni' position and perhaps I should go further: there is ' inferior' and there is 'grim' !
1 1 :a3 !?
There are several openings in which it i s risky for a queen to attempt a smash and grab raid on an enemy b-pawn. Now the one on b2 is most definitely poisoned as :b3 would trap the black queen.
l l ... 'ii'c7 12 i.e2 h5
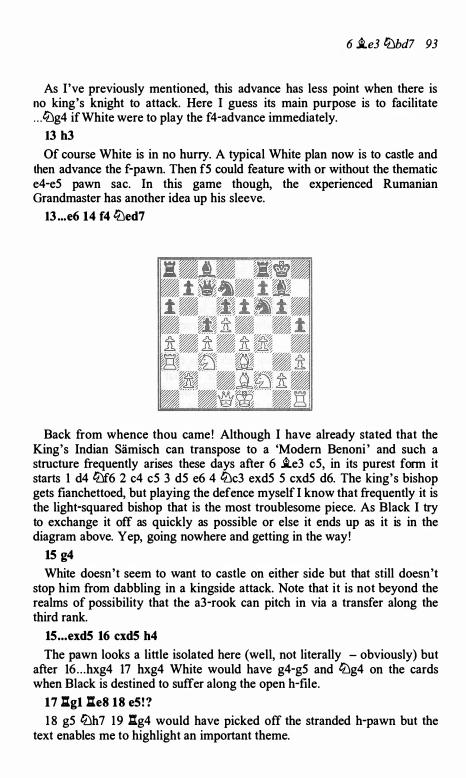
6 i.e3 t'iJbd7 93
As I've previously mentioned, this advance has less point when there is no king's knight to attack. Here I guess its main purpose is to facilitate . . . t'!Jg4 if White were to play the f4-advance immediately.
13 h3
Of course White is in no hurry. A typical White plan now is to castle and then advance the f-pawn. Then f5 could feature with or without the thematic e4-e5 pawn sac. In this game though, the experienced Rumanian Grandmaster has another idea up his sleeve.
13 ... e6 14 f4 t'!Jed7
Back from whence thou came! Although I have already stated that the King's Indian Siimisch can transpose to a 'Modern Benoni ' and such a structure frequently arises these days after 6 i.e3 c5, in its purest form it starts I d4 t'iJf6 2 c4 c5 3 d5 e6 4 t'!Jc3 exd5 5 cxd5 d6. The king's bishop gets fianchettoed, but playing the defence myself I know that frequently it is the light-squared bishop that is the most troublesome piece. As Black I try to exchange it off as quickly as possible or else it ends up as it is in the diagram above. Y ep, going nowhere and getting in the way!
15 g4
White doesn't seem to want to castle on either side but that still doesn't stop him from dabbling in a kingside attack. Note that it is not beyond the realms of possibility that the a3-rook can pitch in via a transfer along the third rank.
15 ... exd5 16 cxdS h4
The pawn looks a little isolated here (well, not literally - obviously) but after 16 . . . hxg4 17 hxg4 White would have g4-g5 and t'!Jg4 on the cards when Black is destined to suffer along the open h-file.
17 l:r.g1 l:r.e8 18 e5! ?
1 8 g5 t'iJh7 19 l:r.g4 would have picked off the stranded h-pawn but the text enables me to highlight an important theme.
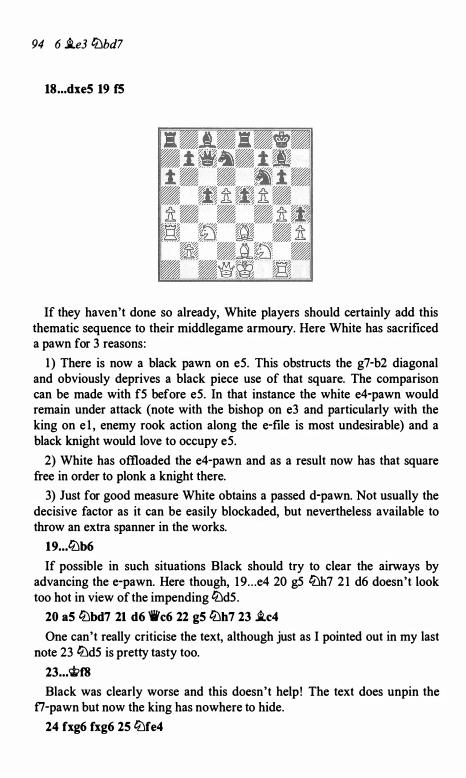
94 6 i.e3 &Dbd7
18 . . . dxe5 19 f5
If they haven't done so already, White players should certainly add this thematic sequence to their middlegame armoury. Here White has sacrificed a pawn for 3 reasons :
1 ) There is now a black pawn on e5. This obstructs the g7-b2 diagonal and obviously deprives a black piece use of that square. The comparison can be made with f5 before e5. In that instance the white e4-pawn would remain under attack (note with the bishop on e3 and particularly with the king on e 1 , enemy rook action along the e-file is most undesirable) and a black knight would love to occupy e5.
2) White has otlloaded the e4-pawn and as a result now has that square free in order to plonk a knight there.
3) Just for good measure White obtains a passed d-pawn. Not usually the decisive factor as it can be easily blockaded, but nevertheless available to throw an extra spanner in the works.
19 . . . &Db6
If possible in such situations Black should try to clear the airways by advancing the e-pawn. Here though, 1 9 . . . e4 20 g5 &Dh7 2 1 d6 doesn't look too hot in view of the impending &Dd5 .
20 a5 &Dbd7 21 d6 1li'c6 22 g5 &Dh7 23 i.c4
One can't really criticise the text, although just as I pointed out in my last note 23 &Dd5 is pretty tasty too.
23 . . . 'iti>f8
Black was clearly worse and this doesn't help ! The text does unpin the f7-pawn but now the king has nowhere to hide.
24 fxg6 fxg6 25 &Dfe4
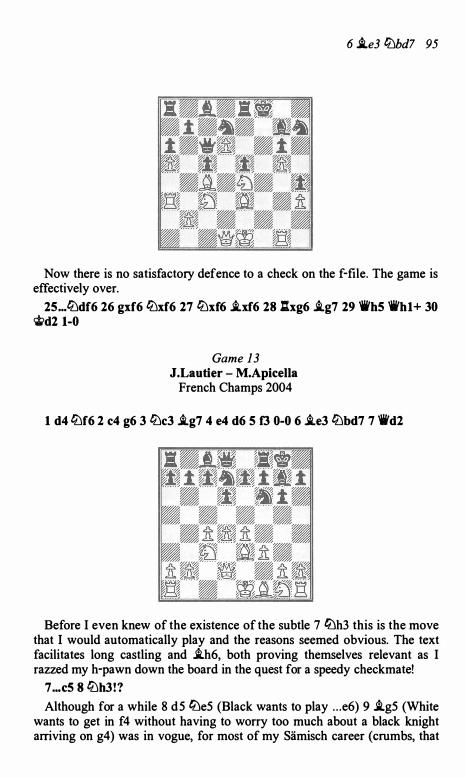
6 .i..e3 0.bd7 95
Now there is no satisfactory defence to a check on the f-file. The game is effectively over.
2S ... 0.df6 26 gxf6 0.xf6 27 0.xf6 .i..xf6 28 .:.xg6 .i..g7 29 'ii'hS 'ii'hl + 30 �d2 1-0
Game l3 J.Lautier - M.Apicella
French Champs 2004
1 d4 0.f6 2 c4 g6 3 0.c3 .i..g7 4 e4 d6 S f3 0-0 6 .i..e3 0.bd7 7 'ii'd2
Before I even knew of the existence of the subtle 7 0.h3 this is the move that I would automatically play and the reasons seemed obvious. The text facilitates long castling and .i..h6, both proving themselves relevant as I razzed my h-pawn down the board in the quest for a speedy checkmate!
7 ..• cS 8 0.h3!?
Although for a while 8 d5 0.e5 (Black wants to play . . . e6) 9 .i..g5 (White wants to get in f4 without having to worry too much about a black knight arriving on g4) was in vogue, for most of my Samisch career (crumbs, that
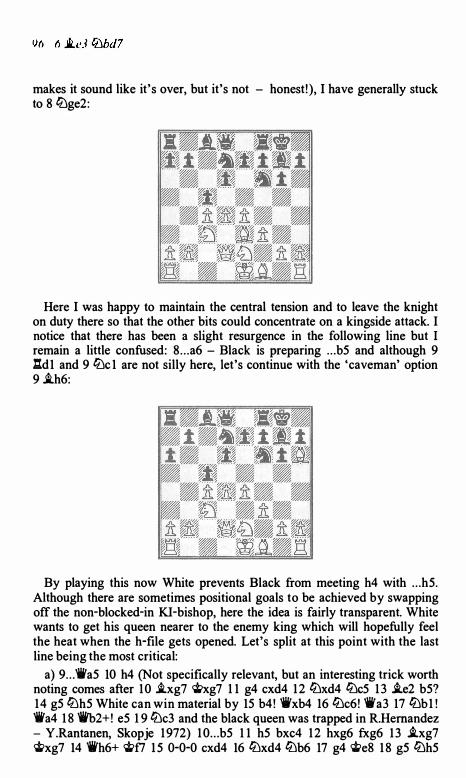
makes it sound like it' s over, but it's not - honest! ), I have generally stuck to 8 l2:Jge2:
Here I was happy to maintain the central tension and to leave the knight on duty there so that the other bits could concentrate on a kingside attack. I notice that there has been a slight resurgence in the following line but I remain a little confused: 8 . . . a6 - Black is preparing . . . b5 and although 9 l:tdl and 9 tt:Jc l are not silly here, let's continue with the 'caveman' option 9 .th6:
By playing this now White prevents Black from meeting h4 with . . . h5. Although there are sometimes positional goals to be achieved by swapping off the non-blocked-in KI-bishop, here the idea is fairly transparent. White wants to get his queen nearer to the enemy king which will hopefully feel the heat when the h-file gets opened. Let's split at this point with the last line being the most critical:
a) 9 . . . 'ii'a5 10 h4 (Not specifically relevant, but an interesting trick worth noting comes after 10 Ji..xg7 <J;xg7 1 1 g4 cxd4 1 2 tt:Jxd4 tt:Jc5 1 3 .te2 b5? 14 g5 l2:Jh5 White can win material by 15 b4 ! 'i'xb4 16 tt:Jc6! 'i'a3 17 tt:Jb1 ! 'ii'a4 1 8 'ii'h2+! e5 1 9 tt:Jc3 and the black queen was trapped in R.Hemandez - Y.Rantanen, Skopje 1972) 1 0 . . . b5 1 1 h5 bxc4 1 2 hxg6 fxg6 1 3 .txg7 �xg7 14 'i'h6+ <J;f7 1 5 0-0-0 cxd4 16 tt:Jxd4 tt:Jb6 17 g4 �e8 1 8 g5 l2:Jh5
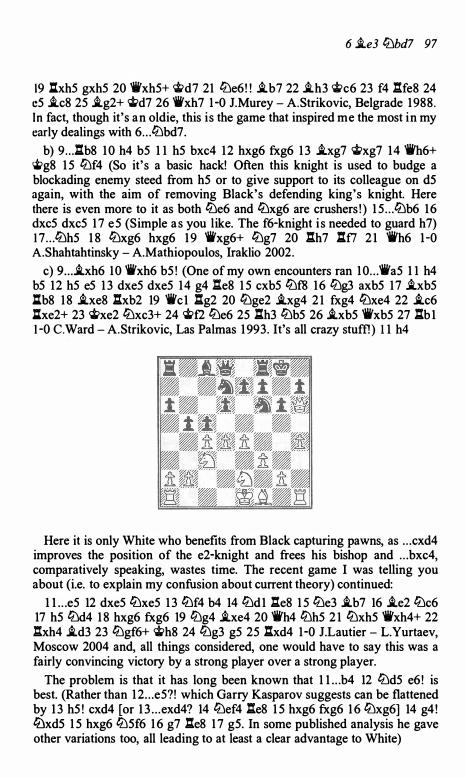
6 ii.e3 fi:Jbd7 97
19 l:.xh5 gxh5 20 'ii'xh5+ �d7 21 fi:Je6! ! i.b7 22 .i.h3 �c6 23 f4 l:He8 24 e5 .i.c8 25 .i.g2+ �d7 26 'ii'xh7 1 -0 J.Murey - A.Strikovic, Belgrade 1988 . I n fact, though it's an oldie, this is the game that inspired me the most in my early dealings with 6 . . . fi:Jbd7.
b) 9 . . . .l:.b8 1 0 h4 b5 1 1 h5 bxc4 12 hxg6 fxg6 1 3 .i.xg7 �xg7 14 'ii'h6+ �g8 1 5 fi:Jf4 (So it's a basic hack! Often this knight is used to budge a blockading enemy steed from h5 or to give support to its colleague on d5 again, with the aim of removing Black's defending king's knight. Here there is even more to it as both fi:Je6 and fl:Jxg6 are crushers ! ) 1 5 . . . fi:Jb6 16 dxc5 dxc5 1 7 e5 (Simple a s you like. The f6-knight i s needed to guard h7) 1 7 . . . fi:Jh5 1 8 fi:Jxg6 hxg6 1 9 'ii'xg6+ fl:Jg7 20 .l:th7 .l:.t7 2 1 'ii'h6 1 -0 A.Shahtahtinsky - A.Mathiopoulos, Iraklio 2002.
c) 9 . . . .i.xh6 10 'ii'xh6 b5 ! (One of my own encounters ran 1 0 . . . 'ii'a5 1 1 h4 b5 12 h5 e5 1 3 dxe5 dxe5 14 g4 .l:te8 1 5 cxb5 fi:Jf8 16 fi:Jg3 axb5 17 .i.xb5 l:.b8 1 8 .i.xe8 .l:.xb2 19 'ii'c 1 .l:.g2 20 fl:Jge2 i.xg4 2 1 fxg4 fl:Jxe4 22 .i.c6 l:.xe2+ 23 �xe2 fl:Jxc3+ 24 �f2 fi:Je6 25 .l:.h3 fi:Jb5 26 .i.xb5 'ii'xb5 27 .l:.b 1 l -0 C.Ward - A.Strikovic, Las Palmas 1 993. It's all crazy stuffi) 1 1 h4
Here it is only White who benefits from Black capturing pawns, as . . . cxd4 improves the position of the e2-knight and frees his bishop and . . . bxc4, comparatively speaking, wastes time. The recent game I was telling you about (i.e. to explain my confusion about current theory) continued:
1 l . . .e5 12 dxe5 fl:Jxe5 1 3 fi:Jf4 b4 14 fi:Jd1 l:te8 1 5 fi:Je3 .i.b7 16 .i.e2 fi:Jc6 17 h5 fi:Jd4 1 8 hxg6 fxg6 19 fi:Jg4 .i.xe4 20 'ii'h4 fi:Jh5 2 1 fi:Jxh5 'ii'xh4+ 22 l:txh4 .i.d3 23 fi:Jgf6+ �h8 24 fi:Jg3 g5 25 .l:.xd4 1-0 J.Lautier - L.Yurtaev, Moscow 2004 and, all things considered, one would have to say this was a fairly convincing victory by a strong player over a strong player.
The problem is that it has long been known that 1 l . . .b4 12 fi:Jd5 e6 ! is best. (Rather than 1 2 . . . e5?! which Garry Kasparov suggests can be flattened by 1 3 h5 ! cxd4 [or 1 3 . . . exd4? 14 fi:Jef4 l:te8 1 5 hxg6 fxg6 1 6 fl:Jxg6] 14 g4 ! fi:Jxd5 1 5 hxg6 fi:J5f6 1 6 g7 .l:.e8 1 7 g5. In some published analysis he gave other variations too, all leading to at least a clear advantage to White)
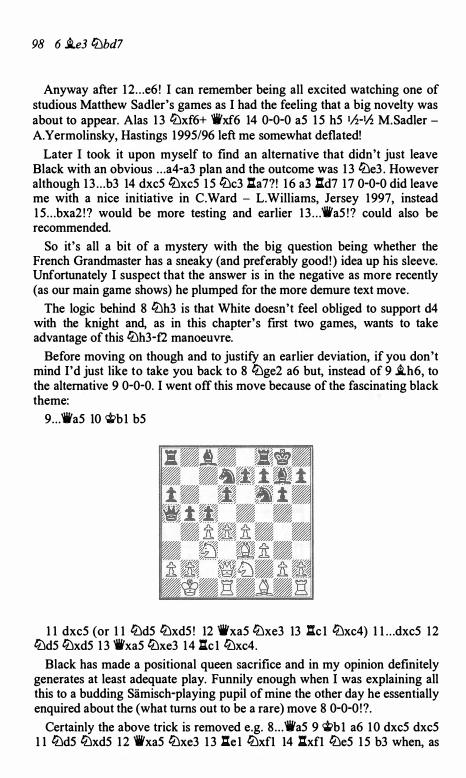
98 6 .ie3 l:Dbd7
Anyway after 1 2 . . . e6 ! I can remember being all excited watching one of studious Matthew Sadler's games as I had the feeling that a big novelty was about to appear. Alas 1 3 &Dxf6+ 'iixf6 14 0-0-0 aS 1 S hS Ih-th M.Sadler A.Yermolinsky, Hastings 199S/96 left me somewhat deflated!
Later I took it upon myself to find an alternative that didn't just leave Black with an obvious . . . a4-a3 plan and the outcome was 1 3 &De3 . However although 1 3 . . . b3 14 dxcS &DxcS 1 S &Dc3 l:.a7?! 1 6 a3 l:.d7 1 7 0-0-0 did leave me with a nice initiative in C.Ward - L.Williams, Jersey 1997, instead 1 S . . . bxa2 ! ? would be more testing and earlier 1 3 . . . 'ii'aS ! ? could also be recommended.
So it's all a bit of a mystery with the big question being whether the French Grandmaster has a sneaky (and preferably good! ) idea up his sleeve. Unfortunately I suspect that the answer is in the negative as more recently (as our main game shows) he plumped for the more demure text move.
The logic behind 8 &Dh3 is that White doesn't feel obliged to support d4 with the knight and, as in this chapter's first two games, wants to take advantage of this &Dh3-f2 manoeuvre.
Before moving on though and to justify an earlier deviation, if you don't mind I'd just like to take you back to 8 &Dge2 a6 but, instead of 9 .ih6, to the alternative 9 0-0-0. I went off this move because of the fascinating black theme:
9 . . . 'iiaS 10 'iti>b1 bS
1 1 dxcS (or 1 1 &DdS &DxdS ! 12 "ifxaS &Dxe3 13 .l:.c l &Dxc4) 1 l . . .dxcS 12 &DdS &DxdS 1 3 'ii'xaS &Dxe3 14 l:.c 1 &Dxc4.
Black has made a positional queen sacrifice and in my opinion definitely generates at least adequate play. Funnily enough when I was explaining all this to a budding Siimisch-playing pupil of mine the other day he essentially enquired about the (what turns out to be a rare) move 8 0-0-0 ! ?.
Certainly the above trick is removed e.g. 8 . . . 'iVaS 9 �b l a6 1 0 dxcS dxcS 1 1 &DdS &DxdS 1 2 'iVxaS &Dxe3 1 3 lle1 &Dxfl 14 l:txfl &Des 1 S b3 when, as

6 .i.e3 tiJbd7 99
the gl -knight hadn't yet gone to e2, Black didn't net the c-pawn in D.Krumpacnik - D.Vombek, Graz 1 994.
My initial answer was that in contrast to our main game it commits the king and perhaps critical then is 8 . . . cxd4 9 .i.xd4 a6 10 �bl b5 !? . As it happens there are very few practical encounters in this line but the ones that exist turn out badly (at least in terms of results) for Black. Featuring, as White, apparently one of the world's leading exponents of the line, make what you will of 1 1 cxb5 axb5 12 .ixb5 'ii'a5 1 3 tlJge2 tiJb6 14 tlJcl .i.e6 1 5 g4 l1tb8 16 g5 tiJfd7 1 7 .i.xg7 �xg7 1 8 .i.xd7 tlJxd7 1 9 tiJd5 .i.xd5 20 exd5 .l:.b4 21 .!:the l tlJc5 22 :e3 :ab8 23 b3 �g8 24 :c3 'ika3 25 'ikc2 tiJa4 26 I:tc8+ :xc8 27 'ii'xc8+ �g7 28 'ii'c2 :b7 29 :d3 l:tc7 30 bxa4 1 -0 D.Krumpacnik - W.Ebner, Graz 1 992.
8 . . . cxd4
Eventually Black will have to make a decision about what to do in the centre as it is clear that with tiJ£2, .i.e2 and 0-0 still to come, White has more useful waiting moves at his disposal than his opponent.
The only reasonable-looking alternative is 8 . . . 'ii'a5 but then 9 tiJ£2 a6 1 0 dxc5 (Delayed for a move, an attractive miniature was 1 0 .i.e2 .l:r.b8 1 1 dxc5 dxc5 12 Q-0 lle8 1 3 f4 e5 14 f5 b5 1 5 g4 .l:r.d8 16 l:tadl b4 1 7 tiJd5 tlJxd5 1 8 exd5 gxf5 19 gxf5 tiJf6 20 .i.h6 .i.xf5 2 1 .ixg7 �xg7 22 tlJg4 ! ! 1 -0 T.Marinelli - F.Curione, Filettino 1 994) lO . . . tiJxc5?! 1 1 l1bl ! 'ikb4 12 .i.e2 tiJcd7 1 3 0-0 had certainly turned out comfortably for White in A.Karpov -J.Timman, Holland 1 993. White has a nice space advantage and would arguably have a tougher time against 10 . . . dxc5. However, although . . . tiJb8(or e5)-c6-d4 is a plan, you have to ask yourself whether 6 . . . tiJbd7 was a real success !
9 .i.xd4 a6
It seems to me that around here Black has the choice between handling the position like a 'Maroczy Bind Accelerated Dragon' or aiming for a 'Hedgehog' . In our main game he opts for the latter but the recent 9 . . . tiJc5 10 tiJ£2 tiJe6 1 1 .i.e3 b6 12 .i.e2 .i.a6 13 :c l .l:r.c8 14 b3 'ii'c7 1 5 0-0 'ikb8 16 g4 .i.b7 17 g5 tiJd7 1 8 tiJd5 llfe8 19 tlJg4 tlJc7 20 tlJc3 .l:.f8 21 f4 'ii'a8 22 f5 i.xe4 23 tlJxe4 gxf5 24 tlJxd6 exd6 25 :xf5 tlJe5 26 l1cfl tlJe6 27 .i.£3 tiJxg4 28 .i.xa8 tlJxe3 29 .i.d5 tiJxf5 30 :xf5 of K.Bischoff -K.Wolter, Senden 2003 is more like the former. Clearly White's kingside expansion had paid dividends.
10 tiJf2 'ii'c7 Black wants to get in . . . e6 soon or else White can play tiJd5 at his leisure.
After lO . . . tiJe5, for example, White shouldn't take that knight in case the enemy bishop emerges to rule the dark squares. Instead 1 1 tiJd5 ! is sensible when an attempt to break out after l l . . .tiJxd5 1 2 cxd5 with 1 2 . . . f5 ! ? can be thwarted by 1 3 f4 ! tiJd7 14 .i.xg7 �xg7 1 5 exf5 .l:r.xf5 16 .i.e2 ! tiJf6 1 7 .i.£3. The holes in Black's position outweigh the weakness of White's isolated d-pawn.
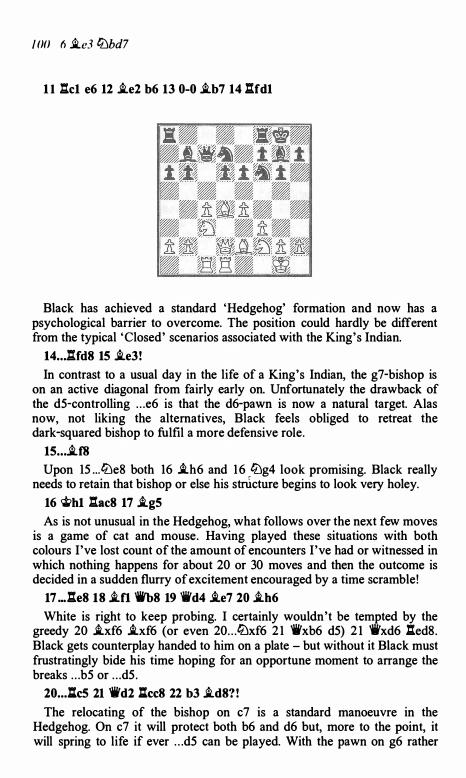
I ()() fl i..e3 l:t:Jbd7
1 1 .l:r.c1 e6 12 .te2 b6 13 0-0 .tb7 14 l:tfd1
Black has achieved a standard 'Hedgehog' formation and now has a psychological barrier to overcome. The position could hardly be different from the typical 'Closed' scenarios associated with the King's Indian.
14 .. Jlfd8 15 .te3!
In contrast to a usual day in the life of a King's Indian, the g7-bishop is on an active diagonal from fairly early on. Unfortunately the drawback of the d5-controlling . . . e6 is that the d6-pawn is now a natural target. Alas now, not liking the alternatives, Black feels obliged to retreat the dark-squared bishop to fulfil a more defensive role.
15 ... .tf8
Upon 15 . . . l:t:Je8 both 16 .th6 and 16 l:t:Jg4 look promising. Black really needs to retain that bishop or else his stnicture begins to look very holey.
16 'ith1 .l:r.ac8 17 .tg5
As is not unusual in the Hedgehog, what follows over the next few moves is a game of cat and mouse. Having played these situations with both colours I've lost count of the amount of encounters I've had or witnessed in which nothing happens for about 20 or 30 moves and then the outcome is decided in a sudden flurry of excitement encouraged by a time scramble!
17 ... l:te8 18 .tn ...,8 19 'ifd4 .te7 20 .th6
White is right to keep probing. I certainly wouldn't be tempted by the greedy 20 .txf6 .txf6 (or even 20 . . . l:t:Jxf6 2 1 'ii'xb6 d5) 2 1 'ii'xd6 l:r.ed8. Black gets counterplay handed to him on a plate - but without it Black must frustratingly bide his time hoping for an opportune moment to arrange the breaks . . . b5 or . . . d5 .
20 ... l:r.c5 21 'ii'd2 l:r.cc8 22 b3 .td8? !
The relocating of the bishop on c7 is a standard manoeuvre in the Hedgehog. On c7 it will protect both b6 and d6 but, more to the point, it will spring to life if ever . . . d5 can be played. With the pawn on g6 rather
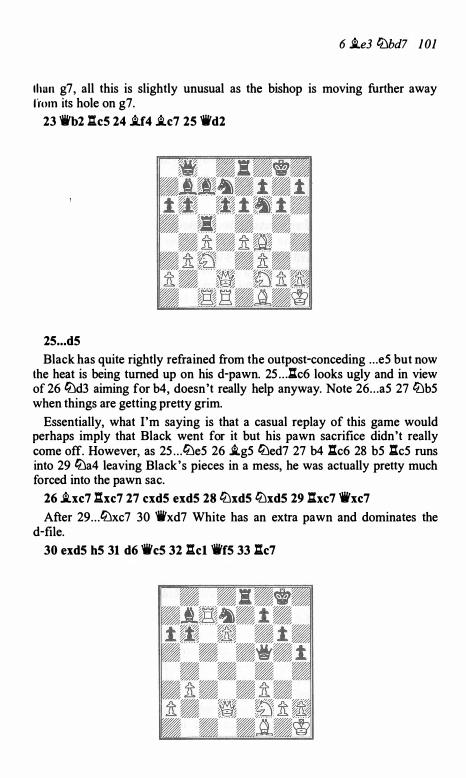
6 i.e3 lDbd7 101
thun g7, all this is slightly unusual as the bishop is moving further away l i om its hole on g7.
23 'it'b2 l:1c5 24 i.f4 i.c7 25 'ii'd2
25 ... d5
Black has quite rightly refrained from the outpost-conceding . . . e5 but now the heat is being turned up on his d-pawn. 25 . . J:lc6 looks ugly and in view of 26 0.d3 aiming for b4, doesn't really help anyway. Note 26 . . . a5 27 lDb5 when things are getting pretty grim.
Essentially, what I'm saying is that a casual replay of this game would perhaps imply that Black went for it but his pawn sacrifice didn't really come off. However, as 25 . . . 0.e5 26 i.g5 0.ed7 27 b4 l:1c6 28 b5 .l:r.c5 runs into 29 0.a4 leaving Black's pieces in a mess, he was actually pretty much forced into the pawn sac.
26 i.xc7 .l:r.xc7 27 cxd5 exd5 28 0.xd5 0.xd5 29 1hc7 'ii'xc7
After 29 . . . 0.xc7 30 'ii'xd7 White has an extra pawn and dominates the d-file.
30 exd5 h5 31 d6 'ii'c5 32 .l:r.cl 'it'f5 33 llc7
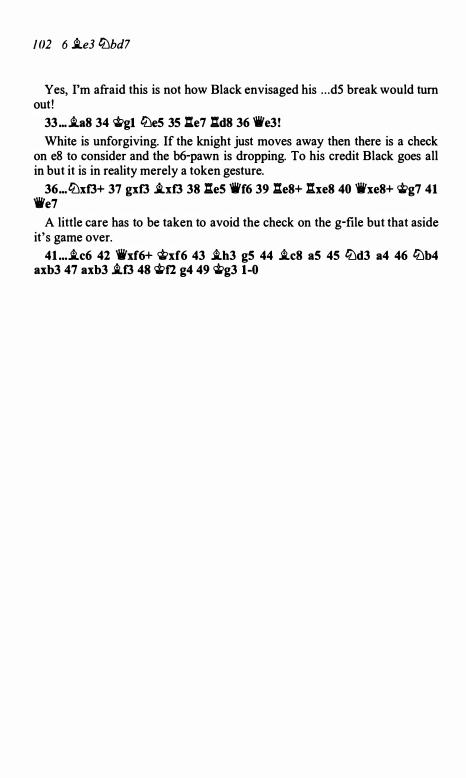
/ 02 6 i.e3 0.bd7
Yes, I'm afraid this is not how Black envisaged his . . . d5 break would turn out !
33 ... i.a8 34 �g1 0.e5 35 l:.e7 l:.d8 36 'ii'e3 !
White is unforgiving. If the knight just moves away then there is a check on e8 to consider and the b6-pawn is dropping. To his credit Black goes all in but it is in reality merely a token gesture.
36 ... 0.xf3+ 37 gxf3 i.xf3 38 l:.eS 'ii'f6 39 l:.e8+ :txe8 40 'iWxe8+ �g7 41 'ii'e7
A little care has to be taken to avoid the check on the g-file but that aside it's game over.
41 ... i.c6 42 �xf6+ �xf6 43 i.h3 gS 44 i.c8 aS 45 0.d3 a4 46 0.b4 axb3 47 axb3 i..f3 48 �f2 g4 49 �g3 1-0
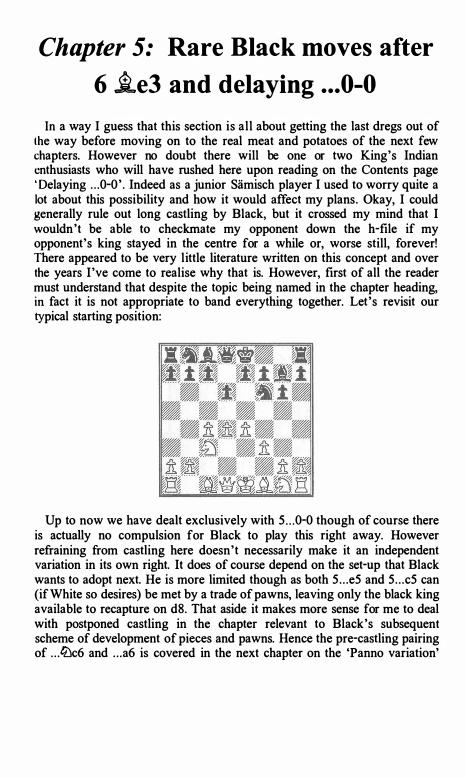
Chapter 5: Rare Black moves after
6 �e3 and delaying . . . 0-0
In a way I guess that this section is all about getting the last dregs out of the way before moving on to the real meat and potatoes of the next few chapters. However no doubt there will be one or two King's Indian enthusiasts who will have rushed here upon reading on the Contents page ' Delaying . . . 0-0 ' . Indeed as a junior Slimisch player I used to worry quite a lot about this possibility and how it would affect my plans. Okay, I could generally rule out long castling by Black, but it crossed my mind that I wouldn't be able to checkmate my opponent down the h-file if my opponent's king stayed in the centre for a while or, worse still, forever! There appeared to be very little literature written on this concept and over the years I 've come to realise why that is. However, first of all the reader must understand that despite the topic being named in the chapter heading, in fact it is not appropriate to band everything together. Let's revisit our typical starting position:
Up to now we have dealt exclusively with 5 . . . 0-0 though of course there is actually no compulsion for Black to play this right away. However refraining from castling here doesn't necessarily make it an independent variation in its own right. It does of course depend on the set-up that Black wants to adopt next. He is more limited though as both 5 . . . e5 and 5 . . . c5 can (if White so desires) be met by a trade of pawns, leaving only the black king available to recapture on d8. That aside it makes more sense for me to deal with postponed castling in the chapter relevant to Black's subsequent scheme of development of pieces and pawns. Hence the pre-castling pairing of . . . ltlc6 and . . . a6 is covered in the next chapter on the 'Panno variation'
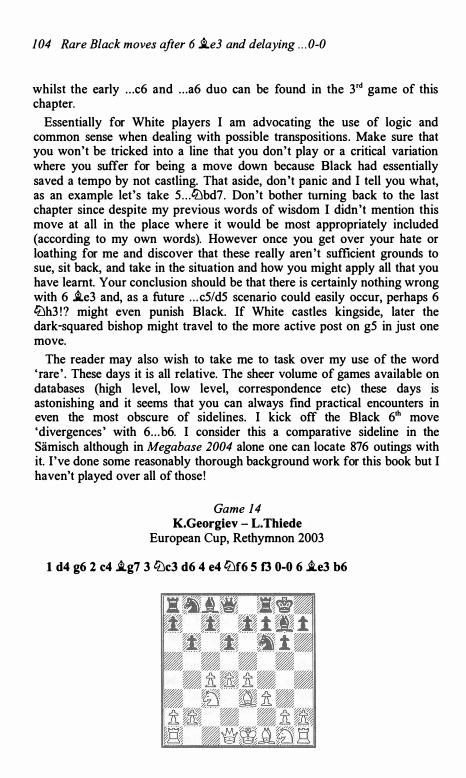
104 Rare Black moves after 6 i..e3 and delaying . . . 0-0
whilst the early . . . c6 and . . . a6 duo can be found in the 3'd game of this chapter.
Essentially for White players I am advocating the use of logic and common sense when dealing with possible transpositions. Make sure that you won't be tricked into a line that you don't play or a critical variation where you suffer for being a move down because Black had essentially saved a tempo by not castling. That aside, don't panic and I tell you what, as an example let's take 5 . . . li'lbd7. Don't bother turning back to the last chapter since despite my previous words of wisdom I didn't mention this move at all in the place where it would be most appropriately included (according to my own words). However once you get over your hate or loathing for me and discover that these really aren't sufficient grounds to sue, sit back, and take in the situation and how you might apply all that you have learnt. Your conclusion should be that there is certainly nothing wrong with 6 i..e3 and, as a future . . . c5/d5 scenario could easily occur, perhaps 6 li'lh3 ! ? might even punish Black. If White castles kingside, later the dark-squared bishop might travel to the more active post on g5 in just one move.
The reader may also wish to take me to task over my use of the word 'rare ' . These days it is all relative. The sheer volume of games available on databases (high level, low level, correspondence etc) these days is astonishing and it seems that you can always find practical encounters in even the most obscure of sidelines. I kick off the Black 61h move 'divergences ' with 6 . . . b6. I consider this a comparative sideline in the Siimisch although in Megabase 2004 alone one can locate 876 outings with it. I 've done some reasonably thorough background work for this book but I haven't played over all of those!
Game 14 K.Georgiev - L. Thiede
European Cup, Rethyrnnon 2003
1 d4 g6 2 c4 i..g7 3 lt'lc3 d6 4 e4 li'lf6 5 f3 0-0 6 i..e3 b6
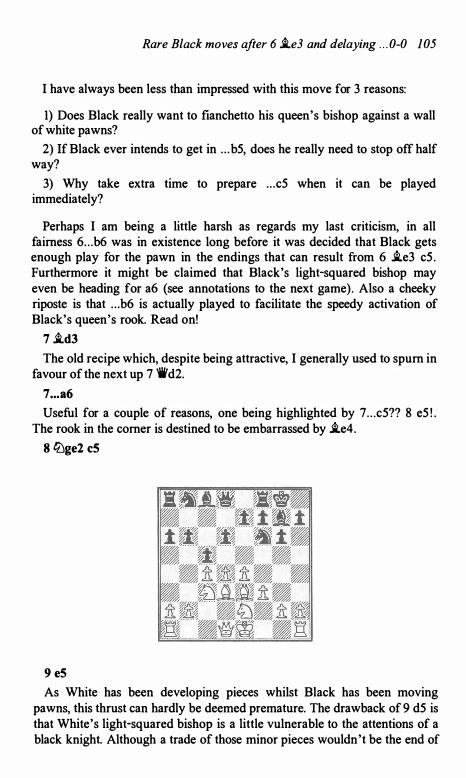
Rare Black moves after 6 i.e3 and delaying . . . 0-0 105
I have always been less than impressed with this move for 3 reasons:
1) Does Black really want to fianchetto his queen's bishop against a wall of white pawns?
2) If Black ever intends to get in . . . b5, does he really need to stop off half way?
3) Why take extra time to prepare . . . c5 when it can be played immediately?
Perhaps I am being a little harsh as regards my last criticism, in all fairness 6 . . . b6 was in existence long before it was decided that Black gets enough play for the pawn in the endings that can result from 6 i.e3 c5 . Furthermore it might be claimed that Black's light-squared bishop may even be heading for a6 (see annotations to the next game) . Also a cheeky riposte is that . . . b6 is actually played to facilitate the speedy activation of Black's queen's rook. Read on!
7 i.d3
The old recipe which, despite being attractive, I generally used to spurn in favour of the next up 7 'ii'd2.
7 . . . a6
Useful for a couple of reasons, one being highlighted by 7 . . . c5?? 8 e5 ! . The rook in the corner is destined to be embarrassed by i.e4.
8 ltJge2 c5
9 e5
As White has been developing pieces whilst Black has been moving pawns, this thrust can hardly be deemed premature. The drawback of 9 d5 is that White's light-squared bishop is a little vulnerable to the attentions of a black knight. Although a trade of those minor pieces wouldn't be the end of
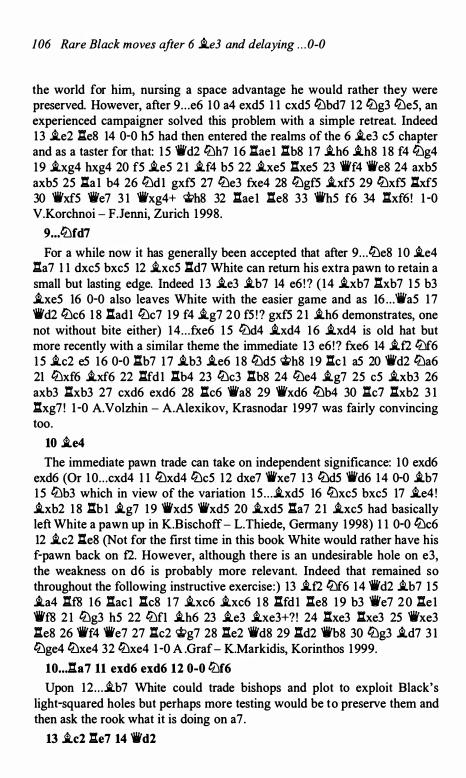
106 Rare Black moves after 6 i.e3 and delaying . . . 0-0
the world for him, nursing a space advantage he would rather they were preserved. However, after 9 . . . e6 1 0 a4 exd5 1 1 cxd5 ltlbd7 12 ltlg3 ltle5, an experienced campaigner solved this problem with a simple retreat. Indeed 1 3 i..e2 .l:r.e8 14 0-0 h5 had then entered the realms of the 6 i..e3 c5 chapter and as a taster for that: 1 5 'i'd2 li:lh7 1 6 l:tae1 l:tb8 1 7 i..h6 i..h8 1 8 f4 ltlg4 1 9 i..xg4 hxg4 20 f5 i..e5 2 1 i..f4 b5 22 i..xe5 l:.xe5 23 'ii'f4 'ii'e8 24 axb5 axb5 25 l:ta1 b4 26 li:ld1 gxf5 27 ltle3 fxe4 28 ltlgf5 i..xf5 29 ltlxf5 l:txf5 30 'ii'xf5 'fke7 3 1 'ii'xg4+ '.i?h8 32 l:tae1 l:te8 33 'ii'h5 f6 34 l:txf6! 1 -0 V.Korchnoi - F.Jenni, Zurich 1 998.
9 ... li:lfd7
For a while now it has generally been accepted that after 9 . . . ltle8 1 0 i.e4 .l:r.a7 1 1 dxc5 bxc5 12 i.xc5 l:td7 White can return his extra pawn to retain a small but lasting edge. Indeed 1 3 i.e3 i..b7 14 e6 ! ? ( 14 i..xb7 :Xxb7 1 5 b3 i..xe5 16 0-0 also leaves White with the easier game and as 16 . . . 'ii'a5 1 7 'ii'd2 ltlc6 1 8 l:tad1 ltlc7 1 9 f4 i.g7 2 0 f5 ! ? gxf5 2 1 i..h6 demonstrates, one not without bite either) 14 . . . fxe6 1 5 li:ld4 i..xd4 1 6 i..xd4 is old hat but more recently with a similar theme the immediate 1 3 e6 ! ? fxe6 14 i..f2 li:lf6 1 5 i..c2 e5 16 0-0 l:tb7 1 7 i..b3 i..e6 1 8 ltld5 �h8 1 9 l:tc 1 a5 20 'ii'd2 ltla6 21 ltlxf6 i..xf6 22 l:tfd 1 ltb4 23 ltlc3 l:b8 24 ltle4 i..g7 25 c5 i..xb3 26 axb3 l:txb3 27 cxd6 exd6 28 l:.c6 'ii'a8 29 'ii'xd6 ltlb4 30 l:tc7 l:txb2 3 1 :1xg7 ! 1 -0 A.Volzhin - A.Alexikov, Krasnodar 1997 was fairly convincing too.
10 i..e4
The immediate pawn trade can take on independent significance: 1 0 exd6 exd6 (Or 1 0 . . . cxd4 1 1 ltlxd4 ltlc5 12 dxe7 'ii'xe7 1 3 ltld5 'ii'd6 14 0-0 i..b7 1 5 ltlb3 which in view of the variation 1 5 . . . i..xd5 16 ltlxc5 bxc5 17 i.e4 ! i..xb2 1 8 l:tb 1 i..g7 1 9 'ii'xd5 'ii'xd5 20 i..xd5 l:.a7 2 1 i..xc5 had basically left White a pawn up in K.Bischoff- L.Thiede, Germany 1 998) 1 1 0-0 ltlc6 12 i..c2 lle8 (Not for the first time in this book White would rather have his f-pawn back on f2. However, although there is an undesirable hole on e3, the weakness on d6 is probably more relevant. Indeed that remained so throughout the following instructive exercise:) 13 i..f2 ltlf6 14 'ii'd2 i..b7 1 5 i..a4 l:tf8 16 :lac l ltc8 1 7 i.xc6 i..xc6 1 8 l:.fd1 l:te8 1 9 b3 'i'e7 2 0 l:te1 'ii'f8 2 1 ltlg3 h5 22 li:lfl i..h6 23 i..e3 i..xe3+? ! 24 ltxe3 .l:txe3 25 'ii'xe3 l:te8 26 'ii'f4 'ii'e7 27 l:tc2 'i;g7 28 l:te2 'ii'd8 29 l:td2 'ii'b8 30 ltlg3 i..d7 3 1 ltlge4 ltlxe4 3 2 ltlxe4 1 -0 A . Graf- K.Markidis, Korinthos 1 999.
10 ... .I:ta7 11 exd6 exd6 12 0-0 li:lf6
Upon 12 . . . i.b7 White could trade bishops and plot to exploit Black's light-squared holes but perhaps more testing would be to preserve them and then ask the rook what it is doing on a7.
13 i..c2 l:te7 14 'ii'd2
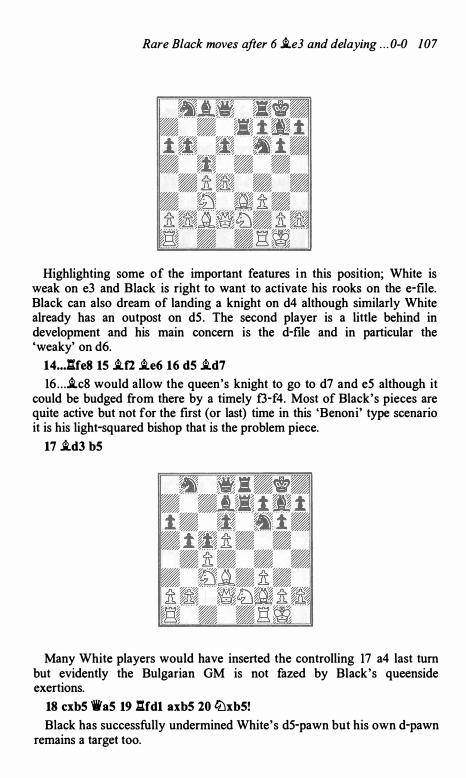
Rare Black moves after 6 ii.e3 and delaying . . . 0-0 107
Highlighting some of the important features in this position; White is weak on e3 and Black is right to want to activate his rooks on the e-file. Black can also dream of landing a knight on d4 although similarly White already has an outpost on d5 . The second player is a little behind in development and his main concern is the d-file and in particular the 'weaky' on d6.
14 . • . .1:tfe8 15 ii.f2 ii.e6 16 d5 ii.d7
16 . . . ii.c8 would allow the queen's knight to go to d7 and e5 although it could be budged from there by a timely f3-f4. Most of Black's pieces are quite active but not for the first (or last) time in this 'Benoni' type scenario it is his light-squared bishop that is the problem piece.
17 ii.d3 b5
Many White players would have inserted the controlling 17 a4 last turn but evidently the Bulgarian GM is not fazed by Black's queenside exertions.
18 cxb5 'i'a5 19 .l:tfd1 axb5 20 ltJxbS!
Black has successfully undermined White's d5-pawn but his own d-pawn remains a target too.
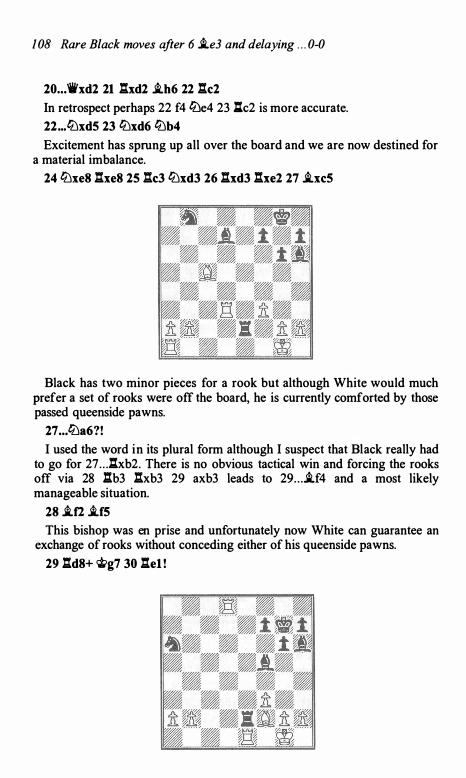
I 08 Rare Black moves after 6 i..e3 and delaying . . . 0-0
20 ... 'it'xd2 21 .l:.xd2 i..h6 22 .l:.c2
In retrospect perhaps 22 f4 lbe4 23 .Uc2 is more accurate. 22 ... lbxd5 23 lbxd6 lbb4
Excitement has sprung up all over the board and we are now destined for a material imbalance.
24 lbxe8 .l:.xe8 25 .l:.c3 lbxd3 26 .l:.xd3 .l:.xe2 27 i..xcS
Black has two minor pieces for a rook but although White would much prefer a set of rooks were off the board, he is currently comforted by those passed queenside pawns.
27 ... lba6?!
I used the word in its plural form although I suspect that Black really had to go for 27 . . . .l:.xb2. There is no obvious tactical win and forcing the rooks off via 28 .l:.b3 l:1xb3 29 axb3 leads to 29 . . . i..f4 and a most likely manageable situation.
28 i..f2 i..fS
This bishop was en prise and unfortunately now White can guarantee an exchange of rooks without conceding either of his queenside pawns.
29 .l:.d8+ �g7 30 .l:.el !

Rare Black moves after 6 i.e3 and delaying . . . 0-0 109
30 .. Jbel+
Otehrwise 3 1 i.d4+ would have led to mate. 31 i.xel i.e3+ 32 'ito>fl 'iti>f6
To his credit Black doesn't give up but I'm afraid that there was only ever going to be one outcome.
33 'Oti>e2 i.cS 34 l:le8 i.d4 35 .l:.d8 i.cS 36 i.f2 i.e7 37 l:la8 fi:Jc7 38 :as h5 39 i.cS i.d8 40 i.b6 'Oti>e7 41 .l:.c5 �d7 42 l:i.cl 'itc8 43 i.aS 'Oti>b7 44 g3 i.d7 45 b4 i.bS+ 46 �fl i.c6 47 a3 i.gS 48 f4 i.d8 49 'it>e2 i.bS+ 50 �d2 i.a4 51 �d3 i.c6 52 .l:r.c2 i.d7 53 lieS fi:Je6 54 i.xd8 fi:Jxc5+ 55 bxc5 �c6 56 'iitd4 i.g4 57 a4 'it>d7 58 i.b6 'iitc6 59 �e5 i.dl 60 'iti>f6 i.b3 61 'ito>e7 i.dS 62 h4 i.b3 63 aS i.c4 64 'iii>d8 �b5 65 'iti>d7 i.dS 66 'iti>d6 i.e4 67 J..d8 J..f3 68 i.b6 i.e4 69 'iti>eS i.f3 70 f5 gxf5 7l 'ifi>xf5 i.g4+ 72 'iti>gS i.f3 73 �f6 i.dS 74 'iti>e7 i.f3 75 'iti>xti i.g4 76 rJ;e7 i.e2 77 'iti>d7 i.g4+ 78 �c7 i.f3 79 'iti>d6 i.a8 80 g4 hxg4 81 h5 g3 82 h6 i.c6 83 h7 g2 84 h8='W gl ='W 85 'iib2+ 'iti>a6 86 i.d8 i.bS 87 'ii'f6 i.c4 88 'iti>d7+ 'it>bS 89 'iib6+ 'ita4 90 c6 'Wg4+ 91 'iitc7 'Wrs 92 a6 'Wti+ 93 'it>b8 'ii'f4+ 94 c7 i.dS 95 a7 l-0
Game 15 C . Ward - A.Lauber
Hamburg 1 995
l d4 fi:Jf6 2 c4 g6 3 fi:Jc3 i.g7 4 e4 d6 5 f3 0-0 6 i.e3 b6 7 'ii'd2
In my early experiences of 6 . . . b6 I guess my attitude was ' I don't see what that does and so I think I' ll just get on with my kingside attack' . Later I realised that it's not quite possible to completely ignore Black and so a simple i.h6, h4-h5 plan may not be applicable. Instead as in this game I preferred a favourable transposition to 6 . . . c5 lines with the inclusion of . . . b6 not being so relevant.
7 .•. c5 8 fi:Jge2 fi:Jc6

1 1 0 Rare Black moves after 6 �e3 and delaying . . . 0-0
Though they both prepared . . . c5, the advantage that 6 . . . b6 has over the 6 . . . lC!bd7 of the last chapter is that this queen's knight is able to develop on the c6 square from where it pressurises the centre,
9 d5 lC!e5 10 lC!gJ
Although I think that I have only reached this exact position on one occasion, I have had it with the queen home on d1 and the pawn back on b7 several times. "comparing the two situations demonstrates this to be the superior version for White as his insert is the more useful of the two.
10 . . . h5 With a white knight on g3 this is a thematic advance although the main
alternative also suggests itself. After 10 . . . e6 1 1 �e2 exd5 (The subtle 1 l . . .�a6 fails in its attempt to swap off bishops as upon 12 b3 exd5 White has 1 3 exd5 . The bishop is misplaced and 1 3 . . . .l:.e8 14 0-0 "ile7 1 5 �g5 "ilf8 16 f4 lC!ed7 1 7 f5 clearly left White with a kingside initiative in I.Novikov - B.Belotti, Forti 1 993) 12 cxd5 a6 we would have reached the position below:
As is common in these type of positions White has a choice of roads to take. He can either restrict his opponent (see 'a') or metaphorically speaking he can give him enough rope to hang himself (see 'b') :

Rare Black moves after 6 i.e3 and delaying . . . 0-0 1 1 1
a) 1 3 a4 .l:.b8 (Upon 1 3 . . . h5 14 0-0 h4 1 5 tt:'lh1 , the knight will re-emerge on what we have previously discovered is the very useful square f2. Instead l 3 . . . i.d7 also prepares a further b-pawn advance. However not only does 14 0-0 'iic7 1 5 .l:.fc 1 'ilb7 1 6 .l:.ab 1 b5 1 7 b4, as in K.Bischoff - G.Reis, Fuerth 200 1 , demonstrate how White can play on the queenside too, the reality is that with the black b-pawn on b7 rarely does White want to play the pawn-fixing a4-a5 anyway as . . . l:b8 and . . . b5 would grant Black play along the b-file. Essentially then I 'm simply re-iterating the relative unimportance of the move . . . b6) 14 h3 c4 (instigating a standard pawn sacrifice in a not so standard position. Each of . . . a6, . . . b6 and . . . .l:.b8 look irrelevant given that Black wants to utilise the c-file) 1 5 f4 tt:'ld3+ 16 i.xd3 cxd3 17 0-0 tt:'ld7 1 8 b4 ! ? a5 1 9 b5 1i'h4 20 .l:f.f3 tt:'lc5 2 1 i.xc5 bxc5 22 'Wxd3 f5 23 exf5 i.xf5 24 tt:'lxf5 l:xf5 25 ft.afl 1:.bf8 26 tt:'le2 l:5f7 27 'ili'd2 .l:.e8 28 tt:'lg3 c4 29 'ili'xa5 c3 30 b6 'ii'f6 3 1 'ilb5 'ii'd4+ 32 �h2 l:tfe7 33 a5 c2 34 b7 'iib2 35 'ii'xb2 i.xb2 36 ft.b3 c 1='ii' 37 1:.xc 1 i.xc 1 38 a6 .l:.e3 39 .l:.xe3 lhe3 40 a7 1 -0 C.Ward - P.Littlewood, England 1 995.
b) 1 3 i.h6 ! ? i.xh6 14 'ii'xh6 b5 15 0-0 c4 16 h3 .l:.e8 17 ..ti>h2 tt:'led7 1 8 b4 ! (White wants to deprive the black knight use of the c5-square. Indeed squares are what it's all about in the middlegame and Black now takes en passant as his supported passed c-pawn wouldn't be of any use until the endgame, which given White's kingside initiative may not come at all ! ) 1 8 . . . cxb3 19 axb3 i.b7 20 b4 ! The bishop on b7 was a lemon in J.Fedorowicz - J.Piket, Wijk aan Zee 1 99 1 .
1 1 i.e2 h4 1 2 tt:'lfl a6
Perhaps now is the time to put a spanner in the works with 12 . . . h3 ! ? However, although White could take this pawn and try to utilise the half-open g-file, I can't see anything obviously wrong with 1 3 g4. At the very least, with the coast clear the white knight could come back out to g3 .
13 i.h6!?

1 12 Rare Black moves after 6 i..e3 and delaying . . . 0-0
The drawback of having the white queen on d2 is that the fl-knight had no options available to it. As well as being a useful move in its own right, the text vacates the e3-square.
l3 ... b5
Already it's clear that there could be some repercussions to Black's early h-pawn sortie. Furthermore it's not exactly a thorn after 1 3 . . . h3 14 g4 i..xh6 1 5 'ii'xh6 b5 1 6 ll'lg3 bxc4 1 7 ll'!f5 ! when the black king would be in serious danger.
14 ii.xg7 �xg7 15 cxbS axbS
Still 15 . . . h3 would have no great impact e.g. 16 g4 axb5 17 g5 ll'!fd7 1 8 f4 ll'lc4 19 i.xc4 bxc4 2 0 ll'le3 . White can continue his kingside expansion, with Black having nothing on the queenside.
16 f4
More humanistic than 1 6 i.xb5 c4.
16 ... ll'lc4 17 i.xc4 bxc4 18 ll'le3
Now White has got pretty much all that he could ask for - with the chance to net the c4-pawn a mere bonus.
18 ... e6
Necessary before White locked this bishop out of the equation with f4-f5 .
19 0-0 exdS 20 ll'lexdS
Black's c4-pawn is of little interest to White compared to the joys that can be obtained down the f- and g-files.
20 ... i.b7 21 fS ii.xdS 22 exdS
White clearly holds a position of strength but he must not get complacent. Observe 22 ll'lxd5? ! ll'lxd5 23 'ii'xd5 'ii'f6 ! 24 fxg6 'ii'd4+ when Black can cope in the endgame.
22 ... 'ii'd7 23 :o

Rare Black moves after 6 i.e3 and delaying . . . 0-0 1 13
Simple chess! Now Black i s made to squirm on the f-file.
23 ... l:tab8 24 llafl We7 2S l:tel
2S ... l:.xb2
White was not after a repetition as 25 . . . 'it'd7 26 1Wf2 would demonstrate.
26 Wct
No, Black's last move was not overlooked by White who will now have a free run at the black king.
26 ... �7 27 'il'gS l:tc2
27 . . . lC!h7 28 f6+ �h8 29 Wh6 .l:.g8 would have encountered the pretty 30 .l:.e8 ! .
2 8 fxg6 fxg6 2 9 1Wxh4 'ii'b2 3 0 WgS! 1Wxc3
White's threat was l:.e7+ and upon 30 . . . \Wb7, the invasion would be completed via 3 1 l:te6 ! .
31 llxc3 l:txc3 3 2 Wf4
Materially speaking, Black is only 1 pt down but the reality of the situation is that his remaining pawns are weak and, as is typical with rook and knight pairings, his army lacks coordination.
32 ... l:.d3 33 1Wxd6 l:.xdS 34 Wf4 c3 3S 'ii'c4 l:.d2 36 'il'xc3 l:.xa2 37 l:.e7+ <l.>h6 38 'it'e3+ gS 39 'it'h3+ �g6 40 'ili'd3+ <Jth6 41 h3 .:tal+ 42 <li>h2 l:ta4 43 'iic2 l:.aa8 44 'ii'fS l:.a6 4S 'fixeS 'it>g6 46 .l:teS 1-0
Game 1 6 J.Bellin - M.Hebden
Isle of Man 1995
1 d4 lC!f6 2 c4 g6 3 lC!c3 i.g7 4 e4 d6 S f3 0-0 6 i.e3 aS

114 Rare Black moves after 6 i..e3 and delaying . . . 0-0
In my time as a trainer I have coached a lot of juniors who have been eager to add the King's Indian to their opening repertoire. As I believe it is extremely instructive to study the way in which strong players handle an opening, I have often recommended the viewing of games starring either legend Garry Kasparov or English Grandmaster Mark Hebden as Black. Though Kasparov has dabbled in several defences to 1 d4, aside from his early exploits in the 'Benko Gambit' , Mark has long remained loyal to his true love. Not only does he consistently employ the King's Indian but he also has his own little pet systems. It would be difficult to take the text seriously if I didn't know that the new acquisition to the England Men's team hadn't wheeled it out from time to time, albeit clearly as a surprise weapon rather than the 'real deal ' .
7 'i'd2
This looks very sensible and although 7 �ge2 is playable, the main alternative (particularly regarding piece set-up) must be 7 i..d3 . The drawback with it is that the d4-pawn is less well protected and hence the 7 . . . �c6 8 �ge2 �d7
9 i..c2 (Upon 9 0-0 most likely Mark's intention was 9 . . . e5 1 0 d5 �d4. Then the knight would be difficult to budge and I personally would prefer 1 1 �b5 ! ? over parting company with the dark-squared bishop) 9 . . . e5 of

Rare Black moves after 6 i.e3 and delaying . . . 0-0 1 15
J .Duquesnoy - M.Hebden, France 1 998. Play continued 1 0 d5 ltlb4 when the bishop-preserving 1 1 i.b 1 was hit by 1 I . . .i.h6! White players should beware of this idea, made possible because of the queen check on h4. The game was finely balanced after 1 2 i.f2 f5 1 3 a3 ltla6 14 b4 ltlf6. Actually perhaps most would favour White but the rest of the game sees Hebden turning to his considerable experience: 1 5 exf5 gxf5 1 6 0-0 i.d7 1 7 'iib3 'ii'e8 1 8 'it>h1 'ifi>h8 1 9 ltlg3 ltlh5 20 ltlxh5 'ii'xh5 2 1 ltle2 l:g8 22 ltlg3 'ii'g5 23 l:gl b6 24 l:ta2 l:.af8 25 l:te2 l:tf6 26 ii.d3 i.c8 27 'ii'b l axb4 28 axb4 i.f8 29 i.e3 'ii'g6 30 l:a2 "ikfl 3 1 i.f2 i.h6 32 c5 i.f4 33 ltlfl .:.h6 34 g3 'ii'xd5 35 i.e2 ltlxb4 36 'ii'xb4?? "ikxa2 37 i.c4 'ii'xf2 0- 1 .
7 ... a4
Though 6 . . . a5 is seriously lacking in practical outings, I think I can safely say that the 7 . . . .:te8? ! 8 h4 ltla6 9 0-0-0 c6 10 i.h6 i.h8 1 1 h5 "ikc7 1 2 'it>b1 l:tb8 1 3 hxg6 hxg6 14 g4 e6 1 5 'ii'h2 ltlh7 16 i.f4 f6 1 7 i.xd6 'ii'fl 1 8 i.xb8 e5 1 9 i.d6 exd4 20 l:xd4 f5 2 1 e5 fxg4 22 i.e2 ltlb4 23 fxg4 c5 24 .l:.f4 'i'd7 25 e6 'i'g7 26 l:.fl 1 -0 of U.Hochstein - C.Finzi, Bochum 1 990 won't be of much theoretical interest!
8 ii.d3
The former England ladies team representative continues her development and although it is very hard to criticise this (after all the insertion of 'ii'd2 and . . . a4 looks favourable when compared to my previous note) there must also be a temptation to try and bash Black over the head! Indeed 8 0-0-0 ! ? and 8 i.h6 ! ? must be candidates too with that h-pawn just raring to go !
8 ... c5!?
Hebden i s very selective in his employment of this offbeat variation but I 'm sure that in rapid play games I 've seen him persevere with the advance of the a-pawn whatever his opponent does. Being a serious rated game, here he shows more subtlety. The text then is reminiscent of the 6 i.e3 c5 pawn sac.
Though it has cost him two moves, the placing of the pawn on a4 has its pluses. The further advance . . . a4-a3 is always in the air and the black queen

1 16 Rare Black moves after 6 i.e3 and delaying . . . 0-0
has the comfortable square a5 to whip out to. That would vacate d8 for the rook which in turn would leave the bishop on d3 very awkwardly placed.
9 l'Llge2
After 9 d5 l'Llbd7, bearing in mind the prospect of . . . l'Lle5, White has no satisfactory way to preserve her bishop.
9 ... l'Llc6 10 l:td1
Possible after 10 dxc5 dxc5 1 1 i.xc5 is 1 1 . . . l'Lld7 when the black knights will have e5 and c5 in their sights whilst the immediate I O . . . l'Lle5 ! ? also looks very worthy of consideration.
10 ... 'ifa5 11 dxc5?! dxc5 12 0-0
I'm not ecstatic about the way White has handled the opening as although she has a lead in development, the positional features favour Black. The most notable of these is that the d4-square is an outpost but the d5-square isn't.
12 ... 1:td8 13 l'Lld5 e6 14 'ifxa5 l:txa5 15 l'Llb6
This guarantees the win of a bishop for a knight but although arguably with potential, the one on c8 is hardly the greatest catch that the world has ever seen!
15 . . • l'Lld7 16 l'Llxc8 l:txc8 17 i.d2

Rare Black moves after 6 i.e3 and delaying . . . 0-0 1 1 7
17 ... i.xb2!
There was certainly nothing wrong with retreating the rook but the exchange sac leaves the KI bishop reigning supreme.
18 i.xa5 lLlxa5 19 .l:td2 a3
Necessary to prevent . . . tLle5 and desirable to try and promote the light-squared bishop from the role of 'big pawn' !
20 f4 tLlb6 21 .l:tc2 .l:td8
22 .:.o
As 22 l:td l would have left the bishop pinned, Black could have simply taken the c-pawn.
22 ... tLlc6!
All of White's pieces are tied up and now she has . . . lLlb4 to deal with.
23 l:.c3
This looks wet but the fact is that there was nothing else.
23 ... .ixc3 24 ltJxc3 tLlb4 25 .tn l:td2 26 lLlb5 .l:txa2 27 lLlxa3 e5

1 1 8 Rare Black moves after 6 .i.e3 and delaying . . . 0-0
Cruel ! Black ensures that White's bishop will remain 'bad' . The rest of the game makes for painful viewing.
28 �b5 �c6 29 �d6 �d4 30 .l:.fl .l:.xfl 31 �xfl exf4 32 �xb7 �d7 33 .i.e2 �g7 34 .i.d1 �e6 35 .i.a4 �e5 36 h4 'it>f6 37 .i.b5 h5 38 .i.a4 �g4+ 39 �e1 �e3 40 'it>fl �xc4 41 .i.b3 �d2 42 .i.xe6 fxe6 43 �xc5 'it>e5 0-1
Game 1 7 J.Levitt - D.Friedgood
4NCL, Birmingham 1998
1 d4 �f6 2 c4 g6 3 �c3 .i.g7 4 e4 d6 5 f3 c6 6 .i.e3 a6
Black has plumped for an . . . a6 and . . . c6 system and to justify still further the game's inclusion in this chapter, Black has delayed castling.
7 c5!?
7 'iVd2 0-0 8 0-0-0 would transpose to the next game in which White launches a kingside offensive. As such a policy wouldn't be as effective if the black king didn't commit itself to the kingside, it does however pay to have a 'plan B' . It would be wrong to compare this game with the next, simply labelling it as the positional approach and the next as a 'hack' . There is more subtlety involved than that and here for example White decides that Black's move order allows him to delete 'ii'd2.
7 • • . b5
7 . . . 0-0 8 cxd6 ! ? (Chapter 8 will describe my own personal distaste for the position that would arise after 8 �ge2. Still one man's meat is another man's poison! ?) 8 . . . exd6 9 .i.d3 �bd7 10 �ge2 would most likely transpose as 1 O . . . b5 would be a very reasonable move.
8 cxd6 exd6 9 .i.d3 0-0 10 �gel �bd7 1 1 0-0

Rare Black moves after 6 i.e3 and delaying . . . 0-0 1 1 9
White has completed his development and has two assets to work with: 1) A half-open c-file which he can use to pressurise the black c-pawn. 2) A space advantage afforded to him by the presence of an extra centre
pawn. l l . . . b4?!
Although this asks White's knight a question, i t i s not a difficult one to answer and for my liking the text gives away the c4-square far too cheaply. 1 1 . . .c5 makes more sense and after 1 2 .l:.cl i.b7 1 3 d5 �e5 14 a3 the middlegame is taking shape. I like Black's pawn structure (being a Benoni player I would do ! ) and his kingside pieces but the bishop on b7 is a bit duff. It's difficult to know exactly what to make of 14 . . . �fd7 1 5 �h1 �xd3 16 'ii'xd3 �e5 17 'ii'c2 li'd7 1 8 .l:.cdl a5 19 b3 b4 20 �a4 'iib5 2 1 f4 �d7 22 .l:.fel i.a6 23 axb4 'ii'xb4 24 i.d2 'iib7 25 i.c3 .l:tab8 26 i.xg7 �xg7 27 �cl f6 28 �b2 'iWb4 29 �bd3 'iib5 30 e5 fxe5 3 1 fxe5 dxe5 32 'iVc3 .l:.be8 33 �e2 i.b7 34 �ef4 �g8 35 �e6 .l:.xe6 36 dxe6 'ii'c6 37 l:td2 'ii'xe6 38 �gl e4 39 �xc5 �xc5 40 'ii'xc5 'iVxb3 4 1 .l:.d7 i.a6 42 'iWd4 1 -0 B .Alterman - B.Kreiman, New York 1 997 except that Black was more in the game there than he ever gets in our main encounter here.
12 �a4 'ii'a5 13 b3 i.b7 14 'ii'd2 c5 15 a3 !

120 Rare Black moves after 6 i.e3 and delaying . . . 0-0
Now White has pressure against the c- and b-pawns and the black queen isn't on the greatest of locations either.
15 ..• i.c6 16 l:.fc1
Pinning Black's c-pawn and thus threatening axb4 big time. 16 • . • l:.tb8 17 lt.'lb2
Seeking out the holy grail otherwise known as 'c4 ' ! 17 • . . lt.'le8 18 a 4 'ii'd8 19 ftc2 'ii'e7 2 0 :tact
Ironically though, 20 lt.'lc4 is an obvious choice here too - in fact the knight never actually arrives on this square. However I'm certainly not going to criticise White's play as the game continuation is as smooth as silk.
20 . • . d5
Keeping the white knight out of c4 but creating problems elsewhere. 21 e5 i.b7 22 f4!
Maintaining the support of e5. Now White is ready to resolve the situation on c5, but Black does it for him.
22 . • . cxd4 23 lt.'lxd4
23 ..• l:.c8

Rare Black moves after 6 i.e3 and delaying . . . 0-0 121
A further irony is that an attempt to free our friend on g7 via 23 . . . f6 would only result in 24 e6 �f8 25 f5 and two bad bishops !
The text drops a pawn but doing nothing would encourage further torture e.g. 23 . . .'�h8 24 a5 'itg8 25 iLe2 'ith8 26 �d3 .
24 .lhc8 .l:txc8 25 .l:txc8 i.xc8 26 �c6 'ike6 27 �d4
White is enjoying himself and has no intention of allowing a draw by repetition.
27 ... 'ike7 28 �c6 'ike6 29 �xb4 g5
On another day this undermining attempt might offer Black some counterplay. Unfortunately it's not a good week( ! ) and there is more bad news coming his way.
30 �xd5! gxf4
And not of course 30 . . . 'ihd5 3 1 i.xh7+. 31 i.xf4 �xe5 32 i-fS!
1-0
After a tidy demonstration of positional chess, this is a nice tactic with which to round things off. The knight on d5 was effectively guarded by a bishop check and now that same bishop is guarded by a knight check.

122 Rare Black moves after 6 1i.e3 and delaying . . . 0-0
Game 18 J.Campos Moreno - J.Candela Perez
Orense open 1997
1 d4 lllf6 2 c4 g6 3 lllc3 ii.g7 4 e4 d6 5 f3 0-0 6 ii.e3 c6 7 'ild2 a6
Black's system is obviously geared toward a quick . . . b5 and he is prepared to forgo striking in the centre and developing queenside pieces in order to arrange that ASAP. The main reason for this set-up not really catching on is that not a lot actually happens when the pawn gets there. White must ensure that he doesn't capture on b5 as . . . axb5 would provide Black with a handy a-file. Instead he is advised to get on with his own thing and to let the black b-pawn 'do its worst' .
In chapter 8 you will discover why Black's queenside pawn play is reasonable if White has committed his king's knight to e2, but in respect of the above position that is not a candidate. Instead I would say that three moves in particular give the impression of 'really going for it ' .
8 0-0-0! ?
I don't think that I 've ever actually played 8 h4 myself but 8 ii.h6 I definitely have:
a) 8 . . . b5 9 h4 bxc4 10 h5 ii.xh6 1 1 'ifxh6 g5 12 1i.xc4 d5 13 exd5 'iiih8 14 'it'xg5 l:g8 15 'ii'd2 cxd5 16 ii.b3 lllc6 17 g4 e5 18 dxe5 lllxe5 19 0-0-0 'ii'c7 20 g5 1i.f5 21 'ifd4 a5 22 f4 a4 23 ii.xa4 .l:.xa4 24 'ii'xe5 'ii'xe5 25 fxe5 .l:.c8 26 gxf6 d4 27 fth4 .l:.xa2 28 .l:.hxd4 .l:.al+ 29 'ii?d2 .l:.a5 30 'ii?e3 .l:.xe5+ 3 1 'itf4 l:r.ce8 32 lllf3 1 -0 C. Ward - T.Gavriel, Guernsey 1989.
b) 8 . . . 1i.xh6 9 1i'xh6 e5 10 0-0-0 1i'e7 1 1 h4 b5 12 h5 .l:.a7 13 g4 b4 14 lllce2 d5 15 lllg3 exd4 16 'ii'f4 lllbd7 17 g5 llle8 18 exd5 cxd5 19 cxd5 l:r.c7+ 20 �b l 'ifc5 2 1 l:th2 'ii'xd5 22 'ii'xd4 'ii'xd4 23 .l:.xd4 llle5 24 .l:.xb4 llld6 25 b3 f6 26 l:r.b6 lllf5 27 llle4 fxg5 28 hxg6 lllxg6 29 ii.c4+ rt;g7 30 lllxg5 h6 3 1 llle6+ ii.xe6 32 l:.xe6 a5 33 llle2 .l:.f6 34 .l:.xf6 �xf6 35 lllc3 �e5 36 fte2+ 1 -0 C. Ward - J.Cooper, British Champs Eastbourne 1 99 1 .

Rare Black moves after 6 i.e3 and delaying . . . 0-0 123
I guess I personally used to prefer 8 i.h6 before playing h4 because it eliminated the possibility of the blocking .. . h5 . Upon reflection though I think I quite like the text. Moving the king could (a little harshly) be viewed as a wasted tempo especially as it's not necessarily going to be safe on the queenside. However I think that the advantage of having a rook on d1 is plain to see. Black is prevented from playing . . . e5 and the prospect of a future e4-e5 comes very much into play.
8 . . . b5
9 i.h6!? I really like this and indeed the rest of the game. Nevertheless White has
obtained success here with several other moves too and they are all worth viewing:
a) 9 h4 tLlbd7 10 i.h6 e5 1 1 tLlge2 'ili'a5 12 i.xg7 <j;xg7 1 3 h5 b4 14 ltlb1 'ii'xa2 1 5 tLlg3 tLlb6 16 c5 tLlc4 1 7 'ili'xb4 tLle3 1 8 :d2 i.e6 1 9 'ili'c3 ltlxfl 20 ltxfl exd4 2 1 h6+ �xh6 22 ltxd4 cj;g7 23 cxd6 cj;g8 24 'ili'a3 'ili'xa3 25 tLlxa3 and after all that excitement White had reached a favourable endgame in A.Moiseenko - E.Miroshnichenko, Kapuskasing 2004.
b) 9 e5 tLlfd7 10 exd6 exd6 1 1 h4 bxc4 12 i.xc4 tLlb6 1 3 i.d3 a5 14 i.h6 i.a6 1 5 i.xg7 <j;xg7 1 6 ltlh3 i.xd3 1 7 'ili'xd3 tLla6 1 8 a3 d5 1 9 h5 tLlc4 20 f4 'ili'b6 21 tLla4 'ilfb5 22 hxg6 hxg6 23 tLlg5 'ili'xa4 24 lth7+ �f6 25 'ii'h3 ! (threatening the 26 .l:.xf7+ that even Fritz took a while to notice. Mind you it is late ! ) 25 . . . l:.ae8 26 'iib4 �e7 27 tLlxf7+ cj;d7 28 'ii'g4+ �c7 29 tLld8+ 1 -0 T.Reilly - G.Lane, Canberra 2004.
c) 9 cj;b1 i.b7 (I don't think much of this but White's last move was crafty. 9 . . . 'ili'a5 would have walked into 1 0 tLld5 ! whilst 9 . . . tLlbd7 could also have been hit by 10 e5 ! ) 10 e5 tLle8 1 1 exd6 tLlxd6 12 c5 ltlf5 13 i.t2 e6 14 tLle4 ltld7 1 5 g4 tLle7 1 6 tLld6 l:ta7 17 f4 tLlf6 1 8 g5 tLlfd5 1 9 i.d3 a5 20 h4 a4 2 1 h5 a3 22 b3 b4 23 tLle2 i.a6 24 i.xa6 ltxa6 25 'ili'd3 'ili'a5 26 hxg6 hxg6 27 lth2 tLlf5 28 .l:tdh1 tLlxd6 29 l:th8+! ! 1 -0 I.Khenkin - V.Piza, Pardubice 1 993. I like the way that Igor handles the Slimisch and I particularly like this visual encounter.

124 Rare Black moves after 6 ii.e3 and delaying . . . 0-0
d) 9 g4 ltJbd7 10 g5 ltJh5 1 1 ltJge2 ltJb6 12 ltJg3 ltJxc4 1 3 i.xc4 bxc4 14 ltJxh5 gxh5 1 5 f4 d5 16 f5 dxe4 17 l:r.dfl l:r.b8 1 8 f6 exf6 1 9 gxf6 i.xf6 20 ltJxe4 i.g7 2 1 .:t.hg l Wh8 22 l:r.xg7 ! 'iti>xg7 23 i.h6+ cl;h8 24 i.xf8 �xf8 25 �f4 l:r.b5 26 ltJd6 i.e6 27 ltJxb5 axb5 28 l:r.g1 h6 29 �e5+ �h7 30 'ii'e4+ cl;h8 3 1 �xc6 �8 32 'ii'e4 c3 33 bxc3 i.xa2 34 'ii'g2 'ii'f4+ 35 �b2 1 -0 R.Perhinig - E.Schoeppl, Graz 2003 .
Throughout this book I have tried to refrain from 'padding things out' by giving full game scores without justification. Here though there has been every reason. It really does look as though White is spoilt for choice.
9 . • . ltJbd7
9 . . . 'ii'a5 10 h4 (More recently 10 i.xg7 cl;xg7 1 1 �b 1 ltJbd7 12 h4 h6 1 3 g4 ltJb6 14 e 5 dxe5 1 5 dxe5 ltJxg4 16 fxg4 i.xg4 1 7 l:r. e 1 .:t.fd8 1 8 'ii'e3 i.f5+ 19 �a 1 ltJxc4 20 i.xc4 bxc4 2 1 �f4 l:r.ab8 22 l:th2 ! was always looking good for White in V.Erdos - S.Orgovan, Hungary 2003) 10 . . . b4 1 1 ltJb 1 ltJbd7 1 2 i.xg7 ..t>xg7 1 3 h5 e5 14 hxg6 fxg6 1 5 'ifh6+ Wg8 1 6 ltJh3 l:r.a7 17 ltJg5 ltJb6? ! 1 8 c5 ! brings back good memories. Here 1 8 . . . ltJa4 1 9 i.c4+ d5 2 0 exd5 cxd5 2 1 ltJxh7 l:r.xh7 2 2 Ji.xd5+ would have been a pretty finish but instead 1 8 . . . exd4 19 cxb6 'ii'c5+ 20 cl;d2 l:r.e7 2 1 l:r.c l saw me able to grind out a win in C .Ward - Wu Wenjin, Beijing 1994 (quite an achievement the way I was playing in that particular tournament).
10 i.xg7 '1Pxg7 1 1 e5 ltJe8 1 l . . .dxe5 12 dxe5 ltJe8 1 3 h4 ! ? is a worse version for Black of the main
game and incidentally minus the h-file attack. The positional pawn sac 1 3 e6 i s also quite good.
12 h4!? h5
With Black's knights not at the races he can't allow h4-h5 and the opening of the h-file or else the white queen would descend on h6 in a flash.
13 g4!

Rare Black moves after 6 i..e3 and delaying . . . 0-0 125
Correctly going with the flow. 13 •. J:th8
It's all hands to the pump for Black but unfortunately this seems to be the only hand that he's got! A long time ago 13 . . . dxe5 14 gxh5 lLldf6 1 5 hxg6 'ii'xd4 16 �d3 bxc4 1 7 gxf7 cxd3 1 8 fxe8='ii' .l:.xe8 19 lbge2 'ii'c4 20 b3 'ii'c5 2 1 .l:.hg1+ <li>f7 22 'ii'xd3 e4 23 'ii'c2 .l:.h8 24 lbxe4 'ii'xc2+ 25 �xc2 i..f5 26 lbd4 i..xe4+ 27 fxe4 lbxe4 28 <iti>b2 .l:.xh4 29 l:tdfl + lLlf6 30 lLlxc6 had seen Black escape and grovel to an inferior endgame. Yes F.Gheorghiu - K.Georgiev, Prague 1 985 seemed like a better achievement until eventually he lost anyway!
14 gxh5 .l:.xh5 15 lLlge2 lLlb6 16 lLlg3 l::th6 17 h5
The solitary rook isn't going to be able to hold the fort all on its own. 17 ..• dxe5 18 i..d3 lbxc4
19 'ii'xh6+!
Stunning, although in view of 19 �xc4 bxc4 20 hxg6 lhg6 2 1 'ii'h2 not strictly speaking necessary.
19 ... �xh6 20 hxg6+ �g7

126 Rare Black moves after 6 J..e3 and delaying . . . 0-0
20 .. .'1tg5 2 1 .l:th5+ �f4 (or 2 1 . . .'1t>f6 22 lDce4+ '1t>e6 23 J..xc4+ bxc4 24 lDc5+ �d6 25 dxe5+) 22 lDce2+ �e3 23 J..e4 is a case of 'Come into my parlour said the spider to the fly' . There is no satisfactory way for Black to deal with lDfl + and .l:th2 mate.
21 l:th7+ �f6
Or 2 1 . . .<1tf8 22 g7+! because 22 . . . �g8 23 lDh5 is looking like mate soon and 22 . . . lDxg7 23 .l:th8 is looking like mate now!
22 .l:txti+ �g5 23 lDge4+ �xg6 24 lDd6+
24 . . . J..f5
24 . . . �g5 25 l:r.gl + <1th6 26 .l:th7 mate is a direct route to the end but Black can prolong things by offloading a piece or two first.
25 J..xf5+ �g5 26 J..e4 lDf6 27 lDe2 lDxe4 28 .l:tgl+ 1-0
Upon 28 . . . Wh6, 29 lDf5 is mate in two.

Chapter 6: The Panno
6 �e3 etJc6
Game l 9 C . Ward - G.Gibbs
Caribbean Open 1 999
1 d4 tllf6 2 c4 g6 3 f3 i.g7 4 e4 d6 5 tllc3 0-0 6 tllge2
As it clearly transposes this game belongs here rather than m the independent lines of chapter 8 .
6 . . • tllc6 7 i.e3 a6 8 'ii'd2 .l:.b8
Strictly speaking the starting position for the 'Panno' variation is after 1 d4 tllf6 2 c4 g6 3 tllc3 i.g7 4 e4 d6 5 f3 0-0 6 i.e3 tllc6 but . . . a6 and . . . .l:.b8 usually follow.
Here Black opts for the time being to keep his c-pawn at home. As in chapters 2 and 3 the likelihood is that he will employ his e-pawn to strike at White's centre but that is not a certainty. His intention is to keep White guessing in the middle whilst he starts playing around the edges. As is often the choice in the Samisch, White can respond with a kingside offensive or play a more controlled game. Starting with the latter this chapter will look at each of these approaches and observe how sometimes even a combination of the two is feasible.

128 The Panno 6 .i.e3 lbc6
9 lbcl
It's funny how even the opening repertoires of Grandmasters can be moulded by the lines that they first learnt as a junior even though these might have been completely random. Though the more studious top players probably have no qualms about taking time out to learn a completely new defence, the lazier individuals tend not to stray far from their roots. For example my first defence to 1 e4 was l . . . c5 and I have always played the Dragon ever since. Of course I 'd prefer to put that down to the fact that it's stunningly brilliant and I have no need to change rather than ' I can't be bothered' ! With reference to the KI Siimisch and this line in particular, although I generally liked to attack this was the first 'Panno variation' that I ever saw and consequently it is what I played. Certainly 9 lbc 1 is a positional continuation. The logic is that although this knight really wants to guard d4, on e2 it obstructs the king's bishop. If Black kept to himself, White's idea would be to relocate the knight on b3 (from where it again supports the centre as well as queenside advances), park the bishop on e2 and castle kingside. There won't be a quick checkmate but White would have a comfortable space advantage.
9 . • • e5
Obviously consistent with 6 . . . lbc6. In typical KI tradition Black closes off the diagonal of the KI bishop in the hope that it will make a big splash should it re-emerge later. Black is taking advantage of White's temporary lack of control over d4.
10 d5
Although 10 lbb3 is possible, I 've never really been a fan of it. Okay, Black hasn't perhaps played the world's most useful moves but after a trade on d4 that whole lbc 1 -b3 manoeuvre was pretty much wasted.
10 ... lbd4

The Panno 6 i.e3 ltJc6 129
The outpost that the black knight dreams of. From here it keeps an eye on many wonderful squares and it is essential that White doesn't allow a black pawn to c5 to protect it forever.
l l lt:J1e2
1 1 i.xd4? exd4 12 'ii'xd4 should never really be a consideration even without the presence of the tactic 12 . . . lt:Jxe4 ! 1 3 'ifxe4 .:te8. White must preserve his dark-squared bishop.
l l .•. lt:Jxe2
The alternative 1 1 . . . c5 is discussed in detail in the next game.
12 i.xe2 lt:Jh5
Clearing the path for the all too familiar break . . . f5 .
13 0-0-0 i.d7
Generally upon 1 3 . . . lt:Jf4 White is advised to preserve the bishop with 14 .ifl . Undeniably f4 i s a good square for the black knight but although White will rarely want to win a pawn with i.xf4, he can certainly budge the enemy steed by g3 .
The other obvious move is the immediate 1 3 . . . f5 when I would like to share with you an important lesson I learnt as an already experienced player: 14 c5 �h8 1 5 �b 1 b6
(As English Grandmaster Jonathan Levitt correctly observed afterwards, White could now retain a slight advantage by temporarily sealing things off on the queenside with 16 c6. However I figured that that would mean a long haul and generally believe that the main aim of the pawn break 14 c5 is to create an open file for the rooks)
16 cxb6 cxb6 1 7 l:tc 1 b5 1 8 i.d3 lt:Jf6 1 9 h3 (Preventing a black knight from coming to g4 and placing that kingside thrust itself on the menu) 19 . . . f4 20 .ia7 Ab7 2 1 i.t2 i.d7 22 lt:Je2 lt:Je8 23 l:tc2 i.f6

130 The Panno 6 i.e3 lDc6
(Okay, now doubling rooks stands out as an obvious plan, but I also wanted to use the c ! -square to manoeuvre my knight to the queenside. As a junior I would undoubtedly have responded correctly here by moving my h 1 -rook (e.g. to d 1 ) so as to prevent Black from trading off his bad bishop. But, oh no, not the new look GM Chris Ward, who doesn't need to bother with such trivialities ! )
24 b4? ! (In my view fixing Black's queenside pawns i s a good plan as Black is unable to exploit any weakness in the white king position. However the timing is wrong and as 25 i.gl looks ridiculous, dark square holes soon appear in White's camp) 24 . . . i.h4 25 i.xh4 1i'xh4 26 lDc l 1i'd8 27 lDb3 .,6 28 .l:.hc l .l:.c7 29 lDa5 .l:.xc2 30 1i'xc2 lDf6 3 1 1i'c7 'iVd4 32 'ifc3 'ifb6 33 'ikc7 'iVd4 34 1i'c3 'ikf2 35 'ikc2 'ii'e3 36 'ife2 .,6 37 a3 <Ji;g7 38 .l:.c3 .l:.c8 39 l:r.xc8 i.xc8 40 'ii'c2 i.d7 4 1 lDb3 (Ward-Hennigan).
White's c-file domination never emerged, the knight has no future on a5 and with Black taking control of the a7-g l diagonal, he has a big endgame advantage thanks to the possibility of infiltrating on the kingside.
14 c5 'ike7 15 b4! ?
Most will agree that White can advance on the queenside despite his king being on that side of the board - but some will still be reticent about

The Panno 6 i.e3 .!Llc6 131
completely opening i t up. The key point of course is that the presence of a white space advantage makes it practically impossible for Black to 'get around the back' .
15 . • • a5 16 cxd6 cxd6
16 . . . 'iixd6? would leave the e- and c-pawns as targets but will more relevantly fall foul of 1 7 i.c5 .
17 bS
This concedes the c5-square but the piece that will most benefit from that is the black knight and that is a million miles away!
17 ... l:f.fc8 18 'it>b2
Don't worry, there is no chance of Black's e5-pawn doing a disappearing act!
18 ... 'iie8 19 a4 b6
Without casting aspersions and suggesting that Black was only playing for a draw I would say from the post mortem that my opponent was wondering how I might may make progress now. The text ensures that Black's aS-pawn won't drop off but it also concedes a big hole on c6.
20 l:f.cl 'iie7 21 c!Llb1 !
There is zero point in White trying to touch the kingside and instead the text offers up a c!Lla3-c4 manoeuvre whilst preparing the next move.
21 ... f5 22 l:f.c6!
Sliding the rook down to this square was a great feeling. The rook can't be ignored as White can build up on the c-file or just pick off the black b-pawn.
22 ... i.xc6 23 dxc6
White has lost the exchange but has gained a strong supported passed c-pawn and an extremely juicy outpost on d5 .
23 ... fxe4 24 fxe4 .!Llf6 25 c!Llc3 �h8

132 The Panno 6 .i.e3 ltlc6
As Black, I think I would have tried 25 . . . d5 but 26 l'Llxd5 l'Llxd5 27 i.c4 doesn't offer much activity.
26 i.g5 'ifc7 27 i.xf6
It is certainly acceptable to concede this bishop now as White's remaining minor pieces are magic and there is no danger of a backlash on the dark squares.
27 ... i.xf6 28 i.g4
28 ... i.g7
The attacked rook could move but then l'Lld5 and c7 would follow. 29 l'Lld5 'ifd8 30 i.xc8 l:txc8 31 'iffl
Hitting b6 and offering an entry down the f-file. 31...'ifg5 32 h4 'ifh5 33 'iff3 'ifh6 34 'ii'e3
These white queen moves aren't strictly speaking necessary but the sadistic intent is that Black doesn't even get a glimmer of a check!
34 .•. 1i'h5 35 l'Llxb6 .l:U8 36 c7 i.h6
37 'iff3
Cute!

The Panno 6 .i.e3 lt:\c6 133
37 . • Jbt3 38 gxt3 'ii'xt3 39 c8='if+ .i.f8 40 l:tcl dS 41 'ii'xf8+
Rubbing salt in the wound, even the new queen gives itself up. My opponent didn't deserve this game but the upside is that I really enjoyed it !
41...'ii'xf8 42 l:.c8 1-0
Game 20 C. Ward - E.Gullaksen
Isle of Man 1 998
1 d4 lt:lf6 2 c4 g6 3 lt:lc3 .i.g7 4 e4 d6 S t3 0-0 6 lt:\ge2 lt:lc6 7 .i.e3 a6
Although White's .i.e3, 'ii'd2 and lt:\ge2 are often interchangeable and tend to transpose, of independent significance is Black delaying (or even deleting) . . . a6 in favour of 7 . . . l:.e8 8 'ii'd2 l:.b8 (see position below).
Once you have played over the main game you will understand why I will now tender a warning to those intending to play 9 lt:\c 1 . I'm sure that is not a mistake in itself but if Black continues as in the main game then with a half-open e-file the move . . . l:te8 is going to be far more useful than . . . a6. If you compare these two after say move 14 then you will understand exactly what I'm talking about.

134 The Panno 6 i..e3 tLlc6
I suppose the move 7 . . . l:.e8 does facilitate the preservation of bishops with . . . i..h8 following i..h6 but in the overall scheme of things it's not that useful. When you have completed this chapter (and don't forget my advice is to play over all of the games before making your judgements) you may conclude for example that 9 l:tb 1 or even 9 a3 are most applicable responses. I wouldn't disagree although the following constitutes a very sensible continuation too:
9 h4 ! ? h5 1 0 0-0-0 a6 1 1 tl:lf4 e5 1 2 dxe5 dxe5 1 3 "ii'xd8 l:txd8 14 l:txd8+ tl:lxd8 1 5 tl:lfd5 tl:le6 1 6 c5 i..d7 1 7 c6 bxc6 1 8 tl:lxf6+ i..xf6 1 9 i..xa6 tl:ld4 20 i..c4 i..e6 2 1 i..xe6 tl:lxe6 22 'iti>c2 �f8 23 tl:la4 l:.b5 24 b3 c5 25 �d3 c6 26 g3 tl:ld4 27 i..xd4 exd4 28 l:r.c 1 i..e7 29 l:tc2 �e8 30 tl:lb2 'iti>d7 3 1 tl:lc4 f6 32 g4 hxg4 33 fxg4 'iti>e6 34 h5 gxh5 35 gxh5 l:tb8 36 l:th2 f5 37 h6 f4 38 h7 i..f6 39 l:th6 1 -0 A.Karpov - M.Kinnunen, simultaneous, Jyvaskyla, 1 989.
8 "ii'd2 l:tb8 9 tl:lcl
It's fair to say that with the emergence of the quick . . . c5 variations, the Panno (6 . . . tl:lc6) went out of fashion for quite a while . Comparatively, it probably still is although I have encountered it a few times recently. 9 tl:lcl is the move that I first adopted when I didn't know any better and although I have dabbled with pretty much every option here, lately I seem to have been returning to my roots.
9 ... e5 10 d5 tl:ld4 1 1 tl:l1e2 This appears a little slow, but with 1 1 tl:lb3 the alternative, it is imperative
to remove Black's intrusive knight and preferably without having to part company with the dark-squared bishop.
l l ... c5 This is more ambitious than the just seen 1 1 . . .tl:lxe2 as Black strives to
maintain his steed in the centre. 12 dxc6 bxc6 Sacrificing a pawn in this manner leads to a very complex middlegame.
The safer option is 1 2 . . . tl:lxc6 when I have something to say about Black's ugly looking position below.

The Panno 6 j_eJ lt:)c6 135
He has a grim KI bishop and a backward d-pawn that is sure to be targeted, yet provided he plays actively all is not lost. It is natural for White to want to free his fl -bishop but upon 1 3 lt:)c 1 j_e6 14 j_d3? ! , the compensation is clear after 14 . . . b5 ! 1 5 cxb5 axb5 1 6 j_xb5 lt:)d4 1 7 j_d3 d5. White's position is not easy to play and 1 8 exd5 lt:)xd5 1 9 lt:)xd5 'ifxd5 20 0-0 .l:r.fd8 2 1 l:td1 'ifb7 22 l:tb 1 f5 23 'ife1 e4 24 fxe4 fxe4 25 j_e2 lt:)c2 26 .l:r.xd8+ .:xd8 27 'ifh4 'ifd5 28 j_f2 g5 0- 1 A.Zakharchenko -A.Volokitin, Alushta, 2001 is not such a shock.
The above is just a demonstration of how Black can spring to life. Probably 14 lt:)b3 is better but, backtracking a little, in fact Black can meet 1 3 lt:)c 1 with the immediate 1 3 . . . b5 having the same 14 cxb5 axb5 1 5 j_xb5 lt:)d4 1 6 j_d3 d5 theme in mind. Ironically 14 lt:)b3 is again possibly better, at least from a 'keeping Black at bay' point of view, but perhaps White should try looking elsewhere for an advantage.
Both 13 l:td1 and 1 3 0-0-0 have something to be said for them whilst the following also offers encouragement:
1 3 lt:)d5 ! ? j_e6 (again I feel that Black should try 1 3 . . . b5 ! ? although then after 14 lt:)ec3 White will have the option of recapturing on d5 with this second knight) 14 lt:)ec3 lt:)h5 1 5 j_d3 lt:)d4 16 0-0 f5 1 7 exf5 gxf5 1 8 .l:r.ae1 lt:)c6 1 9 f4 �h8 20 'ii'd 1 lt:)f6 2 1 j_b6 'ii'd7 22 lt:)c7 j_g8?! 23 j_xf5 ! 'ifxf5 24 fxe5 'ifg6 25 exf6 j_xf6 26 lt:)7d5 j_g7 27 b3 lt:)e5 28 j_d4 b5 29 lt:)e7 'iig5 30 lt:)xg8 l:txg8 3 1 lt:)e4 'iig6 32 �h1 bxc4 33 bxc4 lt:)xc4 34 .l:r.f6 j_xf6 35 j_xf6+ .l:r.g7 36 j_xg7+ 'ii'xg7 37 'ifd3 l:tb2 38 lt:)g3 'ifb7 39 'ii'fl �g8 40 l:te8+ 1 -0 A.Riazantsev - AI Sayed, Dubai open 2000.
13 lt:)xd4 exd4 14 j_xd4 d5
This is the move that Black strives to get in as soon as he sacs his pawn with 12 . . . bxc6. Played now, clearly the opinion is that 'there is no time like the present' ! Of course it is possible to make more preparations and transpositions are possible:
a) 14 . . . j_e6 15 l:tc l 'ii'a5 (The position can also be reached via 14 . . . 'ii'a5 1 5 l:tc 1 j_e6) 16 j_e2 (If a deviation is sought, then b3 now or on the next turn is certainly food for thought. White wouldn't have to worry about his b- or c-pawns and he could always offer a queen trade by retreating his knight at some point) 1 6 . . . l:tfd8 1 7 0-0 'ifb4 1 8 b3 d5 1 9 'ii'e3 ! ? dxc4 20 j_c5 'i1Va5 21 b4 'ifc7 22 l:tfd1 l:txdl+ 23 l:txd1 l:td8 . The inevitable endgame is bound to be a little better for White and after 24 j_b6 .:xd1 + 25 lt:)xd1 'ii'e5 26 j_d4 'iib5 27 'Wc3 lt:)e8 28 j_xg7 lt:)xg7 29 lt:)e3 c5 30 a3 cxb4 3 1 axb4 'ifb6 32 �fl lt:)e8 33 j_xc4 the full point was later obtained in T.Reich - P.Oppitz, German Bundesliga 1 99 1 .
b) 14 . . . l:te8 1 5 j_e2 d5 1 6 cxd5 l:tb4 ! ? (This is a tricky move but with accurate play White can weather the storm) 1 7 .ltc5 lt:)xe4 1 8 fxe4 j_xc3 19 'i1Vxc3 l:tbxe4 20 0-0 l:txe2 2 1 dxc6 'ii'g5 (Or 2 1 . . .'ii'd5 22 j_f2 l:t8e3 23 'i1Vxe3 l:txe3 24 j_xe3 'ifxc6 25 l:.ac l 'ifb7 when the rook pair is superior to the queen) 22 l:.f2 (I notice that not long ago 22 j_f2 l:t8e3 23 'Wc4 l:te4 24

136 The Panno 6 ii.e3 lt)c6
'ii'd3 l:.4e3 25 _.c4 l:[e4 occurred in J.Ehlvest - I.Smirin, Connecticut 2003 when White tried to avoid the repetition and went on to lose. Not wishing to sound big headed I had analysed that long ago, instead coming up with the following:) 22 . . . Ji.h3
23 Ji.f8 ! ! (23 "ii'xh3 ?? 'ii'xc5 is complete disaster for White who can't deal with the threats on f2 and e l ) 23 . . . 'ii'e5 (After 23 . . . f6 24 'ii'c4+ l:.2e6 25 Ji.b4 Black's awkwardly placed pieces are in no position to continue their offensive) 24 l:.xe2 ! 'ii'xc3 25 bxc3 l:.xe2 26 gxh3 �xf8 27 c7 l:[e8 28 l:[bl . The c-pawn will promote.
15 cxd5 cxd5 16 e5 lt:)d7 17 f4
17 . • . f6
White wants to keep the centre blocked and, despite the weak d5-pawn, it is important that Black starts chiselling away.
18 e6 l:.e8
The 1 8 . . . 'ii'e7 1 9 Ji.e2 lt:)c5 20 0-0 ii.xe6 2 1 'ii'e3 l:.fc8 22 f5 ! gxf5 23 lt:)xd5 'ii'f8 24 lt:)f4 of P.Bazant - J.Buran, Stare Mesto open 2003 shared a similar outcome. Black got lousy pawns and lost !
19 Ji.e2 lt:)f8 20 f5

The Panno 6 .i.e3 lbc6 137
The aim behind 1 8 e6 was to return the pawn, hopefully leaving myself with the better structure. I did however also have in mind this move, essentially swinging to a pawn deficit.
20 ... gxf5 21 0-0-0 �a5 22 .i.O .i.xe6 23 'it>bl .l:ted8 24 lbe4!
Obviously the crowd is bound to boo after such a move, but this rules out any attacking aspirations that Black may have had. White has 5 isolated pawns to target and the more pieces that are traded off, the weaker they become.
24 ... �xd2 25 lbxd2 lbd7 After the game, my opponent only had derogatory things to say about the
whole opening as he didn't feel that he had really made any mistakes. I suggested possibly 25 . . . f4 ! ?, intending to activate the light-squared bishop immediately, but it 's easy to see why he wanted to resurrect his knight.
26 lbb3 f4
Black has a plan of trying to cement his bishop on e4 and indeed, if achieved, that could be very annoying for White (bearing in mind that de-isolating the black centre pawns isn't an attractive option).
27 .i.a7!

138 The Panno 6 .i.e3 lLlc6
I was pretty chuffed with this move that came like a bolt out of the blue to the Norwegian IM. To interrupt the . . . .i.f5+-e4 plan, I wanted to attack the d5-pawn, but it was necessary to force the black rook onto an awkward square.
27 ... l:.b7 28 .i.f2 lLleS
The point is that 28 . . . .i.f5+ 29 �al .i.e4 falls foul of 30 l:.xd5 ! 29 lLlc5 .i.f5+ 30 'it>a1 l::tb5 31 .i.xd5+ �f8 32 lLle6+ .i.xe6 33 .i.xe6
l:.db8 34 ..tb3 lLlg4
I had re-established material equality and whilst leaving Black with weak pawns I had also preserved two raking bishops. Nonetheless I was hoping to avoid problems on b2 and an incursion into my position by the black knight. A solution came in the form of:
35 .i.a7!
Amazing that such an obscure move can be so successful twice within such a short period of time. What's amusing is that again this came as a shock to my opponent!
35 ... l:t8b7 36 l:.d8+ �e7 37 l::tg8 .i.h6 38 l::txg4 l:txa7 39 l:r.h4 ..tg7 40 l:r.xf4
It's true that this ending involves opposite coloured bishops. However there are rooks present to hassle Black's remaining weak pawns and his king is rather vulnerable too.
40 ... f5 41 l:r.e1+ �d8 42 l:r.d1+ �e7 43 g4 aS 44 gxf5 .i.e5 45 f6+! ..txf6 46 l::tel+ 1-0
Game 21 A.Gupta - N.Vinuthna
Commonwealth Champs, India 2004
1 d4 g6 2 c4 .i.g7 3 lLlc3 d6 4 e4 lLJf6 5 f3 0-0 6 ..te3 lLlc6 7 lLlge2 a6 8 1i'd2 l::tb8 9 g4

The Panno 6 i..e3 lL!c6 139
Although this move should still be considered a comparative sideline, I am pleased to see that it continues to be played from time to time. Of the attacking options 9 h4 has always been the most popular. White is more than ready to sacrifice a pawn with h4-h5 in order to open the h-file and in that respect it should be faster than 9 g4. The advantage of the text move though is that it provides . the e2-knight with a comfortable post on g3 particularly in the case of the fl -bishop being required to protect the c4-pawn after . . . lL!a5 . Of course it always has that square available but if Black blocks h4 with . . . h5 then White may want to force the issue with g4. That of course would not be possible with the knight obstructing it on g3 .
9 . . . b5
To back up my last remarks, after 9 . . . e5 1 0 d5 lL!a5 1 1 lLlg3 everything is covered and White can get on with rolling the h-pawn. Check out the n : . . c5 1 2 h4 b5 1 3 h5 'ike7 14 0-0-0 lL!xc4 1 5 i..xc4 bxc4 1 6 i..h6 lLle8 1 7 i..e3 (I wasn't after a draw - honest! ) 1 7 . . . lL!c7 1 8 i..xc5 ! lL!b5 1 9 lL!xb5 axb5 20 i..b4 i..f6 2 1 �b1 .l:td8 22 llh3 i..g5 23 'ii'c3 'ii'a7 24 .l:tdhl h6 25 'ikc2 'ii'd4 26 a3 l:lb7 27 i..c3 'ii'e3 28 lLlfl 'ii'c5 29 hxg6 fxg6 30 i..d2 �g7 3 1 i..xg5 hxg5 32 'ii'c 1 �f6 33 l:lh6 l:g7 34 ll1h5 9i/f7 35 'ii'xg5 l:dg8 36 l:lh1 b4 37 axb4 'ii'xb4 38 'ii'd2 'ii'b3 39 lL!e3 i..a6 40 .l:th7 :tb8 41 lL!f5 l:lxh7 42 llxh7+ 'ito>g8 43 .l:tg7+ �f8 44 :ta7 'ii'd3+ 45 'ii'xd3 cxd3 46 l:ha6 gxf5 47 gxf5 d2 48 'ito>c2 l:lxb2+ 49 �d1 1 -0 of C.Ward - P.Hagesather, Gausdal Troll Masters 1 995. Talk about making a meal of things( ! ) but nevertheless a winning endgame had been reached.
Also fairly instructive (if I say so myselfl) was 9 . . . i..d7 1 0 h4 e5 1 1 d5 lL!a5 12 lL!g3 b5 1 3 h5 'ii'e7 14 cxb5 axb5 1 5 b4 ! ? lL!c4 1 6 i..xc4 bxc4 1 7 l:lb 1 c 6 1 8 dxc6 i..xc6 1 9 b 5 i..a8 2 0 hxg6 (Played now when Black has a tough decision to make. Either he must risk being mated along the open h-file or he has to settle for an inferior pawn structure. He plumped for the latter where his h-pawn had significantly less impact than White's f-pawn:) 20 . . . fxg6 21 0-0 'ii'e6 22 g5 lL!d7 23 liJd5 l:lfc8 24 lLle2 lL!c5 25 i..xc5 l:hc5

140 The Panno 6 .te3 lbc6
26 lDec3 (Black has the bishop pair but with the rare distinction of having two bad bishops ! ) 26 . . . .tf8 27 a4 .te7 28 lDxe7+ 'ii'xe7 29 a5 d5 30 exd5 :d8 3 1 'ii'e3 .txd5 32 l:.bd1 l:.d7 33 ltfe 1 .te6 34 a6 .tf5 35 l:lxd7 .txd7 36 a7 l:lc8 37 'ii'xe5 'ii'f7 38 lDe4 .txb5 39 tbf6+ �f8 40 'ii'd6+ �g7 4 1 l:le7 c3 42 :xf7+ �xf7 4 3 'ii'd5+ 1 -0 C.Ward - D.Coleman, British Champs 1 992.
The text is the most accurate as Black keeps White guessing in the d4 department whilst getting on with something on the queenside.
10 h4
lO . . . hS!
The pawn sac 10 .. . e5 1 1 d5 lDd4 12 lDxd4 exd4 13 .txd4 only helped White in C.Ward - G.Moore, National Club, England 1 997 whilst . . . bxc4 leaves a black pawn where the knight would rather be.
l l lDg3
Effectively this is where White must decide to go all in. The text abandons the important d4-square but is necessary to force the issue on h5 .
ll • • • eS!
Again definitely best. It may not seem fair but after 1 l . . .hxg4?! 1 2 h5 gxf3? White can keep the h-pawn marching on i.e. 1 3 h6 .th8 14 h7+. Here 14 . . . �g7 would run into 1 5 .th6+ whilst 14 . . . lDxh7 is crushed by 1 5 'ii'h2.
12 dxeS!
Black had spotted a window of opportunity and after 12 d5 lDd4 the central black steed would be too much of a handful.
12 . • . lDxeS
Even on e5 the black knight hits some pretty useful squares, but at least White can budge it from here.
13 .te2

The Panno 6 ii.e3 tl)c6 141
13 . . . tt:)xc4
This isn't the most critical continuation but as it is a recent outing and I had a practically identical simultaneous display encounter the other day I thought I 'd include it as the main game.
However perhaps the acid test of White's system comes after 1 3 . . . hxg4 14 f4. One would imagine now that Black doesn't get too much action himself from 14 . . . lL!xc4 1 5 J.xc4 bxc4 1 6 h5 although 16 . . . gxh5 1 7 tt:)xh5 tt:)xe4 was a good attempt in C.Ward - G.Buckley, Guildford 1 99 1 . Alas (I don't know why I'm saying that! ) the rook proved superior to the pawns in what followed: 1 8 tt:)xe4 .l:[xb2 1 9 tt:)hf6+ J.xf6 20 tt:)xf6+ 'Wxf6 2 1 'Wd4 'Wxd4 22 J.xd4 .l:.e8+ 23 �fl f6 24 J.xb2 .l:.e4 25 .l:.h2 g3 26 .l:[c2 �f7 27 �g2 .l:.xf4 28 �xg3 .l:.g4+ 29 �f3 .l:.h4 30 .l:.fl J.f5 3 1 l:.cf2 .l:.h5 32 'ito>e3 'it>e6 33 �d4 l:.h4+ 34 .l:.f4 .l:[xf4+ 35 l:.xf4 J.d3 36 'it>e3 f5 37 .l:.h4 �d5 38 l:.h6 J.b1 39 a3 J.d3 40 l:tf6 'it>c5 4 1 .l:[f7 �b6 42 'iti>d4 c6 43 J.c l J.e4 44 J.f4 d5 45 J.d6 'it>a5 46 l:tb7 c5+ 47 J.xc5 f4 48 .l:[b4 1 -0.
Probably superior is 14 . . . tt:)f3+1 5 J.xf3 gxf3 16 h5 tt:)g4 17 0-0-0 leading to the position below.

142 The Panno 6 �e3 lLlc6
Here 17 . . . lLlxe3 18 'ii'xe3 b4 19 ltld5 c6 20 h6! �f6 2 1 lLlxf6+ 'ii'xf6 22 f5 ! aS was very strong for White in C.Ward - J.Gallagher, London 1992. The game ended in a draw after an over-elaboration: 23 lLlh5 gxh5 24 .:txd6 �e6 25 'ii'xf3 �h7 26 'ii'xh5 l:tbd8 27 l:txd8 l:txd8 28 fxe6 fxe6 29 'ii'h4 'iVd4 30 'ii'e7+. It strikes me now though that in fact I had several ways to try and capitalise on my advantage. However, whilst for example 23 h7+! �h8 24 'ii'h6 'ii'g7 25 'ii'xg7+ �xg7 26 l:txd6 looks pretty convincing, in all fairness Black should get his improvement in first.
Yes 17 . . . b4 ! ? 1 8 ltld5 c6 is better when the fun is just beginning: 19 h6 lLlxh6 (rather than 19 . . . �xh6 20 f5 ltlxe3 21 l:txh6 ltlg4 22 l:tdh1 which looks destined for disaster) I must confess that I was miffed when Joe annotated our encounter in his 1 995 book as 9 g4 was very rare back then and so the only purpose it seemed to achieve was preparing all my future opponents ! His conclusion now was that White may be able to scrape a draw after the complications resulting from 20 lLlxb4 'ii'a5 2 1 lLlxc6 'ii'xa2 22 ltle7+ <Jo>h7 23 .:txh6+ �xh6 24 �d4. Though that's interesting stuff I would have thought that 20 f5 ! ? is more in the spirit of things. Play might continue with 20 . . . ltlg4 2 1 f6 when there is an obvious fork in the proceedings :
a) 2 1 . . .lLlxf6 22 �h6 lLlg4 (After 22 . . . ltlxd5 23 �xg7 c:j;xg7 24 exd5 l:th8 25 'ii'd4+ f6 26 l:txh8 'ii'xh8 27 dxc6 with the c6-pawn the most dangerous of them all, it hardly looks as though Black is two pawns up ! ) 23 i.xg7 �xg7 24 lLle3 . It's three pawns but there is no denying White's compensation. The h-file is an obvious resource but the utilisation of the pinned black d-pawn via e4-e5 is also of relevance.
b) 2 l . . .�xf6 22 ltlxf6+ 'ii'xf6 (Rather than 22 . . . lLlxf6?? 23 'ii'h2) 23 �d4 ltle5. Now who knows what's going on after the tricky 24 c5. The only thing for sure is that 24 . . . dxc5? bites the bullet to 25 'ii'h2 .l:r.e8 26 'ii'h7+ Wf8 27 i.xc5+ and the alternatives make for fascinating home study! (What, do you want all the answers?)
14 �xc4 bxc4 15 gxh5 lLlxh5
It's easy to criticise this move but in truth the error has most likely already been made. Black has no good alternative whilst White can continue to pound down the g- and h-files.
16 ltlxh5 gxh5 17 0-0-0 �h7
The open g-file makes the black king a little draughty but there is no hiding!
18 .l:r.hg1
This move plays itself, the immediate threat now being .:tg5.
18 • . . �f6 19 'ii'd5!

The Panno 6 J.e3 lbc6 143
Black had an unenviable position but presumably this was overlooked. Now the end is nigh.
l9 ... J.e5 20 l:tg5 ..tg7 2l l:tdgl �f6 22 l:txg7+ �xg7 23 �xh5+ <ifi>g8 24 l:txg7+ l-0
Black is significant material down and besides J.h6+ will force mate.
Game 22 J.Rowson - K.Arakhamia-Grant British Champs, Scarborough 2004
l d4 lbf6 2 c4 g6 3 lLlc3 J.g7 4 e4 d6 5 f3 0-0
Perhaps when the reader has played over this game and therefore completed a broad overview of the numerous set-ups available to White, he may wish to return here and in particular to the concept of Black delaying . . . 0-0. In general I would suggest that how White treats this depends on how White had intended to handle the standard 'Panno' . Clearly a kingside attack wouldn't appear to be as effective although it is often awkward for Black to get too fruity on the queenside with his own king still in the centre. An old variation that I can recall being quoted is 5 . . . lbc6 6 J.e3 a6

144 The Panno 6 i.e3 lbc6
7 lt'lge2 :t.b8 8 'ii'd2 b5 9 cxb5 axb5 10 d5 lt'le5 1 1 lt'ld4 with the implication being that White stands better because of the hole on c6 and the impending capture of Black's b-pawn. Interestingly I can only find one practical outing with this line where after 1 l . . .b4 1 2 lt'lcb5 i.d7 1 3 'ii'xb4 Black actually went on to win. It is doubtful that this is how things should have turned out although clearly Black can drum up something for his pawn.
Backing up a little, White could alter the whole structure of the position by 7 d5 lt'le5 8 f4 lt'led7 9 lt'lf3 0-0 1 0 i.e2 c5 1 1 a4 'ii'c7. In U.Adianto F.Donguines, Genting 1995 the position was now more reminiscent of a 'Four Pawns Attack' than a ' Siimisch' . Actually I really don't like Black's position at all, with his last move being necessary to arrange . . . e6. Perhaps he should have played for . . . c6 rather than . . . c5 and, earlier still, 8 . . . lt'leg4 ! ? would have mixed things up more.
Finally if White plans one of the positional options then just as Black hopes to ' save' on . . . 0-0 (unlikely in the long term), White could at least temporarily forgo 'ii'd2. In fact after 8 lt'lc 1 (and by the way 8 a3, 8 .l:tb1 and presumably 8 l:tc 1 are also possible too) 8 . . . e5, White even gained a comfortable space advantage by 9 lt'lb3 exd4 10 lt'lxd4 0-0 1 1 i.e2 i.d7 12 0-0 a long time ago in A.Beliavsky - A. Martin Gonzalez, Alicante 1978. That said, nor do I see anything wrong with 9 d5 when 9 . . . lt'ld4 can be met by either 10 lt'lc 1 -e2, as given earlier in this chapter, or by 1 0 lt'lb3 . As previously inferred, Black is going to have to castle at some point but White may choose to develop his queen on a square other than d2.
6 i.e3 lt'lc6 7 lt'lge2 a6 8 'ii'd2 .l:.b8 9 .l:.cl !?
The modern approach to the ' Siimisch Panno' . White doesn't worry about how he's going to develop his kingside yet and instead sets about expanding on the queenside. Whilst 9 :t.b1 and 8 :t.d1 have been seen too, even I've dabbled in 9 a3 l:le8 10 b4 i.d7 1 1 l:lcl . White has a space advantage as usual but nevertheless the 1 l . . .e6 12 g3 b5 1 3 cxb5 axb5 14 i.h3 lt'le7 1 5 i.g5 'ii'c8 1 6 o-o 'ji'a6 17 lt'lb1 'ii'a7 1 8 i.e3 lt'lc8 19 d5 lt'lb6 20 dxe6 fxe6 2 1 'ii'a2 'Wb7 22 lt'ld2 �h8 23 lt'ld4 e5 (or 23 . . . d5 24 e5 lt'lg8

The Panno 6 i..e3 ttlc6 145
25 f4 ttlc4 26 ttlxc4 bxc4 27 b5 with an undeniable edge) 24 i.xd7 exd4 25 i.xe8 (25 i.c6! was stronger) 25 . . . dxe3 26 i.c6 'ifa7 27 ttlb l ttlc4 28 �hl ttle5 29 'ife2 'iib6 30 i.d5 ttlxd5 3 1 exd5 ttlc4 32 a4 'it'd4 33 axb5 ttlb2 34 l:c2 l:.e8 35 l:.xc7 'iixb4 36 l:.c2 'it'd4 37 ttlc3 ttld3 38 �g2 ttlb4 39 l:cc l ttld3 40 l:.cdl ttlf4+ 4 1 gxf4 'ifxc3 42 b6 i.d4 43 b7 i.c5 44 l:bl :lb8 45 'ifb2 1 -0 of C.Ward - G.Burgess, 4NCL, England 1996 was a completely different KI Siimisch game from what I'd been used to in the past.
9 . . . i.d7 Typically after an 9 . . . e5 10 d5 ttle7 sequence White would like to play g4
but this is less attractive now that White can't castle long. Slightly different here was the 10 dxe5 ttlxe5 1 1 b3 h5 12 h3 ttlh7 13 f4
ttlc6 14 g3 l:te8 1 5 i.g2 f5 16 exf5 i.xf5 17 0-0 ttlf6 1 8 i.f2 'Otth7 19 �h2 'ifd7 20 ttld4 ttlxd4 2 1 i.xd4 ttle4 22 ttlxe4 i.xe4 23 i.xg7 'ifxg7 24 :lcel i.xg2 25 �xg2 l:txel 26 l:.xel of T.Lematschko - L.Costantini, Plovdiv 2003 in which White had reached a favourable endgame.
10 ttldl
White's plan could hardly be different from the kingside hack of our last game. Now the point of 9 l:tc 1 is clear. When the time is right White wants to advance his c-pawn further. This retreat is simply the start of a relocation of the knight to f2.
10 . • . e5
I could say here that "Black has to do something and obviously White's intention is to meet 1 0 . . . b5 with 1 1 c5 when Black may regret weakening himself with that queenside advance". As it happens though, Black's best result in this 9 .l:r.c l variation (which is still comparatively speaking in its early stages) came by 'hanging loose' . Only after IO . . . a5 1 1 g3 b6 1 2 .i.g2 did 12 . . . e5 1 3 d5 ttle7 appear. Clearly Black's a- and b-pawn advances had bought Black a bit of time (i.e. in the kingside vs queenside pawn races) and the 14 o-o ttlh5 1 5 ttlt2 f5 16 b3 l:.f7 17 a3 'iff8 1 8 ttld3 h6 1 9 b4 axb4 20 axb4 g5 21 exf5 ttlxf5 22 i.f2 ttlf6 23 ttlc3 ttld4 24 l:tcel l:te8 25 b5 .i.f5 26 ttle4 ttld7 27 i.e3 ttlc5 28 ttldxc5 dxc5 29 l:f.f2 .l:r.a8 30 'ifdl .l:r.a3 3 1

146 The Panno 6 i.e3 lDc6
i.c1 l:.a1 32 1i'd3 1i'a8 33 f4 exf4 34 gxf4 g4 35 'ii'fl 'ii'f8 36 lDg3 l:.e7 37 lDxf5 :xe1 38 1i'xe1 'ii'xf5 39 .l:.fl lhc 1 40 'ii'e8+ 'ii'f8 0- 1 of i.Novikov Z.Efimenko, Montreal 2004 was a little reminiscent of a 'Classical variation' . I'm not sure how much we can read into this result as it seemed to me that White was doing quite well. However if White was worried by the prospect of Black's kingside advances, then he could perhaps have considered instead maintaining the tension in the centre with 1 3 0-0. Justifying that decision would be the fact that . . . b5 is no longer a break that Black could hope to favourably achieve.
1 1 d5 l:i:Je7
12 l:i:Jf2
I can't see anything obviously wrong with 12 c5 ! ? and the 12 . . . lDe8 13 b4 f5 14 lDec3 lDf6 15 i.e2 'iti>h8 1 6 lDb2 fxe4 17 fxe4 l:i:Jh5 1 8 i.f3 b6 19 c6 i.c8 20 0-0 lDf4 2 1 g3 l:i:Jh3+ 22 �g2 l:i:Jg8 23 lt:Jc4 h5 24 b5 .l:.a8 25 bxa6 i.xa6 26 i.e2 _.c8 27 a4 i.xc4 28 i.xc4 lDf6 29 ii.e2 lt:Jg4 30 l:txf8+ i.xf8 3 1 i.xg4 1i'xg4 32 'ii'd1 i.e7 33 'ii'xg4 hxg4 34 l:i:Jb5 .l:.c8 35 .l:.c2 'iti>g8 36 lt:Ja7 l:ta8 37 i.xb6 lt:Jg5 38 l:.c4 i.d8 39 i.e3 l:i:Jf3 40 h4 l:i:Je 1+ 4 1 'iii>f2 l:i:Jd3+ 42 �e2 1 -0 of A.Kuzmin - R.Garcia, Andorra la Vella 2004 was even more 'Classical '-like, again with . . . a6 and .l:.b8 being relative timewasters.
12 ... l:i:Je8 13 g3
The advantage of · leaving the knight on e2 is that d4 is permanently supported thus vastly reducing the chances of a black knight landing there. The drawback is that the fl-bishop must find another way into the game. The text provides that whilst adding some extra control to the f4-square.
13 . . . c5
This doesn't really work out but I guess that the tempi situation after 1 3 . . . f5 would compare unfavourably to the Novikov-Efimenko encounter that I referred to earlier.
14 b4
The pawn sacrifice 14 i.g2 b5 1 5 b4 ! cxb4 16 c5 had turned out very well after 16 . . . dxc5 1 7 i.xc5 a5 1 8 0-0 i.c8 1 9 d6 lt:Jc6 20 d7 i.xd7 2 1

The Panno 6 i.e3 lDc6 147
l:.fdl lDd4 22 lDxd4 exd4 23 f4 .J\.e6 24 e5 f6 25 .Jtxf8 in T.Vasilevich A.Kuzmin, Catalan Bay 2004 but one can hardly fault the text. Right now the black knights are of no use in blockading c5.
14 ... b6 15 .Jtg2 f5 16 0-0 lDf6 17 .l:tb1
As far as White is concerned, the b-file is where he is going to get his main action. A similar aim was achieved after 17 l:c2 �h8 1 8 l:bl 'flc7 1 9 bxc5 bxc5 2 0 l:cb2 in K.Bischoff - A.Piroth, France 2003 . Black's kingside play hadn't really got going and the queenside invasion of 20 . . . .1:tfc8 2 1 'ii'c3 .Jte8 22 iLd2 .l:txb2 23 'iVxb2 lDd7 24 'ifb7 'iVxb7 25 .l:txb7 l:b8 26 l:xb8 lDxb8 27 .Jta5 lDd7 28 .Jth3 lDc8 29 exf5 lDcb6 30 f6 iLxf6 3 1 .Jtxd7 lDxd7 32 lDe4 i.e7 33 .J\.c7 �g8 34 ..t>f2 g5 35 g4 .J\.g6 36 lD2c3 h6 37 �e3 �fl 38 .Jtxd6 proved decisive.
17 ... 'ii"c7 18 l:fc1 �h8 19 l:lc3
Essentially White's plan is to double or treble on the b-file but this third rank lift, if desired, enables a stop off on a3 ftrst.
19 ... l:tbe8?!
It's easy to criticise this and so I will ! Seriously, I have some sympathy with Black for abandoning this file as grovelling in an endgame (such as the Bischoff - Piroff example above) was never going to be an attractive prospect. Alas guarding the b7-square with . . . .Jtc8 isn't going to solve all of Black's problems and the kingside counter-play is still nowhere to be seen.
20 a4!
The b6-pawn is holding Black's queenside together and White is preparing to offer it an extra challenge.
20 ... .Jtc8
20 . . . .Jtxa4 2 1 b5 would see the bishop trapped behind enemy lines whilst 20 . . . a5 2 1 bxa5 bxa5 22 .l:tcb3 .Jtxa4 23 :.b7 'iVd8 24 .!:tal i.d7 25 'iVxa5 'ii'xa5 26 l:xa5 would leave the 71h rank and the d6-pawn natural targets for the white rooks.
The text guards b7 but there are other problems ahead.

1 48 The Panno 6 i..e3 ttJc6
21 aS cxb4
Or 2 l . . .bxa5 22 bxc5 when not for the first time 22 . . . dxc5? is unavailable because of the fork 23 d6.
22 l:txb4 bxa5 23 l:tb2 ttJd7
The concept of 23 . . . f4 has not been a problem for White up to now and in view of 24 i..b6 'iVd7 25 c5 it still wouldn't be.
24 ttJd3
The c5-square is all important now and regarding the control there, Black simply can't match White's firepower.
24 . • . fxe4
This time all 24 . . . f4 25 i..t2 achieves is the donation of the h3-c8 diagonal to the white light-squared bishop.
25 fxe4 ttJg8 26 c5
Inevitable. Black's pawn structure is about to crumble. 26 ... ttJxc5 27 ttJxc5 dxcS 28 i..xcS l:tf7 29 i..e3 'ii'd7 30 'ii'cl ttJf6?
In view of the strength of White's next move this must be deemed a mistake although it's difficult to blame someone for wanting some activity.
31 l:tbc2!
Threatening both l:.xc8 and l:tc7. 31 ... l:tff8 32 h3
32 l:.c7 looked good too but in avoiding . . . 'ii'g4 the text keeps things clean.
32 ... 'ii'bs 33 l:tb2 'ii'a4 34 l:tc4 'ii'd7 35 l:.c7
35 ... 'ii'a4
Or 35 . . . 'ii'd6 36 l%b6 'ii'd8 37 l:.b8 . The black queen has nowhere to hide. 36 ttJc3 'ii'a3 37 i..c5 1-0

Chapter 7: 6 �e3 cS ! ?
Game 23 J.Rowson - V.Kotronias
Hastings Premier 2003/2004
l d4 ltJf6 2 c4 g6 3 ltJc3 �g7 4 e4 d6 5 t3 0-0 6 �e3 c5!?
Now we're talking! As I mentioned in the introduction, in its early days this pawn sacrifice was dismissed by a variation or two. As I write this book however it remains the critical test of the 6 �e3 Slimisch. Indeed I must confess that when I was first planning this project I originally decided that the chapters up to now were comparatively irrelevant because it seemed to me that there had been such a theoretical shift toward this move. A closer examination then showed that in fact Black players are starting to return to variations such as the 'Panno' even though it may not be entirely clear why. Whilst I would acknowledge that probably a whole book alone could be written on this position, there are some important points to note:
1) Though I will attempt to demonstrate how White has recently been striving to win by accepting the gambit, he has always been pretty much able to force a draw. That is generally acceptable at the top levels but not necessarily in club chess where competitors need to be able to win with both colours.
2) Though the Benoni positions that arise after an eventual (or immediate) d4-d5 result in the bishop being misplaced on e3, the next up 6 ltJge2 and 6

150 6 i.e3 c5!?
i.g5 seem almost to be designed with 6 . . . c5 in mind. Arguably (and particularly in the case of 6 lDge2) comparatively (i.e. to this King's Indian version rather than the standard 1 d4 lDf6 2 c4 c5 3 d5 one !) superior 'Benoni' positions can occur. Should Black therefore wish to avoid that, then, whilst there are independent lines available, transpositions to earlier chapters are likely.
3) In the year 2004 a quick . . . c5 remains 'all the rage' . However it could well be that an outright refutation of this gambit is one day discovered or perhaps the materialistic Fritz will convince everybody that 'a pawn is a pawn' ! If 6 . . . c5 is written off the menu then Black (if indeed he changed at all) will have to return to the likes of 6 . . . e5, 6 . . . c6, 6 . . . lDbd7 or 6 . . . lDc6.
7 dxc5
I really believe that 7 d5 is an admission that White is having to enter an inferior Benoni line. The 4'h and 5th games here deal with 7 lDge2 lDc6 8 d5 but first of all I want to investigate the repercussions of grabbing the pawn.
7 ... dxc5 8 "ii'xd8
As White is going to net a pawn it seems only logical to swap off the queens as, after all, White should theoretically be better off in an endgame. The obvious drawback of this is that Black is granted temporary dominance of the d-file and although White can challenge it with his a 1 -rook, its compatriot on h 1 will be out of action for some time.
8 ••. l:.xd8 9 i.xc5
I've started and so I ' ll fmish! There is no point in backing out now. 9 • • • lDc6 10 i.a3 Though I'm not personally too impressed with it either, to understand this
retreat you need to view the now readily accepted theoretical variation 10 lDd5 .
lO . . . lDd7! (rather than the 10 . . . lDxd5 1 1 cxd5 i.xb2 1 2 l:r.b1 i.c3+ 1 3 � f2 that I mentioned i n the book's introduction) 1 1 i.xe7 1 1 . . .lDxe7 1 2 lDxe7+ � f8 1 3 lDd5 i.xb2 14 l:.b1 i.g7 1 5 lDh3 (Recently 1 5 lDe2 b6 16

6 i..e3 c5!? 151
lbec3 lbc5 17 i..e2 i..e6 18 'it>d2 .l:r.ac8 1 9 .l:r.hd1 .l:r.d7 20 'it>e3 lbb7 2 1 lbb5 lba5 22 .l:r.bc 1 f5 23 lbd4 i..IJ 24 �d3 :c5 25 g4 lbc6 26 lbxc6 l:txc6 27 a4 .l:r.c5 28 .l:r.c2 l:td6 also left Black with enough activity for a draw in A.Braun - I.Nataf, Stockholm 2003 and while I'm here 1 5 . . . lbb6! ? also looked reasonable seeing as White really doesn't want the a-file opened) 1 5 . . . lbc5 16 lbf2 i..e6 1 7 i..e2 .l:r.d6. Of course there is nothing wrong with 17 . . . l:tac8 either but this adds a new dimension. White has a great knight on d5 that was keeping the black rooks out of the game. However the text prepares a rook switch along the 3'd rank. Taking into consideration the rock on c5 and also Black's dominance on the dark squares, it's easy to see why White has scored poorly from this position.
When I look back at the horrible encounters I've had such as 1 1 i..a3 e6 1 2 lbe3 (and 1 2 lbc7 l:r.b8 1 3 0-0-0 b6 14 lbb5 i..a6 1 5 lbe2 lbde5 16 lbec3 i..h6+ 17 �c2 l:txd1 1 8 lbxd1 l:td8 C.Ward - D.Hassabis, British Champs 1990) 12 . . . b6 1 3 lbh3 lbc5 14 lbf2 f5 1 5 l:td1 i..d4 16 'it>e2 f4 17 lbc2 i..a6 1 8 lbxd4 lbxd4+ 19 �d2 lbx£3+ 20 'it>c2 .l:r.xd1 2 1 lbxd1 lbe5 1h-1h C. Ward - W.Watson, British Champs 1 994, I can remember why I went off snatching this hot pawn. I managed to grovel a draw in both of these but as there were plenty of others like it, I guess one day I thought 'enough is enough' when wondering whether this is really how White should be playing a game of chess.
It's really not much fun and incidentally, although White can preserve his bishop instead through 1 1 lbxe7+ lbxe7 12 i..xe7 i..xb2 1 3 i..xd8 i..xa1 , in that case the d-file will be at Black's mercy.
10 . . . a5!
More testing than 10 . . . b6 which after 1 1 lbge2 would transpose to the notes of our next game.
1 1 l:tdl i..e6 12 lbd5 lbb4!
White had tried to prevent this but it is played anyway. Note that after 1 2 . . . i..xd5?! 1 3 cxd5 lbb4 White is not obliged to capture the knight and indeed 14 i..b5 lbc2+ 1 5 �f2 lbxa3 16 bxa3 e6 17 d6 e5 1 8 lbe2 i..f8 19

152 6 .i.e3 c5!?
d7 .i.xa3 20 g4 h6 21 h4 left Black fighting for a draw in V.Kramnik J.Nunn, Manila Olympiad 1992.
13 liJxe7+
White would be seriously lacking in development after 1 3 lLlxb4 l:r.xd1 + 14 �xd 1 axb4 1 5 .i.xb4 l:txa2 and indeed getting his bits out is the main difficulty that White must try to overcome when accepting the 6 . . . c5 gambit.
13 ... �h8 14 liJd5
14 l:xd8+ is no better and while I'm here the hypothetical variation 14 . . . l:txd8 1 5 .i.xb4 axb4 16 liJd5 l:ta8 17 liJxb4 liJd7 would leave White three pawns up but in a bit of trouble due to the pressure that Black's active pieces exert. Most of White's are of course sitting at home doing nothing!
14 ... lLlc2+
Black is obviously about to lose his bishop anyway but though the fork messes up his pawn structure, at least the black rooks are kept out of the a-file.
15 'iii>f2 lLlxa3 16 bxa3 b5!
There is no peace for the wicked (that's White ! ) as Black relentlessly strives to open up lines for his rook. He is of course right to continue actively and the text also undermines the protection of the knight on d5 .
17 a4! ?
I was commentating live on this game and knowing Scottish GM and new British Champion Jon Rowson to be a bit of a theory buff and a relatively studious individual I was eagerly waiting for the novelty that might change the whole assessment of 6 . . . c5 . To be honest it came a bit late in the variation for my liking and anyway Jon later confessed that none of this was home preparation. He had been expecting Mr Kotronias to play something different earlier. Although this new move is not enough to turn the tide in White's favour, it definitely appears to be better than all that had occurred previously. Indeed both 1 7 cxb5 liJxd5 1 8 exd5 .i.xd5 19 lLlh3 .i.xa2 and

6 i..e3 c5!? 153
1 7 lLlh3 llac8 1 8 i..e2 bxc4 19 lLlhf4 lLlxd5 20 lLlxd5 i..xd5 2 1 llxd5 llxd5 22 exd5 i..d4+ 23 <it>g3 c3 lead to Black wins whereas at least the text helps gain half a point!
l7 . • . bxa4!?
After 17 . . . bxc4 1 8 i..xc4 llac8 1 9 i..b3 i..xd5 20 exd5 White obviously still has some concerns on the dark squares but at least his bishop covers both c2 and d5 .
l8 lLle2 llab8
The point behind Black's last choice. Although White's knight remains secure on d5, at least there is no white bishop parked on b3 .
19 liJcl llb2+ 20 i..e2 l:.c8
White is one and a half pawns up but things could easily go pear shaped if Black obtained a passed a-pawn (or two!) . White now turns to a repetition in order to prevent . . . llxc4.
2l lLle7
Only Jon knows how seriously he considered 2 1 <jre3 . Playing on in this manner could be brave or it could be stupid. Only time - and maybe the next book on the Siimisch - will tell !
2l ... lle8
Of course absolutely not 2 I . . .llxc4?? when 22 lld8+ punishes Black's only poorly placed piece (i.e. his king!) .
22 liJdS llc8 23 lLle7 lle8 24 liJdS 1/z-1/z
Game 24 A.Zakharchenko - S.Pavlov
Kiev 2004
I c4 lLlf6 2 lLlc3 g6 3 d4 i..g7 4 e4 d6 S f3 0-0 6 i..e3 cS 7 dxcS dxcS 8 _.xd8 l:.xd8 9 i..xcS lLlc6 10 ltJge2

/54 6 i.e3 c5!?
In this gambit variation the king's knight is usually the most difficult piece to get developed. It generally won't want to go to h3 whilst Black has . . . iLxh3 available but on the other hand obstructing the fl -bishop doesn't seem ideal either. If this line ultimately comes good for White (and this game offers at least some promise) then the logic must be that leaving it at home merely puts off the problem and that e2 is only a temporary stop off.
lO • . • liJd7
The most popular continuation in this position sees Black setting about relocating his king's knight whilst unleashing his dark-squared bishop. There is no time like the present though to consider some alternatives:
a) 10 . . . i.e6 1 1 liJd5 liJd7 1 2 i.a3 liJde5 1 3 ltJec3 . Black still has a lead in development but with White's knights posted as they are, he can breathe a sigh of relief. If nothing much happens he has easy moves to be getting on with, whilst something like 1 3 . . . ltJa5 14 iLxe7 .l:.d7 1 5 0-0-0 ltJexc4 16 i.xc4 ltJxc4 17 liJf6+ i.xf6 1 8 iLxf6 would also leave him very content.
b) 1 O . . . e6 has the advantage of keeping White's knights out of d5 but the drawback of locking in the c8-bishop. Though he eventually went on to lose I believe that Black had generated a very reasonable amount of play after 1 1 l:.dl l:.xdl+ 1 2 �xdl b6 1 3 i.a3 i.b7 14 �c2 .l:.d8 1 5 liJc i liJd4+ 1 6 �b l liJh5 17 ltJ3e2 ltJxe2 1 8 ltJxe2 f5 19 exf5 gxf5 20 b3 e5 2 1 i.b2 e4 in J.Campos Moreno - O.Renet, Andorra 1997. However whilst 1 2 ltJxdl ! ? looks like an interesting deviation, with the king then guarding the c2 square (i.e. after 1 2 �xdl ), I would have thought that 1 3 i.e3 ! ? is very possible too.
c) 10 . . . b6 1 1 i.a3 (Otherwise . . . ltJb4 would I suspect be too hot to handle)
My own belief is that the above position could be a critical one. A rare victory for me in this line went 1 I . . .i.b7 1 2 .l:.dl (or 1 2 liJd5 e6!) 1 2 . . . .l:.xdl+ 1 3 �xdl liJd7 14 �c2 e6 15 ltJc 1 liJde5 16 liJb3 a5 17 ltJa4 liJb4+ 1 8 �b I liJd7 19 c5 ! ltJxc5 20 ltJaxc5 bxc5 2 1 ltJxc5 i.c6 22 i.e2

6 i.e3 c5!? 155
l:.c8 23 :d1 h5 24 i.xb4 axb4 25 i.a6 .:lb8 26 i.c4 h4 27 ltla6 l:.c8 28 ltlxb4 i.xe4+ 29 i.d3 i.b7 30 i.a6 i.xa6 3 1 ltlxa6 i.f8 32 b4 l:.c3 33 b5 l:.a3 34 h3 l:.a5 35 ltlc7 i.c5 36 l:.d8+ 1;g7 37 l:.a8 i.a7 38 �b2 'itf6 39 �b3 1;e7 40 a4 i.b6 41 ltla6 i.f2 42 l:.c8 f5 43 ltlb4 'itd7 44 .:.gs l:.a7 45 ltlc6 1 -0 C.Ward - M.Hebden, Le Touquet 1992 but whilst I worked hard for that, there are numerous attempts at improvement that Black could try. First of all 12 . . . e6 and 1 2 . . . ltld7 should be considered but also 1 l . . .i.b7 is far from forced. Indeed from the last diagram position each of 1 l . . .i.a6, 1 l . . .a5, 1 1 . . .ltld7 and 1 l . . .e6 has been played with varying degrees of success.
The conclusion then is that White's move order has sidestepped the 10 . . . a5 ! of our last game but clearly deploying the knight on e2 (i.e. on move 1 0) before committing the bishop opens up an entirely different can of worms.
1 1 i.f2!?
In my opinion the recent discovery of this bishop retreat offers White more hope than anything else I 've seen for White in years of the accepted gambit variation. Practical experiences suggest that White's dark-squared bishop has a tendency to get locked out of the game on a3 (e.g. by the previously viewed idea . . . a5 and . . . ltlb4). On e3 it is especially vulnerable to a . . . ltlb4-c2 manoeuvre, but from f2 it can utilise the f2-h4 diagonal.
l l ... ltldeS The immediate 1 1 . . .ltlb4 can of course be met by 1 2 0-0-0 as, with the
black knight still on d7, it is legal ! 12 ltlf4 i.h6 On first sight the variation 12 . . . ltlb4 1 3 l:.d1 ltlc2+ 14 �e2 would appear
to be the most uncomfortable for White but a closer inspection suggests that Black can't inflict any serious damage. Indeed after 14 . . . i.e6 1 5 ltlcd5 White is ready to evict the c2-knight with l:.d2.
13 i.g3

156 6 if..e3 c5!?
I guess it' s possible that 13 lL!fd5 e6 14 lLlc7 may be playable but for me at least there are definitely alarm bells ringing. It's more comforting to keep Black's dark-squared bishop out of the main action and the text wouldn't be possible had the bishop previously retreated to the most undesirable square g l .
1 3 • • . lL!b4 1 4 l'Ld1
14 . • . l:txd1+
There is no time to take on f4 in order to give a fork on d3 because the rook is currently undefended on d8. Clearly Black would quite like to simply connect his rooks. However noting that 14 . . . if..e6?? 1 5 lL!xe6 leaves the knight on e5 hanging, the problem is the lack of squares available to the c8-bishop (i.e. those that don't obstruct the d-file).
Little seems to be gained by 14 . . . lL!c2+ 15 �f2 l:txd1 16 lL!xd l . 15 <li>xd1
With the king on this square there is no piece-winning fork and with lL!fd5, if allowed, next on the agenda, White is very close to completely consolidating his extra pawn advantage.
15 .•• if..xf4 16 if..xf4 lL!ed3 17 a3

6 i..e3 c5!? 157
I would say that this i s the most practical of some reasonable looking alternatives available to White whose aim now is to repel Black's pieces and to simplify the situation.
17 ... lLlxb2+?
After 17 . . . lLlf2+ 1 8 �d2 lLlxh1 1 9 axb4 the cornered knight would soon find itself rounded up whilst he no longer has anything like adequate play for the pawn after 17 . . . lLlxf4 1 8 axb4.
Black's selection however merely encourages a premature end to the game.
18 ..t>d2 lLlc6 19 �cl 1-0
Ironically then the knight found itself trapped on the other side of the board instead!
Game 25 J.Murey - I.Lentze
European Senior Champs, Saint Vincent 2003
1 c4 g6 2 lLlc3 i.g7 3 d4 lLlf6 4 e4 d6 5 f3 0-0 6 i.e3 c5 7 dxc5 dxc5 8 i.xc5
I guess if White is hell bent on preserving the queens then 8 e5 lLlfd7 9 f4 is another possibility. I have never been impressed though and any complications after 9 . . . f6 always seemed to me to be fine for Black.
8 ... lLlc6 9 'iVa4!?
It' s clear that with the queens on their home squares, whoever trades first will be donating the file to the enemy rook. The assessment of the old reference 9 i.e3 lLld7 10 l:.c1 'iVa5 1 1 lLlh3 l:.d8 12 lLlf2 lLlc5 1 3 i.d2 i.xc3 14 bxc3 i.e6 1 5 'iVc2 lLle5 1 6 i.f4 lLlxc4 1 7 i.e2 g5 ! 1 8 i.xg5 lbd3+ 19 i.xd3 'iVxg5 a s clearly better for Black (M.Dlugy - B.Gelfand, Palma de Mallorca 1989) would also suggest that White does need to be concerned

158 6 J..e3 c5!?
about the prospect of Black's queen swinging out to a5 . The cheeky text stops that whilst also facilitating l:td1 .
9 ... ttld7 The start of what should now be a familiar manoeuvre. As it doesn't
appear to work out too well in this game, in a quest for improvements Black could already begin looking here. Actually I don't have any obvious suggestions as 9 . . . J..d7 10 'ii'a3 b6 1 1 J..e3 ttla5 1 2 l:tc1 has previously been assessed by Postny as clearly better for White whilst 9 . . . J..e6 10 .l:td1 is annoying for the black queen. Perhaps 10 . . . ttld7 1 1 'ii'a3 f5 ! ? is the right way to mix things up as it certainly looks more appealing than 10 . . . "iVc7 1 1 ttld5 .
10 J..f'2 This bishop had to move. Please observe the dismal failure of 1 0 l:r.d1 ??
J..xc3+ 1 1 bxc3 ttlxc5.
10 • • . ttlde5 Though 9 "iVa4 ! ? is rare, the reference 10 . . . ttlb6 1 1 "iVa3 J..e6 12 .l:tdl "iVc7
1 3 c5 J..xc3+ 1 4 bxc3 ttlc4 1 5 J..xc4 J..xc4 16 J..g3 "iVcS 1 7 ttle2 b5 1 8 ttld4 a5 1 9 .l:td2 f5 2 0 e 5 f4 2 1 ttlxc6 "iVxc6 2 2 J..t2 'ii'e6 2 3 J..d4 b4 24 "iVb2 l:tfb8 25 'iPf2 b3 26 a4 .l:tf8 27 l:r.e1 'ii'c6 28 "iVa3 e6 29 �g1 l:r.ad8 30 .l:r.edl l:td5 3 1 J..f2 .l:tfd8 32 .l:td4 .l:txd4 33 cxd4 .l:.b8 34 .l:tb l .l:tb4 35 J..e l .l:r.xa4 36 "iVc1 g5 37 J..xa5 J..d5 38 J..c3 rj;;g7 39 'ii'd2 .l:.a2 40 J..b2 h6 4 1 h4 'ii'e8 42 hxg5 hxg5 43 .l:tcl "iVc6 44 l:[fl "iVaS 45 l:[f2 "iVa5 46 "iVdl 'ifb4 47 l:[d2 "iVaS 48 l:[f2 "iVb4 49 "iVc 1 �f7 50 c6 J..xc6 51 "iVxc6 "iVel+ 52 l:[fl "iVe3+ 53 �h2 l:r.xb2 54 "iVd7+ �g6 55 "iVxe6+ lli>hS 56 'ii'g4+ �g6 57 l:r.al l:ta2 58 1i'e6+ �h5 59 l:txa2 bxa2 60 1i'xa2 "iVxd4 6 1 1i'f7+ 1 -0 J.Murey H.Tirard, Koszalin 1 999 demonstrates that the entertaining Israeli Grandmaster had employed it with some success previously too.
Actually, as a deviation from that, fascinating is the queen sacrifice I I . . .ttle5 1 2 .l:r.dl ttlexc4 1 3 J..xc4 ttlxc4 14 "iVc5 ( 14 "iVb4 J..xc3+ 1 5 "iVxc3 "iVa5 16 'ii'xa5 ttlxa5 1 7 ttle2 also provides a miniscule edge although with opposite coloured bishops it is doubtful whether it's enough for a win) 14 . . . ttlxb2 ! ? but although White still has a little trouble getting untangled after 1 5 .l:xd8 .l:xd8 16 "iV a3 ttld3+ 1 7 �fl J..e6 1 8 ttlge2 (or 1 8 ttld5 J..xd5 1 9 exd5 l:txd5 20 'ii'xe7 .l:tc8 2 1 ttle2) 1 8 . . . J..c4 it' s still hard to believe.
The main alternative approach for Black is to wreck White's queenside pawn structure by I O . . . J..xc3+. Then 1 1 bxc3 'ii'a5 ( 1 l . . .'ii'c7 is double edged. With a lead in development, it' s logical to preserve the queens but not so hot given the potential weakness of the new hole on g7) 12 1i'xa5 ttlxa5 13 0-0-0 is an unbalanced ending. Black will most likely regain a pawn (the prime candidate being c4) but White has the bishop pair and would do well to park his remaining knight on d5 .
1 1 l:[dl

6 i.e3 c5!? 159
ll . . .'ii'aS?!
This definitely seems to simplify things in White's favour. Instead either of l l . . .i.d7 or l l . . .ll:ld7 would keep the game more exciting although admittedly there is always a down side to self-pinning.
12 �xaS ll:lxaS 13 ll:ldS! ll:lac6
13 . . . e6? is foiled by 14 ll:lc7 .:.b8 1 5 i.xa7. 14 i.cS fS 15 f4
As 1 5 i.xe7 :f7 16 i.c5 fxe4 1 7 fxe4 i.g4 1 8 i.e2 b6 is a little murky I can't help wondering whether White might have employed a more solid 14th move. Still it makes it interesting for the rest of us !
1S • . • ll:ld7 16 i.xe7 .:.es
17 i.a3
As White is already two pawns up I suspect that he may also have been able to get away with 1 7 e5 ! ? .:.xe7 (or 1 7 . . . ll:lxe7? 1 8 ll:lc7) 1 8 ll:lxe7+ ll:lxe7 19 ll:lf3 ll:lc5 20 h4 ! ? too. Things are never clear when it' s two minor pieces for a rook but here Black's dark-squared bishop is out of it whilst White's king's rook can enter the fray via the h-file.
17 • . . .:.xe4+ 18 'iiif2 i.d4+ 19 'ii?g3 ll:lf6

160 6 i..e3 c5!?
As White's kingside is still at home, this sort of thing is always going to be a concern. Maybe that is being unfair to the first player though as he seems to manage okay.
20 i.d3 l:te8
Yes perhaps White felt that the likes of 20 . . . lDh5+ 2 1 �h4 l:.xf4+ 22 lDxf4 i.f6+ 23 �h3 lDxf4+ 24 �g3 lDxd3 25 l:.xd3 were always under control anyway!
21 lDt3 lDhS+ 22 �h3 i.b6 23 g3
Now the white king is clearly safe and his other pieces can do the talking. 23 •.• i.d8 24 l:the1 i.d7 25 .:txe8+ i.xe8 26 b4 lDe7 27 lDeS
The knight on d5 was a monster; this is a beast! 27 ... lDxd5 28 cxdS l:.c8 29 bS a6 30 bxa6 bxa6 31 d6 i.a4 32 i.xa6
l:.c2 33 l:tcl 1-0
Game 26 C. Ward - J.Gallagher
British Champs 1999
1 d4 lDf6 2 c4 g6 3 lDc3 i.g7 4 e4 d6 5 f3 0-0 6 i.e3 c5 7 lDge2

6 i.e3 c5!? 161
The problem with accepting the gambit is that White spends a lot of the middlegame on the defensive. By refusing the offering White can hope to retain the initiative and ultimately make something of his space advantage.
7 ... ltJc6
The most principled move and the obvious reason for the 6 i.e3 ltJbd7 (intending . . . c5) line going out of fashion. Black's light-squared bishop isn't even temporarily inconvenienced whilst White must now keep the d4-square reinforced.
8 d5
It's not too late for White to transpose to game 24 with 8 dxc5 but, that aside, this is the only move that I really want to consider. White could have traded pawns on d4 last turn to transpose to a 'Maroczy Bind Accelerated Dragon' and that would arguably be a better version after 8 'ii'd2 cxd4. Barring this, in my opinion White runs out of useful moves first as apart from 8 . . . cxd4, 8 . . . 'ii'a5 is very reasonable too.
8 ... ltJe5
There is no doubt that this is a very nice square for the black knight. White generally spends much of the middlegame trying to force it away with f3-f4 but that's not as simple as it may sound. The knight hits the white c-pawn at the moment and has the ability to hop to g4 as well if White's f-pawn advances prematurely.
9 ltJg3
It is possible to withdraw this knight to c l but that has proven nowhere near as popular as the text. On g3 the white steed covers the useful squares f5 and h5 whilst tendering extra support to the e4-pawn. Sounds good doesn't it? Well, truth be told, there are a lot of pros and cons to discuss about this knight but they will all become clear over the next few games.
9 • • • e6
This game and the next will demonstrate Black's two expansions of . . . a6 and . . . h5 . Although it is possible for Black to play either of those pawn

162 6 i.e3 c5!?
advances now, it is inevitable that Black should turn to the text for the real action. Specifically then I would suggest that 9 . . . h5 will probably transpose to the next game but White has options after 9 . . . a6. Although 10 a4 is sensible, once you've played over this game and its notes you will understand why that may not fit in with White's plans. Hence the independent significance of 9 . . . a6 1 0 h3 ! ? ( 10 f4 ! ? tL!eg4 1 1 i.d2 is interesting too) 10 . . . b5 1 1 cxb5 axb5 12 f4 {I didn't fancy taking that b-pawn although others might) 1 2 . . . tL!c4 1 3 i.xc4 bxc4 14 0-0 tiJd7 1 5 l:lf2 of C. Ward - S.Lelic, Gausdal Troll Masters 1 995. At the time I really liked White's position but upon reflection I would say that the chances are equal. The fact that Black has an e-pawn rather than an a-pawn takes the sting out of the thematic e5 dxe5, f5 concept.
10 i.e2 exd5 l l cxd5
Basically we have now entered the realms of a 'Benoni Defence' but as this pawn formation has occurred on bucket loads of occasions via the 6 i.e3 c5 variation, it' s clear that it more than warrants its place in this Siimisch book. The fact that these positions are generally classified by ECO as A65s rather than E8 1 s makes them no less relevant here.
l l . . . a6
The 'Benko Gambit' style 1 1 . . .b5 1 2 lDxb5 l:lb8 1 3 _.d2 i.a6 14 a4 lDe8 1 5 i.g5 f6 16 i.e3 f5 17 o-o _.d7 1 8 exf5 gxf5 19 tiJh5 tiJg6 20 lDxg7 tL!xg7 2 1 i.h6 l:lfe8 22 l:lfe 1 l:le5 23 f4 l:tee8 24 i.d3 lDh5 25 l:lxe8+ llxe8 26 i.xf5 _.xf5 27 lDxd6 _.d7 28 tDxe8 -.xe8 29 f5 1 -0 evidently didn't quite cut it in I .Khenkin - M.Manninen, Rilton Cup, Stockholm 1997.
The main alternative then is 1 l . . .h5 ! ? and that is the subject of our next game.
12 .. d2!?
My objection to 12 a4 here i s that Black can sort of transpose to the next game with 1 2 . . . h5. Indeed I believe that is his best as 1 2 . . . i.d7 1 3 h3 lDe8 14 0-0 'ii'h4 15 _.e 1 f5 (After 1 5 . . . c4 16 f4 lDd3 17 i.xd3 cxd3 1 8 llf3 f5 1 9 exf5 gxf5 20 _.d2 lDf6 2 1 _.xd3 l:lae8 22 i.f2 'ii'h6 23 tDxf5 i.xf5 24

6 i..e3 c5!? 1 63
'ii'xf5 lDh5 25 ._g4 White had emerged a clear pawn up in C.Ward -M.Hebden, Charlton 1 99 5) 1 6 f4 lDfl 1 7 exf5 gxf5 1 8 i..d3 lDh8 1 9 l:[f3 lDg6 20 �1 ._f6 2 1 lDh5 "ike7 22 lDxg7 lDxg7 looks better for White whichever side of the board he chooses to focus on.
It's only in more recent years that I have even entertained the thought of allowing Black to expand on the queenside. However 12 0-0 b5 13 b3 or still 1 3 ._d2, e.g. 13 . . . b4 14 lDdl a5 1 5 .l:lcl .l:le8 16 i.h6 c4 17 i..xg7 <Jixg7 1 8 lDe3 lDd3 19 .l:lxc4 lDc5 20 .l:lcc l i..a6 2 1 i..xa6 l:.xa6 22 lDc4 h6 23 Wd4 lDcd7 24 f4 lDb6 25 lDe3 lDbd7 26 lDc4 lDb6 27 e5 dxe5 28 fxe5 lDfxd5 29 lDd6 .l:le6 30 .l:lxfl+ �g8 3 1 .:tcfl .l:la8 32 Wg4 l:.xd6 33 .l:lf8+ Wxf8 34 l:txf8+ �xf8 35 exd6 .l:ld8 36 Wxg6 1-0 K.Sakaev - K.Maslak, Dos Hermanas 2003 are both playable. Again my reservation is that after 12 0-0 Black still has 1 2 . . . h5 ! ? at his disposal.
12 • • • .1:le8
White has made his intentions clear and what I like about 1 1 'ii'd2 ! ? is that it justifies the existence of 6 i..e3 . If White had instead just gone for a4 and o-o then the fact is that i..e3 was not worth the time spent. Instead it might as well have remained on c 1 , only choosing where to go to when Black had laid his cards on the table (e.g. from c l to g5 after . . . h5). Of course, given that he committed this piece as early as move 6 when it wasn't known what variation Black would employ, that is obviously no longer an option. Hopefully already the reader will start to understand the attraction of the 6 lDge2 that is the subject of the next chapter.
The text offers the option of preserving the dark-squared bishops but the following variations should also prove instructive:
a) 12 . . . b5 1 3 i..h6 l:te8 (or 1 3 . . . .:tb8 14 0-0 .l:le8 1 5 i..xg7 <J;xg7 16 .l:lac l 'ifb6 17 lDhl i..d7 1 8 lDf2 c4 19 lDcdl h5 20 lDe3 as in K.Bischoff E. Can, Istanbul 2003) 14 i..xg7 �xg7 1 5 0-0 b4 16 lDd 1 a5 1 7 lDe3 i..a6 1 8 i..xa6 l:txa6 1 9 h3 a4 20 .l:lael a3 2 1 b3 .l:la7 22 f4 lDed7 23 lDc4 J.Piket - J.Polgar, Amber-blindfold 1996. A white knight will always sit pretty on c4 and here the first player has a free hand on the kingside too.

164 6 �e3 c5!?
b) 12 . . . h5 1 3 �h6 ti)h7 14 �xg7 �xg7 1 5 f4 ti)g4 (or 1 5 . . . ti)d7 1 6 a4 h4 1 7 ti)fl f5 1 8 exf5 gxf5 1 9 ti)e3 it'f6 20 ti)c4 when Black has problems developing his queenside minor pieces and weaknesses on the kingside) 16 �xg4 hxg4 (or 16 . . . �xg4 1 7 f5 ! ) . White's kingside initiative i s what counts and in that respect both 1 7 0-0 and 1 7 h4 ! ? gxh3 1 8 f5 look promising.
13 �h6!
Played anyway. At this point I certainly wasn't after checkmate and I didn't have any particular plans of razzing my h-pawn down the board. No the main purpose of the text (whether or not Black traded the bishops) was to vacate the e3-square for a knight and to prevent Black's h-pawn from advancing and hassling my g3-knight (the attraction of which to Black is self-evident in the next game).
13 . . • �h8 14 0-0
There is definitely the potential for White to completely dominate but he must handle the position with care. Take for example the premature 14 f4 ti)ed7 1 5 a4 c4 16 �xc4 ti)xe4 ! . White will have completely lost control.
14 ... b5
15 lt:ld1 !?
Preparing to re-locate the knight. Black must be careful how he advances his queenside pawns as he doesn't want a white knight taking up permanent residence on c4.
15 ... lt:lfd7 16 l::tcl
A useful waiting move. Removing the rook from the a 1 -h8 diagonal facilitates White's next move.
16 ... lt:lb6 17 b3 f6
Typically this is unattractive but Black had to do something and the offering up of the f7-square to a knight gives Black the chance to budge the bishop on h6. Besides I'm sure Joe's expectation was that this f-pawn would get to f5 soon anyway (and he wasn't wrong!) .
18 �e3 �d7

6 i..e3 c5!? 165
19 h4 Up to now one could have gone along with all that 'the threat is more
deadly than the execution' stuff. However now was definitely a good opportunity for 1 9 f4 ! because after 1 9 . . . lLlf7 the clamp 20 f5 would have ensured (for the foreseeable future at least) the closing off of Black's dark-squared bishop. Black would have the e5-square for his knight but nothing else and though 19 h4 held appeal at the time, I soon regretted my decision.
19 ... lLlti 20 h5 f5! ? Now the Kl bishop springs to life once more and soon all hell breaks
loose. 21 hxg6 hxg6 22 exf5
22 ... :xe3!?
Black could have simply recaptured on f5 but this exchange sacrifice was always going to be hard to resist.
23 lLlxe3 i..d4
Now the bishop that I should have shut out has become a giant. Fortunately (from my point of view) it can't win the game all on its own.
24 fxg6 lLlxd5

166 6 i.e3 c5!?
Although it was obviously possible to move the attacked steed, instead Black persists with the ' in for a penny, in for a pound' philosophy.
25 gxti+ �xti
26 'ii'xd4!
The pin pressure was reaching a critical point but luckily I had a defensive resource. As White has been amassing a bit of material over the last few moves, he can now afford to give some back.
26 .•. cxd4 27 lt:lxd5 'ii'gS
Currently White has a rook and two pieces for the queen but the text forks the white knights.
28 l:tc7 'ii'xg3 28 . . . l:td8 29 i.d3 (threatening i.f5) 29 . . . �f8 would have been a better
defence as I 'm not sure that I would have been ecstatic about 30 l:txd7 l:txd7 3 1 lt:lf5 . This was just a crazy game!
29 f4 l:td8 30 i.f3 And the action continues but with Joe having to make moves at a slightly
faster rate than me. 30 . . . 'iti>f8 31 lt:lf6 i.fS?

6 i..e3 c5!? 167
A decisive mistake. I t would still have been fun and games after 3 l . . . 'ii'g7 !
32 i..d5 'ii'e3+
With mate threatened on f7, things are looking bad for Black but this doesn't help his cause. Similar to the game continuation, after 32 . . . i..g6 33 f5 the bishop would no longer be able to guard the key squares.
33 ..th2 i..g6 34 :.o 'ii'd2 35 f5 i..h5 36 tiJh7+
36 l:tg3 was the easiest but all roads lead to Rome. 36 .. .'�e8 37 f6
Now White is threatening mate via f6-f7 or by .l:.e7. Black's time trouble ravaged response provides a 3'd option.
37 ... i..f7 38 i..xti mate.
Game 2 7 R.Kasimdzhanov - A. Volokitin
Bundesliga, Katernberg 2003
1 d4 tiJf6 2 c4 g6 3 ltJc3 i..g7 4 e4 d6 5 f3 0-0 6 i..e3 c5 7 ltJge2 ltJc6 8 d5 ltJe5 9 ltJg3 e6 10 i..e2 exd5 1 1 cxd5 h5!?
My experiences in the present variation have led me to the conclusion that this is the most accurate move for Black here. Given enough time White would castle, play h3 and f4 and then, with or without parking a knight on c4, squash Black on the kingside. The text throws a spanner in the works by giving the g3-knight something to think about whilst simultaneously providing for the useful retreat . . . tiJh7.
12 0-0
Looking back at my own games I 've tended to employ 12 h3 here instead. Although it stops a black pawn from ever arriving on this square and it prepares f3-f4, after 12 . . . tiJh7 White must beware of . . . 'it'h4. Hence 13 0-0 (Crafty was the 1 3 tiJfl of A.Graf - T.Radjabov, Benidorm 2003 . The

168 6 .i.e3 c5!?
knight appears to be preparing to utilise the square on d2, not yet occupied by the white queen, but 1 3 . . . g5 encouraged a change of heart: 14 lbg3 ! ? h4 1 5 lLlh5 .i.h8 1 6 o-o f5 17 f4 ! ? gxf4 1 8 lLlxf4 'fle7 1 9 lbe6! .i.xe6 20 dxe6 'flxe6 2 1 exf5 'fld7 (2 1 . . .l:txf5 22 l:txf5 1i'xf5 23 'flxd6 would leave Black with some weak pawns and an exposed king) 22 'ii'd5+ lbfl 23 .i.c4 .i.e5 24 'fle4 lbf6 25 'flxh4 d5 26 .l:r.ad1 'ii'e7 27 .i.xd5 �g7 28 .i.e6 l:th8 29 1i'f2 lbg4 30 f6+ lbxf6 3 1 .i.xfl lbg4 32 1i'f5 1 -0) 13 . . . h4 14 lLlh1 (This isn't as bad as it looks as the knight is destined for the most satisfactory f2-square) when the more obvious reason for Black retreating the knight comes into play. Yes 14 . . . f5 and after the 1 5 'fi'd2 intended to prevent a further advance of the f-pawn, we have reached the position below.
From here three occurrences of my own are: a) 15 . . . f4 (yes, anyway! ) 16 .i.xf4 g5 17 .i.e3 lbg6 1 8 lLlf2 .i.e5 19 .i.c4
lLlf4 20 lbd3 'flf6 2 1 lbxe5 'ifxe5 22 l:tf2 .i.d7 23 a4 l:tfl 24 lbe2 C. Ward L.McShane, Kilkenny Masters 1 996.
b) 15 . . . g5 16 exf5 .i.xf5 17 lLlf2 lbg6 18 lLlfe4 lLlf4 19 .i.xf4 gxf4 20 'flxf4 .i.e5 21 'flh6 .i.xe4 22 lbxe4 .i.f4 23 'ifb5 C.Ward - D.Wegener, Hamburg 1995.
c) 1 5 . . . .i.d7 16 lbf2 b5 17 f4 lbc4 18 i.xc4 bxc4 19 e5 dxe5 20 .i.xc5 l:te8 2 1 fxe5 .i.xe5 22 .i.d4 (22 d6 ! ?) 22 . . . 1i'g5 23 'fi'xg5 lbxg5 24 .i.xe5 l:txe5 25 .l:r.ae 1 l:tae8 26 .l:r.xe5 .l:r.xe5 27 lLlfd1 lLlfl 28 l:tf4 lbd6 29 .l:r.xh4 C.Ward - S.Conquest, Hastings Masters 1995.
I 'm sure everyone in their time has had at least one of those post mortems where their opponent insisted that they had been winning an encounter throughout - despite inexplicably losing at the end! I like to think that I 'm fairly objective when it comes to after-match analysis. Nevertheless I can't help thinking that I was better in each of the above despite the eventual outcome of three draws ! It's only upon researching this book that a fourth idea of 1 5 . . . fxe4 16 lbxe4 b5 ! ? has occurred to me. Reading the notes to 1 3 lbh1 ? ! will show you how I came up with that.
l2 . . . lbh7

6 i.e3 c5!? 169
13 'ifd2
Generally useful but before moving on let's investigate a couple of alternatives:
a) 1 3 f4 lbg4 14 i.xg4 i.xg4 15 •d2 h4 16 lbh1 h3 ! 1 7 g3 l:te8 1 8 lDf2 i.f3 19 lbxh3 i.xe4 20 lbxe4 l:txe4 2 1 lbf2 l:tb4 when, judging by the avoidance of repetition after 22 lbd3 l:te4 23 lbf2 l:te8, Black, for one, thought he stood better in A.Moiseenko - I.Nataf, Montreal 2004.
b) 13 lbh1 f5 14 'ifd2 fxe4 15 lbxe4 b5 ! ? (This wouldn't be possible had . . . a6 and a4 been thrown in somewhere along the line but here it is a sound sacrifice as 16 i.xb5 l:tb8 leaves . . . l:.xb2 on cards should the bishop move) 16 i.h6 �6 1 7 i.xg7 rl;xg7 1 8 lbhf2 c4 19 <i;h1 with chances for both sides in A.Galliamova - M.Zulfugarli, Moscow 2002. This sort of scenario is not uncommon in these 'gambit declined' lines. White has an isolated d-pawn but possibilities to make something of the holes on Black's kingside. Here Black has managed to get his queenside majority on the map and can consider the half-open f-file a handy asset too.
13 . . . h4 Logical but seeing as the knight may adopt the ensuing re-route anyway,
by no means forced. Indeed 1 3 . . . l:f.e8 14 tllh1 a6 1 5 a4 f5 16 lDf2 'iff6 reaches a standard type of position.

1 70 6 i..e3 c5!?
Here White can try to play on the queenside by inserting 1 7 a5 or angling for b2-b4 (perhaps via l:ta3 and l:tb 1) but more common is for him to gear up for action on the kingside. Hence 1 7 l:tae1 i..d7 makes sense when White has to decide whether to make further preparations with 1 8 h3 or whether to go for 1 8 f4 ! ? immediately e.g. 1 8 . . . .!Llg4 ! ? ( 1 8 . . . .!Llt7 is also possible anyway as 19 e5 dxe5 20 fxe5 'it'xe5 2 1 i..xc5 l:tac8 doesn't leave White with any obviously fantastic discovered queen attacking bishop moves) 19 i..xg4 hxg4 20 e5 ! ? dxe5 2 1 fxe5 'ii'xe5 22 i..xc5 'ii'c7. In V.Bogdanovski - G.Arsovic, Bijeljina Dvorovi 2002 White had a passed centre pawn but Black had the bishop pair and a superior kingside pawn structure. As we've just seen that the black knight can retreat to f7 anyway, it's not clear how useful 1 8 h3 is. These positions are not easy to assess and to a certain extent it is about taste.
14 .!Llhl gS
The text immediately grips on to the f4-square and seems to have superseded the obvious 14 . . . f5 in popularity. Introducing further ideas after 1 5 .!Ll£2 . . .
In the above position we have: a) 1 5 . . . i..d7 16 l:tad1 (You will soon see that the rook is keen to move
anywhere to get off of its current diagonal. In view of White's next move though perhaps 1 6 l:tab1 should be a candidate too) 1 6 . . . l:te8 1 7 b4 ! ? b6 (the intention was to meet 1 7 . . . cxb4 with 1 8 .!Llb5) 1 8 .!Llb5 .!Llt7 1 9 bxc5 bxc5 20 exf5 gxf5 2 1 i..f4 l:tb8 22 l:tb 1 (Rather than 22 .!Llxd6? .!Llxd6 23 i..xd6 l:tb2) 22 . . . 'ii'e7 23 i..d3 .!Lle5 •h-tA I.Khenkin - Z.Efimenko, Fuerth 2002.
b) 1 5 . . .'ii' f6 16 f4 .!Llt7 1 7 i..d3 ( 1 7 e5 ! ? dxe5 1 8 i..xc5 l:td8 19 fxe5 must as usual always be a consideration) 1 7 . . . i..d7 1 8 a4 l:tfe8 19 l:tael l:tac8 20 �h1 'ii'd8 2 1 l:.g1 .!Llf6 22 exf5 i..xf5 23 g4 hxg3 24 l:.xg3 . White has compromised his kingside pawn structure to get play down the g-file and now 24 . . . .!Llh5 25 l:.xg6! ? i..xg6 26 i..xg6 .!Llf6 27 i..f5 was previously assessed as slightly better for White in A.Vyzhmanavin - A.Belov, Moscow 1 987.

6 i..e3 c5!? 1 71
c) 1 5 . . . a6 16 a4 b6 1 7 l:.ab 1 l:.a7 1 8 f4 &i)fl 19 b4 l:lc7 20 l:.fc 1 :e8 2 1 a5 . In S.Joachim - M.Schaefer, Bremer 2003 Black had played a little passively for my liking.
15 &j)f2
The knight is always going to have to re-enter the game via this move but nevertheless it' s easy to see why the immediate 1 5 f4 has also been employed before. After 1 5 . . . gxf4 16 i..xf4 the e5-square is an outpost but Black's split kingside pawns aren't too attractive. I would have thought that . . . f5 should come soon but the 16 . . . i..d7 17 a4 'i'f6 1 8 &i)f2 :ae8 19 �h1 a6 20 l:.a3 'ii'g6 2 1 'ii'd1 �h8 22 l:.b3 i..c8 23 i..h5 'i'f6 24 &i)g4 &i)xg4 25 i..xg4 i..h6 26 'ii'c 1 i..xf4 27 l:.xf4 'ifg5 28 i..xc8 l:lxc8 29 l:.xb7 f5 30 &i)e2 J:[g8 3 1 'ii'c3+ &i)f6 32 g3 hxg3 33 l:.xf5 g2+ 34 'iii>g1 1 -0 of T.Sammalvuo S.
·Bekker Jensen, Politiken Cup, Copenhagen 1998 clearly saw it appear
too late.
15 ... 'it>h8
I'm not that sure about this move which was also seen after 1 5 . . . 'ii'f6 16 'ith1 ( 16 f4 gxf4 1 7 i.xf4 i..d7 1 8 'ith1 as in G.Kaidanov - Y.Shulman, Chicago 2002 is also not stupid) 16 . . . i..d7 17 a4 in T.Ernst - O.Gritsak, Stockholm 2002. Indeed then 1 7 . . . 'it>h8?! 1 8 l:.ab1 l:tac8 19 &i)fd1 a6 20 b4 c4 2 1 a5 &i)d3 should have led to a White advantage through 22 b5 ! e.g. 22 .. . &i)f4 23 bxa6 &i)xe2 24 'ii'xe2 bxa6 25 l:.b6.
However clearly vacating the g-file does appear to be a regular fixture with 1 5 . . . i.d7 16 g3 <Ji>h8 occurring in A.Kuzmin - P.Doggers, Amsterdam 2004. However that didn't continue as might have been expected with 1 7 gxh4 g4 1 8 &i)xg4 &i)xg4 1 9 fxg4 'ii'xh4 2 0 i..f4 i..xg4 2 1 i.g3 'ifh3 2 2 'it>h 1 l:lad8 23 &i)b5 &i)f6 24 l:.xf6 ! i..xe2 25 'ifxe2 i.xf6 26 &i)xd6 i..g7 27 l:tfl being well worth the exchange.
16 'it;h1

1 72 6 i.e3 c5!?
I can't believe that it is really necessary to follow suit at this particular juncture although I guess that it is a useful inclusion. By way of alternatives surely White could look to either of 16 f4 or 16 b4 to get on with things.
16 •.• i.d7 17 .l:tae1
Very instructive is the recent 17 f4 ! ? gxf4 1 8 i.xf4 'ike7 (After 1 8 . . . .l:tg8 19 tbd3 tbc4 20 'ifc 1 h3 2 1 g3 Black's knight will be ejected by b3 and in the long run one would expect him to suffer because of his isolated kingside pawns) 1 9 a4 a6 20 aS .:.ae8 2 1 .l:tae 1 .l:tg8 22 tbcdl 'ii'f6 23 l:gl i.b5 24 b3 i.xe2 25 .l:txe2 tbg6 26 i.e3 'iVe5 27 lbb2 'it'h5 28 tbc4 of J.Lautier -I.Nataf, Val d'Isere 2004. Two very strong players, it's amazing how quickly Black's position falls after a white knight settles on c4: 28 . . . ..ie5 29 tbh3 tbf6 30 tbg5 .l:tg7? (dealing with the threat to f7 but leaving the black queen decidedly low on retreat squares) 3 1 .l:tf2 tbg4 32 .l:tf5 �g8 33 tbxfl! 'it'h7 34 tbcxd6 tbxe3 35 'it'xe3 i.d4 36 'ii'g5 .l:tf8 37 l:gfl 1-0.
17 . . • .l:tg8 18 a3
Now 1 8 f4 gxf4 19 i.xf4 'ii'f6 20 tbd3 tbc4 2 1 'it'c 1 is far less convincing because of 2 l . . .'iVg6 and the build up on g2 .
18 •.. 'ii'f6 19 b4 b6!
Black would be uncoordinated and vulnerable on the 2"d rank after 19 . . . cxb4 20 axb4 tbxf3 2 1 gxf3 'ifxc3 22 'ifxc3 i.xc3 23 l:c 1 i.xb4 24 .l:tc7 whilst 1 9 . . . tbxf3 20 gxf3 'ifxc3 2 1 'ifxc3 i.xc3 22 bxc5 ! ? looks like a reasonable exchange sacrifice as the board's remaining dark-squared bishop would dominate.
20 l:.cl 'iVg6 21 bxcS bxcS 22 l:tb1
I know that Black hasn't done an awful lot himself over the last few moves either but White's back rank rook moves have certainly appeared a little indecisive.
22 •.• l:ab8 23 h3 rs
23 . . . l:txb l 24 l:[xb1 tbf6, intending to hop over to h5, is an intriguing alternative but there is no need to concede the b-file just yet.

6 i..e3 c5!? 1 73
24 exf5
Forced as White can't allow this pawn to make it to f4. Now White has gained the e4-square for his knights but Black has activated his bishop and can try to utilise the half-open f-file.
24 . • . i..xf5 25 ll:lce4 :xbl
Things would get complicated after 25 . . . g4 26 hxg4 ll:lxg4 27 ll:lxg4 i..xg4 28 l:.xb8 :xb8 29 ll:lxd6 and there is no compulsion for Black to travel down that road.
26 :xbl i..xe4 27 ll:lxe4
White would always prefer to recapture on e4 with a piece and here is no different. Indeed after 27 fxe4 although White has the bishop pair, the static nature of the pawn structure favours the black knights. One is already a rock on e5 and it' s not too difficult to envisage the other making it to f4 or g3 too.
27 ... g4! ?
2 8 hxg4 ll:lxg4 2 9 i..d3
This is clearly superior to 29 fxg4?! 'ifxe4 which leaves Black with a better pawn structure and his queen in a dominant position.

1 74 6 .i.e3 c5!?
29 . • . 4:Jxe3 30 'ii'xe3 .i.e5
Opposite coloured bishops favour the attacker and Black is hoping to do some damage on the dark squares.
31 g4??
One can only assume that what followed now must have come as a bolt out of the blue to the most recent world champion. He had to defend g2 with his queen but now he loses by force.
31 ... hxg3 32 �g2 'ii'h5 33 l:thl
33 ... 'ii'xhl+! 34 �xhl g2+ 35 �gl .i.d4
When the dust settles Black is simply going to be the exchange up. 36 'ii'xd4+ cxd4 37 lLlxd6 lLlg5 0-1
This game could have gone either way but it's not the specific result that counts. In my opinion this is the critical variation of the 6 .i.e3 Slimisch and I'm sure that the line will witness many more encounters before a concrete assessment can be made.

Chapter 8: 6 lZJge2
Game 28 C. Ward - S.Buckley British Champs 1999
1 d4 lt:lf6 2 c4 g6 3 lt:lc3 .i.g7 4 e4 d6 S f3 0-0 6 lt:lge2
I think that I would go as far as saying that this move has been pretty much developed with 6 . . . c5 in mind. In the other variations White might not want to commit this knight right now but with a quick . . . c5, d5 it is White's c 1 -bishop that wants to bide its time.
6 ... cs
There is actually now just cause to play something different and a summary of Black's options is mapped out in game 3 1 .
7 dS e6 8 lt:lg3 exdS 9 cxdS lt:lbd7 1 0 .i.e2

1 76 6 li)ge2
10 . . . h5
My quickest win in this system saw my opponent get completely confused: 10 . . . 0,e5 1 1 f4 0,eg4 1 2 h3 li)h6 1 3 0-0 li)fg4 (Very optimistic but with his knight on h6 so poorly placed Black felt that something radical was called for) 14 e5 ! (There is no need to enter the complications of 14 hxg4 i.d4+ 1 5 .l:lf2 'ii'h4) 14 . . . dxe5 1 5 hxg4 exf4 1 6 l:.xf4 'iih4 17 li)fl i.d7 1 8 i.e3 1-0 C.Ward - D. Bekker Jensen, Copenhagen KS 1997. Clearly the promising Danish junior had got his wires crossed with the standard 6 i.e3 c5 lines.
Yes, not only is our main game about to see White's dark-squared bishop travel to a more useful post in one go, but that miniature saw White benefiting from not having the bishop attacked on e3 .
1 1 i.gS
The right place for the bishop. Here it is not as vulnerable as it is on e3 and whilst still fitting in with a 'ii'd2 and i.h6 sequence, on g5 the bishop provides a couple of other obvious benefits too. The f6-knight is temporarily pinned whilst . . . h4 must be put on ice.
l l . . . a6 12 a4 'ii'e8 Black wants to unpin the knight and chooses this square because he
intends to 'get j iggy with it' on the kingside and therefore wants her majesty on hand to help out. After 1 2 . . . .l:le8 13 0-0 li)f8 14 f4 ! ? li)Sh7 1 5 i.h4 'ii'a5 16 h3 Black's knights were left looking a little silly in D.Svetushkin - I.Sofronie, Bucharest 2002 but alternative unpins are available. 1 2 . . . 'iic7 doesn't really appeal but 1 2 . . . 'ii'a5 1 3 'iid2 has been seen before. With all things considered I think that White stands a little better and that goes for the 1 2 . . . 'ii'b6 too which as the next game shows, is in fact better employed earlier.
13 'ifd2 li)h7
White has a simple plan in mind and 13 . . . l:.b8 won't sidetrack him i.e. 14 i.h6 li)e5 1 5 i.xg7 Wxg7. White can play 16 f4 now or keep i t in hand.
14 i.h6

6 liJge2 1 77
14 .te3?! makes no sense now as Black can play . . . f5 before or after . . . h4 . As this game demonstrates, the exchanging of the dark-squared bishops makes it more difficult for Black to employ a successful . . . f5 .
14 . • . f5
A couple of other possibilities spring to mind here with the first proving to be of a not dissimilar nature:
a) 14 . . . h4 1 5 liJfl f5 16 .txg7 �xg7 1 7 exf5 gxf5 1 8 f4 ! (Just as in our main game, Black's isolated pawns are far more of a concern to him than White's one on d5 is to his opponent. Indeed the d6-pawn is more of a target. Added to that the black king is exposed and the weather forecast for the c8-bishop is very poor!) 1 8 . . . liJdf6 19 liJe3 b6 20 0-0 �h8 2 1 l:ae 1 ! . White went on to win in J.Rowson - N.Berry, Edinburgh 1999.
b) 14 . . . 'ii'e5 15 .txg7 1i'xg7 16 0-0 h4 17 liJh1 'ii'd4+ 18 'ii'xd4 cxd4 19 liJb 1 a5 20 liJd2 liJc5 2 1 .tb5 f5 22 liJf2 left White with the better endgame in C. Ward - A.Ledger, England 1999 but possibly 16 liJfl ! ? intending 16 . . . 1i'd4 17 liJe3 is even more accurate.
15 exf5
White players must pay attention as White's interchangeable next two moves are absolutely the correct decision. After 1 5 0-0? .txh6 16 'ii'xh6 f4

1 7 8 6 t"iJge2
17 t"iJhl t"iJe5 not only would Black have everything that he wants positionally, but tactically the white queen is in trouble too !
15 .•• gxf5 16 .txg7 �xg7 17 'ii'f4! ?
At the time I didn't know that this move had been recommended by Krarnnik with an assessment of 'slightly better for White' . I wouldn't like to disagree with the (well at least one of them) world champion except to suggest that the advantage is greater than that. The white queen parks herself on the square that the black f-pawn would have liked to have made it to, simultaneously hitting d6 and halting . . . h4.
17 ... t"iJe5 18 0-0 'ii'g6 19 'ii'b4
The white queen makes a menace of herself, attacking h5 and eyeing up the e7-square.
19 ... �h6 20 f4!
A strong move but in all fairness a very obvious one. 20 . . . t"iJg4 21 l:tae1
White's position is so easy to handle and that is in stark contrast to the complex scenarios discussed in the last game of the previous chapter.

6 llJge2 1 79
Without the dark-squared bishops the weaknesses in Black's camp are accentuated.
21 . •. i.d7 22 iLxg4
Played only because a winning tactic is on the horizon.
22 • . . fxg4
Upon 22 . . . 'ii'xg4, 23 'iie7 nets the d6-pawn and more.
23 l:te7 .l:.f7
After 23 . . . .l:.ad8 the combination 24 llJxh5 ! 'ifxh5 25 .l:.xh7+ is easy to spot.
24 llJxh5
Not that this version is exactly rocket science!
24 ... .l:.xe7
Or 24 . . . 'iixh5 25 'ifxh5+ �xh5 26 .l:.xt7.
25 llJg3+ �g7 26 'ifxe7+ 'ikf7 27 'ikxd6
All of those Black weaknesses that I mentioned earlier have been exploited to the maximum. The rest is plain sailing.
27 ... &£Jf6 28 .l:.el .l:.e8 29 .l:.e5 b5 30 axb5 axb5 31 llJce4 llJxe4 32 llJxe4 i.f5 33 l:.xe8 'iixe8 34 'ikf6+ 1-0
Game 29 D.Svetushkin - G.Arsovic Backa Palanka open 2002
I d4 &iJf6 2 c4 d6 3 llJc3 g6 4 e4 i.g7 5 f3 0-0 6 llJge2 c5 7 d5 e6 8 llJg3 exd5 9 cxd5 h5 10 i.g5 'iib6

1 80 6 ti:Jge2
This is the other unpinning option that I alluded to in the last game. However, it makes more sense to engage in it without . . . a6 and a4 thrown in, as that way the black queen can't be hassled by a4-a5 . Either way of course White must now deal with the problem of the attacked b-pawn.
l l 'ifd2!?
It's very hard to believe 1 1 ti:Ja4 'ii'a5+ 12 .id2 as wherever the black queen retreats to, the white knight and bishop are now going to be misplaced. Hence White should probably defend the pawn with the queen and 1 1 'ifb3 is the main alternative. Actually this is not as ridiculous as it looks, mainly because after 1 1 . . .'ii'xb3 12 axb3 the presence of a half-open a-file means that Black has problems dealing with the threat of ti:Jb5. With 12 . . . .id7 available it ' s far from clear that Black is much worse but the endgame isn't an exciting prospect. Hence 1 l . . .'ifc7 ! ? is a more practical response when the question is how well placed the white queen is on the queenside.
l l ... ti:Jh7 12 .th4!?
As the black queen still hits b2, the point of Black's last move is that 12 .ih6? simply drops a pawn to 1 2 . . . .ixh6. That aside, i f the belief i s that i t is

6 ltJge2 181
misplaced on b6 then certainly 12 i.e3 is possible too. Though clearly provocative, the advantage of the text is that it keeps the squares e7 and d8 within its sights.
12 . . . l:te8
The first important point to note here is that 12 . . . g5? 1 3 i.xg5 ltJxg5 14 'ii'xg5 'ii'xb2 1 5 :c 1 is not interesting for Black as he has severe difficulties on the kingside. In view of ltJxh5, probably 1 5 . . . f6 is forced when 16 'ii'e3 leaves the KI bishop out in the cold and the h5-pawn looking decidedly lonely.
Next, although 12 . . . ltJd7 does develop, it also kind of gets in the way. Whilst 13 i.e2 and 0-0 (and by the way 1 3 . . . i.d4 14 ltJb5 i.f6 15 i.xf6 ltJhxf6 16 a4 h4 17 ltJfl would be looking comfortable for White with the knight heading for c4) looks sensible, another instructive encounter saw 13 f4 ! ? ltJdf6 14 h3 :es 1 5 i.e2 c4 1 6 i.f3 i.d7 17 ltJge2 "iV a5 1 8 0-0 b5 19 a3 b4 20 axb4 "il'xb4 2 1 l:ta6 i.b5 22 l:t.a2 a5 23 ltJd4 i.d7 24 l:te 1 i.h6 25 i.g5 i.g7 26 i.h4 i.h6 27 ltJc6 i.xc6 28 dxc6 :ac8 29 :a4 "il'b3 30 i.f2 ltJf8 3 1 l:r.xa5 'ifb8 32 l:tb5 'ii'a8 33 'ii'xd6 l:t.xc6 34 e5 J:txd6 35 i.xa8 .l:[d3 36 i.c6 :e6 37 i.f3 ltJ6d7 38 i.d5 i.xf4 39 i.xc4 i.d2 40 i.xd3 i.xe1 4 1 i.xe1 ltJxe5 4 2 i.e4 1 -0 I.Khenkin - M.Cebalo, Bratto 200 1 . As I think I 've mentioned before, Grandmaster lgor (Khenkin) has long been one of the world's leading exponents of the Samisch and from a theoretical point of view his games are always worth studying.
13 i.e2 a6
The obvious drawback of 1 0 . . . 'ii'b6 is that it obstructs the b-pawn but that is something that Black soon attempts to remedy. Note also that 12 . . . l:te8 keeps White's bishop out of e7.
It has just occurred to me now that Black seems to lose this game without making any obvious mistakes. Possibly this whole . . . a6 and . . . b5 thing is too slow or possibly White's position is just good!
14 0-0 c4+ 15 �h1

182 6 liJge2
IS . • . 'ii'd4
With the queens off, . . . g5 would be available to trap White's bishop and the b-pawn is free to advance.
16 'ii'c2 ! bS
Upon 16 . . . g5 White had presumably planned the crafty 17 liJf5 ! i.xf5 1 8 i.f2 'ii'f6 (or 1 8 . . . i.xe4 1 9 fxe4 .,e5 20 i.xc4) 19 exf5 . Black's h- and gpawn advances will be shown to be detrimental.
17 l:tadl 'ife3 18 f4 i.g4
Upon 1 8 . . . liJd7 both 19 l:.de1 and 19 l:.f3 suggest themselves although I quite like 19 e5 ! ? dxe5 20 liJge4 {In this particular position the thematic 20 f5? fails to 20 . . . g5) White has a nice initiative and Black must avoid 20 . . . exf4? 2 1 i.t2.
19 i.xg4 hxg4 20 eS! ? dxeS 21 fS
2 1 . . ... h6
After 2 l . . .g5 22 f6! gxh4 23 liJf5 'i'b6 White seems to have a tremendous attack whether he takes on g7 with the knight or the pawn.
22 fxg6 fxg6
White clearly has excellent play for a pawn but at least recapturing this way keeps the white knight out of f5 .
23 d6! liJd7
White's threats are too great after 23 . . . 'ifxh4 24 'ifxg6. Yep, there is no way that Black can deal with .,xe8, liJf5 and .,f7+.
24 i.e7 liJbf6 25 liJce4 liJhS 26 liJxhS gxhS 27 liJgS
Now the white queen is ready to invade via f5 or e4.
27 ... i.f6 28 i.xf6 liJxf6 29 'iffS

6 l:Dge2 183
29 ... &Dh7
White can win in several ways after 29 . . . l:lf8, the simplest being 30 &De6 l:lf7 3 1 d7.
30 &Dxh7 'ii'xh7 31 d7 l:ted8 32 .,e6+ 1-0
A white rook is about to descend on f7.
Game 30 I.Khenkin - A.Fishbein
New York Open 2000
1 d4 lDf6 2 c4 g6 3 &Dc3 .tg7 4 e4 d6 5 f3 0-0 6 I:Dge2 cS 7 dS e6 8 I:Dg3 exdS 9 cxdS lDhS!?
When this idea was first played against me by King's Indian specialist Igor Glek it was a complete shock, although for some time after it seemed as though all of my opponents were playing it against me ! Black can swing his knight to the edge now or in the variation 9 . . . a6 10 a4 10 . . . &Dh5 !? . Then after 1 1 &Dxh5 gxh5

184 6 li:Jge2
. . . the advantages to Black of having the a-pawn advances thrown in are that the b4-square is weak, castling queenside is now very unattractive to White (you will have to play over the variations below to understand the relevance of this one! ) and the first player can't ever stick a piece on b5. The disadvantages are that he can't now play . . . li:Ja6 but White can swing a rook up to the 3'd (or in the case of a5, the 4'h) rank.
Some of these points become apparent in the variations below:
a) 12 ..tf4 ! ? f5 13 'ii'd2 splitting again:
a 1 ) 13 . . . 'ii'f6 14 ..tg5 'ii'g6 1 5 ..td3 when 1 5 . . . f4 16 ..txf4 l:[xf4 17 'ii'xf4 'ifxg2 is unsound because of 1 8 0-0-0 ! . Oh, okay, I lied about that queenside castling being undesirable bit!
a2) 1 3 . . . fxe4 14 lt:Jxe4 ..txb2 1 5 ..tg5 or 14 . . . .l:te8 1 5 0-0-0 (Yes again! ) both with a White advantage.
a3) 1 3 . . . ..txc3 14 bxc3 fxe4 1 5 fxe4 li:Jd7 16 ..txd6 'ii'h4+ 17 �dl . My previous home study concluded that White has a clear advantage here and more of this ..tf4 intrigue can be found in the main game notes to White's 1 1 th move.
b) 12 ..td3 f5 1 3 exf5 (My original view was that this was forced as White didn't want Black fixing this pawn on f4 and then sticking a piece on e5 to control the game. Our main game has altered my thinking a little in that department) 1 3 . . . ..txf5 14 0-0 li:Jd7 1 5 a5 ! ? 'ii'f6 16 .l:ta4 ! ? 'ii'g6 1 7 ..txf5 l:txf5 1 8 l:.e4 l:.af8 1 9 l:.e6 ..td4+ 20 'it>h1 l:t8f6 2 1 .l:tfe 1 lt:Je5 22 li:Je2 l:txe6 23 dxe6 'ii'xe6 24 li:Jxd4 cxd4 25 f4 li:Jd3 26 .l:txe6 li:Jf2+ 27 'it>g1 lt:Jxd1 28 :xd6 with (probably) a winning endgame for White in C. Ward - S. Bekker Jensen, Politiken Cup 1998.
Returning to the position after 9 . . . a6, something the readers will all be aware of now is that 1 0 a4 is far from compulsory. Also what I like about this 6 lt:Jge2 variation is that it isn't saturated with practical encounters and so there is still plenty of space for innovative thought. Take for example my over-the-board novelty 10 ..tf4 ! ?

6 l"iJge2 185
I 'm not quite sure how it fares after 10 . . . h5 as 1 1 Jld3 h4 1 2 l"iJge2 l"iJh5 1 3 Jle3 f5 14 'ii'd2 b5 is unclear and 1 1 'ii'd2 h4 12 Jlh6 ( ! ? or ? ! ) probably too ambitious. However 10 . . . b5 1 1 'ii'd2 'ii'b6 12 a4 b4 1 3 l"iJdl l"iJbd7 14 l"iJe3 l"iJe5 1 5 Jlxe5 dxe5 16 l"iJc4 'ii'b8 17 h4 h5 1 8 Jld3 �h7 1 9 l"iJfl l"iJd7 20 g4 l"iJf6 2 1 'ii'g5 l:lh8 22 l"iJg3 �g8 23 gxh5 l"iJxh5 24 l"iJxh5 l:txh5 25 'ii'd8+ Jlf8 26 l"iJb6 .llb7 27 'ii'xb8 l:1xb8 28 l"iJd7 l:lc8 29 l"iJf6+ �h8 30 l"iJxh5 gxh5 certainly went down a treat in C.Ward - G.Singh, British Champs 200 1 .
10 l"iJxhS gxhS
Rather embarrassingly I must confess that in my first practical outing with Glek it momentarily crossed my mind that perhaps he'd overlooked that. . .'ii'h4+?? can be met by l"iJg3 . Basically, even despite my early memories of that famous Fischer-Spassky . . . l"iJh5, Jlxh5 Benoni idea, at first I just couldn't get my head around this ' isolani packed' concept.
1 1 Jld3 But obviously I did eventually and, taking it very seriously as you've just
seen in the notes to 9 . . . a6, I came up with 1 1 .llf4. My logic was that sticking a piece on this square would stop the black f-pawn from taking up residence there and l l . . .f5 1 2 'ii'd2 'ii'f6 1 3 Jlg5 'ii'g6 14 Jld3 occurred twice:

186 6 t'Dge2
a) 14 . . . t'Da6 1 5 0-0 .i.d7 16 l:lae1 .l:.£7 17 exf5 .i.xfS 1 8 l:te6 .i.f6 19 l:txf6 ( 19 .i.xf6 .i.xd3 20 .i.gS 'iffS 2 1 l:tfe 1 is also very good) 1 9 . . . l:txf6 20 .i.xa6 bxa6 2 1 .i.xf6 'ii'xf6 22 t'De4 .i.xe4 23 fxe4 'ifd4+ 24 'ifxd4 cxd4 25 :td1 Ilb8 26 b3 l:tb4 27 �f2 �£7 28 �e2 aS 29 l:tc 1 a4 30 :tc7+ �f6 3 1 bxa4 :txa4 32 l:lxh7 �eS 33 .l:.e7+ �f4 34 g3+ �g4 35 �d3 .l:.xa2 36 l:te6 l:ta6 37 eS .l:.a3+ 38 'it>xd4 dxeS+ 39 l:txe5 l:ta2 40 d6 .l:.d2+ 4 1 �cS l:tc2+ 42 'it>dS .l:.xh2 43 .:te4+ �xg3 44 d7 l:td2+ 45 l:ld4 1 -0 C.Ward - G.Buckley, British Champs 2000.
b) 14 . . . fxe4 1 5 .i.xe4 .i.fS 16 0-0 t'Dd7 17 l:tae1 t'DeS 1 8 .i.f4 .i.xe4 19 Ilxe4 .l:.ae8 20 �h1 a6 2 1 a4 b6 22 'ii'e2 c4 23 .i.xeS .i.xeS 24 'ii'xc4 .i.xc3 25 l:txe8 'ii'xe8 26 bxc3 bS 27 'ii'h4 .l:.f5 28 axb5 axb5 29 l:te1 l:teS 30 'ii'g3+ �f8 3 1 'ii'f4+ 'ii'£7 32 'ii'h6+ <t>e8 33 l:lxeS+ dxeS 34 'ii'c6+ 'ii'd7 35 'ii'cS �£7 36 �g1 h4 37 �f2 'ii'fS 38 'ii'c7+ �f6 39 'ii'd8+ �£7 40 'iixh4 'ii'c2+ 4 1 <li>g3 'ii'xc3 42 'ii'xh7+ �f6 43 d6 'ii'd4 44 'ife7+ �fS 45 h4 'i'dS 46 d7 1 -0 C. Ward - I.Snape, 4NCL Birmingham 2002.
I couldn't ask for better in terms of results but the second game in particular didn't always feel under control.
l l . . . f5 12 0-0
Also seeing Black taking advantage of the lack of a-pawn movements was 12 exf5 .i.xf5 1 3 0-0 t'Da6 !? 14 .i.xa6 bxa6 1 5 .i.e3 l:tb8 16 'ii'd2 'iif6 1 7 l:tac 1 'if g6 1 8 b3 h4 1 9 t'De2 .i.d3 20 t'Df4 l:txf4 2 1 .i.xf4 .i.xfl 22 �xfl h3 23 g3 .:tf8 24 J:te1 .i.eS 25 .i.xeS l:txf3+ 26 'iti>g1 dxeS 27 l:txeS l:txg3+ 28 hxg3 'i'xg3+ 29 q;,h1 'ii'xeS and an eventual draw in C.Ward -E.Mortensen, Politiken Cup 1 999. After 1 3 . . . t'Da6 !? I could find no significant improvements for White.
12 . . . t'Da6 Evidently the avenue that my home studies had been neglecting was
1 2 . . . f4 1 3 t'De2 .i.eS 14 g3 . Just as in our main game the point is that there is no black g-pawn around to offer support to f4. Actually I'm not entirely convinced by the following but it certainly introduces a new approach: 14 . . . fxg3 15 hxg3 .i.h3 16 l:tf2 h4 17 l:lh2 'ii'c8 18 t'Df4 c4 19 l:txh3 l:txf4 20 .i.fl l:t£7 21 f4 .i.f6 22 'i'c2 l:tg7 23 .i.e3 hxg3 24 l:th6 'i'd8 25 .i.h3 t'Dd7 26 .i.e6+ �h8 27 <li>g2 t'Df8 28 l:tah1 'ike7 29 .i.fS �g8 30 'ii'xc4 l:te8 3 1 'ii'e2 'ii'£7 3 2 'ii'hS Ile7 3 3 'ikx£7+ �x£7 3 4 l:tc l .i.xb2 3 5 l:.c8 .i.f6 36 l:lxf6+ �xf6 37 .l:.x£8+ l:tg£7 38 .i.d4+ 1-0 M. Narciso Dublan - H. Herraiz Lopez, Barcelona 2000.
Also possible is 12 . . . t'Dd7 13 .i.c2 t'DeS 14 t'De2 when 14 . . . 'ii'h4 (Perhaps Black should try 14 . . . t'Dg6 ! ? as 1 5 exf5 .i.xf5 16 .i.xf5 l:txf5 1 7 t'Dg3 l:.£7 1 8 t'DxhS .i.d4+ 19 'iti>h1 'ii'h4 20 f4 J:te8 is one possibility, leaving him with good play for the pawn) 1 5 f4 t'Dc4 1 6 t'Dg3 t'Dxb2 17 'ike2 'ii'g4 1 8 J:tf3 h4 19 e5 dxe5 20 h3 'ii' g6 2 1 fxe5 t'Dc4 22 'ii'xc4 .i.xeS 23 l:tb 1 .i.xg3 24 .i.f4 b6 25 .l:.xg3 hxg3 26 l:tb3 'iff6 27 l:txg3+ 'iti>£7 28 'ii'e2 'ii'h4 29 'ii'eS 1 -0 A.Dreev - Peng Xiaomin Beijing 2000 was an especially entertaining encounter.

6 l'iJge2 187
13 a3!?
Keeping the knight out of b4 but preserving the light-squared bishop (something I wish I 'd done in my aforementioned game with the Danish GM Erling Mortensen).
13 .•• i..d7 14 �h1 !?
Predicting perfectly the way the game i s about to unfold. Already White knows that the g-file is going to be important.
14 ... f4 15 t'iJe2 i..eS Given time (perhaps even one move for . . . h4), Black could dominate.
Unfortunately he doesn't have that as White immediately gets to the point. 16 g3! fxg3 17 t'iJxg3 'ii'h4 Upon 17 . . . h4 1 8 t'iJh5 White will force through f4 and his major pieces
wiU be able to utilise the g-file. 18 f4!
It' s frightening just how quickly things now go downhill for Black. 18 ... i..xf4 19 i..xf4 l:lxf4 20 l:lxf4 'ifxf4 21 t'iJxhS
Knights on the rim are supposed to be dim. I would say that that applies to just one of the steeds here!

188 6 tiJge2
2t . • .'iWes 22 'iff3! <Ji1h8 23 :n h6
Needless to say 23 . . . .l:tg8 24 tiJf6 l:£8 25 tiJxd7 lhf3 26 &iJxe5 l:txfl+ 27 i..xfl dxe5 28 i..xa6 bxa6 would be a hopeless king and pawn endgame and the text has been selected to avoid 'ii'£8+.
24 'ifti 1-0
Black has no checks and can do nothing about tiJf6.
Game 31 P.Motwani - C.Hanley
British Champs 2004
1 c4 tiJf6 2 tiJc3 g6 3 e4 d6 4 tiJge2 i..g7 5 d4 0-0 6 f3 a6! ?
The time has come for us to investigate alternatives to 6 . . . c 5 and to compare them with all that has passed in this book up to now. Actually it's not as daunting a task as i t may sound.
First up, 6 . . . e5 can of course be met by 7 i..e3 which is the variation covered in chapter 3 . I wouldn't recommend that for Black though as the also available 7 dxe5 ! ? (well I 'm not exactly sure that ' interesting' is a word that I would use to describe this move but I guess it's half way towards a ' ! ') 7 . . . dxe5 8 'ifxd8 l:txd8 9 tiJd5

6 0,ge2 189
.. . leads to a very pleasant endgame for White. The inclusion of 0,ge2 rather than iLe3 is a real plus for White and though some may find endings boring, actually I really enjoyed the 9 . . . 0,xd5 (Even as a junior I obtained a strong position against an IM after 9 . . . 0,e8 1 0 0,e7+ �f8 l l 0,xc8 ltxc8 1 2 JLe3 Ci)d7 13 o-o-o �e7 14 g 3 l:r.d8 1 5 JLh3 c 6 16 �c2 0,c7 17 l:r.d3 b6 1 8 lthdl (f)f8 19 c 5 ltxd3 2 0 ltxd3 in C.Ward - P.Thipsay, London 1987) lO cxd5 Ci)d7 1 1 0,c3 Ci)b6 12 a4 iLd7 1 3 a5 0,c8 14 a6 b6 1 5 JLb5 iLxb5 16 0,xb5 Ci)d6 17 0,xd6 ltxd6 1 8 iLd2 iLf8 19 �e2 c5 20 dxc6 .l:.xc6 2 1 .l:.hc I ltd6 22 l:r.c7 .l:.ad8 23 iLc3 .1:.6d7 24 llxd7 ltxd7 25 iLxe5 :e7 26 iLd4 f5 27 e5 iLh6 28 g3 f4 29 'iti>d3 l:.e8 30 'it>e4 1-0 of C.Ward - C.Grubert, Copenhagen 2000.
A direct transposition to the 'Panno' after 6 . . . 0,c6 or indeed 6 . . . a6 7 iLe3 0,c6 is very possible but it is my belief that it is the comparison with chapters 5 and 6 that should hold the most interest for Black players. Okay let's cut to the chase here. As regards chapter 6, after 6 . . . 0,bd7, having already committed the steed, White would no longer have available the Ci)h3 lines. On the other hand we have already seen that after 7 iLe3 c5 White isn't obliged to enter the realms of chapter 7 with 8 d5 0,e5 either. If however White does have the feeling that he is being railroaded into Black's territory, then he could turn to 7 iLg5 ! ?. There will be more on that move in the next chapter.
As for chapter 5 ' s rarer moves, although White can't choose the iLd3 line, I think that we can safely say that he wouldn't lose much sleep over 6 . . . b6. On the other hand the concept of . . . a6 and . . . c6 (as now explained) is of some concern.
7 iLe3 c6
Reiterating my previous assertion, in my opinion the . . . a6 and . . . c6 permutation (in which ever order it is played) seeks to take the most advantage of White's selected move order (6 0,ge2).
8 g4!?
Although in theory the concept of 8 c5 dxc5(?) 9 dxc5 'ii'xdl+ 10 ltxdl Ci)bd7 1 1 0,a4 talks a good game, the reality is somewhat different! In that

1 90 6 !Dge2
instance, having full control over the b6-square, White would be in heaven. However I'm still sulking over the 8 . . . b5 ! ? 9 cxd6 exd6 10 !De l !Dbd7 1 1 i.e2 l:te8 1 2 'il'd2 c5 1 3 dxc5 !Dxc5 1 4 0-0 i.b7 1 5 b4 !De6 16 !Db3 .l:.c8 17 l:.ac I d5 1 8 !Dxd5 i.xd5 1 9 .l:.xc8 'il'xc8 20 exd5 l::tdS 2 1 l:tc I 'il'bs 22 !Da5 .l:.xd5 23 'ii'c3 'ii'f8 24 'il'cS l:tdS 25 'ii'xa6 !Dd5 26 i.f2 !Dd4 27 i.fl !Df4 2S �hi 'ii'xb4 29 .l:.cS l:tf8 30 .l:.xf8+ i.xf8 3 1 !Db3 !Dxb3 32 axb3 'il'd2 33 i.gl b4 34 'ii'c4 !De6 35 'ii'd3 'ii'c3 36 i.e3 i.c5 37 i.d2 'il'h2 3S 'ii'd5 h5 39 g3 i.d4 40 i.e l 'il'c l 0- 1 of C. Ward - M.Hebden, British Champs 200 1 . Okay, s o without time trouble perhaps I wouldn't have lost that ending and maybe Dreev's 10 !Df4 ! ? does score better. Nevertheless whilst I did find small improvements for myself, that game was no fun and whereas Mark seemed comfortable with his set-up, I don't feel inclined toward a repeat performance.
Regarding alternatives I have always found the idea of S a4 a5 ! uninspired due to the squares that are conceded. Far more interesting is S 'ifd2 b5 9 i.h6 although as I have already mentioned, 0-0-0 or h4 would be more relevant inclusions than !Dge2.
8 . . . e5
To be honest I 'm not really sure why I've selected this particular encounter as the main game other than because it involved two very in-form players and it is hot off the press ! That aside, I believe that there are two more critical moves than the text:
a) 8 . . . b5 9 !Dg3 (or 9 h4 when 9 . . . !Dbd7 would transpose to the Hebden-Ward game below and 9 . . . h5 10 e5 dxe5 1 1 dxe5 'ifxdl+ 1 2 l:.xd1 !DeS 1 3 gxh5 i.xe5 14 l:.g 1 !Dd6 1 5 !Dd4 c5 16 !Db3 !Dxc4 17 i.xc4 bxc4 1 S !Dxc5 which was a somewhat premature draw in J.Piket - Van Wely, Wijk aan Zee 1 999) 9 . . . bxc4 (After 9 . . . !Dbd7, 10 g5 !DeS 1 1 f4 would be a whole new ball game whilst 10 h4 bxc4 1 1 'ii'd2 !Db6 1 2 h5 !Dfd7 1 3 i.h6 e5 14 i.xg7 �xg7 1 5 hxg6 hxg6 16 !Df5+ 'it>f6 1 7 g5+ �e6 1 S d5+ cxd5 19 exd5+ !Dxd5 20 !Dg7+ <i;e7 2 1 !Dxd5 mate, E.Winkelmann - M.Schulz, Verden Aller 2002 was exceedingly entertaining! ) 1 0 g5 !Dfd7 1 1 i.xc4

6 lDge2 1 91
lDb6 1 2 i.b3 aS 1 3 h4 a4 14 i.xa4 lDc4 1 5 i.c l c5. Though White went on to win in Nguyen Anh Dung - B.Zueger, Moscow 1994 it looks like good value for a pawn.
b) 8 . . . li:Jbd7 9 h4 b5 10 'ifd2 'ifa5 1 1 h5 e5 12 i.h6 (After 1 2 d5 b4 1 3 li:Jd 1 cxd5 14 cxd5 lDc5 1 5 lDc 1 I would be nervous about the precarious situation of the f, g and e pawns and indeed perhaps 1 5 . . . i.xg4 ! ? is already possible) 12 . . . b4 1 3 li:Jd1 i.xh6 14 'ifxh6 exd4 1 5 lDxd4 lDe5 16 i.e2 b3+ 17 'ii'd2 'ifxd2+ 1 8 �xd2 bxa2 19 l:.xa2 c5 20 lDc2 g5. This earlier C.Ward - M.Hebden, (Hastings 1997) encounter was more enjoyable than the other. It ended in a draw but throughout the game there are plenty of deviations for both sides worthy of investigation.
9 li:Jg3
Although White eventually won, I 'm not entirely happy with the way the amiable Scottish GM Paul Motwani handles this game.
After 9 dxe5 dxe5 1 0 'ifxd8 l:.xd8 Black would regret having played . . . a6 and . . . c6 and thanks to those holes on b6 and c5 I would have thought that White has at least a small endgame advantage. Also of course 9 d5 cxd5 1 0 cxd5 b5 1 1 li:Jg3 must be a contender despite the fact that compared to this book's very first game, Black's b-pawn is able to deharmonise White's development.
9 ... exd4 10 i.xd4 c5 !?
Conceding d5 as an outpost but creating a new opportunity for Black's own queen's knight.
1 1 i.e3 lDc6 12 'ii'd2 'ifa5
There are many occasions when Black is prepared to sacrifice the backward d-pawn and this is one of them!
13 i.e2
1 3 'ifxd6? lDxg4 ! doesn't bear thinking about. 13 ... i.e6 14 0-0 li:Jd4 15 .l:.ac1 b5

192 6 /1)ge2
A common error amongst chess players is to look at a final result and then assume that that side was doing well throughout. Indeed it annoys me when casual annotations make that mistake although I may even have been guilty of it myself somewhere in this book. Unlikely though( ! ) and I'm definitely not going to start now. I don't believe that Black is worse here.
16 b3 .:.res
I'm not sure why Black deems this necessary and I quite like the look of 16 . . . /1)d7 ! ?.
17 �g2 bxc4
1 7 . . . /1)xe2 ! ? 1 8 /1)cxe2 'ii'xd2 19 .i.xd2 bxc4 20 bxc4 /1)d7 also looks quite tempting as White's c-pawn remains a target.
18 .i.xc4 .i.xc4 19 bxc4 /1)d7 20 /1)ge2 /1)e5 21 /1)xd4 cxd4
Black hasn't exactly made any mistakes but having missed a few opportunities to take the initiative the feeling is that the tide has turned. After 2 1 . . ./1)xc4?! 22 /1)b3 ! /1)xd2 23 /1)xa5 /1)xf1 24 �xfl it' s better to have White's two pieces.
22 .i.xd4 /1)xc4 23 'ii'fl .i.xd4?!
Things are simplifying in White's favour.
24 'ii'xd4 /1)b6 25 l:tbl l:rab8 26 l:rfl 'ifcS 27 'ii'xcS dxcS 28 l:ttb2 /1)d7 29 /1)d5
I wouldn't go as far as saying that Black is lost now but clearly he is starting to suffer. The rest is obviously not relevant to the opening although the knight and pawn ending that crops up is very interesting.
29 ••. Citg7 30 gS h6 31 gxh6+ Citxh6 32 Ab7 c4 33 Citfl fS 34 exfS gxfS 35 Axb8 l:xb8 36 l:xb8 /1)xb8 37 /1)e3 c3 38 /1)xf5+ CitgS 39 /1)e3 /1)c6 40 Cite2 /1)d4+ 41 �d3 /1)xt3 42 /1)fl �g4 43 Citxc3 �h3 44 a4 Citg2 45 /1)d2 /1)xh2 46 Citb4 �fl 47 �aS �e3 48 �xa6 /1)g4 49 a5 /1)h6 50 Citb7 /1)f5 51 /1)c4+ Citd4 52 a6 'itxc4 53 a7 /1)d6+ 54 Citc6 1-0

Chapter 9: 6 .i.g5 ! ?
Game 32 M.Sadler - P. Thipsay
British Champs, Torquay 1998
1 d4 lt:!f6 2 c4 g6 3 lt:!c3 .tg7 4 e4 d6 5 f3 0-0 6 .tgS
I thought that it would be very fitting to start off this chapter with a Matthew Sadler game as the English Grandmaster has long been a leading exponent of this variation. To be honest I always thought that I was quite good with the Samisch (and to be fair I have excellent results with it) but 6 .tg5 is the one move I never employed because frankly I never understood it! I guess I was always a believer that the bishop had to be on e3 to support the centre and on g5 it could probably be forced back to e3 by . . . h6 anyway. Actually I did acknowledge that a black pawn on h6 would be a weakness but my main objection was that the bishop on g5 might obstruct my g-pawn. However as the reader will now be well aware, the spotlight these days in the Samisch is on the . . . c5 lines. Not only is g2-g4 a rare occurrence in the Benoni positions of chapters 7 and 8 but we have seen there how the bishop is much better placed on g5 than e3 (albeit usually after the black pawn has advanced to h5). Writing all this makes me sound like a one trick pony (always wanting g4, and h4-h5) and Matthew Sadler (who opted for 6 .tgS right from the oft) a man well ahead of his time!
6 • • • c5

194 6 i..g5!?
One bonus of 6 i..gS is that 6 . . . eS? is now an outright mistake in view of 7 dxeS dxeS 8 'ii'xd8 :xd8 9 .!LldS . The first time we encountered the straight swap on eS in this book was with the bishop instead on e3 . I observed then that White obtained nothing through 7 dxeS but if i..e3 was substituted by .!Llge2, he would have an endgame plus. With the bishop on gS, the black f6-knight is pinned and consequently the c7-pawn is a goner.
As . . . cS is the modem treatment of the Siimisch, it seems natural for me to tackle this first. Other moves are considered in game 3S .
7 dS
Referring to my original objections to 6 i..gS, note that 7 .!Llge2? ! isn't too advisable in view of 7 . . . cxd4 8 .!Llxd4 .!Llc6. White is loose in the centre and 9 i..e3 would clearly have seen him lose a move and become even more vulnerable to a possible . . . 'ii'b6!? .
7 . . . e6
This game is going to seem like a tribute to English GM Matthew Sadler. No, he's not dead (well unless you're reading this well into the future), but he has retired from serious chess. Judging by the recent performances of our national team I'd better take this opportunity to say "Come back Matty, your country needs you!" .
Anyway 7 . . . 'ii'aS 8 'ii'd2 e6 9 .!Llge2 exdS 1 0 cxdS bS 1 1 .!Llg3 c4 1 2 i..e2 .!Llbd7 1 3 0-0 i..a6 14 a3 .!DeS 1 S l:.ab 1 l:.fe8 1 6 i..h6 i..h8 1 7 �h 1 .!Llfd7 1 8 f4 .!Lla4 19 eS dxeS 20 fS .!Llxc3 2 1 bxc3 .!DeS 2 2 d6 i..b7 2 3 'ii'gS .!Lle4 24 .!Llxe4 i..xe4 2S d7 i..xb 1 26 dxe8='ii'+ l:.xe8 27 l:.xb1 'ii'xc3 28 l:.d1 a6 29 i..hS e4 30 fxg6 hxg6 3 1 i..xg6 'ii'f6 32 i..xf7+ �xf7 33 'ii'hS+ 1 -0 M.Sadler - R.Djurhuus, Malmo 199S certainly shows that it is possible to attack without the use of the g-pawn!
8 'ii'd2 exdS 9 cxdS
9 . . . h6
Offering White extra options, some Black players like to slip . . . h6 in earlier to avoid the endgame that is now forced after 10 i..xh6. Game 34

6 i..g5!? 1 95
details those options whilst demonstrating that the pawn grab isn't that great for White anyway.
In order to come up with some alternatives (i.e. to 9 . . . h6) for Black, here it is useful to compare our last diagram with the now familiar Benoni positions of chapters 7 and 8. The pawn structure is exactly the same but you may recall how White often has ltlge2-g3 and i..e2 in place before 'ii'd2 figures, whilst a black knight is typically already on e5. White's comparative advantage is that he has a pin set up on f6 that could be worked with and the king's knight not yet on g3 doesn't need to fear . . . h5-h4. A pro for Black is that instead of using up two moves for . . . ltlbd7-e5 he can consider employing that steed on the queenside instead. Two interesting possibilities then are:
a) 9 . . . b6 10 a4 (any takers for 10 h4 ! ? instead?) 10 . . . ltla6 (Or 10 . . . i..a6 1 1 ltlb5 ! ?) 1 1 ltlh3 (or 1 1 ltlge2 when 1 1 . . .ltlb4 1 2 ltlg3 a6 1 3 i..e2 'ii'c7 14 0-0 ltle8 1 5 �h1 f5 16 i..c4 'ii'f7 17 exf5 i..xf5 1 8 l:.ae1 l:.a7 19 l:le6! felt very nice for White in T.Hoyer - P.Stippekohl, Bundesliga 11 1989) l l . . .ltlb4 (Aside from back home, wherever White's bishop retreats after 1 l . . .i..xh3 12 i..xa6 i..c8 sQould be satisfactory) 12 ltlf2 h6 1 3 i..e3 . White can continue as usual with i..e2 and 0-0 with f4 and e5/f5 most likely on his mind already. Black meanwhile must try for . . . f5 or . . . b5. Whether the black knight is well or poorly placed on b4 is not entirely clear.
b) 9 . . . i..d7 ! ?
International Master Andrew Martin advocates this move (or at least he did 1 5 or so years ago ! ) and though there are others, four obvious White responses present themselves:
b l ) 10 ltlge2 ltla6 1 1 ltlg3 l:tb8 ! and Black's b-pawn is under starter's orders with the knight ready to park itself on b4 in the event of 12 a4 just as in the variation below.
b2) 10 a4 ltla6 1 1 ltlge2 ltlb4 12 ltlg3 h6 1 3 i..e3 h5 14 i..c4 a6 1 5 0-0 l:le8 16 i..g5 'ii'c7 1 7 cJilh1 ltlh7 1 8 i..h4 b6 19 f4 l:lab8 20 f5 b5 . In

196 6 i.g5!?
S.Shevelev - E.Prie, Hyeres open 1992 a good old kingside attack vs queenside play was well under way.
b3) 10 i.c4 ltla6 1 1 ltlge2 :tb8 1 2 a4 ltlc7 1 3 0-0 a6 14 aS b6 1 5 axb6 :txb6. In N.Zhukova - L.Pantsulaia, Batumi 2001 White had fewer pawn islands and the standard plan of f4 and e5. Black had play along the b-file and the opportunity to park a piece on b5.
b4) 10 'ii'f4 !? . Okay I made this one up since as far as I can see it remains untried. This would put both f6 and d6 under pressure although White must be a little careful not to fall for the trick 1 0 . . . :te8 1 1 'ii'xd6? ltlxe4 ! . Instead though 1 1 Q-0-0! ? looks like fun and the variation 10 . . . 'ii'e7 1 1 h4 ! ? also isn't exactly boring! Finally a . . . c5 line where White can attack down the h-file! The black bishop on d7 is good for supporting . . . b5 but not so helpful when it comes to trying to unpin the knight.
10 i.e3 Again a reminder that you can find more about I 0 i.xh6 ltlxe4 1 1 ltlxe4
'ii'h4+ in game 34. lO • • • a6
Not for the first time in this book IO . . . ltlbd7 is well met by 1 1 ltlh3 when the standard-type moves of 1 I . . .ltlh7 12 i.e2 a6 1 3 a4 ltle5 14 ltlf2 h5 1 5 0-0 f5 ultimately led to a winning advantage for White in M.Sadler -B.Chatalbashev, Cannes 1996 after 16 f4 ltlil 17 e5 ! ? dxe5 1 8 i.xc5 ltld6 19 fxe5 i.xe5 20 ltld3 .
A couple of years earlier Matthew had found different but no less attractive squares for his knights after 10 .. .'�'h7 1 1 ltlge2 ltlbd7 12 ltlg3 ltle5 13 i.e2 i.d7 14 h3 b5 1 5 o-o b4 16 ltld1 i.e8 17 b3 ltlg8 1 8 ltlb2 f5 19 f4 ltld7 20 ltlc4 ltlb6 2 1 e5 ! (M.Sadler - M.Alava, Gausdal 1 994).
Another possible course of action is 10 . . . ltla6 1 1 i.d3 (not that there is anything wrong with 1 1 ltlge2) 1 l . . .h5 12 ltlge2 ltlc7 1 3 0-0 :tb8 14 a4 a6 1 5 :tab 1 b6 16 b4. This time White had a comfortable initiative on the queenside in P.Genov - G.Nikolaou, Korinthos 2002.

6 JI..g5!? 197
Finally lO . . . .:.es i s examined in the next game but whilst the immediate 1 O . . . h5 is also possible you should start to observe the recurrence of similar themes.
t t l:[ct ! ?
Even this move has been seen before (despite the fact it was under the completely different conditions of a 'Panno' ! ) . 1 1 a4 is very playable but Sadler has no qualms about allowing . . . b5. Though it could be that White has a b2-b4 break in mind, it soon becomes clear that the primary reason for the text is to facilitate the preservation of the light-squared bishop. Read on.
l l ... tbh7
Indirectly guarding the h-pawn via the check on h4 and clearing the way for . . . f5 . Nevertheless as Black never gets around to that anyway I think that the older 1 l . . .l:[e8 12 b3 b5 1 3 Jl..d3 b4 ! ? 14 tbd1 a5 1 5 tbe2 a4 of A.Yusupov - B.Gelfand, Munich 1993 poses White more problems. White can still manoeuvre a knight to c4 but Black can challenge that with a knight on b6 or a bishop on a6. Meanwhile the fact that the KI bishop has a1 within its grasp means that Black can try to make something of the a-file.
12 Jl..d3 tbd7 13 b3 tbe5 14 Jl..b1
Out of sight but not out of mind! Keeping the black knight away from c4 was obviously the point behind 1 3 b3 and White's l l 'h move was included to stop the rook from being incarcerated on a 1 .
1 4 ... b5 1 5 tbge2 'ii'h4+
Seemingly throwing a spanner in the works but in the overall scheme of things not altering the general nature of the game. Note that now 16 g3? is unavailable because of . . . tbxf3+.
16 tbg3 Jl..d7 17 0-0 aS
The 17 . . . b4 18 tbce2 J..b5 19 h3 c4 of M.Sadler - R.Bates, England 1998 is a more aggressive defence although that has the disadvantage of conceding the d4-square.
18 J..f2

1 98 6 i.g5!?
Threatening lLlfS in the short term but long term aiming for the h3 and f4 that would force Black's e5-knight back.
18 . • . 'iie7 19 h3 b4 20 lL!ce2
20 lLldl , intending to ultimately re-locate via e3 to c4, is nice in theory but fails in practice to the active 20 . . . i.b5 2 1 l:tel lLlg5 ! .
2 0 ... i.b5 21 f4 lL!d7 2 2 eS!
I 've already lost track of the amount of times in which we've seen this theme successfully employed.
22 ... dxe5 23 fS Naturally! Black would rather have anything but a pawn on e5 whilst the
e4-square remains free for a piece of White's choosing. Meanwhile the white f-pawn starts to create havoc.
23 ... l%a6 24 i.e3 l%c8 25 i.d3
Actually 25 i.xh6 i.xh6 26 'iixh6 is possible because of 26 . . . gxf5? 27 lL!xfS but it' s not the dark-squared bishops that White is interested in trading off.
2S ... i.xd3 26 'iixd3 l%f6 27 fxg6 fxg6 28 lL!e4 .l:txfl+ 29 .l:.xfl

6 i..g5!? 1 99
White remains his sacrificed pawn down yet his passed d-pawn looks the most dangerous of them all. Meanwhile White is in control of many key squares and his knight on e4 is an absolute joy.
29 ... ltJhf8 30 ltJ2g3 ltb8
Outwardly passive-looking but at least preventing 'ii'b5.
31 ltc1 'ii'd8 32 �h1 liJb6 33 ltd1
Black would get some activity after 33 AxeS ltJe6 34 l:r.c6 ltJf4 and instead White plays the containing game.
33 ... ltJfd7 34 ltJxc5 ltJxc5 35 i..xc5 ltJd7 36 i..e3 �h7 37 ltJe4
White has regained his pawn and his pieces are no less dominant than before.
37 ... 'iVh4 38 i..f2 'iVe7 39 ltc1 ltJf6 40 i..h4 ltJxe4
Black is lucky (relatively speaking! ) to have this, otherwise the good knight vs bad bishop scenario following i..xf6 would have led to unbearable suffering.
41 'iVxe4
And not 4 1 i..xe7?? ltJf2+.
41 ... 'iVf7 42 d6
Unfortunately Black's bishop is still 'bad' and White's d-pawn is now what it' s all about.
42 ... ltb7 43 i..e7 ltxe7
The concession of the exchange seemed inevitable with, for example, 43 . . . ltd7 44 ltc7 'ii'e6 45 'ii'b7 demonstrating why it isn't possible to simply blockade the danger pawn.
44 dxe7 'ii'xe7 45 l:.c6
Now the white queen can just sit tight while the rook does all the gritting.

200 6 i..g5!?
45 . . . 'ii'ti 46 l:b6 h5 47 h4 'it>h6 48 c;t>gt 'it>h7 49 �h2 �h6 50 l:a6 �h7 51 l:xa5 'ii'f2 52 llb5 i.f8 53 l:lb7+ 'ith6 54 l:.c7 1-0
Game 33 H.Stefansson - T.Ghitescu
Cappelle la Grande 1999
1 d4 tllf6 2 c4 c5 3 d5 d6 4 tllc3 g6 5 e4 i.g7 6 f3 0-0 7 i.g5 h6 8 i.e3 e6 9 'ii'd2 exd5 10 cxd5 l:.e8
The first deviation from our last game. Obviously ideas are going to be transferable between variations but this encounter brings a new White approach into play.
1 1 tllge2
Unless Black's queen's knight develops via d7, this is where the white knight usually moves to first. That's because f3-f4 (intending tllf3) really early on is far too impractical (due to the vulnerability of the e4-pawn and the g4-square) and allowing . . . i.xh3 (i.e. after tllh3) is rarely good.

6 J..g5!? 201
1 l. .. �h7
The aims of this retreat are to give the queen access to the kingside, to open up the bishop and to enable, if desired, a future . . . f5 . A couple of other Black alternatives also allow me to make a point about White's king's knight:
a) l l . . .h5 1 2 �c l ! ? (there is no need to play into the hands of the black h-pawn by trying to make a home on the familiar g3-square) 1 2 . . . �a6 1 3 J..e2 �c7 14 0-0 a6 1 5 a4 l:.b8 1 6 a S b 5 1 7 axb6 l:txb6 1 8 'iti>hl J..d7 19 �d3 J..b5 20 �xb5 l:.xb5 (Upon 20 . . . axb5 both 2 1 b4 and 2 1 �b4 look attractive) 2 1 l:.a4 ! ?. White is ready to attack Black's queenside and the tactic 2 l . . .�cxd5 22 exd5 "ile7 failed to 23 �xc5 ! "ii'xe3 24 'ii'xe3 l:.xe3 25 J..xb5 dxc5 (or 25 . . . axb5 26 .l:ta8+) 26 J..c4 �d7 27 b3 in H.Nakamura G.Henriksen, Linares 2003 .
b) l l . . .a6 12 a4 �bd7 1 3 �cl .:b8 14 J..e2 �e5? ! 1 5 J..xh6 ! . This is well worth paying attention to. The standard 1 5 . . . �xe4 1 6 �xe4 1Wh4+ 17 g3 'ii'xh6 (discussed in the next game) now ran into 1 8 'ii'xh6 J..xh6 19 �f6+ (yep, this fork is not usually available) 10 . . . �f8 20 �xe8 in A.Mestel -J.Naylor, 4NCL, Birmingham 200 1 .
12 �cl a6 1 3 a4 �d7 1 4 J..e2 .l:tb8 15 0-0 h5
In contrast to plenty of other . . . c5 Benoni encounters that we've seen, the only purpose that this advance now serves is to remove the pawn from its ' en prise' condition. Actually now is a perfect time for a comparison between the moves of Black's h-pawn and White's dark-squared bishop:
White's bishop has taken two turns to get to e3 when it could have got there in one. On the other hand Black has expended two tempi on his h-pawn when in fact now (generally speaking i.e. not given that there is something else there now) he might wish rather it was back on h7 anyway!
16 l:.b1 !? "ikc7
White was obviously gearing up for b2-b4 and the text at least forces White to think about the safety of his c3-knight.
17 �d3

202 6 i.g5!?
Though the knight could also have come here from f4 instead of c 1 , White has a simple and attractive plan in mind. He wants to put Black's queenside under pressure and l:lfc 1 and b4 are just the moves for the job. Black's defensive task is made tougher because of the ' in the way' bishop on c8. As the reader has already discovered, although in these systems White's f-pawn is often itching to advance further down the board, its presence on f3 makes it very difficult for Black's light-squared bishop to obtain an active role or trade itself off.
17 . • • b5 18 axb5 axb5 19 b4! c4
A supported passed pawn on c4 is of little use to Black in the middlegame but 1 9 . . . cxb4 20 lbd1 lDb6 2 1 lbxb4 lbc4 22 ._.cl ! ? is unattractive too. Black has an inferior pawn structure and the white knights some tasty holes to aim for.
20 lDe1 lDe5 21 lDc2
The big concession of 1 9 . . . c4 is that it allows the opponent access to the d4-square. White rightly intends to make the most of that.
21 ... i.d7 22 lDd4 'iib7
23 h3
e5 is a great square for the black knight but, just as we've already seen on numerous occasions before, it is never allowed to stay there forever. The big problem here for Black is the lack of alternative homes !
23 ... lDf6
To his credit Black decides that sacrificing the c-pawn is going to be preferable to the undesirable advance of his g- or f-pawns. However White does not intend to be hurried.
24 l:la1 !
One doesn't need a crystal ball to see White's vision of his rooks entering the black position via a7.
24 ... .l:.a8 25 f4 lbd3 26 l:lxa8 'iVxa8

6 J.g5!? 203
26 . . . l:xa8 is not necessarily any better as it's not clear whether the remaining black rook wants to be on the a-file or the c-file. The b5-pawn is going to be weak but Black has counterplay against e4.
27 J.xd3 cxd3 28 ltJdxb5 J.xb5 29 liJxb5 ltJxe4 30 'ii'xd3
Things are starting to simplify but Black still has a trick or two left up his sleeve.
30 ... 'iia6 31 .!:td1 liJg3 32 liJa3 'iixd3?!
Over-estimating the ensuing combination. To make things more difficult for his opponent Black should keep the queens on.
33 .l:.xd3
33 ... l:xe3 34 :xe3 J.d4 35 �fl ltJf5 36 ltJc2
White just about holds everything together and when the dust settles he will be left with that extra b-pawn.
36 ... ltJxe3 37 ltJxe3 'itif8 38 �e2 �e7 39 �d3 J.a7
The fact that Black has a bishop for a knight here is not going to help him. The Icelandic GM has no trouble from here on in.
40 f5 'ittd7 41 �e4 J.b6 42 ltJc4 J.fl 43 'itf4 J.h4 44 b5 J.e7 45 b6 �c8 46 f6 J.f8 47 g4 hxg4 48 hxg4 1-0
After playing g4-g5 the white king will return to the queenside. The bishop on f8 is dead in the water.
Game 34 I.Novikov - A.David New York Open 2000
1 d4 ltJf6 2 c4 g6 3 ltJc3 J.g7 4 e4 d6 5 f3 0-0 6 J.g5 c5 7 d5 e6
If - and I stress the ' if - it turns out that (as played in our main game) White can prove an advantage by grabbing the pawn on h6 then Black would need to turn to a different move order to try and reach the Benoni

204 6 i..g5!?
positions of the previous two games. An obvious candidate is the immediate 7 . . . h6 which after S i..e3 e6 9 'ii'd2 exd5 10 cxd5 would transpose back to those now familiar lines. To throw a spanner in the works though, White could then try S i..f4.
This would make Black think about the well-being of his d-pawn (i.e. assuming he is still after arranging .. . e6) and the following have appeared in practical play:
a) S . . . a6 9 'ii'd2 (9 lbge2 is sensible but then White must cater for the 'Benko Gambit'-style 9 . . . b5 ! ?) 9 .. .'�h7 10 a4 e6 ( I O . . . lbbd7 1 1 lbh3 ! lbe5 12 lbf2 is pretty standard stuff and another idea for the databanks, IO . . . 'ii'a5, is well met by 1 1 l%a3 placing the rook on a protected square and thus putting the brakes on . . . b5) 1 1 g4 ! ? (This time 1 1 dxe6 i..xe6 1 2 i..xd6 l%eS tenders undeniable compensation as White has some most undesirable holes on the queenside) l l . . .exd5 12 cxd5 . The assessment of a famous J.Lautier - A.Shirov, encounter (Horgen 1 994) has changed over time. It started off as unclear and it has ended up as 'unclear' ! Seriously, experts have tended to favour White but Black should be okay as long as he plays actively.
b) S . . . e6 (?! or ! ?), showing complete disregard for White's subtlety, has always been considered ropey but after 9 dxe6 i..xe6 I 0 i..xd6 :es 1 1 i..xc5 lbc6 !? (in some ways more intriguing than the previously seen I I . . .lbfd7 12 i..d4 and I I . . .'ii'a5 12 b4) in Dao Thien Hai - A.Watanabe, Yangon 199S Black was handling the position like the 6 i..e3 c5 gambit. After 1 2 'ii'xdS l:taxdS 1 3 i..e3 lba5 it is actually two pawns and although it is a little difficult to buy into Black's idea, certainly after 14 .txa7 lbxc4 1 5 i..xc4 i..xc4 16 lbge2 lbd7 17 0-0-0 b 6 I S �bl i..e6 19 lbf4 i..xc3 2 0 bxc3 l%e7 2 1 lbxe6 fxe6 22 l%d6 :as 23 i..xb6 l1bS 24 �c2 l1xb6 25 l1xb6 lbxb6 26 l1b l lbd7 27 l1b5 cj;f7 2S a4 l:teS 29 a5 �e7 30 f4 �d6 3 1 �d3 �c6 32 c4 :rs 33 g3 :as 34 �d4 l%dS 35 �e3 lbc5 36 l%b6+ �c7 37 l1b5 �c6 3S l1b6+ �c7 39 l:tb5 it was White begging for (and getting! ) the draw.
c) S . . . 'ii'b6 9 'ii'd2 �h7 1 0 i..e2 e6 1 1 l%c l exd5 1 2 cxd5 a6. Now the queen looks a little misplaced on b6 and the 1 3 lba4 'ii'dS 14 b4 ! ? of

6 i..g5!? 205
A.Bykov - V.Krapivin, Omsk Perm 1998 was an interesting way to try to exploit it.
d) 8 . . . lt:lh5 9 i.e3 . Now Black should choose between 9 . . . f5 and 9 . . . e5. The former does weaken e6 but the latter is a favourable version of the not great line 6 i.e3 e5 7 d5 c5. In that case you might recall 8 g4 ! being strong. In this position however, Black already has his knight on h5 . I'd say it's playable but still a little better for White.
8 1i'd2 exd5 9 cxd5
The text is pretty much taken as read but for instructional purposes the alternatives are just worth a mention� After 9 exd5? ! , the advance f2-f3 is detrimental and the white king looks silly on an open file.
Instead 9 lt:lxd5 appears logical as, after all, the knight occupies a nice outpost, its compatriot can support it (i.e. via e2-c3) and Black's backward d-pawn seems there to be attacked. The drawbacks though are also clear. Black's own queen's knight has access to d4 via the usually unavailable c6 square and his light-squared bishop is gifted an obvious chance to swap itself off. Remember that bit is so often Black's troublesome piece and it will be more than happy with the short (but relatively successful) life . . . i.e6xd5.
9 . . . h6
So now the big question; is this pawn there for the taking? Let's find out! 10 i.xh6
A few years ago it was suggested that, if required at all, Black had to flick in . . . h6 a couple of moves earlier to avoid suffering in the ensuing ending. Time doesn't seem to have justified that assessment (at least the suffering bit ! ) as few strong White players actually take this pawn these days. Remember that we've seen already in this chapter that it is far from forced with 10 i.f4 and 10 i.e3 being perfectly reasonable alternatives. On the other hand beware that 1 0 i.h4? walks into 10 . . . lt:lxe4 ! 1 1 i.xd8 lt:lxd2 1 2 i.e7 (or 1 2 i..c7 lt:lxfl 1 3 �xfl i..xc3 14 bxc3 lt:la6 1 5 i.xd6 l:.d8 16 i.f4 gS) 12 . . . lt:lxf3+ 13 lt:lx£3 l:.e8.

206 6 J-g5!?
10 . • • lDxe4
This should now be a familiar tactic to the reader. White must always remember that check on h4.
l l lDxe4 'iVh4+ 12 g3 'iVxh6 13 'iVxh6 J-xh6 14 lDxd6
Stopping here for a second; White has won what is often the important d6-pawn. However the fact that he has lost his own e-pawn means that d5 is a little weak. His material advantage is due to the absence of a black h-pawn and the surplus for White there won't have the greatest of impacts for a while. Black currently holds the advantage of the two bishops but though that pairing is unlikely to remain together for long, he will be happy that his dark-squared bishop will survive. Overall he will have compensation for the pawn because of his lead in development. There is no need to stop here though. Let's keep going!
14 ... liJd7 Though 14 . . Jid8 is possible here, the text remains the most popular move
in practice. Black doesn't want to lose a move with his rook and is eager to get his knight into the action.
15 J-h3

6 i.g5!? 207
After 15 f4 the Danish IM K.laus Berg has at least twice been the recipient of the advantageous ending that occurs after 1 5 . . . lbb6 16 0-0-0 .l:.d8 17 lbxc8 .l:.axc8 1 8 i.h3 f5 1 9 lbf3 ! lbxd5 20 .l:.he 1 . The knight on d5 looks a little shaky and with White's pieces ready to flood in, Black's g6-pawn is weak too. After 20 . . . lbb4 2 1 lDe5 �h7 22 a3 lbc6 23 .:.xd8 l:.xd8 24 lbxc6 bxc6 25 l:te7+ i.g7 26 i.fl a5 27 a4 l:.d4 28 b3 .l:.e4 29 .l:.xe4 fxe4 he even went on to win the opposite-coloured bishop ending in K.Berg - R.Bates, Richmond 1994.
However it seems that 15 . . . lbf6(! ) is more accurate as upon the similar 16 0-0-0 l:.d8 17 lbxc8 .l:.axc8 1 8 i.g2 (or 18 d6 lbe4 ! ) 1 8 . . . lbg4 19 .l:.d2 (I notice that 19 i.h3 lbt2 20 i.xc8 lbxd1 2 1 �xd1 .l:.xc8 22 lbe2 l:.d8 23 lbc3 i.g7 24 �c2 i.xc3 with the d-pawn dropping has ended as a draw on a few occasions) 19 . . . lbe3 (Black could even get ambitious with 19 . . . c4 ! ? ) 20 i.h3 l:.b8 2 1 lDf3 l:.xd5 22 .l:.xd5 lbxd5 23 l:.d1 lDf6 Black comfortably held in A. Vidarte Morales - C.Santos, Medina del Campo 2001 as the g6-weakness wasn't there this time.
Regarding the above, probably of more interest to Black though is 16 . . . i.g4 ! ? 1 7 i.e2 b6 1 8 i.xg4 lbxg4 19 lbh3 l:.ad8 20 lbe4 (probably this is an error) 20 . . . i.g7 2 1 lbc3 i.d4 22 .l:.he1 lbxh2 23 .l:.e7 lbg4 24 .l:.xa7 lbe3 25 l:.h1 i.xc3 26 bxc3 lbxd5 27 �b2 .l:.de8 which, with a superior position already, Black did go on to win in R.Kutirov - I.Smirin, Struga 1995.
I 'm certainly not concluding that 15 f4 is losing, based on the latter example, but clearly Black has chances to at least hold his own.
15 ... lbb6 16 i.xc8 lbxc8
17 lbe4
I would suggest that after 1 7 lbxc8?! l:.axc8 1 8 lbe2 .l:.cd8 19 .l:.d1 l:.fe8 Black is probably already better despite the ongoing pawn deficit.
17 ... lbb6 18 .l:.d1 lbc4
It's comparatively early days but one can sense Black's activity brewing. 19 b3 lbb2 20 .l:.b1 lbd3+ 2 1 �fl

208 6 i..g5!?
The white king remains awkwardly placed after 21 �e2 �cl+ 22 �fl �xa2 and for obvious reasons it really doesn't want to be on the d-file either.
21 ... rs 22 �c3 :res
White still has his extra pawn to cling to but this can't be much fun. 23 �ge2 lte3! 24 �dl
Black has bucket loads of compensation for the pawn after 24 f4 ltae8 25 ltdl i..g7 and in fact White is almost in zugzwang.
24 ••• l:.xf3+ 25 �g2 �e5
Being a strong GM, the White player in this game is no slouch. However clearly Black (also a useful GM) has taken over White's operation and the first player must now battle hard for a draw.
26 �f2 .l:.d8 27 lthdl lte3 28 l:tb2 �f7 29 �f4 i..xf4 30 gxf4 b6 31 ltbd2 �d6 32 l:tgl �g7 33 �dl lte4 34 �f3
I know which colour I'd prefer (and it's not White) ! 34 ... �b5 35 �e3 �fi 36 �c2 �d4+ 37 �xd4 cxd4 38 ltcl ltxd5 39
l:.c7+ �f6

6 i.g5!? 209
White should be able to hold the rook and pawn endgame after 39 . . . l:te7 but I wouldn't rule out the possibility of a bigger Black improvement a little earlier. Either way, certainly as things stand at the moment, I could have no justification for recommending that White players grab the h6-pawn. In my opinion the fact that Matthew Sadler has never selected 10 i..xh6 speaks volumes.
40 .:.xa7 l:tcS 41 l:r.d7 l:.c3+ 42 �g2 .l:.xf4 43 .l:.7xd4 IA-1/l
Game 35 A.Dreev - K. Arakhamia-Grant
World Team Champs, Luzem 1997
1 d4 lLlf6 2 c4 g6 3 ltlc3 i.g7 4 e4 d6 5 f3 0-0 6 ltlge2
Essentially this final game of the chapter is all about looking at Black's alternatives to attempting a quick . . . c5 . After 6 i.g5 we have already ruled out 6 . . . e5 but that aside it should be clear that transpositions to other variations are far from impossible. On g5 the bishop can get to h6 in exactly the same amount of time as it can from e3 and so for example 6 . . . c6 7 'ii'd2 a6 8 0-0-0 b5 9 i.h6 would lead us directly into game 1 8 . Also after 6 . . . ltlbd7 the reader would surely by now recognise that whilst there is nothing remotely wrong with 7 'ii'd2, the opportunity is also there for 7 ltlh3 !? . After 7 . . . c5 8 d5 a6 9 ltlf2 in I.Lutsko - A.Vlasov, Voronezh 2004 perhaps Black should have tried 9 . . . b5 as 9 . . . .:tb8 10 a4 'ii'a5 1 1 i.e2 h6 12 i.e3 �h7 1 3 0-0 'ii'c7 14 f4 b6 1 5 'ii'd2 i.b7 16 l:tae1 l:tbe8 1 7 ltld3 e5 1 8 f5 left him with a horribly passive position. Perhaps these specific moves are new, but in terms of plans for this book at least, nothing else is.
6 ... ltlbd7 7 i.gS
Although after 6 i.g5 ltlbd7 as mentioned above White may have preferred 7 ltlh3 ! ? over 7 ltlge2, it is necessary for me to discuss this position as it could have come (as indeed it did here) from the last chapter. Yes I did say there that after 6 ltlge2, there was a certain air of craftiness

210 6 J.g5!?
about 6 . . . liJbd7 and that to prevent being railroaded into a variation that he may not want (i .e. 7 J.e3 c5) White might try 7 J.g5 ! ?. Well here it is!
7 • • • a6
Regarding alternatives, after 7 . . . h6 8 J.e3 the inevitable 'ifd2 is effectively going to gain a tempo thanks to that new target on h6 whilst the 7 . . . c6 8 'ifd2 'ifc7 of J.Campos Moreno - A. Arias Igual, Burgas 1999 was taking the micky! Black was evidently in no hurry and I like the 9 h4 ! ? e5 10 J.h6 exd4 1 1 ltJxd4 d5 1 2 0-0-0 liJb6 1 3 h5 dxe4 14 J.xg7 �xg7 1 5 ltJxe4 ltJxe4 16 fxe4 c 5 1 7 ltJ£3 J.g4 1 8 'if g 5 J.x£3 19 h6+ 1 -0 that will perhaps make him reconsider in the future!
Finally 7 . . . e5 is now possible but the bishop is certainly no worse on g5 than on e3 . White can then choose between 8 'ifd2 and 8 d5 but for that matter doesn't have to make this closing/retaining the tension in the centre decision just yet anyhow.
8 d5
A new idea for this book prompted by Black's apparent indecision over her c- and e-pawns. Now 8 . . . e5 or 8 . . . c5 would return to normal parameters but those aside White intends to use the d4-square to further his own aims.
8 • • • c6 9 'ifd2 liJe5 10 liJd4
Bringing the knight to an attractive post and freeing the light-squared bishop.
10 . . • c5
It' s not clear what Black does next after 10 . . . 'ifb6 1 1 J.e2 and, as a trade on d5 would merely leave White with the c-file, the highly rated Georgian lady player opts to return us to a more familiar pawn structure.
1 1 liJc2
We have seen this king' s knight make its home on f2 on plenty of occasions but this is a first for c2 ! I 'd have to say though that I quite like its position here. First of all it doesn't get in the way of any other pieces and

6 i..g5!? 21 1
secondly it has some handy options in its own right. It's not inconceivable that White could plan a b2-b4 break whilst on e3 the knight could help with a kingside initiative or transfer to c4 later in the day.
l l • . • bS
This looks aggressive but in terms of ideas Black isn't exactly spoilt for choice. This could be the only chance to get in this break whilst it may already be too late for 1 l . . .e6 because of 1 2 f4 ! ?.
12 cxb5 axb5 13 i..xb5 i..a6
Black has the half-open a- and b- files to work with and now wants to battle for access to the c4-square. Nevertheless the way that the game unfolds now leads one to the conclusion that White has a good 'Benko Gambit' .
14 i..xa6 l:txa6 15 f4!
15 • . • ttJed7
Alas 1 5 . . . ltJc4? drops a piece to 16 'ii'd3 .
16 0-0 l:tb6 17 b3 'ii'c7 18 l:tael !?
White isn't interested in trying to make something of his extra pawn on the queenside and quite rightly wants to work with his kingside space advantage instead.
18 ... :as 19 �h1 ttJe8
It's easy to criticise this move but what else was there for Black to do?
1 9 . . . c4 would be met by 20 b4 (gee, what a good piece that is on c2 ! ) whilst doing nothing would have meant a painful death on the kingside.
20 i..xe7 i..xc3 21 'ii'xc3 l:txa2 22 ltJe3
Time for the knight to realise some of its potential !
22 ... l:ta3 23 ltJg4

212 6 i.g51?
Suddenly the adventurous knight threatens mate in one. 23 ... f6 24 eS llaxb3 25 'ii'al
Black has regained het gambited pawn but now the focus is all on the kingside.
25 .•• dxe5 26 fxeS fxeS 27 ltJxeS
27 • . . ltJxe5
White was threatening to trade on d7 and deliver mate on f8 and 27 . . . llb2 28 liJxd7 'ii'xd7 29 i.xcS llb8 30 llf8+ �g7 3 1 llf2 is just one of a few possible routes to victory.
28 d6 1-0

Chapter 10: Odds and Ends
A complete opening disaster that I once had went as follows: 1 c4 lLlf6 2 ltJc3 cS 3 ltJfJ g6 4 d4 .ig7 S e4 0-0 6 eS?
It seemed like a good idea at the time to advance my e-pawn but after 6 . . . ltJg4! I soon realised that my centre was about to come apart at the seams. Black can simply remove my d-pawn and then pick off the one on e5 with or without the help of . . . lbc6. I tried 7 h3 cxd4 8 hxg4 (i.e. not much fancying 8 'ii'xd4 lbxe5 ! 9 lbxe5 d6) but after dxc3 9 'ii'd3 'ii'aS frankly I could almost have resigned already!
Since then in particular, but in fact often as a junior, I have wondered what the correct move is after 1 d4 lLlf6 2 c4 g6 3 lbc3 .ig7 4 e4 0-0

214 Odds and Ends
Clearly the temptation is there for 5 e5 but after 5 ... lt:Je8 White can be sure that Black will start to chisel away at his centre with the likes of . . . d6, . . . c5 and maybe even . . . f6. That certainly doesn't make 5 e5 a mistake as with 6 i.f4, 6 f4 and 6 lt:Jf3 possible he isn't in the mess that I was in! Basically I'd suggest that it is a matter of taste but the question then is, if eschewed, what should a Samisch player play in the above position instead?
Well as Black could easily play . . . d6 next move anyway it pays to employ something that is going to fit in with your system (i.e. rather than be tricked into a line that you'd rather not play). Clearly 5 f3 would, but you may feel like a bit of a dope opting for that here seeing as there is no danger of . . . lt:Jg4. I will however move on to that exact position shortly. Above not very bright would be 5 lt:Jf3 (ask the f-pawn what it thinks of that! ! ! ) but 5 i.e3, 5 i.g5 and 5 lt:Jge2 would most likely transpose back to one of this book's chapter's following . . . d6 and f3 .
So, I hear you ask, what of 5 f3 ?
Clearly Black could just rejoin standard paths with 5 . . . d6 but he could also try to punish White's move order. One interesting gambit idea I have seen before is 5 . . . c5 intending 6 dxc5 b6! ?. That looks like fun for Black but is also kind of irrelevant seeing as there is nothing wrong with the obvious 6 d5 . Having carefully taken in all that this book has to offer on the . . . c5 lines no doubt the reader will be an expert on those 'Benoni'-type positions by now. A quick referral to your knowledge on the ins and outs of these variations should tell you that in fact White can turn this particular situation to his advantage. He hasn't had to commit his dark-squared bishop yet and nor will he need to in the near future. He can concentrate on the development of his kingside pieces and if Black doesn't free his own light-squared bishop (i.e. by . . . d6) then White may favour a lt:Jh3-f2 manoeuvre over a lt:Jge2-g3 or c 1 one.

Odds and Ends 215
I was generally more intrigued by the concept of 5 . . . c6 6 �e3 d5 7 e5 lbe8 (For a while now theory has considered 7 . . . lbfd7? 8 cxd5 cxd5 9 lbxd5 'ii'a5+ 10 lbc3 to provide insufficient compensation for a pawn).
If supporting the pawn on e5 is going to be of paramount importance then the one on f3 looks a bit redundant now. It did keep Black's knight out of g4 but changing the structure seems very acceptable in White's first two alternatives in the position above:
a) 8 f4 lbc7 9 lbf3 dxc4 10 �xc4. It' s very different from our typical 5 f3 games but it pays to be flexible and given that this was seen in A.Dreev -A.Zhigalko, European Cup, Rethymnon 2003 clearly at least one Siimisch expert is happy with the space advantage that this provides!
b) 8 cxd5 cxd5 9 f4 lbc6 10 lbf3 �g4 1 1 �e2 e6 12 0-0 f6 13 l:cl was assessed as ' slightly better for White' in J.Rukavina - B.lvanovic, Yugoslavian Champs 1982 but I quite like the pin-avoiding 10 h3 ! ? f6 1 1 lbf3 �h6 1 2 g3 as seen in V.Arbakov - I.Kurnosov, Alushta 2002.
Actually though, it is still possible to do away with f3-f4 as two different approaches show:
c) 8 'ii'd2 f6 9 �h6 �xh6 10 'ii'xh6 lbg7 1 1 g4 (One would have thought that the primary aim of this is to keep the black knight out of f5 but the following demonstrates that a kingside attack should be taken seriously! ) 1 l . . .b5 12 cxb5 a6 1 3 h4 axb5 14 h5 gxh5 1 5 �d3 f5 16 lbh3 'ii'e8 17 gxf5 l:xf5 1 8 l:g1 'ii'f7 19 �d2 c5 20 e6 'ii'f6 2 1 l:xg7+ 'ii'xg7 22 l:g1 1 -0 R.Knaak - B.lvanovic, Tallinn 1 979.
d) 8 h4 dxc4 9 �xc4 c5 10 f4 cxd4 1 1 'ii'xd4 'ii'xd4 12 �xd4 lbc6 1 3 �e3 h5 14 lDf3 Not perhaps the h-ftle hack that might have been envisaged. Nevertheless in E.Solozhenkin - S.Djuric, Padova 2000 White's attractive kingside pawn structure kept his opponent's pieces sufficiently at bay to ultimately help him convert an endgame.

216 Odds and Ends
Another reason for me just discussing 5 f3, even after Black had withheld . . . d6, is that the position could have been reached by transposition had f3 been employed even earlier. A prime candidate is depicted above (typically arrived at via 1 d4 ltlf6 2 c4 g6 3 f3).
I must admit that 3 f3 looks a tad ridiculous yet I 've now played it on numerous occasions myself and its popularity in recent times has really soared (no, not just because of me!) . To be honest on face value it is difficult to justify creating a hole around one's own king in preference to developing a piece! That's just the negative side though, the positive being that this move order avoids the Griinfeld Defence (quite an achievement if you have the poor record that I have against it ! ) . Indeed now 3 . . . d5 4 cxd5 lt:lxd5 5 e4 sees Black's d5-knight unable to conduct its usual trade for a white steed on c3 (as it's not there yet !) . For Griinfeld players this constitutes a whole new ball game but whilst 3 . . . lt:lc6 and 3 . . . e5 are intriguing deviations, obviously 3 . . . i.g7 4 e4 is not unlikely to return to the realms of a normal KI Samisch.
Originally (and I refer you back to that delaying . . . d6, . . . c6 and . . . d5 stuff) I assumed that only Black KI players could gain from White's employing of f3 ahead of lt:lc3 . However one day I got to thinking about the position below in which it is now White to play.

Odds and Ends 21 7
5 tl:'lc3 leads straight to a standard Samisch and the good old 'knights before bishops' opening principle dictates that this should be best. Nevertheless, and indicating that there is still plenty of room for innovative thought, I wondered whether 5 ..ie3 might in fact be an intricate subtlety of amazing magnitude (i.e. maybe okay!) . Of course it could equally be garbage but there is some logic behind not committing the knights too early:
1 d4 tl:'lf6 2 c4 g6 3 f3 ..ig7 4 e4 d6 5 ..ie3 0-0 6 'ii'd2 c5 7 d5 e6 8 tl:'le2 exd5 9 cxd5
.. .is something I've since had on a couple of occasions, the aim being to park the e-knight on c3 and possibly after a2-a4, the b 1 -knight on c4. Clearly if Black plays ball then White can get his knights on the best squares fairly quickly. Indeed I 'd even wondered about something like:
7 tl:'le2 tl:'lc6 8 dxc5 dxc5 9 ..ixc5 b6 10 ..ia3 ..ib7 1 1 tl:'lec3 'ii'xd2+ 12 tl:'lxd2
. . . which compared to the normal . . . c5 gambit accepted line may at least have helped to solve White's usual awkward problem of how to develop his king's knight.
All interesting stuff and what I also find amusing is what has recently been the 'main line' of the Trompowsky:
L.McShane - R.Wojtaszek
1 d4 tl:'lf6 2 ..ig5 tl:'le4 3 ..if4 c5 4 f3 'ii'a5+ 5 c3 tl:'lf6 6 d5 'ifb6 7 ..icl e6 8 c4 exd5 9 cxd5 d6 (9 . . c4 is the big alternative here but as you will see the text soon leads to an eerily similar KI Samisch!Benoni position. ) 10 e4 g6 1 1 tl:'le2 ..ig7 12 tl:'lec3 0-0 13 ..ie2 tl:'lbd7 14 0-0 a6 15 a4 .l:.b8 16 �h1 'ii'd8 17 ..ie3 l:r.e8 18 tl:'la3
I too wheeled out the Julian Hodgson's favourite 'Trompowsky' for a while (and still do occasionally) because I liked playing the white side of these positions particularly against opponents that didn't even play the

218 Odds and Ends
King's Indian or the Benoni themselves ! Of course, although I 've just said that it was very popular for a while (i.e. 6 d5 'ifh6 7 i.cl ), Black is by no means obliged to enter all this. As regards the above position though you can see how England's rising superstar Luke McShane has blatantly copied my white knight manoeuvring idea! The queen's knight looked destined to settle on the attractive post c4 and the talented young GM went on to win comfortably.
As I'm hardly going to recommend that everyone starts taking up 2 i.g5 (at least not until this book has sold out!) , what will be of more relevance to the reader is 1 d4 d6
This can be very annoying for White queen's pawn players who don't like the idea of entering a king's pawn game (perhaps the 'Pirc Defence' or the 'Philidor') via the otherwise sensible 2 e4 lDf6 3 lDc3 .
I actually believe 2 c4 e5 ! ? to be a reasonable move for Black but a Siimisch player won't want to prevent this with 2 iDf3 for obvious reasons. Instead my recommendation would be 2 e4 lDf6 3 f3!?
Our familiar pawn advance sees the delay of lDc3 at least until the c-pawn makes it to c4. I say at least because after 3 . . . g6 4 c4 i.g7, just as I have

Odds and Ends 219
talked about before, perhaps the sneaky 5 �e3 (or even 5 lDge2) could be played first to try and turn this whole different move order to your own advantage. Hell, even 4 �e3, delaying even c4, might be extra devious. Plenty of food for thought and while I'm here (from the last diagram) 3 . . . e5 4 d5 (with an 'Old Indian' or 'Czech Benoni' possible, not necessarily transposing to a King's Indian) could be followed up by c4 shortly but 3 . . . d5( ! ?) is of independent significance. In that instance White should choose between the space-gaining 4 e5, when f3-f4 is an inevitable follow-up, or the entertaining 4 lDc3 dxe4 5 �g5 with a 'Blackmar-Diemer Gambit' a tempo up!
Finally I'd like to end this chapter with a look at 1 d4 g6 2 e4 (White should have no objection to playing this when Black can do nothing to prevent c2-c4; oh and by the way I won't mention 2 . . . lDf6?! 3 e5 lDh5 -oops I just did! ) 2 . . . i.g7 3 c4 d6 4 lDc3
Okay, I've taken 4 lDc3 as read although perhaps the enthused White Samisch-playing reader may now be inspired by a different ' subtlety' here in order to try and turn Black's move order to his own advantage. Anyway what I wanted to say is that although 4 . . . lDf6 5 f3 would be a direct transposition to the Samisch, officially we are still in a 'Modem Defence' where Black has other possibilities too. I'm not going to go into much detail about those except to give the following poor attempts to handle them:
a) 4 . . . lDc6 5 �e3 e5 6 d5 lDce7 7 f3 f5 8 �d3 lDf6 9 lDge2 b) 4 . . . lDd7 5 f3 e5 6 d5 f5 7 �e3 lDgf6 8 'iid2 c) 4 . . . e5 5 d5 f5 6 f3 lDf6 7 �e3 The reader should recall that in the 6 �e3 e5 7 d5 lines of the Samisch,
Black's king's knight has to move from f6 to facilitate . . . f5 and may often return anyway. If White just casually plays f3 as in the variations mentioned above then it could easily be claimed that Black is two tempi up on standard KI lines.

220 Odds and Ends
Two general alternative solutions to tackling the situation in which . . . ttlf6 is delayed are:
1 ) To maintain the tension in the centre. Black will rarely want to play . . . f5 when dxe5 is possible as the result will be easily pressurised hanging black pawns (i.e. after exf5 gxf5 too) on e5 and f5.
2) By all means advance the d-pawn but as soon as . . . f5 comes, take it. A queen check on h5 may be available (after . . . gxf5) and instead of f3, consider the testing f4! ? to challenge Black's e- and f-plans.
Basically, don't play f2-f3 if it doesn't seem applicable and the easily reachable position below is another good example.
I think I've played 5 .i.d3 intending 5 . . . .i.h6 6 .i.xh6 ttlxh6 7 h4 ! ? but whilst other moves are possible, I couldn't recommend 5 f3 as it doesn't do a lot and merely encourages Black to seek a trade of bishops.
And that's all I'm afraid, folks. I really hope that you've enjoyed this book and will join me for the likely sequel 'The not remotely controversial Samisch King's Indian' !
Goodbye and good luck!

Index of Illustrative Games
J.Bellin - M.Hebden J.Campos Moreno - J.Candela Perez A.Dreev - K.Arakhamia-Grant A.Graf- P.Thipsay A.Gupta - N. Vinuthna P .Haba - J.Pachow M.Herbold - J.Mudrak A.Istratescu - L.Simon A.Karpov - P. Virostko R.Kasimdzhanov - F.Nijboer R.Kasimdzhanov - A.Volokitin A.Kaspi - B.Kogan I.Khenkin - A.Fishbein J.Lautier - M.Apicella J.Levitt - D.Friedgood P.Motwani - C.Hanley J.Murey - I.Lentze I.Novikov - A.David J.Rowson - K.Arakhamia-Grant J.Rowson - V.Kotronias M.Sadler - P.Thipsay H.Stefansson - T.Ghitescu D.Svetushkin - G.Arsovic P.Timoschenko - M.Bakhtadze C. Ward - D.Agnos C. Ward - S.Buckley C. Ward - K.Denny C. Ward - J.Gallagher C. Ward - G.Gibbs C. Ward - E.Gullaksen C. Ward - A.Kohtz C. Ward - A.Lauber C. Ward - C.McNab A.Zakharchenko - S.Pavlov
Page
1 1 3 122 209
70 1 38 35 42 90 56 83
167 23
1 83 95
1 1 8 1 88 1 57 203 143 149 193 200 1 79 6 1 1 5
1 75 76
160 1 27 1 33 28
1 09 48
1 53

Main Variations:
Quick Reference Guide
(numbers in brackets refer to pages)
1 d4 d6 (218)
l . . .g6 (219)
l . . ..!Llf6 2 c4 g6 3 f3 (21 6)
3 ttlc3 Ji..g7 4 e4 0-0 (213)
4 . . . d6 5 f3 a6 6 Ji..e3 c6 (1 18)
6 . . . .!Llc6 (1 43)
5 . . . 0-0
6 Ji..e3 e5 7 d5 c6 8 'Wd2 cxd5 9 cxd5 a6 (1 6)
9 . . . .!Llh5 (24)
7 . . . c5 (42)
7 . . . .!Lle8 (29)
7 . . . ttlh5 8 'Wd2 f5 9 0-0-0 f4 (30)
9 . . . .!Llbd7 (35)
8 . . . 'Wh4+ 9 g3 (43)
9 cj;d1 (48)
7 .!Llge2 .!Llc6 (56)
7 . . . exd4 8 .!Llxd4 c6 9 'ii'd2 (63)
9 Ji..e2 (64)
7 . . . c6 8 'Wd2 exd4 9 Ji..xd4 (70)
8 . . . .!Llbd7 9 0-0-0 a6 10 <li>b1 'Wa5 (72)
1 0 . . . 'We7 (73)
1 0 . . . b5 (76)

Main Variations: Quick Reference Guide 223
6 .i.e3 .!Dbd7 7 .!Dh3 c6 (84)
7 . . . e5 (85)
7 . . . c5 8 .!Dh3 (95)
8 d5 (90)
7 'ii'd2 c5 8 .!Dge2 (96)
6 .i.e3 b6 7 .i.d3 (105)
7 'fid2 (1 09)
6 . . . a5 (1 13)
6 . . . a6 7 'fid2 c6 (122)
6 .i.e3 .!Dc6 7 'fid2 l:te8 (134)
7 . . . a6 8 .!Dge2 .l:.b8 9 g4 (1 38)
9 .l:.c l (144)
9 .!De l e5 10 d5 .!Dd4 1 1 .!D l e2 .!Dxe2 (129)
l l . . . c5 (134)
6 .i.e3 c5 7 dxc5 dxc5 8 .i.xc5 (1 5 7)
8 'ii'xd8 .l:.xd8 9 .i.xc5 .!Dc6 10 .!Dd5 (150)
1 0 .i.a3 (151)
10 .!Dge2 (154)
7 .!Dge2 .!Dc6 8 d5 .!De5 9 .!Dg3 a6 (1 62)
6 .!Dge2 e5 (188)
6 . . . .!Dbd7 7 .i.g5 (209)
6 . . . a6 7 .i.e3 c6 (1 89)
9 . . . e6 1 0 .i.e2 exd5 1 1 cxd5 a6 (162) l l . . . h5 (167)
6 . . . c5 7 d5 e6 8 .!Dg3 exd5 9 cxd5 .!Dbd7 (1 75)
9 . . . h5 (1 79)
9 . . . .!Dh5 (183)
9 . . . a6 10 .i.f4 (185)
10 a4 .!Dh5 (184)

224 Main Variations: Quick Reference Guide
6 i.g5 c5 7 d5 h6 (204)
7 . . . e6 8 'iVd2 exd5 9 cxd5 b6 (195)
9 . . . i.d7 (195)
9 . . . h6 10 i.xh6 (205)
1 0 i.e3 a6 (196)
lO . . . :.es (200)


l 'kely to see pos1t1onal queenside
play as any deadly assault on the
Black king .
I n th1s innovative opening book,
Grandmaster Chris Ward takes a
look at its transformation over time.
He offers a unique insight 1nto the
subtleties of th1s system and reflects
on many of h1s own experiences,
while observing why modern greats
such as Karpov, Kasparov and
Kramnik have been tempted by the
characteristically aggressive 5 f3.
If you have had enough of endless
pages of daunting variations but
The Queen's Gambit Accepted C IS a d
0 1 34 8467 5
Endgame Play Chris Ward
0 7 1 34 7920 5
An Attacking Repertoire for White Sam Collins
0 71 34 891 0 3
For more information on Batsford
chess titles, please contact:
Sales and Marketing
B T Batsford
want to develop your understanding .....--..:::::..��..,;....::="--, of a fascinating opening, then this is
the book for you. it offers useful t ips
on how to further your preparations •
as well as invaluable pointers on
previously discarded lines that
deserve to be revisited .
Chris Ward is an International
Grandmaster and former British
Champion. He is also an
experienced and popular chess
coach as well as the author of
numerous books on the game,
including Chess Choice Challenge 3 , Endgame Play and Queen 's Gambit Accepted, all published by Batsford .
UPC ISBN 0-71 34-8872-7
3
UK £1 5.99 us $22.95 Can $32.95
ks. co.uk
www.chrysalisbooks.co.uk


