Assignment: LINEAR PERSPECTIVE –CITYSCAPE
NOTES: Perspective – a tool artists use to create depth in a two dimensional artwork Horizon Line – the line where the ground and sky appear to meet in the distance Vanishing Point – the point where all lines seem to converge on the horizon line
Emphasis – a Principle of Design artists use to draw attention to a particular place in the artwork
ASSIGNMENT:
Part One: You must follow the instructions on the “A Lesson in 2-Point Perspective” handout found on the next pages.
Part Two: You will create a city using two point linear perspective. See grading criteria below or #4 on the “Lesson in 2-Point Perspective” for the requirements. See the next pages for step by step help in drawing a pitched roof house and garage.
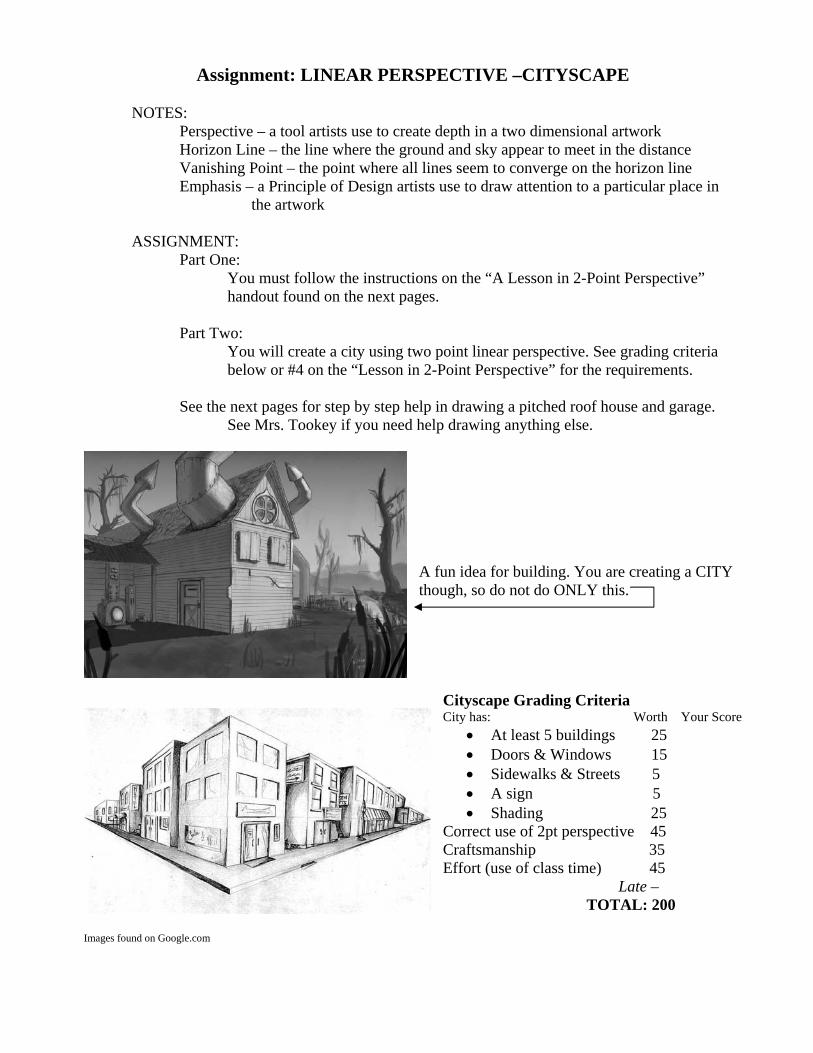
See Mrs. Tookey if you need help drawing anything else. A fun idea for building. You are creating a CITY though, so do not do ONLY this.
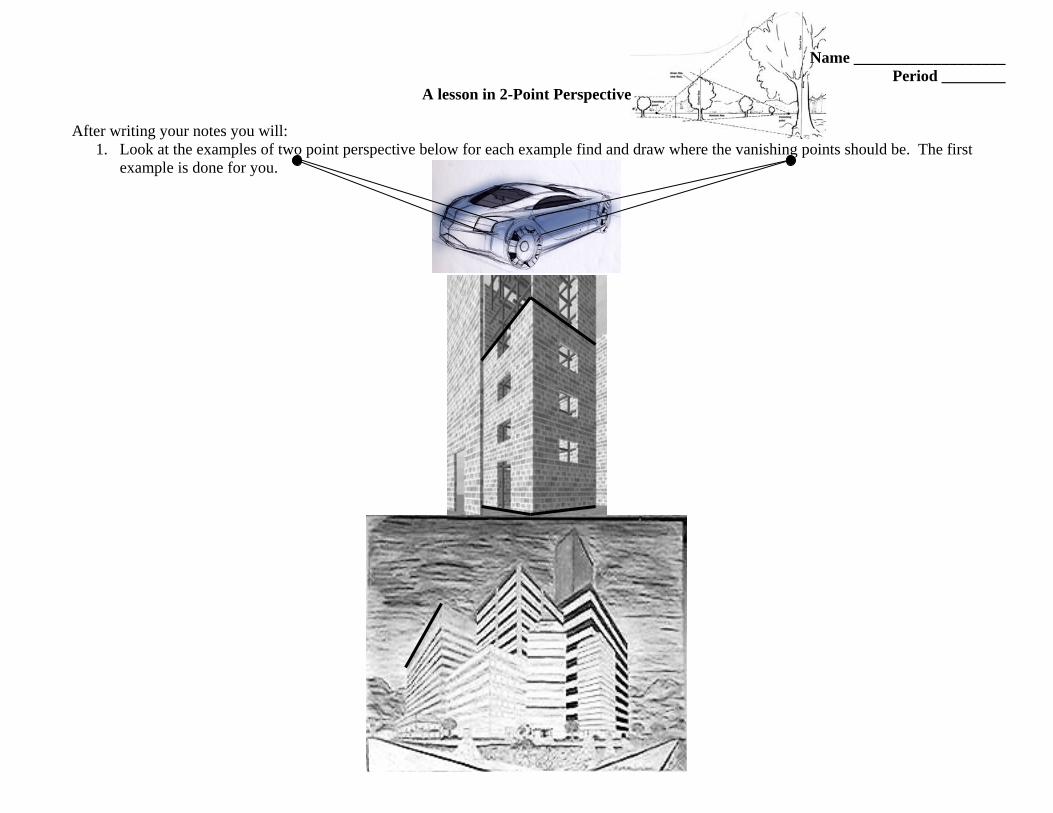
Cityscape Grading Criteria City has: Worth Your Score
At least 5 buildings 25 Doors & Windows 15 Sidewalks & Streets 5 A sign 5 Shading 25
Correct use of 2pt perspective 45 Craftsmanship 35 Effort (use of class time) 45 Late – TOTAL: 200
Images found on Google.com
Name ___________________ Period ________
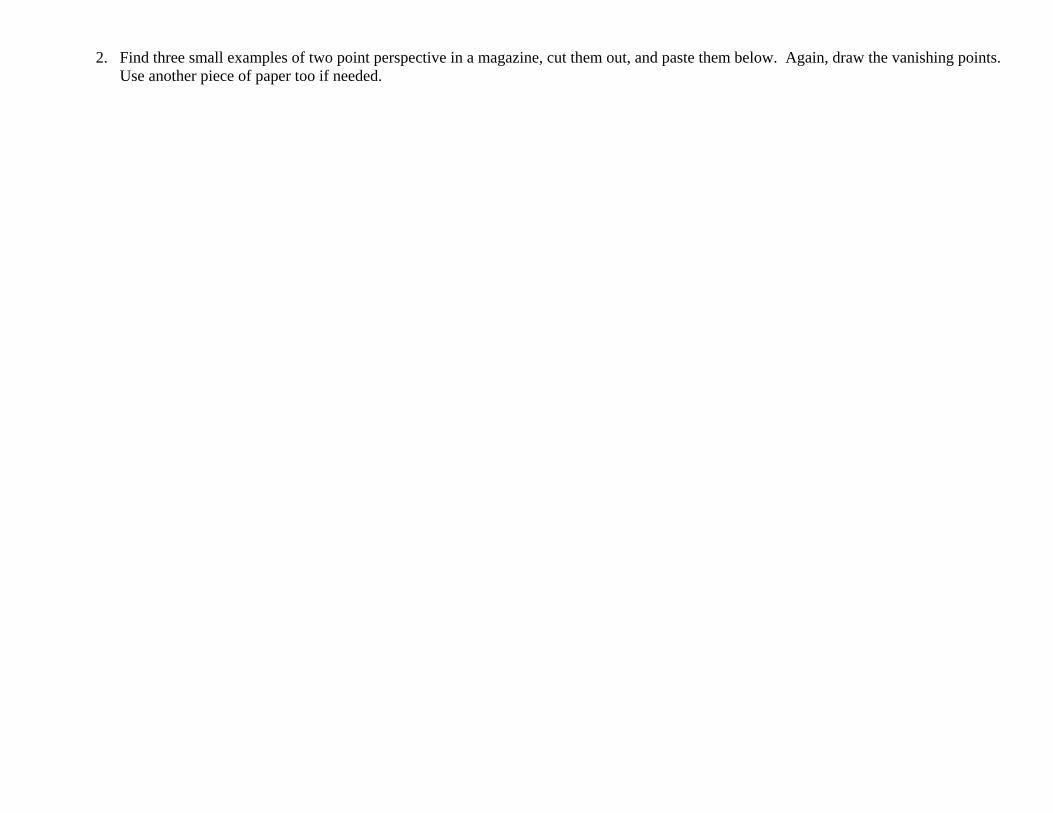
A lesson in 2-Point Perspective
After writing your notes you will: 1. Look at the examples of two point perspective below for each example find and draw where the vanishing points should be. The first
example is done for you.
2. Find three small examples of two point perspective in a magazine, cut them out, and paste them below. Again, draw the vanishing points. Use another piece of paper too if needed.
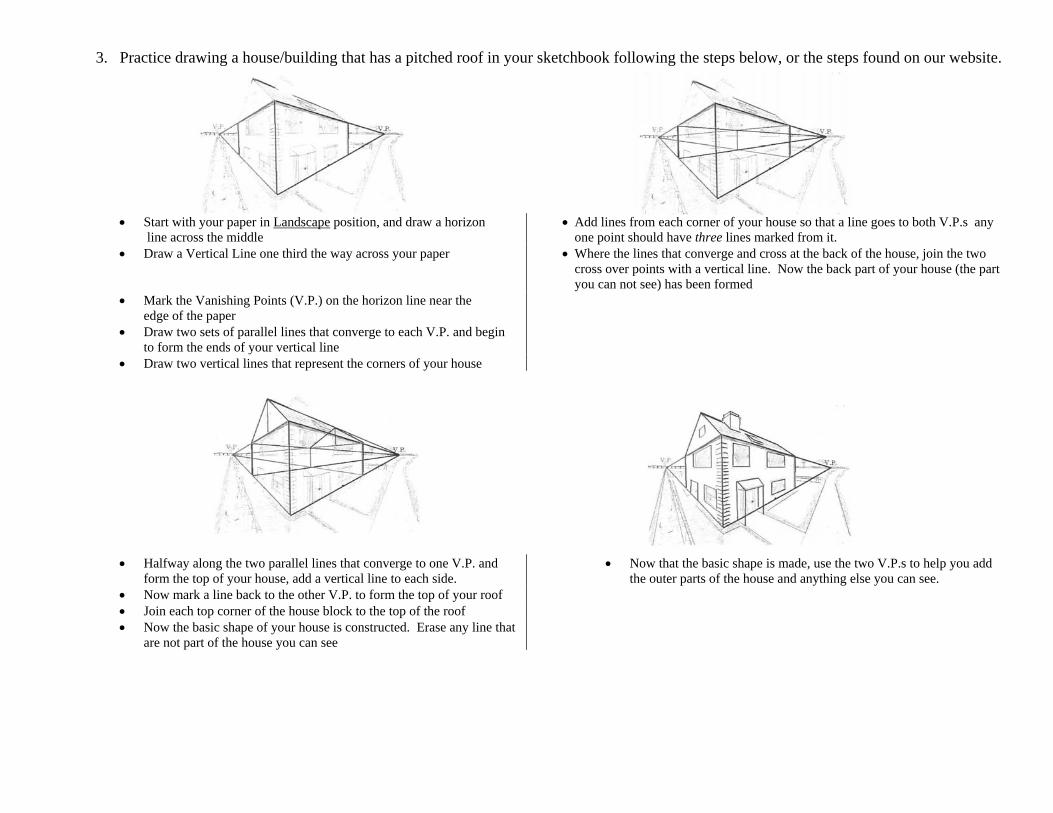
3. Practice drawing a house/building that has a pitched roof in your sketchbook following the steps below, or the steps found on our website.
Start with your paper in Landscape position, and draw a horizon line across the middle
Add lines from each corner of your house so that a line goes to both V.P.s any one point should have three lines marked from it.
Draw a Vertical Line one third the way across your paper Where the lines that converge and cross at the back of the house, join the two cross over points with a vertical line. Now the back part of your house (the part you can not see) has been formed
Mark the Vanishing Points (V.P.) on the horizon line near the edge of the paper
Draw two sets of parallel lines that converge to each V.P. and begin to form the ends of your vertical line
Draw two vertical lines that represent the corners of your house
Halfway along the two parallel lines that converge to one V.P. and form the top of your house, add a vertical line to each side.
Now that the basic shape is made, use the two V.P.s to help you add the outer parts of the house and anything else you can see.
Now mark a line back to the other V.P. to form the top of your roof Join each top corner of the house block to the top of the roof Now the basic shape of your house is constructed. Erase any line that
are not part of the house you can see
4. Now you will plan a cityscape. Your city must have at least five buildings with windows, doors, signs on at least one (a store or billboard), a sidewalk and streets. Draw a rough draft below. You will draw your final draft in your sketchbook.
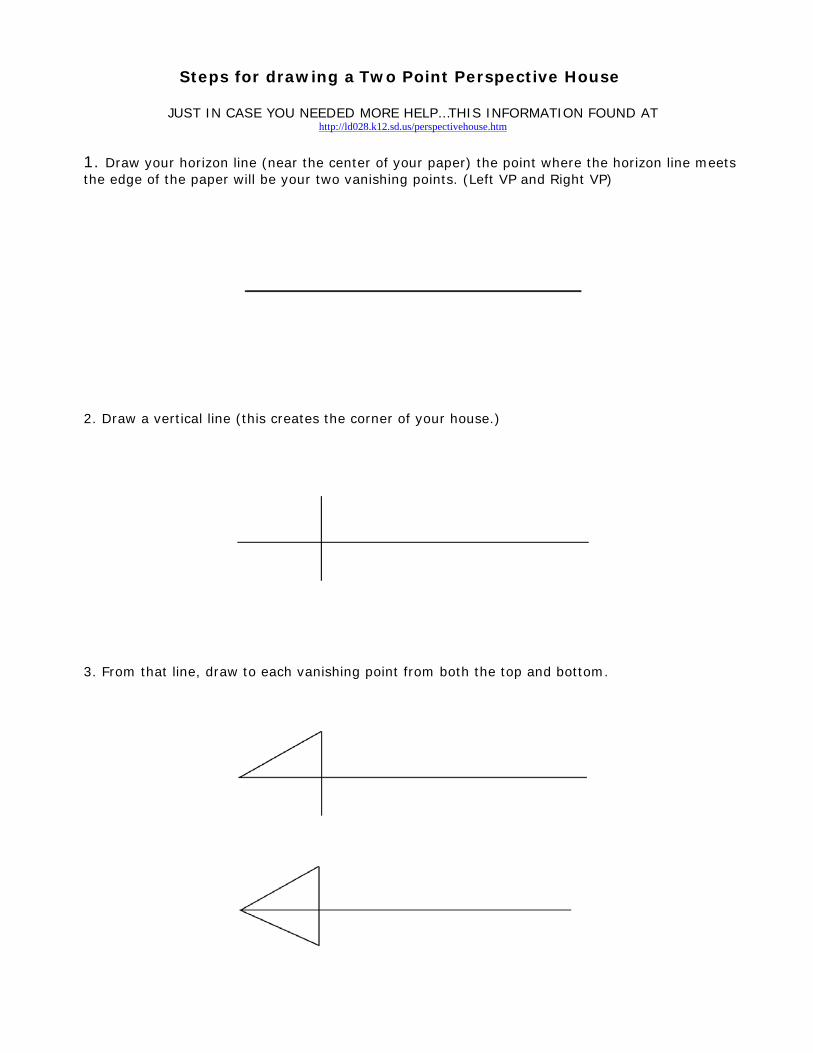
Steps for drawing a Two Point Perspective House
JUST IN CASE YOU NEEDED MORE HELP…THIS INFORMATION FOUND AT http://ld028.k12.sd.us/perspectivehouse.htm
1. Draw your horizon line (near the center of your paper) the point where the horizon line meets the edge of the paper will be your two vanishing points. (Left VP and Right VP)
2. Draw a vertical line (this creates the corner of your house.)
3. From that line, draw to each vanishing point from both the top and bottom.
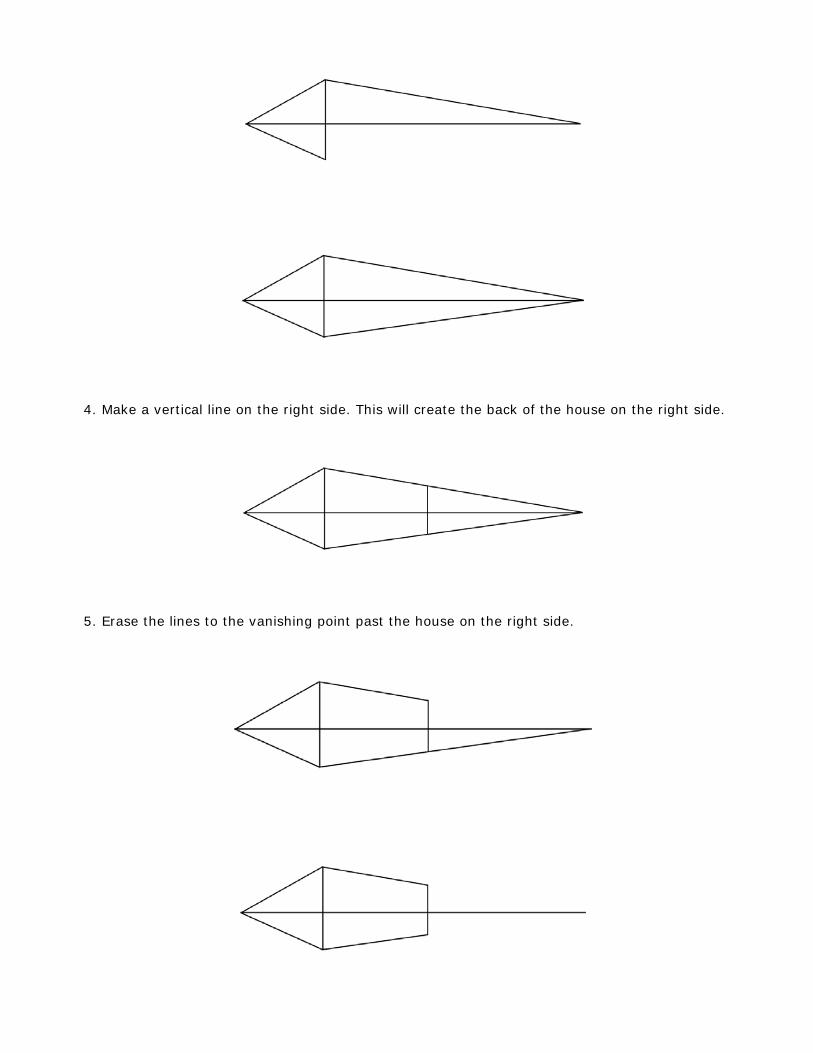
4. Make a vertical line on the right side. This will create the back of the house on the right side.
5. Erase the lines to the vanishing point past the house on the right side.
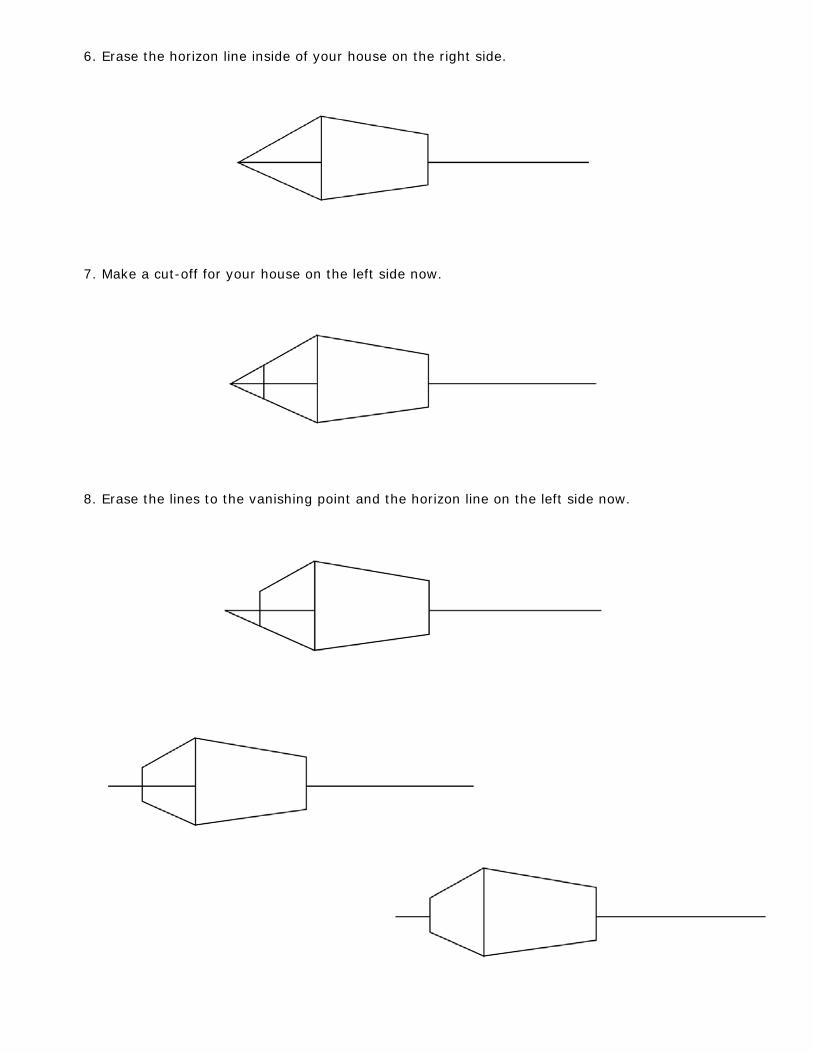
6. Erase the horizon line inside of your house on the right side.
7. Make a cut-off for your house on the left side now.
8. Erase the lines to the vanishing point and the horizon line on the left side now.
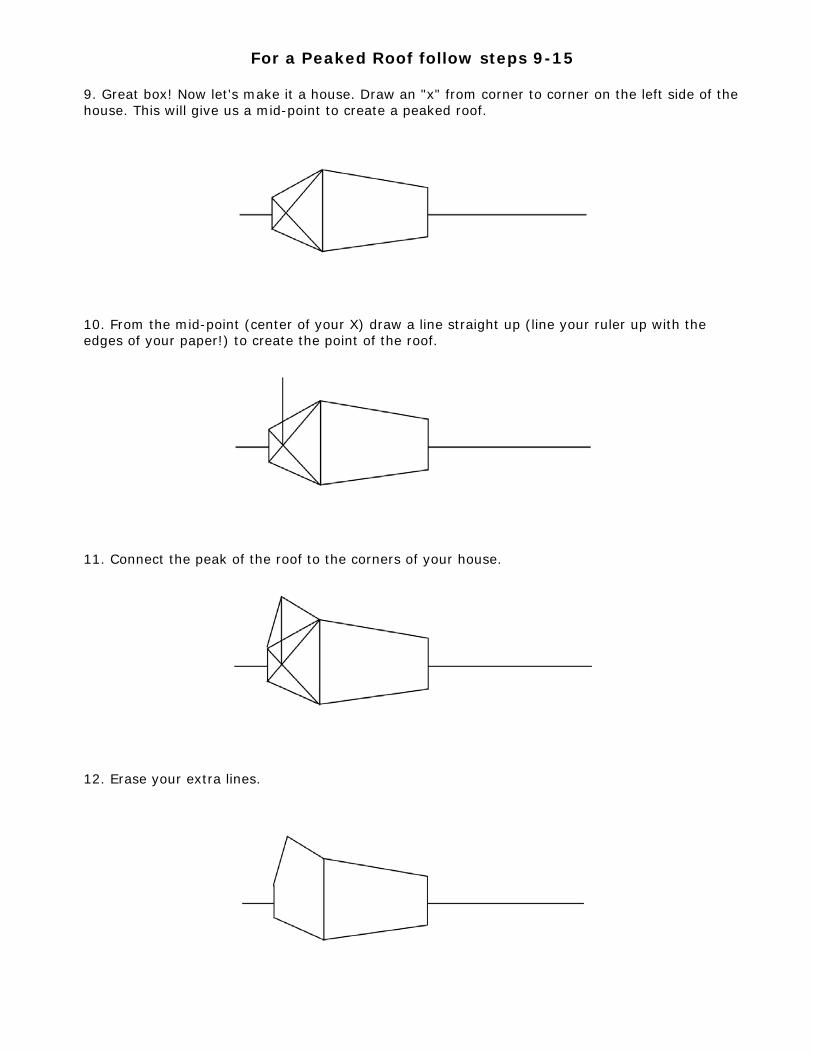
For a Peaked Roof follow steps 9-15
9. Great box! Now let's make it a house. Draw an "x" from corner to corner on the left side of the house. This will give us a mid-point to create a peaked roof.
10. From the mid-point (center of your X) draw a line straight up (line your ruler up with the edges of your paper!) to create the point of the roof.
11. Connect the peak of the roof to the corners of your house.
12. Erase your extra lines.
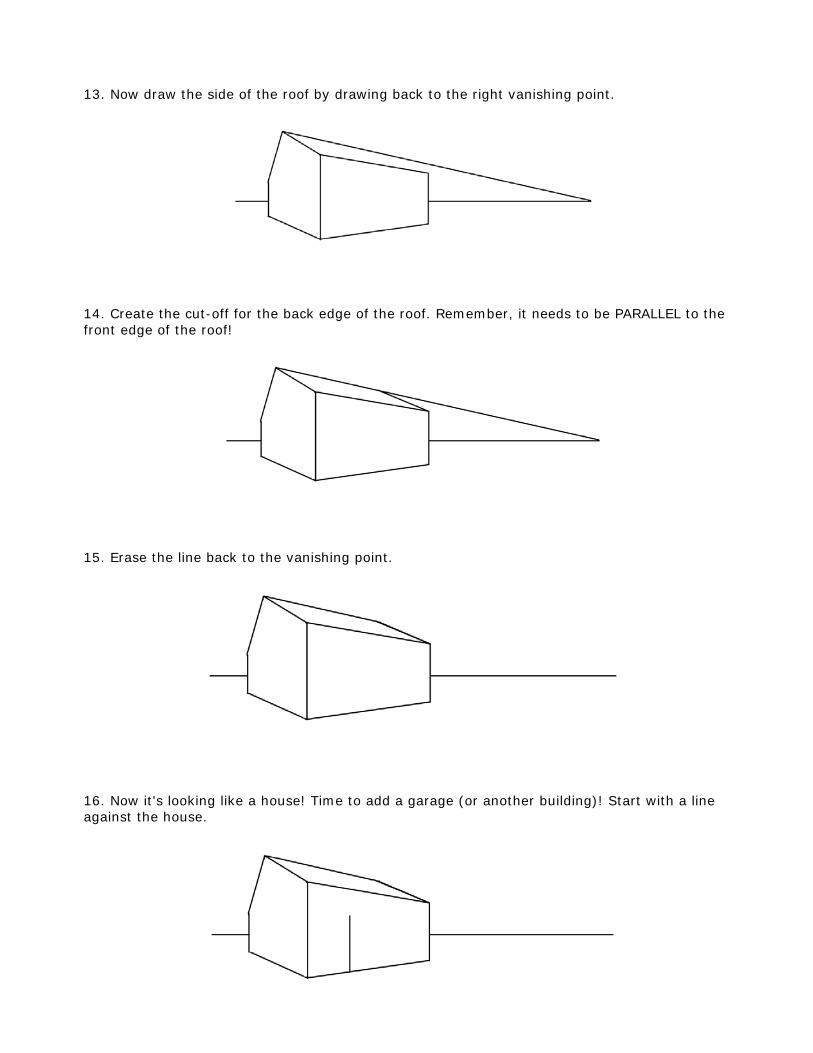
13. Now draw the side of the roof by drawing back to the right vanishing point.
14. Create the cut-off for the back edge of the roof. Remember, it needs to be PARALLEL to the front edge of the roof!
15. Erase the line back to the vanishing point.
16. Now it's looking like a house! Time to add a garage (or another building)! Start with a line against the house.

16. Draw from the top of our new garage line to the left vanishing point.
17. Now do the same for the bottom.
18. Draw a cut-off for the front of the garage.
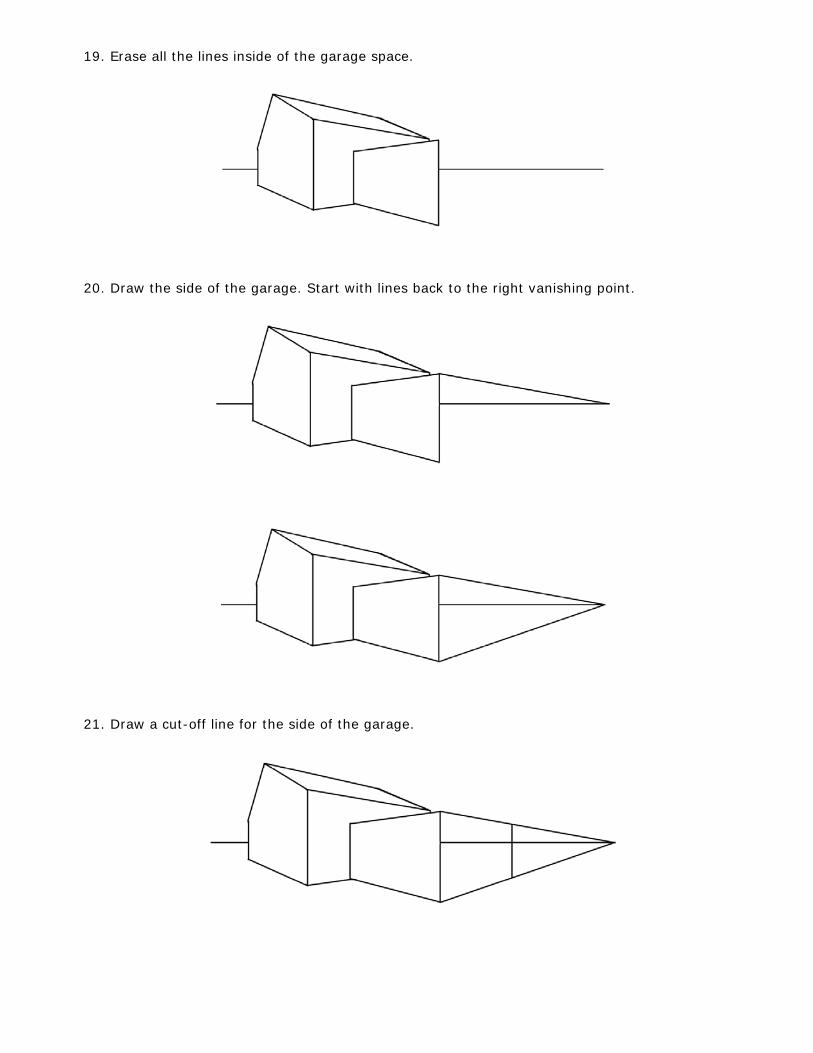
19. Erase all the lines inside of the garage space.
20. Draw the side of the garage. Start with lines back to the right vanishing point.
21. Draw a cut-off line for the side of the garage.
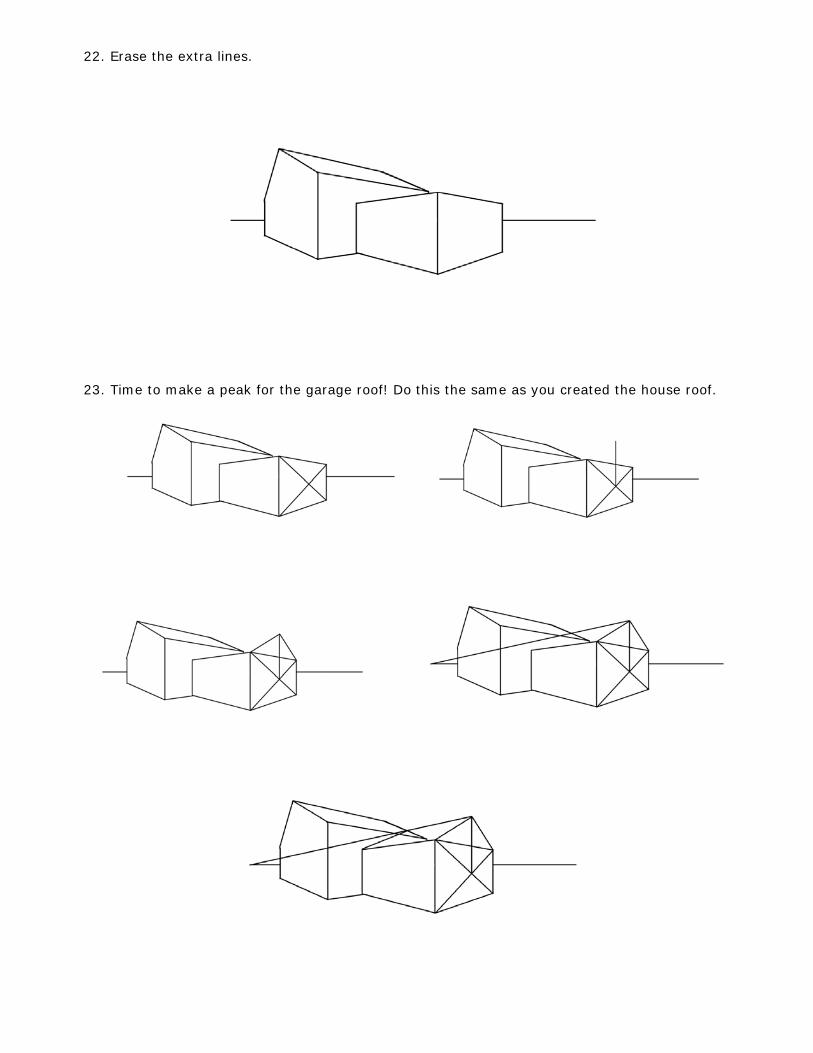
22. Erase the extra lines.
23. Time to make a peak for the garage roof! Do this the same as you created the house roof.
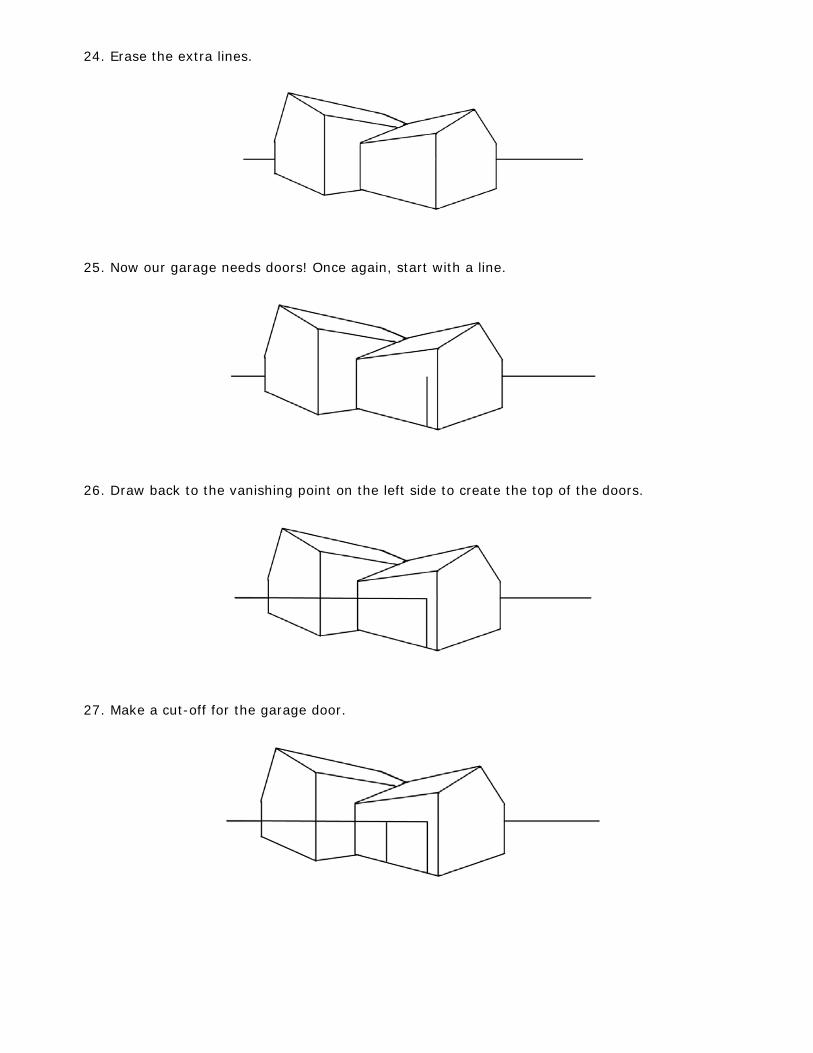
24. Erase the extra lines.
25. Now our garage needs doors! Once again, start with a line.
26. Draw back to the vanishing point on the left side to create the top of the doors.
27. Make a cut-off for the garage door.
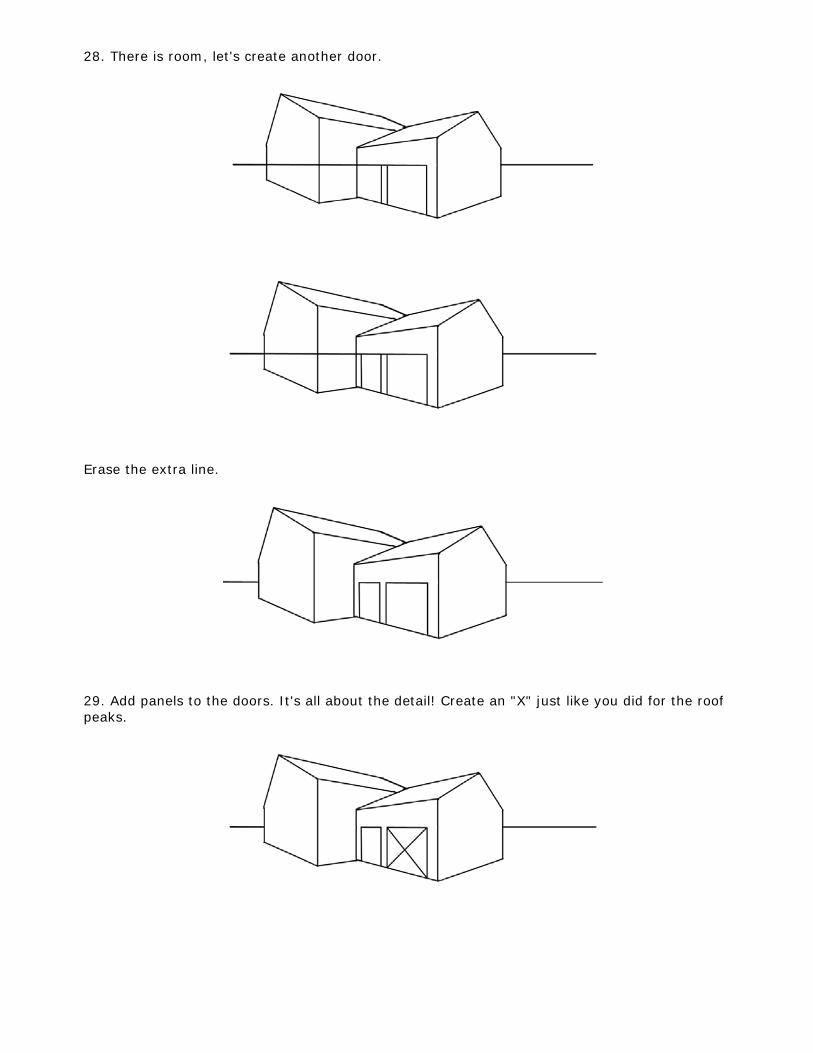
28. There is room, let's create another door.
Erase the extra line.
29. Add panels to the doors. It's all about the detail! Create an "X" just like you did for the roof peaks.
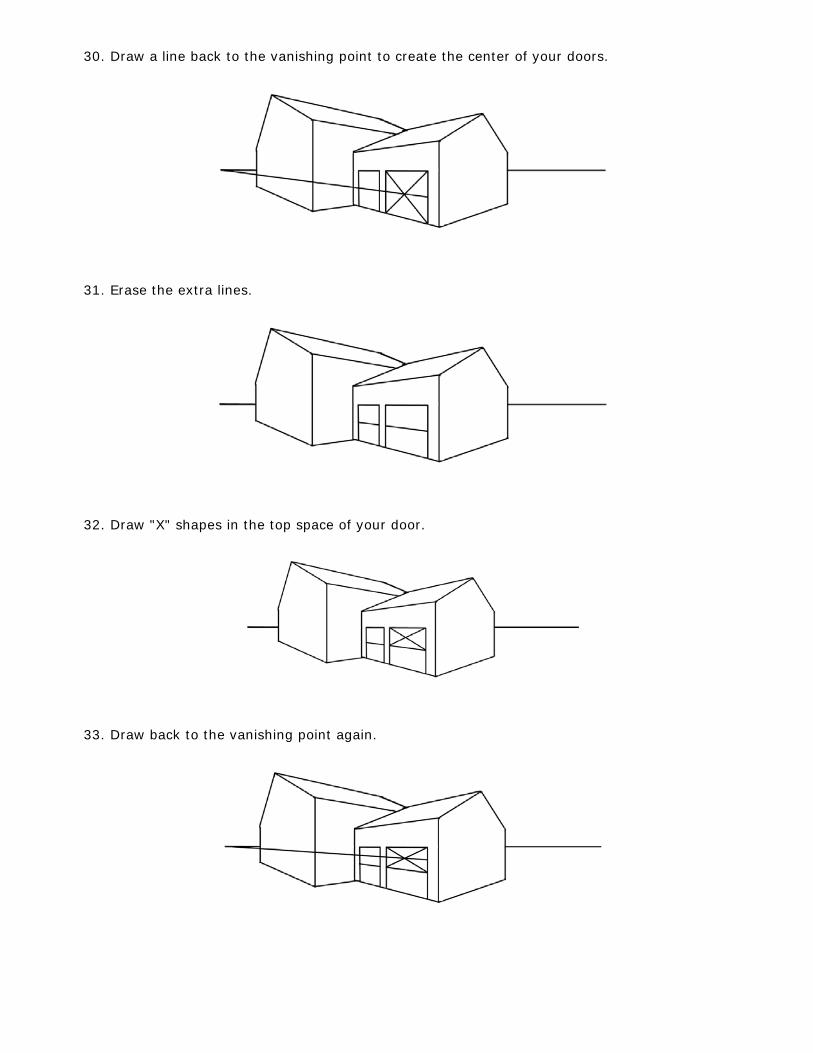
30. Draw a line back to the vanishing point to create the center of your doors.
31. Erase the extra lines.
32. Draw "X" shapes in the top space of your door.
33. Draw back to the vanishing point again.
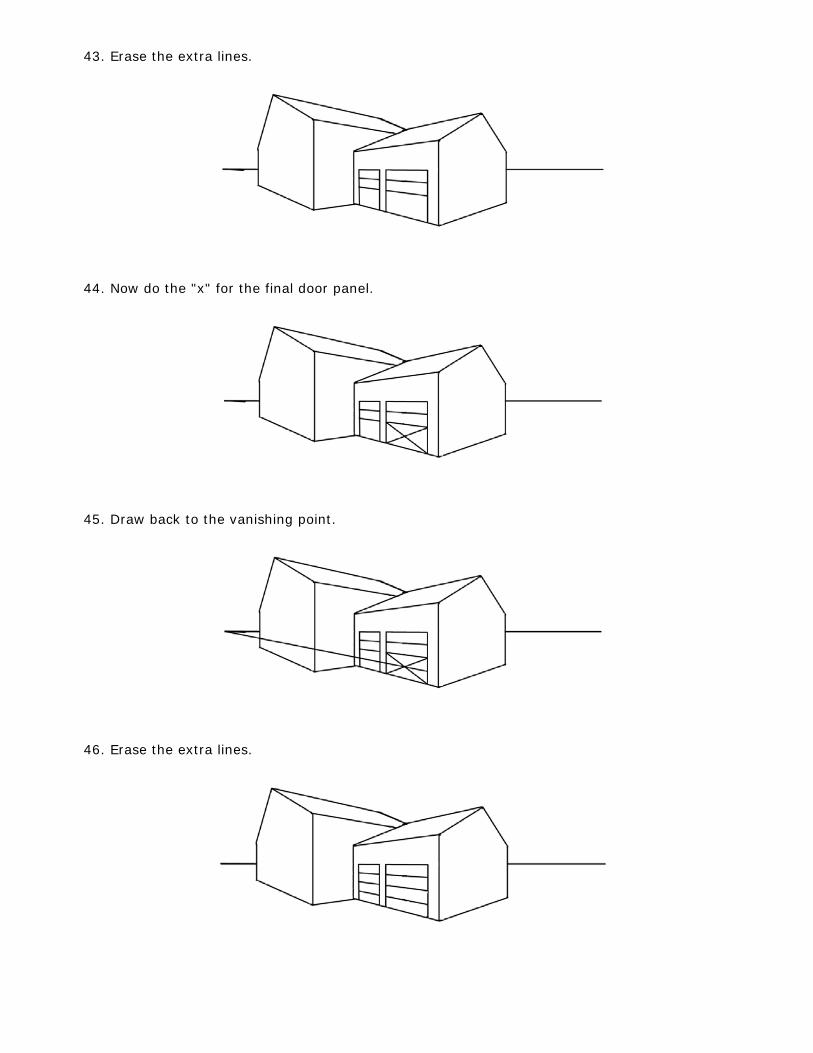
43. Erase the extra lines.
44. Now do the "x" for the final door panel.
45. Draw back to the vanishing point.
46. Erase the extra lines.
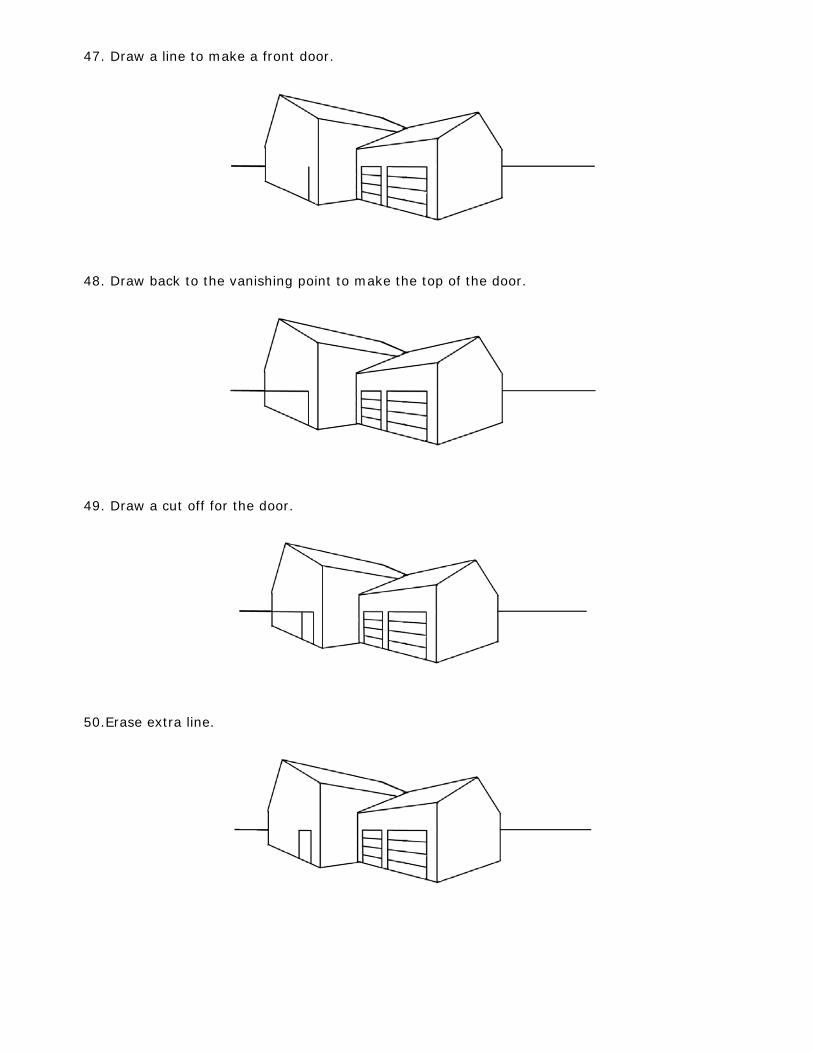
47. Draw a line to make a front door.
48. Draw back to the vanishing point to make the top of the door.
49. Draw a cut off for the door.
50.Erase extra line.
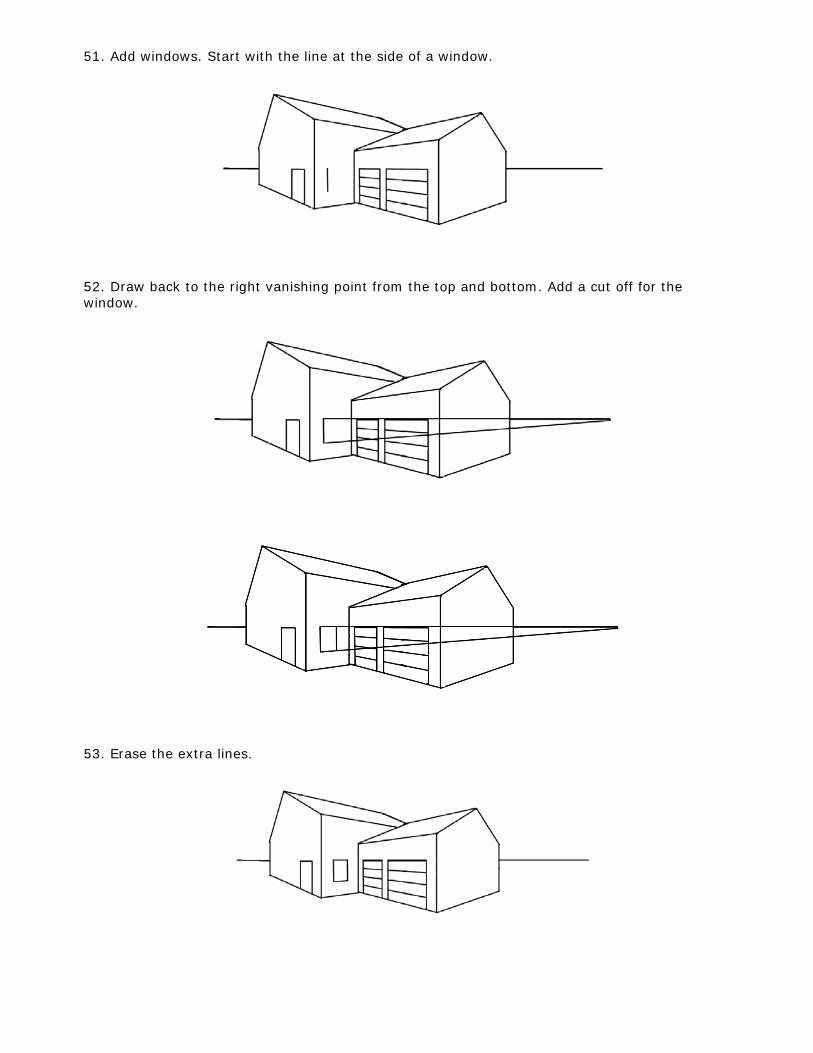
51. Add windows. Start with the line at the side of a window.
52. Draw back to the right vanishing point from the top and bottom. Add a cut off for the window.
53. Erase the extra lines.
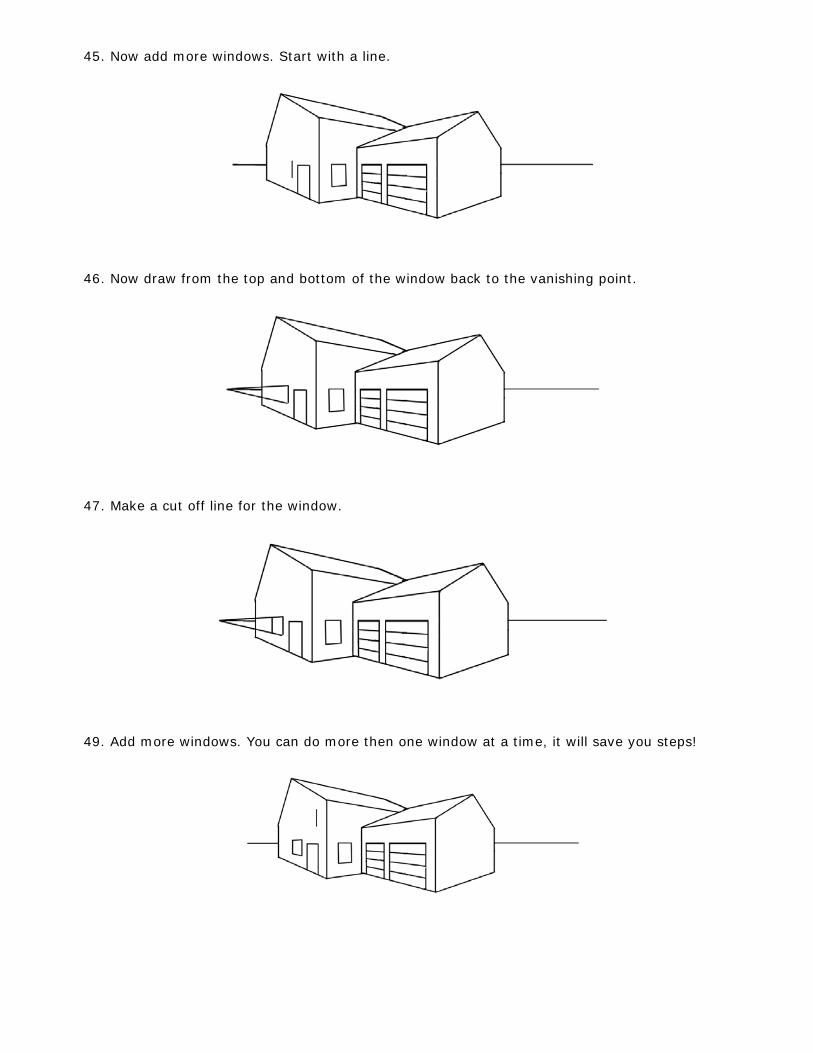
45. Now add more windows. Start with a line.
46. Now draw from the top and bottom of the window back to the vanishing point.
47. Make a cut off line for the window.
49. Add more windows. You can do more then one window at a time, it will save you steps!
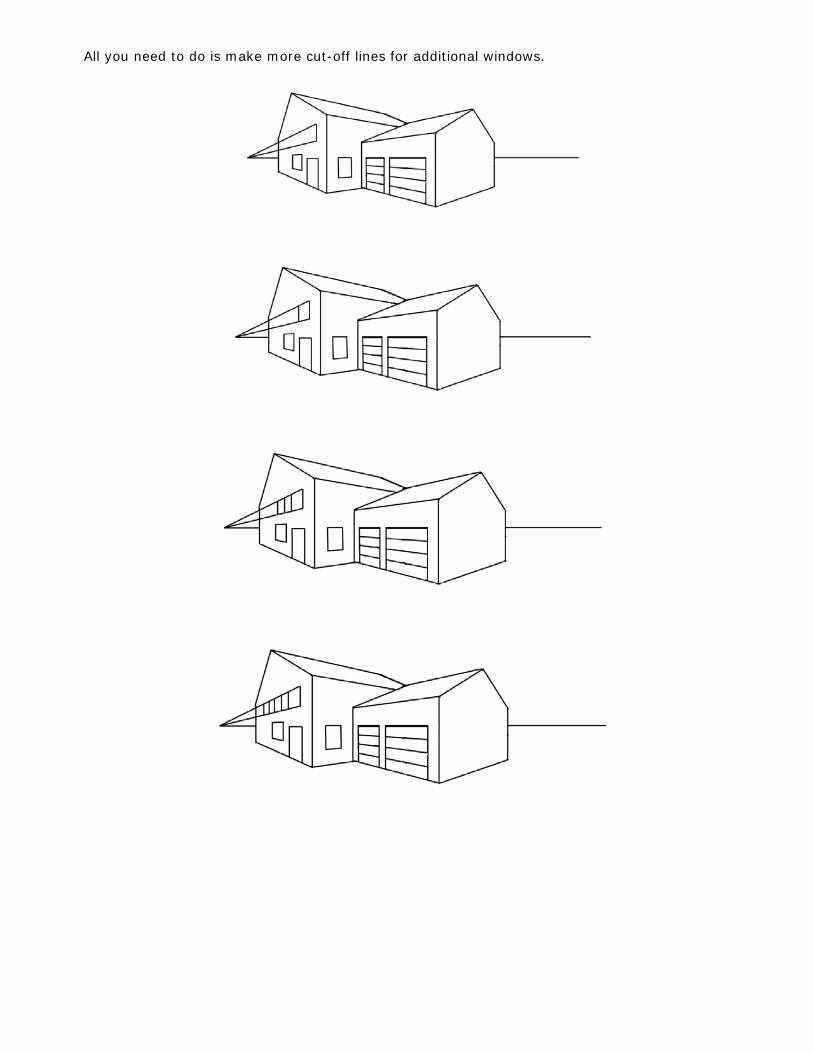
All you need to do is make more cut-off lines for additional windows.
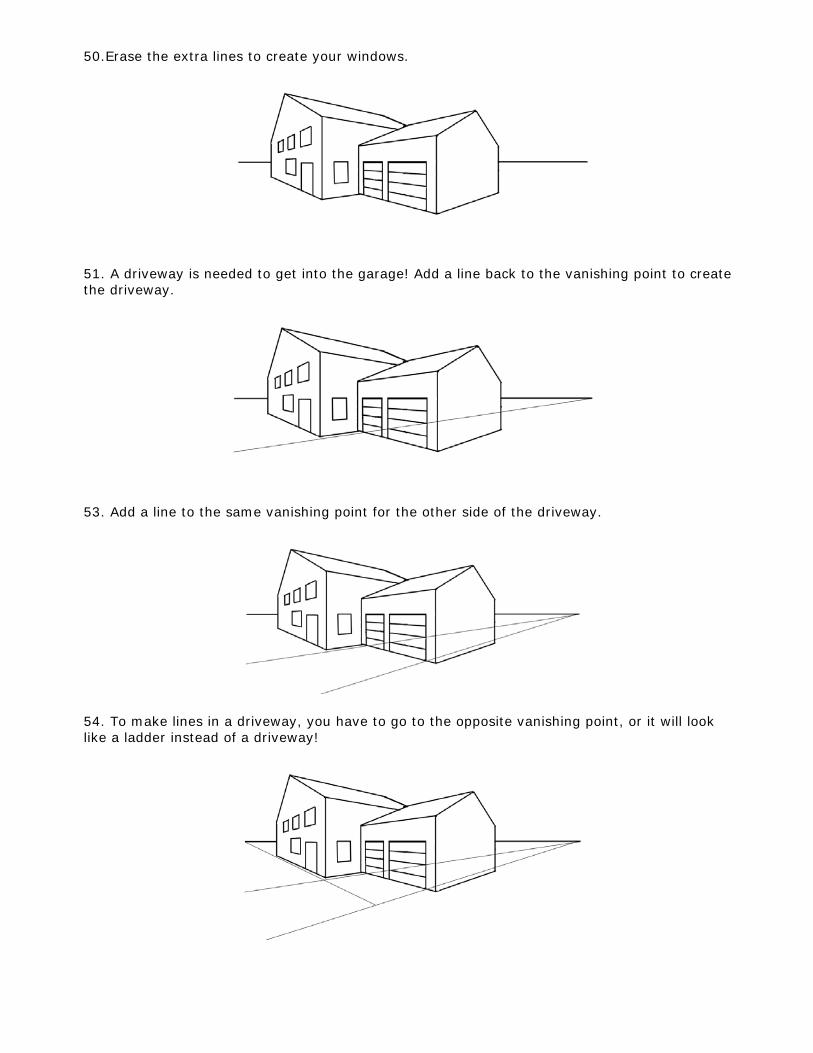
50.Erase the extra lines to create your windows.
51. A driveway is needed to get into the garage! Add a line back to the vanishing point to create the driveway.
53. Add a line to the same vanishing point for the other side of the driveway.
54. To make lines in a driveway, you have to go to the opposite vanishing point, or it will look like a ladder instead of a driveway!
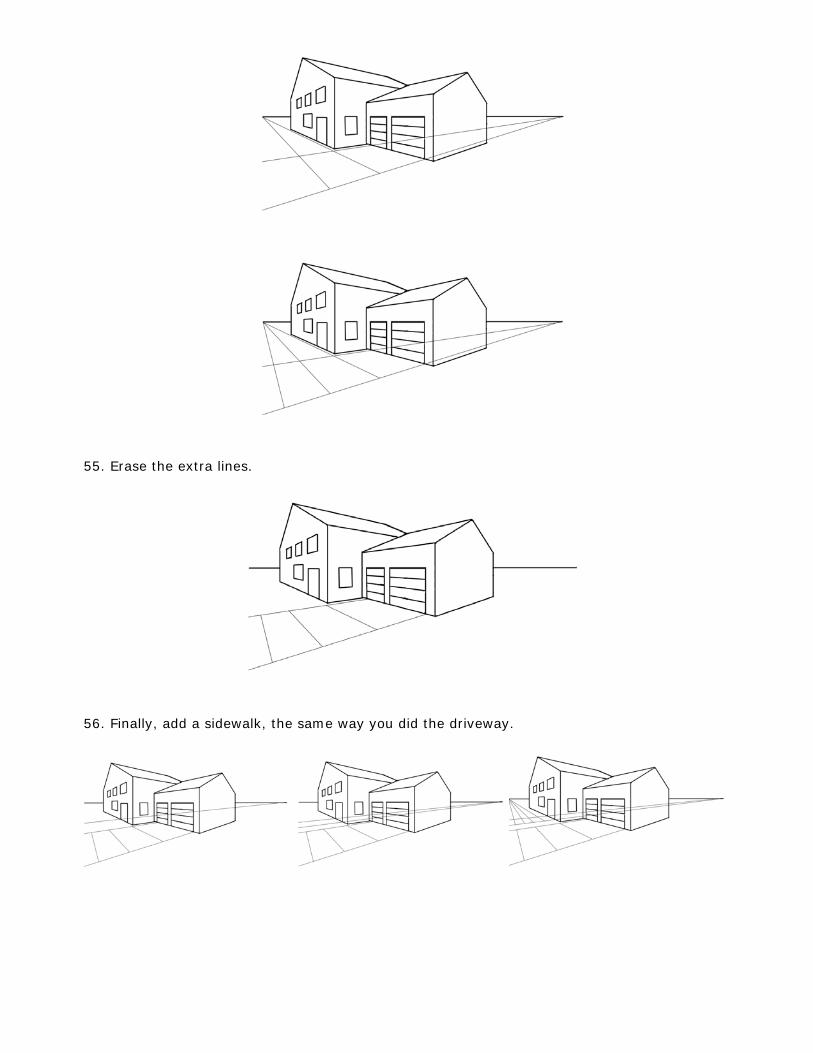
55. Erase the extra lines.
56. Finally, add a sidewalk, the same way you did the driveway.
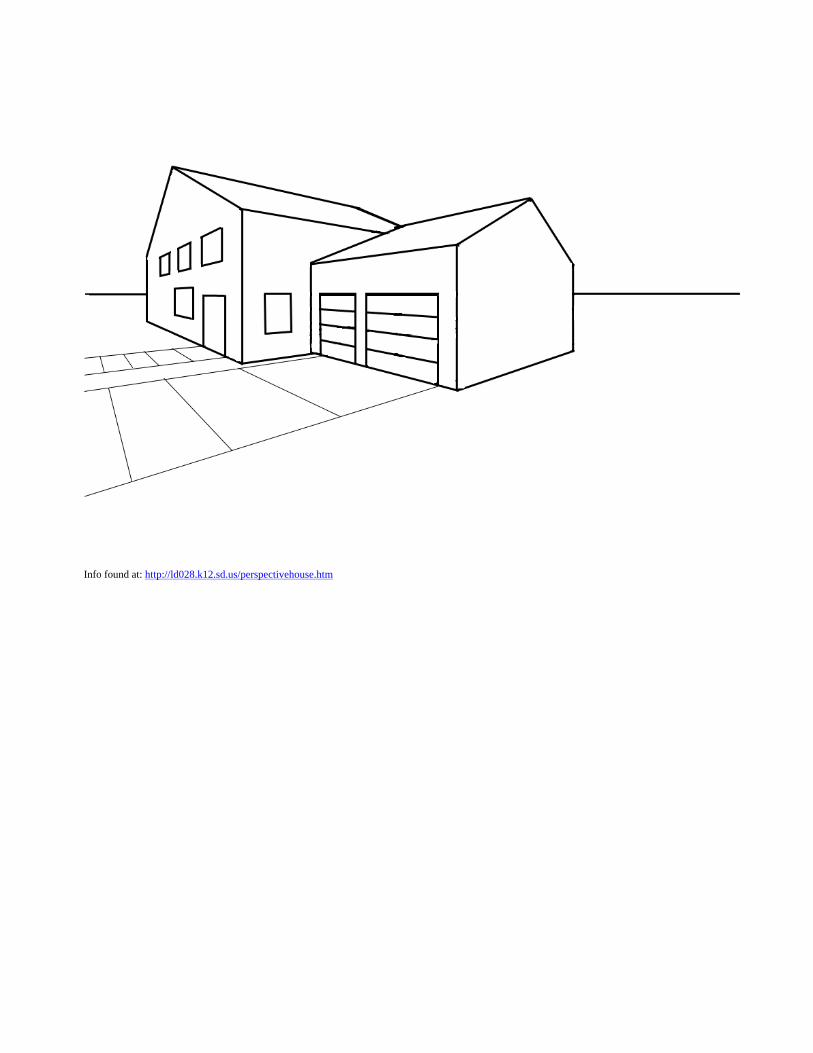
Info found at: http://ld028.k12.sd.us/perspectivehouse.htm


