601: Mobilizing your enterprise apps with the Citrix Mobile SDK for Windows apps Hands-on Lab Exercise Guide Make money selling Field Services Stop by the Education and Consulting booths in the Solutions Expo to find out how! We're here to help.
| 1 |
Contents Contents .................................................................................................................................... 1
Overview .................................................................................................................................... 2
Scenario..................................................................................................................................... 5
Exercise 1 .................................................................................................................................. 6
Introducing the Citrix Mobile SDK for Windows Apps ................................................................. 6
Exercise 2 .................................................................................................................................30
Integrating with Mobile Device Capabilities ...............................................................................30
Exercise 3 .................................................................................................................................54
Using the XenApp Mobile Console ............................................................................................54
Exercise 4 .................................................................................................................................68
Mobilizing a Legacy Application ................................................................................................68
Exercise 5 ............................................................................................................................... 100
Creating a Mobile Employee “Punch In” App ........................................................................... 100
| 2 |
Overview Hands-on Training Module Objective This training will provide hands-on experience with the Citrix Mobile SDK for Windows Apps.
Prerequisites Required: Working knowledge of Windows Server concepts. Optional: Basic software development skills and a working knowledge of Citrix XenApp 6.5.
Audience Citrix customers and partners looking to securely deliver Windows applications to mobile devices while leveraging local device functionality and providing a great user experience.
| 3 |
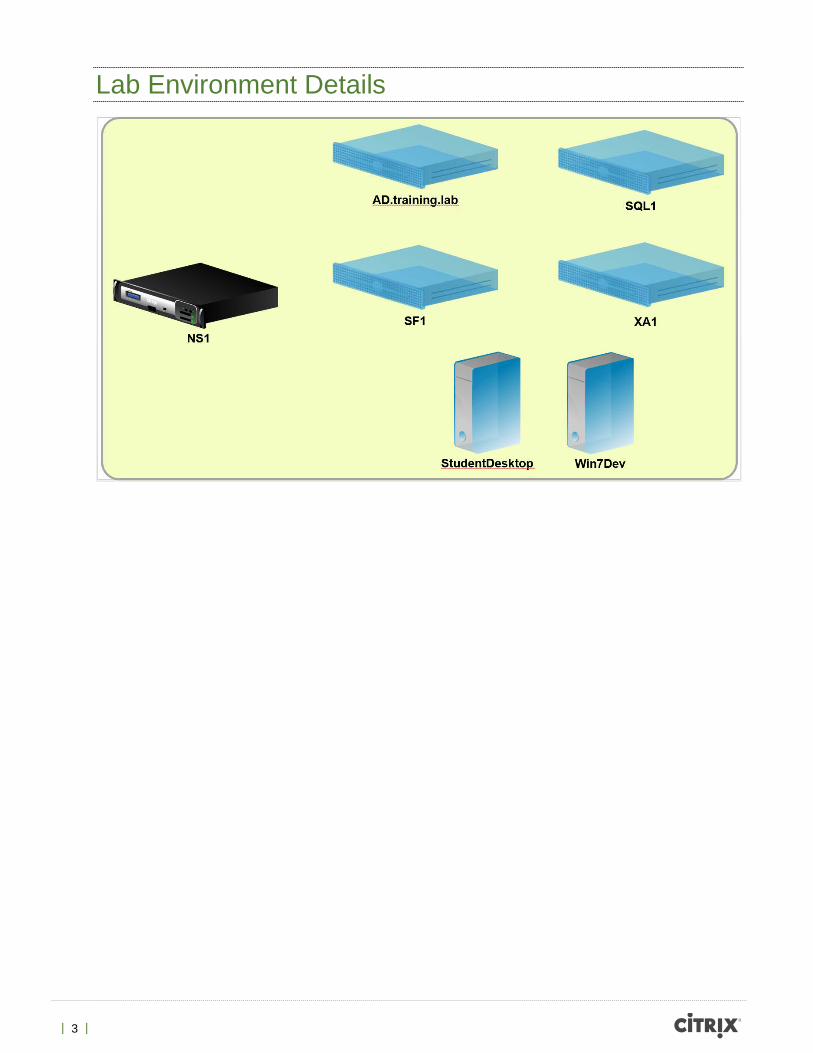
Lab Environment Details
| 4 |
Lab Guide Conventions Indicates particular attention must be paid to this step
Special note to offer advice or background information
reboot Text to enter or select is printed like this
Start Bold text indicates reference to a button or object
Focuses attention on a particular part of the screen (R:255 G:20 B:147)
Shows where to click or select an item on a screenshot (R:255 G:102 B:0)
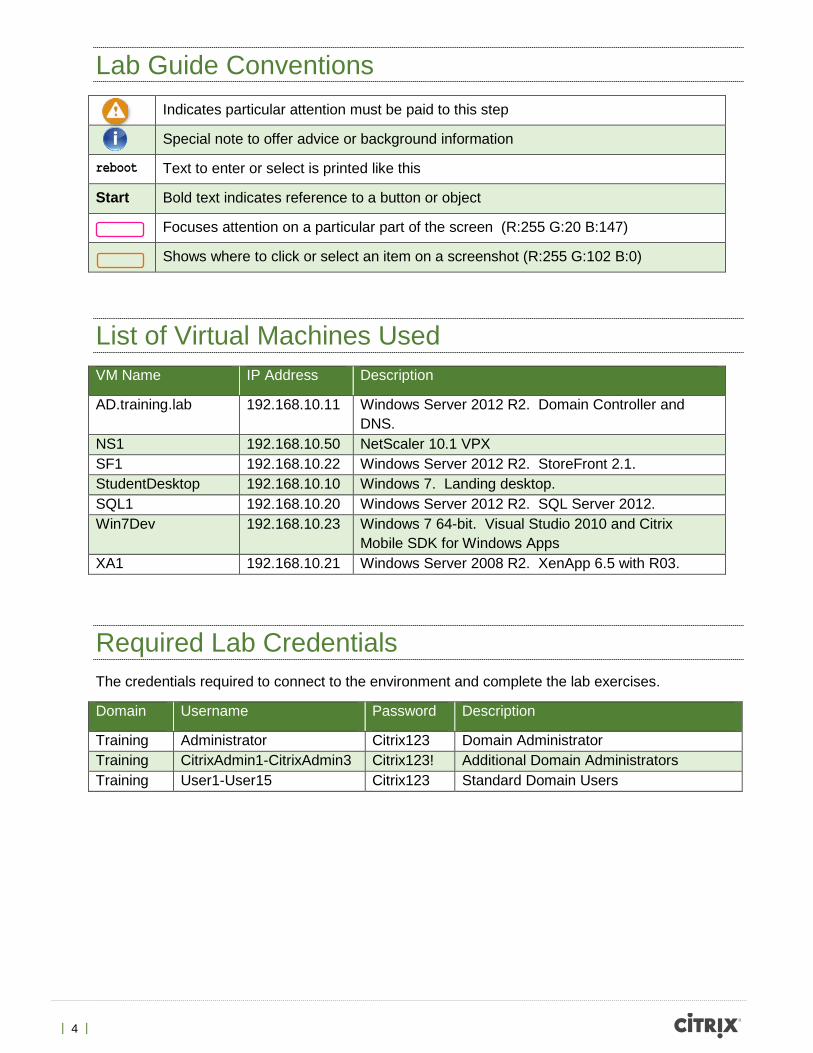
List of Virtual Machines Used VM Name IP Address Description
AD.training.lab 192.168.10.11 Windows Server 2012 R2. Domain Controller and DNS.
NS1 192.168.10.50 NetScaler 10.1 VPX SF1 192.168.10.22 Windows Server 2012 R2. StoreFront 2.1. StudentDesktop 192.168.10.10 Windows 7. Landing desktop. SQL1 192.168.10.20 Windows Server 2012 R2. SQL Server 2012. Win7Dev 192.168.10.23 Windows 7 64-bit. Visual Studio 2010 and Citrix
Mobile SDK for Windows Apps XA1 192.168.10.21 Windows Server 2008 R2. XenApp 6.5 with R03.
Required Lab Credentials The credentials required to connect to the environment and complete the lab exercises.
Domain Username Password Description
Training Administrator Citrix123 Domain Administrator Training CitrixAdmin1-CitrixAdmin3 Citrix123! Additional Domain Administrators Training User1-User15 Citrix123 Standard Domain Users

| 5 |
Scenario You have been assigned the task of mobilizing your company’s Windows applications. Your company already runs XenApp 6.5 to deliver applications to various devices. As project lead, management expects you to assess the feasibility of mobilizing the company’s line-of-business applications delivered through XenApp to meet key requirements. The requirements include use of local GPS and camera capabilities. To start off, you explore the capabilities of the Citrix Mobile SDK for Windows Apps.
| 6 |
Exercise 1 Introducing the Citrix Mobile SDK for Windows Apps Overview In this exercise we will be introduced to the SDK with a simple “Hello World” application. It is based on the blog posts at http://citrixblogger.org/2013/11/22/simple-winforms-hello-world-example/ and http://citrixblogger.org/2013/11/25/mobile-winforms-hello-world/.
Step by step guidance Estimated time to complete this lab: 30 minutes.
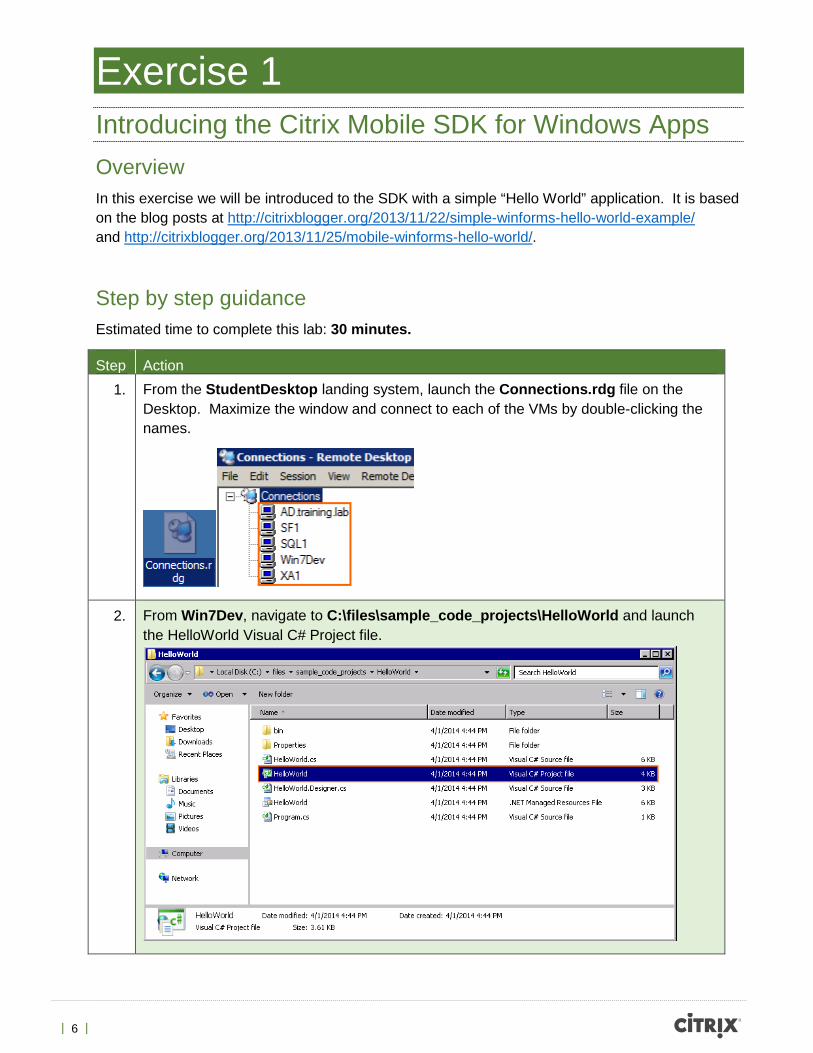
Step Action 1. From the StudentDesktop landing system, launch the Connections.rdg file on the
Desktop. Maximize the window and connect to each of the VMs by double-clicking the names.
2. From Win7Dev, navigate to C:\files\sample_code_projects\HelloWorld and launch the HelloWorld Visual C# Project file.
| 7 |
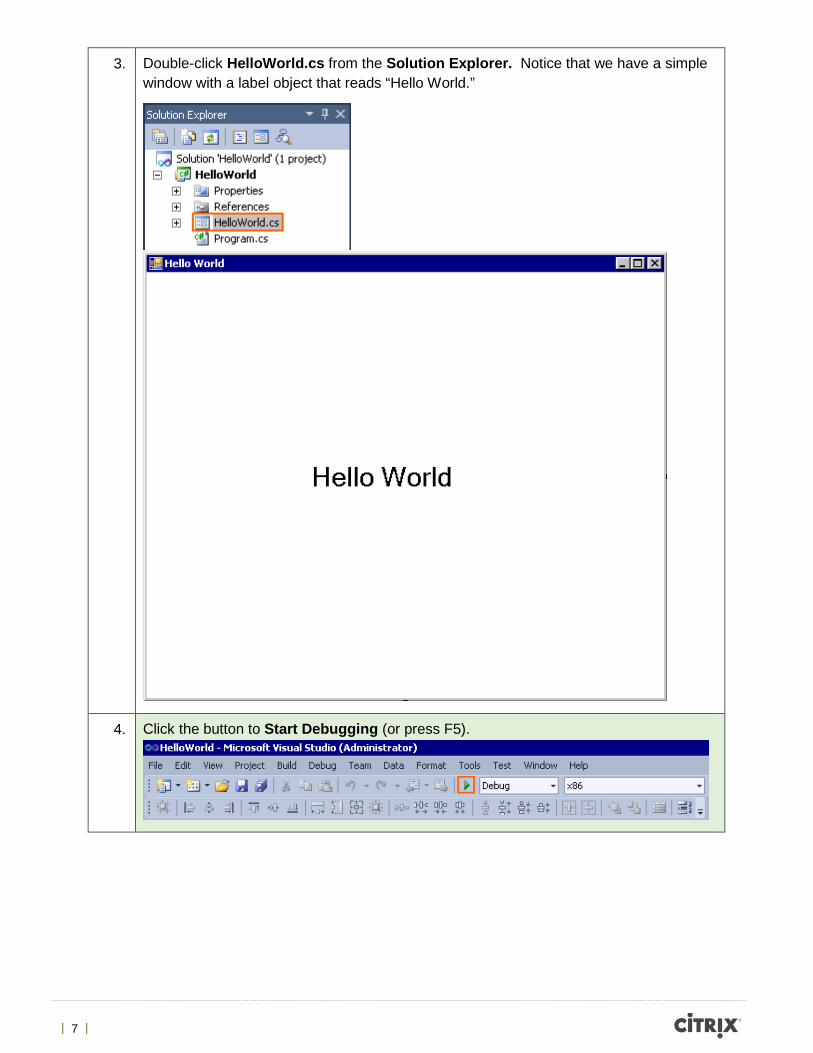
3. Double-click HelloWorld.cs from the Solution Explorer. Notice that we have a simple window with a label object that reads “Hello World.”
4. Click the button to Start Debugging (or press F5).
| 8 |
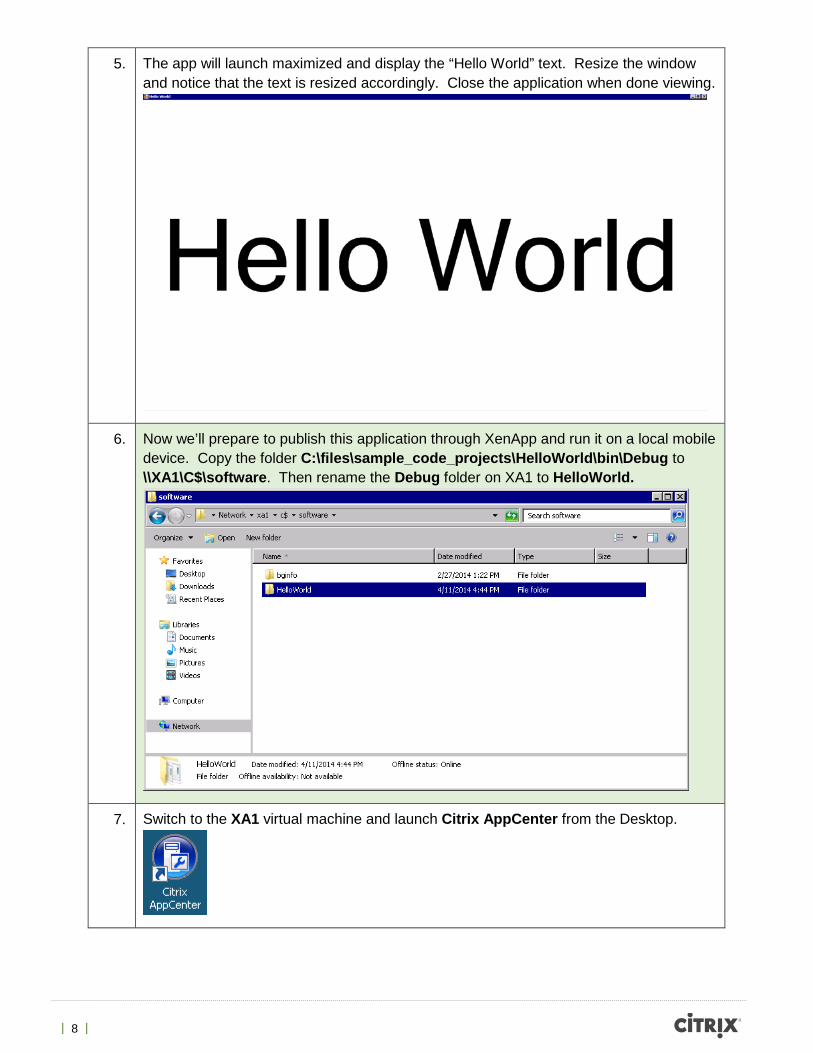
5. The app will launch maximized and display the “Hello World” text. Resize the window and notice that the text is resized accordingly. Close the application when done viewing.
6. Now we’ll prepare to publish this application through XenApp and run it on a local mobile device. Copy the folder C:\files\sample_code_projects\HelloWorld\bin\Debug to \\XA1\C$\software. Then rename the Debug folder on XA1 to HelloWorld.
7. Switch to the XA1 virtual machine and launch Citrix AppCenter from the Desktop.
| 9 |
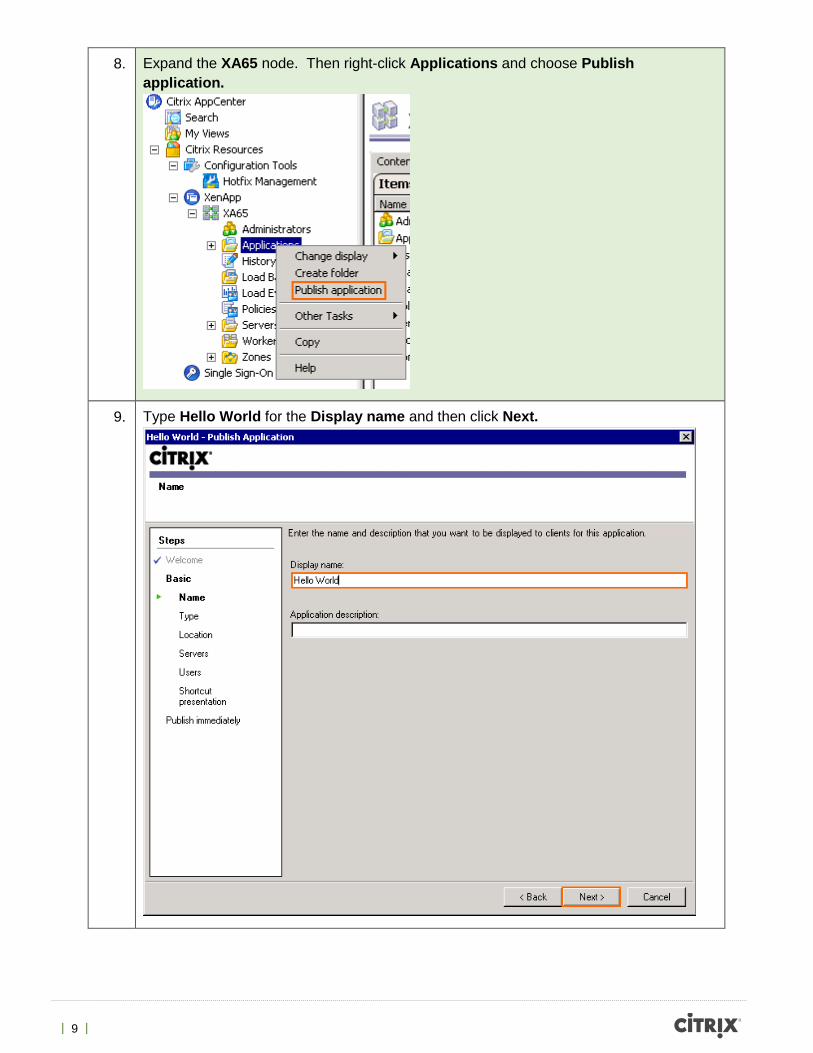
8. Expand the XA65 node. Then right-click Applications and choose Publish application.
9. Type Hello World for the Display name and then click Next.

| 10 |
10. Click Next on the Type screen.
| 11 |
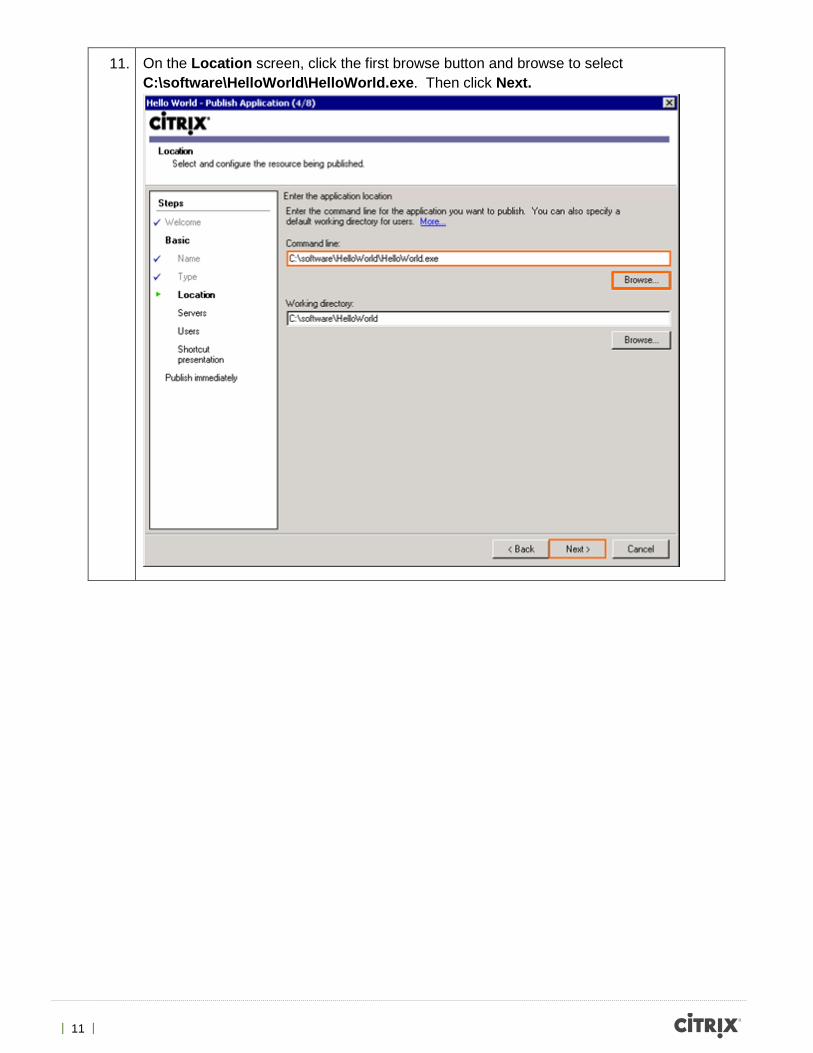
11. On the Location screen, click the first browse button and browse to select C:\software\HelloWorld\HelloWorld.exe. Then click Next.
| 12 |
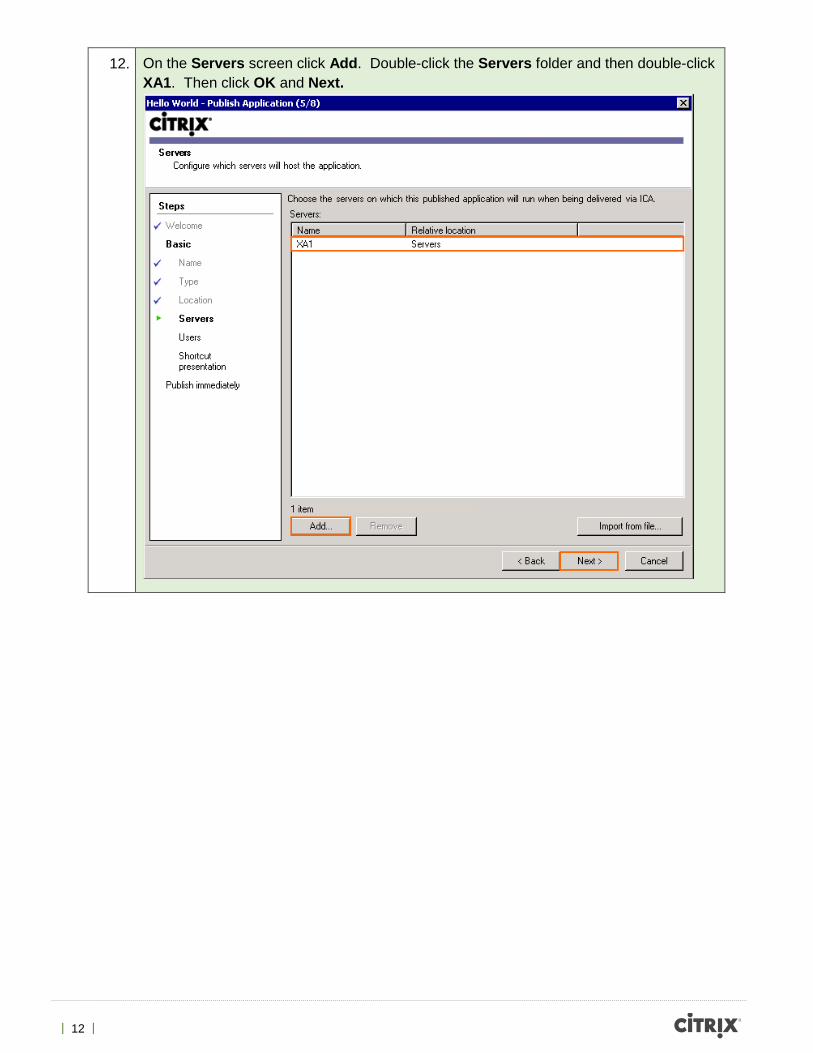
12. On the Servers screen click Add. Double-click the Servers folder and then double-click XA1. Then click OK and Next.
| 13 |
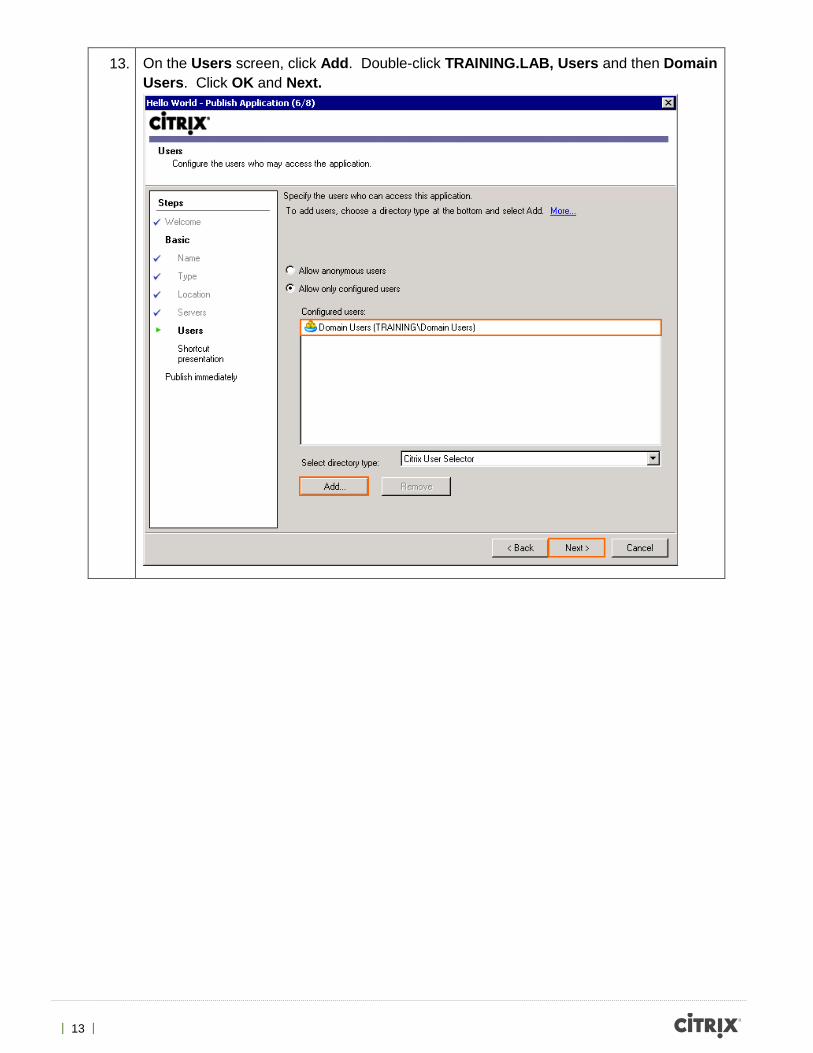
13. On the Users screen, click Add. Double-click TRAINING.LAB, Users and then Domain Users. Click OK and Next.
| 14 |
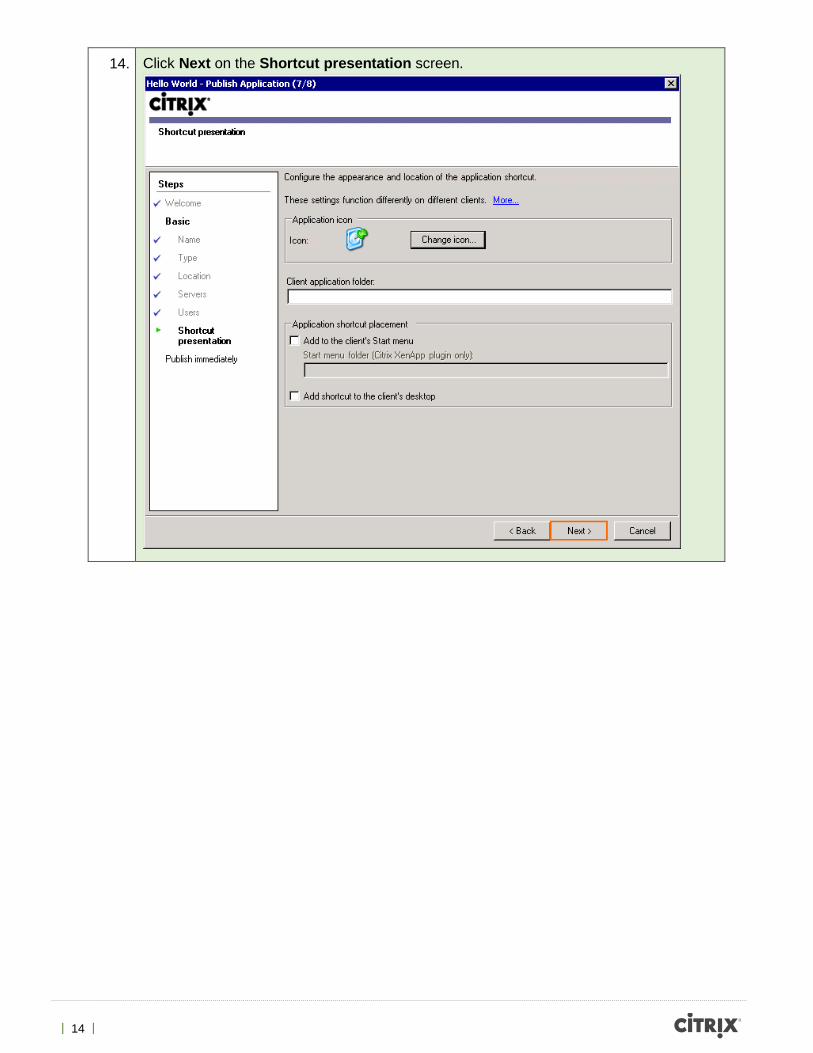
14. Click Next on the Shortcut presentation screen.
| 15 |
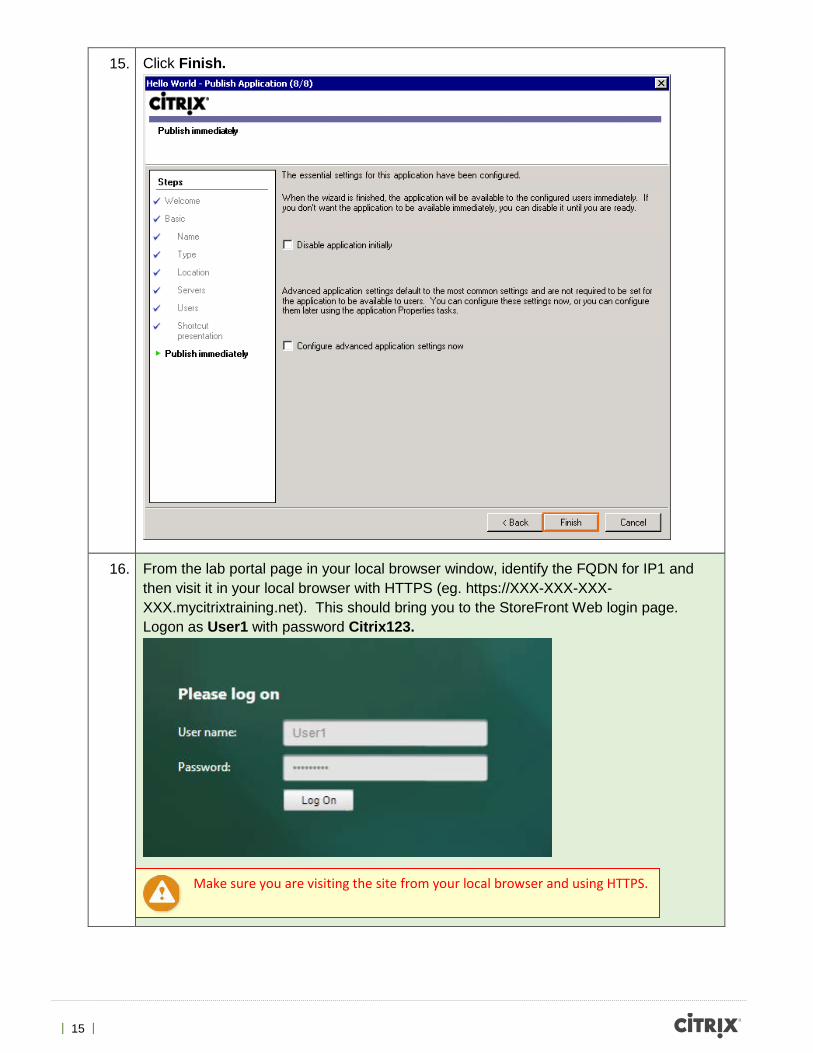
15. Click Finish.
16. From the lab portal page in your local browser window, identify the FQDN for IP1 and then visit it in your local browser with HTTPS (eg. https://XXX-XXX-XXX-XXX.mycitrixtraining.net). This should bring you to the StoreFront Web login page. Logon as User1 with password Citrix123.
Make sure you are visiting the site from your local browser and using HTTPS.
| 16 |
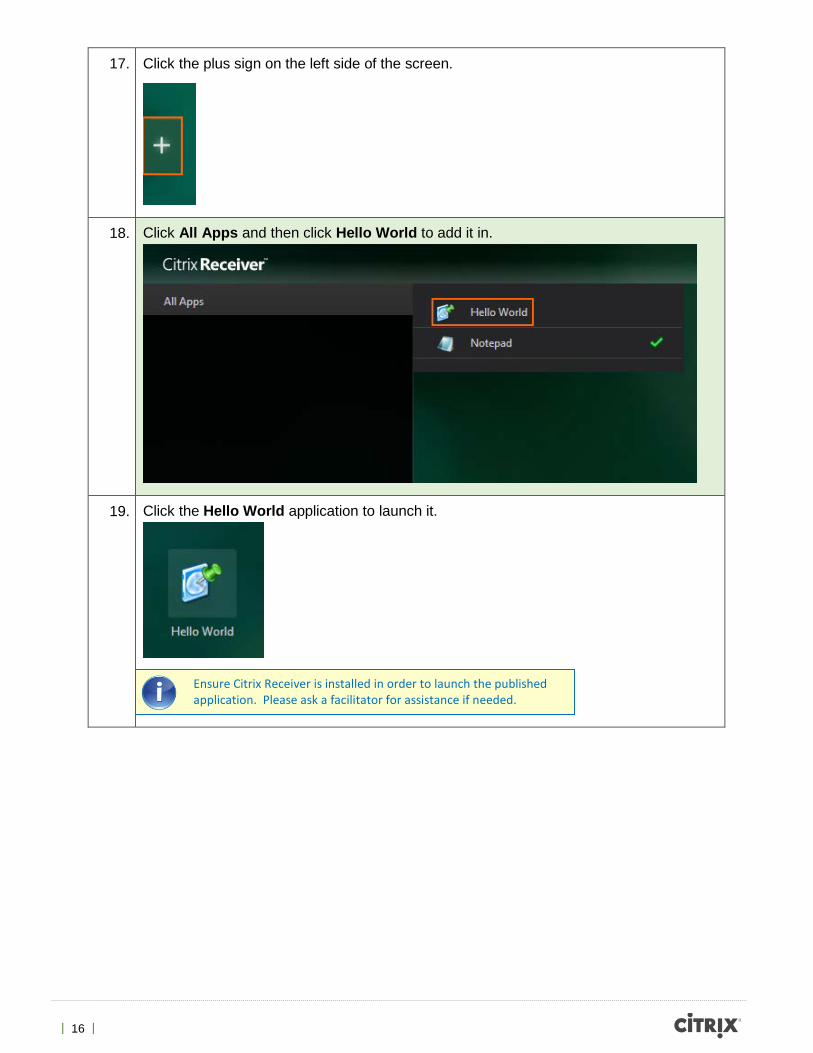
17. Click the plus sign on the left side of the screen.
18. Click All Apps and then click Hello World to add it in.
19. Click the Hello World application to launch it.
Ensure Citrix Receiver is installed in order to launch the published application. Please ask a facilitator for assistance if needed.

| 17 |
20. The application will load. Resize the application in various window sizes and see the results. Close it when done.
One problem with this Hello World sample is that it always shows the standard Windows title bar. When we are delivering apps to mobile devices we want to hide the title bar to make it look as much like a native mobile app as possible. In the next sample you will try this additional capability.
| 18 |
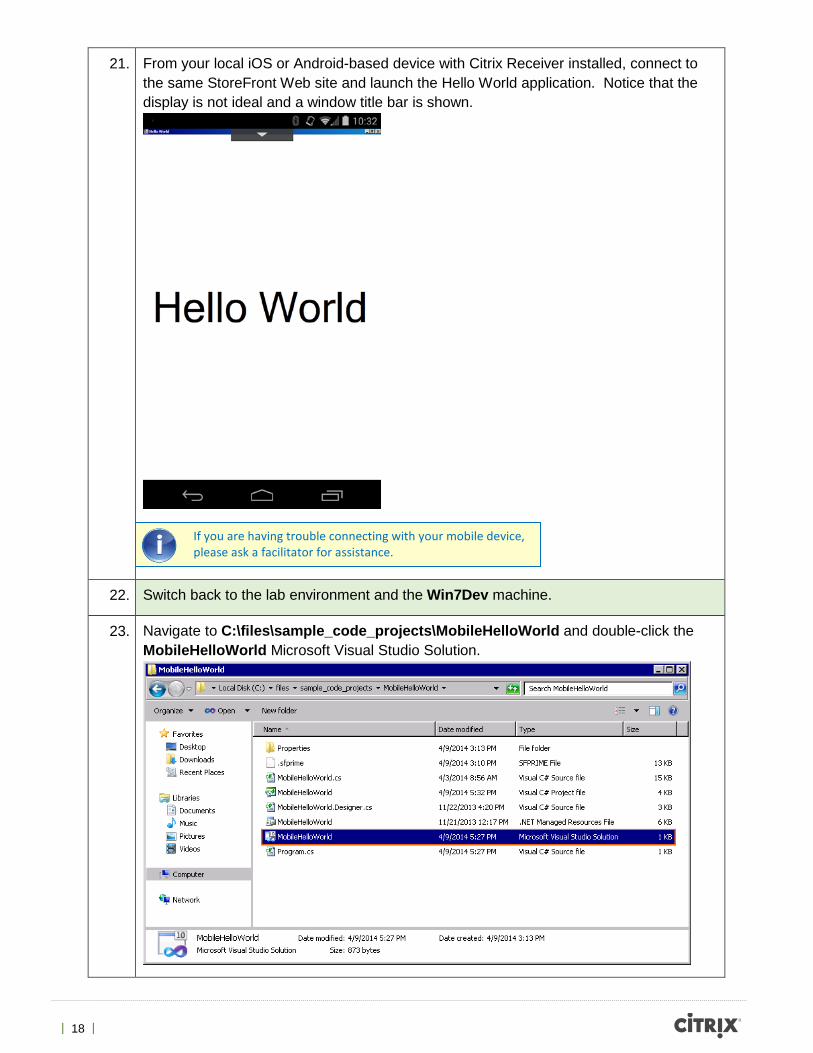
21. From your local iOS or Android-based device with Citrix Receiver installed, connect to the same StoreFront Web site and launch the Hello World application. Notice that the display is not ideal and a window title bar is shown.
22. Switch back to the lab environment and the Win7Dev machine.
23. Navigate to C:\files\sample_code_projects\MobileHelloWorld and double-click the MobileHelloWorld Microsoft Visual Studio Solution.
If you are having trouble connecting with your mobile device, please ask a facilitator for assistance.
| 19 |
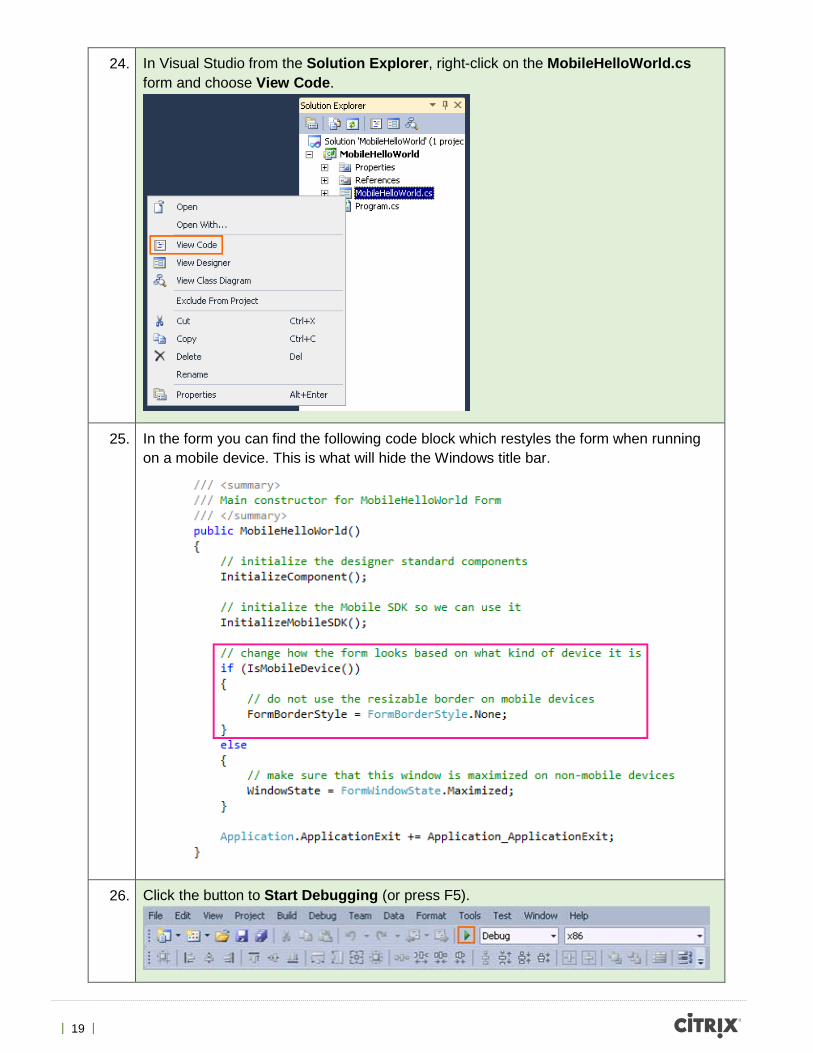
24. In Visual Studio from the Solution Explorer, right-click on the MobileHelloWorld.cs form and choose View Code.
25. In the form you can find the following code block which restyles the form when running on a mobile device. This is what will hide the Windows title bar.
26. Click the button to Start Debugging (or press F5).
| 20 |
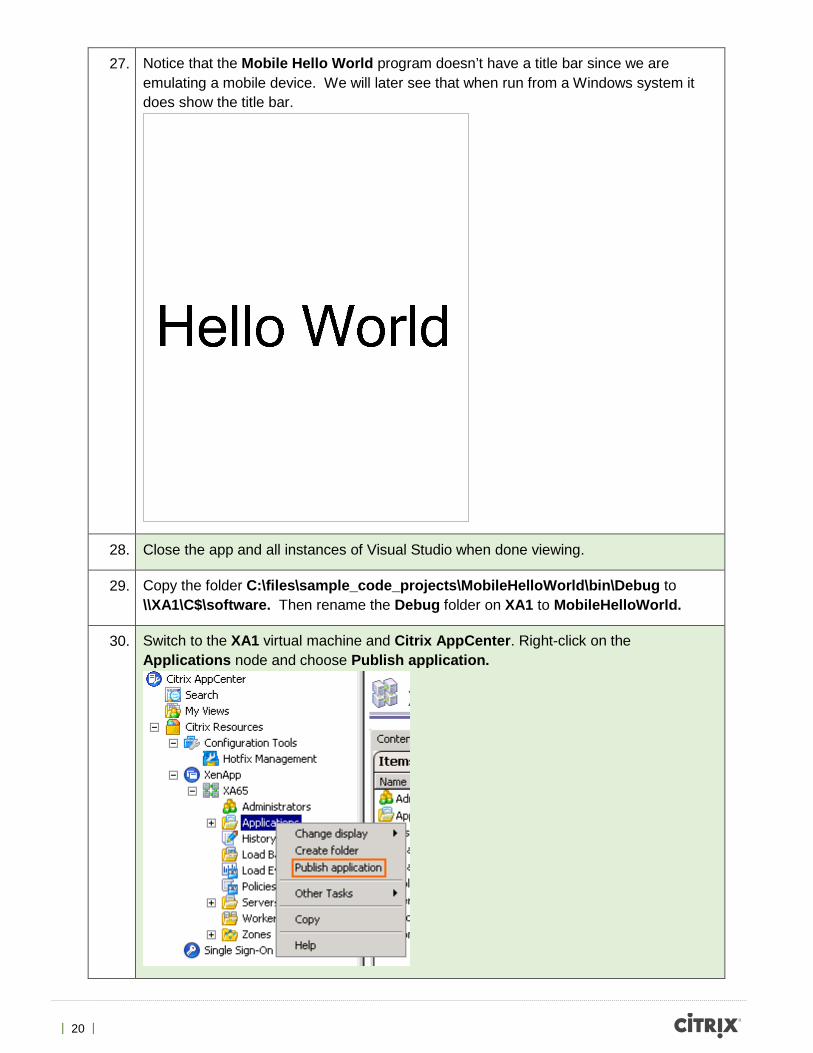
27. Notice that the Mobile Hello World program doesn’t have a title bar since we are emulating a mobile device. We will later see that when run from a Windows system it does show the title bar.
28. Close the app and all instances of Visual Studio when done viewing.
29. Copy the folder C:\files\sample_code_projects\MobileHelloWorld\bin\Debug to \\XA1\C$\software. Then rename the Debug folder on XA1 to MobileHelloWorld.
30. Switch to the XA1 virtual machine and Citrix AppCenter. Right-click on the Applications node and choose Publish application.
| 21 |
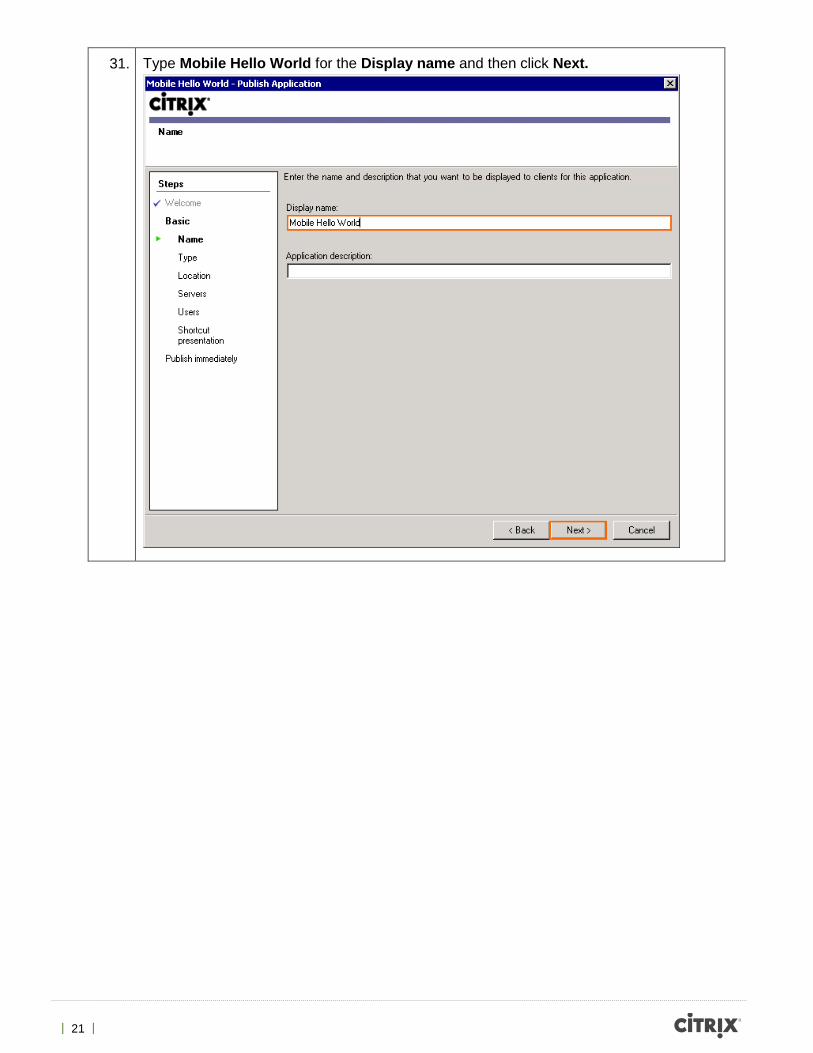
31. Type Mobile Hello World for the Display name and then click Next.
| 22 |
32. Click Next on the Type screen.

| 23 |
33. On the Location screen, browse to select C:\software\MobileHelloWorld\MobileHelloWorld.exe. Then click Next.
| 24 |
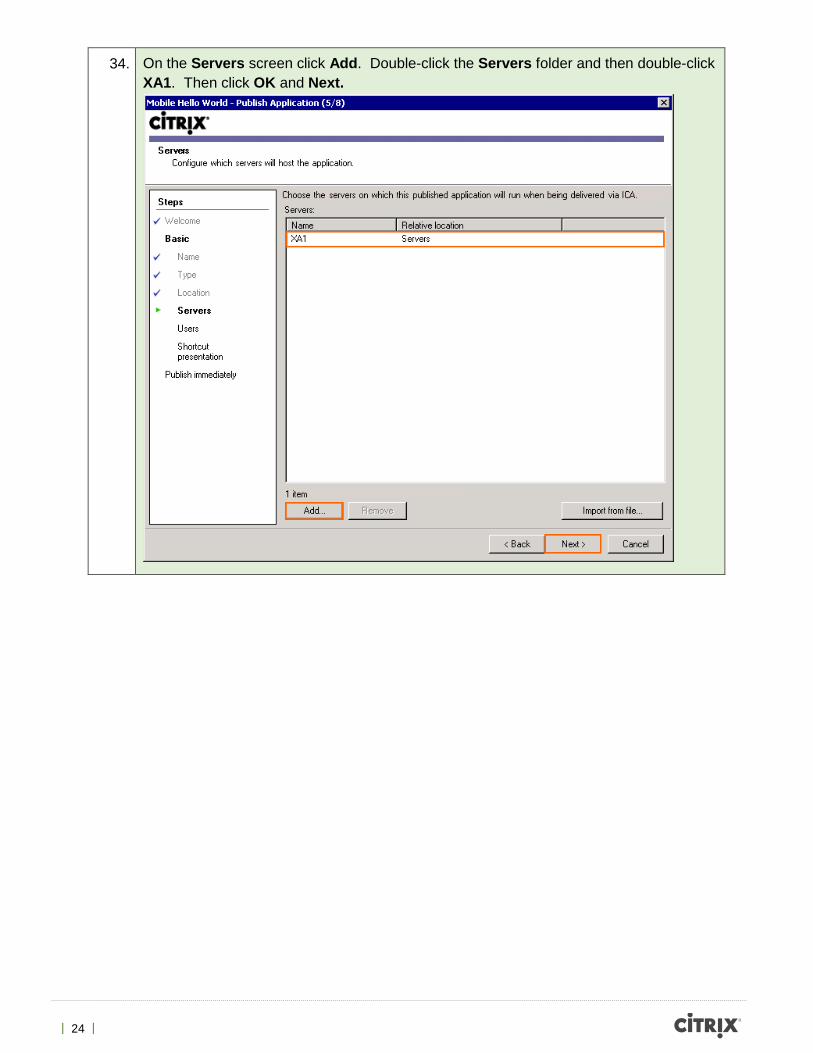
34. On the Servers screen click Add. Double-click the Servers folder and then double-click XA1. Then click OK and Next.
| 25 |
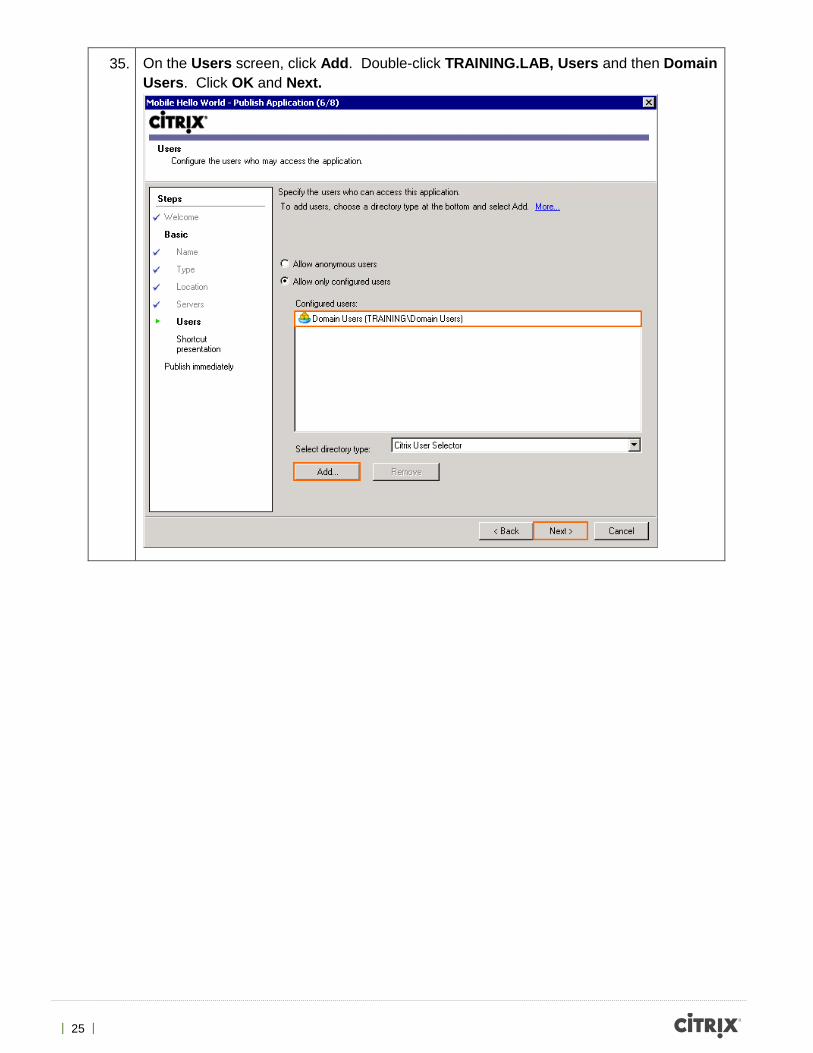
35. On the Users screen, click Add. Double-click TRAINING.LAB, Users and then Domain Users. Click OK and Next.
| 26 |
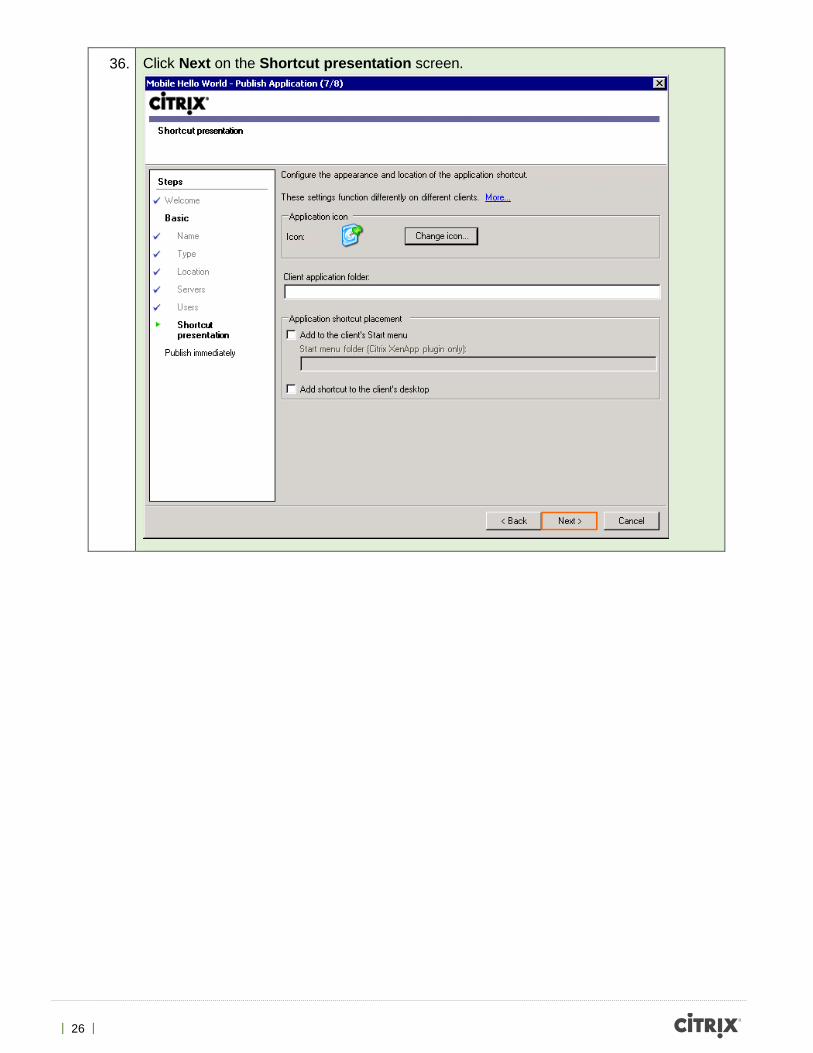
36. Click Next on the Shortcut presentation screen.
| 27 |
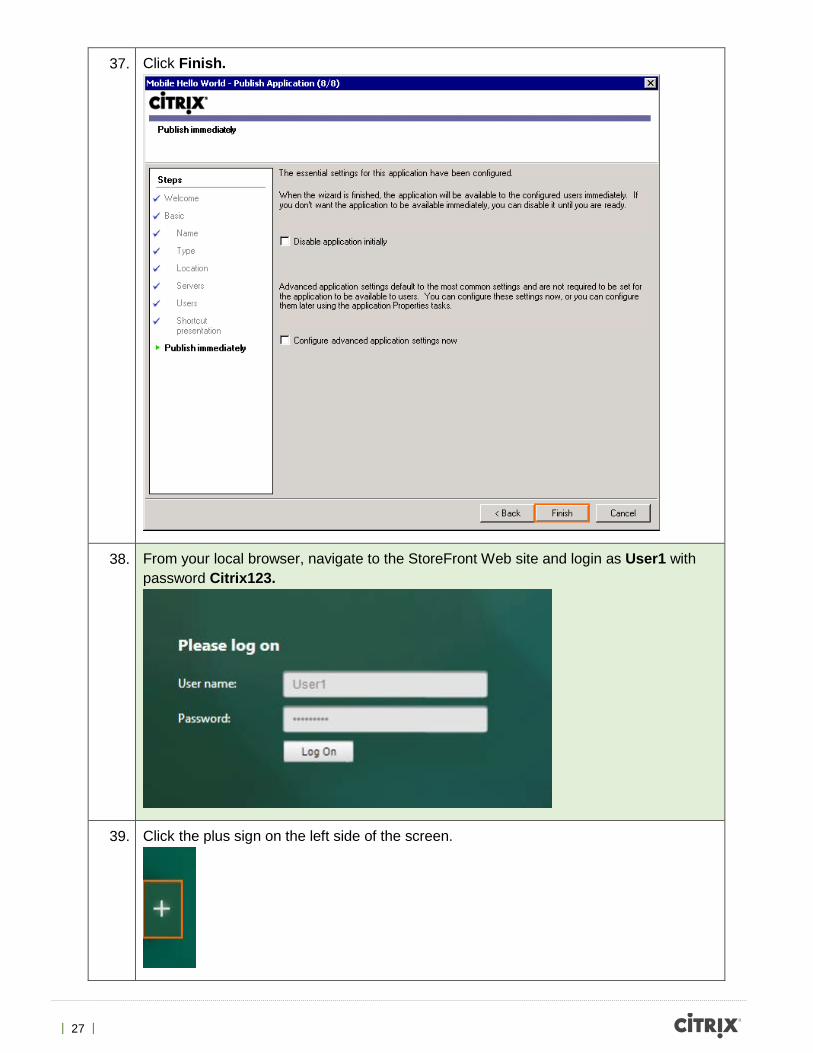
37. Click Finish.
38. From your local browser, navigate to the StoreFront Web site and login as User1 with password Citrix123.
39. Click the plus sign on the left side of the screen.
| 28 |
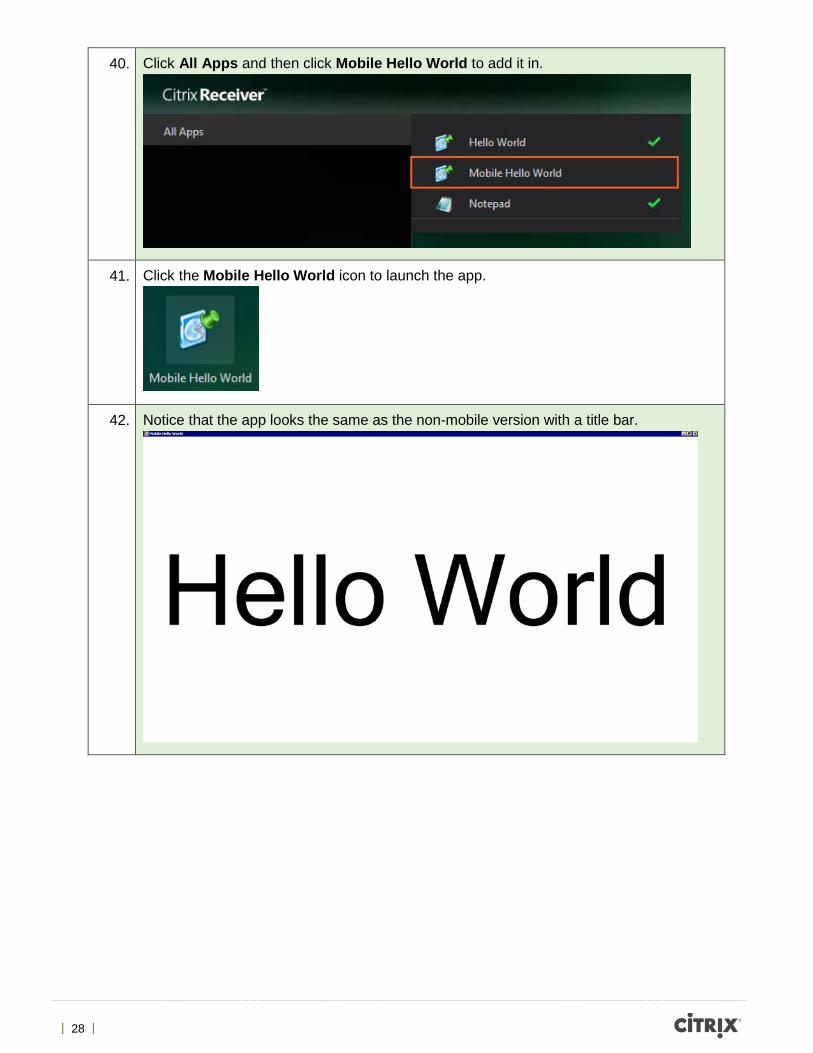
40. Click All Apps and then click Mobile Hello World to add it in.
41. Click the Mobile Hello World icon to launch the app.
42. Notice that the app looks the same as the non-mobile version with a title bar.
| 29 |
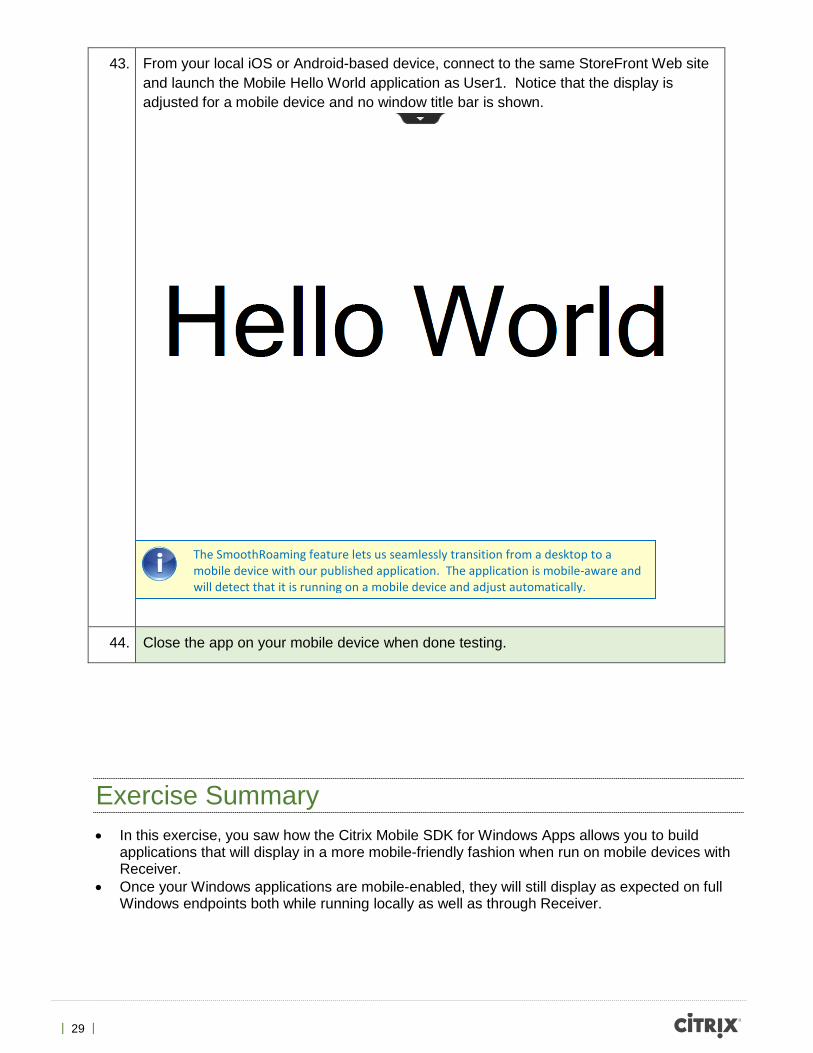
43. From your local iOS or Android-based device, connect to the same StoreFront Web site and launch the Mobile Hello World application as User1. Notice that the display is adjusted for a mobile device and no window title bar is shown.
44. Close the app on your mobile device when done testing.
Exercise Summary • In this exercise, you saw how the Citrix Mobile SDK for Windows Apps allows you to build
applications that will display in a more mobile-friendly fashion when run on mobile devices with Receiver.
• Once your Windows applications are mobile-enabled, they will still display as expected on full Windows endpoints both while running locally as well as through Receiver.
The SmoothRoaming feature lets us seamlessly transition from a desktop to a mobile device with our published application. The application is mobile-aware and will detect that it is running on a mobile device and adjust automatically.

| 30 |
Exercise 2 Integrating with Mobile Device Capabilities Overview In this exercise we will explore the possibilities of integrating with various mobile device features.
Step by step guidance Estimated time to complete this lab: 30 minutes.
Step Action 1. From Win7Dev, open the CitrixMobilitySdkSamples project from
C:\files\sample_code_projects\MobileSdkDemo\Demo.WPF
| 31 |
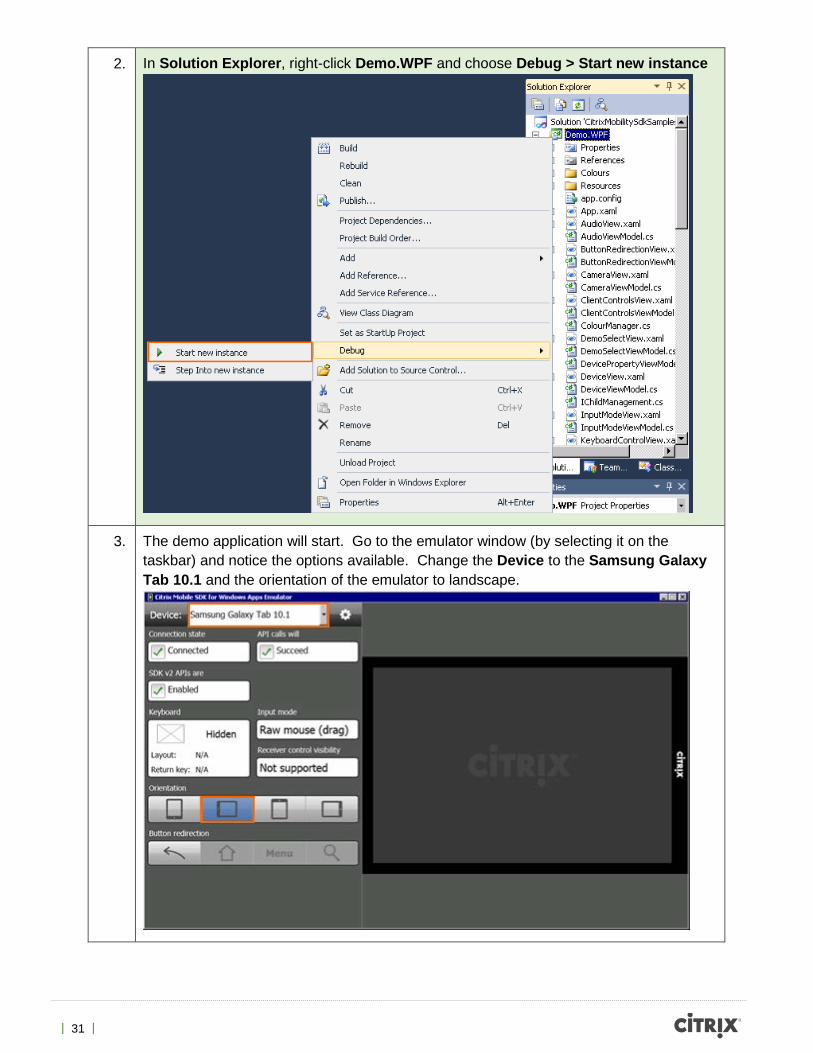
2. In Solution Explorer, right-click Demo.WPF and choose Debug > Start new instance
3. The demo application will start. Go to the emulator window (by selecting it on the taskbar) and notice the options available. Change the Device to the Samsung Galaxy Tab 10.1 and the orientation of the emulator to landscape.
| 32 |
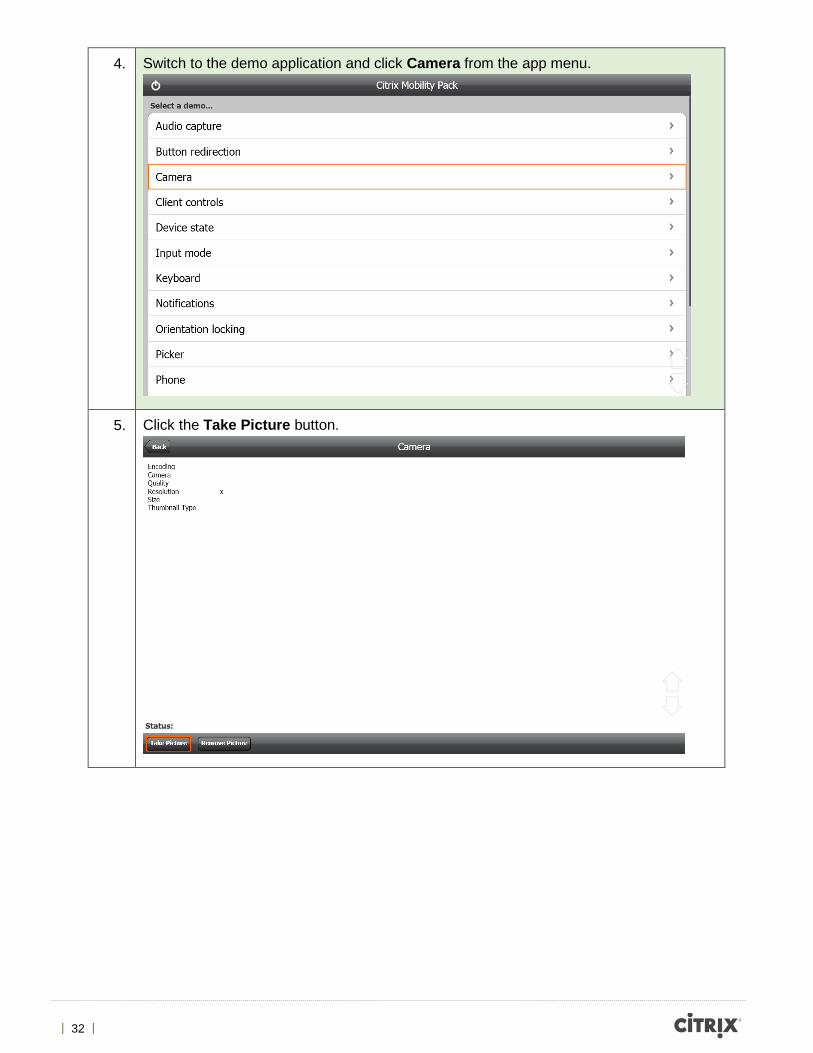
4. Switch to the demo application and click Camera from the app menu.
5. Click the Take Picture button.
| 33 |
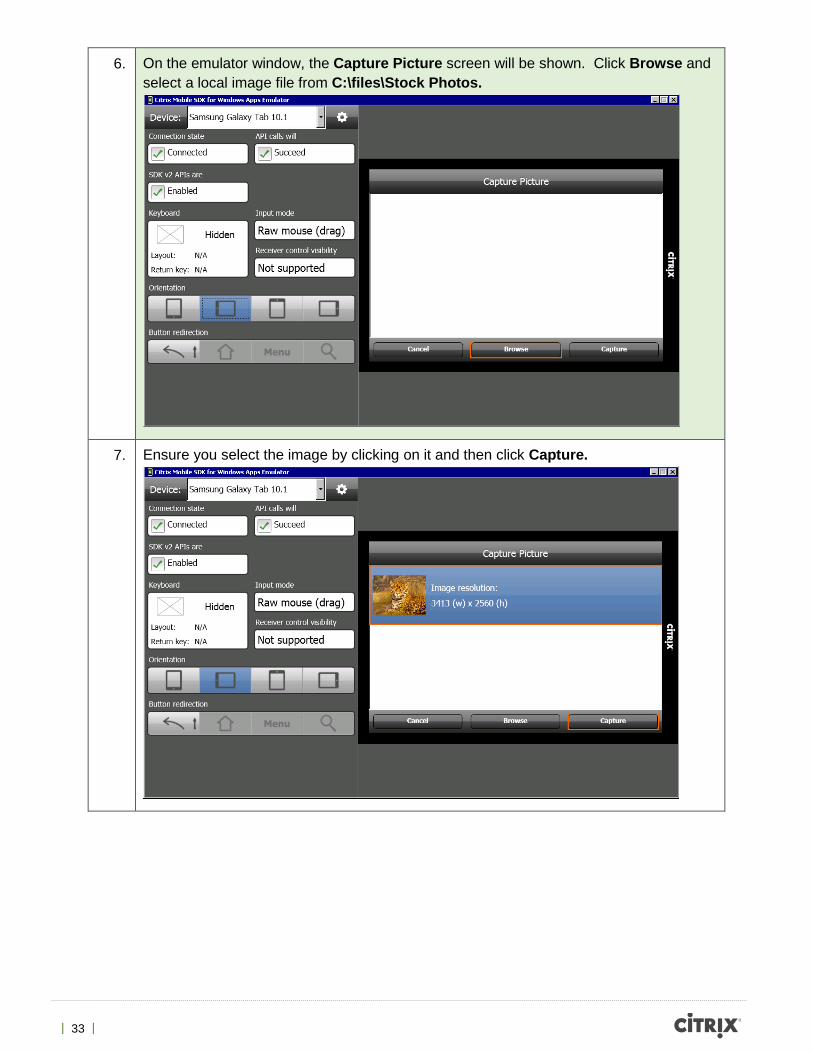
6. On the emulator window, the Capture Picture screen will be shown. Click Browse and select a local image file from C:\files\Stock Photos.
7. Ensure you select the image by clicking on it and then click Capture.
| 34 |
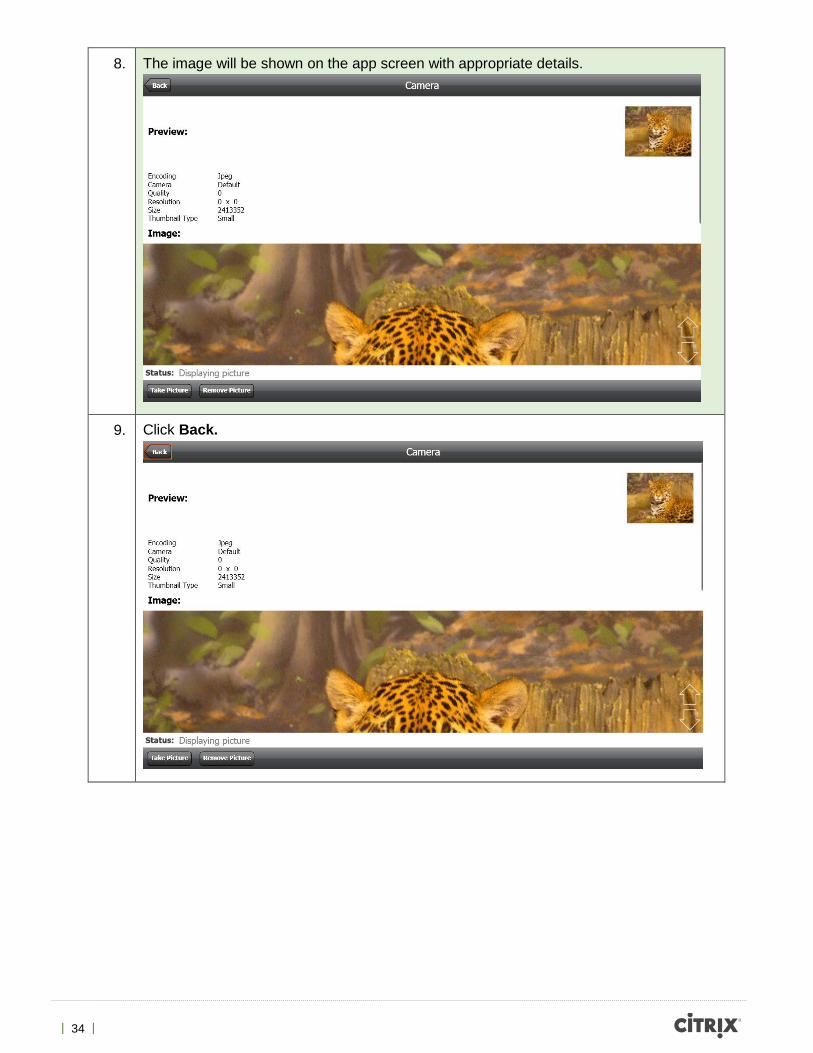
8. The image will be shown on the app screen with appropriate details.
9. Click Back.
| 35 |
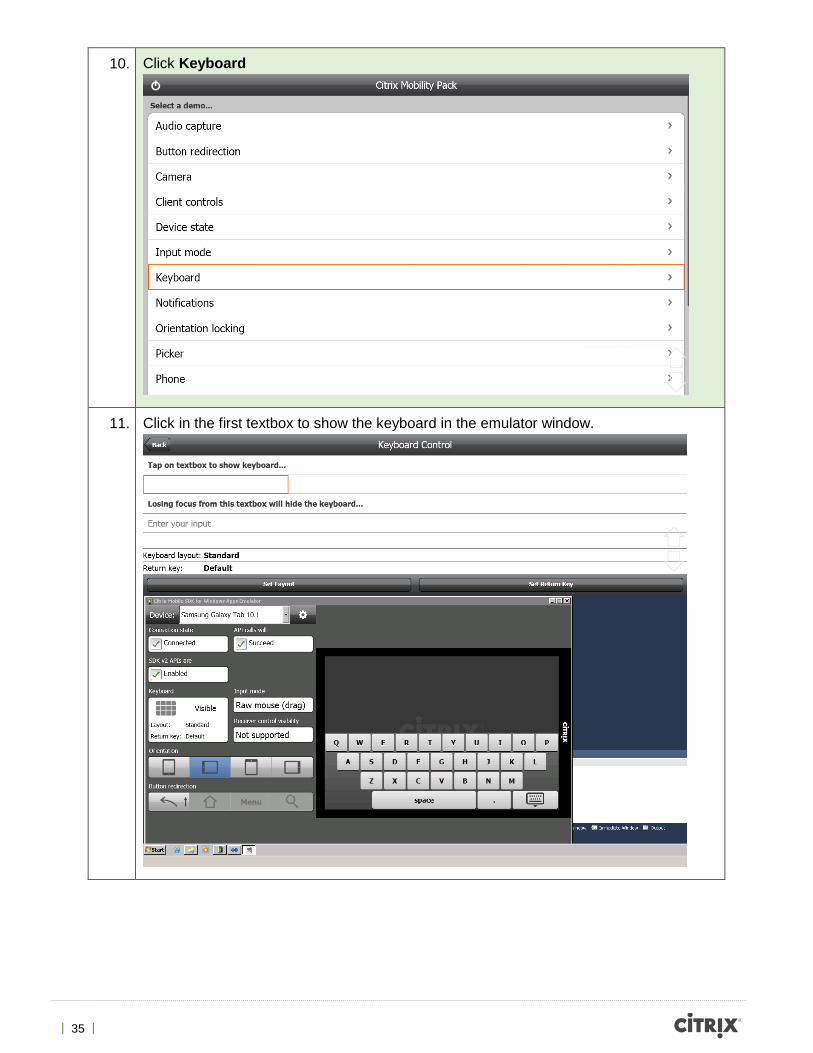
10. Click Keyboard
11. Click in the first textbox to show the keyboard in the emulator window.
| 36 |
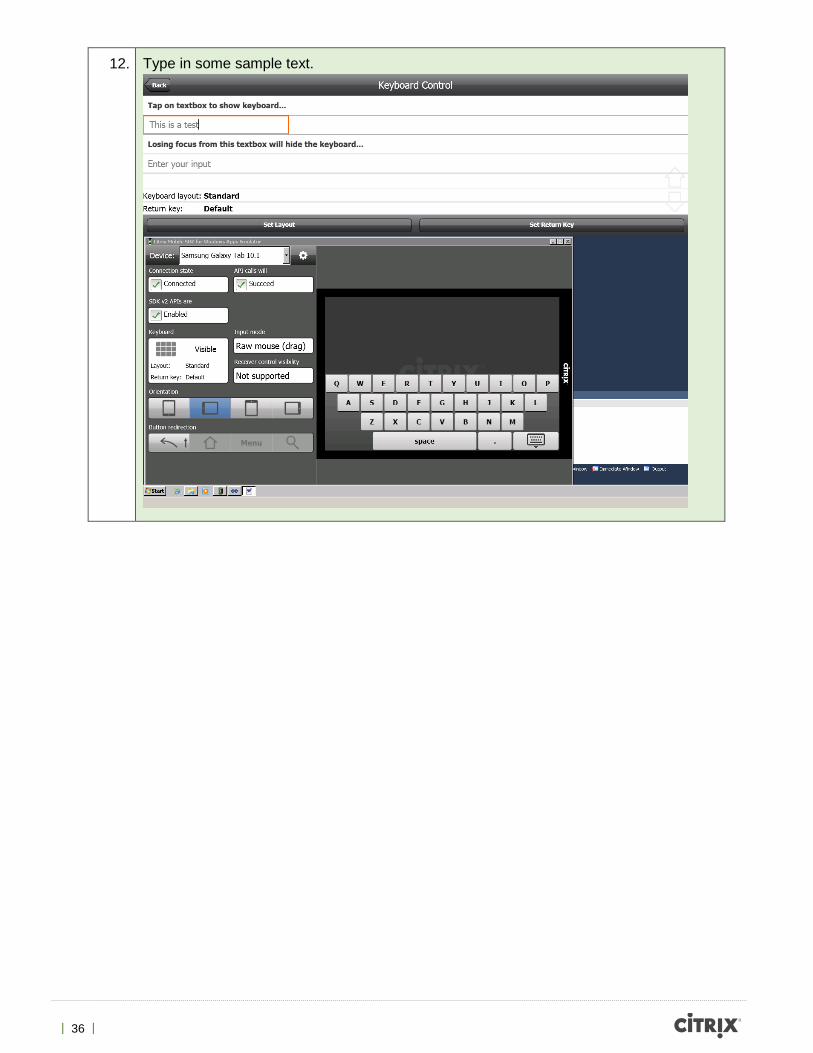
12. Type in some sample text.
| 37 |
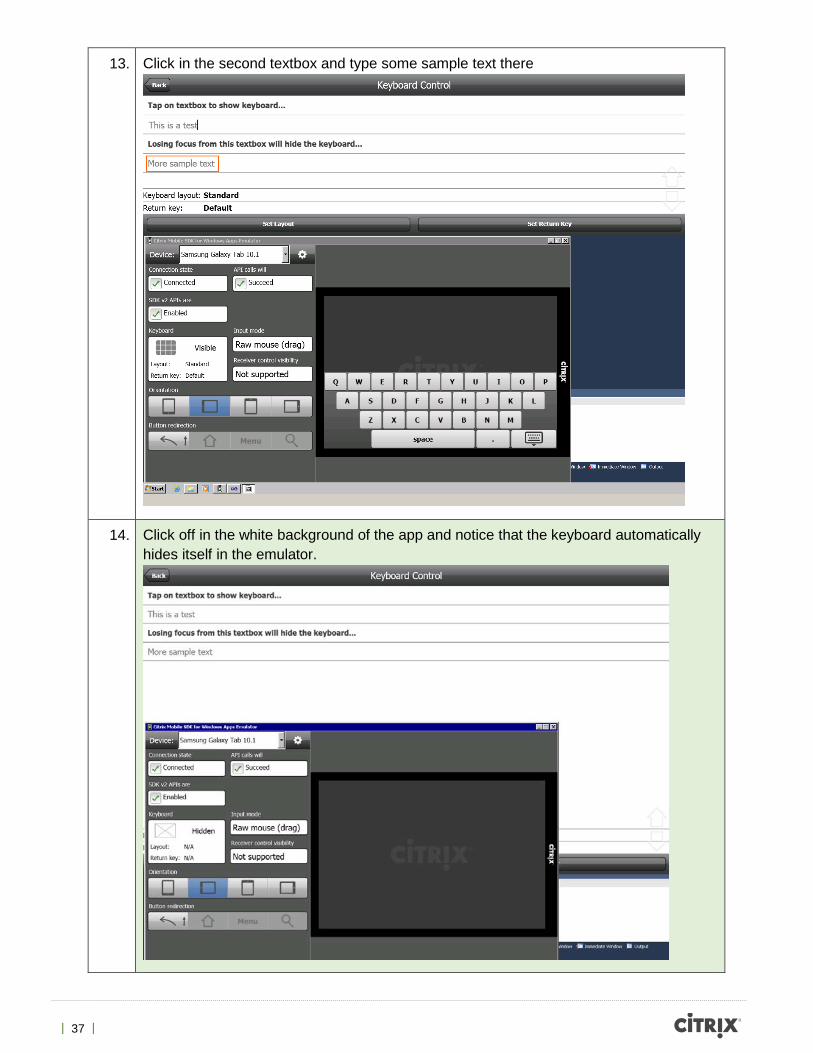
13. Click in the second textbox and type some sample text there
14. Click off in the white background of the app and notice that the keyboard automatically hides itself in the emulator.
| 38 |
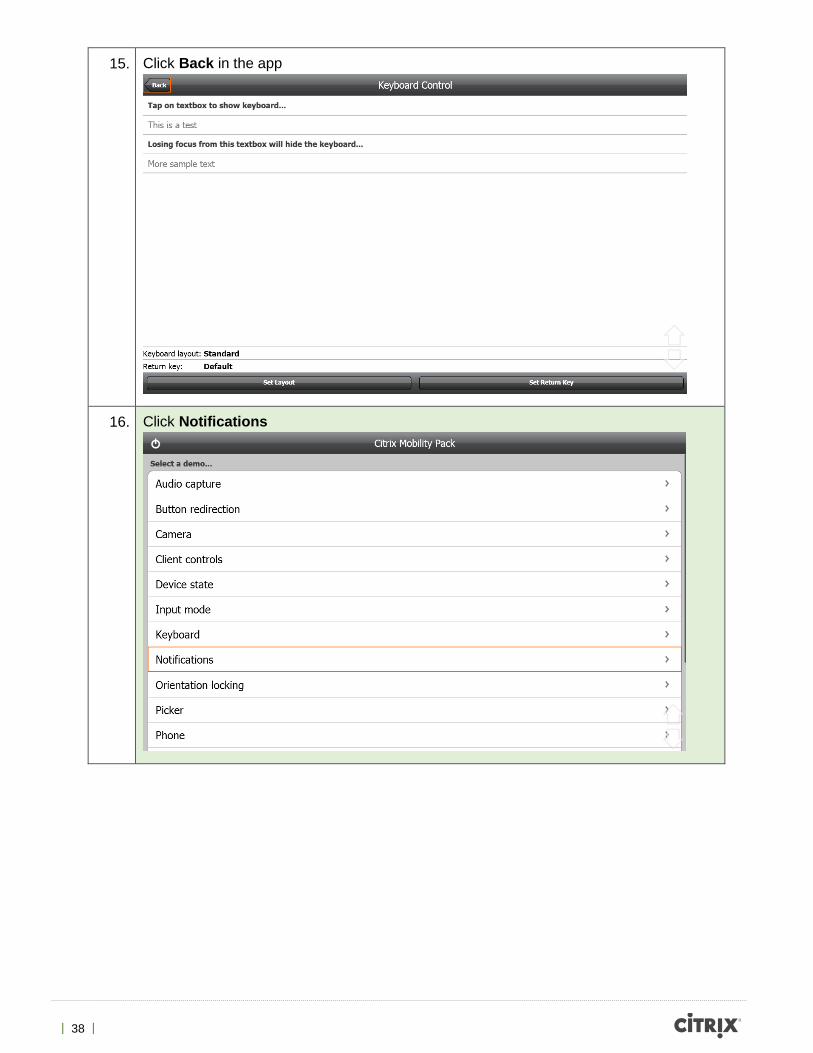
15. Click Back in the app
16. Click Notifications
| 39 |
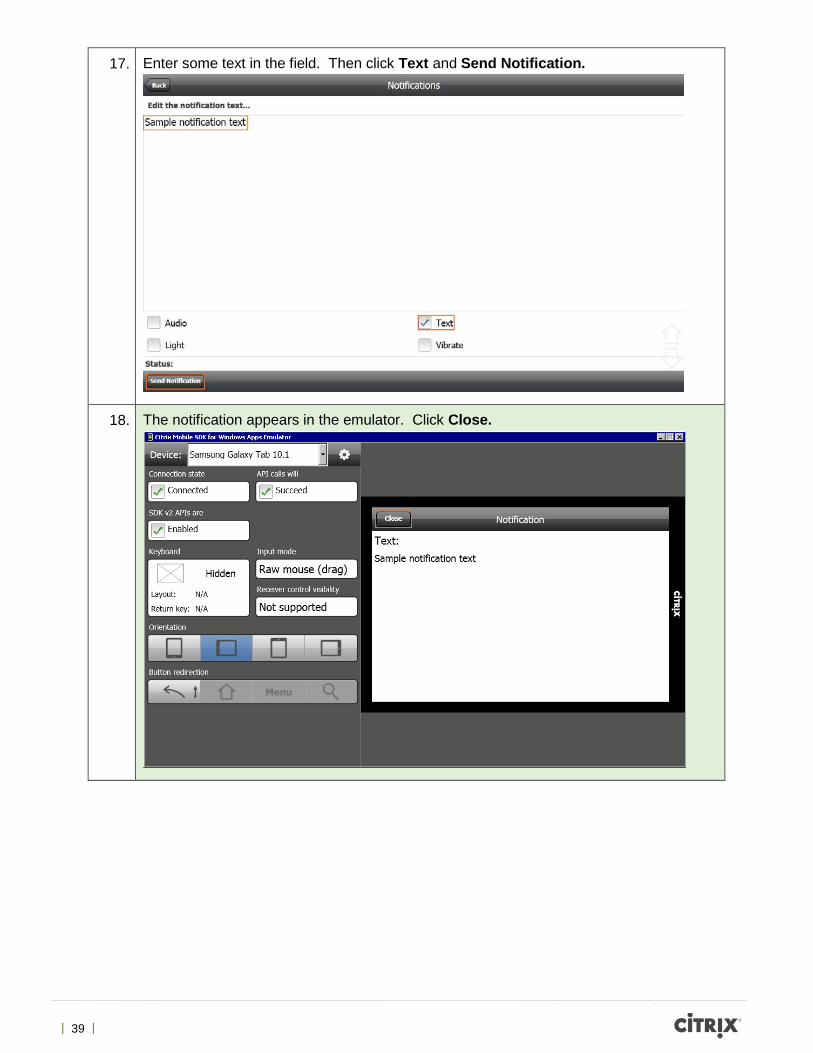
17. Enter some text in the field. Then click Text and Send Notification.
18. The notification appears in the emulator. Click Close.
| 40 |
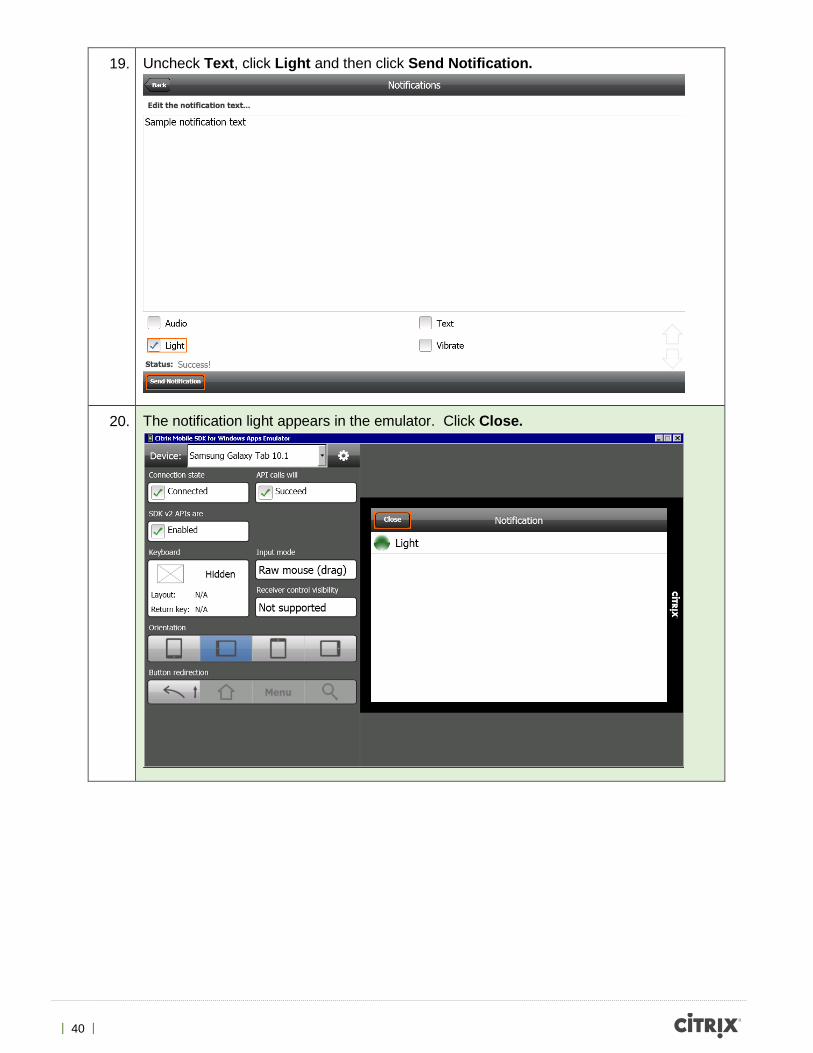
19. Uncheck Text, click Light and then click Send Notification.
20. The notification light appears in the emulator. Click Close.

| 41 |
21. Click Back in the app.
22. Scroll down and click Video Capture.
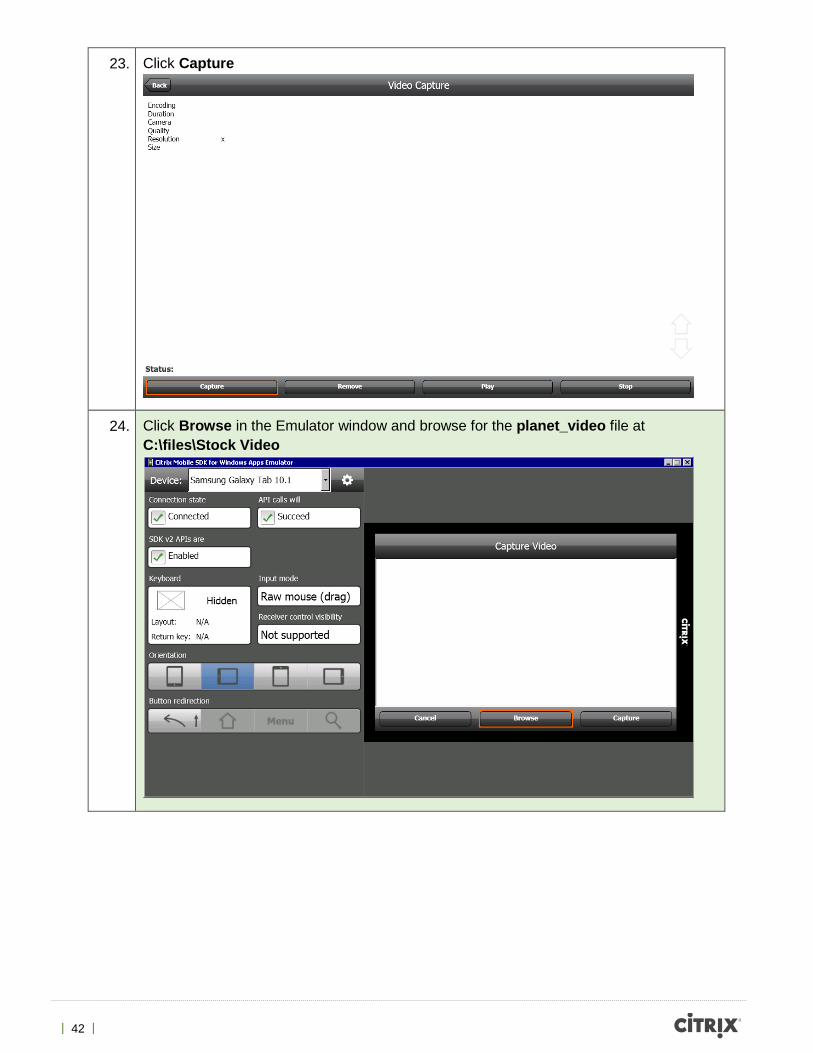
| 42 |
23. Click Capture
24. Click Browse in the Emulator window and browse for the planet_video file at C:\files\Stock Video
| 43 |
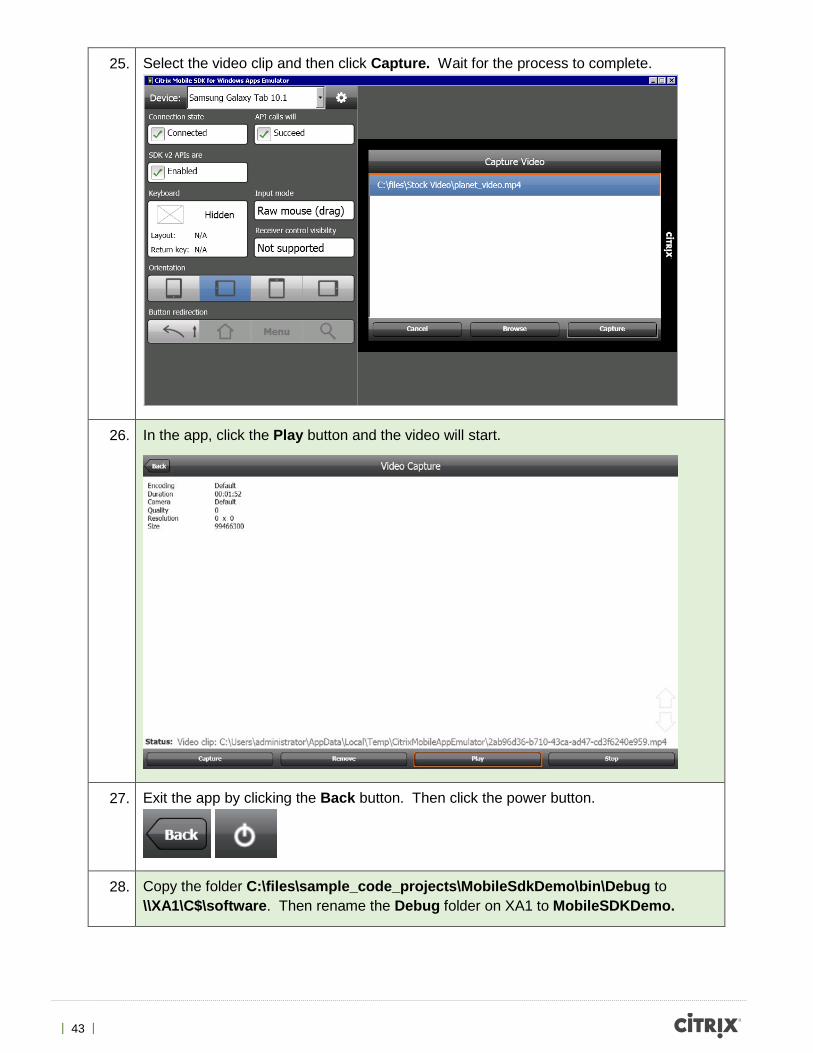
25. Select the video clip and then click Capture. Wait for the process to complete.
26. In the app, click the Play button and the video will start.
27. Exit the app by clicking the Back button. Then click the power button.
28. Copy the folder C:\files\sample_code_projects\MobileSdkDemo\bin\Debug to \\XA1\C$\software. Then rename the Debug folder on XA1 to MobileSDKDemo.
| 44 |
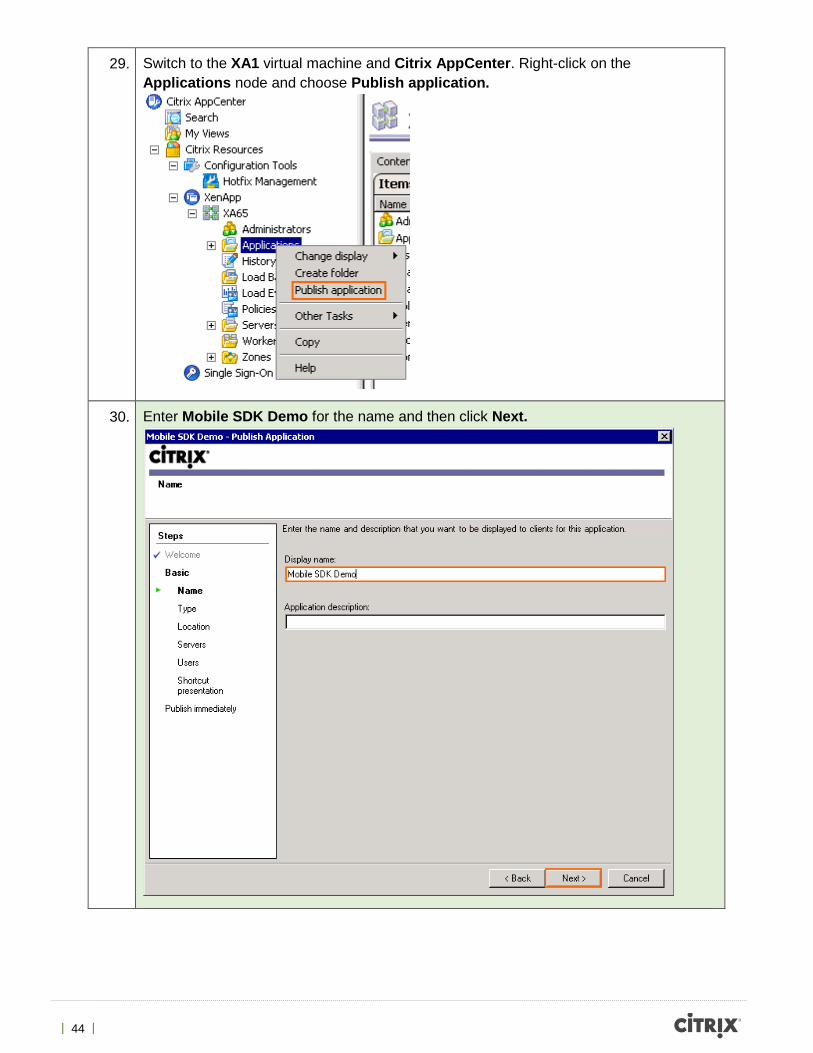
29. Switch to the XA1 virtual machine and Citrix AppCenter. Right-click on the Applications node and choose Publish application.
30. Enter Mobile SDK Demo for the name and then click Next.
| 45 |
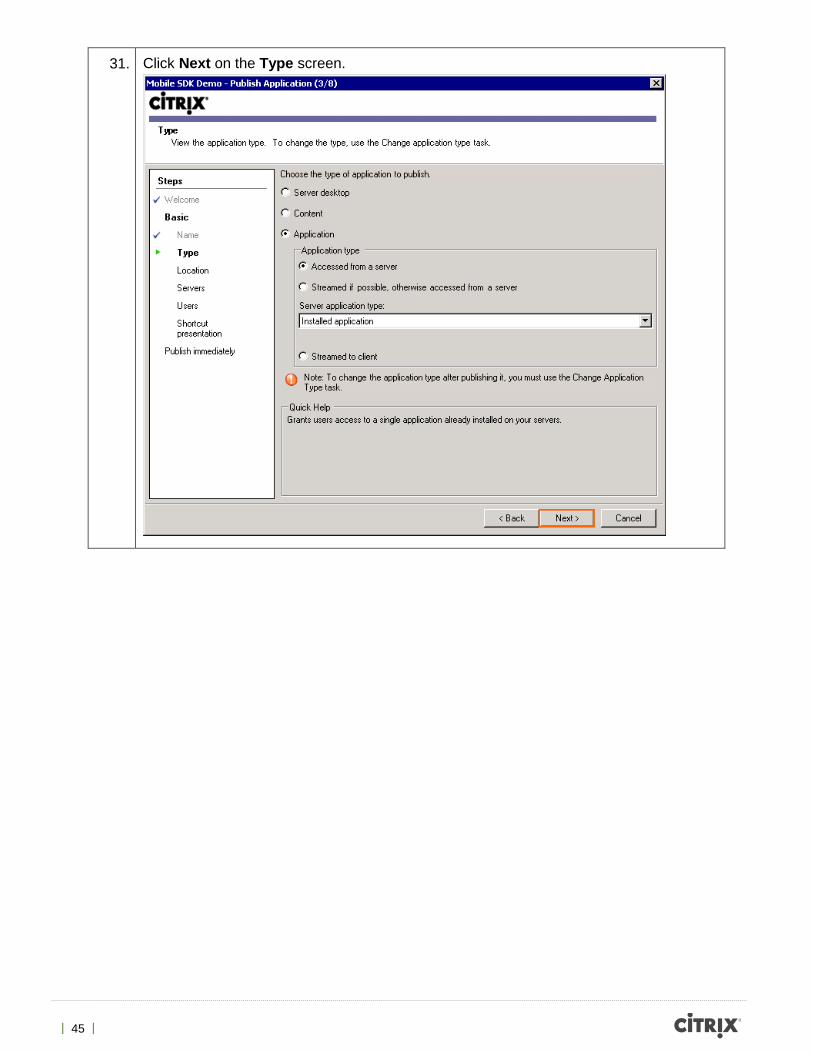
31. Click Next on the Type screen.

| 46 |
32. Click the first Browse button and browse to select C:\software\MobileSDKDemo\CmpWpfDemo.exe. Then click Next.
| 47 |
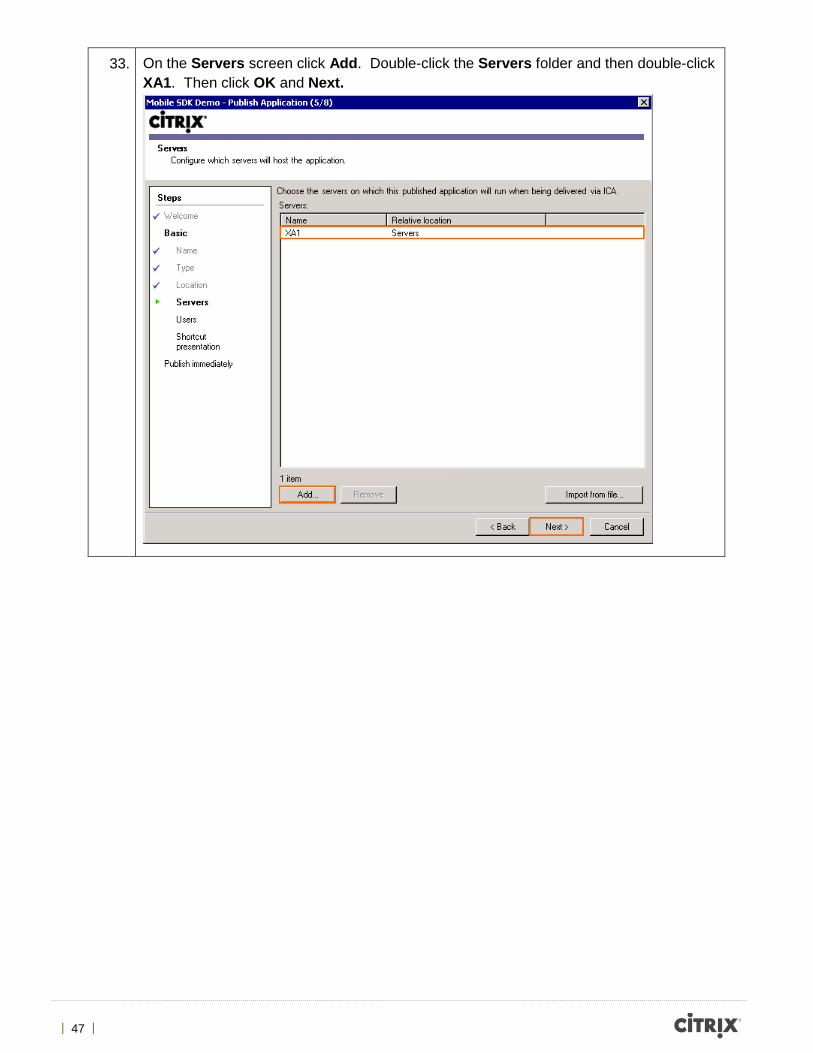
33. On the Servers screen click Add. Double-click the Servers folder and then double-click XA1. Then click OK and Next.
| 48 |
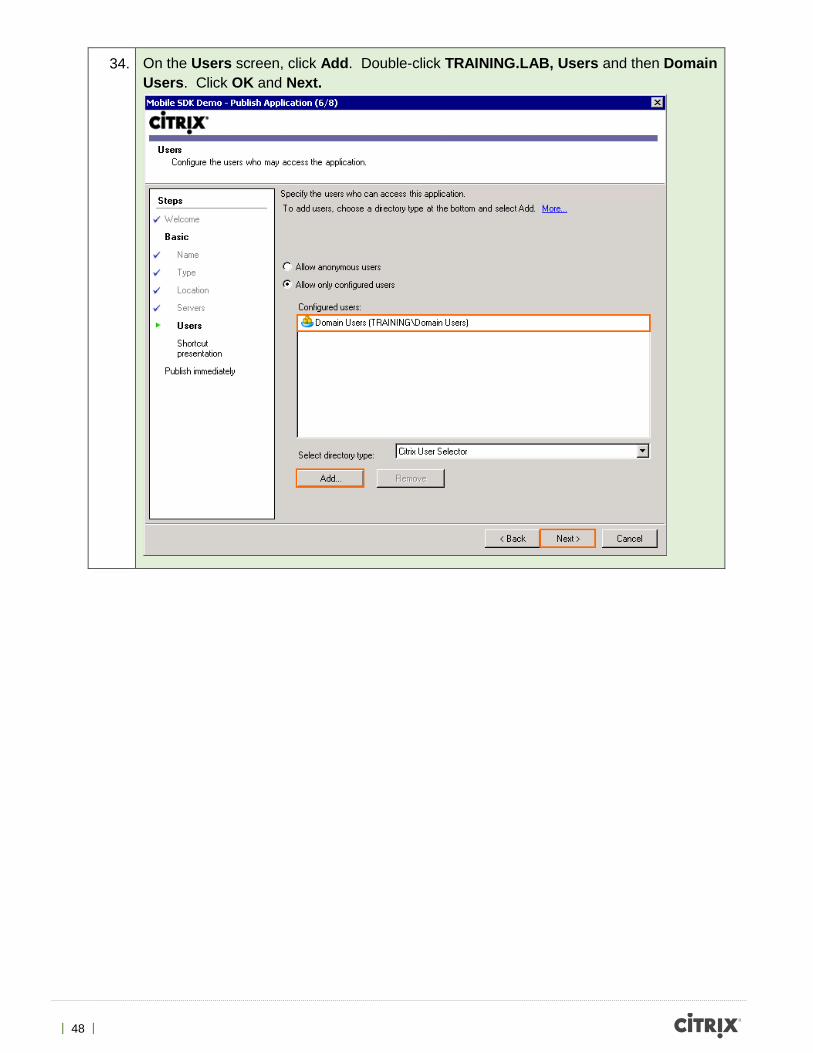
34. On the Users screen, click Add. Double-click TRAINING.LAB, Users and then Domain Users. Click OK and Next.
| 49 |
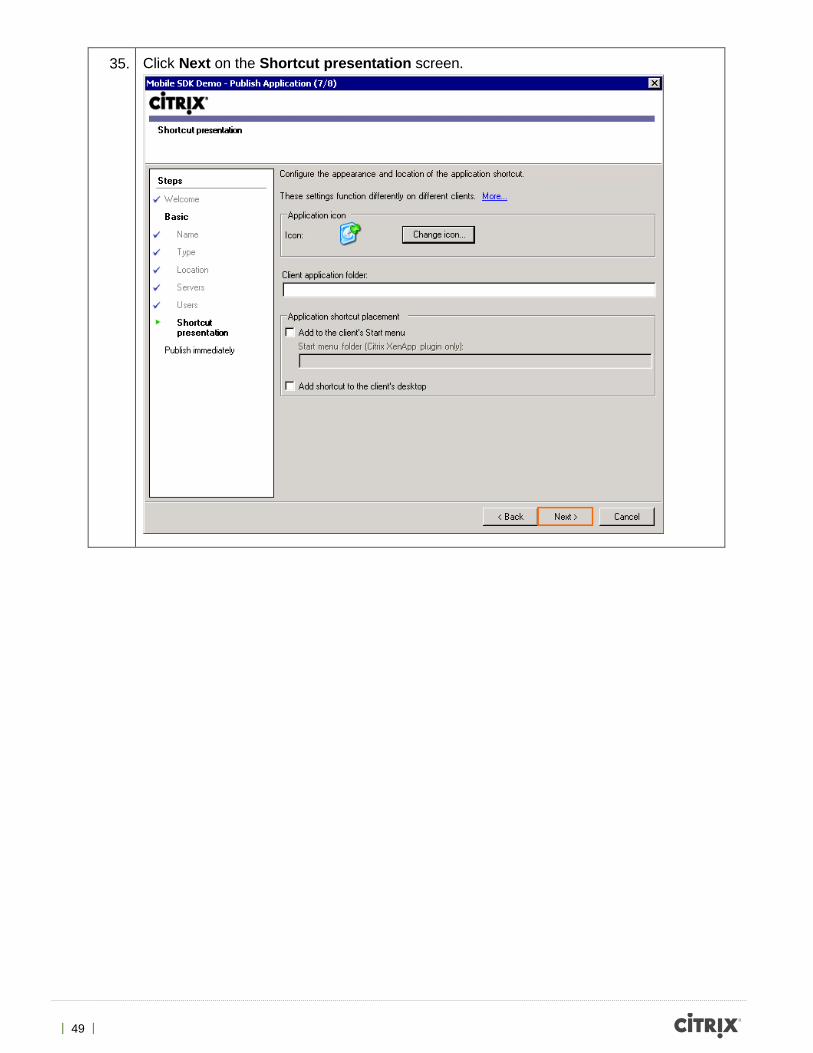
35. Click Next on the Shortcut presentation screen.
| 50 |
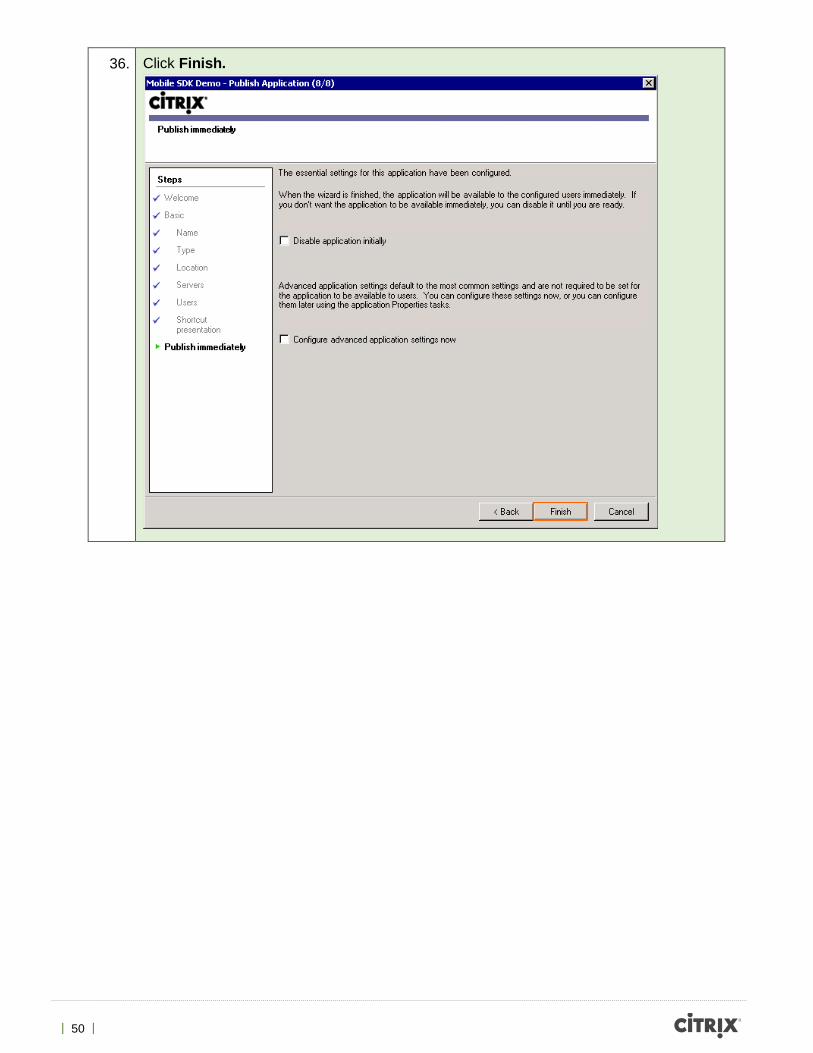
36. Click Finish.
| 51 |
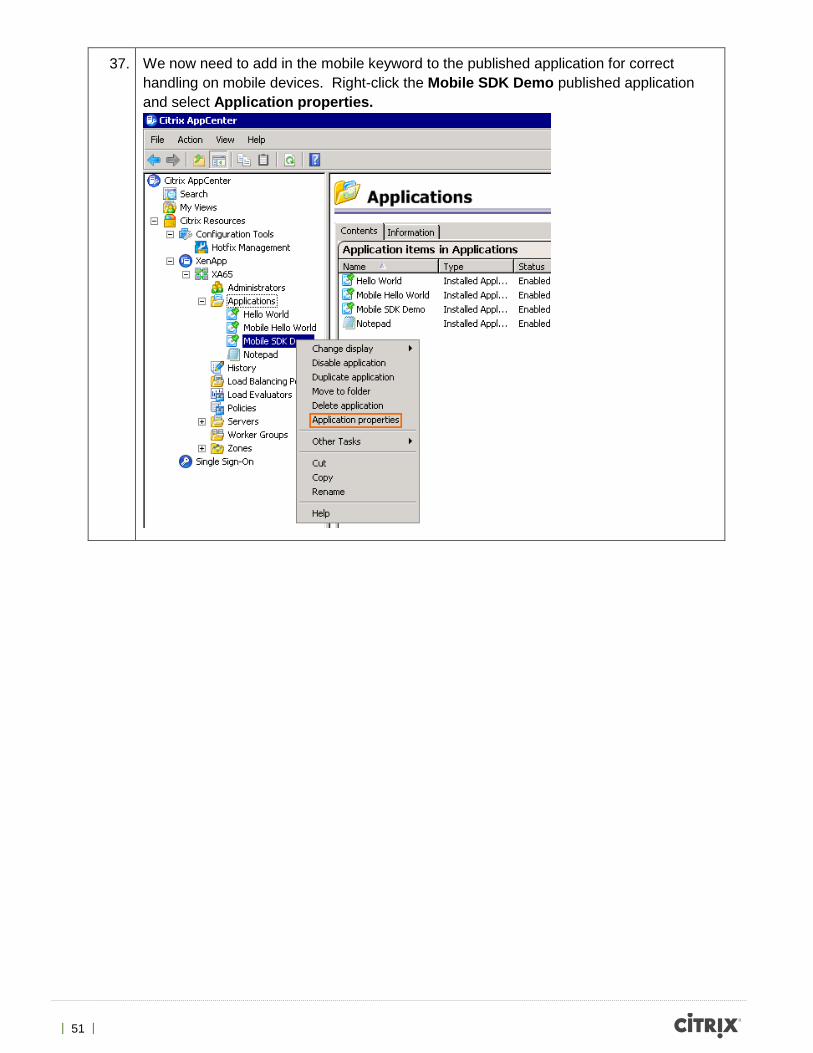
37. We now need to add in the mobile keyword to the published application for correct handling on mobile devices. Right-click the Mobile SDK Demo published application and select Application properties.
| 52 |
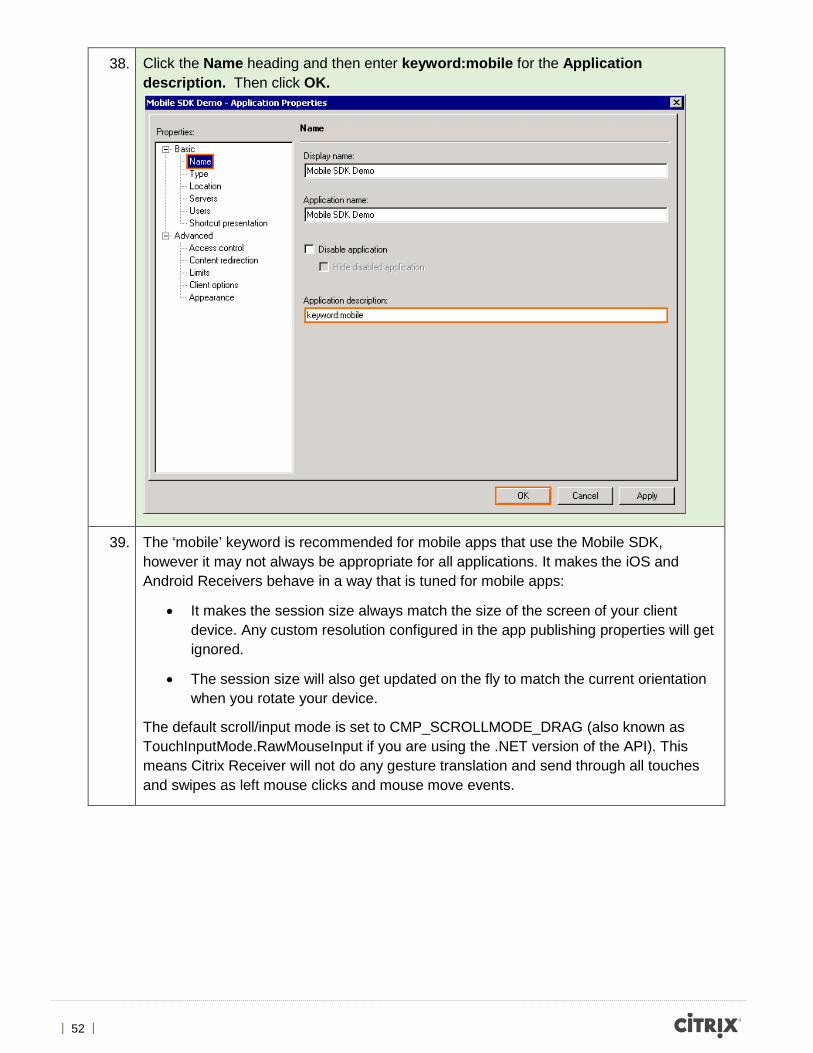
38. Click the Name heading and then enter keyword:mobile for the Application description. Then click OK.
39. The ‘mobile’ keyword is recommended for mobile apps that use the Mobile SDK, however it may not always be appropriate for all applications. It makes the iOS and Android Receivers behave in a way that is tuned for mobile apps:
• It makes the session size always match the size of the screen of your client device. Any custom resolution configured in the app publishing properties will get ignored.
• The session size will also get updated on the fly to match the current orientation when you rotate your device.
The default scroll/input mode is set to CMP_SCROLLMODE_DRAG (also known as TouchInputMode.RawMouseInput if you are using the .NET version of the API). This means Citrix Receiver will not do any gesture translation and send through all touches and swipes as left mouse clicks and mouse move events.
| 53 |
40. Access the Mobile SDK Demo application through NetScaler Gateway as User1 and re-test the same functionality you tried using the emulator on your local iOS or Android device.
In the Citrix Receiver settings you will need to enable Client Drive Mapping for the take picture API calls to work. To enable this, perform the following steps:
iOS:
1. Settings > Advanced
2. Enable ‘Use iPad/iPhone Storage’
Android:
1. Settings > Advanced
2. Tap ‘Use device storage’
3. Select the ‘Full access’ option
Exercise Summary • The SDK has a variety of functions that can be easily demonstrated with a sample project using
the emulator software
If you are having trouble connecting with your mobile device, please ask a facilitator for assistance.
| 54 |
Exercise 3 Using the XenApp Mobile Console Overview Managing a XenApp environment from a mobile device has traditionally been less than ideal. The MMC-based Citrix AppCenter management console works great on full PCs yet is not very easy to work with on mobile form factors. Using the Mobile SDK for Windows Apps, we have a sample XenApp Mobile Console that allows administrators to quickly perform common tasks such as logging off and resetting sessions. More information on the XenApp Mobile Console is available at http://blogs.citrix.com/2013/08/14/xenapp-administration-going-mobile/.
Step by step guidance Estimated time to complete this lab: 10 minutes.
Step Action 1. From the StudentDesktop, launch Internet Explorer and navigate to
http://sf1.training.lab.
2. Click Allow in the information bar.
3. In the security dialog, click the checkbox Do not show me the warning for this program again and then click Allow.
To test the XenApp Mobile Console we first want to create a session on the XenApp server that we can view and reset. So in the first few steps you will launch published Notepad which you will then reset using the console.
| 55 |
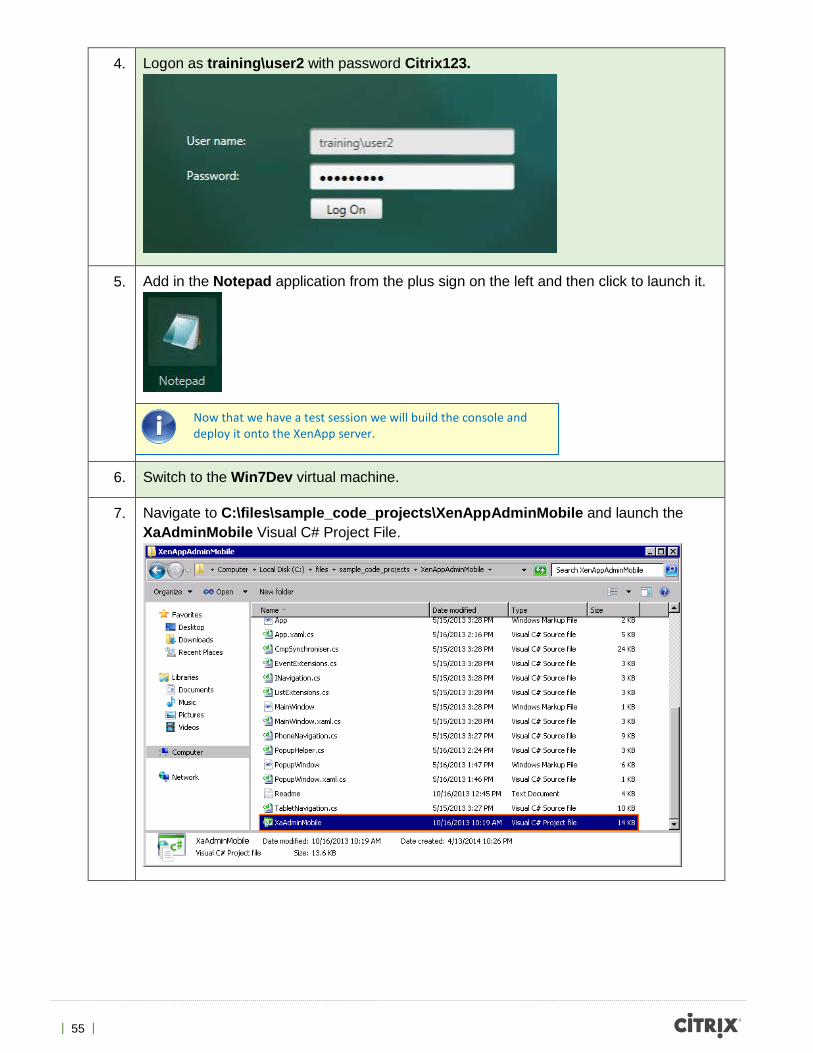
4. Logon as training\user2 with password Citrix123.
5. Add in the Notepad application from the plus sign on the left and then click to launch it.
6. Switch to the Win7Dev virtual machine.
7. Navigate to C:\files\sample_code_projects\XenAppAdminMobile and launch the XaAdminMobile Visual C# Project File.
Now that we have a test session we will build the console and deploy it onto the XenApp server.
| 56 |
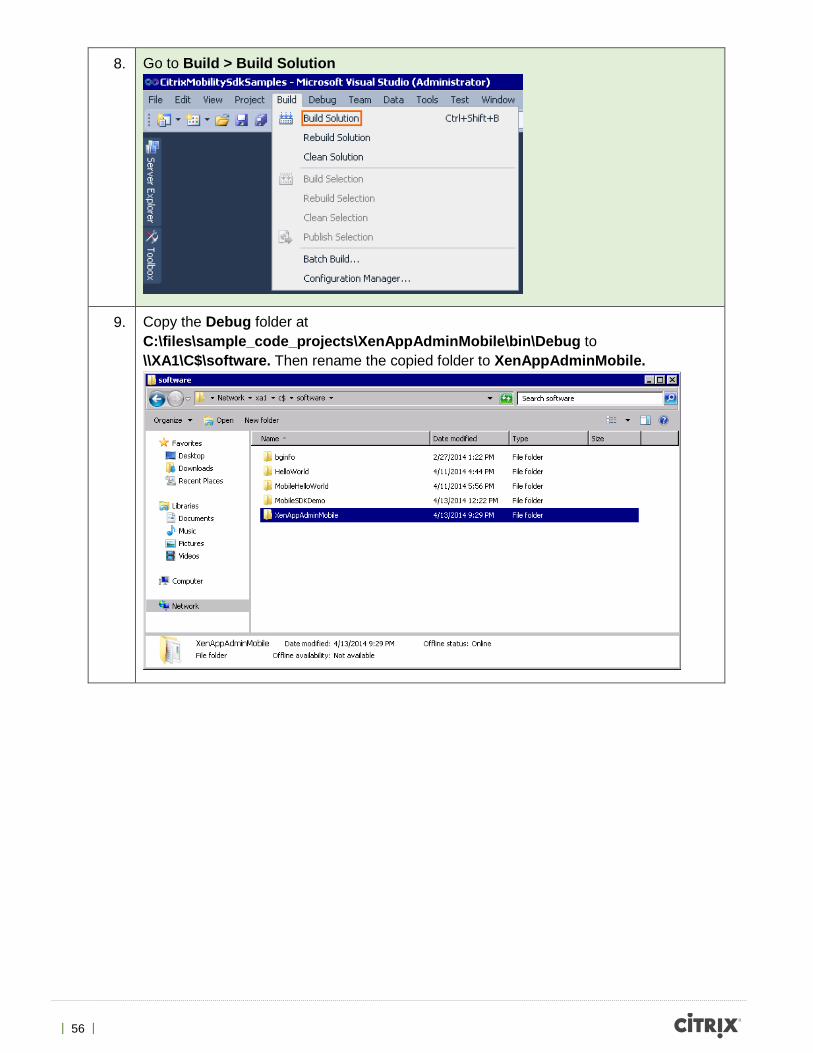
8. Go to Build > Build Solution
9. Copy the Debug folder at C:\files\sample_code_projects\XenAppAdminMobile\bin\Debug to \\XA1\C$\software. Then rename the copied folder to XenAppAdminMobile.

| 57 |
10. Switch to the XA1 virtual machine and Citrix AppCenter. Right-click on the Applications node and choose Publish application.
11. Type XenApp Admin Mobile for the Display name and then click Next.
| 58 |
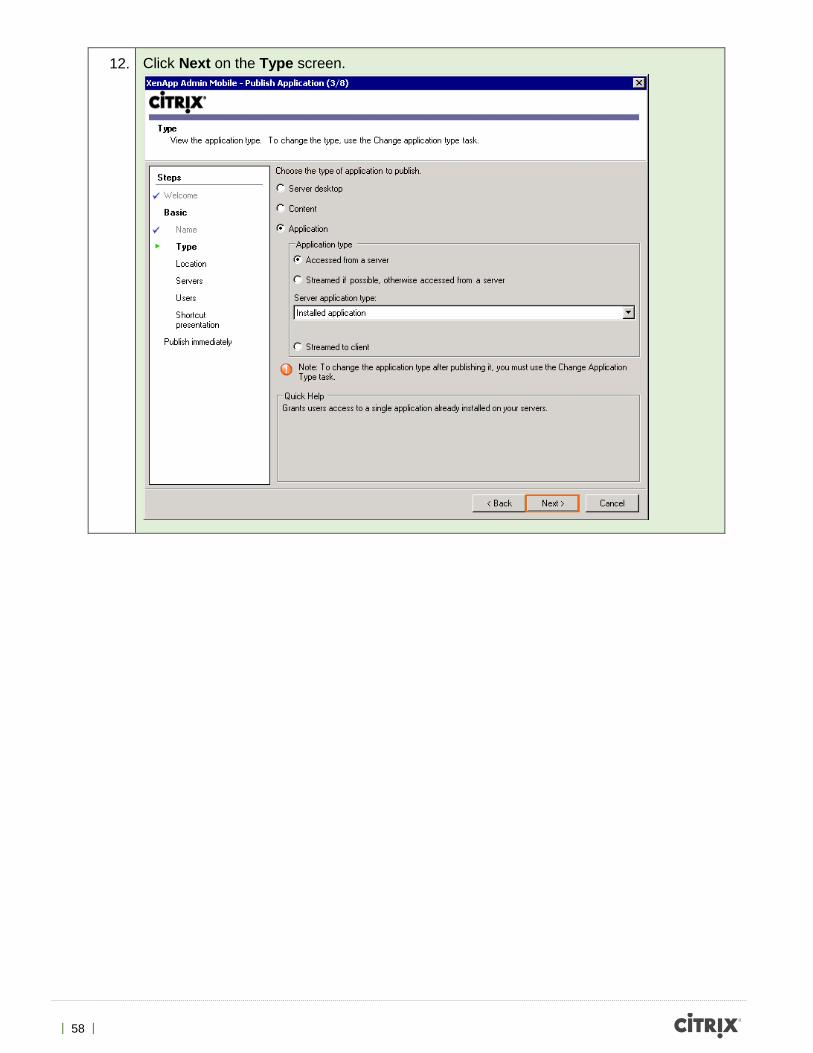
12. Click Next on the Type screen.
| 59 |
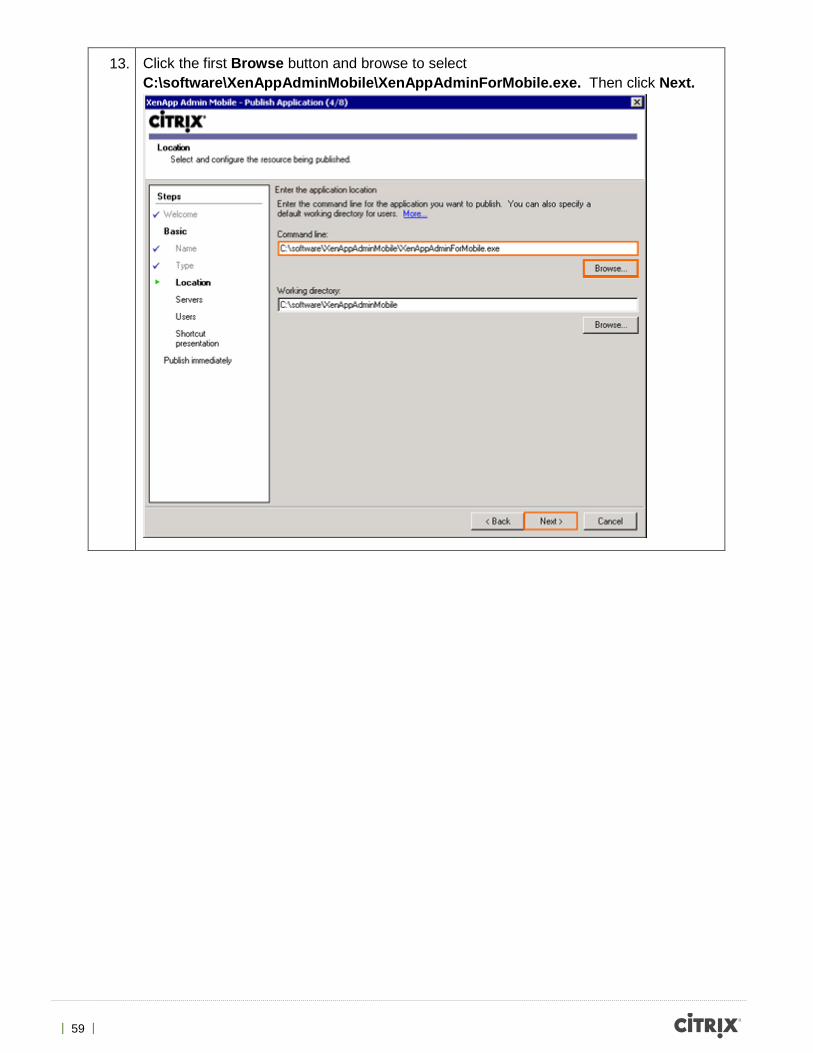
13. Click the first Browse button and browse to select C:\software\XenAppAdminMobile\XenAppAdminForMobile.exe. Then click Next.
| 60 |
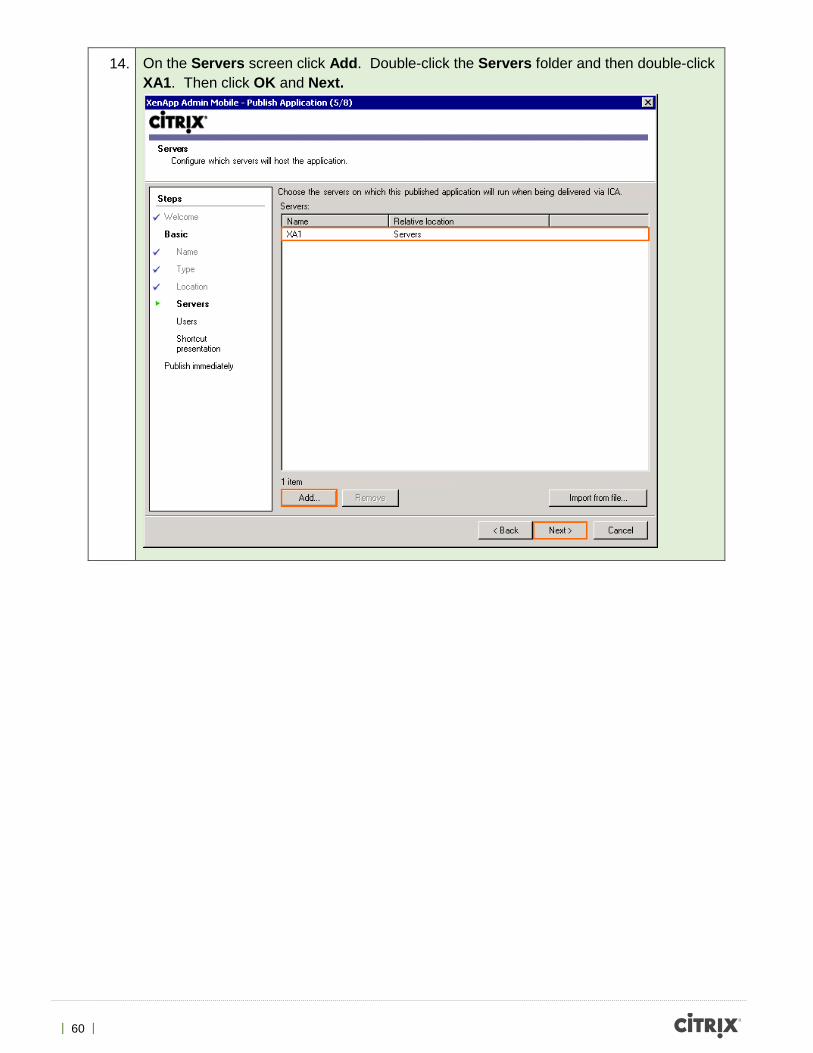
14. On the Servers screen click Add. Double-click the Servers folder and then double-click XA1. Then click OK and Next.
| 61 |
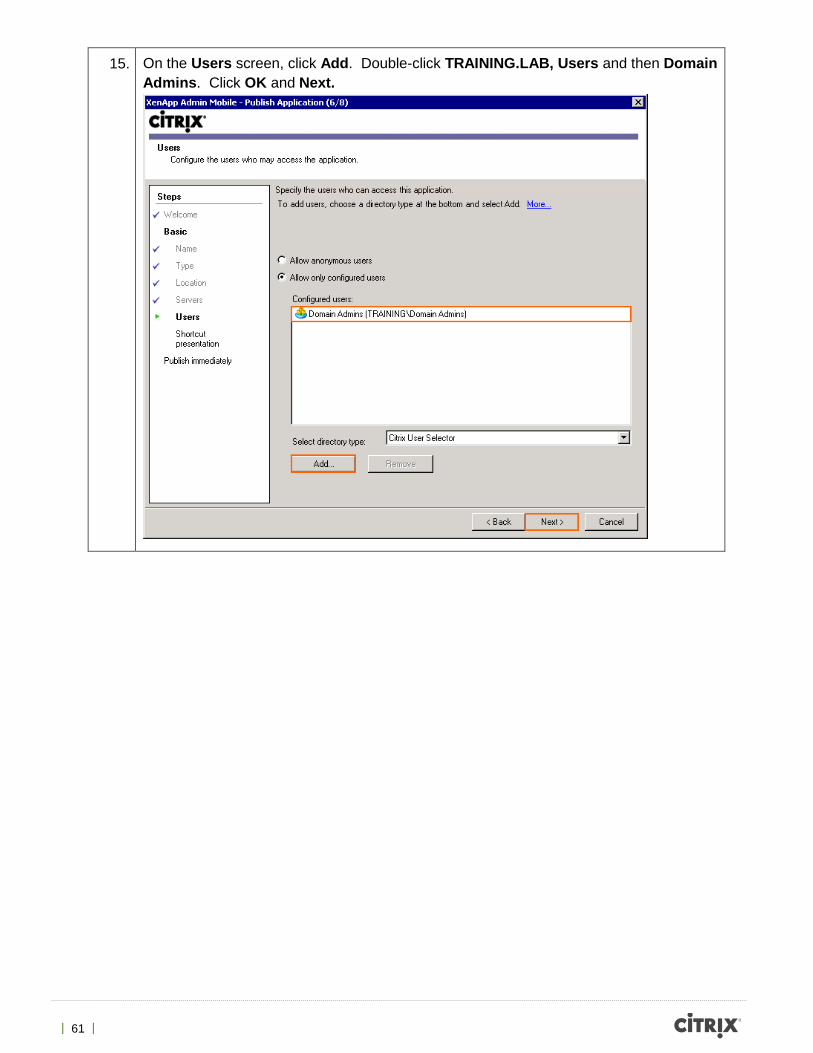
15. On the Users screen, click Add. Double-click TRAINING.LAB, Users and then Domain Admins. Click OK and Next.
| 62 |
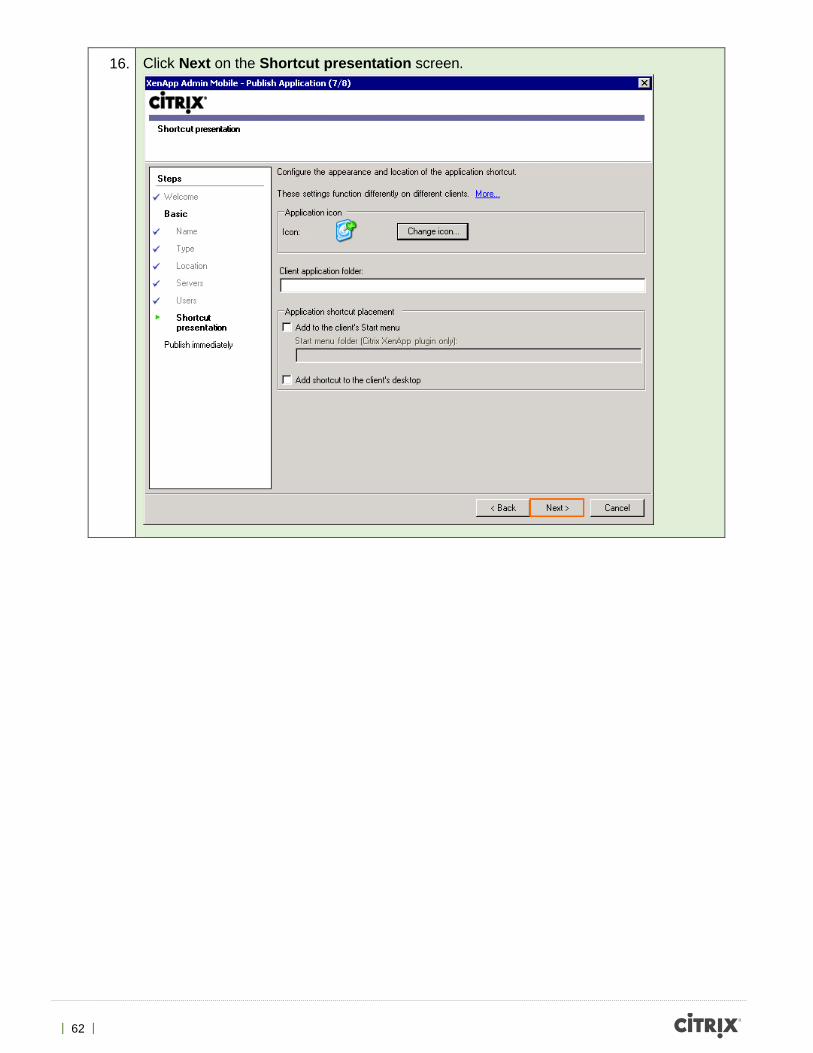
16. Click Next on the Shortcut presentation screen.
| 63 |
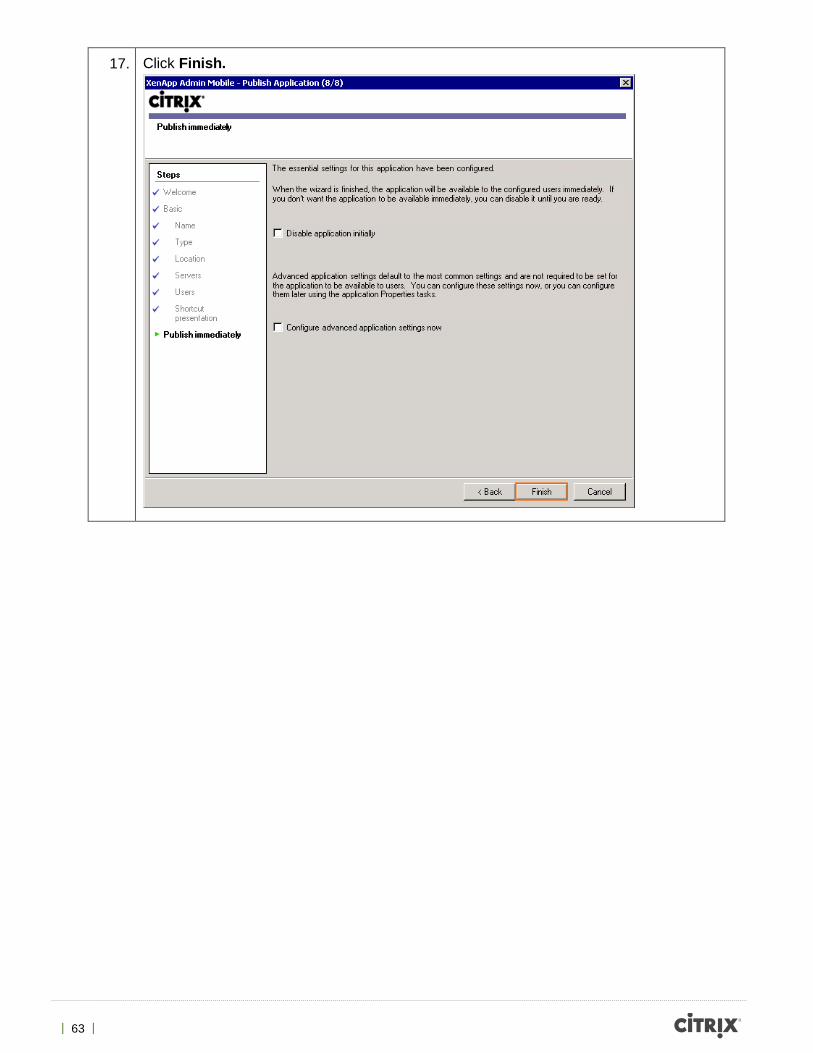
17. Click Finish.

| 64 |
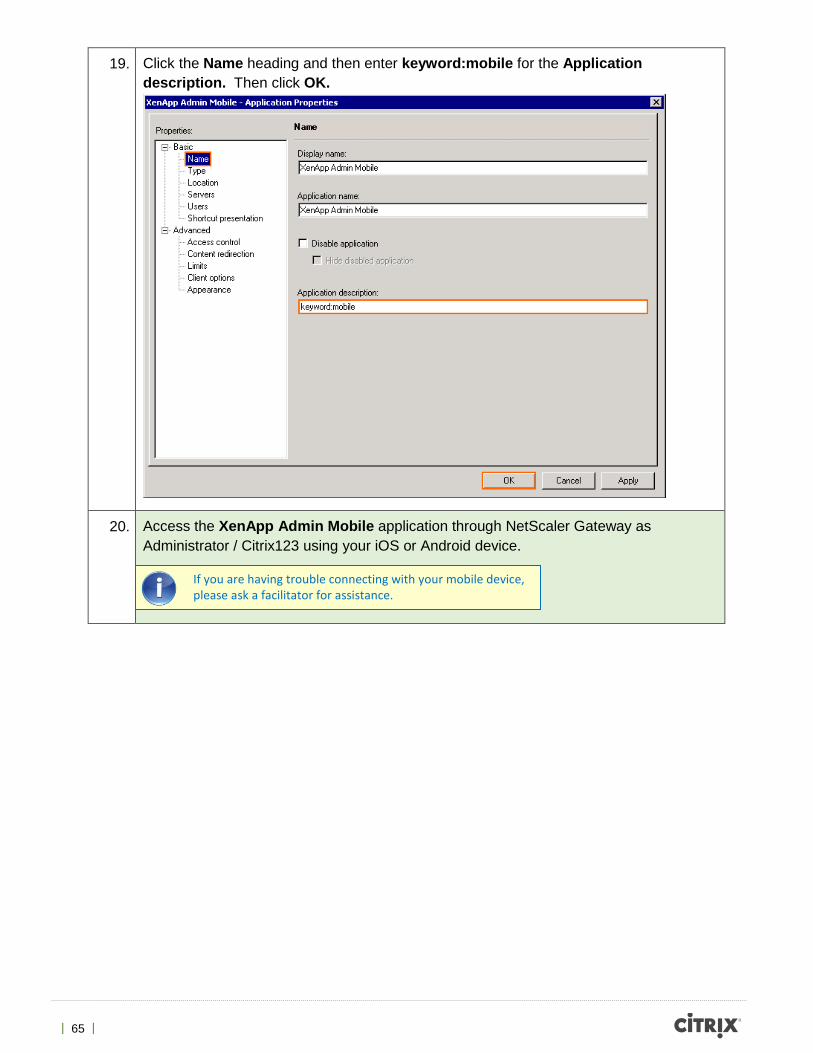
18. We now need to add in the mobile keyword to the published application for correct handling on mobile devices. Right-click the XenApp Admin Mobile published application and select Application properties.
| 65 |
19. Click the Name heading and then enter keyword:mobile for the Application description. Then click OK.
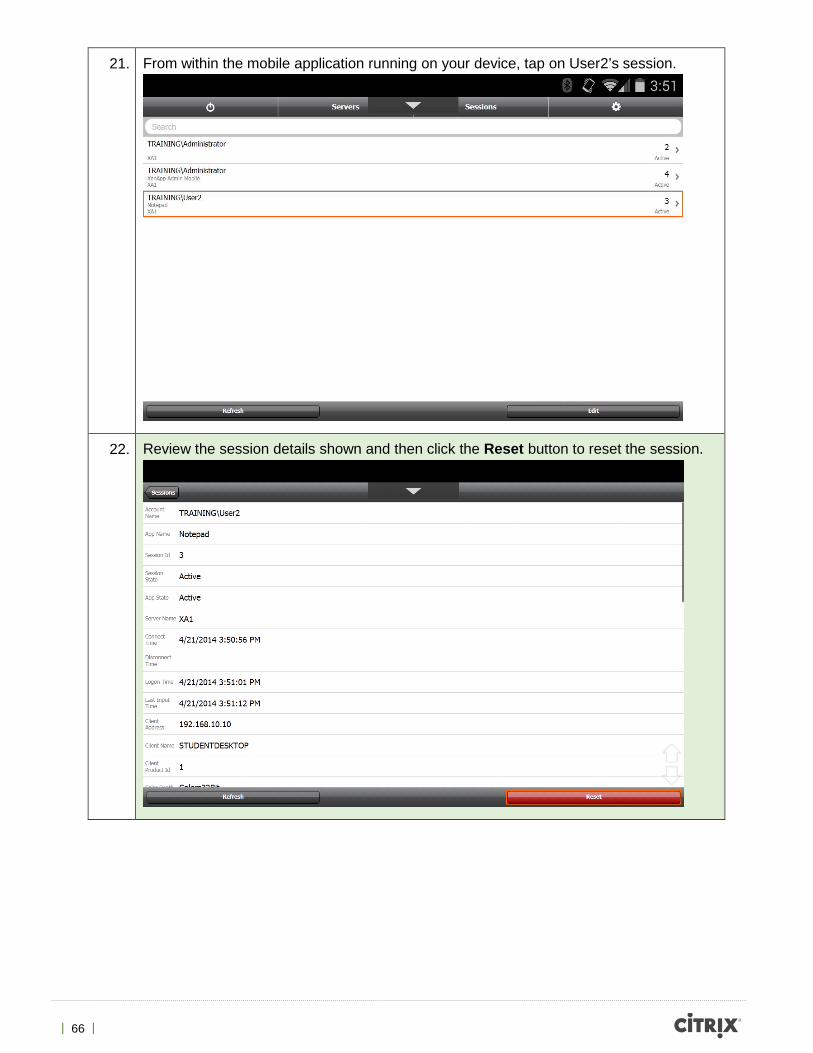
20. Access the XenApp Admin Mobile application through NetScaler Gateway as Administrator / Citrix123 using your iOS or Android device.
If you are having trouble connecting with your mobile device, please ask a facilitator for assistance.
| 66 |
21. From within the mobile application running on your device, tap on User2’s session.
22. Review the session details shown and then click the Reset button to reset the session.
| 67 |
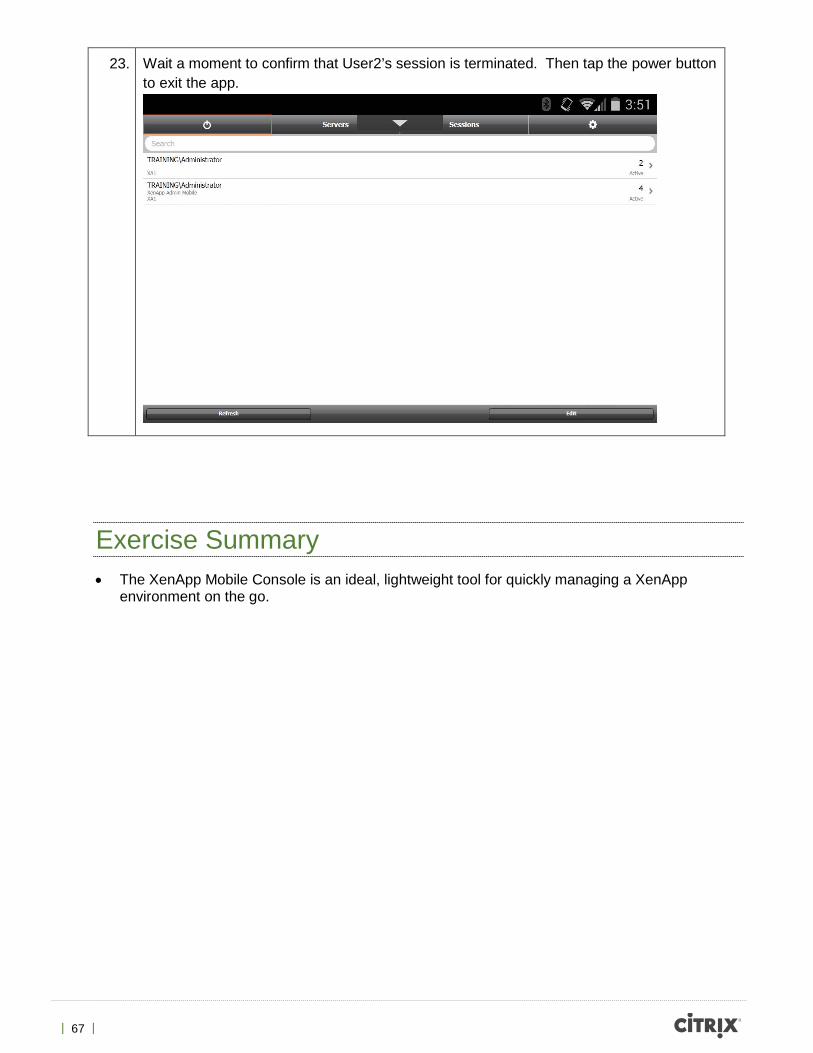
23. Wait a moment to confirm that User2’s session is terminated. Then tap the power button to exit the app.
Exercise Summary • The XenApp Mobile Console is an ideal, lightweight tool for quickly managing a XenApp
environment on the go.

| 68 |
Exercise 4 Mobilizing a Legacy Application Overview In this exercise we will take a sample line-of-business application and make some modifications to it to make it mobile friendly. We will be using a .NET WinForms application as this is a common platform for line-of-business apps. While we will be integrating a couple of Mobile SDK features, you will see that much of the work in making an app mobile friendly is in updating the layout (e.g. controls must be large and touch friendly, and scale up on high DPI devices).
Step by step guidance Estimated time to complete this lab: 35 minutes.
Step
Action
1. From Win7Dev, open the existing LegacyApp project by double clicking the LegacyApp.sln Visual Studio Solution File at C:\files\sample_code_projects\Mobilizing a Legacy Application\Exercise_Step_1.
2. Click the button to Start Debugging (or press F5).
| 69 |
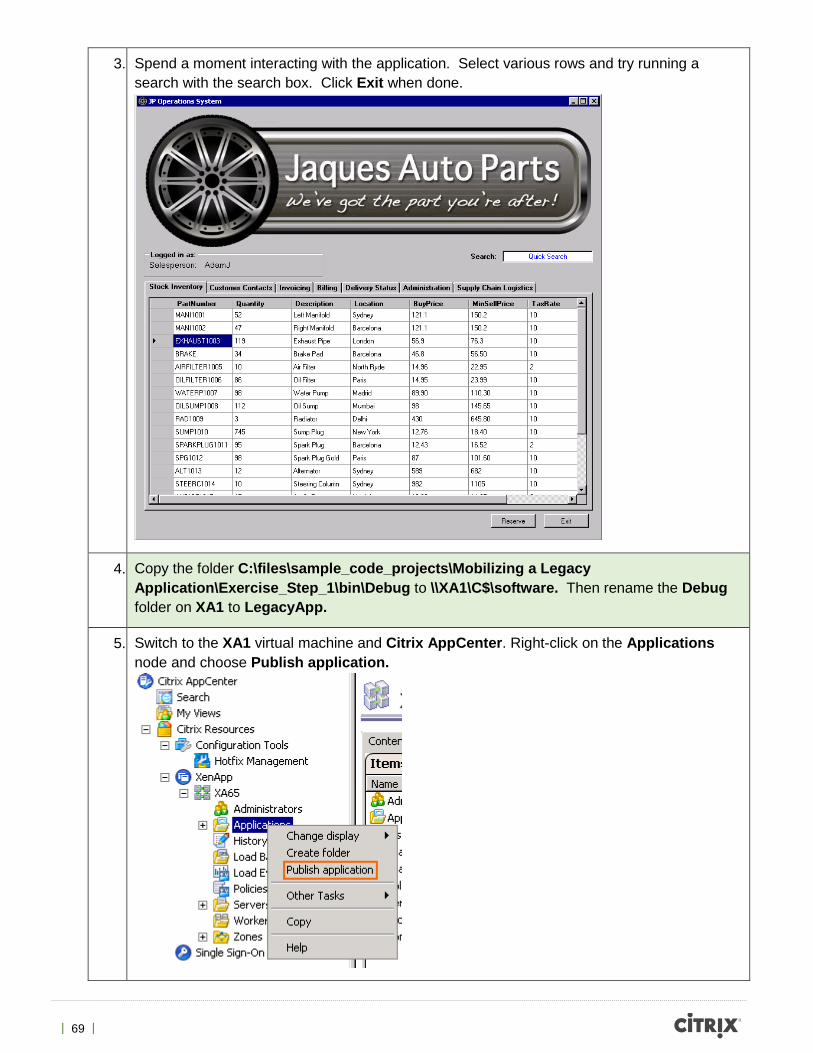
3. Spend a moment interacting with the application. Select various rows and try running a search with the search box. Click Exit when done.
4. Copy the folder C:\files\sample_code_projects\Mobilizing a Legacy Application\Exercise_Step_1\bin\Debug to \\XA1\C$\software. Then rename the Debug folder on XA1 to LegacyApp.
5. Switch to the XA1 virtual machine and Citrix AppCenter. Right-click on the Applications node and choose Publish application.
| 70 |
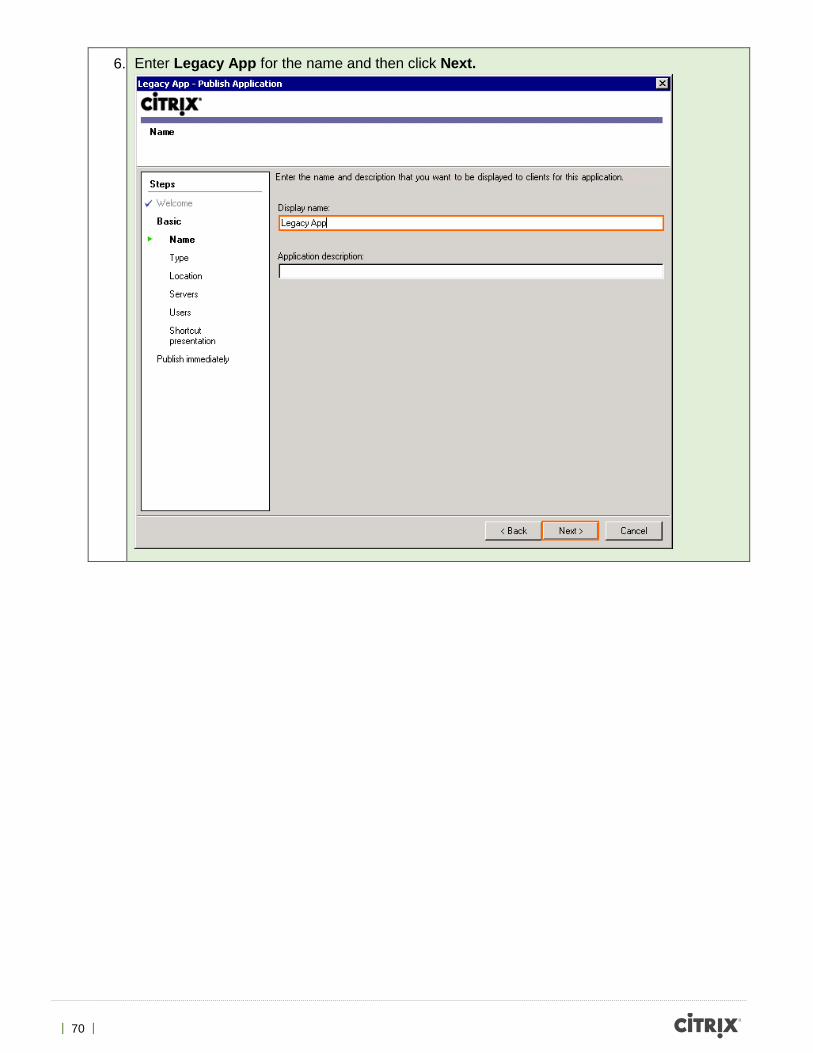
6. Enter Legacy App for the name and then click Next.
| 71 |
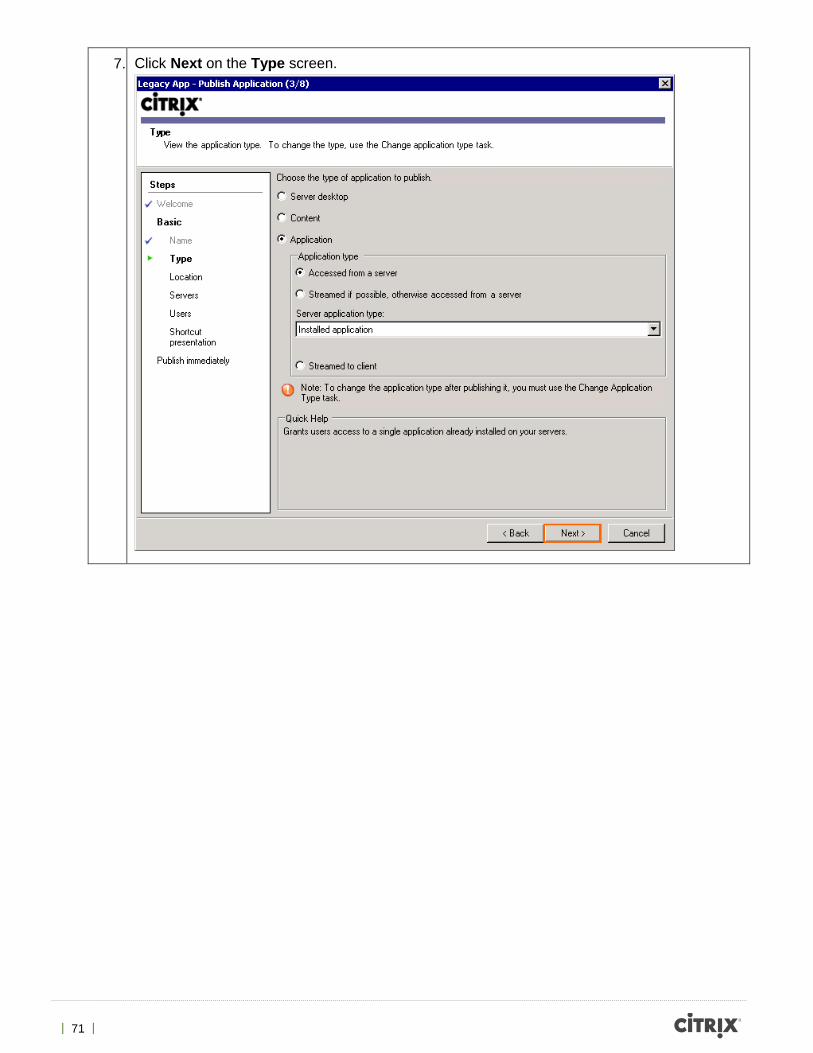
7. Click Next on the Type screen.
| 72 |
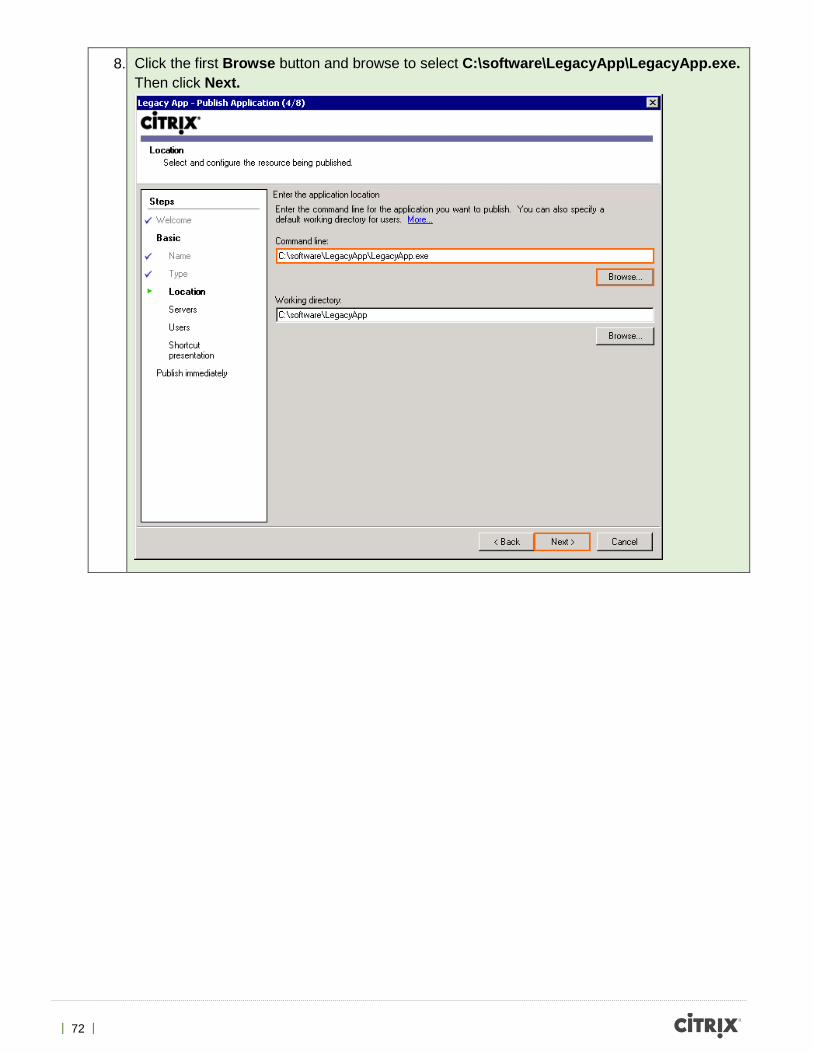
8. Click the first Browse button and browse to select C:\software\LegacyApp\LegacyApp.exe. Then click Next.
| 73 |
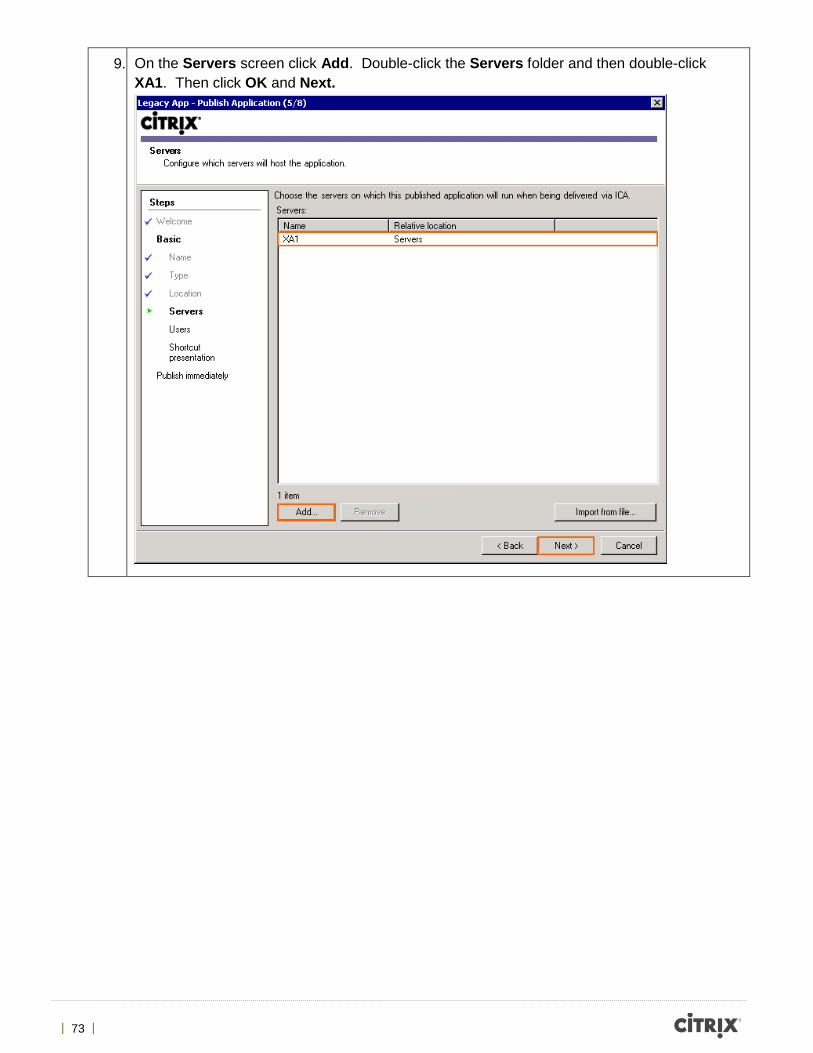
9. On the Servers screen click Add. Double-click the Servers folder and then double-click XA1. Then click OK and Next.
| 74 |
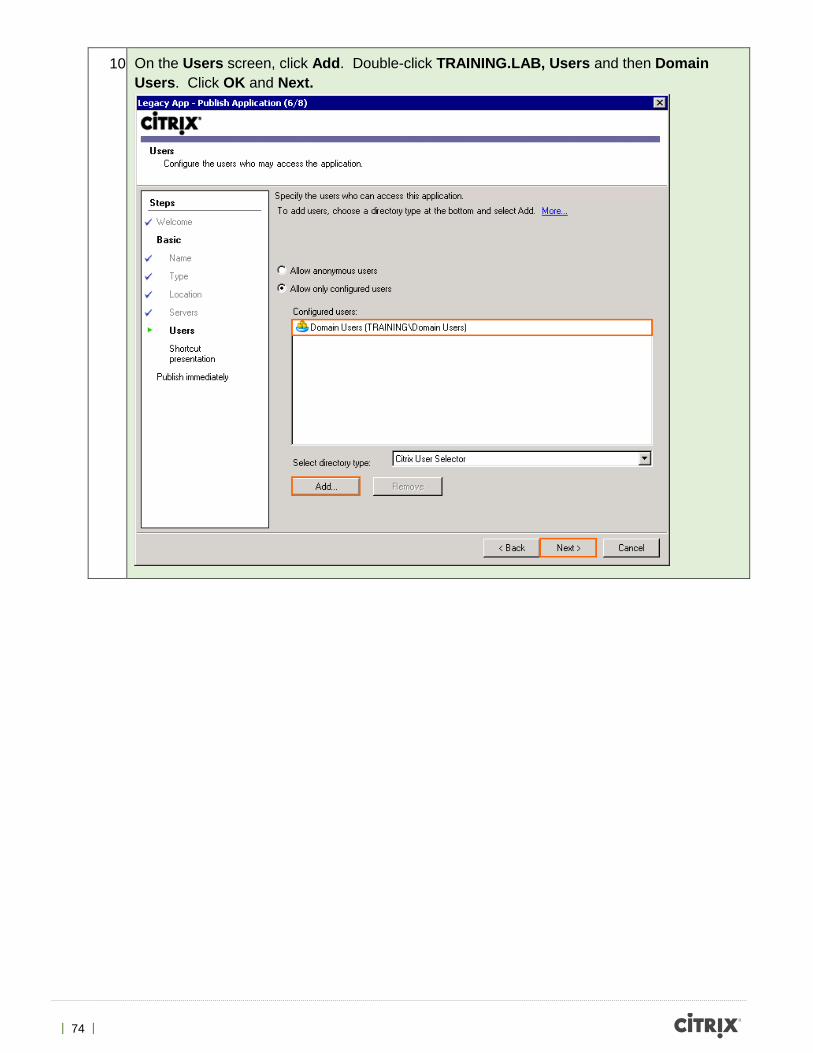
10 On the Users screen, click Add. Double-click TRAINING.LAB, Users and then Domain Users. Click OK and Next.

| 75 |
11 Click Next on the Shortcut presentation screen.
| 76 |
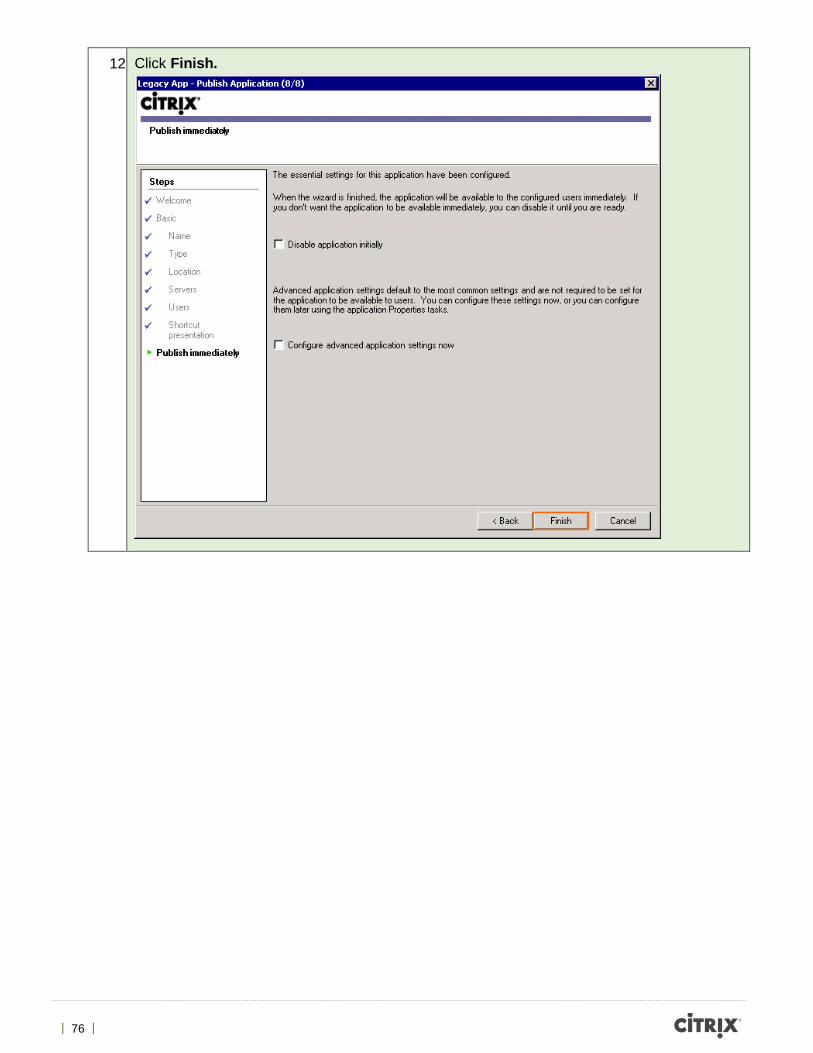
12 Click Finish.
| 77 |
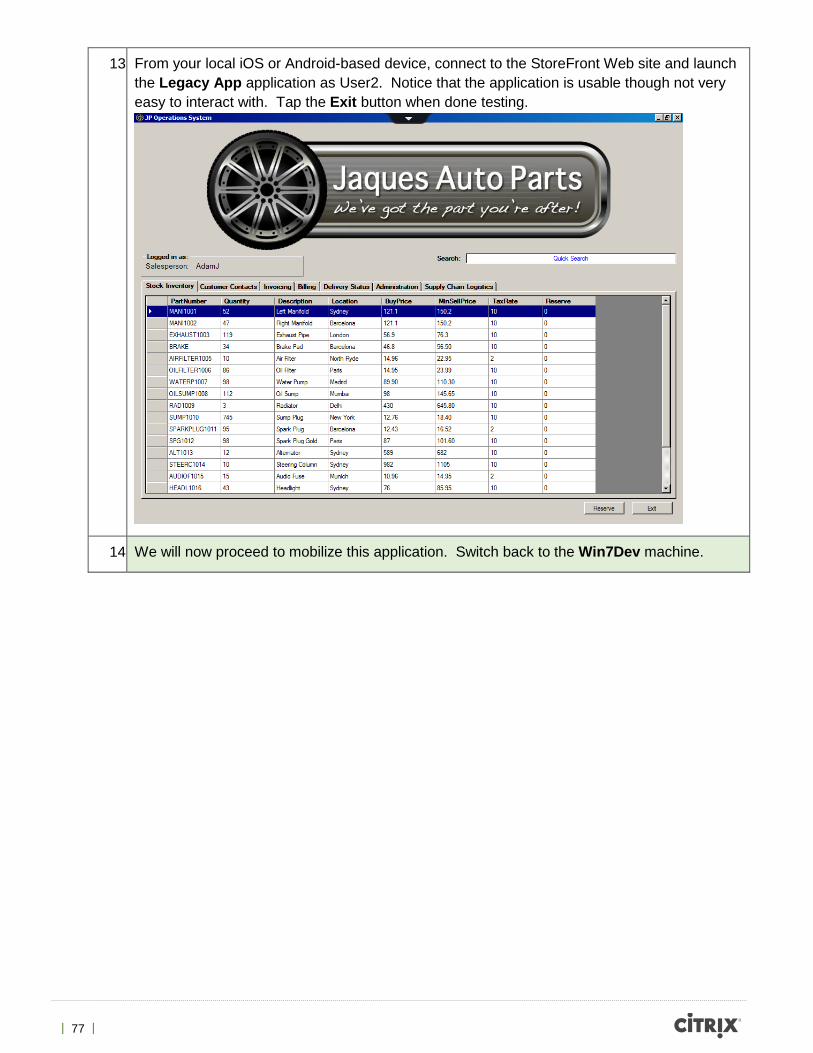
13 From your local iOS or Android-based device, connect to the StoreFront Web site and launch the Legacy App application as User2. Notice that the application is usable though not very easy to interact with. Tap the Exit button when done testing.
14 We will now proceed to mobilize this application. Switch back to the Win7Dev machine.

| 78 |
15 From Visual Studio with the LegacyApp Solution, open the main form by double clicking on Form1.cs from the Solution Explorer.
16 The logo takes up valuable space on the form. We don’t have as much screen real estate on mobile devices so we want to get rid of it.
• Click on the Jaques Auto Parts logo to select it.
• Press Delete on your keyboard to delete it.
17 The layout of the form is using a typical, fixed size layout. So for example the sizes of the buttons and text boxes will never change as the window gets resized. To make this app mobile friendly we want to change this to use a proportional layout so that our controls get stretched out as the window gets bigger.
This is important for mobile apps to make them DPI scalable. On very high DPI devices, using a legacy app can be difficult as the controls are often too small.
So we will be using a table layout which supports proportional layouts.
| 79 |
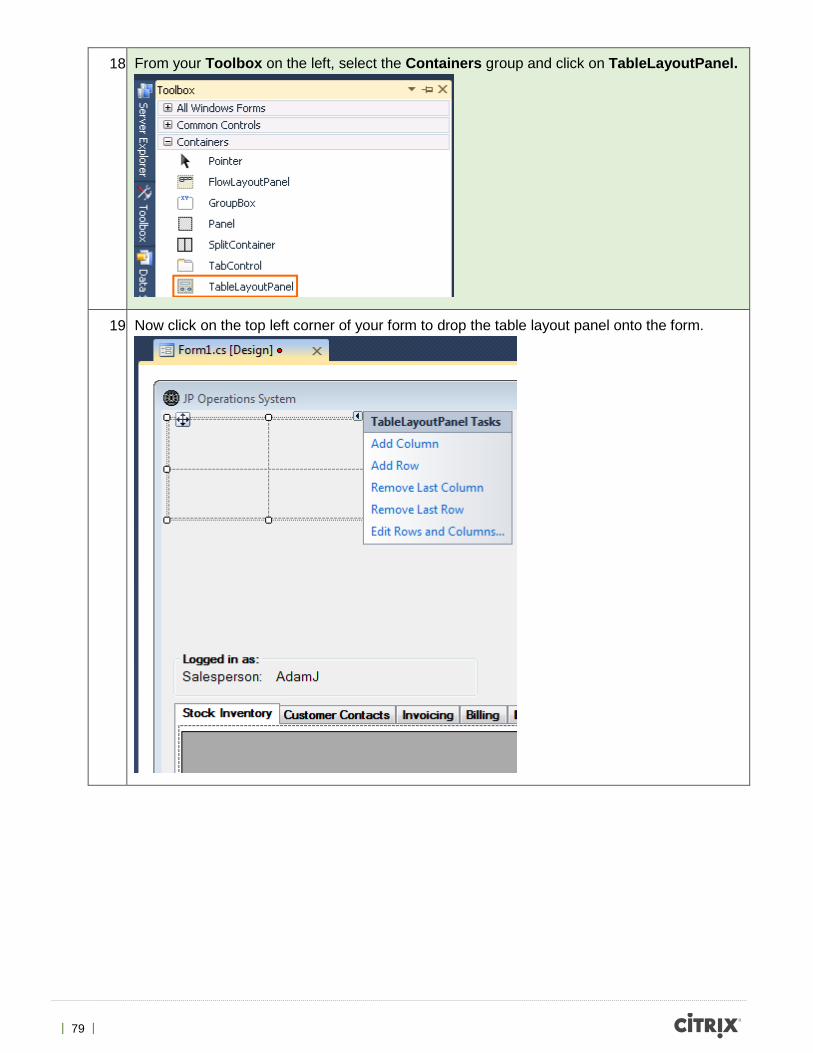
18 From your Toolbox on the left, select the Containers group and click on TableLayoutPanel.
19 Now click on the top left corner of your form to drop the table layout panel onto the form.
| 80 |
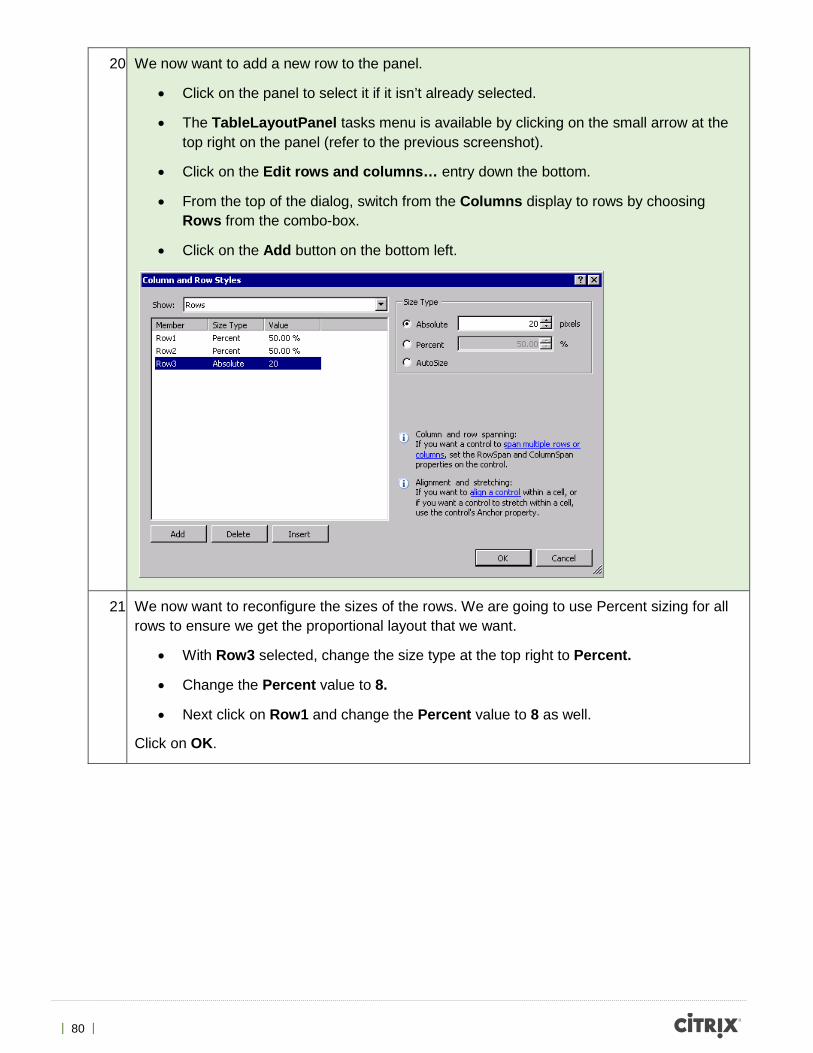
20 We now want to add a new row to the panel.
• Click on the panel to select it if it isn’t already selected.
• The TableLayoutPanel tasks menu is available by clicking on the small arrow at the top right on the panel (refer to the previous screenshot).
• Click on the Edit rows and columns… entry down the bottom.
• From the top of the dialog, switch from the Columns display to rows by choosing Rows from the combo-box.
• Click on the Add button on the bottom left.
21 We now want to reconfigure the sizes of the rows. We are going to use Percent sizing for all rows to ensure we get the proportional layout that we want.
• With Row3 selected, change the size type at the top right to Percent.
• Change the Percent value to 8.
• Next click on Row1 and change the Percent value to 8 as well.
Click on OK.
| 81 |
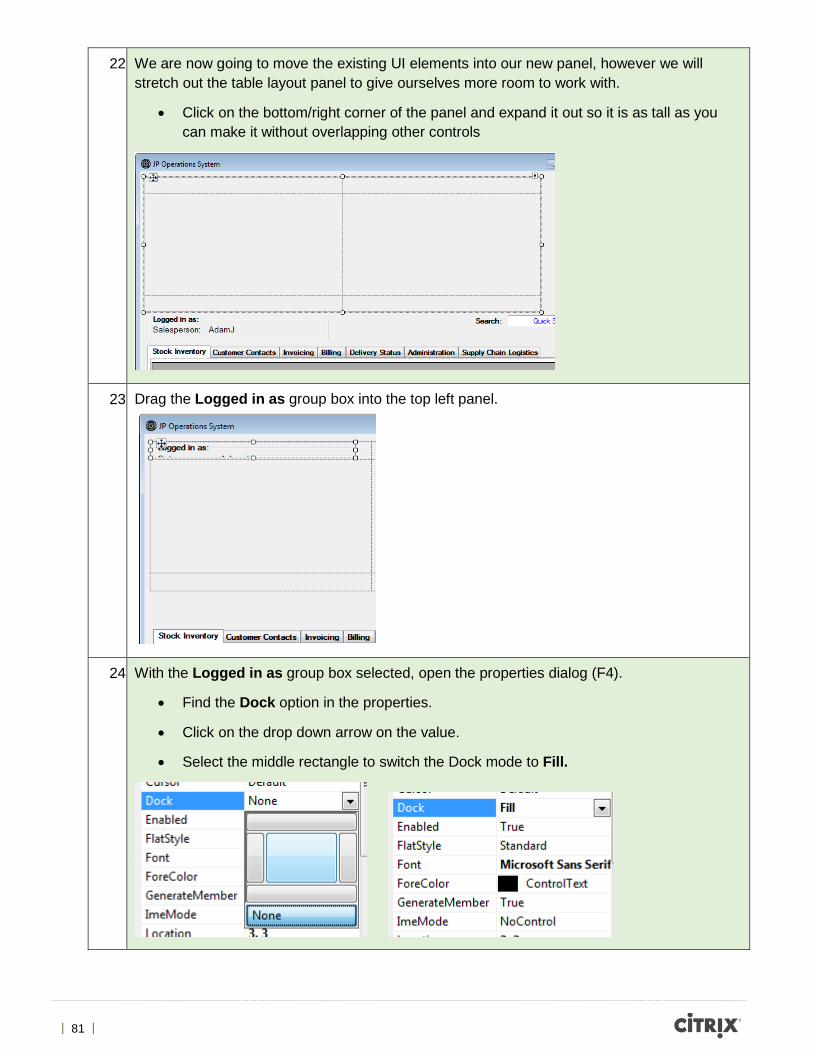
22 We are now going to move the existing UI elements into our new panel, however we will stretch out the table layout panel to give ourselves more room to work with.
• Click on the bottom/right corner of the panel and expand it out so it is as tall as you can make it without overlapping other controls
23 Drag the Logged in as group box into the top left panel.
24 With the Logged in as group box selected, open the properties dialog (F4).
• Find the Dock option in the properties.
• Click on the drop down arrow on the value.
• Select the middle rectangle to switch the Dock mode to Fill.
| 82 |
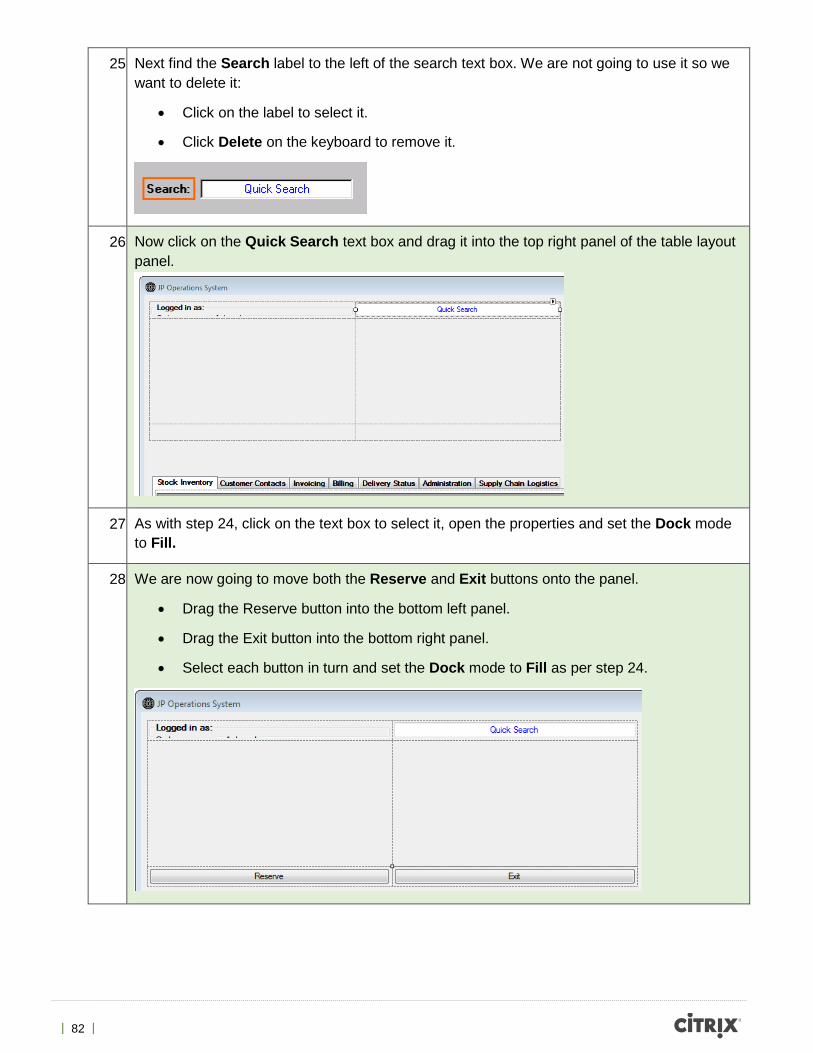
25 Next find the Search label to the left of the search text box. We are not going to use it so we want to delete it:
• Click on the label to select it.
• Click Delete on the keyboard to remove it.
26 Now click on the Quick Search text box and drag it into the top right panel of the table layout panel.
27 As with step 24, click on the text box to select it, open the properties and set the Dock mode to Fill.
28 We are now going to move both the Reserve and Exit buttons onto the panel.
• Drag the Reserve button into the bottom left panel.
• Drag the Exit button into the bottom right panel.
• Select each button in turn and set the Dock mode to Fill as per step 24.
| 83 |
29 Now we are going to move the main tab control:
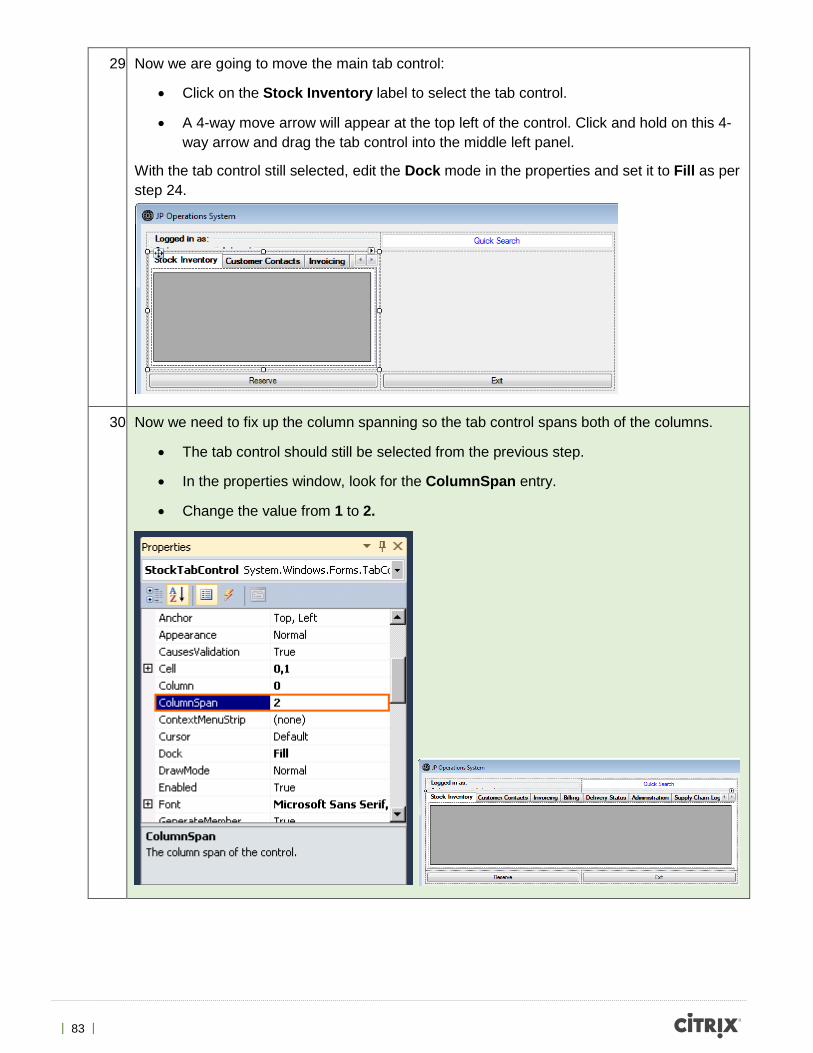
• Click on the Stock Inventory label to select the tab control.
• A 4-way move arrow will appear at the top left of the control. Click and hold on this 4-way arrow and drag the tab control into the middle left panel.
With the tab control still selected, edit the Dock mode in the properties and set it to Fill as per step 24.
30 Now we need to fix up the column spanning so the tab control spans both of the columns.
• The tab control should still be selected from the previous step.
• In the properties window, look for the ColumnSpan entry.
• Change the value from 1 to 2.
| 84 |
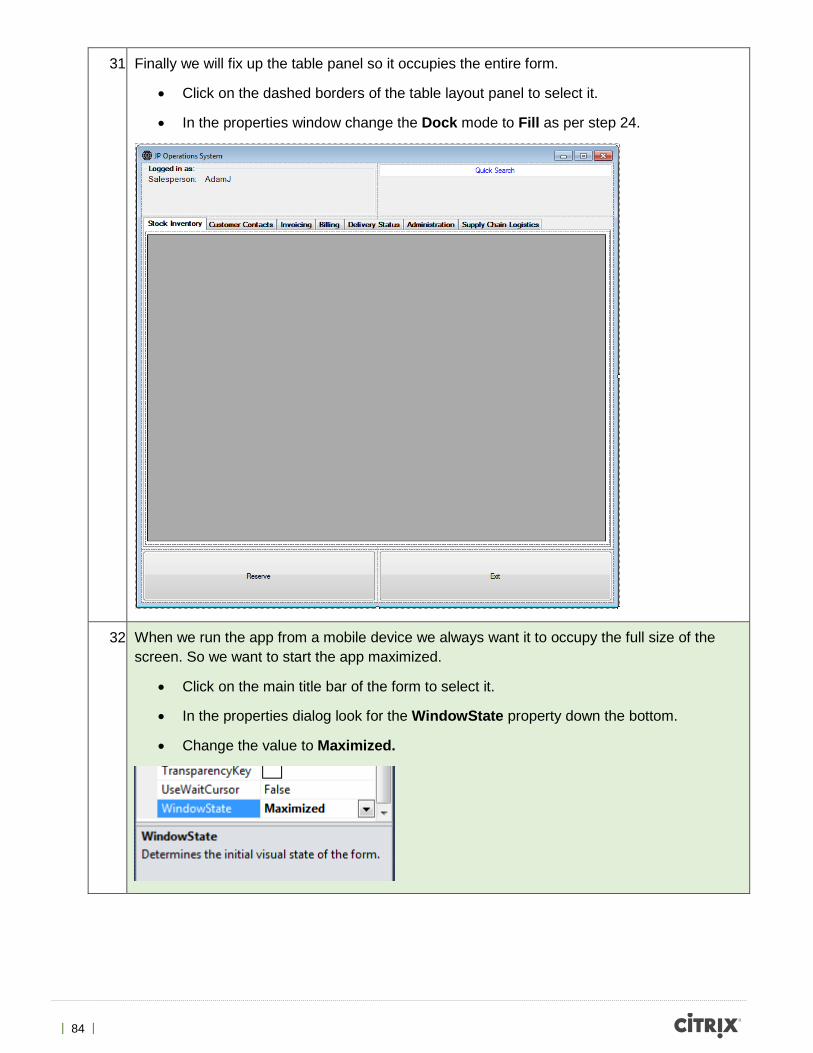
31 Finally we will fix up the table panel so it occupies the entire form.
• Click on the dashed borders of the table layout panel to select it.
• In the properties window change the Dock mode to Fill as per step 24.
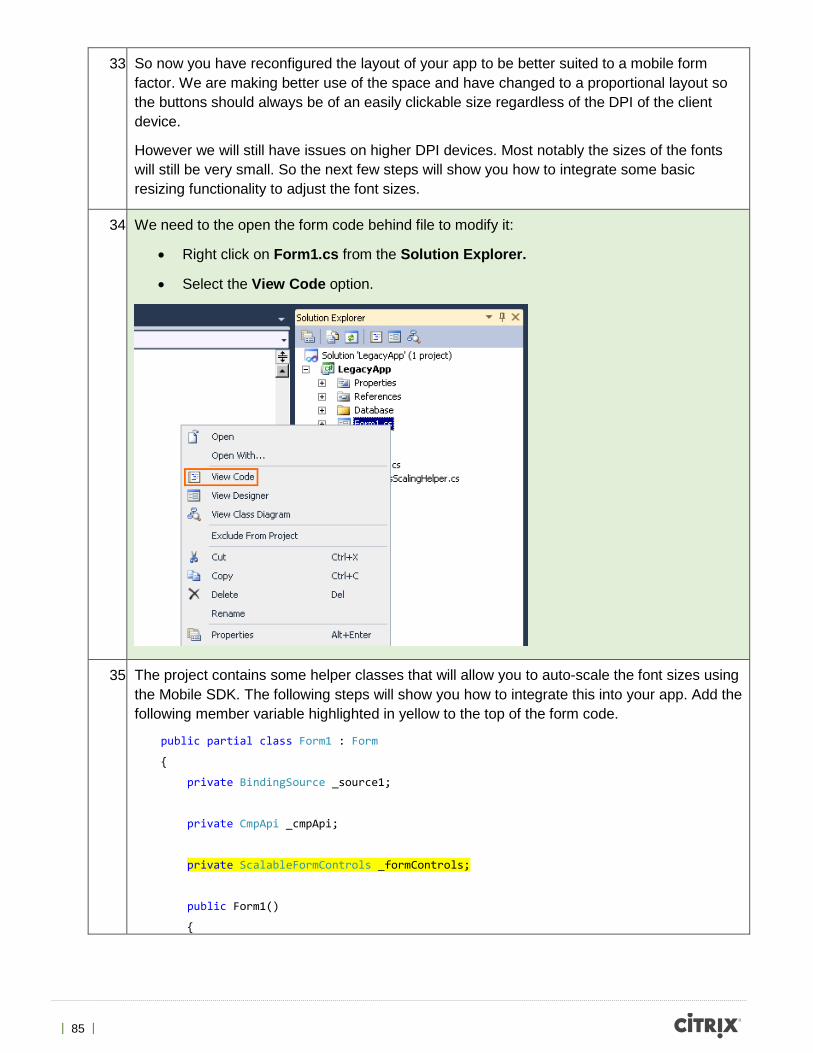
32 When we run the app from a mobile device we always want it to occupy the full size of the screen. So we want to start the app maximized.
• Click on the main title bar of the form to select it.
• In the properties dialog look for the WindowState property down the bottom.
• Change the value to Maximized.
| 85 |
33 So now you have reconfigured the layout of your app to be better suited to a mobile form factor. We are making better use of the space and have changed to a proportional layout so the buttons should always be of an easily clickable size regardless of the DPI of the client device.
However we will still have issues on higher DPI devices. Most notably the sizes of the fonts will still be very small. So the next few steps will show you how to integrate some basic resizing functionality to adjust the font sizes.
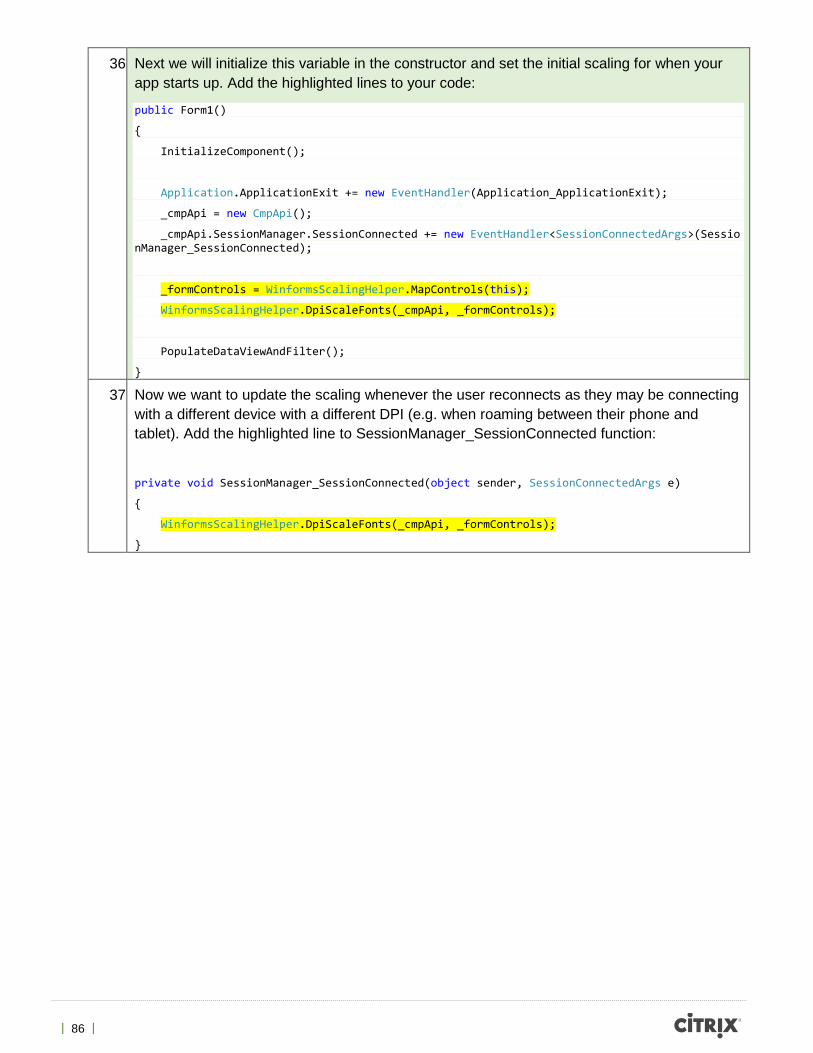
34 We need to the open the form code behind file to modify it:
• Right click on Form1.cs from the Solution Explorer.
• Select the View Code option.
35 The project contains some helper classes that will allow you to auto-scale the font sizes using the Mobile SDK. The following steps will show you how to integrate this into your app. Add the following member variable highlighted in yellow to the top of the form code.
public partial class Form1 : Form
{
private BindingSource _source1;
private CmpApi _cmpApi;
private ScalableFormControls _formControls;
public Form1()
{
| 86 |
36 Next we will initialize this variable in the constructor and set the initial scaling for when your app starts up. Add the highlighted lines to your code:
public Form1()
{
InitializeComponent();
Application.ApplicationExit += new EventHandler(Application_ApplicationExit);
_cmpApi = new CmpApi();
_cmpApi.SessionManager.SessionConnected += new EventHandler<SessionConnectedArgs>(SessionManager_SessionConnected);
_formControls = WinformsScalingHelper.MapControls(this);
WinformsScalingHelper.DpiScaleFonts(_cmpApi, _formControls);
PopulateDataViewAndFilter();
}
37 Now we want to update the scaling whenever the user reconnects as they may be connecting with a different device with a different DPI (e.g. when roaming between their phone and tablet). Add the highlighted line to SessionManager_SessionConnected function:
private void SessionManager_SessionConnected(object sender, SessionConnectedArgs e)
{
WinformsScalingHelper.DpiScaleFonts(_cmpApi, _formControls);
}

| 87 |
38 The last change we will make to the app is to integrate keyboard popup support to the search text box.
• Switch back to the Form1.cs [Design] tab.
• Click on the Quick Search textbox to select it.
• Open the Properties dialog (F4).
• At the top of the Properties dialog click on the lightning bolt so we can add some event handlers.
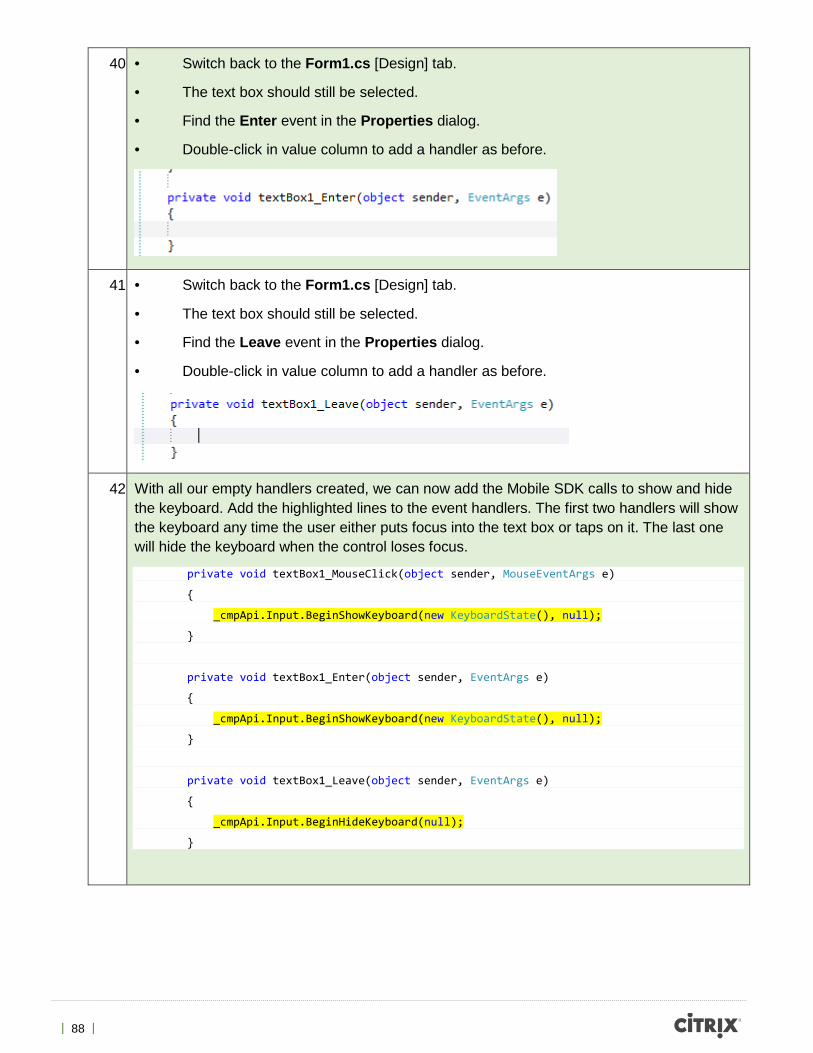
39 We are now going to add handlers for several events:
• Find the MouseClick event. Double-click in the empty value column to the right of the event name to add a handler.
• This will automatically add the handler and open the Form1.cs code file.
| 88 |
40 • Switch back to the Form1.cs [Design] tab.
• The text box should still be selected.
• Find the Enter event in the Properties dialog.
• Double-click in value column to add a handler as before.
41 • Switch back to the Form1.cs [Design] tab.
• The text box should still be selected.
• Find the Leave event in the Properties dialog.
• Double-click in value column to add a handler as before.
42 With all our empty handlers created, we can now add the Mobile SDK calls to show and hide the keyboard. Add the highlighted lines to the event handlers. The first two handlers will show the keyboard any time the user either puts focus into the text box or taps on it. The last one will hide the keyboard when the control loses focus.
private void textBox1_MouseClick(object sender, MouseEventArgs e)
{
_cmpApi.Input.BeginShowKeyboard(new KeyboardState(), null);
}
private void textBox1_Enter(object sender, EventArgs e)
{
_cmpApi.Input.BeginShowKeyboard(new KeyboardState(), null);
}
private void textBox1_Leave(object sender, EventArgs e)
{
_cmpApi.Input.BeginHideKeyboard(null);
}
| 89 |
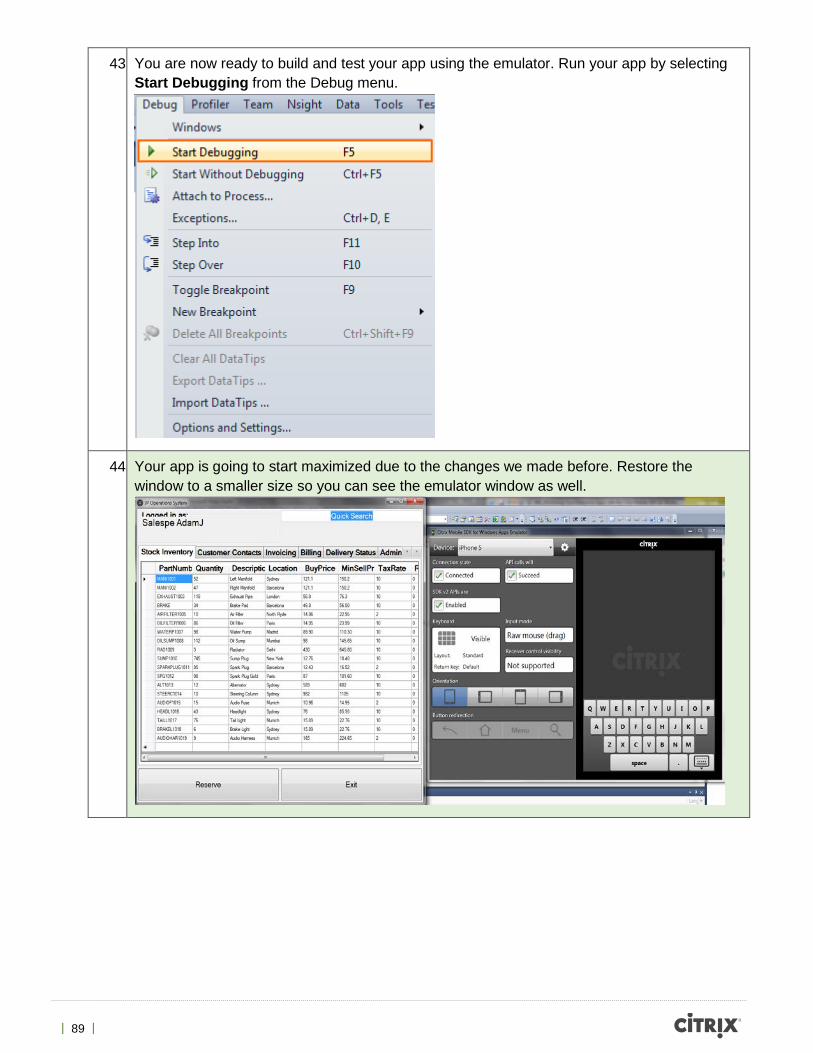
43 You are now ready to build and test your app using the emulator. Run your app by selecting Start Debugging from the Debug menu.
44 Your app is going to start maximized due to the changes we made before. Restore the window to a smaller size so you can see the emulator window as well.
| 90 |
45 Now we can test the app:
• First note the large font sizes.
• The app starts with focus on the search text box, so the emulator should already show the keyboard as displayed.
• If you click on one of the rows in the stock inventory note how the keyboard gets hidden.
• If you click back into the search text box it should be displayed again.
46 Click the Exit button to close the app. Then copy the folder C:\files\sample_code_projects\Mobilizing a Legacy Application\Exercise_Step_1\bin\Debug to \\XA1\C$\software. Then rename the Debug folder on XA1 to LegacyAppMobile.
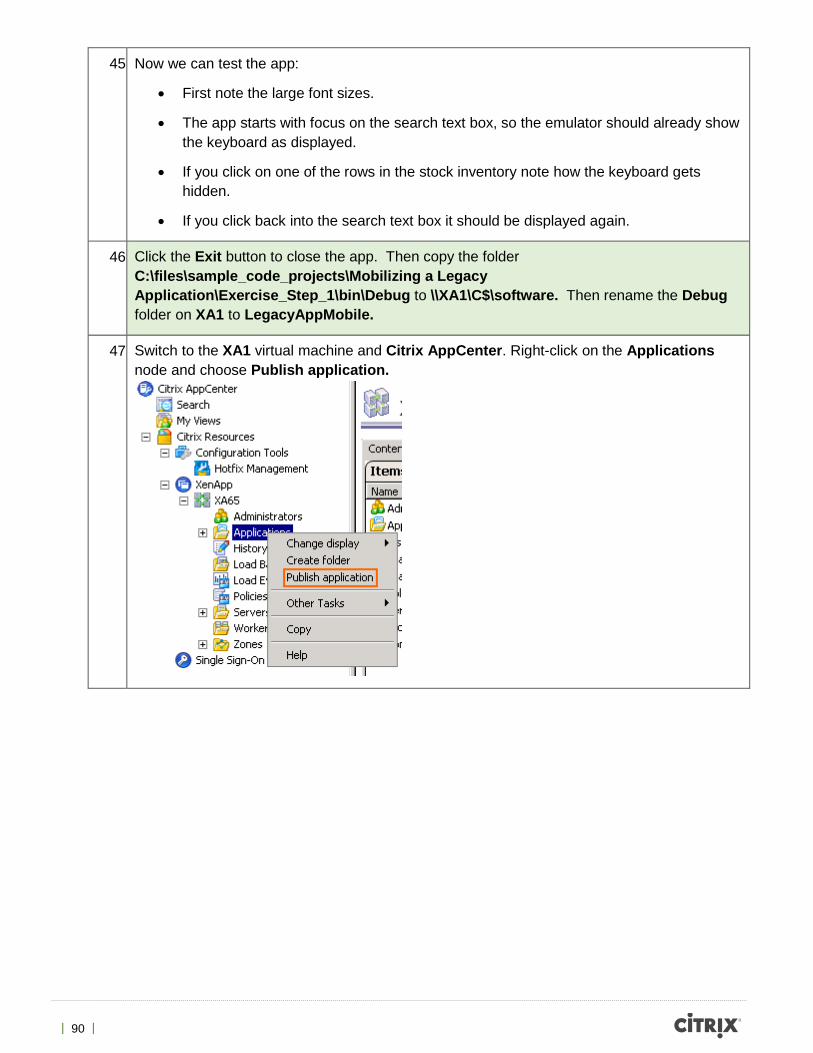
47 Switch to the XA1 virtual machine and Citrix AppCenter. Right-click on the Applications node and choose Publish application.
| 91 |
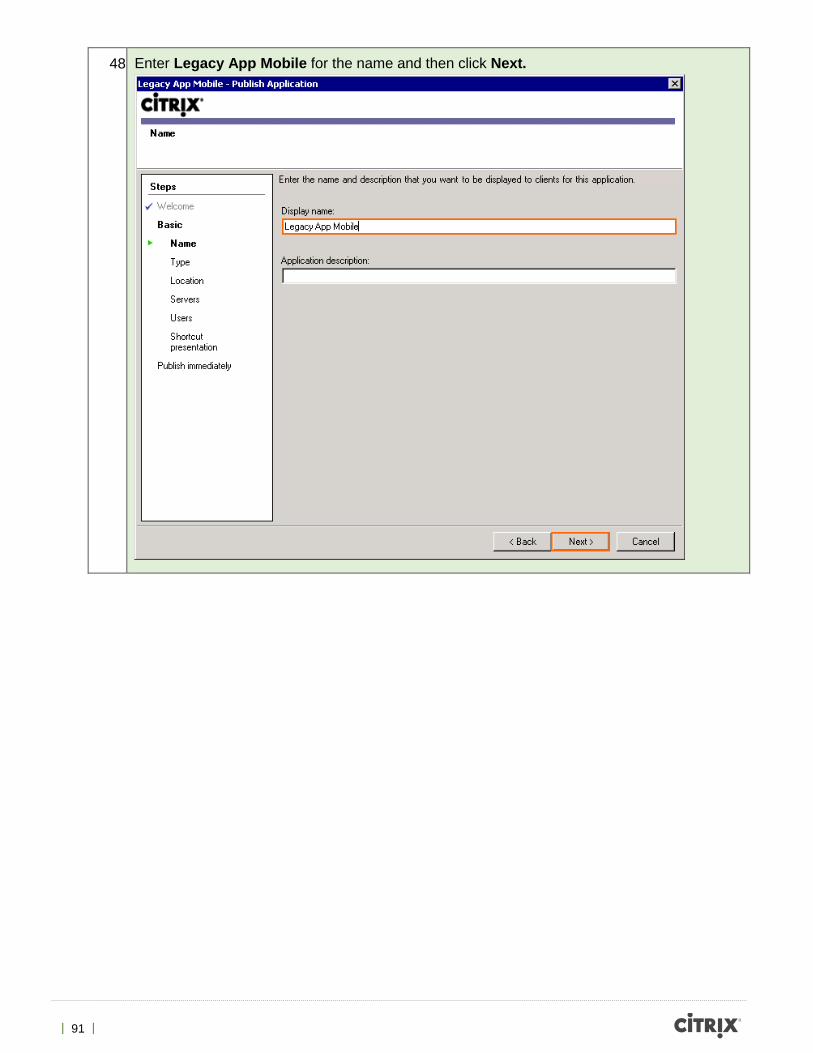
48 Enter Legacy App Mobile for the name and then click Next.

| 92 |
49 Click Next on the Type screen.
| 93 |
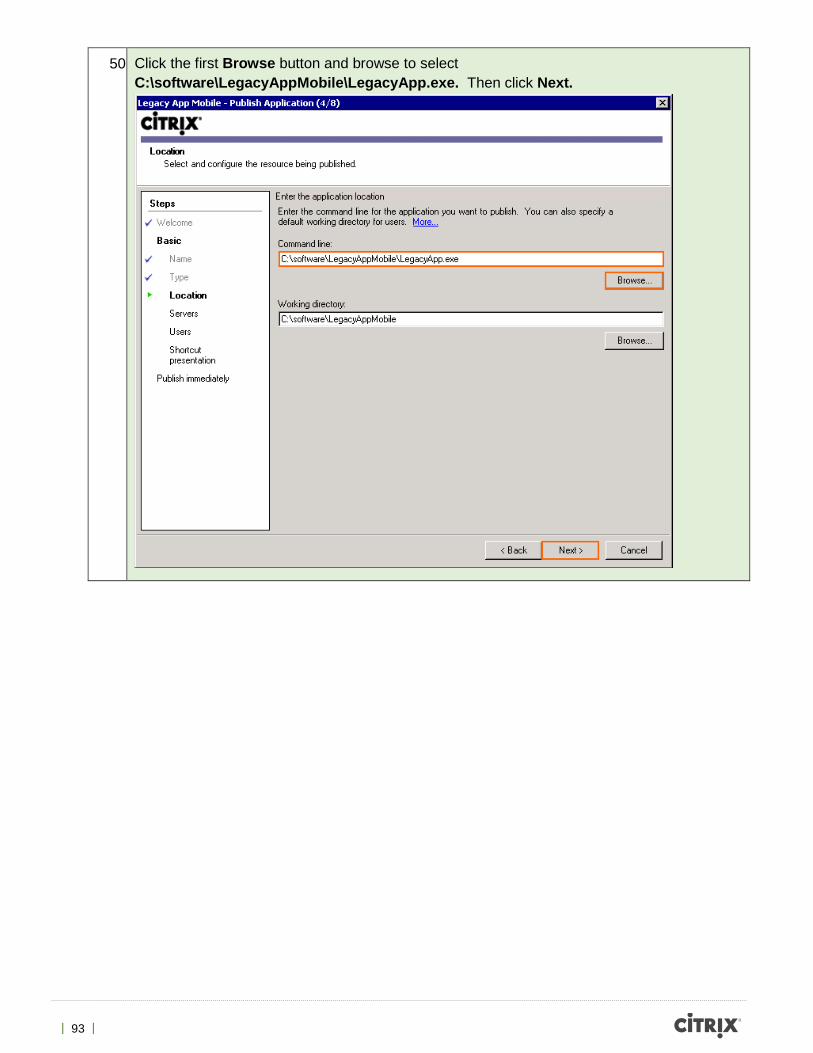
50 Click the first Browse button and browse to select C:\software\LegacyAppMobile\LegacyApp.exe. Then click Next.
| 94 |
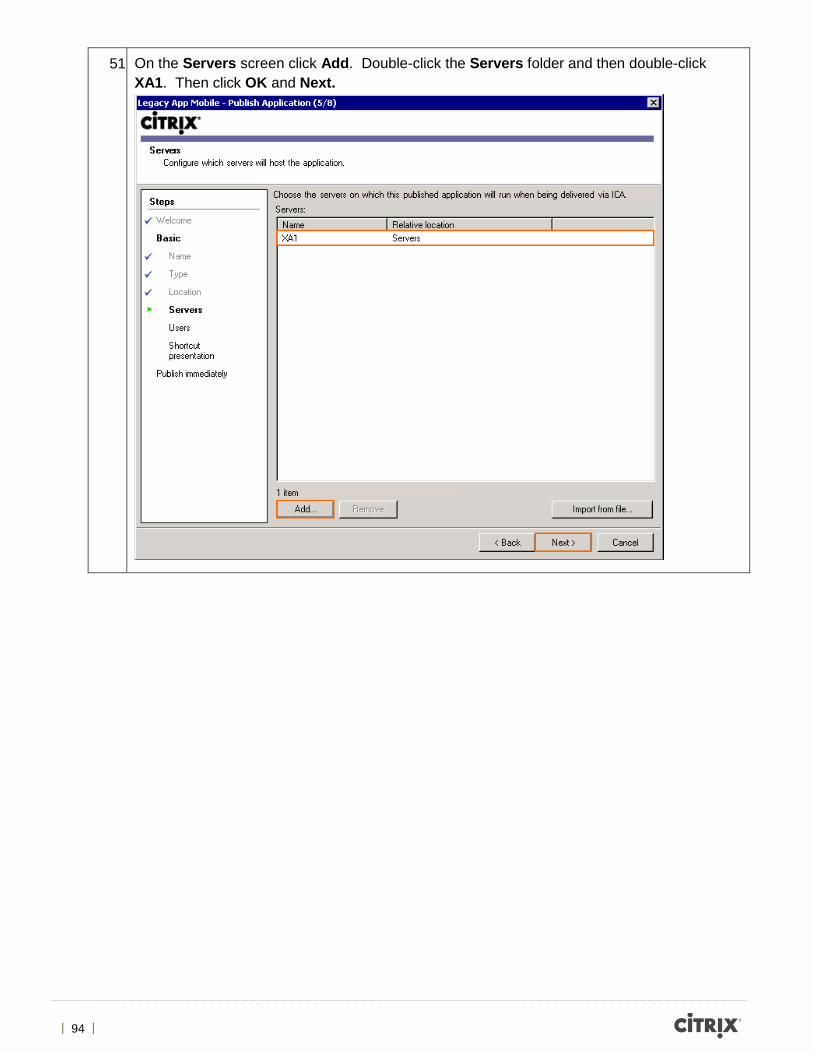
51 On the Servers screen click Add. Double-click the Servers folder and then double-click XA1. Then click OK and Next.
| 95 |
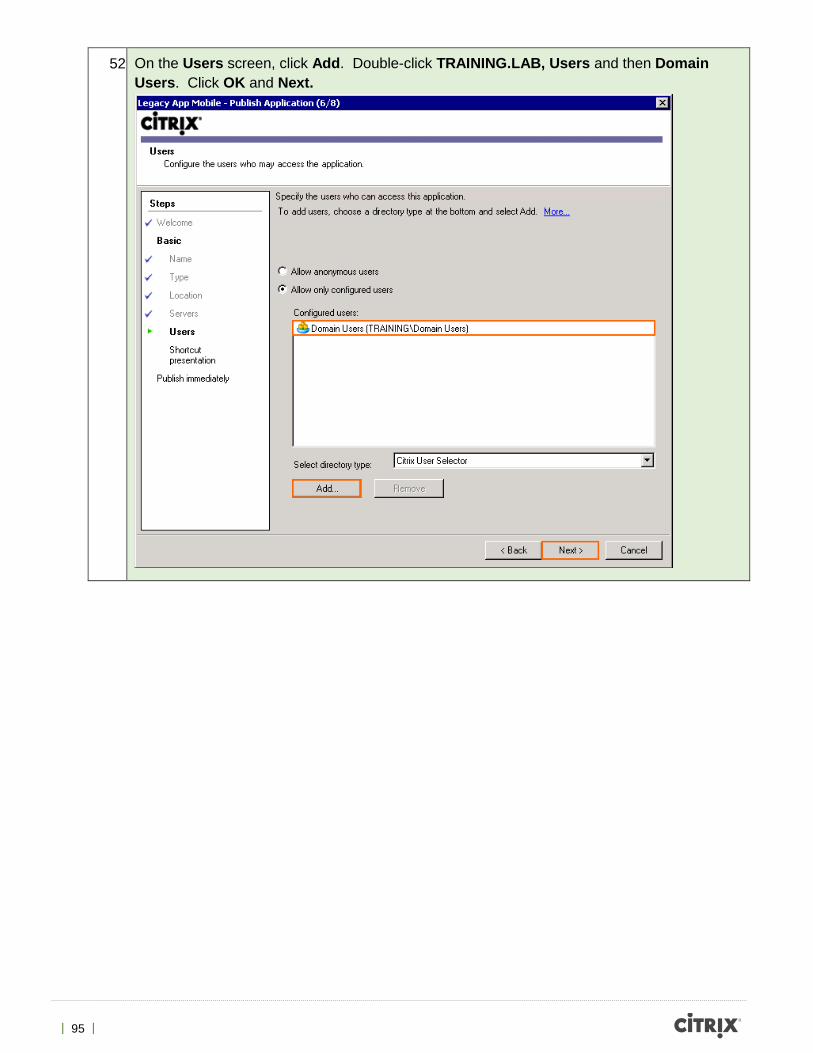
52 On the Users screen, click Add. Double-click TRAINING.LAB, Users and then Domain Users. Click OK and Next.
| 96 |
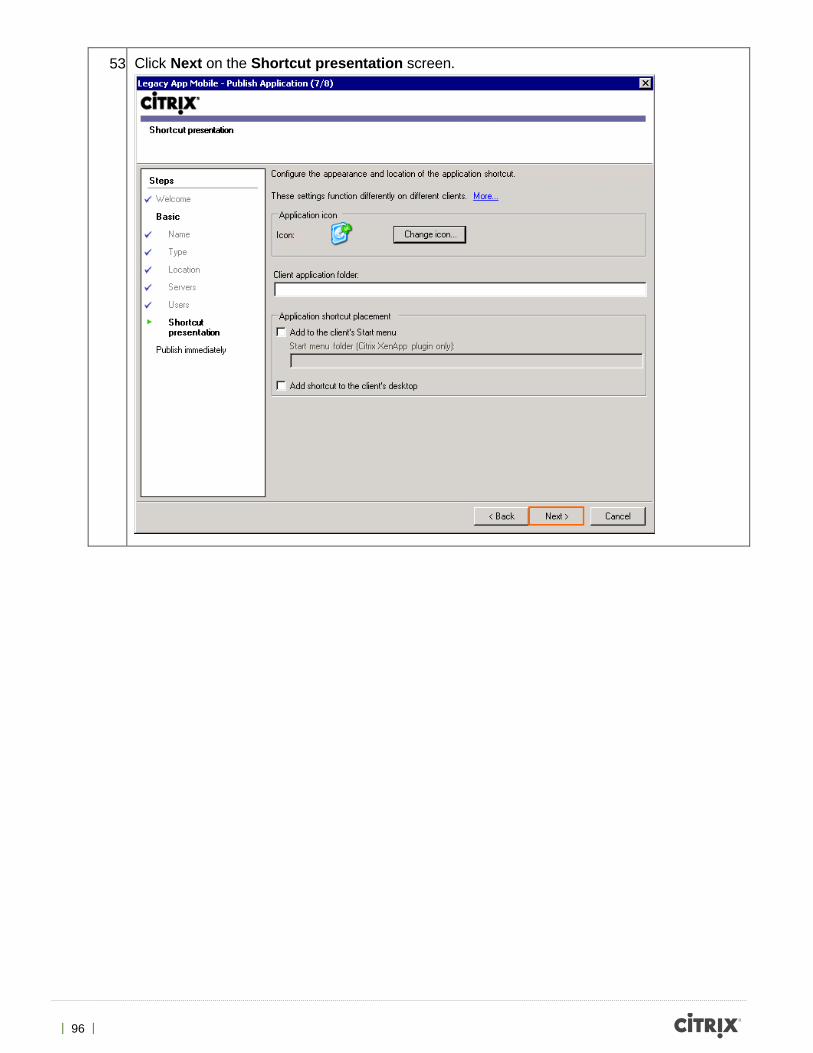
53 Click Next on the Shortcut presentation screen.
| 97 |
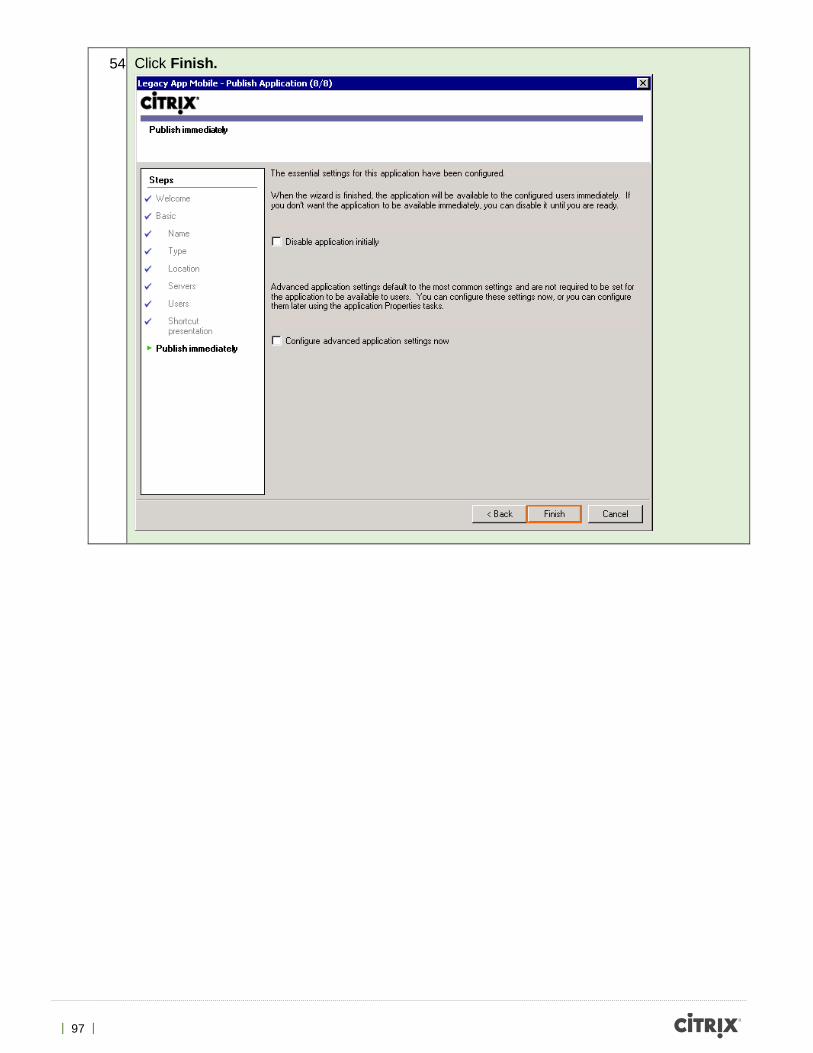
54 Click Finish.
| 98 |
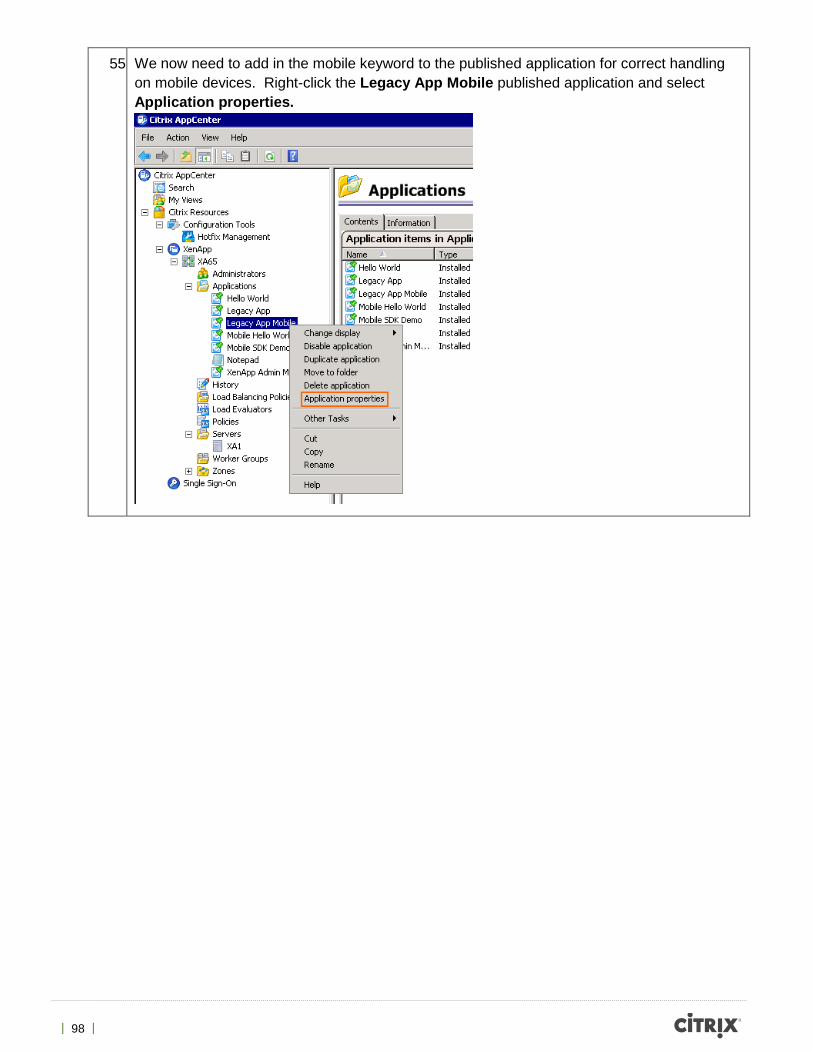
55 We now need to add in the mobile keyword to the published application for correct handling on mobile devices. Right-click the Legacy App Mobile published application and select Application properties.
| 99 |
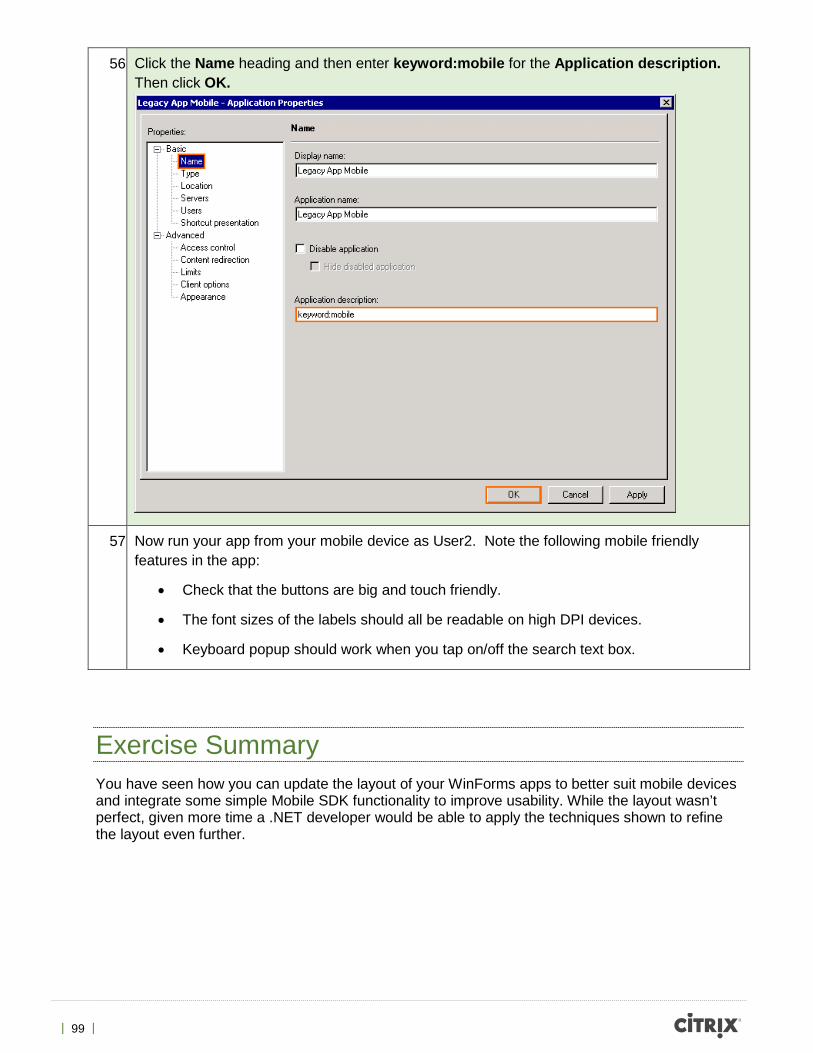
56 Click the Name heading and then enter keyword:mobile for the Application description. Then click OK.
57 Now run your app from your mobile device as User2. Note the following mobile friendly features in the app:
• Check that the buttons are big and touch friendly.
• The font sizes of the labels should all be readable on high DPI devices.
• Keyboard popup should work when you tap on/off the search text box.
Exercise Summary You have seen how you can update the layout of your WinForms apps to better suit mobile devices and integrate some simple Mobile SDK functionality to improve usability. While the layout wasn’t perfect, given more time a .NET developer would be able to apply the techniques shown to refine the layout even further.
| 100 |
Exercise 5 Creating a Mobile Employee “Punch In” App Overview In this exercise we are going to create a brand new mobile application that makes use of the camera and GPS. The app simulates a “punch in” system that tracks when employees are onsite. By taking a picture the employer can verify the identity of the user, while the GPS coordinates ensure employees are in the right place. This is a real world example that was developed by a Citrix Technology Professional using the Mobility SDK to support one of his customers.
If at any point you get stuck on this exercise, you can find pre-created solutions for different stages of this exercise. Under the Exercise 5 files, look for the folder with the next step number after the current step you are stuck on.
Step by step guidance Estimated time to complete this lab: 30 minutes.
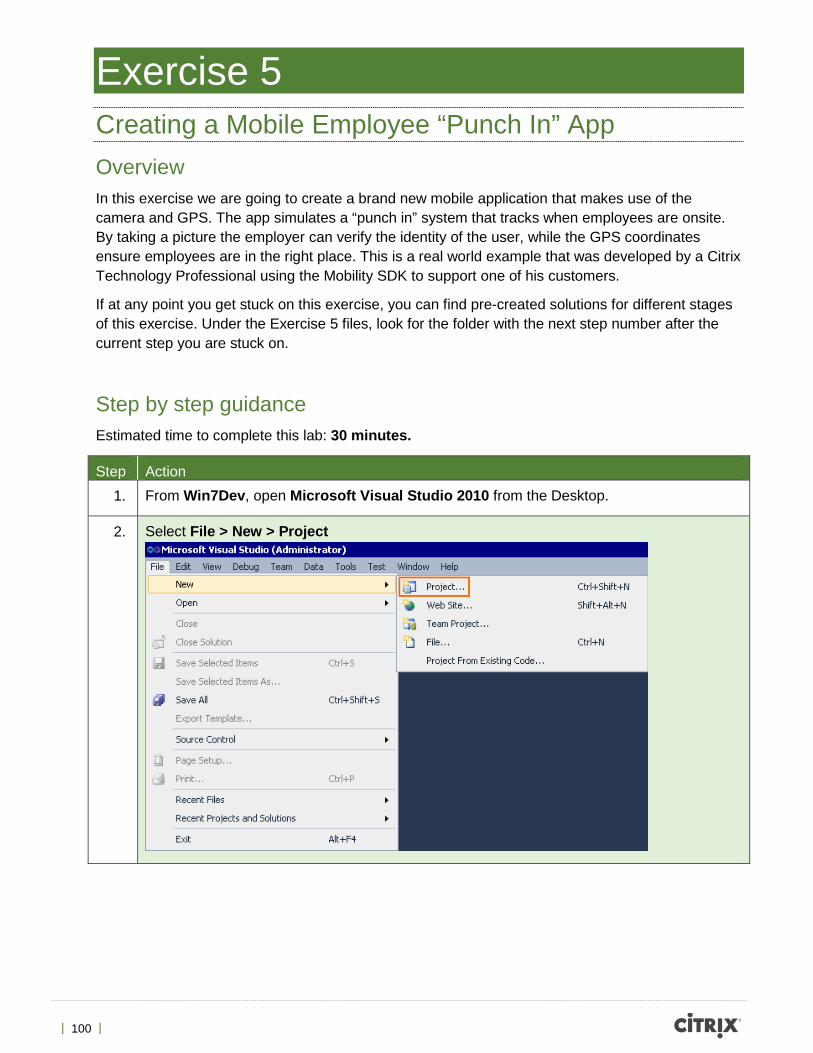
Step Action 1. From Win7Dev, open Microsoft Visual Studio 2010 from the Desktop.
2. Select File > New > Project
| 101 |
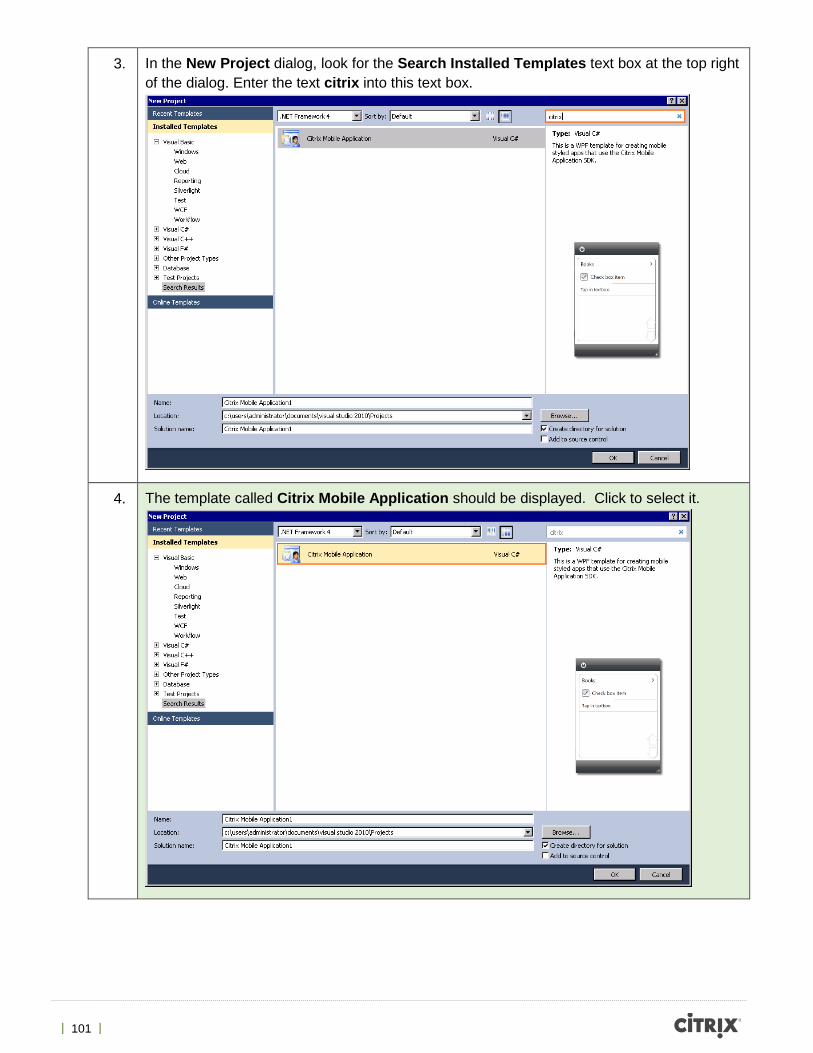
3. In the New Project dialog, look for the Search Installed Templates text box at the top right of the dialog. Enter the text citrix into this text box.
4. The template called Citrix Mobile Application should be displayed. Click to select it.
| 102 |
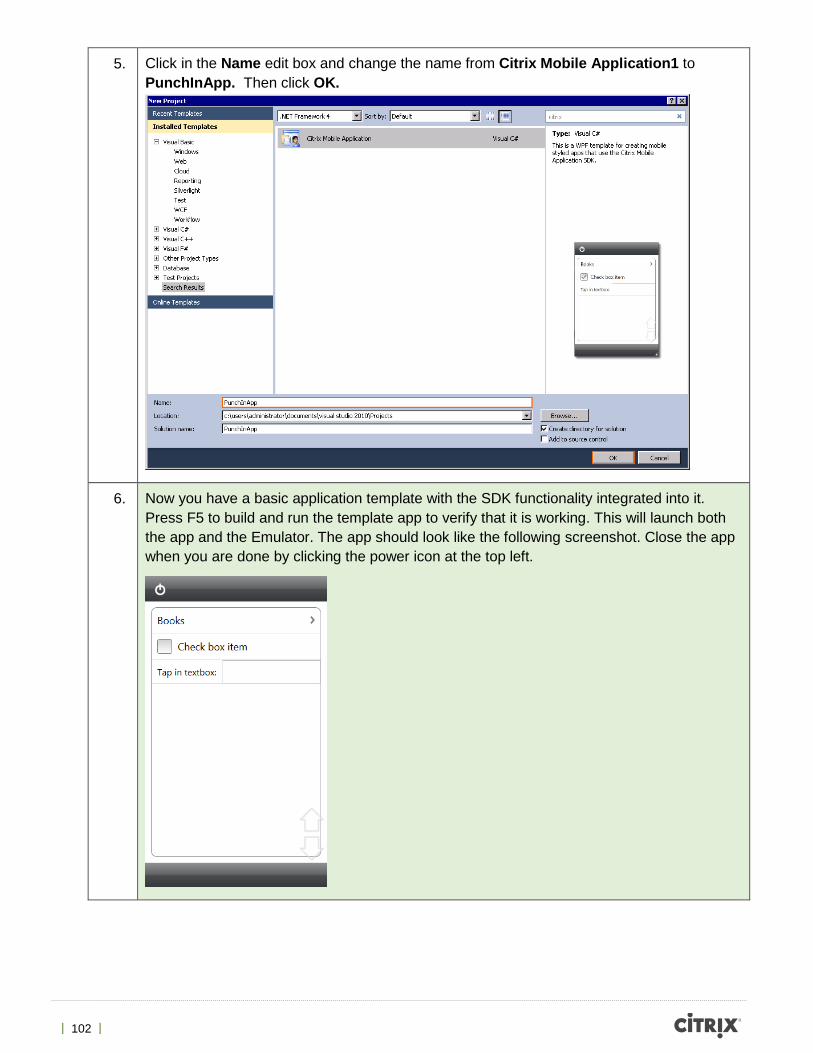
5. Click in the Name edit box and change the name from Citrix Mobile Application1 to PunchInApp. Then click OK.
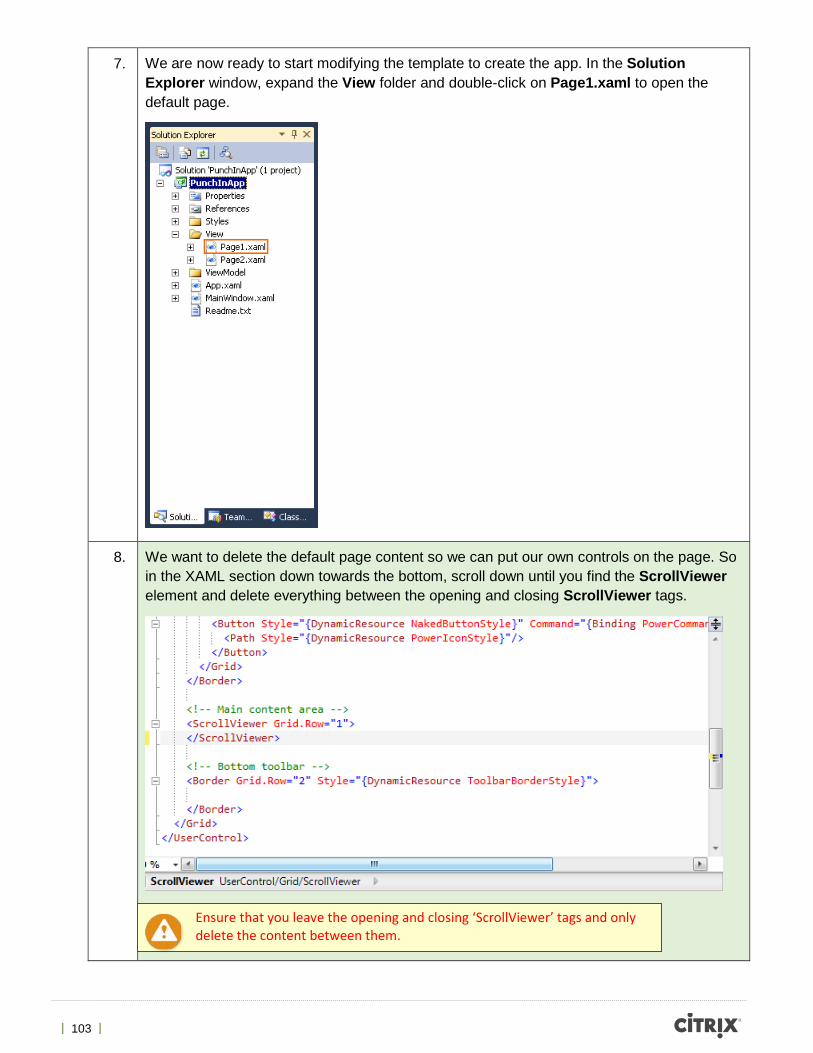
6. Now you have a basic application template with the SDK functionality integrated into it. Press F5 to build and run the template app to verify that it is working. This will launch both the app and the Emulator. The app should look like the following screenshot. Close the app when you are done by clicking the power icon at the top left.
| 103 |
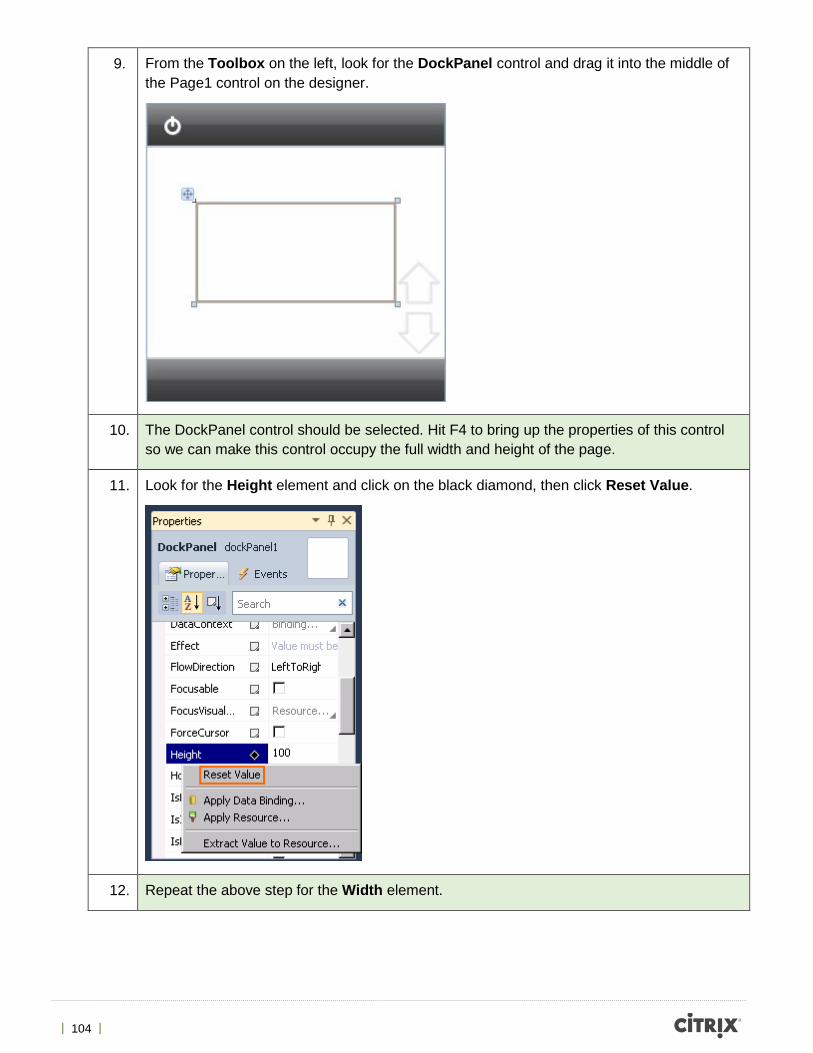
7. We are now ready to start modifying the template to create the app. In the Solution Explorer window, expand the View folder and double-click on Page1.xaml to open the default page.
8. We want to delete the default page content so we can put our own controls on the page. So in the XAML section down towards the bottom, scroll down until you find the ScrollViewer element and delete everything between the opening and closing ScrollViewer tags.
Ensure that you leave the opening and closing ‘ScrollViewer’ tags and only delete the content between them.
| 104 |
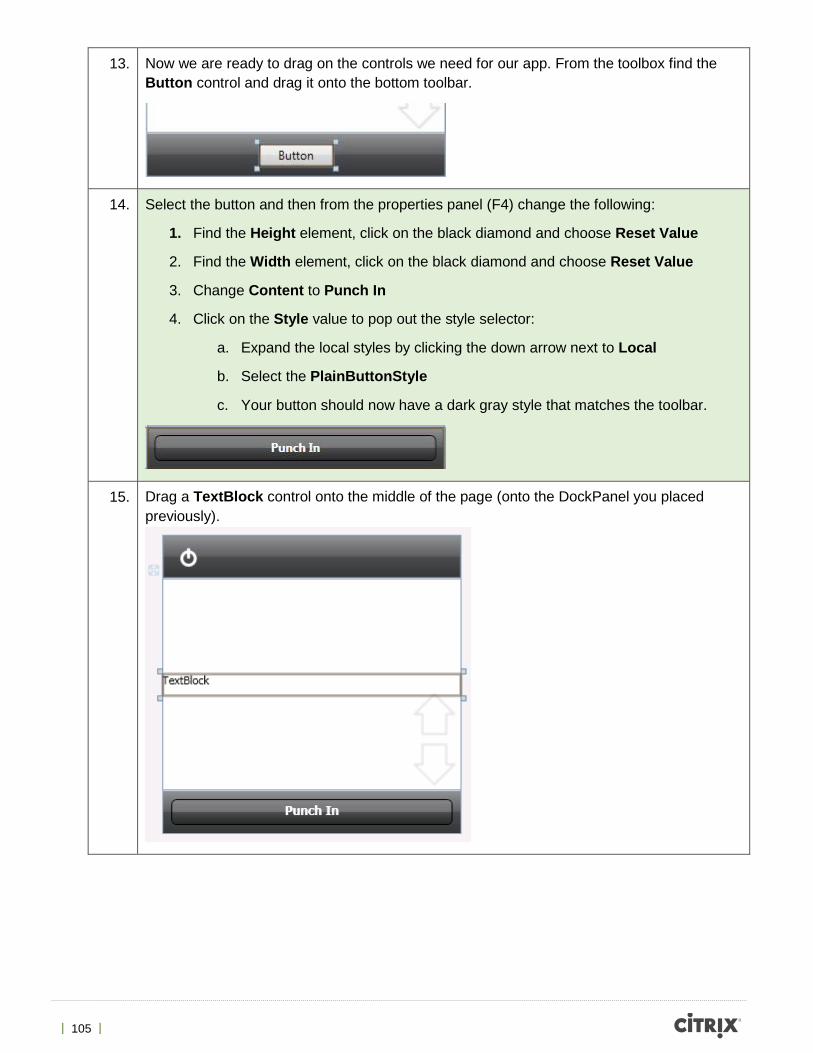
9. From the Toolbox on the left, look for the DockPanel control and drag it into the middle of the Page1 control on the designer.
10. The DockPanel control should be selected. Hit F4 to bring up the properties of this control so we can make this control occupy the full width and height of the page.
11. Look for the Height element and click on the black diamond, then click Reset Value.
12. Repeat the above step for the Width element.
| 105 |
13. Now we are ready to drag on the controls we need for our app. From the toolbox find the Button control and drag it onto the bottom toolbar.
14. Select the button and then from the properties panel (F4) change the following:
1. Find the Height element, click on the black diamond and choose Reset Value
2. Find the Width element, click on the black diamond and choose Reset Value
3. Change Content to Punch In
4. Click on the Style value to pop out the style selector:
a. Expand the local styles by clicking the down arrow next to Local
b. Select the PlainButtonStyle
c. Your button should now have a dark gray style that matches the toolbar.
15. Drag a TextBlock control onto the middle of the page (onto the DockPanel you placed previously).
| 106 |
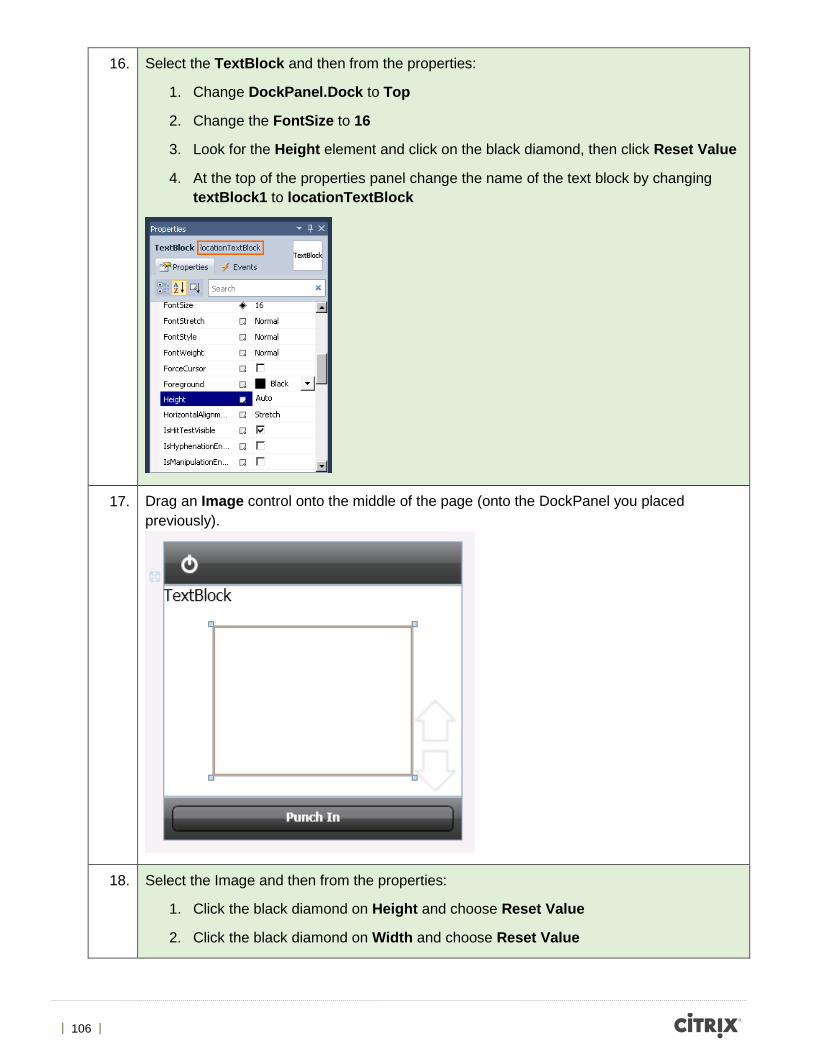
16. Select the TextBlock and then from the properties:
1. Change DockPanel.Dock to Top
2. Change the FontSize to 16
3. Look for the Height element and click on the black diamond, then click Reset Value
4. At the top of the properties panel change the name of the text block by changing textBlock1 to locationTextBlock
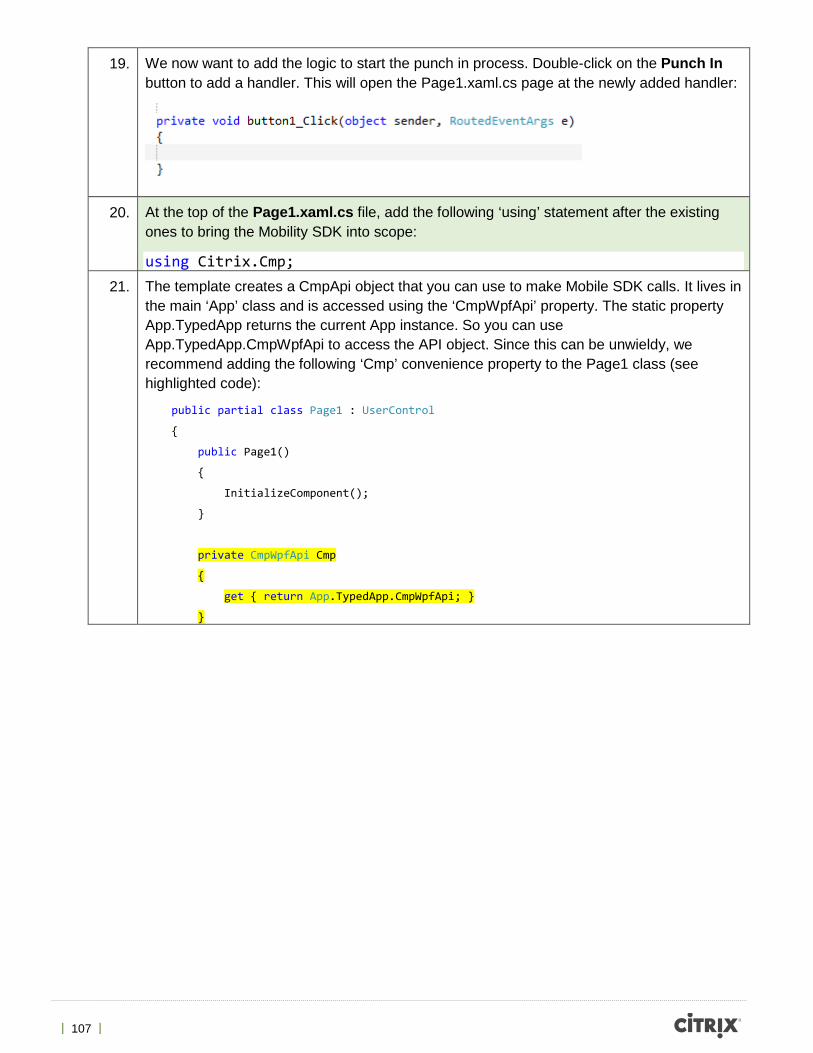
17. Drag an Image control onto the middle of the page (onto the DockPanel you placed previously).
18. Select the Image and then from the properties:
1. Click the black diamond on Height and choose Reset Value
2. Click the black diamond on Width and choose Reset Value
| 107 |
19. We now want to add the logic to start the punch in process. Double-click on the Punch In button to add a handler. This will open the Page1.xaml.cs page at the newly added handler:
20. At the top of the Page1.xaml.cs file, add the following ‘using’ statement after the existing ones to bring the Mobility SDK into scope:
using Citrix.Cmp; 21. The template creates a CmpApi object that you can use to make Mobile SDK calls. It lives in
the main ‘App’ class and is accessed using the ‘CmpWpfApi’ property. The static property App.TypedApp returns the current App instance. So you can use App.TypedApp.CmpWpfApi to access the API object. Since this can be unwieldy, we recommend adding the following ‘Cmp’ convenience property to the Page1 class (see highlighted code):
public partial class Page1 : UserControl
{
public Page1()
{
InitializeComponent();
}
private CmpWpfApi Cmp
{
get { return App.TypedApp.CmpWpfApi; }
}
| 108 |
22. We can now add the code to take a picture using the SDK. Add the following code to the button click handler ‘button1_Click’. This code requests the device to take a picture without blocking for the result. The inline function will get called automatically when the request completes.
private void button1_Click(object sender, RoutedEventArgs e)
{
// We try to start with the front camera if the device supports this.
var options = new PictureOptions
{
CameraSelection = CameraSelection.Front
};
Cmp.Camera.BeginTakePicture2(options, TimeSpan.FromSeconds(180), ar =>
{
// This inline function is called when the request completes
try
{
var picture = Cmp.Camera.EndTakePicture2(ar);
}
catch (CmpException)
{ }
catch (NotSupportedException)
{ }
catch (TimeoutException)
{ }
});
}
| 109 |
23. Once we have the picture, we need to do something with it. So add the following function to the Page1 class to copy the picture off the device and onto the Citrix server using Client Drive Mapping. This function copies the picture to the current users’ ‘My Pictures’ folder.
private string CopyPictureToServer(Picture picture)
{
string serverLocation = null;
if (picture.FileExists)
{
var destination = Environment.GetFolderPath(Environment.SpecialFolder.MyPictures);
try
{
serverLocation = picture.CopyFile(destination);
}
catch (CmpException)
{ }
}
return serverLocation;
}
24. Now we can go back and modify the original take picture handler to use this new copy function and show the image. Add the highlighted lines to the original handler. Note the use of ‘this.Dispatcher’ to update the UI on the main UI thread. Mobility SDK callbacks will run on a worker thread, so we will get an exception if we try to update the UI directly on this worker thread.
try
{
var picture = Cmp.Camera.EndTakePicture2(ar);
string serverPath = CopyPictureToServer(picture);
if (!string.IsNullOrEmpty(serverPath))
{
this.Dispatcher.BeginInvoke((Action)delegate
{
image1.Source = new BitmapImage(new Uri(serverPath));
});
}
}
catch (CmpException)
{ }
catch (NotSupportedException)
{ }
catch (TimeoutException)
{ }
| 110 |
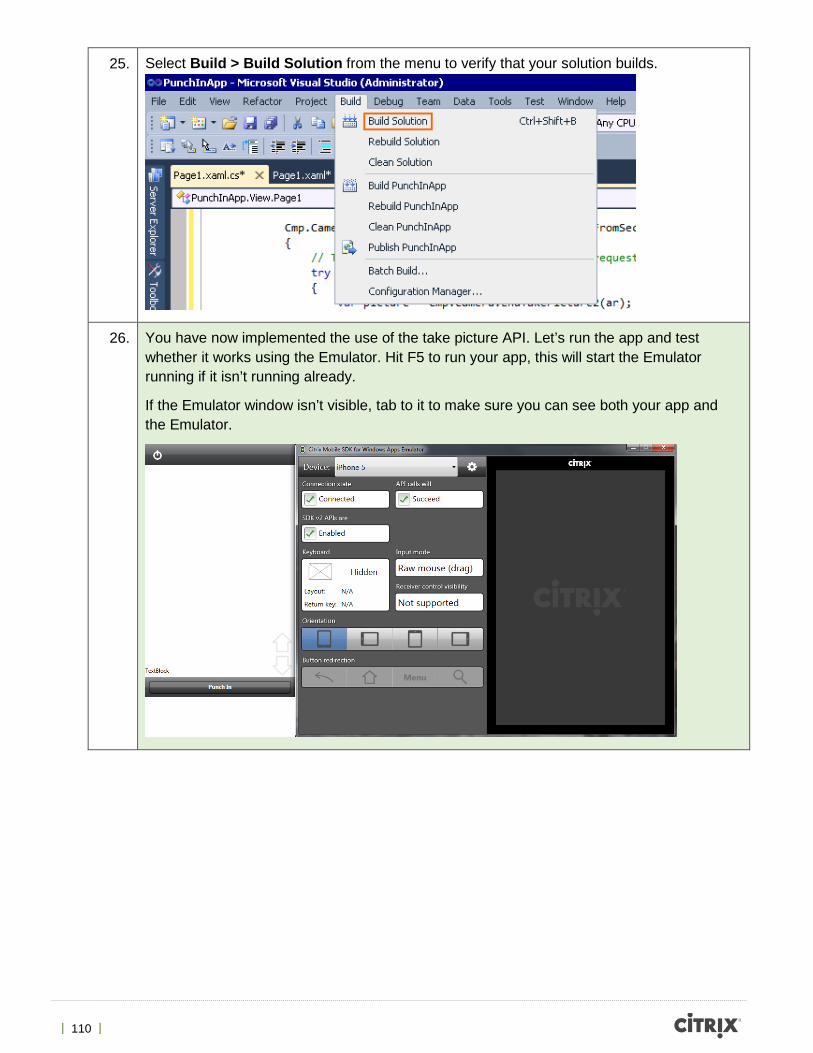
25. Select Build > Build Solution from the menu to verify that your solution builds.
26. You have now implemented the use of the take picture API. Let’s run the app and test whether it works using the Emulator. Hit F5 to run your app, this will start the Emulator running if it isn’t running already.
If the Emulator window isn’t visible, tab to it to make sure you can see both your app and the Emulator.
| 111 |
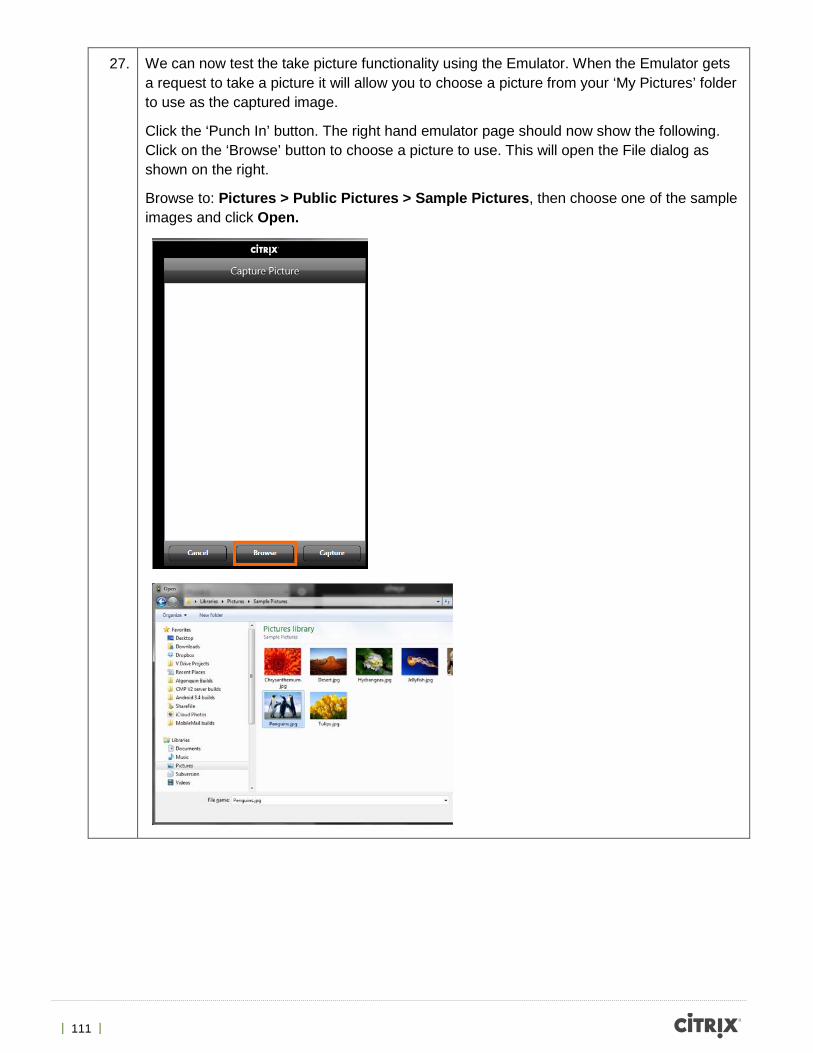
27. We can now test the take picture functionality using the Emulator. When the Emulator gets a request to take a picture it will allow you to choose a picture from your ‘My Pictures’ folder to use as the captured image.
Click the ‘Punch In’ button. The right hand emulator page should now show the following. Click on the ‘Browse’ button to choose a picture to use. This will open the File dialog as shown on the right.
Browse to: Pictures > Public Pictures > Sample Pictures, then choose one of the sample images and click Open.
| 112 |
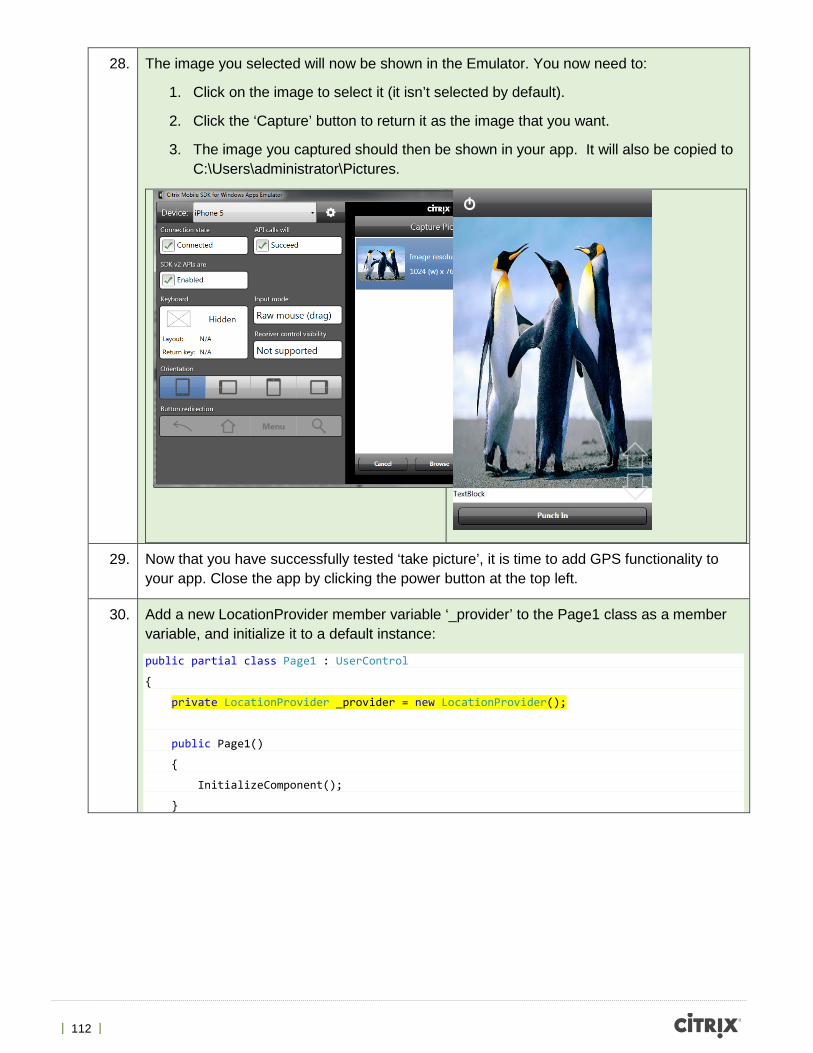
28. The image you selected will now be shown in the Emulator. You now need to:
1. Click on the image to select it (it isn’t selected by default).
2. Click the ‘Capture’ button to return it as the image that you want.
3. The image you captured should then be shown in your app. It will also be copied to C:\Users\administrator\Pictures.
29. Now that you have successfully tested ‘take picture’, it is time to add GPS functionality to your app. Close the app by clicking the power button at the top left.
30. Add a new LocationProvider member variable ‘_provider’ to the Page1 class as a member variable, and initialize it to a default instance:
public partial class Page1 : UserControl
{
private LocationProvider _provider = new LocationProvider();
public Page1()
{
InitializeComponent();
}
| 113 |
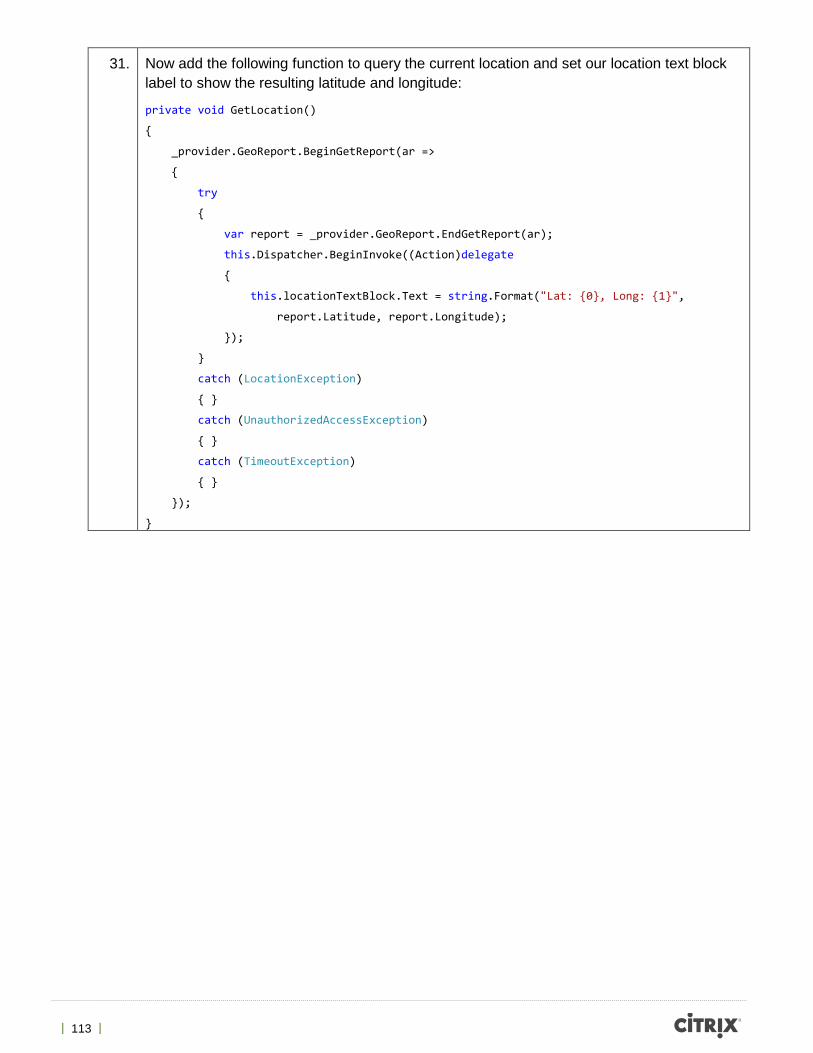
31. Now add the following function to query the current location and set our location text block label to show the resulting latitude and longitude:
private void GetLocation()
{
_provider.GeoReport.BeginGetReport(ar =>
{
try
{
var report = _provider.GeoReport.EndGetReport(ar);
this.Dispatcher.BeginInvoke((Action)delegate
{
this.locationTextBlock.Text = string.Format("Lat: {0}, Long: {1}",
report.Latitude, report.Longitude);
});
}
catch (LocationException)
{ }
catch (UnauthorizedAccessException)
{ }
catch (TimeoutException)
{ }
});
}
| 114 |
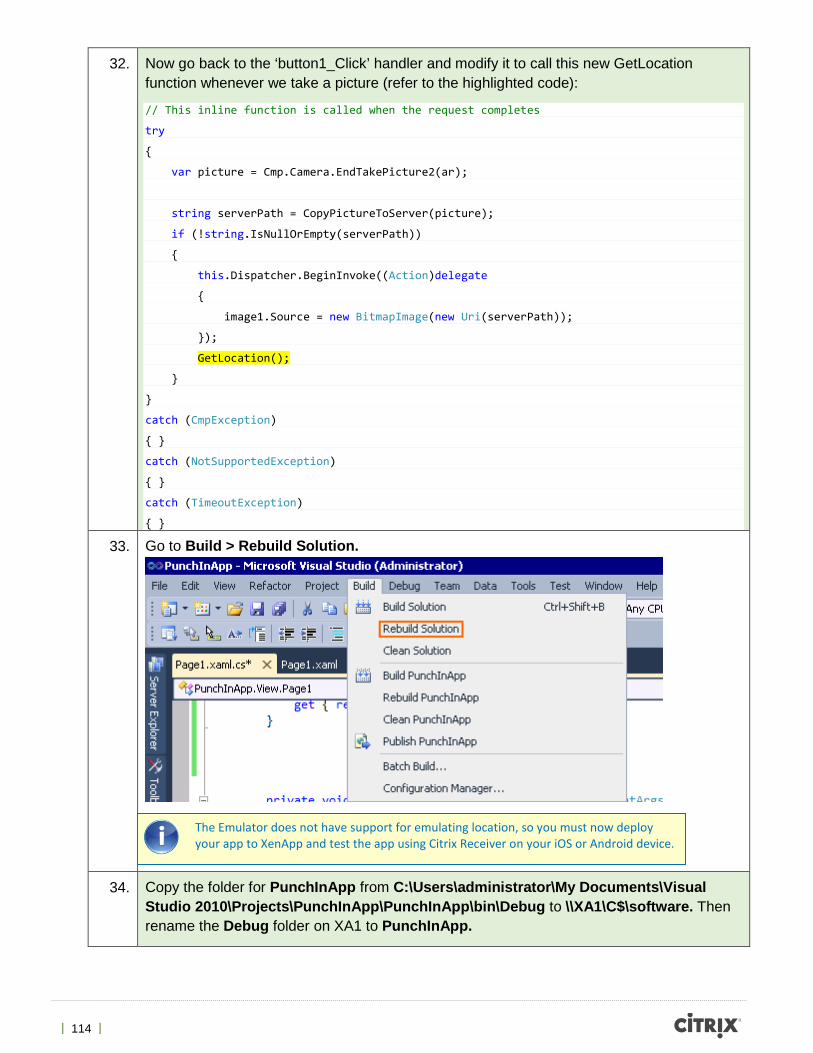
32. Now go back to the ‘button1_Click’ handler and modify it to call this new GetLocation function whenever we take a picture (refer to the highlighted code):
// This inline function is called when the request completes
try
{
var picture = Cmp.Camera.EndTakePicture2(ar);
string serverPath = CopyPictureToServer(picture);
if (!string.IsNullOrEmpty(serverPath))
{
this.Dispatcher.BeginInvoke((Action)delegate
{
image1.Source = new BitmapImage(new Uri(serverPath));
});
GetLocation();
}
}
catch (CmpException)
{ }
catch (NotSupportedException)
{ }
catch (TimeoutException)
{ }
33. Go to Build > Rebuild Solution.
34. Copy the folder for PunchInApp from C:\Users\administrator\My Documents\Visual Studio 2010\Projects\PunchInApp\PunchInApp\bin\Debug to \\XA1\C$\software. Then rename the Debug folder on XA1 to PunchInApp.
The Emulator does not have support for emulating location, so you must now deploy your app to XenApp and test the app using Citrix Receiver on your iOS or Android device.
| 115 |
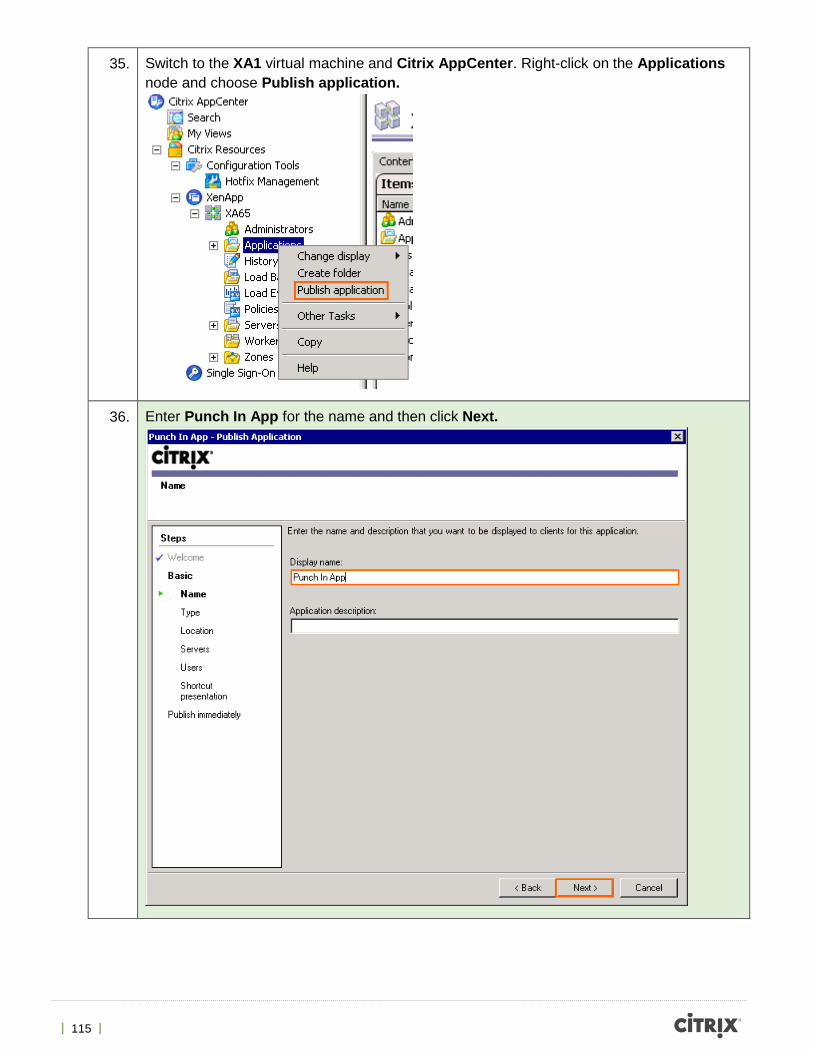
35. Switch to the XA1 virtual machine and Citrix AppCenter. Right-click on the Applications node and choose Publish application.
36. Enter Punch In App for the name and then click Next.
| 116 |
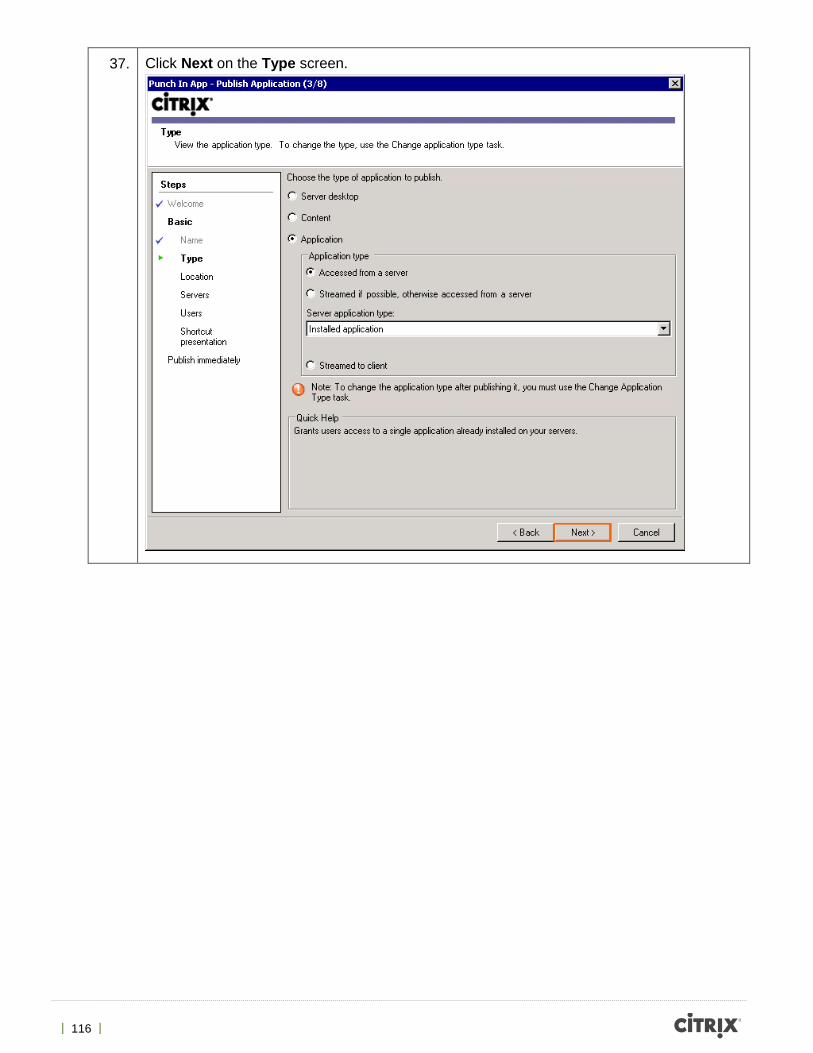
37. Click Next on the Type screen.
| 117 |
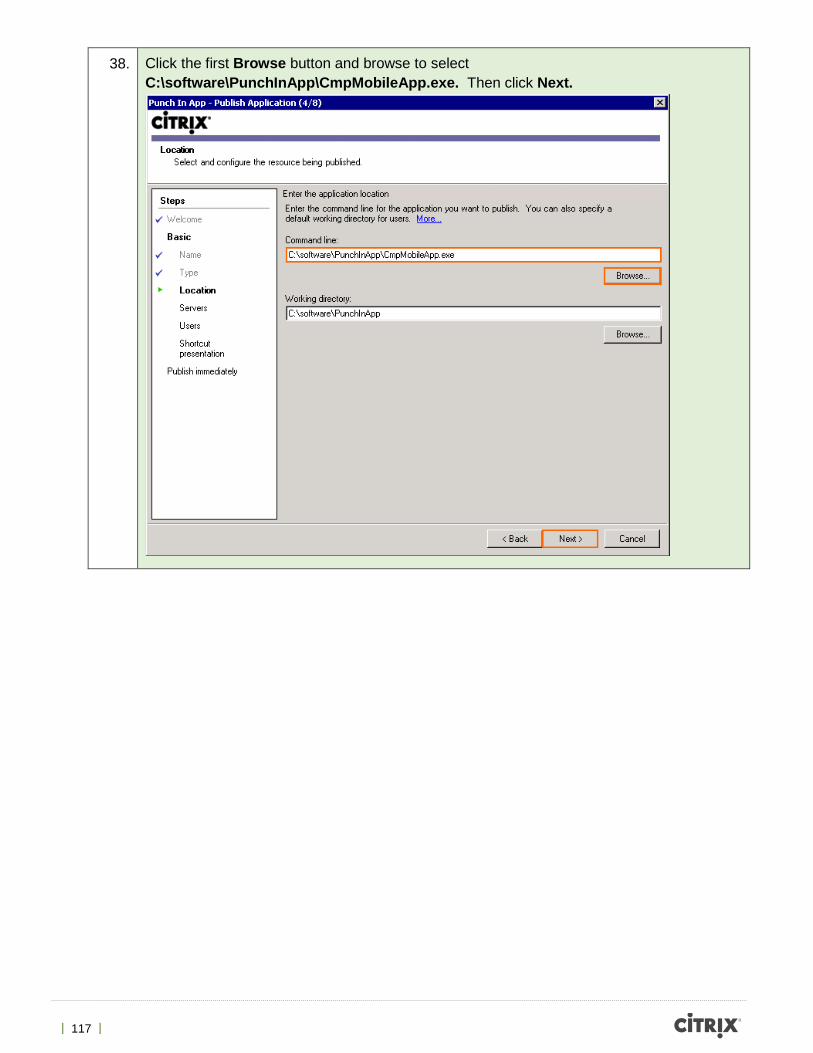
38. Click the first Browse button and browse to select C:\software\PunchInApp\CmpMobileApp.exe. Then click Next.
| 118 |
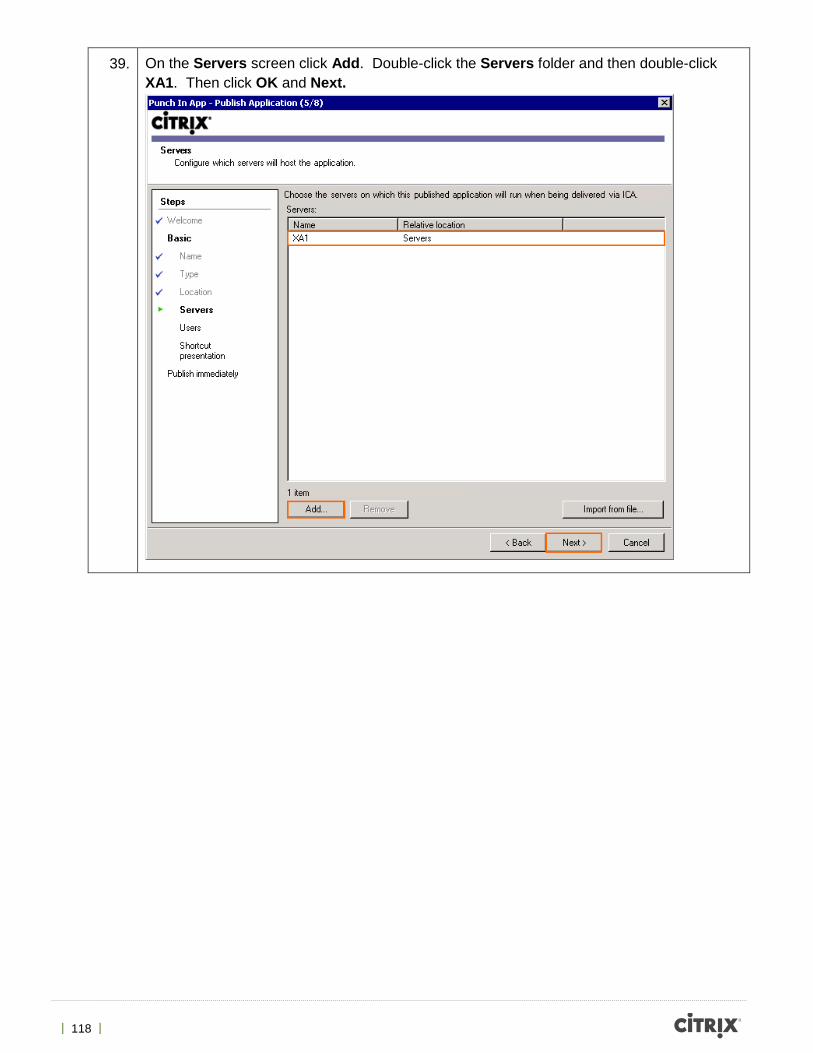
39. On the Servers screen click Add. Double-click the Servers folder and then double-click XA1. Then click OK and Next.
| 119 |
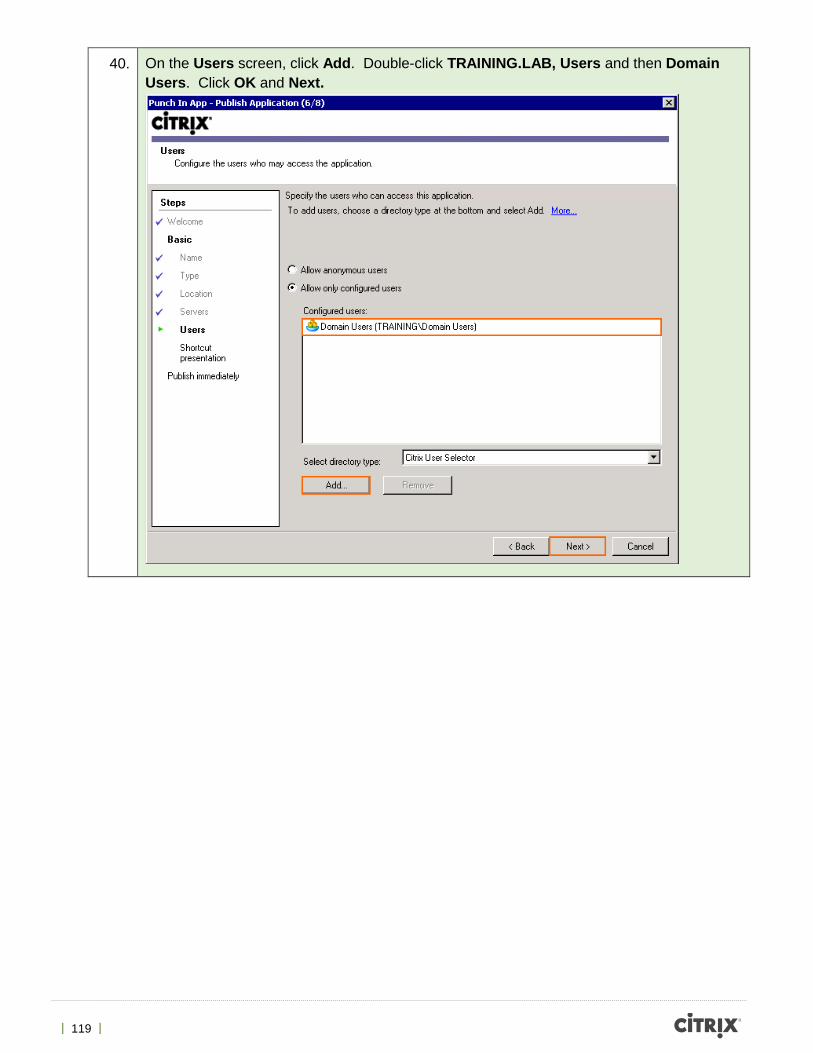
40. On the Users screen, click Add. Double-click TRAINING.LAB, Users and then Domain Users. Click OK and Next.
| 120 |
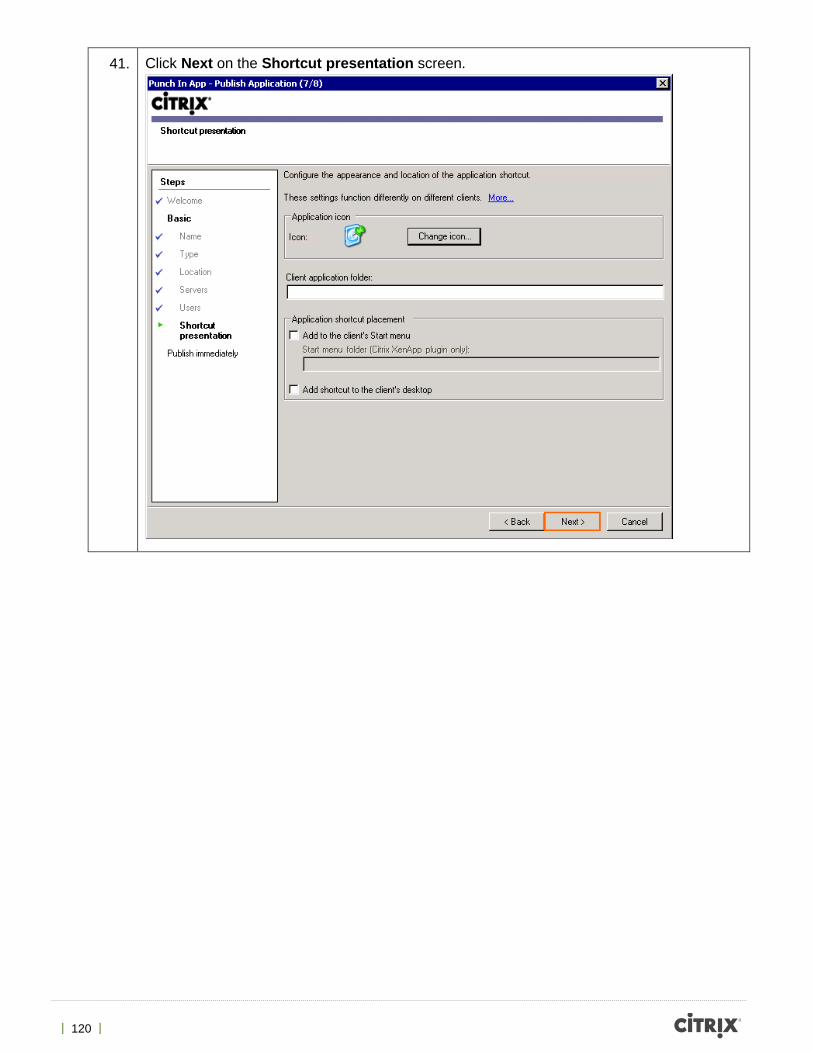
41. Click Next on the Shortcut presentation screen.
| 121 |
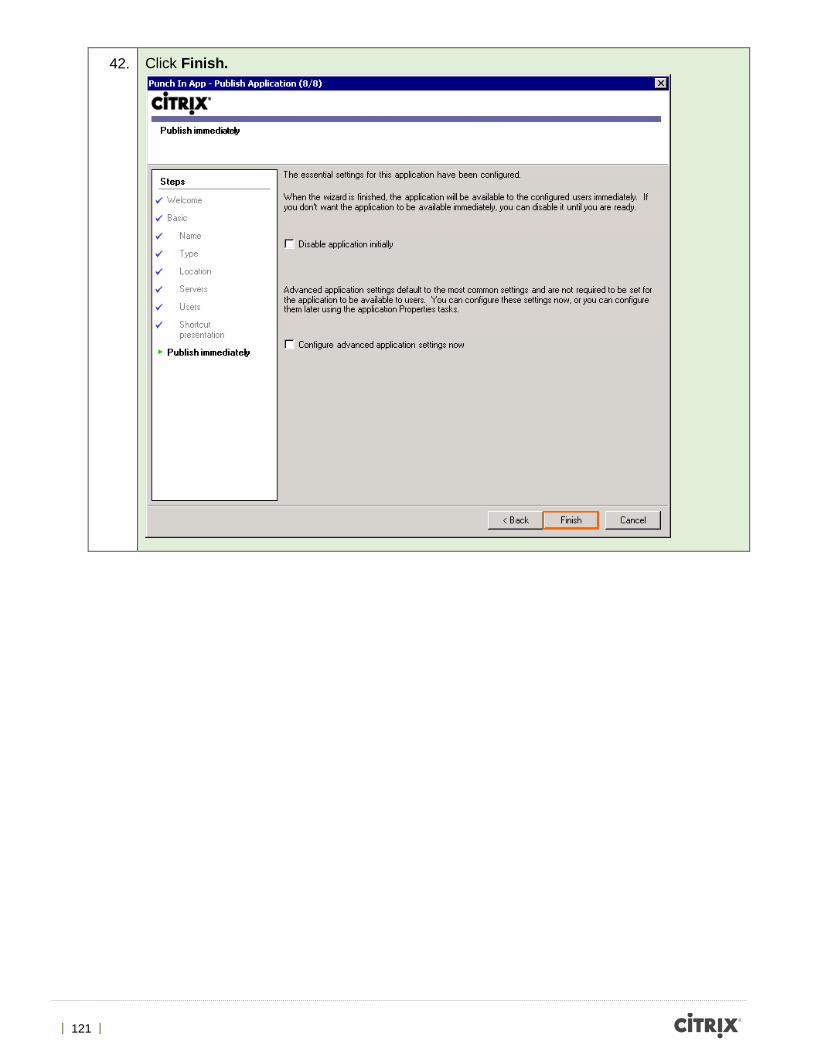
42. Click Finish.
| 122 |
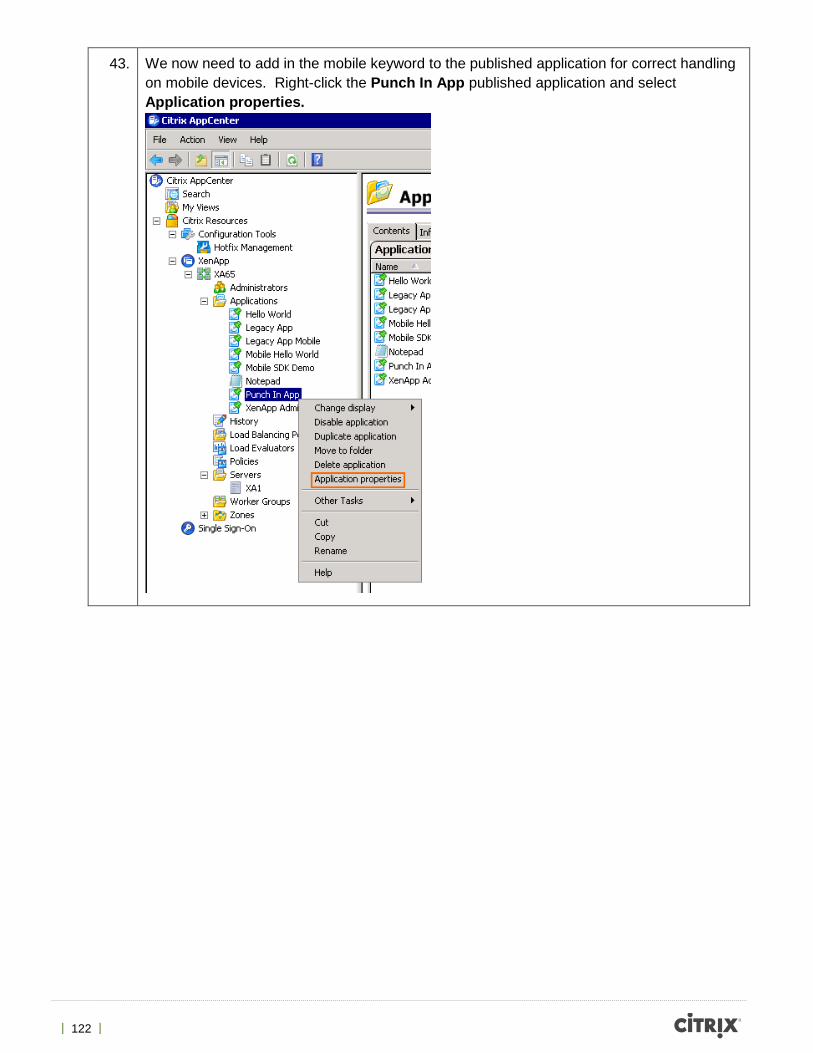
43. We now need to add in the mobile keyword to the published application for correct handling on mobile devices. Right-click the Punch In App published application and select Application properties.
| 123 |
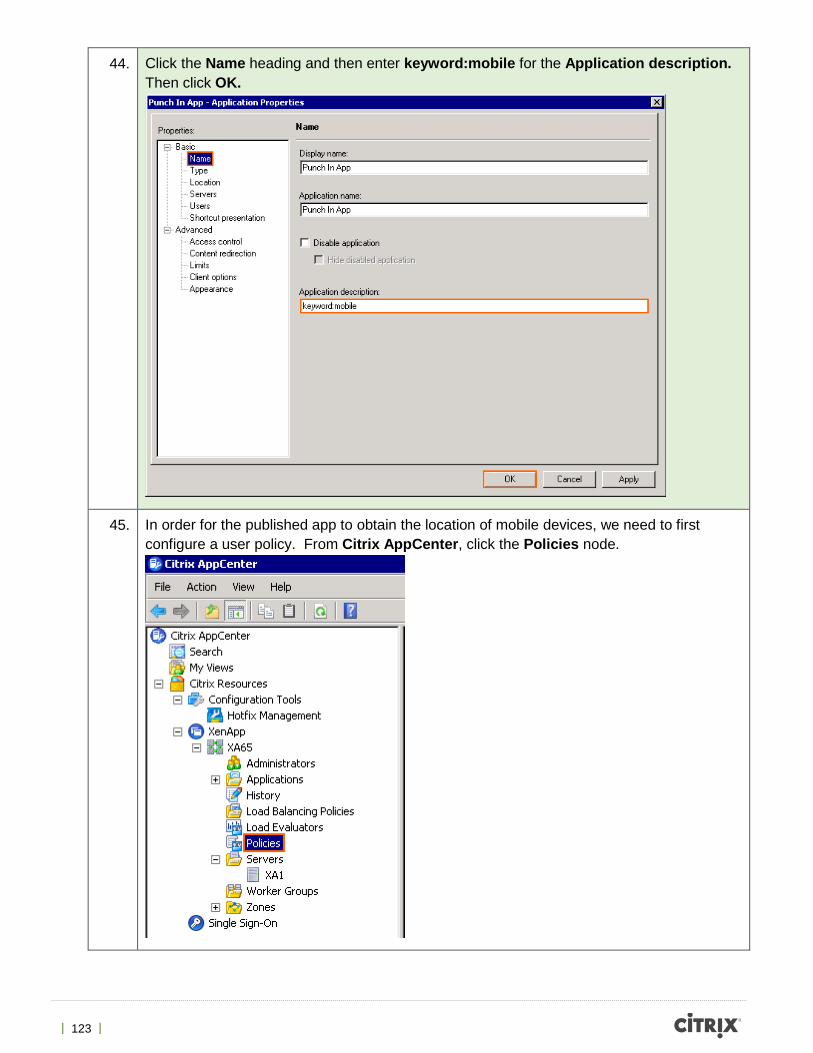
44. Click the Name heading and then enter keyword:mobile for the Application description. Then click OK.
45. In order for the published app to obtain the location of mobile devices, we need to first configure a user policy. From Citrix AppCenter, click the Policies node.
| 124 |
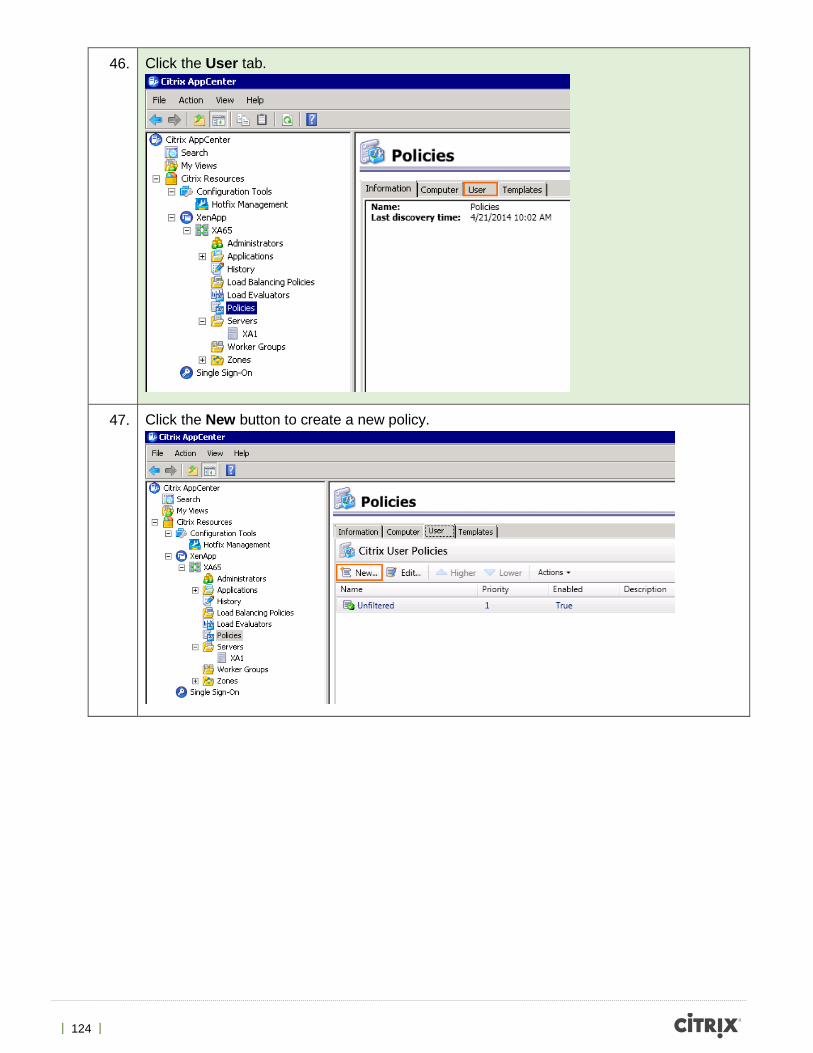
46. Click the User tab.
47. Click the New button to create a new policy.
| 125 |
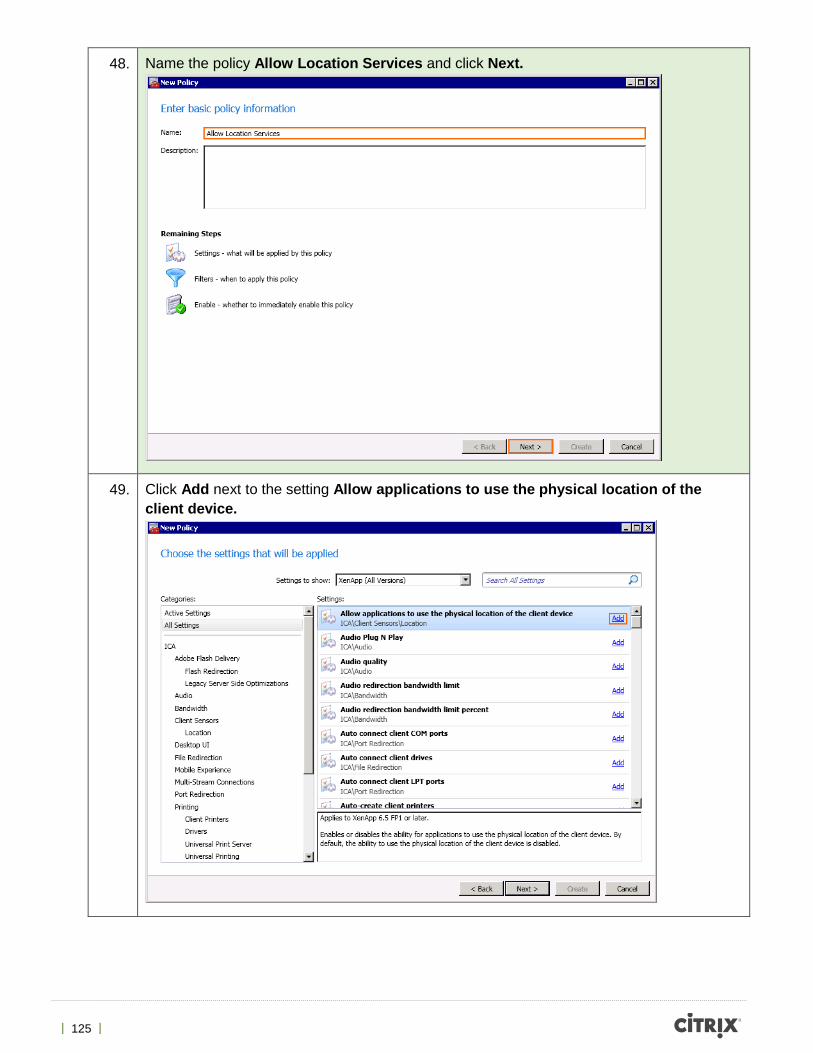
48. Name the policy Allow Location Services and click Next.
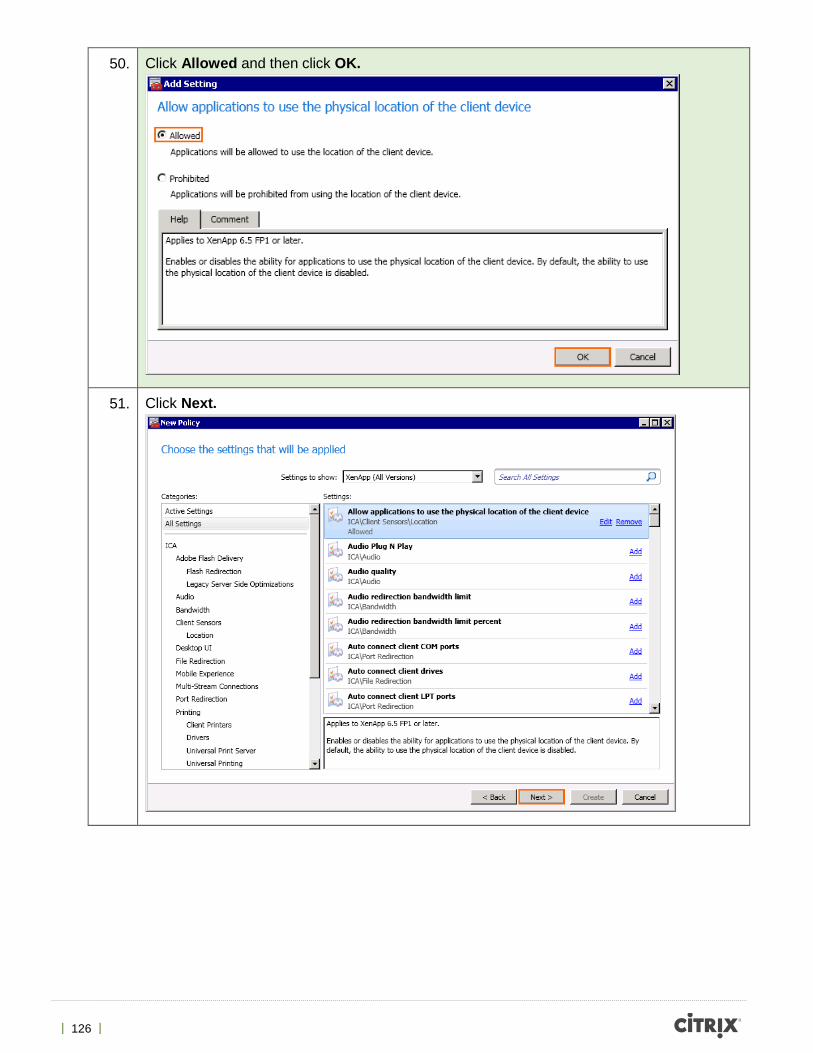
49. Click Add next to the setting Allow applications to use the physical location of the client device.
| 126 |
50. Click Allowed and then click OK.
51. Click Next.
| 127 |
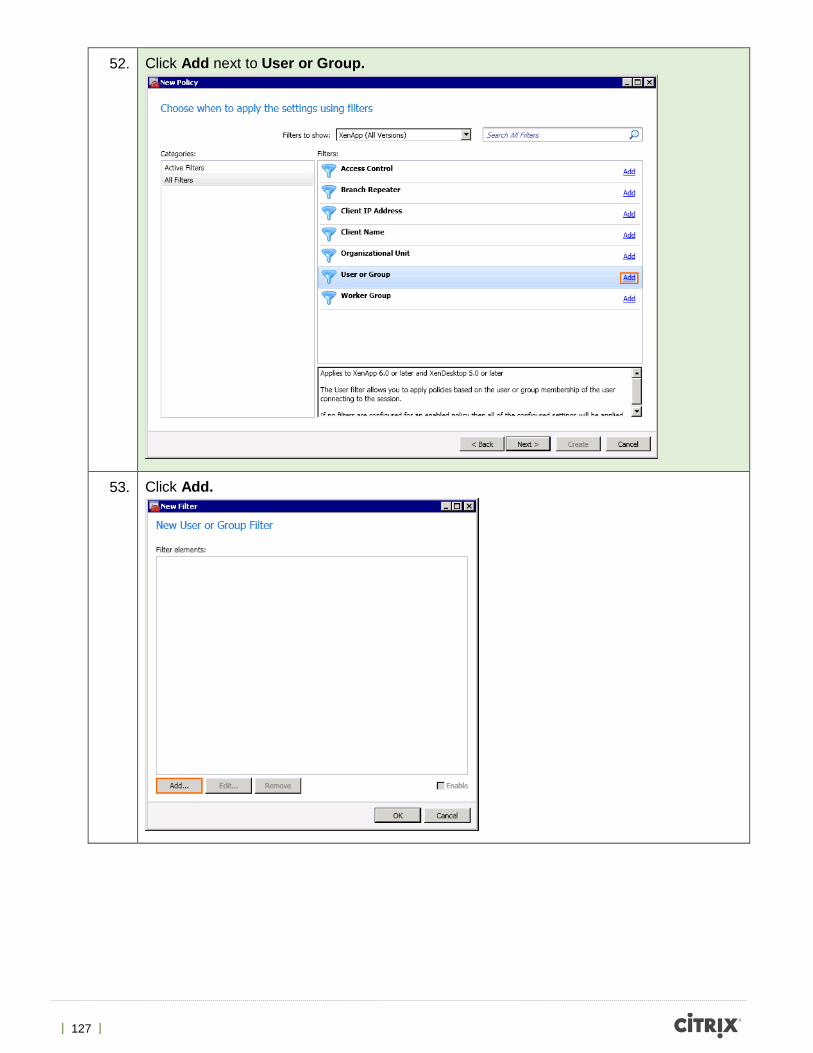
52. Click Add next to User or Group.
53. Click Add.
| 128 |
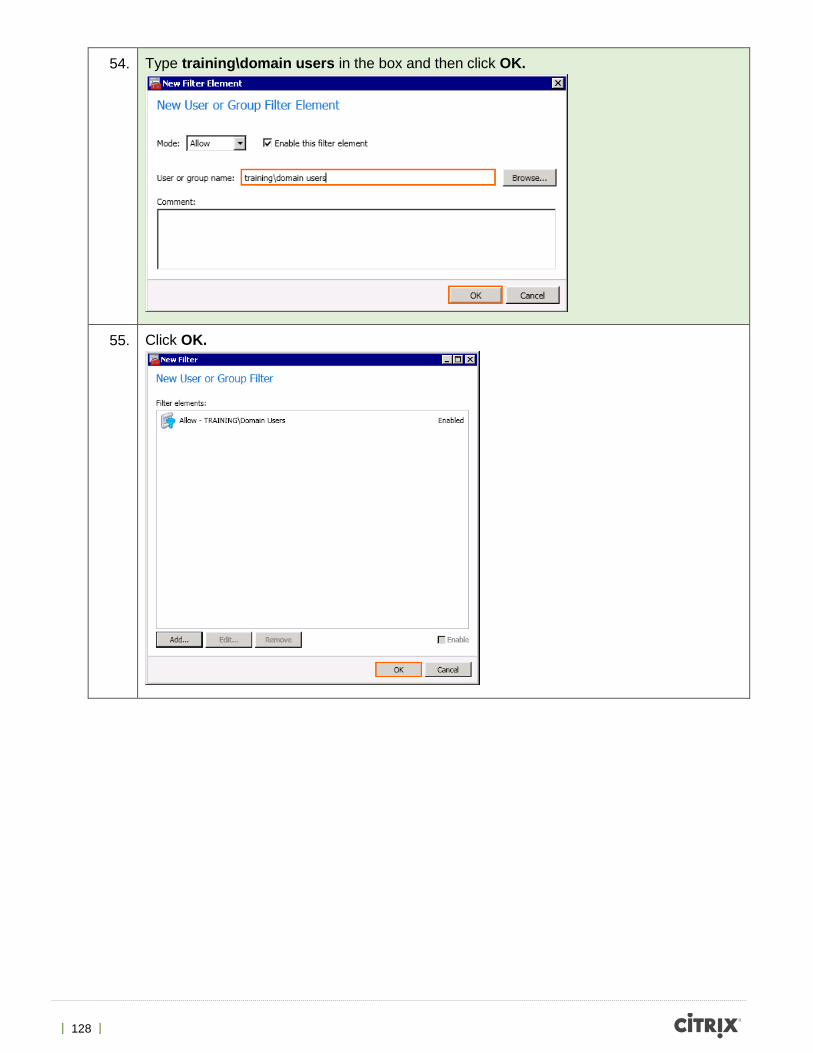
54. Type training\domain users in the box and then click OK.
55. Click OK.
| 129 |
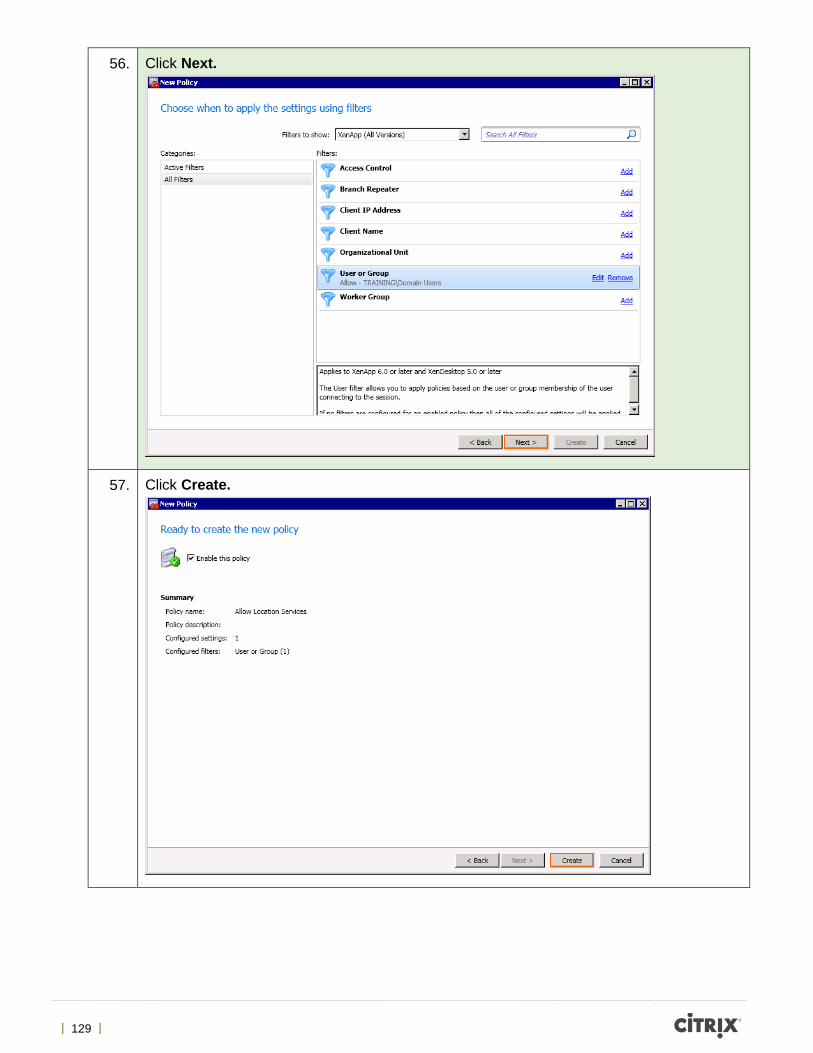
56. Click Next.
57. Click Create.
| 130 |
58. In the Citrix Receiver settings on your mobile device, you will need to enable Client Drive Mapping for the take picture API calls to work. Perform the following steps:
iOS:
1. Settings > Advanced
2. Enable ‘Use iPad/iPhone Storage’
Android:
1. Settings > Advanced
2. Tap ‘Use device storage’
3. Select the ‘Full access’ option
59. Now run the published Punch In App from your mobile device as User2.
60. Select the Punch In button.

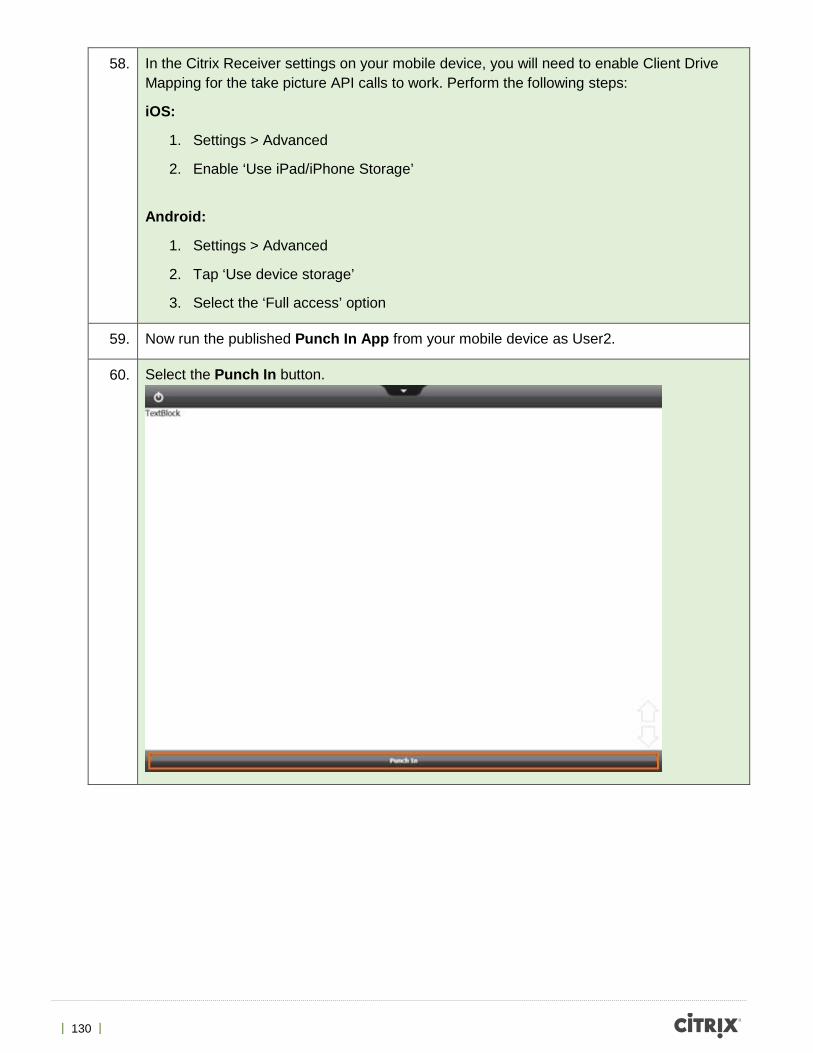
| 131 |
61. Take a picture when the device camera is started. Click the confirmation button on your device to use the picture you just took.
62. The Punch In App should now be redisplayed. It will take a few seconds for the picture to be uploaded over WiFi to the XenApp server. Note that the photos will appear in the C:\Users\User2\My Pictures.
63. Once the picture is visible the device will get your current location. You should get a prompt asking for your permission to get the device location. Hit OK.
| 132 |
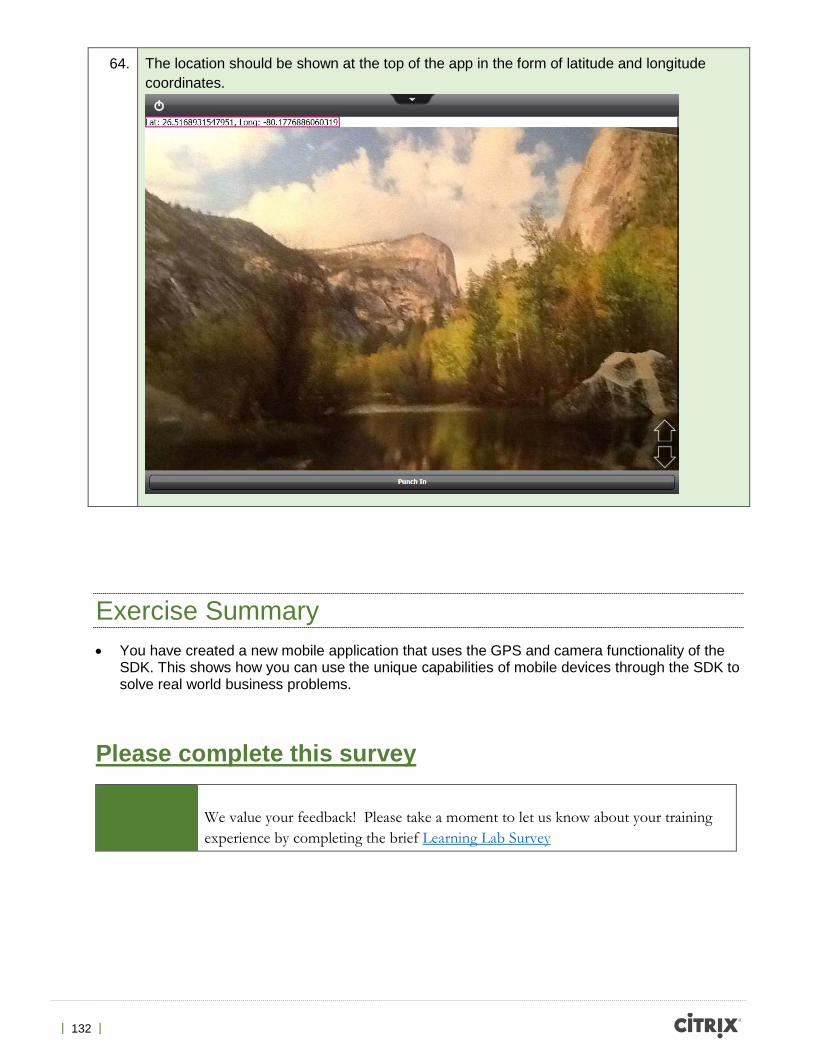
64. The location should be shown at the top of the app in the form of latitude and longitude coordinates.
Exercise Summary • You have created a new mobile application that uses the GPS and camera functionality of the
SDK. This shows how you can use the unique capabilities of mobile devices through the SDK to solve real world business problems.
Please complete this survey
We value your feedback! Please take a moment to let us know about your training experience by completing the brief Learning Lab Survey
| 133 |
Revision Change Descriptions Updated By Date
1.0 Original Version Allen Furmanski May 2014
About Citrix Citrix (NASDAQ:CTXS) is a cloud company that enables mobile workstyles—empowering people to work and collaborate from anywhere, securely accessing apps and data on any of the latest devices, as easily as they would in their own office. Citrix solutions help IT and service providers build clouds, leveraging virtualization and networking technologies to deliver high-performance, elastic and cost-effective cloud services. With market-leading cloud solutions for mobility, desktop virtualization, networking, cloud platforms, collaboration and data sharing, Citrix helps organizations of all sizes achieve the speed and agility necessary to succeed in a mobile and dynamic world. Citrix products are in use at more than 330,000 organizations and by over 100 million users globally. Annual revenue in 2012 was $2.59 billion. Learn more at www.citrix.com.


