dondi manual
TRANSCRIPT
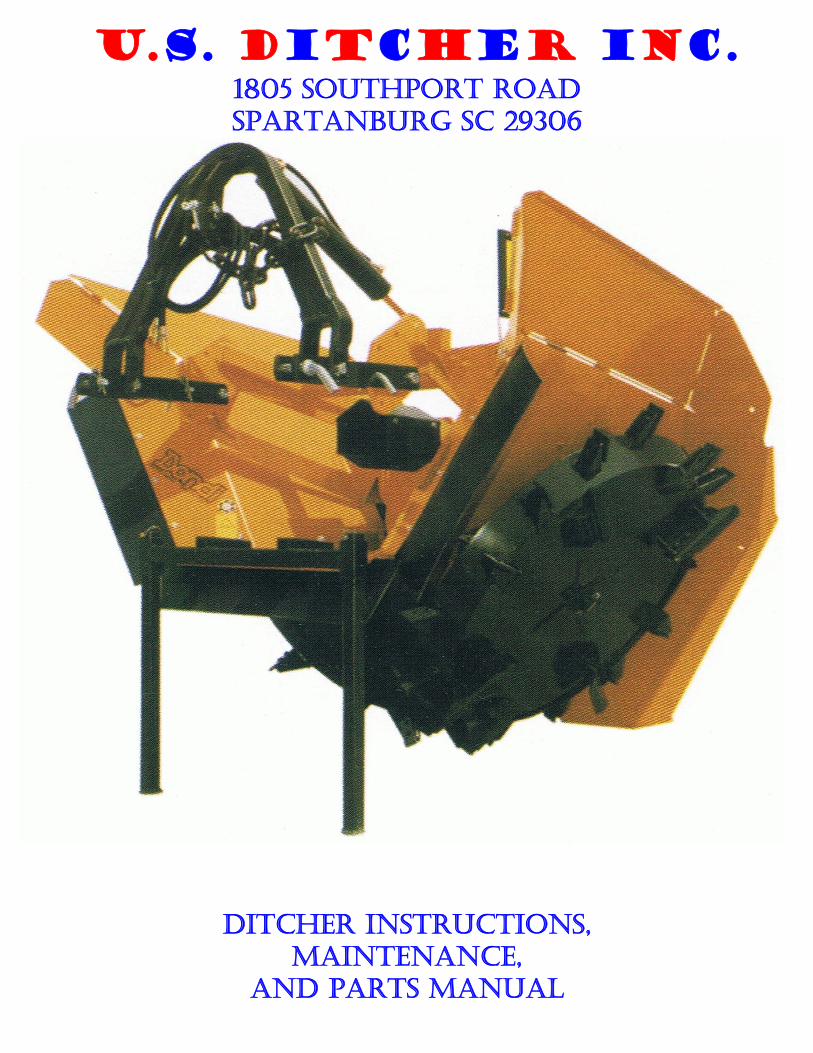
U.S. DITCHER INC. 1805 SOUTHPORT ROAD SPARTANBURG SC 29306
DITCHER INSTRUCTIONS, MAINTENANCE,
AND PARTS MANUAL
DONDI DITCHER INSTRUCTION AND MAINTENANCE MANUAL FOR DONDI DITCHER PREFACE First of all US Ditcher and Dondi Ditcher would like to thank you for purchasing one of our machines. The extensive experience we have gained by working hand in hand with the people who use our machinery, have added to the wide range of ditchers which have helped us become a world leader in our field. This is our best guarantee of high quality and prompt service when ever you need it. This manual which is supplied as part of this machinery is an indispensable guide that will instruct you in the best way to use the machine, help you become familiar with and allow you to make the most of your investment. Carefully read the manual cover to cover before operating the ditcher. This will help you gain basic technical knowledge and information about the proper way to use the ditcher with utmost safety in order to prevent any accidents. Special attention must also be paid to the section entitled “Maintenance” where you can find all the information and precautions you need to follow in order to keep the machine fully efficient and avoid any potentially serious malfunctions,
The Dondi company considers this manual to be an integral part of the machine and advises dealers who distribute both new and used machinery to keep proof on hand demonstrating that the manual was supplied together with machinery. If this manual should become lost or damaged, another copy can be obtained directly through US Ditcher. We will need the following information.
- Machine model - Serial Number
THIS MANUAL MUST REMAIN ALWAYS WITH THE MACHINE

DONDI DITCHER INSTRUCTION AND MAINTENANCE MANUAL FOR DONDI DITCHER PURPOSE OF THE MACHINE Dondi rotary ditchers are state-of-the-art machines that offer top performance for digging and maintaining drain and irrigation ditches. They can be used with any type wheeled or crawler tractor with climbing gears (creeper gears). They are available in mono wheel, mono double wheel, and double wheel models in order to meet the various needs faced by users. In addition, for different types of soil or special applications, Ditchers with non-standard excavation angles can also be supplied. In order to use the ditcher the tractor must be ballasted properly prior to use, as indicated below. Depth adjustment is handled by means of the hydraulic jack on the tractor in the controlled position. If any crops need to be protected of if you are working on a ditch near or adjacent to roadbeds and / or houses, the excavated soil can be kept along side the edge of ditch by closing the adjustable guard covers. However normal operation envision envisio0ns spreading the excavated material over a wide working radius (guard covers open). These types of machines have been designed exclusively for agricultural application or for similar uses (maintenance of roadway drainage ditches, etc). Therefore any other type of utilization does not comply with its designed use. This machine must be utilized, repaired and maintained solely by a qualified personal that are familiar with its specific features and know the proper safety procedures. All standards that generally apply to work safety, such as roadway transportation regulations must always be observed. Any arbitrary modifications made on this machine will relieve the manufacturer of all responsibility for any damage or injury this may cause.
FAILURE TO OBSERVE THESE REGULATIONS WILL RELEASE THE MANUFACTURER FROM ANY RESPONSIBILITY FOR DAMAGE. DONDI IS ALWAYS AT YOUR DISPOSAL FOR ANY INFORMATION, RECOMMENDATIONS YOU MAY NEED TO ACHIEVE OPTIMUM DITCHER PREFORMANCE
DONDI DITCHER INSTRUCTION AND MAINTENANCE MANUAL FOR DONDI DITCHER WARNINGS AND NOTES ABOUT SAFITY
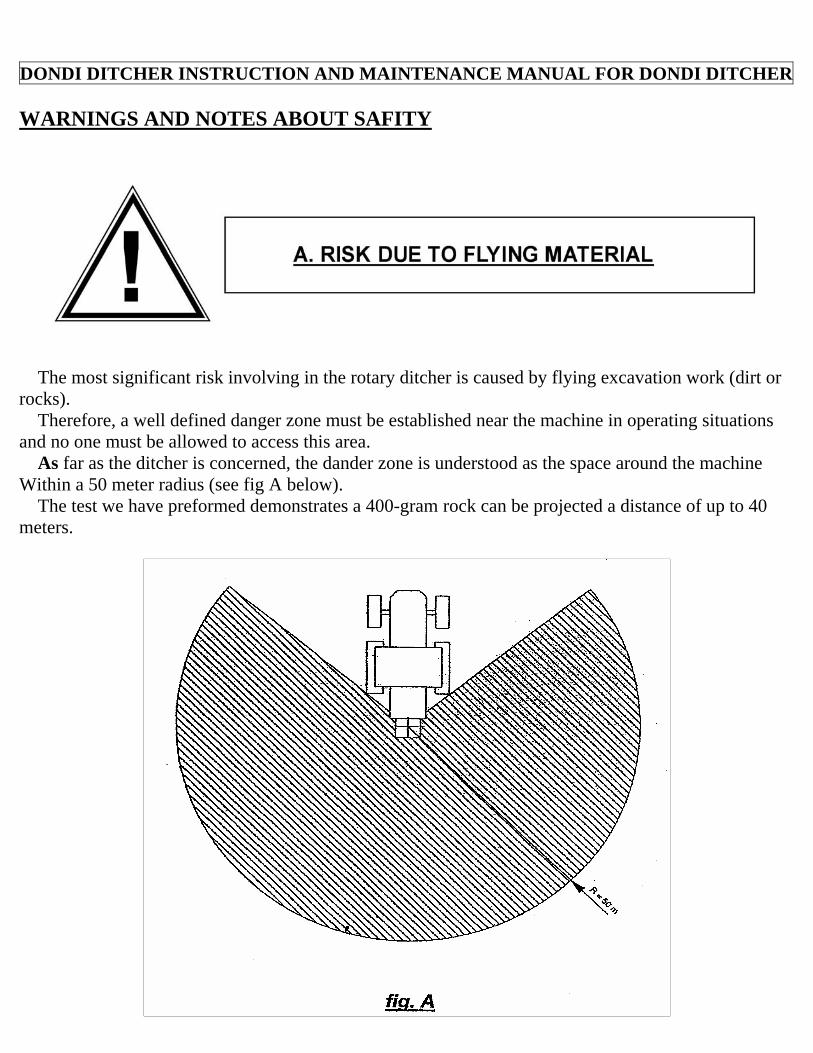
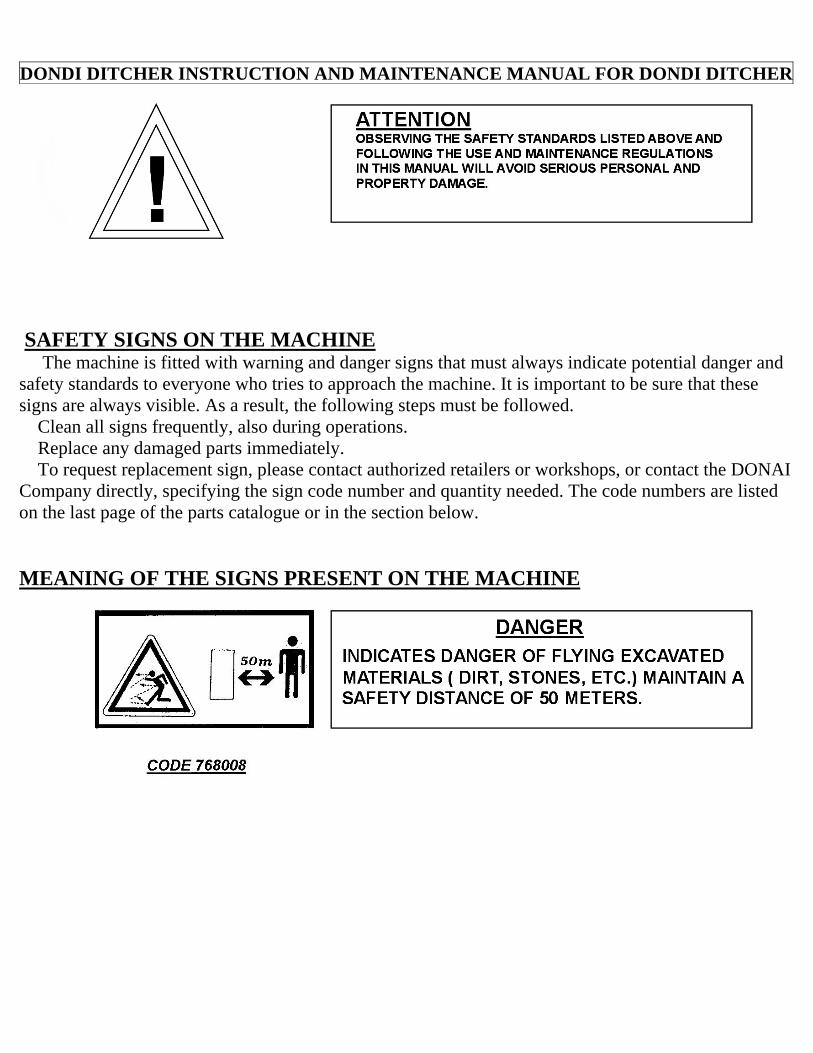
The most significant risk involving in the rotary ditcher is caused by flying excavation work (dirt or rocks). Therefore, a well defined danger zone must be established near the machine in operating situations and no one must be allowed to access this area. As far as the ditcher is concerned, the dander zone is understood as the space around the machine Within a 50 meter radius (see fig A below). The test we have preformed demonstrates a 400-gram rock can be projected a distance of up to 40 meters.
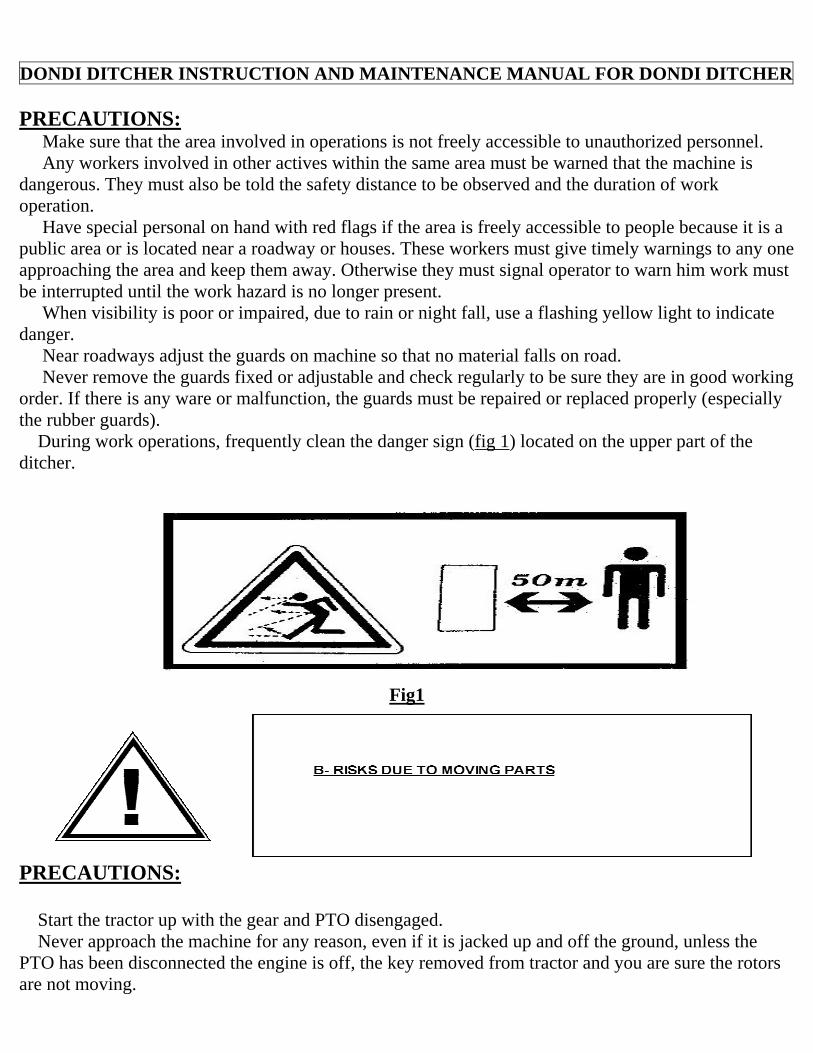
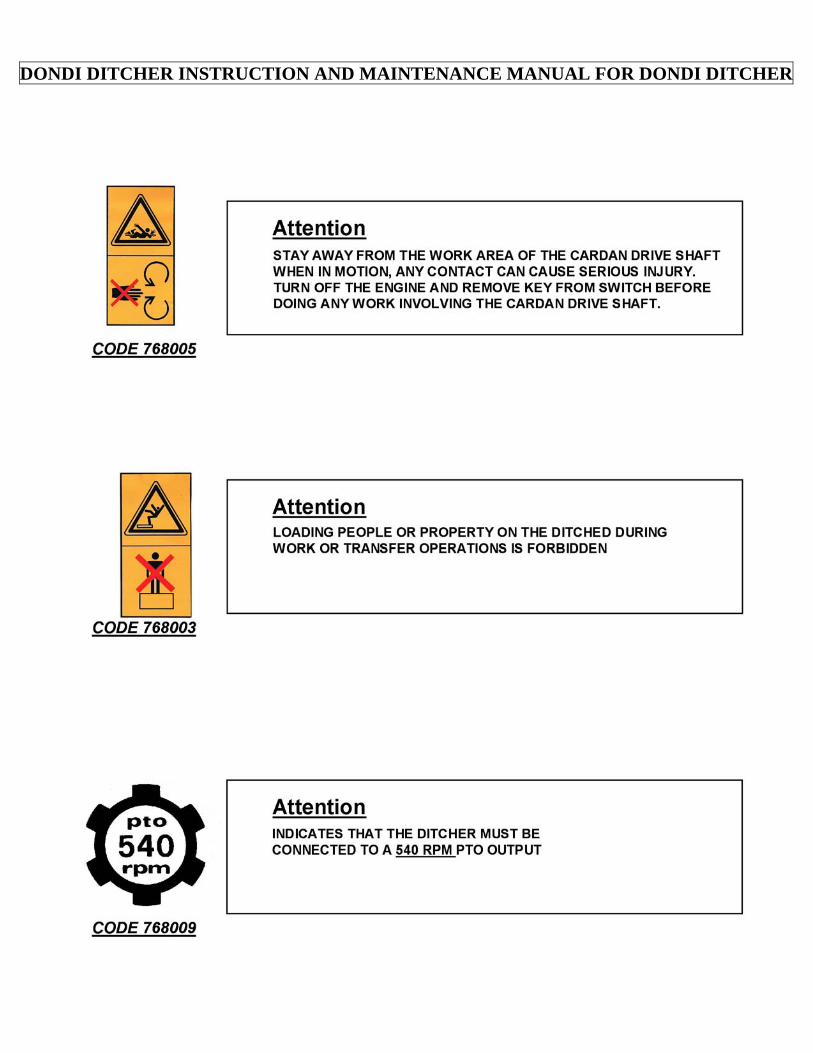
DONDI DITCHER INSTRUCTION AND MAINTENANCE MANUAL FOR DONDI DITCHER PRECAUTIONS: Make sure that the area involved in operations is not freely accessible to unauthorized personnel. Any workers involved in other actives within the same area must be warned that the machine is dangerous. They must also be told the safety distance to be observed and the duration of work operation. Have special personal on hand with red flags if the area is freely accessible to people because it is a public area or is located near a roadway or houses. These workers must give timely warnings to any one approaching the area and keep them away. Otherwise they must signal operator to warn him work must be interrupted until the work hazard is no longer present. When visibility is poor or impaired, due to rain or night fall, use a flashing yellow light to indicate danger. Near roadways adjust the guards on machine so that no material falls on road. Never remove the guards fixed or adjustable and check regularly to be sure they are in good working order. If there is any ware or malfunction, the guards must be repaired or replaced properly (especially the rubber guards). During work operations, frequently clean the danger sign (fig 1) located on the upper part of the ditcher.
Fig1
PRECAUTIONS: Start the tractor up with the gear and PTO disengaged. Never approach the machine for any reason, even if it is jacked up and off the ground, unless the PTO has been disconnected the engine is off, the key removed from tractor and you are sure the rotors are not moving.
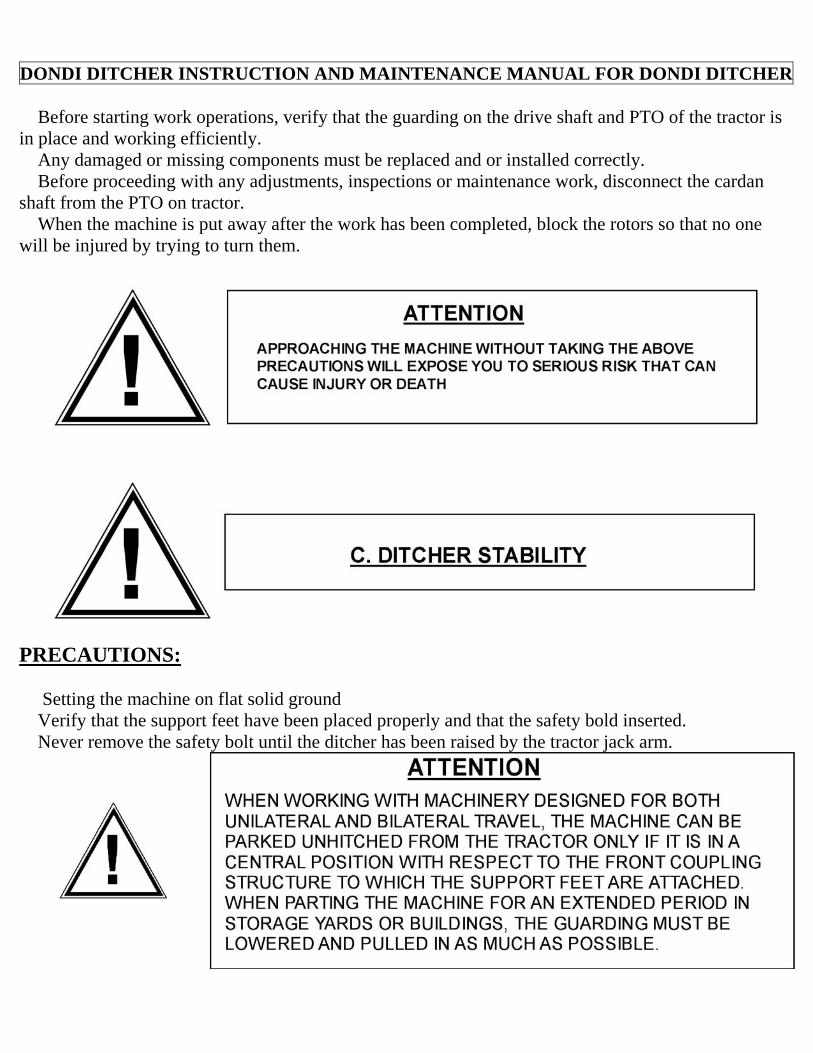
DONDI DITCHER INSTRUCTION AND MAINTENANCE MANUAL FOR DONDI DITCHER Before starting work operations, verify that the guarding on the drive shaft and PTO of the tractor is in place and working efficiently. Any damaged or missing components must be replaced and or installed correctly. Before proceeding with any adjustments, inspections or maintenance work, disconnect the cardan shaft from the PTO on tractor. When the machine is put away after the work has been completed, block the rotors so that no one will be injured by trying to turn them.
PRECAUTIONS: Setting the machine on flat solid ground Verify that the support feet have been placed properly and that the safety bold inserted. Never remove the safety bolt until the ditcher has been raised by the tractor jack arm.
DONDI DITCHER INSTRUCTION AND MAINTENANCE MANUAL FOR DONDI DITCHER
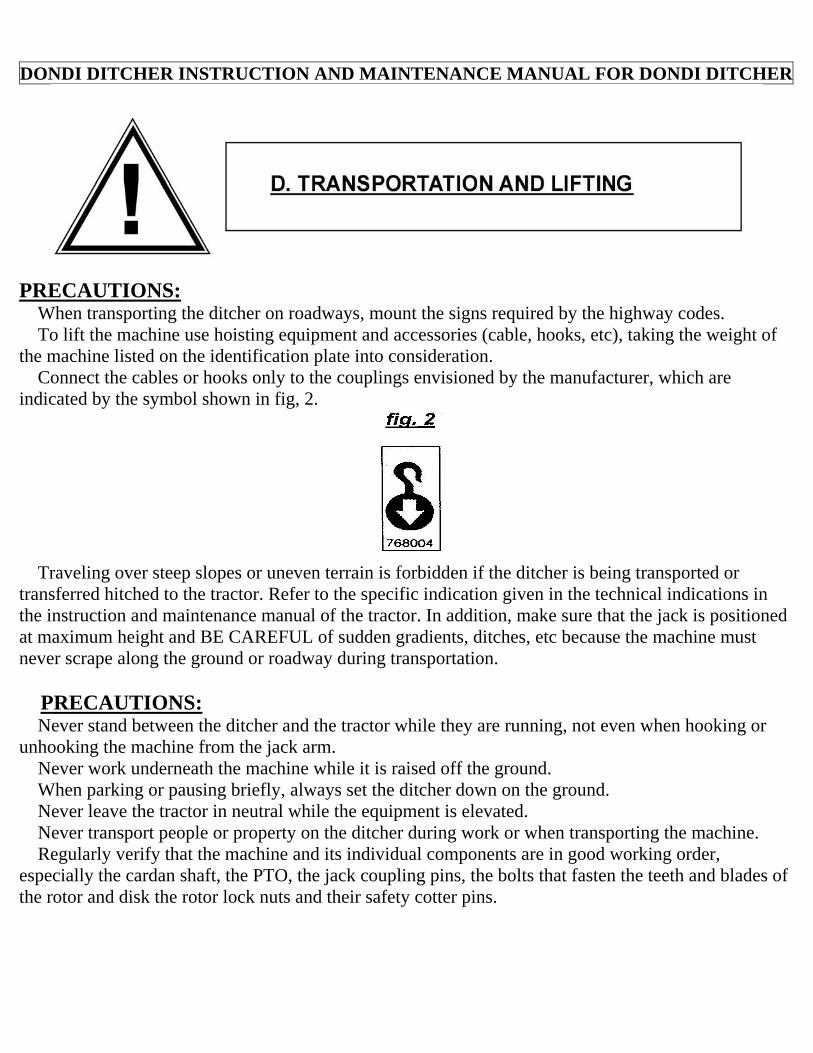
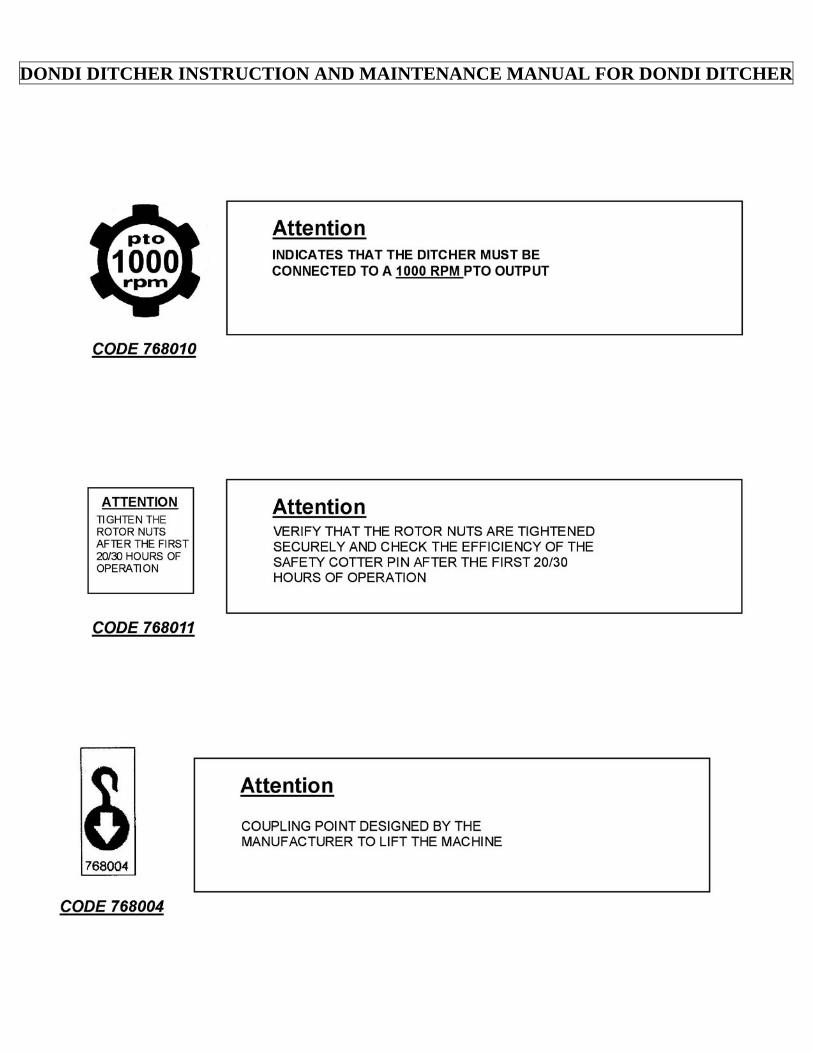
PRECAUTIONS: When transporting the ditcher on roadways, mount the signs required by the highway codes. To lift the machine use hoisting equipment and accessories (cable, hooks, etc), taking the weight of the machine listed on the identification plate into consideration. Connect the cables or hooks only to the couplings envisioned by the manufacturer, which are indicated by the symbol shown in fig, 2.
Traveling over steep slopes or uneven terrain is forbidden if the ditcher is being transported or transferred hitched to the tractor. Refer to the specific indication given in the technical indications in the instruction and maintenance manual of the tractor. In addition, make sure that the jack is positioned at maximum height and BE CAREFUL of sudden gradients, ditches, etc because the machine must never scrape along the ground or roadway during transportation. PRECAUTIONS: Never stand between the ditcher and the tractor while they are running, not even when hooking or unhooking the machine from the jack arm. Never work underneath the machine while it is raised off the ground. When parking or pausing briefly, always set the ditcher down on the ground. Never leave the tractor in neutral while the equipment is elevated. Never transport people or property on the ditcher during work or when transporting the machine. Regularly verify that the machine and its individual components are in good working order, especially the cardan shaft, the PTO, the jack coupling pins, the bolts that fasten the teeth and blades of the rotor and disk the rotor lock nuts and their safety cotter pins.
DONDI DITCHER INSTRUCTION AND MAINTENANCE MANUAL FOR DONDI DITCHER
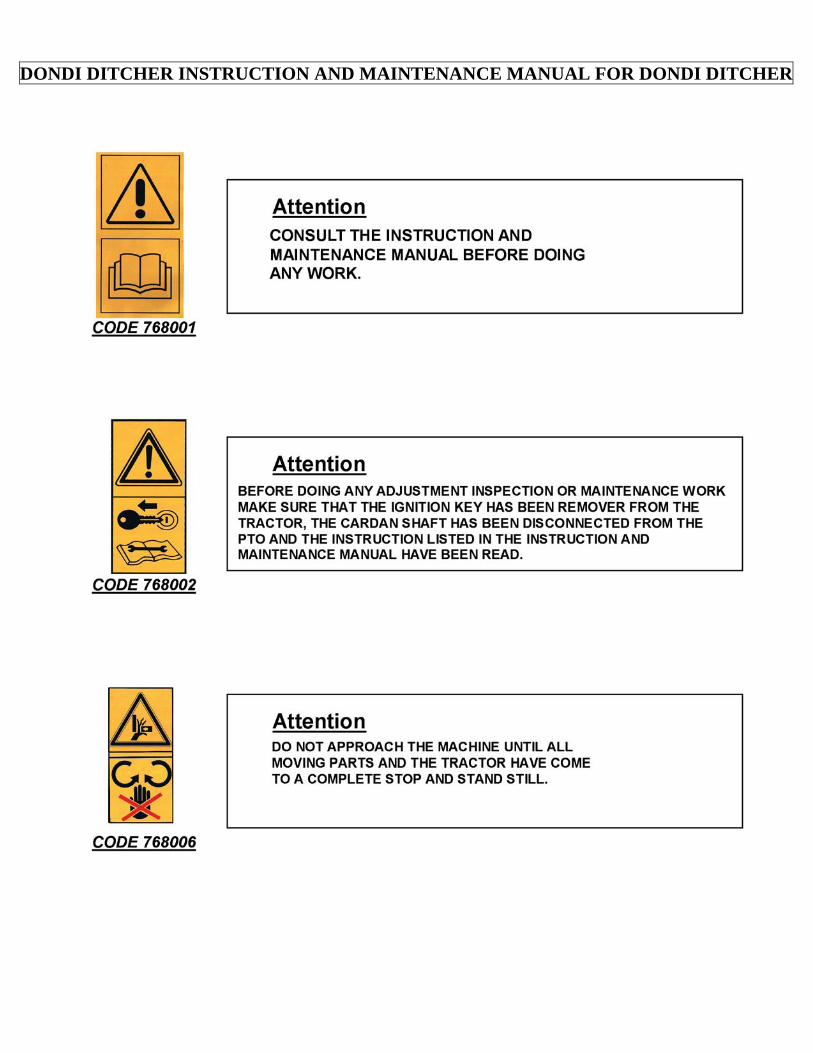
SAFETY SIGNS ON THE MACHINE The machine is fitted with warning and danger signs that must always indicate potential danger and safety standards to everyone who tries to approach the machine. It is important to be sure that these signs are always visible. As a result, the following steps must be followed. Clean all signs frequently, also during operations. Replace any damaged parts immediately. To request replacement sign, please contact authorized retailers or workshops, or contact the DONAI Company directly, specifying the sign code number and quantity needed. The code numbers are listed on the last page of the parts catalogue or in the section below. MEANING OF THE SIGNS PRESENT ON THE MACHINE
DONDI DITCHER INSTRUCTION AND MAINTENANCE MANUAL FOR DONDI DITCHER
DONDI DITCHER INSTRUCTION AND MAINTENANCE MANUAL FOR DONDI DITCHER
DONDI DITCHER INSTRUCTION AND MAINTENANCE MANUAL FOR DONDI DITCHER
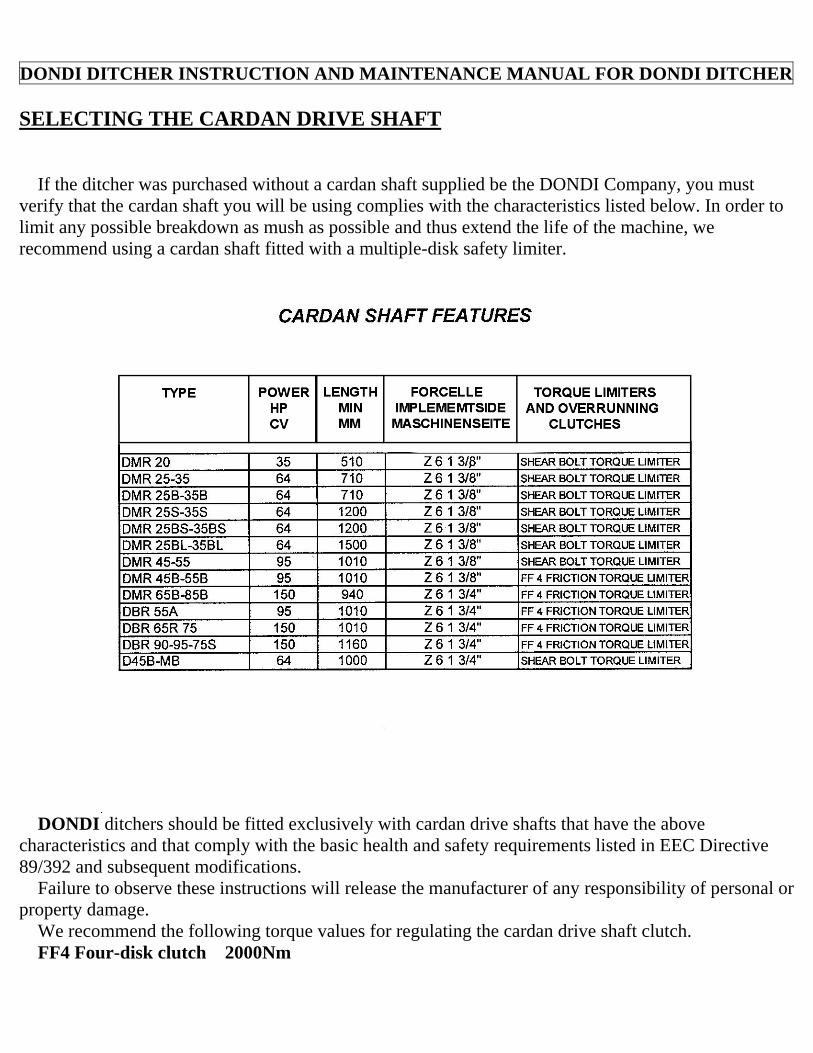
DONDI DITCHER INSTRUCTION AND MAINTENANCE MANUAL FOR DONDI DITCHER SELECTING THE CARDAN DRIVE SHAFT If the ditcher was purchased without a cardan shaft supplied be the DONDI Company, you must verify that the cardan shaft you will be using complies with the characteristics listed below. In order to limit any possible breakdown as mush as possible and thus extend the life of the machine, we recommend using a cardan shaft fitted with a multiple-disk safety limiter.
DONDI ditchers should be fitted exclusively with cardan drive shafts that have the above characteristics and that comply with the basic health and safety requirements listed in EEC Directive 89/392 and subsequent modifications. Failure to observe these instructions will release the manufacturer of any responsibility of personal or property damage. We recommend the following torque values for regulating the cardan drive shaft clutch. FF4 Four-disk clutch 2000Nm
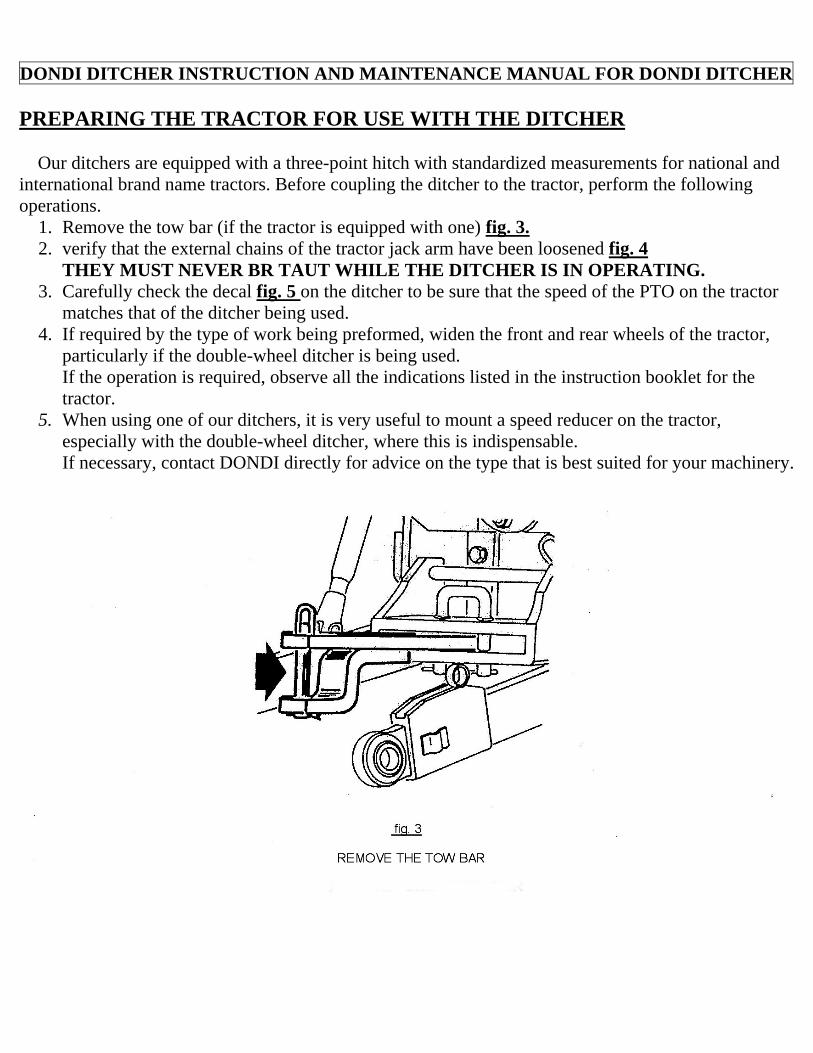
DONDI DITCHER INSTRUCTION AND MAINTENANCE MANUAL FOR DONDI DITCHER PREPARING THE TRACTOR FOR USE WITH THE DITCHER Our ditchers are equipped with a three-point hitch with standardized measurements for national and international brand name tractors. Before coupling the ditcher to the tractor, perform the following operations.
1. Remove the tow bar (if the tractor is equipped with one) fig. 3. 2. verify that the external chains of the tractor jack arm have been loosened fig. 4
THEY MUST NEVER BR TAUT WHILE THE DITCHER IS IN OPERATING. 3. Carefully check the decal fig. 5 on the ditcher to be sure that the speed of the PTO on the tractor
matches that of the ditcher being used. 4. If required by the type of work being preformed, widen the front and rear wheels of the tractor,
particularly if the double-wheel ditcher is being used. If the operation is required, observe all the indications listed in the instruction booklet for the tractor.
5. When using one of our ditchers, it is very useful to mount a speed reducer on the tractor, especially with the double-wheel ditcher, where this is indispensable. If necessary, contact DONDI directly for advice on the type that is best suited for your machinery.
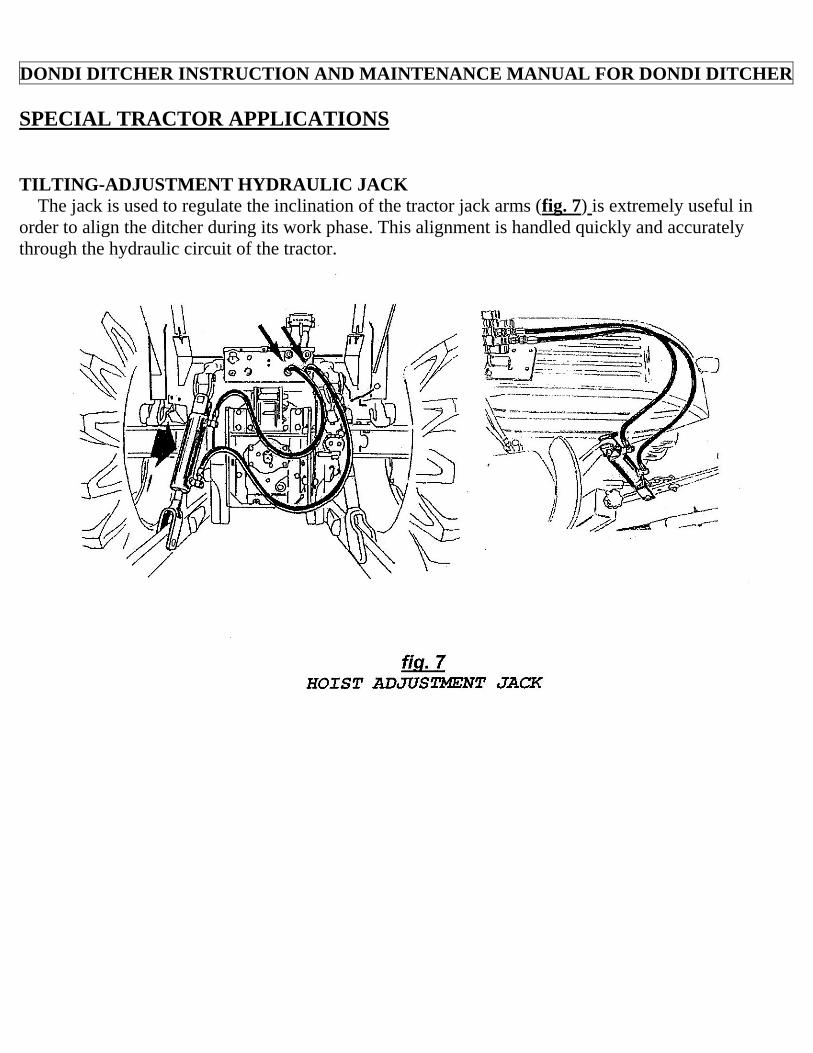
DONDI DITCHER INSTRUCTION AND MAINTENANCE MANUAL FOR DONDI DITCHER SPECIAL TRACTOR APPLICATIONS TILTING-ADJUSTMENT HYDRAULIC JACK The jack is used to regulate the inclination of the tractor jack arms (fig. 7) is extremely useful in order to align the ditcher during its work phase. This alignment is handled quickly and accurately through the hydraulic circuit of the tractor.
DONDI DITCHER INSTRUCTION AND MAINTENANCE MANUAL FOR DONDI DITCHER
DONDI DITCHER INSTRUCTION AND MAINTENANCE MANUAL FOR DONDI DITCHER
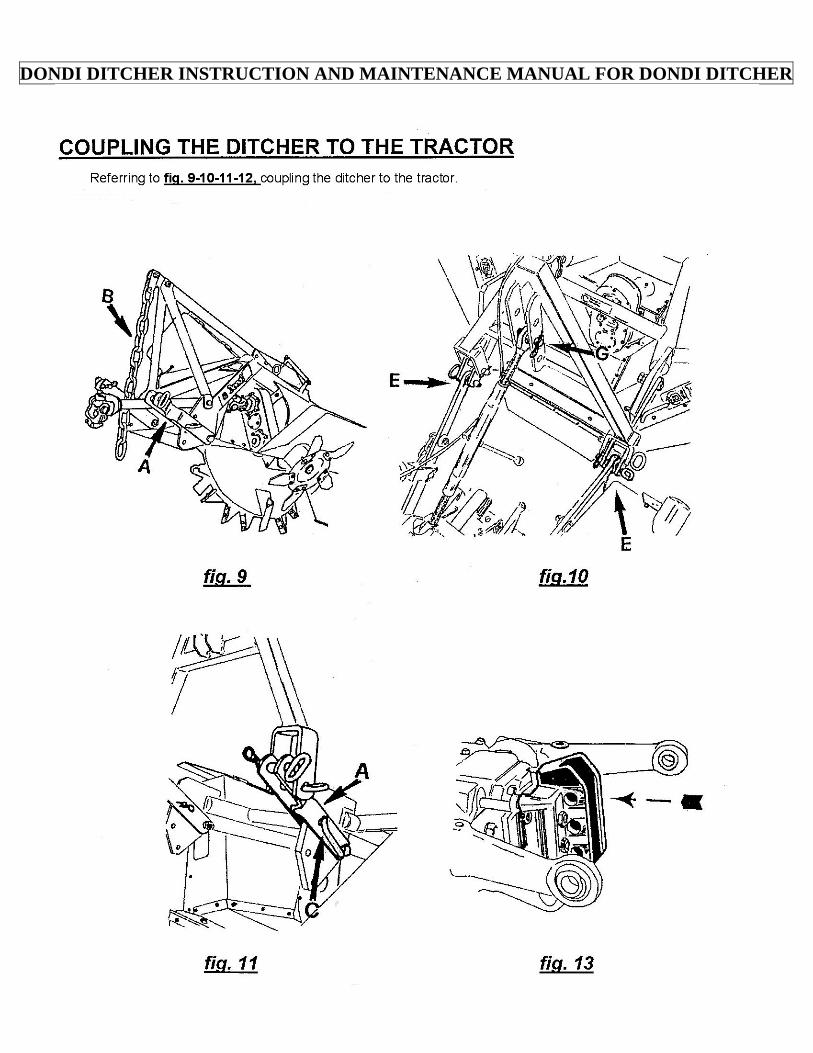
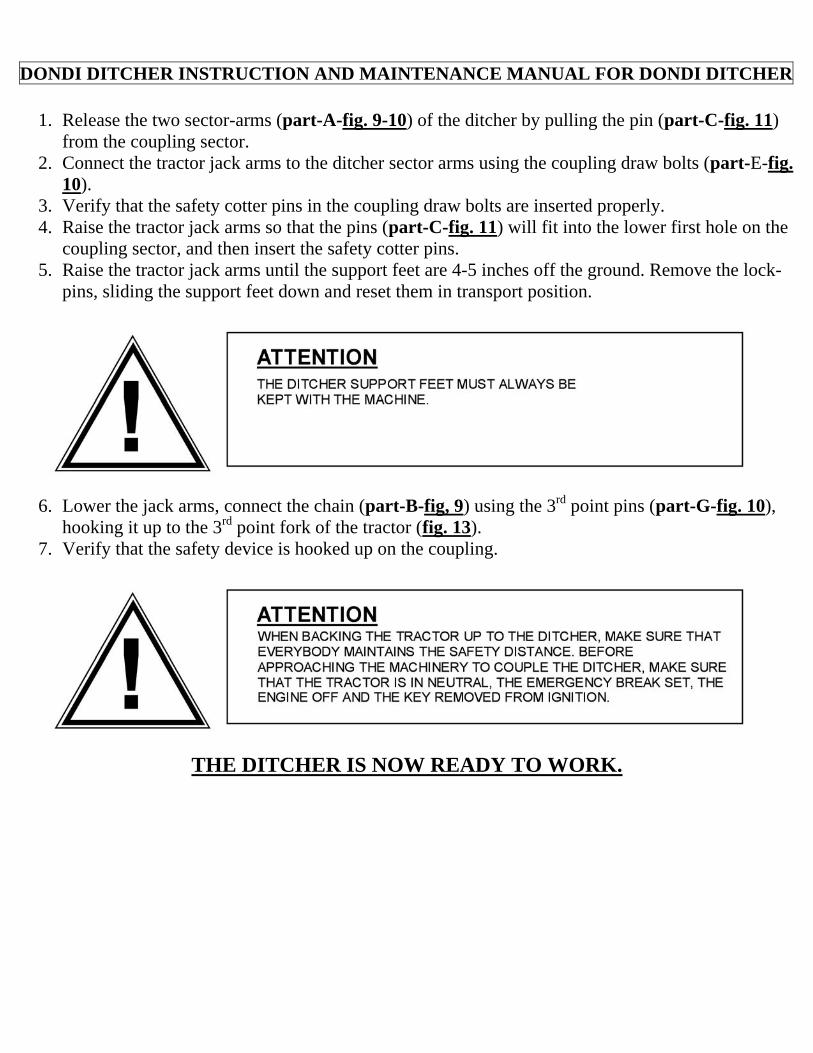
1. Release the two sector-arms (part-A-fig. 9-10) of the ditcher by pulling the pin (part-C-fig. 11) from the coupling sector.
2. Connect the tractor jack arms to the ditcher sector arms using the coupling draw bolts (part-E-fig. 10).
3. Verify that the safety cotter pins in the coupling draw bolts are inserted properly. 4. Raise the tractor jack arms so that the pins (part-C-fig. 11) will fit into the lower first hole on the
coupling sector, and then insert the safety cotter pins. 5. Raise the tractor jack arms until the support feet are 4-5 inches off the ground. Remove the lock-
pins, sliding the support feet down and reset them in transport position.
6. Lower the jack arms, connect the chain (part-B-fig, 9) using the 3rd point pins (part-G-fig. 10),
hooking it up to the 3rd point fork of the tractor (fig. 13). 7. Verify that the safety device is hooked up on the coupling.
THE DITCHER IS NOW READY TO WORK.
DONDI DITCHER INSTRUCTION AND MAINTENANCE MANUAL FOR DONDI DITCHER WORKING WITH THE DITCHER
1. Verify that the work area is not freely accessible to unauthorized personal, warn all working involved in other activities within the same area of the danger involved in the operation you are about to carry out, indicate the safety distance that must be observed at all times through out the entire operation.
2. Have special personnel on hand with red flags if the area is freely accessible to people because it is a public area or near roadway or houses. These workers must give timely warning to anyone approaching the area and keep them away. Otherwise they must sign the operator to warn him that work must stop until hazard is no longer present.
3. Before beginning to excavate a new ditch, it is advisable to stake some reference poles to help the operator move in the right direction.
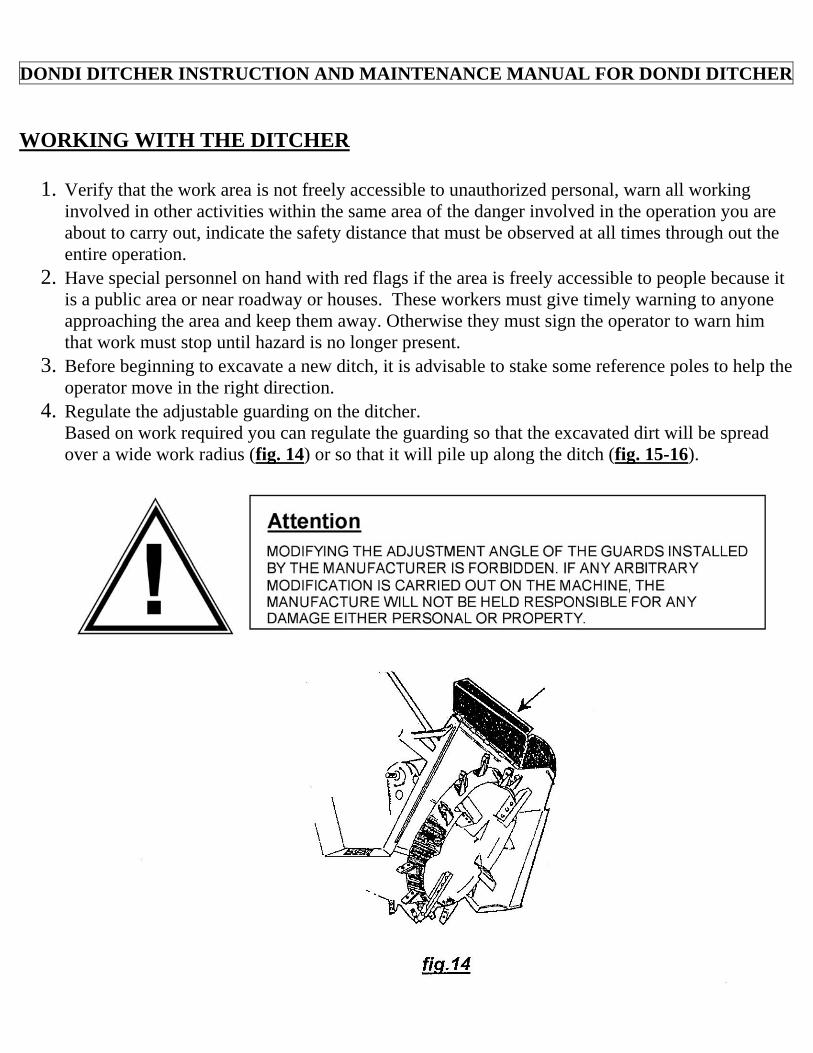
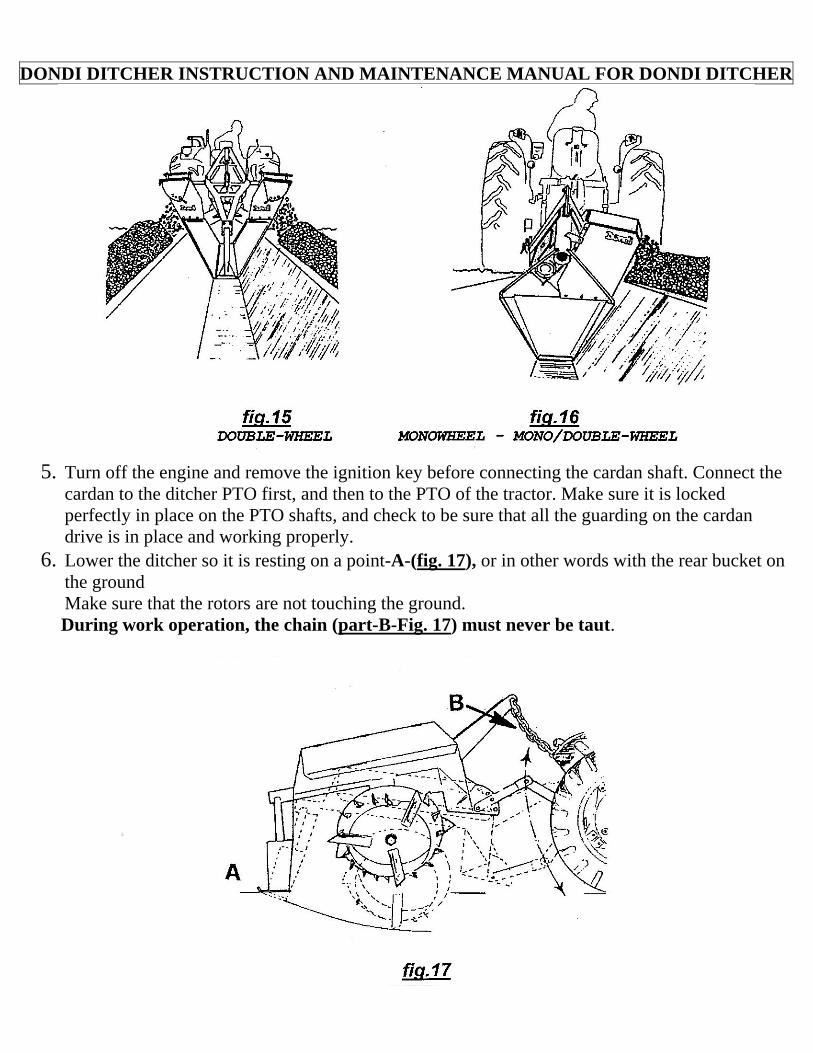
4. Regulate the adjustable guarding on the ditcher. Based on work required you can regulate the guarding so that the excavated dirt will be spread over a wide work radius (fig. 14) or so that it will pile up along the ditch (fig. 15-16).
DONDI DITCHER INSTRUCTION AND MAINTENANCE MANUAL FOR DONDI DITCHER
5. Turn off the engine and remove the ignition key before connecting the cardan shaft. Connect the
cardan to the ditcher PTO first, and then to the PTO of the tractor. Make sure it is locked perfectly in place on the PTO shafts, and check to be sure that all the guarding on the cardan drive is in place and working properly.
6. Lower the ditcher so it is resting on a point-A-(fig. 17), or in other words with the rear bucket on the ground Make sure that the rotors are not touching the ground.
During work operation, the chain (part-B-Fig. 17) must never be taut.
DONDI DITCHER INSTRUCTION AND MAINTENANCE MANUAL FOR DONDI DITCHER
7. Keeping the tractor running but at a standstill and without engaging the gears, start up the PTO and then the ditcher rotors.
With the tractor at a standstill, accelerate gradually, increasing the rotation of the rotors. Slowly lower the jack arms until the rotors come in contact with the ground and begin excavating. 8. Engage the lowest drove gear on the tractor and start excavating the ditch, gauging the depth in
relation to the available HP of the tractor and drive speed of the tractor. REMBER THE ADVANCEMENT SPEED LISTED IN THE TECHNICAL CHART ON PAGES 14-15-16-17 OF THIS INSTRUCTIONAL AND MAINTENANCE MANUAL.
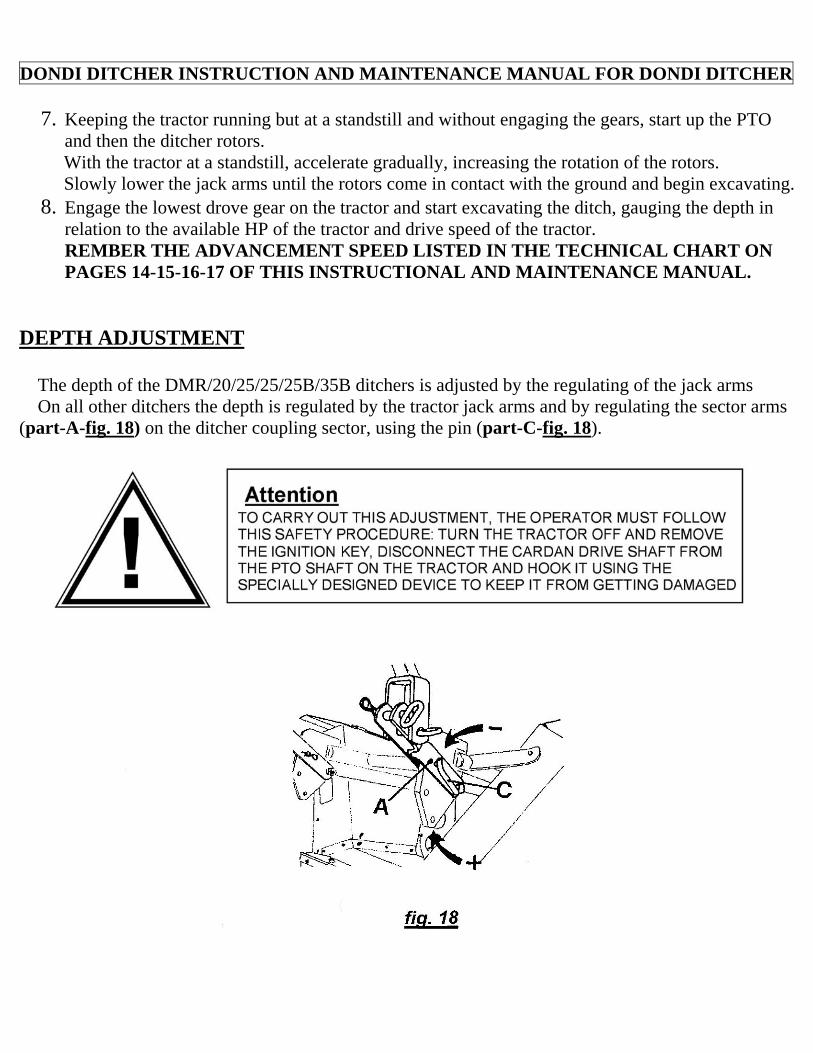
DEPTH ADJUSTMENT The depth of the DMR/20/25/25/25B/35B ditchers is adjusted by the regulating of the jack arms On all other ditchers the depth is regulated by the tractor jack arms and by regulating the sector arms (part-A-fig. 18) on the ditcher coupling sector, using the pin (part-C-fig. 18).
DONDI DITCHER INSTRUCTION AND MAINTENANCE MANUAL FOR DONDI DITCHER
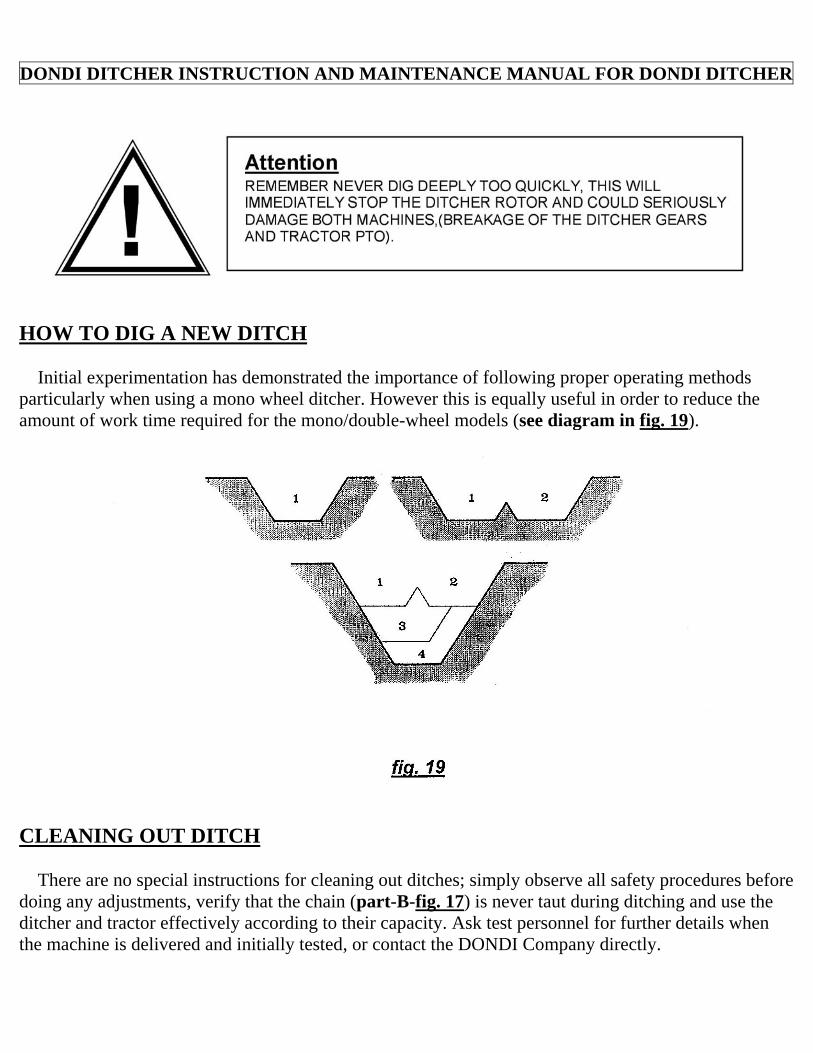
HOW TO DIG A NEW DITCH Initial experimentation has demonstrated the importance of following proper operating methods particularly when using a mono wheel ditcher. However this is equally useful in order to reduce the amount of work time required for the mono/double-wheel models (see diagram in fig. 19).
CLEANING OUT DITCH There are no special instructions for cleaning out ditches; simply observe all safety procedures before doing any adjustments, verify that the chain (part-B-fig. 17) is never taut during ditching and use the ditcher and tractor effectively according to their capacity. Ask test personnel for further details when the machine is delivered and initially tested, or contact the DONDI Company directly.
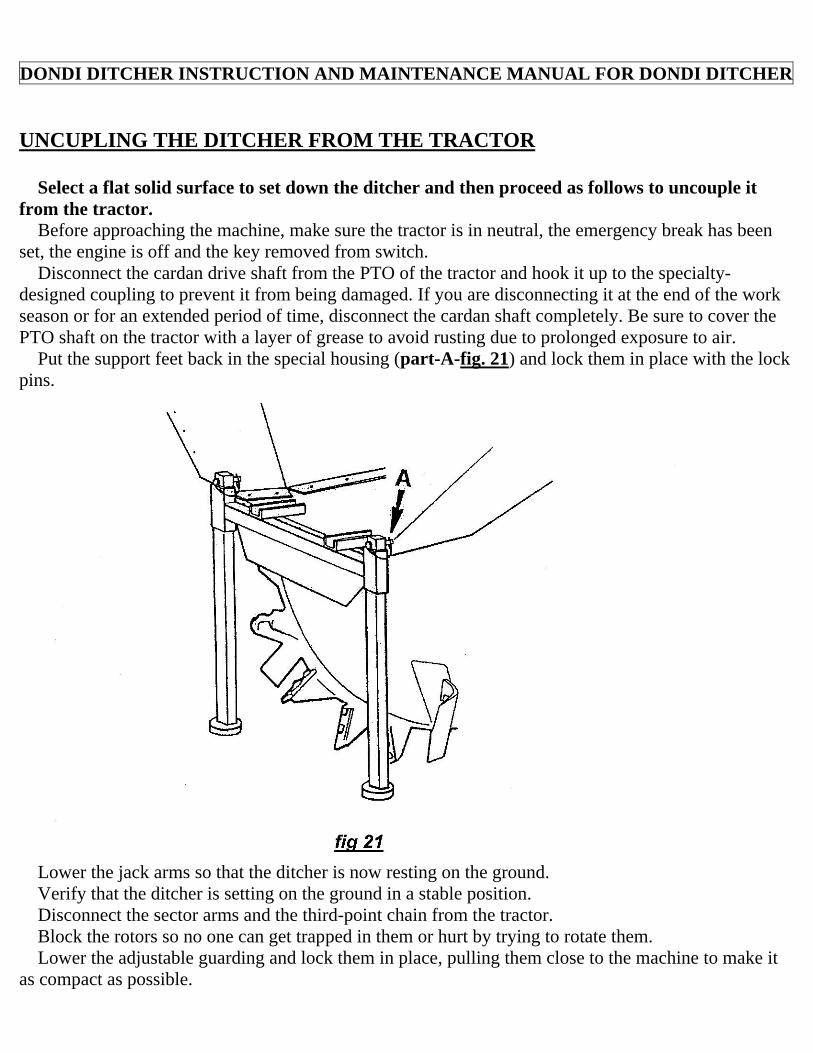
DONDI DITCHER INSTRUCTION AND MAINTENANCE MANUAL FOR DONDI DITCHER UNCUPLING THE DITCHER FROM THE TRACTOR Select a flat solid surface to set down the ditcher and then proceed as follows to uncouple it from the tractor. Before approaching the machine, make sure the tractor is in neutral, the emergency break has been set, the engine is off and the key removed from switch. Disconnect the cardan drive shaft from the PTO of the tractor and hook it up to the specialty-designed coupling to prevent it from being damaged. If you are disconnecting it at the end of the work season or for an extended period of time, disconnect the cardan shaft completely. Be sure to cover the PTO shaft on the tractor with a layer of grease to avoid rusting due to prolonged exposure to air. Put the support feet back in the special housing (part-A-fig. 21) and lock them in place with the lock pins.
Lower the jack arms so that the ditcher is now resting on the ground. Verify that the ditcher is setting on the ground in a stable position. Disconnect the sector arms and the third-point chain from the tractor. Block the rotors so no one can get trapped in them or hurt by trying to rotate them. Lower the adjustable guarding and lock them in place, pulling them close to the machine to make it as compact as possible.
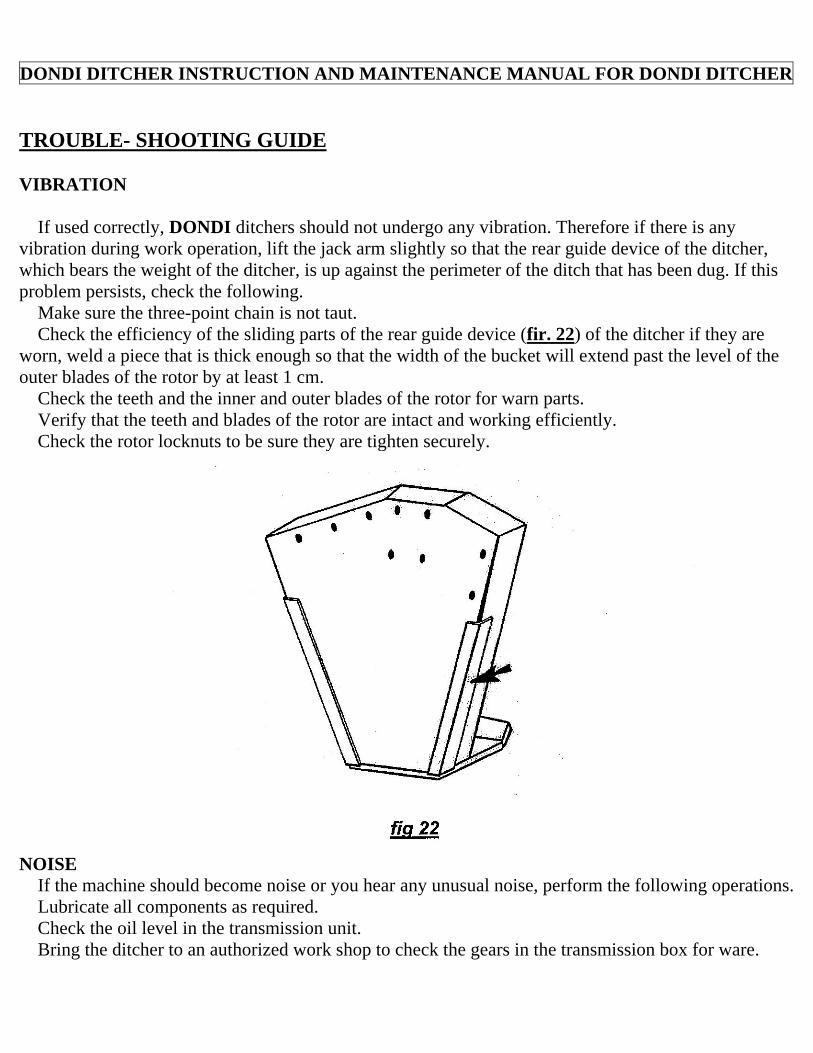
DONDI DITCHER INSTRUCTION AND MAINTENANCE MANUAL FOR DONDI DITCHER TROUBLE- SHOOTING GUIDE VIBRATION If used correctly, DONDI ditchers should not undergo any vibration. Therefore if there is any vibration during work operation, lift the jack arm slightly so that the rear guide device of the ditcher, which bears the weight of the ditcher, is up against the perimeter of the ditch that has been dug. If this problem persists, check the following. Make sure the three-point chain is not taut. Check the efficiency of the sliding parts of the rear guide device (fir. 22) of the ditcher if they are worn, weld a piece that is thick enough so that the width of the bucket will extend past the level of the outer blades of the rotor by at least 1 cm. Check the teeth and the inner and outer blades of the rotor for warn parts. Verify that the teeth and blades of the rotor are intact and working efficiently. Check the rotor locknuts to be sure they are tighten securely.
NOISE If the machine should become noise or you hear any unusual noise, perform the following operations. Lubricate all components as required. Check the oil level in the transmission unit. Bring the ditcher to an authorized work shop to check the gears in the transmission box for ware.
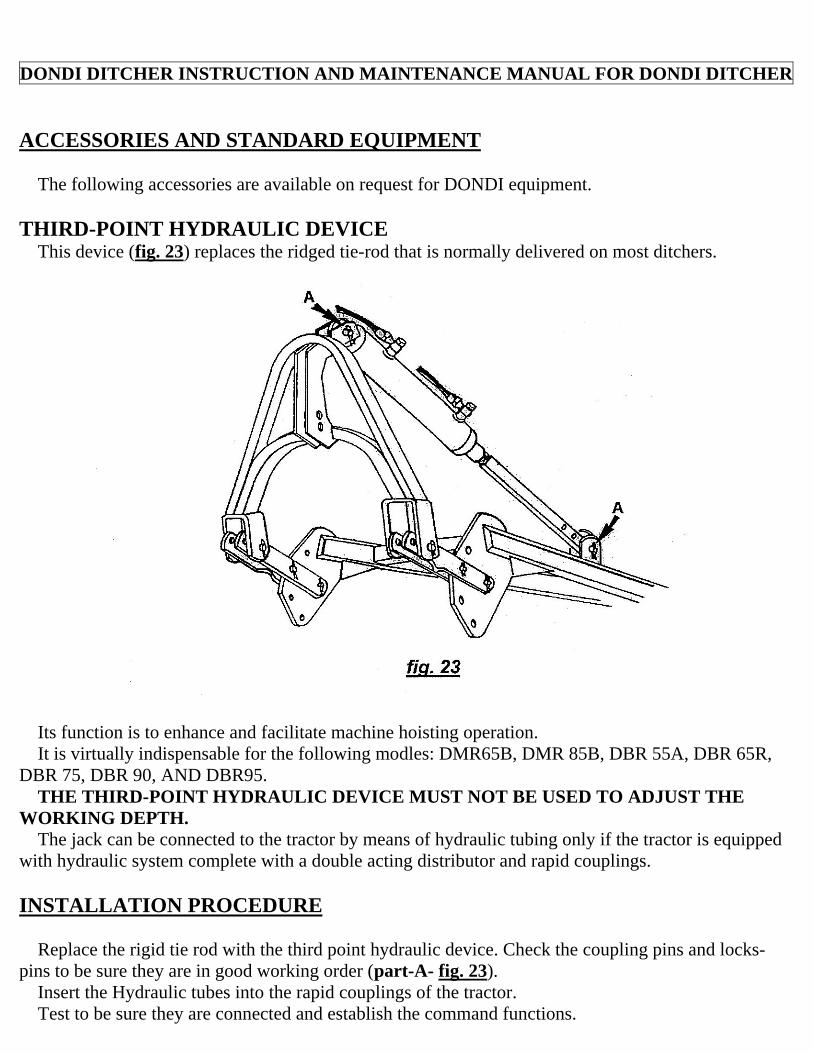
DONDI DITCHER INSTRUCTION AND MAINTENANCE MANUAL FOR DONDI DITCHER ACCESSORIES AND STANDARD EQUIPMENT The following accessories are available on request for DONDI equipment. THIRD-POINT HYDRAULIC DEVICE This device (fig. 23) replaces the ridged tie-rod that is normally delivered on most ditchers.
Its function is to enhance and facilitate machine hoisting operation. It is virtually indispensable for the following modles: DMR65B, DMR 85B, DBR 55A, DBR 65R, DBR 75, DBR 90, AND DBR95. THE THIRD-POINT HYDRAULIC DEVICE MUST NOT BE USED TO ADJUST THE WORKING DEPTH. The jack can be connected to the tractor by means of hydraulic tubing only if the tractor is equipped with hydraulic system complete with a double acting distributor and rapid couplings. INSTALLATION PROCEDURE Replace the rigid tie rod with the third point hydraulic device. Check the coupling pins and locks- pins to be sure they are in good working order (part-A- fig. 23). Insert the Hydraulic tubes into the rapid couplings of the tractor. Test to be sure they are connected and establish the command functions.
DONDI DITCHER INSTRUCTION AND MAINTENANCE MANUAL FOR DONDI DITCHER
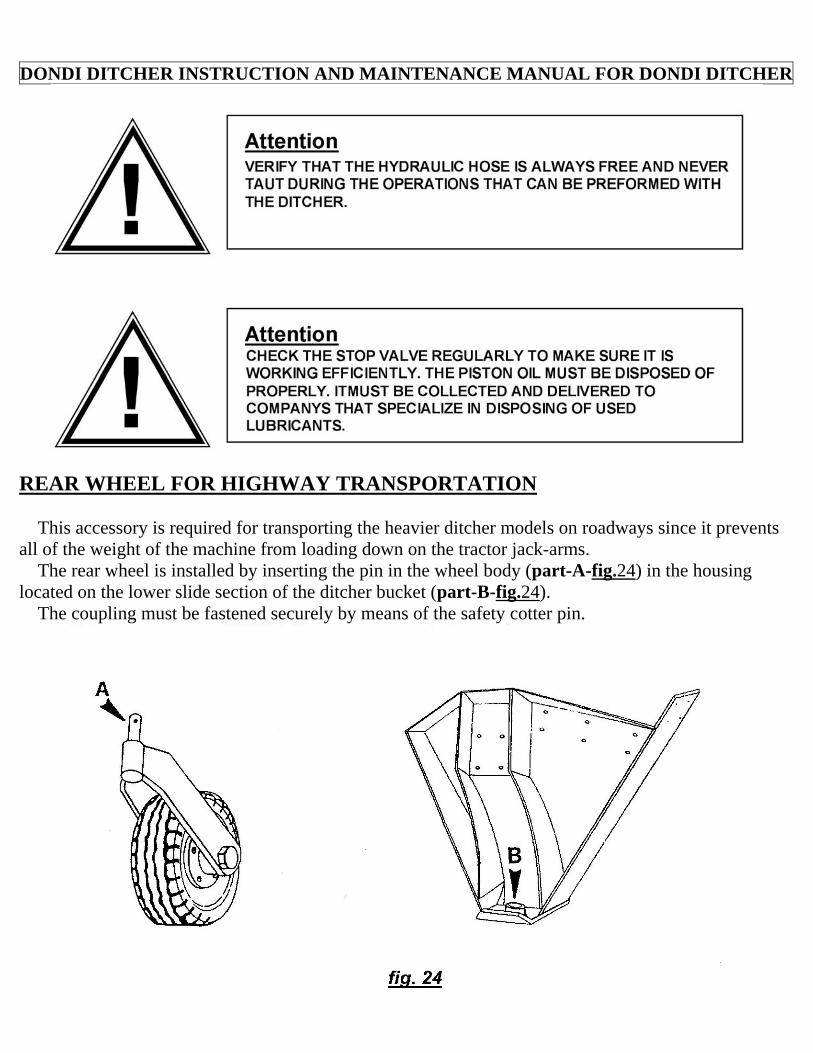
REAR WHEEL FOR HIGHWAY TRANSPORTATION This accessory is required for transporting the heavier ditcher models on roadways since it prevents all of the weight of the machine from loading down on the tractor jack-arms. The rear wheel is installed by inserting the pin in the wheel body (part-A-fig.24) in the housing located on the lower slide section of the ditcher bucket (part-B-fig.24). The coupling must be fastened securely by means of the safety cotter pin.
DONDI DITCHER INSTRUCTION AND MAINTENANCE MANUAL FOR DONDI DITCHER MAINTAINING THE DONDI DITCHER
DONDI DITCHER INSTRUCTION AND MAINTENANCE MANUAL FOR DONDI DITCHER MATERIAL FOR PERFECT MAINTENANCE
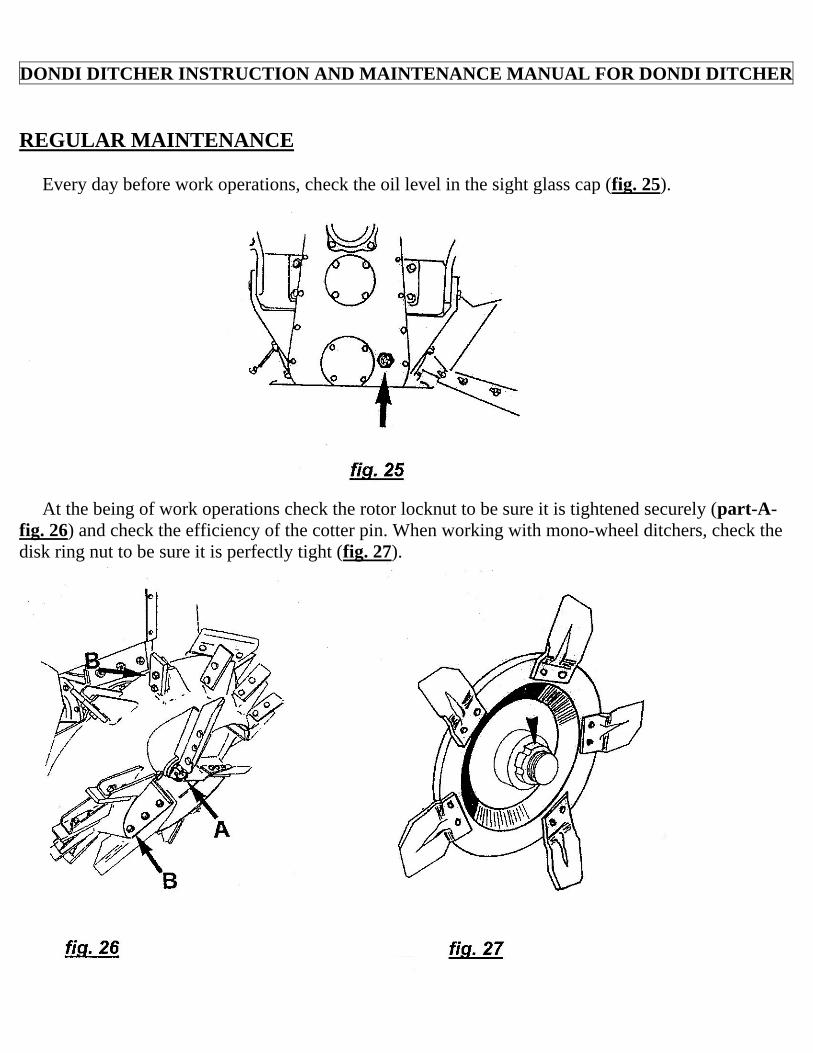
DONDI DITCHER INSTRUCTION AND MAINTENANCE MANUAL FOR DONDI DITCHER REGULAR MAINTENANCE Every day before work operations, check the oil level in the sight glass cap (fig. 25).
At the being of work operations check the rotor locknut to be sure it is tightened securely (part-A-fig. 26) and check the efficiency of the cotter pin. When working with mono-wheel ditchers, check the disk ring nut to be sure it is perfectly tight (fig. 27).
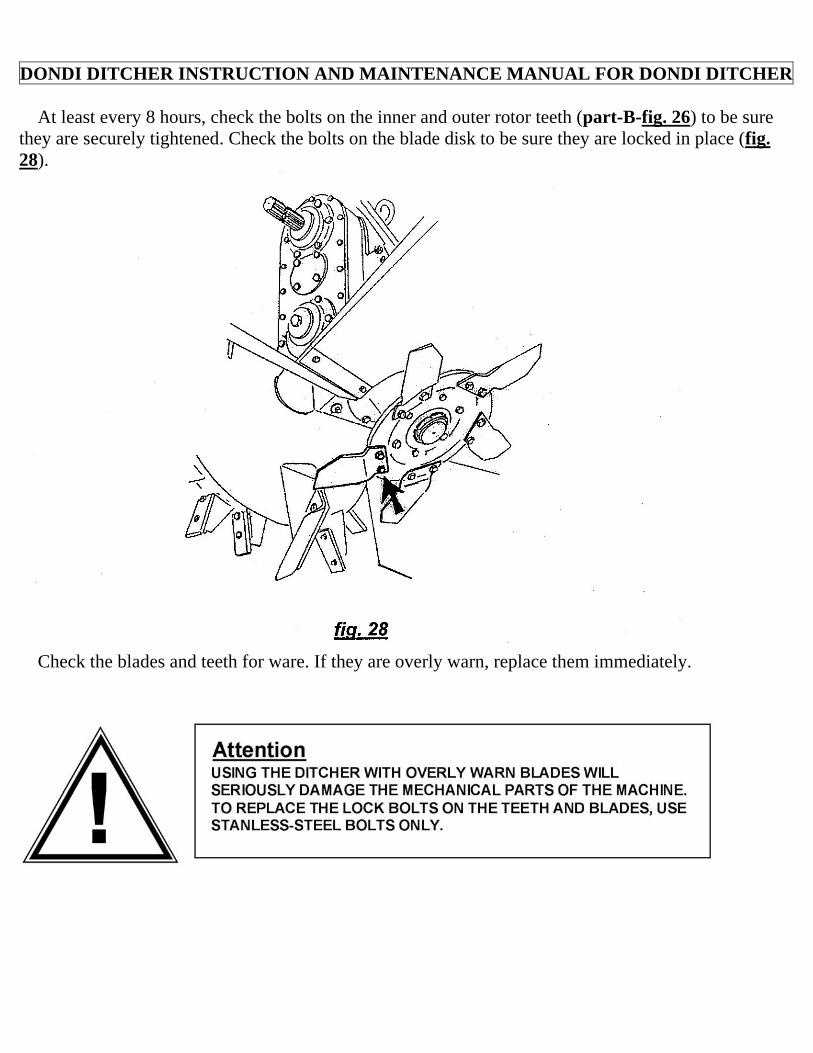
DONDI DITCHER INSTRUCTION AND MAINTENANCE MANUAL FOR DONDI DITCHER At least every 8 hours, check the bolts on the inner and outer rotor teeth (part-B-fig. 26) to be sure they are securely tightened. Check the bolts on the blade disk to be sure they are locked in place (fig. 28).
Check the blades and teeth for ware. If they are overly warn, replace them immediately.

DONDI DITCHER INSTRUCTION AND MAINTENANCE MANUAL FOR DONDI DITCHER Grease the components of the cardan drive shaft, scrupulously following the diagram below.
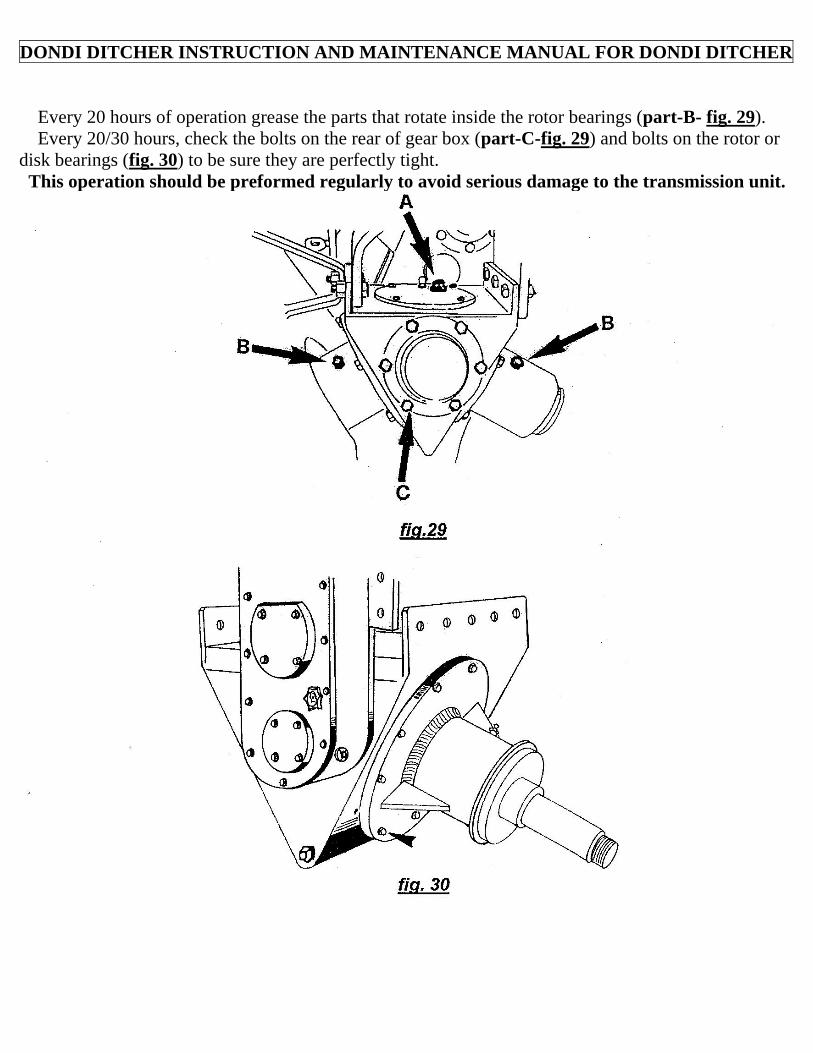
DONDI DITCHER INSTRUCTION AND MAINTENANCE MANUAL FOR DONDI DITCHER Every 20 hours of operation grease the parts that rotate inside the rotor bearings (part-B- fig. 29). Every 20/30 hours, check the bolts on the rear of gear box (part-C-fig. 29) and bolts on the rotor or disk bearings (fig. 30) to be sure they are perfectly tight. This operation should be preformed regularly to avoid serious damage to the transmission unit.
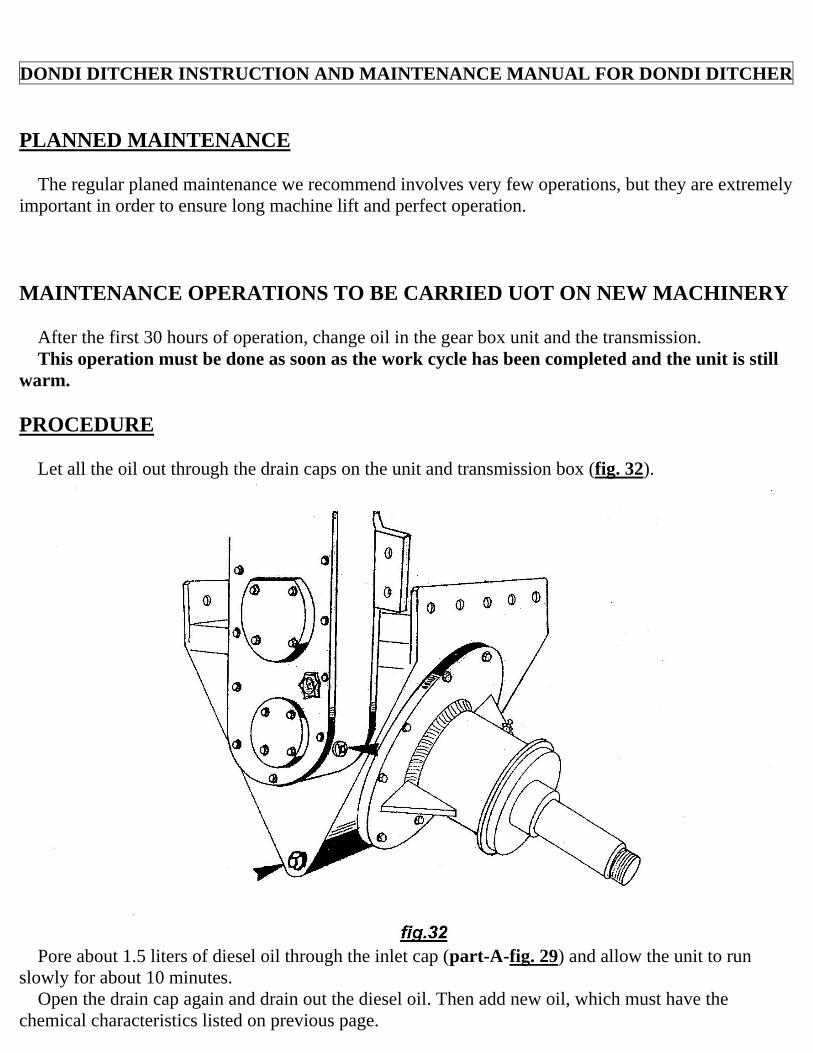
DONDI DITCHER INSTRUCTION AND MAINTENANCE MANUAL FOR DONDI DITCHER PLANNED MAINTENANCE The regular planed maintenance we recommend involves very few operations, but they are extremely important in order to ensure long machine lift and perfect operation. MAINTENANCE OPERATIONS TO BE CARRIED UOT ON NEW MACHINERY After the first 30 hours of operation, change oil in the gear box unit and the transmission. This operation must be done as soon as the work cycle has been completed and the unit is still warm. PROCEDURE Let all the oil out through the drain caps on the unit and transmission box (fig. 32).
Pore about 1.5 liters of diesel oil through the inlet cap (part-A-fig. 29) and allow the unit to run slowly for about 10 minutes. Open the drain cap again and drain out the diesel oil. Then add new oil, which must have the chemical characteristics listed on previous page.
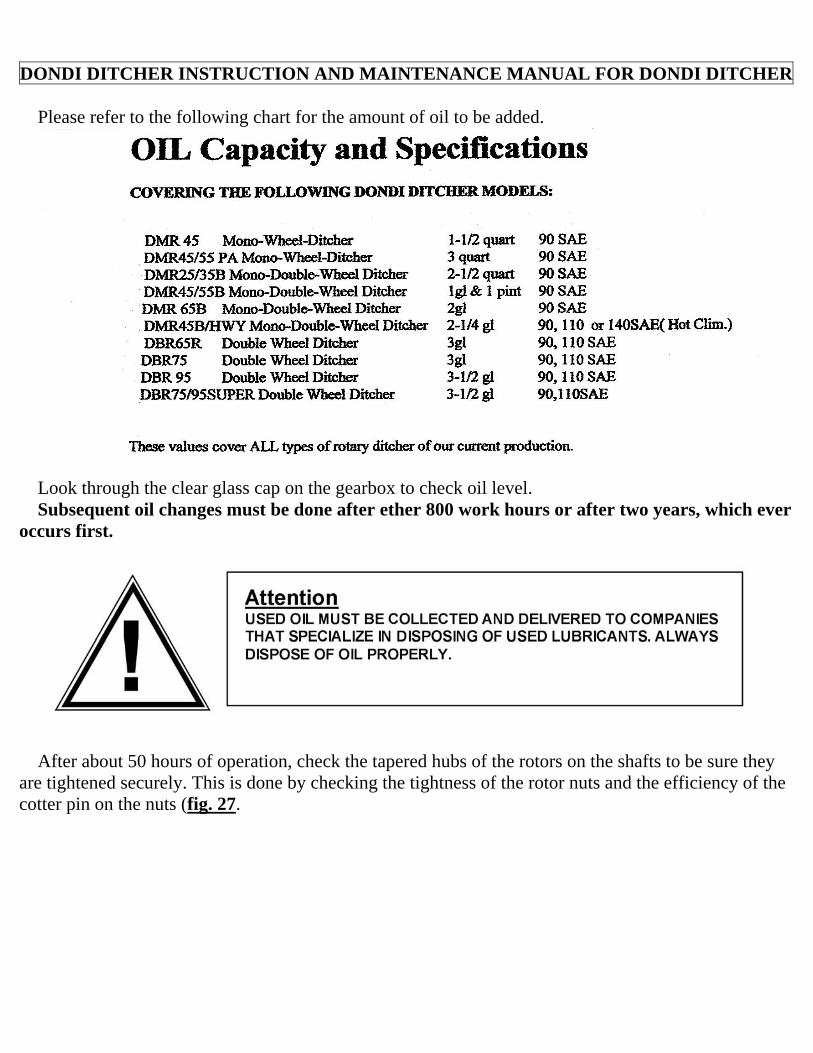
DONDI DITCHER INSTRUCTION AND MAINTENANCE MANUAL FOR DONDI DITCHER Please refer to the following chart for the amount of oil to be added.
Look through the clear glass cap on the gearbox to check oil level. Subsequent oil changes must be done after ether 800 work hours or after two years, which ever occurs first.
After about 50 hours of operation, check the tapered hubs of the rotors on the shafts to be sure they are tightened securely. This is done by checking the tightness of the rotor nuts and the efficiency of the cotter pin on the nuts (fig. 27.
DONDI DITCHER INSTRUCTION AND MAINTENANCE MANUAL FOR DONDI DITCHER AT THE END OF THE SEASON Before stowing the machine for a few days or at the end of the season, perform the following operations. After removing the cardan drive shaft, make sure that the rotors have been locked in place and that the machine has been set on the ground in a stable position. Clean the machine and lubricate the essential points indicated in the section entitled Planned Maintenance. Check the ditcher thoroughly, replace any warn parts with original spares and contact specialized work shop if the ditcher requires any major repair work. This will prepare the ditcher for next season. Cover all parts in direct contact with the soil using grease or rust preventer. Cover the PTOP shaft with a layer of grease to prevent rust. If necessary use paint to touch up the chassis cover to help prevent rust. Cover the cleaned and lubricated machine completely. AT THE BEGINNING OF THE SEASON Examine the machine well in advance to be sure that all than maintenance operation listed above has been completed. HANDLING AND TRANSPORTATION HANDLING Before handling the ditcher with hoisting equipment, check the machine weight, which is listed on the technical chart in this manual. The machine must be hooked up at the points indicated by the manufacturer and marked with the symbol shown in fig. 2 on page 7.
DONDI DITCHER INSTRUCTION AND MAINTENANCE MANUAL FOR DONDI DITCHER
TRANSPORTING THE DITCHER COUPLED TO THE TRACTOR When transporting the machine on public roadways or on roads open to traffic, observe highway codes and regulations and respect all safety standards currently in forced. IN ADDITION Mount the signs if any required by law for agricultural machines. Verify that all the adjustable guards on the ditcher are lowered, pulled in as much as possible and locked in place. Check the coupling pins and third point for ware, and verify that there safety cotter pins are in good working order. Verify that the Cardan drive shaft has been disconnected from the PTO on the tractor and that it has been hooked up in its support in a stable condition. During transport operation, move at a moderate speed in order to avoid subjecting the machine to excessive oscillation, which could damage the structure of the machine. TRANSPORTING THE DITCHER BY TRUCK OR TRAILER The weight of the ditcher must be taken into consideration when transporting the ditcher using a truck or trailer. PROCEDURE Verify that the vehicle being used to transport the ditcher is type approved for roadway use. Fasten the ditcher to the transport vehicle in a stable position using sturdy cables or straps. Make sure that the ditcher can not become unhooked suddenly by mistake.
DONDI DITCHER INSTRUCTION AND MAINTENANCE MANUAL FOR DONDI DITCHER PUTTING THE DITCHER OUT OF COMMISSION The ditcher is composed of some highly pollutant parts. Therefore a specialized company must be called in order to put the ditcher out of commission. Dispose of the ditcher properly! WARRANTY The DONDI Company guarantees the machine it manufactures, when supplied new, for the first season after purchase. If any defects or breakdowns should occur during the period thereafter, the company guarantees that, following inspection and based on its unquestionable judgment, it will quickly repair or replace any defective parts ether directly or through its representatives. Any replacement done by the company’s technical personal must be done pursuant to the request of the client, who will be charged for labor costs. The company is not responsible for reimbursing any financial damages caused by down time for machine breakdown. The company’s decision concerning any clams is final. The company dose not guarantee perfect operation of the spare parts it supplies if have not been mounted by its own staff or by personal authorized by the company. The warranty is not valid in the following cases: Normal ware. Breakdown or failure due to negligence or improper use of the machine, to use in conditions other than the ones for which it has been designed and, in particular, to coupling the ditcher to tractors with a power rating that exceeds the manufactures indications. Machine modifications by unauthorized personal. Non-original parts that have been installed and acknowledged as such. THE COMPANY DOSE NOT FURNISH ANY WARRANTIES OTHER THAN THE ABOVE AND WILL NOT BE RESPONSIBLE IN RELATION TO ANY CLAUSE, DECLARATION OR WARRANTY, TACIT OR EXPRESSED, LEGAL OR OTHERWISE, THAT HAS NOT BEEN INDICATED IN THR MANUAL, NOR SHALL IT BE RESPONSIBLE FOR ANY PERSONAL INJERY CAUSED BY FAILURE TO OBSERVE THE SAFETY REGULATIONS LISTED IN THIS MANUAL.
ENJOY USING YOUR DITCHER!
