dog training guide
TRANSCRIPT
2
Table of Contents Part I Teaching the Humans ....................................................................................................................3
General Care, Suggested Goals .......................................................................................................3
Socializing Your Puppy ..................................................................................................................5
Strategies to Deal with Problem Behaviors ....................................................................................6
Why use Rewards and not Punishments Such as Collar Corrections to Train Your Dog? ............7
Training Tips ...................................................................................................................................8
Frequently Asked Questions About Clicker Training ....................................................................9
The Science of Treats......................................................................................................................10
Part 2: Teaching the Dog ..........................................................................................................................11
Name Response ...............................................................................................................................11
Come ...............................................................................................................................................12
Drop It .............................................................................................................................................14
Leave It ...........................................................................................................................................15
Sit ....................................................................................................................................................16
Accepting Handling ........................................................................................................................18
Leash Manners ................................................................................................................................20
Lie Down ........................................................................................................................................23
Stay .................................................................................................................................................24
Go ....................................................................................................................................................25
Settle ...............................................................................................................................................26
Part 3: Problem Solving ...........................................................................................................................26
Nipping ...........................................................................................................................................26
Jumping Up .....................................................................................................................................27
Housetraining ..................................................................................................................................28
Barking ............................................................................................................................................31
The End – (But you’re Never Done Teaching Your Dog!) .......................................................................33
3
Part I: Teaching the Humans
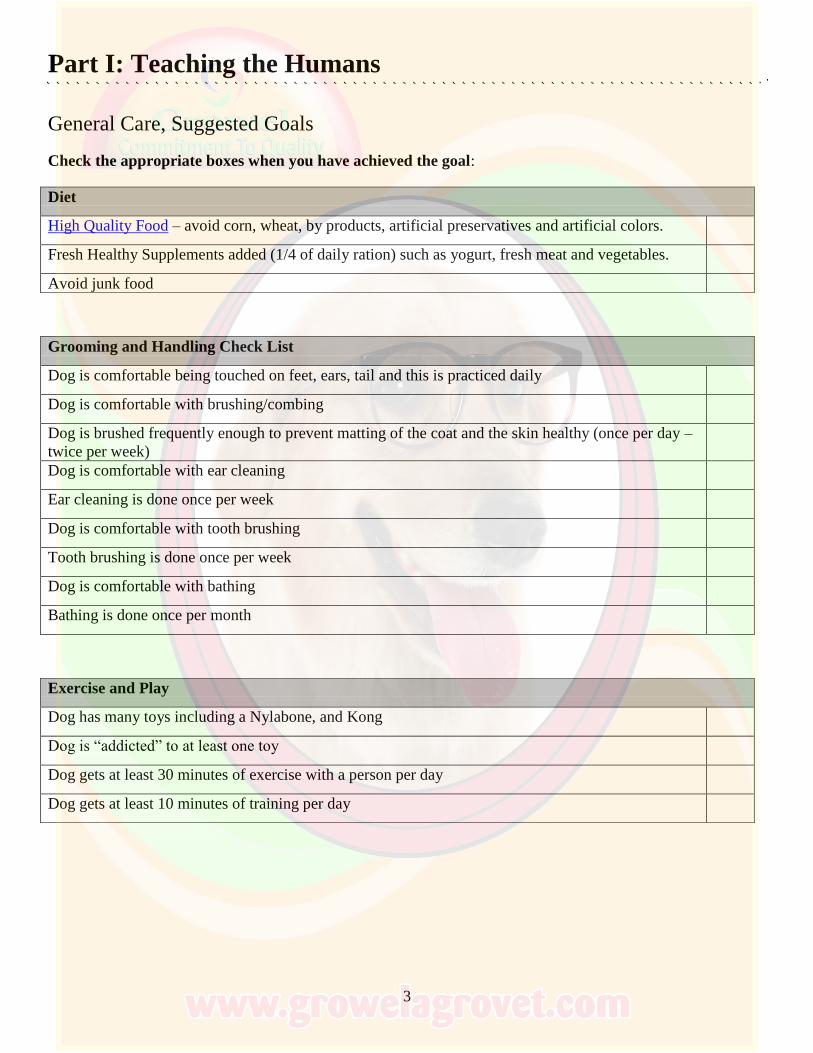
General Care, Suggested Goals
Check the appropriate boxes when you have achieved the goal:
Diet
High Quality Food – avoid corn, wheat, by products, artificial preservatives and artificial colors.
Fresh Healthy Supplements added (1/4 of daily ration) such as yogurt, fresh meat and vegetables.
Avoid junk food
Grooming and Handling Check List
Dog is comfortable being touched on feet, ears, tail and this is practiced daily
Dog is comfortable with brushing/combing
Dog is brushed frequently enough to prevent matting of the coat and the skin healthy (once per day –
twice per week)
Dog is comfortable with ear cleaning
Ear cleaning is done once per week
Dog is comfortable with tooth brushing
Tooth brushing is done once per week
Dog is comfortable with bathing
Bathing is done once per month
Exercise and Play
Dog has many toys including a Nylabone, and Kong
Dog is “addicted” to at least one toy
Dog gets at least 30 minutes of exercise with a person per day
Dog gets at least 10 minutes of training per day
4
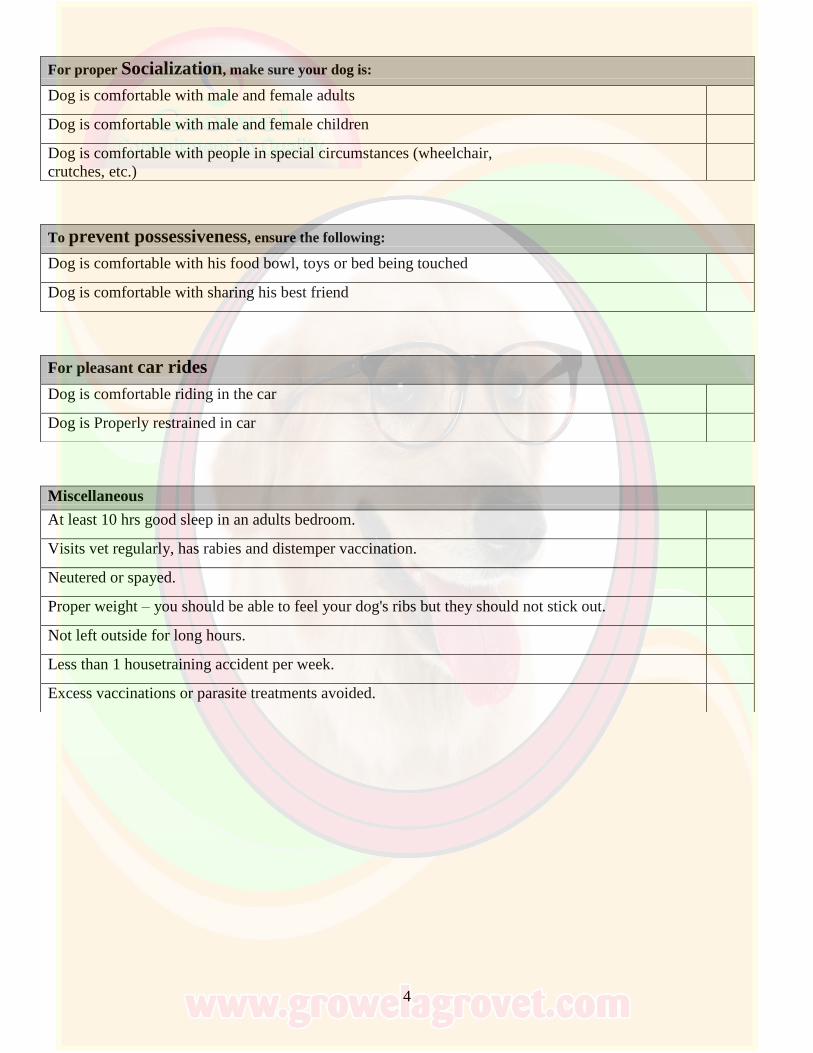
For proper Socialization, make sure your dog is:
Dog is comfortable with male and female adults
Dog is comfortable with male and female children
Dog is comfortable with people in special circumstances (wheelchair,
crutches, etc.)
To prevent possessiveness, ensure the following:
Dog is comfortable with his food bowl, toys or bed being touched
Dog is comfortable with sharing his best friend
For pleasant car rides
Dog is comfortable riding in the car
Dog is Properly restrained in car
Miscellaneous
At least 10 hrs good sleep in an adults bedroom.
Visits vet regularly, has rabies and distemper vaccination.
Neutered or spayed.
Proper weight – you should be able to feel your dog's ribs but they should not stick out.
Not left outside for long hours.
Less than 1 housetraining accident per week.
Excess vaccinations or parasite treatments avoided.
5
Socializing Your Dog or Puppy
Ongoing socialization is extremely important to prevent behavior problems. Socialization is especially
important before the age of 6 months, but should also throughout your dog’s lifetime. Gentle socialization plays
a huge role in preventing aggression and fearful behavior. Lack of socialization can lead to hyperactive
behavior, barking, shyness and aggression. The younger you begin socializing your dog, the better, but all dogs
can be gradually brought into new and even initially fearful situations and learn to enjoy them. Socialization is a
lifelong process. For example, if your dog does not see any dogs for months or years at a time, you would
expect his behavior to change around them when he does finally see them again.
How to expose your dog to something new or something he is wary of:
Make sure that you remain calm and up-beat and keep his leash loose, if he is wearing one.
Expose him gradually to what he is fearful of, never forcing him. Allow him to retreat if he wants too.
Reward him for being calm or for exploring the new situation.
Try to expose your dog regularly to all of the things and situations you would like him to be able to cope with
calmly in the future. Progress slowly enough so that it is easy for your dog to enjoy the sessions. It will seem
like a lot of time to spend at first, but it will pay off with a well-behaved dog! Below are some examples, but is
not an exhaustive list:
Meeting new people of all types, including children, men, crowds, people wearing hats, disabled, etc.
Meeting new dogs (due to disease risk, do not bring your pup to areas with lots of dogs until after 4 months
– unless it’s a well-run puppy kindergarten). Positive training classes are great for this.
Exposure to other pets such as cats, horses, birds
Teach him to enjoy his crate
Riding in the car (be sure to restrain him using a secured crate or dog seatbelt for safety).
Being held, touched all over and in different ways, being bathed and groomed.
Visiting the veterinarian’s office, groomer, daycare, boarding kennel.
Exposure to loud noises and strange objects (ex. umbrella opening).
Exposure to traffic, motorcycles, bicycles, skateboards, joggers.
Getting him used to being left alone for a few hours at a time.
6
Strategies to Deal with Problem Behaviors (more specific problem solving help is at the end of
the book).
Prevention:
Socialization and the creation of a proper living environment are key factors to avoiding problems. Try to
imagine all of the elements of his life with humans that he will need to accept to be comfortable with us such as
being bathed, walking on streets, vacuum cleaners, etc. Teach your dog that such things are not scary by slowly
introducing him using treats, toys and praise.
Another key prevention is to create a means of communication through training. Once you’ve taught the dog
that calm behavior is frequently rewarded and that you control access to all of his favorite things, you have
made a big step towards solving any problems that may come your way in the future.
Keep the dog’s environment appropriate for him. Think about the amount of exercise he’s getting, whether his
intellect is being challenged, or if he has enough opportunities to socialize with other dogs and people. Make
sure his diet is good and his health is well maintained.
Let him feel the confidence that comes from working for a living and the security or having a strong leader. Ask
him for a behavior before giving his access to good stuff like the couch or his dinner.
Finding Solutions:
Many problems reported by dog owners are with behaviors that are instinctual to the dog such as barking,
digging, pulling, jumping up, nipping, chewing etc. Others are things that we have accidentally trained into the
dog such as barking for attention. It helps to try to understand what is the dog’s motivation for his behavior? For
example, why won’t your dog come to you when he’s playing with other dogs even though he “knows” what
“come” means? If your dog chooses not to come to you sometimes it is probably because coming to you is not
more rewarding than what he is currently doing. To help change that, when you call him, be sure you have a
good treat and often times let him continue playing. Begin your practice with short distances.
Below are some helpful steps to follow when trying to decide how to help your dog through any problem
behavior:
1. Consider his environment and health. Is he getting enough exercise - both mental and physical, a good diet,
enough sleep, etc? Could the misbehavior be due to a medical problem?
2. Prevent the misbehavior until you’ve had time to teach him what you want him to do.
3. Make sure that you are not accidentally rewarding the misbehavior. Hint: Any response could be interpreted
by your dog as a reward! Ignore the misbehavior or give him a 5 minute time out in a safe but boring area.
4. Think of something that you could reward that would replace the misbehavior. For example, teach your dog
to sit instead of jumping up to receive affection. Do your best to ask him for and reward the behavior you
want before your dog begins to misbehave. Make sure your reward is of more value to your dog than the
misbehavior. Practice the replacement behavior and reward the correct response, ignoring mistakes. Begin
with challenges that are easy for him and then gradually increase the difficulty.
5. If your dog’s misbehavior is caused by fear, try to change his dog’s mind about the “scary thing” by pairing
it with something he loves. For example: If your dog has a problem with the mail carrier, teach him that the
mail carrier’s visit is followed by a super treat. He will soon begin to look forward to the mail carriers visits.
This technique works best if you also work to prevent him from getting so “worked up”.
6
7
Why use Rewards and not Punishments Such as Collar Corrections to Train Your
Dog?
Punishment can cause distrust, fear, injury and aggression. Rubbing a dogs nose in “it” can cause him to avoid
going to the bathroom in front of you, electric fences can cause him to avoid his yard, and choke collars can
cause throat injury and back and neck misalignment.
Punishments tend to escalate. If your were to resort to physical punishment, you would find that a light tap
would get your dogs attention at first, but then the contact would tend to get more and more force behind it.
Punishment inhibits creativity. If your dog is punished for lying down when asked to sit, he will be confused
and fearful when asked “down”.
Punishment has side effects. If his pinch collar tightens every time he sees another dog, he may not understand
that it is his pulling that causes the pinch and may conclude that the other dog is the reason for his distress.
Pinch or prong collars have been known to cause aggression towards other dogs.
We know better now. In the past we punished children more harshly and have since learned better ways to
motivate them. It is the same with our dogs.
Punishment can ruin your relationship with your dog. The act and mindset of looking for errors in your dogs
behavior automatically places you in an adversarial relationship.
Training with punishment takes a lot of skill. Most people don’t have this amount of skill. If you have poor
timing or use to much force you can really harm your pet physically and psychologically. With reward training,
the worst you can do is to be set back a bit or move more slowly until you become more skilled.
Punishment causes the learner to focus on avoiding the punishment instead of changing the behavior. A traffic
violator doesn’t usually stop speeding; he just gets a radar detector. Your pet will become adept at being a sneak
or doing the minimum of a behavior to avoid punishment.
Your dog (and you) will not find training a pleasurable experience. There will be a lot of jerking and forcing
going on and your dog will not want to participate.
Children will not be able to participate in punishment-based training. It will be too difficult for them, as it
requires so much skill.
Training using rewards relies on teaching the dog to behave as we would like using treats, toys, play, petting
and whatever else the dog likes. If your dog is doing something you don’t like, instead of punishing, teach him
to do something different for a reward, and have fun!

8
Training Tips
"Any time you are with your dog, one of you is being trained. It is better to be the trainer than the
trainee." - Steve White
TREATS: Make them small (just enough to taste)! Feeding him a treat for correct behavior is one of the easiest
ways to effectively communicate to your dog that he did something right, (but we will use other methods too).
Your dog should believe that you could produce a treat for him at any time and it just might be something really
awesome! I strongly suggest putting a treat container in the main rooms of the house so as not to miss any good
opportunities for reinforcement and always carry treats on walks. Fresh treats such as meat or cheese are useful
when working outside in distractions.
DON’T GIVE IT AWAY FOR FREE: ask for a sit, stay, down, etc before giving him what he loves like
feeding, walks and play.
ALL GOOD THINGS COME FROM YOU: By asking for good behavior before giving your dog the things he
likes you can demonstrate your leadership without using force.
REMEMBER: your attention is a reward (sometimes even if you are yelling!).
MYTH: Dogs should behave out of a selfless “desire to please” and respect, and not for treats. This myth has
killed a lot of dogs, and trainers who don’t use reward-based training are using punishment (choke chains) to
motivate the dogs and not “respect”. We have to deliberately demonstrate to the dog why he should listen to us
(we have the food, the toys and the fun).
THINK about what you want your dog to do rather than what you don't want him to do. Then prevent him doing
what you don’t want and reward him doing what you do want. Get it? Teach him some words to help
communicate what you want such as “leave it”, and “drop it”.
USE PUNISHMENTS VERY CAREFULLY (they can have yucky side-effects). Never strike your dog.
SHORT AND SWEET: Train in 5 minute sessions, 3 times (or more, go nuts!) per day. Also be aware that you
are always teaching your dog how to behave by your response to his behavior.
RUN your dog every day until her tongue is hanging out. Run twice if she’s still got too many “ants in the
pants”.
HELP HIM LIVE LONGER. Feed your dog a premium human grade diet with fresh supplements. Avoid over
vaccinating and excess flea and tick repellent chemicals. Clean teeth and ears once a week, bathe and trim nails
once per month.
ALL DOGS HAVE THE POTENTIAL TO BITE. That’s why it’s important to teach your dog to be
comfortable in all situations and to be gentle with his mouth.
MYTH: “Kids and dogs are great together”. Actually kids are the most likely to be bitten because they
accidentally do things that frighten dogs or they act like prey. Never leave a dog and child unsupervised. Teach
children not to approach a dog that is unknown to them, or when an adult is not present.
YOUR DOG IS ALWAYS LEARNING (and so you are always teaching/training). You will need to refresh the
cues that you teach your dog throughout her lifetime.
9
Frequently Asked Questions about Clicker Training
"What is a clicker training?” A clicker is a small device that makes a click sound. It is used to tell the dog that he did the right thing and a
treat is coming. When your dog does the right thing, such as open his mouth to drop your sneaker, you click and
give him a small tasty treat. Clicker trainers actively try to set up their animals to succeed while ignoring or
preventing any undesirable behaviors. The training goals are broken down into small, achievable steps.
Punishments (or “corrections”) are not a part of the learning process when using this method.
“Why not just say ‘good’ or 'yes' instead of clicking?”
Yes you can, but training with a clicker is generally a bit faster.
“Do I need to carry a clicker all of the time?”
No, the clicker is a learning tool and does not need to be used once the dog understands what you are asking
him. At that point you can use a verbal reward marker. If you forget your clicker, it’s ok (but less effective) to
use a word such as “good”.
“Won’t all the treats make my dog fat?” Treats should be pea-sized, used in moderation and deducted from the dog’s daily ration. You can use food
from his meal to do your inside training, when outside it is vital to use fresh high quality, healthy food such as
meat or cheese.
“Can I use other rewards instead of treats?”
Yes, and it is very important to do this. I tend to use the clicker and treats in my initial teaching phase and then a
verbal marker and all kinds of rewards once the behavior has been learned. It’s also a good idea to ask your dog
to “sit” or some other behavior before giving him other things/privileges that he values.
"If I use a clicker and food to train my dog, won't that mean the dog will only obey if he can see the treat
or the clicker?" This is true only if the trainer makes a mistake of always showing the dog the treat first. To use the clicker
method correctly, the dog is rewarded after performing the behavior!
"Shouldn't my dog listen to me because he loves and respects me and not just for treats?" Yes and no. You are often asking your dog to do things that he doesn't want to do and to do them no matter
what else is going on. You are going to find you will often need something else besides a great relationship to
motivate with and you have two choices, punishment or rewards.
“Can I teach my dog to NOT do things using a clicker?”
Yes, you can simply click and treat your dog for abstaining from the behavior you don’t like. Alternatively, you
can use the clicker method to teach him to do something to replace the offending behavior. For instance, you
can teach him to sit instead of jumping up to greet you. The clicker should not to be used to distract your dog
from engaging in problem behaviors.
“What do I do if my dog disobeys a command?”
If your dog disobeys you, he has not been trained properly so you are the one to take the responsibility. Your
reward is either not good enough or he has not been taught thoroughly. Make the task easier and try again. If
you do not have a reward equal to the one he is distracted by, play the numbers game (for example: when your
dog responds to the “drop it” cue, frequently return the object after feeding a treat. This way, if he picks up
something really gross, he will drop it when you ask even though you couldn’t possibly have anything better!).
“What does C/T mean?”
Click your clicker and feed your dog a treat.
10
The Science of Treats
Treats need to be pea-sized and easy to get to (in your pocket, training pouch or a nearby table top)
Distracting environments call for better treats. You can usually get away with something like Cheerios in
the house without much going on, but for outside leash walking practice whip out the cubed cheddar or
dried liver.
A mix of treats is ideal so that the dog never knows what’s next.
Treat ideas:
o Cubed lunch meat (to dry it out a bit: microwave it 3 times for 30 seconds sandwiched between
pieces of paper towel).
o Shredded cheese
o Cream cheese, peanut butter or Easy Cheese (a lick per behavior! Also great for grooming practice
and stuffing in Kong when your dog will be alone for a while).
o Cereal such as Cheerios
o Kibble (dry food) – Try placing some in a paper bag with a couple of pieces of bacon to “stinkify” it.
o Kitty treats or food
o Dried liver
o Beef Jerky
o Carrot or apple pieces
o Popcorn
o Imitation crab (try peeling the layers apart and placing them in a frost-free freezer in a colander to
dry them out)
o Meat baby food
o Commercial dog treats (be sure to check the ingredients for nasties such as artificial colors,
preservatives, and by products.
o Ice cubes
11
Part 2: Teaching the Dog
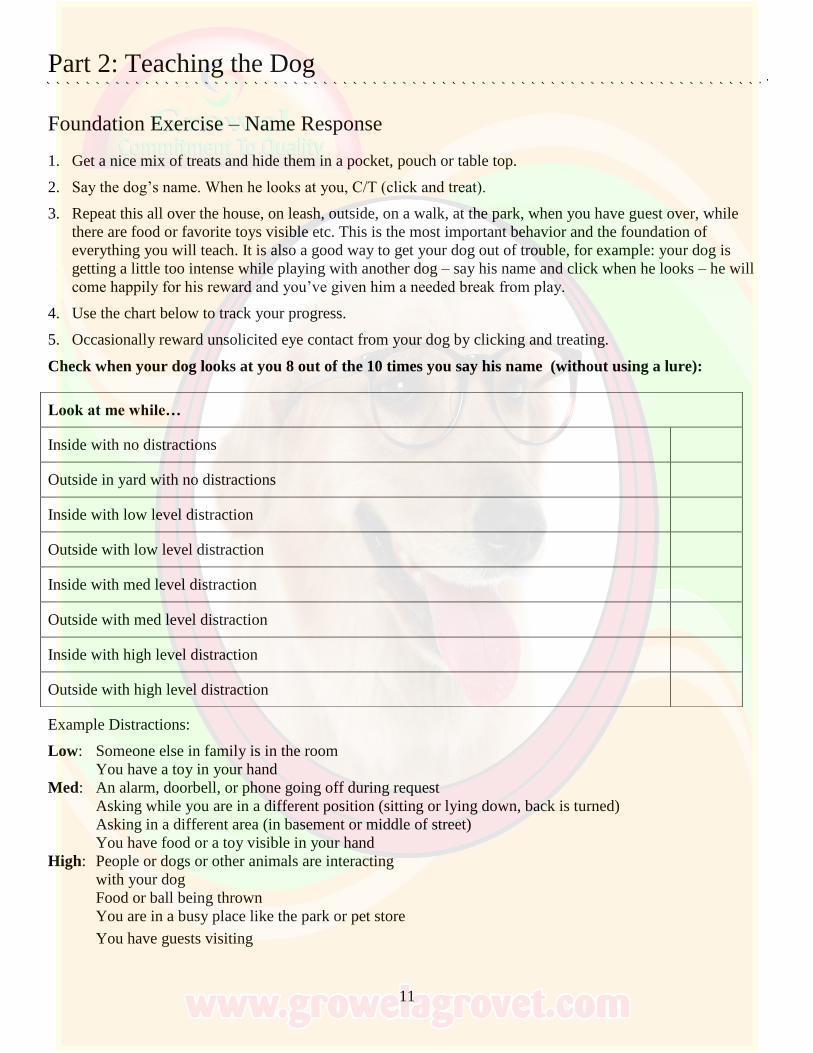
Foundation Exercise – Name Response
1. Get a nice mix of treats and hide them in a pocket, pouch or table top.
2. Say the dog’s name. When he looks at you, C/T (click and treat).
3. Repeat this all over the house, on leash, outside, on a walk, at the park, when you have guest over, while
there are food or favorite toys visible etc. This is the most important behavior and the foundation of
everything you will teach. It is also a good way to get your dog out of trouble, for example: your dog is
getting a little too intense while playing with another dog – say his name and click when he looks – he will
come happily for his reward and you’ve given him a needed break from play.
4. Use the chart below to track your progress.
5. Occasionally reward unsolicited eye contact from your dog by clicking and treating.
Check when your dog looks at you 8 out of the 10 times you say his name (without using a lure):
Example Distractions:
Low: Someone else in family is in the room
You have a toy in your hand
Med: An alarm, doorbell, or phone going off during request
Asking while you are in a different position (sitting or lying down, back is turned)
Asking in a different area (in basement or middle of street)
You have food or a toy visible in your hand
High: People or dogs or other animals are interacting
with your dog
Food or ball being thrown
You are in a busy place like the park or pet store
You have guests visiting
Look at me while…
Inside with no distractions
Outside in yard with no distractions
Inside with low level distraction
Outside with low level distraction
Inside with med level distraction
Outside with med level distraction
Inside with high level distraction
Outside with high level distraction
12
A Potential Life Saver – “Come”
Why teach your dog to come to you? This is the ultimate in safety cues! If your dog ever escapes the home
you will want to have a solid foundation for this behavior to potentially save his life. It is also a great way to
direct him onto something else. If he is about to check out what’s in the trash, call “Come!” (And give him his
reward as you cover the trash can.)
Do these exercises after your dog has learned “Name Recognition”
Teaching the Basic Behavior, “Come”
1. Find a quiet place to practice and get your clicker, treats and dog. Put a treat on the floor for your dog to eat
and walk to the other side of the room. Hold your hand out with a treat visible and say your dogs name if he
is not looking at you. Once you get his attention (or if you already have it), say “come” in a normal/happy
tone of voice. Click when your dog begins to come to you. Praise him the rest of the way and give him a
treat when he gets to you. While you reward him, touch his collar (this is a good idea in case your dog ever
decides to play the grab the treat and run game!). Practice this about 10 times and take a break. Alternatively
you can play this with a second person and “Ping Pong” him back and forth.
2. Begin the exercise in the same way as above, hold your hand out as if you have a treat in it, but it will be
empty (we will fool him a bit!). Click him for beginning to come and treat him when he gets to you from
your pouch or pocket. Repeat 10 times and take a break.
3. Continue practicing using the empty-hand. This is now a “hand signal”! If you would like, you can also fade
this so that the dog responds to the verbal cue alone.
Becoming an Expert at Coming
1. Practice out of sight, outside and in more distracting environments as detailed on the worksheet.
2. Decoy exercise: One person is the “handler” and will call the dog. The other person is a “teaser” and will try
to tempt the dog with food or a toy. If the dog goes toward them while the handler is calling, the teaser
should ignore the dog and turn away. When the dog finally comes to the handler, he gets rewards from both
the handler and the teaser.
3. Fetch-interrupt exercise: Toss a ball or piece of food. As the dog is chasing it call him. If he comes after
getting the ball/treat he gets clicked and one small treat. If he comes before getting the ball/food he gets a
click and jackpot. Sometimes you might need a little luring to get him started: toss the ball/food and then
quickly put your treat to his nose, click and jackpot if he comes directly to you then fade the lure out.
Alternatively if your dog will fall for it you can try faking him out by making the appropriate motions but
not throwing anything. This is a great game to play with his meal of dry food – toss one piece of food, if he
interrupts chasing it to come to you when you call, click and give him a whole handful of it.
4. Hide and seek: When you are outside together and your dog is wandering around and seems to have
forgotten you exist, hide behind a tree. When your dog comes looking for you C/T and make a big deal of
him. Always work in a safe area.
Tips:
Never call your dog for something he may feel is unpleasant. For example when leaving the park, call your
dog, put his leash on and play for a bit longer before exiting.
Make coming to you always fabulous! Always treat, use the jackpot, and occasionally bring out a ball from
your pocket and throw it or play a little chase as an additional reward.
If your dog does not respond when you call and you must get him, try these tricks: running backwards away
from the dog, crouching down, clapping your hands, whistling, squeaking a toy, or showing him food. Do
not run towards him as this is an invitation to play “catch me” and humans usually lose this game! Once he
13
comes to you he must ALWAYS be rewarded, even if he didn’t come initially and stressed you out in the
process!
C/T your dog for “checking in” when you haven’t cued it and he’s off lead.
Practice “Come” at least 5 times per day (forever!).
Work in a fenced area or use a “long line”- get a light clothesline rope and knot it every couple of feet. Let
your dog drag this and practice in a park or field. Make sure it is long enough so that you will be able to step
on it if he decides to “take off”. It is safest for your dog to attach the rope to a body harness instead of a
neck collar.
Have two “Come” cues, one that means a great food treat is not necessarily involved (as in “Cum’ere and sit
on the sofa with me”) and another that means “I have great stuff!”
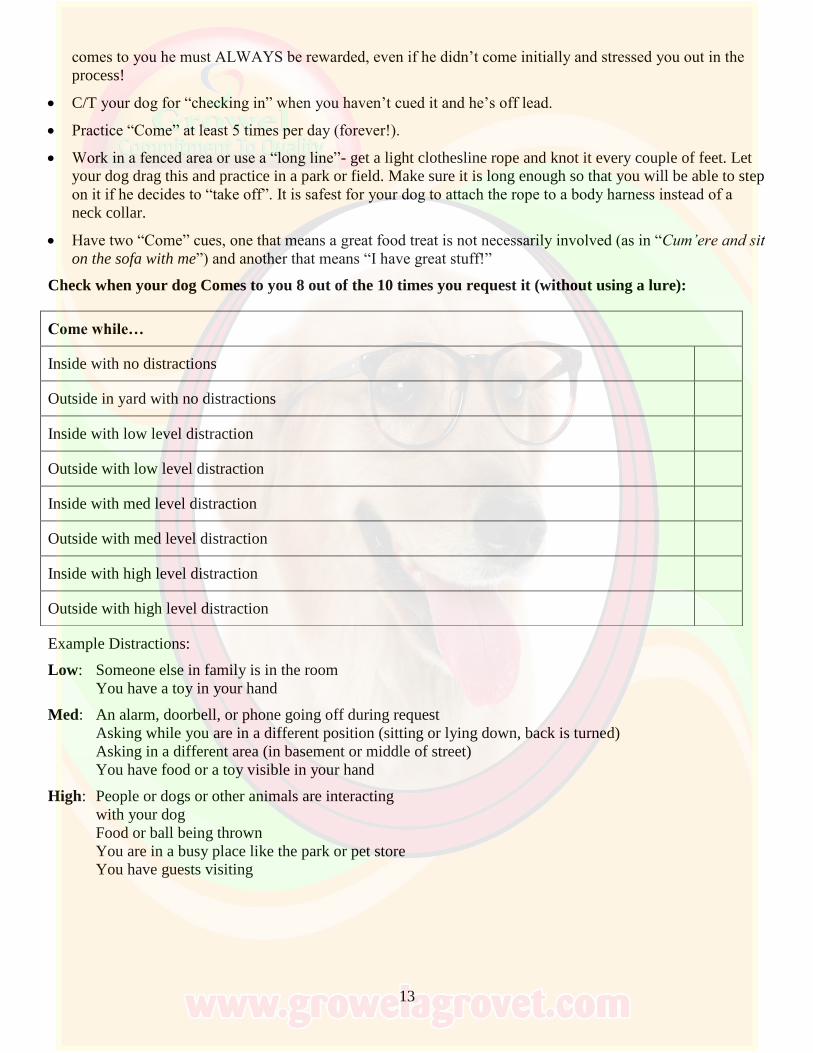
Check when your dog Comes to you 8 out of the 10 times you request it (without using a lure):
Example Distractions:
Low: Someone else in family is in the room
You have a toy in your hand
Med: An alarm, doorbell, or phone going off during request
Asking while you are in a different position (sitting or lying down, back is turned)
Asking in a different area (in basement or middle of street)
You have food or a toy visible in your hand
High: People or dogs or other animals are interacting
with your dog
Food or ball being thrown
You are in a busy place like the park or pet store
You have guests visiting
Come while…
Inside with no distractions
Outside in yard with no distractions
Inside with low level distraction
Outside with low level distraction
Inside with med level distraction
Outside with med level distraction
Inside with high level distraction
Outside with high level distraction
14
A Potential Life Saver – “Drop It”
Why teach a dog to “drop it”? If you have a young puppy, you know the answer to this - it’s because they
frequently have something valuable or dangerous in their mouths! The goal is that when you cue “drop it”, your
dog will open her mouth releasing whatever was in there and allow you to retrieve the item. It is very important
to make sure your dog is making a good bargain with you for her prize (you give her a good treat) and that you
stay calm and don’t chase her. If this is taught correctly, your dog will be happy to hear you say “drop it”. If
your dog isn’t happy to hear “drop it” for all items yet, then it is best keep those items out of reach until you
have practiced with them. This exercise is also important because it can prevent food guarding. If your dog
knows that you do not "steal" she will not worry about you approaching favorite items.
Teaching “drop it”:
1. Get together a few items your dog might like to chew on, your clicker and some good treats like cheese or
turkey. (I’m sure you now have your dog’s attention!)
2. Have a piece of food ready in your other hand as you encourage your dog to chew on one of the objects.
Once she has her mouth on it, put a piece of food close to her nose and say “drop it”. Click when she opens
her mouth and feed her the treat as you pick up the item with your other hand. Return the item to her.
3. Try to get her to pick up the object again so you can continue practicing, but beware that once your dog
knows there are treats involved she may want to keep her mouth free for eating! In this case, keep your
treats handy throughout the day and whenever you see her randomly pick up an object or toy you can
practice. Aim for at least 10 repetitions per day. Occasionally you will not be able to give her the object
back (if she’s found a forbidden object), but that’s okay just be sure to give her an extra nice treat.
4. Once you’ve completed about 10 repetitions, repeat the process in #2 exactly, but this time you will be
sneaky and won’t actually have the treat in the hand that you put close to her nose (I call this “empty
fingers”). She will most likely drop the object anyway and you can click and get the treat out of your pouch.
Give her the equivalent of 3 treats the first time you use empty fingers and she drops the item.
5. After a few days of practicing, try it with a tasty item. Get a carrot or hard chew. Hold it in your hand and
offer the other side of the item to your dog to chew on – but don’t let go! Let her put her mouth on it and
then cue “drop it”. Give her the equivalent of 3 treats the first time she does this and offer her the object
again. If your dog won’t retake the item, just put it away and practice another time. Get 10 reps of this
before going on to step 6.
6. Now get your hard chew again and some really fresh yummy treats (meat or cheese). This time you will
offer the object to your dog and let go and then right away cue “drop it”. When she does give her the
equivalent of 10 of your extra yummy treats and THEN give her the item to keep (this should make a very
good impression!). If she doesn’t release the item, try showing her your treat first and if that doesn’t work,
just let her have it and try again later with a lower value food-related item. You will be able to build up to
the highest value items once your dog realizes it is worth her while to listen.
7. Practice the “drop it” with real-life objects around that she enjoys but are not allowed such as: tissues, pens
(begin with an empty one), wrappers, shoes, etc. Then practice this outside!
Tips:
If your dog already enjoys grabbing objects and having a game of chase, you should begin by teaching her
that you will not chase her. Just ignore her and then she will probably drop the item on her own once she is
bored of it. You can also try distracting her by ringing the doorbell or knocking on the door.
If your dog will not drop a dangerous item, even for a yummy treat (or if you don’t have one at the moment
– shame on you!) place your fingers on the lips of her upper jaw where her canines are and push in and pull
up. This will open her mouth so you can retrieve the item. Make sure you give her a big reward (even if
15
you’re frustrated) for allowing this invasive treatment and keep that item out of reach in the future until you
are ready to teach her to drop it.
It’s okay to show her a treat (bribe her) if she has a forbidden item that is higher in value than what she has
been training with. Be careful not to make a habit of this!
Practice “drop it” during tug and fetch games.
“Leave It”
Why teach your dog to “Leave It”? The goal is to have your dog take his attention away from an object of
interest when you cue “leave it”. This is important when the item of interest is unsafe, such dropped medication
and is also a useful self-control exercise.
Do this exercise after “Name Recognition”
1. Have treats hidden in both of your fists. Let him sniff one of your fists. Click and treat (C/T) when he
eventually looks away from your fist and feed the treat with your other hand. Repeat until he no longer tries
to get the treat from your fist when you present it.
2. Open your hand containing the treat and show him the treat. Close it if he tries to get the treat. Repeat until
he decides to ignore the treat while your hand is open and then C/T by feeding a treat with your other hand.
Repeat the exercise until every time you present your open “decoy” hand with a treat in it he ignores it right
away. At this point, add the cue "leave it" (say this just once for each repetition of the exercise) as you show
him the decoy treat. Repeat.
3. Set the treat on the floor and say "leave it". Cover the treat with your hand if he tries to get it. C/T when he
looks away from the treat. Repeat the exercise until he doesn't try to get the treat from the floor once you say
"leave it". Repeat.
4. Set the treat on the floor, say "leave it" and stand up. Cover it with your foot if he tries for it. C/T for
ignoring the treat. Repeat.
5. Walk him past the treat on leash, say "leave it" when he sees the treat and keep him from getting it with the
leash. C/T when he ignores the decoy treat on the floor. Repeat
6. Next have fun and increase the length of time that he leaves it or stack treats on his paws or toss them
around.
7. Teach him that “leave it” also applies to objects such as toys and living things. By beginning with
something very easy and building up to the more difficult.
8. Use the chart on the back to keep track of your progress.
16
Check when successful at “leaving it” for 8 out of 10 requests:
Example objects:
Low value: Cheerio
High value: cheese cube or piece of rawhide
Sit
Why teach your dog to sit? He will learn that in order to get good-stuff-for-dogs he had better put his fanny on
the ground and this is a good default behavior. It is very simple to teach; it helps establish human leadership and
is a great substitute for jumping up and lots of other problems.
Teaching the Basic Behavior, Sit:
1. Find a quiet place to practice and get your clicker, treats and dog. Wait for him to sit. When his bum hits the
floor click and treat (C/T). Feed the treat while he is sitting and then toss another treat to get him up again.
Continue to practice until your dog is sitting again right away after you feed his treat.
2. Now say “sit” just as he begins to do so and C/T. From now on you will only reward sits that you have cued.
Becoming an Expert at Sitting:
1. Practice for 5 minutes, twice per day by asking him to “sit” in increasingly distracting situations. Use the
chart provided to track your progress.
2. Practice “Go Crazy and Sit”: Run around with your dog while squeaking a toy and then ask him to sit. C/T
success.
3. “Say Please”: Ask your dog to sit whenever you give him something he likes such as access to outside, his
food bowl, or petting.
4. If you are having trouble, don’t get frustrated, just back up a step, succeed at that, take a break and then try
again later (maybe with better treats).
Will leave…
Low value object in your hand
High value object in your hand
Low and high value object, on the floor
Low and high value object on floor with you 10 feet away
Walk by object, on leash inside or outside
Thrown or dropped object inside or outside
Live subject inside or outside
Object/subject for 1 minute or more
17
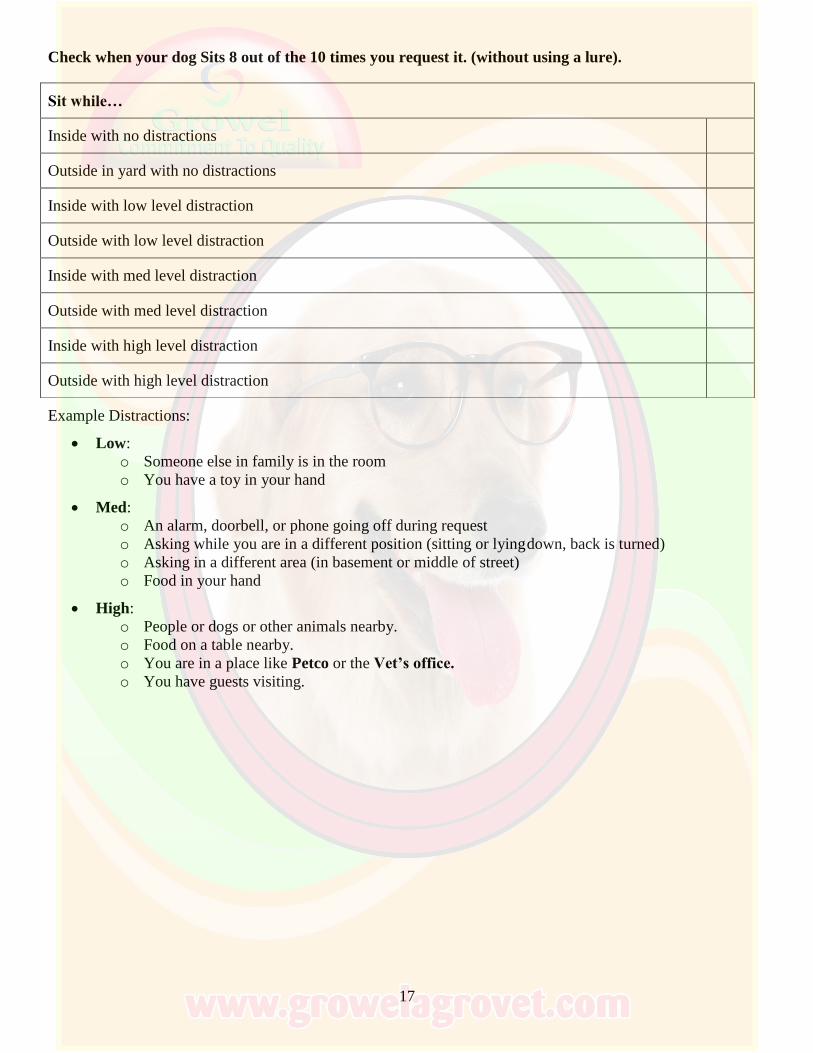
Check when your dog Sits 8 out of the 10 times you request it. (without using a lure).
Example Distractions:
Low:
o Someone else in family is in the room
o You have a toy in your hand
Med:
o An alarm, doorbell, or phone going off during request
o Asking while you are in a different position (sitting or lying down, back is turned)
o Asking in a different area (in basement or middle of street)
o Food in your hand
High:
o People or dogs or other animals nearby.
o Food on a table nearby.
o You are in a place like Petco or the Vet’s office.
o You have guests visiting.
Sit while…
Inside with no distractions
Outside in yard with no distractions
Inside with low level distraction
Outside with low level distraction
Inside with med level distraction
Outside with med level distraction
Inside with high level distraction
Outside with high level distraction
18
Accepting Handling
This exercise will teach your dog to remain still and wait for a reward when you need to handle him for
grooming or medical reasons and also to accept accidental inappropriate handling. It is an extremely important
behavior for your dog to learn to keep him calm and to prevent aggression.
Tips:
Do not use your clicker to close too his head! -It’s okay to use a word such as “yes” or “good” and then
deliver your treat, if clicking is awkward. The i-click can be used by pressing it with your foot.
Once your dog has learned the following exercises with you, practice with other people.
Easy cheese or peanut butter spread on the floor or refrigerator door is a simple way to keep your wiggly
dog still for handling when you have not trained him yet to be still.
If your dog already dislikes being handled, you can teach him to accept it by following this method and
going very slowly. Have a professional (or at least – someone else) do any needed manipulations such as
grooming until he has learned to be comfortable. Muzzles do not hurt the dog and can be helpful in keeping
people safe while we teach him that it’s okay to be handled.
All dogs need to practice handling exercises for one or two minutes several times a week to remain
comfortable with the process (forever!).
For all of the exercises, follow these steps:
Begin with very brief, non-invasive touches. If he stays still and calm and does not try to wiggle away,
C/T. If he wiggles, continue touching him, but do not resist his movement. Think of your hands as
“sticky” - they will stay stuck to the dog but move with him until he is still and then you will C/T and
release him.
Do not proceed to the next step until your dog enjoys the current one.
Only work these exercises for a couple of minutes at a time.
Teaching your dog to accept handling of different body areas:
1. Collar: Find a quiet place to practice and get your clicker, treats and dog.
a. Touch your dog’s collar under his chin and immediately release him while you click and treat (C/T).
Repeat 10 times or until your dog is happy about this exercise.
b. Hold onto his collar under his chin for 2 seconds. Repeat until he is happy with this exercise and
then up the time gradually to 10 seconds.
c. Hold his collar under his chin and tug on it a bit. C/T if he accepts this without resisting. If he
wiggles, gently stay “stuck” to him until he calms and then release and C/T. Repeat this until he’s
comfortable and then try it from the top-side of his collar. Increase the intensity and duration slowly
as you practice.
2. Paws: Many dogs are very sensitive about their paws. It is important to proceed slowly with this exercise so
that your dog is enjoying it and to continue handling his paws throughout his lifetime. Do not trim your dogs
nails unless you are absolutely sure you know what you are doing as it is easy to make a mistake and cause
pain. In all of these exercises, if he does not try to pull away, C/T, if he wiggles, “stick” to him and C/T and
release when he stops resisting. Each step in this exercise should take several days to complete with dozens
of repetitions. Complete each step before proceeding the next one. Practice with all 4 paws.
19
a. Pick up his paw and immediately C/T. Repeat 5 times and then progress to holding his paw for 1
second.
b. Hold the paw for 10 seconds with no resistance from your dog.
c. Hold the paw and move it around.
d. Massage the paw.
e. Pretend to trim the nails.
3. Ears:
a. Reach around the side of your dog’s head and touch his ear. C/T. Repeat 10 times.
b. Once your dog is comfortable with this, practice holding the ear for 1 second. If he wiggles, stay
“stuck” to the ear, but move with him. If he stays still, C/T and release. Continue to practice this way
until you can hold each ear for 10 seconds.
c. Practice manipulating the ear and pretending to clean it. Remember to go slowly enough so that your
dog enjoys this practice. It should take several days of practice before your dog will remain still for
the “cleaning”. If your dog is already sensitive about his ears, it may take longer.
4. Mouth:
a. Gently touch your dog’s mouth and C/T. Repeat 10 times.
b. Touch the side of his mouth and pull up a lip to expose a tooth. C/T and release only when he is not
resisting.
c. Proceed slowly through the following steps: lifting the lip to expose more and more teeth, on both
sides of the mouth and then opening the mouth.
d. Touch a tooth with a toothbrush and then work up to brushing his teeth for 1-10 seconds.
5. Tail: Many dogs are sensitive about having their tails handled.
a. Begin by briefly touching your dog’s tail. Repeat 10 times with clicks and treats. Once he’s
comfortable, proceed to being able to hold his tail for up to 10 seconds.
b. Progress slowly through the following steps: pulling the tail up, brushing, pulling gently on it.
6. Touching by children:
a. Prepare your dog with the strange sorts of touches that children may give him (always supervise and
keep everyone safe when dogs and kids are together!) Practice by C/Ting him for accepting odd
touches from you such as ear tugs, tail tugs, head pats and hugs. As with all exercises proceed
slowly.
7. Lifting: In an emergency you may have to lift up even a large dog. Practice doing this by first putting your
arms around him using clicks and treats for the briefest of touches and then proceed to being able to lift him
off of the ground while he remains calm. For dogs that require professional grooming, practice picking him
up and putting him on a table and practicing other handling exercises
8. Brushing: Get your dog’s brush and lightly touch him with it and C/T. Repeat until he is comfortable with a
normal level of brushing and remains still.
20
Leash Manners
Imagine your dog walking happily by your side, stopping when you stop, turning when you turn and continuing
with you past other dogs and people. He doesn’t pull on the leash and he only goes potty and sniffs when you
give permission. It is the most challenging thing you will probably teach him to do, but it is fun too! Read on to
begin make this vision a reality.
A head collar (such as a Gentle Leader or Halti) or front-attachment harness (such as an Easy Walk) can help
to discourage your dog from pulling, but he will need training to learn to walk beside you without pulling at all.
A front-attachment harness is a safe and easy to use no-pull device that is great for all dogs. Choose a head
collar for dogs with aggressive tendencies or for those that need the maximum amount of control such as a
small owner with giant-breed dog. The front-attachment harness and head collar should only be used with
leashes that are a maximum of 6 feet long. If the leash is too long, it is possible that he could get going fast
enough to hurt himself if he were to hit the end of the leash abruptly.
A simple way to help your dog learn to walk without pulling on the leash is to stop moving forward when he
pulls and to reward him with treats when he walks by your side.
If your dog is not very interested in food treats, then you can a tug a toy or toss a ball for him whenever feeding
a treat or giving a reward is mentioned. The steps below will go into more detail in order to help you to teach
him how to have excellent leash manners.
Step 1: “Walking with my person is delicious!”
Start by attaching your dog to a rope, or leash that is 10-20 feet long (but not retractable), while he is wearing a
standard harness. Get some pea-sized pieces of fresh meat or cheese to use to reward your dog and go to a
familiar outdoor area like your backyard.
Decide whether you prefer your dog to walk on your left or right. Whichever side you choose (left is
traditional), you will feed him his treat reward right by your thigh on that side. He will soon begin to seek out
that side since that is where yummy treats come from!
Walk briskly and randomly around your yard. Whenever your dog happens to choose to walk beside you,
reward him click and feed your treat next to your thigh on your preferred side. If he continues walking next to
you, C/T every step you take together. Don’t worry, as he gets better at this you will not need to reward him as
often.
Practice until your dog is is staying beside you more often than not as you walk.
Step 2: “It’s worth my while to watch where my person is going and go along too!”
Begin walking about your yard. Wait for a moment when your dog is walking off on his own, or is lagging
behind to sniff or go potty. Say “let’s go” in an up beat voice, slap your thigh the first few times to make sure
that he notices you and turn and walk away from your dog.
If he catches up with you before the leash gets tight C/T by feeding a few treats to him next to your preferred
side and then C/T every couple of steps if he continues to stay with you as you walk.
If he catches up to you after the leash gets tight do not give him a reward but instead say “let’s go” again
while you still have his attention and C/T after he takes a couple of steps with you. C/T for every couple of
steps you take together if he chooses to continue walking by your side.
If he does not come towards you after you’ve said “let’s go” and the leash has gotten tight, stop walking
while continuing to apply gentle leash pressure. Praise him and release the pressure once he begins to come
towards you. When he gets to you, do not give him a reward but instead say “let’s go” again while you still
21
have his attention. C/T after he takes a couple of steps with you and for every couple of steps, if he continues
to stay with you as you walk.
Continue to practice this Step until he is staying by your side most of the time while you walk in your backyard
and if he veers off away from your side, saying “let’s go”, gets him coming back to you.
Step 3: “I know when it’s time to smell (or to pee on) the roses”
Your dog needs time sniff and to go potty while on the leash, but it will help him to learn better manners if you
decide when that will be. As you are practicing your leash walking with your dog, about every 5 minutes, at a
time when you would usually C/T, instead say something like “go sniff” and let him sniff around or go potty
while he is on the leash. This is a privilege or reward, so if he pulls on the leash during this free time say “lets
go” and walk in the opposite direction, thereby ending the free time.
When you are ready to end the free-time, say “let’s go” and begin walking.
Step 4: “Sometimes I really need to pay attention to where my person is going!”
Continue practicing leash walking in your yard as in steps 1 through 3 but by using a shorter leash. Eventually
reduce the leash length to 6 feet.
Practice walking extra fast or slow, stopping or changing directions. C/T him if he is able stay by your side
during these challenges.
Begin to C/T him less frequently for walking by your side but be sure to continue to C/T him when it was
challenging for him because you changed directions or there was a distraction.
Taking it to the Street:
On your neighborhood walks you will apply the same techniques as you did in your yard, but now there will be
additional distractions and challenges such as friendly strangers, squirrels and other dogs. Consider using a
front-attachment harness or head collar for extra control and bringing fresh meat or cheese for use as treats.
Say “let’s go” and walk in the opposite direction when he forgets about you or pulls, and reward him with treats
when he walks beside you. Be sure to reward him with extra treats when it was extra difficult for him to pay
attention to you. Don’t forget sniff breaks!
Red Light Green Light Exercise:
Outfit your dog in a standard harness attached to a 6 foot leash. Hold your dog’s leash and toss a ball or treat 20
feet away from you and your leashed dog.
If he pulls toward the object, say “let’s go” and turn and walk in the opposite direction. If he walks beside you
while you walk towards it allow him to continue towards the object until he reaches it and can take it as his
reward.
Use a longer leash or a less desirable object if you need to make this easier for him at first.
Leash Manners Troubleshooting:
If your dog is crossing in front of you stomp or shuffle your feet a bit to make your presence known.
If he is lagging behind a great deal, he may probably be frightened or not feeling well, so use lots of
encouragement instead of pulling him along. If he is lagging to sniff or to potty, simply keep walking but be
sure to apply only gentle pressure on the leash.
Don’t forget to use lots of rewards when he does walk with you.
22
Heel:
Teaching him to heel is useful for short periods when you need him very close to you and paying attention. It
can be very helpful when walking him past distractions like other animals.
Begin practicing in your home. Place a treat in your fist and let him sniff it. Say “heel” and take a couple of
steps leading him along with the treat in your fist near your thigh. C/T when he is following your fist with his
nose.
Now, practice having your dog follow your empty fist. C/T for every couple of steps that he follows the fist.
Continue practicing “heel” and increasing your standards each session. Your closed fist will remain as a “hand
signal” for heel.
Try this outside and in more distracting circumstances.
Use the chart below to track your leash manners progress:
Check when successful about 80% of the time without a lure:
Walk nicely (no pulling or lagging) beside you while…
Walking in your yard with a long leash
Walking in your yard with a 6’ leash
In neighborhood during quiet period, for 5 minute walk
In neighborhood at a busier time for 5 minute walk
In neighborhood, busy and 20 minute walk
In the park
In Petco
23
Lie Down
Why teach your dog to lie down? Down is useful to help keep the dog in one place and to calm him. It is a
good substitute for barking.
Teaching the Basic Behavior, Down
1. Find a quiet place to practice and get your clicker, treats and dog. Wait for him to lie down. Click and feed
him the treat while he is lying down. Toss another treat to get him up.
3. Continue to practice until your dog is lying again right away after he retrieves the second treat.
4. Now say “down” just as he begins to do so and C/T. From now on you will only reward downs that you
have cued.
2. “Take it on the road”: Practice this in all sorts of locations and distraction levels. Don’t forget to expect a bit
less from your dog in a new or exciting situation.
Problem Solving:
“My dog won’t go down!”: Try teaching this in the bathroom since there’s not much else for him to do
there, he will probably lay down faster.
“He goes down but pops right back up!” Make sure you deliver your treat in the down position as often as
possible.
Becoming an Expert at Downing
Use the chart provided to keep track of your progress.
Check when your dog Downs 8 out of the 10 times you request it (without using a lure).
Example Distractions (see “sit” distractions above):
Down while…
Inside with no distractions
Outside in yard with no distractions
Inside with low level distraction
Outside with low level distraction
Inside with med level distraction
Outside with med level distraction
Inside with high level distraction
Outside with high level distraction
24
Stay
Why teach stay? This is an excellent self control exercise as well as having many practical uses, such as:
keeping your dog from bolting out of the door, jumping on people, and just keeping him still while you wait for
your vet appointment.
Do this exercise after teaching “Sit” and “Down”
Teaching the Basic Behavior, Stay:
1. Find a quiet place to practice and get your clicker, treats and dog. Cue your dog into a sit and instead of
C/Ting right away, wait 2 seconds.
2. Proceed in this manner until you can wait 10 seconds before C/Ting. Begin to use the cue “sit stay” (which
really only means “long sit”). When you say “stay”, use a hand signal that is your flat hand about a foot
from your dog’s face.
3. If your dog gets up, this means you are proceeding too quickly. Say “oops” and try again with a shorter
stay time goal and build up slowly again.
4. Take one half step away from your dog and C/T for staying. Proceed until you can take 2 steps in ANY
direction from your dog. Always return to your dog before C/Ting.
5. Take several steps away until you can go out of sight. And work until you can have him stay for 2 minutes
while you are in sight. (If you are very ambitious you can work on combining the 2 situations)
6. Try all of this from “Down”.
Tips:
Vary the difficulty of each stay repetition. If the game always gets more difficult your dog may decide not to
play.
Reward your dog where he was when you asked him to stay. If you have him “come” after staying his stay
will be weakened by his anticipation of the release.
Practice stay regularly before giving the food bowl, before he greets someone and before going out of a
door.
Use the check list provided to keep track of your progress.
If you are having trouble, don’t get frustrated, just back up a step, succeed at that, take a break and then try
again later (maybe with better treats).
25
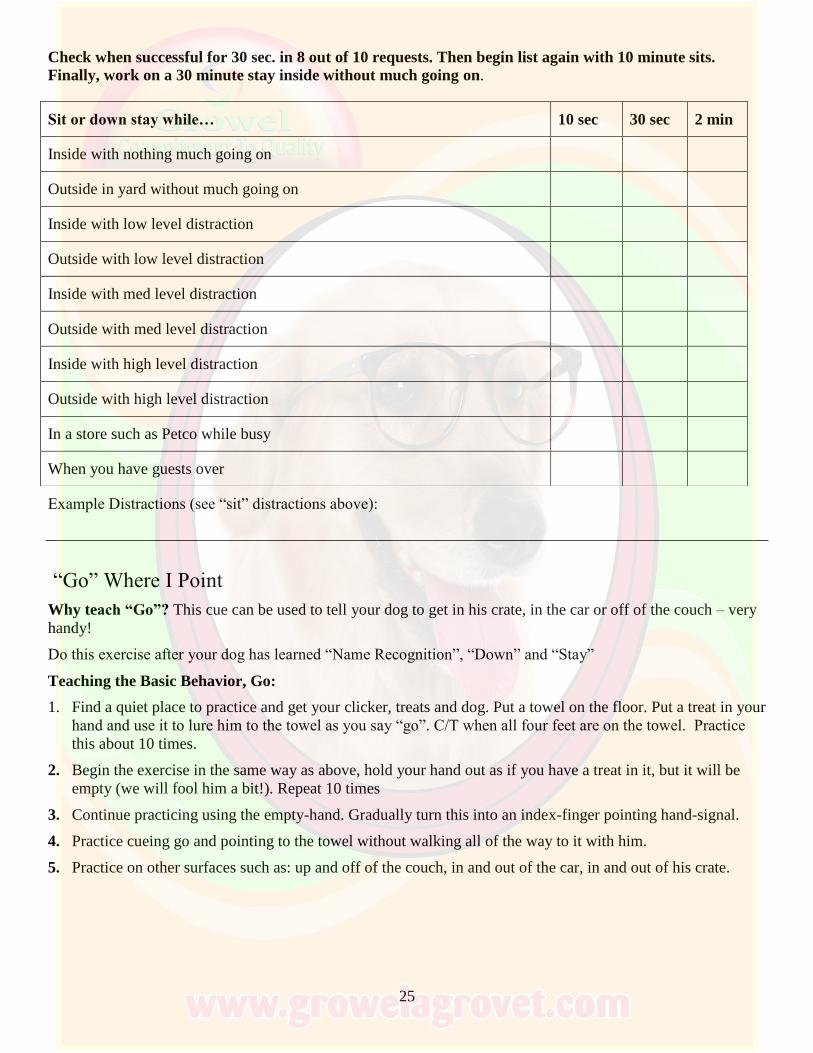
Check when successful for 30 sec. in 8 out of 10 requests. Then begin list again with 10 minute sits.
Finally, work on a 30 minute stay inside without much going on.
Example Distractions (see “sit” distractions above):
“Go” Where I Point
Why teach “Go”? This cue can be used to tell your dog to get in his crate, in the car or off of the couch – very
handy!
Do this exercise after your dog has learned “Name Recognition”, “Down” and “Stay”
Teaching the Basic Behavior, Go:
1. Find a quiet place to practice and get your clicker, treats and dog. Put a towel on the floor. Put a treat in your
hand and use it to lure him to the towel as you say “go”. C/T when all four feet are on the towel. Practice
this about 10 times.
2. Begin the exercise in the same way as above, hold your hand out as if you have a treat in it, but it will be
empty (we will fool him a bit!). Repeat 10 times
3. Continue practicing using the empty-hand. Gradually turn this into an index-finger pointing hand-signal.
4. Practice cueing go and pointing to the towel without walking all of the way to it with him.
5. Practice on other surfaces such as: up and off of the couch, in and out of the car, in and out of his crate.
Sit or down stay while… 10 sec 30 sec 2 min
Inside with nothing much going on
Outside in yard without much going on
Inside with low level distraction
Outside with low level distraction
Inside with med level distraction
Outside with med level distraction
Inside with high level distraction
Outside with high level distraction
In a store such as Petco while busy
When you have guests over
26
Bonus – Settle (Teach your dog to go to a mat and lie on it until released):
1. Put a mat on the floor.
2. Cue “Go” and C/T when he has all 4 feet on the mat. While he is still on the mat, cue “Down Stay”. Go to
him and C/T.
3. Cue “Settle” and then repeat #2.
4. Cue “Settle” and wait for him to go to the mat and lie down before C/Ting (do not use any other cues)
5. Increase the difficulty of this by: varying distance, distraction and duration.
Problem Solving
Nipping
Why do friendly puppies nip people? They do this to play, to get attention and because they are teething. The
good news is that this is a puppy behavior that almost all will grow out of naturally. It is very important to avoid
getting frustrated and resorting to punishments / corrections which could damage your relationship down the
road. It is also important to teach the puppy how delicate human skin is, so let her experiment a bit and to give
her feedback (say “yipe!” and remove your attention) when she nips too hard. If you get more and more
sensitive to nips she will soon find that humans are very sensitive and respond accordingly with her teeth.
We’re in luck! This is a very easy behavior to modify because we KNOW what the pup wants - to play and
chew! So, give her lots of available chew toys and whenever she nips, walk away from her and ignore her (if
she follows nipping at your heels you need to use a tie back, time out or gate). Then when she’s gentle, stay and
play. Don’t forget… This too will pass!!
Want more details about what do you do with that cute little shark?
1. PREVENT
a. Always have a toy in your hand to play with your puppy so she can make a correct choice (unless
you are doing the practice in #2).
b. Exercise your puppy to get rid of excess energy (1 hour per day).
c. Make sure your puppy is getting enough rest (12 hours per day).
d. Have lots of great chew toys around to get her through teething (frozen wet rags, frozen raw marrow
bones).
e. Don’t leave kids and dogs unattended. Teach kids not to run and scream from nipping puppies but to
quietly walk away or stop moving.
f. Use a tie-back (only under supervision), gate or time-out area more frequently as a management tool
if the above is not working. Sometimes bitter spray on clothing can help ease nipping at clothing and
shoes.
2. TEACH
a. Tie your puppy back or put her in a room with a gate that you can quickly climb over.
27
b. Begin playing with her. Praise her for being gentle, but when she nips say “yipe” (like a puppy
would) and quickly walk away.
c. Wait 1 minute. Return and give her another try. Practice in 2-3 minute sessions with each family
member taking a turn.
d. The tie-back method also works well for other attention getting behaviors such as jumping up
barking and humping.
Jumping Up
We tend to ignore our dogs when they decide come to us, stand with us, and walk with us. However, when they
jump on us we stop what we are doing, face them, speak to them, and put our hands on them until they are back
on the ground. Then we immediately ignore them again! We feed them, open doors for them, and touch them,
all while they jump. Obviously this is not helping the situation. We need to train the humans!
It is important to avoid punishing (shouting “no”, kneeing, etc) a dog who is jumping up because this could
result in your dog no longer wanting to greet people or becoming fearful of them. When a dog does jump up on
you it is best to turn your back on them and only give your attention to a dog with "4 on the floor".
Instead of teaching your dog “off” which requires him to be “up” in the first place, we can cue “sit” which most
dogs have already been introduced to. In addition, we will attempt to teach him that jumping up does not lead
to attention.
New Doggie Law: The only way to get attention from people is by keeping all four paws on the floor. The most
important part of this training is to absolutely prevent him from being given attention for jumping up.
You will need at least 10 people to practice this lesson with your dog for him to understand that he will only get
attention by remaining on the ground and that this rule applies for all humans. If you don’t have enough people
to help you practice, you can teach him to remain grounded for his family and then teach a really solid sit-stay
to deal with others.
It is also often helpful to desensitize your dog to the sound of the doorbell.
I. Teach Him Not to Jump on Family Members:
It is easiest to teach your dog not to jump on the family and frequent visitors because he has many more
opportunities for learning; also, everyone is (hopefully) on the same page and doesn’t mind doing a little
training. When you come in from outside and your dog begins to jump, say “oops” and immediately leave
through the door. Repeat after a few seconds. Give him lots of attention when he is finally not jumping. Have
everyone do the same exercise when coming home. If he is jumping on family other times besides when you
enter, be sure to ignore that and put work into giving your dog attention when he is sitting.
II. Teach Him Not to Jump on Everyone Else:
Prevention is key here, especially with a large dog. You can prevent a dog from jumping up by using a leash,
tie-back, crate or gate. Until you have given your dog enough practice to know what you want him to do, you
should make sure you are using one of these methods to prevent him from hurting anyone or by perhaps being
rewarded by jumping and getting a nice pat.
1. Dog training volunteers (infrequent visitors)
a. In the Home: the guest comes in the door and when jumped on says “oops” and leaves as in the
family members exercise. Practice this with 5 different people. Encourage them to do multiple
entrances in the same visit.
28
b. On the Street: Have your dog on leash. The guest will then move towards your dog. If the dog strains
at the leash or begins to jump, the guest will turn and walk away a bit. When the dog calms itself
again the guest will continue towards the dog. Continue until the guest can pet and greet the dog and
then have the volunteer repeat her approach a few times.
2. Guests who aren’t interested in training the dog:
a. Make a tie-back: attach an extra leash to something sturdy, within view of the doorway, but not
blocking the entrance and keep it there for the next few months. When a guest arrives, hook the dog
up to the secured leash and let the guest in.
b. Once your dog is calm, the visitor can attempt to greet him if they wish. Give him treats for calm
behavior if the guest does not wish to greet him. If he barks, take him to his crate for a time out.
c. If he is able to greet them on the tie-back calmly, he may be released (you may want to hold on to
the leash just to be sure!).
3. Alternative method #1: Teach your dog that crossed arms equals a hand signal for “sit”, then you can simply
ask guests/strangers to cross their arms and wait for the dog to sit until being petted. (This will help you
with people who unintentionally do things to get the dog all excited like waving their hands around).
Prevention is also very important in this exercise.
4. Alternative method #2: Teach your dog that each time someone enters the home, treats will be tossed about
6-10 feet away from the person. You can easily accomplish this by keeping some treats by the door and
tossing them as you come in. He should start to anticipate this and begin to stay away (and therefore, off of
them!) from the person to get the treats. Once he has calmed down a bit you can then ask him to sit and give
him some attention.
Housetraining
The most important housetraining rule is to avoid mistakes.
To housetrain a dog we are relying on the fact that dogs are fairly particular about where they "go" and build
strong habits. It is very important to prevent accidents, because every time she relieves herself in the house, she
is building a preference for this area. Every time your dog relieves herself in the house, blame YOURSELF (but
please be forgiving)! Until your dog has learned where to go potty, she should be under constant surveillance
(with her leash tied to your belt if possible), in her crate, or tethered on a comfy mat (tether should be used only
under supervision). The crate should be just big enough for her to stand up, turn around and lay down in. If your
dog is having accidents in the crate, make sure it isn’t too big and remove absorbent bedding. When you are
inside and she is out of her crate, keep her tethered to your waist and watch her constantly for sniffing or
circling. Take her out immediately when you see this behavior. Also, set a timer to go off every hour (this time
can be increased as you progress) so that you don’t forget to take her out before nature calls. If she doesn’t
relieve herself when you take her out and it’s been a few hours, take her back in for 15 minutes (under your
closest supervision or crated) and then try bringing her back out again.
Stick to a strict schedule.
You should take your dog or puppy out many times during the day, especially after eating, playing or sleeping.
Feed 2-3 times per day and leave the food down for about 15 minutes per feeding. Your dog can generally “hold
it” for its age in months + 1 hr, but no longer than about 8 hours as an adult. The more often you bring your dog
outside in the beginning the better because you will minimize the chances for mistakes and give your dog more
opportunities for you to reward her for doing what you want. Water can remain down until about 8:00 at night.
29
Be consistent and keep it simple.
Until she is reliably housetrained, bring her to the same spot each time, and leave a bit of her waste there. Use
this spot only as a potty area, and not for play. Bring her there on leash and say something like “hurry up” when
you see her getting ready. As she goes, say nothing so as not to distract her, but when she finishes praise or
click, give her a tasty treat and spend 5 minutes playing outside away from the potty area. If she doesn’t go,
return to the house, put her in her crate and wait 15 minutes before trying again.
“But, what if she goes in the house…”
Hit yourself on the head with a rolled up newspaper!
If you see your dog relieving itself in the wrong spot, bring her quickly outside and praise her for finishing
there. If you find a mess, clean it very well (without her watching you) using an cleaner specific for pet stains.
“How can I teach her to tell me when she needs to go out?”
Hang a bell near the door you use to take her out. Smear a bit of peanut butter on the bell and when she touches
it and it rings, instantly open the door. Repeat each time you take her out to potty and eventually she will begin
to ring it without the peanut butter. Now she will be able to tell you when she needs to go outside (or when she
just WANTS to go outside…to prevent this from happening, each time she rings the bell taker her out for a
potty break only. If she begins to play bring her back inside).
“Why are small dogs so difficult to potty train?”
In my experience, small dogs often take longer to potty train. I’m not sure why this is, but my solution to the
problem is to take them out more frequently than you would a large dog. Maximum time without a potty break
as an adult should only equal about 4 hours. Many small dogs do very well with a litter box. I prefer this method
because this way we can be sure that she can go whenever nature calls, even when it’s a blizzard outside and
she doesn’t want to get her toes cold.

30
Housetraining Log
Date/Time Pee Poop On cue? Fed Other
31
Barking
Dogs bark for many reasons. The more common ones are listed below with some ideas for solving the problem.
He wants attention:
He may want you to play or get up and feed him. Whatever it is... Don’t do it! If you do, you will be teaching
him that barking “works” to get his owner moving. Say “leave it” and then Ignore him (don’t even look at him –
walk away or go into another room and close the door) until he stops for a few seconds and relaxes and then you
may do what he would like you to do. For the long term, make an effort to initiate activities he enjoys and make
them happen on your schedule. Make sure that everything he gets he “earns”. Have him “sit” to be given a
privilege such as going outside, or getting his leash put on, his food bowl, petting, etc.
He hears or sees something interesting:
When you are home:
1. Prevent: Block the source of sound/sights using a fan or blinds or keeping him in a different area of the
house.
2. Teach "Quiet":
1. When your dog barks, wag a piece of food in front of his nose as you say “Quiet”. When he stops
barking to sniff the treat, C/T. After about 3 trials this way, next time he barks, just “pretend” to be
holding out a treat as you say “Quiet”. When he complies, C/T. C/T again for every few seconds
which he remains quiet after hearing the cue. Gradually increase the time elapsed between clicks.
2. Reward him for choosing to be quiet on his own when he hears or sees something that usually makes
him bark.
3. Use a “Time Out”:
1. A "Time Out" (TO) should be used infrequently. By removing the dog from his social circle, you are
administering what is called a negative punishment. This punishment can have side-effects that we
don't necessarily want like him learning that you walking towards him is a bad thing. This is why the
TO should be used sparingly and an emphasis should be put on teaching the dog an alternative
behavior that you prefer and preventing the misbehavior.
2. First decide on a spot to use as a TO. The best spot is one that your dog will find neither scary or
wonderful and is safe for him. Good examples are a gated pantry, bathroom (remove the toilet paper
first!) or tether. If your dog does not mind his crate, you can use that as a TO area. Have him wear a
2 foot piece of rope with a knot on the end. When your dog barks, say "time out" in a neutral voice,
walk calmly to him, grasp the rope and walk him gently but firmly to his time out space. Place him
there for 5 minutes (or longer if you need a time out from him!). After the 5 minutes, if he is calm,
release him. He may need you to demonstrate this a few time before he understands which behavior
is earning him the TO.
4. Use a Citronella Spray Collar: This should be reserved for when you “can’t take it anymore!” and the
barking is not associated with fear or aggression.
When you are not home:
1. Prevent: Block the source of sound / sights using a fan or blinds or by keeping him in a different area of the
house.
2. Use a Citronella Spray Collar: This should be reserved for when you “can’t take it anymore!” and the
barking is not associated with fear or aggression. You will have to first use the collar when you are home to
make sure he understands how it works.
32
On a walk (barking at other dogs, people. or cars, etc out of excitement):
1. Teach him “Watch Me”:
1. Begin in the house with few distractions present. Say your dog’s name and “Watch me” while
holding a treat to your nose. C/T when your dog looks at the treat for 1 second.
2. Practice this 10 times. Then practice it while only “pretending” to have a treat. This will become
your hand signal.
3. Build up the length of time that your dog can continue watching you.
4. Practice “watch me” while you are walking around inside. Practice “watch me” while you are
outside (you may need to revert to showing him the treat for a few reps.). Practice “watch me” when
you are outside near something interesting. Practice “watch me” in a situation when he would
normally bark.
2. Teach “Quiet”:
1. Teach him the “Quiet” cue as explained above.
2. When he begins to bark or you see one of his triggers, say “Quiet” and C/T. C/T every few seconds
that he remains quiet. Teach him that his trigger means “Quiet”. Example: barking at cars.
Whenever a car goes by waggle a treat in his face and bring it towards yours. When he looks at you
C/T. Repeat until he voluntarily looks at you (without barking) when a car is coming.
3. Reward Calm Behavior:
1. When you come upon something that usually makes him bark and he hasn’t barked, C/T.
4. Escape!:
1. If he is unable to respond to the “Quiet” cue (or doesn’t know it yet) just turn around and calmly
walk away from the thing that is getting him so excited. Reward him when he becomes calm.
5. Use a Citronella Spray Collar: This should be reserved for when you “can’t take it anymore!” and the
barking is not associated with fear or aggression.
He is afraid, aggressive or territorial:
1. Prevent outbursts by crating, gating, blocking windows, using a fan or not taking him places that cause him
to have outbursts. This is not meant to be a permanent solution, but is helpful while you are teaching him
that he does not need to be afraid. It is best to do this for 7 days before beginning training to give his body
and mind a chance to calm down.
2. Stay calm.
3. Consider hiring a professional positive trainer for private sessions.
4. Get him to change his mind about what he is upset about:
1. Teach him that, what he was upset about before now predicts his favorite things.
i. When the trigger appears at a distance, C/T. Gradually get him closer to the trigger and C/T
frequently. For a territorially aggressive dog, it may be helpful to teach him that the doorbell
(or knock) means he should get in his crate and wait for treats. You can begin to teach this by
ringing the doorbell and then luring him to his crate and feeding treats.
ii. It’s also helpful to lure him through his fears if possible. For instance, if you are on a walk
and confront one of his triggers get his attention and put a treat to his nose to lead him along.
Continue feeding him until you are out of the “danger zone”.

33
5. Teach him “Watch Me” (see above). Use that cue when you predict he will get nervous and C/T frequently
for watching you.
6. Reward calm behavior.
He is bored or frustrated:
1. Prevent by keeping him busy and tiring him out with chew toys, exercise and training. He should have at
least 30 minutes of aerobic exercise per day, plus 1 hour of chewing and 15 minutes of training.
2. Teach "Quiet" (see above).
3. Use a “Time out” (see above).
4. Use a Citronella Spray Collar: This should be reserved for when you “can’t take it anymore!” and the
barking is not associated with fear or aggression.
He is excited to play:
1. Teach him that when he begins to bark the play ends.
1. Leave a short leash on him if you need to in order to lead him out of the play session. When he
begins to bark, time him out (see above) or stop playing with him. Reward him with continued play
when he is quiet.
2. Use a Citronella Spray Collar: This should be reserved for when you “can’t take it anymore!” and the
barking is not associated with fear or aggression.