document resume ed 119 444 logan, thomas e. · document resume. ec 081 696. logan, ... obstacle...
TRANSCRIPT
ED 119 444
AUTHORTITLE
INSTITUTION
PUB DATENOTE
AVAILABLE FROM
EDRS PRIG'DESCRIPTORS
DOCUMENT RESUME
EC 081 696
Logan, Thomas E.The Logan School Motor Development Program for theDeaf-Blind and Sensory Impaired.Council for the Retarded of Saint Joseph County,Inc., Southbend, Ind.; South Bend Community SchoolCorp., Ind.75144p.; Not available in hard copy due to marginalreproducibility of original documentInformation and Research Utilization Center, 120116th Street, N.W., Washington, D.C. 20036 ($9.25xerox copy)
MF-$0.83 Plus Postage. HC Not Available from EDRS.Behavioral Objectives; Communication Skills; DeafBlind; Exceptional Child Education; *HandicappedChildren; *Mentally Handicapped; *Motor Development;*Multiply Handicapped; Perceptual Development;*Physical Activities; Physical Education; TeachingMethods
ABSTRACTPresented are numerous motor development activities
for sensory impaired, severely and profoundly mentally retarded, andmultiply handicapped mentally retarded students of all ages.Background information is provided on program objectives andadministration, the multiply handicapped child, motor development,and methods of movement training; Activities for locomotion-mobility,manipulation, stability, and perceptual-cognitive skills are includedin the categories of motor development, general movement, and earlydevelopmental training. Specific objectives are given along with unitintroductions and individual activities. Sample activities includestair walking, jumping from a height, tumbling, and following anobstacle course. In a final chapter communication is discussed interms of listening activities, manual signs for movements anddirections, and the factor of sound. (Author/LS)
***********************************************************************Documents acquired by ERIC include many informal unpublished
* materials not available from other sources. ERIC makes every effort ** to obtain the best copy available. Nevertheless, items of marginal ** reproducibility are often encountered and this affects the quality ** of the microfiche and hardcopy reproductions ERIC makes available ** via the ERIC Document Reproduction Service (EDRS). EDRS is not* responsible for the quality of the original document. Reproductions ** supplied by EDRS are the best that can be made from the original.***********************************************************************
THE LOGAN SCHOOL MOTOR DEVELOPMENT PROGRAM
FOR THE DEAF-BLIND AND SENSORY IMPAIRED
U.S. DEPARTMENT OF HEALTH,EDUCATION L WELFARENATIONAL INSTITUTE OF
EDUCATION
THIS DOCUMENT HAS BEEN REPRO-DUCED EXACTLY AS RECEIVED FROMTHE PERSON OR ORGANIZATION ORIGIN-ATING IT POINTS OF VIEW OR OPINIONSSTATED DO NOT NECESSARILY REPRE-SENT OFFICIAL NATIONAL INSTITUTE OFEDUCATION POSITION OR POLICY
WILLIAM THOMAS, Corrective Therapist, (bid) Logan School;COUNCIL FOR THE RETARDED OF ST. JOSEPH COUNTY, INC.,and South Bend Community School Corporation.
Logan CenterP.O. Box 10491235 N. Eddy Street.Sbuth Bend, Indiana46624 (1975)
"").VNT fs'aDT,07 VATTA Tyr..A:AU1 %An ii
FOPEWPD
The deaf-blind or sensory impaired child is, for the teacheriaa veryspecial kind of a challenge as a student. This student priesents pro-blems which make the teaching techniques used even for blind studentsunacceptable. Although blind, deaf and otherwise impaired students are.included in the population intended to be served by this physical educa-
etton program, its main purpose is to provide the all-important Movementexperiences necessary for the total developmental progress of the deaf-blind. For the deaf-blind student the potential to move is one area whichmust be developed to the highest level. Of course, there can be no priori-ties made on developmental progress. But of the areas of development de-serving special concern the area of motor develOpMent is certainly one ofprime importance. The close relationship between physical education, motordevelopment and many other developmental areascannot be overlooked and cer-tainly should receive a high priority in all programming.
If a primary fault exists in this program it can be said it attempts to reachtoo broad a spectrum of special students. This problem is .somewhat alleviatedby the general nature of this program as it is written. Each activity is de-signed to, with certain considerations, suit the needs of the total populationof sensory impaired students as well as those who are severely and profoundlymentally retarded, and multihandicapped mentally retarded.
What is provided for the teacher is a number of acceptable and effective activieties which will fulfill neededeobjectives in the motor. development of the-stu-dent. No specific directions in relation to the vact methods of presentationare given. This is to allot! the teacher the freedom to use his own methods.Suggestions and. ints are given which directly apply to deaf, deaf-blind, orblind students when special considerations are. called for. Otherwise theteacher's application and use of the activities are dependent upon the needsofthe student and the ability of the teacher to carry out the activity asit is written. Activities are presented within each section in a develop-mental orde.as they would.normally appear. It is best for the teacher tofirst consult a list of normally appearing developmental characteristics.The chronological ages givenwill not apply but the sequence of developmentwill be similar on almost every check list whiCh may be consulted. The re-ferences in the bibliography by Cratth, Stephens and Tilton have reasonablygood lists of developmental characteristics. The teacher should find and be-gin with the point where the student appears to be functioning-and use activi-ties which will suit the specific needs of the 'student to accomplish, these 'goals.
Some of the activities presented may be called inactive in nature. Others are-simple adoptions of well-used activities for motor development. The teacheris encouraged to use all activities which may be of benefit to the student.The teacher must remember that it is the overall educational stimulation andadvancement of the student with which we are ultimately concerned. Do notmisjudge or dismiss an activity because a degree of difficulty exists forthe teacher or student. Attempt to obtain help and assistance wherever ap-plicable. If safety seems to be a factor, make provisions to protect youreself and the student. No activity is intended to cause harm to either thestudent-or.teacher. But the possibilities exist and should be clearly re-cognized. It is the teacher's judiciary and effective use of ,this programwhich will determine its possible benefit.
3
ACKNOWLEDGMENTS
"If the reader seems to agree with the statements presented, it 1-,,.ay meanthat "great minds run in similar channels", (Cratty P. 183). I found thisto be so withsome of the references which I used as background material.If the realer of this progrurfeels7as though in a similar channel with agreat mind it may not-be that this write is or-a- of the 'groat minds".There were many persons who through their efforts in writing influenced thisprogram.
For the most part the background formation and general organizational materialis derived from two main sources. These two writers are Bryant, Cratty ofUCLA and David Gallahue of Indiana University. Cratty nas written an ex-cellent text covering the area of movement and the blind. The readina anduse of this book as a resource helped to frame my thoughts and ideas so thatthey could more completely be put-into an organized whole for the maierial.In one section on sound and object identification the Cratty text was moreclosely followed in the information presented
David Gallahve et.al., was an influence both as a professor and as a- writer.His organizational basis for the teaching of Physical Education has been ofgreat help to me in all my programming. He has authored or co-authored manybooks and articles in the area of Physical Education, especially ElementaryPhysical Education, whin deserve reading and may be of help to teachers-concerned with the-areas of Special Physical Education.
. Two additional sources. were used enough so as to deservespecial acknowledgment. The Guide to Early Developmental Training was usedextensively to make up one section. This manual is an all-inclusive com
tconipila-
tion of a vast number of aciaities in all areas of development. This manualis used here at Logan Center for all levels of age groupings. its develop- .
mental progressions of check lists and activities are quite usable and accuratefor use with Mentally retarded and handicapped students.
In the beginning writing of this program, two important sources were used toset_ a mental base for my-writing and to develop a.programatic outline. Theworks listed by Louis Tutt, Motor Development Specialist of the Michigan Schoolfor the Blind and 3. Van Dijk of .the School for the Deaf, Deaf -biind Unit, St.Michielsgestel, Holland were used for this purpose.
.A comprehensive program of developmental learning has been put together throughthe University of Michigan, Within this program IS a language deveiopment sec-.tion designed for use-by-trained-mentally retarded workers who are able toteach basic communication skills to others. The information within my programconcernedwith communication is derived mostly from this basic language program.
As always, it is the students of this agnncy and those who may benefit fromthis program that most deserve the acknowledgment of this writer. if it werenotfor the inspiration provided by their .special and unique needs a programsuch as this would not be of any purpose. These students, though handicappedby impaired vision and/or hearing, reveal through their being that they areof worth. and deserving of whatever we, who are lucky not to be so handicapped,can do to fulfill their lives. For by he them to achieve their greatness,we take a-step toward our own greatness.
would like to express _special thanks to -.Tani lop heillustrations on pages 131-1'55.. 4
'TABLE OF CONTENTS
Page
Foreword
AcknOwledgMentsii
General Program Objectives1
Specific Program Objectives2
Organizational Content2
Program Administration3
The Multiply Handicapped Child4
Sensory Impaired4
Deaf5
Blind v5Deaf-Blind
6Motor Development
7Motor Development and Sensory Impairment 7Development of the'Deaf-Blind Child
9Methods of Presentation10
Co-Active Movement 10Sensory Stimulation
11General Procedural Methods 12Activities for Motor Development 13
Locomotion-Mobility Activities 14Mobility Skills 38Manipulation Activities 44Stabilization Activities 75
General Movement Activities81
Obstacle Course 95Early Developmental Training 98
Locomotion Activities 99Manipulation Activities 113Stability Activities 121Perceptual;=Cognitive Activities 125
Communication - Listening, Signs and Sound 128Listening Activities 129Signs For Movements and Directions 130
,-- The Factor of Sound 135Evaluation 138Bibliography 139
LOGAN SCHOOL MOTOR DEVELOPMENT PROGRAM FOR SENSORY IMPAIRED CHILDREN
General Program Objectives
1. To control the environment through physical-motor movements.
The child needs to move outside of himself - the "I being". Learning to exploreobjects and obstacles outside the "I being" inhibits the need or tendancy toturn to the "I being" for satisfaction. When the child is aware of his abilityto move in, around, over, through, under, obstacles he gains control of himselfand his environment.
2. Increase capacities to perform functional activities.
Certain abilities are necessary for daily living and independence. For the mostpart, these abilities are motor movements. For the multiply handicapped sensoryimpaired child, especially those who are severely and profoundly mentally retarded,these abilities may be the height of their learning capacity. The motor abilitybase muse taught to these children. For them it isof the utmost importance.For the Ahers, having lesser degrees of mental retardation, the importance isnot negated, but it is understood that they are capable of higher degrees ofindependence.
3. Learn new physical motor skills.
Physical-motor skills are those which involve the use of the body and its variousparts with the neuro-muscular coordination necessary to make their performance onthe skill level. Physical referring to the body, motor referring to the neuro-muscular coordination. Aside from the skills and abilities needed for dailyliving activities the vast variety of movement skills need to be learned. Theseskills include throwing, running, hopping, jumping, catching, kicking, static(lateral) balance, skipping, etc.
4. Awareness.of self through motor movements.
This objective elates closely to numbers one (1) and five (5). The child movesthrough his environment and learns, not only about the environment but also abouthimself. He learns the capabilities he has in movement of joints and muscles.He develops an image of himself as highly capable, not so capable or just average.Also he develops an image of himself as to Teft arm, right leg, head, chest,stomach, etc. In short, he learns what he is and what he is able to do.
5. Develop improved body and self concept.
Although this objective is part of number four (4) it holds great importance inand of itself. The child needs to explore and know his own environment withinhimself before he can realistically explore the environment outside of himself.
-2-
Body image and self-concept are the beginnings of a relationship with objectsand other people. The need to know your own face, arms, legs, is important tothe eventual knowledge that they are just like or slightly different than thoseof other people. When the child knows these things he is ready to expand intonew fields of learning and development.
Self,.concept and body image are important in physical education and are some-times easily learned through movements. The child learns where his arm is bymoving it or having it moved. He may then learn that by grasping an objectand moving his arm in a specific manner he can throw the object.
6. Utilization of auditory and/or visual cues which can be potentially received.
This objective is most important for the child who has partial amounts of theaffected sense or senses useable. This fact is most prevalent with the deaf-blindchild. Using the sense present and those unaffected to explore and receive in-formation from the environment cannot be overover emphasized.
The deaf-blind child must be taught especially to use the eyes and ears. Ablind child must be continually told what is happening and about his immediatesurroundings. Always talk to a deaf child and be expressive with your body, usesigns and/or gestures for communication.
SPECIFIC PROGRAM OBJECTIVES
The general objectives given above cover the entire program. Specific objec-tives will be given along with unit introductions and individual activities.
ORGANIZATIONAL CONTENT
All activities' aill be listed and described under one of three headings. Thesecontent areas will be locomotion-mobility, manipulation and stability. For theadministration of the program these units will be .presented in periodic inter-vals throughout the school year. Their relative importance' will determine thelength of concentration time. Locomotion-mobility will be considered of mostimportance, stability, second most, and manipulation third. Each content areawill receive full consideration during this unit time period. It must be under-:stood that because of the nature of these content areas there will be some.over-lapping. But not to the point where one area's objectives override the areareceiving concentration.
PROGRAM ADMINISTRATION
Physical Education Director
The primary concern for programming and -program administration will be withthe Physical Education Director. It will be this person's responsibilityto develop individual programs for each student-. These programs will be.based on the child's needs as far as present developmental level and_handi-cap are concerned. Programs, objective and activities will be taken fromthose activities included within this program description. Material may beobtained from other sources and added, adapted or developed to fit the needsof the students covered by this program at any time.
Classroom Personal
Secondary assistance will be required of the teacher, aides andfor volun-teers:associated with the deaf-blind class. These persons will be keptinformed of the content of the program, objectives for the individual andtheir achievement, and program chanaes. Cooperation from the teacher willbe solicited and will be given by the Physical Education Director in allphases of development and.program administration. it is understood thatthe Physical Education Director specializes in motor development and theSensory impaired Teacher is knowledgeable of the theoretical. and practicalaspects of the sensory impaired child. However, part of this program willbe to acquaint and educate all particpants in the understanding and educa-tion of sensory impaired child... Also it is important to recognize thatthe child needs total experience in all areas of deVelopment in order toprogress. The Gym and the classroom are a necessary combination for thebenefit of the.student.--
Administration Procedures
Specifically, the administration of the program will begin with a physical-motor development test, specially designed for use with the sensory impairedchild. It will be a stated objective of this prOgram to develop such a test.These testaitems will relate closely with the .items included in the LoganSchool Test of Motor'Development.
The results of this test along with objectives of developmental plans andPERC reviews will be used to set objectives in motor development. As statedabove, objectives will be individually directed as will he their achievement.Some students will be able to achieve earlier than others and visa versa.
When objectives have been set, activity programs will be developed to meetthese objectives, set basis for new objectives and maintain previously achievedgoals. It will be these activities which form the heart of this motor develop-ment program.
At regular intervals re-evaluation, byuse of the test, will be made and thecycle renewed. At any time new objectives can' and will be made to accommodatethe advancements of the student. The test will be used only as an initialevaluation and as a periodic, overall progress assessment. The testing interval will.be manual to correspond or alternate with the administration Of the Logan SchoolTest for Moir;~ Development.
THE MULTIPLY HANDICAPPED CHILD
The multiply handicapped child is a unique challenge for developmental sequencing.This child may have a combination of maladies including mental retardation (usuallyin combination with one or more of the others), physical handicaps, neurologicalhandicaps, and sensory handicaps - hearing, speech and/or sight. Of these thechild who is sensory impaired, especially visually and/or auditorily,is the mostdifficult to program for. The child is unable to use the two most importantsenses necessary in the normal educational development processes. However, theother senses remain intact and are used to the fullest extent for every educationaladvantage.
This program'is specifically designed to suit the needs of those children who areimpaired in the sensory areas.of hearing and/or vision. For the child concernedhere there may be the additional handicap of mental retardation. The retardationvaries and may or may not be adequately measured. For this reason we will beconcerned with working on the sensory handicaps more than the mental handicap ifpresent to any degree. We would expect mental and intellectual difficulties to.improve along with the physical-motor development.
THE SENSORY IMPAIRED CHILD
As with all development the progression from one step to the next is sequential. Themotor development levels progress from gross to fine movements and/or simple to complex.There is also some overlapping between levels as in any area of development. Ingeneral it can be said that a sensory impaired child develops much the same as anyother child, only possibly slower. The degree of developmental retardation dependsupon the amount of concentrated effort put into the child's growth. This program isdesigned to play a major role in forming a strong basis in movement and motorcontrol and for the-continuing development in all areas of growth and developmentfor the sensory impaired child;
The problem for the sensory impaired child is that he or she is unable touse one or more of the senses. A true picture of the world within and withoutis not detectable. :Intimations can only be made from information received fromthe receiving senses (sometimes including the incomplete or distorted informationfrom nearly blind eyes or nearly deaf ears). Rarely is a child, totally-deaf andblind. The higher percentage of deaf-blind children can sense small amounts ofhearing and vision. To say that this program of motor development will drasticallyalter a given prognosis of impairment, improve impaired senses, or effect any formof cure is to unrealistically extend the actual scope of the program. A conditionof sensory impairment is understood to be caused by conditions outside the realm ofthe possibilities for any physical-motor development program_and definitely beyondthe expressed scope of this program.
_5_
The range of this program is found in the area of adaption to the environmentin which the child is involved. For the deaf-blind child this also includeslearning to use the defective senses to the utmost. In addition, to adapt orcope with an environment of objects the child must be allowed to experiencea large variety of movements and learn movement patterns, abilities and skills.The forms of movement must be dependent upon their ultimate use in adult lifeor as formation of base skills. The program will begin with the most simplemovement experiences and move up to those movements, abilities and skillswhich lead to adaptation and normalization.
The Deaf Child
What are the sensory impaired children like? What characteristics do theyhave? How far can they go in the area of motor development?
The deaf child exhibits problems in the area of hearing only. This may effectthe speech of the child in addition but.this is not necessarily Affected tothe,point where it cannot be developed. The senses of vision, touch, tasteand smell are unaffected and used to the fullest extent for sensory experiencesand in developing lines of communication.
Many times when hearing is lost, for whatever reasons, there is also impair-ment in the balancing mechanisms of the inner ear. This fact may make itdifficult to experience some movement patterns associated With locomotion inparticular. For this reason a determination of the balance impairment, ifany, should be made and an extra effort put into developing this sense. Asecond loss which_may occur in conjunction with deafness is a lack of rhythm.This is a necessary factor in the smooth coordination of bodily movementsand in the eventual enjoyment of physical motion. A program which utilizesthe development of rhythmic movement and coordination will be an essentialpart of the program for the child deterMined to have a hearing loss. Usingthe vision sense and the sense of touch as related to proprioceptive andkinesthetic responses of the individual a total program of movement and physicaldevelopment can be created and used. Motor patterns for the deaf child areexperienced throughout the senses of vision and touch. It is then these twosenses which are used as a pathway around the lost auditory sense.
The child learns by imitation of movements and experiences movement throughthe tactual sensations of the movement. These tactual sensations are pro -prioceptive - sensing positions of the body and its parts, kinesthetic -sensing the movement of the body through space, and the periferal sensationof the surface moved over, around, within, through, etc. Obviously theseoccur in conjunction with one another. The child imitates movement and inthe imitation the child experiences the movement.
The Blind Child
The totally or legally blind child lacks full use of the sense of vision. Theother senses remain intact.
10
-6-
For the purposes. of motor development programming the senses of hearing andtouch are primarily used. The child in a world without sight is more nearlyrelated to the deaf-blind child because of the importance of sight to theinitial self-explorations and exploration of the immediate environment thatare so necessary to the developmental process. With, the deaf child objectsand obstacles can be seen and felt. The blind child only feels most objects,unless it also makes a noise or has a particular odor, thus allowing thechild only one mentallsensual,or perceptual picture of the object. It isa well known fact of learning that learning will accrue much faster and bemore complete if more than one sense is used in the learning experience.
The use of the remaining functional senses is much like that for the deaf-blind child. Co-active movement programming is used. This can be donemore simply because the child is also able to hear visual cues to movements.The auditory cues should relate to the movement of body parts and the directionsof movements-thus giving the child a good image of self and of his environment.
The Deaf-Blind Child
The child who is both deaf and blind is uniquely separate from a child who iseither deaf or blind. The deaf-blind child has few of the characteristicsof the deaf child or the blind child. Their world is within themselves becausethey know little to nothing of the outside world. All of their sensations areof "Me", not me and someone else, or me in relation to something else. The "Ibeing" is all there is to this child. All stimulation and sensation arisefrom within this "I being". The senses of touch, taste and smell are theonly contact with the outside world. However, these senses do not allow aneasily accessable pathway for any form of communication or relation to theoutside world.
The deaf-blind child may experience many things on the sensation level -
objects, textures, movements, inner feelings of hunger, pain, etc hot andcold, and any number of other sensual experiences. Without some form ofeducational programming it is most difficult for this child to move up tothe perception level .,.of experience'and beyond, especially if some mentalretardation is,also present.
The motor development program for the deaf-blind child is most important.--because it is the early development of physical -motor control which sets-the-basis for all other areas of development. It is in the area of physical-motor experience and expression that the first forms of communication withthe outside world can be made. It is also through physical-motor pathwaysthat early communication can be made with the "I being" within the child.Therefore, this program will center on the use of personal contact with thechild in motor movements in the form of co-active movements. More willbe said about co-active movement later.
-7-
MOTOR DEVELOPMENT
All development is sequential, all development builds upon previous development,all development Moves upward step by step, all development is systematic. Fromthis point on development depends upon the indiVidual. Human development canbe either normal or abnormal. The development of. the multiply handicapped, sen-sory impaired and/or deaf-blind child is far from normal. "Normal" developmentalscales are used as a guide and a resource but by no mear,e, an individual growthchart.
The developmental stages are common, in one.form or another, to all children.However, in atypical development it is not the developmental sequence which isdifferent, but the rate and pattern of development. In normal development,the transition from one stage to another is not always easily detected. Onthe other hand, the time between stages may be more prolonged with a child whosedevelopment is delayed.
Motor development is governed by two principles. These are the cephaic- caudaland proximal-distal- growth principles. The former refers to the progression ofdevelopment from head to foot. The latter refers togrowth from the midlineor center of the body outward. In line with these two principles is thefact that movement develops from awkward mass movements-to more precisionalgross and fine coordinated-movement patterns, abilities and skills. At eachdevelopmental age level-certain progressions occur through a spiraling effect.'Some skills may remain constant while others mature. A child may revert toan earlier form of behavior without having lost any of his previous skill.This form of regression is usually purposeful in that it provides- an opportu-nity, for the child to review and strengthen a previously accomplished skillin order to develop the next sequential step. This then is the spiralingprogression of review, picking up new skills and strengthening old ones.For the deaf-blind and/or sensory impaired child this form of development ismost important as a tool for teaching and learning.
MOTOR DEVELOPMENT AND SENSORY IMPAIRMENT
. For the sensory impaired child movement is essential, the development of a varietyof movement patterns and skills is necessary for adaptation to a life which lacksone or more senses. The individual must-eventually become aware of his environ-ment and be able to move within it, be it familiar or not. This knowledge of cnvi-ronmental characteristics begins with a self-image. Progressing outward fromthat point ofinternal sensation of self. :The individual advances to a concu--tualization of sights and/or sounds found in the world within and withodt.Between these two levels of experience are found the levels of perception - the com-bination of sensation with experience, imanery - formation of a mental picture,and symbolism - being able to relate_or associate mental images of the environ-ment. Sensatioh preceeds these three and conceptualization is the highest step,following symbolism.
12
-
Stages of Motor Development
There are five sequ-ces of movement experience which parallel Myklebust's Hierarchyof Experience, presented above. These are exploration, discovery, combination,selection, and performance. The levels are usually defined relating to normal children.For the purpose of this program they will be defined to relate more to the needs ofthe sensory impaired child. Exploration of motor movements relates to the sensationof experiences. During this level of experience, the child learns to extend himselfwithin his environment. He is able to feel his movement and sense the variety of wayshe is able to move. Exploration then is a means of experiencing movement through thesenses.
For the sensory impaired child this experience is limited by the handicap orhandicaps involved. The teacher or parent must provide those experiences on the. sensorylevel which are beneficial to the child. A blind child would profit most from themovement of arms, legs, and head which explore the environment within his reachjust as a normal sighted child would. The multiply handicapped blind or otherwisesensory impaired child benefits from this type of movement as well as would the child'who may not have mental retardation as an adjunct handicap.
On the level of discovery_ the child is able to experience movement throughperception of that movement. The child has now explored and.sensed a vastnumber of movements. From these sensations perceptions are formed from theexperience of many movements. As the child perceives movements he is then ableto discover new movement and to combine movement patterns. These experiences be-come repetitive. From this repetition the child is able to form mental images ofmovement and combinations of movements. Using these learned movements, new patternscan be combined to make any number of new patterns leading to the development of skills.
A'deaf child should have little difficulty in these early stages_of development if theproper movement stimulation is either present or induced by the parents or a teacher.However, the blind or deaf-blind child will have much difficulty unless some effortis Put into the sensation - exploration and perception - discovery levels because ofthe great need for vision at this time. Here the child must manually be put throughmovements. and encouraged to self-initiate movements. The children on these levelsmust be made to sense, explore, perceive and thus discover a wide range of movements.
Using the intact senses, the child has sensedlperceived, explored and discovered anumber of skills. The child can reach out purposefully and strike or bat at a toy orother object to receive satisfaction and enjoyment from the movement and its results.This is combination of movements which, lead to selection and eventual performance ofselected skills on the highest. level.
The development and expansion of movement skills leads the child to the selectionof skill combinations to be used as apart of a specific group of actions or ingames or other informal.occupational activities. Th6S selection utili2es the levelof imagery to experience movement, combine and select specific uses of movement skills.
13
At theehighest level of playSi.c.al-motor experience the child functions at thelevel of conceptualization - able to make ideas concrete and think in abstract terms.When the child, nearing adulthood, is able to conceive movements as.specific skillsto be used in.a game situation he is then able to pick and choose skills for per-formance in games and sports. These skills are performed under circumstanceswhere accuracy and a highly successful performance are expected. The person selectsa few skills to develop to a high level, therefore slighting other skills. At thislevel the importance is placed on the .degree of perforMance in a few sports, notexperience in a wide range.
The sensory impaired child does no, progress to this peak level any differently thana normal child would. A stronger base must be developed. The lower two or threelevels must receive great effort. From there on up the progress, though not simple,requires only a certain amount of compensation for tied handicap or handicaps, butno more than this. These compensations vary but must be made with the objectiveof increasing personal independence and skill achievement.
DEVELOPMENT OF THE DEAF-BLIND CHILD
Aside from the few general characteristics and principles-of motor development,a great many factors enter into the individual's.developMental progression.For the handicapped child two major factors are important. These are matura-tion, related to timeand aging changes, and experience. Experience isespecially personal and closely associated with the child's environment. Ex-perience can be contrived or normal interactions with the environment withinor outside the child. As teachers it is our job to see that experiences, con=-tri'ved or natural, elicit learning - development - and that experiences covera wide range of those possible within the environment.
It is most important to recognize that all children have thepotential to develop.Multiply handicapped children develop at a slower rate, even with adequatetraining opportunities, and very little or not at all with no training. Withthe deaf-blind or sensory impaired child training and stimulation are imperative.Experencial development of-sensual and movement experiences is not likely withoutit. The childis left to little more than the normal aging and maturational.development of the body.
An adequate program of deaf-blind - sensory impaired motor development includesmuch in the area of sensation and perception. Many theorists, have closely rela-ted motor movements, the perception movement, and perceptual-motor movements tointellectualdevelopment. The ultimate goal of any educational training pro-gram is the-maximuruse of the intellectual processes. This motor development
-10-
program is geared to the objective of building a strong developmental base inmovement and the use of senses leading to the ultimate use of perception andcognition of environmental experiences.
As development progresses from one level to the next the child reaches plateauswhich are most important for a motor development program. The greatest emphasisshould be placed at these points with recognition of spiraling and regressionin mind. Small increments of skill level linked with each other are most im-portant to progression on a plateau and from one step to the next.
METHODS OF PRESENTATION
The normal child develops with little aid receiving cues and proper activitiesat readiness points. The multiply handicapped retarded child cannot proceedas simply as this. For the "atypical" child learning is development and this,child must, in a sense be taught to develop. TRe normal developmental processmust be fabricated with care so as to not miss vital landmarks of development.Cues must be presented in the form of stimulation, movement or positioning.Activities are presented as a form of experience. The activities take thechild through experiences which closely simulate normal developmental patterns.In some cases activities are designed to adapt or correct handicaps. In othercases activities can be utilized to set the basis for progression in other fieldsof development dependent upon physical-motor factors. This includes such areasas communication, socialization, and adaption to sensory handicaps.
Methodology for teaching deaf-blind and sensory impaired must include sensorystimulation. This means the use of functional senses - fully or partiallyfunctional - and developing pathways around senses which are totally lost.
CO-ACTIVE MOVEMENT
The most frequently used method of movement training for basic motor developmentis co-active movement. As the term implies movements are presented and experiencedin conjunction with another force. This outside force is the teacher.
Most learning experiences require imitation of movement patterns or skills. Forpartially sighted And blind children thiS Ts impossible by visual means. Thesenses of touch, kinesthesis and proprioception must be developed and utilized.Co-active movement does this in order to teach movement skills.
Co-active movement is Lhe teacher and student moving together. It is a form ofkinetic stimulation utilizing passive and active-assistive movements. In a sensethe teacher and student become one moving body. The teacher providing all orpart of the muscular movement and the student utilizing his tactual senses topattern the movement. The student's part is mostly unconscious neuromuscularpatterning which should eventually develop into conscious movement controlpatterns, abilities and skills. This development follows the levels as de-scribed by Myklebust's Hierarchy.
In essence the child is alige to feel the movements of the teacher. The childsenses the bending of a leg or arm, the force and distance of the movement.Total body contact is necessary for total body movement. This is necessary-for
15
beginning_training,less contact is -required as motor control increases. A childwith, higher functioning level may sense movement of the teacher when he is inclose relationship to the student. Under these circumstances the child senses.just movement and.not the actual -physical-motor action. For this reason themethod. can be. used only for a movement pattern whiCh is already learnee or witha child who functions high enough to -both sense and imitate the movement. ThisMethod cannot be used for initial movement pattern training.
For the most part co-action is used as a beginning phase of teaching. Its usepromotes interaction with the environment, imitation training and basic skilllevel training. The outcomes are as stated before;,that being, to provide abasis for communication, socialization and intellectual functioning skills.It is especially useful in the ultimate use of the body as a means of expression.
Co- action can be effectively used to teach any form of movement. For the pur-poses of this program it will be used asa base elementary teaching method. In-general, the teacher begins with lower leVel.Skilis and progresses on using acti-vities to develop skill factors. Initially begin with total control of thechild's movement. As the child gradually progresses he should take more controlof his own movements.
Teaching body parts, laterality and directionality becomes important to theeventual independence and skill level of the child. This should be done by .
verbal communication of parts, direction, and left-right commands and naming parts.while moving. Tactile sensations become associated with movement which in turnbecomes associated with a body part or direction. Always be accurate and.consis-tent with all terminology. Coordination must exist between classroom teacher andmotor development specialist on all terms to be used.
SENSORY STIMULATION
Using co-action basic skills.tan be easily presented. For continuation of pre-viously learned skills or to teach a child who has effective communication stimulation of the senses is useful. This can be accomplished by touching a body partor initiating a desired movement. A combination of the two is also possible inthe early phases of learning. The use of this form of stimulation should not moveinto co-action as this method gives much more support and aid than required. Theultimate goal of any teaching method should be the development of independence.A method which does not promote independence and higher functionshould not betolerated under.any circumstances.
Tactal stimulation is used as motivation or a cue to initiate a movement pattern.If the child is-aware of the desired movement touching the body part to be movedshould be satisfactory. In order to communicate the desired action the extremetymay-be put through the action. The child then repeats the action on cue.
In lower level communication the actual muscle' Or muscle group may be stimulatedby touch - lightly stroking the area in the direction in which contraction of themuscle is desired. Of course a basic knowledge of muscle locations and actionsis required for this method. It cannot and should not be attempted without thisprior knowledge.
I. 6
-12-
The use of tactal senses of the deaf-blind, sensory impaired 'child cannot beover emphasized. These senses are generally the only remaining senses useful formotor development training. However, other senses can and Should be used whenappropriate. The multi-sensory approach to teaching works well even with sensoryimpaired children. Sometimes it is all that is left when the'visual and auditorysenses are totally lost.
GENERAL PROCEDURAL METHODS
As a general principle all methods should be beneficial to the chjld and satisfythe accomplishment of objectives. Always begin with the objectives 'as given bythe activity. Begin with the simplest or most appropriate objective and followthe procedure of the activity always keppjng in mind the objectives.
The ultimate results of everything you do for the child must be the highestform of independence attainable. The less things you do for the child the better. Itis appropriate to give support but support should be lessened as the child'sability to "stand on his own" increases. This is not to say that the childcannot place confidence in yousbut he must have the confidence that you arehelping, not making him dependent upon you.
Under these circumstances la child learning to climb stairs would require agreat deal of support and assistance. Co-active movement would be used firstof all, where the teacher does everything with the child following. Co-actionadvances to stimulation or active-assistive movements where the teacher stimulatesthe child to step up or down with the appropriate leg. At this point the childshould be able to balance fairly well going up and down the stairs.
Next the child is encouraged to transfer support from the teacher to a will orrailing. The teacher moves with the child, supporting the other side. As thechild advances, lessen support on the side opposite the railing or wall. Thiswill force the child to accept more of his own weight and be respontible formore of his own support. Eventually the amount of support will be reduced towhere the child takes your arm or holds your hand. Actual physical support isreplaced always with motivation and much praise. The actual encouragement issomething between you and the child, but there should never be a lack of it andthere cannot be too'much.
A deaf-blind child should never be left alone or allowed to fall without support.It is understandable that a child may fall or trip but someone must be there tobreak the fall and return the child to the task as quickly as possible. Falling,tripping, etc. are not bad or undesirable happenings. They are part of life.But a deaf-blind, sensory impaired child should not experience the fear or paincausing factors of falling until he or she is able to satisfactorily cope withthe fall and be able to get up and start over on their own. This is a conceptrelated to failure. The handicapped child does not need to experience failureuntil self-image and confidence are such that failures can be accepted and over-come.
17
ACTIVITIES FOR MOTOR DEVELOPMENT
The following activities are specifically designed to elicit motor. development progress from sensory impaired and deaf-blind children.
In most cases their actual use may be varied depending upon the in-dividual child and the teacher's approach to the activity. Objec-tives given for each activity are general and related directly tothe activity and equipment used. For many of the activities otherobjectives may be introduced in order to suit the child's needs.These must be adaptable to the activity and equipment without los-ing the actual intent of the activity.
All activities will be categorized as locomotion-mobility, manipu-lation, or stability. A separate section will be concerned withthe obstacle course, which is a special area of need for the deaf-blind child. Other activities related to motor development areavailable and will be used in addition to these to correct or developspecial areas of problems and handicaps.
18.

-14-
LOCOMOTION-MOBILITY
The ability to move about from place to place is a most important animalcharacteristic. It is one of the main differences between plants andanimals. The ability to move on two legs in an erect posture is uniqueto the primates, of which man is the principle member. Using the mentalpowers and physical characteristics which belong to man alone we are ableto move from one place to another through a vast number of means. Theseinclude movement by self-propulsion, or vehicles which provide propulsionother than that provided by man's physical strength alone.
The fact that we, as humans, are able to progress from a child, unable tomove with purpose, to a fully developed individual, able to move about with-in nearly any environment, is a remarkable happening specific to the humancreature. This happening is a procession of inter-dependent skill develop-ments which begin from the first movements of the child and are able to con-tinue throughout life with any number of adaptions or additions. All motor develop-ment of locomotor skills is based on the patterns, abilities and skills devel-oped and learned in the first seven to eight years of a normal life. With achild unable to progress at a normal rate, these years are broken into a num-ber of developmental levels or plateaus. Additional handicaps must be com-pensated for in the developmental progression and some areas given more.at-tendon and more importance.
The area "of locomotion, the ability to move from point to point, is a specificarea of motor development which is important, calling for specific attention.The blind and deaf-blind child requires this additional attention in locomo-tion in order to develop through a normal sequence. For this child the abilityto move from one point to the next'effectively is only part of the overallneeds. The ability to move in a controlled efficient manner is of equal im-.portance. This special capability can be termed mobility.
The blind and deaf-blind child, youth and adult must not only be able to walk,run, skip, hop, jump, etc. from one point to another, but do so in an effec-tive and efficient manner. This usually calls for locomotion in a straightline, or the easiest and shortest path between two points. The non-sightedor visually limited individual may have difficulty moving in a straight line(a veering tendancy is common to blind persons), difficulty perceiving curves,corners or grades of a surface, or difficulty negotiating obstacles of varioussizes, shapes and configurations. Therefore, not only the simple ability tomove from place to place but the ability to do it with a degree of efficientcontrol and perception is most necessary.
It is this specific area of locomotor and mobility skill development whichthis section will be most concerned. The activities will be designed toteach, develop and practice these skills in developmental levels of sensation,perception, imagery, and possibly symbolism. The first three levels will beof primary importance due to the intellectual level of many of the students.who will be affected by this program and the fact that the other levels ofexperience call for other experiences outside the area of motor development.When the child passes into and beyond the imagery stage of experience he or sheis out of the range of purely physical experience and not as dependent on move-ments for experience only.
'19fr
-15-
The Locomotion-Mobility section will progress from the earliest form oflocomotor movements to the more complex skills which are within the scope ofthis program and the average range of the students affected by this program.Reference must be made to the sections of this program dealing with generalmovement or early developmental training for activities necessary to bringthe child to the level of locomotion skills as will be presented here.
BASIC LEVEL SKILLS
The following skills will be presented in the order by Which they logicallyappear in a normal developmental sequence. In general it will be understoodthat the sensory impaired and deaf-blind child could not develop along thisprogression unless the described training is introduced at the proper times.The premise that the child is able to sit unsupported and creep will be takenfor granted. Previous work in early infant stimulation and developmental activi-ties will have already been accomplished. Information and activities in thisarea are to be found in the-section entitled Early Developmental Training.
Basic level skills are those motor skills which are primarily simple, oneaction movements. They are not necessarily associated with or in combina-tion with other movement skills and include the fewest number of outside (nonphysical-motor), factors. This does not mean that basic-skills cannot be madedifficult bythe introduction of variations or outside factors. But in theirpure form they are unique in and of themselves. Essentially a basic skill ispositively related to the well known atomic elements of matter in that theycannot be broken into other compound factors.
The basic skillS of locomotion-mobility are walking, stair walking, climbing,jumping, hopping, horizontal jump(for distance), and sliding. The develop.;ment of these skills set the necessary base for further progression in loco-motion and independence in mobility.
WALKING is the act of putting one foot ahead of the other with the corres-sponding shift of body weight to the lead leg following which the opposite legmoves ahead to take the weight as the cycle continues.
This is indeed. a simple description of a much more complicated. task. For ourpurposes it will suffice to maintain the fact that each step is followed hy ashift of weight. This is almost a reciprocal motion which cannot and shouldnot be reversed except in the very early walking stages.
KNEE WALKING
Objectives
Equipment
To develop the walking pattern, increase postural strength of hips.and trunk, develop. alternating cross-pattern motion, develop andenhance the use of arms in balance and movement.
Mat, knee pads if necessary.
20
-1G-
Position- The student is standing in an erect position on the knees.The hands are held clenched or open, the elbows are slightlyflexed, the arms are at the side.
Action- One or two assistants may be needed to-Provide support for thestudent in the initial phases of work. With the support of the assistants thestudent walks on his knees progressing forward by moving one leg at a time.
Initially it will be-necessary to provide most of the positioning supportwhile the student moves his legs only. Gradually ask the student to takeincreasing amounts of his own weight and to support his own trunk. Manipulatethe student's arms so that they move in an exaggerated cross-pattern movement.Again allow the student to.take on more and more of this arm motion. The cross-pattern should already be present from creeping but may have to be reviewed andpracticed. This would be an example of the spiraling progression within adevelopmental plateau.
With this activity and the others it may be a good idea the teacher to do theactivity first on your own. Although the teacher and assistants may be verycapable of performing the exercise without any difficulty they should attempt togain some empathy with what they are attempting to get the student to do.
Teaching this activity may require some muscle stimulation and most likelyco-active movement for the initial phases. Be sure the student is aware ofthe movements to be performed before attempting to get him to move while takingany part of his own support. A deaf child may pick up this exercise veryeasily while watching a demonstration by the teacher or. aide.
CRUISING
Objectives- Increase independence of walking, develop leg, hip and trunkstrength, enhance the use of the arms in the walking action.
Equipment- Stall bars, parallel bars or other pieces of furniture orclassroom equipment which are stable enough to support thestudent's weight.
Position- The student stands erect maintaining support with the aid ofa bar or piece of furniture. It is suggested that thestudent pull herself to this position to begin the action.
Action- While maintaing support and balance on the bar the studentwalks from one end to the other and returns.
Although this activity should be accomplished as independently as possiblesome aid will need to be provided in the early stages of learning. Thestudent will need to be able to find his own best standing position wherehe can maintain balance and stability. This may appear quite awkward atfirst. Help the student find his most comfortable position. When onbalance he will appear to have a rather gross sense of symetry and stabili-ty. Movements may also be quite hesitant and "jerky". Provide muchencouragement to keep the student up and moving. When he falls get himback up and moving again quickly.
21
-17-
Although the parallel bars are a good tool to aid the student's walkingprogress and develop a degree of independence, they do not work with allstudents. If the student shows severe dislike of the parallel bars usethe physical contact methods already presented in order to keep a continuouspace of successful advancement.
A third level of assisted support is simply to hold the student's. elbow orhand while standing at his side. From this the child receives mostlyemotional support and guidance and occasional aid when he may lose balance.A blind student can be worked into guidance training from this by askingthe student to hold the teacher's arm. For the blind and deaf-blind thiswill be a necessary mobility skill.--
When providing support or assistance to a student from the'side it is agood practice to switch sides periodically during the practice session. Thisallows the student to gain strength on both sides and keeps him from dependingtoo much on one side-only.
The release of support included in this activity is leading the,-student intothe next activity which may be initiated when the student is into the thirdlevel of assistance support.
UNASSISTED WALKING
Objectives- To increase and further develop the muscles used in walking andposturing support, increase balance, develop normal walking gait,develop independent walking.
Equipment- None except an obstacle-free area
Position- The student stands erect'in a normal walking position. Thestudent maintains his own support and balance. A teacher maystand at his side, but only for the purpose of correcting anoccasional error in step or balance. The student should bemade aware that the teacher is there and what the teacher'spurpose is in being at the student's side.
Action- The student walks independently for as many steps as he is able.Much suport in the form of encouragement and praise should be given.
At first the student's posture and walking gait may resemble his firstefforts at assisted walking, legs spread and a forward lean of thebody. This is another example of the spiraling progression of development.When this occurs the teacher must point out the student's errors and insome cases give sensory stimulation to remind the student of correctposture or walking gait.
When a student has gained independence or near independende, initiate aprogram where the student 4 asked to use his hands to find obstacles inthe environment or to follow a path. In this program the student istaught to follow a wall by keeping a hand in contact with the wall. Healso is taught to use his_hands in front of him to warn of impendingobstacles or-obstructions in his path. These skills are primarily re-moved from "the physical Education class but are best initiated in a regularprogram at this_point or even earlier in some cases. This is also anotherreason for keeping the student's hand at shoulder level back in the assistedwalking stage.
22

-13-
The initial phases of cruising will require some exploration and two orthree different pieces of equipment should be provided on which the childmay cruise. Eventually the child should be cruising on a wide variety ofobjects and should be able to find his own cruising area and should pullhimself up to standing. This is a normal step in the developmental processand should receive much emphasis. A child who is able to cruise independentlywill eventually gain a higher degree of independence in walking
. Forthe deaf-blind and blind student this can be very important.
ASSISTED WALKING
Objectives- Improve independent walking, increase strength in the legs, hipand trunk, increase balance and stability, develop and improvestanding and walking posture.
Equipment- Broom handle, large rubber ring, string or rope.
Position- The student is standing with one or both hands holding a baror holding the teacher's hand or hands. The student's handshould not be raised above shoulder height under any circum-stances. This is because the arms and hands are'an integral partof the balancing process for the student. When the hands areraised above the head it raises the center of mass or center of
,'.*gravity thus requiring an unnatural stabilization effort on thestudent's part.
Action- The student walks in a normal walking pattern with the aid orsupport of the teacher. At this point the student shoUld be able to standalone for extended periods and posturing should not be a difficulty. Thesupport _assistance provided by the teacher is to help the student with thetransfer of weight while stepping. This weight transfer is necessary so that onefoot may be lifted and carried forward while the other leg takes the weightof the body.
In order for the student to eventually accomplish this transfer independentlythe support of the teacher will have to be gradually released as the studentis asked and encouraged to take his own weight and support. The normalprogression of releasing support can be accomplished as follows: First, supportcan be given by holding from behind and under the arms, the teacher's handsclasped around the student's chest. At this point almost total support isgiven and movement is co-active. This procedure advances to the teacherstanding at one side or the other and holding the student under the rightarm (the teacher is on the student's left side) with the teacher's righthand, and holding the student's left elbow with the teacher's left hand. Fromthis position minimal support and direction can be given. At this levelthe teacher may also guide the student from in front by holding the student'shands and walking backward giving minimal support and direction. (The studentis walking forward; the teacher backwards.) Other pieces of equipment suchas a bar, ring, or rope may be used which the student holds onto whilewalking. One piece of equipment which may be beneficial to the studentat this point is the parallel bars. These should be set at a height whichis even with the student's wrist when he is standing and his arms are heldstraight at the sides.. When the student is walking in the parallel bars,he holds onto both bars, one in each hand. Stress the cross-pattern place-ment of hands.and feet. The right hand slides forward as the left foot steps, etc.
23
-19-
'-(2) STAIR WALKING - As a definitive term, stair walking does not followclosely with the definition given basic skills. However, . for theblind and deaf-blind, this skill is, in a sense, a step up, as itwere, from the walking skill. In addition to this the ability to walkthe stairs independently is a skill which will ultimately normalizethe student into the world of the sighted.
Stair walking is then both a locomotor and a mobility skill. In its basiclevel form it is a locomotor skill related to. climbing. As a mobilityskill it is necessary to negotiate not only stairways in buildings and houses,but also curbs and other similar obstacles and obstructions.
STAIR CRAWLING
Objectives- Develop initial independence on the stairs, set a basis of motorand kinesthetic sensation or memory as related to the stairs,increase strength of postural muscles, enhance cross-patternmovement.
Equipment- A flight of stairs or a set of therapeutic stairs consisting ofnot more than three or four steps and not less than two stepsboth up and down.
Position- The student is placed or gets himself into a position bothfeet are on the floor and the hands are placed on the- stairs, twoto three steps from the floor.
Action- The student executes a normal creeping movement, moving up thestairs one step at a time. When-the student reaches the top he stops andreturns to the floor by reversing the action of going up. Do not allow thestudent to go down the stairs forward, at first. The cross-pattern shouldbe maintained throughout. Although the student may perform the two-stepalternating gait, where one foot then the other is placed on a step so that...both feet are on the same step. Encourage the performance of a cross-patternand an-alternating one-foot-per-step action. Some sensory stimulation may benecessary even to the.point,of passive-assistive movement to develop the cross,.pattern.
Work to develop the awareness of where the legs and feet, arms and hands,are located in relation to each other and in relation to the stairs. Thedeaf -blind, deaf, or partially sighted student should be able to watchthese bOdy. parts as they move. This is a good idea to have the studentwatch the movement of body parts while performipg all movement skills. For
the totally. blind student, continually remind him of limb position and callattention to movement of each. Perhaps more sensory stimulation, touchinga moving limb will be required for the totally blind.
The concepts of up and down can be presented quite adequately-during thisset of activities.. Remind the student of his direction of movement, upor down. Attempt to present a motor memory or sensation of height or movementup or down by physically relating the student to a stationary point which hasbeen previously perceived as being high or low in relation to the student'sposition while standing on the floor.
-20-
For example, a mark which can be felt is placed at a stationary point onthe wall above the student's head, within his reach. This point is sensedand described to the student as being high (another point can be describedand sensed as being low). When thestudent climbs one or two steps againhave the student feel these points and describe his relationship between them,the difference between the floor-standing and stair-standing heights as thestudents perceives it.
ASSISTED STAIR WALKING
Objectives-
Ceuipment-
Posi tion-
Develop a stair walking. pattern in an erect stance, improve.strength in balance ,and stability, develop independence onstairs.
kflight of stairs or therapy .stairs with, a railing or positionednear or next to a wall.
The student stands erect at the base of the stairs. The handsmay be holding the rail or placed against the wall.
Action- When the student has gained some definite independence on thestair crawling skills, begin this activity in conjunction with stair crawling.The student should be able to stand in an erect posture with little or noassistance for. at least 30 seconds before initiation of this activity.
In the first phase the student should use the support of the teacher and thewall or railing to walk up the steps. Progression is a two-step (two feet onone step) alternating movement one step at a time. This should eventuallylead or be lead into an alternating one-foot-per-step progression up and downthe stairs. The student will be able to Walk up this way before he is ableto walk down by this means. If the flight of stairs is..more than three tofour steps do not go up or down more than three to four steps. to begin,with.
The student should rely on the teacher and/or the wall for support and balanceand not standing support. Although the student may at first be fearful ofthe stairs, provide much encouragement and motivation to keep the student-sbpporting his u4n weight and depending on aid for balance only. Thit alsowith the understanding that the support will be gradually released as the student isis able to take on more of his own balance activity.
The complicated transfer of weight in stair walking is equal to that necessarywhen the student first learned to walk unsupported.. The progression ofsupport release should be gaged the same and much of. the same methods ofmotivation and gradual release can be used.
For the blind and deaf-blind student co- active movement experiences areuseful as a teaching tool and as a method of support in the early phases.To progress from this to other forms of assisted walking the teacher canprovide side support .(as described in the assisted walking activity) orwalking up the stairs with the .student. Eventually, if this is possible,the teacher can assist by walking-along side the.student and provide what-ever assistance is necessary.
Gradually the teacher should ask the student to use the railing or wall forsupport along with taking control of his own balance. This removes the
21-
teacher from the stair Walking activity and will thus -increase the student'sindependence. The student should not be left alone at this time and stillrequires much encouragement from the teacher. This may require simplyholding the student's hand; without giving physical support.
UNASSISTED STAIR WALKING
Obj actives_- Develop and improve stair walking independence, improve strengthof leg and posture muscles, develop normal alternate one-foot-per-step stair walking gait
ETlipment- A flight of stairs or set of therapy stairs with or without arailing. If without a railing the stairs should be moved awayfrom the wall.
Position- The student stands in an erect position at the base, of the stairs.
Action- The student walks up and down the stairs without the aid of arailing, wall or other outside assistance. If the student has been given agood base of support in the assisted Walking activty and allowed to take hisoan weight and balance in a steady, gradual progression of release and aid,.he will be ready to successfully take.on the stairs alone.
Lie sure that the student maintains a good walking posture throughout theactivity. Going up and down, the body should have just a slight forwardtilt. Actually the line of the body should forma right angle with thesteps at all times. Some students will walk with the body tilted backwardsin an attempt to over-compensate fOr the abnormal,step-up. This shows a -
lack of coordination and it needs definite work. Instruct the student to leanforward while walking; but not so far as ti touch the steps with the hands.The teacher may have to manually position the student in the proper position,over - compensating forward just a little, until he is able to sense the properposture on his own.
At the beginning the stepping may be the two-foot-per-step variety. Thiscan be allowed at first ,'until the student gains some self confidence ofhi c own on. the stairs. As soon as_possible get him to begin the one-foot-per-st =ep stair walking gait.- This will take some effort becaUse of the lateraland frontal shifts of weight which are called for simultaneously- in thismovement pattern.
The student may require. a small amount of support, mostly moral, by holdinghis hand. Also-first passive-assistive movement placements, then sensorystimulation of the stepping leg will need to be given.- The size of thestep, up and out, should be known to the student but be sure that he ismade aware of these distances at this point-so that a good motor-memory isestablished relating- to the length and height of the steps. This seems tobe most important in the phase where the student is alternately putting onefoot on each step. Do not allow the deaf-blind or partially sighted student-to-only feel the step to gage distance. Have the student look at the stepand watch the movement of the feet and legs so that the feet are placed.properly on each step. This will normally become less and less a habit asthestudent becomes used 'to steps and can. step properly without consistentatt6htion to the step placement procedure. The student should gain thehabit of-looking periodically to check for obstacles and his own foot place-ment. This is actually a very normal thing we all do or should do whilewalking up or down stairs.
26
(3) CLIMBING - Climbing is the act of moving the body, weally up or down, andover, into, through, around, etc. an obstacle,or obstacles. Stair walkingcan be included in this but due to its specific need in mobility and thenormalizing development of the sensory impaired student, stair walking wasleft as a separate skill.
Necessary for the correct performance of the climbing skill is a base formof coordination of the arms and legs. The arms are usually thought to bethe. giros C important limbs used in climbing because they provide the pulling upor slow release down of the body. The legs usually act as a guide and assistthe arms in stabilization and support. In most cases climbing involves amodified creeping movement.
ASSISTED CLMING
eeObjectives To develop and strengthen the muscles of the arms, shoulders, legs,and trunk, improve body awareness, develop and improve the coordina-tion and cooperation of the upper and lower limbs of the body, im-prove sense of confidence or self-image, develop and enhance exper-iences and, relationships with obstacles within the environment.
Eouiwent Various objects, large and small, all s'iapes and sizes which may beclimbed and support the student safely. (Tables, chairs, benchesSwedish Box, stairs, boxes, mats, a barrel on a stand, a ladder, etc.).
Position. The student stands next to the object to be climbed with a hand orhands placed on it, on the top if possible.
Action The definition of climbing given is a very general statement. Itsays little about the object which is to be climbed and the students action inrelation to it. To attempt to describe the action which is involved in climb-ing a large number of objects, only one will be used in a descriptive sense.It is my desire here to be able to make it easier.to generalize the actions toother objects, which are to be climbed. The object which will be described is alarge box which is approximately 5 feet high. It is usually termed a SwedishBox or Vaulting Box. For our purposes it serves as an effective piece of equip-ment for climbing.
The student reaches up as.far as possible on the box. If the student is unableto at least reach the top help him with a boost or haye him start from a benchplaced next to the box. When the student has a hold on the top have him pullwith his arms to raise his body from the starting surface, the floor or bench.
It may be necessary to teach the concept of "pulling" to the student. This canbe lone,by pulling on his arms from the front thus initiating a simple stretchreflex when the student pulls away. This should' be done before the student be-gins the climb. Another method is to combine the above action with manuallyputting the student's arm through the movement of pulling. When climbing it isalso helpful to lift the student up as she climbs with her hands in place. Thiswill automatically put her arms through the pulling motion of flexing the arms.
When the student has pulled himself up, the legs are then used to push on thesurface of the object being climbed. If thisais- not possible go to the nextstep. The student raises the leg opposite the lead arm, the left arm for aright handed person; thus the.right leg would be lifted. This leg is raisedby flexing at the hip and knee so that the leg can be .placed on the top with.the arms.- A rotation of the body also occurs to allow this. leg. placement. TheStudent then uses this leg and the arms to further pull the body'up.-
At this point the leg, two arms and the trunk are on the top. One leg remainshanging over the side. The body is rotated around the obstacle so that thelead-arm s over the side with the leg still hanging (the left leg in this case).The lead-leg is rotated to the opposite side. As the body further rotates aroundthe obstacle the stomach and chest maintain contact with the top of the obstacle.Both hands then move to the side just climbed and both legs are on the opposite,down-side.
The actions of the arms in the climbin.g action is reversed to allow the bodyto slide down slowly to the floor. The arms slowly extend, holding the bodyup until the feet reach t floor.
Assistance can be given at any point of the climb, up Or down. This may re-quire the aid of one or two people depending on the size and strength of thestudent and the teachers or aides. The student can be easily boosted up byholding at the waist, or better, under the arms. This place- the arms in theirworking position. To bring the leg up the teacher's hands can be placed underthe student's arm and on the leg at the knee, just a little above the bend ofthe knee.
When the student is in position on the top, help may he given to rotate thebody around. The teacher must beoon the down-side of the obstacle to-give aid.Here aid can be given by holding the student under the arms or at the waist tohelp lower his. bodyeto the floor.
Always keep in mind that it is the student's ultimate. need to be able to accom-plish this feat on his own. So give only that help which is necessary and allowthe student to take whatever amount of his own weight he is able.
Oe sure to name. and point out body parts and their actions throughout this climb-ing skill practice. This is most important because sensory input is being re-
' ceived from all parts of the body during this set of movements and the studentneeds to be aware of what these sensory stimuli mean.
UNASSISTED CLIMBING
The objectives, equipment and action remain the same as described in the previousactivityt Only the assistance given by the teacher is dropped. The studentShould be allowed to discover and climb a wide variety of obstacles which callfor new stimuli ancLsome variation in the basic climbing action.
Some help will be necessary to negotiate new obstacles, but this can be releasedearly so that the student becomes completely independent on all forms, shapes andsizes of obstacles and can easily move the body up and down without difficulty.
-24-
(4) JUMPING
Jumping is the forceful act of propelling the body from the floor or any surfaceby the use of the muscles of the legs in particular. The basic movement is asimple jump using the legs only for the upward force. As the skill increases andcoordination becomes more of a factor the arms, trunk, and hips are also includedin the jump. The specific use of the arms in combination with the legs will bethe only other factor introduced into this activity. A jump will be considereda jump when the individual's feet leave the floor under his own power or assistedpower.
ASSISTED JUMPING
Objectives To develop and improve the skill of jumping, to increase the strengthof the legs, hips, arm and shoulder muscles, develop and improve gen-eral coordination of the arms and legs, enhance body awareness, in-troduce and practice a means of propelling the body through space,spatial awareness, development of a base of jumping skill to use inother forms of jumping.
Equipment Trampoline Mat.
Position The student is standing in an erect position. An aide or teacher isstanding behind the student or in front of the student.
Action For the initial work on this skill two aides will be needed to helpsupport and guide the student. The student must first be introduced to the motionof the legs. The action of the knees and the ankles are most important in thiseffort. Even though the deaf child will be able to watch the performance of theteacher as he demonstrates, the feel, kinesthetic sense, of this movement, as wellas others which may be presented at any time, are most important. So manuallyputting, the student's legs, knees and ankle joints, through the specific motionsof jumping in-a. standing position is most important to'the student's eventual learn-ing of this skill. It should be done while standing so that the student is able tosense the shift of mass involved in the jump.
For this activity one aide supports the student while the-other puts her throughthe movements of bending the knees and ankles and the spring upwards. The feetdo not have to leave the floor at this time since it is the basic feeling of thebody's movement which is important here. Put the student through this movement3 or 4 times in succession. Continue to use this as a means of stimulation andreview periodically as the student practices the jumping skill. It can only helpto reinforce the motor memory pattern development which is so necessary especiallyto the blind and deaf-blind student.
The second phase which should be used along with the initial patterning is whenthe teacher, standing in front of the student performs a single jump. This is anattempt to get the student to perform the jump or to raise up on his toes as theteacher jumps. A drill which will be helpful here is to perform simple toe raiserswith the student while holding the student's hands. In this way the student is ableto feel along with the teacher the movement of raising his body up.
During this time the trampoline is a valuable tool for teaching and practice.
29
-25-
Along with the aid of the teacher and the trampoline the student is able to per-form a jump with little effort and experience the weight shift and balance main-tenance involved with this skill performance.
As with all skills continually ask the student to perform as much of the skill aspossible independently. The juMping skill can'be performed with relative in-dependence by the student while standing near a bar, or wall or on the trampline.Progress to the use of these means of lessened support and assistance as soonas the student is able.
UNASSISTED JUMPING
The objectives, equipment and position remain the same as in the above. Theaction is'also the same excepting for the exclusion of aid or support given bythe teacher. Leading up to this activity the student is asked to do more andmore for himself. This requires the moral support of the teacher in buildingthe self-confidence of the student. This form of independence is oftentimesdifficult to develop within a student who is quite used to and accepting of hisdependency on others. Failure increases this sense of self-uselessness, a lowlevel of self-imagei successes, contrived or actual, are the keys to develop-ing a positive sense of self-worth and eventual independence.
As stated previously, independence,at whatever level possible is the highest
.goal we should seek in teaching sensory'impaired, especially deaf-blind andblind students. Independence comes only when the student feels she has rea-son to attempt independence. It is then the skills and self-esteem developedwithin a total program of training that can give the student the ability toseek and find independence.
The inclusion of the arms to help raise the body may be introduced at anyphase of the jumping skill training. As the student attempts to jump he isactually attempting to raise his center of gravity or mass, located usuallyin the area of the abdomen. This is easily accomplished when the arms areraised. When the arms are raised just prior to the forceful explosion ofjumping, it gives the body a headstart on shifting the weight upwards. Asense of coordination, a,cooperation between the action of the arms and thelegs, needs to be developed. This can only be felt by the student as it isdifficult to adequately describe to the student.
Allow the student to jump on the tramp with his arms raised above the head.When jumping with the student, raise his arms as he jumps. Encourage him todo this on his own so that the fine coordination can be developed. Practicesquat jumps where the student begins from a crouched or squat position and ex-plodes upwards beginning by raising the hands and arms upwards forcefully andfollowing with a full, forceful extension of the legs. Encourage the studentto reach as high as possible for objects just out of his reach.
(5) HOPPING
Objectives Basically hopping is jumping on one leg. It requires a morerefined sense of balance in that the student must maintain hisbody weight on one leg while jumping and landing on that same
30

-26-
leg, Initially the student will have a preferred leg to hopon. This will be the same leg on which the student prefers tostand when standing on one leg. Eventually the student shouldbe able to stand and jump, hop, on either leg. Pre-requisiteto the hopping skill is a somewhat advanced ability to stand in-dependently on one leg from 5-6 seconds. However, one skill maybe used to enhance the progression of the other. In ,either casethere are assisted forms of teaching which will be utilized sothat when the student is able to jump well he can also begin tolearn to hop and develop his lateral balance as well.
ASSISTED HOPPING
Objectives Develop and improve lateral stability, develop and strengthen themuscles of the arms, shoulders, trunk, hips and legs involved injumping, hopping and lateral stability, introduce and enhance avariation of jumping, improve gross and fine coordination of thebody, improve self-image and self-confidence, spatial awareness,body awareness.
Equipment Trampoline, Stall Bar or Parallel Bars.
Position The student is standing with one leg held up from the floor. Theweight should be mostly on the leg on the floor with some weighttaken by the bar or the assistance of a teacher or aide. Thesupport is mostly for stability and not to carry the student'sweight.
Action The student jumps up using the force and power of one leg, withthe support of the teacher. The balance support will need to be provided justahead of the lift off, in the air and upon landing. When the student has leftthe ground, be careful so as not to set him off balance by shifting his weight.
The lift off should be straight and with the full force of the foot on thefloor. Attempt to get the student to absorb her own weight by landing on thetoe and bending the knee slightly. The teacher will need to help the studentwith this by taking some weight at first because injury may result if the stu-dent lands incorrectly.
At the beginning the student may have difficulty holding her leg up whenhopping. She may even drop the foot to help with balance upon landing. Thisis to be expected and is acceptable, but should be discouraged when the studentbecomes more used to the hopping movement.
Encourage the use of the arms as in jumping. The arms become particularly im-portant when hopping not only for the aid in raising the center of mass,.butalso to help with balancing the body. fi
UNSUPPORTED HOPPING
The objectives, position and action remain the same as with assisted hopping.The student performs the skill without assistance from outside support. Inthis activity as with the previous activity the trampoline is used for build-ing strength in the muscles used in the'hop and the association balance activity.
31
-27-
The uneven, changing b -e of the trampoline calls for a well developed senseof spatial and body awareness as well as good balance skills. Even though the.student may never be able to jump or hop unsupported on the trampoline the assist-ed forms of these skills on the trampoline are more enjoyable and beneficial toa program of physical-motor development.
In the unsupported phase of hopping the student should be encouraged to performthe skill on either leg. Although the performance on one leg may be easierthan the other, it is important for total body development and development ofbody and spatial awareness for the student to experience this movement on bothsides.
In actuality hopping is the same as jumping as far as the force produced in theleg. For this reason the procedures used to introduce and practice jumping maybe used simply with the hopping skill. It may be helpful to have the studentstand on the leg to be hopped un before performing the hopping movement. Thiswill help to heighten the student's awareness of balance and make the actioneasier.
(6) HORIZONTAL JUMPING (Jumping for distance).
A variation of basic jumping is jumping in a horizontal plane. The motion isup and out and the entire body is used for the movement. The essential differ-ence between the horizontal jump and the basic jump is the direction of appliedforce.
The horizontal jump could be said to not follow the definition of a basic skilland should he included in the secondary level skills. However, because it isthe first skill which the student is asked to significantly alter an alreadylearned skill it can be included with the basic skills. If removed from thecategory of jump variations and described as a single low level movement skill,as it actually is, it can easily be included as a basic skill.
As a basic movement skill the7ibrizontal jump can be either very simple or moreadvanced. The advanced nature of the skill depends upon the effort of thestudent and the movements included prior to the jump. The simple horizontaljump is done with the legs on'I with minimal hip action. The jump for distance,long jump, involves the legs, hip and the arms all working together to propelthe body upwards and aut. As an athletic event the horizontal jump is pro-ceeded by a run which adds further momentum, directional force to the body pre-ceding the jump.
ASSISTED HORIZONTAL JUMP
Objectives
ufi
Position
To develop and strengthen the muscles of the legs:, trunk and arms,enhance total body coordination and agility, develop a variationof the basic jumping skill, develop body awarenet4and spatialawareness, enhance self-confidence and self- image:-
None.
Student standing erect hands holding the teacher's hands. Theteacher is positioned in front of the student.
-28-
Action A forceful explosion of effort from the teacher and the studenttogether is necessary for this activity. As the student jumps,-the teacherforcefully pulls her forward. Watch the action of the student's-2feet, Asthe toes are ready to leave the floor, pull the student toward you. Thiswill effectively change the direction of her jumping force. Encourage herto lean a little forward just before the jump so that she. can help you. Re-peat this action several times so that the student receives the feel of themovement.
The legs are the most important factor in the jump. Have the student beginin a crouched position, or from sitting in a chair, feet flat on the floor.Give assistance as needed and repeat several times so that the student candevelop a sense of the leg's movement in tte_jumping action.
Introduce the use of the arms in this jumping form. The arm's action hereis related to their use in the basic jumping action. In the horizontal jump-ing action the arms are thrown up and out so as to pull the body in this dir-ection. Encourage the student to attempt this action independently even ifa jump is not included. The fact that the student is able to feel the changesin the body weight mass when the arms are thrown out is enough at this time.
UNASSISTED HORIZONTAL JUMPING
The objectives remain the same as the assisted activity. The starting position--and- the-action-are a little different.
Position The student stands in a semi-crouched position (a half-squat). Thehands are held behind the student at the sides. The student isstanding on his toes.
Action Following the forceful extension of the arms and hands upward andoutward, the student extends the legs and jumps forward. Encourage the studentto reach out and pull himself forward.
The deaf-blind'or bliod.student must be made aware of direction in space especiallyup, down, forward, backward and out. To these students the sensation of themovements is most important. A motor memory of this set of movements needs tobe developed, SQ practice in the correct action is essential. Some aid from theteacher may be needed at first to insure'proper performance.
Some concept formation of distance in space can be attempted. Have thestudent jump out from a wall or other stationary objeGt. Relate the dis-tance jumped to this point and a point on the student's body. (i.e., an armor leg). Relate a change in effort and the resultant distance jumped by thesame means. ("The first time you jumped the length of your arm.. This timeyou jumped the length of your leg, from the floor to your knee"). These ex-planations can be simplified or related to other objects or measurement in-struments depending upon the intelligence and developmental level of thestudent. For most students the legs are best to relate jumping distance.Tags can be placed on the students trousers or tape placed on the leg toequal the distance jumped on the floor. In this way the student receivessome body awareness as well as spatial awareness.
33
-29-
(7) SLIDING
Stepping to the side in either direction is a foreign movement to even anormal child. For'any student the practice and execution of this movementseems to enhance the sense of bodily movement and spatial awareness. Itsimportance lies in the fact that .we move mostly in the sagittal plane of thebody, either forwards or backwards. Sliding moves sideways in the frontal
.plane of the body, to the left or right. Primarily a level of the sense oflaterality is developed through this movement. The student slides left orright and develops a perception, image and concept of the left and rightsides of his body and the movement through space to either of these sides.
If we are to develop acrtotal sense of movement and the total of possiblemovements which the body is capable we must introduce and develop the sidingskill on the basi.c 'level.- Once a new movement direction becomes part of thestudent's movement capabilities, the student will be more willing and ableto take on the task of new learning in all areas. For the blind and deaf-blind student it will be a necessity to be able to move around obstacles bywhatever means is required. The sliding movement skill is then importantto the student who is to exist in the normal world.
ASSISTED SLIDING
Objectives Laterality, develop a variation of movement, further the possiMlities of bodily movement, enhance coordination of the legs.and arms, spatial awareness, directional awareness, improveself-image and body awareness.
Equipment None.
Position The student stands erect, hands at the side. The teacher standsbehind or in front of the student.
Action This is a co-active learning activity. Together the student andteacher step to the side with the lead foot. Second bring the other foot tothe lead foot so that the instep of the feet touch. The continuing action isa step-slide-step-slide or slide-slide-slide in the direction of movement.The action should be practiced in both directions, with the left and rightfoot as lead-foot. If the student has evidenced a preferred foot begin byUsing this as a lead-foot. More work, in a relative sense, will need to begiven for the non-preferred foot than the preferred foot, if there is one.Otherwise work equally with one as with the other. Sidedness will be developedor can be developed by other means. It is not our purpose now to attempt tointerject any form of training for sidedness. The expressed objective here isrelated simply to a basic perception or cognitive of the fact that the body hastwo sides, a right and a left. No other concepts are applied or intended.
As with the other forms of training in co-action, look for the student to con-trol his own motions. The bodily contact between teacher and student must becontinued, but should be gradually released to become more sensory stimulationthan co-action. Allow the student to move independently ajew times to geta total experience.of the motion. There should be little or no concern forstability since the student is only widening her base of support and not neces-sarily moving out of the base of support. To insure this fact, do not allow thestudent to step more than a few inches at a time, so that the feet are spreadno more than shoulder width.
34
The deaf student without vision difficulties will require the use of co-actionas well as the blind or deaf-blind.- However, its use will not be necessary forsuch an extended time as the deaf-blind student. The sensation of the move-ment is important to all students. The blind and deaf-blind need the extraeffort in order to develop the motor memory.
UNASSISTED SLIDIN
The objectives remain the same as with the previous activity.
Equipment A line taped on the floor, a rope, ladder or foot placement ladder.
Position The student stands erect, hands at the sides.
Action Without the aid of the teacher, the student steps and slides toone side and continues the action as described in the previous activity. Theline or rope may be used as a guide. The teacher may raise the student's handon their side to point the direction of movement. In this way the teacher canstop the movement and change the direction through gross manual signals. Verbalcommands relating "stop", "go", or "right" may be used in conjunction with thesesignals. The sighted child may be able to follow the teacher as he points toone direction or the other. Make direction changes slow and do not allow thestudent to cross over his feet.
Encourage the student to take increasingly wider, lengthen, steps when sliding.Encourage variation. One time the student may step with the lead foot and slidethe other. Another time he may slide the lead and step the other. Use the ladderand have the student walk through it by moving sideways, picking up the feet al-ternately. Raise the ladder from the floor 2-3 inches or angle its height, (i.e.,from 2 inches to 6,inches) to give other forms of variation. Always encouragethe student to think about her movement and what she is doing and how she isrelating to the floor or the obstacle over which she is moving.
SECONDARY LEVEL SKILLS
In a general Elementary School Physical Education Program most of the skillsalready described and those to be included in this section are referred to asbasic skills. These are normally a part of each child's skill capabilitiesaround ages 9-12 years. This physical Education program is designed for in-dividuals who are both abnormal, as related to a sensory impairment and sub-normal intellectually. The intellectual ranges are from low educable retardedto moderately mentally retarded and the severe and profoundly mentally retarded.These persons have the additional handicap of retarded mental developmentwhich seems to be closely related to motor development. Therefore the basiclevel skills may be the most to be expected for these persons. -'A second levelhere is presented to include the full range of possible skills which can belearned by the sensory impaired student of any intellectual level.
35
-31-
The secondary level skill i5 one which may be one distinct movement, but in-corporates other factors of physical-motor movement or intellectual conceptswhich make the skill more complex and therefore more difficult. The essentialfactor of varience between these terms, basic and secondary skills, is thefactor of intelligence. Where basic skills are almost nearly simple physicalactions involving some sensation, secondary skills involve conception and.per-ception of the movement. No image of the action or already-learned actionsneeds to be brought into play and certainly no symbolic'presentatiOn of .theaction is asked for. The student explores the movement capabilities of hisbody. There is also a small amount of discovery as the student may experi-ment. No combination is attempted because of the lack of an image of themovement.
Secondary skills will allow the student with the ability to perform them(thjs ability requiring image formUlation.and symbolic presentation exper-iences), the opportunity to select and eventually perform the selected skillsunder more refined conditions. The objectives of the physical education pro-gram progresses from widening the students skills, basic skills, to narrowingdown a few skills to be practiced and performed on a higher level of accomplish-ment.
We saywe want the student to develop his highest potential. For some thismay be basic level skills, for others it may be the skilled performance of aprofessional athlete.or professibnal dancer, or an individual who chooses touse his leisure time participating in sports or other physical activities.The level.of attainment dependS upon the individual. The opportunity to reachthis goal should be.available to every individual. The secondary level ofskills is present ed here to fulfill this need and to give the more adept student.the strong base in physical-motor skills necessary to move onto the selectionand performance stages of motor development.
(I) JUMP FROM A HEIGHT
To jump from a platform above. the surface of the floor is more difficult thanit sounds or appears-. For the deafblind or blind student the action of throw-ing ones body into space to drop an unknown distance i s no doubt most frighten-ing. The initial action is simple. What is required is to execute a jump fordistance to propel the body from the platform. Following a short flight throughspace there is a landing. This is the difficult part.
In a sense the student is asking his body, legs and hips in particular, totake more weight, in the form of momentum, than previously taken in a jumpingskill, The weight, forte, must be absorbed so as not to cause unwarranted pain-or injury. Essentially the body becomes a spring. The force is taken first atthe toes and ankle joints and progresses upwards to the knee joints, hip jointsand the. joints and energy absorbing mechanisms of the spinal columns. This isa coordinated movement, a sort of reverse contraction of-all the muscles, andmust be learned and performed as any other of the movement skills presented -here.
ASSISTED JUMP FROM A HEIGHT
Objectives To increase the student's jumping capabilities, increase the strengthof legs, hips, and trunk, increase self-confidence and self-image, en-hance specified awareness, directional awareness.
36
-32-
Equipment A stair step, low,bench, adjustable platform.
Position The student stands on the bench or platform-in an erect position.The teacher is standing on the floor holding the student's hAndsor holding the student's waist, the student's hands on the tea-cher's shoulders or upper arms..
Action Pre-requisite to this activity is the ,S1011 of jumping .a distance,a length of at lease one inch or more. Prior to jumping the student shouldsense the distance to the floor from the platform. Initially this distanceShould be no more than ,2-3 inches.
With the aid of the teacher in take off and landing, the student jumps outfrom the platform and lands on the floor. The initial landing may be withone foot only (an exaggerated step down). This should be changed to a two-foot take off and landing. The functioning level of the student and theself-confidence possessed by the student will determine the position of,theteacher. Initially it will be important to stand in front of the student andpull her slightly to take some of the force of landing by pulling up on hestudent's arms. The teacher as well as the student should bend the kneesslightly upon landing. A student with sufficient self-confidence and trustin the teacher will be able to tolerate the teacher jumping at the student'sside, holding the student's hand. This will give the student more of an aware-ness of the body's action and positions during action as the student sensesthe movement of the teacher in close proximity. This is not a co-active move-ment.
Prior to any jump,-instruct the student in the force absorbing action of theankle and knee joints. This part of this jumping skill will appear quiteawkward and uncoordinated at first. With practice an efficiency of motionshould be developed. The reasons for the correct landing procedure have beendiscussed earlier. The importance of developing a correct landing skill andthe initial use of a low jumping distance cannot be overrated. As the studentgains skill and efficiency in landing the height may be raised.. As the heightis raised significantly, the proCedure of assisted jumping may need to be reviewed for each level. This may well be necessary even when the student hasgained a level of independence in this skill.
UNASSISTED JUMPING FROM A HEIGHT
The objectives and action remain the same.
Equipment
Position
Adjustable platform, benches of various heights, stairs, tables -
with adequate support and stability.
The student stands erect on the platform. A crouched stand maybe taken if desired. In this case the student will take off andland in a crouched position.
The student performs the action without the aid of the teacher orother guides. Be sure the student knows the distance up she will bejumping from. These distances can and should be varied. A sight-less student or student with limited vision will need to be ableto judge the distance to be jumped in order to execute the land-ing procedure correctly.
37

-33-
When the height to be jumped exceeds three or four feeteor theestudent has weak ankles, legs or'hips, an additional action willbe necessary upon landing. This procedure involves a forward roll,shoulder roll, or sideward roll immediately following landing. Atthis point no more will be'said about this because a further dis-cussion of this skill is beyond the scope of this program. It isintroduced here for infOrmational purposes only. If the student iscapable of jumping from distances which would call for the additionalenergy absorbtion allowed by the roil upon landing -, the teacher shOuldconsult another source for this information. 'At this level of skillthere are specific safety aspects which must be considered which arealso beyond the scope ofethis.orogram.
The self-confidence built from the successful, independent perfor-mance of this skill by any student cannot be calculated. For thevisionally impaired student, the awareness of spatial distances,self-confidence development and skill advancement is well worth theeffort of the teacher and the student who is capable. of performingthis skill.
(2) LEAP
The leap is simply an exaggerated step which includes a jumping type push offby the foot pushing off. The deaf-blind and blind student will rarely use theleap as a mobility skill. But as a skill the ability to leap is a good inclusionin the repertoire 'of skills possessed by any individual. The leaping skill ismore or less a natural extension of the very basic walking skills of stepping.There also are advanced factors of laterality, directionality, spatial aware-ness, self -- confidence, development, stability and balance, and muscle strengthdeVelopment which are called into play in the performance of this skill.
The method of teaching the student is primarily an unassisted activity. Whatis actually required is much practice and the support and encouragement of theteacher. The action is simply an extended step with a push off which is intend-ed to bring the trailing leg up to the lead leg. The teacher needs to encouragethe student to.step out increasingly longer distances. This will call into playthe necessity tc maintain balance in an extended position and following this toshift the body's center of mass the distance to the base of support,with both feettogether. The student should be able to do this in a smooth series of movements.
In the initial stages the teacher will haye to help the student with the dis-tance of the step and provide some balance support. The student should be in-structed to continually lean forward, the direction of movement, by bending atthe waist. This will keep the weight mass moving in the direction of movement,Watch to be sure the student does not lean backward when the feet'a're broughttogether. at the completion of the movement. This will be a common error in theearly-stages of practice.
As the student progresses, have her attempt leaps of increasing distances.Emphasize the use of the arms in the skill. The arms are used just as they arein the jumping for distance skill. In" this case, the arm on the side of thelead leg is thrust forward as the leg steps out. Encourage the student to useboth legs alternately as lead legs. This produces an exaggerated walking gaitwhen put into a series of one leap after the other, first left leg, then rightleg leading.
38
-34-
(3) VERTICAL JUMP
The vertical jump is a natural extension of the basic jump. Actually thevertical jump is the same as the basic jump except the student is asked tojump up higher than just to have his feet leave the floor. The expectationin the vertical jump is to jump for height and increase the distance jumped.The strength of the legs in particular and the other body, parts used in thejump is very highly related positively to the ability to-jump for height. Thelegs then are-the most important factor in the vertical jump. For this reasonthe most important objective of this activity will be to strenghten the musclesof the legs. The secondary objective will be to strenghten the muscles of theother parts of the body, arms, hip and trunk which are used in the jumping action.
A goal or point to surpass is another important factor in this activity. There-fore, the objectives of spatial and directional awareness enhancement are im-portant within this activity. Also when a student seeks and reaches or fails toreach a goal she receives a bit of information relating to her self-image andeither increases or decreases self-confidence. The idea of course is to placea goal so that it can be reached and so that self-image and self-confidence,and thus independence, are increased.
The setting of goals requires some equipment. Most likely some chalk, a wall,a step or adjustable platform, some textured markers. These may be used in anumber of ways. The individual can attempt to jump to the step or to succeed-ing heights of the adjustable platform. The chalk can be held in the student'shands and made to mark the height of a jump on the wall to give a point ofadvancement or a goal to exceed. The textured markers serve the same purpose.They can be placed on the wall to mark the height of a jump which the student isasked to reach or exceed. These are particularly useful for the blind anddeaf-blind.
Position The student stands erect or in a semi-crouched position, arms atthe sides.
Action The student executes the jump as described in the earlier descrip-tion of the jump. This is not necessarily an assisted activity. But someassistance may be used to develop an understanding of the use of the arms andlegs to jump up and reach a point which is beyond the student's reach. Thismay be necessary for the blind and deaf-blind student.
The use of the legs at the ankle and knee joints must be well developed inorder for a good execution of the jump to occur. This is a powerful coordina-ted action. The forceful extension of the feet and knees is the primary fac-tor in the jump up. Of course do not forget the use of the arms. The studentmay need to be stimulated to use his arms and legs and motivated to exert thefull force of these body parts. A method of motivating the student is hard todescribe. What is necessary is to find some factor which will elicit a force-ful response from the student. Some drive or maximum effort which is withinthe student but hard to bring out sometimes. Once this effort has been usedand accompanied by the reward of success and praise it is much easier to bringout again.

-35-
In my work with dependent handicapped individuals I have found that thisfactor of effort is usually not present. But if it has been brought outsuccessfully it is a great step forward for the independence of the individual.If possible for nothing else the vertical jump is important for the reasonthat it may elicit this response which will lead to the furtherance of thestudent's self-confidence and independence.
(4) RHYTHMICAL HOP (alternating feet).
Incorporating the skill of,hopping and the factor of rhythm develops the skillof the rhythmical hop. This skill is a lead-up to the most advanced of thesecondary level skills, the skipping movement skill. The rhythmic hop ,is bothan enjoyable and a difficult skill. For the sensory impaired student rhythmand moving in response to a rhythmic stimulus, a drum beat or music is fun and::enjoyable. However, if a student has never performed a rhythmic movement, thi'sskill can be most difficult. Also the alternate jumping and hopping can bedifficult for the student to learn-. However, with patience and effort good,satisfying results are developed.
Objectives
Equipment
Position
To increase the strength and coordination of the legs and, armswith associated developihentx9f the hip and trunk, develop arhythmic movement, develop temporal awareness, enhance bodyimage, self-image and self-confidence, increase the variety ofmovement abilities, promote relaxation in rhythmic movement.
A drum, record player and records with a definite rhythm im-posed (a 2/4 or 4/4 is best).
The student is standing on one foot, hands at the side. The teachermay'assist by standing behind or in front of the student to providea co-active-movement situation for introductory learning.
Action The student, alone or along with the movement of the teacher, hopsfirst on one leg, one time only, then on the other, one time only. This move-ment continues alternating legs. This action can be varied any number of waysby changing_the number of times the student hops on each foot. For instancethe student can be asked to hop two left, two right, one left, two right, twoleft, one right etc. The hopping pattern can be made to fit the rhythm ofthe music: A 2/4 rhythm could call for two left, two right or one right,one left for a faster movement, a 3/4 rhythm could be 2 two right, one leftor two left, one right.
This series of action begins with the one left one right sequence. It is thissequence which must be mastered before moving onto other variations. The use ofmusic and rhythm is important for the student. These activities may be per-formed without music or a rhythm, but they lose some of their effect if donethis way all the time.
For the deaf and deaf-blind student there will need to be definite rhythmicalmovement cues which can be'followed and imitated. The student can follow theclapping of the teacher or.watch as the teacher beats a drum.; Ear phones canbe placed on the student's ears to help her either hear or feel the vibrationof the rhythm. If possible a good bass dial adjustment up and a loud volumeon the base or rhythm side of a stereo phonograph will help the deaf or deaf-blind student feel the vibration of the rhythm.
40

-36-
(.5) RHYTHMICAL JUMP g
Utilizing the previously learned skill of jumping the student will be able toincorporate the factor of rhythm into the movement as in the above hopping skill.The rhythmical jump is performed as is the hop but the two feet jump togetherin response to a rhythmical cue. This movement can be performed along with al-most any rhythm. The student does not have to remain in one place to jump. Ifpossible the student can jump along a line, through obstacles, or around a roomin response to music or a rhythm pounded on a drum.
Objectives To increase the students rhythm potential and abilities, increaseoverall body agility, increase strength of the leg, arm and trunkmuscles,, increase movement possibilities, improve temporal aware-ness, spatial awareness, body awareness, directional awareness,enhance self-image and self-confidence.
Equipment Drum, records and record player, blocks, Castanets; other rhythminstruments.
Position The student stands erect, hands at the sides. The teacher maystand in front of or behind the student in close proximity.
Action With or without the aid of the teacher the student jumps in re-sponse to the rhythm of the music or the beat of the drum. It will be bestto begin with the student jumping in one small area without additional move-ment. The teacher may jump with the student to help with the introductorylearning cues and present movement stimulation in the form of co-active'movement. There should be as little physical contact as possible.
As the student becomes more able to respond consistently to the musicalrhythm have him jump from one point to another or freely around the roomin response to the rhythm. If desired obstacles may be used for the studentto jump around or over while maintaining the rhythm imposed by the musicAnother variation which may prove quite challenging even to the teacher wouldbe to include the rhythmic jumping along with the rhythm hopping. If no appro-priate music could be obtained to fit the possible patterns some routine can be
`-'worked out by clapping or beating the drum or a combination of both. For instancethe student can dump and hop to a 3/4 rhythm one left, one right, jump, one left,jump,one right; one right, jump, jump, one left, jump, jump, etc. These varia-tions may prove to be difficult but with some effort and concentration they canbe learned. The student can be only benefited when asked to think and concentratewhile moving.
(6) SKIPPING
Skipping is the combination of the rhythmic hopping and the walking skills. Theperformance of this skill is dependent upon, the coordination of the total bodyto combining the skills into one and to perform the skill as one complex_move-ment skill.
The teacher must recognize that the skip is a difficult skill to learn even forthe most advanced student. It is actually three distinct steps each requiringits own separate actions must be made into one. The first is the hop; the
41
-37-
second is the step forward; the third is the recovery step forward immediatelyfollowed by another hop. To further complicate the total action, the feet arealternated and the hop is taken on the foot which has just taken the step (i.e.,Right step, hop, left step, hop; right step, hop, left step, hop).
Objectives To increase total body coordination and agility, add variation tothe jumping and rhythmic jumping and hopping skills, improve strengthof the legs and arms, improve balance, lateral stability, advancethe base of movement skills, enhance temporal awareness, directionalawareness and sidedness.
Equipment None.
Position The student begins by standing erect, hands at. sides.
Action The student raises one leg (right) hopping on the other, (left) thensteps out with the raised leg (right). When the body's weight is taken on thelead leg (right) the student then hops on that leg and steps with the other leg,(left) hopping on it. The action continues (right raised, hop left, step right,,hop right, step.left, hop left step right, hop right, etc.) Begin by having thestudent skip in straight lines or through parallel bars without attempting a turnwhen .skipping. Emphasize the use of the arms. The opposite arm is thrust for-ward and up as the lead leg steps forward and the student hops on it. In otherwords the cross pattern movement begun in the walking skill is still a part ofall locomotor skills.
As stated in activity number four the rhythmic hop is an adequate lead-up skillto skipping. Practice the rhythmic hop several times before attempting theskipping skill. Some co-active movement may be used as a teaching method forskipping but is difficult unless the student is aware of the action, the bodyparts to be moved and the coordination involved. In this case co-action may beused somewhat like muscle sensory stimulation to present the movement and pro -vide aid in the very early practice times. Remember the coordination and cam-bioation of movement between the arms and legs.is most important in this skill.-,Emphasize their combined use to perform the skill correctly.
42
-38-
MOBILITY SKILLS
Mobility can be termed the practical use of locomotor skills most oftenrunning and walking. The world outside the school and classroom is anenvironment filled with uneven walking surfaces and with obstacles which'must be overcome in order to locomote, move from place to place. Thestudent must at least have a basic concept of how to move over varioussurfaces, up and down grades of land or sidewalk, on surfaces which tiltand/or curve. The individual who is to live a normal life in the normalworld must be able to negotiate successfully almost any path hr: is askedto walk. For the sensory impaired person this is a difficult problem.
City streets and sidewalks are filled with a large variety of situationswhich will arise for the individual who chooses to walk them. Even theyard surrounding the individual's home can be a difficult terrain to negotiate.The three areas of surface variations which will be considered here arethe surface gradient, the existence of curves or corners, and the presenceof steps up or down. Another area which is possible in the environmentbut will be considered secondary is the existence of jagged, uneven orirregular surfaces.
The deaf individual should not have much difficulty with mobility skills.The student should be trained to use the senses of vision and kinesthesisto distinguish changes in the surface or other features of the environment.A good introduction to many variations of surface will be appropriate andbeneficial for the deaf student. These experiences will effectively en-.hance the student's movement experience possibilities.
For the blind and deaf-blind the performance of these skills and abilitiesis most necessary to normalization possibilities in the world outside theschool or even'within the school. The student should be introduced tovariations in surface and changes in walking path as soon as she is able towalk or crawl independently. Although there are at least eight separateskills which are considered part of the area of mobility only one will beconsidered completely appropriate for this type of a program. The use ofarms and hands as sensors and communicators of the environment and obstaclesin the environment will be the only skill considered. The other skills willbe considered beyond the scope of this program and within the limits of amobility training program outside the Physical Education program. This sec-tion is mainly then for the blind and deaf-blind students but may be usedeffectively for general movement experiences with any student sensory handi-capped or not.
GRADIENT
The gradient is the angle or slope of a surface. The surface is usually con-sidered flat but the grade. or slope may be up, down to the left or to the right.
4'3

-39-
Also these grades may be combined. For example a surface may slope down andto the left or up to the right. This does:not suggest curves but the shape. ofthe surface. The surface may be completely irregular and without a definiteslope or grade. A prime example of this would be a freshly plowed field. Ofcourse.'a mat could be considered irregular especially when objects are placedunder it to cause lumps or bulges in the surface at irregular spots.
Whatever the grade or slope direction the student must be able to adapt tothe surface and move over it with as little diffieulty as possible: Forthe deaf-blind this is almost a totally kinesthetic skill. Of course somebalance and locomotor agility are necessary. WhateVer vision is present canand should be used to distinguish. the grade 'and slope of the surface beingtraversed. But for-the most part the kinesthetic sense is the mostnecessary and important sense for both the blind and deaf-blind. These.special -individuals need to deVelop a motor memory of the surface and buildup a feedback system of all variations of surface. This system can be calledupon and the specific motor memory tape can be plugged in to suit the surfateor combination of surfaces-which may be encountered. For this a great dealof learning experience, both classroom and practical, must be presented.
A series of surface variations must be presented in such a way so as to benefitany child no matter what associative handicaps, physical or mental, are pre-sent with the sensory impairment. For the sensory impaired - mentally retardedindividual these experiences are of great benefit becaUSe it is extremelydifficult to get this type of individual acclimated to the normal world inany area of endeavor.
These experiences should be a part of the general-classroom program and thespecialized physical education - motor development program. Much practicalexperience is also necessary outside the classroom in the halls of the schoolbuilding and on the outside on the streets and sidewalks of the city or town.
In general the method of presentation is simple. It may get more complex whendealing with the individuals special needs and the severely and profoundlyretarded. student. 'Variations in walking surface can be distinguished, ona Very base level, by these individuals and should not be excluded from theirprogram of education or training. The student simply moves over the surface,and with the help of the teacher experiences the feeling and kinestheticcharacteristics of the surface; The teacher needs only to convey specificcues relating to these characteristics. For example, the direction of slope;i.e. up, down, left, right, the position of the student's body in relationto the surface gradient, and what position the student should make to adjustto this grade. For the most part connections are made in the .feet, ankles,and legs. But they must be sensed in the head..
The blind and. deaf-blind student will find it difficult to sense slight changesin the angle of slope. (For a good discussion of this read Movement and.Spatial Awareness in Blind Children and Youth, B.J. Cratty, the chapter -onMobility Training, p. 206-218Y. For this reason an adjustable platform ormany platforms of various angles of slope should be introduced and used.The introductory phases should have experiences primarily an angled plat-forms with very definite slope angleS such as 15-20! The progression oflearning experiences could move from the larger angles to the very fine angles,l-2Thf slope. Steps at first should be large, 4-5 between steps. Gradually
44
the student will be asked to experience-and discriminate between in-creasingly slight changes in slope. Of course, the student's, intellectualcapacity will affect the degree of discrimination possibilities. A studentof normal intellect with training should be able to discriminate, very slightchanges of slope. The severely intellectually limited student may not beable to dtstinguish the variance of slope, but this individual should be ableto adequately move across a surface with any reasonalble slope or grade var-iance from a totally flat surface.
This method of presenting learning experiences may also include the use ofthe tactile: sensation of surface gradient from smaller form boards made torepresent the platform being walked or any number of grade variances. whichmaybe encountered. The form board would be small enough to be hand heldand have an angle and direction of slope equaling the platform surfaces. Thestudent may be allowed to feel this board just prior to walking on the largerplatform with like slope. The teacher can take this time to introduce thesensation of gradient and present the cues which will be replicated when thestudent walks on the platform. The student can also carry the board withhim while walking on the platform. This will provide an extra stimulus withwhich to internalize the motor memory and kinesthetic feelings of the platform.
An irregular surface presents a special problem, especially for the totallyblind child. To walk a lumpy, jagged surface calls for continual sensationand feedback by the individuals. This call for much concentration and efforton the individuals part. A high degree of balance and body control are neces-sary. All students should experience irregular surfaces but many may not beable to acceptor successfully traverse any form of irregular surface withtotal independence. Most students should be able to walk an irregular sur-face with the support of the teacher. Of course the amount of support isdependent upon the student's individual ability.
CURVES AND CORNERS
All paths are not straight. So the individual must be ready to accept andnegotiate what turns and deviations from the straight path there may be.Just as the blind person is unable to recognize a slight slope of the sur-face, the sensation of a gradual curve proves difficult or impossible. Formost individuals this may not be considered any problem, just so they areable to stay on the path, sidewalk, no matter what direction it may take.Actually the ability to recognize a curve or the degree of a curve is notimportant except that it is part of the physical-motor information which thestudent should be able to experience.
The more important and more frequently encountered, aspect of directionchange is the incidence of corners, on buildings, and walls and on side-walks. The blind and deaf-blind person must be aware of the.character-istics of corners and the direction change occurring at a corner. Thisis mostly an internalized learning factor which will take a good deal oftime to present and learn. The more experiences in this area the betterfor the individual..
The blind or deaf-blind student who is able to assimilate the character -
istics of corners and negotiate corners and curves without difficulty is
45
-41-
in a position to accept independent mobility. For the individual Who isable to accept this level of experience this is great. For the individualwhose intellectual handicap may prevent the acceptance of this level oflearning, different expectations need to be set. The mentally retardedstudent needs only to experience the movement of his body and directionalawareness which may come from the experience. More cues in the_form ofguidance and stimulation will need to be presented along with the experience.Curves and corners are part of the- .world that the blind and the deaf-blindstudent will live and move around in. Therefore, these can and must be partof the overall experiences which the student will be introduced during schooltraining.
The preSentation,of these learning experiences is accomplished the same waythat experiences in gradient deviations were presented. The student shouldbe taken regularly around the classroom and the building and allowed to in-vestigate the features of the wall and corners. On the outside the studentshould be taken to explore sidewalks, buildings of various sizes and shapesand taken for short trips into well traveled sidewalks in the business sec-tion of the city or town. The teacher shoUld constantly provide cues to thecharacteristics of the sidewalks and corners, and the directional changesmade when turning a corner. If for nothing else the time away from the class-room and the experience of walking city streets within the community is ample.reason to take the student out when ever possible.
Models, both life size and those,which can be held in the hand, are also anintegral part of the students experience with the outside world. They canbe used as associative stimuli while traversing a sidewalk or building wall.A model of a curve will be most helpful in discriminating the shape andvariation of the walking path when negotiating a curve.
On the streets and sidewalks of the city or town outside the school, thestudent will run into the barrier of curbs. These should prove to be nomore difficult than stairs'except that curbs are of varying heights and.often times irregular shapes, sometimes square or rounded. With experiencethe student should be able to handle curbs with little problem.
It is not the objective of this section on mobility to present a programfor total mobility training. This rightly belongs to those persons who arespecifically trained to teach the mobility skills which the\blind and deaf-blind will need. However, these skills and needs which have been discussedhere are general in nature to the ability of the student to use the loco-motor skills which are part of this program. They are presented here onlyas a general part of the total program of training for the sensory impaired
..student as may be given in the area of Physical Education. It is hoped thattheir introduction and use will provide a good base for the eventual learn-ing of more normalizing mobility training.
VEERING AND TURNING CHARACTERISTICS
Without being blind or experiencing blindness we find it quite difficultto know what it is like to be Without the sense of sight. We use our sightfor many more purposes than we sometimes realize. One of these uses of visionis to keep us in a relationship with the environment. We always know wherewe are in relation to something because we can see it and keep track of ourmovements in relation to it. The blind and deaf-blind individual is not able
-42-
to do this well. For this re on these persons evidence the inability towalk a straight line, veering, or turn in a circle correctly without someform. of environmental feed back.
It will be important for the student to have a basic concept of where she isin space. This means that the individual must be able to walk in a reasonablystraight line and to know, have a motor-memory of a circle, rotation of thebody, and its parts, half-way and one-fourth-way around. Again, the degreeto which this concept may be assimilated is dependent upon the students in-tellectual capacity. The normal, above normal or high educatable retardateshould be able to accept these concepts with some teaching and practice.The moderate to profound mentally retarded student will not likely be ableto fully realize parts of a circle, body rotation around a central axis, orvisualize in the "mind's eye" a straight line and how to walk it. For theselow functioning, mentally retarded students these areas are simply anotherpossibility for bodily movement experience. Just because they will not beable to reach a concept of these two facts does not mean that they should notexperience this movement and develop the ability to move their body in astraight line, or near to it, and rotate in a circular rotation, more or less.
What is necessary for the training in these two areas of movement are cueswhich will give the student a relationship to the environment. These canbe models, tactual and hand held, tactual lines or circles placed on thefloor, parallel bars, or the use of sound cues. The mentally retarded studentwill need stimuli, (i.e., walking a tactual line on the floor and holding amodel with a tactual straight line on it) and additional reinforcements fora full or partial correct performance. Again, for the mentally retarded stu-dent, the experience of the movement and the baSic ability to perform some-where near normal is what can and should be expected.
For further information on the concepts of veering, standing rotary move-ment and gradient variations see Movement and Spatial Awareness in BlindChildren and Youth, B. J. Cratty, pp. 63-100.
GENERAL METHODS OF PRESENTATION
As has been stated earlier this program has been designed for the sensoryimpaired but it is aimed at the mentally retarded, sensory impaired in-dividual. This type of individual proves to be a very special handicappedperson. The presence of the mental retardation serves. to make the process-of training, and adaption more difficult, but no less possible. Yes, on alower level, with lower expectations but still with the overall objective'of-seeing the student reach his full potential of motor-abilities and totalindependence.
The methods of presenting these mobility skills must then. be geared to thestudents capabilities and eventual placement in society. Independence isalways the one common goal on the mind of the teacher and student. The tea-ching situation must reflect this consistently. The. use of models and tact-tual and/or auditory stimuli must be adapted and used wisely by the tea-cher to suit the student. The more stimuli that is present for the studentwhen learning the better. But too many stimuli "cloud the issue" and makeit d iEffiCult for the student to take in learning cues.
The use of sound can be important to the blind student in relating to the en-
47
-43-
vironment. The blind individual can use sound much like radar, to bounceoff objects or to focus on a point in space. However, too much sound stimuliwill cause disorientation and make it extremely difficult for the blind stu-dent to perform well. These things must always be kept in mind when workingwith the blind student.
The deaf-blind student should be encouraged to use what hearing and visionis available to her. In the area of mobility this is most Important becauseof the increased need to move around in the normal world. Of course the useof the available senses should be constantly stressed in all phases of thestudents programming.,
18
-44-
MANIPULATION ACTIVITIES
Probably the most easily self-initiating area of movement, manipulationis the control of movement, direction and speed of objects. An objectcan be held, dropped, carried, handed, rolled, struck, stopped, kickedor thrown. These objects can be a ball, a "frisbie", a wheel, a scooteror the person's own body. For the most part all objects which can bemanipulated are objects outside thebody. However, bodymanipulationcan be considered a form of object control whet' performing some tumblingstunts. Those to be considered body manipulation are for the forwardbackward, and sideward rolls, and the seat, knee, and chest drop onthe trampoline. 'These skills are considered part of the area of manipu-lation because the person is controling the forceful movement of the bodyin the performance of the stunt. Walking could also be considered bodymanipulation and the rolling skills could be considered locomotor move-ments. The difference lies in the use of the'skill, walking is a necessityto normalization. The rolling skills and trampoline stunts are movementswhich have a usefulness for performance only and are rarely, if ever, usedas a means of moving from place to place or a means of life normalization.
There is one form of manipulation which may have both a locomotor andmanipulatory description and use. This skill would be the use of awheelchair, bicycle, tricycle or other similar self-propelled conveyancewhich would be used to get from one point to another. These objects areused in a locomotor sense but the movements of the body are manipulatory.It may also be said that a certain amount of stability is required tomanipulate these objects in order to locomote. Thus we can see the pre-sence of overlapping in the three areas of movement as described earlier.In this section all skills will be described and discussed in the con-text of the pure manipulatory characteristics of that skill.
Another area of manipulation which may be included as body manipulationis stunts performed on the trapeze, horizontal bar or parallel bars.These are manipulation skills performed with relation to another object,the trapeze or bar. These skills prove to be very beneficial to thesensory impaired. student in many areas of learning and development. Theselearning factors will be discussed further when the appropriate activitiesare covered.
Manipulation skills are developmental in nature as are all skills. Thissection will start with the more practical skills which lead up to themanipulation of objects. The earlier skills, which are observable at orbefore the age of one to one and half years in the normal child, will becovered in the section on early developmental training. The skills in thissection on manipulation will be presented in a developmental sequence as theywould'or should appear in the normal child. In most cases the skills arearranged from easiest to most difficult.
The skills and activities to be presented here will not go beyond the basicskill level, as defined in the locomotion section. The body manipulationand trapeze skills will be considered basic movements for our purposes, al-though they do not fit the definition of a basic skill.
49

-45-
OBJECT RECOGNITION AND CONTROL
From the very beginning the student should be introduced to and be expectedto handle and/or have some recognition of many objects. These objects shouldbe of various shapes and sizes within the ability of the child to handle them.A small child should not be expected to handle large, heavy bricks. Nor shouldthe older child who is capable, be expected to not handle bricks and otherheavy objects, as well as light objects, along with objects of varying shapesand sizes.
As a very basic activity, beyond those in the early developmental trainingsection, the student should be experiencing many objects. These.objectsshould be held, handled, explored as the teacher gives cuesto their specificcharacteristics. For the blind and deaf-blind student textured objects mayalso be used. The deaf student may enjoy objects which make noise or vibrate.The important thing to remember is that the student-should be exploring theobject. The object does not need to be held, it may be on a table, on thefloor or a bench in front of the student. At this point the ability to senseand differentiate objects is most important. When the student has exploredsufficiently he is ready to begin the basic control skills.
PICK-UP
Equipment - small balls, trinkets, spoons, tups, small trays or unbreakableplates, blocks, small toys, etc.
The student's first means of actual control of an object is to pick it up.Other early forms of manipulation activities in which the student has parti-cipated have exhibited a certain amount of control. But these activities arenot necessarily conscious, purposeful control.
The act of picking up an object with the hand or hands is a directed move-ment which calls for purposeful control in a manipulatory-sense by the student.This movement does not have to include reaching for the object or moving theobject following the act-. To pick up an object the student simply removesthe object from..the surface on which it is lying. The removal of the objectimplies.-a-liftandasuspension of the object from the surface for a periodof time.
Most often the hands are thought of in conjunction with the act of pickingup objects. The hands, arms, legs and trunk, in part the whole body canactually be used to pick up an object, depending upon the size of the ob-ject. For our-purposes the use of the hands, fingers and arras will besufficient for consideration here. For farther'information on hand-fingerdexterity a good kinesiology text or a book concerted with developmentalphysical activities will usually discuss dexterity. For now, dexterity issimply fine movement agility or the agility or he hands in particular andthe hands and arms in general.
Activity - The student should be seated at a table or a tray which has afew objects on ft.- The teacher should be positioned in front or behind thestudent and prepared to manipulate the student's hands. With the aid of
-4G
the teacher the student picks up one object at a time, practicing with eachobject several times. (be sure to use objects of various weights, shapesand sizes). The teacher aids by pressing the object between the student'sfingers and palm. This is the earliest form of grasping. Also use the thumb-finger grasp, the thumb-forefinger grasp and grasping larger objects withboth hands and lifting with the arms.
The intellectually normal or near normal student should be able to rlcvelopthese various grasps and pick-up with a little practice following introduc-tion. The blind and deaf-blind student will take a little more time becauseof the lack of a good visual input. The deaf student should have little diffi-culty. The subnormal intellectual student will take more time and will re-quire a good'deal of training and stimulation.
As the student learns to grasp and pick-up well, have her begin to reachout and pick-up objects. The objects should be placed at points away fromher body, but within arms length. Objects which require the use of one handand objects which need two hands to lift should be used. The blind studentshould be encouraged to reach out for the objects. The deaf-blind studentshould be encouraged to look for and reach for the objects. Use objectswhich are bright and visable. Also be sure there is sufficient light, with-out unnecessary shadows.
HOLDING
When the student is able to accomplish the grasp and pick-up with littledifficulty begin encouraging him to hold the objects. Holding is the ex-tension of picking up the object. To pick-up an object it is raised andsuspended for a period of time. To hold, the object is maintained sus-pended in the student's. grasp for a longer period of time. The object maybe held with fingers, a hand, hands, or hands and arms,.singly or separately.
If a student has the strength and coordinatiOn to pick-up an object holdingwill be an easy concept to teach. The same objects as for the previousactivity will be used. The student is encouraged to keep the object inher hands fora longer period of time. The teacher may need to hold thestudent's hands to prevent the object from falling or being dropped.
The holding skill should be considered a'static, non-movement skill. There-fore, there should not be any movement at this phase of learning. The ob-ject is grasped, picked up and held. In later skill activities the objectmay be moved while holding. On this very basic level there should be nothingto complicate the concentration on holding the object.
CARRY
When the object is held for longer periods of time the student should be .
able to begin combining bodily movement while holding the object. Of coursethe size of the object has a lot to do with how the object is carried. Wewill consider basically objects which are not cumbersome. We will also takeit for granted that the student is able to move about adequately.
To carry an object the student, while holding the object, moves from oneplace to another. The movement may or may not have a purpose relating to

-47-
the object being carried. The student does not need to be carrying a bookto a table but may just walk or run with an object within what ever limitsmay be set by the teacher, or from one point or line to another.
Activity
Equipment - Balls and blocks of various s'zes, other objects as mentionedin the previous activities.
The student is asked to hold the object and move with it to anotherpoint,or around the room. It is probably best to set a goal to leng-then the distance and time the object is held and carried. The blindand deaf-blind student may walk to a localized sound or flashing light.
Gradually the student should be expected to carry the ball for in-creasing distances. The objects to be carried should be changed often.
If the student is physically handicapped to the point where walkingis possible, but difficult, or the student is confined to a wheel-chair, crutches or braces, assistance may be given. The teachermay help with the walking or push the wheelchair but the holdingactivity should be done by the studeht. Other adaptations may alsoneed to be made to compensate for debility of the arm and/or hands.The definition of the holding activities given include the broaduse of necessary adaptations. The student should be able to ac-complish the task with the maximum use of the involved hands and/orarms and with the least use of outside aid as can be allowed.
PUT OR PLACE
What could. be called the ultimate in early manipulation skills is theability to put or place an object on or in a point or designated areaThe accomplishment of this task is the combination of the previouslylearned manipulation skills. The student picks up an object, holds it,carries it to a point and places it on that point. The ability to putor place involves the use of the hands and arms in conjunction witheach other. The eyes or ears are used in coordinated effort with thehands and arms.
The point or area may be a square on a table, the floor or the wall, abox or can, the teacher's hand. Recognize that this skill includes bothgrasp and release of the object. The student may be asked to touch orpoints or areas (targets) with the object,.but should eventually be askedto place the object and release it. Important objectives in self-aware-ness and the awareness of others can be accomplished when the student isasked to take from and give objects to another person. Be sure thegrasp and release are self-initiated by the student and that the objectis purposefully handed and placed so that the person receiving the objectmay take it easily. This concept will be most important to the earlydeveloping deaf-blind student. This is a good way to begin to releasethe hold of the "I being" from the deaf-blind student.
52
BASIC MANIPULATION SKILLS
The skills to be presented here are those most often considered in thearea of manipulatory skills. These are important to the student in thatthey are skills calling for movements controlling objects Outside the in-dividuals body. In the area of physical-motor development, the practiceand performance of these skills is necessary to extending the numbeofpossible movement capabilities. In the area of the general developmentof the individual these skills can open the door to expanding the aware-ness the student has of himself, other persons, and the environment ofwhich he may be a part. A simple example of this would be when a studentexplores the enyironmentl_a part of.this exploration will include handlingobjects. From this exploration the student is able to discover variousfacts about the object encountered. If the Object can be held and mani-pulated more can be found out about it than if it can not be manipulated.This manipulatory exploration can also reveal much about the student tothe student. The student finds that she is able to lift a spoon butunable to lift a table. The size and weight, shape and other variationsof the object are discovered and along with this, the abilities of thestudent also becomes quite evident. This happening will be occurringthroughout the development of the student.
Manipulation will be considered the control of objects. The act ofaccepting force from an object or giving force to an object is manipu-lation. The skills are then the basic level skills which are includedin the actions, which give or receive force to or from-objects.
It is one of the main considerations of Physical Education in generaland this program in particular to develop within the student a senseof the vast number of movement possibilities and capabilities inherentin the student's body. Manipulation skills are rarely thought of asunique in this sense. Most often the locomotor skills and the skillsof-balance and gross body control are thought of in this vein. Theapt use of the body in skills of manipulation are factors which maybe successfully used to give the student an awareness of his possibil-,,;vities and thus open areas of development which may never have beenconsidered. This statement may. seem a little out of line and withoutevidence to back.it up. But the use of adequate learning transfermethods by the teacher can lead to just such an accomplishment by thestudent.
DROP
The purposeful action of releasing a held object and allowing it tofall will be considered a dropping skill.
Equipment - Balls which bounce-rubber playground balls of all sizes.
Activity - The student is standing or sitting while holding the ball.On command the student releases and drops the ball. The teacher mayhold the student's hands and move them to release the ball and catchthe ball upon bouncing.
There must be a continual line of communication between the teacher andstudent. Name the movement and tell what is happening. Drop, throw,
catch and roll are the key words to use to describe the action. Thestudent is already aware of pick up, hold, carry, and put or place. Whenthe ball is dropped, say "drop", "drop the ball", or just "drop". As itbounces, "the ball bounces", or "bounce". When practicing the droppingactivity the ball is dropped, bounces and is caught but the teacher shouldverbally cue "drop" and not "bounce" or "catch".
The student will make the initial movement of releasing the ball and possiblyattempt or complete the catch. Use targets on the floor, a box or a markedsquare in which the student should drop the ball. A sound producing deviceplaced in a box will work well for the blind and deaf-blind student.
CATCH
Continuing on from the previous activity the student will catch the ballas it bounces back in the student's hands. A catch will be considered ab-:sorbing the movement force of the'object so that it is stopped and held.The teacher will need to hold the student's hands or arms, above the wristto aid with catching at first. The movement skills includdd are similarto those used in the put or place activity. Eye-hand coordination or ear-hand sound localization are the most important factors in this skill. Thestudent will need to be able to reach or move her hands to the ball andmove to stop its action at the proper times.
The blind student will have particular difficulty with this skill and theother catching skills to be presented due to the lack of visual stimuli.More cues to give the location of the ball or object and when the catchingmovement should be initiated will need to given.. Two or more teachers and/oraides may be necessary. Vocal cues should come from only one person duringthe training periods. A sound producing ball such as the sound balls avail-able from Bell Laboratories. The ball is held by the teacher at the pointwhere the movement to catch it should be started.
Allow the student to localize on the sound and to get a sensory memory ofthe distance from his body: Practice bouncing the ball and cue the studentwhen the ball reaches the point for initiation of movement. Have him reachout.and.attempt a catch; the ball need not be caught. The teacher may helpdirect the, student's hands to the ball and with the catching action in orderto present the timing and coordination which is necessary.
Activity - If the above method does not work or proves too difficUlt use thebounce of the ball as the cue for movement. The student times her movementto catch to the sound of the ball when it bounces in the surface. Again someassistance and practice will be necessary to learn the timing and coordinationnecessary.
. With this and the other method.the teacher can verbally cue by saying "catch"to start the-NoYement. This may be sufficient for the blind student but mayprove to be too many stimuli at one time and cause frustration rather than
-learning. If this becomes the case, lessen the stimuli.
BOUNCE
A ball is bounced when force is applied to it before it is released. The action
54
-50-
of bouncing is when the ball strikes the floor and rebounds. When the studentinitiates the force on the ball, over and above the force of gravity this isbouncing in a manipulatory sense. A ball can be bouhced on the floor, a wall,a ceiling or any other stable object or surface. For our purposes a bouncewill be considered only when the ball is pushed to the floor and caused tobounce by the force which the student applies to it. In this sense the bouncewill be considered an extension of the dropping skill, or a drop with forceapplied.
Activity - With the aid of the teacher or independently the student pushesthe ball to the floor. The ball may be caught, but does not need to be atthis time. This is a separate skill because of the increased speed of move-ment and coordination required to bounce and catch the ball. The verbal cueis "bounce" and emphasis should be placed on the amount of force applied.The student should bounce the ball so that its return can be timed to makethe eventual catch easier. Allow the student the opportunity to experimentwith and investigate what happens when the force of the bounce is increasedor lessened. Emphasize the student's awareness on what effect her forceapplication has on the ball. Show the student how she is manipulating theball and controlling its speed and direction.
BOUNCE AND CATCH
The force applied to a ball will effect the movement and timing of thestudent. The ball may be caught as it is moving up after the bounce orafter it has reached its apex of flight and is dropping. The studentshould be aware of these things and attempt to control the bounce so thatthe ball is easily caught. The student who is able to coordinate boththe bounce and the catch has achieved a high level of self-control andself-awareness as well as a good understanding of things outside of him-self and the effect he can have on certain objects in the environment.
Activity - The learning practice for bouncing and catching is the sameas with the drop and catch except that the student is actually controllingthe entire action sequence from bounce to catch. Practice should emphasizetiming, coordination and the student's control of the ball.
ROLL
Almost any object of any size may roll. The ball is probably the easiestobject to roll, so its use will be considered mandatory in this skill ac-tivity. An object is considered to be rolling when, from a standing posi-tion, force is applied to the object causing it to move across a surface.The object should not leave the surface at any time. When an object isrolling it must qaintain continuous contact with the surface. When itleaves the surface it is considered a bounce.
Equipment - Balls of various sizes - small playground balls to large cageballs.
Activity - In a seated position, the student is directed to, or with handsmanipulated, roll the ball on the floor. For the blind or deaf-blind stu-
.
-51-
dent the sound bail will be important for the perception of caused movement.The concept of "push" may need to be described to the student at this time.In any case the method of pushing so that there is no lift on the ball shouldbe presented.
The student is holding the ball with both hands, palms and fingers touchingthe ball. A ball small enough to manipulate easily yet big enough to holdwith both hands should be used. (a 9-12" playground ball is satisfactory).The student pushes with the directed force of the arms and hands, maintainingcontact with the ball through approximately one-quarter turn of the ball, orthe extent of the student's reach, which ever happens first. This is a follow-through action where contact is continued until the last possible point ofrelease. The direction of force is out,, away from the body, and down, thedirection of the roll of the ball. The action of the arms, and hands in parti-cular describes an arc equal to the arc of the ball on which hand contact ismaintained.
All of this action is so that the students manipulatory force is exertedthroughout the longest possible time. This, of course, is not always possibleor necessary. A small tap of the finger could start the ball rolling. Butthe idea is to have the student provide the manipulatory action to the maximumextent so that the student develops a sense of control and his full effect onthe ball.
In the beginning the ball may be rolled to a person directly in front of thestudent. This person sits with legs spread so that there is little chancefor error. This person should provide a sound source for the blind or deaf-blind student. As the student gains control of the skill the person, target,'may move to one side of the student. In most cases the student will need toface the target in order to roll it properly. A good deal of training insound localization for the deafeklind, blind or even the deaf student is possiblehere. When the target moves,then provides the sound source the student mustrespond to it by turning and rolling the ball to the target.
Activity-- Roll To Catch- The skill of catching the ball, or actually trap-ping, can be presented easily at this point. The student, simply receives theball when it is rolled to her. She should he sitting in the spread -leg posi-tion so that the ball is funneled to her hands: The teacher can make it easyor hard for the student by the way,the teacher rolls the ball.. Of. course, atfirst the ball should be rolled. directly to the student's. hands. But as timegoes on the .studeot may be asked to reach td either side of or in front ofher body to catch or stop the ball as it rolls. ThiS activity t'sy'be done inthe sitting, kneeling or standing positions. The position will determine therange which the student will be expected to cover.
As the student's skill increases, targets of various sizes may be used. BoxeS,barrels, targets marked on the wall, etc, may be used effectively. 'Under these-circumstances a sound source, the teacher's clapping, a bell orbuzzer, or otherform of continuous or intermittent sound source placed on or near the target willbe necessary for the blind or deaf-blind student. For the deaf -blind and deafstudent additional visualestimuli such as a bright or flashing light, or brightcolored outlines may be used to describe the target. This is particularly re-commended for the deaf-blind student so that both senses are used to localizethe target's position.-
56

-52-
TWO-HAND TOSS 1Underhand)
It may be argued, and rightly so, that some other manner of throwing is themore basic developmental step of throwing objects. But, without regard to thesearguments if there be any, this program will strike ouand state that the under-hand toss or throw is the most basic developmentally, and the easiest to learn.This would mean that the other two throwing skills to be presented here' thetwo-hand over head throw and the two hand push throw, will naturally followthe developmental succession of the underhand throwing skill. The one-handform of these skills, in particular the overhand and underhand throws, will.be left out because they are not necessarily considered basic level skills, andtheir progression easily follows the attainment of the similar two-hand skills.
The underhand toss will be considered here first because it should logicallyand, I believe, developmentally, come before any other throwing skill. Firstof all the underhand throw is a more natural movement of the arm and shoulderjoints. When the hands are positiObed with palms up, supinated in the anato-mical position, the bones and joints of the lower arm and upper arm are at theopen position, providing the most efficient flow of motion through the jointof the elbow. The shoulder joint at the head of the upper. arm (humerus) isalso positioned so that its movement is least restricted by the bones andmuscles surrounding it. Secondly, the muscles of the arm and shoulders, usedin the throwing action, are positioned for best and most efficient use when the_arm and hand are in this "open" position. Also this position more musclesof the arm and hand can be called into play t,nd they may be used to their maxi-mum possible effort. Thirdly, the type of lever (third class) and the lengthof the lever arm (distance from the point of effort to the point of resistance)is most conducive to an efficient movement with the least effort on the part ofthe student.
The most efficient and most naturally occurring movement of the arm wouldseem the most easiest to develop in a learning situation. The normal in-dividual walks usually with palms facing in toward the body, and the armsswinging easily and loosely in this position. This would then seem to be themost natural position for motion of the arm and shoulders. For this reasonand the othersgiven above the two-handed under arm toss will be presentedhere as the first step in developmental sequencing of the throwing skill.It will be assumed that as soon as the student is able to understand theconcept of the throwing the other forms of throwing, overhand and push,can be introduced and learned along with the underhand toss. By this waythe student learns three means of throwing almost simultaneously,.and thesimplest throwing form' is used to introduce the concept of throwing. Thisconcept is important especially to the blind student, who has no visual modelfor the action and force needed for the throw. This is an exertion of forceand power which may not have been experienced prior to the introduction andpractice of these throwing actions.
Equipment - Playground balls (9-12 " balls are most appropriate).
Activity - The teacher and student stand together, teacher behind the student.An aide or volunteer may be necessary to help with this activity. With theco-active help of the teacher, the student practices the underhand throwmovement. This should be done several times without the ball, then withthe ball several times. The teacher holds the student's wrists or hands
-53-
and manipulates the underhand arm swing. Start with the student's handsplaced at her waist, the palms of the hands facing in and 9-12 inches apartas if holding a ball. The hands swing out and up in an arc starting at thehips and ending just after the release of the ball. When practicing with-out the ball or with the ball co-actively, the teacher should slightly out-wardly rotate the hands, bringing, the little fingers together, at the pointwhere the ball would be released. After the release of the ball the handsand arms should continue their swinging motion up to shoulder level.
Practice of this skill should continue up to the point where the studentself-initiates and carries through with the initial throwing motion. Ofcourse, continual review of co-active practice will be necessary up to thetime when the student is able to perform the entire skill without aid. Themethod of regarding attempts and near attempts at correct motion while per-forming co-actively or not is a necessary process with this skill and mostof the other throwing skills. The teacher will reward, praise or otherwise,any appropriate motion toward throwing correctly that the student makes.This is immediately followed by the co-active performance of the remainderof the skill activity.
From the beginning a target of some type should be used. This does not implythat the student will be expected to aim for or even hit the target. Theidea here is that the student is able to sense some cause and effect reas-oning for the throwing motion and this also provides a base recognition of atarget for later use when the student will be expected to hit targets ofvarying sizes. The ball can be thrown at a wall or to another person, anaide or volunteer. The ball may be returned to the student or he may catchit from the rebound or throw-back. The catch is noteimportant at this timeand should be referred to only as a factor and not as a skill to be con-sidered at this time. See the.drop and catch activity further explanationof the place of the catching skill.
TWO HAND TOSS (Overhand)
The appearance 'and movement of the overhand throw is exactly opposite thatof the underhand. The ball is held above the head and:_the throw is directedout away from the body. The movement of the arms is out and down toward thebody. In the beginning the student will more than likely throw the ball outand down. However, with the overhand movement there are more possible dirk-tions in which the ball can be thrown. The initial direction can be directedupwards, downwards or almost any angle of flight inbetween allowing the re-lease. This would, be one of the characteristics of the overhand throw whichwould make it more useful to the student than the two-hand underhand toss;The greater range of motion of the arms is the reason for this differenceand greater variety of throwing possibilities. This begs es important tothe student who is asked to hit targets at various dis.t' u es and those whichmay be above, below the shoulders, to the left, or right,of the body.
Equipment - Playground balls (9-12 inch sizes are best).
Activity - The methods and general procedures remain much the same as withthe underhand toss. The differences to the student and teacher arise withthe possibilities of movement and the increased motor coordination and skillrequired to perform this skill. This must be recognized by the teacher andcommunicated to the student.
53
-54-
Begin with co-active motion, wtthout the ball. The teacher stands behindthe student holding the student's wrists. The student hands hold the ballwith palms facing in. Practice the overhand motion beginning from abovethe head, arms slightly extended, elbows slightly flexed. The arm actionis outward and downward away from the body, when the ball is released thearms and hands continue toward the body, in a follow through motion. Asthe ball is released the hands rotate outwards, bringing the thumbs together.The teacher manipulates or guides the student's movement throughout severaltimes with or without the ball.
Encourage independent movement and praise partial or beginning movements byC.2 appropriate means. Targets are again important for the first trialsas well as when controlled direction is required. Use a target which is atabout head or shoulder level. Although a target at arms length height mayalso be used. Always_ remember that the ultimate goal is to have the studentbe able to accurately hit targets at heights above and below the head aswell as to the right and left of the body using the overhand toss.
PUSH TOSS
To hold the ball at chest level and push it away from the body by forcefullyextending the arms is commonly referred to as a chest pass. It is an oftenused skill but seldom recognized as a definite skill which can be learned.Its importance to the individual lies partially in this fact. It is notusually considered because it is not an easy swinging motion of the handsand arms and therefore not simply taught in a relative sense. A totallynew concept, possibly, of "push" must be introduced and learned. The im-plications of course are visable when the push action is realized. The cono-tation of pushing other persons or pushing object out of the way is sometimesquite negative and not considered the kind of learning we would want to havethe student-child learn.
When the part of the student's total development is considered and thebasic importance to the student of the total or most widely applicablemotor development is brought to light the development or lack of presen-tation by the teacher of a simple skill can be a great loss. To limit .astudent's capabilities because a skill may hold some derogatory factorsis to check the.student, and a disregard for the total learning which weas teachers are attempting to provide for the student. If we as teacherscannot present and teach a skill and not limit its negative factors, whileexpressing its positive points to the student we are indeed poor teachersand unworthy of our position.
Getting tack to the skill description.
Equipment - Playground Balls (9-12 inches in diameter).
Activity - The teacher stands behind the student holding the studentswrists. Co-actively practice the pushing motion without the ball-a fewtimes. The students palms face in and at a distance apart to simulateholding the ball. The student's hands are forced out, away from her bodyat about chest height, the hands rotate inward, thumbs coming together,
r-C
as the ball is released. The arms are fully extended andT:there is nofollow through as such.
Keep up a line of communication with the student. Name movements andactions (keep these consistent when used).. Point-out body parts andtheir movement. Point out balls and the difference in sizes. For theblind and deaf-blind student use balls of various textrues and talk. aboutthe. differences and similarities.
When the student has gained some skill in these throwing skills use ballsof different sizes and weights. This wilt make the student aware of thespecific differences and what his body must do to compensate for thesedifferences. Also introduce objects of shppes, other than that of a ball.Bricks, boxes, unbreakable toys are good items, for throwing exploratimThe use of these items is not to encourage deviant or destructive be-havior but to allow the student a normal set or exploration experiences.In actuality the more severely retarded student will require this designedform of experiences. The student of normal intellect will probably dis-cover these things for himself without direction.
BASKET CATCH
For the visually sensory impaired student the act of catching objects willbe a most difficult, although possible, manipulation skill. Catching en-tails the absorption of force froM an.object. To catch an object the forceand motion of that object must be halted. This requires what may seem tobe less physical-motor ability than other manipulation skills. But theactions which will be described here are similar in difficulty to the othermanipulation skills. For the most part the actions required prior to catchinglmoving body parts to the object, are the most significant actions of theseskills
It may be necessary to return to the practice of the bounce and catchlandroll and catch from roll skills as preliminary activities to this. Em-phasize the. catching actions of these skills. Point out how the handsstop and hold the ball. Use balls of all sizes to increase stimulationand experience.
Equipment - Playground balls (9-12 diameter).
Activity - Use the preliminary skills described above to review and stimu-late necessary learning. The basket catch is a combined use of the arms,hands and body, trunk, to stop and hold the ball. The teacher should bepositioned behind the student, holding the student's wrists so as to con-trol the action of the arms and hands as well as the trunk.
In a sitting or kneeling position with the teacher behind her, the studentstands ready to accept-the.ball thrown in her direction. An aide or vol-unteer stands directly in front of the student holding a ball. This per -son bounces the ball so that. it rollt and bounces or so that it- has a lowbounce,to the student so that the ball reaches the student at or belowthe waist while kneeling. With the co- active aid of the teacher thestudent reaches, Stops. and holds the ball. Both hands aresused as a"scoop" so that the ball is directed to the student's body. Simultaneouslythe student brings her hands toward her body so as to surround and hold.
60
-56-
the ball with hands and arms. The teacher's aid is to help with the coor-dination of movement and to direct the students hands to the ball. It isimportant that the aide throwing or rolling the ball be accurate and con-sistent, especially in the early practice experiences. This is so thatthe student can begin to expect the ball at a certain spot and thereforedevelops coordination and independence much more easily. The visually im-paired student should be encouraged to listen for a bounce of the ball andto time movements to this. The use of a sound ball is important here. Butthe basic learning of the student should be in relation to a bounce prior tocatching.
When the student begins to gain some independent movement in the kneeling posi-tion have him stand and catch the ball. Use co-active movement or stimulationas needed. Do not vary the height of the bounce or direction from whirl' theball is thrown.
Activity - A second, more advanced form of the basket catch is the two-handcatch. The ball is caught at about chest height or in the area of the trunk.The hands stop and hold the ball and the arms recoil, and flex, acceptingthe force of the ball. The important facet of this skill is the action ofstooping and holding of the hands. Do not allow the student to simply stopthe ball with flat hands. In this way the ball is reflected off the handsand little manipulatory action takes place.
A co-action movement is necessary here to help the student learn to stopand hold the ball with the hands. Holding the student's wrists, the tea-cher manipulates thestudents hands to catch and hold the ball. A goodreview of the bounce and catch skill is helpful here to stimulate controlof the ball with the hands. The ability to catch the ball by use of thehands is important to the development of the next two skill activities.
CATCH. (under, below waist).
When a ball bounces so low so as not to reach the waist the student will needto place the hands in a position to catch the ball below the waist. Thisusually involves bending at the waist and reaching down with thehands andarms. Unless the blind or deaf-blind student is able to distinguish theforce and direction of rebound from the sound of the bounce some communica-tion between teacher and student will be necessary. For ease of descrip-tion and quickness of reaction one-word directions are best used. Wordssuch as high, low, under or above should be consistently used to describethe expected flight of the ball.
Activity - The teacher again stands behind the student holding her wrists.The teacher should also be able to direct the movement of the student'strunk so that she bends to reach the ball. The aide bounces the ball tothe student so that it reaches the student at or about knee level. Thestudent bends and reaches for the ball stopping and holding it with thehands only. The force can be absorbed by allowing the arms to swing throughthe student's straddled legs.
Tell the student that the ball is going to bounce to his knees and be con-sistent with the bounce. The aide should also say "low", to describe theflight of the ball. Encourage the deaf-blind or deaf student withnormalvision to watch the flight of the ball and react to it.
61
=57-
CATCH (over, above the head)
Just as the ball may bounce below the waist at trunk level it may bounceabove the student's head. This requires a movement of the arms and handsto a point above the head to catch the ball.
Activity - With the help of the teacher, the student reaches up above thehead to catch the ball. This should again be in response to a bounce of theball and the direction of the teacher. The flight of the ball is describedas "high" or "above". The ball is stopped and held with the hands and theforce is accepted by the arms as they swing back. The movement of the armsare somewhat limited above the head so a stronger stopping and holding actionof the hands will be required.
Use balls of differenct sizes 4nd weights. Always communicate the directionof flight to the visually impaired student. When some skill is gained in allthree types of catches vary the direction from where the ball is thrown andthe height of the bounce. The deaf studenishould also be able to accepta ball thrown withcut a bounce. A sound ball should be used when throwingwithout a bounce to the blind or deaf-blind student.
KICK
The use of the feet and legs for specific physical-motor skills is littleheard of in this country. A punter or place kicker in football are thenearest we have to persons skilled in foot-leg skills. However, soccer isbecoming a more popular sport in the U.S., so there is hope for using thelegs for something other than walking and kicking. The implication hereis not to promote sports in this program. It is simply a general state-ment concerning the use of the legs in physical activity. A statementwhich shows how little we use our total body as it should be. We lackmuch in understanding and experiencing the sum of movement possibilities of thephysical body. It is, of course, one objective of this program to allowthe student to discover these possibilities.
Kicking, an object is a striking action where the foot forcefully contactsan object,propelling it in the direction of applied force. The object maybe struck by any point on the foot. Usually the toe or the heal are thestriking points. Force is obtained by swinging the entire leg back thenforward to the object. Force and movement came from the muscles of thehip, knee and ankle and are coordinated in that order.
Equipment - Playground balls (9-12 in diameter).
Activity. - The practice and learning of the kick should be presented muchthe same as with the throwing skills. A target should be used throughoutall the learning phases. Only when some control is developed will thestudent, be asked to become consistent at hitting a target. The targetsize should be 11/2 - 2 feet square and not more than 1-2 inches from the floor.The best position is on a wall at the lowest point with one side being the floor.
The student is seated in a chair with feet on the floor. The teacher standsto one side of the student. Swing the student's leg a few times easily bend-
62

_r
ing at the knee and keeping the foot held straight (dorsi-flexed). Placea on the floor directly in front of the student on the side of his pre-ferred foot. Both feet will be practiced, so that if there is no preferredfoot,use one for a few times then the other. A student who'has preferencefor the use of one foot-over the other will learn easier if the preferred footis practiced more than the non-preferred foot. However it'is necessary andbenericial to practice and be able to use both feet for kicking even thoughone may not always be as good as the other.
With the help of the teacher manipulating the lower leg only, the studentkicks the ball. The ball should be kicked several times as the teacherrepeats the word "kick". This seated practice is to develop the idea ofusing the leg and foot to strike an object and to get the feel of the pri-mary action. After the student has practiced 2-3 times with each foot haveher stand and begin the second activity. Return often to this activity to reviewthe ideaof kicking and the movement involved.
,-
Activity - The student is standing with the ball placed at her feet. The1.-cher stands directly behind the student. A second person, volunteer oraide, may be needed to help with directions and retrieving the ball. Co-activelythe teacher helps the student with the kicking action. If desirable and ift;.!e teacher is physically capable the leg of the teacher may be strapped to'sic student lightly at the ankle and the mid thigh. The teacher may also stand),=_ry close to the student with the leg contacting the kicking leg of the stu-:hot. The teacher holds the student's waist. This is to give the entan idea of the shift of weight which is required in order to free the kickingleg ,)o that it may swing without bearing weight.
-Which ever method of co-action is used the teacher executes the action withthe student. The teacher's instep is placed behind the student's heal sothat the kicking-out may be controlled. Begin by freely swinging the en-tire leg at the hip. After a few times add the motion of the knee. Withthese two actions integrated the ball is then placed at the student's feetand kicked several times with the co-active aid of the teacher. Emphasizethe shift of weight to the non-kicking leg, the swing of the hip and theforceful extension of the lower leg just before the ball is kicked.
Although it dces.not make much difference in the beginning where on the ballthe foot strikes, gradually encourage the student to strike the ballaround the center of the ball's surface nearest the student. Thisbecomes more important as the student is asked to exert more controlby hitting-targets at different distances and of varying sizes. Usea hail which has a sound and/or a light source to help with recogni-titn rild direction. Give targets a sound and/or a light source forthe blind or ref -blind student to more easily direct the ball to atircrA.
*MAP
When a:ball is cau0t with the foot we can say that it was trapped.The definition for catch will be broadened because the foot and lowerleglack the fine control inherent in the hand,and arm to catch andhold a ball. Although a ball may be stopped' and_ held to the ground
63
with the foot this is not always possible, even with the most skilledperformer. So definitively we will say that a trap is when the ballis scooped, the movement of the ball is caused to cease, by the ab-sorption of force by the leg and/or foot. The leg and/or foot eatinto the path of flight of the ball and ceases its motion in onedirection. After motion stops the ball may be held or rebound inanother direction from the leg.
Equipment - Playground balls (9-12 inches in diameter).
A ball or can filled with rocks or bells.
Activity - A ball may be stopped or trapped with either one or bothlegs. To begin with the student will be asked to trap with two legs.This requires that the student place his body in front of a low fly-ing or bouncing ball. When one leg is used more range of movementis possible and quicker movement much easier.
As with the other skills presented a co-active method of presentationis used to help the student perform and learn the skill. The actionhere at first is inaction. The student stands and stops a ball-whichis rolled to her. This involves nothing more for the student thanstanding and allowing the ball to strike her legs. The teacher standsbehind the student to keep up communication with the student. Thestudent should be stimulated to recognize what effect, control, sheis having on the ball. Make the student aware of her legs as theyrelate to the ball and the part her legs are taking in stopping themotion of the ball.
When the student has developed this sense of awareness and controlthe ball or can as suggested for sound output, should be rolled toone side of the student, not more than a steps distance from thestudent. When the ball is rolled the student, in response to thevisual or auditory stimulus, steps to the side-and stops the ballby placing his body in the path of the ball. This should be re-peated several times-to each side. Be aware that the student willhave difficulty-co-ordinating the movement of his body to the move-ment of the ball. The main difficulty here will be seed of move-ment. Attempt to time the speed of the roll to the speed of move -ment of .the student so the possibility of failure is lessened.
The teacher is standing behind the student and co- actively moves with thestudent to get her body to the ball. It may help to loosely strap the tea-cher's legs Tto the stu::!ent's because of the importance of the log movementand placemort.. The doaf-blind or deef.student.should be encouraged to keepvisual contact with the ball up to the time it is stopped.
When one leg is used to trap a' ball the surface area presented is importantTwo positions will be considered here. These are the instep of the footand the sole the foot. These are the two larqest areas c! tostop a rol1ir., or bouncinc, ball with me leg. The instep is used to stopa ball on one.side of the student's body. For this the lies, is rotai :ed out-ward so as to place inst, in the path of the ball. Ti hall Contactsthe foot and force can be tapen by allowing the leg to swing hE:ckslightly.The bo:y's.veht is ti;cn on the opposite leg as tills skill is rerferilTd.
64
-60-
A ball may be stopped by the sole of the foot when the body is placed dir-ectly in the path of the ball. The leg is raised and the foot flexed topoint up (dorsi-flexed) so that contact with the ball is made on the archof the foot or between the ball of the foot and the arch. The body'sweight is taken ol the opposite leg. Force of the ball is taken by slightlyflexing at the knee after contact.
When practicing either form of the one-foot trap practice several timeswith each foot. The preferred foot, if there is one, will be the easiestfor the student. Make the roll or bounce of the ball as consistent aspossible and keep up communication with the student. Encourage all effortsand keep the student's awareness of the control of the legs. Remember,that when the legs are used and the body's weight must be shifted to per-form a skill there must be a great deal of control exerted over the totalbody's movement as well as the performing body segmerit, the legs.
-61-
BODY NANIPULATION
To control and dir:.ct the m'ovoii';ents of the body is in essence the pervadingobjective of this r!.ntiro program. Each skill to be learned requires thecontrol of a bOdy Dart or parts to perform the skill adenuately. There area set of skills which do not adequately fit the total definition- of loco-motion or stability. These skills overlap in both of these, context areas.The actual movemant and force of the performance of this skill is distinctlymanipulation,
If we say that the hody is en object with the. characteristics of objectswhich nay receive aw!, give force, we can then take the premise that thisobject, the body, may be struck,.pushed, rolled, thrown, in a sense, topresent force, partially or in total, Inai-be within the body itself oroutside the hid-!'. o th s case we cannot and will not deScribe a location .
of the initIatin of the force. The-source of the force applied to an objecthas little or nothinq to do with the fact that its total movement is beingcontrolled in the i>:_,for. ;ncct of a
Body manipulation istho control of t he body in the performance of a skillwhere the body is both th initiator of the force applied (manipulation),and the object of thi: manipulatory effort. The' student thrusts, catches,or kicks a ball. A rr.ohipulatory effort is being exerted over the ball bythe student. '.!hen tFeHttudent performs a forward rolli, a log roll, or a,-seat drop on the trampoli-ne, the body of the student is being manipulated,controlled, and diref,:t:':.d,in- the performance of a skill as is the ball whenit is thrown, caught, or kicked. Force is being applied to or received bythe body by the controlled direction of the student's body. itself. Thestudent applies force to .or receives force from his own body to performa skill of manipulatory nature.
Walking, crawling, locomotor rolling, standing are'all skills where thebody manipulates itself, These are strictly defined as locomotor or sta-bility skills and their basic nature. iS for the purpose of locomoting orreraining stahle. However, the basic purpose of the simple skills to bedescribed here is for the performance of the skill .andjhe Control of thebody, Their purpose lies not in a useful way.in_locomotion or stabilitybut in the performpec of a manipulation skill. This is the reason for-their labeling as manipulation skills and not As one of the other contentareas. The specific differences and similarities will be related laterwhen the skills are described and discussed.
The skills to be included hero -as-body manipulation skills are skillswhich are performed are one of throe environmental surfaces. The tram-poline, the mat for tumbling skills, and the horizontal bar or-trapezeare the surfaces to be used. On these surfaces the body will be movedover or around. The skills presented will be basic in nature. Theirpresentation is specifically to allow the student to develop an increasedawareness of the control the student has over his body. By doing this it
66
1
is intended that the student will develop a more thorough control of his body.The movement skills are of a very gross nature, involving the whole body orlarge parts of it in the Movement performance. It is realized that theseskills may he made more complex and difficult and there are ether closelyrelated skills which could be included here. This program will not go be-yond 'what is presented in order to maintain its objective purpose of pro-gramming for basic RhYsical Education of sensory-impaired and mentallyhandicapped students. If a student is capable of performinci skills be-yond those presented, by all means) go beyond this. The same,similan, methodsmay be used effectively to teach higher skills as are described here. Re.member that a student who is able to perform skills above those presentedhere is more than likely of normal or near-normal Intelligence and themethods will actually be slightly different.
TRAMPOLINE BO1;NCINI1 STUNTS
The action of bouncing and being bounced is a stimulating venture in move-ment experience. We Will go into this facet of movement stimulation on thetrampoline in a later section of this program which will be concerned withgeneral movement and sensory stimulation. At this time we will deal withthe fundamental stunts from the trampoline.: 1:hree stunts will. be presentedfollowing the simple jump. These are. the "seat drop", "knee drop', and"chest drop". Anothei "drop" stunt which could be considered, but willnot be, is the "back drop". It is a natural opposite to the "chest drop"but is too difficult and dannerous to teach to the type of student we areattempting to reach through this program.
This exception of the "back drop" is not because it Would not he acceptablefor presentation to a sensory impaired student. The multiply handicappedmentally retarded student would find this stunt most frightening and thedancer of injury to the neck ls too high to be included in this selectionof stunts. howevor, if the student is willing and capable and the teacheris knowledgenble in control and presentation methods, the "back dro6"canand should be used successfully as a part of the student's Physical Educa-tion program. The sugnestion here is that this stunt is not recommendedfor severely and profoundly mentally retarded students and for nniltiplyhandicapped students.
. .
The "seat drop", "knee drop", "chest drop', and "back drop", if used, arestunts which require movement of the body in four directions within oneplane. While facing in one general. direction the student can jump and landon his seat-buttocks, krvs,s, chest, or back, mostly through the movementdirectly or indirectly of the legs. The body action is a whole, gross bodymovement. The logs initiate the movement and are responsible for most ofthe force of the continued movement and return to the standing position.The movement of the lens should be emphasized but remember that the wholebody is involved in the skill...
In order to be able to perform a trampoline stunt the student must firstbe able to jump on.tho tramp and control her movement without bouncingall over the tramp. The student sh,Pladable,to jump within a 1-11/2.footsquare consistently without jumping out of it. All of the stunts shouldalso be performed within the general area of the square.
When the student is able to keep within the body of e square while jump-ing, he is ready to begin practice .F the stunts.
Activity - A student whc. is able to standiunsupported and walk with somesupport is able to get up on the trampoline and begin jumping. if theteacher needs to co-actively jump with the student, there is no immediatereason to believe that assisted jumping is possible when some.independenceand stability is. present:
The teacher stands on the'trampoline with the student. Teacher .and studentare.facing and holding hands. The teacher provides-suPport and stabilitymuch as would be provided while walking a beam. Two methods Marc possiblehere. If the student is -able to jump with some control the teacher stands,absorbing the bounces as the student jumps independently, holding the tea--cher's hands. If the.student is unable to jump independently, the studentjumps undar'the control of the teacher. The teacher applies force ,dowwardson the tramp. The rebound of the tramp should carry the student and teacherupwards. Begin first with bouncing, where the feet do not leave the trampbed. This is to give the student the fuel of the up and down movement. Pro-gress to jumping whsre the feet leave the surface. To accomplish.this theteacher applies more downward force on the jump, It will be help to theteacher to have practiced tnis technique with a skilled student before usingit with a student who is less. skilled.
Trampoline stunts are manipulation skills. However, remember that the tram-poline is also manipulating the student's body. The trampoline bed is mov-ing down and up in response to the force applied by the student and teacher.The upward rebound of the trampoline .bed and springs is an action-reactionforce which carries the student's body upward, then-absorbs the force ofthe body as it lands. Because of the action of these two force producingand accepting factors, the body and the trampoline, the student needs tocontrol, manipulaten both the trampoline and his own body. This is aunique factor of skill development which is provi dad by toe tnampolinc.
As the student. gains skills and has gained some independence and control aspotting belt with rope may he used to insure the student'S safety and help'with support. Also aides, volunteers or other students may act as spotterson the side of the tramnoline, at le=st ore on each side. The blind studentwill need extra help.and encouragement in order to stay in the middle of thetrampoline bed. , sound source, a constant sound, buzzer or bell, etc. , orthe voice of the teacher standing at or near the middle point of the tramp-.oline bed She should become quite familiar with the bounce at center andbe able to distinguish slight variances of spring:
Of course, complete independence and control are the necessary objectivesto reach. When these have been met begin the progressions of the stunts.
68
-64-
SEAT DROP
Activity - In all three of the trampoline stunts communication is important.Through the use of co-active movement, vocal stimuli, or signs given alongWith the performance of the stunt the student can be led into an independentperformance. A name, "seat drop", the sign for "sit" is used-so that thestudent relates the name to the action. Relating name to action is an in-tegral part of Special- Physical Education but is most evident here becauseof the distance between teacher and student imposed by the trampoline whenthe student performs-independently. When the teacher is standing on the.floor and the student is on the trampoline it is difficult for the teacherto present anything, other than verbal or manual sign stimuli. Under theseconditions the student needs to have a recognizable command to follow.
Two .lethods of presentation are possible for a beginning or introduction tothe seat Drop. both methods involve imitation. The first is co-action,the second is model imitation. With co-action, the teacher stands behindthe student holding the student's hands, with contact on the student'selbows and legs. This is most useful for blind students and studentswho have difficulty with body image and recognition of body parts. Themore severely retarded individual will certainly require this method ofpresentation. It will be of help for the child who is not blind to watcha teacher or aide perform the stunt prior to the student's attempt so thatan image of the whole action can he developed.
To coactively present the "seat drop", the teacher first jumps with thestudent so that the movements of their bodies are coordinated, The tea-cher then says, "seat drop", (another person may give the "sit" sign with-in the student's visual range). As the teacher does this he executes a"seat drop" along with the student. The teacher will need to force thestudent's legs out and keep the student's hands down. Great effort onthe teacher's part may need to be given to support the student's trunkas this may fall backward into the teacher. (Huch difficulty will hetaken away if the teacher practices this co-active presentation with askilled student, aide or volunteer. Also a spotting belt can he used,controlled by two aides on the.side.of the trampoline, to support thestudent's trunk so that she sits-straight upon landing). The weight ofthe two bodies should provide enough rebound force so that the return tostanding cannot be .too difficult._ Watch that the student's legs arebrought back along with the teachers: This should occur by the force ofgravity, but if not, the teacher should be prepared to return to the sittingposition.quickly.
The important points to look for in this method are first of all the move-ment of the .student's legs. They must be forced straight out: The- trunkmist. remain. straight upon landing, And the legs must he returned. t6 apoint below the student's body for standing. Always keep a line of com-munication. Consistently repeat "seat drop", "jump", and whatever dir--ecttonal cues may be necessary.. Perhaps with this skill more than othersan athlete teacher is a necessity and this person will require much prac-,tice so that mistakes Are few and the danger of the co-active presentationis lessened.
69
A model of the perfor:';aica of the student may be given the student tofollow. For thiz t'oc: stoJent Nay be on the floor or on the trampolinewith the tf,acho.r Then the student and teacher are on the trampolinetogether a larq;::.trm::Gline should be used with spotters on 411 sides.For this rathed the techer performs thestunt several times as thestudent WitCh7: The .LeJickir repeats verbal and/or manual Sign cuesas with thc,. 'on:2r ir-thod as thc,,stunt is .being performed. Thestudent is thea ethod te porform the stunt as the teacher has. Againthe tc,cher r the cues consistently as the student makes an attemptat he stunt, A this noint the tsacher on the trampoline with the studelt,may hr.21p '.itudnnt's hands as the- student attempts to stunt.The toach;:y the position of the trunk and may help return thestudent to stndin-. hy :Mlintnup. The teacher should not be ,ipmping withthe tim:.!, As the stur!ent gains Control. the teacher re-l sc he mc?.thod then becomes simple. The'teacher's performanceis followh',: the :,tudnt'sperformnce, one after the ether.
thcirportnt pr,int to -cJok far is the return to-standing from the sittingnosition, This rf.:',:res a push up with the hands and a quick movementof the logs trunl: to position the body in the standing position.The teacher he c2,coful to sot a coOd example. by performing the stuntand a phesi zi n tha 2:.-Ants in the performance.
the studE,nt's first experience with the free-float-This is 5. completely unique experience when you
the stuc'ant is, by this time very used to moving onhard. !.!?1T ,Mn!-; f:wr17c, against some resistance. Although.these stunts
ac 1.-,7,scal1y through the force which comes from the trampoline1.)fore ii fiaff, the movement is in the air where no resistance or support
present. the- cutious student this may at first be a frighteningadvcnl.uro r the r!Woring, outgoing., student it will be an exhilaratingoxreince. Yr I i.t.dfnts-some degree of fear and excitement will ac-c.,1,mwny initi;11 :Ittc:mr.-:t.:=, and he present within all 0roceeding performances.
nrE nor)tdUr
The knee c!ro7; us a stunt which is simple in nature. It may be difficultto perform die the =,!..vpr:mts and. !-)alance reeuired. The stunt, itself,is accTilol'isjiedir-ily bendinq the legs at th,:, knee immediately afterjumpin(1, then lah-/inq On the knees and low,..T legs for one bounce, thenreturnino to Ye st3n6i,lq Ilesition on the feet.
TH: presentation of this stunt will prove to be toonot he given here. The imitation of
amtt'el is the r:oly ra;lod which is offr?ctivcly possible. it will benecessary to '7ir:it put .. the studont in the position of landing, on thekn;:-.ns with t:-f:11 s'iraiht, prior to attemptini the stunt. The studentmay be honaca-a In 'this ;aosition a few times to get the feel of the move-ment and sur,port,nc:coss:iry. After watching the performance of the tea-cher the studntP.tter:Tts the stunt independently. The blind studentmaY jump %nd PF2r1,-1 the "knee. drop" with the teacher jumping and per-forming at thc.: sf.udt's side, By this means the teacher and the blind
7 0
-66-
student perform together much as they would co-actively. The student mayonly feel the movement and position of the teacher in a kinesthetic orproprioceptive sense. The.teacher will need to exert a great deal ofcontrol over herself as well as the student to attempt this method. Thesame athletic teacher used with the co-active "seat drop" will be anecessity. Communication` should be consistent and cues given so thatthe student has time to respond.and move with the teacher.
The teacher may stand on the trampoline with the student, holding hishands, in order to provide support and insure proper positioning. Watchthat the student does not jump, out, forward, before coming to his knees.The stunt should be performed within the same area as the jump. Ifa cross or other mark in the canter of the trampoline is available usethis as a reference point for all stunts. Be sure that the student isable to land correctly in the flexed-leg position. The trunk must bekept straight so that undue pressure is not given the lower back. Donot allow the student to lean forward or backward upon landing. Ifnecessary use a spotting belt to keep the student's trunk in correctposition. Emphasize the fact that the hips do not flex, but remain fixed uponlanding. The:,arms'held atshoulder height are 'used to maintain position-of the trunk.
CHEST DROP
This stunt should only be presented to the most skilled performers. Whenthe student has developed some skill at the independent performance of theknee and "seat drops", the "chest drop" may be presented. The "chest drop"is the movement of the legs back and out, and the forward tilting of thetrunk so that the body is placed in a prone layout position. The body con-tacts the bed of the trampoline initially on the chest. The action is thenreversed so that the student returns to standing. The factor of fear willbe most present with this stunt unless the student has good confidence andthe ability to control his body well: A bi-product and main objective ofthis stunt is the development of these two factors of confidence and bodycontrol-.
Activity - The.student must first be made aware of the landing position,,and___the placement or position of body parts in preparation for landing. To dothis a simple drill may be employed which will give the student the experienceof dropping to the chest for a low height. The student is positioned on thetrampoline in a hand-knee stand. The teacher bounces the student on the tramp-oline by pushing down on the bed and allowing the student to bounce. Thepush should be timed to the downward motion of the student on the bed. Onthe command of the teacher the student is instructed to throwilis_arms_and.legs out from under his body, allowing his body to fall to the mat. Theteacher, and an aide, may pull the student's arms and legs out from underhis body if necessary. Do this only after describing to the student whatyou are going to do*and when.
When the student has gained some confidence and ability in this'drill beginto instruct the student on the placement of the hands. The hands should beplaced on the trampoline, upon landing, just below the shoulders or in frontof the face. The arms are raised and elbows flexed as if in the positionwhere the student would lay to rest on his hands. Emphasize that the headshould be held up and kept from striking the bed of the trampoline. This
-67-
skill should be first practiced from the hand-knee position.
To begin the practice of the "chest drop" from the standing position firsthave the student jump normally on the trampoline. On command have. her fallforward throwing her legs back and Tand in the prescribed manner on thechest, with hands and ahms-protecting the face and head. Some studentsmay want to fall to the hand-knee 'position, bounce once, then to the chestdrop. This is permissable, but encourage the student to attempt the com-plete stunt. Failures initially are normal and acceptable. The studentwill need much positive motivation at this phase in order to move aheadsuccessfully with this stunt.
To return from the drop to standing the student pushes off with the hands,by extending the elbows, and keeping the trunk erect, swings the legs for-ward to standing. It may he helpful to bend the knees and hips to allowthe legs to pass, under the body. They are then extended to stand and con-tinue jumping.
Watch for the motion of the legs, back and the tilt of the trunk to bringthe body into a prone position. The head is.held up and the hands and armsare placed on the bed to protect the head. The hands and arms then pushaway forcing the body up and back to standing. Always emphasize the move-ment of the legs because they are used,aseprime movers of the body in thisskill.
This skill, though it may appea-dangerous, is neither dangerous nor diffi-cult when presented in the proper manner. If the teacher takes the time toexplain what is to be done and keeps the student calm and relaxed, yet motivatedto do well, the student will reap the full benefit. of his successful perfor-mance.of this skill. This skill, and all the others, are within the range ofmost of the students covered within this program. Do- not -let a sensory, mentalor physical handicap be the sole reason for keeping a student from at leastattempting this stunt, or any others, when the developmental pre-requisiteshave already been met. The efforts of the teacher and aides are not close toequalling the effort the student must put out to learn these skills. The reewards for bothstudent and teacher-are great when a successful and consistent
--performance results.
LOG ROLL.
Beginning in a hand-knee- stand the student drops to oneside and rolls. Orbeginning in a back lying positionthe student rolls to one side on hisshoulder, return to the back. These are the two methods of executing the logroll, which is the most elemental of the three rolls to be presented. The logroll is one of the earliest of the developmental locomotor skills developed.This is most common with a normal.child but should be developed in the retardedor sub-normal child no matter what age the child may be ready. The use ofthe head, arms, hips, and legs together in a coordinated, whole body move-ment skill is most important to -latter development of strength, coordinationand movement possibilities. The sensory impaired student will receive a gooddeal of body awareness sensory stimulation and gross body movement capabilitiesfrom this skill and the other two to be presented.
72
-68-
Activity - For the student who is unable to assume the hand-knee, creeping,position use-the prone, stomach, lying position as a beginning point. Al-ways practice the roll in both directions equally. A student at the develop-mental level where this skill needs to be taught has not developed, or willnot for some time develop a perference or strength of one side or the other.This student must be made-distinctly aware that he has two sides and that hemay move in either direction, left or right.
The student lies on her back with hands above-the-head-or arms and handsheld on the chest. Movement begins with the slight flexion of the rightleg, when turning to the left; left leg when turning to the right. Thisleg is -then brought across the opposite leg. At the same time the arm onthe same side is moved across the body as the head turns to the side ofthe body's motion. The combined movement of the arm and leg cause thehips to rotate, keeping up with'the. whole body motion. Do not get theidea that the hips go along for, the ride. They are a contributing member inthe movement, acting both in a supportive and associative role.
These combined movements get the student onto her side. The continuance_.,of these actions along with the pull of gravity bring the student througha full 180° turn. He is now on his stomach. Returning to the back isaccomplished by a continuing motion of the body carried by the movementsof the opposite limbs, The left leg and arm, when the right leg and armstart the movement, are flexed and,carried back so as to "pull" the bodyaround, rotate, to the back lying position. The hips again act to helprotate and stabilize the body. The log roll may actually start with thestudent lying on the back or on the stomach. Simply reverse the directionsgiven above.
Activity - When starting in the creeping position the same movements occurexcept that the student must first get to a side-lying position from thestanding position. Doing this the student momentarily shifts weight to theopposite side while raising the arm and bringing it up under the body. Whenthe weight is shifted back the student allows her body to slowly fall to themat. At this point movements continue as with the back lying start.
All students should be asked to perform the roll completely, executing atotal 360° rotation. Some may need to be given aid with positioning orbody movement at some points. The more severely retarded student may needto be manipulated throughout the entire movement skill performance. Allstudents shall receive a consistent line of communication relating to themovement of the body parts and direction of motion.
As one rotation becomes possible with some ease encourage students toattempt two, three or four rotations. Use a long mat or series of matstogether on which the student can roll. Emphasize keeping legs, hips,and arms in position so that the body rolls straight, keeping on the mat.The blind or deaf-blind student will need to be given cues relating toposit ion on the mat and line of travel. All students should be expectedto be able to log roll in a fairly straight line for at least 16 feet.
-69-
FORWARD ROLL
This movement skill requires that spotting techniques be used to protectthe students pa.rticularily in the head and neck area. The student should-also be taught to use his hands and arms to lift and hold the head abovethe mat to avoid injury, Although. the main purpose of this skill istopresent a movement experience which cannot be presented in any other way,the use-of the hands must be emphasized because of ..the -dangerinherent inthis skill when performed independently without support. A move-ment experience which relates closely to this skill may be found in theGeneral Movement. Section.
Activity - The beginning.student will start on her knees; the more ad-vanced in a semi-crouched position, knees, flexed so that the thigh ishorizontal , with hands on the floor outside the legs. For explanationpurposes this skill will.be broken down into five steps, the start, thetuck, the hip raise, the roll , and the landing. The start has alreadybeen given. Step two is the most important, because with its completionthe protection of the head and neck is nearly assured. The student tucksher head to her chest by bending the head forward so that the chin touchesthe chest just below the neck, The head should remain in this positionthr oughout the performance of the.skill. This fact-should be emphasizedat all times! The hip raise is accomplished when first the student assumesthe hand-knee position,- when starting on the knees; or a position whereonly the hands and feet touch the mat. The back of the head, close tothe top, touches the mat but supporting no weight. From_this positionthe student's hips are raised up and over so that the feet leave the mat.This movement of weight, forward causes the body to roll over the back ofthe head, neck and back. During the rolling phase the back is roundedand the legs and hips are flexed so that the student assumes a closed"ballelike" position. Emphasize the fact thatjhe hands and arms takethe weight of the body and lift slightly so that-the head may clear_as
--- the body is rolled over it. Spotting should be done here at the student'sneck. The teacher places his hand.on the hack of the student's neck tokeep the head in the tucked position and lifteif the head is not clearing!A push on the buttocks may be necessary to help the student roll. A stu-dent starting im the knee standing position will most certainly require-a push at this point. To land, the student simply comes to a sittingposition by extending her legs and placing her hands at her sides onthe mat.
Most students will require this skill to be taught..step-by-step and noas whole movement skill. The first part is presented, then the secondis practiced and added to the first, then the third, and so on until theentire skill may-be performed. The backward roll should also be taughtby this method.
BACKWARD ROLL
. Essentially the backward roll is performed as the forward roll. Thedifficult part is the placement of the hands for and support. There
4
-70-
may also be some degree of fear of moving backward. This may be most evidentin sighted or partially sighted students, although this may be a new andunusual direction' of movement for the totally blind student. As with theforward roll there are five steps. The start and landing may vary slightlyfrom the forward roll.
Activity - The student may start in a semi crouched position or a sittingposition with legs flexed and drawn up to the chest. The student's backis facing the direction of the roll. Again the tuck is important. Tuckthe chin to the chest and keep it there! At this time also, the hands aremoved to a point above the shoulders, palms up and fingers pointing backin the direction of. the roll. Maintaining this position the student beginsthe hip-raise step by failing backward onto his back. The legs are thenforced, "kicked", back in the direction of the roll, raising the hips upand over the head. At this point the roll is almost completed. The handscontact the mat and simultaneoUsly push so that the body is raised from the mat.The back is rounded and the legs are flexed. The student lands by stoppinghimself with his hands when they are placed on the mat behind his body atthe completion of the roll. By extending his legs just after pushing up withthe hands his feet contact the floor and the student may end in a standingposition if desired.
Safety is the one important aspect of the presentation of these two rollingstunts. Any student, even the most talented, will require spotting to protectthe neck. Never allow a student to perform these stunts without these pre-cautions.
TRAPEZE SKILLS (Horizontal bar, Parallel Bars).
The stationary trapeze is a special medium in which movement stunts canbe performed. The muscles used and the manner in which they are used canbe duplicated in no other way. The support of the body and the small sur-face in which thebody must be supported are possibly the most significantaspects of these skills. The student must exert a special type of pinpointmuscle action in order to move and support the body. There is only a rela-tively small surface of the bar on which the student moves. The studentmust be able to support his body mass on this small area.
Trapeze skills are included here as manipulatory skills and not as stabilitybecause these movements are a manipulation of the body. The stabilizationefforts are secondary to this movement function. The two climbing skillsprobably can be considered more locomotion than manipulation. But when theskill is considered as a movement over a surface with a high degree of bodycontrol involved the skills become more manipulation. These movements arefor performance purposes only and serve little in the locomotor sense tomove purposefully from one point to another. The two climbing skills arethen manipulation skills requiring locomotion and not locomotion skills whichrequire manipulation. The hanging stunts are stability skills. They arepresented there because they are useful for introduction and acclimationto the trapeze or horizontal bar. For organizational purposes they shouldbe considered stabilization skills. But for developmental needs they arepart of the introductory skills to be learned on the trapeze.
There are, of course, many more movement skills which may be performed onthe trapeze. These go beyohd the intent of this program. They are merelyintroductory and experimental movement stunts. We are interested in broad-ening the student's movement experiences. It is highly suegested for theinterested and capable student that a more complete progression and ex-pansion of skills be :introduced and practiced.
The sensory impaired student will find the experience of movement on orover a trapeze quite exciting after initial responses of fear or apprehen-sion have been alleviated. Of course, the accomplishment of skills on aspecial medium as theetrapeze is and can be rewarding -to the student's self -image and self - confidence, two areas of importance to the handicapped person.Also, the body awareness and image which can be developed and enhanced throughthe stimulation of movement over the bar must be considered. as useable objec-tives for the student to accomplish.
BAR HANG - Hands
A mat should be placed under the bar and spotters will be necessary to helpthe student. The bar should be positioned just a. :little (3 4 inches) abovethe studentts reach. The student may be lifted to the bar or a chair or stoolmay be used. The student would hold the bar and. step. off the chair to assumethe hang.
Strength is the most prominant factor of this skill. The arm, hand andshoulder muscles are called into play mostly. A straight arm hand will beintroduced first. As strength and ability increase the hand position canbe reversed and a bent arm hang or chin-ups can be attempted.
Activity - The student begins, on the chair or on the floor, standing withHands above the head. The hands grasp the bar in a forward grip, palms awayfrom the student. The fingers and thumb are wrapped around the bar, if thestudent's hands are big enough, If this is not possible the student shouldattempt to get the fingers and hand to. surround as much of the bar as possible.When a good hold is obtained allow the student to step down or take the weightof the body so that it hangt from the bar. Due to initial weakness the stu-dent will.reeuire a little support to help hold his body up. As practice in-creases so will .the student's ability to hold himself independently; and the
....time-of holding will also increase.
In the beginning the important thing to look for is that the student keepsher hands on the bar and the body is held straight. There may be a tendencyfor the student to flex. her arms or hip, This should not be allowed. Thestudent should be encouraged to control her body well enough to keep thebody segments in proper position.
BAR HANG - Legs
This may possibly be the first experience for the student in an invertedposition. Because of this, care should be taken to alleviate fear and an-xiety. Also spotting techniques become important and a mat below the baris a necessity. Actually little strength is required for this stunt. However,getting into position for the hang my-be difficult.
76

-72-
Activity - The student may start in hanging position or may be put in a posi-tion on the bar with the knees over the bar and the hands holding the baroutside the legs. In which case the student is already nearly in the hangingposition. If the student is to be placed in this hanging position, two ormore people must help. When the student starts in the hand-hanging positionsome help may also be needed. The more stronger and adept students will beable to start this way. The first move from hanging is to raise the bodyup by pulling with the arms. The legs are then brought up further and backso that they go through the arms touching the bar with the back of the knees.The knees are then flexed so that they hang over the bar. The student main-tains this position by holding with the hands and keeping the knees flexed.
Allow the student to practice hanging in this position so that she may beable to become used to it. From this point the student releases her handsfrom the bar and allows her trunk to fall so.that she is hanging verticallywith the head down. .Keep the knees flexed tightly. The student should hangwithout swinging. To return to the starting position the student reaches upto grasp the bar, outside the legs.- Some .011 on the abdominal muscles, exe-cuting a sit-up, may be necessary to bring the student up to the bar for thehands to grasp.
The teacher and an aide must always be at the student's side to give supportand directions. Watch the student's legs' to be sure that they are holdingthe bar. If the student is having difficulty return him to the startingposition or support his weight so that he- may make-corrections. Under no-circumstances should the student be allowed to hang upside down for morethan ten seconds. If the student has some cardiac difficulties he should tryno longer than five seconds. A period of thirty seconds to one-minuteshouidebeeallowed for the student's circulation to recover upon rightinghimself.
SWING
When the student has become accustomed to the bar and is hanging independently,encourage her to begin to swing herself while suspended 'from the bar. Thisis accomplished by the use of the legs..
Activity - The student begins in the hand-hanging position. The hands gripthe bar lightly. To swing the student raises her legs by flexing-at her hips,thus raising the legs while keeping the knees. straight. The hands are re-leased slightly so that they may move around the bar as the body swings. Asthe momentum of the body starts back the student allows his body to swing untilmovement is about to cease. At this point the student should flex the arms,pulling the body up slightly; then.extend, straighten,. the arms as the bodyreaches a completely vertical position, right angle to the floor, the legsare kicked forward, flexed slightly at the hip. This momentum will carrythe body forward. When movement in this direction ceases the body is allowedto swing back. Just after the vertical position. has been passed the armsand shoulders again flex bringing the body up and back; the cycle continuesas long as it may be attempted.
7
Activity - For the beginnlng student the momentum, or force, of movementwillneed to come from a teacher or aide standing at the student's side. Thestudent simply grasps the bar and 'allows his hands to move around the baras the body. swings. The student must also keep his body as straight aspossible and .keep the. knees straight. The hips only should be allowed tomove. The teacher pushes on the student's thighs, upper leg. Each timeallow the student to return before pushing forward again. Push very easilyat first, so that there is very slight movement. The swing can be increased.as the student shows the ability to hold onto the bar. This ability to graspthe bar and allow-the body to swing will be long in coming becaUse it callsfor a fine coordinated effort of the hands and arms. Many trials will beneeded and much encouragement Must be given the student. As a teacher youshould attempt to decrease failures, but they should also be expected. Al-ways encourage the student to move her legs as they are being pushed. The-student should be stimulated to sense the movement of-the legs as they swing.They will swing freely the way they should be manipulated by the student.That is, if the student attempts-to-reproduce the swinging motion. of thelegs by her own power,this would be the skill needed to perform a swing onthe bar.
The line of communication to the student from the teacher is most important.The student Should be kept aware of body position and the direction of move-ment, forward, or back. Because of the importance of the leg movement keepthe student informed er their position in particular and the motion they aremaking. Remind the student, when necessary, to allow the legs to swing freely,except when they are to be controlled.
CLIMB OVER
To be described here are two stunts which can be done on a set of parallelbars and worked out as a part of a'routine if desired. Their purpose is toprovide an experience in locomotor-manipulation of the body over and. on asmall and restrictive surface. The bars have an extremely small surfaceon which to Work. This lack of area calls fora challenge which cannot befound in .any dthcr area.. More than likely the student who has a low abilitylevel, for what,', ever reason, will be Unable to attempt these skills. How-ever, the experience of moving over or being moved over the bars is an im-portant experience for all.students, no matter what the ability level.
Activity In actuality the two skills are performed the same. This descrip-tion will then include both actions. The only difference is that when climbingtwo bars the student will cross over two bars rather than one. For thestudent this will be a different experience, but perforMed alike in- eithercase. An adjustable set of sturdy parallel bars are used for this activity.Either the type used for walking or gymnastic bars may be used. Mats shouldhe placed under and around the bars and the teacher and one or two aidesshould be spotting the student.
The student begins by standing and facing the:bar, or bars. The bars are.ad-justed.to be somewhere between the students chest height or the height of the
.student's reach. The ability of the student-.should determine the placementof the bars within this range. The bars are grasped and the student pulls herbody up, At the same time one leg, likely the preferred leg, is raised to get,---
.--
78
-74-
the foot over the bar. When the foot is.on top of the bar, the student con-tinues to pull with the arms and the leg. When crossing two bars the studentwill pull up with the arm and leg they cross the lead leg over to the second bar.
When the student has pulled his body to the bar he lays out on the bar, thechest and arms taking the weight of the body. The lead leg "continues overthe bar as the arms and the trailing leg hold the body on the bar. Thetrailing leg is lowered to the floor and the arms slowly extend to lowerthe body to the floor. The lead leg touches first, followed by the trail leg.
The student should not_hold her body on the bar, but slides over it. The handsprovide a good deal of support and the position of the head is important.WOO these two points, the head leads the direction of the body unless itis ontrolled. The legs movement should initiate the movement of the restof the body, not the head. The hands will need to be shifted at the top ofthe bar, so that better support can be given and their position can be putin place for coming down the other side. The hand on the same side as thelead leg will have to cross over the other hand and hold in that'positionuntil-the other hand can be switched. The fingers should pointaway from thebody in the forward- grip coming up and going down.
Realize that this will be difficult for the student but will come naturallywith practice. Do not be too eager to allow the student to perform theseskills independently too soon. A great deal of control is necessary, and thisrequires much practice. The teacher should always be ready to help or spotthe student, even when independence has been gained.
-75-
STABILIZATION ACTIVITIES
What may be-referred to as maintaining a base of support is usually calledstabilization. This customarily includes such things as balancing on onefoot and walking a beam. As will be described, stabiliiation activitiesinclude much more than these relatively simple stunts requiring balance..
Balance is an important, and integral, factor involved in stability, Butbalances,not the. one prime factor of stabilization. The individual'sability to remain stable position depends. upon the sense of balanceas well as the "senses" of kinesis and proprioception, feeling of movement,
. and body poSition, and a sense of bodily control which includes coordina-tion and agility. a
The working mechanism of stability is found in the ability of the individualto keep balanced. This can be said to be a sense in thatthe..bodies balanceis felt and sensed, and thata.part of the ears.are the sense organs forbalance. The inner ear, located approximately in'the center core of theskull and filled, with a liquid, senses the movements of the head as it re-lates-to the body and helps gives the individual information as to thebody's position in space. The prOprioceptivp sense, already "referred toin an earlier section, is located in the neuromuscular system of the body,and gives information relating to the position of body parts, in particular, thearms and legs. The kinesthetic "sense" is closely associated toproprio-ception. Kinesis provides information in regards to bodily movement. Itcan also be said to be.located in the neuro-muscular system.
It should be pointed out that the "senses" of kinesis and proprioceptionare on the experience level of perception. These movements and positionsare sensed by the individual but cannot be used appropriately for stabiliza-tion until the individual can perceive the movement or position and respondto these sensed cues.
To remain stable the individual must first receive a cue from the-inner earthat the head is moving and in what direction. The position and movementof the arms and legs must be.perceived, as they may be the cause of the Imbalance and certainly the means for the re-stabilization. When these things-are sensed, the body Must react to put itself in a position where it may stand.'This reaction is wherethe individual's coordination and agility come into play.If the individual is incapable of righting himself, the work of senses in-volved prior to this is all for naught. It is in this area of agility andcoordination where these activities and the work of the teacher become im-portant. Coordination, and agility to a point, .are teachable, The teachermust, through the use of these activities teach the student.to react to thesenses in order to keep a stable base of support, under'all Conditions.
It has been mentioned earlier that an auditory handicap may be closely re-lated to a handicap in balance.. This'is caused-by the damage to the earand its effect on the inner ear. When this occurs it must be overriddenand the remainingsenses of proprioception and kinesis must be developedto cope with and overcome this loss.
80
-76-
Quickly here the importance of the sense of sight to balance will be men-tioned. This will be elaborated in relation to the activities latter. Theindividual must balance in relation to the sense and perception of movementwithin her body and also to movement or position outside the body. The eyesare the means for sensing these factors outside the body. The body can bemaintained in a position when its motion or positioning can be related to anexternal object or point in space. This object or.point_is usually stationarybut may be moving. The visual sense then acts much like the inner ear and inconjunction with it, when both are operable.
The sensory impaired student is more than likely differenct in one or both ofthese senses. This presents a unique problem to the performance of stabilityactivities. The problem must be dealt with on an individual basis. Any degreeof useful vis-ual or auditory sense must be considered and used to its fullestextent.
The following activities will be concerned with practicing and developing thebasic abilities and skills involved with maintaining a stable bodily position,both as a performance of balance and as a part of a performance of movementand movement skills.
For ease of explanation, balance and stability will be defined. Balance isprimarily the sensory act of keeping the body in a state of positioning equi-librium. Stability is a physical-motor act incorporating balance which main-tains a balanced state of the body and its parts in both stationary and movingactivities.
(1) STANDING
This is possibly the most basic of the stability activities. There are threeforms of standing which will be considered here. It should be recognizedthat there are many more standing postures and positions than these three.Other standing variations would be based upon the three positions two-footstand, one foot stand, and heel-toe stand. This is why they. are includedhere. A student capable of performing the three basics is capable of attempt-ing and succeeding at most variations.
Standing is the act of positioning the body on one or both legs and maintain-ing an upright, erect position. The theories and attitudes pertaining toposture and its correctness or acceptability may be discussed here, but willnot be due to its inappropriateness. It will be sufficient to say that thehuman body can be considered as a whole made up,of parts or sections, oneatop another. The legs form the base on which the body stands. The basemay be as wide or narrow as the structure_of the base section allows. Thehips sit on top of the legs; the trunk on top of the hips; the arms andshoulders rest on the trunk; and the neck and head rest upon the shoulders.Each of these five sections may move, twist, turn, spread, be raised orlowered, together or independently. Each has its own weight mass and thismass has an effect upon the other sections and the entire body. A movementof the head and arms will effect the position the legs, hips and trunk musttake in order to maintain a stable standing position. The head is particul-arily important due to the sense organ of the middle ear which is located
81
within it. In essence the head directs most of the moyements. It is mostdifficult to move in a direction opposite that of the head.
TWO FOOT STAND
This form of standing is mostJlatural and common. It has been referred to inthe locomotion activities section. Standing is one of the developmental stepswhich must be achieved before walking may occur. In fact the performance ofmost of the activities presented in this program are done in a ,standing position.
As the student-stands he 'Should be encouraged to hold an erect position foras long as possible. Practice will gradually increase this time. A groupof related muscles in the legs, abdomen, and back are referred to as the POS.-turing muscles. These muscles act on the-reflex level to almost unconsciouslykeep the body erect. They are almost always in a state of contraction whenthe student is standing. In the beginning their use must he conscious andthe student must be made aware of their use. Tactial stimulation is mostnecessary-in the early phases of standing work. These muscles are foundalong the entire back bone, the stomach region, the front and back. of theupper and lower legs and the feet, in particular the toes,
Activity- Stand the student with the help of one teacher and-a bar or otherstationary object, or with two teachers or aides. When the stuOent is stand-ing remember the idea of body sections. Watch to see that each section sitsbalanced one upon the other. initial weakness in the posturing muscles willcause these sections to not sit properly. If this occurs attempt to positionthe student as best as possible and stimulate the use of the muscles. Motiva-tion is usually the key to the use of the muscles. It is the teacher's properpositioning of the student's body which determines how well the muscles areused and how well the student will eventually stand.
Gradually increase the amount of time the student is asked to stand and de-crease the support given. Incorporate the standing-practice with walkingpractice as described in the walking activities.
ONE FOOT STAND
This has been alluded to in the locomotion section in referente to hopping.All of the standing activities are much the same. It is a process of stand-ing for longer periods of time with more independence. The student beginsby standing with a lot of help and eventually reaches the point wherein-
-
dependent standing is accomplished.
Standing on one leg is important to developing sidedness, an awareness ofthe sides of the body and preference for one side over the other, Although-the student may prefer standing on one foot, the right: or left), she shouldbe encouraged to practice using each foot. This will result in a more com-plete knowledge and awareness of both sides of the body, and consequentlya better body usage and self-image.
82
-73-
Activity - The student with the help of one or two teachers or aides, standson one leg only. The leg not.being used is held suspended, off the floor.The student may hold it up by bending at the knee or simply raising it fromthe:floOr. All of the student's body weight is transferred tothe one legon which she is standing. The hips, trunk, arms, shoUlders and head mustcompensate their positions so that the entire body is'balanced and held stable.The arms are important to help keep the:body in balance. When the body weightshifts to one side the arm on the opposite side may be moved so as to compen-sate for this slight imbalance.
When the student gains some independence the teacher may simply hold thestudent's hands or forearms and help the student keep balanced. For theblind student the tactial and kinesthetic senses must be kept active andstimulated. It is these senses which are most often used to react and adjustthe stability of the body. The importance to the blind or partially sightedstudent of a good sense -of stationary stability and balance must be recog--nizetLIf-a-student is able to maintain an erect posture, no matter whatthe base, with no more than normal difficulties, he has set a good base forstabilization when moving. Understand that the blind student'must be ableto feel balance and a stability from within. There cannot be any visualcues with which to relate.:, Some auditory cuesmay be possiblebut not al-ways sufficient. (Just try to stand blind folded for a period of time with-out moving). The teacher must position the, students body so that it isbalanced. This will most likely be the most comfortable for the student.But do not rely too much on the student's tactial comfort. Oftentimes in-correct and damaging postures may be comfortable. A correct standing pos-ture-is-never damaging nor is it truly uncomfortable. .
HEEL-TOE STAND
When the student has developed some competence in one-leg standing have herattempt a heel-toe stand. This is accomplished by placing one foot behindthe other and touching the toe of the rear foot to the heel of the forwardfoot. The feet may be alternated. They do not need to touch in the initialphases. A good thing to use is a line,approximately 2-3 inches wide, placedon the floor. The student is asked to stand with both feet on the line, oneahead of the other.
Activity - Have the student stand'as described above, with some support.Again, gradually release support as the student is able to take his own.Encourage the use of the arms a--oompensators for imbalance. Be sure thatthe feet remain on the line, one behind the, other. Because of flexibilityprobleMs this position may be difficult-to assume and hold. With practiceit will become much easier. It may be necessary to just practice keepingthe'feet in'position before actually standing in this position.
(2) BENDING
This activity and those to follow, numbers two to six, are performed orbegin from a two foot standing position. The associated movement which is
-79-
part of the activity takes part in one or more of the body's sections. Thisnecessarily involves compensation for stability from the other sections. Forthe most part these movements put the body out of balance and the compensa-tion is necessary to maintain stability.
The activities which are to be done along with (numbers 2-6) -- the following abilities.will be the same. It is simply practice with some support and assistance inthe movement. The support and assistance is of course gradually removed.These activities shoud be,-used.primarily for the purpose of their stimula-tory experience, The movements are relatively simple and the movement stimu-lation received is important and enjoyable- to the student. As with mostbasic movements and postures a good deal of general independence may be gainedby their performance, These movements are easily incorporated into routinesand form the essentials of the more complicated skill movements associatedwith games and sports. For these reasons do notunder emphasize their useand practice. They are an important and necessary part of any good motordevelopment and/or 'physical education prOgram.
The descriptions iio these activities will.be taken from the book Moving andLearning, by David Gullahue, Peter Werner, and George Luedke, Kendall/HuntPublishing Co., Dubuqoe, Iowa. (1972).
"Bending involves bringing.,.... (p.55).
(3) Stretching p.58(0 Twisting p.60(5) Turning p.62(6) Swinging p.63
(7) STOPPING
This skill is involved in all locomotion activities. It is essentially anabsorption of the forward momentum, stopping the body's movement. The stopis accomplished by just spreading the base, applying friction on the floor,and a-backward'lean of the body. This keeps the body-in balance and helps_to neutralize the forward momentum. When the student is walking or runningin a straight line he stops by placing one foot forward,.spreading-the base,the friction between the foot and -the floor slows the body down. The studentleans slightly back, neutralizing the forward momentum. The knees may alsobend to help absorb force.
The movements of this skill are quite simple. It is the positioning whichis the most important action to be accomplished. The body's balance mustbe maintained and held stable, so that the student doeS not fall. When the.body is -,held up, it is easier for the rest of the.body to hold a stable position.This applies for the blind student as well as the partially sighted. .The deafstudent may have no problem positioning the head. But if the inner ear isaffected this student will need to rely on sight to a great extent to holdpositioning.
Activity -.Begin.as simply as is necessary. Walk with the student, holdingher hand or elbow. . At this point most students should be able to feel theposition and when asked to stop should not have much difficulty. Explainto the. student that as you are walking you will periodically ask him to stop(you must stop with him). When the student stops, watch for the points presentedabove, especially the body positioning.
84

-80-
If the student stops and falls over his feet or otherwise incorrectly performs,explain what is to be done, Point out, demonstrate, and practice the step towiden the base, the lean back, the knee bend, and the head position. Yourdemonstration may be a little over.exaggerated so as to more clearly pointout the backward lean. This lean may be the most difficult.to get across.
When the student has gained the idea of the action which is called for, prac-tice by walkinr around a room, 'in a hall, or on a sidewalk. Stop periodically.Be sure to call out the direction to "stop". When the student is able to re-late the word to the action progress will become more easy. Gradually re-lease your contact with the student and rely on the verbal command. The stu-dent may start by taking two or three steps to stop. This will lessen andshould be expected at first.
Begin to walk faster and start a run. When practicing proceed as slow orfast as the student is able to accept. The idea is to get the student tocome to an abrupt halt' from a run. -This.is difficult and requires muchpractice from the beginning. In the --fonq run it is very beneficial to theoverall agility of the student. The ability to stop without difficulty isalso an integral part of eventual mobility training, if this is to be done
DODGING
Continuing on from the skill of stopping is the skill of dodging, stopping andchanging direction. Dodging may be done in relation to an object or barrierin the individual's path. The student needs to stop and change direction inorder to dodge or walk around the obstacle. When the student has masteredthe stopping skill, dodging comes easy. The studentmay be asked to dodgestationary or non-stationary objects, while walking or running. Walkingand dodging stationary objects is the simplest form to begin_. with.
Activity - As with the stopping activity, begin by guiding the student arounda room or in a hail. Place objects (chairs, tables, large toys,pilons, etc.)in the area at various intervals.. Directions apply for both sighted or sightimpaired students. The student is to walk with the teacher. Upon meetingan obstacle -she is to
Giveand change direction. The direction does not need
to be designated. Give the student the opportunity to make this choice. Theteacher should attempt to influence a varying number of choices.-
The movement for change of direction should be slow and controlled at first.The student moves his feet, turns his body and proceeds in the desired direc-tion very deliberately. As the student gains control and experience increaseher walking speed and the speed of dodging. The student should gradually pro-gress from bumping the obstacles to not even touching them. Introduce slowlymoving obstacles. The student can move slowly in a room where the obstaclesare moving or being moved. The student must guess the relative speed anddistance in order to avoid the object as it approaches.
A good game to play is to have a class of six to eight students in an areaof 15-20 feet square. All objects, desks, tables, mats, etc., are removedso that the area is open. The students are directed to walk about the de-
85
-81-
finedsarea without contacting, another student.. With blind or visually im-paired students this may be changed -slightly to suit the needs and abilitiesof the students.
Iteis easy to see that this sKill activity is obviously more important. andnecessary for the deaf-blind, blind and visually impaired students thanfor others In any case the skill is important and necessary for overallcontrol and agility. For those visually limited these movement skills arerequirements in the path to normalization., This actiVity and the othersin the stability section would be appropriate to include in a.mobilitytraining program and may be used for that purpose.
GENERAL MOVEMENT
What is General Movement?----------------
Without calling this section a catch all" for those undefinable movements,I will say that this section is de Voted to descriptions and aAivities ofmovements which promote a general .base of movement skill. It may be moreprecise to state that these skills are not skills but the patterns of move-
: ment which form the base for the abilities and skills to follow develop -mentally. Actually some of these patterns do, not have a definite place inthe prescribed "normal" path of physical-motor development. The achieve-ment of one of these patterns is not-a plateau or benchmark for develop-mental advancement.
These patterns, general movements, are the prime members of those factorswhich make up the most basic of all development. Development of a childcan be described as if ft were a tree. A tree with roots, strong trunk,branches and twigs of various sizes in lengths and thicknesses . ThOsootsare the base and underlying streegth of the tree. Structurally, the rootsare the tree's support. A tree, no matter how .big the trunk, would cer-tainly fall if not for strone roots. The trunk: is the above - ground evidenceof the tree's size and strength. The branches and twigs reveal the tree'sdiversity and spreading of developmental pathways.
When a child is born his developmental-roots _begin to form. The tap rootor main feedereline of available developmental material is the five sensesof the body. A good deal of inforffeetion is taken in during the first two orthree years of life. A large percentage of this initial sensory 'input is de-rived from the child's, movement. The child's sensations of the movementof her body are aeprimary developmental branCh-root from the tap root. Itis in a structural sense for the developmental tree, a prime factor of support.The child's first and possibly the strongest force encountered in the pre-natal life is the sensation of movement of the mother, in which the neo-natalis livir!g.

QI)
Life in the womb probably holds.little tactile sensations due to the watersurrounding the pre-natal child. As the mother moves about walking, bending,stooping, .sitting standing, etc., the child. receives the input of this motionof the body in which he finds himself. It is not my purpose here to go intoa discussion of the prenatal period of life. But let it be stated that thesesensations are stored, on a computer type in the hild's brain as it were,kept there for future reference. The sensory re .once tapes indicate eventhe movements during labor and the child's brust'n, -forth into the worldoutside. The first days and months of postnatal life are full of sensorymovement experiences which must be taken in and stored. Few of these move-ment experiences are self-initiated for the very young.child is highly de-pendent on those around herfor sensory input of all types.
It is these sensory movement experiences which parents, adults, and otherswho care for the child provide. We know that the kinesthetic senses arenot the only senses stimulated,' But for-our purposes we will considerthese alone. The branch root which entails motor development is then theearliest to develop, and possibly the most important, as it may have strongconnections with other areas, branches', of development. This is of course,hypothetical and hiohly.speculatory at this time.
Taking these things into account I will go on to state that the structureof the developmental tree produces a trunk which is the combination of allof the -developmental roots. Each of these roots are interconnetted andinter-related. The trunk is the storage place for all the abilities andskills which form the developmental process of the child. The branchesare the diverse. skills Which come from the combination and use of the variousdevelopmental factors within the trunk. Remember that the ultimate strengthof the tree is dependent upon its base in the strength and full .developmentof the root system.
What this analogy is attemptting -to point out is that the child requires andoftentimes does not receive-a strong base of sensory development, the inputreference tapes. This is especially true of children who are handicappedbecause of neurological, brain or central nervous system damage. This damagecauses mental retardation, physical handicaps. and sensory impairments. In
particular this refers to students in the severe and profound range of mentalretardation, those wittOWId to severe brain dysfunction and cerebral palsy,and those who have limited sensory function or total loss of vision, speechand/or hearing. The base, root development, so necessary for development.is absent betause it has not been provided.- These students are not ableto take in this important information on their own, but require specialmeans of stimulation to begin and develop comprehensive reference. tapes.It is for this purpose that this section is being presented and the reasonwhy it should be a strong part of the developmental programming for the men-tally handicapped and sensory impaired student.
GENERAL MOVEMENT IN PRACTICE
A small child is carried about by another person. The child does not movefrom place to place on its own. Movement stimulation received is;from thesensation of movement throuah space, the rocking and swinging in a swing
3 7
83-
or.mother's arms, 'bouncing on fathpr'S knee, the turning and twisting thatgoes on in. the everyday life of the child as it is moved about'dressed,changed, bathed, fed, etc.
The sensation of movement which the child receives is stimulating andsatisfying. For the most part these sensations are enjoyable and relaxing;a child will go to sleep much easier when helersouthed and rocked by a parent.The usefulness of the sensation to the child's motor development is based uponthe resource typed which are stored concerning these initial early movement ex-periences A child who finds movement. enjoyable, comforting, stimulating, secure, relaxing, will have little difficulty accepting and initiating his ownmovements. The security and motivation here is most important for the childand the student.
For the student not able to fully take in the movement simuli afforded addi-tional work and cues need to be provided. This student requires a more con-centrated program of general movement experiences, The general movementactivities are then integral parts of the normal.motor development process.Their importance lies in the formation of a strong base, deep roots withwhich to hold the developmental tree, a base of movement patterns whichlead to and are part of the abilities and skills to follow-.
The movement .sensations received are held in memory, resource tepes. Thetapes act as the vital, link to th2 perceptions and concepts which must bedeveloped in order txJlearn movements'and develop. independence.
As part of this program the general movements activities will be used asearly motor development stimulations. For the student who shows signs ofdifficulty with factors such as body image, spatial awareness and/or ageneral inability to sense or accept movement possibilities of the bodythese activities will be indicated. Their use will be a specified part ofa total program for this student.in Physical Education and Motor Development.Because the general nature of these activities i t will be difficult to
exact uses for each activity,. The benefits arise from the student'sabilities and needs as related to movement experiences. For the deaf -blindand blind student the gross'movements of swinging, bouncing and rolling aremost beneficial and enjoyable. A strong base of body image, spatial-aware-ness and movement possibilities provided throudh these activities is especiallynecessary to the student's development of physical-motor and mobility skills.Their use also during the plateau periods between each skill accomplishmentis invaluable, The general movements here will be closely related to theprevious and upcoming skill.
GENERAL MOVEMENT ACTIVITIES
These activities may take place in anyone of three stituations; on a trampo-line, a mat or carpeted floor, or;as the student is held in nt:,1 teacher's orparent's arms. Many, of the same activities may be 'performed in all three.situations. Some-are-specific to the situation. The activities will be _
___.,__
88
-84-
.thus organized as to trampoline activities, mat activities,'and-teachersupported activities. Where an activity may be used in one or the otherof the situations it will be mentioned in the description and discussionof that movement activity. All of the activities are performed passivelyby the student. The teacher along with. the help of aides provide the move-ment force and direction. For_ ,the student these activities are play andshe should simply take in the stimulation offered through the movements.The teacher is.to see that the student receives this stimulation throughthe tactile, kinesthetic, visual_ and auditory senses as much as is possible.In actuality these activities are as much or more exercise for the teacher
. .as for the student. The teacher will therefore need to be in good physicalconditton. If the teacher suffers from inhibiting handicaps or conditionsof the heart which may cause difficulties it would be contraindicated touse these activities or another person may be designated for this responsibility.
TRAMPOLINE ACTIVITIES
Before descriptions of these activities are started it will be best tostrongly remind the teacher of the extreme necessity of takingicare toprotect and safely watch the movement and support of the student's headand neck. Many of the students for which these activities are indicatedare not able- to support. and control the head and neck. Because of thevigorous, physical activity involved with these techniques caution-mustbe taken so as not to cause injury or to take undue chances with theapplication-of these methods.
However, this should not be taken to imply that these methods are overlydangerous. They are no more dangerous than ny other method of stimula7tion or therapy when the proper procedures and precautions are taken.
The trampoline is an especially unique piece of equipment which providespurposeful and beneficial movement experiences. It may be effectivelyused to provide passive, passiveassistive or self-assisted movementsof a stimulating, and enjoyable nature. The possibilities for movementexperiences are great, and certainly pass beyond those given here. Thelimits lie in the teacher's capabilities and the student's needs.
A trampoline of secure, sturdy construction with steel springs and aclosed canvas bed is suggested. The size ranges from 4 x 8 bed on up.
(1) LYING BOUNCE
Position - The student lies prone (on stomach) or supine (on back). Theactivity may be done either way. The teacher stands on the trampstraddling the student's body at the waist preferably.
Objectives - The student should receive some initial movement stimulation.The act of bouncing is supported movement in space. There are sensa-tion of movement in almost all of the joints of the body. Though
-85-
basic,-these movements provide a base to movement and initial inroadsto self-image, spatial awareness, directionality and body awareness.
Action - The teacher begins by lightly bouncing on the bed. The tea-cher's feet should not leave the bed. Watch for the student's reactionto gage acceptance of this movement. The force of the bounce may be in-creased as the student tolerates and thp teacher.is able to perform. Toprovide:extra stimulation and experience-the teacher may shift his weightwhile jumping. The teadner bounces one time by applying force on the leftfoot; then bouncing on the right foot. The sides are alternated. Thebounce shOuld give the student some sense of. movement to the side and possi-bly elicit some reflex responses. The bounces may be increased:as the stu-dent tolerates, Do not bounce so hard sd'as to flip or turn the student over.
Watch for excess movement of the joints of the body. The arms O legs and headshould net be jolted or harshly bounced or "flopped" on the trampeebedo Thevariations of positioning the student on his side or in a tuck position whilebouncing may also he done.
(2) BACK BOUNCING (leg manipulation)
Position - The student lies on her back. The-teacher is positioned at thestudent's feet, standing or kneeling.- -The teacher grasps the student's:ankles firmly.
Objectives *- A. sense of the movements of the legs and hips required forwalking-nd sensation of those muscles and joints required for supportand walking, turning and rolling is elicited-from this activity:
-Activity - The teacher bounces lightly holding. the student's legs. Pushslightly on the downward bounce and pull slightly on the upward thrust.The knees are kept locked so that the force is effectively felt throughoutthe leg and especially at the weight bearing points on the hip. Beginningeasily the knees may be slightly bent. (flexed) on the downward thrust, and
.straightened (extended) on the upward bounce. This may be gradually in-creased so that the knees and hips are flexed. and-extended. The legs maybe alternated; first the right then the left alternately flexed and extended.
To twist the student slightly as he is bounced, hold the ankles as above.Turn bOth legs. at the hip, keeping knees locked, just one way then the otheras the student bounced. One leg may be alternately crossed over the other.Do not turn so far so as to turn 'the student completely over. If she isturned to the side-lying position, this is far enough.
Watch that the student's head is not abruptly turned to the side.. Also,when bending the legs do not force them to bend or straighten forcefully.They should almost fall into place. If the student resists a movement dodo not attempt to take the legs beyond this point. The legs may be flexedor extended, without bouncing, sp that the student is aware of what is tohappen and may more readily accept this action. Encourage the student toassist in these movements if possible.
The rhythmical motion of the bounce and the twisting or bending is most im-portant. The student will accept consistency in bounce and manipulation much
9
-86-
easier. The teacher must be sure of the movements to be performed and theappropriate actions to take.
(3) SITTING BOUNCE
Position - The student is seated on the trampoline, on' oe near theThe teacher is seated behind the student so that the student is sittingbetween the teacher's legs (supported). Or the teacher stands, behind.or in front of the student on the trampoline outside the middle area ofthe tramp bed. (unsupported).
Objective - To increase awareness of self and bodily movement in the sittingposition. This activity can also increase the postural balance andstrengthen necessary sitting and eventual standing.
Action - The teacher lightly bounces the student on the tramp. In thesupported postion the teacher may gently manipulate the student's body,bending at the waist, moving forward, backward and to each side, touchingbody parts, raising and lowering or extending them to the sides, forwardor back.
In the unsupported position the teacher proceeds as with the lying actions.Watch always that the student is able to maintain the sitting position withlittle difficulty and is able to support himself in the sitting position.The force of the bounce may be increased as the student is able to acceptthe change and maintain position. The teacher may vary the directionalforce by bouncing on different points on the tramp bed and moving aboutas she bounces.
Other positions which may be' similarly used are the kneeling and hand-kneecreeping positions. The student can assume these positions while bouncingand receive many of the same Objectives as with sitting.
(4) BOUNCING FOR RELAXATION
A student who is having difficulty accepting a new environment such as thetrampoline and its varied movement possiblities will be tense and excited.This anxiousness.is a,definitely inhibiting learning progress. The studentis unable to accept the movement stimulation being offered. In this case,and possibly in all initial encounters on the trampoline the student willneed to be physically relaxed before the movement stimulation can be effec-tively accepted. Also, the student who is hypertonic - having excess muscletone, spastic or athetoid cerebral palsied, or affected'by some form ofparalysis will need some relaxation and relaxation training in order to beable to accept learning stimuli.
Position - The teacher is sitting on the trampoline bed with or near thestudent who is lying on his back in a comfortable position. Ifap-plicable, the teacher may support the student or hold the studentwhile bouncing.
91
hci
-87-
Objective -,To promote the occurrence of relaxation and security in movementfor the student.
Action - All bouncing movements for relaxation will need to be rhythmic andlight: The feeling will he continuous and flowing. The teacher must supportthe student as much as possible, in particular the head and arms. AlOng withthe bouncing movements the teacher may slowly rock the student from side toside. When the student is lying on his back this side to side rocking can beaccomplished as the teacher lightly boUhces first on the left foot, then onthe right. Do not attempt side to side rocking until the student has gainedsome .acceptance of the bouncing movement. The rocking should be in rhythm withthe bouncing.
This activity. can be particularily useful with the student who may takeawhile to accepta ne0-situatton. The movements are not overly exciting yetoffer some more movement stimulatiOn. This activity is most effective whenused as the basis for developing more active and controlled movements on thetrampoline. Taking care not to over excite the student, the teacher may gradeually increase the force of the bounce, still keeping the rhythm. If performedproperly the student will be receiving more active movement stimuli withoutbecoming over excited. This may take a period of time and gradually increasethe amount of time the student is on the trampoline along with increasing theintensity of the bounce. For the student who lacks trust and. security in his _a.or other person's movement this.activityacan be most beneficial.
(5) ACCWIPANYING ARM AND LEG MOVEMENTS
As the student is being .bounced in the sitting or lying position the armand /or, legs- may °b4-passively moved, The support and assistance are the re-sponsibility of the teacher. The student may be encouraged to assist withthe movement if this is an appropriate objective for the student.
Position - The student is sitting or lying as in the previous two activities,(#3 and 4`4).
Objective - To present the stimuli of movement of the armsand leys in con-__jaction with other bodily movement. This may be the first intro-duction of coordinated movements of the total body-leading.to or inassociation with the introduction of crawling, creeping, and rolling.The introduction of body image and laterality.
Action - One or two persons may be used to move the student's arms and legs.Al i movements are simple and essentially non-directed
Arm Movements - The teacher should be holding the student's wrists. Somesupport of the student's.arms can be given when the teacher is seated behindthe student. The student's arms can rest lightly on the teacher's arms andmove with them. Movements are free flowing movements withinthe student'srange of motion.
CLAPPING - The teacher brings the student's hands together at the student'smid-lineeat about chest height. This may be charmed so that the hands are
92
-88-
raised or lowered and brought together. above the head or below the waistor any where in between. The hands may also be brought together to the leftor right of the student's body. Make all movements deliberate and as rhy-mical as possible.
SLAPPING - The hands may be placed or slapped, separately or together, atvarious points on the student's or teacher's body, or on the trampoline asthe student is bounced. The points and combinations of hand placements arenot limited. The hands may be placed on the knees of the student on onebounce, held for a bounce then placed on the knees of the teacher. Cross-over, placing the student's right hand on the teacher's or student's leftknee, leg or ankle, then repeat with the other side. The hands. may be placedon the bed or head to reach and move, Touch legs, arms, toes, ankles oppositeand same sides. Compare with touching similar parts on the teacher. This helpsthe student relate to another person; she is able to feel if not see other, per-sons and discover likenesses and possible differences. The teacher'namess partand may even make up a rhyme or sing to go along with the movements. Althoughthe variety of movement explored is important, attempt to keep as much con-sistency as possible: Do not attempt to introduce the student to too manystimuli and new concepts all at once.
(6) STANDING BOUNCE
This activity should be used only with the student who has sufficient legstrength to stand and a minimum amount of trunk strength to maintain. an erectstance. The student must have completead control and balance. The pur-.pose of this activity is not to lead up to the jumping skill, but may be usedfor 'this when the introduction of jumping is an adequate objective for thestudent.
Position - The teacher stands with the student facing the same direction asthe student. The teacher holds the student's arms at the elbow or atthe wrist. If the student has sufficient dynamic balance the teachermay stand facing the student holding his hands. If necessary the tea-cher may hold the student's elbows as the student's interlock this gripby holding the teacher's elbows,
Objectives - To promote stimulation of movement in the standing position. Toincrease balance possibilities while standing. To increase the posturalstrength of the legs, hips and trunk.
Action - The teacher must consistently watch the placement and position of thestudent's legs and feet. If the student is unable to support herself and standswithout some difficulty, putting joints out of normal position, thiseactivityis contraindicated until these difficulties can be corrected.:
Supporting the student as much as is required the teacher bounces on thetrampoline with the student. The teacher provides the bouncing force. Thestudent's feet should not leave the trampoline bed. The teacher may addvariety by shifting her weight as she jumps or move the student's hands asshe bounces: -A different sensory input is afforded when the student's armsare moved up above the head, out to the sides or down to the sides.
93
89-
If the student is able to support himself in a recovery phase of jumping be-gin to get the student's feet off the bed on the bounce, The teacher needsto push down with a quick forceful action which" will rebound the student offthe .bed. This should be light at first: but may be increased as the student-accepts it and the -teacher is able to perform the manavcr:
Other movements may be added and performed simultaneously with the jump ofthe student. The student's hands may be pulled slightly so that he twistswhile-in the air. The student may be pushed or pulled. lightly so that _asher feet leave the bed she moves forward or backward. By pulling on thestudent's arms and moving with him the teacher and student may jump in acircle moving in.either dire(eion, left or right. As these movements areperformed the teacher keep up communication with the student concerning thedirection of movement and the actions being performed. The teacher may .singor make up a rhyme about the-performance.
The bouncing of the student while standing may Olso be accomplished asthe student is unsupported.-- The teacher may want to use spotters aroundthe trampoline or a safety be The student stands just a little Off thecenter point of the tramp bed. and the teacher stands opposite him, just a
"elittleewayefrometheecenterpoin-teeeThe teacher:bounces lightly at first. Watththe student's stance and ability to support herself and make 'adaptions to moveement. 'As the student is able to, increase the force of the jump, do not go beyondthe ability of the student.
This activity calls for the independence of the student. Although independenceis appropriate and necessary for the student, it should not be forced upon him.Only the student who has security and trust in the teacher should be put throughthis activity. The introduction of this type of independence for the -blind anddeaf-blind student is quite important and can lead to a greaten amount.of in-dependence when the introduction is gradual and the student is aware of thepurpose for the activity. The student must be willing and able. to work withthe teacher. It is the teacher's responsibility to have this self trust Andsecurity built' within the student so that this activity and future steps atindependence can be successful.
MAT ACTIVITIES
(1) TUMBLING WITH THE TEACHER
In order for these activities to be performed properly and safely the teacher,must take care to support the student's head and neck. Also the teacher mustbe aware of the movement and position of the student's body as well as her arm.This is necessary in order to avoid injury or other difficulties for the student.These activities are of essence Quite physical and vigorous. The student willreceive the feeling of being tossed about and possibly strike the mat roughly.These are common, normal occurrences in normal. play and should hq.expected. The
94
-90-
student., with the help of the teacher, should learn-to accept the vigorous,rough, movement. With experience the student will learn to enjoy this type ofactivity and may eventually overtly seek out vigorous play.
Initially respect the feelings of the student as to the acceptance of roughplay. Some students may take to it quite readily and others may be initiallyquite fearful. In either case the teacher is responsible for the introductionof a safe, secure means. of play and learning for the student.
Position - The teacher in a sitting position cradles the student in her arms,the student's body perpendicular to-the teacher's. The student is lyingon her back in the teacher's arms,'
Objective - This activity provides the student with a variety a stimuli elicitedfrom the tumbling movements. Directions change frequently for the studentand movement may be in two planes at the same time, thus stimulating moreareas of experience.
Action - For the teacher, movements are backward and to one side or the other.71----Roll backwards and over the right shoulder, kick your legs up and overto the right to provide momentum. You should come to a sitting position afterrolling.- Take care to watch for the student's head. Take the weight of yourbody on your shoulder first then your elbows, always holding the student inyour arms securely. (Roll backwards and over your left shoulder, return-ing to a sitting position after a log roll. These maneuvers may be repeatedseveral times. You may stop between each to make then a continuous roll in acircle.
The teacher may wish to practice rolling with a bag or mat before attemptingthis activity with a student. Always be aware of where the student's headis and where you place your body weight. It may not be advisable for someteachers to lie on a student.
(2) LOG ROLL
This is another teacher assisted roll. The teacher performing the roll withthe student firmly in his grasp. This stunt may also be done without the stu-dent rolling with the teacher.
Position - The student lies on his back. The teacher kneels over the student.The teacher places his arms under the student's arms and around his back.One of the student's legs is positioned between the teacher's legs. Theteacher holds this leg with his legs. The teacher supports the studentbut does not hold tightly.
Objective - The log roll is a developmental skill which is important to even-tual crawling, sitting, and walking skill development. This activityprovides a basis in movement experience for the directional movementrequired for the log roll.
Action - The teacher executes a log roll (sideways roll) along with thestudent. The student remains suspended in the teacher's grasp throughoutthe movement, Be sure to allow yourself enough room on the mat to roll with
-91
the studeo7 Toe two of you will take more room lengthwise than either oneof re alone. A long mat or series of m.,its 16-20 feet in ler,;..fth is hest forthis activity, f.311 in both directions.
Action - Without the student suspended by the teacher the action of thestudeh-t is similar. Tiv?, teacher positions the student and provide:: whatforct:: is necssary Lay the student on her hack on the mat. To roll theleg and arm oust be raised and moved in the desired direction of movement.To roll to the student's left the left arm is positioned at the student'sside or above his had. The ripht arm is brought across the body. Rendthe right 1c4 at the hip and 1,:ee and bring it over, this wi I start to turnthe st.,,;dent's body. Be sure the studr2nt's hand turns to face the dirctionof movem:mt.. Start the student over and allow gravity to continu,,'. the move-went. .7u retUrn f7om the stomach the left arm is brounht across the back and
Ieq Ptilling lightly at ru points will return the .-I.Jud,..3nt to the4peat the roll in 0-!e same direction. (Jy. r:iturn to the
startin ffint by .ollin,71 to the right, rev2rsing the direztion atoo
SITTfOG Wl7f THE rEACHER Ass:stPd Arm.Movements.
,
asc.isted ar41 wiT:ch are des(.ribed in number Five f,.5) of thetrwpCine ti s so he done on the mat alone. wcth or ins toad oft?oir usq C 1 Ttey should b..e used ;in the place-fthera=1.00ine n student -15,, especially fearf!ll of
line. Th!.. fear nd anxiousuess would he (-7re,aly inhibitinc zheto rIthr activities oh(...hriay-h
forin on the wi1l he given Each of these may ju:t as easilyof
PhsitThn Yudrt t sits hetwqen the teacher's legs. The tr.tacrsud7cTFand holds tl-,q -:;Ludent around the waist, er upper ar!.,s.
increase the experiences :ending to the deveioDmoll. oulipc.,00a;tv- concept of movement through since
Action - The teacher tilts the student to the side. The stud.ar,t,oy putnng his hand out 1,o :,,Loo his in ,1 If he does not dr thi=., cut it cur
there for him. .This a reflex-and may be aocc:ntuated by h.)1d.:.Qarm up and lightly pung hack toward yourself. Do this to ooth s';des.tilting to the side may also. he done with the hands held to the nody. This 5rillprovide Fore stimul'l to the hi rs and trunk. .
The direction of forward and bach and the use of the legs in aretrodUcd Uhroul,b rOckihti. The student may be held in the teac.h:Y.'c. Ian in atuck position.. The teachr holds the student from behind the st:ynt1.5. kres.The teaeher lays bc-i_ck, brioqing his legs up and the student Lact, ;nthturn to sitting then bene, forward .with the student. . Be. care-Ful so rs not. io:bend the ztudent too far for rd, which may cause strain or 4,n
(4) TY,C1(. t'ilhti n-iel Mriveniants
These ntivities Aro acc:-,-(.!1lished the same as those in number of Owline activit4c7;, The bouncing is excluded on the mat

(5) FORWARD ROLL
This activity is performed as it is described in the Marihulation Activities.Section,: page , except the object here is for the general movement ex-
perience of moving ihrough space and body awareness. Folloo the given direc-tions to guide the student in the roll. The force is totally provided by theteacher. No attempt should. be made at this level to get the student toper-form on hiS own. This is simply not the expressed objective of thr-se-actjvities.
TEACHER SUPPORTED ACTIVITIES
These activities are definitely for the teacher who is physically able toperform them with a student. Even for the most physically it teacher agood deal of caution will need to be taken to prevent a child from falling.The teacher must be sure that her strength is great enough to hold, support,and move the student safely and effectively. If the teacher is just notcapable, these activities should not be-attempted. The other activities givenpreviously in the General Movement Section will suffice for the student's needs.
(1) SWINGrNG
The student may be swinging from the arms or by the legs. In either case theteacher must be sure to have a, strong grasp.
Position The teacher is standing behind the. student. Reach around the student'strunk from under the arms. Grasp your hands tightly and bold.
Objective - To provide a stimulus of moving freelytnrough space.
Action - The teacher leans back slightly and begins to step around in a circle.Tne student is :Lifted and swung around as the teacher spins. Watch that youkeep your balance and that there is enough room, free from obstacles, The stu-dent should be swung only 2 or 3 times around before stopping. This may be re-peated. But only after the student is stopped and observed to have no, ill effectsfrom the spinning. The student may have .difficulty regaining equilibrium.
Action - Hoding the student,.by the legs in front of you, spin himHand your-ielf around as above.. The student'is held about the waist. The teacher'shands should be clasped behind the.student's back. The student's legs straddlethe teachers at the waist.
Do not suspend a student by the ankles and swing her in this manner: Th chancefor injury is just too great. It may look Fun but it is difficult to return astudent to the floor or mat, and it s to hand to hold a sure grip en thestudent's ankles.
97
(2) 1URNYW,
!'osition - One of three positions f,;ay e used to support and turn thestudent,The position used depenL Irdon ability of the teach9:r. Es:;ehtiallythe saTe move::loht experiences may be obtained from either of the positions.
'Fireman's carry" -..The student is held on the teacher's shoulders,lyino perpendicular to the 4:ez,cher's body.
The student Is cradled in the teacher's arms as in number 4 o theMat Acti.',iities
.
'Piggy G3Ckl - The student rides on the teacher back. The studert's.arm are su,,,,bendee over the teacher' shoulders. The teacher holdsthe student's imper The teacher ma,y- bold the student by the
f-cr,'. the .rear i the student is capal..11.1 of 'ecldinj the teacheraround the neck. If possible the student may hold onto the
aroond the waist with her legs,
Objectlye. - To provide tie movement-expe;--ience of mov.ing.thro6ph space -sus-bnnded or 71rtiAlly supported. The sensations are felt in the head in
mchaiiislo,:., and in the joints of the bod,. (Vestibular
Action - As :..;ith the swinging about,- the student is spun around. The teachermay move room, stop, change direction, turn fuil than half'turns andmate as much variety of turning movements as possible.
). :;17
As the ability and size of the teacher allows the following activity may beperformed. The student is held in one of the positions, or C, as givenabove in activity number two. The teacher, with the student walks over, orunder a number of obstacles or pieces ofeouipment in the room,. Examples are:a balanze beam, stairs, bench, parts of an obstacle course, etc.
(4) TOS'ANG
This is an TAtremely risky activity which is most effectively performed witha. smal chid by a teacher who is physically capable; The activity should. de-finitely not be attempted uness the teacher is capable of controlling theflight of tee student's body and safely catching and holding the student. Donot under any circumstes Attempt this activity unless-you are physicallycapable of a successful performance! The effects for the student is not wortha possible in,jury which may occur,
Position - The student is held by the waist. The teacher stands on his kneesBe ,or on The o you have a stable. base and are ready to accept the
student's force o andincj
98
-94-
Objective - To provide the student with the experience of free movementthrough space. The student moves for a short period of time un-supported.
Action The teacher tosses the student no in the air. At first the studentis simply raised to shoulder level and released. The teacher catches thestudent almost immediately. This should be.. repeated several times to givethe student the feeling of what is to happen. As the student accepts andthe teacher is able to safely perform, the distance the student is tossed.may be increased. In actuality the student 'snould never be tossed more than4-6 inches from the teacher's hands: Alklays be very sure that you are ableto accept the student's weight and control the landing. fleyer .Wempt togo beyond your ability to completely control this entire activitY..
This activity may be performed on a mat or on the trampoline 85 the teacherand stuJent.are jumping. Always use great caution when performing this activity.But do not use it if you are capable just because of the apparent danger.The teacher may practice with a weighted bag a life size doll in order to gainexperience. The possibilities for movement experience for the student shouldbe allowed if at all possible.
..95.-
)3STACLE CCPRsF---
The use of a s!Lccializad course made op of pieces of eQuipment which serveas obstacles tt;rough which the student will be asked to maneuver, is an--essential p cf r:uly program for-deaf-blind, blind and sensory impairedstudents. Even for students not handicapped by sensory iMeairments an ob-stacle-course is an 7,7sentlal part of the Motor Development prohram, Fortho deaf-4)1ind, ard :Ind students the obstacle course cannot be excluded,the imoortancro of the Ostbdie course lies in the development 0 not onlyphysical-motor ski l but the mobility skills which are so necessory fo- in-dividuals who ae visually andicapped.
Many students may not :ave obstacles in their home with which .:hF-y have tocontend. Not ail-children are allowed- to explore sMrs, if.thfl : student'shome has cta!r'=,--:-,:n ar,-. not allowed to-climb on chairs or t-bi:os. Somestudents wir not navc yard in which to explore. Oftentimes Many handl-.capped students ire ncc allowed to move about freely in their hocle environ-ment due to a 1.1.,7.k ccinuous available supervision, or to the inabilityof the parents andthei- ..=amily members to recognize and understand the needsof the handicapped
The Nrisical Eo'ca7cion-Motor Development prooraM needs to include the obstaclecoi_rse-as both a vmet e.;berience and as a -!r:arning experience. it's use shouldbe a realer 2art the Physical Education period or as a part of the daily routine.
STALF (;tipi 1"
In actoa ii tv almest any object which reqUirs that the student move Qn,over, undcr, around, between, or through it can be incIu0ed in the course.Many educational -Cupbly and physical .education or recreation supply com--panies have oeuipment which mavbe purchased tu he included in en obstaclecou-rse., Thes, OiPC, must be sturdy and well bOilt. If th tudot tomove over at; ob,-ject it must be able to withstand this weioht an .1 be structur-a3l sbuhd. cts which 6re stable and stationary are 2,ugqested. If thereLs a chance e fafling nc s'liPping, standard tuml)liro mats rTus;... be.includedas equipment aril es basic parts of the course.
Macy obstacles may be made by an industrcous teacher. Al l that is usuallyneeded is soma wood, 2 x plywood, some nails, reds6r_ebeIs, etc..,.'a.ribus pieces of equipment usually found in the gym or class room may beused as part c th course, by adapting them or using them as they are,i board of any 'size, or length way be used as a. baln!.7c Vam; a tablecan be w.7.1ked ova r or crawled under; poles can be suspeno between chairsto steo ovcr o crawl under; chairs may also he placed so that the student.has to in 1k around cr over them; parallel bars can be covered to make aimnnel or leyoered so shut: thy student has to stew or crawl over. p: oaksof Variou car 1..).e placed on the floor to walk on A ilinht- of stairsor therapeWj Ytebs re ha used as part of the course. The use of 'materialsand a-vailable ra.-!uinrrit 1-; dopcnd,ant uror the teacher's needs and versatility.
1 u0
-96-
My,11',i;:c FOR OBSTPCIF COURSE
The obstcla cu-se is designee to elicit responses which are wecific tomovemet. skills and variod according to the individual. The prime generalobjective would ;,:e to provide a lame variety of movement e.xperenee within°inc. e.ctivity The student specjfically.will learn to accept and cope withobjects in his environment. AU of the 'regular objectives are included;-self-image,-body awareness, agility, balance, simple skill development',laterality. The basis_for eventual mobility is gained. The student mustwalk or somehow move around the course meeting obstacles and somehow over-come them, These se-e things will occur as the student moves about a room,a hoi.cse, r school-, on city streets and sidewalks.
An objer,tiv,t of the obstacle course not normally found in teaching movementthe develowent of a sense of series relationship, This Concept
is not ri;,.,11zed but its basis may be set and transferable to a-morecognitive use in the classroom. The student moves from one cituation (object)to another. The ouject or the movement from one object to another causeschanyle of '.iirc,ction, to the -sides or of and...down. There is a beginning andan (?)-idn: A h.[,.r's of steps, objects, follow one after the other. ThisHea of mcrments will occur both 'in the more difficult movementskj l;-;. and areas of the student's schni and post school experiences.
nyinl that the obstacle course is Mormalizirg" I will say that itfor making the handicapned peron's life a little easier
for it's use as a learning activity.
PPCCi..DURJOR USE OF THE OBSTACLE COURSE.
The ctstacla cou-c should. be made up of at least six to eight pieces. Moreoirces may 'pe incl,.:ded if dosirable. The working space of the room or gymis trE, to orfor the course size. All pienes are out together -.
in a conctinq faOlion, -Rey do not need to touch or actually connect.2ut oc* slit Od lead into the next. Variety of movements reouirodto ctego c. st the course is the key to the working of the course. Build indirection -old change the sequence, direction and placement of thecourse C7,1- -F,Tic!-, f.ly it is to be used. Contrary to the common thought, thestoden't sho!.0 'f.]t he able to recognize a set seo,Jence of objects. The -Vout-
side wol-Id" cl0Q5 not allow her this advantage and neither should the school.
Under no circuostmwes should the obstacle Course be considere6 the completetTogram of 9fty's;a1 fducation-Motor Development for any student, It's effec-tive use lies in its coTbination with other activities of motor developmentor "} vsi cal Ju' 1 t'n By the,sa*_tokerne studetC,: should he deprived theuse o the Obstacle course. Walking or crawling are not kerecuisite forthL: t' ,c' ef tre coursc The studentls needs for the ..-vement experience arethe ci.iteriawhil7 m;.,y, he considered. All students will -require varied amounts
of assistance '!11 i%,ecotTating the course. Ea:chstideTI,t-should he afforded the
movement expeliences PO at':,er what the handicap.
It may t',D. of heIo to both tho teachen and student to have two NssibTythree different cours,,s. Each c:ou(se woud be deslpn,-6 for a specific level7f ability o for spec'fic needs There mly he two levels of difficulty andthen 0110 which incorporate:: many tactual and sensory e,.periences. Acoursc maY be des'icned and utill2ed so thelt the student has to perform
speci'.'ic skill io to a piece of equipment, no matter where it isfrluno the.ce (La, on a beFIch the student must crawl, on a board hefzust '.:1:;mb-:n.7.; '017j: he must: Crimb up, than'ree;7, across, etc.). Theseactivitie clll for- WoIner level of caoi tive 'unctloninc;, but are useful:nd
.%,;T:;'''. of course is no to the teacher and the limits ofThe resourceful teacher ar easily find
mab.y fron, which to.-Fbrr o can uc: adapted t'-.) suit_the ntae(*... of ha Wi,atever the siix,ation,-the s,lould not ba de-prived be a.tzaued from Mi.;
hi2
-93-
EARLY DEVELOPMENTAL. TRAINING'
There are several developmental skills .which preclude. the more dynamic of.the levels of development usually referred to by developmentalists. Theseskills-play an important roll in the eventual achievement of these goals.These skills are patterns-or parts of the.whole which are integral factorsin the developmental process. They are the steps in. the spiral staircaseleading up to the next level,of development.
The activities .cf general movement in the previous section of this programcan be closely related to these skills. However, these skills are just that,
.
skills, and not simple.activities. They are specific steps to a goal and notgeneral procedures. The activities to reach these goals will be organizedinto the areas of locomotion, manipulation, stability, and perceptual-cogni-tive. The goals within these areas lead up to the first level of developmentin that area. In locomotion the goals lead to walking, in manipulation theylead to object control, in stability they lead to general control of the bodyin a. stationary position; the perceptual-cognitive goals lead in a generalnature to skills in perception and concept dev.elopment. The perceptual-cognitive goals may go beyond the area of physical education-motor develop-ment but are actually interrelated areas of development where physical-motorfactors play an important role.
THE USE OF DEVELOPMENTAL GOALS
For the student who is,-not to the first prominence, of development in the areasdescribed the proper gbal should be given. The goals are presented in develop-mental order. Find the:.point at which the student is currently. performing andwork on the activities for the next goal. The student should be performinga skill consistently well before it can be said that .a goal has been reached.
. For the student who has developed splinter skills, skills learned- out of develop-mental order, find the appropriate goals below and work on-these along withmaintaining the present Skill. This wi)1 make it possible,fwd the student tobuild a more adequate base while still holding an already-achieVed level.
Use these activities only when necessary for initial developmental achievement.Their use wiil prove unmotivating for the student who is far above the first.level of development. It will be a good idea' to use related' activities fromthe General Movement category.. These will, help strengthen the student's effortsand experiential advancement. The general movements can be used beyond theachievement of the goal. The activities for the goal should only be used inter-mittently as 'a means. for review or for purposes of overlearning.
These activities.are taken from an adapted, re-organized version of theGuide to Early Development Training) James Tilton, Donna Liska, and JackBourland, Eds, Wabash Center for the Mentally Retarded,-Lafayette, Indiana.The particular activities for motor- development were written by Miriam Bender,PhD, RPT of Purdue University. My thanks and special acknowledument go tothese -people and the other contributors to this well written manual.
1
tOr.OTOR AUIVTTIES FOR rARI.Y DFVELOPMET
ood!s 4:0" "kSirined to lead tP the r,uccessful aaisvement of tte perfbr-mance Jf creepInc an,7' f..lventual independent walkiog, The activities in thestabii1y 61't WAll some cases overlap or be quite the same as in this
pals wh.*,ch are similar or which lead'to develop-ment of the sme tog!ther. The ilhird goal in locomotionand the fIrst arn the 0 tho ck,:velopment of the fourthoal in locomot-qIn k nTosy re'iated to 1-%)mbers one -In stability. The sta-hility goal upon the ,Mevecltcrt of lecemtion goal in thiscase.
of this sect. or and the others hwtd he followed as theyae describad. :1'27e! intances wInre handps inhibit thc use ofrpotivat%onal forms of motivation shoulq be found. Where sightclnd hea''!n to any :.,gree use it to 1 u:.:mst potential. Objectswhich pr:-:.vicle 7,e;is,.,re, much stimuli-visual and aildittTy are important.Deai the sza1 ni-.'7, needs. to achieve Ps much.as posible, This willmore I pa ,?ad 1e a strong 7coundatiop for fnrther.
The fol--F-ci-r. 1/2171 L1c i ca low that of tne Guide to TrI v Developmentalas Tven. No cifc eouipmpat is nPcessary
cep: a mat-,
F.
CONTENTS L0C0MOT1T Page
100
chi is able to hold had. erect without supportov.7:)-- your- shpulder -1-)d when lying pr his ba 1
Goal: The child able to lift Oead and upo,?..'
on ..... ... .......... 101
,Lhild holds head erect when support-0 r the
....... ,....., 102
(4) 6.7=a1 Tne chi o roves one litt accoss the frowt or back ofthy otire7-. or p'zii is both Hrimlbs toqether...... ......... ....... 102
(17) able to rol7 back to either ide ndn ..... ..... ....,,, ....... ,.. 100
(6) able to roll ov&r, from back to blly thboth 6irecticri,; . 103
104
-100-
Page
(7) Goal: The child is able to roll from belly to back in eitheroirection 104
(8) Goal: The child. is able to crawl on his belly progressing fromarm and leg on same side to pulling and pushing with the oppositearm and leg ( cross pattern)
(9) Goal: The child begins to push backlyino on her belly and propped up
(10) Goal: The child intentionally lexes
onto her knees when sheon straight
and extends
104
arms 106
knees, andthrusts legs forward
(11) Goal: The child uses stomach muscles efficiently
(12) Goal: The child moves legs sideward and togethermovement.,
106
to move legs 107
108
in controlled
(1'1 Goal The child rocks forward and backward and may push him-.) .A
assumes theoaf.Kwarc fe a,,surie he creeping position from - lyingon his belly lr'4
(14) Goal: .The chile Is able to move from a lying position to a
-11;.TH:Imi,a position independently 109
(15) Goal: The child is able td creep on hands and knees efficiently._ _ _ _and rapidly._ 109
(1 ) Goal: -Ne child cruises along furniture and attempts to stand-alone momentarily. 110
-(17) Goal: The child steps over obstacleswithout an exaggeratedstet 110
(18) Goal: The child is able to move about his environment withoutcontinually bumping into objects 111
t1)
ACTIVITIES -
Goal: The child is able to hold head erect with support when heldover your shoulder' and when lying on his belly.
I Kee .child lying on his belly much of the tame to stimulatehim to raise his head.
2. Gently lift his head and turn it to either side. --Encourage.him as you. work with him. Give him only as much. assistance ashe needs to carry out the movement. Repeat several times eachhour, turning his head froM site to side
105
Stimato with r, sound or tc y. from dirct"L.: in fron of hishcath, 11-rt his had :,ind tura Co find tt., toy with
t-t !lim do as much o the movc,..7riont s ho can. Ifh can l*q't ii iaid but not ho.:(1 it, help him hold it up longenouch to 'the -;:oy And watch it briefly' beforo lowering it.',epeat s.c,ivri times in succsSlon.
t. P!ace the hild on a tabe on ti21:y with hi head extendingover the oy a(1,7; sr.-;icirted 1 c..'61 with his body. Pad the table
blant or t. :ewer ns hoA enough to Liut a Httiestretc,n f n ne:k muse en say 'up as you Helptim lifthis H;:1,.:1.. r to get the chld to ho Id the position oven momentar*, several f.
5, Pin,- child on hi ha_ booge a shiny or hrighr, nbject,i'by or7e .1O3' 50 to front of hi C6 W vooau rove thu toy across ih frot
-Try i*.z t.n turn hi..L oad anc l. oil ow toe tcy tayes,i ciet. to follow the ,ibjc!ct from one slue to the
ntAr.±
1d iy on as mud', a, pos-,ible_ Play with him,talk. acc..,2 a o' 1' colbred Oeoe he can see
head up: motile of objects vfilich make noise
(2). Cual The lift up head and upper chest when lying on
1. With i-J;e ch:l.A on his hellv, place his fcrerms close to his sidesio pcsitioo in which he can push up On them,
(a) aoqie ,a toy in front of tvm, raise it -higher and higher toauao Him to. lift his head and chest rind to push up on
f~fireart,i.
h;17; raised his P,nd, help him lift higher. His:0:J11 tend to move into posi tion to take hi s weight.
When is hapr.on hold them there with \!'o r hilnqs ql-ile heholds his head. Talk to him,' praise him, encourage:nim
ih this position as long as he can,
0) cion attd Diane the child across your knees on his belly.Encounloe him to. arch his back and hold his had and legs up
(d) Yi th child on his be fly :rd op on his; forearms or han&...wth him by :Iroping or soft cloth
Tior facr, and him o pull it off. You may need Co starthy c.ovng your ow face
(e) Tuck child's knes und,Ir hi by li.f.'tIng up on his hips
and thn press'lrq hic OuttGcks back th,,:fxd his heels. _In
this peY,:ition, encorF;n1 to 'Lift his 4:ad', hell? him uo
106
-102-
(3) Goal: The child holds head erect when Supported in the sitting position.
1. Support the child in sitting position by holding his shoulders.He may be on your lap, on a table, or sitting on the edge of atable with his feet dangling.
(a) Holding him by the shoulders, tilt him backwards just farenough for him to lose his head balance. Then slowly bringhim upright again, encouraging' him to pull his head back tobalance again. If he cannot bring it forward unassisted, tilthim far enough forward for gravity to help him.
(b) Tilt him diagonally hack to one side, twisting him slightlyso. theopposite shoulder moves farther back until he loseshis head balance. Then slowly bring him back, encourage himto regain his head control. Repeat to the opposite side.
(c) Tilt him directly toward one side. until he loses, his head.balance,, then slowly bring him upright again, encouraginghim to regain his head control. Repeat to the other side.
2. Sit in front of a mirror with the child on your lap. Point outhis reflection in the Mirror. Say his name as you do. so, or saysome other appropriate word bah, little.girl,.little boy. En-conrage him to lean forward and pat the mirror. A shiny objector flickering light source may be used to hold the child's at-tention,
NOTE: Make a. game of these, repeating the tilt in each direction severaltimes to oiVe him practice in regaining his head balance from eachdirection.
(4) Goal: The child moves one limb across the front or back o the otherlimb, or pulls both limbs together.
1. Side lying: Place. the foot of the upper leg on a hassock, chairor supported by yourself. Then ask. the child to raise the lowerleg until it touches the_supeorted leg. Reverse sides.
2. On back or stomach Have the child spread his legs apart orswing one leg out to the side, Place a weight slightly abovethe knee or ankle of the one leg and ask the child to slide theweight with hisleg into the other leg,. Slide two weights onewith each leg. simultaneously to touch each other.
3. Standing: With feet apart ask the child to slide one leg in nextto the fired leg. Again a weight placed at the inner surface ofthe foot may be pushed past the other leg. Alternate with feetapart.
4. Exaggerated walk: Forward and backward. Set up markers, i.e.stepping stones, etc., which if the child follows will make thechild cross one leg in front of the other or behind one anotheras he walks over the mark.; forward and backward.
1u7
(5) Goal: The chi/d 7rbm b;,.;.c;-, to either side and back again.
1, Carry the child around with you for d whilo to stimulate a re-sponse to changes in pesition. Stno, start, change directions,turn ar-;)und, back up, lean over straighLen up, sit down, standup apain. At .the same time c)anqe the child's position in yourarms from time to time---erct ovtr your shoulder, lying down inyour arms. head one way, then the other way. Carry hitironyour back, fc.-o a while, t'nu carry i'r:jb on your chest.
(6)
Start with child- o h s hack, oll hill back and forth from-side to side, talking rlavfuil1. with him all the while.
Goal: The child is at:lr.. to rcll ovE.r, froT uack t3 belly in bothdirections.
With child lyin,) on his bac , bogih rolling him back and forthtoward side. F..a.ch time roll hio further until gravity rollshim ov..s2r onzo hif hl 7!-ot-:-we him then to lift his head and
arm i from :,mdP,r him. Help him only if necessary. ,13e-
pvt- the activity -as often as fc::-tclerates- it without'resiStaate.Make a of It. 'h alterTqc triv, roll him toward the other side.
2. Assist,",d 7:111Ci lying. on his back. Turn hishead to the 1:Ft head up. Pull his right hand acrosshis ba,-.iyflnd up just Or,:d his 'oft shoulder. Hold him in. thispo;.;itioh until nhild FOro.e attempt to complete the roll, thenusist only as :)a.e'.:ed nrt he hvi completed it.
Repositinr him on nis back a,pain and reverse the procedure to rollhim over toward his right.
3. chjk or hi:, s do. nnw 10-Hp an attractive toy and then placeit .just out of his arm's re.el and at about level with the top ofhead but positioned s:.-1 he can still see it. Encourage him 'to reachfor the toy ,wi.th As he reaches he wTh roll over.Let him'play with the toy briefly, then reposition him. Makeseveral tries to the then several to the right.
When he can do this 7.;...Tt him from a position midway betweenback endsid::,, lying pr.:pped win a pillow or wit-: your hand, thenproceed as hefoe., When he can roll easily from this position, starthim from tack-lyinq. Show n'im the toy:, as he reach'Ps for It moveit so that he must ell over to reach it. Be sue to let him havethe toy for a time af'..ar eacn successful roll.
4 Roll over with ;(!9 child lying on his back, lift hisri9ht leg with th,'; cross it over the left, pressing hisknee- toward the mat until h s 1,-ght hip is raised. Hold in this position until thp it ovyr. Id:, first you itay need to turn hishead to th& left, t :ir: n s f'ace uo, to emphasize the movement,iVe only- os.owch e;s7,1st.,,neo a- hfrnneeds to accomplish the roll. Re-
verse the pf'dtedurc t o r. h ir u roll over to the right: Be sureto give equ,?1 practiui in eath direction.
4:s; 1i)8

(7)
5. With the child lying opehis back, present a toy just.out of arm'sreach, then move it fo-jonc side and slightly above his head, keepingit within the child's field of vision, Encourage him to roll overin order to get it. Give him only as much assistance as 'he-needs toaccomplish the task; often. it is enough just to keep him from rollingback once he gets started. Be sure to work with both right and leftsides. It may be necessary to either substitute tactual -and/or audi-tory stimuli for those who are unable to respond to the visual stimulus.
Goal: The child is able co roll from belly to back-Th either direction.
1. By turning his head and shoulders first---Place the child face downon the floor.. Draw. his left hand across and under his body at shoulderlevel. Turn iris. head to the right and tip his face up. Hold him inthis position until he rights himself by roiling over. Reverse theprocedure to help him turn over from the left. Prattice from bothsides equally.
2. By pushing With arm and leg---Place the child face down on the floor.Turn his head to the right. Place one of yOur hands under the rightside of his pelvis and lift them 'sharply in order to stimulate him toreflexively bend his right hip and knee. Once.he has responded con-tinue to hold the right side of his pelvis up and also hold his rightfoot against the floor. Encourage him to tUrn himself by pushing withhis right arm and leg to turn over. Reverse this procedure to assisthim to turn over from the left.
3. Active assisted rolling---With the child lying face down, hold a soundtoy (or other attractive object) above, behind and a little to the rightof his head and shoulders. Attract his attention. He should be ableto see the toy by, lifting and turning his head. Encourage him to turnover to reach for it. Present the toy alternately on the right and theleft. Assist him when needed, but only as much as he needs to succeedby working hard at the task.
(8) Goal: The child is able to crawl on his belly progressing from armand leg on same side to pulling and pushing with the opposite arm andleg (cross-pattern) .
1. Reflex-assisted crawling
a. Place the child on his belly on a smooth floor or use twomats, end to end. He should have his shoes off. Toss orplace a toy out about five feet in front of him and callhiS attention to it.
b. Place one hand under the right side of the child's pelvisand lift sharply, His right hip and knee will bend. Shiftyour hand to the sole of his right foot to give counter-pressure.
c. With your, other hand lift the left side of his pelvis sharply,moving him slightly forward at the same time. Then shift this_hand to the sole of his left foot.
iu9
d. Contine to stimulate reflex bending of one hip and knee asyou stimulate straightening of the opposite hip and knee.
e. Do not be concerned about his arm movements. They-Oil:tendto paralTel the leg movements_ When the child reaches'theL_toy allow him to play with it for a while. Then toss it butin front of him again and assist him to crawl.tbkr,d-it oncemore.
\,
2. Gravity-assisted crawling
Hook one end of a wooden sliding hoard over the top rung of anadult chair or over the second rung of one of the small metalclimbers. Place a mat under the low end. The upper end shouldbe 18-24 inches higher than the lower end, Place a triy abouttwo feet beyond the end of the slide. Place the child on-hisbelly, head down, at the top of the slide. Call his attentionto the tOy. Encourage him to wave his arms and kick his legs.Any movement he makes will serve to make him slide downhill dlittle at a time. He will soon get the idea that if he keepsmovinq he can get somewhere. When he reaches- the toy praise himand let biro play with it for a while before repeating the activity:If the child is <;ressed in Nnu pants it will be easier for him toslide.
3. Active-assisted crawlirq
Place the belly down on a smooth floor, or use two matsplaced end to end: Place a toy out in front of him about- twoor three feet beyond his reach-, Talk to him. Encourage him tomake an effort to reach. the toy. If he draws one leg up underhim iace your hand against the sole of his foot.and hold it tothe floor (apply slight pressure to resist sliding of his foot),'When he straightens his leg he will push himself forward,. Con-tinue:to help him in tr,-; w.v, making a happy game of his effortsto reach the toy. ';,hen he achieVes his goal allow him to playwith his prize for a time before repeating, the activity,: Grad-ually. mve the toy furth r out in front of him as he begins tomove more puv-posefully.- A ball is often a good motivator whenrolled out in front of him.
4. Encourase him to crawl t% keeping him on the floor on his belly.Give him rollilirtoys whidh will stimulate him to crawl after them.Children moving up to this developmental level should. spend-atleast a total of two hours a day on the floor on their bellies tostimulate crawling. It should be remembered that the child's en-vironment and 'position should -be varied throughout the day.
5. Roll a ball or toss a to,y under a chair or into some restrictedspace and encourage the child to crawl after it and get it out.
110
7106
-6. Short tunnel - Take a cardboard carton and remove the top andbottom. Place the carton on its side and -coax'llie child to crawlthrough the tunnel. Hoops can also be used in this way. A blanketmay be spread over a table or a line of 4-6 chairs placed back toback to form a tunnel also. Be sure to leave two ends open.
NOTE: Because of spastic leg muscles which prevent earlier development ofcrawling, some children have taught themselves to roll from belly toback before they have learned to crawl. Such children resist. beingplaced on their bellies and immediately turn over. A "roll-bar" canbe helpful to prevent rolling. This can be made from a yard stick,a flat extensioneof a curtain rod, or a brooth handle. Fasten theyard stick, curtain rod or handle across the child's upper back. Manytimes- it can be run through the straps of his overalls and pinned seecurely in place. Such a "roll bar" effectively prevents the child.from rolling over and keeps him on his belly without otherwise re-stricting his activities.
(9) Goal: The child begins to push back onto her knees when she is lyingon her belly and propped up on straight arms.
1. Assisted, from tuck position, with child lying face down; placeone hand under each hip. Lift him sharply to refleXively bendhis hips and knees under him, then pull his hips back into "tucked"position.- Encourage him to push up with both hands while you tta-bilize his hips. 4-fa-needed, supply some support under his chestor forehead teget him started. Help him get his balance in thisposition and maintain it as he looks around.
(10) Goal: The child intentionally flexes and extends knees, and thrustslegs forward.
1. Leg Thrusts: Double leg stretch or thrust (child lying on back) -
Bend the child's knees up against his stomach. Hold them gentlyin place until he starts to resist. Then let him push his legsto floor-gently and,evehT!yeagainst your slight resistance.
Single leg thrust, Same as above. Hold down the leg (at the knee)not being-activated.
3. Alternating leg thrusts - Use same procedure, hold non-working leg.
4.- Bicycling - Begin with one knee bent and other straight. Give re,sistante to the one that is straightening by slightly pushing againstthe movement of the leg.
5. - Knee Flexion: Lie on stomach, legs straight. Stabilize hip andbend knee, drawing foot slowly up to the buttock. After doing thiswith each foot, perform with both legs together.
-107-
. .
6. Place a. weight over the ankle and ask the child to flex the kneewhile lying on stomach, raising the weighted ankle. Watch forsubstitution from the hips by raising the hips from the ground.
7. Stand and without bending at hips, flex the leg at the knee,kicking the foot back and up as Far as. possible.
8. Knee Extension: Lying oe side lower knee flexed, upper legsupported, place a weight in front of the flexed leg and havethe child pushthe weight,until the lOwer leg if fully extended.Lie on the other side and repeat above.
9. ,With child on his back, knees flexed and feet on the floor withtoes against the wall, have the child push his'bOdy along thefloor away from the wall, extending his legs.
10. Double leg (child lying on his back) Grasp child's legsfirmly and draw them downward until they are straight. Then givea tug and hold them gently.
11. Single leg pull.: Same as above but only one leg at a time. Holdthe knee down of the leg that is not being activated.
(11) Goal: The child uses stomach muscles efficiently to move legs.
1, Lay the child over 4 chair or bench with the small of his backmeeting the edge of the chair. Help him by holding down theupper part of his body.
2. Have the child lie on his back. Draw a leg up with the knee bent.Bend the thigh closer to the body against resistance, i.e. a hand,towel or strap placed just above the knee. Alternate legs, thenperform bilaterally.
3. Lie on back, legs extended, knees straight. _Lift each leg up and'owe-. Each leg should be raised to a right angle with the restof the body if possible. Resistance applied at theethigh justabove the knee may also be added when raising leg.
4. Stand and kick one leg forward, keeping the knee straight, thendown then alternate. Give the child a goal as to how riigh to raisethe leg, and as the movement becomes smoother, increase the rangeof-the goal, Keep back straight.
5. March or run in place: raise the knees as high as possible and keepthe back and shoulders.straight.
6. Lie on stomach. Stabilize the pelvis and have the child raise .a,
leg as high as possible, with the knee straight, up from the floor.Alternate the legs, then raise both legs at the same time.
7. Lie on the side. With knee straight and body in total alignment,stabilize the pelvis. Keep upper trunk immobile and extend. lower
--leg back as far as possible or setha physical goal the childmust touch with his heels. Then extend both legs back together.-Roll over and do the same task on the oppos'ite,side.
112

-103-
8:- 'Standing: Hold onto a chair, table top, etc., keep back straight,stabilize upper trunk and arms, then extend a leg away from body -to the back; keeping knees straight and foot on floor. Alternate.sides. Then kick to the back -- establish a goal so that the kickgradually becomes higher. Weights may also he used and the speedof the movement varied.
9. Walking backward: Keep back straight, arms down to the side. Puta-weight or other object on the floor, ask the child to push theweight back with each foot as he walks backward.
10. Lie on stomach .ona table. Let legs hang over the table edge.Swing legs up so that body alignment is straight, then back down.Alternate legs and perform bilaterally (legs together).
(12) Goal: The child moves legs -sideward and together in controlled movement.
1. Legs spread and together. Child is lying on back, arms at hissides, head at midline, legs straight and together. Place yourhands ageinst outside of_ his ankles, middle finger hooked overheel cords, or place heels 'in palms of hands -- no pressure onfingers. Push child's feet together sharply and resist as hespreads his legs apart. Say "push" as he pushes legs against,your resistance. When child has completed his movement say"hold" and-make the child maintain his position for about three.seconds as you slowly increase pressure then discontinue resis-tance so he can complete movement. NoW shift your hand position.Move flat of hands to inside of ankles or release pressure of heelof hand and use flat of fingers against inside of heel. Take upslack by slowly spreading legs further apart, then give quick,short push further stretching legs apart as he rebounds say "pull":Resist slightly as he pulls legs together. :When movement is al-most completed say "hold" and make child maintain position for 3seconds as you slowly increase pressure, then discontinue resis-tance and let him complete leg movements,
2.. One leg at a time. Same as above. Perform with leg individually --first-right then left. Place right hand on inside of .right ankleand left hand on inside of left ankle for pulling to inside. Forpushing to outside right hand on outside of left ankle and lefthand on outside of right ankle. Always support the non-activeleg at the knee. Your position should be at the child's feet.
3. Have child lie on his back with legs extended. Stabilize pelvis..Have him slide one leg out to the side and back, then the otherleg and finally both. A guide may be placed at various distancesaway from the leg so that the child must slide his leg out to touchthe guide. .Place a weight at the child's ankle and ask the child.to slide the weight out to a designated goal., These tasks may alsobe done while .the child lies on his stomach with toes out to thesides, so that the inner foot Ties flat on the mat.
,113
-109-
4. Side lying: have the child lie on one side with lower knee slightlyflexed for balance.- the child to raise the upper leg as youapply resistance above the knee joint. Roll over and try this onthe other side.
5. Standing: ask the child to slide one leg out to the side with thetoe of that foot on the ground. Then do the same thing with thetoes turned out to the -side.. Reverse. sides. Set -markers for thechild to reach with the free log as the other leg remains fixed,or push a weight out to a goal Make the weight ankle or knee high.Keep the knees and trunk straight.
(13) Goal: The child rocks forward ano backward and may push himself backwardwhen he assumes the creeping position from lying on his1)elly.
1. Rocking: Once the child has learned to maintain his balance in atucked position, gently push forwar' and upward on his buttocks tomove his weight forward over his arms and bring him into the hand--knee creeping position. Mike a game of rocking him back and forthuntil his arms collapse.
2. Resisted rocking: With the child in the hand -knee creeping position,gently apply pressure by pushing with your hand against the child'sbuttocks as he rocks backward and against his shoulders as he rocksforward. The resistance should not 'halt the child's movement.
(14) Goal : The child is-able to move frOm a lying position to a hand-kneeposition independently.
1. From lying on his back, roll him on to his side with knees bent.Encourage him and assist him to push up on his hands and over ontohis knees.
2. From lying on his belly: When he is pushed up strongly on both arms,lift one side of his pelvis sharply to reflexively bend his hip andknee under him. Hold him in this position and encourage him to pullhis other knee under him.
NOTE: Observe the child's roiling activities. Choose the----Ji-lethod by whichYou think he will be most likely to succeed. CarryThim through theactivity with as much help.as he neuds at first. Then as he attemptsto achieve the.position on his own., assist him only as much as neededfor 'success. Make him work at it. It he.almost makes it once or twicebut loses his balance and falls back utr Cannot quite push hard enough,help him keep his balance or maintain the halfway position until withanother effort he cart complete the movement en his own.
(15) Goal":The child-is able to creep on hands and knees efficiently andrapidly.
1. Using an assistive strap or towel - An assistive strap of canvasabout 1 2 -inches wide and 36 inches long. You may subStitute a
long towel folded in half lengthwise. With the child on his handsand knees Pass the assistive strap under his middle andend in each hand, Call the child's attention to a toy placedabout 5 feet in front of hinn if he attempts to drop to his bellyin order to crawl toward the toy, use the strap to keep his trunkoff the floor and encourage him to creep toward the toy on hishands and knees. Give just enough assistance with the strap toprevent his collapse to the floor.. As the child gains 'betterbalance and control of his creeping movements, encourage him tocreep over longer distances.
2. With minimal assistance from his own clothing: Stimulate thechild to attempt. creeping on his own. Offer assistance to,hisbalance by holding lightly on to the waistband of. his pants. Ifa girl happens to be wearing a dress:, gather the skirt snuglyabout hernwaist and use it to assist her.
3. Once the child has achieved independent creeping, arrange hisactivities to give him frequent practice in it. Require him tomove from one place or activity in the room to another under hisOwn power Praise his efforts and make this independence enjoy-able to'him.
NOTE: When a child achieves his objectives -- toy.or place -- do not let himpush back onto Nis knees and sit between-his feet in the "W" position.Habitual sitting in this position leads to deformities of the legs andfeet. Help the child, if necessary, to move into a sitting position withhis feet in front of him.
(16) Goal: The child cruises along furniture and attempts to stand alonemomentarily.
1. Cruising: As the child pulls himself up to a chair next to atable, encourage him to transfer his hold from chair to table.Present a toy on the table just out of arm's reach.- Coax him totake a sideward step along the table in order to reach the toy.As he becomes more skillful at taking such sideward steps whileholding the table encourage him to cruise around the-table.
2. Provide opportunities-for him to pull up to and cruise aroundsome of the larger equipment in the play room: along the windowsills, the chalkboard ledge or the utility cabinets-in the classroom.,
When he cruises fairly well and shows a desire to transfer to anearby different support, be alert to his hesitation and encouragehis daring by giving minimal support so that he can succeed.
:(17) Goal: The child steps over obstacles without an exaagerated step.
1. Lay a four-inch walking board on the floor. Have the child'walk back and forth across the floor stepping over the board '-
each time; or have him walk in a circle stepping over each endin turn.

2. Lay two four-inch-walking boards or one eight inch walking boardfor the child to step over as he walks back and forth across thefloor or around in a circle.
a. Lay them parallel twofeet, then three-feet, then four-feet,apart.
b. Lay them in -a UV about three4eetapart at one end: and one-foot apart'at the other.
3. Lay one of the short straight meal. ladders flat, on the -floor --or use the -foot placement ladder.
a. Have the child walk back and forth across the ladder, stepping over the side rail into the space between two ruffs,then over the other .side rail.
b. Walk with one foot in the spaces between rungs, the otherfort outside. Walk down and back along the same side.
_Welk the lehgth of the ladder stepping over each rung andbringing both feet together in each space.
d. Walk the lehgth of the ladder stepping over rungs with-al-ternate feet, 46.
Walk along the ladder, stepping into each space.
1, Marking time, always leading with preferred foot.Same. as #1 but leading with ion- preferred foot.Alternating feet, walk the ladder stepping on rungs withone foot, into spaces with the other.
. Repeat reversingfeet.
Move sideward from one end. of the ladder to the other,hands on one side rail. feet on the other, movein onedirection, then the other.
S. "Climb" the ladder, walking the rungs with hands-and. feet.Ladder. horizontal, but elevated four inches from the floor.-Repeat tasks listed above.
(18) Goal: The child is able to move about his envirinment without continuallybumping into objects.
1. Encourage crawling, creeping, roiling, walking, running, over, undervarious pieces of equipment. Let him discover for himself what hereeds to do to get. through.
a, Have him crawl or wiggle on his belly under a chair, through
a cardboard carton 2 2 feet in size withtop and bottomremoved and laid on its side, between rungs of a straight-laddertlaid on its side, across a sandpile, and through atunnel.
i 6

-112-
b. Have him creep4on hands and knees under one of the low tables,around the table or around one or more of its legs and backagain, .through a tunnel, through a larger cardboard cartonwith the top'and bottom removed, down a "road" between twoWalled rows of chairs or two ladders held on their sides.
NOTE: Begin by having him go through, over; under one object and progress tomany objects. When numerous objects are used it is called an obstaclecourse. This can be carried indefinitely by using:
-different equipment.c:lifferent.positionsfor the eqUipment-different modes of locomotion (walking, running, hopping, etc.)-different modes'of instructions
This activity (#1) ts particularly good for the child who is afraidto lie on his back, or is always looking for a wall of a corner toback up against. This type of activity ( #1) should. be done with Otherconcepts such as around, above, over, on top of below, through, beneath.See the section of this program concerning the Obstacle Course.
-113-
MANIPULATION ACTIVI ALS FOR EARLY DEVELOPMENT
These goals.are listed closely by developmental order. There may besome gaps and goals which appear irrelevant. All goals relate to thebuild up of_skilIs necessary to the performance of the manipulation skillsto follow, These s; :is can be found in .the section of this lirogramideal,.Ing with manipulation skills. The use of the activities 'presented here isfor the specific needs if the student for correcting i weakness or gap indevelopment.
CONTENTS MANIPULATION Page
(1) Goal The child is able to 'assist by pulling with arms when pulledfrom back. to lying position to sitting 114
(2) 'Goal: The child flexes and elt.tends arms without assistance. J14"
(3) Goal: The child moves shoulders intentionally and independently . 115
(4) Goal: The child is able to move botharMs together in a generalizedmove:Fent
115
(5) Goal: The child brings his hands together at.therlidline and at the-sametime- attempts a voluntary grasp 115
(6) Goal: The child moves wrist and hand easily 116-
AI) Goal: The child reaches and grasps .. . 116
(8) Goal: The child reaches and grasps with one hand at a tune. -117
(9) Goal: The child is able to release obir,cts voluntarily and withoutExaggerated movements 117
(10) Goal': The, child integrates hand and eye coordination 118
(1T) Goal: The child Moves upper trunk independent of lower trunk. 119
(12) Goal: The child moves lower trunk independent of upper trunk 117
(13) Goal: The child is able- to move body parts in a controlled andEii-ardinated pattern. . 119
ACTIVITIES.
(1) Goal: The child is able to assist by pulling with arms when pulledfrom back. to lying position to sitting.
1. Pull toward sitting:' Place child on his back. Grasp bothhands and slowly pull him .up toward a sitting. position. En-courage him to help by lifting his head and pulling with hisarms. Then shift your hands to the sides of his shouldersand lower him to the mat again,- encouraging him :to hold hishead up as long as he can.Variation: Place the child on his back. Tuck a small ballinto the waistband of his pants. Encourage him to remove it.He will have to lift his'head.to look at the "nuisance".
2. Tilting balance.. .Continue tilting. balance activities as de.,
scribed in head and trunk control with child sitting on your.lap, on.the floor, or at the edge of a table with his legs_hanging over. (These can he found in activities for locomotion)Tilt him further and begin to give him gentle resistance as hetries to regain the upright position of sitting.
3. Airplane, This is a variation of the tilting exercises described.earlier. Seat the child at the edge of the table; -knee's bentand feet. hanging dowrL Stand with knees in front of him, closeenough so that your bqdy will keep his knee's from straightening.Held his hands and-raise his arms out to the side. Say, "This isthe way the airplane goes, "bzzzzz," as you tilt him to one sideand then the other. Each time encourage him to help himself backto sitting. Then tilt him to one side, bring him around and upfrom the back,, Repeat from the other side. Begin this activityslowly and make sure the child feels secure enough to enjoy it.
(2) Goal: The child flexes and extends arms without assistance.
1. Arm Pull: Lie child on his baCk, arms at his side. Grasp child'shand, give quick pull doWn on hand until child begins. to pull armup. Hold gently, then release. Do this with both-arms together,then each arm independently.
2. Bilateral and unilateral tasks: With Weights in each hand, touch-ing shoulders, elbows flexed, lift above head until fully extended,then back down to shoulder,. up, etc. Extend arms horizontally atsides and back to shoulders, then with-hands, on shoulders, extendhands out to front of body and back, etc. Lie on back, arms ex-tended at right angles to body,!palms up, bend elbow and back down.These tasks may be done on table br on floor.
3. Sit at a table shdulder level and pUt a weighted object .directlyin front. of the child. Have the child push the, weight. straight outaway from him, then pull it back. Vary the weight. and-the distances.so that the movements can be controlled and not burstS of pressure.
11.9

-115,
4. With elbow on table or floor and palm down, twist the forearm sothat the palm faces up from the table, then down on the table, etc.,''thus moving wrist and hand with forearm, but do not move shoulderand upper arm.
(3) Goal: The child moves ,shoulders intentionally and independently.
Activities may be found on pages 210-212' of Wabash Manual.
(4) Goal: The child is able to move both arms together, in a generalizedmovement.
1. With child lying on his back,
a. Grasp his wrists. Gently draw his arms upward over hishead then down again to his sides. Move both arms to-gether several times-a then move. alternately.
b. Bend and straighten each elbow several times both al-ternately and together. a--
c. Draw his arms down and Cross .them over his abdomen, thencarry them up and out to make a "V" over his head. Repeatseveral times.
2. Stimulate the child to move actively.
a. handsTap his closed harm, to-tryeto get them to open. Also tryrubbing the backs of his closed hands gently with your finpere.Rubbing and/or tapping' may be used on any large muscTe ormuscle group to stimulate movement.
(5) Goal: The child brings his-bands together at the midline and at the s;uJietime attempts a voluntary grasp.
1. Place the child on his side with hips and knees flexed. Pull hislower. arm and shoulder forward. Also press the upper shoulder forward so that both arms are in front of him. Carry out the follow-ing activities just on-one side and then the other.
a. Rub each palm briskly with your finger tip, opening his handif necessary.
b. Place his two hands together, put them together, rub themtogether, curl one hand around the other. Talk-to him, singto him, or say jingles to keep his attention sand to preventany resistance.
c. Place squares of cloth of different. textures -- rough, smooth,-soft between his palms and rub his hands against them. Pullone through betweenhis index and middle finger and leave itstuck there to see if he will attempt to get rid of it.
120
-116-
Variation: (a) Offer the child three wood blocks which havebeen covered on both sides With assorted textures.
(b) Offer him assorted small sponges.(c) Place a small ball, .block or other bright colored
toy between his hands. Move them around on it.Encourage him to hold it with one or both hands.
(d) Dangle a noise-making toy or other attactivetoy near his hands.' Get attention and en-courage him to grasp it.
(e) Place a brightly colored toy near his upperhand. Encourage_him to reach for and grasp it.
NOTE: The child should not be allowed to place his hands in his mouth duringthese exercises. This will inhibit the progress of these activities.Some form of stimulation can be offered for the child's lips and mouth.
(6) Goal: The child moves wrist and hand easily.Refer to page 212 of Guide to Early Developmental Training.
(7) Goal: The child reaches and grasps.
1. Provide a number of toys in a large variety of sizes, shapes,texture, and weights.
2. Support the child in sitting position in a high chair, or aspecial chair with a tray, or pushed up close to a table ofsuitable height. Present a variety of objects to be handledand explored; some should lay on the table, others should hangin front of the child or the teacher may dangle the toys in frontof the child; a long flexible object can be inserted into a balLof clay on the table in order to provide a stationary yet moveableobject which will not fall off. Do not present too many 64 ferenth, --toys or objects at one time, but, rather, change them frequently.He should get as much experience with things of different sizesand shapes as you can find to give him. Encourage him to bane themon the table or against each other.
3. Play games such as "Peek-a-Boo" and "Pat-a-Cake."
4. As he becomes more able to control his trunk, let him manipulatetoys while in various positions:
(a) Sitting on the floor with legs outstretched.(b) Sitting on floor with legs crossed.(c) Sitting in a highchair.(d) Sitting in a kindergarten chair with a low table,.
5. If the child is disinterested in reaching and grasping or if heis blind, support the child in a sitting position or lie him onhis back being sure he is comfortable and secure. Grasp his wristand put an ;object in his hand or hands. Be sure the object has anoticeable texture or "feel". Tell the child to "feel" the toy.
(8)
(9)
-117-
Take the toy from his.hand or hands, hold it 3" to 12" from onehand and tell him to "take the ball". Grasp .his wrist and extendarm and hand out to the object.-- Put it in his hands and praisehim for accomplishing the task. Continue to do this using differenttoys and objects and putting them in different positions and atvarying distances until-he has mastered the task. If the child isblind be sure to use an object that will make noise..
6. Continue the above activity gradually decreasing the size of theobject to he reached.
Goal: The child reaches 'and grasps with one hand at a time.
1. With child lying on -the floor on his back or first on one sidethen the other. Present toys that are easily held and seen; firstplace themclose to the other. As he develops a better reach, grad-ually present'them at greater distances.
2. .While supporting the child in a sitting position, on your lap-crin a high chair, present toys which are easy to grasp: Spongefigures or rice bags in the form of animals, for instance. Presentthem one at a time. Encourage him to grasp a dangling toy, to takea toy from your hand, or to pick up a toy from the high chair trayor table top. Occasionally present two or three toys at a time.
3. To develop reaching and grasping objects placed so that he Mustcross the midline', do the above exercises but place objects so thathe must reach across his body.
4.. To heir the child learn to grasp objects placed at arms length orslightly past arms length place toys or objects at a distance sohe must stretch to reach. Be sure he then moves the toy closer tohim in order to efficiently examine it.
Goal: The child is able to release objects voluntarily and withoutexaggerated movements.
1. Develop an efficient release by doing basic activities in manipu-lation previously presented and those to follow dealing with eye-hand coordination.
2. If the child cannot release when he wants to, or does not releasewhen he should, do "take and put"exercises in following goal activity.When the hand reaches the container grasp the child's wrist, holdthe hand with object grasped in it over the container. Apply gentlepressure. to wrist until the object falls. Continue this in a varietyof other situations until the child learns.to open his hand tore-lease a grasped object.
NOTE: If the child's grasp is weak strengthen the-hand by letting him graspand release play dough, foam balls or toys that can be put in the palmof the hand and squeezed.
162
-118-
(10) Goal: The child integrz". s hand and eye coordination.
1. "Take and Put"
Seat the child with body supported and stabilized and sit in frontof him. Using a weighted flexible object like a bean bag or otherattractive object, hold it in front of the child.
a. As you say, "Take," help the child deposit the bean bag-in acontainer or in a designated place by directing his arm ifnecessary and applying pressure to wrist if he cannot "release".
NOTE: This exercise assumes a reach, grasp, and release ability but it can beachieved at the lower level of "rake and drop". Stop the moving objecteach time his eye is not directly on it. Do not let him take it untilhe has eyes on the object.
2. The child is on his stomach, on the floor or on a mat, headturned first just to one side then to the other. Use a smallrolling toy or other attractive object preferably one that makesnoise.
a., Place the child's hand on the object. .Try to avoid conceal-ing the object. Perhaps push it from behind. Direct hishand in moving the object:
(1) In short vertical movements which are no longer thanchin to forehead at first.
(2) Then in horizontal movements covering a distance fromthe child'sarms reach to his elbow.
(3) Finally, move the object in a small arc.
Place the toy on a strip of pile carpeting to increase theresistance and force the child's attention to it. If he doesnot grasp it, place his hand on it.
c. Use a more advanced position. Place the child on his sidewith a sandbag or other support behind his back as a prop.
-He uses hand opposite to brace. Repeat same actions as above.
3. Facilitated pursuits. Have the child lie on his back, limb's im-mobile. Put fingernail polish or a piece of colored fingernail'polish on child's thumb nail. As you hold bean bag 24" abovehis eyes, he is to grasp end of bean bag with thumb facing hiseyes. Now move end of bean bag slowly in an arc telling him to"look at his thumb." (Raise the-bean bag su that his arm is notbent at the elbow.) Move hag horizontally, vertically, diagonally,in a circle. The arc may extend for only the width of.his shoulders,or if he can follow, extend a foot or so on either side of hisshoulders. Tell him to hold his head still. Only the eyes are tomove. You can hold his head.
,119-
"Point to !" Explain that when you say, "Point to (some-thing in 156ii," the child is to look at that thing and pointto it until you give the next command. Begin with "Point to me!"This is -a good way to get him started. Continue to have the childpoint to various objects in the room, or vary this by pointing tosome other individuals.
(11) Goal: The child moves upper trunk independent of lower trunk.
(12) Goal: The child moves lower trunk independent of upper trunk,
Refer-o pages 217-218 in Wabash manual for activities to accomplishthese goals,
(13) Goal:,The child is able to move body parts in a-controlled andcoordinated pattern.
Integration of se'nses occurs. when the teacher or therapist directs allsensory channels to one purpose at the-same time. The method Used isto involve one sense, the Haptic (tactual and kinesthetic), by startingthe-physical ,activity and then involving each remaining sense one at atime until the total sensory system is.involved with the body 'movement.-The exercises below are examples of how to do this.. It*can be done withany number of exercises particularly those listed that are concerned-with differentiations eye-hand coordination and locomotion.
1. Leg Thrusts.- The child is lying on his back. Bend his- kneesagathst his stomach. Hold them gently in place until he startsto push back, Say, "Push, push" as you let him straighten andlower his legs. You apply gentle pressure against his downwardthrust. Be sure his hands are at his side and still and that heis looking at you. The senses will be integrated if:
a. Eyes are .focusing on one target, preferably your nose,throughout the exercise. You decide on the target andsee that he-looks at it.. Stop. exercise until he does.
b.- He listens to.your voice as you ,use language that is appro-priate for the child and is connected to the activity. Itcould be "push, pull, look, you are moving, your leg,"Jackis moving his leg,.! or a noise that will distract him fromother auditory stimuli within the room..
c The onlyhis
or' tactual iMput is that of your pressure.
against his thrust-and of your hands holding his legs. Todo this see that his arms and hands are still; his eyes andhead are not Moving; his fingers are not scratching on thefloor; he is not chewing on his tongue; all other body move-ment has stopped: he has nothing in his mouth.
2. Resisted Walking
a. Pushing - Face the child, get ready to walk on your knees
-120-
so you are at his eye level. Put child's hands on yourshoulders, your hands on his shoulders. Remember not to"dig in" with your fingertips. Now tell the child to "push"you across the mat. Work for even, regular steps and smooth,strong progression. Now do it having him look at your noseconstantly. The older child can do the same exercises walkingon his knees.
b. Pulling.- Stand behind the child. Hold him at the hips withyour flat fingers over the front of his pelvis. Bend yourknees and lean back so your elbows are straight. Tell himto- "pull". Walk across the room or for 8-10 feet. "Pull".Now do it having him look at a target. The older child cando this while walkili on his knees.
3. Resisted Creeping
a. Pulling - Establish pattern by telling the child to creepto a particular object or spot. Bring him back or call himback to the original position. Grasp his ankle and tell himto creep again. Be sure this is a game. He must pull againstyour resistance as you creep behind him. Increase resistanceas much as possible but be sure he can continue a smooth evencreeping pattern. Then try it giving him a target to look at.This can become a game by having him creep to get a toy, apiece of candy placed ahead of him 8-10 feet, other treats helikes as a goal. Tell him to pull as he creeps. .
b. Pushing - Child in creeping position, you at his eye levelfacing him. Put your hands on his shoulders. Have him creeptoward you - you resist as much as possible but allow him tomove smoothly. Tell him to "Push me across the mat". Tryagain having him look at your nose throughout the entireexercise.
STABILITY ACTIVITIES FOR EARLY DEVELOPMENT
These goals are closely related and necessary for development of the loco-motor skills.' They are important In and of th&seives because of the needfor stability and balance to perform the skills of not only locomotion butalso manipulation, and the other activities and skills within and outsideof physical education and motor development.
Page.
. (1) Goal: The child moves neck muscles purposefully to develop head control ....121
(2) Goal: The child is able to go from lying to sitting position withoutassistance
1?2
(3) Goal:Thechild sits with support. and is: able to attend to anothor task.Refer to pages 47-60 in Wabash Manual for activities to accomplish thisgoal
(4) Goal: The child is able to sit. erect without-support and with good balance.122
(5) Goal: The child is able to support his weight in standing, to activelybend and straighten his knees when held in standing position, and tobalance trunk efficiently 123
(6) Goal: The child is able to stand independently and attend to other tasks 123
(7) Goal: The child is able to fall safely: 'to hands and knees and to sittingposition
124'
(8). Goal: The child is able to seat himself in a chair without assistance....-124
ACTIVITIES
(1) Goal: The child moves neck muscles-purposefully to develop head control.
1. Have child slowly roil his head in a circle touching chin to chest,ear to shoulder, back of head to back, etc. Add. weighted headbandor helmet for resistance: Do this with the child sitting, standingbalancing oh balance saucer. Have him change his hand-and leg posi-tions.
2. Have child- raise head, put your hand on his forehead and tell himto push your hand to the ground. Gently push against-his head togive some resistance.
-122-
3 -With child's chin resisting on his chest, place your hand on theback of his head. Tel him to push your hand up and away. Applygentle pressure as in #2.
NOTE: Make these exercises games. With the use of resistance to movement theadditional outcome of strength building is present. Do not allow thisto overshadow the intended purpose. Always strive to meet the prescribedgoals.
(2) Goal: The child is able to go from lying toSItting.position withoutassistance.
1. From lying on his side: Position yourself behind the child'ships. Bend his knee up toward his chest. With one hand grasphis upper hand and gently pull him U0 sideward toward sitting.He will help by turning and lifting his head, pulling himselftoward you and getting his other forearm and hand under him.Use your other hand wherever needed to keep him from fall;ngback, to hold his underneath hand on the floor, or to help insome other way. Help him only as much as necessary for him toaccomplish the task. Try this first from one side then fromthe other. He will perform better from one side. This is hispreferred side and he will achieve sitting independently fromthis side first. Work equally from both sides although you mayneed to do'more work with the non-preferred side. Ao:
2. From lying face down: Draw one arm across and beneath his headand chest. He will roll onto his side and usually bend his hipsand knees. If he does not bend them as desiredibend them forhim. Then proceed as from side lying. Once he gets'the idea hewill turn onto his side by himself, ready to be helped to sitting.
3. From lying on his back: Turn his head to one side and draw. hisOppOsite arm across his chest. He will roll onto his Ode. If
he does not bend his hips and knees, bend them for him. Then pro-ceed as before.
4. From hands and knees: Push him gently over onto one hip.but donot allow the arm to collapse. Support him in this position andencourage him to work himself over into a straight sitting position.
(3) Goal:' The child sits with support and is able to attend to another task.Refer to pages 47 -50 in Wabash Manual for activities to accomplish thisgoal.
(4) Goal: The child is able to sit erect withoUt support and with good balance.
1. Seat child on the floor. Encourage him to reach forward, to oneside or the other, up over his head, and turning his body by pre-senting toys to him in a variety ofways and from many differentdirections.
'127
2. Encourage him -to sit for play and provide him with objects ofmanyesizes and shapes which he can manipulate. Place, some objectsso that he must reach for them.
3. Seathhim on,a large block with his knees bent and his feet -firmlyon the floor. In this position play games such as'Pat-a-Cake andPeek-a-Boo. Hold a light but fairly large ball on his head andmakehim reach up to take it off. Place a bean bag On one of hisfeet or drape a scarf over his legs and encourage him to take it off.
4o Seat him in a chair of suitable size to play at a table.. Place ablock under his feet if they do not touch the floore This Will givehim more stability..
5. Seat him on rocking toys such as a saucer, innertube, rocking horse,cage ball. Encourage him to attend to other tasks such as reachingfor a toy, holding a toy, imitating a sound.
(5) Goal: The child is able to support his weight in standing, to activelybend and straighten his knees when held in standing position, and to .
balance trunk efficiehtly.
1. To stimulate suPporting reflex activity in his feei and legs,hold the child erect so that his feet touch the floor, or yourlap, -supporting him with your hands at his upper ribs beneathhis arms. Lower and. raise, him, always keeping his feet in con-tact with the floor, and encourage him to support some of hisweight on his legs.
-
2. Bouncing while held erect. Hold child in standing position withhis feet on your lap or on the floor. Allow his knees to bend,then lift him erect again. Encourage him to help straighten hisknees as you lifthim to standing and to bear increasing, amountsof his weight.
3. Assisted from sitting to standing.' Place the child on .his backon the floor.. Sit at his feet with your thigh at right anglesto his feet. Grasp his knegshand pull him toward you until hiships and 'knees are bent shari31-Yibut his feet are still flat onthe floor. Tuck his toes under the edge of your thigh to stabilizehis feet, Take his.hands and pull him toward sitting; he shouldhe by lifting his head and pulling with his arms. When his trunkis eeect continue to pull him forward until his .weight is over hisfeet. Then encourage and assist him to push up to. standing, youwill probably have to shift your hands from his hands to the sidesof his. chest beneath his arms. When his knees buckle, lower himagain to sitting, theh to lying,
(6) Goal: The child is able to stand independently and attend to other tasks.
1. Stand the child with his back in a corner of a'room: This giveshim support at his back and to both sides, Encourage him to re-main standing and maintain balance while attending to other tasks.
128'
-124-
2. Stand child with his back against a wall. This deereaSed the degreeof support offered. Now he is protected only from falling backward.Play with him using a wide variety of activities. When you believethat his balance is fairly stable, stand him a few inches away fromthe wall and continue his balance training. Should he lose his balanceand fall backward he will break his fall and he will just slide downto sitting.
3. Standing in the middle of the floor., Stand him up or kneel on the"floor and let him pull to a stand against you., Then help him toget his balance. Once he is balanced guard him with your arms,collapse and laugh with him. Then try again.
4. Standing at a low table. Provide activities and toys he can enjoyas he supports himself against a table. If possible push the tablenear a corner so that he will have more security. If this is notpossible push something up behind him yourself Don't touch him,just be there to break his fall if he collapses.
NOTE: Development of complete control.or balance of body comes when the childis able to attend to his environment and everything that is going onaround him while he is performing any of the numerous locomotion skillsrather than his stability or manipulation skills.
(7) Goal: The child is able to fall safely: to hands and knees and to sittingposition.
1. Falling forward. Use a soft inflated beach ball at least eighteeninches in diameter. Place the-ball on a mat. Lay the Child on hisbelly on the ball. Roll him forward (Head first) to stimulate hisprotective arm reflex. He should automatically put his hands outto protect his head and face. If he does not, take his hands and placethem in the desired pos'ition showing him that he can protect himself.Then continue to roll him forward and back, each time urging him tocatch himself on his hands. Practice daily until his protective re-sponses are consistent.
2. failing backward. Practice going from squat to stand as in thegoal concerned with this action, but instead of lowering him gentlyto sitting, release hands to let him drop the last inch or two.Exaggerate your releaSe by throwing your arms wide. Say, "Boom!"as he lands. This makes. a great game and he learns not only howto fall, but that falling is no tragedy.
(8)' Goal: The child is able to seat himself in a chair without assistance.
1. Place the child at the side of a child's chair. Let him pull toa stand. A child's usual procedure from here is to hold on to theback with one hand, the seat with the other and get one knee ontothe seat. Then he pulls himself to meet the seat, turning himselfaround to sit down. Guide the child through this process givinghelp only as needed.
-125-
PERCEPTUAL - COGNITIVE ACTIVITIES FOR EARLY DEVELOPMENT
The child develops in a wide variety of areas in the early years. Strongfoundations are formed. The area of physical-motor activity has much todo with these early formations. These activities are presented.to providea means for helping with these formations. Of course, other areas outsidethe physical-motor area must be introduced along with these activities.The pathways to perceptive and cognitive include physical-motor-pathwaysbut include much more which cannot be excluded in favor of another.- Allmust be approached and utilized to its utmost.
Only two of these goals will be included here. The others may be found inthe Guide To Early Developmental Training. The Guide To Early DevelopmentalTraining may .be obtained for the Wabash Center for the Mentally Retarded, Inc.,Lafayette, Indiana. The- page numbers for this manual in which the activitiesfor each goal may be found are given along with the goal. It.is suggestedthat the interested teacher get a copy of the Manual. It contains much in-Formation and useable activities for the training of mentally retarded andhandicapped students. For the sensory impaired student many of these activi-ties are quite appropriate and useful. The ranges of coverage in the develop-mental areas are all inclusive. For .the most part the activities will needto be adapted to suit the specific needs of the sensory impaired student since,they seem to be intended for use with developmentally.handicapped children.The actions of the activities are the most important. In most cases if theteacher is able to put the student through the action and provide as manylearning stimuli along with the action the-goal can be just as realisticalyachieved. The teacher will probably provide more of the movement assistanceand/or use stronger stimuli than that suggested in the Manual. The teacher'suse of her knowledge and understanding of the students, and acceptable teachingmethods, will determine how these activities may be used. I would encourageeach teacher to use his imagination and creativity in adapting these activitiesso that the students may receive the ultimate advantages from these activities.'
CONTENTS-PERCEPTUAL-COGNITIVE
(1) Goal: The child sorts or matches objects byfeel and is able to movebody parts when tactually stimulated. Pages 117-118.
(2) Goal The child can attach the correct sound to objects and people inthe environment. Page 119.
(3) Goal: The child listens. does not took, and follows beat along withTheinstructor. Page 123.
(4) Goal: The child sequences auditory rhythms with long and .short beats.Page-135.
130
-126-
Page
(5) Goal: The child sequences events in task directions.
2 steps3 steps
(6) Goal: The child is becoming aware that his body has different partsand where they are located on his body. Page 195.
(7) Goal: The child is able to locate body parts on other people. Page 225.
(8) Goal: The child is able to locate body parts on three dimensionalobjects. Page 225.
(9) Goal: The child is able to locate body parts in pictures. Page 225.
(10) Goal: The child imitates specific body movements accurately and quickly. 126
(11) Goal: The child moves body parts to specific verbal commands quickly and 127accurately.
(12) Goal: The child looks for causes of actions. Page 294.
(13) Goal: The child locates the source of a sound with his eyes. Page 299.
(14) Goal: The child finds the "right" side of an object. Page 302.
(15) Goal: The child goes around an obstacle to get a toy. Page 306.
(16) Goal: The child indicates awareness of a person's absence. Page 307.
(17) Goal: The child responds vocally as you talk to him. Page 309.
(18) Goal: The child imitates a movement already familiar to him. Page 315.
(19) Goal: The child imitates a series of movements. Page 316.
(20) Goal: The. child imitates an unfamiliar invisible movement. Page 318.
(21) Goal: The child remembers on.activity and performs it later. Page 319.
ACTIVITIES
(10) Goal: The child imitates specific body movements accurately and quickly.
1. Do as I do: Children imitate your changing arm positions outlinedbelow while standing on both feet or knees and then while standingon one foot or one knee. Allow child to use preferred foot at'firstthen have him switch to non-preferred foot. Move both arms together,smoothly but definitely:
-127-
.
Pagea. .Overheadb. Sideward at shoulder heightc. Forward at shoulder heightd. Place hands on shoulders, on hips, on head
Vary the sequence used. Say "Do as I do, before each change. Holdeach position about five. seconds.
2. Teach simple action songs or rhymes. Have child imitate yourmovements as they sing or recite.
3. Demonstrate and have child imitate your movements in games, animal. walks exercises.
(11) Goal: The child moves body parts to specific verbal commands quickly andaccurately.
1. Seat child in front of mirror. Put finger on your eyes. Say "eyes".Take child's hand, and repeat preceeding actions.. Progress throughfacial features, legs, hands, feet, fingers, toes and trunk bodyparts.
2. Begin play. with such requirements as "Give me your (shakehis hand); "Give me your foot" (shake his foot); point to the handor foot as you ask him to give it to you.
3.- Ups and Downs:- lie on your back with your head nearest the wall.jump up.
Vary your commands having child lie on back, stomach or side,orienting themselves as directed.
4. Do as I say. Direct the child as follows: "Touch your elbowto the knee". Put one knee on the floor. "Touch your head tothe wall".
132
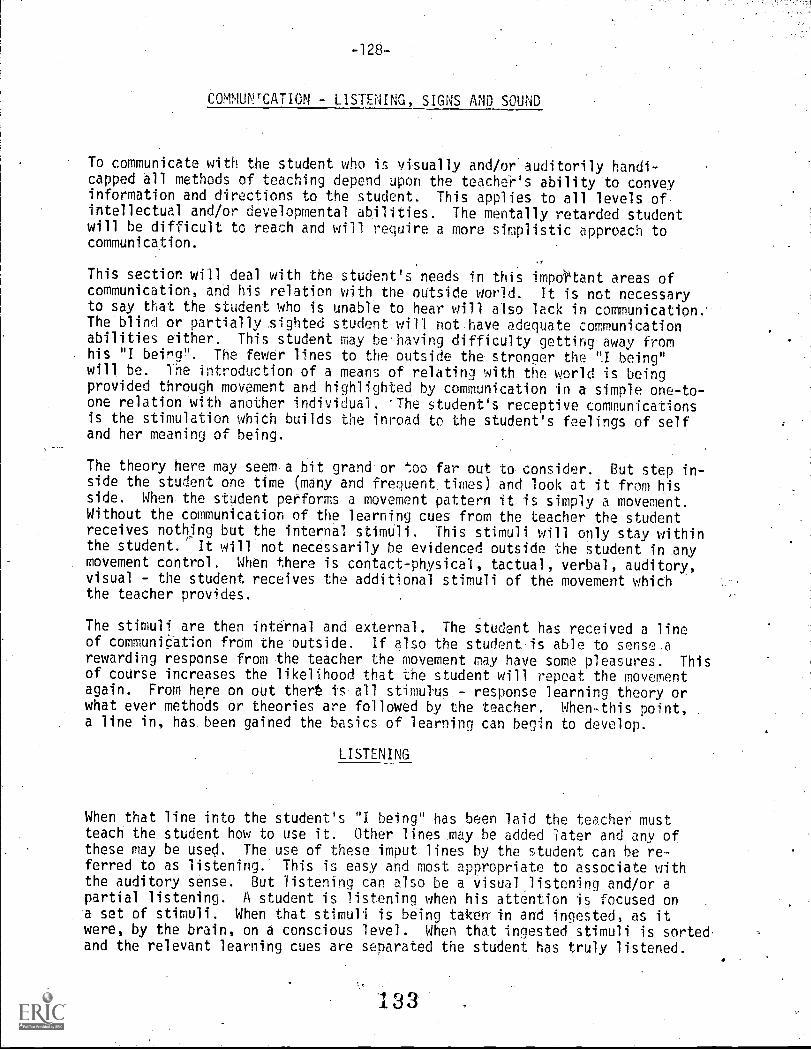
-128-
COMMUNICATION - LISTENING, SIGNS AND SOUND
To communicate with the student who is visually and/or'auditorily handi-capped all methods of teaching depend upon the teachet's ability to conveyinformation and directions to the student. This applies to all levels of.intellectual and/or developmental abilities. The mentally retarded studentwill be difficult to reach and will require a more simplistic approach tocommunication.
This section will deal with the student's needs in this impatant areas ofcommunication, and his relation with the outside world. It is not necessaryto say that the student who is unable to hear will also lack in communication..The-blind or partially,_sighted student will not have adequate communicationabilities either. This student may behaving difficulty getting away fromhis "I being". The fewer lines to the outside the stronger the ".1 being"will be. The introduction of a means of relating with the world is beingprovided through movement and highlighted by communication in a simple one-to-one relation with another individual. The student's receptive communicationsis the stimulation which builds the inroad to the student's feelings of selfand her meaning of being.
The theory here may seem a hit grand-or too far out to consider. But step in-side the student one time (many and frequent_ times) and look at it from hisside. When-the student performs a movement pattern it is simply a movement.Without the communication of the learning cues from the teacher the studentreceives nothing but-the internal stimuli. This stimuli will only stay withinthe student.' It will not necessarily be evidenced outside the student in .anymovement control. When there is contact-physical, tactual, verbal, auditory,visual - the student receives the additional stimuli of the movement whichthe teacher provides.
The stimuli are then internal and external. The student has received a lineof communication ftom the outside. If also the studentis able to sense.arewarding response from the teacher the movement may have some pleasures. Thisof course increases the li-kelihood that the student will repeat the movementagain. From here on out thert is -all stimulus.- response learning theory orwhat ever methods or theories are followed by the teacher. When-this point, .
a line in, has been gained the basics of learning can begin to develop.
LISTENING
When that line into the student's "I being" has-been laid.the teacher mustteach the student how to use it. Other lines may be added later and any ofthese may be used. The use of these imput lines by the student can be -re-ferred to as listening. This is easy and most appropriate to associate withthe auditory sense. But listening can also be a visual listening and/or apartial listening. A student is listening when his attention is focused on-a set of stimuli. When that stimuli is being taken- in and ingested, as itwere, by the brain, on a conscious level. When that ingested stimuli is sorted-and the relevant learning cues are separated the student has truly listened.
133
-129-
There, are then-three levels of listening. The sensation of sound, the per-ception of that sound and, the sortingsofthe relevant sound stimuli. It maybe-difficult for the teacher to tell egadtly on what level the student is lis-tening. The performance of the desired motor patterns-will for the discerningteacher, ,serve as an indication of where the student is listening. How fardo the stimuli reach before they are consciously or unconsciously stopped. If
consciously stopped, the student has selectively chosen to refuse the stimuli.If unconsciously stopped, the student has not yet reached the experience levelat which he may perceive or adequately discriminate valuable stimuli. Althoughmany factors may enter into this process to inhibit or enhance its outcome,basically it can be taught and learned by most students. If a sensory handicapor handicaps limit or.completely deny this learning to occur some means to workaround it needs to be found and instituted.
The previously discussed philosophy belongs to the Writer alone. It is basedupon. experience and a shell of knowledge and information in the area of listen-ing. The use of this philosophy lies in its teaching and understanding facility.I am sure that many speech therapists and clinicians can effectively debatethis idea, and win. The teacher, not of these professions, may find this ex-planation enlightening and workable for understanding the student'S needs andprobable abilities. If further practice, research, and contemplation seem toconflict with this philosophy it will be recinded. If the reader wishes tocomment upon findings of its use or simply on the philosophy itself, please do so.Ifthere is teal agreement. I'll believe I may have done something worthwhile.
LISTENING ACTIVITIES
There are no special activities which may be listed here which will elicit alistening skill. Primarily listening is a practiced afTi. It is learnedand developed through practice of listening during relevant movement activities.As soon as the teither is able to contact the student, listening practice muststart. The progress of development begins in the simple stage of stimulatingthe child through the open line then broadening the stimuli to increase theirnumber. 'Eadh line is then expanded and developed -so that the student is ableto accept many forms of each set of stimuli.
To increase the.student's acceptance of relevant stimuli the teacher must putan accent on those cues which are important and lead to future learning. Theteacher points out and emphasizes such things as points of reference for walk-ing - the feet in particular, textures of walls, floors, other walking surfaces,the tactual sense of heat and cold, the movements.of the students arms - a gen-eral or a specific nature, directions in space - as related to other personsand to the student's body. The redundant nature of these activities is thefactor'which directly -affects their. eventual learning. They must be repeatedand repeated under relevant circumstances. The student does not memorizenecessary cues, but through experience the student comes to recognize thosecues which hold importance under various conditions.
The sections concerning coractive movements, early locomotor skills, earlydevelopmental training and general movement point out the fact, in anotherway, that the student. needs to sense movement and develop an awareness of thestimuli which relate to this motion. The student must be listening in orderto develop this awareness. The teacher provides a touch or a.coactive motion
134
-130-
or support in the proper area in order to help the student move or positionherself properly. By this means stimuli are taken in which relate to the per-formance of the ability or skill. To sit, the student'needs to feel balancein his head and support, himself mostly by- using the musclg5 surrounding thespine (erector spinae). The arms and legs come into play,:the arms in parti-cular for protective reaction and a little support. When performing an activitywhich has to do with sitting the teacher points out, by touch and support,the use of the back muscles. By moving thestUdent's.head. slightly to theleft and right, forward and back, he develops a sense of balance whilesitting. The student has received the important cues from. the teacher, inthe. balance mechanisms of the head and the supportive musclessof the back..These are stimuli which hold more iMportanC6,- at the time, for the studentthan any others which.maY enter the communication paths.
We can say that the. student is listening to the important cues when he isable to adequately perform the skill, sitting independently. This means.he ls.sorting stimuli. and allowing only those which hold importance for theskill to enter. At a later time the student will be asked to sit unsupportedand attend to other stimuli in the environment. At this time the importantlistening - for sitting - has been learned and is, more or less,.on an un-conscious level and a new, more complex level of this basic listening mustbe developed. This level is beyond the three levels already described butmay develop in much the same manner. Its progres's will not be discussedat this time.
SIGNS FOR MOVEMENTS AND DIRECTIONS
These signs given in this section are adapted or taken from A ModifiedLanguage Aquisition Pro_gram, Martha S. Roland, which is adapted from "ALanguage Aquisition program for the Retarded", in McLean, J.E., Yoder, D.E.,and Schiefelbusch, R.L., (Eds), Language Intervention With the Retarded:Developing Stratigies. Baltimore, Md., University Press,71972). The signsare an adapted form of the Ameslan (American Sign Language) manual sign lan-guage systems References for these are given in the bibliography for thisprogram.
The earliest form of communication is definitely not verbal. It is mostly aphysical expressionof feelings. For the student who is severely mentallyretarded or developmentally delayed because of sensory impairment handicaps,language must remain on this purely physical level. For our purposes it mustbe receptive only. The. expressive forms of manual signs are beyond the scopeof this program. It is also likely that the teacher will want to use anothersystem of sign language, It is not our intent to develop a system of totalcommunication for-the student but to provide a means of receptive communica-tion which allows the student to accept more stimuli related to the perfor-mance of movement patterns, abilities and skills.
The signs are of a general nature and for use only in giving directions to thestudent concerning the performance ofa movement. The teacher is to performthe sign and speak the phrase simultaneously. There should be no attempt toget the student to repeat the sign only to follow the directtions .as presented
135
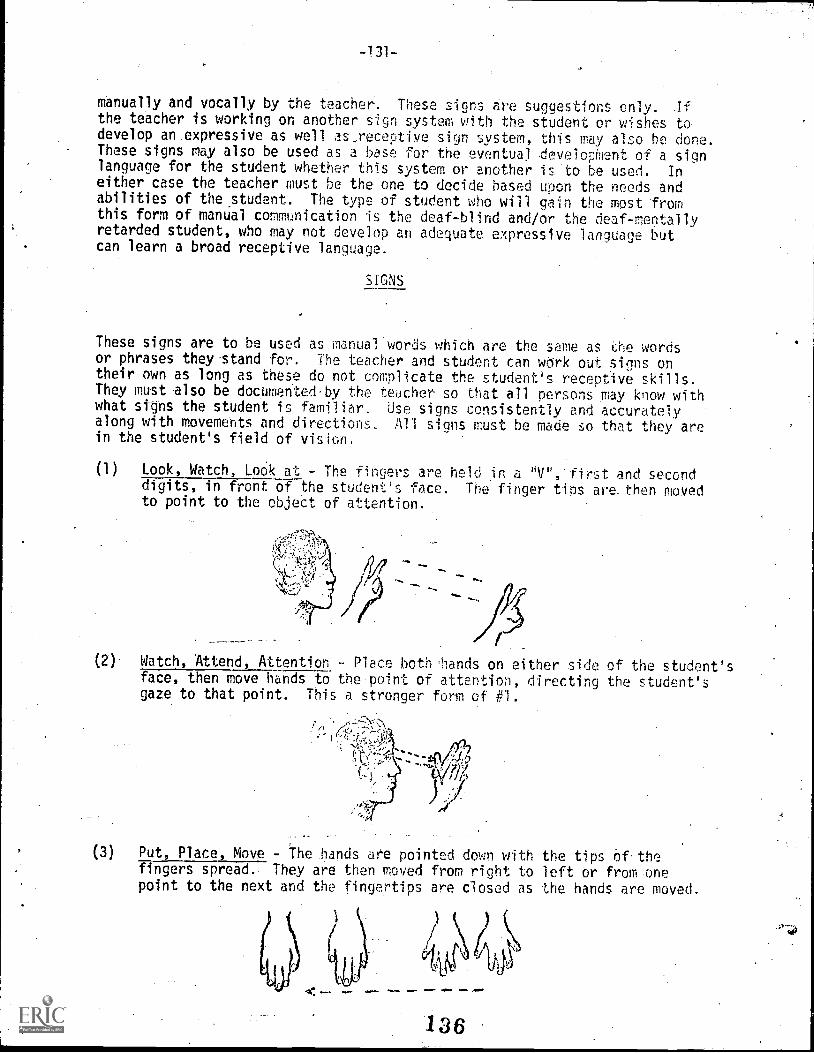
-13l-
manually and vocally by the teacher. These signs are suggestions only.. Ifthe teacher is working on another sign system with the student or wishes todevelop an .expressive as well as,receptive sign system, this may also be done.These signs may also be used as a base for the eventual- developMent of a signlanguage for the student whether this system or another is 'to be used. Ineither case the teacher must he the one to decide based upon the needs andabilities of the _student. The type of student who will gain the most fromthis form of manual communication is the deaf-blind and/or the deaf- mentallyretarded student, who may not develop an adequate expressive language butcan learn a broad receptive language.
SIGNS
These signs are to be used as manual words which are the same as the wordsor phrases they stand for. The teacher and student can wrk out signs ontheir own as long as these do not complicate the student's receptive skills.They must also be documented. by the teacher so that all persons may know withwhat signs the student is familiar. Use signs consistently and accuratelyalong with movements and directions. All signs-must be made so that they arein the student's field of vision,
(1) Look, Watch, Lodi( at - The fingers are held in a "V",'first and seconddigits, in front of the student's face. The finger tips are. then movedto point to the object of attention.
(2)- -Watch, Attend, Attention - Place bothliands on either side of the student'sface,. then move hands to the-point of attention, directing the student'sgaze to that point. This a stronger form of #1.
(3) Put,' Place, Move - The .hands are pointed down with the tips of. thefingers spread.- They are then moved from right to left or from onepoint to the next and the fingertips are closed as the hands are moved.
(111j
.de: a.= AM.
136
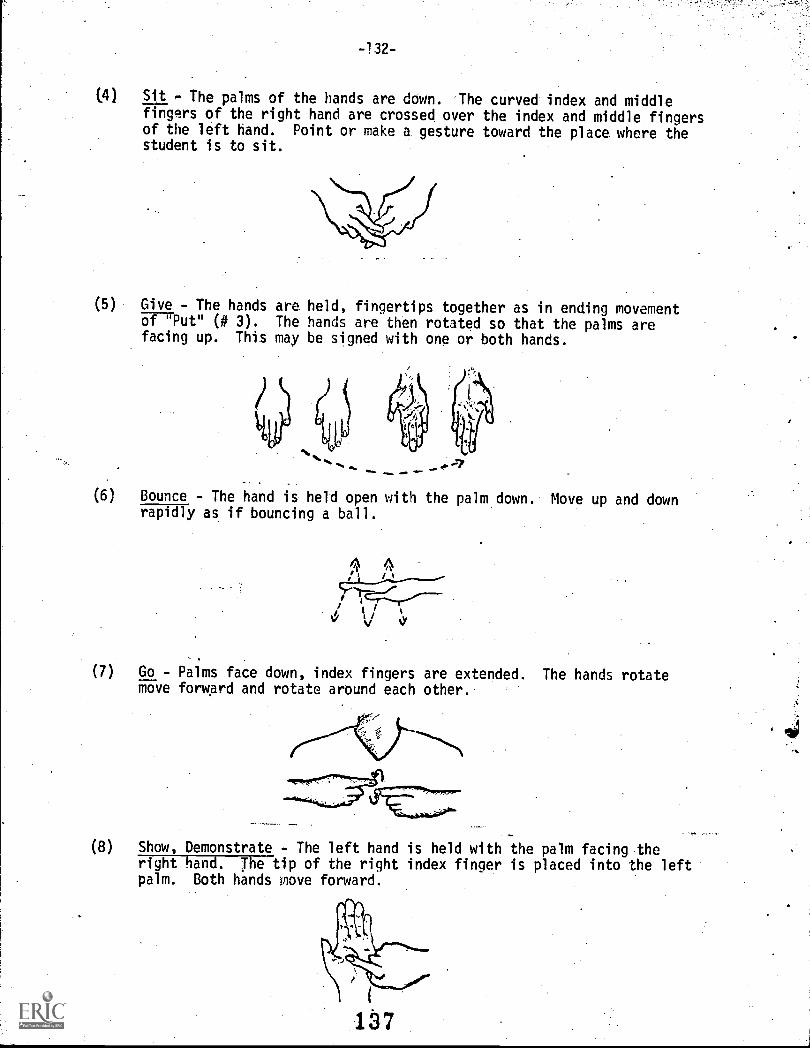
-132-
(4) Sit - The palms of the hands are down. The curved index and middlefingqrs of the right hand are crossed over the index and middle, fingersof the left hand. Point or make a gesture toward the place where thestudent is to sit.
(5) Give - The hands are held, fingertips together as in ending movementof "Put" (# 3). The hands are then rotated so that the palms arefacing up. This may be signed with one or both hands.
(6) Bounce - The hand is held open with the palm down. Move up and downrapidly as if bouncing a ball.
(7) Go - Palms face down, index fingers are extended. The hands rotatemove forward and rotate around each other.
(8) Show, Demonstrate - The left hand is held with the palm facing theright hand. The tip of the right index finger is placed into the leftpalm. Both hands move forward.
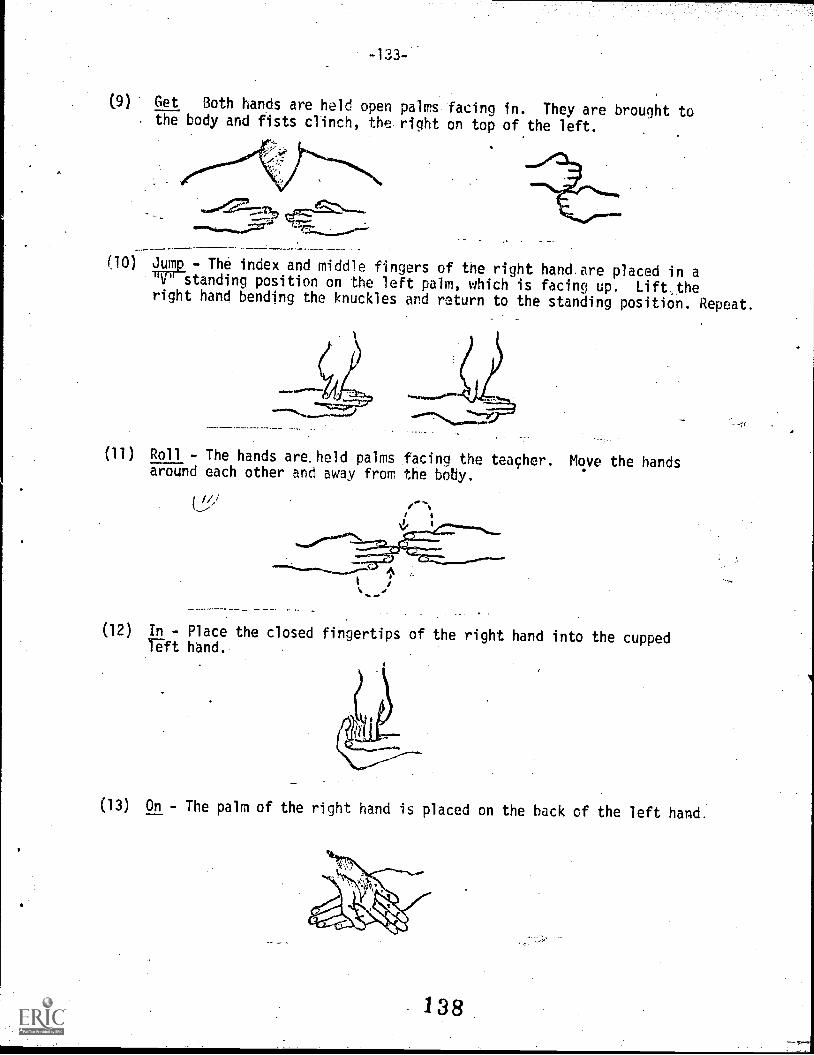
-133-
(9) Get Both hands are held open palms facing in. They are brought to. the body and fists clinch, the right on top of the left.
(10) Jump - The index and middle fingers of the right hand.are placed in a"V" standing position on the left palm, which is facing up. Lift,theright hand bending the knuckles and return to the standing position. Repeat.
(11) Roll - The hands are. held palms facing the teacher. Move the handsaround each other and away from the botiy.
/
t
(12) In - Place the closed fingertips of the right hand into the cuppedleft hand.
(13) On - The palm of the right hand is placed on the back of the left hand.
138
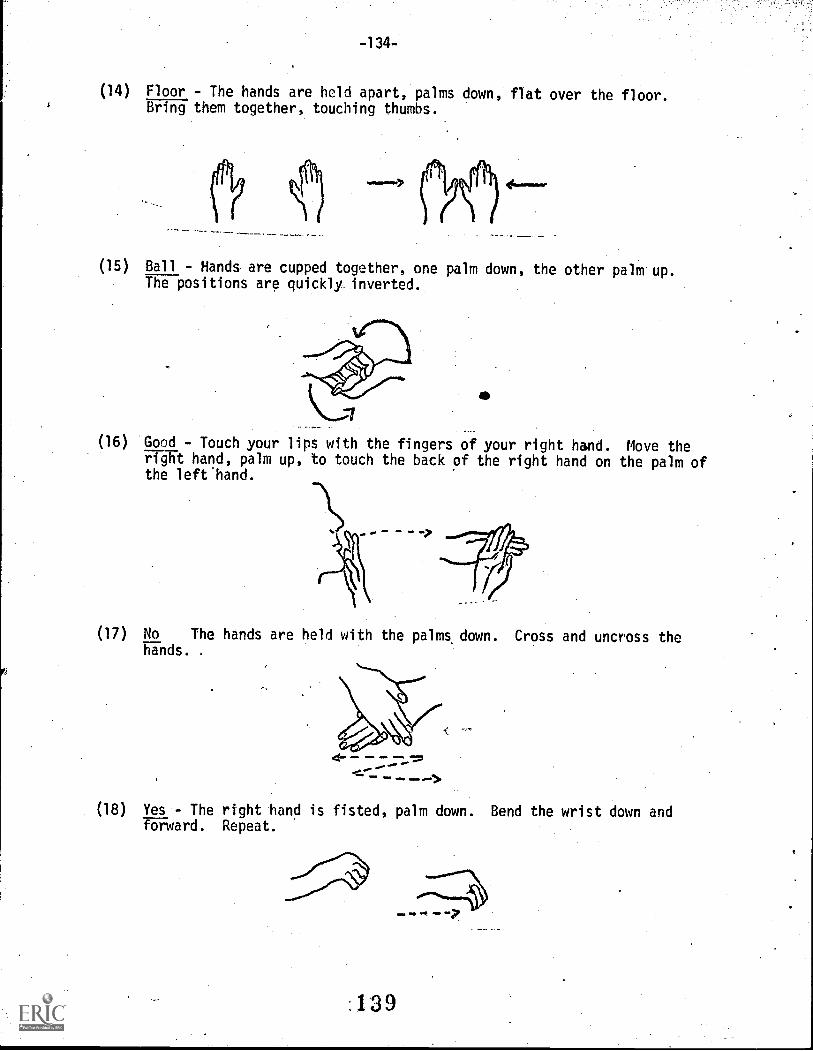
-134-
(14) Floor - The hands are held apart, palms down, flat over the floor.Bring them together, touching thumbs.
(15) Ball - Hands are cupped together, one palm down, the other palm up.The positions are quickly inverted.
(16) Good - Touch your lips with the fingers of your right hand. Move therigTit hand, palm up, to touch the back of the right hand on the palm ofthe left hand.
- - -
(17) No The hands are held with the palms. down. Cross and uncross thehands. .
(18) Yes - The right hand is fisted, palm down. Bend the wrist down andforward. Repeat.
:139
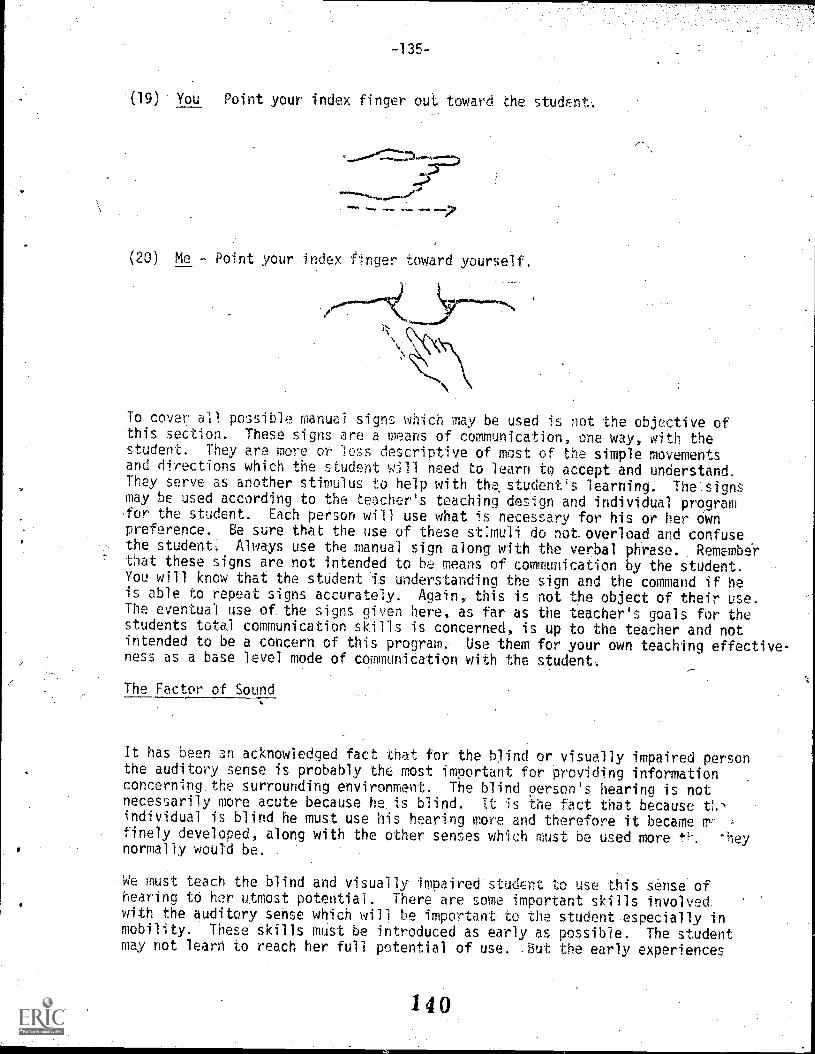
-135-
-(19) You Point your index finger out toward the student.
(20) Me - Point your index finger toward yourself.
To cover all possible manual signs which may be used is not the objective ofthis section. These signs are a means of communication, one way, with thestudent. They are more or less descriptive of most of the simple movementsand directions which the student will need to learn to accept and understand.They serve as another stimulus to help with the student's learning. The signsmay be used according.to the teacher's teaching design and individual programfor the student. Each person will use what is necessary for his or her ownpreference. Be sure that the use of these stimuli do not. overload and confusethe student: Always use the manual sign along with the verbal phrase.. RetembEirthat these signs are not intended to be. means of communication by the student.You will know that the student is understanding the sign and the command if heis able to repeat signs accurately. Again, this is not the object of their use.The eventual use of. the signs given here, as far as the teacher's goals for thestudents total communication skills is concerned, is up to the teacher and notintended to be a concern of this program. Use them for your own teaching effective-ness as a base level mode of communication with the student.
The Factor of Sound
It has been an acknowledged fact that for the blind or visually impaired personthe auditory sense is probably the most important for providing informationconcerningethe surrounding environment. The blind person's hearing is notnecessarily more acute because he.is blind. It is the fact that becauSe thnindividual is blind he must use his hearing more and therefore it became m,finely developed, along with-the other senses which must be used more th *heynormally would be.
We must teach the blind and visually impaired student to use this sense ofhearing to her utmost potential. There are some important skills involvedwith the auditory sense which will be important to the student-especially inmobility. These skills must be introduced as early as possible. The studentmay not learn to reach her full potential of use. But the early experiences
140
-136-
with this form of training can highlight an area of effective sensory controlwhich will be of help to the student in nearly everything he may eventually doin life.
From research done with the blind over many ;years it has been found that the.sense of hearing is used much like radar. Sound waves that bounce from an objectand return to the student can be used to localize that object. The decree ofaccuracy can be well developed with proper training. The blind are able totell size, shape and distance to the object with a good degree of accuracy.It has been found that the width of the object is more easily detected thanheight. The sound is best detected when the source of the sound is the in-dividual and not a secondary source behind or to either side of the individual.This implies that the refractive angle of the sound waves has a great deal todo with the blind person's interpretation of the object. If the sound originatesfrom behind the object, as related to the student, the individual will be ableto detect what is known as a. ":sound shadow". The "sound shadow" is the auditoryequivalent of the light shadow.. A source emits sound from behind an object.The individual hears the sound waves which come around the object and not thosewhich are stopped by the object. The individual receives-an auditory pictureor outline of the object.
These are factors which affect the capability of the individual to use thisauditory sense. Excess sound in the environment which causes extraneous audi-tory stimuli confuses the individuals ability to use his hearing as a sourceof information. detection. Another factor with which the teacher must be con-cerned is that the student who is deaf- blind will not be able to accuratelyuse audition as an effective information gathering sense. The deaf-blindhave not shown an ability to develop or use what hearing may be presentto sense objects'or environmental characteristics. This cannot infer thatthe deaf-blind student should not-be greatly encouraged to use her hearingsense to find out as much about the surrounding environment as can possiblybe done. The possible use of the combination of vision and audition.as onesense cannot be overlooked. It is highly suggested- that the deaf -blind stu-dent be put through many of the same activities for sound usage as the blindand visually-impaired. This should be done with the idea that the sense ofvision present may also be used along with the auditory sense.
The student's training in the use of sound as a sensory tool to replace visionshoUld be incorporated in all phases of the developmental process. Trainingis basically a series of increasingly complex experiences with sound object de-tection. The student is introduced to and allowed-to experience many sounds.These should be categorized into groups which are appropriate for the student.Home sounds, kitchen, living room, bedroom, school sound classroom, lunchroom,halls, gym, pool, etc., outside sounds traffic, grass, sidewalks, birds sing-ing, etc. The student must experience and relate with these sounds as a per-son would visually become accustomed to the various sights in'the world. Thestudent will categorize the sounds and become familiar' with.them as well as heis able. These will develop through experience associated with the apprppriateteaching cues.
Localizing sound and object detection will be developed in the same manner. Anobstacle course on which the student may experience and practice object detec-tion may be devised and used regularily in the classroom and the gym. Theseobstacles should be panels which are placed in a path on which the studentwalks. The panels can be wood. or cardboard sheets which are suspended or support-
141
-137-
ed.from behind. Their size should be 4-6 feet high and 3 -4 feet in width.This can be separate from or incorporated into the obstacle course used formotor development purposes. it is of primary importance to first teach thestudent to make his own sound. Have his own sound source. Sound feedbackcomes from the sound of foot steps orra hard surface, clapping, fingers tapping,talking-yelling. The student should use whatever is most appropriate andeffective. Initial experiences should be in an area where extraneous soundsare not a factor. The teacher should limit her Own talking as much as possible,so as not to disorganize the student's auditory input. In all other casesattempt to limit the external noise as much as possible. Eventually the stu-dent may need to be able to maneuver within a crowded hail and on noisy citystreets.The introduction of this form. of training is best accomplished whenthe student has developed the ability to confidently walk within an environ-ment where sources of noise are limited. The training of the student formobility outside the school and home environment is best accomplished by aspecial mobility trainer for the blind. It should not be our intent to dothis person's job, but to provide preliminary training and experiences whichwill make the job of. mobility training much easier and therefore more complete.
The student's eventual ability to communicate with and experience the world asit is should be part of all areas of education fornthe student. Each areahas something to contribute for the sensory impaired student. The area ofPhysical Education-Motor_Deveiopment has an important part to play becausemovement is easily related to words and manual sicms. The movement exper-iences and motor learnirg with which..the student is introduced and confrontedin his schooling will effect many other areas of his total development. Thedevelopment of effective communication skills and physical capabilities willpositively affect the student's integration into a world where she is limitedby the handicaps of sensory impairment. These aspects of the student's develop-ment cannot then realistically be overlooked to any degree if we are trulyconcerned with the total student.
112
xi
-138-
EVALUATION
The. Logan School Test of Motor Development for Deaf-Blindand Sensory Impaired.
A test will be developed which will serve to evaluate the students baselevel and progress in the area of. Motor Development. This test will followclosely the already - developed Logan School Test of Motor Development. Itwill include similar items and testing areas but be specifically designedfor administration to deaf-blind and sensory impaired students.
Following a period of observational evaluation and program development thetest will be devised. Because to my knowledge no test of this type existsfor this specific population I feel this period of research and study needsto be taken. For those who participate in this program a copy of the testand administration procedures will be provided when they are available. It
. is hoped that the broad use and development of this program will lead to anevaluation tool-Which can accurately serve the needs of this program and thespecial population of students intended to be served by this program. Thoseteachers and other professionals who may participate in this program are in-vited to submit any and all comments and suggestions on the administrationof the test and particularily concerning the program itself. Your help isconsidered valuable and necessary to the total development of this program.Our main concern is the progress and positive advancement of our studentsand we can best serve them through positive assessment and cooperation. Allof your help 'and assistance is solicited and much appreciated.
143
-139-
BIBLIOGRAPHY
-(1) Cratty, Bryant, 3., Movement and Spatial Awareness in Blind Childrenand Youth, Chas. C. Thomas, Publisher, Springfield, Illinois, (1971).
(2) Gallahue, David; Peter Werner, George Luedke, Moving and Learning -A Conceptual Approach to the Physical Edkation of Young Chdren,Kendall Hunt, Publishing Co., Dubuque, Iowa, (1972).
(3) Guldager, Virginia, "Body image and The Severely Handicapped RubellaChild," Watertown, Mass. Perkins School for the Blind, 1970, pp. 3 -6.
(4) Fait, Hollis, Special Physical Education - Adaptive, Corrective, Develop-mental, W.B. Saunders Co., Philadelphia, Pa., (1972). 3rd Edition.
(5) Rowland, Martha, A Modified Language Aquisition Program, Part of ASupplementary Manual for The Training of Severely Mentally Retarded,Hugh McBride, Fred Chappel; Division of Special Education, State De-partment of Public instruction, Lansing, Michigan, Through Public Act91-230.
(6) Royal National Institute for the Blind, Report of a Seminar on The Teachit-1g of Deaf-Blind Children, July 23-27, 1965. The Royal National In-'stitute for the Blind, Landen. Articles used were by Dr. J. Van Dijk.
(7) Tilton, James; Donna Liska and Jack Bourland (Ed), Guide to EarlyDevelopmental Training, Wabash Center for the Mentally Retarded, La-fayette, Indiana, (1972).
(8) Tutt, Louis, M., Motor Skill Development of the Visually and Auditor-ally Unique Child, unpublished program and summer workshop materials,Michigan School for The Blind, Deaf-Blind Department, Lansing, Michigan.
(9) Van Dijk, J., Movement and Communication with Rubella Children, from atalk given at the annual meeting of the National Association for Deaf/Blind and Rubella Children, May 6, 1968,
ADDITIONAL RESOURCES
(1) Language Acquisition Program for The Severely Retarded, Louise R.Kent, Research Press, Champaign, Illinois, 0974).
( (2) An Educational Approach Utilizing Developmental Sequencing and the4TOIRTV6 Movement eory ,. enny7Ro4inson, Of- Public Instruction,Harold Negley, Supt., northern Regional Service Center, 63!..) So. iain St.
South Bend, Ind, 46623.