doc with toc - irisxerte.org.uk/docs/xot/help/scenarioconnectorpageguide.pdf · more to make the...
TRANSCRIPT

Guide to using the Scenario Connector page
ContentsPre-requisites........................................................................................................................................2Introduction to Connector pages..........................................................................................................3
Important changes to the Connector Pages......................................................................................3Changes that affect all project types...........................................................................................3Changes that only affect Xerte Online Toolkits and Xerte Page Templates projects..................3
Compatibility issues for projects containing Connector Pages when changing over to XOT 1.9...4The Scenario page................................................................................................................................5
Features unique to Scenario Pages...................................................................................................5Scenario Page Diagram....................................................................................................................5
The Scenario Page layout.....................................................................................................................6A worked example................................................................................................................................7
Initial setup......................................................................................................................................7Setting up the Scoring options.........................................................................................................9Actions...........................................................................................................................................12
It's modelling time!...................................................................................................................12Adding actions to a Scene..............................................................................................................13Action Outcomes and Action Conditions......................................................................................15
More Modelling........................................................................................................................16How planning ahead can save you time.........................................................................................17Adding Props.................................................................................................................................18Adding Actions to Props................................................................................................................20Action Conditions..........................................................................................................................21
Prop Location............................................................................................................................21Adjusting the order of the Action Elements..............................................................................23More Actions.............................................................................................................................23
Outcome Conditions......................................................................................................................24Scoring and How the Game Ends..................................................................................................27
Adding the Game Winning Outcomes......................................................................................28XOT user tidy up.......................................................................................................................31The importance of testing.........................................................................................................31
Creating the other props.................................................................................................................32More Testing.............................................................................................................................33Add the final Prop.....................................................................................................................34Testing the Game Win...............................................................................................................34
Setting up the Game Lost Outcomes.............................................................................................34Add new Outcomes to the Cross the River actions ..................................................................35
Scenario Page Reference Guide to Optional Parameters....................................................................40
Contents Page 1 of 41

Guide to using the Scenario Connector page
Pre-requisitesThis guide is intended for people who already have some experience of authoring projects in Xerte on-line toolkits. To make use of this guide the following needs to apply.
• You have access to a Xerte on-line toolkits installation or a desktop Xerte installation.
• You are able to create new projects and add pages to the project.
• You are able to use the wizard form for a page and add, delete and change the properties the form offers to you.
Contents Page 2 of 41

Guide to using the Scenario Connector page
Introduction to Connector pagesConnector pages enable you to set up connections between different pages in your project.
Important changes to the Connector Pages
Since the introduction of the Connector Pages in October of 2012 there have been some significant developments.
Changes that affect all project types
• Every page type now has an attribute “Navigation Buttons” (either mandatory or optional) which allows the author to specify which navigation buttons will be enabled when that page is displayed to the user.
◦ As a result of the above Connection pages no longer offer any options to set the navigation button settings of a destination page.
• The “Navigation” attribute of the learning object now has an additional option “Historic” which displays the following buttons Home, Back (taking you back to the last page you visited rather than to the previous page in the project sequence), and Next (taking you to the next page in the project sequence.
Changes that only affect Xerte Online Toolkits and Xerte Page Templates projects
• It is now possible for the project Author to select some text in a page and then right click on it, to add a Page Link to another page in the project. This effectively turns every page type into a Connector page.
◦ As a result of the above the following Connector pages have been removed from XOT.
▪ Plain Text Connector.
▪ Redirector Connector.
▪ Tabbed Navigator Connector.
• The use of a Page ID property is no longer required. A new Page List control allows you to select the page you are going to link to from a list of the pages in the project.
◦ XOT will automatically compensate for this in pages created prior to this feature that make use of Page IDs.
Contents Page 3 of 41

Guide to using the Scenario Connector page
Compatibility issues for projects containing Connector Pages when changing over to XOT 1.9
• The Plain Text Connector page will no longer function – replace it with any page you like and use the new Page Link feature to create your links.
• The Redirector Connector page will no longer function – replace it with any page you like and use the new Page Link feature to create your links. Use the new Navigation Buttons attribute to control which navigation buttons you want to be enabled.
• The Tabbed Navigator Connector will no longer work – replace it with the Tabbed Navigator Page and use the Page Link feature to create your links.
• If you have used any Connector Pages in your project with the navigation buttons set to be disabled then you will need to recreate the page in your project as the navigation buttons will default to being shown. Once you delete the page data and recreate it you will gain control over the navigation buttons.
Contents Page 4 of 41

Guide to using the Scenario Connector page
The Scenario pageThe Scenario Page allows the learning object author to set up a wide variety of text based scenarios usually by using several Scenario pages, each one describing a particular scene or location in the overall scenario. The learner (player) interacts with the Scenario page, examining Props (think Theatrical) and selecting from the range of actions available to them, in order to solve the problems posed in the Scenario.
Features unique to Scenario Pages
• They can share data across several scenario pages. For example once you have configured the scoring for the first scenario page all the other pages can share this data, so you don't need to set up the scoring in subsequent pages.
• A scenario page has the following features
◦ The scene or location
◦ Props (items present in the scene that the player can interact with)
◦ Actions that the player can take (either associated with the location or with a specific Prop).
◦ Action Conditions that define when an action is available.
◦ Outcomes that happen when an action is taken.
◦ Outcome Conditions that define when a particular outcome will happen as a result of the associated action being taken.
◦ Game over conditions, both for winning and losing.
Scenario Page Diagram
The following diagram may help you to form a picture of how the Scenario Page works
Contents Page 5 of 41
Scene
Prop
Action
ActionCondition
Outcome
OutcomeCondition

Guide to using the Scenario Connector page
The Scenario Page layout
A brief look at the Scenario Page layout provides a good feel for what the Scenario Page offers. The yellow call outs are not part of the page layout but have been added to aid in this explanation.
A) This is the description of the current scene it. It can also display additional text as a result of an Effect type of action, which you will learn more about later.
B) This is the list of actions available to take at this point in time in the Scenario.
C) This is an action result message. When you take an action the action and the outcome of the action are displayed in a text box. When the player clicks on the Continue button the effects of their action are reflected in the updated Scenario Page display. In this example the player has clicked on an object to read its description.
D) The scores section. You can configure up to 3 scores, each of which can be affected by the outcomes of actions taken by the player. Each score can be set to end the Scenario on reaching either the minimum or maximum value allowed for that score as a win or a loss.
E) A list of what the player is currently carrying in the Scenario.
F) A list of items that are in the current scene but which are not being carried (and which are
Contents Page 6 of 41
A
B
C
D
E
E

Guide to using the Scenario Connector page
visible) Clicking on an item that is carried or which can be seen, results in the description of the item being displayed – as in the example in the picture above.
A worked exampleThe Scenario page is designed to enable you to set up different scenarios that the player can interact with in order to solve problems. A scenario consists of one or usually more than one Scenario page which work together to deliver the overall scenario.
To give you a basic understanding of how the Scenario page works this guide will take you through the process of setting up a well known puzzle as a Scenario for the learner to solve.
You are strongly encouraged not to just follow the instructions. At every step seek to understand why options are set as they are. It is not enough to be able to duplicate the example in this guide. If you can understand why options are set as they are; why actions are modelled in a particular way; then you will be well on the path to creating your own unique scenarios.
You may have guessed from the picture that the puzzle is the one about the Farmer with the Goat, Fox and Bag of Grain. They are all one side of the river. The challenge is to get the Goat, the Fox and the Bag across the river, but there are some restrictions that must be managed.
1. The Farmer (in this case the person playing the scenario) can only carry one item at a time.
2. If the Farmer leaves the Goat with the Bag of Grain then the Goat will eat the grain.
3. If the Farmer leaves the Fox with the Goat then the Fox will kill the Goat.
So let's see how this can be set up and in the process learn how to use the Scenario Page.
The Scenario Page is easy to use. Often the biggest challenge when creating a new Scenario is to work out how to model your Scenario as a series of Scenario pages. As we build the example Scenario you will get a feel for some of the considerations involved.
As we approach each part of the Scenario some tasks will repeat. Once you have a basic understanding of the task e.g. setting score values or setting up an action, try to figure out for yourself how to implement the next example, rather than simply following the instructions. This will help you to start thinking of your problems in terms of Scenario Page features.
For the demonstration I am going to use Xerte On-Line Toolkit (XOT). However with minor modifications to how you add a page to a project these instructions will work just as well for desktop Xerte users who want to use a “Pages” project or a “pageTemplates” project.
NB. It is a good idea to save your work regularly. In particular XOT users should click on the Publish button from time to time as this will save their project. Failure to do this can result in work being lost if you close the project window without first publishing your project!
Initial setup
1. In Xerte or XOT create your project, then add a single Scenario Connector page to your project. The Scenario Connector page is available in the Connectors page menu.
Contents Page 7 of 41

Guide to using the Scenario Connector page
2. Select the Scenario page you have just added (in a “pages” project you will need to double click on the page to open the page's wizard form)
Note: Unique Page ID only displays in desktop Xerte projects.
3. We need to change a few things. The scenario will start on the west bank of the river so make the following changes
a) Scenario Name = West Bank (XOT will link this page name to a hidden page ID)
b) Unique Page ID = westBank (only applies to desktop Xerte projects to identify the page)
c) Scenario Title = The west bank of a river.
d) Description = You are standing on the west bank of a gently flowing river. (you can add more to make the description more evocative if you want to)
e) Navigation Buttons (formerly displays as “This Page Navigation”) - leave as “None” as we don't want the player wandering off to locations)
Contents Page 8 of 41

Guide to using the Scenario Connector page
Setting up the Scoring options
4. Your project tree should now look something like this
5. We will now look at setting up the scoring. You will only need to do this in the first page of your Scenario as the other pages will be able to share the scoring information from the first page.
6. In the project tree select “Score Configuration” the score form will be displayed.
7. Only the first part of the score form is shown above. If you compare this to the actual form you will see that the settings for score 2 and 3 duplicate the options available for score 1.
8. Let's set up score 1 first. We will use score 1 to display the players overall score. The score will start at 0 and rise to 100. When it goes beyond 100 the player will have solved the
Contents Page 9 of 41

Guide to using the Scenario Connector page
puzzle and a game win will be triggered. To achieve this score 1 is set up as shown below.
a) The Scenario set up option is only displayed in the page tree and can be left as is.
b) The Score 1 Lose Message can be left as is as Score 1 will not trigger a game lost so the message will never be displayed.
c) The “Score 1 Win go to” and “Score 1 Lose go to” let you select a page (enter a Page ID in Xerte) that the Player will be taken to after the game ends. These both need setting to valid values. This will be revisited once we have more pages entered into the project.
9. Now for score 2. We will use this to display the Goat's health, which will start at its maximum and then be reduced as the Goat gets attacked. When the Goat's health goes beyond the minimum value a game lost must be triggered. Take a look now at the Scenario Page Layout picture and see if you can figure out what settings to use, based on what you now know from setting the options for Score 1. from the Scenario Page Layout picture.
10. Now for score 3. This will be used to keep track of the amount of grain remaining. Like the Goat's Health this will start at its maximum and reduce as the grain is eaten by the goat. When the grain remaining falls below the minimum value then a game lost situation will be triggered. Again refer to the Scenario Page Layout picture to give you an idea of what options settings you need to make for Score 3.
Contents Page 10 of 41

Guide to using the Scenario Connector page
11.When you have completed setting up the options for score 2 and 3 compare your entries with the examples shown on the next page and if there are errors correct them.
Contents Page 11 of 41

Guide to using the Scenario Connector page
a) Remember you only need to set the Win Message if the Score has been set to trigger a game win. The same principle applies for the Lose Message.
b) Publish your project to save your changes.
Actions
Actions are the heart of the Scenario Page. They provide the majority of the interactive features of the Scenario Page and define the logic of how the Scenario will function.
It's modelling time!
When you create a Scenario you have to think about the real world situation that you are going to represent in the Scenario. You have to consider the actions that take place; the objects that people interact with; other people who are involved; restrictions on what can be done and rules that have to be obeyed. In short all the factors that frame and define the situation you are seeking to represent in a Scenario. This may seem a little daunting at first but, if you cut your teeth on some simple examples like the one we are using here, it will soon become second nature to you.
Take a moment to think about the puzzle we are seeking to turn into a Scenario. The Player trying to solve the puzzle plays the part of the Farmer. The task of the Farmer is to carry each of the three items across the river. So what actions need to be made available to the Player to enable them to do this? Stop and take a few moments now to think this through, only then look at the answer below. Remember there are no rules about how to model a situation. Often there will be more than one way. Generally the best way is the simplest way.
OK – Ready for the answer?
The player needs to be able to:
• Cross the river from the West Bank to the East Bank.
• Cross the river from the East Bank to the West Bank.
• Pick up the Goat.
• Put the Goat down (not as in terminate with extreme prejudice!)
• Pick up the Fox.
• Put the Fox down (same idea as for the goat).
• Pick up the Bag.
• Put the Bag down.
With these few simple actions the player will be able to transport any of the three Props (the Goat, the Fox, the Bag) from one side of the river to the other by carrying out three actions.
• Pick up an item
• Cross the river (carrying the item as they just picked it up)
• Put the item down (now on the other bank of the river).
Now we have a list of actions the next question is “where to put them?”.
Contents Page 12 of 41

Guide to using the Scenario Connector page
Actions don't exist in a Scenario in isolation. Actions “belong” or “are associated with” either a Scene or Location (actually a Scenario Page) or a Prop (e.g. the Goat, the Fox etc.) In a Scenario actions become available when the thing that they are associated with is present in the Scenario. This means that actions associated with a Scene are only available when the player is looking at the particular Scenario Page that they are associated with. Actions associated with a Prop are only available when that Prop is “in the scene”.
So take another look at the list of actions above and see if you can figure out which actions you would associate with a Scene (a Scenario Page) and which with a Prop. Try also to identify which Scenario Page or Prop to associate it with.
When you have your answer, compare it with the list below.
• Cross the river from the West Bank to the East Bank.(West Bank Scenario Page)
• Cross the river from the East Bank to the West Bank. (East Bank Scenario Page)
• Pick up the Goat. (the Goat Prop)
• Put the Goat down (the Goat Prop)
• Pick up the Fox. (the Fox Prop)
• Put the Fox down (the Fox Prop).
• Pick up the Bag. (the Bag Prop)
• Put the Bag down. (the Bag Prop)
Adding actions to a Scene
Having taken a few moments to plan the basics of our Scenario it's time to add the actions to the Scenes.
12. Click on the Scenario page title (West Bank) in the project tree to return to the Scenario Page form.
13. In the list of new items that can be added to a Scene click on “New List of scenario Actions”
Contents Page 13 of 41

Guide to using the Scenario Connector page
14. You don't need to edit the “List of scenario actions” data in the Actions at this scenario property as it only displays in the page tree on the left, to help you navigate the page tree structure. The “List of Scenario Actions” exists solely as a container in which you can enter all the Scene based actions for this Scenario Page. Scenario page tree structures can become quite long, so it is a big help if Scene based actions and Prop based actions are kept separate.
15. Click on “New User Action” to add a new action.
16. Lets take a look at the options here
a) Unique Action ID – is used to give a unique recognisable identifier for the action.
b) Action Title – Is displayed in the action list (flagged as “B” in the Scenario Page Layout picture above.
c) What happens – describes the action taken and not the outcome of the action. This is displayed in the text box that opens when an action is taken.
d) Action Type – In Scenario pages there are two types of actions “Action” and “Effect”.
• “Action” type actions are offered to the Player and are processed by Xerte when the
Contents Page 14 of 41

Guide to using the Scenario Connector page
Player clicks on the text associated with that action in the action list.
• “Effect” type actions take place when the Xerte loads the Scenario page and their text and outcome text is displayed after the Scene description. There main use is to provide a bit of atmosphere, by making it possible for the same Scenario Page to vary in the text it displays. “Effect” actions have all the features of “Action” type actions, but any changes they make other than to the text displayed by the scene only becomes apparent once the page has been refreshed. There are no “Effect” type actions required in our example.
17. Set up the new Action as shown below.
Action Outcomes and Action Conditions
Notice that with actions there come two new elements that can be added to an Action, “Action Outcomes” and “Action Conditions”.
• Action Outcomes allow us to set up what happens when an action is taken.
◦ “Action” type actions will not be displayed to the Player if they do not have an outcome. There is little point in offering an action to the Player that does not do anything.
◦ “Effect” type actions can take place without an outcome. It may be that all that is intended is to add a bit of atmosphere by adding a phrase such as “A leaf flutters by in the breeze” to the scene description, which can be achieved, without an outcome being added, by simply entering the phrase in the action's “What happens” text box.
• Action Conditions allow us to define what criteria must be met before an action is available
Contents Page 15 of 41

Guide to using the Scenario Connector page
to be taken. If just one of the Action Conditions defined for an action fails to be met then that action will not be offered to the Player, or if it is an “Effect” type of action then the action will take place.
More Modelling
Time for a little more thinking. We now have an action defined of “Cross the river”, but what if any conditions do we need to set for the action and what outcome do we want? Again take a few moments now to think this through before reading further.
All done thinking? Then lets press on.
Is there any situation in the Scenario where we would not want the Player (the Farmer) to be able to cross the river? Granted that there may be times when crossing the river may be a bad idea – the Farmer might leave the Goat alone with the bag or the Fox alone with the Goat, either of which would lose the game. But then we learn by our mistakes, so we should let the player make them. As long as the Farmer is on the river bank he/she should be able to cross the river. Since the action is associated with the river bank that condition is built in, so we don't need to set any conditions.
What about the outcome? The simple answer is that the Farmer needs to get to the other side of the river. There are more outcomes to consider, such as the possibility that in crossing the river the Farmer left the Goat with the Bag or the Fox with the Goat, but we will pick those issues up a little later on. So for now we just need to add the outcome of getting to the other side of the river.
18. Click on “New Action Outcome” and complete the form as shown below.
19. The “Outcome title” just shows in the page tree. The Player will see the “Outcome text” when a message is displayed containing the “What happens” text followed by the “Outcome text”. But telling the Player they have got to the other side is well and good. We still have to get them there. Action Outcomes have a number of optional properties. Click on the optional properties menu button (marked by a red box in the picture below)
20. If you are using Xerte you can set the destination page ID to “eastBank”. XOT users will need to wait to set the value of the Destination Page until we have added the East Bank page, before we can select it from the list of pages in the project.
Contents Page 16 of 41

Guide to using the Scenario Connector page
How planning ahead can save you time
If you think carefully about your Scenario before you start to create it then you may discover opportunities for saving your self a lot of time. The situation we have now is a prime example, as will be the creation of the Props (the Goat etc.) later on. This Scenario needs both a West Bank location and an East Bank location. At both locations the Player has to be able to cross over to the other side of the river. However XOT (and pageTemplates) projects allow you to copy pages. So once you have created your first river bank you can copy and edit the copy to create the second river bank.
• In a desktop Xerte pages project the easiest way is to create a new Scenario page and then to copy the XML file from the first page's folder to the second pages folder in projectFolder/pages/page folder.
• The process is not quite as easy as for XOT but it is doable and can save you time.
21. Let's take a copy of the West Bank scenario page and turn it into the East Bank.
a) Click on the West Bank page in the project tree, then click on the Copy Button – a second West Bank Scenario page is created.
b) Edit the second West Bank Scenario page (the first one will be the page the project opens at) – first edit the main Scene form as follows – changes are marked in red.
Note: This image displays the Xerte version which includes the page ID attribute. XOT users can ignore this field.
c) The only other form that needs changing is the Outcome form “go to other bank”, change it as shown below, by selecting West Bank from the list of pages in the project. (Xerte users should set the Destination Page ID to “westBank”)
Contents Page 17 of 41

Guide to using the Scenario Connector page
d) Finally since we know that Scenario pages share the score settings set up by the first Scenario page in a project delete the East Bank page's Score Configuration section by clicking on it and then clicking on the Delete button. Your project tree should look like the one at the top of the next page.
Note: Leaving the Score section in place will do no harm, but deleting it avoids confusion.
22. If you have not done so Publish your project. This will save your changes.
23. If you like you can now click Play and take a look at how your Scenario is progressing. You won't have much yet, but you should be able to see the Scores set and there should be one action you can perform. You should be able to cross the river and then re-cross the river.
Adding Props
Props are things that can be placed in a Scene. They can have actions associated with them to enable the Player to interact with them. In a Scenario Page anything that you want the user to interact with, that is not a Scene, is a Prop. So in our scenario this means the Goat, the Fox and the Bag of Grain.
Props are introduced into a scenario by being defined in a Scenario Page. Once defined they become available when the Player visits that page. They can be moved from one scene to another if the Player picks them up. Whilst they are carried they will be available in every scene. If the Player puts them down then they will remain in the scene that the player put them down, unless you as the scenario author decide otherwise.
In our puzzle the Farmer can carry any of the three Props. There is nothing that the Farmer can do with one of the Props that cannot be done with any of the other props. This offers some time saving opportunities again. The similarity between the three Props means that if we create the first Prop we can, once we have finished setting it up, simply copy it and edit the copy to create each of the other two Props.
Since in our puzzle all three props start the scene on one bank of the river we will need to create all three props in the opening Page i.e. the West Bank.
24. Click on the “West Bank” entry in the project tree.
25. Click on “New List of Props in scenario” - this will add a new element to the Project
Contents Page 18 of 41

Guide to using the Scenario Connector page
Tree.
26. With the “List of props in scenario” highlighted in the project tree click on “New Prop”, to add a new Prop to the scene.
Notice that the “List of props in scenario” element in the project tree acts as a container for all the Props in the scene., just like the “List of scenario actions” acts as a container for the scenario based actions. When you are working on Actions and Props you can expand and collapse these elements making it easier to work on a Scenario page that has a lot of elements added to it.
27. Leave the Prop State as “Visible”, but edit the rest of the Prop as shown.
Contents Page 19 of 41

Guide to using the Scenario Connector page
28. The Prop form contains the following properties
a) Prop Unique ID - Each Prop must have a unique identifier that can be referred to by Action Conditions, Action Outcomes and Outcome Conditions (These will be explained soon).
b) Prop Title – This is displayed in the “You can see “ list, when the Prop is visible in the scene, and in the “You have with you” list when the Prop is carried and visible.
c) Description – This is displayed to the Player when they click on a Prop Title displayed in the “You can see” or “You have with you” list.
d) Prop State – Options are Visible or Hidden. This enable you to place Props in a scene and enable events to be triggered by them even if you don't want the player to know they are there yet. Only props that have a Prop State of “Visible” count in the number of items being carried. So you could have a “Hidden” item carried as a means of making an action available in every scene.
Adding Actions to Props
Actions are added to Props in the same way that they are added to Scenes.
We have now created our Goat but we need to be able to do things with it. The puzzle requires that the Farmer (the Player) can carry the Goat across the river. So what actions do we need to provide for the Goat? Remember there is no single correct way of achieving something in your scenario, but often there is a way that is the simplest to implement.
When you have thought this through and have your own idea of what actions you need to create, read on.
We only need to implement two actions – Pick up the Goat, and Put the Goat down. If the Player
• picks up the Goat.
• crosses the river.
• puts the Goat down.
Then they will complete the task of transporting the Goat from one side of the river to the other.
29. With the “goat” selected in the project tree, click on “New User Action” - you will see the same Action Form that you saw when you first created the “crossRiver” action.
30. Complete the form as follows leaving “Action Type” = Action.
Contents Page 20 of 41

Guide to using the Scenario Connector page
Remember the “What happens” property only describes the first half of the action, the outcome of the action is described in the Action Outcome.
31. Click on “New Action Outcome” to add an outcome to the action. Complete the Outcome form as follows.
As with the “crossRiver” action it is one thing to describe it and another thing to actually make it happen in the scene. We need to add an optional property to the action.
32. Drop down the list of Optional Properties and select “Prop Action” then click the Add button.
33. Set Prop Action to “Carry”
Setting the Prop Action to “Carry” changes the location of the Prop to a special location in Scenario Pages called the “Inventory”. All Props located in the Inventory are carried.
Action Conditions
For scenarios to make sense we often need to set conditions that must be true before an action is offered to the Player. It would not make sense for example for the Player to see in the list of actions “Pick up the Goat” unless the goat was present in the scene. How do you pick up something that is not there?
So we need to set up a condition for the action that only allows the Farmer to “Pick up the Goat” if the goat is there.
34. With the “takeGoat” action (not the “carryGoat” outcome) highlighted in the project tree, click on “New Action Condition”.
35. Complete the Action Condition form as follows.
Note that the “Prop Location” is an optional property, which you will need to add to the form.
Prop Location
This is one of the optional properties available in Action Conditions, it specifies where the Prop
Contents Page 21 of 41

Guide to using the Scenario Connector page
must be for the action to be allowed to take place. Whenever an Action as associated with a Prop the Scenario page assumes by default that any conditions specified will relate to that Prop. This is why you can select “Prop Location” and the Scenario Page will know you mean the location of the Goat.
If you wanted to refer to a different Prop then there is an optional property “Prop Name” that you would add to the Action Condition. In actions associated with scenes there is no “default Prop” so you always have to add the “Prop Name” property when setting Prop related conditions.
The “Prop Location” property has six options, which make it possible to identify every possible combination of where a prop might or might not be. The six Prop Location options are:
• On Stage – Props at the current scene (location) that are not carried.
• Carried – Props that are carried.
• Off Stage – Props that are neither carried or in the current scene
• Not on Stage – The opposite or “On Stage” i.e. all Props that are Carried OR Off Stage
• Not Carried – The opposite of “Carried” i.e. all Props that are On Stage or Off Stage
• In Scene – The opposite of “Off Stage” i.e. all Props that are On Stage or Carried
Consider for example a point half way through solving our puzzle.
Current Page West Bank | | East Bank
Bag of Grain | | Fox
Goat (Carried) | |
The scene (i.e. the Scenario Page the player is looking at) is the West Bank. The Farmer has already carried over the river the Fox which is on the East Bank, the Bag of Grain is on the West Bank and the Farmer is carrying the Goat.
Which Prop Locations are true for each of the three Props?
• Bag of Grain – On Stage (which means it is also In Scene and Not Carried)
• Goat – Carried (which means it is also In Scene and Not On Stage)
• Fox – Off Stage (which means it is also Not Carried and Not On Stage)
NB: There are two potential area of confusion to watch out for
• Don't confuse Off Stage with Not On Stage
◦ (Things that are Off Stage are never “In Scene”.
◦ Things that are Not On Stage may in another scene or they might be in this scene but being carried.
• Be aware that until the Scenario Page in which a particular Prop is defined has been viewed by the Player then that Prop does not exist. Therefore it does not test as true for being at any of the six Prop Locations.
To review what we have just done. By setting the Action Condition of Prop Location = On Stage for the Goat Prop we are ensuring that the Action “Pick up the Goat” will be available whenever the Goat is located at the current scene. The action will not be offered if the Goat is not at the current
Contents Page 22 of 41

Guide to using the Scenario Connector page
scene or if the Goat is currently being carried.
Adjusting the order of the Action Elements
Because Actions have both Outcome and Action Condition Elements at the same level in the Project Tree it is easy to get the two confused when you are looking in the Project Tree to locate a particular element. Also by default they will simply display in the order they are added to the action. It is good practice to tidy the order up so that you have after the action, first all the conditions that must be true for that action to take place, second all the possible outcomes for that action.
Currently in your project the Outcome “carryGoat” is listed before the Action Condition “goatOnStage” so we'll swap them around.
36. Click on the Action Condition “goatOnStage” in the project tree.
37. Click on the “Up” button to move the Action Condition above the “carryGoat” Outcome.
This may seem trivial now, but as the page gets more populated with Props, Actions, Action Conditions, Outcomes, and Outcome Conditions (more on these in a moment) you will find it really pays to keep things tidy. It also makes logical sense as if the Action Conditions are not met then the Action will not happen and therefore the Outcome will not result.
More Actions
Using what you now know about actions see if you can figure out how to add the second action we need to the Goat – Putting the Goat down again. When you have given it some thought or even had a go at doing it yourself, then check your solution with the answers below.
38. Your Page Tree should look similar to the following
Contents Page 23 of 41

Guide to using the Scenario Connector page
Action “dropGoat” with Action Condition “goatCarried” and Outcome “releaseGoat” are new..
39. The details of the action are as follows (Action Type = Action)
40. The details of the Action Condition are as follows
41. The details of the Action Outcome are as follows
42. Now publish your project and then play it. You should be able to pick up and drop the goat. You can even pick up the Goat, cross the river and drop it on the East Bank.
Outcome Conditions
Our puzzle states that the Farmer can only carry one item at a time. So how could this be implemented in the Scenario?
One way would be to set a Condition for each Pick Up action that checked how many items were already being carried. The trouble with this approach is that the Player might find it all rather confusing since the Goat would be standing there larger than life waiting to be picked up yet the Action “Pick up the Goat” would not be offered to the player.
An excellent way of delivering learning is to offer people problems to solve which allow them to get the answer wrong or to make mistakes, so that they can be presented with the result of their error and learn from it. Learning can be quite engaging when you are never quite sure what might happen as a result of the decisions you have to take and the factors you need to take into account.
Contents Page 24 of 41

Guide to using the Scenario Connector page
What we need is a way of allowing the action “Pick up the Goat” even when the Player is already carrying something else. What we need to change is not the condition for the action to be available, but the outcome that results. This is where Outcome Conditions come in. With outcome conditions we can set up situations like the following
Pick up the Goat
if (one or more items are already being carried)
Outcome is “You can't carry anymore”
else
Outcome is “You pick up the Goat”
NB: Remember the difference between Action Conditions and Outcome Conditions
• Action Conditions decide if an Action will be displayed in the list of available actions.
• Outcome Conditions decide, when an Action is taken, which Outcome(s) will take place.
So let's now make sure the Player can only pick up one item at a time.
43. Select the “takeGoat” action in the page tree.
44. Click on “New Action Outcome” to add a new Outcome, with details as below.
We now need to think about what test we can carry out to select between the two outcomes. The puzzle states that no more than one item can be carried at a time, so how can this be modelled in a Scenario Page?
Outcome Conditions have a number of optional properties that are designed to be used in conjunction with each other. Three of these are:
• Score or Counter
◦ This option allows you to select any of the three scores or the Count of Items Carried.
• Score / Counter Value
◦ This option allows you to set a value which will be compared with the value of the Score or Counter selected in the previous option.
• Score / Counter Comparison
◦ This option allows you to select the type of comparison you want to make (Greater Than, Equal to, or Less Than.
So by selecting the “Items Carried” counter we can run one test to identify if the goat gets picked up and another test to see if the Player is told they can only carry one item at a time.
NB: All tests made for Action Conditions and Outcome Conditions are made when the Page is refreshed, that is on completion of one action and before the user gets to take the next Action. So any outcomes that would change the result of a test will have no effect on a test until the next
Contents Page 25 of 41
Guide to using the Scenario Connector page
attempt to take an action is made.
Put another way, if we have the Outcome “Pick up the Goat” followed by the Outcome “You can only carry one item at a time”, then the first outcome will not immediately result in triggering the second outcome because the Player is now carrying the Goat. What will happen is that the first time the Player tries to pick up the goat they will be able to do so. But if they then do the same action again, the “You can only carry one item at a time” outcome will then be triggered.
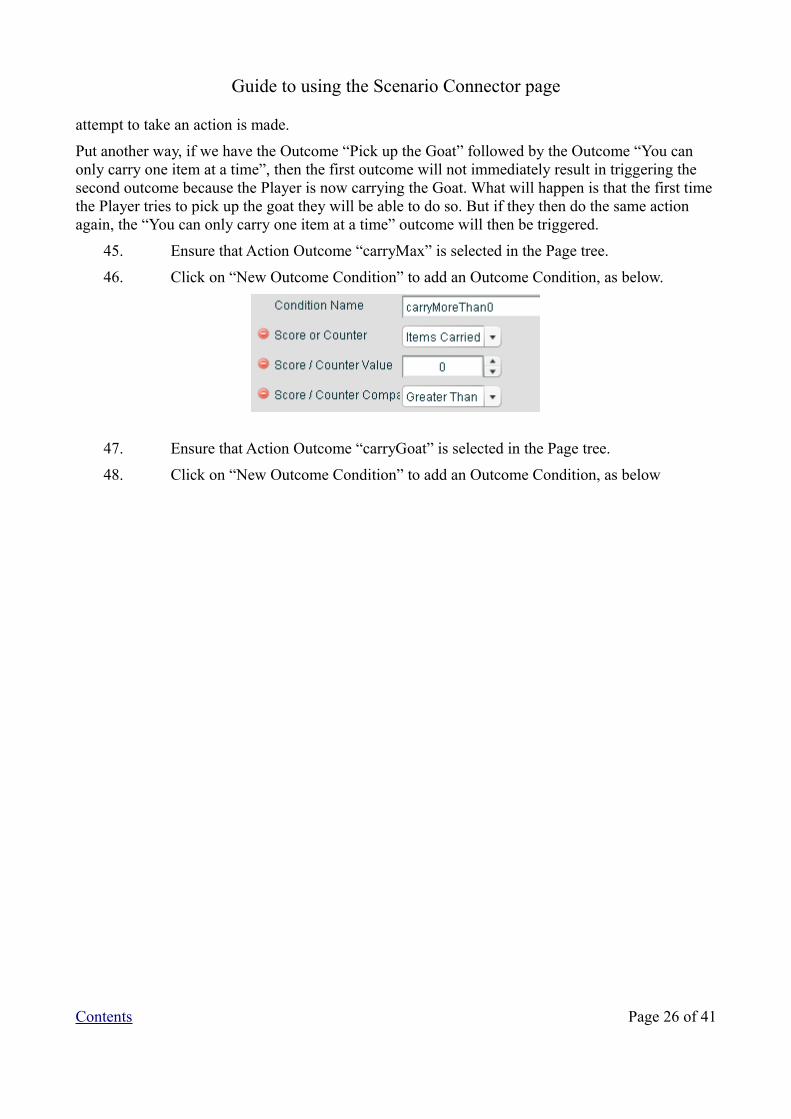
45. Ensure that Action Outcome “carryMax” is selected in the Page tree.
46. Click on “New Outcome Condition” to add an Outcome Condition, as below.
47. Ensure that Action Outcome “carryGoat” is selected in the Page tree.
48. Click on “New Outcome Condition” to add an Outcome Condition, as below
Contents Page 26 of 41

Guide to using the Scenario Connector page
Look at the conditions set for each outcome and take a moment to be sure you understand how they each make the correct test to select the appropriate outcome.
Your project tree should now look like the one below
It's a little early to test your project again to see if the Outcome Conditions work as we only have one Prop to pick up. However we have a little more to add to the Goat Prop before we start copying the Prop to create the other Props.
Scoring and How the Game Ends
Action Outcomes have optional properties that include
• Change Score 1
• Change Score 2
• Change Score 3
For each of these properties you can set their value to a positive or negative number to modify the related score.
You may recall that earlier on we set the Win and Lose conditions for the Scenario
• Win = Score 1 Max (100)
• Lose = Score 2 Min (0)
• Lose = Score 3 Min (0)
Contents Page 27 of 41

Guide to using the Scenario Connector page
The Game End will trigger when any of these scores go beyond the Max or Min value. Where no Game End condition is specified the effect of the Action Outcome is curtailed to set the score at its limit e.g. Score 1 minimum value is 0. If an Action Outcome had the optional property Change Score 1 = -50, and the Outcome was triggered at a time when Score 1 = 40 then Score 1 would reset to 0.
In the Puzzle the game ends with a win when the Farmer deposits all three items on the far bank of the river. Our challenge is to find a way to model this outcome in the Scenario. As usual there is more than one way.
Since we know that the winning condition (in Scenario speak) is
• current Scene is East Bank
• Goat location is On Stage
• Fox location is On Stage
• Bag location is On Stage
We could have an Action of type “Effect” for the East Bank page, with Action Conditions Goat On Stage, Fox On Stage, Bag On Stage, and an Outcome that set the Score 1 to 105 (anything bigger than 100). However this would provide a sudden victory with no intermediate change of score as the puzzle became partially solved.
Also remember that the page is displayed based on the scores when the page opens or is refreshed when the Player clicks the Continue button on an action outcome text box. So the effect would be to set the score to a win, but this would not be evident to the player until a further action was taken.
There is however an alternative approach. We could top up score 1 every time the Player dropped an item on the East Bank. If we added just over a third of the maximum for score 1 each time the player dropped the Fox, Goat or Bag on the East bank then when they dropped the third item on the East Bank the maximum value for score 1 would be exceeded and the Game win would trigger.
However there is a problem. If this was all we did, some one would eventually figure out a shortcut to winning the Scenario. They would just take one item over to the East bank and keep dropping it and then picking it up again until they had achieved a winning score!
To counter this we also need to add an extra outcome and condition to the pick up action's so that if they are picked up on the East bank the same amount that was added when the item was dropped is removed from score 1.
We will then have a solution that triggers a game end when the final act of dropping the third item takes place. We will also have some movement in Score 1 to indicate progress towards the solution.
It is in situations like this where the power of Outcome Conditions is revealed.
Adding the Game Winning Outcomes
Once again we can save a little time.
49. Click on the Action Outcome “carryGoat”so that it is selected in the Project Tree.
50. Click on the “Copy” button, to create a second outcome “carryGoat”
51. Modify the second copy of “carryGoat” as follows.
Contents Page 28 of 41

Guide to using the Scenario Connector page
Note that the Outcome text is deleted, because we don't want this outcome to add any text to the Outcome displayed to the Player.
Also note that the Change Score 1 value is negative. We are taking away 34 points for picking the Goat up (on the East Bank)
Because we copied our “carryGoat” Action Outcome, we already have an Outcome Condition, but we need to add an extra condition or two.
52. Click on the “carry0” Outcome Condition for your new carryGoatScore Outcome and modify it as follows. (Xerte version shown. XOT users just select “East Bank” from the list of pages.)
Contents Page 29 of 41

Guide to using the Scenario Connector page
Notice that we kept the check on items carried as we only want to reduce Score 1 when the Goat actually gets picked up.
This example introduces two new optional properties.
• Scenario State
◦ A scenario page is current if it is the one that the Player is viewing. Options are Current or Not Current
• Scenario Page ID
◦ This is the page ID of the scenario page being tested for
The test that is being carried out for this Outcome then is “Are there 0 items being carried AND is the current page the East Bank”
Now we have to add the additional outcome to the dropGoat Action.
53. Click on the “releaseGoat” outcome in the page tree to select it.
54. Click the Copy button.
55. Edit the new copy of the releaseGoat outcome as shown below.
Again notice that we have deleted the Outcome text and that this time we are adding 34 to score 1.
However we don't want 34 points adding every time the goat is put down. We only want to add the points when the goat is put down on the East Bank.
56. Click on releaseGoatScore in the Page Tree to select it.
57. Click on “New Outcome Condition”
58. Set up the Outcome Condition as shown below.
Note: Xerte version shown, XOT users just select “East Bank” from the list of pages in the project.
Contents Page 30 of 41

Guide to using the Scenario Connector page
Take a moment to think this through. The Action Condition ensures that the dropGoat action can only take place when the goat is carried. So the only condition we need to add for the releaseGoatScore Outcome Condition is to check that the current scene is the eastBank.
The player will be able to release the goat in any scene, but the score will only be added if the scene is the eastBank.
XOT user tidy up.
XOT users following this guide will not have been able to set the destination page for the West Bank action “go to the other bank” as at the time the East Bank scene had not been created so go back to this scene and set the action outcomes destination page to “East Bank”.
The importance of testing
We have now added all the Actions, Action Conditions, Outcomes and Outcome Conditions that we need to enable the Player to pick up the Goat and put the Goat down again. When they put the Goat down on the East Bank of the river they will score 34 points for Score 1 and if they pick the Goat up on the East Bank of the River they will lose 34 points.
Before we copy the Goat prop and turn the copy into a Fox prop it needs testing.
Whenever you have added a testable section test it, whilst the logic is fresh in your mind, to ensure it does what you expect it to do.
59. Publish your project to save your changes.
60. Play your project and test it.
a) Pick up the Goat on the West Bank
• The goat should show in items carried
• There should be no change to score 1
• Drop the goat should become available as an action
b) Drop the Goat on the West Bank
• The pick up Goat action should be available
• The goat should be listed as something you can see
• You should be carrying nothing
• There should be no change to score 1
c) Pick up the Goat again
d) Cross the river
Contents Page 31 of 41

Guide to using the Scenario Connector page
e) Drop the goat
• Score 1 should change to 34
• The same changes to the actions and items carried / seen should occur as when you last last dropped the goat.
f) Pick up the Goat
• Score 1 should drop to 0 again
• The same changes to the actions and items carried / seen should occur as when you last picked up the goat.
Creating the other props
61. Click on the “goat” Prop in the page tree to select it.
62. Click on the Copy button to create a second “goat” prop. Your project tree should look like the following.
63. Work your way down the structure of the new Prop, selecting each element in turn and editing any reference to Goat to read Fox. You may want to be a bit creative with the text descriptions to make them less “goat like” and more “fox like”.
Notice that other than changing condition names (for your own ease of understanding the page
Contents Page 32 of 41

Guide to using the Scenario Connector page
later) the Action Conditions and Outcome Conditions do not need to change as by default they use the Prop that they are a child off in the Page structure.
Below are shown the first four elements as an example.
The Prop
The Action
The Action Condition
The first Outcome
More Testing
Before adding the Bag of Grain Prop there is a further test to carry out.
By copying the Goat to create the Fox we can be fairly confident that the picking up and putting down, including the score changes to Score 1 should work. But the one thing we have not tested is the restriction on picking up more than one item at a time.
64. Publish your project
65. Play your project and confirm that you can only pick up one item at a time. When you try to pick up a second item
a) the “You can only carry one item at a time” Outcome should take place
b) the second item should not appear on the items carried list.
Contents Page 33 of 41

Guide to using the Scenario Connector page
Add the final Prop
66. In the Page Tree click on the “goat” to select it.
67. Click on the Copy button.
68. As you did with when you created the “fox” Prop, edit the new copy of the “goat” Prop. This time change all references to “goat” to “bag”. In text description refer to “bag” as “Bag of Grain”. The Prop element is shown below to start you off.
69. When you have completed editing the “bag” Prop, publish your project to save your changes.
Testing the Game Win
With all three Props added there is enough in place to test that the Game Win is triggered.
Before you test your project XOT users will need to go to the West Bank page, Score Configuration and set the win and lose “go to” pages to “West Bank” so that on completion the project restarts at the first page.
70. Publish your project to save your changes.
71. Play your project
a) In turn pick up each Prop, Cross the River and Put your Prop down on the East Bank.
b) The order you do this in is not critical as we have not yet set up the Outcomes that will check if the Fox and Goat or Goat and Bag have been left together.
c) On the dropping of the third item the Game Win should trigger.
Setting up the Game Lost Outcomes
The puzzle states that the Fox and the Goat cannot be left alone together and the Goat and the Bag of Grain cannot be left alone together. So how can this be implemented?
Take a few moments now to use what you know about Scenario Pages to see if you can figure out how to do it.
Possibly the most obvious way might be to use an Action of type “Effect” for each location. This could have a condition of “fox” is “Off Stage” and and “goat” is “Off Stage”. The reasoning being that the Farmer (the Player) is at whatever page is currently being viewed. So anything that is “Off Stage” is not at the current location (On Stage) or being carried (Carried). However as mentioned before Actions of type “Effect” have a delayed impact, because any changes they make to scores are not shown until the next refresh of the page.
Contents Page 34 of 41

Guide to using the Scenario Connector page
Since the Action “Cross the River” implies the act of the Farmer deserting the current location, e.g. When “westBank” is the current scene, taking the action “Cross the River” means changing location to “eastBank”. So we could test to see what was “On Stage” at the time the “Cross the River” action was taken. As anything “On Stage” would be left behind when the scene changed to the other bank of the river.
If you are still not sure about this, then perhaps as we implement the Outcomes for this the reasoning will become clearer.
Add new Outcomes to the Cross the River actions
Recently we have been adding all our Props to the West Bank page.
Recall that both the “westBank” and the “eastBank” pages have a “crossRiver” Action, so we will need to update each of those in turn.
72. Click on the “crossRiver” Action for the “westBank” Page. (I have collapsed some elements in the Project Tree to make things clearer)
All the “crossRiver” Action has is a “go to other bank” Outcome, without any Action Conditions or Outcome Conditions.
73. Click on New Action Outcome to add a second Outcome to the “crossRiver” Action.
74. Complete the new Outcome as shown below.
Contents Page 35 of 41

Guide to using the Scenario Connector page
To be strictly true to the Puzzle leaving the Fox alone with the Goat should be fatal to the Goat. We could implement this by Changing Score 2 (which we earlier labelled as Goat Health) by -101 which would take Score 2 below its minimum value and trigger a Game Lose. However by setting the value to -34 we give the Player an opportunity to learn from their mistake. They can also retry the Scenario if they Win but with less than maximum scores to the “goat” or “bag” to try to get a “perfect” win.
We now need to add the Outcome Conditions that will ensure this Outcome only occurs when the Fox and Goat are left alone.
75. Click on the Outcome “foxAttackOnStage” to select it.
76. Click on New Outcome Condition.
77. Set the outcome condition as follows
Notice that because the Outcome Condition is for a Scenario based action and not a Prop based action, we have to explicitly state which Prop we are referring to.
78. Copy the “foxOnStage” Outcome Condition to give you a second Outcome Condition and edit it as follows.
79. Your Page Tree should now look like the following
We need to ensure that whichever scene is current we have an outcome for when the items that cannot be left together are On Stage i.e. at the current location, or Off Stage i.e. on the other bank of the river. So we need to add a further Outcome. We can save time by copying our “foxAttackOnStage” outcome.
80. Select the “foxAttackOnStage” Outcome and Copy it.
81. Edit the Copy changing all references of “OnStage” to “OffStage” including the Prop
Contents Page 36 of 41

Guide to using the Scenario Connector page
Location values which should now read “Off Stage”.
Having added the Outcomes that will trap the fox attack we now need to add the Outcomes for the Goat eating the grain. The quickest way to do this is again to copy our “foxAttackOnStage” and “foxAttackOffStage” outcomes and then to edit them. Before we do this, check that your Page Tree looks like the following.
82. Select the “foxAttackOnStage” outcome and Copy it.
83. Edit the copy of the “foxAttackOnStage” outcome as follows so that it models the situation where the “goat” and the “bag” Props have been left together.
84. The Outcome should look like the following, note that it is Score 3 that needs to change this time.
85. The “goatOnStage” Outcome Condition can stay as is, but you need to change the “foxOnStage” Outcome Condition to refer to the bag.
86. Now copy your “goatMealOnStage” Outcome and edit all references to “On Stage” and make them “Off Stage”. Remember to change the Prop Location values from “On Stage” to “Off Stage”
87. You may find that your “foxAttack” Outcomes and your “goatMeal” Outcomes are not grouped together as you would like (it won't affect their performance as long as each Outcome has the right Outcome Conditions associated with it). But if you want to you can select an Outcome in the Page Tree and use the Up and Down buttons at the bottom left of the screen to change its position in the tree.
Contents Page 37 of 41

Guide to using the Scenario Connector page
You have now added the new Outcomes to the “crossRiver” Action for the West Bank page.
You now need to add the same Outcomes to the “crossRiver” action for the East Bank page.
Before we do just check your Page tree should look like the following.
88. Add the same additional Outcomes with their associated Outcome Conditions to the “crossRiver” Action for the East Bank page. The steps to do this are covered above from number 73 onwards. Just remember you are now working on the East Bank page and not the West Bank page. We can use Copy and Paste to speed things up a little
a) Add the first Outcome to the East Bank “crossRiver” action.
b) Click on the matching Outcome for the West Bank page, highlight / select the Outcome Title and hold down the CTRL key then press the C key (short-cut on Windows PCs for copy to clipboard – for other operating systems use their equivalent)
c) Click in the newly added Outcome on the East Bank page then paste into the Outcome Title property the value copied from the West Bank equivalent. On a windows PC holding the CTRL key down and pressing the V key will paste the text.
d) You can repeat this process for all text based fields as you populate your Outcome.
e) Checking back to the West Bank equivalent element, as you add the Outcomes and their Conditions to the East Bank “crossRiver” action will help to ensure that your newly added elements remain consistent with their West Bank equivalents.
If you collapse the Outcomes in the project tree as you complete adding them then this can help you to keep track of what you are doing.
One you have added your new Outcomes and their conditions this should complete the Scenario.
Contents Page 38 of 41

Guide to using the Scenario Connector page
89. Publish your Project.
90. Test your project.
a) Check that all the limitations built into the puzzle are reproduced in the Scenario.
b) Check your scores change as expected – if not you have probably selected a wrong score change in one of your outcomes.
As a final check the complete project tree is show below.
The left picture shows the West Bank page expanded, save for the List of Props, the right picture expands the list of Props. Note the structure of the “bag” Prop and the “fox” Prop are the same as for the “goat” Prop.
The East Bank in structure is a copy of the West Bank save that it lacks both the Score Configuration element and the List of Props element as no Props are defined in the second page.
Contents Page 39 of 41

Guide to using the Scenario Connector page
Scenario Page Reference Guide to Optional Parameters
Element Name Usage
Page Narration Add a sound file to the page
Auto Play Narration Play sound on page load
Init Object Pass values to a swf
Interactivity Add control bar to a swf
Video Size e.g. 320,240 defines size of video / image panel
Reset on Completion Used to rewind video on completion
FLV, SWF or Image Type of media file used (A media file can be added to a scene)
Hide Media Button Select position for the Hide Media Button
Output Check List Provides a report of page IDs if project has Author support added to Learning Object. (Xerte only)
Score Config Lose Sound File Sound file to play on game lose
Win Sound File Sound file to play on game win
Action (no optional properties)
Action Condition
Out of 10 Number from 1 – 9 increasing the probability that this condition will be met.
Score Comparison Specifies comparison to make
Score / Counter Value Specifies value to compare with score
Score or Counter Specifies which score to compare with
Scenario State Current or Not Current
Scenario Page Id ID of scenario page to test State of
Prop Location On Stage, Carried, Off Stage, Not On Stage, Not Carried, In Scene (these options are discussed in detail in the worked example)
Prop State Visible or Hidden
Prop Unique ID Identifies which Prop to test location or state of
Outcome Sound File Sound file to play on outcome happening
Destination Page Page to go to if this outcome happens.
Prop Destination Page Page to set Prop Location to (this page must have been visited earlier in the Scenario)
Prop Action Carry (sets prop location to inventory)Drop ( sets prop location to current scene)Specified (used in conjunction with Prop Destination
Contents Page 40 of 41

Guide to using the Scenario Connector page
ID)Destroy (sets prop location to a special “bin” location)
Prop State Visible (shown in “you can see” and “you have with you” lists.Hidden (not shown in lists)
Prop Unique ID ID of Prop referred to by other Prop related properties. Defaults to current Prop if the action is a child of a Prop.
Change Score 1 (2, 3) Change the selected Score
Outcome Condition
Same as for Action Conditions
Contents Page 41 of 41