dita-fmx user guide - leximationdocs.leximation.com/dita-fmx/1.00/ditafmx.1.00.26.pdfprovides dita...
TRANSCRIPT

DITA-FMx User Guide
Version 1.00.2631 August 2008
by Leximation, Inc. and Silicon Publishing, Inc.Copyright © 2008

Contents
Chapter: 1 Using DITA-FMx . . . . . . . . . . . . . . . . . . . . . . . . . . . . . . . . . . . . 1Features . . . . . . . . . . . . . . . . . . . . . . . . . . . . . . . . . . . . . . . . . . 1Revision History . . . . . . . . . . . . . . . . . . . . . . . . . . . . . . . . . . . . . 5
1.0 (1.00.26 update)- 31 August 2008 . . . . . . . . . . . . . . . . . . . . . 51.0 - 7 July 2008 . . . . . . . . . . . . . . . . . . . . . . . . . . . . . . . . . . 60.02 - 18 December 2007 . . . . . . . . . . . . . . . . . . . . . . . . . . . 110.01 - 20 August 2007 . . . . . . . . . . . . . . . . . . . . . . . . . . . . . 14
Limitations . . . . . . . . . . . . . . . . . . . . . . . . . . . . . . . . . . . . . . . . 14Tips and Troubleshooting . . . . . . . . . . . . . . . . . . . . . . . . . . . . . . . 15Using the Reference Manager . . . . . . . . . . . . . . . . . . . . . . . . . . . . . 18
External Xref . . . . . . . . . . . . . . . . . . . . . . . . . . . . . . . . . . 19Working with Images . . . . . . . . . . . . . . . . . . . . . . . . . . . . . . . . . . 20Filtering Content . . . . . . . . . . . . . . . . . . . . . . . . . . . . . . . . . . . . 21
Auto-Conditionalizing Elements . . . . . . . . . . . . . . . . . . . . . . . 21Ditaval Filtering . . . . . . . . . . . . . . . . . . . . . . . . . . . . . . . . 22Filtering with the Read-Write Rules File . . . . . . . . . . . . . . . . . . 23
Chapter: 2 Installation and Setup . . . . . . . . . . . . . . . . . . . . . . . . . . . . . . . . 25Before Running the Installer - FM8 . . . . . . . . . . . . . . . . . . . . . . . . . . 25Before Running the Installer - FM7.2 . . . . . . . . . . . . . . . . . . . . . . . . . 26Reinstalling DITA-FMx . . . . . . . . . . . . . . . . . . . . . . . . . . . . . . . . 27Run the Installer Application . . . . . . . . . . . . . . . . . . . . . . . . . . . . . 27Installing the Structure Applications . . . . . . . . . . . . . . . . . . . . . . . . . 28Advanced Installation Issues . . . . . . . . . . . . . . . . . . . . . . . . . . . . . . 30
Structure Application Requirements . . . . . . . . . . . . . . . . . . . . . 30Customizing the Default Structure Applications . . . . . . . . . . . . . . 36Setting Up to Use the Generate Output Command . . . . . . . . . . . . 38Setting Up to Use Cross-References . . . . . . . . . . . . . . . . . . . . . 41
i

Creating Element Templates . . . . . . . . . . . . . . . . . . . . . . . . . 43Switching Between DITA-FMx and FM8-DITA . . . . . . . . . . . . . . 44INI-Only Settings . . . . . . . . . . . . . . . . . . . . . . . . . . . . . . . 45
Uninstalling DITA-FMx . . . . . . . . . . . . . . . . . . . . . . . . . . . . . . . . 49
Chapter: 3 DITA-FMx Commands . . . . . . . . . . . . . . . . . . . . . . . . . . . . . . . 51New DITA File . . . . . . . . . . . . . . . . . . . . . . . . . . . . . . . . . . . . . 51Build Map from Outline . . . . . . . . . . . . . . . . . . . . . . . . . . . . . . . . 53Build WorkBook from Map . . . . . . . . . . . . . . . . . . . . . . . . . . . . . . 54
Open All XML Files in Book . . . . . . . . . . . . . . . . . . . . . . . . . 54Prepare Variables . . . . . . . . . . . . . . . . . . . . . . . . . . . . . . . . . . . . 54Rebuild Variables . . . . . . . . . . . . . . . . . . . . . . . . . . . . . . . . . . . . 55Xref to Hyperlink . . . . . . . . . . . . . . . . . . . . . . . . . . . . . . . . . . . . 55Ditaval Manager . . . . . . . . . . . . . . . . . . . . . . . . . . . . . . . . . . . . . 56Apply Ditaval as Conditions . . . . . . . . . . . . . . . . . . . . . . . . . . . . . . 58
Using the Apply Ditaval as Conditions Command . . . . . . . . . . . . . 59Update References . . . . . . . . . . . . . . . . . . . . . . . . . . . . . . . . . . . 60
References in DITA Maps . . . . . . . . . . . . . . . . . . . . . . . . . . . 60References in DITA Topics . . . . . . . . . . . . . . . . . . . . . . . . . . 61
Search in Files . . . . . . . . . . . . . . . . . . . . . . . . . . . . . . . . . . . . . . 61Where Used . . . . . . . . . . . . . . . . . . . . . . . . . . . . . . . . . . . . . . . 62Insert Conref . . . . . . . . . . . . . . . . . . . . . . . . . . . . . . . . . . . . . . 63Assign ID to Element . . . . . . . . . . . . . . . . . . . . . . . . . . . . . . . . . . 64Set Attributes . . . . . . . . . . . . . . . . . . . . . . . . . . . . . . . . . . . . . . 65
Setting Up Filtering Groups . . . . . . . . . . . . . . . . . . . . . . . . . . 67DITA Options . . . . . . . . . . . . . . . . . . . . . . . . . . . . . . . . . . . . . . 68
New File Options . . . . . . . . . . . . . . . . . . . . . . . . . . . . . . . . 72Auto-Prolog Options . . . . . . . . . . . . . . . . . . . . . . . . . . . . . 74
Generate Output . . . . . . . . . . . . . . . . . . . . . . . . . . . . . . . . . . . . 75Generate Book from Map . . . . . . . . . . . . . . . . . . . . . . . . . . . . . . . 77
Chapter: 4 Extending DITA-FMx . . . . . . . . . . . . . . . . . . . . . . . . . . . . . . . . 79FixBookRefs . . . . . . . . . . . . . . . . . . . . . . . . . . . . . . . . . . . . . . . 79
Syntax . . . . . . . . . . . . . . . . . . . . . . . . . . . . . . . . . . . . . . 80Return Value . . . . . . . . . . . . . . . . . . . . . . . . . . . . . . . . . . 80
FMxVer . . . . . . . . . . . . . . . . . . . . . . . . . . . . . . . . . . . . . . . . . 80Syntax . . . . . . . . . . . . . . . . . . . . . . . . . . . . . . . . . . . . . . 80Return Value . . . . . . . . . . . . . . . . . . . . . . . . . . . . . . . . . . 80
LoadReferences . . . . . . . . . . . . . . . . . . . . . . . . . . . . . . . . . . . . . 81Syntax . . . . . . . . . . . . . . . . . . . . . . . . . . . . . . . . . . . . . . 81Return Value . . . . . . . . . . . . . . . . . . . . . . . . . . . . . . . . . . 81
Index . . . . . . . . . . . . . . . . . . . . . . . . . . . . . . . . . . . . . . . . . . 83
ii
1
Using DITA-FMxDocumentation last updated: 31 August 2008
Updated for plugin versions: authoring support client v.1.00.26; import/export client v.1.00.19.
Features
Provides DITA map and topic authoring commands as well as enhanced DITA features.
DITA-FMx is a plugin and set of structure applications that let you create and edit DITA XML files in FrameMaker. DITA-FMx 1.0 supports DITA 1.0 and is available for FrameMaker 7.2 and 8.0. DITA-FMx is provided by a collaboration of efforts from Leximation and Silicon Publishing.
For a complete list of changes between versions of DITA-FMx, see Revision History. The following describes the general features provided by DITA-FMx.
DITA Map SupportA structure application is provided for DITA map development. This structure application provides support for topic references and relation-ship tables (topicref and reltable elements). Through the import/export client and read/write rules, the resulting DITA map file is completely DITA-compliant, although within FrameMaker some additional elements have been added to provide proper FrameMaker interaction. These elements have an “fm-” prefix.On the opening of a DITA map file, all topicref elements are processed to include a new “fm-topicreflabel” element that contains a locked text range. This text range typically displays the title (navtitle attribute), but if the referenced file is not available, the label “FILE NOT FOUND” is added. If there is no navtitle attribute value, the filename (href attribute) of the referenced file is displayed. When you double click the inset, the referenced file opens for editing. These labels are formatted with a char-
1

USING DITA-FMXFEATURES
acter style named “DITA-Topicref,” you can change the color and format-ting of topicrefs by modifying the character style definition in the template file.The Build Map from Outline command creates a DITA map and option-ally DITA stub files from a simple FrameMaker file.The Build WorkBook from Map command builds a FrameMaker book file that contains all of the files referenced in the current DITA map and all sub-maps. This “Work Book” is not intended for publishing, but makes it possible to use FrameMaker’s built-in book processing commands such as spell checking and searching at the book level. In order to use these book processing commands you must first open all of the files in the book. This can be done with the Open All XML Files in Book command which provides the option to resolve references in each file, or open the files without resolving references.
Ditaval SupportConditional filtering based on ditaval files can be applied to FrameMaker-based content (in books or files) using the Apply Ditaval as Conditions command. Ditaval files can also be specified for output gener-ated through the Open Toolkit. The Ditaval Manager provides an easy to use interface for creating and managing ditaval files.
Conref SupportContent references can be placed to reuse elements from the same file or other files on the same file system. If enabled (through the Options command) on the opening of a file, the content of any conrefed elements is resolved and displayed as a locked text range (similar to a text inset).
Xref and Link SupportOn the opening of a file, all xref and link elements are resolved and displayed as a locked text range. The auto-loading functionality may be enabled/disabled with the Options command.When an xref or link element is inserted (from the element catalog), the Reference Manager dialog displays allowing you to select the target element for that element. Unless you enter text in the Alternate Xref Text field, the xref or link text will match that of the target element. The External Xref button lets you create an xref or link to an external file.The Xref to Hyperlink command converts DITA-based xrefs and links into live Hyperlinks in generated FM files.DITA-FMx handles both DITA-based and FM-based cross-refs as both xref and link elements, for more information see Setting Up to Use Cross-References .
2

USING DITA-FMXFEATURES
Enhanced Attributes CommandThe Set Attributes command provides quick and easy access to setting attributes on elements. In particular, this command makes use of the FrameMaker “Strings” attribute type and allows you to select one or more default values that are applied to the attribute. This is particularly useful with the DITA filtering attributes.
Output SupportThe Generate Book from Map command builds a FrameMaker book from a DITA map. It creates “chapter” FM files from the top-level topi-crefs and their child topicrefs. This allows you to generate a PDF of the entire map. The Apply Ditaval as Conditions command can be run on the generated book in order to perform ditaval-based filtering on FM files.The Generate Output command provides the ability to run a specific target in an Ant script to generate output through the DITA Open Toolkit. One option lets you use a provided Ant script to generate output based on the current file (a topic or map), or another option lets you select a target in an Ant script that you provide. Using the Current File option, you can specify a ditaval file for filtering. For more information see, Generate Output.
Locating Content in FilesA Search in Files command lets you search for content in files within a folder (and sub-folders) or in files referenced by a DITA map. The search criteria can be a mix of textual content, element or attribute names, or attribute value.A Where Used command generates a report listing all files that reference the selected element or current topic.
Support for FrameMaker VariablesThe Prepare Variables and Rebuild Variables commands make it possible to use variables in DITA files and have those variables available in the geneated FrameMaker book files.
OptionsAn Options command provides the ability to specify the structure appli-cations for DITA map and topic file authoring, the structure application used for the book processing, as well as control of various DITA-FMx options.
Context-sensitive Help on DITA elementsYou can get context-sensitive help for DITA authoring by pressing Alt+F1. The DITA Reference will display the topic that relates to the element type currently selected. If you have added elements through
3

USING DITA-FMXFEATURES
specialization, you can add information about your elements to the CHM file (the source is provided in the DITA Open Toolkit).
SpecializationDITA-FMx should fully support specialization (or at least not hinder it). If you have a specialized data model, you will need to make the parallel changes to your DITA EDD and r/w rules. The only effect of specialized elements is with regard to element names, and the only place the plugin operates solely on element names is with the processing of tables (and in this case, additional table elements can be defined in the ditafmx.ini file). In all other cases, the plugin processes elements based on their class name, so it should properly handle specialized elements. Since the conref feature only operates at the attribute level, it shouldn’t care if an element has been specialized or not. The processing of xref and topicref elements is done based on the class value, so those should be fine.
Import/Export ProcessingTable Support. Pre-parses the imported file to count the number of columns in tables that have no column number attribute (required by FrameMaker to display a table). By default this supports reltable and simpletable elements, but can be extended to handle other table elements as specified by the user (in the ditafmx.ini). The column number data is used during the actual import of the file into FrameMaker to properly display those tables. Indexterm Support. On import, the plugin converts indexterm elements to a FrameMaker-compatible format. DITA specifies that index suben-tries are defined by nested indexterm elements. This feature collapses nested indexterm elements into a single semicolon-delimited string within the top-level indexterm element which can be properly interpreted by FrameMaker and converted into an Index marker. This functionality keys off of the value of the class attribute, allowing it to work for special-ized instances of the indexterm element. On export, the Index markers are converted back to valid nested indexterm elements. Special Reltable Support. On import, the plugin converts reltable/topic-meta elements to reltable/fm-reltablemeta elements (to allow for proper mapping to a FrameMaker TableTitle object). These convert back to valid DITA topicmeta elements on export.Reference Support. All references (topicrefs, conrefs, xrefs, and lnks) are represented in FrameMaker as locked text ranges, similar to text insets. These text ranges are not linked to text flows but are used as a means to lock a region of text and allow the user to click on the object. In order to maintain valid DITA files, the plugin converts these text ranges to the appropriate XML structure on export.
4
USING DITA-FMXREVISION HISTORY
Revision History
Describes the changes between versions of DITA-FMx.
1.0 (1.00.26 update)- 31 August 2008
New Features
Search in Files command matches on partial attribute values.The Search in Files command now allows for matching on partial attribute values. This is especially useful for locating elements that have multiple values applied to their filtering attributes.
Structure Application Updates
None.
Bug Fixes
Apply Ditaval as Conditions command applies overlapping conditions.The Apply Ditaval as Conditions command now applies overlapping conditions as required by attribute settings.
Generate Book from Map no longer saves XML files as FM.In rare circumstances the Generate Book from Map command would save the XML file as a binary FM file making it impossible to continue. This no longer happens.
WMF images are now properly handled.When adding a WMF image, it was not properly shrinkwrapped and the href value was not set until file save. WMF files are now handled the same as other image types
Windows Vista problems fixed.On Windows Vista, inserting an xref no longer causes FM to crash.
Element templates must be closed to be used.If you try to use an element template for a new file when the element template is open, you now receive a warning that you must close the template before it can be used.
5

USING DITA-FMXREVISION HISTORY
Build Map from Outline handles invalid para styles.If a paragraph style in the outline document references a style that doesn’t map to a topic type FM will no longer crash.
Conref problems resolved.A conref to an xref will no longer cause FM to hang. Conrefs can now be made to simpletable elements (and related table types).
1.0 - 7 July 2008
New Features
FrameMaker 8 support.Now supports FrameMaker 8 and all of its Unicode functionality.
Full support for link elements.Link elements in the related-link section of a topic are now managed the same way xref elements have been.
Search in Files command.Provides the ability to search for content in files within a folder (and sub-folders) or in files referenced by a DITA map. The search criteria can be a mix of textual content, element or attribute names, or attribute value.
Where Used command.Generates a report listing all files that reference the selected element or current topic.
Set Attributes command.Provides quick and easy access to setting attributes on elements. In partic-ular, this command makes use of the FrameMaker “Strings” attribute type and allows you to select one or more default values that are applied to the attribute.
Updated New DITA File command.The New DITA File dialog now lets you enter the topic or map title and automatically generate a proposed file name based on your specification (in the New File Options dialog). You can also optionally select an element template to insert predefined structure and content to the new file. If needed, you can specify a folder name along with the file name and that folder will be created if needed.
Integrated ditaval support and management.The Ditaval Manager provides an easy to use interface for creating and managing ditaval files. These files can be used to apply conditional
6

USING DITA-FMXREVISION HISTORY
filtering to FrameMaker books and documents as well as passed to the Open Toolkit for filtering of the generated content.
Handles “pretty-printed” XML files.A new option strips padding (spaces and tabs) from files on import.
Auto-Prolog feature.A new option lets you specify certain prolog data to automatically add or update on file creation and file save.
Build Map from Outline command.Creates a DITA map and optionally DITA topic files from a simple FrameMaker document.
Build ‘WorkBook’ from Map command.Generates FrameMaker book file that contains all of the DITA files refer-enced by a DITA map and any sub-maps. This command facilitates the use of FrameMaker’s commands that iterate over files in a book (such as spell checking and search).
Open All XML Files in Book command.Intended to be used with the “WorkBook,” this command opens all of the XML files in a book and provides the option to resolve references or not in the opened files.
Topicref labels in DITA maps.A new option allows you to choose the type of content displayed in the topicref label. You can see the title, the file name or both.
New DITA File updates.The New DITA File command is now available from the File menu in addition to the DITA-FMx menu. When creating a new DITA file, you can now overwrite an existing file, and create new folders.
ID attribute validation.When manually changing an ID attribute value, a warning is displayed if it is invalid.
Added Xref to Hyperlink command.This command converts DITA-based xrefs and links into FrameMaker Hyperlinks that are live hyperlinks in generated PDF files.
Variables persist through the Map to Book process.Two new commands have been added, Prepare Variables and Rebuild Variables, which make it possible for FrameMaker variables that are used in DITA files to be available as live variables in the generated book files.
7
USING DITA-FMXREVISION HISTORY
Reference Manager “remembers” last selected element type.When you use the Reference Manager, it now defaults to selecting the last referenced element type.
Added option to disable coloring of conrefs.If the coloring of conrefs causes problems for your output tools (WebWorks in particular doesn’t like it), you can now disable this in the Topic or Book applications.
Now recognizes the “include” ditaval action.The Ditaval Manager and the Apply Ditaval as Conditions command now recognize the “include” ditaval action value.
Added Check for Updates command.The Check for Updates command was added to the menu as well as a setting in the Options dialog to specify the frequency to automatically check for updates.
Added “break conref” functionality.If you need to convert a conref into editable text (and sever the connection to the source element), delete the conref attribute value and double-click the conref.
Added special image-handling features.The “fmdpi” feature maintains alternate image sizes within FrameMaker. Add the value, “fmdpi:<DPI>” to the image/@otherprops attribute (where <DPI> is the DPI value). See the Working with Images topic for more info.The default alignment for new images is now defined by the default value of the image/@align attribute.
Added API calls.FMxVer, FixBookRefs, and LoadReferences.
Added the fm-* elements to the DITA Reference.Now when you use Alt+F1 to get help on the selected element, it will work for the “fm-*” elements as well.
Structure Application Updates
Changed “String” to “Strings” type for filtering attributes.To allow easy use of the new filtering groups feature of the Set Attributes command, the attribute type for platform, product, audience, and other-props has been changed to “Strings” in the Topic and Map applications.
Added a user-settable method of round tripping graphics as non-cropped.A “don't crop” read/write rule has been added to the topic and book rules files. By default it is commented out, but by enabling it, graphics can
8
USING DITA-FMXREVISION HISTORY
round-trip without FrameMaker resetting them to "Cropped" during import.
Added formatting support for more elements within a fig.Some formatting support for lists (ul and ol), p, dl, and note has been added and now includes formatting for contexts where fig has its attribute expanse set to page. Also, a list whose compact attribute is set to “yes” within a fig will now format as a horizontal list.
Line below Task is more reliably drawn.The line indicating the completion of a Task now occurs in more contexts.
Corrected format of Topic label text in reltable heading.The “Topic,” “Reference,” “Concept,” and “Task” text that automatically appears in the column heading of a reltable is now properly left-aligned in its cell.
Topicmeta formats for author and keyword are now more consistent.Author element text now properly aligns with the other elements in topic-meta. And, keyword elements receive more consistent formatting where multiple keywords occur.
Book template DITA-Comment and DITA-Prolog conditions display default is now properly set.
With the DITA option set to conditionalize Prolog or Comment elements, when a DITA file is opened that contains comment or prolog elements, the template default is now to Hide those elements. (For Topic and Map templates, the default behavior is still to Show those conditions.)
Bug Fixes
Processing Instructions after the document close tag.Opening an XML file that has a PI (processing instruction) after the docu-ment's closing tag no longer crashes FM when you save that file.
Proper handling of colons in the forced sort area of an index entry.Colons in the forced sort area of an index entry (within square brackets) are no longer treated as level separators when saving to XML. The forced sort content is written to the last indexterm element.
fm-xref and fm-link element fixes.Fixed problem where fm-xref and fm-link elements did not properly reference sub-topic elements.
New file command properly creates topics with specialized title elements.If your specialized topic type uses a “title” element with a name other than “title” it properly uses that specialized element.
9
USING DITA-FMXREVISION HISTORY
Clipboard content is not lost when opening a new topicref.If you copy something to the clipboard, then open a topic by clicking a topicref, that content is still available for pasting.
Conrefs that specify no file name now resolve to the current file.When the conref attribute specifies no file name (as in conref="#topicid/elemid") the conref looks for “topicid/elemid” in the current file.
Topicrefs that reference a topicid now process correctly.Updated the book processing XSLT file so it can handle topicrefs that reference a file and a topicid (topicref/@href='filename.xml#topicid').
On file open, a missing image now triggers the “missing image” dialog.When opening a file, if an image can’t be found, the default “Select image file” dialog is now displayed.
Replacing an existing image properly updates the href attribute.If an existing image is replaced through the FrameMaker interface, when the file is reopened the new file name is still properly specified.
Column widths in simpletable and choicetable elements.These elements now round trip properly.
Tables in generated files are full width.When building a book, tables now fill the width of the text column.
Moved INI parameters around a bit.The following INI parameters have been moved from one section to another (as indicated):General -> INIOnly/AutoLoadTopicrefsGeneral -> INIOnly/XrefElementsGeneral -> INIOnly/StructappsFileGeneral -> INIOnly/FmXrefElemGeneral -> INIOnly/FileOpenClientGeneral -> INIOnly/DitaHelpKeysGeneral -> INIOnly/DitaReferenceGeneral -> DitavalDefaults/DitavalNameGeneral -> DitavalDefaults/DitavalExcludeConditionNameGeneral -> DitavalDefaults/DitavalExcludeConditionNameTypeGeneral -> DitavalDefaults/DitavalExcludeConditionVisibilityGeneral -> DitavalDefaults/DitavalFlagConditionNameGeneral -> DitavalDefaults/DitavalFlagConditionNameType
10

USING DITA-FMXREVISION HISTORY
General -> DitavalDefaults/DitavalFlagConditionVisibilityGeneralImport -> General/CheckForComments
Other misc. fixes.Various cleanup and bug fixes.
0.02 - 18 December 2007
New Features
Book-building component is now included.The ability to generate a FrameMaker book from a DITA map is now included with DITA-FMx.
Added ditaval filtering for authoring and output.The Apply Ditaval as Conditions command lets you apply ditaval filtering to the document being authored, and the Use Selected Ditaval File option in the Generate Output dialog lets you specify a ditaval file for use with a DITA-OT target.
New “Auto Smart-Spaces” option makes it easier to work with code in docu-ments.
If enabled, this option automatically disables and enables the FrameMaker “Smart Spaces” option when the insertion point is moved into and out of a preformatted text element (one based on the “topic/pre” class).
Child elements and line breaks can coexist in preformatted elements.The new option, “Fix line breaks in topic/pre elements,” properly allows for child elements within preformatted ("topic/pre") elements. If this option is enabled, line breaks are no longer lost when a child element is before or after a line break. (This overcomes the native FrameMaker bug/feature.)
The character sequence “]]>” can be used in FrameMaker.Typically, you can’t include the characters “]]>” within a FrameMaker document saved to XML. DITA-FMx now overcomes this standard limi-tation.
Specify the number of reference levels to resolve.When you open a DITA file (and the auto-loading reference options are enabled), DITA-FMx resolves all conrefs and xrefs in all referenced files. This new option allows you to specify the number of reference levels to resolve (typically 2 is plenty). For documentation sets that make extensive use of references, this can significantly speed up the time it takes to open topic files.
11

USING DITA-FMXREVISION HISTORY
Pressing ESC while files are resolving will interrupt the process.If you need to abort the file resolving process, press ESC.
The Reference Manager dialog now defaults to the last referenced file.Instead of defaulting to the current file, the Reference Manager now defaults to the most recently referenced file.
External Xref dialog now provides External or Peer options for the scope attribute.
The scope attribute of external xrefs were previously assigned the value of “external,” this value can now be set to either “external” or “peer.”
When xrefs are created they are now populated with the proper type, format, and scope attributes.
Xref elements created and modified through the Reference Manager are now assigned the proper type, format, and scope attributes.
Set up environment variables before running the Ant script.The EnvironmentSetup INI-only parameter lets you specify a batch file to run before the Ant script in order to properly set up the environment for an OT build.
Updated support for topicmeta element in a map.The EDD and template have been updated to provide a nicer rendering of topicmeta data. Also, a new option was added to the Options dialog to allow conditionalizing of topicmeta on file open.
TOC and Index templates provided for easy book-building.Two template files are now provided with the Book application making it easy to set up a complete book.
Structure Application Updates
Topic Application.<note> - Formatting changes to correct some indention issues. <ol>, <ul>, <sl>, <li>, and <sli> - Formatting changes to correct indention and “red text” issues. <xref> - Character format added for context scope= "external" (link.external). <apiname> - Now formats as a text range.
Book Application.Same updates as those for the Topic application.<fm-ditabook> - Added <fm-subditamap>.
12

USING DITA-FMXREVISION HISTORY
<title> - Modified formatting of <title> to provide support for maps of maps. Modified syntax- and group-related context labels so that they'd not be picked up in TOC generation that went to Level4.
Map Application.Corrected copyright and legal info.<topicmeta> - Added formatting for all <topicmeta> elements when option is invoked. Added DITA-Topicmeta condition to template.
Bug Fixes
Conrefs resolve properly.All known problems with conrefs have been fixed, including conrefs to tables and conrefs to single block elements.
Xrefs that wrap over a line are no longer truncated on save.Xrefs at the end of a paragraph now save properly.
Indexterms in book builds aren't duplicated.Nested indexterms in a book build resulted in the duplication of all but the top level entry, this no longer happens.
Indexterm elements are no longer saved with the hard-coded class value.This made it impossible to specialize the indexterm element.
DITA-Comment and DITA-Prolog conditions are no longer saved as PIs.Because conditions are saved as Processing Instructions, the DITA-Comment and DITA-Prolog conditions were saved as well. This caused a problem when the "Conditionalize element on file open" options were used, causing the condition to be set even when the options were disabled.
In the DITA Options dialog, if an application is not selected, it shows as empty.
Previously, this would default to the first application in the list.
Table format and tgroup/@outputclass value are now in sync.Changing one updates the other.
The clipboard contents are now saved before creating a new DITA file.Previously, the clipboard contents were lost when the New DITA File command was used.
The Open All Topicrefs command properly processes all topicref files.Now all topicrefs are processed.
13

USING DITA-FMXLIMITATIONS
No longer displays warning about comments when resolving references.This warning now only happens on file open (if the option is enabled).
Elements with general rule of “<TEXT>” now conref properly.Any elements with the lone general rule of “<TEXT>” were saved incor-rectly when conrefed. A temporary fix was to change the general rule to “(<TEXT>)*” but this fix is no longer needed.
The Reference Manager dialog now properly highlights the selected topic.Previously when double-clicking an existing xref, the current file was not selected.
Long application names now display properly in the Options dialog.Previously, if an application name was so long that it wrapped in the struc-tapps.fm file the name would be truncated in the Options dialog.
0.01 - 20 August 2007
Initial Beta release.
Limitations
Known limitations in the current version of DITA-FMx.
The following list describes the currently known issues:
• References made to files on a UNC path (“\\servername”) will result in that file being referenced using an absolute path even if the target file is in the same folder. When working with files on a network, it is best to use named drives for those locations.
• Indexterms with multiple child elements that are siblings, will not round-trip properly. On import, the sibling indexterms are incorrectly converted into FM index syntax, which means the exported indexterms will be nested rather than siblings. A workaround is to disable indexterm conversion on import and export (although this will not allow you to generate a FM index). This will be fixed in a future update.
• Xrefs within the link/desc element will not resolve properly on file open. After file open, running the Update References command will resolve these references. This may be fixed in a future update.
14
USING DITA-FMXTIPS AND TROUBLESHOOTING
• The Generate Book From Map command disallows the building of a book from a DITA map that references files on multiple disk drives. This appears to be a core FrameMaker limitation.
• If an XML file is “pretty-printed” and a line breaks after an inline element (such as a <ph>), when opened in Frame the space between that element and the following word will be lost.
• Child elements within an xref or link are lost on import if the Auto-Load Xrefs option is enabled. If your xrefs contain child elements, disable this option.
• For the Apply Ditaval as Conditions command, currently only the “prop” ditaval element is supported. Other elements may be recognized in a future release if that is seen as beneficial.
• Conrefs within titles won’t be included when you run the Update Refer-ences command in a DITA map unless the target file is already open. If you have conrefs in your titles, you should open the file first before running the Update References command.
• Deleting an fm-topicreflabel element from a DITA map file without deleting the entire topicref, may result in the “plus” symbol being left in the map. This is a temporary issue and will go away the next time you open the file; it has no effect on the ability to process the files.
• In the FM7.2 version of DITA-FMx, double-byte characters are garbled in the fm-topicreflabel elements, and don’t update properly. (The FM8 version of DITA-FMx works fine in this respect.)
Using DITA-FMx for DITA authoring in binary FrameMaker files has the following limitations:
• A file that can’t be opened due to missing fonts or images and it is the target of a conref or xref, the Reference Manager won’t display when the conref or xref is double-clicked. This can be resolved by opening the refer-enced file before double-clicking the conref or xref.
• Double-clicking a conref then choosing Update, will delete the conref.
Please send any problems or suggestions to <ditafmx-help AT leximation DOT com>.
Tips and Troubleshooting
Tips for making the most efficient use of DITA-FMx.
15

USING DITA-FMXTIPS AND TROUBLESHOOTING
The following lists of tips will be expanded in future updates. For additional information, please visit the FrameMaker/DITA Community KB at kb.lexima-tion.com/dfm/.
If you have tips or suggestions you’d like to share, please send them to <ditafmx-help AT leximation DOT com>.
Do you often choose the wrong application when opening a map?Because both the Book and Map applications use the “map” doctype, it is easy to mistakenly choose the Book app when opening a map file. The applications are listed in the “disambiguator” dialog in the order that they are entered in the structure applications definitions file. If you move the Map app so it is before the Book app, you’ll reduce the chance of choosing the wrong app.
Supporting round-tripping of image sizes.To support the proper sizing and placement of image elements, certain read/write rules must be defined. If you’re using a custom or older struc-ture application, the height and width rules may not be properly defined. Refer to the image topic for the proper rules.
Making use of page-wide tables.If you want a table to extend to the full width of the text frame, set the table/@pgwide attribute to 1.
Using FrameMaker variables with DITAUser variables will round-trip properly in topic files provided the following points are observed (system variables will not round-trip):
• Do not name your variable with other than alphanumeric, under-score, or hyphen characters, and do not use a numeric character as the first character in the name.
• Be sure to add the variable definitions to the application’s template file, to ensure that any character formatting is properly applied. Note that this formatting will only be visible in print (or PDF) output from FrameMaker since it has no element structure.
• Variables will not live through the map to book process. If you want to have live variables in your generated FM files, you need to use the Prepare Variables command.
• If you use the Prepare Variables command and feel inclined to set attributes on the <ph> elements that wrap the variables, don’t do it. The <ph> wrappers are temporary and are deleted each time the Prepare Variables command is run. If you want to apply filtering or other attributes to variables, wrap them in a <ph> element and apply the attributes on that element.
16

USING DITA-FMXTIPS AND TROUBLESHOOTING
NOTE: Using FrameMaker variables is not really considered to be a “best practice” although there may be situations where it is an ideal solution for a particular problem. The proper DITA way to use “variables” is that of a conref to a phrase element.
Heavy use of references slowing things down?If you make heavy use of references (conrefs or xrefs), you may find it more efficient to open the target files first (those that are the destination of an xref or the source of a conref). If the target files are already open when you open topic files, the referencing process will go much faster.
Reference problems while converting unstructured content to DITAWhile converting an existing set of unstructured files into DITA, you may want to disable the auto-loading of xrefs and conrefs. If auto-loading is enabled you may get a lot of referencing errors when opening files if the target of those references is not a completely valid file.
Conrefs in title elementsIf you have titles that contain conrefs, be sure to have that file open when updating the DITA map file, otherwise the conref content will not appear in the topicref label.
Use of inline formatting within “preformatted” elements (like codeblock)FrameMaker uses the read/write rule “preserve line breaks” to allow the line breaks within code or preformatted elements to round trip between XML and the authoring view. The use of inline child elements such as <b> or <i> within a preformatted element poses a particular problem since you generally don’t want line breaks preserved for those child elements when used in non-code situations. There are a number of ways to handle this problem, but the easiest is to only apply these inline elements within a line (don’t tag multiple lines), and don’t let the child element start at the begin-ning of the line (allow at least a leading space before the inline element starts and ends). What appears to be a Frame bug causes the preserved line break to be lost if a child element starts or ends a line.
Use of draft-comments inlineIf you make use of the draft-comment element within running text, be sure to wrap a trailing (or leading) space within the element so that when (or if) you conditionalize these elements so they are hidden in Frame, you don’t end up with a double space.
Quick way to add a row to tablesPlace the cursor anywhere in a row, press Ctrl+Enter and a new row is added after the current row.
17

USING DITA-FMXUSING THE REFERENCE MANAGER
Spell checking XML filesWhen spell checking XML files, the Allow in Document option has no effect once you close the current file. The “document dictionary” is not saved in XML files. If you want Frame to remember a particular spelling you should use the Learn option.
Using the Reference Manager
Lets you select a conref, xref, or link target by specifying the file, element type, and element.
The Reference Manager is displayed when inserting a conref, xref, or link. To insert a conref, choose Insert Conref from the DITA menu, to insert an xref or link, use the Element Catalog. Note that the Reference Manager is only displayed for xref or link elements if they are defined as a “Container” rather than a “Cross-Reference” element in your EDD.
To insert a reference of any kind, first specify the file that contains the reference source. All files currently open will be available in the Source File drop-down list. If you want to place a reference to a file that is not open, use the Browse button to open another file. For conrefs, the Element Tag list displays all of the elements that are valid at the current insertion point. For xrefs and links, the Element Tag list displays the all of the elements that are valid targets (those that
18
USING DITA-FMXUSING THE REFERENCE MANAGER
can have an id attribute). If you want to limit the xref or link targets to a specific list of elements, use the XrefElements parameter in the ditafmx.ini file (for details, see INI-Only Settings). When you select an element tag name from the list, the available target elements display in the Element Data list. By default, only elements that have an ‘id’ value are available, but if you select the Show All Elements option, you will be able to select from all available elements of the selected type. The elements are listed with their ‘id’ and textual content. To place the reference, select an element and choose the Insert button. If you have selected an element that does not have an ‘id’ value, you will be prompted to provide an ‘id’ for that element (the ‘id’ is written to the source file, so be sure to save that file before exiting). If you want to specify text for the xref that is different than that of the target element, enter that text in the Alternate Xref Text field. To insert an xref to an external file, choose the External Xref button.
Conrefs are inserted as a locked range of text (like a text inset) and are tagged with the “DITA-Conref” color. By default this color is defined as blue, but because it is defined in the template, you can change it to suit your needs.
Xrefs and links are also inserted as a locked range of text, but no coloring or formatting is applied other than that specified by your structure application (EDD or template). When an xref or link is created or modified, the type attri-bute is set to the name of the target element, the format attribute is set to “dita,” and the scope attribute is set to “local.”
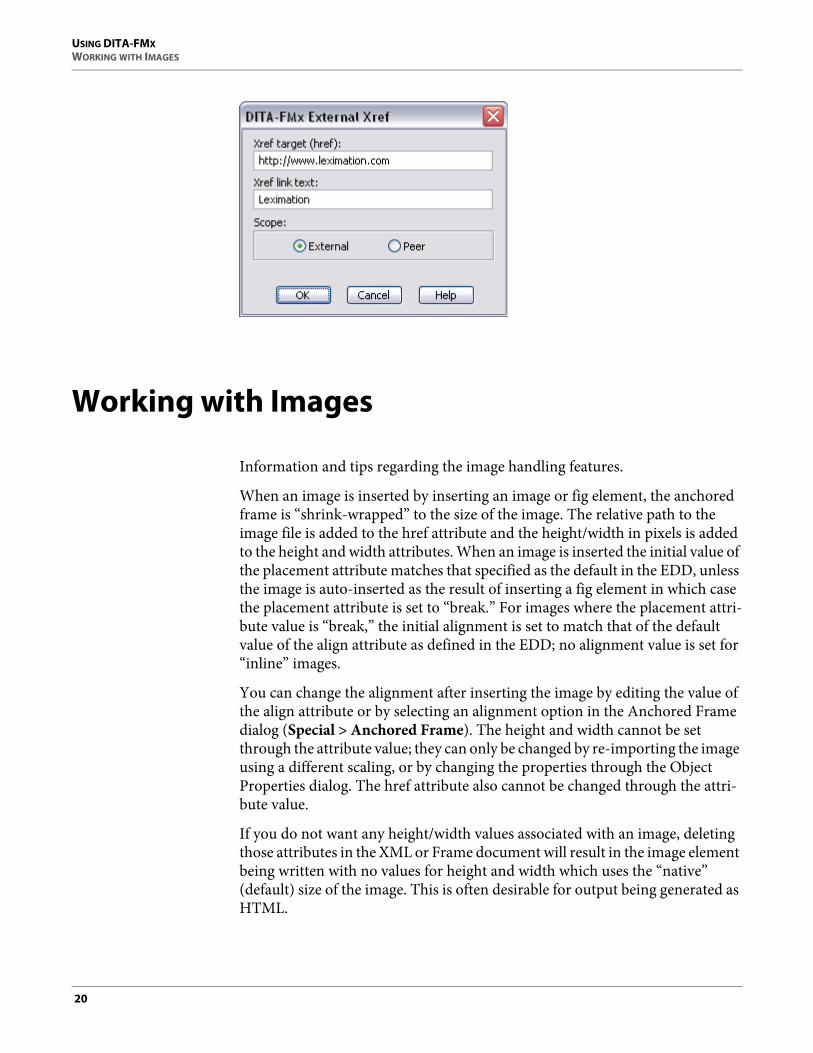
External Xref
Choose the External Xref button in the Reference Manager dialog to insert an xref or link that references files outside of the documentation set. Specify the xref target (the href attribute value) and the xref link text (the content of the xref element), as well as the value for the scope attribute (“external” or “peer”). For URLs, the format attribute is set to “html,” but for other types of file references the format attribute is set to the value of the file extension. For example, if you set the href attribute to “InstallGuide.pdf” the format attribute will be set to “pdf”.
Once an external reference has been created you can modify it by double-clicking the xref.
19
USING DITA-FMXWORKING WITH IMAGES
Working with Images
Information and tips regarding the image handling features.
When an image is inserted by inserting an image or fig element, the anchored frame is “shrink-wrapped” to the size of the image. The relative path to the image file is added to the href attribute and the height/width in pixels is added to the height and width attributes. When an image is inserted the initial value of the placement attribute matches that specified as the default in the EDD, unless the image is auto-inserted as the result of inserting a fig element in which case the placement attribute is set to “break.” For images where the placement attri-bute value is “break,” the initial alignment is set to match that of the default value of the align attribute as defined in the EDD; no alignment value is set for “inline” images.
You can change the alignment after inserting the image by editing the value of the align attribute or by selecting an alignment option in the Anchored Frame dialog (Special > Anchored Frame). The height and width cannot be set through the attribute value; they can only be changed by re-importing the image using a different scaling, or by changing the properties through the Object Properties dialog. The href attribute also cannot be changed through the attri-bute value.
If you do not want any height/width values associated with an image, deleting those attributes in the XML or Frame document will result in the image element being written with no values for height and width which uses the “native” (default) size of the image. This is often desirable for output being generated as HTML.
20

USING DITA-FMXFILTERING CONTENT
If you want to use the native image size for output generated through the Open Toolkit but want to use a specific DPI for output generated from FrameMaker, add an “fmdpi:<DPI>” attribute value to the image/@otherprops attribute, where <DPI> is the DPI value. Adding this value to the otherprops attribute allows the DPI setting to round trip from XML to Frame and it will only be used by FrameMaker; other output processes will see no height and width values and will use the native image size. Adding this value to the otherprops attribute deletes any value set to the height or width attributes.
NOTE: If your images sizes are not round-tripping properly, your read/write rules file probably needs to be updated. Refer to the image topic for the proper rules, especially with regard to the height and width attribute definitions.
Filtering Content
Tips for filtering and conditionalizing content in topic files or maps.
DITA-FMx provides many ways to filter the content in your DITA files. The auto-conditionalizing options apply conditions to elements each time you open a file, and the Apply Ditaval as Conditions command can approximate the effect of applying a ditaval file to a topic file or book. You can also achieve filtering when generating a FM book from a DITA map by modifying the Book application’s read-write rules file.
Auto-Conditionalizing Elements
There are three options for applying conditions to elements on file open. The Conditionalize Prolog on File Open and Conditionalize Comments on File Open options apply the DITA-Prolog and DITA-Comment conditions to the respective elements each time you open a topic file. The Conditionalize Topic-meta on File Open option applies the DITA-Topicmeta to the topicmeta element when opening a DITA map file. On file save, these conditions are stripped (all other conditions you may apply will honor the Conditional Text setting in the structure application definition).
The term “Conditionalize” does not necessarily mean to “hide,” it just means that the associated condition will be applied to the elements. It is up to you to set the hide/show state as well as the color and style for these conditions (in the structure application template).
When any of these options are enabled, the plugin does a “show all” then a “hide” of the appropriate conditions when the XML or FM file is opened. If the
21
USING DITA-FMXFILTERING CONTENT
file makes extensive use of conditions, this may result in the addition of blank pages at the end of the document. For XML files, this is not a problem since the blank pages are not saved, but if you’re working on generated FM files, you may end up with extra blank pages that you can’t get rid of (each time you save then reopen, the blank pages will reappear). If this is the case, you should disable the auto-conditionalizing options when doing final pagination on generated FM files.
Ditaval Filtering
In order to filter content in FM files based on a ditaval file, you should use the Apply Ditaval as Conditions command. Before using this command you need to first create the ditaval file (using the Ditaval Manager or other means), then register it with the Ditaval Manager. Once the ditaval file has been registered with DITA-FMx, you can use it with the Apply Ditaval as Conditions command. Detailed information about using this command is available in the Using the Apply Ditaval as Conditions Command topic.
Although, not a requirement, it is best to use this command only on generated FM files, not on your DITA XML files. If you use it on the XML files, the condi-tions are saved to the XML as processing instructions (PIs) and will persist in the state set the next time you open the file (this persistence is dependent on the Conditional Text setting in the associated structure application definition).
When you generate an FM book from a DITA map, these PIs are filtered out during the import XSLT processing and not included in the generated FM files. However, any conditions that have been applied to content that is the source of a conref, will appear in the generated FM files because the conref source is not passed through the import XSLT processing, but pulled in by the conref resolu-tion process which happens after the initial topic file aggregation. This results in an FM file with some conditions that appear to have survived the conversion while other have not. This confusing situation can be avoided by not applying conditions to the XML files.
Regardless of whether you have applied conditions to the XML files or not, you can still run the Apply Ditaval as Conditions command to apply conditions based on the properties in a ditaval file.
NOTE: The Apply Ditaval as Conditions command cannot currently apply over-lapping conditions. If your ditaval file defines a complex filtering scheme, the result may not be as expected.
22

USING DITA-FMXFILTERING CONTENT
Filtering with the Read-Write Rules File
If there are certain elements that you want to exclude from your generated FM book files, use the “drop” rule. For example, if you want to exclude the shortdesc element from your generated files, add the following rule to the Book applica-tion’s rules file:
element "shortdesc" drop;
This results in the shortdesc element being removed from the generated FM files while it remains in the source topic files.
23

USING DITA-FMXFILTERING CONTENT
24

2
Installation and SetupProvides information about installing DITA-FMx.
DITA-FMx can be downloaded from www.leximation.com/dita-fmx/.
DITA-FMx version 1.0 supports DITA 1.0 on FrameMaker versions 7.2 and 8.0.
DITA-FMx is made up of three plugin components, one that provides import/export processing, one that provides general authoring support, and one that provides FrameMaker book generation. DITA-FMx also provides three structure applications (DTD, EDD, template, and read/write rules files), two for DITA topic and map authoring and one for book publishing. The EDD and rules files have been set up specially to allow proper interaction with DITA-FMx. If you want to build your own DITA structure applications, you should clone these files and modify them as needed. For more information see Customizing the Default Structure Applications.
If you have any installation problems or questions, please contact us at <ditafmx-help AT leximation DOT com>.
Before Running the Installer - FM8
If you are installing DITA-FMx on FrameMaker 8 you must edit the maker.ini file to disable the existing DITA support. DITA-FMx cannot coexist with the default FM8 DITA support.
• Open the maker.ini file and locate the APIClients section. Look for lines that start with ditafm, ditafm_app, ditabook, and possibly ditaOpen-Toolkit (if you’ve installed the DITA OpenToolkit connector). Delete or comment out these lines (by adding a semicolon at the start of the line).
NOTE: If you’re interested in switching between the FM8-DITA plusing and DITA-FMx, refer to the topic Switching Between DITA-FMx and FM8-DITA.
You may now proceed to Run the Installer Application.
25

INSTALLATION AND SETUPBEFORE RUNNING THE INSTALLER - FM7.2
Before Running the Installer - FM7.2
If you are installing DITA-FMx on FrameMaker 7.2 and are upgrading from the Adobe DITA App Pack or from the first beta version of DITA-FMx (v.0.01), you may need to modify the maker.ini file or disable existing client plugins. If you’re new to DITA authoring or haven’t installed either of these plugins (DITA-FMx 0.02 is fine), proceed to Run the Installer Application.
In order to eliminate any possible conflicts with previous versions of the DITA authoring plugins, check the following:
• Verify that there are no “ditafm” or “ditafmx” plugin DLLs in the FrameMaker/fminit/Plugins folder (or any subfolders). Files to look for are: ditafm.dll, ditafm_app_72.dll, fm-ditabook.dll, ditafmx_72.dll, and ditafmx_app_72.dll. If any of these files are found, move them to a backup location outside of the Plugins folder.
This only applies to files in the “Plugins” folder; files found in the \fminit\ditafm folder can be left alone.
IMPORTANT: Do not rename the DLLs or move them to a sub-folder of the Plugins folder. You must completely move them to an alternate location. If the files exist (under any name) within or below the Plugins folder, FrameMaker will still load them.
• Open the maker.ini file and locate the APIClients section. Look for lines that start with “ditafm” or “ditafm_app” and delete or comment them out (by adding a semicolon at the start of the line). Lines that start with “ditafmx” or “ditafmx_app” will be updated by the installer and do not need to be commented out.
• If you have been using an earlier version of DITA-FMx, you may want to backup the FrameMaker\DITA-FMx folder. This is not required, but the installer will overwrite any like-named files in the FrameMaker\DITA-FMx folder during the installation process. You do not need to back up any existing structure applications, the installer will not modify the structapps.fm file or any structure applications.
You may now proceed to Run the Installer Application.
26

INSTALLATION AND SETUPREINSTALLING DITA-FMX
Reinstalling DITA-FMx
To reinstall or update DITA-FMx over an existing installation, just run the installer. No backup or uninstall is required. The installer will overwrite all like-named files in the DITA-FMx folder. It will not overwrite the ditafmx.ini file, so your settings will not be lost.
If you’d like to get a “fresh” install, you can rename the existing DITA-FMx folder (perhaps to something like DITA-FMx.<oldversion>) before running the new installer. This will give you a completely new installation of files, but will let you compare the new files to the old files and allow you to “roll back” to a previous version if needed. If you choose this approach, you will need to manu-ally migrate any manually entered settings in the ditafmx.ini file.
After reinstalling, you may want to copy the new structure applications to the FrameMaker\Structure\xml\ folder so you can take advantage of any changes that have been made.
Proceed to Run the Installer Application.
Run the Installer Application
The DITA-FMx installer application is provided in a ZIP archive. As part of the installation process, the installer modifies the maker.ini file. If you feel it is necessary, you may want to make a backup of this file before running the installer. If you are installing an update, see Reinstalling DITA-FMx.
NOTE: There is no Uninstall application provided; because most of the installation is done manually, it would be misleading to provide an uninstaller. To remove DITA-FMx, just delete the DITA-FMx folder and remove the “ditafmx” lines from the maker.ini file.
Extract the executable from the archive and run it. The installer extracts and copies the required files to the FrameMaker\DITA-FMx folder.
The following files are installed:
• ditafmx_72.dll / ditafmx_80.dll - Authoring support plugin DLL.
• ditafmx_72_app.dll / ditafmx_80_app.dll - Import/export client DLL.
• ditafmx_72_book.dll / ditafmx_80_book.dll - Book processing client DLL.
27

INSTALLATION AND SETUPINSTALLING THE STRUCTURE APPLICATIONS
• pt_updates.dll - The DLL that provides web access for the “check for updates” command.
• ditafmx.chm - DITA-FMx User Guide online Help file.
• ditafmx-ref.chm - DITA Reference online Help file (for element-based context sensitive authoring help). Includes the special DITA-FMx elements.
• DITA-FMx_Help_Source.zip - Source for the user documentation.
• DITA-FMx_apps.zip - Structure application files.
• ditafmx-ant.xml - Ant script that provides targets for the Current File option of the Generate Output command.
• PROJECT.xml - Sample Ant script for the Selected Target option of the Generate Output command.
After extracting the new files, the installer updates the APIClients section of the maker.ini file with references to the plugin DLLs. The following lines are added:
ditafmx=Standard, ditafmx, DITA-FMx\ditafmx_80.dll, structured ditafmx_app=Standard, ditafmx_app, DITA-FMx\ditafmx_80_app.dll, structured ditafmx_book=Standard, ditafmx_book, DITA-FMx\ditafmx_80_book.dll, structured
If you are upgrading from the Adobe DITA App Pack or from the first beta version of DITA-FMx (v.0.01), you may need to modify the maker.ini file or disable the client plugins. If you are see console errors when starting FrameMaker, make sure you have addressed the issues described in Before Running the Installer - FM7.2.
Once the installation has completed, you need to set up the structure applica-tions before you can create and edit DITA files. Continue to Installing the Struc-ture Applications.
If you want to disable any of the plugin clients, comment out the ditafmx, ditafmx_app, or ditafmx_book entries in the APIClients section of the maker.ini file.
Installing the Structure Applications
In order for FrameMaker to properly import and export DITA files, you must have structure applications that support the authoring of topic and map files. DITA-FMx provides both of these applications as well as a structure application
28

INSTALLATION AND SETUPINSTALLING THE STRUCTURE APPLICATIONS
for book processing. If you want to customize the appearance of the templates or change the elements supported (adding through specialization or removing unwanted elements), you should clone the provided structure application folders and modify the cloned versions.
If you are upgrading from the App Pack, and want to continue using those structure applications (or your customized version), you’ll need to edit the “stub” files for those applications and change the “Use API Clients” element so it references the client “ditafmx_app” instead of “ditafm_app.” Or, if you want to use the new structure application that are provided with DITA-FMx, you may want to delete the old ones to eliminate possible confusion. The steps below refer to the Structure Tools menu, in FM7.2, this is on the File menu (File > Structure Tools).
The following steps describe the installation of the structure applications provided with DITA-FMx.
1) Make a backup copy of your current structure application definitions file (typically found at FrameMaker\Structure\structapps.fm. Store this file in a safe location before making modifications.
2) Extract the contents of the DITA-FMx_apps.zip file to the FrameMaker\Structure\xml folder. This will create a folder named DITA-FMx that contains folders named Book, dtd, Map, and Topic. These folders contains the three structure application as well as the DITA 1.0 DTD files used by the applications.
3) Start FrameMaker and open the structure application definitions file (Structure Tools > Edit Application Definitions).
4) In the structure application definitions file place the insertion point just after the Version element.
5) Choose File > Import > File, then navigate to the structapps-stub_topic.fm file in the DITA-FMx\Topic folder created in step 1. Select the Import by Reference option and choose the Import button. In the next dialog accept the defaults and choose Import.
6) Repeat step 4 for the “structapps-stub” files in the DITA-FMx\Map and DITA-FMx\Book folders.
7) Save the file, then choose Structure Tools > Read Application Defini-tions.
8) Close the file and exit FrameMaker.
9) Restart FrameMaker and run the DITA-FMx > Options command and select DITA-FMx-Topic for the DITA Topic Application, DITA-FMx-Map for the DITA Map Application, and DITA-FMx-Book for the DITA Book Application.
29

INSTALLATION AND SETUPADVANCED INSTALLATION ISSUES
NOTE: If your folder structure is non-standard, you may need to modify the paths specified in the “structapps-stub” files to match the file paths on your system. To do this, just open the structure application definitions file and double-click each application’s text inset. In the dialog that displays, choose the Open Source button and make the changes in the “stub” file. When you have finished editing the stub file, save and close that file, then double-click the text inset again and choose the Update Now button.
If you plan to make use of the DITA Open Toolkit for generating output, see Setting Up to Use the Generate Output Command.
Advanced Installation Issues
The following topics are provided for those who want to customizing the struc-ture applications or modify the functionality of the authoring environment. If you are new to DITA, and have completed the previous installation instruc-tions, you should be all ready to use DITA-FMx for creating and authoring DITA XML files.
Structure Application Requirements
Provides details on the element definitions used with DITA-FMx.
The easiest way to get up and running with DITA in Frame is to use the default structure applications provided with DITA-FMx; they will “just work” right out of the box. Once you’re comfortable with things and want to make some adjust-ments to fit your house style or want to specialize, you can either clone the apps provided, use some DITA apps provided by someone else, or make your own from scratch. If you want to customize the apps provided with DITA-FMx, refer to the topic Customizing the Default Structure Applications. If you want to use other applications or want to make your own, just be sure that they adhere to the requirements expected by DITA-FMx. In order to implement certain DITA features in DITA-FMx, the applications must be set up in a very specific way.
The information in the following topics describes the requirements that need to exist in a DITA structure application so that it functions properly with DITA-FMx. All of the modifications described affect the structure application files only (EDD, template, rules file), no modifications need to be made to the DITA DTD files. The items are grouped by feature, some of these features require the addition of multiple elements or structure application modifica-tions. If you don’t want to make use of a given feature, you can skip the modifi-
30
INSTALLATION AND SETUPADVANCED INSTALLATION ISSUES
cations described in that section. There are many other rules and EDD modifications that are needed for proper use of DITA files in FrameMaker, these are not discussed; only those features that are required or used by DITA-FMx are documented at this time.
The easiest way to set up these features in your custom application is to copy and paste from the default DITA-FMx applications.
fm-xref
The fm-xref element is used to create a FrameMaker-style cross-reference used inline as a standard DITA xref element would be used. On file save, this converts to a standard DITA xref element and on file open, it converts back into an fm-xref element. The way an fm-xref is identified as such is the type attribute value which is given the format of “fm:<format name>”. Where <format name> is the cross-reference format name as defined in the FrameMaker template. When an fm-xref element is inserted, the standard FrameMaker Cross-Ref dialog displays, select the target element and the cross-ref is inserted as the fm-xref element.
To use the fm-xref feature requires the creation of the fm-xref element defini-tion.
1) Create an fm-xref element definition (in the EDD):
a) Make a copy of the default xref element definition.
b) Change the name to “fm-xref”
c) Delete the general rule (an fm-xref cannot have child elements)
2) Add fm-xref to the appropriate general rules (everywhere that an xref element is valid, the fm-xref element should also be).
Th fm-xref element should be added to both the Topic and Book applications.
fm-link
The fm-link element is used to create a FrameMaker-style cross-reference as a related-links item. On file save, this converts to a standard DITA link element and on file open, it converts back into an fm-link element. The way an fm-link is identified as such is the type attribute value which is given the format of “fm:<format name>”. Where <format name> is the cross-reference format name as defined in the FrameMaker template. When an fm-link element is inserted, the standard FrameMaker Cross-Ref dialog displays, select the target element and the cross-ref is inserted as a fm-linkref element (child of fm-link). You can optionally add a standard desc element as a sibling of the fm-linkref.
31

INSTALLATION AND SETUPADVANCED INSTALLATION ISSUES
To use the fm-link feature requires the creation of fm-link and fm-linkref elements.
1) Create an fm-link element definition (in the EDD):
a) Make a copy of the default link element definition.
b) Change the name to “fm-link”
c) Change the general rule to “fm-linkref, desc?”
d) Change the default value for the class attribute to “- topic/fm-link”
e) Add an automatic insertion of a child “fm-linkref” element.
2) Create an fm-linkref element definition (in the EDD):
a) Make a copy of the default link element definition.
b) Change the name to “fm-linkref”
c) Change the element type from Container to CrossReference
d) Delete the general rule
e) Make all of the attributes into the type “String” that is “Optional” with a Special Attribute Control of “Hidden”. Remove all default values.
3) Add fm-link to the appropriate general rules (everywhere that a link element is valid, the fm-link element should also be).
The fm-link and fm-linkref elements should be added to both the Topic and Book applications.
link
In order to provide a clickable label for the link element, the fm-linklabel element must be added to the EDD. This element is discarded on file save, and is recreated on file open.
The only thing required to implement this feature is to add the element defini-tion to the EDD and to add it to the general rule of the link element. The fm-linklabel element should have a general rule of “<TEXT>”. If you want to apply character formatting you can add text format rules.
If this element is not added to the EDD, you will be able to create link elements, but they will have no label to click on.
NOTE: It has been found that children of this element may not import properly if your EDD specifies a prefix rule for the link element. The FM8-DITA and early DITA-FMx Topic applications specify a prefix rule for link. If you’re having link import problems, you may want to investigate this possibility.
32

INSTALLATION AND SETUPADVANCED INSTALLATION ISSUES
The fm-linklabel element should be added to both the Topic and Book applica-tions.
simpletable
Tables based on the simpletable element require a slightly different structure than that provided by DITA in order to render properly as a table in FrameMaker. To accommodate this difference, these tables need an extra level of hierarchy added to define the table heading area and the table body area while working in FrameMaker.
The simpletable element and those elements that are specialized from simplet-able (properties and choicetable) need a Table Heading element named “fm-<tabletype>head” and a Table Body element named “fm-<tabletype>body” added to the EDD. The fm-simpletablehead element specifies a general rule of “sthead” and the fm-simpletablebody element specifies a general rule of “strow+”. The general rule for the <tabletype> element should be “fm-<table-type>head?, fm-<tabletype>body”.
In addition to the EDD modifications, the following rules are needed for each simpletable-based structure:
fm element "fm-simpletablehead" unwrap; fm element "fm-simpletablebody" unwrap; element "simpletable" { is fm table element; attribute "relcolwidth" is fm property column widths; } element "sthead" { is fm table row element; fm property row type value is "Heading"; } element "strow" { is fm table row element; fm property row type value is "Body"; }
The initial rules (first two lines) discard the head and body wrappers on file save. The remaining rules define the root table element (in this case simpletable), the row element that is a “Heading” row (in this case sthead) and the row element that is a “Body” row (in this case strow). For simpletable specializations, you must provide these three rule groups so the row elements are placed into the right “fm-<tabletype>head” or “fm-<tabletype>body” elements.
33

INSTALLATION AND SETUPADVANCED INSTALLATION ISSUES
Because the choicetable element must have only 2 columns, the root table rule looks like the following:
element "choicetable" { is fm table element; fm property columns value is "2"; attribute "relcolwidth" is fm property column widths; }
And because the properties (table) element must have only3 columns, the root table rule looks like the following:
element "properties" { is fm table element; fm property columns value is "3"; attribute "relcolwidth" is fm property column widths; }
The fm-simpletablehead, fm-simpletablebody, and the head/body elements for other simpletable-specialized elements should be added to both the Topic and Book applications.
image
To support the proper sizing and placement of image elements, add the following to the “image” rule in both Topic and Book apps:
element "image" { is fm graphic element; fm property import by reference or copy value is "ref"; writer facet default { specify size in pt; } attribute "href" { is fm attribute "href"; is fm property file; } attribute "align" { is fm property alignment; value "left" is fm property value align left; value "right" is fm property value align right; value "center" is fm property value align center; value "current" is fm property value align center;
34
INSTALLATION AND SETUPADVANCED INSTALLATION ISSUES
} attribute "height" { is fm property height; is fm attribute; } attribute "width" { is fm property width; is fm attribute; } }
topicref
In order to provide a clickable label for the topicref element, the fm-topicref-label element must be added to the EDD. This element is discarded on file save, and is recreated on file open.
To implement this feature the fm-topicreflabel element definition must be added to the EDD and added to the general rule of the topicref element. The fm-topicreflabel element should have a general rule of “<TEXT>”. If you want to apply character formatting you can add text format rules.
Because the fm-topicreflabel element is not part of the DITA specification, it must be deleted on file save. Add the following rule to the Map applicaiton rules file:
fm element "fm-topicreflabel" drop;
If this element is not added to the EDD, you will be able to create topicref elements, but they will have no label to click on.
The fm-topicreflabel element should be added only to Map application.
reltable
Because DITA defines the reltable element with the same structure as a simplet-able element, it requires additional internal structure to be rendered properly as a table within FrameMaker. This adds the fm-reltablehead and fm-reltablebody elements. Also, in order to support the use of the topicmeta element as the child of a reltable, the fm-reltablemeta element is added. On file save, the fm-reltablemeta element is converted into a topicmeta, and on import a topic-meta that is the child of a reltable is converted into an fm-reltablemeta element.
In the EDD, general rule for reltable should be “(fm-reltablemeta)?, (fm-reltablehead)?, (fm-reltablebody)”. The fm-reltablehead elementis defined as a Table Heading element named and the fm-reltablebody element is defined
35

INSTALLATION AND SETUPADVANCED INSTALLATION ISSUES
as a Table Body element. The fm-reltablehead element specifies a general rule of “relheader” and the fm-reltablebody element specifies a general rule of “relrow+”. The fm-reltablemeta element is defined as a Table Title element and has the same general rule as the topicmeta element. It also has the same attribute definitions as the topicmeta element, but no other element definition properties are needed for fm-reltablemeta.
In addition to the EDD modifications, the following rules are needed for the reltable structure:
fm element "fm-reltablehead" unwrap; fm element "fm-reltablebody" unwrap; fm element "fm-topicreflabel" drop; element "fm-reltablemeta" { is fm table title element; } element "reltable" { is fm table element; } element "relheader" { is fm table row element; fm property row type value is "Heading"; } element "relrow" { is fm table row element; fm property row type value is "Body"; }
The initial rules (first two lines) discard the head and body wrappers on file save. The next line discards the fm-topicreflabel element. The remaining rules define fm-reltablemeta as a Table Title, the root table element (reltable), the row element that is a “Heading” row (relheader) and the row element that is a “Body” row (relrow).
Customizing the Default Structure Applications
Procedure for cloning the default structure application to create your own custom version.
We strongly recommend that you maintain an instance of the DITA-FMx struc-ture applications in their original form. Because these applications work prop-
36
INSTALLATION AND SETUPADVANCED INSTALLATION ISSUES
erly with DITA-FMx, as you customize/build your own apps, you may need to refer back to the originals in case something goes wrong (which it often does).
The following describes how to clone the default apps so you can make your own version.
First, copy the FrameMaker\Structure\XML\DITA-FMx folder (with all subfolders included) to a new folder name, for our purposes here, we’ll call it DITA-MyCo. In the new DITA-MyCo folder are the three application folders (Topic, Map, and Book), and the DTD folder. You’ll be modifying files in the application folders, and leaving the DTD folder as it is (unless you’re special-izing, which we won’t go into here). You’ll want to make the same initial changes to each of the applications (replace “<app>” with the Topic, Map, or Book application in the steps below).
1) From the new DITA-MyCo\<app> folder open the <app>.edd.fm file in FrameMaker. At the top of the file, you’ll see a line that says “Structured Application: DITA-FMx-<app>”, change that to “DITA-MyCo-Topic”. Save this file, but leave it open for now.
2) From the DITA-MyCo\<app> folder open the <app>.template.fm file in FrameMaker. Choose File > Import > Element Definitions, select the EDD from the list and choose Import.
3) Save and close the template, then save and close the EDD.
4) From the DITA-MyCo\<app> folder open the structapps-stub_<app>.fm file in FrameMaker. Change all instances of “DITA-FMx” to “DITA-MyCo”. This involves modifying the text of a variable. You’ll actu-ally want to create a new variable and use that, don’t just modify the content of the existing variable; if you modify the content of the variable, it will mess up other applications since this “stub” file is imported into the structure application definitions file.
a) Open the Variable dialog (Special > Variable).
b) Select “DITA-FMx-Path” from the list and choose Edit Definition.
c) In the Edit user variable dialog, change the name from “DITA-FMx-Path” to “DITA-MyCo-Path”, then in the Definition field change “DITA-FMx” to “DITA-MyCo”. Then choose Add then Done. Choose Done again in the Variables dialog.
d) Double-click the first DITA-FMx-Path variable and in the Variables dialog select “DITA-MyCo-Path” and choose Replace.
e) Now copy and paste this new variable overall instances of it in the stub file (in the Template, DTD, Read/Write Rules, and numerous places in Entity Locations).
5) Save and close the stub file.
37

INSTALLATION AND SETUPADVANCED INSTALLATION ISSUES
6) Now open the structure application definitions file with the Structure Tools > Edit Application Definitions command (on FM7.2 the Structure Tools menu is on the File menu).
7) Place the insertion point just after the Version element (use the Structure View window to see this location easily), and choose File > Import > File. Navigate to the new structapps-stub_<app>.fm file and select it. In the Import Text Flow By Reference dialog, accept the defaults and choose Import.
Once you have followed those steps for each application, you’ll have created a “clone” of the default applications and are now ready to customize them as needed.
Setting Up to Use the Generate Output Command
Details on setting up DITA-FMx to communicate with the DITA Open Toolkit.
The DITA-FMx > Generate Output command lets you generate output through the DITA Open Toolkit. This command provides two main options, you can generate output from the current topic or map file, or by using a specific Ant target. The setup required for these two options is described below.
DITA-FMx makes a call to the DITA Open Toolkit (DITA-OT) through a batch file named ~ant-build.cmd. This file is generated on the fly in the FrameMaker\DITA-FMx folder. In order for this batch file to work properly, the environment variables that define the location of Java and Ant (and possibly other utilities) must be properly defined. DITA-FMx provides an INI parameter (EnvironmentSetup) that lets you specify a batch file which loads in the proper environment settings. If you use this parameter and follow the instructions below, your OT connection should be fairly simple. However, if you use an older version of the OT or have special requirements you may need to ensure that the environment settings are defined globally.
If you are using DITA-OT 1.4.1 or later, we have found that you must use Java 1.5 or higher. We recommend that you use the “fullpackage” version of DITA-OT. Complete the following steps to ensure that you are able to generate output through the Open Toolkit (similar instructions apply if you’ve down-loaded the OT version 1.4.2 or later):
1) Download the "DITA-OT1.4.1_fullpackage_bin.zip" file from Source-Forge <http://sourceforge.net/project/show-files.php?group_id=132728&package_id=145774&release_id=556111>. Extract the contents of this file to your local file system into a directory named C:\DITA (or similar). It is important that the directory path that contains the DITA-OT directory has no spaces in any of the directory
38

INSTALLATION AND SETUPADVANCED INSTALLATION ISSUES
names. After extracting the contents of the OT archive, you will have a path such as C:\DITA\DITA-OT1.4.1.
2) Download and install the Java Development Kit (JDK) version 5 or higher (http://java.sun.com/javase/downloads/index.jsp). (Yes the DITA-OT install instructions say JDK1.4.2, but that won't work with OT 1.4 it appears. You must use version 5 or higher!
3) Set your JAVA_HOME environment variable to the path to the newly installed JDK (perhaps "C:\Program Files\Java\jdk1.6.0_04").
4) Copy the "ditafmx-ant.xml" file from the DITA-FMx folder to your DITA-OT folder.
5) In the DITA-OT folder, copy the "startcmd.bat" file to "ditafmx-startcmd.bat"
6) Open the "ditafmx-startcmd.bat" file in Notepad (or other text editor) and comment out the last line (add a "REM " in front of the line). If you don't comment out this line, it will still work, you'll just get an empty shell that hangs around each time you build. It should look like this:
REM start "DITA-OT" cmd.exe
7) Open the ditafmx-ini file in Notepad and locate the "EnvironmentSetup" parameter in the BuildFile section. This parameter should point to the "ditafmx-startcmd.bat" file. For example ..
EnvironmentSetup=C:\DITA-OT1.4.1\ditafmx-startcmd.bat
If you make use of the "Selected Target" option with the Generate Output command in Frame, you'll need to update this parameter in the associated "ANT:<targetname>" sections as well.
This should let you generate output through the default OT 1.4.1 targets, without requiring you to set up the system environment. If you use the PDF2 transform, you may need to do some additional work such as starting Frame from a shell in the OT directory (or adding a "cd %DITA_DIR%" line to the ditafmx-startcmd.bat file.
Alternatively, you may want to start FM from the DITA-OT directory. To do this just create a shortcut to FrameMaker.exe, and in the "Start In" field of the Shortcut tab, set this value to the path to your DITA-OT directory.
Generate Output: Current File Option
The Current File option of the Generate Output command lets you generate output from the current topic or map file using a pre-defined Ant script. The
39
INSTALLATION AND SETUPADVANCED INSTALLATION ISSUES
files referenced below are initially installed to the FrameMaker/DITA-FMx folder.
1) Copy the ditafmx-ant.xml file to your DITA-OT directory.
2) In the DITA-FMx > Options dialog, set the DITA-OT Directory field to reference the DITA-OT directory on your system.
That should be all that is required. The information about the current file and project are passed to the Ant script through command line parameters. By default, this provides three targets: HTML, CHM, and PDF. If you want to add others, modify the ditafmx-ant.xml file accordingly and add more targets to the BuildFile section of the ditafmx.ini file.
If you need to set up environment variables different from the default environ-ment, the optional EnvironmentSetup parameter lets you specify a batch file to run before running the Ant script.
The ditafmx-ant.xml file contains a target for the FrameMaker Adapter. If you have this installed, you can enable access to it from the Generate Output dialog by adding a 4th item to the BuildFile section of the ditafmx.ini file “4=FMAd-apter” and updating the Count parameter to 4.
In order to take advantage of ditaval filtering, you must register or create ditaval files so they are known to DITA-FMx. The Ditaval Manager provides the means to add existing files, or create new files.
Generate Output: Selected Target Option
The following steps should get you up and running with the Selected Target option of the Generate Output command.
1) Copy the PROJECT.xml file to your DITA-OT directory and rename it something appropriate for your project.
2) Edit the <project>.xml file and set the properties indicated in the comments so they match your system and project.
3) Set up the ditafmx.ini file as follows:
NOTES:
• Be sure that the LogFile parameter specifies a directory that exists before the Ant script is run, otherwise the build will fail.
• The optional EnvironmentSetup parameter can be used to specify a batch file to run before running the Ant script in order to set up the environ-ment.
• In the examples below, swap “<PROJECT>” for the actual project name.
40
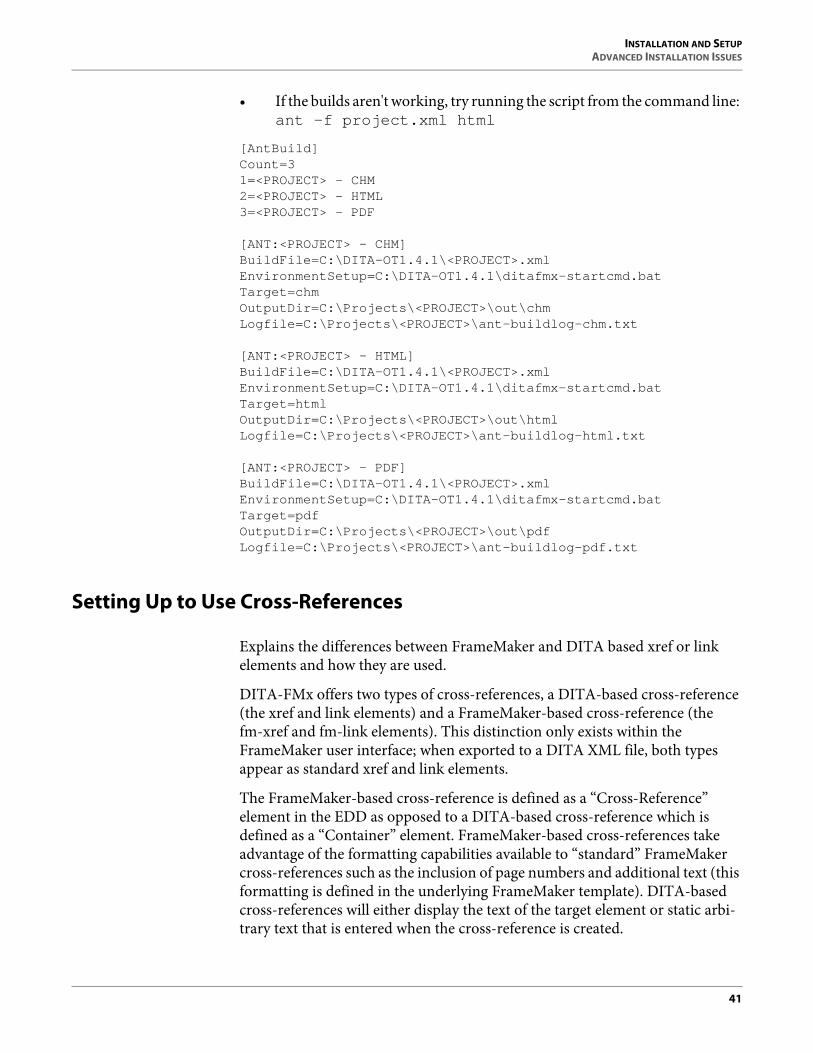
INSTALLATION AND SETUPADVANCED INSTALLATION ISSUES
• If the builds aren't working, try running the script from the command line: ant -f project.xml html
[AntBuild] Count=3 1=<PROJECT> - CHM 2=<PROJECT> - HTML 3=<PROJECT> - PDF [ANT:<PROJECT> - CHM] BuildFile=C:\DITA-OT1.4.1\<PROJECT>.xml EnvironmentSetup=C:\DITA-OT1.4.1\ditafmx-startcmd.bat Target=chm OutputDir=C:\Projects\<PROJECT>\out\chm Logfile=C:\Projects\<PROJECT>\ant-buildlog-chm.txt [ANT:<PROJECT> - HTML] BuildFile=C:\DITA-OT1.4.1\<PROJECT>.xml EnvironmentSetup=C:\DITA-OT1.4.1\ditafmx-startcmd.bat Target=html OutputDir=C:\Projects\<PROJECT>\out\html Logfile=C:\Projects\<PROJECT>\ant-buildlog-html.txt [ANT:<PROJECT> - PDF] BuildFile=C:\DITA-OT1.4.1\<PROJECT>.xml EnvironmentSetup=C:\DITA-OT1.4.1\ditafmx-startcmd.bat Target=pdf OutputDir=C:\Projects\<PROJECT>\out\pdf Logfile=C:\Projects\<PROJECT>\ant-buildlog-pdf.txt
Setting Up to Use Cross-References
Explains the differences between FrameMaker and DITA based xref or link elements and how they are used.
DITA-FMx offers two types of cross-references, a DITA-based cross-reference (the xref and link elements) and a FrameMaker-based cross-reference (the fm-xref and fm-link elements). This distinction only exists within the FrameMaker user interface; when exported to a DITA XML file, both types appear as standard xref and link elements.
The FrameMaker-based cross-reference is defined as a “Cross-Reference” element in the EDD as opposed to a DITA-based cross-reference which is defined as a “Container” element. FrameMaker-based cross-references take advantage of the formatting capabilities available to “standard” FrameMaker cross-references such as the inclusion of page numbers and additional text (this formatting is defined in the underlying FrameMaker template). DITA-based cross-references will either display the text of the target element or static arbi-trary text that is entered when the cross-reference is created.
41

INSTALLATION AND SETUPADVANCED INSTALLATION ISSUES
FrameMaker-based cross-references can only reference another element, while a DITA-based cross-reference can reference another element or content outside of the local scope such as a website. Both cross-reference types have their purpose and it’s up to the author to decide which suits their needs best.
You can use either or both of these cross-reference types. The provided struc-ture applications are set up to use both types of references.
When saved to PDF, the FrameMaker-based cross-references will become live hyperlinks. In order for DITA-based references to become hyperlinks, you must run the Xref to Hyperlink command after generating the book/FM files.
By default, the structure application is set up to only allow fm-xref and fm-link elements to reference other topics (topic, task, concept, and reference elements) and section elements. You can customize the EDD to allow referencing of other elements if needed. In order for an element to appear in the FrameMaker Cross-Reference dialog as a cross-reference target, the “id” attribute of that element must be defined as a type of “UniqueID.” By default, most id attributes are defined as a type of “String.” Just change the type to UniqueID and that element will be listed in the Cross-Reference dialog.
REMEMBER: If you are using FM-based cross-references, always use the Source Type of “Elements,” never use a Source Type of “Paragraphs” or “Cross-Ref Markers.” If the elements thatyou want to refreence are not available, you need to update the EDD as described above.
Advanced Cross-Reference Options
NOTE: The following information is provided for those who want to change the default functionality for FrameMaker-based cross-references; there is no reason to read further if the default setup is fine for your needs.
To ensure compliance with the DITA specification, when an fm-xref or fm-link element is saved to XML, it is saved to the corresponding DITA element. By default the fm-xref element is saved to the xref element and the fm-link element becomes a link element. When reopened in FrameMaker, these elements convert back into the proper FM-based element. If needed, you can change the way this process works.
To save to specialized xref or link element names.If your DITA model uses a specialized xref or link elements, as long as the class attribute values indicate the proper inheritance, they should function properly. If you make use of the fm-xref or fm-link functionality, you must choose only one element for each to convert into on file save. To specify an element other than the default xref or link for the fm-xref or fm-link elements make the following changes to the ditafmx.ini file:
• Set GeneralExport\XrefProcessing to 1
42
INSTALLATION AND SETUPADVANCED INSTALLATION ISSUES
• Set GeneralExport\CrossRefToXref to 1
• Set GeneralExport\DitaXrefElem to the “xref” element name
• Set GeneralExport\DitaLinkElem to the “link” element name
To write the FM-based cross-reference text to XML.Normally on file save, the FM-based cross-reference text is not saved to the XML file; it is regenerated on file open. If you want the reference text saved to the XML file, you must modify the ditafmx.ini file as follows:
• Set GeneralExport\WriteLinkTextToFmXrefs to 1
To disable all cross-reference processingIf you want to manage all cross-reference processing through read/write rules or XSLT transformations, make the following modifications to the ditafmx.ini file:
• Set GeneralExport\XrefProcessing to 0
• Set GeneralExport\CrossRefToXref to 0
• Set GeneralExport\DitaXrefElem to ““ (nothing)
• Set GeneralExport\DitaLinkElem to ““ (nothing)
Creating Element Templates
Provides a method to add predefined structure and content to new files.
An element template is an FM binary file that contains structural and textual content that is inserted into a new topic when it is created. You can have many different element templates for each topic type. Available element templates may be selected in the New DITA File dialog.
By default, element templates are stored in the folder that contains the structure application template file. You can specify another folder (local or network loca-tion) to store these files in the New File Options dialog which is available from the New DITA File dialog or the Options dialog.
Element template files must follow a strict naming convention in order to appear in the list in the New DITA File dialog. The file name pattern is “new~<topictype>~<template name>.fm”. That is “new” followed by a tilde followed by the topic or map element type (such as “topic”, “concept”, “task” etc.), followed by a tilde, followed by the name that you want to appear in the list, with an “.fm” file extension.
To create an element template just create a new DITA file and insert the elements and content that you want in the template, then save this file to a binary FM file into the specified element template folder. Note that when the
43

INSTALLATION AND SETUPADVANCED INSTALLATION ISSUES
new file is created using your template, the text of the title element will be replaced with the text entered in the New DITA File dialog, and the ID attribute of the root topic will be replaced with a new unique ID (assuming that the “auto-add IDs” option is enabled in Options).
Sample topic and task element templates are provided in the DITA-FMx Topic application folder.
Switching Between DITA-FMx and FM8-DITA
If needed, you can easily switch between DITA-FMx and the built-in FM8 DITA support.
For testing purposes, you may want to alternate between DITA-FMx and the built-in FrameMaker 8 DITA support. Fundamentally, this is very simple to do, and if you do this frequently, there are things you can do to make it even easier.
All that is required to switch between these two DITA plugins is to update the maker.ini file. When you installed DITA-FMx, you should have commented out the lines that initialize the default DITA support. To enable the default support and disable DITA-FMx, just uncomment the “ditafm” lines and comment out the “ditafmx” lines. Then to switch back to DITA-FMx just do the reverse. Of course, each time you modify the maker.ini file you’ll ned to restart FrameMaker to initialize the alternate plugin.
IMPORTANT: Before modifying the maker.ini file you should make a backup and keep it in a safe place.
You may want to set up the maker.ini file so it’s easy to make this change. Just move the lines to the end of the APIClients section and add some comments to look like this (note that the FM8 DITA lines have been modified slightly):
; Default FM8-DITA ;ditafm=Standard, FM8-DITA, fminit\ditafm.dll, structured ;ditafm_app=Standard, FM8-DITA, fminit\ditafm_app.dll, structured ;ditabook=Standard, FM8-DITA, fminit\ditabook.dll, structured ;ditaOpenToolkit=Standard, FM8-DITAOT, fminit\openToolkit.dll, structured ; DITA-FMx ditafmx=Standard, ditafmx, DITA-FMx\ditafmx_80.dll, structured ditafmx_app=Standard, ditafmx_app, DITA-FMx\ditafmx_80_app.dll, structured ditafmx_book=Standard, ditafmx_book, DITA-FMx\ditafmx_80_book.dll, structured
This way you can easily add or remove the semicolon to comment or uncom-ment the appropriate lines.
44

INSTALLATION AND SETUPADVANCED INSTALLATION ISSUES
One additional step that will streamline this process is to change the FM8 DITA entry for “ditafm_app” to “ditafmx_app,” then make the same change in the structure application definitions file (change “ditafm_app” to “ditafmx_app” in the UseApiClient entries). This won’t change the functionality of the FM8 DITA import/export client, it just means that you can use the same structure application for both plugins and you won’t have to edit the structapps file each time you switch. If you call them both “ditafmx_app,” then when you install an update of DITA-FMx, it will be an easier installation.
Leximation provides a plugin called IniSwitcher that modifies specified lines in an INI file from a command within FrameMaker. This plugin was specifically developed to make it easy to switch between the DITA authoring plugins. If you are interested in using this plugin, check www.leximation.com/tools or contact Leximation for more information.
INI-Only Settings
Describes the settings that must be applied manually in the ditafmx.ini file.
The default values for these parameters should be sufficient for most people, but there are reasons that you may want to change the default behavior. The following settings must be changed manually in the ditafmx.ini file.
INIOnly sectionLastReferencedElement - Record of the last element tag selected in the Reference Manager to allow access to last referenced elements.ForceTablesWide - If set to 1, tables are forced to fill the text column (or page if the pgwide attribute is set to 1). This overcomes a limitation where under certain circumstances tables are not rendered full width in Book builds. If your EDD already handles “pgwide” tables, you may need to disable this functionality by setting ForceTablesWide to 0.StructappsFile - If set, this file is used as the structapps definition file. In order for this to function properly you must also have set the Directo-ries/StructureDir parameter in the maker.ini file.XrefElements - A vertical-bar delimited list of element names that defines the elements that are valid as xref or link targets. For example, setting XrefElements to the following string limits the xref targets to the elements specified:
• XrefElements=topic|concept|task|reference|section|dt
DitaFMxGuide - Specifies the name of the DITA-FMx User Guide Help file (relative to the DITA-FMx folder).DitaHelpKeys - Specifies the shortcut keystrokes to launch context-help for DITA authoring (this runs the “DitaReference” Help file).
45
INSTALLATION AND SETUPADVANCED INSTALLATION ISSUES
DitaReference - Specifies the name of the DITA Reference Help file (rela-tive to the DITA-FMx folder).DitaRefTargetType - Specifies the file extension of target topics in the “DitaReference” Help file for context sensitive Help.MapFromOutlineTemplate - Specifies the “Map from Outline” template file used as the template for the New ‘Map from Outline’ Template command. The default value for this parameter is “$STRUCTDIR\xml\DITA-FMx\map-from-outline_template.fm”.
INIOnly section (for use with the Set Attributes command)SetAttrIgnore - Specifies the attributes to ignore (and not display) in the dialog. This is a vertical bar delimited string. By default this is set to the following values, you can change these values as needed.xtrc|xtrf|xmlns|class|xmlns:ditaarch|ditaarch:DITAArchVersion|domains
SetAttrStrings - Specifies an INI file that defines additional “default” values for the indicated “Strings” attributes (the default value of this parameter is FilterGroups.ini). These default values are organized into named groups which can be associated with a specific file system path. All topic files that fall within the specified root path are mapped to that group. Each group lists one or more attributes and a vertical bar delimited list of default values for that attribute. This lets you provide alternate filtering options for different projects that use the same structure application without modifying the EDD.Unless the value of the SetAttrStrings parameter specifies an absolute path and file name, it is relative to the FrameMaker\DITA-FMx folder. If you use a SetAttrStrings file, no default values need be set in the EDD at all. This adds flexibility to the EDD not otherwise obtainable. For more infor-mation and details, see Set Attributes.SetAttrStringsDefault - Specifies the “default” value that is ignored when displaying the list of defaults.
NOTE: This INI parameter is for very specialized and atypical use. Unless you are doing special FDK processing using attributes of type “Strings” you can safely ignore the following information.
When you specify default values to a Strings attribute in the EDD, the first default may be used as the actual default for certain types of processing. If you want to specify a special value as the first default so that your processing can match on it and ignore the value, enter that string as the value for the SetAttrStringsDefault parameter. A likely value is the dot (“.”) character, but you can specify any value that makes sense for your processing. If you specify this value, it will be ignored and excluded from the options displayed in the Set Attribute dialog.
46

INSTALLATION AND SETUPADVANCED INSTALLATION ISSUES
If you do not have processing that cares about the initial default value of a Strings attribute, you can ignore this parameter.
GeneralImport sectionIndextermProcessing - If set to 1, enables conversion of indexterm elements to proper format required by FrameMaker.TableProcessing - If set to 1, enables the counting of table columns for proper import of simpletable and other table types into FrameMaker.UseLanguageTemplate - If set to 1, enables the use of language-specific template files. When opening a DITA XML file, if the “topic”/@xml:lang attribute specifies a value, the plugin checks for a language template in the same folder as the default template. The language template must be named “<templatename>.<langval>.fm” (the “.fm” extension is optional, but if the default template includes the extension, the language template must also. For example, if your default template is topic.template.fm, a Japanese language template would be named topic.template.ja-jp.fm (assuming that “ja-jp” was the value in the xml:lang attribute).
GeneralExport sectionIndextermProcessing - If set to 1, enables conversion of indexterm elements from the format required by FrameMaker back to one required by DITA.XrefProcessing - If set to 1, enables processing and conversion of xrefs and links.CrossRefToXref - If set to 1, enables the conversion of FM-based cross-references to DITA-based xrefs and links.DitaXrefElem - Defines the element name to use when mapping FM-based cross-refs to DITA xrefs on file export (only used if GeneralEx-port/CrossRefToXref is enabled).DitaLinkElem - Defines the element name to use when mapping FM-based cross-refs to DITA links on file export (only used if GeneralEx-port/CrossRefToXref is enabled).IgnoreElemPrefix - If you use elements in FrameMaker that do not exist in the DITA DTDs, you should make sure they all have the same prefix (“fm-” for example). This INI setting specifies that prefix. This is required for proper generation of conrefs on export, and should be used in conjunction with any read/write rules that may be needed.
TableImport sectionSetColumnsProp - If set to 1, enables the automatic assignment of the “columns” property.SetColumnWidthsProp - If set to 1, enables the automatic assignment of the “column width” property.
47

INSTALLATION AND SETUPADVANCED INSTALLATION ISSUES
CustomTableCount and N - Specifies the number of instances of simplet-able elements that have been specialized that need to be automatically analyzed for their column number. The Count value should match the number of N values. Each N value should have the following format: “<table-element>|<row-element>|<cell-element>”.
BuildFile sectionAntCommand - Specifies the command or path/command used to run Ant. The default is “ant”, but if you need to specify another executable or if you need to include the path, change this value. This value is used for both Generate Output options, Current File and Selected Target.EnvironmentSetup - Specifies a batch file to run before the Ant script in order to set up any needed environment variables.AntScript - Specifies the filename of the Ant script that is run for the Generate Output: Current File option. The default is “ditafmx-ant.xml”, but if you need to specify another filename, change this value. This file-name is assumed to be relative to the path specified by the DitaDir param-eter.Count and N - Specifies the number of build options available in the AntScript file (and thus displayed in the Generate Output: Current File output option). If you modify the targets in that script, be sure to update the Count value and add/remove the related N value.
AntBuild sectionCount and N - Specifies the number of “ANT:” sections which define the available build options displayed in the Generate Output: Selected Target output option. For each “ANT:” section added, you must update the Count value and add/remove the related N value. The value of each N parameter must exactly match the text following the “ANT:” section name.
ANT:build name sectionBuildFile - Specifies path and filename of the associated Ant script (use double backslashes as the directory delimiter).EnvironmentSetup - Specifies a batch file to run before the Ant script in order to set up any needed environment variables.Target - Specifies target within the BuildFile.OutputDir - Specifies the path to the output directory (use double back-slashes as the directory delimiter).Logfile - Specifies the path and filename to the log file (use double back-slashes as the directory delimiter).
DitavalFiles sectionEach parameter and value in this section define a “friendly name” and path/filename for a ditaval file. These ditaval files must be created manu-
48

INSTALLATION AND SETUPUNINSTALLING DITA-FMX
ally and added manually to the INI file in order to be recognized by the Generate Output command and the Apply Ditaval as Conditions command.
Uninstalling DITA-FMx
There is no Uninstall application provided with DITA-FMx. Because most of the installation is done manually, it would be misleading and possibly harmful to provide an uninstaller.
To remove DITA-FMx, just delete the DITA-FMx folder and remove the “ditafmx” lines from the APIClients section of the maker.ini file. If you just want to disable DITA-FMx, you can comment out the “ditafmx” lines by adding a semicolon at the beginning of each line.
If you’re using FrameMaker 8 and want to reinstall the default DITA support, just uncomment the lines in the maker.ini file that you commented out when installing DITA-FMx. If you deleted those lines, just add the following lines to the APIClients section of the maker.ini file:
ditafm=Standard, Translation client for DITA, fminit\ditafm.dll, structured ditafmx_app=Standard, Translation client for DITA, fminit\ditafm_app.dll, structured ditabook=Standard, Translation client for DITA, fminit\ditabook.dll, structured
49

INSTALLATION AND SETUPUNINSTALLING DITA-FMX
50

3
DITA-FMx CommandsDescribes the commands and functionality available in DITA-FMx.
New DITA File
Creates a new empty DITA map or topic file.
There are two groups of items on the DITA-FMx > New DITA File menu. Items above the divider create a new map file and items below the divider create a new topic file. The number and label text of these items will vary depending on the map and topic structure applications you have selected in the Options dialog. The map items are those elements with a class attribute value of “map/map” and the topic items are elements those with a class attribute value of “topic/topic.”
At the bottom of the “map” area is the command New ‘Map from Outline’ Template. This command creates a new FM file using the “Map from Outline” file as the template. By default, this template is named map-from-outline_template.fm and is in the root of the DITA-FMx structure application folder ($STRUCTDIR\xml\DITA-FMx\). You can specify an alter-nate template file by changing the MapFromOutlineTemplate parameter in the INIOnly section of the ditafmx.ini file. For more information, see Build Map from Outline and INI-Only Settings.
51
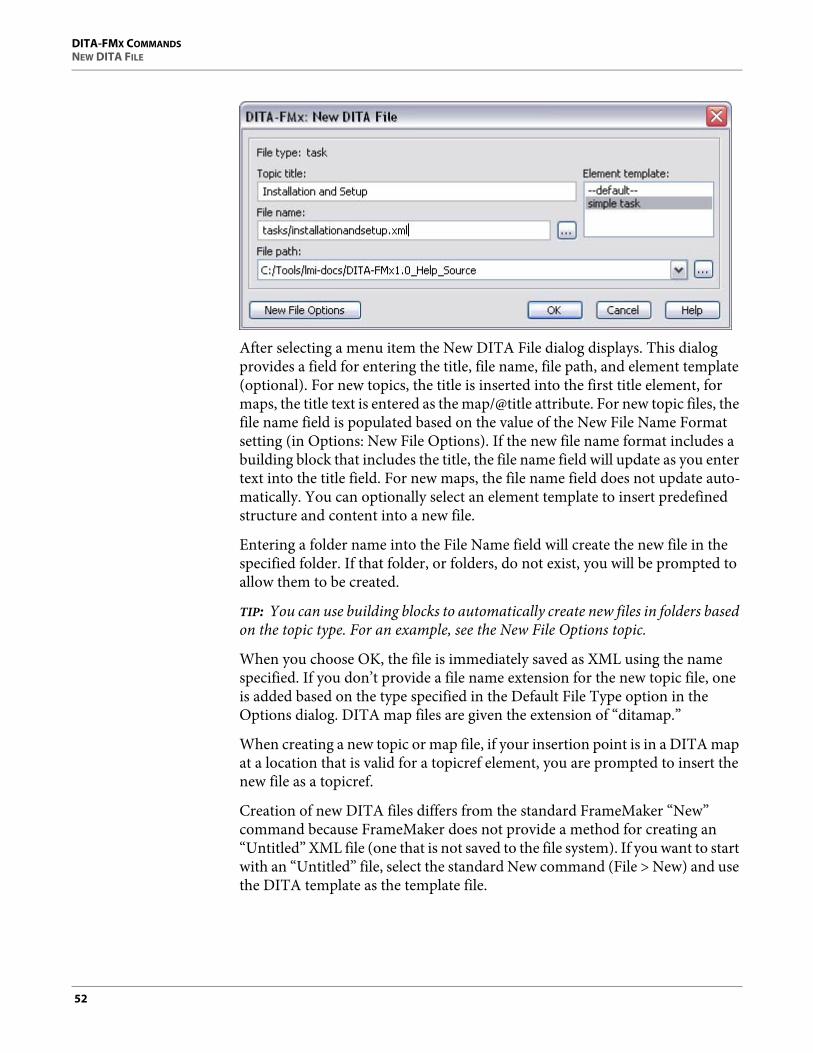
DITA-FMX COMMANDSNEW DITA FILE
After selecting a menu item the New DITA File dialog displays. This dialog provides a field for entering the title, file name, file path, and element template (optional). For new topics, the title is inserted into the first title element, for maps, the title text is entered as the map/@title attribute. For new topic files, the file name field is populated based on the value of the New File Name Format setting (in Options: New File Options). If the new file name format includes a building block that includes the title, the file name field will update as you enter text into the title field. For new maps, the file name field does not update auto-matically. You can optionally select an element template to insert predefined structure and content into a new file.
Entering a folder name into the File Name field will create the new file in the specified folder. If that folder, or folders, do not exist, you will be prompted to allow them to be created.
TIP: You can use building blocks to automatically create new files in folders based on the topic type. For an example, see the New File Options topic.
When you choose OK, the file is immediately saved as XML using the name specified. If you don’t provide a file name extension for the new topic file, one is added based on the type specified in the Default File Type option in the Options dialog. DITA map files are given the extension of “ditamap.”
When creating a new topic or map file, if your insertion point is in a DITA map at a location that is valid for a topicref element, you are prompted to insert the new file as a topicref.
Creation of new DITA files differs from the standard FrameMaker “New” command because FrameMaker does not provide a method for creating an “Untitled” XML file (one that is not saved to the file system). If you want to start with an “Untitled” file, select the standard New command (File > New) and use the DITA template as the template file.
52
DITA-FMX COMMANDSBUILD MAP FROM OUTLINE
Build Map from Outline
Generates a DITA map and stub files from a simple FrameMaker document or text file.
This command builds a DITA map and associated DITA topic files based on the title text in paragraphs in a FrameMaker document (a binary FM file, not an XML file) or a text file opened in FrameMaker. The topic type for each topicref is defined by the paragraph tag name, and the nesting level is defined by the number of tabs that indent each paragraph. You can optionally provide an “element template” to define the initial structure for each new topic file.
A “map from outline” template file is provided in the Structure\xml\DITA-FMx folder. This file provides the paragraph tags for the basic topic types, but you can add your own tags for any specialized topic types that are needed. Any para-graph tags that start with an underscore are ignored when creating topicrefs. The new DITA map file is named based on the FM file’s name and all files are created relative to the FM file.
The paragraph tag named “_map-title” defines the text that will be used for the map/@title attribute (the map’s title). The paragraph tags “topic,” “concept,” “task,” and “reference” are used to define a topicref of the specified type. To specify an element template, include the name of the template after the topic title in angle brackets. For example, in the following paragraphs the first one is tagged with the “concept” style and the second is tagged with the “task” style. When converted into a map, it would create two topics, the first being a concept that used no element template, and the second a task that used the element template named “new~task~basic-task.fm”.
Linear Objects Drawing Lines <basic-task>
The file names of the generated topic files are defined by the New File Name Format in the DITA-FMx Options dialog. This may mean that the filenames are title-based or they could be based on the topic’s unique ID, the date/time, or other values. You can also use that format to create the new files in topic-based folders.
If the text of the paragraph is a DITA file name (must end with “.xml”, “.dita”, or “.ditamap” and have no spaces), that file name will be used for the href attri-bute value. If the paragraph tag is named “Body” it will assume the “topic” type. This allows you to open a text file that is a listing of files, and quickly generate a DITA map from that list.
53

DITA-FMX COMMANDSBUILD WORKBOOK FROM MAP
Build WorkBook from Map
Generates a FrameMaker book that contains all of the XML files referenced by a DITA map.
A “WorkBook” is a FrameMaker book that contains all of the XML files refer-enced by a DITA map and any sub-maps. This book is used for book-wide processing using FrameMaker’s built-in commands; it is not intended to be used for publishing or output generation. Use the Open All XML Files in Book command to open the XML files before using a book-wide processing command.
Open All XML Files in Book
Opens all XML files in a “WorkBook” to facilitate the use of book-wide actions.
This command is only available when a FrameMaker book has the focus. In order to take advantage of FrameMaker’s book-wide processing commands (such as spell checking and search), XML files must be opened before running the command (FrameMaker will not automatically open XML files as it does with binary FM files).
This command provides the option to open and resolve references in the XML files or just open the files without resolving references. Opening without resolving references may be preferable under certain circumstances, but you may be warned of invalid spelling errors due to the extra spaces left when an xref or conref doesn’t resolve.
Prepare Variables
Saves variable names to attribute values so they can be rebuilt after the map to book conversion.
FrameMaker variables are saved to XML as entities, and will round-trip fine in and out of Frame (as long as they are named properly). However, any variables that are processed by the Generate Book from Map command are flattened (converted to text) because entities do not survive XSLT processing. This command was developed as a way to work around this limitation.
Before running the Generate Book from Map command, run the Prepare Variables command on all files that contain FrameMaker variables. This wraps
54

DITA-FMX COMMANDSREBUILD VARIABLES
each variable in a ph element and assigns the variable name to the keyref attri-bute using the format “fmvar:VARNAME” (where VARNAME is the name of the variable). After conversion to a book and chapter files, you can run the Rebuild Variables command to rebuild live variables from the data stored in the ph elements.
You can run the Prepare Variables command individually on each DITA file, or you can use the Build Workbook from Map command to create a “work-book” from which you can process all of the files at once. Before running the Prepare Variables command on the workbook, you must first open all of the files with the Open All XML Files in Book command.
It is fine to run this command multiple times on the same files or variables, so you may just want to run the command after entering a variable or before saving a file.
If you use the Prepare Variables command and feel inclined to set attributes on the ph elements that wrap the variables .. don’t do it. The ph wrappers are temporary and are deleted each time the command is run. If you want to apply filtering or other attributes to variables, wrap them in a ph element and apply the attributes on that element.
Rebuild Variables
Rebuilds variables after conversion to a FrameMaker book.
In order to resurrect variables that have been flattened to text by the map to book conversion process, they must have been first processed with the Prepare Variables command. The Rebuild Variables command locates all ph elements with a keyref attribute value that matches the pattern of “fmvar:VARNAME”, and replaces the content of the ph element with the variable. The variable will added, only if a matching variable definition is found in the file. Because of this you may need to import the variable definitions into the file before running the Rebuild Variables command.
Xref to Hyperlink
Builds FrameMaker Hyperlinks at each xref or link element, to enable live hyperlinks in generated PDF files.
55

DITA-FMX COMMANDSDITAVAL MANAGER
By default, only fm-xref or fm-link elements become “live” hyperlinks in a PDF generated from FrameMaker (as opposed to a PDF generated through the DITA-OT). Run the Xref to Hyperlink command on an FM file or book to build hyperlinks from each xref or link element. This command only processes “internal” xref and link elements (those where the scope attribute is set to some-thing other than “external”). To ensure that external xrefs or links become live hyperlinks, you must enable the Add Hypertext Marker to External Xrefs option in the Options dialog before generating the FM file or book.
This command should be run only on generated FM files, not the source XML files. Running this command on XML files results in the Hypertext markers being saved to the XML as processing instructions and needlessly clutters the files.
Ditaval Manager
Create and edit ditaval files, and manage the list of ditaval files available to DITA-FMx.
DITA-FMx provides two commands (“Generate Output” and “Apply Ditaval as Conditions”) which let you select from a list of ditaval files that are available to DITA-FMx. The Ditaval Manager lets you add and remove files from this list. Each ditaval file has an associated name that is displayed in the lists. By default, this name is the ditaval file name, but can be changed if needed.
56

DITA-FMX COMMANDSDITAVAL MANAGER
If you have existing ditaval files that you want to use with DITA-FMx, choose the Add button and select the file. Once it has been added to the list in the Ditaval Manager dialog, this file will be available to the other commands that make use of ditaval files. Use the Rename button to change the name that is shown in the list (this does not change the actual ditaval file name). The Remove button will remove a name from the list and can optionally delete the file as well. You can also use the Add button to create a new ditaval file and add it to the list.
The contents of the currently selected ditaval file displays in the Ditaval File Entries list in the dialog. Selecting a “prop” element makes the attributes of that element available for editing. Only prop elements can be edited through this dialog, but all elements (as well as comments) will be shown in the list. After selecting a prop element, change the values of the att and val attributes as needed, then choose the Save To File button to write your changes back to the ditaval file.
Use the Add <prop> button to add a new empty prop element to the file, and the Update <prop> button to update the attribute values of the selected entry in the list based on the values in the text boxes. The Delete Entry button deletes the currently selected entry.
The following code shows a simple ditaval file. Each prop element has three attributes. The att and val attributes specify the filtering attribute and its value to match on. Valid values for the action attribute are “exclude” and “flag.” This file specifies two filtering schemes, the first excludes all elements whose audi-
57

DITA-FMX COMMANDSAPPLY DITAVAL AS CONDITIONS
ence attribute has the value of “admin” and the second excludes all elements whose product attribute has the value of “PROD1.”
<?xml version="1.0" encoding="UTF-8"?> <val> <prop att="audience" val="admin" action="exclude"/> <prop att="product" val="PROD1" action="exclude"/> </val>
Apply Ditaval as Conditions
Applies conditions to files based on the filtering properties defined in a ditaval file.
The Apply Ditaval as Conditions command can be used while authoring and for setting up PDFs that are generated through FrameMaker. If the command is run with a file active, the conditions will be applied to that file. If a book is active, the conditions will be applied to all files in that book.
58

DITA-FMX COMMANDSAPPLY DITAVAL AS CONDITIONS
In order to use this command you must have at least one ditaval file registered with DITA-FMx. A ditaval file is “registered” with DITA-FMx when you use the Ditaval Manager to create new ditaval files or add existing ditaval files to the drop-down list. When you run the Apply Ditaval as Conditions command, the dialog box lists the available ditaval files (those that have been registered), and the options for the ditaval action values (“exclude”, “include” and “flag”). The settings in the three “action=” areas define the condition name and the visibility of the conditions that are applied when a prop action attribute matches the spec-ified type.
For each prop element in a ditaval file the action attribute specifies either to exclude, include, or flag elements with matching attributes and values. When a ditaval file is applied as conditions in a FrameMaker file, elements are matched based on the att and val attributes, and a named condition is applied to each element. In the Apply Conditions dialog you specify that the condition name is defined as a fixed string (such as “Exclude”, “Include” or “Flag”) or that it is defined based on a combination of the att and val attribute values. For example, given the following line from a ditaval file, if the condition name is defined by the att and val attributes, it would be “audience=admin.”
<prop att="audience" val="admin" action="exclude" />
The condition visibility options are Show, Hide, and Default. If set to Show or Hide, the conditions will be shown or hidden accordingly. However, if Default is selected, the condition visibility will be defined by the settings in the template assuming that the condition is already defined.
Using the Apply Ditaval as Conditions Command
PREREQUISITE
The ditaval file must be registered with DITA-FMx. To create a new ditaval file or register an existing ditaval file, use the Ditaval Manager.
TASK
1. Open the document or book to apply the condtions.
2. Run the DITA-FMx > Apply Ditaval as Conditions command.
3. In the Apply Conditions dialog, select the ditaval file to use from the list box.
4. For each “action” type defined in the ditaval file, set up the options in the appropriate “action=” section.ADDITIONAL INFORMATION: For example, if your ditaval file contains two prop elements where each action attribute is set to “exclude”, you need to decide if the condition to apply to the matching elements should be a specific name (one name for all “excluded” elements) or if you want it to apply a unique
59
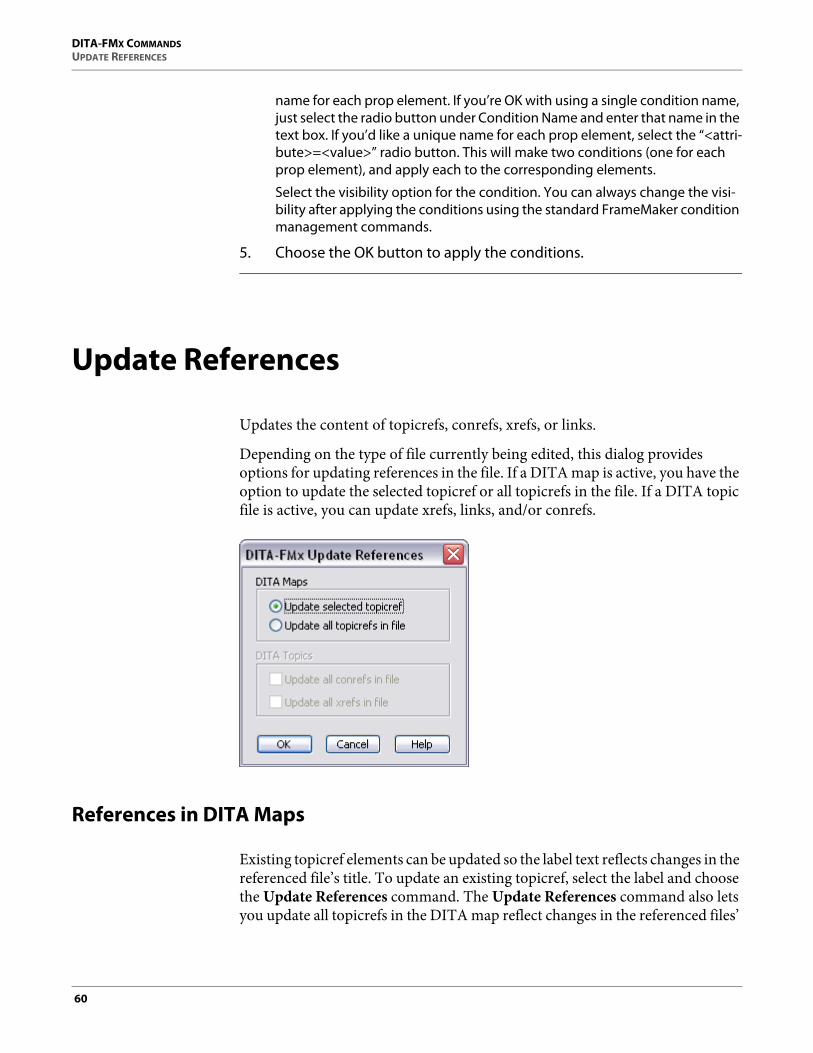
DITA-FMX COMMANDSUPDATE REFERENCES
name for each prop element. If you’re OK with using a single condition name, just select the radio button under Condition Name and enter that name in the text box. If you’d like a unique name for each prop element, select the “<attri-bute>=<value>” radio button. This will make two conditions (one for each prop element), and apply each to the corresponding elements.
Select the visibility option for the condition. You can always change the visi-bility after applying the conditions using the standard FrameMaker condition management commands.
5. Choose the OK button to apply the conditions.
Update References
Updates the content of topicrefs, conrefs, xrefs, or links.
Depending on the type of file currently being edited, this dialog provides options for updating references in the file. If a DITA map is active, you have the option to update the selected topicref or all topicrefs in the file. If a DITA topic file is active, you can update xrefs, links, and/or conrefs.
References in DITA Maps
Existing topicref elements can be updated so the label text reflects changes in the referenced file’s title. To update an existing topicref, select the label and choose the Update References command. The Update References command also lets you update all topicrefs in the DITA map reflect changes in the referenced files’
60

DITA-FMX COMMANDSSEARCH IN FILES
titles. This command honors the setting of the topicref’s locktitle attribute; if locktitle is set to ‘yes’ the navtitle text is not updated.
Update Selected TopicrefUpdates the content of the selected topicref (only if a topicref is selected).
Update All Topicrefs in FileUpdates all of the topicrefs in the current file to reflect any changes to titles in referenced files.
References in DITA Topics
Update All Conrefs in FileUpdates all of the conrefs in the current file to reflect any changes to the source content.
Update All Xrefs in FileUpdates all of the xrefs and links in the current file to reflect any changes to titles in referenced files.
Search in Files
Search for content in files on your file system.
Specify search criteria of the following: textual content, element tag name, or attribute name and attribute value. If a DITA map has the focus, you can choose “current map” as the scope, or you can specify a file system path.
61

DITA-FMX COMMANDSWHERE USED
The “Search For” value matches on partial strings (case sensitivity as specified). When searching for an element tag and/or an attribute name, the results will only provide exact matches. Providing an attribute value can optionally match on partial strings, which is useful for locating individual items within a filtering attribute. You can search on the element tag or attribute name only, but if you enter an attribute value, you must also enter the attribute name.
The search results are listed in the dialog showing the topic title and the file name. Select a file and choose Open to open the file.
If the search is taking too long, pressing the Esc key (possibly multiple times) will terminate the search.
Where Used
Generates a report of all references to an element or topic.
Before modifying a topic or referenced element (an element used as a conref), it may be useful to know all of the files that reference that topic or element.
62
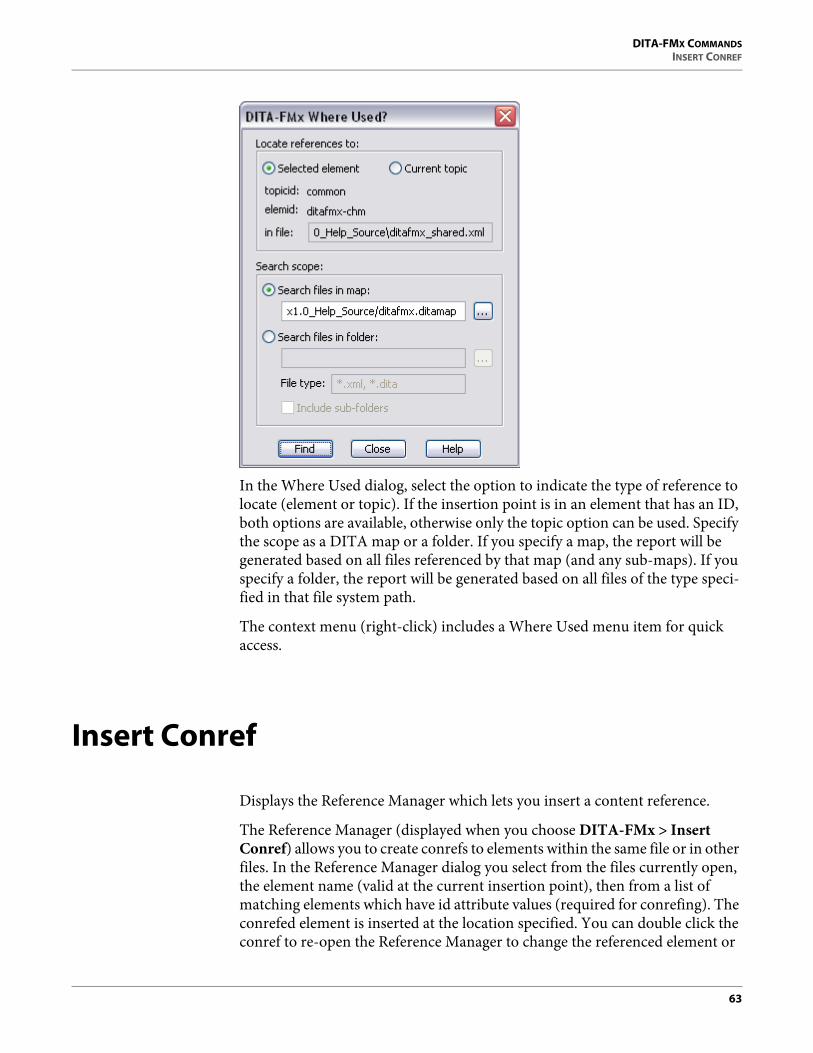
DITA-FMX COMMANDSINSERT CONREF
In the Where Used dialog, select the option to indicate the type of reference to locate (element or topic). If the insertion point is in an element that has an ID, both options are available, otherwise only the topic option can be used. Specify the scope as a DITA map or a folder. If you specify a map, the report will be generated based on all files referenced by that map (and any sub-maps). If you specify a folder, the report will be generated based on all files of the type speci-fied in that file system path.
The context menu (right-click) includes a Where Used menu item for quick access.
Insert Conref
Displays the Reference Manager which lets you insert a content reference.
The Reference Manager (displayed when you choose DITA-FMx > Insert Conref) allows you to create conrefs to elements within the same file or in other files. In the Reference Manager dialog you select from the files currently open, the element name (valid at the current insertion point), then from a list of matching elements which have id attribute values (required for conrefing). The conrefed element is inserted at the location specified. You can double click the conref to re-open the Reference Manager to change the referenced element or
63

DITA-FMX COMMANDSASSIGN ID TO ELEMENT
edit the source file. The Reference Manager also lets you display the list of all elements for conrefing (even if they have no id value), you must provide the id value at insertion time.
On the opening of a file, the content of any conrefed element is resolved and displayed as a locked text range (similar to a text inset). The color of conrefs is defined by the “DITA-Conref” color (this is a custom color definition and can be changed in the template). The auto-loading functionality may be enabled/disabled with the Options command.
The Update References command provides an option to load and build the conref elements (if they were not initially loaded by the auto-load functionality), and update the conrefs to reflect changes in the source files.
If you want to “break” a conref (make it into editable text rather than a locked range), just delete the value of the conref attribute, then double-click the conref. You’ll get the Text Inset Properties dialog with a Convert to Text button. Choose the Convert to Text button then the Convert button in the next dialog. This completely severs the connection to the source file.
Assign ID to Element
Assigns a generated ID to the selected element.
64
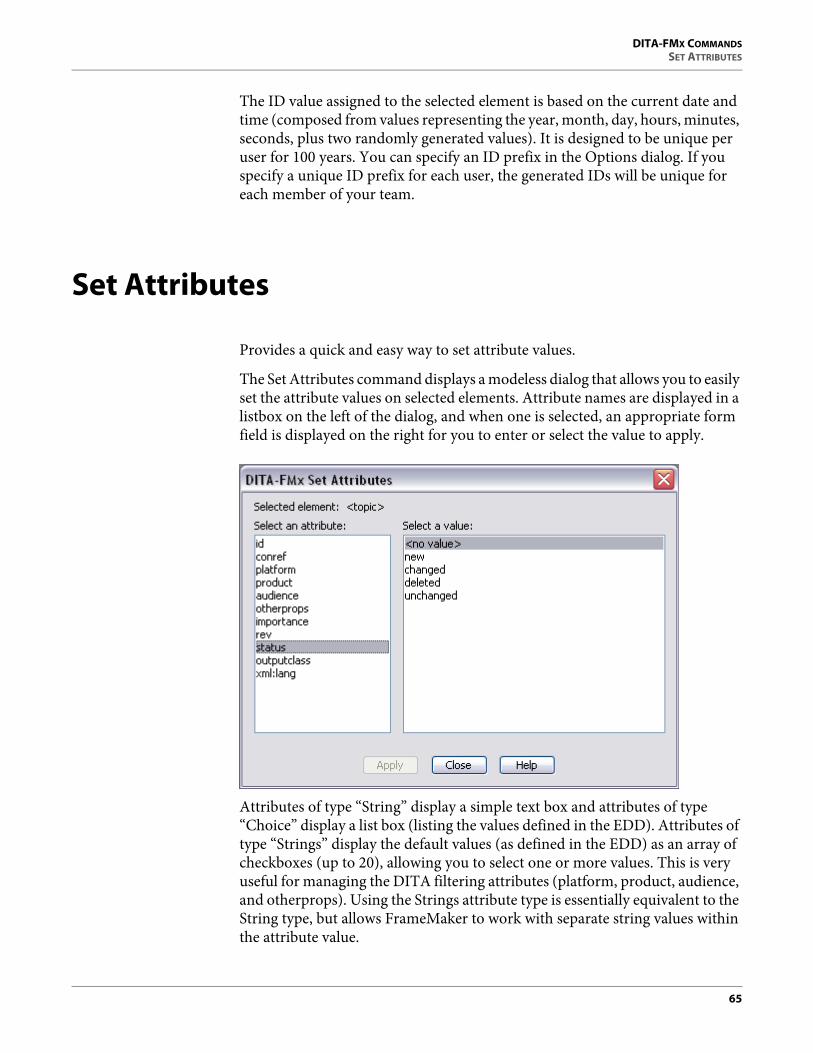
DITA-FMX COMMANDSSET ATTRIBUTES
The ID value assigned to the selected element is based on the current date and time (composed from values representing the year, month, day, hours, minutes, seconds, plus two randomly generated values). It is designed to be unique per user for 100 years. You can specify an ID prefix in the Options dialog. If you specify a unique ID prefix for each user, the generated IDs will be unique for each member of your team.
Set Attributes
Provides a quick and easy way to set attribute values.
The Set Attributes command displays a modeless dialog that allows you to easily set the attribute values on selected elements. Attribute names are displayed in a listbox on the left of the dialog, and when one is selected, an appropriate form field is displayed on the right for you to enter or select the value to apply.
Attributes of type “String” display a simple text box and attributes of type “Choice” display a list box (listing the values defined in the EDD). Attributes of type “Strings” display the default values (as defined in the EDD) as an array of checkboxes (up to 20), allowing you to select one or more values. This is very useful for managing the DITA filtering attributes (platform, product, audience, and otherprops). Using the Strings attribute type is essentially equivalent to the String type, but allows FrameMaker to work with separate string values within the attribute value.
65

DITA-FMX COMMANDSSET ATTRIBUTES
Because the dialog is modeless, you can leave it open and whenever desired, select an element and apply new attribute values. In addition to the main DITA-FMx menu, the Set Attributes command is available from the context (right-click) menus.
If you’d like to be able to select from different “Strings” options for different projects, a mechanism is provided that lets you associate a filtering group name with a file system path. When editing a DITA file that is within the specified path, the values associated with that group are displayed with those defined in the EDD. These groups and their associated attribute names and possible values are defined in an INI file named (by default) FilterGroups.ini that is created in the FrameMaker\DITA-FMx folder.
The following sample filtering groups file defines two groups named ProductA and ProductB. When you edit a DITA file that is in the path specified by group ProductA, selecting the product attribute will offer the three products listed (in addition to any already defined in the EDD) as options. Likewise, selecting audi-ence or platform will offer those items as options.
[General] ProductA=C:\projects\product-a ProductB=C:\projects\product-b [ProductA] product=ProdALite|ProdAFull|ProdASimple audience=Novice|Expert|Admin platform=Windows|Mac|Linux [ProductB] product=ProdBLite|ProdBFull audience=User|Developer|Admin platform=Windows|Mac|Linux|Solaris
66

DITA-FMX COMMANDSSET ATTRIBUTES
There are three “INI-Only” parameters that can be used to enhance the func-tionality of this command. In particular, you can specify an alternate location and name for the filtering groups file (possibly for use by a team on a network). To modify these settings, you must manually edit the ditafmx.ini file and update (or add) these values to the INIOnly section. For more information see INI-Only Settings.
Setting Up Filtering Groups
PREREQUISITE
Before you can make use of filtering groups, your EDD must be set up to use the “Strings” attribute type for the attributes that you want to use with a filtering group. You can optionally add “default” values to the attribute definitions in the EDD, but that is not required (and may not be desirable). At a minimum, just change the “String” type to “Strings” and you should be all set.
The default DITA-FMx Topic and Map templates use the Strings type for all instances of the platform, product, audience, and otherprops attributes.
The following task creates two filtering groups named “ProductA” and “ProductB” and sets up unique values for each group that are available to apply
67

DITA-FMX COMMANDSDITA OPTIONS
to the attributes specified. Feel free to change the names and file paths to match those on your system.
TASK
1. Using a text editor such as Notepad, create a file named filtergroups.ini in the FrameMaker\DITA-FMx folder.
2. Create a “General” section that defines the group names and the asso-ciated root paths, then create a section for each group that defines the attribute names and available values.
[General] ProductA=C:\projects\product-a ProductB=C:\projects\product-b [ProductA] product=ProdALite|ProdAFull|ProdASimple audience=Novice|Expert|Admin platform=Windows|Mac|Linux otherprops=001|002|003|004|005|006 [ProductB] product=ProdBLite|ProdBFull audience=User|Developer|Admin platform=Windows|Mac|Linux|Solaris
3. Save this file.
AFTER COMPLETING THIS TASK:
In FrameMaker, when you open a file in Product A (somewhere below the path C:\projects\product-a), when you run the Set Attributes command, and select one of the filtering attributes from the list, you will be able to select one or more of the values specified in the INI file.
DITA Options
Specify options that define the functionality of DITA-FMx.
The Options dialog provides access to the frequently modified properties and settings. Other settings can be changed manually in the ditafmx.ini file, see the INI-Only Settings topic for details.
68

DITA-FMX COMMANDSDITA OPTIONS
DITA Topic ApplicationThe name of the Topic structure application used when a DITA topic file is opened by the plugin (such as when you reference a topic from a topic or a map).
DITA Map ApplicationThe name of the Map structure application used when a DITA map is opened by the plugin (such as when you reference a map from another map).
DITA Book ApplicationThe name of the Book structure application used by the Generate Book from Map command.
Default ID PrefixThe string that is used as a prefix on IDs that are automatically generated.
Default “New” TypeSpecifies the file extension applied to new topic files when one is not provided as part of the file name.
69

DITA-FMX COMMANDSDITA OPTIONS
DITA-OT DirectorySpecifies the root directory of the DITA-Open Toolkit to be used by the Generate Output command. If you don’t make use of the DITA-OT, you may leave this field empty.
Wrap New Topics in DITA ElementWhen a new topic file is created (using the New DITA File command), the new file is created with a dita element at its root. If you plan to include multiple topics in a single file, that file must have dita as the root element.
Auto-Add IDs if Required by ElementWhen an element is inserted that has a required ID attribute, that attribute value is automatically added.
Add Hypertext Marker to External XrefsOn file open or on insertion of an external xref (one that has the scope attribute set to “external”), a FrameMaker Hypertext marker is added so that this element is hyperlinked when a PDF is generated through FrameMaker.
Auto Smart-SpacesTurns the FrameMaker Smart Space feature on and off as the insertion point is moved into and out of a preformatted element.
Apply DITA-Conref Color to ConrefsSpecifies that coloring is applied to conrefs in Topic and/or Book files. If selected, the color “DITA-Conref” is applied to conrefs. This color should be defined in the template as a custom color. If this custom color is not defined and the option is selected, this color will be created and assigned the color Blue.
Max Reference LevelsSpecifies the number of nested files that are opened due to the auto-loading of references (xref or conref). If your files never have refer-ences within references (such as an xref within a conref), then you should set this to a value of “1.” If your files do make use of nested references, set this value equal to the maximum number of reference levels that exist. The greater the number the longer it may take to open files since all references in all opened files will resolve (unless limited by this option). Valid values are 0 through 9 or “*” (asterisk means unlimited levels). Setting this value to 0 disables the auto-updating of xrefs and conrefs.
Auto-Load Conrefs on File OpenOn file open, any conrefs are resolved and updated. Note that this auto-loading is applied to all files opened as a result of a reference in that file being resolved. The number of levels of reference resolution is deter-mined by the Max Reference Levels option.
70

DITA-FMX COMMANDSDITA OPTIONS
Auto-Load Xrefs and Links on File OpenOn file open, any xref (or fm-xref) and link (or fm-link) elements are resolved and the labels are updated with the text of the target element. Note that this auto-loading is applied to all files opened as a result of a reference in that file being resolved. The number of levels of reference resolution is determined by the Max Reference Levels option. If this option is disabled, fm-xref and fm-link elements are not converted from their base xref or link elements; they will remain as xref or link elements until you enable this option.
Auto-Load Topicrefs on File OpenOn file open of a DITA map, labels (as fm-topicreflabel elements) are added to all topicref elements. To open the associated file, double-click the label. If this option is selected, the additional “Show” options are available:
• Titles - displays the target file’s title as the label.
• File names - displays the target file’s file name as the label (the value of the href attribute).
• Both - displays the target file’s title and file name as the label.
Conditionalize Prolog on File OpenOn file open, the prolog element is tagged with the “DITA-Prolog” condi-tion. If this condition does not exist, it is created, and set to “Show.” If this condition already exists in the template, the condition is applied and the current Show/Hide state is used.
Conditionalize Topicmeta on File OpenOn file open (of a map), the topicmeta element is tagged with the “DITA-Topicmeta” condition. If this condition does not exist, it is created, and set to “Show.” If this condition already exists in the template, the condition is applied and the current Show/Hide state is used.
Conditionalize Comments on File OpenOn file open, any draft-comment elements are tagged with the “DITA-Comment” condition. If this condition does not exist, it is created, and set to “Show.” If this condition already exists in the template, the condition is applied and the current Show/Hide state is used.
Strip XML Padding on ImportStrips spaces and tabs from the beginning of lines in the XML file. This is often added by XML editors to “pretty-print” XML files for ease of use.
Fix Line Breaks in “topic/pre” ElementsIn order to deal with a “bug” in FrameMaker, on file save this option adds a space between the end of an inline child element and the end of line in a preformatted (code) element. If an inline child element starts at the begin-
71

DITA-FMX COMMANDSDITA OPTIONS
ning of a line within a preformatted element, this option moves the start element to the previous line and adds a space between it and the line end.
Check for XML CommentsOn file open, a message displays at the console window if the file contains XML comments. This option is not available (or needed) in FM8 since comments round-trip as markers.
Check for Updates FrequencyDITA-FMx provides a Check for Updates feature so you can be notified of any updates to the plugin. You can run the command manually from the DITA-FMx menu, and you can also have it automatically check for updates at a specified frequency. To specify a frequency to automatically check for updates (in days), enter that value in this field. To disable auto-matic checking, enter “0” in this field. If you have disabled automatic checking, you can still manually use the Check for Updates command.
New File OptionsChoose this button to access the New File Options dialog.
Auto-Prolog OptionsChoose this button to access the Auto-Prolog Options dialog.
New File Options
Provides settings that affect the creation of new files.
The new file options affect the functionality of the New DITA File dialog. You can access these options from the main Options dialog as well as the New DITA File dialog.
New File Name FormatThis field defines the text of auto-generated file names. File names are auto-generated in the New DITA File dialog as well as the Build Map from Outline command. You can enter plain text in this field as well as
72
DITA-FMX COMMANDSDITA OPTIONS
special building blocks. A building block is a string of text enclosed in angle brackets. You can include a modifyer value after the building block name in square brackets. This value must be a number (from 0 to 99), and if provided, limits the length of the resulting string to that value.Valid building blocks are listed below (some of these make more sense to use in a file name than others):
• <$FM_USER> - maker.ini/RegInfo/User
• <$FM_COMPANY> - maker.ini/RegInfo/Company
• <$T_YYYY> - 4 digit year
• <$T_YY> - 2 digit year
• <$T_MM> - 2 digit month (zero padded)
• <$T_MON> - 3 character month
• <$T_MONTH> - full month name
• <$T_DD> - 2 digit date (zero padded)
• <$T_HOUR> - 2 digit hour (zero padded)
• <$T_MIN> - 2 digit minute (zero padded)
• <$T_SEC> - 2 digit second (zero padded)
• <$TITLE> - the actual text of the title (as entered in the New File dialog)
• <$TITLE_LC> - the text of the title lowercased
• <$TITLE_NOSPACE> - the text of the title with spaces removed
• <$TITLE_NOSPACELC> - the text of the title, lowercased with spaces removed
• <$TITLE_SPACETOUNDER> - the text of the title with spaces replaced with underscores
• <$TITLE_SPACETOUNDERLC> - the text of the title with spaces replaced with underscores and lowercased
• <$UNIQUEID> - the unique ID as applied to the root topic element
• <$TOPIC_TYPE> - the topic type’s element name
Note that you can include slashes (always use forward slashes or double backslashes in FrameMaker dialog boxes) in the New File Name Format field to automatically fill in subdirectory names. For example, if you
73

DITA-FMX COMMANDSDITA OPTIONS
always want files to be saved into folders based on the topic type, you might use the following format string:<$TOPIC_TYPE>/<$TOPIC_TYPE[2]>_<$TITLE_NOSPACELC>.ditaIf the title was “Using New Tools” and the topic type was task, the resulting filename would be “task/ta_usingnewtools.dita”.
Element Template folderSpecifies the folder where element templates are stored. This can be a local or network location. If the element template folder field is empty, the default location is the folder that contains the structure application template file.
NOTE: When entering paths in text fields, you must use the forward slash as the directory separator.
Auto-Prolog Options
Allows you to enable and specify the content for automatically inserted prolog data.
If enabled, the auto-prolog options automatically insert and update basic data in a topic’s prolog. There are two types of options, prolog data that is added on file creation and data that is added/updated on file save. Each option can be enabled independently.
Each option provides a text field where you can enter plain text and special building blocks (similar to those used for new file names, but limited in scope). The building blocks that are appropriate for the prolog are listed below.
74

DITA-FMX COMMANDSGENERATE OUTPUT
File creation: authorIf enabled, inserts the value from this field into the prolog/author element. If an element template is used that contains an author element, this value is appended to that which already exists.
File creation: critdates/created@dateIf enabled, inserts the value from this field into the critdates/created@date attribute.
File save: critdates/revised@modifiedIf enabled, inserts the value from this field into the crit-dates/revised@modified attribute. If the Only Update the Last Element option is selected, the modified attri-bute value will be updated on the last critdates/revised element. If not selected, a new revised element is added each time the new value for the modified attribute is different than the previous sibling element (typically a new element for each day the file is saved).
The building blocks that are appropriate for prolog fields are:
• <$FM_USER> - maker.ini/RegInfo/User
• <$FM_COMPANY> - maker.ini/RegInfo/Company
• <$T_YYYY> - 4 digit year
• <$T_YY> - 2 digit year
• <$T_MM> - 2 digit month (zero padded)
• <$T_MON> - 3 character month
• <$T_MONTH> - full month name
• <$T_DD> - 2 digit date (zero padded)
• <$T_HOUR> - 2 digit hour (zero padded)
• <$T_MIN> - 2 digit minute (zero padded)
• <$T_SEC> - 2 digit second (zero padded)
Generate Output
Provides methods for generating output through the DITA Open Toolkit (DITA-OT) from within FrameMaker.
75

DITA-FMX COMMANDSGENERATE OUTPUT
Select the build type and the desired options, then choose the Build button to generate output through the DITA Open Toolkit. If you want to generate output based on the current file (a topic or map) using one of the pre-defined targets (such as CHM, XHTML, or PDF), use the Current File option. If you have set up an Ant script to build a specific project (not necessarily the current file), use the Selected Target option.
Current FileThis option uses a provided Ant script for processing the current map or topic file using the selected target. You can also use the Use Selected Ditaval File option to specify filtering using a selected ditaval file. For setup information, see Generate Output: Current File Option.
When this build type is used, a folder is created in the current file’s folder named build-<filename>. Within that folder, another folder is created to match the selected output type. The files are generated in that folder.
Selected TargetThis option lets you run an Ant script and target that you have provided. For information on using this feature, see the section Generate Output: Selected Target Option.
Additional options are available for use with either Generate Output build option.
76

DITA-FMX COMMANDSGENERATE BOOK FROM MAP
Open OutputIf selected, the output folder will be opened after the build completes.
Write LogfileIf selected, a log file is generated and opened after the build completes. If this option is not selected, the build status displays in a command shell window.
Keep Dialog OpenIf selected, the Generate Output dialog remains open so you can easily run another build.
Use Selected Ditaval FileThis option is only available for use with the Current File output type. If selected, the selected ditaval file is used for the build. Note that you must have added ditaval files with the Ditaval Manager in order for ditaval files to be listed here.
Generate Book from Map
Generates a FrameMaker book and chapter files from the current DITA map.
This command builds a FrameMaker book by creating “chapter” files from the top-level topicrefs in a DITA map. All child topics of each top-level topicref are merged to form a single chapter file. After the book is generated and all chapter files are built you can add frontmatter and backmatter files such as a TOC and Index.
If the current DITA map file has not been saved, you are prompted to save it (the file must be saved before processing can begin). This command first prompts for the name and location of the book file to create. It then assembles all chapter files and resolves all references. The resulting FM files are named based on the root topic file’s relative path and filename with a “.fm” file extension.
Conrefs and xrefs that point to content within the book, are updated to point to the new FM files. Any references to DITA files that are not part of the final book, remain pointing at the source DITA file (with the href modified to suit the new path if it has changed). The paths to referenced graphics are updated to account for any changes due to relative differences between the source files and the new FM files. If your files do reference files that are not part of the book (typically graphics and possibly conrefs), it is important to choose an appropriate location to generate the book so that the FM files and referenced files can be moved as needed.
77

DITA-FMX COMMANDSGENERATE BOOK FROM MAP
The recommended way to build and maintain a book is as follows:
1) Generate the book and FM files with the Generate Book from Map command. Think of this as a “throw-away” book, and name it something temporary like temp.book.
2) Create a new book by doing a SaveAs from the throw-away book. This is your “real” book, give it an appropriate name.
3) Add your TOC, Index, and other non-DITA-based files to the “real” book.
4) Setup the properties for each file in the “real” book. Select each file and right-click, then choose Numbering, Pagination, or Set Up, as appro-priate.
5) Now choose Edit > Update Book to generate your TOC and Index.
6) Save the “real” book.
Now, when you update your DITA files, re-run the Generate Book from Map command and overwrite the “throw-away” book and the FM content files will be replaced with fresh versions. Just close the “throw-away” book file that’s been generated, then open your “real” book and do an Edit > Update to refresh the TOC and Index and your book is ready to print.
NOTE: It is not uncommon to get “XML Parser Messages” in the “XML Read Report Log” regarding IDs that have been “already used.” This happens if you’ve used a conref multiple times and that conref contains an ID that is of type “UniqueID.” Frame doesn’t like multiple instances of the same UniqueID in the same document. DITA doesn’t care since they are in different topics. If you get this message, just choose the “OK” button and proceed.
78

4
Extending DITA-FMxProvides methods for controlling DITA-FMx from other applications.
DITA-FMx 1.0 provides a limited set of “CallClient” function calls. These func-tions can be used by other FDK plugin clients as well as by FrameScript and FrameAC.
A typical syntax statement shows the call from an FDK client using the F_ApiCallClient() function. A similar call can be made from FrameScript using the CallClient function. In either situation the the case of the parameters passed to these functions is not important.
All calls require the DITA-FMx client name (“ditafmx”) and a call client func-tion name. Some calls may have additional (required or optional) parameters. When additional parameters are provided, they are passed as a single space delimited string. For example, the FixBookRefs call can make use of the bookId. To pass the bookId (an integer value) convert it to a string and concatenate that string to the initial parameter. For example, if the bookId is 3489237, the FDK call would be as follows:
F_ApiCallClient("ditafmx", "FixbookRefs 3489237");
If you would like to have access to specific DITA-FMx functionality that is not currently exposed, please let us know.
FixBookRefs
Normalizes all references in the files of a FM book file.
Use this function to rebuild and correct all references (xrefs, links, conrefs, and image references) after aggregating loose DITA topics into “chapter” files. Call this function using the “FixBookRefs” parameter to update the active book, or pass the bookId value (as a string) after this parameter to update a specific book.
79
EXTENDING DITA-FMXFMXVER
Syntax
F_ApiCallClient("DITAFMX", "FixBookRefs [bookId]");
Return Value
0Failure. Unable to update the specified book. It is also possible that DITA-FMx is not available for calls. Verify that DITA-FMx is registered in the maker.ini file using the client name of “ditafmx”.
-1Failure. bookId is not a structured book.
-2Failure. No non-generated files in book.
>0Successfully updated the specified book (this is the value of the bookId processed).
FMxVer
Determines if DITA-FMx is initialized and accessible to external calls.
Use this call to determine that the DITA-FMx client is available in addition to ensuring that you are working with the version that you expect.
Syntax
F_ApiCallClient("DITAFMX", "FMxVer");
Return Value
0DITA-FMx is not available for calls. Verify that DITA-FMx is registered in the maker.ini file using the client name of “ditafmx”.
>0Indicates the DITA-FMx version number. A return value of 1 is version 1.0.
80
EXTENDING DITA-FMXLOADREFERENCES
LoadReferences
Updates the references in the specified or current file.
Use this function to update all references (xrefs, links, conrefs, and image refer-ences) in the specified file. Call this function using the “LoadReferences” parameter to update the active document, or pass the docId value (as a string) after this parameter to update a specific document.
Syntax
F_ApiCallClient("DITAFMX", "LoadReferences [docId]");
Return Value
0Failure. Unable to update the specified document. It is also possible that DITA-FMx is not available for calls. Verify that DITA-FMx is registered in the maker.ini file using the client name of “ditafmx”.
-1Failure. Invalid docId.
-2Failure. document is not a DITA file.
>0Successfully updated the specified document (this is the value of the docId processed).
81

EXTENDING DITA-FMXLOADREFERENCES
82

Index
Symbols$ building blocks 73
AAnt, setting up 38APIClients section of maker.ini 28
Bbuild map from outline command 53
Ccheck for updates 72commands
Generate Output 38conref support features 64conref, convert to text 64convert conref to text 64
DDITA Open Toolkit 38ditafmx-ant.xml file 40ditamap structure application, installing 29ditamap support features 1DITA-OT 38ditaval 57ditaval filtering 40, 58DitavalFiles INI section 40dpi, image 21
Eele ments
link 31element template 43elements
choicetable 33fm-link 31fm-linklabel 32, 35fm-linkref 31fm-propertiesbody 33fm-propertieshead 33fm-simpletablebody 33fm-simpletablehead 33fm-xref 31link 32, 35properties 33simpletable 33xref 31
Ffeatures
conref support 64ditamap support 1import/export
processing 4output support 3specialization 4xref
83

support 2filtergroups.ini file 67filtering groups 67fmdpi setting 21FrameMaker variables 16
GGenerate Output commmand 38
Iimage dpi 21image handling 20image size 16image size, native 20images, shrink-wrapped 20import/export processing features 4indexterm 14, 16installing DITA-FMx 25
JJava, setting up 38
Llanguage template 47
Mmaker.ini parameters 28map from outline template 51MapFromListTemplate, INI parameter 46
Nnative image size 20
OOpen Toolkit, DITA 38output support features 3
Pplugins, installing 27PROJECT.xml file 40
Ssample file 57specialization features 4
Ttables
page-wide 16templates, language-specific 47
Uuninstall 27, 49updates, chec k ing 72
Vvariables 16
Xxref support features 2
84