digital photography for dummies® (king/digital) || first steps, first shots
TRANSCRIPT

3First Steps, First Shots
In This Chapter▶ Setting up your camera
▶ Setting focus and exposure automatically
▶ Getting better results by using the automatic scene modes
▶ Reviewing critical picture-taking settings
Digital camera manufacturers work hard to create a good “out of box” experience — that is, to make your first encounter with your camera
fun, easy, and rewarding. To that end, cameras leave the factory in automatic picture-taking mode, using default settings that are likely to produce a good picture the first time you press the shutter button.
Before you snap that first shot, however, scan the information in this chapter, which offers advice on setting up your new camera. This chapter also introduces you to some common autoex-posure modes, including scene modes designed to best capture certain types of pictures, such as portraits and landscapes.
Setting Up Your New CameraEvery camera is different, so providing specifics on setting up your particular model is impossible. But the following list contains a few general steps that you should take to ensure that your “out of box” experience runs smoothly and that the camera is ready to perform its picture-taking magic for you:
✓ Most cameras come with a quick-start guide to walk you through basic setup procedures. Included somewhere in that guide or in the first few pages of your manual, you should find a list of all the
Digital Photography for Dummies®, 6th Editionby Julie Adair King and Serge TimacheffCopyright © 2009 Wiley Publishing, Inc.

60 Part I: Peering Through the Digital Viewfinder
components that are sup-posed to come with the camera. It’s a good idea to unpack and examine everything, as shown in Figure 3-1, to make sure that nothing was omitted from the box.
✓ Look for a card or docu-ment that enables you to register your purchase with the manufacturer. You also may be able to register online. Either way, do take the time to regis-ter the camera; the camera company needs your name and contact information in order to notify you of any updates to the camera firmware (internal software).
✓ If your camera comes with rechargeable batteries, charge them fully before you do anything else. The batteries might have a little juice in them without charging, but it’s really not a good idea to start up the camera that way — doing so can cause the batteries to have a permanently limited charge.
✓ Whatever type of batteries your camera uses, be sure to load them cor-rectly with the positive (+) and minus (–) sides correctly positioned. Loading them incorrectly can damage your camera.
✓ Another good thing to do right away is to attach your camera strap — and get into the habit of using it when you shoot. The last thing you want to do is drop your new camera while trying to figure out its functions!
✓ Some cameras ship with a memory card (that’s the thing that stores your pictures). The type of card varies from camera to camera, but most are small enough to get lost as you rip into the camera box, so use cau-tion. If your camera doesn’t come with a card, check the manual to find out what type to buy. (Chapter 2 offers some advice on this purchase.)
✓ Be careful when putting the memory card in the camera. Look at your quick-start guide to see which direction to orient the card, and use gentle pressure when inserting it.
Serge Timacheff
Figure 3-1: Open your new camera carefully and inspect all the components.

61 Chapter 3: First Steps, First Shots
With batteries installed, card inserted, and strap attached, the camera should now be ready to go. But before you switch it on, grab your manual and keep it handy as you explore the rest of this chapter, which explains some common setup options and guides you through taking your first pictures.
Adjusting the viewfinder to your eyesightIf your camera has a viewfinder, chances are that it also has a view-finder diopter adjustment control, or something with a similar name. This control is a little knob or wheel, usu-ally placed along the edge of the view-finder, that enables you to adjust the viewfinder to your eyesight. Figure 3-2 offers a close-up look at how this con-trol appears on some Canon dSLRs. If you don’t take this step, then what you see through the viewfinder may not be an accurate reflection of the scene, focusing wise.
Although you should check your manual for details, you usually adjust the viewfinder in this fashion: Point the camera at a plain surface, such as a wall or sheet of paper. Then look through the viewfinder and concentrate on the little marks inside the view-finder that indicate the camera’s possible focusing areas. (These vary from camera to camera.) Concentrating just on those marks — not on the scene in front of the lens — adjust the diopter control until the marks appear sharply focused. If no amount of adjustment makes things sharp, you may be able to buy a viewfinder accessory that allows a greater amount of adjustment.
Note that if you wear glasses and will wear them when using your camera, you should have them on when you adjust the diopter.
Exploring basic setup optionsSomewhere on the back of your camera, you should find a Menu button that displays the camera menus on the monitor. And on one or more of those menus, you should find a few options for customizing the camera. Again, your manual contains specifics, but here are a few bits of advice regarding the most common setup options:
✓ Date and time: This setting is perhaps the most critical of the basic operation controls. Your camera records the current date and time in the image file, along with details about what other camera settings were
Diopter adjustment control
Figure 3-2: Be sure to adjust the viewfinder to your vision.
62 Part I: Peering Through the Digital Viewfinder
in force when you shot the picture. In many photo editors and image browsers, you can view this information, known as metadata.
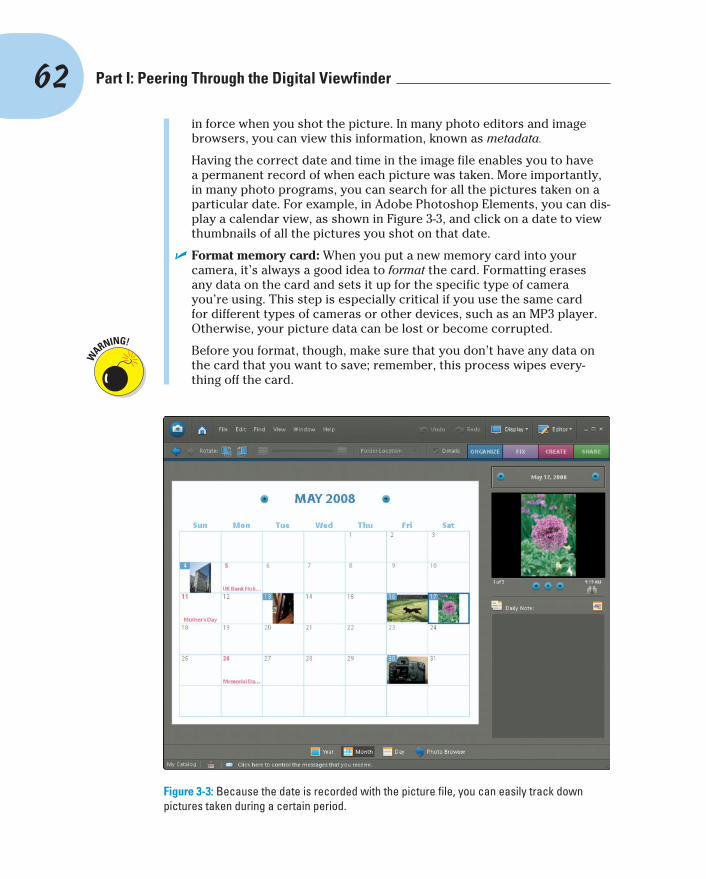
Having the correct date and time in the image file enables you to have a permanent record of when each picture was taken. More importantly, in many photo programs, you can search for all the pictures taken on a particular date. For example, in Adobe Photoshop Elements, you can dis-play a calendar view, as shown in Figure 3-3, and click on a date to view thumbnails of all the pictures you shot on that date.
✓ Format memory card: When you put a new memory card into your camera, it’s always a good idea to format the card. Formatting erases any data on the card and sets it up for the specific type of camera you’re using. This step is especially critical if you use the same card for different types of cameras or other devices, such as an MP3 player. Otherwise, your picture data can be lost or become corrupted.
Before you format, though, make sure that you don’t have any data on the card that you want to save; remember, this process wipes every-thing off the card.
Figure 3-3: Because the date is recorded with the picture file, you can easily track down pictures taken during a certain period.

63 Chapter 3: First Steps, First Shots
✓ Auto shut-off: To conserve battery power, many cameras turn off auto-matically after a few minutes of inactivity. The drawback is that you can miss fleeting photographic opportunities — by the time you restart the camera, your subject may be gone. If you’re not happy with the way this option works, see whether you can adjust the length of time that the camera must be idle before auto shutdown occurs; some cameras also give you the option of turning the feature off entirely.
✓ Shoot without memory card: Most cameras will let you take a photo without a memory card. The image is stored in a tiny bit of internal camera memory but usually isn’t retained for more than a few minutes. (The point of the function is to enable camera salespeople to demon-strate cameras without having to keep memory cards in all of them.) If you’re worried that you might shoot all day and forget that you didn’t insert a memory card, turn off this function!
✓ Instant review: After you take a picture, your camera may display it auto-matically for a few seconds. On some cameras, you can’t take another picture until the review period is passed, and if that’s the case with your model, you may want to turn off instant review when you’re trying to cap-ture fast-paced subjects. And because monitors consume power, also turn off instant review if you’re worried about running out of battery juice. You may also be able to adjust the length of the instant-review period.
✓ Monitor brightness: Adjusting the monitor brightness can make pic-tures easier to view in bright light. But be careful: The monitor may then give you a false impression of your image exposure. Before you put your camera away, double-check your pictures in a setting where you can use the default brightness level. As another alternative, you may be able to display an exposure guide called a histogram; see Chapter 5 for details.
✓ Sound effects: Digital cameras are big on sounds: Some play a little ditty when the camera is turned on. Some beep to let you know that the camera’s autofocus or autoexposure mechanism has done its thing, and others emit a little “shutter” sound as you take the picture. There have even been cameras that said “Goodbye” in this odd little digitized voice when you turned the camera off. Before heading to a wedding or any other event where your camera’s bells and whistles won’t be appreci-ated, check your camera menu to see whether you can silence them or at least turn down the volume.
Some cameras offer a Museum mode. When you choose this setting, the camera automatically stifles its vocal chords and also disables the flash because flash photography isn’t permitted in most museums.
✓ File numbering: Cameras assign filenames to photos, often beginning with a few letters and a symbol (for example, IMG_0023.JPG, DSCN0038.JPG, or something similar). You can often set up your camera to number files beginning with certain numbers, and some cameras actually let you put in a few of your own letters with the file numbers (although it’s usu-ally very limited).

64 Part I: Peering Through the Digital Viewfinder
Some cameras have an option that automatically restarts the file-numbering sequence when you swap out a memory card. For example, if the current memory card contains a file named IMG_0001.JPG, and you put in a new memory card, the camera assigns that same filename to the first picture you take. Obviously, this option can lead to trouble after you download pictures to your computer because you can wind up with multiple pictures that share the same name. So check your manual to find out whether this option exists on your camera, and if so, avoid it.
✓ Auto rotate: You may be able to choose whether you want the camera to automatically rotate vertically oriented pictures so they appear as shown on the left in Figure 3-4. If you don’t choose this option, the image appears on its side, as shown on the right in the figure.
When you turn on auto-rotation, the camera stores the picture-orientation information as part of the data file. Some photo software can read that orientation data, too, so that when you display the picture on your com-puter monitor, the image also appears in its proper orientation.
Serge Timacheff
Figure 3-4: Most cameras enable you to rotate vertical pictures to their proper orientation.
Taking Your First PicturesAfter completing basic camera setup and familiarizing yourself with your camera’s buttons and menus, you’re ready for the big moment: time to actu-ally take some pictures.
Although you no doubt can figure out the basics of shooting with your digital camera on your own, the following sections offer some bits of information that can help you get better results from the get-go.

65 Chapter 3: First Steps, First Shots
Setting the focus mode: Auto or manual?Most point-and-shoot digital cameras offer only autofocus, but a few do permit manual focusing. When you’re just getting comfortable with your camera, stick with autofocus — with manual focusing on a point-and-shoot camera, you usually have to dig through menus and specify an exact camera-to-subject distance, which is tricky.
If you own a dSLR, you can either take advantage of autofocus or focus manu-ally by twisting a focusing ring on the lens barrel. Typically, you use a switch on the lens barrel or the camera body to specify which focusing option you want to use. Look for a switch that has the labels A or AF and M or MF.
On some dSLR lenses, you also get a switch for enabling or disabling image stabilization, a feature designed to prevent blurring caused by camera move-ment that can occur when you handhold the camera. See Chapter 1 for a complete explanation of this feature, and check your camera or lens manual to find out how to best take advantage of it with your equipment.
More focus factors to considerWhen you focus the lens, either in autofocus or manual focus mode, you determine only the point of sharpest focus. The distance to which that sharp-focus zone extends — what photog-raphers call the depth of field — depends in part on the aperture setting, which is an expo-sure control. And the aperture setting varies depending on the automated photography mode you select.
The Portrait setting, for example, uses an aper-ture setting that shortens the depth of field so that background objects are softly focused — an artistic choice that most people prefer for por-traits. On the flip side of the coin, the Landscape setting selects an aperture that produces a large depth of field so that both foreground and back-ground objects appear sharp.
Another exposure-related control, shutter speed, plays a focus role when you photograph
moving objects. Moving objects appear blurry at slow shutter speeds; at fast shutter speeds, they appear sharply focused. On your camera, the Sports shooting mode automatically selects a high shutter speed to help you “stop” action, producing blur-free shots of the subject.
A fast shutter speed can also help safeguard against allover blurring that results when the camera is moved during the exposure. The faster the shutter speed, the shorter the expo-sure time, which reduces the time that you need to keep the camera absolutely still. Using a tripod is the best way to avoid the problem when you use a slow shutter speed.
For an explanation of the role of shutter speed and aperture in exposure, check out Chapter 5. Chapter 6 discusses various issues related to focusing.
66 Part I: Peering Through the Digital Viewfinder
Choosing an automatic exposure modeMost digital cameras offer a variety of automatic exposure modes, which you select either via menus or an external dial or switch. In all these modes, the camera handles critical exposure decisions, such as selecting the aperture setting and shutter speed, leaving you free to concentrate on composition and your subject. Shooting in automatic mode also typically means that the camera handles most other settings, too, including those that affect color and autofocusing.
Although the number and type of automatic exposure modes vary from camera to camera, they can be broken down into two general categories:
✓ Full Auto: This setting is designed to deliver good results no matter what your subject. Think of it as one-size-fits-all shooting.
✓ Scene modes: These settings are specialized modes geared to specific subjects — people, landscapes, and so on.
The next few sections offer some more information about shooting in Full Auto mode and give you an overview of four of the most common scene modes (Portrait, Landscape, Close-up, and Sports).
One word of advice before you move on, though: Automatic exposure modes are great in that you don’t have to know much about photography or have to worry about setting a bunch of controls before you shoot. But the downside is that you typically lose access to some features that may be helpful for cap-turing your subject. For example, the camera usually decides whether or not a flash is needed, and you can’t override that decision. And some cameras don’t let you tweak color or exposure, either.
So if your camera offers more advanced exposure modes, such as aperture-priority autoexposure or manual exposure, it’s worth your time to learn how to use them. They may take a while to fully grasp, but they make your life easier in the long run because you can easily tweak exposure, color, and focus settings to precisely suit your subject. See Chapters 5 through 7 for a look at the many picture-taking options you can access when you shift out of fully automatic exposure modes.
Full Auto modeIn this mode, the camera selects all settings based on the scene that it detects in front of the lens. Some cameras use different settings if they detect motion in the scene, for example, than if they detect a stationary subject. You may be able to specify the image resolution and a few other settings (explained later in this chapter), but for the most part, you get no input into how the picture is captured.

67 Chapter 3: First Steps, First Shots
If you have exposure or color problems in this mode, check out Chapters 5 and 6 to discover some possible remedies. But again, whether you have access to the techniques covered in those chapters depends on your camera and how it implements Full Auto mode.
Portrait modePortrait mode attempts to select exposure settings that produce a blurry background, which puts the visual emphasis on your subject, as shown in Figure 3-5. Keep in mind, though, that in certain lighting condi-tions, the camera may not be able to choose the exposure settings that best produce the soft background. Additionally, the background blur-ring requires that your subject be at least a few feet from the background. The extent to which the background blurs also depends on the other depth-of-field factors that you can explore in Chapter 6.
Keep in mind that you can use Portrait mode any time you want a slightly blurry background, not just for people pictures. Try this mode when shooting statues, still-life arrangements (such as a vase of flowers on a kitchen table), insects, and the like.
Check your manual to find out what other image adjustments may be applied in Portrait mode. Some cameras, for example, tweak color and sharpness in a way designed to produce flattering skin tones and soften skin texture. And one more tip: If you’re not sure that your subject will remain motionless, the Sports mode, which is designed to capture moving subjects without blur, may deliver better results.
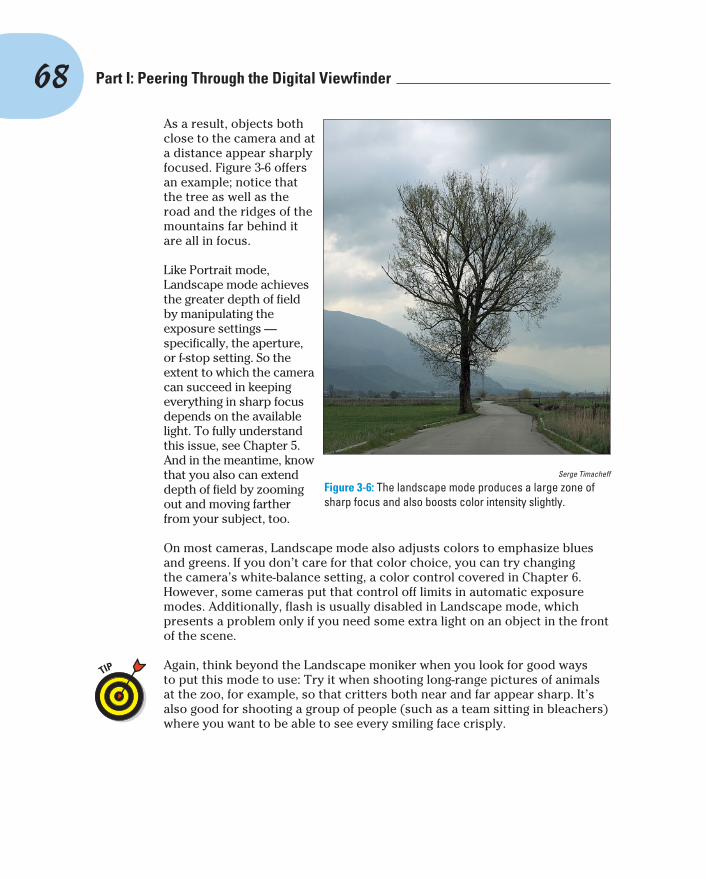
Landscape modeWhereas Portrait mode aims for a very shallow depth of field (small zone of sharp focus), Landscape mode, which is designed for capturing scenic vistas, city skylines, and other large-scale subjects, produces a large depth of field.
Serge Timacheff
Figure 3-5: The portrait setting produces a softly focused background.
68 Part I: Peering Through the Digital Viewfinder
As a result, objects both close to the camera and at a distance appear sharply focused. Figure 3-6 offers an example; notice that the tree as well as the road and the ridges of the mountains far behind it are all in focus.
Like Portrait mode, Landscape mode achieves the greater depth of field by manipulating the exposure settings — specifically, the aperture, or f-stop setting. So the extent to which the camera can succeed in keeping everything in sharp focus depends on the available light. To fully understand this issue, see Chapter 5. And in the meantime, know that you also can extend depth of field by zooming out and moving farther from your subject, too.
On most cameras, Landscape mode also adjusts colors to emphasize blues and greens. If you don’t care for that color choice, you can try changing the camera’s white-balance setting, a color control covered in Chapter 6. However, some cameras put that control off limits in automatic exposure modes. Additionally, flash is usually disabled in Landscape mode, which presents a problem only if you need some extra light on an object in the front of the scene.
Again, think beyond the Landscape moniker when you look for good ways to put this mode to use: Try it when shooting long-range pictures of animals at the zoo, for example, so that critters both near and far appear sharp. It’s also good for shooting a group of people (such as a team sitting in bleachers) where you want to be able to see every smiling face crisply.
Serge Timacheff
Figure 3-6: The landscape mode produces a large zone of sharp focus and also boosts color intensity slightly.
69 Chapter 3: First Steps, First Shots
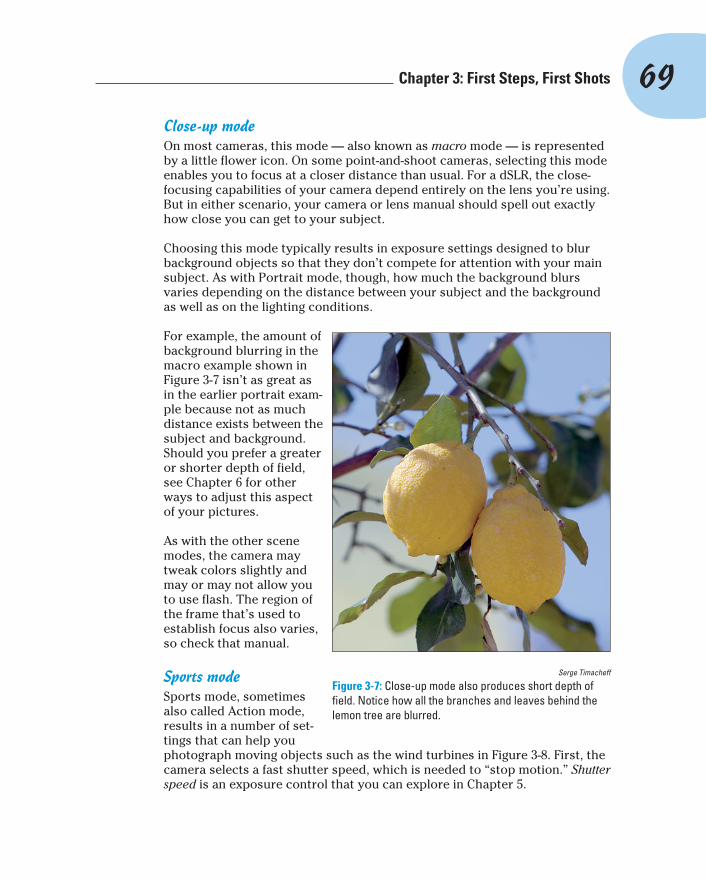
Close-up modeOn most cameras, this mode — also known as macro mode — is represented by a little flower icon. On some point-and-shoot cameras, selecting this mode enables you to focus at a closer distance than usual. For a dSLR, the close-focusing capabilities of your camera depend entirely on the lens you’re using. But in either scenario, your camera or lens manual should spell out exactly how close you can get to your subject.
Choosing this mode typically results in exposure settings designed to blur background objects so that they don’t compete for attention with your main subject. As with Portrait mode, though, how much the background blurs varies depending on the distance between your subject and the background as well as on the lighting conditions.
For example, the amount of background blurring in the macro example shown in Figure 3-7 isn’t as great as in the earlier portrait exam-ple because not as much distance exists between the subject and background. Should you prefer a greater or shorter depth of field, see Chapter 6 for other ways to adjust this aspect of your pictures.
As with the other scene modes, the camera may tweak colors slightly and may or may not allow you to use flash. The region of the frame that’s used to establish focus also varies, so check that manual.
Sports modeSports mode, sometimes also called Action mode, results in a number of set-tings that can help you photograph moving objects such as the wind turbines in Figure 3-8. First, the camera selects a fast shutter speed, which is needed to “stop motion.” Shutter speed is an exposure control that you can explore in Chapter 5.
Serge Timacheff
Figure 3-7: Close-up mode also produces short depth of field. Notice how all the branches and leaves behind the lemon tree are blurred.

70 Part I: Peering Through the Digital Viewfinder
Serge Timacheff
Figure 3-8: To capture moving subjects without blur, try Sports mode — even if you’re not shooting a sporting event.
With some cameras, dialing in Sports mode also selects some other set-tings that facilitate action shooting. For example, if your camera offers burst mode or continuous capture, in which you can record multiple images with one press of the shutter button, Sports mode may automatically shift to that gear. And flash is usually disabled, which can be a problem in low-light situa-tions; however, it also enables you to shoot successive images more quickly because the flash needs a brief period to recycle between shots.
The other critical thing to understand about Sports mode is that whether the camera can select a shutter speed fast enough to stop motion depends on the available light and the speed of the subject itself. On the other hand, a little blurring in an action photo can sometimes be acceptable and add to the effect of motion.
To fully understand shutter speed, visit Chapter 5. And for more tips on action photography, check out Chapter 7.
Reviewing other critical capture settingsIn addition to choosing an exposure mode, you should review the following additional picture-taking settings before you shoot. Later chapters get into these options in more detail, but here’s a quick introduction to the most criti-cal ones so that your first photos are at least close to being perfect:

71 Chapter 3: First Steps, First Shots
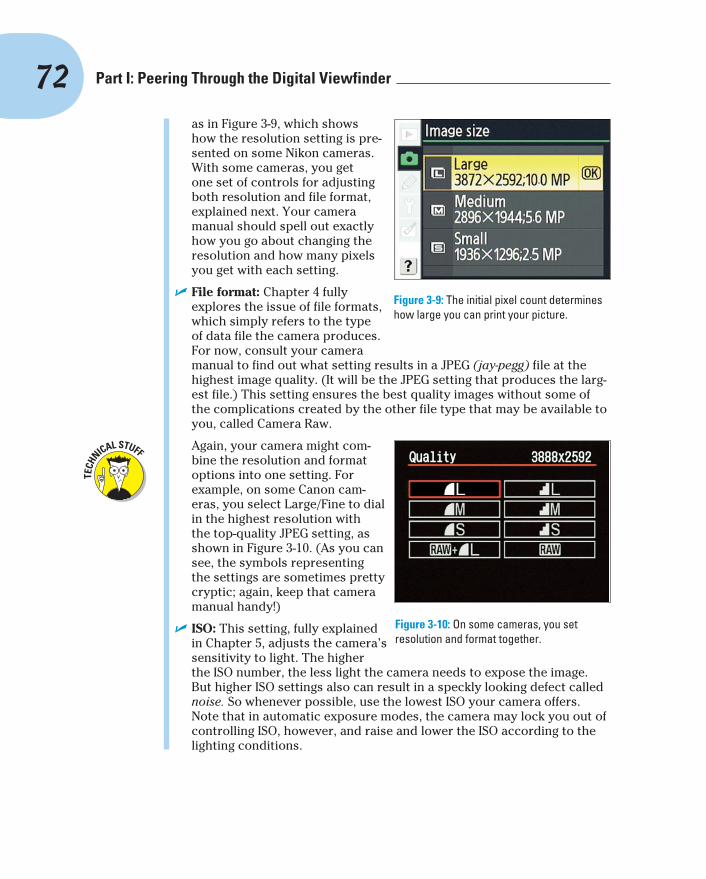
✓ Resolution: This option determines how many pixels the image will con-tain. Pixels are the tiny colored tiles from which all digital pictures are created. The more pixels you have, the larger you can print your photos and expect good picture quality.
Most cameras enable you to select from two or more resolution settings, each of which creates the image using a different number of pixels. For now, just select the camera’s top resolution setting — it’s better to have too many pixels than too few. You can also refer to the Cheat Sheet at the front of the book to find out how many pixels you need to produce different sizes of prints.
The resolution option is presented in different ways, depending on the camera. You may be given a choice of pixel dimensions or total pixel count in megapixels (1 megapixel equals 1 million pixels). Some cam-eras take another approach, using vague option names such as Large, Medium, or Small. And sometimes, you get all three methods combined,
A Parallax! A Parallax!You compose your photo perfectly. The light is fine, the focus is fine, and all other photographic planets appear to be in alignment. But after you snap your picture and view the image on the camera monitor, the framing is off, as though your subject repositioned itself while you weren’t looking. You’re not the victim of some cruel digital hoax — just a photographic phe-nomenon known as a parallax error.
On most point-and-shoot cameras, the view-finder looks out on the world through a sepa-rate window from the camera lens. Because the viewfinder is located an inch or so above or to the side of the lens, it sees your subject from a slightly different angle than the lens. But the image is captured from the point of view of the lens, not the viewfinder.
When you look through your viewfinder, you may see some lines near the corners of the frame. The lines indicate the boundaries of the
frame as seen by the camera lens. Pay atten-tion to these framing cues, or you may wind up with pictures that appear to have been lopped off along one edge.
The closer you are to your subject, the bigger the parallax problem becomes, whether you use a zoom lens or simply position the camera lens closer to your subject. Some cameras provide a second set of framing marks in the viewfinder to indicate the framing boundaries that apply when you’re shooting close-up shots. Check your camera manual to determine which fram-ing marks mean what. (Some markings have to do with focusing and exposure, not framing.)
Another solution is to simply use the monitor to frame your shots; the monitor reflects the image as seen by the lens. (On some cameras, the LCD monitor turns on automatically when you switch to macro mode for close-up shooting.)
72 Part I: Peering Through the Digital Viewfinder
as in Figure 3-9, which shows how the resolution setting is pre-sented on some Nikon cameras. With some cameras, you get one set of controls for adjusting both resolution and file format, explained next. Your camera manual should spell out exactly how you go about changing the resolution and how many pixels you get with each setting.
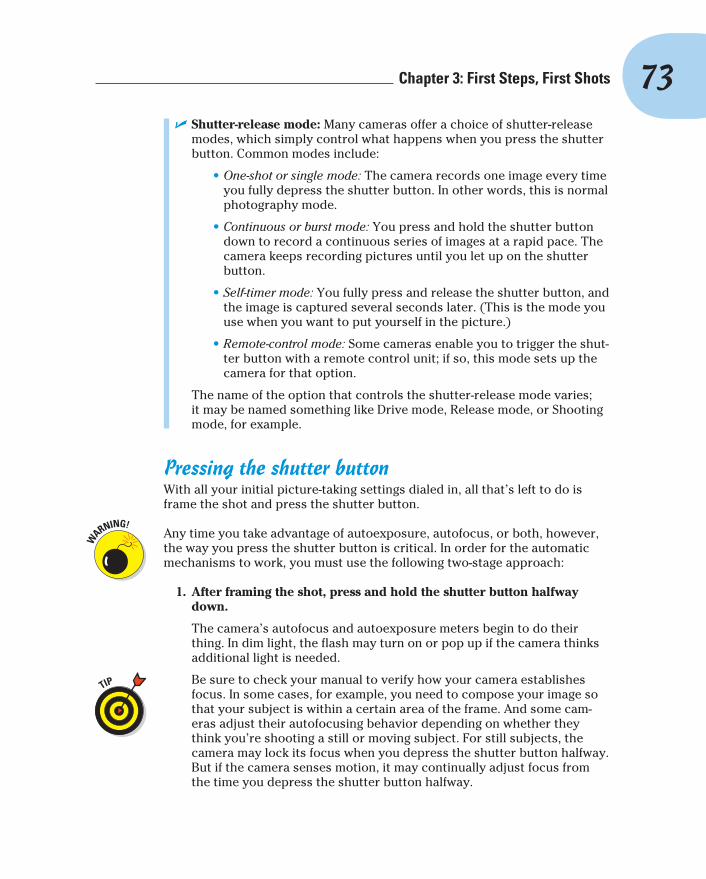
✓ File format: Chapter 4 fully explores the issue of file formats, which simply refers to the type of data file the camera produces. For now, consult your camera manual to find out what setting results in a JPEG (jay-pegg) file at the highest image quality. (It will be the JPEG setting that produces the larg-est file.) This setting ensures the best quality images without some of the complications created by the other file type that may be available to you, called Camera Raw.
Again, your camera might com-bine the resolution and format options into one setting. For example, on some Canon cam-eras, you select Large/Fine to dial in the highest resolution with the top-quality JPEG setting, as shown in Figure 3-10. (As you can see, the symbols representing the settings are sometimes pretty cryptic; again, keep that camera manual handy!)
✓ ISO: This setting, fully explained in Chapter 5, adjusts the camera’s sensitivity to light. The higher the ISO number, the less light the camera needs to expose the image. But higher ISO settings also can result in a speckly looking defect called noise. So whenever possible, use the lowest ISO your camera offers. Note that in automatic exposure modes, the camera may lock you out of controlling ISO, however, and raise and lower the ISO according to the lighting conditions.
Figure 3-9: The initial pixel count determines how large you can print your picture.
Figure 3-10: On some cameras, you set resolution and format together.
73 Chapter 3: First Steps, First Shots
✓ Shutter-release mode: Many cameras offer a choice of shutter-release modes, which simply control what happens when you press the shutter button. Common modes include:
• One-shot or single mode: The camera records one image every time you fully depress the shutter button. In other words, this is normal photography mode.
• Continuous or burst mode: You press and hold the shutter button down to record a continuous series of images at a rapid pace. The camera keeps recording pictures until you let up on the shutter button.
• Self-timer mode: You fully press and release the shutter button, and the image is captured several seconds later. (This is the mode you use when you want to put yourself in the picture.)
• Remote-control mode: Some cameras enable you to trigger the shut-ter button with a remote control unit; if so, this mode sets up the camera for that option.
The name of the option that controls the shutter-release mode varies; it may be named something like Drive mode, Release mode, or Shooting mode, for example.
Pressing the shutter buttonWith all your initial picture-taking settings dialed in, all that’s left to do is frame the shot and press the shutter button.
Any time you take advantage of autoexposure, autofocus, or both, however, the way you press the shutter button is critical. In order for the automatic mechanisms to work, you must use the following two-stage approach:
1. After framing the shot, press and hold the shutter button halfway down.
The camera’s autofocus and autoexposure meters begin to do their thing. In dim light, the flash may turn on or pop up if the camera thinks additional light is needed.
Be sure to check your manual to verify how your camera establishes focus. In some cases, for example, you need to compose your image so that your subject is within a certain area of the frame. And some cam-eras adjust their autofocusing behavior depending on whether they think you’re shooting a still or moving subject. For still subjects, the camera may lock its focus when you depress the shutter button halfway. But if the camera senses motion, it may continually adjust focus from the time you depress the shutter button halfway.

74 Part I: Peering Through the Digital Viewfinder
When focus is established, the camera will likely beep at you, assuming that you didn’t silence its voice during setup.
2. Press the shutter button the rest of the way and then release it to record the image.
While the camera sends the image data to the camera memory card, another light on your camera may illuminate. Don’t turn off the camera or remove the memory card while the lamp is lit, or you may damage both camera and card.
When the recording process is finished, the picture appears briefly on the LCD display. If you want a longer look at the image, you’ll need to put the camera into playback mode.
If the picture didn’t work out as planned, move on to Part II of the book to discover all the myriad ways you may be able to manipulate exposure, color, focus, and other characteristics of your photo.