digital performer getting started
DESCRIPTION
Digital Performer Getting StartedTRANSCRIPT
Getting Started
DIGITAL PERFORMER 8
1280 Massachusetts AvenueCambridge, MA 02138
Business voice: (617) 576-2760Business fax: (617) 576-3609
Technical support: (617) 576-3066Tech support web: www.motu.com/support
Web site: www.motu.com
Title page
About the Mark of the Unicorn License Agreement and Limited Warranty on Software
TO PERSONS WHO PURCHASE OR USE THIS PRODUCT: carefully read all the terms and conditions of the “click-wrap” license agreement presented to you when you install the software. Using the software or this documentation indicates your acceptance of the terms and conditions of that license agreement.
Mark of the Unicorn, Inc. (“MOTU”) owns both this program and its documentation. Both the program and the documentation are protected under applicable copyright, trademark, and trade-secret laws. Your right to use the program and the documentation are limited to the terms and conditions described in the license agreement.
Reminder of the terms of your license
This summary is not your license agreement, just a reminder of its terms. The actual license can be read and printed by running the installation program for the software. That license agreement is a contract, and clicking “Accept” binds you and MOTU to all its terms and conditions. In the event anything contained in this summary is incomplete or in conflict with the actual click-wrap license agreement, the terms of the click-wrap agreement prevail.
YOU MAY: (a) use the enclosed program on a single computer; (b) physically transfer the program from one computer to another provided that the program is used on only one computer at a time and that you remove any copies of the program from the computer from which the program is being transferred; (c) make copies of the program solely for backup purposes. You must reproduce and include the copyright notice on a label on any backup copy.
YOU MAY NOT: (a) distribute copies of the program or the documentation to others; (b) rent, lease or grant sublicenses or other rights to the program; (c) provide use of the program in a computer service business, network, time-sharing, multiple CPU or multiple user arrangement without the prior written consent of MOTU; (d) translate, adapt, reverse engineer, decompile, disassemble, or otherwise alter the program or related documentation without the prior written consent of MOTU.
MOTU warrants to the original licensee that the disk(s) on which the program is recorded be free from defects in materials and workmanship under normal use for a period of ninety (90) days from the date of purchase as evidenced by a copy of your receipt. If
failure of the disk has resulted from accident, abuse or misappli-cation of the product, then MOTU shall have no responsibility to replace the disk(s) under this Limited Warranty.
THIS LIMITED WARRANTY AND RIGHT OF REPLACEMENT IS IN LIEU OF, AND YOU HEREBY WAIVE, ANY AND ALL OTHER WARRANTIES, BOTH EXPRESS AND IMPLIED, INCLUDING BUT NOT LIMITED TO WARRANTIES OF MERCHANTABILITY AND FITNESS FOR A PARTICULAR PURPOSE. THE LIABILITY OF MOTU PURSUANT TO THIS LIMITED WARRANTY SHALL BE LIMITED TO THE REPLACEMENT OF THE DEFECTIVE DISK(S), AND IN NO EVENT SHALL MOTU OR ITS SUPPLIERS, LICENSORS, OR AFFILIATES BE LIABLE FOR INCIDENTAL OR CONSEQUENTIAL DAMAGES, INCLUDING BUT NOT LIMITED TO LOSS OF USE, LOSS OF PROFITS, LOSS OF DATA OR DATA BEING RENDERED INACCURATE, OR LOSSES SUSTAINED BY THIRD PARTIES EVEN IF MOTU HAS BEEN ADVISED OF THE POSSIBILITY OF SUCH DAMAGES. THIS WARRANTY GIVES YOU SPECIFIC LEGAL RIGHTS WHICH MAY VARY FROM STATE TO STATE. SOME STATES DO NOT ALLOW THE LIMITATION OR EXCLUSION OF LIABILITY FOR CONSEQUENTIAL DAMAGES, SO THE ABOVE LIMITATION MAY NOT APPLY TO YOU.
Update Policy
In order to be eligible to obtain updates of the program, you must visit motu.com/registration and complete the on-line product registration form (or complete and return to MOTU the Competitive Upgrade envelope if you have purchased a Competitive Upgrade).
Copyright Notice
Copyright ©2012, 2011, 2010, 2009, 2008, 2007, 2006, 2005, 2004, 2003, 2002, 2001, 2000, 1999, 1998, 1997, 1996, 1995, 1994, 1993, 1992, 1991 by Mark of the Unicorn, Inc. All rights reserved. No part of this publication may be reproduced, transmitted, transcribed, stored in a retrieval system, or translated into any human or computer language, in any form or by any means whatsoever, without express written permission of Mark of the Unicorn, Inc., 1280 Massachusetts Avenue, Cambridge, MA, 02138, U.S.A.
Digital Performer, MOTU, Mark of the Unicorn and the unicorn silhouette logo are trademarks of Mark of the Unicorn, Inc.
III
Contents
Part 1: Setup
7
Computer Requirements
7 Minimum computer requirements7 Getting started7 Familiarity with your computer7 Visit motu.com for software updates8 Technical support
9
Installing Digital Performer
9 Package Contents9 Important! Register your software9 Running the Digital Performer installer9 Opening Digital Performer9 Examining VST and AU plug-ins10 Enabling audio I/O10 Setting up MIDI hardware10 Using virtual instruments10 Interapplication MIDI (Mac OS X only)10 Updating Digital Performer10 Technical support
11
Configuring MIDI Devices
11 Overview11 Setting up your MIDI equipment11 Connecting MIDI gear directly11 Connecting MIDI gear using a MIDI interface13 The MIDI Devices tab15 Daisy-chaining MIDI devices15 Interapplication MIDI (Mac OS X only)16 Audio MIDI Setup (Mac OS X only)
19
Configuring Audio Devices
19 Overview19 What is the MOTU Audio System?19 Preparing your computer19 Test your audio hardware first20 Supported audio hardware20 Configuring the hardware driver24 Controlling monitoring latency24 Slaving to external sync24 Optimizing performance24 Configure Studio Settings26 Fine-tuning audio I/O timing27 More ways to enhance performance27 Monitoring system performance
Part 2: Getting Started
31
What Next?
33
About Digital Performer
33 Overview33 Design philosophy33 MIDI sequencing34 Digital audio recording35 Seamless MIDI and audio35 Editing35 Arranging35 Automated mixing35 MIDI and audio effects processing36 Virtual instruments36 Mastering36 Music notation36 Studio configuration management36 Synchronization36 A customized workspace
37
Hard Disk Recording Concepts
37 Overview37 How audio is recorded on disk
37 How hard disk recording differs from tape39 How much disk space does audio require?40 Hard disk requirements and maintenance40 Digital audio terms
43
User Interface Basics
43 Overview43 Learn to use your computer43 Windows45 Control Panel45 The Window menu46 Modifier keys47 Clicking shortcuts47 Using modifier keys with cursor actions47 Contextual menus48 Standard keyboard shortcuts49 Customizing keyboard shortcuts49 Changing text box values by dragging49 Main counter shortcuts50 Using the numeric keypad
51
A Guided Tour of Digital Performer
51 If you don’t like to read manuals51 Before you begin52 Creating, opening, and saving Projects53 Control Panel54 Consolidated window55 Tracks window56 Soundbites window57 Bundles window58 Sequence Editor59 MIDI Editor60 Event List61 Drum Editor62 QuickScribe Editor63 Waveform Editor64 Meter Bridge65 Markers66 Tool Palette67 Selecting68 Editing69 Mixing Board70 Effects window71 Movie window72 Congratulations!72 Continuing on your own72 Recording your first audio
73
New Features in DP 8
Part 3: Tutorials
77
Tutorial 1: Recording MIDI
77 Overview77 Opening the tutorial file77 Record-enabling a track78 Setting the playback device79 Setting up the instrument’s sound81 Step Record81 Opening the Event List84 Saving your sequence84 Congratulations!84 Problems
87
Tutorial 2: Recording Audio
87 Overview87 How it works87 Opening the tutorial file87 Enabling audio hardware88 Using third-party audio hardware88 Using built-in audio
89 Completing the audio hardware configuration89 Choosing an input90 Preparing an audio track for recording90 Monitoring the live signal90 Establishing audio input and checking the level91 Recording92 Playing back the recorded track
93
Tutorial 3: Building a Sequence
93 What’s in this tutorial93 Tutorial checklist93 Opening the tutorial file93 Set up memory cycle recording95 Set up a Metronome click96 Set up a one bar countoff97 Set up a track for recording98 Open the Drum Editor98 Quantizing99 And now the fun really begins100 Record kick and snare first101 Fix mistakes and get ready to add the hi-hat part101 Add the hi-hat101 Save what you have done so far102 Select the loop and apply a groove103 Add a Guitar sample loop105 Prepare to record a second track105 Step record another part108 Bass part110 Transpose the bass part to the proper octave111 Make a four bar phrase111 The next step
113
Tutorial 4: Mixing and Finishing
113 What’s in this tutorial113 Tutorial checklist113 The Mixing Board114 Start mixing114 Automated mixing115 Drawing controller data in the Sequence Editor116 Plug-ins117 Bouncing to Disk118 Congratulations!
Part 4: More Information
121
Frequently Asked Questions
121 Overview121 Installing121 Setting up123 Becoming familiar with DP123 Recording and playback126 Editing126 Mixing and Finishing127 Plug-ins127 Virtual instruments (“soft synths”)
129
Additional Resources
129 Overview129 Frequently Asked Questions (FAQ)129 The Digital Performer User Guide129 Help Viewer130 motu.com
131
Index
Contents

C O N T E N T S
IV
Part 1
Setup

CHAPTER
7
1
Computer Requirements
MINIMUM COMPUTER REQUIREMENTS
Here are the computer system requirements for Digital Performer:
■
Mac or PC with Intel Core Duo CPU 1.83 GHz or faster; multiple processors or a multi-core processor is required. Intel Core 2 Duo CPU 2.0 GHz or faster recommended. Macs with PowerPC CPUs are not supported.
☛
The faster the computer, and the more RAM installed in it, the more responsive Digital Performer is. Scrolling during playback is smoother, the counter updates regularly, and actions that you take with the program are faster — especially during playback.
■
2 GB of RAM is required; 4 GB or more is highly recommended.
☛
Since plug-ins and virtual instruments are loaded into the computer’s RAM, add as much RAM as possible to your computer.
☛
Digital Performer is 64-bit compatible. When running in 64-bit mode, it can take advantage of all of the RAM installed in your computer.
■
A display with at least 1024 x 768 resolution (1280 x 1024 resolution or higher is recommended).
■
CD/DVD disc drive for installation.
■
Mac OS X (version 10.6.8, 10.7.x, 10.8) or Windows 7.
■
Large hard disk, preferably at least 100 GB. The disk on which tracks are recorded must be a fast drive.
Requirements for 64-bit operation
For native 64-bit operation, Digital Performer has the following additional requirements:
■
Mac and PC: a 64-bit CPU
■
PC: a 64-bit version of Windows 7 or Vista
Running in 64-bit or 32-bit mode
You can run Digital Performer in either 64- or 32-bit mode on both Mac OS X and Windows. This can be useful when using 32-bit plug-ins and virtual instruments (that are 32-bit only).
On Mac OS X, Digital Performer runs in 64-bit mode by default. To switch to 32-bit mode, select Digital Performer in the Finder, Get Info, then enable
Open in 32-bit mode
.
On Windows, there are separate 64- and 32-bit builds of the Digital Performer application. Just run the 32-bit executable instead of the 64-bit executable.
GETTING STARTED
Follow the directions in the next few chapters of this guide to successfully begin using Digital Performer.
FAMILIARITY WITH YOUR COMPUTER
This manual assumes that your are familiar with using your computer. If not, please review your computer’s user guide before proceeding.
VISIT MOTU.COM FOR SOFTWARE UPDATES
Software updates are periodically posted on our web site, so check our web site for the latest updates at www.motu.com. You can also check for updates directly using the commands in Digital Performer’s Help menu.

C O M P U T E R R E Q U I R E M E N T S
8
TECHNICAL SUPPORT
If you have questions, please review this manual carefully first. You can reach MOTU tech support as follows:
■
24-hour online tech support database with search engine: www.motu.com/support
■
Online: www.motu.com/support
■
Phone: +1 (617) 576-3066 (9 a.m. – 6 p.m. Eastern)
■
Downloads: www.motu.com/download

CHAPTER
9
2
Installing Digital Performer
PACKAGE CONTENTS
Your Digital Performer package includes:
■
DP installer disc
■
DP extras disc
■
DP Getting Started Guide
■
DP User Guide
The Digital Performer installer disc contains everything you need to install and use Digital Performer.
IMPORTANT! REGISTER YOUR SOFTWARE
MOTU can only provide customer service and technical support to registered users. Therefore, it is very important for you to register your software immediately after purchase. To do so, follow the directions below that apply to you:
RUNNING THE DIGITAL PERFORMER INSTALLER
1
Insert the Digital Performer Installer disc.
2
Double-click the
Install Digital Performer
or
Setup.exe
icon.
3
Follow the directions the installer gives you.
OPENING DIGITAL PERFORMER
After a successful installation, you are ready to launch Digital Performer for the first time. At this time you will need to activate Digital Performer by entering your keycode and some other information.
EXAMINING VST AND AU PLUG-INS
Digital Performer supports third-party VST plug-ins (on Mac and Windows) and Mac OS X Audio Unit (AU) plug-ins. When you first run Digital Performer, it examines third-party plug-ins currently installed in your system, checking them for problems.
Choosing a primary external plug-in format (Mac OS X only)
On Mac OS X, DP will ask you to choose either VST or AU as your primary external plug-in format. Choose AU if you have a large number of existing DP projects that use AUs, and you don’t need to transfer DP projects to and from Windows systems. Choose VST to increase the cross-platform compatibility of your projects. This choice can be changed at any time in the audio plug-in preferences (see “Primary external plug-in format (Mac only)” on page 843 in the
DP User Guide
). Once you’ve made your initial choice, Digital Performer scans and enables plug-ins in
Method of purchase How to register:
If you purchased Digital Performer
Register online at: www.motu.com/registration
If you purchased an upgrade from an earlier version of Digital Per-former (or Performer)
You are already registered and no further action is necessary.
If you purchased a Digital Performer Competitive Upgrade
Follow the directions included with your Competitive Upgrade for reg-istering your Competitive Upgrade.
I N S T A L L I N G D I G I T A L P E R F O R M E R
10
your primary format. Later, you can manually choose the desired format for each plug-in in the audio plug-in preferences.
The plug-in examination process
The plug-in examination process may take a few minutes, depending on the nature and quantity of the plug-ins installed in your system. Each plug-in is examined only once, the first time it is loaded by Digital Performer. On subsequent launches of DP, plug-ins that have already been examined will not be examined again. If a problem is detected with a particular plug-in, it will not be loaded for use in Digital Performer to prevent crashing and other serious problems. For more details about using VSTs and AUs, see “Working with VST and Audio Unit plug-ins” on page 839 in the
DP User Guide
.
ENABLING AUDIO I/O
To enable Digital Performer’s audio recording and playback abilities, choose
Setup menu> Audio System> MOTU Audio System
. For further details, see chapter 4, “Configuring Audio Devices” (page 19).
You can freely disable audio recording and playback at any time by choosing
Setup menu> Audio System> MIDI Only
.
SETTING UP MIDI HARDWARE
To set up Digital Performer for use with MIDI hardware devices connected to your computer, see chapter 3, “Configuring MIDI Devices” (page 11).
USING VIRTUAL INSTRUMENTS
Digital Performer does not require any additional preparation for use with virtual instrument plug-ins. Simply open virtual instruments as described in chapter 16, “Instrument Tracks” (page 137) in the
DP User Guide
, and its audio and MIDI inputs and outputs will appear in Digital Performer’s I/O menus.
INTERAPPLICATION MIDI (MAC OS X ONLY)
On Mac OS X, if a virtual instrument operates as a separate application, run it concurrently with Digital Performer, and any MIDI inputs and outputs that it publishes to Core MIDI will appear in Digital Performer’s MIDI input and output menus.
If you would like to work with Core MIDI-compatible MIDI software that does not publish MIDI inputs and/or outputs, Digital Performer has the ability to publish its own Core MIDI inputs and outputs, which the other application can access for MIDI I/O with Digital Performer. For details, see “Interapplication MIDI (Mac OS X only)” on page 15.
UPDATING DIGITAL PERFORMER
Digital Performer can automatically check for updates; see “Checking for updates” on page 83.
TECHNICAL SUPPORT
If you have questions, please review this manual carefully first. You can reach MOTU tech support as follows:
■
24-hour online tech support database with search engine: www.motu.com/support
■
Web-based tech support:www.motu.com/support
■
Phone: (617) 576-3066 (9 a.m. – 6 p.m. Eastern)
■
Downloads: www.motu.com/download
CHAPTER
11
3
Configuring MIDI Devices
OVERVIEW
This chapter explains how to connect MIDI hardware devices to your computer and successfully establish MIDI input and output with the device. Here are some examples of MIDI devices:
■
Controller keyboard
■
Keyboard synthesizer
■
Drum machine
■
Sound module
Additionally, this chapter explains how to set up interapplication MIDI under Mac OS X, which allows other software applications (such as stand-alone virtual instruments) to send and receive MIDI data to and from Digital Performer.
☛
Virtual instrument plug-ins, such as those included with Digital Performer, do not require any configuration for MIDI I/O.
Setting up your MIDI equipment . . . . . . . . . . . . . . . . . . . . 11
Connecting MIDI gear directly . . . . . . . . . . . . . . . . . . . . . . . 11
Connecting MIDI gear using a MIDI interface . . . . . . . . 11
The MIDI Devices tab . . . . . . . . . . . . . . . . . . . . . . . . . . . . . . . . 13
Daisy-chaining MIDI devices . . . . . . . . . . . . . . . . . . . . . . . . . 15
Interapplication MIDI (Mac OS X only) . . . . . . . . . . . . . . . 15
Audio MIDI Setup (Mac OS X only) . . . . . . . . . . . . . . . . . . . 16
SETTING UP YOUR MIDI EQUIPMENT
MIDI gear connects to your computer in one of two ways:
■
Directly (via USB, FireWire, etc.)
OR
■
Using a MIDI interface
CONNECTING MIDI GEAR DIRECTLY
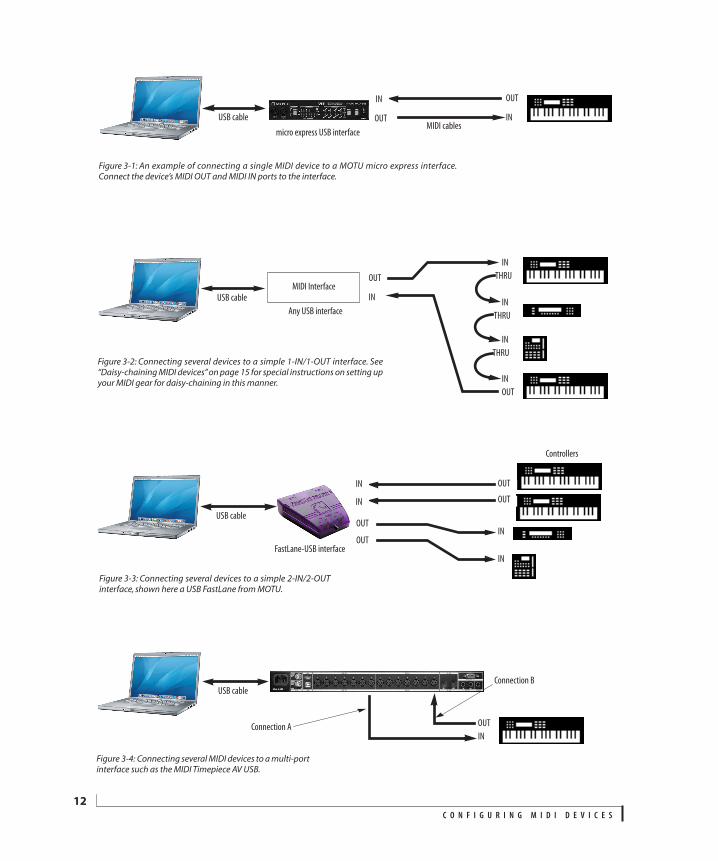
For MIDI equipment that connects directly to your computer with USB, FireWire or other standard computer peripheral connection, follow the directions for installation, including the installation of any software (drivers, etc.) that it may require. No special additional procedures are necessary for Digital Performer. When you are finished installing the MIDI device as directed, Digital Performer should be able to “see” the device’s MIDI input and output channels (and cables).
CONNECTING MIDI GEAR USING A MIDI INTERFACE
For MIDI equipment that connects to your computer using a MIDI interface, you will need:
■
Any Mac or PC compatible MIDI interface
■
MIDI cables
1
Connect your MIDI interface to your computer and connect your MIDI devices to it as shown in the examples on page 12.
☛
If your hardware situation requires that you daisy-chain your MIDI devices, be sure to see “Daisy-chaining MIDI devices” on page 15.
2
Turn on the MIDI interface, if it has a power switch (some devices are bus-powered).
C O N F I G U R I N G M I D I D E V I C E S
12
USB cableMIDI cables
IN
OUT
OUT
IN
Figure 3-1: An example of connecting a single MIDI device to a MOTU micro express interface.Connect the device’s MIDI OUT and MIDI IN ports to the interface.
micro express USB interface
OUT
IN
Figure 3-2: Connecting several devices to a simple 1-IN/1-OUT interface. See“Daisy-chaining MIDI devices” on page 15 for special instructions on setting upyour MIDI gear for daisy-chaining in this manner.
IN
THRU
IN
THRU
IN
THRU
IN
OUT
Any USB interface
MIDI Interface
USB cable
Figure 3-3: Connecting several devices to a simple 2-IN/2-OUTinterface, shown here a USB FastLane from MOTU.
IN
OUT
IN
OUT
OUT
Controllers
FastLane-USB interface
OUTIN
IN
USB cable
Connection A
Figure 3-4: Connecting several MIDI devices to a multi-portinterface such as the MIDI Timepiece AV USB.
Connection B
OUT
IN
USB cable
C O N F I G U R I N G M I D I D E V I C E S
13
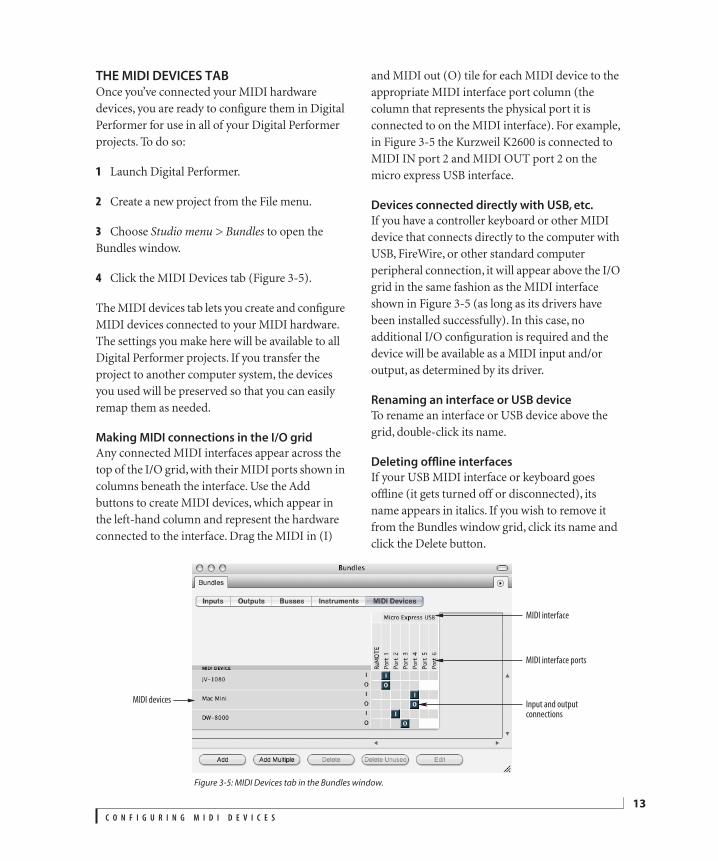
THE MIDI DEVICES TAB
Once you’ve connected your MIDI hardware devices, you are ready to configure them in Digital Performer for use in all of your Digital Performer projects. To do so:
1
Launch Digital Performer.
2
Create a new project from the File menu.
3
Choose
Studio menu > Bundles
to open the Bundles window.
4
Click the MIDI Devices tab (Figure 3-5).
The MIDI devices tab lets you create and configure MIDI devices connected to your MIDI hardware. The settings you make here will be available to all Digital Performer projects. If you transfer the project to another computer system, the devices you used will be preserved so that you can easily remap them as needed.
Making MIDI connections in the I/O grid
Any connected MIDI interfaces appear across the top of the I/O grid, with their MIDI ports shown in columns beneath the interface. Use the Add buttons to create MIDI devices, which appear in the left-hand column and represent the hardware connected to the interface. Drag the MIDI in (I)
and MIDI out (O) tile for each MIDI device to the appropriate MIDI interface port column (the column that represents the physical port it is connected to on the MIDI interface). For example, in Figure 3-5 the Kurzweil K2600 is connected to MIDI IN port 2 and MIDI OUT port 2 on the micro express USB interface.
Devices connected directly with USB, etc.
If you have a controller keyboard or other MIDI device that connects directly to the computer with USB, FireWire, or other standard computer peripheral connection, it will appear above the I/O grid in the same fashion as the MIDI interface shown in Figure 3-5 (as long as its drivers have been installed successfully). In this case, no additional I/O configuration is required and the device will be available as a MIDI input and/or output, as determined by its driver.
Renaming an interface or USB device
To rename an interface or USB device above the grid, double-click its name.
Deleting offline interfaces
If your USB MIDI interface or keyboard goes offline (it gets turned off or disconnected), its name appears in italics. If you wish to remove it from the Bundles window grid, click its name and click the Delete button.
Figure 3-5: MIDI Devices tab in the Bundles window.
MIDI interface
MIDI interface ports
MIDI devicesInput and output connections
C O N F I G U R I N G M I D I D E V I C E S
14
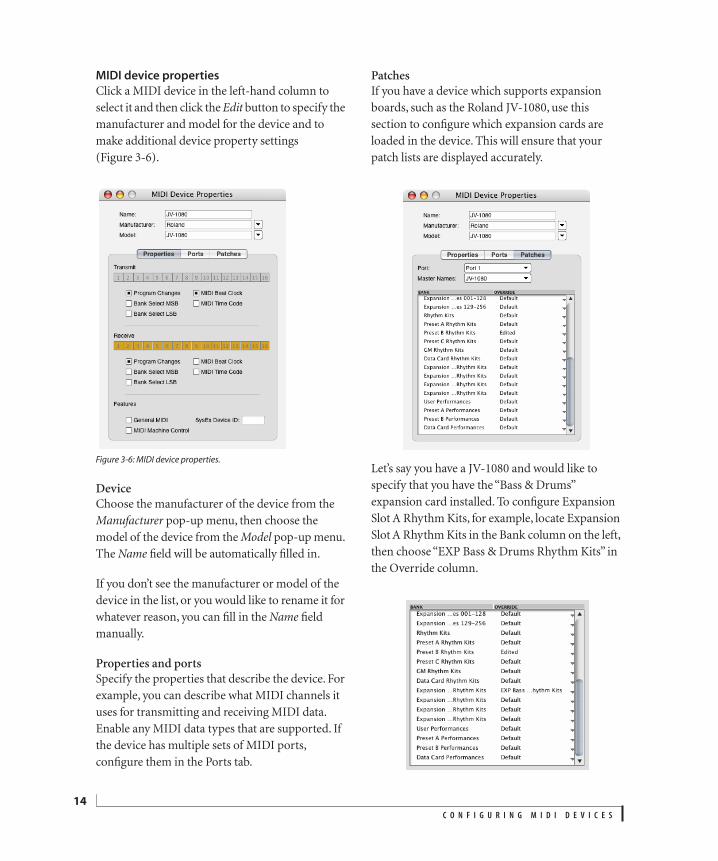
MIDI device properties
Click a MIDI device in the left-hand column to select it and then click the
Edit
button to specify the manufacturer and model for the device and to make additional device property settings (Figure 3-6).
Figure 3-6: MIDI device properties.
Device
Choose the manufacturer of the device from the
Manufacturer
pop-up menu, then choose the model of the device from the
Model
pop-up menu. The
Name
field will be automatically filled in.
If you don’t see the manufacturer or model of the device in the list, or you would like to rename it for whatever reason, you can fill in the
Name
field manually.
Properties and ports
Specify the properties that describe the device. For example, you can describe what MIDI channels it uses for transmitting and receiving MIDI data. Enable any MIDI data types that are supported. If the device has multiple sets of MIDI ports, configure them in the Ports tab.
Patches
If you have a device which supports expansion boards, such as the Roland JV-1080, use this section to configure which expansion cards are loaded in the device. This will ensure that your patch lists are displayed accurately.
Let’s say you have a JV-1080 and would like to specify that you have the “Bass & Drums” expansion card installed. To configure Expansion Slot A Rhythm Kits, for example, locate Expansion Slot A Rhythm Kits in the Bank column on the left, then choose “EXP Bass & Drums Rhythm Kits” in the Override column.
C O N F I G U R I N G M I D I D E V I C E S
15
DAISY-CHAINING MIDI DEVICES
In general, daisy-chain MIDI devices (as shown in Figure 3-2 on page 12) should be avoided because it is more complicated to set up than connecting each device directly, as shown in the other diagrams on that page.
If you have no choice but to daisy-chain, you need to configure each device such that it doesn’t share any MIDI channels with other devices in the chain. Otherwise, you’ll hear several instruments play at once because data sent to one unit is received by all the devices in the daisy chain that are listening to that same MIDI channel. To avoid this sort of unwanted instrument layering:
1
Double-click on the first device in your MIDI device configuration (Figure 3-5 on page 13) and disable some channels as shown in Figure 3-6 on page 14; leave others enabled.
2
Repeat this for the other devices in the daisy chain so that no two devices have the same channels enabled.
For example, if you daisy chain a Korg Triton and a Roland JV-1080, set the Triton to use channels 1-8 and the JV-1080 to use channels 9-16.
3 Now go to the front panel of each MIDI instrument itself and program it to respond to only the channels that are enabled in your MIDI device configuration. Refer to the documentation for the device for details on this last step.
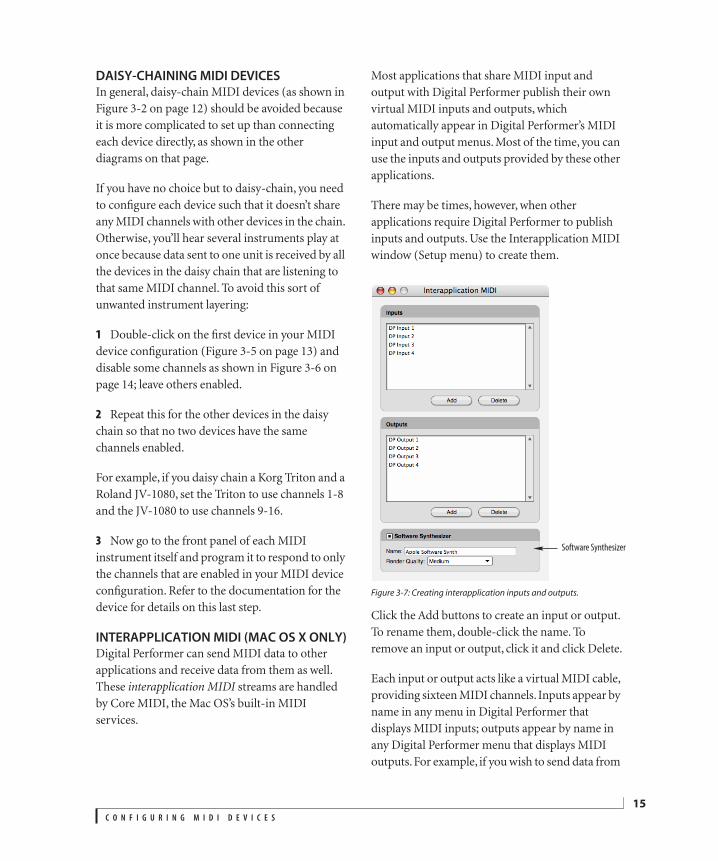
INTERAPPLICATION MIDI (MAC OS X ONLY)Digital Performer can send MIDI data to other applications and receive data from them as well. These interapplication MIDI streams are handled by Core MIDI, the Mac OS’s built-in MIDI services.
Most applications that share MIDI input and output with Digital Performer publish their own virtual MIDI inputs and outputs, which automatically appear in Digital Performer’s MIDI input and output menus. Most of the time, you can use the inputs and outputs provided by these other applications.
There may be times, however, when other applications require Digital Performer to publish inputs and outputs. Use the Interapplication MIDI window (Setup menu) to create them.
Figure 3-7: Creating interapplication inputs and outputs.
Click the Add buttons to create an input or output. To rename them, double-click the name. To remove an input or output, click it and click Delete.
Each input or output acts like a virtual MIDI cable, providing sixteen MIDI channels. Inputs appear by name in any menu in Digital Performer that displays MIDI inputs; outputs appear by name in any Digital Performer menu that displays MIDI outputs. For example, if you wish to send data from
Software Synthesizer
C O N F I G U R I N G M I D I D E V I C E S
16
a Digital Performer MIDI track to another application, assign the track’s output to a Digital Performer MIDI output.
Digital Performer’s interapplication MIDI inputs and outputs are published to all MIDI applications that support the Mac OS’s built-in MIDI services. A Digital Performer output appears as an input in other applications; conversely, a Digital Performer input appears as an output to other applications.
The software synthesizer
Mac OS X provides a basic software synthesizer that supplies a general MIDI sound set. To make this virtual instrument available as a MIDI destination and sound source in Digital Performer, check the box provided (Figure 3-7), and give it a name. Then name you choose then shows up as a MIDI output destination in Digital Performer and other Core MIDI-compatible applications (when Digital Performer is running). To specify the audio output destination for the software synthesizer (i.e. where you’ll hear it), go to the Audio tab in Mac OS X’s Audio MIDI Setup utility and choose the desired Default Output destination. The Render quality menu lets you choose the audio quality for the instrument playback. Higher quality places higher demand on the computer’s CPU resources.
AUDIO MIDI SETUP (MAC OS X ONLY)Audio MIDI Setup is a utility included with Mac OS X that provides a graphical interface for configuring the MIDI devices connected to your computer. You can use Audio MIDI Setup as an alternative to the MIDI Devices tab in Digital Performer’s Bundles window. Any changes you make in Audio MIDI Setup are automatically reflected in Digital Performer’s MIDI Devices tab, and vice versa.
☛ Using Audio MIDI Setup is not required. It is merely an alternative to using Digital Performer’s MIDI Devices tab.
Audio MIDI Setup provides two main advantages over the MIDI Devices tab:
■ A graphical environment with device icons and “virtual cables” that you can arrange on-screen in a similar fashion to the physical layout in your studio space
■ A single place to configure your MIDI devices for multiple MIDI applications, if you use other MIDI software besides Digital Performer
Audio MIDI Setup serves all Core MIDI compatible applications.
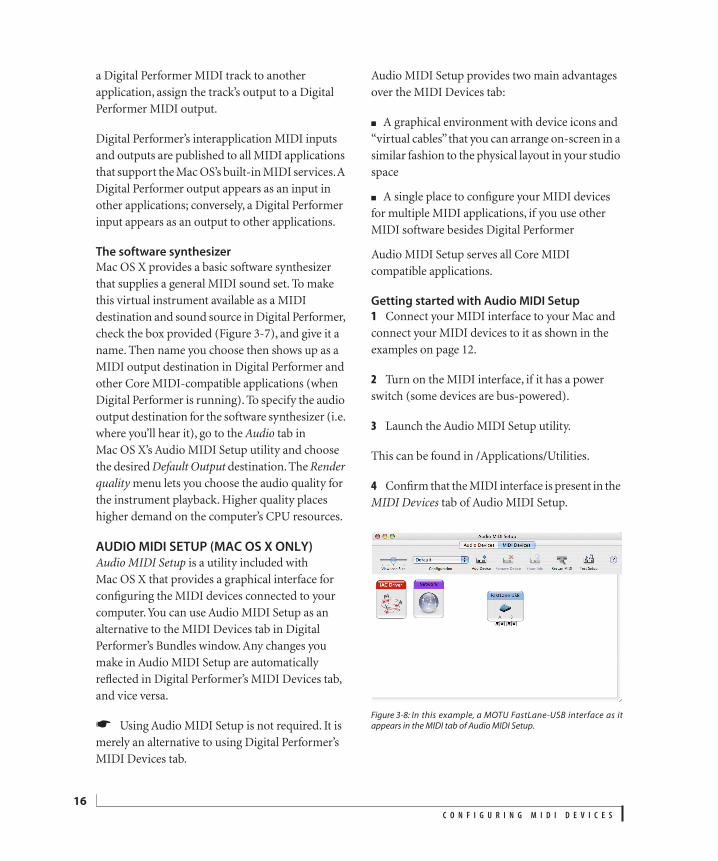
Getting started with Audio MIDI Setup
1 Connect your MIDI interface to your Mac and connect your MIDI devices to it as shown in the examples on page 12.
2 Turn on the MIDI interface, if it has a power switch (some devices are bus-powered).
3 Launch the Audio MIDI Setup utility.
This can be found in /Applications/Utilities.
4 Confirm that the MIDI interface is present in the MIDI Devices tab of Audio MIDI Setup.
Figure 3-8: In this example, a MOTU FastLane-USB interface as itappears in the MIDI tab of Audio MIDI Setup.
C O N F I G U R I N G M I D I D E V I C E S
17
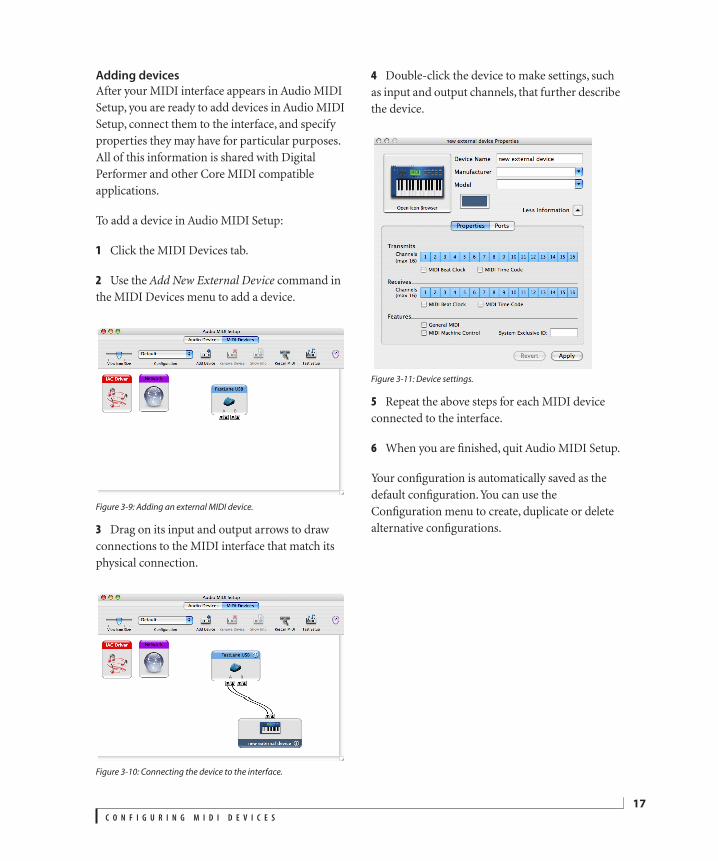
Adding devices
After your MIDI interface appears in Audio MIDI Setup, you are ready to add devices in Audio MIDI Setup, connect them to the interface, and specify properties they may have for particular purposes. All of this information is shared with Digital Performer and other Core MIDI compatible applications.
To add a device in Audio MIDI Setup:
1 Click the MIDI Devices tab.
2 Use the Add New External Device command in the MIDI Devices menu to add a device.
Figure 3-9: Adding an external MIDI device.
3 Drag on its input and output arrows to draw connections to the MIDI interface that match its physical connection.
Figure 3-10: Connecting the device to the interface.
4 Double-click the device to make settings, such as input and output channels, that further describe the device.
Figure 3-11: Device settings.
5 Repeat the above steps for each MIDI device connected to the interface.
6 When you are finished, quit Audio MIDI Setup.
Your configuration is automatically saved as the default configuration. You can use the Configuration menu to create, duplicate or delete alternative configurations.

C O N F I G U R I N G M I D I D E V I C E S
18
CHAPTER
19
4 Configuring Audio Devices
OVERVIEWThis chapter helps you get the most out of Digital Performer’s audio recording and playback features. This chapter explains what MAS is, how to configure it for your audio hardware, and how to obtain the best performance possible from your computer. The performance tips in this chapter can have a dramatic effect on how well Digital Performer operates, so be sure to review this chapter carefully.
What is the MOTU Audio System? . . . . . . . . . . . . . . . . . . . 19
Preparing your computer. . . . . . . . . . . . . . . . . . . . . . . . . . . . 19
Test your audio hardware first . . . . . . . . . . . . . . . . . . . . . . . 19
Supported audio hardware. . . . . . . . . . . . . . . . . . . . . . . . . . 20
Configuring the hardware driver . . . . . . . . . . . . . . . . . . . . 20
Controlling monitoring latency. . . . . . . . . . . . . . . . . . . . . . 24
Slaving to external sync. . . . . . . . . . . . . . . . . . . . . . . . . . . . . . 24
Optimizing performance . . . . . . . . . . . . . . . . . . . . . . . . . . . . 24
Configure Studio Settings . . . . . . . . . . . . . . . . . . . . . . . . . . . 24
Fine-tuning audio I/O timing . . . . . . . . . . . . . . . . . . . . . . . . 26
More ways to enhance performance. . . . . . . . . . . . . . . . . 27
Monitoring system performance . . . . . . . . . . . . . . . . . . . . 27
WHAT IS THE MOTU AUDIO SYSTEM?MAS is the hard disk recording engine that drives Digital Performer’s digital audio recording capabilities. MAS provides a complete audio recording environment, including many features previously only available on expensive hardware-based systems. Advanced features include an adjustable number of internal busses, aux tracks, master faders and sends. MAS also provides a plug-in architecture for real-time audio effects, such as reverb, compression and EQ. Real time effects are covered in detail in chapter 72, “Audio Effects Processing” (page 835) in the DP User Guide.
PREPARING YOUR COMPUTERHere are several things you need to do before using Digital Performer’s native audio recording and playback features.
Hard drives
Hard disk recording makes severe demands on your computer’s hard drive. The more tuned-up your hard drive, the better performance you will get. For conventional drives, 7200 rpm or faster performance is recommended, though it is possible with smaller projects to use a slower drive (such as those found inside some laptops). Solid state drives, while more expensive, offer an excellent high-performance alternative to conventional drives. Generally speaking, however, Digital Performer has no special requirements for hard disks. Better drive performance means better overall performance from Digital Performer.
Free up as much RAM as possible
Hard disk recording uses a lot of RAM. In addition, the number of audio tracks you can record and play simultaneously is directly related to the amount of memory available in your computer. More available RAM gives you more audio tracks, up to the limits of your hard drive, and smoother performance overall.
TEST YOUR AUDIO HARDWARE FIRSTWe recommend that you install and test your audio hardware before installing Digital Performer. If possible, try using any software that comes with the audio hardware — recording and playing audio, if possible — to verify that the hardware is properly installed and functioning normally. If you experience problems, this will help focus your troubleshooting and eliminate Digital Performer as a possible cause. After you’ve gotten the audio
C O N F I G U R I N G A U D I O D E V I C E S
20
hardware working properly with its own software, you will most likely not have problems with Digital Performer. Contact technical support (or our web site) for late-breaking information about compatibility with other systems. See “Technical support” on page 950 in the DP User Guide.
SUPPORTED AUDIO HARDWAREDigital Performer supports the built-in audio hardware in your computer and any Mac or Windows compatible audio hardware that ships with standard ASIO drivers, Mac OS Core Audio drivers, or Windows Audio (WASAPI) drivers. After the device’s driver has been successfully installed (as described in its installation instruc-tions), and it has been chosen for use in Digital Performer (Setup menu> Configure Audio System>Configure Hardware Driver), it will appear as a choice for audio input and output inside Digital Performer, as explained in the next section.
All MOTU audio hardware, including PCI systems, FireWire interfaces, and USB interfaces, ship with Core Audio and ASIO drivers that allow them to operate successfully with virtually all Mac and Windows audio software.
Track count and system performance
Regardless of whether you are using the computer’s built-in audio or other audio hardware, the number of audio tracks you can record and play simultaneously depends on your computer system. A faster computer with more RAM and a fast hard drive gives you more tracks. A slower computer with less RAM and a slow hard drive gives you fewer tracks.
CONFIGURING THE HARDWARE DRIVERA hardware driver is software component of your computer system that allows Digital Performer to communicate with a piece of audio hardware, such as the audio circuitry inside your computer, a FireWire audio interface, a USB or USB 2.0 audio interface, or an audio PCI card installed in one of
your computer’s PCI slots. If you haven’t already installed the driver for your audio hardware, do so now, before proceeding below.
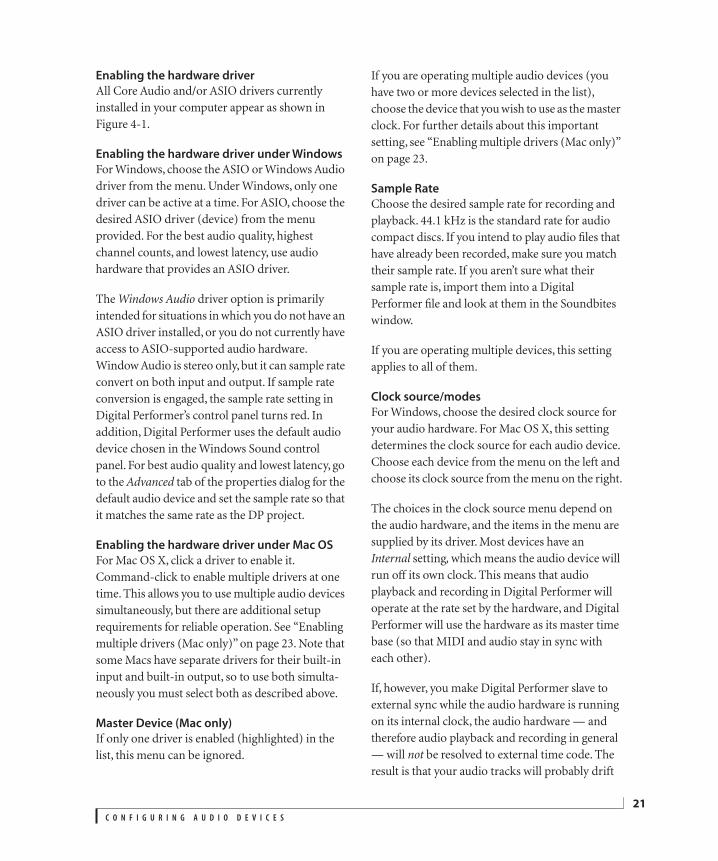
To establish the link between Digital Performer and your audio hardware, you need to activate its driver in Digital Performer. To do so, go to the Setup menu and choose Configure Audio System>Configure Hardware Driver. The Configure Hardware Driver window appears as shown below in Figure 4-1:
Figure 4-1: The Configure Hardware Driver window. On the Mac, youcan select multiple drivers to operate several audio devices simulta-neously. In this example, a MOTU 828mk3 (FireWire) interface is beingused with the computer’s built-in audio.
C O N F I G U R I N G A U D I O D E V I C E S
21
Enabling the hardware driver
All Core Audio and/or ASIO drivers currently installed in your computer appear as shown in Figure 4-1.
Enabling the hardware driver under Windows
For Windows, choose the ASIO or Windows Audio driver from the menu. Under Windows, only one driver can be active at a time. For ASIO, choose the desired ASIO driver (device) from the menu provided. For the best audio quality, highest channel counts, and lowest latency, use audio hardware that provides an ASIO driver.
The Windows Audio driver option is primarily intended for situations in which you do not have an ASIO driver installed, or you do not currently have access to ASIO-supported audio hardware. Window Audio is stereo only, but it can sample rate convert on both input and output. If sample rate conversion is engaged, the sample rate setting in Digital Performer’s control panel turns red. In addition, Digital Performer uses the default audio device chosen in the Windows Sound control panel. For best audio quality and lowest latency, go to the Advanced tab of the properties dialog for the default audio device and set the sample rate so that it matches the same rate as the DP project.
Enabling the hardware driver under Mac OS
For Mac OS X, click a driver to enable it. Command-click to enable multiple drivers at one time. This allows you to use multiple audio devices simultaneously, but there are additional setup requirements for reliable operation. See “Enabling multiple drivers (Mac only)” on page 23. Note that some Macs have separate drivers for their built-in input and built-in output, so to use both simulta-neously you must select both as described above.
Master Device (Mac only)
If only one driver is enabled (highlighted) in the list, this menu can be ignored.
If you are operating multiple audio devices (you have two or more devices selected in the list), choose the device that you wish to use as the master clock. For further details about this important setting, see “Enabling multiple drivers (Mac only)” on page 23.
Sample Rate
Choose the desired sample rate for recording and playback. 44.1 kHz is the standard rate for audio compact discs. If you intend to play audio files that have already been recorded, make sure you match their sample rate. If you aren’t sure what their sample rate is, import them into a Digital Performer file and look at them in the Soundbites window.
If you are operating multiple devices, this setting applies to all of them.
Clock source/modes
For Windows, choose the desired clock source for your audio hardware. For Mac OS X, this setting determines the clock source for each audio device. Choose each device from the menu on the left and choose its clock source from the menu on the right.
The choices in the clock source menu depend on the audio hardware, and the items in the menu are supplied by its driver. Most devices have an Internal setting, which means the audio device will run off its own clock. This means that audio playback and recording in Digital Performer will operate at the rate set by the hardware, and Digital Performer will use the hardware as its master time base (so that MIDI and audio stay in sync with each other).
If, however, you make Digital Performer slave to external sync while the audio hardware is running on its internal clock, the audio hardware — and therefore audio playback and recording in general — will not be resolved to external time code. The result is that your audio tracks will probably drift
C O N F I G U R I N G A U D I O D E V I C E S
22
out of time with your MIDI tracks, and they won’t stay in sync with the external time code. Your best bet in this scenario is to slave your audio hardware to the same source that is feeding time code to Digital Performer. You can use a synchronizer such as the MOTU MIDI Timepiece AV or Digital Timepiece to resolve to time code and supply the your audio hardware with resolved digital audio clock via word clock or another digital audio sync format. See chapter 84, “Audio Sync” (page 923) in the DP User Guide for complete details.
If your audio hardware has digital inputs (such as a S/PDIF connector), the clock source menu will probably also provide settings that let you clock off the digital input source. In general, the audio hardware either needs to slave off the external digital source or vice versa. Or both the audio hardware and the external source need to be resolved via a third device, such as a digital audio synchronizer. If the two devices are not resolved with one another, you’ll hear clicks, pops, distortion, or other similar artifacts in your digital transfers.
Configure Driver (Windows ASIO only)
Click the Configure driver button to launch your hardware’s console software for further hardware settings, including the very important buffer size setting (explained below). Some ASIO drivers require that you make this setting in the hardware’s own console software, which you can access from this button.
Buffer Size
Mac OSOn Mac OS X, the buffer size is set in the Configure Hardware Driver window (Figure 4-1 on page 20).
WindowsOn Windows, the buffer size can be set by checking the Override internal buffer size check box and choosing the desired buffer from the menu. If this option is grayed out, it means that your audio
hardware’s ASIO driver doesn’t allow host applications to change its buffer size setting. In this case, click the Configure Driver button (Figure 4-1 on page 20) to launch the hardware’s console software to make the setting there.
The importance of buffer sizeA buffer is a small part of computer memory that briefly holds digital audio samples as they are passed between the computer and your audio hardware. Choosing a smaller buffer size reduces latency, which is the delay you may hear when listening to live audio input that you are monitoring through Digital Performer — or when triggering virtual instruments from your MIDI controller. But lower settings also increase the processing load on your Mac, which impacts the number of real-time effects plug-ins you can run at one time.
If you won’t be running live inputs through Digital Performer, or playing software instruments, you can choose higher settings to free up CPU processing bandwidth for plug-ins or other processor-intensive components of your virtual studio. A typical setting for this scenario is 512 or 1024 samples.
If you are running live input through Digital Performer, or triggering virtual instruments, choose the lowest setting that your computer can handle, keeping in mind that you still need to give your computer enough processing power to handle the plug-ins and virtual instruments you are using with Digital Performer. Settings of 256 or lower produce reasonable monitoring latency: a setting of 256 samples produces round-trip monitoring latency of around 12-13 milliseconds (ms), and the delay starts to become inaudible. If, after choosing a lower setting, you hear clicks and pops in your audio, or you see spikes in the processor meter in the Audio Performance window (Studio menu), try raising it again.
C O N F I G U R I N G A U D I O D E V I C E S
23
Monitoring latency has no effect on recording: it only exists for a live signal as it is being monitored. It has no effect whatsoever on the timing accuracy of the material being recorded to disk. Digital Performer is precisely calibrated to record and play back hard disk audio perfectly on time.
If adjusting the Buffer Size setting just doesn’t allow you to strike the right balance between processor load and acceptable monitoring latency, you can also try external hardware monitoring. as explained in “Audio input monitoring” on page 217 in the DP User Guide.
Host Buffer Multiplier (Mac only)
If you are using just one audio driver (only one driver is selected in the driver list shown in Figure 4-1 on page 20), choose a setting of 1.
If you are using two or more audio drivers (two or more are selected in the driver list shown in Figure 4-1 on page 20), choose a setting of 2. If you experience problems with your audio (clicks, pops, distortion, gaps, etc.), try a setting of 3 or 4.
The overall buffer size employed by MAS is a product of the Host Buffer Multiplier and the Buffer Size. Therefore, it is best to keep the Host Buffer Multiplier setting as low as possible.
Work priority (Mac only)
The Work Priority option (Figure 4-1 on page 20) lets you set the Mac OS X thread priority for the MOTU Audio System engine. Choose the highest setting your audio hardware allows. Some audio devices, such as the Yamaha 01X mixer, require the Low setting. If you are experiencing audio performance problems with other third-party audio hardware, try the Medium setting. If problems persist, try the Low setting. When using the Medium and Low settings, you may need to increase the buffer size for best results. For all MOTU audio interfaces, leave this option set to High.
Enabling multiple drivers (Mac only)
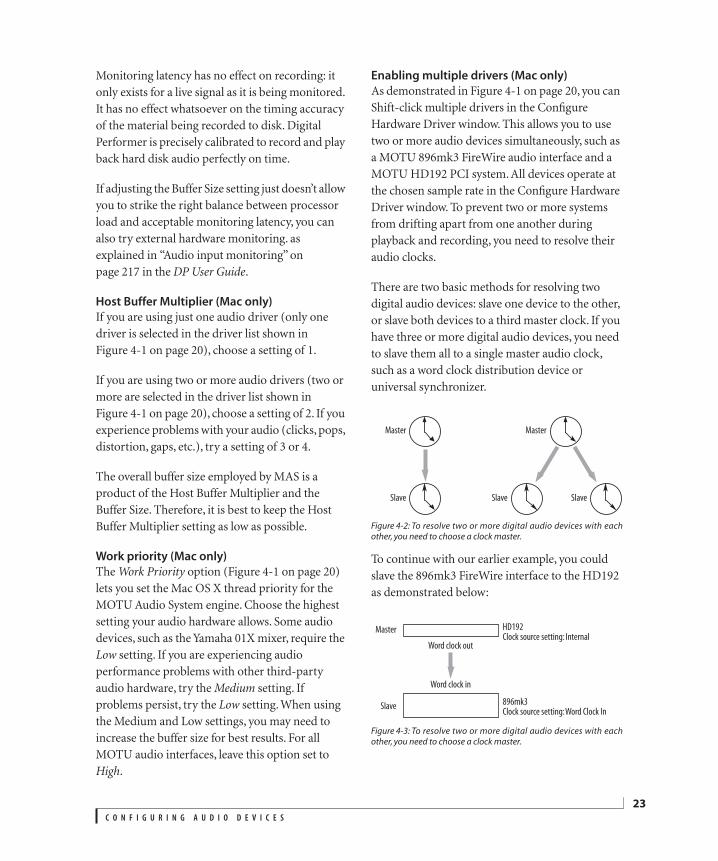
As demonstrated in Figure 4-1 on page 20, you can Shift-click multiple drivers in the Configure Hardware Driver window. This allows you to use two or more audio devices simultaneously, such as a MOTU 896mk3 FireWire audio interface and a MOTU HD192 PCI system. All devices operate at the chosen sample rate in the Configure Hardware Driver window. To prevent two or more systems from drifting apart from one another during playback and recording, you need to resolve their audio clocks.
There are two basic methods for resolving two digital audio devices: slave one device to the other, or slave both devices to a third master clock. If you have three or more digital audio devices, you need to slave them all to a single master audio clock, such as a word clock distribution device or universal synchronizer.
Figure 4-2: To resolve two or more digital audio devices with eachother, you need to choose a clock master.
To continue with our earlier example, you could slave the 896mk3 FireWire interface to the HD192 as demonstrated below:
Figure 4-3: To resolve two or more digital audio devices with eachother, you need to choose a clock master.
Master
Slave
Master
Slave Slave
Master
Slave
HD192Clock source setting: Internal
896mk3Clock source setting: Word Clock In
Word clock out
Word clock in
C O N F I G U R I N G A U D I O D E V I C E S
24
Specifying the master deviceSpecify the device that will be the master device by choosing it from the Master Device menu (Figure 4-1 on page 20).
Specifying clock sourcesUse the clock source menus (Figure 4-1 on page 20) to specify the clock source for each device. Typically, the master device will be set to Internal — or a similarly named clock mode that implies that it will be operating under its own clock — unless you are slaving your entire system to an external clock source of some kind, such as synchronizer that is resolving to video, blackburst, etc.
The clock source setting for all other devices should reflect how they are being slaved to the master device. In our example shown in Figure 4-3 on page 23, the clock source setting for the 896mk3 is Word Clock In, since it is slaved to the HDD192 via word clock.
Using the Mac’s built-in audio with external audio hardwareThe Mac’s built-in audio hardware has no way of sending or receiving a digital audio clock, so it cannot be resolved with external audio hardware. Therefore, caution is advised when running built-in audio with external audio, as you are likely to experience drift between the built-in audio and external audio — and possibly artifacts in the audio.
CONTROLLING MONITORING LATENCYThere are several computer performance issues that you should know about regarding Audio Patch Thru when running Digital Performer (regardless of whether you are using the computer’s built-in audio, a MOTU audio interface, or any other audio I/O). For details, see “Buffer Size” on page 22 and “Audio input monitoring” on page 217 in the DP User Guide.
SLAVING TO EXTERNAL SYNCIn addition, if you plan to slave Digital Performer to external sync (SMPTE time code), be sure to read chapter 84, “Audio Sync” (page 923) in the DP User Guide for important information.
OPTIMIZING PERFORMANCEYou can further refine the audio performance of your system with the items in the Configure Audio System sub-menu (Setup menu). The following sections discuss these features.
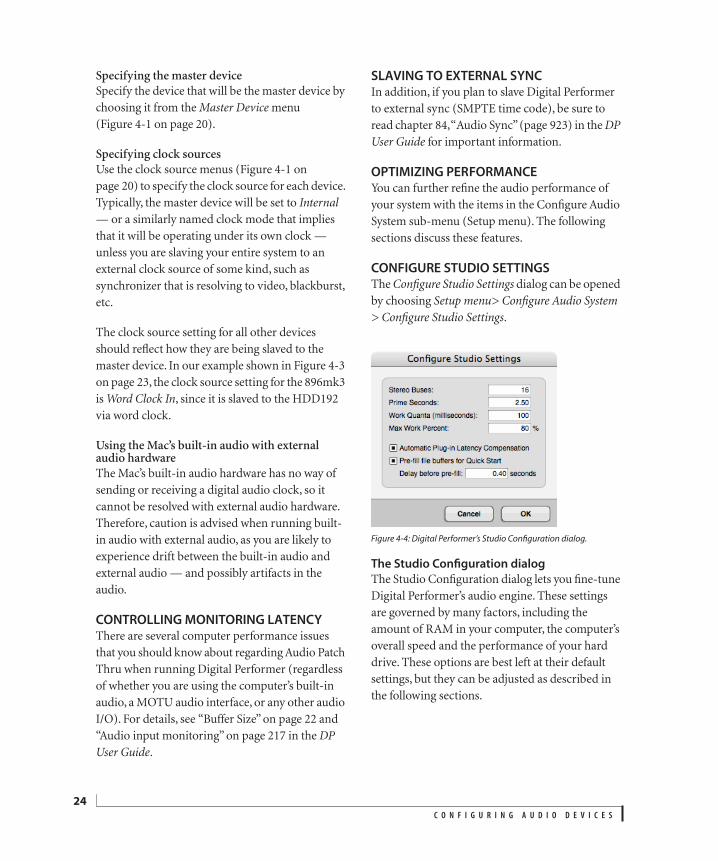
CONFIGURE STUDIO SETTINGSThe Configure Studio Settings dialog can be opened by choosing Setup menu> Configure Audio System > Configure Studio Settings.
Figure 4-4: Digital Performer’s Studio Configuration dialog.
The Studio Configuration dialog
The Studio Configuration dialog lets you fine-tune Digital Performer’s audio engine. These settings are governed by many factors, including the amount of RAM in your computer, the computer’s overall speed and the performance of your hard drive. These options are best left at their default settings, but they can be adjusted as described in the following sections.
C O N F I G U R I N G A U D I O D E V I C E S
25
Free up as much RAM as possible
Before you attempt to adjust your studio configu-ration, you should try to free up as much RAM in your computer as possible. Here are several things you can do:
■ Quit all other programs when running Digital Performer.
■ Buy more RAM (it’s affordable these days)
Stereo buses
This setting determines the number of internal audio buses provided by Digital Performer and seen in the audio menus in the Tracks window and Mixing Board. This value is fairly arbitrary and does not in itself affect system performance that much. The number of buses you actually use, however, may have an impact your system resources.
Prime Seconds
The Prime Seconds setting determines how far in advance Digital Performer pre-cues disk audio before playback begins, pre-rendering effects processing, if any, that would be required to play back the audio. If you experience any issues with playback immediately after it begins, you can try increasing this setting in small increments (0.5 seconds). Doing so may clear up issues of this kind.
Conversely, if you find that hitting the play button is not as responsive as you would like, especially after cueing to a new playback location, try lowering the Prime Seconds settings. Doing so means that Digital Performer has less data to pre-cue, which will make it more responsive.
Work Quanta
The Work Quanta setting controls the intervals at which the MAS engine does its calculations. This setting is best left at its factory default value (100ms). Raising it can free up some CPU processing for more real-time effects, but at the expense of possibly affecting the smoothness of
real-time graphics displays (such as the playback wiper). Conversely, lowering it can help smooth out even further the playback wiper and other animated graphic elements.
Max Work Percent
Max Work Percent lets you control the amount of CPU usage for the MAS engine when it is pre-rendering disk tracks and cueing them for playback. You will likely achieve the best performance on your system using the default value of 80%. You can adjust upwards or downwards from 80% based on your computer’s overall speed, the size and intensity of your Digital Performer projects, the nature of the work you are doing (studio recording versus live performance, etc.) and other factors specific to your individual situation. Higher values devote more processing to the audio engine and less to graphics display (and other tasks). Lower values reduce CPU resources for audio and increase them for graphics redraw and other tasks.
Automatic plug-in latency (delay) compensation
Some plug-ins introduce a small amount of delay (latency) to the track on which they are instantiated. Here are a few examples of plug-ins that introduce latency:
■ Universal Audio UAD-1 plug-ins
■ TC Electronic PowerCore plug-ins
■ Any plug-in that employs look-ahead
The amount of the delay depends on the plug-in, and the delay is usually unavoidable, due to the nature of the plug-in itself. For example, a look-ahead peak limiter must delay the signal by the amount of the look-ahead in order to do its job (usually several milliseconds). Hardware accelerated plug-ins, such as UAD-1 and PowerCore plug-ins, require an extra loop in their signal path between the host computer and the
C O N F I G U R I N G A U D I O D E V I C E S
26
acceleration hardware, and this loop introduces a small amount of delay (usually on the order of several hundred samples or so).
Digital Performer provides automatic compensation for plug-in latency when disk audio is being played through the plug-in. In essence, Digital Performer knows the exact amount of delay introduced by the plug-in (down to the sample) and simply feeds the disk audio to the plug-in early by that same amount, so that the plug-in has just enough time to process the audio and play it perfectly on time, with sample-accurate precision.
Automatic delay compensation only works with audio files being played back from a hard disk or virtual instruments being triggered by prerecorded MIDI tracks. Delay compensation cannot be applied to live audio or MIDI being patched through from an external live source (because it cannot be cued early by the audio engine).
Digital Performer automatically determines the delay compensation for each plug-in, if any. There is no additional preparation necessary. In addition, Digital Performer supports delay compensation for any MAS, VST, or Audio Unit plug-in or virtual instrument.
Most of the time, you will probably want to leave the Auto Plug-in Latency Compensation option enabled. The only time you would likely need to disable it is if you are working with a project created in an earlier version of Digital Performer in which you set up latency compensation manually with delay plug-ins, etc. To make your old file play back exactly like it did in earlier versions of DP without making any changes to it, unchecked this option. If you wish, you could then remove your manual latency compensation and then re-enable automatic compensation.
Pre-fill file buffers for quick start
The Pre-fill buffers for quick start option, when checked, causes Digital Performer to fill its playback buffers before you press the play button. The result is that Digital Performer starts much more quickly because it does not need to load massive amounts of audio data from disk at the instant you initiate playback. Instead, Digital Performer loads the play buffers any time you move the play head (main counter) to a new location, or make any changes that would affect playback near the play head.
FINE-TUNING AUDIO I/O TIMINGAll audio hardware adds slight timing offsets to audio that it records and plays back. Digital Performer calibrates itself to compensate for these offsets. Usually, the result is that audio plays perfectly in time with MIDI.
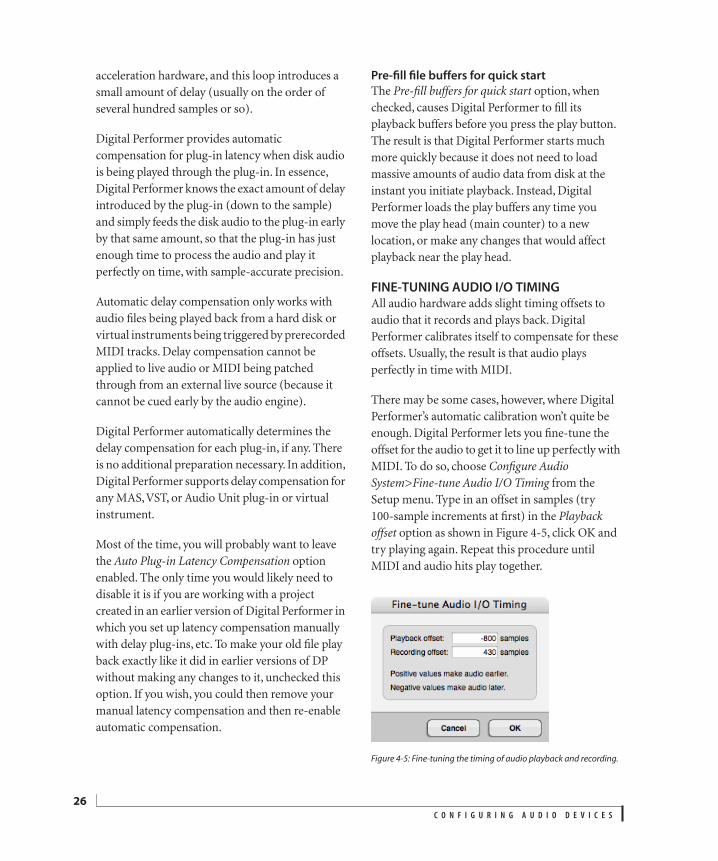
There may be some cases, however, where Digital Performer’s automatic calibration won’t quite be enough. Digital Performer lets you fine-tune the offset for the audio to get it to line up perfectly with MIDI. To do so, choose Configure Audio System>Fine-tune Audio I/O Timing from the Setup menu. Type in an offset in samples (try 100-sample increments at first) in the Playback offset option as shown in Figure 4-5, click OK and try playing again. Repeat this procedure until MIDI and audio hits play together.
Figure 4-5: Fine-tuning the timing of audio playback and recording.
C O N F I G U R I N G A U D I O D E V I C E S
27
After you have fine-tuned the built-in audio playback offset, you can also fine-tune the Recording offset. To do so, you need to record MIDI hits back into the file as audio and then compare the recorded version with the original, “live” MIDI version. If you hear flamming, adjust the Recording Offset option in the Fine-Tune Audio I/O Timing dialog. Repeat the procedure as many times as needed to fine-tune the timing.
MORE WAYS TO ENHANCE PERFORMANCEHere are a few additional ways in which you can improve audio performance:
Get a multi-processor/multi-core computer
Digital Performer takes full advantage of multi-processor and multi-core processor computers. This is best way to get the most out of your Digital Performer experience. For example, a dual-processor or dual-core machine would effectively double the performance of Digital Performer on its single-CPU or single-core counterpart.
Bouncing to play more tracks
Another way to play more audio tracks is by using Digital Performer’s Bounce to Disk feature, which takes any number of selected audio tracks and bounces them down to a single track. For more information, see chapter 81, “Bounce To Disk” (page 885) in the DP User Guide.
Spreading audio files over several disks
Another way to improve audio performance is to spread your audio files over several hard disks. This makes it easier on each drive, making your system more responsive and possibly allowing you to be able to play more tracks.
Choosing a lower sample rate
You can greatly improve audio performance — as well as increase the number of simultaneous audio tracks — by using lower sample rates (44.1 kHz instead of 96 kHz for example).
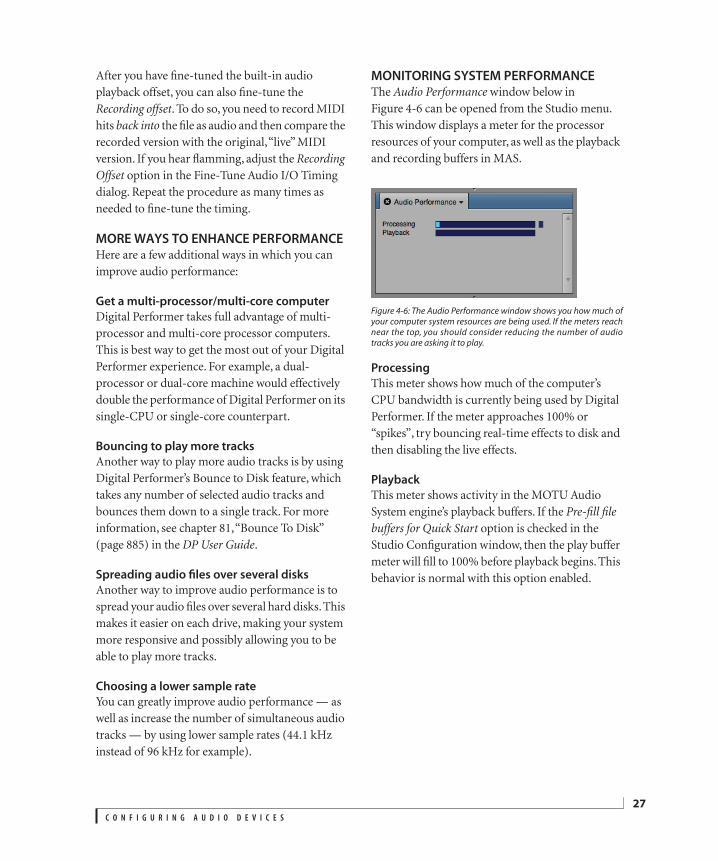
MONITORING SYSTEM PERFORMANCEThe Audio Performance window below in Figure 4-6 can be opened from the Studio menu. This window displays a meter for the processor resources of your computer, as well as the playback and recording buffers in MAS.
Figure 4-6: The Audio Performance window shows you how much ofyour computer system resources are being used. If the meters reachnear the top, you should consider reducing the number of audiotracks you are asking it to play.
Processing
This meter shows how much of the computer’s CPU bandwidth is currently being used by Digital Performer. If the meter approaches 100% or “spikes”, try bouncing real-time effects to disk and then disabling the live effects.
Playback
This meter shows activity in the MOTU Audio System engine’s playback buffers. If the Pre-fill file buffers for Quick Start option is checked in the Studio Configuration window, then the play buffer meter will fill to 100% before playback begins. This behavior is normal with this option enabled.

C O N F I G U R I N G A U D I O D E V I C E S
28
Part 2
Getting Started

CHAPTER
31
5 What Next?
You are now ready to record and play MIDI and audio tracks in Digital Performer. Here is an overview of where to go for further information:
If you don’t read manuals and would like to begin sequencing right away
Go for it. Before you do, though, you might want to check out chapter 9, “A Guided Tour of Digital Performer” (page 51) and chapter 15, “Frequently Asked Questions” (page 121).
For basic feature overviews and tutorials
Turn to Part 2 , “ Getting Started” (page 29) and Part 3 , “ Tutorials” (page 75). They provide an overview of how to operate Digital Performer, along with several extensive tutorials. “User Interface Basics” and “A Guided Tour of Digital Performer” take you through the basics of the program. Two tutorials take you step-by-step through the process of recording your first MIDI and audio track. Another tutorial shows you step-by-step how to build an entire project, introducing
you to a number of basic tasks such as quantizing and step recording, and a final tutorial helps you mix and finish your project.
These tutorials are ideal for anyone who is new to Digital Performer and would like a quick look at “the lay of the land”.
For users of previous versions of Digital Performer
If you are familiar with Digital Performer version 5 or earlier, please note that some user interface elements have changed in Digital Performer version 6 and later. For information on these changes, please refer to the “Users of previous versions of Digital Performer” page in DP’s online help files (Help menu > Digital Performer Help).
For more information
Turn to Part 4 , “ More Information” (page 119) for Frequently Asked Questions and other resources.
To do this Go here
To get a brief overview of Digital Performer chapter 6, “About Digital Performer” (page 33)chapter 9, “A Guided Tour of Digital Performer” (page 51)
To get a brief, step-by-step tutorial for MIDI recording chapter 11, “Tutorial 1: Recording MIDI” (page 77)
To get a brief, step-by-step tutorial for audio recording chapter 12, “Tutorial 2: Recording Audio” (page 87)
To get an extensive tutorial about how to cycle-record and build a sequence
chapter 13, “Tutorial 3: Building a Sequence” (page 93).
To get a tutorial on mixing and finishing your sequence chapter 14, “Tutorial 4: Mixing and Finishing” (page 113)
If you don’t read manuals and would like to begin sequencing right away
Go for it. Before you do, though, you might want to check out chapter 9, “A Guided Tour of Digital Performer” (page 51) and chapter 15, “Frequently Asked Questions” (page 121)
If you would like brief overview of the most recent changes in Digital Performer
Turn to chapter 10, “New Features in DP 8” (page 73).

W H A T N E X T ?
32

CHAPTER
33
6 About Digital Performer
OVERVIEWDigital Performer is an integrated digital audio workstation and MIDI sequencer designed for the music and audio recording professional. It provides a creative environment for comprehensive multitrack recording, editing, arranging, mixing, processing and mastering for a large variety of applications. Its speed, accuracy and flexibility make it the audio sequencer of choice for music and audio professionals the world over. Digital Performer™ provides a powerful approach to computer-based audio production: it combines MIDI sequencing with desktop digital music production inside your computer, allowing you to simultaneously record and play back multiple tracks of digital audio and MIDI data in a compre-hensive, totally integrated, creative environment. Digital Performer’s award-winning design provides you with unprecedented flexibility and control over the music that you make.
Design philosophy. . . . . . . . . . . . . . . . . . . . . . . . . . . . . . . . . . . 33
MIDI sequencing. . . . . . . . . . . . . . . . . . . . . . . . . . . . . . . . . . . . . 33
Digital audio recording . . . . . . . . . . . . . . . . . . . . . . . . . . . . . . 34
Seamless MIDI and audio . . . . . . . . . . . . . . . . . . . . . . . . . . . . 35
Editing . . . . . . . . . . . . . . . . . . . . . . . . . . . . . . . . . . . . . . . . . . . . . . . 35
Arranging. . . . . . . . . . . . . . . . . . . . . . . . . . . . . . . . . . . . . . . . . . . . 35
Automated mixing . . . . . . . . . . . . . . . . . . . . . . . . . . . . . . . . . . 35
MIDI and audio effects processing . . . . . . . . . . . . . . . . . . . 35
Virtual instruments . . . . . . . . . . . . . . . . . . . . . . . . . . . . . . . . . . 36
Mastering. . . . . . . . . . . . . . . . . . . . . . . . . . . . . . . . . . . . . . . . . . . . 36
Music notation. . . . . . . . . . . . . . . . . . . . . . . . . . . . . . . . . . . . . . . 36
Studio configuration management. . . . . . . . . . . . . . . . . . 36
Synchronization . . . . . . . . . . . . . . . . . . . . . . . . . . . . . . . . . . . . . 36
A customized workspace . . . . . . . . . . . . . . . . . . . . . . . . . . . . 36
DESIGN PHILOSOPHYIf one could use only a few words to describe Digital Performer’s design philosophy, perhaps the best two would be clarity and depth. Digital Performer is loaded with features, structured in a modular fashion such that you can use the ones you want and not worry about the others. This is helpful for those of you who are new to the program, as well as experienced users who need functional power without unnecessary complexity.
The basic recording and playback functions are very straightforward, modeled after tape deck functions. They are located in Digital Performer’s Control Panel:
Figure 6-1: Digital Performer’s Control Panel.
MIDI and audio data is recorded in Digital Performer with the highest degree of precision and accuracy ever achieved in an audio sequencer: sample-accurate precision for audio and sub-millisecond timing accuracy for MIDI. Adjustable PPQ (Parts Per Quarter Note) resolution allows you to work at any degree of precision you like. As many tracks as you need for recording and playback are available to you. Almost every operation in Digital Performer can be done while the sequence is playing back or recording, so you don’t have to stop the music to get things done.
MIDI SEQUENCINGTo use Digital Performer for MIDI sequencing, you must have a computer, a MIDI controller of some kind (such as a keyboard synthesizer or MIDI drum kit) and a sound source (such as a MIDI sound module or a software synthesizer running on the computer). Your external MIDI gear may
A B O U T D I G I T A L P E R F O R M E R
34
also require a MIDI interface, although some MIDI hardware products now connect directly to a computer.
This is the minimal setup you will need, although Digital Performer can support any configuration of MIDI instruments. Digital Performer works well with all MIDI instruments. It is capable of handling the most complex MIDI situations. It is compatible with any MIDI-equipped hardware device, such as synthesizers, samplers, drum machines, hardware sequencers, synchronization devices and more. It is also compatible with many “virtual” software synthesizer and sampler products now available. Using the built-in sound capabilities of your computer and third-party virtual instrument products, you could complete Digital Performer projects with no extra hardware whatsoever.
A MIDI sequencer is like a cross between a tape recorder and a player piano: the physical actions you make when playing the keyboard or other MIDI controller instruments are stored not as audio signals (as your tape machine would record) but as numerical information that represents music (pitches, attacks, releases, pitch bends and more). The nuances in your musical performance are analyzed and its components encoded and stored. When played back, the synthesizer recreates your original performance. In this way, the recorded sequence is more like a player piano roll, telling the instrument exactly how to play itself. One nice thing about MIDI is that you can use any compatible instrument for playback. You can also edit the individual elements of your sequence, such as a single bad note in an otherwise flawless performance. MIDI sequencing provides you with a way to manipulate virtually any parameter of a musical performance.
For example, Digital Performer’s custom consoles let you build a MIDI data transmission console from scratch, adding buttons, knobs, sliders, LCD readouts, and more, and you can program them to generate any type of MIDI data, including SysEx.
Digital Performer offers sophisticated rhythmic correction (quantizing) features. It is possible to vary the degree of effectiveness of quantization, allowing you to preserve the “free” quality of your performance while putting the critical notes on the beat. In addition, special metric effects such as beat shifting and doubling attacks can be done. The powerful Humanize command can produce more human feel in a part that may have been over-quantized. In fact, most of Digital Performer’s powerful editing commands provide humanization options that can loosen up the feel so that it’s just right.
DIGITAL AUDIO RECORDINGDigital Performer can record and play digital audio on any computer that meets the minimum requirements —without any extra audio cards installed inside the computer. Digital Performer also supports professional PCI, FireWire and high-speed USB 2.0 hard disk recording systems from MOTU and other companies.
Digital Performer also provides sophisticated mixing and mastering capabilities. A track bouncing feature allows you to create a mixdown of your project for mastering (in Digital Performer or any other mastering system). You can then burn your mastered mix onto an audio compact disc from within Digital Performer, or export the file and burn with any commercially available audio CD burning software. Digital Performer can take you from your initial creative idea all the way to your final mix—all within the high-fidelity, powerful and flexible realm of computer-based random access digital audio recording.

A B O U T D I G I T A L P E R F O R M E R
35
If you are not familiar with hard disk recording and playback, there are aspects to Digital Performer that may be entirely new to you. If so, we recommend that you review chapter 7, “Hard Disk Recording Concepts” (page 37) for a briefing on concepts that are crucial for working with Digital Performer.
SEAMLESS MIDI AND AUDIOThroughout Digital Performer, you’ll find features that work on MIDI and audio data in exactly the same way — often in the same window. For example, the Sequence Editor window graphically displays MIDI and audio data side by side in resizable track strips. Soundbites (parcels of audio data) can be cut, copied, and pasted at the same time as MIDI note data.
EDITINGAfter you’ve recorded, there is a great deal of editing power at your fingertips — you can change anything in your sequence, from a single event to a large section of data. Single events or selections of data can be edited or inserted anywhere in the sequence. The basic Cut and Paste operations and the region editing commands allow you to edit and create data: you can transpose whole sections, change controller values smoothly, create new pitch bend data, control velocity to create dynamic effects, create echo effects and more, each in only a few steps. State-of-the-art quantizing features such as Humanize and Groove Quantize help you perfect the rhythmic nuance in your sequences.
To access the data that makes up your sequence, Digital Performer offers seven powerful event-editing environments: the Event List, the MIDI Editor, the Notation Editor, the Drum Editor, the QuickScribe Editor, the Waveform Editor and the Sequence Editor. All windows support single-event and region editing as described above, and every track in your sequence can be viewed and edited in any window at any time.
The Undo History window gives you complete freedom to experiment, always allowing you to return your project to any prior state.
ARRANGINGDigital Performer’s arranging features give you creative freedom to make large-scale changes to your project quickly and efficiently. In addition, many of its arranging features let you interact musically with your project, via key signatures, meter changes, very flexible and powerful tempo control features, and much more.
AUTOMATED MIXINGDigital Performer’s Mixing Board window provides a virtual, automated mixing environment. Use pan pots, volume faders and plug-in parameter controls to automate your entire mix. Based on familiar mixing board design, Digital Performer’s Mixing Board can be customized to fit your computer screen and your mixing needs. Instantly show and hide tracks, and even hide cross-sections of the console that you aren’t using at the moment. You can save custom board layouts as well. Fader groups can be created. Real time MIDI effects processing inserts can be applied to any track. The Mix menu allows you create multiple mixdowns, which store all of the mix automation data for the entire sequence under one name. You can create an unlimited number of multiple mixdowns.
When you’re ready to jump into full surround production, Digital Performer provides all the tools you need to fully record, mix, process and master your project in any standard surround sound format.
MIDI AND AUDIO EFFECTS PROCESSINGDigital Performer ships with over 60 MIDI and audio effects plug-ins that you can apply freely to your mix in the Mixing Board. From a simple 2-band EQ to premium plug-ins such as Sonic Modulator and PreAmp-1, to the 64-bit
A B O U T D I G I T A L P E R F O R M E R
36
MasterWorks series, Digital Performer’s included plug-ins give you all the tools you need for great-sounding recordings.
VIRTUAL INSTRUMENTSDigital Performer includes a host of simple, great-sounding virtual instruments that will get you started making music quickly. From the beefy, monophonic BassLine to the evocative FM synth, Proton, hundreds of presets and intuitive programming give you many sounds at your fingertips.
Digital Performer also serves as a virtual studio platform for a wide range of compatible third-party plug-in and virtual instrument products.
MASTERINGAfter you’ve recorded, edited, arranged, mixed and processed your project, Digital Performer gives you mastering plug-ins and bounce to disk features, allowing you to master your mix for delivery in any form, from WAVE and AIFF to audio compact disc and MP3. Bounce and burn to take your project from multi-track to audio CD in one step.
MUSIC NOTATIONDigital Performer’s QuickScribe Editor displays any combination of tracks as music notation on screen exactly as it will print out. Add musical symbols such as hairpin dynamics, articulations, and lyrics. Then arrange your score with repeats, endings, codas and other score arrangement features. QuickScribe is ideal for lead sheets, instrument parts, or scores, which can be printed on any printer.
If you want to transfer your sequence to a dedicated notation program, simply save your work as a Standard MIDI File. The transfer process is simple and fast.
STUDIO CONFIGURATION MANAGEMENTDigital Performer provides an intuitive, convenient, and consistent way for you to interact with the hardware in your studio, such as intuitive device selection menus that refer to your gear by name. Studio configuration is quick and easy, and it applies across all projects. If you bring your projects to another studio, Digital Performer remembers your original hardware configuration for easy remapping at the other studio.
SYNCHRONIZATIONDigital Performer has extensive synchronization capabilities, including Tap tempo. This type of sync allows you not only to control the tempo of an existing sequence as it plays back, but to create a tempo map in real time before, during, or after recording — all by simply tapping the tempo on your MIDI controller. For example, you can tap along to a prerecorded acoustic performance, creating a precise tempo map complete with accelerandos, ritards, and rubato passages, then sync your Digital Performer sequence to the recording. After you’ve got a tempo map, the powerful Scale Tempos command provides you with every conceivable way of tweaking your tempo map, including scaling tempos to fit time.
Since their inception, both Performer and Digital Performer have provided extensive SMPTE synchronization and tempo programming features. Coupled with its flexible tempo features, Digital Performer’s synchronization capabilities make it the audio sequencer of choice for musicians working with film and video.
A CUSTOMIZED WORKSPACEDigital Performer can be customized from top to bottom to fit your needs, from MIDI note velocity shading to entire window sets. To learn more, see Part 2 , “ Customizing Your Workspace” (page 65) in the DP User Guide.
CHAPTER
37
7 Hard Disk Recording Concepts
OVERVIEWThis chapter briefly covers several important concepts about hard disk-based digital audio recording. You may not feel that you have the time to review the “basics”, but the more you know, the more you will be able to accomplish. After you read this chapter (it will only take a few minutes):
■ You will get a better sense of the vast creative possibilities open to you with this technology.
■ You will work more efficiently.
■ You will be less likely to make costly mistakes.
If you are using an audio interface from another company, be sure to consult the owner’s manual, as the use of third-party hardware can impact Digital Performer in many important ways.
How audio is recorded on disk. . . . . . . . . . . . . . . . . . . . . . . 37
How hard disk recording differs from tape. . . . . . . . . . . 37
How much disk space does audio require? . . . . . . . . . . 39
Hard disk requirements and maintenance. . . . . . . . . . . 40
Digital audio terms . . . . . . . . . . . . . . . . . . . . . . . . . . . . . . . . . . 40
HOW AUDIO IS RECORDED ON DISKDigital Performer and other computer-based digital audio recording systems record audio data in much the same way. Audio data gets recorded onto the hard disk in the form of an audio file: you press record in Digital Performer, play in some music, and the audio signal is encoded digitally in the audio file.
Digital Performer automatically creates a separate audio file for each record take. By default, Digital Performer uses interleaved audio, which stores all channels for each track in a single file. If you record
onto a mono audio track, a stereo audio track, and a 5.1 audio track, Digital Performer will create three audio files.
You may also use non-interleaved, or split stereo, audio files. If so, recorded stereo audio data is stored as separate mono files with the same name and .L and .R before the file extensions, such as “Guitar-1.L.wav” and “Guitar-1.R.wav.” The corresponding soundbites in the track remain perfectly sample-locked, no matter what you do. The same applies to surround tracks, but the naming scheme is slightly more complicated. The mixing format and channel designation is appended after the filename. The final filename may end up as “my mix.5.1.L.wav” for the front left channel of a 5.1 surround track.
Every time you press the record button, record some music, and then stop, Digital Performer automatically creates a new audio file when you start recording, records the audio data into the audio file as you play, and then closes the audio file when you press stop. Digital Performer immediately readies another audio file for the next take while inserting the last one into the audio track at the appropriate time and adding it to the list in the Soundbites window.
HOW HARD DISK RECORDING DIFFERS FROM TAPEConsider for a moment how audio is recorded on a tape deck: it is essentially a linear process. The audio signal gets recorded in a straight line (on the tape) from beginning to end. To play back, the tape passes over the head of the tape deck. If you want to start playback at a certain location in the music, you have to fast-forward or rewind the tape to that
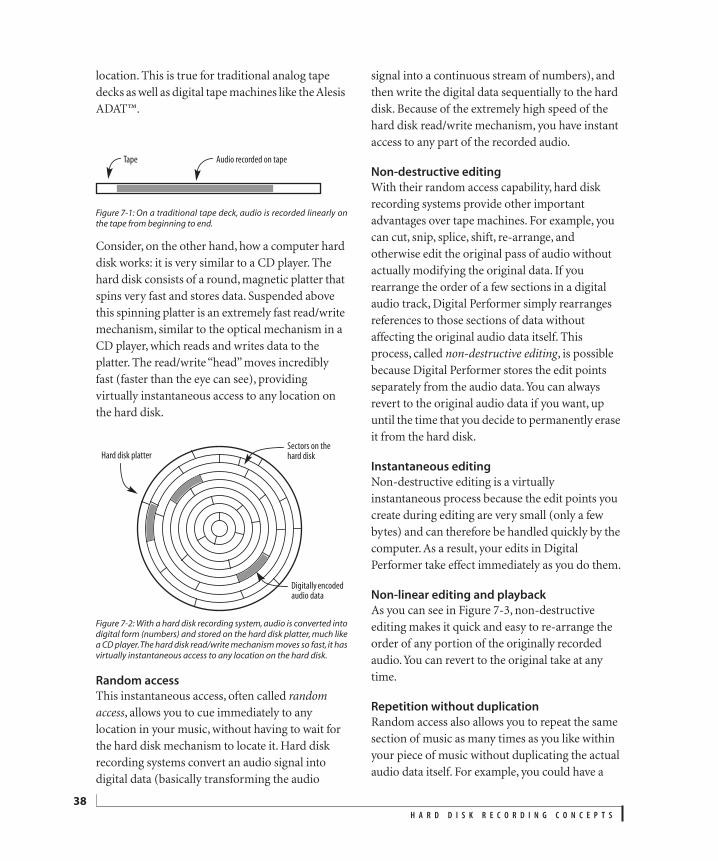
H A R D D I S K R E C O R D I N G C O N C E P T S
38
location. This is true for traditional analog tape decks as well as digital tape machines like the Alesis ADAT™.
Figure 7-1: On a traditional tape deck, audio is recorded linearly onthe tape from beginning to end.
Consider, on the other hand, how a computer hard disk works: it is very similar to a CD player. The hard disk consists of a round, magnetic platter that spins very fast and stores data. Suspended above this spinning platter is an extremely fast read/write mechanism, similar to the optical mechanism in a CD player, which reads and writes data to the platter. The read/write “head” moves incredibly fast (faster than the eye can see), providing virtually instantaneous access to any location on the hard disk.
Figure 7-2: With a hard disk recording system, audio is converted intodigital form (numbers) and stored on the hard disk platter, much likea CD player. The hard disk read/write mechanism moves so fast, it hasvirtually instantaneous access to any location on the hard disk.
Random access
This instantaneous access, often called random access, allows you to cue immediately to any location in your music, without having to wait for the hard disk mechanism to locate it. Hard disk recording systems convert an audio signal into digital data (basically transforming the audio
signal into a continuous stream of numbers), and then write the digital data sequentially to the hard disk. Because of the extremely high speed of the hard disk read/write mechanism, you have instant access to any part of the recorded audio.
Non-destructive editing
With their random access capability, hard disk recording systems provide other important advantages over tape machines. For example, you can cut, snip, splice, shift, re-arrange, and otherwise edit the original pass of audio without actually modifying the original data. If you rearrange the order of a few sections in a digital audio track, Digital Performer simply rearranges references to those sections of data without affecting the original audio data itself. This process, called non-destructive editing, is possible because Digital Performer stores the edit points separately from the audio data. You can always revert to the original audio data if you want, up until the time that you decide to permanently erase it from the hard disk.
Instantaneous editing
Non-destructive editing is a virtually instantaneous process because the edit points you create during editing are very small (only a few bytes) and can therefore be handled quickly by the computer. As a result, your edits in Digital Performer take effect immediately as you do them.
Non-linear editing and playback
As you can see in Figure 7-3, non-destructive editing makes it quick and easy to re-arrange the order of any portion of the originally recorded audio. You can revert to the original take at any time.
Repetition without duplication
Random access also allows you to repeat the same section of music as many times as you like within your piece of music without duplicating the actual audio data itself. For example, you could have a
Tape Audio recorded on tape
Hard disk platterSectors on the hard disk
Digitally encoded audio data
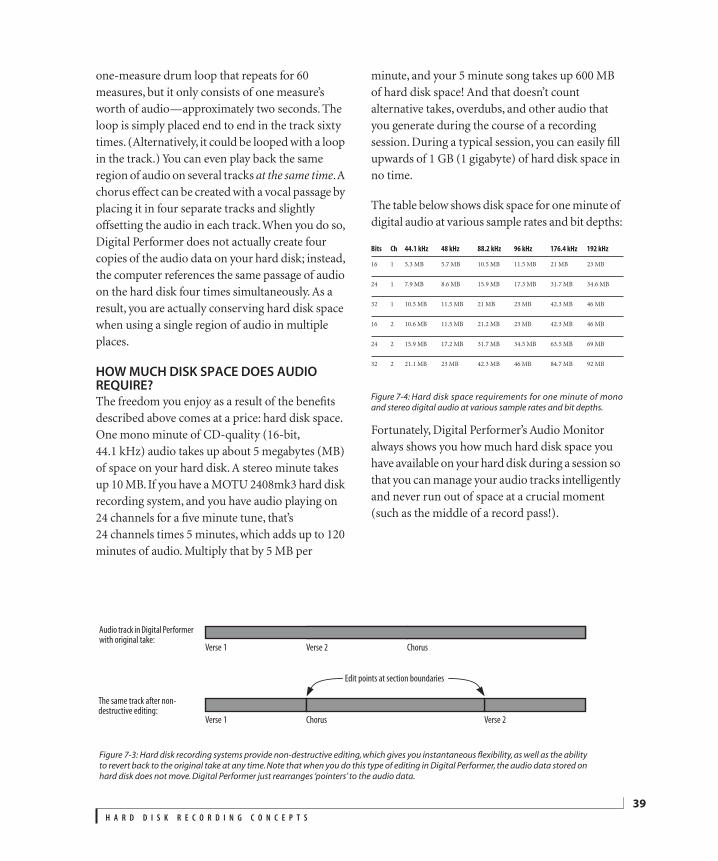
H A R D D I S K R E C O R D I N G C O N C E P T S
39
one-measure drum loop that repeats for 60 measures, but it only consists of one measure’s worth of audio—approximately two seconds. The loop is simply placed end to end in the track sixty times. (Alternatively, it could be looped with a loop in the track.) You can even play back the same region of audio on several tracks at the same time. A chorus effect can be created with a vocal passage by placing it in four separate tracks and slightly offsetting the audio in each track. When you do so, Digital Performer does not actually create four copies of the audio data on your hard disk; instead, the computer references the same passage of audio on the hard disk four times simultaneously. As a result, you are actually conserving hard disk space when using a single region of audio in multiple places.
HOW MUCH DISK SPACE DOES AUDIO REQUIRE?The freedom you enjoy as a result of the benefits described above comes at a price: hard disk space. One mono minute of CD-quality (16-bit, 44.1 kHz) audio takes up about 5 megabytes (MB) of space on your hard disk. A stereo minute takes up 10 MB. If you have a MOTU 2408mk3 hard disk recording system, and you have audio playing on 24 channels for a five minute tune, that’s 24 channels times 5 minutes, which adds up to 120 minutes of audio. Multiply that by 5 MB per
minute, and your 5 minute song takes up 600 MB of hard disk space! And that doesn’t count alternative takes, overdubs, and other audio that you generate during the course of a recording session. During a typical session, you can easily fill upwards of 1 GB (1 gigabyte) of hard disk space in no time.
The table below shows disk space for one minute of digital audio at various sample rates and bit depths:
Figure 7-4: Hard disk space requirements for one minute of monoand stereo digital audio at various sample rates and bit depths.
Fortunately, Digital Performer’s Audio Monitor always shows you how much hard disk space you have available on your hard disk during a session so that you can manage your audio tracks intelligently and never run out of space at a crucial moment (such as the middle of a record pass!).
Figure 7-3: Hard disk recording systems provide non-destructive editing, which gives you instantaneous flexibility, as well as the abilityto revert back to the original take at any time. Note that when you do this type of editing in Digital Performer, the audio data stored onhard disk does not move. Digital Performer just rearranges ‘pointers’ to the audio data.
Audio track in Digital Performer with original take:
Verse 1 Verse 2 Chorus
Verse 1 Verse 2Chorus
The same track after non-destructive editing:
Edit points at section boundaries
Bits Ch 44.1 kHz 48 kHz 88.2 kHz 96 kHz 176.4 kHz 192 kHz
16 1 5.3 MB 5.7 MB 10.5 MB 11.5 MB 21 MB 23 MB
24 1 7.9 MB 8.6 MB 15.9 MB 17.3 MB 31.7 MB 34.6 MB
32 1 10.5 MB 11.5 MB 21 MB 23 MB 42.3 MB 46 MB
16 2 10.6 MB 11.5 MB 21.2 MB 23 MB 42.3 MB 46 MB
24 2 15.9 MB 17.2 MB 31.7 MB 34.5 MB 63.5 MB 69 MB
32 2 21.1 MB 23 MB 42.3 MB 46 MB 84.7 MB 92 MB
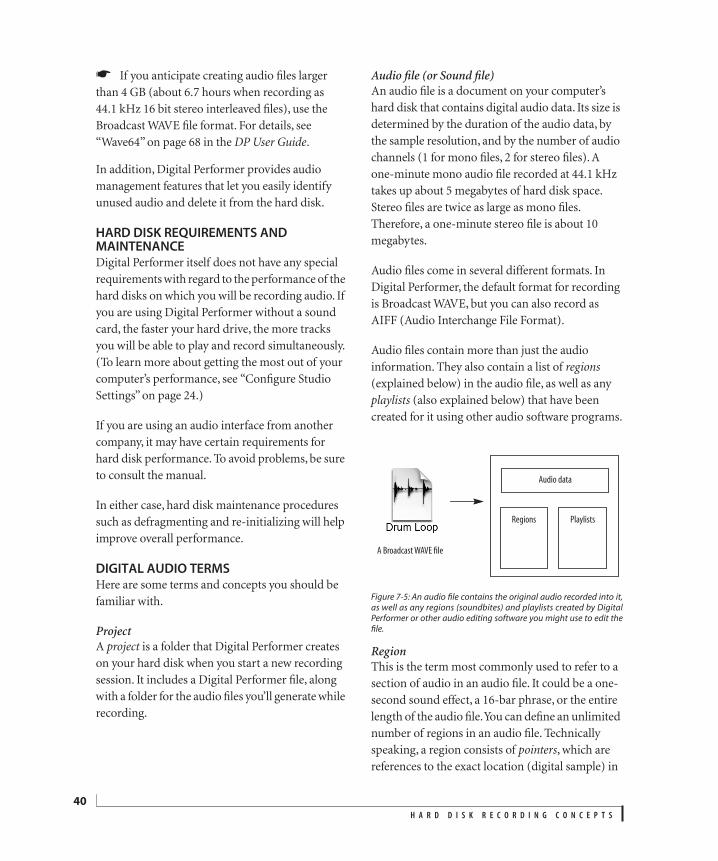
H A R D D I S K R E C O R D I N G C O N C E P T S
40
☛ If you anticipate creating audio files larger than 4 GB (about 6.7 hours when recording as 44.1 kHz 16 bit stereo interleaved files), use the Broadcast WAVE file format. For details, see “Wave64” on page 68 in the DP User Guide.
In addition, Digital Performer provides audio management features that let you easily identify unused audio and delete it from the hard disk.
HARD DISK REQUIREMENTS AND MAINTENANCEDigital Performer itself does not have any special requirements with regard to the performance of the hard disks on which you will be recording audio. If you are using Digital Performer without a sound card, the faster your hard drive, the more tracks you will be able to play and record simultaneously. (To learn more about getting the most out of your computer’s performance, see “Configure Studio Settings” on page 24.)
If you are using an audio interface from another company, it may have certain requirements for hard disk performance. To avoid problems, be sure to consult the manual.
In either case, hard disk maintenance procedures such as defragmenting and re-initializing will help improve overall performance.
DIGITAL AUDIO TERMSHere are some terms and concepts you should be familiar with.
ProjectA project is a folder that Digital Performer creates on your hard disk when you start a new recording session. It includes a Digital Performer file, along with a folder for the audio files you’ll generate while recording.
Audio file (or Sound file)An audio file is a document on your computer’s hard disk that contains digital audio data. Its size is determined by the duration of the audio data, by the sample resolution, and by the number of audio channels (1 for mono files, 2 for stereo files). A one-minute mono audio file recorded at 44.1 kHz takes up about 5 megabytes of hard disk space. Stereo files are twice as large as mono files. Therefore, a one-minute stereo file is about 10 megabytes.
Audio files come in several different formats. In Digital Performer, the default format for recording is Broadcast WAVE, but you can also record as AIFF (Audio Interchange File Format).
Audio files contain more than just the audio information. They also contain a list of regions (explained below) in the audio file, as well as any playlists (also explained below) that have been created for it using other audio software programs.
Figure 7-5: An audio file contains the original audio recorded into it,as well as any regions (soundbites) and playlists created by DigitalPerformer or other audio editing software you might use to edit thefile.
RegionThis is the term most commonly used to refer to a section of audio in an audio file. It could be a one-second sound effect, a 16-bar phrase, or the entire length of the audio file. You can define an unlimited number of regions in an audio file. Technically speaking, a region consists of pointers, which are references to the exact location (digital sample) in
A Broadcast WAVE file
Audio data
Regions Playlists
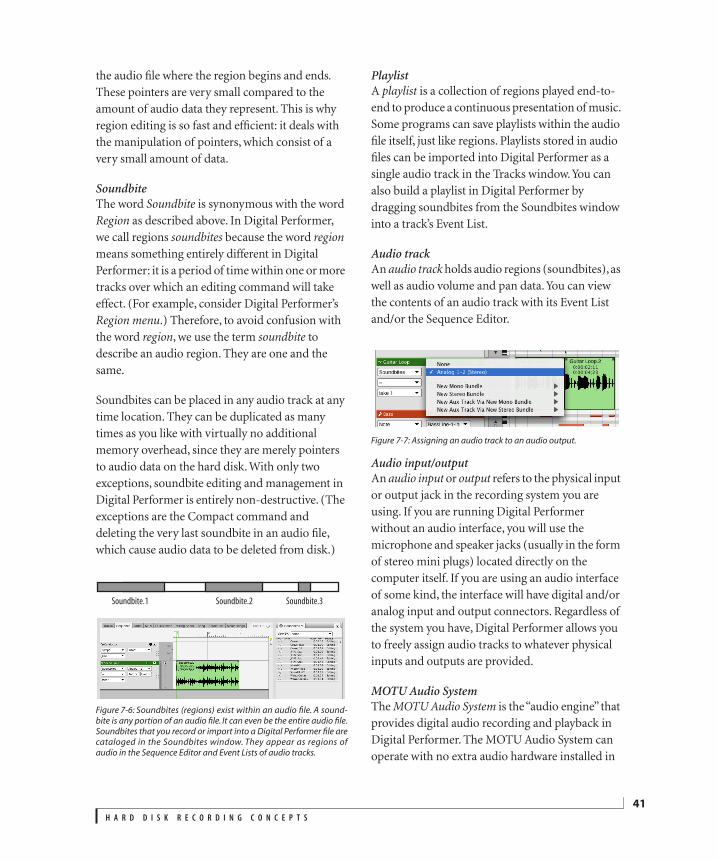
H A R D D I S K R E C O R D I N G C O N C E P T S
41
the audio file where the region begins and ends. These pointers are very small compared to the amount of audio data they represent. This is why region editing is so fast and efficient: it deals with the manipulation of pointers, which consist of a very small amount of data.
SoundbiteThe word Soundbite is synonymous with the word Region as described above. In Digital Performer, we call regions soundbites because the word region means something entirely different in Digital Performer: it is a period of time within one or more tracks over which an editing command will take effect. (For example, consider Digital Performer’s Region menu.) Therefore, to avoid confusion with the word region, we use the term soundbite to describe an audio region. They are one and the same.
Soundbites can be placed in any audio track at any time location. They can be duplicated as many times as you like with virtually no additional memory overhead, since they are merely pointers to audio data on the hard disk. With only two exceptions, soundbite editing and management in Digital Performer is entirely non-destructive. (The exceptions are the Compact command and deleting the very last soundbite in an audio file, which cause audio data to be deleted from disk.)
Figure 7-6: Soundbites (regions) exist within an audio file. A sound-bite is any portion of an audio file. It can even be the entire audio file.Soundbites that you record or import into a Digital Performer file arecataloged in the Soundbites window. They appear as regions ofaudio in the Sequence Editor and Event Lists of audio tracks.
PlaylistA playlist is a collection of regions played end-to-end to produce a continuous presentation of music. Some programs can save playlists within the audio file itself, just like regions. Playlists stored in audio files can be imported into Digital Performer as a single audio track in the Tracks window. You can also build a playlist in Digital Performer by dragging soundbites from the Soundbites window into a track’s Event List.
Audio trackAn audio track holds audio regions (soundbites), as well as audio volume and pan data. You can view the contents of an audio track with its Event List and/or the Sequence Editor.
Figure 7-7: Assigning an audio track to an audio output.
Audio input/outputAn audio input or output refers to the physical input or output jack in the recording system you are using. If you are running Digital Performer without an audio interface, you will use the microphone and speaker jacks (usually in the form of stereo mini plugs) located directly on the computer itself. If you are using an audio interface of some kind, the interface will have digital and/or analog input and output connectors. Regardless of the system you have, Digital Performer allows you to freely assign audio tracks to whatever physical inputs and outputs are provided.
MOTU Audio SystemThe MOTU Audio System is the “audio engine” that provides digital audio recording and playback in Digital Performer. The MOTU Audio System can operate with no extra audio hardware installed in
Soundbite.1 Soundbite.2 Soundbite.3
H A R D D I S K R E C O R D I N G C O N C E P T S
42
the computer, although it also supports all MOTU audio interfaces and a wide variety of third-party audio hardware.
The MOTU Audio System also supplies real-time effects plug-ins that you can use to process audio tracks in real time with effects like parametric EQ, reverb, chorusing, etc. It is also an open system, supporting real time plug-ins from other companies as well. All plug-ins are processed with extremely high fidelity 32-bit, floating point calculations.
In general, the overall performance of the MOTU Audio System (the number of audio tracks you can play simultaneously, along with the maximum amount of effects processing you can employ in real time) depends on the overall speed and performance of your computer. Together with these features, the MOTU Audio System also
supports all MOTU Audio interfaces, as well as a wide variety of third-party audio hardware. When you use the MOTU Audio System with one of these systems, you get the best of both worlds: you get to take advantage of the large number of possible audio tracks and real-time effects provided by the MOTU Audio System, along with the high-fidelity analog and digital inputs and outputs supplied by the audio hardware.
For the most part, you don’t need to be concerned with the MOTU Audio System. It runs automatically when you use Digital Performer. The only time you would think about it is if you would like to try to optimize its performance with the Configure Audio System in the Setup menu of Digital Performer. For details, see “Configure Studio Settings” on page 24.
CHAPTER
43
8 User Interface Basics
OVERVIEWThe user interface encompasses everything that you do to interact with the program: what you see on the screen and how you use the mouse, keyboard, and peripheral devices. In this chapter you’ll find information about Digital Performer’s windows, dialog boxes, mouse and keyboard actions, and how to specify and change time locations.
Learn to use your computer . . . . . . . . . . . . . . . . . . . . . . . . . 43
Windows. . . . . . . . . . . . . . . . . . . . . . . . . . . . . . . . . . . . . . . . . . . . . 43
Control Panel . . . . . . . . . . . . . . . . . . . . . . . . . . . . . . . . . . . . . . . . 45
The Window menu . . . . . . . . . . . . . . . . . . . . . . . . . . . . . . . . . . 45
Clicking shortcuts. . . . . . . . . . . . . . . . . . . . . . . . . . . . . . . . . . . . 47
Using modifier keys with cursor actions . . . . . . . . . . . . . 47
Contextual menus . . . . . . . . . . . . . . . . . . . . . . . . . . . . . . . . . . . 47
Standard keyboard shortcuts. . . . . . . . . . . . . . . . . . . . . . . . 48
Customizing keyboard shortcuts . . . . . . . . . . . . . . . . . . . . 49
Changing text box values by dragging . . . . . . . . . . . . . . 49
Main counter shortcuts . . . . . . . . . . . . . . . . . . . . . . . . . . . . . . 49
Using the numeric keypad. . . . . . . . . . . . . . . . . . . . . . . . . . . 50
LEARN TO USE YOUR COMPUTERBefore using Digital Performer, please review the standard user interface conventions for your computer. Be sure you are familiar with how to:
■ Use the mouse and keyboard
■ Open, copy and delete files
■ Drag and drop items
■ Choose commands from menus
■ Select options using push buttons, radio buttons and check boxes
■ Respond to dialog boxes
■ Use keyboard shortcuts
■ Enter and edit text
WINDOWSAn example of a Digital Performer window is shown in Figure 8-2 on page 44.
Window controls
All of Digital Performer’s standard window controls, such as the close button, minimize button, zoom button, and scroll bars, work the same way as standard window controls.
Window title
The window title shows the name of the window, and often the track or sequence that it pertains to.
Window target
Click this tab to switch the window to a different track, sequence, etc. For more details, see “Window Target” on page 303 in the DP User Guide.
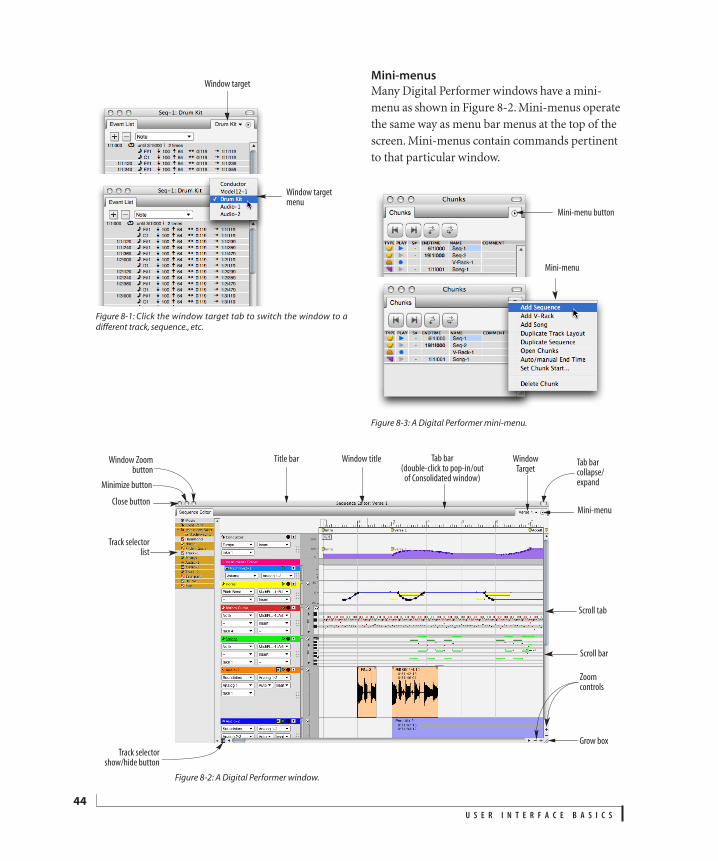
U S E R I N T E R F A C E B A S I C S
44
Figure 8-1: Click the window target tab to switch the window to adifferent track, sequence., etc.
Mini-menus
Many Digital Performer windows have a mini-menu as shown in Figure 8-2. Mini-menus operate the same way as menu bar menus at the top of the screen. Mini-menus contain commands pertinent to that particular window.
Figure 8-3: A Digital Performer mini-menu.
Window target
Window target menu
Figure 8-2: A Digital Performer window.
Window Zoombutton
Close buttonMini-menu
Scroll tab
Scroll bar
Grow box
Window title
Track selectorshow/hide button
Track selectorlist
Minimize button
Tab bar(double-click to pop-in/out
of Consolidated window)
Zoom controls
Tab bar collapse/expand
Window Target
Title bar
Mini-menu button
Mini-menu
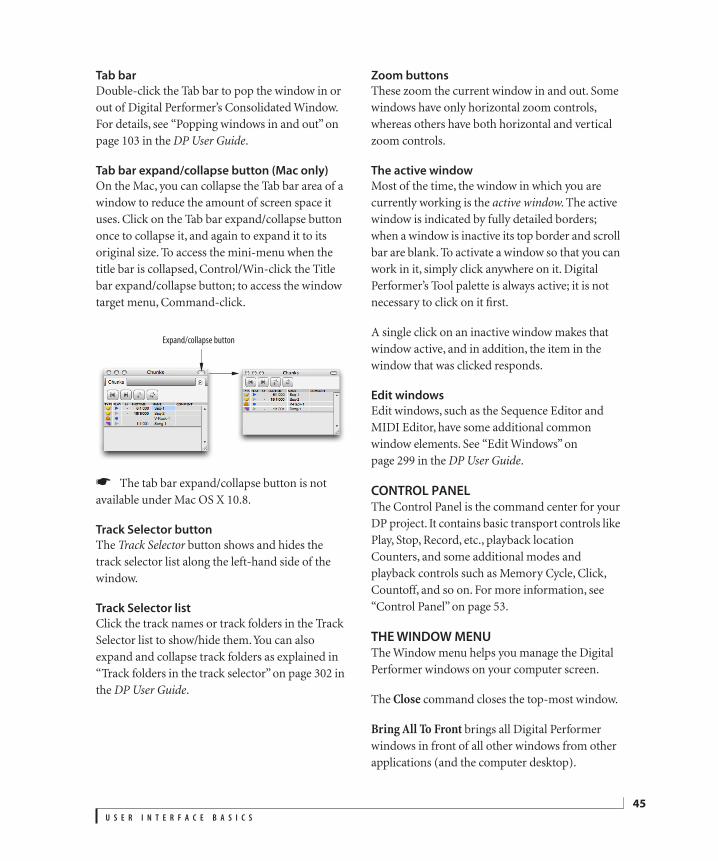
U S E R I N T E R F A C E B A S I C S
45
Tab bar
Double-click the Tab bar to pop the window in or out of Digital Performer’s Consolidated Window. For details, see “Popping windows in and out” on page 103 in the DP User Guide.
Tab bar expand/collapse button (Mac only)
On the Mac, you can collapse the Tab bar area of a window to reduce the amount of screen space it uses. Click on the Tab bar expand/collapse button once to collapse it, and again to expand it to its original size. To access the mini-menu when the title bar is collapsed, Control/Win-click the Title bar expand/collapse button; to access the window target menu, Command-click.
☛ The tab bar expand/collapse button is not available under Mac OS X 10.8.
Track Selector button
The Track Selector button shows and hides the track selector list along the left-hand side of the window.
Track Selector list
Click the track names or track folders in the Track Selector list to show/hide them. You can also expand and collapse track folders as explained in “Track folders in the track selector” on page 302 in the DP User Guide.
Zoom buttons
These zoom the current window in and out. Some windows have only horizontal zoom controls, whereas others have both horizontal and vertical zoom controls.
The active window
Most of the time, the window in which you are currently working is the active window. The active window is indicated by fully detailed borders; when a window is inactive its top border and scroll bar are blank. To activate a window so that you can work in it, simply click anywhere on it. Digital Performer’s Tool palette is always active; it is not necessary to click on it first.
A single click on an inactive window makes that window active, and in addition, the item in the window that was clicked responds.
Edit windows
Edit windows, such as the Sequence Editor and MIDI Editor, have some additional common window elements. See “Edit Windows” on page 299 in the DP User Guide.
CONTROL PANELThe Control Panel is the command center for your DP project. It contains basic transport controls like Play, Stop, Record, etc., playback location Counters, and some additional modes and playback controls such as Memory Cycle, Click, Countoff, and so on. For more information, see “Control Panel” on page 53.
THE WINDOW MENUThe Window menu helps you manage the Digital Performer windows on your computer screen.
The Close command closes the top-most window.
Bring All To Front brings all Digital Performer windows in front of all other windows from other applications (and the computer desktop).
Expand/collapse button

U S E R I N T E R F A C E B A S I C S
46
Push Window to Back moves the topmost DP window behind all other DP windows.
The Next/Last Edit window commands cycle through all of the currently open edit windows.
The Show/Hide Left/Right Sidebar commands expand or collapse the left and right sidebars in the Consolidated window.
The Set Focus to Next/Previous Cell commands let you move the cell focus in the Consolidated window, for things like keyboard shortcuts and menu commands. Close Cell closes the currently focused cell. Pop Out of Consolidated Window removes the currently focused cell from the Consolidated Window and puts it into its own window.
The Window Sets hierarchical menu lets you save your favorite window layouts, assign keyboard shortcuts to them, and recall them whenever you want. For details, see chapter 10, “Window Sets” (page 105) in the DP User Guide.
The Windows List displays all of the open windows, with a check next to the active window. Select a window to make it the active window.
Closing all edit windows
Digital Performer provides several shortcuts for closing all open edit windows (Event Lists, MIDI Editors, the Drum Editor, QuickScribe Editor, etc.):
■ Press Command-Option-W (Mac) or Ctrl-Alt-W (Windows).
■ Option/Alt-click the close button in any edit window.
■ Press the Option/Alt key and the Close command in the Window menu changes to Close All Edit windows.
Closing all windows
To close all open windows (except the Control Panel, if it is ), press Command-Control-W (Mac) or Ctrl-Win-W (Win). If you hold down the Command and Control keys (Mac) or Ctrl and Win keys (Windows) when choosing the Close command in the Window menu, it changes to Close All Windows.
Closing all effect windows
To close all open effect windows, press Command-Shift-Control-W (Mac) or Control-Shift-Win-W (Windows). If you hold down the Shift and Control/Win keys when choosing the Close command in the Window menu, it changes to Close All Effect Windows.
MODIFIER KEYSDP employs the following modifier keys on Mac and Windows:
In this manual, references to the Mac Control key spell out the whole word, while references to the Windows Ctrl key use the abbreviated form found on most PC keyboards.
When referring to modifier keys, this manual uses the following conventions:
Mac Windows
Shift Shift
Option Alt
Command Ctrl
Control Windows logo (Win)
Separator Example What it indicates
- (dash) Ctrl-Alt-click Indicates modifier keys that should be pressed in combination
/ (slash) Option/Alt-click Serves as a separator between Mac and Windows keys.
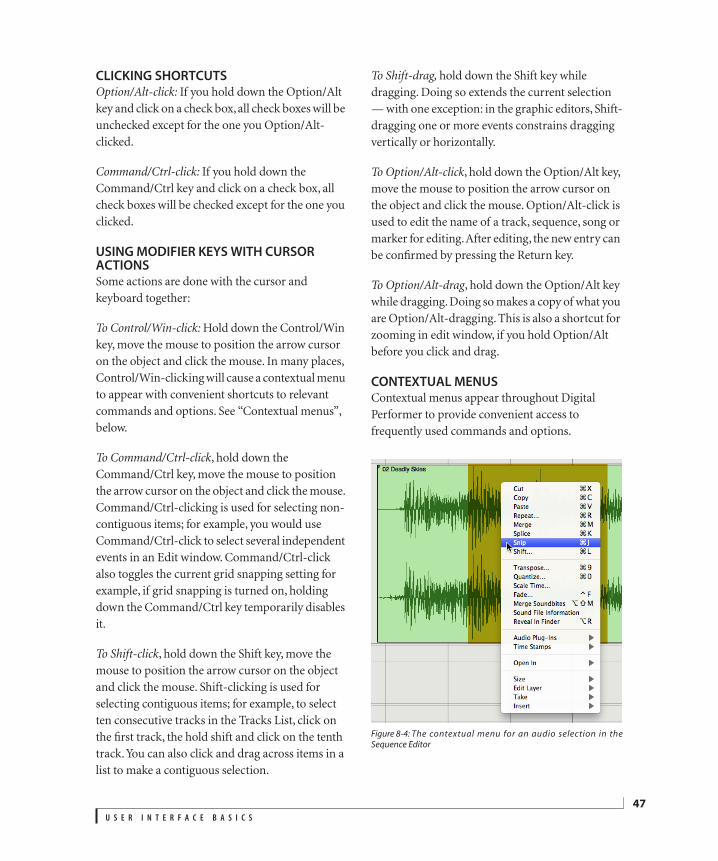
U S E R I N T E R F A C E B A S I C S
47
CLICKING SHORTCUTSOption/Alt-click: If you hold down the Option/Alt key and click on a check box, all check boxes will be unchecked except for the one you Option/Alt-clicked.
Command/Ctrl-click: If you hold down the Command/Ctrl key and click on a check box, all check boxes will be checked except for the one you clicked.
USING MODIFIER KEYS WITH CURSOR ACTIONSSome actions are done with the cursor and keyboard together:
To Control/Win-click: Hold down the Control/Win key, move the mouse to position the arrow cursor on the object and click the mouse. In many places, Control/Win-clicking will cause a contextual menu to appear with convenient shortcuts to relevant commands and options. See “Contextual menus”, below.
To Command/Ctrl-click, hold down the Command/Ctrl key, move the mouse to position the arrow cursor on the object and click the mouse. Command/Ctrl-clicking is used for selecting non-contiguous items; for example, you would use Command/Ctrl-click to select several independent events in an Edit window. Command/Ctrl-click also toggles the current grid snapping setting for example, if grid snapping is turned on, holding down the Command/Ctrl key temporarily disables it.
To Shift-click, hold down the Shift key, move the mouse to position the arrow cursor on the object and click the mouse. Shift-clicking is used for selecting contiguous items; for example, to select ten consecutive tracks in the Tracks List, click on the first track, the hold shift and click on the tenth track. You can also click and drag across items in a list to make a contiguous selection.
To Shift-drag, hold down the Shift key while dragging. Doing so extends the current selection — with one exception: in the graphic editors, Shift-dragging one or more events constrains dragging vertically or horizontally.
To Option/Alt-click, hold down the Option/Alt key, move the mouse to position the arrow cursor on the object and click the mouse. Option/Alt-click is used to edit the name of a track, sequence, song or marker for editing. After editing, the new entry can be confirmed by pressing the Return key.
To Option/Alt-drag, hold down the Option/Alt key while dragging. Doing so makes a copy of what you are Option/Alt-dragging. This is also a shortcut for zooming in edit window, if you hold Option/Alt before you click and drag.
CONTEXTUAL MENUSContextual menus appear throughout Digital Performer to provide convenient access to frequently used commands and options.
Figure 8-4: The contextual menu for an audio selection in theSequence Editor
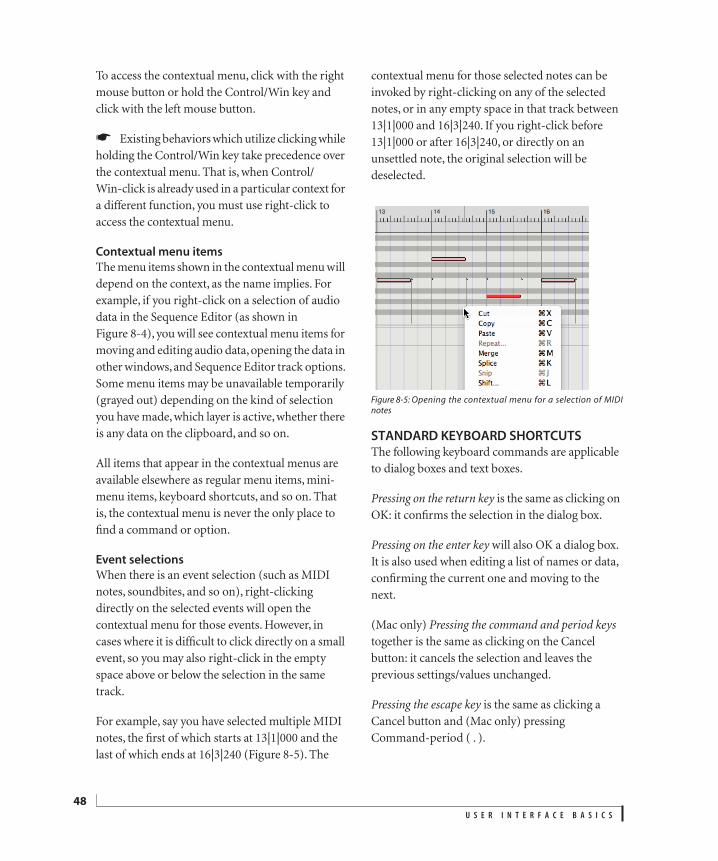
U S E R I N T E R F A C E B A S I C S
48
To access the contextual menu, click with the right mouse button or hold the Control/Win key and click with the left mouse button.
☛ Existing behaviors which utilize clicking while holding the Control/Win key take precedence over the contextual menu. That is, when Control/Win-click is already used in a particular context for a different function, you must use right-click to access the contextual menu.
Contextual menu items
The menu items shown in the contextual menu will depend on the context, as the name implies. For example, if you right-click on a selection of audio data in the Sequence Editor (as shown in Figure 8-4), you will see contextual menu items for moving and editing audio data, opening the data in other windows, and Sequence Editor track options. Some menu items may be unavailable temporarily (grayed out) depending on the kind of selection you have made, which layer is active, whether there is any data on the clipboard, and so on.
All items that appear in the contextual menus are available elsewhere as regular menu items, mini-menu items, keyboard shortcuts, and so on. That is, the contextual menu is never the only place to find a command or option.
Event selections
When there is an event selection (such as MIDI notes, soundbites, and so on), right-clicking directly on the selected events will open the contextual menu for those events. However, in cases where it is difficult to click directly on a small event, so you may also right-click in the empty space above or below the selection in the same track.
For example, say you have selected multiple MIDI notes, the first of which starts at 13|1|000 and the last of which ends at 16|3|240 (Figure 8-5). The
contextual menu for those selected notes can be invoked by right-clicking on any of the selected notes, or in any empty space in that track between 13|1|000 and 16|3|240. If you right-click before 13|1|000 or after 16|3|240, or directly on an unsettled note, the original selection will be deselected.
Figure 8-5: Opening the contextual menu for a selection of MIDInotes
STANDARD KEYBOARD SHORTCUTSThe following keyboard commands are applicable to dialog boxes and text boxes.
Pressing on the return key is the same as clicking on OK: it confirms the selection in the dialog box.
Pressing on the enter key will also OK a dialog box. It is also used when editing a list of names or data, confirming the current one and moving to the next.
(Mac only) Pressing the command and period keys together is the same as clicking on the Cancel button: it cancels the selection and leaves the previous settings/values unchanged.
Pressing the escape key is the same as clicking a Cancel button and (Mac only) pressing Command-period ( . ).
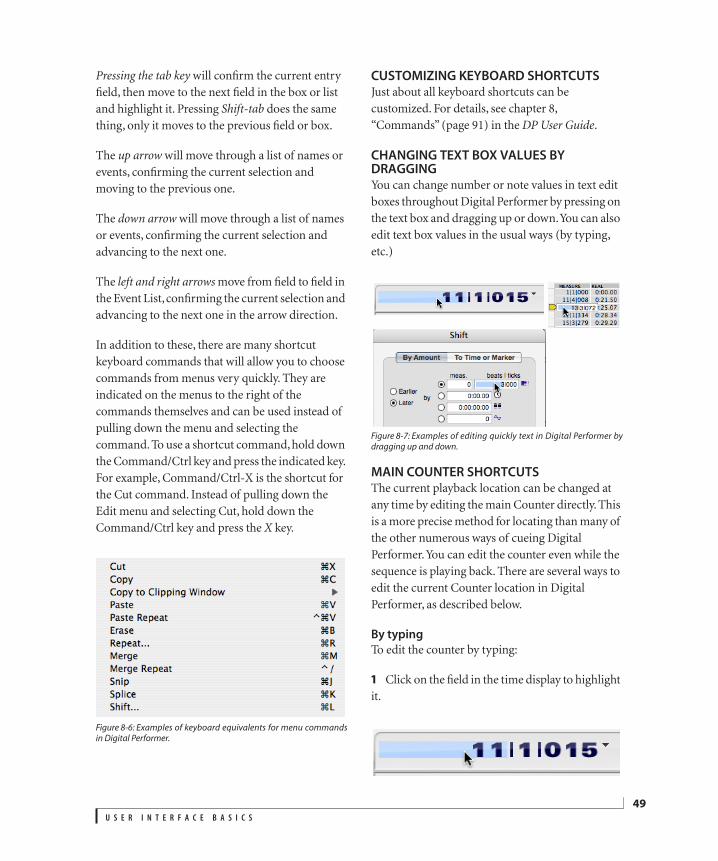
U S E R I N T E R F A C E B A S I C S
49
Pressing the tab key will confirm the current entry field, then move to the next field in the box or list and highlight it. Pressing Shift-tab does the same thing, only it moves to the previous field or box.
The up arrow will move through a list of names or events, confirming the current selection and moving to the previous one.
The down arrow will move through a list of names or events, confirming the current selection and advancing to the next one.
The left and right arrows move from field to field in the Event List, confirming the current selection and advancing to the next one in the arrow direction.
In addition to these, there are many shortcut keyboard commands that will allow you to choose commands from menus very quickly. They are indicated on the menus to the right of the commands themselves and can be used instead of pulling down the menu and selecting the command. To use a shortcut command, hold down the Command/Ctrl key and press the indicated key. For example, Command/Ctrl-X is the shortcut for the Cut command. Instead of pulling down the Edit menu and selecting Cut, hold down the Command/Ctrl key and press the X key.
Figure 8-6: Examples of keyboard equivalents for menu commandsin Digital Performer.
CUSTOMIZING KEYBOARD SHORTCUTSJust about all keyboard shortcuts can be customized. For details, see chapter 8, “Commands” (page 91) in the DP User Guide.
CHANGING TEXT BOX VALUES BY DRAGGINGYou can change number or note values in text edit boxes throughout Digital Performer by pressing on the text box and dragging up or down. You can also edit text box values in the usual ways (by typing, etc.)
Figure 8-7: Examples of editing quickly text in Digital Performer bydragging up and down.
MAIN COUNTER SHORTCUTSThe current playback location can be changed at any time by editing the main Counter directly. This is a more precise method for locating than many of the other numerous ways of cueing Digital Performer. You can edit the counter even while the sequence is playing back. There are several ways to edit the current Counter location in Digital Performer, as described below.
By typing
To edit the counter by typing:
1 Click on the field in the time display to highlight it.
U S E R I N T E R F A C E B A S I C S
50
2 Type in a new time value.
While a field is highlighted, just type in a new value. Use the backspace key to erase an incorrect entry.
Press the Tab key or the decimal key on the numeric keypad to cycle through each field of a time display, highlighting each so that you can type in a value. (On Windows, make sure the Num Lock key is engaged before you use the decimal key on the keypad.) For example, to enter the time 11|1|015 as shown in the example above:
1 Click on the beats field to highlight it.
2 Press 11.
3 Press the Tab or decimal key.
4 Press 1.
5 Press the Tab or decimal key.
6 Press 0, 1, and 5.
7 Press the Return key.
As a shortcut, you can press the decimal key on the numeric keypad (with the Num Lock key engaged under Windows). To cancel the edit, press Command/Ctrl-period (Mac only) or escape.
By dragging
This is a great short cut for quickly “yanking” the counter:
1 Press on the desired measure, beat, or tick field (or hour, minute, second, or frame field if you are working with SMPTE).
2 Drag up or down.
By pasting
Counter values can be copied and pasted from nearly any field where a counter value is displayed: the main counter, aux counter, Information Bar, and so on.
1 Click in any counter field.
2 Press Command/Ctrl-C or choose Edit menu > Copy.
3 Click in the main or aux counter field to highlight it.
4 Press Command/Ctrl-V or choose Edit menu > Paste.
USING THE NUMERIC KEYPADDigital Performer provides many factory default shortcuts on your computer’s standard extended numeric keypad (if it has one), from basic transport controls to specialized shortcuts for specific features, such as QuickScribe note entry and Step Record functions.
Windows Num Lock key
On Windows, be sure to engage the Num Lock key to enable the numeric keypad shortcuts discussed in this manual.
CHAPTER
51
9 A Guided Tour of Digital Performer
IF YOU DON’T LIKE TO READ MANUALSThis chapter provides an overview of Digital Performer’s features in the form of a guided tour through the windows used in a typical Digital Performer project. Each page gives you a brief introduction to Digital Performer’s important windows and features. You’ll probably get a good idea of how to get around in the program just by scanning these pages. Once you have, you’ll be primed and ready for the step-by-step tutorials that follow. Or you can try to begin sequencing on your own.
BEFORE YOU BEGINThe tour assumes that you have successfully installed Digital Performer. This includes creating your MIDI device configuration. If you haven’t yet done so and you plan to follow along in the Digital Performer, refer to the installation instructions that accompany this manual before proceeding.
Also, if you’re not familiar with Digital Performer’s basic conventions, please first read chapter 8, “User Interface Basics” (page 43).
Creating, opening, and saving Projects . . . . . . . . . . . . . . . 52
Control Panel. . . . . . . . . . . . . . . . . . . . . . . . . . . . . . . . . . . . . . . . . 53
Consolidated window. . . . . . . . . . . . . . . . . . . . . . . . . . . . . . . . 54
Tracks window . . . . . . . . . . . . . . . . . . . . . . . . . . . . . . . . . . . . . . . 55
Soundbites window. . . . . . . . . . . . . . . . . . . . . . . . . . . . . . . . . . 56
Bundles window . . . . . . . . . . . . . . . . . . . . . . . . . . . . . . . . . . . . . 57
Sequence Editor. . . . . . . . . . . . . . . . . . . . . . . . . . . . . . . . . . . . . . 58
MIDI Editor . . . . . . . . . . . . . . . . . . . . . . . . . . . . . . . . . . . . . . . . . . . 59
Event List. . . . . . . . . . . . . . . . . . . . . . . . . . . . . . . . . . . . . . . . . . . . . 60
Drum Editor . . . . . . . . . . . . . . . . . . . . . . . . . . . . . . . . . . . . . . . . . . 61
QuickScribe Editor . . . . . . . . . . . . . . . . . . . . . . . . . . . . . . . . . . . 62
Waveform Editor . . . . . . . . . . . . . . . . . . . . . . . . . . . . . . . . . . . . . 63
Meter Bridge . . . . . . . . . . . . . . . . . . . . . . . . . . . . . . . . . . . . . . . . . 64
Markers . . . . . . . . . . . . . . . . . . . . . . . . . . . . . . . . . . . . . . . . . . . . . . 65
Tool Palette. . . . . . . . . . . . . . . . . . . . . . . . . . . . . . . . . . . . . . . . . . . 66
Selecting . . . . . . . . . . . . . . . . . . . . . . . . . . . . . . . . . . . . . . . . . . . . . 67
Editing . . . . . . . . . . . . . . . . . . . . . . . . . . . . . . . . . . . . . . . . . . . . . . . 68
Mixing Board. . . . . . . . . . . . . . . . . . . . . . . . . . . . . . . . . . . . . . . . . 69
Effects window. . . . . . . . . . . . . . . . . . . . . . . . . . . . . . . . . . . . . . . 70
Movie window . . . . . . . . . . . . . . . . . . . . . . . . . . . . . . . . . . . . . . . 71
Congratulations! . . . . . . . . . . . . . . . . . . . . . . . . . . . . . . . . . . . . . 72
Continuing on your own . . . . . . . . . . . . . . . . . . . . . . . . . . . . . 72
Recording your first audio. . . . . . . . . . . . . . . . . . . . . . . . . . . . 72
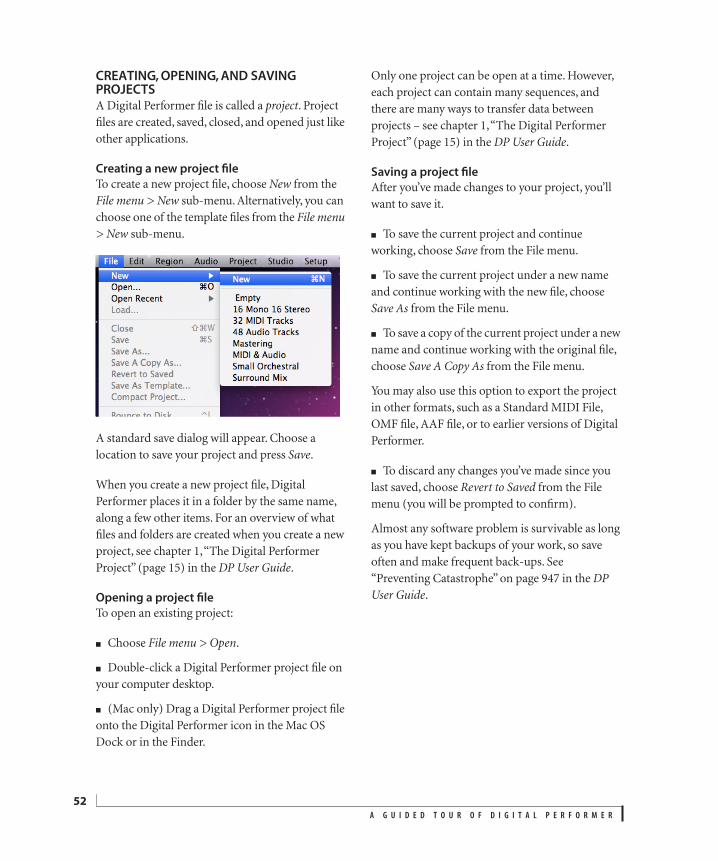
A G U I D E D T O U R O F D I G I T A L P E R F O R M E R
52
CREATING, OPENING, AND SAVING PROJECTSA Digital Performer file is called a project. Project files are created, saved, closed, and opened just like other applications.
Creating a new project file
To create a new project file, choose New from the File menu > New sub-menu. Alternatively, you can choose one of the template files from the File menu > New sub-menu.
A standard save dialog will appear. Choose a location to save your project and press Save.
When you create a new project file, Digital Performer places it in a folder by the same name, along a few other items. For an overview of what files and folders are created when you create a new project, see chapter 1, “The Digital Performer Project” (page 15) in the DP User Guide.
Opening a project file
To open an existing project:
■ Choose File menu > Open.
■ Double-click a Digital Performer project file on your computer desktop.
■ (Mac only) Drag a Digital Performer project file onto the Digital Performer icon in the Mac OS Dock or in the Finder.
Only one project can be open at a time. However, each project can contain many sequences, and there are many ways to transfer data between projects – see chapter 1, “The Digital Performer Project” (page 15) in the DP User Guide.
Saving a project file
After you’ve made changes to your project, you’ll want to save it.
■ To save the current project and continue working, choose Save from the File menu.
■ To save the current project under a new name and continue working with the new file, choose Save As from the File menu.
■ To save a copy of the current project under a new name and continue working with the original file, choose Save A Copy As from the File menu.
You may also use this option to export the project in other formats, such as a Standard MIDI File, OMF file, AAF file, or to earlier versions of Digital Performer.
■ To discard any changes you’ve made since you last saved, choose Revert to Saved from the File menu (you will be prompted to confirm).
Almost any software problem is survivable as long as you have kept backups of your work, so save often and make frequent back-ups. See “Preventing Catastrophe” on page 947 in the DP User Guide.
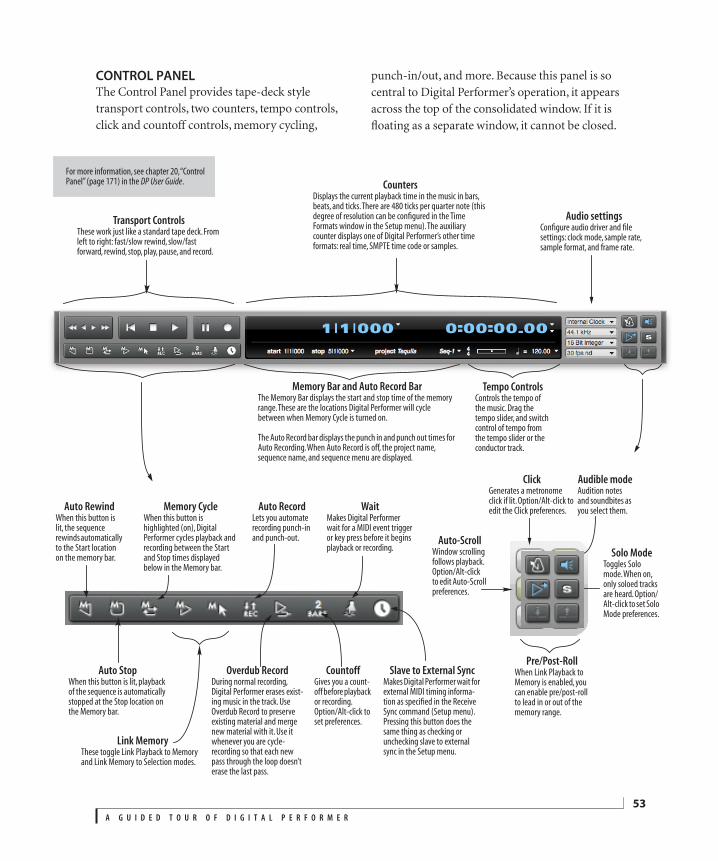
A G U I D E D T O U R O F D I G I T A L P E R F O R M E R
53
CONTROL PANELThe Control Panel provides tape-deck style transport controls, two counters, tempo controls, click and countoff controls, memory cycling,
punch-in/out, and more. Because this panel is so central to Digital Performer’s operation, it appears across the top of the consolidated window. If it is floating as a separate window, it cannot be closed.
Memory CycleWhen this button is highlighted (on), Digital Performer cycles playback and recording between the Start and Stop times displayed below in the Memory bar.
Transport ControlsThese work just like a standard tape deck. From left to right: fast/slow rewind, slow/fast forward, rewind, stop, play, pause, and record.
Tempo ControlsControls the tempo of the music. Drag the tempo slider, and switch control of tempo from the tempo slider or the conductor track.
CountersDisplays the current playback time in the music in bars, beats, and ticks. There are 480 ticks per quarter note (this degree of resolution can be configured in the Time Formats window in the Setup menu). The auxiliary counter displays one of Digital Performer’s other time formats: real time, SMPTE time code or samples.
Memory Bar and Auto Record BarThe Memory Bar displays the start and stop time of the memory range. These are the locations Digital Performer will cycle between when Memory Cycle is turned on.
The Auto Record bar displays the punch in and punch out times for Auto Recording. When Auto Record is off, the project name, sequence name, and sequence menu are displayed.
Auto RecordLets you automate recording punch-in and punch-out.
WaitMakes Digital Performer wait for a MIDI event trigger or key press before it begins playback or recording.
CountoffGives you a count-off before playback or recording. Option/Alt-click to set preferences.
Overdub RecordDuring normal recording, Digital Performer erases exist-ing music in the track. Use Overdub Record to preserve existing material and merge new material with it. Use it whenever you are cycle-recording so that each new pass through the loop doesn’t erase the last pass.
For more information, see chapter 20, “Control Panel” (page 171) in the DP User Guide.
Auto StopWhen this button is lit, playback of the sequence is automatically stopped at the Stop location on the Memory bar.
ClickGenerates a metronome click if lit. Option/Alt-click to edit the Click preferences.Auto Rewind
When this button is lit, the sequence rewinds automatically to the Start location on the memory bar.
Link MemoryThese toggle Link Playback to Memory and Link Memory to Selection modes.
Audio settingsConfigure audio driver and file settings: clock mode, sample rate, sample format, and frame rate.
Slave to External SyncMakes Digital Performer wait for external MIDI timing informa-tion as specified in the Receive Sync command (Setup menu). Pressing this button does the same thing as checking or unchecking slave to external sync in the Setup menu.
Audible modeAudition notes and soundbites as you select them.
Solo ModeToggles Solo mode. When on, only soloed tracks are heard. Option/Alt-click to set Solo Mode preferences.
Auto-ScrollWindow scrolling follows playback. Option/Alt-click to edit Auto-Scroll preferences.
Pre/Post-RollWhen Link Playback to Memory is enabled, you can enable pre/post-roll to lead in or out of the memory range.
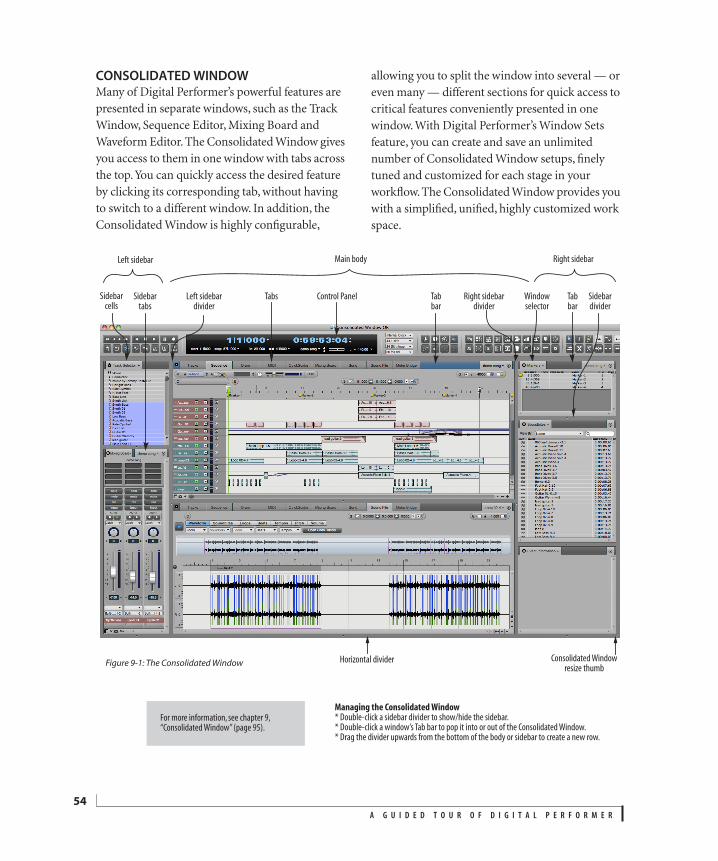
A G U I D E D T O U R O F D I G I T A L P E R F O R M E R
54
CONSOLIDATED WINDOWMany of Digital Performer’s powerful features are presented in separate windows, such as the Track Window, Sequence Editor, Mixing Board and Waveform Editor. The Consolidated Window gives you access to them in one window with tabs across the top. You can quickly access the desired feature by clicking its corresponding tab, without having to switch to a different window. In addition, the Consolidated Window is highly configurable,
allowing you to split the window into several — or even many — different sections for quick access to critical features conveniently presented in one window. With Digital Performer’s Window Sets feature, you can create and save an unlimited number of Consolidated Window setups, finely tuned and customized for each stage in your workflow. The Consolidated Window provides you with a simplified, unified, highly customized work space.
Figure 9-1: The Consolidated Window
For more information, see chapter 9, “Consolidated Window” (page 95).
Managing the Consolidated Window* Double-click a sidebar divider to show/hide the sidebar.* Double-click a window’s Tab bar to pop it into or out of the Consolidated Window.* Drag the divider upwards from the bottom of the body or sidebar to create a new row.
Left sidebar Main body Right sidebar
Right sidebar divider
Tabs
Horizontal divider
Tab bar
Consolidated Window resize thumb
Window selector
Left sidebar divider
Tab bar
Sidebar tabs
Sidebar cells
Sidebar divider
Control Panel
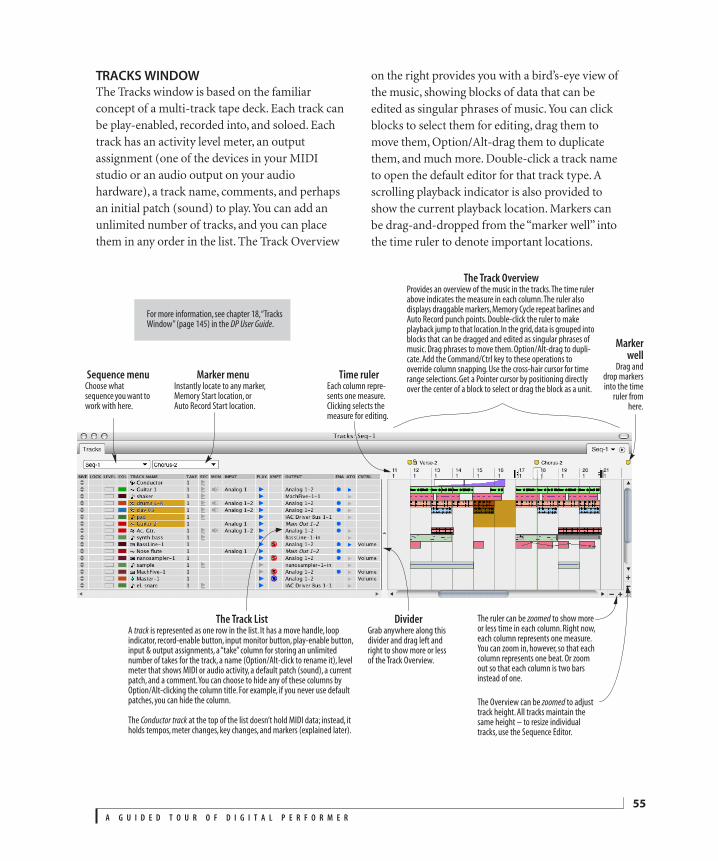
A G U I D E D T O U R O F D I G I T A L P E R F O R M E R
55
TRACKS WINDOWThe Tracks window is based on the familiar concept of a multi-track tape deck. Each track can be play-enabled, recorded into, and soloed. Each track has an activity level meter, an output assignment (one of the devices in your MIDI studio or an audio output on your audio hardware), a track name, comments, and perhaps an initial patch (sound) to play. You can add an unlimited number of tracks, and you can place them in any order in the list. The Track Overview
on the right provides you with a bird’s-eye view of the music, showing blocks of data that can be edited as singular phrases of music. You can click blocks to select them for editing, drag them to move them, Option/Alt-drag them to duplicate them, and much more. Double-click a track name to open the default editor for that track type. A scrolling playback indicator is also provided to show the current playback location. Markers can be drag-and-dropped from the “marker well” into the time ruler to denote important locations.
Markerwell
Drag anddrop markersinto the time
ruler fromhere.
The Track ListA track is represented as one row in the list. It has a move handle, loop indicator, record-enable button, input monitor button, play-enable button, input & output assignments, a “take” column for storing an unlimited number of takes for the track, a name (Option/Alt-click to rename it), level meter that shows MIDI or audio activity, a default patch (sound), a current patch, and a comment. You can choose to hide any of these columns by Option/Alt-clicking the column title. For example, if you never use default patches, you can hide the column.
The Conductor track at the top of the list doesn’t hold MIDI data; instead, it holds tempos, meter changes, key changes, and markers (explained later).
The Track OverviewProvides an overview of the music in the tracks. The time ruler above indicates the measure in each column. The ruler also displays draggable markers, Memory Cycle repeat barlines and Auto Record punch points. Double-click the ruler to make playback jump to that location. In the grid, data is grouped into blocks that can be dragged and edited as singular phrases of music. Drag phrases to move them. Option/Alt-drag to dupli-cate. Add the Command/Ctrl key to these operations to override column snapping. Use the cross-hair cursor for time range selections. Get a Pointer cursor by positioning directly over the center of a block to select or drag the block as a unit.
The ruler can be zoomed to show more or less time in each column. Right now, each column represents one measure. You can zoom in, however, so that each column represents one beat. Or zoom out so that each column is two bars instead of one.
DividerGrab anywhere along this divider and drag left and right to show more or less of the Track Overview.
For more information, see chapter 18, “Tracks Window” (page 145) in the DP User Guide.
Marker menuInstantly locate to any marker, Memory Start location, or Auto Record Start location.
Sequence menuChoose what sequence you want to work with here.
The Overview can be zoomed to adjust track height. All tracks maintain the same height – to resize individual tracks, use the Sequence Editor.
Time rulerEach column repre-sents one measure. Clicking selects the measure for editing.

A G U I D E D T O U R O F D I G I T A L P E R F O R M E R
56
SOUNDBITES WINDOWThe Soundbites window serves as a catalog of all the soundbites (audio regions) in the file. It provides a great deal of information about each soundbite, including its duration, sample rate, number of channels, and parent audio file for each
soundbite. To open Digital Performer’s full-featured Waveform Editor, which allows you to perform all kinds of waveform editing tasks, from single-sample pencil tool edits to normalizing to crossfades and more, double-click a soundbite in the Soundbites window.
Double-click on a soundbite to open the Waveform Editor. Digital Performer includes a fully featured Waveform Editor where you can edit with a pencil, normalize, add fades, or define regions and loops.
Use the Sound File Info window.This window (Studio menu) updates to the selected soundbite automatically. Here you can view and edit the attributes of selected Soundbites. For example, you can edit how time stretching and transposition affects a soundbite or add comments.
Click a soundbite’s name to hear it.With Audible mode enabled, just click on the name of a soundbite to audition it (you don’t have to keep holding the mouse down).
Use this handle to “drag and drop” soundbites into other windows.You can drag and drop audio into the Track overview, the Sequence Editor and audio Event Lists.
Open the Soundbites window by choosing its name from the Project menu, pressing Shift-B, or selecting it from the Consolidated Window sidebar window list.
For more information, see chapter 3, “Soundbites Window” (page 33) in the DP User Guide.

A G U I D E D T O U R O F D I G I T A L P E R F O R M E R
57
BUNDLES WINDOWThe Bundles window serves as the crucial link between the virtual mixing world in Digital Performer and the audio and MIDI hardware that is physically connected to your computer. The Bundles window provides a convenient layer between them that lets you effectively manage audio and MIDI input and output.
Sources are displayed across the top and your virtual bundles are listed on the left side. To assign a bundle to a source, such as a physical input or output, one of Digital Performer’s internal busses, or a plug-in’s output, drag the bundle’s tile to match up with the desired source.
For more information, see chapter 13, “Bundles” (page 117) in the DP User Guide.
BundlesBundles are named automatically based on their source assignment, but you can Option/Alt-click the name to rename it. Grab a bundles in the “MV” (move) column to reorder them. The topmost bundle on the Output page will be used for Auditioning.
TabsUse these tabs to switch between each bundle group.
SourcesAvailable sources for your bundles.
AssignmentMove the bundle “tile” to assign the bundle (on the left) to a source (on the top). In this case, the “DW8000” bundle has been assigned to PCI-424 ADAT 3-4.
Bundle managementQuickly add or remove bundles; when viewing the MIDI Devices tab, use the Edit button to edit a MIDI device’s properties.
Bundle modelView and change the bundle model, from mono all the way up to 10.2 surround.

A G U I D E D T O U R O F D I G I T A L P E R F O R M E R
58
SEQUENCE EDITORThe Sequence Editor provides a multitrack graphic environment for hands-on, precision editing of MIDI, audio and conductor track data all at once. It also includes a movie track for displaying a project’s QuickTime movie along the same timeline. You can view one or more tracks at a time using Digital Performer’s standard track selector to show and hide tracks as desired.
Graphically insert and edit automation curves for volume, pan, mute, effect settings, and more. Comprehensive audio editing tools include trim, copy, paste, slice, comp, scrub, and more.
The Sequence Editor provides “one-stop shopping” for editing and managing a Digital Performer project.
Use Memory Cycle to repeat a section.Enable Memory Cycle and drag the Memory Start and End points in the ruler.
Click the track selector button to open the track selector.The Track Selector lets you quickly show and hide tracks simply by clicking their name.
Click on a line to create a point; drag it to adjust.
Create automation curves.Click the Pencil tool in the tool palette and draw automation curves.
Use the right tool.The Tool palette (Studio menu) provides a variety of editing tools to help shape your sequence.
For more information, see chapter 35, “Sequence Editor” (page 329) in the DP User Guide.
Create a tempo map.Edit the Conductor track to create detailed tempo maps, enter key and meter changes, and more.
Change layers to view different data types.Change the visible layer for each track in the track info pane on the left side. View audio, MIDI, volume, pan, pitch automation, continuous controllers, conductor data, and more.
Zoom the window.Horizontal and vertical zoom give control over what you see. Zoom in for sample-level preci-sion, or zoom out for a bird’s-eye view.
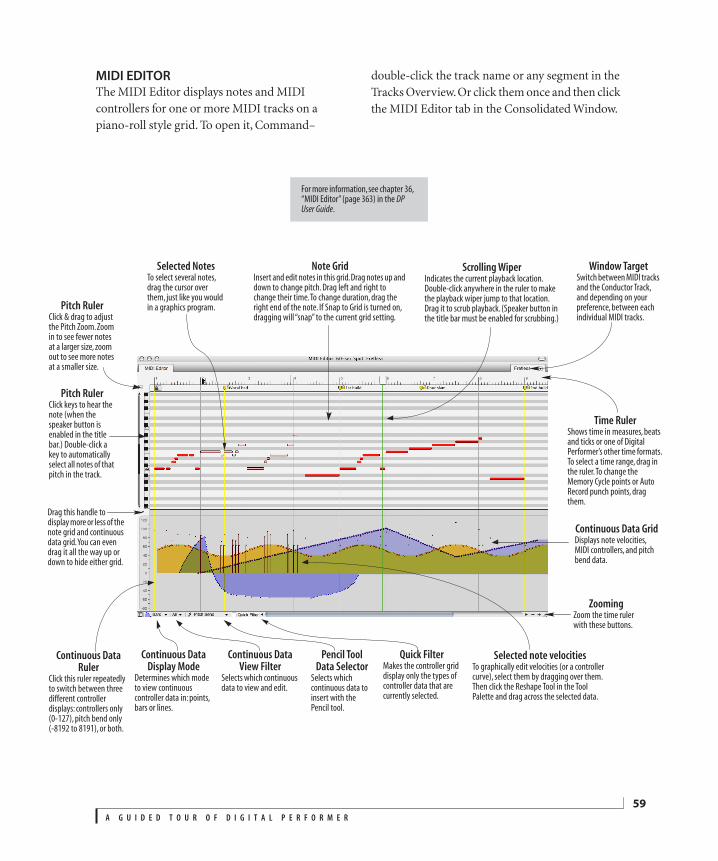
A G U I D E D T O U R O F D I G I T A L P E R F O R M E R
59
MIDI EDITORThe MIDI Editor displays notes and MIDI controllers for one or more MIDI tracks on a piano-roll style grid. To open it, Command–
double-click the track name or any segment in the Tracks Overview. Or click them once and then click the MIDI Editor tab in the Consolidated Window.
Time RulerShows time in measures, beats and ticks or one of Digital Performer’s other time formats. To select a time range, drag in the ruler. To change the Memory Cycle points or Auto Record punch points, drag them.
Window TargetSwitch between MIDI tracks and the Conductor Track, and depending on your preference, between each individual MIDI tracks.
Note GridInsert and edit notes in this grid. Drag notes up and down to change pitch. Drag left and right to change their time. To change duration, drag the right end of the note. If Snap to Grid is turned on, dragging will “snap” to the current grid setting.
Scrolling WiperIndicates the current playback location. Double-click anywhere in the ruler to make the playback wiper jump to that location. Drag it to scrub playback. (Speaker button in the title bar must be enabled for scrubbing.)
Selected NotesTo select several notes, drag the cursor over them, just like you would in a graphics program.
Pitch RulerClick keys to hear the note (when the speaker button is enabled in the title bar.) Double-click a key to automatically select all notes of that pitch in the track.
Drag this handle to display more or less of the note grid and continuous data grid. You can even drag it all the way up or down to hide either grid.
Continuous Data Ruler
Click this ruler repeatedly to switch between three different controller displays: controllers only (0-127), pitch bend only (-8192 to 8191), or both.
Continuous Data GridDisplays note velocities, MIDI controllers, and pitch bend data.
Selected note velocitiesTo graphically edit velocities (or a controller curve), select them by dragging over them. Then click the Reshape Tool in the Tool Palette and drag across the selected data.
For more information, see chapter 36, “MIDI Editor” (page 363) in the DP User Guide.
Quick FilterMakes the controller grid display only the types of controller data that are currently selected.
Continuous Data Display Mode
Determines which mode to view continuous controller data in: points, bars or lines.
Continuous DataView Filter
Selects which continuous data to view and edit.
Pencil Tool Data Selector
Selects which continuous data to insert with the Pencil tool.
ZoomingZoom the time ruler with these buttons.
Pitch RulerClick & drag to adjust the Pitch Zoom. Zoom in to see fewer notes at a larger size, zoom out to see more notes at a smaller size.
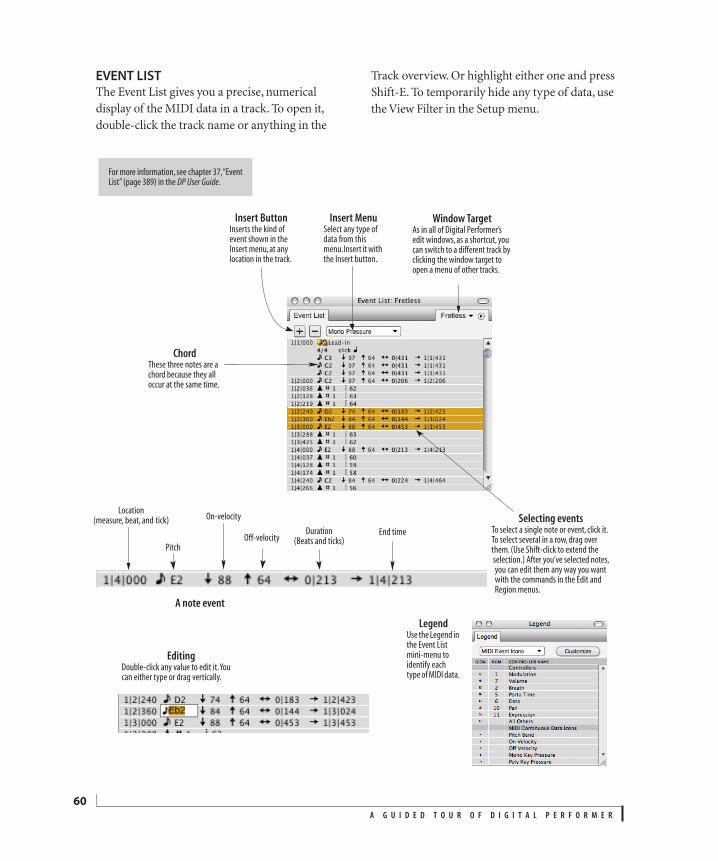
A G U I D E D T O U R O F D I G I T A L P E R F O R M E R
60
EVENT LISTThe Event List gives you a precise, numerical display of the MIDI data in a track. To open it, double-click the track name or anything in the
Track overview. Or highlight either one and press Shift-E. To temporarily hide any type of data, use the View Filter in the Setup menu.
LegendUse the Legend in the Event List mini-menu to identify each type of MIDI data.
Insert MenuSelect any type of data from this menu. Insert it with the Insert button.
ChordThese three notes are a chord because they all occur at the same time.
Selecting eventsTo select a single note or event, click it. To select several in a row, drag over them. (Use Shift-click to extend the selection.) After you’ve selected notes, you can edit them any way you want with the commands in the Edit and Region menus.
EditingDouble-click any value to edit it. You can either type or drag vertically.
Location(measure, beat, and tick)
Pitch
On-velocity
Duration(Beats and ticks)
A note event
For more information, see chapter 37, “Event List” (page 389) in the DP User Guide.
End time
Insert ButtonInserts the kind of event shown in the Insert menu, at any location in the track.
Off-velocity
Window TargetAs in all of Digital Performer’s edit windows, as a shortcut, you can switch to a different track by clicking the window target to open a menu of other tracks.
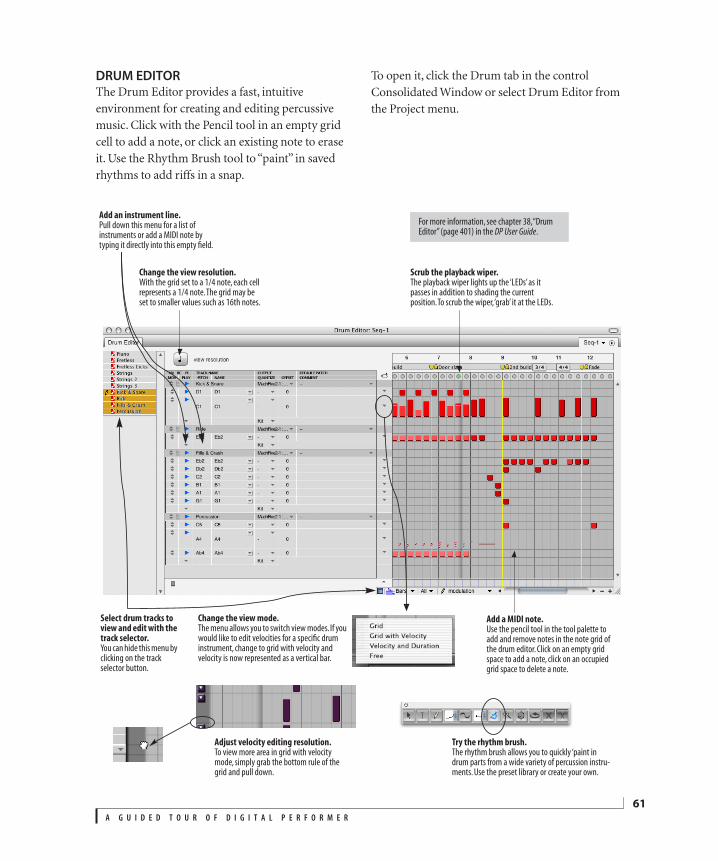
A G U I D E D T O U R O F D I G I T A L P E R F O R M E R
61
DRUM EDITORThe Drum Editor provides a fast, intuitive environment for creating and editing percussive music. Click with the Pencil tool in an empty grid cell to add a note, or click an existing note to erase it. Use the Rhythm Brush tool to “paint” in saved rhythms to add riffs in a snap.
To open it, click the Drum tab in the control Consolidated Window or select Drum Editor from the Project menu.
Add an instrument line.Pull down this menu for a list of instruments or add a MIDI note by typing it directly into this empty field.
Scrub the playback wiper.The playback wiper lights up the ‘LEDs’ as it passes in addition to shading the current position. To scrub the wiper, ‘grab’ it at the LEDs.
Select drum tracks to view and edit with the track selector.You can hide this menu by clicking on the track selector button.
Add a MIDI note.Use the pencil tool in the tool palette to add and remove notes in the note grid of the drum editor. Click on an empty grid space to add a note, click on an occupied grid space to delete a note.
Change the view mode.The menu allows you to switch view modes. If you would like to edit velocities for a specific drum instrument, change to grid with velocity and velocity is now represented as a vertical bar.
Adjust velocity editing resolution.To view more area in grid with velocity mode, simply grab the bottom rule of the grid and pull down.
For more information, see chapter 38, “Drum Editor” (page 401) in the DP User Guide.
Change the view resolution.With the grid set to a 1/4 note, each cell represents a 1/4 note. The grid may be set to smaller values such as 16th notes.
Try the rhythm brush.The rhythm brush allows you to quickly ‘paint in drum parts from a wide variety of percussion instru-ments. Use the preset library or create your own.
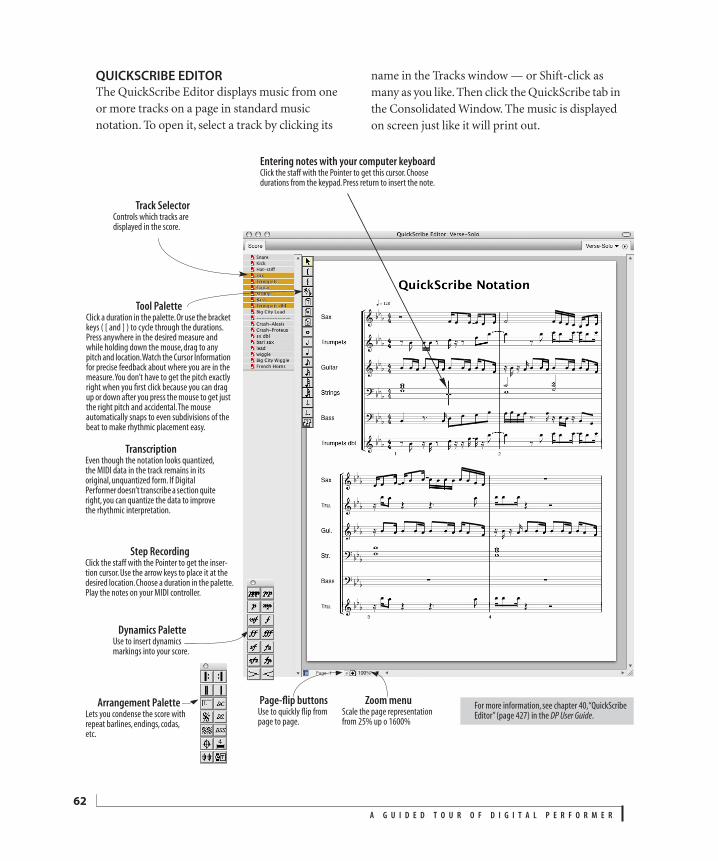
A G U I D E D T O U R O F D I G I T A L P E R F O R M E R
62
QUICKSCRIBE EDITORThe QuickScribe Editor displays music from one or more tracks on a page in standard music notation. To open it, select a track by clicking its
name in the Tracks window — or Shift-click as many as you like. Then click the QuickScribe tab in the Consolidated Window. The music is displayed on screen just like it will print out.
Arrangement PaletteLets you condense the score with repeat barlines, endings, codas, etc.
TranscriptionEven though the notation looks quantized, the MIDI data in the track remains in its original, unquantized form. If Digital Performer doesn’t transcribe a section quite right, you can quantize the data to improve the rhythmic interpretation.
Tool PaletteClick a duration in the palette. Or use the bracket keys ( [ and ] ) to cycle through the durations. Press anywhere in the desired measure and while holding down the mouse, drag to any pitch and location. Watch the Cursor Information for precise feedback about where you are in the measure. You don’t have to get the pitch exactly right when you first click because you can drag up or down after you press the mouse to get just the right pitch and accidental. The mouse automatically snaps to even subdivisions of the beat to make rhythmic placement easy.
Entering notes with your computer keyboardClick the staff with the Pointer to get this cursor. Choose durations from the keypad. Press return to insert the note.
Step RecordingClick the staff with the Pointer to get the inser-tion cursor. Use the arrow keys to place it at the desired location. Choose a duration in the palette. Play the notes on your MIDI controller.
Track SelectorControls which tracks are displayed in the score.
For more information, see chapter 40, “QuickScribe Editor” (page 427) in the DP User Guide.
Dynamics PaletteUse to insert dynamics markings into your score.
Page-flip buttonsUse to quickly flip from page to page.
Zoom menuScale the page representation from 25% up o 1600%
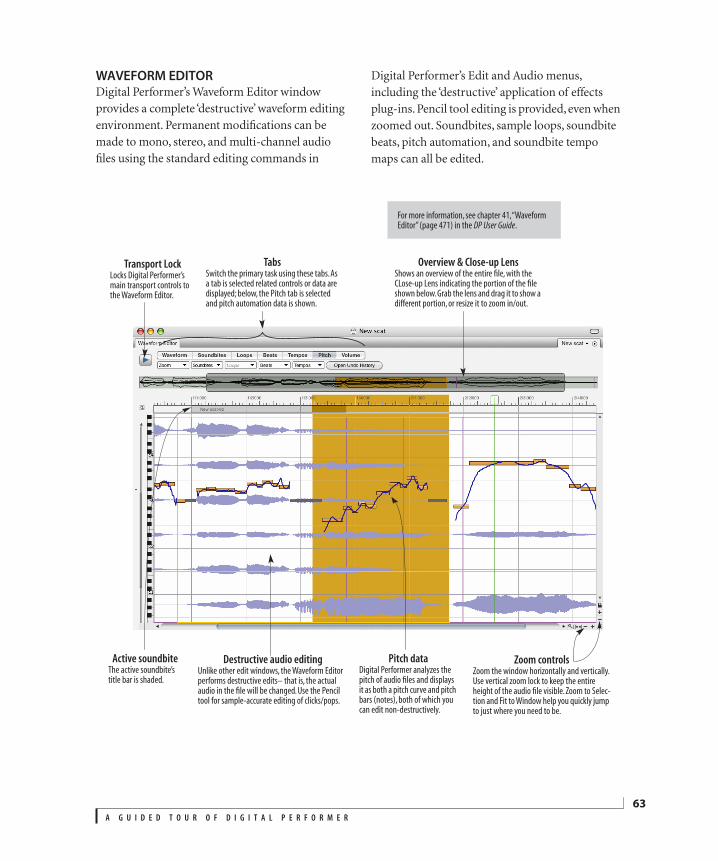
A G U I D E D T O U R O F D I G I T A L P E R F O R M E R
63
WAVEFORM EDITORDigital Performer’s Waveform Editor window provides a complete ‘destructive’ waveform editing environment. Permanent modifications can be made to mono, stereo, and multi-channel audio files using the standard editing commands in
Digital Performer’s Edit and Audio menus, including the ‘destructive’ application of effects plug-ins. Pencil tool editing is provided, even when zoomed out. Soundbites, sample loops, soundbite beats, pitch automation, and soundbite tempo maps can all be edited.
For more information, see chapter 41, “Waveform Editor” (page 471) in the DP User Guide.
Zoom controlsZoom the window horizontally and vertically. Use vertical zoom lock to keep the entire height of the audio file visible. Zoom to Selec-tion and Fit to Window help you quickly jump to just where you need to be.
TabsSwitch the primary task using these tabs. As a tab is selected related controls or data are displayed; below, the Pitch tab is selected and pitch automation data is shown.
Transport LockLocks Digital Performer’s main transport controls to the Waveform Editor.
Overview & Close-up LensShows an overview of the entire file, with the CLose-up Lens indicating the portion of the file shown below. Grab the lens and drag it to show a different portion, or resize it to zoom in/out.
Destructive audio editingUnlike other edit windows, the Waveform Editor performs destructive edits– that is, the actual audio in the file will be changed. Use the Pencil tool for sample-accurate editing of clicks/pops.
Active soundbiteThe active soundbite’s title bar is shaded.
Pitch dataDigital Performer analyzes the pitch of audio files and displays it as both a pitch curve and pitch bars (notes), both of which you can edit non-destructively.
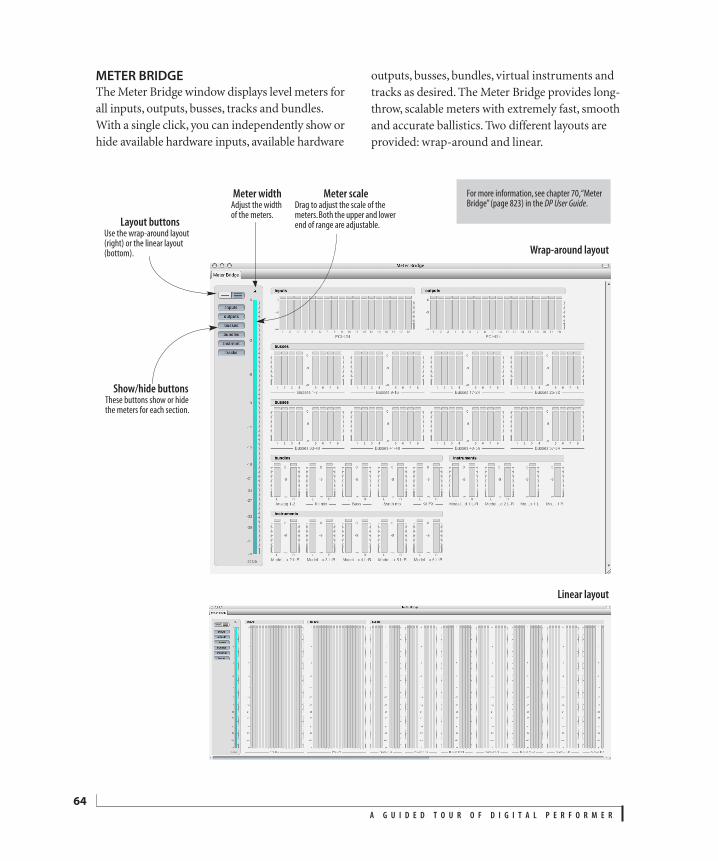
A G U I D E D T O U R O F D I G I T A L P E R F O R M E R
64
METER BRIDGEThe Meter Bridge window displays level meters for all inputs, outputs, busses, tracks and bundles. With a single click, you can independently show or hide available hardware inputs, available hardware
outputs, busses, bundles, virtual instruments and tracks as desired. The Meter Bridge provides long-throw, scalable meters with extremely fast, smooth and accurate ballistics. Two different layouts are provided: wrap-around and linear.
For more information, see chapter 70, “Meter Bridge” (page 823) in the DP User Guide.
Show/hide buttonsThese buttons show or hide the meters for each section.
Meter widthAdjust the width of the meters.
Layout buttonsUse the wrap-around layout (right) or the linear layout (bottom).
Linear layout
Meter scaleDrag to adjust the scale of the meters. Both the upper and lower end of range are adjustable.
Wrap-around layout
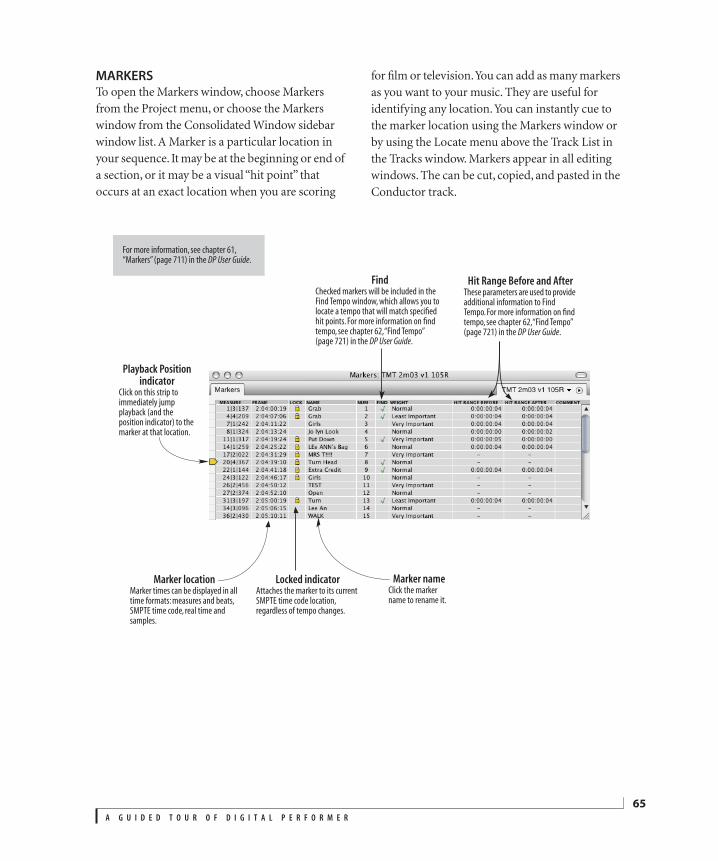
A G U I D E D T O U R O F D I G I T A L P E R F O R M E R
65
MARKERSTo open the Markers window, choose Markers from the Project menu, or choose the Markers window from the Consolidated Window sidebar window list. A Marker is a particular location in your sequence. It may be at the beginning or end of a section, or it may be a visual “hit point” that occurs at an exact location when you are scoring
for film or television. You can add as many markers as you want to your music. They are useful for identifying any location. You can instantly cue to the marker location using the Markers window or by using the Locate menu above the Track List in the Tracks window. Markers appear in all editing windows. The can be cut, copied, and pasted in the Conductor track.
Playback Position indicator
Click on this strip to immediately jump playback (and the position indicator) to the marker at that location.
Marker nameClick the marker name to rename it.
Locked indicatorAttaches the marker to its current SMPTE time code location, regardless of tempo changes.
Marker locationMarker times can be displayed in all time formats: measures and beats, SMPTE time code, real time and samples.
For more information, see chapter 61, “Markers” (page 711) in the DP User Guide.
FindChecked markers will be included in the Find Tempo window, which allows you to locate a tempo that will match specified hit points. For more information on find tempo, see chapter 62, “Find Tempo” (page 721) in the DP User Guide.
Hit Range Before and AfterThese parameters are used to provide additional information to Find Tempo. For more information on find tempo, see chapter 62, “Find Tempo” (page 721) in the DP User Guide.
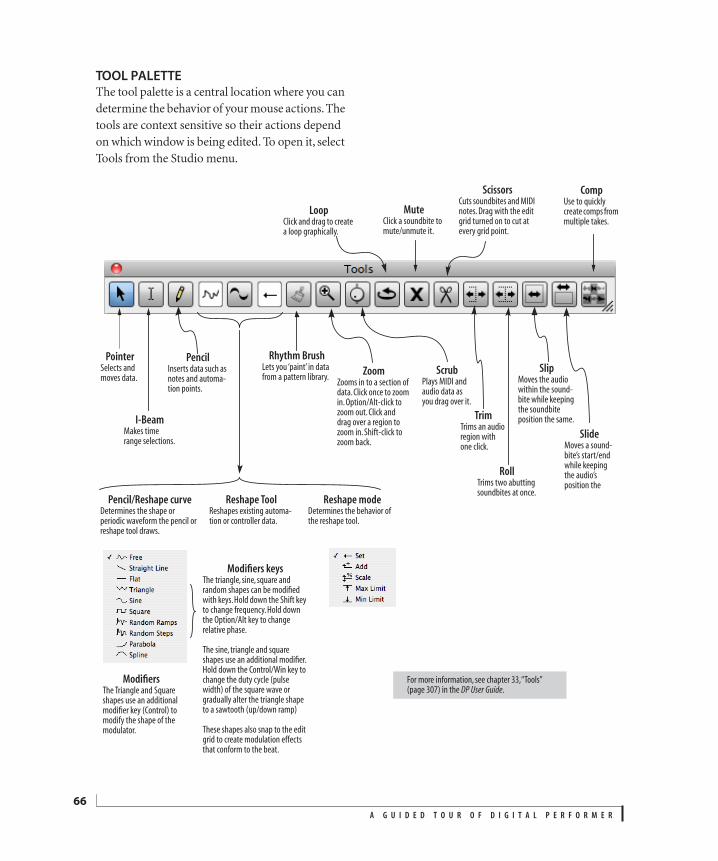
A G U I D E D T O U R O F D I G I T A L P E R F O R M E R
66
TOOL PALETTEThe tool palette is a central location where you can determine the behavior of your mouse actions. The tools are context sensitive so their actions depend on which window is being edited. To open it, select Tools from the Studio menu.
PointerSelects and moves data.
PencilInserts data such as notes and automa-tion points.
Pencil/Reshape curveDetermines the shape or periodic waveform the pencil or reshape tool draws.
Reshape modeDetermines the behavior of the reshape tool.
ZoomZooms in to a section of data. Click once to zoom in. Option/Alt-click to zoom out. Click and drag over a region to zoom in. Shift-click to zoom back.
ScrubPlays MIDI and audio data as you drag over it.
Modifiers keysThe triangle, sine, square and random shapes can be modified with keys. Hold down the Shift key to change frequency. Hold down the Option/Alt key to change relative phase.
The sine, triangle and square shapes use an additional modifier. Hold down the Control/Win key to change the duty cycle (pulse width) of the square wave or gradually alter the triangle shape to a sawtooth (up/down ramp)
These shapes also snap to the edit grid to create modulation effects that conform to the beat.
ModifiersThe Triangle and Square shapes use an additional modifier key (Control) to modify the shape of the modulator.
Reshape ToolReshapes existing automa-tion or controller data.
LoopClick and drag to create a loop graphically.
Rhythm BrushLets you ‘paint’ in data from a pattern library.
I-BeamMakes time range selections.
ScissorsCuts soundbites and MIDI notes. Drag with the edit grid turned on to cut at every grid point.
Mute Click a soundbite to mute/unmute it.
TrimTrims an audio region with one click.
RollTrims two abutting soundbites at once.
Comp Use to quickly create comps from multiple takes.
SlipMoves the audio within the sound-bite while keeping the soundbite position the same.
SlideMoves a sound-bite’s start/end while keeping the audio’s position the
For more information, see chapter 33, “Tools” (page 307) in the DP User Guide.

A G U I D E D T O U R O F D I G I T A L P E R F O R M E R
67
SELECTINGAfter you’ve recorded, Digital Performer provides powerful editing features to mold your music any way you want. But before you can edit even a single note, Digital Performer needs to know exactly what
you want to edit. This section shows you some of the many convenient ways to select music in Digital Performer. Once you’ve selected it, you can unleash Digital Performer’s powerful editing features.
Using the Track overviewZoom the display to a useful zoom level. Then drag over the area you want to select with the cross-hair cursor. Or just select an entire phrase block by positioning the cursor over its center and clicking it with the Pointer cursor. To select non-adjacent areas of the grid or phrase blocks, Shift-click each one. To select an entire column, click in the time ruler above the column. To get rid of the current selection, click in the blank space below the grid.
Selecting all notes of the same pitchDouble-click the key on the pitch ruler in the MIDI Editor or Sequence Editor.
Dragging in Edit window time rulersAny notes or controller data within the highlighted time range become selected. To make your dragging “snap” to rhythmic grid locations, check the Snap to Grid box and set the desired grid resolution.
Selecting the Memory Cycle rangeClick either cycle point in the Track Overview or any edit window ruler to select everything within the Memory Cycle range.
Selecting in the note gridDrag a rectangle over the beginning of the notes you want to select.
Using the Selection Information windowSet the start and end times, and then select the tracks you want to edit within the those times. To set the start and end times, type them in. Or load them using the Set To menu. Or click the buttons next to each field — during playback, if you like — to load the current playback location. To select a single track, click its name. To select several non-adjacent tracks, Command/Ctrl-click each one. To select a group of adjacent tracks, drag over their names. To select all tracks, press command-A.
Using the Event ListClick an event to select it. To select several non-adjacent events, Command/Ctrl-click each one. To select a group of adjacent events, drag over them. To extend the current selection, Shift-click. To select all events, press command-A.
For more information, see chapter 42, “Selecting” (page 493) in the DP User Guide.
“Smart Selections”The Smart Selections command in the Edit menu makes Time Range selecting easier and more musical and intuitive. With Smart Selections enabled, you can turn on grid snapping, make selec-tions at measure and beat boundaries, and Digital Performer will take care of events that are a few ticks before or after the selection boundaries, either including or excluding them, depend-ing on what makes sense musically.
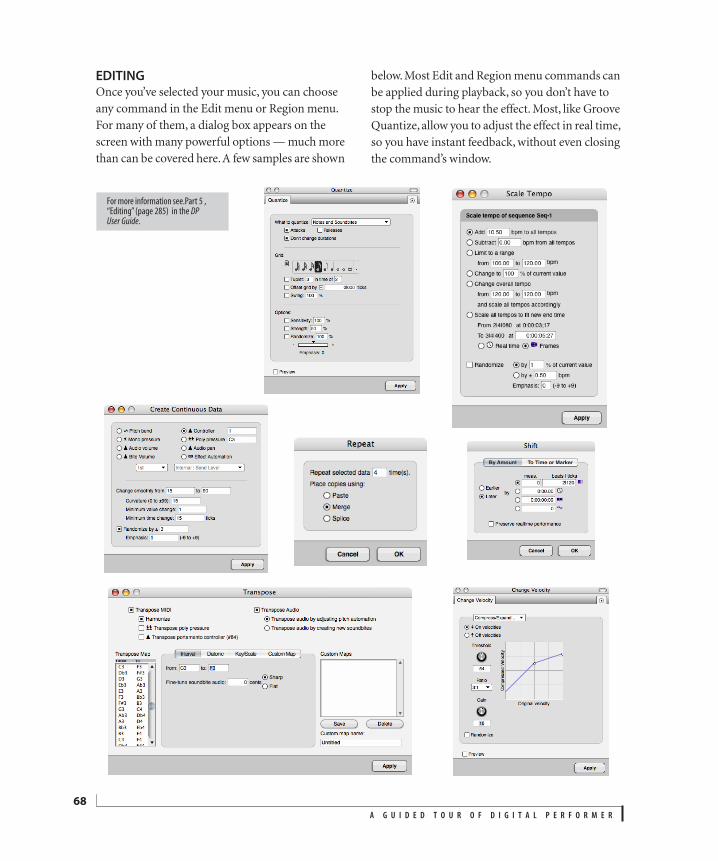
A G U I D E D T O U R O F D I G I T A L P E R F O R M E R
68
EDITINGOnce you’ve selected your music, you can choose any command in the Edit menu or Region menu. For many of them, a dialog box appears on the screen with many powerful options — much more than can be covered here. A few samples are shown
below. Most Edit and Region menu commands can be applied during playback, so you don’t have to stop the music to hear the effect. Most, like Groove Quantize, allow you to adjust the effect in real time, so you have instant feedback, without even closing the command’s window.
For more information see.Part 5 , “Editing” (page 285) in the DP User Guide.
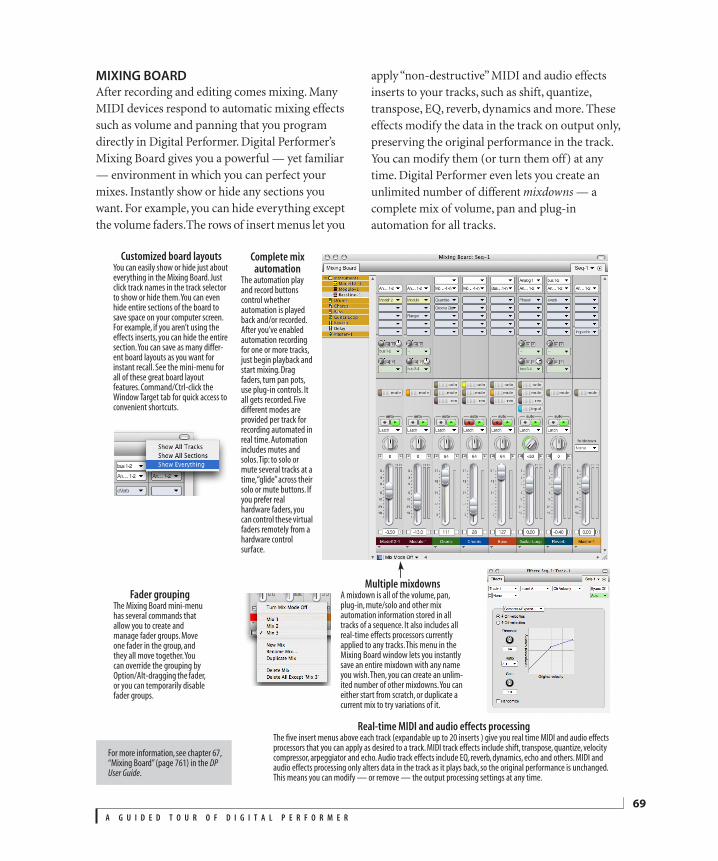
A G U I D E D T O U R O F D I G I T A L P E R F O R M E R
69
MIXING BOARDAfter recording and editing comes mixing. Many MIDI devices respond to automatic mixing effects such as volume and panning that you program directly in Digital Performer. Digital Performer’s Mixing Board gives you a powerful — yet familiar — environment in which you can perfect your mixes. Instantly show or hide any sections you want. For example, you can hide everything except the volume faders.The rows of insert menus let you
apply “non-destructive” MIDI and audio effects inserts to your tracks, such as shift, quantize, transpose, EQ, reverb, dynamics and more. These effects modify the data in the track on output only, preserving the original performance in the track. You can modify them (or turn them off) at any time. Digital Performer even lets you create an unlimited number of different mixdowns — a complete mix of volume, pan and plug-in automation for all tracks.
Fader groupingThe Mixing Board mini-menu has several commands that allow you to create and manage fader groups. Move one fader in the group, and they all move together. You can override the grouping by Option/Alt-dragging the fader, or you can temporarily disable fader groups.
For more information, see chapter 67, “Mixing Board” (page 761) in the DP User Guide.
Multiple mixdownsA mixdown is all of the volume, pan, plug-in, mute/solo and other mix automation information stored in all tracks of a sequence. It also includes all real-time effects processors currently applied to any tracks. This menu in the Mixing Board window lets you instantly save an entire mixdown with any name you wish. Then, you can create an unlim-ited number of other mixdowns. You can either start from scratch, or duplicate a current mix to try variations of it.
Customized board layoutsYou can easily show or hide just about everything in the Mixing Board. Just click track names in the track selector to show or hide them. You can even hide entire sections of the board to save space on your computer screen. For example, if you aren’t using the effects inserts, you can hide the entire section. You can save as many differ-ent board layouts as you want for instant recall. See the mini-menu for all of these great board layout features. Command/Ctrl-click the Window Target tab for quick access to convenient shortcuts.
Complete mix automation
The automation play and record buttons control whether automation is played back and/or recorded. After you’ve enabled automation recording for one or more tracks, just begin playback and start mixing. Drag faders, turn pan pots, use plug-in controls. It all gets recorded. Five different modes are provided per track for recording automated in real time. Automation includes mutes and solos. Tip: to solo or mute several tracks at a time, “glide” across their solo or mute buttons. If you prefer real hardware faders, you can control these virtual faders remotely from a hardware control surface.
Real-time MIDI and audio effects processingThe five insert menus above each track (expandable up to 20 inserts ) give you real time MIDI and audio effects processors that you can apply as desired to a track. MIDI track effects include shift, transpose, quantize, velocity compressor, arpeggiator and echo. Audio track effects include EQ, reverb, dynamics, echo and others. MIDI and audio effects processing only alters data in the track as it plays back, so the original performance is unchanged. This means you can modify — or remove — the output processing settings at any time.

A G U I D E D T O U R O F D I G I T A L P E R F O R M E R
70
EFFECTS WINDOWThe Effects window provides controls for real-time audio and MIDI effects and instrument plug-ins. MIDI effects include shifting, velocity compression, note transposing, quantizing, MIDI echo, a MIDI arpeggiator, and more. Audio effects plug-ins include parametric EQ, reverb, dynamics (compressor, expander, limiter, gate), chorus,
flange, reverb, modeled guitar amps and cabinets, and many more, as well as all third-party MAS, VST and Audio Unit (AU) plug-ins. Plug-ins can be accessed via effects inserts in the Mixing Board, which open the Effects window shown below, or by selecting a track name in any edit window and choosing Effects from the Project menu (or pressing Shift-F).
For more information, see chapter 71, “Effects Window” (page 829) in the DP User Guide.
Preset controlsBrowse presets using the next/previous buttons. Load, save, and edit presets with the Preset menu.
Track, insert, and plug-in menusUse the first two menus to select which track and insert you’re viewing and the third menu to choose the plug-in for that insert.
Window Target menuChange which sequence or V-Rack the Effects window is viewing.
Plug-in controlsControl the plug-in’s settings. Each plug-in has different controls (though many of the plug-ins included with Digital Performer have common elements).
Choosing a plug-in from the Mixing BoardYou can choose a plug-in from the insert slots for any track. in the Mixing Board. You’ll see Digital Performer’s included native real-time MAS plug-ins, along with any third-party MAS, VST or AU plug-ins you have installed in your system.
For instrument tracks, you’ll see only instrument plug-ins in the top-most insert slot, and audio plug-ins under the rest.
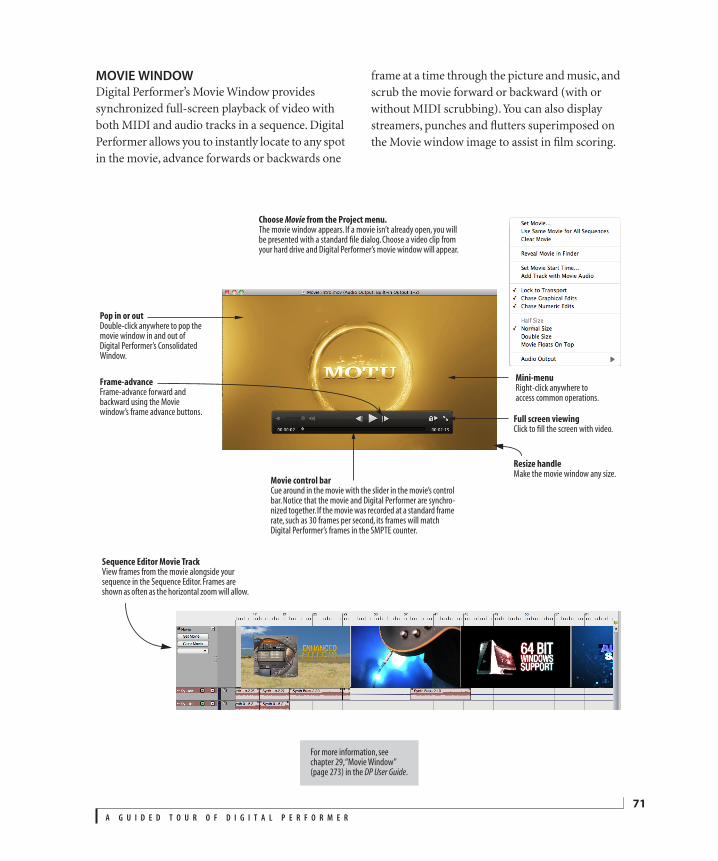
A G U I D E D T O U R O F D I G I T A L P E R F O R M E R
71
MOVIE WINDOWDigital Performer’s Movie Window provides synchronized full-screen playback of video with both MIDI and audio tracks in a sequence. Digital Performer allows you to instantly locate to any spot in the movie, advance forwards or backwards one
frame at a time through the picture and music, and scrub the movie forward or backward (with or without MIDI scrubbing). You can also display streamers, punches and flutters superimposed on the Movie window image to assist in film scoring.
Frame-advance Frame-advance forward and backward using the Movie window’s frame advance buttons.
Choose Movie from the Project menu.The movie window appears. If a movie isn’t already open, you will be presented with a standard file dialog. Choose a video clip from your hard drive and Digital Performer’s movie window will appear.
Movie control barCue around in the movie with the slider in the movie’s control bar. Notice that the movie and Digital Performer are synchro-nized together. If the movie was recorded at a standard frame rate, such as 30 frames per second, its frames will match Digital Performer’s frames in the SMPTE counter.
Resize handleMake the movie window any size.
For more information, see chapter 29, “Movie Window” (page 273) in the DP User Guide.
Mini-menuRight-click anywhere to access common operations.
Sequence Editor Movie TrackView frames from the movie alongside your sequence in the Sequence Editor. Frames are shown as often as the horizontal zoom will allow.
Full screen viewingClick to fill the screen with video.
Pop in or outDouble-click anywhere to pop the movie window in and out of Digital Performer’s Consolidated Window.
A G U I D E D T O U R O F D I G I T A L P E R F O R M E R
72
CONGRATULATIONS!Congratulations! You are now familiar with several of Digital Performer’s most important features.
CONTINUING ON YOUR OWNFeel free to play around further with any of the features you have learned about already, or poke around to find ones we didn’t cover. Don’t worry about “messing up” the tutorial file because you can quit without saving the changes you make.
RECORDING YOUR FIRST AUDIOIf you’d like to try recording some audio, now is a good time. Just go to the Project menu and choose Add Track. Check disk space and input level in the Audio Monitor and then just press the record button in Digital Performer’s main transport panel. For a more detailed step-by-step recording tutorial, see chapter 12, “Tutorial 2: Recording Audio” (page 87).

CHAPTER
73
10 New Features in DP 8
Digital Performer version 8 introduces the following major enhancements. Page numbers refer to the accompanying Digital Performer User Guide unless otherwise noted.
Windows support. . . . . . . . . . . . . . . . . . . .(Getting Started) 7
DP 8 is now compatible with both Mac OS X and Windows 7.
64-bit operation . . . . . . . . . . . . . . . . . . . . .(Getting Started) 7
DP 8 will now operate in either 64-bit or 32-bit mode on Mac OS X and Windows 7. This means DP can take advantage of all available RAM in your system.
Support for VST plug-ins. . . . . . . . . . . . . . . . . . . . . . . . . . . . 839
DP 8 now supports VST plug-ins and instruments on both Mac OS X and Windows 7. If you have cross-platform VSTs instantiated in a DP project, you can move it across platforms and maintain plug-in settings.
New effects plug-ins . . . . . . . . . . . . . . . . . Plug-in Guide PDF
DP8 includes seventeen new effects plug-ins, from meticulously modeled guitar tones to world-class mastering and engineering tools. New plug-ins include two new classic guitar amp models, Live Room | B™ (a bass cabinet model similar to Live Room | G™), several classic guitar pedals, modeled analog delay, a multi-band dynamic equalizer, a de-esser, the Subkick™ kick drum enhancer, Sprin-gamabob™, a modeled vintage spring reverb processor and Spatial Maximizer, a new mid-side mastering plug-in.
ACE-30. . . . . . . . . . . . . . . . . . . . . . . . . . . . . Plug-in Guide PDF 4
Analog Delay . . . . . . . . . . . . . . . . . . . . . . Plug-in Guide PDF 5
Analog Flanger . . . . . . . . . . . . . . . . . . . . Plug-in Guide PDF 6
Analog Phaser . . . . . . . . . . . . . . . . . . . . . Plug-in Guide PDF 7
Clear Pebble . . . . . . . . . . . . . . . . . . . . . .Plug-in Guide PDF 11
De-Esser. . . . . . . . . . . . . . . . . . . . . . . . . . Plug-in Guide PDF 14
Dynamic Equalizer . . . . . . . . . . . . . . . Plug-in Guide PDF 19
Dyna-Squash. . . . . . . . . . . . . . . . . . . . . Plug-in Guide PDF 22
Ensemble Chorus . . . . . . . . . . . . . . . . Plug-in Guide PDF 23
Hi-Top Booster . . . . . . . . . . . . . . . . . . . Plug-in Guide PDF 26
Live Stage . . . . . . . . . . . . . . . . . . . . . . . . Plug-in Guide PDF 31
Precision Delay. . . . . . . . . . . . . . . . . . . Plug-in Guide PDF 58
Soloist. . . . . . . . . . . . . . . . . . . . . . . . . . . . Plug-in Guide PDF 66
Spatial Maximizer . . . . . . . . . . . . . . . . Plug-in Guide PDF 70
Springamabob . . . . . . . . . . . . . . . . . . . Plug-in Guide PDF 72
Subkick . . . . . . . . . . . . . . . . . . . . . . . . . . Plug-in Guide PDF 72
Punch Guard™ . . . . . . . . . . . . . . . . . . . . . . . . . . . . . . . . . . . . . .224
Punch Guard™ confidence recording now records several seconds of audio both before and after record passes. For example, if you clicked record a little late, use Edge edit to expose several seconds of audio from before the beginning. If you clicked stop while the reverb was still decaying, you can edge edit past the end to expose the rest of the reverb tail. New preferences let you set the pre- and post-roll amounts.
New video engine. . . . . . . . . . . . . . . . . . . . . . . . . . . . . . . . . . .273
DP 8’s new video engine allows full-screen viewing of 720 or 1080 HD video clips on a primary or secondary computer monitor, or on a conventional HDMI or SDI video monitor connected to a MOTU video interface such as the HD Express or HDX-SDI. The new video playback engine takes full advantage of the latest technologies, providing accurate synchronization between video and audio and efficient GPU-accelerated operation.
Embedded control panel. . . . . . . . . . . . . . . . . . . . . . . . . . . .174
You can now embed the control panel in the consolidated window to conserve screen space. When embedded in the consolidated window, it is possible to customize what appears and doesn’t
N E W F E A T U R E S I N D P 8
74
appear in the control panel, including the shortcut buttons, editor tools and audio performance meters. The control panel is embedded by default, but you can pop it out easily by right-clicking in the control panel and checking or unchecking Dock in Consolidated Window.
New themes . . . . . . . . . . . . . . . . . . . . . . . . . . . . . . . . . . . . . . . . . 72
DP 8 adds fourteen new artistically crafted user interface designs (themes), including Hi-Fi, Arctic, Earthling, and None More Black.
Plug-in chooser . . . . . . . . . . . . . . . . . . . . . . . . . . . . . . . . . . . . . 769
DP 8’s new plug-in chooser lets you quickly find the effect plug-in or preset you are looking for. You can also organize all your plug-ins, factory and third-party alike, just the way you prefer.
Name change: Graphic Editor is now MIDI Editor . . . 363
The Graphic Editor has been appropriately renamed to MIDI Editor.

Part 3
Tutorials

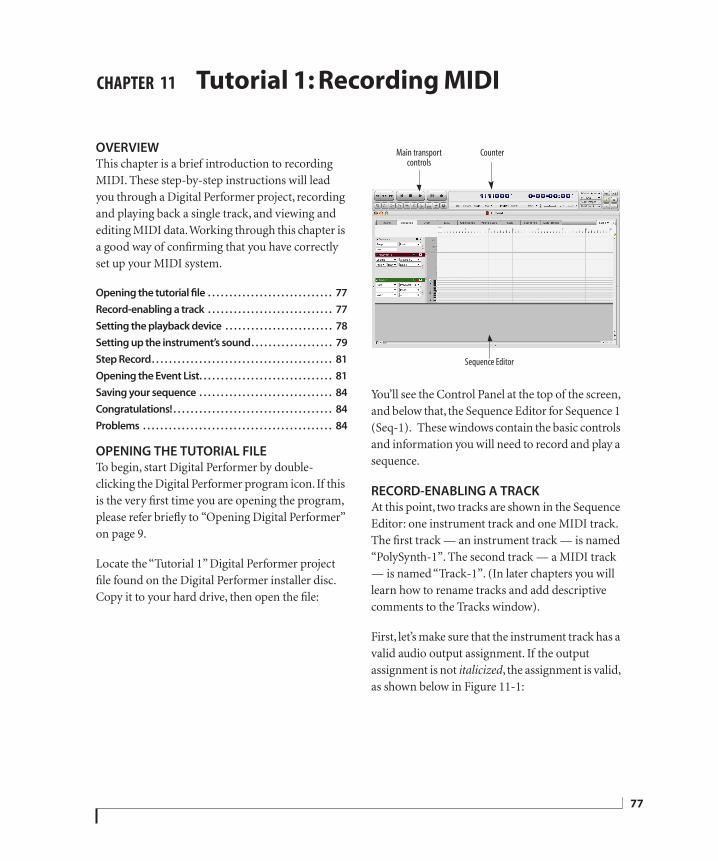
CHAPTER
77
11 Tutorial 1: Recording MIDI
OVERVIEWThis chapter is a brief introduction to recording MIDI. These step-by-step instructions will lead you through a Digital Performer project, recording and playing back a single track, and viewing and editing MIDI data. Working through this chapter is a good way of confirming that you have correctly set up your MIDI system.
Opening the tutorial file . . . . . . . . . . . . . . . . . . . . . . . . . . . . . 77
Record-enabling a track . . . . . . . . . . . . . . . . . . . . . . . . . . . . . 77
Setting the playback device . . . . . . . . . . . . . . . . . . . . . . . . . 78
Setting up the instrument’s sound. . . . . . . . . . . . . . . . . . . 79
Step Record. . . . . . . . . . . . . . . . . . . . . . . . . . . . . . . . . . . . . . . . . . 81
Opening the Event List. . . . . . . . . . . . . . . . . . . . . . . . . . . . . . . 81
Saving your sequence . . . . . . . . . . . . . . . . . . . . . . . . . . . . . . . 84
Congratulations!. . . . . . . . . . . . . . . . . . . . . . . . . . . . . . . . . . . . . 84
Problems . . . . . . . . . . . . . . . . . . . . . . . . . . . . . . . . . . . . . . . . . . . . 84
OPENING THE TUTORIAL FILETo begin, start Digital Performer by double-clicking the Digital Performer program icon. If this is the very first time you are opening the program, please refer briefly to “Opening Digital Performer” on page 9.
Locate the “Tutorial 1” Digital Performer project file found on the Digital Performer installer disc. Copy it to your hard drive, then open the file:
You’ll see the Control Panel at the top of the screen, and below that, the Sequence Editor for Sequence 1 (Seq-1). These windows contain the basic controls and information you will need to record and play a sequence.
RECORD-ENABLING A TRACKAt this point, two tracks are shown in the Sequence Editor: one instrument track and one MIDI track. The first track — an instrument track — is named “PolySynth-1”. The second track — a MIDI track — is named “Track-1”. (In later chapters you will learn how to rename tracks and add descriptive comments to the Tracks window).
First, let’s make sure that the instrument track has a valid audio output assignment. If the output assignment is not italicized, the assignment is valid, as shown below in Figure 11-1:
Main transport controls
Counter
Sequence Editor
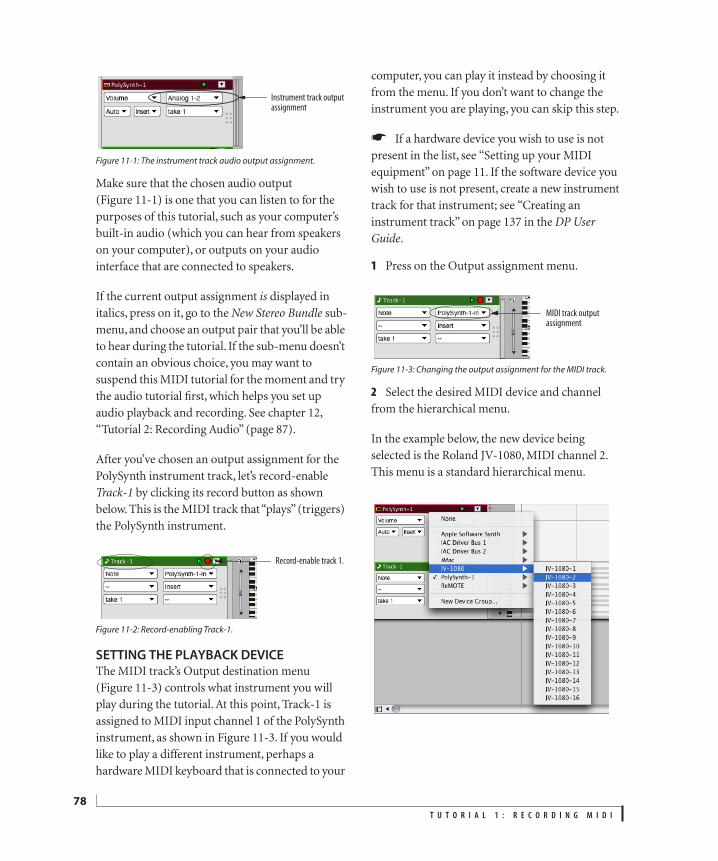
T U T O R I A L 1 : R E C O R D I N G M I D I
78
Figure 11-1: The instrument track audio output assignment.
Make sure that the chosen audio output (Figure 11-1) is one that you can listen to for the purposes of this tutorial, such as your computer’s built-in audio (which you can hear from speakers on your computer), or outputs on your audio interface that are connected to speakers.
If the current output assignment is displayed in italics, press on it, go to the New Stereo Bundle sub-menu, and choose an output pair that you’ll be able to hear during the tutorial. If the sub-menu doesn’t contain an obvious choice, you may want to suspend this MIDI tutorial for the moment and try the audio tutorial first, which helps you set up audio playback and recording. See chapter 12, “Tutorial 2: Recording Audio” (page 87).
After you’ve chosen an output assignment for the PolySynth instrument track, let’s record-enable Track-1 by clicking its record button as shown below. This is the MIDI track that “plays” (triggers) the PolySynth instrument.
Figure 11-2: Record-enabling Track-1.
SETTING THE PLAYBACK DEVICEThe MIDI track’s Output destination menu (Figure 11-3) controls what instrument you will play during the tutorial. At this point, Track-1 is assigned to MIDI input channel 1 of the PolySynth instrument, as shown in Figure 11-3. If you would like to play a different instrument, perhaps a hardware MIDI keyboard that is connected to your
computer, you can play it instead by choosing it from the menu. If you don’t want to change the instrument you are playing, you can skip this step.
☛ If a hardware device you wish to use is not present in the list, see “Setting up your MIDI equipment” on page 11. If the software device you wish to use is not present, create a new instrument track for that instrument; see “Creating an instrument track” on page 137 in the DP User Guide.
1 Press on the Output assignment menu.
Figure 11-3: Changing the output assignment for the MIDI track.
2 Select the desired MIDI device and channel from the hierarchical menu.
In the example below, the new device being selected is the Roland JV-1080, MIDI channel 2. This menu is a standard hierarchical menu.
Instrument track output assignment
Record-enable track 1.
MIDI track output assignment
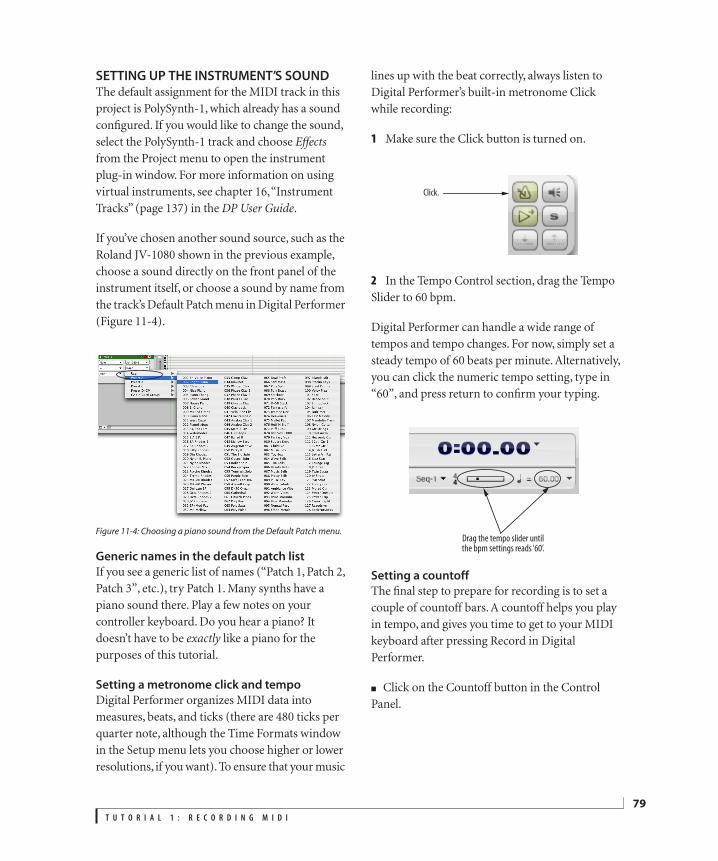
T U T O R I A L 1 : R E C O R D I N G M I D I
79
SETTING UP THE INSTRUMENT’S SOUNDThe default assignment for the MIDI track in this project is PolySynth-1, which already has a sound configured. If you would like to change the sound, select the PolySynth-1 track and choose Effects from the Project menu to open the instrument plug-in window. For more information on using virtual instruments, see chapter 16, “Instrument Tracks” (page 137) in the DP User Guide.
If you’ve chosen another sound source, such as the Roland JV-1080 shown in the previous example, choose a sound directly on the front panel of the instrument itself, or choose a sound by name from the track’s Default Patch menu in Digital Performer (Figure 11-4).
Figure 11-4: Choosing a piano sound from the Default Patch menu.
Generic names in the default patch list
If you see a generic list of names (“Patch 1, Patch 2, Patch 3”, etc.), try Patch 1. Many synths have a piano sound there. Play a few notes on your controller keyboard. Do you hear a piano? It doesn’t have to be exactly like a piano for the purposes of this tutorial.
Setting a metronome click and tempo
Digital Performer organizes MIDI data into measures, beats, and ticks (there are 480 ticks per quarter note, although the Time Formats window in the Setup menu lets you choose higher or lower resolutions, if you want). To ensure that your music
lines up with the beat correctly, always listen to Digital Performer’s built-in metronome Click while recording:
1 Make sure the Click button is turned on.
2 In the Tempo Control section, drag the Tempo Slider to 60 bpm.
Digital Performer can handle a wide range of tempos and tempo changes. For now, simply set a steady tempo of 60 beats per minute. Alternatively, you can click the numeric tempo setting, type in “60”, and press return to confirm your typing.
Setting a countoff
The final step to prepare for recording is to set a couple of countoff bars. A countoff helps you play in tempo, and gives you time to get to your MIDI keyboard after pressing Record in Digital Performer.
■ Click on the Countoff button in the Control Panel.
Click.
Drag the tempo slider until the bpm settings reads ‘60’.

T U T O R I A L 1 : R E C O R D I N G M I D I
80
Figure 11-5: Enabling the countoff.
A Countoff of two bars is provided, with a metronome click every quarter note. (If you want to change the number of countoff bars, Option-click the button to open the Countoff preferences which lets you do so.)
Turning off Memory Cycle and Overdub
The Memory Cycle button causes Digital Performer to loop a section of the music indefinitely. This extremely useful feature will be explored later. For now, let’s make sure that it is off, as shown below. The same goes for Overdub record.
Recording a scale
You are now ready to record. Read over the next couple of steps beforehand, and make sure your controller keyboard is turned on and set up to send MIDI. When you’re ready:
1 Click the Record button in the Control Panel.
The two bars of countoff will begin as soon as the Record button is pressed. Count the eight beats of introduction while you move to your controller keyboard and prepare to play.
2 Play an ascending C major scale, starting on Middle C and ending on the C an octave above.
Use quarter notes, one per metronome click.
3 When you’re finished, click on the Stop button.
Digital Performer will stop recording. Note that the counter has advanced.
If you make a mistake, don’t panic. Press the Rewind button to return to the start of the sequence, then repeat the previous three steps.
Playing back your sequence
To hear what you just recorded:
1 Click on the Rewind button in the Control Panel.
This returns Digital Performer to the start of the sequence. Note that the Counter is reset to its starting value.
2 Turn off the Countoff button (Figure 11-5 on page 80).
This is so you don’t have to wait for the countoff to hear what you recorded. Leave the click turned on, however, so you can hear what you played referenced to the click.
3 Click on the Play button.
Countoff
Memory Cycle Overdub
The Record button
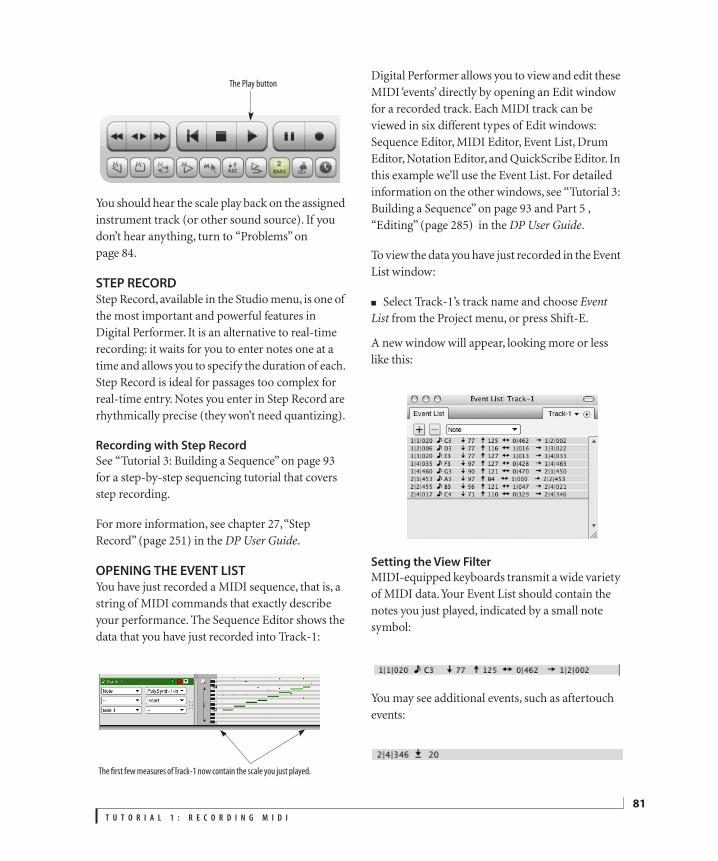
T U T O R I A L 1 : R E C O R D I N G M I D I
81
You should hear the scale play back on the assigned instrument track (or other sound source). If you don’t hear anything, turn to “Problems” on page 84.
STEP RECORDStep Record, available in the Studio menu, is one of the most important and powerful features in Digital Performer. It is an alternative to real-time recording: it waits for you to enter notes one at a time and allows you to specify the duration of each. Step Record is ideal for passages too complex for real-time entry. Notes you enter in Step Record are rhythmically precise (they won’t need quantizing).
Recording with Step Record
See “Tutorial 3: Building a Sequence” on page 93 for a step-by-step sequencing tutorial that covers step recording.
For more information, see chapter 27, “Step Record” (page 251) in the DP User Guide.
OPENING THE EVENT LISTYou have just recorded a MIDI sequence, that is, a string of MIDI commands that exactly describe your performance. The Sequence Editor shows the data that you have just recorded into Track-1:
Digital Performer allows you to view and edit these MIDI ‘events’ directly by opening an Edit window for a recorded track. Each MIDI track can be viewed in six different types of Edit windows: Sequence Editor, MIDI Editor, Event List, Drum Editor, Notation Editor, and QuickScribe Editor. In this example we’ll use the Event List. For detailed information on the other windows, see “Tutorial 3: Building a Sequence” on page 93 and Part 5 , “Editing” (page 285) in the DP User Guide.
To view the data you have just recorded in the Event List window:
■ Select Track-1’s track name and choose Event List from the Project menu, or press Shift-E.
A new window will appear, looking more or less like this:
Setting the View Filter
MIDI-equipped keyboards transmit a wide variety of MIDI data. Your Event List should contain the notes you just played, indicated by a small note symbol:
You may see additional events, such as aftertouch events:
The Play button
The first few measures of Track-1 now contain the scale you just played.
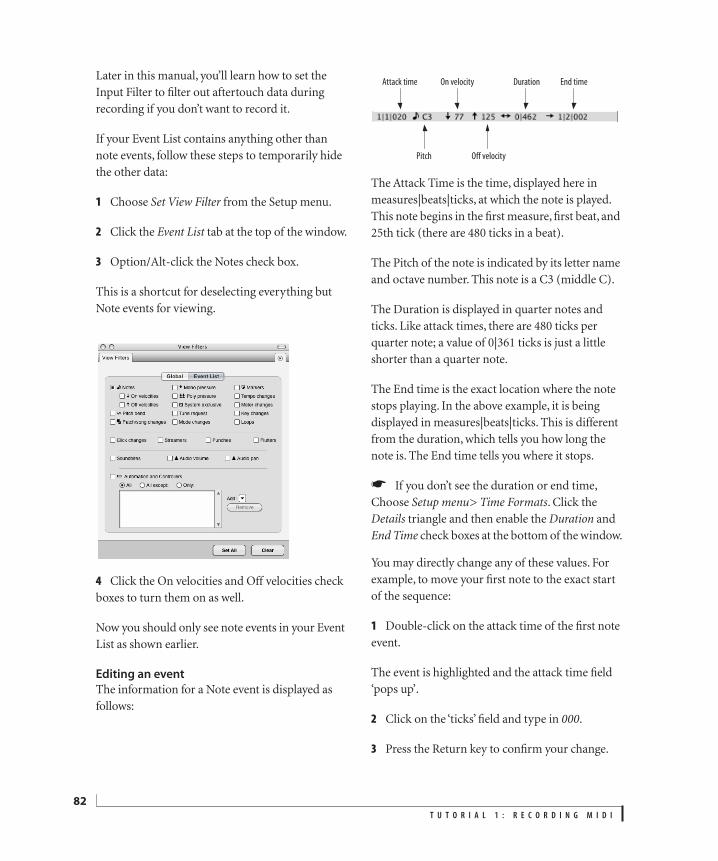
T U T O R I A L 1 : R E C O R D I N G M I D I
82
Later in this manual, you’ll learn how to set the Input Filter to filter out aftertouch data during recording if you don’t want to record it.
If your Event List contains anything other than note events, follow these steps to temporarily hide the other data:
1 Choose Set View Filter from the Setup menu.
2 Click the Event List tab at the top of the window.
3 Option/Alt-click the Notes check box.
This is a shortcut for deselecting everything but Note events for viewing.
4 Click the On velocities and Off velocities check boxes to turn them on as well.
Now you should only see note events in your Event List as shown earlier.
Editing an event
The information for a Note event is displayed as follows:
The Attack Time is the time, displayed here in measures|beats|ticks, at which the note is played. This note begins in the first measure, first beat, and 25th tick (there are 480 ticks in a beat).
The Pitch of the note is indicated by its letter name and octave number. This note is a C3 (middle C).
The Duration is displayed in quarter notes and ticks. Like attack times, there are 480 ticks per quarter note; a value of 0|361 ticks is just a little shorter than a quarter note.
The End time is the exact location where the note stops playing. In the above example, it is being displayed in measures|beats|ticks. This is different from the duration, which tells you how long the note is. The End time tells you where it stops.
☛ If you don’t see the duration or end time, Choose Setup menu> Time Formats. Click the Details triangle and then enable the Duration and End Time check boxes at the bottom of the window.
You may directly change any of these values. For example, to move your first note to the exact start of the sequence:
1 Double-click on the attack time of the first note event.
The event is highlighted and the attack time field ‘pops up’.
2 Click on the ‘ticks’ field and type in 000.
3 Press the Return key to confirm your change.
Attack time On velocity
Pitch Off velocity
Duration End time
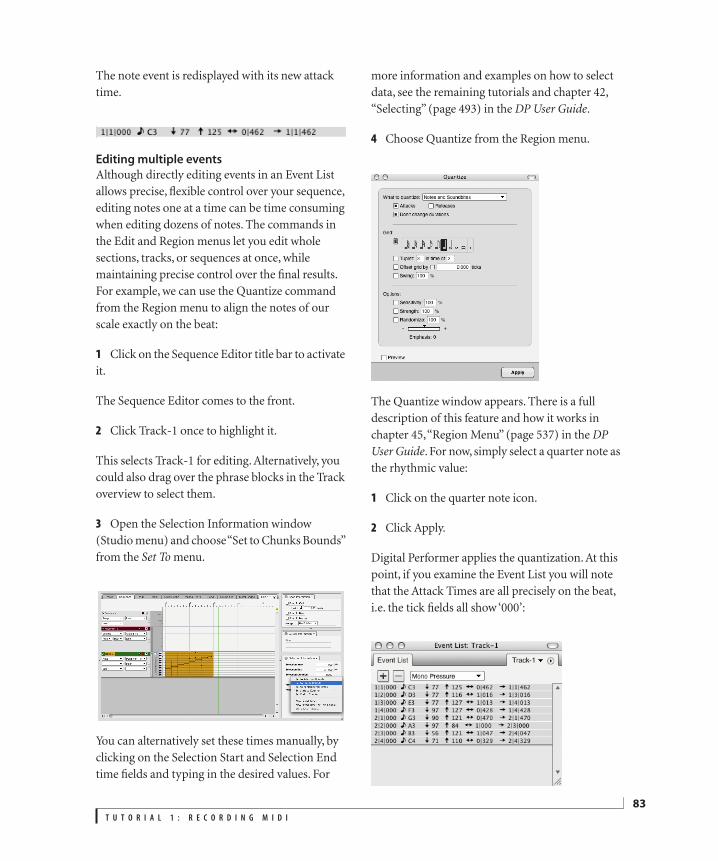
T U T O R I A L 1 : R E C O R D I N G M I D I
83
The note event is redisplayed with its new attack time.
Editing multiple events
Although directly editing events in an Event List allows precise, flexible control over your sequence, editing notes one at a time can be time consuming when editing dozens of notes. The commands in the Edit and Region menus let you edit whole sections, tracks, or sequences at once, while maintaining precise control over the final results. For example, we can use the Quantize command from the Region menu to align the notes of our scale exactly on the beat:
1 Click on the Sequence Editor title bar to activate it.
The Sequence Editor comes to the front.
2 Click Track-1 once to highlight it.
This selects Track-1 for editing. Alternatively, you could also drag over the phrase blocks in the Track overview to select them.
3 Open the Selection Information window (Studio menu) and choose “Set to Chunks Bounds” from the Set To menu.
You can alternatively set these times manually, by clicking on the Selection Start and Selection End time fields and typing in the desired values. For
more information and examples on how to select data, see the remaining tutorials and chapter 42, “Selecting” (page 493) in the DP User Guide.
4 Choose Quantize from the Region menu.
The Quantize window appears. There is a full description of this feature and how it works in chapter 45, “Region Menu” (page 537) in the DP User Guide. For now, simply select a quarter note as the rhythmic value:
1 Click on the quarter note icon.
2 Click Apply.
Digital Performer applies the quantization. At this point, if you examine the Event List you will note that the Attack Times are all precisely on the beat, i.e. the tick fields all show ‘000’:
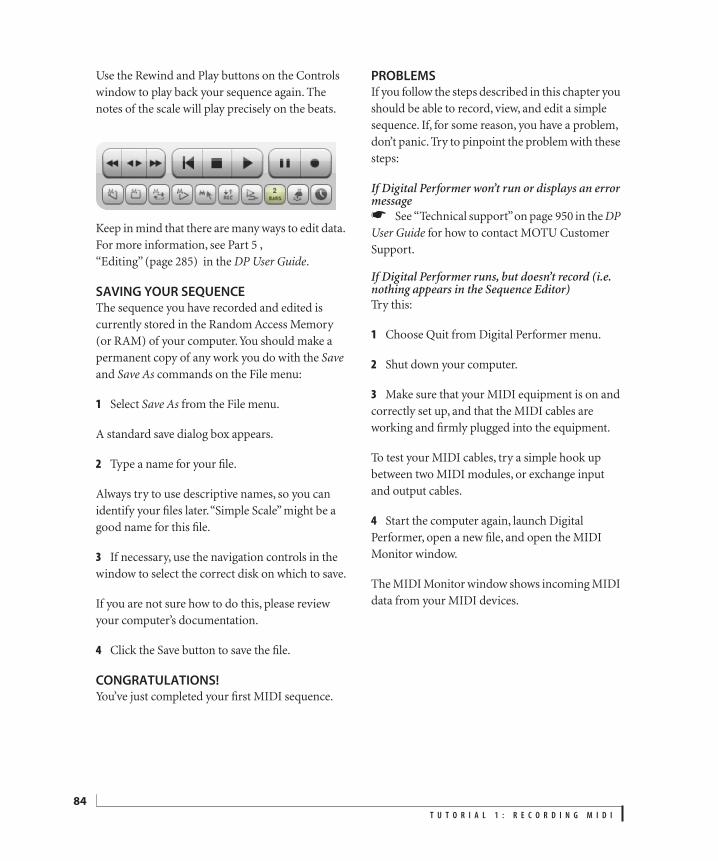
T U T O R I A L 1 : R E C O R D I N G M I D I
84
Use the Rewind and Play buttons on the Controls window to play back your sequence again. The notes of the scale will play precisely on the beats.
Keep in mind that there are many ways to edit data. For more information, see Part 5 , “Editing” (page 285) in the DP User Guide.
SAVING YOUR SEQUENCEThe sequence you have recorded and edited is currently stored in the Random Access Memory (or RAM) of your computer. You should make a permanent copy of any work you do with the Save and Save As commands on the File menu:
1 Select Save As from the File menu.
A standard save dialog box appears.
2 Type a name for your file.
Always try to use descriptive names, so you can identify your files later. “Simple Scale” might be a good name for this file.
3 If necessary, use the navigation controls in the window to select the correct disk on which to save.
If you are not sure how to do this, please review your computer’s documentation.
4 Click the Save button to save the file.
CONGRATULATIONS!You’ve just completed your first MIDI sequence.
PROBLEMSIf you follow the steps described in this chapter you should be able to record, view, and edit a simple sequence. If, for some reason, you have a problem, don’t panic. Try to pinpoint the problem with these steps:
If Digital Performer won’t run or displays an error message☛ See “Technical support” on page 950 in the DP User Guide for how to contact MOTU Customer Support.
If Digital Performer runs, but doesn’t record (i.e. nothing appears in the Sequence Editor)Try this:
1 Choose Quit from Digital Performer menu.
2 Shut down your computer.
3 Make sure that your MIDI equipment is on and correctly set up, and that the MIDI cables are working and firmly plugged into the equipment.
To test your MIDI cables, try a simple hook up between two MIDI modules, or exchange input and output cables.
4 Start the computer again, launch Digital Performer, open a new file, and open the MIDI Monitor window.
The MIDI Monitor window shows incoming MIDI data from your MIDI devices.
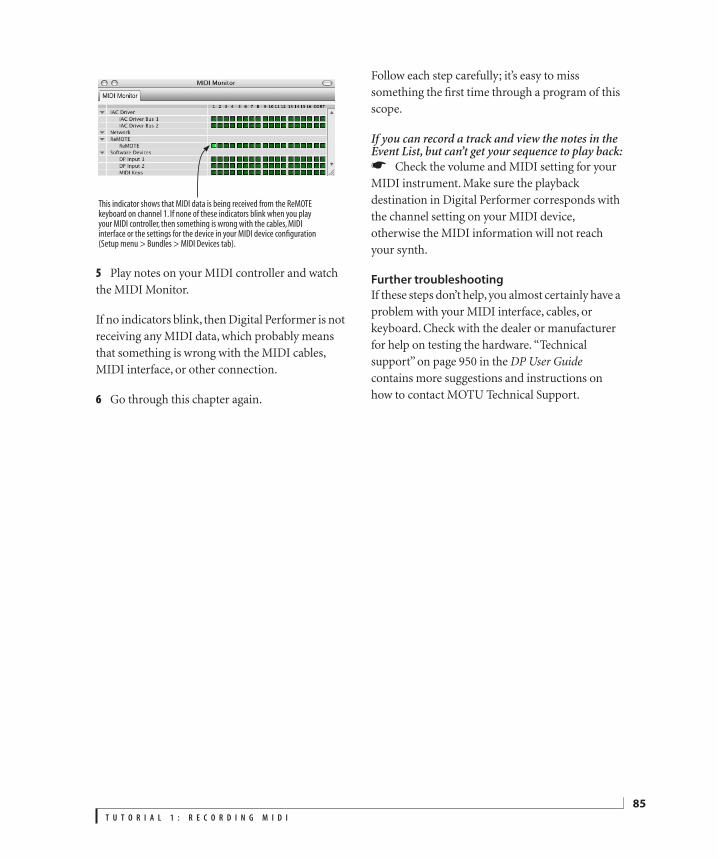
T U T O R I A L 1 : R E C O R D I N G M I D I
85
5 Play notes on your MIDI controller and watch the MIDI Monitor.
If no indicators blink, then Digital Performer is not receiving any MIDI data, which probably means that something is wrong with the MIDI cables, MIDI interface, or other connection.
6 Go through this chapter again.
Follow each step carefully; it’s easy to miss something the first time through a program of this scope.
If you can record a track and view the notes in the Event List, but can’t get your sequence to play back:☛ Check the volume and MIDI setting for your MIDI instrument. Make sure the playback destination in Digital Performer corresponds with the channel setting on your MIDI device, otherwise the MIDI information will not reach your synth.
Further troubleshooting
If these steps don’t help, you almost certainly have a problem with your MIDI interface, cables, or keyboard. Check with the dealer or manufacturer for help on testing the hardware. “Technical support” on page 950 in the DP User Guide contains more suggestions and instructions on how to contact MOTU Technical Support.
This indicator shows that MIDI data is being received from the ReMOTE keyboard on channel 1. If none of these indicators blink when you play your MIDI controller, then something is wrong with the cables, MIDI interface or the settings for the device in your MIDI device configuration (Setup menu > Bundles > MIDI Devices tab).

T U T O R I A L 1 : R E C O R D I N G M I D I
86
CHAPTER
87
12 Tutorial 2: Recording Audio
OVERVIEWThese instructions show step by step how to record and play back an audio signal in Digital Performer. Working through this tutorial is a good way of confirming that you have correctly set up your computer audio system.
How it works. . . . . . . . . . . . . . . . . . . . . . . . . . . . . . . . . . . . . . . . . 87
Opening the tutorial file . . . . . . . . . . . . . . . . . . . . . . . . . . . . . 87
Enabling audio hardware. . . . . . . . . . . . . . . . . . . . . . . . . . . . 87
Using third-party audio hardware . . . . . . . . . . . . . . . . . . . 88
Using built-in audio. . . . . . . . . . . . . . . . . . . . . . . . . . . . . . . . . . 88
Completing the audio hardware configuration . . . . . . 89
Choosing an input . . . . . . . . . . . . . . . . . . . . . . . . . . . . . . . . . . . 89
Preparing an audio track for recording . . . . . . . . . . . . . . 90
Establishing audio input and checking the level . . . . . 90
Monitoring the live signal. . . . . . . . . . . . . . . . . . . . . . . . . . . . 90
Recording. . . . . . . . . . . . . . . . . . . . . . . . . . . . . . . . . . . . . . . . . . . . 91
Playing back the recorded track . . . . . . . . . . . . . . . . . . . . . 92
HOW IT WORKSThe procedure for recording an audio signal into a computer can be broken into two basic steps.
First, hardware must be set up to provide a path for the audio signal into the computer.
Second, software must be set up on the computer to record that information. Playing back digital audio from a computer is a reversal of that process. Software is set up to play back a digital audio file. A path is set up from the digital audio file to a set of speakers or headphones.
An audio signal that you want to record into Digital Performer could come from several different sources. You may want to sing, talk or play an acoustic instrument and record that signal. You may have an electronic instrument that you want to record such as an electric guitar or synthesizer. You
may want to play back an analog tape or even a vinyl LP and record that audio into the computer. You may also generate sounds inside the computer itself that you want to record into Digital Performer. An example of this would be a virtual instrument such as a software synthesizer or sampler.
To record an audio signal into Digital Performer, a path from the origin of that signal into the software must be set up. Conversely, for playback, the software settings must be correct and there must be a path for the signal to reach speakers or headphones.
OPENING THE TUTORIAL FILELocate the “Tutorial 2” Digital Performer project file found on the Digital Performer installer disc. Copy it to your hard drive, then open the file.
You’ll see the Control Panel at the top of the screen, and below that, the Sequence Editor for Sequence 1 (Seq-1). These windows contain the basic controls and information you will need to record and play audio.
ENABLING AUDIO HARDWAREThe key to using any audio system is to follow the signal flow. The first step is to get an audio signal into the computer. You can choose which audio inputs and outputs are available to Digital Performer as follows:
1 Choose Setup menu>Configure Audio System>Configure Hardware Driver.
2 The Configure Hardware dialog appears.

T U T O R I A L 2 : R E C O R D I N G A U D I O
88
This window allows you to select the audio hardware that Digital Performer is currently using and to make changes to that hardware. Refer to your computer platform below.
Mac OS
When Digital Performer is first installed in the computer, the software defaults to using the computer’s built-in audio for audio input and output. The first time you open the Configure Hardware Driver window, it will be set to the built-in audio controller (as shown below). If not, make sure that it is:
Note that some Macs have separate drivers for their built-in input & and built-in output, so to use both simultaneously you must select both by Command-clicking them. You will also need to set the Host Buffer Multiplier to 2. See “Enabling multiple drivers (Mac only)” on page 23.
Windows
Choose either ASIO or Windows Audio from the menu at the top, depending on the audio hardware you have installed in your system. If you haven’t installed a sound card or connected and audio
interface, choose Windows Audio to use the built-in audio features of your PC. In the example below, ASIO has been chosen for the MOTU MicroBook audio interface.
USING THIRD-PARTY AUDIO HARDWAREDigital Performer is compatible with a wide range of third-party audio hardware. If you have additional audio interface hardware connected to your computer, you can set Digital Performer to use that hardware by selecting the appropriate device in the Configure Hardware Driver window, as shown above. By doing so, you will use that hardware as the path for audio record and playback. When you select the driver for your audio interface, the Configure Hardware Driver dialog will show the available settings for that audio hardware, such as clock source and sample rate. The audio driver may also have additional software used to configure the hardware, such as enabling/disabling inputs and outputs, monitoring inputs, and so on. Check the instructions that came with the audio hardware for further details.
When using audio hardware, you’ll use your audio interface for both input to Digital Performer and output from Digital Performer.
USING BUILT-IN AUDIOIf there is no additional audio hardware connected to the computer, Digital Performer can only record and play back audio via the computer’s built-in audio.
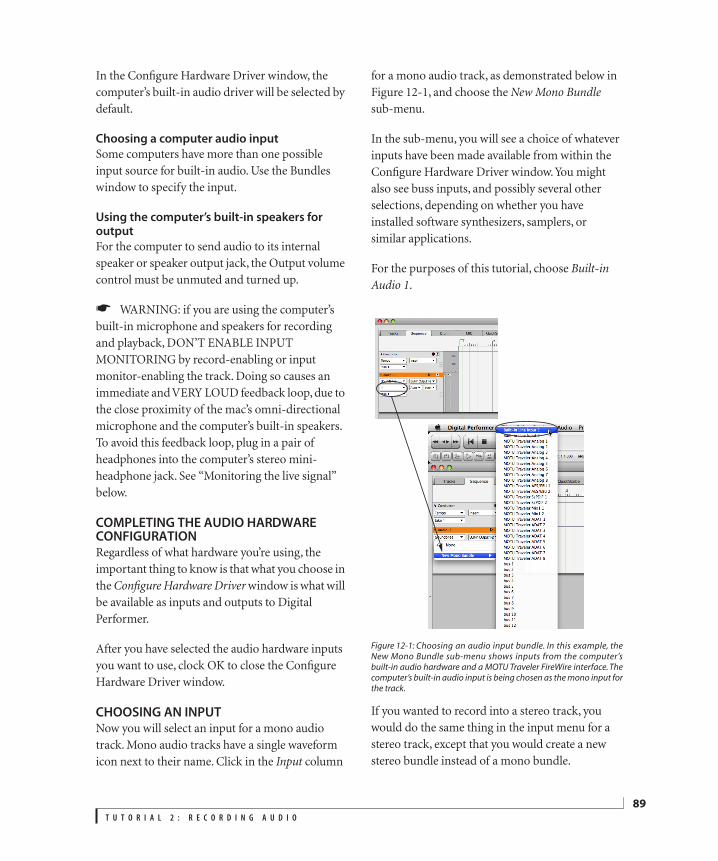
T U T O R I A L 2 : R E C O R D I N G A U D I O
89
In the Configure Hardware Driver window, the computer’s built-in audio driver will be selected by default.
Choosing a computer audio input
Some computers have more than one possible input source for built-in audio. Use the Bundles window to specify the input.
Using the computer’s built-in speakers for output
For the computer to send audio to its internal speaker or speaker output jack, the Output volume control must be unmuted and turned up.
☛ WARNING: if you are using the computer’s built-in microphone and speakers for recording and playback, DON’T ENABLE INPUT MONITORING by record-enabling or input monitor-enabling the track. Doing so causes an immediate and VERY LOUD feedback loop, due to the close proximity of the mac’s omni-directional microphone and the computer’s built-in speakers. To avoid this feedback loop, plug in a pair of headphones into the computer’s stereo mini-headphone jack. See “Monitoring the live signal” below.
COMPLETING THE AUDIO HARDWARE CONFIGURATIONRegardless of what hardware you’re using, the important thing to know is that what you choose in the Configure Hardware Driver window is what will be available as inputs and outputs to Digital Performer.
After you have selected the audio hardware inputs you want to use, clock OK to close the Configure Hardware Driver window.
CHOOSING AN INPUTNow you will select an input for a mono audio track. Mono audio tracks have a single waveform icon next to their name. Click in the Input column
for a mono audio track, as demonstrated below in Figure 12-1, and choose the New Mono Bundle sub-menu.
In the sub-menu, you will see a choice of whatever inputs have been made available from within the Configure Hardware Driver window. You might also see buss inputs, and possibly several other selections, depending on whether you have installed software synthesizers, samplers, or similar applications.
For the purposes of this tutorial, choose Built-in Audio 1.
Figure 12-1: Choosing an audio input bundle. In this example, theNew Mono Bundle sub-menu shows inputs from the computer’sbuilt-in audio hardware and a MOTU Traveler FireWire interface. Thecomputer’s built-in audio input is being chosen as the mono input forthe track.
If you wanted to record into a stereo track, you would do the same thing in the input menu for a stereo track, except that you would create a new stereo bundle instead of a mono bundle.
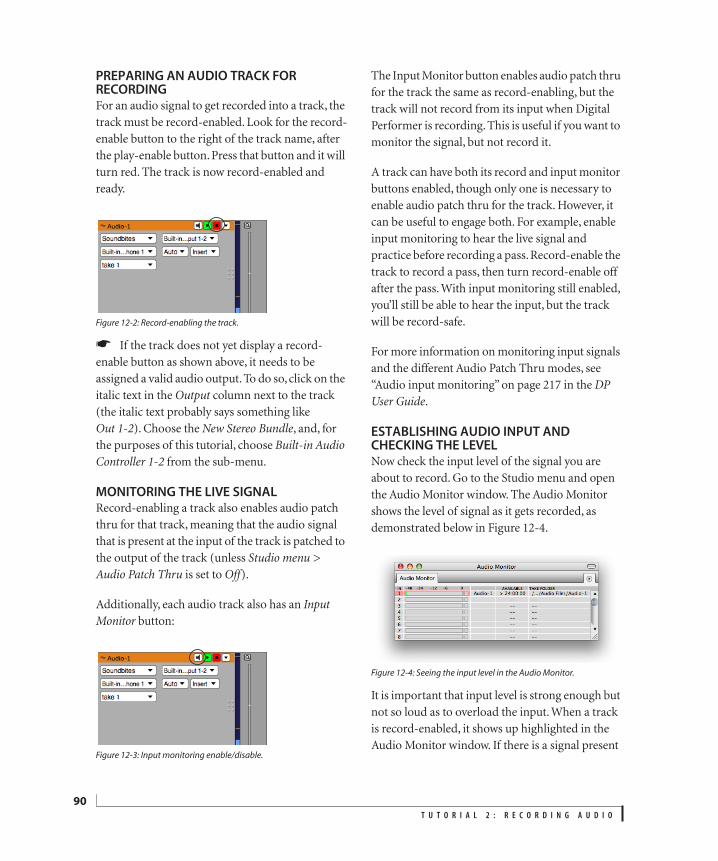
T U T O R I A L 2 : R E C O R D I N G A U D I O
90
PREPARING AN AUDIO TRACK FOR RECORDINGFor an audio signal to get recorded into a track, the track must be record-enabled. Look for the record-enable button to the right of the track name, after the play-enable button. Press that button and it will turn red. The track is now record-enabled and ready.
Figure 12-2: Record-enabling the track.
☛ If the track does not yet display a record-enable button as shown above, it needs to be assigned a valid audio output. To do so, click on the italic text in the Output column next to the track (the italic text probably says something like Out 1-2). Choose the New Stereo Bundle, and, for the purposes of this tutorial, choose Built-in Audio Controller 1-2 from the sub-menu.
MONITORING THE LIVE SIGNALRecord-enabling a track also enables audio patch thru for that track, meaning that the audio signal that is present at the input of the track is patched to the output of the track (unless Studio menu > Audio Patch Thru is set to Off).
Additionally, each audio track also has an Input Monitor button:
Figure 12-3: Input monitoring enable/disable.
The Input Monitor button enables audio patch thru for the track the same as record-enabling, but the track will not record from its input when Digital Performer is recording. This is useful if you want to monitor the signal, but not record it.
A track can have both its record and input monitor buttons enabled, though only one is necessary to enable audio patch thru for the track. However, it can be useful to engage both. For example, enable input monitoring to hear the live signal and practice before recording a pass. Record-enable the track to record a pass, then turn record-enable off after the pass. With input monitoring still enabled, you’ll still be able to hear the input, but the track will be record-safe.
For more information on monitoring input signals and the different Audio Patch Thru modes, see “Audio input monitoring” on page 217 in the DP User Guide.
ESTABLISHING AUDIO INPUT AND CHECKING THE LEVEL Now check the input level of the signal you are about to record. Go to the Studio menu and open the Audio Monitor window. The Audio Monitor shows the level of signal as it gets recorded, as demonstrated below in Figure 12-4.
Figure 12-4: Seeing the input level in the Audio Monitor.
It is important that input level is strong enough but not so loud as to overload the input. When a track is record-enabled, it shows up highlighted in the Audio Monitor window. If there is a signal present

T U T O R I A L 2 : R E C O R D I N G A U D I O
91
at the input of the record-enabled track, you will see VU activity in the Audio Monitor window. When you see this signal, you are ready to record.
If the input signal is too loud or not loud enough, you must change that level before the signal reaches the input of the computer or audio interface. Matching audio levels is critical to getting a good recorded sound.
Mac users: if you are using the Mac’s built-in microphone, you can adjust the input level in the Audio tab of the Audio MIDI Setup utility.
PC users: if your PC has a built-in microphone, use whatever controls Windows provides to adjust its input level.
If you have a third-party audio interface, use the input gain controls on it, if any. If it doesn’t have input gain control, a simple mixer or microphone preamplifier is a good way to ensure that input levels are strong enough without overloading.
Generally, software generated audio signals, such as soft synths or samplers, will have optimum level by default. On some soft synths or samplers you may also have settings available to control output gain.
Note that the Mixing Board in Digital Performer controls playback output from the program. It has no control over input level.
Setting the audio file destination
The Audio Monitor window also lets you select where on your computer that new audio files will be created and shows you available recording time on the destination disk.
Figure 12-5: If you want, you can change the destination of the audiofile that is generated by the record operation.
For this tutorial, let’s use the location already provided. but if you wanted to change it, you would click the take file name to select it and then choose Set Take Folder from the Audio Monitor mini-menu.
RECORDINGTo put Digital Performer into record mode, at least one track must be record-enabled, as you did earlier in this tutorial (Figure 12-2 on page 90).
Now press the Record button in the Control Panel and Digital Performer will start to record. As Digital Performer records, you should see the green wiper moving in the Sequence Editor window. A red stripe will appear trailing behind the wiper indicating that audio is being recorded. The Audio Monitor window will show the strength of the signal as it gets recorded.
Figure 12-6: Recording audio.
Double-click here to change where the audio file to be recorded will be placed.
Click once here to view the full path name for the current destination.

T U T O R I A L 2 : R E C O R D I N G A U D I O
92
PLAYING BACK THE RECORDED TRACK After you have recorded a signal, you can stop the transport and turn off the track’s input monitor-enable and record-enable buttons. Then rewind, and play: you should hear what you just recorded. The Mixing Board in Digital Performer will allow you to adjust output level of the recorded track.
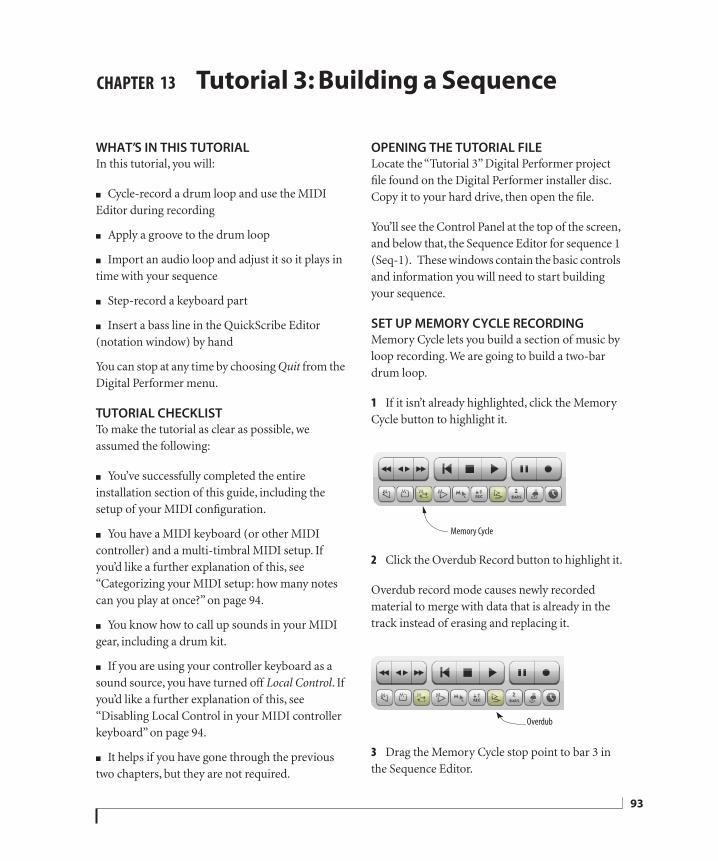
CHAPTER
93
13 Tutorial 3: Building a Sequence
WHAT’S IN THIS TUTORIALIn this tutorial, you will:
■ Cycle-record a drum loop and use the MIDI Editor during recording
■ Apply a groove to the drum loop
■ Import an audio loop and adjust it so it plays in time with your sequence
■ Step-record a keyboard part
■ Insert a bass line in the QuickScribe Editor (notation window) by hand
You can stop at any time by choosing Quit from the Digital Performer menu.
TUTORIAL CHECKLISTTo make the tutorial as clear as possible, we assumed the following:
■ You’ve successfully completed the entire installation section of this guide, including the setup of your MIDI configuration.
■ You have a MIDI keyboard (or other MIDI controller) and a multi-timbral MIDI setup. If you’d like a further explanation of this, see “Categorizing your MIDI setup: how many notes can you play at once?” on page 94.
■ You know how to call up sounds in your MIDI gear, including a drum kit.
■ If you are using your controller keyboard as a sound source, you have turned off Local Control. If you’d like a further explanation of this, see “Disabling Local Control in your MIDI controller keyboard” on page 94.
■ It helps if you have gone through the previous two chapters, but they are not required.
OPENING THE TUTORIAL FILELocate the “Tutorial 3” Digital Performer project file found on the Digital Performer installer disc. Copy it to your hard drive, then open the file.
You’ll see the Control Panel at the top of the screen, and below that, the Sequence Editor for sequence 1 (Seq-1). These windows contain the basic controls and information you will need to start building your sequence.
SET UP MEMORY CYCLE RECORDINGMemory Cycle lets you build a section of music by loop recording. We are going to build a two-bar drum loop.
1 If it isn’t already highlighted, click the Memory Cycle button to highlight it.
2 Click the Overdub Record button to highlight it.
Overdub record mode causes newly recorded material to merge with data that is already in the track instead of erasing and replacing it.
3 Drag the Memory Cycle stop point to bar 3 in the Sequence Editor.
Memory Cycle
Overdub
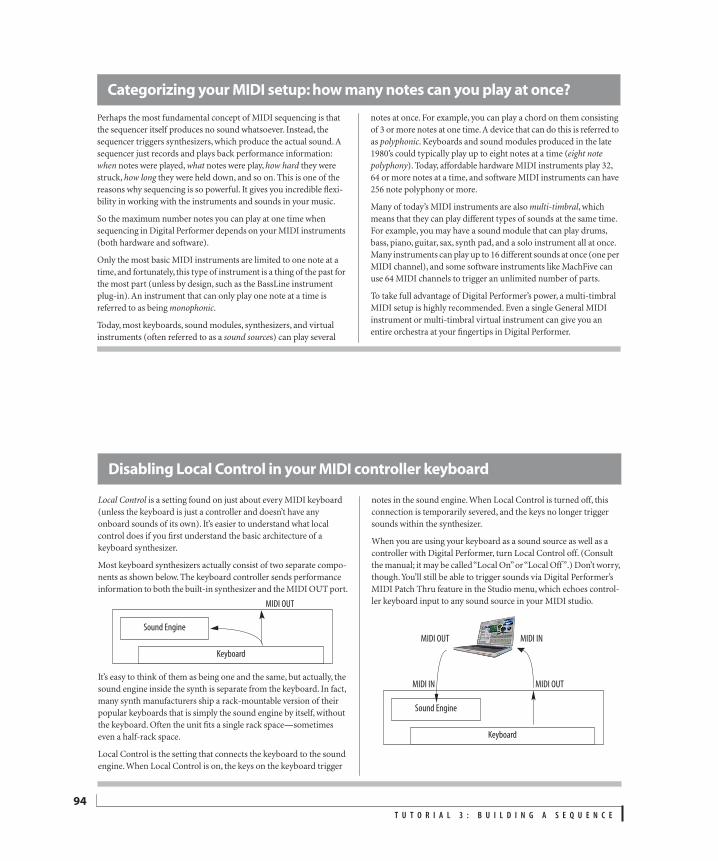
T U T O R I A L 3 : B U I L D I N G A S E Q U E N C E
94
Perhaps the most fundamental concept of MIDI sequencing is that the sequencer itself produces no sound whatsoever. Instead, the sequencer triggers synthesizers, which produce the actual sound. A sequencer just records and plays back performance information: when notes were played, what notes were play, how hard they were struck, how long they were held down, and so on. This is one of the reasons why sequencing is so powerful. It gives you incredible flexi-bility in working with the instruments and sounds in your music.
So the maximum number notes you can play at one time when sequencing in Digital Performer depends on your MIDI instruments (both hardware and software).
Only the most basic MIDI instruments are limited to one note at a time, and fortunately, this type of instrument is a thing of the past for the most part (unless by design, such as the BassLine instrument plug-in). An instrument that can only play one note at a time is referred to as being monophonic.
Today, most keyboards, sound modules, synthesizers, and virtual instruments (often referred to as a sound sources) can play several
notes at once. For example, you can play a chord on them consisting of 3 or more notes at one time. A device that can do this is referred to as polyphonic. Keyboards and sound modules produced in the late 1980’s could typically play up to eight notes at a time (eight note polyphony). Today, affordable hardware MIDI instruments play 32, 64 or more notes at a time, and software MIDI instruments can have 256 note polyphony or more.
Many of today’s MIDI instruments are also multi-timbral, which means that they can play different types of sounds at the same time. For example, you may have a sound module that can play drums, bass, piano, guitar, sax, synth pad, and a solo instrument all at once. Many instruments can play up to 16 different sounds at once (one per MIDI channel), and some software instruments like MachFive can use 64 MIDI channels to trigger an unlimited number of parts.
To take full advantage of Digital Performer’s power, a multi-timbral MIDI setup is highly recommended. Even a single General MIDI instrument or multi-timbral virtual instrument can give you an entire orchestra at your fingertips in Digital Performer.
Categorizing your MIDI setup: how many notes can you play at once?
Disabling Local Control in your MIDI controller keyboard
Local Control is a setting found on just about every MIDI keyboard (unless the keyboard is just a controller and doesn’t have any onboard sounds of its own). It’s easier to understand what local control does if you first understand the basic architecture of a keyboard synthesizer.
Most keyboard synthesizers actually consist of two separate compo-nents as shown below. The keyboard controller sends performance information to both the built-in synthesizer and the MIDI OUT port.
It’s easy to think of them as being one and the same, but actually, the sound engine inside the synth is separate from the keyboard. In fact, many synth manufacturers ship a rack-mountable version of their popular keyboards that is simply the sound engine by itself, without the keyboard. Often the unit fits a single rack space—sometimes even a half-rack space.
Local Control is the setting that connects the keyboard to the sound engine. When Local Control is on, the keys on the keyboard trigger
notes in the sound engine. When Local Control is turned off, this connection is temporarily severed, and the keys no longer trigger sounds within the synthesizer.
When you are using your keyboard as a sound source as well as a controller with Digital Performer, turn Local Control off. (Consult the manual; it may be called “Local On” or “Local Off ”.) Don’t worry, though. You’ll still be able to trigger sounds via Digital Performer’s MIDI Patch Thru feature in the Studio menu, which echoes control-ler keyboard input to any sound source in your MIDI studio.
Keyboard
Sound Engine
MIDI OUT
Keyboard
Sound Engine
MIDI IN MIDI OUT
MIDI INMIDI OUT
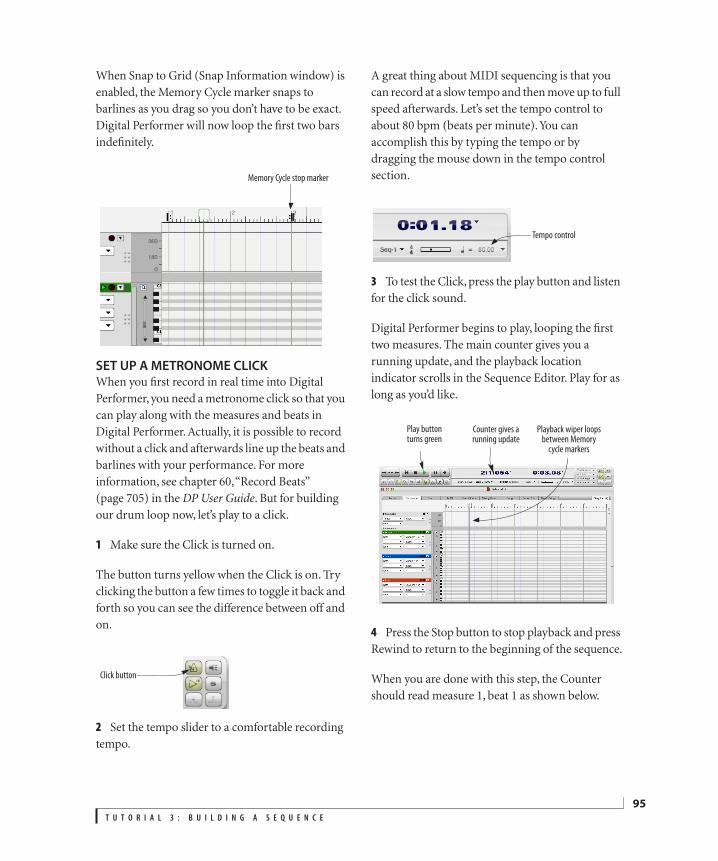
T U T O R I A L 3 : B U I L D I N G A S E Q U E N C E
95
When Snap to Grid (Snap Information window) is enabled, the Memory Cycle marker snaps to barlines as you drag so you don’t have to be exact. Digital Performer will now loop the first two bars indefinitely.
SET UP A METRONOME CLICKWhen you first record in real time into Digital Performer, you need a metronome click so that you can play along with the measures and beats in Digital Performer. Actually, it is possible to record without a click and afterwards line up the beats and barlines with your performance. For more information, see chapter 60, “Record Beats” (page 705) in the DP User Guide. But for building our drum loop now, let’s play to a click.
1 Make sure the Click is turned on.
The button turns yellow when the Click is on. Try clicking the button a few times to toggle it back and forth so you can see the difference between off and on.
2 Set the tempo slider to a comfortable recording tempo.
A great thing about MIDI sequencing is that you can record at a slow tempo and then move up to full speed afterwards. Let’s set the tempo control to about 80 bpm (beats per minute). You can accomplish this by typing the tempo or by dragging the mouse down in the tempo control section.
3 To test the Click, press the play button and listen for the click sound.
Digital Performer begins to play, looping the first two measures. The main counter gives you a running update, and the playback location indicator scrolls in the Sequence Editor. Play for as long as you’d like.
4 Press the Stop button to stop playback and press Rewind to return to the beginning of the sequence.
When you are done with this step, the Counter should read measure 1, beat 1 as shown below.
Memory Cycle stop marker
Click button
Tempo control
Play buttonturns green
Counter gives a running update
Playback wiper loops between Memory
cycle markers

T U T O R I A L 3 : B U I L D I N G A S E Q U E N C E
96
5 If you did not hear the Click during playback, or if you feel that it won’t be loud enough during recording, see the side-bar “Setting up a Click”.
SET UP A ONE BAR COUNTOFFDigital Performer can give you a countoff before you begin recording, just like a conductor would, to get you into the tempo before the first downbeat. In fact, as you probably know, it’s almost impossible to play in time with the first downbeat without a countoff.
By default, Digital Performer gives you a two-bar countoff. But we are recording at a fairly slow tempo, and we don’t want to have to wait through a full two bars, so let’s change the countoff to one bar.
1 Click the Countoff button once to turn it on.
2 Option/Alt-click the Countoff button to open the Countoff Preferences.
3 In the Countoff Options section, change the 2 in the text box to a 1.
Stop button
Rewind button
After rewind, the Counter returns to measure 1.
Digital Performer’s audio click uses audio files to generate a click sound of your choice.
To set up an audio click:
1. From the Studio menu choose Click Options. You can also access this window by Option/Alt-clicking the metronome icon in the Control Panel.
2. As soon as the Click Options window opens, you should hear a click coming from your computer speaker. If not, enable the Audition click option at the bottom of the window.
3. At the top left of the window, uncheck the MIDI check box and check the Audio check box.
4. On the right, choose the audio file you would like to use for the accented click from the menu provided. A number of files are provided for you, but you may also use your own mono WAVE, AIFF, or SDII file.
The accented click falls on the downbeats of measures.
5. Set the level of the click as desired.
6. Make the Normal click settings in the same fashion.
The Normal click falls on beat boundaries within each measure.
7. Set the overall click volume (for both Accented and Normal) using the Master Volume slider.
8. Click Done.
Setting up a Click
In addition to Digital Performer’s audio click, you can use a drum machine, sampler, or other MIDI sound source to generate a click sound of your choice.
To set up a MIDI click:
1. At the top left of the Click preferences window, uncheck the Audio check box and check the MIDI check box.
2. On the right, choose the device you would like to use for the accented click from the menu provided.
The accented click falls on the downbeats of measures.
3. Double-click in the Pitch box to select it and either type the desired note or simply play the desired note on your controller keyboard.
4. Set the note-on velocity (0-127) and gate (duration in milliseconds) as desired.
5. Make the Normal click settings in the same fashion.
The Normal click falls on beat boundaries within each measure.
6. Click Done.
Countoff button
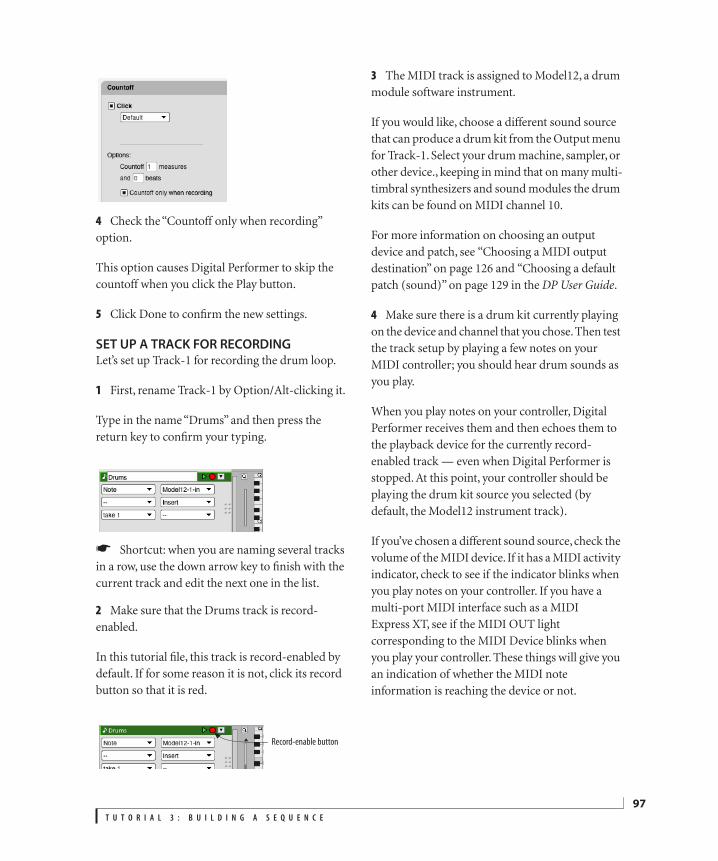
T U T O R I A L 3 : B U I L D I N G A S E Q U E N C E
97
4 Check the “Countoff only when recording” option.
This option causes Digital Performer to skip the countoff when you click the Play button.
5 Click Done to confirm the new settings.
SET UP A TRACK FOR RECORDINGLet’s set up Track-1 for recording the drum loop.
1 First, rename Track-1 by Option/Alt-clicking it.
Type in the name “Drums” and then press the return key to confirm your typing.
☛ Shortcut: when you are naming several tracks in a row, use the down arrow key to finish with the current track and edit the next one in the list.
2 Make sure that the Drums track is record-enabled.
In this tutorial file, this track is record-enabled by default. If for some reason it is not, click its record button so that it is red.
3 The MIDI track is assigned to Model12, a drum module software instrument.
If you would like, choose a different sound source that can produce a drum kit from the Output menu for Track-1. Select your drum machine, sampler, or other device., keeping in mind that on many multi-timbral synthesizers and sound modules the drum kits can be found on MIDI channel 10.
For more information on choosing an output device and patch, see “Choosing a MIDI output destination” on page 126 and “Choosing a default patch (sound)” on page 129 in the DP User Guide.
4 Make sure there is a drum kit currently playing on the device and channel that you chose. Then test the track setup by playing a few notes on your MIDI controller; you should hear drum sounds as you play.
When you play notes on your controller, Digital Performer receives them and then echoes them to the playback device for the currently record-enabled track — even when Digital Performer is stopped. At this point, your controller should be playing the drum kit source you selected (by default, the Model12 instrument track).
If you’ve chosen a different sound source, check the volume of the MIDI device. If it has a MIDI activity indicator, check to see if the indicator blinks when you play notes on your controller. If you have a multi-port MIDI interface such as a MIDI Express XT, see if the MIDI OUT light corresponding to the MIDI Device blinks when you play your controller. These things will give you an indication of whether the MIDI note information is reaching the device or not.
Record-enable button
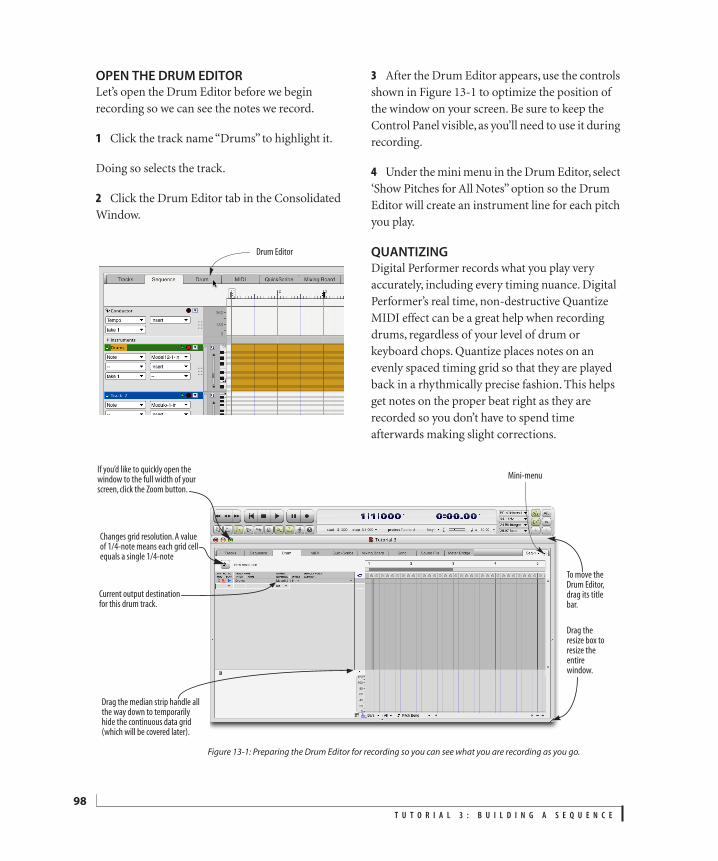
T U T O R I A L 3 : B U I L D I N G A S E Q U E N C E
98
OPEN THE DRUM EDITORLet’s open the Drum Editor before we begin recording so we can see the notes we record.
1 Click the track name “Drums” to highlight it.
Doing so selects the track.
2 Click the Drum Editor tab in the Consolidated Window.
3 After the Drum Editor appears, use the controls shown in Figure 13-1 to optimize the position of the window on your screen. Be sure to keep the Control Panel visible, as you’ll need to use it during recording.
4 Under the mini menu in the Drum Editor, select ‘Show Pitches for All Notes” option so the Drum Editor will create an instrument line for each pitch you play.
QUANTIZINGDigital Performer records what you play very accurately, including every timing nuance. Digital Performer’s real time, non-destructive Quantize MIDI effect can be a great help when recording drums, regardless of your level of drum or keyboard chops. Quantize places notes on an evenly spaced timing grid so that they are played back in a rhythmically precise fashion. This helps get notes on the proper beat right as they are recorded so you don’t have to spend time afterwards making slight corrections.
Drum Editor
If you’d like to quickly open the window to the full width of your screen, click the Zoom button.
Drag the median strip handle all the way down to temporarily hide the continuous data grid (which will be covered later).
To move the Drum Editor, drag its title bar.
Changes grid resolution. A value of 1/4-note means each grid cell equals a single 1/4-note
Current output destination for this drum track.
Drag the resize box to resize the entire window.
Figure 13-1: Preparing the Drum Editor for recording so you can see what you are recording as you go.
Mini-menu
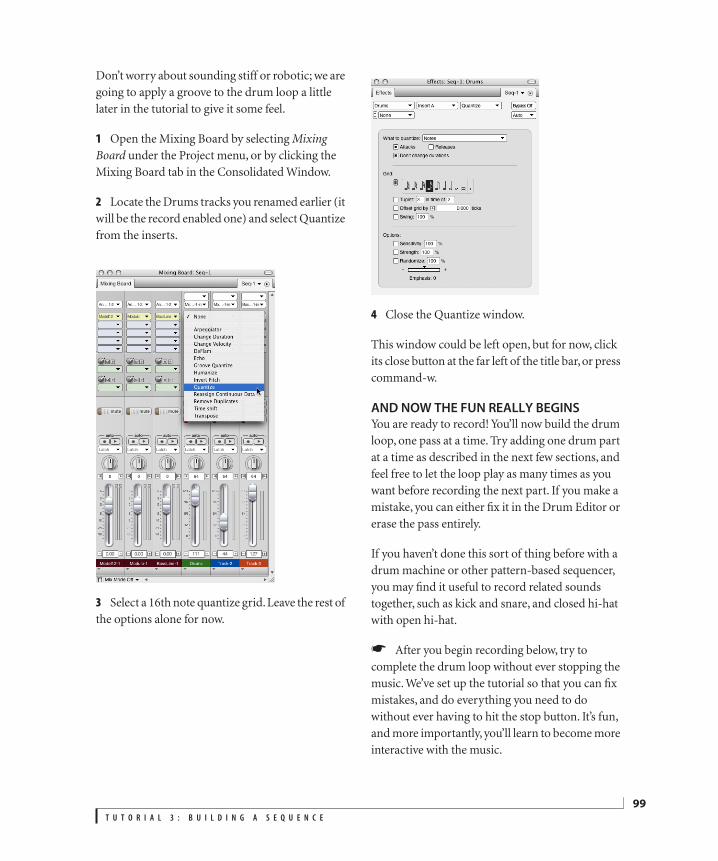
T U T O R I A L 3 : B U I L D I N G A S E Q U E N C E
99
Don’t worry about sounding stiff or robotic; we are going to apply a groove to the drum loop a little later in the tutorial to give it some feel.
1 Open the Mixing Board by selecting Mixing Board under the Project menu, or by clicking the Mixing Board tab in the Consolidated Window.
2 Locate the Drums tracks you renamed earlier (it will be the record enabled one) and select Quantize from the inserts.
3 Select a 16th note quantize grid. Leave the rest of the options alone for now.
4 Close the Quantize window.
This window could be left open, but for now, click its close button at the far left of the title bar, or press command-w.
AND NOW THE FUN REALLY BEGINSYou are ready to record! You’ll now build the drum loop, one pass at a time. Try adding one drum part at a time as described in the next few sections, and feel free to let the loop play as many times as you want before recording the next part. If you make a mistake, you can either fix it in the Drum Editor or erase the pass entirely.
If you haven’t done this sort of thing before with a drum machine or other pattern-based sequencer, you may find it useful to record related sounds together, such as kick and snare, and closed hi-hat with open hi-hat.
☛ After you begin recording below, try to complete the drum loop without ever stopping the music. We’ve set up the tutorial so that you can fix mistakes, and do everything you need to do without ever having to hit the stop button. It’s fun, and more importantly, you’ll learn to become more interactive with the music.
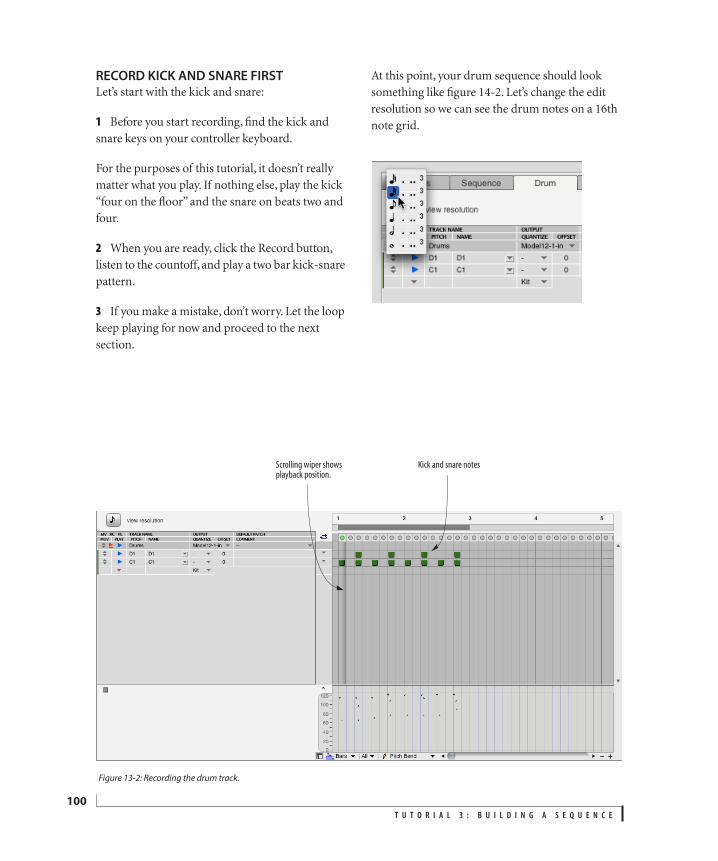
T U T O R I A L 3 : B U I L D I N G A S E Q U E N C E
100
RECORD KICK AND SNARE FIRSTLet’s start with the kick and snare:
1 Before you start recording, find the kick and snare keys on your controller keyboard.
For the purposes of this tutorial, it doesn’t really matter what you play. If nothing else, play the kick “four on the floor” and the snare on beats two and four.
2 When you are ready, click the Record button, listen to the countoff, and play a two bar kick-snare pattern.
3 If you make a mistake, don’t worry. Let the loop keep playing for now and proceed to the next section.
At this point, your drum sequence should look something like figure 14-2. Let’s change the edit resolution so we can see the drum notes on a 16th note grid.
Figure 13-2: Recording the drum track.
Scrolling wiper shows playback position.
Kick and snare notes
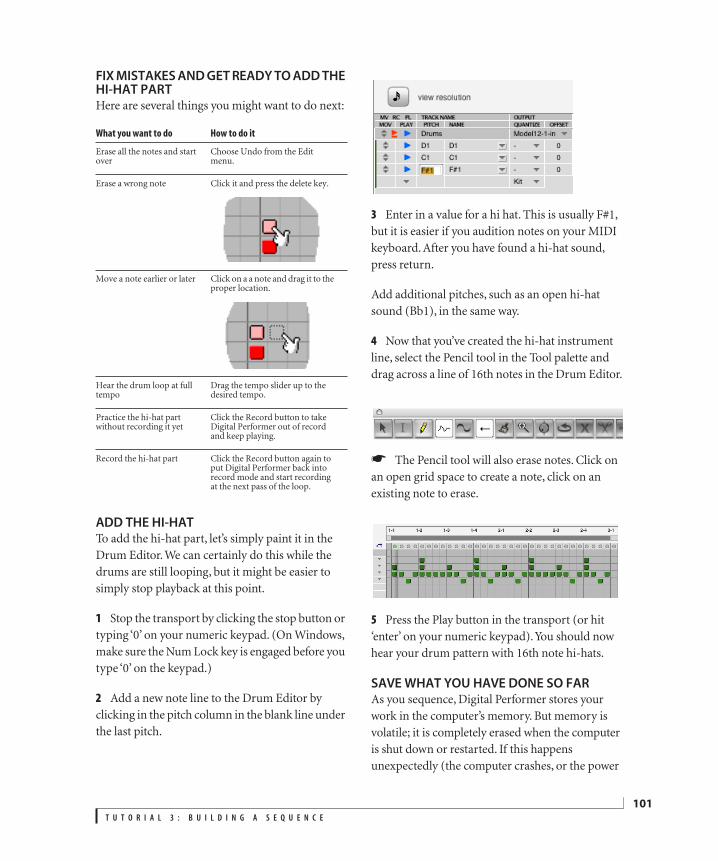
T U T O R I A L 3 : B U I L D I N G A S E Q U E N C E
101
FIX MISTAKES AND GET READY TO ADD THE HI-HAT PARTHere are several things you might want to do next:
ADD THE HI-HATTo add the hi-hat part, let’s simply paint it in the Drum Editor. We can certainly do this while the drums are still looping, but it might be easier to simply stop playback at this point.
1 Stop the transport by clicking the stop button or typing ‘0’ on your numeric keypad. (On Windows, make sure the Num Lock key is engaged before you type ‘0’ on the keypad.)
2 Add a new note line to the Drum Editor by clicking in the pitch column in the blank line under the last pitch.
3 Enter in a value for a hi hat. This is usually F#1, but it is easier if you audition notes on your MIDI keyboard. After you have found a hi-hat sound, press return.
Add additional pitches, such as an open hi-hat sound (Bb1), in the same way.
4 Now that you’ve created the hi-hat instrument line, select the Pencil tool in the Tool palette and drag across a line of 16th notes in the Drum Editor.
☛ The Pencil tool will also erase notes. Click on an open grid space to create a note, click on an existing note to erase.
5 Press the Play button in the transport (or hit ‘enter’ on your numeric keypad). You should now hear your drum pattern with 16th note hi-hats.
SAVE WHAT YOU HAVE DONE SO FARAs you sequence, Digital Performer stores your work in the computer’s memory. But memory is volatile; it is completely erased when the computer is shut down or restarted. If this happens unexpectedly (the computer crashes, or the power
What you want to do How to do it
Erase all the notes and start over
Choose Undo from the Edit menu.
Erase a wrong note Click it and press the delete key.
Move a note earlier or later Click on a a note and drag it to the proper location.
Hear the drum loop at full tempo
Drag the tempo slider up to the desired tempo.
Practice the hi-hat part without recording it yet
Click the Record button to take Digital Performer out of record and keep playing.
Record the hi-hat part Click the Record button again to put Digital Performer back into record mode and start recording at the next pass of the loop.
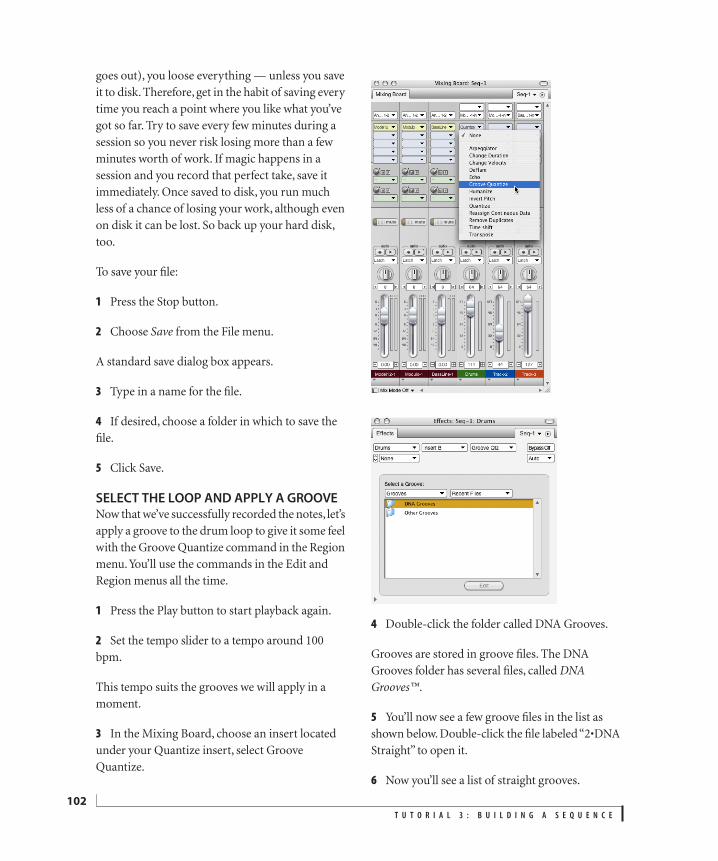
T U T O R I A L 3 : B U I L D I N G A S E Q U E N C E
102
goes out), you loose everything — unless you save it to disk. Therefore, get in the habit of saving every time you reach a point where you like what you’ve got so far. Try to save every few minutes during a session so you never risk losing more than a few minutes worth of work. If magic happens in a session and you record that perfect take, save it immediately. Once saved to disk, you run much less of a chance of losing your work, although even on disk it can be lost. So back up your hard disk, too.
To save your file:
1 Press the Stop button.
2 Choose Save from the File menu.
A standard save dialog box appears.
3 Type in a name for the file.
4 If desired, choose a folder in which to save the file.
5 Click Save.
SELECT THE LOOP AND APPLY A GROOVENow that we’ve successfully recorded the notes, let’s apply a groove to the drum loop to give it some feel with the Groove Quantize command in the Region menu. You’ll use the commands in the Edit and Region menus all the time.
1 Press the Play button to start playback again.
2 Set the tempo slider to a tempo around 100 bpm.
This tempo suits the grooves we will apply in a moment.
3 In the Mixing Board, choose an insert located under your Quantize insert, select Groove Quantize.
4 Double-click the folder called DNA Grooves.
Grooves are stored in groove files. The DNA Grooves folder has several files, called DNA Grooves™.
5 You’ll now see a few groove files in the list as shown below. Double-click the file labeled “2•DNA Straight” to open it.
6 Now you’ll see a list of straight grooves.
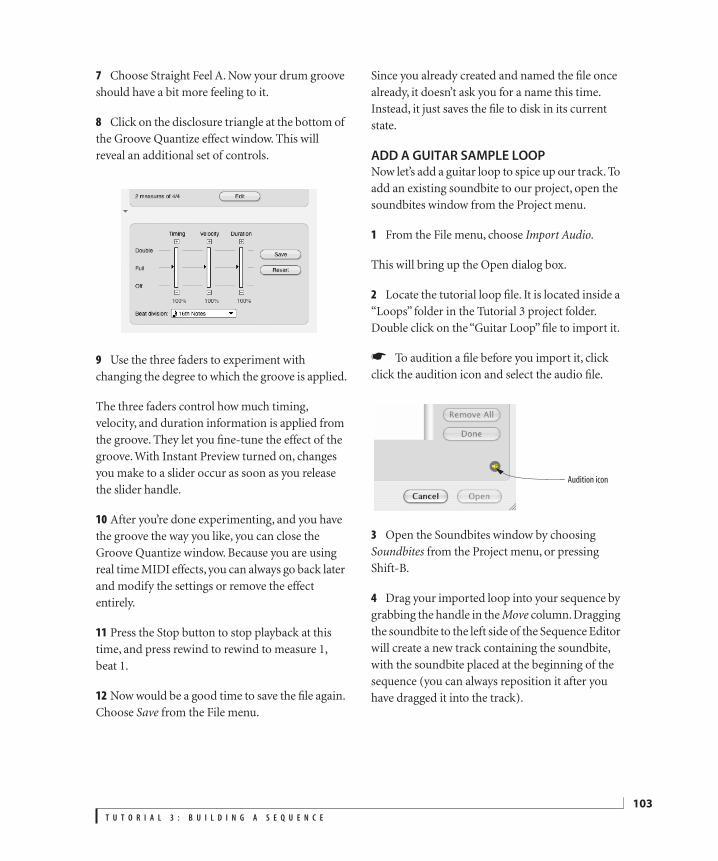
T U T O R I A L 3 : B U I L D I N G A S E Q U E N C E
103
7 Choose Straight Feel A. Now your drum groove should have a bit more feeling to it.
8 Click on the disclosure triangle at the bottom of the Groove Quantize effect window. This will reveal an additional set of controls.
9 Use the three faders to experiment with changing the degree to which the groove is applied.
The three faders control how much timing, velocity, and duration information is applied from the groove. They let you fine-tune the effect of the groove. With Instant Preview turned on, changes you make to a slider occur as soon as you release the slider handle.
10 After you’re done experimenting, and you have the groove the way you like, you can close the Groove Quantize window. Because you are using real time MIDI effects, you can always go back later and modify the settings or remove the effect entirely.
11 Press the Stop button to stop playback at this time, and press rewind to rewind to measure 1, beat 1.
12 Now would be a good time to save the file again. Choose Save from the File menu.
Since you already created and named the file once already, it doesn’t ask you for a name this time. Instead, it just saves the file to disk in its current state.
ADD A GUITAR SAMPLE LOOPNow let’s add a guitar loop to spice up our track. To add an existing soundbite to our project, open the soundbites window from the Project menu.
1 From the File menu, choose Import Audio.
This will bring up the Open dialog box.
2 Locate the tutorial loop file. It is located inside a “Loops” folder in the Tutorial 3 project folder. Double click on the “Guitar Loop” file to import it.
☛ To audition a file before you import it, click click the audition icon and select the audio file.
3 Open the Soundbites window by choosing Soundbites from the Project menu, or pressing Shift-B.
4 Drag your imported loop into your sequence by grabbing the handle in the Move column. Dragging the soundbite to the left side of the Sequence Editor will create a new track containing the soundbite, with the soundbite placed at the beginning of the sequence (you can always reposition it after you have dragged it into the track).
Audition icon
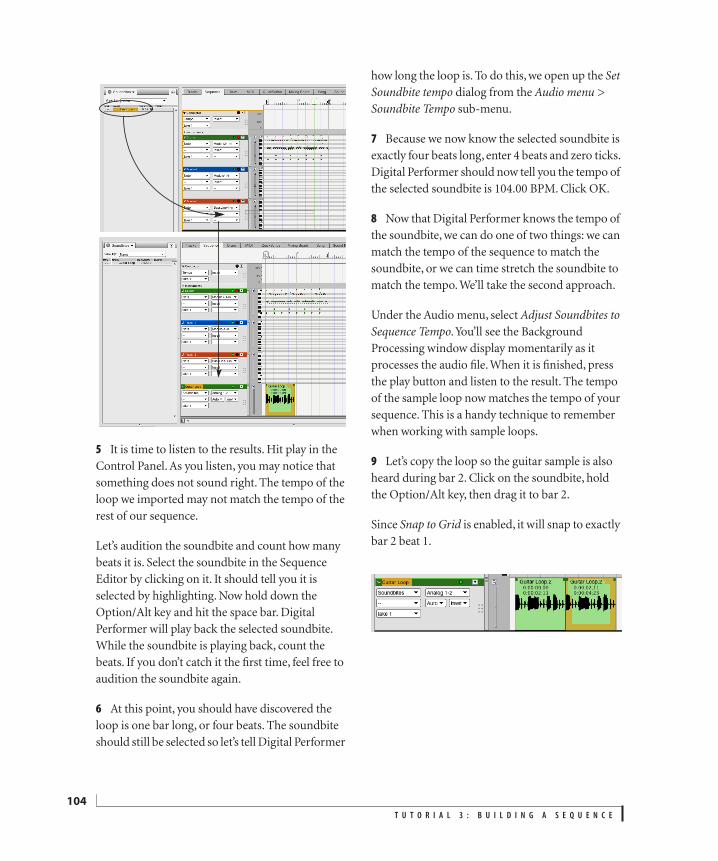
T U T O R I A L 3 : B U I L D I N G A S E Q U E N C E
104
5 It is time to listen to the results. Hit play in the Control Panel. As you listen, you may notice that something does not sound right. The tempo of the loop we imported may not match the tempo of the rest of our sequence.
Let’s audition the soundbite and count how many beats it is. Select the soundbite in the Sequence Editor by clicking on it. It should tell you it is selected by highlighting. Now hold down the Option/Alt key and hit the space bar. Digital Performer will play back the selected soundbite. While the soundbite is playing back, count the beats. If you don’t catch it the first time, feel free to audition the soundbite again.
6 At this point, you should have discovered the loop is one bar long, or four beats. The soundbite should still be selected so let’s tell Digital Performer
how long the loop is. To do this, we open up the Set Soundbite tempo dialog from the Audio menu > Soundbite Tempo sub-menu.
7 Because we now know the selected soundbite is exactly four beats long, enter 4 beats and zero ticks. Digital Performer should now tell you the tempo of the selected soundbite is 104.00 BPM. Click OK.
8 Now that Digital Performer knows the tempo of the soundbite, we can do one of two things: we can match the tempo of the sequence to match the soundbite, or we can time stretch the soundbite to match the tempo. We’ll take the second approach.
Under the Audio menu, select Adjust Soundbites to Sequence Tempo. You’ll see the Background Processing window display momentarily as it processes the audio file. When it is finished, press the play button and listen to the result. The tempo of the sample loop now matches the tempo of your sequence. This is a handy technique to remember when working with sample loops.
9 Let’s copy the loop so the guitar sample is also heard during bar 2. Click on the soundbite, hold the Option/Alt key, then drag it to bar 2.
Since Snap to Grid is enabled, it will snap to exactly bar 2 beat 1.
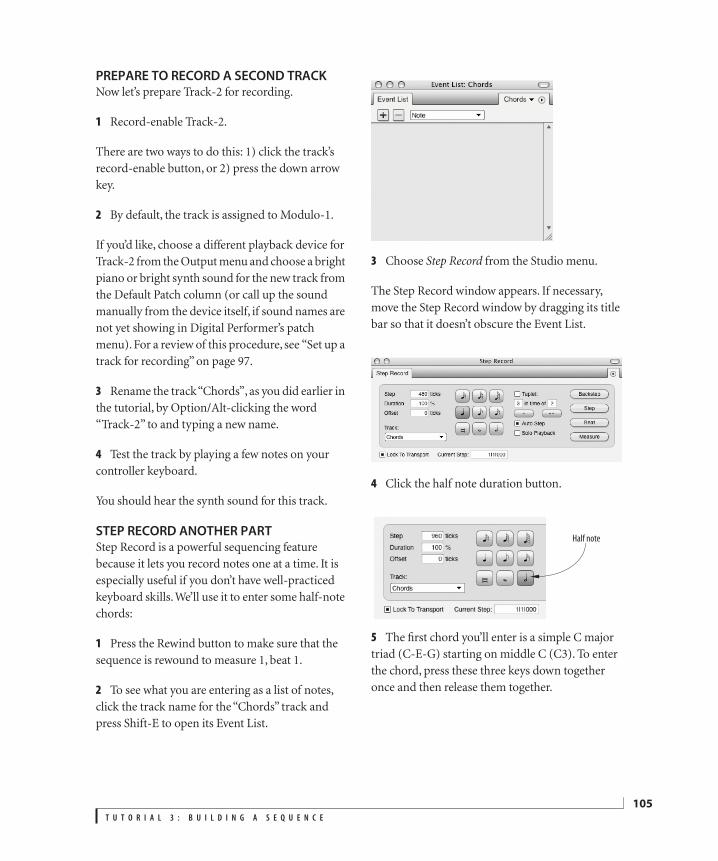
T U T O R I A L 3 : B U I L D I N G A S E Q U E N C E
105
PREPARE TO RECORD A SECOND TRACKNow let’s prepare Track-2 for recording.
1 Record-enable Track-2.
There are two ways to do this: 1) click the track’s record-enable button, or 2) press the down arrow key.
2 By default, the track is assigned to Modulo-1.
If you’d like, choose a different playback device for Track-2 from the Output menu and choose a bright piano or bright synth sound for the new track from the Default Patch column (or call up the sound manually from the device itself, if sound names are not yet showing in Digital Performer’s patch menu). For a review of this procedure, see “Set up a track for recording” on page 97.
3 Rename the track “Chords”, as you did earlier in the tutorial, by Option/Alt-clicking the word “Track-2” to and typing a new name.
4 Test the track by playing a few notes on your controller keyboard.
You should hear the synth sound for this track.
STEP RECORD ANOTHER PARTStep Record is a powerful sequencing feature because it lets you record notes one at a time. It is especially useful if you don’t have well-practiced keyboard skills. We’ll use it to enter some half-note chords:
1 Press the Rewind button to make sure that the sequence is rewound to measure 1, beat 1.
2 To see what you are entering as a list of notes, click the track name for the “Chords” track and press Shift-E to open its Event List.
3 Choose Step Record from the Studio menu.
The Step Record window appears. If necessary, move the Step Record window by dragging its title bar so that it doesn’t obscure the Event List.
4 Click the half note duration button.
5 The first chord you’ll enter is a simple C major triad (C-E-G) starting on middle C (C3). To enter the chord, press these three keys down together once and then release them together.
Half note
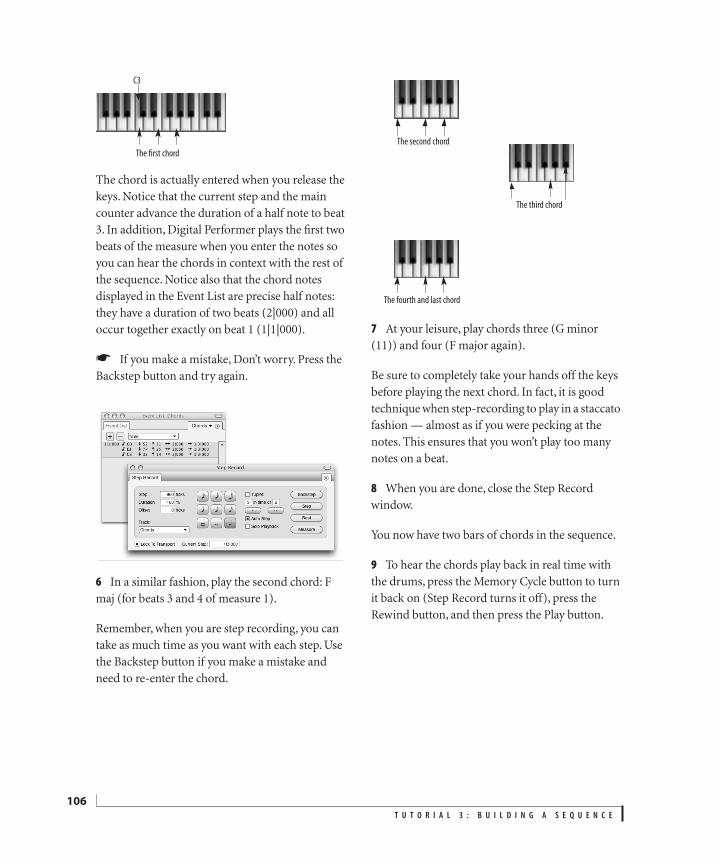
T U T O R I A L 3 : B U I L D I N G A S E Q U E N C E
106
The chord is actually entered when you release the keys. Notice that the current step and the main counter advance the duration of a half note to beat 3. In addition, Digital Performer plays the first two beats of the measure when you enter the notes so you can hear the chords in context with the rest of the sequence. Notice also that the chord notes displayed in the Event List are precise half notes: they have a duration of two beats (2|000) and all occur together exactly on beat 1 (1|1|000).
☛ If you make a mistake, Don’t worry. Press the Backstep button and try again.
6 In a similar fashion, play the second chord: F maj (for beats 3 and 4 of measure 1).
Remember, when you are step recording, you can take as much time as you want with each step. Use the Backstep button if you make a mistake and need to re-enter the chord.
7 At your leisure, play chords three (G minor (11)) and four (F major again).
Be sure to completely take your hands off the keys before playing the next chord. In fact, it is good technique when step-recording to play in a staccato fashion — almost as if you were pecking at the notes. This ensures that you won’t play too many notes on a beat.
8 When you are done, close the Step Record window.
You now have two bars of chords in the sequence.
9 To hear the chords play back in real time with the drums, press the Memory Cycle button to turn it back on (Step Record turns it off), press the Rewind button, and then press the Play button.
The first chord
C3
The second chord
The fourth and last chord
The third chord
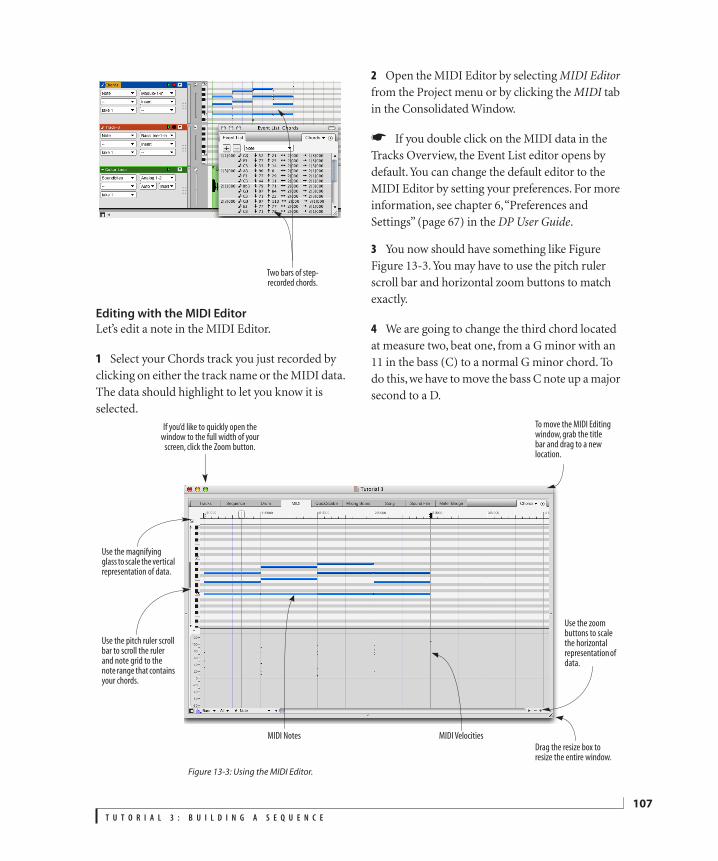
T U T O R I A L 3 : B U I L D I N G A S E Q U E N C E
107
Editing with the MIDI Editor
Let’s edit a note in the MIDI Editor.
1 Select your Chords track you just recorded by clicking on either the track name or the MIDI data. The data should highlight to let you know it is selected.
2 Open the MIDI Editor by selecting MIDI Editor from the Project menu or by clicking the MIDI tab in the Consolidated Window.
☛ If you double click on the MIDI data in the Tracks Overview, the Event List editor opens by default. You can change the default editor to the MIDI Editor by setting your preferences. For more information, see chapter 6, “Preferences and Settings” (page 67) in the DP User Guide.
3 You now should have something like Figure Figure 13-3. You may have to use the pitch ruler scroll bar and horizontal zoom buttons to match exactly.
4 We are going to change the third chord located at measure two, beat one, from a G minor with an 11 in the bass (C) to a normal G minor chord. To do this, we have to move the bass C note up a major second to a D.
Two bars of step-recorded chords.
Figure 13-3: Using the MIDI Editor.
If you’d like to quickly open the window to the full width of your
screen, click the Zoom button.
MIDI VelocitiesMIDI Notes
Use the zoom buttons to scale the horizontal representation of data.
Use the magnifying glass to scale the vertical representation of data.
Use the pitch ruler scroll bar to scroll the ruler and note grid to the note range that contains your chords.
To move the MIDI Editing window, grab the title bar and drag to a new location.
Drag the resize box to resize the entire window.
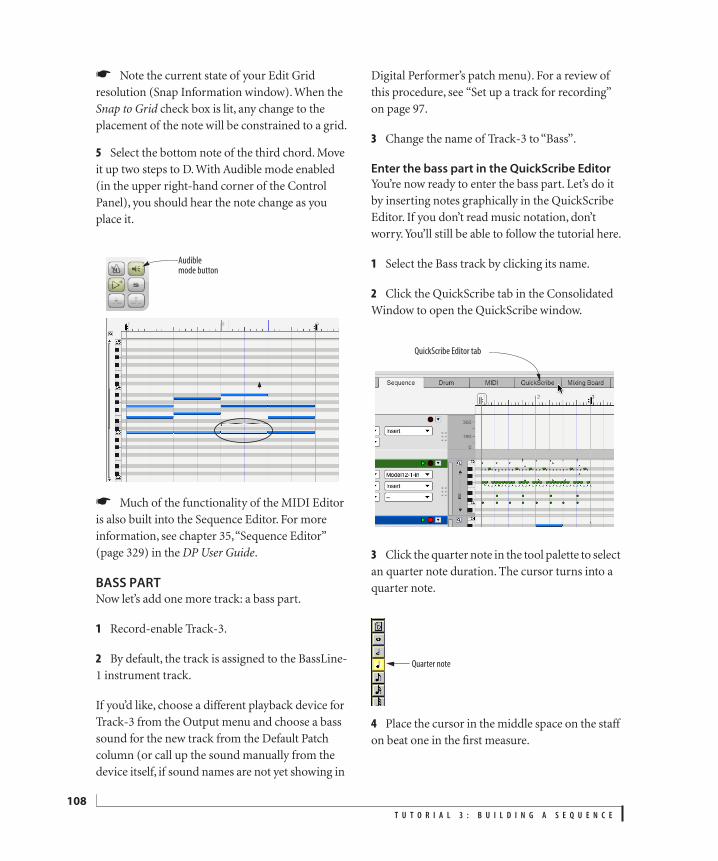
T U T O R I A L 3 : B U I L D I N G A S E Q U E N C E
108
☛ Note the current state of your Edit Grid resolution (Snap Information window). When the Snap to Grid check box is lit, any change to the placement of the note will be constrained to a grid.
5 Select the bottom note of the third chord. Move it up two steps to D. With Audible mode enabled (in the upper right-hand corner of the Control Panel), you should hear the note change as you place it.
☛ Much of the functionality of the MIDI Editor is also built into the Sequence Editor. For more information, see chapter 35, “Sequence Editor” (page 329) in the DP User Guide.
BASS PARTNow let’s add one more track: a bass part.
1 Record-enable Track-3.
2 By default, the track is assigned to the BassLine-1 instrument track.
If you’d like, choose a different playback device for Track-3 from the Output menu and choose a bass sound for the new track from the Default Patch column (or call up the sound manually from the device itself, if sound names are not yet showing in
Digital Performer’s patch menu). For a review of this procedure, see “Set up a track for recording” on page 97.
3 Change the name of Track-3 to “Bass”.
Enter the bass part in the QuickScribe Editor
You’re now ready to enter the bass part. Let’s do it by inserting notes graphically in the QuickScribe Editor. If you don’t read music notation, don’t worry. You’ll still be able to follow the tutorial here.
1 Select the Bass track by clicking its name.
2 Click the QuickScribe tab in the Consolidated Window to open the QuickScribe window.
3 Click the quarter note in the tool palette to select an quarter note duration. The cursor turns into a quarter note.
4 Place the cursor in the middle space on the staff on beat one in the first measure.
Audible mode button
QuickScribe Editor tab
Quarter note
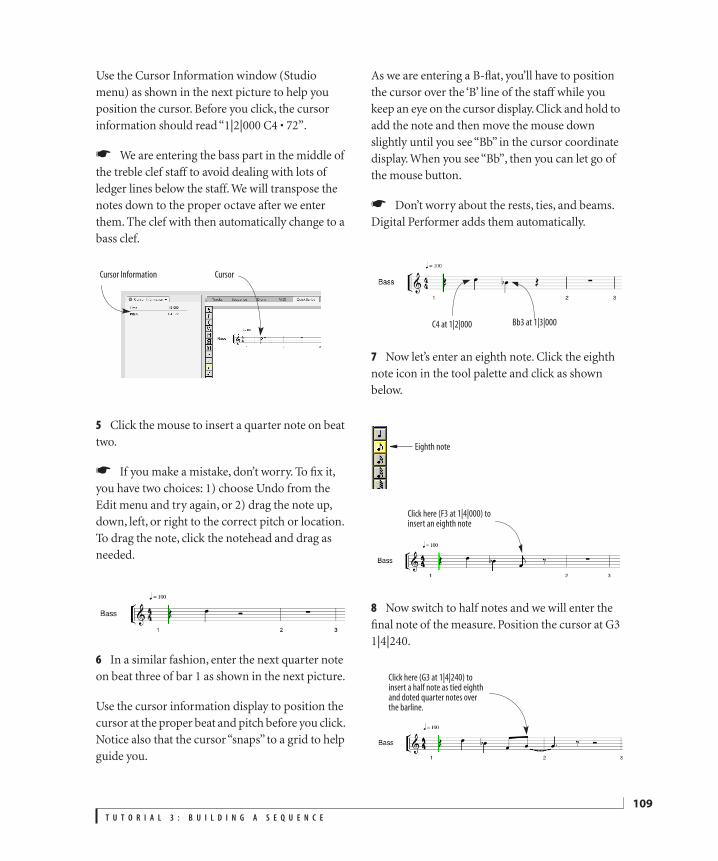
T U T O R I A L 3 : B U I L D I N G A S E Q U E N C E
109
Use the Cursor Information window (Studio menu) as shown in the next picture to help you position the cursor. Before you click, the cursor information should read “1|2|000 C4 • 72”.
☛ We are entering the bass part in the middle of the treble clef staff to avoid dealing with lots of ledger lines below the staff. We will transpose the notes down to the proper octave after we enter them. The clef with then automatically change to a bass clef.
5 Click the mouse to insert a quarter note on beat two.
☛ If you make a mistake, don’t worry. To fix it, you have two choices: 1) choose Undo from the Edit menu and try again, or 2) drag the note up, down, left, or right to the correct pitch or location. To drag the note, click the notehead and drag as needed.
6 In a similar fashion, enter the next quarter note on beat three of bar 1 as shown in the next picture.
Use the cursor information display to position the cursor at the proper beat and pitch before you click. Notice also that the cursor “snaps” to a grid to help guide you.
As we are entering a B-flat, you’ll have to position the cursor over the ‘B’ line of the staff while you keep an eye on the cursor display. Click and hold to add the note and then move the mouse down slightly until you see “Bb” in the cursor coordinate display. When you see “Bb”, then you can let go of the mouse button.
☛ Don’t worry about the rests, ties, and beams. Digital Performer adds them automatically.
7 Now let’s enter an eighth note. Click the eighth note icon in the tool palette and click as shown below.
8 Now switch to half notes and we will enter the final note of the measure. Position the cursor at G3 1|4|240.
Cursor Information Cursor
C4 at 1|2|000 Bb3 at 1|3|000
Eighth note
Click here (F3 at 1|4|000) to insert an eighth note
Click here (G3 at 1|4|240) to insert a half note as tied eighth and doted quarter notes over the barline.
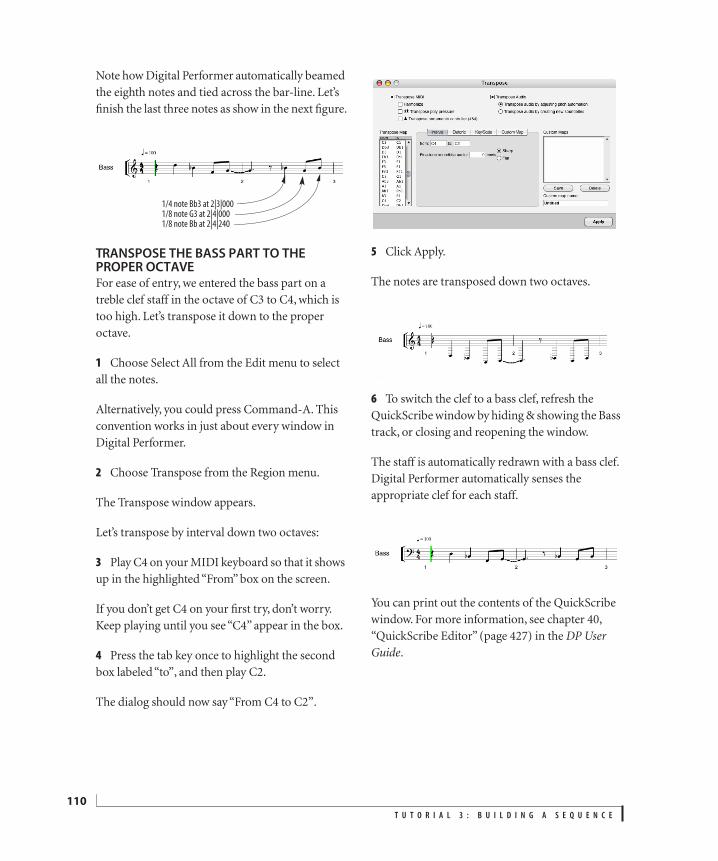
T U T O R I A L 3 : B U I L D I N G A S E Q U E N C E
110
Note how Digital Performer automatically beamed the eighth notes and tied across the bar-line. Let’s finish the last three notes as show in the next figure.
TRANSPOSE THE BASS PART TO THE PROPER OCTAVEFor ease of entry, we entered the bass part on a treble clef staff in the octave of C3 to C4, which is too high. Let’s transpose it down to the proper octave.
1 Choose Select All from the Edit menu to select all the notes.
Alternatively, you could press Command-A. This convention works in just about every window in Digital Performer.
2 Choose Transpose from the Region menu.
The Transpose window appears.
Let’s transpose by interval down two octaves:
3 Play C4 on your MIDI keyboard so that it shows up in the highlighted “From” box on the screen.
If you don’t get C4 on your first try, don’t worry. Keep playing until you see “C4” appear in the box.
4 Press the tab key once to highlight the second box labeled “to”, and then play C2.
The dialog should now say “From C4 to C2”.
5 Click Apply.
The notes are transposed down two octaves.
6 To switch the clef to a bass clef, refresh the QuickScribe window by hiding & showing the Bass track, or closing and reopening the window.
The staff is automatically redrawn with a bass clef. Digital Performer automatically senses the appropriate clef for each staff.
You can print out the contents of the QuickScribe window. For more information, see chapter 40, “QuickScribe Editor” (page 427) in the DP User Guide.
1/4 note Bb3 at 2|3|0001/8 note G3 at 2|4|0001/8 note Bb at 2|4|240
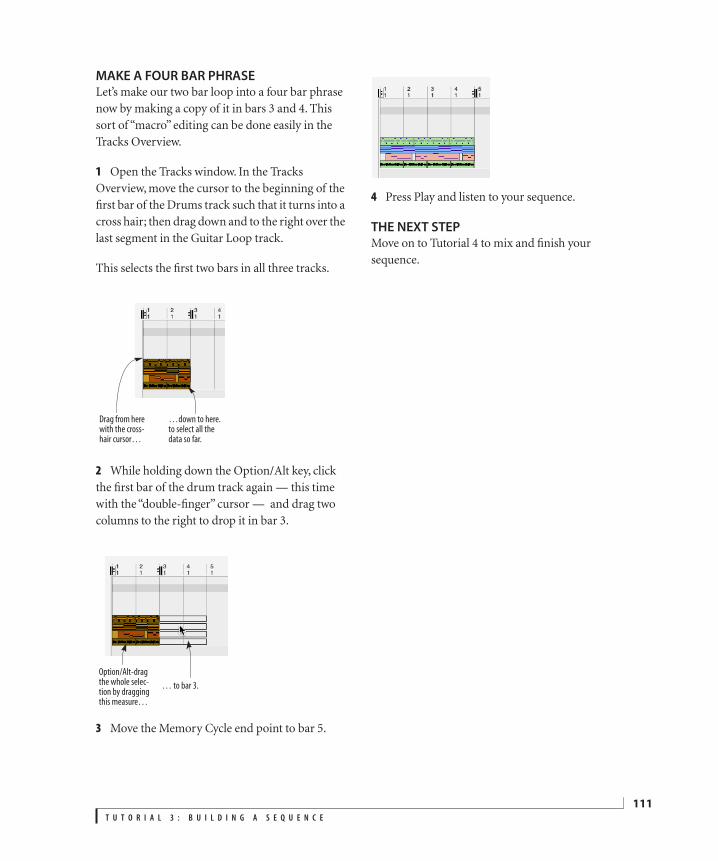
T U T O R I A L 3 : B U I L D I N G A S E Q U E N C E
111
MAKE A FOUR BAR PHRASELet’s make our two bar loop into a four bar phrase now by making a copy of it in bars 3 and 4. This sort of “macro” editing can be done easily in the Tracks Overview.
1 Open the Tracks window. In the Tracks Overview, move the cursor to the beginning of the first bar of the Drums track such that it turns into a cross hair; then drag down and to the right over the last segment in the Guitar Loop track.
This selects the first two bars in all three tracks.
2 While holding down the Option/Alt key, click the first bar of the drum track again — this time with the “double-finger” cursor — and drag two columns to the right to drop it in bar 3.
3 Move the Memory Cycle end point to bar 5.
4 Press Play and listen to your sequence.
THE NEXT STEPMove on to Tutorial 4 to mix and finish your sequence.
Drag from here with the cross-hair cursor…
…down to here. to select all the data so far.
Option/Alt-drag the whole selec-tion by dragging this measure…
… to bar 3.

T U T O R I A L 3 : B U I L D I N G A S E Q U E N C E
112
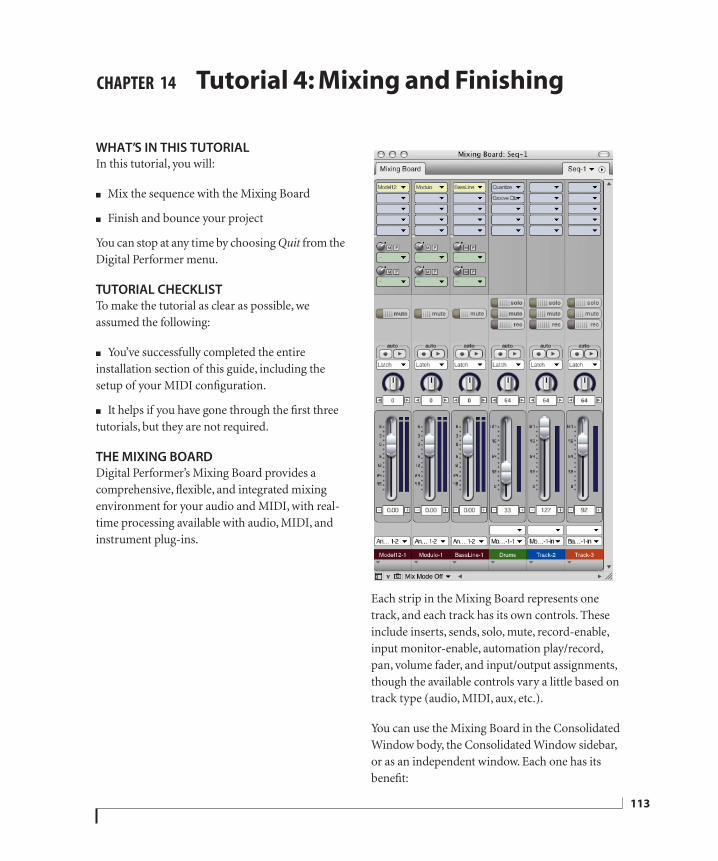
CHAPTER
113
14 Tutorial 4: Mixing and Finishing
WHAT’S IN THIS TUTORIALIn this tutorial, you will:
■ Mix the sequence with the Mixing Board
■ Finish and bounce your project
You can stop at any time by choosing Quit from the Digital Performer menu.
TUTORIAL CHECKLISTTo make the tutorial as clear as possible, we assumed the following:
■ You’ve successfully completed the entire installation section of this guide, including the setup of your MIDI configuration.
■ It helps if you have gone through the first three tutorials, but they are not required.
THE MIXING BOARDDigital Performer’s Mixing Board provides a comprehensive, flexible, and integrated mixing environment for your audio and MIDI, with real-time processing available with audio, MIDI, and instrument plug-ins.
Each strip in the Mixing Board represents one track, and each track has its own controls. These include inserts, sends, solo, mute, record-enable, input monitor-enable, automation play/record, pan, volume fader, and input/output assignments, though the available controls vary a little based on track type (audio, MIDI, aux, etc.).
You can use the Mixing Board in the Consolidated Window body, the Consolidated Window sidebar, or as an independent window. Each one has its benefit:
T U T O R I A L 4 : M I X I N G A N D F I N I S H I N G
114
■ In the Consolidated Window sidebar: this is useful as a single-channel inspector while editing. With the Scroll the Mixing Board to the selection preference enabled (Preferences > Consolidated Window), the Mixer will update to follow the selected track.
■ In the Consolidated Window body: this is the best configuration when mixing is the central task.
■ As an independent window: this is best for advanced window layouts. For example, you might need to see lots of faders at once, or you may have two monitors with your main editor on your first monitor and the Mixing Board on the second.
START MIXINGFirst, let’s set initial levels and panning in the Mixing Board. You can adjust as you playback to hear your changes as you make them. You can adjust faders and pan knobs by clicking and dragging them, or if your mouse has a scroll wheel, by placing your mouse over them and scrolling.
After you have the initial mix, you can start automating it.
AUTOMATED MIXINGNow let’s do some automated mixing.
1 Turn on automation playback for each channel by clicking on the automation playback and gliding across all other channels while holding down the mouse button. Do the same for automation recording.
2 Start playback by pressing the space bar, and adjust the mix as follows.
☛ Some MIDI instruments don’t respond to the MIDI messages sent by Digital Performer’s Mixing Board (CC 7 for volume and CC 10 for pan). If you don’t get any response from your MIDI device as you adjust the controls in the Mixing Board, this is probably the case. The software instruments included in this tutorial project respond to MIDI volume, but not MIDI pan. To pan the instruments, use the pan knobs on the instrument tracks rather than the pan knobs on the MIDI tracks.
3 Turn off automation recording by gliding back over the channels.
4 After you’ve got the volume level and pan setting you’d like for each track, stop playback and rewind to the beginning of the sequence.
Click and hold down mouse button here
Glide over all automation buttons while holding the mouse
To do this Do this
Adjust a track’s volume
Drag each track slider individually. You can also press on the plus and minus buttons, or click anywhere on the slider to make a sudden jump.
Adjust panning Drag a knob up and down or left and right. You can also click on the value box below the knob and type in the desired value (between zero and 127, where 64 is pan center).
Solo or mute tracks Click their solo or mute buttons. Try “gliding” (dragging) over the solo and mute buttons. (It’s fun.)
Record a fader move-ment
1. Record-enable any empty track.2. Press the Record button.3. Move the fader you want to record.When you record a fader, it generates a stream of continuous controller data in the track it controls. Since you are Mem-ory Cycle recording, be aware of where you are in the loop as you record so that you don’t overlap. For example, try to start recording in bar 1 and finish in bar 4. To start recording the slider, just grab it’s handle with the mouse. To stop, just let it go.
Watch a fader animate after recording
Just play the sequence.
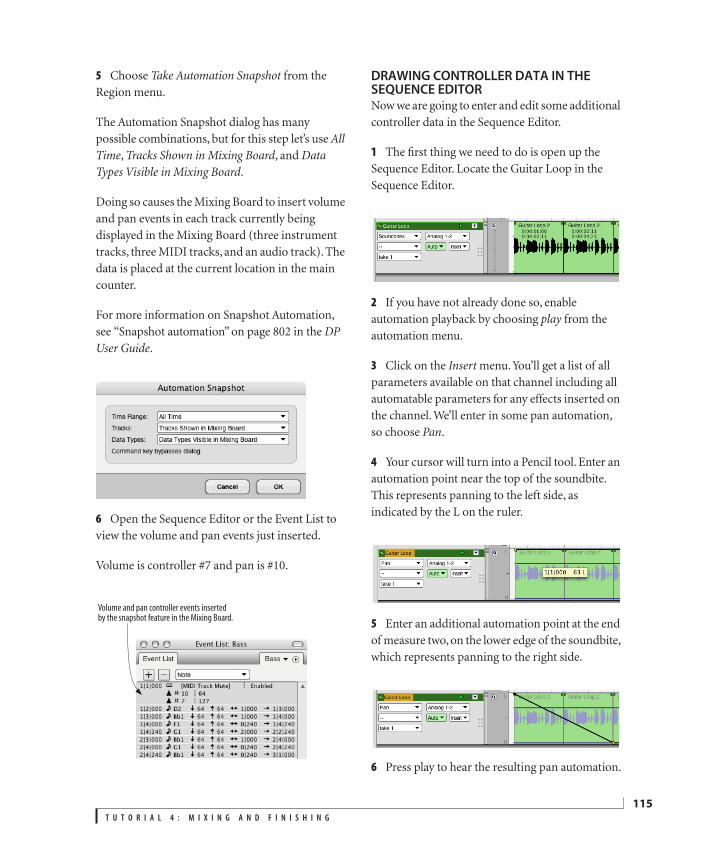
T U T O R I A L 4 : M I X I N G A N D F I N I S H I N G
115
5 Choose Take Automation Snapshot from the Region menu.
The Automation Snapshot dialog has many possible combinations, but for this step let’s use All Time, Tracks Shown in Mixing Board, and Data Types Visible in Mixing Board.
Doing so causes the Mixing Board to insert volume and pan events in each track currently being displayed in the Mixing Board (three instrument tracks, three MIDI tracks, and an audio track). The data is placed at the current location in the main counter.
For more information on Snapshot Automation, see “Snapshot automation” on page 802 in the DP User Guide.
6 Open the Sequence Editor or the Event List to view the volume and pan events just inserted.
Volume is controller #7 and pan is #10.
DRAWING CONTROLLER DATA IN THE SEQUENCE EDITORNow we are going to enter and edit some additional controller data in the Sequence Editor.
1 The first thing we need to do is open up the Sequence Editor. Locate the Guitar Loop in the Sequence Editor.
2 If you have not already done so, enable automation playback by choosing play from the automation menu.
3 Click on the Insert menu. You’ll get a list of all parameters available on that channel including all automatable parameters for any effects inserted on the channel. We’ll enter in some pan automation, so choose Pan.
4 Your cursor will turn into a Pencil tool. Enter an automation point near the top of the soundbite. This represents panning to the left side, as indicated by the L on the ruler.
5 Enter an additional automation point at the end of measure two, on the lower edge of the soundbite, which represents panning to the right side.
6 Press play to hear the resulting pan automation.
Volume and pan controller events inserted by the snapshot feature in the Mixing Board.
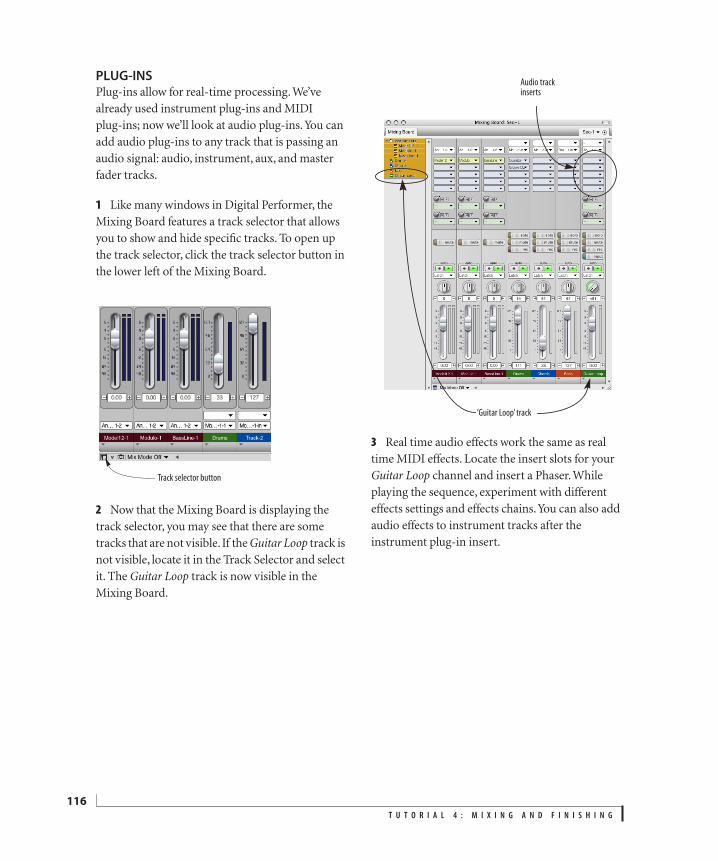
T U T O R I A L 4 : M I X I N G A N D F I N I S H I N G
116
PLUG-INSPlug-ins allow for real-time processing. We’ve already used instrument plug-ins and MIDI plug-ins; now we’ll look at audio plug-ins. You can add audio plug-ins to any track that is passing an audio signal: audio, instrument, aux, and master fader tracks.
1 Like many windows in Digital Performer, the Mixing Board features a track selector that allows you to show and hide specific tracks. To open up the track selector, click the track selector button in the lower left of the Mixing Board.
2 Now that the Mixing Board is displaying the track selector, you may see that there are some tracks that are not visible. If the Guitar Loop track is not visible, locate it in the Track Selector and select it. The Guitar Loop track is now visible in the Mixing Board.
3 Real time audio effects work the same as real time MIDI effects. Locate the insert slots for your Guitar Loop channel and insert a Phaser. While playing the sequence, experiment with different effects settings and effects chains. You can also add audio effects to instrument tracks after the instrument plug-in insert.
Track selector button
‘Guitar Loop’ track
Audio track inserts
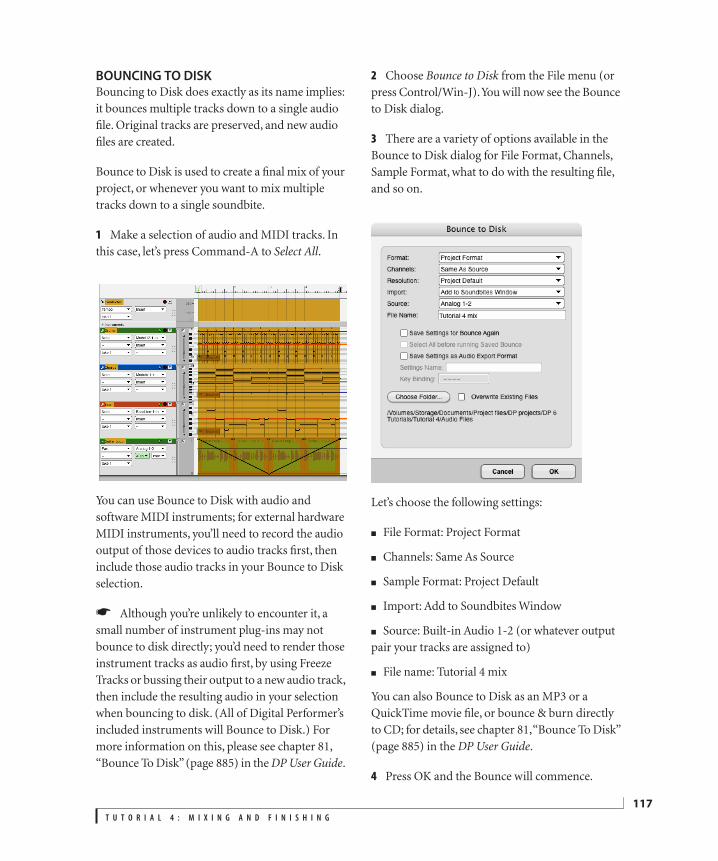
T U T O R I A L 4 : M I X I N G A N D F I N I S H I N G
117
BOUNCING TO DISK Bouncing to Disk does exactly as its name implies: it bounces multiple tracks down to a single audio file. Original tracks are preserved, and new audio files are created.
Bounce to Disk is used to create a final mix of your project, or whenever you want to mix multiple tracks down to a single soundbite.
1 Make a selection of audio and MIDI tracks. In this case, let’s press Command-A to Select All.
You can use Bounce to Disk with audio and software MIDI instruments; for external hardware MIDI instruments, you’ll need to record the audio output of those devices to audio tracks first, then include those audio tracks in your Bounce to Disk selection.
☛ Although you’re unlikely to encounter it, a small number of instrument plug-ins may not bounce to disk directly; you’d need to render those instrument tracks as audio first, by using Freeze Tracks or bussing their output to a new audio track, then include the resulting audio in your selection when bouncing to disk. (All of Digital Performer’s included instruments will Bounce to Disk.) For more information on this, please see chapter 81, “Bounce To Disk” (page 885) in the DP User Guide.
2 Choose Bounce to Disk from the File menu (or press Control/Win-J). You will now see the Bounce to Disk dialog.
3 There are a variety of options available in the Bounce to Disk dialog for File Format, Channels, Sample Format, what to do with the resulting file, and so on.
Let’s choose the following settings:
■ File Format: Project Format
■ Channels: Same As Source
■ Sample Format: Project Default
■ Import: Add to Soundbites Window
■ Source: Built-in Audio 1-2 (or whatever output pair your tracks are assigned to)
■ File name: Tutorial 4 mix
You can also Bounce to Disk as an MP3 or a QuickTime movie file, or bounce & burn directly to CD; for details, see chapter 81, “Bounce To Disk” (page 885) in the DP User Guide.
4 Press OK and the Bounce will commence.
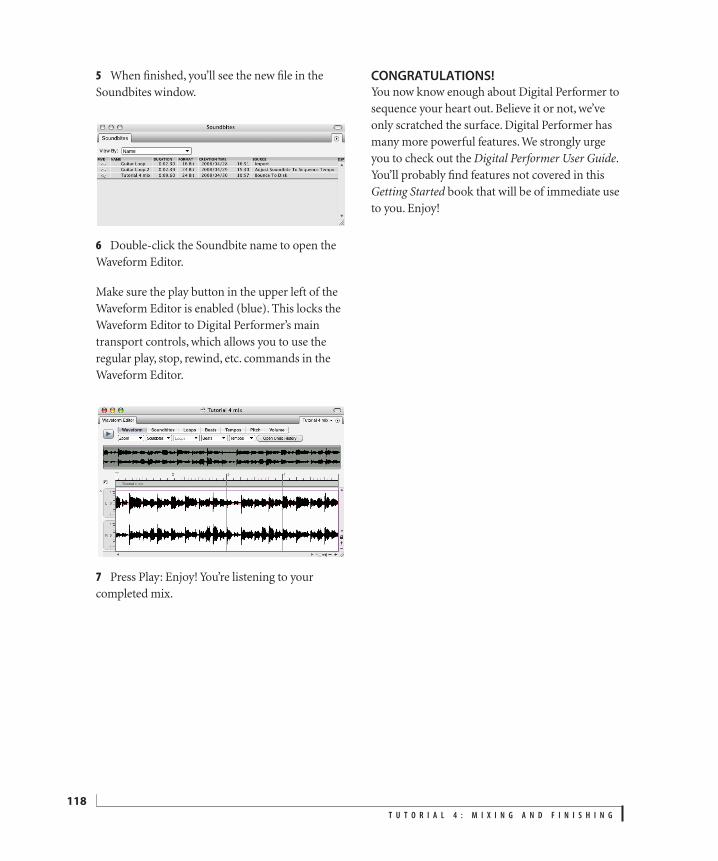
T U T O R I A L 4 : M I X I N G A N D F I N I S H I N G
118
5 When finished, you’ll see the new file in the Soundbites window.
6 Double-click the Soundbite name to open the Waveform Editor.
Make sure the play button in the upper left of the Waveform Editor is enabled (blue). This locks the Waveform Editor to Digital Performer’s main transport controls, which allows you to use the regular play, stop, rewind, etc. commands in the Waveform Editor.
7 Press Play: Enjoy! You’re listening to your completed mix.
CONGRATULATIONS!You now know enough about Digital Performer to sequence your heart out. Believe it or not, we’ve only scratched the surface. Digital Performer has many more powerful features. We strongly urge you to check out the Digital Performer User Guide. You’ll probably find features not covered in this Getting Started book that will be of immediate use to you. Enjoy!
Part 4
More Information

CHAPTER
121
15 Frequently Asked Questions
OVERVIEWThis chapter provides answers to frequently asked questions, organized by topic.
Installing. . . . . . . . . . . . . . . . . . . . . . . . . . . . . . . . . . . . . . . . . . . . 121
Setting up . . . . . . . . . . . . . . . . . . . . . . . . . . . . . . . . . . . . . . . . . . 121
Becoming familiar with DP . . . . . . . . . . . . . . . . . . . . . . . . . 123
Recording and playback . . . . . . . . . . . . . . . . . . . . . . . . . . . . 123
Editing . . . . . . . . . . . . . . . . . . . . . . . . . . . . . . . . . . . . . . . . . . . . . . 126
Mixing and Finishing . . . . . . . . . . . . . . . . . . . . . . . . . . . . . . . 126
Plug-ins . . . . . . . . . . . . . . . . . . . . . . . . . . . . . . . . . . . . . . . . . . . . . 127
Virtual instruments (“soft synths”) . . . . . . . . . . . . . . . . . . 127
INSTALLINGI enter my name and keycode, but the OK button doesn’t become active.Make sure you are entering the keycode, not the serial number. Your keycode is found on the inside of one of the covers of your manual. The keycode looks something like ABCDE-FGHIJ-KLMNO, and it must be entered exactly as it appears, using capital letters with dashes included.
I enter my name and keycode, but when I click OK, the screen comes back again. You must be logged in under a user account with admin privileges to authorize Digital Performer. Also make sure the Digital Performer CD is in the CD drive, as this is a required part of the authorization process.
SETTING UPOn Windows, the buffer size setting is grayed out in the Configure Hardware Driver dialog (Setup menu). Why?Some ASIO drivers don’t allow host applications to change their buffer size setting. In this case, click the Configure Driver button (Figure 4-1 on page 20) to launch the hardware’s console software to make the setting there.
How do I configure my audio inputs and outputs? Use the Bundles window (Studio menu). See “Bundles window” on page 57 in the DP Getting Started Guide and “Bundles” on page 117 in the Digital Performer User Guide.
How do I change the input and/or output on multiple tracks simultaneously? Select the desired tracks, then choose Studio > Audio Assignments (or press Option/Alt-A). If you don’t see the inputs or outputs available that you wish to use, go to the Bundles window and create bundles for them.
☛ See “Making audio assignments for multiple tracks” on page 134 in the DP User Guide.
Why do I get a “no outputs enabled” error when launching Digital Performer? If your computer has separate drivers for input and output, and only the input driver has been enabled in Digital Performer, you’ll get an error telling you that there are no outputs enabled. Open the Configure Hardware Driver dialog and enable both the input and output drivers.
☛ See “Enabling multiple drivers (Mac only)” on page 23.
How do I change the tempo, meter, or key of my project? The two most common tempo modes are the Tempo Slider and the Conductor Track. To change the tempo mode, click the Tempo menu to the right of the tempo value.
For information on these and other tempo modes, see “Tempo Controls” on page 190 in the DP User Guide. Here are brief overviews of the Tempo Slider and Conductor Track modes.
F R E Q U E N T L Y A S K E D Q U E S T I O N S
122
Tempo Slider:
■ The tempo can be set using the slider or the tempo text field in the Tempo Control section of the Control Panel (beneath the counters).
■ Also, you may tap in a tempo using the backslash (“\”) key on your computer keyboard.
The meter is set at 4/4 in Tempo Slider mode, and a key of no sharps or flats. To switch to other meters or keys, use Conductor Track mode. In Tempo Slider mode, there is one tempo, beat, and meter for the whole sequence. If you need changes throughout your sequence, use Conductor Track mode.
Conductor Track:
■ In Conductor Track mode, Digital Performer follows the Conductor Track for tempo, meter, and key changes. Each type of event can be inserted and manipulated in a number of ways. The Conductor Track can be edited in the Tracks Overview, Event List, MIDI Editor, Sequence Editor, and QuickScribe Editor, and altered with the commands found under Project menu > Modify Conductor Track.
How do I hear a click or countoff? To configure a metronome click:
1 Choose Click preferences from the Studio menu, or Option/Alt-click the Click button in the Control Panel.
2 Choose the type of click you want to hear: MIDI click or audio click (for information on Visual Punches, see “Visual Punches” on page 233 in the Digital Performer User Guide). You can enable one or the other, or both.
For a MIDI click, choose a MIDI device, channel, and note; for an audio click, choose the audio output and click file (mono AIFF, WAVE, or SDII).
☛ If you are using MIDI Only mode, the audio click routing option is not available; the click & countoff will then be automatically routed to a device in your MIDI configuration (in the Bundles window MIDI Devices tab).
3 To audition the click to hear what it will sound like, check the Audition click option in the lower left; it will audition at the current tempo.
4 Close the Preferences window, then enable the Click button in the Control Panel.
To configure a Countoff:
1 Open the Preferences and choose Countoff from the list on the left, or Option/Alt-click the Countoff button in the Control Panel.
2 First, set the number of measures and beats for your countoff; the default is 2 measures, 0 beats.
3 Next, choose whether you want to have a Countoff all of the time, or only when recording.
4 Audition the Countoff in the same way as the Click: enable the Audition Countoff box in the lower left.
5 Close the Preferences window, then enable the Countoff button in the Control Panel.
How do I view or change key commands? Open the Commands window from the Setup menu (or press Shift-L). You can scroll the list to find the command you are looking for, or you can search using the text box at the top. To enter a new key command, click in the Key 1 column, and press the desired key combination.
F R E Q U E N T L Y A S K E D Q U E S T I O N S
123
You can save or load sets of key bindings via the mini-menu’s Export and Import commands.
To Print the key commands, open the Commands window and choose Print from the File menu. Note that you can collapse any section by clicking its disclosure triangle (holding option while clicking a disclosure triangle collapses or expands all sections at once).
For more information, see “Commands” on page 91 in the DP User Guide.
BECOMING FAMILIAR WITH DPI’m familiar with an older version of Digital Performer. What changes have been made?If you are familiar with Digital Performer version 5 or earlier, some user interface elements have changed in Digital Performer version 6 and later. For information on these changes, please refer to the “Users of previous versions of Digital Performer” page in DP’s online help files (Help menu > Digital Performer Help).
RECORDING AND PLAYBACKMIDI input is not recording. What should I do?Here are some things to try if you are not able to record MIDI into Digital Performer:
■ Make sure the MIDI input light of your MIDI interface is lighting up when you play your MIDI controller keyboard. If not, check you have a MIDI cable going out of the keyboard into the interface.
■ Try a different MIDI cable.
■ Make sure your keyboard is set up to Local Off or Local Control: Off mode, and configured to send out MIDI notes. If you have other MIDI keyboards or modules with a MIDI IN connection, try connecting the MIDI OUT of your controller directly into the MIDI IN connection of one of those pieces of MIDI gear: does it receive MIDI notes?
■ Check that the interface and MIDI keyboard is properly configured in your MIDI device configuration (Setup menu > Bundles > MIDI Devices tab).
■ Open the MIDI Monitor window (Studio menu) to see if Digital Performer is receiving MIDI data from your controller.
■ Click the Set All button in Input Filter and View Filter windows to enable all MIDI data to be recorded and viewed.
■ Check that you are not in MultiRecord mode, or if you are in MultiRecord that you have specified the specific input and channel your controller is transmitting on.
■ Try using the MIDI Keys window (Studio menu). Open the MIDI Keys window and press any letter in the “ASDF” row of your computer keyboard. You can also click the keys on-screen in the MIDI Keys window.
How do I use my USB MIDI keyboard with Digital Performer?Some MIDI controller keyboards have USB connections that allow them to connect directly to the computer, instead of through a MIDI interface.
Some keyboards will be recognized automatically. Once connected via USB, they will simply appear as an input option (when using Multi Record) and an output option (if the keyboard has MIDI output ports).
If the keyboard isn’t automatically recognized:
1 Install the drivers and software provided by the keyboard’s manufacturer.
2 When that is successful, you will see the keyboard in your MIDI device configuration (Setup menu > Bundles > MIDI Devices tab). It will appear similar to a MIDI interface, with its MIDI ports displayed on the bottom of the device.
F R E Q U E N T L Y A S K E D Q U E S T I O N S
124
3 Choose Add New External Device from the MIDI Devices menu, and double-click the New external device to open its Device Properties window.
4 For Device Name, type the name of the keyboard (this name is what it will be referred to as in DP).
5 Hit Apply and close the Device Properties window.
6 Draw a connection in and out of this device to the keyboard that originally appeared (the one with the ports on the bottom).
Now when you choose MIDI inputs or outputs in Digital Performer you will be able to choose your USB MIDI keyboard.
MIDI input is recording, but I can’t hear my MIDI instrument.If you’re sending MIDI to a virtual instrument on an instrument track in Digital Performer:
■ Make sure the instrument track has its output assigned to a valid audio bundle. If the output assignment is italicized then it is invalid; reassign the output to a valid bundle.
■ Make sure the instrument track is not muted.
■ If the instrument is multi-timbral, make sure that you’ve assigned your MIDI track to the correct MIDI channel.
If you’re sending MIDI to a hardware MIDI instrument:
■ Have you connected the audio output of the MIDI device to an input on your audio interface? This must be done to bring the audio output from the MIDI device back into your Digital Performer project.
■ Have you created an audio or aux track in your sequence that corresponds to the hardware input you’ve connected the MIDI device’s output to? Make sure the input and output assignments are valid and that the track is not muted.
■ Try listening directly to the MIDI device’s output, perhaps from its headphone output. Do you hear output there?
■ If the MIDI device responds to MIDI volume messages (CC 7), try adjusting the MIDI track’s fader in the Mixing Board to send MIDI volume messages to the MIDI device.
■ If the MIDI device doesn’t respond to MIDI volume message, make sure the volume control on the hardware is turned up.
■ If the MIDI device has multiple audio outputs, check that the MIDI channel you are triggering is assigned to the desired outputs on the device.
Audio input is not recording.■ Make sure the input meters on your audio interface are lighting up when you send input. If they’re not, check that you have audio cables connected properly.
■ Try a different cable or microphone. For condenser microphones, make sure that you have phantom power enabled.
■ Try using a different input on your interface. If you have one, try a different interface.
■ Check that the audio interface is properly configured. For example, if you can enable or disable inputs on the interface, make sure that the input you want to use is enabled.
■ Make sure that the outputs your tracks are assigned to are the inputs you are recording from. For example, if your microphone is connected to Mic/Guitar 1 on an 828mk3, make sure your audio track is assigned to Mic/Guitar 1.
F R E Q U E N T L Y A S K E D Q U E S T I O N S
125
■ Are your input assignments in italics? Make sure that your audio interface is being seen in the Setup > Configure Audio System > Configure Hardware Driver window, and that it is the selected driver. If it is being seen, open Studio > Bundles and make sure that the bundles you have are assigned the inputs you want.
■ Is the track record-enabled?
■ Is the track enabled? Make sure the Enable column in the Tracks Overview is enabled (the Enable item is also accessible under the Track Settings menu in the Sequence Editor, and from the track pop-up menu available at the bottom of the channel strip in the Mixing Board).
■ Open the Meter Bridge (Studio menu). Enable all items along the left side, and examine the signal chain to see where the problem may be.
I press play and I do not hear anything.■ Make sure that the outputs your tracks are assigned to are the outputs you are monitoring from. For example, if you are monitoring from an 828mk3’s Main Outs, make sure your tracks are assigned to Main Out 1-2.
■ Are your output assignments in italics? Make sure that your audio interface is being seen in the Setup > Configure Audio System > Configure Hardware Driver window, and that it is the selected driver. If it is being seen, open Studio > Bundles and make sure that the bundles you have are assigned the outputs you want.
■ Are the tracks are muted in the Mixing Board?
■ Is Solo Mode engaged?
■ Are the tracks enabled? Make sure the Enable column in the Tracks Overview is enabled (the Enable item is also accessible under the Track Settings menu in the Sequence Editor, and from the track pop-up menu available at the bottom of the channel strip in the Mixing Board).
■ Is the Master Fader and main outs of your audio interface or mixer turned up?
■ Speakers on? Volume turned up on your speakers and/or amplifier?
■ Everything plugged in the way it should be? Try different cables, headphones, or speakers.
■ Open the Meter Bridge (Studio menu). Enable all items along the left side, and examine the signal chain to see where the problem may be.
■ Try bypassing plug-ins to see if an effect is altering your audio in a way that it cannot be heard.
How do I convert my MIDI sequence to Audio?MIDI is a language and does not contain audio in and of itself, rather it gives commands and triggers MIDI devices to play sounds and controller information.
If your MIDI triggers sounds that are generated from an external sound source such as a MIDI sound module, synthesizer, or sampler, then you will need to connect the analog or digital outputs of that device into your audio interface to record the audio onto an audio track.
If your MIDI sequence uses sounds from virtual instruments, you can simply select the MIDI tracks and use Bounce to Disk.
A limited number of virtual instruments may not Bounce to Disk. If so, you can use the Freeze command:
■ Highlight the instrument track that your instrument is on
■ Highlight the MIDI tracks that are assigned to that instrument track
■ Choose Audio menu > Freeze Selected Tracks. The audio output of the instrument will be recorded onto a new audio track.
F R E Q U E N T L Y A S K E D Q U E S T I O N S
126
If your MIDI sequence is using sounds from a ReWire application like Reason or another application:
■ Add a stereo audio track or mono audio track.
■ Set the input to be the outputs of whichever application you are sending from.
For example, if you are using Reason, add a stereo audio track and set the input to be Reason Main: L-R, or any specific output that your Reason rack unit is outputting to.
After I record some audio, the soundbites disappear. OR I playback my project and I hear the audio, but I don’t see any soundbites.Open the View Filter (Setup menu), and make sure that the box next to Soundbites is checked.
EDITINGWhy is my track name underlined in the Sequence Editor?When a track name is underlined, it indicates that the track is frame-locked. This is also indicated by a lock icon in the Tracks List. For more information, refer to “Lock button” on page 152 in the DP User Guide.
Why do my crossfades have a blue or red outline?Fades and crossfades are normally the same color as the soundbites underneath, as are the fade outlines. Two special colors are used to indicate problems:
■ Blue fade outlines mean that there is not enough audio to compute the fade
■ Red fade outlines mean that the faded audio is clipping.
For more information, see “Fades that cannot be fully computed” and “Clipping when crossfades are calculated” in chapter 47, “Fades and Crossfades” (page 599) in the DP User Guide.
MIXING AND FINISHINGWhy are the meters in the Mixing Board labeled as +/-48 dB?When an audio track’s meter scale is labeled as +/-48 dB instead of -48 to +6 dB, the track is in Trim Touch or Trim Latch automation mode. For more information, refer to “The Trim modes” on page 796 in the DP User Guide.
How do I mixdown my project to a stereo file? Use the Bounce to Disk command. See “Bouncing to Disk” on page 117 for a quick introduction, and see “Bounce To Disk” on page 885 in the DP User Guide for in-depth detail.
How do I burn a song made in Digital Performer to a CD? (Mac only)Refer to “Bouncing to a CD or disk image (Mac only)” on page 892 in the DP User Guide.
How do I export as an MP3?To enabled MP3 export, you need to have the LAME library installed on your system. The LAME library is not included with Digital Performer. It is open source software that can be downloaded free of charge. Try searching Google or Version-Tracker.com for “LAME library” to download it. Follow the instructions that are included with it to install. The LAME library should be placed here:
*If you are running the 32-bit version of DP on a 64-bit Windows system, the root of the path is: C:\Program Files (x86).
To take a finished mix done in Digital Performer and convert it to an MP3, follow these steps:
Platform LAME library Path
Mac OS X libmp3lame.dylib /Library/Audio/Plug-ins/MOTU Audio Export/
Windows* lame_enc.dll C:\Program Files\Common Files\MOTU\Plug-ins\MOTU Audio Export

F R E Q U E N T L Y A S K E D Q U E S T I O N S
127
1 Prepare the project as if you were bouncing down to any other format, such as WAVE, AIFF, etc. See “How do I mixdown my project to a stereo file?”
2 Select LAME Audio Export: MP3 as the Format. Give the file a name, and choose the location where you’d like the file to be saved. When you press OK, you’ll see a second dialog with some options for the MP3 you are creating. If you don’t have any preference for these settings, just use the default settings. Press OK in this dialog, and the file will begin bouncing.
3 After the bounce is complete, you can open this file in your MP3 player software of choice, such as iTunes.
You can also export any soundbite in the Soundbites List as an MP3. Select the desired soundbites and choose Export Selected Soundbites from the mini-menu. Choose LAME Audio Export: MP3 from the File Format menu.
How do I back-up a Digital Performer project?To backup the data for your entire Digital Performer project, use the File > Save A Copy As command. Make sure to check the Duplicate audio and copy shared samples to project option. This will take all of the audio files that your project is using and make a copy of them into the new project’s Audio Files folder, and also copy any samples you are using with nanosampler or Model12.
Digital Performer supports using WAVE, AIFF, and SDII files. For the most broadly compatible back-ups, using WAVE files is recommended.
PLUG-INSHow do I use MAS, VST and Audio Unit (AU) plug-ins?See chapter 16, “Instrument Tracks” (page 137) in the DP User Guide and chapter 72, “Audio Effects Processing” (page 835) in the DP User Guide.
How do I force Digital Performer to rescan my VST and Audio Unit plug-ins?Open the Plug-in Preferences, select the desired plug-ins, and hit Reexamine. For more information on managing your plug-ins, see “Audio plug-in preferences” on page 840 in the DP User Guide.
How do I use RTAS plug-ins?RTAS plug-ins are not supported.
VIRTUAL INSTRUMENTS (“SOFT SYNTHS”)How do I use virtual instruments (“soft synths”) in Digital Performer? Digital Performer includes six virtual instruments, and you can also use third-party MAS, VST and Audio Unit instruments. To use a virtual instrument in DP:
1 Add an Instrument Track (Project menu > Add Track > Instrument Track).
2 Choose the desired instrument from the Instrument Tracks list, and it will create an Instrument Track for it.
3 Next, add a MIDI track; you’ll see the virtual instrument you just added in the list of outputs.
4 Assign the output of the MIDI track the instrument you just created.
5 Record enable the MIDI track and the instrument will be receiving MIDI data.
For more information, see chapter 16, “Instrument Tracks” (page 137) in the DP User Guide.
I closed the window for my virtual instrument, how do I open it again?In Digital Performer’s Mixing Board (Project menu, or press Shift-M), locate the instrument track. The first insert will be tinted yellow; this is the instrument plug-in. Double-click this yellow insert to open the instrument’s interface.
F R E Q U E N T L Y A S K E D Q U E S T I O N S
128
Alternatively, you can open the Effects window (Project menu, or press Shift-F) and select your instrument track from the first drop-down menu. You may also double-click an instrument track name in the Tracks window to open its instrument plug-in interface.
How do I use multiple outputs from my virtual instrument? To use multiple outputs from Digital Performer’s included MAS instrument plug-in, VST instruments, Audio Unit instruments, and ReWire applications, see “Multiple audio outputs” on page 845 in the DP User Guide.
Some MAS instruments, such as MachFive, tap directly into DP’s internal busses. For such instruments, assign the part to the desired bus in the instrument plug-in window.
After the bundles are created, you can create an aux track or an input monitor-enabled audio track with that same bus as the input.
Input monitor-enabled audio tracks have the benefit of being able to switch between monitoring and recording audio easily. For example, while composing you will leave the track input monitor-enabled, but once the part is finished you can record-enable the audio track and record the instrument’s output in real-time. This is particularly advantageous when you have many outputs from one instrument, as you can record all of them to their corresponding audio tracks at once.
Under Mac OS X, how do I access the QuickTime General MIDI sounds in DP?Digital Performer can access QuickTime’s GM sounds in two ways: via the Apple Software Synth or the Apple DLSMusicDevice.
Using the Apple Software Synth 1 Go to Setup menu > Interapplication MIDI
2 Check the box for “Software Synthesizer”
3 Select the resolution at which you’d like the sounds to render. If you’re just using the QuickTime GM sounds as a “scratch pad” or a quick reference, try the lower resolutions.
4 Go to Project > Add Track > MIDI Track.
5 Assign the output of this MIDI track to any of the 16 channels of “Apple Software Synth”.
6 You will hear this MIDI track’s output from the hardware device you have selected for “Default Output” under Audio MIDI Setup. If you don’t hear anything, go back to Setup menu > Interapplication MIDI and uncheck and re-check “Software Synthesizer”.
One advantage to this method is that you can use it while Digital Performer is in MIDI Only mode.
Use the Apple DLSMusicDevice 1 Go to DP’s Project menu > Add Track > Instrument Track > Apple: DLSMusicDevice (stereo)
2 Assign this instrument track a valid stereo output bundle.
3 Go to Project > Add Track > MIDI Track.
4 Assign the output of this MIDI track to any of the 16 channels of “DLSMusicDevice-1”.
One advantage to this method is that you can add a second DLSMusicDevice instrument track, and have 16 more channels of GM sounds. You can add as many DLSMusicDevice instrument tracks as you need.
How do I slave Reason or Live to DP?Digital Performer can be a ReWire host for programs like these. See “ReWire” on page 281 in the Digital Performer User Guide.
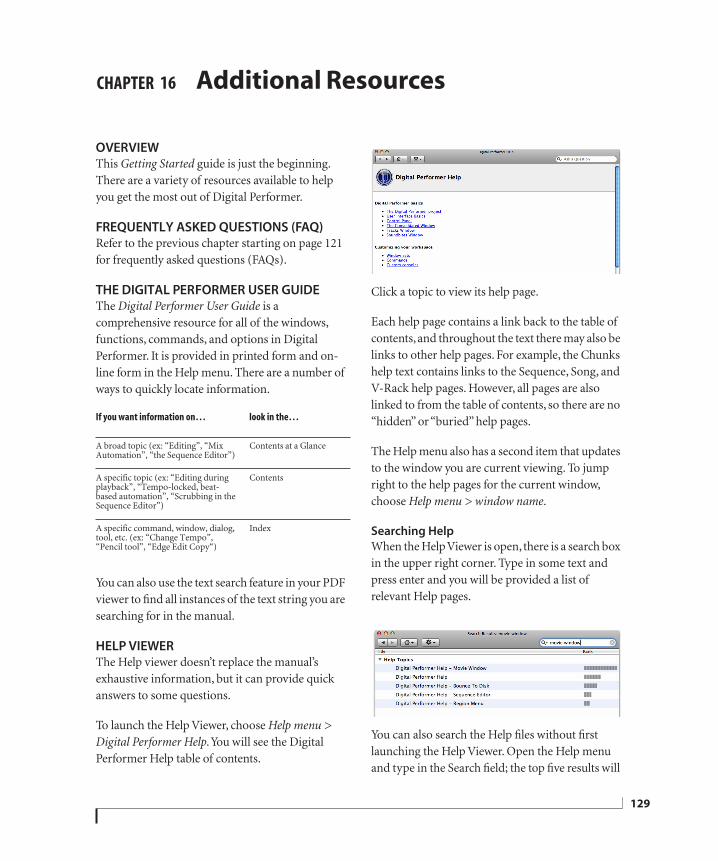
CHAPTER
129
16 Additional Resources
OVERVIEWThis Getting Started guide is just the beginning. There are a variety of resources available to help you get the most out of Digital Performer.
FREQUENTLY ASKED QUESTIONS (FAQ)Refer to the previous chapter starting on page 121 for frequently asked questions (FAQs).
THE DIGITAL PERFORMER USER GUIDEThe Digital Performer User Guide is a comprehensive resource for all of the windows, functions, commands, and options in Digital Performer. It is provided in printed form and on-line form in the Help menu. There are a number of ways to quickly locate information.
You can also use the text search feature in your PDF viewer to find all instances of the text string you are searching for in the manual.
HELP VIEWERThe Help viewer doesn’t replace the manual’s exhaustive information, but it can provide quick answers to some questions.
To launch the Help Viewer, choose Help menu > Digital Performer Help. You will see the Digital Performer Help table of contents.
Click a topic to view its help page.
Each help page contains a link back to the table of contents, and throughout the text there may also be links to other help pages. For example, the Chunks help text contains links to the Sequence, Song, and V-Rack help pages. However, all pages are also linked to from the table of contents, so there are no “hidden” or “buried” help pages.
The Help menu also has a second item that updates to the window you are current viewing. To jump right to the help pages for the current window, choose Help menu > window name.
Searching Help
When the Help Viewer is open, there is a search box in the upper right corner. Type in some text and press enter and you will be provided a list of relevant Help pages.
You can also search the Help files without first launching the Help Viewer. Open the Help menu and type in the Search field; the top five results will
If you want information on… look in the…
A broad topic (ex: “Editing”, “Mix Automation”, “the Sequence Editor”)
Contents at a Glance
A specific topic (ex: “Editing during playback”, “Tempo-locked, beat-based automation”, “Scrubbing in the Sequence Editor”)
Contents
A specific command, window, dialog, tool, etc. (ex: “Change Tempo”, “Pencil tool”, “Edge Edit Copy“)
Index
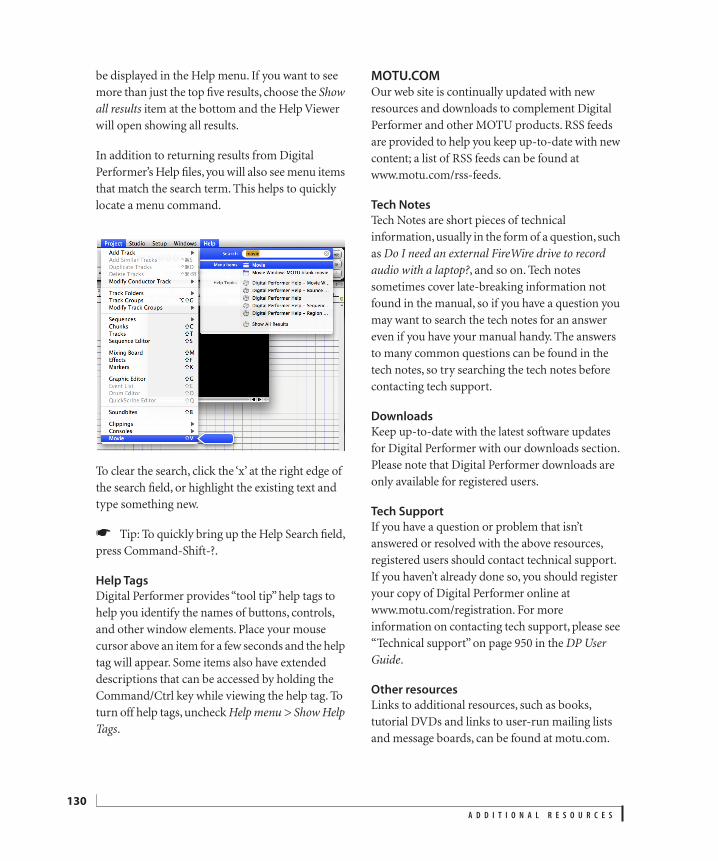
A D D I T I O N A L R E S O U R C E S
130
be displayed in the Help menu. If you want to see more than just the top five results, choose the Show all results item at the bottom and the Help Viewer will open showing all results.
In addition to returning results from Digital Performer’s Help files, you will also see menu items that match the search term. This helps to quickly locate a menu command.
To clear the search, click the ‘x’ at the right edge of the search field, or highlight the existing text and type something new.
☛ Tip: To quickly bring up the Help Search field, press Command-Shift-?.
Help Tags
Digital Performer provides “tool tip” help tags to help you identify the names of buttons, controls, and other window elements. Place your mouse cursor above an item for a few seconds and the help tag will appear. Some items also have extended descriptions that can be accessed by holding the Command/Ctrl key while viewing the help tag. To turn off help tags, uncheck Help menu > Show Help Tags.
MOTU.COMOur web site is continually updated with new resources and downloads to complement Digital Performer and other MOTU products. RSS feeds are provided to help you keep up-to-date with new content; a list of RSS feeds can be found at www.motu.com/rss-feeds.
Tech Notes
Tech Notes are short pieces of technical information, usually in the form of a question, such as Do I need an external FireWire drive to record audio with a laptop?, and so on. Tech notes sometimes cover late-breaking information not found in the manual, so if you have a question you may want to search the tech notes for an answer even if you have your manual handy. The answers to many common questions can be found in the tech notes, so try searching the tech notes before contacting tech support.
Downloads
Keep up-to-date with the latest software updates for Digital Performer with our downloads section. Please note that Digital Performer downloads are only available for registered users.
Tech Support
If you have a question or problem that isn’t answered or resolved with the above resources, registered users should contact technical support. If you haven’t already done so, you should register your copy of Digital Performer online at www.motu.com/registration. For more information on contacting tech support, please see “Technical support” on page 950 in the DP User Guide.
Other resources
Links to additional resources, such as books, tutorial DVDs and links to user-run mailing lists and message boards, can be found at motu.com.
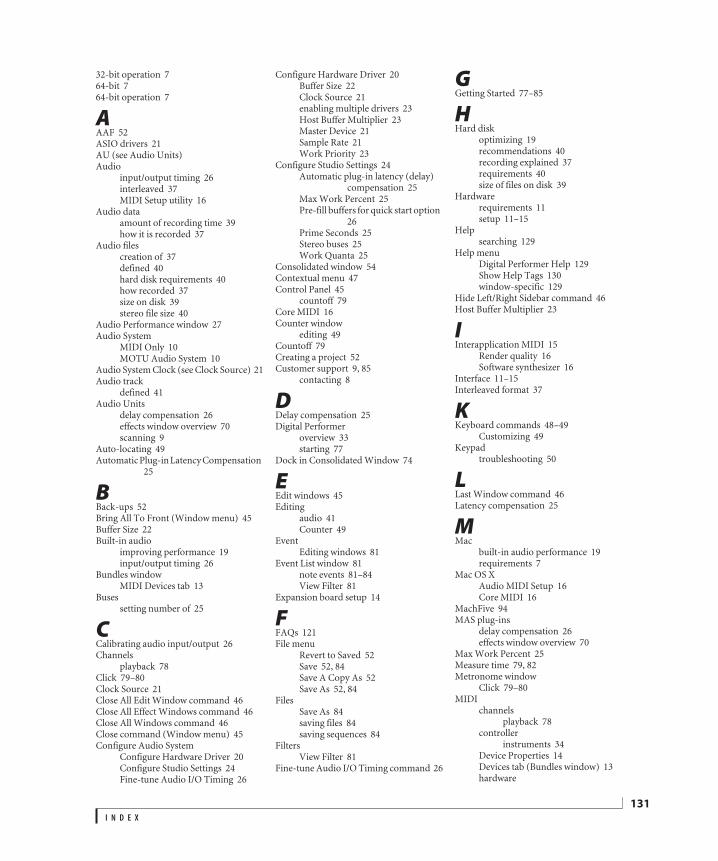
I N D E X
131
32-bit operation 764-bit 764-bit operation 7
AAAF 52ASIO drivers 21AU (see Audio Units)Audio
input/output timing 26interleaved 37MIDI Setup utility 16
Audio dataamount of recording time 39how it is recorded 37
Audio filescreation of 37defined 40hard disk requirements 40how recorded 37size on disk 39stereo file size 40
Audio Performance window 27Audio System
MIDI Only 10MOTU Audio System 10
Audio System Clock (see Clock Source) 21Audio track
defined 41Audio Units
delay compensation 26effects window overview 70scanning 9
Auto-locating 49Automatic Plug-in Latency Compensation
25
BBack-ups 52Bring All To Front (Window menu) 45Buffer Size 22Built-in audio
improving performance 19input/output timing 26
Bundles windowMIDI Devices tab 13
Busessetting number of 25
CCalibrating audio input/output 26Channels
playback 78Click 79–80Clock Source 21Close All Edit Window command 46Close All Effect Windows command 46Close All Windows command 46Close command (Window menu) 45Configure Audio System
Configure Hardware Driver 20Configure Studio Settings 24Fine-tune Audio I/O Timing 26
Configure Hardware Driver 20Buffer Size 22Clock Source 21enabling multiple drivers 23Host Buffer Multiplier 23Master Device 21Sample Rate 21Work Priority 23
Configure Studio Settings 24Automatic plug-in latency (delay)
compensation 25Max Work Percent 25Pre-fill buffers for quick start option
26Prime Seconds 25Stereo buses 25Work Quanta 25
Consolidated window 54Contextual menu 47Control Panel 45
countoff 79Core MIDI 16Counter window
editing 49Countoff 79Creating a project 52Customer support 9, 85
contacting 8
DDelay compensation 25Digital Performer
overview 33starting 77
Dock in Consolidated Window 74
EEdit windows 45Editing
audio 41Counter 49
EventEditing windows 81
Event List window 81note events 81–84View Filter 81
Expansion board setup 14
FFAQs 121File menu
Revert to Saved 52Save 52, 84Save A Copy As 52Save As 52, 84
FilesSave As 84saving files 84saving sequences 84
FiltersView Filter 81
Fine-tune Audio I/O Timing command 26
GGetting Started 77–85
HHard disk
optimizing 19recommendations 40recording explained 37requirements 40size of files on disk 39
Hardwarerequirements 11setup 11–15
Helpsearching 129
Help menuDigital Performer Help 129Show Help Tags 130window-specific 129
Hide Left/Right Sidebar command 46Host Buffer Multiplier 23
IInterapplication MIDI 15
Render quality 16Software synthesizer 16
Interface 11–15Interleaved format 37
KKeyboard commands 48–49
Customizing 49Keypad
troubleshooting 50
LLast Window command 46Latency compensation 25
MMac
built-in audio performance 19requirements 7
Mac OS XAudio MIDI Setup 16Core MIDI 16
MachFive 94MAS plug-ins
delay compensation 26effects window overview 70
Max Work Percent 25Measure time 79, 82Metronome window
Click 79–80MIDI
channelsplayback 78
controllerinstruments 34
Device Properties 14Devices tab (Bundles window) 13hardware
Index
I N D E X
132
requirements 11setup 11–15
interface 11–15ports 14
MIDI Device Properties 14MIDI Monitor window 84MIDI Only 10MIDI Sequencer
description 34Mini-menu 44Modifier keys 47MOTU
MachFive 94MOTU Audio System 19–27
defined 41Fine-tune Audio I/O Timing 26improving performance 19input/output timing 26System requirements 7
Mouse techniques 47
NNew project 52Next Window command 46Non-destructive editing 41
defined 38Non-interleaved 37Note events
Event List window 81–84Num Lock Key (Windows) 50Numericals 49
OOMF 52Open in 32-bit mode 7Opening a project 52Override internal buffer size 22
PPatch Lists
expansion boards 14Performance (see Audio Performance
window)Piano roll 34Playback 78Playback offset option 26player piano 34Playlists
defined 41Plug-ins
delay compensation 25latency compensation 25scanning Audio Units
Pop Out of Consolidated Window 46Ports (MIDI) 14Pre-fill buffers for quick start option 26Pre-fill file buffers for Quick Start option
27Prime Seconds 25Project folder
defined 40Push Window to Back command (Win-
dow menu) 46
QQuantize 83
RRAM
freeing up RAM for Digital Perform-er 19
increasing available RAM 25recommendations/requirements 7
Random Accessdefined 38
Recording 80Record-Enable button 77
Recording offset option 27Region
defined 40Render quality 16Revert to Saved 52Right-click menu (see Contextual menu)
SSample Rate 21Save 52Save A Copy As 52Save As 52, 84Saving
files 84project 52sequences 84
Set Focus to Next/Previous Cell command 46
Setup menuAudio System
MIDI Only 10MOTU Audio System 10
Interapplication MIDI 15Shortcut commands 49Show Left/Right Sidebar command 46Software synthesizer 16Sound file (see Audio file)Soundbites
defined 41definition 41
Split stereo 37Standard MIDI File 52Starting Digital Performer 77Stereo audio files
size on disk 40Stereo buses setting (Studio Configuration
dialog) 25Studio menu
Audio Performance 27Click 79
Synchronizationoverview 36
System errors 84System Requirements 7
TTab bar 45
expand/collapse button 45Tap tempo
overview 36Technical support 8
contacting 8Time
measure|beat|tick time 82Track selector
button 45list 45
Tracks windowRecord-Enable button 77
Troubleshooting 84–85, 121–128buffer size option grayed out 22Keypad on Windows 50
Tutorial 77–85
UUpdates 7USB
MIDI hardware (installing) 11User interface 43–50
VView Filter 81VST plug-ins
delay compensation 26effects window overview 70scanning
WWASAPI 21Window controls 43Window menu 45
Bring All to Front 45Close 45Close All Edit Windows 46Close All Effect Windows 46Close All Windows 46Hide Left/Right Sidebar 46Last Window 46Next Window 46Pop Out of Consolidated Window
46Push Window to Back 46Set Focus to Next/Previous Cell 46Show Left/Right Sidebar 46Window Sets 46
Window Sets 46Window target 43Window title 43Windows 43–45
active window 45Audio driver 21Num Lock key 50WASAPI 21
Work Priority 23Work Quanta 25
ZZoom box 45Zoom buttons 45