digital mobile sketch mapping - fs.fed.us · digital mobile sketch mapping (dmsm) is an android...
TRANSCRIPT
United States Department of Agriculture
Forest Service
Digital Mobile Sketch Mapping (DMSM)
Digital Mobile Sketch Mapping User’s Manual v2.0
Digital Mobile Sketch Mapping User’s Manual v2.0 April 2017
Forest Service i
Table of Contents
Introduction ............................................................................... 1
System Requirements .................................................................... 1
Getting Started ............................................................................ 1
AGOL ....................................................................................................... 1
Installing, Uninstalling, Upgrading DMSM ............................................................ 2
To install: ....................................................................................................... 2
To uninstall: ................................................................................................... 2
To update DMSM: ............................................................................................ 2
Required Files to Run DMSM .............................................................................. 3
Application Layout ....................................................................... 4
Top Buttons ............................................................................................... 4
Side Bar .................................................................................................... 6
DMSM Settings ............................................................................. 8
Data View ................................................................................ 10
Change Service .......................................................................................... 10
Load/Reload Geodatabase ............................................................................ 10
Build Flightlines ......................................................................................... 11
Sync Geodatabase ...................................................................................... 12
Quick Keys and the Quick Key View ................................................ 12
Quick Key View .......................................................................................... 13
Quick Key Sorting and Customization ................................................................ 14
Quick Key Preferences ................................................................................. 15
Using GPS in DMSM ..................................................................... 16
Collect Mode ............................................................................. 17
Time-Saving Options .................................................................................... 19
Digital Mobile Sketch Mapping User’s Manual v2.0 April 2017
Forest Service ii
GeoNotes ................................................................................................. 20
Identify Tool ............................................................................................. 20
Edit Attribute Mode .................................................................... 21
Edit Geometry Mode ................................................................... 23
Syncing Data ............................................................................. 24
More Options ............................................................................ 24
About ..................................................................................................... 24
Flight line Filter ......................................................................................... 24
Damage Feature Filter ................................................................................. 25
Show Navigation Bar .................................................................................... 25
Select Data Directory .................................................................................. 27
Select Project Directory ............................................................................... 27
Download FDM Data .................................................................................... 28
Export/Import Settings ................................................................................ 28
Close DMSM .............................................................................................. 29
Appendix A – Data Collection Workflow ............................................ 30
Appendix B – Using Bluetooth GPS .................................................. 31
Tablet and Application Setup ......................................................................... 31
Appendix C – Emergency Data Off-Loading ........................................ 32
Appendix D – FAQ ....................................................................... 33
Appendix E – Troubleshooting ........................................................ 33
Appendix F – Damage Intensity Guidelines ........................................ 33
Digital Mobile Sketch Mapping User’s Manual v2.0 April 2017
Forest Service 1
Introduction Digital Mobile Sketch Mapping (DMSM) is an Android application built from the ESRI core framework that streamlines data collection, sharing, and analysis. DMSM also encompasses tablet hardware, software, and back end data support processes, including ArcGIS Server, which allow trained aerial surveyors, in light aircraft, and ground observers to record forest disturbances and their causal agents. The DMSM system greatly improves both the quality, quantity of forest health data while ensuring the safety of forest health surveyors. This document describes the tablet application, its functions and tools, as well as steps for configuring the tablet to use DMSM.
System Requirements Android OS – Lollipop or later Tablets 9.7” or greater 64GB SD Card
Getting Started Prior to using DMSM, a few tasks need to be completed by the user to ensure successful use of the application. This includes obtaining an ArcGIS Online (AGOL) organizational account, obtaining or preparing maps layers, and downloading and installing the application on the tablet.
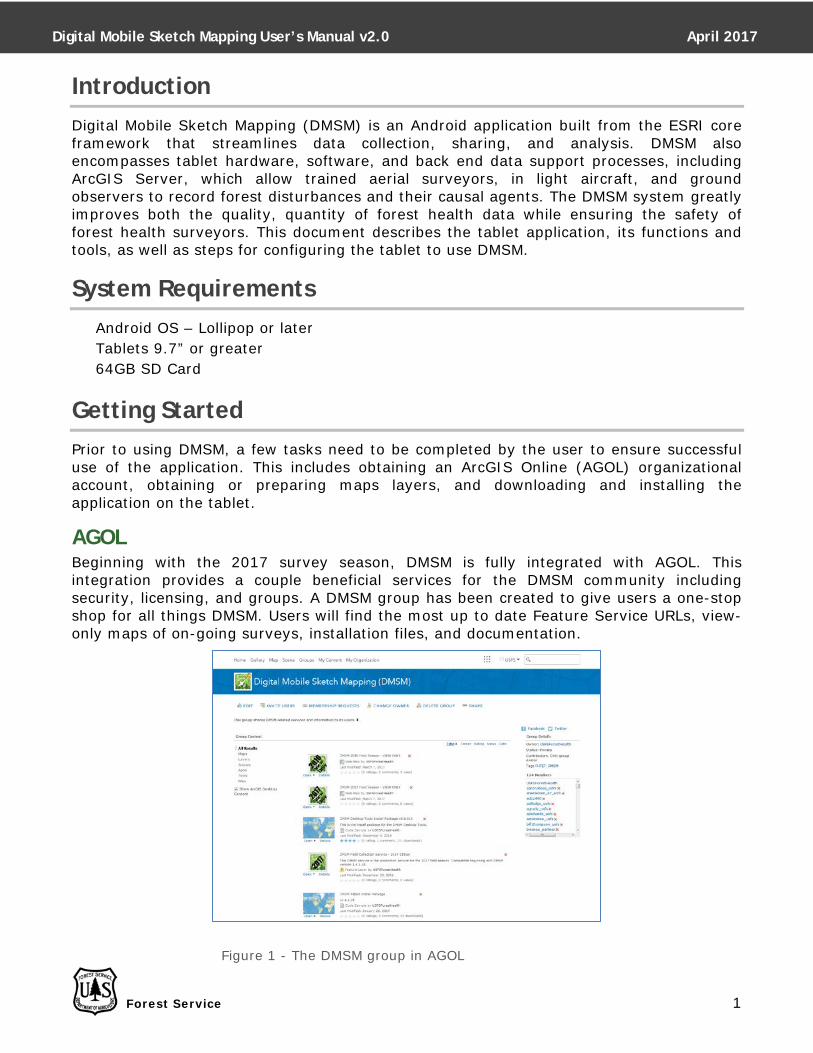
AGOL Beginning with the 2017 survey season, DMSM is fully integrated with AGOL. This integration provides a couple beneficial services for the DMSM community including security, licensing, and groups. A DMSM group has been created to give users a one-stop shop for all things DMSM. Users will find the most up to date Feature Service URLs, view-only maps of on-going surveys, installation files, and documentation.
Figure 1 - The DMSM group in AGOL
Digital Mobile Sketch Mapping User’s Manual v2.0 April 2017
Forest Service 2
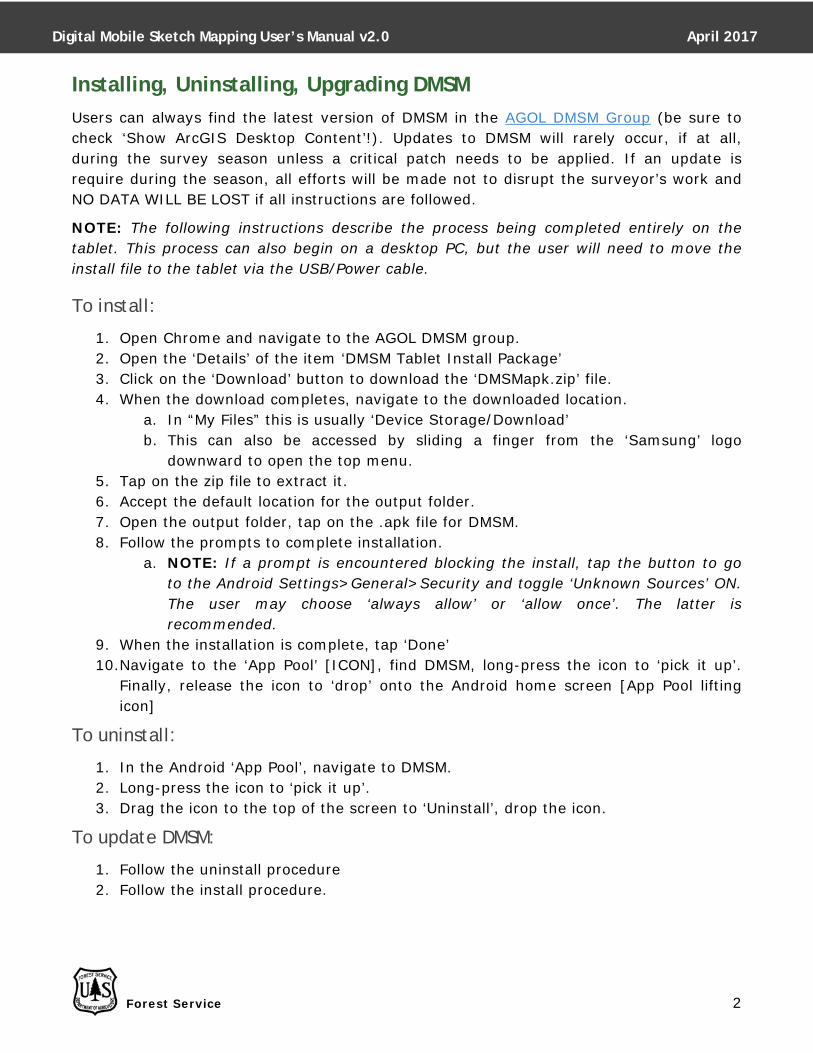
Installing, Uninstalling, Upgrading DMSM Users can always find the latest version of DMSM in the AGOL DMSM Group (be sure to check ‘Show ArcGIS Desktop Content’!). Updates to DMSM will rarely occur, if at all, during the survey season unless a critical patch needs to be applied. If an update is require during the season, all efforts will be made not to disrupt the surveyor’s work and NO DATA WILL BE LOST if all instructions are followed.
NOTE: The following instructions describe the process being completed entirely on the tablet. This process can also begin on a desktop PC, but the user will need to move the install file to the tablet via the USB/Power cable.
To install:
1. Open Chrome and navigate to the AGOL DMSM group. 2. Open the ‘Details’ of the item ‘DMSM Tablet Install Package’ 3. Click on the ‘Download’ button to download the ‘DMSMapk.zip’ file. 4. When the download completes, navigate to the downloaded location.
a. In “My Files” this is usually ‘Device Storage/Download’ b. This can also be accessed by sliding a finger from the ‘Samsung’ logo
downward to open the top menu. 5. Tap on the zip file to extract it. 6. Accept the default location for the output folder. 7. Open the output folder, tap on the .apk file for DMSM. 8. Follow the prompts to complete installation.
a. NOTE: If a prompt is encountered blocking the install, tap the button to go to the Android Settings>General>Security and toggle ‘Unknown Sources’ ON. The user may choose ‘always allow’ or ‘allow once’. The latter is recommended.
9. When the installation is complete, tap ‘Done’ 10.Navigate to the ‘App Pool’ [ICON], find DMSM, long-press the icon to ‘pick it up’.
Finally, release the icon to ‘drop’ onto the Android home screen [App Pool lifting icon]
To uninstall:
1. In the Android ‘App Pool’, navigate to DMSM. 2. Long-press the icon to ‘pick it up’. 3. Drag the icon to the top of the screen to ‘Uninstall’, drop the icon.
To update DMSM:
1. Follow the uninstall procedure 2. Follow the install procedure.
Digital Mobile Sketch Mapping User’s Manual v2.0 April 2017
Forest Service 3
Required Files to Run DMSM
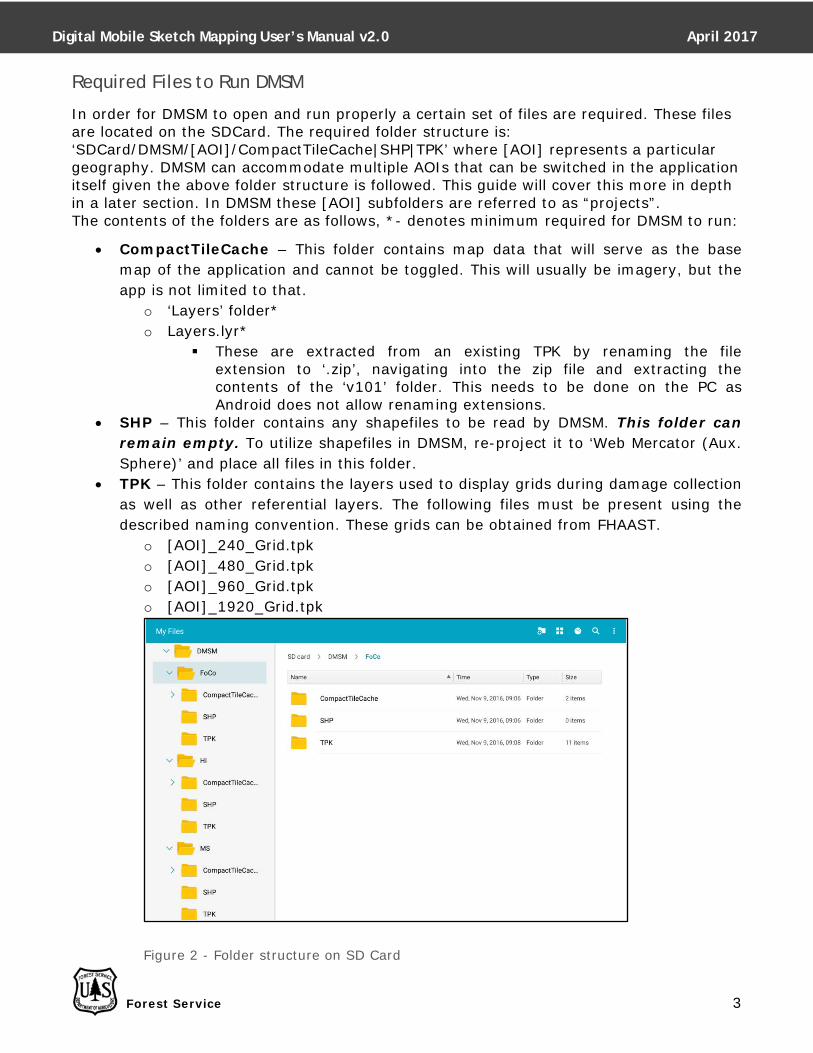
In order for DMSM to open and run properly a certain set of files are required. These files are located on the SDCard. The required folder structure is: ‘SDCard/DMSM/[AOI]/CompactTileCache|SHP|TPK’ where [AOI] represents a particular geography. DMSM can accommodate multiple AOIs that can be switched in the application itself given the above folder structure is followed. This guide will cover this more in depth in a later section. In DMSM these [AOI] subfolders are referred to as “projects”. The contents of the folders are as follows, *- denotes minimum required for DMSM to run:
• CompactTileCache – This folder contains map data that will serve as the base map of the application and cannot be toggled. This will usually be imagery, but the app is not limited to that.
o ‘Layers’ folder* o Layers.lyr*
These are extracted from an existing TPK by renaming the file extension to ‘.zip’, navigating into the zip file and extracting the contents of the ‘v101’ folder. This needs to be done on the PC as Android does not allow renaming extensions.
• SHP – This folder contains any shapefiles to be read by DMSM. This folder can remain empty. To utilize shapefiles in DMSM, re-project it to ‘Web Mercator (Aux. Sphere)’ and place all files in this folder.
• TPK – This folder contains the layers used to display grids during damage collection as well as other referential layers. The following files must be present using the described naming convention. These grids can be obtained from FHAAST.
o [AOI]_240_Grid.tpk o [AOI]_480_Grid.tpk o [AOI]_960_Grid.tpk o [AOI]_1920_Grid.tpk
Figure 2 - Folder structure on SD Card
Digital Mobile Sketch Mapping User’s Manual v2.0 April 2017
Forest Service 4
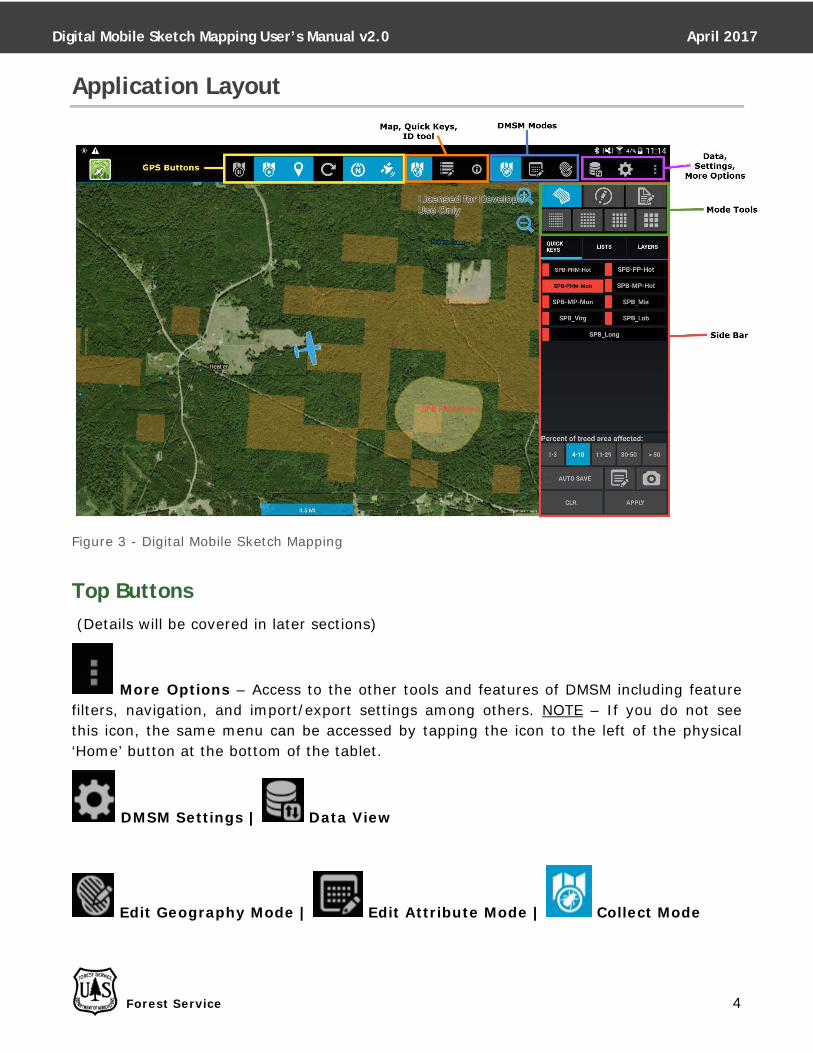
Application Layout
Figure 3 - Digital Mobile Sketch Mapping
Top Buttons (Details will be covered in later sections)
More Options – Access to the other tools and features of DMSM including feature filters, navigation, and import/export settings among others. NOTE – If you do not see this icon, the same menu can be accessed by tapping the icon to the left of the physical ‘Home’ button at the bottom of the tablet.
DMSM Settings | Data View
Edit Geography Mode | Edit Attribute Mode | Collect Mode
Digital Mobile Sketch Mapping User’s Manual v2.0 April 2017
Forest Service 5
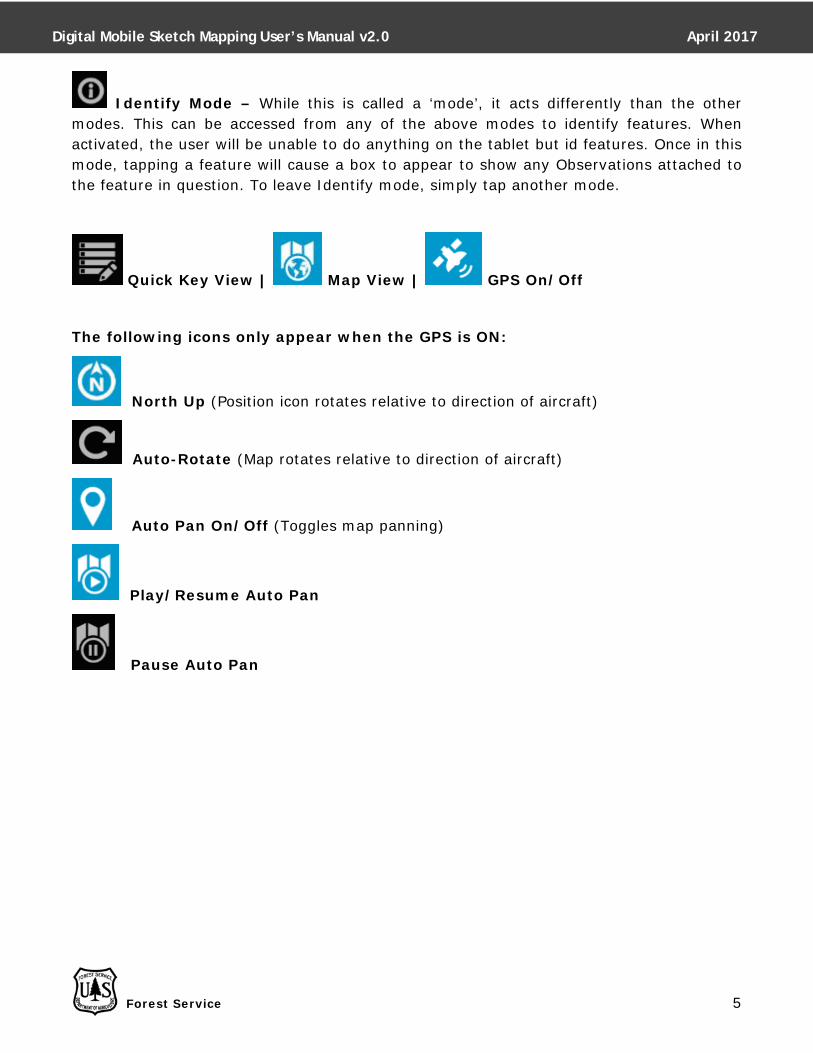
Identify Mode – While this is called a ‘mode’, it acts differently than the other modes. This can be accessed from any of the above modes to identify features. When activated, the user will be unable to do anything on the tablet but id features. Once in this mode, tapping a feature will cause a box to appear to show any Observations attached to the feature in question. To leave Identify mode, simply tap another mode.
Quick Key View | Map View | GPS On/Off
The following icons only appear when the GPS is ON:
North Up (Position icon rotates relative to direction of aircraft)
Auto-Rotate (Map rotates relative to direction of aircraft)
Auto Pan On/Off (Toggles map panning)
Play/Resume Auto Pan
Pause Auto Pan
Digital Mobile Sketch Mapping User’s Manual v2.0 April 2017
Forest Service 6
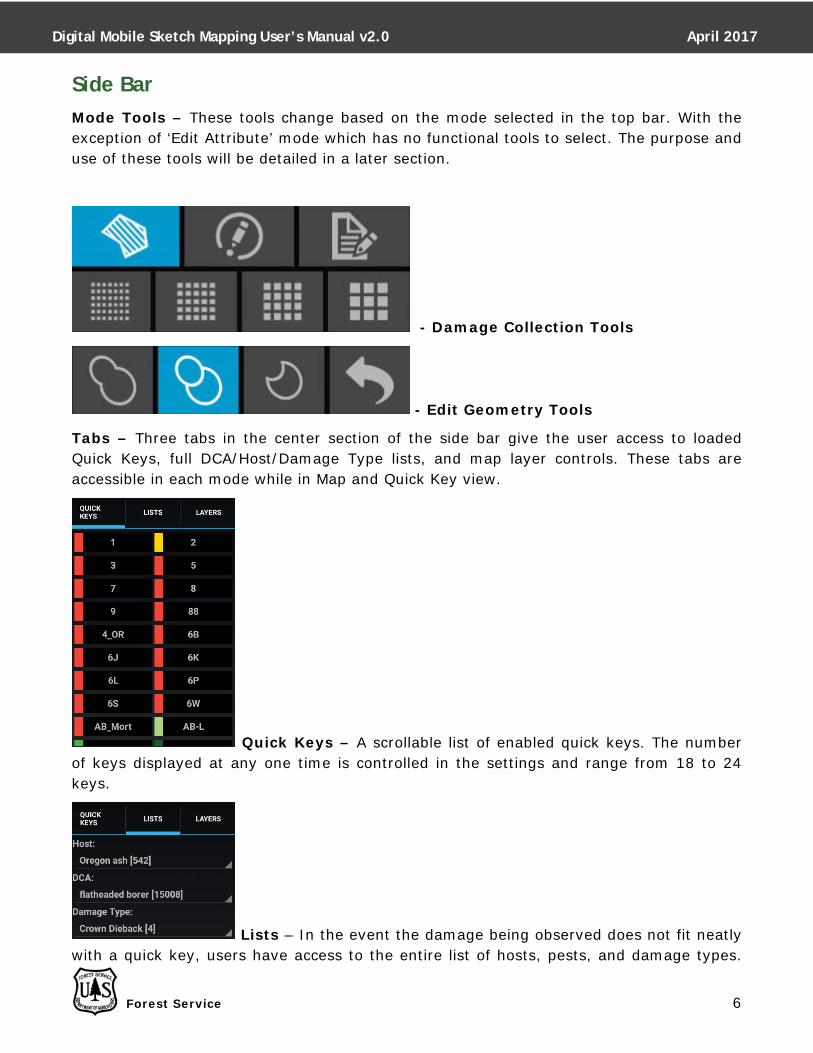
Side Bar Mode Tools – These tools change based on the mode selected in the top bar. With the exception of ‘Edit Attribute’ mode which has no functional tools to select. The purpose and use of these tools will be detailed in a later section.
- Damage Collection Tools
- Edit Geometry Tools
Tabs – Three tabs in the center section of the side bar give the user access to loaded Quick Keys, full DCA/Host/Damage Type lists, and map layer controls. These tabs are accessible in each mode while in Map and Quick Key view.
Quick Keys – A scrollable list of enabled quick keys. The number of keys displayed at any one time is controlled in the settings and range from 18 to 24 keys.
Lists – In the event the damage being observed does not fit neatly with a quick key, users have access to the entire list of hosts, pests, and damage types.
Digital Mobile Sketch Mapping User’s Manual v2.0 April 2017
Forest Service 7
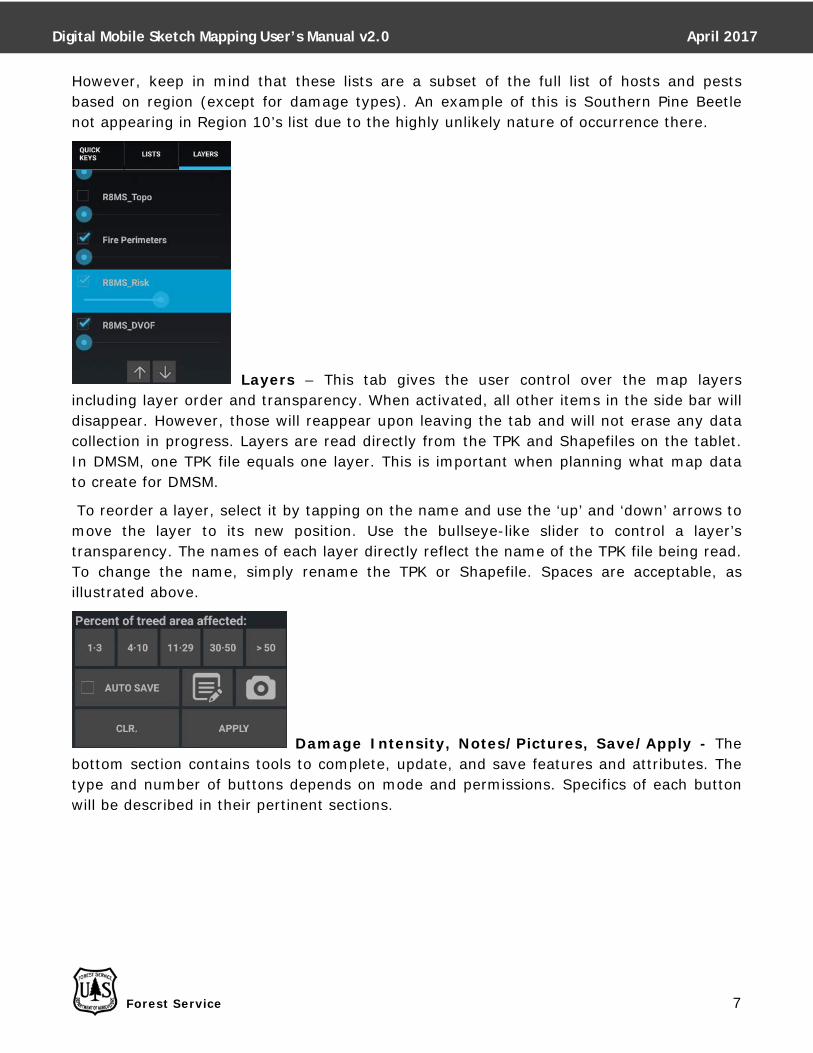
However, keep in mind that these lists are a subset of the full list of hosts and pests based on region (except for damage types). An example of this is Southern Pine Beetle not appearing in Region 10’s list due to the highly unlikely nature of occurrence there.
Layers – This tab gives the user control over the map layers including layer order and transparency. When activated, all other items in the side bar will disappear. However, those will reappear upon leaving the tab and will not erase any data collection in progress. Layers are read directly from the TPK and Shapefiles on the tablet. In DMSM, one TPK file equals one layer. This is important when planning what map data to create for DMSM.
To reorder a layer, select it by tapping on the name and use the ‘up’ and ‘down’ arrows to move the layer to its new position. Use the bullseye-like slider to control a layer’s transparency. The names of each layer directly reflect the name of the TPK file being read. To change the name, simply rename the TPK or Shapefile. Spaces are acceptable, as illustrated above.
Damage Intensity, Notes/Pictures, Save/Apply - The bottom section contains tools to complete, update, and save features and attributes. The type and number of buttons depends on mode and permissions. Specifics of each button will be described in their pertinent sections.
Digital Mobile Sketch Mapping User’s Manual v2.0 April 2017
Forest Service 8
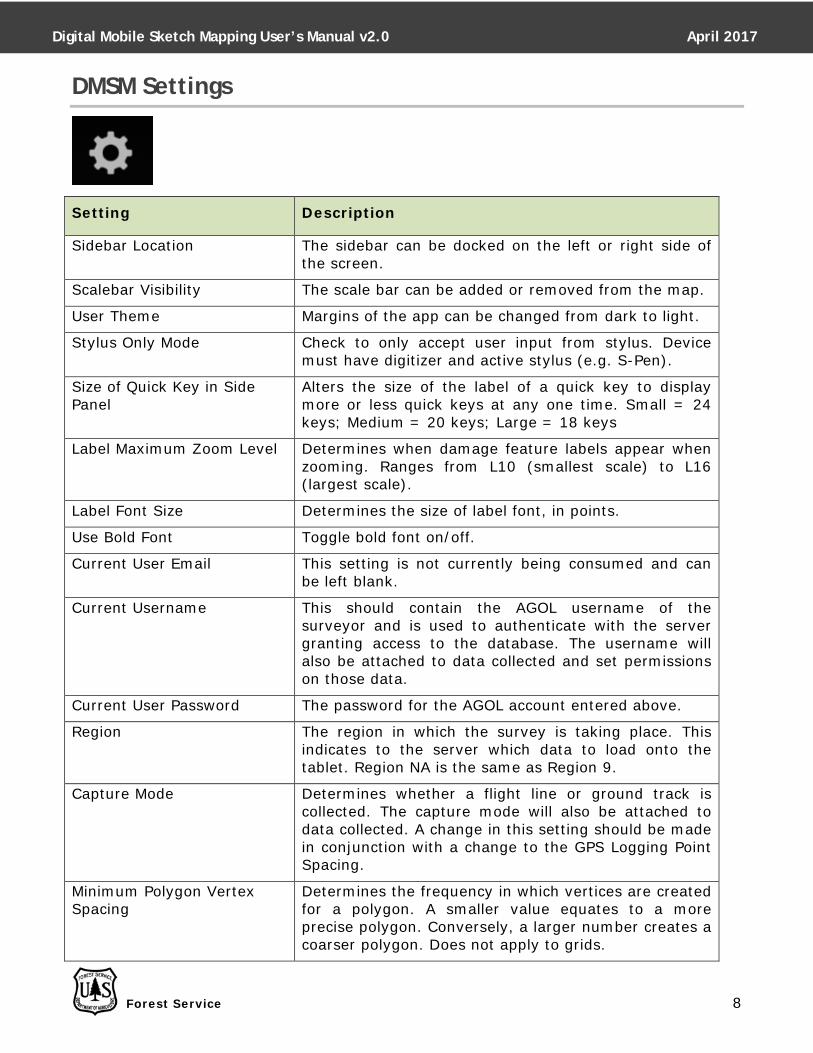
DMSM Settings
Setting Description
Sidebar Location The sidebar can be docked on the left or right side of the screen.
Scalebar Visibility The scale bar can be added or removed from the map.
User Theme Margins of the app can be changed from dark to light.
Stylus Only Mode Check to only accept user input from stylus. Device must have digitizer and active stylus (e.g. S-Pen).
Size of Quick Key in Side Panel
Alters the size of the label of a quick key to display more or less quick keys at any one time. Small = 24 keys; Medium = 20 keys; Large = 18 keys
Label Maximum Zoom Level Determines when damage feature labels appear when zooming. Ranges from L10 (smallest scale) to L16 (largest scale).
Label Font Size Determines the size of label font, in points.
Use Bold Font Toggle bold font on/off.
Current User Email This setting is not currently being consumed and can be left blank.
Current Username This should contain the AGOL username of the surveyor and is used to authenticate with the server granting access to the database. The username will also be attached to data collected and set permissions on those data.
Current User Password The password for the AGOL account entered above.
Region The region in which the survey is taking place. This indicates to the server which data to load onto the tablet. Region NA is the same as Region 9.
Capture Mode Determines whether a flight line or ground track is collected. The capture mode will also be attached to data collected. A change in this setting should be made in conjunction with a change to the GPS Logging Point Spacing.
Minimum Polygon Vertex Spacing
Determines the frequency in which vertices are created for a polygon. A smaller value equates to a more precise polygon. Conversely, a larger number creates a coarser polygon. Does not apply to grids.
Digital Mobile Sketch Mapping User’s Manual v2.0 April 2017
Forest Service 9
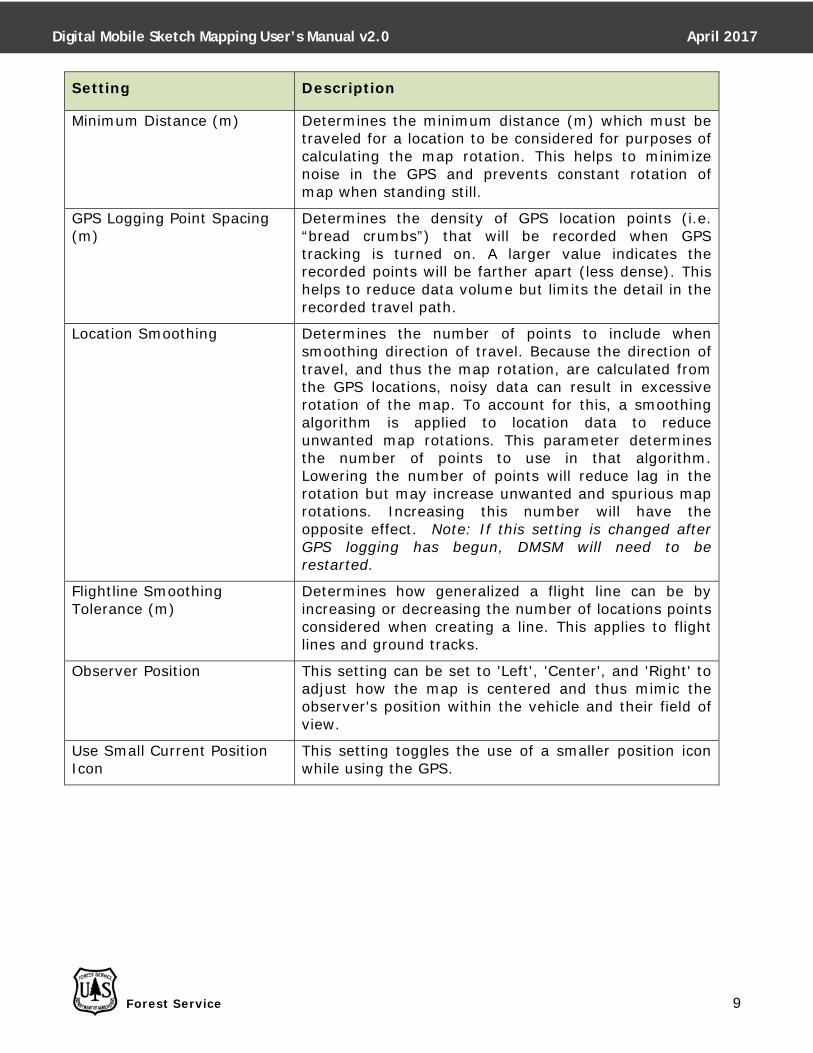
Setting Description
Minimum Distance (m) Determines the minimum distance (m) which must be traveled for a location to be considered for purposes of calculating the map rotation. This helps to minimize noise in the GPS and prevents constant rotation of map when standing still.
GPS Logging Point Spacing (m)
Determines the density of GPS location points (i.e. “bread crumbs”) that will be recorded when GPS tracking is turned on. A larger value indicates the recorded points will be farther apart (less dense). This helps to reduce data volume but limits the detail in the recorded travel path.
Location Smoothing Determines the number of points to include when smoothing direction of travel. Because the direction of travel, and thus the map rotation, are calculated from the GPS locations, noisy data can result in excessive rotation of the map. To account for this, a smoothing algorithm is applied to location data to reduce unwanted map rotations. This parameter determines the number of points to use in that algorithm. Lowering the number of points will reduce lag in the rotation but may increase unwanted and spurious map rotations. Increasing this number will have the opposite effect. Note: If this setting is changed after GPS logging has begun, DMSM will need to be restarted.
Flightline Smoothing Tolerance (m)
Determines how generalized a flight line can be by increasing or decreasing the number of locations points considered when creating a line. This applies to flight lines and ground tracks.
Observer Position This setting can be set to 'Left', 'Center', and 'Right' to adjust how the map is centered and thus mimic the observer's position within the vehicle and their field of view.
Use Small Current Position Icon
This setting toggles the use of a smaller position icon while using the GPS.

Digital Mobile Sketch Mapping User’s Manual v2.0 April 2017
Forest Service 10
Data View
Figure 4 - Data view screen
The Data View screen is used to set the Feature Service, build flight lines, and load and sync the geodatabase. To perform either action, connect to the internet and ensure that your username, password, and region have been set in the DMSM settings.
Change Service
This button allows the user to specify the Feature Service URL to which the application will connect for loading and syncing the geodatabase. Once the geodatabase is loaded, the button is disabled until the loaded geodatabase is removed.
Load/Reload Geodatabase
Note: The steps outlined in this section require the tablet to be connected to the Internet.

Digital Mobile Sketch Mapping User’s Manual v2.0 April 2017
Forest Service 11
After a URL is specified as outlined above, the next step is to load the geodatabase. This operation should only be required under the following situations:
• The application is being used for the first time, or for the first time in a season.
• The application is being used in a new region.
• The application is being used after an upgrade.
After ‘Load Geodatabase’ is initiated, a series of messages will appear regarding the status of the process. The process is complete when the status that appears next to the ‘Load Geodatabase’ button shows “Geodatabase Loaded:” along with a timestamp. The messages below may also say “GDB not synced” THIS IS OKAY. If an error is encountered during this process, ensure the tablet has a strong Wi-Fi connection and all user information is correct. When this is verified, try again. If problems continue, contact FHAAST for support.
After a geodatabase has been loaded, the ‘Load Geodatabase’ button will change to ‘Reload Geodatabase’ upon returning to the Data View screen. The purpose of this change reflects a change to the button’s functionality. ‘Reload Geodatabase’ is the method for removing a geodatabase from the tablet to load another geodatabase. Reasons for this can include changing from the training database to production or moving from one Forest Service region to another. When the process is initiated, a warning will appear reminding the user that the database will be deleted and that all data should be synced prior to running the task. If the user accepts the warning, the app will close. THIS IS NORMAL. To load a new geodatabase, reenter the app and follow the instructions above.
Build Flightlines
This utility converts the GPS location points collected into lines thus simplifying and reducing the size of the data that needs to be synced. This tool MUST be run in order to activate the ‘Sync Geodatabase’ button, even when no location points are on the tablet. However, a sync does not need to be done each time ‘Build Flightlines’ is run. When a sync is not necessary, running ‘Build Flightlines’ can be viewed as a geodatabase clean-up task that occurs on the tablet to improve performance. When started, the task begins by thinning out the Location Points using the value chosen in the ‘Flightline Smoothing Tolerance (m)’ section of the DMSM Settings. The remaining points are connected based on timestamp with new paths being created if the time between two points is greater than 15 minutes. Finally, the tool deletes all Location Points leaving the flight lines to be synced with the rest of the data.
Digital Mobile Sketch Mapping User’s Manual v2.0 April 2017
Forest Service 12
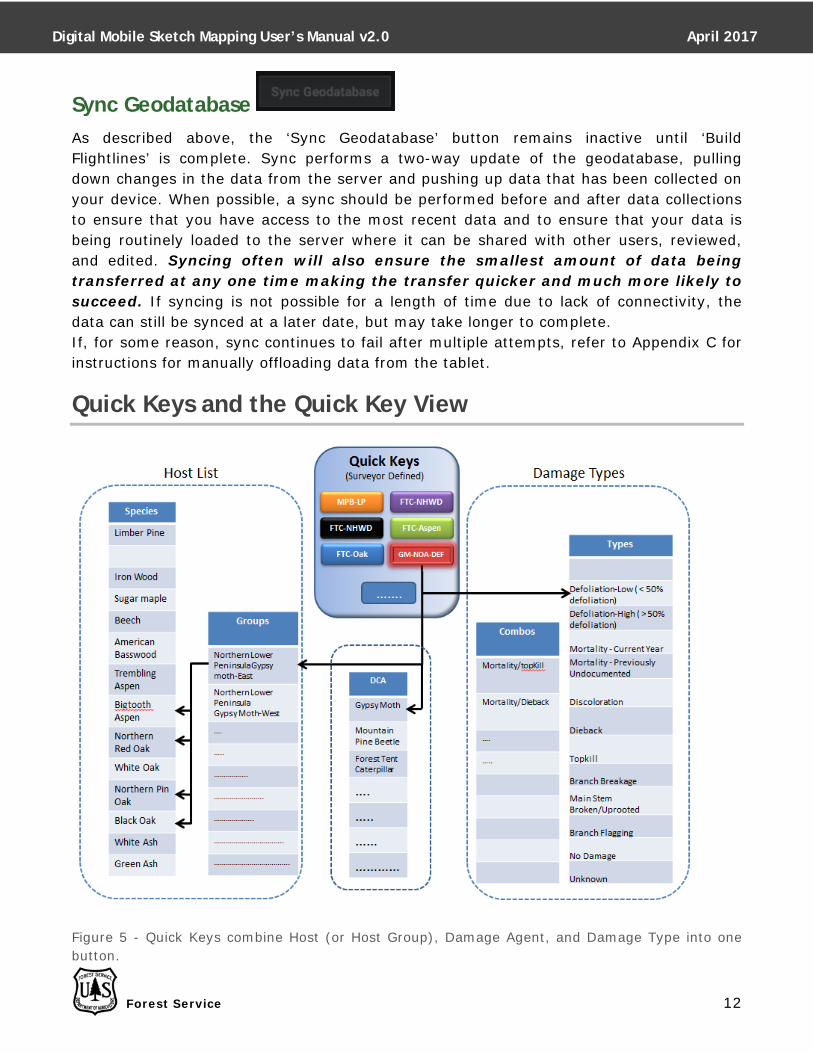
Sync Geodatabase
As described above, the ‘Sync Geodatabase’ button remains inactive until ‘Build Flightlines’ is complete. Sync performs a two-way update of the geodatabase, pulling down changes in the data from the server and pushing up data that has been collected on your device. When possible, a sync should be performed before and after data collections to ensure that you have access to the most recent data and to ensure that your data is being routinely loaded to the server where it can be shared with other users, reviewed, and edited. Syncing often will also ensure the smallest amount of data being transferred at any one time making the transfer quicker and much more likely to succeed. If syncing is not possible for a length of time due to lack of connectivity, the data can still be synced at a later date, but may take longer to complete. If, for some reason, sync continues to fail after multiple attempts, refer to Appendix C for instructions for manually offloading data from the tablet.
Quick Keys and the Quick Key View
Figure 5 - Quick Keys combine Host (or Host Group), Damage Agent, and Damage Type into one button.
Digital Mobile Sketch Mapping User’s Manual v2.0 April 2017
Forest Service 13
Quick Keys (QK) are an amalgamation of a host, damage agent, and damage type to be applied to a collected damage feature, effectively combining what would have been 3 taps on the screen down to one. While the contents of a QK are derived from a national, standardized code list, the labels are left up to the region or state to determine and manage. This gives flexibility to the Region or State to use the label to gather additional information.
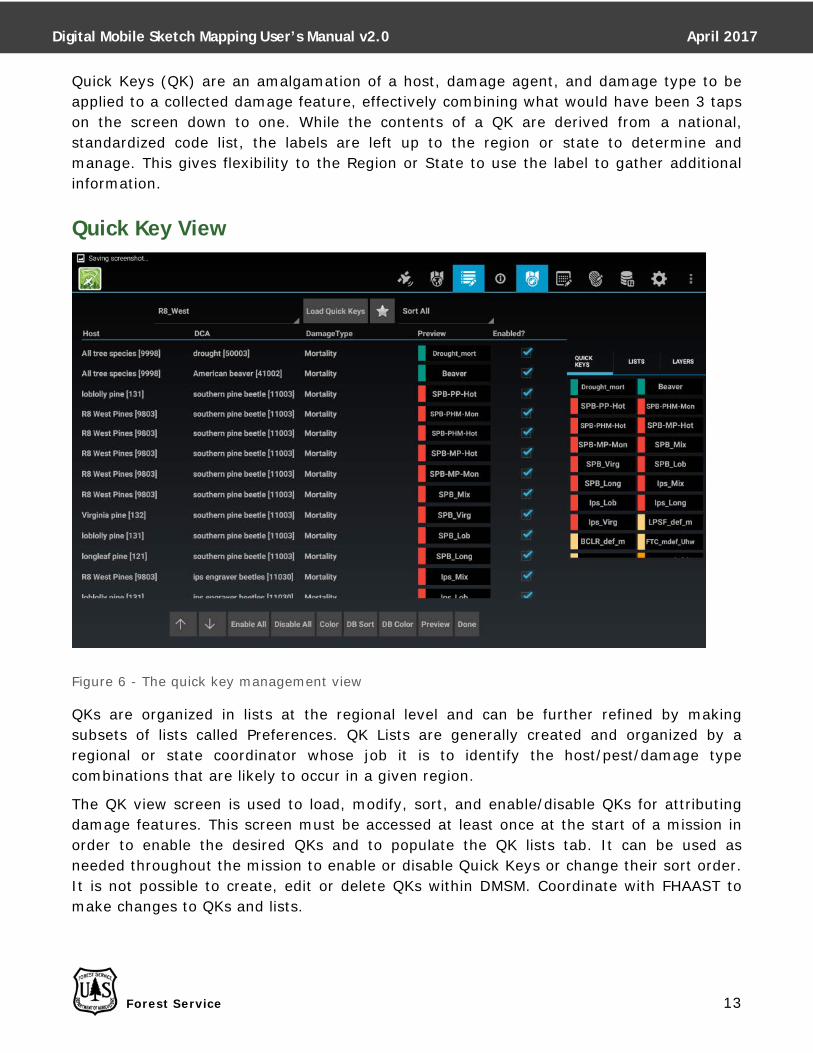
Quick Key View
Figure 6 - The quick key management view
QKs are organized in lists at the regional level and can be further refined by making subsets of lists called Preferences. QK Lists are generally created and organized by a regional or state coordinator whose job it is to identify the host/pest/damage type combinations that are likely to occur in a given region.
The QK view screen is used to load, modify, sort, and enable/disable QKs for attributing damage features. This screen must be accessed at least once at the start of a mission in order to enable the desired QKs and to populate the QK lists tab. It can be used as needed throughout the mission to enable or disable Quick Keys or change their sort order. It is not possible to create, edit or delete QKs within DMSM. Coordinate with FHAAST to make changes to QKs and lists.
Digital Mobile Sketch Mapping User’s Manual v2.0 April 2017
Forest Service 14
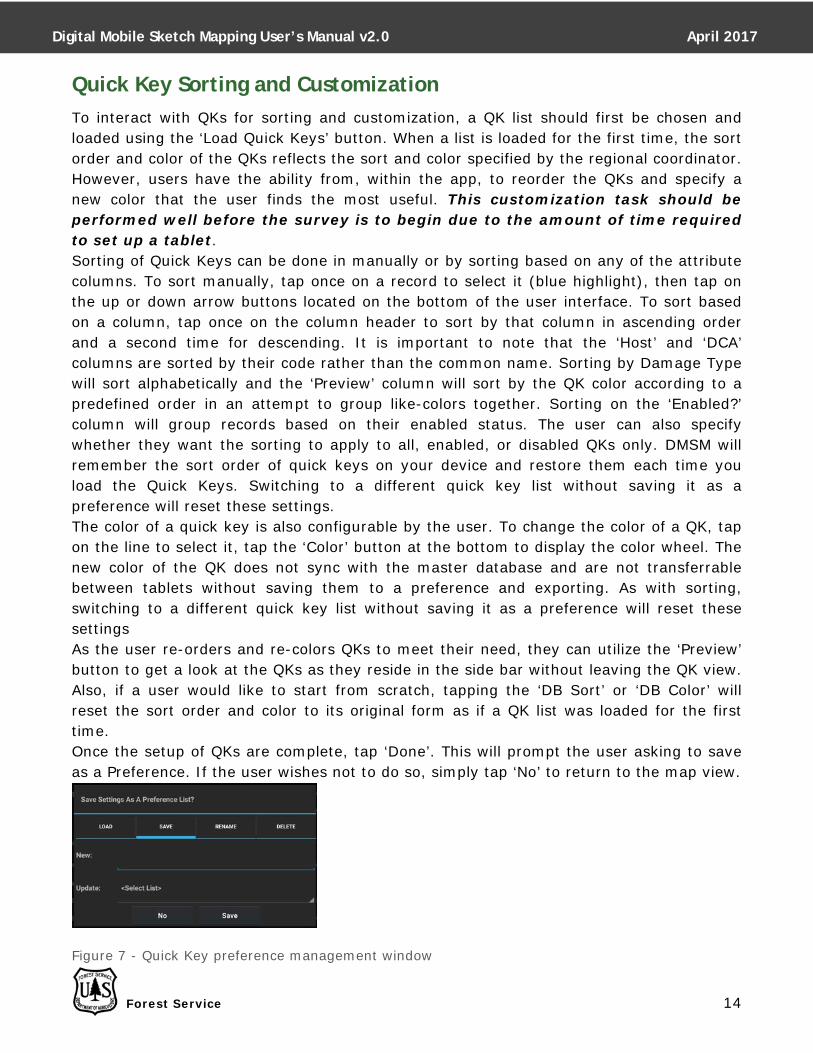
Quick Key Sorting and Customization To interact with QKs for sorting and customization, a QK list should first be chosen and loaded using the ‘Load Quick Keys’ button. When a list is loaded for the first time, the sort order and color of the QKs reflects the sort and color specified by the regional coordinator. However, users have the ability from, within the app, to reorder the QKs and specify a new color that the user finds the most useful. This customization task should be performed well before the survey is to begin due to the amount of time required to set up a tablet. Sorting of Quick Keys can be done in manually or by sorting based on any of the attribute columns. To sort manually, tap once on a record to select it (blue highlight), then tap on the up or down arrow buttons located on the bottom of the user interface. To sort based on a column, tap once on the column header to sort by that column in ascending order and a second time for descending. It is important to note that the ‘Host’ and ‘DCA’ columns are sorted by their code rather than the common name. Sorting by Damage Type will sort alphabetically and the ‘Preview’ column will sort by the QK color according to a predefined order in an attempt to group like-colors together. Sorting on the ‘Enabled?’ column will group records based on their enabled status. The user can also specify whether they want the sorting to apply to all, enabled, or disabled QKs only. DMSM will remember the sort order of quick keys on your device and restore them each time you load the Quick Keys. Switching to a different quick key list without saving it as a preference will reset these settings. The color of a quick key is also configurable by the user. To change the color of a QK, tap on the line to select it, tap the ‘Color’ button at the bottom to display the color wheel. The new color of the QK does not sync with the master database and are not transferrable between tablets without saving them to a preference and exporting. As with sorting, switching to a different quick key list without saving it as a preference will reset these settings As the user re-orders and re-colors QKs to meet their need, they can utilize the ‘Preview’ button to get a look at the QKs as they reside in the side bar without leaving the QK view. Also, if a user would like to start from scratch, tapping the ‘DB Sort’ or ‘DB Color’ will reset the sort order and color to its original form as if a QK list was loaded for the first time. Once the setup of QKs are complete, tap ‘Done’. This will prompt the user asking to save as a Preference. If the user wishes not to do so, simply tap ‘No’ to return to the map view.
Figure 7 - Quick Key preference management window
Digital Mobile Sketch Mapping User’s Manual v2.0 April 2017
Forest Service 15
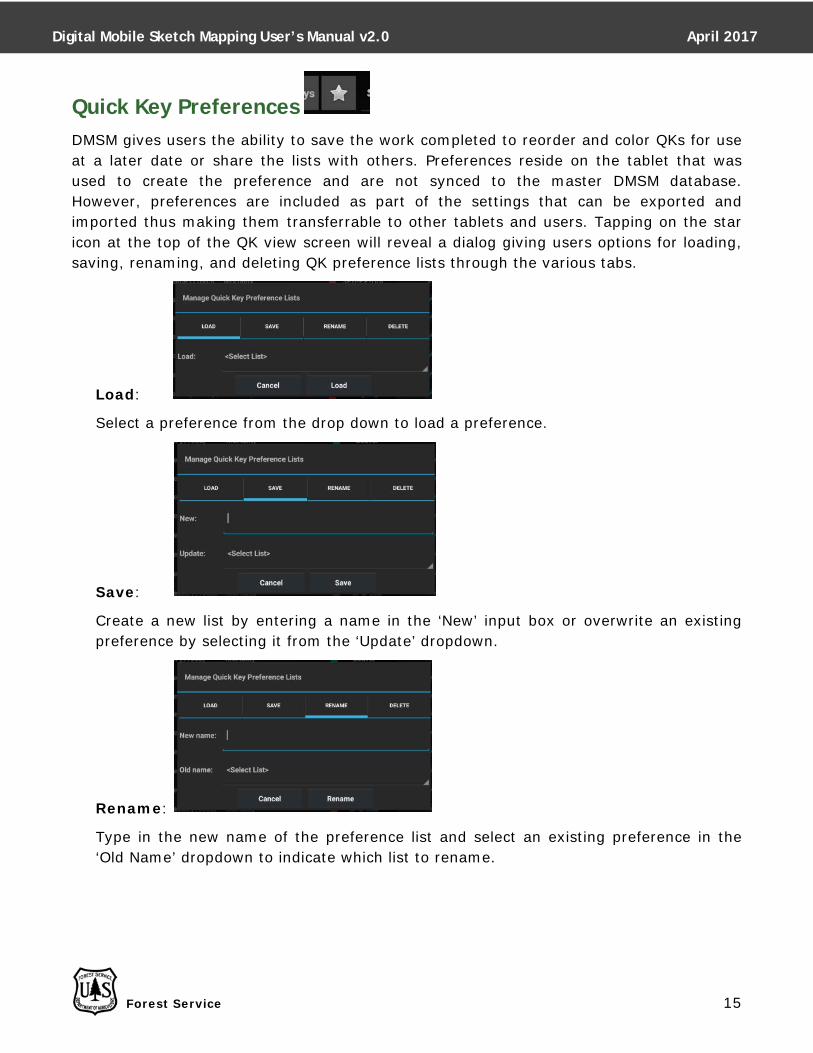
Quick Key Preferences
DMSM gives users the ability to save the work completed to reorder and color QKs for use at a later date or share the lists with others. Preferences reside on the tablet that was used to create the preference and are not synced to the master DMSM database. However, preferences are included as part of the settings that can be exported and imported thus making them transferrable to other tablets and users. Tapping on the star icon at the top of the QK view screen will reveal a dialog giving users options for loading, saving, renaming, and deleting QK preference lists through the various tabs.
Load:
Select a preference from the drop down to load a preference.
Save:
Create a new list by entering a name in the ‘New’ input box or overwrite an existing preference by selecting it from the ‘Update’ dropdown.
Rename:
Type in the new name of the preference list and select an existing preference in the ‘Old Name’ dropdown to indicate which list to rename.

Digital Mobile Sketch Mapping User’s Manual v2.0 April 2017
Forest Service 16
Delete:
Choose a list in the dropdown to delete it
Using GPS in DMSM
Prior to a survey or hike/drive for survey, the GPS needs to be activated to begin collection of location points as well as keeping the map updated to the user’s current position. As outlined in a previous section, activation of the GPS will display five additional icons related to map orientation and updating.
North Up (Position icon rotates relative to direction of aircraft)
Auto-Rotate (Map rotates relative to direction of aircraft)
Auto Pan On/Off (Toggles map panning)
Play/Resume Auto Pan
Pause Auto Pan
Upon activation and acquisition of a signal, a location indicator will appear on the map and the device will begin recording location points. By default, the orientation is set to ‘North Up’ and ‘Auto Pan’ is off. The user will need to activate ‘Auto Pan’ for the map to actively update with the location of the user.
Digital Mobile Sketch Mapping User’s Manual v2.0 April 2017
Forest Service 17
Collect Mode
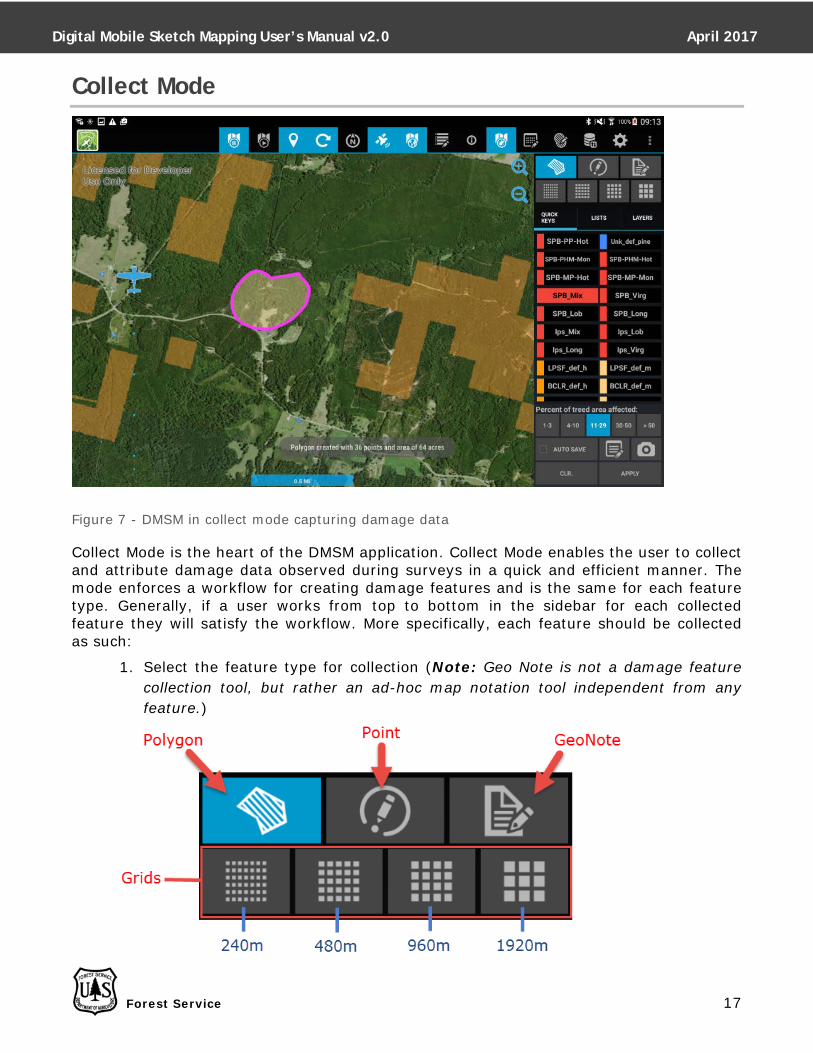
Figure 7 - DMSM in collect mode capturing damage data
Collect Mode is the heart of the DMSM application. Collect Mode enables the user to collect and attribute damage data observed during surveys in a quick and efficient manner. The mode enforces a workflow for creating damage features and is the same for each feature type. Generally, if a user works from top to bottom in the sidebar for each collected feature they will satisfy the workflow. More specifically, each feature should be collected as such:
1. Select the feature type for collection (Note: Geo Note is not a damage feature collection tool, but rather an ad-hoc map notation tool independent from any feature.)
Digital Mobile Sketch Mapping User’s Manual v2.0 April 2017
Forest Service 18
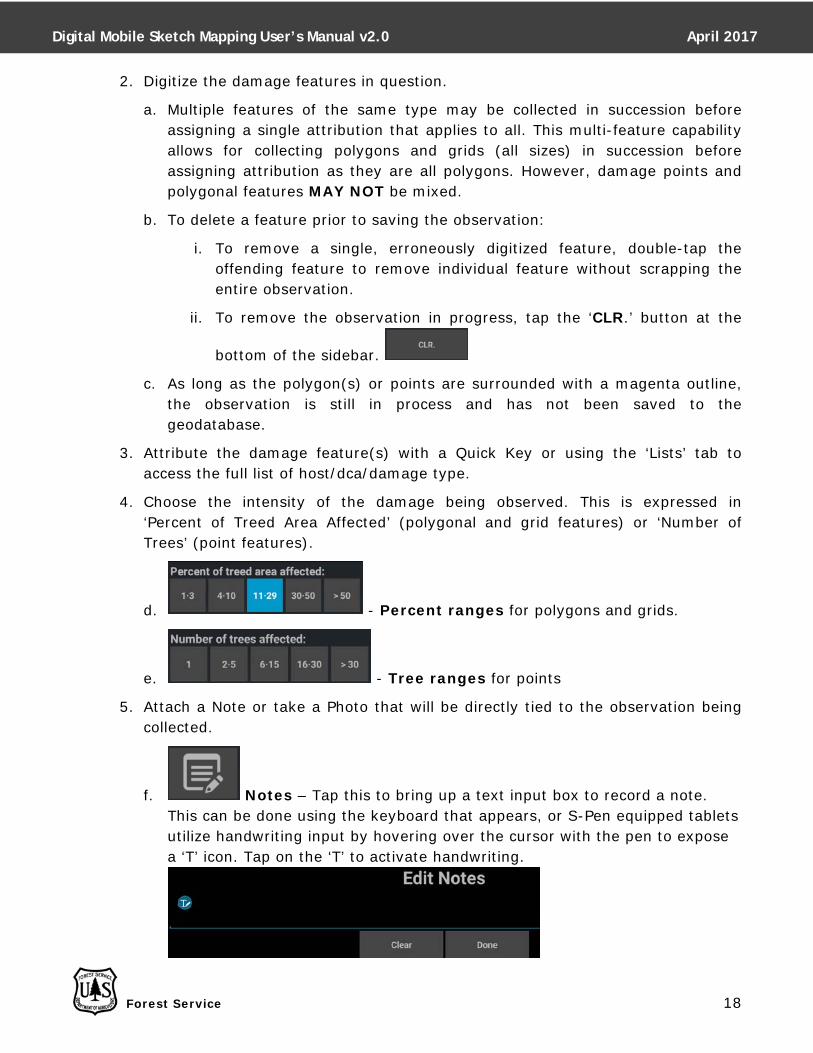
2. Digitize the damage features in question.
a. Multiple features of the same type may be collected in succession before assigning a single attribution that applies to all. This multi-feature capability allows for collecting polygons and grids (all sizes) in succession before assigning attribution as they are all polygons. However, damage points and polygonal features MAY NOT be mixed.
b. To delete a feature prior to saving the observation:
i. To remove a single, erroneously digitized feature, double-tap the offending feature to remove individual feature without scrapping the entire observation.
ii. To remove the observation in progress, tap the ‘CLR.’ button at the
bottom of the sidebar.
c. As long as the polygon(s) or points are surrounded with a magenta outline, the observation is still in process and has not been saved to the geodatabase.
3. Attribute the damage feature(s) with a Quick Key or using the ‘Lists’ tab to access the full list of host/dca/damage type.
4. Choose the intensity of the damage being observed. This is expressed in ‘Percent of Treed Area Affected’ (polygonal and grid features) or ‘Number of Trees’ (point features).
d. - Percent ranges for polygons and grids.
e. - Tree ranges for points
5. Attach a Note or take a Photo that will be directly tied to the observation being collected.
f. Notes – Tap this to bring up a text input box to record a note. This can be done using the keyboard that appears, or S-Pen equipped tablets utilize handwriting input by hovering over the cursor with the pen to expose a ‘T’ icon. Tap on the ‘T’ to activate handwriting.
Digital Mobile Sketch Mapping User’s Manual v2.0 April 2017
Forest Service 19
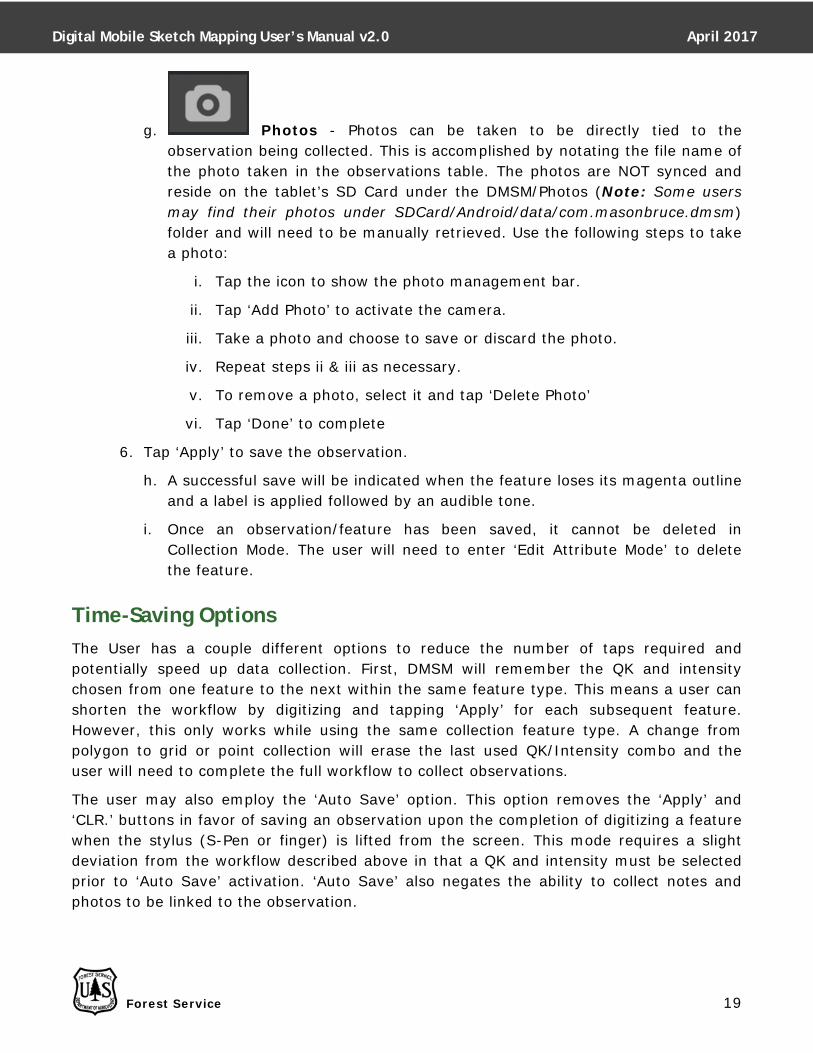
g. Photos - Photos can be taken to be directly tied to the observation being collected. This is accomplished by notating the file name of the photo taken in the observations table. The photos are NOT synced and reside on the tablet’s SD Card under the DMSM/Photos (Note: Some users may find their photos under SDCard/Android/data/com.masonbruce.dmsm) folder and will need to be manually retrieved. Use the following steps to take a photo:
i. Tap the icon to show the photo management bar.
ii. Tap ‘Add Photo’ to activate the camera.
iii. Take a photo and choose to save or discard the photo.
iv. Repeat steps ii & iii as necessary.
v. To remove a photo, select it and tap ‘Delete Photo’
vi. Tap ‘Done’ to complete
6. Tap ‘Apply’ to save the observation.
h. A successful save will be indicated when the feature loses its magenta outline and a label is applied followed by an audible tone.
i. Once an observation/feature has been saved, it cannot be deleted in Collection Mode. The user will need to enter ‘Edit Attribute Mode’ to delete the feature.
Time-Saving Options The User has a couple different options to reduce the number of taps required and potentially speed up data collection. First, DMSM will remember the QK and intensity chosen from one feature to the next within the same feature type. This means a user can shorten the workflow by digitizing and tapping ‘Apply’ for each subsequent feature. However, this only works while using the same collection feature type. A change from polygon to grid or point collection will erase the last used QK/Intensity combo and the user will need to complete the full workflow to collect observations.
The user may also employ the ‘Auto Save’ option. This option removes the ‘Apply’ and ‘CLR.’ buttons in favor of saving an observation upon the completion of digitizing a feature when the stylus (S-Pen or finger) is lifted from the screen. This mode requires a slight deviation from the workflow described above in that a QK and intensity must be selected prior to ‘Auto Save’ activation. ‘Auto Save’ also negates the ability to collect notes and photos to be linked to the observation.
Digital Mobile Sketch Mapping User’s Manual v2.0 April 2017
Forest Service 20
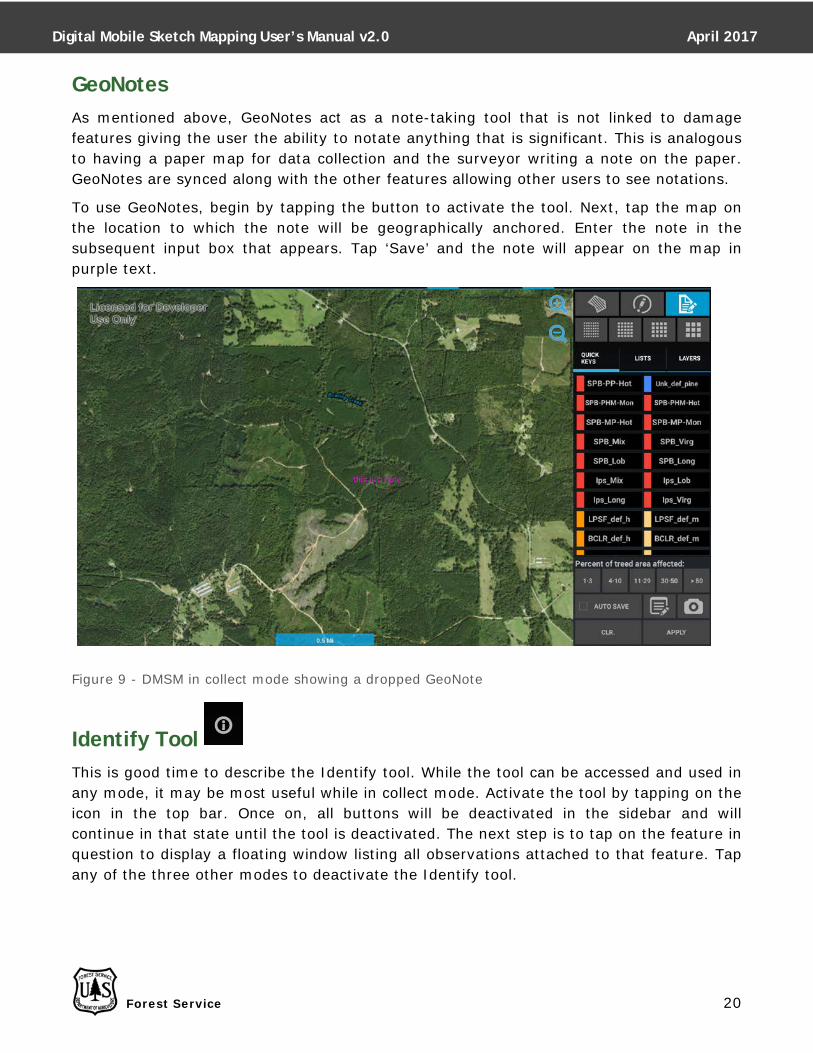
GeoNotes As mentioned above, GeoNotes act as a note-taking tool that is not linked to damage features giving the user the ability to notate anything that is significant. This is analogous to having a paper map for data collection and the surveyor writing a note on the paper. GeoNotes are synced along with the other features allowing other users to see notations.
To use GeoNotes, begin by tapping the button to activate the tool. Next, tap the map on the location to which the note will be geographically anchored. Enter the note in the subsequent input box that appears. Tap ‘Save’ and the note will appear on the map in purple text.
Figure 9 - DMSM in collect mode showing a dropped GeoNote
Identify Tool
This is good time to describe the Identify tool. While the tool can be accessed and used in any mode, it may be most useful while in collect mode. Activate the tool by tapping on the icon in the top bar. Once on, all buttons will be deactivated in the sidebar and will continue in that state until the tool is deactivated. The next step is to tap on the feature in question to display a floating window listing all observations attached to that feature. Tap any of the three other modes to deactivate the Identify tool.
Digital Mobile Sketch Mapping User’s Manual v2.0 April 2017
Forest Service 21
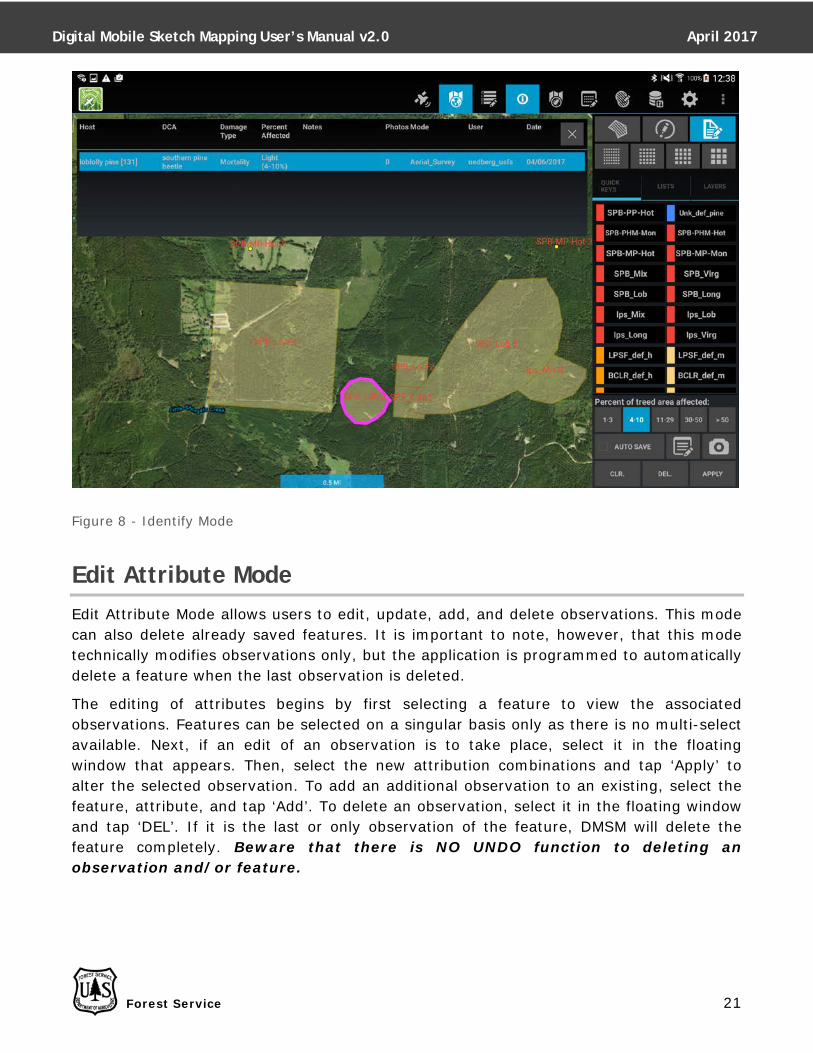
Figure 8 - Identify Mode
Edit Attribute Mode Edit Attribute Mode allows users to edit, update, add, and delete observations. This mode can also delete already saved features. It is important to note, however, that this mode technically modifies observations only, but the application is programmed to automatically delete a feature when the last observation is deleted.
The editing of attributes begins by first selecting a feature to view the associated observations. Features can be selected on a singular basis only as there is no multi-select available. Next, if an edit of an observation is to take place, select it in the floating window that appears. Then, select the new attribution combinations and tap ‘Apply’ to alter the selected observation. To add an additional observation to an existing, select the feature, attribute, and tap ‘Add’. To delete an observation, select it in the floating window and tap ‘DEL’. If it is the last or only observation of the feature, DMSM will delete the feature completely. Beware that there is NO UNDO function to deleting an observation and/or feature.
Digital Mobile Sketch Mapping User’s Manual v2.0 April 2017
Forest Service 22
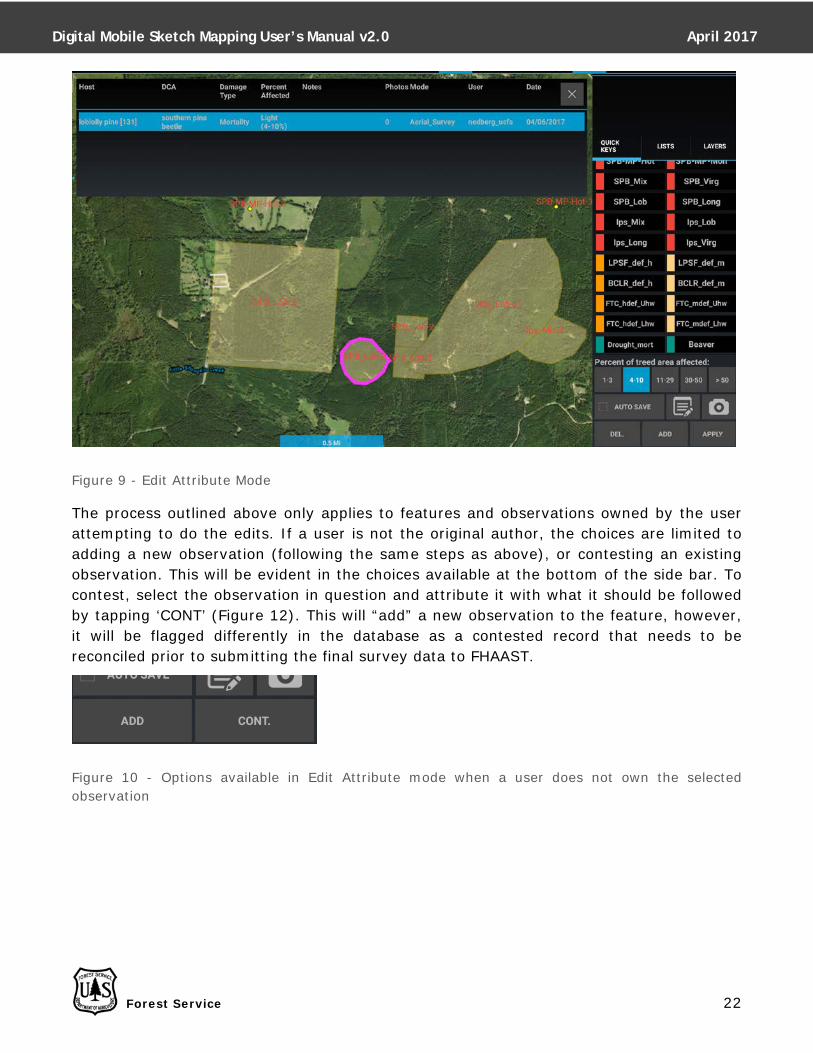
Figure 9 - Edit Attribute Mode
The process outlined above only applies to features and observations owned by the user attempting to do the edits. If a user is not the original author, the choices are limited to adding a new observation (following the same steps as above), or contesting an existing observation. This will be evident in the choices available at the bottom of the side bar. To contest, select the observation in question and attribute it with what it should be followed by tapping ‘CONT’ (Figure 12). This will “add” a new observation to the feature, however, it will be flagged differently in the database as a contested record that needs to be reconciled prior to submitting the final survey data to FHAAST.
Figure 10 - Options available in Edit Attribute mode when a user does not own the selected observation
Digital Mobile Sketch Mapping User’s Manual v2.0 April 2017
Forest Service 23
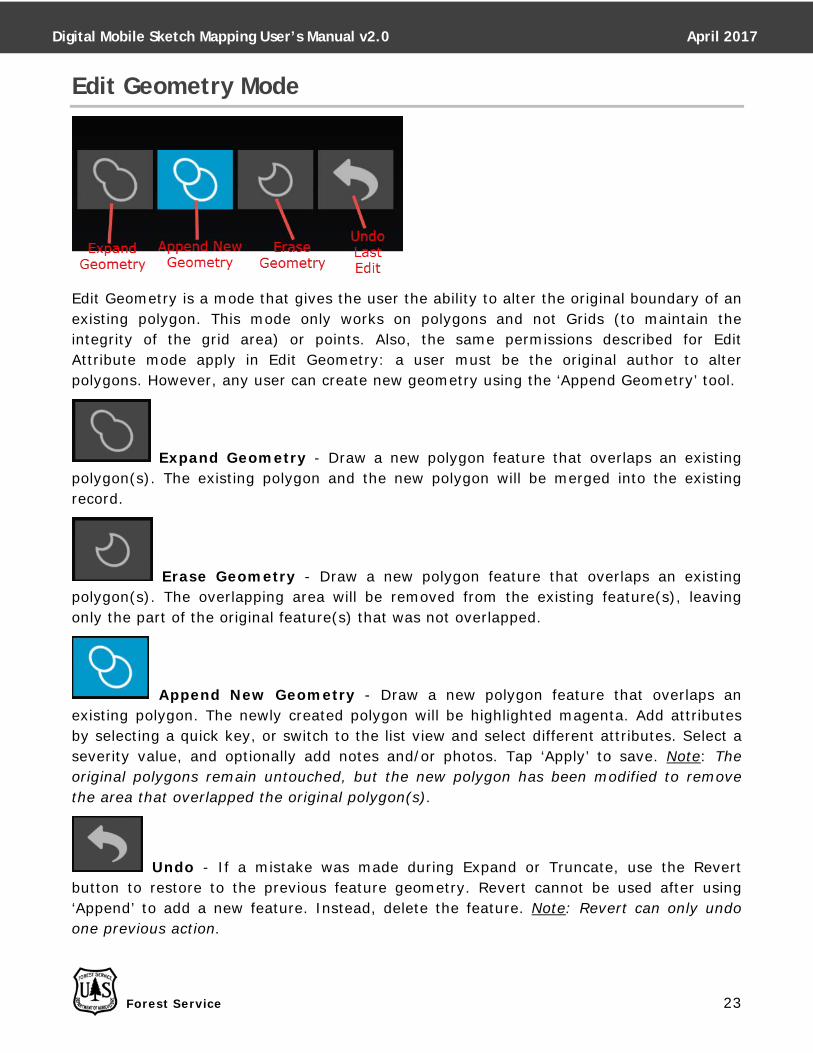
Edit Geometry Mode
Edit Geometry is a mode that gives the user the ability to alter the original boundary of an existing polygon. This mode only works on polygons and not Grids (to maintain the integrity of the grid area) or points. Also, the same permissions described for Edit Attribute mode apply in Edit Geometry: a user must be the original author to alter polygons. However, any user can create new geometry using the ‘Append Geometry’ tool.
Expand Geometry - Draw a new polygon feature that overlaps an existing polygon(s). The existing polygon and the new polygon will be merged into the existing record.
Erase Geometry - Draw a new polygon feature that overlaps an existing polygon(s). The overlapping area will be removed from the existing feature(s), leaving only the part of the original feature(s) that was not overlapped.
Append New Geometry - Draw a new polygon feature that overlaps an existing polygon. The newly created polygon will be highlighted magenta. Add attributes by selecting a quick key, or switch to the list view and select different attributes. Select a severity value, and optionally add notes and/or photos. Tap ‘Apply’ to save. Note: The original polygons remain untouched, but the new polygon has been modified to remove the area that overlapped the original polygon(s).
Undo - If a mistake was made during Expand or Truncate, use the Revert button to restore to the previous feature geometry. Revert cannot be used after using ‘Append’ to add a new feature. Instead, delete the feature. Note: Revert can only undo one previous action.
Digital Mobile Sketch Mapping User’s Manual v2.0 April 2017
Forest Service 24
Syncing Data Syncing is the process of the tablet connecting to the master database and exchanging changes made by the user and other users since the last sync. Sync can be performed any time the tablet has a strong, reliable connection to the Internet. Many factors play into the speed and success of a sync. These factors include Wi-Fi strength, Internet speed (think hotel internet), and data volume. The more these factors can be improved, the better chance there is of syncing occurring quickly and efficiently. For more information on building flight lines and initiating sync, please refer to section on the ‘Data View’ screen.
More Options
By accessing the ‘More Options’ menu, users will have access to additional tools to augment the data collection experience. Note: If the tablet does not have the icon shown
above, the ‘More Options’ menu can be accessed by tapping the button to the left of the physical home button on the tablet.
About This gives the user information regarding the version of the app as well as the developer.
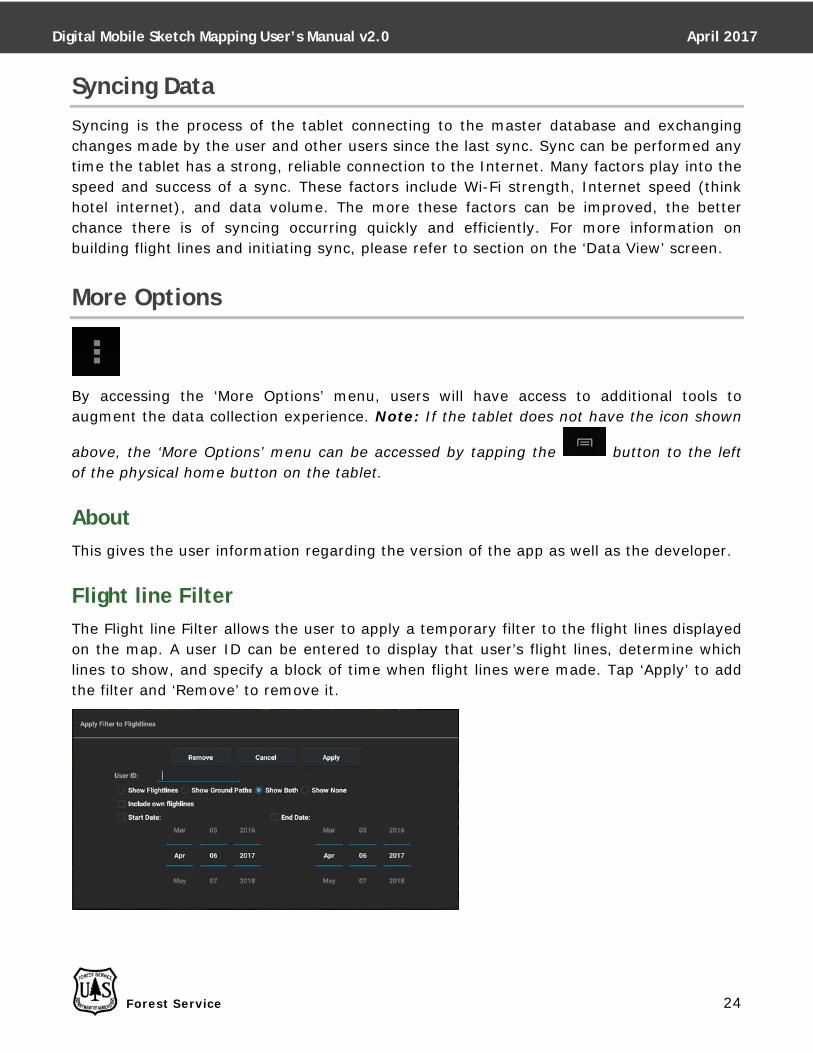
Flight line Filter The Flight line Filter allows the user to apply a temporary filter to the flight lines displayed on the map. A user ID can be entered to display that user’s flight lines, determine which lines to show, and specify a block of time when flight lines were made. Tap ‘Apply’ to add the filter and ‘Remove’ to remove it.
Digital Mobile Sketch Mapping User’s Manual v2.0 April 2017
Forest Service 25
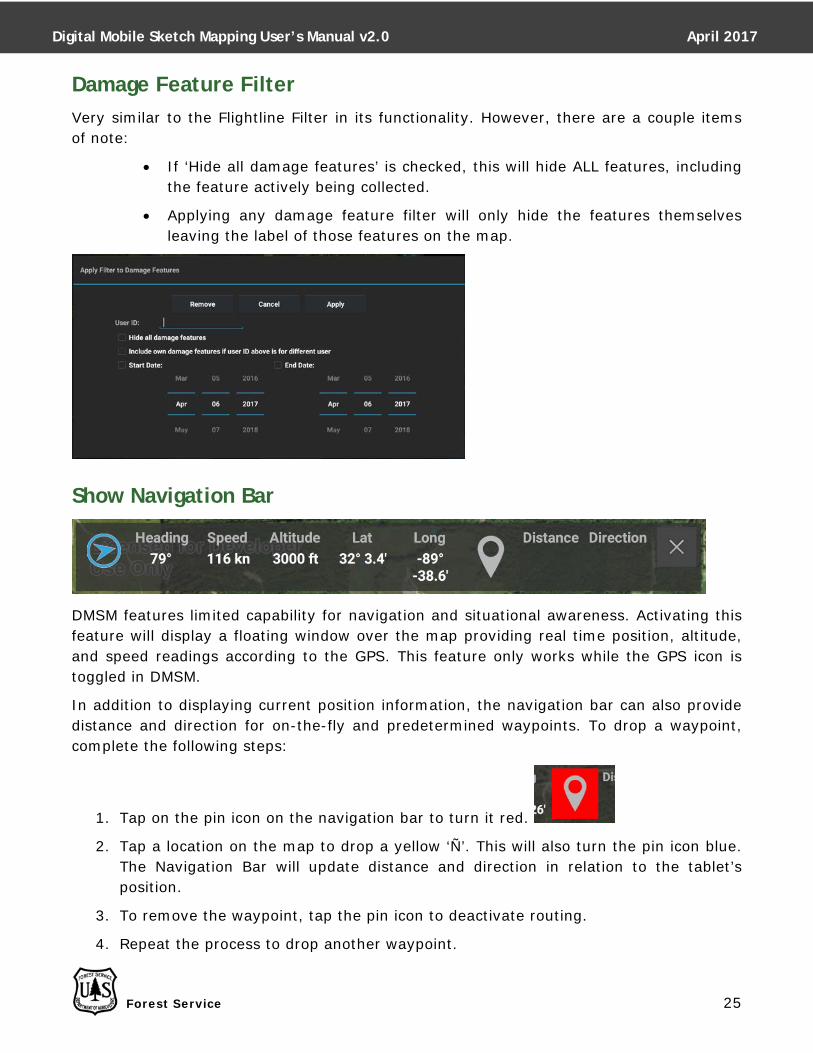
Damage Feature Filter Very similar to the Flightline Filter in its functionality. However, there are a couple items of note:
• If ‘Hide all damage features’ is checked, this will hide ALL features, including the feature actively being collected.
• Applying any damage feature filter will only hide the features themselves leaving the label of those features on the map.
Show Navigation Bar
DMSM features limited capability for navigation and situational awareness. Activating this feature will display a floating window over the map providing real time position, altitude, and speed readings according to the GPS. This feature only works while the GPS icon is toggled in DMSM.
In addition to displaying current position information, the navigation bar can also provide distance and direction for on-the-fly and predetermined waypoints. To drop a waypoint, complete the following steps:
1. Tap on the pin icon on the navigation bar to turn it red.
2. Tap a location on the map to drop a yellow ‘Ñ’. This will also turn the pin icon blue. The Navigation Bar will update distance and direction in relation to the tablet’s position.
3. To remove the waypoint, tap the pin icon to deactivate routing.
4. Repeat the process to drop another waypoint.
Digital Mobile Sketch Mapping User’s Manual v2.0 April 2017
Forest Service 26
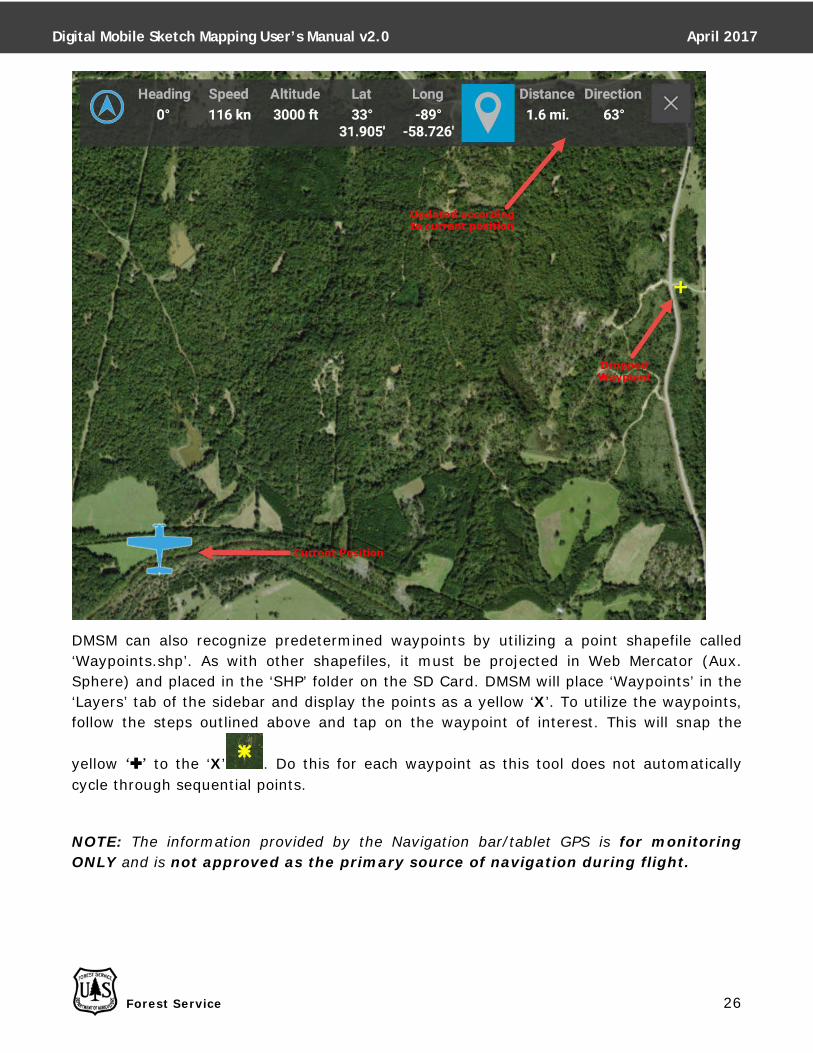
DMSM can also recognize predetermined waypoints by utilizing a point shapefile called ‘Waypoints.shp’. As with other shapefiles, it must be projected in Web Mercator (Aux. Sphere) and placed in the ‘SHP’ folder on the SD Card. DMSM will place ‘Waypoints’ in the ‘Layers’ tab of the sidebar and display the points as a yellow ‘X’. To utilize the waypoints, follow the steps outlined above and tap on the waypoint of interest. This will snap the
yellow ‘Ñ’ to the ‘X’ . Do this for each waypoint as this tool does not automatically cycle through sequential points.
NOTE: The information provided by the Navigation bar/tablet GPS is for monitoring ONLY and is not approved as the primary source of navigation during flight.
Digital Mobile Sketch Mapping User’s Manual v2.0 April 2017
Forest Service 27
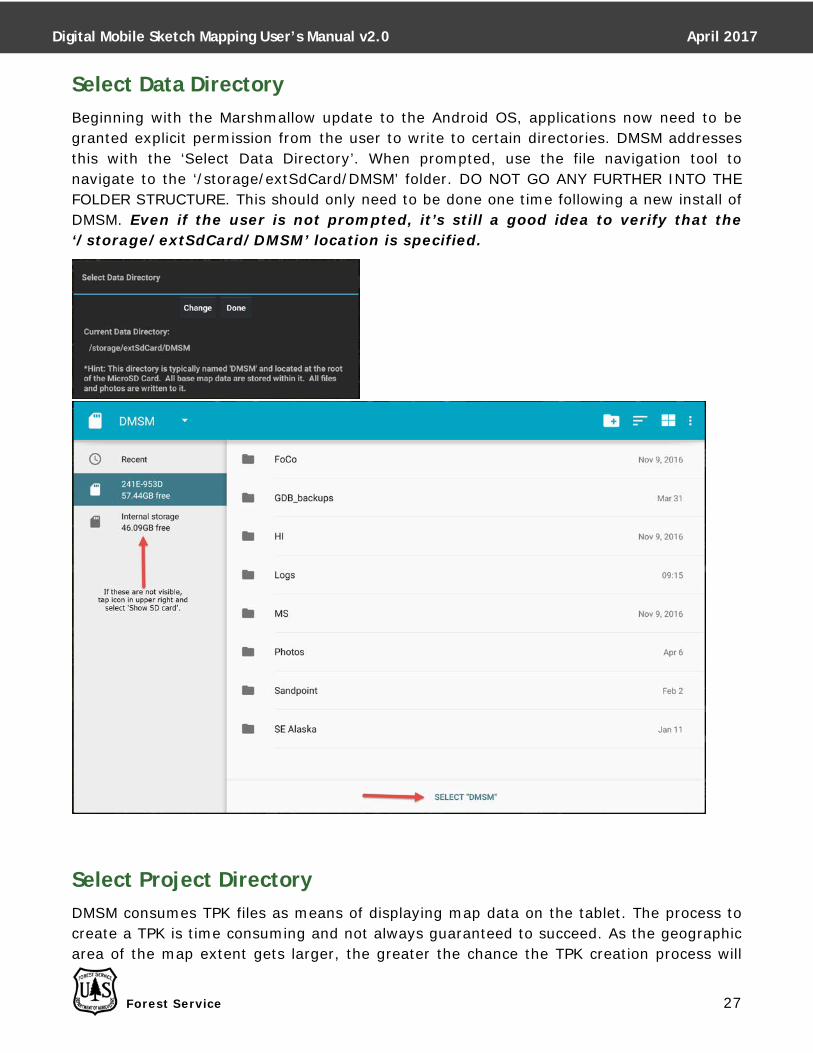
Select Data Directory Beginning with the Marshmallow update to the Android OS, applications now need to be granted explicit permission from the user to write to certain directories. DMSM addresses this with the ‘Select Data Directory’. When prompted, use the file navigation tool to navigate to the ‘/storage/extSdCard/DMSM’ folder. DO NOT GO ANY FURTHER INTO THE FOLDER STRUCTURE. This should only need to be done one time following a new install of DMSM. Even if the user is not prompted, it’s still a good idea to verify that the ‘/storage/extSdCard/DMSM’ location is specified.
Select Project Directory DMSM consumes TPK files as means of displaying map data on the tablet. The process to create a TPK is time consuming and not always guaranteed to succeed. As the geographic area of the map extent gets larger, the greater the chance the TPK creation process will

Digital Mobile Sketch Mapping User’s Manual v2.0 April 2017
Forest Service 28
fail. This leads to large geographic areas, such as western states, being broken up into smaller extents. To accommodate this reality, DMSM has the ability to switch between these smaller geographies seamlessly. However, in order for this to work, the folder structure needs to be set up in the proper configuration. In the ‘SDCard/DMSM’ folder, there should be one folder for each geography and each containing their own set of CompactTileCache|SHP|TPK’ folders.
To switch geographies, select it in the ‘Select Project Directory’ dropdown.
Note: Changing the Project Directory does nothing to change the loaded geodatabase. This is especially important when changing between areas in two different regions. Moving from one FS Region to another will require a change in the settings and reloading the geodatabase.
Download FDM Data The Forest Disturbance Monitor has been integrated with DMSM to provide users with up-to-date remotely sensed forest disturbance information. Entering the tool will bring up a new screen with a map in the approximate location of the user/tablet. Next, the user pans and zooms the map to the desired extent and scale. Tapping the white ‘Download’ button will download FDM data for the specified area and place it in the ‘Layers’ tab of the sidebar. Please see the ‘Known Issues’ appendix for more information.
Export/Import Settings This feature gives users the ability to propagate the settings and QK preferences created from one tablet to another. Upon tapping ‘Export Settings’ a notification will appear at the bottom of the map indicating the location of the output file. The naming convention will be ‘DMSM_settings_[user name]_[date].txt and the output location is always the ‘Download’ folder on the tablet’s hard drive.
Importing settings is a little more involved:
1. Begin by tapping the ‘Import Settings’ button to reveal a floating window.

Digital Mobile Sketch Mapping User’s Manual v2.0 April 2017
Forest Service 29
2. Tap ‘Select File’, then navigate to the ‘Download’ folder (do not use the available ‘Downloads’ shortcut) and select the file to import.
3. From the settings values contained within the file, select/deselect the items to be imported.
4. Tap ‘Import’.
Any setting that was checked on in step 3 is now applied.
Close DMSM Closes the application.
Digital Mobile Sketch Mapping User’s Manual v2.0 April 2017
Forest Service 30
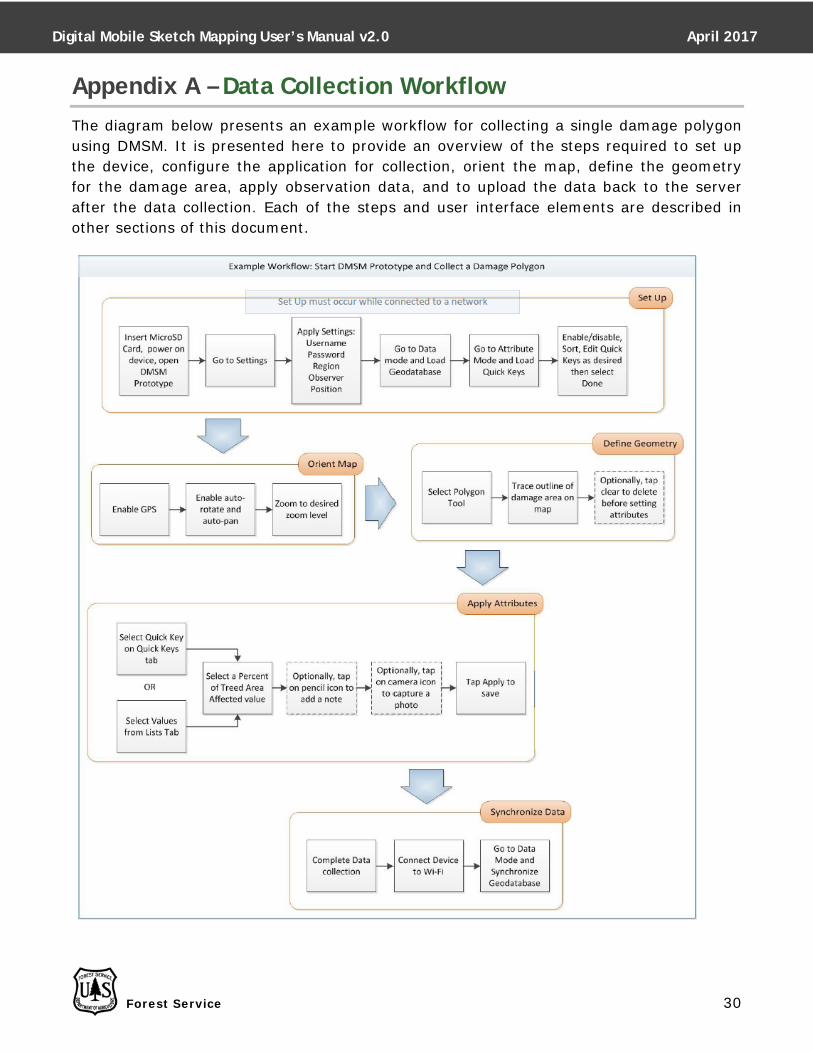
Appendix A – Data Collection Workflow The diagram below presents an example workflow for collecting a single damage polygon using DMSM. It is presented here to provide an overview of the steps required to set up the device, configure the application for collection, orient the map, define the geometry for the damage area, apply observation data, and to upload the data back to the server after the data collection. Each of the steps and user interface elements are described in other sections of this document.
Digital Mobile Sketch Mapping User’s Manual v2.0 April 2017
Forest Service 31
Appendix B – Using Bluetooth GPS When using DMSM in high-wing aircraft, certain positions that place the tablet directly beneath the wing can cause the on-tablet GPS chipset to lose the satellite signal. To mitigate this, the use of an external Bluetooth GPS paired to the tablets is recommended. This requires a third-party app to read the incoming GPS signals.
Tablet and Application Setup FHAAST recommends using an app called ‘Bluetooth GPS’ by GG MobLab. This is a free app that can be found in the Google Play store.
Next, the tablet needs to be configured to accept GPS data from the Bluetooth using the following steps:
1. Open the Android settings (usually a blue and white sprocket)
2. In Settings, navigate to General and, on the left, scroll to ‘Developer options’
a. If ‘Developer options’ is not showing, scroll to ‘About device’, select, then scroll to ‘Build number’. Tap on ‘Build number’ seven times to activate ‘Developer options’
3. In ‘Developer options’, select ‘Allow mock locations’
If the above instructions don’t describe what the tablet is displaying, you may have a newer version of the OS (Marshmallow and later) and should follow these steps. Bluetooth GPS should already be installed:
1. Open Android settings
2. Scroll to ‘Developer options’, select.
a. If ‘Developer options’ is not showing, scroll to ‘About device’, select, then scroll to ‘Build number’. Tap on ‘Build number’ 7 times to activate ‘Developer options’
3. In ‘Developer options’, tap ‘Mock location app’, select ‘Bluetooth GPS’
Next, the tablet needs to be paired with a Bluetooth GPS unit. FHAAST recommends the Bad Elf GPS, but any Android-compatible unit will suffice. The following instructions pertain to the tablet side only. Please refer to the GPS unit’s instructions for pairing.
1. In Android settings, locate the control for Bluetooth.
Digital Mobile Sketch Mapping User’s Manual v2.0 April 2017
Forest Service 32
2. With the GPS Unit turned on, locate the name of the unit in the list of devices available for pairing. Select the GPS to pair. Note: Some units require the comparison of key codes between the tablet and GPS unit, refer to the GPS unit’s instructions
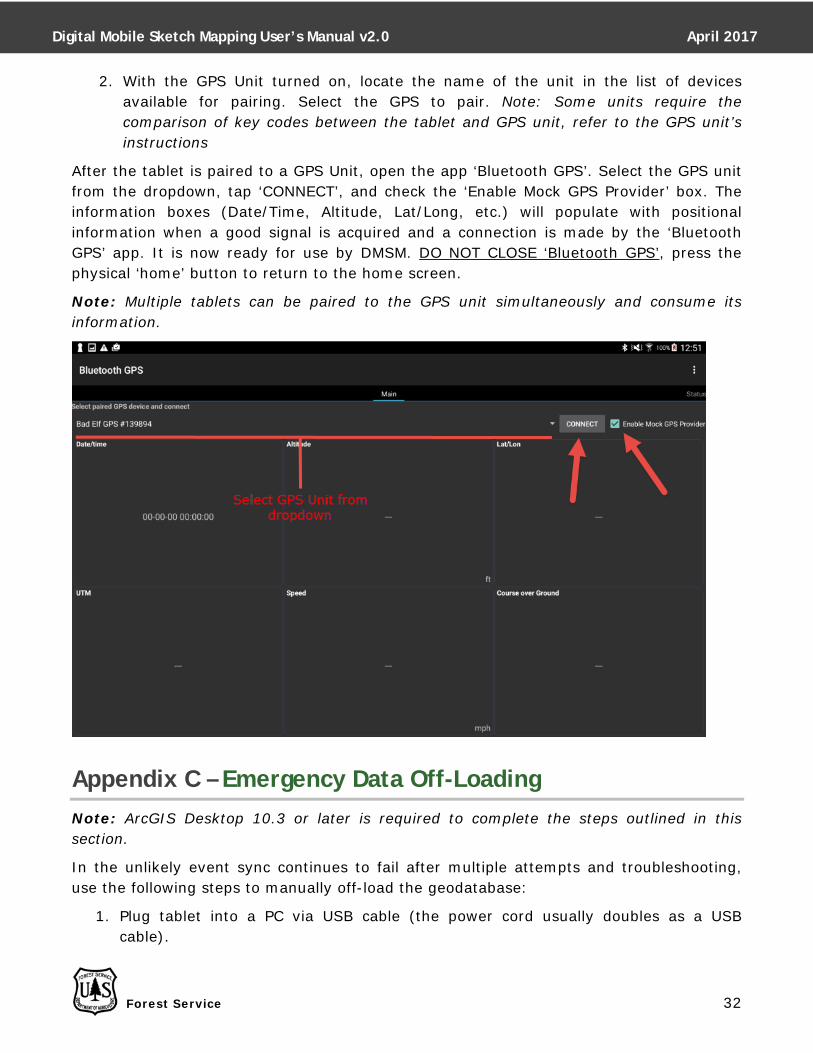
After the tablet is paired to a GPS Unit, open the app ‘Bluetooth GPS’. Select the GPS unit from the dropdown, tap ‘CONNECT’, and check the ‘Enable Mock GPS Provider’ box. The information boxes (Date/Time, Altitude, Lat/Long, etc.) will populate with positional information when a good signal is acquired and a connection is made by the ‘Bluetooth GPS’ app. It is now ready for use by DMSM. DO NOT CLOSE ‘Bluetooth GPS’, press the physical ‘home’ button to return to the home screen.
Note: Multiple tablets can be paired to the GPS unit simultaneously and consume its information.
Appendix C – Emergency Data Off-Loading Note: ArcGIS Desktop 10.3 or later is required to complete the steps outlined in this section.
In the unlikely event sync continues to fail after multiple attempts and troubleshooting, use the following steps to manually off-load the geodatabase:
1. Plug tablet into a PC via USB cable (the power cord usually doubles as a USB cable).
Digital Mobile Sketch Mapping User’s Manual v2.0 April 2017
Forest Service 33
2. On the PC, open Windows explorer and double-click the tablet’s icon.
3. Navigate to: ‘[Tablet Name]/Tablet/Android/data/com.masonbruce.com/GDB’.
4. Copy the 'offline.geodatabase' to the PC.
5. Complete one of the following:
a. Zip up 'offline.geodatabase' and contact FHAAST to transfer the file for conversion and inclusion into the master DMSM database.
b. In ArcMap, run the tool ‘Copy Runtime Geodatabase to File Geodatabase (Conversion)’.
c. Zip up resulting file geodatabase from step b. and contact FHAAST to transfer the file for inclusion into the master DMSM database.
Appendix D – FAQ
Appendix E – Troubleshooting
Appendix F – Damage Intensity Guidelines