department inpatient solution carenet revised: … · department: inpatient solution: carenet...
TRANSCRIPT

DEPARTMENT: Inpatient SOLUTION: CareNet REVISED: 6/18/14
1
Inpatient RN Cerner Training
DEPARTMENT: Inpatient SOLUTION: CareNet REVISED: 6/18/14
2
Table of Contents
Start of Shift p.3 Logging in to Cerner p.3 Logging out of Cerner p.5 Searching For a Patient p.6 Patient Summary p.8 Looking Over Orders p.15 Results Review p.17 eMAR p.18 Setup Patient List p.29 Customize Columns on Patient List p.34 Affinity Face Sheet Lookup p.37 CPOE (Computerized Provider Order Entry) p.38 Lab Orders p.41 Placing a Consult p.43 Medications p.45 PowerPlans p.46 Protocol Orders p.49 Provider Refuses to Sign Order p.51 i-View p.54 Vital Signs p.62 I&O p.66 Correcting Errors p.64 Scanning Documents p.72 BCMA (Bar Code Medication Administration) p.78 Scheduled Medications p.78 Additional Information Required p.81 Witness Required p.82 Overdose Scanned p.84 PRN p.90 Vaccinations p.91 IV Medication Administration p.91 Medication Not Given p.95 Correcting Errors p.96 Documenting Stop Times p.97 Downtime p.98 Notify Pharmacy of Error or Medication Missing p.99 Medication Scanning Error p.100
Chart Assessment p.102 Correcting Errors p.109 Adding Results to a Signed Column p.109 Modify Information p.109 Flagging Results p.112 Problem History p.113

DEPARTMENT: Inpatient SOLUTION: CareNet REVISED: 6/18/14
3
Start of Shift
Notes: Terminology: Inpatient RNs use a part of Cerner called CareNet. You may also hear the term “Powerchart” being used. All of these terms refer to what everyone has been calling Cerner.
Logging in to Cerner Go to the Novell window for the Holland Hospital Network. Find the icon, regardless of its label. Double-click on it:
The Cerner Millennium login screen will open. You will see PowerChart listed in the bottom left corner:

DEPARTMENT: Inpatient SOLUTION: CareNet REVISED: 6/18/14
4
Type in your user name in the box under ‘User Name.’ Type in your password in the box under ‘Password.’ Domain should already be filled in and greyed out. Click ‘OK’
Congratulations! You have logged in to Cerner and are now looking at the CareCompass:
DEPARTMENT: Inpatient SOLUTION: CareNet REVISED: 6/18/14
5
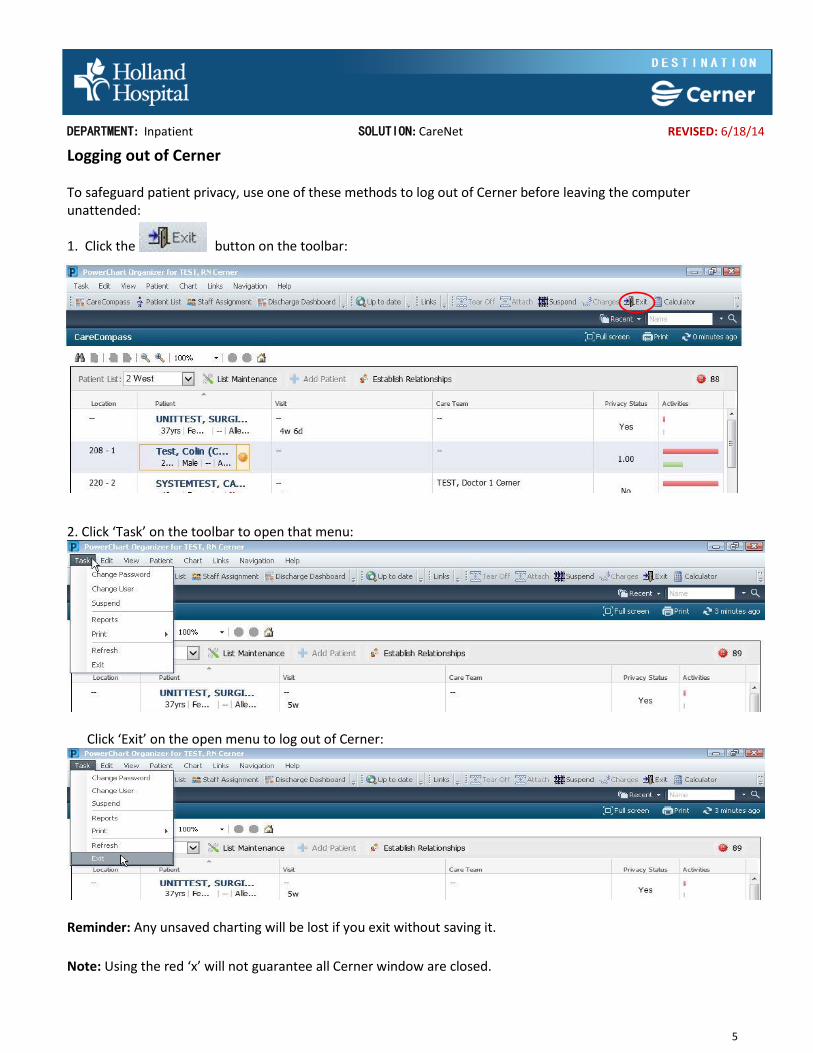
Logging out of Cerner To safeguard patient privacy, use one of these methods to log out of Cerner before leaving the computer unattended: 1. Click the button on the toolbar: 2. Click ‘Task’ on the toolbar to open that menu:
Click ‘Exit’ on the open menu to log out of Cerner:
Reminder: Any unsaved charting will be lost if you exit without saving it. Note: Using the red ‘x’ will not guarantee all Cerner window are closed.
DEPARTMENT: Inpatient SOLUTION: CareNet REVISED: 6/18/14
6
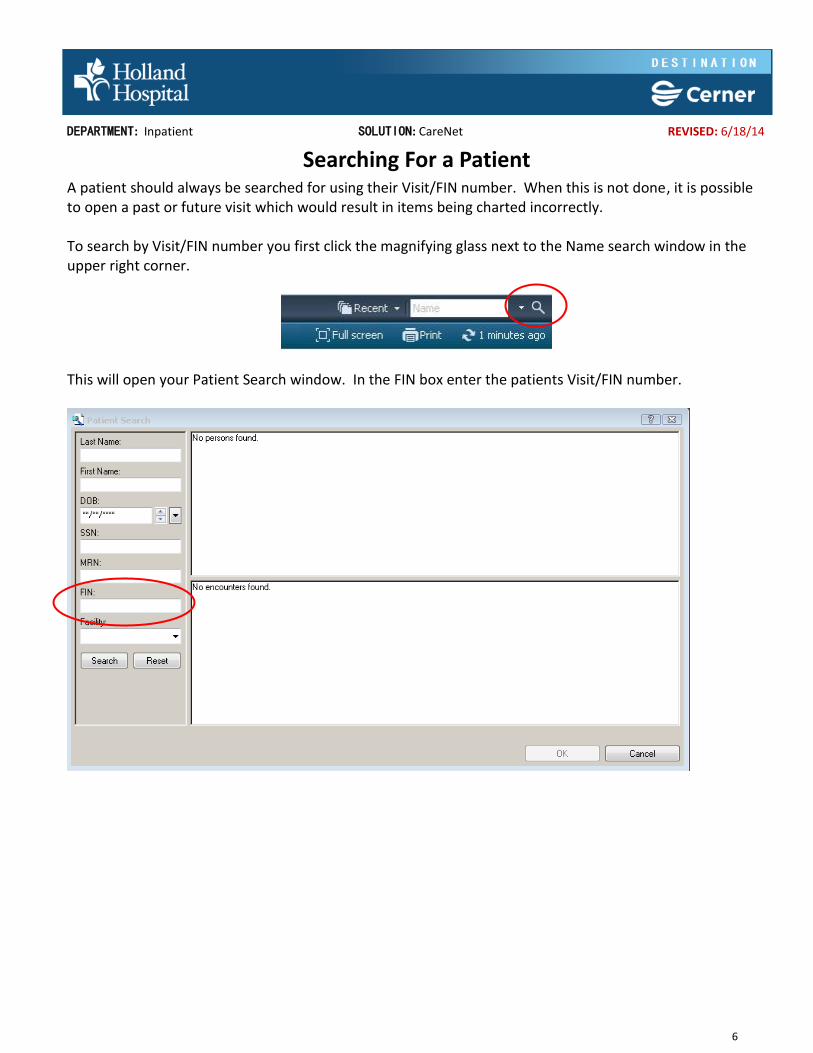
Searching For a Patient A patient should always be searched for using their Visit/FIN number. When this is not done, it is possible to open a past or future visit which would result in items being charted incorrectly. To search by Visit/FIN number you first click the magnifying glass next to the Name search window in the upper right corner.
This will open your Patient Search window. In the FIN box enter the patients Visit/FIN number.

DEPARTMENT: Inpatient SOLUTION: CareNet REVISED: 6/18/14
7
After you enter the Visit/FIN number you click Search. This will display the patients correct visit. You then click OK.
The chart will now open and you can document on the correct visit.

DEPARTMENT: Inpatient SOLUTION: CareNet REVISED: 6/18/14
8
Patient Summary Workflow: The summary gives an overview of the patient's orders, results and problem list in order to communicate to the oncoming shift the status of the patient in relation to care needs in the Situation/Backround, Assessment, and Recommendation format. Notes: For those who have used Cerner at other hospitals: the Patient Summary replaces the Kardex. There is not a Kardex in Holland Hospital’s Cerner.
Before reviewing any further, make sure you are in the correct patient chart by verifying the patient’s name in the demographic bar towards the top of the page:

DEPARTMENT: Inpatient SOLUTION: CareNet REVISED: 6/18/14
9
Take a moment to review the other information that shows on the Demographic Bar. The first tab of the Patient Summary is Situation/Background. Scroll down to see all of the information. If a section is not visible, click on the to open it.
I can go to this tab to find the following information:

DEPARTMENT: Inpatient SOLUTION: CareNet REVISED: 6/18/14
10
The next tab is Assessment:
I can go to this tab to find the following information:

DEPARTMENT: Inpatient SOLUTION: CareNet REVISED: 6/18/14
11
Recommendation tab:
I can go to this tab to find the following information:

DEPARTMENT: Inpatient SOLUTION: CareNet REVISED: 6/18/14
12
Patient Summary tab:
I can go to this tab to find the following information:

DEPARTMENT: Inpatient SOLUTION: CareNet REVISED: 6/18/14
13
Discharge tab:
I can go to this tab to find the following information:

DEPARTMENT: Inpatient SOLUTION: CareNet REVISED: 6/18/14
14
Note: Here you can use the Table of Contents (TOC) on the left side of the screen to access more components of the patient chart.

DEPARTMENT: Inpatient SOLUTION: CareNet REVISED: 6/18/14
15
Looking Over Orders
Workflow: Orders are reviewed at beginning of shift and frequently throughout your shift. Select 'Orders' from Table of Contents. All Active Orders should display by default:
The View navigator shows orders by categories. Items that are greyed out do not contain active orders. Click the order category you want to see:

DEPARTMENT: Inpatient SOLUTION: CareNet REVISED: 6/18/14
16
In the main section, the orders display. The Order Name tells what the order is. The Detail column tells when the order was entered, frequency, stop date, and any order comments.
Status Meaning Ordered Current Active order for the patient
Discontinued Order is no longer active
In-Process Order is being worked on (Labs, Radiology, etc.)
Suspended DO NOT USE
Documented This is NOT an active order. Only seen with home medications that are not ordered
Prescribed A medication that has had a prescription printed for it

DEPARTMENT: Inpatient Units SOLUTION: CareNet REVISED: 6/6/14
17
Results Review
Workflow: Accessing lab, microbiology, and radiology results is as simple as clicking the band on the Table of Contents (TOC). Select 'Results Review' from the TOC. As assessments, diagnostic tests and documentation are completed, the results will display on the flowsheets.

DEPARTMENT: Inpatient Units SOLUTION: CareNet REVISED: 6/6/14
18
eMAR
or electronic Medication Administration Record
Workflow: IV medications appear on the same screen as scheduled and PRN medications. With Cerner’s eMAR, it is easy to review historical information relating to medication administration. It is also easy to review discontinued medications. Note: NO MEDICATION DOCUMENTATION IS TO BE DONE FROM THIS SCREEN, except in very limited circumstances. Please refer to policy and procedure for more information.
MAR Tab Clicking on the ‘MAR’ (Medication Administration Record) tab displays the patient’s medication orders and documented administrations for the selected time frame and selected order status.
Medications will display when a Provider has entered the order into PowerChart or Pharmacy has entered them into the PharmNet application.

DEPARTMENT: Inpatient Units SOLUTION: CareNet REVISED: 6/6/14
19
Time Frame Selection
The MAR tab time frame default is the current 24 hrs and the previous 24 hrs. If you do not see medications for your shift or want to review for a different time period, change the time frame. To do this, right- click on the Search Criteria bar. Select 'Change Search Criteria'. You may also select ‘Set to Today.’
Enter the desired time frame and click ‘OK’ button.

DEPARTMENT: Inpatient Units SOLUTION: CareNet REVISED: 6/6/14
20
Navigator and Medication Sections of the MAR The Navigator on the MAR tab allows you to move within the Medication Section by clicking the various medication categories (the ‘Future’ category is not used). The Medication Section displays the patient’s medications and associated order details. The time frame and filters selected determine which medications will be listed. Administration dates and times are displayed to the right. Medications already administered show as text item under column for the time they were administered on the same row. Pending medications/medications to be given have a box (medication task cell) under the column for the time they are scheduled (for scheduled meds) or the current date and time column (for PRN meds and continuous infusions). Overdue medications will show a red box in the column for the time they are due. The current date and time column is highlighted in yellow.

DEPARTMENT: Inpatient Units SOLUTION: CareNet REVISED: 6/6/14
21
Time View This is the default view for the MAR. The Time View band on the Navigator section divides medications into scheduled, unscheduled, PRN, continuous infusions and discontinued. The Future bar is not used. Scheduled Medications Scheduled Medications are those that have a specific time for appropriate administration. This category includes morning and evening meds, QD/BID/TID/etc. meds, insulins, IVPB antibiotics, and some respiratory treatments.
Unscheduled Medications
Unscheduled medications do not have associated administration due times. For example, medications given prior to surgery (ie—prophylactic IV abx) do not have times assigned. These tasks display in the Unscheduled Meds band in the MAR section.

DEPARTMENT: Inpatient Units SOLUTION: CareNet REVISED: 6/6/14
22
PRN Medications
PRN medications are those that are not given unless there is a reason. They appear in the PRN section of the eMAR. The last administration time shows under the current time column.
Discontinued Medications
Discontinued medication display in the Discontinued section. They are further distinguished by appearing as grayed out. Make sure ‘All Active Medications’ is selected from the drop-down first. 1
Note: Overdue medications will still show as red boxes even if the medication has been discontinued.
1

DEPARTMENT: Inpatient Units SOLUTION: CareNet REVISED: 6/6/14
23
Therapeutic Class View This view shows only those medications belonging to the pharmaceutical class selected from the column underneath.
Route View This view shows active medications separated by route of administration. You can sort by route by unclicking the checkboxes that appear.

DEPARTMENT: Inpatient Units SOLUTION: CareNet REVISED: 6/6/14
24
Plan View This view shows only those meds that belong to a certain PowerPlan. Active PowerPlans with medications show in the column on the left. Click on each to change between PowerPlans.
Navigation Shortcuts Mouse Over To see a larger view of basic order information in Medication Order section, hold the pointer arrow over the medication:

DEPARTMENT: Inpatient Units SOLUTION: CareNet REVISED: 6/6/14
25
Right-click Options in the Medication Order Section
The following options are available by right-clicking the medication order:
Option What it allows you to do
Order Info… Displays detailed information about the order
Event/Task Summary… Gives a summary of the admission times for this medication
Reference Manual… Opens the drug reference for this medication. Also has a patient education tab.
Med Request… Used to send a message to Pharmacy
Additional Dose… Add an extra dose of the medication to the MAR
Create Admin Note… Create a note about how to best administer the medication to the patient

DEPARTMENT: Inpatient Units SOLUTION: CareNet REVISED: 6/6/14
26
Right-click Options in the Administration Section The following options are available by right-clicking the medication task cell:
Option What it allows you to do Order Info… Detailed information about the order
Task Info… Detailed information about the task associated with the order
Chart Details… Opens the Medication Charting Window. DO NOT USE
Quick Chart… DO NOT USE
Chart Not Done… Chart the medication as not given
Unchart… Correct a medication that was charted incorrectly
Reschedule This Dose… Change the date and time the current dose is to be given

DEPARTMENT: Inpatient Units SOLUTION: CareNet REVISED: 6/6/14
27
Right-click Options for a Charted Medication The following options are available by right-clicking the cell showing a charted medication:
Option What it allows you to do View Details… Shows all of the information about the administration of the medication
View Comments… Displays any comments that might have been added
View Order Info… Shows the order details
Modify… Activates the med so that a change can be made
Unchart… Removes the administration of the medication
Forward/Refuse… Sends a message to the chosen user to review or sign the medication

DEPARTMENT: Inpatient Units SOLUTION: CareNet REVISED: 6/6/14
28
Important Icons
You can see that icons may show above the medication name. Here is a short list of some important icons:
Nurse Review
The indicates the medication order has not been reviewed by a nurse.
Pharmacist Verification
The indicates the med has not been verified by a pharmacist
Note: The pharmacist verifies the order before dispensing, but not before the order displays in PowerChart. The medication will not show as available in the Pyxis. Do not administer a medication that has not been pharmacist verified unless it is an urgent situation. A indicates that pharmacy is refusing to verify the medication. This will require further investigation as to the reason that the pharmacist is refusing to verify the order. Order Set
indicates that the medication was ordered as part of a plan.
Pending Complete:
This icon of a yellow ball with a minus sign in it means that the order has reached its stop date and time.

DEPARTMENT: Inpatient Units SOLUTION: CareNet REVISED: 6/6/14
29
Setup Patient List
Patient Lists only need to be setup once. They are user specific and can be customized. Log in to PowerChart. Click on the Organizer toolbar. Depending on the position of the toolbar, you may need to select the
toolbar drop down to display the Patient List Option.
Select the List Maintenance icon The Modify Patient Lists window will open. Click on ‘New.’

DEPARTMENT: Inpatient Units SOLUTION: CareNet REVISED: 6/6/14
30
Click on the New Button
From the Patient List Type dialog box, select Location, then select Next.

DEPARTMENT: Inpatient Units SOLUTION: CareNet REVISED: 6/6/14
31
Click plus sign next to Locations to open location hierarchy
Continue to click the plus sign next to Holland Hospital, then Holland Hospital again

DEPARTMENT: Inpatient Units SOLUTION: CareNet REVISED: 6/6/14
32
Click checkbox next to unit or units you want in your list. List name will appear in name field. Then click Finish.
The new Patient list displays in the Available list window. Highlight the list you created, move it to the Active List window by selecting the arrow.

DEPARTMENT: Inpatient Units SOLUTION: CareNet REVISED: 6/6/14
33
The list you created should now show under Active lists. Click ‘OK.’ The Modify Patient Lists window closes.

DEPARTMENT: Inpatient Units SOLUTION: CareNet REVISED: 6/6/14
34
Customize Columns on Patient List
You can customize your columns on your patient list to add things such as: Room number, Bed Number, or several other demographic data. However, be sure you DO NOT remove the FIN number column as this is your Visit number.
Click the Patient List button in the Toolbar. Click on the Custom Columns icon in the Patient List toolbar.

DEPARTMENT: Inpatient Units SOLUTION: CareNet REVISED: 6/6/14
35
This will open the Customize Columns Tool. As you will see there are several available columns to choose from.
Click on the Column you would like to add to your Patient List such as Room. Then click the to push the new column to the Existing Columns box.

DEPARTMENT: Inpatient Units SOLUTION: CareNet REVISED: 6/6/14
36
The column will now be in the Existing Columns Box. You can now adjust order of the columns by using the
up and down arrow buttons. When you are finshed adding and arranging your columns you click the
save button. Then click the red X in the upper right hand corner to close the window.
The red x button is used to delete columns from your Existing Columns box.

DEPARTMENT: Inpatient Units SOLUTION: CareNet REVISED: 6/6/14
37
Affinity Face sheet Lookup While in the patient’s chart go the last option under the Menu on the left and choose “Affinity Facesheet”.
When prompted, enter your network username and password. Be sure to enter hoho\ in the beginning of
your username. Click OK
Click Open on the File Download dialog prompt.
You may choose to print the PDF after the PDF opens. Just go to File/Print and choose your printer to print
to.

DEPARTMENT: Inpatient Units SOLUTION: CareNet REVISED: 6/6/14
38
CPOE (Computerized Provider Order Entry)
or How to Enter Orders in Cerner
Workflow: It is expectation that providers will enter all of their own orders if they are at the hospital and able to access a computer. If entering orders for a provider it needs to be written by the provider or the provider must remain on the phone until the order entry process is complete.
Order Entry On the TOC, click ‘Orders’. Click on the add button in the upper top left of screen.
DEPARTMENT: Inpatient Units SOLUTION: CareNet REVISED: 6/6/14
39
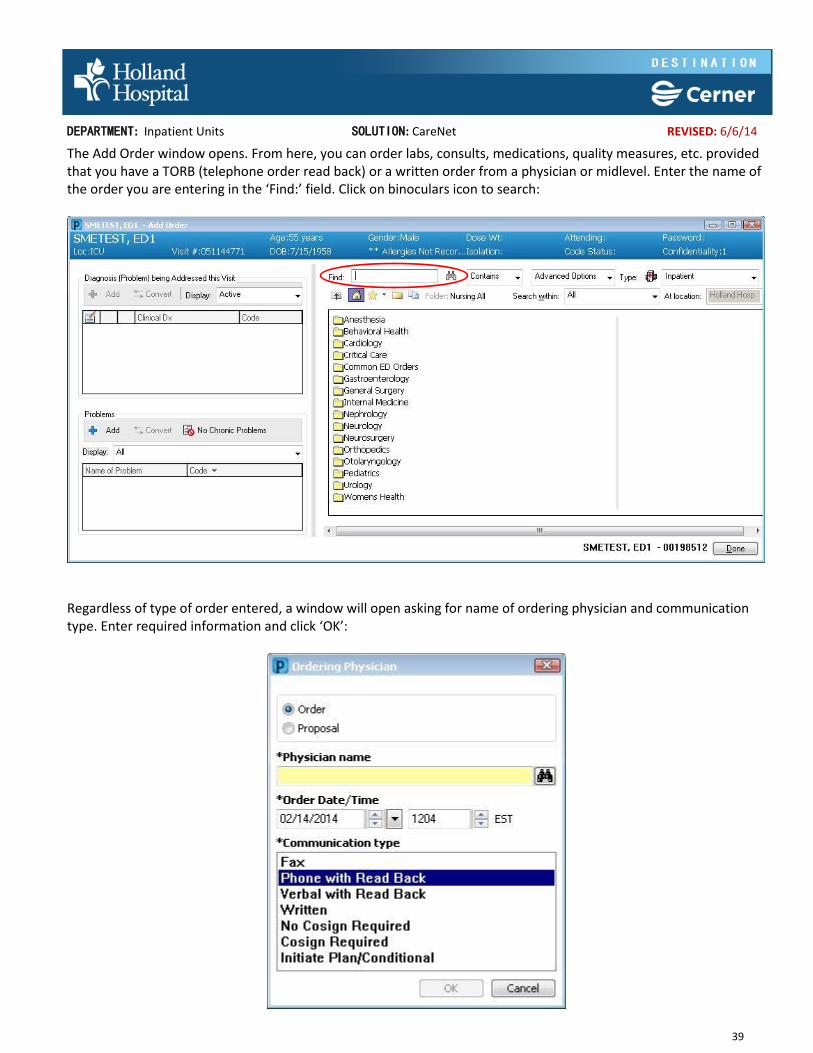
The Add Order window opens. From here, you can order labs, consults, medications, quality measures, etc. provided that you have a TORB (telephone order read back) or a written order from a physician or midlevel. Enter the name of the order you are entering in the ‘Find:’ field. Click on binoculars icon to search:
Regardless of type of order entered, a window will open asking for name of ordering physician and communication type. Enter required information and click ‘OK’:

DEPARTMENT: Inpatient Units SOLUTION: CareNet REVISED: 6/6/14
40
Order Communication Types
Communication Type Description
Fax Used when entering orders that are signed by the
physician/MLP and faxed to the department for entry into the EMR.
Phone with Read Back Used when the nurse/designee takes a phone order from
the physician, enters it into CPOE, and it requires a cosign.
Verbal with Read Back Used when the nurse/designee takes a verbal order from
the physician, enters it into CPOE, and it requires a cosign.
No Cosign Required
Used in those instances an order is initiated by a clinician
and a physician co signature is NOT required. Examples
include protocol orders which were previously entered and signed by a physician/MLP (i.e. Potassium
Replacement Protocol subsequent doses, lab orders on Heparin Protocol etc.). This also applies to orders that
are within the scope of practice for nurses to implement that do not require a co-signature (i.e. ordering a Quality
Measure, turns, bed check). A physician name will
continue to be associated to these orders, but these orders will not be directed to that physician for a co-
signature.
Cosign Required
Used in those instances an order is initiated by a clinician and a physician co-signature is required (such as initial
entry of protocol orders, standing orders or scope of
practice orders that require cosign).
Written Applied automatically by the system with provider entered orders.
Initiate Plan/Conditional Used when initiating plans that had previously been in a
planned status.

DEPARTMENT: Inpatient Units SOLUTION: CareNet REVISED: 6/6/14
41
Lab Orders Follow the above general procedures for order entry. After you have selected what lab to order and entered provider information, a screen will show any missing required information to be completed. Yellow fields are required. Complete information as appropriate. Please note that there is the option to specify if the sample is to be collected by the RN. If the ‘Yes’ button is clicked, the task will not show for hospital phlebotomists. Click ‘Sign’ to complete and sign order.

DEPARTMENT: Inpatient Units SOLUTION: CareNet REVISED: 6/6/14
42
Click refresh. The order will appear. Verify in the ‘Status’ column that the lab test shows as ‘Ordered.’

DEPARTMENT: Inpatient Units SOLUTION: CareNet REVISED: 6/6/14
43
Placing a Consult Follow the above general procedures for order entry. In the ‘Find:’ field, enter specialty type (ie—cardiology, nephrology, etc.) After you have selected what consult to order and entered information for the ordering provider, a screen will show any missing required information to be completed. Yellow fields are required.
Click ‘Order Comments.’ Enter the clinical reason for consult. Verify order information is correct.

DEPARTMENT: Inpatient Units SOLUTION: CareNet REVISED: 6/6/14
44
Important: When entering an order for a consult, do not forget the Consult Communication field. Ask the ordering provider which option is most appropriate. The option you select determines whether this consult will show on the UCs work queue to be called to the consulted provider.
Click ‘Sign’ to complete and sign order. Click refresh.

DEPARTMENT: Inpatient Units SOLUTION: CareNet REVISED: 6/6/14
45
Medications Follow the above general procedures for order entry. In the ‘Find:’ field, enter medication name. After you have selected medication, route, dose and entered information for the ordering provider, a screen will show any missing required information to be completed. Yellow fields are required.
Verify order information is correct. Click sign in bottom right-hand corner.

DEPARTMENT: Inpatient Units SOLUTION: CareNet REVISED: 6/6/14
46
Powerplans
Reminder:. It is essential that the RN repeats the order back to ordering provider to verify all information is correct before signing TORB orders in Cerner. Follow the above general procedures for order entry. In the ‘Find:’ field, enter name of Powerplan the
physician/midlevel provider is ordering. Powerplans have the ‘pizza box’ icon: Click on the correct Powerplan to start the process:

DEPARTMENT: Inpatient Units SOLUTION: CareNet REVISED: 6/6/14
47
With the provider still on the phone, review the items checked in the order screen. Check items to be ordered. Uncheck items the provider does not want ordered. Scroll down to make sure all sections are completed:
Scroll down and confirm with the provider that the Powerplan is complete. Click the ‘Initiate’ button:
A window will open asking for name of ordering physician and communication type. Enter required information and click ‘OK’:

DEPARTMENT: Inpatient Units SOLUTION: CareNet REVISED: 6/6/14
48
Sign the orders:
Scroll through the orders under the Powerplan you just initiated as one last double-check before hanging up with the ordering provider.
Once you have completed your double-check in Cerner and verified with the provider there are no more orders, NOW you may end your phone call.

DEPARTMENT: Inpatient Units SOLUTION: CareNet REVISED: 6/6/14
49
Protocol Orders
Protocol Orders show as Communication Orders in the Orders section of the patients chart. You can see in the Navigator that this patient has the Potassium Replacement Protocol ordered:
Scroll down to Communication Orders to see what actions the protocol allows the RN to take. All communication orders show here. It is necessary to find the one(s) relevant to the protocol. If you mouse over the Details for a Communication Order, a window will pop-up showing the entire communication order:

DEPARTMENT: Inpatient Units SOLUTION: CareNet REVISED: 6/6/14
50
This communication order states that the “Physician advises nursing staff to initiate any subsequent interventions based on assessment of subsequent serum potassium levels.”

DEPARTMENT: Inpatient Units SOLUTION: CareNet REVISED: 6/6/14
51
Provider Refuses to Sign Order There can be many reasons a provider might refuse to sign an order. The order could have been placed on the wrong patient, it could be the wrong time, wrong dose, wrong route, etc. However, it is the responsibility of the nurse to make the correction as soon as possible. To see if an order has been refused you will view it in the Orders section of the patient’s menu. The icon
you are looking for is .

DEPARTMENT: Inpatient Units SOLUTION: CareNet REVISED: 6/6/14
52
If you hover over the Icon you will get a pop up box. Click the blue text to open the order details window.
Click on the History Tab to view the reason for the Refusal.

DEPARTMENT: Inpatient Units SOLUTION: CareNet REVISED: 6/6/14
53
Here you will see the reason for the refusal. Correct the error by either canceling, modifiy, or reordering the order with the correct information.
DEPARTMENT: Inpatient Units SOLUTION: CareNet REVISED: 6/6/14
54
How to Chart in i-View
Navigating to Interactive View
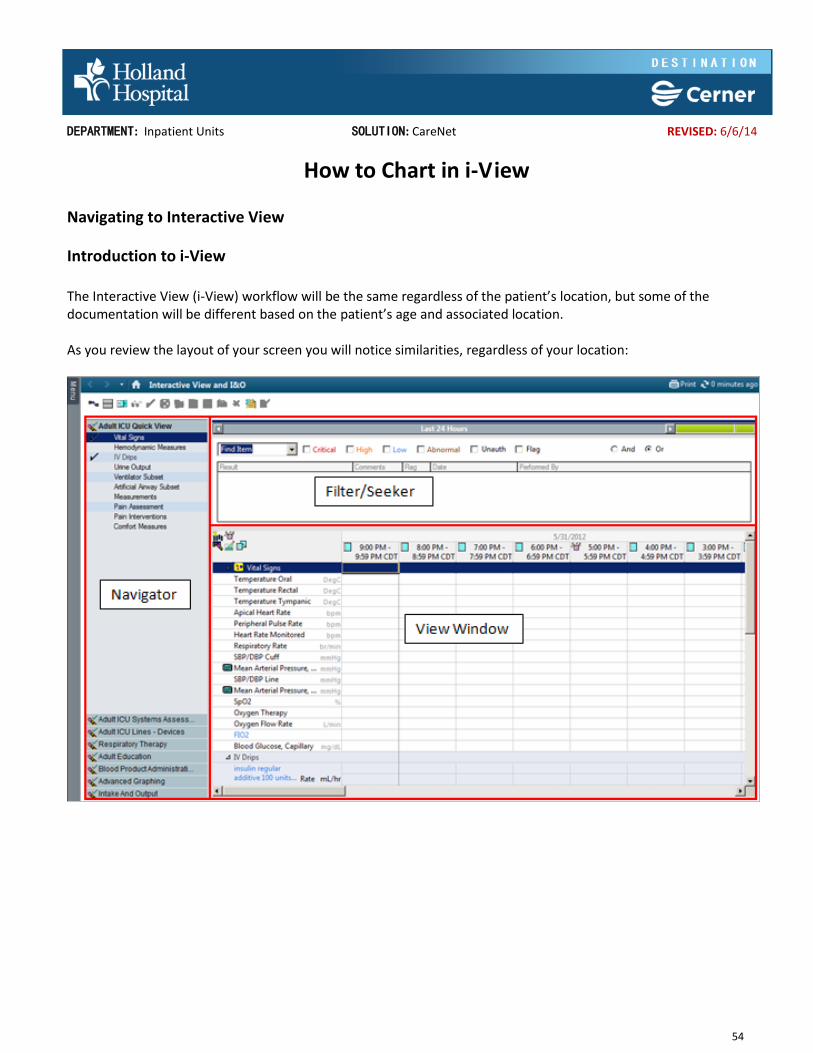
Introduction to i-View The Interactive View (i-View) workflow will be the same regardless of the patient’s location, but some of the documentation will be different based on the patient’s age and associated location. As you review the layout of your screen you will notice similarities, regardless of your location:

DEPARTMENT: Inpatient Units SOLUTION: CareNet REVISED: 6/6/14
55
The left side of the Interactive View tab is the Navigator section. The Navigator is made up of a number of bands and each band is made up of sections. As sections are selected from the Navigator, they will open ready for charting.
Sections can be expanded and collapsed by selecting the triangle at the top of the section.
DEPARTMENT: Inpatient Units SOLUTION: CareNet REVISED: 6/6/14
56
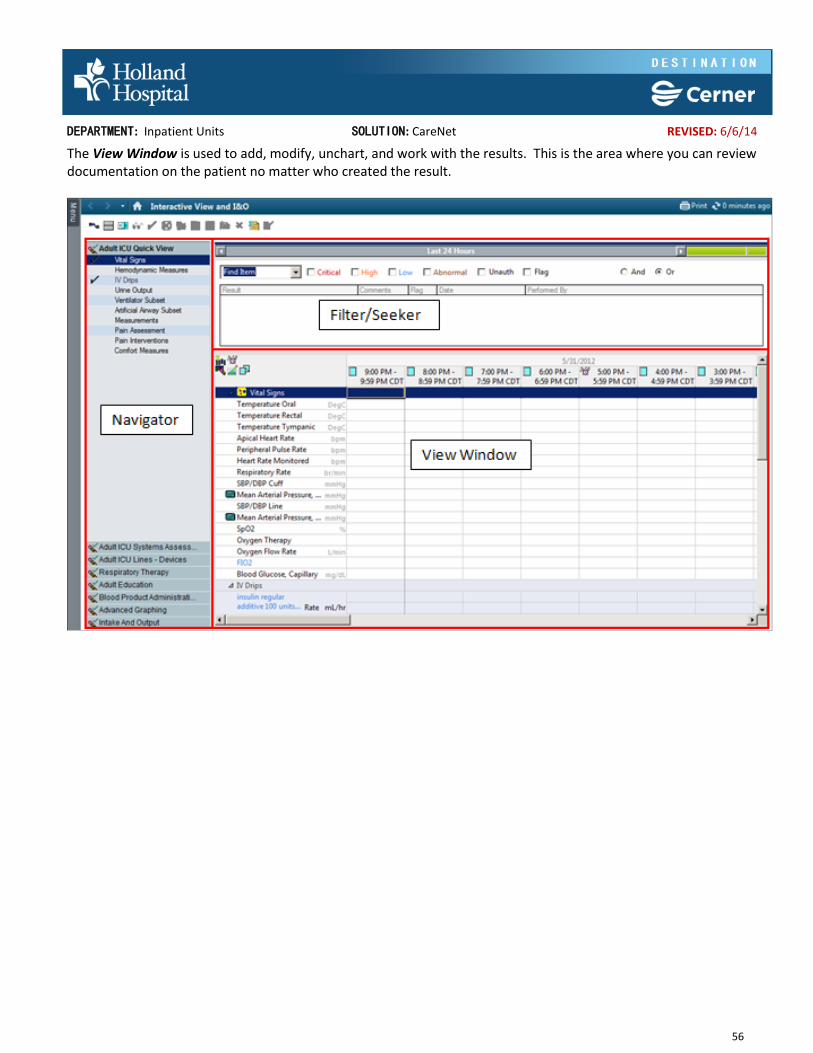
The View Window is used to add, modify, unchart, and work with the results. This is the area where you can review documentation on the patient no matter who created the result.

DEPARTMENT: Inpatient Units SOLUTION: CareNet REVISED: 6/6/14
57
The actual view window is made up of several components:
The Filter and Seeker windows are used for searching and filtering results. We will talk about this more with vital
signs and I&O.
DEPARTMENT: Inpatient Units SOLUTION: CareNet REVISED: 6/6/14
58
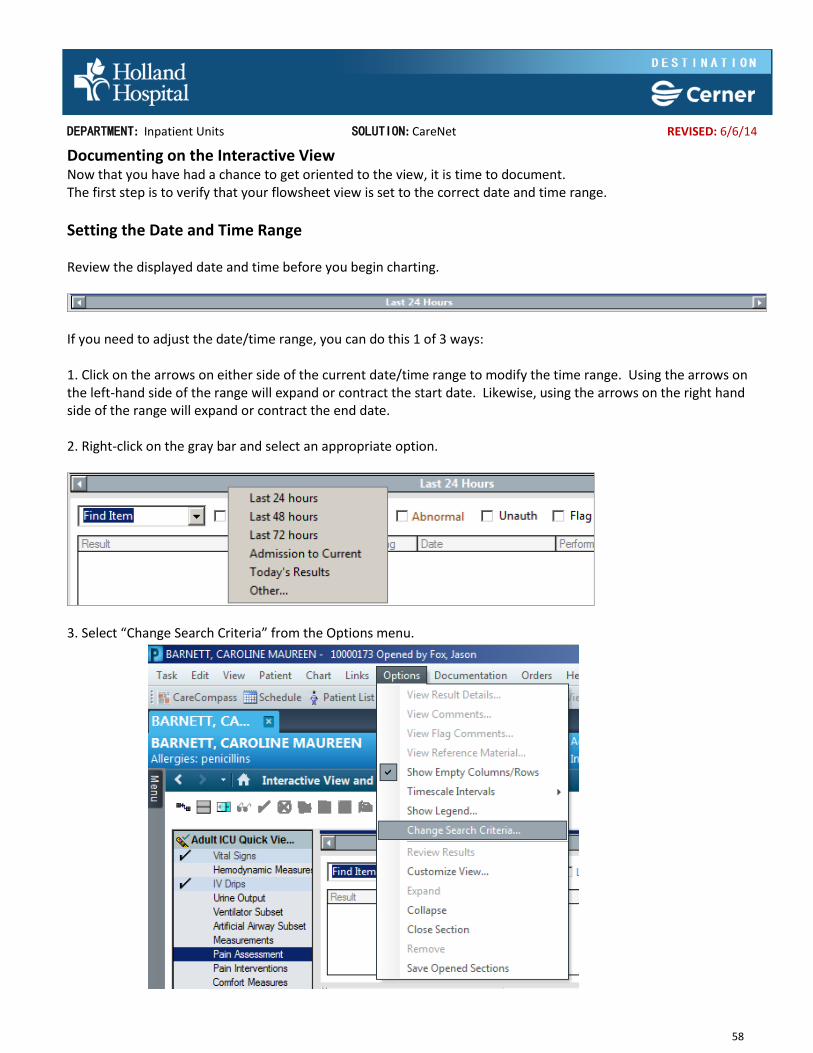
Documenting on the Interactive View Now that you have had a chance to get oriented to the view, it is time to document. The first step is to verify that your flowsheet view is set to the correct date and time range.
Setting the Date and Time Range Review the displayed date and time before you begin charting.
If you need to adjust the date/time range, you can do this 1 of 3 ways: 1. Click on the arrows on either side of the current date/time range to modify the time range. Using the arrows on the left-hand side of the range will expand or contract the start date. Likewise, using the arrows on the right hand side of the range will expand or contract the end date. 2. Right-click on the gray bar and select an appropriate option.
3. Select “Change Search Criteria” from the Options menu.

DEPARTMENT: Inpatient Units SOLUTION: CareNet REVISED: 6/6/14
59
Setting the Timescale Interval The time scale interval determines the span of time included in each time column of the Interactive View. To change the timescale, access the Options menu from the task bar at the top of the medical record and choose Timescale Intervals and highlight the interval you need .
Actual shows a column only when a new result is documented for the patient, plus a column for charting at the exact current time. Interval mode shows a new column for each period of time contained within the interval range regardless of information having been entered.

DEPARTMENT: Inpatient Units SOLUTION: CareNet REVISED: 6/6/14
60
Activating Cells and Documenting on the Interactive View Before documenting in i-View, it is necessary to “activate” the areas where you will be charting. Verify the flowsheet date/time range. Click on Adult Systems Assessment band. Click on ‘Breath Sounds Assessment’ section.
Double-click on the cell at the intersection of the section name and the column, this will activate the cells in that section for direct data entry. The check mark in the intersection of the section name and the time column indicates the entire section is active for documentation.

DEPARTMENT: Inpatient Units SOLUTION: CareNet REVISED: 6/6/14
61
Double-clicking on the time cell will activate the entire column allowing for multiple sections to be documented on without activating each section.
Click in the appropriate cell to enter assessment data. Note: You can move from cell to cell by left clicking on another cell with your mouse or by utilizing the TAB or ENTER key. Different cells will ask for information in different formats. The simplest will have you select one option from a list; some will expect you to type in a number, while others will require more information.

DEPARTMENT: Inpatient Units SOLUTION: CareNet REVISED: 6/6/14
62
Vital Signs
Workflow: Vital signs are to be charted at the bedside after they are taken. Vital signs will be charted directly into i-View. Notes: It is important to refresh i-View and verify the correct time in the column heading prior to charting vital signs in order to ensure accuracy. Please refer to unit policy regarding time frame for documenting patient vital signs.
Charting a Basic Set of Vital Signs: Go to ‘Interactive View’ Select ‘Vital Signs’ band Verify correct time shows at top of column Double-clicking on the time cell will activate the entire column allowing for multiple sections to be documented on without activating each section. Click in the appropriate cell and enter the vital signs assessment. Note: You can move from cell to cell by left clicking on another cell with your mouse or by utilizing the TAB or ENTER key.

DEPARTMENT: Inpatient Units SOLUTION: CareNet REVISED: 6/6/14
63
Notice that the data entered displays in purple; this indicates that the results are unsigned. Before you sign your entry, double-check that information entered is correct. To correct an entry that still shows as purple, click on the cell and enter the correct information. Click on to sign results.
Information should now appear in black. The exception will be any results considered to be outside normal limits. Critical values will appear in red. Results that are high, but not critical, appear in orange. Those that are low appear in blue.

DEPARTMENT: Inpatient Units SOLUTION: CareNet REVISED: 6/6/14
64
Correcting Vital Sign Errors Please refer to Charting in i-View section of training manual Session I for reminder how to modify or unchart information that has been entered and signed. Remember: Information in i-View that is corrected does not disappear. Modified cells will now have a small triangle in the corner indicating that information was modified. Cells where information was uncharted or moved to a different time will show the message “In Error.”
Searching for Results in the Interactive View One of the benefits of Interactive View is the search capability of results based on a high/low/critical type of qualifier. An elevated oral temperature was documented; we will search for that result using the Filter and Seeker window. Paired together, the filtering can color specific results a different color and the seeker window can allow the clinician to skip directly to the filtered data.
Click in the checkbox next to the High option in the window. Note: You may have to expand the Filter window to see the results return.
Review your returns and their associated documentation.

DEPARTMENT: Inpatient Units SOLUTION: CareNet REVISED: 6/6/14
65
You can also search for your data by selecting the specific type of result from the drop down window. Click on the arrow. After the menu appears you can narrow your search by typing the first letter of the result, then scroll to find the correct one. The same data should be returned with this method.

DEPARTMENT: Inpatient Units SOLUTION: CareNet REVISED: 6/6/14
66
I&O
Workflow: I&O is to be charted at the bedside . This information will be charted directly into i-View. Drains and ostomies do not show by default in i-View and must be added either via Dynamic Group or Customize View (“Magic Box”). I&O does not need to be charted under ‘Actual’ time as ‘Hour View’ is narrowest timeview allowed. UTs will not be documenting color and other characteristics of output. This is considered an assessment and outside their scope of practice. If the patient has a change in output or abnormal output, the UT will notify the RN to assess the output prior to discarding it.
Charting I&O: Go to ‘Interactive View and I&O’ Select ‘Intake And Output’ band Change Time Scale to Hourly

DEPARTMENT: Inpatient Units SOLUTION: CareNet REVISED: 6/6/14
67
Scrolling down will let you see the entire list of options available to chart. If the patient has a continuous infusion IV, that information will pull from the MAR. Click on appropriate section under the Intake and Output band to go directly to that section.
Verify correct time shows at top of column. Click in the appropriate cell and enter the intake or output information. Note: You can move from cell to cell by left clicking on another cell with your mouse or by utilizing the TAB or ENTER key. Notice that the data entered displays in purple; this indicates that the results are unsigned. Before you sign your entry, double-check that information entered is correct. To correct an entry that still shows as purple, click on the cell and enter the correct information. Click on to sign results for Input and/or Output amounts. Click on Adult Systems Assessment to chart characteristics of output.

DEPARTMENT: Inpatient Units SOLUTION: CareNet REVISED: 6/6/14
68
Select appropriate system (ie—Genitourinary for urine output). Double-click on appropriate cell to enter information.
Click on to sign results charted here. To Add a Section to I&O: For example, your patient has a colostomy. There is no line to chart colostomy output. You will need to add the colostomy to the I&O Band to chart output AND to the Adult Systems Assessment band to document ostomy assessments and related interventions (dressing changes, etc.). Note: The RN is responsible for assessing the ostomy type; therefore, adding sections to I&O cannot be delegated to a UT. Open patient’s chart. Navigate to ‘i-View’ on the TOC.

DEPARTMENT: Inpatient Units SOLUTION: CareNet REVISED: 6/6/14
69
Click on the Adult Systems Assessment band. Click on the Gastrointestinal section. Then, click on the Customize View
icon , also known as the “Magic Box.”
This window will open. Click the Collapse All button to get a more simplified view. Click the checkbox for ‘GI Ostomy’ under the ‘On View’ column. Click ‘OK’ when finished.

DEPARTMENT: Inpatient Units SOLUTION: CareNet REVISED: 6/6/14
70
The GI Ostomy section will appear. Click on the Dynamic Group icon for that section.
A Dynamic Group window will open. Click the checkboxes to document the patient’s colostomy. Click ‘OK.’:

DEPARTMENT: Inpatient Units SOLUTION: CareNet REVISED: 6/6/14
71
The colostomy now shows under the GI Ostomy section in i-View:
The colostomy also shows in the ‘Intake And Output’ band. Click on the ‘Intake And Output’ band to see. The colostomy now shows on the Ostomy Output section of the Intake and Output band. Scroll down until you see ‘Ostomy Output.’ Click the green arrow to sign.

DEPARTMENT: Inpatient Units SOLUTION: CareNet REVISED: 6/6/14
72
Scanning Documents
Workflow: Certain documents will be scanned directly into Cerner on the unit: Signed consent forms, advanced directives, and the signature page of the discharge instructions. The Unit Clerk will have primary responsibility for scanning documents. Log into PowerChart, open a patient's chart and navigate to the Notes tab under the TOC. Then choose the scan icon
.
The Scanning window will open. Ensure the author field is populated with your name in the author search window.

DEPARTMENT: Inpatient Units SOLUTION: CareNet REVISED: 6/6/14
73
Select the document type to be scanned. A drop down will appear with document options.
Choose Advanced Directive (or whatever document you are scanning). In Subject Line, type Advanced Directive (or the name of the document you are scanning).

DEPARTMENT: Inpatient Units SOLUTION: CareNet REVISED: 6/6/14
74
Load documents into scanner Upside Down & Face Down. PaperStream IP (TWAIN) window will open.
Choose 001:B&W default, confirm Feeder (both sides). Feeder (both sides) will populate text boxes.
Click Scan. Documents scan.

DEPARTMENT: Inpatient Units SOLUTION: CareNet REVISED: 6/6/14
75
Click Close on (TWAIN) screen. (TWAIN) window closes and Add Document window appears.
Review scanned documents in viewing window
Click on the light blue/gray viewing bar. Viewing window opens.

DEPARTMENT: Inpatient Units SOLUTION: CareNet REVISED: 6/6/14
76
Deleting Documents
Select the page that was scanned into the incorrect location. Click double arrows to move the page up or down as many pages as needed to place pages into correct order.
Review scanned documents in viewing window. To delete a page, click on page you want deleted, click on red X that states (delete page). The CPDI Image Modify window appears and asks "The following pages will be deleted, continue?" Click OK. Scroll down and review scanned document (ensure edits done correctly). Click Sign.

DEPARTMENT: Inpatient Units SOLUTION: CareNet REVISED: 6/6/14
77
It is very important that when scanning a document that you click Sign instead of Save. Clicking Save will not file the document and will leave it in a pending state.
Return to the Notes Tab in the TOC. Using the folder hierarchy, confirm proper placement of document that was scanned.
Important Note for Scanning: Do not unplug USB from computer.

DEPARTMENT: Inpatient Units SOLUTION: CareNet REVISED: 6/6/14
78
BCMA (Bar Code Medication Administration)
Workflow: Medications will be administered only after patient’s identity has been verified verbally (name & DOB) and by scanning the patient’s id band. Each individual medication’s bar code will be scanned to assist RN in verifying right med, right dose, right route, and right time. Medication orders must be reviewed electronically by RN. No paper orders unless Cerner downtime. Medications requiring verification by a second RN will require that RN to enter his/her Cerner password for confirmation. Notes: It is important to take medications out of Pyxis that have clear barcodes on them. Any medications with damaged bar codes are to be returned to pharmacy per policy. Medications that arrive from pharmacy will be labeled with a bar code. Any medications arriving from pharmacy without additives (insulin pens, heparin drips, etc.) should have the original product label scanned with the patient’s name verified on the pharmacy label. Please refer to policy in case of any questions regarding timeframe for administering medications.
Charting Scheduled Medications using BCMA
Verifying with MAR, gather medications scheduled for patient. Do NOT remove the medications from the individual packaging until you are have scanned the medication at the patient’s bedside. Note: refer to policy for appropriate time frames for medication administration.
In patient’s room, log on to workstation/Cerner. Open patient’s chart and go to e-MAR.
Click on Medication Administration Wizard (MAW) button located on top toolbar.

DEPARTMENT: Inpatient Units SOLUTION: CareNet REVISED: 6/6/14
79
The Medication Administration window opens. Verify patient's identity using two identifiers: patient’s name and date of birth.
THEN, using scanner device attached to workstation, scan barcode on patient’s wristband by pressing on trigger. You will see red light where scanner is reading.
Helpful hints for successful patient scanning:
Make sure barcode label on wristband is clear and not smudged or covered with stains. If barcode is blurred, scanning will not work. Obtain another wristband before proceeding, if patient condition allows.
Flatten barcode as much as comfortable for patient.
If barcode won’t scan, try moving scanner closer or farther from patient wristband while holding down trigger.
Your scan is successful when you hear a ‘beep’ and a list of the patient medications due shows in the window.

DEPARTMENT: Inpatient Units SOLUTION: CareNet REVISED: 6/6/14
80
Review with the patient the medications to be given before unpackaging them. It is important to do this now so that if the patient refuses a medication, you avoid scanning that medication and accidentally documenting it as given. Note: Set refused medication aside so that it is not inadvertently administered.
Now you can scan the barcodes for the medications you will be administering. A blue checkmark will appear when medication is appropriately scanned.
Note: If you click the checkbox next to a medication instead of scanning it, even though you have scanned the patient, you will not get credit for properly documenting the medication. It will be possible to get reports from the system on each RN reflecting degree of compliance with this expectation.
Once all medications are properly scanned and blue checkmarks appear next to all medications to be given, administer medications as ordered.
Click 'Sign' button at the bottom of the Medication Administration window to sign that medications were given:
Click 'Refresh' on MAR.

DEPARTMENT: Inpatient Units SOLUTION: CareNet REVISED: 6/6/14
81
Medications Requiring Additional Information.
If a blue circle with a white 'x' on it appears instead, more information is required. Double-click the yellow band to open the window to chart the missing information.
Fields that appear in yellow are required. Click 'OK' to sign and return to medication administration window.

DEPARTMENT: Inpatient Units SOLUTION: CareNet REVISED: 6/6/14
82
Witnessing Medication Dosing
Notice that one of the required fields for Lovenox is ‘Witnessed by’:
Cerner requires the name of the second RN AND that RN needs to type in his/her Cerner ID to document the medication was properly witnessed. Complete the fields in yellow and click ‘OK.’ The Verify user window will open. The witnessing RN will type in Password and click ‘OK.’

DEPARTMENT: Inpatient Units SOLUTION: CareNet REVISED: 6/6/14
83
The medication now has a blue checkmark and can be signed.
These are the most common medications that require a witness:
Heparin IV
Insulin
Lovenox

DEPARTMENT: Inpatient Units SOLUTION: CareNet REVISED: 6/6/14
84
What if I Scan a Medication and the Blue Checkmark or Blue Circle Does Not Appear?
There are several reasons something other than a blue checkmark appears when scanning a medication. Some are errors that need correcting, others are types of medications that require additional information be entered. Here are some common things that may occur:
Wrong Patient:
If you have one patient's chart open and scan the wristband of a different patient, the following warning will show:
Click 'OK' to close the warning window. Close the open chart and either
If you have the medications for the patient you scanned, open the correct patient chart.
If you have medications for a different patient, exit Cerner, apologize to the patient, and go to the correct patient's room.
Overdose Scanned:
This occurs when the dose scanned is greater than that ordered. An alert window opens, read the alert and click 'OK.' The medication shows as red. Instead of a blue checkmark, an X in a red circle shows:
If this message is expected, as when you scan an insulin pen, double-click the yellow section and enter the correct dosage information.
If the alert is not expected, the medication dispensed was more than what was ordered, notify pharmacy of the discrepancy and acquire the correct dosage amount.

DEPARTMENT: Inpatient Units SOLUTION: CareNet REVISED: 6/6/14
85
Underdose Scanned:
This occurs when the dose scanned is less than that ordered. A white exclamation point in a red triangle appears instead of a blue checkmark:
If the medication is PRN with a certain dosage range, you can give the one tablet as scanned and click 'Sign.'
If this is a scheduled med and it takes two or more tablets to get the ordered dose, scan the remaining tablets of the same medication. When you have the correct total scanned, a blue checkmark will appear. Click 'Sign.'
If alert is not expected, notify pharmacy of the discrepancy and acquire the correct dosage amount.
Late Medication Administration: This alert shows when medication is scanned outside of appropriate timeframe. (Please refer to policy for timeframes for default, NOW, and STAT medications.) You will see a little alarm clock icon in front of late medications that show on the list. The following window appears. Choose a reason for the late administration and click 'OK.' If you pick 'Other,' type in the reason in the Comment box before clicking 'OK.'
On your computer, take a moment to look through the reasons for late medication options available in the dropdown box. Remember: Use your judgment and consult the physician/mid-level if a medication is so late that it seems inappropriate to give. For example, a patient has a medication ordered TID. She missed the second dose due to being off the unit to a procedure. She returned to the unit an hour before the time the third dose can be given.

DEPARTMENT: Inpatient Units SOLUTION: CareNet REVISED: 6/6/14
86
Medication Given Too Frequently: An alert will tell you if you are giving a medication too close to the previous dose. You have three choices: Yes Click this option if you have spoken with the physician/mid-level and they have given approval for the early dose. You will be asked to document an Override Reason. No Click this option to deselect and clear that the med was scanned. Not Given Click here if you want to document the medication “Not Given”
Medication not on Profile: This occurs when scanning a medication that is not on the medication task list. It is either the wrong product, wrong dose, or outside the current time span:
Click 'OK' to clear the message window. Verify the user has the correct medication. If they have the correct medication, verify it is due at this time. Consider adjusting the time frame.

DEPARTMENT: Inpatient Units SOLUTION: CareNet REVISED: 6/6/14
87
If the medication needs to be charted, verify that administration task could be rescheduled. Policy and Procedure dictates when it is appropriate to reschedule medication tasks. If you can see the medication is correct as it appears on the device/MAW, notify the pharmacy to further investigate why the product is not scanning. Failed to Convert Units:
This alert occurs when the UNIT of Measure of the product scanned does not match the Unit of Measure of the order entered by the pharmacy. Example: the furosemide dose scanned is in mg/mL and the order is for mg.
Call pharmacy to verify the order/product is correct.
Form-Form Error: This occurs when scanning a medication that was ordered with a dosage form that differs from the medication the clinician is scanning, for example: the medication scans as a powder but it was ordered as a lotion. Click 'OK' to clear the warning message, and then determine what action is needed before proceeding.
Verify you have the correct medication in your hand. This medication should not be administered as it is not the ordered dosage form. Contact pharmacy to verify:
If the order is incorrect, pharmacy would need to discontinue the existing order and enter a new order.
If the dose was sent to the floor by pharmacy and is the incorrect form. Pharmacy would need to send a new medication.

DEPARTMENT: Inpatient Units SOLUTION: CareNet REVISED: 6/6/14
88
Route-Form Error: This order occurs when the dosage form of the product scanned is not compatible with the route of the order entered by the pharmacy. For example, you scan a medication in the form of tablet and the order's route is IV. Click 'OK' to close the alert window. This medication should not be administered as it is not the ordered dosage form. Contact pharmacy to verify:
If the order is incorrect, pharmacy would need to edit or discontinue the existing order and enter a new order.
If the dose was sent to the floor by pharmacy and is the incorrect form. Pharmacy would need to send a new medication.
Med Not Identified
There are several reasons why this is error could appear: an issue with the barcode on the medication, the scanner device has lost connection, or the medication is not on the pharmacy formulary. Note: This is a different alert than if the medication does not appear in patient's active MAR.
To troubleshoot:
Ensure the device is still connected to the network. The network connection indicator should not have an “X” through it.
Try to scan another package of the same medication. If there is an issue with the barcode, follow procedure for reporting the error to pharmacy.

DEPARTMENT: Inpatient Units SOLUTION: CareNet REVISED: 6/6/14
89
Multiple Select Screen:
A scanned medication may have more than one order. For example, a patient gets scheduled norco BID and has a PRN order for norco for breakthrough pain. Or, you scan normal saline and multiple products containing it appear.
You will need to click on the correct form of the order for the timing of the medication you are giving:

DEPARTMENT: Inpatient Units SOLUTION: CareNet REVISED: 6/6/14
90
Charting PRN Medications PRN medications are not given unless there is a reason. In addition to documenting the information, the reason why the medication is given must be documented. To verify the time is right to give the PRN medication, review the MAR. Log in to Cerner and open patient’s chart. Select MAR from the table of contents and view the PRN medications. If the medication has been previously administered, the administration details will display on the dose task:
Just like with a scheduled medication, gather PRN medication to be given to patient. Note: refer to policy for appropriate timeframes for medication administration.
In patient’s room, log on to workstation/Cerner. Open patient’s chart and go to MAR. Click on Medication Administration Wizard located on top toolbar.
Verify patient's identity using two identifiers: patient’s name and date of birth. THEN, using scanner device attached to workstation, scan barcode on patient’s wristband by pressing on trigger. Now you can scan the bar codes for the medications you will be administering.
Remember to click the ‘Sign’ button to document the medication administration.
INPATIENT NURSING ONLY: A new Medication Administration task is generated and the details of this administration display on the MAR.
A follow-up task for Pain Re-assessment is generated and displays on the MAR and in CareCompass. Note: The time for a pain reassessment is 30 minutes after the administration time. Time parameters for follow up tasks are defined based on the drug and the route, please refer to appropriate policy for details. If a medication is a one-time dose and requires a response be documented, it may be necessary to include inactive medications in your view in order to see the med response task.

DEPARTMENT: Inpatient Units SOLUTION: CareNet REVISED: 6/6/14
91
Vaccinations Follow the BCMA procedure for administering vaccinations. You will need to complete the following screen before signing that the vaccination was given. Yellow fields are required. In the Nurse Administered field, make sure that ‘Initial’ is selected from the drop-down box. Any additional vaccines given will be charted as ‘Subsequent.’ Click ‘OK’ when all required information is entered. Note: You will need to document Manufacturer, Lot Number, and Expiration Date, so bring any vial or container that shows this information to the room with you so that it may be documented correctly at the time of administration.
IV Medication Administration Just like with a scheduled medication, verify with MAR and gather IV medication scheduled for patient. Note: refer to policy for appropriate timeframes for medication administration.
In patient’s room, log on to workstation/Cerner. Open patient’s chart and go to MAR. Click on Medication Administration Wizard located on top toolbar.
Verify patient's identity using two identifiers: patient’s name and date of birth. THEN, using scanner device attached to workstation, scan barcode on patient’s wristband by pressing on trigger. Now you can scan the bar codes for the IV med.

DEPARTMENT: Inpatient Units SOLUTION: CareNet REVISED: 6/6/14
92
A charting form specifically designed for IV charting is displayed. Required fields display with a yellow background. The IV Event (Begin Bag) defaults and displays in the bottom right corner of the window.
Complete the IV detail section:
The current time defaults in the Performed Date/Time boxes.
The Performed by field defaults to the person logged in to Cerner.
The Bag # field refers to the number of bags administered for continuous IVF.
In the Site box, select the IV insertion site used to administer IVF from the list
The volume entered on the order is defaulted by the system. If you are infusing a different amount, enter it here. For example, a patient returning from surgery with an uncharted bag of fluids infusing.
The infusion rate is defaulted by the system to the rate entered on the order.
Additional information can be entered by selecting ‘Comment’. The Comment dialog box displays. Program the IV pump as appropriate. Start infusion. Click ‘OK’ to close the window. Click ‘Sign’ to finish documenting the IV med.

DEPARTMENT: Inpatient Units SOLUTION: CareNet REVISED: 6/6/14
93
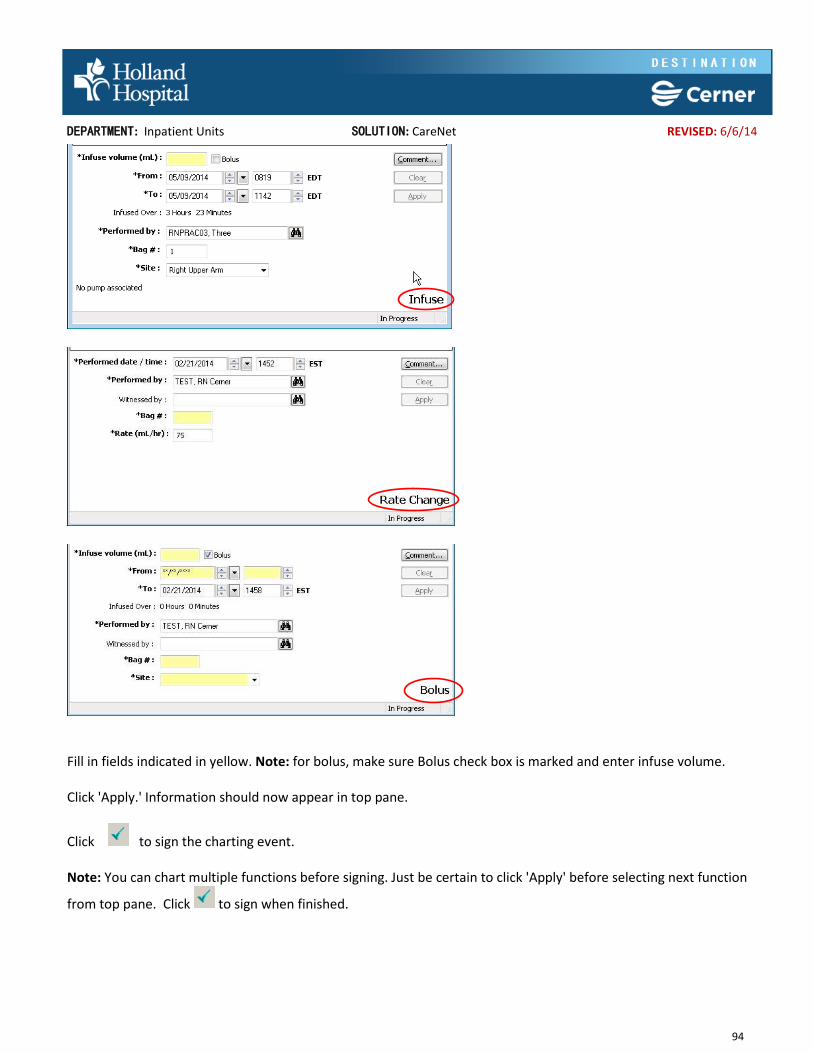
Document Infused Volume, Bolus a Continuous IVF, Rate Change on IVF Note: One time when you can chart directly from the MAR without penalty. Log in to workstation in patient's room. Open the MAR. Double-click pending cell for the correct med.
Select function from top pane by double-clicking on appropriate line. Verify you are in the right fields by checking label at bottom of dialog box:
DEPARTMENT: Inpatient Units SOLUTION: CareNet REVISED: 6/6/14
94
Fill in fields indicated in yellow. Note: for bolus, make sure Bolus check box is marked and enter infuse volume. Click 'Apply.' Information should now appear in top pane.
Click to sign the charting event. Note: You can chart multiple functions before signing. Just be certain to click 'Apply' before selecting next function
from top pane. Click to sign when finished.

DEPARTMENT: Inpatient Units SOLUTION: CareNet REVISED: 6/6/14
95
Documenting Scheduled Medications Not Given 'Chart Not Done' or 'Not Given' will chart the medication task as not given and remove the task from the MAR. Note: These functions complete the task so it is not available to use later.
Open the MAR. Right-click on the medication task on the appropriate time.
Click 'Chart Not Done.'
Click 'Reason Not Done' field drop-down arrow and select an option:
Click . Then click refresh button. Medication shows on eMAR as 'Not Done' with reason following.
DEPARTMENT: Inpatient Units SOLUTION: CareNet REVISED: 6/6/14
96
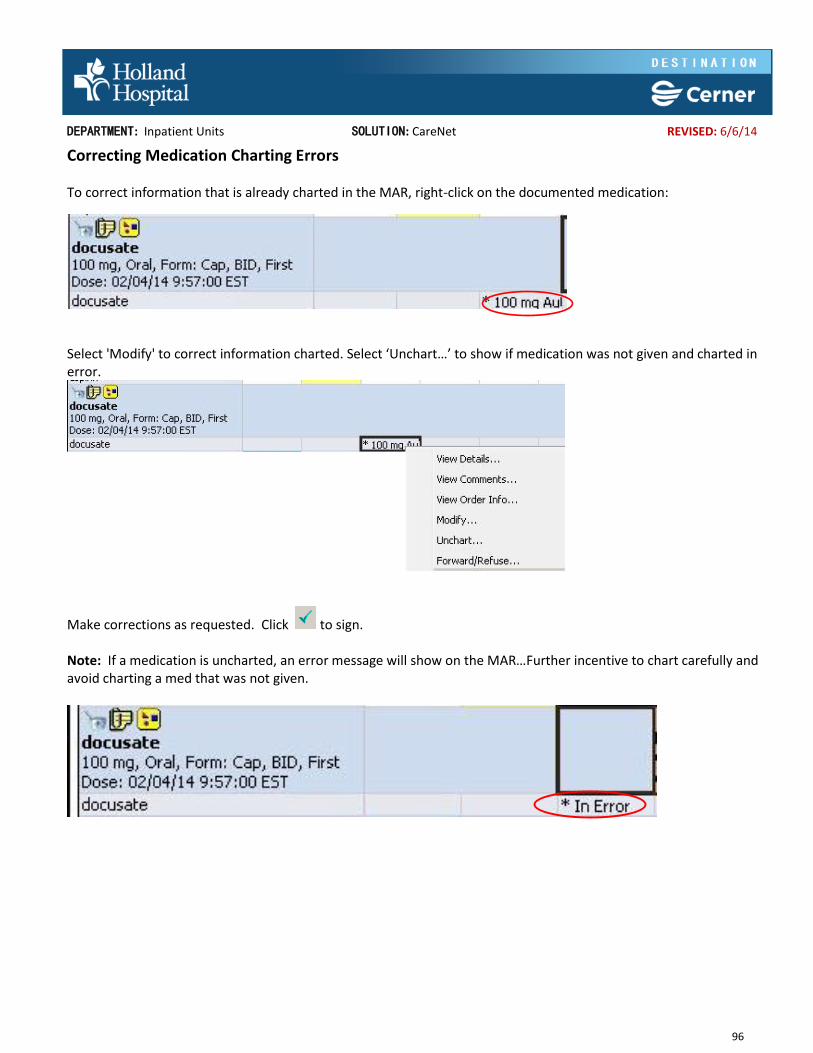
Correcting Medication Charting Errors To correct information that is already charted in the MAR, right-click on the documented medication:
Select 'Modify' to correct information charted. Select ‘Unchart…’ to show if medication was not given and charted in error.
Make corrections as requested. Click to sign. Note: If a medication is uncharted, an error message will show on the MAR…Further incentive to chart carefully and avoid charting a med that was not given.

DEPARTMENT: Inpatient Units SOLUTION: CareNet REVISED: 6/6/14
97
Documenting Stop Times on IV Medications There will be two different processes for when an IV medication (continuous fluids or IVPB) is stopped. Which process is used depends on whether the patient is inpatient or outpatient status. Examples of patients considered to be outpatient for billing purposes are Observations patients and ATU patients admitted to an inpatient unit. Inpatients For inpatients, there is no extra documentation required for the stop time of IV fluids or IVPB medications. IVPBs are scanned and documented like a scheduled medication. For IV fluids, the time the order is discontinued is considered to be the stop time for that IV fluid. (Remember: MDs and mid-level providers have primary responsibility for ordering and discontinuing medications.) Outpatients (Observation or ATU patients in inpatient locations) If you have a patient who is outpatient status, an icon will appear next to any IV fluid or IVPB ordered for that patient:
Click on the icon to document the stop time of that IV fluid or IVPB medication.

DEPARTMENT: Inpatient Units SOLUTION: CareNet REVISED: 6/6/14
98
Administering Medications Prior to Verification by Pharmacy
Do NOT administer medications unless verified by pharmacy. Exception criteria for administering medications before pharmacist verification: When resulting delay would harm the patient When a Licensed Independent Practitioner (LIP) is physically present to oversee the preparation and administration of the medication
When administering medication without pharmacist verification Med must be available as override in Pyxis. Do not borrow medication from another patient. After documenting as defined above, you will be asked the additional question if you are sure you want to document an unverified medication. Click 'Yes' to answer the question.
Downtime
During periods of scheduled or unscheduled Cerner downtime, medication charting will be completed on the paper MAR. When Cerner becomes available, RNs will be responsible for charting all medication administrations documented on the paper MAR in PowerChart. If the nurse who administered medications for a particular patient has left for the day, another RN will transcribe the information from the paper MAR into PowerChart, sign the paper MAR “entered by” with initials and date, and the paper MAR will be retained in the paper chart. Please refer to the Downtime Policy for more detailed information.

DEPARTMENT: Inpatient Units SOLUTION: CareNet REVISED: 6/6/14
99
Notifying Pharmacy of Error or To Request Dose of Medication To report errors to Pharmacy or to communicate you need the next dose of a medication, the process is the same.
Return to the MAR. Right-click on the medication in question. On the menu that appears, click on ‘Med Request’:
The Medication Request window will open for the medication on which you right-clicked. Select the reason for your message to Pharmacy from the drop-down list:

DEPARTMENT: Inpatient Units SOLUTION: CareNet REVISED: 6/6/14
100
Type a brief description of your issue in the comment box. Click ‘OK’ to send:
Further Troubleshooting Medication Administration
Medication does not scan
Check:
Scanning light. If it is not present, check that scanner is charged.
Correct patient, med, dose, time, route
A scanned med for the wrong patient will generate an alert.
Scanning the wrong product dispensed by pharmacy will also generate an alerts. Tap No (or OK depending on the alert) and change patient or meds.
Correct scanning technique o The scanning light is over the bar code o Move the medication package closer or further away from the scanner. o Scan the manufacturer’s bar code on insulin vials and pens
If correct patient/med/time/dose/route, scanner battery is okay, and your scanning technique is correct, the bar code is faulty. Notify Pharmacy using the following procedure:

DEPARTMENT: Inpatient Units SOLUTION: CareNet REVISED: 6/6/14
101
Go to the MAR, right-click on the medication name, and left-click ‘Med Request…’.
The Medication Request window opens. Click on the arrow to open the drop-down menu. Click on ‘Scanning/barcode failure’ as reason.
In the blank space, click so that you see the cursor in that space. Scan your medication using the barcode scanner. A series of letters and numbers will appear. This communicates with pharmacy how Cerner is interpreting that barcode.
Click ‘OK’ to send the error message to pharmacy. No need to type in anything additional.

DEPARTMENT: Inpatient Units SOLUTION: CareNet REVISED: 6/6/14
102
Assessment and iView
Notes: For those who are familiar with other versions of Cerner, there is no Power form or Ad Hoc charting of patient assessments in Holland Hospital’s Cerner. Assessment charting is done in i-View. YOU DO NOT NEED TO CHART ON EVERY SINGLE LINE IN I-VIEW, only chart on those items relevant for the proper assessment of your patient.
Click on the cell for All Lobes Breath Sounds. Note the check boxes in front of your answer options; this represents the ability to choose more than one answer:
To document rhonchi with an expiratory wheeze are present in all lobes, click to check the boxes in front of 'Rhonchi' and 'Expiratory Wheeze.'

DEPARTMENT: Inpatient Units SOLUTION: CareNet REVISED: 6/6/14
103
Hit the TAB or Enter key to move to the next cell. The entered information shows as purple. This means it has not been signed.
Also notice that you only see a part of the information entered. Mouse-over the cell to see the entire result.
NOTE: Document on only those sections that are required and/or relevant to your assessment. In the above example, you have already charted breath sounds for all lobes. The remaining Breath Sounds Assessment section lines can be left blank.

DEPARTMENT: Inpatient Units SOLUTION: CareNet REVISED: 6/6/14
104
Continue to document additional data if desired. To sign your documentation, click the green checkmark above the i-View Navigator:
The information should now show as black:
Note: Any information that has not been signed (shows as purple) will not be saved if you exit Cerner.

DEPARTMENT: Inpatient Units SOLUTION: CareNet REVISED: 6/6/14
105
Some sections need you to specify the item to be documented before the required fields will show. Most often, this is for IVs, lines, tubes, and drains. This is charted using what is called a Dynamic Group. To chart an IV that was not previously documented, go to i-View. Click on the Adult Lines - Devices band. Click on ‘Peripheral IV’
To add an IV, click the Add a Dynamic Group icon:

DEPARTMENT: Inpatient Units SOLUTION: CareNet REVISED: 6/6/14
106
The Dynamic Group window will open:

DEPARTMENT: Inpatient Units SOLUTION: CareNet REVISED: 6/6/14
107
Click on the appropriate options to document the IV site, catheter type, laterality, and size. You will notice that the information populates the Label field. Click ‘OK’ to sign.

DEPARTMENT: Inpatient Units SOLUTION: CareNet REVISED: 6/6/14
108
The label that appeared in the Dynamic Group window will now show as a subsection under Peripheral IV. You can now document on this IV location.
Repeat for any and all additional undocumented Peripheral IVs. Be sure to sign your results when finished. Note: If your result isn’t displaying correctly or at all, be sure to refresh your screen by clicking the refresh button:

DEPARTMENT: Inpatient Units SOLUTION: CareNet REVISED: 6/6/14
109
Correcting Documentation Errors If you want to change information you have entered BEFORE it is signed (still shows as purple) double-click on that cell and make the necessary corrections. Sign your charting. If you make a mistake before signing your charting and want to start over, click to unchart information that shows in purple.
Adding Results to a Column That Has Already Been Signed If results are signed before all information is entered, there are two ways to enter the missing information: 1. Activate the column or section by double clicking the time column or the section header and entering information as described in the previous section. If you only need to enter information in one cell, double-click that cell. 2. Right click on the cell where you wish to chart select “Add Result” and enter/sign the data as before. Note: You must move your cursor out of the cell to activate the Sign option.
Modifying Information Already Signed: Correcting information that is not purple (is signed) starts with right-clicking on information that needs to be modified.

DEPARTMENT: Inpatient Units SOLUTION: CareNet REVISED: 6/6/14
110
This menu will appear:

DEPARTMENT: Inpatient Units SOLUTION: CareNet REVISED: 6/6/14
111
The section for correcting information is in the middle: Note: Information in i-View that is corrected does not disappear. Modified cells will now have a small triangle in the corner indicating that information was modified. Cells where information was uncharted or moved to a different time will show the message “In Error.”
Click if information entered under wrong time.
Click if information entered on wrong patient.
Click if incorrect information was entered and needs to be changed.

DEPARTMENT: Inpatient Units SOLUTION: CareNet REVISED: 6/6/14
112
Flagging Results in the Interactive View If the patient has a significant event (such as a code or a fall), flag the assessment results at the time when the event occurred. You can 'Flag with Comment...' to document in i-View conversations with a physician or midlevel related to the significant event only. The result will show as flagged which identifies the event and related documentation in the patient’s chart. Note: This is NOT where provider notifications for abnormal vitals, lab results, medication questions, etc. are documented. These notifications are documented in i-View under Provider Notification in the Quick View band.
After reviewing the options available, choose the Flag with Comment option and document that the physician has been notified about the elevated temperature and additional orders were received.
You will now notice a yellow flag next to the result . Double left click on the result to access the result review window. Select the Comments to review the entered note

DEPARTMENT: Inpatient Units SOLUTION: CareNet REVISED: 6/6/14
113
Problem History
This is where information is captured for patient’s medical history. RNs are responsible for completing the Problem section of this form and the Most Recent Hospitalizations. “Problem” refers to medical problems patient has/had. Start by clicking on Diagnosis & Problems under the patient’s menu.
To document on the Problems list: Click on add icon under problems. Type the name of problem in yellow search field and click on binoculars icon next to search field:

DEPARTMENT: Inpatient Units SOLUTION: CareNet REVISED: 6/6/14
114
In the Problem Search window, scroll down and click on appropriate problem. Click ‘OK’.
Note: Keep it simple. As you can see, many items may show when you search for a problem. Pick the simplest one and move on. Make sure the Terminology column shows SNOWMED CT and the Terminology Axis shows Finding. The physician will clarify if a modifier needs to be added to the patient’s problem. Click on the down arrow under Confirmation and select appropriate option. Repeat for Status.
If you are an RN entering this information, make sure that ‘Medical’ shows under Classification. Note: This does NOT mean that the information you have entered is a medical diagnosis. There is no ICD diagnosis code associated with this entry. Also, permissions are set up behind the scenes where an inpatient RN cannot enter information as a diagnosis. Click ‘OK & Add New’ button. Repeat until patient problem history is complete. Click ‘OK’ when finished. The physician can work from the problem list you created to add diagnoses to patient’s information.