deep carpet cleaner - rug doctor · getting ready to clean carpets your rug doctor deep carpet...
TRANSCRIPT
Deep Carpet Cleaner
USER MANUALModel Number: 93170 series
Deep down cleaning on:
Carpets High Traffic Areas
Stairs Upholstery Vehicles
YE
A
R GUARANT
EE
CA
RP
ET CARE SYSTEM RENTAL BRAND
WORLD'S
No.1
CONGRATULATIONS,YOU NOW OWN A
RUG DOCTOR!
Founded by a professional carpet cleaner in 1972,
the first machines were designed and built for
professional use. A brand was born and soon after, Rug
Doctor launched the first rental program that made
professional-grade carpet cleaning machines available
to the public. More than 40 years later, Rug Doctor has
grown to become a household name and continues as
the leader in carpet care rental systems with powerful
machines and innovative products.
3 Safety Instructions 4 Parts, Components5 Tool Caddy Wrap System6 Getting Ready To Clean Carpets 7 Cleaning Carpets10 Getting Ready To Clean Upholstery etc.11 Cleaning Upholstery etc.14 Troubleshooting15 Replacement Parts16 Rug Doctor Solutions18 Guarantee Information
SAVE THESE INSTRUCTIONS
IMPORTANT SAFETY INSTRUCTIONSPlease read all instructions before using. When using an electrical appliance, basic precautions should always be followed, including the following:
∆ To avoid scalding or burns, use caution when filling hand hot tap water into the clean water tank. Do not boil or microwave water to be used in machine.
∆ Do not leave appliance unattended when plugged in or while it is on. Unplug from mains socket when not in use and before cleaning or servicing.
∆ To reduce the risk of fire and electric shock due to internal component damage, use only Rug Doctor® cleaning products intended for use with this appliance.
See the Cleaning Product section of this manual.
∆ Do not allow to be used as a toy. Not intended for use by children age 12 and under. Close attention and adult supervision is necessary when used near children. Do not allow children to place their body parts in or near openings and moving parts.
∆ Use only as described in this manual. Use only Rug Doctor’s recommended products.
∆ Do not use with damaged cable or plug. If appliance is not working as it should, has been dropped, damaged, left outdoors, or dropped into water, stop using and return it to Rug Doctor.
∆ Do not pull or carry by cable, use cable as a handle, close a door on cable, or pull cable around sharp edges or corners. Do not run appliance over cable. Keep cable away from heated surfaces.
∆ Do not unplug by pulling on cable. To unplug, grasp the plug, not the cable.
∆ Do not handle plug or appliance with wet hands.
∆ Do not put any object into openings. Do not use if any opening is blocked; keep free of dust, lint, hair, and anything that may reduce air flow.
∆ Keep hair, loose clothing, fingers, and all parts of body away from openings and moving parts.
∆ Turn off all controls before unplugging.
∆ Use extra care when cleaning on stairs.
∆ Do not use to pick up flammable or combustible liquids or materials such as petrol, solvents, paints or use in areas where they may be present.
∆ Do not use to pick up anything that is burning or smoking, such as cigarettes, matches, or hot ashes.
∆ Do not place in or pick up caustic or toxic materials (Such as, bleach, ammonia, toilet bowl cleaner and drain cleaners) with machine.
∆ Use only on surfaces moistened by cleaning process or small spills. Do not place or submerge machine in standing water or try to clear flooded areas.
∆ Do not clean over floor electrical sockets.
∆ The use of an extension cable is not recommended. Failure to follow the foregoing instructions may expose the user to the possibility of electric shock, personal injury
and/or death.
∆ When clean water tank runs out stop using and follow instructions to refill.
∆ Do not operate without tanks or in any manner inconsistent with above warnings or
the operating instructions set forth in this manual.
WARNINGTO REDUCE THE RISK OF FIRE, ELECTRIC SHOCK, INJURY OR PROPERTY DAMAGE:
Retain for your records: To save time if calling Customer Service for information about your Rug Doctor® machine, it is recommended that you record your machine information below.
Serial #:
Model #:
Date of Purchase:
Rug Doctor Ltd., Unit 29, Decoy Road Timberlaine Trading Estate, Worthing
West Sussex BN14 [email protected]
www.rugdoctor.co.uk
2 01903 235558 rugdoctor.co.uk rugdoctor.co.uk 01903 235558 3
Flexible vacuum and solutions hoses for
compact storage
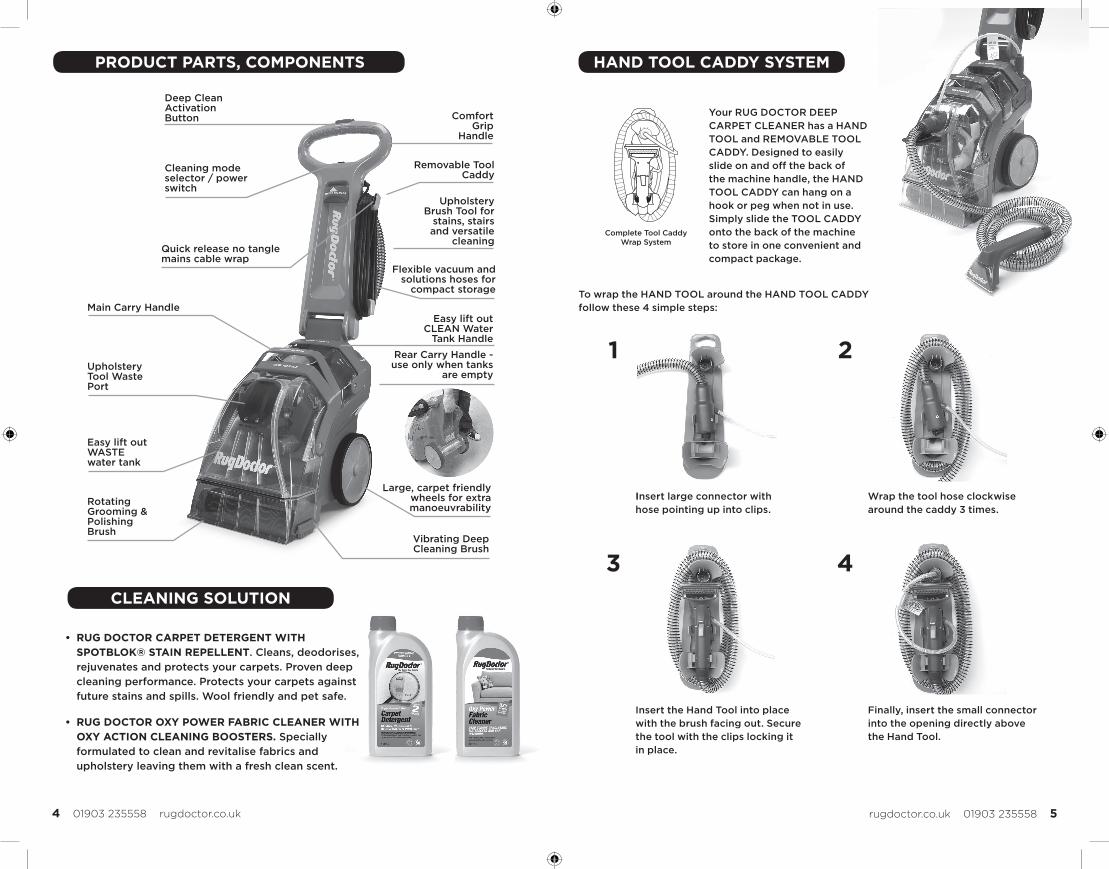
PRODUCT PARTS, COMPONENTS
CLEANING SOLUTION
• RUG DOCTOR CARPET DETERGENT WITH SPOTBLOK® STAIN REPELLENT. Cleans, deodorises, rejuvenates and protects your carpets. Proven deep cleaning performance. Protects your carpets against future stains and spills. Wool friendly and pet safe.
• RUG DOCTOR OXY POWER FABRIC CLEANER WITH OXY ACTION CLEANING BOOSTERS. Specially formulated to clean and revitalise fabrics and upholstery leaving them with a fresh clean scent.
Upholstery Brush Tool for
stains, stairs and versatile
cleaning
Removable Tool Caddy
Quick release no tangle mains cable wrap
ComfortGrip
Handle
Deep Clean ActivationButton
Cleaning mode selector / power switch
Main Carry HandleEasy lift out
CLEAN Water Tank Handle
Rear Carry Handle - use only when tanks
are emptyUpholsteryTool Waste Port
Large, carpet friendly wheels for extra manoeuvrability
Easy lift out WASTEwater tank
Rotating Grooming &PolishingBrush
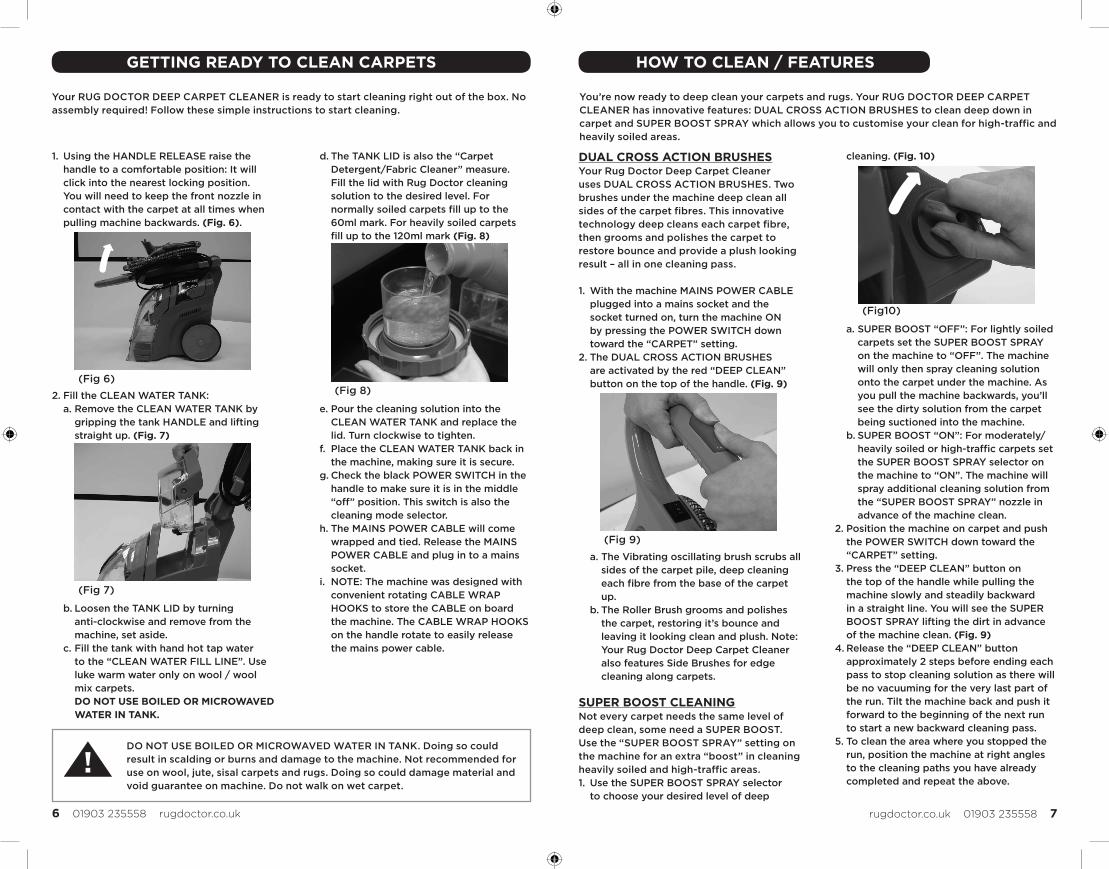
HAND TOOL CADDY SYSTEM
Complete Tool CaddyWrap System
Vibrating Deep Cleaning Brush
Your RUG DOCTOR DEEP CARPET CLEANER has a HAND TOOL and REMOVABLE TOOL CADDY. Designed to easily slide on and off the back of the machine handle, the HAND TOOL CADDY can hang on a hook or peg when not in use. Simply slide the TOOL CADDY onto the back of the machine to store in one convenient and compact package.
To wrap the HAND TOOL around the HAND TOOL CADDY follow these 4 simple steps:
Insert large connector with hose pointing up into clips.
1 2
3 4
Finally, insert the small connector into the opening directly above the Hand Tool.
Insert the Hand Tool into place with the brush facing out. Secure the tool with the clips locking it in place.
Wrap the tool hose clockwise around the caddy 3 times.
4 01903 235558 rugdoctor.co.uk rugdoctor.co.uk 01903 235558 5
DUAL CROSS ACTION BRUSHESYour Rug Doctor Deep Carpet Cleaner uses DUAL CROSS ACTION BRUSHES. Two brushes under the machine deep clean all sides of the carpet fibres. This innovative technology deep cleans each carpet fibre, then grooms and polishes the carpet to restore bounce and provide a plush looking result – all in one cleaning pass.
1. With the machine MAINS POWER CABLE plugged into a mains socket and the socket turned on, turn the machine ON by pressing the POWER SWITCH down toward the “CARPET” setting.
2. The DUAL CROSS ACTION BRUSHES are activated by the red “DEEP CLEAN” button on the top of the handle. (Fig. 9)
a. The Vibrating oscillating brush scrubs all sides of the carpet pile, deep cleaning each fibre from the base of the carpet up.
b. The Roller Brush grooms and polishes the carpet, restoring it’s bounce and leaving it looking clean and plush. Note: Your Rug Doctor Deep Carpet Cleaner also features Side Brushes for edge cleaning along carpets.
SUPER BOOST CLEANINGNot every carpet needs the same level of deep clean, some need a SUPER BOOST. Use the “SUPER BOOST SPRAY” setting on the machine for an extra “boost” in cleaning heavily soiled and high-traffic areas.1. Use the SUPER BOOST SPRAY selector
to choose your desired level of deep
cleaning. (Fig. 10)
a. SUPER BOOST “OFF”: For lightly soiled carpets set the SUPER BOOST SPRAY on the machine to “OFF”. The machine will only then spray cleaning solution onto the carpet under the machine. As you pull the machine backwards, you’ll see the dirty solution from the carpet being suctioned into the machine.
b. SUPER BOOST “ON”: For moderately/heavily soiled or high-traffic carpets set the SUPER BOOST SPRAY selector on the machine to “ON”. The machine will spray additional cleaning solution from the “SUPER BOOST SPRAY” nozzle in advance of the machine clean.
2. Position the machine on carpet and push the POWER SWITCH down toward the “CARPET” setting.
3. Press the “DEEP CLEAN” button on the top of the handle while pulling the machine slowly and steadily backward in a straight line. You will see the SUPER BOOST SPRAY lifting the dirt in advance of the machine clean. (Fig. 9)
4. Release the “DEEP CLEAN” button approximately 2 steps before ending each pass to stop cleaning solution as there will be no vacuuming for the very last part of the run. Tilt the machine back and push it forward to the beginning of the next run to start a new backward cleaning pass.
5. To clean the area where you stopped the run, position the machine at right angles to the cleaning paths you have already completed and repeat the above.
1. Using the HANDLE RELEASE raise the handle to a comfortable position: It will click into the nearest locking position. You will need to keep the front nozzle in contact with the carpet at all times when pulling machine backwards. (Fig. 6).
2. Fill the CLEAN WATER TANK:a. Remove the CLEAN WATER TANK by
gripping the tank HANDLE and lifting straight up. (Fig. 7)
b. Loosen the TANK LID by turning anti-clockwise and remove from the machine, set aside.
c. Fill the tank with hand hot tap water to the “CLEAN WATER FILL LINE”. Use luke warm water only on wool / wool mix carpets. DO NOT USE BOILED OR MICROWAVED WATER IN TANK.
d. The TANK LID is also the “Carpet Detergent/Fabric Cleaner” measure. Fill the lid with Rug Doctor cleaning solution to the desired level. For normally soiled carpets fill up to the 60ml mark. For heavily soiled carpets fill up to the 120ml mark (Fig. 8)
e. Pour the cleaning solution into the CLEAN WATER TANK and replace the lid. Turn clockwise to tighten.
f. Place the CLEAN WATER TANK back in the machine, making sure it is secure.
g. Check the black POWER SWITCH in the handle to make sure it is in the middle “off” position. This switch is also the cleaning mode selector.
h. The MAINS POWER CABLE will come wrapped and tied. Release the MAINS POWER CABLE and plug in to a mains socket.
i. NOTE: The machine was designed with convenient rotating CABLE WRAP HOOKS to store the CABLE on board the machine. The CABLE WRAP HOOKS on the handle rotate to easily release the mains power cable.
GETTING READY TO CLEAN CARPETS
Your RUG DOCTOR DEEP CARPET CLEANER is ready to start cleaning right out of the box. No assembly required! Follow these simple instructions to start cleaning.
DO NOT USE BOILED OR MICROWAVED WATER IN TANK. Doing so could result in scalding or burns and damage to the machine. Not recommended for use on wool, jute, sisal carpets and rugs. Doing so could damage material and void guarantee on machine. Do not walk on wet carpet.
HOW TO CLEAN / FEATURES
You’re now ready to deep clean your carpets and rugs. Your RUG DOCTOR DEEP CARPET CLEANER has innovative features: DUAL CROSS ACTION BRUSHES to clean deep down in carpet and SUPER BOOST SPRAY which allows you to customise your clean for high-traffic and heavily soiled areas.
(Fig 6)(Fig 8)
(Fig 9)
(Fig10)
(Fig 7)
6 01903 235558 rugdoctor.co.uk rugdoctor.co.uk 01903 235558 7
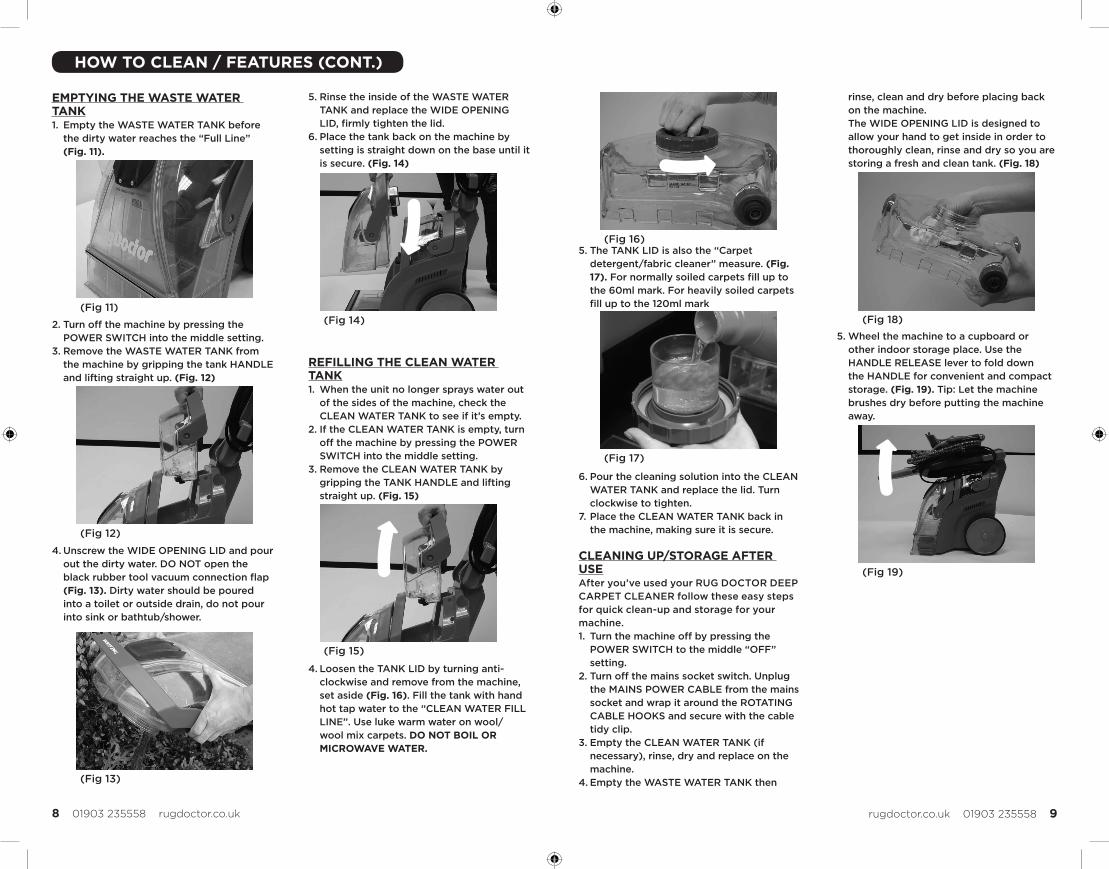
5. The TANK LID is also the “Carpet detergent/fabric cleaner” measure. (Fig. 17). For normally soiled carpets fill up to the 60ml mark. For heavily soiled carpets fill up to the 120ml mark
6. Pour the cleaning solution into the CLEAN WATER TANK and replace the lid. Turn clockwise to tighten.
7. Place the CLEAN WATER TANK back in the machine, making sure it is secure.
CLEANING UP/STORAGE AFTER USEAfter you’ve used your RUG DOCTOR DEEP CARPET CLEANER follow these easy steps for quick clean-up and storage for your machine.1. Turn the machine off by pressing the
POWER SWITCH to the middle “OFF” setting.
2. Turn off the mains socket switch. Unplug the MAINS POWER CABLE from the mains socket and wrap it around the ROTATING CABLE HOOKS and secure with the cable tidy clip.
3. Empty the CLEAN WATER TANK (if necessary), rinse, dry and replace on the machine.
4. Empty the WASTE WATER TANK then
rinse, clean and dry before placing back on the machine. The WIDE OPENING LID is designed to allow your hand to get inside in order to thoroughly clean, rinse and dry so you are storing a fresh and clean tank. (Fig. 18)
5. Wheel the machine to a cupboard or other indoor storage place. Use the HANDLE RELEASE lever to fold down the HANDLE for convenient and compact storage. (Fig. 19). Tip: Let the machine brushes dry before putting the machine away.
EMPTYING THE WASTE WATER TANK1. Empty the WASTE WATER TANK before
the dirty water reaches the “Full Line” (Fig. 11).
2. Turn off the machine by pressing the POWER SWITCH into the middle setting.
3. Remove the WASTE WATER TANK from the machine by gripping the tank HANDLE and lifting straight up. (Fig. 12)
4. Unscrew the WIDE OPENING LID and pour out the dirty water. DO NOT open the black rubber tool vacuum connection flap (Fig. 13). Dirty water should be poured into a toilet or outside drain, do not pour into sink or bathtub/shower.
5. Rinse the inside of the WASTE WATER TANK and replace the WIDE OPENING LID, firmly tighten the lid.
6. Place the tank back on the machine by setting is straight down on the base until it is secure. (Fig. 14)
REFILLING THE CLEAN WATER TANK1. When the unit no longer sprays water out
of the sides of the machine, check the CLEAN WATER TANK to see if it’s empty.
2. If the CLEAN WATER TANK is empty, turn off the machine by pressing the POWER SWITCH into the middle setting.
3. Remove the CLEAN WATER TANK by gripping the TANK HANDLE and lifting straight up. (Fig. 15)
4. Loosen the TANK LID by turning anti-clockwise and remove from the machine, set aside (Fig. 16). Fill the tank with hand hot tap water to the “CLEAN WATER FILL LINE”. Use luke warm water on wool/wool mix carpets. DO NOT BOIL OR MICROWAVE WATER.
HOW TO CLEAN / FEATURES (CONT.)
(Fig 11)(Fig 14)
(Fig 15)
(Fig 16)
(Fig 17)
(Fig 19)
(Fig 18)
(Fig 12)
(Fig 13)
8 01903 235558 rugdoctor.co.uk rugdoctor.co.uk 01903 235558 9
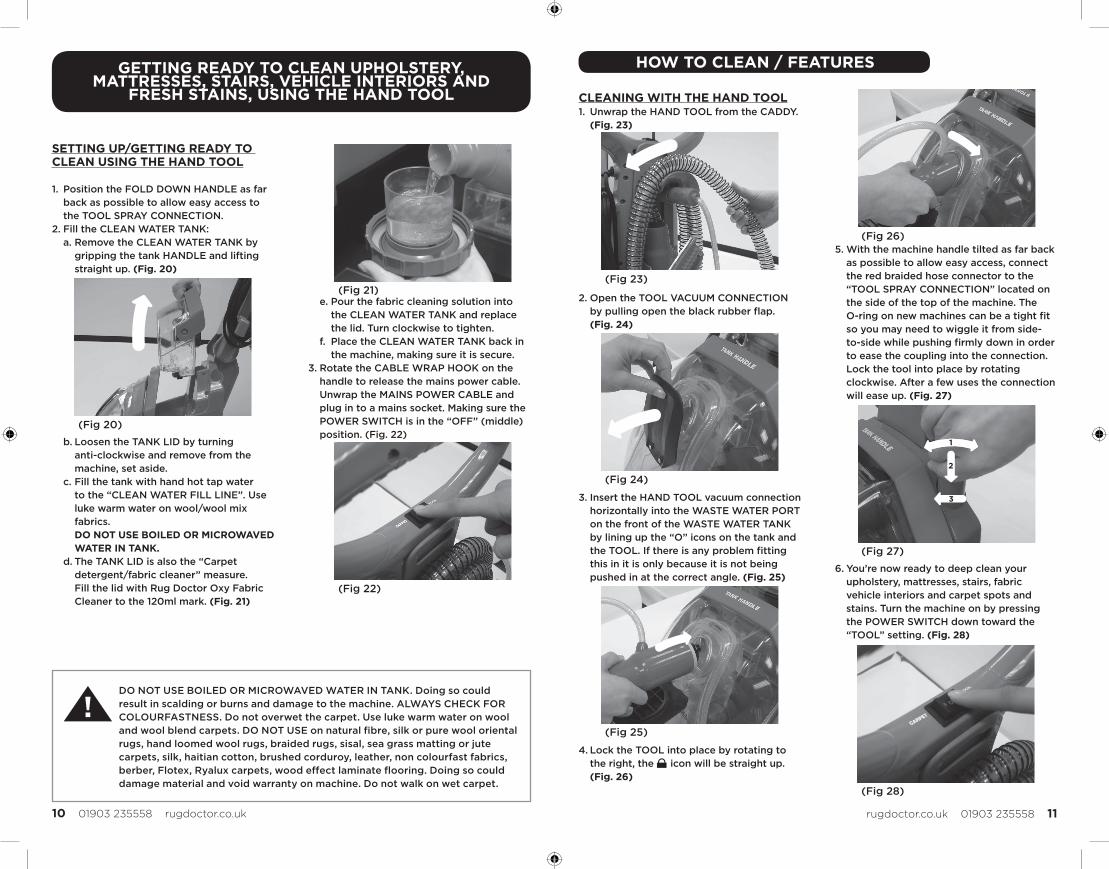
CLEANING WITH THE HAND TOOL1. Unwrap the HAND TOOL from the CADDY.
(Fig. 23)
2. Open the TOOL VACUUM CONNECTION by pulling open the black rubber flap. (Fig. 24)
3. Insert the HAND TOOL vacuum connection horizontally into the WASTE WATER PORT on the front of the WASTE WATER TANK by lining up the “O” icons on the tank and the TOOL. If there is any problem fitting this in it is only because it is not being pushed in at the correct angle. (Fig. 25)
4. Lock the TOOL into place by rotating to the right, the icon will be straight up. (Fig. 26)
5. With the machine handle tilted as far back as possible to allow easy access, connect the red braided hose connector to the “TOOL SPRAY CONNECTION” located on the side of the top of the machine. The O-ring on new machines can be a tight fit so you may need to wiggle it from side-to-side while pushing firmly down in order to ease the coupling into the connection. Lock the tool into place by rotating clockwise. After a few uses the connection will ease up. (Fig. 27)
6. You’re now ready to deep clean your upholstery, mattresses, stairs, fabric vehicle interiors and carpet spots and stains. Turn the machine on by pressing the POWER SWITCH down toward the “TOOL” setting. (Fig. 28)
SETTING UP/GETTING READY TO CLEAN USING THE HAND TOOL
1. Position the FOLD DOWN HANDLE as far back as possible to allow easy access to the TOOL SPRAY CONNECTION.
2. Fill the CLEAN WATER TANK:a. Remove the CLEAN WATER TANK by
gripping the tank HANDLE and lifting straight up. (Fig. 20)
b. Loosen the TANK LID by turning anti-clockwise and remove from the machine, set aside.
c. Fill the tank with hand hot tap water to the “CLEAN WATER FILL LINE”. Use luke warm water on wool/wool mix fabrics. DO NOT USE BOILED OR MICROWAVED WATER IN TANK.
d. The TANK LID is also the “Carpet detergent/fabric cleaner” measure. Fill the lid with Rug Doctor Oxy Fabric Cleaner to the 120ml mark. (Fig. 21)
e. Pour the fabric cleaning solution into the CLEAN WATER TANK and replace the lid. Turn clockwise to tighten.
f. Place the CLEAN WATER TANK back in the machine, making sure it is secure.
3. Rotate the CABLE WRAP HOOK on the handle to release the mains power cable. Unwrap the MAINS POWER CABLE and plug in to a mains socket. Making sure the POWER SWITCH is in the “OFF” (middle) position. (Fig. 22)
GETTING READY TO CLEAN UPHOLSTERY, MATTRESSES, STAIRS, VEHICLE INTERIORS AND
FRESH STAINS, USING THE HAND TOOL
DO NOT USE BOILED OR MICROWAVED WATER IN TANK. Doing so could result in scalding or burns and damage to the machine. ALWAYS CHECK FOR COLOURFASTNESS. Do not overwet the carpet. Use luke warm water on wool and wool blend carpets. DO NOT USE on natural fibre, silk or pure wool oriental rugs, hand loomed wool rugs, braided rugs, sisal, sea grass matting or jute carpets, silk, haitian cotton, brushed corduroy, leather, non colourfast fabrics, berber, Flotex, Ryalux carpets, wood effect laminate flooring. Doing so could damage material and void warranty on machine. Do not walk on wet carpet.
(Fig 20)
(Fig 21)
(Fig 22)
(Fig 23)
(Fig 24)
(Fig 25)
(Fig 26)
(Fig 27)
(Fig 28)
HOW TO CLEAN / FEATURES
1
2
3
10 01903 235558 rugdoctor.co.uk rugdoctor.co.uk 01903 235558 11
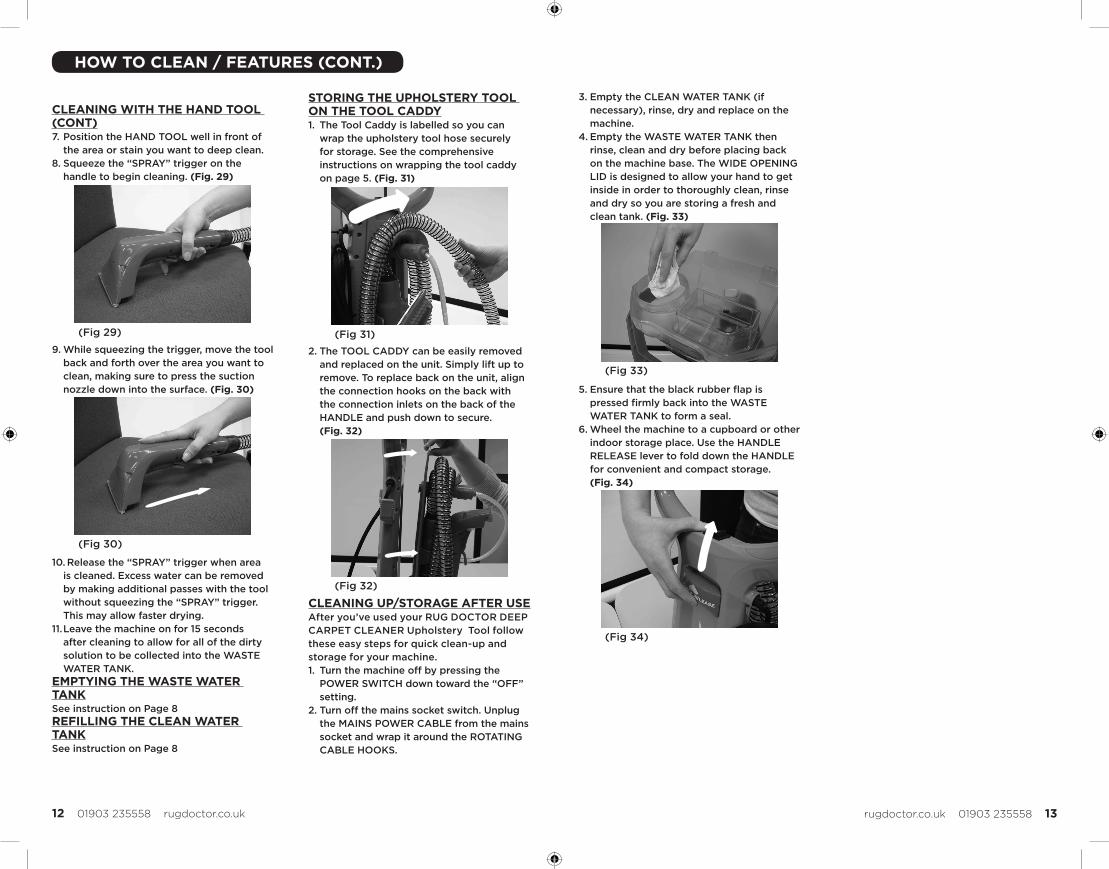
3. Empty the CLEAN WATER TANK (if necessary), rinse, dry and replace on the machine.
4. Empty the WASTE WATER TANK then rinse, clean and dry before placing back on the machine base. The WIDE OPENING LID is designed to allow your hand to get inside in order to thoroughly clean, rinse and dry so you are storing a fresh and clean tank. (Fig. 33)
5. Ensure that the black rubber flap is pressed firmly back into the WASTE WATER TANK to form a seal.
6. Wheel the machine to a cupboard or other indoor storage place. Use the HANDLE RELEASE lever to fold down the HANDLE for convenient and compact storage. (Fig. 34)
HOW TO CLEAN / FEATURES (CONT.)
CLEANING WITH THE HAND TOOL (CONT)7. Position the HAND TOOL well in front of
the area or stain you want to deep clean.8. Squeeze the “SPRAY” trigger on the
handle to begin cleaning. (Fig. 29)
9. While squeezing the trigger, move the tool back and forth over the area you want to clean, making sure to press the suction nozzle down into the surface. (Fig. 30)
10. Release the “SPRAY” trigger when area is cleaned. Excess water can be removed by making additional passes with the tool without squeezing the “SPRAY” trigger. This may allow faster drying.
11. Leave the machine on for 15 seconds after cleaning to allow for all of the dirty solution to be collected into the WASTE WATER TANK.
EMPTYING THE WASTE WATER TANKSee instruction on Page 8REFILLING THE CLEAN WATER TANKSee instruction on Page 8
STORING THE UPHOLSTERY TOOL ON THE TOOL CADDY1. The Tool Caddy is labelled so you can
wrap the upholstery tool hose securely for storage. See the comprehensive instructions on wrapping the tool caddy on page 5. (Fig. 31)
2. The TOOL CADDY can be easily removed and replaced on the unit. Simply lift up to remove. To replace back on the unit, align the connection hooks on the back with the connection inlets on the back of the HANDLE and push down to secure. (Fig. 32)
CLEANING UP/STORAGE AFTER USEAfter you’ve used your RUG DOCTOR DEEP CARPET CLEANER Upholstery Tool follow these easy steps for quick clean-up and storage for your machine.1. Turn the machine off by pressing the
POWER SWITCH down toward the “OFF” setting.
2. Turn off the mains socket switch. Unplug the MAINS POWER CABLE from the mains socket and wrap it around the ROTATING CABLE HOOKS.
(Fig 29)
(Fig 30)
(Fig 31)
(Fig 32)
(Fig 33)
(Fig 34)
12 01903 235558 rugdoctor.co.uk rugdoctor.co.uk 01903 235558 13
Problem Possible Reason How to FixNo Power Mains Power Cable not plugged
in
Mains power switch not switched on
Cleaning mode not selected
Plug Mains Power Cable into mains socket
Turn on mains power switch
Select CARPET or TOOL at the POWER SWITCH.
No / Low Spray Not pressing spray trigger
Clean Water / solution tank is empty or low
Clean Water tank is not seated or installed correctly
Spray is clogged
Press spray trigger
Fill Clean Water tank with water and solution
Lift Up Clean Water tank, and place back into position
Clean spray tip
No / Low Suction Dirty Water / collection tank Is full
Dirty Water / collection tank is not seated /installed correctly
Empty Dirty Water /collection tank
Lift Up Dirty Water /collection tank and place back into position
Rotating Brush Doesn’t Rotate
Not Pressing Deep clean Button
If something gets lodged in the brush roll, Brush will stop rotating
Press Deep clean Button on Handle
Turn Unit off at both POWER SWITCH & mains before removing obstruction. Turn machine back on to reset.
Vibrating Oscillating Brush doesn’t vibrate or oscillate
Not Pressing DEEP CLEAN Button
If something gets lodged in the brush roll, Brush will stop rotating
Press DEEP CLEAN Button on Handle
Turn Unit off at both POWER SWITCH & mains before removing obstruction. Turn machine back on to reset.
No/Low Spray from the Hand Tool
Not Pressing Spray Trigger
Red braided hose connector not installed correctly into Tool Spray Connection
Clean Water/Solution Tank Empty/Low
Clean Water Tank Is Not Seated/Installed Correctly
Press Spray Trigger
Make sure symbols are aligned when installing and push firmly down. You may need to wiggle the connector from side to side whilst pushing down when machine is new.
Fill Clean Water Tank with Water and Solution
Lift Up Clean Water tank and place back into position
No/Low Suction from the Hand Tool
Dirty Water/Collection Tank Is Full
Dirty Water/Collection Tank is Not Seated/Installed Correctly
TOOL VACUUM CONNECTOR not fitted horizontally into the Tool Vacuum Connection
Empty Dirty Water/Collection Tank
Lift Up Dirty Water/Collection tank and place back into position
Make sure symbols are aligned when installing and that the connector is installed horizontally.
TROUBLE SHOOTING
Please call Customer Services on 01903 235558 if problem is not resolvedPlease do not return this product to the store.
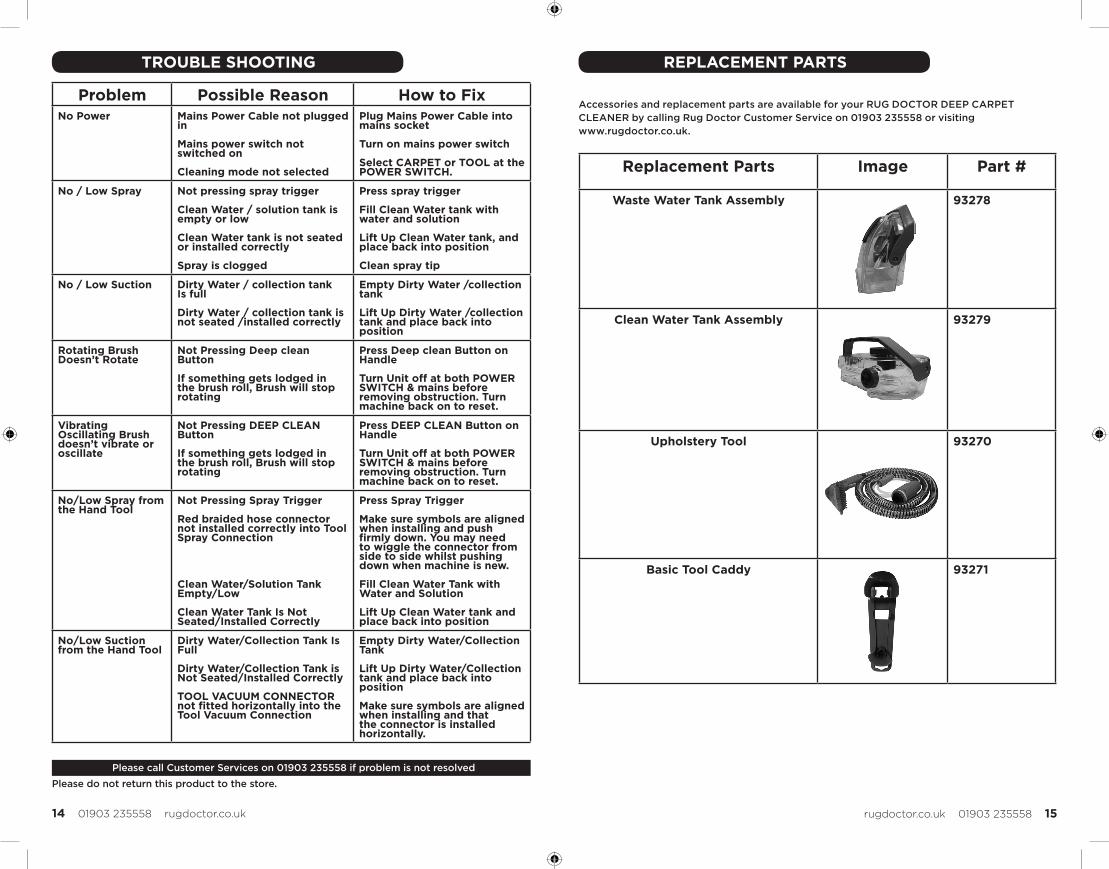
Replacement Parts Image Part #
Waste Water Tank Assembly 93278
Clean Water Tank Assembly 93279
Upholstery Tool 93270
Basic Tool Caddy 93271
REPLACEMENT PARTS
Accessories and replacement parts are available for your RUG DOCTOR DEEP CARPET CLEANER by calling Rug Doctor Customer Service on 01903 235558 or visiting www.rugdoctor.co.uk.
14 01903 235558 rugdoctor.co.uk rugdoctor.co.uk 01903 235558 15
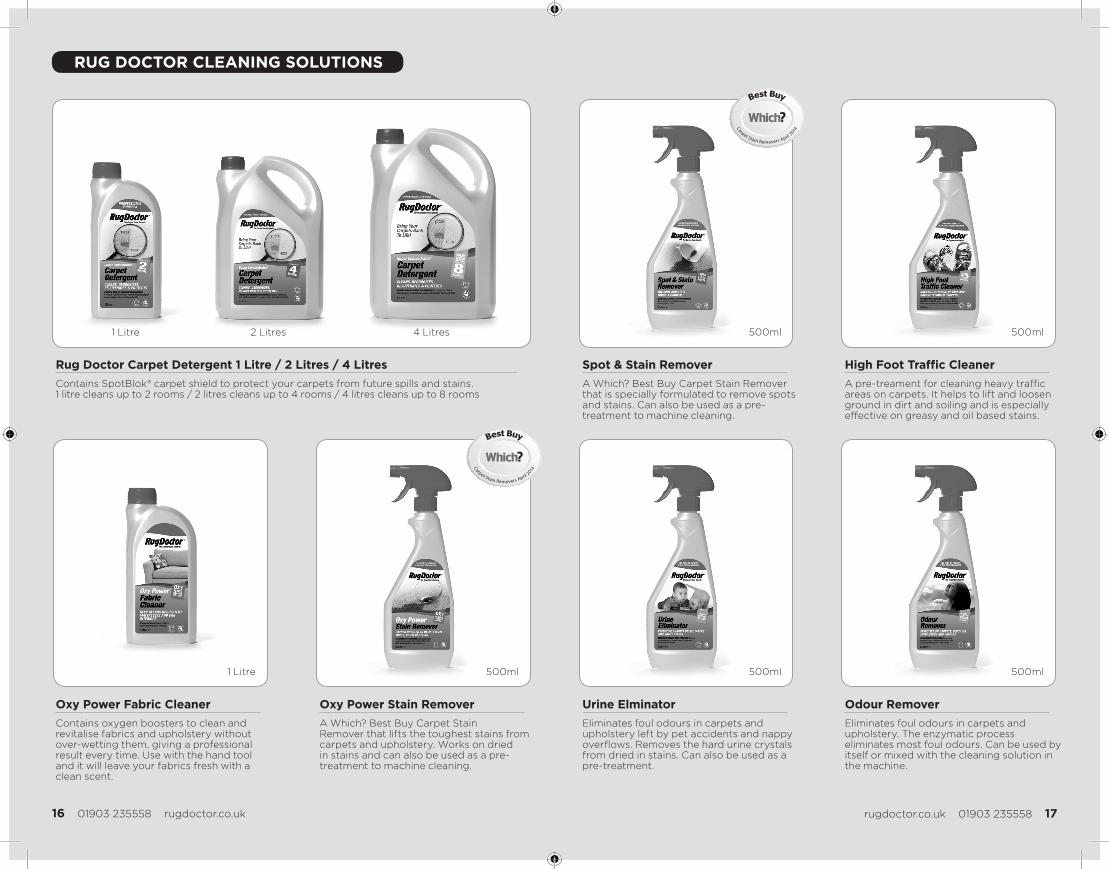
RUG DOCTOR CLEANING SOLUTIONS
Rug Doctor Carpet Detergent 1 Litre / 2 Litres / 4 LitresContains SpotBlok® carpet shield to protect your carpets from future spills and stains.1 litre cleans up to 2 rooms / 2 litres cleans up to 4 rooms / 4 litres cleans up to 8 rooms
Oxy Power Fabric CleanerContains oxygen boosters to clean and revitalise fabrics and upholstery without over-wetting them, giving a professional result every time. Use with the hand tool and it will leave your fabrics fresh with a clean scent.
1 Litre
1 Litre 2 Litres 4 Litres
500ml 500ml
500ml
500ml
500ml
Oxy Power Stain RemoverA Which? Best Buy Carpet StainRemover that lifts the toughest stains from carpets and upholstery. Works on dried in stains and can also be used as a pre-treatment to machine cleaning.
Urine ElminatorEliminates foul odours in carpets and upholstery left by pet accidents and nappy overflows. Removes the hard urine crystals from dried in stains. Can also be used as a pre-treatment.
Spot & Stain RemoverA Which? Best Buy Carpet Stain Remover that is specially formulated to remove spots and stains. Can also be used as a pre-treatment to machine cleaning.
High Foot Traffic CleanerA pre-treament for cleaning heavy traffic areas on carpets. It helps to lift and loosen ground in dirt and soiling and is especially effective on greasy and oil based stains.
Odour RemoverEliminates foul odours in carpets and upholstery. The enzymatic process eliminates most foul odours. Can be used by itself or mixed with the cleaning solution in the machine.
16 01903 235558 rugdoctor.co.uk rugdoctor.co.uk 01903 235558 17
What Does This Guarantee Cover / How Long Does The Guarantee Last1.1. Rug Doctor guarantees to the original purchaser for a period of 2 years from the
date of purchase (“Guarantee Period”), the machine supplied by Rug Doctor and every component part thereof (collectively, “Machine”) shall be free from material defects. However, this guarantee is subject to Clauses 1.2, 1.4 and 2.4 and does not apply in the circumstances described in Clause 2.1.
1.2. Subject to Clause 2.1, if:
(a) you give notice (in accordance with the “How Do I Get Service Under This Guarantee” section below) to Rug Doctor during the Guarantee Period within a reasonable time of discovery that the Machine has a material defect; and
(b) Rug Doctor is given a reasonable opportunity of examining the Machine; and
(c) you (if asked to do so by Rug Doctor) return the Machine to Rug Doctor’s place of business, payment for which will be in accordance with the “Expenses” section below;
Rug Doctor will repair or replace the Machine without further charge.1.3. The guarantee at Clause 1.1 shall apply to any replacement Machine (for a period of
2 years from the date of delivery of that replacement) and any repaired Machine (for the original Guarantee Period) supplied by Rug Doctor.
1.4. This Guarantee is given in addition to, and does not affect, your legal rights in relation to the Machine that is faulty or not as described. Advice about your legal rights is available from your local Citizens’ Advice Bureau or Trading Standards office.
What The Guarantee Does Not Cover2.1. The guarantee at Clause 1.1 does not apply to any defect in the Machine arising
from:
(a) any further use of the Machine made by you or any third party after giving notice in accordance with Clause 1.2;
(b) your failure, or that of any third party, to follow Rug Doctor’s oral or written instructions (including but not limited to the User Guide supplied with the Machine) as to the storage, use and maintenance of the Machine (as to the latter, for best operating efficiency and cleaning, use of only Rug Doctor cleaning products is recommended);
(c) any alteration or repair, or attempted alteration or repair, by you or any third party of the Machine without the written consent of Rug Doctor;
(d) fair wear and tear, wilful damage, negligence by you or any third party, accident, improper use and abuse, or abnormal storage or working conditions; or
(e) use by you or any third party of the Machine in any way or at any time for rental purposes.
2.2. If Rug Doctor fails to comply with these terms, then it shall be responsible for loss or damage that you suffer that is a reasonably foreseeable result of its breach of the terms or its negligence, but Rug Doctor shall not be responsible for any loss or damage that is not reasonably foreseeable.
2.3. Rug Doctor is only supplying the Machine for domestic and private use. You agree not to use the Machine for any commercial, business or re-sale purpose, and Rug Doctor has no liability to you for any loss of profit, loss of business, business interruption, or loss of business opportunity.
GUARANTEE INFORMATION
2.4. Rug Doctor does not exclude or limit in any way its liability for:
(a) death or personal injury caused by its negligence or the negligence of its employees, agents or subcontractors;
(b) fraud or fraudulent misrepresentation;(c) breach of the terms implied by section 12 of the Sale of Goods Act 1979
(title and quiet possession);(d) breach of the terms implied by sections 13, 14 and 15 of the Sale of
Goods Act 1979 (description, satisfactory quality, fitness for purpose and samples); and
(e) defective products under the Consumer Protection Act 1987.
ExpensesIf a Machine is returned to Rug Doctor for repair under the guarantee at Clause 1.1 within thirty (30) days of delivery, Rug Doctor will pay the delivery charges both from and back to you. However, you will be responsible for paying any delivery charges for Rug Doctor sending the Machine back to you if the Machine is not considered by Rug Doctor to have a material defect.Thereafter, you may be required to send the machine to Rug Doctor should repairs be required during the Guarantee Period. You will be responsible for paying any delivery charges for sending the Machine to and from Rug Doctor for repairs occurring under the guarantee and within the Guarantee Period and after the initial thirty (30) days.
How Do I Get Service Under This Guarantee?TO OBTAIN GUARANTEE ASSISTANCE, please call the Rug Doctor Consumer Support Team on: 01903 235558 (9.00 am to 5.00 pm Mon - Fri) or e-mail [email protected]. Rug Doctor will need the following information in order to assist you: your name, address and telephone number, product model and serial number, proof of purchase showing date and place of purchase. Please explain the nature of the problem. Rug Doctor will review all the facts involved and advise you as to recommended procedure. We recommend you keep the original carton and packing materials.Rug Doctor Ltd, Unit 29, Timberlaine Trading Estate Decoy Road, Worthing, West Sussex BN14 8ND E-mail: [email protected] Web Site: www.rugdoctor.co.ukUnauthorised UseFor the avoidance of doubt, use of the Machine for rental purposes is strictly forbidden and would result in you being unable to rely on this Guarantee. This Guarantee gives you specific legal rights. We hope you enjoy your Portable Spot Cleaner cleaning experience.
You can register your Rug Doctor® Deep Carpet Cleaner machine at www.rugdoctor.co.uk
18 01903 235558 rugdoctor.co.uk rugdoctor.co.uk 01903 235558 19
Deep Carpet Cleaner
71495 © 2015 Rug Doctor, LLC – All rights reserved.
EEC Statement of ComplianceManufacturer/EEC importer: Rug Doctor, LLC, hereby on our own responsibility, declare that the product 93170 Deep Carpet Cleaner has been manufactured in compliance with the following Directives:Safety: using the following transposed harmonised European Standards and technical specifications: IEC 60335-2-2The Low Voltage Directive EMC: 2004/108/EC Electromagnetic Compatibility Directive and subsequent amendments
Waste electrical products should not be disposed of with household waste. Please recycle where facilities exist. Check with your Local Authority or retailer for recycling advice.