ddms®/ddmsplus™: setting up & using delivery...
TRANSCRIPT

Updated January 2020
DDMS®/DDMSPLUS™: Setting Up & Using Delivery Manifests

© 2020 ECI and the ECI logo are registered trademarks of ECI Software Solutions, Inc. All rights reserved.
ContentsAbout Delivery Manifests ...............................................................................................3Before You Begin ............................................................................................................3
Importing Sales Orders and Customers ........................................................................................... 3Setting Delivery Manifest Parameters ............................................................................................. 3
Setting General Parameters ................................................................................................................3Setting Route Parameters ...................................................................................................................5
Setting the URL for Your eCommerce Site .......................................................................................6
Using Delivery Manifests ................................................................................................7Creating and Appending to Manifests ............................................................................................. 7Selecting and Editing Manifests ..................................................................................................... 11
Limiting Manifests.............................................................................................................................12Printing Manifests .............................................................................................................................12Releasing Manifests ..........................................................................................................................12Deleting Manifests ............................................................................................................................13Deleting Tickets From a Manifest .....................................................................................................14Exporting to a Third Party .................................................................................................................14Importing From a Third Party............................................................................................................14Exporting to JumpTrack ....................................................................................................................15Importing From JumpTrack ...............................................................................................................15
Transferring Tickets ......................................................................................................................... 15

3 continue to next page
DDMS®/DDMSPLUS™: Setting Up & Using Delivery Manifests
About Delivery ManifestsThe Delivery Manifest application is designed to help you streamline the delivery manifest. In line with our other EBS products, including Price Modeling, Price Plans, and Reporting, the Delivery Manifest application replaces a text-based screen with a graphical interface that has added functionality. The Delivery Manifest application replaces the text-based (TS) Shipping Manifest screen and the (L8) Manifest & Route Parameters screen.
Using the Delivery Manifest application, you can scan tickets, add tickets based on limit criteria, or use manual entry. You can create a new manifest or append to an existing manifest.
Before You BeginBefore you begin creating Delivery Manifests, you must complete the following steps:
1. Set up your routes and add tickets in Order Entry. For more information, see your online help.
2. Import sales journals and customers.
3. Set general and route parameters.
4. (Optional) Set up sorts on customers. See your online help.
Importing Sales Orders and CustomersBoth sales orders and customers should be imported periodically throughout the day. For example, you can set up a schedule to update every 15 minutes.
Note: Sales journals and customers should be imported each time a change is made to either of these databases. Not importing a customer causes any orders associated with the customer not to show on manifests.
You must also import sales journals to SQL so that you can access past sales. You do this using the EBS SQL Import Panel. You can use the Import Sales Journal function to import data from sales journal files to the SalesOrderJournal SQL Table and the SalesOrderArchive SQL Table. The SalesOrderJournal contains your most recent sales. You must specify the number of months to store in this table. All sales that are older than the specified number of months can be imported to the SalesOrderArchive during the same procedure. After the initial import, the system automatically adds new completed sales to the SalesOrderJournal file. It also moves past sales that are no longer within the specified number of months to the SalesOrderArchive table. Before using any EBS program for the first time, you must import your existing data to the new SQL database.
For more information, see the Using the EBS SQL Import Panel handout on our Customer Support Center.
Setting Delivery Manifest ParametersBefore using the Delivery Manifest application, you need to set parameters. There are two sets of parameters conveniently located within the application itself: general parameters and route parameters.
Note: Shipping manifest parameters previously set in the (L8) and (L8)[R] are automatically imported into the Delivery Manifest program. Changes made in the Delivery Manifest program also update the text-based (L8) and (L8)[R] parameters.
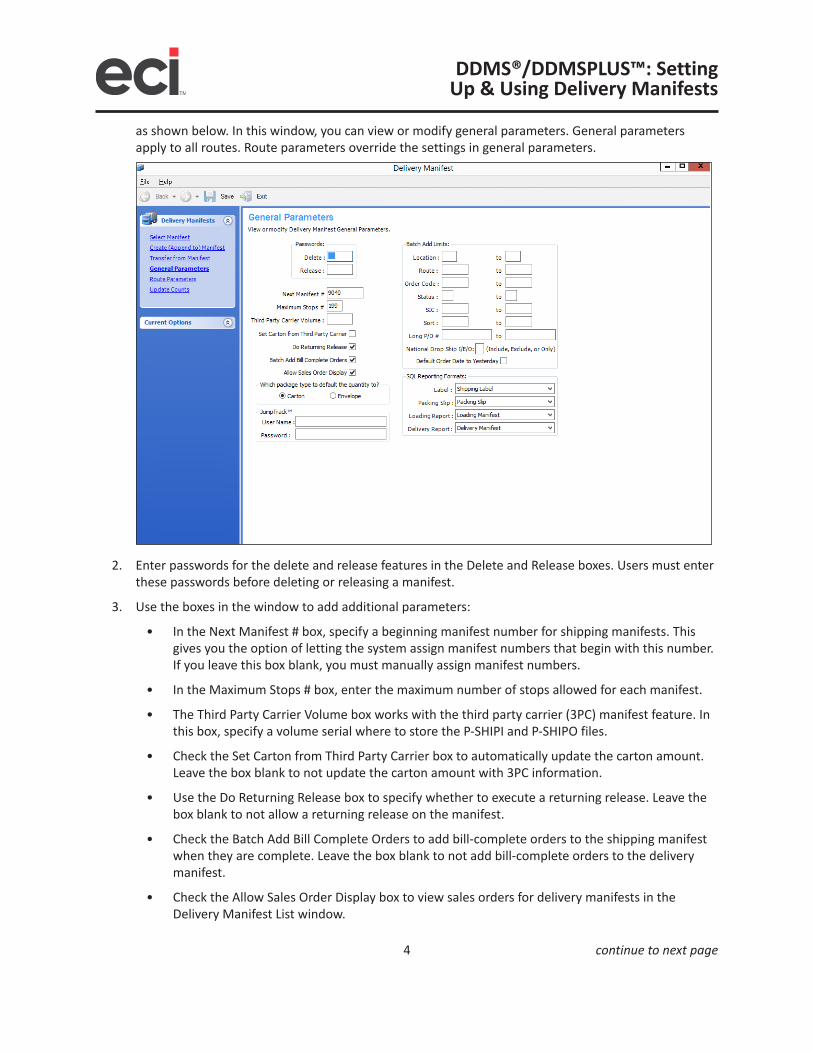
Setting General Parameters1. From the Delivery Manifests menu, click General Parameters. The General Parameters window opens,
4 continue to next page
DDMS®/DDMSPLUS™: Setting Up & Using Delivery Manifests
as shown below. In this window, you can view or modify general parameters. General parameters apply to all routes. Route parameters override the settings in general parameters.
2. Enter passwords for the delete and release features in the Delete and Release boxes. Users must enter these passwords before deleting or releasing a manifest.
3. Use the boxes in the window to add additional parameters:
• In the Next Manifest # box, specify a beginning manifest number for shipping manifests. This gives you the option of letting the system assign manifest numbers that begin with this number. If you leave this box blank, you must manually assign manifest numbers.
• In the Maximum Stops # box, enter the maximum number of stops allowed for each manifest.
• The Third Party Carrier Volume box works with the third party carrier (3PC) manifest feature. In this box, specify a volume serial where to store the P-SHIPI and P-SHIPO files.
• Check the Set Carton from Third Party Carrier box to automatically update the carton amount. Leave the box blank to not update the carton amount with 3PC information.
• Use the Do Returning Release box to specify whether to execute a returning release. Leave the box blank to not allow a returning release on the manifest.
• Check the Batch Add Bill Complete Orders to add bill-complete orders to the shipping manifest when they are complete. Leave the box blank to not add bill-complete orders to the delivery manifest.
• Check the Allow Sales Order Display box to view sales orders for delivery manifests in the Delivery Manifest List window.

5 continue to next page
DDMS®/DDMSPLUS™: Setting Up & Using Delivery Manifests
• Use the Carton and Envelope buttons to select which package type to use for the default quantity.
• Use the JumpTrack™ User Name and Password boxes to enter your JumpTrack login information.
4. The Batch Add Limits boxes allow you to add limits. For example, You can use the Route box and corresponding To box to limit the delivery manifest according to a particular route code or a range of route codes. These limits are the default limits when building a delivery manifest. However, you can change these limits any time you are building a delivery manifest. If you are using the Route/To boxes to limit according to route, you can use the R/M box when you run the delivery manifest to assign the route to the ticket.
• Use the National Drop Ship box to specify whether to include national drop ship orders on de-livery manifests. You can specify to include national drop ship orders on manifests by typing I, exclude by typing E, or enter O to only include national drop ship orders.
• The Default Order Date to Yesterday box lets you specify whether the delivery manifest defaults the order to yesterday’s date. Check the box to default delivery manifests to orders with yester-day’s date. Leave the box blank to default delivery manifests to orders with the current system date.
5. The SQL Reporting Formats section provides new delivery manifest parameters. This box allows you to select what to print on the label, packing slip, loading report, and delivery report.
6. Click .
Setting Route Parameters1. In the Delivery Manifest List, click the route for which to change parameters.
2. From the Delivery Manifests menu, click Route Parameters. The Route Parameters window opens. In this box you can override the settings in the General Parameters dialog box and create route specific parameters.
3. The Route box displays the code for the selected route. Verify that the correct route is selected. If the correct route is not selected, use the Routes box at the bottom of the page to select the correct route.
4. You can change the driver, route description, delivery days, maximum number of stops, and the substitute list ID. For more information on the corresponding boxes, see your online help.
5. Check the Build Third Party Source Table When Releasing box to use the route with a third party carrier service. You must check this box if you are using a proof of delivery system.
Leave this box blank to not use this route with a third party carrier service.
6. In the How to Default the Label Copies box, select from one of the following options:
Cartons and Envelopes: This option prints the number of labels for cartons and envelopes.
Cartons and SPR Cartons: This option prints the number of labels both for your carton count and the SPR carton count.
SPR Cartons: Use this option to print only the labels for the SPR cartons.
7. In the SQL Reporting Formats section, select the layout of the Label, Packing Slip, Loading Report, and Delivery Report using the drop down boxes.
6 continue to next page
DDMS®/DDMSPLUS™: Setting Up & Using Delivery Manifests
8. Click .
Setting the URL for Your eCommerce Site1. Log in to DDMSPLUS™ Administration.
2. Click Configuration.
3. Click Application Settings. The Application Settings page opens.
4. Click Edit next to the JumpTrack ECinteractive Address box.
5. Click the JumpTrack Ecinteractive Address box and enter your URL.
6. Click Save.
7 continue to next page
DDMS®/DDMSPLUS™: Setting Up & Using Delivery Manifests
Using Delivery ManifestsUsing Delivery Manifests involves:
• Creating Manifests
• Selecting and Editing Manifests
• Transferring Tickets
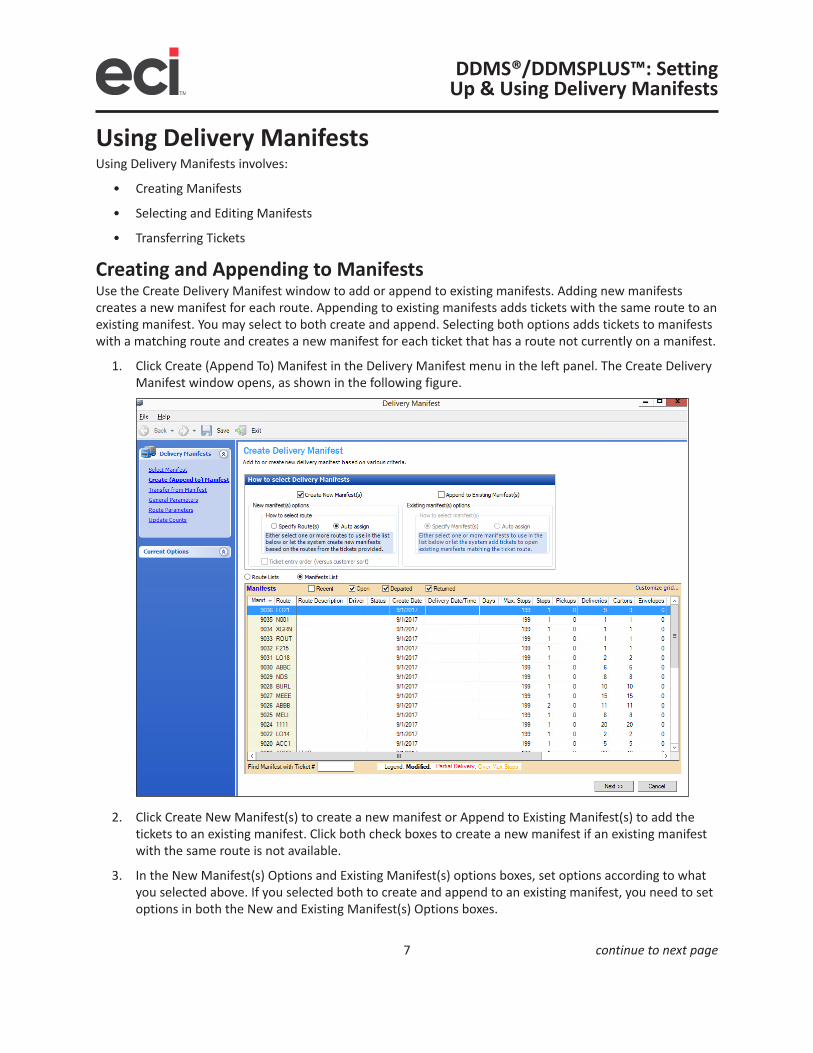
Creating and Appending to ManifestsUse the Create Delivery Manifest window to add or append to existing manifests. Adding new manifests creates a new manifest for each route. Appending to existing manifests adds tickets with the same route to an existing manifest. You may select to both create and append. Selecting both options adds tickets to manifests with a matching route and creates a new manifest for each ticket that has a route not currently on a manifest.
1. Click Create (Append To) Manifest in the Delivery Manifest menu in the left panel. The Create Delivery Manifest window opens, as shown in the following figure.
2. Click Create New Manifest(s) to create a new manifest or Append to Existing Manifest(s) to add the tickets to an existing manifest. Click both check boxes to create a new manifest if an existing manifest with the same route is not available.
3. In the New Manifest(s) Options and Existing Manifest(s) options boxes, set options according to what you selected above. If you selected both to create and append to an existing manifest, you need to set options in both the New and Existing Manifest(s) Options boxes.

8 continue to next page
DDMS®/DDMSPLUS™: Setting Up & Using Delivery Manifests
3.1 Choose how to select routes. You can select Specify Route(s) or Auto Assign.
• If you select Specify Route(s), the routes display in the Routes box below. In addition, the Ticket Entry Order option becomes available if creating a new manifest.
• Select Ticket Entry Order to sort by ticket order instead of customer order.
• In the Routes box, select the routes for which to create a manifest. To select several different lines, press the Ctrl key and click individual lines. You can also select several lines in a row by clicking the first line, holding the Shift key and clicking the last line.
• If you select Auto Assign, each route is automatically placed on its own manifest.
3.2 Choose how to select the Manifest. You can select Specify Manifest(s) or Auto Assign.
• If you select Specify Manifests, the Manifests List displays below. Use the Recent, Open, Departed, and Returned boxes to determine which manifests display. You can also find a manifest by ticket number using the search box.
Note: To switch between the Route List and Manifests List, use the buttons above the Lists grid.
• Use the Manifest List to select the manifests to which to append. To select several different lines, press the Ctrl key and click individual lines. You can also select several lines in a row by clicking the first line, holding the Shift key and clicking the last line.
• If you select Auto Assign, each ticket is automatically placed on a manifest matching the ticket route.
4. Click Next. The Creating Manifest Tickets and Printing window opens, as shown in the figure below.
5. In the How to Select Tickets box, select whether to manually enter tickets or find tickets matching a set of limits. If you select Manually Enter or Scan in Tickets, you can choose to use the Carton Scanning Flow.
9 continue to next page
DDMS®/DDMSPLUS™: Setting Up & Using Delivery Manifests
The regular flow when manually entering tickets means that tickets are assigned to a manifest as soon as they are entered. If a manifest exists with the route of the ticket, the ticket is placed on that route. If a manifest does not exist, a new manifest is automatically created. The manifest is printed after each entry.
The carton scanning flow allows you to enter all the tickets before assigning any to a manifest. Once you click save, the tickets are placed on manifests matching the ticket route. New manifests are created if there is no manifest matching the route. The manifest is not printed after each entry.
If you select Find All Tickets Matching the Limits, go to Step 8.
6. In the After Creating Manifests Automatically Print box, select whether to print delivery labels or packing slips automatically.
Note: This option is not available for the carton scanning flow.
To print delivery labels, click the Delivery Labels check box and use the drop down arrow in the Printer box to select the printer.
To print packing slips, click the Packing Slips check box and use the drop down arrow in the Printer box to select the printer.
Note: Once you select a printer, that printer becomes the default until changed.
7. Click Next and go to Step 11.
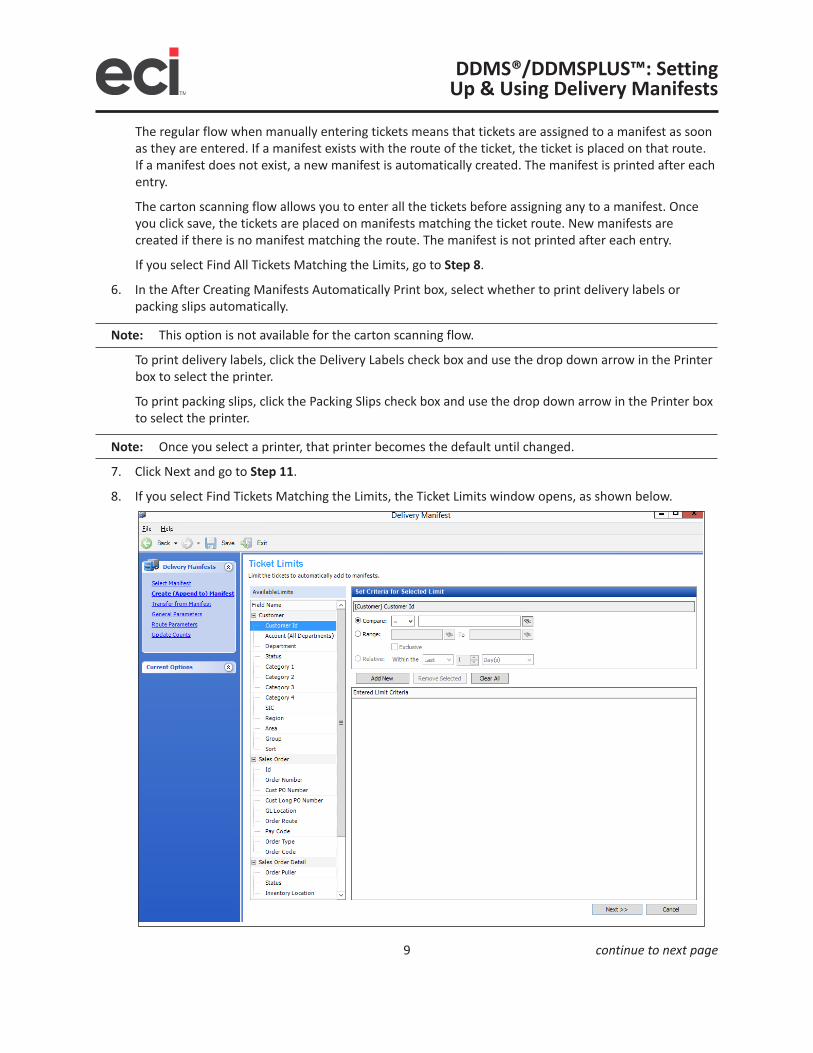
8. If you select Find Tickets Matching the Limits, the Ticket Limits window opens, as shown below.
10 continue to next page
DDMS®/DDMSPLUS™: Setting Up & Using Delivery Manifests
Use this window to set up limits. To see all the limits, click + (plus sign) in front of the field name.
Click the field name, then set the criteria for that filter. For example, to limit by customer ID, click the Customer ID option under Customer.
In the Set Criteria for Selected Limit box, select Compare or Range.
Use the Compare boxes to specify whether to limit by numbers that are greater than, less than, or equal to the numbers entered in these boxes.
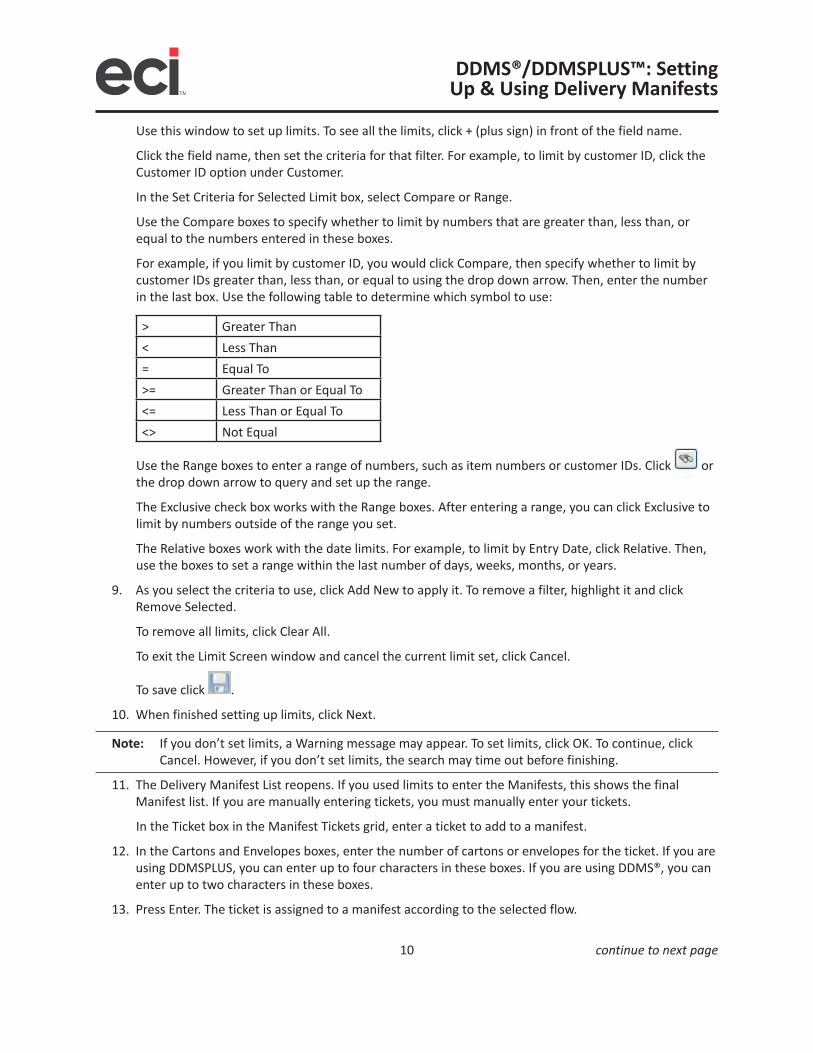
For example, if you limit by customer ID, you would click Compare, then specify whether to limit by customer IDs greater than, less than, or equal to using the drop down arrow. Then, enter the number in the last box. Use the following table to determine which symbol to use:
> Greater Than< Less Than= Equal To>= Greater Than or Equal To<= Less Than or Equal To<> Not Equal
Use the Range boxes to enter a range of numbers, such as item numbers or customer IDs. Click or the drop down arrow to query and set up the range.
The Exclusive check box works with the Range boxes. After entering a range, you can click Exclusive to limit by numbers outside of the range you set.
The Relative boxes work with the date limits. For example, to limit by Entry Date, click Relative. Then, use the boxes to set a range within the last number of days, weeks, months, or years.
9. As you select the criteria to use, click Add New to apply it. To remove a filter, highlight it and click Remove Selected.
To remove all limits, click Clear All.
To exit the Limit Screen window and cancel the current limit set, click Cancel.
To save click .
10. When finished setting up limits, click Next.
Note: If you don’t set limits, a Warning message may appear. To set limits, click OK. To continue, click Cancel. However, if you don’t set limits, the search may time out before finishing.
11. The Delivery Manifest List reopens. If you used limits to enter the Manifests, this shows the final Manifest list. If you are manually entering tickets, you must manually enter your tickets.
In the Ticket box in the Manifest Tickets grid, enter a ticket to add to a manifest.
12. In the Cartons and Envelopes boxes, enter the number of cartons or envelopes for the ticket. If you are using DDMSPLUS, you can enter up to four characters in these boxes. If you are using DDMS®, you can enter up to two characters in these boxes.
13. Press Enter. The ticket is assigned to a manifest according to the selected flow.
11 continue to next page
DDMS®/DDMSPLUS™: Setting Up & Using Delivery Manifests
Note: The regular flow when manually entering tickets means that tickets are assigned to a manifest as soon as they are entered. If a manifest exists with the route of the ticket, the ticket is placed on that route. If a manifest does not exist, a new manifest is automatically created. The manifest is printed after each entry. The carton scanning flow allows you to enter all the tickets before assigning any to a manifest. Once you click Save, the tickets are placed on manifests matching the ticket route. New manifests are created if there is no manifest matching the route. The manifest is not printed after each entry.
14. Continue entering tickets, pressing Enter after each ticket to move to the next line.
15. When finished entering tickets, click .
Note: Added tickets display in bold until they are saved.
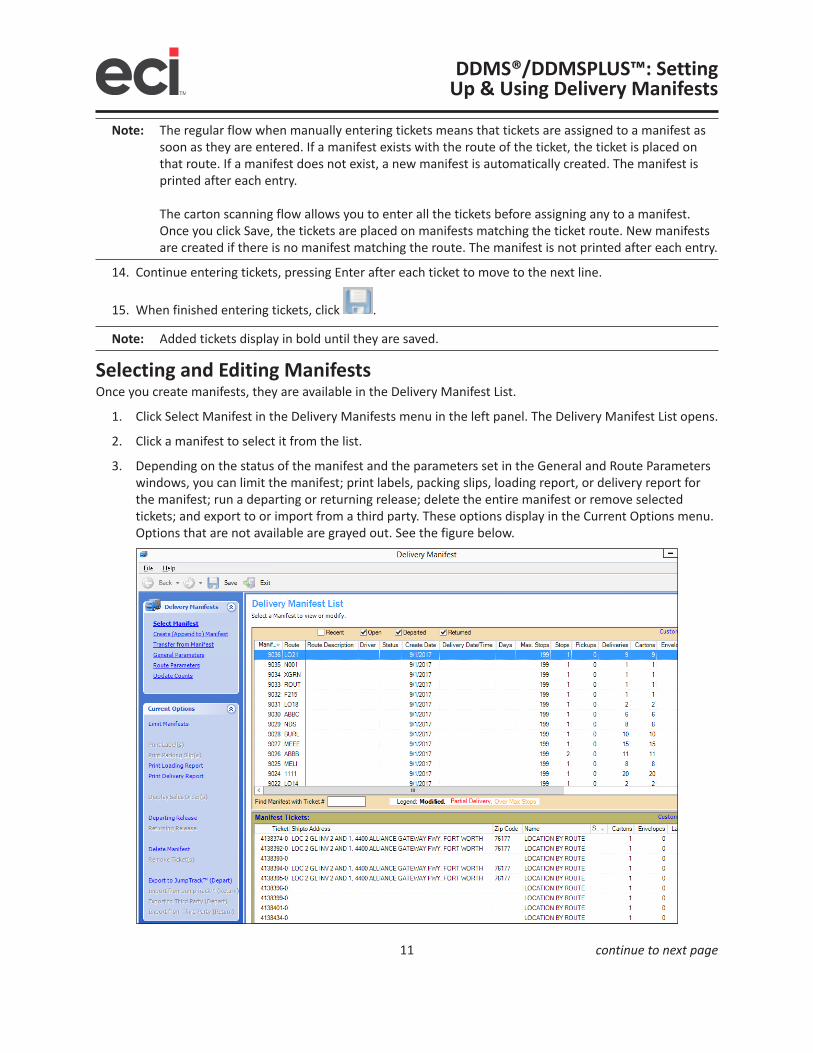
Selecting and Editing ManifestsOnce you create manifests, they are available in the Delivery Manifest List.
1. Click Select Manifest in the Delivery Manifests menu in the left panel. The Delivery Manifest List opens.
2. Click a manifest to select it from the list.
3. Depending on the status of the manifest and the parameters set in the General and Route Parameters windows, you can limit the manifest; print labels, packing slips, loading report, or delivery report for the manifest; run a departing or returning release; delete the entire manifest or remove selected tickets; and export to or import from a third party. These options display in the Current Options menu. Options that are not available are grayed out. See the figure below.

12 continue to next page
DDMS®/DDMSPLUS™: Setting Up & Using Delivery Manifests
Limiting Manifests1. Select a manifest in the Delivery Manifest List.
2. Click Limit Manifests in the Current Options menu. The Delivery Manifest Limit window displays, as shown in the figure below. This Limits window works just like the Ticket Limits window, except you are limiting manifests instead of tickets. For more information, refer back to Steps 8-11 under the heading Creating and Appending to Manifests.
Printing ManifestsPrinting manifests is quick and easy with the new Delivery Manifest application. Simply select a manifest in the Delivery Manifest List and select the printing option in the Current Options menu.
You can print labels, packing slips, a loading report, or a delivery report for each manifest. The availability of these printing options depends on the status of the manifest and the parameters set in the Route and General Parameters windows.
Releasing ManifestsWhen you are ready to load and deliver the orders, you should release the manifest. Releasing a manifest attaches delivery information to the order. This delivery information, which is stored in the file P-SPECIAL, includes the manifest number, the delivery time, the name of the driver making the delivery, and the number of cartons and envelopes.
After releasing a manifest, you can view the delivery information in Order History. Viewing these orders lets
13 continue to next page
DDMS®/DDMSPLUS™: Setting Up & Using Delivery Manifests
you quickly determine the date and time of the delivery, the number of cartons and envelopes, and so on.
There are two types of releases: a departing release and a returning release. A departing release lets you enter delivery information before it is actually delivered, while the returning release lets you add or change information on the delivery manifest once the driver returns.
You can execute both departing and returning releases.
To execute a departing release on a manifest:
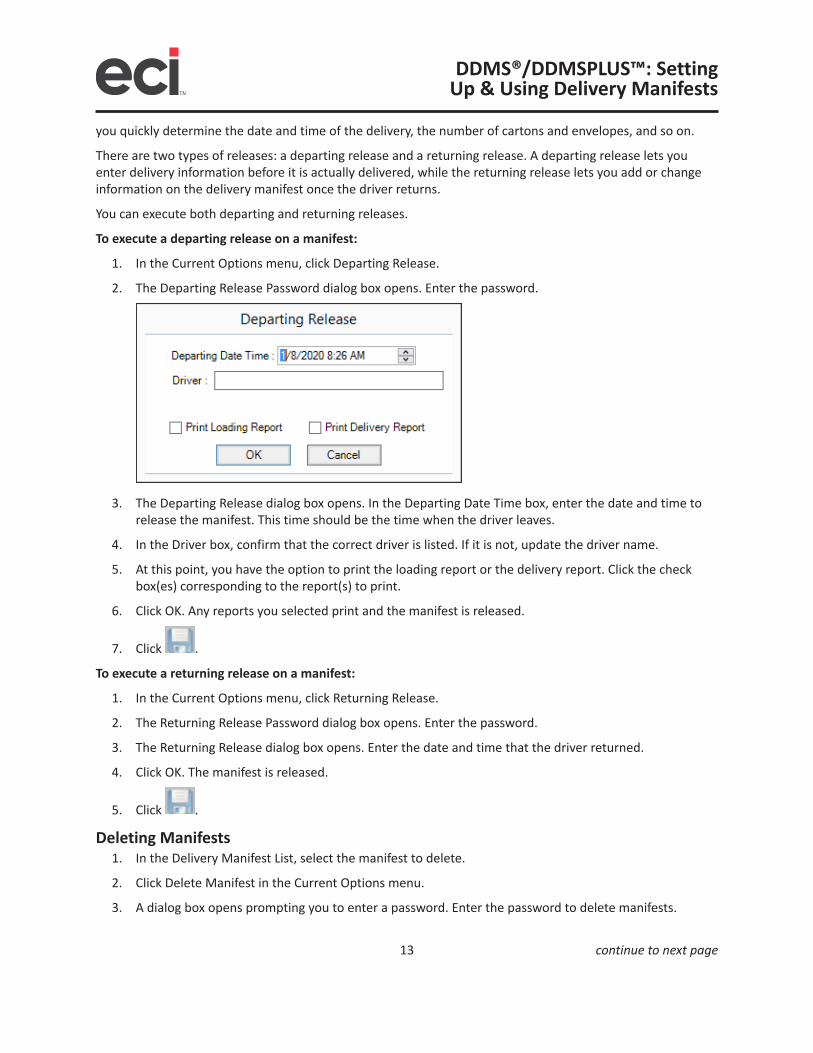
1. In the Current Options menu, click Departing Release.
2. The Departing Release Password dialog box opens. Enter the password.
3. The Departing Release dialog box opens. In the Departing Date Time box, enter the date and time to release the manifest. This time should be the time when the driver leaves.
4. In the Driver box, confirm that the correct driver is listed. If it is not, update the driver name.
5. At this point, you have the option to print the loading report or the delivery report. Click the check box(es) corresponding to the report(s) to print.
6. Click OK. Any reports you selected print and the manifest is released.
7. Click .
To execute a returning release on a manifest:
1. In the Current Options menu, click Returning Release.
2. The Returning Release Password dialog box opens. Enter the password.
3. The Returning Release dialog box opens. Enter the date and time that the driver returned.
4. Click OK. The manifest is released.
5. Click .
Deleting Manifests1. In the Delivery Manifest List, select the manifest to delete.
2. Click Delete Manifest in the Current Options menu.
3. A dialog box opens prompting you to enter a password. Enter the password to delete manifests.
14 continue to next page
DDMS®/DDMSPLUS™: Setting Up & Using Delivery Manifests
4. At the Manifest Delete confirmation box, click OK. The selected manifest is deleted.
5. Click .
Deleting Tickets From a Manifest1. In the Delivery Manifest List, select the manifest for which to delete tickets.
2. The tickets display in the Manifest Tickets box below. Click the ticket(s) to delete. To select several different lines, press Ctrl and click individual lines. You can also select several lines in a row by clicking the first line, holding Shift and selecting the last line.
3. Click Remove Ticket(s) in the Current Options menu.
4. When prompted, enter your password to delete tickets.
5. Click OK. The tickets are deleted.
6. Click .
Exporting to a Third Party1. Before you can export to a third party, make sure the Build Third Party Source Table When Releasing
box in the Route Parameters window is checked. Checking this box ensures that the PSHIPO file is created. After you’ve built the PSHIPO file, you’re ready to export the information to your 3PC service.
2. Click Export to Third Party (Export) in the Current Options menu. The rest of the process is done using the third party carrier’s software. Usually this software resides on a Windows® PC. You can obtain this software from your third party carrier service.
Since third party carrier service export instructions vary, they are not included in this document. For instructions on performing this function, refer to your third party carrier’s software documentation.
Once you export the information, the third party carrier processes the information and determines the package’s weight, the method by which to ship the package, insurance information, and freight charges. While you may have several pick tickets listed on each manifest, the freight shown by the third party carrier represents the total amount for the package being shipped.
After the information is processed, the third party carrier also creates and prints your shipping labels, using your on-site label printer. This saves you the necessity of printing the labels yourself.
3. Click .
Importing From a Third PartyOnce the labels are printed, you can import the third-party carrier information back to your system. When you do, the DDMS system places the information, including the tracking number on the ticket as an MMMM line. You can view this information in Order Entry.
1. Click Import from Third Party (Return) in the Current Options menu.
2. The Third Party Import Exceptions dialog box opens. In this box, you can review any exceptions. To print these exceptions, click Print Exceptions. To continue with the Import, click OK.
3. The Returning Release dialog box opens. Change the date if needed using the arrows and click OK. The third party information is imported.
15 continue to next page
DDMS®/DDMSPLUS™: Setting Up & Using Delivery Manifests
4. Click .
Exporting to JumpTrack1. Select the manifest to export from the list.
2. Under the Current Options menu, click Export to JumpTrack (Depart).
3. Enter the departing release password. The Departing Release dialog box opens and displays the departing driver and time. At this point, you can print reports, if needed.
4. Click OK.
Importing From JumpTrack1. Select the departed manifest from the list.
2. Under the Current Options menu, click Import From JumpTrack (Return). The Returning Release dialog box opens.
3. Adjust the date as needed.
4. Click OK. The information is imported from JumpTrack.
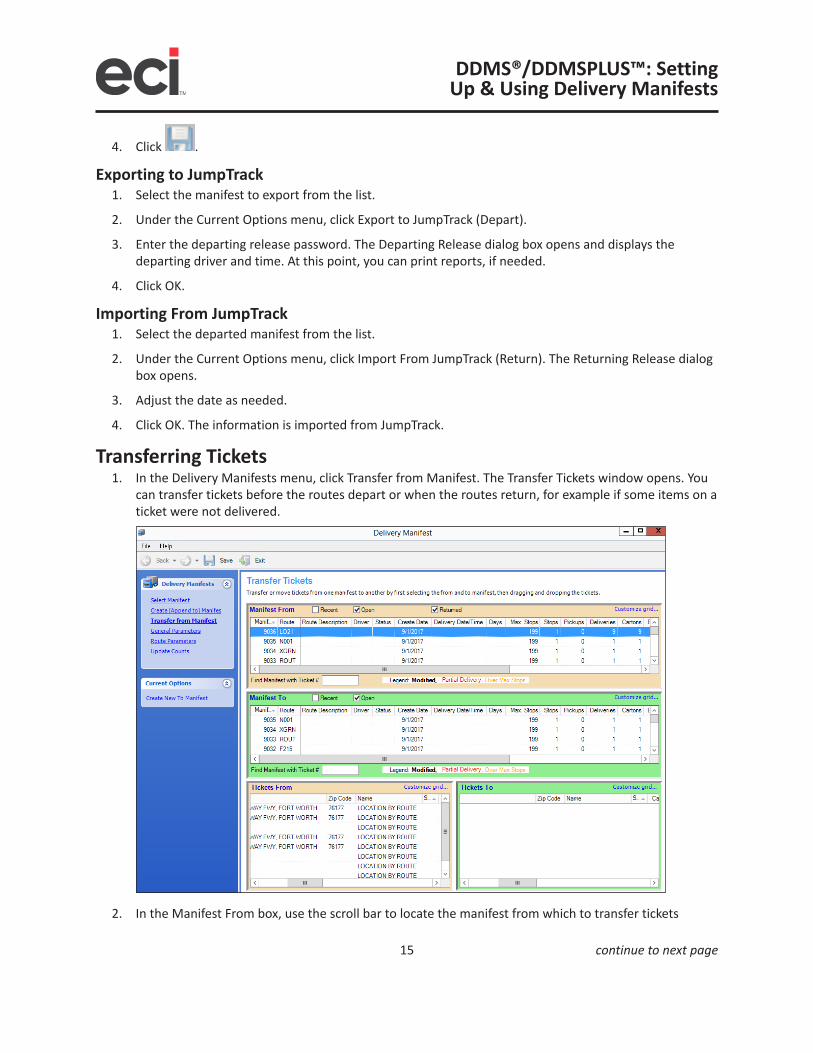
Transferring Tickets1. In the Delivery Manifests menu, click Transfer from Manifest. The Transfer Tickets window opens. You
can transfer tickets before the routes depart or when the routes return, for example if some items on a ticket were not delivered.
2. In the Manifest From box, use the scroll bar to locate the manifest from which to transfer tickets
16
DDMS®/DDMSPLUS™: Setting Up & Using Delivery Manifests
and highlight it to select. You can also use the Recent, Open, and Returned check boxes to limit the manifests that display. To find a manifest with a particular ticket, enter the number for the ticket in the Find Manifest with Ticket # box.
3. In the Manifest To box, use the scroll bar to locate the manifest to which to transfer tickets and highlight it to select. You can also use the Recent and Open check boxes to limit the manifests that display. To find a manifest with a particular ticket, enter the number for the ticket in the Find Manifest with Ticket # box.
4. Once you have selected both the manifest to transfer from and the manifest to transfer to, use the Tickets From and Tickets To to transfer the tickets. Double-click and drag the ticket from the Tickets From to the Tickets To box.
You can also transfer the tickets to a new manifest. Click Create New To Manifest. The Tickets To box is blank, allowing you to create a new manifest. Drag the tickets to the Tickets To box.
5. Click .