date sold: serial number: - gmw associates gmw m… · section 1 magnet control system...
TRANSCRIPT

GMW
USER’S MANUAL
MODEL: LVMCTRL-
LABVIEW MAGNET CONTROL
LabVIEW Driver V2.0
For LabVIEW Ver 8.2 [or later version]
Date Sold:____________
Serial number: ________
PROPRIETARY
THIS DOCUMENT CONTAINS CONFIDENTIAL INFORMATION PROPRIETARY TO GMW ASSOCIATES. IT MUST NOT BE REPRODUCED OR DISCLOSED TO OTHERS OR USED IN ANY WAY EXCECPT FOR THE INSTALLATION, OPERATION OR MAINTENANCE OF GMW ASSOCIATES PRODUCTS.
File No: MLVMCTRL GMW Magnet Control Software manual v2.0.doc Revision Date: Jan 11, 2008 _________________________________________________________________________________
GMW
955 Industrial Road, San Carlos, CA 94070 Tel: (650) 802-8292 Fax: (650) 802-8298 Email: [email protected] Web site: www.gmw.com

TABLE OF CONTENTS MAGNET CONTROL SYSTEM SPECIFICATIONS Section 1 Magnet Control System Overview Magnet Control System Basic Requirements WARNINGS [Refer to this section before operation of Electromagnet System] Section 2 MAGNET CONTROL SYSTEM SETUP Section 3
Hardware: Supported field meters Supported power supplies Typical system configurations Digital Teslameter Setup Power Supply Setup Analog Device Interface Setup
Software: Install GPIB-USB driver Install NI-DAQmx software for DAQPad Verify hardware software installation Install magnet control software from GMW
MAGNET CONTROL SYSTEM OPERATION Section 4
The main operation screen Software block diagram Starting and Stopping the Software Operation Menu Chart Control Log to File. PID Setup. PID CONTROL OPERATION
PID Controller Overview PID Control Operation Warning Loading an Open Loop Characterization Plot Making an Open Loop Characterization Plot Tuning the PID Controller PID Controller Operation PID Controller Initial Settings Tables
Open Loop File. Setup Status HW Setup. Wave Form Mode. Table Mode.
MAINTENANCE Section 5 EXCITATION CURVES Section 6 TEST DATA Section 7 Sorensen power supply stability test Kepco power supply stability test
APPENDIX Section 8

Section 1 MAGNET CONTROL SYSTEM SPECIFICATIONS
Magnet Control System Overview The Magnet Control System is a special application driver written for using with LabVIEW for Windows version 8.2 or later. This driver provides the user with a GUI [Graphical User Interface] between LabVIEW and the Magnet Control System hardware. It enables operator control of up to two magnet systems comprising Electromagnet, Teslameter and Power Supply in four control modes:
- Open Loop Current Control mode. - Open Loop Field Control mode. - Closed Loop Field Control Simple mode. - Closed Loop Field Control Hybrid mode.
It also supports magnet system without Teslameter in Open Loop Current Control mode or Open Loop Field control mode. Magnet Control System Basic Requirements
A magnetic field meter from one of the following supported model [Note 1]. - Group3 DTM model: DTM-132/133-DG or DTM-141/151-DG. - Senis Magnetic Field Transducer YM/3M [Note 2] - MetroLab NMR 2020/2025 with GPIB
A suitable Power Supply which can be either controlled using analog signal [Note 3] or one of the following supported power supplies.
- Danfysik 853/858 power supply with GPIB interface. - Sorensen SGA with GPIB interface - Kepco BOP with GPIB interface - GMW 231HC with NI DAQPad digital control option
A suitable computer system. At the time of printing this manual, suggested computer configuration: 1GB RAM, 1GB available hard drive space, Pentium 4 or equivalent CPU, 2 GHz or above.
Operating system Windows XP, SP2 One available USB 2.0 port for GPIB-USB controller if required One available USB 2.0 port for NI DAQPad if required A CD drive for installing software LabVIEW for Windows version 8.2 or later. [Note4] NI DAQPad 6015/6251.
Required only if using either Senis transducer, GMW 231HC or analog controlled power supply. USB 2.0 interface. Two analog output channels. Output Range: +/-10V. Output Resolution: 16bit. Output impedance: 0.1 Ohm.
Table Mode. Note: 1. Field (Closed Loop) Control mode cannot be used without a Teslameter installed on the Magnet Control System. 2. Senis Transducer is read through NI DAQ. 3M model is supported but only one field axis is read. 3. Power supply can be bipolar or unipolar. The analog programming range is -10DCV to +10DCV, 16bit resolution. 4. Both source VI and version of stand alone executable program file provided with the CD. The stand alone executable version cannot be altered by the end user. The stand alone executable version does not require LabVIEW.
1-1

Section 2 WARNINGS
REFER TO WARNINGS BELOW BEFORE OPERATING ELECTROMAGNET SYSTEM
1 Personnel Safety
If during operation the magnet fringing field is in excess of 0.5mT (5G), it can cause malfunctioning of sensitive electronic and magnetic components. We recommend that warning signs are posted in areas where the fringing field may exceed 0.5mT indicating that a magnetic field may be present.
2 Ferromagnetic Objects During operation the magnet exerts magnetic attraction towards ferromagnetic objects in the near vicinity of its pole
faces. Keep ferromagnetic items clear! 3 Arcing Magnet stores energy in its field during operation. Do not disconnect any current lead while under load or the magnetic
field energy will be discharged across the interruption causing arcing and possible damage to electronic circuits. 4 Coil Hot Resistance Do not exceed the maximum coil hot resistance for the Electromagnet(s) given in the specifications or coil overheating and possible damage may occur 5 Watches, Credit Cards, and Magnetic Disks Do not move magnetically sensitive items into the close vicinity of the magnet pole gap. Even some anti-magnetic
watches can be damaged when placed in close proximity to the pole gaps during operation. Credit cards, and magnetic disks are affected by magnetic fields as low as 0.5mT (5G). Depending on the previous operating field and the pole gap, the remanent field in the gap can be in excess of 0.5mT (5G) with the magnet power supply off or disconnected.
6 Power off Power Supply Switch off power supply before performing any hardware setup task around magnet or power supply. The current leads
of magnet are isolated from ground. There is an electrical potential difference between the current leads and ground, even when the output current is zero. It could be a safety hazard for personnel or instruments if accidentally contacted to the current leads.
2-1

Section 3 MAGNET CONTROL SYSTEM SETUP
3.1 Hardware. The Magnet Control System software can be used with different combination of supported field meter and power supply. Some typical combinations of field meter and power supply are listed as below. -Supported field meter: Group3 DTM 133/151 with GPIB interface. Senis magnetic field transducer 0.2T/1T/2T/5T with analog output, must be used with NI DAQPad, USB 2.0 interface MetroLab NMR teslameter 2025, GPIB interface. -Supported power supply: GMW 231HC, with NI DAQPad, USB 2.0 interface. DANFYSIK 853/858, GPIB/RS232 interface. Kepco BOP, GPIB interface. Sorensen SGA GPIB interface Sorensen SGA analog with NI DAQPad Sorensen SGA analog with GMW Reversal switch, GPIB interface with ADI, USB 2.0 interface with new version of GMW Reversal Switch. Custom power supply with analog programming +/-10V. Computer interface: USB 2.0 port. GPIB: NI PCI GPIB board NI USB to GPIB controller, using one USB 2.0 port. RS232: USB to RS232 converter. -Typical system configurations:
System setup 1
Without a field meter, this setup can be used for Open Loop Current and Open Loop Field control mode. Low cost and fast response.
3-1
Computer Kepco BOP analog
Magnet
Power Supply:
NI DAQPad, USB
Kepco BOPGPIB
GMW 231 HCNI DAQPad, USB
Sorenson SGA GPIB
Sorenson SGA analogNI DAQPad, USB
SGA /reversal switchGPIB/DAQPad

Section 3
System setup 2
Basic setup used for Closed Loop Control. Low cost, low resolution and can be fast response.
System setup 3
Closed Loop Control setup used for high field stability. Slow response and high resolution.
System setup 4
Two systems control are supported for low speed system setup. Analog control (using NI DAQ) is not supported for two channel control.
3-2
Computer
Danfysik 853/858Magnet 1
Power Supply 1 and Field Meter 1:
GPIB
DTM151/NMR2025GPIB
Danfysik 853/858GPIB
DTM151/NMR2025GPIB
Power Supply 2 and Field Meter 2:
Magnet 2
Computer
Danfysik 853/858
Magnet
Power Supply:
GPIB
DTM 151GPIB
NMR 2025GPIB
Field Meter:
Computer
Kepco BOP analog
Magnet
Power Supply:
NI DAQPad, USB
Kepco BOPGPIB
GMW 231 HCNI DAQPad, USB
Sorenson SGA GPIB
DTM 133GPIB
Senis 0.2T/2T/5TNI DAQPad
Field Meter:
SGA/reversal switchGPIB/NI DAQPad
Sorenson SGA analogNI DAQPad, USB
NI DAQPad, USB
Custum Power supply with analog control

Section 3
System setup 5
3.2 Field meter setup 3.2.1 Digital Teslameter [ DTM -151/132/133-DG] setup
1. Power down the Digital Teslameter. 2. Remove the bottom cover by undoing the cover securing screw in the center of the cover. 3. The DIP switches located under the bottom cover must be set as detailed in the following table. 4. Replace the bottom cover. 5. Connect the GPIB cable to the GPIB connector located on the rear panel of the Digital Teslameter. 6. Connect the GPIB cable to the GPIB interface board installed in the computer. 7. Connect the Hall Probe. 8. Power up the Digital Teslameter.
Digital Teslameter
DIP Switch Settings SW 1-1 OFF GPIB address (Note 1) SW 1-2 ON GPIB address SW 1-3 OFF GPIB address SW 1-4 OFF GPIB address
Section 3
SW 1-5 OFF GPIB address SW 1-6 OFF dual primary addressing disabled SW 1-7 OFF talker/listener SW 1-8 OFF not used
SW 2-1 ON serviced requests enabled SW 2-2 ON EOI asserted SW 2-3 ON terminator carriage return SW 2-4 OFF double terminator disabled
SW 2-5 OFF field units tesla SW 2-6 OFF no units symbol SW 2-7 ON digital filtering ON SW 2-8 OFF defaults no action
Note 1: Each DTM requires an unique GPIB address.
3-3
Main Computer
Power Supply 1
Magnet 1
Power Supply 1 and Field Meter 1:
Field Meter 1
Power Supply 2
Field Meter 2
Power Supply 2 and Field Meter 2:
Magnet 2
Computer 1
Computer 2
Ethernet
Ethernet
Section 3 3.2.2 MetroLAB NMR 2025 setup 1. Power down the Digital Teslameter. 2. Set Micro-switch on the rear panel. 1 to 5: GPIB address. 6: Set to 0 7: Set to 0. Listener/Talker mode 8: Set to 1. Send <CR><LF> to terminate messages 9: Set to 1. select GPIB (IEE 488) interface. 3. Connect all the cables. 3.3 Power Supply Setup Below are brief descriptions for setting up powe supply for computer control. For details of how to setup either power supply, please refer to power supply documentation. 3.3.1 GMW 231HC
GMW 231HC has two versions of control. External Analog Control uses a customer provided programming source, such as a Waveform Function Genarator. Internal Analog Control uses a NI DAQ as programming source. - Ensure the power switch is OFF - Switch the Control Mode toggle Switch on the back of the GMW 231HC to Internal. - Connect USB cable from NI DAQPad to computer USB port - Install all software before power up the DAQPad.
3.3.2 Kepco - Ensure the power switch is OFF - Ensure the GPIB Interface board model setup matches power supply model. All new Kepco GPIB boards are set to 200V, 5A model. User needs to change the model on the GPIB board either using a DIP switch (model BIT4882F) or through computer (model BIT4886). - Set the GPIB address. GMW Control Software uses 1 as default GPIB address. Power supply shipped from GMW will all set GPIB address to 1. If GPIB address needs to be changed, refer to the power supply user manual. Each instrument on the same GPIB bus must have a unique GPIB address. - Ensure the AC line voltage is correct. - Connect the currnt cable to magnet. Connect AC cord to power supply. - Set Kepco power supply front control: Mode to Current, Voltage Control to OFF, Current Control to OFF.
3.3.3 Sorenson - Ensure the power switch is OFF - Set the rear panel switch S1-1 to ON to set the unit to remote mode. - Set the rear panel switch S1-2 to OFF to set the power supply to no SRQ upon power-on. - Set the rear panel switch S1-3 to ON to set the power supply to be the master device. - Set the GPIB address. The rear panel switch S1-4 to S1-8 is GPIB address. Power supply shipped from GMW will all set GPIB address to 1. If GPIB address needs to be changed, refer to the power supply user manual. Each instrument on the same GPIB bus must have a unique GPIB address. - Ensure the AC line voltage is correct. - Connect the currnt cable to magnet. Connect AC cord to power supply.
3-4

Section 3
3.3.4 Danfysik - Ensure the power switch is OFF - Set the GPIB address. If using NI GPIB-232CV-A, the following needs to be check/set. 1. Danfysik power supply main control board:
- Remote Line needs to be set to RS232: Jumper on ST9. ST10 and ST11 must be left open without jumper. - Remote Line communication parameters are as Danfysik power supply defult: 9600 BAUD, No Parity, 8 Data bit, 1 Stop bit.
2. Cable between main control board and GPIB-232CV-A must be null modem cable, DB25 Male/DB9 Female. 3. NI GPIB-232CV-A. - Mode: D - Config:SRQ Disabled, small serial buffer - GPIB address: 1 - Hand Shake:XON/OFF disabled - Data formate: 8 Data bit/No Parity/1 Stop bit - Baud: 9600
Power supply shipped from GMW will all set GPIB address to 1. If GPIB address needs to be changed, refer to the power supply user manual. Each instrument on the same GPIB bus must have a unique GPIB address.
- Ensure the AC line voltage is correct. - Connect the currnt cable to magnet. Connect AC cord to power supply. - Power on the Danfysik power supply. From front panel, change the Local/Remote control to REMote.
3.4 Analog Device Interface Setup for NI DAQPad [ 6015] 1. Ensure the power switch is OFF 2. Connect NI DAQPad analog output (BNC, male) to power supply analog control input. 3. Connect USB cable from NI DAQPad to computer USB port. 4. Install all software before power up the DAQPad.
3-5
Section 3
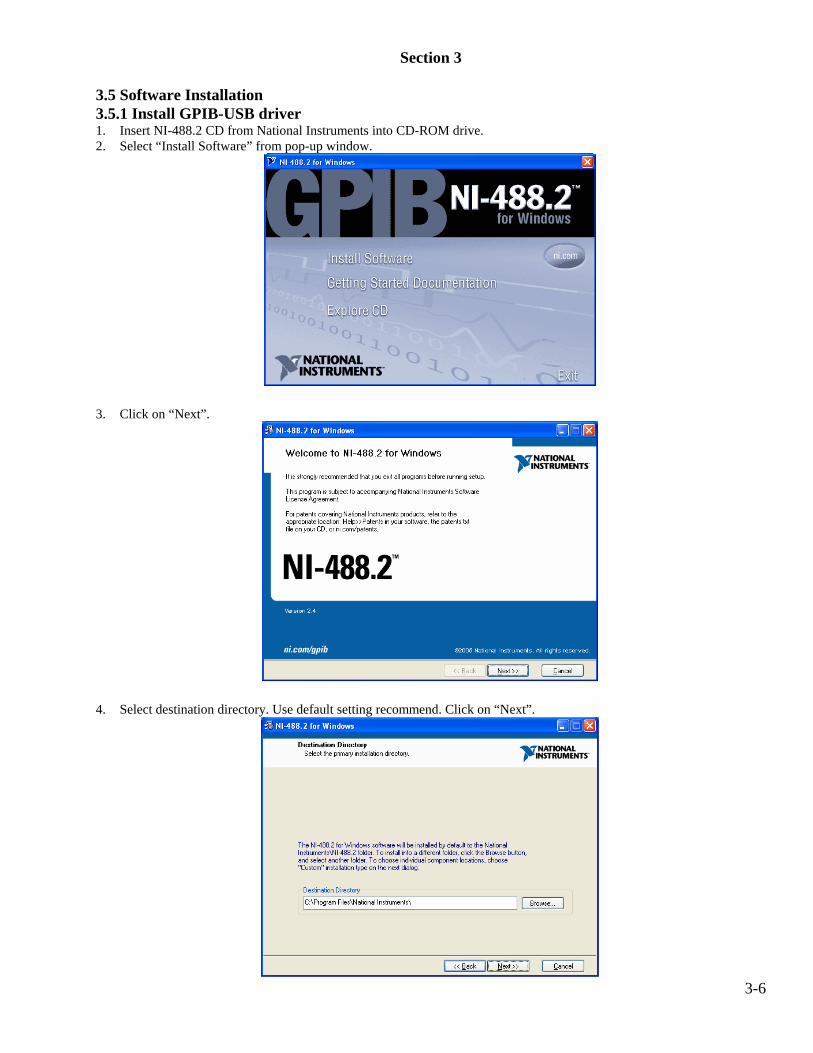
3.5 Software Installation 3.5.1 Install GPIB-USB driver 1. Insert NI-488.2 CD from National Instruments into CD-ROM drive. 2. Select “Install Software” from pop-up window.
3. Click on “Next”.
4. Select destination directory. Use default setting recommend. Click on “Next”.
3-6

Section 3
5. Select Installation option. Select “Custom”. Click on “Next”.
6. Select Features to install. Click on “NI-VISA 3.2”. Select “Install this feature to a local drive” from the drop-down menu. Click on “Next”.
7. Accept the License Agreements. Click on “Next”.
3-7

Section 3
8. Start Installation. Click on “Next”.
9. Wait until the installation complete. Click on “Next”.
3-8
Section 3
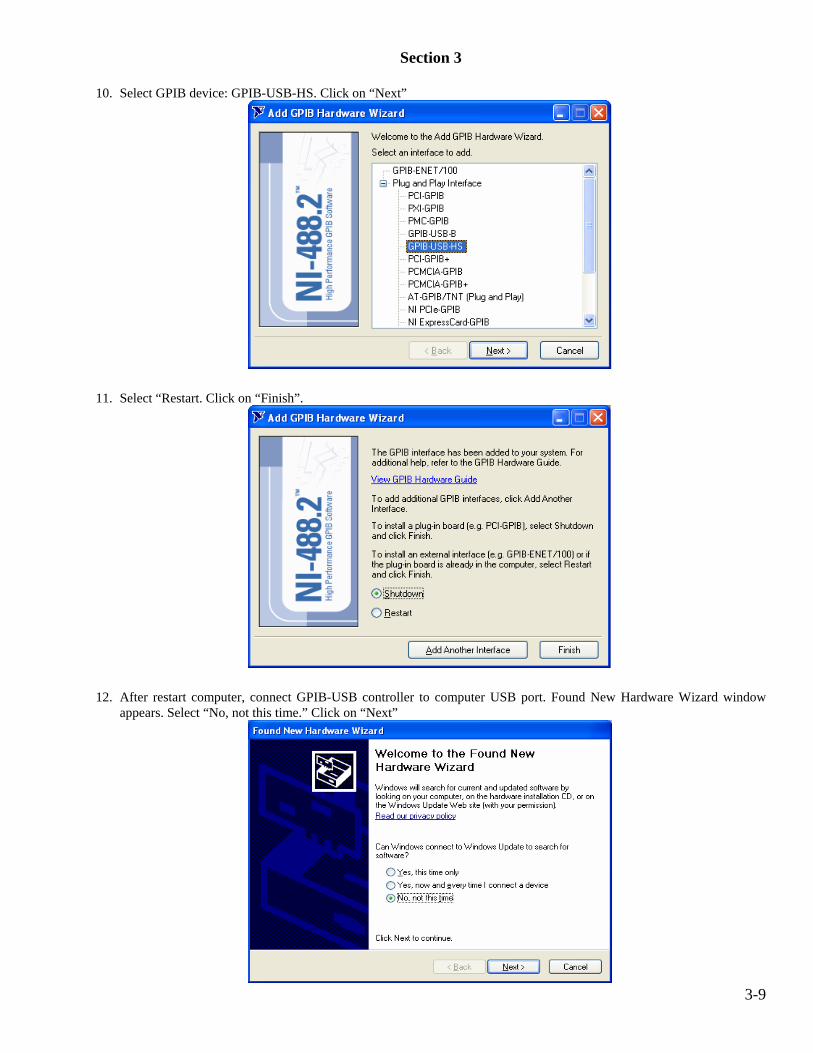
10. Select GPIB device: GPIB-USB-HS. Click on “Next”
11. Select “Restart. Click on “Finish”.
12. After restart computer, connect GPIB-USB controller to computer USB port. Found New Hardware Wizard window appears. Select “No, not this time.” Click on “Next”
3-9
Section 3
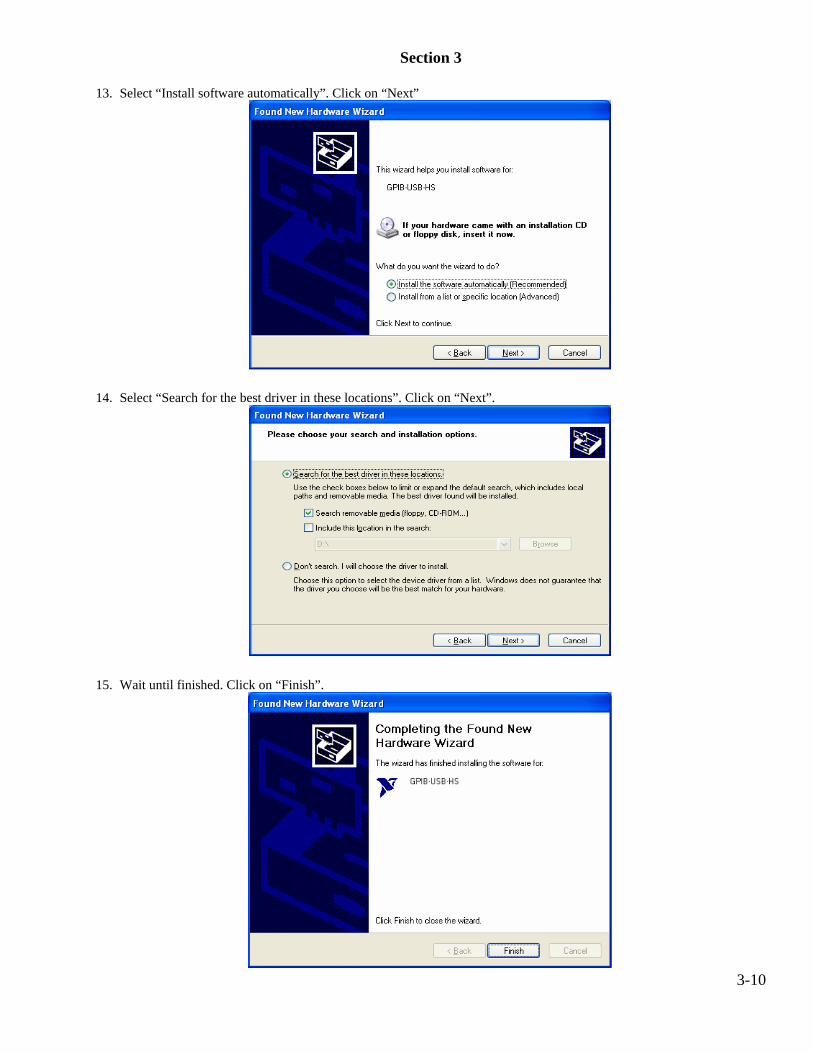
13. Select “Install software automatically”. Click on “Next”
14. Select “Search for the best driver in these locations”. Click on “Next”.
15. Wait until finished. Click on “Finish”.
3-10

Section 3
16. Select the option for registration hardware. Click on “Finish”.
17. “NI 488.2 Getting Started Wizard” window appears. After verifying hardware and software installation, click on “Exit”.
3-11

Section 3
3.5.2 Install NI-DAQmx software for DAQPad. Following steps are for NI-DAQmx 8.0.1. Actual step and screen may vary depend on version of DAQmx 1. Insert DAQmx CD from National Instruments. From the pop-up window, select “Install NI-DAQmx/VI Logger”.
2. Product Information window appears. Click on “Next”.5
3. Select destination directory. Recommend using default directory setting. Click on “Next”
3-12
Section 3
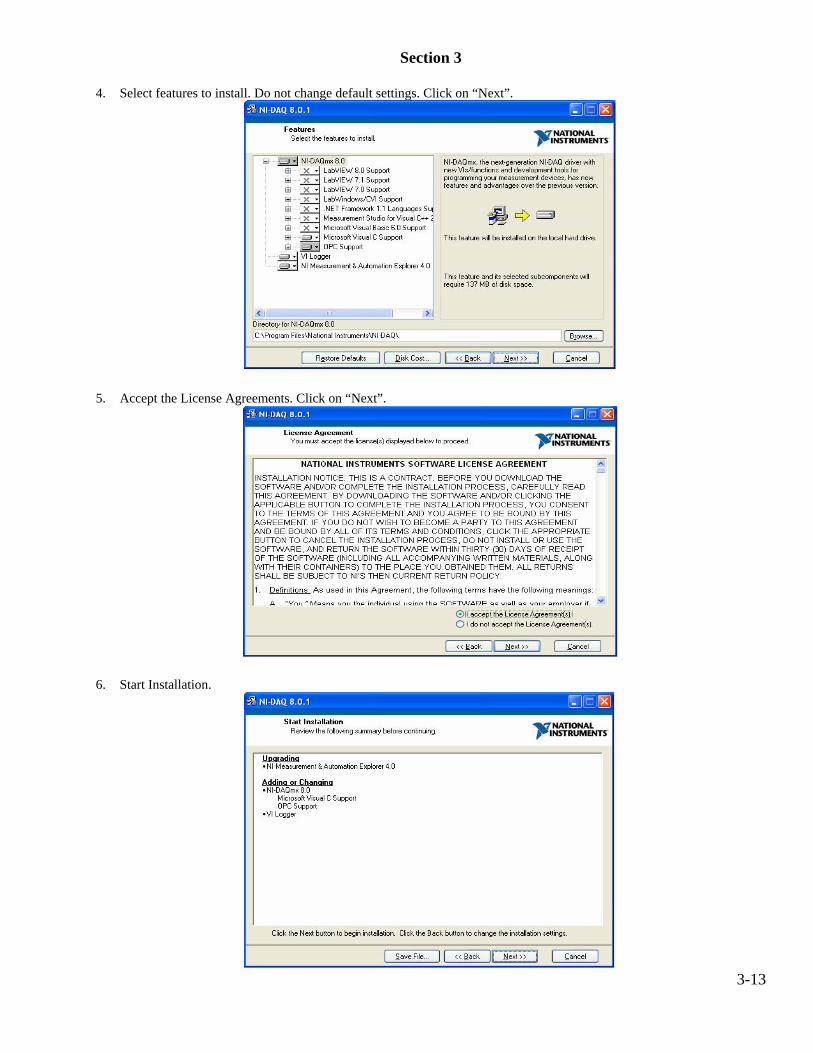
4. Select features to install. Do not change default settings. Click on “Next”.
5. Accept the License Agreements. Click on “Next”.
6. Start Installation.
3-13
Section 3
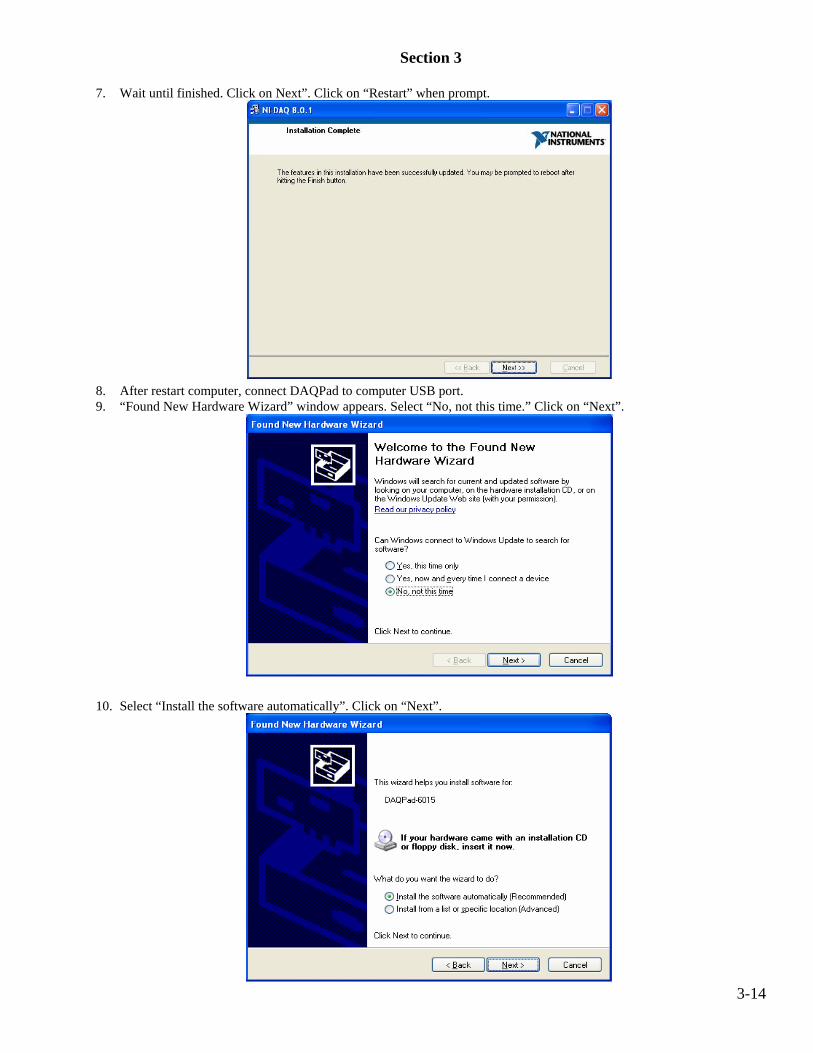
7. Wait until finished. Click on Next”. Click on “Restart” when prompt.
8. After restart computer, connect DAQPad to computer USB port. 9. “Found New Hardware Wizard” window appears. Select “No, not this time.” Click on “Next”.
10. Select “Install the software automatically”. Click on “Next”.
3-14

Section 3
11. Wait until finished. Click on “Finish”. 12. NI-Max will detect new data acquisition device. Select “Take No Action”. Click on “OK”.
3.5.3 Verify hardware software installation 1. Open “Measurement and Automation Explorer” from National Instruments. 2. Go to “My System/Device and Interfaces”. There should be two entries, one as “GPIB0(GPIB-USB-HS)”, one as “NI-
DAQmx Devices”
3-15

Section 3
3. Right click on “GPIB0 (GPIB-USB-HS)”. Select “Scan for Instruments” from the drop down menu. All GPIB devices on the GPIB bus should appear in the right side window. The GPIB addresses will be needed later for software setup.
4. Click on “NI-DAQmx Devices”. The DAQPad should show on the right side window, without red cross. Note the device reference is “Dev1”. If more than one DAQPad have been connected to this computer, there will be more devices showing. This reference for device will be needed later for software setup.
3-16

Section 3
3.5.4 Install magnet control software from GMW. 1. Insert software CD from GMW. Select D:\Installer\Setup.exe to start the installation. 2. Select destination directory. Make changes if wanted. It is recommended leave the “Directory for National Instruments
products” unchanged. Click on ”Next”
3. Accept the License Agreements. Click on “Next”
3-17

Section 3
4. Start Installation. Click on “Next”.
5. Wait until finished. Click on “Finish”.
6. Restart computer when prompted.
3-18

Section 4 OPERATION
4.1 The main operation screen - Shows Field readings from the field meter if connected and configured correctly. - Window control for selecting Window Sub Panels, Operation, PID, Chart, Wave Form, Table Mode and Ramp Mode - Shows the system status. - Access to Hardware setup menu. (HW Setup button) - Controller Mode selects from one out of four control modes: Open Loop Current, Open Loop Field, Closed Loop Field Simple or Closed Loop Field Hybrid. - STOP button programs the power supply to zero current and stops the program exection. - System Parameters Strip chart shows system parameters on a strip chart under Chart tab. More details later.
4-1

Section 4 4.2. Software block diagram.
4-2
Start. Load Settings from file.
Initialize field meter. Initialize power supply.
Check GPIB bus. Check DAQPad.
Load Open Loop Curve
Error? Bus
errors?
Read field. Set PS current. PID.
Exit
Set PS current to 0A.
Exit?
Current or field mode?
Set PS current.
Yes Yes
No
HW Setup.
Yes
No
Current mode
Field mode
Make Open Loop Curve
Software block diagram
Save data
No

Section 4 4.3. Starting and Stopping the Software
To open the program, go from Start>>Program>GMW Magnet System Closed Loop Control>GMW Magnet System Closed Loop Control V2.
To start the software, click on the arrow button on the top of the screen. To stop the software, click on Stop button or use <Esc> key.
The software will load default settings from a configuration file (Config.txt) every time the software starts. To change the default settings click on HW Setup. For first time setup, click HW Setup before starting the software. It will open the hardware setup window. If more than one power supply/field meter are enabled in hardware setup, another tab will appear to show the second system. The second system display and control is identical with the first system. The description below is for the first system unless specified.
4.4. Operation Menu. 4.4.1 If controlling more than one power supply, power supply under control is selected by click on the proper tab. If no
second magnet tab shown, the software is controlling one power supply.
4.4.2 Operation Mode: Open Loop Current Control. Controls power supply current output by setting the Set Current to desired current
value. User can not change Set Field under Current mode.
To change the current output of power supply under current mode, select Open Loop Current Mode, input desired current at Set Current. Output current will change after hit <Enter> or click anywhere outside the Set Current box.
Open Loop Field Control. Set power supply current output to reach a given field. Software will determine the
output current from the given field through a predefined Field vs. Current excitation curve, (OLC, Open Loop Characterization file). The OLC file can be made either using a field meter support or a simulation file. OLC file in use is displayed under PID tab. The accuracy of Open Loop Field Control depends on the accuracy of the OLC file.
To change the current output of power supply under open loop field mode, select Open Loop Field Control, input desired field at Set Field. Output current will change after hit <Enter> or click on any where outside the Set Field box.
Close Loop Field Control Simple. Adjust power supply current output to maintain a given field by setting the
Set Field to desired field value. Software will compare the desire field and the reading of field meter, adjust the output current accordingly. User can not change Set Current under Field mode.
To change the current output of power supply under close loop control field simple mode, select Close Loop
Field Control Simple, input desired field at Set Field. Output current will change after hit <Enter> or click any where outside the Set Field box.
Close Loop Field Control Hybrid. In this mode the controller uses data from the Open Loop Characterization
File and operates in PID mode only when the controller is within a 5% window of the desired Field Setpoint. The Open Loop Characterization File provides the controller with the field versus current excitation curve. The controller will not operate correctly if an Open Loop Characterization file is not loaded or the file has incorrect data for the magnet. When the user gives the system a new Field Setpoint the controller calculates an initial current setting for the desired Field Setpoint and transmits it to the Power Supply. During the ramp up or down to the desired Field Setpoint the PID Controller is disabled. When the actual field reaches a value within the Hybrid control window (defined in the HW setup and loaded when software started) the PID controller is activated. During the change over to PID control the Derivative control is disabled to allow the controller to settle before taking control of the system.
Generally the Hybrid PID mode is preferred since it provides the fastest transition time to a new Field Setpoint. User can not change Set Current under Field mode.
4-3
Section 4 To change the current output of power supply under close loop field control mode, select Close Loop Field
Control Hybrid, input desired field at Set Field. Output current will change after hit <Enter> or click on any where outside the Set Field box.
4.4.3 Field Probe Location: Probe at Sample Position. Field reading from probe is used directly to control the field without change. The
software is controlling the field at the point the probe is located. Probe at Secondary Position. Field reading from probe is modified before used for controlling the field. The
modification is made either by a constant multiplier or looking into two OLC files at Sample position and Secondary position. This allows controlling field indirectly if the probe cannot be placed at the intend controlling location. The constant multiplier and the two OLC files are defined in HW Setup window.
4.4.4 Closed Loop Field Control Operation Warning Before attempted to run the Magnet Control System in the Closed Loop Field control mode check the items listed below. 1 The Teslameter is powered up. 2 The Teslameter probe is inserted in the magnet gap securely. 3 The Teslameter is set to the correct field range. 4 The Teslameter is connected to the GPIB bus and is returning correct field readings. 5. The Teslameter is reading the field correctly.
Running close loop field control without the field meter properly installed will cause the power supply to ramp up to max current. It is dangerous for both the operator and equipment setup.
4.4.5. Field Meter Range. Select the field meter full-scale range to be higher than the maximum possible field. 4.4.6. Field Reading. - Probe Field. Shows the field meter reading. - Sample Field. Shows the field at sample position. If the probe is located at sample position, the Probe and Field and Sample Field are the same. If the probe is located at secondary location, the Sample Field is calculated field.
4.5. Chart Control. - Auto Scale ON/OFF: Turn on/off auto scaling for Y-axis. - Time Axis: Set the time span for X-axis. - Channel Select: Select/deselect which trace to be shown on the chart. This setting also determines if the trace
will be saved to a file. 4.6. Log to File. Save data to a text file. The traces to be saved are selected from the Chart display, Channel Select.
If a trace is unselected, that trace will not be saved to file. After Log to File is started, Select/unselect trace will cause software misplace data. User should avoid changing Change Select during logging. - Log To File: Shows the data file name/path. - Start Log: Click on Start Log. A window will prompt user for file name/directory to be saved. - Auto/Manual: If Auto is selected, data will be saved every time interval defined by Sample Interval.
If Manual is selected, data will be saved every time the user clicks on Manual Log. 4.7. PID Setup. This menu is used for tuning the PID Controller Before using the PID controller for the first time the controller will need to be tuned to obtain optimum performance. Follow the instructions listed below.
1. Select the PID Setup tab. The PID control panel will appear. 2. Set the Controller Mode required, either Hybrid PID or Simple PID control. 3. Enable the display of the field on the stripchart by selecting it on the Channel Select on the side of the stripchart. 4. Set the PID and Lead Lag controls to the initial values. Set the Lead Lag gain to 1, lag time to 0.2, lead time to 0. 5. Check that the correct Open Loop Characterization file is loaded. If no Open Loop Characterization file is found, a
Default.olc will be loaded. [See Section 4.10 for Loading an Open Loop Characterization Plot.] 6. Set the Integral and Derivative controls to 0.00.
4-4

Section 4
7. Enter a Field Setpoint value of 0.100000 Tesla. Retry with a Field Setpoint of 0.200000Tesla. 8. Increase lag time until the field can reach the target field quickly and does not have overshot. 9. Observe the trace of the field for the controller response on the System Parameter chart. It should not oscillate. 10. Increase the PID Gain a small increment. 11. Repeat steps 9 and step 10. 12. Continue repeating steps 10 and 11 until the controller oscillates in a steady state. Steady state oscillations mean the
oscillations neither decrease or increase over a period of time. 13. Reduce the PID Gain a small increment, repeat steps 8 and step 9. If the controller does not oscillate then the system
is set at maximum gain. 14. Reset the PID Integral and Derivative controls to the initial values given in Section 9 of this manual. 15. Repeat step 8 and step 9. If the system oscillates then decrease both the Integral and Derivative controls. If the
systems overshoot the Field Setpoint then increase both the Integral and Derivative controls. Note: 1. Integral and Derivative controls should have an approximate ratio of 4 to 1 between their settings.
[e.g. If the Integral control is set to 6.00 then the Derivative should be set to 1.50]. 2. All the PID tuning control settings are saved only at HW Setup.
4.8 Open Loop File.
4.8.1 Load Open Loop File Before the PID controller is run, a B v I Open Loop Characterization File must first be loaded that matches the magnet and gap being used. This B v I Open Loop Characterization file (OLC file) can be generated either using a field meter or using a simulated field vs. current curves. An example OLC file below shows the file format. Current and Field columns is TAB delimited.
Current (Amps) Field (Tesla) 0.0000E+0 -3.0350E-4 8.3333E-1 6.4058E-2 1.6667E+0 1.2882E-1 2.5000E+0 1.9346E-1 3.3333E+0 2.5757E-1 4.1667E+0 3.2085E-1 5.0000E+0 3.8263E-1
If the appropriate OLC file exists in the system, the OLC file can be loaded as detailed below. If the appropriate file does not exist the user will need to make the Open Loop Characterization File, [see Section 4.8.2 “Making an Open Loop Characterization Plot”]. To make the OLC to be loaded every time the software starts, making the OLC file in use as default file in the HW Setup window. [see Section 4.10 “HW Setup”]
1. Click on the LabVIEW Run arrow to start the Magnet Control software [if not already running].
4-5

Section 4 2. Click on the PID tab and then click on Open Loop Characterization.
3. The Open Loop Characterization screen will appear, click on the Load button.
4. Select an Open Loop Characterization file by clicking on the desired file name. [A valid Open Loop
Characterization file will have .olc extension on the end of the filename]. 5. Click on OK or press the Enter key. The selected file will be loaded. 6. Check the selected file name is shown in the Loaded Open Loop Characterization File indicator. If correct then
click on the Done button. The Open Loop Characterization Plot panel will close. 7. To use the selected OLC file each time the software starts, input the OLC file name and path in HW
Setup>Power Supply>Open Loop File Path. Save the configuration.
4-6
Section 4
4.8.2 Making an Open Loop Characterization Plot. Follow the previous steps to open the Open Loop Characterization screen.
1. Set the Max and Min current for the intend power supply operating range. It is not necessary the Max and Min current match the output range of the power supply.
2. Set the Steps. More steps will generate more accurate Open Loop Characterization Plot. 3. Click on Begin button. 4. The system will start taking data and report status in the status indicator. When the system reports it is Idle then
click on the Save Button. Name the plot file using the correct format in the Filename box and click on OK or press the Enter key. [See next Section 4.8.3 for description of Open Loop Characterization filename format].
4.8.3 Open Loop Characterization filename format It is recommended the Open Loop Characterization File name has the following format.
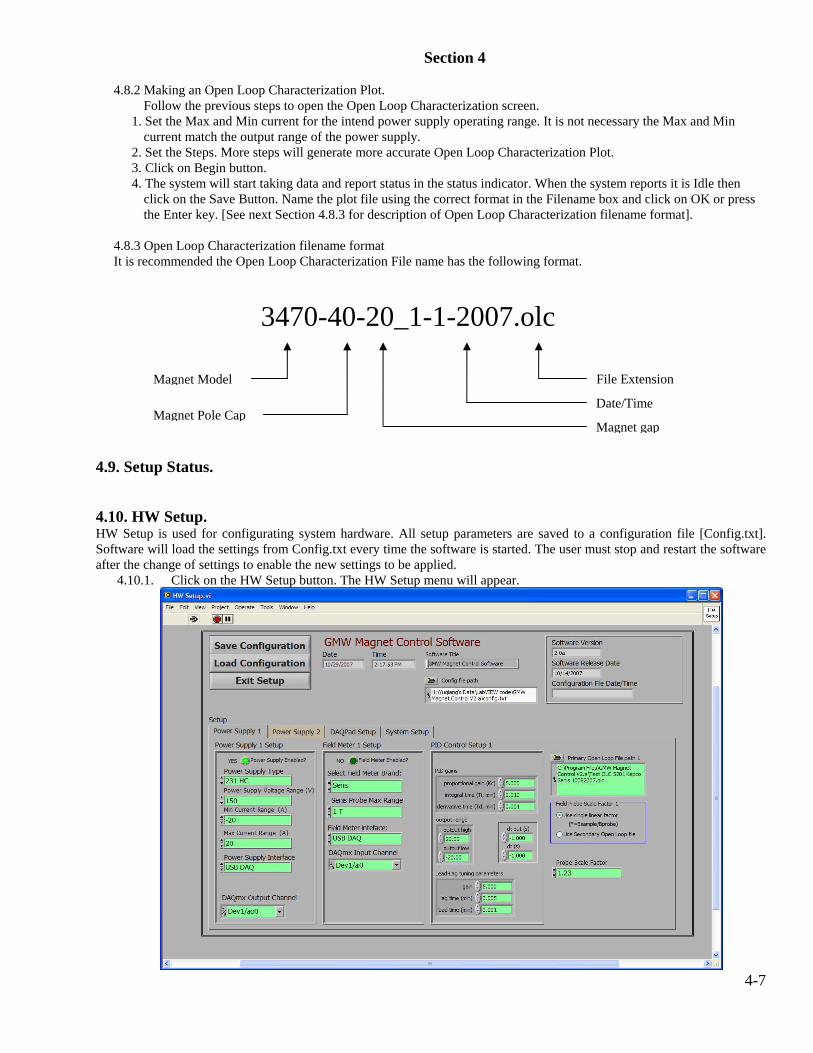
4.9. Setup Status. 4.10. HW Setup. HW Setup is used for configurating system hardware. All setup parameters are saved to a configuration file [Config.txt]. Software will load the settings from Config.txt every time the software is started. The user must stop and restart the software after the change of settings to enable the new settings to be applied.
4.10.1. Click on the HW Setup button. The HW Setup menu will appear.
4-7
3470-40-20_1-1-2007.olc
Magnet Model
Magnet Pole Cap
File Extension
Magnet gap
Date/Time
Section 4 4.10.2. Power supply 1 and power supply 2 have identical setup panels. 4.10.3. Select Power supply Type. 4.10.4. Input the minimum and maximum current range according to the power supply. 4.10.5. Select Power Supply Interface. 4.10.6. Select DAQmx Output Channel from the pull-down menu if using 231 HC or customer power supply with
analog control. This is the analog output channel from National Instruments DAQPad. The Dev is the device address automatically assigned by software. DAQPad has two analog output channels, AO 0 and AO 1. Set the
channel according to the physical connection between DAQPad and power supply. If only one power supply is under control, the default output channel is AO 0. If no pull-down menu is available, check the NI software installation and verify the hardware according to the Software/Hardware Installation section.
4.10.7. Select Field Meter Brand. 4.10.8. Select Field Meter Model or Range. 4.10.9. Select Field Meter interface. 4.10.10. Select the Field Meter GPIB addresses or DAQPad Channel from the pull-down menu. All devices on the same
GPIB bus must have an unique GPIB address. The pull-down menu will show all the devices on the same GPIB interface. If no device shows on the pull-down menu, check the GPIB cable connection and power connection to the devices.
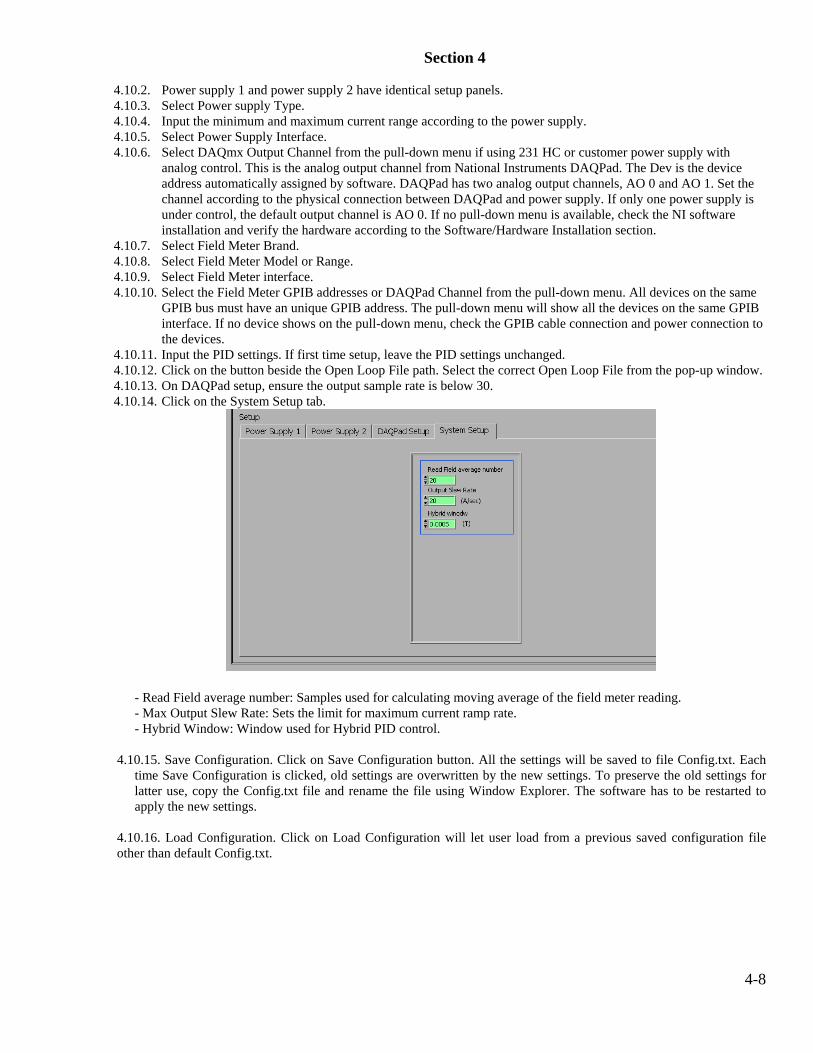
4.10.11. Input the PID settings. If first time setup, leave the PID settings unchanged. 4.10.12. Click on the button beside the Open Loop File path. Select the correct Open Loop File from the pop-up window. 4.10.13. On DAQPad setup, ensure the output sample rate is below 30. 4.10.14. Click on the System Setup tab.
- Read Field average number: Samples used for calculating moving average of the field meter reading. - Max Output Slew Rate: Sets the limit for maximum current ramp rate. - Hybrid Window: Window used for Hybrid PID control. 4.10.15. Save Configuration. Click on Save Configuration button. All the settings will be saved to file Config.txt. Each
time Save Configuration is clicked, old settings are overwritten by the new settings. To preserve the old settings for latter use, copy the Config.txt file and rename the file using Window Explorer. The software has to be restarted to apply the new settings.
4.10.16. Load Configuration. Click on Load Configuration will let user load from a previous saved configuration file other than default Config.txt.
4-8
Section 4
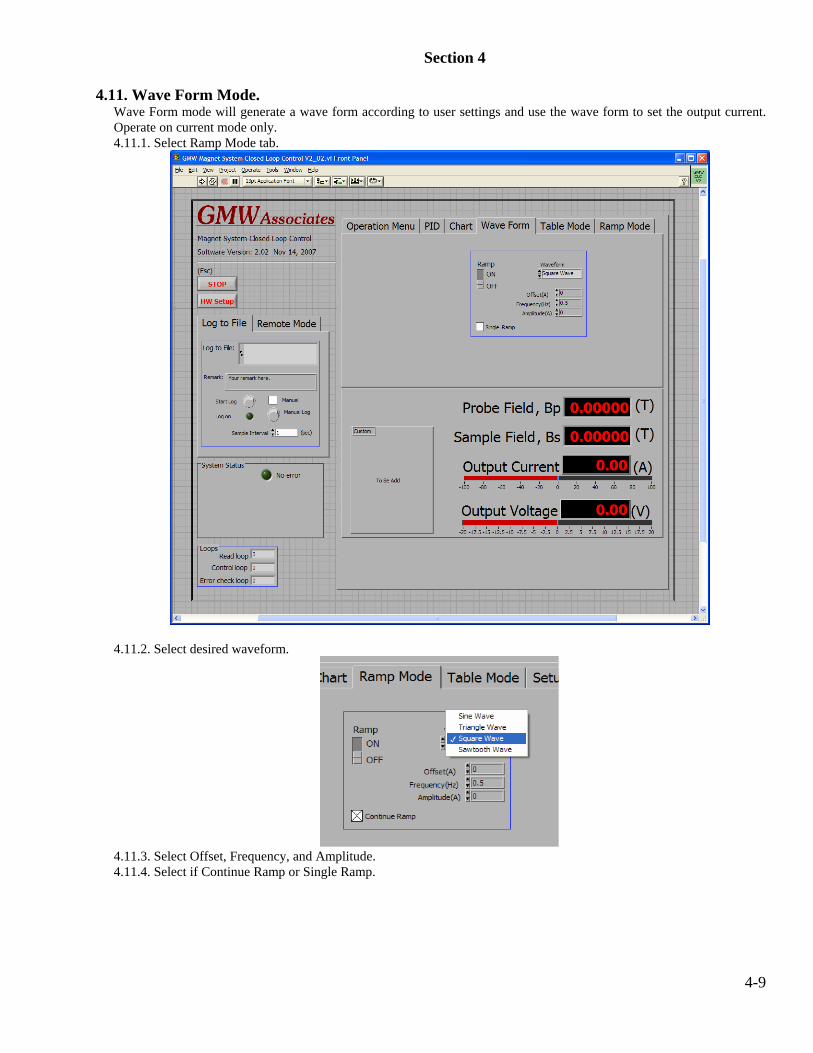
4.11. Wave Form Mode. Wave Form mode will generate a wave form according to user settings and use the wave form to set the output current. Operate on current mode only. 4.11.1. Select Ramp Mode tab.
4.11.2. Select desired waveform.
4.11.3. Select Offset, Frequency, and Amplitude. 4.11.4. Select if Continue Ramp or Single Ramp.
4-9
Section 4
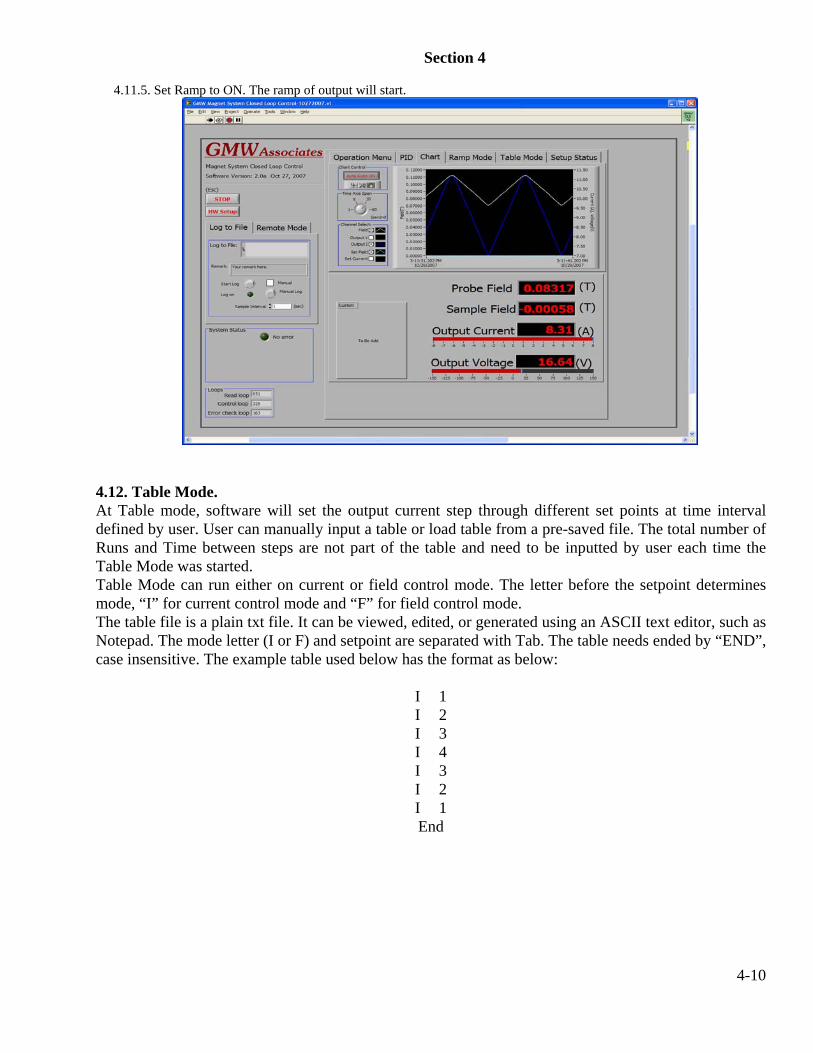
4.11.5. Set Ramp to ON. The ramp of output will start.
4.12. Table Mode. At Table mode, software will set the output current step through different set points at time interval defined by user. User can manually input a table or load table from a pre-saved file. The total number of Runs and Time between steps are not part of the table and need to be inputted by user each time the Table Mode was started. Table Mode can run either on current or field control mode. The letter before the setpoint determines mode, “I” for current control mode and “F” for field control mode. The table file is a plain txt file. It can be viewed, edited, or generated using an ASCII text editor, such as Notepad. The mode letter (I or F) and setpoint are separated with Tab. The table needs ended by “END”, case insensitive. The example table used below has the format as below:
I 1 I 2 I 3 I 4 I 3 I 2 I 1 End
4-10

Section 4 4.12.1. Select from Table Mode tab.
4.12.2. Set Table Mode to ON. A Table Mode Setup window will appear.
- Load Table From File. Load the table from a pre-saved file.
4-11
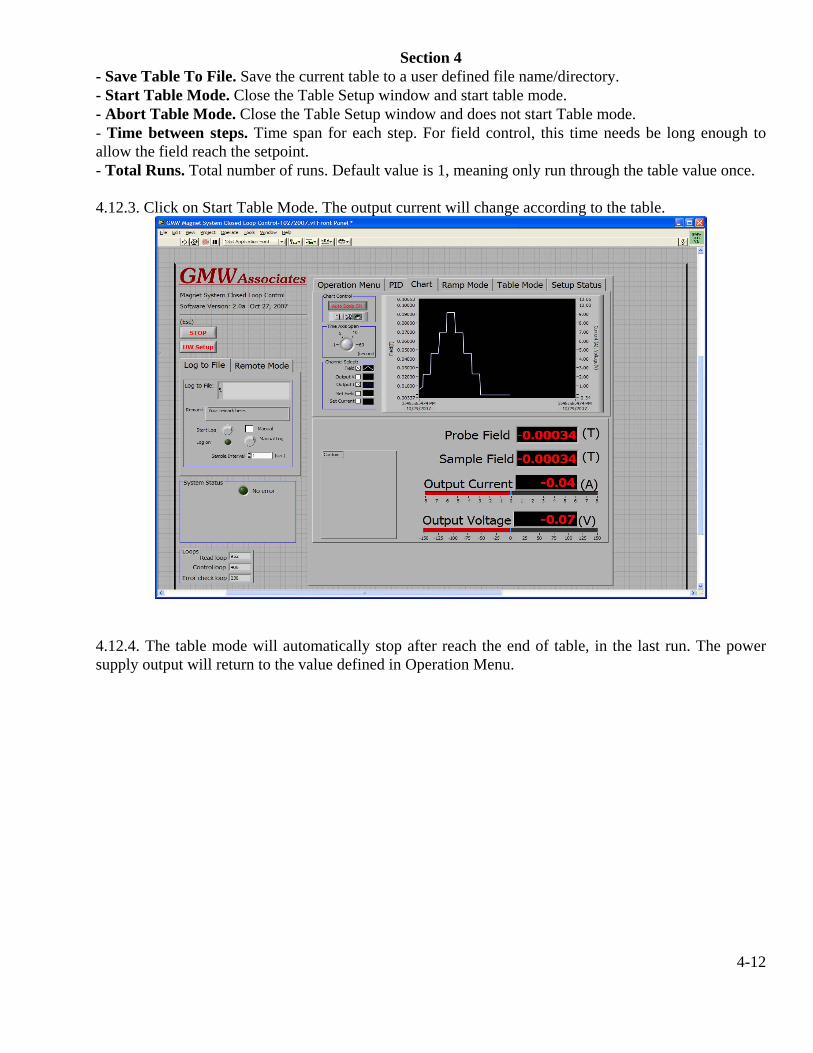
Section 4 - Save Table To File. Save the current table to a user defined file name/directory. - Start Table Mode. Close the Table Setup window and start table mode. - Abort Table Mode. Close the Table Setup window and does not start Table mode. - Time between steps. Time span for each step. For field control, this time needs be long enough to allow the field reach the setpoint. - Total Runs. Total number of runs. Default value is 1, meaning only run through the table value once. 4.12.3. Click on Start Table Mode. The output current will change according to the table.
4.12.4. The table mode will automatically stop after reach the end of table, in the last run. The power supply output will return to the value defined in Operation Menu.
4-12

Section 5 MAINTENANCE
5-1

Section 6
EXCITATION CURVES
6-1

Section 7 TEST DATA
1. Sorensen power supply stability test. 2. Kepco power supply stability test.

GMW AssociatesElectromagnet Stability Plot
Model: 3473-70 Model: 5403EG-50 Engr: Y.QinSN: 127 Serial Number: 2 Date: 4/13/2007Pole Gap: 25mm Pole Gap: 5mmPole Face: 150mm Pole Face: 76mmField Meter: DTM-151(MPT-141-7S), NMR 2025Power supply: Two Kepco BOP 20-20Note 1: DAQ controlling two power suppl mag 1 set at 1.2T, mag 2 set at 0.3T(~18A)Note 2: Field mode (closed loop control), ~8 hour test, 1.1T, DTM digital filter ONNote 3: Kepco PS Temp Coefficient: 200ppm/ deg C, 8-hour drift: 200ppmNote 4: DTM Temp Coeffcient: +/-10ppm/deg C; Zero +/-3ppm/deg C; Cable -3ppm*7m/deg C
1.10470
1.10471
1.10472
1.10473
1.10474
1.10475
1.10476
1.10477
1.10478
1.10479
1.10480
10:00:00 11:00:00 12:00:00 13:00:00 14:00:00 15:00:00 16:00:00 17:00:00 18:00:00 19:00:00 20:00:00Time
NM
R F
ield
(T)
19
20
21
22
23
24
Tem
pera
ture
(C)
NMR Field ReadingSeries3Temperature
1.099931.099941.099951.099961.099971.099981.099991.100001.100011.100021.100031.100041.100051.100061.100071.10008
10:00:00 11:00:00 12:00:00 13:00:00 14:00:00 15:00:00 16:00:00 17:00:00 18:00:00 19:00:00 20:00:00Time
DTM
Fie
ld (T
)
18.105
18.105
18.106
18.106
18.107
18.107
18.108
18.108
10:00:00 11:00:00 12:00:00 13:00:00 14:00:00 15:00:00 16:00:00 17:00:00 18:00:00 19:00:00 20:00:00Time
I Pro
gram
min
g(A
)

GMW AssociatesElectromagnet Stability Plot
Model: 3473-70 Model: 5403EG-50 Engr: Y.QinSN: 127 Serial Number: 2 Date: 4/13/2007Pole Gap: 25mm Pole Gap: 5mmPole Face: 150mm Pole Face: 76mmField Meter: DTM-151(MPT-141-7S), NMR 2025Power supply: Two sorensen, 160V/31ANote 1: DAQ controlling two power suppl mag 1 set at 1.2T, mag 2 set at 0.25T(~15A)Note 2: Field mode (closed loop control), ~8 hour test, 1.2T, DTM digital filter ONNote 3: Sorensen PS Temp Coefficient: 300ppm/ deg C (0.03%/deg C)Note 4: DTM Temp Coeffcient: +/-10ppm/deg C; Zero +/-3ppm/deg C; Cable -3ppm*7m/deg C
1.20520
1.20530
1.20540
1.20550
1.20560
1.20570
1.20580
1.20590
1.20600
1.20610
1.20620
9:00:00 10:12:00 11:24:00 12:36:00 13:48:00 15:00:00 16:12:00Time
NM
R F
ield
(T)
22
23
24
25
26
27
Tem
pera
ture
(C)
NMR Field Reading
Temperature
1.19990
1.19992
1.19994
1.19996
1.19998
1.20000
1.20002
1.20004
9:00:00 10:00:00 11:00:00 12:00:00 13:00:00 14:00:00 15:00:00 16:00:00 17:00:00Time
DTM
Fie
ld (T
)
30.23030.24030.25030.26030.27030.28030.29030.30030.31030.320
9:00:00 10:00:00 11:00:00 12:00:00 13:00:00 14:00:00 15:00:00 16:00:00 17:00:00Time
I Pro
gram
min
g(A
)

Section 8 APPENDIX APPENDIX 1. NATIONAL INSTRUMENTS DAQPad 6015/6016 DATA SHEET APPENDIX 2. NATIONAL INSTRUMENTS USB-DAQ 6251 DATA SHEET APPENDIX 3. SORENSEN SG SERIES POWER SUPPLY DATA SHEET APPENDIX 4. KEPCO BOP SERIES POWER SUPPLY DATA SHEET

Hardware DescriptionThe National Instruments DAQPad-6015 and DAQPad-6016
multifunction data acquisition devices provide plug-and-play
connectivity via USB for acquiring, generating, and logging data in a
variety of portable and desktop applications. They include built-in
screw terminal connectivity so you can easily connect sensors and
signals without extra cost. Both devices feature 16-bit accuracy at
up to 200 kS/s. The DAQPad-6016 also provides 32 digital I/O lines
for applications requiring an extended interface to digital sensors
and actuators.
Software DescriptionNI DAQPad-6015 and DAQPad-6016 devices include NI-DAQmx
Measurement Services software with which you can quickly
configure and begin taking measurements with your DAQ device.
NI-DAQmx provides a seamless interface to LabVIEW,
LabWindows/CVI, and Measurement Studio development environments
with features such as DAQ Assistant.
Recommended AccessoriesThe DAQPad-6015 and DAQPad-6016 both have built-in
connectivity, so no additional accessories are required.
Common ApplicationsThe DAQPad-6015 and DAQPad-6016 devices are ideal for a number
of applications where portability and accurate measurements are
essential, such as:
• Portable data logging – log environmental or voltage data quickly
and easily
• Field monitoring applications
• Embedded OEM applications
• In-vehicle data acquisition
• Academic lab use – academic discounts available for quantities
of five or more. Visit ni.com/academic for details.
Information for OEM CustomersFor information on special configurations and pricing, please
visit ni.com/oem.
Portable High-Performance Multifunction DAQ for USB
• 16 analog inputs at up to 200 kS/s,16-bit resolution
• Built-in screw terminal connectors for easier and more cost-effective connectivity
• 2 analog outputs for accurate output signals
• 8 or 32 digital I/O lines (5 V TTL/CMOS)
Operating Systems• Windows 2000/XP
Recommended Software• LabVIEW• LabWindows/CVI• Measurement Studio• VI Logger
Measurement Services Software (included)• NI-DAQmx
NI DAQPad-6015, NI DAQPad-6016
NI DAQPad-6015 ..........................................................779047-01NI DAQPad-6016 ..........................................................779025-01Includes NI-DAQmx software
Ordering Information
Product Bus Analog Inputs1 Input Resolution Sampling Rate Input Range Analog Outputs Output Resolution Output Rate2 Output Range Digital I/O Counter/Timers TriggersNI 6015 USB 16 SE/8 DI 16 bits 200 kS/s ±0.05 to ±10 V 2 16 bits 300 S/s ±10 V 8 2 DigitalNI 6016 USB 16 SE/8 DI 16 bits 200 kS/s ±0.05 to ±10 V 2 16 bits 300 S/s ±10 V 32 2 Digital1SE – single ended, DI – differential 2System dependent

These specifications are typical at 25 °C unless otherwise stated.
Analog InputAccuracy Specifications
Input CharacteristicsNumber of channels......................................... 16 single-ended or 8 differential (software-selectable
per channel)Type of ADC...................................................... Successive approximationResolution......................................................... 16 bits, 1 in 65,536Maximum sampling rate .................................. 200 kS/sInput signal ranges (bipolar only)
Input coupling................................................... DCMaximum working voltage (signal + common mode) .................................. Each input should remain within ± 11 V of ground
Overvoltage protection
FIFO buffer size................................................. 4,096 samplesData transfers .................................................. Interrupts, programmed I/OConfiguration memory size .............................. 512 words
Transfer CharacteristicsRelative accuracy ............................................. ±1.5 LSB typical, ±3.0 LSB maximumDNL................................................................... ±0.5 LSB typical, ±1.0 LSB maximumNo missing codes............................................. 16 bits, guaranteed
Amplifier CharacteristicsInput impedance
Normal powered........................................ 100 GΩ in parallel with 100 pFPowered off ............................................... 820 ΩOverload..................................................... 820 Ω
Input bias current ............................................. ±200 pAInput offset current .......................................... ±100 pACMRR (DC to 60 Hz)
Range ± 10 V, ± 5 V ................................... 85 dBRange ± 500 mV, ± 50 mV ......................... 96 dB
Dynamic CharacteristicsSmall signal (-3 dB) bandwidth........................ 425 kHzLarge signal (17. THD) bandwidth ................... 450 kHzSystem noise (LSBrms, including quantization)
Settling time to full scale step
Crosstalk (DC to 100 kHz)Adjacent channels ..................................... -75 dBAll other channels ..................................... -90 dB
Analog OutputAccuracy Specifications
Output CharacteristicsNumber of channels......................................... 2 voltage outputsResolution......................................................... 16 bits, 1 in 65,536Maximum update rate...................................... 300 S/s, system dependentType of DAC...................................................... Double-buffered, multiplyingFIFO buffer size................................................. NoneData transfers .................................................. Interrupts, programmed I/O
Transfer CharacteristicsRelative accuracy (INL)..................................... ±3 LSB, typicalDNL................................................................... ±2 LSB, typicalMonotonicity .................................................... 15 bits
Voltage OutputRange................................................................ ±10 VOutput coupling ................................................ DCOutput impedance ............................................ 0.1 Ω , maximumCurrent drive..................................................... ±5 mA, maximumProtection ......................................................... Short-circuit to groundPower-on state ................................................. ±250 mV
Dynamic CharacteristicsSettling time to full-scale step ........................ 8 µs to ±1 LSB accuracySlew rate .......................................................... 4 V/µsNoise ................................................................ 360 µVrms, DC to 400 kHzGlitch energy at mid-scale transition
Magnitude ................................................. ±100 mVDuration ..................................................... 4.0 µs
Digital I/ONumber of channels......................................... 8 input/outputCompatibility .................................................... 5 V TTL/CMOS
P0.<0..7>Digital logic levels
Power-on state .......................................... Input (high impedance), 1.5 kΩ pull down to D GNDData transfers............................................ Programmed I/OMax transfer rate ...................................... 250 S/s, system dependent
P1.<0..7>, P2.<0..7>, P3.<0..7> (NI 6016 only)Digital logic levels
Specifications
Portable High-Performance Multifunction DAQ for USB
2 National Instruments • Tel: (800) 433-3488 • Fax: (512) 683-9300 • [email protected] • ni.com
Signal Name Powered Off (V) Powered On (V)AI<0..15> ±15 ±25AI SENSE ±15 ±25
Device Gain (Software-Selectable) Range0.5 ±10 V1 ±5 V10 ±500 mV100 ±50 mV
Range LSBrms
± 10 V, ± 5 V 0.9
± 500 mV 1.1± 50 mV 6.7
Range Accuracy± 10 V ±4 LSB, 5µs typical± 5 V ±2 LSB, 5µs maximum± 50 mV, ± 500 mV ±2 LSB, 5µs typical
Level Minimum (V) Maximum (V)Input low voltage 0 0.8Input high voltage 2.0 5.0Output low voltage (Iout = 2.5 µA) – 0.4Output high voltage (Iout = -2.5 µA) 4.35 –
Level Minimum (V) Maximum (V)Input low voltage 0 0.8Input high voltage 2.2 5.0Output low voltage (Iout = 24 mA) – 0.4Output high voltage (Iout = -13 mA) 3.7 –
Absolute Accuracy Relative AccuracyPercent of Reading Noise + Quantization (mV) Absolute Accuracy Temperature Resolution (mV)
Nominal Range (V) 24 hours 1 year Offset (mV) Single Point Averaged at Full Scale (mV) Drift (%/°C) Single Point Averaged± 10 0.0658 0.0700 1.8798 0.9330 0.0824 8.984 0.0010 1.0849 0.1085± 5 0.0158 0.0200 0.9598 0.4665 0.0412 2.003 0.0005 0.5425 0.0542± 0.5 0.0658 0.0700 0.1158 0.0562 0.0050 0.471 0.0010 0.0663 0.0066± 0.05 0.0658 0.0700 0.0314 0.0314 0.0031 0.069 0.0010 0.04038 0.0040
Absolute AccuracyPercent of Reading Absolute Accuracy Temperature
Nominal Range (V) 24 hours 1 year Offset (mV) at Full Scale (mV) Drift (%/°C)± 10 0.0154 0.0196 1.5680 3.530 0.0005

Portable High-Performance Multifunction DAQ for USB
3National Instruments • Tel: (800) 433-3488 • Fax: (512) 683-9300 • [email protected] • ni.com
Handshaking .............................................. 2-wirePower-on state .......................................... Input (high impedance), 100 kΩ pull up to +5 VDCData transfers............................................ Interrupts, programmed I/OMax transfer rate ...................................... 250 S/s, system dependent
Timing I/ONumber of channels
Up/down counter/timers ........................... 2Frequency scaler........................................ 1
ResolutionUp/down counter/timers ........................... 24 bitsFrequency scaler........................................ 4 bits
Compatibility .................................................... 5 V TTL/CMOSDigital logic levels
Base clocks availableUp/down counter/timers ........................... 20 MHz, 100 kHzFrequency scaler........................................ 10 MHz, 100 kHz
Base clock accuracy ......................................... ±0.01%Maximum external source frequency
Up/down counter/timers ........................... 20 MHzExternal source selections ............................... PFI <0..9>External gate selections................................... PFI <0..9>Minimum source pulse duration ...................... 10 ns, edge-detect modeMinimum gate pulse duration.......................... 10 ns, edge-detect modeData transfers
Up/down counter/timer............................. Interrupts, programmed I/OFrequency scaler........................................ Programmed I/O
Digital TriggersPurpose
Analog input .............................................. Start, reference, and pause trigger, sample clockAnalog output ............................................ Start and pause trigger, sample clockCounter/timers........................................... Source, gate
Source ............................................................ PFI <0..9>Response .......................................................... Rising or falling edge, software-selectableCompatibility .................................................... 5 V TTLPulse width....................................................... 10 ns minimum
CalibrationRecommended warm-up time.......................... 15 minutesCalibration interval........................................... 1 yearOnboard calibration reference
Level........................................................... 5.000 V (± 3.5 mV) over full operating temperature, actual value stored in EEPROM
Temperature coefficient ............................ ± 5.0 ppm/°C maximumLong-term stability .................................... ± 15.0 ppm/sqrt (1000 hours)
PhysicalEnclosure dimensions ...................................... 17.60 x 14.85 x 3.08 cm
(8.00 x 6.75 x 1.40 in.)Weight ............................................................ 2 lbI/O Connectors ................................................. Screw terminals
Bus InterfaceType .................................................................. USB 2.0, full speed
Power Requirement9 to 25 V ........................................................... 12 WPower available at I/O connector .................... +4.65 to + 5.25 VDC at 1 A
EnvironmentOperating temperature..................................... 0 to 55 °C Storage temperature ........................................ -20 to 70 °C Relative humidity ............................................. 10 to 90%, noncondensing
Certifications and CompliancesCE Mark Compliance
View additional specifications at ni.com/manuals.
Level Minimum (V) Maximum (V)Input low voltage 0 0.8Input high voltage 2.0 5.0Output low voltage (Iout = 5 mA) – 0.4Output high voltage (Iout = -3.5 mA) 4.35 –

© 2004 National Instruments Corporation. All rights reserved. LabVIEW, LabWindows, CVI, Measurement Studio, and ni.com are trademarks of National Instruments. Other product and company names listed are trademarks or trade names of their respective companies.
NI Services and SupportNI has the services and support to meet your
needs around the globe and through the
application life cycle – from planning
and development through deployment
and ongoing maintenance. We offer
services and service levels to meet
customer requirements in research,
design, validation, and manufacturing.
Visit ni.com/services.
Training and CertificationNI training is the fastest, most certain route to productivity with our
products. NI training can shorten your learning curve, save
development time, and reduce maintenance costs over the
application life cycle. We schedule instructor-led courses in cities
worldwide, or we can hold a course at your facility. We also offer a
professional certification program that identifies individuals who
have high levels of skill and knowledge on using NI products.
Visit ni.com/training.
Professional ServicesOur Professional Services Team is comprised of NI applications
engineers, NI Consulting Services, and a worldwide NI Alliance
Partner Program of more than 600 independent consultants and
integrators. Services range
from start-up assistance to
turnkey system integration.
Visit ni.com/alliance.
OEM SupportWe offer design-in consulting and product integration assistance
if you want to use our products for OEM applications. For
information about special pricing and services for OEM customers,
visit ni.com/oem.
Local Sales and Technical SupportIn offices worldwide, our staff is local to the country, giving you
access to engineers who speak your language. NI delivers industry-
leading technical support through online knowledge bases, our
applications engineers, and access to 14,000 measurement and
automation professionals within NI Developer Exchange forums.
Find immediate answers to your questions at ni.com/support.
We also offer service programs that provide automatic upgrades to
your application development environment and higher levels of
technical support. Visit ni.com/ssp.
Hardware ServicesNI Factory Installation ServicesNI Factory Installation Services (FIS) is the fastest and easiest way to
use your PXI or PXI/SCXI™ combination systems right out of the
box. Trained NI technicians install the software and hardware and
configure the system to your specifications. NI extends the standard
warranty by one year on hardware components (controllers, chassis,
modules) purchased with FIS. To use FIS, simply configure your
system online with ni.com/pxiadvisor.
Calibration Services NI recognizes the need to maintain properly calibrated devices for
high-accuracy measurements. We provide manual calibration
procedures, services to recalibrate your products, and automated
calibration software specifically designed for use by metrology
laboratories. Visit ni.com/calibration.
Repair and Extended Warranty NI provides complete repair services for our products. Express repair
and advance replacement services are also available. We offer
extended warranties to help you meet project life-cycle requirements.
Visit ni.com/services.
National Instruments • Tel: (512) 683-0100 • Fax: (512) 683-9300 • [email protected]
ni.com • (800) 433-3488
SERVICE NEEDS

High-Performance M Series Multifunction DAQ for USB –16-Bit, up to 1.25 MS/s, up to 80 Analog Inputs
Overview and ApplicationsWith recent bandwidth improvements and new innovations fromNational Instruments, USB has evolved into a core bus of choice for measurement and automation applications. National Instruments M Series devices for USB deliver high-performance data acquisition in an easy-to-use and portable form factor through USB ports on laptopcomputers and other portable computing platforms. NI designed a new and innovative patent-pending NI signal streaming technology that enables sustained bidirectional high-speed data streams on USB. The new technology, combined with advanced external synchronizationand isolation, helps engineers and scientists achieve high-performanceapplications on USB.
NI M Series high-performance multifunction data acquisition (DAQ)modules for USB are optimized for superior accuracy at fast samplingrates. They provide an onboard NI-PGIA 2 amplifier designed for fast settling times at high scanning rates, ensuring 16-bit accuracy even when measuring all available channels at maximum speed. All high-performance devices have a minimum of 16 analog inputs, 24 digital I/O lines, seven programmable input ranges, analog and
digital triggering, and two counter/timers. High-speed NI USB-625x and NI USB-622x M Series devices have two-year and one-yearcalibration intervals, respectively. USB M Series devices are ideal for test, control, and design applications including:• Portable data logging – log environmental or voltage data
quickly and easily • Field-monitoring applications• Embedded OEM applications• In-vehicle data acquisition• Academic lab use – academic discounts available
NI Signal StreamingTo optimize the use of the Universal Serial Bus (USB) and deliver high-performance data acquisition, National Instruments created severalkey technologies to push the limits of USB throughput and latency. NI signal streaming combines three innovative hardware- and software-level design elements to enable sustained high-speed and bidirectionaldata streams over USB. For more information, visit ni.com/usb.
• Up to 80 analog inputs at 16 bits,1.25 MS/s (1 MS/s or 750 KS/sscanning)
• Up to 4 analog outputs at 16 bits,2.8 MS/s (2 µs full-scale settling)
• Up to 48 TTL/CMOS digital I/O lines (up to 32 hardware-timed at up to 1 MHz)
• Two 32-bit, 80 MHz counter/timers• Analog and digital triggering• NI-PGIA 2 and NI-MCal
calibration technology for improvedmeasurement accuracy
• NI signal streaming for 4 high-speeddata streams on USB
• Power supply included• 1-year warranty• Additional warranty and calibration
services available
Operating Systems• Windows Vista (32- and 64-bit)/XP/2000
Recommended Software• LabVIEW• LabVIEW SignalExpress• LabWindows™/CVI• Measurement Studio
Other Compatible Software• Visual Studio .NET• C/C++/C#
Measurement Services Software (included)• NI-DAQmx driver software• Measurement & Automation Explorer
configuration utility• LabVIEW SignalExpress LE
NI USB-6221, NI USB-6225, NI USB-6229,NI USB-6251, NI USB-6255, NI USB-6259
Family BusAnalogInputs
Resolution(bits)
Max Rate(S/s)
AnalogOutputs
Analog Output Resolution (bits)
Max Rate(S/s) Range (V) Digital I/O
Clocked DIO1 Counter
Resolution(bits)
NI 6251 USB 16 16 1.25 M 2 16 2.86 M ±10 24 8, up to 1 MHz1 2 32NI 6255 USB 80 16 1.25 M 2 16 2.86 M ±10 24 8, up to 1 MHz1 2 32NI 6259 USB 32 16 1.25 M 4 16 2.86 M ±10 48 32, up to 1 MHz1 2 32NI 6221 USB 16 16 250 k 2 16 833 k ±10 24 8, up to 1 MHz1 2 32NI 6225 USB 80 16 250 k 2 16 833 k ±10 24 8, up to 1 MHz1 2 32NI 6229 USB 32 16 250 k 4 16 833 k ±10 48 32, up to 1 MHz1 2 321Correlated DIO can be clocked at up to 1 MHz across the USB bus and up to 10 MHz using onboard regeneration.
Table 1. Selection Guide for High-Performance M Series Multifunction DAQ for USB

USB M Series for TestFor test, you can use the M Series high-speed analog inputs and 10 MHz digital lines with NI signal conditioning for applicationsincluding test, component characterization, and sensor measurement.High-speed USB-625x M Series devices are compatible with the NI SCC signal conditioning platform, providing amplification filtering andpower for virtually every type of sensor. This platform is also compliantwith IEEE 1451.4 smart transducer electronic data sheet (TEDS) sensors,which offer digital storage for sensor data sheet information.
USB M Series multifunction DAQ devices also complement existingtest systems that need additional measurement channels. For higher-channel-count signal conditioning on USB, consider the NI CompactDAQor SCXI platforms.
USB M Series for ControlUSB M Series digital lines can drive 24 mA for relay and actuatorcontrol. By clocking the digital lines as fast as 10 MHz (with onboardregeneration), you can use these lines for pulse-width modulation (PWM) to control valves, motors, fans, lamps, and pumps. With fourwaveform analog outputs, two 80 MHz counter/timers, and four high-speed data streams on USB, M Series devices can execute multiplecontrol loops simultaneously. High-speed USB-625x M Series devicesalso offer direct support for encoder measurements, protected digitallines, and digital debounce filters. With up to 80 analog inputs, 32 clocked digital lines, and four analog outputs, you can executemultiple control loops with a single device.
You can also create a complete custom motion controller by combiningUSB M Series devices with the NI SoftMotion Development Module.
USB M Series for DesignFor design applications, you can use a wide range of I/O – from 80 analog inputs to 48 digital lines – to measure and verify prototypedesigns. USB M Series devices and National Instruments LabVIEWSignalExpress interactive measurement software bring benchtopmeasurements to the PC. With NI LabVIEW SignalExpress, you can quickly create design verification tests. The fast acquisition andgeneration rates of high-performance USB M Series high-speed devices along with LabVIEW SignalExpress provide fast design analysis.You can convert your tested and verified LabVIEW SignalExpress projectsto LabVIEW applications for immediate M Series DAQ use, and bridgethe gap between test, control, and design applications.
USB M Series for OEMsShorten your time to market by integrating National Instruments OEM products in your design. Board-only versions of USB M Series DAQ devices are available for OEM applications, with competitivequantity pricing and software customization. The NI OEM Elite Programoffers free 30-day trial kits for qualified customers. Visit ni.com/oemfor more information.
Recommended Training and ServicesAll M Series devices are available with additional warranty andcalibration services. For new data acquisition programmers, NI recommends the “Data Acquisition: 7 Steps to Success” tutorial kit.This tutorial kit helps shorten development time for data acquisitionapplications by describing the various stages of getting started with DAQincluding system definition, setup, test, and application programming.
Recommended SoftwareNational Instruments measurement services software, built around NI-DAQmx driver software, includes intuitive application programminginterfaces, configuration tools, I/O assistants, and other tools designed toreduce system setup, configuration, and development time. NationalInstruments recommends using the latest version of NI-DAQmx driversoftware for application development in National Instruments LabVIEW,LabVIEW SignalExpress, LabWindows/CVI, and Measurement Studio. Toobtain the latest version of NI-DAQmx, visit ni.com/support/daq/versions.NI measurement services software speeds up your development withfeatures including: • A guide to create fast and accurate measurements with no programming
using DAQ Assistant• Automatic code generation to create your application in LabVIEW;
LabWindows/CVI; LabVIEW SignalExpress; and Visual Studio .NET,C/C++/C#, or Visual Basic using Measurement Studio
• Multithreaded streaming technology for 1,000 times performanceimprovements
• Automatic timing, triggering, and synchronization routing to makeadvanced applications easy
• More than 3,000 free software downloads to jump-start your project available at ni.com/zone
• Software configuration of all digital I/O features without hardwareswitches/jumpers
• Single programming interface for analog input, analog output, digitalI/O, and counters on hundreds of multifunction DAQ hardware devices
M Series devices are compatible with the following versions (or later) ofNI application software – LabVIEW, LabWindows/CVI, or MeasurementStudio versions 7.x or LabVIEW SignalExpress 2.x.
High-Performance M Series Multifunction DAQ for USB –16-Bit, up to 1.25 MS/s, up to 80 Analog Inputs
2
BUY ONLINE at ni.com or CALL 800 813 3693 (U.S.)

High-Performance M Series Multifunction DAQ for USB –16-Bit, up to 1.25 MS/s, up to 80 Analog Inputs
3
BUY ONLINE at ni.com or CALL 800 813 3693 (U.S.)
Ordering InformationNI USB-6221
Screw terminal ................................................................779808-0P1
NI USB-6225Screw terminal ................................................................779973-0P1
Mass terminal ..................................................................779974-0P1
NI USB-6229Screw terminal ................................................................779810-0P1
NI USB-6251Screw terminal ................................................................779627-0P1
Mass terminal ..................................................................779694-0P1
NI USB-6255Screw terminal ................................................................779958-0P1
Mass terminal ..................................................................779959-0P1
NI USB-6259Screw terminal ................................................................779628-0P1
Mass terminal ..................................................................779695-0P1
Includes NI-DAQmx software.1 P is 1 (U.S. 120 VAC); 2 (Swiss 220 VAC); 3 (Australian 240 VAC);4 (Universal Euro 240 VAC); 6 (United Kingdom 240 VAC); 7 (Japanese 100 VAC)Includes data acquisition driver software, 1 m USB cable, and AC adapter.
Board-Only Devices for OEMNI USB-6221 OEM (qty 1)......................................................195959-02NI USB-6225 OEM (qty 1) ......................................................197294-01NI USB-6229 OEM (qty 1)......................................................195959-01NI USB-6251 OEM (qty 1)......................................................194929-03NI USB-6255 OEM (qty 1) ......................................................197201-01NI USB-6259 OEM (qty 1)......................................................194929-01
AccessoriesCables
SH68-68-EP (shielded) ......................................................184749-01SH68-68-S (for USB-62x5) ................................................185262-01R6868 (unshielded ribbon) ................................................182482-01
Terminal Blocks and Signal Conditioning CarrierSCC-2345 carrier ..............................................................777458-01SCC-68 screw-terminal block for mass termination ........779475-01SCB-68 screw-terminal block for mass termination ........776844-01BNC-2110 BNC terminal block for mass termination ......777643-01
Data Acquisition ServicesData Acquisition: 7 Steps to Success ..................................779489-01
BUY NOW!For complete product specifications, pricing, and accessory information, call 800 813 3693 (U.S.) or go to ni.com/usb.
Recommended Accessories (Mass-Termination Versions)Signal conditioning is required for sensor measurements or voltageinputs greater than 10 V. NI SCC products, which are designed toincrease the performance and reliability of your data acquisition system,are up to 10 times more accurate than using terminal blocks alone. Refer to Table 2 for more information or visit ni.com/sigcon.
Sensor/Signals (>10 V)System Description Cable CarrierSCC Signal Conditioning SH68-68-EP SCCSensor/Signals (<10 V)System Description Cable Terminal BlockScrew Terminal (Shielded)2 SH68-68-EP SCC-681
BNC Connectivity SH68-68-EP BNC-2110 Screw Terminal (Nonshielded)2 R68-68 SCC-681
Screw Terminal (Shielded)2, 3 SH68-68-S SCB-681Includes SCC signal conditioning.2Consider the integrated screw termination version of the USB DAQ device.3For use with Connector 1 on USB-6225 and USB-6255 devices.
Table 2. Recommended Accessories

High-Performance M Series Multifunction DAQ for USB –16-Bit, up to 1.25 MS/s, up to 80 Analog Inputs
4
BUY ONLINE at ni.com or CALL 800 813 3693 (U.S.)
Specifications>> For complete specifications, see the NI 622x Specifications and theNI 625x Specifications manuals at ni.com/manuals.
Specifications listed below are typical at 25 ˚C unless otherwise noted.
Analog InputNumber of channels
USB-6221/6251 ......................... 8 differential or 16 single endedUSB-6229/6259 ........................... 16 differential or 32 single endedUSB-6225/6255 ........................... 40 differential or 80 single ended
ADC resolution .................................... 16 bitsMaximum sampling rate
USB-6221/6225/6229..................... 250 kS/s single channel, 250 kS/s multichannel(aggregate)
USB-6251/6259 ............................. 1.25 MS/s single channel,1.00 MS/s multichannel (aggregate)
USB-6255 ....................................... 1.25 MS/s single channel,750 kS/s multichannel (aggregate)
Input coupling ..................................... DCInput range
USB-6221/6225/6229..................... ±10, ±5, ±1, ±0.2 VUSB-6251/6255/6259..................... ±10, ±5, ±2, ±1,
±0.5, ±0.2, ±0.1 VMaximum working voltage for analog inputs(signal + common mode)..................... ±11 V of AI GND Input impedanceDevice on
AI+ to AI GND................................. >10 GΩ in parallel with 100 pFAI– to AI GND................................. >10 GΩ in parallel with 100 pF
Device offAI+ to AI GND................................. 820 ΩAI– to AI GND................................. 820 Ω
Input bias current................................ ±100 pACrosstalk (at 100 kHz)
Adjacent channels .......................... -75 dBNonadjacent channels
USB-6221/6225/6229................. -90 dBUSB-6251/6255/6259................. -95 dB
Input FIFO size..................................... 4,095 samplesScan list memory ................................ 4,095 entriesData transfers ..................................... NI signal streaming on USB,
programmed I/O
Analog Triggers (USB-625x Devices Only)Functions ............................................. Start Trigger
Reference TriggerPause TriggerSample ClockConvert ClockSample Clock Timebase
Modes ................................................ Analog edge triggering, analogedge triggering with hysteresis,and analog window triggering
Resolution ........................................... 10 bits, 1 in 1,024
Analog OutputNumber of channels
USB-6221/6225/6251/6255 ........... 2USB-6229/6259 ............................. 4
DAC resolution .................................... 16 bitsMaximum update rate
USB-6221/6225/62291 channel .................................... 833 kS/s2 channels .................................. 740 kS/s per channel3 channels .................................. 666 kS/s per channel4 channels .................................. 625 kS/s per channel
USB-6251/6255/6259 1 channel .................................... 2.86 MS/s2 channels .................................. 2.00 MS/s per channel3 channels .................................. 1.54 MS/s per channel4 channels .................................. 1.25 MS/s per channel
Timing accuracy .................................. 50 ppm of sample rateTiming resolution ................................ 50 nsOutput range
USB-6221/6225/6229..................... ±10 VUSB-6251/6255/6259..................... ±10 V, ±5 V, ±external reference
on APFI <0..1>Output coupling................................... DCOutput impedance............................... 0.2 ΩOutput current drive............................ ±5 mAOutput FIFO size .................................. 8,191 samples shared
among channels usedData transfers ..................................... NI signal streaming,
programmed I/O
Calibration (AI and AO)Recommended warm-up time............. 15 minutesCalibration interval
USB-6221/6225/6229..................... 1 yearUSB-6251/6255/6259..................... 2 years
Digital I/O/PFIStatic CharacteristicsNumber of channels
USB-6221/6225/6251/6255 ........... 24 total, 8 (P0.<0..7>), 16 (PFI <0..7>/P1, PFI <8..15>/P2)
USB-6229/6259 .............................. 48 total, 32 (P0.<0..31>), 16 (PFI <0..7>/P1, PFI <8..15>/P2)
Ground reference ................................ D GNDDirection control ................................. Each terminal individually
programmable as input or outputPull-down resistor ............................... 50 kΩ typical, 20 kΩ minimum

High-Performance M Series Multifunction DAQ for USB –16-Bit, up to 1.25 MS/s, up to 80 Analog Inputs
5
BUY ONLINE at ni.com or CALL 800 813 3693 (U.S.)
Waveform Characteristics (Port 0 Only)Terminals used
USB-6221/6225/6251/6255 ........... Port 0 (P0.<0..7>) USB-6229/6259 ............................. Port 0 (P0.<0..31>)
Port/sample sizeUSB-6221/6225/6251/6255 ........... Up to 8 bitsUSB-6229/6259 .............................. Up to 32 bits
Waveform generation (DO) FIFO......... 2,047 samplesWaveform acquisition (DI) FIFO .......... 2,047 samplesDI sample clock frequency.................. 0 to 1 MHz, system dependentDO sample clock frequency
Regenerate from FIFO..................... 0 to 10 MHzStreaming from memory................. 0 to 1 MHz, system dependent
Data transfers ..................................... NI signal streaming,programmed I/O
PFI/Port 1/Port 2 FunctionalityFunctionality........................................ Static digital input,
static digital output, timing input, timing output
Timing output sources......................... Many AI, AO, counter, DI, DO timing signals
Debounce filter settings ..................... 125 ns, 6.425 µs, 2.56 ms, disable; high and low transitions;selectable per input
General-Purpose Counter/TimersNumber of counter/timers .................. 2Counter measurements....................... Edge counting, pulse, semiperiod,
period, two-edge separationPosition measurements ...................... X1, X2, X4 quadrature encoding
with Channel Z reloading; two-pulse encoding
Output applications............................. Pulse, pulse train with dynamic updates, frequency division, equivalent time sampling
Internal base clocks ............................ 80 MHz20 MHz0.1 MHz
Base clock accuracy............................ 50 ppmInputs................................................... Gate, Source, HW_Arm, Aux, A,
B, Z, Up_DownData transfers ..................................... NI signal streaming,
programmed I/O
Frequency GeneratorNumber of channels............................ 1Base clocks ......................................... 10 MHz, 100 kHzDivisors................................................ 1 to 16Base clock accuracy............................ 50 ppmOutput can be available on any PFI or RTSI terminal
Phase-Locked Loop (PLL)Number of PLLs................................... 1Reference signal ................................. PXI_STAR,
PXI_CLK10, RTSI <0..7>
Output of PLL....................................... 80 MHz timebase; other signalsderived from 80 MHz timebase including 20 MHz and 100 kHz timebases
External Digital TriggersSource ................................................. Any PFI, RTSI, PXI_TRIG,
PXI_STARPolarity ................................................ Software-selectable for
most signalsAnalog input function ......................... Start Trigger
Reference TriggerPause TriggerSample ClockConvert ClockSample Clock Timebase
Analog output function ....................... Start TriggerPause TriggerSample ClockSample Clock Timebase
Counter/timer functions...................... Gate, Source, HW_Arm, Aux, A,B, Z, Up_Down
Digital waveform generation (DO) function ....................................... Sample ClockDigital waveform acquisition (DI) function......................................... Sample Clock
Bus InterfaceUSB .................................................... Hi-Speed USB or full-speed USBNI signal streaming............................. 4 high-speed data streams;
can be used for analog input,analog output, digital input, digital output, counter/timer 0,counter/timer 1
Power RequirementsUSB power supply requirements ........ 11 to 30 VDC, 20 W
Power Limits+5 V terminal....................................... 1 A maxP0/PFI/P1/P2 and +5 V terminals combined .................... 2 A maxPower supply fuse............................... 2 A, 250 V
Physical RequirementsEnclosure dimensions (includes connectors)
Screw termination .......................... 26.67 by 17.09 by 4.45 cm(10.5 by 6.73 by 1.75 in.)
Mass termination ........................... 18.8 by 17.09 by 4.45 cm (7.4 by 6.73 by 1.75 in.)

High-Performance M Series Multifunction DAQ for USB –16-Bit, up to 1.25 MS/s, up to 80 Analog Inputs
6
BUY ONLINE at ni.com or CALL 800 813 3693 (U.S.)
Environmental Operating temperature ....................... 0 to 45 ºCStorage temperature........................... -20 to 70 ºCHumidity .............................................. 10 to 90% RH, noncondensingMaximum altitude............................... 2,000 mPollution degree (indoor use only) ...... 2
Safety
This product is designed to meet the requirements of the following standards of safety for electrical equipment for measurement, control,and laboratory use:• IEC 61010-1, EN 61010-1• UL 61010-1, CSA 61010-1
Note: For UL and other safety certifications, refer to the product label or visit ni.com/certification, search by model number or product line,and click the appropriate link in the Certification column.
Electromagnetic Compatibility
This product is designed to meet the requirements of the following standards of EMC for electrical equipment for measurement, control, and laboratory use:• EN 61326 EMC requirements; Minimum Immunity• EN 55011 Emissions; Group 1, Class A• CE, C-Tick, ICES, and FCC Part 15 Emissions; Class A
Note: For EMC compliance, operate this device according to product documentation.
CE Compliance
This product meets the essential requirements of applicable EuropeanDirectives, as amended for CE marking, as follows:
• 2006/95/EC; Low-Voltage Directive (safety)• 2004/108/EC; Electromagnetic Compatibility Directive (EMC)
Note: Refer to the Declaration of Conformity (DoC) for this product forany additional regulatory compliance information. To obtain the DoC for this product, visit ni.com/certification, search by model number orproduct line, and click the appropriate link in the Certification column.
Waste Electrical and Electronic Equipment (WEEE)
EU Customers: At the end of their life cycle, all products must be sent to a WEEE recycling center. For more information about WEEErecycling centers and National Instruments WEEE initiatives, visitni.com/environment/weee.htm.
Environmental Management
NI is committed to designing and manufacturing products in anenvironmentally responsible manner. NI recognizes that eliminatingcertain hazardous substances from our products is beneficial not only to the environment but also to NI customers.
For additional environmental information, refer to the NI and theEnvironment Web page at ni.com/environment. This page contains the environmental regulations and directives with which NI complies, as well as any other environmental information not included in this document.
Management Methods for Controlling Pollution Caused byElectronic Information Products Regulation (China RoHS)

NI Services and Support
NI has the services and support to meetyour needs around the globe and throughthe application life cycle – from planningand development through deploymentand ongoing maintenance. We offerservices and service levels to meetcustomer requirements in research,design, validation, and manufacturing. Visit ni.com/services.
Training and CertificationNI training is the fastest, most certain route to productivity with ourproducts. NI training can shorten your learning curve, save developmenttime, and reduce maintenance costs over the application life cycle. Weschedule instructor-led courses in cities worldwide, or we can hold acourse at your facility. We also offer a professional certification programthat identifies individuals who have high levels of skill and knowledge onusing NI products. Visit ni.com/training.
Professional ServicesOur NI Professional Services team is composed of NI applications and systems engineers and a worldwide National Instruments AlliancePartner program of more than 600 independent consultants and
integrators. Services range from start-up assistance toturnkey system integration. Visit ni.com/alliance.
OEM SupportWe offer design-in consulting and product integration assistance if youwant to use our products for OEM applications. For information aboutspecial pricing and services for OEM customers, visit ni.com/oem.
Local Sales and Technical SupportIn offices worldwide, our staff is local to the country, giving you accessto engineers who speak your language. NI delivers industry-leadingtechnical support through online knowledge bases, our applicationsengineers, and access to 14,000 measurement and automationprofessionals within NI Developer Exchange forums. Find immediateanswers to your questions at ni.com/support.
We also offer service programs that provide automatic upgrades toyour application development environment and higher levels of technicalsupport. Visit ni.com/ssp.
Hardware Services
NI Factory Installation ServicesNI Factory Installation Services (FIS) is the fastest and easiest way touse your PXI or PXI/SCXI combination systems right out of the box.Trained NI technicians install the software and hardware and configurethe system to your specifications. NI extends the standard warranty byone year on hardware components (controllers, chassis, modules)purchased with FIS. To use FIS, simply configure your system online with ni.com/pxiadvisor.
Calibration Services NI recognizes the need to maintain properly calibrated devices for high-accuracy measurements. We provide manual calibrationprocedures, services to recalibrate your products, and automatedcalibration software specifically designed for use by metrologylaboratories. Visit ni.com/calibration.
Repair and Extended Warranty NI provides complete repair services for our products. Express repair and advance replacement services are also available. We offer extended warranties to help you meet project life-cycle requirements. Visit ni.com/services.
© 2007 National Instruments Corporation. All rights reserved. CVI, LabVIEW, Measurement Studio, National Instruments, National Instruments Alliance Partner, NI, ni.com, NI CompactDAQ, NI SoftMotion, RTSI, SCXI, and SignalExpress are trademarks of National Instruments. The mark LabWindows is used under a license from Microsoft Corporation.Other product and company names listed are trademarks or trade names of their respective companies. A National Instruments Alliance Partner is a business entity independent fromNational Instruments and has no agency, partnership, or joint-venture relationship with National Instruments.
National Instruments • [email protected]
ni.com • 800 813 3693 *351497B-01*351497B-01 2007-9287-301-101-D

Programmable Precision DC Power SupplySG Series
5 kW - 150 kW // 40 V - 600 V
Product Validation
Production ATE
Burn-In
DC Bus Power For Further Information or Sales SupportContact Elgar Electronics Corporation
www.Elgar.com 858.450.0085Ethernet

Advanced Power Simulation
SGI model provides constant power mode allowing independent setting of the max
voltage, current and power
The SG series represents the next generation of high power programmable DC power supplies. Designed for exceptional load transient response, low noise and the highest power density in the industry. The industry leading power density is enhanced by a stylish front air intake allowing supplies to be stacked without any required clearance between units.
At the heart of the SG series is a 5 kW power module. Depending on the output voltage, one to six modules can be configured in a single chassis to deliver 5 kW to 30 kW of power. Combinations of these chassis can then be easily paralleled to achieve power levels up to 150 kW. Paralleled units operate like one single supply providing total system current. Available in two control versions, the SGA has basic analog controls, while the SGI provides intelligent control features
SGI: Advanced Intelligent Control(Sorensen General purpose Intelligent) The SGI combines onboard intelligent controls with the outstanding power electronics common to all SG family supplies. These controls enable sophisticated sequencing, constant power mode and save/recall of instrument settings. Looping of sequences makes the SGI idea for repetitive testing. An impressive vacuum fluorescent graphical display in eight languages, context sensitive “soft” keys and front panel keyboard simplify programming of the SGI.
SGA: Outstanding Value - Analog Control(Sorensen General purpose Analog) The SGA, with its industry leading price performance, is available for customers requiring simple front panel analog controls or external control. With the same high performance power electronics as the SGI, the SGA provides essential features like 10- turn potentiometers for setting voltage and current, 3 ½ digit LED readout plus front panel over-voltage protection (OVP) preview/adjustment and reset.
Overview
Feature SGA SGI
Modular Design • •
Fast Load Transient • •
Parallelable • •
Analog & Digital Summing Optional •
Direct Front Panel V/I Control • •
3½ Digit LED Readout •
Graphics Display •
Sequencing •
Save/Recall Setups •
System Power Readouts •
Constant Power Mode •
IEEE-488.2/RS-232C OptionalRS-232C StdIEEE-488.2
Optional LXI Compliant Ethernet Optional Optional
SGI / SGA Comparison Chart
Process Options: AA: No option AB: Certificate of Calibration (includes Test Data)Accessories: 890-453-03: Paralleling Cable (for up to 5 units, requires one cable
per unit placed in parallel) K550212-01: 3U Rack Slides (for 5kW, 10kW and 15kW models) K550213-01: 6U Rack Slides (for 20kW, 25kW and 30kW models)
-ASG
Control Designation
100
Voltage
1A AA
Remote Control Options
Process Options
100/
Current
C
Input Voltage Options
A = AnalogI = Intelligent
Control Options: A: Analog I: IntelligentInput Options: C: Input Voltage 187 / 242VAC, 3 Phase D: Input Voltage 342 / 440VAC, 3 Phase E: Input Voltage 396 / 528VAC, 3 PhaseRemote Control Options: 0A: No Option 1A: IEEE-488.2 + RS-232C 1C: Ethernet + RS-232C 1D: Isolated Analog Control 1E: Shaft Locks (SGA series only)Contact factory for other combinations
Options and Accessories
SGI / SGA Model Number Description
Compliant Ethernet

Applications Process ControlWhether you are controlling ion beams for the manufacture of semiconductors, or driving a current through electrolyte for precise control in a plating process, the SG series is an ideal choice with it’s small size, reliable modular design and standard analog programma-bility. Direct control of V and I along with monitoring of the actual voltage and current, provides a simple interface for your PLC or other type of analog controller.
Product DevelopmentTesting & Burn-in of DC-DC converters, laser diodes, automotive and semiconductor components and aircraft flight hardware are just a few of the items being tested using the SG product family. From simple front panel control to complex test sequences for compliance testing, the SG series will keep pace with your changing application needs.
ResearchA research environment presents some of the most demanding requirements on your test instrumentation. Equipment that is sufficient today, may not meet the needs of the next project. With the SG series this is no longer a problem. The modular design allows you to easily upgrade to higher power levels in the future, or parallel units to achieve up to 150 kW. With the sophisticated sequencing capability of the SGI model, you can build an infinite variety of test or diagnostic programs and have them execute directly from the power supply.
Automotive Component TestThe 16-bit resolution and Ethernet enabled hardware triggering allows for detailed sequencing associated with battery fluctuation simulation. The tight load regulation capability of the SG series makes it a superior source for validation and acceptance testing and burn-in of automotive components. The 40V models, in particular, provide a full range of testing to simulate battery conditions. Margin testing of components, such as electronic control units (ECU) and electromechanical components, is easily achieved.
Rackmount ATE SystemsThe high power density of the SG series makes it ideal for ATE System integration. The wide variety of voltage and current combinations in 3U and 6U heights allows multiple voltage outputs in a small amount of space. The wide variety of control methods possible, allows easy integration into legacy systems as well as high speed systems.
Battery ChargingThe SG series provides high accuracy voltage output to optimize battery charging. Battery charging requires high accuracy voltage and stable current output. With the remote interface options, the charging process can easily be automated for volume production.
Key Features
• High Power Density: Up to 15 kW in a 3U / 30 kW in a 6U chassis
• Wide Voltage Range: 0-40V up to 0-600V, in increments of 5 kW from 5 to 30 kW
• Fast Load Transient Response: Protection from undesired voltage excursions
• Low Ripple and Noise: Suitable for the most sensitive applications
• Parallelable up to 150 kW: Expandable as your requirement grows
• Modular Design: Upgradeable for the ultimate in investment protection.
• Sequencing: Program custom waveforms
• Easy-to-read Fluorescent Display: SGI supports English, French, German, Italian, Spanish, Chinese, Japanese, and Korean languages
• 16-bit Resolution: Optional IEEE-488.2 + RS-232C or Ethernet provides precise control
• Ethernet Control: LXI Class C compliant communication with integrated web server
• Direct Relay Control: Control output and sense isolation relays, along with polarity relays. (Ethernet Option Only)
• Hardware Trigger: Ethernet Option Only
• 5 Year Warranty
Burn-In Compliance Testing
Materials Research Process Control
Product Validation Automotive Electronics
Rackmount ATE Systems Battery Charging
See the SFA product brochure for very high current slew rate and low stored energy applications.
Applications
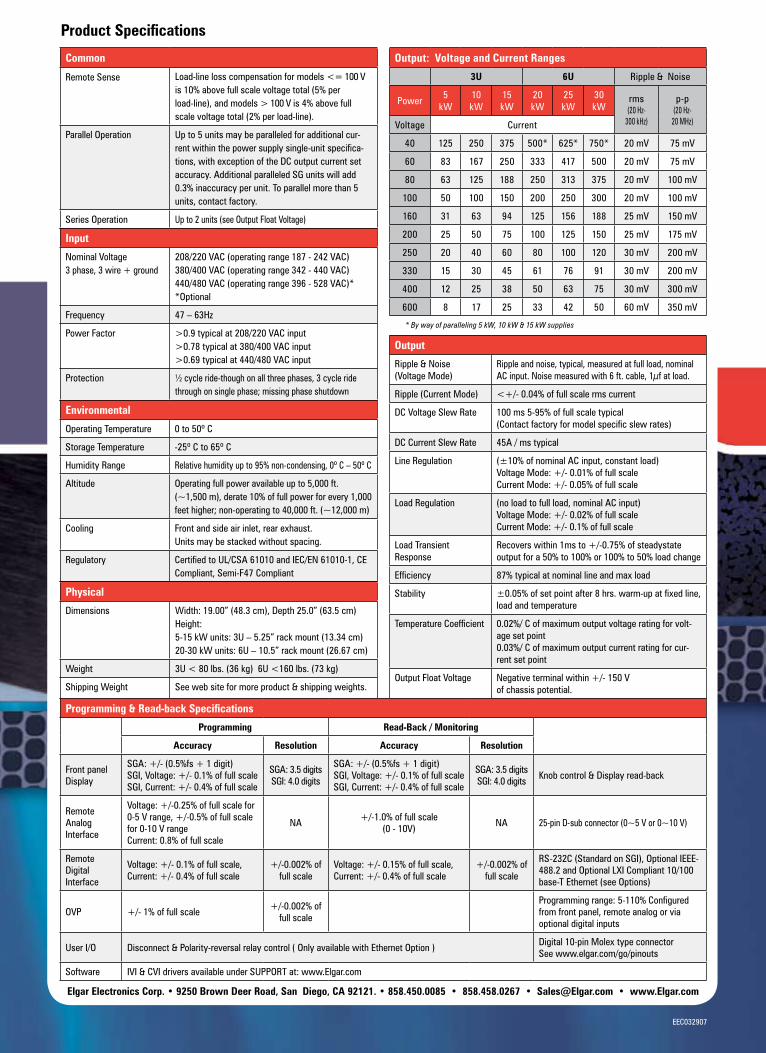
Common
Remote Sense Load-line loss compensation for models <= 100 V is 10% above full scale voltage total (5% per load-line), and models > 100 V is 4% above full scale voltage total (2% per load-line).
Parallel Operation Up to 5 units may be paralleled for additional cur-rent within the power supply single-unit specifica-tions, with exception of the DC output current set accuracy. Additional paralleled SG units will add 0.3% inaccuracy per unit. To parallel more than 5 units, contact factory.
Series Operation Up to 2 units (see Output Float Voltage)
Input
Nominal Voltage 3 phase, 3 wire + ground
208/220 VAC (operating range 187 - 242 VAC)380/400 VAC (operating range 342 - 440 VAC)440/480 VAC (operating range 396 - 528 VAC)* *Optional
Frequency 47 – 63Hz
Power Factor >0.9 typical at 208/220 VAC input>0.78 typical at 380/400 VAC input>0.69 typical at 440/480 VAC input
Protection ½ cycle ride-though on all three phases, 3 cycle ride through on single phase; missing phase shutdown
Output: Voltage and Current Ranges
3U 6U Ripple & Noise
Power5
kW10 kW
15 kW
20 kW
25 kW
30 kW
rms (20 Hz-
300 kHz)
p-p (20 Hz-
20 MHz)Voltage Current
40 125 250 375 500* 625* 750* 20 mV 75 mV
60 83 167 250 333 417 500 20 mV 75 mV
80 63 125 188 250 313 375 20 mV 100 mV
100 50 100 150 200 250 300 20 mV 100 mV
160 31 63 94 125 156 188 25 mV 150 mV
200 25 50 75 100 125 150 25 mV 175 mV
250 20 40 60 80 100 120 30 mV 200 mV
330 15 30 45 61 76 91 30 mV 200 mV
400 12 25 38 50 63 75 30 mV 300 mV
600 8 17 25 33 42 50 60 mV 350 mV
* By way of paralleling 5 kW, 10 kW & 15 kW supplies
Elgar Electronics Corp. • 9250 Brown Deer Road, San Diego, CA 92121. • 858.450.0085 • 858.458.0267 • [email protected] • www.Elgar.com
Product Specifications
Environmental
Operating Temperature 0 to 50º C
Storage Temperature -25º C to 65º C
Humidity Range Relative humidity up to 95% non-condensing, 0º C – 50º C
Altitude Operating full power available up to 5,000 ft. (~1,500 m), derate 10% of full power for every 1,000 feet higher; non-operating to 40,000 ft. (~12,000 m)
Cooling Front and side air inlet, rear exhaust.Units may be stacked without spacing.
Regulatory Certified to UL/CSA 61010 and IEC/EN 61010-1, CE Compliant, Semi-F47 Compliant
Physical
Dimensions Width: 19.00” (48.3 cm), Depth 25.0” (63.5 cm)Height: 5-15 kW units: 3U – 5.25” rack mount (13.34 cm) 20-30 kW units: 6U – 10.5” rack mount (26.67 cm)
Weight 3U < 80 lbs. (36 kg) 6U <160 lbs. (73 kg)
Shipping Weight See web site for more product & shipping weights.
Output
Ripple & Noise (Voltage Mode)
Ripple and noise, typical, measured at full load, nominal AC input. Noise measured with 6 ft. cable, 1µf at load.
Ripple (Current Mode) <+/- 0.04% of full scale rms current
DC Voltage Slew Rate 100 ms 5-95% of full scale typical(Contact factory for model specific slew rates)
DC Current Slew Rate 45A / ms typical
Line Regulation (±10% of nominal AC input, constant load)Voltage Mode: +/- 0.01% of full scaleCurrent Mode: +/- 0.05% of full scale
Load Regulation (no load to full load, nominal AC input)Voltage Mode: +/- 0.02% of full scaleCurrent Mode: +/- 0.1% of full scale
Load Transient Response
Recovers within 1ms to +/-0.75% of steadystate output for a 50% to 100% or 100% to 50% load change
Efficiency 87% typical at nominal line and max load
Stability ±0.05% of set point after 8 hrs. warm-up at fixed line, load and temperature
Temperature Coefficient 0.02%/ C of maximum output voltage rating for volt-age set point0.03%/ C of maximum output current rating for cur-rent set point
Output Float Voltage Negative terminal within +/- 150 V of chassis potential.
Programming & Read-back Specifications
Programming Read-Back / Monitoring
Accuracy Resolution Accuracy Resolution
Front panel Display
SGA: +/- (0.5%fs + 1 digit)SGI, Voltage: +/- 0.1% of full scaleSGI, Current: +/- 0.4% of full scale
SGA: 3.5 digitsSGI: 4.0 digits
SGA: +/- (0.5%fs + 1 digit)SGI, Voltage: +/- 0.1% of full scaleSGI, Current: +/- 0.4% of full scale
SGA: 3.5 digitsSGI: 4.0 digits Knob control & Display read-back
Remote Analog Interface
Voltage: +/-0.25% of full scale for 0-5 V range, +/-0.5% of full scale for 0-10 V rangeCurrent: 0.8% of full scale
NA +/-1.0% of full scale(0 - 10V) NA 25-pin D-sub connector (0~5 V or 0~10 V)
Remote Digital Interface
Voltage: +/- 0.1% of full scale, Current: +/- 0.4% of full scale
+/-0.002% of full scale
Voltage: +/- 0.15% of full scale, Current: +/- 0.4% of full scale
+/-0.002% of full scale
RS-232C (Standard on SGI), Optional IEEE-488.2 and Optional LXI Compliant 10/100 base-T Ethernet (see Options)
OVP +/- 1% of full scale +/-0.002% of full scale
Programming range: 5-110% Configured from front panel, remote analog or via optional digital inputs
User I/O Disconnect & Polarity-reversal relay control ( Only available with Ethernet Option ) Digital 10-pin Molex type connectorSee www.elgar.com/go/pinouts
Software IVI & CVI drivers available under SUPPORT at: www.Elgar.com
EEC032907

50KEPCO, INC. • 131-38 Sanford Avenue • Flushing, NY 11352 USA • Tel: (718) 461-7000 • Fax: (718) 767-1102
Email: [email protected] • www.kepcopower.com/bop.htm
Analog MetersModel BOP 50-2M (top) and BOP 100-4M (bottom)
100, 200 and 400 Watt Linear High-Speed Amplifiers
Digital MetersModel BOP 20-5D (top) and BOP 72-6D (bottom)
100, 200 and 400 Watt Linear High-Speed Amplifiers
BOP are high speed power operational amplifiers that can be used toprovide dynamically agile voltage for test and simulation. They arenot general purpose power supplies. By the nature of the bipolar highspeed design, they do not have any energy-storage noise discrimi-nating output capacitors. To realize the full high speed potential ofBOP, the load characteristics should be mainly resistive. If the loadis capacitive, (>0.1 microfarad), the BOP must be slowed to avoidoscillation. This is accomplished in voltage mode by increasing thevalue of the feedback capacitance. Special terminals on the user portare available to slow the BOP for optimum current-mode stabilityinto inductive loading.
BOP, while fully rated power supplies, arealso high-powered operational amplifierswith full 4-quadrant, bipolar operation. Theiroutput is capable of both sustained d-c and thereplication of arbitrary a-c waveforms.
In Kepco’s BOP, the voltage and current out-puts can be controlled smoothly and lin-early through the entire rated plus and minusranges, passing smoothly through zero withno polarity switching.
SERIES BOP

51KEPCO, INC. • 131-38 Sanford Avenue • Flushing, NY 11352 USA • Tel: (718) 461-7000 • Fax: (718) 767-1102
Email: [email protected] • www.kepcopower.com/bop.htm
A N I S O 9 0 0 1 C O M P A N Y
BOP accept plug-in cards for remote digital control
• BIT 4882 provides 12-bit IEEE 488.2 talk-listen control with SCPI support.
• BIT 4886 provides 16-bit IEEE 488.2 talk-listen control with SCPI support.
• BIT TMA-27 connect BOP to Kepco’ssingle-address multiple instrument serialbus for long range (>300m) control fromIEEE 488.2, RS 232 or VXI-based hosts.
• BIT 488B or BIT 488D offer listen-onlyGPIB support in binary or Hex format.
Cards may be factory installed. See page55 for appropriate suffix designations.
CLOSED LOOP GAINVOLTAGE CURRENT OUTPUT IMPEDANCE
MODEL(1) (5) d-c OUTPUT RANGE CHANNEL CHANNEL VOLTAGE MODE CURRENT MODEEo max. Io max. GV G I SERIES R SERIES L(2) SHUNT R SHUNT C (3)(V/V) (A/V)
100 WATT
BOP 20-5M ± 20V ± 5A 2.0 0.5 80µΩ 20µH 40kΩ 0.05µF
BOP 50-2M ± 50V ± 2A 5.0 0.2 0.5mΩ 100µH 50kΩ 0.05µF
BOP 100-1M ± 100V ± 1A 10.0 0.1 2.0mΩ 200µH 100kΩ 0.05µF
200 WATT
BOP 20-10M ± 20V ± 10A 2.0 1.0 40µΩ 50µH 20kΩ 0.1µF
BOP 36-6M ± 36V ± 6A 3.6 0.6 120µΩ 50µH 36kΩ 0.1µF
BOP 50-4M ± 50V ± 4A 5.0 0.4 0.25mΩ 100µH 50kΩ 0.05µF
BOP 72-3M ± 72V ± 3A 7.2 0.3 0.48mΩ 200µH 72kΩ 0.05µF
BOP 100-2M ± 100V ± 2A 10.0 0.2 1.0mΩ 200µH 100kΩ 0.05µF
BOP 200-1M(4) ± 200V ± 1A 20.0 0.1 4.0mΩ 1.2mH 200kΩ 0.03µF
400 WATT
BOP 20-20M ± 20V ± 20A 2.0 2.0 20µΩ 50µH 20kΩ 0.2µF
BOP 36-12M ± 36V ± 12A 3.6 1.2 60µΩ 50µH 36kΩ 0.2µF
BOP 50-8M ± 50V ± 8A 5.0 0.8 125µΩ 100µH 50kΩ 0.15µF
BOP 72-6M ± 72V ± 6A 7.2 0.6 240µΩ 200µH 72kΩ 0.1µF
BOP 100-4M ± 100V ± 4A 10.0 0.4 500µΩ 200µH 100kΩ 0.1µF
BOP MODEL TABLE
(1) For factory installed digital interfaces add appropriate suffix. See page 55.(2) For determining dynamic impedance in voltage mode.(3) For determining dynamic impedance in current mode.(4) Same size as 400W models.(5) To specify digital display, substitute the suffix letter “D” for the suffix letter “M.”
FEATURES
• Source and sink 100% of their current rating. See Figure 1.
• Separate control circuits for voltage and current with automaticcrossover to current and voltage limits.
• All controls and flag signals accessible through a 50-terminal user-port at the rear.
• Zeroable preamplifier available for scaling and summing externalsignals.
• Optional digital displays. Specify by substituting the suffix “D” inplace of the “M.”
The tabulation of the effective series resistanceand inductance in voltage mode, and theeffective shunt resistance and shunt capacitancein current mode, is done to allow a calculationof the output impedance versus frequency.
For high power bipolar power supplies, see Series BOP HighPower, page 44.
For high voltage bipolar power supplies, see Series BOP-HV,page 56.

KEPCO, INC. • 131-38 Sanford Avenue • Flushing, NY 11352 USA • Tel: (718) 461-7000 • Fax: (718) 767-1102Email: [email protected] • www.kepcopower.com/bop.htm52
FIGURE 1Output Source-Sink plot
TABLE 1 Source current measured worst case, 125V a-c.
MODEL CURRENT(Amps)
BOP 20-5M 2.6BOP 20-10M 5.5BOP 20-20M 11.0BOP 36-6M 5.1BOP 36-12M 10.6BOP 50-2M 2.6BOP 50-4M 4.8BOP 50-8M 9.5BOP 72-3M 5.0BOP 72-6M 10.8BOP 100-1M 2.6BOP 100-2M 4.8BOP 100-4M 9.2BOP 200-1M 5.5
4-QUADRANTTM
BOP are CE marked per the Low VoltageDirective (LVD), EN61010-1.
SPECIFICATI0N RATING/DESCRIPTION CONDITION
INPUTa-c Voltage 95-113, 105-125, User selectable
190-226, 210-250V a-c
Current See Table 1 Max load, 115V a-cFrequency 47-65Hz RangeOUTPUTd-c Output Bi-direction, series pass Transistor (1)
Type of stabilizer Automatic crossover Voltage/currentVoltage 0 to 100% of rating (bipolar) Adjustment rangeCurrent 0 to 100% of rating (bipolar) for temp 0-55°C
Sink See source/sink plot Duty cycleError Sense 0.5V per load wire Voltage allowanceIsolation Voltage 500V d-c or peak Output to groundLeakage Current <5 microamperes rms at 115V a-c 60HzOutput to Ground <50 microamperes p-p at 115V a-c 60HzSeries Connection 500V Max voltage off groundParallel Connection Current sharing Use master-slave connectionOVP Not availableCONTROLType Voltage
Variable input, fixed gainCurrentVoltage/ Current
Local 10-turn zero-center potRemote Analog -10V to +10V
Local Digital Serial bus or GPIB or VXI Optional internal BIT cardRemote Digital Use SN or SNR interface
Bounding ±Volt/current local Four screwdriver trimmers±Volt/current remote 0 to 10 volts
Dynamics See dynamic spec table Fast onlyUser Amplifiers Uncommitted gain 20K Two providedReferences ±10 volts, 1mA Two providedOptions (built-in) GPIB hex card Suffix -488BFor user added GPIB BCD card Suffix -488Dcard refer to “BIT” Long range serial card/VXI Suffix -TMAmodels page 55
Talk-listen 4882 card (SCPI) Suffix -4882Talk-listen 4886 card (SCPI) Suffix -4886
Serial RS 232 Suffix -232MECHANICALInput Connection Detachable IEC type 3-wire All models
Output Front signal /output Binding postsConnections Rear user port 50-terminal connector
Rear output Barrier stripMeters Two 21⁄2˝ horiz., Front panel
2% zero center analog
Indicators Four LEDs Voltage/Current/BoundingMounting Use RA 37 rack adapter 3⁄4 rack size(in std 19" racks) Mounting “ears” supplied Full rack sizeCooling Forced air Exhaust to rearDimensions inches 57⁄32 x 1217⁄32 x 179⁄64 3⁄4 rack size
mm 132.6 x 318.3 x 435.4inches 57⁄32 x 19 x 205⁄64 Full rack size
mm 132.6 x 482.6 x 510Finish; Fed Std 595 Light gray, color 26440 Front panelWeight 47lb (21.4Kg) 3⁄4 rack size (100W)(packed for 53lb (24.1Kg) 3⁄4 rack size (200W)shipment)
76lb (34.5Kg) Full rack size
(1) 200V model uses FET.
BOP GENERAL SPECIFICATIONS
(HxWxD) add21⁄2˝ to rear for connector
A N I S O 9 0 0 1 C O M P A N Y
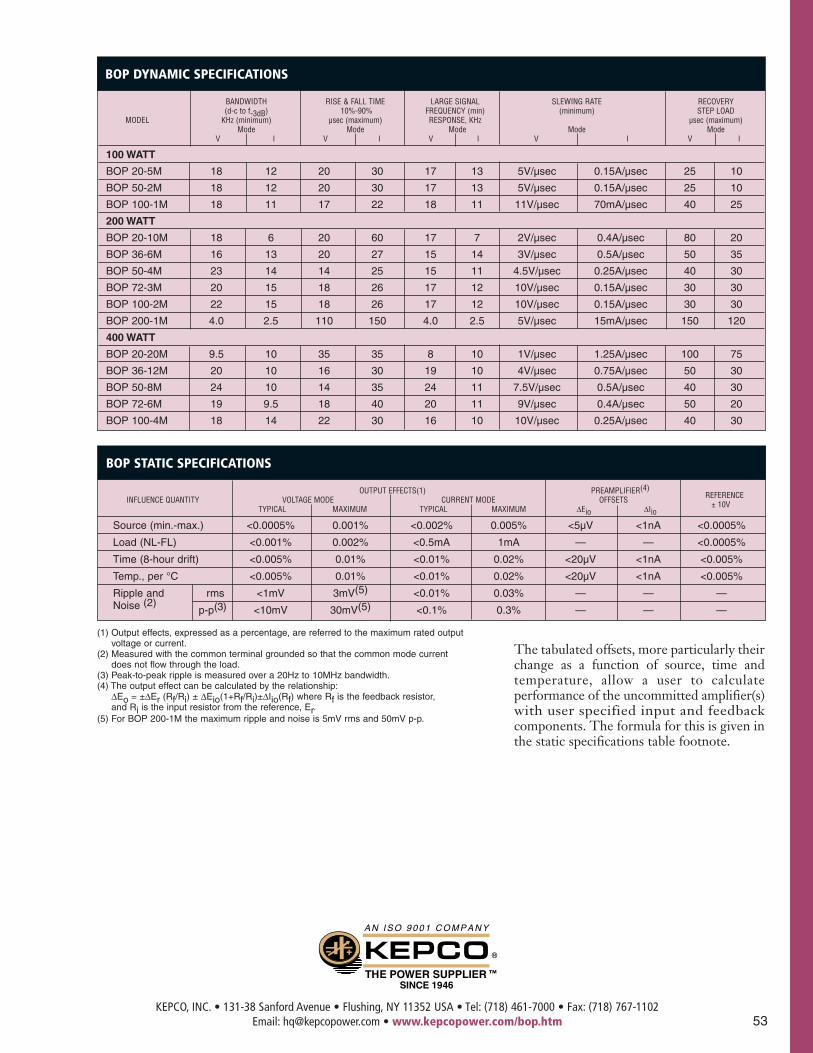
53KEPCO, INC. • 131-38 Sanford Avenue • Flushing, NY 11352 USA • Tel: (718) 461-7000 • Fax: (718) 767-1102
Email: [email protected] • www.kepcopower.com/bop.htm
A N I S O 9 0 0 1 C O M P A N Y
BANDWIDTH RISE & FALL TIME LARGE SIGNAL SLEWING RATE RECOVERY(d-c to f-3dB) 10%-90% FREQUENCY (min) (minimum) STEP LOAD
MODEL KHz (minimum) µsec (maximum) RESPONSE, KHz µsec (maximum)Mode Mode Mode Mode Mode
V I V I V I V I V I
100 WATT
BOP 20-5M 18 12 20 30 17 13 5V/µsec 0.15A/µsec 25 10
BOP 50-2M 18 12 20 30 17 13 5V/µsec 0.15A/µsec 25 10
BOP 100-1M 18 11 17 22 18 11 11V/µsec 70mA/µsec 40 25
200 WATT
BOP 20-10M 18 6 20 60 17 7 2V/µsec 0.4A/µsec 80 20
BOP 36-6M 16 13 20 27 15 14 3V/µsec 0.5A/µsec 50 35
BOP 50-4M 23 14 14 25 15 11 4.5V/µsec 0.25A/µsec 40 30
BOP 72-3M 20 15 18 26 17 12 10V/µsec 0.15A/µsec 30 30
BOP 100-2M 22 15 18 26 17 12 10V/µsec 0.15A/µsec 30 30
BOP 200-1M 4.0 2.5 110 150 4.0 2.5 5V/µsec 15mA/µsec 150 120
400 WATT
BOP 20-20M 9.5 10 35 35 8 10 1V/µsec 1.25A/µsec 100 75
BOP 36-12M 20 10 16 30 19 10 4V/µsec 0.75A/µsec 50 30
BOP 50-8M 24 10 14 35 24 11 7.5V/µsec 0.5A/µsec 40 30
BOP 72-6M 19 9.5 18 40 20 11 9V/µsec 0.4A/µsec 50 20
BOP 100-4M 18 14 22 30 16 10 10V/µsec 0.25A/µsec 40 30
OUTPUT EFFECTS(1) PREAMPLIFIER(4)INFLUENCE QUANTITY VOLTAGE MODE CURRENT MODE OFFSETS REFERENCE
TYPICAL MAXIMUM TYPICAL MAXIMUM ∆Eio ∆Iio ± 10V
Source (min.-max.) <0.0005% 0.001% <0.002% 0.005% <5µV <1nA <0.0005%
Load (NL-FL) <0.001% 0.002% <0.5mA 1mA — — <0.0005%
Time (8-hour drift) <0.005% 0.01% <0.01% 0.02% <20µV <1nA <0.005%
Temp., per °C <0.005% 0.01% <0.01% 0.02% <20µV <1nA <0.005%
Ripple and rms <1mV 3mV(5) <0.01% 0.03% — — —Noise (2)
p-p(3) <10mV 30mV(5) <0.1% 0.3% — — —
BOP STATIC SPECIFICATIONS
(1) Output effects, expressed as a percentage, are referred to the maximum rated outputvoltage or current.
(2) Measured with the common terminal grounded so that the common mode current does not flow through the load.
(3) Peak-to-peak ripple is measured over a 20Hz to 10MHz bandwidth.(4) The output effect can be calculated by the relationship:
∆Eo = ±∆Er (Rf/Ri) ± ∆Eio(1+Rf/Ri)±∆Iio(Rf) where Rf is the feedback resistor, and Ri is the input resistor from the reference, Er.
(5) For BOP 200-1M the maximum ripple and noise is 5mV rms and 50mV p-p.
BOP DYNAMIC SPECIFICATIONS
The tabulated offsets, more particularly theirchange as a function of source, time andtemperature, allow a user to calculateperformance of the uncommitted amplifier(s)with user specified input and feedbackcomponents. The formula for this is given inthe static specifications table footnote.

54KEPCO, INC. • 131-38 Sanford Avenue • Flushing, NY 11352 USA • Tel: (718) 461-7000 • Fax: (718) 767-1102
Email: [email protected] • www.kepcopower.com/bop.htm
100 & 200 WATT MODELS(THREE-QUARTER RACK)
400 WATT MODELS (FULL RACK)AND BOP 200-1M
OUTLINE DIMENSIONAL DRAWINGSFractional dimensions in light face type are in inches,dimensions in bold face type are in millimeters.
Tolerance: ± 1/64" (0.4) between mounting holes± 1/32" (0.8) other dimensions
BOP 3/4 rack width power supplies can be rack mounted using RA 37. See page 77.
FRONT VIEW FRONT VIEW
BOTTOM VIEW BOTTOM VIEW
SIDE VIEW SIDE VIEW
REAR VIEW REAR VIEW