d2 rdna fungal identification - thermo fisher scientific · microseq™ d2 rdna fungal...
TRANSCRIPT

For Research Use Only. Not for use in diagnostic procedures.
MicroSEQ™ D2 rDNA Fungal IdentificationUSER GUIDE
using:MicroSEQ™ D2 rDNA Fungal PCR Kit andMicroSEQ™ D2 rDNA Fungal Sequencing Kit
Catalog Numbers 4349153 (PCR kit) and 4347481 (Sequencing kit)Publication Number 4346294
Revision E

The information in this guide is subject to change without notice.
DISCLAIMER
TO THE EXTENT ALLOWED BY LAW, LIFE TECHNOLOGIES AND/OR ITS AFFILIATE(S) WILL NOT BE LIABLE FOR SPECIAL, INCIDENTAL, INDIRECT,PUNITIVE, MULTIPLE, OR CONSEQUENTIAL DAMAGES IN CONNECTION WITH OR ARISING FROM THIS DOCUMENT, INCLUDING YOUR USE OF IT.
LIMITED USE LABEL LICENSE No. 492: Environmental Testing, Quality Control/Quality Assurance Testing, Food and Agricultural Testing
Notice to Purchaser: The purchase of this product conveys to the purchaser the limited, non-transferable right to use the purchased amount of theproduct (a) to perform internal research for the sole benefit of the purchaser; and (b) for environmental testing, quality control/quality assurancetesting, food and agricultural testing, including reporting results of purchaser's activities in environmental testing, quality control/quality assurancetesting, food and agricultural testing for a fee or other commercial consideration. No other right is hereby granted expressly, by implication, or byestoppel. This product is for environmental testing, quality control/ quality assurance testing, food and agricultural testing and research purposesonly.
The purchase of this product does not grant the purchaser any additional rights, including (without limitation) the right to transfer or resell theproduct in any form or the right to use the product as a therapeutic agent or diagnostics test component. For information on obtaining additionalrights, please contact [email protected] or Out Licensing, Life Technologies, 5791 Van Allen Way, Carlsbad, California 92008.
Trademarks
All trademarks are the property of Thermo Fisher Scientific and its subsidiaries unless otherwise specified. ExoSAP-IT is a registered trademark ofAffymetrix, Inc. Centri-Sep is a trademark of Princeton Separations Inc.
©2015 Thermo Fisher Scientific Inc. All rights reserved.

Contents
■ About this guide . . . . . . . . . . . . . . . . . . . . . . . . . . . . . . . . . . . . . . . . . . . . . . . . . . . . . . . . . . . . 5
Revision history . . . . . . . . . . . . . . . . . . . . . . . . . . . . . . . . . . . . . . . . . . . . . . . . . . . . . . . . . . . . . . . . . 5
■ Product Information . . . . . . . . . . . . . . . . . . . . . . . . . . . . . . . . . . . . . . . . . . . . . . . . . . . . . . . 6
Purpose of the product . . . . . . . . . . . . . . . . . . . . . . . . . . . . . . . . . . . . . . . . . . . . . . . . . . . . . . . . . . . 6
Instrument platforms . . . . . . . . . . . . . . . . . . . . . . . . . . . . . . . . . . . . . . . . . . . . . . . . . . . . . . . . . . . . 6
Kit contents and storage . . . . . . . . . . . . . . . . . . . . . . . . . . . . . . . . . . . . . . . . . . . . . . . . . . . . . . . . . 6Storage guidelines . . . . . . . . . . . . . . . . . . . . . . . . . . . . . . . . . . . . . . . . . . . . . . . . . . . . . . . . . . 7
Materials and equipment required . . . . . . . . . . . . . . . . . . . . . . . . . . . . . . . . . . . . . . . . . . . . . . . . 7
■ Methods . . . . . . . . . . . . . . . . . . . . . . . . . . . . . . . . . . . . . . . . . . . . . . . . . . . . . . . . . . . . . . . . . . . . . 8
Workflow . . . . . . . . . . . . . . . . . . . . . . . . . . . . . . . . . . . . . . . . . . . . . . . . . . . . . . . . . . . . . . . . . . . . . . 8
Collect and prepare samples . . . . . . . . . . . . . . . . . . . . . . . . . . . . . . . . . . . . . . . . . . . . . . . . . . . . . 8Important procedural guidelines . . . . . . . . . . . . . . . . . . . . . . . . . . . . . . . . . . . . . . . . . . . . . . 8Isolate genomic DNA from samples . . . . . . . . . . . . . . . . . . . . . . . . . . . . . . . . . . . . . . . . . . . 9Dilute genomic DNA for PCR . . . . . . . . . . . . . . . . . . . . . . . . . . . . . . . . . . . . . . . . . . . . . . . . . 9
Amplify the D2 LSU rDNA region . . . . . . . . . . . . . . . . . . . . . . . . . . . . . . . . . . . . . . . . . . . . . . . . . 10Important procedural guidelines . . . . . . . . . . . . . . . . . . . . . . . . . . . . . . . . . . . . . . . . . . . . . 10Prepare the PCR reactions . . . . . . . . . . . . . . . . . . . . . . . . . . . . . . . . . . . . . . . . . . . . . . . . . . 10Perform the amplification run . . . . . . . . . . . . . . . . . . . . . . . . . . . . . . . . . . . . . . . . . . . . . . . 10(Optional) Analyze PCR products . . . . . . . . . . . . . . . . . . . . . . . . . . . . . . . . . . . . . . . . . . . . . 11Purify PCR products for cycle sequencing . . . . . . . . . . . . . . . . . . . . . . . . . . . . . . . . . . . . . 11
Perform cycle sequencing . . . . . . . . . . . . . . . . . . . . . . . . . . . . . . . . . . . . . . . . . . . . . . . . . . . . . . . 12Important procedural guidelines . . . . . . . . . . . . . . . . . . . . . . . . . . . . . . . . . . . . . . . . . . . . . 12Prepare cycle sequencing reactions . . . . . . . . . . . . . . . . . . . . . . . . . . . . . . . . . . . . . . . . . . 12Perform the cycle sequencing run . . . . . . . . . . . . . . . . . . . . . . . . . . . . . . . . . . . . . . . . . . . 12Purify extension products . . . . . . . . . . . . . . . . . . . . . . . . . . . . . . . . . . . . . . . . . . . . . . . . . . . 13
Perform electrophoresis of extension products . . . . . . . . . . . . . . . . . . . . . . . . . . . . . . . . . . . . 13Important procedural guidelines . . . . . . . . . . . . . . . . . . . . . . . . . . . . . . . . . . . . . . . . . . . . . 13Configure the instrument for electrophoresis . . . . . . . . . . . . . . . . . . . . . . . . . . . . . . . . . 14Prepare samples and perform electrophoresis . . . . . . . . . . . . . . . . . . . . . . . . . . . . . . . . 14
MicroSEQ™ D2 rDNA Fungal Identification User Guide 3

Troubleshooting . . . . . . . . . . . . . . . . . . . . . . . . . . . . . . . . . . . . . . . . . . . . . . . . . . . . . . . . . . . . . . . 15
Frequently asked questions . . . . . . . . . . . . . . . . . . . . . . . . . . . . . . . . . . . . . . . . . . . . . . . . . . . . . 17Sensitivity and quantitation . . . . . . . . . . . . . . . . . . . . . . . . . . . . . . . . . . . . . . . . . . . . . . . . . 17Sample preparation and storage . . . . . . . . . . . . . . . . . . . . . . . . . . . . . . . . . . . . . . . . . . . . . 17Contamination . . . . . . . . . . . . . . . . . . . . . . . . . . . . . . . . . . . . . . . . . . . . . . . . . . . . . . . . . . . . . 17Overlapping sequences . . . . . . . . . . . . . . . . . . . . . . . . . . . . . . . . . . . . . . . . . . . . . . . . . . . . . 18PCR product size . . . . . . . . . . . . . . . . . . . . . . . . . . . . . . . . . . . . . . . . . . . . . . . . . . . . . . . . . . 18Species libraries . . . . . . . . . . . . . . . . . . . . . . . . . . . . . . . . . . . . . . . . . . . . . . . . . . . . . . . . . . . 18Additional documentation . . . . . . . . . . . . . . . . . . . . . . . . . . . . . . . . . . . . . . . . . . . . . . . . . . . 18
■ APPENDIX A Ordering Information . . . . . . . . . . . . . . . . . . . . . . . . . . . . . . . . . . . 19
■ APPENDIX B Additional Supported Instruments . . . . . . . . . . . . . . . . . . . . 21
Electrophoresis settings for additional supported instruments . . . . . . . . . . . . . . . . . . . . . . . 21
■ APPENDIX C Supplemental Procedures and Guidelines . . . . . . . . . . . . 22
Good laboratory practices for PCR and RT-PCR . . . . . . . . . . . . . . . . . . . . . . . . . . . . . . . . . . . . 22
Seal the PCR plate . . . . . . . . . . . . . . . . . . . . . . . . . . . . . . . . . . . . . . . . . . . . . . . . . . . . . . . . . . . . . 22Seal the plate with strip caps . . . . . . . . . . . . . . . . . . . . . . . . . . . . . . . . . . . . . . . . . . . . . . . . 22Seal the plate with adhesive film . . . . . . . . . . . . . . . . . . . . . . . . . . . . . . . . . . . . . . . . . . . . . 23
Prevent evaporation during electrophoresis . . . . . . . . . . . . . . . . . . . . . . . . . . . . . . . . . . . . . . . 24Prepare a diluted sample . . . . . . . . . . . . . . . . . . . . . . . . . . . . . . . . . . . . . . . . . . . . . . . . . . . 24Dry-down and resuspend the sample . . . . . . . . . . . . . . . . . . . . . . . . . . . . . . . . . . . . . . . . . 24
■ APPENDIX D Supplemental Product Information . . . . . . . . . . . . . . . . . . . . 26
MicroSEQ™ system overview . . . . . . . . . . . . . . . . . . . . . . . . . . . . . . . . . . . . . . . . . . . . . . . . . . . . . 26
About MicroSEQ™ ID Analysis Software . . . . . . . . . . . . . . . . . . . . . . . . . . . . . . . . . . . . . . . . . . . . 26MicroSEQ™ ID proprietary libraries . . . . . . . . . . . . . . . . . . . . . . . . . . . . . . . . . . . . . . . . . . . 27Custom libraries . . . . . . . . . . . . . . . . . . . . . . . . . . . . . . . . . . . . . . . . . . . . . . . . . . . . . . . . . . . 27MicroSEQ™ ID reports . . . . . . . . . . . . . . . . . . . . . . . . . . . . . . . . . . . . . . . . . . . . . . . . . . . . . . 27
About dye-labeled terminator chemistry . . . . . . . . . . . . . . . . . . . . . . . . . . . . . . . . . . . . . . . . . . 28
■ APPENDIX E Safety . . . . . . . . . . . . . . . . . . . . . . . . . . . . . . . . . . . . . . . . . . . . . . . . . . . . . 30
Chemical safety . . . . . . . . . . . . . . . . . . . . . . . . . . . . . . . . . . . . . . . . . . . . . . . . . . . . . . . . . . . . . . . . 31
Biological hazard safety . . . . . . . . . . . . . . . . . . . . . . . . . . . . . . . . . . . . . . . . . . . . . . . . . . . . . . . . . 32
■ Documentation and support . . . . . . . . . . . . . . . . . . . . . . . . . . . . . . . . . . . . . . . . . . . . . 33
Related documentation . . . . . . . . . . . . . . . . . . . . . . . . . . . . . . . . . . . . . . . . . . . . . . . . . . . . . . . . . 33
Customer and technical support . . . . . . . . . . . . . . . . . . . . . . . . . . . . . . . . . . . . . . . . . . . . . . . . . 33
Limited product warranty . . . . . . . . . . . . . . . . . . . . . . . . . . . . . . . . . . . . . . . . . . . . . . . . . . . . . . . 34
Contents
4 MicroSEQ™ D2 rDNA Fungal Identification User Guide
About this guide
IMPORTANT! Before using this product, read and understand the information in the“Safety” appendix in this document.
Revision history
Revision Date Description
D August 2015 Updated legal and contact information.
E October 2015 Corrected amplification thermal cyclingconditions.
MicroSEQ™ D2 rDNA Fungal Identification User Guide 5
Product Information
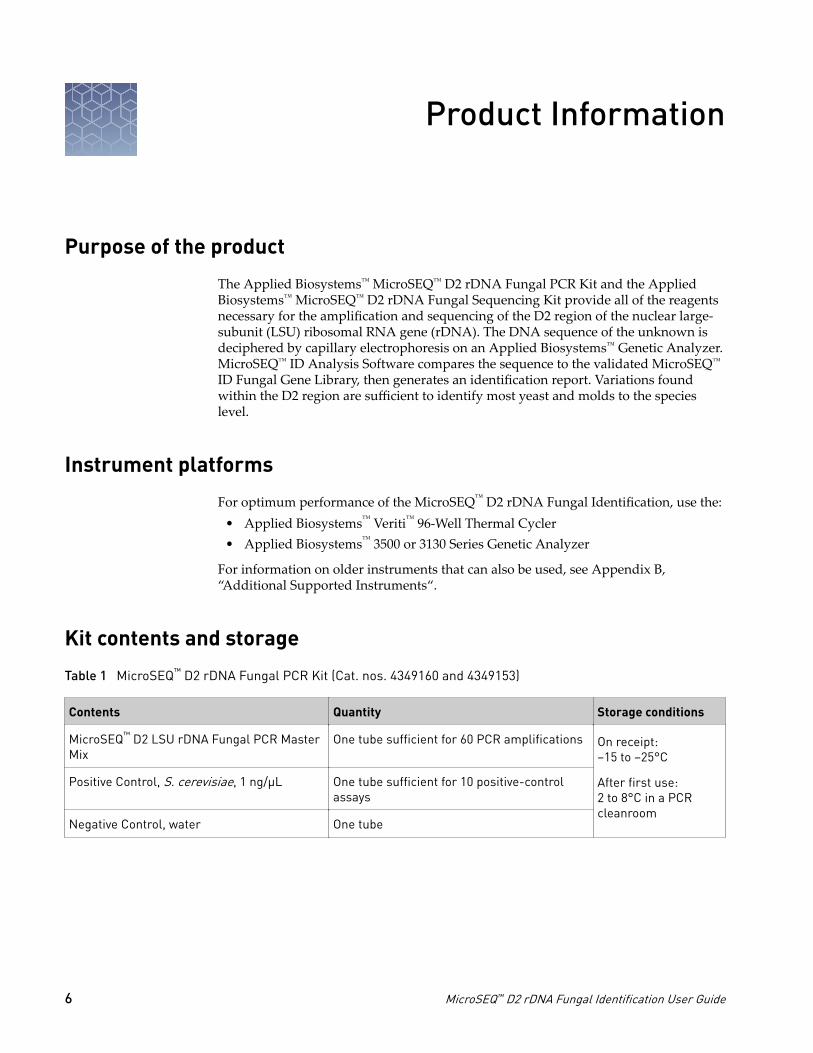
Purpose of the product
The Applied Biosystems™ MicroSEQ™ D2 rDNA Fungal PCR Kit and the AppliedBiosystems™ MicroSEQ™ D2 rDNA Fungal Sequencing Kit provide all of the reagentsnecessary for the amplification and sequencing of the D2 region of the nuclear large‐subunit (LSU) ribosomal RNA gene (rDNA). The DNA sequence of the unknown isdeciphered by capillary electrophoresis on an Applied Biosystems™ Genetic Analyzer.MicroSEQ™ ID Analysis Software compares the sequence to the validated MicroSEQ™
ID Fungal Gene Library, then generates an identification report. Variations foundwithin the D2 region are sufficient to identify most yeast and molds to the specieslevel.
Instrument platforms
For optimum performance of the MicroSEQ™ D2 rDNA Fungal Identification, use the:• Applied Biosystems™ Veriti™ 96‐Well Thermal Cycler• Applied Biosystems™ 3500 or 3130 Series Genetic Analyzer
For information on older instruments that can also be used, see Appendix B,“Additional Supported Instruments“.
Kit contents and storage
Table 1 MicroSEQ™ D2 rDNA Fungal PCR Kit (Cat. nos. 4349160 and 4349153)
Contents Quantity Storage conditions
MicroSEQ™ D2 LSU rDNA Fungal PCR MasterMix
One tube sufficient for 60 PCR amplifications On receipt:–15 to –25°C
After first use:2 to 8°C in a PCRcleanroom
Positive Control, S. cerevisiae, 1 ng/µL One tube sufficient for 10 positive-controlassays
Negative Control, water One tube
6 MicroSEQ™ D2 rDNA Fungal Identification User Guide

Table 2 MicroSEQ™ D2 rDNA Fungal Sequencing Kit (Cat. no. 4347481)
Contents Quantity Storage conditions
MicroSEQ™ D2 LSU rDNA Fungal ForwardSequence Mix
Two tubes sufficient for a total of 55 reactions –15 to –25°C
MicroSEQ™ D2 LSU rDNA Fungal ReverseSequence Mix
Two tubes sufficient for a total of 55 reactions
• Avoid excess freeze‐thaw cycles. Aliquot reagents in smaller amounts, ifnecessary.
• Before each use of the kit, allow the frozen reagents to thaw at room temperatureor on ice.
IMPORTANT! Do not heat the reagents.
• Whenever possible, keep thawed reagents on ice during use.• Mix the reagents by gently vortexing the tubes. Centrifuge the tubes briefly to
collect all liquid at the bottom of the tube.
Materials and equipment required
Contact your local MicroSEQ™ ID representative for a list of additional materials andequipment required.
Storageguidelines
Product InformationMaterials and equipment required
MicroSEQ™ D2 rDNA Fungal Identification User Guide 7
Methods
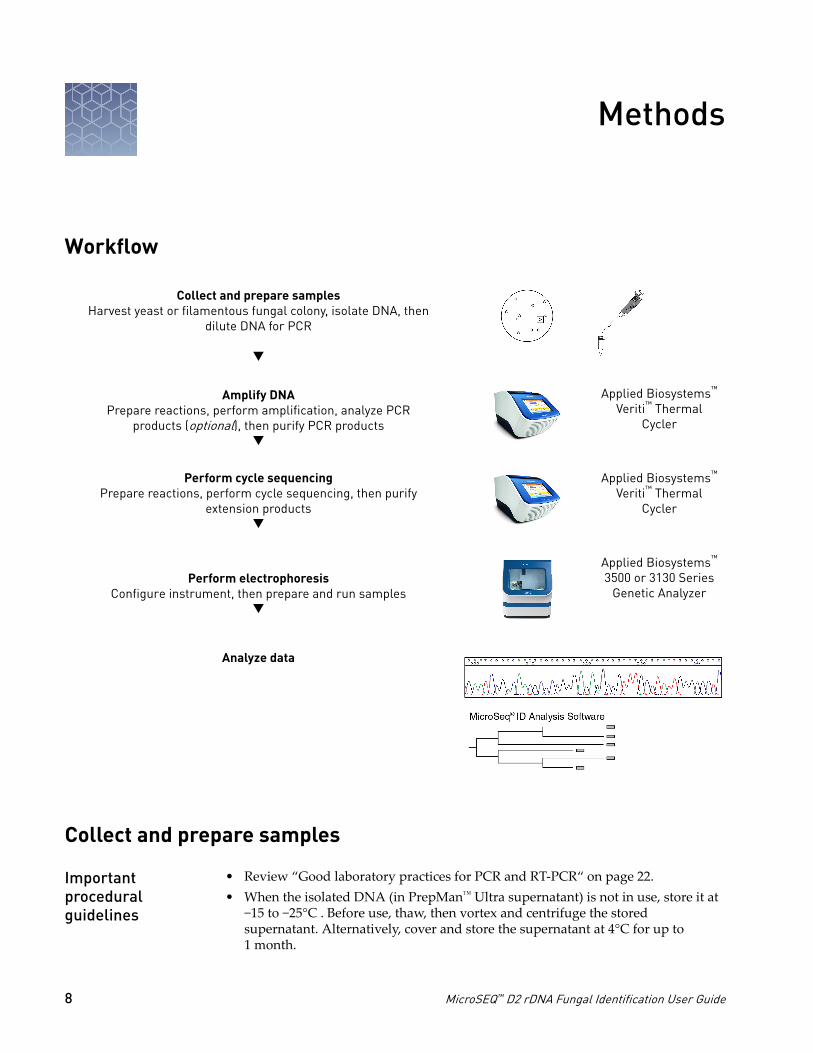
Workflow
Collect and prepare samplesHarvest yeast or filamentous fungal colony, isolate DNA, then
dilute DNA for PCR
q
Amplify DNAPrepare reactions, perform amplification, analyze PCR
products (optional), then purify PCR productsq
Applied Biosystems™
Veriti™ ThermalCycler
Perform cycle sequencingPrepare reactions, perform cycle sequencing, then purify
extension productsq
Applied Biosystems™
Veriti™ ThermalCycler
Perform electrophoresisConfigure instrument, then prepare and run samples
q
Applied Biosystems™
3500 or 3130 SeriesGenetic Analyzer
Analyze data
Collect and prepare samples
• Review “Good laboratory practices for PCR and RT‐PCR“ on page 22.• When the isolated DNA (in PrepMan™ Ultra supernatant) is not in use, store it at
−15 to −25°C . Before use, thaw, then vortex and centrifuge the storedsupernatant. Alternatively, cover and store the supernatant at 4°C for up to1 month.
Importantproceduralguidelines
8 MicroSEQ™ D2 rDNA Fungal Identification User Guide
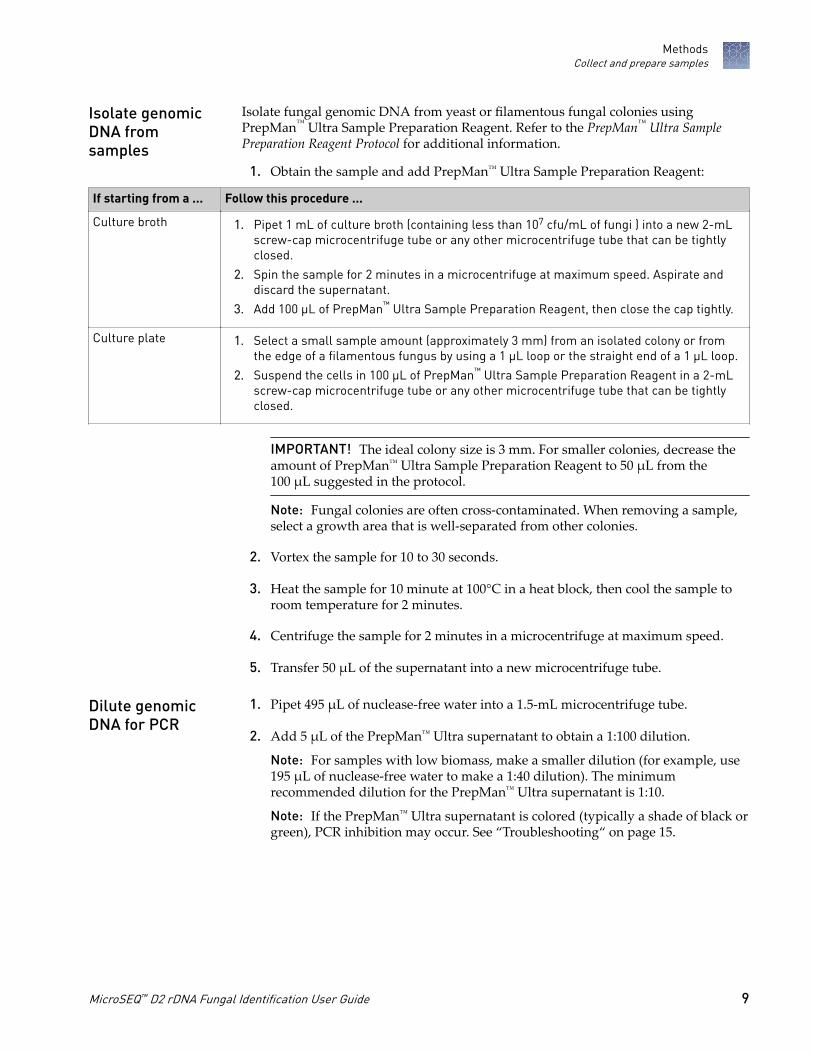
Isolate fungal genomic DNA from yeast or filamentous fungal colonies usingPrepMan™ Ultra Sample Preparation Reagent. Refer to the PrepMan™ Ultra SamplePreparation Reagent Protocol for additional information.
1. Obtain the sample and add PrepMan™ Ultra Sample Preparation Reagent:
If starting from a ... Follow this procedure ...
Culture broth 1. Pipet 1 mL of culture broth (containing less than 107 cfu/mL of fungi ) into a new 2-mLscrew-cap microcentrifuge tube or any other microcentrifuge tube that can be tightlyclosed.
2. Spin the sample for 2 minutes in a microcentrifuge at maximum speed. Aspirate anddiscard the supernatant.
3. Add 100 µL of PrepMan™ Ultra Sample Preparation Reagent, then close the cap tightly.
Culture plate 1. Select a small sample amount (approximately 3 mm) from an isolated colony or fromthe edge of a filamentous fungus by using a 1 µL loop or the straight end of a 1 µL loop.
2. Suspend the cells in 100 µL of PrepMan™ Ultra Sample Preparation Reagent in a 2-mLscrew-cap microcentrifuge tube or any other microcentrifuge tube that can be tightlyclosed.
IMPORTANT! The ideal colony size is 3 mm. For smaller colonies, decrease theamount of PrepMan™ Ultra Sample Preparation Reagent to 50 μL from the100 μL suggested in the protocol.
Note: Fungal colonies are often cross‐contaminated. When removing a sample,select a growth area that is well‐separated from other colonies.
2. Vortex the sample for 10 to 30 seconds.
3. Heat the sample for 10 minute at 100°C in a heat block, then cool the sample toroom temperature for 2 minutes.
4. Centrifuge the sample for 2 minutes in a microcentrifuge at maximum speed.
5. Transfer 50 μL of the supernatant into a new microcentrifuge tube.
1. Pipet 495 μL of nuclease‐free water into a 1.5‐mL microcentrifuge tube.
2. Add 5 μL of the PrepMan™ Ultra supernatant to obtain a 1:100 dilution.
Note: For samples with low biomass, make a smaller dilution (for example, use195 μL of nuclease‐free water to make a 1:40 dilution). The minimumrecommended dilution for the PrepMan™ Ultra supernatant is 1:10.
Note: If the PrepMan™ Ultra supernatant is colored (typically a shade of black orgreen), PCR inhibition may occur. See “Troubleshooting“ on page 15.
Isolate genomicDNA fromsamples
Dilute genomicDNA for PCR
MethodsCollect and prepare samples
MicroSEQ™ D2 rDNA Fungal Identification User Guide 9

Amplify the D2 LSU rDNA region
• Select the appropriate tubes or 96‐well plates for your thermal cycler. See yourinstrument user guide (available at thermofisher.com).
• Using strip caps instead of 96‐well adhesive plate covers may help reduce cross‐contamination.
• Before preparing the PCR reactions, review “Good laboratory practices for PCRand RT‐PCR“ on page 22 and “Storage guidelines“ on page 7 for sample andreagent handling instructions.
• If necessary after performing PCR or purifying PCR products, cover and store thePCR products at –15°C to –25°C until you are ready to use them.
Note: PCR products are stable for 6 months or longer at –15°C to –25°C.
1. Vortex the diluted supernatant to mix the tube contents.
2. Using the volumes shown in the table, prepare samples and controls inMicroAmp™ reaction tubes or 96‐well plates.
Reaction type Volume for one reaction
Negative controls • 15 μL PCR Master Mix
• 15 μL negative control (provided with kit)
Samples • 15 μL PCR Master Mix
• 15 μL of 1:100 dilution of PrepManTM Ultrasupernatant
Positive controls • 15 μL PCR Master Mix
• 15 μL positive-control DNA (provided with kit)
Note: To help avoid cross‐contamination, we recommend that you pipetcomponents in the following order: negative controls, samples, positive controls.If possible, leave empty cells between different reaction types.
3. Use strip caps and the capping tool, or adhesive film and the sealing tool, to capthe tubes or plate (see “Seal the PCR plate“ on page 22). Vortex, spin briefly,then place the tubes or the plate in the thermal cycler.
IMPORTANT! Apply significant downward pressure on the sealing tool in allsteps to form a complete seal.
1. Set the appropriate ramp mode for your thermal cycler:• Veriti™ 96‐Well Thermal Cycler — 9600 emulation
Note: To use the 9600 emulation mode, select Tools Menu4Convert aMethod49600 Emulation Mode, then enter the thermal cycling conditions.See the Veriti™ Thermal Cycler User Guide for details.
• 9800 Fast Thermal Cycler — Std• GeneAmp™ PCR System 9700 — 9600 emulation (9600)
Importantproceduralguidelines
Prepare the PCRreactions
Perform theamplification run
MethodsAmplify the D2 LSU rDNA region
10 MicroSEQ™ D2 rDNA Fungal Identification User Guide
2. Set the thermal cycling conditions:
Initial stepEach of 35 cycles Final
extension Final stepMelt Anneal Extend
HOLD CYCLE HOLD HOLD
95°C10 min
95°C30 sec
53°C30 sec
72°C1 min
72°C10 min
4°C∞
3. Set the reaction volume to 30 μL, then start the run.
4. Before removing the caps or adhesive film, briefly centrifuge the tubes or plate.
Note: Centrifuging helps avoid cross‐contamination from liquid remaining onthe caps or plate covers.
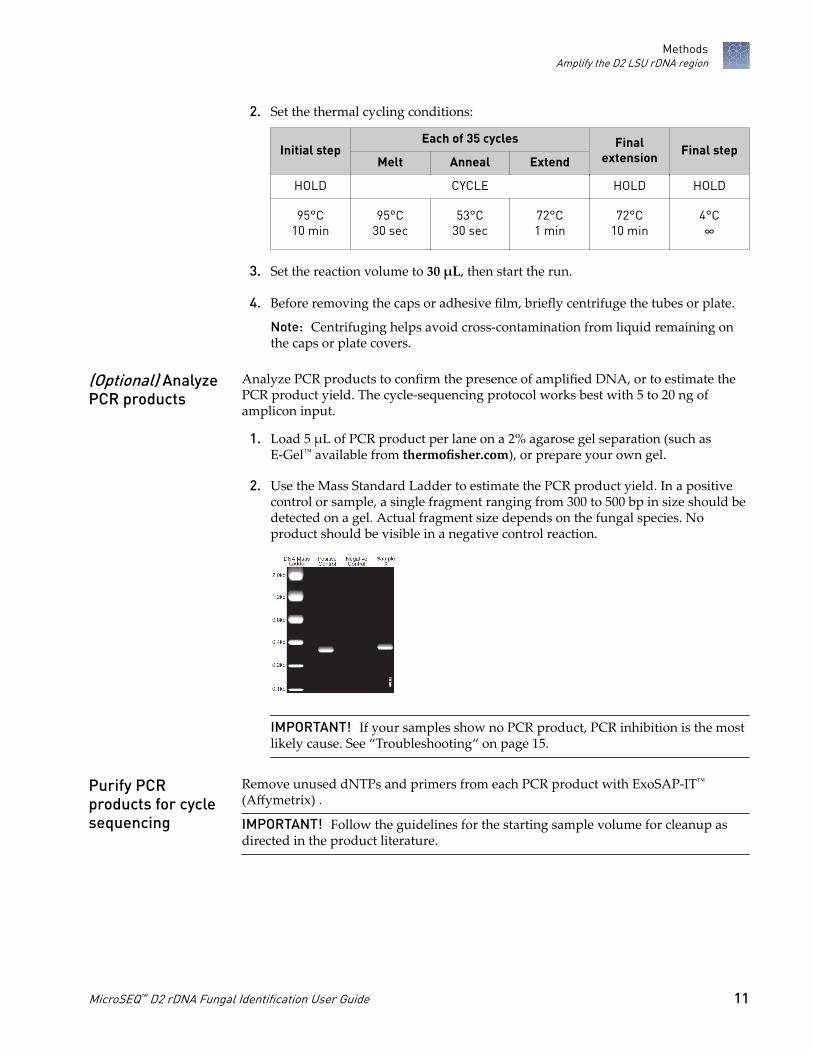
Analyze PCR products to confirm the presence of amplified DNA, or to estimate thePCR product yield. The cycle‐sequencing protocol works best with 5 to 20 ng ofamplicon input.
1. Load 5 μL of PCR product per lane on a 2% agarose gel separation (such asE‐Gel™ available from thermofisher.com), or prepare your own gel.
2. Use the Mass Standard Ladder to estimate the PCR product yield. In a positivecontrol or sample, a single fragment ranging from 300 to 500 bp in size should bedetected on a gel. Actual fragment size depends on the fungal species. Noproduct should be visible in a negative control reaction.
IMPORTANT! If your samples show no PCR product, PCR inhibition is the mostlikely cause. See “Troubleshooting“ on page 15.
Remove unused dNTPs and primers from each PCR product with ExoSAP‐IT™
(Affymetrix) .
IMPORTANT! Follow the guidelines for the starting sample volume for cleanup asdirected in the product literature.
(Optional) AnalyzePCR products
Purify PCRproducts for cyclesequencing
MethodsAmplify the D2 LSU rDNA region
MicroSEQ™ D2 rDNA Fungal Identification User Guide 11
Perform cycle sequencing
Cycle sequencing occurs when successive rounds of denaturation, primer annealing,and primer extension in a thermal cycler result in the incorporation of dye terminatorsinto extension products. The products are then loaded into a genetic analyzer todetermine the D2 LSU rDNA sequence. For additional information about cyclesequencing chemistries, refer to the DNA Sequencing by Capillary ElectrophoresisChemistry Guide.
• Select the appropriate tubes or 96‐well plates for your thermal cycler. See yourinstrument user guide (available at thermofisher.com).
• Using strip caps instead of 96‐well adhesive plate covers may help reduce cross‐contamination.
• If you are using a CentriSep™ Spin Column to purify extension products (see“Purifying Extension Products” on page 15), hydrate the column with highlypurified (nuclease free) water during the cycle sequencing run.
• If necessary, cover and store the unused portions of the purified PCR products at–15°C to –25°C until you are ready to use them.
Note: PCR products are stable for 6 months or longer at –15°C to –25°C.• If necessary, cover and store the extension products at 4°C overnight or at –15°C
to –25°C for up to 1 week before purifying them.
1. Before you remove the tube or plate caps, briefly centrifuge the purified PCRproducts.
Note: Centrifuging helps avoid cross‐contamination from liquid remaining onthe caps or plate covers.
2. In reaction tubes or a 96‐well plate, prepare separate forward‐ and reverse‐sequencing reactions for each PCR product and control:
• Forward‐sequencing reaction — Combine 7 μL of purified PCR product orcontrol with 13 μL forward sequence mix.
• Reverse‐sequencing reaction — Combine 7 μL of purified PCR product orcontrol with 13 μL reverse sequence mix.
Note: To help avoid cross‐contamination, pipet components in the followingorder: negative controls, samples, positive controls.
1. Cap the tubes or the plate, then place the tubes or the plate in the thermal cycler.
2. Set the appropriate ramp mode for your thermal cycler:• Veriti™ 96‐Well Thermal Cycler — 9600 emulation• 9800 Fast Thermal Cycler —Std• GeneAmp™ PCR System 9700 — 9600 emulation (9600)
Importantproceduralguidelines
Prepare cyclesequencingreactions
Perform the cyclesequencing run
MethodsPerform cycle sequencing
12 MicroSEQ™ D2 rDNA Fungal Identification User Guide

3. Set the thermal cycling conditions:
Each of 25 cyclesFinal step
Melt Anneal Extend
CYCLE HOLD
96°C10 sec
50°C5 sec
60°C4 min
4°C∞
4. Set the reaction volume to 20 μL, then start the run.
5. Before removing the tube or plate caps, briefly centrifuge the extension products.
Note: Centrifuging helps avoid cross‐contamination from liquid remaining onthe caps or plate covers.
After cycle sequencing, use one of the following products to remove excess dyeterminators, non‐incorporated nucleotides, and primers from the extension products.Select an appropriate purification product depending on whether you performedcycle sequencing in tubes or a plate. Follow the guidelines and procedures suppliedwith the kits.
For cyclesequencing in ... Purify using ...[1]
Tubes • MicroSEQ™ ID Purification Combo Kit, with clean-upcartridges (Includes ExoSAP-IT™ Reagent; Cat. no. 4427807)
• MicroSEQ™ ID Sequencing Clean-up Cartridges (36 columns;Cat. no. 4408228)
96-well plates • MicroSEQ™ ID Purification Combo Kit, with clean-up plates(Includes ExoSAP-IT™ Reagent; Cat. no. 4415506)or
• MicroSEQ™ ID Sequencing Clean Up Plates (Cat. no. 4408227)
[1] Contact your local MicroSEQ™ ID representative for additional options.
Perform electrophoresis of extension products
• Use only the 50‐cm capillary array length regardless of the instrument that youare using. Refer to your instrument user guide for more information.
• If you are not using a 3500 or 3130 Series Genetic Analyzer, select the appropriateparameter settings from the table in “Electrophoresis settings for additionalsupported instruments“ on page 21. Refer to the MicroSEQ™ ID AnalysisSoftware Online Help for more information.
• Cover and store any unused purified extension products at 4°C overnight orat –15°C to –25°C for up to 1 week.
Purify extensionproducts
Importantproceduralguidelines
MethodsPerform electrophoresis of extension products
MicroSEQ™ D2 rDNA Fungal Identification User Guide 13
1. Configure your data collection software:• Applied Biosystems™ 3500 Series Genetic Analyzers — Use MicroSEQ™ ID
Analysis Software Version 3.0 (or greater)• Applied Biosystems™ 3130 and 3130xl Genetic Analyzers — Use
MicroSEQ™ ID Analysis Software Version 2.0 (or greater)• For all other instruments — Please contact your local MicroSEQ™ ID
representative
Note: See “Additional documentation“ on page 18 for a list of MicroSEQ™ IDdocumentation.
2. Configure the instrument as described in the following table:
Instrument Procedure
3500/3500xL Create a plate using the MSID plate template in the 3500 SeriesData Collection software. This plate template contains aninstrument protocol/run module (POP-6™ polymer) and abasecalling protocol optimized for MicroSEQ™ ID applications.
3130/3130xl Specify:
• Filter Set – E
• Run Module – StdSeq50_POP6_1[1]
• Base-caller – KB.bcp
• DyeSet/Primer (Mobility File) – KB_3130_POP6_BDT v1.mob
[1] You can use POP-7™ polymer with the StdSeq50_POP7 run module and the KB_3130_POP7_BDT v1.mob file. However, this instrument configuration reduces data quality within the first 40 bases on the 5¢ end of the sequence.
IMPORTANT! If the electrophoresis run time will be longer than 24 hours (forexample, if you are injecting more than 40 wells on a 4‐capillary instrument or morethan 160 wells on a 16‐capillary instrument), evaporation might occur. Therefore, werecommend that you add formamide to the reactions. See “Prevent evaporationduring electrophoresis“ on page 24.
1. Before removing the tube caps or plate cover, briefly centrifuge the extensionproducts.
2. Prepare reactions:a. Pipette at least 15 μL of each purified extension product or control into
separate wells in a 96‐well plate.
b. Pipette 15 μL of Hi‐Di™ Formamide into each blank well that will be injectedtogether with samples.
3. Cover the plate, centrifuge, then load the plate into your instrument. Start therun.
Note: Centrifuging removes bubbles from the bottom of the wells.
Configure theinstrument forelectrophoresis
Prepare samplesand performelectrophoresis
MethodsPerform electrophoresis of extension products
14 MicroSEQ™ D2 rDNA Fungal Identification User Guide
4. When the run is complete, review the data using the MicroSEQ™ ID AnalysisSoftware.
Note: If you are not using autoanalysis with a 3500 or 3130 Series GeneticAnalyzer, refer to the MicroSEQ™ ID Analysis Software Getting Started Guide fordata analysis instructions.
Troubleshooting
Observation Possible cause Recommended action
No PCR product • No biomassor
• Bacterial sampleor
• PCR inhibitionor
• Cells were not disruptedby the PrepMan™ Ultramethodor
• Incorrect dilution
1. If no PCR product is seen, use morefungal cells.
2. If the problem persists, the isolate you aretrying to identify may be bacteria. Amplifythe sample with the Fast MicroSEQ™ 50016S rDNA PCR Kit (Cat. no. 4370653).
3. If the problem persists, make one or morenew dilutions of the PrepMan™ Ultrasupernatant, then run several PCRreactions of each dilution to increase yourchance of obtaining a PCR product of thecorrect size. If the PrepMan™ Ultrasupernatant is:
• Clear–Make smaller dilutions (1:40or 1:10) of the original PrepMan™
Ultra supernatant.
• Colored (typically a shade of black orgreen)– Make the following dilutions:
– Smaller dilutions (1:40 or 1:10)of the original PrepMan™ Ultrasupernatant.
– A 1:1000 dilution of the originalPrepMan™ Ultra supernatant.
4. If you do not obtain a PCR product fromany of the diluted samples, try one of thefollowing solutions:
• Use a DNA extraction kit to isolatepure DNA.or
• Use the bead-beating method toisolate fungal genomic DNA orbacterial genomic DNA.
MethodsTroubleshooting
MicroSEQ™ D2 rDNA Fungal Identification User Guide 15

Observation Possible cause Recommended action
Signal is too high Too much amplicon in thesequencing reaction
Dilute the purified extension product withHi‑Di™ Formamide, then perform a new run.
If you ran purified extension product that was:
• Not diluted — Dilute the purified extensionproduct at a ratio of 1:1.
• Diluted at a 1:1 ratio — Dilute the purifiedextension product at a 1:10 ratio.
• Diluted at a 1:10 ratio — Dilute thepurified extension product at a 1:40 ratio.
See “Prevent evaporation duringelectrophoresis“ on page 24.
Absence of signal/blankelectropherogram
Sample evaporation See “Prevent evaporation duringelectrophoresis“ on page 24.
The sequence is short and/orthe first part of the sequence isvery bright and off-scale andthe remainder has very lowintensity
• High starting amount ofDNAor
• Too much DNA template inthe sequencing reaction
1. Decrease the amount of fungal cellmaterial using one of the followingmethods:
• Use a smaller colony or pellet.
• Further dilute the PrepMan™ Ultrasupernatant.
2. If the problem persists, estimate the PCRproduct yield on agarose gel and use 5–20 ng of amplicon for sequencing asdescribed in “(Optional) Analyze PCRproducts“ on page 11.
Both results and raw data showoccasional high spikes for allfour dye colors
Bubbles in the capillary Check the instrument maintenance andtroubleshooting guides.
Large regions of overlappingsequence or cannot call basesfor large regions of sequence
• Pipetting more than onetemplate per wellor
• DNA sample iscontaminated (that is, theDNA is derived from morethan one species of fungi)or
• The organism has multiplecopies of the rDNA gene,and some copies haveinsertions or deletions
1. Prepare new reactions, then repeatelectrophoresis.
2. If the problem persists, sub-culture theorganism to pure culture, then repeatidentification.
3. If the problem persists, clone the PCRproduct (using a kit such as the TOPO™
PCR Cloning Kit) before performingsequencing.
Small regions of overlappingsequence
In fungal species with multiplecopies of the rRNA gene, thegene can be polymorphic,resulting in overlap of up to 1%of the sequence
No action needed.
MethodsTroubleshooting
16 MicroSEQ™ D2 rDNA Fungal Identification User Guide

Frequently asked questions
What is the sensitivity of the MicroSEQ™ D2 rDNA Fungal Identification?
As long as you start from a visible colony or cell pellet, MicroSEQ™ kits will work.Can I use the MicroSEQ™ D2 rDNA Fungal Identification to quantify bacteria?
No. The PCR is an endpoint assay.
Which kits should I use to identify yeast samples?
Use the Fast MicroSEQ™ D2 rDNA Fungal Identification or the MicroSEQ™ D2 rDNAFungal Identification to sequence and identify yeast samples.What is the best way to prepare yeast samples?
Prepare yeast samples using the PrepMan™ Ultra Sample Preparation Reagent orbead‐beating method, just as you would prepare bacterial samples. Extra dilutions ofthe fungal DNA supernatant are sometimes necessary.Are there alternative methods for preparing genomic DNA?
If the PrepMan™ Ultra Sample Preparation Reagent method does not successfullydisrupt cells, you can use the bead‐beating method to isolate genomic DNA.
Alternatively, you can use a DNA extraction kit (available from various vendors) toisolate pure DNA.Can I use less PrepMan™ Ultra Sample Preparation Reagent if I start with asmaller colony?
Yes. The ideal colony size is 3 mm. For smaller colonies, you can decrease the amountof PrepMan™ Ultra Sample Preparation Reagent to 50 μL from the suggested 100 μLin the PrepMan™ Ultra Sample Preparation Reagent Protocol.Can I enrich my genomic DNA by using less PrepMan™ Ultra SamplePreparation Reagent?
Yes. However, be careful not to overload the PCR mix. Enriched samples tend to havemore cellular and other debris, which can interfere with PCR.At what temperature should I store my PrepMan™ Ultra-isolated DNA?
Store isolated DNA at –15 to –25°C. (Alternatively, you can safely keep it overnight atroom temperature or at 4°C.)
How can I tell if my sequence is representative of a single species?
The DNA sequence from a single species should be distinct (easy to call base pairs),without significant regions of overlapping sequence.If my initial DNA sample is contaminated (that is, it comes from multiplespecies), how can I sequence my PCR product?
Clone the PCR product using a kit such as the TOPO™ TA Cloning™ Kit(Cat. no. K4575‐J10) .
Sensitivity andquantitation
Samplepreparation andstorage
Contamination
MethodsFrequently asked questions
MicroSEQ™ D2 rDNA Fungal Identification User Guide 17
My sequence has large regions of overlap (>5% mixed bases). What does thismean?
See Troubleshooting, “Large regions of overlapping sequence or cannot call bases forlarge regions of sequence“ on page 16.My sequence has small regions (less than or equal to 1% of overlap). Whatdoes this mean?
See Troubleshooting, “Small regions of overlapping sequence“ on page 16.
Can I always expect the same size PCR product for all species?
PCR products can vary from the expected product size, depending on the species.
Expected product sizes for the:• MicroSEQ™ Fungal Kits – 1 band at 300–500 bp• MicroSEQ™ 500 Kits – 1 band at 460–560 bp• MicroSEQ™ Full Gene Kit – 1 band at 460–560 bp and 2 bands at 700–800 bp
Can I increase the number of cycles to increase the PCR yield?
Yes, but doing so can cause additional background signal from the negative control.
How are species in the MicroSEQ™ libraries validated?
Please contact your local MicroSEQ™ representative to obtain a copy of theMicroSEQ™ ID Library Validation Statement for additional information.Where does Thermo Fisher Scientific obtain the strains used to determinethe reference sequencing in the MicroSEQ™ libraries?
The strains are derived from major culture collections such as the American TypeCulture Collection (ATCC) and the Deutsche Sammlung von Mikroorganismen undZellkulturen GmbH (DSMZ) (German Collection of Microorganisms and CellCultures).What is the difference between the libraries for the MicroSEQ™ Full Gene kitand the MicroSEQ™ 500 kits?
The sequences in the library for the MicroSEQ™ 500 kits are ~500 bp, which is theexpected size of the PCR products for this kit. The sequences in the library for theMicroSEQ™ Full Gene kit are ~1440 bp, the maximum sequence length that the kitallows you to determine.
Where can I find additional information about MicroSEQ™ ID AnalysisSoftware?
Refer to the following documentation for MicroSEQ™ ID Analysis Software Version2.0 or greater:
• MicroSEQ™ ID Analysis Software Quick Reference Card• MicroSEQ™ ID Analysis Software Getting Started Guide• MicroSEQ™ ID Analysis Software Online Help
Note: For additional documentation, see “Customer and technical support“ onpage 33.
Overlappingsequences
PCR product size
Species libraries
Additionaldocumentation
MethodsFrequently asked questions
18 MicroSEQ™ D2 rDNA Fungal Identification User Guide
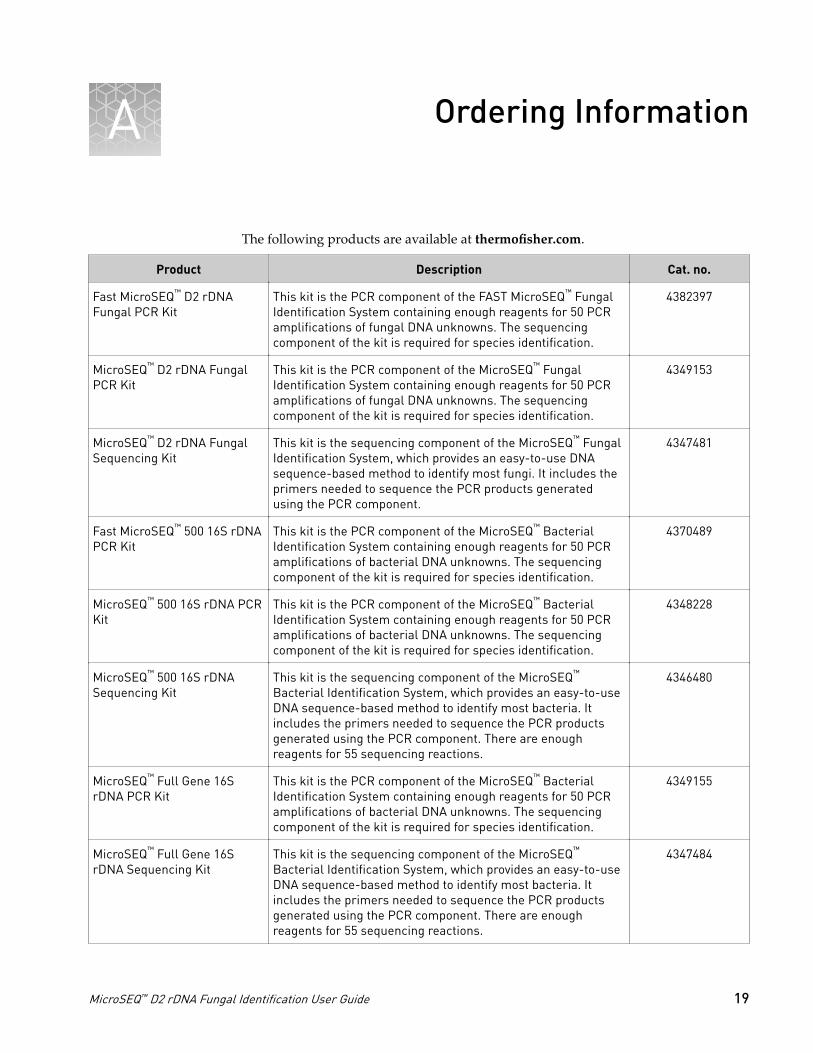
Ordering Information
The following products are available at thermofisher.com.
Product Description Cat. no.
Fast MicroSEQ™ D2 rDNAFungal PCR Kit
This kit is the PCR component of the FAST MicroSEQ™ FungalIdentification System containing enough reagents for 50 PCRamplifications of fungal DNA unknowns. The sequencingcomponent of the kit is required for species identification.
4382397
MicroSEQ™ D2 rDNA FungalPCR Kit
This kit is the PCR component of the MicroSEQ™ FungalIdentification System containing enough reagents for 50 PCRamplifications of fungal DNA unknowns. The sequencingcomponent of the kit is required for species identification.
4349153
MicroSEQ™ D2 rDNA FungalSequencing Kit
This kit is the sequencing component of the MicroSEQ™ FungalIdentification System, which provides an easy-to-use DNAsequence-based method to identify most fungi. It includes theprimers needed to sequence the PCR products generatedusing the PCR component.
4347481
Fast MicroSEQ™ 500 16S rDNAPCR Kit
This kit is the PCR component of the MicroSEQ™ BacterialIdentification System containing enough reagents for 50 PCRamplifications of bacterial DNA unknowns. The sequencingcomponent of the kit is required for species identification.
4370489
MicroSEQ™ 500 16S rDNA PCRKit
This kit is the PCR component of the MicroSEQ™ BacterialIdentification System containing enough reagents for 50 PCRamplifications of bacterial DNA unknowns. The sequencingcomponent of the kit is required for species identification.
4348228
MicroSEQ™ 500 16S rDNASequencing Kit
This kit is the sequencing component of the MicroSEQ™
Bacterial Identification System, which provides an easy-to-useDNA sequence-based method to identify most bacteria. Itincludes the primers needed to sequence the PCR productsgenerated using the PCR component. There are enoughreagents for 55 sequencing reactions.
4346480
MicroSEQ™ Full Gene 16SrDNA PCR Kit
This kit is the PCR component of the MicroSEQ™ BacterialIdentification System containing enough reagents for 50 PCRamplifications of bacterial DNA unknowns. The sequencingcomponent of the kit is required for species identification.
4349155
MicroSEQ™ Full Gene 16SrDNA Sequencing Kit
This kit is the sequencing component of the MicroSEQ™
Bacterial Identification System, which provides an easy-to-useDNA sequence-based method to identify most bacteria. Itincludes the primers needed to sequence the PCR productsgenerated using the PCR component. There are enoughreagents for 55 sequencing reactions.
4347484
A
MicroSEQ™ D2 rDNA Fungal Identification User Guide 19

Product Description Cat. no.
PrepMan™ Ultra SamplePreparation Reagent
PrepMan™ Ultra Sample Preparation Reagent was developedfor the rapid preparation of DNA template from Gram-negativefood-borne pathogens for use in PCR amplification reactions.These samples often have high lipid content that can inhibitPCR amplification of the template. Using a simple boil and spinprotocol, PrepMan™ Ultra Sample Preparation Reagentefficiently inactivates PCR inhibitors, significantly reducing theneed to repeat the template preparation step.
4318930
MicroSEQ™ ID AnalysisSoftware Version 3.0
This easy-to-use software enables you to identify and classifyunidentified bacterial or fungal sequences by comparing themto a validated microbial library.
Contact your localMicroSEQ™ IDrepresentative
Appendix A Ordering InformationFrequently asked questionsA
20 MicroSEQ™ D2 rDNA Fungal Identification User Guide
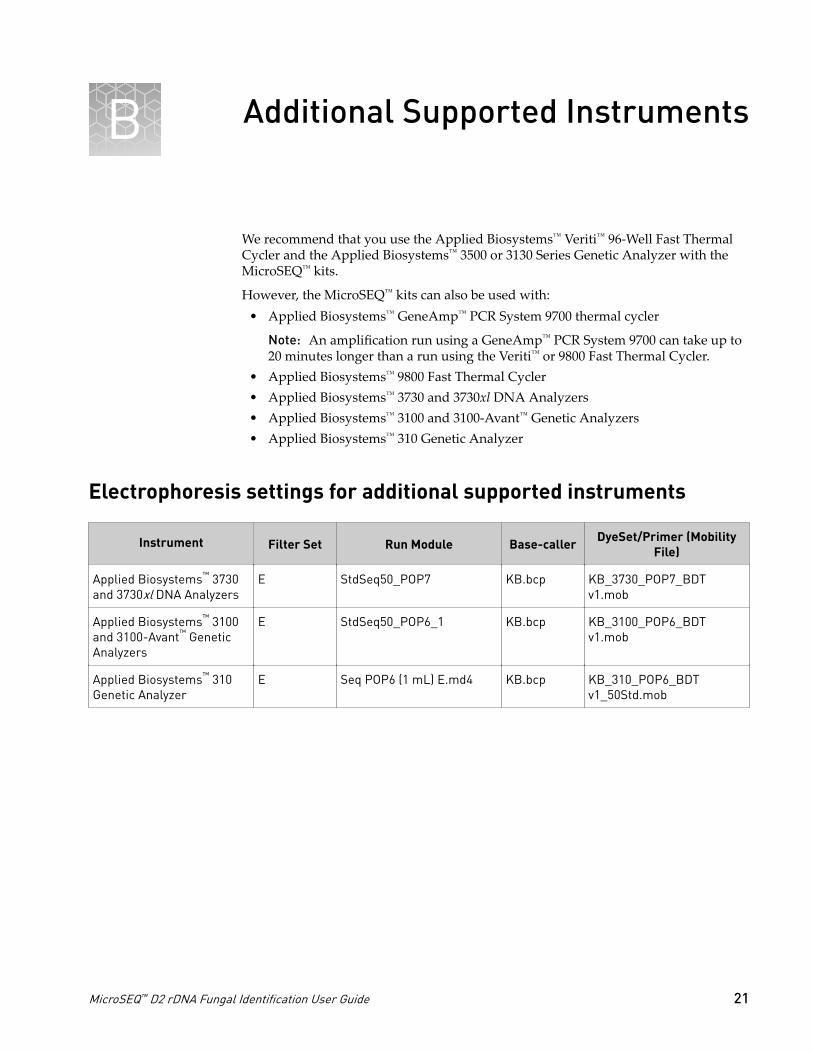
Additional Supported Instruments
We recommend that you use the Applied Biosystems™ Veriti™ 96‐Well Fast ThermalCycler and the Applied Biosystems™ 3500 or 3130 Series Genetic Analyzer with theMicroSEQ™ kits.
However, the MicroSEQ™ kits can also be used with:• Applied Biosystems™ GeneAmp™ PCR System 9700 thermal cycler
Note: An amplification run using a GeneAmp™ PCR System 9700 can take up to20 minutes longer than a run using the Veriti™ or 9800 Fast Thermal Cycler.
• Applied Biosystems™ 9800 Fast Thermal Cycler• Applied Biosystems™ 3730 and 3730xl DNA Analyzers• Applied Biosystems™ 3100 and 3100‐Avant™ Genetic Analyzers• Applied Biosystems™ 310 Genetic Analyzer
Electrophoresis settings for additional supported instruments
Instrument Filter Set Run Module Base-caller DyeSet/Primer (MobilityFile)
Applied Biosystems™ 3730and 3730xl DNA Analyzers
E StdSeq50_POP7 KB.bcp KB_3730_POP7_BDTv1.mob
Applied Biosystems™ 3100and 3100-Avant™ GeneticAnalyzers
E StdSeq50_POP6_1 KB.bcp KB_3100_POP6_BDTv1.mob
Applied Biosystems™ 310Genetic Analyzer
E Seq POP6 (1 mL) E.md4 KB.bcp KB_310_POP6_BDTv1_50Std.mob
B
MicroSEQ™ D2 rDNA Fungal Identification User Guide 21

Supplemental Procedures andGuidelines
Good laboratory practices for PCR and RT-PCR
When preparing samples for PCR or RT‐PCR amplification:• Wear clean gloves and a clean lab coat (not previously worn while handlingamplified products or during sample preparation).
• Change gloves whenever you suspect that they are contaminated.• Maintain separate areas and dedicated equipment and supplies for:
– Sample preparation and reaction setup.– Amplification and analysis of products.
• Do not bring amplified products into the reaction setup area.• Open and close all sample tubes carefully. Avoid splashing or spraying samples.• Keep reactions and components capped as much as possible.• Use a positive‐displacement pipettor or aerosol‐resistant barrier pipette tips.• Clean lab benches and equipment periodically with 10% bleach solution or
DNAZap™ Solutions (Cat. no. AM9890).
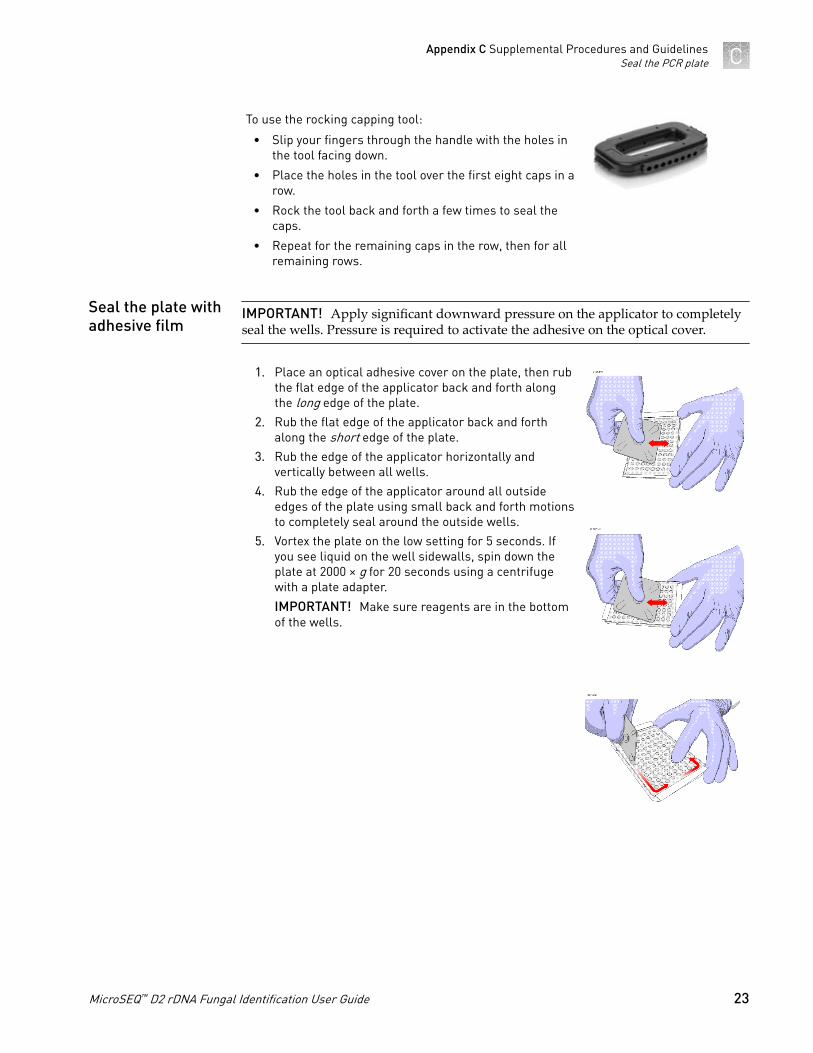
Seal the PCR plate
IMPORTANT! Apply significant downward pressure on the sealing tool in all steps toform a complete seal.
Note: Use of strip caps instead of 96‐well adhesive plate covers may help reducecross‐contamination.
To use the rolling capping tool:
• Roll the capping tool across all strips of caps on theshort edge, then the long edge of the tray.
• Roll the capping tool around all outer rows of strips ofcaps.
C
Seal the plate withstrip caps
22 MicroSEQ™ D2 rDNA Fungal Identification User Guide
To use the rocking capping tool:
• Slip your fingers through the handle with the holes inthe tool facing down.
• Place the holes in the tool over the first eight caps in arow.
• Rock the tool back and forth a few times to seal thecaps.
• Repeat for the remaining caps in the row, then for allremaining rows.
IMPORTANT! Apply significant downward pressure on the applicator to completelyseal the wells. Pressure is required to activate the adhesive on the optical cover.
1. Place an optical adhesive cover on the plate, then rubthe flat edge of the applicator back and forth alongthe long edge of the plate.
2. Rub the flat edge of the applicator back and forthalong the short edge of the plate.
3. Rub the edge of the applicator horizontally andvertically between all wells.
4. Rub the edge of the applicator around all outsideedges of the plate using small back and forth motionsto completely seal around the outside wells.
5. Vortex the plate on the low setting for 5 seconds. Ifyou see liquid on the well sidewalls, spin down theplate at 2000 × g for 20 seconds using a centrifugewith a plate adapter.
IMPORTANT! Make sure reagents are in the bottomof the wells.
Seal the plate withadhesive film
Appendix C Supplemental Procedures and GuidelinesSeal the PCR plate C
MicroSEQ™ D2 rDNA Fungal Identification User Guide 23
Prevent evaporation during electrophoresis
We recommend that you use Hi‐Di™ Formamide to prevent sample evaporationduring long electrophoresis runs. If your run time is:
• 24 hours or less, addition of formamide is not necessary• Between 24 and 48 hours, see “Prepare a diluted sample“ on page 24• Longer than 48 hours, see “Dry‐down and resuspend the sample“ on page 24
1. Prepare reactions using a 1:1 ratio of purified extension product and formamide:a. In a 96‐well plate, pipette 10 μL of Hi‐Di™ Formamide into each well to
which you will add purified extension products or controls.
b. Pipette 10 μL of Hi‐Di™ Formamide into each blank well that will be injectedtogether with the samples.
c. Add 10 μL of purified extension product or control to each well filled in step1a, then mix by pipetting up and down.
Note: If after a 1:1 dilution you do not detect a sequencing ladder due to a lowsignal, rerun the sample without diluting.
2. Centrifuge the plate, load the plate into your instrument, then start the run.
Note: Centrifuging removes bubbles from the bottom of the wells.
Note: See “Configure the instrument for electrophoresis“ on page 14 for details.
3. Cover and store the unused portion of the purified extension products overnightat 4°C or for up to 1 week at –15°C to –25°C.
When the run is complete, review the data using the MicroSEQ™ ID AnalysisSoftware.
Note: If you are not using a 3500 or 3130 Series Genetic Analyzer, refer to theMicroSEQ™ ID Analysis Software Getting Started Guide for data analysis instructions.
1. Centrifuge the tubes or plate containing the purified extension products in aspeed vac.
Note: Centrifuge time and speed depend on the number of samples and the typeof speed vac used. Typical times range from 30–60 minutes.
IMPORTANT! Do not over‐dry the DNA pellet, and do not use heat to dry thepellet.
2. Resuspend the DNA in 15 μL of Hi‐Di™ Formamide.
Note: Formamide disrupts hydrogen bonds in double‐stranded DNA, inhibitingsecondary structure and DNA conglomeration, and resulting in cleaner andmore consistent electrophoresis runs.
Prepare a dilutedsample
Dry-down andresuspend thesample
Appendix C Supplemental Procedures and GuidelinesPrevent evaporation during electrophoresisC
24 MicroSEQ™ D2 rDNA Fungal Identification User Guide
3. Centrifuge the plate, load the plate into your instrument, then start the run.
Note: Centrifuging removes bubbles from the bottom of the wells.
Note: See “Configure the instrument for electrophoresis“ on page 14 for details.
When the run is complete, review the data using the MicroSEQ™ ID AnalysisSoftware.
Note: If you are not using a 3500 or 3130 Series Genetic Analyzer, refer to theMicroSEQ™ ID Analysis Software Getting Started Guide for data analysis instructions.
Appendix C Supplemental Procedures and GuidelinesPrevent evaporation during electrophoresis C
MicroSEQ™ D2 rDNA Fungal Identification User Guide 25
Supplemental Product Information
MicroSEQ™ system overview
The MicroSEQ™ Microbial Identification System combines all of the instruments,reagents, sequence libraries, and software required for automated microbialidentification using DNA sequencing.
The MicroSEQ™ system is easy to use and suitable for the routine identification of allbacterial and fungal isolates, including organisms that are difficult to grow, non‐viable, or unidentifiable using phenotypic methods. The MicroSEQ™ system identifiesbacterial and fungal isolates from a small sample of pure culture without preliminarytesting or growth on selective media.
About MicroSEQ™ ID Analysis Software
The MicroSEQ™ ID Analysis Software analyzes sequences obtained with any of theMicroSEQ™ Microbial Identification Kits.
The software assembles the D2 region rDNA sequence for the unknown, thencompares the sequence with known reference D2 region rDNA sequences. For theMicroSEQ™ D2 rDNA Fungal Identification, data is compared to the MicroSEQ™ IDFungal Gene Library. Based on the comparison, the software provides a potential IDfor the unknown fungal species.
With the software, you can perform:• Basecalling with assignment of quality values• Clear‐range determination, which lets you exclude data near sequence ends
(typically poor‐quality data) from analysis• Assembly and alignment of sequences to generate a high‐quality consensus
sequence• Comparison of the consensus sequence to the MicroSEQ™ ID proprietary libraries
to generate a list of the closest matches, including percentage match scores• Exports of projects and consensus sequences to facilitate data‐sharing between
collaborators
The software also has features that assist with 21 CFR Part 11 compliancerequirements.
For more information, refer to the MicroSEQ™ ID Analysis Software Online Help,MicroSEQ™ ID Analysis Software Quick Reference Card, and the MicroSEQ™ ID AnalysisSoftware Getting Started Guide for software version 3.0 or later.
D
26 MicroSEQ™ D2 rDNA Fungal Identification User Guide
MicroSEQ™ ID library sequences are carefully validated. Polymorphic positions aretaken into account and included in library species.
MicroSEQ™ ID Analysis Software allows you to create custom libraries using datagenerated by the MicroSEQ™ ID software, or using sequences from public databases.Custom libraries are easy to import and export, making information sharingconvenient.
During the analysis process, you can search proprietary and custom librariessimultaneously to determine 3–20 closest matches to the sequence of your unknownfungal species.
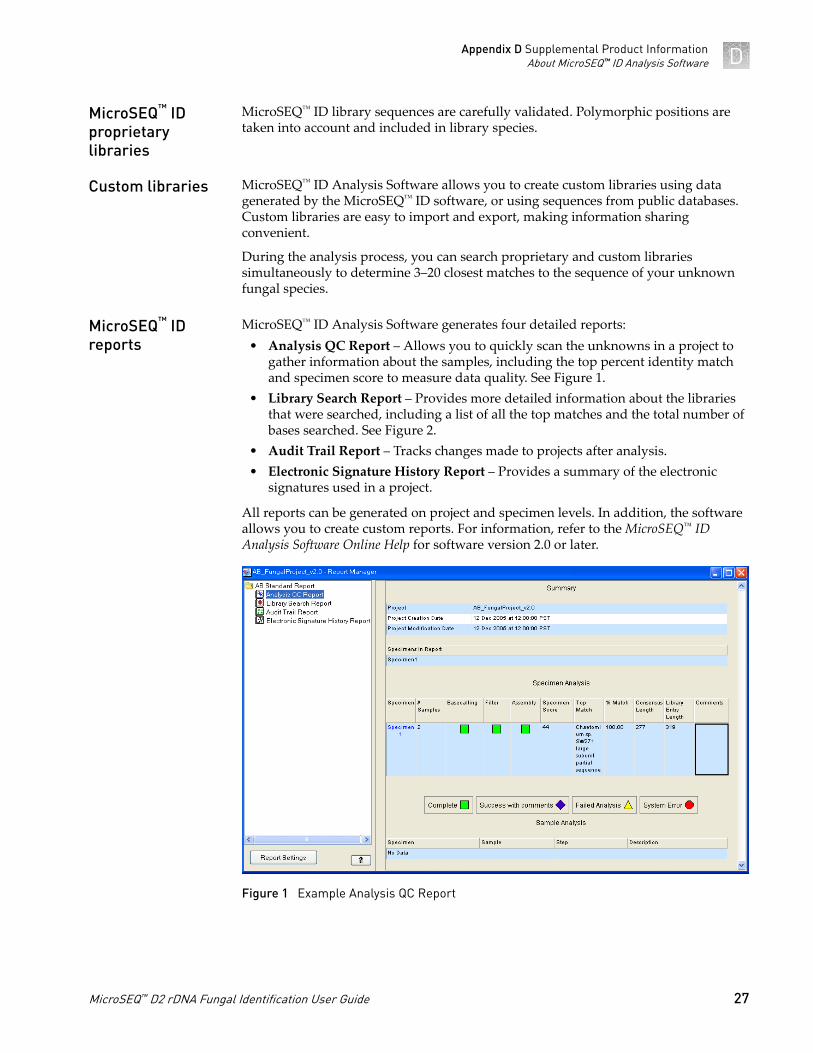
MicroSEQ™ ID Analysis Software generates four detailed reports:• Analysis QC Report – Allows you to quickly scan the unknowns in a project to
gather information about the samples, including the top percent identity matchand specimen score to measure data quality. See Figure 1.
• Library Search Report – Provides more detailed information about the librariesthat were searched, including a list of all the top matches and the total number ofbases searched. See Figure 2.
• Audit Trail Report – Tracks changes made to projects after analysis.• Electronic Signature History Report – Provides a summary of the electronic
signatures used in a project.
All reports can be generated on project and specimen levels. In addition, the softwareallows you to create custom reports. For information, refer to the MicroSEQ™ IDAnalysis Software Online Help for software version 2.0 or later.
Figure 1 Example Analysis QC Report
MicroSEQ™ IDproprietarylibraries
Custom libraries
MicroSEQ™ IDreports
Appendix D Supplemental Product InformationAbout MicroSEQ™ ID Analysis Software D
MicroSEQ™ D2 rDNA Fungal Identification User Guide 27

Figure 2 Example Library Search Report
About dye-labeled terminator chemistry
The MicroSEQ™ D2 rDNA Fungal Sequencing Kit uses BigDye™ Terminator v1.1chemistry. Forward and Reverse Sequence Mixes contain sequence‐terminating 3′‐dideoxynucleotide triphosphates (ddNTPs). Each of the four ddNTPs is tagged with adifferent fluorescent dye. When the ddNTPs are incorporated into extension productsduring cycle sequencing, the extension products are simultaneously terminated andlabeled with the dye that corresponds to the incorporated base, as shown in thefollowing figure.
Figure 3 BigDye™ Terminator v1.1 chemistry
Appendix D Supplemental Product InformationAbout dye-labeled terminator chemistryD
28 MicroSEQ™ D2 rDNA Fungal Identification User Guide

For more information about dye‐labeled terminators and other sequencingchemistries, refer to the DNA Sequencing by Capillary Electrophoresis Chemistry Guide.See “Related documentation“ on page 33.
Appendix D Supplemental Product InformationAbout dye-labeled terminator chemistry D
MicroSEQ™ D2 rDNA Fungal Identification User Guide 29

Safety
WARNING! GENERAL SAFETY. Using this product in a manner not specifiedin the user documentation may result in personal injury or damage to theinstrument or device. Ensure that anyone using this product has receivedinstructions in general safety practices for laboratories and the safetyinformation provided in this document.
· Before using an instrument or device, read and understand the safetyinformation provided in the user documentation provided by themanufacturer of the instrument or device.
· Before handling chemicals, read and understand all applicable Safety DataSheets (SDSs) and use appropriate personal protective equipment (gloves,gowns, eye protection, etc). To obtain SDSs, see the “Documentation andSupport” section in this document.
E
30 MicroSEQ™ D2 rDNA Fungal Identification User Guide
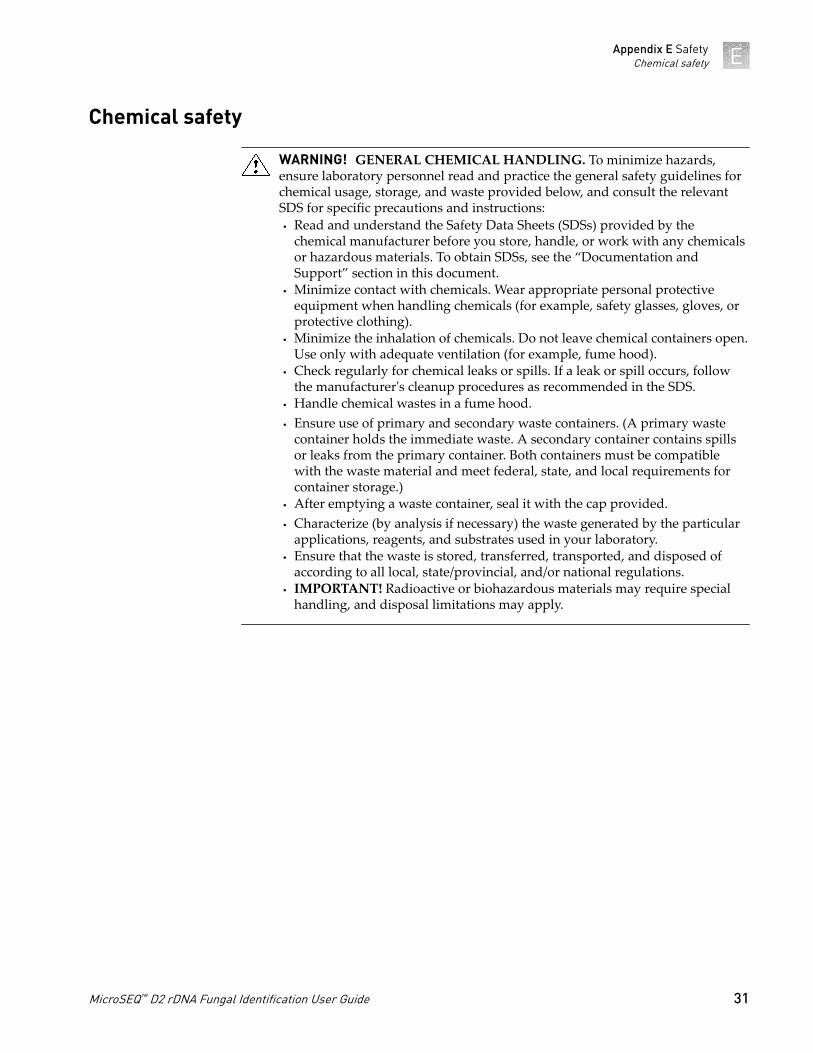
Chemical safety
WARNING! GENERAL CHEMICAL HANDLING. To minimize hazards,ensure laboratory personnel read and practice the general safety guidelines forchemical usage, storage, and waste provided below, and consult the relevantSDS for specific precautions and instructions:· Read and understand the Safety Data Sheets (SDSs) provided by the
chemical manufacturer before you store, handle, or work with any chemicalsor hazardous materials. To obtain SDSs, see the “Documentation andSupport” section in this document.
· Minimize contact with chemicals. Wear appropriate personal protectiveequipment when handling chemicals (for example, safety glasses, gloves, orprotective clothing).
· Minimize the inhalation of chemicals. Do not leave chemical containers open.Use only with adequate ventilation (for example, fume hood).
· Check regularly for chemical leaks or spills. If a leak or spill occurs, followthe manufacturer's cleanup procedures as recommended in the SDS.
· Handle chemical wastes in a fume hood.· Ensure use of primary and secondary waste containers. (A primary waste
container holds the immediate waste. A secondary container contains spillsor leaks from the primary container. Both containers must be compatiblewith the waste material and meet federal, state, and local requirements forcontainer storage.)
· After emptying a waste container, seal it with the cap provided.· Characterize (by analysis if necessary) the waste generated by the particular
applications, reagents, and substrates used in your laboratory.· Ensure that the waste is stored, transferred, transported, and disposed of
according to all local, state/provincial, and/or national regulations.· IMPORTANT! Radioactive or biohazardous materials may require special
handling, and disposal limitations may apply.
Appendix E SafetyChemical safety E
MicroSEQ™ D2 rDNA Fungal Identification User Guide 31
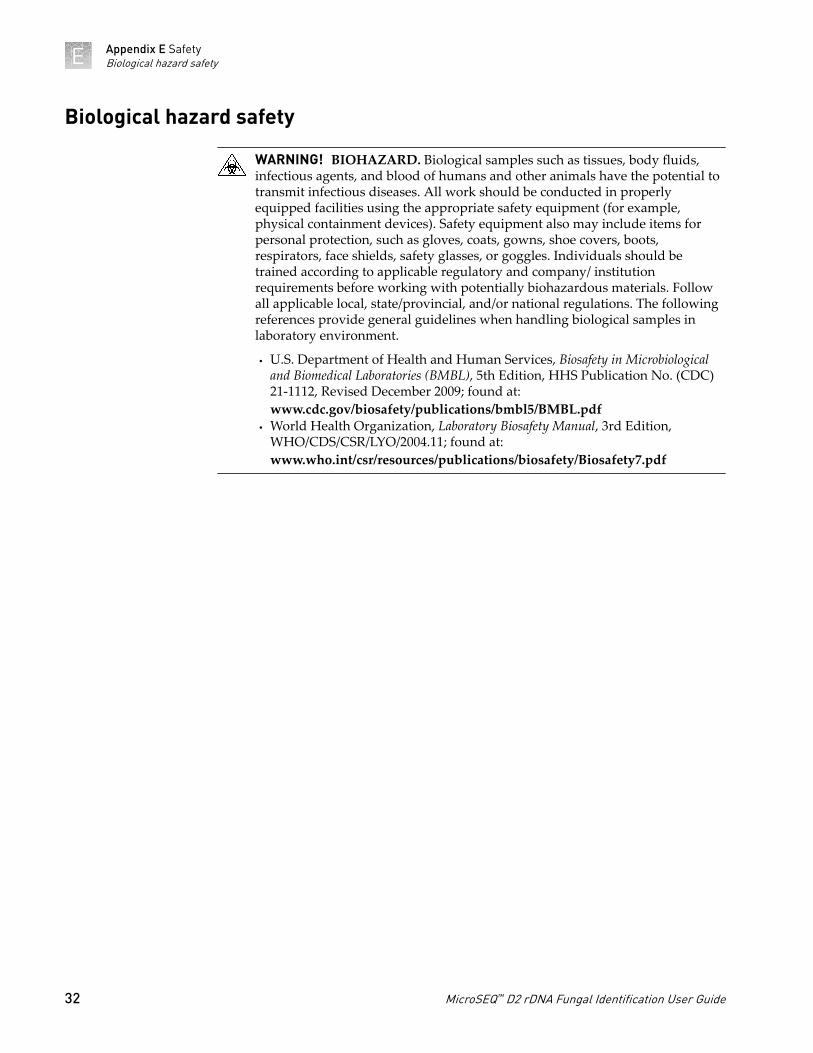
Biological hazard safety
WARNING! BIOHAZARD. Biological samples such as tissues, body fluids,infectious agents, and blood of humans and other animals have the potential totransmit infectious diseases. All work should be conducted in properlyequipped facilities using the appropriate safety equipment (for example,physical containment devices). Safety equipment also may include items forpersonal protection, such as gloves, coats, gowns, shoe covers, boots,respirators, face shields, safety glasses, or goggles. Individuals should betrained according to applicable regulatory and company/ institutionrequirements before working with potentially biohazardous materials. Followall applicable local, state/provincial, and/or national regulations. The followingreferences provide general guidelines when handling biological samples inlaboratory environment.
· U.S. Department of Health and Human Services, Biosafety in Microbiologicaland Biomedical Laboratories (BMBL), 5th Edition, HHS Publication No. (CDC)21‐1112, Revised December 2009; found at:www.cdc.gov/biosafety/publications/bmbl5/BMBL.pdf
· World Health Organization, Laboratory Biosafety Manual, 3rd Edition,WHO/CDS/CSR/LYO/2004.11; found at:www.who.int/csr/resources/publications/biosafety/Biosafety7.pdf
Appendix E SafetyBiological hazard safetyE
32 MicroSEQ™ D2 rDNA Fungal Identification User Guide
Documentation and support
Related documentation
The following related documents are available at thermofisher.com/support:
Document Publication number
MicroSEQ™ D2 rDNA Fungal Identification Quick Reference 4346290
PrepMan™ Ultra Sample Preparation Reagent Protocol 4367554
Veriti™ Thermal Cycler User Guide 4375799
DNA Sequencing by Capillary Electrophoresis Chemistry Guide 4305080
MicroSEQ™ ID Analysis Software Getting Started Guide v3.0: 4448336
v2.2: 4445126
v2.0: 4364623
MicroSEQ™ ID Analysis Software Quick Reference Card v2.2: 4445420
v2.0: 4364624
Note: For additional documentation, see “Customer and technical support“ onpage 33.
Customer and technical support
Visit thermofisher.com/support for the latest in services and support, including:• Worldwide contact telephone numbers• Product support, including:
– Product FAQs– Software, patches, and updates
• Order and web support• Product documentation, including:
– User guides, manuals, and protocols– Certificates of Analysis– Safety Data Sheets (SDSs; also known as MSDSs)
Note: For SDSs for reagents and chemicals from other manufacturers,contact the manufacturer.
MicroSEQ™ D2 rDNA Fungal Identification User Guide 33
Limited product warranty
Life Technologies Corporation and/or its affiliate(s) warrant their products as set forthin the Life Technologies' General Terms and Conditions of Sale found on LifeTechnologies' website at www.thermofisher.com/us/en/home/global/terms‐and‐conditions.html. If you have any questions, please contact LifeTechnologies at www.thermofisher.com/support.
Documentation and supportLimited product warranty
34 MicroSEQ™ D2 rDNA Fungal Identification User Guide


For support visit thermofisher.com/support or email [email protected]
thermofisher.com
24 October 2015