cyprus stonex shower floors · cyprus stonex® shower floors installation instructions cyprus...
TRANSCRIPT

SPECIFICATIONSRecommended use Domestic, Hotel and Commercial (Indoor use only).
Material STONEX® Reinforced Resin.
Colour Availability Arena, Blanco, Cemento, Pizarra.
Outlet Position Centre Rear.
Waste Type Stainless Steel Drain Cover with 50mm Grate Outlet.
Base Height 30mm.
Size Availability & Weight
900 x 900 25kg
1000 x 1000 31kg
1200 x 900 33kg
900 x 1500 45kg
Features High Resistance to Abrasive Chemical Products and Ultraviolet Light.
Textured Finished for High Slip Resistance.
Slim Design Facilitates Level Floor Installation.
900x1500 Can be cut down up to 300mm (To Special Order).
CLEANING RECOMMENDATIONS
To see the complete ROCA range go to www.reece.com.au/bathrooms
CYPRUS STONEX® SHOWER FLOORS
We recommend the use of soapy water or approved cleaners.
This product should not be cleaned with abrasive materials.
Damage caused by any improper treatment is not covered by the product warranty. Refer to Warranty Conditions.
Disclaimer: Products in this specification manual must by regulation be installed by licensed and registered trade people. The manufacturer/distributor reserves the right to vary specifications or delete models from their range without prior notification. Dimensions are nominal measurements only. Dimensions and set-outs listed are correct at time of publication however the manufacturer/distributor takes no responsibility for printing errors.
Tech Page Version 1
Arena PizarraBlanco Cemento
page 1 of 14

Dimensions are nominal measurements only.
900
900
B
B
30
200
B
SECTION B-B
30
13
DETAIL BSCALE 1 : 5
41
Cyprus 900GeneralDimensions
BathroomProductsAustralia
Cyprus Shower Base
07-Mar-2017
NTS
1
1 R 0.0 29/8
Scale
Project
Date
Sheet
Revision/Issue
Project Name and Address
Firm Name and Address
No. Date
General Notes
900
900
B
B
30
200
B
SECTION B-B
30
13
DETAIL BSCALE 1 : 5
41
Cyprus 900GeneralDimensions
BathroomProductsAustralia
Cyprus Shower Base
07-Mar-2017
NTS
1
1 R 0.0 29/8
Scale
Project
Date
Sheet
Revision/Issue
Project Name and Address
Firm Name and Address
No. Date
General Notes
CYPRUS STONEX® SHOWER FLOORS
page 2 of 14
Plumbers, please ensure a copy of the installation instructions is left with the end user for future reference

100
0
1000
B
B
30 2
00
B
SECTION B-B
30
13
DETAIL BSCALE 1 : 5
41
Cyprus 1000GeneralDimensions
BathroomProductsAustralia
Cyprus Shower Base
07-Mar-2017
NTS
1
1 R 0.0 29/8
Scale
Project
Date
Sheet
Revision/Issue
Project Name and Address
Firm Name and Address
No. Date
General Notes
100
0
1000
B
B
30
200
B
SECTION B-B
30
13
DETAIL BSCALE 1 : 5
41
Cyprus 1000GeneralDimensions
BathroomProductsAustralia
Cyprus Shower Base
07-Mar-2017
NTS
1
1 R 0.0 29/8
Scale
Project
Date
Sheet
Revision/Issue
Project Name and Address
Firm Name and Address
No. Date
General Notes
CYPRUS STONEX® SHOWER FLOORS
page 3 of 14

900
1200
A
A
30
200
B
SECTION A-A
30
13
DETAIL BSCALE 1 : 5
41
Cyprus 1200GeneralDimensions
BathroomProductsAustralia
Cyprus Shower Base
07-Mar-2017
NTS
1
1 R 0.0 29/8
Scale
Project
Date
Sheet
Revision/Issue
Project Name and Address
Firm Name and Address
No. Date
General Notes
900
1200
A
A
30
200
B
SECTION A-A
30
13
DETAIL BSCALE 1 : 5
41
Cyprus 1200GeneralDimensions
BathroomProductsAustralia
Cyprus Shower Base
07-Mar-2017
NTS
1
1 R 0.0 29/8
Scale
Project
Date
Sheet
Revision/Issue
Project Name and Address
Firm Name and Address
No. Date
General Notes
CYPRUS STONEX® SHOWER FLOORS
Dimensions are nominal measurements only.
page 4 of 14

• 1500mm Can be cut down by up to 300mm to suit the exact dimension of larger shower areas
150
0
900
A
A
30
200
3
00
B
SECTION A-A
30
13
DETAIL BSCALE 1 : 5
41
Cyprus 1500GeneralDimensions
BathroomProductsAustralia
Cyprus Shower Base
07-Mar-2017
NTS
1
1 R 0.0 29/8
Scale
Project
Date
Sheet
Revision/Issue
Project Name and Address
Firm Name and Address
No. Date
General Notes
CYPRUS STONEX® SHOWER FLOORS
page 5 of 14

CYPRUS STONEX® SHOWER FLOORSINSTALLATION INSTRUCTIONS
Cyprus Shower Floor
Instructions for Installation and Use
A. WATERPROOFING
The area in which the Cyprus Shower Floor is to be installed must be fully waterproofed as required by the Building Code of Australia (BCA) and as specified in Australian Standard AS 3740 (Waterproofing of Domestic Wet Areas) prior to the installation of the Shower Floor.
This Shower Floor does not form part of the waterproofing of the bathroom.
To complete waterproofing of area underneath the Shower Floor, use of a device such as a Puddle-Flange, or a Smart Pan is strongly recommended and details of such installation can be found in the relevant parts of this instructions manual.
B. INSTALLATION
Important Note for all types of installation - Indoor use only.
Once the area is prepared in accordance to these instructions, and before the Shower Floor is adhered permanently to floor, the Shower Floor is to be positioned as is intended to be installed, and tested for correct drainage by pouring water in all parts of the Shower Floor, and verifying it drains correctly to the waste without any pooling.
See figure 1.
Failure to conduct this test prior to installation may void the warranty.
Figure 1
2
Instructions for Installation and Use
A. WATERPROOFINGThe area in which the Cyprus® ShowerFloor is to be installed must be fully waterproofed as required by the Building Code of Australia (BCA) and as specified in Australian Standard AS 3740 (Waterproofing of Domestic Wet Areas) prior to the installation of the ShowerFloor.
This ShowerFloor does not form part of the waterproofing of the bathroom.
To complete waterproofing of area underneath the ShowerFloor, use of a device such as a Puddle-Flange, or a Smart-Pan® is strongly recommended and details of such installation can be found in the relevant parts of this instructions manual.
B. INSTALLATIONImportant Note for all types of installation:
Once the area is prepared in accordance to these instructions, and before the ShowerFloor is adhered permanently to floor, the ShowerFloor is to be positioned as is intended to be installed, and tested for correct drainage by pouring water in all parts of the ShowerFloor, and verifying it drains correctly to the waste without any pooling. See figure 1.
Failure to conduct this test prior to installation may void the warranty.
Figure 1
B1. Installation on a Timber FloorImportant: for both New or Existing Timber floor, you may wish to raise the floor around the ShowerFloor slightly, such that the end result will be a continuous uni-level bathroom floor.
This may be achieved as detailed in figure 2:
Figure 2
Tiles or floor cladding
Tile adhesive or mortar bed
Waterproofing
Floor boards
Raised joists
Floor joists
Sealant
Shower Floor ®
page 6 of 14

B1. Installation on a Timber Floor
Important: for both New or Existing Timber floor, you may wish to raise the floor around the Shower Floor slightly, such that the end result will be a continuous uni-level bathroom floor.
This may be achieved as detailed in figure 2:
Figure 2
Tiles or floor cladding
Tile adhesive or mortar bed
Waterproofing
Floor boards
Raised joists
Floor joists
Sealant Shower
Floor
1. Floor boards or sheet floor must cover the entire underside of Floor, cladded andwaterproofed.
2. Check exact position of the Shower Floor, (see also figure 8), and cut hole for waste outlet.Hole cut through floor is to suit drainage device used, but to be no greater than Ø120mm, at the position of the Waste outlet in the installed Shower Floor.
Existing or New Floor – it is recommended to install an 80mm Puddle flange (or similar device) onto the floor in the exact location of the Waste Outlet, have it connected to the pipework, and fully waterproof before installing the Shower Floor. See figure 3.
Figure 3
Timber floor and wallsfully cladded and waterproofed
Puddle flange
CYPRUS STONEX® SHOWER FLOORS
page 7 of 14

CYPRUS STONEX® SHOWER FLOORS
If using a device such as a Smart-Pan, it is to be installed to floor prior to waterproofing as illustrated in figure 4:
Figure 4
Floor board Lid
Smart Pan
Note: If renovating, please check floor boards for soundness. Rotting may have occurred and floor may need replacing.
3. Spread a 10mm min. thick mortar bed of 4:1 Washed Sand Cement over entire area where Shower Floor is to be installed and trowel off level, or use a cement base tile adhesive spread on floor with a 12mm notched trowel to ensure the whole area of Shower floor is fully supported.
Note: Do not use silicone and/or ‘Liquid Nails’ adhesive type to install Shower Floor!
4. Lay Shower Floor on prepared leveled mortar bed and using a spirit level ensure Shower Floor is level both side to side and front to rear. This will allow the Shower Floor to drain effectively as it has inbuilt fall to the waste outlet.
Ensure the Waste Outlet is positioned accurately above your drainage aperture.
5. At this point it is imperative to test for water run-off to the waste outlet prior to lining shower walls. This will ensure the Shower Floor is draining correctly. Failure to do so will be a breach of the warranty. See also Page 2, figure 1.
6. Once set, install the Waste outlet into the Shower Floor.
Note that the outlet is to be threaded in the anti-clockwise direction from the top of the Shower Floor. Refer to waste outlet instructions.
B2. Installation in a Concrete Slab
In new installations, it is possible to recess the Shower Floor into the floor in order to achieve a step-free surface, however it is important to ensure that the Shower Floor edges are a min. of 3mm away from the surrounding surfaces, and are sealed all around.
Refer to Figure 5.
Figure 5
Tiles or floor cladding
Tile adhesive or mortar bed
Waterproofing
Sealant
Shower Floor
page 8 of 14

Note: in an Existing concrete slab, it is recommended to install an 80mm Puddle Flange onto the pipework at the exact waste outlet position prior to waterproofing.
See figure 6:
Figure 6
For New concrete slabs, we recommend to follow this procedure:
1. Pre-install and waterproof a drainage device into the concrete such as Iplex® Smart Pan into which the Shower Floor Waste outlet can be fitted directly.
Otherwise, a boxed opening in the concrete is to be provided as shown in figure 7.
Figure 7
[mm]
2. Spread a 10mm min. thick mortar bed of 4:1 Washed Sand/Cement over entire area where Shower Floor is to beinstalled and trowel off level or use a cement based tile adhesive. Spread on floor with a 12mm notched trowel toensure the entire underside area of the Shower Floor is fully supported.
NOTE: Do not use silicone and/or ‘Liquid Nails’ type adhesives to adhere Shower Floor to place!
3. Lay Shower Floor on prepared levelled mortar bed and using a spirit level ensure Shower Floor is level both side to sideand front to rear. This will allow Shower Floor to drain effectively as it has inbuilt fall to the waste outlet.
4. At this point it is imperative to test for water run off to outlet prior to backfilling opening in slab, to ensure Shower-Floor drains correctly. Failure to do so will be a breach of the warranty terms. See also Page 2, figure 1.
5. Install the Waste outlet into the Shower Floor.
Note that the outlet is to be threaded in the anti-clockwise direction from the top of the Shower Floor. Instructions can be found with the waste outlet.
CYPRUS STONEX® SHOWER FLOORS
page 9 of 14

Ensure correct engagement of the Waste outlet with drainage device, or if using boxed opening – have the pipework connected to the waste outlet.
* Important: should you be installing the Shower Floor by providing a boxed opening under the waste, suchboxed opening in slab must not exceed 200mm in width underneath Shower Floor. Once installed asdescribed above, backfill any opening in slab with a 4:1 Washed Sand and Cement Mix, ensuring the mortar is packedtightly around waste outlet and all the way back into the boxed section of the slab and up to the underside of theShower Floor to provide it with full support around the outlet.
Note: Where required by regulations, plastic pipe & fittings may need to be lagged prior to back filling.
C. GENERAL DIMENSIONS
Table 1 in conjunction with Figure 8 shows nominal dimensions of the Shower Floor
Table 1
Shower Floor Dim ‘A’ Dim ‘B’ Dim ‘C’ Dim ‘D’
[mm]
900 900 900
200
N/A1000 1000 1000 N/A1200 1200 900 N/A1500 900 1500 300
Figure 8
A
1/2 A
CB
[mm]
30
30
D
30
CYPRUS STONEX® SHOWER FLOORS
page 10 of 14

D. GENERAL INSTALLATION NOTES
1. To install the Waste outlet, thread it into the Shower Floor in an anti-clockwise direction, and secure firmly.
Refer also to the instructions which are enclosed with the waste outlet itself.
2. If installing over a Smart Pan, ensure a connector piece of about 100mm in length is firmly threaded to theoutlet, before it is fitted. Refer to figure 9.
Figure 9
2” BSP
3. It is recommended installation practice to check the edge of the Shower Floor into the wall by the thicknessof the cladding material in order to provide a leak-free joint with the wall cladding material (see figure 10).
Figure 10
Tiles or floor cladding
Tile adhesive or mortar bed
Waterproofing
Vilaboard or water resistantplaster lining
SealantWall stud
Bottom plate
Floor board
4. IIn order to ensure the longevity of the installation, a leak-free joint with wall cladding material (refer to Figure 10) is to be created. Use anti-fungal sealant, a Flushing or Sealing Tape where the wall meets the Shower Floor.
If an anti-fungal silicone was used on edges of the Shower Floor, allow to dry for 24 hours before proceeding with ins-tallation work.
5. Important to all installation types: When using Smart Pan the lid needs to be cut out to the size of the Waste outlet pipe (must not be removed) and repositioned over the opening. This lid support is mandatory. Failure to follow this instruction will void warranty for Shower Floor.
6. Protective film must be removed from all surfaces to which it is applied prior to sealing them to surrounding surfaces.Failure to remove the film may result in leakages.
E. CLEANING
The surface of the Shower Floor will resist surface build-up. However, to preserve its high lustre it may be cleaned with a soft cloth using warm soapy water and a household mild detergent.
Note: Avoid All Forms of abrasion. If accidental abrasion occur, the surface brilliance can be restored by polis-hing with a silicone-based polish.
F. WARRANTY
Roca Shower Floor is made from STONEX® reinforced resin.
Shower Floor is guaranteed for seven (7) years against faulty materials or workmanship*.
Warning
Warranty will be voided if product comes in contact with water at temperature which exceeds 55ºC. All instructions are to be adhered to in full.
Refer also to the enclosed Warranty leaflet for more details.
* Must also be read in conjunction with Roca’s general warranty conditions:
Roca will not accept claims against this warranty where the following conditions are found to exist:
• Plumbing installations have not been carried out by a licensed plumber.
• Installations that are not in compliance with the Australian Plumbing Code (AS3500), Waterproofing standards (AS3740) and ABCB Guidelines.
• The goods have been installed by a licensed plumber but not correctly installed.
• The goods have been installed correctly by a licensed plumber, but subsequent repairs, modifications and/or ad-justments to the goods after installation have not been carried out by a licensed plumber.
• Claims for visual defects to product surfaces may be rejected where harsh cleaning or scouring products have been used (rather than mild household detergent and soft, non-abrasive cloths).
• Claims where proof of purchase is not provided.
• It is the responsibility of the installer to fully check the product for any defects, flaws, blemishes and the like prior to it being installed. No such claims will be accepted after installation.
• The Shower Floor has not been installed indoors.
CYPRUS STONEX® SHOWER FLOORS
page 11 of 14

6. Protective film must be removed from all surfaces to which it is applied prior to sealing them to surrounding surfaces.Failure to remove the film may result in leakages.
E. CLEANING
The surface of the Shower Floor will resist surface build-up. However, to preserve its high lustre it may be cleaned with a soft cloth using warm soapy water and a household mild detergent.
Note: Avoid All Forms of abrasion. If accidental abrasion occur, the surface brilliance can be restored by polis-hing with a silicone-based polish.
F. WARRANTY
Roca Shower Floor is made from STONEX® reinforced resin.
Shower Floor is guaranteed for seven (7) years against faulty materials or workmanship*.
Warning
Warranty will be voided if product comes in contact with water at temperature which exceeds 55ºC. All instructions are to be adhered to in full.
Refer also to the enclosed Warranty leaflet for more details.
* Must also be read in conjunction with Roca’s general warranty conditions:
Roca will not accept claims against this warranty where the following conditions are found to exist:
• Plumbing installations have not been carried out by a licensed plumber.
• Installations that are not in compliance with the Australian Plumbing Code (AS3500), Waterproofing standards (AS3740) and ABCB Guidelines.
• The goods have been installed by a licensed plumber but not correctly installed.
• The goods have been installed correctly by a licensed plumber, but subsequent repairs, modifications and/or ad-justments to the goods after installation have not been carried out by a licensed plumber.
• Claims for visual defects to product surfaces may be rejected where harsh cleaning or scouring products have been used (rather than mild household detergent and soft, non-abrasive cloths).
• Claims where proof of purchase is not provided.
• It is the responsibility of the installer to fully check the product for any defects, flaws, blemishes and the like prior to it being installed. No such claims will be accepted after installation.
• The Shower Floor has not been installed indoors.
CYPRUS STONEX® SHOWER FLOORS
G. GENERAL ADVICE:
1. If you are using Smart-Pan for the installation, the minimum floor depth required is 265mm with a 100mm DWV bend,or a minimum of 225mm floor depth with a 100 x 50 pot gully. Refer to figure 11.
Figure 11
Ø295
Ø160 NOMINAL
TO FIT BORE FO100mm DWV PIPE
150
69
2. The position of the waste in the installation should be pre-determined in accordance with Figure 8 on page 6.
3. Shower Floor is supplied with a protective film over the top surface. It is imperative to leave the film on theproduct until all installation is completed, however the edges of the film may need to be peeled back to allow forbuilding it into the floor and walls, and sealing all around.
Please allow for a normal manufacturing tolerance of ±5mm of any dimension.
page 12 of 14
Plumbers, please ensure a copy of the installation instructions is left with the end user for future reference
CYPRUS STONEX® SHOWER FLOORS
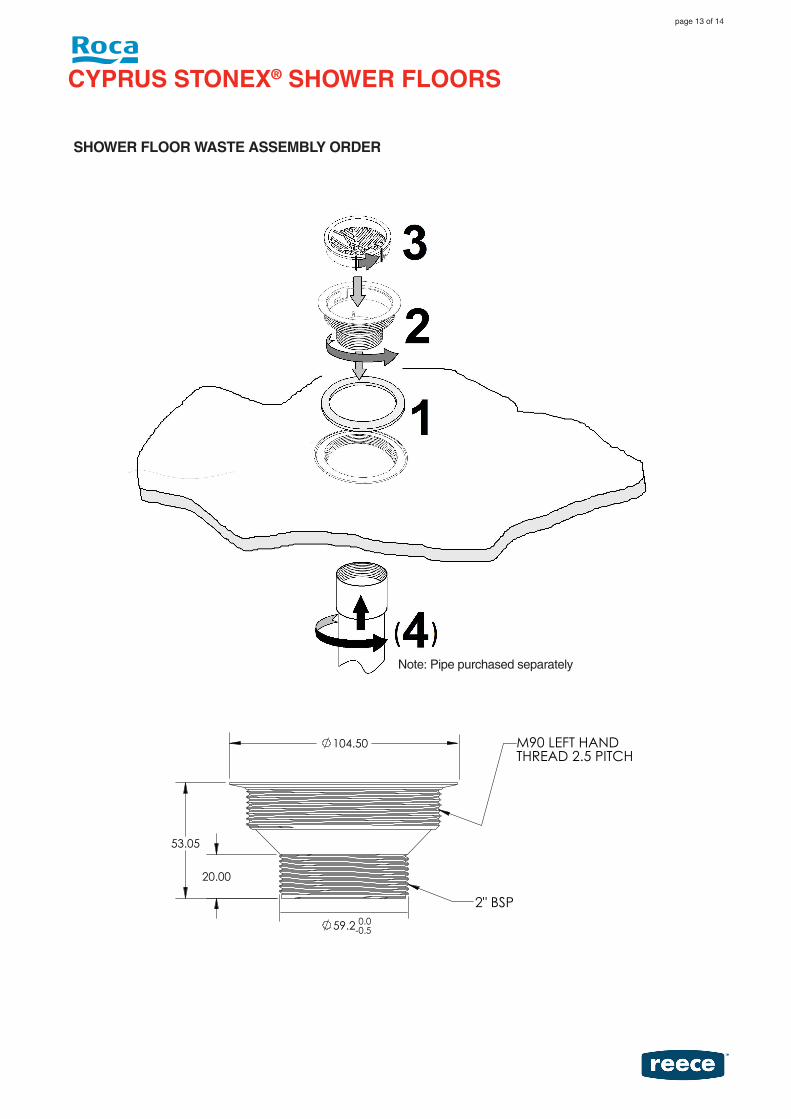
SHOWER FLOOR WASTE ASSEMBLY ORDERCYPRUS STONEX® SHOWER FLOORS
SHOWER FLOOR WASTE ASSEMBLY ORDER
page 13 of 14
Note: Pipe purchased separately
page 13 of 14

CYPRUS STONEX® SHOWER FLOORS
6. Protective film must be removed from all surfaces to which it is applied prior to sealing them to surrounding surfaces.Failure to remove the film may result in leakages.
E. CLEANING
The surface of the Shower Floor will resist surface build-up. However, to preserve its high lustre it may be cleaned with a soft cloth using warm soapy water and a household mild detergent.
Note: Avoid All Forms of abrasion. If accidental abrasion occur, the surface brilliance can be restored by polis-hing with a silicone-based polish.
F. WARRANTY
Roca Shower Floor is made from STONEX® reinforced resin.
Shower Floor is guaranteed for seven (7) years against faulty materials or workmanship*.
Warning
Warranty will be voided if product comes in contact with water at temperature which exceeds 55ºC. All instructions are to be adhered to in full.
Refer also to the enclosed Warranty leaflet for more details.
* Must also be read in conjunction with Roca’s general warranty conditions:
Roca will not accept claims against this warranty where the following conditions are found to exist:
• Plumbing installations have not been carried out by a licensed plumber.
• Installations that are not in compliance with the Australian Plumbing Code (AS3500), Waterproofing standards (AS3740) and ABCB Guidelines.
• The goods have been installed by a licensed plumber but not correctly installed.
• The goods have been installed correctly by a licensed plumber, but subsequent repairs, modifications and/or ad-justments to the goods after installation have not been carried out by a licensed plumber.
• Claims for visual defects to product surfaces may be rejected where harsh cleaning or scouring products have been used (rather than mild household detergent and soft, non-abrasive cloths).
• Claims where proof of purchase is not provided.
• It is the responsibility of the installer to fully check the product for any defects, flaws, blemishes and the like prior to it being installed. No such claims will be accepted after installation.
• The Shower Floor has not been installed indoors.
Don’t risk it, use a licensed plumber.™
page 14 of 14