culinary boot camp training guide
TRANSCRIPT

cuLinAry boot cAMP trAining guide
School Food Initiative
Student workbook from the School Food Initiative Culinary Boot Camp.
ACulinary Boot Camp training guide Book
Culinary Boot Camp

B Culinary Boot Camp training guide Book

CCulinary Boot Camp training guide Book
Culinary Boot Camp
© 2013 Orfalea Foundation. All rights reserved. This manual is intended for educational purposes only and may be copied and distributed by third parties, but may not be used for any commercial purpose.
Version 1.7

i Culinary Boot Camp training guide Book
CONTENTSCulinary Boot Camp
1 Welcome Note
2 Introduction to the School Food Initiative
4 Schedule - A Week at a Glance
10 The Simple DOs and DON’Ts of Food Safety and Handling
11 Calibrating a Thermometer Using the Ice Point Method
12 Foodborne Illness
13 FAT TOM
14 The Food Temperature Danger Zone
15 Traveling through the Danger Zone
16 Standard Operating Procedure (SOP): Proper Cooling
18 Standard Operating Procedure (SOP): Reheating Potentially Hazardous Foods
19 Temperature Guidelines for Cooking Potentially Hazardous Foods
20 Organizing a Walk-In Refrigerator
22 USDA Food Safety Checklist
26 How to Read a Recipe
27 Time Management: Definitions
28 Time Management: Activity
29 Kitchen Brigade System
30 Day One Notes and Journal
34 Setting Up a Knife Station
35 Anatomy of a Knife (and Knife Safety)
iiCulinary Boot Camp training guide Book
36 Basics at a Glance
38 Quick Culinary Conversions
39 Converting Culinary Measurements
40 Converting Recipes
44 How Much Sugar are We Serving?
45 Rethink your Drink
46 Taking a Closer Look at Sugar
47 How to Read a Food Label
52 A Closer Look at Grains
53 The Inside Scoop on Legumes
54 Artificial Flavors: Mimicking Mother Nature
56 Taste Defined
57 Anatomy of Taste
58 Our Food System
59 Food Distribution Chains
60 The Local Food Chain
61 The Multiplier Effect
63 Salad Bar Basics
64 Make a Rainbow at the Salad Bar
66 Seasonality Chart for Santa Barbara County Produce
67 The Clean Fifteen and the Dirty Dozen
68 Day Three Notes and Journal
CONTENTSCulinary Boot Camp
iii Culinary Boot Camp training guide Book
CONTENTSCulinary Boot Camp
72 Animals as Food
74 Standard Operating Procedure (SOP): Safe Handling of Raw Meat
77 USDA Commodity Processing Fact Sheet
81 National School Lunch Program: Past and Current Requirements
84 Ideas for Menu Themes
85 Theme Menu Planning Calendar
86 Two Week Cycle Menu Planning Calendar
87 Day Four Notes and Journal
91 Day Five Notes, Journal and Goal Setting
98 Additional Resources
99 USDA Sample HACCP Plan
127 Glossary
130 What Comes Next: A Note on Transitions

1Culinary Boot Camp training guide Book
wElCOmE NOTECulinary Boot Camp
Welcome to the School Food Initiative’s Culinary Boot Camp, a week-long training designed to reintroduce you to the basics. Working directly with our Chef Instructors and your peers, you will practice the skills required for integrating more scratch-cooking techniques into your school kitchen. We strive to support continuing professional development and culinary training in the school setting; keeping in mind the specific requirements and unique limitations of school facilities and budgets. Culinary Boot Camp is designed to expose you to practical techniques and knowledge that will be useful to you and the students that you feed every day.
As a school food service worker, you feed our future. Every child who comes through the lunch line is directly influenced by the food that they are served and the experience that they have in the cafeteria. The School Food Initiative aims to empower you and your school district to prepare and serve healthy scratch-cooked meals that nourish your school community.
Below are some highlighted lessons that we will cover during our week together:
• Baking Techniques
• Simple Breakfasts
• Basic Knife Skills
• Sauce Production
• Salad Bar Essentials
• Poultry, Roasts, and Ground Meat
• Flavor Profiles
• Math in the Kitchen
• Time Management
• Local Procurement
• Menu Planning
• Commodities Ordering
And the learning does not stop after our week together. Once you return to your school kitchen, you will receive follow-up visits from our Mobile Chef Instructors to ensure that the lessons have been absorbed and integrated into your daily routine. You can contact us for support as you perfect new recipes, test more efficient production methods, introduce fresh ingredients from local farmers and vendors, and create a plan to market your new menu items. The obstacles between you and serving scratch-cooked meals will be tackled one by one.

2 Culinary Boot Camp training guide Book
The School Food Initiative Mission is to empower school districts in Santa Barbara County to implement and sustain nourishing cooked-from-scratch food programs by:
Providing education and training opportunities for school communitiesIntensive culinary workshops, in-service training, and ongoing professional development programs, coupled with education about food systems, empower food service workers and facilitate change in their operations. In parallel, students form a personal relationship with real whole foods through hands-on cooking and gardening experiences on their own campuses.
Assisting with local procurement A healthy school food culture supports and is supported by local agriculture. Connecting school cafeterias with our community’s farms ensures fresh, delicious and healthy produce and reduces the environmental impact of long-distance distribution. The School Food Initiative facilitates the connections between food service teams, students and local producers.
Providing strategic resources The School Food Initiative provides on-going in-service support for school kitchens on topics such as ordering, menu planning, kitchen design and marketing new foods to students. In addition, individual grants will be made available on a case-by-case basis to fund the equipment needed to prepare safe and healthy cooked-from-scratch meals.
Increasing public awareness of the links between whole food and healthThe School Food Initiative promotes events and educational opportunities that inform students, parents, school personnel and the public about food system issues and related topics. Increasing the food literacy in a school builds a base of support for better school meals to be accepted. New healthy eating behaviors in the school travel home and into the community at large.
Working for national level reformGalvanizing local and national resources spreads school food reform beyond our county’s borders and engages an ever widening range of individuals and organizations. Sharing of the School Food Initiative’s best practices and general roadmap will pave the way for other communities as they join the movement towards healthier school food.
Together with food service personnel, principals, teachers, students, parents, and the community at large, we will continue to promote the health of students by enabling School Districts to provide more wholesome school food.
iNTrOduCTiONCulinary Boot Camp
The School Food Initiative envisions the children of Santa Barbara County making healthy food choices throughout their lives.
For more information on the School Food Initiative, visit our website www.SchoolFood.org
3Culinary Boot Camp training guide Book
SCheduleCulinary Boot Camp
4 Culinary Boot Camp training guide Book
Culinary Boot Camp
day ONEm o n d ay
Check-in
Welcome, Orientation
Food Safety and Sanitation
Kitchen Essentials
Recipe Reading
Kitchen Tour
Kitchen Production
Baking
Lunch
Classroom Session
Movie Viewing
Time Management
Taste Exploration
Review
5Culinary Boot Camp training guide Book
day TwOtueSday
Culinary Boot Camp
Breakfast Team
Breakfast Service
Kitchen Essentials
Knife Basics
Sauce
Kitchen Production
Sauce Production
Knife Skills Lab
Lunch
Classroom Session
Movie Viewing
Time Management
Recipe Conversions
Taste Exploration
Review

6 Culinary Boot Camp training guide Book
Culinary Boot Camp
day ThrEEwedneSday
Breakfast Team
Breakfast Service
Kitchen Essentials
Plants as Food
Cooking Techniques Part 1
Kitchen Production
Plant Cookery
Lunch
Classroom Session
Movie Viewing
Food Systems
USDA
Taste Exploration
Review

7Culinary Boot Camp training guide Book
Culinary Boot Camp
day fOurt h u r S d ay
Breakfast Team
Breakfast Service
Kitchen Essentials
Cooking Techniques Part 2
Kitchen Production
Meat and Poultry
Lunch
Classroom Session
Movie Viewing
NSLP
Menu Planning
Wellness Policies
Taste Exploration
Review

8 Culinary Boot Camp training guide Book
Culinary Boot Camp
day fivEf r i d a y
Breakfast Team
Breakfast Service
Culinary Jeopardy
Movie Viewing
Goal Setting
Managing Transitions
Guests Arrive
Graduation
Celebratory Lunch

9Culinary Boot Camp training guide Book
Culinary Boot Camp
day ONEm o n d ay
Check-inWelcome, OrientationFood Safety and SanitationKitchen Essentials Recipe Reading Kitchen TourKitchen Production BakingLunchClassroom Session Movie Viewing Time Management Taste ExplorationReview
10 Culinary Boot Camp training guide Book
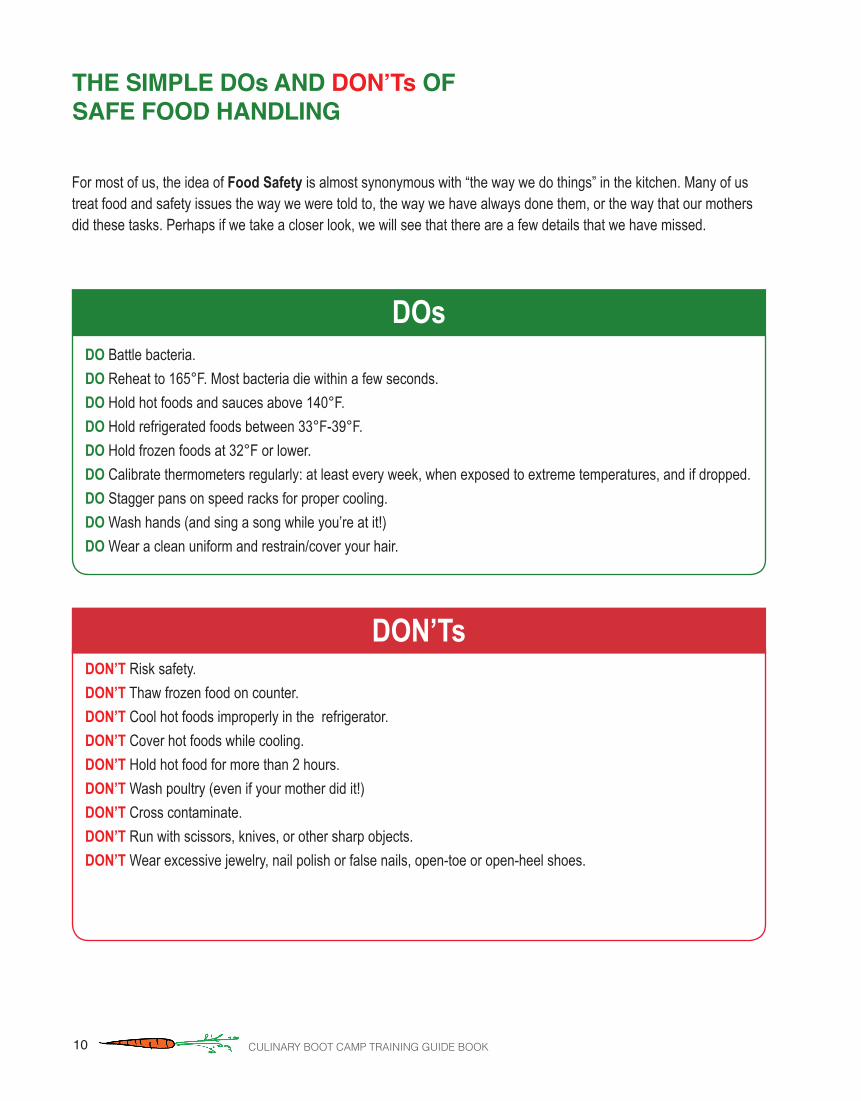
the Simple dos and DON’Ts of Safe food handling
For most of us, the idea of Food Safety is almost synonymous with “the way we do things” in the kitchen. Many of us treat food and safety issues the way we were told to, the way we have always done them, or the way that our mothers did these tasks. Perhaps if we take a closer look, we will see that there are a few details that we have missed.
DON’T Risk safety.DON’T Thaw frozen food on counter.DON’T Cool hot foods improperly in the refrigerator. DON’T Cover hot foods while cooling.DON’T Hold hot food for more than 2 hours.DON’T Wash poultry (even if your mother did it!)DON’T Cross contaminate.DON’T Run with scissors, knives, or other sharp objects.DON’T Wear excessive jewelry, nail polish or false nails, open-toe or open-heel shoes.
DO Battle bacteria.DO Reheat to 165°F. Most bacteria die within a few seconds.DO Hold hot foods and sauces above 140°F.DO Hold refrigerated foods between 33°F-39°F.DO Hold frozen foods at 32°F or lower.DO Calibrate thermometers regularly: at least every week, when exposed to extreme temperatures, and if dropped.DO Stagger pans on speed racks for proper cooling.DO Wash hands (and sing a song while you’re at it!)DO Wear a clean uniform and restrain/cover your hair.
DOs
DON’Ts

11Culinary Boot Camp training guide Book
day ONECulinary Bo
ot
Camp
mo
nd
ayCaliBrating a thermometer
1. Fill a large container with at least 4 inches of crushed ice. Add cold tap water to the depth of the ice and stir the mixture well.
2. Immerse the thermometer probe stem into the ice mixture so that the sensing dimple is com-pletely submerged (at least 2 inches) and wait 30 seconds. Make sure the thermometer stem does not touch the sides or bottom of the container.
3. Without removing the thermometer from the ice mixture, hold the adjusting nut securely with a wrench and rotate the head of the thermometer until it reads exactly 32°F.
A thermometer is an indispensable tool in the kitchen. But only if it is accurate. To ensure a ther-mometer’s accuracy, calibrate at least once a week, or anytime it is dropped, banged or subjected to extreme temperatures.
Steps for Calibrating:
HEAD
STEM
ADJUSTMENT NUT
SENSOR
CRUSHED ICE & WATER
4”MINIMUMDEpTH
the iCe point CaliBration method

12 Culinary Boot Camp training guide Book
foodBorne illneSS
Foodborne illness, commonly known as food poisoning is the result of eating foods or beverages contaminated with:• Harmful biological organisms (bacteria, parasites, viruses) • Chemical agents (cleaning supplies, pesticides, etc.)• Physical agents (foreign objects such as staples, jewelry, hair, glass, etc.)
Foodborne illness remains a major public health issue in the United States, and is increasing worldwide.
On average, over 48 million people (1 out of 4 people in the US) become sick due to foodborne illnesses each year.
Children are especially at risk because their bodies and immune systems are still developing and their stomachs may not produce enough acid needed to kill microorganisms.
Each year over 128,000 people are hospitalized and 5,000 people die as a direct result of foodborne illness. Salmonella was the leading cause of estimated hospitalizations and deaths.
Within the category of cases connected to known pathogens, approximately 90% of estimated illnesses and deaths were from seven pathogens: Salmonella, Norovirus, Campylobacter, Toxoplasma, E.coli O157, Listeria and Clostridium perfringens. These microorgan-ismsaremorelikelytoflourishinthetemperaturedangerzone.Thetemperaturedangerzoneisbetween41°Fand135°F. According to the USDA, 4% to 20% of raw poultry samples test positive for Salmonella.
Unwashed or improperly washed hands, surfaces and equipment are prime causes of foodborne illness, and are examples of poor personal hygiene and cross-contamination. In order to serve safe food, all foodservice employees must follow all approved proce-dures during purchasing, storage, preparation, holding, service, and cleanup.

13Culinary Boot Camp training guide Book
day ONECulinary Bo
ot
Camp
mo
nd
ayfat tom
Certain favorable conditions are required for the growth of foodborne pathogens. FAT TOM is an acronym that can assist food service professionals in remembering and avoiding these six factors. Write these down and commit them to memory.
Food, Acidity, Temperature, Time, Oxygen and Moisture
FATTOM

14 Culinary Boot Camp training guide Book
the food temperature danger zone
Beef Roast, Pork Roast, BRT
135
41
Ground Beef, Ground Pork, Egg Dishes
*The School Food Initiative recognizes the food temperature danger zone as 41°F–135°F consistent with the 2003 Supplement to the FDA food code and 2012 recommendations by Servsafe and the National Food Service Management Institute.
41°F – 135°F
165 All Poultry, Ground Poultry, Reheating food
212 Boiling Point for Water (At sea level)

15Culinary Boot Camp training guide Book
Let’s take a look at a typical breakfast buffet to demonstrate the three types of food items that we handle in the kitchen. Imagine that it is Tuesday morning and we are serving a hot vegetable frittata, oatmeal, and a fruit smoothie for breakfast. Each one of these foods represents a different type of preparation process and may travel through the danger zone one or more times.
Do any of these foods travel through the Danger Zone? If so, how many times?
Smoothies:To make our smoothies, on Tuesday morning, we blend frozen berries and peaches with cold milk, yogurt, and ice. The smoothies are then served.How many trips has the food taken through the Danger Zone (41°F-135°F)? Is this a No-Cook, Same-Day Service, or Complex food?
Oatmeal:We arrive on Tuesday morning and set out to cook our oatmeal on the stove. The oats are cooked in boiling water and served when tender. How many trips has the food taken through the Danger Zone (41°F-135°F)? Is this a No-Cook, Same-Day Service, or Complex food?
Frittata:The vegetable frittata was baked on Monday afternoon to an internal temperature of 160°F. It was then cooled in the walk-in refrigerator to a temperature of 40°F within 4 hours. On Tuesday, we removed the chilled frittata from the walk-in and reheated in the oven to an internal temperature of 165°F and served.How many trips has the food taken through the Danger Zone (41°F-135°F)? Is this a No-Cook, Same-Day Service, or Complex food?
traveling through the danger zone day ONE
Culinary Bo
ot
Camp
mo
nd
ay
0
1
32
1
t r av e l i n g through the danger zone
16 Culinary Boot Camp training guide Book
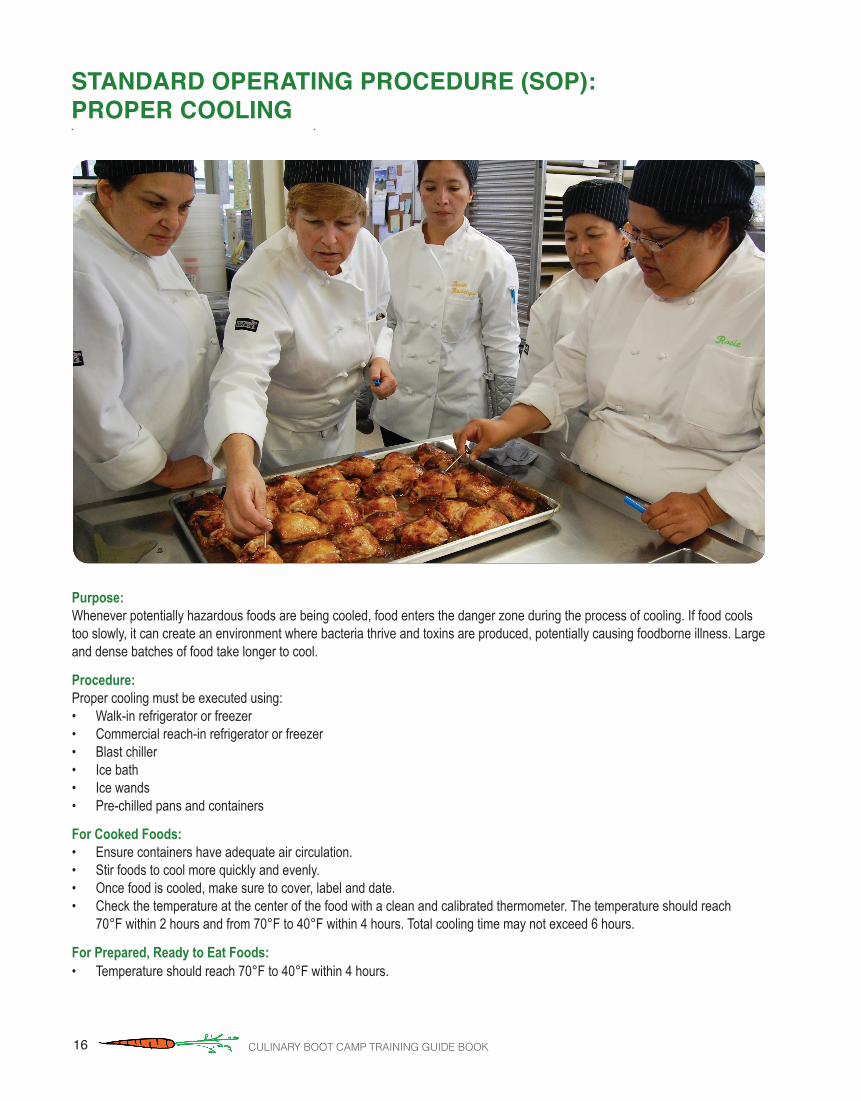
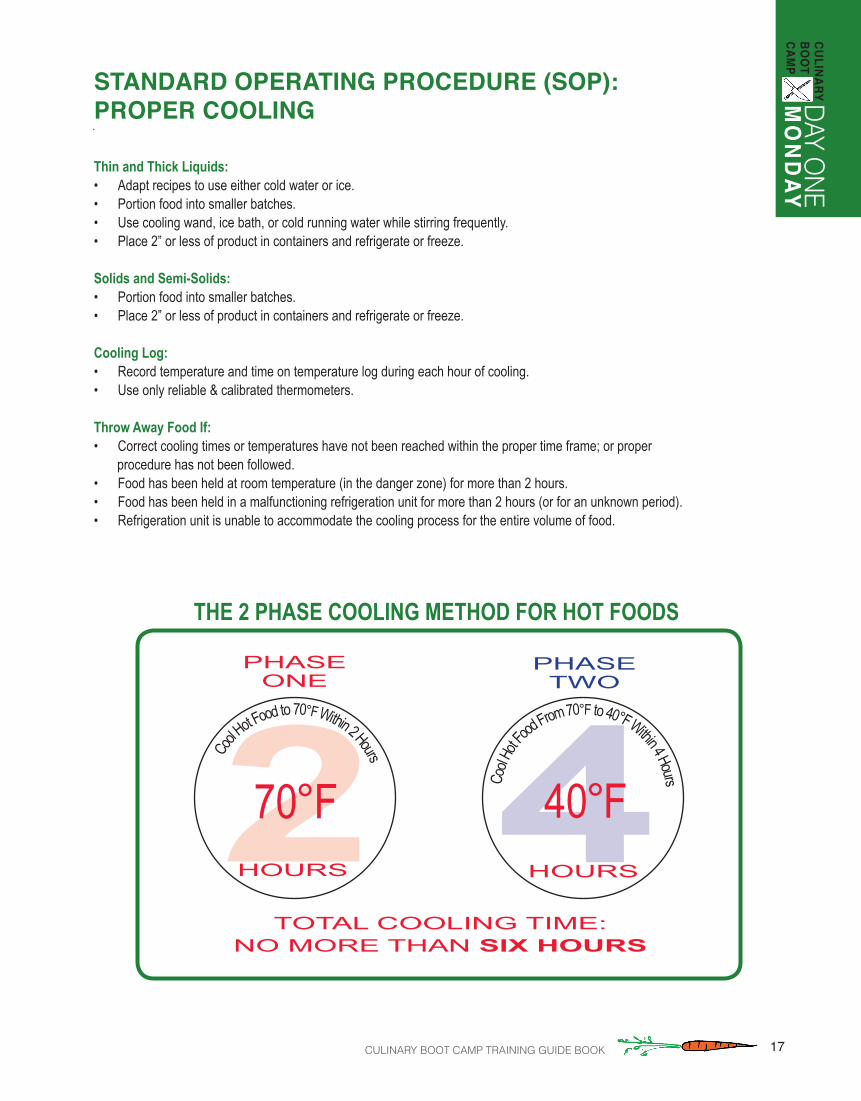
Standard operating proCedure (Sop):proper Cooling
For Cooked Foods:• Ensure containers have adequate air circulation.• Stir foods to cool more quickly and evenly.• Once food is cooled, make sure to cover, label and date.• Check the temperature at the center of the food with a clean and calibrated thermometer. The temperature should reach
70°F within 2 hours and from 70°F to 40°F within 4 hours. Total cooling time may not exceed 6 hours.
For Prepared, Ready to Eat Foods:• Temperature should reach 70°F to 40°F within 4 hours.
Purpose:Whenever potentially hazardous foods are being cooled, food enters the danger zone during the process of cooling. If food cools too slowly, it can create an environment where bacteria thrive and toxins are produced, potentially causing foodborne illness. Large and dense batches of food take longer to cool.
Procedure:Proper cooling must be executed using:• Walk-in refrigerator or freezer• Commercial reach-in refrigerator or freezer• Blast chiller• Ice bath• Ice wands• Pre-chilled pans and containers
17Culinary Boot Camp training guide Book
Standard operating proCedure (Sop):proper Cooling day ONE
Culinary Bo
ot
Camp
mo
nd
ay
Thin and Thick Liquids:• Adapt recipes to use either cold water or ice.• Portion food into smaller batches.• Use cooling wand, ice bath, or cold running water while stirring frequently.• Place 2” or less of product in containers and refrigerate or freeze.
Solids and Semi-Solids:• Portion food into smaller batches. • Place 2” or less of product in containers and refrigerate or freeze.
Cooling Log:• Record temperature and time on temperature log during each hour of cooling. • Use only reliable & calibrated thermometers.
Throw Away Food If:• Correct cooling times or temperatures have not been reached within the proper time frame; or proper procedure has not been followed. • Food has been held at room temperature (in the danger zone) for more than 2 hours.• Food has been held in a malfunctioning refrigeration unit for more than 2 hours (or for an unknown period).• Refrigeration unit is unable to accommodate the cooling process for the entire volume of food.
PHASETWO
2Cool Hot Food to 70°F Within 2 Hours
70°FHOURS
PHASEONE
Cool H
ot F
ood From 70°F to 40°F Within 4 Hours440°F
HOURS
TOTAL COOLING TIME:NO MORE THAN SIX HOURS
THE 2 PHASE COOLING METHOD FOR HOT FOODS
18 Culinary Boot Camp training guide Book
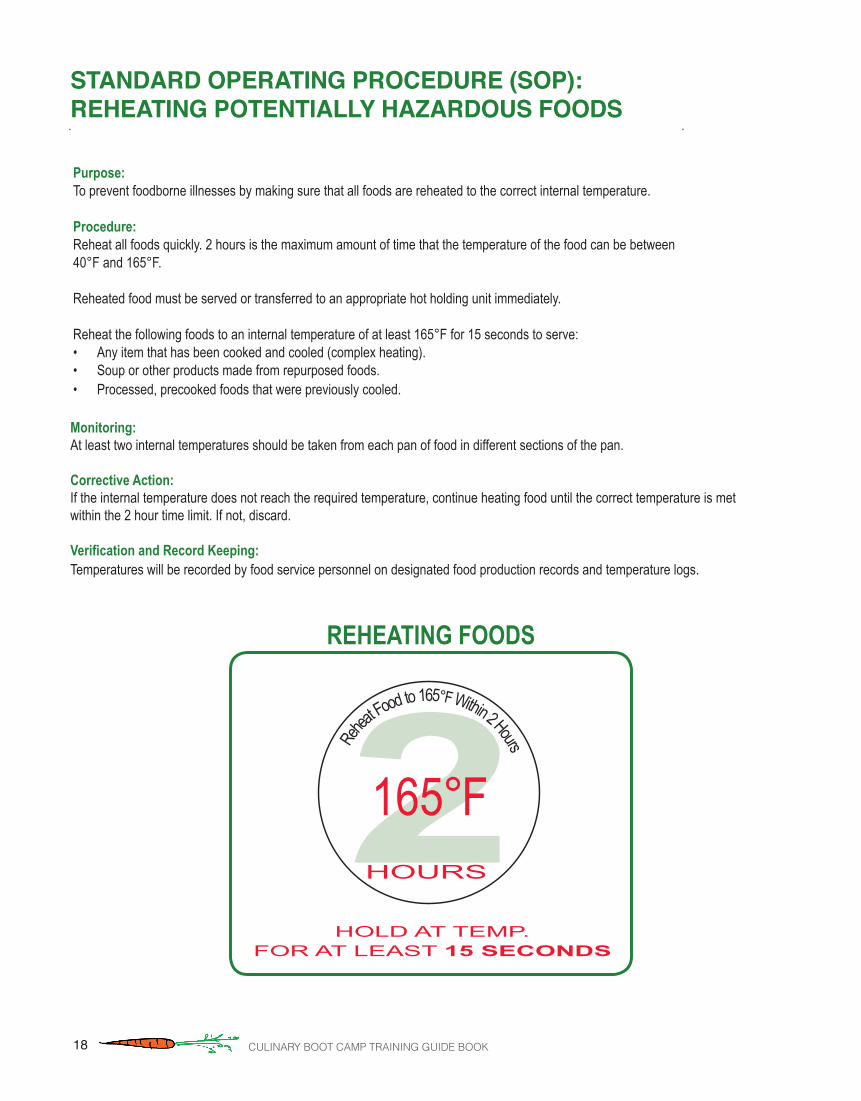
Purpose:To prevent foodborne illnesses by making sure that all foods are reheated to the correct internal temperature.
Procedure:Reheat all foods quickly. 2 hours is the maximum amount of time that the temperature of the food can be between 40°F and 165°F.
Reheated food must be served or transferred to an appropriate hot holding unit immediately.
Reheat the following foods to an internal temperature of at least 165°F for 15 seconds to serve:• Any item that has been cooked and cooled (complex heating).• Soup or other products made from repurposed foods.• Processed, precooked foods that were previously cooled.
Standard operating proCedure (Sop): reheating potentially hazardouS foodS
Monitoring:At least two internal temperatures should be taken from each pan of food in different sections of the pan.
Corrective Action:If the internal temperature does not reach the required temperature, continue heating food until the correct temperature is met within the 2 hour time limit. If not, discard.
Verification and Record Keeping:Temperatures will be recorded by food service personnel on designated food production records and temperature logs.
2Reheat Food to 165°F Within 2 Hours
165°FHOURS
HOLD AT TEMP.FOR AT LEAST 15 SECONDS
REHEATING FOODS

19Culinary Boot Camp training guide Book
FOOD PRODUCT
CATEGORIES
COOK PRODUCTS TODESIGNATED TEMPERATURE
(Must reach and maintain the temperature below for 15 seconds.)
• Fresh, frozen, or canned fruits and vegetables that are going to be held on a steam table or in a hot box
• Oatmeal and other hot cereals135°F
• Beef, pork or seafood
• Eggs cooked to order that are placed onto a plate and immediately served
145°F
• Products containing ground beef, ground pork, or fish
• Eggs held on a steam table 160°F• Poultry
• Stuffed fish, pork, or beef
• Pasta stuffed with eggs, fish, pork, or beef (like lasagna)165°F
temperature guidelineS for Cooking potentially hazardouS foodS day ONE
Culinary Bo
ot
Camp
mo
nd
ay

20 Culinary Boot Camp training guide Book
Organizing Raw Meat in the Walk-In
• The temperature of the walk-in should stay at about 38°F (below 40°F ) to
properly store cold foods.
• If there is adequate space, store raw meat products away from ready-to-eat foods and produce. If not possible, meat should always be stored below produce.
• Raw meat products should always be stored on sheet trays to catch juices.
• Store raw animal foods in refrigerators or walk-in coolers by placing the raw animal foods on shelves in the following order of cooking temperature: whole beef or pork on top shelf, raw ground meats on middle shelf, and poultry on bottom shelf.
organizing a walk-in refrigerator
Ready-to-Eat &Fully Cooked Foods
Produce
Raw Poultry, Eggs
Whole Muscle Meats
Ground Meats
To prevent dangerous cross-contamination, stack foods top to bottom as shown.
FIFO: “First In, First Out”
• Items should be used in order of “FIFO,” especially perishable products, meat, and fresh produce. Those items with an earlier expiration date should always be used before those with a later date.
21Culinary Boot Camp training guide Book
To prevent dangerous cross-contamination, stack foods top to bottom as shown.
day ONECulinary Bo
ot
Camp
mo
nd
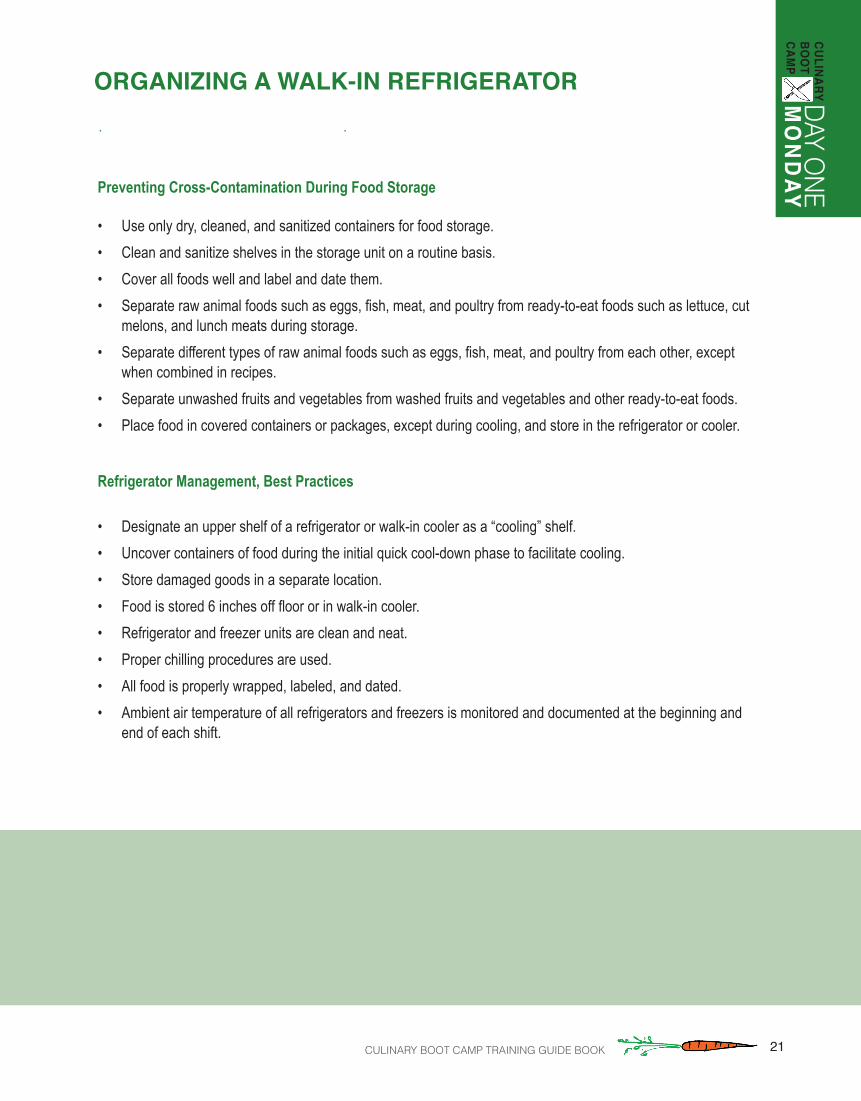
ayPreventing Cross-Contamination During Food Storage
• Use only dry, cleaned, and sanitized containers for food storage.• Clean and sanitize shelves in the storage unit on a routine basis.• Cover all foods well and label and date them.• Separate raw animal foods such as eggs,fish,meat,andpoultryfromready-to-eatfoodssuchaslettuce,cut
melons, and lunch meats during storage.• Separate differenttypesofrawanimalfoodssuchaseggs,fish,meat,andpoultryfromeachother,except
when combined in recipes.• Separate unwashed fruits and vegetables from washed fruits and vegetables and other ready-to-eat foods.• Place food in covered containers or packages, except during cooling, and store in the refrigerator or cooler.
Refrigerator Management, Best Practices
• Designate an upper shelf of a refrigerator or walk-in cooler as a “cooling” shelf.• Uncover containers of food during the initial quick cool-down phase to facilitate cooling.• Store damaged goods in a separate location.• Foodisstored6inchesofffloororinwalk-incooler.• Refrigerator and freezer units are clean and neat.• Proper chilling procedures are used.• All food is properly wrapped, labeled, and dated.• Ambient air temperature of all refrigerators and freezers is monitored and documented at the beginning and
end of each shift.
organizing a walk-in refrigerator

22 Culinary Boot Camp training guide Book
uSda food Safety CheCkliSt
FOOD SAFETY CHECKLIST Date___________________________ Observer_______________________________________ Directions: Use this checklist daily to determine areas in your operations requiring corrective action. Record corrective action taken and keep completed records in a notebook for future reference. ___________________________________________________________________________________________ PERSONAL HYGIENE Yes No Corrective Action
• Employees wear clean and proper uniform including shoes.------------ □ □ _____________
• Effective hair restraints are properly worn.-------------------------------- □ □ __________
• Fingernails are short, unpolished, and clean (no artificial nails). ------ □ □ __________
• Jewelry is limited to a plain ring, such as a wedding band and a watch - no bracelets. --------------------------------------------------------- □ □ __________
• Hands are washed properly, frequently, and at appropriate times.----- □ □ __________
• Burns, wounds, sores or scabs, or splints and water-proof bandages on hands are bandaged and completely covered with a foodservice
glove while handling food. --------------------------------------------------- □ □ __________ • Eating, drinking, chewing gum, smoking, or using tobacco are
allowed only in designated areas away from preparation, service, storage, and ware washing areas. ------------------------------------------- □ □ __________
• Employees use disposable tissues when coughing or sneezing and then immediately wash hands. ----------------------------------------- □ □ __________
• Employees appear in good health.----------------------------------------- □ □ ______________
• Hand sinks are unobstructed, operational, and clean.-------------------- □ □ ______________
• Hand sinks are stocked with soap, disposable towels, and warm water. --------------------------------------------------------------------------- □ □ ______________
• A handwashing reminder sign is posted.---------------------------------- □ □ ______________
• Employee restrooms are operational and clean.-------------------------- □ □ ______________
FOOD PREPARATION Yes No Corrective Action
• All food stored or prepared in facility is from approved sources.---- □ □ ___________
• Food equipment utensils, and food contact surfaces are properly washed, rinsed, and sanitized before every use. ------------------------- □ □ ___________
• Frozen food is thawed under refrigeration or in cold running water. ------------------------------------------------------------------------- □ □ ___________
• Preparation is planned so ingredients are kept out of the temperature danger zone to the extent possible. --------------------------------------- □ □ ___________
• Food is tasted using the proper procedure.------------------------------ □ □ ___________
• Procedures are in place to prevent cross-contamination.-------------- □ □ ___________
70

23Culinary Boot Camp training guide Book
day ONECulinary Bo
ot
Camp
mo
nd
ay
• Food is handled with suitable utensils, such as, single use gloves or tongs. ------------------------------------------------------------------------ □ □ ___________
• Food is prepared in small batches to limit the time it is in the temperature danger zone. ---------------------------------------------- □ □ ___________
• Clean reusable towels are used only for sanitizing equipment, surfaces and not for drying hands, utensils, or floor. ------ ------------ □ □ __________
• Food is cooked to the required safe internal temperature for the appropriate time. The temperature is tested with a calibrated food thermometer. ------------------------------------------------------------------ □ □ ___________ • The internal temperature of food being cooked is monitored and documented. ------------------------------------------------------------------- □ □ ___________
HOT HOLDING Yes No Corrective Action
• Hot holding unit is clean.--------------------------------------------- □ □ ___________ • Food is heated to the required safe internal temperature before placing in hot holding. Hot holding units are not used to reheat potentially hazardous foods. ---------------------------------------------- □ □ ___________ • Hot holding unit is pre-heated before hot food is placed in unit.----- □ □ ___________ • Temperature of hot food being held is at or above 135 F.----------- □ □ ___________ • Food is protected from contamination.---------------------------------- □ □ ___________
COLD HOLDING Yes No Corrective Action
• Refrigerators are kept clean and organized.----------------------------- □ □ ___________ • Temperature of cold food being held is at or below 41 F.------------ □ □ ___________ • Food is protected from contamination.----------------------------------- □ □ ___________
REFRIGERATOR, FREEZER, AND MILK COOLER Yes No Corrective Action
• Thermometers are available and accurate.------------------------------- □ □ ___________ • Temperature is appropriate for pieces of equipment.------------------ □ □ ___________ • Food is stored 6 inches off floor or in walk-in cooling equipment.-- □ □ ___________ • Refrigerator and freezer units are clean and neat.----------------------- □ □ ___________ • Proper chilling procedures are used.-------------------------------------- □ □ ___________ • All food is properly wrapped, labeled, and dated.---------------------- □ □ ___________
• The FIFO (First In, First Out) method of inventory management is
used. --------------------------------------------------------------------------- □ □ ___________ • Ambient air temperature of all refrigerators and freezers is monitored and documented at the beginning and end of each shift. -------------- □ □ ___________
71
uSda food Safety CheCkliSt

24 Culinary Boot Camp training guide Book
FOOD STORAGE AND DRY STORAGE Yes No Corrective Action
• Temperatures of dry storage area is between 50 F and 70 F or State public health department requirement.------------------------------ □ □ ___________
• All food and paper supplies are stored 6 to 8 inches off the floor.----- □ □ ___________ • All food is labeled with name and received date.------------------------- □ □ ___________ • Open bags of food are stored in containers with tight fitting lids and
labeled with common name.------------------------------------------------- □ □ ___________ • The FIFO (First In, First Out) method of inventory management is used.-------------------------------------------------------------------------- □ □ ___________ • There are no bulging or leaking canned goods. -------------------------- □ □ ___________ • Food is protected from contamination.------------------------------------- □ □ ___________ • All food surfaces are clean.-------------------------------------------------- □ □ ___________ • Chemicals are clearly labeled and stored away from food and food related supplies.--------------------------------------------------------------- □ □ ___________ • There is a regular cleaning schedule for all food surfaces.-------------- □ □ ___________
CLEANING AND SANITIZING Yes No Corrective Action
• Three-compartment sink is properly set up for ware washing.--------- □ □ ___________ • Dishmachine is working properly (i.e. gauges and chemicals are at
recommended levels).------------------------------------------------------ □ □ ___________ • Water is clean and free of grease and food particles.-------------------- □ □ ___________ • Water temperatures are correct for wash and rinse.--------------------- □ □ ___________ • If heat sanitizing, the utensils are allowed to remain immersed in 171 F water for 30 seconds.----------------------------------------------- □ □ ___________ • If using a chemical sanitizer, it is mixed correctly and a sanitizer strip is used to test chemical concentration.----------------------------- □ □ ___________ • Smallware and utensils are allowed to air dry.-------------------------- □ □ ___________ • Wiping cloths are stored in sanitizing solution while in use.--------- □ □ ___________
UTENSILS AND EQUIPMENT Yes No Corrective Action
• All small equipment and utensils, including cutting boards and knives, are cleaned and sanitized between uses.------------------------ □ □ ___________ • Small equipment and utensils are washed, sanitized, and air-dried.-- □ □ ___________ • Work surfaces and utensils are clean.------------------------------------ □ □ ___________
72
uSda food Safety CheCkliSt

25Culinary Boot Camp training guide Book
73
• Work surfaces are cleaned and sanitized between uses.--------------- □ □ ___________ • Thermometers are cleaned and sanitized after each use.-------------- □ □ ___________ • Thermometers are calibrated on a routine basis.------------------------ □ □ ___________ • Can opener is clean.--------------------------------------------------------- □ □ ___________ • Drawers and racks are clean.----------------------------------------------- □ □ ___________ • Clean utensils are handled in a manner to prevent contamination of areas that will be in direct contact with food or a person’s mouth.---- □ □ ___________
LARGE EQUIPMENT Yes No Corrective Action
• Food slicer is clean.--------------------------------------------------------- □ □ ___________ • Food slicer is broken down, cleaned, and sanitized before and after
every use.--------------------------------------------------------------------- □ □ ___________ • Boxes, containers, and recyclables are removed from site.------------ □ □ ___________ • Loading dock and area around dumpsters are clean and odor-free.-- □ □ ___________ • Exhaust hood and filters are clean.---------------------------------------- □ □ ___________
GARBAGE STORAGE AND DISPOSAL Yes No Corrective Action
• Kitchen garbage cans are clean and kept covered.----------------------- □ □ ___________ • Garbage cans are emptied as necessary.---------------------------------- □ □ ___________ • Boxes and containers are removed from site.---------------------------- □ □ ___________ • Loading dock and area around dumpster are clean.--------------------- □ □ ___________ • Dumpsters are clean.-------------------------------------------------------- □ □ ___________
PEST CONTROL Yes No Corrective Action
• Outside doors have screens, are well-sealed, and are equipped with a self-closing device.------------------------------------------------------ □ □ ___________ • No evidence of pests is present.------------------------------------------- □ □ ___________ • There is a regular schedule of pest control by licensed pest control operator.---------------------------------------------------------------------- □ □ ___________
day ONECulinary Bo
ot
Camp
mo
nd
ayuSda food Safety CheCkliSt
26 Culinary Boot Camp training guide Book
how to read a reCipe
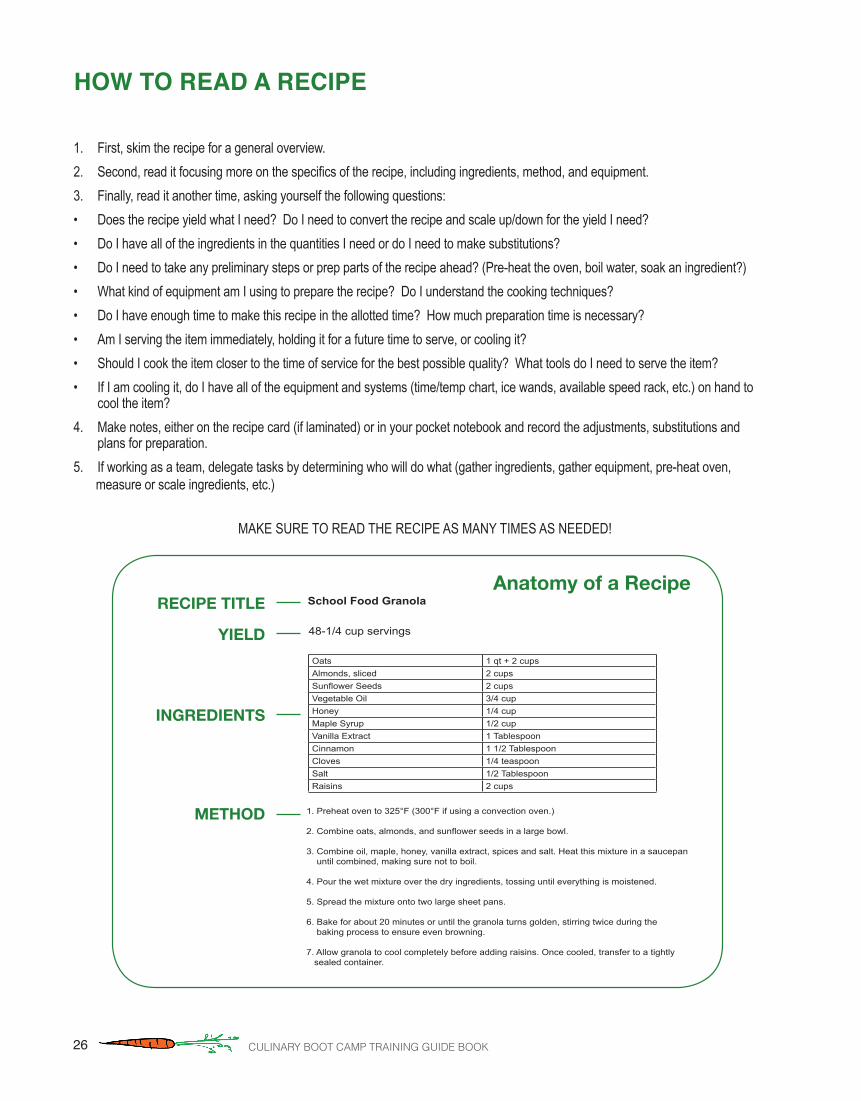
1. First, skim the recipe for a general overview.2. Second,readitfocusingmoreonthespecificsoftherecipe,includingingredients,method,andequipment.3. Finally, read it another time, asking yourself the following questions: • Does the recipe yield what I need? Do I need to convert the recipe and scale up/down for the yield I need? • Do I have all of the ingredients in the quantities I need or do I need to make substitutions?• Do I need to take any preliminary steps or prep parts of the recipe ahead? (Pre-heat the oven, boil water, soak an ingredient?)• What kind of equipment am I using to prepare the recipe? Do I understand the cooking techniques?• Do I have enough time to make this recipe in the allotted time? How much preparation time is necessary? • Am I serving the item immediately, holding it for a future time to serve, or cooling it?• Should I cook the item closer to the time of service for the best possible quality? What tools do I need to serve the item?• If I am cooling it, do I have all of the equipment and systems (time/temp chart, ice wands, available speed rack, etc.) on hand to
cool the item? 4. Make notes, either on the recipe card (if laminated) or in your pocket notebook and record the adjustments, substitutions and
plans for preparation.5. If working as a team, delegate tasks by determining who will do what (gather ingredients, gather equipment, pre-heat oven, measure or scale ingredients, etc.)
Anatomy of a RecipeSchool Food Granola
48-1/4 cup servings
Raisins
Oats 1 qt + 2 cupsAlmonds, sliced 2 cupsSunflower Seeds 2 cupsVegetable Oil 3/4 cupHoney 1/4 cupMaple Syrup 1/2 cupVanilla Extract 1 TablespoonCinnamon 1 1/2 TablespoonCloves 1/4 teaspoonSalt 1/2 TablespoonRaisins 2 cups
1. Preheat oven to 325°F (300°F if using a convection oven.)
2. Combine oats, almonds, and sunflower seeds in a large bowl.
3. Combine oil, maple, honey, vanilla extract, spices and salt. Heat this mixture in a saucepan until combined, making sure not to boil.
4. Pour the wet mixture over the dry ingredients, tossing until everything is moistened.
5. Spread the mixture onto two large sheet pans.
6. Bake for about 20 minutes or until the granola turns golden, stirring twice during the baking process to ensure even browning.
7. Allow granola to cool completely before adding raisins. Once cooled, transfer to a tightly sealed container.
RECIPE TITLE
METHOD
INGREDIENTS
YIELD
MAKE SURE TO READ THE RECIPE AS MANY TIMES AS NEEDED!

27Culinary Boot Camp training guide Book
Safety First: Time management is not about rushing or cutting corners; time management is about structuring tasks so they can be achieved safely and efficiently.
Time Management: Priority-based structuring of time available to complete a set of tasks.
List Making: An itemized approach to management of objectives.
Prioritize: To arrange the order in which things/tasks happen.
Team Player: One who acts as part of a collective effort to complete a desired outcome.
Cross-training: A policy of training coworkers in more than one position so one may step in when needed. An excellent way to learn and appreciate each other’s contribu-tion.
Deferral: Postponement.
Delegation: Dividing of necessary tasks among team members.
Zoning: Defining an appropriate area, sometimes including strict boundaries, for specific tasks.
Sequencing: Process for completing tasks in the most logical/efficient order.
Assembly Line: Multiple coworkers working in se-quential steps to complete a process.
Economies of Motion: The simplification and reduc-tion of body motions to preserve energy. Budget movement.
Economies of Scale: Savings in cost and/or energy achieved by combining tasks.
Multi-tasking: Engaging in more than one task at a time.
Working Ahead: Using foresight to identify needs/tasks beforehand.
Pros/Cons: A list of the potential outcomes of doing a task or making a decision. Positives and negatives associated with a decision or task.
Mise en Place: To put in place.
Flexibility and Imagination: Use of substitution, adapt-ability, and creativity to achieve desired outcomes within the specified timeframe.
time management: definitionS day ONE
Culinary Bo
ot
Camp
mo
nd
ay
“The only reason for time is so that everything doesn’t happen at once.”—Albert Einstein

28 Culinary Boot Camp training guide Book
time management:aCtivity

29Culinary Boot Camp training guide Book
The brigade system of organization and zoning were introduced into the professional kitchen in the early 1900s by Auguste Escoffier,amanknownbysomeasthe“KingofChefs.”Escoffierwasthefirsttoincorporatethemilitarybrigadestyleoforganization and discipline into chaotic kitchens. Instead of everyone working on random tasks without any clear manage-ment, the brigade system assigned reponsibility for each section of the kitchen to a particular Chef improving communication andefficiencyofproduction.
The School Food Initiative Culinary Boot Camp employs its own organizational brigade which looks something like this:
kitChen Brigade SyStem day ONECulinary Bo
ot
Camp
mo
nd
ay
HEAD CHEFINSTRUCTOR
CHEF INSTRUCTORCLASSROOM 1
CHEF INSTRUCTORCLASSROOM 2
SOUS CHEFINSTRUCTOR
EQUIPMENT MGR.CHEF INSTRUCTOR
PRODUCT MGR.CHEF INSTRUCTOR
EVENTCOORDINATOR
ASST. TO EVENTCOORDINATOR
DISHWASHER 1 DISHWASHER 2

30 Culinary Boot Camp training guide Book
day one noteS
31Culinary Boot Camp training guide Book
day one noteS day ONECulinary Bo
ot
Camp
mo
nd
ay
32 Culinary Boot Camp training guide Book
day one journal

33Culinary Boot Camp training guide Book
day TwOt u e S d ay
Culinary Boot Camp
Breakfast TeamBreakfast ServiceKitchen Essentials Knife Basics SauceKitchen Production Sauce Production Knife Skills Lab LunchClassroom Session Movie Viewing Time Management Recipe Conversions Taste ExplorationReview
34 Culinary Boot Camp training guide Book
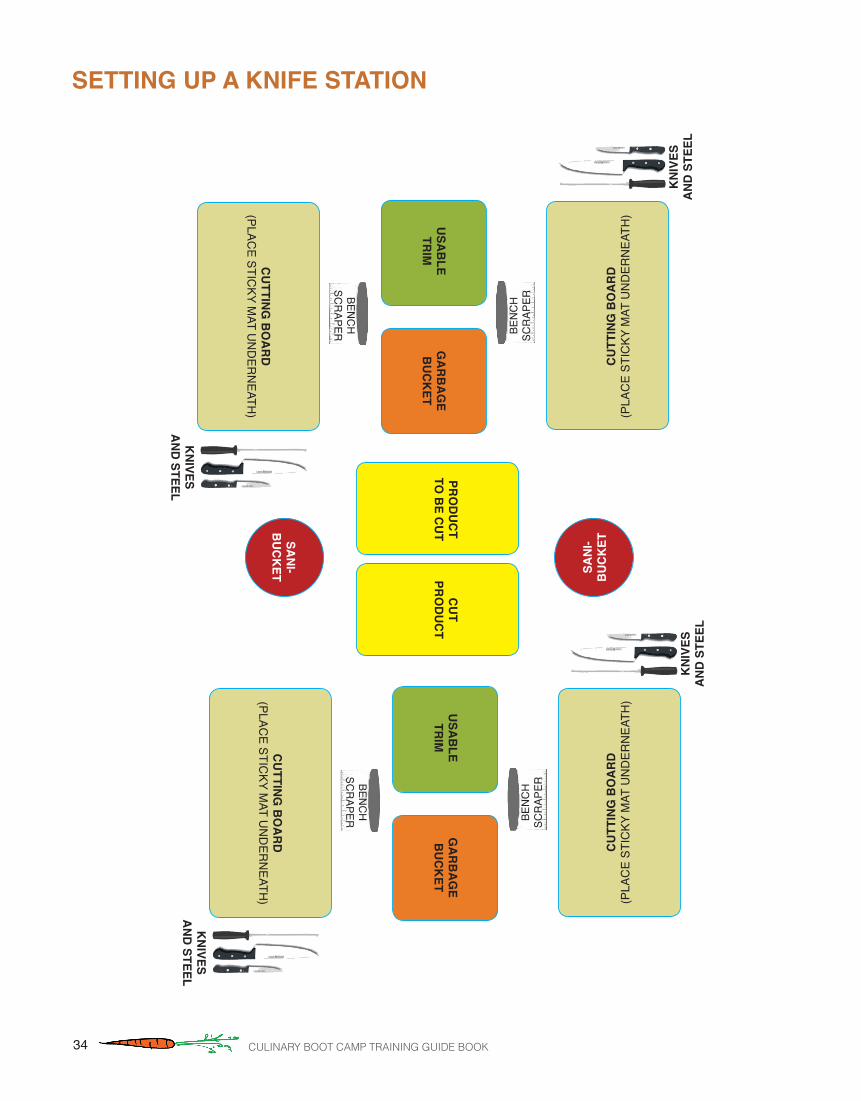
SETTING UP A KNIFE STATION
PRO
DU
CT
TO B
E CU
TC
UT
PRO
DU
CT
SAN
I-B
UC
KET SA
NI-
BU
CK
ET
USA
BLE
TRIM
GA
RB
AG
EB
UC
KET
CU
TTING
BO
AR
D(PLAC
E STICKY M
AT UN
DER
NEATH
)
KN
IVESA
ND
STEEL
BENC
HSC
RAPER BE
NC
HSC
RAP
ER
KN
IVES
AN
D S
TEEL
USA
BLE
TRIM
GA
RB
AG
EB
UC
KET
CU
TTING
BO
AR
D(PLAC
E STICKY M
AT UN
DER
NEATH
)
KN
IVESA
ND
STEEL
BENC
HSC
RAPER BE
NC
HSC
RAP
ER
KN
IVES
AN
D S
TEEL
CU
TTIN
G B
OA
RD
(PLA
CE
STIC
KY M
AT U
ND
ERN
EATH
)C
UTT
ING
BO
AR
D(P
LAC
E ST
ICKY
MAT
UN
DER
NEA
TH)
Setting up a knife Station
35Culinary Boot Camp training guide Book
day TwO
tueSd
ayCulinary Bo
ot
Camp
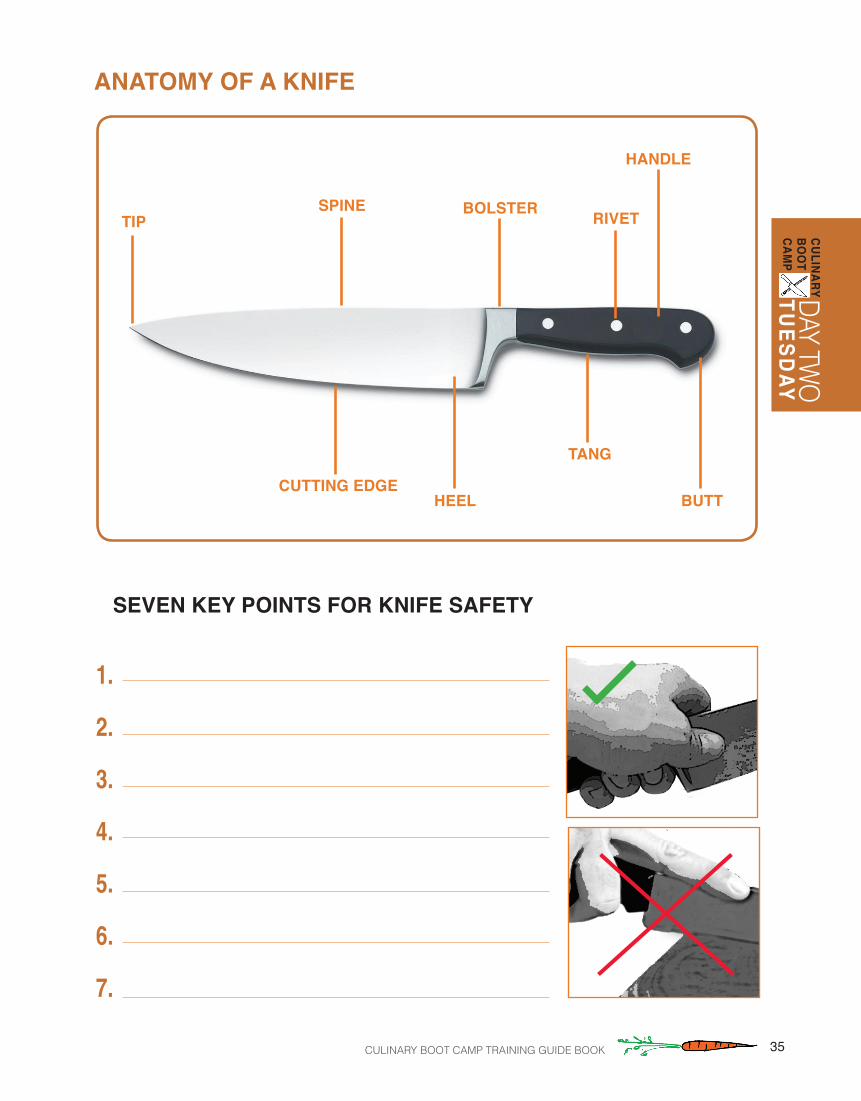
anatomy of a knife
Cutting edge
rivet
tang
tipBolSterSpine
Butt
handle
heel
1.
2.
3.
4.
5.
6.
7.
Seven key pointS for knife Safety

36 Culinary Boot Camp training guide Book
Recipe Abbreviationsapprox. = approximate
tsp or t = teaspoon
Tbsp or T = tablespoon
c = cup
pt = pint
qt = quart
gal = gallon
wt = weight
oz = ounce
lb or # = pound (e.g., 3#)
g = gram
kg = kilogram
vol = volume
mL = milliliter
L = liter
fl oz = fluid ounce
No. or # = number (e.g., #3)
in. or " = inches (e.g., 12")
°F = degree Fahrenheit
°C = degree Celsius orcentigrade
Volume Equivalents for Liquids
60 drops = 1 tsp
1 Tbsp = 3 tsp = 0.5 fl oz
1/8 cup = 2 Tbsp = 1 fl oz
1/4 cup = 4 Tbsp = 2 fl oz
1/3 cup = 5 Tbsp + 1 tsp = 2.65 fl oz
3/8 cup = 6 Tbsp = 3 fl oz
1/2 cup = 8 Tbsp = 4 fl oz
5/8 cup = 10 Tbsp = 5 fl oz
2/3 cup = 10 Tbsp + 2 tsp = 5.3 fl oz
3/4 cup = 12 Tbsp = 6 fl oz
7/8 cup = 14 Tbsp = 7 fl oz
1 cup = 16 Tbsp = 8 fl oz
1/2 pint = 1 cup = 8 fl oz
1 pint = 2 cups = 16 fl oz
1 quart = 2 pt = 32 fl oz
1 gallon = 4 qt = 128 fl oz
Equivalent Weights16 oz = 1 lb = 1.000 lb
12 oz = 3/4 lb = 0.750 lb
8 oz = 1/2 lb = 0.500 lb
4 oz = 1/4 lb = 0.250 lb
1 oz = 1/16 lb = 0.063 lb
Scoops (Dishers)Size/No.1 Level Measure Color Code2
6 2/3 cup8 1/2 cup
10 3/8 cup12 1/3 cup16 1/4 cup20 3-1/3 Tbsp24 2-2/3 Tbsp30 2 Tbsp40 1-2/3 Tbsp50 3-3/4 tsp60 3-1/4 tsp70 2-3/4 tsp
100 2 tsp
1 Scoops are left or right hand or squeeze type that can be used forboth hands. Number on the scoop indicates how many level scoop-fuls make one quart. For example, eight No. 8 scoops = 1 quart.
=2 Use colored dots matching the brand-specific color coding of scoop sizes.
LadlesPortion Servers
Ladle Approx. Measure Portion Server fl oz fl oz1 oz 1/8 cup 1 oz2 oz 1/4 cup 2 oz3 oz 3/8 cup 3 oz4 oz 1/2 cup 4 oz6 oz 3/4 cup 6 oz8 oz 1 cup 8 oz
12 oz 1-1/2 cups —
Ladles and portion servers (measuring-serving spoons that arevolume-standardized) are labeled “oz.” “Fl oz” would be moreaccurate since they measure volume, not weight.
Use ladles for serving soups, stews, creamed dishes, sauces,gravies, and other liquid products.
Use portion servers (solid or perforated) for portioning solids and semi-solids such as fruits and vegetables, and condiments.
Cooking or Serving Spoons
Solid Spoons
Perforated Spoons
Slotted Spoons
Spoons vary in length (11", 13", 15", 18", 21") for ease ofuse in cooking or serving. Spoons can have plastic handlesthat are heat-resistant. Level scoops, ladles, and portionservers provide more accurate portion control than servingspoons that are not volume-standardized measure.
Specialty Spoons
A thumb notch on a server or spoon handle prevents thespoon from slipping into the pan and prevents hands fromsliding into the food. Triple-edge (solid or perforated)spoons have a flat edge that increases the area where thespoon touches the bottom of the pan when stirring.
Metric Equivalents by WeightCustomary Unit Metric Unit(avoirdupois)
Ounces (oz) Grams (g)
1 oz = 28.35 g
4 oz = 113.4 g
8 oz = 226.8 g
16 oz = 453.6 g
Pounds (lb) Grams (g)
1 lb = 453.6 g
2 lb = 907.2 g
Pounds (lb) Kilograms (kg)
2.2 lb = 1 kg (1000 g)
Metric Equivalents by VolumeCustomary Unit (fl oz) Metric Unit
1 cup (8 fl oz) = 236.59 mL
1 quart (32 fl oz) = 946.36 mL
1.5 quarts (48 fl oz) = 1.42 L
33.818 fl oz = 1.0 L
©National Food Service Management InstituteThe University of Mississippi
800-321-3054 www.nfsmi.orgEX60-02A
Revised 2002, Reprinted 2004
This project has been funded by the USDA, Food and Nutrition Service through a grant to The University of Mississippi.The University of Mississippi is an EEO/AA/ADA/ADEA/TITLES VI & IX/SECTION 504 Employer. 04/04
Steamtable Pan CapacityPan Size Approx. Serving Ladle Scoop Approx. #
Capacity Size (fl oz) # Servings
12" x 20" x 2-1/2" 2 gal 1/2 cup 4 oz 8 643/8 cup 3 oz 10 801/3 cup 2.65 oz 12 961/4 cup 2 oz 16 128
12" x 20" x 4" 3-1/2 gal 1/2 cup 4 oz 8 1123/8 cup 3 oz 10 1351/3 cup 2.65 oz 12 1681/4 cup 2 oz 16 224
12" x 20" x 6" 5 gal 1/2 cup 4 oz 8 1603/8 cup 3 oz 10 2001/3 cup 2.65 oz 12 2401/4 cup 2 oz 16 320
1/1
2/3
1/2
2/4
1/3
1/4
1/6
1/9
Other Pan Sizes
Steamtable or counterpans are available in various sizes. Smallersize pans may require theuse of an adapter bar.
Approximate Dimensions of Serving Sizes from Different Pan SizesPan Approx. Size No. and Approx. Size Servings per Pan
25 50 100Baking or steamtable 12" x 20" x 2-1/2" 2" x 3-3/4" 2" x 2" - - - - -Sheet or bun 18" x 26" x 1" 3-1/4" x 5" 3-1/4" x 2-1/2" 1-3/4" x 2-1/2"
Basics at a GlanceBasics at a Glance
For 50 servings cut 5 x 10 For 100 servings cut 10 x 10
5
10
10
10
3
8
Fraction to Decimal Equivalents
1/8 = 0.125
1/4 = 0.250
1/3 = 0.333
3/8 = 0.375
1/2 = 0.500
5/8 = 0.625
2/3 = 0.666
3/4 = 0.750
7/8 = 0.875
20-3/4" x 12-3/4"
13-7/8" x 12-3/4"
10-3/8" x 12-3/4"
20-3/4" x 6-7/16"
6-7/8" x 12-3/4"
6-3/8" x 10-3/8"
6-7/8" x 6-1/4"
6-7/8" x 4-1/4"
Cutting Diagrams for Portioning
5
5
For 25 servings cut 5 x 5 For 48 servings cut 3 x 8 then diagonally
BaSiCS at a glanCe
Recipe Abbreviationsapprox. = approximate
tsp or t = teaspoon
Tbsp or T = tablespoon
c = cup
pt = pint
qt = quart
gal = gallon
wt = weight
oz = ounce
lb or # = pound (e.g., 3#)
g = gram
kg = kilogram
vol = volume
mL = milliliter
L = liter
fl oz = fluid ounce
No. or # = number (e.g., #3)
in. or " = inches (e.g., 12")
°F = degree Fahrenheit
°C = degree Celsius orcentigrade
Volume Equivalents for Liquids
60 drops = 1 tsp
1 Tbsp = 3 tsp = 0.5 fl oz
1/8 cup = 2 Tbsp = 1 fl oz
1/4 cup = 4 Tbsp = 2 fl oz
1/3 cup = 5 Tbsp + 1 tsp = 2.65 fl oz
3/8 cup = 6 Tbsp = 3 fl oz
1/2 cup = 8 Tbsp = 4 fl oz
5/8 cup = 10 Tbsp = 5 fl oz
2/3 cup = 10 Tbsp + 2 tsp = 5.3 fl oz
3/4 cup = 12 Tbsp = 6 fl oz
7/8 cup = 14 Tbsp = 7 fl oz
1 cup = 16 Tbsp = 8 fl oz
1/2 pint = 1 cup = 8 fl oz
1 pint = 2 cups = 16 fl oz
1 quart = 2 pt = 32 fl oz
1 gallon = 4 qt = 128 fl oz
Equivalent Weights16 oz = 1 lb = 1.000 lb
12 oz = 3/4 lb = 0.750 lb
8 oz = 1/2 lb = 0.500 lb
4 oz = 1/4 lb = 0.250 lb
1 oz = 1/16 lb = 0.063 lb
Scoops (Dishers)Size/No.1 Level Measure Color Code2
6 2/3 cup8 1/2 cup
10 3/8 cup12 1/3 cup16 1/4 cup20 3-1/3 Tbsp24 2-2/3 Tbsp30 2 Tbsp40 1-2/3 Tbsp50 3-3/4 tsp60 3-1/4 tsp70 2-3/4 tsp
100 2 tsp
1 Scoops are left or right hand or squeeze type that can be used forboth hands. Number on the scoop indicates how many level scoop-fuls make one quart. For example, eight No. 8 scoops = 1 quart.
=2 Use colored dots matching the brand-specific color coding of scoop sizes.
LadlesPortion Servers
Ladle Approx. Measure Portion Server fl oz fl oz1 oz 1/8 cup 1 oz2 oz 1/4 cup 2 oz3 oz 3/8 cup 3 oz4 oz 1/2 cup 4 oz6 oz 3/4 cup 6 oz8 oz 1 cup 8 oz
12 oz 1-1/2 cups —
Ladles and portion servers (measuring-serving spoons that arevolume-standardized) are labeled “oz.” “Fl oz” would be moreaccurate since they measure volume, not weight.
Use ladles for serving soups, stews, creamed dishes, sauces,gravies, and other liquid products.
Use portion servers (solid or perforated) for portioning solids and semi-solids such as fruits and vegetables, and condiments.
Cooking or Serving Spoons
Solid Spoons
Perforated Spoons
Slotted Spoons
Spoons vary in length (11", 13", 15", 18", 21") for ease ofuse in cooking or serving. Spoons can have plastic handlesthat are heat-resistant. Level scoops, ladles, and portionservers provide more accurate portion control than servingspoons that are not volume-standardized measure.
Specialty Spoons
A thumb notch on a server or spoon handle prevents thespoon from slipping into the pan and prevents hands fromsliding into the food. Triple-edge (solid or perforated)spoons have a flat edge that increases the area where thespoon touches the bottom of the pan when stirring.
Metric Equivalents by WeightCustomary Unit Metric Unit(avoirdupois)
Ounces (oz) Grams (g)
1 oz = 28.35 g
4 oz = 113.4 g
8 oz = 226.8 g
16 oz = 453.6 g
Pounds (lb) Grams (g)
1 lb = 453.6 g
2 lb = 907.2 g
Pounds (lb) Kilograms (kg)
2.2 lb = 1 kg (1000 g)
Metric Equivalents by VolumeCustomary Unit (fl oz) Metric Unit
1 cup (8 fl oz) = 236.59 mL
1 quart (32 fl oz) = 946.36 mL
1.5 quarts (48 fl oz) = 1.42 L
33.818 fl oz = 1.0 L
©National Food Service Management InstituteThe University of Mississippi
800-321-3054 www.nfsmi.orgEX60-02A
Revised 2002, Reprinted 2004
This project has been funded by the USDA, Food and Nutrition Service through a grant to The University of Mississippi.The University of Mississippi is an EEO/AA/ADA/ADEA/TITLES VI & IX/SECTION 504 Employer. 04/04
Steamtable Pan CapacityPan Size Approx. Serving Ladle Scoop Approx. #
Capacity Size (fl oz) # Servings
12" x 20" x 2-1/2" 2 gal 1/2 cup 4 oz 8 643/8 cup 3 oz 10 801/3 cup 2.65 oz 12 961/4 cup 2 oz 16 128
12" x 20" x 4" 3-1/2 gal 1/2 cup 4 oz 8 1123/8 cup 3 oz 10 1351/3 cup 2.65 oz 12 1681/4 cup 2 oz 16 224
12" x 20" x 6" 5 gal 1/2 cup 4 oz 8 1603/8 cup 3 oz 10 2001/3 cup 2.65 oz 12 2401/4 cup 2 oz 16 320
1/1
2/3
1/2
2/4
1/3
1/4
1/6
1/9
Other Pan Sizes
Steamtable or counterpans are available in various sizes. Smallersize pans may require theuse of an adapter bar.
Approximate Dimensions of Serving Sizes from Different Pan SizesPan Approx. Size No. and Approx. Size Servings per Pan
25 50 100Baking or steamtable 12" x 20" x 2-1/2" 2" x 3-3/4" 2" x 2" - - - - -Sheet or bun 18" x 26" x 1" 3-1/4" x 5" 3-1/4" x 2-1/2" 1-3/4" x 2-1/2"
Basics at a GlanceBasics at a Glance
For 50 servings cut 5 x 10 For 100 servings cut 10 x 10
5
10
10
10
3
8
Fraction to Decimal Equivalents
1/8 = 0.125
1/4 = 0.250
1/3 = 0.333
3/8 = 0.375
1/2 = 0.500
5/8 = 0.625
2/3 = 0.666
3/4 = 0.750
7/8 = 0.875
20-3/4" x 12-3/4"
13-7/8" x 12-3/4"
10-3/8" x 12-3/4"
20-3/4" x 6-7/16"
6-7/8" x 12-3/4"
6-3/8" x 10-3/8"
6-7/8" x 6-1/4"
6-7/8" x 4-1/4"
Cutting Diagrams for Portioning
5
5
For 25 servings cut 5 x 5 For 48 servings cut 3 x 8 then diagonally

37Culinary Boot Camp training guide Book
day TwO
tueSd
ayCulinary Bo
ot
Camp
Recipe Abbreviationsapprox. = approximate
tsp or t = teaspoon
Tbsp or T = tablespoon
c = cup
pt = pint
qt = quart
gal = gallon
wt = weight
oz = ounce
lb or # = pound (e.g., 3#)
g = gram
kg = kilogram
vol = volume
mL = milliliter
L = liter
fl oz = fluid ounce
No. or # = number (e.g., #3)
in. or " = inches (e.g., 12")
°F = degree Fahrenheit
°C = degree Celsius orcentigrade
Volume Equivalents for Liquids
60 drops = 1 tsp
1 Tbsp = 3 tsp = 0.5 fl oz
1/8 cup = 2 Tbsp = 1 fl oz
1/4 cup = 4 Tbsp = 2 fl oz
1/3 cup = 5 Tbsp + 1 tsp = 2.65 fl oz
3/8 cup = 6 Tbsp = 3 fl oz
1/2 cup = 8 Tbsp = 4 fl oz
5/8 cup = 10 Tbsp = 5 fl oz
2/3 cup = 10 Tbsp + 2 tsp = 5.3 fl oz
3/4 cup = 12 Tbsp = 6 fl oz
7/8 cup = 14 Tbsp = 7 fl oz
1 cup = 16 Tbsp = 8 fl oz
1/2 pint = 1 cup = 8 fl oz
1 pint = 2 cups = 16 fl oz
1 quart = 2 pt = 32 fl oz
1 gallon = 4 qt = 128 fl oz
Equivalent Weights16 oz = 1 lb = 1.000 lb
12 oz = 3/4 lb = 0.750 lb
8 oz = 1/2 lb = 0.500 lb
4 oz = 1/4 lb = 0.250 lb
1 oz = 1/16 lb = 0.063 lb
Scoops (Dishers)Size/No.1 Level Measure Color Code2
6 2/3 cup8 1/2 cup
10 3/8 cup12 1/3 cup16 1/4 cup20 3-1/3 Tbsp24 2-2/3 Tbsp30 2 Tbsp40 1-2/3 Tbsp50 3-3/4 tsp60 3-1/4 tsp70 2-3/4 tsp
100 2 tsp
1 Scoops are left or right hand or squeeze type that can be used forboth hands. Number on the scoop indicates how many level scoop-fuls make one quart. For example, eight No. 8 scoops = 1 quart.
=2 Use colored dots matching the brand-specific color coding of scoop sizes.
LadlesPortion Servers
Ladle Approx. Measure Portion Server fl oz fl oz1 oz 1/8 cup 1 oz2 oz 1/4 cup 2 oz3 oz 3/8 cup 3 oz4 oz 1/2 cup 4 oz6 oz 3/4 cup 6 oz8 oz 1 cup 8 oz
12 oz 1-1/2 cups —
Ladles and portion servers (measuring-serving spoons that arevolume-standardized) are labeled “oz.” “Fl oz” would be moreaccurate since they measure volume, not weight.
Use ladles for serving soups, stews, creamed dishes, sauces,gravies, and other liquid products.
Use portion servers (solid or perforated) for portioning solids and semi-solids such as fruits and vegetables, and condiments.
Cooking or Serving Spoons
Solid Spoons
Perforated Spoons
Slotted Spoons
Spoons vary in length (11", 13", 15", 18", 21") for ease ofuse in cooking or serving. Spoons can have plastic handlesthat are heat-resistant. Level scoops, ladles, and portionservers provide more accurate portion control than servingspoons that are not volume-standardized measure.
Specialty Spoons
A thumb notch on a server or spoon handle prevents thespoon from slipping into the pan and prevents hands fromsliding into the food. Triple-edge (solid or perforated)spoons have a flat edge that increases the area where thespoon touches the bottom of the pan when stirring.
Metric Equivalents by WeightCustomary Unit Metric Unit(avoirdupois)
Ounces (oz) Grams (g)
1 oz = 28.35 g
4 oz = 113.4 g
8 oz = 226.8 g
16 oz = 453.6 g
Pounds (lb) Grams (g)
1 lb = 453.6 g
2 lb = 907.2 g
Pounds (lb) Kilograms (kg)
2.2 lb = 1 kg (1000 g)
Metric Equivalents by VolumeCustomary Unit (fl oz) Metric Unit
1 cup (8 fl oz) = 236.59 mL
1 quart (32 fl oz) = 946.36 mL
1.5 quarts (48 fl oz) = 1.42 L
33.818 fl oz = 1.0 L
©National Food Service Management InstituteThe University of Mississippi
800-321-3054 www.nfsmi.orgEX60-02A
Revised 2002, Reprinted 2004
This project has been funded by the USDA, Food and Nutrition Service through a grant to The University of Mississippi.The University of Mississippi is an EEO/AA/ADA/ADEA/TITLES VI & IX/SECTION 504 Employer. 04/04
Steamtable Pan CapacityPan Size Approx. Serving Ladle Scoop Approx. #
Capacity Size (fl oz) # Servings
12" x 20" x 2-1/2" 2 gal 1/2 cup 4 oz 8 643/8 cup 3 oz 10 801/3 cup 2.65 oz 12 961/4 cup 2 oz 16 128
12" x 20" x 4" 3-1/2 gal 1/2 cup 4 oz 8 1123/8 cup 3 oz 10 1351/3 cup 2.65 oz 12 1681/4 cup 2 oz 16 224
12" x 20" x 6" 5 gal 1/2 cup 4 oz 8 1603/8 cup 3 oz 10 2001/3 cup 2.65 oz 12 2401/4 cup 2 oz 16 320
1/1
2/3
1/2
2/4
1/3
1/4
1/6
1/9
Other Pan Sizes
Steamtable or counterpans are available in various sizes. Smallersize pans may require theuse of an adapter bar.
Approximate Dimensions of Serving Sizes from Different Pan SizesPan Approx. Size No. and Approx. Size Servings per Pan
25 50 100Baking or steamtable 12" x 20" x 2-1/2" 2" x 3-3/4" 2" x 2" - - - - -Sheet or bun 18" x 26" x 1" 3-1/4" x 5" 3-1/4" x 2-1/2" 1-3/4" x 2-1/2"
Basics at a GlanceBasics at a Glance
For 50 servings cut 5 x 10 For 100 servings cut 10 x 10
5
10
10
10
3
8
Fraction to Decimal Equivalents
1/8 = 0.125
1/4 = 0.250
1/3 = 0.333
3/8 = 0.375
1/2 = 0.500
5/8 = 0.625
2/3 = 0.666
3/4 = 0.750
7/8 = 0.875
20-3/4" x 12-3/4"
13-7/8" x 12-3/4"
10-3/8" x 12-3/4"
20-3/4" x 6-7/16"
6-7/8" x 12-3/4"
6-3/8" x 10-3/8"
6-7/8" x 6-1/4"
6-7/8" x 4-1/4"
Cutting Diagrams for Portioning
5
5
For 25 servings cut 5 x 5 For 48 servings cut 3 x 8 then diagonally
BaSiCS at a glanCe

38 Culinary Boot Camp training guide Book
1 kilo = 2.2 lbs1 fl. oz = 28 gram
s1 lb = 454 gram
s1 liter = 34 fl. oz.
3 t1 T
1/2 fl oz1/32 lb
2 T1/8 c
1 fl oz1/16 lb
4 T1/4 c
2 fl oz1/8 lb
8 T1/2 c
4 fl oz1/4 lb
16 T1 c or 1/2 pt
8 fl oz1/2 lb
32 T2 c or 1pt
16 fl oz1 lb
64 T4 c or 1 qt
32 fl oz2 lb
128 T8 c or 1/2 gal
64 fl oz4 lb
256 T16 c or 1 gal
128 fl oz8 lb
Teaspoon = t, tspTablespoon = T, tbs, tbsp
Ounce = oz
Pound = lb, #Cup = c
Pint = ptQ
uart = qtG
allon = galPackage = pkg
Each = ea
Quick Culinary Conversions
Abbreviations
Metric Equivalents
SCH
OO
LF
OO
DO
ur Food, O
ur Future
39Culinary Boot Camp training guide Book
40 Culinary Boot Camp training guide Book
Converting reCipeS
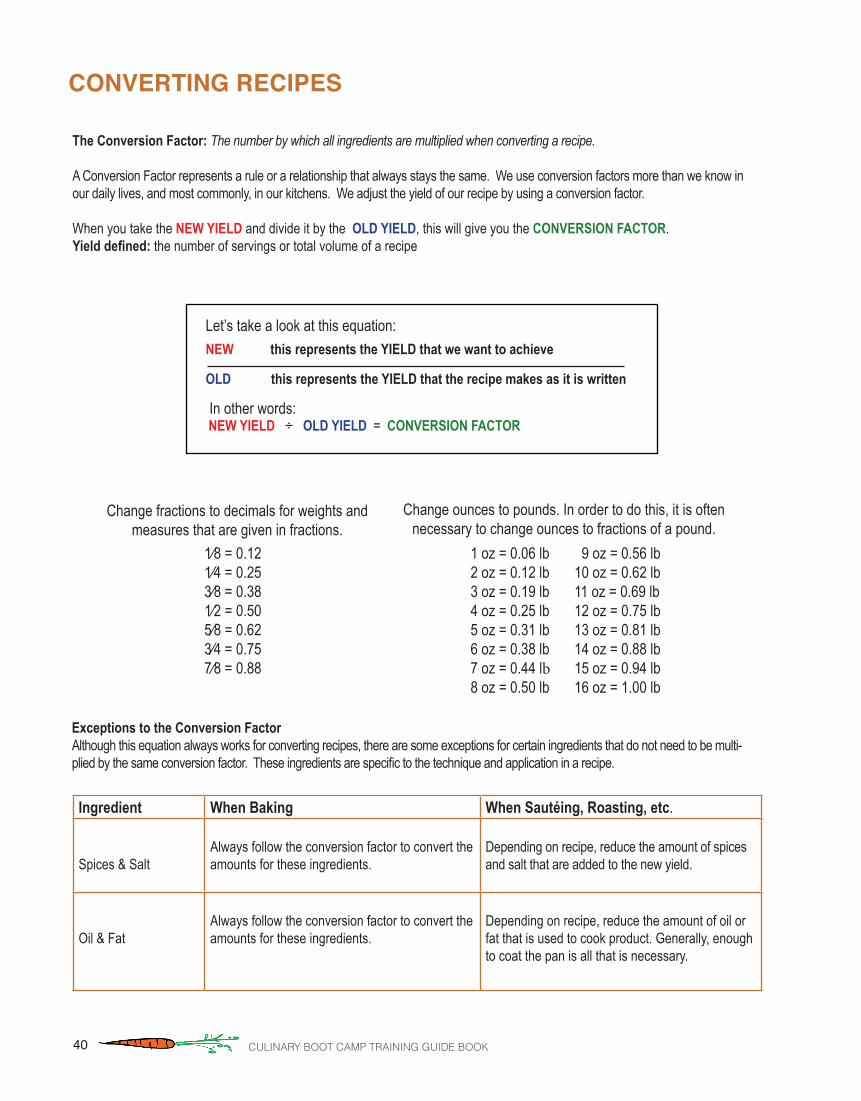
The Conversion Factor: The number by which all ingredients are multiplied when converting a recipe.
A Conversion Factor represents a rule or a relationship that always stays the same. We use conversion factors more than we know in our daily lives, and most commonly, in our kitchens. We adjust the yield of our recipe by using a conversion factor.
When you take the NEW YIELD and divide it by the OLD YIELD, this will give you the CONVERSION FACTOR.Yield defined: the number of servings or total volume of a recipe
Ingredient When Baking When Sautéing, Roasting, etc.
Spices & SaltAlways follow the conversion factor to convert the amounts for these ingredients.
Depending on recipe, reduce the amount of spices and salt that are added to the new yield.
Oil & FatAlways follow the conversion factor to convert the amounts for these ingredients.
Depending on recipe, reduce the amount of oil or fat that is used to cook product. Generally, enough to coat the pan is all that is necessary.
Exceptions to the Conversion FactorAlthough this equation always works for converting recipes, there are some exceptions for certain ingredients that do not need to be multi-pliedbythesameconversionfactor.Theseingredientsarespecifictothetechniqueandapplicationinarecipe.
In other words: NEW YIELD ÷ OLD YIELD = CONVERSION FACTOR
Let’s take a look at this equation:NEW this represents the YIELD that we want to achieve
OLD this represents the YIELD that the recipe makes as it is written
Change ounces to pounds. In order to do this, it is often necessary to change ounces to fractions of a pound.
9 oz = 0.56 lb10 oz = 0.62 lb 11 oz = 0.69 lb 12 oz = 0.75 lb 13 oz = 0.81 lb 14 oz = 0.88 lb 15 oz = 0.94 lb16 oz = 1.00 lb
1 oz = 0.06 lb 2 oz = 0.12 lb 3 oz = 0.19 lb 4 oz = 0.25 lb 5 oz = 0.31 lb 6 oz = 0.38 lb 7 oz = 0.44 lb8 oz = 0.50 lb
1⁄8=0.121⁄4=0.253⁄8=0.381⁄2=0.505⁄8=0.623⁄4=0.757⁄8=0.88
Change fractions to decimals for weights and measures that are given in fractions.
41Culinary Boot Camp training guide Book
day TwO
tueSd
ayCulinary Bo
ot
Camp
Converting reCipeS: exampleS
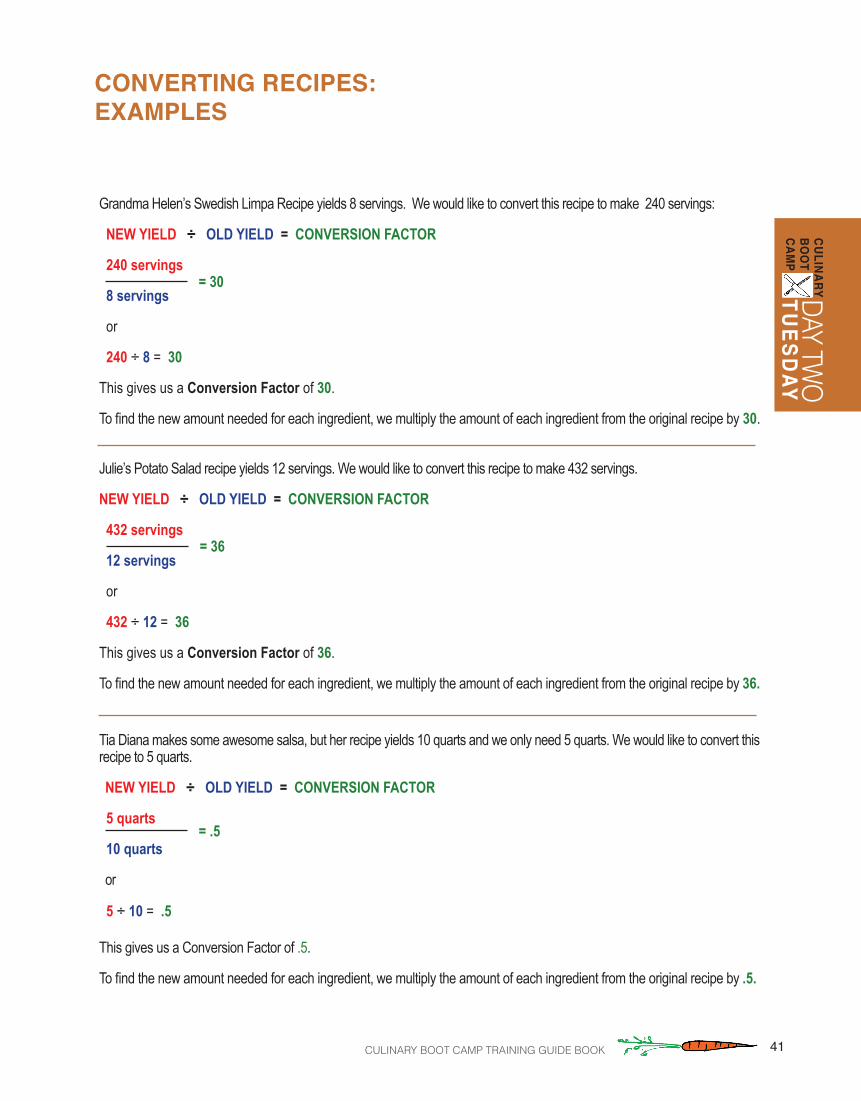
Grandma Helen’s Swedish Limpa Recipe yields 8 servings. We would like to convert this recipe to make 240 servings:
NEW YIELD ÷ OLD YIELD = CONVERSION FACTOR
240 servings
8 servings
or
240 ÷ 8 = 30
This gives us a Conversion Factor of 30.
Tofindthenewamountneededforeachingredient,wemultiplytheamountofeachingredientfromtheoriginalrecipeby 30.
Julie’s Potato Salad recipe yields 12 servings. We would like to convert this recipe to make 432 servings.
NEW YIELD ÷ OLD YIELD = CONVERSION FACTOR
432 servings
12 servings
or
432 ÷ 12 = 36
This gives us a Conversion Factor of 36.
Tofindthenewamountneededforeachingredient,wemultiplytheamountofeachingredientfromtheoriginalrecipeby36.
Tia Diana makes some awesome salsa, but her recipe yields 10 quarts and we only need 5 quarts. We would like to convert this recipe to 5 quarts.
NEW YIELD ÷ OLD YIELD = CONVERSION FACTOR
5 quarts
10 quarts
or
5 ÷ 10 = .5 This gives us a Conversion Factor of .5.
Tofindthenewamountneededforeachingredient,wemultiplytheamountofeachingredientfromtheoriginalrecipeby.5.
= 30
= 36
= .5

42 Culinary Boot Camp training guide Book
Find the Conversion Factor and scale the recipe to the desired number of servings for each of the recipes.
Remember, NEW YIELD ÷ OLD YIELD = CONVERSION FACTOR
Tassajara Granola serves 48, scale for 24
Converting reCipeS: aCtivity
Work Station
Ingredient AmountOats 1 qt + 2 cupsAlmonds, sliced 2 cupsSunflower Seeds 2 cupsVegetable Oil 3/4 cupHoney 1/4 cupMaple Syrup 1/2 cupVanilla Extract 1 TablespoonCinnamon 1 1/2 TablespoonCloves 1/4 teaspoonSalt 1/2 TablespoonRaisins 2 cups
43Culinary Boot Camp training guide Book
day TwO
tueSd
ayCulinary Bo
ot
Camp
Work Station
Converting reCipeS: aCtivity
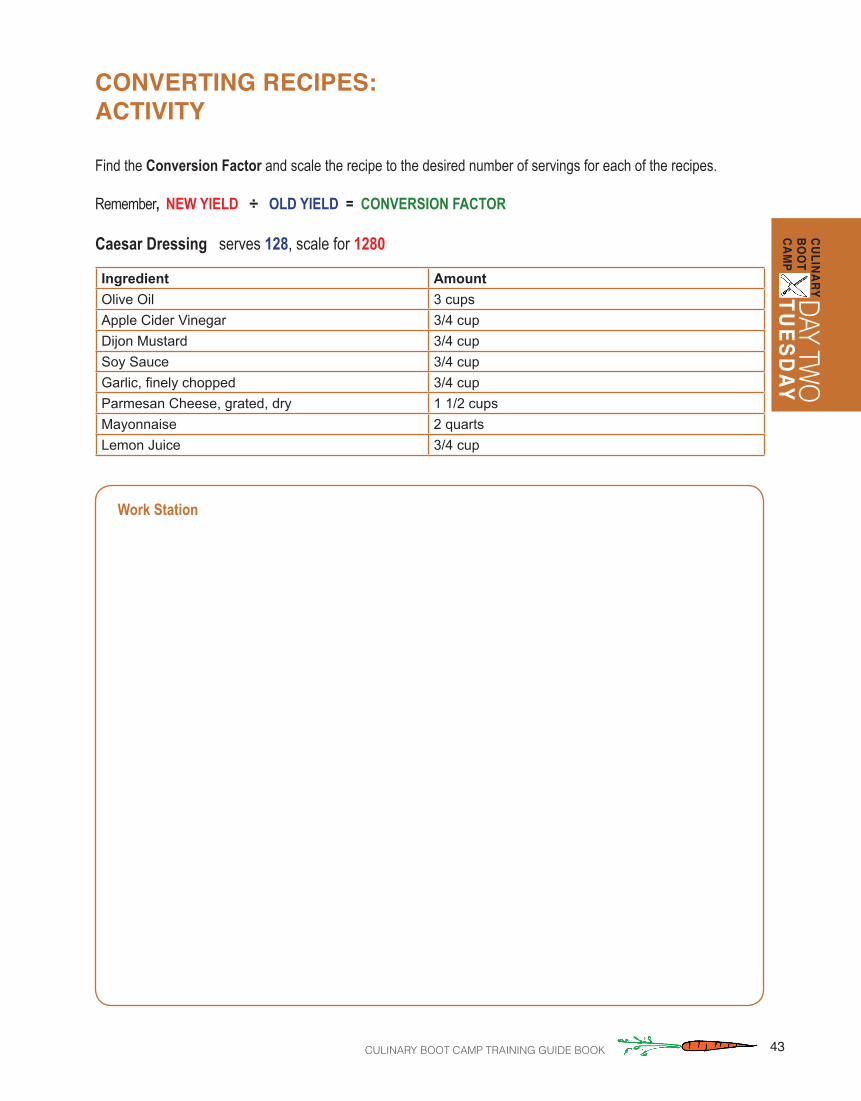
Find the Conversion Factor and scale the recipe to the desired number of servings for each of the recipes.
Remember, NEW YIELD ÷ OLD YIELD = CONVERSION FACTOR
Caesar Dressing serves 128, scale for 1280
Ingredient AmountOlive Oil 3 cupsApple Cider Vinegar 3/4 cupDijon Mustard 3/4 cupSoy Sauce 3/4 cupGarlic, finely chopped 3/4 cupParmesan Cheese, grated, dry 1 1/2 cupsMayonnaise 2 quartsLemon Juice 3/4 cup

44 Culinary Boot Camp training guide Book
Using the information from above, let’s practice some calculations:
10 teaspoons of sugar is how many grams? (10 teaspoons × 4.2 grams = 42 grams)
20 teaspoons of sugar is how many grams?(20 teaspoons × 4.2 grams = 84 grams)
100 teaspoons of sugar is how many grams?(100 teaspoons × 4.2 grams = 420 grams)
Now try grams into teaspoons:
42 grams = how many teaspoons of sugar?(42 ÷ 4.2 = 10 teaspoons)
84 grams = how many teaspoons of sugar?(84 grams ÷ 4.2 = 20 teaspoons)
420 grams = how many teaspoons of sugar?(420 ÷ 4.2 = 100 teaspoons)
how muCh Sugar are we Serving?aCtivity
*rule of thumb, as granularity of sugars differ
4.2 grams = 1 teaspoon granulated* sugar
114 teaspoons = 1 pound of sugar
1 pound of body weight = 3,500 calories
1 teaspoon of granulated sugar =15 calories
Sugar at a Glance
Work Station

45Culinary Boot Camp training guide Book
day TwO
tueSd
ayCulinary Bo
ot
Camp
How do you calculate the total amount of extra sugar consumed by a student if he or she drinks flavored milk for their entire thirteen-year school career?
rethink your drink: aCtivity
There are 26 grams of sugar in an 8 ounce serving of chocolate-flavored milk. How can we determine how many teaspoons of sugar that is?
26 grams = how many teaspoons of sugar?
What if the bottle of chocolate-flavored milk is 24 ounces? What can we do to figure out the amount of sugar in this whole bottle?
We take the total size of the bottle (24 oz) and divide it by the serving size (8 oz). This is our number of servings per con-tainer (which is generally listed on the packaging.)
How do we find the total amount of sugar per container?
We take the amount of sugar per serving (6.19 teaspoons) and multiply it by the number of servings in the container (3).
(26 ÷ 4.2 = 6.19 teaspoons of sugar)
(24 ÷ 8 = 3 servings)
(6.19 x 3 = 18.57 teaspoons of sugar)
46 Culinary Boot Camp training guide Book
Sugar Trivia
• Sugar is the only taste humans are born craving.
• As early as 500 B.C. in India, a “reed which gives honey without bees” existed. This reed would later become known as sugar cane.
• In London during the 16th century, 1 teaspoon of sugar cost $5.
• The English word, sugar, originates from the Arabic word, sukkar.
Sugar and the Body
• Naturally occurring sugar and added sugar are different. Natural sugar from fruit (fructose) and other whole foods releases energy moreslowlyandevenly,ascomparedtoartificialorprocessedsugarsfoundinsugarydrinksandcerealswhichgiveshortburstsof energy that burn quickly.
• When your body has absorbed the energy that it needs from sugar, it converts any extra into fat that is stored for later use.
• Sugar gives us energy quickly, but it also can cause a ‘crash’ or tiredness. That causes us to crave more sugar in order to sustain the high energy feeling. Sugar does not contain any of the minerals or vitamins that our bodies require.
Sugar Numbers
• The average American consumes between 60-100 pounds of sugar a year.
• The American Heart Association recommends that men limit added sugar to 36 grams per day and that women and children limit added sugar to 24 grams and 12 grams respectively.
• The average 12 oz. can of soda contains around 40 grams of sugar, more than three times a child’s daily allowance. A 32 oz. Big Gulp with 4 oz. of ice contains an average of 91 grams of sugar, more than a child’s entire weekly maximum recommendation.
• According to researchers at the Harvard School of Public Health, people who drink just one 12-oz. serving of soda or other sweetened soft drink each day have a 15 percent higher chance of developing type 2 diabetes, and those who drink two servings increase their risk by 26 percent.
taking a CloSer look at Sugar
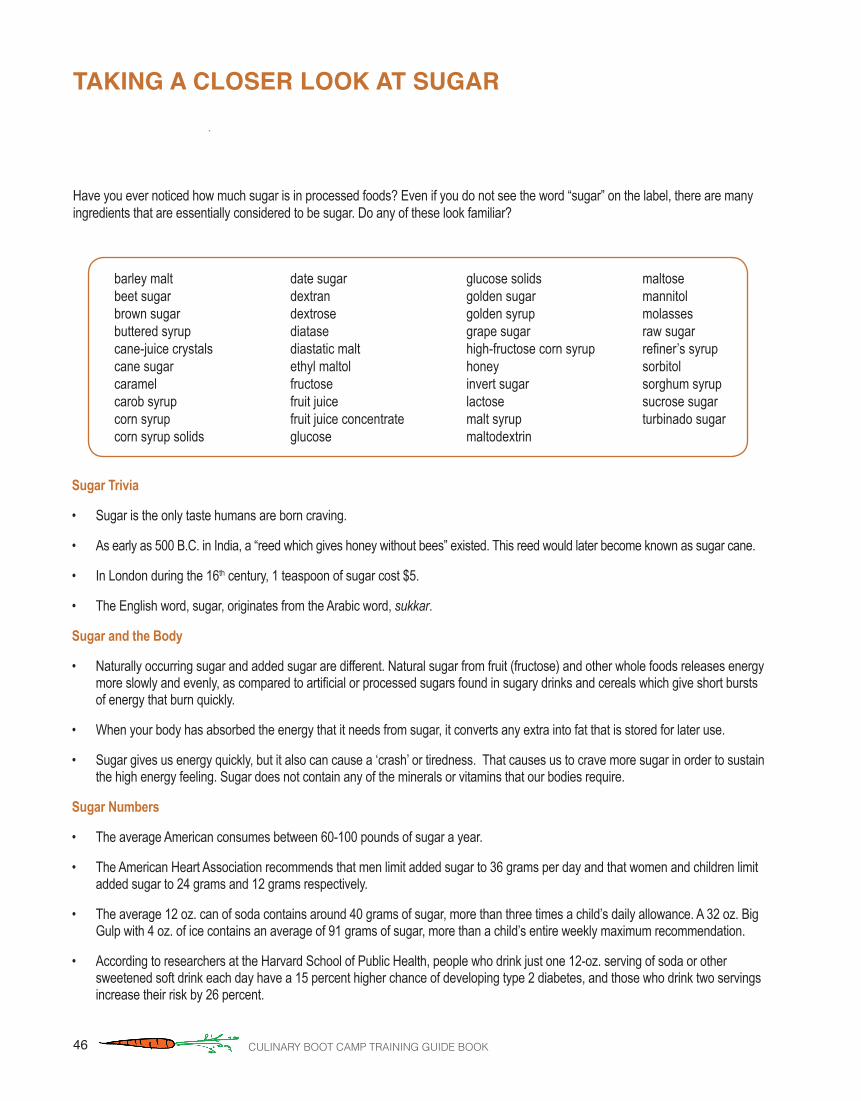
Have you ever noticed how much sugar is in processed foods? Even if you do not see the word “sugar” on the label, there are many ingredients that are essentially considered to be sugar. Do any of these look familiar?
barley maltbeet sugarbrown sugarbuttered syrupcane-juice crystalscane sugarcaramelcarob syrupcorn syrupcorn syrup solids
date sugardextrandextrosediatasediastatic maltethyl maltolfructosefruit juicefruit juice concentrateglucose
glucose solidsgolden sugargolden syrupgrape sugarhigh-fructose corn syruphoneyinvert sugarlactosemalt syrupmaltodextrin
maltosemannitolmolassesraw sugarrefiner’ssyrupsorbitolsorghum syrupsucrose sugarturbinado sugar

47Culinary Boot Camp training guide Book
day TwO
tueSd
ayCulinary Bo
ot
Camp
If we know how to read and decipher food labels, we can start to “do the math.” Reading labels and knowing what we are putting into our bodies (and our family’s bodies) are a valuable source of empowerment. If we can incorporate this activity as a habit in our daily lives, we can nourish ourselves and our loved ones by making informed choices.
ThefirstplacetostartwhenyoulookattheNutritionFactslabel is the serving size and the number of servings in the package. Serving sizes are standardized to make it easier to compare similar foods. They are provided in familiar units, such as cups or pieces, followed by the metric amount, e.g., the number of grams.
Thesizeoftheservingonthefoodpackageinfluencesthenumber of calories and all the nutrient amounts listed on the top part of the label. Pay attention to the serving size, espe-cially how many servings there are in the food package. Then ask yourself, “How many servings am I consuming?” On a product label, the ingredients are listed in order of predomi-nance,withtheingredientsusedinthegreatestamountfirst,followed in descending order by those in smaller amounts.
how to read a food laBel
Source: www.fda.gov/Food/ResourcesForYou/Consumers
%DailyValue(DV)defined:thedailyvalueistheFDA’srecommended amount of a given nutrient that a person should intake each day based upon a 2,000 calorie diet. An individual’s age, height, weight, sex and other factors will determine his or her actual daily requirements of any given nutrient. When you see Daily Value on a food label, it will be listed as a percentage (%) of daily value, which means that one is receiving this % of the recommended amount in each serving. Nutrients like fat, sodium, sugar and cholesterol should be limited to no more than 100% of the daily value. Eat at least the daily value of other nutrients such as protein, vitamins,mineralsanddietaryfiber.

48 Culinary Boot Camp training guide Book
day two noteS

49Culinary Boot Camp training guide Book
day two noteSday Tw
Otu
eSday
Culinary Bo
ot
Camp
50 Culinary Boot Camp training guide Book
day two journal

51Culinary Boot Camp training guide Book
Culinary Boot Camp
day ThrEEw e d n e S d ay
Breakfast TeamBreakfast ServiceKitchen Essentials Plants as Food Cooking Techniques Part 1Kitchen Production Plant CookeryLunchClassroom Session Movie Viewing Food Systems USDA Taste ExplorationReview

52 Culinary Boot Camp training guide Book
A: Some answers include: amaranth, barley, buck-wheat, bulgar, farro, millet, oats, rye, teff, wild rice
a CloSer look at grainS
Grainsarethehardseedsofcerealgrassesthatfirststartedoutaswildcropsthathumanshavecultivatedasasourceoffoodfor thousands of years. Today, wheat, rice and corn are the main staple grains that feed the world.
Q: Can you think of any other grains? Hint: Think of the types of bread that you see in your market and some of the specialty pastas that are now available for gluten-intolerant people. A: See below.
As seen below, the structure of a grain consists of the hull, bran, endosperm and germ.
• The HULL is the outermost protective coating of a grain that surrounds the edible kernel.
• TheBRANisthesecondlayerofprotectivecoatingofagrain.Itisagoodsourceoffiber,andalsocontainscarbohy-drates, calcium, and phosphorus.
• The ENDOSPERM is the middle layer that contains carbohydrates and proteins.
• The GERM is the innermost part of the grain kernel’s nucleus or embryo that actually sprouts. Sprouted grains have sub-stantially higher nutritional values and are sometimes found in commercial breads. The germ is rich in vitamins, minerals andisasubstantialsourceofthiamine,vitaminE,ironandriboflavin.Thegermalsocontainstheessentialfattyacidsthatcan cause rancidity and spoilage.
Theall-purposeflourthatmostofusarefamiliarwithisrefinedfromwheatwhichhashadthehull,branandgermremoved.Theremainingendospermisgroundintoflour,losingmuchofthenutritionalvaluethatwasonceavailableinthewholegrain.
Wholewheatflourisconsideredawholegrainasthe whole grainisgroundintoflour.
Historically,refinedgrainsbecamedesirablewhenpeople started urbanizing and moving away from theirlocalgrainmills.Storingrefinedgrainswaseasier because the germ that contains the oil in a grain had been removed, and this meant that the product would have a longer shelf life. Communi-ties moved from processing their cracked wheat, whole wheat and cornmeal on a weekly basis to buyingrefinedfloursfromgeneralstoresmuchless frequently.
Today,grainsandflourshouldbestoredinacool, dry place for optimal shelf life, and bought in smaller quantities based on usage.

53Culinary Boot Camp training guide Book
day ThrEECulinary Bo
ot
Camp
wedneSday
Legumes are plants that produce seed pods that split along the two sides when ripe with a single row of seeds inside.
Legumes are an often underappreciated source of nutrients in the modern diet. While not as popular in U.S., these unsung heroes are the basis of many diets around the world. Besides being an excellent addition to a healthy diet, legumesareinexpensive,easytocook,andhighlyflavorful.
Historically, legumes are a critical ingredient in the cuisine of almost every country and culture around the world. Fava beans have been found in ancient archaeological sites and soybeans were cultivated over 4,000 years ago. They’reinexpensiveandversatile,lendingthemselvestomanyflavors,spicesandincombinationwithawholegrainconstitute a complete protein comparable to that of meat with fewer calories and at a lower cost.
Asasourceofprotein,beansarecomparabletomeat,buttheyoutshinemeatwiththeirhighfiberandwatercontent. These two elements make us feel fuller more quickly, discouraging over-eating. Not only do we eat more sensiblywhenweaddbeanstoourdiet,butweremainsatisfiedforalongeramountoftimeasourbodyworkstodigestthefiber.Beansalsohavesomethingelsethatmeatlacks:antioxidants.Theseantioxidantshelpincapacitatecell-damaging free radicals, which have been linked to cancer, and Parkinson’s and Alzheimer’s diseases. In a U.S. Department of Agriculture study, researchers measured the antioxidant capacities of more than 100 common foods, and three types of beans made the top four! There are many classic or traditional combinations of grains and legumes from around the world. Do you recognize any of these combinations?
• Rice and beans (Latin and Central America)
• Lentils and rice (Lebanon, Indian sub-continent)
• Pigeon peas and rice (Africa)
• Fava beans and risotto (Italy)
• Succotash of fresh corn and beans (USA)
• Sticky glutinous rice and black adzuki beans (Japan)
• Pasta (or rice) and beans in minestrone soup (Italy)
• Pistou soup with white beans (France)
the inSide SCoop on legumeS

54 Culinary Boot Camp training guide Book
Isoamyl Acetate Banana
Cinnamic Aldehyde Cinnamon
Limonene Orange
Methyl Salicylate Wintergreen
Ethyl Maltol Sugar (or Cotton Candy)
Benzaldehyde Bitter Almond
ChemicalEngineers**worktoalterandcreatethefoodsthatweeateveryday.Ifyouareeatingflavoredoatmeal, chicken nuggets, or many types of candy, or if you are taking aspirin, using shaving cream, or wear contact lenses, then you are using something that has probably been manipulated by a Chemical Engineer. If you are eating or using something processed that has a scent or a taste, there are chemicals involved.
Belowisapartiallistofartificialflavorsinboththeirscientificandsimpleforms.
artifiCial flavorS*: mimiCking mother nature
CHEMICAL COMPOUND FLAVOR / TASTE / SCENT
*Chemicalmixturesthatmimicanaturalflavor**Thescienceorprofessionofapplyingchemistrytoindustrialprocesses
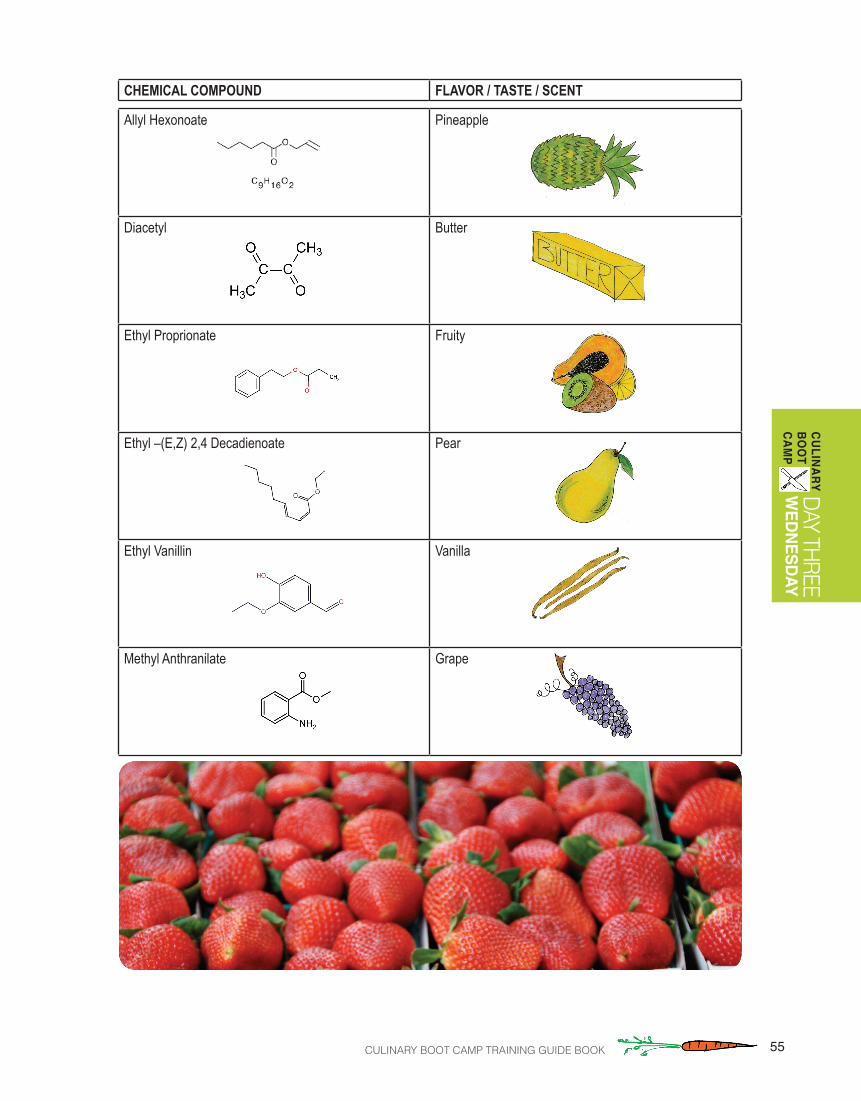
55Culinary Boot Camp training guide Book
day ThrEECulinary Bo
ot
Camp
wedneSday
Allyl Hexonoate Pineapple
Diacetyl Butter
Ethyl Proprionate Fruity
Ethyl –(E,Z) 2,4 Decadienoate Pear
Ethyl Vanillin Vanilla
Methyl Anthranilate Grape
CHEMICAL COMPOUND FLAVOR / TASTE / SCENT
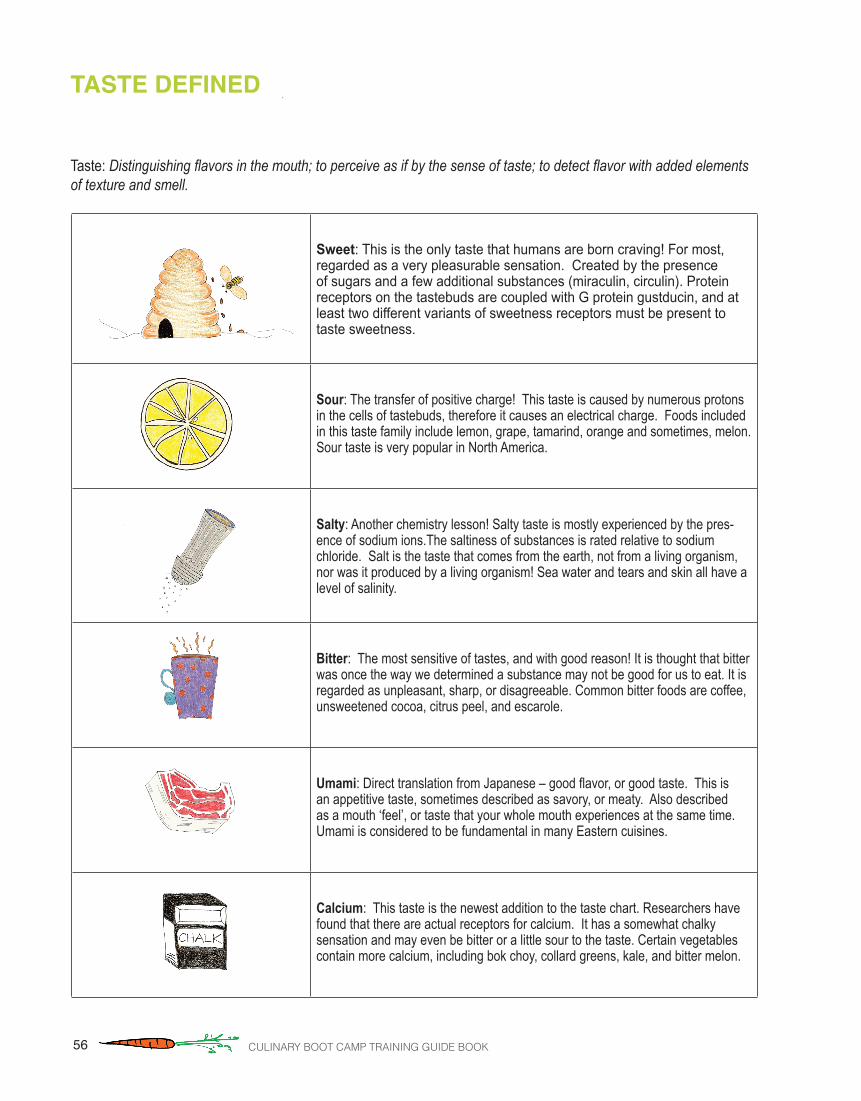
56 Culinary Boot Camp training guide Book
taSte defined
Sweet: This is the only taste that humans are born craving! For most, regarded as a very pleasurable sensation. Created by the presence of sugars and a few additional substances (miraculin, circulin). Protein receptors on the tastebuds are coupled with G protein gustducin, and at least two different variants of sweetness receptors must be present to taste sweetness.
Sour: The transfer of positive charge! This taste is caused by numerous protons in the cells of tastebuds, therefore it causes an electrical charge. Foods included in this taste family include lemon, grape, tamarind, orange and sometimes, melon. Sour taste is very popular in North America.
Salty: Another chemistry lesson! Salty taste is mostly experienced by the pres-ence of sodium ions.The saltiness of substances is rated relative to sodium chloride. Salt is the taste that comes from the earth, not from a living organism, nor was it produced by a living organism! Sea water and tears and skin all have a level of salinity.
Bitter: The most sensitive of tastes, and with good reason! It is thought that bitter was once the way we determined a substance may not be good for us to eat. It is regarded as unpleasant, sharp, or disagreeable. Common bitter foods are coffee, unsweetened cocoa, citrus peel, and escarole.
Umami:DirecttranslationfromJapanese–goodflavor,orgoodtaste.Thisisan appetitive taste, sometimes described as savory, or meaty. Also described as a mouth ‘feel’, or taste that your whole mouth experiences at the same time. Umami is considered to be fundamental in many Eastern cuisines.
Calcium: This taste is the newest addition to the taste chart. Researchers have found that there are actual receptors for calcium. It has a somewhat chalky sensation and may even be bitter or a little sour to the taste. Certain vegetables contain more calcium, including bok choy, collard greens, kale, and bitter melon.
Taste: Distinguishing flavors in the mouth; to perceive as if by the sense of taste; to detect flavor with added elements of texture and smell.

57Culinary Boot Camp training guide Book
day ThrEECulinary Bo
ot
Camp
wedneSday
A Tale of 10,000 Taste Buds
Five hundred years ago, the value of spices coming from Southeast Asia matched that of gold powder. Humans have always been hard-wired to appreciate the taste and experience of food. Spices were such a luxury that they inspired people to travel thousands of miles to obtain different spices, crossing mountains, oceans, and deserts along the way.
Today,wehavetheluxuryofspicesatourfingertips.Wearemoreknowledgeableaboutthelandswherespicescomefrom, and we are exposed to the foods of many cultures, which naturally includes the spices and spice blends that en-hance these dishes.
Tasteisoftenconsideredthequeenofthesenses.Thenumberoftastebudsthateachmouthhasvariessignificantlyfrom person to person. Most people have around 10,000 taste buds, while others can have as little as 500 or as many as20,000.Wearebornwiththesenaturaldeliverersofflavor,butasweageweslowlylosesomeofthisoriginal“tastingpower.” Other factors that contribute to the loss of taste buds are chemical-laden foods, smoking, and burning the tongue or mouth.
Taste buds are actually receptors. These receptors are grouped on tiny, round protuberances located on the tongue, roof of the mouth, pharynx, and esophagus. Each taste bud contains over 100 cells, and all buds react to the six basic tastes, thoughsomebudsreacttocertaintastesfirst.Sweet,sour,andsaltytypesoftasteinduceelectricalsignals.Bittertrig-gers a chemical signal, but overall, the sense of taste is considered a chemical sense, much like the sense of smell.
anatomy of taSte

58 Culinary Boot Camp training guide Book
In the United States...
• Two companies are responsible for 98% of the poultry industry and two companies sell 58% of U.S. GMO (Genetically ModifiedOrganism)seedcorn.
• The Food and Drug Administration (FDA) has allowed the production of cloned meat animals since 2008.
• Geneticallymodified(GMO)cropshaveincreasedoverallpesticideuseby318.4millionpoundsoverthefirst13yearstheyhave been in use.
• Chemicalpesticideshavebeenassociatedwithcancer,autismandotherneurologicaldiseases,andartificialsweetenerslikeaspartame have been linked to migraines, memory loss, seizures, obesity and infertility.
• The majority of all food products travel 1,500 miles to get to the consumer.
• Food transporting accounts for almost 33,000 TONS of greenhouse gas emissions every year!
• The greatest contributor to greenhouse gas emissions are industrialized agriculture production methods.
And Locally...
• In 2008, Santa Barbara County’s agricultural production was valued at $1.14 billion, which placed it in the top 1% of all coun-ties in the U.S.
• Less than 1% of produce grown in Santa Barbara County is consumed in Santa Barbara County.
• CSA stands for “Community Supported Agriculture,” usually in the form of a small, farmer-driven business that delivers fresh, seasonal produce and other locally grown items (honey, jam, meat, etc.) to members. A community really can support local agriculture, so check your own area for a local CSA and visit your local farmers’ markets.
our food SyStem
59Culinary Boot Camp training guide Book
Five Reasons to Buy Local Food
1. Local produce tastes better and it’s better for you.
A recent study showed that fresh produce loses nutrients quickly. In a weeklong (or more) delay from harvest to dinner table, sugars turn to starches, plant cells shrink, and produce loses its vitality. Even in California, produce may have trav-eled surprisingly far to get to your grocery store. Food grown in your own community was probably picked within the past dayortwo.Itiscrisp,sweetandloadedwithflavor.
2. Local food supports local farm families.
Fewer than one million Americans now claim farming as their primary occupation (less than 1%). Farming is a vanishing lifestyle. And no wonder: the farmer today gets less than 10 cents of the retail food dollar. Local farmers who sell directly to consumers cut out the many middlemen and get full retail price for their food — which means farm families can afford to stay on the farm, doing the work they love.
3. Local food protects genetic diversity.
In the modern industrial agriculture system, produce varieties are chosen for their ability to ripen simultaneously and withstand harvesting equipment. Shippers demand produce with a tough skin that can survive packing, transport, and a long shelf life in the store. Only a handful of hybrid varieties of each fruit and vegetable meet those rigorous demands, so there is little genetic diversity in the plants grown. In contrast, local farmers that sell direct to you or direct to your local restaurantsandgrocerystoresgrowahugenumberofvarietiesselectedbecausetheyhavethebestflavors,providea long harvest season, and come in an array of eye-catching colors. Many varieties are heirlooms, passed down from generation to generation because they taste good. These old varieties contain genetic material from hundreds or even thousands of years of human selection. They may someday provide the genes needed to adapt to a changing climate.
4. Local food preserves open space, and supports a clean environment.
As the value of direct-marketed fruits and vegetables increases, selling farmland for development becomes less likely. A well-managed family farm is a place where the resources of fertile soil and clean water are valued. Good stewards of the land grow cover crops that prevent erosion and replace nutrients used by their crops. Cover crops also capture emissionsandhelpcombatglobalwarming.Inaddition,thepatchworkoffields,hedgerows,pondsandbuildingsistheperfectenvironmentformanybelovedspeciesofwildlife.Thatlandscapewillsurviveonlyaslongasfarmsarefinanciallyviable. When you buy locally grown food, you are doing something proactive about preserving the agricultural landscape.
5. Local food is about the future.
By supporting local farmers today, you can help ensure that there will be farms in your community tomorrow, and that futuregenerationswillhaveaccesstonourishing,flavorfulandabundantfood.
(From the “Central Coast Buy Fresh Buy Local” Campaign)
loCal proCurementday ThrEE
Culinary Bo
ot
Camp
wedneSday
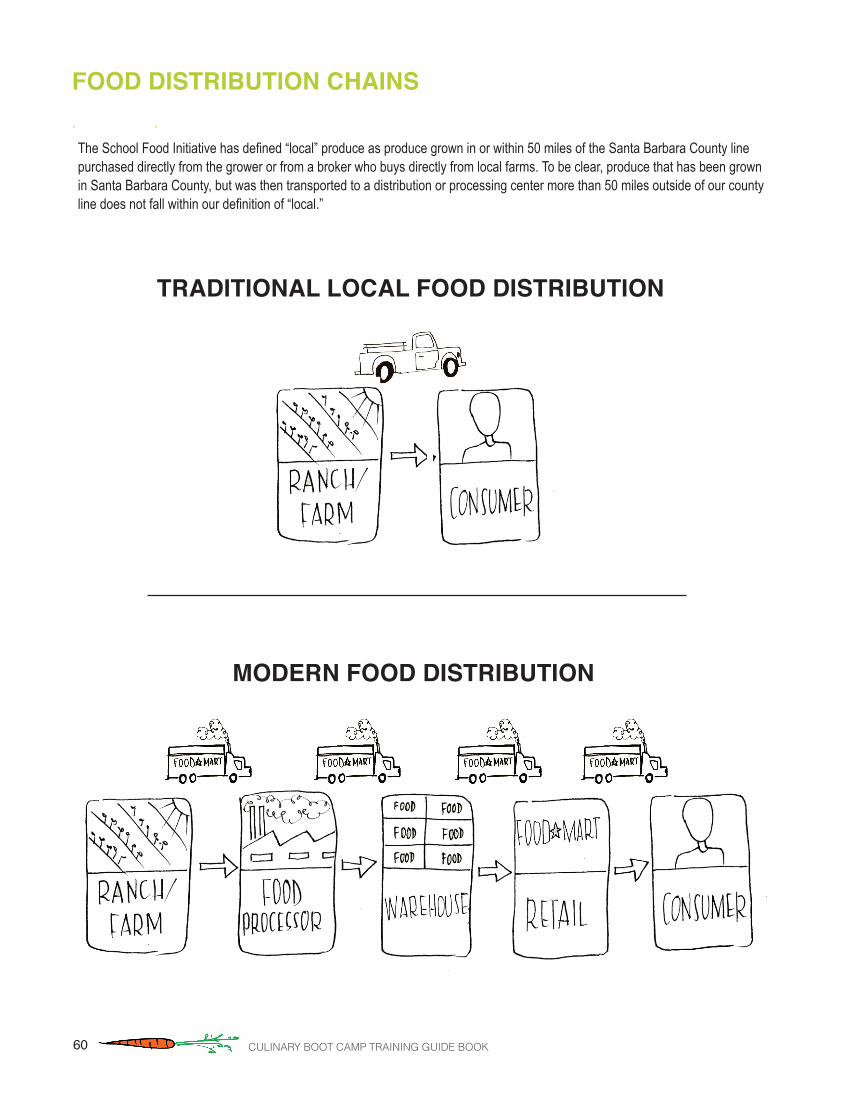
60 Culinary Boot Camp training guide Book
food diStriBution ChainS
TheSchoolFoodInitiativehasdefined“local”produceasproducegrowninorwithin50milesoftheSantaBarbaraCountylinepurchased directly from the grower or from a broker who buys directly from local farms. To be clear, produce that has been grown in Santa Barbara County, but was then transported to a distribution or processing center more than 50 miles outside of our county linedoesnotfallwithinourdefinitionof“local.”
traditional loCal food diStriBution
modern food diStriBution

61Culinary Boot Camp training guide Book
the multiplier effeCtday ThrEE
Culinary Bo
ot
Camp
wedneSday

62 Culinary Boot Camp training guide Book
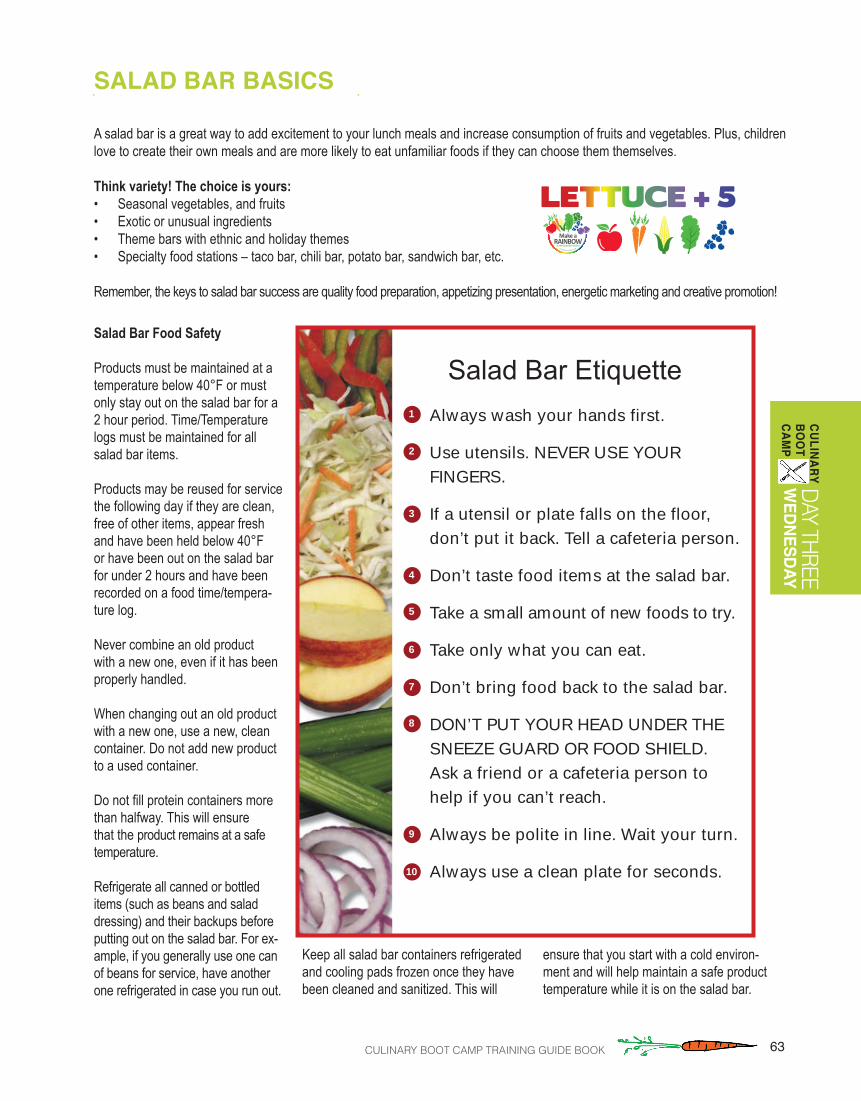
63Culinary Boot Camp training guide Book
A salad bar is a great way to add excitement to your lunch meals and increase consumption of fruits and vegetables. Plus, children love to create their own meals and are more likely to eat unfamiliar foods if they can choose them themselves.
Think variety! The choice is yours: • Seasonal vegetables, and fruits• Exotic or unusual ingredients• Theme bars with ethnic and holiday themes• Specialty food stations – taco bar, chili bar, potato bar, sandwich bar, etc.
Remember, the keys to salad bar success are quality food preparation, appetizing presentation, energetic marketing and creative promotion!
Salad Bar Food Safety
Products must be maintained at a temperature below 40°F or must only stay out on the salad bar for a 2 hour period. Time/Temperature logs must be maintained for all salad bar items.
Products may be reused for service the following day if they are clean, free of other items, appear fresh and have been held below 40°F or have been out on the salad bar for under 2 hours and have been recorded on a food time/tempera-ture log.
Never combine an old product with a new one, even if it has been properly handled.
When changing out an old product with a new one, use a new, clean container. Do not add new product to a used container.
Donotfillproteincontainersmorethan halfway. This will ensure that the product remains at a safe temperature.
Refrigerate all canned or bottled items (such as beans and salad dressing) and their backups before putting out on the salad bar. For ex-ample, if you generally use one can of beans for service, have another one refrigerated in case you run out.
6
1
2
3
4
5
6
7
8
9
10
Salad Bar EtiquetteAlways wash your hands first.
Use utensils. NEVER USE YOUR FINGERS.
If a utensil or plate falls on the floor,don’t put it back. Tell a cafeteria person.
Don’t taste food items at the salad bar.
Take a small amount of new foods to try.
Take only what you can eat.
Don’t bring food back to the salad bar.
DON’T PUT YOUR HEAD UNDER THESNEEZE GUARD OR FOOD SHIELD. Ask a friend or a cafeteria person to help if you can’t reach.
Always be polite in line. Wait your turn.
Always use a clean plate for seconds.
Salad Bar Etiquette
Salad Bar BaSiCSday ThrEE
Culinary Bo
ot
Camp
wedneSday
Keep all salad bar containers refrigerated and cooling pads frozen once they have been cleaned and sanitized. This will
ensure that you start with a cold environ-ment and will help maintain a safe product temperature while it is on the salad bar.
LETTUCE + 5
LETTUCE + 5

64 Culinary Boot Camp training guide Book
REDLycopene and anthocyanins!The delicious variety of red fruits and veggies can prevent cancer and help keep you from getting sick.
ORANGELots of antioxidants!Vitamin C and beta carotene (vitamin A) galore. Fight off those colds and help out your eyes.
YELLOWEat yellow for antioxidants and an abundance of Vitamin C. Eating yellow also helps to maintain healthy skin and strengthens bones and teeth.
GREENSo many veggies are green!Lots to choose from and lots of nutrients to gain. Eat dark leafy greens for your heart and eat broccoli and zucchini for reducing your chance of getting cancer.
PURPLEPurple colored fruits and veggies can help reduce your risk of getting a number of life-threatening diseases.
BLUEBlueberries. The magical fruit that helps improve your memory and aid in brain function.
make a
at the Salad bar rainbow

65Culinary Boot Camp training guide Book
day ThrEECulinary Bo
ot
Camp
wedneSday
Greens:All lettuce varieties: butter, head, iceberg, leaf, romaine or precutChardEndive Escarole Lettuce mixKaleFresh spinach Red or green cabbage
Vegetables:Asparagus, Beans, driedBeans, freshBeetsBroccoliCarrots CauliflowerCelery Cucumbers Green peasJicama Mushrooms OnionsPeppers Radishes Scallions Squash
Sweet potatoesTomatoesWater chestnutsZucchini
Fruits:MelonsAvocados Apples Bananas BerriesGrapes Kiwifruit OrangesPearsPeaches Pineapple Plums Strawberries Tangerines
Protein Items:Yogurt Meats – turkey, tuna, chicken, ham, etc. Cheeses – grated, sticks, cubes, slices, string cheese, cottage cheese Hard-cooked eggs Seasoned taco meat
Misc. Nuts – almonds, walnuts, peanuts, pecansNut butters – almond, pea-nut, sesame, etc. Toasted sunflowerandsesameseeds
Grain/Bread Items:Bread varieties, croutons, crackers, pita, tortillas, etc.Chow mein noodles, Pasta and pasta salad Rice and rice salad
Other Items:Dried fruit – raisins, cranberries, cherries, apples, apricotsVegetable/Fruit Salads:Variety of salad dressingsPickles, OlivesSalsaGuacamole Jalapeño peppers
Green vegetables • The color is adversely af-
fected by heat and acid.• Cook only until crisp-
tender; overcooking will produce a dull olive-green or yellow product.
• An acid such as lemon juice should never be added to a green veg-etable during cooking to avoid the color change.
• Never add baking soda to green vegetables. While it makes the green color brighter, it destroys important nutrients and can make the vegetables slimy.
Orange & yellow vegetables • The color is more stable
than in green vegetables. • Cook only until crisp-
tender.
Red vegetables • Add a small amount
of acid (lemon juice or vinegar) to beets or red cabbage to enhance colorandflavor.
White vegetables • Cook in a liquid that is
neutral or slightly acidic, covered, to retain the color.
Salad Bar ideaS and tipS
Write down some of your own ideas here:
Cooking Tips:

66 Culinary Boot Camp training guide Book
SeaSo
na
lity Ch
ar
t for
Sa
nta B
ar
Ba
ra C
ou
nty
pro
du
Ce
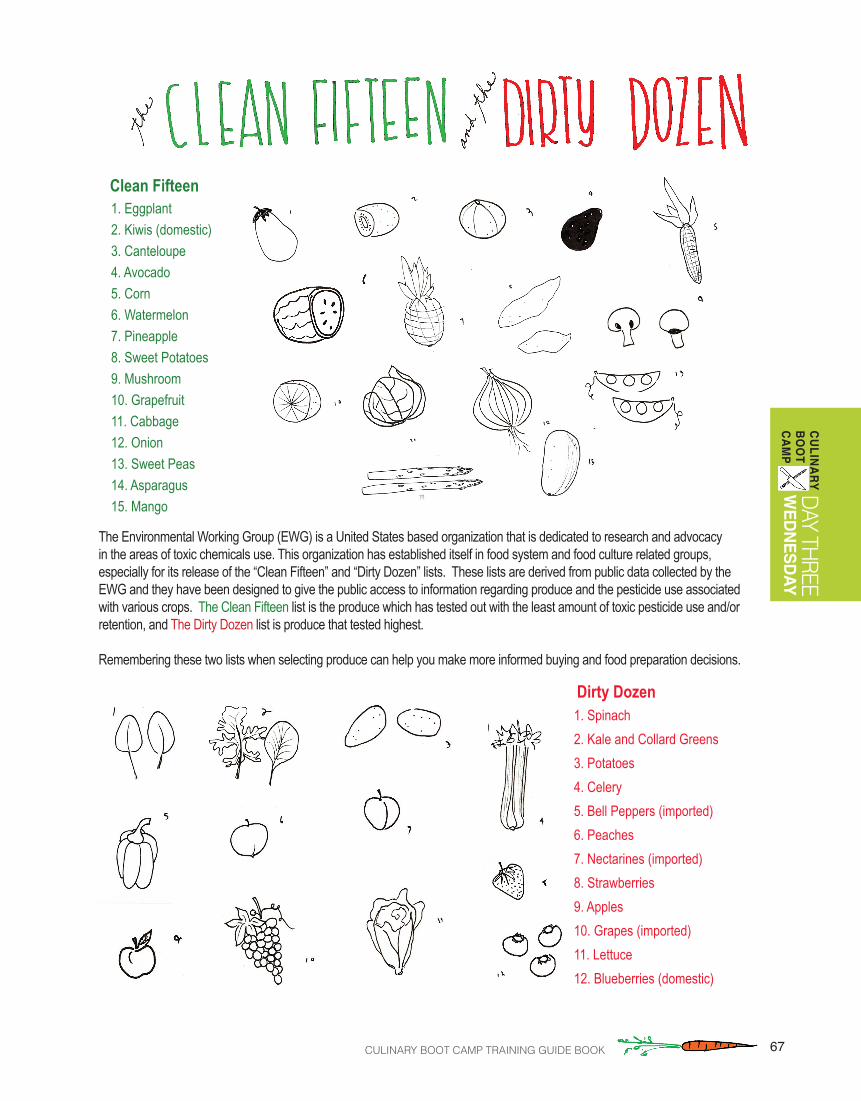
67Culinary Boot Camp training guide Book
day ThrEECulinary Bo
ot
Camp
wedneSday
The Environmental Working Group (EWG) is a United States based organization that is dedicated to research and advocacy in the areas of toxic chemicals use. This organization has established itself in food system and food culture related groups, especially for its release of the “Clean Fifteen” and “Dirty Dozen” lists. These lists are derived from public data collected by the EWG and they have been designed to give the public access to information regarding produce and the pesticide use associated with various crops. The Clean Fifteen list is the produce which has tested out with the least amount of toxic pesticide use and/or retention, and The Dirty Dozen list is produce that tested highest.
Remembering these two lists when selecting produce can help you make more informed buying and food preparation decisions.
1. Spinach2. Kale and Collard Greens3. Potatoes4. Celery5. Bell Peppers (imported)6. Peaches7. Nectarines (imported)8. Strawberries9. Apples10. Grapes (imported)11. Lettuce12. Blueberries (domestic)
1. Eggplant2. Kiwis (domestic)3. Canteloupe4. Avocado5. Corn6. Watermelon7. Pineapple8. Sweet Potatoes9. Mushroom10. Grapefruit11. Cabbage12. Onion13. Sweet Peas 14. Asparagus15. Mango
Clean Fifteen
Dirty Dozen
14

68 Culinary Boot Camp training guide Book
day three noteS

69Culinary Boot Camp training guide Book
day three noteSday ThrEE
Culinary Bo
ot
Camp
wedneSday

70 Culinary Boot Camp training guide Book
day three journal

71Culinary Boot Camp training guide Book
Culinary Boot Camp
day fOurt h u r S d ay
Breakfast TeamBreakfast ServiceKitchen Essentials Cooking Techniques Part 2Kitchen Production Meat and PoultryLunchClassroom Session Movie Viewing NSLP Menu Planning Wellness Policies Taste ExplorationReview
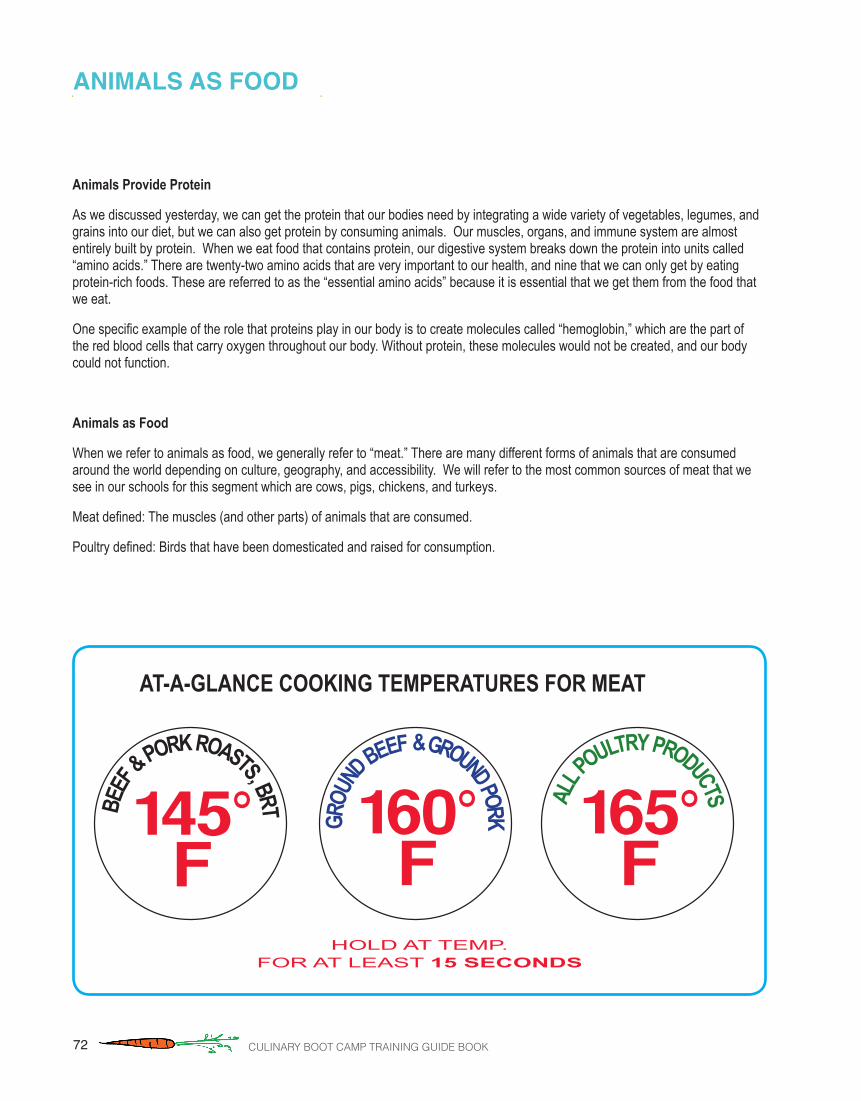
72 Culinary Boot Camp training guide Book
Animals Provide Protein
As we discussed yesterday, we can get the protein that our bodies need by integrating a wide variety of vegetables, legumes, and grains into our diet, but we can also get protein by consuming animals. Our muscles, organs, and immune system are almost entirely built by protein. When we eat food that contains protein, our digestive system breaks down the protein into units called “amino acids.” There are twenty-two amino acids that are very important to our health, and nine that we can only get by eating protein-rich foods. These are referred to as the “essential amino acids” because it is essential that we get them from the food that we eat.
Onespecificexampleoftherolethatproteinsplayinourbodyistocreatemoleculescalled“hemoglobin,”whicharethepartofthe red blood cells that carry oxygen throughout our body. Without protein, these molecules would not be created, and our body could not function.
Animals as Food
When we refer to animals as food, we generally refer to “meat.” There are many different forms of animals that are consumed around the world depending on culture, geography, and accessibility. We will refer to the most common sources of meat that we see in our schools for this segment which are cows, pigs, chickens, and turkeys.
Meatdefined:Themuscles(andotherparts)ofanimalsthatareconsumed.
Poultrydefined:Birdsthathavebeendomesticatedandraisedforconsumption.
animalS aS food
AT-A-GLANCE COOKING TEMPERATURES FOR MEAT
145°F
BEEF
& PORK ROASTS, BRT
HOLD AT TEMP.FOR AT LEAST 15 SECONDS
160°F
GROU
ND BEEF & GROUND PORK 165°
F
ALL P
OULTRY PRODUCTS
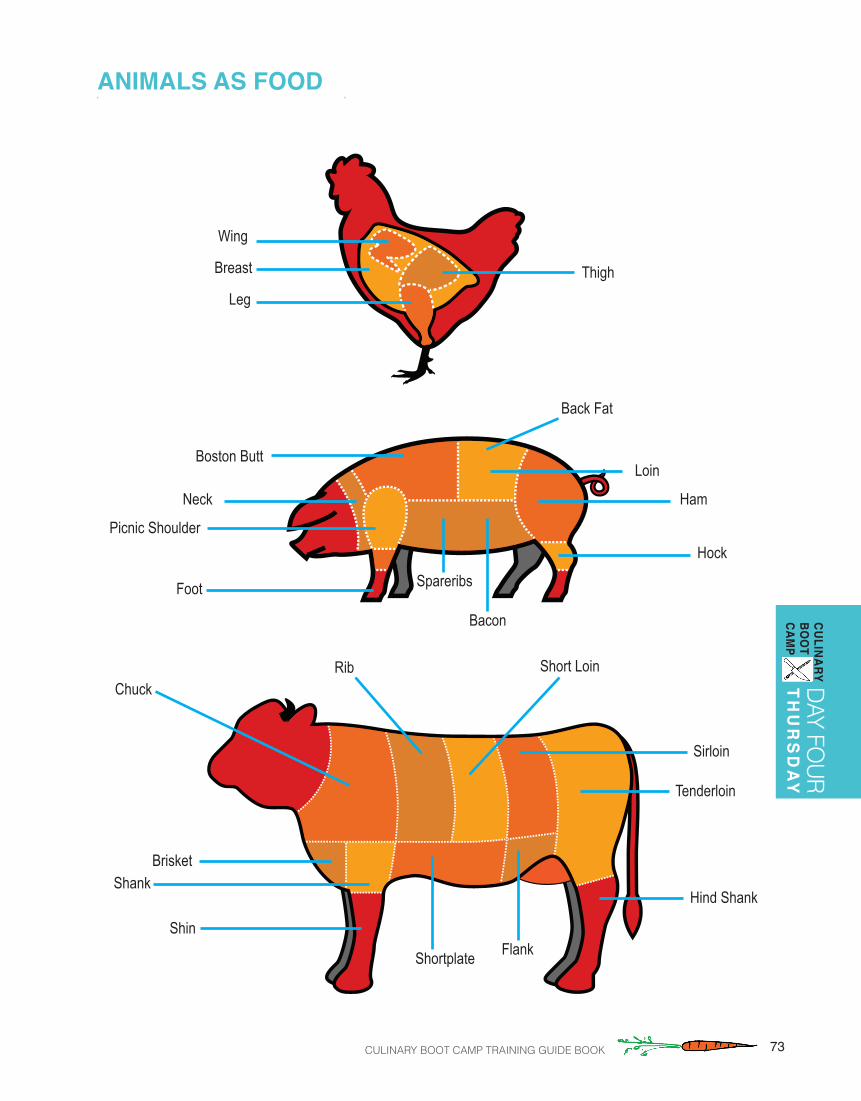
73Culinary Boot Camp training guide Book
animalS aS foodday fO
urt
hu
rS
da
yCulinary Bo
ot
Camp
Wing
Breast
LegThigh
Brisket
Rib Short Loin
Sirloin
Tenderloin
Hind Shank
Shortplate Flank
Shank
Chuck
Loin
Back Fat
Ham
Hock
Boston Butt
Neck
Picnic Shoulder
Bacon
Foot Spareribs
Shin

74 Culinary Boot Camp training guide Book
Pre-Preparation
Defrosting: Raw protein should be thawed in the refrigerator on the appropriate shelf with a pan in place to catch dripping. Note: Ground meat and roasts can take two days or more to defrost so be sure to PLAN AHEAD!
• Assignaplaceinthewalk-incoolerspecificallyforrawmeatthatisasafedistancefromproduceandready-to-eatfoods.• Rawmeatsshouldbestoredinorderofcookingtemperature:highestfinalcookingtemperatureatthebottomtolowest
finalcookingtemperatureatthetop.• Containers should always be covered to avoid cross-contamination.• If raw proteins are removed from their case, make sure to thoroughly clean and sanitize your work area and any equip-
ment utilized.
Choosing Your Workstation:Youwillneedsufficientcounterspacetohandlerawproteinsandtransferthemtohotelpansforcooking. No other production can happen in this area while you are handling raw proteins.
Wash and Sanitize work area before you start working.
Mise en place: Gather and organize necessary equipment before taking raw protein out of refrigerator or walk-in. • Hotel pans (for holding raw protein once removed from package)• Speed rack (for preparing a large quantity of raw protein)• Sanitizer bucket with sanitation solution and side towel (in case of spills)• Small knife (for opening packaging that hold raw protein)• Lined trashcan (for immediate disposal of gloves, packaging, disposable aprons, etc.)• Gloves (remove from box before beginning) to wear while preparing raw proteins• Preheat oven to the appropriate temperature if you are roasting right away.
Wash hands thoroughly!
Standard operating proCedure (Sop) Safe handling of raw meat

75Culinary Boot Camp training guide Book
Preparation • Have proper amounts of marinade or preparation ingredients measured and ready before taking out raw protein.
Bring out only what you need, never bringing out a larger batch of raw protein than you need for service. Raw proteins can easily become cross-contaminated and need to be thrown out.
• Only bring out the amount of raw protein that you can prepare in 1 hour. Bringing out too much can increase the time spent in the “danger zone,” and cause foods to become hazardous.
• Open bags and transfer proteins to hotel pans for cooking. Be cautious as to minimize cross-contamination. • NEVER WASH RAW PROTEINS.• Throw away contaminated bags into designated, lined trashcan.• If a large quantity is being prepared, carefully put full hotel pans onto sheetpans on speed rack to avoid spillage. • This process is to be repeated for the entire amount of raw protein being prepared. If the cooking does not
happen within one hour of prepping, move the speed rack into refrigeration.
Cooking • Cook items to the correct internal temperatures: 165°F for 15 seconds for ground poultry and turkey roasts 160°F for 15 seconds for ground beef and ground pork 145°F for 15 seconds for whole pork and beef roasts• Make sure your thermometer is accurately calibrated weekly and after dropping.• Check temperature at multiple locations on the roasts and ground meat. Wash and sanitize thermometer
between readings. • Thethickestpartofthefleshshouldbetestedonroasts,andtheboneshouldbeavoided.
Cleaning and Sanitizing • Wash and sanitize all counter tops, walls, and sinks thoroughly in the preparation space (Don’t forget the sink
handles and spouts!) Make sure to sanitize fronts of drawers and shelves under the counter as well. When in doubt, clean it!
• Walk-in and reach-in door handles must be sanitized if they’ve been touched, shelves if there was spillage, and raw protein contaminated equipment.
• All contaminated equipment should be brought to the dish room. Personally wash and sanitize this equipment or communicate with the dishwasher that it has been used for raw protein and must be washed with urgency. Never just leave it by the sink and walk away. Drain, sanitize, and change the water in the 3-compartment sink after washing.
• Throw away sanitizer bucket solution, wash bucket, and set up new solution with a clean towel. • Put all used towels in the laundry bag.
day fOur
th
ur
Sd
ay
Culinary Bo
ot
Camp
Standard operating proCedure (Sop) Safe handling of raw meat

76 Culinary Boot Camp training guide Book
Washing Food: Does it Promote Food Safety?Historically, we equate washing with cleanliness. We wash clothes, linens, cars, dishes, and ourselves. So, it is logical that many people believe meat and poultry can be made cleaner and safer by washing it. Is this true? Does washing meat, poultry, eggs, fruits, and vegetables make them safer to eat?
Washing Meat and PoultryWashing raw poultry, beef, pork, lamb, or veal before cooking it is NOT RECOMMENDED. Washing does not kill bacteria in raw meat and poultry, and juices can be spread to other foods, utensils, and surfaces. We call this cross-contamination.
Some consumers think they are removing bacteria and making their meat or poultry safe. However, some of the bacteria are so tightly attached that you could not remove them no matter how many times you washed. There are other types of bacteria that can be easily washed off and splashed on the surfaces of your kitchen. Failure to clean these contaminated areas can lead to foodborne illness. Cooking (baking, broiling, boiling, and grilling) to the right temperature kills the bacteria, so washing food is not necessary.
Using a food thermometer is the only sure way of knowing if your food has reached a high enough temperature to destroy food-borne bacteria. Cook all raw meat to recommended minimum internal temperature as measured with a food thermometer before removing meat from the heat source.
Washing EggsDo not wash eggs before storing them. Washing is a routine part of commercial egg processing and the eggs do not need to be washed again. Federal regulations outline procedures and cleansers that may be used. “Bloom,” the natural coating on just-laid eggs that helps prevent bacteria from permeating the shell, is removed by the washing process and is replaced by a light coating of edible mineral oil which restores protection. Extra handling of the eggs, such as washing, could increase the risk of cross-contamination, especially if the shell becomes cracked.
Packaging materials from raw meat or poultry also can cause cross-contamination. Never reuse them with other food items. These and other disposable packaging materials, such as foam meat trays, egg cartons, or plastic wraps, should be discarded.
Standard operating proCedure (Sop) Safe handling of raw meat
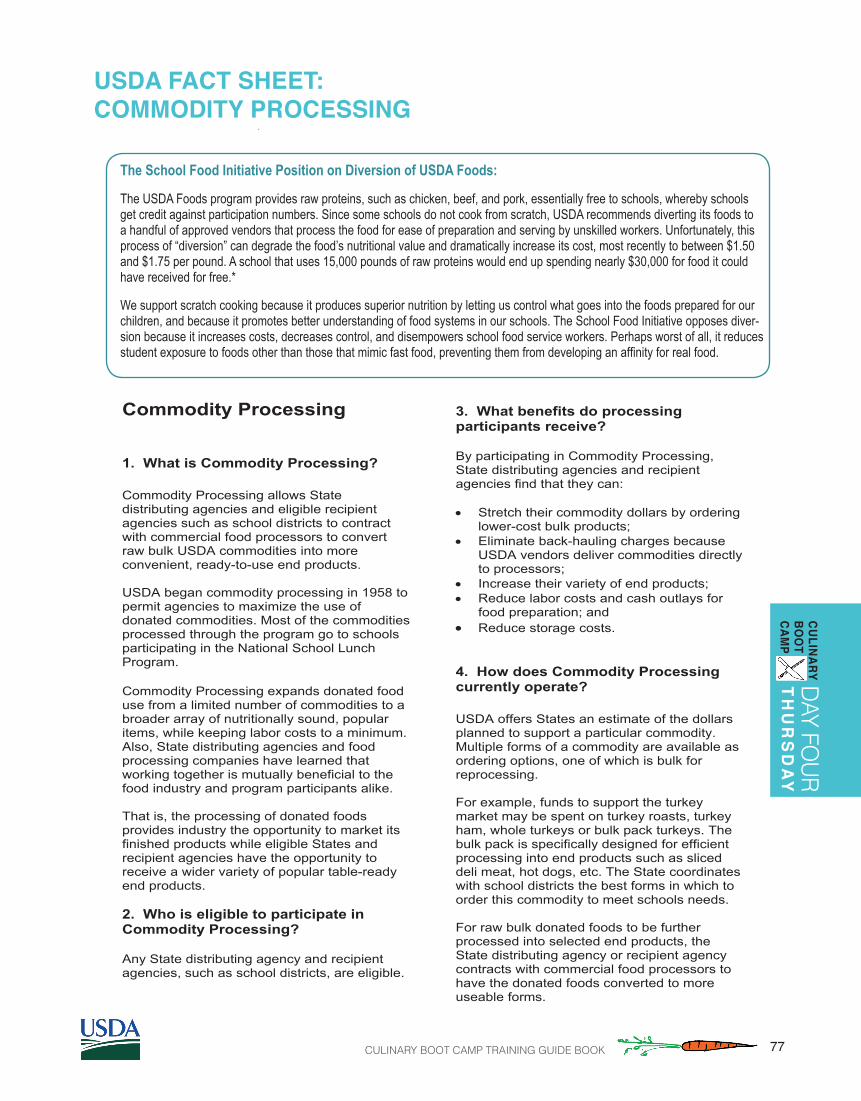
77Culinary Boot Camp training guide Book
day fOur
th
ur
Sd
ay
Culinary Bo
ot
Camp
United States Department of Agriculture
Food and Nutrition ServiceFood Distribution Fact Sheet
June 2007
Page 1
Commodity Processing
1. What is Commodity Processing?
Commodity Processing allows State distributing agencies and eligible recipient agencies such as school districts to contract with commercial food processors to convert raw bulk USDA commodities into more convenient, ready-to-use end products.
USDA began commodity processing in 1958 to permit agencies to maximize the use of donated commodities. Most of the commodities processed through the program go to schools participating in the National School Lunch Program.
Commodity Processing expands donated food use from a limited number of commodities to a broader array of nutritionally sound, popular items, while keeping labor costs to a minimum. Also, State distributing agencies and food processing companies have learned that working together is mutually beneficial to the food industry and program participants alike.
That is, the processing of donated foods provides industry the opportunity to market its finished products while eligible States and recipient agencies have the opportunity to receive a wider variety of popular table-ready end products.
2. Who is eligible to participate in Commodity Processing?
Any State distributing agency and recipient agencies, such as school districts, are eligible.
3. What benefits do processing participants receive?
By participating in Commodity Processing, State distributing agencies and recipient agencies find that they can:
• Stretch their commodity dollars by ordering lower-cost bulk products;
• Eliminate back-hauling charges because USDA vendors deliver commodities directly to processors;
• Increase their variety of end products; • Reduce labor costs and cash outlays for
food preparation; and • Reduce storage costs.
4. How does Commodity Processing currently operate?
USDA offers States an estimate of the dollars planned to support a particular commodity. Multiple forms of a commodity are available as ordering options, one of which is bulk for reprocessing.
For example, funds to support the turkey market may be spent on turkey roasts, turkey ham, whole turkeys or bulk pack turkeys. The bulk pack is specifically designed for efficient processing into end products such as sliced deli meat, hot dogs, etc. The State coordinates with school districts the best forms in which to order this commodity to meet schools needs.
For raw bulk donated foods to be further processed into selected end products, the State distributing agency or recipient agency contracts with commercial food processors to have the donated foods converted to more useable forms.
The School Food Initiative Position on Diversion of USDA Foods:
The USDA Foods program provides raw proteins, such as chicken, beef, and pork, essentially free to schools, whereby schools get credit against participation numbers. Since some schools do not cook from scratch, USDA recommends diverting its foods to a handful of approved vendors that process the food for ease of preparation and serving by unskilled workers. Unfortunately, this process of “diversion” can degrade the food’s nutritional value and dramatically increase its cost, most recently to between $1.50 and $1.75 per pound. A school that uses 15,000 pounds of raw proteins would end up spending nearly $30,000 for food it could have received for free.*
We support scratch cooking because it produces superior nutrition by letting us control what goes into the foods prepared for our children, and because it promotes better understanding of food systems in our schools. The School Food Initiative opposes diver-sion because it increases costs, decreases control, and disempowers school food service workers. Perhaps worst of all, it reduces studentexposuretofoodsotherthanthosethatmimicfastfood,preventingthemfromdevelopinganaffinityforrealfood.
uSda faCt Sheet:Commodity proCeSSing

78 Culinary Boot Camp training guide Book
Food Distribution Fact Sheet Commodity Processing
Page 2
This legally binding agreement (or processing agreement) allows the processor to receive USDA donated food like bulk chicken as an ingredient in the production of a finished end product like chicken nuggets or patties. In turn, the value of the donated food is passed through to the recipient agency in the form of a lower cost for the finished product. USDA purchases and delivers bulk donated foods to the designated processing location as ordered by the State. Some State agencies delegate certain processing functions, such as ordering, bidding, and monitoring, to school districts. Others manage these functions themselves.
5. How does the commodity value get passed on to the recipient agency?
Processors entering into these types of agreements must ensure that the full value of the donated food contained in the finished products is returned to the recipient agency. This value can be returned to the recipient agency by:
(a) discounting the normal commercial price of a product; or
(b) paying a refund to the school,
(c) charging a fee for service for converting the donated food.
End products made from meat or poultry are usually produced under fee-for-service agreements. Under this arrangement the end products are sold at a processing fee, which represents the processor's costs for labor, packaging, other ingredients, and administrative overhead. With a fee for service, the value of the donated commodities in the end products is not included in the price of the product.
6. What is the purpose of a Commodity Processing Agreement?
As with any contractual arrangement, the processing agreement is designed to protect
the interests of all parties involved—i.e., the distributing agency, the recipient agency and the processor. Under this agreement, the processor agrees to protect and account for all USDA donated foods delivered to them for further processing.
Processors also agree to produce the end products in the specific form requested by the State distributing agency or school.
7. Is there only one type of Commodity Processing Agreement?
No. Processing agreements can be between FNS, a distributing agency and a processor, or a recipient agency and a processor. There are four basic types of agreements:
National Processing Agreement (NPA). Toreduce costs and paperwork, FNS has taken on the role of holding the agreement with the processor, monitoring the bond and approving all of the end products manufactured under the agreement. Almost all States are participating in some NPA. By SY 07 all multi-State processors must have a national agreement in place. For additional information on NPA, clickhere: www.fns.usda.gov/fdd/processing/national/
State Master Agreement. Under a State master agreement, the distributing agency enters into an agreement with the processor and designated eligible recipient agencies may purchase end products from their processor.
State Agreement. Under a State agreement, the distributing agency negotiates bids/and/or prices, selects the processor and the end products which will be produced, and enters into an agreement with the processor.
Recipient Agency Agreement. Under a recipient agency agreement, the recipient agency or school enters into an agreement with the processor. This kind of arrangement requires the approval of the distributing
uSda faCt Sheet:Commodity proCeSSing

79Culinary Boot Camp training guide Book
Food Distribution Fact Sheet Commodity Processing
Page 3
agency. Once approved, the recipient agency may purchase end products from that processor. A recipient agency agreement should be used after the agency has completed its procurement process.
8. Who is responsible for the procurement of processing services?
• Under a National agreement, the State DA or recipient agency is responsible for conducting procurement depending on who controls the finished product.
• Under a State agreement, the State is responsible for conducting procurement.
• Under both the State master agreement and the recipient agency agreement, the recipient agency is responsible for conducting the procurement.
Regardless of the type of agreement that is used, processing services should be procured as stipulated in 7 CFR 3016.36.
All procurements are subject to the most stringent procurement thresholds whether that is Federal, State, or local thresholds.
9. What should be included in the Processor Agreement?
It is essential that the processing agreement be accurately completed. The agreement must contain the following:
• State distributing agency information--State, agency name, agency representative or contact person, address, and telephone number;
• Processor information--company name, company representative, address, and telephone number;
• List of all donated foods used by the processor--the processor must be very
specific about what donated foods will be used;
• Specific information regarding the processor’s plant location(s);
• Effective dates of the agreement--both beginning and ending dates must be specified;
• Information regarding the value pass-through system(s) the processor will use—e.g., discount system vs. refund system;
• Debarment certification which states that the processor has not been debarred, suspended, proposed for debarment, declared ineligible, or voluntarily excluded from certain transactions with the Federal or State government;
• Specific information that may be required in a "Special Provisions" article of the agreement, such as subcontracting information, delivery requirements, information regarding by-product credits (particularly for meat and poultry processing), etc.; and
• Names, addresses, titles, and signatures of the authorizing persons who represent the distributing agency and the processor.
10. How many processors participate in Commodity Processing?
Over 150 processors.
11. How many processors have processing agreements in more than one State?
Over 100 processors.
day fOur
th
ur
Sd
ay
Culinary Bo
ot
Camp
uSda faCt Sheet:Commodity proCeSSing

80 Culinary Boot Camp training guide Book
uSda faCt Sheet:Commodity proCeSSing Food Distribution Fact Sheet Commodity Processing
Page 4
12. What is the value of the foods processed under Commodity Processing Agreements?
In SY 2005/6 approximately $1 billion worth of USDA commodities were made available to
schools. Of that total, over half was diverted for further processing under processing agreements.
13. What foods are available for reprocessing?
At least 70 products are reprocessed. Those that are reprocessed most often are:
BasicCommodity
Processed End Products
Pork Cooked sausage patties and links, pizza topping, pork bar-b-que
Beef Charbroiled patties, crumbles, meat balls
Frozen fruit Fruit pops, turnovers
Chicken Nuggets, patties, roasted pieces, breaded chicken
Turkey Turkey ham, bologna, breast deli slices
Flour, mozzarella,tomato paste
Pizza
14. What regulations govern Commodity Processing?
Commodity Processing is governed by regulations contained in the Code of Federal Regulations @ 7 CFR Part 250.30. For a complete copy of 7 CFR 250 regulations may be found on the Food Distribution website at: www.fns.usda.gov/fdd/regs/fd_regulations.htm
15. Who should I contact for more information about Commodity Processing?
For more information about Commodity Processing, we suggest that you contact your State distributing agency. A list of these State Contacts may be found on the Food Distribution web site at: www.fns.usda.gov/fdd/contacts/sdacontacts.htm.
”In accordance with Federal law and U.S. Department of Agriculture policy, this institution is prohibited from discriminating on the basis of race, color, national origin, sex, age, or disability.
To file a complaint of discrimination, write USDA, Director, Office of Civil Rights, Room 326-W, Whitten Building, 1400 Independence Avenue, SW, Washington, D.C. 20250-9410 or call (202) 720-5964 (voice and TDD). USDA is an equal opportunity provider and employer.”
Visit us at www.fns.usda.gov/fdd.
Food Distribution Fact Sheet Commodity Processing
Page 4
12. What is the value of the foods processed under Commodity Processing Agreements?
In SY 2005/6 approximately $1 billion worth of USDA commodities were made available to
schools. Of that total, over half was diverted for further processing under processing agreements.
13. What foods are available for reprocessing?
At least 70 products are reprocessed. Those that are reprocessed most often are:
BasicCommodity
Processed End Products
Pork Cooked sausage patties and links, pizza topping, pork bar-b-que
Beef Charbroiled patties, crumbles, meat balls
Frozen fruit Fruit pops, turnovers
Chicken Nuggets, patties, roasted pieces, breaded chicken
Turkey Turkey ham, bologna, breast deli slices
Flour, mozzarella,tomato paste
Pizza
14. What regulations govern Commodity Processing?
Commodity Processing is governed by regulations contained in the Code of Federal Regulations @ 7 CFR Part 250.30. For a complete copy of 7 CFR 250 regulations may be found on the Food Distribution website at: www.fns.usda.gov/fdd/regs/fd_regulations.htm
15. Who should I contact for more information about Commodity Processing?
For more information about Commodity Processing, we suggest that you contact your State distributing agency. A list of these State Contacts may be found on the Food Distribution web site at: www.fns.usda.gov/fdd/contacts/sdacontacts.htm.
”In accordance with Federal law and U.S. Department of Agriculture policy, this institution is prohibited from discriminating on the basis of race, color, national origin, sex, age, or disability.
To file a complaint of discrimination, write USDA, Director, Office of Civil Rights, Room 326-W, Whitten Building, 1400 Independence Avenue, SW, Washington, D.C. 20250-9410 or call (202) 720-5964 (voice and TDD). USDA is an equal opportunity provider and employer.”
Visit us at www.fns.usda.gov/fdd.
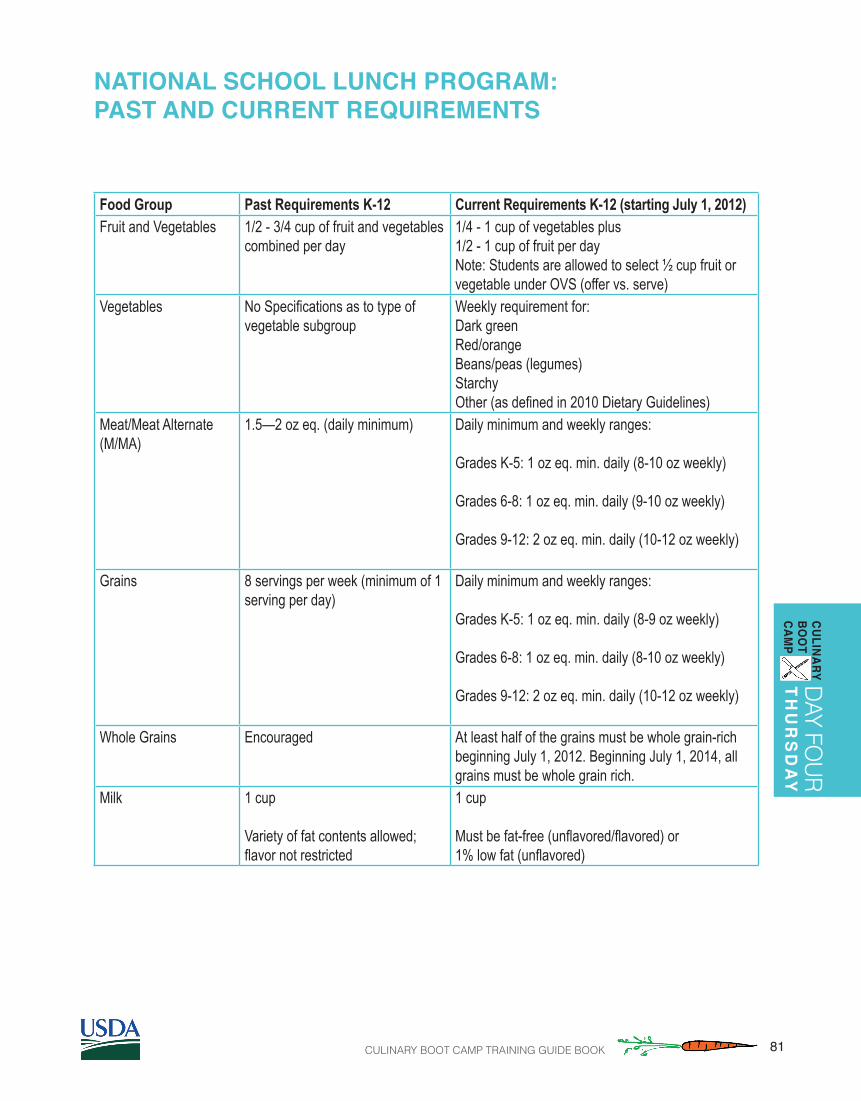
81Culinary Boot Camp training guide Book
Food Group Past Requirements K-12 Current Requirements K-12 (starting July 1, 2012)Fruit and Vegetables 1/2 - 3/4 cup of fruit and vegetables
combined per day 1/4 - 1 cup of vegetables plus 1/2 - 1 cup of fruit per dayNote: Students are allowed to select ½ cup fruit or vegetable under OVS (offer vs. serve)
Vegetables NoSpecificationsastotypeofvegetable subgroup
Weekly requirement for:Dark green Red/orangeBeans/peas (legumes)StarchyOther(asdefinedin2010DietaryGuidelines)
Meat/Meat Alternate(M/MA)
1.5—2 oz eq. (daily minimum) Daily minimum and weekly ranges:
Grades K-5: 1 oz eq. min. daily (8-10 oz weekly)
Grades 6-8: 1 oz eq. min. daily (9-10 oz weekly)
Grades 9-12: 2 oz eq. min. daily (10-12 oz weekly)
Grains 8 servings per week (minimum of 1 serving per day)
Daily minimum and weekly ranges:
Grades K-5: 1 oz eq. min. daily (8-9 oz weekly)
Grades 6-8: 1 oz eq. min. daily (8-10 oz weekly)
Grades 9-12: 2 oz eq. min. daily (10-12 oz weekly)
Whole Grains Encouraged At least half of the grains must be whole grain-rich beginning July 1, 2012. Beginning July 1, 2014, all grains must be whole grain rich.
Milk 1 cup
Variety of fat contents allowed; flavornotrestricted
1 cup
Mustbefat-free(unflavored/flavored)or1%lowfat(unflavored)
day fOur
th
ur
Sd
ay
Culinary Bo
ot
Camp
national SChool lunCh program: paSt and Current requirementS

82 Culinary Boot Camp training guide Book
School Breakfast Program Meal Pattern
Food Group Past Requirements K-12 Current Requirements K-12Fruit ½ cup per day (vegetable substi-
tution allowed)1 cup per day (vegetable substitution allowed)Note: Quantity required SY 2014-15. Students are allowed to select ½ cup of fruits under OVS.
Grains and Meat/MeatAlternate (M/MA)
2 grains, or 2 meat/meat alter-nates, or 1 of each per day
Daily min. and weekly ranges for grains:
Grades K-5: 1 oz eq. min. daily (7-10 oz weekly)
Grades 6-8: 1 oz eq. min. daily (8-10 oz weekly)
Grades 9-12: 1 oz eq. min. daily (9-10 oz weekly)Note: Quantity required SY 2013-14. Schools may substitute M/MA for grains after the minimum daily grains requirement is met.
Whole Grains Encouraged At least half of the grains must be whole grain-rich beginning July 1, 2013. Beginning July 1, 2014, all grains must be whole grain rich.
Milk 1 cup
Variety of fat contents allowed; flavornotrestricted
1 cup
Mustbefat-free(unflavored/flavored)or1%lowfat(unflavored)
Nutrient Standards Nutrient Current Requirements K-12
SodiumReduce, no set targets
Target I: SY 2014-15 Lunch ≤1230mg(K-5)≤1360mg(6-8)≤1420mg(9-12)Breakfast ≤540mg(K-5)≤600mg(6-8)≤640mg(9-12)
Target 2: SY 2017-18Lunch ≤935mg(K-5)≤1035mg(6-8)≤1080mg(9-12)Breakfast ≤485mg(K-5)≤535mg(6-8)≤570mg(9-12)
Final target: SY 2022-23Lunch ≤640mg(K-5)≤710mg(6-8)≤740mg(9-12)Breakfast ≤430mg(K-5)≤470mg(6-8)≤500mg(9-12)
national SChool lunCh program: paSt and Current requirementS

83Culinary Boot Camp training guide Book
national SChool lunCh program: paSt and Current requirementS
day fOur
th
ur
Sd
ay
Culinary Bo
ot
Camp
Calories (min. only) Traditional Menu Planning Lunch: 633 (grades K-3) 785 (grades 4-12) 825 (optional grades 7-12) Breakfast: 554 (grades K-12) Enhanced Menu Planning Lunch: 664 (grades K-6) 825 (grades 7-12) 633 (optional grades K-3) Breakfast: 554 (grades K-12) 774 (optional grades 7-12) Nutrient-Based Menu Planning Lunch: 664 (grades K-6) 825 (grades 7-12) 633 (optional grades K-3) Breakfast: 554 (grades K-12) 618 (optional grades 7-12)
Calorie Ranges (min. & max.) Only food-based menu planning allowed
Lunch: 550-650 (grades K-5) 600-700 (grades 6-8) 750-850 (grades 9-12) Breakfast: 350-500 (grades K-5) 400-550 (grades 6-8) 450-600 (grades 9-12)
Saturated Fat <10% of total calories
Saturated Fat <10% of total calories
Trans Fat: No limit Newspecification:Zerogramsperserving(nutritionlabel)
Nutrient Standards
Past Requirements K-12 Current Requirements K-12
84 Culinary Boot Camp training guide Book
IDEAS FOR MENU THEMESSCHOOL FOOD
Our Food, Our Future
(Use when planning a cycle menu)
MENU THEME MENU THEME MENU THEME
MENU ITEMS IN THIS THEME MENU ITEMS IN THIS THEME MENU ITEMS IN THIS THEME
MENU ITEMS IN THIS THEME MENU ITEMS IN THIS THEME MENU ITEMS IN THIS THEME
MENU THEME MENU THEME MENU THEME
menu itemS: theme #1 menu itemS: theme #2 menu itemS: theme #3
menu itemS: theme #4 menu itemS: theme #5 menu itemS: theme #6

85Culinary Boot Camp training guide Book
day fOur
th
ur
Sd
ay
Culinary Bo
ot
Camp
MO
ND
AY
TUE
SD
AY
WE
DN
ES
DA
YTH
UR
SD
AY
FRID
AY
THE
ME
ME
NU
PLA
NN
ING
CA
LEN
DA
RTH
EME
THEM
ETH
EME
THEM
ETH
EME
86 Culinary Boot Camp training guide Book
MO
ND
AYTU
ESDAY
WED
NESD
AYTH
UR
SDAY
FRID
AY
WEEK 12 W
EEK C
YCLE M
ENU
PLAN
NIN
G C
ALEN
DA
R FO
R B
REA
KFA
STWEEK 2

87Culinary Boot Camp training guide Book
day four noteSday fO
urt
hu
rS
da
yCulinary Bo
ot
Camp
88 Culinary Boot Camp training guide Book
day four noteS
89Culinary Boot Camp training guide Book
day four journalday fO
urt
hu
rS
da
yCulinary Bo
ot
Camp
90 Culinary Boot Camp training guide Book
day four journal

91Culinary Boot Camp training guide Book
Culinary Boot Camp
day fivEf r i d a y
Breakfast TeamBreakfast ServiceCulinary JeopardyMovie ViewingGoal SettingManaging TransitionsGuests ArriveGraduationCelebratory Lunch

92 Culinary Boot Camp training guide Book
day five journal

93Culinary Boot Camp training guide Book
day five journalday fivEf
rid
ay
Culinary Bo
ot
Camp
94 Culinary Boot Camp training guide Book
goal Setting

95Culinary Boot Camp training guide Book
goal Settingday fivEf
rid
ay
Culinary Bo
ot
Camp

96 Culinary Boot Camp training guide Book

97Culinary Boot Camp training guide Book
Culinary Boot Camp reSourCeS
Additional ResourcesSample HACCP PlanGlossaryWhat Comes Next

98 Culinary Boot Camp training guide Book
Links:School Food Initiative: www.schoolfood.orgOrfalea Foundation: www.orfaleafoundation.orgThe Lunchbox-Healthy Tools to Help Schools: www.thelunchbox.orgCivil Eats Blog: www.civileats.comEdible Schoolyard: www.edibleschoolyard.orgNational School Lunch Program: www.fns.usda.gov/cnd/lunch Slow Food: www.slowfoodusa.orgEnvironmental Working Group: www.ewg.orgEnvironmental Footprint Calculator: http://footprint.wwf.org.ukFood Myth Busters: www.foodmyths.orgFood Politics by Marion Nestle: www.foodpolitics.comCenter for Ecoliteracy: www.ecoliteracy.orgThe Food Times: www.thefoodtimes.orgSmall Bites: www.smallbites.andybellatti.comSeafood Watch: www.montereybayaquarium.org/cr/seafoodwatch.aspxAppetiteforprofit:www.appetiteforprofit.com
additional reSourCeS
Books:The Omnivore’s Dilemma, In Defense of Food and Food Rules by Michael PollanFood Politics, Safe Food, What to Eat, and Why Calories Count by Marion NestleStuffed and Starved by Raj PatelDiet for a Small Planet by Frances Moore LappeFast Food Nation by Eric SchlosserAppetite for Profit by Michele SimonFood Fight: The Citizen’s Guide to a Food and Farm Bill by Daniel ImhoffSlow Food Nation: Why our food should be Good, Clean, Fair by Carlo PetriniPlenty: One Man, One Woman, and a Raucous Year by Alicia Smith and J.B. MckinnonThe Food of a Younger Land by Mark KulanskyA Year without “Made in China” by Sara BongiorniThe End Of Overeating: Taking Control of the Insatiable American Appetite by David A. KesslerAll You Can Eat: How Hungry is America? by Joel Berg
Films:Dirt: The Movie (2009) Food Fight (2008)Food, Inc. (2008)Food Stamped (2010)Forks Over Knives (2011)Fresh (2009)Killer at Large (2008)King Corn (2007)Super Size Me (2004)The Garden (2008)The Future of Food (2004)The Real Dirt on Farmer John (2006)The True Cost of Food (2008)Truck Farm (2011)Ground Operations (2012)
Add Your Own:
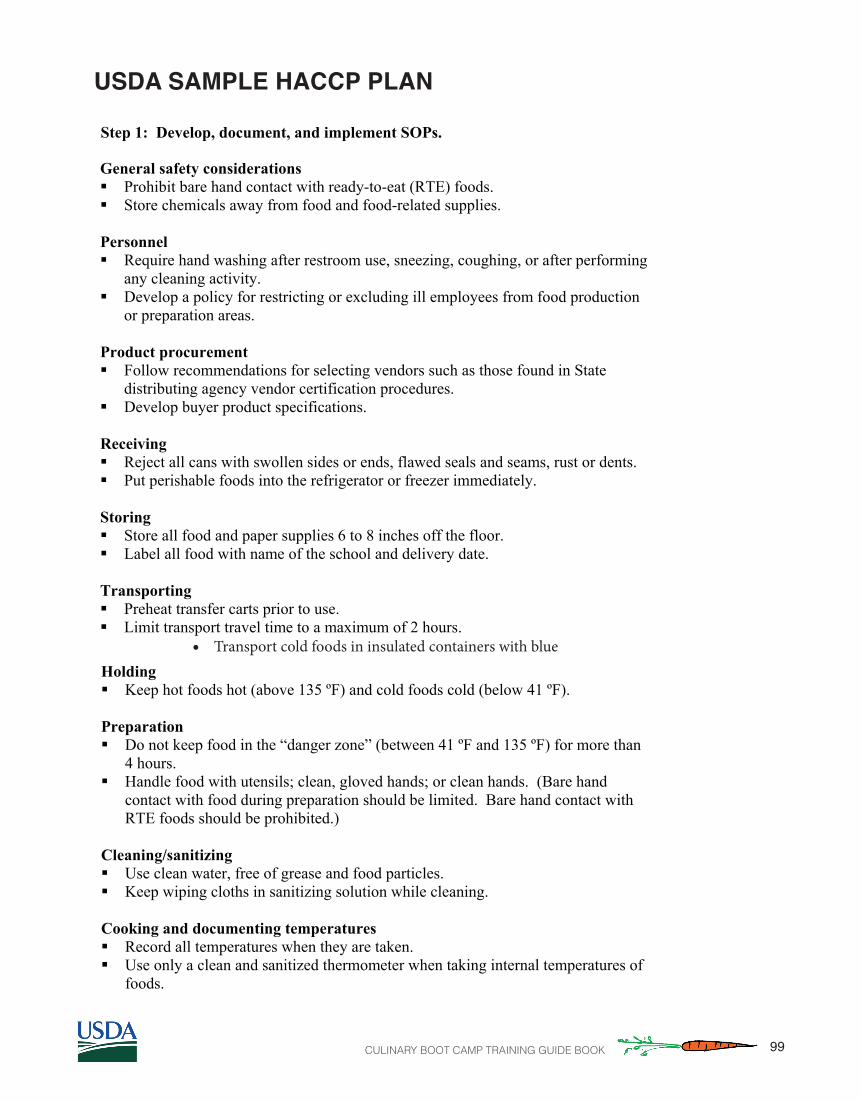
99Culinary Boot Camp training guide Book
General safety considerations Prohibit bare hand contact with ready-to-eat (RTE) foods. Store chemicals away from food and food-related supplies.
Personnel Require hand washing after restroom use, sneezing, coughing, or after performing
any cleaning activity. Develop a policy for restricting or excluding ill employees from food production
or preparation areas. Product procurement Follow recommendations for selecting vendors such as those found in State
distributing agency vendor certification procedures. Develop buyer product specifications.
Receiving Reject all cans with swollen sides or ends, flawed seals and seams, rust or dents. Put perishable foods into the refrigerator or freezer immediately.
Storing Store all food and paper supplies 6 to 8 inches off the floor. Label all food with name of the school and delivery date.
Transporting Preheat transfer carts prior to use. Limit transport travel time to a maximum of 2 hours.
Holding Keep hot foods hot (above 135 ºF) and cold foods cold (below 41 ºF).
Preparation Do not keep food in the “danger zone” (between 41 ºF and 135 ºF) for more than
4 hours. Handle food with utensils; clean, gloved hands; or clean hands. (Bare hand
contact with food during preparation should be limited. Bare hand contact with RTE foods should be prohibited.)
Cleaning/sanitizing Use clean water, free of grease and food particles. Keep wiping cloths in sanitizing solution while cleaning.
Cooking and documenting temperatures Record all temperatures when they are taken. Use only a clean and sanitized thermometer when taking internal temperatures of
foods.
10
V. Developing a School Food Safety Program Before developing your food safety program you should review the foodservice operations within your SFA and describe the facility, functions, and standard procedures for each. Some basic information to consider when doing this initial review includes:
• Types of facilities in your SFA • Existing SOPs • Number and type of employees at each site • Types of equipment • Processes for food preparation • Menu items
After describing the operations in your jurisdiction, the following steps will help you develop your food safety program. 1. Develop, document in writing, and implement SOPs. 2. Identify and document in writing all menu items according to the Process
Approach to HACCP. 3. Identify and document control measures and critical limits. 4. Establish monitoring procedures. 5. Establish corrective actions. 6. Keep records. 7. Review and revise your overall food safety program periodically. Step 1: Develop, document, and implement SOPs.
SOPs lay a strong foundation for your overall school food safety program. SOPs are step-by-step written instructions for routine food service tasks that affect the safety of food (‘nonspecific’ hazards), such as proper dishwashing procedures, or for tasks that are a part of the HACCP-based plan (specific hazards), such as proper cooking procedures. Each SOP should include instructions on monitoring, documentation, corrective actions, and periodic review of the procedures they cover. Adherence to SOPs allows food service managers and employees to effectively control and prevent hazards. SFAs may already have SOPs developed and in place. If not, USDA is developing a series of SOPs applicable to school food service establishments. The final versions of these SOPs will be posted on the National Food Service Management Institute’s (NFSMI) website (www.nfsmi.org). NFSMI will also be conducting training sessions subsequent to the release of these documents on customizing these generic SOPs to fit your specific operations. The main categories of SOPs with some example topics for school foodservice are listed below. See Appendix I for sample SOPs.
9
• Transport cold foods in insulated containers with blue
uSda Sample haCCp plan
100 Culinary Boot Camp training guide Book
Cooling Cool rapidly by storing food in small batches in individual containers; cover
loosely so that heat can escape quickly. Keep cold foods cold by pre-chilling ingredients for salads.
Reheating Transfer reheated food to hot-holding equipment only when the food reaches the
proper temperature. Use only cooking ranges, ovens, steamers, and microwave ovens to reheat foods.
Use hot-holding equipment only to maintain temperature and not for rapidly heating food.
Step 2: Identify and document in writing all menu items according to the Process Approach to HACCP.
The Process Approach to HACCP is a method of classifying food preparation into three broad categories. These categories are based on the number of times a menu item makes a complete trip through the temperature danger zone. The way food is prepared at each site determines into which of the three food preparation processes it will fall. Temperature, if not controlled properly during food preparation and service, can contribute to a higher risk of foodborne illness. Therefore, it is critical to manage the temperature of food. In order to protect foods from potential hazards, it is important to keep hot foods hot and cold foods cold. It is most important to keep food out of the temperature danger zone (41ºF - 135º F).
The danger zone temperatures used in this guidance are from the 2001 FDA Food Code (as amended August 29, 2003 in the Supplement to the 2001 Food Code). The temperatures in your State may be different so this guidance should be adapted as necessary to include State and local public health department code requirements
and school food authority policies and procedures.
To assign menu items to one of the three processes, consider the processes and procedures used to prepare the food in each of your school district’s facilities. Determine whether menu items have no cook step involved, undergo a cook step for same day service, or receive additional cooling and reheating following a cook step. This will enable you to place each menu item into the appropriate process. Identify the number of times each menu item goes up (heating) or comes down (cooling) through the danger zone (41ºF - 135º F) and classify items into the following food preparation processes:
Process #1 – No Cook The menu item does not go completely through the danger zone in either direction.
Process #2 – Same Day Service
11
control points specific to the site, for example checking the temperature of the food upon arrival and keeping the food at a safe temperature until service. Both must adhere to all applicable SOPs. In addition to initial food preparation, some foodservice operations make use of leftovers. If your State or local authority has allowed for the use of leftovers, a procedure for handling leftovers should be implemented. Generally, leftovers will fall into Process #3 as they have most likely been cooked and cooled prior to being stored and used again. A sample of a procedure for handling leftovers can be found in Appendix II.
Step 3: Identify and document control measures and critical limits. Control measures are any means taken to prevent, eliminate, or reduce hazards. Collectively, control measures include SOPs as well as the Critical Control Points (CCPs) and the corresponding critical limits established in each of the three processes. Once you identify the appropriate process for each menu item, determine what control measures are needed to prevent the introduction of hazards at each stage of food preparation from receiving to service. Decide which of the control measures are absolutely essential to ensuring safe food. Identifying CCPs and Implementing Essential Control Measures in the Process Approach The control measures that are absolutely essential must be applied at key points, known as CCPs, during the food preparation process to control specific hazards (physical, chemical, or biological). A CCP is a key point where a step can be taken to prevent, eliminate, or reduce a food safety hazard to an acceptable level. Loss of control at this point may result in an unacceptable health risk. You will find that despite the different specific hazards, the control measures used to prevent, eliminate, or reduce hazards in all menu items under each of the three processes are similar. The following are CCPs, related to each food preparation process:
For Process #1 – No Cook:
• Cold holding or limiting time in the danger zone to inhibit bacterial growth and toxin production (e.g., limiting time would be holding at room temperature for 4 hours and then discarding)
For Process #2 – Same Day Service:
• Cooking to destroy bacteria and other pathogens • Hot holding or limiting time in the danger zone to prevent the outgrowth
of spore-forming bacteria For Process #3 – Complex Food Preparation:
13
• Cooking to destroy bacteria and other pathogens • Cooling to prevent the outgrowth of spore-forming bacteria • Hot and cold holding or limiting time in the danger zone to inhibit
bacterial growth and toxin formation • Reheating for hot holding, if applicable
CCPs and Corresponding Critical Limits Each CCP includes boundaries that define safety. These boundaries or critical limits are the time and/or temperatures that must be achieved or maintained to control a food safety hazard. When critical limits are not met, the food may not be safe. The 2001 FDA Food Code (as amended August 29, 2003 in the Supplement to the 2001 Food Code) provides critical limits designed to prevent, eliminate, or reduce hazards in food. For example, when cooking chicken, the Food Code sets the critical limit at 165 ºF for 15 seconds. Critical limits (time/temperature) are measurable and observable. The following graphic demonstrates minimum temperatures and holding times (critical limits) for some common food service menu items.
14
Step 4: Establish monitoring procedures. Monitoring is an important step for an effective food safety program. Control measures, including CCPs and SOPs, must be monitored, controlled, and documented in writing. Monitoring involves making direct observations or taking measurements to see that the food safety program is being followed. For example, the CCPs are managed by adhering to the established critical limits. Monitoring will identify when there is a loss of control so that corrective action can be taken. In establishing your monitoring procedures, consider the following questions:
• How will you monitor CCPs and SOPs? • When and how often will you monitor? • Who will be responsible for monitoring?
What you are going to monitor depends on the critical limits associated with each CCP for a menu item. Final temperature and time measurements are very important, and you should determine how you will effectively monitor the critical limits for them. Determining the appropriate means for monitoring is an important factor. If equipment is selected to monitor a specific CCP, you should ensure that it is accurate. The equipment you choose should also be appropriate for the monitoring function. When deciding how often you will monitor, you should ensure that the monitoring interval will be reliable enough to ensure hazards are being controlled. Your procedure for monitoring should be simple and easy to follow. Individuals chosen to be responsible for a monitoring activity may be a manager, line supervisor, or other reliable employee. Employees should be given the training and equipment necessary to properly perform the monitoring activities.
Monitoring examples: The CCP for cold foods is cold holding. The critical limit is holding at 41 ºF or below. Therefore, the temperature of the refrigerator must be recorded on a refrigeration temperature monitoring chart at least three times daily to make sure the temperature is 41 ºF or below.
A CCP for chicken is cooking. The critical limit is cooking at 165 ºF for 15 seconds. Therefore, the internal temperature of the chicken must be monitored and recorded to make sure it is at or above 165 ºF for 15 seconds.
17
Step 5: Establish corrective actions. Whenever a critical limit is not met, a corrective action must be carried out immediately. A corrective action may be simply continuing to heat food to the required temperature. Other corrective actions may be more complicated, such as rejecting food items that were not delivered at the right temperature, or discarding food that has been held without temperature control too long. Your food safety program must include corrective actions. Employees must know what these corrective actions are, and be trained in making the right decisions. This preventive approach is the heart of HACCP. Problems will arise, but you need to find them and correct them before they cause illness or injury. It is also important to document corrective actions when they are taken.
Corrective action examples: SOP: If the temperature in the refrigerator is above 41 ºF, then the equipment must be checked to see if it is working properly. Also, the thermometer that is used to record the temperature must be calibrated regularly and checked to see if it is working properly. CCP: When cooking raw poultry, corrective action must be taken if the internal temperature does not reach 165 ºF for 15 seconds at the end of the designated cooking period. The corrective action would be to continue cooking the chicken until the internal temperature reaches 165 ºF for at least 15 seconds.
Corrective actions should be determined for all SOPs and CCPs. A list of appropriate corrective actions must be included in your school food safety program. See Appendices I and III for sample SOPs and a sample school food safety program. Both, the appendices and the sample program, include corrective actions. Step 6: Keep records.
There are certain written records or kinds of documentation that are needed to verify that the food safety program is working. These records will normally involve the food safety plan and any monitoring, corrective action, or calibration records produced in the operation of the food safety program based on HACCP principles. Recordkeeping also provides a basis for periodic reviews of the overall food safety program. In the event your operation is implicated in a foodborne illness, documentation of activities related to monitoring and corrective actions can provide proof that reasonable care was exercised in the operation of your facility.
18
uSda Sample haCCp plan, Continued

101Culinary Boot Camp training guide Book
Cooking Potentially Hazardous Foods (Sample SOP)
Purpose: To prevent foodborne illness by ensuring that all foods are cooked to the appropriate internal temperature Scope: This procedure applies to foodservice employees who prepare or serve food. Key Words: Cross-Contamination, Temperatures, Cooking Instructions:
1. Train foodservice employees who prepare or serve food on how to use a food thermometer and cook foods using this procedure.
2. If a recipe contains a combination of meat products, cook the product to the highest required temperature.
3. Follow State or local health department requirements regarding internal cooking temperatures.
4. If State or local health department requirements are based on the 2001 FDA Food Code, cook products to the following temperatures:
5. 145 oF for 15 seconds a. Seafood, beef, and pork b. Eggs cooked to order that are placed onto a plate and immediately served
6. 155 oF for 15 seconds a. Ground products containing beef, pork, or fish b. Fish nuggets or sticks c. Eggs held on a steam table d. Cubed or Salisbury steaks
7. 165 oF for 15 seconds a. Poultry b. Stuffed fish, pork, or beef c. Pasta stuffed with eggs, fish, pork, or beef (like lasagna or manicotti)
8. 135 oF for 15 seconds a. Fresh, frozen, or canned fruits and vegetables that are going to be held on
a steam table or in a hot box Monitoring: 1. Use a clean, sanitized, and calibrated probe thermometer (preferably a thermocouple). 2. Avoid inserting the thermometer into pockets of fat or near bones when taking
internal cooking temperatures. 3. Take at least two (2) internal temperatures from each batch of food by inserting the
thermometer into the thickest part of the product (usually the center).
31
uSda Sample haCCp plan, Continued
102 Culinary Boot Camp training guide Book
Cooking Potentially Hazardous Foods, continued (Sample SOP)
4. Take at least two (2) internal temperatures of each large food item, like a turkey, to
ensure that all parts of the product reach the required cooking temperature. Corrective Action: Continue cooking food until the internal temperature reaches the required temperature. Verification and Record Keeping: Foodservice employees will record product name, time, the two (2) temperatures/times, and any corrective action taken on the Cooking - Reheating Temperature Log. Foodservice manager will verify that foodservice employees has taken the required cooking temperatures by visually monitoring foodservice employees and preparation procedures during the shift and reviewing, initialing, and dating the temperature log at the close of each day. The Cooking – Reheating Temperature Log are kept on file for a minimum of one year. Date Implemented: By: Date Reviewed: By: Date Revised: By:
32
uSda Sample haCCp plan, Continued
103Culinary Boot Camp training guide Book
Cooling Potentially Hazardous Foods (Sample SOP)
Purpose: To prevent foodborne illness by ensuring that all potentially hazardous foods are cooled properly Scope: This procedure applies to foodservice employees who prepares, handles, or serves food. Key Words: Cross-Contamination, Temperatures, Cooling, Holding Instructions: 1. Train foodservice employees who prepare or serve food on how to use a food
thermometer and how to cool foods using this procedure. 1. Modify menus, production schedules, and staff work hours to allow for
implementation of proper cooling procedures. 2. Prepare and cool food in small batches. 3. Chill food rapidly using an appropriate cooling method:
• Place food in shallow containers (no more than 4 inches deep) and uncovered on the top shelf in the back of the walk-in or reach-in cooler
• Use a quick-chill unit like a blast chiller • Stir the food in a container placed in an ice water bath • Add ice as an ingredient • Separate food into smaller or thinner portions • Pre-chill ingredients and containers used for making bulk items like salads
4. Follow State or local health department requirements regarding required cooling parameters.
5. If State or local requirements are based on the 2001 FDA Food Code, chill cooked hot food from:
• 135 ºF to 70 ºF within 2 hours. Take corrective action immediately if food is not chilled from 135 ºF to 70 ºF within 2 hours.
• 70 ºF to 41 ºF or below in remaining time. The total cooling process from 135 ºF to 41 ºF may not exceed 6 hours. Take corrective action immediately if food is not chilled from 135 ºF to 41 ºF within the 6 hour cooling process.
6. Chill prepared, ready-to-eat foods such as tuna salad and cut melons from 70 ºF to 41 ºF or below within 4 hours. Take corrective action immediately if ready-to-eat food is not chilled from 70 ºF to 41 ºF within 4 hours.
33
uSda Sample haCCp plan, Continued

104 Culinary Boot Camp training guide Book 6
Cooling Potentially Hazardous Foods, continued (Sample SOP) Monitoring: 1. Use a clean, sanitized, and calibrated probe thermometer to measure the internal
temperature of the food during the cooling process. 2. Monitor temperatures of products every hour throughout the cooling process by
inserting a thermometer into the center of the food and at various locations in the product.
Corrective Action: 1. Reheat cooked hot food to 165 ºF for 15 seconds and start the cooling process again
using a different cooling method when the food is • Above 70 ºF and 2 hours or less into the cooling process; and • Above 41 ºF and 6 hours or less into the cooling process.
2. Discard cooked hot food immediately when the food is • Above 70 ºF and more than 2 hours into the cooling process; or • Above 41 ºF and more than 6 hours into the cooling process.
3. Use a different cooling method for prepared ready-to-eat foods when the food is above 41 ºF and less than 4 hours into the cooling process.
4. Discard prepared ready-to-eat foods when the food is above 41 ºF and more than 4 hours into the cooling process.
Verification and Record Keeping: Foodservice employees will record temperatures and corrective actions taken on the Cooling Temperature Log. Foodservice employees will record if there are no foods cooled on any working day by indicating “No Foods Cooled” on the Cooling Temperature Log. Foodservice manager will verify that foodservice employees are cooling food properly by visually monitoring foodservice employees during the shift and reviewing, initialing, and dating the temperature log each working day. The Cooling Temperature Logs are kept on file for a minimum of one year. Date Implemented: By: Date Reviewed: By: Date Revised: By:
34
uSda Sample haCCp plan, Continued
105Culinary Boot Camp training guide Book
Holding Hot and Cold Potentially Hazardous Foods (Sample SOP)
Purpose: To prevent foodborne illness by ensuring that all potentially hazardous foods are held at the proper temperature Scope: This procedure applies to foodservice employees who prepare or serve food. Key Words: Cross-Contamination, Temperatures, Holding, Hot Holding, Cold Holding, Storage Instructions: 1. Train foodservice employees who prepare or serve food about proper hot and cold
holding procedures. Include in the training a discussion of the temperature danger zone.
2. Follow State or local health department requirements regarding required hot and cold holding temperatures. If State or local health department requirements are based on the 2001 FDA Food Code:
• Hold hot foods at 135 ºF or above; and • Cold foods at 41 ºF or below.
3. Preheat steam tables and hot boxes. Monitoring: 1. Use a clean, sanitized, and calibrated probe thermometer to measure the temperature
of the food. 2. Take temperatures of foods by inserting the thermometer near the surface of the
product, at the thickest part, and at other various locations. 3. Take temperatures of holding units by placing a calibrated thermometer in the coolest
part of a hot holding unit or warmest part of a cold holding unit. 4. For hot-held foods:
• Verify that the air/water temperature of any unit is at 135 ºF or above before use.
• Reheat foods in accordance with the Reheating for Hot Holding SOP. • All hot potentially hazardous foods should be 135 ºF or above before placing
the food out for display or service. • Take the internal temperature of food before placing it on a steam table or in a
hot holding unit and at least every 2 hours thereafter. 5. For cold foods held for service:
• Verify that the air/water temperature of any unit is at 41 ºF or below before use.
• Chill foods, if applicable, in accordance with the Cooling SOP.
35
uSda Sample haCCp plan, Continued

106 Culinary Boot Camp training guide Book
8
Holding Hot and Cold Potentially Hazardous Foods, continued (Sample SOP)
• All cold potentially hazardous foods should be 41 ºF or below before placing
the food out for display or service. • Take the internal temperature of the food before placing it onto any salad bar,
display cooler, or cold serving line and at least every 2 hours thereafter. 6. For cold foods in storage:
• Take the internal temperature of the food before placing it into any walk-in cooler or reach-in cold holding unit.
• Chill food in accordance with the Cooling SOP if the food is not 41 ºF or below.
• Verify that the air temperature of any cold holding unit is at 41 ºF or below before use and at least every 4 hours thereafter during all hours of operation.
Corrective Action: For hot foods:
• Reheat the food to 165 ºF for 15 seconds if the temperature is found to be below 135 ºF and the last temperature measurement was 135 ºF or higher and taken within the last 2 hours. Repair or reset holding equipment before returning the food to the unit, if applicable.
• Discard the food if it cannot be determined how long the food temperature was below 135 ºF.
For cold foods:
• Rapidly chill the food using an appropriate cooling method if the temperature is found to be above 41 ºF and the last temperature measurement was 41 ºF or below and taken within the last 2 hours:
• Place food in shallow containers (no more than 4 inches deep) and uncovered on the top shelf in the back of the walk-in or reach-in cooler
• Use a quick-chill unit like a blast chiller • Stir the food in a container placed in an ice water bath • Add ice as an ingredient • Separate food into smaller or thinner portions
• Repair or reset holding equipment before returning the food to the unit, if applicable.
• Discard the food if it cannot be determined how long the food temperature was above 41 ºF.
36
uSda Sample haCCp plan, Continued

107Culinary Boot Camp training guide Book9
Holding Hot and Cold Potentially Hazardous Foods, continued (Sample SOP) Verification and Record Keeping: Foodservice employees will record temperatures of food items and document corrective actions taken on the Hot and Cold Holding Temperature Log. A designated foodservice employee will record air temperatures of coolers and cold holding units on the Refrigeration Logs. Foodservice manager will verify that foodservice employees have taken the required holding temperatures by visually monitoring foodservice employees during the shift and reviewing the temperature logs at the close of each day. The temperature logs are kept on file for a minimum of one year. Date Implemented: By: Date Reviewed: By: Date Revised: By:
37
uSda Sample haCCp plan, Continued

108 Culinary Boot Camp training guide Book10
Date Marking Ready-to-Eat, Potentially Hazardous Food
(Sample SOP)
Purpose: To ensure appropriate rotation of ready-to-eat food to prevent or reduce foodborne illness from Listeria monocytogenes Scope: This procedure applies to foodservice employees who prepares, stores, or serves food. Key Words: Ready-to-Eat Food, Potentially Hazardous Food, Date Marking, Cross-Contamination Instructions: 1. Establish a date marking system and train employees accordingly. The best practice
for a date marking system would be to include a label with the product name, the day or date, and time it is prepared or opened. Examples of how to indicate when the food is prepared or opened include:
• Labeling food with a calendar date, i.e. cut cantaloupe, 5/26/05, 8:00 a.m., • Identifying the day of the week, i.e. cut cantaloupe, Monday, 8:00 a.m., or • Using color-coded marks or tags, i.e. cut cantaloupe, blue dot, 8:00 a.m.
means “cut on Monday at 8:00 a.m.”. 2. Label ready-to-eat, potentially hazardous foods that are prepared on-site and held for
more than 24 hours. 3. Label any processed, ready-to-eat, potentially hazardous foods when opened, if they
are to be held for more than 24 hours. 4. Refrigerate all ready-to-eat, potentially hazardous foods at 41º F or below. 5. Serve or discard refrigerated, ready-to-eat, potentially hazardous foods within 7 days. 6. Indicate with a separate label the date prepared, the date frozen, and the date thawed
of any refrigerated, ready-to-eat, potentially hazardous foods. 7. Calculate the 7-day time period by counting only the days that the food is under
refrigeration. For example: • On Monday, 8/1/05, lasagna is cooked, properly cooled, and refrigerated with
a label that reads, “Lasagna – Cooked – 8/1/05.” • On Tuesday, 8/2/05, the lasagna is frozen with a second label that reads,
“Frozen – 8/2/05.” Two labels now appear on the lasagna. Since the lasagna was held under refrigeration from Monday, 8/1/05 – Tuesday, 8/2/05, only 1 day is counted towards the 7-day time period.
• On Tuesday, 8/16/05, the lasagna is pulled out of the freezer. A third label is placed on the lasagna that reads, “Thawed – 8/16/05.” All three labels now appear on the lasagna. The lasagna must be served or discarded within 6 days.
8. Follow State and local public health requirements.
38
uSda Sample haCCp plan, Continued
109Culinary Boot Camp training guide Book
11
Date Marking Ready-to-Eat, Potentially Hazardous Food, continued (Sample SOP)
Monitoring: A designated employee will check refrigerators daily to verify that foods are date marked and that foods exceeding the 7-day time period are not being used or stored. Corrective Measure: Foods that are not date marked or that exceed the 7-day time period will be discarded. Verification and Record Keeping: Foodservice manager will complete the Food Safety Checklist daily. Date Implemented: By: Date Reviewed: By: Date Revised: By:
39
uSda Sample haCCp plan, Continued

110 Culinary Boot Camp training guide Book
12
Personal Hygiene
(Sample SOP)
Purpose: To prevent contamination of food by foodservice employees Scope: This procedure applies to foodservice employees who handles, prepares, or serves food Key Words: Personal Hygiene, Cross-Contamination, Contamination Instructions: 1. Train foodservice employees on the employee health policy (Develop SOP for
Implementing an Employee Health Policy) and on practicing good personal hygiene. 2. Follow the employee health policy. 3. Report to work in good health, clean, and dressed in clean attire. 4. Change apron when it becomes soiled. 5. Wash hands properly, frequently, and at the appropriate times. 6. Keep fingernails trimmed, filed, and maintained so that the edges are cleanable and
not rough. 7. Avoid wearing artificial fingernails and fingernail polish. 8. Wear single-use gloves if artificial fingernails or fingernail polish are worn. 9. Do not wear any jewelry except for a plain ring such as a wedding band. 10. Treat and bandage wounds and sores immediately. When hands are bandaged, single
use gloves must be worn. 11. Cover a lesion containing pus with a bandage. If the lesion is on a hand or wrist,
cover with an impermeable cover such as a finger cot or stall and a single-use glove. 12. Eat, drink, use tobacco, or chew gum only in designated break areas where food or
food contact surfaces may not become contaminated. 13. Taste food the correct way:
• Place a small amount of food into a separate container. • Step away from exposed food and food contact surfaces. • Use a teaspoon to taste the food. Remove the used teaspoon and container to the
dish room. Never reuse a spoon that has already been used for tasting. • Wash hands immediately.
14. Wear suitable and effective hair restraints while in the kitchen. 15. Follow State and local public health requirements.
40
uSda Sample haCCp plan, Continued

111Culinary Boot Camp training guide Book
13
Personal Hygiene, continued (Sample SOP) Monitoring: A designated foodservice employee will inspect employees when they report to work to be sure that each employee is following this SOP. The designated foodservice employee will monitor that all foodservice employees are adhering to the personal hygiene policy during all hours of operation. Corrective Action: Any foodservice employee found not following this procedure will be retrained at the time of the incident. Affected food will be discarded. Verification and Record Keeping: The foodservice manager will verify that foodservice employees are following this policy by visually observing the employees during all hours of operation. The foodservice manager will complete the Food Safety Checklist daily. Foodservice employees will record any discarded food on the Damaged or Discarded Product Log, which will be kept on file for a minimum of one year. Date Implemented: By: Date Reviewed: By: Date Revised: By:
41
uSda Sample haCCp plan, Continued

112 Culinary Boot Camp training guide Book14
Reheating Potentially Hazardous Foods
(Sample SOP)
Purpose: To prevent foodborne illness by ensuring that all foods are reheated to the appropriate internal temperature Scope: This procedure applies to foodservice employees who prepare or serve food. Key Words: Cross-Contamination, Temperatures, Reheating, Holding, Hot holding Instructions: 1. Train foodservice employees who prepare or serve food on using a food thermometer
and how to reheat foods using this procedure. 2. Follow State or local health department requirements regarding reheating
temperatures. 3. If State or local requirements are based on the 2001 FDA Food Code, heat processed,
ready-to-eat foods from a package or can, such as canned green beans or prepackaged breakfast burritos, to an internal temperature of at least 135 oF for 15 seconds for hot holding.
4. Reheat the following products to 165 oF for 15 seconds: • Any food that is cooked, cooled, and reheated for hot holding • Leftovers reheated for hot holding • Products made from leftovers, such as soup • Precooked, processed foods that have been previously cooled
5. Reheat food for hot holding in the following manner if using a microwave oven: • Heat processed, ready-to-eat foods from a package or can to at least 135 oF for 15
seconds • Heat leftovers to 165 oF for 15 seconds • Rotate (or stir) and cover foods while heating • Allow to sit for 2 minutes after heating
6. Reheat all foods rapidly. The total time the temperature of the food is between 41 oF and 165 oF may not exceed 2 hours.
7. Serve reheated food immediately or transfer to an appropriate hot holding unit. Monitoring: 1. Use a clean, sanitized, and calibrated probe thermometer. 2. Take at least two internal temperatures from each pan of food.
42
uSda Sample haCCp plan, Continued

113Culinary Boot Camp training guide Book
15
Reheating Potentially Hazardous Foods, continued (Sample SOP)
Corrective Action: Continue reheating/heating food if the internal temperature does not reach the required temperature.
Verification and Record Keeping: Foodservice employees will record product name, time, the two temperatures/times, and any corrective action taken on the Cooking – Reheating Temperature Log. Foodservice manager will verify that foodservice employees have taken the required reheating temperatures by visually monitoring foodservice employees during the shift and reviewing, initialing, and dating the Cooking – Reheating Temperature Log at the close of each day. The Cooking – Reheating Temperature Logs are kept on file for a minimum of one year. Date Implemented: By: Date Reviewed: By: Date Revised: By:
43
uSda Sample haCCp plan, Continued

114 Culinary Boot Camp training guide Book
16
Receiving Deliveries (Sample SOP)
Purpose: To ensure that all food is received fresh and safe when it enters the foodservice operation, and to transfer food to proper storage as quickly as possible Scope: This procedure applies to foodservice employees who handles, prepares, or serves food. Key Words: Cross-Contamination, Temperatures, Receiving, Holding, Frozen Goods, Delivery Instructions: 1. Train foodservice employees who accept deliveries on proper receiving procedures. 2. Schedule deliveries to arrive at designated times during operational hours. 3. Post the delivery schedule including the names of vendors, days and times of
deliveries, and drivers’ names. 4. Establish a rejection policy to ensure accurate, timely, consistent, and effective
refusal and return of rejected goods. 5. Organize freezer and refrigeration space, loading docks, and store rooms before
deliveries. 6. Gather product specification lists and purchase orders, temperature logs, calibrated
thermometers, pens, flashlights, and clean loading carts before deliveries. 7. Keep receiving area clean and well lighted. 8. Do not touch ready-to-eat foods with bare hands. 9. Determine whether foods will be marked with the date of arrival or the “use-by” date
and mark accordingly upon receipt. 10. Compare delivery invoice against products ordered and products delivered. 11. Transfer foods to their appropriate locations as quickly as possible.
Monitoring: 1. Inspect the delivery truck when it arrives to ensure that it is clean, free of putrid
odors, and organized to prevent cross-contamination. Be sure refrigerated foods are delivered on a refrigerated truck.
2. Check the interior temperature of refrigerated trucks. 3. Confirm vendor name, day and time of delivery, as well as driver’s identification
before accepting delivery. If driver’s name is different than what is indicated on the delivery schedule, contact the vendor immediately.
4. Check frozen foods to ensure that they are all frozen solid and show no signs of thawing and refreezing, such as the presence of large ice crystals or liquids on the bottom of cartons.
44
uSda Sample haCCp plan, Continued
115Culinary Boot Camp training guide Book
17
Receiving Deliveries, continued (Sample SOP)
5. Check the temperature of refrigerated foods.
a. For fresh meat, fish, and poultry products, insert a clean and sanitized thermometer into the center of the product to ensure a temperature of 41 ºF or below. The temperature of milk should be 45 ºF or below.
b. For packaged products, insert a food thermometer between two packages being careful not to puncture the wrapper. If the temperature exceeds 41 ºF, it may be necessary to take the internal temperature before accepting the product.
c. For eggs, the interior temperature of the truck should be 45 ºF or below. 6. Check dates of milk, eggs, and other perishable goods to ensure safety and quality. 7. Check the integrity of food packaging. 8. Check the cleanliness of crates and other shipping containers before accepting
products. Reject foods that are shipped in dirty crates. Corrective Action: 1. Reject the following:
a. Frozen foods with signs of previous thawing b. Cans that have signs of deterioration – swollen sides or ends, flawed seals or
seams, dents, or rust c. Punctured packages d. Expired foods e. Foods that are out of safe temperature zone or deemed unacceptable by the
established rejection policy Verification and Record Keeping: Record temperature and corrective action on the delivery invoice or on the Receiving Log. Foodservice manager will verify that foodservice employees are receiving products using the proper procedure by visually monitoring receiving practices during the shift and reviewing the Receiving Log at the close of each day. Receiving Logs are kept on file for a minimum of one year. Date Implemented: By: Date Reviewed: By: Date Revised: By:
45
uSda Sample haCCp plan, Continued
116 Culinary Boot Camp training guide Book
18
Storing and Using Poisonous or Toxic Chemicals (Sample SOP)
Purpose: To prevent foodborne illness by chemical contamination Scope: This procedure applies to foodservice employees who use chemicals in the kitchen. Keywords: Chemicals, Cross-Contamination, Contamination, Material Safety Data Sheet Instructions: 1. Train foodservice employees on the proper use, storage, and first aid of chemicals and
on the proper use of chemical test kits as specified in this procedure. 2. Designate a location for storing the Material Safety Data Sheets (MSDS). 3. Label and date all poisonous or toxic chemicals with the common name of the
substance. 4. Store all chemicals in a designated secured area away from food and food contact
surfaces using spacing or partitioning. 5. Limit access to chemicals by use of locks, seals, or key cards. 6. Maintain an inventory of chemicals. 7. Store only chemicals that are necessary to the operation and maintenance of the
kitchen. 8. Mix, test, and use sanitizing solutions as recommended by the manufacturer, State, or
local health department. 9. Use the appropriate chemical test kit to measure the concentration of sanitizer each
time a new batch of sanitizer is mixed. 10. Follow manufacturer’s directions for specific mixing, storing, and first aid
instructions on chemicals. 11. Do not use chemical containers for storing food or water. 12. Use only hand sanitizers that comply with the 2001 FDA Food Code. Confirm with
the manufacturer that the hand sanitizers used meet the requirements of the FDA Food Code.
13. Label and store first aid supplies in a container that is located away from food or food contact surfaces.
14. Label and store medicines for employee use in a designated area and away from food contact surfaces. Do not store medicines in food storage areas.
15. Store refrigerated medicines in a covered, leak proof container, where they are not accessible to children, and cannot contaminate food.
16. Follow State and local public health requirements.
46
uSda Sample haCCp plan, Continued

117Culinary Boot Camp training guide Book
19
Storing and Using Poisonous or Toxic Chemicals, continued (Sample SOP)
Monitoring: Foodservice employees and foodservice manager will visually observe that chemicals are being stored, labeled, and used properly during all hours of operation. Corrective Action: Discard any food contaminated by chemicals. Label and/or properly store any unlabeled or misplaced chemicals. Verification and Record Keeping: Foodservice manager will complete the Food Safety Checklist daily to indicate that monitoring is completed. Foodservice employees will record the name of the contaminated food, date, time, and the reason why the food was discarded on the Damaged and Discarded Product Log. The foodservice manager will verify that appropriate corrective actions are being taken by reviewing, initialing, and dating the Damaged and Discarded Product Log each day. Damaged and Discarded Product Logs are kept on file for a minimum of one year. Date Implemented: By: Date Reviewed: By: Date Revised: By:
47
uSda Sample haCCp plan, Continued

118 Culinary Boot Camp training guide Book
20
Using Suitable Utensils When Handling Ready-to-Eat Foods
(Sample SOP)
Purpose: To prevent foodborne illness due to hand-to-food cross-contamination Scope: This procedure applies to foodservice employees who prepare, handle, or serves food. Key Words: Ready-to-Eat food, Cross-Contamination Instructions: 1. Use proper hand washing procedures to wash hands and exposed arms prior to
preparing or handling food or at anytime when the hands may have become contaminated.
2. Do not use bare hands to handle ready-to-eat foods at any time unless washing fruits and vegetables.
3. Use suitable utensils when working with ready-to-eat food. Suitable utensils may include: • Single-use gloves • Deli tissue • Foil wrap • Tongs, spoodles, spoons, and spatulas
4. Wash hands and change gloves: • Before beginning food preparation • Before beginning a new task • After touching equipment (such as refrigerator doors) or utensils that have not
been cleaned and sanitized • After contacting chemicals • When interruptions in food preparation occur, such as when answering the
telephone or checking in a delivery • Handling money • Anytime a glove is torn, damaged, or soiled • Anytime contamination of a glove might have occurred
5. Follow State and local public health requirements. Monitoring: A designated foodservice employee will visually observe that gloves or suitable utensils are used and changed at the appropriate times during all hours of operation.
48
uSda Sample haCCp plan, Continued

119Culinary Boot Camp training guide Book21
Using Suitable Utensils When Handling Ready-to-Eat Foods,
continued (Sample SOP) Corrective Action: Employees observed touching ready-to-eat food with bare hands will be retrained at the time of the incident. Ready-to-eat food touched with bare hands will be discarded. Verification and Record Keeping: The foodservice manager will verify that foodservice workers are using suitable utensils by visually monitoring foodservice employees during all hours of operation. The foodservice manager will complete the Food Safety Checklist daily. The designated foodservice employee responsible for monitoring will record any discarded food on the Damaged and Discarded Product Log. This log will be maintained for a minimum of one year. Date Implemented: By: Date Reviewed: By: Date Revised: By:
49
uSda Sample haCCp plan, Continued
120 Culinary Boot Camp training guide Book22
Washing Fruits and Vegetables
(Sample SOP)
Purpose: To prevent or reduce risk of foodborne illness or injury by contaminated fruits and vegetables. Scope: This procedure applies to foodservice employees who prepare or serve food. Keywords: Fruits, Vegetables, Cross-Contamination, Washing Instructions: 1. Train foodservice employees who prepare or serve food on how to properly wash and
store fresh fruits and vegetables. 2. Wash hands using the proper procedure. 3. Wash, rinse, sanitize, and air-dry all food-contact surfaces, equipment, and utensils
that will be in contact with produce, such as cutting boards, knives, and sinks. 4. Follow manufacturer’s instructions for proper use of chemicals. 5. Wash all raw fruits and vegetables thoroughly before combining with other
ingredients, including: • Unpeeled fresh fruit and vegetables that are served whole or cut into pieces. • Fruits and vegetables that are peeled and cut to use in cooking or served ready-to-
eat. 6. Wash fresh produce vigorously under cold running water or by using chemicals that
comply with the 2001 FDA Food Code. Packaged fruits and vegetables labeled as being previously washed and ready-to-eat are not required to be washed.
7. Scrub the surface of firm fruits or vegetables such as apples or potatoes using a clean and sanitized brush designated for this purpose.
8. Remove any damaged or bruised areas. 9. Label, date, and refrigerate fresh-cut items. 10. Serve cut melons within 7 days if held at 41 ºF or below (see SOP for Date Marking,
Ready-to-Eat, Potentially Hazardous Food). 11. Do not serve raw seed sprouts to highly susceptible populations such as preschool-age
children. 12. Follow State and local public health requirements. Monitoring: Foodservice manager will visually monitor that fruits and vegetables are being properly washed, labeled, and dated during all hours of operation. In addition, foodservice employees will check daily the quality of fruits and vegetables in cold storage.
50
uSda Sample haCCp plan, Continued

121Culinary Boot Camp training guide Book
23
Washing Fruits and Vegetables, continued (Sample SOP) Corrective Action: Unwashed fruits and vegetables will be removed from service and washed immediately before being served. Unlabeled fresh cut items will be labeled and dated. Discard cut melons held after 7 days. Verification and Record Keeping: Foodservice manager will complete the Food Safety Checklist daily to indicate that monitoring is being conducted as specified in this procedure. Date Implemented: By: Date Reviewed: By: Date Revised: By:
51
uSda Sample haCCp plan, Continued

122 Culinary Boot Camp training guide Book
24
Washing Hands
(Sample SOP) Purpose: To prevent foodborne illness caused by contaminated hands Scope: This procedure applies to anyone who handles, prepares, and serves food. Keywords: Handwashing, Cross-Contamination Instructions: 1. Train any individual who prepares or serves food on proper handwashing. Training
may include viewing a handwashing video and demonstrating proper handwashing procedure.
2. Post handwashing signs or posters in a language understood by all foodservice staff near all handwashing sinks, in food preparation areas, and restrooms.
3. Use designated handwashing sinks for handwashing only. Do not use food preparation, utility, and dishwashing sinks for handwashing.
4. Provide warm running water, soap, and a means to dry hands. Provide a waste container at each handwashing sink or near the door in restrooms.
5. Keep handwashing sinks accessible anytime employees are present. 6. Wash hands:
• Before starting work • During food preparation • When moving from one food preparation area to another • Before putting on or changing gloves • After using the toilet • After sneezing, coughing, or using a handkerchief or tissue • After touching hair, face, or body • After smoking, eating, drinking, or chewing gum or tobacco • After handling raw meats, poultry, or fish • After any clean up activity such as sweeping, mopping, or wiping counters • After touching dirty dishes, equipment, or utensils • After handling trash • After handling money • After any time the hands may become contaminated
52
uSda Sample haCCp plan, Continued

123Culinary Boot Camp training guide Book25
Washing Hands, continued (Sample SOP)
7. Follow proper handwashing procedures as indicated below:
• Wet hands and forearms with warm, running water (at least 100 ºF) and apply soap.
• Scrub lathered hands and forearms, under fingernails and between fingers for at least 10 - 15 seconds. Rinse thoroughly under warm running water for 5 - 10 seconds.
• Dry hands and forearms thoroughly with single-use paper towels. • Dry hands for at least 30 seconds if using a warm air hand dryer. • Turn off water using paper towels. • Use paper towel to open door when exiting the restroom.
8. Follow FDA recommendations when using hand sanitizers. These recommendations are as follows:
• Use hand sanitizers only after hands have been properly washed and dried. • Use only hand sanitizers that comply with the 2001 FDA Food Code.
Confirm with the manufacturers that the hand sanitizers used meet these requirements. Use hand sanitizers in the manner specified by the manufacturer.
Monitoring: A designated employee will visually observe the handwashing practices of the foodservice staff during all hours of operation. In addition, the designated employee will visually observe that handwashing sinks are properly supplied during all hours of operation. Corrective Action: Employees that are observed not washing their hands at the appropriate times or using the proper procedure will be asked to wash their hands immediately. Employee will be re-trained to ensure proper handwashing procedure. Verification and Record Keeping: Foodservice manager will complete the Food Safety Checklist daily to indicate that monitoring is being conducted as specified. Date Implemented: By: Date Reviewed: By: Date Revised: By:
53
uSda Sample haCCp plan, Continued
124 Culinary Boot Camp training guide Book26
Appendix II. (SAMPLE) Procedure for Handling Leftover Sliced Turkey A. Roast Turkey. Cook, Serve, Cool Leftovers, Reheat, and Serve ↓ Receive: Frozen turkey from certified vendor (USDA inspected). ↓ Store in walk-in freezer (0°F or below). ↓ Thaw bulk turkey in refrigerator (41°F or below). ↓ Cook to proper temperature (165 °F for a minimum of 15 seconds). ↓ Slice, portion, and serve (hot holding at 135 °F or above). ↓ Immediately refrigerate leftovers. Place in shallow pans and cool to 41°F or below within 6 hours but from 135F to at least 70F in the first 2 hours. (Take temperature at 1.5 hours.) ↓ Remove leftovers from refrigerator and reheat to 165 °F for a minimum of 15 seconds. ↓ Hot hold at 135 °F or above. ↓ Serve.
54
uSda Sample haCCp plan, Continued

125Culinary Boot Camp training guide Book
28
(SAMPLE: Food Safety Program Cont’d) Food Safety Program Review Checklist 1. Documents to review ___ Standard Operating Procedures ___ Food Preparation Process Charts ___ Control Measures in the Process Approach (CCPs and SOPs) ___ Corrective Actions 2. Monitoring recordkeeping. Choose at random one week from the previous four. Type of Record (SOP, CCP, Corrective Action, etc.)
Monitoring Frequency and Procedure (How often? Initialed and dated? Etc.)
Record Location (Where is record kept?)
2. Describe the strengths or weaknesses with the current monitoring or recordkeeping methods.
3. Who is responsible for verifying that the required records are being completed and properly maintained?
4. Describe the training that has been provided to support the food safety
program.
5. Do the managers and staff demonstrate knowledge of the plan?
6. Have there been any changes to the menu or operation (new equipment, etc.)?
7. Was the plan modified because of these changes?
68
27
(SAMPLE: Food Safety Program Cont’d) REVIEW OF THE SCHOOL FOOD SAFETY PROGRAM
The school food service manager will review the school food safety program at the beginning of each school year and when any significant changes occur in the operation. The attached checklist will be used for the review.
67
uSda Sample haCCp plan, Continued
126 Culinary Boot Camp training guide Book
28
(SAMPLE: Food Safety Program Cont’d) Food Safety Program Review Checklist 1. Documents to review ___ Standard Operating Procedures ___ Food Preparation Process Charts ___ Control Measures in the Process Approach (CCPs and SOPs) ___ Corrective Actions 2. Monitoring recordkeeping. Choose at random one week from the previous four. Type of Record (SOP, CCP, Corrective Action, etc.)
Monitoring Frequency and Procedure (How often? Initialed and dated? Etc.)
Record Location (Where is record kept?)
2. Describe the strengths or weaknesses with the current monitoring or recordkeeping methods.
3. Who is responsible for verifying that the required records are being completed and properly maintained?
4. Describe the training that has been provided to support the food safety
program.
5. Do the managers and staff demonstrate knowledge of the plan?
6. Have there been any changes to the menu or operation (new equipment, etc.)?
7. Was the plan modified because of these changes?
68
uSda Sample haCCp plan, Continued

127Culinary Boot Camp training guide Book
Bake: To surround food with hot dry air in the oven as with cakes, bread, and pastries
Baste: To lightly moisten a dish by spooning over melted fat or cooking juices from the dish itself
Beat: To work a substance of mixture energetically to modify its consistency, appearance, or color
Blanch:Tocookbrieflyinboilingwatertofixcolorandtenderize
Boil: To cook submerged in water that has reached 212°F
Bone:Toremovebonesfrommeat,fish,orpoultry
Braise:Tocookcoveredinasmallamountofliquid,withorwithoutbrowningfirst
Bran: The hard outer covering of kernels of wheat and other grains
Bread: To coat with bread crumbs through standard breading procedure
Broil: To cook using radiant overhead heat
Caramelize: To turn sugar into caramel by gently heating; also, browning the natural sugars of certain vegetables
Clarify: To remove impurities
Cream: To blend ingredients together
Creaming Method: To beat fat and sugar together to blend them uniformly and incorporate air
Deep Fry: Cooking an item in fat, usually between 325°F and 375°F
Deglaze: To use the addition of a liquid to lift sediment left in pan after roasting or sautéing in order to make a sauce or gravy
Degrease: To remove excess grease
Dice: To cut into cubes
Drain: To remove excess water or liquid
Dredge:Tocoatwithflour
Dress: To season, stuff and tie poultry
Dry Roast: To roast with no fat or liquid
Dust:Tolightlycoverwithflour,etc.
Emince: To cut into thin slices or rounds
Eviscerate:Toremoveinternalorgansfromfishandpoultry
Extract:Aconcentratedaromaticliquidusedtoenhancetheflavorofcertainculinarypreparations.
gloSSary
128 Culinary Boot Camp training guide Book
Fold: To gently mix in ingredients with a rubber spatula in a folding motion so as to retain volume and lightness
Filet: To remove bones
Garnish: To decorate or embellish a dish or plate
Glaze: To add sweet or shiny coating
Gluten:Anelasticsubstance,formedfromproteinspresentinwheatflours,thatgivesstructureandstrengthtobakedgoods
Griddle: Flat top stove
Grill: To cook by radiant heat, using heat source from below
Hydrogenation: A process that converts liquid oils to solid fats (shortenings) by chemically bonding hydrogen to the fat molecules (now, which are referred to as Trans Fats and are thought to be unhealthful)
Leavening: The production or incorporation of gases in a baked product to increase volume and to produce shape and texture especially in baked goods. Yeast, baking soda and powder are all forms of leavenings
Line: To cover the bottom and sides of a pan to prevent sticking
Marinate:Tosoakinaseasonedorflavoredliquid
Muffin Method: A mixing method, commonly used in baking, in which the mixed dry ingredients are combined with the mixed liquid ingredients
Mince:Tochopfinely
Pan Fry:Tocookinshallowoil,1/2-inch.Foodisusuallyflouredorbreadedfirst
Parboil: To partially cook in boiling water
Pare/Peel: To remove outer skin with knife or peeler
Plunge: To shock in cold water
Poach:Tocookgentlyinflavoredoracidicliquid,160°F to 180°F
Pour Batter: A batter that is liquid enough to pour
Pressure Cook: To cook in liquid under pressure
Proof: To expand dough through yeast’s production of carbon dioxide
gloSSary, Continued

129Culinary Boot Camp training guide Book
Rest: To allow meat to sit before slicing so juices will redistribute throughout the meat; also, to put dough or batter in a cool place as part of its preparation
Rice:Topassthroughthefineholesofaricer(aswithcookedpotatoes)
Roast: To surround food with hot dry air, as in an oven or an open air spit
Sauté: To cook quickly in a small amount of fat
Scaling: To measure ingredients by weight
Sear: To brown on all sides
Simmer: To cook slowly and steadily in a sauce or other liquid over gentle heat at 185°F
Skim: To remove scum and impurities that rise to the surface of a stock or sauce when it is boiled
Steaming: To cook in a perforated container or steamer basket, which is set above boiling water
Steep:Tosoakfoodsinhotliquidtoaddflavor
Stew: As with braising but with bite sized pieces
Stir: To agitate ingredients gently with a utensil
Sweat: To cook vegetables in fat over gentle heat so that they become soft but not brown
Truss: To thread twine through the body of poultry or game bird
Whip/Whisk: To beat and incorporate air
Whole Wheat Flour: Flour made by grinding the entire wheat kernel, including the bran and germ
gloSSary, Continued
130 Culinary Boot Camp training guide Book
A Note on Transitions from Kathleen de Chadenèdes, Director, School Food Initiative
After spending a week in Culinary Boot Camp we hope that you have experienced some moments of professional andpersonaltransformation.Inorderforyouandthechildrenyouservetoderivethemaximumbenefitfromyour hard work at Culinary Boot Camp, the Orfalea Foundation will provide the following services to ensure your professional development:
• Give a presentation on Transitions Management that gives you the tools to make the most of change.
• Arrange for a goal-setting session for you and the decision makers in your workplace to agree on some achievable short-term and long-term goals.
• Conduct a follow-up visit. Members of the Culinary Boot Camp Instructional Team will assist you in the imple-mentation of your goals, evaluate the need to apply for an equipment or infrastructure grant, and help you strategize your way to success.
• Provide on-going technical assistance from our team of Mobile Chef Instructors.
Better school food depends on the cooperation of inspired individuals who keep that Culinary Boot Camp “spark” alive as they implement incremental changes in their food service operations. That spark may manifest itself in a more positive attitude or the courage to use new skills on the job.
Please reach out to each other to share best practices and seek encouragement when confronting challenges. We could not transform school food without you; you are the agents of change.
what ComeS next:

131Culinary Boot Camp training guide Book

132 Culinary Boot Camp training guide Book
Our primary objective is the empowerment of others.We take pride in our dedication to this transformative work, which demands boldness and courage from us and our partners.
We value accountability, candor, initiative, teamwork, and learning through shared successes and failures.We strive to be receptive listeners, and to always show respect for our coworkers, partners, community, and environment.
We honor the entrepreneurial spirit of our founders by seeking innovative solutions and measurable results.
At our best, we use our strength to help others find theirs.
www.OrfaleaFoundation.org