cued recall graphical password resistant to shoulder surfingrepository.um.edu.my/403/1/cued recall...
TRANSCRIPT

CUED RECALL GRAPHICAL PASSWORD SYSTEM RESISTANT TO SHOULDER SURFING
LAI HOOI LI @ LEE HOOI LI
A THESIS SUBMITTED FOR THE MASTER OF COMPUTER SCIENCE IN
THE FACULTY OF COMPUTER SCIENCE AND INFORMATION
TECHNOLOGY, UNIVERSITY OF MALAYA
JULY 2009

ii
Abstract
Access to computer system is often based on the use of alphanumeric passwords.
However, users tend to have difficulty in remembering passwords that are long or
randomly generated. As a consequence, they have the tendency to create short and
simple passwords or write it in a text file and store it in an insecure place such as desk
drawer (Adams and Sasse 1999; Morris and Thompson 1979), which in essence is
highly vulnerable. To overcome such shortcoming, we proposed the use of graphical
password. Graphical password essentially uses images or representation of images as
passwords. Fundamentally, graphical password was designed to make passwords easier
for user to remember, which should in reality points to a more secure password.
According to some survey (Brostoff and Sasse 2000; De Angeli et al. 2002; De Angeli
et al. 2005; Dhamija 2000; Dhamija and Perrig 2000; Wiedenbeck et al. 2005c),
human’s brain is good in remembering picture than textual character.
There are various graphical password schemes or graphical password software in
the market. However, it seems that only a few are capable of resolving the shoulder
surfing issue. Therefore, this research would like to present a graphical password system
which known as Cued Recall Graphical Password System Resistant to Shoulder Surfing
(CRGPS) that uses a scheme that is resistant to shoulder surfing. The adapted scheme is
based on the challenge response interactions and cued recall method. In challenge
response interactions, server will present a challenge to the client and the client need to
give response according to the condition given. If the response is correct then access is
granted. Cued recall is basically a component of a memory task in which the subject
will be asked to recall on items that were presented to them during an initial training or
presentation with some hints being given. Cued recall method was used to increase user
capability in remembering of password. During the usability testing, the experimenter
explained the purpose of the system and how it worked using the user manual. After that,
the participants proceed to login process to authenticate themselves. The first character
of each password will be shown as a hint to the participant in the login process.
A usability testing was carried out to measure the satisfactory level of users on
the completeness of the system, which include factors such as, turnaround time to
access the system, remembering of password using the system and resistant to shoulder
surfing. The testing result shows that the CRGPS is resistant to shoulder surfing.
Besides, the CRGPS is also user friendly and easy to familiarise with the system.

iii
Acknowledgment
I would like to express my deepest gratitude to my supervisor for this project, Dr.
Omar Zakaria, for spending his precious time on supervising me throughout the
semesters. I am thankful to him for the guidance and valuable comments, advices and
suggestions that he has given to me throughout the duration of this project.
My appreciation also goes to Lee Sin Yin, Lim Li Ann, Norhashimi Hussain and
Chandrakumar s/o Sangapillai for providing references.

iv
Table of Contents
Abstract ............................................................................................................................ ii
Acknowledgment ............................................................................................................ iii
Table of Contents ........................................................................................................... iv
List of Figures ............................................................................................................... viii
List of Tables .................................................................................................................. xi
Chapter 1 Introduction ............................................................................................. 1
1.1 Project Overview ............................................................................................ 2
1.2 Project Motivation ......................................................................................... 3
1.3 Problem Definition ......................................................................................... 3
1.4 Objectives of the project ................................................................................ 4
1.5 Project Scope .................................................................................................. 5
1.6 Project Constraints ........................................................................................ 5
1.7 Expected Outcome ......................................................................................... 5
1.8 Project Schedule ............................................................................................. 6
1.9 Conclusion ....................................................................................................... 6
1.10 Thesis Structure ............................................................................................. 7
Chapter 2 Literature Review.................................................................................... 8
2.1 Introduction .................................................................................................... 8
2.2 Authentication ................................................................................................ 9
2.3 Passwords as Authentication Method ........................................................ 10
2.4 Passwords Authentication ........................................................................... 11
2.4.1 Textual Passwords ....................................................................................... 11
2.4.2 Non Textual Passwords (Graphical Passwords) ......................................... 11
2.5 Aspects of Graphical Passwords ................................................................. 12
2.5.1 Remembrance .............................................................................................. 12
2.5.2 Hard to Guess .............................................................................................. 13
2.5.3 Resistant of Shoulder Surfing ..................................................................... 13
2.6 Reviews on Existing Graphical Password Technique ............................... 14
2.6.1 Graphical Password Scheme by Greg Blonder ........................................... 15
2.6.2 Draw - A – Secret (DAS) ............................................................................ 16
2.6.3 Grid Selection.............................................................................................. 17
2.6.4 Graphical Password Scheme by Syukri et al. ............................................. 17
2.6.5 Passpoints .................................................................................................... 18

v
2.6.6 Story ............................................................................................................ 19
2.6.7 Déjà vu ........................................................................................................ 20
2.6.8 Picture Password ......................................................................................... 21
2.6.9 Image-based Authentication........................................................................ 22
2.6.10 Challenge Response Authentication by Sobrado and Birget ...................... 22
2.6.11 Challenge Response Authentication by Man et al. (2003) ......................... 24
2.6.12 Challenge Response Authentication by Hong et al. (2004) ........................ 24
2.6.13 V-Go ............................................................................................................ 25
2.6.14 visKey ......................................................................................................... 26
2.6.15 PassFaces™ ................................................................................................. 27
2.7 Summarisation of Graphical Password Schemes and Software .............. 29
2.8 Cued Recall Graphical Password System Resistant to Shoulder Surfing
(CRGPS) ................................................................................................................... 30
2.9 Conclusion ..................................................................................................... 32
Chapter 3 Methodology .......................................................................................... 33
3.1 Software Development Approach Adapted ............................................... 33
3.2 Suitability of the Proposed Approach ........................................................ 33
3.3 The Unified Process ..................................................................................... 34
3.3.1 The Core Workflows ................................................................................... 36
3.3.2 The Iteration Workflows ............................................................................. 48
3.4 Conclusion ..................................................................................................... 50
Chapter 4 Requirement Capture and Analysis .................................................... 51
4.1 Requirements Capture................................................................................. 51
4.1.1 Actor and Use Cases ................................................................................... 51
4.1.2 Non-functional Requirements Analysis ......................................................... 65
4.1.3 User Interface .............................................................................................. 67
4.1.4 State Machine Diagram ............................................................................... 67
4.1.5 Activity Diagram ......................................................................................... 68
4.2 Analysis ......................................................................................................... 73
4.2.1 Use Case Realisation - Analysis ................................................................. 73
4.2.2 Analysis Class ............................................................................................. 77
4.3 A Review of Development Tools ................................................................. 78
4.3.1 Programming Languages ............................................................................ 78
4.3.2 Relational Databases ................................................................................... 82
4.3.3 Database Connectivity ................................................................................ 83

vi
4.3.4 Web Server .................................................................................................. 84
4.3.5 Consideration of Client-Server Computing ................................................ 85
4.3.6 Cryptography .............................................................................................. 86
4.4 Proposed Tools ............................................................................................. 87
4.5 Run Time Requirements ............................................................................. 88
4.6 Conclusion ..................................................................................................... 88
Chapter 5 Design ..................................................................................................... 89
5.1 Use Case Realisation – Design ..................................................................... 89
5.2 Design Class .................................................................................................. 93
5.3 Database Design ........................................................................................... 93
5.3.1 Data Flow Diagram (DFD) ......................................................................... 94
5.3.2 Table Name and Functions.......................................................................... 95
5.3.3 Design of Tables ......................................................................................... 96
5.4 Entity Relationship Diagram ...................................................................... 97
5.5 Overview of CRGPS Structure ................................................................... 97
5.6 Interface Design ............................................................................................ 98
5.6.1 Form Design .............................................................................................. 101
5.7 System Design ............................................................................................. 102
5.8 Conclusion ................................................................................................... 102
Chapter 6 Implementation ................................................................................... 103
6.1 Activity: Architectural implementation ................................................... 103
6.2 Activity: Integrate system.......................................................................... 104
6.3 Activity: Implement a subsystem .............................................................. 105
6.4 Activity: Implement a class ....................................................................... 106
6.5 Perform unit test ........................................................................................ 107
6.6 Conclusion ................................................................................................... 107
Chapter 7 Testing .................................................................................................. 108
7.1 Activity: Plan test ....................................................................................... 108
7.2 Activity: Design test ................................................................................... 109
7.3 Activity: Implement test ............................................................................ 115
7.4 Activity: Perform integration test............................................................. 116
7.5 Activity: Perform system test .................................................................... 116
7.6 Activity: Evaluate test ................................................................................ 117
7.7 Usability Study ........................................................................................... 117
7.8 Discussion and Conclusion ........................................................................ 120

vii
Chapter 8 Discussion ............................................................................................. 121
8.1 Problem Encounter .................................................................................... 121
8.2 System strengths ......................................................................................... 121
8.3 System Limitations ..................................................................................... 122
8.4 Research Contribution .............................................................................. 122
8.5 Epilogue ....................................................................................................... 122
BIBLIOGRAPHY ....................................................................................................... 124
Appendix A – CRGPS’s Source Code I (Login) ....................................................... 129
Appendix B – CRGPS’s Source Code II (Registration) .......................................... 150
Appendix C – CRGPS’s Source Code III (Reset) .................................................... 169
Appendix D – CRGPS’s Source Code (Failed Login) .............................................. 192
viii
List of Figures
Figure 1-1 Flow chart analysing the deficiency of a typical alphanumeric passwords
authentication system ........................................................................................................ 3
Figure 1-2 Project scope for CRGPS ................................................................................ 5
Figure 1-3 Gant chart showing the schedule of this project ............................................. 6
Figure 2-1 Simple Layout of a Firewall (O’Gorman et al. 2005, pp. 546) ..................... 10
Figure 2-2 Graphical password scheme suggested by Blonder 1996 ............................. 16
Figure 2-3 Draw – A – Secret scheme ............................................................................ 17
Figure 2-4 Grid selection scheme ................................................................................... 17
Figure 2-5 Syukri et al. scheme ...................................................................................... 18
Figure 2-6 Passpoints scheme ......................................................................................... 19
Figure 2-7 Story scheme ................................................................................................. 20
Figure 2-8 Déjà Vu scheme............................................................................................. 20
Figure 2-9 Picture password scheme............................................................................... 21
Figure 2-10 Image-based authentication scheme ............................................................ 22
Figure 2-11 Sobrado and Birget’s first method-triangle scheme .................................... 23
Figure 2-12 Sobrado and Birget’s second method-intersection scheme ......................... 23
Figure 2-13 Sobrado and Birget’s third method-movable frame scheme ....................... 23
Figure 2-14 Shoulder surfing solution of Man et al. ....................................................... 24
Figure 2-15 V-Go login screens ...................................................................................... 26
Figure 2-16 visKey login screens .................................................................................... 27
Figure 2-17 PassFaces™ login window .......................................................................... 28
Figure 3-1 Models of the Unified Process ...................................................................... 34
Figure 3-2 Phases further divided into more iteration .................................................... 35
Figure 3-3 Core workflows in iteration ........................................................................... 35
Figure 3-4 Iterations in action ......................................................................................... 35
Figure 3-5 Emphasis shifts over the iterations, from requirements capture and analysis
toward design, implementation, and testing .................................................................... 36
Figure 3-6 The workflow of capturing requirements as use cases .................................. 37
Figure 3-7 Use cases model of CRGPS .......................................................................... 38
Figure 3-8 CRGPS user interface design ........................................................................ 39
Figure 3-9 Message state machine diagram .................................................................... 39
Figure 3-10 Login activity diagram ................................................................................ 40
Figure 3-11 The workflow in analysis ............................................................................ 41

ix
Figure 3-12 Login communication diagram ................................................................... 41
Figure 3-13 The input and result of activity analyse a class ........................................... 42
Figure 3-14 Class diagram showing the analysis class of CRGPS ................................. 43
Figure 3-15 Login sequence diagram .............................................................................. 45
Figure 3-16 Class diagram of CRGPS ............................................................................ 46
Figure 3-17 The input and result of activity design a class ............................................ 47
Figure 3-18 Deployment diagram of CRGPS ................................................................. 47
Figure 4-1 Use cases model of CRGPS .......................................................................... 52
Figure 4-2 CRGPS user interface design ........................................................................ 67
Figure 4-3 Message state machine diagram .................................................................... 68
Figure 4-4 Password state machine diagram ................................................................... 68
Figure 4-5 Detail state machine diagram ........................................................................ 68
Figure 4-6 Login activity diagram .................................................................................. 69
Figure 4-7 Register activity diagram............................................................................... 70
Figure 4-8 Reset Activity Diagram ................................................................................. 72
Figure 4-9 Login communication diagram ..................................................................... 74
Figure 4-10 Register communication diagram ................................................................ 75
Figure 4-11 Reset Communication diagram ................................................................... 76
Figure 4-12 Class diagram showing the analysis classes of CRGPS .............................. 78
Figure 4-13 Two tier Architecture .................................................................................. 85
Figure 4-14 Three-tier Architecture ................................................................................ 86
Figure 5-1 Login sequence diagram ................................................................................ 90
Figure 5-2 Register sequence diagram ............................................................................ 91
Figure 5-3 Reset sequence diagram ................................................................................ 92
Figure 5-4 Class diagram of CRGPS .............................................................................. 93
Figure 5-5 Content level DFD......................................................................................... 94
Figure 5-6 Level 1 DFD .................................................................................................. 95
Figure 5-7 Entity Relationship Diagram ......................................................................... 97
Figure 5-8 CRGPS Architecture ..................................................................................... 98
Figure 5-9 CRGPS simple flow chart ............................................................................. 98
Figure 5-10 Login page design ....................................................................................... 99
Figure 5-11 Registration page design ........................................................................... 100
Figure 5-12 Reset page design ...................................................................................... 101
Figure 6-1 The activities in the implementation workflow ........................................... 103
Figure 6-2 The input and result of activity architectural implementation .................... 104

x
Figure 6-3 Deployment diagram ................................................................................... 104
Figure 6-4 The input and result of activity integrate system ........................................ 105
Figure 6-5 The input and result of activity implement a subsystem ............................. 106
Figure 6-6 The input and result of activity implement a class ...................................... 107
Figure 6-7 The input and result of activity perform unit test ........................................ 107
Figure 7-1 The activities in workflow test .................................................................... 108
Figure 7-2 The input and result of activity plan test ..................................................... 109
Figure 7-3 The input and result of activity design test.................................................. 110
Figure 7-4 The input and result of activity implement test ........................................... 115
Figure 7-5 The input and result of activity perform integration test ............................. 116
Figure 7-6 The input and result of activity perform system test ................................... 116
Figure 7-7 The input and result of activity evaluate test ............................................... 117
Figure 7-8 Mean times for input of 10 correct logins (N = 15) .................................... 118

xi
List of Tables
Table 2-1 Summarisation of graphical password schemes or software .......................... 29
Table 3-1 Use cases and flow of events of Login in CRGPS ......................................... 37
Table 3-2 Analysis class table ......................................................................................... 42
Table 3-3 Test cases of CRGPS ...................................................................................... 48
Table 4-1 Use case diagram‘s symbol and explanation .................................................. 51
Table 4-2 Use cases and flow of events of Login process .............................................. 52
Table 4-3 Use cases and flow of events of Register process .......................................... 55
Table 4-4 Use cases and flow of events of Reset process ............................................... 59
Table 4-5 State machine diagram’s symbol and explanation.......................................... 67
Table 4-6 Activity diagram’s symbol and explanation ................................................... 68
Table 4-7 Communication diagram’s symbol and explanation ...................................... 73
Table 4-8 Analysis classes with their responsibilities and attributes .............................. 77
Table 4-9 Class diagram’s symbol and explanation ....................................................... 77
Table 5-1 Sequence diagram’s symbol and explanation ................................................. 89
Table 5-2 DFD’s symbol and explanation ...................................................................... 94
Table 5-3 Table Detail .................................................................................................... 96
Table 5-4 Table Password ............................................................................................... 96
Table 7-1 Test case about password of CRGPS ........................................................... 111
Table 7-2 Test cases about User ID of CRGPS ............................................................ 112
Table 7-3 Test cases about Login page of CRGPS ....................................................... 113
Table 7-4 Test cases about Register page of CRGPS ................................................... 114
Table 7-5 Test cases about Reset page of CRGPS ........................................................ 115
Table 7-6 Comments on Shoulder Surfing the system.................................................. 119

1
Chapter 1 Introduction
User authentication for network or internet based environment posed a
challenging task for system and network administrator. This statement is truly and is
still very much applicable till these days as it is a well known fact that authentication is
being widely incorporated as part of access control for most systems.
Authentication has been the catalyst for business organisation in information
protection and security. Implementation of access control policies, standards or
procedures would surely involve the identification of appropriate authentication
mechanism whereby the criticality of the information being protected are being used as
justification for having a more refined authentication mechanism as compared to a more
simple approach.
Without the appropriate authentication mechanism in place, attacker could easily
gain access to systems or applications by utilising personal information, gained through
various means, including but not limited to social engineering.
Conventional textual passwords are the most common mechanism used in
authentication. This method requires a user to enter their username and password, either
in alphabet or numeric, or more commonly, a mixture of both forms as authentication
tokens to gain access to system or applications. Two recent surveys have shown that
users choose short, simple passwords that are easily guessable, for example, “password”,
personal names of family members, names of pets, and dictionary words (Sasse et al.
2001; Brown et al. 2004). Ironically, these practices are one of many loopholes that can
be compromise easily. Therefore, it is essential that the application of this mechanism
involve having appropriate complexity rules, such that the probability of password
being crack is less likely.
Without the appropriate complexity, passwords can be easily crack through
dictionary attack. With the complexity in place, especially when using a non dictionary
word, users tend to type such passwords 40 percent slower than the time use for typing
of dictionary words (Thomas et al. 2005). The slower rate of typing essentially would
render the user more vulnerable to shoulder surfing. Shoulder surfing is basically a form
of social engineering whereby an attacker would look over his/her victim shoulder to
establish the password that are being entered.
To counteract the shoulder surfing problem and to make a balancing act on user
friendliness and authentication complexity, we presented the usage of graphical

2
passwords in the authentication process to offset against shoulder surfing and make the
graphical password system more memorable to the users by using cued recall method.
This chapter would be an introductory chapter to the project whereby an
overview of the project, the motivations behind, definition of the problem domain, the
objectives of the project, the project scope, project constraints, the expected outcome of
this project, the project schedule will be presented. Finally, the conclusion of this
chapter and a thesis structure respectively.
1.1 Project Overview
The outcome for this project would be a web based authentication system, with
graphical password as the access control mechanism. The outcome is code name
‘CRGPS’ (Cued Recall Graphical Password System Resistant to Shoulder Surfing) and
will be known as such throughout this document.
The implementation of the system on web platform is to ensure that the system
is platform independent, which can be adapted for most, if not all type of systems. Also,
as current trend shows, there is an urgent need to have a more secure authentication
mechanism for web based environment, where most current systems are typically being
emphasises on and where commercial growth are apparent at this moment. Our focus
for this project is to ensure the balancing between user friendliness and hard to guess by
using the graphical password authentication mechanism and will be discussed and
presented throughout this document.
Present authentication system usually employ alphanumeric password for their
access control, which has been in existence since 1960s. It is well known that such
authentication mechanism are highly susceptible to attack as user has the tendency to
choose passwords that are easy to remember, which means that it will also be easy for
an attacker to crack it (Windenbeck et al. 2005a, 2005b, 2006). Essentially, this project
would also emphasise on providing a secure environment to its user, without
compromising on the user-friendliness of the system.
3
1.2 Project Motivation
This project is driven by the fact that there are many weaknesses for existing
alphanumeric passwords authentication system. Most problems associated with
alphanumeric passwords are related to the recollection of secure passwords
(Windenbeck et al. 2005a, 2005b, 2006; Sobrado and Birget 2002).
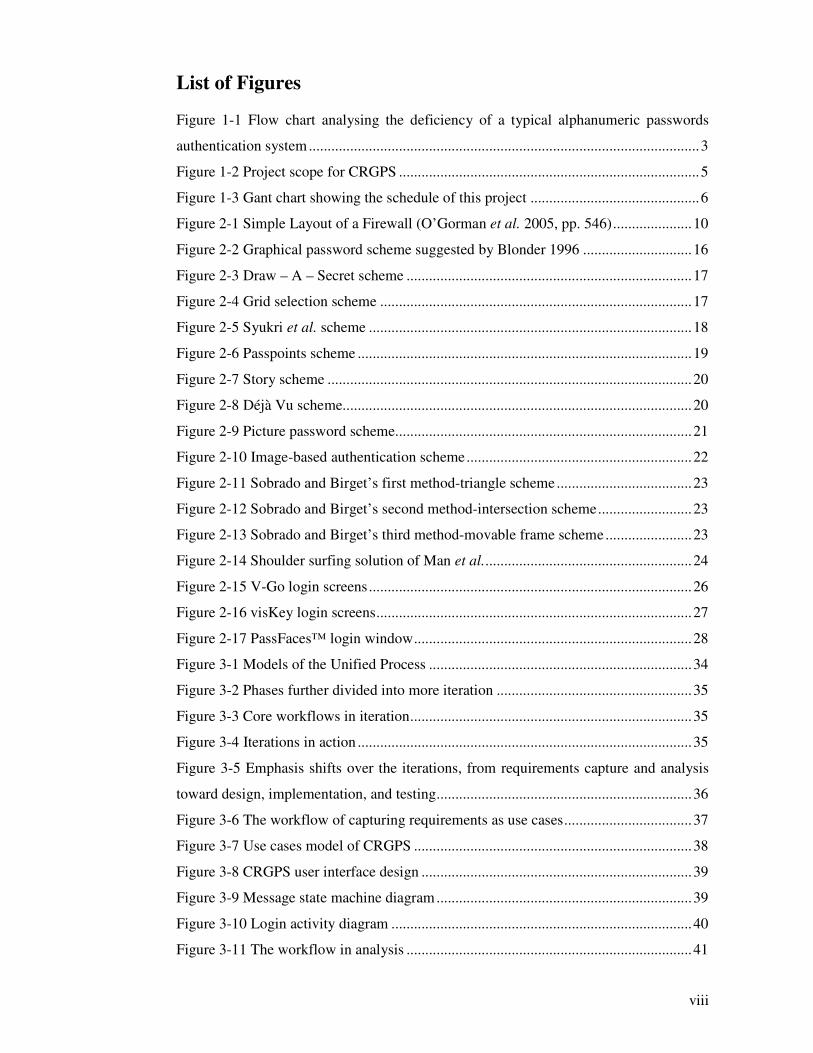
In order to obtain a clearer view, a problem analysis was performed to locate the
deficiencies of a typical alphanumeric passwords authentication system. The result is
illustrated in Figure 1-1. Flow chart below outlined four problems of a typical
alphanumeric passwords authentication system. These problems will be further
discussed in section 1.3.
Figure 1-1 Flow chart analysing the deficiency of a typical alphanumeric passwords authentication
system
1.3 Problem Definition
Through comparison of the four problems being mentioned in Figure 1-1, the
problem associated to vulnerability to shoulder surfing is a major flaw that needs to be
address for current authentication system including graphical password authentication
system and traditional alphanumeric password authentication system. According to
Webopedia Computer Dictionary, ‘shoulder surfing refer to a direct observation, such as
looking over a person’s shoulder, to obtain information’ (Jupitermedia Corporation
2008). As define, shoulder surfing usually happen in busy and crowded place, where the
person standing behind would try to peek over your back in order to obtain private
Motivation of Research Weaknesses of textual
password
Textual password was:
1. hard to remember
2. easy to guess
3. prone to shoulder surfing
4. less password space
Problem Statements
Developing CRGPS Potential solution

4
information, such as when you enter your private information into a web based check
out shopping cart. Examples of private information are your ATM Pin number or credit
card details.
Easy to guess passwords are the other common problem of traditional textual
passwords. Many users choose textual passwords that are relatively easy to guess for
convenient sake. The criticality of this problem has been analysed and emphasised in
several studies (Klein 1990; Adams and Sasse 1999; Yan et al. 2000; Belgers 1993). For
the past decade or so, crackers or hackers have been focusing on the usages of
“dictionary attack”, along with buffer overflow and packet sniffing, in cases more than
any other type of attack (Password Portal, Inc. 2004).
However, usage of a passwords which is not a dictionary word or is a hard to
guess words, such as a pseudo phase, means that the password will bring about another
issue, which is to remember the strong password. Passwords and PIN are use for variety
of daily function such as authentication, access control and signatures. Thus, with so
many passwords to remember, it would be quite impossible for users to manage them. A
number of studies show that most users cannot remember a unique set of authenticator
for each system they use (Adams and Sasse 1999; Weinshall and Kirkpatrick 2004; Yan
et al. 2004). Apparently, this problem is the biggest contributor to usability issues.
It is known that typical eight character textual passwords would have much less
password space as compared to graphical passwords. Typical textual passwords consist
of upper or lower case character or no- alphanumeric character such as %, *, = and etc.
The size of the textual password of length 8 was 958≈2
53. However, this comparison
does not stop there as graphical passwords are typically more complicated and has a
more complex access control mechanism as compared to traditional authentication
system.
1.4 Objectives of the project
The objectives of this project are:
1. To study various methods of graphical password systems.
2. To develop an appropriate graphical password authentication system that is
resistant to shoulder surfing.
3. To test and ensure that the developed graphical password authentication system
resistant to shoulder surfing.

5
1.5 Project Scope
The system for this project will be developed through use of object-oriented
method. The main purpose for usage of object-oriented method is to realise the
objective of having an architecture design that are easily expandable and robust in
nature. The project scope includes an authentication system that can connect to the other
kind of system such as accounting system, administration system or payroll system as
show in Figure 1-2.
Figure 1-2 Project scope for CRGPS
1.6 Project Constraints
Some of the project constraints are listed below:
1. Need to have Internet access.
2. The connection speed of the Internet Access might affect the effectiveness of the
web-based environment.
3. Server’s low bandwidth could cause the connection to ‘drop’ and ‘down’ the
website.
4. Extra hardware or software might be needed such as IIS 6.0.
1.7 Expected Outcome
The expected outcome of the project should be clearly outlined even before the
development phase. These expectations are outlined by taking into account the
capabilities of the system developer, technology available, as well as the project
timeline. These expectations are as follows:
1. The Cued Recall Graphical Password System Resistant to Shoulder Surfing
(CRGPS) is expected to be a platform allowing users to link to other system that
using Microsoft OS without any difficulties.
2. The system should resistant to shoulder surfing.
3. The system should be user friendly and the password should be hard to guess.

6
4. The system should be well defined whereby any ‘hole’ of the system will be
analyst thoroughly and ‘patch’ accordingly in system testing and unit testing.
5. A user manual will be provided to end users.
1.8 Project Schedule
ID Task Name Start End Duration
2007
Q3Q1 Q4
1 2.80w8/2/20077/16/2007Inception Phase
2 4.60w9/3/20078/2/2007Elaboration Phase
3 57.60w10/8/20089/3/2007Construction Phase
4 12.20w12/31/200810/8/2008Transition Phase
Q2Q3
2008
Q4
Figure 1-3 Gant chart showing the schedule of this project
Figure 1-3 is a Gantt chart outlining the project schedule. Tasks identified for
this project would follow the software development approach. The approach will be
further described in Chapter 3.
1.9 Conclusion
The expected product for this project is a graphical password system that are
resistant to shoulder surfing. The objective of this project would be to strive to identify
and study the pros and cons of existing graphical password system and to come out with
a more comprehensive graphical passwords authentication system. It is also hopeful that
the new system would be able to address the four problem identified earlier, which are
difficulty in remembering of strong password, vulnerability of current method to
shoulder surfing, insufficient passwords space or complexity and vulnerability of
password to dictionary attack for easy to guess passwords. Other than the graphical
passwords system, a printed user manual will also be provides as part of this project.

7
1.10 Thesis Structure
This research focus on the development of a system named Cued Recall
Graphical Password System Resistant to Shoulder Surfing (CRGPS), a web based
authentication system. There are total twelve chapters in this report. The first chapter is
the introduction to the project. This chapter would provide a short outline and
introduction of the CRGPS. Details included are the project overview, project
motivation, problem definition, objectives of the project, project scope, project
constraints, expected outcome, project schedule, conclusion and thesis structure.
The second chapter is the literature review where research conducted and
literature surveyed before the project analysis and design phase are described. This
chapter indicates finding, summarisation, analysis and synthesis for all the literature
being reviewed.
The third chapter is on methodology. Through this chapter the methodology,
mechanism, and approach to be adapted is clearly identified. The quality of the
proposed tools, which refers to the practicality of the chosen tools, their effectiveness,
and appropriateness in solving the problems are being introduced here.
The forth chapter is about requirement capture and analysis, where project and
system requirements are captured and analyst for implementation during the design
phase.
The fifth chapter, which is the system design, clearly identified and explained
the various component of the proposed system. This chapter describes in detail the
translation of the system requirements into a representation of the system.
The sixth chapter presents the result of the implementation. This chapter
includes details on architectural implementation, system integration, implementation of
subsystem and unit testing.
Chapter seven would discusses the software testing and provide description on
how to plan, design and implement the testing. Software testing for this system includes
integration test and system test. The last part of chapter would provide an evaluation on
the test and a usability study of the system.
Chapter eight would interpret on the resulting system. This chapter would
discuss on the various problem encountered, the system strengths and system
weaknesses, the conclusion and future work. This chapter concludes the project and
gives some aspect for future works
The last chapter of this document are the bibliography and appendices.

8
Chapter 2 Literature Review
2.1 Introduction
Literature review is an analysis on gathered information about the topic, which
in this context, the system which we intend to develops. In order to gauge the state or
limitation of existing system, this approach will be use in evaluation of existing system
with regards to the topic. And hopefully, the evaluation results would provide basis on
factors that could be improves or develops upon. Literature review would also
encompass the comparison of software, tools and approaches that could be adopted in
order to come out with the best combination that could produce the best outcome.
Without this analysis, we would not be able to identity the strength and weaknesses of
each and every factor that would have an impact on the effectiveness and efficiency in
which this project would flow upon.
Overall, all the information needed for this project was gathered through several
ways and methods which include:
� Printed material
� Books, journals and articles
� Internet - Search engines such as Yahoo, Google and MSN are used to look up
for information.
� Reviews on existing graphical password authentication systems - Survey was
done on some of the graphical password schemes and software to have a better
understanding of how graphical password functions and are implemented. In
addition, problems or issues faced by existing systems are also noted.
Essentially, the literature review for this project will focus on reviewing of
existing graphical password schemes and on the selection of the most appropriate
development tools. The chapter would start with a brief overview in section 2.1. Section
2.2 will define what is authentication whereas section 2.3 will explain why password
had been chosen in authentication process. Section 2.4 will list out the categories of
passwords. Section 2.5 will talk about the aspects in passwords authentication. The
reviews of existing graphical passwords scheme will be described in section 2.6. Then
section 2.7 presented a summarization of graphical password schemes and software.
Whereas section 2.8 provides proposal on the Cued Recall Graphical Password System
Resistant to Shoulder Surfing. Finally, a conclusion of this chapter will be presented in
section 2.9.

9
2.2 Authentication
A web-based application is a program that runs on a computer that can be
connected via the Internet, where it can be control through use of simple Web interface
that a browser (such as Netscape Navigator or Internet Explorer) provides. The interface
consists of all of the various objects that a browser can display, such as text, images,
text boxes, check boxes, radio buttons, and push buttons. HTML, the underlying
language that describes how a web page should appear is somewhat restrictive with
regards to exact layout specifications and sizing. However, the very same Web browser
can conceivably act as an interface to just about any program that exists.
A Web application usually parallels a program that would normally run on a
home computer, known as desktop application. Examples of desktop applications are an
e-mail program, scheduling program, spreadsheet or accounting program, word
processor, or collaboration tool. The most popular example of a Web-based application
would probably be Microsoft's Hotmail, which is simply a large-scale e-mail program
that runs on Microsoft's server computers.
One of the most argued issues in developing a Web-based application will be on
security. In the world of Internet, nothing is 100% secured. Therefore, what we can do
is just to decrease the possibility of security being breached. In order to do so, some
techniques and protocols were introduced. Including setting up firewall, setting up
Secure Socket Layer (SSL) connection, authentication and encryption and so on.
O’Gorman mentioned that ‘a firewall in a network is a node set up as a barrier to
prevent traffic crossing from one segment to another’ (O’Gorman et al. 2005, pp. 546)
As seen in Figure 2-1, firewalls are used to improve network traffic as well as for
security purposes, and may well serve as a barrier between the connected public (left of
the firewall) and private (right of the firewall) networks. A firewall may be
implemented in a router or it may be a network device specialised for this purpose. It
has the following attributes:
� Provides protection at the boundary of a domain.
� Checks data entering or leaving a domain.
� TCP/IP based.

10
Figure 2-1 Simple Layout of a Firewall (O’Gorman et al. 2005, pp. 546)
SSL was first developed by Netscape Communication Corporation. It is used for
authenticated and encrypted communication between clients and servers on the World
Wide Web (WWW). It works by using a private key to encrypt data sent through the
SSL connection. Web pages that require an SSL connection starts with “https:” for
internet’s address. The SSL protocol is designed to provide privacy between client and
server. Second, the protocol is designed to authenticate the server, and optionally the
client. (Just 2004)
Authentication is the process to allow users to confirm his or her identity to a
Web application. This process usually refers to as login. When the user wants to login to
a system, the user enter a username and password to the server and the server will grant
access to the user if the provided username and password match the original username
and password.
Passwords usually stored in a file or database’s table. The passwords file or
passwords field in database are encrypted to secure the system. Encryption will be
discuss in section 4.3.6 Cryptography.
2.3 Passwords as Authentication Method
Authentication can be handled in many ways. The importance of selecting an
environment appropriate authentication method is the most crucial decision in designing
a secure system. User authentication can be handled by one or more authentication
methods (Owen et al. 2007). For examples are passwords only, password and token card
or biometric such as fingerprints, retina scan or voice recognition. Passwords are the
most widely used authentication method (Owen et al. 2007). Passwords can be
categorised into textual and non textual passwords. Other authentication methods not
widely used because of the highly installation cost or will cause extra cost.

11
2.4 Passwords Authentication
2.4.1 Textual Passwords
In textual passwords, users provide an identifier, a typed in word or phrase.
Common used guideline for textual passwords included (Microsoft Corporation 2009):
� The password should be at least 8 characters long.
� The password should not be easy to relate to the user (e.g., last name, birth date).
� The password should not be a word that can be found in a dictionary or public
directory.
� Ideally, the user should combine upper and lower case letters and digits.
Remembering a password was relies on pure recall memory. Textual password
authentication is generally simple and does not require much more processing power.
However textual password authentication has several vulnerabilities. Among the most
obvious are:
� Passwords may easy to guess if the users used dictionary words or write down
the password in a highly accessible place.
� Password may hard to remember if the users used some random characters.
� Discovering password by social engineering or eavesdropping.
� Vulnerable to shoulder surfing if the attacker can see the keyboard or “read” the
user keystrokes as the user types the password.
Due to this, non textual passwords have been introduced.
2.4.2 Non Textual Passwords (Graphical Passwords)
Alternative authentication method, such as biometrics, has been employed to
address the problems with traditional username-password authentication. Our focus in
this paper however is the other alternative, which is using pictures as passwords. One
reason graphical password schemes is chosen as an alternative to text-based schemes is
because human can remember pictures much effortlessly compared to text (Shepard
1967). Pictures are also generally easier to recognize as compared to text plus it is more
interesting. Graphical password authentication system refers to a system that uses
picture or graphic as password to authenticate a user. Generally, when the user wants to
login, the user would need to enter his username and perform some action on the
selected picture correctly. Or when the user wants to login, the user would need to select
the pre-selected password image among the decoy images. In each round, the user is
shown another password image. The user logs in successfully if all challenges are

12
responded correctly. The advantage of this kind of challenge response system is that it
relies on recognition memory. (Norman 1988) Possible drawbacks of such system may
include:
� Longer login time if want larger passwords space. This can be achieved by a
larger number of decoy images in each round.
� User may be strongly attracted by certain image. User tend to choose the same
images for their password and the will reduce the password space.
Graphical passwords have been chosen as this paper research topic because this
method does not incur extra cost, but might provide more secure authentication system
in the aspects of easy to remember and hard to guess.
2.5 Aspects of Graphical Passwords
2.5.1 Remembrance
Graphical passwords had been proposed as an alternative to the traditional
textual passwords. Motivated by the fact that human can remember image better than
text. (Shepard 1967) Moreover, image based passwords have shown good memorability
in user testing. (Brostoff and Sasse 2000; De Angeli et al. 2002; De Angeli et al. 2005;
Dhamija 2000; Dhamija and Perrig 2000; Wiedenbeck et al. 2005c)
The presented graphical passwords system is a challenge response system that
used image and text as the passwords. Each password image is associated with text.
Users can assign their own text for each image they choose as their password images.
The studies of other challenge response system such as Passfaces (Brostoff and Sasse
2000) and Déjà vu (Dhamija and Perrig 2000) suggest that passwords using a challenge
response scheme are easy for users to remember over time. Beside that, the presented
graphical password system adapted the cued recall method to help increase the user
memorability. Cued recall is basically a component of a memory task in which the
subject will be asked to recall on items that were presented to them during an initial
training or presentation with some hints been given. In the developed system (CRGPS),
the first alphabet for each original password to each password image is displayed as a
cued or hint to the user in the authentication process. Whereas in the registration process,
the user was required to chose their preferred pictures and associated each with their
selected word. The purpose of doing this was to provide better recognition from picture
to password and vice versa.

13
2.5.2 Hard to Guess
For some graphical password system that required user to identify the pre-
selected pictured to be authenticated. Then if the number of possible pictures is
sufficiently large, the possible password space also large. The password spaces of a
graphical password scheme may exceed that of textual schemes and thus presumably
offer better resistance or hard to guess. For example, a number of faces will be required
to form a Passfaces Code. There are five screens in Passfaces from which each user will
need to choose one correct face (from a 3 by 3 face grid). In the end, a password
containing five characters will be chosen from five 3x3 grids, which provides 95
combinations (Real User Corporation 2001). Besides that, some graphical passwords
system required user to click on several pre-registered locations of a picture in the right
sequence. These graphical data represent millions of bytes of information and thus
provide large password spaces, such as Blonder’s scheme (Blonder 1996) and
Passpoints by Birget, Hong and Memon. (Birget at al. 2003) The passwords space were
N^K where N is the number of pixels or smallest units of a picture and K is the number
of locations to be clicked on.
A traditional textual password contains 948 if the length of the password was 8.
In the presented research, the password spaces were 9412
because there are 94 printable
characters excluding SPACE and the length of the password was 12. The bigger length
of the password provides better resistance. The length of the password can be adjust in
the presented system but need to adjust manually. The presented graphical password
system required users enter the second to fourth characters of the original password
according to the pictures show on the authentication screen and three characters of a
fake password in random order. The purpose to include the fake password was to
confuse the observer who stands behind and to make the password hard to guess.
2.5.3 Resistant of Shoulder Surfing
According to Wiedenbeck et al. (2006, pp. 23 - 26):
When users input their passwords in a public place, they may be at risk of attacker
stealing their password. An attacker can capture a password by direct observation
or by recording the individual’s authentication session. This is referred to as
shoulder surfing.
Shoulder-surfing is a well known method of stealing passwords and other
sensitive information and is recognised as a serious security threat (Giblin 2005;
Wftv.com 2004; Wagstaff 2005). Like textual password, most of the graphical password

14
systems or schemes were not resistant to shoulder. (Blonder 1996; Jermyn et al. 1999;
Thorpe and van Oorschot 2004b; Syukri et al. 1998; Birget et al. 2003; Davis et al.
2004; Dhamija and Perrig 2000; Jansen et al. 2003; Takada and Koike 2003) This was
because as the users clicking on the image may make the users’ actions easier to
capture. Once a password has been filmed by an attacker, the attacker can surely use the
password to login. Only a few of the graphical password schemes resistances to
shoulder surfing. (Sobrado and Birget 2002; Man et al. 2003; Hong et al. 2004)
The presented research was resistant to shoulder surfing according to the
usability testing. In the registration process, user selects 5 pictures from 5 categories and
associated each picture with text to form their passwords. In the authentication process,
3 of the 5 pictures will be randomly chosen from the passwords collection and show on
the login screen. The first character of the associated text will be show as hint to the
user. The user need to enter the less started from the second character until the fourth
character. If the observer standing behind a user or manages to record the login screen
with recorded device, the observer may not able to analyse and figure out the passwords
due to the system features:
1. The pictures show on the login screen was 50 pictures. Among the 50 only 3
were password images. There are 503
= 12500 combinations of images.
2. The number of attempt to login was limited to 3 attempts only. When the
number of attempts exceeds 3, the login page will direct the user to a failure
login page. This feature makes the observer more difficult to guess the
passwords correctly.
3. If the shoulder surfer fail to login in the first attempt, then the system will keep
repeated the same login screen at the second attempt or third attempt to prevent
provide additional information about the password.
2.6 Reviews on Existing Graphical Password Technique
Depending on the type of graphical background being used, graphical password
schemes can be divided into two categories, which are, the image based scheme and
grid based scheme. Image based scheme uses single image or multiple images to
construct graphical passwords, whereas grid based scheme uses grid as the background
in composing of graphical passwords.
Common problems associated with single image scheme include:

15
1. The background images have to be sufficiently complex and are capable of
providing many memorable points. However, if the image are too complex, such
images will be difficult to compress effectively, and more storage and network
bandwidth resources will be required to store and reload such image during the
authentication process;
2. Difficulty in inputting the password using a keyboard, unless the tab function is
being used;
3. Finding small spots in a complex picture will be tedious and this could prove
difficult for users with poor vision.
Common problems associated with multiple image based schemes include:
i. Large display space will be required in presentation of multiple images on the
screen;
ii. The size of individual image for a group of images would be smaller as the
number of images increases, due to limitation in screen area availability.
The proposed Grid based scheme by Jermyn et al. (1999), which is being
implemented by using a grid as the background have several advantages:
a. It eliminates the need to store graphics into the database at the server side and
removes the overhead in transferring of images through network;
b. It minimise the requirement for quality displays because a grid is a simple object,
which does not require extensive amount of resources to run;
c. It does not have a limit on the size of a password, which implies that a user can
easily create password with a much longer length. Theoretically, the full password
space of a grid-based scheme is infinite;
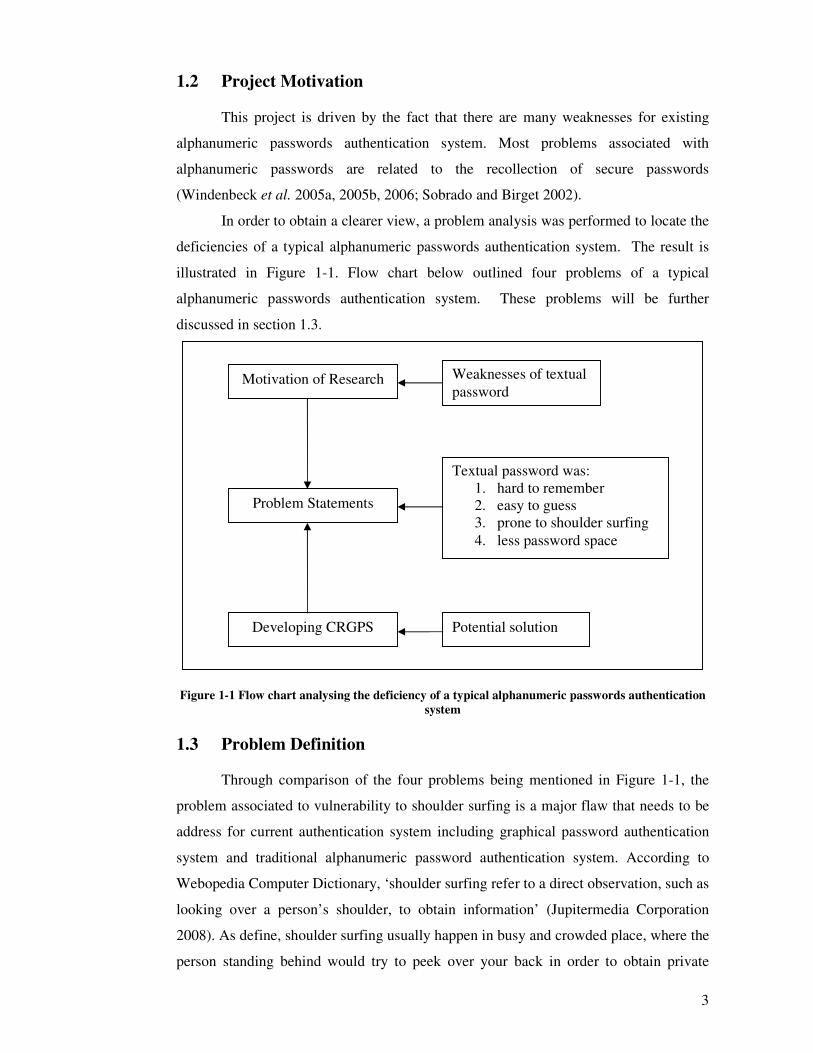
2.6.1 Graphical Password Scheme by Greg Blonder
The first graphical password scheme was introduced by Greg Blonder (1996). In
his scheme, a user is offered with one preset image, which is displayed on screen. The
user is then required to select one or more fixed positions, which is recognised as “tap
regions” on the displayed image, in a particular order to access the system. This scheme
was not resistant to shoulder surfing because as the users clicking on the image may
make the users’ actions easier to capture and the attacker can gain the access to the
system with the same password. The attacker can get the password with the simplest
way by standing behind the user when the user selects the “tap region” on the image.
Example of such image is as shown in Figure 2-2. The major flaw of this scheme is that:
16
� The users are not allowed to click randomly on the background.
� Only pre-processed pictures can be used.
Figure 2-2 Graphical password scheme suggested by Blonder 1996
2.6.2 Draw - A – Secret (DAS)
Draw – A – Secret (DAS) was suggested by Jermyn et al. (1999). DAS requires
a user to draw a secret design on a grid as a way to input a password. The coordinates of
the grids occupied by the picture are stored in the order of the drawing. During
authentication, the user is asked to re-draw the picture. If the drawing touches the same
grids in the same sequence, then the user is authenticated. One major advantage of this
scheme is DAS could offer very large password space for reasonable parameters. For
example, on a 5×5 grid, the total number of passwords of length 12 or less is 2.3 × 10¹⁷
,
larger than textual passwords composed of 8 printable ASCII characters which is 958 =
6.6 × 10¹⁵
.
Thorpe and van Oorschot (2004a) analysed the memorable password space of
the graphical password scheme by Jermyn. They defined a length parameter for the
DAS type graphical passwords and showed that DAS passwords of length 8 or larger on
a 5 x 5 grid may be less susceptible to dictionary attack than textual passwords. They
also showed that the space of mirror symmetric graphical passwords is significantly
smaller than the full DAS password space. Thorpe and van Oorschot showed that the
size of the space of mirror symmetric passwords of length about L + 5 exceeds that of
the full password space for corresponding length L <= 14 on a 5 x 5 grid. Thorpe and
van Oorschot (2004b) further studied the impact of password length and stroke-count as
a complexity property of the DAS scheme. Their study showed that stroke-count has the
largest impact on the DAS password space. The size of DAS password space decreases
significantly with fewer strokes for a fixed password length.
Use of DAS scheme was not resistant to shoulder surfing because when users re-
draw the picture on the grid, the users’ actions can be captured by attackers simply by
standing behind the user during authentication process.

17
Figure 2-3 Draw – A – Secret scheme
Source: Jermyn et al. 1999
2.6.3 Grid Selection
To improve the security of Draw-A-Secret technique, Thorpe and van Oorschot
(2004b) proposed a “Grid Selection” technique. The selection grid is an initially large,
fine grained grid from which the user selects a drawing grid, a rectangular region to
zoom in on, in which they may enter their password. This would significantly increase
the DAS password space. But this technique also not resistant to shoulder surfing
because as the users re-draw the picture on the grid may make the users’ actions easier
to capture and the attacker can gain the access to the system with the same password.
The attacker can still obtain the password by standing behind the user during
authentication process.
Figure 2-4 Grid selection scheme
Source: Thorpe and van Oorschot 2004b
2.6.4 Graphical Password Scheme by Syukri et al.
Syukri et al. (1998) propose a system where authentication is conducted by
having the user drawing their signature on the screen using a mouse. Their technique
included two stages which are registration and verification. During the registration stage:
the user will first be asked to draw their signature on the screen with a mouse, and then
the system will extract the signature area and either enlarge or scale-down the signature,
and rotates if needed, also known as normalizing. The information will later be saved
into the database. The verification stage first takes the user input, and does the

18
normalization again, and then extracts the parameters of the signature. After that, the
system conducts verification using geometric average means and a dynamic update of
the database. According to the paper the rate of successful verification was satisfying.
The biggest advantage of this approach is that there is no need to memorise one’s
signature and the signatures are hard to fake. However, not everybody is familiar with
using a mouse as a writing device; the signature can therefore be hard to draw. One
possible solution to this problem would be to use a pen-like input device. Also, adding
of new hardware to the current system can be expensive. We believe such a technique is
more useful for small devices such as a PDA, which may already have a stylus.
Furthermore, this technique was not resistant to shoulder surfing because the attacker
can easily used a video capture device to capture users’ actions and the attacker can gain
the access to the system with the same password.
Figure 2-5 Syukri et al. scheme
Source: Syukri et al. 1998
2.6.5 Passpoints
Passpoints was introduced by Birget et al. (2003). Passpoints allow a user to
click on any point inside a background image as an indication of his or her password
entry. Through a multi-grid method called “robust discretization”, as long as the user
entry are within a predetermined tolerance distance of the originally chosen point, the
clicking will be encoded as the same as that for the original. The password will then be
stored as a result of a hash function. However, the information about the safe grid,
which is one of the three grids referred for each click are not encrypted. If this flaw is
being exposed by an attacker, the system will be compromise by the attacker. For this
scheme, users could choose any image as their password background such as a scene
image, an animal image or their own image. In such cases, the login process would
begin with an extra process, in which a bidirectional communication is needed to submit
a user id to the server. This process is to initiate transmission of the corresponding user-
defined image back to the user after making a search in the database. A user study on

19
the Passpoints scheme was conducted by Wiedenbeck et al. (2005c). Their study shows
that it is easier to create a Passpoints password than an alphanumerical password. Also,
their findings shows hat it will only take 64 seconds on the average to create a new
Passpoints password, and that only one out of twenty participants had to make two
attempts to successfully create a Passpoints password. Alphanumeric passwords, on the
other hand, were shown to be harder to create, as it took an average of 81 seconds to
successfully create an alphanumeric password. Also, more frequent failed attempts were
also observed in the study. However, for the learning process, Passpoints took more
trials than the alphanumeric passwords in achieving 10 correct password inputs. The
study also observed that graphical passwords took a longer time to input, compared to
alphanumeric passwords. The difference was not due to the mechanics of movement
and selection, but was due to the time in assessing and locating the correct click region
and determines precisely where to click. Passpoints was not resistant to shoulder surfing
because the attacker can used a video capture type device to record user’s action or used
a Trojan house to capture the mouse movements on the screen and gain the password
after analysed.
Figure 2-6 Passpoints scheme
Source: Birget et al. 2003
2.6.6 Story
Story scheme was suggested by Davis et al. (2004), in which the user’s
password is a sequence of images selected by the user through storytelling. Story was
not resistant to shoulder surfing because as the user is clicking on the image, the users’
actions can be easily captured by the attacker by standing behind the user. Later, the
attacker can gain the gain access to the system with the same password. A sample login
screen is as shown in Figure 2-7.

20
Figure 2-7 Story scheme
Source: Davis et al. 2004
2.6.7 Déjà vu
Déjà Vu was designed with non-describable abstract images rather than
photographs. (Dhamija and Perrig 2000) An example is as shown in Figure 2-8. This
scheme was develop through exploitation of the hash visualization techniques. The
login is accomplished in one round where the user simultaneously sees 25 images
displayed on the screen, five of which are the user’s password images and the remaining
20 are decoy images. To be authenticated the user must click on all five password
images and not click on any of the decoy images. The advantage of using these types of
images is that they can be generated through a method called Random Art, which
remove the need to store and transmit images back and forth between the client and
server. A study conducted showed that it took a longer time period to create a graphical
password then a textual password. (Dhamija and Perrig 2000) In addition, 90% of the
authentication attempts using Déjà Vu were successful compared to just 70%, using
textual passwords. However, the password space of textual passwords is much larger
than Déjà Vu. It is also concluded that password generated by Déjà Vu is not much
easier to remember than traditional textual passwords. Déjà vu authentication process is
not considered resistant to shoulder surfing because of its vulnerability to attackers’
view during the process of clicking the password image. During the process, the
attacker can easily view the password images just by standing behind the users.
Figure 2-8 Déjà Vu scheme
Source: Dhamija and Perrig 2000
21
2.6.8 Picture Password
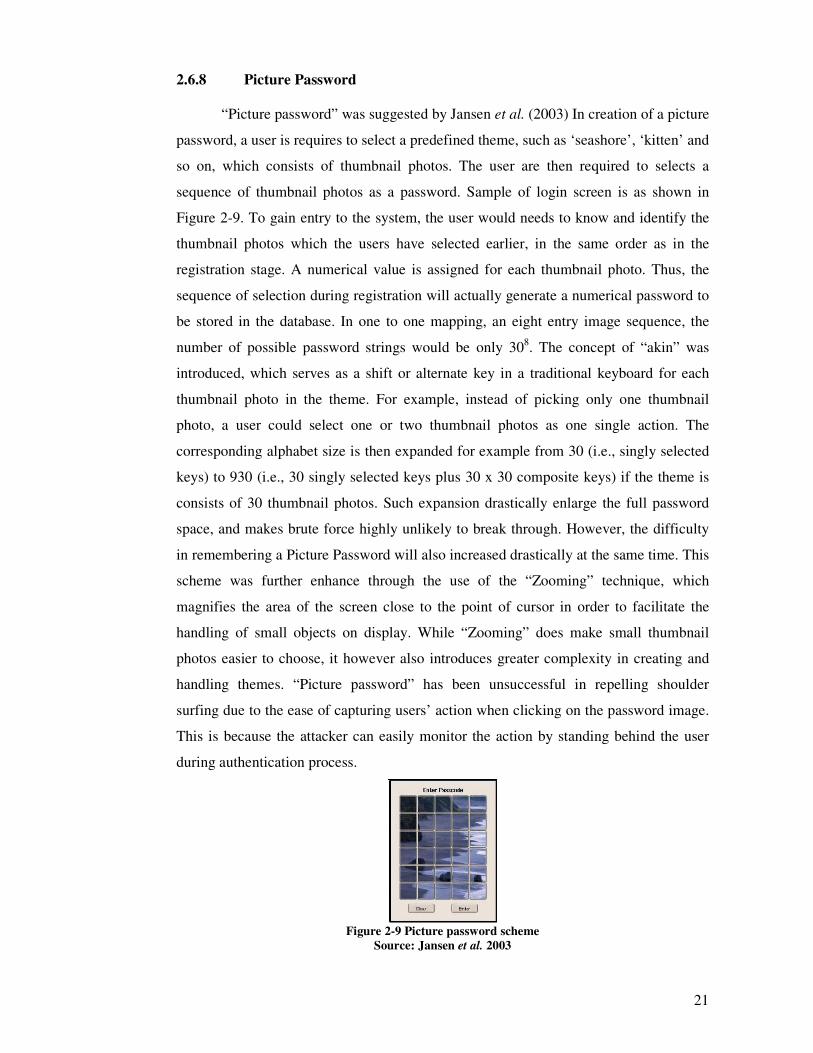
“Picture password” was suggested by Jansen et al. (2003) In creation of a picture
password, a user is requires to select a predefined theme, such as ‘seashore’, ‘kitten’ and
so on, which consists of thumbnail photos. The user are then required to selects a
sequence of thumbnail photos as a password. Sample of login screen is as shown in
Figure 2-9. To gain entry to the system, the user would needs to know and identify the
thumbnail photos which the users have selected earlier, in the same order as in the
registration stage. A numerical value is assigned for each thumbnail photo. Thus, the
sequence of selection during registration will actually generate a numerical password to
be stored in the database. In one to one mapping, an eight entry image sequence, the
number of possible password strings would be only 308. The concept of “akin” was
introduced, which serves as a shift or alternate key in a traditional keyboard for each
thumbnail photo in the theme. For example, instead of picking only one thumbnail
photo, a user could select one or two thumbnail photos as one single action. The
corresponding alphabet size is then expanded for example from 30 (i.e., singly selected
keys) to 930 (i.e., 30 singly selected keys plus 30 x 30 composite keys) if the theme is
consists of 30 thumbnail photos. Such expansion drastically enlarge the full password
space, and makes brute force highly unlikely to break through. However, the difficulty
in remembering a Picture Password will also increased drastically at the same time. This
scheme was further enhance through the use of the “Zooming” technique, which
magnifies the area of the screen close to the point of cursor in order to facilitate the
handling of small objects on display. While “Zooming” does make small thumbnail
photos easier to choose, it however also introduces greater complexity in creating and
handling themes. “Picture password” has been unsuccessful in repelling shoulder
surfing due to the ease of capturing users’ action when clicking on the password image.
This is because the attacker can easily monitor the action by standing behind the user
during authentication process.
Figure 2-9 Picture password scheme
Source: Jansen et al. 2003

22
2.6.9 Image-based Authentication
Takada and Koike (2003) introduced image-based authentication for use in
mobile phones through use of user-defined images. In the password registration phase, a
user can choose his or her images as pass-images. He or She is then required to
recognise and identify them among decoy images in the authentication phase as shown
in Figure 2-10. The user would need to go through several rounds of verification to
ensure the password is secure enough. For each round, the user has to select a pass-
image or choose nothing, if no correct pass-image is being displayed. The authentication
process will deem to be successful if all verifications are successful. As shown in the
studies by Davis et al. (2004) users’ choices of picture passwords are often predictable.
Allowing users to use their own pictures would make the password even more
predictable, especially if the attacker is familiar with the user. Moreover, the password
image can be easily observed by the attacker by standing behind the user when the users
are in the midst of clicking on the password images.
Figure 2-10 Image-based authentication scheme
Source: Takada and Koike 2003
2.6.10 Challenge Response Authentication by Sobrado and Birget
The challenge response authentication was introduced by Sobrado and Birget.
The principle of this scheme is, if entity B wants to gain access to a system, entity B
will need to know of a secret that are only known between the system and B. The shared
secret would even establish the way a password mechanism would be constructed for a
particular access. Sobrado and Birget presented three techniques for their scheme. For
the first technique, the user is presented with a screen that shows a large amount of
graphical objects, which are generated and distributed randomly each time they are
displayed. With that, the user is to identify the objects that form the password. In this
technique, the shared secret between system and the user are the triangle, in which the
user must identify to forms the convex hull of the invisible triangle that forms the
password.

23
Figure 2-11 Sobrado and Birget’s first method-triangle scheme
Source: Sobrado and Birget 2002
The second technique requires the user to click at the diagonal intersection point
of a set of four points (As shown in Figure 2-12).
Figure 2-12 Sobrado and Birget’s second method-intersection scheme
Source: Sobrado and Birget 2002
And the third example is move a frame to align one object on a mobile frame
with others that are fixed on the screen.
Figure 2-13 Sobrado and Birget’s third method-movable frame scheme
Source: Sobrado and Birget 2002
These three technique objective is to prevent shoulder surfing from happening
(Sobrado and Birget 2002). However, these three techniques can authenticate a user in
an insecure location because the users never have to click directly on their password
images. The third technique has the advantage that it discloses the least information.
There are two disadvantages for this scheme though.
� If the number of graphical objects is large, the user will need to spend a much
longer time in searching for objects that form the password. Objects are also
more difficult to locate because of the random distribution of objects, which
changes every time the user attempt to login. Thus, the scheme employed here

24
does not need to use as much pictures, and each picture employed are much
larger. This will allow the user to search for the picture passwords at a much
faster pace.
� If the randomly distributed objects that make up a given password are clustered
in a corner of the screen, the convex hull of the triangle will be very small ,
which makes it easier to guess the password. Thus, the scheme employed here
does not use such method.
2.6.11 Challenge Response Authentication by Man et al. (2003)
Man et al. (2003) suggested another shoulder surfing resistant solution. In
creation of a password, a user has to choose a number of pass-objects, and has to
remember the textual characters that are related to each variant of their pass-objects.
During login, the pass-objects, which are randomly generated, are displayed on the
screen with about 400 to 500 decoy objects. The user has to input a string of textual
characters, in accordance to the order of the pass-objects. The advantage of this scheme
is that, even if the process of login is filmed by a video camera, the attacker will not be
able to derive the password, as the password is time variant and is different for each
login. However, if attackers are able to observe the password entries for a few times,
attacker might be able to guess that time was used as the actual password. Thus, the
employed scheme does not implement this strategy.
Figure 2-14 Shoulder surfing solution of Man et al.
Source: Man et al. 2003
2.6.12 Challenge Response Authentication by Hong et al. (2004)
Hong et al. (2004) improves the scheme of Man, Hong and Mathews (2003),
which allows users to choose their own words to associate with each pass-object variant.
For example, “three” can be used to be associated with a pass-object variant which
exhibits a shape similar to the shape of “3”. This option would facilitate the task of

25
password recall. However, this process would significantly extend the time for
password registration. For instance, if each pass-object has five variances and there are
eight pass-objects, a user has to make 5 × 8 = 40 associations before a password can be
created successfully. Moreover, these 40 associations must be remembered by the user.
If any of the association is forgotten, the user might not be able to login successfully.
Apparently this scheme will substantially increases the difficulty in remembering of a
password, and this may discourage users to adopt this password scheme. Thus, CRGPS
overcome this weakness by reducing the number of pass-objects to 5 only. Moreover,
CRGPS also provided hints for each pass-object in the authentication process.
2.6.13 V-Go
V-GO is commercial authentication software by Passlogix Inc. (2004). V-GO
allows a user to create graphical password by navigating through an image, as shown in
Figure 2-15. To set or enter a password, a user can click and/or drag on a series of items
within that image. For example, with regards to a kitchen image, a user can dip the
vegetables in water, take the food from a fridge and put it into the oven, or set a timer
on the clock. Other password environment include dialling a phone number, preparing a
meal by selecting and cooking ingredients, setting the date and time on a clock, making
a stock trade, or choosing a hand of cards. In all, it allows for a sequence of activities
being perform as depicted and allow by the image. One major drawback of V-GO is that
the full password space is small. For example, in a kitchen image, there are only few
places where one can take food from and put into, thus does put some limitation on the
choice of V-GO passwords. This vulnerability is highly critical considering the
processing power of recent computers. In addition, password chosen by a user can be
easily guessable, considering the small availability of password space. For example, a
hand of cards chosen by a user can be quite predictable. The chosen card could be same
in colour, or in a sequence, because the part on remembering of a hand of random cards
would poses the same challenges that befall traditional scheme of passwords, which are
people’s memorization capabilities. V-GO was not resistant to shoulder surfing because
as the users clicking on/or drag on a series of items within the image may make the
users’ actions easier to capture and the attacker can gain the access to the system with
the same password. The attacker can get the password with the simplest way by
standing behind the user when during authentication process.

26
Figure 2-15 V-Go login screens
Source: Passlogix Inc 2004
2.6.14 visKey
visKey is commercial authentication software by SFR IT Engineering (2005).
visKey was designed for operating system of pocket PC such as PDA and Handheld
Palm. In this scheme, pictures or visual door called visKey, which are stored in common
format such as JPEG, GIF, PNG or BMP, can be chosen by a user as the graphical
password background during the password initialization phase. The graphical password
consists of one to nine predefined spots, as shown in Figure 2-16. To enter a password
correctly, a user has to touch the same sequence of spots as in the registration stage. It is
not necessary to, and usually not possible to touch the exact points, as visKey will
accept all input within a certain tolerance area around the exact points. The size of this
area can be predefined by users. The input precision needs to be set carefully, as it will
directly influence the security and usability of the graphical password. If the tolerance
area is too big, the password will be relatively easy to crack since there are fewer
possible password combinations. If the tolerance area is too small, users might have
difficulty to enter a password correctly. For a reasonable setting of parameters, a four-
spot visKey can offer theoretically at almost 1 billion (approximately 30 bits)
possibilities to define a password, comparable to password space of a five alphanumeric
characters (945
= 7.3 x 10⁹) textual password. This amount of password space, however,
is not large enough to resist off-line attacks by a fast computer. Therefore, in order to
defend against brute-force attacks, more spots are recommended. visKey was not
resistant to shoulder surfing because as the users clicking on the image may make the
users’ actions easier to capture and the attacker can gain the access to the system with
the same password. The attacker can get the password with the simplest way by
standing behind the user when the user identifies the spots on the picture during
authentication process.

27
Figure 2-16 visKey login screens
Source: SFR IT Engineering 2005
2.6.15 PassFaces™
PassFaces is a commercial graphical passwords system by Real User
Corporation (2001). Passfaces can be thought of as a kind of reverse biometrics. Studies
on Passfaces indicate that human have the natural ability to recognise faces long after
we have been exposed to them. In short, faces are much easier to “remember” than
passwords or Pins. With that in mind, Passfaces Corporation decides to use faces as
replacement for passwords, where users are assigned Passfaces much like they are
assigned passwords. A number of faces will be required to form a Passfaces Code.
There are five screens in Passfaces from which each user will need to choose one
correct face (from a 3 by 3 face grid). In the end, a password containing five characters
will be chosen from five 3 x 3 grids, which provides 95 combinations (Real User
Corporation 2001). According to a user study, password using Passfaces is easier to
remember than alphanumeric passwords (Brostoff and Sasse 2000). However, according
to another research, this authentication system was vulnerable to shoulder surfing if a
mouse is used in entering of Passfaces passwords. (Tari et al. 2006) The study noted
that if keyboard are used in entering of Passfaces password, the difficulty to shoulder
surf someone private information will increase tremendously. This is because the
shoulder surfer will need to observe the screen pictures and the keyboard at the same
time. Another problem with PassFaces is that some of the displayed faces might not be
welcome by certain users. In other words, if a user was to choose his/her password, it is
likely that he/she will choose faces that he/she likes. An empirical study’s result shows
that the user’s choice is highly affected by race, gender of the user and the attractiveness
of the faces. (Davis et al. 2004)

28
Figure 2-17 PassFaces™ login window
Source: Real User Corporation 2001

29
2.7 Summarisation of Graphical Password Schemes and Software Name of author or scheme Resistant to Shoulder Surfing
Blonder (Blonder 1996)
No. Because as the users clicking on the image may make the users’
actions easier to capture.
Draw-A-Secret (DAS)
(Jermyn et al. 1999)
No. Because as the users re-draw the picture on the grid may make
the users’ actions easier to capture.
Sykri, Okamoto and Mambo
(Syukri et al.1998)
No. Because the attacker can easily used a video capture device to
capture users’ actions.
Passpoints (Birget et al.
2003)
No. because the attacker can use a video capture type device to
record user’s action or used a Trojan house to capture the mouse
movements on the screen and gain the password after analysed.
Déjà vu (Dhamija and Perrig
2000)
No. Because as the users clicking on the image may make the users’
actions easier to capture.
Picture Password (Jansen et
al. 2003)
No. Because as the users clicking on the image may make the users’
actions easier to capture.
Image-based Authentication
(Takada and Koike 2003)
No. Because as the users clicking on the image may make the users’
actions easier to capture.
Challenge-response
Authentication (Sobrado and
Birget 2002), (Man et al.
2003), (Hong et al. 2004)
Yes but have limitations.
L1: The registration and authentication process can be tedious and
time consuming because many pictures need to be load from the
database at the same time.
L2: Can be hard to remember when large numbers of objects are
involved.
V-Go (Passlogix Inc 2004) No. Because as the users clicking on/or drag on a series of items
within the image may make the users’ actions easier to capture.
visKey (SFR IT Engineering
2005)
No. Because as the users clicking on the image may make the users’
actions easier to capture.
PassFacesTM
(Real User
Corporation 2001)
No. Because as the users clicking on the image may make the users’
actions easier to capture.
Cued Recall Graphical
Password System Resistant to
Shoulder Surfing (CRGPS)
Yes.
1) User do not need to click on the picture instead user enter the
password associated with each picture that show on the screen to
prevent the attacker record using video camera or standing behind
the user to capture the user’s action as the user clicking on the
image.
2) User needs to enter the second character until the forth character
of the password which make the password difficult to guess
although attacker can record using video camera or observe the
login process because the password will be different in each login
process depending on the password picture that will be show on the
screen.
3) The password picture will be select randomly and place randomly
with other decoy picture where total 125 pictures will be show on
the screen while in the login process to make the system resistant to
shoulder surfing.
To overcome the previous research’s limitation (L1), CRGPS have
the following solutions.
S1: Reduce the number of picture to be load from database to 50
pictures each authentication session.
S2: Categorised the pictures according to theme such as flower,
animal, insect, reptile and bird.
To overcome the previous research’s limitation (L2), CRGPS have
the following solutions.
S3: Reduce the number of picture need to be remembered to 5
pictures only.
Table 2-1 Summarisation of graphical password schemes or software

30
2.8 Cued Recall Graphical Password System Resistant to Shoulder
Surfing (CRGPS)
In this research, a graphical password system that uses the challenge response
authentication method is presented. A system is created in such a way where it will
provide a test or a challenge to the user when the user want to login. The user would
need to provide the correct answer which was determined at the registration process. A
correct response to the system would enable him to log on successfully.
The presented graphical password system is based on Man et al.’s (2003)
original idea that overcomes its limitation where users are required to remember the
predefined textual character associated with the pass-object. The proposed graphical
password system allows users to choose their own words to associate with each pass-
object.
This presented graphical password scheme is also based on Hong et al.’s (2004)
idea that overcome its limitation where users are required to remember the pass-objects
and their variances. For instance, each pass-object has five variances and there are eight
pass-objects, a user has to make 5 × 8 = 40 associations before a password can be
created successfully. The proposed graphical password system reduces the number of
pass-objects to be remembered by the users, such that the users would only need to
remember five pass-objects and their association’s pass-code.
CRGPS can be carried out in three processes. There was registration process,
authentication process and reset process. These three processes were explained in detail
below.
1. Registration process
In the registration process, the user is required to fill in their detail such as
username, name, identification number, email address, and so on. The user will
be directed to a page where they can create their pass-objects and the pass-
objects association pass-code. To create a password, a user has to choose five
pass-objects and to create words to associate with each pass-object. The user
would need to remember textual characters that are related with each of their
pass-objects among the 125 pass-objects, which is categorise in five categories,
such as animal, flower, bird, insect and reptile. For example, the user can choose
a cat image as his first pass-object and assign 'kitty' as the images pass-code. The
user could also assign any number, alphabet or symbol on the keyboard as part
of the pass-code. After finishing the selection process, the system would display
a review page automatically. The user will need to confirm on the selection of

31
pass-objects and their association pass-code. This confirmation is done by
clicking on the “Confirm” button, which will save the user’s information into the
database. If the user want to change the pass-objects and the pass-objects
association pass-code, the user could do it in the review page before the user’s
information is save into the database. The pass-objects association pass-code
will be save into the database in RSA encryption format.
2. Authentication process
In the authentication process, the user is requested for the username. The user is
given three chances to enter the username correctly. At third failed log in
attempt, user will be force to leave the log in page. If the username is correct
then the user is directed to the second page, where 3 pass-objects that are
randomly chosen from the user’s pass-objects are displayed on the screen
together with another 47 decoy objects from database. The user has to input a
string of textual characters for each pass-object shown on the screen and a fake
pass-code. The proposed graphical password system will use the cued recall
method to help increase the user memorability. The first alphabet for each pass-
code to each pass-object is displayed as a cued to the user. The proposed
graphical password system will also adopt the fault point method, in which the
system would request the user to enter a fake pass-code to confuse the person
standing behind who will try to peek over your back in order to obtain private
information. The answer required is based on query-directed password’s idea,
where the user has to input the second, third and forth characters of each pass-
code for each pass-object as the answers to the system. The system will fetch all
the user’s pass code from the database and execute decryption process on it and
compare the user entered pass-code to the decrypted pass-code from the
database. If the comparison matches, then the user is authenticated successfully.
All of the three pass-objects association pass-code must match any of the three
decrypted pass-code from the database. Username will be disabling out after
three failed log in attempts. At third failed log in attempt, user will be force to
leave the log in page and an e-mail containing user’s original pass-objects and
the pass-objects association pass-codes will be sent to the user’s email using the
user’s e-mail address in the user detail.
3. Reset process
In the reset process, the user is required to enter their username to the system. If
the username is found in the database then the user is directed to the second page.

32
In the second page, the user’s detail is displayed. The user can change their
personal information in the second page. Then the user is directed to a page to
change their pass-objects and the pass-objects association pass-codes. The user
can choose a new selection of his 5 pass-objects and their association pass-code
for each pass-object from five themes of pictures such as flower, animal, bird,
insect and reptile. After the selection, the system will direct the user to the
review page where user can confirm the selection or make change to the
selection before the user’ data is saved into the database with a click on the
Confirm button.
2.9 Conclusion
This chapter has reviewed fifteen type of graphical password authentication
scheme. The review of graphical password authentication system has provided an input
to the subsequent steps. A new graphical password system had been developed and
named Cued Recall Graphical Password System Resistant to Shoulder Surfing (CRGPS).
CRGPS was based on Man et al. (2003) original idea and Hong et al.’s (2004) idea that
overcomes their limitations which have been mentioned above. According to usability
testing, CRGPS was resistant to shoulder surfing. CRGPS implemented three features to
counter shoulder surfing. Among the features are:
1. User does not need to click on the picture instead user enter the password
associated with each picture that show on the screen to prevent the attacker
record using video camera or standing behind the user to capture the user’s
action as the user clicking on the image.
2. User needs to enter the second character until the forth character of the password
which make the password difficult to guess although attacker can record using
video camera or observe the login process because the password will be different
in each login process depending on the password picture that will be show on the
screen.
3. The password picture will be select randomly and place randomly with other
decoy picture where total 125 pictures will be show on the screen while in the
login process to make the system resistant to shoulder surfing.

33
Chapter 3 Methodology
This chapter provides a description of the development approach used for this
project. The main section for this chapter is Section 3.1, which describes the approach
used. Section 3.2 will provide an outline of the strength of this approach while Section
3.3 would explain the Unified Process and finally Section 3.4 would provide a
conclusion of the chapter.
3.1 Software Development Approach Adapted
The software development approach that has been employed for this project is
the Unified Software Development Process or in short, the Unified Process. The Unified
Process is component-based, which means that the software being built is made up of
software components interconnected via well-defined interfaces. Besides that, the
Unified Process uses Unified Modelling Language (UML) in preparation of blueprints
for the software.
3.2 Suitability of the Proposed Approach
The Unified Software Development Process is the outcome of more than thirty
years of experience by Jacobson et al. (1999). The methodology is shaped in a way that
has solves the many problems that many software development methods possess.
1. Use case model for requirements capture
The two main concerns of requirements capture are to find the true requirements
and to represent them in a suitable way. Use case model has been the choice of
the Unified Process. In a use-case model, there are use cases, which represent a
piece of functionality in the system, and actors, which represent the users and
any external system that the system interacts with. Use-case model states
requirements that are value added to the user. In other words, requirement
captures are according to the perspective of each type of user, considering what
the system should provides in order for them to do their work. Use cases have
been adopted almost universally for capturing the requirements of software
systems in general but of component-based system in particular.
2. Use-case driven
To be use-case driven means that a development process proceeds through a
series of workflows that are initiated from the use cases. In other words, they

34
drive the whole development process. Figure 3-1 illustrates the models of the
Unified Process where all the models have dependencies with the use-case
model. In other words, use cases are traceable through all the models.
Specified by
Realised by
Distributed by
Implemented by
Verified by
Figure 3-1 Models of the Unified Process
3. Iterative and incremental
Iterative and incremental development enables developing software in small
steps with major and minor milestones which allow the developer to control the
development process more effectively. It can be shaped to deal with the
development of any kinds of software product due to the flexibility of the
iteration workflow. For larger projects, the construction phase could be carried
out in more iteration while for complex and green field projects, the inception
and elaboration phase could be extended to more iteration to better understand
the project before making further steps.
3.3 The Unified Process
The Unified Process is an iterative and incremental life cycle model, which is
made up of two distinct types of workflows. They are called the core workflows and the
iteration workflows. There are five tasks classified that are as core workflows:
requirements, analysis, design, implementation, and test. As for the iteration workflows,
there are four phases: inception, elaboration, construction, and transition.
In Unified Process, the development process is performed as iterations. The
phases in which the iteration workflows can be carried out in one iteration or divided
into more iteration depend very much on the project scope. Figure 3-2 shows the whole
cycle, which consists of four phases being divided into more iteration. The five core
workflows will performed as shown in Figure 3-3 for all iteration. Hence, all the nine

35
iterations in Figure 3-2 will sweep through the five core workflows sequentially as
shown in Figure 3-4.
Inception
iteration
Elaboration
iteration
Construction
iteration
Transition
iteration
Iteration 1 Iteration 2 Iteration 3 Iteration 4 Iteration 5 Iteration 6 Iteration 8 Iteration 9Iteration 7
Figure 3-2 Phases further divided into more iteration
The generic
iteration
Requirements Analysis Design Implementation Test
Includes:-
• Iteration Planning
• Iteration Assessment
Figure 3-3 Core workflows in iteration
Iteration 1 Iteration 2 Iteration 3
Req.s Analysis Design Impl. Test
Req.s Analysis Design Impl. Test
Req.s Analysis Design Impl. Test
Figure 3-4 Iterations in action
The iteration has different emphasis in different phases, as illustrated by Figure
3-5. During the inception and elaboration phases, most of the effort is directed toward
capturing the requirements, and preliminary analysis and design. During construction,
emphasis shifts to detailed design, implementation, and testing. The five core workflows

36
will be carried as far as required for each iteration. For example, the later workflows,
such as implementation and test, might not be used in early inception phase.
Figure 3-5 Emphasis shifts over the iterations, from requirements capture and analysis toward
design, implementation, and testing
3.3.1 The Core Workflows
This section will describe the five core workflows from requirements to testing
while stating the activities, the input and results of each activity.
1. Requirements The purpose of requirements workflow is to ensure development toward the
right system as specified by user. This workflow has been shaped into two parts, namely
requirements capture, and to capture requirement as use cases.
Workflow 1: Requirements Captures
The following have been performed.
� Stakeholders come up with good ideas that might turn into requirements.
o Suggestion by stakeholders such as used Q&A in the authentication
process.
� The context in which the system is set upon is required.
o CRGPS was an authentication system that can be used as a subsystem to
other main system such as accounting system or payroll system.
� Identifying requirements based on use cases in which each use case represents
one way of using the software system.
o A table with each use case with their definition, actor involved, post and
pre-condition, and the flow of event was created for each process. Table
3-1 shows the main flow of events in the login process.

37
Use Case Description
Login A USER needs to login before performing any transaction.
Actor/s: USER
Pre-condition:
A registered user.
Main flow of events:
1. The USER clicks the LOGIN button on the Home Page.
2. The system displays the Log-in Page.
3. The USER enters his/her username.
4. The USER clicks the NEXT button.
5. The system validates the username information against the DETAIL
table in the database.
6. Username exists; the system displays the next page.
7. The system request user to enter his/her password code for the pass
objects that appear on the screen.
8. The USER enters his/her password.
9. The USER clicks the NEXT button.
10. The system validates the password code information against the
PASSWORD table in the database.
11. USER is an authorised user; the system displays a message
“Congratulation!! Login Successfully!!” to the USER.
Post-condition:
The USER has been authorised to perform transaction.
Table 3-1 Use cases and flow of events of Login in CRGPS
� Identifying non functional requirements.
o Non functional requirements such as portability, security, scalability and
usability were being considered.
Workflow 2: Capturing Requirements as Use Cases
The workflow capturing requirements as use cases consist of five activities:
finding actors and use cases prioritise use cases, detailing a use case, prototype user
interface, and structuring of use-case model. These five activities and the logical flows
are illustrated in Figure 3-6. The path in Figure 3-6 shows the logical sequence of
activities using results from the previously performed activity as input.
Finding Actors
and Use Cases
Prioritise
Use Cases
Detail a
Use Case
Structure the
Use-Case Model
Prototype
User Interface
Figure 3-6 The workflow of capturing requirements as use cases

38
Activity 1: Finding actors and use cases
All types of system users and all external systems in which the system interacts
with are identified. Actors identified from the previous steps are used to identify
candidate use cases for each actor. Candidate use cases may also come from customers
and users. The candidate use cases are then revised to produce a set of use cases that has
an appropriate scope. Each use case is briefly described. The description consists of a
few sentences that summarise the actions, and a step-by-step description of what the
system need to do when interacting with its actors. Diagrams and description to explain
the use-case model as a whole is prepared with emphasis on how the use cases relate to
each other and to the actors. Figure 3-7 shows the use cases model of CRGPS.
CRGPS
User
Log-in
Register
1 1
include1
1
Resetinclude
Figure 3-7 Use cases model of CRGPS
Activity 2: Prioritise use cases
The purpose of this activity is to determine which use cases need to be
developed in early iterations, and which can be developed in later iterations.
Activity 3: Detail a use cases
The purpose of this activity is to describe the use case’s flow of events in detail,
including how it starts, ends, and interacts with actors. An example was show in Table
3-1.
Activity 4: Prototype user interfaces
The purpose of this activity is to build the user interface prototype. This activity
will produce a set of user interface sketches and prototypes for the most important
actors. This step identified the user interface elements that are needed for users to
interact with a use case. The use cases will be evaluated one by one to identify the
proper user interface elements for each use case. During this step, sketches of user
interface element combined to form the physical user interface. Then, executable

39
prototypes are built for the important user interface elements. These sketches and
prototypes will be validated through user interface review and will work as a
specification of the user interface when the real user interface is being constructed.
CRGPS user interface design was show in Figure 3-8.
Figure 3-8 CRGPS user interface design
Activity 5: Structure the use cases model
This activity is to extract general and shared use-case description of
functionality that can be used by more specific use-case descriptions, and also to extract
additional or optional use-case description of functionality that can extend more specific
use-case description. State machine diagram and activity diagram were used in this
activity. Figure 3-9 shows one of the state machine diagram and Figure 3-10 shows one
of the activity diagrams.
Generated Displayed
/ Pop-up
Figure 3-9 Message state machine diagram
Register Login
CRGPS
Home Reset

40
WebSiteCustomer
To login Display home page
Click LOGIN
Display login page
Request enter usernameEnter username
Click NEXT Verify username
Request enter passw ord
Display successful login page
[verif ied][rejected]
[verif ied][rejected]
Enter passw ord sent email to user
Click NEXT Verify passw ords
Display failed login page
Figure 3-10 Login activity diagram
2. Analysis
The purpose of the analysis workflow is to analyse the requirements in order to
acquire a more precise understanding of the requirements, and to acquire a description
of the requirements that is easy to maintain and helps us in structuring of the whole
system. Analysis is the focus during the initial elaboration iterations. It contributes to a
sound and stable architecture and facilitates an in-depth understanding of the
requirements. Figure 3-11 illustrates the workflow in analysis with the four participating
activities. Each activity will be described in a subsection.

41
Architectural
Analysis
Analyse a
Use Case
Analyse a
Class
Analyse a
Package
Figure 3-11 The workflow in analysis
Activity 1: Architectural analysis The purpose of architectural analysis is to outline the analysis model and the
architectural. The objective of this activity is achieved by identifying the analysis
packages, obvious analysis class, and common special requirements.
Activity 2: Analyse a use case The purpose of this activity is to identify the analysis classes whose objects are
needed to perform the use case’s flow of events, distribute the behaviour of the use case
to interacting analysis objects, and capture special requirements on the realization of the
use case. This activity is also called use case refinement as we refine each use case as a
collaboration of analysis classes. In the identifying analysis classes, the control, entity,
and boundary classes needed to realise the use case are identified and their names,
responsibilities, attributes, and relationships are outlined. The way that analysis objects
interact is described by using communication diagrams that contain the participating
actor instances, analysis objects, and their links. Special requirements on a use-case
realization are captured. One of the communication diagrams was shows in Figure 3-12.
:HomePage
:LoginPage:Detail
1 : c lickLogin()
2 : display()
3 : enter username
4 : clickNext()
5 : verify Login(username)
:User
6 : verified
7 : enter password code
8 : clickNext()
:Password
9 : verifyLogin(password)10 : verified
:MessagePage
11 : display()
Figure 3-12 Login communication diagram

42
Activity 3: Analyse a class The purposes to analyse a class is to identify and maintain the responsibilities of
an analysis object, identify and maintain the attributes and relationships of the analysis
class, and capture special requirements on the realisation of the analysis class. Hence, it
will produce the complete analysis class as output as illustrated in Figure 3-13, while
taking the use-case realisation of analysis and the outline of analysis class as input.
Responsibilities of the analysis classes are identified in this step. The responsibilities of
a class is be collected by examining all the roles that it plays in different use-case
realizations. The attributes of the analysis classes will be also identified in this step.
Since attributes are often related to realising the responsibilities of its class, the result of
the preceding step helps. Associations and aggregations between classes are identified
to structure them. Generalizations are used to extract shared and common behaviour
among several analysis classes. This further structures the analysis classes. In capturing
special requirements, we capture all requirements of an analysis class that are identified
in analysis but should be handled in design and implementation. A table with analysis
class, responsibilities and attributes are created and show in Table 3-2. A class diagram
showing the analysis class of CRGPS also created and show in Figure 3-14.
Analyse
a Class
Analysis Class
[outlined]
Use Case
Realisation
- AnalysisAnalysis Class
[complete]
Figure 3-13 The input and result of activity analyse a class
Analysis Class Responsibilities Attributes
Password -username
-password image
-password code
Detail -username
-name
-IC number
-gender
-race
-address
-state
-postcode
-country
-password image 1
-password image 2
-password image 3
-password image 4
-password image 5
-private key
Table 3-2 Analysis class table

43
+verifyPassw ord(in pass_code : String)
+UserName : String+pass_image : String-pass_code : String
Passw ord
+verifyUsername(in UserName : String)+getEmail(in e_mail : String)
+name : String+address : String+UserName : String+IC : String+gender : String+race : String+state : String+postcode : String+country : String+e_mail : String+pass_image_1 : String+pass_image_2 : String+pass_image_3 : String+pass_image_4 : String+pass_image_5 : String+private_key : String
Detail
has
Figure 3-14 Class diagram showing the analysis class of CRGPS
3. Design
The purposes of the design workflow are to:
1. Acquire an in-depth understanding of issues regarding non-functional
requirements and constraints.
2. Create an appropriate input to and point of departure for subsequent
implementation activities.
3. Be able to decompose implementation work into more manageable pieces.
4. Be able to visualise and reason about the design.
5. Create a seamless abstraction of the system’s implementation.
In the software life cycle (see Figure 3-5), the design is in focus during the end
of elaboration and the beginning of construction phase. It contributes to a sound and
stable architecture and creates a blueprint for the implementation model.
Activity 1: Architectural design
The purpose of activity architectural design is to outline the design and
development models, and their architecture. The resulting interfaces, or other design
elements, are then incorporated into the design model. This activity will have the use-
case model, analysis model, and architecture description as input to produce an outline
of interface, an outline of design class, an outline of deployment model, and the
architecture description. In identifying nodes and network configurations, the physical
network configuration will be defined. Nodes and network configuration is essential to
the software’s architecture. Architecturally significant design classes are identified at
this activity to initiate the design work. These architecturally significant design classes
could be identified from the architecturally significant analysis classes. Active classes

44
that are required by the system in order to consider the concurrency requirements should
be identified too. In identifying generic design mechanisms, common requirements and
special requirements are studied to decide how to handle them with the available design
and implementation technologies.
Activity 2: Design a use case
The purposes of this activity are to identify the design classes whose instances
are needed to perform the use case’s flow of events, to distribute the behaviour of the
use case to interacting design objects, to define requirements on the operations of design
classes and their interfaces, and to capture implementation requirements for the use case.
This step has the use-case model; analysis model, design model, and deployment model
as input to produce the use case realization of design, an outline of design classes, and
an outline of interfaces. In identifying the participating design classes, the design classes
needed to realise the use case are identified. At describing design object interactions, an
outline of the design classes needed to realise the use case is obtained. Sequence
diagrams containing the actor instances and design objects are used to describe how
these corresponding design objects interact. All requirements are captured on the use-
case realisation. One of the sequence diagrams was show in Figure 3-15.

45
User
:HomePage :LoginPage :Detail
clickLogin()
display()
enter username
verifyUsername(UserName)
verif ied
display()
The User clicks the Loginbutton on the HomePage.
The system displays theLogin Page.
The User enters his/herusername and thenclicks the Next button.
The system verify theusername against thepersistent Detail data.
The system displayslogin successfulmessage.
enter passw ord code
clickNext()
clickNext()
verifyPassw ord(passw ord)
verif ied
:Passw ord :MessagePage
The system verify thepassw ord code againstthe persistent Passw orddata.
The User enters his/herpassw ord code and thenclicks the Next button.
Figure 3-15 Login sequence diagram
Activity 3: Design a class
The purpose of this activity is to create a design class that fulfils its role in use-
case realization and the non-functional requirements that apply to it. Design class for
CGPS was show in Figure 3-16. As illustrated in Figure 3-17, this activity will have as
input the use-case realization, an outline of design classes, an outline of interface, and
the analysis class to produce the design class. The following are eight steps to be taken
to perform this activity.
1. Outlining the design class based on the analysis class and/or interface as input.
The design classes identified here should be assigned trace dependencies to the
corresponding analysis classes.

46
2. Operations that need to be provided by the design class are identified and
described using syntax of the programming language. The operations will need
to support all the roles that the class plays in all use-case realizations it
participates.
3. The attributes required by the design class are identified and described using the
programming language syntax. Attributes are often implied and required by the
operations of the class.
4. Associations and aggregations among design classes are identified in this step.
5. Generalizations are identified. At this stage, generalizations should be used with
the same semantics as defined by the programming language.
6. Methods are used to specify how operations are realised.
7. State chart diagrams are used to describe the states of those design objects that
are state controlled, which means that the state determines its behaviour.
8. Any requirements that have not been considered in the preceding steps are dealt
with in this step.
+UserName : String+pass_image : String+pass_code : String
Passw ord
+name : String+address : String+UserName : String+IC : String+gender : String+race : String+state : String+country : String+postcode : String+e_mail : String+pass_image_1 : String+pass_image_2 : String+pass_image_3 : String+pass_image_4 : String+pass_image_5 : String+private_key : String
Detail
+clickNext()+verifyUserName(in UserName : String)+verifyPassw ord(in pass_code : String)+display()
Login Page
+clickLogin()+clickRegister()+clickReset()+display()
Home Page
+clickNext()+verifyUserName(in UserName : String)+clickSubmit()+clickConfirm()+display()
Register Page
displays
displays+clickNext()+verifyUserName(in UserName : String)+clickSubmit()+clickConfirm()+display()
Reset Page
displays
create
update
create
update
Figure 3-16 Class diagram of CRGPS

47
Design a
Class
Analysis Class
[complete]
Interface
[outlined]
Design Class
[outlined]
Use Case
Realisation
- Design
Design Class
[complete]
Figure 3-17 The input and result of activity design a class
4. Implementation
The purposes of the implementation workflow are to:
1. Plan the system integrations required in each iteration.
2. Distribute the system by mapping executable components onto nodes in the
deployment model.
- A deployment diagram was created as show in Figure 3-18.
:Intranet
WebBrow ser
WebBrow ser
WebBrow ser
Cued Recall Graphical Passw ord System
CRGPS DB: Database
Computer(Admin)
Printer
Figure 3-18 Deployment diagram of CRGPS
3. Implement the design classes during design.
4. Unit test the components, and then to integrate them.
Further elaboration will be presented in Chapter 6 Implementation.
5. Test
This is the stage where all the design will be turned into codes. These codes will
then be tested separately. Once all the codes have been tested, it is considered that the
particular part is complete and free from error. Once all the parts have been tested

48
successfully, a discussion will be carried out between the system developers and the
users to consider if any other functions are required to be added or modified.
Algorithm:
If Yes
Go back to Requirement Capture and Analysis again.
Else
Continue with the next phase – System testing and implementation
After all the “small parts” have been tested separately and were proven to be
error free, those small parts will be joined together, one by one in this stage and will be
tested again as a whole, complex, and complete system. If everything is running
smoothly, the model will proceeds to the implementation stage. If any errors do occur,
the model will lead to the previous stages. The part where the errors occur will be
double checked. Test cases were created in this phase and the result was recorded in a
table. Part of the test cases was show in Table 3-3. Usability testing was performing in
this phase too and the result was recorded in Chapter 7 Testing.
No. Test case Expected
result
Actual
result
Status After
Fix
1. Password:
The following parameters will be
tested out
a) Min password length of 4
characters
i) Password length < 4 chars
ii) Password length > 4 chars
iii) Password length = 4 chars
- Password not
allowed
-Appropriate
message
displayed to
user
-Password
allowed
-Password
allowed
-As expected
-As expected
-As expected
-OK
-OK
-OK
Table 3-3 Test cases of CRGPS
Further elaboration will be in Chapter 7 Testing.
3.3.2 The Iteration Workflows
This section will describe the four iteration workflows with emphasis of each
iteration workflow on the activities in the five core workflows.

49
1. Inception iteration
The overall intent of the inception phase is to launch the project. Hence, the goal
in the inception phase is to come out with the business case as justification for the
undertaking of the project. In order to achieve these goals, there are four steps to be
taken for this phase, which are:
(a) The scope of the proposed software has to be delimited. The system boundary
should be defined and the interfaces to related systems outside the boundary are
identified. The scope is needed to understand what the architecture has to cover,
where to look for critical risks, to provide the boundaries on cost, schedule, and on
estimates of return-on-investment.
(b) The candidate architecture of the system has to be described or outlined. The
emphases are on those parts that are new, risky, or difficult. This step ends with an
architecture description where no executable prototype is required since the goal of
this phase is to assure that a stable architecture could be created to support the
system scope.
(c) Critical risks have to be identified. In this phase, the stress in on risks that affect
feasibility, meaning risks that threaten the successful development of the system.
Other risks are recorded for consideration in later phases. Risks management has
been proposed at this early stage to avoid project failure. This is due to the fact that
risks discovered at late stages such as system integration and testing might not be
mitigated within budget and scheduled time. Prototype can also be used to manage
and mitigate risk, as prototype could help in exposing of high risk area.
(d) Finally, if the product is a new type of software, a demonstration may be performed
with a proof-of-concept prototype.
2. Elaboration iteration
The primary product of the elaboration phase is a stable architecture.
(a) An architectural baseline that covers the architecturally significant functionality of
the system is created. This architectural baseline will consist of the model artefacts,
architecture description, and executable implementation. Hence, it takes the
architecture a step from the inception phase by creating the executable architecture.
(b) Significant risks, that is, risks that could upset the plans and schedule of later phase,
are identified.
(c) The levels to be attained by quality attributes are specified.

50
(d) Use cases to about eighty percent of functional requirements are captured. This
would be sufficient to plan for the construction phase.
(e) A proposal covering all the resources is prepared.
3. Construction iteration
The general objective of this phase is a product with initial operational capability.
This phase ends with a product that is ready for beta testing. The general activities of
this phase include:
(a) Extending the use-case identification, description, and realization to the entire body
of the use cases.
(b) Finishing analysis, design, implementation, and test.
(c) Maintaining the integrity of the architecture.
(d) Monitoring critical and significant risks carried over from the first two phases.
4. Transition iteration
This phase typically begins with the beta release. This signifies that the software
product is capable of initial operations and is distributed to a representative sample of
the community of actual user. The activities of this phase include:
(a) Preparation activities.
(b) Advising the customer on updating the environment in which the software is to
operate.
(c) Preparation of manuals and other documentation for product release.
(d) Adjusting the software to operate under the actual parameters of the user
environment.
(e) Correcting defects found after feedback from the beta tests.
(f) Modifying the software in the light of unforeseen problems.
3.4 Conclusion
This chapter has provides a description of the Unified Software Development
Process, the methodology that is being adopted for this project. This chapter also
specified the strength of the Unified Process. Among the strength is the efficient use of
use case model for requirement capture, the process being use case driven, and the
development through use of iteration and incremental model. The detail on the steps
carried out in the Unified Process was discussed in this chapter and example of the
result was show too.

51
Chapter 4 Requirement Capture and Analysis
This chapter presents the result of captured requirements, and analysis on the
requirements. This chapter consists of four sections where Section 4.1 presents the
result of requirements capture. As for the result of analysis, it is presented in Section 4.2
through use-case realization of the analysis model and the analysis classes. Section 4.3
presents the non-functional requirements analysis. The final sections, section 4.4 would
conclude the whole chapter.
4.1 Requirements Capture
This section presents the outcome of requirements capture in four subsections.
The first subsection provides a description of actors and use cases identified and the
flow of events for these use cases. The second subsection provides the user interface
design for this application. The third subsection and fourth subsection provides the state
machine diagram and activity diagram respectively whereas the fifth subsection
provides the non-functional requirements of the CRGPS.
4.1.1 Actor and Use Cases
This subsection specifies the use case model. A use case specifies the behaviour
of a system and it is use to capture intended behaviour (functional requirement) of the
system that we are developing. Table below shows the graphical notation use in use
case diagram and their symbol name.
Symbol Name Notation Explanation
Actor
This symbol represents an actor which interacts
with a use case.
Use Case
This symbol represents a coherent unit of
functionality provided by a system or class.
Communicates
This symbol indicates the participation of an actor
in a use case.
Include
This symbol indicates that an instance of one use
case will also include the behaviour specified by
another.
Table 4-1 Use case diagram‘s symbol and explanation
User
Login
1 1
<<include>>

52
CRGPS
User
Log-in
Register
1 1
include1
1
Resetinclude
Figure 4-1 Use cases model of CRGPS
Figure 4-1, Figure 4-2 and Figure 4-3 illustrates the structured use-case model of
application CRGPS. The user interacts with three use cases: Login, Register and Reset.
The table below will give a better view of each use case with their definition, actor
involved, post and pre-condition, and the flow of event.
Use Case Description
Login A USER needs to login before performing any transaction.
Actor/s: USER
Pre-condition:
A registered user.
Main flow of events:
1. The USER clicks the LOGIN button on the Home Page.
2. The system displays the Log-in Page.
3. The USER enters his/her username.
4. The USER clicks the NEXT button.
5. The system validates the username information against the DETAIL
table in the database.
6. Username exists; the system displays the next page.
7. The system request user to enter his/her password code for the pass
objects that appear on the screen.
8. The USER enters his/her password.
9. The USER clicks the NEXT button.
10. The system validates the password code information against the
PASSWORD table in the database.
11. USER is an authorised user; the system displays a message
“Congratulation!! Login Successfully!!” to the USER.
Post-condition:
The USER has been authorised to perform transaction.
Table 4-2 Use cases and flow of events of Login process

53
Table 4-2, continued
Alternate flow of event: 1. The USER clicks the LOGIN button on the Home Page.
2. The system displays the Log-in Page.
3. The USER enters his/her username.
4. The USER clicks the NEXT button.
5. The system validates the username information against the DETAIL
table in the database.
6. USER is not an existing user; the system displays a pop-up message
“invalid user” to inform the USER.
Post-condition:
The USER is not authorised to perform transaction.
Alternate flow of event: 1. The USER clicks the LOGIN button on the Home Page.
2. The system displays the Log-in Page.
3. The USER enters his/her username.
4. The USER presses the CANCEL button.
5. The system stops the transaction.
Post-condition:
No changes are made to the USER account.
Alternate flow of event: 1. The USER clicks the LOGIN button on the Home Page.
2. The system displays the Log-in Page.
3. The USER enters his/her username.
4. The USER presses the CLEAR button.
5. The USER re-enter his/her username.
6. The USER clicks the NEXT button.
7. The system validates the username information against the DETAIL
table in the database.
8. USER is an existing user; the system displays the next page.
9. The system request user enters his/her password code for the pass
objects that appear on the screen.
10. The USER enters his/her password.
11. The USER clicks the NEXT button.
12. The system validates the password code information against the
PASSWORD table in the database.
13. USER is an authorised user; the system displays a message
“Congratulation!! Login Successfully!!” to the USER.
Post-condition:
The USER is authorised to perform the transaction.

54
Table 4-2, continued
Alternate flow of event: 1. The USER clicks the LOGIN button on the Home Page.
2. The system displays the Log-in Page.
3. The USER enters his/her username.
4. The USER clicks the NEXT button.
5. The system validates the username information against the DETAIL
table in the database.
6. USER is an existing user; the system displays the next page.
7. The system request user enters his/her password code for the pass
objects that appear on the screen.
8. The USER enters his/her password.
9. The USER clicks the NEXT button.
10. The system validates the password code information against the
PASSWORD table in the database.
11. The USER is not an authorised user; the system displays a message
“Wrong password!! Please try again!! Your email has been successfully
sent!” to the USER.
12. The system sent an email contains password information to the
USER.
Post-condition:
The USER is not authorised to perform transaction.
Alternate flow of event: 1. The USER clicks the LOGIN button on the Home Page.
2. The system displays the Login Page.
3. The USER enters his/her username.
4. The USER clicks the NEXT button.
5. The system validates the username information against the DETAIL
table in the database.
6. USER is an existing user; the system displays the next page.
7. The system request user enters his/her password code for the pass
objects that appear on the screen.
8. The USER clicks the NEXT button.
9. The system displays a message “Required” to the USER require
USER to enter his/her password.
8. The USER re-enters his/her password.
9. The USER clicks the NEXT button.
10. The system validates the password code information against the
PASSWORD table in the database.
11. USER is an authorised user; the system displays a message
“Congratulation!! Login Successfully!!” to the USER.
Post-condition:
The USER has been authorised to perform transaction.

55
Use Case Description
Register
A new USER needs to be register into the system before performing any
transaction.
Actor/s: USER
Pre-condition: An unregistered USER.
Main flow of events:
1. The USER clicks the REGISTER button on the Home Page.
2. The system displays the Register Page.
3. The USER enters all of the required information.
4. The USER clicks the NEXT button.
5. The USER chooses an image from 5 categories (animal, insect,
flower, reptile, bird).
6. The system shows the selected image at the image box below.
7. The USER enters password code for the chosen image.
8. The USER click on the SUBMIT button to confirm the selection.
9. Step 5 until step 8 repeat 5 times.
10. The system shows the result for review.
11. The USER clicks the CONFIRM button.
12. The system updates account information in the DETAIL and
PASSWORD tables in the database.
13. The system returns the USER to the Log-in Page.
Post-condition:
The new USER has registered. The DETAIL and PASSWORD tables
are updated.
Alternate flow of event: 1. The USER clicks the REGISTER button on the Home Page.
2. The system displays the Register Page.
3. The USER skip in filling in the compulsory field, then a message
“Required will appear after the skipped field’s textbox.
4. The USER fills in the compulsory field.
5. The USER clicks the NEXT button.
6. The USER chooses an image from 5 categories (animal, insect,
flower, reptile, bird).
7. The system shows the selected image at the image box below.
8. The USER enters password code for the chosen image.
9. The USER click on the SUBMIT button to confirm the selection.
10. Step 6 until step 9 repeat 5 times.
11. The system shows the result for review.
12. The USER clicks the CONFIRM button.
13. The system updates account information in the DETAIL and
PASSWORD tables in the database.
14. The system returns the USER to the Log-in Page.
Post-condition:
The new USER has registered. The DETAIL and PASSWORD tables
are updated.
Table 4-3 Use cases and flow of events of Register process

56
Table 4-3, continued
Alternate flow f event:
1. The USER clicks the REGISTER button on the Home Page.
2. The system displays the Register Page.
3. The USER enters all of the required information.
4. The USER fill in the IC No. and E-mail address field in wrong
format, a message that shows the correct format will appear.
5. The USER re-enter the information in a correct format.
6. The USER clicks the NEXT button.
7. The USER chooses an image from 5 categories (animal, insect,
flower, reptile, bird).
8. The system shows the selected image at the image box below.
9. The USER enters password code for the chosen image.
10. The USER click on the SUBMIT button to confirm the selection.
11. Step 7 until step 10 repeat 5 times.
12. The system shows the result for review.
13. The USER clicks the CONFIRM button.
14. The system updates account information in the DETAIL and
PASSWORD tables in the database.
15. The system returns the USER to the Log-in Page.
Post-condition:
The new USER has registered. The DETAIL and PASSWORD tables
are updated.
Alternate flow of event:
1. The USER clicks the REGISTER button on the Home Page.
2. The system displays the Register Page.
3. The USER enters all of the required information.
4. The USER chooses a Username that already owned by other person, a
message “invalid username” will appear and request the USER to enter
a new UserName to register.
5. The USER re-enter a new Username.
6. The USER clicks the NEXT button.
7. The USER chooses an image from 5 categories (animal, insect,
flower, reptile, bird).
8. The system shows the selected image at the image box below.
9. The USER enters password code for the chosen image.
10. The USER click on the SUBMIT button to confirm the selection.
11. Step 7 until step 10 repeat 5 times.
12. The system shows the result for review.
13. The USER clicks the CONFIRM button.
14. The system updates account information in the DETAIL and
PASSWORD tables in the database.
15. The system returns the USER to the Log-in Page.
Post-condition:
The new USER has registered. The DETAIL and PASSWORD tables
are updated.

57
Table 4-3, continued
Alternate flow of event: 1. The USER clicks the REGISTER button on the Home Page.
2. The system displays the Register Page.
3. The USER enters all of the required information.
4. The USER clicks the NEXT button.
5. The USER chooses an image from 5 categories (animal, insect,
flower, reptile, bird).
6. The system shows the selected image at the image box below.
7. The USER enters password code for the chosen image.
8. The USER click on the SUBMIT button to confirm the selection.
9. The USER chooses the same image again.
10. The system prompts a message “Image already chosen!! Please
choose another image!!”
11. The USER chooses a new image.
12. The system shows the selected image at the image box below.
13. The USER enters password code for the chosen image.
14. The USER click on the SUBMIT button to confirm the selection.
15. Step 5 until step 8 repeat 5 times.
16. The system shows the result for review.
17. The USER clicks the CONFIRM button.
18. The system updates account information in the DETAIL and
PASSWORD tables in the database.
19. The system returns the USER to the Log-in Page.
Post-condition:
The new USER has registered. The DETAIL and PASSWORD tables
are updated.
Alternate flow of event:
1. The USER clicks the REGISTER button on the Home Page.
2. The system displays the Register Page.
3. The USER enters all of the required information.
4. The USER clicks the NEXT button.
5. The USER chooses an image from 5 categories (animal, insect,
flower, reptile, bird).
6. The system shows the selected image at the image box below.
7. The USER clicks the SUBMIT button.
8. The system prompts a message “Required”.
9. The USER re-enter the password code for the chosen image.
10. The USER click on the SUBMIT button to confirm the selection.
11. Step 5 until step 8 in the main flow of event repeat 5 times.
12. The system shows the result for review.
13. The USER clicks the CONFIRM button.
14. The system updates account information in the DETAIL and
PASSWORD tables in the database.
15. The system returns the USER to the Log-in Page.
Post-condition:
The new USER has registered. The DETAIL and PASSWORD tables
are updated.

58
Table 4-3, continued
Alternate flow of event: 1. The USER clicks the REGISTER button on the Home Page.
2. The system displays the Register Page.
3. The USER enters all of the required information.
4. The USER clicks the NEXT button.
5. The USER chooses an image from 5 categories (animal, insect,
flower, reptile, bird).
6. The system shows the selected image at the image box below.
7. The USER enters password code for the chosen image.
8. The USER click on the SUBMIT button to confirm the selection.
9. Step 5 until step 8 repeat 5 times.
10. The system shows the result for review.
11. The USER clicks the CHANGE PICTURE button.
12. Step 5 until step 8 repeat.
13. The system shows the result for review.
14. The USER clicks the CONFIRM button.
15. The system updates account information in the DETAIL and
PASSWORD tables in the database.
16. The system returns the USER to the Log-in Page.
Post-condition:
The new USER has registered. The DETAIL and PASSWORD tables
are updated.
Alternate flow of event: 1. The USER clicks the REGISTER button on the Home Page.
2. The system displays the Register Page.
3. The USER enters all of the required information.
4. The USER clicks the NEXT button.
5. The USER chooses an image from 5 categories (animal, insect,
flower, reptile, bird).
6. The system shows the selected image at the image box below.
7. The USER enters password code for the chosen image.
8. The USER click on the SUBMIT button to confirm the selection.
9. Step 5 until step 8 repeat 5 times.
10. The system shows the result for review.
11. The USER changes the password code for the selected images.
12. The USER clicks the CONFIRM button.
13. The system updates account information in the DETAIL and
PASSWORD tables in the database.
14. The system returns the USER to the Log-in Page.
Post-condition:
The new USER has registered. The DETAIL and PASSWORD tables
are updated.

59
Use Case Description
Reset A USER wants to change his/her personal information.
Actor/s: USER
Pre-condition:
A registered user.
Main flow of events:
1. The USER clicks the RESET button on the Home Page.
2. The system displays the Reset Page.
3. The USER enters his/her username.
4. The USER clicks the NEXT button.
5. The system validates the username information against the DETAIL
table in the database.
6. The USER is an existing user; the system displays USER’s detail.
7. The USER change personal detail.
8. The USER clicks the NEXT button.
9. The system displays USER’s detail and password information for
review.
10. The USER clicks the CHANGE PICTURE button.
11. The system displays password image for USER to choose.
12. The USER chooses an image from 5 categories (animal, insect,
flower, reptile, bird).
13. The system shows the selected image at the image box below.
14. The USER enters password code for the chosen image.
15. The USER click on the SUBMIT button to confirm the selection.
16. The system shows the result for review.
17. Step 10 until step 16 repeat for each time USER clicks on the
CHANGE PICTURE button.
18. The USER clicks the CONFIRM button.
19. The system updates account information in the DETAIL and
PASSWORD tables in the database.
20. The system returns the USER to the Login Page.
Post-condition:
The DETAIL and PASSWORD tables are updated.
Alternate flow of event: 1. The USER clicks the RESET button on the Home Page.
2. The system displays the Reset Page.
3. The USER enters his/her username.
4. The USER clicks the NEXT button.
5. The system validates the username information against the DETAIL
table in the database.
6. USER is not an existing user; the system displays a pop-up message
“invalid user” to inform the USER.
Post-condition:
The USER is not authorised to perform transaction.
Table 4-4 Use cases and flow of events of Reset process

60
Table 4-4, continued
Alternate flow of event:
1. The USER clicks the RESET button on the Home Page.
2. The system displays the Reset Page.
3. The USER enters his/her username.
4. The USER clicks the NEXT button.
5. The system validates the username information against the DETAIL
table in the database.
6. The USER is an existing user; the system displays USER’s detail.
7. The USER change personal detail.
8. The USER skip to fill in the compulsory field, then a message
“Required will appear after the skipped field’s textbox.
9. The USER fills in the compulsory field.
10. The USER clicks the NEXT button.
11. The system displays USER’s detail and password information for
review.
12. The USER clicks the CHANGE PICTURE button.
13. The system displays password image for USER to choose.
14. The USER chooses an image from 5 categories (animal, insect,
flower, reptile, bird).
15. The system shows the selected image at the image box below.
16. The USER enters password code for the chosen image.
17. The USER click on the SUBMIT button to confirm the selection.
18. The system shows the result for review.
19. Step 12 until step 18 repeat for each time USER clicks on the
CHANGE PICTURE button.
20. The USER clicks the CONFIRM button.
21. The system updates account information in the DETAIL and
PASSWORD tables in the database.
20. The system returns the USER to the Login Page.
Post-condition:
The DETAIL and PASSWORD tables are updated.

61
Table 4-4, continued
Alternate flow of event: 1. The USER clicks the RESET button on the Home Page.
2. The system displays the Reset Page.
3. The USER enters his/her username.
4. The USER clicks the NEXT button.
5. The system validates the username information against the DETAIL
table in the database.
6. The USER is an existing user; the system displays USER’s detail.
7. The USER change personal detail.
8. The USER fill in the IC No. and E-mail address field in wrong
format, a message that shows the correct format will appear.
9. The USER re-enter the information in a correct format.
10. The USER clicks the NEXT button.
11. The system displays USER’s detail and password information for
review.
12. The USER clicks the CHANGE PICTURE button.
13. The system displays password image for USER to choose.
14. The USER chooses an image from 5 categories (animal, insect,
flower, reptile, bird).
15. The system shows the selected image at the image box below.
16. The USER enters password code for the chosen image.
17. The USER click on the SUBMIT button to confirm the selection.
18. The system shows the result for review.
19. Step 12 until step 18 repeat for each time USER clicks on the
CHANGE PICTURE button.
20. The USER clicks the CONFIRM button.
21. The system updates account information in the DETAIL and
PASSWORD tables in the database.
22. The system returns the USER to the Login Page.
Post-condition:
The DETAIL and PASSWORD tables are updated.

62
Table 4-4, continued
Alternate flow of event: 1. The USER clicks the RESET button on the Home Page.
2. The system displays the Reset Page.
3. The USER enters his/her username.
4. The USER clicks the NEXT button.
5. The system validates the username information against the DETAIL
table in the database.
6. The USER is an existing user; the system displays USER’s detail.
7. The USER change personal detail.
8. The USER clicks the NEXT button.
9. The system validates the username information against the DETAIL
table in the database.
10. The USER chooses a Username that already owned by other person,
a message “invalid username” will appear and request the USER to
enter a new Username to register.
11. The USER re-enter a new Username.
12. The USER clicks the NEXT button.
13. The system displays USER’s detail and password information for
review.
14. The USER clicks the CHANGE PICTURE button.
15. The system displays password image for USER to choose.
16. The USER chooses an image from 5 categories (animal, insect,
flower, reptile, bird).
17. The system shows the selected image at the image box below.
18. The USER enters password code for the chosen image.
19. The USER click on the SUBMIT button to confirm the selection.
20. The system shows the result for review.
21. Step 14 until step 20 repeat for each time USER clicks on the
CHANGE PICTURE button.
22. The USER clicks the CONFIRM button.
23. The system updates account information in the DETAIL and
PASSWORD tables in the database.
24. The system returns the USER to the Login Page.
Post-condition:
The DETAIL and PASSWORD tables are updated.

63
Table 4-4, continued
Alternate flow of event: 1. The USER clicks the RESET button on the Home Page.
2. The system displays the Reset Page.
3. The USER enters his/her username.
4. The USER clicks the NEXT button.
5. The system validates the username information against the DETAIL
table in the database.
6. The USER is an existing user; the system displays USER’s detail.
7. The USER change personal detail.
8. The USER clicks the NEXT button.
9. The system displays USER’s detail and password information for
review.
10. The USER clicks the CHANGE PICTURE button.
11. The system displays password image for USER to choose.
12. The USER chooses an image from 5 categories (animal, insect,
flower, reptile, bird).
13. The system shows the selected image at the image box below.
14. The USER enters password code for the chosen image.
15. The USER click on the SUBMIT button to confirm the selection.
16. The system shows the result for review.
17. Step 10 until step 15 repeat.
18. The USER chooses the same image again.
19. The system prompts a message “Image already chosen!! Please
choose another image!!”
20. The USER chooses a new image.
21. The system shows the selected image at the image box below.
22. The USER enters password code for the chosen image.
23. The USER click on the SUBMIT button to confirm the selection.
24. Step 10 until step 16 repeat 3 times.
25. The system shows the result for review.
26. The USER clicks the CONFIRM button.
27. The system updates account information in the DETAIL and
PASSWORD tables in the database.
28. The system returns the USER to the Login Page.
Post-condition:
The DETAIL and PASSWORD tables are updated.

64
Table 4-4, continued
Alternate flow of event: 1. The USER clicks the RESET button on the Home Page.
2. The system displays the Reset Page.
3. The USER enters his/her username.
4. The USER clicks the NEXT button.
5. The system validates the username information against the DETAIL
table in the database.
6. The USER is an existing user; the system displays USER’s detail.
7. The USER change personal detail.
8. The USER clicks the NEXT button.
9. The system displays USER’s detail and password information for
review.
10. The USER clicks the CHANGE PICTURE button.
11. The system displays password image for USER to choose.
12. The USER chooses an image from 5 categories (animal, insect,
flower, reptile, bird).
13. The system shows the selected image at the image box below.
14. The USER click on the SUBMIT button to confirm the selection.
15. The system prompts a message “Required”.
16. The USER re-enter the password code for the chosen image.
17. The USER click on the SUBMIT button to confirm the selection.
18. The system shows the result for review.
19. Step 10 until step 16 repeat for each time USER clicks on the
CHANGE PICTURE button.
20. The USER clicks the CONFIRM button.
21. The system updates account information in the DETAIL and
PASSWORD tables in the database.
22. The system returns the USER to the Login Page.
Post-condition:
The DETAIL and PASSWORD tables are updated.

65
Table 4-4, continued
Alternate flow of event: 1. The USER clicks the RESET button on the Home Page.
2. The system displays the Reset Page.
3. The USER enters his/her username.
4. The USER clicks the NEXT button.
5. The system validates the username information against the DETAIL
table in the database.
6. The USER is an existing user; the system displays USER’s detail.
7. The USER change personal detail.
8. The USER clicks the NEXT button.
9. The system displays USER’s detail and password information for
review.
10. The USER clicks the CHANGE PICTURE button.
11. The system displays password image for USER to choose.
12. The USER chooses an image from 5 categories (animal, insect,
flower, reptile, bird).
13. The system shows the selected image at the image box below.
14. The USER enters password code for the chosen image.
15. The USER click on the SUBMIT button to confirm the selection.
16. The system shows the result for review.
17. Step 10 until step 16 repeat for each time USER clicks on the
CHANGE PICTURE button.
18. The USER changes the password code for the selected images.
19. The USER clicks the CONFIRM button.
20. The system updates account information in the DETAIL and
PASSWORD tables in the database.
21. The system returns the USER to the Login Page.
Post-condition:
The DETAIL and PASSWORD tables are updated.
4.1.2 Non-functional Requirements Analysis
There are eight major key areas of non-functional requirements and they are
listed as below:
a. Portability
Portability refers to the capability of the system to operate on various platforms
regardless of manufacturer or operating system. Since the selected server side language,
which is ASP.NET, is available in most popular platforms, especially Windows,
CRGPS portability will be assured. Secondly, since the output of ASP.NET is based on
international standards, all users using browsers that implement these standards will
have no problems in accessing to CRGPS.
b. Security
Security refers to the ability of systems to be immune and protected from any
criminal attacks such as hacking, malicious codes attack and in this case, shoulder
surfing. Every request to edit user details, such as resetting of password and changing of

66
user detail, will requires users’ identity to be authenticated before changes are allowed.
RSA encryption algorithm is also adopted to enhance protection of password codes.
c. Scalability
Scalability refers to the potential of the system to be enhanced, depending upon
the need and without much change of the underlying components. As CRGPS is a Web-
based and modular based system, it can be easily implemented on most of the machines
as long as the lowest requirements of software and hardware are fulfilled. Furthermore,
database scalability issues can be resolved through use of distributed database
architecture whereas Web application upgrades can be addressed through increase of
bandwidth or by adding additional Web server.
d. Flexibility
Flexibility refers to the system’s ability to adopt new technologies and resources,
as well as implementation to dynamic environments. As CRGPS is based on Web
technologies, it is foreseeable that future Web technologies that can work with existing
web technologies will have no problem in implementation of CRGPS.
e. Usability
Usability refers to user friendliness of a system. CRGPS is developed to be user
centric and consistent in its user interface. Beside this, cued recall and query-directed
password method was adopted to make the system more memorable.
f. Reliability
Reliability refers to the ability to rate the failure occurrence of the system.
CRGPS will run on Windows XP with Microsoft Internet Information Server (IIS)
service, which is known to be very reliable, and widely use. Thus, the reliability of
CRGPS is ensured as long as the Internet connection is good and the machine running
the system is stable and reliable. The system should operate 24 hours a day, 7 days a
week, and has a guarantee uptime of 99% for its service. A maximum 4 hours downtime
is permitted for maintenance purpose.
g. Efficiency
Efficiency refers to ability of systems to process user requests as much as
possible at the least response time. Besides, space usage of on hard disk and memory is
also important but is of secondary concern. A major concern is the spaces that are being
used database storage. This very much depends on the systems installed and the number
of records that are added to the database.
h. User-friendliness
The system must provide step-by-step guidance on usage of the system.
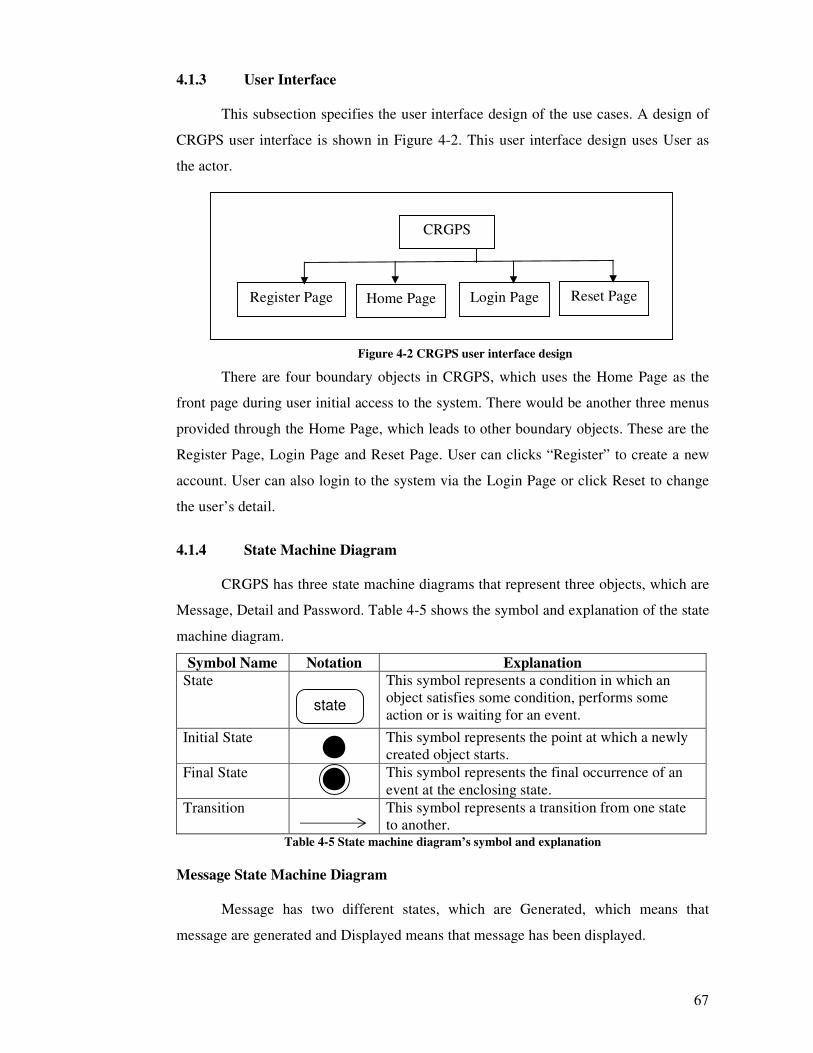
67
4.1.3 User Interface
This subsection specifies the user interface design of the use cases. A design of
CRGPS user interface is shown in Figure 4-2. This user interface design uses User as
the actor.
Figure 4-2 CRGPS user interface design
There are four boundary objects in CRGPS, which uses the Home Page as the
front page during user initial access to the system. There would be another three menus
provided through the Home Page, which leads to other boundary objects. These are the
Register Page, Login Page and Reset Page. User can clicks “Register” to create a new
account. User can also login to the system via the Login Page or click Reset to change
the user’s detail.
4.1.4 State Machine Diagram
CRGPS has three state machine diagrams that represent three objects, which are
Message, Detail and Password. Table 4-5 shows the symbol and explanation of the state
machine diagram.
Symbol Name Notation Explanation
State
This symbol represents a condition in which an
object satisfies some condition, performs some
action or is waiting for an event.
Initial State
This symbol represents the point at which a newly
created object starts.
Final State
This symbol represents the final occurrence of an
event at the enclosing state.
Transition
This symbol represents a transition from one state
to another. Table 4-5 State machine diagram’s symbol and explanation
Message State Machine Diagram
Message has two different states, which are Generated, which means that
message are generated and Displayed means that message has been displayed.
state
Register Page Login Page
CRGPS
Home Page Reset Page

68
Generated Displayed
/ Pop-up
Figure 4-3 Message state machine diagram
Password State Machine Diagram
Account is an object that has two different states, which is Wait and it means
that the system is idle, and New Record Created means that a new record is being
created upon registration.
Wait New Record Created
/ Register
Figure 4-4 Password state machine diagram
Detail State Machine Diagram
Detail is an object that has two different states, which are Wait. This means that
the system is idle. New Record Created means a new record is being created upon
registration.
Wait New Record Created
/ Register
Figure 4-5 Detail state machine diagram
4.1.5 Activity Diagram
This section will show you the activity diagram for each use cases. Table 4.4
shows the symbol and provides explanation on the activity diagram. In our activity
diagram, we use one or more swim lanes that represent the actor, who is responsible for
the specified action.
Symbol Name Notation Explanation
Action State ActionState1
This symbol represents an action state whose purpose
is to execute an action that allows transition to
another state.
Control Flow This symbol represents a transition from a state to
another state
Decision
This symbol expresses a decision when guard
conditions are used to indicate the possibilities that
are Boolean dependent. Table 4-6 Activity diagram’s symbol and explanation
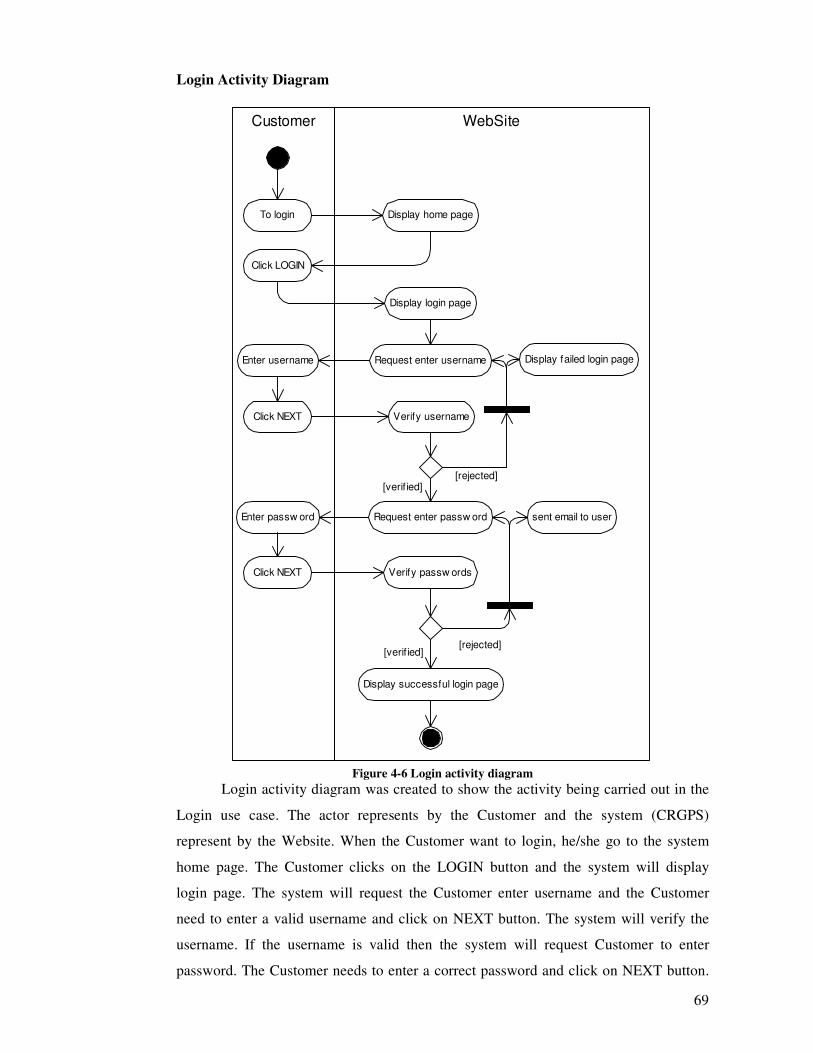
69
Login Activity Diagram
WebSiteCustomer
To login Display home page
Click LOGIN
Display login page
Request enter usernameEnter username
Click NEXT Verify username
Request enter passw ord
Display successful login page
[verif ied][rejected]
[verif ied][rejected]
Enter passw ord sent email to user
Click NEXT Verify passw ords
Display failed login page
Figure 4-6 Login activity diagram
Login activity diagram was created to show the activity being carried out in the
Login use case. The actor represents by the Customer and the system (CRGPS)
represent by the Website. When the Customer want to login, he/she go to the system
home page. The Customer clicks on the LOGIN button and the system will display
login page. The system will request the Customer enter username and the Customer
need to enter a valid username and click on NEXT button. The system will verify the
username. If the username is valid then the system will request Customer to enter
password. The Customer needs to enter a correct password and click on NEXT button.

70
The system will verify the password. If the password tally with database’s data then the
system will display successful login page else the system will sent an email that contain
Customer’s original password to Customer.
Register Activity Diagram
WebSite
To register Display home page
Click REGISTER
Display register page
Enter personal informationEnter information
Click NEXT
Enter in compulsory field
Enter in correct format Verify username
Display Log-in page
[verif ied]
[rejected]
:Passw ord
[create]
:Detail[create]
Display resultReview
Click CONFIRM
Verify f ields
[verif ied][rejected]
Enter passw ord image and codeClick passw ord image
Enter passw ord code Display chosen passw ord image
Click SUBMIT
repeat 5 times
Customer
[confirmed][rejected]
Click CHANGE PICTURE
Alter passw ord code
Figure 4-7 Register activity diagram
Register activity diagram was created to show the activity being carried out in
the Register use case. The actor represents by the Customer and the system represent by
the Website. When a new user wants to register, he/she go to the system home page.
The user clicks on the REGISTER button and the system will display register page. The

71
system will request the Customer to fill in the registration form and the Customer need
to fill in all the compulsory fields. The system will check whether the Customer has
entered information in the compulsory fields and whether the information is in its
correct format. If everything is correct then the system will verify the username. If the
username is accepted then the Customer can create his/her own password. After finish
creating the password the Customer click on SUBMIT button. The system will display
the selected password and username in a review page. The Customer can review the
information and do any necessary changes if needed and click on the COMFIRM button
to confirm everything is correct. Then the system will display the login page to the
Customer and create the Customer’s password and also add in the Customer detail in
database.
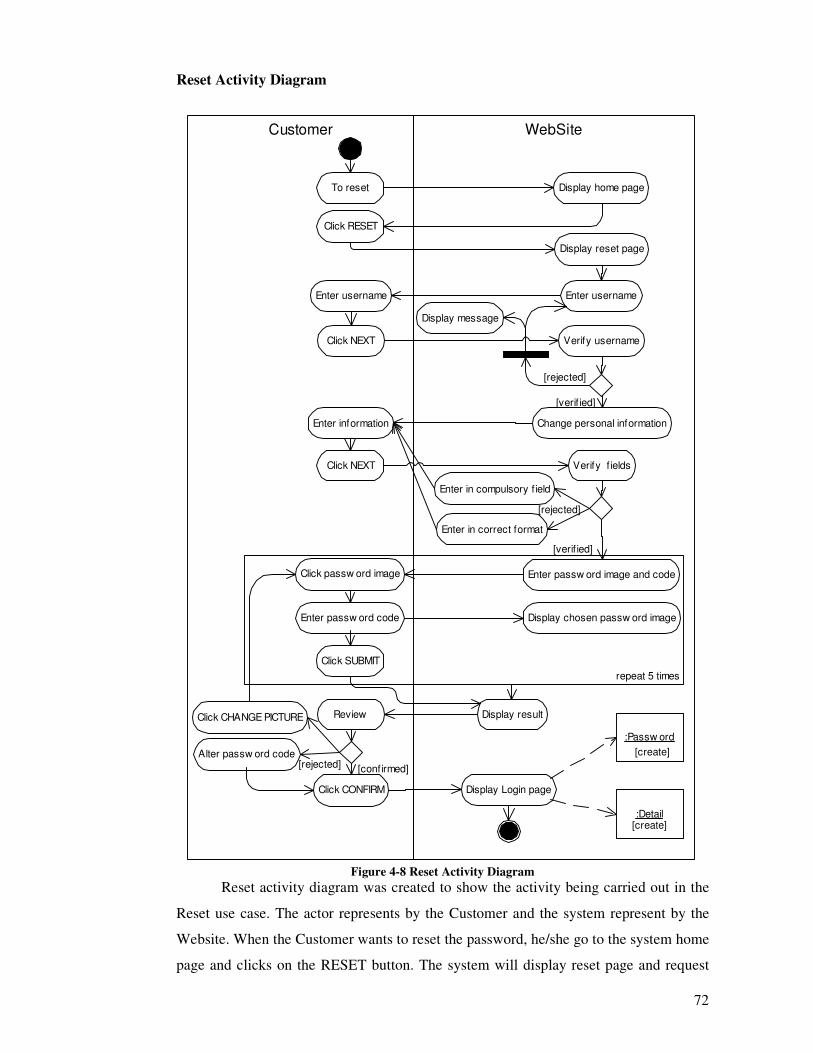
72
Reset Activity Diagram
WebSite
To reset Display home page
Click RESET
Display reset page
Enter information
Click NEXT
Enter in compulsory field
Enter in correct format
Display Login page
[verif ied]
:Passw ord
[create]
:Detail[create]
Display resultReview
Click CONFIRM
Verify f ields
[rejected]
Enter passw ord image and codeClick passw ord image
Enter passw ord code Display chosen passw ord image
Click SUBMIT
repeat 5 times
Customer
[confirmed][rejected]
Click CHANGE PICTURE
Alter passw ord code
[verif ied]
[rejected]
Display message
Enter username
Click NEXT Verify username
Change personal information
Enter username
Figure 4-8 Reset Activity Diagram
Reset activity diagram was created to show the activity being carried out in the
Reset use case. The actor represents by the Customer and the system represent by the
Website. When the Customer wants to reset the password, he/she go to the system home
page and clicks on the RESET button. The system will display reset page and request

73
the Customer to enter username. The Customer needs to enter a valid username and
click on the NEXT button. The system will verify the username. If the username is
correct, then the system will display the Customer detail and the Customer can alter the
information. After the Customer make the changes, the system will check whether the
compulsory fields had been fill in and whether the information is in its correct format. If
everything is OK then the system will display the Customer’s password in a review
page. The Customer can change the password image with clicking on the CHANGE
PICTURE button or click on the CONFIRM button to confirm. The system will display
the login page and save the information in database.
4.2 Analysis
This section would describe the result of analysis. It is divided into two
subsections. The first subsection describes the use-case realisation of analysis model
while the second subsection specifies the analysis classes.
4.2.1 Use Case Realisation - Analysis
This section shows each use case realization of analysis. Communication
diagrams are used to describe the communication between analysis objects.
Communication diagram is an interaction diagram that emphasises the structural
organization of the objects that participate in an interaction. Table 4-7 shows the symbol
and the explanation of communication diagram. CRGPS have three communication
diagrams. They are Login, Register and Reset diagrams. Every communication diagram
will have a flow of event to further describe the diagram.
Symbol Name Notation Explanation
Boundary
Object
This symbol represents the existence of a
boundary object.
Entity Object
This symbol represents the existence of an
entity object.
Path This symbol represents a path how one object
is linked to another.
Path Direction This symbol represents a path direction.
Table 4-7 Communication diagram’s symbol and explanation

74
Login Communication diagram
:HomePage
:LoginPage:Detail
1 : c lickLogin()
2 : display()
3 : enter username
4 : clickNext()
5 : verify Login(username)
:User
6 : verified
7 : enter password code
8 : clickNext()
:Password
9 : verifyLogin(password)10 : verified
:MessagePage
11 : display()
Figure 4-9 Login communication diagram
Flow of event:
The user clicks the Login button on the Home Page (See Figure 4-9 step 1). The
system displays the Login Page (See Figure 4-9 step 2). The user enters his or her
username and then clicks the Next button (See Figure 4-9 step 3 and step 4). The system
verifies the login information against the persistent Detail data and then returns the user
to the Login page (See Figure 4-9 step 5 and step 6). The user enters his or her password
code and then clicks the Next button (See Figure 4-9 step 7 and step 8). The system
verifies the login information against the persistent Password data and then returns the
user to the Login page (See Figure 4-9 step 9 and step 10). The system display a login
successfully message (See Figure 4-9 step 11).

75
Register Communication Diagram
:HomePage
:RegisterPage
:Password
1 : c lickRegister()
2 : display()
3 : enter personal detail
4 : c lickNext()
12 : create
:User
5 : verifyUsername(username)
:Detail
12 : create
6 : verified
7 : choose password image
and enter password code
8 : clickSubmitt()9 : step 7 and
step 8 repeat 5
times
10 : check result11 : clickConfirm()
:LoginPage
13 : display()
Figure 4-10 Register communication diagram
Flow of event:
The user clicks the Register button on the Home Page (See Figure 4-10 step 1).
The system displays the Register Page (See Figure 4-10 step 2). The user enters the
personal detail and then clicks the NEXT button (See Figure 4-10 step 3 and step 4).
The system verifies the username against the persistent Detail data and then returns the
user to the Register page (See Figure 4-10 step 5 and step 6). The user chooses his or
her password image and enters his or her password for each image then click the
SUBMIT button (See Figure 4-10 step 7 and step 8). Step 7 and step 8 are repeated 5
times (See Figure 4-10 step 9). The user check the result and then click the CONFIRM
button (See Figure 4-10 step 10 and step 11). The system creates a record in the Detail
and Password tables in the databases (See Figure 4-10 step 12). The system displays the
Login page (See Figure 4-10 step 13).

76
Reset Communication Diagram
:HomePage
:ResetPage
:Password
1 : c lickRegister()
2 : display()
7 : enter personal detail4 : c lickNext()
14 : update
:User
5 : verifyUsername(username)
:Detail
16 : update
6 : verified
9 : enter passwords10 : clickSubmitt() 11 : step 9 and
step 10 repeat
5 times
12 : check result
13 : clickConfirm()
:LoginPage
15 : display()
3 : enter username
8 : clickNext()
Figure 4-11 Reset Communication diagram
Flow of event:
The user clicks the Reset button on the Home Page (See Figure 4-11 step 1). The
system displays the Reset Page (See Figure 4-11 step 2). The user enters his or her
username and then clicks the Next button (See Figure 4-11 step 3 and step 4). The
system verifies the username information against the persistent Detail data and then
returns the user to the Reset page (See Figure 4-11 step 5 and step 6). The user enters
his/her personal detail and then clicks the NEXT button (See Figure 4-11 step 7 and step
8). The user chooses his or her password image and enters his or her password for each
image then click the SUBMIT button (See Figure 4-11 step 9 and step 10). Step 9 and
step 10 are repeated 5 times (See Figure 4-11 step 11). The user check the result and
then click the CONFIRM button (See Figure 4-11 step 12 and step 13). The system
updates the Detail and Password tables in the databases (See Figure 4-11 step 14). The
system displays the Login page (See Figure 4-11 step 15).

77
4.2.2 Analysis Class
This subsection specifies and identified the analysis classes. The results
presented in this subsection are extracted from the previous subsection, which has
provided a clear picture of the analysis model. This is done by describing each use case
realisation as collaboration of analysis objects.
The responsibilities and attributes of each analysis classes are described in Table
4-8. These responsibilities are needed by the analysis classes to perform use case
realization. Class diagram are use to model the system involves and to identify things
that are important to a particular view. Those things form the vocabulary of the system
that we are modelling. In this project, we have five class or objects that will represent
the system as a whole. Table 4-9 shows the symbol and the meaning of the class
diagram. Figure 4-12 shows the class diagram of CRGPS with object’s attributes and
functions.
Analysis Class Responsibilities Attributes
Password -username
-password image
-password code
Detail -username
-name
-IC number
-gender
-race
-address
-state
-postcode
-country
-password image 1
-password image 2
-password image 3
-password image 4
-password image 5
-private key Table 4-8 Analysis classes with their responsibilities and attributes
Symbol Name Notation Explanation
Class Class1
This symbol represents a descriptor for a set
of objects with similar structure, behaviour
and relationship.
Association
This symbol represents an association
between two classes. Table 4-9 Class diagram’s symbol and explanation

78
+verifyPassw ord(in pass_code : String)
+UserName : String+pass_image : String-pass_code : String
Passw ord
+verifyUsername(in UserName : String)+getEmail(in e_mail : String)
+name : String+address : String+UserName : String+IC : String+gender : String+race : String+state : String+postcode : String+country : String+e_mail : String+pass_image_1 : String+pass_image_2 : String+pass_image_3 : String+pass_image_4 : String+pass_image_5 : String+private_key : String
Detail
has
Figure 4-12 Class diagram showing the analysis classes of CRGPS
4.3 A Review of Development Tools
4.3.1 Programming Languages
Overall, there are two major types of scripting languages, the server side
scripting language and client side scripting language. For instances, ASP.NET (Active
Server Page), PHP (Professional Home Page), CGI (Common Gateway Interface) are
some examples of server side scripting language. These languages require their software
to be installed into the server before they can run them on that particular server. These
languages are mainly used in supporting and producing of dynamic web pages.
On the other hand, HTML (Hyper Text Mark-up Language), JavaScript and VB
Script are languages that are run on the client side. In essence, HTML is not exactly a
‘scripting’ language. There are some differences between plain HTML Web pages and
dynamic Java / VB Script embedded HTML web pages. While HTML is being used in
creation of simple document for viewing through web browsers on the World Wide
Web, JavaScript or VB Script is able to increase the aesthetics and friendliness of
websites through addition of author-specified user events, such as a mouse event.
(a) Server Side Scripting Language
i. Microsoft ASP.NET 2.0
ASP.NET 2.0 is a server side scripting technology that enables embedded scripts
to be executed by an Internet/web server. In essence, ASP.NET 2.0 is a program that
runs on the IIS platform. Essentially, when a browser requests for an ASP.NET file, IIS
will passes the request to the ASP.NET engine on the server. The ASP.NET engine

79
would read the file, line by line, and executes the scripts in the file. Finally, the
ASP.NET file is returned to the browser and interpreted as plain HTML.
In this project, ASP.NET 2.0 was selected as the main programming language
because:
1. ASP.NET provides object-oriented programming. Also, inheritance,
polymorphism, and encapsulation are supported by ASP.NET.
2. ASP.NET provides a flexible development environment. For instance,
developers could use WebMatrix, a community-supported tool, Visual
Studio .NET, or various Borland tools such as Delphi and C++ Builder as their
development tools. Visual Studio, for instance, allows setting of breakpoints,
tracing sections of code, and reviewing of call stack.
3. ASP.NET integrates well with most databases through ODBC, which provides
for consistent set of calling functions to access databases.
ii. Perl / Common Gateway Interface (CGI)
Common Gateway Interface (CGI) is an interface specification that allows
communication between client programs and information servers through Hyper-Text
Transfer Protocol (HTTP). TCP/IP is use as the communications protocol between the
CGI script and the server. The default port for communications is port 80 (privileged),
but other non-privileged ports may be specified.
CGI scripts can perform relatively simple processing on the client side. A CGI
script can be used to format Hyper-Text Mark-up Language (HTML) documents,
dynamically create HTML documents, and dynamically generate graphical images. CGI
can also perform transaction recording using standard input and output mechanism. CGI
stores information in system environment variables that can be accessed through the
CGI scripts. CGI scripts also have the capability to accept command line arguments.
For this project, CGI was not chosen as the preferred programming language
because:
1. CGI is rather weak on its input validation functionality (Ellison et al. 2000, pp.
311-8). Through CGI specification, which allows reading of files and shell
access, it is possible that access to the servers and host are exploited. Possible
means of access include exploitation of script assumptions, weaknesses to server
environment, and exploitation of weaknesses in other programs and system calls.
Such exploitation could corrupt the file systems.

80
iii. Professional Home Page 5 (PHP)
PHP, also known as Personal Home Page, was created by Rasmus Lerdorf.
Similar to ASP.NET, PHP is also a server-side scripting language use to create dynamic
Web pages. However, unlike ASP.NET, PHP is an Open Source and can be
implemented across various platforms. PHP's strongest feature is its database interfacing
capability, which supports many of the most popular database servers on the market.
These include MySQL, Oracle, Sybase and Generic ODBC databases.
PHP was not chosen as the preferred programming language because:
1. Its lack of exceptions, event-based error-handling instances could interrupt the
normal flow of a program.
2. PHP is considered a weak object-oriented programming.
3. It has a bad recursion mechanism. Recursion is the mechanism in which a
function calls itself.
(b) Client Side Scripting Language
i. HTML and DHTML
HTML language is only a mark-up language for the process of document
viewing. To be more specific, it produces only static Web pages. The original design
goal of HTML was to be device independent. That is, it was to be used on a variety of
computer systems and platform without change. Accordingly, it was designed to be a
language to describe document structure, rather than document presentation. So, the
basic HTML elements specify such things as headings, titles, and paragraphs - but not
margins and fonts. It was left up to the browser on any specific system to take care of
rendering the document in whatever way the browser author thought most suitable.
The basic idea of Dynamic HTML is quite simple - to allow any element of a
page to be changeable at any time. Dynamic HTML builds upon existing HTML
standards to expand the possibilities of Web page design, presentation, and interaction
(Shamir 1979, pp. 612-3). Basically, mastering DHTML will allow you to build Web-
based applications, rather than just plain HTML. Because DHTML is essentially an
"added value" technology to HTML, it is rather similar to basic Web page design that
uses traditional HTML specifications. In order to transform a Web page from static
status to dynamic, some of the existing scripting languages can be embedded to the
HTML language. Those languages are ASP.NET, PHP, Cold Fusion, Perl, Java or
Visual Basic Script and others.

81
ii. JavaScript
JavaScript is also referred to as a scripting language. It is developed by Netscape
and Sun Microsystems in late 1995. In addition to the common features found in most
programming languages, such as variables, functions, flow control, statements, and a
full suite of operators, JavaScript also possesses some capabilities of object-oriented
languages. Essentially, JavaScript allows a script author to access objects which appear
on a page. User will be allowed to use or modify the object attributes, which are often,
refer to as events.
JavaScript is also much more dynamic than plain HTML. For example,
JavaScript can be embedded into a page statement, which allows users response for
certain common events such as mouse clicks or form requests. Another nice feature of
JavaScript is that it is not a sophisticated programming language as inexperience script
writer will be able to create active scripts and practical user events with ease.
iii. Visual Basic.NET (VB.NET)
VB.NET is developed by Microsoft. VB.NET is commonly used to build
window based application and as a scripting language. In this project, VB.NET chosen
as the main scripting language because:
1. It is very easy to learn
2. Application and algorithm implementation is quick
3. There are a lot of in-built functionality
4. It has complete object-oriented programming support
(c) Database Language SQL
SQL is a programming language that is used in manipulation and retrieval of data
from relational databases. SQL enables a programmer or database administrator to do
the following:
� Modification of a database structure,
� Changing of system security settings,
� Adding of user permissions on databases or tables,
� Querying of database for information,
� Updating contents of a database.

82
The most commonly used statement in SQL is the SELECT statement. This
statement would retrieve data from the database for the user. In addition to the SELECT
statement, SQL provides statements for creation of new databases, tables, fields, and
indexes, as well as statements for insertion and deletion of records.
4.3.2 Relational Databases
The concept behind a database is rather simple. A database is like file cabinets
that can stores information. A database can also be treated as a collection of information,
with relation to application. Relational database management system is a type of
database management system (DBMS) that stores data in the form of related tables.
Relational databases are powerful because very few assumptions are required on how
the data is related in order to extract the data from the database. As a result, the same
database can be viewed in many different ways. An important feature of relational
systems is that a single database can spread across several tables. This differs from flat-
file databases, where each database is self-contained in a single table.
i. Microsoft SQL 2005 Server Express Edition
SQL Server 2005 Express Edition is a free and easy-to-use database product that
is based on SQL Server 2005 technology. It is designed to provide a database platform
that offers ease of use and enabling fast deployments for its target scenarios. The ease of
use is through a simple and robust graphical user interface (GUI) setup, which guides
the user through the installation process. GUI tools that come with the SQL Server
Express include SQL Server Management Studio Express Edition, Surface Area
Configuration Tool, and SQL Server Configuration Manager. These tools simplify the
basic database operations. The design and development of database applications are
made even easier through integration with Visual Studio projects. In addition, it
introduces the ability to deploy database applications by moving them like typical
Windows files. Servicing and patching are also simplified and automated.
SQL Server Express uses the same reliable and high-performance database engine
as the other versions of SQL Server 2005. It also uses the same data access APIs such as
ADO.NET, SQL Native Client, and T-SQL. In fact, it is differentiated from the rest of
the SQL Server 2005 editions only by the following (Microsoft Corporation 2008):
� Lack of enterprise features support
� Limited to one CPU
� One GB memory limit for the buffer pool

83
� Maximum 4 GB size for databases.
ii. MySQL 5.0
MySQL is a multi-threaded, multi-user and robust SQL database server. MySQL
is also flexible in allowing user to store logs and pictures into it. Although MySQL is
seen as a small and compact database server, it is still ideal for all sizes of applications.
In addition to supporting standard SQL (ANSI), it also has multithreading abilities on
UNIX servers, which make for great performance. For non-Unix users, MySQL is run
as a service on Windows 2000 and as a normal process in Windows 98/XP.
In this project, MySQL was not chosen because:
� It has limited support resources and a small partner ecosystem.
� Its performance is questionable and has limited scalability
� It was not benchmark to industry standard performance such as TPC and SAP.
� It has no distributed partitioned views.
� It has a basic query optimizer that is not optimized for the highest performance
4.3.3 Database Connectivity
i. Open Database Connectivity (ODBC)
ODBC is rather dynamic because it employs a single uniform language in
accessing different databases, instead of using the propriety language of each database.
This is done through usage of a standard set of APIs (Application Program Interface).
As each type of databases has its own API, this would allow ODBC to interpret any
request that is sent to ODBC by the programmer. This open connectivity to a database
allows an application to get data from any kind of database by using the appropriate
ODBC driver. The ODBC driver is packaged with Microsoft SQL 2005 Server,
Microsoft Access and so on.
ii. Java Database Connectivity (JDBC)
JDBC (Java Database Connectivity) technology is an API that allows user
access to virtually any data source from any Java programs or systems. It provides
cross-DBMS connectivity to a wide range of SQL databases. JDBC API also provides
access to other tabular data sources, such as spreadsheets or flat files. JDBC is modelled
upon ODBC (Object Database connectivity). Additionally, it provides an object-
oriented model for accessing databases, permitting use of Java methods as well as SQL

84
for querying and updating data. The JDBC standard means that applications can be
written without considering what driver will be used in the final deployment. This
capability gives system managers the freedom to change database engines without
requiring a change in program logic.
4.3.4 Web Server
A Web server is a program that uses the client/server model and Hypertext
Transfer Protocol (HTTP), which is use for forming of Web pages for web user, whose
computers contain HTTP clients that forward their requests. Every computer on the
Internet that hosts a Web site must have a Web server program. The most popular Web
servers are Microsoft’s Internet Information Server (IIS).
i. Microsoft Internet Information Server 6.0 (IIS)
Microsoft has quickly established its Internet Information Server (IIS) as one of
the premier Web servers on the Net. IIS is available for most windows server operating
system packages and this has transformed the window platform into a feasible solution
for delivering Web-based applications. With IIS, Web administrators does not have to
turn to the more complicated UNIX platforms to provide fast and reliable Web services;
IIS is just as powerful and is much easier to set up and maintain than many of its UNIX-
based competitors.
ii. Apache Web Server
Apache is a high-end enterprise-level server. Based originally on NCSA’s freely
available HTTP server, it dominate the Web server market and left its competitor such
as Microsoft Internet Information Server quite far behind. Apache is famous with its
rock-solid reliability, outstanding performance, and rich set of features.
The major advantages of Apache are its price because Apache is a freeware,
cross-platform support, performance and robustness, rock-solid reliability, security,
support for most HTTP protocol, extensibility, quick technical support via Usenet
newsgroup, and its streamlined interface.
There are some drawbacks for Apache Web Server though, such as an interface
that is lacking in wizards and graphical administration tools for facilitation of
configuration and administration tasks, more extensive technical support would requires
the purchase of a third-party support contract.

85
4.3.5 Consideration of Client-Server Computing
Client-server describes the relationship between two computer programs in which
one program, the client, makes a service request to another program, the server, which
fulfils the request. In a network, the client-server model provides a convenient way to
interconnect programs that are distributed efficiently across different locations.
In the usual client-server model, one server, sometimes called a daemon or
service, is activated and would await client requests. Typically, multiple client programs
would share the services of a common server program. Both the client programs and
server programs are often part of a larger program or application. Relative to the
Internet, Web browser is a client’s program that requests services such as the sending of
Web pages or files from a Web server which technically is called a Hypertext Transport
Protocol or HTTP server in another computer somewhere on the Internet. Client-server
computing can comes in a number of tiers, such as two-tier, three-tier or N-tier.
i. Two tier Architecture
The simplest variant, the two tier architecture is useful for small-scale
applications. Data management for this variant is moved to a dedicated server, where
it’s accessible through multiple clients over a network.
Web Client Web Sever
Figure 4-13 Two tier Architecture
ii. Three tier Architecture
Two tier client-servers architecture is satisfactory at best, but do not necessarily
make the most of the server processing power. If there are objects that are working with
data only, and perform business-related functions, then we can put the object on an
application server. The objects can be called from the client whenever they are needed.
This reduces some of the network traffic and allows closer integration between the
application server and the database server.

86
Web Client Web Server Database
Figure 4-14 Three-tier Architecture
iii. N-tier Architecture
N-tier architecture is an extension of the three tiers Architecture and work in similar
fashion but with additional object separation. For N-tier Architecture, many partitions
can be created. Theoretically, there are:
� A user interface.
� A set of business objects that checks and organise the client’s request.
� A mirror image of those business objects that provides persistence code.
� A database.
4.3.6 Cryptography
Encryption is required to increase the security between the client and server.
Cryptography helps in securing of data from being viewed or modified. It provides a
secure means of communication over otherwise insecure channels. For example, data
can be encrypted using a cryptographic algorithm, transmitted in an encrypted state, and
later decrypted by the intended party. If the data is intercepted by a third party, it will be
difficult for him/her to decipher the data.
Cryptography is used to achieve the following goals:
� Confidentiality: To help protect a user's identity or data from being read.
� Data integrity: To help protect data from being altered.
� Authentication: To assure that data can only be access by authorise personnel.
There are two types of encryptions. The first one is the secret-key encryption
(symmetric cryptography) and the second one is public-key encryption (asymmetric
cryptography).
Secret-key encryption algorithms use a single secret key to encrypt and decrypt data.
Secret-key encryption is also referred to as symmetric encryption because the same key
is used for encryption and decryption. Secret-key encryption algorithms are extremely
fast (as compared to public-key algorithms) and are well suited for performing

87
cryptographic transformations on large streams of data. Typical secret-key algorithms
are RC2, DES, TripleDES, and Rijndael.
Public-key encryption uses a private key that must be kept secret from
unauthorised users and a public key that can be made public to anyone. The public key
and the private key are mathematically linked; data encrypted with the public key can be
decrypted only with the private key, and data signed with the private key can only be
verified with the public key. The public key can be made available to anyone and is
used for encrypting data to be sent to the keeper of the private key. Both keys are unique
to the communication session. Public-key cryptographic algorithms are also known as
asymmetric algorithms because one key is required to encrypt data while another is
required to decrypt data. Typical public-key algorithms are RSA and CSA encryption.
In this project, the public-key encryption was chosen because:
� Data to be encrypted, which is the user’s password, is rather small.
� By using the public-key encryption, the speed for performing the cryptographic
transformations is acceptable.
4.4 Proposed Tools
The tools that will be used for this project includes:
⇒ Server
The CRGPS will be built based on the two tier client server model and will use
Microsoft SQL 2005 Server Express edition as its database. It will run on
Microsoft Internet Information Server 6.0 with embedded ASP.NET 2.0 on the
Windows XP platform. The reason for choosing these components is that
compatibility would not be an issue as each of these components will be able to
run well in Windows based environment. Therefore, this would ensure that
compatibility issues are minimised and implementation is less complicated.
⇒ Programming Languages
ASP.NET 2.0 is chosen as the server side scripting language to allow production
of DHTML documents as output. ASP.NET is chosen because it is a powerful
language and is designed principally for the Windows platform. VB.NET is
chosen as the client side scripting language to produce the system functions.
DHTML technology is used because as it is currently the most popular
technology and is recognised as the standard web technology. HTML will be use
as a major presentation tool and will be assisted by use of CSS (Cascading Style
Sheet).

88
4.5 Run Time Requirements
Server hardware requirement:
� Pentium 4 processor or higher,
� Minimum 512 RAM or higher,
� Minimum 2.0 GB of hard disk or higher.
Server software requirement:
� Windows XP Professional SP2,
� Microsoft Internet Information Server 6.0(IIS),
� Microsoft SQL 2005 Server Express Edition,
� Internet Explorer 6.0 or above.
Client hardware requirement
� Minimum Pentium I processor or higher,
� Minimum16 MB of RAM or higher,
� Minimum 1.0 GB of hard disk or higher,
� VGA colour monitor,
� Standard Keyboard and Mouse.
Client Software Requirement
� Internet Explorer 6.0 or above.
4.6 Conclusion
The use case model, which defines the requirements of the product and the
analysis model, which describes the detail requirements, has been presented in this
chapter. These use cases can be mapping to the design and will be explain in detail
chapter 5. Two analysis classes have been identified to realise the three use cases
identified earlier. A review on development tools discussed about the various
programming language, database connectivity, computing architecture and
cryptography. This section also discussed about the limitation in using these tools. The
chosen tools had been listed out in the following section. Then, the minimal run time
requirement had been clarified to make sure CRGPS can run smoothly.

89
Chapter 5 Design
This chapter present the resulting design for this project. There are seven
sections in this chapter. The first section, section 5.1 will specify the result of use-case
realisation of the design model. Section 5.2 describes the design classes as a whole.
Section 5.3 describes the database design while section 5.4 describes the entity
relationship diagram to provide a better understanding of the system. The fifth section,
section 5.5 provides an overview of CRGPS structure while section 5.6 presents the
interface design. Finally, section 5.7 will provides a conclusion of the chapter.
5.1 Use Case Realisation – Design
The use case realization of the design model is described using sequence
diagrams to show the collaboration of design objects. Every use case realization will be
described with one sequence diagram and the flow of event. A sequence diagram is an
interaction diagram that emphasizes the time ordering of the messages. Table 5-1 shows
the symbol and the meaning of the sequence diagram. CRGPS have three sequence
diagrams. There are Login, Register and Reset as show in Figure 5-1 and Figure 5-2.
Symbol Name Notation Explanation
Object Lifeline This symbol represents the existence of an object
at a particular time.
Activation
This symbol represents the period of time during
which an object is performing an action.
Message(call) Message1()
This symbol represents a communication
(message call) between objects.
Message(return) Message1()
This symbol represents a communication
(message return) between objects.
Table 5-1 Sequence diagram’s symbol and explanation

90
Login sequence diagram
User
:HomePage :LoginPage :Detail
clickLogin()
display()
enter username
verifyUsername(UserName)
verif ied
display()
The User clicks the Loginbutton on the HomePage.
The system displays theLogin Page.
The User enters his/herusername and thenclicks the Next button.
The system verify theusername against thepersistent Detail data.
The system displayslogin successfulmessage.
enter passw ord code
clickNext()
clickNext()
verifyPassw ord(passw ord)
verif ied
:Passw ord :MessagePage
The system verify thepassw ord code againstthe persistent Passw orddata.
The User enters his/herpassw ord code and thenclicks the Next button.
Figure 5-1 Login sequence diagram

91
Register sequence diagram
User
:HomePage :RegisterPage
clickRegister()
display()
clickNext()
enter personal information
The User clicks theREGISTER button on theHome Page.
The system displays theRegister Page.
The User enters thepersonal information andthen clicks the NEXTbutton.
The system creates arecord in the Detail andPassw ord tables in thedatabases.
The system displaysLogin Page.
verifyUsername(UserName)
:Detail
<<create>>
:Passw ord
<<create>>
verif ied
choose passw ord image and enter passw ord code
clickSubmit()
repeat 5 times
clickConfirm()
check result
:LoginPage
display()
The system verify theusername against thepersistent Detail data.
The User chooses his orher passw ord image andenters his or herpassw ord for eachimage then click SUBMITbutton.
Above step repeat 5times.
The User check theresult and then click theCONFIRM button.
Figure 5-2 Register sequence diagram

92
Reset sequence diagram
User
:HomePage :ResetPage
clickReset()
display()
clickNext()
change personal information
The User clicks theRESET button on theHome Page.
The system displays theReset Page.
The User changes his orher personal informationand then clicks the NEXTbutton.
The system creates arecord in the Detail andPassw ord tables in thedatabases.
The system displaysLogin Page.
:Detail
<<create>>
:Passw ord
<<create>>
clickSubmit()
repeat 5 times
clickConfirm()
check result
:LoginPage
display()
The User chooses his orher passw ord image andenters his or herpassw ord for eachimage then click SUBMITbutton.
Above step repeat 5times.
The User checks theresult and then click theCOMFIRM button.
enter username
verifyUsername(UserName)
verif ied
The User enters his/herusername and thenclicks the Next button.
The system verify theusername against thepersistent Detail data.
clickNext()
The system displaysUser's passw ords.
The User clicks CHANGEPICTURE button.
clickChangePicture()
choose passw ord imageand enter passw ord code
Alternative
Figure 5-3 Reset sequence diagram

93
5.2 Design Class
This subsection specifies the design classes of this project. The results presented
in this subsection are extracted from the previous subsection, which has provided a clear
picture of the design classes through describing of each use case realisation as
collaboration of design objects using sequence diagram.
+UserName : String+pass_image : String+pass_code : String
Passw ord
+name : String+address : String+UserName : String+IC : String+gender : String+race : String+state : String+country : String+postcode : String+e_mail : String+pass_image_1 : String+pass_image_2 : String+pass_image_3 : String+pass_image_4 : String+pass_image_5 : String+private_key : String
Detail
+clickNext()+verifyUserName(in UserName : String)+verifyPassw ord(in pass_code : String)+display()
Login Page
+clickLogin()+clickRegister()+clickReset()+display()
Home Page
+clickNext()+verifyUserName(in UserName : String)+clickSubmit()+clickConfirm()+display()
Register Page
displays
displays+clickNext()+verifyUserName(in UserName : String)+clickSubmit()+clickConfirm()+display()
Reset Page
displays
create
update
create
update
Figure 5-4 Class diagram of CRGPS
Based on their identification, there are three kinds of objects. Those objects are
Boundary Object, Control Object and Entity Object. Boundary object can be visualised
as the user interface. There are four boundary objects in the system, which are Login
page, Register page, Reset page and Home page. There are two entity objects in the
system. Entity object can be seen as tables, represented in a database. The two entity
objects are: Password that holds the username and password data, and Detail that hold
the user detail.
5.3 Database Design
The data design transforms the information domain model created during
analysis into data structures that are required to be implemented as software. Database

94
design is the most important design of all design activities. Microsoft SQL 2005 Server
Express Edition is selected to develop the database system because it is compatible with
Microsoft ASP.NET, which is the programming tool used to create the system. The
database that is created is connected to the application to perform functions such as
updating, adding or deletion.
5.3.1 Data Flow Diagram (DFD)
A Data Flow Diagram is a technique used to graphically illustrate the flow of
data through a system and the process performed by the system. DFD gives an overview
of inputs and outputs, processes and the flow of data through each process.
A DFD is drawn using four basic symbols to represent processes, data flows,
data stores, and external entities. CRGPS have two DFDs which is a content level DFD
and a level 1 DFD, as show in Figure 5-5 and Figure 5-6.
Symbol Name Notation Explanation
Process
Register
This symbol represents process which transform or
manipulates data within the system.
Data Flow This symbol represents flow of data between two
objects. The arrow denotes the direction of the data
flow.
Data Store
Account
This symbol represents data stores where the data is
held for a time frame within the system.
Entity
Customer
This symbol represents external entity, can be
external source or recipient (e.g., person or other
system) which donates and receives information
from the system.
Table 5-2 DFD’s symbol and explanation
User
Register
Login
user detail
registeredusername and passw ord
access services
Context Level DFD
Figure 5-5 Content level DFD
User will need to register by supplying some user detail, for example name,
address and IC number to the system. The system will register the user. If the user is a

95
register user then the user can login to the system. User can login by providing his/her
username and password. If the username and password are correct, system will allow
access to the appropriate services, which should include reset of password and changing
of user’s detail.
User
update userdetails
Login
user detail
registered
username and passw ord
access services
Level 1 DFD
Passw ord
update details
valid accesspermission
Detailusername and passw ord
permission status
Figure 5-6 Level 1 DFD
User can register by supplying the user detail. The system will create a record at
the Detail table in the database. The system will return the user to the Login page.
User can login by supplying the username and password. The system will check the
authentication of the supplied username and password as compared to information in the
Detail table and Password table in the database. If the username and password is correct
then permission to access the services is granted.
5.3.2 Table Name and Functions
The CRGPS database consists of two tables. The name for each table and a short
description of each table’s function is described in the following section.
1. Detail - Keeps personal record of user, inclusive of username, name, IC number
and so on.
2. Password - Stores user’s password information.

96
5.3.3 Design of Tables
Data storage is considered to be the most important part of a system. The general
objectives in design of data storage are listed as below.
� Data availability
� Efficiency of data storage
� Purposeful information retrieval
� Efficiency of data updates and retrieval
� Data integrity
� Avoid data duplication
The design of tables was as follow:
Field Name Data Type Description
UserName nchar(12) username
name nchar(40) name
IC nchar(20) identification card number
gender nchar(10) gender
race nchar(20) race
address nchar(60) address
state nchar(20) state
postcode nchar(10) postcode
country nchar(20) country
e_mail nchar(20) e-mail
pass_image_1 nchar(20) password image 1
pass_image_2 nchar(20) password image 2
pass_image_3 nchar(20) password image 3
pass_image_4 nchar(20) password image 4
pass-Image_5 nchar(20) password image 5
private_key nchar(100) private key of RSA encryption Table 5-3 Table Detail
Field Name Data Type Description
UserName nchar(12) username
pass_image nchar(20) password image
pass_code nchar(500) password code Table 5-4 Table Password

97
5.4 Entity Relationship Diagram
User
name
IC gender
Account
1
1
Has
UserName
race
address
state
postcode
e_mail
country
pass_code
pass_image
UserName
Figure 5-7 Entity Relationship Diagram
Figure 5-7 illustrate an entity relationship diagram between a user (Detail) and
the user account (Password). A user has a user account and a user account is owned by a
user. A user has many attributes such as name, address, e_mail and IC. An account has
three attributes which are UserName, pass_image and pass_code.
5.5 Overview of CRGPS Structure
CRGPS architecture is divided into 2 distinct tiers – client tier and host tier.
Client tier provides user services. Users’ services are used to support user’s input and
allow queries to be performed via web browsers. This tier basically forwards the request
for Web documents to the host tier.
The host tier provides the authentication services. This tier resides in the
machine running Microsoft Internet Information Server (IIS). Requests and responses
are handled and controlled by this tier explicitly written codes that produce ASP.NET
pages. The host tier also provides database services. This tier contains a repository of
relevant data stored in Microsoft SQL 2005 Server Express Edition database.

98
CRGPS Client
(Browser)
Request
Response
Store data
Receive data
CRGPS Web
Server and
Database Server
Figure 5-8 CRGPS Architecture
Figure 5-9 shows a simple flow chart for non-IT users. This flow chart will
provide a better understanding on the system’s overall functions flow.
Start
User Exist?
Login?
Reset?
Register
Login
Reset
Exit?
Exit?
Exit?
End
No
No
No
No
Yes
Yes
YesYes
Yes
Yes
No
Figure 5-9 CRGPS simple flow chart
5.6 Interface Design
An interface design is very important to determine the quality of a system. A
well-designed interface should meet the objectives of efficiency, accuracy, ease of use
(user friendliness), simplicity, and attractiveness. To increase the attractiveness of the
system, several basic techniques are considered, which are:
1. Scan-ability - Layout of CRGPS should include things like headings,
subheadings, bulleted lists and highlighting of key words in the text.

99
2. Simple Language - Simple language that is concise to the point, with no
waffling, correct spelling and grammar. Text messages should avoid technical
jargon, and limited to a maximum of three lines.
3. Page Navigation - Navigation refers to the structure of the system and the
patterns, by which users traverse the system, and the linking mechanism, by
which they move from one place to another. The system must be neat, consistent
and has an intuitive navigational interface to attract visitors. Few factors that
could lead to the success of navigational portal are:
a. Use of clear and consistent navigational aids page names, logos, banners,
and icons, and background colours as virtual clues for users.
b. Consistent icon or design to notify people that will take them to another page.
4. Overall Appearance - Interface controls (capitalization, alignment, highlighting,
etc) are consistently labelled. Attractive media such as animation, sound and
graphics can make content come alive.
5. Animation - Moving text must be short and only indicates the major title of the
page to attract visitors and alert people of updated information.
6. Graphic/Images
a. Optimal use of graphics and image only in relevant page to avoid slow down
in loading of pages.
b. Text colour, background colour and size effect should be matching. .
c. Strongly contrast colour between background and foreground colour.
Figure 5-10 Login page design

100
Figure 5-11 Registration page design

101
Figure 5-12 Reset page design
5.6.1 Form Design
Forms play a very important role as a tool for obtaining or capturing data in any
information system. They are the most commonly used dialogue-types data entry. They
are also used in retrieval and editing of data. Use of form can be an error prone process
because people may misunderstand the instruction, fields might be skipped, or
information is given in the wrong format.
Forms are also designed to be use during system development as it can be used
as the basis for data entry screen design. With use of form, user will be familiar with the
data entry interface layout as all layouts will be similar aesthetically. There are three
types of forms’ layout, which can be used in designing forms. They are:
� Caption before
� Caption after
� Caption and box design
The caption and box design is usually favoured because it gives the best visual
link between the caption and the data entry area. It also encourages readable input and

102
provides a more visible structure to the form. In order to make the process flows better,
these components will be used for the purpose of interface design:
� Text Field
� Button
� Drop down list
� Validator such as require field validator and regular expression validator
5.7 System Design
In summary, features included in the CRGPS are:
� Users – Customer of the product or system.
� General Administrator – The person or a group of persons in charge on general
administration of the whole system.
� System Access – Inclusive of login page, registration page and reset page that
allow users to modify their details.
� Database – Using the Microsoft SQL 2005 Server Express Edition.
5.8 Conclusion
The design model for this project has been presented and described in this
chapter. Six design classes are used in the realisation of the three use cases specified in
the previous chapter.

103
Chapter 6 Implementation
This chapter presents the result of project implementation. There are six sections
in this chapter. The first section, section 6.1 will specify the architectural
implementation. Section 6.2 describes on how to integrate the system. Section 6.3
describes on implementation of subsystem while section 6.4 describes implementation
of a class. The fifth section, section 6.5 describes how to perform the unit test. Finally,
section 6.6 provides a conclusion of the chapter. The purposes of the implementation
workflow are to:
� Plan the system integrations required as per iteration.
� Distribute the system by mapping executable components onto nodes in the
deployment model.
� Implement the design classes and subsystems established during design.
� Unit test the components, and then integrate them.
In software life cycles (see Figure 3-5), the focus on implementation was during
the construction iterations. It is also done during elaboration phase to create executable
architectural baseline, and during the transition phase to handle late defects. Figure 6-1
illustrates the implementation workflow with the five participating activities.
Architectural
Implementation
Integrate
System
Implement a
Subsystem
Implement a
Class
Perform
Unit Test
Figure 6-1 The activities in the implementation workflow
6.1 Activity: Architectural implementation
The purpose of activity architectural implementation is to outline the
implementation model and its architecture by identifying architecturally significant
components such as executable components, and mapping them to nodes in the relevant
network configurations. As illustrated by Figure 6-2, this activity will have the design
model, deployment model, and the architecture description as input to produce an
outline of components and the architectural description of implementation and
deployment model.

104
Architectural
Implementation
Deployment
Model
[outlined]
Architecture
Description
[view of the design
and deployment model]
Design
Model
Architecture Description
[view of the implementation
and deployment model]
Component
[outlined and possibly
mapped onto nodes]
Figure 6-2 The input and result of activity architectural implementation
Deployment model
:Intranet
WebBrow ser
WebBrow ser
WebBrow ser
Cued Recall Graphical Passw ord System
CRGPS DB: Database
Computer(Admin)
Printer
Figure 6-3 Deployment diagram
The CRGPS deployment diagram shows a collection of nodes, and also
dependencies and associations among those nodes. This system has three main nodes,
which are the web browsers that are used to view the system; CRGPS included the
database, and the Administrator computer. We include a printer as one node, where it is
designated as the administrator local printer.
6.2 Activity: Integrate system
The purposes of this activity are to create an integration build plan describing
the builds required in iteration, the requirements on each build, and to integrate each
build before being subjected to integration tests. As illustrated in Figure 6-4, the input
for this activity would be the supplementary requirements, use-case model, design

105
model, and implementation model, in order to produce the integration build plan and the
implementation model.
Planning a subsequent build The activity will start with planning on the following
build. The build may be the first, or continuation of the previous build. Every build
should add additional functionality.
Integrating a build In this step, builds are integrated. It is done by collecting the
implementation subsystems and components, compiling them, and linking them into a
build.
Integrate
System
Supplementary
Requirements
Use-Case
Model
Design
Model
Implementation
Model
[previous builds]
Integration
Build Plan
Implementation
Model
[subsequent builds]
Figure 6-4 The input and result of activity integrate system
6.3 Activity: Implement a subsystem
The purpose of activity to implement a subsystem is to ensure that a subsystem
fulfils its role in each build. In other words, it is to ensure that the requirements are
implemented in the build, and those that affect the subsystem are correctly implemented
by components or other subsystem within the subsystem. The input for this activity is
the integration builds plan, architectural description, design subsystem, and interface to
produce the implementation subsystem, and the interface (see Figure 6-5). Interface
examples for CRGPS were show in Figure 5-10, Figure 5-11 and Figure 5-12.

106
Implement a
Subsystem
Interface
[complete]
Integration
Build Plan
Architecture
Description
[view of the
Implementation
model]
Subsystem
[complete]
Interface
[implemented
for a build]
Implementation
Subsystem
[implemented
for a build]
Figure 6-5 The input and result of activity implement a subsystem
6.4 Activity: Implement a class
The purpose of this activity is to implement a design class in a file component,
which includes outlining a file component that contain the source code, generating
source code from the design class, implementing the operations of the design class, and
ensuring that the components provide the same interface as the design class. As
illustrated in Figure 6-6, design class, and interface provided by the design class will
form the input and the activity will produce the implemented component as the result.
The activity will be carried out in four steps.
Outlining the file components In this step, the file components where the source
code that implements the design class resides are outlined.
Generating code from a design class The source code is generated according to the
design class in this step. If the design class has been described using the syntax of the
programming language during design, this step will be straightforward.
Implementing operations In this step, operations of the class will be produced. This
step involves choosing a suitable algorithm and specified data structure, and then coding
the actions required.
Making the component provide the right interface In this step, interfaces are
verified to ensure that the component provide the same interface as the design classes
that it implements.

107
Implement a
Class
Design Class
[complete]
Interface
[provided by the
design class]
Component
[implemented]
Figure 6-6 The input and result of activity implement a class
6.5 Perform unit test
The purpose of this activity is to test the implemented components as individual
units. The component and interface will form the input of this activity to produce the
unit-tested component (see Figure 6-7). The following are two types of unit test
performed.
Specification tests Specification test is also known as “black-box test”. It is done to
verify the component’s behaviour without considering how that behaviour is
implemented within the component. The test is conducted by observing the output that
the component will return when given certain input, and when starting in a particular
state.
Structure tests Structure test is also know as “white-box test”. It is done to verify that
a component works internally as intended. During structure testing, all code should be
tested. In other words, every statement has to be executed at least once.
Perform
Unit Test
Interface
Component
[implemented]
Component
[unit tested]
Figure 6-7 The input and result of activity perform unit test
6.6 Conclusion
Chapter 6 discussed the system implementation’s activity of the CRGPS. The
detail of the implementation activity is presented in this chapter.

108
Chapter 7 Testing
This chapter presents the result of testing for this project. There are seven
sections in this chapter. The first section, section 7.1 will specify on planning for the test.
Section 7.2 describes on how to design the test. Section 7.3 describes how to implement
the test plan while section 7.4 describes how to perform the integration test. The fifth
section, section 7.5 describes on how to perform system testing while section 7.6
describes on evaluation of the test. Then, section 7.7 described a usability study. Finally,
section 7.8 provides a conclusion of the chapter.
In the test workflow, the result from implementation are verified by testing each
build, inclusive of both internal and intermediate builds, as well as the final versions of
the system to be released to external parties. As illustrated in Figure 7-1, this workflow
will be performed with six activities. The purposes of this workflow are to plan the tests
required in each iteration, to design and implement the testing through test cases that
specify what to test, and perform the various tests and on handling of test results for
each test. In the software life cycle (see Figure 3-5), test is the focus during the
elaboration phase, when the executable architectural baseline is tested, and during
construction, when the bulk of the system is implemented. However, some initial test
plan may occur during the inception phase, when the system scope is being determined.
Plan Test Design
Test
Implement
Test
Perform
Integration
Test
Perform
System
Test
Evaluate
Test
Figure 7-1 The activities in workflow test
7.1 Activity: Plan test
The purpose of activity: plan test is to plan the testing efforts in iteration by
describing a testing strategy, estimating the requirements for the testing effort, and
scheduling the testing effort. The supplementary requirements, use-case model, analysis
model, design model, implementation model, and architectural description will form the
input of this activity. The activity will produce the test plan as the result (see Figure 7-2).

109
Plan Test
Supplementary
Requirements
Use-Case
Model
Analysis
Model
Design
Model
Architecture
Description
[view of the model]
Implementation
Model
Test Plan
Figure 7-2 The input and result of activity plan test
7.2 Activity: Design test
The purpose of activity: design test is to identify and describe test cases for each
build, and to identify and structure test procedures, specifying on how to perform the
test case. As illustrated in Figure 7-3, the input for this activity is the supplementary
requirements, use-case model, analysis model, design model, implementation model,
architectural description, and test plan to produce the test case, and the test procedure.
Designing integration test cases In this step, integration test case is designed.
Integration test cases are used to verify that the components interact properly with each
other after they have been integrated into a build.
Designing system test cases System test cases will be designed in this step. System
test cases are used to verify that the system functions properly as a whole.
Designing Regression test cases Regression test cases would be designed in this step.
Regression test case must be flexible enough to be resilient to changes of the software
that is tested.
Identifying and structuring test procedures In this step, test procedures are
identified and structured. This is done by walking through the test cases in order to
suggest the testing procedures for each one.

110
Design
Test
Supplementary
Requirements
Use-Case
Model
Analysis
Model
Design
Model
Architecture
Description
[view of the model]
Implementation
Model
Test Plan
[testing strategy
and schedule]
X
Test Case
Test
Procedures
Figure 7-3 The input and result of activity design test
A series of test cases was the result of this activity. Table 7-1 show the test cases
done on the password aspect. Table 7-2 show the test cases done on the User ID aspect.
Table 7-3 show the test cases done on the login page. Table 7-4 show the test cases done
on the registration page and Table 7-5 show the test cases done on the reset page.
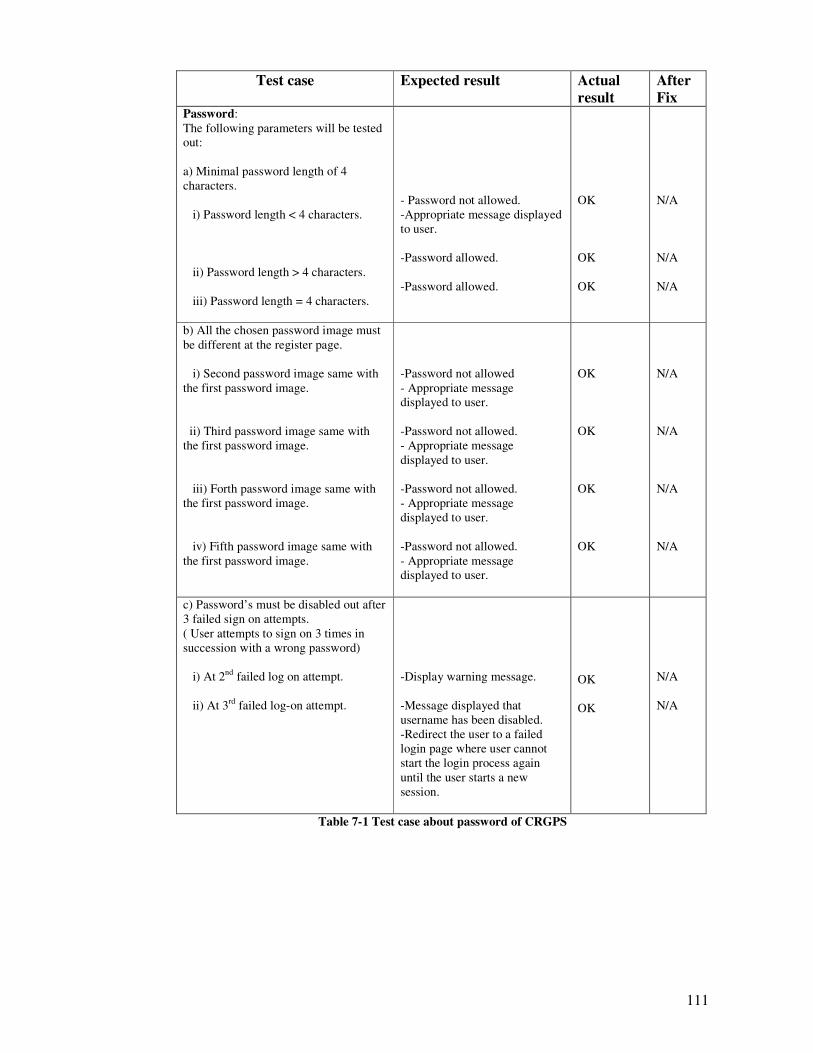
111
Test case Expected result Actual result
After Fix
Password:
The following parameters will be tested
out:
a) Minimal password length of 4
characters.
i) Password length < 4 characters.
ii) Password length > 4 characters.
iii) Password length = 4 characters.
- Password not allowed.
-Appropriate message displayed
to user.
-Password allowed.
-Password allowed.
OK
OK
OK
N/A
N/A
N/A
b) All the chosen password image must
be different at the register page.
i) Second password image same with
the first password image.
ii) Third password image same with
the first password image.
iii) Forth password image same with
the first password image.
iv) Fifth password image same with
the first password image.
-Password not allowed
- Appropriate message
displayed to user.
-Password not allowed.
- Appropriate message
displayed to user.
-Password not allowed.
- Appropriate message
displayed to user.
-Password not allowed.
- Appropriate message
displayed to user.
OK
OK
OK
OK
N/A
N/A
N/A
N/A
c) Password’s must be disabled out after
3 failed sign on attempts.
( User attempts to sign on 3 times in
succession with a wrong password)
i) At 2nd
failed log on attempt.
ii) At 3rd
failed log-on attempt.
-Display warning message.
-Message displayed that
username has been disabled.
-Redirect the user to a failed
login page where user cannot
start the login process again
until the user starts a new
session.
OK
OK
N/A
N/A
Table 7-1 Test case about password of CRGPS

112
Test case Expected result Actual result
After Fix
User ID: The following parameters will be tested
out:
a) Only the valid username can access
system.
i) Sign on using valid username.
ii) Sign on using invalid username.
iii) Sign on using blank field.
-Access allows.
-Access not allows.
-Appropriate message displayed
to user.
-Access not allows.
-Appropriate message displayed
to user.
OK
OK
OK
N/A
N/A
N/A
b) Only the ‘Admin’ username can have
access to change the user’s information.
(Check availability of security
administration features)
i) Sign on as ‘Admin’.
ii) Sign on as ‘Administrator’.
iii) Sign on as any other user.
-Can setup user’s information.
-Cannot setup user’s
information.
-Cannot setup user’s
information.
OK
OK
OK
N/A
N/A
N/A
c) Username’s must be disabled out
after 3 failed sign on attempts. ( User
attempts to sign on 3 times in
succession with a wrong username)
i) At 2nd
failed log on attempt.
ii) At 3rd
failed log-on attempt.
-Display warning message.
-Message displayed that
username has been disabled.
-Redirect the user to a failed
login page where user cannot
start the login process again
until the user start a new
session.
OK
OK
N/A
N/A
Table 7-2 Test cases about User ID of CRGPS

113
Test case Expected result Actual result
After Fix
Login Page a) Run the login page.
-Login page display
OK
N/A
b) Test the links available.
-Link redirect the user to the
destination page
OK
N/A
c) Password code stored in the database
was decrypted to make comparison with
the user enter password code.
-Password code were decrypted
Password
code can not
be decrypt.
OK
d) Failed login will receive an email
contain user’s password code and
password image.
-email sent to the user using
user’s email address in
registration process.
Attachments
cannot
display.
OK
e) Only three of the user’s password
images displayed.
-randomly displayed three of the
password images together with
other 47 images.
Cannot
displayed
user’s
password
images.
OK
f) User must enter all the password code
including the fake password code.
i) Skip enters one of the password
code.
ii) Skip enters the fake password code.
-Not allow to proceed.
-Appropriate message displayed
to user.
-Not allow to proceed.
-Appropriate message displayed
to user.
OK
OK
N/A
N/A
Table 7-3 Test cases about Login page of CRGPS

114
Test case Expected result Actual result
After Fix
Register Page a) Run the register page.
-Register page display.
OK
N/A
b) Register success when all the
compulsory fields were filling in and in
correct format.
i) With some compulsory fields left
blank.
ii) With some fields in wrong format.
-Not allow to register.
-Appropriate message displayed
to user.
-Not allow to register.
-Appropriate message displayed
to user.
OK
Accept the
registration.
N/A
OK
c) Only the valid username can be allow
to register.
i) Register with a username owned by
another user.
-Not allow to register.
-Appropriate message displayed
to user.
OK
N/A
d) Username and password were stored
in the database after the registration
process completed.
-Information stored in database. OK
N/A
e) All the password code was encrypted. -Password code encrypted in
base 64 format.
Password
code
encrypted in
other format.
OK
Table 7-4 Test cases about Register page of CRGPS

115
Test case Expected result Actual result
After Fix
Reset Page a) Run the reset page.
-Reset page display.
OK
N/A
b) Reset success when all the
compulsory fields were filling in and in
correct format.
i) With some compulsory fields left
blank.
ii) With some fields in wrong format.
-Not allow to reset.
-Appropriate message displayed
to user.
-Not allow to reset.
-Appropriate message displayed
to user.
OK
Accept the
reset.
N/A
OK
c) Only the valid username can be allow
to reset.
i) Reset with a username owned by
another user.
-Not allow to reset.
-Appropriate message displayed
to user.
OK
N/A
d) Username and password were
updated in the database after the reset
process completed.
-Information updated.
OK
N/A
e) All the password code was encrypted. -Password code encrypted in
base 64 format.
Password
code
encrypted in
other format.
OK
Table 7-5 Test cases about Reset page of CRGPS
7.3 Activity: Implement test
The purpose of this activity is to automate test procedures by creating test
components. However, not all test procedures can be automated. This activity will use
test case, test procedures, and implementation model as input and produces the test
component (see Figure 7-4).
Implement
Test
X
Test Case
Test
Procedures
Implementation
Model
[build to be tested]
Test
Component
Figure 7-4 The input and result of activity implement test
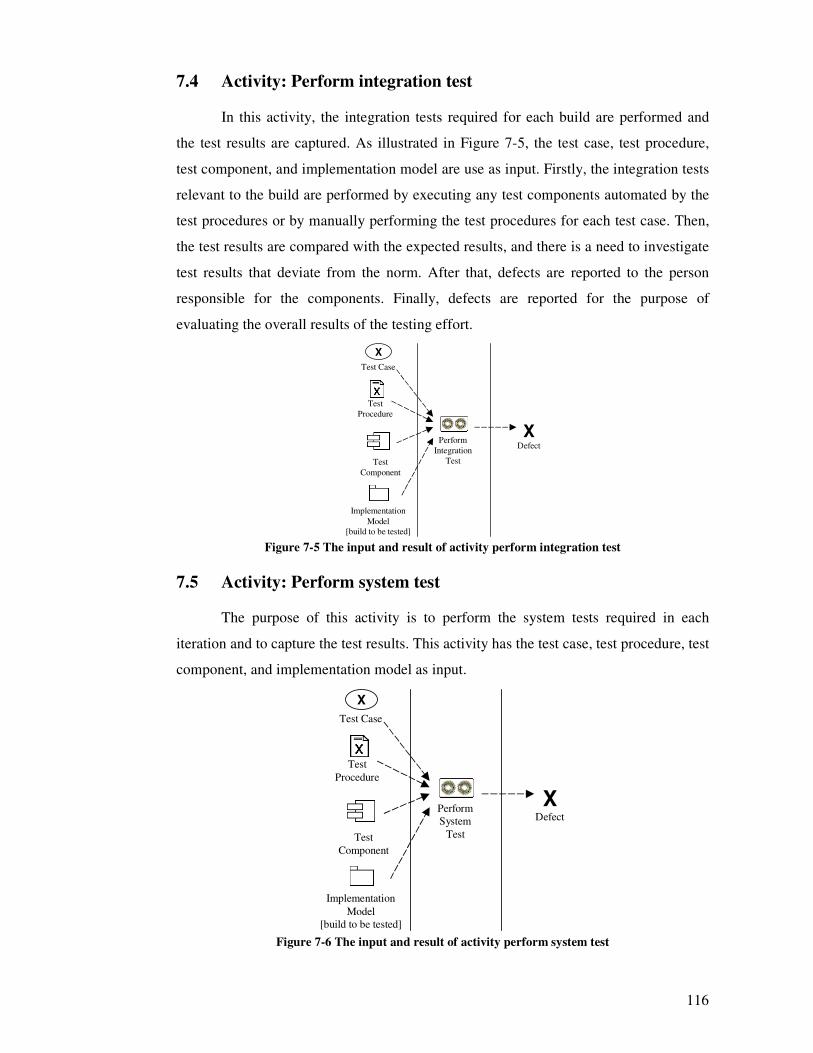
116
7.4 Activity: Perform integration test
In this activity, the integration tests required for each build are performed and
the test results are captured. As illustrated in Figure 7-5, the test case, test procedure,
test component, and implementation model are use as input. Firstly, the integration tests
relevant to the build are performed by executing any test components automated by the
test procedures or by manually performing the test procedures for each test case. Then,
the test results are compared with the expected results, and there is a need to investigate
test results that deviate from the norm. After that, defects are reported to the person
responsible for the components. Finally, defects are reported for the purpose of
evaluating the overall results of the testing effort.
Perform
Integration
Test
X
Test Case
Test
Procedure
Implementation
Model
[build to be tested]
Test
Component
XDefect
Figure 7-5 The input and result of activity perform integration test
7.5 Activity: Perform system test
The purpose of this activity is to perform the system tests required in each
iteration and to capture the test results. This activity has the test case, test procedure, test
component, and implementation model as input.
Perform
System
Test
X
Test Case
Test
Procedure
Implementation
Model
[build to be tested]
Test
Component
XDefect
Figure 7-6 The input and result of activity perform system test

117
7.6 Activity: Evaluate test
The purpose of this activity is to evaluate the testing efforts within iteration. The
result of the testing effort is evaluated by comparing the results with goals outlined in
the test plan. This activity uses the test plan, the test model, and the defect reported as
input to produce the test evaluation (see Figure 7-7).
Evaluate
Test
Test Plan
Test Model Test Evaluation
[for an iteration]
XDefect
Figure 7-7 The input and result of activity evaluate test
7.7 Usability Study
Participants
Fifteen users were invited to test the system whether resistant to shoulder surfing
or not. The participants were college student who were computer literate. Ten were
female and five were male.
Materials
The system used in testing displayed 50 thumb nail in a window of 1280x1024
pixels. The set of thumb nail contain flower, animal, insect, reptile and bird. The thumb
nails were randomly select from the database. The set of thumb nail contain 3 user’s
selected earlier thumb nail and 47 other thumb nail. A user manual was distributed to
the participants to explain and train the user to use the system.
Procedure
Participants carried out the testing individually in different session. Testing
involved one participant as the user and another participant as the shoulder surfer. In the
session the experimenter explained the purpose of the system and how it worked using
the user manual. The tutorial took approximately 10 minutes. During a login process, a
participant authenticated him or herself repeatedly until ten successful logins were
achieved. To test the system in resistant to shoulder surfing, another participant act as an
attacker was standing behind. The system was programmed to collect data on the
number of correct and incorrect logins and the total time for each correct login. The

118
attacker was requiring giving comments on whether the system is resistant to shoulder
surfing. The authentication trials took about 15 minutes each. Finally, the participant
was requiring giving comments on whether the system is resistant to shoulder surfing or
not.
Results
All participants achieved the criterion of ten correct logins. The participants
accomplished the criterion of ten correct logins with 1-6 incorrect logins for a total of
30 incorrect logins across all participants. The mean percentage of correctness for
password inputs among all participants was 76.72 percent with a standard deviation of
8.09. The mean time for correct password inputs was also analysed. The mean time for
correct password inputs was 113.53 seconds with a standard deviation of 11.06. The
range was 86-131 seconds. The result shows that the passwords are easy to remember
with a mean percentage of correctness of 76.72. The mean time taken to complete a
successful login process was approximately 1 minute. This result was an acceptable
result. Figure 7-8 shows the mean time for input of 10 correct passwords. The graph
indicates that there was a gentle downward trend in time to input the password. Table 7-
6 show the comments of the 15 attacker on the following question:
Question: Is the system resistant to shoulder surfing?
0
2
4
6
8
10
12
14
1 2 3 4 5 6 7 8 9 10
Logins
Seconds
Figure 7-8 Mean times for input of 10 correct logins (N = 15)

119
Respondent Their Comments
1 I have tried to guess the passwords while observing from behind the
user. However, I was not successful. Thus, the systems appear to be
resistant to shoulder surfing.
2 Numerous attempts to look at the password were not successful. I was
not even able to gauge on the method being used.
3 I was not able to guess the passwords being used. I also have problem
following what the user was doing. Therefore, I believe the system has
been effective in prevention of shoulder surfing.
4 The use of picture passwords prevented me from correctly guessing the
passwords as they seem to be a distraction. Finally, I give up for good
after trying for 5 times.
5 Looking at the screen from behind, I was not able to correctly guess any
of the passwords. Hence, I believe the system has met its main objective
in ensuring resistant to shoulder surfing.
6 The system was successful in making my life difficult when I try to
guess the passwords while observing from behind as I could not guess
any of the passwords correctly.
7 Yes, it is very much resistant to shoulder surfing, mainly due to the
numerous mechanism used when login in.
8 I always have problem following the users’ sequence. As a result, I
believe the mechanism in place indeed helps in resistant to shoulder
surfing.
9 I have used many type of systems and in my opinion, none are as
resistant to shoulder surfing as this system. The use of pictures
passwords is truly amazing and is certainly practical for certain real life
application.
10 The login sequence is effective in ensuring resistant to shoulder surfing,
as I have failed trying to look at the passwords from behind the user.
11 The application is surely resistant to shoulder surfing as I have problem
looking at the passwords and finding any flaws of the system.
12 I tried to capture the user passwords when she tried to login, but I was
not successful even if I look at it for multiple times. To me, this shows
that it is highly resistant to shoulder surfing.
Table 7-6 Comments on Shoulder Surfing the system

120
Table 7-6, continued
7.8 Discussion and Conclusion
System testing is a vital part in a software development process to ensure that
the program is working as expected. This chapter has provided the detail of activity
performed in the testing phase including the various test cases used and the usability
testing. Test cases were implemented to test the system whether it works as expected or
not. It involved passwords, user IDs, login page, registration page and reset page.
In the usability testing, the system was tested in three graphical password
aspects which are remembrance, hard to guess and resistant to shoulder surfing. The
result shows that the passwords are easy to remember with a mean percentage of
correctness of 76.72. This happen due to the fact that human is able to remember image
better that text. (Shepard 1967) In this system, the passwords were in text but the text
was always associated with images. Furthermore, first character of each password was
given in each authentication session. To the user, the first character of the password is a
hint that are familiar to him/her but not to the attacker.
In the aspect of hard to guess, the bigger password space makes the password
more difficult to guess. In the usability testing, the password space was 9412
. The user
needs to enter 4 passwords which are 3 pre-defined passwords and a fake password.
With a bigger password space and a fake password randomly place among the pre-
defined passwords, it make the password very hard to guess.
From the usability testing, a total 15 user’s comments show positive response in
resistant to shoulder surfing. With these findings, we can conclude that the system has
fulfilled the 3 important aspects of graphical password.
Respondent Their Comments
13 The system seems to be resistant to shoulder surfing. Reason being
attempts to obtain the passwords through observation of the login from
ones back have not been successful. Even though I was able to observe
most of the things that was done, I was not able to gauge the
mechanism being used.
14 After observing the password entries for few times, I was not able to
guess the passwords. I believe this shows the effectiveness of resistant
to shoulder surfing.
15 The use of picture passwords make it hard for me to guess the
passwords as the screen does not seem to show any clue on what the
passwords was.

121
Chapter 8 Discussion
This chapter provides discussion on the result of this project. There are three
sections in this chapter. The first section will specify the various problems encountered
during development of the system. Section 8.2 and 8.3 will provide discussion on
system strengths and weaknesses respectively. Finally, section 8.4 would provide a
conclusion for chapter 8.
8.1 Problem Encounter
There are three major issues that were encountered during the development of
Cued Recall Graphical Password System:
1. Lack of programming experience
ASP.NET was used as the major programming language whereas Visual Basic
and SQL were the minor ones being used during the system development
process. I do not have much prior knowledge of these three programming
languages. Thus, I have to learn up these programming languages from scratch
and have to master some of the essential elements within a limited amount of
time. This knowledge was mainly obtained from books and online materials.
2. There were occurrences of no-end loop during the software development process.
Thus, there was a need to have a software modelling mechanism with capability
to show iteration processes. With the adoption of the UML model, such iteration
processes can easily be shown.
3. Lack of graphical design experience
Graphical design is very important for a web page to attract user to use the
system. Balancing between the quality of graphics and proper bandwidth
management are quite tricky. Also, organization of the overall design of the web
page is challenging. Thus, I have look at some graphical design books for ideas
and to expand on my limited graphical design knowledge.
8.2 System strengths
The Cued Recall Graphical Password System has three strength points:
1. The system has adopted the proven cued recall method. Through presentation of
the password first character, it clearly increases the memorability of password.
2. RSA encryption is used to encrypt the user’s password. This has increase the
security level of the authentication process.

122
3. This system provides a password recovery module that allows users to recover
password without calling the technical support staff.
8.3 System Limitations
The Cued Recall Graphical Password System has two weaknesses:
1. ASP.NET is resource hungry with respect to memory usage and execution time,
which is due in large part to a longer code path. For Web-based applications,
these limitations can be a serious problem as the application will be handling
thousands of users’ queries per second. Thus, memory usage on the web server
can be an issue for this system.
2. The system‘s user interface can be improve further to provide a professional feel
to the user.
8.4 Research Contribution
The contribution of this project is the design of a graphical password system that
extends the challenge-response paradigm to resist shoulder surfing. The user study
support the overall concept which are remembrance, hard to guess and resistant to
shoulder surfing. After a short period of explanation and training, most of them made no
mistakes in using the system. Although the time to input password was longer compare
to traditional textual password but this is the general drawback in challenge-response
password system such as Passfaces and Déjà vu. One way that passwords input can be
speed up is for users to become more skilful.
8.5 Epilogue
In summary, CRGPS was easy to learn and remember. After a short training
session, most of the participants did not make any error when using the system.
The graphical password has been use as an alternative to the traditional text-
based passwords. In this paper, we have conducted a comprehensive survey of existing
graphical password schemas. A summarisation of current graphical password schemas
is presented in Table 2-1. Although the main argument for graphical passwords is that
people are better at memorizing graphical passwords than text-based passwords, the
existing user studies are very limited and there is not yet convincing evidence to support
this argument. Our preliminary analysis suggests that it is more difficult to break
graphical passwords using the traditional attack methods such as brute force search,
dictionary attack, or spy ware. However, since there is not yet wide deployment of

123
graphical password systems, the vulnerabilities of graphical passwords are still not fully
understood.
CRGPS overcomes many of the existing problems of the traditional graphical
password system. For instance, the Cued Recall Graphical Password System is shoulder
surfing resistant, and it is using cued recall to increase user memorability. Some of the
possible drawbacks of this system may include: Time consuming and difficult to use.
Possible future improvements may include:
1. System administrator to be able to add, edit or delete the image categories.
2. System administrator to be able to adjust the length of the password to increase
the difficulty in password guessing.
Overall, the current graphical password techniques are still immature. Much
more research and user studies are needed for graphical password techniques to achieve
higher level of maturity and usefulness.

124
BIBLIOGRAPHY
Belgers, W. 1993, UNIX Password Security [Online], Available:
http://citeseerx.ist.psu.edu/viewdoc/download?doi=10.1.1.12.1149&rep=rep1&type
=pdf, [Accessed 14 August 2008].
Birget, J. C., Hong, D., and Memon, N. 2003, Graphical passwords based on robust
discretization [Online], Available: http://eprint.iacr.org/,
[Accessed 14 August 2008].
Blonder, G., 1996. Graphical passwords. United States Patent 5559961, Lucent
Technologies, Inc., Murray Hill, NJ.
Brostoff, S. and Sasse, M. A. 2000, ‘Are Passfaces more usable than passwords? A field
trial investigation’, Proceedings of Human Computer Interaction 2000, Sunderland,
UK.
Brown, A.S., Bracken, E., Zoccoli, S. and Douglas, K. 2004. ‘Generating and
remembering passwords’, Applied Cognitive Psychology, vol. 18, pp. 641-651.
Davis, D., Monrose, F. and Reiter, M. K. 2004, On user choice in graphical password
schemes, [Online], Available: http://www.usenix.org/events/sec04/tech/full_papers
/davis/davis_html/index.html, [Accessed 14 August 2008].
De Angeli, A., Coutts, M., Conventry, L., Cameron, D., Johnson, G.I. and Fisher, M.
2002, ‘VIP: A visual approach to user authentication’, Proceedings of the Working
Conference on Advanced Visual Interfaces (AVI 2002), ACM Press, New York, pp.
316-23.
De Angeli, A., Conventry, L., Johnson, G. and Renaud, K. 2005, ‘Is a picture worth a
thousand words? Exploring the feasibility of graphical authentication systems’,
International Journal of Human-Computer Studies, vol. 63, issue 1-2, pp. 128-52.
Dhamija, R. 2000, Hash visualization in user authentication [Online], Available:
http://people.ischool.berkeley.edu/~rachna/papers/hash_visualization.pdf, [Accessed
14 August 2008].
Dhamija, R. and Perrig, A. 2000, Déjà Vu: A user study using images for authentication,
[Online], Available: http://www.usenix.org/publications/library/proceedings/
sec2000/full_papers/dhamija/dhamija_html/index.html, [Accessed 14 August 2008].

125
Ellison, C., Hall, C., Milbert, R. and Schneier, B. 2000, ‘Protecting secret keys with
personal entropy’, Journal of the Future Generation Computer Systems February
2000, vol. 16, no. 4, pp. 311-8.
Giblin, P. 2005, Identities snatched in blink of eye [Online], Available:
http://www.sachitechcops.org/news012604.htm, [Accessed 18 November 2008]
Hong, D., Man, S., Hawes, B. and Mathews, M. 2004, ‘A password scheme strongly
resistant to spy ware’, Proceedings of International conference on security and
management, Las Vergas, NV.
Jacobson, I., Booch, G., and Rumbaugh, J. 1999, The Unified Software Development
Process, Addison-Wesley, United States.
Jansen, W., Gavrila, S., Korolev, V., Ayers, R. and Swanstrom, R. 2003, Picture
Password: A visual login technique for mobile devices [Online], Available:
http://csrc.nist.gov/publications/nistir/nistir-7030.pdf, [Accessed 14 Augusts 2008].
Jermyn, I., Mayer, A., Monrose, F., Reiter, M. K. and Rubin, A. D. 1999, ‘The design
and analysis of graphical passwords’, Proceedings of the 8th USENIX Security
Symposium.
Jupitermedia Corporation 2008, What is Shoulder Surfing - A Word Definition from the
Webopedia Computer Dictionary [Online], Available:
http://www.webopedia.com/TERM/S/shoulder_surfing.html,
[Accessed 14 August 2008].
Just, M. 2004, ‘Designing and evaluating challenge-question systems’, Journal of IEEE
Security and Privacy September/October 2004, vol. 2, no. 5.
Klein, D. V. 1990, ‘Foiling the cracker: A survey of, and improvements to, password
security’, 2nd
USENIX Security Workshop, pp. 5-14.
Man, S., Hong, D. and Mathews, M. 2003, ‘A shoulder surfing resistant graphical
password scheme’, Proceedings of International conference on security and
management, Las Vegas, NV.
Microsoft Corporation 2008, SQL Server 2005 Express Edition Overview [Online],
Available: http://msdn2.microsoft.com/en-us/library/ms345154.aspx,
[Accessed 15 August 2008].

126
Microsoft Corporation 2009, Strong passwords: How to create and use them [Online],
Available: http://www.microsoft.com/protect/yourself/password/create.mspx,
[Accessed 30 June 2009].
Norman, D.A. 1988, The Design of Everyday Things, Basic Books, New York.
O’Gorman, L., Bagga, A. and Bentley, J. 2005, ‘Query-directed passwords’, Journal of
Elsevier Computer and Security June 2005, vol. 24, pp. 546.
Passlogix Inc 2004, Passlogix [Online], Available: www.passlogix.com,
[Accessed 15 August 2008].
Owen, S. G., Xiaoyuan Suo and Ying Zhu, 2007, ‘Graphical Passwords: A Survey’,
Available: http://www.acsac.org/2005/papers/89.pdf, [Accessed 30 June 2009].
Password Portal Inc. 2004, Password Portal-Password Recovery, Password Cracking,
Hacking Passwords, Email Password Hacking [Online], Available:
http://www.passwordportal.net/, [Accessed 15 August 2008].
Perrig, A. and Song, D. 1999, ‘Hash visualization: A new technique to improve real-
world security’, International Workshop on Cryptographic Techniques and E-
commerce, pp. 131–8.
Pressman, R. S. (ed.) 1992, Software Engineering: A Practitioner’s Approach,
McGraw-Hill, New York.
Real User Corporation 2001, The Science Behind Passfaces [Online], Available:
http://www.realuser.com/published/ScienceBehindPassfaces.pdf,
[Accessed 14 August 2008].
Sasse, M. A., Brostoff, S. and Weirich, D. 2001, ‘Transforming the ‘weakest link’ – a
human/computer interaction approach to usable and effective security’, BT
Technical Journal, vol. 19, pp. 122-131.
SFR IT Engineering 2005, User manual visKey [Online], Available: http://www.sfr-
software.de/cms/root/pocketpc/viskey/files/visKeyPPCDokuEN.pdf,
[Accessed 14 August 2008].
Shamir, A. 1979, ‘How to share a secret’, Journal of ACM Communications November
1979, vol. 22, no. 11, pp. 612-3.

127
Shepard, R. N. 1967, ‘Recognition memory for words, sentences, and pictures’, Journal
of Verbal Learning and Verbal Behavior, vol. 6, pp. 156-163.
Sobrado, L. and Birget, J. C. 2002, Graphical Passwords. The Rutgers Scholar [Online],
Available: http://rutgersscholar.rutgers.edu/volume04/sobrbirg/sobrbirg.htm,
[Accessed 14 August 2008].
Syukri A. F., Okamoto E. and Mambo M. 1998, ‘A User Identification System Using
Signature Written with Mouse’, Proceedings of the Third Australasian Conference
on Information Security and Privacy (ACISP), Springer-Verlag, Lecture Notes in
Computer Science, vol.1438, pp. 403-14.
Takada, T. and Koike, H. 2003, Awase-E: Image-based Authentication for Mobile
Phones using User’s Favorite Images [Online], Available:
http://www.vogue.is.uec.ac.jp/~koike/awasee/MobileHCI2003.pdf, [Accessed 14
August 2008].
Tari, F., Ozok, A. A. and Holden, S. H. 2006, A Comparison of Perceived and Real
Shoulder-surfing Risks between Alphanumeric and Graphical Passwords [Online],
Available: http://cups.cs.cmu.edu/soups/2006/proceedings/p56_tari.pdf,
[Accessed 14 August 2008].
Thomas, R. C., Karahasanovic, A. and Kennedy, G. E. 2005, An Investigation into
Keystroke Latency Metrics as an Indicator of Programming Performance [Online],
Available: http://crpit.com/confpapers/CRPITV42Thomas.pdf,
[Accessed 14 August 2008].
Thorpe J. and van Oorschot P. C. (2004a), ‘Graphical dictionaries and the memorable
space of graphical passwords’, Proceedings of the 13th USENIX Security
Symposium, pp. 9-13, San Deigo, USA.
Thorpe J. and van Oorschot P. C. (2004b), Towards Secure Design Choices for
Implementing Graphical Passwords [Online], Available:
http://www.acsac.org/2004/papers/48.pdf, [Accessed 14 August 2008].
Wagstaff, J. 2005, Shoulder Surfing. The Old New Phishing [Online], Available:
http://loosewire.typepad.com/blog/2005/04/shoulder_surfin.html,
[Accessed 19 November 2008].
Weinshall, D. and Kirkpatrick, S. 2004, Passwords You'll Never Forget, But can't
Recall [Online], Available: http://www.cs.huji.ac.il/~kirk/Imprint_CHI04_final.pdf,
[Accessed 14 August 2008].

128
Wftv.com 2004, Shoulder-surfing gets secret numbers on tape [Online], Available:
http://www.wftv.com/money/3964515/detail.html, [Accessed 18 Nov 2008].
Wiedenbeck, S., Water, J., Birget, J. C., Brodskiy, A. and Menon, N. (2005a),
Authentication using Graphical Passwords: Basic Results [Online], Available:
http://clam.rutgers.edu/~birget/grPssw/susan3.pdf, [Accessed 14 August 2008].
Wiedenbeck, S., Water, J., Birget, J. C., Brodskiy, A. and Menon, N. (2005b),
Authentication using Graphical Passwords: Effect of Tolerance and Image Choice
[Online], Available: http://cups.cs.cmu.edu/soups/2005/2005proceedings/p1-
wiedenbeck.pdf, [Accessed 14 August 2008].
Wiedenbeck, S., Waters, J., Birget, J., Brodskiy, A. and Memon, N. (2005c),
‘PassPoints: Design and longitudinal evaluation of a graphical password system’,
International Journal of Human-Computer Studies, vol. 63, issues 1-2.
Wiedenbeck, S., Water, J., Birget, J. C. and Sobrado, L. 2006, ‘Design and evaluation of
a shoulder-surfing resistant graphical password scheme’, Proceedings of the
Working Conference on Advanced Visual Interfaces (AVI 2006), pp. 23-26, Venezia,
Italy.
Yan, J., Blackwell, A., Anderson, R. and Grant, A. 2000, The Memorability and
Security of Passwords – Some Empirical Results [Online], Available:
http://www.cl.cam.ac.uk/techreports/UCAM-CL-TR-500.pdf,
[Accessed 14 August 2008].
Yan, J., Blackwell, A., Anderson, R. and Grant, A. 2004, ‘Password memorability and
security: Empirical result’, Journal of IEEE Privacy & Security, vol. 2, no. 5, pp.
25-31.

129
Appendix A – CRGPS’s Source Code I (Login)
Home.aspx <%@ page language="VB" MasterPageFile="~/Default.master" %>
Login.aspx
<%@ Page Language="VB" masterpagefile="~/SectionFunctions.master" %>
<%@ mastertype virtualpath="~/SectionFunctions.master" %>
<%@ Import Namespace="System.Data" %>
<%@ Import Namespace="System.Data.SqlClient" %>
<%@ Import Namespace ="System.Net.Mail" %>
<%@ Import Namespace="System" %>
<%@ Import Namespace="System.Security.Cryptography" %>
<%@ Import Namespace="System.Text" %>
<script runat="server">
'assign all the images to array a
Dim a() As String = {"AA0001", "AA0002", "AA0003", "AA0004",
"AA0005", "AA0006", "AA0007", "AA0008", "AA0009", "AA0010",
"AA0011", "AA0012", "AA0013", "AA0014", "AA0015", "AA0016",
"AA0017", "AA0018", "AA0019", "AA0020", "AA0021", "AA0022",
"AA0023", "AA0024", "AA0025", "AA0026", "AA0027", "AA0028",
"AA0029", "AA0030", "AA0031", "AA0032", "AA0033", "AA0034",
"AA0035", "AA0036", "AA0037", "AA0038", "AA0039", "AA0040",
"AA0041", "AA0042", "AA0043", "AA0044", "AA0045", "AA0046",
"AA0047", "AA0048", "AA0049", "AA0050", "AA0051", "AA0052",
"AA0053", "AA0054", "AA0055", "AA0056", "AA0057", "AA0058",
"AA0059", "AA0060", "AA0061", "AA0062", "AA0063", "AA0064",
"AA0065", "AA0066", "AA0067", "AA0068", "AA0069", "AA0070",
"AA0071", "AA0072", "AA0073", "AA0074", "AA0075", "AA0076",
"AA0077", "AA0078", "AA0079", "AA0080", "AA0081", "AA0082",
"AA0083", "AA0084", "AA0085", "AA0086", "AA0087", "AA0088",
"AA0089", "AA0090", "AA0091", "AA0092", "AA0093", "AA0094",
"AA0095", "AA0096", "AA0097", "AA0098", "AA0099", "AA0100",
"AA0101", "AA0102", "AA0103", "AA0104", "AA0105", "AA0106",
"AA0107", "AA0108", "AA0109", "AA0110", "AA0111", "AA0112",
"AA0113", "AA0114", "AA0115", "AA0116", "AA0117", "AA0118",
"AA0119", "AA0120", "AA0121", "AA0122", "AA0123", "AA0124"}
Sub Page_load()
'put cursor into UserName textbox
UserName.Focus()
If Not IsPostBack Then
Step1.Font.Bold = True
End If
'if maximum tries to login using username more than 3 times
then redirect the user to failed login page
If Session("UserNameNumTries") >
Application("UserNameMaxTries") Then
Response.Redirect("./username_failed_login.aspx")
End If
'if maximum tries to login using password more than 3 times
then rdirect the user to failed login page
If Session("PasswordNumTries") >
Application("PasswordMaxTries") Then
Response.Redirect("./password_failed_login.aspx")
End If

130
Login.aspx, continued End Sub
Function CreateDataSource() As ICollection
Dim i As Integer
Dim dt As DataTable
Dim dr As DataRow
Dim DecoyImage As New ArrayList
'create a DataTable
dt = New DataTable
dt.Columns.Add(New DataColumn("image_id", GetType(String)))
'shuffle array a
Dim position As Integer
Dim Temp As String
Randomize()
For i = (a.Length - 1) To 0 Step -1
position = Int(((a.Length) * Rnd()) + 1) - 1
Temp = a(i)
a(i) = a(position)
a(position) = Temp
Next
'add array a into arraylist DecoyImage
For i = 0 To 46
DecoyImage.Add(a(i))
Next
Dim DataArray As New ArrayList
Dim ConnStr As String
ConnStr = "server=(local)\SQLEXPRESS;database=GPS;"
ConnStr &= "Trusted_Connection=yes"
Dim mySqlConn As New SqlConnection(ConnStr)
'open db connection and select password image1 from detail
table and add it to arraylist DataArray
mySqlConn.Open()
Dim SQLSelect1 As String = "SELECT pass_image1 FROM detail
WHERE UserName = '" & UserName.Text & "'"
Dim mySqlCmd1 As New SqlCommand(SQLSelect1, mySqlConn)
Dim Result1 As Object
Result1 = mySqlCmd1.ExecuteScalar()
DataArray.Add(Trim(CType(Result1, String)))
mySqlConn.Close()
'open db cnnection and select password image2 from detail
table and add it to arraylist DataArray
mySqlConn.Open()
Dim SQLSelect2 As String = "SELECT pass_image2 FROM detail
WHERE UserName = '" & UserName.Text & "'"
Dim mySqlCmd2 As New SqlCommand(SQLSelect2, mySqlConn)
Dim Result2 As Object
Result2 = mySqlCmd2.ExecuteScalar()
DataArray.Add(Trim(CType(Result2, String)))
mySqlConn.Close()
'open db connection and select password image3 from detail
table and add it to arraylist DataArray
mySqlConn.Open()
Dim SQLSelect3 As String = "SELECT pass_image3 FROM detail

131
Login.aspx, continued WHERE UserName = '" & UserName.Text & "'"
Dim mySqlCmd3 As New SqlCommand(SQLSelect3, mySqlConn)
Dim Result3 As Object
Result3 = mySqlCmd3.ExecuteScalar()
DataArray.Add(Trim(CType(Result3, String)))
mySqlConn.Close()
'open db connection and select password image4 from detail
table and add it to arraylist DataArray
mySqlConn.Open()
Dim SQLSelect4 As String = "SELECT pass_image4 FROM detail
WHERE UserName = '" & UserName.Text & "'"
Dim mySqlCmd4 As New SqlCommand(SQLSelect4, mySqlConn)
Dim Result4 As Object
Result4 = mySqlCmd4.ExecuteScalar()
DataArray.Add(Trim(CType(Result4, String)))
mySqlConn.Close()
'open db connection and select password image5 from detail
table and add it to arraylist DataArray
mySqlConn.Open()
Dim SQLSelect5 As String = "SELECT pass_image5 FROM detail
WHERE UserName = '" & UserName.Text & "'"
Dim mySqlCmd5 As New SqlCommand(SQLSelect5, mySqlConn)
Dim Result5 As Object
Result5 = mySqlCmd5.ExecuteScalar()
DataArray.Add(Trim(CType(Result5, String)))
mySqlConn.Close()
'shuffle arraylist DataArray
Randomize()
For i = 4 To 0 Step -1
position = Int(((5 * Rnd()) + 1) - 1)
Temp = DataArray(i)
DataArray(i) = DataArray(position)
DataArray(position) = Temp
Next
'Assign DataArray(0) until DataArray(4) to PI1 until PI5
PI1.Text = DataArray(0)
PI2.Text = DataArray(1)
PI3.Text = DataArray(2)
PI4.Text = DataArray(3)
PI5.Text = DataArray(4)
'check if PasswordImage and DecoyImage are the same or not
to prevent redundantcy of image
For i = 0 To 46
If Trim(DecoyImage(i)) = Trim(PI1.Text) Then
DecoyImage(i) = a(47)
ElseIf Trim(DecoyImage(i)) = Trim(PI2.Text) Then
DecoyImage(i) = a(48)
ElseIf Trim(DecoyImage(i)) = Trim(PI3.Text) Then
DecoyImage(i) = a(49)
ElseIf Trim(DecoyImage(i)) = Trim(PI4.Text) Then
If a(50) <> PI1.Text And a(50) <> PI2.Text And a(50)
<> PI3.Text Then
DecoyImage(i) = a(50)
End If
ElseIf Trim(DecoyImage(i)) = Trim(PI5.Text) Then
If a(51) <> PI1.Text And a(51) <> PI2.Text And a(51)
<> PI3.Text Then

132
Login.aspx, continued DecoyImage(i) = a(51)
End If
End If
Next
'Add PI1 until PI3 to DecoyImage
DecoyImage.Add(PI1.Text)
DecoyImage.Add(PI2.Text)
DecoyImage.Add(PI3.Text)
'shuffle the DecoyImage
Randomize()
For i = 49 To 0 Step -1
position = Int((50 * Rnd()) + 1) - 1
Temp = DecoyImage(i)
DecoyImage(i) = DecoyImage(position)
DecoyImage(position) = Temp
Next
'add DecoyImage to DataTable
For i = 0 To 49
dr = dt.NewRow()
dr(0) = DecoyImage(i)
dt.Rows.Add(dr)
Next
'return a DataView to the DataTable
CreateDataSource = New DataView(dt)
End Function
Sub DecrytUserPassword()
Dim ConnStr As String
ConnStr = "server=(local)\SQLEXPRESS;database=GPS;"
ConnStr &= "Trusted_Connection=yes"
Dim mySqlConn As New SqlConnection(ConnStr)
'get password code for Password Image1
Dim SQLSelect1 As String = "SELECT pass_code FROM password "
_& "WHERE UserName='" & UserName.Text & "' AND pass_image='"
& PI1.Text & "'"
mySqlConn.Open()
Dim mySqlCmd1 As New SqlCommand(SQLSelect1, mySqlConn)
Dim Result1 As Object
Result1 = mySqlCmd1.ExecuteScalar()
mySqlConn.Close()
'get password code for Password Image2
Dim SQLSelect2 As String = "SELECT pass_code FROM password "
_& "WHERE UserName='" & UserName.Text & "' AND pass_image='"
& PI2.Text & "'"
mySqlConn.Open()
Dim mySqlCmd2 As New SqlCommand(SQLSelect2, mySqlConn)
Dim Result2 As Object
Result2 = mySqlCmd2.ExecuteScalar()
mySqlConn.Close()
'get password code for Password Image3
Dim SQLSelect3 As String = "SELECT pass_code FROM password "
_& "WHERE UserName='" & UserName.Text & "' AND pass_image='"
& PI3.Text & "'"
mySqlConn.Open()

133
Login.aspx, continued Dim mySqlCmd3 As New SqlCommand(SQLSelect3, mySqlConn)
Dim Result3 As Object
Result3 = mySqlCmd3.ExecuteScalar()
mySqlConn.Close()
'get password code for Password Image4
Dim SQLSelect4 As String = "SELECT pass_code FROM password "
_& "WHERE UserName='" & UserName.Text & "' AND pass_image='"
& PI4.Text & "'"
mySqlConn.Open()
Dim mySqlCmd4 As New SqlCommand(SQLSelect4, mySqlConn)
Dim Result4 As Object
Result4 = mySqlCmd4.ExecuteScalar()
mySqlConn.Close()
'get password code for Password Image5
Dim SQLSelect5 As String = "SELECT pass_code FROM password "
_& "WHERE UserName='" & UserName.Text & "' AND pass_image='"
& PI5.Text & "'"
mySqlConn.Open()
Dim mySqlCmd5 As New SqlCommand(SQLSelect5, mySqlConn)
Dim Result5 As Object
Result5 = mySqlCmd5.ExecuteScalar()
mySqlConn.Close()
Try
'Create a UnicodeEncoder to convert between byte array
and string.
Dim ByteConverter As New UnicodeEncoding()
'Create byte arrays to hold decrypted data.
Dim decryptedData1() As Byte
Dim decryptedData2() As Byte
Dim decryptedData3() As Byte
Dim decryptedData4() As Byte
Dim decryptedData5() As Byte
'get user's private key from db
Dim SQLSelect6 As String = "SELECT private_key FROM
detail " & "WHERE UserName='" & UserName.Text & "'"
mySqlConn.Open()
Dim mySqlCmd6 As New SqlCommand(SQLSelect6, mySqlConn)
Dim Result6 As Object
Result6 = mySqlCmd6.ExecuteScalar()
mySqlConn.Close()
Dim privateKey As String = Trim(CType(Result6, String))
'load the private key
Dim RSA1 As RSACryptoServiceProvider = New
RSACryptoServiceProvider()
RSA1.FromXmlString(privateKey)
'create byte arrays to hold converted password code
Dim getStr1() As Byte
Dim getStr2() As Byte
Dim getStr3() As Byte
Dim getStr4() As Byte
Dim getStr5() As Byte
'convert the password code from string to byte arrays
getStr1 =
System.Convert.FromBase64String(Trim(CType(Result1,

134
Login.aspx, continued String)))
getStr2 =
System.Convert.FromBase64String(Trim(CType(Result2,
String)))
getStr3 =
System.Convert.FromBase64String(Trim(CType(Result3,
String)))
getStr4 =
System.Convert.FromBase64String(Trim(CType(Result4,
String)))
getStr5 =
System.Convert.FromBase64String(Trim(CType(Result5,
String)))
'Pass the data to DECRYPT, the private key information
'(using RSACryptoServiceProvider.ExportParameters(true),
'and a boolean flag specifying no OAEP padding.
decryptedData1 = RSA1.Decrypt(getStr1, False)
decryptedData2 = RSA1.Decrypt(getStr2, False)
decryptedData3 = RSA1.Decrypt(getStr3, False)
decryptedData4 = RSA1.Decrypt(getStr4, False)
decryptedData5 = RSA1.Decrypt(getStr5, False)
'create string to hold converted decrypted byte arrays
Dim str1 As String =
ByteConverter.GetString(decryptedData1)
Dim str2 As String =
ByteConverter.GetString(decryptedData2)
Dim str3 As String =
ByteConverter.GetString(decryptedData3)
Dim str4 As String =
ByteConverter.GetString(decryptedData4)
Dim str5 As String =
ByteConverter.GetString(decryptedData5)
'assign combination of password first letter and the
less of the password to a respective label
decryt1.Text = str1
decryt2.Text = str2
decryt3.Text = str3
decryt4.Text = str4
decryt5.Text = str5
'Catch exception in case the decryption did not succeed.
Catch e As ArgumentNullException
Message1.Text += "Decryption failed."
Catch e As CryptographicException
Message1.Text += e.ToString()
End Try
End Sub
Sub CreatePasswordFirstLetter()
DecrytUserPassword()
'assign the first letter of the decrypted password to 5
labels
c4.Text = (decryt1.Text).Remove(1, ((decryt1.Text).Length()
- 1))
c5.Text = (decryt2.Text).Remove(1, ((decryt2.Text).Length()
- 1))

135
Login.aspx, continued c6.Text = (decryt3.Text).Remove(1, ((decryt3.Text).Length()
- 1))
c7.Text = (decryt4.Text).Remove(1, ((decryt4.Text).Length()
- 1))
c8.Text = (decryt5.Text).Remove(1, ((decryt5.Text).Length()
- 1))
'create a fake password
Dim a() As String = {"a", "b", "c", "d", "e", "f", "g", "h",
"i", "j", "k", "l", "m", "n", "o", "p", "q", "r", "s", "t",
"u", "v", "w", "x", "y", "z", "A", "B", "C", "D", "E", "F",
"G", "H", "I", "J", "K", "L", "M", "N", "O", "P", "Q", "R",
"S", "T", "U", "V", "W", "X", "Y", "Z"}
Dim positionA As Integer
Dim tempA As String
Dim i As Integer
Randomize()
For i = (a.Length - 1) To 0 Step -1
positionA = Int((52 * Rnd()) + 1) - 1
tempA = a(i)
a(i) = a(positionA)
a(positionA) = tempA
Next
'to get the first letter of password randomly
Dim b() As String = {c4.Text, c5.Text, c6.Text, a(0)}
Dim PasswordClue As New ArrayList
'shuffle array b
Dim positionB As Integer
Dim TempB As String
Randomize()
For i = (b.Length - 1) To 0 Step -1
positionB = Int(((b.Length) * Rnd()) + 1) - 1
TempB = b(i)
b(i) = b(positionB)
b(positionB) = TempB
Next
'add array b into arraylist PasswordClue
For i = 0 To 3
PasswordClue.Add(b(i))
Next
'assign the first letter of the passwords to password label
PasswordLabel1.Text = PasswordClue(0)
PasswordLabel2.Text = PasswordClue(1)
PasswordLabel3.Text = PasswordClue(2)
PasswordLabel4.Text = PasswordClue(3)
End Sub
Sub BindList()
'bind dataview to titlelist
titlelist.DataSource = CreateDataSource()
titlelist.DataBind()
End Sub
Sub Next_Click(ByVal Sender As Object, ByVal e As EventArgs)
Select Case Sender.Parent.ID
Case "Page1"
Dim ConnStr As String

136
Login.aspx, continued ConnStr = "server=(local)\SQLEXPRESS;database=GPS;"
ConnStr &= "Trusted_Connection=yes"
Dim mySqlConn As New SqlConnection(ConnStr)
'open db connection and check existence of UserName
mySqlConn.Open()
Dim SQLSelect1 As String = "SELECT Count(*) FROM
detail " _
& "WHERE UserName = '" & UserName.Text & "'"
Dim mySqlCmd1 As New SqlCommand(SQLSelect1,
mySqlConn)
Dim Result1 As Object
Result1 = mySqlCmd1.ExecuteScalar()
mySqlConn.Close()
testing.Text = CType(Result1, String)
'if UserName do exist then display Page2 else
display message "invalid username"
If testing.Text = "1" Then
'display images
BindList()
CreatePasswordFirstLetter()
Page1.Visible = False
Step1.Font.Bold = False
Page2.Visible = True
Step2.Font.Bold = True
PasswordText1.Focus()
ElseIf testing.Text = "0" Then
Session("UserNameNumTries") =
Session("UserNameNumTries") + 1
If Session("UserNameNumTries") >=
Application("UserNameMaxTries") Then
Response.Redirect("./username_failed_login.aspx"
)
Else
invalid.Text = "The user name was not found.
Please try again."
UserName.Text = ""
UserName.Focus()
End If
End If
Dim x As Date = Now
time1.Text = x
Case "Page2"
DecrytUserPassword()
Dim ConnStr As String
ConnStr = "server=(local)\SQLEXPRESS;database=GPS;"
ConnStr &= "Trusted_Connection=yes"
Dim mySqlConn As New SqlConnection(ConnStr)
'get user's password
Dim join1 As String = PasswordLabel1.Text +
PasswordText1.Text
Dim join2 As String = PasswordLabel2.Text +
PasswordText2.Text
Dim join3 As String = PasswordLabel3.Text +
PasswordText3.Text
Dim join4 As String = PasswordLabel4.Text +
PasswordText4.Text

137
Login.aspx, continued 'set control value
c1.Value = "0"
c2.Value = "0"
c3.Value = "0"
c9.Value = "0"
'get first four letter of the password save in db
Dim pw1 As String = (decryt1.Text).Remove(4,
((decryt1.Text).Length - 1) - 3)
Dim pw2 As String = (decryt2.Text).Remove(4,
((decryt2.Text).Length - 1) - 3)
Dim pw3 As String = (decryt3.Text).Remove(4,
((decryt3.Text).Length - 1) - 3)
Dim pw4 As String = (decryt4.Text).Remove(4,
((decryt4.Text).Length - 1) - 3)
Dim pw5 As String = (decryt5.Text).Remove(4,
((decryt5.Text).Length - 1) - 3)
'check if the decryted password similar with the
user's key in password for the first password
If String.Compare(join1, pw1) = 0 Or
String.Compare(join1, pw2) = 0 _
Or String.Compare(join1, pw3) = 0 Or
String.Compare(join1, pw4) = 0 _
Or String.Compare(join1, pw5) = 0 Then
c1.Value = "1"
End If
'check if the decryted password similar with the
user's key in password for the second password
If String.Compare(join2, pw1) = 0 Or
String.Compare(join2, pw2) = 0 _
Or String.Compare(join2, pw3) = 0 Or
String.Compare(join2, pw4) = 0 _
Or String.Compare(join2, pw5) = 0 Then
c2.Value = "1"
End If
'check if the decryted password similar with the
user's key in password for the third password
If String.Compare(join3, pw1) = 0 Or
String.Compare(join3, pw2) = 0 _
Or String.Compare(join3, pw3) = 0 Or
String.Compare(join3, pw4) = 0 _
Or String.Compare(join3, pw5) = 0 Then
c3.Value = "1"
End If
'check if the decryted password similar with the
user's key in password for the forth password
If String.Compare(join4, pw1) = 0 Or
String.Compare(join4, pw2) = 0 _
Or String.Compare(join4, pw3) = 0 Or
String.Compare(join4, pw4) = 0 _
Or String.Compare(join4, pw5) = 0 Then
c9.Value = "1"
End If
'fecth user's email address from detail table
Dim SQLSelect2 As String = "SELECT e_mail FROM
detail WHERE UserName='" & UserName.Text & "'"
mySqlConn.Open()

138
Login.aspx, continued Dim mySqlCmd2 As New SqlCommand(SQLSelect2,
mySqlConn)
Dim Result2 As Object
Result2 = mySqlCmd2.ExecuteScalar()
mySqlConn.Close()
'to get the first image
Dim SQLSelect3 As String = "SELECT pass_image1 FROM
detail " _
& "WHERE UserName='" & UserName.Text & "'"
mySqlConn.Open()
Dim mySqlCmd3 As New SqlCommand(SQLSelect3,
mySqlConn)
Dim Result3 As Object
Result3 = mySqlCmd3.ExecuteScalar()
mySqlConn.Close()
'to get the second image
Dim SQLSelect4 As String = "SELECT pass_image2 FROM
detail " _
& "WHERE UserName='" & UserName.Text & "'"
mySqlConn.Open()
Dim mySqlCmd4 As New SqlCommand(SQLSelect4,
mySqlConn)
Dim Result4 As Object
Result4 = mySqlCmd4.ExecuteScalar()
mySqlConn.Close()
'to get the third image
Dim SQLSelect5 As String = "SELECT pass_image3 FROM
detail " _
& "WHERE UserName='" & UserName.Text & "'"
mySqlConn.Open()
Dim mySqlCmd5 As New SqlCommand(SQLSelect5,
mySqlConn)
Dim Result5 As Object
Result5 = mySqlCmd5.ExecuteScalar()
mySqlConn.Close()
'to get the forth image
Dim SQLSelect6 As String = "SELECT pass_image4 FROM
detail " _
& "WHERE UserName='" & UserName.Text & "'"
mySqlConn.Open()
Dim mySqlCmd6 As New SqlCommand(SQLSelect6,
mySqlConn)
Dim Result6 As Object
Result6 = mySqlCmd6.ExecuteScalar()
mySqlConn.Close()
'to get the fifth image
Dim SQLSelect7 As String = "SELECT pass_image5 FROM
detail " _
& "WHERE UserName='" & UserName.Text & "'"
mySqlConn.Open()
Dim mySqlCmd7 As New SqlCommand(SQLSelect7,
mySqlConn)
Dim Result7 As Object
Result7 = mySqlCmd7.ExecuteScalar()
mySqlConn.Close()
'check if the PasswordText is correct then display

139
Login.aspx, continued message "Congratulation!!Login Successfully!! else
display message "Wrong Password!!Please try again!!
If (c1.Value = "1" And c2.Value = "1" And c3.Value =
"1" And c9.Value = "0") _
Or (c1.Value = "1" And c2.Value = "1" And c3.Value =
"0" And c9.Value = "1") _
Or (c1.Value = "1" And c2.Value = "0" And c3.Value =
"1" And c9.Value = "1") _
Or (c1.Value = "0" And c2.Value = "1" And c3.Value =
"1" And c9.Value = "1") Then
'if the user is administrator then display the
user's information from the database
If UserName.Text = "Admin" Then
Page2.Visible = False
Step2.Font.Bold = False
Page4.Visible = True
Else
Page2.Visible = False
Step2.Font.Bold = False
Page3.Visible = True
Step3.Font.Bold = True
ReviewUserNameText.Text = UserName.Text
Label1.Text = "You have successfully entered
our site. Welcome! Take your time and " _
& "have fun!"
Label2.Visible = False
End If
'add 1 to the sucess column in the database
because user had sucessfully login
Dim SQLSelect8 As String = "SELECT success FROM
detail " _
& "WHERE UserName='" & UserName.Text & "'"
mySqlConn.Open()
Dim mySqlCmd8 As New SqlCommand(SQLSelect8,
mySqlConn)
Dim Result8 As Object
Result8 = mySqlCmd8.ExecuteScalar()
mySqlConn.Close()
Dim s_login As Integer = CType(Result8, Integer)
s_login += 1
Dim SQLUpdate1 As String = "UPDATE detail SET
success='" & s_login & "'WHERE " _
& "UserName='" & UserName.Text & "'"
mySqlConn.Open()
Dim mySqlCommand9 As New SqlCommand(SQLUpdate1,
mySqlConn)
Dim mySqlDR1 As SqlDataReader
mySqlDR1 = mySqlCommand9.ExecuteReader()
mySqlConn.Close()
'calculate user's login time
Dim y As Date = Now
Dim yminute As Integer =
DatePart(DateInterval.Minute, y)
Dim ysecond As Integer =
DatePart(DateInterval.Second, y)
Dim x As Date = CDate(time1.Text)
Dim xminute As Integer =
DatePart(DateInterval.Minute, x)
140
Login.aspx, continued Dim xsecond As Integer =
DatePart(DateInterval.Second, x)
Dim dminute As Integer
Dim dsecond As Integer
Dim myDS As New DataSet()
If yminute = xminute Then
dminute = 0
dsecond = ysecond - xsecond
ElseIf yminute > xminute Then
If ysecond > xsecond Then
dminute = yminute - xminute
dsecond = ysecond - xsecond
ElseIf ysecond < xsecond Then
dminute = yminute - xminute - 1
dsecond = (60 + ysecond) - xsecond
ElseIf ysecond = xsecond Then
dminute = yminute - xminute
dsecond = 0
End If
End If
'add a record to database
mySqlConn.Open()
Dim SQLSelect9 As String = "SELECT Count(*) FROM
login_time " _
& "WHERE UserName = '" & UserName.Text & "'"
Dim mySqlCmd12 As New SqlCommand(SQLSelect9,
mySqlConn)
Dim Result9 As Object
Result9 = mySqlCmd12.ExecuteScalar()
mySqlConn.Close()
Dim id As Integer = CType(Result9, Integer) + 1
Dim SQLInsert1 As String = "INSERT INTO
[login_time] ([duration_id],[UserName],
[minute], [second]) VALUES ('" & id & "', '" &
UserName.Text & "', '" & dminute & "', '" &
dsecond & "')"
mySqlConn.Open()
Dim mySqlCommand11 As New SqlCommand(SQLInsert1,
mySqlConn)
Dim mySqlDR3 As SqlDataReader
mySqlDR3 = mySqlCommand11.ExecuteReader()
mySqlConn.Close()
Else
'increase 1 to failed login for unsucessfull
login
Session("PasswordNumTries")
= Session("PasswordNumTries") + 1
'sent email to user if failed login more than 3
times
If Session("PasswordNumTries") >=
Application("PasswordMaxTries") Then
'Password recovery
Dim Mail As New
MailMessage("[email protected]",
CType(Result2, String))
Dim body As String
Dim sb As New StringBuilder()

141
Login.aspx, continued Mail.Subject = "Password Recovery"
body = "Password 1 = " & decryt1.Text & "
Password 2 = " & decryt2.Text & _
" Password 3 = " & decryt3.Text & "
Password 4 = " & decryt4.Text & _
" Password 5 = " & decryt5.Text
'build the email message body.
sb.Append("The following email was sent to
you from the Graphical Password Recovery ")
sb.Append(vbCrLf)
sb.Append(vbCrLf)
sb.Append("SUBJECT: ")
sb.Append("Password Recovery")
sb.Append(vbCrLf)
sb.Append(vbCrLf)
sb.Append("MESSAGE: ")
sb.Append(body)
sb.Append(vbCrLf)
Mail.Body = sb.ToString
'build the attactments
Dim arlAttachments As New ArrayList
arlAttachments.Add(New
Attachment("C:\Documents and Settings\TYS\My
Documents\" _
& "Visual Studio 2005\WebSites\Home Page
26Mar08\Functions\images\" & _
Trim(CType(Result3, String)) & ".jpg"))
arlAttachments.Add(New
Attachment("C:\Documents and Settings\TYS\My
Documents\" _
& "Visual Studio 2005\WebSites\Home Page
26Mar08\Functions\images\" & _
Trim(CType(Result4, String)) & ".jpg"))
arlAttachments.Add(New
Attachment("C:\Documents and Settings\TYS\My
Documents\" _
& "Visual Studio 2005\WebSites\Home Page
26Mar08\Functions\images\" & _
Trim(CType(Result5, String)) & ".jpg"))
arlAttachments.Add(New
Attachment("C:\Documents and Settings\TYS\My
Documents\" _
& "Visual Studio 2005\WebSites\Home Page
26Mar08\Functions\images\" & _
Trim(CType(Result6, String)) & ".jpg"))
arlAttachments.Add(New
Attachment("C:\Documents and Settings\TYS\My
Documents\" _
& "Visual Studio 2005\WebSites\Home Page
26Mar08\Functions\images\" & _
Trim(CType(Result7, String)) & ".jpg"))
If Not IsNothing(arlAttachments) Then
Dim mailAttachment As Attachment
For Each mailAttachment In
arlAttachments
Mail.Attachments.Add(mailAttachment)
Next
End If

142
Login.aspx, continued 'try to sent email
Try
Dim client As New
SmtpClient("localhost")
client.Send(Mail)
Label2.Text = Label2.Text + "Your email
has been successfully sent!"
Catch exp As Exception
Label2.Text = Label2.Text + "The
following problem occurred when
attempting to " & _
"send your email: " & exp.Message
End Try
'direct user to failed login page
Response.Redirect("./password_failed_login.a
spx")
End If
'display message when password not found
Label2.Text = "The password was not found.
Please try again."
PasswordText1.Focus()
Dim SQLSelect9 As String = "SELECT failure FROM
detail " _
& "WHERE UserName='" & UserName.Text & "'"
mySqlConn.Open()
Dim mySqlCmd9 As New SqlCommand(SQLSelect9,
mySqlConn)
Dim Result9 As Object
Result9 = mySqlCmd9.ExecuteScalar()
mySqlConn.Close()
'add a record to database, increase 1 to failed
login
Dim f_login As Integer = CType(Result9, Integer)
f_login += 1
Dim SQLUpdate2 As String = "UPDATE detail SET
failure='" & f_login & "'WHERE " _
& "UserName='" & UserName.Text & "'"
mySqlConn.Open()
Dim mySqlCommand10 As New SqlCommand(SQLUpdate2,
mySqlConn)
Dim mySqlDR2 As SqlDataReader
mySqlDR2 = mySqlCommand10.ExecuteReader()
mySqlConn.Close()
End If
End Select
End Sub
Sub Previous_Click(ByVal Sender As Object, ByVal e As EventArgs)
Select Case Sender.Parent.ID
Case "Page2"
Page2.Visible = False
Step2.Font.Bold = False
Page1.Visible = True
Step1.Font.Bold = True
Case "Page3"
Page3.Visible = False

143
Login.aspx, continued Step3.Font.Bold = False
Page2.Visible = True
Step2.Font.Bold = True
End Select
End Sub
</script>
<asp:content id="Content1" contentplaceholderid="IntroText"
runat="server">
<asp:Label ID="LoginWiz" runat="server" Font-Bold="True" Font-
Names="Verdana" Font-Size="16pt" Text="Login Wizard"
BorderWidth="7px" BorderStyle ="Ridge"
Width="100%"></asp:Label>
<br />
<asp:Label ID="Step1" runat="server" Font-Names="Verdana"
Text="Step 1: Enter your User Name."></asp:Label>
<br />
<asp:Label ID="Step2" runat="server" Font-Names="Verdana"
Text="Step 2: Enter your password code.">
</asp:Label>
<br />
<asp:Label ID="Step3" runat="server" Font-Names="Verdana"
Text="Step 3: Result."></asp:Label><br />
<br />
<asp:Label ID="time1" runat="server" ></asp:Label>
<asp:Label ID="decryt1" visible="false" runat="server" />
<asp:Label ID="decryt2" visible="false" runat="server" />
<asp:Label ID="decryt3" visible="false" runat="server" />
<asp:Label ID="decryt4" visible="false" runat="server" />
<asp:Label ID="decryt5" visible="false" runat="server" />
</asp:content>
<asp:content id="Content2" contentplaceholderid="FunctionRequire"
runat="server">
<asp:Panel ID="Page1" BackColor ="silver" Width ="400px"
runat="server">
<asp:Label ID="invalid" runat="server" ></asp:Label>
<table align="center" >
<tr>
<td >
<asp:Label ID="UserNameLabel" runat="server"
Text="Username: "></asp:Label></td>
<td >
<asp:TextBox ID="UserName" MaxLength ="30"
runat="server"></asp:TextBox>
<asp:RequiredFieldValidator
ID="UserNameValidator" ControlToValidate
="UserName" Display ="Dynamic" ErrorMessage
="Username is Required" Font-Size="10pt" Font-
Names ="Verdana" runat ="server" />
</td>
</tr>
<tr>
<td colspan ="2" align="center" >
<asp:HyperLink ID="registration" text="New
User?" NavigateUrl
="~/Functions/Registration.aspx" ForeColor
="Blue" runat="server" ></asp:HyperLink>
<asp:HyperLink ID="reset" text="Reset?"
NavigateUrl ="~/Functions/Reset.aspx" ForeColor
="Blue" runat="server" ></asp:HyperLink>
</td>
</tr>

144
Login.aspx, continued <tr>
<td colspan="2" align="center" >
<asp:Button ID="P1Previous" runat="server"
Enabled="False" Text="Previous"
OnClick="Previous_Click"
onmouseover="this.style.backgroundColor='yellow'
"
onmouseout="this.style.backgroundColor='buttonfa
ce'" />
<asp:Button ID="P1Next" runat="server"
Text="Next" OnClick="Next_Click"
onmouseover="this.style.backgroundColor='yellow'
"
onmouseout="this.style.backgroundColor='buttonfa
ce'" />
<input id="P1Reset" type="reset" runat="server"
value="Clear"
onmouseover="this.style.backgroundColor='yellow'
"
onmouseout="this.style.backgroundColor='buttonfa
ce'" />
</td>
</tr>
</table>
<asp:Label ID="testing" visible="false" runat="server" />
</asp:Panel>
<asp:Panel ID="Page2" BackColor ="silver" Width ="400px"
runat="server" Visible="False">
<table width="100%">
<tr>
<td>
<asp:datalist id="titlelist" repeatcolumns="10"
gridlines="both" cellpadding="5" runat="server">
<ItemTemplate>
<table style="font: 10pt verdana">
<tr>
<td valign="top">
<asp:ImageButton
ID="ImageButton1"
ImageAlign="top" ImageURL='<%#
DataBinder.Eval(Container.DataIt
em, "image_id",
"images/{0}.jpg") %>'
runat="server"
CssClass="removeBorder"
BorderWidth="0.2cm"
onmouseover="this.className='app
lyBorder'"
onmouseout="this.className='remo
veBorder'" CommandName="Select"
/>
<asp:label ID="ImageNameLabel"
Text='<%#
DataBinder.Eval(Container.DataIt
em, "image_id") %>'
style="color:darkred"
runat="server"/>
</td>
</tr>
</table>
</ItemTemplate>

145
Login.aspx, continued </asp:datalist>
</td>
</tr>
<tr>
<td align="center" >
<asp:Label ID="Password1" Text="Password 1: "
runat="server" ></asp:Label>
<asp:Label ID="PasswordLabel1" runat="server"
></asp:Label>
<asp:TextBox ID="PasswordText1"
TextMode="Password" runat="server"
></asp:TextBox>
<asp:RequiredFieldValidator
ID="Password1Validator" ControlToValidate
="PasswordText1" Display ="Dynamic" ErrorMessage
="Password 1 is Required" Font-Size="10pt" Font-
Names ="Verdana" runat ="server" />
<asp:RegularExpressionValidator
id="Password1RegularExpressionValidator"
ControlToValidate="PasswordText1"
ValidationExpression="^[\w-]{3}$"
Display="Static" Font-Names="verdana" Font-
Size="10pt" runat="server">
Must be in form: XXX
</asp:RegularExpressionValidator>
</td>
</tr>
<tr>
<td align="center" >
<asp:Label ID="Password2" Text="Password 2: "
runat="server" ></asp:Label>
<asp:Label ID="PasswordLabel2" runat="server"
></asp:Label>
<asp:TextBox ID="PasswordText2"
TextMode="Password" runat="server"
></asp:TextBox>
<asp:RequiredFieldValidator
ID="Password2Validator" ControlToValidate
="PasswordText2" Display ="Dynamic" ErrorMessage
="Password 2 is Required" Font-Size="10pt" Font-
Names ="Verdana" runat ="server" />
<asp:RegularExpressionValidator
id="Password2RegularExpressionValidator"
ControlToValidate="PasswordText2"
ValidationExpression="^[\w-]{3}$"
Display="Static" Font-Names="verdana" Font-
Size="10pt" runat="server">
Must be in form: XXX
</asp:RegularExpressionValidator>
</td>
</tr>
<tr>
<td align="center" >
<asp:Label ID="Password3" Text="Password 3: "
runat="server" ></asp:Label>
<asp:Label ID="PasswordLabel3" runat="server"
></asp:Label>
<asp:TextBox ID="PasswordText3"
TextMode="Password" runat="server"
></asp:TextBox>
<asp:RequiredFieldValidator
ID="Password3Validator" ControlToValidate

146
Login.aspx, continued ="PasswordText3" Display ="Dynamic" ErrorMessage
="Password 3 is Required" Font-Size="10pt" Font-
Names ="Verdana" runat ="server" />
<asp:RegularExpressionValidator
id="Password3RegularExpressionValidator"
ControlToValidate="PasswordText3"
ValidationExpression="^[\w-]{3}$"
Display="Static" Font-Names="verdana" Font-
Size="10pt" runat="server">
Must be in form: XXX
</asp:RegularExpressionValidator>
</td>
</tr>
<tr>
<td align="center" >
<asp:Label ID="Password4" Text="Password 4: "
runat="server" ></asp:Label>
<asp:Label ID="PasswordLabel4" runat="server"
></asp:Label>
<asp:TextBox ID="PasswordText4"
TextMode="Password" runat="server"
></asp:TextBox>
<asp:RequiredFieldValidator
ID="Password4Validator" ControlToValidate
="PasswordText4" Display ="Dynamic" ErrorMessage
="Password 4 is Required" Font-Size="10pt" Font-
Names ="Verdana" runat ="server" />
<asp:RegularExpressionValidator
id="Password4RegularExpressionValidator"
ControlToValidate="PasswordText4"
ValidationExpression="^[\w-]{3}$"
Display="Static" Font-Names="verdana" Font-
Size="10pt" runat="server">
Must be in form: XXX
</asp:RegularExpressionValidator>
</td>
</tr>
<tr>
<td colspan ="8" align="center" >
<asp:Button ID="P2Previous" runat="server"
Text="Previous" OnClick="Previous_Click"
onmouseover="this.style.backgroundColor='yellow'
"
onmouseout="this.style.backgroundColor='buttonfa
ce'" />
<asp:Button ID="P2Next" runat="server"
Text="Next" OnClick="Next_Click"
onmouseover="this.style.backgroundColor='yellow'
"
onmouseout="this.style.backgroundColor='buttonfa
ce'" />
<input id="P2Reset" type="reset" runat ="server"
value="Clear"
onmouseover="this.style.backgroundColor='yellow'
"
onmouseout="this.style.backgroundColor='buttonfa
ce'" />
</td>
</tr>
</table>
<asp:Label ID="c4" visible="false" runat="server" />
<asp:Label ID="c5" visible="false" runat="server" />

147
Login.aspx, continued <asp:Label ID="c6" visible="false" runat="server" />
<asp:Label ID="c7" visible="false" runat="server" />
<asp:Label ID="c8" visible="false" runat="server" />
<asp:Label ID="PI1" visible="false " runat="server" />
<asp:Label ID="PI2" visible="false " runat ="server" />
<asp:Label ID="PI3" visible="false " runat ="server" />
<asp:Label ID="PI4" visible="false " runat ="server" />
<asp:Label ID="PI5" visible="false " runat ="server" />
<asp:HiddenField ID="c1" runat="server" />
<asp:HiddenField ID="c2" runat="server" />
<asp:HiddenField ID="c3" runat="server" />
<asp:HiddenField ID="c9" runat="server" />
</asp:Panel>
<asp:Label ID="Label2" runat="server" ></asp:Label>
<asp:Label ID="Message1" runat="server" ></asp:Label>
<asp:Panel ID="Page3" BackColor ="silver" Width ="600px"
runat="server" Visible="False">
<table align="center" >
<tr>
<td align="center" >
<asp:Label ID="ReviewUserName" runat="server"
Text="User Name: "></asp:Label>
<asp:Label ID="ReviewUserNameText"
runat="server" ></asp:Label>
</td>
</tr>
<tr>
<td colspan="2" align="center" >
<asp:Button ID="P3Previous" runat="server"
Text="Previous" OnClick ="Previous_Click"
Enabled="false"
onmouseover="this.style.backgroundColor='yellow'
"
onmouseout="this.style.backgroundColor='buttonfa
ce'" />
<asp:Button ID="P3Next" runat="server"
Text="Next" OnClick ="Next_Click"
Enabled="false"
onmouseover="this.style.backgroundColor='yellow'
"
onmouseout="this.style.backgroundColor='buttonfa
ce'" />
<input id="P3Reset" type="reset" disabled
="disabled" runat ="server" value="Clear"
onmouseover="this.style.backgroundColor='yellow'
"
onmouseout="this.style.backgroundColor='buttonfa
ce'" />
</td>
</tr>
<tr>
<td align="center" >
<asp:Label ID="Label1"
runat="server"></asp:Label>
</td>
</tr>
</table>
</asp:Panel>
<asp:Panel ID="Page4" BackColor ="silver" Width ="400px"
visible="false" runat="server">
<table align="center" >
<tr>

148
Login.aspx, continued <td>
<asp:GridView ID="GridView1" AllowSorting="true"
AllowPaging="true" Runat="server"
DataSourceID="SqlDataSource1"
AutoGenerateEditButton="true"
DataKeyNames="UserName"
AutoGenerateColumns="False">
<Columns>
<asp:BoundField HeaderText="UserName"
DataField="UserName"
SortExpression="UserName" />
<asp:BoundField HeaderText="Name"
DataField="name" SortExpression="name" />
<asp:BoundField HeaderText="IC" DataField="IC"
SortExpression="IC" />
<asp:BoundField HeaderText="Gender"
DataField="gender" SortExpression="gender" />
<asp:BoundField HeaderText="Race"
DataField="race" SortExpression="race" />
<asp:BoundField HeaderText="Address"
DataField="address" SortExpression="address"
/>
<asp:BoundField HeaderText="State"
DataField="state" SortExpression="state" />
<asp:BoundField HeaderText="Postcode"
DataField="postcode"
SortExpression="posrcode" />
<asp:BoundField HeaderText="Country"
DataField="country" SortExpression="country"
/>
<asp:BoundField HeaderText="E-mail"
DataField="e_mail" SortExpression="e_mail" />
<asp:BoundField HeaderText="Password Image 1"
DataField="pass_image1"
SortExpression="pass_image1" />
<asp:BoundField HeaderText="Password Image 2"
DataField="pass_image2"
SortExpression="pass_image2" />
<asp:BoundField HeaderText="Password Image 3"
DataField="pass_image3"
SortExpression="pass_image3" />
<asp:BoundField HeaderText="Password Image 4"
DataField="pass_image4"
SortExpression="pass_image4" />
<asp:BoundField HeaderText="Password Image 5"
DataField="pass_image5"
SortExpression="pass_image5" />
<asp:BoundField HeaderText="Success Login"
DataField="success" SortExpression="success"
/>
<asp:BoundField HeaderText="Failure Login"
DataField="failure" SortExpression="failure"
/>
</Columns>
</asp:GridView>
<asp:SqlDataSource ID="SqlDataSource1"
Runat="server" SelectCommand="SELECT [UserName],
[name], [IC], [gender], [race],[address],[state],
[postcode], [country], [e_mail] ,
[pass_image1],[pass_image2],
[pass_image3],[pass_image4],[pass_image5],
[success], [failure] FROM [detail]"

149
Login.aspx, continued UpdateCommand="UPDATE [detail] SET [UserName] =
@UserName, [name] = @name, [IC] = @IC, [address] =
@address, [state] = @state, [postcode] = @postcode,
[country] = @country, [e_mail] = @e_mail,
[pass_image1]=@pass_image1,[pass_image2]=@pass_imag
e2,
[pass_image3]=@pass_image3,[pass_image4]=@pass_imag
e4,[pass_image5]=@pass_image5, [success]=@success,
[failure]=@failure WHERE [UserName] = @UserName"
ConnectionString="<%$ ConnectionStrings:GPS %>" />
</td>
</tr>
<tr>
<td>
<asp:GridView ID="GridView2" AllowSorting="true"
AllowPaging="true" Runat="server"
DataSourceID="SqlDataSource2"
AutoGenerateEditButton="true"
DataKeyNames="UserName"
AutoGenerateColumns="False">
<Columns>
<asp:BoundField HeaderText="duration_id"
ReadOnly="true" DataField="duration_id"
SortExpression="duration_id" />
<asp:BoundField HeaderText="UserName"
DataField="UserName"
SortExpression="UserName" />
<asp:BoundField HeaderText="minute"
DataField="minute" SortExpression="minute" />
<asp:BoundField HeaderText="second"
DataField="second" SortExpression="second" />
</Columns>
</asp:GridView>
<asp:SqlDataSource ID="SqlDataSource2"
Runat="server" SelectCommand="SELECT [duration_id],
[UserName], [minute], [second] FROM [login_time]"
UpdateCommand="UPDATE [login_time] SET [UserName] =
@UserName, [minute] = @minute, [second] = @second
WHERE [UserName] = @UserName" ConnectionString="<%$
ConnectionStrings:GPS %>" />
</td>
</tr>
</table>
</asp:Panel>
</asp:content>

150
Appendix B – CRGPS’s Source Code II (Registration) Registration.aspx
<%@ Page Language="VB" masterpagefile="~/SectionFunctions.master" %>
<%@ mastertype virtualpath="~/SectionFunctions.master" %>
<%@ Import Namespace="System.Data" %>
<%@ Import Namespace="System.Data.SqlClient" %>
<%@ Import Namespace="System" %>
<%@ Import Namespace="System.Security.Cryptography" %>
<%@ Import Namespace="System.Text" %>
<script runat="server">
Sub Page_load()
'set cursor to UserName textbox
UserName.Focus()
If Not IsPostBack Then
Step1.Font.Bold = True
End If
End Sub
Sub Next_Click(ByVal Sender As Object, ByVal e As EventArgs)
Select Case Sender.Parent.ID
Case "Page1"
Dim ConnStr As String
ConnStr = "server=(local)\SQLEXPRESS;database=GPS;"
ConnStr &= "Trusted_Connection=yes"
Dim mySqlConn As New SqlConnection(ConnStr)
'open db connection and check the existence of
UserName in the textbox with the UserName in the
'detail Table
mySqlConn.Open()
Dim SQL As String = "SELECT Count(*) FROM detail
WHERE UserName = '" & UserName.Text & "'"
Dim mySqlCmd As New SqlCommand(SQL, mySqlConn)
Dim Result As Object
Result = mySqlCmd.ExecuteScalar()
testing.Text = CType(Result, String)
mySqlConn.Close()
'if none then display Page2 else display message
If testing.Text = "0" Then
Page1.Visible = False
Step1.Font.Bold = False
Page2.Visible = True
Step2.Font.Bold = True
ElseIf testing.Text = "1" Then
invalid.Text = "The user name you entered is in
use by another user. Please enter another " _
& "user name."
UserName.Text = ""
UserName.Focus()
End If
Case "Page2"
Page2.Visible = False
Step2.Font.Bold = False
Page3.Visible = True
Step3.Font.Bold = True
WriteReview()
'disable confirm button and all the edit button when

151
Registration.aspx, continued selection not complete
ConfirmBtn.Enabled = False
If PassImage1.ImageUrl = "images/blank.JPG" Then
Editbtn1.Enabled = False
End If
If PassImage2.ImageUrl = "images/blank.JPG" Then
EditBtn2.Enabled = False
End If
If PassImage3.ImageUrl = "images/blank.JPG" Then
EditBtn3.Enabled = False
End If
If PassImage4.ImageUrl = "images/blank.JPG" Then
EditBtn4.Enabled = False
End If
If PassImage5.ImageUrl = "images/blank.JPG" Then
EditBtn5.Enabled = False
End If
End Select
End Sub
Sub Previous_Click(ByVal Sender As Object, ByVal e As EventArgs)
Select Case Sender.Parent.ID
Case "Page2"
Page2.Visible = False
Step2.Font.Bold = False
Page1.Visible = True
Step1.Font.Bold = True
invalid.Text = ""
Case "Page3"
TextImage.Focus()
Page3.Visible = False
Step3.Font.Bold = False
Page2.Visible = True
Step2.Font.Bold = True
End Select
End Sub
Sub titlelist_Select(ByVal Sender As Object, ByVal E As
EventArgs)
Message1.Visible = False
Dim mySqlConn As New SqlConnection
Dim ConnStr As String
ConnStr = "server=(local)\SQLEXPRESS;database=GPS;"
ConnStr &= "Trusted_Connection=yes"
mySqlConn = New SqlConnection(ConnStr)
'select image_id from img table where
image_id=selecteditemindex in titlelist
Dim Title As String =
titlelist.DataKeys(titlelist.SelectedItem.ItemIndex)
Dim MyCommand As New SqlDataAdapter("select image_id from
img where image_id = '" & Title & "'", mySqlConn)
'fill the dataset and set the title of the table to
"TitleDetail"
Dim DS As New DataSet
MyCommand.Fill(DS, "TitleDetails")
Dim RowView As DataRowView =
DS.Tables("TitleDetails").DefaultView(0)

152
Registration.aspx, continued 'display image according to the selection
DetailsImage.Src = "images/" & RowView("image_id") & ".jpg"
DetailsTitle.Text = "Image Name: " &
RowView("image_id").ToString() & "<br>"
DetailsImage.Visible = True
'rebind titlelist
titlelist.DataBind()
SelectedImageLabel.Text = DetailsImage.Src
TextImage.Value = ""
'set TextImage cursor into textbox
TextImage.Focus()
End Sub
Sub Submit_Click(ByVal Src As Object, ByVal E As EventArgs)
Message1.Visible = False
'set the no. of submit button on click to "1" if no clicking
If (HiddenField2.Value = Nothing) Then
HiddenField2.Value = "1"
End If
'set the position of image to be change to "0" if no changes
If (HiddenField1.Value = Nothing) Then
HiddenField1.Value = "0"
End If
'the length of password must be more than or equal to 4
character
If TextImage.Value.Length() < 4 Then
TextImageValidator1.Text = "Password code must be more
than or equal to 4 character"
TextImageValidator1.Visible = True
TextImage.Value = ""
Else
TextImageValidator1.Visible = False
End If
NoOfSubmitBtnClickLabel.Text += HiddenField2.Value + "
times"
'check how many time submit button is on click and the
position of the image to be change and the value
'of TextImage
If HiddenField2.Value = "1" And TextImage.Value <> "" Then
'show image1 in review
PassImage1.ImageUrl = SelectedImageLabel.Text
TextImage1.Value = TextImage.Value
Editbtn1.Enabled = False
'increment the hidden field value by 1 if the submit
button is on click
HiddenField2.Value = Convert.ToInt32(HiddenField2.Value)
+ 1
ElseIf HiddenField2.Value = "2" And TextImage.Value <> ""
Then
'check existence of the selected image in review if none
show image2 in review
If SelectedImageLabel.Text <> PassImage1.ImageUrl Then
PassImage2.ImageUrl = SelectedImageLabel.Text
TextImage2.Value = TextImage.Value
'increment the hidden field value by 1 if the submit

153
Registration.aspx, continued button is on click
HiddenField2.Value =
Convert.ToInt32(HiddenField2.Value) + 1
Else
Message1.Visible = True
End If
EditBtn2.Enabled = False
ElseIf HiddenField2.Value = "3" And TextImage.Value <> ""
Then
'check existence of the selected image in review if none
show image3 in review
If SelectedImageLabel.Text <> PassImage1.ImageUrl And
SelectedImageLabel.Text <> PassImage2. _
ImageUrl Then
PassImage3.ImageUrl = SelectedImageLabel.Text
TextImage3.Value = TextImage.Value
'Increment the hidden field value by 1 if the submit
button is on click
HiddenField2.Value =
Convert.ToInt32(HiddenField2.Value) + 1
Else
Message1.Visible = True
End If
EditBtn3.Enabled = False
ElseIf HiddenField2.Value = "4" And TextImage.Value <> ""
Then
'check existence of the selected image in review if none
show image4 in review
If SelectedImageLabel.Text <> PassImage1.ImageUrl And
SelectedImageLabel.Text <> PassImage2. _
ImageUrl And SelectedImageLabel.Text <>
PassImage3.ImageUrl Then
PassImage4.ImageUrl = SelectedImageLabel.Text
TextImage4.Value = TextImage.Value
'increment the hidden field value by 1 if the submit
button is on click
HiddenField2.Value =
Convert.ToInt32(HiddenField2.Value) + 1
Else
Message1.Visible = True
End If
EditBtn4.Enabled = False
ElseIf HiddenField2.Value = "5" And TextImage.Value <> ""
Then
'check existence of the selected image in review if none
show image5 in review and display Page3
'and the detail contain
If SelectedImageLabel.Text <> PassImage1.ImageUrl And
SelectedImageLabel.Text <> PassImage2. _
ImageUrl And SelectedImageLabel.Text <>
PassImage3.ImageUrl And SelectedImageLabel. _
Text <> PassImage4.ImageUrl Then
PassImage5.ImageUrl = SelectedImageLabel.Text
TextImage5.Value = TextImage.Value
'increment the hidden field value by 1 if the submit
button is on click
HiddenField2.Value =
Convert.ToInt32(HiddenField2.Value) + 1
Page2.Visible = False
Step2.Font.Bold = False
Page3.Visible = True
Step3.Font.Bold = True

154
Registration.aspx, continued WriteReview()
Message.Visible = "true"
P3Previous.Enabled = False
ConfirmBtn.Enabled = True
Editbtn1.Enabled = True
EditBtn2.Enabled = True
EditBtn3.Enabled = True
EditBtn4.Enabled = True
EditBtn5.Enabled = True
Else
Message1.Visible = True
End If
ElseIf HiddenField1.Value = "1" And TextImage.Value <> ""
Then
'check existence of the selected image in review if none
change image1 and show Page3
If SelectedImageLabel.Text <> PassImage5.ImageUrl And
SelectedImageLabel.Text <> PassImage2. _
ImageUrl And SelectedImageLabel.Text <>
PassImage3.ImageUrl And SelectedImageLabel. _
Text <> PassImage4.ImageUrl Then
PassImage1.ImageUrl = SelectedImageLabel.Text
TextImage1.Value = TextImage.Value
Page2.Visible = False
Step2.Font.Bold = False
Page3.Visible = True
Step3.Font.Bold = True
WriteReview()
Message.Visible = "true"
P3Previous.Enabled = False
ConfirmBtn.Enabled = True
Else
Message1.Visible = True
End If
ElseIf HiddenField1.Value = "2" And TextImage.Value <> ""
Then
'check existence of the selected image in review if none
change image2 and show Page3
If SelectedImageLabel.Text <> PassImage1.ImageUrl And
SelectedImageLabel.Text <> PassImage5. _
ImageUrl And SelectedImageLabel.Text <>
PassImage3.ImageUrl And SelectedImageLabel. _
Text <> PassImage4.ImageUrl Then
PassImage2.ImageUrl = SelectedImageLabel.Text
TextImage2.Value = TextImage.Value
Page2.Visible = False
Step2.Font.Bold = False
Page3.Visible = True
Step3.Font.Bold = True
WriteReview()
Message.Visible = "true"
P3Previous.Enabled = False
ConfirmBtn.Enabled = True
Else
Message1.Visible = True
End If
ElseIf HiddenField1.Value = "3" And TextImage.Value <> ""
Then
'check existence of the selected image in review if none
change image3 and show Page3
If SelectedImageLabel.Text <> PassImage1.ImageUrl And
SelectedImageLabel.Text <> PassImage2.ImageUrl And
155
Registration.aspx, continued SelectedImageLabel.Text <> PassImage5.ImageUrl And
SelectedImageLabel.Text <> PassImage4.ImageUrl Then
PassImage3.ImageUrl = SelectedImageLabel.Text
TextImage3.Value = TextImage.Value
Page2.Visible = False
Step2.Font.Bold = False
Page3.Visible = True
Step3.Font.Bold = True
WriteReview()
Message.Visible = "true"
P3Previous.Enabled = False
ConfirmBtn.Enabled = True
Else
Message1.Visible = True
End If
ElseIf HiddenField1.Value = "4" And TextImage.Value <> ""
Then
'check existence of the selected image in review if none
change image4 and show Page3
If SelectedImageLabel.Text <> PassImage1.ImageUrl And
SelectedImageLabel.Text <> PassImage2. _
ImageUrl And SelectedImageLabel.Text <>
PassImage3.ImageUrl And SelectedImageLabel. _
Text <> PassImage5.ImageUrl Then
PassImage4.ImageUrl = SelectedImageLabel.Text
TextImage4.Value = TextImage.Value
Page2.Visible = False
Step2.Font.Bold = False
Page3.Visible = True
Step3.Font.Bold = True
WriteReview()
Message.Visible = "true"
P3Previous.Enabled = False
ConfirmBtn.Enabled = True
Else
Message1.Visible = True
End If
ElseIf HiddenField1.Value = "5" And TextImage.Value <> ""
Then
'check existence of the selected image in review if none
change image5 and show Page3
If SelectedImageLabel.Text <> PassImage1.ImageUrl And
SelectedImageLabel.Text <> PassImage2. _
ImageUrl And SelectedImageLabel.Text <>
PassImage3.ImageUrl And SelectedImageLabel. _
Text <> PassImage4.ImageUrl Then
PassImage5.ImageUrl = SelectedImageLabel.Text
TextImage5.Value = TextImage.Value
Page2.Visible = False
Step2.Font.Bold = False
Page3.Visible = True
Step3.Font.Bold = True
WriteReview()
Message.Visible = "true"
P3Previous.Enabled = False
ConfirmBtn.Enabled = True
Else
Message1.Visible = True
End If
End If
TextImage.Value = "xxxx"
TextImage.Focus()

156
Registration.aspx, continued End Sub
'write detail
Sub WriteReview()
ReviewUserNameText.Text = UserName.Text
ReviewNameText.Text = Name.Text
ReviewICText.Text = IC.Text
ReviewGenderText.Text = DropDownGender.SelectedItem.Text
ReviewRaceText.Text = DropDownRace.SelectedItem.Text
ReviewAddressText.Text = Address.Text
ReviewStateText.Text = State.Text
ReviewPostcodeText.Text = Postcode.Text
ReviewCountryText.Text = Country.Text
ReviewEmailText.Text = Email.Text
End Sub
'change image1
Sub EditBtn1_Click(ByVal sender As Object, ByVal a As EventArgs)
HiddenField1.Value = "1"
ImagePosition.Text = "Image position: 1"
Decrease()
End Sub
'change image2
Sub EditBtn2_Click(ByVal sender As Object, ByVal a As EventArgs)
HiddenField1.Value = "2"
ImagePosition.Text = "Image position: 2"
Decrease()
End Sub
'change image3
Sub EditBtn3_Click(ByVal sender As Object, ByVal a As EventArgs)
HiddenField1.Value = "3"
ImagePosition.Text = "Image position: 3"
Decrease()
End Sub
'change image4
Sub EditBtn4_Click(ByVal sender As Object, ByVal a As EventArgs)
HiddenField1.Value = "4"
ImagePosition.Text = "Image position: 4"
Decrease()
End Sub
'change image5
Sub EditBtn5_Click(ByVal sender As Object, ByVal a As EventArgs)
HiddenField1.Value = "5"
ImagePosition.Text = "Image position: 5"
Decrease()
End Sub
'display page 2
Sub Decrease()
NoOfSubmitBtnClickLabel.Text = HiddenField2.Value
Page2.Visible = True
Page3.Visible = False
End Sub
Public Shared Function RSAEncrypt(ByVal DataToEncrypt() As Byte,
ByVal RSAKeyInfo As RSAParameters, _
ByVal DoOAEPPadding As Boolean) As Byte()
Try
'create a new instance of RSACryptoServiceProvider

157
Registration.aspx, continued Dim RSA As New RSACryptoServiceProvider()
'import the RSA Key information
RSA.ImportParameters(RSAKeyInfo)
'encrypt the passed byte array and specify OAEP padding.
Return RSA.Encrypt(DataToEncrypt, DoOAEPPadding)
'catch and display a CryptographicException to the
console.
Catch e As CryptographicException
Console.WriteLine(e.Message)
Return Nothing
End Try
End Function
Public Sub EncrytPassword()
Try
'create a UnicodeEncoder to convert between byte array
and string.
Dim ByteConverter As New UnicodeEncoding()
Dim RSA As New
System.Security.Cryptography.RSACryptoServiceProvider()
'gets the public key
Dim publicKey As String = RSA.ToXmlString(False)
'gets the private key
Dim privateKey As String = RSA.ToXmlString(True)
Dim RSA2 As RSACryptoServiceProvider = New
RSACryptoServiceProvider()
RSA2.FromXmlString(publicKey)
'convert the user enter passwords to bytes
Dim EncryptedStrAsByt1() As Byte =
RSA2.Encrypt(System.Text.Encoding.Unicode.GetBytes(TextI
mage1. _
Value), False)
Dim EncryptedStrAsByt2() As Byte =
RSA2.Encrypt(System.Text.Encoding.Unicode.GetBytes(TextI
mage2. _
Value), False)
Dim EncryptedStrAsByt3() As Byte =
RSA2.Encrypt(System.Text.Encoding.Unicode.GetBytes(TextI
mage3. _
Value), False)
Dim EncryptedStrAsByt4() As Byte =
RSA2.Encrypt(System.Text.Encoding.Unicode.GetBytes(TextI
mage4. _
Value), False)
Dim EncryptedStrAsByt5() As Byte =
RSA2.Encrypt(System.Text.Encoding.Unicode.GetBytes(TextI
mage5. _
Value), False)
HiddenField8.Text = privateKey
'convert the bytes to base64 string
HiddenField3.Text =
System.Convert.ToBase64String(EncryptedStrAsByt1)

158
Registration.aspx, continued HiddenField4.Text =
System.Convert.ToBase64String(EncryptedStrAsByt2)
HiddenField5.Text =
System.Convert.ToBase64String(EncryptedStrAsByt3)
HiddenField6.Text =
System.Convert.ToBase64String(EncryptedStrAsByt4)
HiddenField7.Text =
System.Convert.ToBase64String(EncryptedStrAsByt5)
'catch exception in case the encryption did not succeed.
Catch e As ArgumentNullException
Message2.Text += "Encryption failed."
Catch e As CryptographicException
Message2.Text += e.Message
End Try
End Sub
Sub ConfirmBtn_Click(ByVal sender As Object, ByVal e As
EventArgs)
Dim ConnStr As String
ConnStr = "server=(local)\SQLEXPRESS;database=GPS;"
ConnStr &= "Trusted_Connection=yes"
Dim mySqlConn As New SqlConnection(ConnStr)
'if the UserName does not exist then insert the user detail
into detail table and password table
If testing.Text = "0" Then
Dim SQLInsert1 As String
Dim SQLInsert2 As String
Dim SQLInsert3 As String
Dim SQLInsert4 As String
Dim SQLInsert5 As String
Dim SQLInsert6 As String
EncrytPassword()
'open db connection and insert user detail into detail
table
SQLInsert1 = "INSERT INTO [detail] ([UserName], [name],
[IC], [gender], [race], [address], [state], " &
"[postcode], [country], [e_mail], [pass_image1],
[pass_image2], [pass_image3], [pass_image4], " &
"[pass_image5],[private_key],[success],[failure]) VALUES
('" & ReviewUserNameText.Text & "', " & "'" &
ReviewNameText.Text & "', '" & ReviewICText.Text & "',
'" & ReviewGenderText.Text & "', " & "'" &
ReviewRaceText.Text & "', '" & ReviewAddressText.Text &
"', " & "'" & ReviewStateText.Text & "', '" &
ReviewPostcodeText.Text & "', " & "'" &
ReviewCountryText.Text & "', '" & ReviewEmailText.Text &
"', " & "'" & (PassImage1.ImageUrl.Remove(0,
7)).Remove(6, 4) & "', " & "'" &
(PassImage2.ImageUrl.Remove(0, 7)).Remove(6, 4) & "', "
& "'" & (PassImage3.ImageUrl.Remove(0, 7)).Remove(6, 4)
& "', " & "'" & (PassImage4.ImageUrl.Remove(0,
7)).Remove(6, 4) & "', " & "'" &
(PassImage5.ImageUrl.Remove(0, 7)).Remove(6, 4) & "', '"
& HiddenField8.Text & "', " & "'" & 0 & "', '" & 0 &
"')"
mySqlConn.Open()

159
Rgistration.aspx, continued Dim mySqlCommand1 As New SqlCommand(SQLInsert1,
mySqlConn)
Dim mySqlDR1 As SqlDataReader
mySqlDR1 = mySqlCommand1.ExecuteReader()
mySqlConn.Close()
'open db connection and insert first user password into
password table
mySqlConn.Open()
SQLInsert2 = "INSERT INTO [password] " & "([UserName],
[pass_image], [pass_code])" & "VALUES ('" &
ReviewUserNameText.Text & " ', " & "'" &
(PassImage1.ImageUrl.Remove(0, 7)).Remove(6, 4) & "', '"
& HiddenField3.Text & "')"
Dim mySqlCommand2 As New SqlCommand(SQLInsert2,
mySqlConn)
Dim mySqlDR2 As SqlDataReader
mySqlDR2 = mySqlCommand2.ExecuteReader()
mySqlConn.Close()
'open db connection and insert second user password into
password table
mySqlConn.Open()
SQLInsert3 = "INSERT INTO [password] " & "([UserName],
[pass_image], [pass_code]) VALUES ('" &
ReviewUserNameText.Text & "', " & "'" &
(PassImage2.ImageUrl.Remove(0, 7)).Remove(6, 4) & "', '"
& HiddenField4.Text & "')"
Dim mySqlCommand3 As New SqlCommand(SQLInsert3,
mySqlConn)
Dim mySqlDR3 As SqlDataReader
mySqlDR3 = mySqlCommand3.ExecuteReader()
mySqlConn.Close()
'open db connection and insert third user password into
password table
mySqlConn.Open()
SQLInsert4 = "INSERT INTO [password] " & " ([UserName],
[pass_image], [pass_code]) VALUES ('" &
ReviewUserNameText.Text & "', " & "'" &
(PassImage3.ImageUrl.Remove(0, 7)).Remove(6, 4) & "', '"
& HiddenField5.Text & "')"
Dim mySqlCommand4 As New SqlCommand(SQLInsert4,
mySqlConn)
Dim mySqlDR4 As SqlDataReader
mySqlDR4 = mySqlCommand4.ExecuteReader()
mySqlConn.Close()
'open db connection and insert forth user password into
password table
mySqlConn.Open()
SQLInsert5 = "INSERT INTO [password] " & "([UserName],
[pass_image], [pass_code]) VALUES ('" &
ReviewUserNameText.Text & "', " & "'" &
(PassImage4.ImageUrl.Remove(0, 7)).Remove(6, 4) & "', '"
& HiddenField6.Text & "')"
Dim mySqlCommand5 As New SqlCommand(SQLInsert5,
mySqlConn)
Dim mySqlDR5 As SqlDataReader
mySqlDR5 = mySqlCommand5.ExecuteReader()
mySqlConn.Close()

160
Registration.aspx, continued 'open db connection and insert fifth user password into
password table
mySqlConn.Open()
SQLInsert6 = "INSERT INTO [password] " & "([UserName],
[pass_image], [pass_code]) VALUES ('" &
ReviewUserNameText.Text & "', " & "'" &
(PassImage5.ImageUrl.Remove(0, 7)).Remove(6, 4) & "', '"
& HiddenField7.Text & "')"
Dim mySqlCommand6 As New SqlCommand(SQLInsert6,
mySqlConn)
Dim mySqlDR6 As SqlDataReader
mySqlDR6 = mySqlCommand6.ExecuteReader()
mySqlConn.Close()
'display message if insert successfully and redicrect
the user to login page
Message.Text = "Insert successfully"
Message.Visible = True
Response.Redirect("Login.aspx")
End If
End Sub
</script>
<asp:content id="Content1" contentplaceholderid="IntroText"
runat="server">
<asp:Label ID="RegWiz" runat="server" Font-Bold="True" Font-
Names="verdana" Font-Size="16pt" Text="Registration Wizard"
BorderWidth="7px" BorderStyle ="Ridge" Width="100%"></asp:Label>
<br />
<asp:Label ID="Step1" runat="server" Font-Names="Verdana"
Text="Step 1: Enter Personal Info."></asp:Label>
<br />
<asp:Label ID="Step2" runat="server" Font-Names="Verdana"
Text="Step 2: Choose 5 objects as your password object and then
enter password code for each one. Password code must be equal or
more than 4 character."></asp:Label>
<br />
<asp:Label ID="Step3" runat="server" Font-Names="Verdana"
Text="Step 3: Review."></asp:Label><br />
<br />
</asp:content>
<asp:content id="Content2" contentplaceholderid="FunctionRequire"
runat="server">
<asp:Panel ID="Page1" BackColor ="silver" Width ="400px"
runat="server">
<asp:Label ID="invalid" runat="server" ></asp:Label>
<table align="center" >
<tr>
<td >
<asp:Label ID="UserNameLabel" runat="server"
Text="Username: " ></asp:Label></td>
<td >
<asp:TextBox ID="UserName" MaxLength="30"
runat="server"></asp:TextBox>
<asp:RequiredFieldValidator
ID="UserNameValidator" ControlToValidate
="UserName" Display ="Dynamic" ErrorMessage
="Username is Required" Font-Names="Verdana"
Font-Size="10pt" runat ="server" />
</td>
</tr>
<tr>

161
Registration.aspx, continued <td >
<asp:Label ID="NameLabel" runat="server"
Text="Name: "></asp:Label></td>
<td >
<asp:TextBox ID="Name"
runat="server"></asp:TextBox>
<asp:RequiredFieldValidator ID="NameValidator"
ControlToValidate ="Name" Display ="Dynamic"
ErrorMessage ="Name is Required" Font-
Names="Verdana" Font-Size="10pt" runat ="server"
/>
</td>
</tr>
<tr>
<td>
<asp:Label ID="ICLabel" runat="server" Text="I.C
No.: "></asp:Label></td>
<td >
<asp:TextBox ID="IC"
runat="server"></asp:TextBox>
<asp:RequiredFieldValidator ID="ICValidator"
ControlToValidate ="IC" Display ="Dynamic"
ErrorMessage ="IC Number is Required" Font-
Names="Verdana" Font-Size="10pt" runat ="server"
/>
<asp:RegularExpressionValidator
id="ICRegularExpressionValidator"
ControlToValidate="IC"
ValidationExpression="(^[0-9]{6}-[0-9]{2}-[0-
9]{4}$)" Display="Static" Font-Names="verdana"
Font-Size="10pt" runat="server">
Must be in form: XXXXXX-XX-XXXX
</asp:RegularExpressionValidator>
</td>
</tr>
<tr>
<td>
<asp:Label ID="GenderLabel" runat="server"
Text="Gender: "></asp:Label></td>
<td >
<asp:DropDownList id="DropDownGender"
runat="server">
<asp:ListItem>Male</asp:ListItem>
<asp:ListItem>Female</asp:ListItem>
</asp:DropDownList>
</td>
</tr>
<tr>
<td>
<asp:Label ID="RaceLabel" runat="server"
Text="Race: "></asp:Label></td>
<td >
<asp:DropDownList id="DropDownRace"
runat="server">
<asp:ListItem>Chinese</asp:ListItem>
<asp:ListItem>Indian</asp:ListItem>
<asp:ListItem>Malay</asp:ListItem>
<asp:ListItem>Other</asp:ListItem>
</asp:DropDownList>
</td>
</tr>
<tr>

162
Registration.aspx, continued <td >
<asp:Label ID="AddressLabel" runat="server"
Text="Address: "></asp:Label></td>
<td >
<asp:TextBox ID="Address"
runat="server"></asp:TextBox>
</td>
</tr>
<tr>
<td >
<asp:Label ID="StateLabel" runat="server"
Text="State: "></asp:Label></td>
<td >
<asp:TextBox ID="State"
runat="server"></asp:TextBox>
</td>
</tr>
<tr>
<td >
<asp:Label ID="PostcodeLabel" runat="server"
Text="Postcode: "></asp:Label></td>
<td >
<asp:TextBox ID="Postcode"
runat="server"></asp:TextBox>
</td>
</tr>
<tr>
<td >
<asp:Label ID="CountryLabel" runat="server"
Text="Country: "></asp:Label></td>
<td >
<asp:TextBox ID="Country"
runat="server"></asp:TextBox>
</td>
</tr>
<tr>
<td >
<asp:Label ID="EmailLabel" runat="server"
Text="E-mail: "></asp:Label></td>
<td >
<asp:TextBox ID="Email"
runat="server"></asp:TextBox>
<asp:RequiredFieldValidator ID="EmailValidator"
ControlToValidate ="Email" Display ="Dynamic"
ErrorMessage ="Email Address is Required" Font-
Names="Verdana" Font-Size="10pt" runat ="server"
/>
<asp:RegularExpressionValidator
id="EmailRegularExpressionValidator"
runat="server" ControlToValidate="Email"
ValidationExpression="^[\w-]+@[\w-
]+\.(com|net|org|edu|mil)$" Display="Static"
Font-Names="verdana" Font-Size="10pt">
Please enter a valid e-mail address
</asp:RegularExpressionValidator>
</td>
</tr>
<tr>
<td colspan="2" align="center" >
<asp:Button ID="P1Previous" runat="server"
Enabled="False" Text="Previous"
OnClick="Previous_Click"

163
Registration.aspx, continued onmouseover="this.style.backgroundColor='yellow'
"
onmouseout="this.style.backgroundColor='buttonfa
ce'" />
<asp:Button ID="P1Next" runat="server"
Text="Next" OnClick="Next_Click"
onmouseover="this.style.backgroundColor='yellow'
"
onmouseout="this.style.backgroundColor='buttonfa
ce'" />
<input id="P1Reset" type="reset" runat="server"
value="Clear"
onmouseover="this.style.backgroundColor='yellow'
"
onmouseout="this.style.backgroundColor='buttonfa
ce'" />
</td>
</tr>
</table>
<asp:Label ID="testing" visible="false" runat="server" />
</asp:Panel>
<asp:Panel ID="Page2" BackColor ="silver" Width ="400px"
runat="server" Visible="False">
<b>Choose a category:</b>
<asp:DropDownList ID="DropDownList1"
DataSourceID="SqlDataSource2" AutoPostBack="true"
DataTextField="category" runat="server" />
<asp:SqlDataSource ID="SqlDataSource2" runat="server"
SelectCommand="SELECT DISTINCT [category] FROM [img]"
ConnectionString="<%$ ConnectionStrings:GPS %>" />
<table width="100%">
<tr>
<td>
<asp:datalist id="titlelist"
DataSourceID="SqlDataSource1" repeatcolumns="10"
gridlines="both" cellpadding="5"
OnSelectedIndexChanged="titlelist_Select"
DataKeyField="image_id" runat="server">
<ItemTemplate>
<table style="font: 10pt verdana">
<tr>
<td valign="top">
<asp:ImageButton
ImageAlign="top" ImageURL='<%#
DataBinder.Eval(Container.DataIt
em, "image_id",
"images/{0}.jpg") %>'
runat="server"
CssClass="removeBorder"
BorderWidth="0.2cm"
onmouseover="this.className=
'applyBorder'"
onmouseout="this.className=
'removeBorder'"
CommandName="Select" />
<asp:label ID="ImageNameLabel"
Text='<%#
DataBinder.Eval(Container.DataIte
m, "image_id") %>'
style="color:darkred"
visible="false" runat="server"/>
</td>

164
Registration.aspx, continued </tr>
</table>
</ItemTemplate>
<SelectedItemTemplate>
<table style="font: 10pt verdana">
<tr>
<td valign="top">
<asp:ImageButton
ImageAlign="top" ImageURL='<%#
DataBinder.Eval(Container.DataIt
em, "image_id",
"images/{0}.jpg") %>'
runat="server"
CssClass="removeBorder"
BorderWidth="0.2cm"
onmouseover="this.className=
'applyBorder'"
onmouseout="this.className=
'removeBorder'"
CommandName="Select" />
<asp:label ID="ImageNameLabel2"
Text='<%#
DataBinder.Eval(Container.DataIt
em, "image_id") %>'
style="color:darkred"
visible="false" runat="server"/>
</td>
</tr>
</table>
</SelectedItemTemplate>
</asp:datalist>
</td>
</tr>
<tr>
<td valign="top" style="padding-top:15">
<table style="font: 10pt verdana">
<tr>
<td>
<img alt="image" id="DetailsImage"
src="images/blank.JPG"
visible="false" runat="server" />
</td>
<td valign="top" >
<asp:Label id="DetailsTitle"
visible="false" runat="server" />
<asp:Label ID ="SelectedImageLabel"
visible="false"
runat="server"></asp:Label>
<br />
<b>Password Code: </b>
<input id="TextImage" size="15"
maxlength="10" type="text"
value="xxxx" runat="server" />
<asp:RequiredFieldValidator
ID="TextImageValidator"
ControlToValidate ="TextImage"
Display ="Dynamic" ErrorMessage
="Required" runat ="server" />
<asp:Label ID="TextImageValidator1"
Visible="false" runat="server"
></asp:Label>
<br />

165
Registration.aspx, continued <asp:HiddenField ID="HiddenField2"
runat="server" />
<asp:HiddenField ID="HiddenField1"
runat="server" />
<asp:button id="Submit"
Text="Submit" runat="server"
OnClick="Submit_Click"
/>
<asp:Label ID
="NoOfSubmitBtnClickLabel"
Text="Submit Button Clicked: "
visible="false"
runat="server"></asp:Label><br />
<asp:Label ID ="ImagePosition"
runat="server"></asp:Label><br />
<asp:Label ID="Message1"
Text="Image already choosen!!
Please choose another image!!"
visible="false" runat="server"
></asp:Label>
<asp:Label ID="Message2"
visible="false"
runat="server"></asp:Label>
</td>
</tr>
</table>
</td>
</tr>
<tr>
<td colspan="8" align="center" >
<asp:Button ID="P2Previous" runat="server"
Text="Previous" OnClick="Previous_Click"
onmouseover="this.style.backgroundColor='yellow'
"
onmouseout="this.style.backgroundColor='buttonfa
ce'" />
<asp:Button ID="P2Next" runat="server"
Text="Next" OnClick="Next_Click"
onmouseover="this.style.backgroundColor='yellow'
"
onmouseout="this.style.backgroundColor='buttonfa
ce'" />
<input id="P2Reset" type="reset" runat ="server"
value="Clear"
onmouseover="this.style.backgroundColor='yellow'
"
onmouseout="this.style.backgroundColor='buttonfa
ce'" />
</td>
</tr>
</table>
<asp:SqlDataSource ID="SqlDataSource1" runat="server"
SelectCommand="SELECT [image_id], [category] FROM [img]
WHERE ([category] = @category)" ConnectionString="<%$
ConnectionStrings:GPS %>">
<SelectParameters>
<asp:ControlParameter ControlID="DropDownList1"
Name="category" PropertyName="SelectedValue"
Type="String" />
</SelectParameters>
</asp:SqlDataSource>
</asp:Panel>

166
Registration.aspx, continued <asp:Panel ID="Page3" BackColor ="silver" Width ="400px"
runat="server" Visible="False">
<table align="center" >
<tr>
<td >
<asp:Label ID="ReviewUserName" runat="server"
Text="User Name: "></asp:Label></td>
<td >
<asp:Label ID="ReviewUserNameText"
runat="server" ></asp:Label></td>
</tr>
<tr>
<td >
<asp:Label ID="ReviewName" runat="server"
Text="Name: "></asp:Label></td>
<td >
<asp:Label ID="ReviewNameText" runat="server"
></asp:Label></td>
</tr>
<tr>
<td >
<asp:Label ID="ReviewIC" runat="server"
Text="I.C. No. : "></asp:Label></td>
<td >
<asp:Label ID="ReviewICText" runat="server"
></asp:Label></td>
</tr>
<tr>
<td >
<asp:Label ID="ReviewGender" runat="server"
Text="Gender: "></asp:Label></td>
<td >
<asp:Label ID="ReviewGenderText" runat="server"
></asp:Label></td>
</tr>
<tr>
<td >
<asp:Label ID="ReviewRace" runat="server"
Text="Race: "></asp:Label></td>
<td >
<asp:Label ID="ReviewRaceText" runat="server"
></asp:Label></td>
</tr>
<tr>
<td >
<asp:Label ID="ReviewAddress" runat="server"
Text="Address: "></asp:Label></td>
<td >
<asp:Label ID="ReviewAddressText" runat="server"
></asp:Label></td>
</tr>
<tr>
<td >
<asp:Label ID="ReviewState" runat="server"
Text="State: "></asp:Label></td>
<td >
<asp:Label ID="ReviewStateText" runat="server"
></asp:Label></td>
</tr>
<tr>
<td >
<asp:Label ID="ReviewPostcode" runat="server"

167
Registration.aspx, continued Text="Postcode: "></asp:Label></td>
<td >
<asp:Label ID="ReviewPostcodeText"
runat="server" ></asp:Label></td>
</tr>
<tr>
<td >
<asp:Label ID="ReviewCountry" runat="server"
Text="Country: "></asp:Label></td>
<td >
<asp:Label ID="ReviewCountryText" runat="server"
></asp:Label></td>
</tr>
<tr>
<td >
<asp:Label ID="ReviewEmail" runat="server"
Text="E-mail: "></asp:Label></td>
<td >
<asp:Label ID="ReviewEmailText" runat="server"
></asp:Label></td>
</tr>
<tr>
<td>
<asp:label ID="Message" runat="server" Text="You
have selected five images."
Visible="false"></asp:label>
</td>
</tr>
<tr>
<td colspan="3">
<asp:Image ID="PassImage1"
ImageUrl="images/blank.JPG" runat="server" />
<input id="TextImage1" size="10" type="text"
runat="server" />
<asp:button ID="Editbtn1" text="Change Picture"
OnClick="EditBtn1_Click" runat="server" />
</td>
</tr>
<tr>
<td colspan="3">
<asp:Image ID="PassImage2"
ImageUrl="images/blank.JPG" runat="server" />
<input id="TextImage2" size="10" type="text"
runat="server" />
<asp:button ID="EditBtn2" text="Change Picture"
OnClick="EditBtn2_Click" runat="server" />
</td>
</tr>
<tr>
<td colspan="3">
<asp:Image ID="PassImage3"
ImageUrl="images/blank.JPG" runat="server" />
<input id="TextImage3" size="10" type="text"
runat="server" />
<asp:button ID="EditBtn3" text="Change Picture"
OnClick="EditBtn3_Click" runat="server" />
</td>
</tr>
<tr>
<td colspan="3">
<asp:Image ID="PassImage4"
ImageUrl="images/blank.JPG" runat="server" />

168
Registration.aspx, continued <input id="TextImage4" size="10" type="text"
runat="server" />
<asp:button ID="EditBtn4" text="Change Picture"
OnClick="EditBtn4_Click" runat="server" />
</td>
</tr>
<tr>
<td colspan="3">
<asp:Image ID="PassImage5"
ImageUrl="images/blank.JPG" runat="server" />
<input id="TextImage5" size="10" type="text"
runat="server" />
<asp:button ID="EditBtn5" text="Change Picture"
OnClick="EditBtn5_Click" runat="server" />
</td>
</tr>
<tr>
<td>
<asp:button ID="ConfirmBtn" text="Confirm"
OnClick="ConfirmBtn_Click" runat="server" />
<asp:Label ID="HiddenField3" runat="server" />
<asp:Label ID="HiddenField4" runat="server" />
<asp:Label ID="HiddenField5" runat="server" />
<asp:Label ID="HiddenField6" runat="server" />
<asp:Label ID="HiddenField7" runat="server" />
<asp:Label ID="HiddenField8" runat="server" />
<asp:Label ID="HiddenField9" runat="server" />
</td>
</tr>
<tr>
<td colspan="2">
<asp:Button ID="P3Previous" runat="server"
Text="Previous" OnClick ="Previous_Click"
onmouseover="this.style.backgroundColor='yellow'
"
onmouseout="this.style.backgroundColor='buttonfa
ce'" />
<asp:Button ID="P3Next" runat="server"
Text="Next" OnClick ="Next_Click"
Enabled="false"
onmouseover="this.style.backgroundColor='yellow'
"
onmouseout="this.style.backgroundColor='buttonfa
ce'" />
<input id="P3Reset" type="reset" disabled
="disabled" runat ="server" value="Clear"
onmouseover="this.style.backgroundColor='yellow'
"
onmouseout="this.style.backgroundColor='buttonfa
ce'" />
</td>
</tr>
</table>
</asp:Panel>
</asp:content>

169
Appendix C – CRGPS’s Source Code III (Reset) Reset.aspx
<%@ Page Language="VB" masterpagefile="~/SectionFunctions.master" %>
<%@ mastertype virtualpath="~/SectionFunctions.master" %>
<%@ Import Namespace="System.Data" %>
<%@ Import Namespace="System.Data.SqlClient" %>
<%@ Import Namespace="System" %>
<%@ Import Namespace="System.Security.Cryptography" %>
<%@ Import Namespace="System.Text" %>
<script runat="server">
Sub Page_load()
'set cursor in UserName
UserName.Focus()
If Not IsPostBack Then
Step1.Font.Bold = True
End If
'if maximum tries to login using username more than 3 times
then redirect the user to failed login page
If Session("UserNameNumTries") >
Application("UserNameMaxTries") Then
Response.Redirect("./username_failed_login.aspx")
End If
'if maximum tries to login using password more than 3 times
then redirect the user to failed login page
If Session("PasswordNumTries") >
Application("PasswordMaxTries") Then
Response.Redirect("./password_failed_login.aspx")
End If
End Sub
Sub P2Reset_Click(ByVal Sender As Object, ByVal e As EventArgs)
Name.Text = ""
IC.Text = ""
Address.Text = ""
State.Text = ""
Postcode.Text = ""
Country.Text = ""
Email.Text = ""
End Sub
Sub Next_Click(ByVal Sender As Object, ByVal e As EventArgs)
Select Case Sender.Parent.ID
Case "Page1"
Dim ConnStr As String
ConnStr = "server=(local)\SQLEXPRESS;database=GPS;"
ConnStr &= "Trusted_Connection=yes"
Dim mySqlConn As New SqlConnection(ConnStr)
'open database connection and check existence of
UserName in detail table
mySqlConn.Open()
Dim SQLSelect1 As String = "SELECT Count(*) FROM
detail WHERE UserName = '" & UserName.Text & "'"
Dim mySqlCmd1 As New SqlCommand(SQLSelect1,
mySqlConn)
Dim Result1 As Object
Result1 = mySqlCmd1.ExecuteScalar()

170
Reset.aspx, continued testing1.Text = CType(Result1, String)
mySqlConn.Close()
'if UserName do exist then display Page2
If testing1.Text = "1" Then
Page2.Visible = True
Step2.Font.Bold = True
Page1.Visible = False
Step1.Font.Bold = False
'open database connection and select all the
detail from detail table according to the
UserName
mySqlConn.Open()
Dim SQLSelect2 As String = "SELECT * FROM detail
WHERE UserName = '" & UserName.Text & "'"
Dim mySqlCmd2 As New SqlCommand(SQLSelect2,
mySqlConn)
Dim mySqlDR As SqlDataReader
mySqlDR = mySqlCmd2.ExecuteReader()
While mySqlDR.Read() = True
Name.Text = Trim(mySqlDR("name"))
IC.Text = Trim(mySqlDR("IC"))
DropDownGender.SelectedItem.Text =
Trim(mySqlDR("gender"))
DropDownRace.SelectedItem.Text =
Trim(mySqlDR("race"))
Address.Text = Trim(mySqlDR("address"))
State.Text = Trim(mySqlDR("state"))
Postcode.Text = Trim(mySqlDR("postcode"))
Country.Text = Trim(mySqlDR("country"))
Email.Text = Trim(mySqlDR("e_mail"))
End While
mySqlConn.Close()
invalid.Visible = False
ElseIf testing1.Text = "0" Then
'increase 1 to failed login
Session("UserNameNumTries") =
Session("UserNameNumTries") + 1
'if failed login more than 3 times then display
failed login page
If Session("UserNameNumTries") >=
Application("UserNameMaxTries") Then
Response.Redirect("./username_failed_login.aspx"
)
Else
invalid.Text = "The user name was not found.
Please try again."
UserName.Text = ""
UserName.Focus()
End If
End If
Case "Page2"
Dim ConnStr As String
ConnStr = "server=(local)\SQLEXPRESS;database=GPS;"
ConnStr &= "Trusted_Connection=yes"
Dim mySqlConn As New SqlConnection(ConnStr)
'open db connection and select password image1 from
detail table and add it to arraylist
'DataArray()
mySqlConn.Open()

171
Reset.aspx, continued Dim SQLSelect3 As String = "SELECT pass_image1 FROM
detail " & "WHERE UserName = '" & UserName.Text & "'"
Dim mySqlCmd3 As New SqlCommand(SQLSelect3,
mySqlConn)
Dim Result3 As Object
Result3 = mySqlCmd3.ExecuteScalar()
mySqlConn.Close()
'open db cnnection and select password image2 from
detail table and add it to arraylist
'DataArray()
mySqlConn.Open()
Dim SQLSelect4 As String = "SELECT pass_image2 FROM
detail " & "WHERE UserName = '" & UserName.Text & "'"
Dim mySqlCmd4 As New SqlCommand(SQLSelect4,
mySqlConn)
Dim Result4 As Object
Result4 = mySqlCmd4.ExecuteScalar()
mySqlConn.Close()
'open db connection and select password image3 from
detail table and add it to arraylist
'DataArray()
mySqlConn.Open()
Dim SQLSelect5 As String = "SELECT pass_image3 FROM
detail " & "WHERE UserName = '" & UserName.Text & "'"
Dim mySqlCmd5 As New SqlCommand(SQLSelect5,
mySqlConn)
Dim Result5 As Object
Result5 = mySqlCmd5.ExecuteScalar()
mySqlConn.Close()
'open db connection and select password image4 from
detail table and add it to arraylist
'DataArray()
mySqlConn.Open()
Dim SQLSelect6 As String = "SELECT pass_image4 FROM
detail " & "WHERE UserName = '" & UserName.Text &
"'"
Dim mySqlCmd6 As New SqlCommand(SQLSelect6,
mySqlConn)
Dim Result6 As Object
Result6 = mySqlCmd6.ExecuteScalar()
mySqlConn.Close()
'open db connection and select password image5 from
detail table and add it to arraylist
'DataArray()
mySqlConn.Open()
Dim SQLSelect7 As String = "SELECT pass_image5 FROM
detail " & "WHERE UserName = '" & UserName.Text & "'"
Dim mySqlCmd7 As New SqlCommand(SQLSelect7,
mySqlConn)
Dim Result7 As Object
Result7 = mySqlCmd7.ExecuteScalar()
mySqlConn.Close()
'open db connection and get the correctspond
password code
Dim SQLSelect8 As String = "SELECT pass_code FROM
password " & "WHERE UserName='" & UserName.Text & "'
AND pass_image='" & CType(Result3, String) & "'"

172
Reset.aspx, continued mySqlConn.Open()
Dim mySqlCmd8 As New SqlCommand(SQLSelect8,
mySqlConn)
Dim Result8 As Object
Result8 = mySqlCmd8.ExecuteScalar()
mySqlConn.Close()
'open db connection and get the correctspond
password code
Dim SQLSelect9 As String = "SELECT pass_code FROM
password " & "WHERE UserName='" & UserName.Text & "'
AND pass_image='" & CType(Result4, String) & "'"
mySqlConn.Open()
Dim mySqlCmd9 As New SqlCommand(SQLSelect9,
mySqlConn)
Dim Result9 As Object
Result9 = mySqlCmd9.ExecuteScalar()
mySqlConn.Close()
'open db connection and get the correctspond
password code
Dim SQLSelect10 As String = "SELECT pass_code FROM
password " & "WHERE UserName='" & UserName.Text & "'
AND pass_image='" & CType(Result5, String) & "'"
mySqlConn.Open()
Dim mySqlCmd10 As New SqlCommand(SQLSelect10,
mySqlConn)
Dim Result10 As Object
Result10 = mySqlCmd10.ExecuteScalar()
mySqlConn.Close()
'open db connection and get the correctspond
password code
Dim SQLSelect11 As String = "SELECT pass_code FROM
password " & "WHERE UserName='" & UserName.Text & "'
AND pass_image='" & CType(Result6, String) & "'"
mySqlConn.Open()
Dim mySqlCmd11 As New SqlCommand(SQLSelect11,
mySqlConn)
Dim Result11 As Object
Result11 = mySqlCmd11.ExecuteScalar()
mySqlConn.Close()
'open db connection and get the correctspond
password code
Dim SQLSelect12 As String = "SELECT pass_code FROM
password " & "WHERE UserName='" & UserName.Text & "'
AND pass_image='" & CType(Result7, String) & "'"
mySqlConn.Open()
Dim mySqlCmd12 As New SqlCommand(SQLSelect12,
mySqlConn)
Dim Result12 As Object
Result12 = mySqlCmd12.ExecuteScalar()
mySqlConn.Close()
'show user choosen password images
PassImage1.ImageUrl = "images/" &
Trim(CType(Result3, String)) & ".jpg"
PassImage2.ImageUrl = "images/" &
Trim(CType(Result4, String)) & ".jpg"
PassImage3.ImageUrl = "images/" &
Trim(CType(Result5, String)) & ".jpg"

173
Reset.aspx, continued PassImage4.ImageUrl = "images/" &
Trim(CType(Result6, String)) & ".jpg"
PassImage5.ImageUrl = "images/" &
Trim(CType(Result7, String)) & ".jpg"
Try
'create a UnicodeEncoder to convert between byte
array and string.
Dim ByteConverter As New UnicodeEncoding()
'create byte arrays to hold decrypted data.
Dim decryptedData1() As Byte
Dim decryptedData2() As Byte
Dim decryptedData3() As Byte
Dim decryptedData4() As Byte
Dim decryptedData5() As Byte
'get user's private key from database
Dim SQLSelect13 As String = "SELECT private_key
FROM detail " & "WHERE UserName='" &
UserName.Text & "'"
mySqlConn.Open()
Dim mySqlCmd13 As New SqlCommand(SQLSelect13,
mySqlConn)
Dim Result13 As Object
Result13 = mySqlCmd13.ExecuteScalar()
mySqlConn.Close()
Dim privateKey As String = Trim(CType(Result13,
String))
'load the private key
Dim RSA1 As RSACryptoServiceProvider = New
RSACryptoServiceProvider()
RSA1.FromXmlString(privateKey)
'assign password codes get from database to 5
strings
Dim str6 As String = CType(Result8, String)
Dim str7 As String = CType(Result9, String)
Dim str8 As String = CType(Result10, String)
Dim str9 As String = CType(Result11, String)
Dim str10 As String = CType(Result12, String)
'create byte arrays to hold converted password
code
Dim getStr1() As Byte
Dim getStr2() As Byte
Dim getStr3() As Byte
Dim getStr4() As Byte
Dim getStr5() As Byte
'convert the password code from string to byte
arrays
getStr1 = System.Convert.FromBase64String(str6)
getStr2 = System.Convert.FromBase64String(str7)
getStr3 = System.Convert.FromBase64String(str8)
getStr4 = System.Convert.FromBase64String(str9)
getStr5 = System.Convert.FromBase64String(str10)
'pass the data to DECRYPT, the private key
information using
RSACryptoServiceProvider.ExportParameters(true),

174
Reset.aspx, continued and a boolean flag specifying no OAEP padding.
decryptedData1 = RSA1.Decrypt(getStr1, False)
decryptedData2 = RSA1.Decrypt(getStr2, False)
decryptedData3 = RSA1.Decrypt(getStr3, False)
decryptedData4 = RSA1.Decrypt(getStr4, False)
decryptedData5 = RSA1.Decrypt(getStr5, False)
'create string to hold converted decrypted byte
arrays
Dim str1 As String =
ByteConverter.GetString(decryptedData1)
Dim str2 As String =
ByteConverter.GetString(decryptedData2)
Dim str3 As String =
ByteConverter.GetString(decryptedData3)
Dim str4 As String =
ByteConverter.GetString(decryptedData4)
Dim str5 As String =
ByteConverter.GetString(decryptedData5)
'assign combination of password first letter and
the less of the password to a respective label
TextImage1.Value = str1
TextImage2.Value = str2
TextImage3.Value = str3
TextImage4.Value = str4
TextImage5.Value = str5
Catch ce As CryptographicException
t1.Text += ce.ToString()
End Try
WriteReview()
Page2.Visible = False
Step2.Font.Bold = False
Page4.Visible = True
Step4.Font.Bold = True
Case "Page3"
Page3.Visible = False
Step3.Font.Bold = False
Page4.Visible = True
Step4.Font.Bold = True
WriteReview()
'disable confirm button and all the edit button when
selection of image not complete
ConfirmBtn.Enabled = False
If PassImage1.ImageUrl = "images/blank.JPG" Then
Editbtn1.Enabled = False
End If
If PassImage2.ImageUrl = "images/blank.JPG" Then
EditBtn2.Enabled = False
End If
If PassImage3.ImageUrl = "images/blank.JPG" Then
EditBtn3.Enabled = False
End If
If PassImage4.ImageUrl = "images/blank.JPG" Then
EditBtn4.Enabled = False
End If
If PassImage5.ImageUrl = "images/blank.JPG" Then
EditBtn5.Enabled = False
End If
End Select

175
Reset.aspx, continued End Sub
Sub Previous_Click(ByVal Sender As Object, ByVal e As
EventArgs)
Select Case Sender.Parent.ID
Case "Page2"
invalid.Text = ""
Page2.Visible = False
Step2.Font.Bold = False
Page1.Visible = True
Step1.Font.Bold = True
Case "Page3"
Page3.Visible = False
Step3.Font.Bold = False
Page2.Visible = True
Step2.Font.Bold = True
Case "Page4"
Page4.Visible = False
Step4.Font.Bold = False
Page3.Visible = True
Step3.Font.Bold = True
End Select
End Sub
Sub titlelist_Select(ByVal Sender As Object, ByVal E As
EventArgs)
Message1.Visible = False
Dim mySqlConn As New SqlConnection
Dim ConnStr As String
ConnStr = "server=(local)\SQLEXPRESS;database=GPS;"
ConnStr &= "Trusted_Connection=yes"
mySqlConn = New SqlConnection(ConnStr)
'display image according to selection
Dim Title As String =
titlelist.DataKeys(titlelist.SelectedItem.ItemIndex)
Dim MyCommand As New SqlDataAdapter("select image_id from
img " & "where image_id = '" & Title & "'", mySqlConn)
'fill the dataset and named the table as "TitleDetails"
Dim DS As New DataSet
MyCommand.Fill(DS, "TitleDetails")
Dim RowView As DataRowView =
DS.Tables("TitleDetails").DefaultView(0)
DetailsImage.Src = "images/" & RowView("image_id") & ".jpg"
DetailsTitle.Text = "Image Name: " &
RowView("image_id").ToString() & "<br>"
DetailsImage.Visible = True
'rebind titlelist
titlelist.DataBind()
SelectedImageLabel.Text = DetailsImage.Src
TextImage.Value = ""
'set cursor in TextImage
TextImage.Focus()
End Sub
Sub Submit_Click(ByVal Src As Object, ByVal E As EventArgs)

176
Reset.aspx, continued Message1.Visible = False
'check how many time submit button is on click and the
position of the image to be change and the value of TextImage
If HiddenField1.Value = "1" And TextImage.Value <> "" Then
'check existence of the selected image in review if none
change image1 and show Page3
If SelectedImageLabel.Text <> PassImage5.ImageUrl And
SelectedImageLabel.Text <> PassImage2.ImageUrl And
SelectedImageLabel.Text <> PassImage3.ImageUrl And
SelectedImageLabel.Text <> PassImage4.ImageUrl Then
PassImage1.ImageUrl = SelectedImageLabel.Text
TextImage1.Value = TextImage.Value
Page3.Visible = False
Step3.Font.Bold = False
Page4.Visible = True
Step4.Font.Bold = True
WriteReview()
Message.Visible = "true"
P3Previous.Enabled = False
ConfirmBtn.Enabled = True
Else
Message1.Visible = True
End If
ElseIf HiddenField1.Value = "2" And TextImage.Value <> ""
Then
'check existence of the selected image in review if none
change image2 and show Page3
If SelectedImageLabel.Text <> PassImage1.ImageUrl And _
SelectedImageLabel.Text <> PassImage5.ImageUrl And _
SelectedImageLabel.Text <> PassImage3.ImageUrl And _
SelectedImageLabel.Text <> PassImage4.ImageUrl Then
PassImage2.ImageUrl = SelectedImageLabel.Text
TextImage2.Value = TextImage.Value
Page3.Visible = False
Step3.Font.Bold = False
Page4.Visible = True
Step4.Font.Bold = True
WriteReview()
Message.Visible = "true"
P3Previous.Enabled = False
ConfirmBtn.Enabled = True
Else
Message1.Visible = True
End If
ElseIf HiddenField1.Value = "3" And TextImage.Value <> ""
Then
'check existence of the selected image in review if none
change image3 and show Page3
If SelectedImageLabel.Text <> PassImage1.ImageUrl And _
SelectedImageLabel.Text <> PassImage2.ImageUrl And _
SelectedImageLabel.Text <> PassImage5.ImageUrl And _
SelectedImageLabel.Text <> PassImage4.ImageUrl Then
PassImage3.ImageUrl = SelectedImageLabel.Text
TextImage3.Value = TextImage.Value
Page3.Visible = False
Step3.Font.Bold = False
Page4.Visible = True
Step4.Font.Bold = True
WriteReview()
Message.Visible = "true"
P3Previous.Enabled = False
177
Reset.aspx, continued ConfirmBtn.Enabled = True
Else
Message1.Visible = True
End If
ElseIf HiddenField1.Value = "4" And TextImage.Value <> ""
Then
'check existence of the selected image in review if none
change image4 and show Page3
If SelectedImageLabel.Text <> PassImage1.ImageUrl And
SelectedImageLabel.Text <> PassImage2.ImageUrl And
SelectedImageLabel.Text <> PassImage3.ImageUrl And
SelectedImageLabel.Text <> PassImage5.ImageUrl Then
PassImage4.ImageUrl = SelectedImageLabel.Text
TextImage4.Value = TextImage.Value
Page3.Visible = False
Step3.Font.Bold = False
Page4.Visible = True
Step4.Font.Bold = True
WriteReview()
Message.Visible = "true"
P3Previous.Enabled = False
ConfirmBtn.Enabled = True
Else
Message1.Visible = True
End If
ElseIf HiddenField1.Value = "5" And TextImage.Value <> ""
Then
'check existence of the selected image in review if none
change image5 and show Page3
If SelectedImageLabel.Text <> PassImage1.ImageUrl And _
SelectedImageLabel.Text <> PassImage2.ImageUrl And _
SelectedImageLabel.Text <> PassImage3.ImageUrl And _
SelectedImageLabel.Text <> PassImage4.ImageUrl Then
PassImage5.ImageUrl = SelectedImageLabel.Text
TextImage5.Value = TextImage.Value
Page3.Visible = False
Step3.Font.Bold = False
Page4.Visible = True
Step4.Font.Bold = True
WriteReview()
Message.Visible = "true"
P3Previous.Enabled = False
ConfirmBtn.Enabled = True
Else
Message1.Visible = True
End If
End If
TextImage.Value = "xxxx"
TextImage.Focus()
End Sub
'write detail
Sub WriteReview()
ReviewUserNameText.Text = UserName.Text
ReviewNameText.Text = Name.Text
ReviewICText.Text = IC.Text
ReviewGenderText.Text = DropDownGender.SelectedItem.Text
ReviewRaceText.Text = DropDownRace.SelectedItem.Text
ReviewAddressText.Text = Address.Text
ReviewStateText.Text = State.Text
ReviewPostcodeText.Text = Postcode.Text
ReviewCountryText.Text = Country.Text

178
Reset.aspx, continued ReviewEmailText.Text = Email.Text
End Sub
'change image1
Sub EditBtn1_Click(ByVal sender As Object, ByVal a As EventArgs)
HiddenField1.Value = "1"
ImagePosition.Text = "Image position: 1"
Decrease()
End Sub
'change image2
Sub EditBtn2_Click(ByVal sender As Object, ByVal a As EventArgs)
HiddenField1.Value = "2"
ImagePosition.Text = "Image position: 2"
Decrease()
End Sub
'change image3
Sub EditBtn3_Click(ByVal sender As Object, ByVal a As EventArgs)
HiddenField1.Value = "3"
ImagePosition.Text = "Image position: 3"
Decrease()
End Sub
'change image4
Sub EditBtn4_Click(ByVal sender As Object, ByVal a As EventArgs)
HiddenField1.Value = "4"
ImagePosition.Text = "Image position: 4"
Decrease()
End Sub
'change image5
Sub EditBtn5_Click(ByVal sender As Object, ByVal a As EventArgs)
HiddenField1.Value = "5"
ImagePosition.Text = "Image position: 5"
Decrease()
End Sub
'decrease the no. of submit button on click by 1
Sub Decrease()
Page3.Visible = True
Page4.Visible = False
End Sub
Public Shared Function RSAEncrypt(ByVal DataToEncrypt() As Byte,
ByVal RSAKeyInfo As RSAParameters, ByVal DoOAEPPadding As
Boolean) As Byte()
Try
'create a new instance of RSACryptoServiceProvider
Dim RSA As New RSACryptoServiceProvider()
'import the RSA Key information
RSA.ImportParameters(RSAKeyInfo)
'encrypt the passed byte array and specify OAEP padding
Return RSA.Encrypt(DataToEncrypt, DoOAEPPadding)
'catch and display a CryptographicException to the
console.
Catch e As CryptographicException
Console.WriteLine(e.Message)
Return Nothing

179
Reset.aspx, continued End Try
End Function
Public Sub EncrytPassword()
Try
'create a UnicodeEncoder to convert between byte array
and string.
Dim ByteConverter As New UnicodeEncoding()
Dim RSA As New
System.Security.Cryptography.RSACryptoServiceProvider()
'gets the public key
Dim publicKey As String = RSA.ToXmlString(False)
'gets the private key
Dim privateKey As String = RSA.ToXmlString(True)
Dim RSA2 As RSACryptoServiceProvider = New
RSACryptoServiceProvider()
RSA2.FromXmlString(publicKey)
'convert user enter password to bytes
Dim EncryptedStrAsByt1() As Byte =
RSA2.Encrypt(System.Text.Encoding.Unicode. _
GetBytes(TextImage1.Value), False)
Dim EncryptedStrAsByt2() As Byte =
RSA2.Encrypt(System.Text.Encoding.Unicode. _
GetBytes(TextImage2.Value), False)
Dim EncryptedStrAsByt3() As Byte =
RSA2.Encrypt(System.Text.Encoding.Unicode. _
GetBytes(TextImage3.Value), False)
Dim EncryptedStrAsByt4() As Byte =
RSA2.Encrypt(System.Text.Encoding.Unicode. _
GetBytes(TextImage4.Value), False)
Dim EncryptedStrAsByt5() As Byte =
RSA2.Encrypt(System.Text.Encoding.Unicode. _
GetBytes(TextImage5.Value), False)
HiddenField8.Text = privateKey
'convert the bytes to base64 strings
HiddenField3.Text =
System.Convert.ToBase64String(EncryptedStrAsByt1)
HiddenField4.Text =
System.Convert.ToBase64String(EncryptedStrAsByt2)
HiddenField5.Text =
System.Convert.ToBase64String(EncryptedStrAsByt3)
HiddenField6.Text =
System.Convert.ToBase64String(EncryptedStrAsByt4)
HiddenField7.Text =
System.Convert.ToBase64String(EncryptedStrAsByt5)
'catch exception in case the encryption did not succeed.
Catch e As ArgumentNullException
Message2.Text += "Encryption failed."
Catch e As CryptographicException
Message2.Text += e.Message
End Try
End Sub

180
Reset.aspx, continued Sub ConfirmBtn_Click(ByVal sender As Object, ByVal e As
EventArgs)
Dim ConnStr As String
ConnStr = "server=(local)\SQLEXPRESS;database=GPS;"
ConnStr &= "Trusted_Connection=yes"
Dim mySqlConn As New SqlConnection(ConnStr)
Dim SQLUpdate As String
Dim SQLInsert1 As String
Dim SQLInsert2 As String
Dim SQLInsert3 As String
Dim SQLInsert4 As String
Dim SQLInsert5 As String
Dim SqlDelete As String
EncrytPassword()
'open db connection and update detail table accordingly
SQLUpdate = "UPDATE detail " _
& "SET name='" & ReviewNameText.Text & "', IC='" &
ReviewICText.Text & "', " & "gender='" &
ReviewGenderText.Text & "', race='" & ReviewRaceText.Text &
"', " & "address='" & ReviewAddressText.Text & "', state='"
& ReviewStateText.Text & "', " & "postcode='" &
ReviewPostcodeText.Text & "', country='" &
ReviewCountryText.Text & "', " & "e_mail='" &
ReviewEmailText.Text & "', pass_image1='" &
(PassImage1.ImageUrl.Remove(0, 7)). Remove(6, 4) & "',
pass_image2='" & (PassImage2.ImageUrl.Remove(0,
7)).Remove(6, 4) & "', " & "pass_image3='" &
(PassImage3.ImageUrl.Remove(0, 7)).Remove(6, 4) & "', " &
"pass_image4='" & (PassImage4.ImageUrl.Remove(0,
7)).Remove(6, 4) & "', " & "pass_image5='" &
(PassImage5.ImageUrl.Remove(0, 7)).Remove(6, 4) & "', " &
"private_key='" & HiddenField8.Text & "' WHERE UserName='" &
ReviewUserNameText.Text & "'"
mySqlConn.Open()
Dim mySqlCommand1 As New SqlCommand(SQLUpdate, mySqlConn)
Dim mySqlDR1 As SqlDataReader
mySqlDR1 = mySqlCommand1.ExecuteReader()
mySqlConn.Close()
'open db connection and delete all the password detail in
password table according to the UserName
mySqlConn.Open()
SqlDelete = "DELETE FROM [password] WHERE [UserName]='" &
ReviewUserNameText.Text & "'"
Dim mySqlCommand7 As New SqlCommand(SqlDelete, mySqlConn)
Dim mySqlDR7 As SqlDataReader
mySqlDR7 = mySqlCommand7.ExecuteReader()
mySqlConn.Close()
'open db connection and insert the new password1 into
password table
mySqlConn.Open()
SQLInsert1 = "INSERT INTO [password] " & "([UserName],
[pass_image], [pass_code]) VALUES ('" &
ReviewUserNameText.Text & "', " & "'" &
(PassImage1.ImageUrl.Remove(0, 7)).Remove(6, 4) & "', '" &
HiddenField3.Text & "')"
Dim mySqlCommand2 As New SqlCommand(SQLInsert1, mySqlConn)
Dim mySqlDR2 As SqlDataReader

181
Reset.aspx, continued mySqlDR2 = mySqlCommand2.ExecuteReader()
mySqlConn.Close()
'open db connection and insert the new password2 into
password table
mySqlConn.Open()
SQLInsert2 = "INSERT INTO [password] " & "([UserName],
[pass_image], [pass_code]) VALUES ('" &
ReviewUserNameText.Text & "', " _& "'" &
(PassImage2.ImageUrl.Remove(0, 7)).Remove(6, 4) & "', '" &
HiddenField4.Text & "')"
Dim mySqlCommand3 As New SqlCommand(SQLInsert2, mySqlConn)
Dim mySqlDR3 As SqlDataReader
mySqlDR3 = mySqlCommand3.ExecuteReader()
mySqlConn.Close()
'open db connection and insert the new password3 into
password table
mySqlConn.Open()
SQLInsert3 = "INSERT INTO [password] " & "([UserName],
[pass_image], [pass_code]) VALUES ('" &
ReviewUserNameText.Text & "', " & "'" &
(PassImage3.ImageUrl.Remove(0, 7)).Remove(6, 4) & "', '" &
HiddenField5.Text & "')"
Dim mySqlCommand4 As New SqlCommand(SQLInsert3, mySqlConn)
Dim mySqlDR4 As SqlDataReader
mySqlDR4 = mySqlCommand4.ExecuteReader()
mySqlConn.Close()
'open db connection and insert the new password4 into
password table
mySqlConn.Open()
SQLInsert4 = "INSERT INTO [password] " & "([UserName],
[pass_image], [pass_code]) VALUES ('" &
ReviewUserNameText.Text & "', " & "'" &
(PassImage4.ImageUrl.Remove(0, 7)).Remove(6, 4) & "', '" &
HiddenField6.Text & "')"
Dim mySqlCommand5 As New SqlCommand(SQLInsert4, mySqlConn)
Dim mySqlDR5 As SqlDataReader
mySqlDR5 = mySqlCommand5.ExecuteReader()
mySqlConn.Close()
'open db connection and insert the new password5 into
password table
mySqlConn.Open()
SQLInsert5 = "INSERT INTO [password] " & "([UserName],
[pass_image], [pass_code]) VALUES ('" &
ReviewUserNameText.Text & "', " & "'" &
(PassImage5.ImageUrl.Remove(0, 7)).Remove(6, 4) & "', '" &
HiddenField7.Text & "')"
Dim mySqlCommand6 As New SqlCommand(SQLInsert5, mySqlConn)
Dim mySqlDR6 As SqlDataReader
mySqlDR6 = mySqlCommand6.ExecuteReader()
mySqlConn.Close()
'display message"Update, Delete and Insert successfully"
when comlete mission and redirect the user to
'Login Page
Message.Text = "Update,Delete and Insert successfully"
Message.Visible = True
Response.Redirect("Login.aspx")
End Sub

182
Reset.aspx, continued </script>
<asp:content id="Content1" contentplaceholderid="IntroText"
runat="server">
<asp:Label ID="ResetWiz" runat="server" Font-Bold="True" Font-
Names="verdana" Font-Size="16pt" Text="Reset Wizard"
BorderWidth="7px" BorderStyle ="Ridge"
Width="100%"></asp:Label>
<br />
<asp:Label ID="Step1" runat="server" Font-Names="Verdana"
Text="Step 1: Enter Username."></asp:Label>
<br />
<asp:Label ID="Step2" runat="server" Font-Names="Verdana"
Text="Step 2: Enter Personal Info."></asp:Label>
<br />
<asp:Label ID="Step3" runat="server" Font-Names="Verdana"
Text="Step 3: Choose 5 objects as your password object and then
enter password code for each one. Password code must be equal
or more than 4 character."></asp:Label>
<br />
<asp:Label ID="Step4" runat="server" Font-Names="Verdana"
Text="Step 4: Review."></asp:Label><br />
<br />
<asp:Label ID="invalid" runat="server" ></asp:Label>
</asp:content>
<asp:content id="Content2" contentplaceholderid="FunctionRequire"
runat="server">
<asp:Panel ID="Page1" BackColor ="silver" Width ="400px"
runat="server">
<table align="center" >
<tr>
<td >
<asp:Label ID="UserNameLabel1" runat="server"
Text="Username: "></asp:Label></td>
<td >
<asp:TextBox ID="UserName"
runat="server"></asp:TextBox>
<asp:RequiredFieldValidator
ID="RequiredFieldValidator2" ControlToValidate
="UserName" Display ="Dynamic" ErrorMessage
="Username is Required" Font-Names="Verdana"
Font-Size="10pt" runat ="server" />
</td>
</tr>
<tr>
<td colspan="2" align="center" >
<asp:Button ID="P1Previous" runat="server"
Enabled="False" Text="Previous"
OnClick="Previous_Click"
onmouseover="this.style.backgroundColor='yellow'
"
onmouseout="this.style.backgroundColor='buttonfa
ce'" />
<asp:Button ID="P1Next" runat="server"
Text="Next" OnClick="Next_Click"
onmouseover="this.style.backgroundColor='yellow'
"
onmouseout="this.style.backgroundColor='buttonfa
ce'" />
<input id="P1Reset" type="reset" runat="server"
value="Clear"
onmouseover="this.style.backgroundColor='yellow'

183
Reset.aspx, continued "
onmouseout="this.style.backgroundColor='buttonface'"
/>
</td>
</tr>
</table>
<asp:Label ID="testing1" visible="false" runat= "server" />
</asp:Panel>
<asp:Panel ID="Page2" BackColor ="silver" Width ="400px"
visible="false" runat="server">
<table align="center" >
<tr>
<td >
<asp:Label ID="NameLabel" runat="server" Text="Name:
"></asp:Label></td>
<td >
<asp:TextBox ID="Name" runat="server"></asp:TextBox>
<asp:RequiredFieldValidator
ID="RequiredFieldValidator1" ControlToValidate
="Name" Display ="Dynamic" ErrorMessage ="Name is
Required" Font-Names="Verdana" Font-Size="10pt"
runat ="server" />
</td>
</tr>
<tr>
<td>
<asp:Label ID="ICLabel" runat="server" Text="I.C
No.: "></asp:Label></td>
<td >
<asp:TextBox ID="IC" runat="server"></asp:TextBox>
<asp:RequiredFieldValidator ID="ICValidator"
ControlToValidate ="IC" Display ="Dynamic"
ErrorMessage ="IC Number is Required" Font-
Names="Verdana" Font-Size="10pt" runat ="server" />
<asp:RegularExpressionValidator
id="ICRegularExpressionValidator"
ControlToValidate="IC"
ValidationExpression="(^[1-9][0-9]{5}-[0-9][1-9]-[1-
9][0-9]{3}$)" Display="Static" Font-Names="verdana"
Font-Size="10pt" runat="server">
Must be in form: XXXXXX-XX-XXXX
</asp:RegularExpressionValidator>
</td>
</tr>
<tr>
<td>
<asp:Label ID="GenderLabel" runat="server"
Text="Gender: "></asp:Label></td>
<td >
<asp:DropDownList id="DropDownGender"
runat="server">
<asp:ListItem>Male</asp:ListItem>
<asp:ListItem>Female</asp:ListItem>
</asp:DropDownList>
</td>
</tr>
<tr>
<td>
<asp:Label ID="RaceLabel" runat="server"

184
Reset.aspx, continued Text="Race: "></asp:Label></td>
<td >
<asp:DropDownList id="DropDownRace"
runat="server">
<asp:ListItem>Chinese</asp:ListItem>
<asp:ListItem>Indian</asp:ListItem>
<asp:ListItem>Malay</asp:ListItem>
<asp:ListItem>Other</asp:ListItem>
</asp:DropDownList>
</td>
</tr>
<tr>
<td >
<asp:Label ID="AddressLabel" runat="server"
Text="Address: "></asp:Label></td>
<td >
<asp:TextBox ID="Address"
runat="server"></asp:TextBox>
</td>
</tr>
<tr>
<td >
<asp:Label ID="StateLabel" runat="server"
Text="State: "></asp:Label></td>
<td >
<asp:TextBox ID="State"
runat="server"></asp:TextBox>
</td>
</tr>
<tr>
<td >
<asp:Label ID="PostcodeLabel" runat="server"
Text="Postcode: "></asp:Label></td>
<td >
<asp:TextBox ID="Postcode"
runat="server"></asp:TextBox>
</td>
</tr>
<tr>
<td >
<asp:Label ID="CountryLabel" runat="server"
Text="Country: "></asp:Label></td>
<td >
<asp:TextBox ID="Country"
runat="server"></asp:TextBox>
</td>
</tr>
<tr>
<td >
<asp:Label ID="EmailLabel" runat="server"
Text="E-mail: "></asp:Label></td>
<td >
<asp:TextBox ID="Email"
runat="server"></asp:TextBox>
<asp:RequiredFieldValidator ID="EmailValidator"
ControlToValidate ="Email" Display ="Dynamic"
ErrorMessage ="Email Address is Required" Font-
Names="Verdana" Font-Size="10pt" runat ="server"
/>
<asp:RegularExpressionValidator
id="EmailRegularExpressionValidator"
runat="server" ControlToValidate="Email"

185
Reset.aspx, continued ValidationExpression="^[\w-]+@[\w-
]+\.(com|net|org|edu|mil)$" Display="Static" Font-
Names="verdana" Font-Size="10pt">
Please enter a valid e-mail address
</asp:RegularExpressionValidator>
</td>
</tr>
<tr>
<td colspan="2" align="center" >
<asp:Button ID="P2Previous" runat="server"
Enabled="False" Text="Previous"
OnClick="Previous_Click"
onmouseover="this.style.backgroundColor='yellow'
"
onmouseout="this.style.backgroundColor='buttonface'"
/>
<asp:Button ID="P2Next" runat="server" Text="Next"
OnClick="Next_Click"
onmouseover="this.style.backgroundColor='yellow'"
onmouseout="this.style.backgroundColor='buttonface'"
/>
<asp:Button ID="P2Reset" runat="server" Text="Clear"
OnClick="P2Reset_Click"
onmouseover="this.style.backgroundColor='yellow'"
onmouseout="this.style.backgroundColor='buttonface'"
/>
</td>
</tr>
</table>
<asp:Label ID="testing" runat="server" />
</asp:Panel>
<asp:Panel ID="Page3" BackColor ="silver" Width ="400px"
runat="server" Visible="False">
<b>Choose a category:</b>
<asp:DropDownList ID="DropDownList1"
DataSourceID="SqlDataSource2" AutoPostBack="true"
DataTextField="category" runat="server" />
<asp:SqlDataSource ID="SqlDataSource2" runat="server"
SelectCommand="SELECT DISTINCT [category] FROM [img]"
ConnectionString="<%$ ConnectionStrings:GPS %>" />
<table width="100%">
<tr>
<td>
<asp:datalist id="titlelist"
DataSourceID="SqlDataSource1" repeatcolumns="10"
gridlines="both" cellpadding="5"
OnSelectedIndexChanged="titlelist_Select"
DataKeyField="image_id" runat="server">
<ItemTemplate>
<table style="font: 10pt verdana">
<tr>
<td valign="top">
<asp:ImageButton ID="ImageButton1"
ImageAlign="top" ImageURL='<%#
DataBinder.Eval(Container.DataItem,
"image_id", "images/{0}.jpg") %>'
runat="server"
CssClass="removeBorder"

186
Reset.aspx, continued BorderWidth="0.2cm"
onmouseover="this.className='applyBorder'"
onmouseout="this.className='removeBorder'"
CommandName="Select" />
<asp:label ID="ImageNameLabel"
Text='<%#
DataBinder.Eval(Container.DataItem,
"image_id") %>'
style="color:darkred" runat="server"/>
</td>
</tr>
</table>
</ItemTemplate>
<SelectedItemTemplate>
<table style="font: 10pt verdana">
<tr>
<td valign="top">
<asp:ImageButton ID="ImageButton2"
ImageAlign="top" ImageURL='<%#
DataBinder.Eval(Container.DataItem,
"image_id", "images/{0}.jpg") %>'
runat="server"
CssClass="removeBorder"
BorderWidth="0.2cm"
onmouseover="this.className='applyBorder'"
onmouseout="this.className='removeBorder'"
CommandName="Select" />
<asp:label ID="ImageNameLabel2"
Text='<%#
DataBinder.Eval(Container.DataItem,
"image_id") %>'
style="color:darkred" runat="server"/>
</td>
</tr>
</table>
</SelectedItemTemplate>
</asp:datalist>
</td>
</tr>
<tr>
<td valign="top" style="padding-top:15">
<table style="font: 10pt verdana">
<tr>
<td>
<img alt="image" id="DetailsImage"
src="images/blank.JPG" visible="false"
runat="server" />
</td>
<td valign="top" >
<asp:Label id="DetailsTitle" visible="false"
runat="server" />
<asp:Label ID ="SelectedImageLabel"
visible="false" runat="server"></asp:Label>

187
Reset.aspx, continued <br />
<b>Password Code: </b>
<input id="TextImage" size="15"
maxlength="10" type="text"
value="xxxx" runat="server" />
<asp:RequiredFieldValidator
ID="TextImageValidator"
ControlToValidate ="TextImage"
Display ="Dynamic" ErrorMessage
="Required" runat ="server" />
<br />
<asp:HiddenField ID="HiddenField2"
runat="server" />
<asp:HiddenField ID="HiddenField1"
runat="server" />
<asp:button id="Submit"
Text="Submit" runat="server"
OnClick="Submit_Click" />
<asp:Label ID
="NoOfSubmitBtnClickLabel"
Text="Submit Button Clicked: "
visible="false"
runat="server"></asp:Label><br />
<asp:Label ID ="ImagePosition"
runat="server"></asp:Label><br />
<asp:Label ID="Message1"
Text="Image already choosen!!
Please choose another image!!"
visible="false" runat="server"
></asp:Label>
<asp:Label ID="Message2"
visible="false"
runat="server"></asp:Label>
</td>
</tr>
</table>
</td>
</tr>
<tr>
<td colspan="8" align="center" >
<asp:Button ID="P3Previous" runat="server"
Text="Previous" OnClick="Previous_Click"
onmouseover="this.style.backgroundColor='yellow'
"
onmouseout="this.style.backgroundColor='buttonfa
ce'" />
<asp:Button ID="P3Next" runat="server"
Text="Next" OnClick="Next_Click"
onmouseover="this.style.backgroundColor='yellow'
"
onmouseout="this.style.backgroundColor='buttonfa
ce'" />
<input id="P3Reset" type="reset" runat ="server"
value="Clear"
onmouseover="this.style.backgroundColor='yellow'
"
onmouseout="this.style.backgroundColor='buttonfa
ce'" />
</td>
</tr>
</table>
<asp:SqlDataSource ID="SqlDataSource1" runat="server"

188
Reset.aspx, continued SelectCommand="SELECT [image_id], [category] FROM [img]
WHERE ([category] = @category)"
ConnectionString="<%$ ConnectionStrings:GPS %>">
<SelectParameters>
<asp:ControlParameter ControlID="DropDownList1"
Name="category" PropertyName="SelectedValue"
Type="String" />
</SelectParameters>
</asp:SqlDataSource>
</asp:Panel>
<asp:Panel ID="Page4" BackColor ="silver" Width ="400px"
runat="server" Visible="False">
<table align="center" >
<tr>
<td >
<asp:Label ID="ReviewUserName" runat="server"
Text="User Name: "></asp:Label></td>
<td >
<asp:Label ID="ReviewUserNameText"
runat="server" ></asp:Label></td>
</tr>
<tr>
<td >
<asp:Label ID="ReviewName" runat="server"
Text="Name: "></asp:Label></td>
<td >
<asp:Label ID="ReviewNameText" runat="server"
></asp:Label></td>
</tr>
<tr>
<td >
<asp:Label ID="ReviewIC" runat="server"
Text="I.C. No. : "></asp:Label></td>
<td >
<asp:Label ID="ReviewICText" runat="server"
></asp:Label></td>
</tr>
<tr>
<td >
<asp:Label ID="ReviewGender" runat="server"
Text="Gender: "></asp:Label></td>
<td >
<asp:Label ID="ReviewGenderText" runat="server"
></asp:Label></td>
</tr>
<tr>
<td >
<asp:Label ID="ReviewRace" runat="server"
Text="Race: "></asp:Label></td>
<td >
<asp:Label ID="ReviewRaceText" runat="server"
></asp:Label></td>
</tr>
<tr>
<td >
<asp:Label ID="ReviewAddress" runat="server"
Text="Address: "></asp:Label></td>
<td >
<asp:Label ID="ReviewAddressText" runat="server"
></asp:Label></td>
</tr>
<tr>

189
Reset.aspx, continued <td >
<asp:Label ID="ReviewState" runat="server"
Text="State: "></asp:Label></td>
<td >
<asp:Label ID="ReviewStateText" runat="server"
></asp:Label></td>
</tr>
<tr>
<td >
<asp:Label ID="ReviewPostcode" runat="server"
Text="Postcode: "></asp:Label></td>
<td >
<asp:Label ID="ReviewPostcodeText"
runat="server" ></asp:Label></td>
</tr>
<tr>
<td >
<asp:Label ID="ReviewCountry" runat="server"
Text="Country: "></asp:Label></td>
<td >
<asp:Label ID="ReviewCountryText" runat="server"
></asp:Label></td>
</tr>
<tr>
<td >
<asp:Label ID="ReviewEmail" runat="server"
Text="E-mail: "></asp:Label></td>
<td >
<asp:Label ID="ReviewEmailText" runat="server"
></asp:Label></td>
</tr>
<tr>
<td>
<asp:label ID="Message" runat="server" Text="You
have selected five images."
Visible="false"></asp:label>
</td>
</tr>
<tr>
<td colspan="3">
<asp:Image ID="PassImage1" runat="server" />
<input id="TextImage1" size="10" type="text"
runat="server" />
<asp:button ID="Editbtn1" text="Change Picture"
OnClick="EditBtn1_Click" runat="server" />
</td>
</tr>
<tr>
<td colspan="3">
<asp:Image ID="PassImage2"
ImageUrl="images/blank.JPG" runat="server" />
<input id="TextImage2" size="10" type="text"
runat="server" />
<asp:button ID="EditBtn2" text="Change Picture"
OnClick="EditBtn2_Click" runat="server" />
</td>
</tr>
<tr>
<td colspan="3">
<asp:Image ID="PassImage3"
ImageUrl="images/blank.JPG" runat="server" />
<input id="TextImage3" size="10" type="text"

190
Reset.aspx, continued runat="server" />
<asp:button ID="EditBtn3" text="Change Picture"
OnClick="EditBtn3_Click" runat="server" />
</td>
</tr>
<tr>
<td colspan="3">
<asp:Image ID="PassImage4"
ImageUrl="images/blank.JPG" runat="server" />
<input id="TextImage4" size="10" type="text"
runat="server" />
<asp:button ID="EditBtn4" text="Change Picture"
OnClick="EditBtn4_Click" runat="server" />
</td>
</tr>
<tr>
<td colspan="3">
<asp:Image ID="PassImage5"
ImageUrl="images/blank.JPG" runat="server" />
<input id="TextImage5" size="10" type="text"
runat="server" />
<asp:button ID="EditBtn5" text="Change Picture"
OnClick="EditBtn5_Click" runat="server" />
</td>
</tr>
<tr>
<td>
<asp:button ID="ConfirmBtn" text="Confirm"
OnClick="ConfirmBtn_Click" runat="server" />
<asp:Label ID="HiddenField3" runat="server" />
<asp:Label ID="HiddenField4" runat="server" />
<asp:Label ID="HiddenField5" runat="server" />
<asp:Label ID="HiddenField6" runat="server" />
<asp:Label ID="HiddenField7" runat="server" />
<asp:Label ID="HiddenField8" runat="server" />
<asp:Label ID="HiddenField9" runat="server" />
</td>
</tr>
<tr>
<td colspan="2">
<asp:Button ID="P4Previous" runat="server"
Text="Previous" OnClick ="Previous_Click"
onmouseover="this.style.backgroundColor='yellow'
"
onmouseout="this.style.backgroundColor='buttonfa
ce'" />
<asp:Button ID="P4Next" runat="server"
Text="Next" OnClick ="Next_Click"
Enabled="false"
onmouseover="this.style.backgroundColor='yellow'
"
onmouseout="this.style.backgroundColor='buttonfa
ce'" />
<input id="P4Reset" type="reset" disabled
="disabled" runat ="server" value="Clear"
onmouseover="this.style.backgroundColor='yellow'
"
onmouseout="this.style.backgroundColor='buttonfa
ce'" />
</td>
</tr>
</table>

191
Reset.aspx, continued <asp:Label ID="t1" runat="server" ></asp:Label>
</asp:Panel>
</asp:content>
password_failed_login.aspx <%@ Page Language="VB"%>
<script runat="server">
Sub Page_Load(ByVal Sender as Object, ByVal E as EventArgs)
lblMessage.Text = "The password you " _
& "entered were not found. " _
& "Your email has been successfully sent."
End Sub
</script>
<html>
<head>
<title>Failed Log In</title>
</head>
<body Text="black" Link="darkred" Vlink="darkred" Alink="red">
<form runat="server">
<center>
<asp:Label id="lblTitle" BorderWidth="7px" BorderStyle="Ridge"
Width="100%" Font-Size="25pt" Font-Names="Verdana" Text="Failed Log
In" runat="server"
/>
</center>
<p> </p>
<asp:Label id="lblMessage" Font-Size="12pt" Font-Names="Verdana"
runat="server"
/>
</form>
</body>
</html>

192
Appendix D – CRGPS’s Source Code (Failed Login) username_failed_login.aspx
<%@ Page Language="VB"%>
<script runat="server">
Sub Page_Load(ByVal Sender as Object, ByVal E as EventArgs)
lblMessage.Text = "The user name you " _
& "entered were not found. " _
& "Please call support for more information."
End Sub
</script>
<html>
<head>
<title>Failed Log In</title>
</head>
<body Text="black" Link="darkred" Vlink="darkred" Alink="red">
<form runat="server">
<center>
<asp:Label id="lblTitle" BorderWidth="7px" BorderStyle="Ridge"
Width="100%" Font-Size="25pt" Font-Names="Verdana" Text="Failed Log
In" runat="server"
/>
</center>
<p> </p>
<asp:Label id="lblMessage" Font-Size="12pt" Font-Names="Verdana"
runat="server"
/>
</form>
</body>
</html>
Default.master
<%@ master language="VB" %>
<html>
<head id="Head1" runat="server">
<link rel="stylesheet" href="StyleSheet.css" type="text/css" />
</head>
<body>
<form id="Form1" runat="server">
<div>
<table class="main" cellspacing="0" cellpadding="2">
<tr class="header">
<td colspan="2" class="header"/>
</tr>
<tr valign="top">
<td class="sidebar" rowspan="2">
<a id="A1" href="home.aspx" runat="server"
shape="rect" style="font-size: 12pt; font-
family: Verdana;">Home</a><br/>
<h4>Functions</h4>
<a id="A2" href="Functions/Login.aspx"
runat="server" shape="rect" style="font-size:
10pt; font-family: Verdana;">Login</a><br/><br
/>
<a id="A3" href="Functions/Registration.aspx"
runat="server" shape="rect" style="font-size:
10pt; font-family:

193
Verdana;">Register</a><br/><br />
<a id="A4" href="Functions/Reset.aspx"
runat="server" shape="rect" style="font-size:
10pt; font-family: Verdana;">Reset</a><br/>
</td>
<td class="body">
<asp:ContentPlaceHolder id="SectionContents"
runat="server">
<h3>Welcome to my Cued Recall Graphical
Password System website!</h3>
In this research, a graphical password
system using challenge response
authentication method is presented. A
system is created in such a way it will
provide a test which is the challenge to
the user when the user want to login.
Whereas the user need to provide the
answer which the user make with the system
at the registration process which is the
response to the system correctly in order
for him to log on
successesfully.<br/><br/>
In the authentication process, the user is
requested for the username. The user is
given three chances to enter the username
correctly. At third failed log in attempt,
user will be force to leave the log in
page. If the username is correct then the
user is directed to the second page,
where 3 pass-objects that are randomly
chosen from the user’s pass-objects are
displayed on the screen together with
another 47 decoy objects from database.
The user has to input a string of
textual characters for each pass-object
shown on the screen and a fake pass-code.
The proposed graphical password system
will use the easy recall method to help
increase the user memorability. The first
alphabet for each pass-code to each pass-
object is displayed as a cued to the user.
The proposed graphical password system
will also adopt the fault point method, in
which the system would request the user to
enter a fake pass-code to confuse the
person standing behind who will try to
peek over your back in order to obtain
private information. The answer required
is based on query-directed password’s
idea, where the user has to input the
first 3 characters of each pass-code for
each pass-object as the answers to the
system. The system will fetch all the
user’s pass code from the database and
execute decryption process on it and
compare the user entered pass-code to the
decrypted pass-code from the database. If
the comparison matches, then the user is
authenticated successfully. All of the
three pass-objects association pass-code
must match any of the three decrypted
pass-code from the database. Username will
be disabling out after three failed log in
attempts. At third failed log in attempt,

194
Default.master, continued user will be force to leave the log in
page and an e-mail containing user’s
original pass-objects and the pass-objects
association pass-codes will be sent to the
user’s email using the user’s e-mail
address in the user detail. <br /><br />
In the registration process, the user is
required to fill in their detail such as
username, name, identification number,
email address, and so on. The user will be
directed to a page where they can create
their pass-objects and the pass-objects
association pass-code. To create a
password, a user has to choose five pass-
objects and to create words to associate
with each pass-object. The user would need
to remember textual characters that are
related with each of their pass-objects
among the 125 pass-objects, which is
categorise in five categories, such as
animal, flower, bird, insect and reptile.
For example, the user can choose a cat
image as his first pass-object and assign
'kitty' the images pass-code. The user
could also assign any number, alphabet or
symbol on the keyboard as part of the
pass-code. After finishing the selection
process, the system would display a review
page automatically. The user will need to
confirm on the selection of pass-objects
and their association pass-code. This
confirmation is done by clicking on the
“Confirm” button, which will save the
user’s information into the database. If
the user want to change the pass-objects
and the pass-objects association pass-
code, the user could do it in the review
page before the user’s information is save
into the database. The pass-objects
association pass-code will be save into
the database in RSA encryption format.<br
/><br />
In the reset process, the user is required
to enter their username to the system. If
the username is found in the database then
the user is directed to the second page.
In the second page, the user’s detail is
displayed. The user can change their
personal information in the second page.
Then the user is directed to a page to
change their pass-objects and the pass-
objects association pass-codes. The user
can choose a new selection of his 5 pass-
objects and their association pass-code
for each pass-object from five themes of
pictures such as flower, animal, bird,
insect and reptile. After the selection,
the system will direct the user to the
review page where user can confirm the
selection or make change to the selection
before the user’ data is saved into the
database with a click on the Confirm

195
Default.master, continued button.
</asp:ContentPlaceHolder>
</td>
</tr>
<tr>
<td class="footer">
<asp:label id="Footer" font-italic="true"
text="A Project Submitted for the Master of
Computer Science in the Faculty of Computer
Science, University of Malaya" runat="server" />
</td>
</tr>
</table>
</div>
</form>
</body>
</html>
SectionFunctions.master <%@ master language="VB" masterpagefile="~/Default.master"%>
<asp:content ID="Content1" contentplaceholderid="SectionContents"
runat="server">
<asp:contentplaceholder id="IntroText" runat="server"/>
<br /><br />
<asp:contentplaceholder id="FunctionRequire" runat="server"/>
</asp:content>
Global.asax <SCRIPT LANGUAGE="VB" RUNAT="Server">
Sub Application_OnStart
Application("UserNameMaxTries") = 3
Application("PasswordMaxTries") = 3
End Sub
Sub Session_OnStart
Session("UserNameNumTries") = 0
Session("PasswordNumTries") = 0
End Sub
</SCRIPT>
StyleSheet.css
body
{
margin-top:0;
margin-left:0;
margin-right:0;
margin-bottom:0;
}
a
{
color : Yellow;
font-weight:bold;
font-family: verdana;
font-size: 10pt;
}

196
StyleSheet.css, continued table.main
{
border-width:0;
border-style:none;
height:100%;
width:100%;
}
td
{
font-family:Verdana;
font-size:10pt;
}
td.sidebar {
width: 100px;
background-color: #0080ff;
padding-left:10px;
padding-top:10px;
}
tr.header
{
height:138px;
}
td.header
{
width: 150px;
background-repeat: no-repeat;
background-color: white;
background-image :url(Functions/images/headbar.jpg);
}
td.body
{
padding:10,10,10,10;
.applyBorder{border:0.2cm solid blue};
.removeBorder{border:0.2cm solid gainsboro};
}
td.footer
{
padding-left:10;
}
web.config <?xml version="1.0"?>
<configuration>
<appSettings/>
<connectionStrings>
<add name="GPS"
connectionString="Server=(local)\SQLExpress;Integrated
Security=True;Database=GPS;Persist Security Info=True"
providerName="System.Data.SqlClient"/>
</connectionStrings>
<system.web>
<compilation debug="true" strict="false" explicit="true"/>
<pages>
<namespaces>

197
web.config, continued <clear/>
<add namespace="System"/>
<add namespace="System.Collections"/>
<add
namespace="System.Collections.Specialized"/>
<add namespace="System.Configuration"/>
<add namespace="System.Text"/>
<add
namespace="System.Text.RegularExpressions"/>
<add namespace="System.Web"/>
<add namespace="System.Web.Caching"/>
<add namespace="System.Web.SessionState"/>
<add namespace="System.Web.Security"/>
<add namespace="System.Web.Profile"/>
<add namespace="System.Web.UI"/>
<add namespace="System.Web.UI.WebControls"/>
<add
namespace="System.Web.UI.WebControls.WebParts"
/>
<add namespace="System.Web.UI.HtmlControls"/>
</namespaces>
</pages>
<authentication mode="Windows"/>
</system.web>
</configuration>