cue user guide - escenicdocs.escenic.com/cue-user-guide-2.8.pdf · cue user guide 7. enter: #...
TRANSCRIPT

CUE
User Guide2.8.15-1

Table of Contents
1 Introduction.......................................................................................................................................... 4
2 Installing CUE...................................................................................................................................... 5
3 Configuring CUE..................................................................................................................................7
3.1 Web Service CORS Configuration......................................................................................... 8
3.2 Third-Party Authentication.................................................................................................... 10
3.2.1 Google Authentication............................................................................................. 10
3.2.2 Facebook Authentication......................................................................................... 11
3.3 Create new Dialog................................................................................................................11
3.4 Heading Levels.....................................................................................................................12
3.5 Automatic div Removal.........................................................................................................13
3.6 Defining Custom Content Type Icons.................................................................................. 13
3.7 Smart Quotes....................................................................................................................... 14
3.8 Search Filter Panel...............................................................................................................15
4 Installing and Configuring Plug-ins....................................................................................................17
4.1 cue-content-duplication-enrichment-service......................................................................... 18
4.1.1 Installing cue-content-duplication-enrichment-service............................................. 18
4.1.2 Configuring cue-content-duplication-enrichment-service.........................................18
5 Using CUE......................................................................................................................................... 20
5.1 Getting Started..................................................................................................................... 20
5.2 Creating Content...................................................................................................................22
5.3 Finding and Opening Content.............................................................................................. 23
5.4 Searching for Content.......................................................................................................... 24
5.4.1 Saving Search Filters.............................................................................................. 25
5.4.2 Sharing Searches.................................................................................................... 26
5.5 Editing Content..................................................................................................................... 26
5.5.1 Adding Content to Sections.................................................................................... 27
5.5.2 Changing a Document's Authors.............................................................................28
5.5.3 Managing Relations.................................................................................................28
5.5.4 Tagging Content......................................................................................................29
5.6 Editing Persons and Users...................................................................................................30
5.6.1 Changing User State...............................................................................................30
5.7 Publishing Online Content....................................................................................................31
5.8 Multimedia Publishing...........................................................................................................31
5.9 NewsGate Story Folders...................................................................................................... 31

5.10 Exploring CUE.................................................................................................................... 32
6 Extending CUE.................................................................................................................................. 33
6.1 Web Components.................................................................................................................33
6.1.1 Creating a Web Component....................................................................................34
6.1.2 Editor Side Panel.................................................................................................... 37
6.1.3 Editor Metadata Section..........................................................................................44
6.1.4 Custom Field Editor.................................................................................................54
6.1.5 Custom Storyline Element Field Editor................................................................... 56
6.1.6 Home Page Panel................................................................................................... 64
6.1.7 Home Page Metadata Section................................................................................ 68
6.2 Enrichment Services.............................................................................................................72
6.2.1 Configuring Enrichment Services in CUE............................................................... 74
6.2.2 Creating an Enrichment Service............................................................................. 78
6.2.3 Some Examples...................................................................................................... 79
6.2.4 Learning More About Enrichment Services.............................................................83
6.3 Drop Resolvers.....................................................................................................................83
6.3.1 Configuring Drop Resolvers in CUE....................................................................... 83
6.3.2 Drop Resolver Parameters......................................................................................84
6.3.3 Drop Resolver Return Values................................................................................. 85
6.4 URL-based Content Creation............................................................................................... 86
6.4.1 Content Creation URL Structure............................................................................. 86
6.4.2 Example Script........................................................................................................ 87
6.5 Logout Triggers.................................................................................................................... 88

CUE User Guide
1 Introduction
Welcome to CUE, Escenic's new browser-based application for newsroom staff! CUE is now Escenic'sprimary interface for all newsroom staff, and will eventually completely replace Content Studio. CUEis a joint CCI-Escenic project and is capable of acting as an interface to CCI Newsgate systems as wellas Escenic systems, so for newsrooms that use both CCI Newsgate and Escenic, it provides a highlyproductive integrated interface to both systems.
You can use CUE to:
• Create and edit content
• Upload images and other binary content
• Insert in-line images into content items
• Drag and drop / cut and paste content from external systems such as Microsoft Word, Excel,browsers etc.
• Add relations to content items
• Edit sections
• Edit section pages
• Desk content items on section pages
• Tag content items
• Add content items to sections
• Edit lists and inboxes
• Publish content items
• etc...
CUE can in addition easily be extended with custom functionality to meet special workflowrequirements, make use of external services and integrate with existing in-house systems. For moreabout this, see chapter 6.
For information about using CUE with CCI Newsgate, please see "CUE-related CCI NewsGateFunctionality for CUE 2.5", which you will find at http://customer.ccieurope.com/documentation/release-notes/cci-newsgate.aspx (log in using your CCI Customer Portal credentials).
Copyright © 2015-2019 Escenic AS Page 4

CUE User Guide
2 Installing CUE
CUE 2.8.15-1 requires version 6.7 of the Escenic Content Engine and Newsgate 3.10.3 (latest).Contact your customer service manager for availability of corresponding Newsgate versions onprevious release tracks.
Before installing CUE, ensure that the back-end systems you are going to use it with have beenupgraded accordingly:
• If CUE is to use an Escenic back end, make sure your Escenic Content Engine is upgraded toversion 6.7 or higher
• If CUE is to use a CCI Newsgate back end, make sure that Newsgate has been upgraded to one ofthe build numbers listed above
CUE also requires the use of an SSE Proxy to manage the delivery of Server-sent Events fromthe Escenic Content Engine to CUE clients. This means that an Escenic SSE Proxy must have beeninstalled and configured to manage SSE for the Content Engine, and the Content Engine musthave been configured to direct SSE connection requests to the SSE Proxy. For general informationon how to install and configure an SSE Proxy, see the SSE Proxy documentation. For specificguidance on how to configure the Content Engine and the SSE Proxy to work together with CUE,see Configure an SSE Proxy Connection for CUE.
CUE is available as a standard Debian installation package, making installation on Ubuntu or otherDebian-based Linux systems very straightforward. CUE is a standalone web application, not anEscenic plug-in. Although it needs to be connected to an Escenic Content Engine and/or a CCINewsgate back end, it does not need to be co-located with either of them. It can be installed on thesame server as a Content Engine instance, but it does not need to be. An application server such asTomcat is not required to serve CUE. Since it is a pure HTML/Javascript application, a web serversuch as nginx or Apache is sufficient.
The instructions given here are based on the use of an nginx web server, running on Ubuntu.
To install CUE:
1. Log in via SSH from a terminal window.
2. Switch user to root:
$ sudo su
3. If necessary, add the Escenic apt repository to your list of sources:
# curl --silent http://user:[email protected]/repo.key | apt-key add -# echo "deb http://user:[email protected] stable main non-free" >> /etc/apt/sources.list.d/escenic.list
where user and password are your Escenic download credentials (the same ones you use toaccess the Escenic Maven repository). If you do not have any download credentials, please contactEscenic support.
4. You need to install version 1.7.5 or higher of nginx. The version available in the Ubuntu 14.04repositories is too old, so in order to ensure that you install a new enough version, you need toadd a repository containing a more recent version:
# add-apt-repository ppa:nginx/stable
Copyright © 2015-2019 Escenic AS Page 5
CUE User Guide
5. Update your package lists:
# apt-get update
6. Download and install CUE. The recommended way to do this is:
# apt-get install cue-web-2.8
to install only the basic CUE editor, or
# apt-get install cue-web-2.8 cue-plugins
where cue-plugins is a list of 0 or more base plug-ins to be installed together with CUE. For a listof currently available base plug-ins plus general information about installing plug-ins, see chapter4.
7. Download and install nginx
# apt-get install nginx
Copyright © 2015-2019 Escenic AS Page 6

CUE User Guide
3 Configuring CUE
CUE configuration involves configuring CUE itself, and also configuring the nginx web server thatserves the CUE application.
The actual CUE configuration consists of editing YAML format configuration files, identified bythe file type extension .yml. The delivered system includes a number of such configuration filescontaining CUE's default configuration settings. These files are located in the /etc/escenic/cue-web-2.8.15-1/ folder. If your CUE installation includes any extensions, these extensions may havetheir own configurations stored in other locations.
The /etc/escenic/cue-web-2.8.15-1/ folder also contains a file calledconfig.yml.template, containing the property settings that you always need to set when installingCUE. To use this file you rename it to config.yml and then edit the contents.
To configure CUE:
1. If necessary, switch user to root.
$ sudo su
2. Copy /etc/escenic/cue-web-2.8/config.yml.template to config.yml:
# cp /etc/escenic/cue-web-2.8/config.yml.template /etc/escenic/cue-web-2.8/config.yml
3. Open the new /etc/escenic/cue-web-2.8/config.yml for editing. For example
# nano /etc/escenic/cue-web-2.8/config.yml
4. Uncomment and set the required endpoint parameters (which you will find at the top of the file):
endpoints: escenic: "http://escenic-host:81/webservice/index.xml" newsgate: "http://newsgate-host/newsgate-cf/"
where:
• escenic-host is the IP address or host name of the Content Engine CUE is to provide access to
• newsgate-host is the IP address or host name of the CCI Newsgate system CUE is to provideaccess to. If no CCI Newsgate system is present, then do not uncomment the newsgate: line.
5. If your CUE configuration makes use of an Escenic-CCI Newsgate bridge, then you will need toadd a third line under endpoints:
endpoints: escenic: "http://escenic-host:81/webservice/index.xml" newsgate: "http://newsgate-host/newsgate-cf/" bridge: "http://bridge-host:7001/ngece-bridge/"
where bridge-host is the IP address or host name of an Escenic-CCI Newsgate bridge. (A bridgeis a service capable of converting Escenic content to Newsgate format, and is required to supportNewsgate write-to-fit functionality in CUE.)
6. Save the file.
Copyright © 2015-2019 Escenic AS Page 7

CUE User Guide
7. Enter:
# dpkg-reconfigure cue-web-2.8
This reconfigures CUE with the Content Engine web service URL you specified in step 3.
8. Open /etc/nginx/sites-available/default for editing, and replace the entire contentsof the file with the following:
server { listen 81 default; include /etc/nginx/default-site/*.conf;}
9. Create a new folder to contain your site definitions:
# mkdir /etc/nginx/default-site/
10. Add three files to the new /etc/nginx/default-site/ folder, called cue-web.conf andwebservice.conf:
# touch /etc/nginx/default-site/cue-web.conf# touch /etc/nginx/default-site/webservice.confa# touch /etc/nginx/conf.d/request-entity-size-limit.conf
11. Open /etc/nginx/default-site/cue-web.conf for editing and add the followingcontents:
location /cue-web/ { alias /var/www/html/cue-web/; expires modified +310s;}
Depending on the version of nginx that you have installed, the alias specified in cue-web.conf may need to be set to /var/www/cue-web/ instead of /var/www/html/cue-web/.
12. Open /etc/nginx/default-site/webservice.conf for editing and add the contentsdescribed in section 3.1.
13. Open /etc/nginx/conf.d/request-entity-size-limit.conf for editing and add thefollowing contents:
# Disable default 1Mb limit of PUT and POST requests.client_max_body_size 0;
(If you do not add this setting, then nginx will not allow larger files such as images and videos tobe uploaded to CUE.)
You should now be able to access CUE by opening a browser and going to http://host:81/cue-web.
3.1 Web Service CORS ConfigurationYour cue-web application is now running on the nginx default port, 81. In order to be able to runcorrectly it needs to be able to send requests to the Escenic Content Engine's web service. This webservice may possibly be running on a different host in a different domain. Even if it is running on thesame host as nginx, it will most likely be listening on port 8080 (Tomcat's default port). This meansthat by default any requests from the cue-web application to the Content Engine web service will berejected as cross-origin scripting exploits.
Copyright © 2015-2019 Escenic AS Page 8

CUE User Guide
You can, however, enable cross-origin communication between the cue-web application and theContent Engine web service by setting up an nginx proxy for the web service that redirects requests tothe actual web service and also adds the CORS headers needed to ensure that the requests will not berejected.
Here is an example of a suitable /etc/nginx/default-site/webservice.conf:
location ~ "/(escenic|studio|webservice|webservice-extensions)/(.*)" { if ($http_origin ~* (https?://[^/]*\.dev\.my-cue-domain\.com(:[0-9]+)?)$) { set $cors "true"; } if ($request_method = 'OPTIONS') { set $cors "${cors}options"; } if ($request_method = 'GET') { set $cors "${cors}get"; } if ($request_method = 'HEAD') { set $cors "${cors}get"; } if ($request_method = 'POST') { set $cors "${cors}post"; } if ($request_method = 'PUT') { set $cors "${cors}post"; } if ($request_method = 'DELETE') { set $cors "${cors}post"; } if ($cors = "trueget") { add_header "Access-Control-Allow-Origin" "$http_origin" always; add_header "Access-Control-Allow-Credentials" "true" always; add_header "Access-Control-Expose-Headers" "Link,X-ECE-Active-Connections,Location,ETag,Allow" always; } if ($cors = "truepost") { add_header "Access-Control-Allow-Origin" "$http_origin" always; add_header "Access-Control-Allow-Credentials" "true" always; add_header "Access-Control-Expose-Headers" "Link,X-ECE-Active-Connections,Location,ETag" always; } if ($cors = "trueoptions") { add_header 'Access-Control-Allow-Origin' "$http_origin"; add_header 'Access-Control-Allow-Credentials' 'true'; add_header 'Access-Control-Max-Age' 1728000; add_header 'Access-Control-Allow-Methods' 'GET, POST, HEAD, OPTIONS, PUT, DELETE'; add_header 'Access-Control-Allow-Headers' 'Authorization,Content-Type,Accept,Origin,User-Agent,DNT,Cache-Control,X-Mx-ReqToken,Keep-Alive,X-Requested-With,If-Modified-Since,If-Match,If-None-Match,X-Escenic-Locks,X-Escenic-media-filename,X-Escenic-home-section-uri'; add_header 'Content-Length' 0; add_header 'Content-Type' 'text/plain charset=UTF-8'; return 204; } proxy_set_header Host $http_host; proxy_pass http://127.0.0.1:8080;}
Copyright © 2015-2019 Escenic AS Page 9

CUE User Guide
In the origin filter at the top of the file:
if ($http_origin ~* (https?://[^/]*\.dev\.my-cue-domain\.com(:[0-9]+)?)$) { set $cors "true"; }
you must replace my-cue-domain\.com with the actual domain name of your CUE installation.
3.2 Third-Party AuthenticationBoth Escenic Content Engine and CCI Newsgate can be configured to allow third-party authenticationof users. This lets you log in to CUE using your Google or Facebook ID, for example, rather than byentering a CUE-specific user name ad password.
In order to be able to make use of third-party authentication in CUE:
• The Content Engine/CCI Newsgate back-end system(s) must have been configured to allow third-party authentication. For details of how to enable third-party authentication in Escenic, see Third-Party Authentication.
• CUE itself must be configured to display the UI for the third-party authentication methods thathave been enabled.
CUE supports two third-party authenticators – Google and Facebook.
3.2.1 Google Authentication
If the relevant back-end system(s) have been set up to support Google Authentication, then you canconfigure CUE support by adding a YAML configuration file to the CUE configuration folder (/etc/escenic/cue-web-2.8).
When you are configuring third-party authentication for the Content Engine as described in ConfigureOAuth Authentication, you need to add a CUE redirect URI to the Authorized redirect URIin step 16. The URI must be your CUE URI followed by /oauth_callback.html: for examplehttp://your-cue-host/cue-web/oauth_callback.html.
Your configuration file must contain the following settings:
oauth: name: "Google" label: "Log in with Google account" authURI: "https://accounts.google.com/o/oauth2/auth scope: "email" clientId: "google-client-id"
where google-client-id is the client ID you created in the steps described above.
When setting up Google authentication for the Content Engine, you create two client IDs – one fordesktop clients and one for web clients. Make sure that you use the web client ID for configuringCUE.
When you have saved this file, enter (as the root user):
# dpkg-reconfigure cue-web-2.8
Copyright © 2015-2019 Escenic AS Page 10

CUE User Guide
This reconfigures CUE with the changes you have made. The CUE login page will now include a Log inwith Google account option.
3.2.2 Facebook Authentication
If the relevant back-end system(s) have been set up to support Facebook Authentication, then you canconfigure CUE support by adding a YAML configuration file to the CUE configuration folder (/etc/escenic/cue-web-2.8). The file must contain the following settings:
oauth: name: "Facebook" label: "Log in with Facebook account" authURI: "https://graph.facebook.com/oauth/authorize" scope: "email" clientId: "facebook-client-id"
where facebook-client-id is the the web client ID you created when configuring access to the back-end system(s) (see Configure OAuth Authentication).
When setting up Facebook authentication for the Content Engine, you create two client IDs – onefor desktop clients and one for web clients. Make sure that you use the web client ID for configuringCUE.
When you have saved this file, enter (as the root user):
# dpkg-reconfigure cue-web-2.8
This reconfigures CUE with the changes you have made. The CUE login page will now include a Log inwith Facebook account option.
3.3 Create new Dialog
The Create new dialog (shown above) is configurable: you can specify which content types are to bedisplayed as favorites in the top half of the dialog. There is space for a maximum of four favorites: allother options must be selected using the search field in the bottom half of the dialog.
To specify your required favourites:
1. If necessary, switch user to root.
$ sudo su
Copyright © 2015-2019 Escenic AS Page 11
CUE User Guide
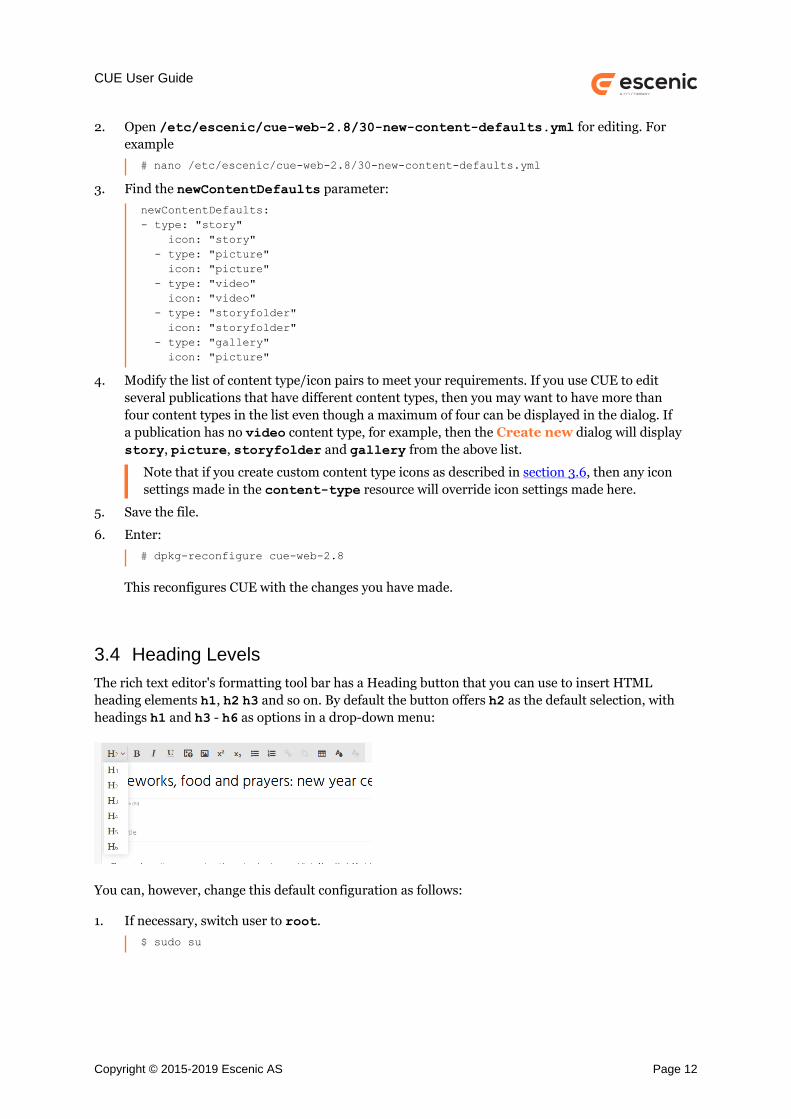
2. Open /etc/escenic/cue-web-2.8/30-new-content-defaults.yml for editing. Forexample
# nano /etc/escenic/cue-web-2.8/30-new-content-defaults.yml
3. Find the newContentDefaults parameter:
newContentDefaults:- type: "story" icon: "story" - type: "picture" icon: "picture" - type: "video" icon: "video" - type: "storyfolder" icon: "storyfolder" - type: "gallery" icon: "picture"
4. Modify the list of content type/icon pairs to meet your requirements. If you use CUE to editseveral publications that have different content types, then you may want to have more thanfour content types in the list even though a maximum of four can be displayed in the dialog. Ifa publication has no video content type, for example, then the Create new dialog will displaystory, picture, storyfolder and gallery from the above list.
Note that if you create custom content type icons as described in section 3.6, then any iconsettings made in the content-type resource will override icon settings made here.
5. Save the file.
6. Enter:
# dpkg-reconfigure cue-web-2.8
This reconfigures CUE with the changes you have made.
3.4 Heading LevelsThe rich text editor's formatting tool bar has a Heading button that you can use to insert HTMLheading elements h1, h2 h3 and so on. By default the button offers h2 as the default selection, withheadings h1 and h3 - h6 as options in a drop-down menu:
You can, however, change this default configuration as follows:
1. If necessary, switch user to root.
$ sudo su
Copyright © 2015-2019 Escenic AS Page 12

CUE User Guide
2. Open etc/escenic/cue-web-2.8/plugins/internal/EscenicHeading/EscenicHeading.yml for editing. For example:
# nano etc/escenic/cue-web-2.8/plugins/internal/EscenicHeading/EscenicHeading.yml
3. To change the default heading level, edit the defaultHeadingLevel property:
defaultHeadingLevel: 2
4. To change the contents of the drop-down menu, edit the headingLevels property:
headingLevels: "1, 2, 3, 4, 5, 6"
5. Save the file.
6. Enter:
# dpkg-reconfigure cue-web-2.8
This reconfigures CUE with the changes you have made.
3.5 Automatic div RemovalCUE can be configured to automatically remove HTML div elements from text pasted into rich textfields. This functionality is useful for some customers, but not for others and is therefore disabled bydefault. To enable it:
1. If necessary, switch user to root.
$ sudo su
2. Open /etc/escenic/cue-web-2.8/config.yml for editing. For example
# nano /etc/escenic/cue-web-2.8/config.yml
3. Add the following setting:
removeDivsAutomatically: true
4. Save the file.
5. Enter:
# dpkg-reconfigure cue-web-2.8
This reconfigures CUE with the changes you have made.
You can disable the functionality by setting removeDivsAutomatically to false.
3.6 Defining Custom Content Type IconsIn most places where content items are listed in CUE, the name is accompanied by an icon. In general,the idea is that the icon represents the content item type - so stories are represented by documenticons, pictures by image icons, and so on. Only a small number of generic icons are supplied with CUE,however, so in publications with many content types, different types will end up being represented bythe same icons. You can, however, define your own icons and associate them with the content typesdefined in your publication.
To define an icon for a content type, you must add a ui:icon element to your publication's content-type resource, as a child of the appropriate content-type element. Suppose, for example, that you
Copyright © 2015-2019 Escenic AS Page 13

CUE User Guide
want to add an icon for your Gallery content type: you would then need to insert a ui:icon element asa child of the <content-type name="gallery"> element.
For general information about the ui:icon element, see here. You will see that the ui:icon supportsa number of built-in icons. These icons are, however, only for use in Content Studio, and cannot beused in CUE. Instead you must:
• Make your own icon as a PNG image.
• Put it in a location on the network that will accessible to CUE.
• Supply the absolute URI of the PNG file in the ui:icon element. For example:
<ui:icon>http://my-company-server/icons/custom-gallery.png</ui:icon>
The icon images you create must have the following characteristics:
• PNG format
• Monochrome: black on a transparent background. CUE automatically inverts the colors wherenecessary.
• 32x32 pixels in size
3.7 Smart QuotesCUE has a "smart quotes" function that can automatically convert default "straight" single or doublequotes to "curly" quotes of various kinds. Different languages (and different publishers) have differentquotation mark conventions, so this function is configurable, allowing you to set up CUE to use thequotation marks you require.
Smart quoting is disabled by default. To enable it:
1. If necessary, switch user to root.
$ sudo su
2. Open /etc/escenic/cue-web-2.8/config.yml for editing. For example:
# nano /etc/escenic/cue-web-2.8/config.yml
3. Add a useSmartQuotes property, and set it to true:
useSmartQuotes: true
This enables the smart quotes function.
4. Add a smartQuotes property with four child properties called openDoubleCurly,closeDoubleCurly, openSingleCurly and closeSingleCurly. Use these properties tospecify the quotation marks you want to use. Straight double quotation marks are replaced bythe characters you specify with openDoubleCurly and closeDoubleCurly, and straightsingle quotation marks are replaced by the characters you specify with openSingleCurly andcloseSingleCurly. The following settings, for example:
useSmartQuotes: truesmartQuotes: openDoubleCurly: "„" closeDoubleCurly: "”" openSingleCurly: "‘"
Copyright © 2015-2019 Escenic AS Page 14

CUE User Guide
closeSingleCurly: "’"
will replace "quotation" with „quotation” and 'quotation' with ‘quotation’.
5. Save the file.
6. Enter:
# dpkg-reconfigure cue-web-2.8
This reconfigures CUE with the changes you have made.
3.8 Search Filter PanelThe CUE search filter panel contains a set of search filters that allow users to narrow down the resultsof a search by limiting the results to all documents of a specified type or all documents created after acertain date, and so on. It is difficult to design a filter panel that meets all customers' requirements inthis area, so the CUE search filter panel is configurable. By editing a configuration file, you can:
• Determine which of the predefined filters supplied with CUE actually appear in the panel
• Determine the order in which the filters appear
• Add your own custom filters
Custom filters are simpler than the predefined filters: they are simple tests that the CUE user can onlyturn on or off. You could, for example, create a "Premium content" filter that selects only content itemswith a Boolean premium field that is set to true.
To modify the search filter panel:
1. If necessary, switch user to root.
$ sudo su
2. Open /etc/escenic/cue-web-2.8/40-search-filter.yml for editing. For example:
# nano /etc/escenic/cue-web-2.8/40-search-filter.yml
3. Modify the default search filter layout to meet your requirements:
searchFilter: - id: "document-types" name: "Document Types" #translate - id: "document-states" name: "Document States" #translate - id: "creation-date" name: "Creation date" #translate - id: "authors" name: "Authors" #translate - id: "sections" name: "Sections" #translate - id: "tags" name: "Tags" #translate
You can, for example, change the order of the predefined filters and remove any you don't need bycommenting them out:
searchFilter: - id: "document-types" name: "Document Types" #translate
Copyright © 2015-2019 Escenic AS Page 15

CUE User Guide
- id: "document-states" name: "Document States" #translate - id: "creation-date" name: "Creation date" #translate - id: "sections" name: "Sections" #translate - id: "authors" name: "Authors" #translate# - id: "tags"# name: "Tags" #translate
You can also add custom filters of your own. You can insert a custom filter anywhere you like, forexample:
searchFilter: - id: "document-types" name: "Document Types" #translate - id: "document-states" name: "Document States" #translate - id: "creation-date" name: "Creation date" #translate - id: "premium-content" name: "Premium Content" #translate query: "premium_b:true" - id: "sections" name: "Sections" #translate - id: "authors" name: "Authors" #translate# - id: "tags"# name: "Tags" #translate
4. Save the file.
5. Enter:
# dpkg-reconfigure cue-web-2.8
This reconfigures CUE with the changes you have made.
Note the following:
• A custom filter's query property of must contain a valid Solr query clause. This means that in orderto write such a clause you need to know both Solr query syntax and your Solr schema (in order toknow what fields are indexed and how to identify the fields correctly).
• The predefined search filters have fixed IDs. Make sure that your custom filter IDs do not clashwith them.
Copyright © 2015-2019 Escenic AS Page 16

CUE User Guide
4 Installing and Configuring Plug-ins
CUE's capabilities can be extended by installing plug-ins. CUE plug-ins fall into three categories:
• Base plug-ins supplied by Escenic that provide self-contained functional extensions. These plug-ins have no dependencies other than CUE itself and freely available system components such asthe nodeJS engine. All the information you need to install and configure base plug-ins is here. Thefollowing base plug-ins are currently available:
cue-content-duplication-enrichment-serviceThis plug-in adds content duplication functions to the home page Search and LatestOpened panels in CUE and to the Search side panel After installing the plug-in, the contextmenu displayed by right-clicking or long-pressing a content item in these panels will containtwo new options, Duplicate and Duplicate as. These options allow you to quickly makecopies of content items.
Base plug-in packages follow CUE version numbering: you should only install base plug-ins thathave the same version number as CUE.
• Escenic plug-in extensions supplied by Escenic. These CUE plug-ins are dependent on Escenicplug-ins. The information you need to install and configure these plug-ins is provided in therelevant Escenic plug-in guide. There is no point installing one of these plug-ins unless you alsoinstall the related Escenic plug-in. The following plug-ins are of this type:
cue-plugin-liveDepends on CUE Live.
cue-plugin-menu-editorDepends on the Escenic Menu Editor plug-in.
cue-plugin-videoDepends the Escenic Video plug-in.
These plug-ins follow the version numbering of the Escenic plug-in they belong to. You should onlyinstall CUE plug-ins with version numbers that match the Escenic plug-in to which they belong.
• Third-party plug-ins that are not made by Escenic. These plug-ins may or may not havedependencies other than CUE itself. The information you need to install and configure these plug-ins must be provided by the plug-in supplier.
In general, CUE plug-ins are installed in the same way as CUE itself, using apt-get install,and can either be installed together with CUE, or at any time later. To install the cue-content-duplication-enrichment-service plug-in together with CUE, for example, you would do asfollows:
# apt-get update# apt-get install cue-web-2.8 cue-content-duplication-enrichment-service-2.8
To install it on its own after the installation of CUE, you would only need to enter:
# apt-get update# apt-get install cue-content-duplication-enrichment-service-2.8
For additional instructions regarding the installation of the cue-content-duplication-enrichment-service plug-in, see section 4.1.
Copyright © 2015-2019 Escenic AS Page 17

CUE User Guide
4.1 cue-content-duplication-enrichment-serviceThis plug-in depends on nodeJS, version 6.4.0 or higher. The node command must be available in$PATH. To check whether this is the case, enter:
$ which node
If this command does not return the path of the node executable, then you need to either install itor add its location to $PATH. If node is available, make sure you check its version, since the versioninstalled by default on Ubuntu systems is too old:
$ node -v
If the version number is less than 6.4.0, then you need to replace it with a newer version. For advice onhow to do this on Ubuntu, see (for example) this page.
4.1.1 Installing cue-content-duplication-enrichment-service
You can install the cue-content-duplication-enrichment-service plug-in either at thesame time as you install CUE itself, or at any time later. The version number of cue-content-duplication-enrichment-service must match the version number of CUE. To install cue-content-duplication-enrichment-service on its own after the installation of CUE, log in asroot and enter:
# apt-get update# apt-get install cue-content-duplication-enrichment-service-2.8
This installs the enrichment service and starts it immediately.
4.1.2 Configuring cue-content-duplication-enrichment-service
The cue-content-duplication-enrichment-service is configured to run on port 8082 bydefault. If for some reason that won't work, you can change the port number as follows:
1. Log in as root if necessary.
2. Open /etc/escenic/content-duplication-service-2.8/content-duplication-service.yaml in an editor.
server: port: 8082
3. Set the port number to whatever value you require and save the file.
4. Restart the service as follows:
# /etc/init.d/content-duplication-service restart
You also need to configure CUE to access the duplication service. To do this:
1. Open /etc/escenic/cue-web-2.8/content-duplication-service.yml in an editor:
enrichmentServices: - name: "Duplicate Service" href: "http://localhost:8082/contentDuplicationService" title: "Duplicate Service" triggers: - name: "on-duplicate"
Copyright © 2015-2019 Escenic AS Page 18

CUE User Guide
properties: {}
authorizedEndpoints: - "http://localhost:8082/"
2. Replace both occurrences of localhost in this file with your CUE host's domain name.
3. If you have changed the duplication service's port number from 8082, then replace bothoccurrences of this as well.
4. Save your changes.
5. Apply your configuration changes by entering:
# dpkg-reconfigure cue-web-2.8
You should now be able to duplicate content items using the Duplicate and Duplicate as contextmenu options in CUE.
Copyright © 2015-2019 Escenic AS Page 19

CUE User Guide
5 Using CUE
This chapter contains the information existing users of Content Studio need to get started using CUE.Although CUE is intended to work on any mobile or desktop device using any modern browser, withthe current version you are recommended to use the following device/browser combinations:
• Chrome on all desktop/laptop computers (including Macs) and all Android devices
• Safari on all IOS devices
5.1 Getting StartedCUE is a tab-based webapp. What we mean by this is that CUE uses browser tabs as documentcontainers. Every content item or section page you open or create is opened in a new browser tab,rather than everything happening in a single tab. If you've used Google Docs or Microsoft's OfficeOnline before, then you'll know what to expect. The following video shows how CUE makes use of tabs.
Video: getting started with CUE
To get started with CUE:
1. Open a browser.
2. Go to the CUE URL you have been given by your network/system manager. You will see the CUElogin window:
Copyright © 2015-2019 Escenic AS Page 20

CUE User Guide
3. Log in using the same credentials as you would use for Content Studio. You will then see the CUEhome page, which looks something like this:
You can now get to work. But before you do, it's probably a good idea to take look at some of the CUEtab's components.
At the top of the tab is the CUE menu bar.
This menu bar is present in all CUE tabs - document containers as well as the tab. Aside from theOffline mode and Language menus that are discussed later, the menu bar contains three importantbuttons:
This is the New button – it creates new content items.
This is the Home button – it opens a new CUE tab containing the home page. Not very usefulwhen you're already on the home page, but useful if you're working on a content item or sectionpage and don't have a home page open in your browser.
This is the Log out button.
Down the left hand side of the page is a column of panel buttons that determine what is displayed onthe home page:
This button displays the CUE Search panel, that you can use to search for content. See section5.3 for further information.
Copyright © 2015-2019 Escenic AS Page 21

CUE User Guide
This button displays the Recent panel, a list of documents you have been working with recently.
This button displays the Sections panel, which you can use to view and work with yourpublications' sections and section pages.
This button displays the Lists panel which contains a list of all your lists.
5.2 Creating Content
To create a new content item, select the button (at the left end of the menu bar) and then select therequired content type from the displayed dialog:
If you can't see a button for the content type you want to create, then use the Search for otheroptions field to find the content type you want to create.
The new content item is displayed in a new browser tab and will look something like this:
Copyright © 2015-2019 Escenic AS Page 22
CUE User Guide
Exactly what fields are included in the content item depends on its type. The fields are usuallydivided into groups that are displayed on separate pages. The group names are listed at the top of thecontent editor, and you can switch between the pages by clicking/tapping the group names. The mostcommonly-used fields are displayed in the first, default group, while less-used fields are relegated tothe other groups.
Click / tap on these links to switch between the cards.
Now all you need to do is to fill in some fields (all the required ones marked with * at least) and clickSave to save your content item.
If you've not used a tab-based webapp before, now is probably a good time to look closely at what
has happened. You started up CUE in one tab, and when you clicked on the button to create a newcontent item, the content item was created in a new tab. So now you have two CUE tabs open in yourbrowser:
• The original CUE home page, which has the tab name CUE.
• Your new content item, which has the content item title as its tab name.
This means that if you have a number of CUE tabs open in your browser, you can easily see what iswhat.
The advantage of displaying each content item in its own browser tab is that each CUE contentitem effectively becomes a web page, with a unique and unchanging URL, just like any other webpage. This means you can bookmark content items using your browser's bookmark functions if youwant. And if you copy the URL of a content item and send it to another CUE user by mail or chat,then that person can open the content item in CUE by simply clicking on the link (and logging in ifnecessary).
When you create a content item in this way using the menu bar button, it is added to yourpublication's default section (usually called New Articles or something similar). You can move it, oradd it to other sections as well if you want. You can, however, also create content items from the home
page's Sections ( ) panel: this allows you to create the content items directly in the correct section.
5.3 Finding and Opening ContentTo find an existing content item:
1. Open the CUE home page.
2. Make sure that the search panel is is displayed (select the button if necessary).
3. Enter a search string in the field at the top of the panel.
Copyright © 2015-2019 Escenic AS Page 23

CUE User Guide
The search results are displayed below the search field:
There are several different ways to open a content item:
Desktop Mobile
Double-click the content item Double-tap the content item
Right-click the content item, then select Openfrom the displayed menu
Long-press the content item, then select Openfrom the displayed menu
Select the content item, then press Enter on thekeyboard
—
The selected content item is opened in a new tab, just the same as when you create a new content item.
For more information about searching for content, see section 5.4.
5.4 Searching for ContentYou've already seen in section 5.3 how you can use the search field at the top of the CUE home pageto find content items you are interested in. Sometimes, however, simple text string searches aren'tenough to find what you want. CUE therefore also includes a powerful set of filters that you can use tonarrow your search.
Copyright © 2015-2019 Escenic AS Page 24

CUE User Guide
To display the search filters, click on the button at the right-hand end of the search field:
You can now narrow down your results using up to six different criteria in addition to a search string:document type, document state, creation date, author, section (that is, the publication section contentbelongs to) and tags. The first three criteria are drop-down selections, and you can only choose oneof the available options: if you select the "Story" document type, then you can't choose "Picture" aswell. Author is also a single choice criterion: if you select one author label, then all the other optionsdisappear. Sections and Tags, however are multiple choice criteria: if you pick several section labels,then the results will be narrowed down to include only documents that belong to all of the selectedsections. Similarly, if you pick several tags, then the results will be narrowed down to include onlydocuments that have all the selected tags.
Note how every selection you can make is followed by a number – this is the number of results thatmatch all the criteria you have already specified plus that particular selection. This makes it easy tosee how you can best narrow down the search results.
By default, CUE shows a small amount of content and some information about each document in the
results list. If you want a more compact list, click on the button at the top right to display titles only.Click a second time to expand the list again.
You don't have to go back to the CUE home page to search for content: document tabs have a side bar
search function. To open the search side bar, click on the button on the left side of the documenttab. The search side bar contains all the same search and filtering functions as the home page.
5.4.1 Saving Search Filters
If you frequently use the same combination of filter selections to search for content, you can save timeby saving search filters. To do this, just select the Save filter button at the bottom of the search filter
Copyright © 2015-2019 Escenic AS Page 25
CUE User Guide
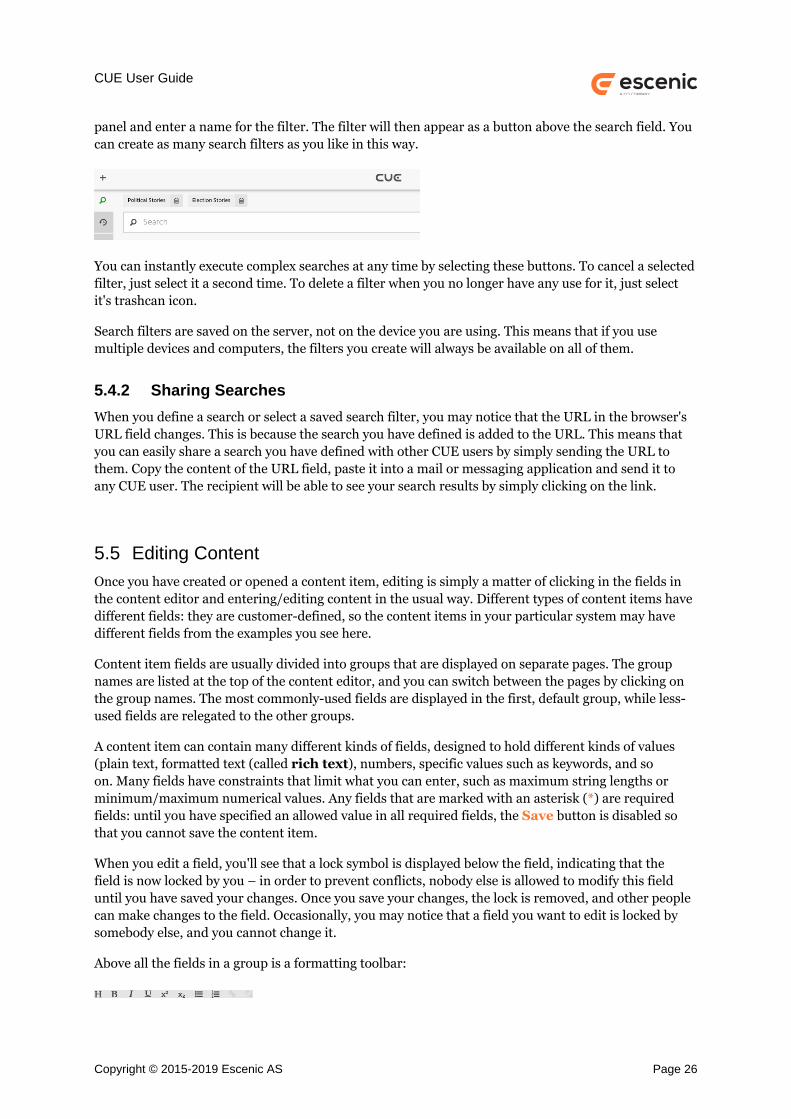
panel and enter a name for the filter. The filter will then appear as a button above the search field. Youcan create as many search filters as you like in this way.
You can instantly execute complex searches at any time by selecting these buttons. To cancel a selectedfilter, just select it a second time. To delete a filter when you no longer have any use for it, just selectit's trashcan icon.
Search filters are saved on the server, not on the device you are using. This means that if you usemultiple devices and computers, the filters you create will always be available on all of them.
5.4.2 Sharing Searches
When you define a search or select a saved search filter, you may notice that the URL in the browser'sURL field changes. This is because the search you have defined is added to the URL. This means thatyou can easily share a search you have defined with other CUE users by simply sending the URL tothem. Copy the content of the URL field, paste it into a mail or messaging application and send it toany CUE user. The recipient will be able to see your search results by simply clicking on the link.
5.5 Editing ContentOnce you have created or opened a content item, editing is simply a matter of clicking in the fields inthe content editor and entering/editing content in the usual way. Different types of content items havedifferent fields: they are customer-defined, so the content items in your particular system may havedifferent fields from the examples you see here.
Content item fields are usually divided into groups that are displayed on separate pages. The groupnames are listed at the top of the content editor, and you can switch between the pages by clicking onthe group names. The most commonly-used fields are displayed in the first, default group, while less-used fields are relegated to the other groups.
A content item can contain many different kinds of fields, designed to hold different kinds of values(plain text, formatted text (called rich text), numbers, specific values such as keywords, and soon. Many fields have constraints that limit what you can enter, such as maximum string lengths orminimum/maximum numerical values. Any fields that are marked with an asterisk (*) are requiredfields: until you have specified an allowed value in all required fields, the Save button is disabled sothat you cannot save the content item.
When you edit a field, you'll see that a lock symbol is displayed below the field, indicating that thefield is now locked by you – in order to prevent conflicts, nobody else is allowed to modify this fielduntil you have saved your changes. Once you save your changes, the lock is removed, and other peoplecan make changes to the field. Occasionally, you may notice that a field you want to edit is locked bysomebody else, and you cannot change it.
Above all the fields in a group is a formatting toolbar:
Copyright © 2015-2019 Escenic AS Page 26

CUE User Guide
This toolbar is only enabled when you are editing a rich text field.
You can copy text into a content item from other content items, from other browser tabs/windowsor from other applications such as Word or Excel either by copying and pasting or by dragging anddropping.
You can preview the current state of the content item at any time by clicking or pressing the buttonbelow the editor.
To save your edits select the Save button below the editor.
On the left hand side of a CUE content tab are two buttons, (Search) and (Recent). Theyhave the same purpose as these buttons do on the home page (displaying search and recently openedpanels) but in this case, the panels they display are just side bars. This allows you to search for othercontent while you are editing a content item – so that you can, for example, add them to the contentitem you are working on as relations. For more about this, see section 5.5.3.
On the right side of a document tab is a column of buttons that you can use to display the document'sattributes panel. Each button displays a different part of the attributes panel:
Displays General info – general information about the document.
Displays Sections – the sections to which the document belongs. You can add/remove thedocument to/from sections here: see section 5.5.1 for details.
Displays Authors – the authors of the document. You can edit the document's list of authorshere: see section 5.5.2 for details.
Displays Related – the documents related to this document. You can add and remove relationshere: see section 5.5.3 for details.
Displays Tags – the document's tags. You can add and remove tags here: see section 5.5.4 fordetails.
5.5.1 Adding Content to Sections
The sections to which a content item belongs are displayed in the attributes panel on the right of the
content editor, in a division called Sections. To display the sections, click/tap the button.
When you save a new content item it is automatically added to your publication's "new articles"section. To include it in other sections as well:
1. Make sure the attributes panel's Section division is expanded.
Copyright © 2015-2019 Escenic AS Page 27

CUE User Guide
2. Click in the Section division's search field and start typing the name of the required section.
3. When the required section appears, select it to include the content item in the section.
Each section the content item belongs to is represented by a section bar that contains the name of thebar, plus the following buttons:
Moves the content item between this section's inboxes. A content item can only be in one inboxat a time.
Adds/removes the content item to/from this section's lists. A content item can be in several listsat the same time.
Sets the content item's home section. Just click on the button of the section that you want tobe the content item's home section.
Removes the content item from this section. You cannot remove a content item from its homesection.
5.5.2 Changing a Document's Authors
A document's authors are displayed in the attributes panel on the right of the content editor, in a
division called Authors. To display the list of authors, click/tap the button.
By default, a document has one author: the user who initially created it. You can, however, add morenames to the list of authors, or replace the default author.
To add an author:
1. Make sure the Authors division of the attributes panel is displayed.
2. Select the button above the author field. This displays a Select authors dialog.
3. Select the content item you want to add as a relation. There is a search field at the top of thedialog to help you find the content item you want.
4. Click /tap Add.
To remove an author from the list of authors, select its button.
5.5.3 Managing Relations
Relations between documents are very important in Escenic systems. They are used to both representlinks between documents (links to related articles, for example), and inclusions of one document inanother (the inclusion of images and/or videos in articles, for example).
Relations are displayed in the attributes panel on the right of the document tab, in a division called
Related. To display the relations, click/tap the button.
Copyright © 2015-2019 Escenic AS Page 28

CUE User Guide
You can then add a relation to the document in either of the following ways:
• 1. Open the Search ( ) or Recent ( ) side panel (on the left side of the document).
2. Find the document you want in the side panel.
3. Drag your chosen document across to the Related section.
4. Drop it in the appropriate relation field.
• 1. Select the button above one of the relation fields. This displays a Pick relation dialog.
2. Select the document you want to add as a relation. There is a search field at the top of thedialog to help you find the document you want.
3. Click /tap Add.
You can also add the document you are currently working on as a relation in another document. Theother document must already be open in CUE as well. To do this:
1. Select the drag handle of the document you are currently working on. A document's drag handle
is the icon displayed in the top right corner of the document.
2. Drag the handle to the tab of the document you want to relate it to.
3. Hold the drag handle over the tab until the target document comes into view.
4. Drag the handle to the required relations field and drop it there. (You might need to first drag
the handle to the button and hold it there until the attributes panel opens and displays theRelated section.)
To remove a relation, select its button.
5.5.4 Tagging Content
A content item's tags are displayed in the attributes panel on the right of the content editor, in a
division called Tags. To display the tags, click/tap the button.
You can then add a tag to the content item as follows:
1. Start typing the name of the tag you want to insert in the Find Tags field. A list of matching tagswill be displayed below the field.
2. Select tag you want to add.
3. The five bars to right of the tag represent the relevance of the tag to the content item. All tagsyou add are initially assigned a relevance of five, but you can change the relevance by clicking/tapping these bars. Relevance can be used to control the display of tags in your publications andto fine tune tag-based searching. If relevance is used in your publications, then you will mostlikely have been given some rules for how to set it - otherwise, you can just ignore it.
If the tag you enter does not already exist, then an option to create it is offered below the field insteadof a list of matches.
To remove a tag, select its button.
Copyright © 2015-2019 Escenic AS Page 29

CUE User Guide
5.6 Editing Persons and UsersContent Engine person and user objects appear in CUE as special content items called Person contentitems. Person content items differ from other content items in the following ways:
• They are predefined by the system, not user-defined as are all other types of content item.
• They have a fixed structure, with a fixed set of fields that cannot be modified.
• They are identified internally by the special name com.escenic.person, and this is the contenttype name you have to use in CUE's Document types search filter.
• They are subject to a different workflow and cannot be published.
The difference between a person and a user is that a user has a Content Engine login. When you opena Person content item you can see whether it represents a person or user by checking the User namefield under General Info in the metadata panel.
Person content items cannot themselves be published, as they are considered to contain privateinformation such as addresses and telephone numbers. Person content items do, however, have aProfiles relation, which you can used to associate ordinary, publishable content items with Persons.Profile content items can be used to hold images, biographical details and so on for use in bylines.
The recommended approach is to define a special "Profile" content type that contains fields/relationsfor all the information you want to be able to publish about authors: biography, email address, Twitterhandle, headshot and so on. A Profile content item is then created for each Person object and droppedin its Profiles relation.
Assuming you have administrator access rights then you can use CUE to edit Person content items (forboth persons and users). You cannot, however, create or delete them. To do these things you need touse Web Studio (see User Administration).
If you do not have administrator access rights then you can only edit your own user's Person contentitem or persons (not users) that you have created yourself.
5.6.1 Changing User State
A user is always in one of the following states:
EnabledThis is the default state. In this state, a user has access to CUE, Content Studio, Web Studio andall other editorial applications.
LimitedIn this state, a user only has access to Mobile Studio, and will not be able to log in to any othereditorial applications. This state is useful for external contributors such as bloggers.
SuspendedNot currently used. Has the same effect as Disabled.
BannedNot currently used. Has the same effect as Disabled.
DisabledIn this state a user has no access to any editorial applications.
Copyright © 2015-2019 Escenic AS Page 30
CUE User Guide
When editing a user's Person content item, you can switch between these states using the workflowbuttons at the bottom of the content editor.
5.7 Publishing Online ContentYou can publish content items from CUE and make other state changes in much the same way as youdo it in Content Studio.
5.8 Multimedia PublishingIf CUE is connected to a CCI NewsGate system as well as an Escenic Content Engine, then ONLINE,PRINT and TABLET options are displayed at the top of content tabs, allowing you to distributecontent to print and tablet publications as well as to online publications.
To publish to print or tablet, select the corresponding view (PRINT or TABLET): you will then seethe settings needed to publish to the selected medium. The settings and publishing process for printand tablet are similar to the settings and procedures in Newsgate.
If there is a print or tablet version of the current Escenic content item (or online package inNewsgate terminology) then the PRINT or TABLET option is displayed in black. If there is no suchversion, then the corresponding option is grayed out. You can however create a version of that type byclicking on the option.
5.9 NewsGate Story FoldersIf CUE is connected to a CCI NewsGate system as well as an Escenic Content Engine, then an extraStory folders button is included in the column of panel buttons displayed on the left hand side ofthe home page. Selecting this button displays a panel containing all your Newsgate story folders.
You can filter the list of story folders by typing in the Filter field at the top of the navigation pane: onlystory folders containing the string you enter will be displayed.
Select a folder from the list to open it in a content tab.
A story folder contains the sections Stories, Assets, Assignments, Team and Contacts. All thesesections have similar contents to the corresponding sections in CCI NewsGate, except for the Storiessection. In NewsGate, stories are added to different packages for output to different media, whereas InCUE, a story can exist in different media versions, all of which share a common text.
To create a new story in CUE, select the + button on the menu bar. This creates a story in a newstory folder, containing an online package (that is, an Escenic content item).
To simply add a new text to a story folder, select the + button in the story folder. The process ofcreating a new text is the same as in NewsGate.
The metadata properties displayed on the right of the story folder are the same as those displayed inCCI Newsgate and have the same meaning/functionality.
Copyright © 2015-2019 Escenic AS Page 31
CUE User Guide
5.10Exploring CUEThere's a lot more to CUE than we've covered in this short introduction. Most of the things you cando in Content Studio, you can now also do using CUE. You can use it, for example, to create and editsections, section pages, lists and inboxes, crop images and so on.
Now you are familiar with CUE's basic content editing functionality, you should find it relatively easyto learn how to use CUE to accomplish other objectives, especially if you are already a Content Studiouser.
Copyright © 2015-2019 Escenic AS Page 32

CUE User Guide
6 Extending CUE
CUE is more than a simple editor for Content Engine - it's an extensible platform. It includes threeextension mechanisms that you can use to add your own functionality and to integrate externalservices into your editorial workflows. The extension mechanisms are:
Web componentsCUE web components are HTML/CSS/Javascript components that you can use to add customfunctionality to CUE. See section 6.1 for further information.
Enrichment servicesEnrichment services are a very powerful and flexible mechanism for extending CUE'sfunctionality. An enrichment service is an HTTP service that communicates with CUE via avery simple protocol. You can implement your own enrichment services to provide additionalfunctionality and integrate CUE with other systems in various ways. See section 6.2 for furtherinformation.
Drop resolversDrop resolvers are HTTP services, rather like enrichment services. Drop resolvers, however, arespecifically designed to handle the processing and import of foreign objects dropped into CUE.See section 6.3 for further information.
URL-based content creationCUE lets you create a draft content item by simply passing a URL to a browser. A script runningin some other application such as Trello, Google Sheets or Slack can simply construct a CUEURL containing the details of a new content item and pass the URL to a browser. CUE will thenstart in the browser and create the requested content item, ready for the user to continue editing(if required), save and publish. See section 6.4 for further information.
Logout triggersA logout trigger is a simple HTTP GET request that is sent to a specified URL when the user logsout from CUE. It provides a mechanism for integrators to automatically perform other actions(such as logging out of a VPN) on logout from CUE. For further information see section 6.5.
6.1 Web ComponentsWeb components is the name given to a set of features being added to the W3C HTML and DOMspecifications that support the creation of reusable components in web documents and webapplications.
CUE makes use of this technology to enable the following types of extensions:
Editor side panelAn editor side panel is displayed as a pop-out panel on the left side of a CUE editor window(similar to an editor Search panel). A custom editor side panel works in the same way as thestandard side panels: a new button is added to the column on the left side of the display, andselecting this button opens and closes the panel.
Editor metadata sectionAn editor metadata section is displayed in the pop-out attributes panel on the right side of aCUE editor window (similar to the General info and Authors sections). A metadata sectionworks in the same way as the standard attributes sections: a new button is added to the column
Copyright © 2015-2019 Escenic AS Page 33

CUE User Guide
on the right side of the display, and selecting this button opens and closes the panel, focused onthe appropriate section.
Custom field editorA custom field editor extension changes the appearance and behavior of a content item field.You can, for example, configure CUE to display an integer field in a content item as a graphicalslider instead of displaying a simple text field. You can also use it to display much more complexcomponents containing many different controls and elements: a color picker component thatoffers the user several different ways to choose a color, for example.
Home page panelA home page panel occupies the main work area of the CUE home tab. A custom home pagepanel works in the same way as the standard Search and Sections panels: a new button isadded to the column on the left side of the display, and selecting this button displays the panelin the main work area.
Home page metadata sectionA home page metadata section is displayed in the pop-out attributes panel on the right sideof a CUE editor window (similar to the General info and Pages sections displayed withthe Sections home page panel). A metadata section works in the same way as the standardattributes sections: a new button is added to the column on the right side of the display, andselecting this button opens and closes the panel, focused on the appropriate section.
All you need to do to add a web component to CUE is:
• Create a JavaScript file containing the definition of your web component.
• Put the web component definition in a web location that is accessible to CUE.
• Add information about the web component to a YAML configuration file and save the file in theCUE configuration folder (/etc/escenic/cue-web-2.8). You can either create a separateconfiguration file for each of your web components, or create a single configuration file for all ofthem.
This process is described in more detail in the following sections.
6.1.1 Creating a Web Component
A web component is an ECMAScript (ES) module. It contains:
• A class extending HTMLElement. The class can use the shadowRoot to define local CSS styles.These styles are only applied to HTML elements inside that shadowRoot – they will not affect anyelements in documents where the web component is displayed.
• A statement to register the class as a custom element. The custom element name must contain a -.
Here is a skeleton web component that you can use as a basis for your own web components:
/** * Creating the web component */class MyComponent extends HTMLElement { constructor() { super();
this.attachShadow({ mode: 'open' }); this.shadowRoot.innerHTML = ` <style>
Copyright © 2015-2019 Escenic AS Page 34
CUE User Guide
:host { width: 100%; display: block; } /* Styles the web component tag */ </style>
<!-- Add your web component HTML here --> `; }
connectedCallback() { console.log('The CUE interface of the web component:', this.cueInterface); // The web component is now attached. // Add your logic here. }}customElements.define('my-component', MyComponent);
/** * Creating the icon (if required) */class MyComponentIcon extends HTMLElement { constructor() { super();
this.attachShadow({ mode: 'open' }); this.shadowRoot.innerHTML = `<!-- Add your web component icon HTML here -->`; }
connectedCallback() { console.log('The CUE interface of the icon:', this.cueInterface); // The icon is now attached. // Add your logic here. }}
customElements.define('my-component-icon', MyComponentIcon);
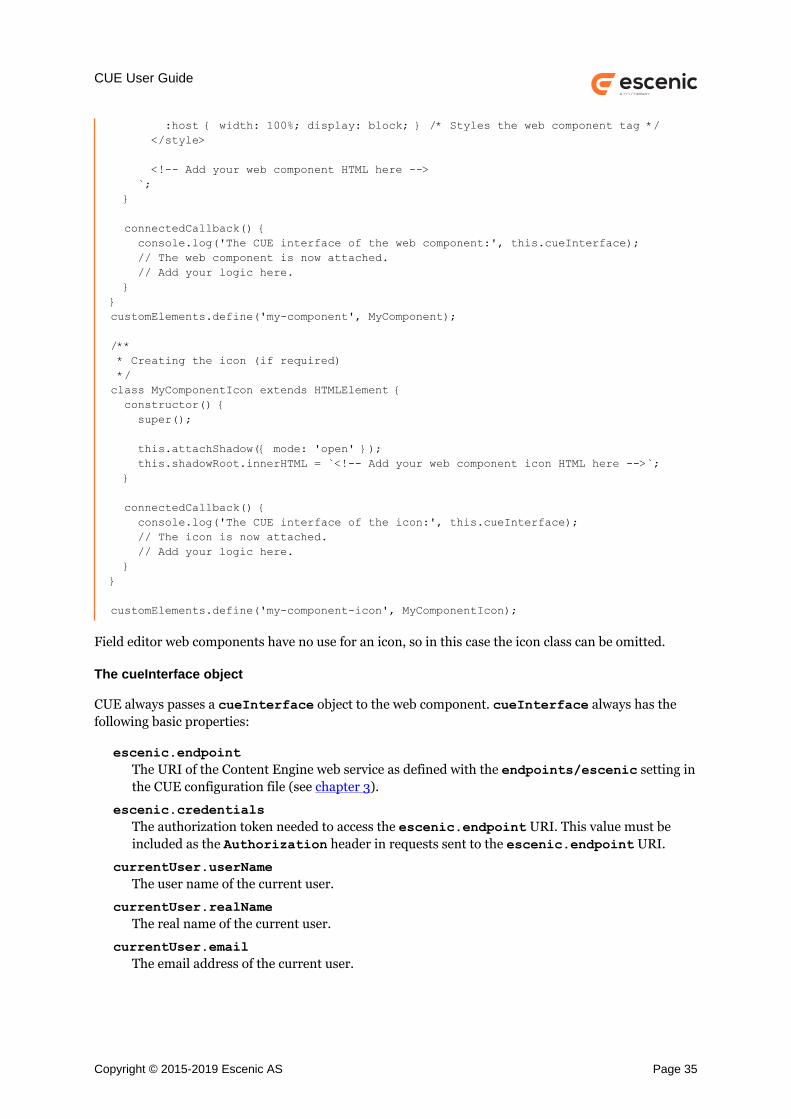
Field editor web components have no use for an icon, so in this case the icon class can be omitted.
The cueInterface object
CUE always passes a cueInterface object to the web component. cueInterface always has thefollowing basic properties:
escenic.endpointThe URI of the Content Engine web service as defined with the endpoints/escenic setting inthe CUE configuration file (see chapter 3).
escenic.credentialsThe authorization token needed to access the escenic.endpoint URI. This value must beincluded as the Authorization header in requests sent to the escenic.endpoint URI.
currentUser.userNameThe user name of the current user.
currentUser.realNameThe real name of the current user.
currentUser.emailThe email address of the current user.
Copyright © 2015-2019 Escenic AS Page 35

CUE User Guide
newsgateAn object providing various functions for interacting with the Newsgate server.
selectionAn object for manipulating the current rich text selection (if any). This object exposes thefollowing functions:
getCurrentSelection()Returns the current rich text selection.
replaceSelection(newContent: string, selection: Selection)Replaces selection with newContent. newContent must be a valid HTML fragment.
forEachBlockInSelection(range: Range, forEachBlock: Function)Loops through every top-level node in the selection and applies the forEachBlockfunction. This is particularly useful for text selections that cross paragraph boundaries.
replaceElement(element: Element, elementName: string, className:string)
Replaces element with a new element of type elementName and class className. Allthe children of element are preserved. In other words, after the function has executed,the children of element will be the children a new element of type elementName.
replaceBlockElement(element: Element, elementName: string,className: string)
Replaces the closest <p> or <div> ancestor of element with a new element of typeelementName and class className. All the children of the ancestor element arepreserved. In other words, after the function has executed, all the children of the ancestorelement will be the children of a new element of type elementName.
addSelectionWatcher(watcher: Function)Adds a watcher that will be notified when the current rich text selection changes. Thewatcher will be invoked with the new selection.
removeSelectionWatcher(watcher: Function)Removes a previously added watcher.
For an example of how to use these functions, see section 6.1.3.4.
For content items, the cueInterface object's properties will also include article URL, article ID andcontent type. For sections it will also include section URL, section ID, and section name.
In addition, the cueInterface object has other context-dependent properties that vary accordingto the type of web component created. These properties are described along with the different webcomponent types.
Drag and drop from web components
You can drag objects from all web components except rich text field extensions to drop zones in CUE.Anywhere in the CUE interface that you can drop an uploaded file, you can also drop an object thathas been dragged from a web component, as long the object is correctly constructed. A correctlyconstructed draggable object is a JSON object with a single property, files. This property is an arrayof objects, each object being composed of three properties:
nameThe file name of this object
Copyright © 2015-2019 Escenic AS Page 36

CUE User Guide
mimeTypeThe mime type of this object
dataURL OR urlFor external objects, the third property is called dataURL, and holds the content of the object,encoded as a data URL. The dropped object may, however, in some cases be an existing Esceniccontent item, in which case the third property is called url and holds the URL of the contentitem.
The entire JSON object must be supplied as the drag event's dragData property and be assigned themime type application/x-web-component-data.
See section 6.1.2.3 for an example of how to construct a draggable object.
6.1.2 Editor Side Panel
An editor side panel is displayed as a pop-out panel on the left side of a CUE editor window (similarto an editor Search panel). A custom editor side panel works in the same way as the standard sidepanels: a new button is added to the column on the left side of the display, and selecting this buttonopens and closes the panel.
An editor side panel is typically used to display information from some external system or web site –the example supplied in section 6.1.2.3 displays images from the Pixabay web site.
6.1.2.1 Editor Side Panel Configuration
The following properties must be defined to configure an editor side panel:
- idThe tag name of the web component. The name you specify must contain a hyphen. Rememberalso that the id property name must be preceded by a hyphen (-).
nameThe display name of the component. The name is only actually displayed when the mouse is heldover the side panel button.
directiveMust be set to "cf-custom-panel-loader".
webComponentInformation about the web component:
modulePathThe URL of the web component
iconThe tag name of the web component's icon. The name you specify must contain ahyphen.
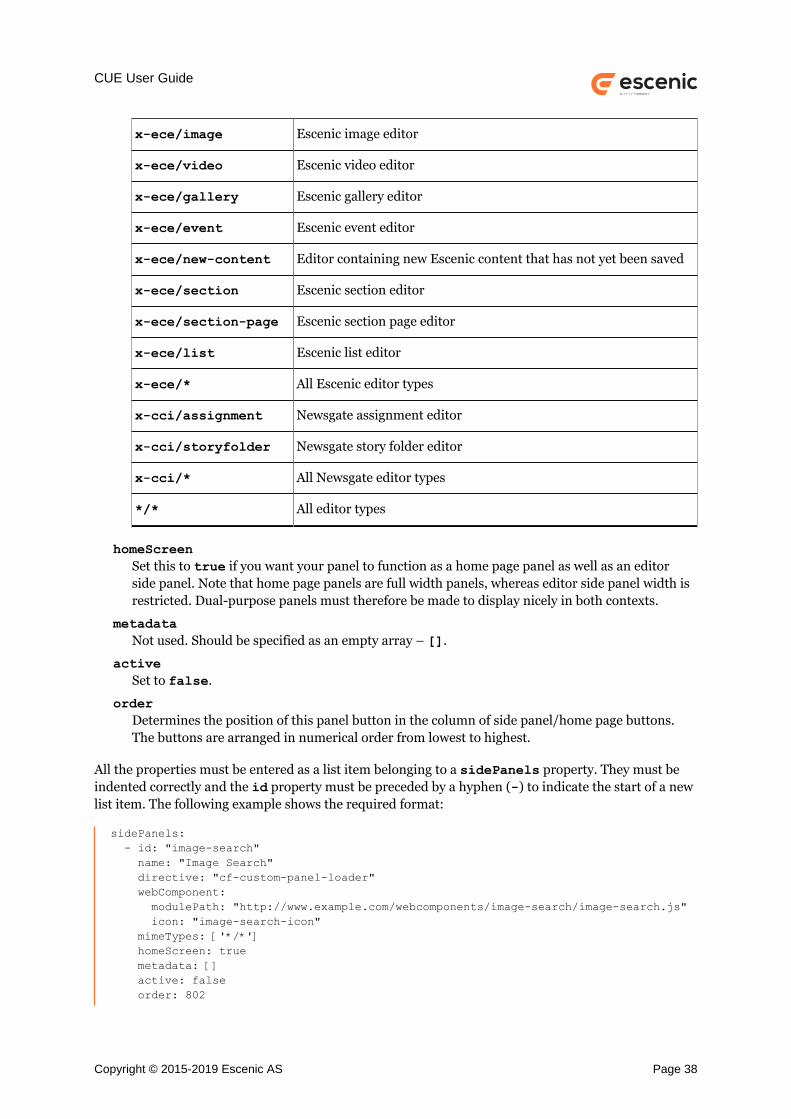
mimeTypesAn array of MIME types specifying the editors for which this panel should be made available.The following MIME types may be specified:
x-ece/story Escenic content editor for items other than images, videos, galleriesand events
Copyright © 2015-2019 Escenic AS Page 37
CUE User Guide
x-ece/image Escenic image editor
x-ece/video Escenic video editor
x-ece/gallery Escenic gallery editor
x-ece/event Escenic event editor
x-ece/new-content Editor containing new Escenic content that has not yet been saved
x-ece/section Escenic section editor
x-ece/section-page Escenic section page editor
x-ece/list Escenic list editor
x-ece/* All Escenic editor types
x-cci/assignment Newsgate assignment editor
x-cci/storyfolder Newsgate story folder editor
x-cci/* All Newsgate editor types
*/* All editor types
homeScreenSet this to true if you want your panel to function as a home page panel as well as an editorside panel. Note that home page panels are full width panels, whereas editor side panel width isrestricted. Dual-purpose panels must therefore be made to display nicely in both contexts.
metadataNot used. Should be specified as an empty array – [].
activeSet to false.
orderDetermines the position of this panel button in the column of side panel/home page buttons.The buttons are arranged in numerical order from lowest to highest.
All the properties must be entered as a list item belonging to a sidePanels property. They must beindented correctly and the id property must be preceded by a hyphen (-) to indicate the start of a newlist item. The following example shows the required format:
sidePanels: - id: "image-search" name: "Image Search" directive: "cf-custom-panel-loader" webComponent: modulePath: "http://www.example.com/webcomponents/image-search/image-search.js" icon: "image-search-icon" mimeTypes: ['*/*'] homeScreen: true metadata: [] active: false order: 802
Copyright © 2015-2019 Escenic AS Page 38

CUE User Guide
6.1.2.2 Editor Side Panel cueInterface Properties
A cueInterface object is passed to both the main side panel component and to the icon component.In addition to the basic properties described in section 6.1.1, this cueInterface object has thefollowing properties in each case:
For the editor side panel component
activeA boolean property that indicates whether or not the panel is currently active.
addActiveWatcher(watcher: Function)A function that adds a watcher that will be notified when the active state of the editor side panelchanges. The watcher will be invoked with the new state.
removeActiveWatcher(watcher: Function)A function that removes a previously added watcher.
For the icon component
activeA boolean property that indicates whether or not the panel is currently active.
addActiveWatcher(watcher: Function)A function that adds a watcher that will be notified when the active state of the editor side panelchanges. The watcher will be invoked with the new state.
removeActiveWatcher(watcher: Function)A function that removes a previously added watcher.
6.1.2.3 Editor Side Panel Example
This example searches the Pixabay web site for images.
(function (imageSearch) { imageSearch.dragStart = function (event) { const imageData = JSON.parse(event.currentTarget.getAttribute('data-hit')); const dataUrl = this.getDataUrlFromImage(event.currentTarget, imageData.webformatWidth, imageData.webformatHeight); const jsonData = JSON.stringify({ files: [ { dataUrl: dataUrl, name: imageData.tags.replace(/, /g, '-') + '-' + imageData.id, mimeType: 'image/jpeg' } ] }); event.dataTransfer.setData('application/x-web-component-data', jsonData); };
imageSearch.getDataUrlFromImage = function (image, width, height) { let canvas = document.createElement('canvas'); canvas.width = width; canvas.height = height;
const context = canvas.getContext('2d'); context.drawImage(image, 0, 0);
Copyright © 2015-2019 Escenic AS Page 39

CUE User Guide
return canvas.toDataURL('image/jpeg'); };})(window.imageSearch || (window.imageSearch = {}));
class ImageSearch extends HTMLElement { constructor() { super();
this.attachShadow({ mode: 'open' }); this.shadowRoot.innerHTML = ` <style> :host { margin: 0; padding: 0; width: 100%; height: 100%; display: flex; }
.content-wrapper { flex-grow: 1; flex-direction: column; margin: 0 10px 0 10px; height: calc(100vh - 60px); }
#wrapper { flex-grow: 1; flex-direction: column; position: relative; overflow: auto; height: calc(100% - 60px); margin-top: 28px; }
.search { position: relative; }
#images { overflow-y: auto; overflow-x: hidden; position: absolute; top: 10px; bottom: 10px; left: 0; right: 0; scrollbar-face-color: #000000; scrollbar-track-color: transparent; }
#images::-webkit-scrollbar { width: 9px; height: 9px; }
#images::-webkit-scrollbar-thumb { background: #333333; border-left: 2px solid #444444; }
Copyright © 2015-2019 Escenic AS Page 40

CUE User Guide
#images::-webkit-scrollbar-track { background: transparent; }
#images img { display: block; max-height: 250px; max-width: 80%; padding: 2px; margin: 0 auto 10px auto; cursor: pointer; border: 2px solid #9c9c9c; opacity: 0.8; transition: all 250ms ease-in-out; }
#images img:hover { border: 2px solid #ffffff; opacity: 1; }
#search-term { position: absolute; z-index: 1; width: 100%; height: 28px; border: 2px solid #000000; background: #333333; font-family: "Hind", Helvetica Neue, Helvetica, Arial, Sans-serif; color: #ffffff; font-weight: 300; font-size: 14px; padding-left: 10px; padding-right: 28px; box-sizing: border-box; }
#search-term:focus, .searchButton:focus { outline: none; }
.searchButton { position: absolute; z-index: 2; top: 2px; right: 2px; width: 24px; height: 24px; border: 0; cursor: pointer; background: transparent; color: #9c9c9c; }
.searchButton:before { font: 16px 'cf'; font-style: normal; font-weight: normal;
Copyright © 2015-2019 Escenic AS Page 41

CUE User Guide
padding: 2px 0 0 4px; line-height: 24px; content: '\\e878'; -webkit-font-smoothing: antialiased; -moz-osx-font-smoothing: grayscale; }
.searchButton:hover{ color: #ffffff; }
h1 { display: block; width: 100%; height: 44px; margin: 0; padding: 0; background: url("webcomponents/image-search/pixabay_logo.png") no-repeat center 10px; }
</style> <div class="content-wrapper"> <h1></h1> <div class="search"> <input id="search-term" type="textbox" value="" placeholder="Search in Pixabay free images"> <div id="search" class="searchButton"></div> </div>
<div id="wrapper"> <div id="images"></div> </div> </div> `; }
connectedCallback() { if (this.cueInterface.editor && this.cueInterface.editor.getTags) { const tags = this.cueInterface.editor.getTags(); if (tags && tags.length > 0) { this.shadowRoot.querySelector('#search-term').value = tags[0].value; } } this.search(); $(this.shadowRoot.querySelector('#search-term')).keypress(event => { if (event.which === 13 /* ENTER */) { this.search(); } }); $(this.shadowRoot.querySelector('#search')).click(this.search.bind(this)); }
ImageSearchProto.search = function() { var searchTerm = panelShadowRoot.querySelector('#search-term').value; searchTerm = searchTerm.replace(' ', '+'); this.loadImages(searchTerm); };
loadImages(searchTerm) {
Copyright © 2015-2019 Escenic AS Page 42

CUE User Guide
const xhr = new XMLHttpRequest(); xhr.open('GET', 'https://pixabay.com/api/?key=<YOUR_API_KEY>&q=' + searchTerm + '&image_type=photo&safesearch=true', true);
xhr.onload = function () { if (xhr.readyState === 4) { if (xhr.status === 200) { this.showImages(xhr.responseText); } else { console.error(xhr.statusText); } } }.bind(this);
xhr.onerror = function () { console.error(xhr.statusText); };
xhr.send(null); };
ImageSearchProto.showImages = function(responseData) { var responseJson = JSON.parse(responseData); var images = ''; responseJson.hits.forEach(function (hit) { images += "<img src='" + hit.webformatURL + "' data-hit='" + JSON.stringify(hit) + "' crossorigin='anonymous' ondragstart='imageSearch.dragStart(event);'>"; });
images += '<a href="https://pixabay.com/" target="_blank"><img src="https://pixabay.com/static/img/public/medium_rectangle_a.png" alt="Pixabay"></a>';
panelShadowRoot.querySelector('#images').innerHTML = images; };
customElements.define('image-search', ImageSearch);
class ImageSearchIcon extends HTMLElement { constructor() { super();
this.attachShadow({ mode: 'open' }); this.shadowRoot.innerHTML = ` <style> :host { margin: 0; padding: 6px; display: block; } img { max-width: 80%; position: relative; top: 3px; left: 3px; } </style> <img class="icon"> `;
ImageSearchIconProto.createdCallback = function () { var template = thisDoc.querySelector('template#icon').content; iconShadowRoot = this.attachShadow({ mode: 'open' }); iconShadowRoot.appendChild(template.cloneNode(true)); };
ImageSearchIconProto.attachedCallback = function() { if (this.cueInterface.homeScreen) {
Copyright © 2015-2019 Escenic AS Page 43

CUE User Guide
this.activeStateChanged(this.cueInterface.isActive()); this.cueInterface.addActiveWatcher(function (active) { this.activeStateChanged(active); }.bind(this)); } else { var img = iconShadowRoot.querySelector('img.icon'); img.src = this.getAbsolutePath(this.editorIconPath); } };
ImageSearchIconProto.activeStateChanged = function(active) { var img = iconShadowRoot.querySelector('img.icon'); if (active) { img.src = this.getAbsolutePath(this.activeIconPath); } else { img.src = this.getAbsolutePath(this.inactiveIconPath); } };
getAbsolutePath(path) { const baseURI = import.meta.url; return baseURI.substring(0, baseURI.lastIndexOf('/') + 1) + path; }}customElements.define('image-search-icon', ImageSearchIcon);
6.1.3 Editor Metadata Section
An editor metadata section is displayed in the pop-out attributes panel on the right side of a CUEeditor window (similar to the General info and Authors sections). A metadata section works in thesame way as the standard attributes sections: a new button is added to the column on the right side ofthe display, and selecting this button opens and closes the panel, focused on the appropriate section.
An editor metadata section is used to display information about the object being edited – the examplesupplied in section 6.1.2.3 displays the history of the content item being edited.
6.1.3.1 Editor Metadata Section Configuration
The following properties must be defined to configure an editor metadata section:
- nameThe display name of the component. The name is only actually displayed when the mouse isheld over the metadata section button. Remember also that the name property name must bepreceded by a hyphen (-).
directiveThe tag name of the web component. The name you specify must contain a hyphen.
webComponentInformation about the web component:
modulePathThe URL of the web component
Copyright © 2015-2019 Escenic AS Page 44

CUE User Guide
iconThe tag name of the web component's icon. The name you specify must contain ahyphen.
mimeTypesAn array of MIME types specifying the editors for which this metadata section should be madeavailable. The following MIME types may be specified:
x-ece/story Escenic content editor for items other than images, videos, galleriesand events
x-ece/image Escenic image editor
x-ece/video Escenic video editor
x-ece/gallery Escenic gallery editor
x-ece/event Escenic event editor
x-ece/new-content Editor containing new Escenic content that has not yet been saved
x-ece/section Escenic section editor
x-ece/section-page Escenic section page editor
x-ece/list Escenic list editor
x-ece/* All Escenic editor types
x-cci/assignment Newsgate assignment editor
x-cci/storyfolder Newsgate story folder editor
x-cci/* All Newsgate editor types
*/* All editor types
orderDetermines the position of this section in the attributes panel (and the position of the button).The sections are arranged in numerical order from lowest to highest.
All the properties must be entered as a list item belonging to an editors/metadata property. Theymust be indented correctly and the name property must be preceded by a hyphen (-) to indicate thestart of a new list item. The following example shows the required format:
editors: metadata: - name: "Content History" directive: "content-history" webComponent: modulePath: "http://www.example.com/webcomponents/history/history.js" icon: "content-history-icon" mimeTypes: ["x-ece/story"] order: 803
Copyright © 2015-2019 Escenic AS Page 45

CUE User Guide
6.1.3.2 Editor Metadata Section cueInterface Properties
A cueInterface object is passed to both the main metadata section component and to the iconcomponent. In addition to the basic properties described in section 6.1.1, this cueInterface objecthas the following properties in each case:
For the editor metadata section component
editorAn object representing the current editor. The properties and functions exposed by this objectvary according to the type of editor as follows:
Story editorActually, any editor with an x-ece/* MIME type for which there is no more specificmatch. This, is in other words, the fallback case. The following properties and functionsare exposed:
typeThe editor type: always story.
getLink()Returns the link object opened in the editor. A GET request to the URI contained inthe object will return an XML document describing the content. Escenic credentialsmust be included in the request as an Authorization header (see general webcomponent information). These credentials are provided in the cueInterfaceobject (see section 6.1.1).
getTitle()Returns the title of the editor.
getArticleId()Returns the ID of the content item opened in the editor.
getContentType()Returns the type of the content item opened in the editor.
getState()Returns the state (draft, published etc.) of the content item opened in the editor.
getPublishedDate()Returns the published date of the content item opened in the editor. The date isreturned as a moment object.
getTags()Returns an array containing any tags assigned to the content item opened in theeditor.
getContent()Returns the entire content item opened in the editor.
updateContentValue(key: string, value: string)Updates the content item opened in the editor by assigning value to the fieldidentified by key.
addContentWatcher(watcher: Function)Adds a watcher that will be notified when the content item changes.
List editorAn editor with the MIME type x-ece/list. The following properties and functions areexposed:
Copyright © 2015-2019 Escenic AS Page 46

CUE User Guide
typeThe editor type: always list.
getLink()Returns the link object opened in the editor. A GET request to the URI containedin the object will return an XML document describing the list. Escenic credentialsmust be included in the request as an Authorization header (see general webcomponent information). These credentials are provided in the cueInterfaceobject (see section 6.1.1).
getTitle()Returns the title of the editor.
addListWatcher(watcher: Function)Adds a watcher that will be notified when the list changes.
Section editorAn editor with the MIME type x-ece/section or x-ece/section-page. Thefollowing properties and functions are exposed:
typeThe editor type: always section.
getLink()Returns the link object opened in the editor. A GET request to the URI contained inthe object will return an XML document describing the section. Escenic credentialsmust be included in the request as an Authorization header (see general webcomponent information). These credentials are provided in the cueInterfaceobject (see section 6.1.1).
getTitle()Returns the title of the editor.
getSection()Returns the section that the opened section page belongs to.
getSectionPage()Returns the section page opened in the editor.
addSectionWatcher(watcher: Function)Adds a watcher that will be notified when the section page changes.
Assignment editorAn editor with the MIME type x-cci/assignment; type=picture. The followingproperties and functions are exposed:
typeThe editor type: always assignment.
getLink()Returns the link object opened in the editor.
getTitle()Returns the title of the editor.
getAssignment()Returns the assignment object opened in the editor.
getStory()Returns the story folder object that the assignment belongs to.
Copyright © 2015-2019 Escenic AS Page 47

CUE User Guide
Story folder editorAn editor with the MIME type x-cci/storyfolder. The following properties andfunctions are exposed:
typeThe editor type: always storyFolder.
getLink()Returns the link object opened in the editor.
getTitle()Returns the title of the editor.
getStoryFolder()Returns the story folder object opened in the editor.
addStoryFolderWatcher(watcher: Function)Adds a watcher that will be notified when the story folder changes.
For the icon component
activeA boolean property that indicates whether or not the metadata section is currently active.
addActiveWatcher(watcher: Function)A function that adds a watcher that will be notified when the active state of the editor metadatasection changes. The watcher will be invoked with the new state.
removeActiveWatcher(watcher: Function)A function that removes a previously added watcher.
6.1.3.3 Editor Metadata Section Example
This example displays the history of the content item being edited.
class HistoryElement extends HTMLElement { constructor() { super();
this.attachShadow({ mode: 'open' }); this.shadowRoot.innerHTML = ` <style> :host { margin: 0; padding: 0; width: 100% } h1 { color: #9c9c9c; font-size: 24px; font-weight: 300; } .entry { width: 100%; display: flex; flex-direction: row; } .state { width: 25% }
Copyright © 2015-2019 Escenic AS Page 48

CUE User Guide
.date { width: 42%; } .author { width: 33%; } </style>
<h1>History</h1> <div class="entries"></div> `; }
HistoryProto.attachedCallback = function() { this.fetchHistory(); this.cueInterface.editor.addContentWatcher(function () { this.fetchHistory(); }.bind(this)); };
HistoryProto.fetchHistory = function() { var historyLinks = this.cueInterface.editor.getContent().links['http://www.vizrt.com/types/relation/log']; if (historyLinks && historyLinks.length > 0) { var historyLink = historyLinks[0]; $.ajax({ url: historyLink.uri.toString(), type: 'GET', accept: historyLink.mimeType.format(), beforeSend: function (xhr) { xhr.setRequestHeader('Authorization', this.cueInterface.escenic.credentials); }.bind(this), success: function (result) { this.displayHistory(result); }.bind(this), error: function (request, error) { console.error(error); } }); } };
HistoryProto.displayHistory = function(document) { var entriesDiv = panelShadowRoot.querySelector('.entries'); var parsedEntries = this.parseDocument(document); entriesDiv.innerHTML = ''; parsedEntries.forEach(function (entry) { entriesDiv.innerHTML += '<div class="entry">' + '<span class="state">' + entry.state + '</span>' + '<span class="date">' + entry.updated.format('lll') + '</span>' + '<span class="author">' + entry.author + '</span>' + '</div>'; }); };
HistoryProto.parseDocument = function(document) { var resolver = function (namespace) { switch (namespace) { case 'app':
Copyright © 2015-2019 Escenic AS Page 49

CUE User Guide
return 'http://www.w3.org/2007/app'; case 'atom': return 'http://www.w3.org/2005/Atom'; case 'vaext': return 'http://www.vizrt.com/atom-ext'; } };
var entries = document.evaluate('//atom:entry', document, resolver); var entry = entries.iterateNext(); var parsedEntries = []; while (entry) { var updated = document.evaluate('./atom:updated', entry, resolver).iterateNext().firstChild.nodeValue; var state = document.evaluate('./app:control/vaext:state', entry, resolver).iterateNext().attributes.getNamedItem('name').value; var author = document.evaluate('./atom:author/atom:name', entry, resolver).iterateNext().firstChild.nodeValue; parsedEntries.push({ updated: moment(updated, moment.ISO_8601, true), state: state, author: author }); entry = entries.iterateNext(); } return parsedEntries; };
document.registerElement('content-history', { prototype: HistoryProto });
/** * Creating the icon (if required) */var HistoryIconProto = Object.create(HTMLElement.prototype); var iconShadowRoot;
this.attachShadow({ mode: 'open' }); this.shadowRoot.innerHTML = ` <style> :host { margin: 0; display: block; } .icon:before { font: 16px 'cf'; font-style: normal; font-weight: normal; color: #444444; content: '\\e8b9'; -webkit-font-smoothing: antialiased; -moz-osx-font-smoothing: grayscale; } .icon.active:before { color: #09ab00; } </style> <span class="icon"></span> `;
Copyright © 2015-2019 Escenic AS Page 50

CUE User Guide
}
HistoryIconProto.attachedCallback = function() { this.activeStateChanged(this.cueInterface.isActive()); this.cueInterface.addActiveWatcher(function (active) { this.activeStateChanged(active); }.bind(this)); };
HistoryIconProto.activeStateChanged = function(active) { var icon = iconShadowRoot.querySelector('.icon'); if (active) { $(icon).addClass('active'); } else { $(icon).removeClass('active'); } };
document.registerElement('content-history-icon', { prototype: HistoryIconProto });
6.1.3.4 Selection API Example
This second example illustrates the use of the rich text editing functionality provided by thecueInterface object's selection property:
class TextModification extends HTMLElement { constructor() { super();
this.attachShadow({ mode: 'open' }); this.shadowRoot.innerHTML = ` <style> :host { width: 100%; display: block; } /* Styles the web component tag */ h1 { color: #9c9c9c; font-size: 24px; font-weight: 300; } button { display: block; font-size: 16px; font-family: "Hind", Helvetica Neue, Helvetica, Arial, Sans-serif; line-height: 32px; height: 32px; text-align: center; border: none; border-radius: 3px; background-color: #d3d3d3; color: #444444; cursor: pointer; padding: 0 10px; margin-bottom: 10px; } button:disabled { background-color: #efefef; color: #999999;
Copyright © 2015-2019 Escenic AS Page 51

CUE User Guide
pointer-events: none; } button:hover { background-color: #efefef; } </style>
<h1>Text Modification</h1> <button class="character-tag">Insert Character Tag</button> <button class="macro-tag">Insert Macro Tag</button> <button class="em-dash">Insert Em dash</button> <button class="queen">Insert #</button> `; }
connectedCallback() { if (this.cueInterface.selection) { this.addButtonEventListeners(); this.selection = this.cueInterface.selection.getCurrentSelection(); this.cueInterface.selection.addSelectionWatcher(newSelection => { this.selection = newSelection; this.setButtonStates(!!newSelection); }); } this.setButtonStates(!!this.selection); }
addButtonEventListeners() { this.addCharacterTagEventListener(); this.addMacroTagEventListener(); this.addEmDashEventListener(); this.addQueenEventListener(); }
addCharacterTagEventListener() { const button = this.shadowRoot.querySelector('.character-tag'); $(button).on('click', () => { if (this.selection.rangeCount) { this.cueInterface.selection.forEachBlockInSelection(this.selection.getRangeAt(0), element => { this.cueInterface.selection.replaceElement(element, 'span', 'quote_attrib'); }); }
}); }
addMacroTagEventListener() { const button = this.shadowRoot.querySelector('.macro-tag'); $(button).on('click', () => { this.cueInterface.selection.replaceSelection('<span class="cci-codes"><extra_leading></span>', this.selection); }); }
addEmDashEventListener() { const button = this.shadowRoot.querySelector('.em-dash'); $(button).on('click', () => { this.cueInterface.selection.replaceSelection('—', this.selection);
Copyright © 2015-2019 Escenic AS Page 52

CUE User Guide
}); }
addQueenEventListener() { const button = this.shadowRoot.querySelector('.queen'); $(button).on('click', () => { this.cueInterface.selection.replaceSelection('#', this.selection); }); }
setButtonStates(enabled) { const buttonSelectors = ['.character-tag', '.macro-tag', '.em-dash', '.queen'];
_.forEach(buttonSelectors, selector => { const button = this.shadowRoot.querySelector(selector); $(button).prop('disabled', !enabled); }); }}customElements.define('text-modification', TextModification);
class TextModificationIcon extends HTMLElement { constructor() { super();
this.attachShadow({ mode: 'open' }); this.shadowRoot.innerHTML = ` <style> :host { margin: 0; padding: 2px; display: block; } /* Styles the web component icon tag */ .icon:before { font: 16px 'cf'; font-style: normal; font-weight: normal; color: #444444; content: '\\e8a6'; -webkit-font-smoothing: antialiased; -moz-osx-font-smoothing: grayscale; } .icon.active:before { color: #09ab00; } </style>
<span class="icon"></span> `; }
connectedCallback() { this.activeStateChanged(this.cueInterface.active); this.cueInterface.addActiveWatcher(active => { this.activeStateChanged(active); }); }
activeStateChanged(active) { const icon = this.shadowRoot.querySelector('.icon'); if (active) { $(icon).addClass('active');
Copyright © 2015-2019 Escenic AS Page 53

CUE User Guide
} else { $(icon).removeClass('active'); } }}customElements.define('text-modification-icon', TextModificationIcon);
6.1.4 Custom Field Editor
A custom field editor extension changes the appearance and behavior of a content item field. You can,for example, configure CUE to display an integer field in a content item as a graphical slider instead ofdisplaying a simple text field (see section 6.1.4.4). You can also use it to display much more complexcomponents containing many different controls and elements: a color picker component that offers theuser several different ways to choose a color, for example.
6.1.4.1 Custom Field Editor Configuration
The following properties must be defined to configure a custom field editor:
- nameThe name of the web component. The name you specify must contain a hyphen. Remember alsothat the id property name must be preceded by a hyphen (-).
tagNameThe name of the custom HTML element that is used to encapsulate the component: the nameused in the document.registerElement() call in the component's script element.
modulePathThe URI of the component.
All the properties must be entered as a list item belonging to a customComponents property. Theymust be indented correctly and the id property must be preceded by a hyphen (-) to indicate the startof a new list item. The following example shows the required format:
customComponents: - name: "custom-slider" tagName: "my-slider" modulePath: "http://www.example.com/webcomponents/my-slider.js"
6.1.4.2 Custom Field Editor Invocation
To use a custom field editor for a particular field, you need to add a ui:editor to the field's definitionin the content-type resource. The ui:editor element has two attributes:
typeThis must always be set to web-component.
nameThis must be set to the name of the component as defined in the field editor configuration file.
To use the slider field editor defined in section 6.1.4.2, for example, you would need to add thefollowing ui-editor element to your field definition:
<field type="number" name="percentage"> <ui:label>Percentage</ui:label>
Copyright © 2015-2019 Escenic AS Page 54

CUE User Guide
<ui:editor type="web-component" name="custom-slider"/></field>
6.1.4.3 Custom Field Editor cueInterface Properties
A cueInterface object is passed to the component. In addition to the basic properties describedin section 6.1.1, this cueInterface object has a number of properties describing the content itemcurrently loaded to the editor:
articleIdThe ID of the current content item.
articleUriThe published URI of the current content item.
contentTypeThe content type of the current content item.
stateThe state of the current content item.
publishedDateThe date on which the current content item was published
6.1.4.4 Custom Field Editor Example
This example creates field editor that allows integer values to be set and displayed using a slider. Notethat the value of the field is written/read using the component's value attribute.
// Creates an object based in the HTML Element prototypeclass MySlider extends HTMLElement { // Fires when an instance of the element is created constructor() { super();
this.attachShadow({ mode: 'open' }); this.shadowRoot.innerHTML = ` <style> :host { margin: 0; padding: 0px; width: 100%; display: block; }
.spacer { padding: 10px; height: 30px; overflow: hidden; }
#thefield { width: 100%; } </style> <div class="spacer"> <input id="thefield" type="range" max="100" min="0" value="0"><br/> </div> `;
Copyright © 2015-2019 Escenic AS Page 55

CUE User Guide
}
readOnlyCallback() { this.shadowRoot.querySelector('#thefield').readOnly = this.cueInterface.readOnly; }
static get observedAttributes() { return ['value']; }
attributeChangedCallback(name, oldValue, newValue) { if (name === 'value') { this.shadowRoot.querySelector('input').value = newValue; } }
connectedCallback() { // getting initial value of value attribute const value = this.hasAttribute('value') ? this.getAttribute('value') : '';
// setting value property of input element this.shadowRoot.querySelector('input').value = value; this.shadowRoot.querySelector('input').addEventListener('input', e => { this.setAttribute('value', e.target.value); });
// Add a watcher that will watch on if the custom field is locked. // If locked then invoke the callback function and make the field readonly. if (this.cueInterface) { this.cueInterface.addReadOnlyWatcher(() => this.readOnlyCallback()); } }}customElements.define('my-slider', MySlider);
6.1.5 Custom Storyline Element Field Editor
A custom storyline element field editor extension changes the appearance and behavior of a storylineelement field. You can, for example, configure CUE to display an integer field in a storyline elementas a graphical slider instead of displaying a simple text field. You can also use it to display much morecomplex components. Examples of two such components, a map component and a data visualization(i.e. table) component are included in the Content Engine 6.7 distribution. For details of how to makeuse of these components, see ??.
Note that no cueInterface object is passed to a storyline element field editor. In this respect,storyline element field editors are different from all other CUE Web Component extensions.
6.1.5.1 Custom Storyline Element Field Editor Configuration
The following properties must be defined to configure a custom storyline element field editor:
- nameThe name of the web component. The name you specify must contain a hyphen. Remember alsothat the id property name must be preceded by a hyphen (-).
Copyright © 2015-2019 Escenic AS Page 56

CUE User Guide
modulePathThe URI of the component.
The properties must be entered as a list item belonging to a customComponents property. They mustbe indented correctly and the id property must be preceded by a hyphen (-) to indicate the start of anew list item. The following example shows the required format:
customComponents: - name: "google-map" modulePath: "http://www.example.com/webcomponents/google-map/google-map.js"
6.1.5.2 Custom Storyline Element Field Editor Invocation
To use a custom editor for a particular storyline element field, you need to add a ui:editor to thefield's definition in the story-element-type resource. The ui:editor element has two attributes:
typeThis must always be set to web-component.
nameThis must be set to the name of the component as defined in the storyline element field editorconfiguration file.
To use the table editor defined in section 6.1.5.1, for example, you would need to add the following ui-editor element to your story-element-type definition:
<?xml version="1.0" encoding="UTF-8"?><story-element-type xmlns="http://xmlns.escenic.com/2008/content-type" xmlns:ui="http://xmlns.escenic.com/2008/interface-hints" name="table"> <ui:label>Table</ui:label> <field mime-type="application/json" type="basic" name="tableeditor"> <ui:editor type="web-component" name="data-visualization" /> </field>
<field name="rowheader" type="boolean"> <ui:label>Use first row as labels</ui:label> <ui:value-if-unset>false</ui:value-if-unset> <ui:editor-style>settings</ui:editor-style> </field>
<field name="columnheader" type="boolean"> <ui:label>Use first column as labels</ui:label> <ui:value-if-unset>false</ui:value-if-unset> <ui:editor-style>settings</ui:editor-style> </field></story-element-type>
6.1.5.3 Custom Storyline Element Field Editor Example
This example is the table editor included in the Escenic Content Engine's starter pack. The webcomponent looks like this
const maxCols = 10;const maxRows = 6;
class DataVisualization extends HTMLElement {
Copyright © 2015-2019 Escenic AS Page 57

CUE User Guide
static get observedAttributes() { return ['value']; }
constructor() { super();
this.attachShadow({mode: 'open'}); this.shadowRoot.innerHTML = ` <style> <-- CSS omitted --> </style> <div class="container grid-placeholder" id="container"> <div id="showSize" class="show-size"></div> <table id="tableContainer" class="grid-table layout-select"></table>
<div id="contextMenu" class="dropdown context-menu" style="display: none;"> <ul class="dropdown-menu" role="menu" aria-labelledby="dropdownMenu" style="position:static;margin-bottom:5px;"> <li><a id="insertRowAbove">Insert row above</a></li> <li><a id="insertRowBelow">Insert row below</a></li> <li><a id="insertColumnLeft">Insert column left</a></li> <li><a id="insertColumnRight">Insert column right</a></li> <li class="dropdown-divider"></li> <li><a id="deleteRow">Delete row</a></li> <li><a id="deleteColumn">Delete column</a></li> </ul> </div> </div> `; }
connectedCallback() { this.resolveData(); }
updateEditor(data) { this.setAttribute('value', JSON.stringify(data)); }
attributeChangedCallback(name, oldValue, newValue) { const table = this.shadowRoot.getElementById('tableContainer');
if (this.isConnected && name === 'value' && newValue !== '' && newValue !== oldValue) { $(table) .find('tr') .remove(); this.resolveData(); } }
resolveData() { const value = this.hasAttribute('value') ? this.getAttribute('value') : '';
if (value !== '') { const tableData = $.parseJSON(value); const rows = tableData.length; const cols = tableData[0].length;
Copyright © 2015-2019 Escenic AS Page 58

CUE User Guide
const extraDataString = this.hasAttribute('extra-data') ? this.getAttribute('extra-data') : ''; const extraData = extraDataString ? $.parseJSON(extraDataString) : {}; this.createDataTable(rows, cols, tableData, extraData); } else { this.createGridSelector(); } }
createGridSelector() { const that = this; const table = that.shadowRoot.getElementById('tableContainer'); const showSizeElement = that.shadowRoot.querySelector('#showSize');
const clickHandler = function() { const target = $(this); const cols = target.index() + 1; const rows = target.parent().index() + 1;
that.createDataTable(rows, cols); that.prepareTableData(); };
for (let i = 0; i < maxRows; i++) { const row = document.createElement('tr'); table.append(row);
for (let j = 0; j < maxCols; j++) { const cell = document.createElement('td');
cell.append(document.createElement('div')); row.append(cell); } }
showSizeElement.innerHTML = '0 x 0';
function clearHighlight(target) { target .parent() .find('div') .removeClass('grid-select-active'); }
function addHighlight(target) { var cellIndex = target.index(); var rowIndex = target.parent().index(); var rows = target .parent() .parent() .children();
for (var i = 0; i <= rowIndex; i++) { $(rows[i]) .children() .eq(cellIndex) .prevAll() .addBack()
Copyright © 2015-2019 Escenic AS Page 59

CUE User Guide
.find('div') .addClass('grid-select-active'); }
showSizeElement.innerHTML = rowIndex + 1 + ' x ' + (cellIndex + 1); }
$(table) .find('td') .on('click', clickHandler);
$(table) .find('td') .on('mouseover', function() { const target = $(this); addHighlight(target); });
$(table).on('mouseout', function() { const target = $(this); clearHighlight(target); }); }
prepareTableData() { const table = this.shadowRoot.getElementById('tableContainer'); // A few jQuery helpers for exporting only jQuery.fn.pop = [].pop; jQuery.fn.shift = [].shift;
const rows = $(table).find('tr:not(:hidden)'); const data = [];
// Convert all existing rows into a loopable array rows.each(function() { var cells = $(this).find('td input'); var cellData = [];
cells.each(function(i, cell) { cellData[i] = $(cell).val() || ''; });
data.push(cellData); }); this.updateEditor(data); }
createDataTable(rows, cols, tableData = [], extraData = {}) { const that = this; const table = that.shadowRoot.getElementById('tableContainer'); const showSizeElement = that.shadowRoot.querySelector('#showSize'); const dataTableContextMenu = that.shadowRoot.querySelector('#contextMenu');
$(table) .find('tr') .remove(); $(table) .parent() .removeClass('grid-placeholder'); $(table)
Copyright © 2015-2019 Escenic AS Page 60

CUE User Guide
.addClass('data-table') .removeClass('layout-select');
if (showSizeElement) { showSizeElement.remove(); }
const createNewRow = function(rowValues = []) { const tr = $('<tr>');
for (let c = 0; c < cols; c++) { const cellValue = rowValues[c] || ''; $( '<td><input type="text" class="data-cell" value="' + cellValue + '"></td>' ).appendTo(tr); } return tr; };
const createNewColumn = function(position) { $(table) .find('tr') .each(function(index) { this.insertCell(position).outerHTML = '<td><input type="text" class="data-cell" value=""></td>'; }); };
function setCaretPosition(element, position) { element.childNodes[0].focus(); element.childNodes[0].setSelectionRange(position, position); }
const dataUpdateHandler = function(event) { const activeCellElement = event.target.parentElement; const rowIndex = activeCellElement && activeCellElement.parentElement ? activeCellElement.parentElement.rowIndex : -1; const cellIndex = activeCellElement && isNaN(activeCellElement.cellIndex) ? -1 : activeCellElement.cellIndex; const position = event.target.selectionStart;
that.prepareTableData();
if (rowIndex !== -1 && cellIndex !== -1) { const cellElement = $(table).find( `tr:eq(${rowIndex}) td:eq(${cellIndex})` ); setCaretPosition(cellElement.get(0), position); } };
const dataTableContextMenuHandler = function(event) { const dataElement = $(event.target).parent(); event.preventDefault();
Copyright © 2015-2019 Escenic AS Page 61

CUE User Guide
dataTableContextMenu.style.display = 'block'; $(dataTableContextMenu).css({ left: dataElement.get(0).offsetLeft, top: dataElement.get(0).offsetTop, });
$(dataTableContextMenu.querySelector('#insertRowAbove')) .unbind() .click(function(e) { dataElement.parent().before(createNewRow()); dataUpdateHandler(e); });
$(dataTableContextMenu.querySelector('#insertRowBelow')) .unbind() .click(function(e) { dataElement.parent().after(createNewRow()); dataUpdateHandler(e); });
$(dataTableContextMenu.querySelector('#deleteRow')) .unbind() .click(function(e) { dataElement.parent().remove(); dataUpdateHandler(e); });
$(dataTableContextMenu.querySelector('#insertColumnLeft')) .unbind() .click(function(e) { createNewColumn(dataElement[0].cellIndex); dataUpdateHandler(e); });
$(dataTableContextMenu.querySelector('#insertColumnRight')) .unbind() .click(function(e) { createNewColumn(dataElement[0].cellIndex + 1); dataUpdateHandler(e); });
$(dataTableContextMenu.querySelector('#deleteColumn')) .unbind() .click(function(e) { const columnIndex = dataElement[0].cellIndex;
$(table) .find('tr') .each(function(index) { this.deleteCell(columnIndex); });
dataUpdateHandler(e); });
$(document).click(function(event) { dataTableContextMenu.style.display = 'none'; }); $(document).mousedown(function(event) { if (event.which === 3) {
Copyright © 2015-2019 Escenic AS Page 62

CUE User Guide
dataTableContextMenu.style.display = 'none'; } });
return false; };
for (let r = 0; r < rows; r++) { createNewRow(tableData[r]).appendTo(table); }
$(table) .find('tr td input') .on('input', dataUpdateHandler); $(table) .find('tr td input') .contextmenu(dataTableContextMenuHandler);
if (extraData.rowheader) { $(table) .find('tr:eq(0)') .addClass('row-heading'); }
if (extraData.columnheader) { $(table) .find('tr') .each(function(index, row) { $(row) .find('td:eq(0)') .addClass('column-heading'); }); } }}
customElements.define('data-visualization', DataVisualization);
As with the custom field editor (see section 6.1.4.4), the value of the field is written/read using thecomponent's value attribute. In a storyline element field editor, however, additional information mayalso be supplied via an extra-data attribute:
• The value attribute contains the value of the storyline element field that is marked as a webcomponent in the storyline element definition (the tableeditor field in this case)
• The extra-data attribute is a JSON structure containing the values of all the other fields in thestoryline element (rowheader and columnheader in this case)
6.1.5.4 Configuring the Sample Storyline Element Field Editors
The Content Engine 6.7 distribution incorporates two sample storyline element types that make use ofstoryline field editors:
• map, a storyline element type for maps, plus a supporting web component called google-map.
• table, a storyline element type for editing tables, plus a supporting web component called data-visualization.
Copyright © 2015-2019 Escenic AS Page 63

CUE User Guide
You will find the storyline element definitions and the supporting web components in the ContentEngine's contrib folder. The storyline element definitions are in the contrib/starter-pack/storyline-element-types folder and the web components are in the are in the contrib/starter-pack/story-element-web-components folder.
To make use of these storyline element types, in your publications you need to:
1. Upload to the Content Engine:
• The storyline element types
• A storyline template that contains references to the new storyline element types (for example,the sample template contrib/starter-pack/storyline-templates/blank.xml)
For a description of how to do this, see Manage Shared Resources.
2. Upload the web components to a web location that is accessible to CUE.
3. Add a configuration file to your CUE config folder (/etc/escenic/cue-web-2.8/) containingthe following definitions:
customComponents: - name: "google-map" modulePath: "http://your-server-location/google-map/google-map.js" - name: "data-visualization" modulePath: "http://your-server-location/data-visualization/data-visualization.js"
where your-server-location is the location to which you uploaded the web components.
6.1.6 Home Page Panel
A home page panel occupies the main work area of the CUE home tab. A custom home page panelworks in the same way as the standard Search and Sections panels: a new button is added to thecolumn on the left side of the display, and selecting this button displays the panel in the main workarea.
A home page panel is typically used to display information from some external system or web site – theexample supplied in section 6.1.6.3 displays a Twitter timeline.
6.1.6.1 Home Page Panel Configuration
The following properties must be defined to configure a home page panel:
- idThe tag name of the web component. The name you specify must contain a hyphen. Rememberalso that the id property name must be preceded by a hyphen (-).
nameThe display name of the component. The name is only actually displayed when the mouse is heldover the side panel button.
directiveMust be set to "cf-custom-panel-loader".
webComponentInformation about the web component:
Copyright © 2015-2019 Escenic AS Page 64

CUE User Guide
modulePathThe URL of the web component
iconThe tag name of the web component's icon. The name you specify must contain ahyphen.
mimeTypesFor a pure home page panel, this property should be specified as an empty array – []. You can,however, specify values in which case the component will also function as an editor panel. Fordetails of the values that may be specified, see section 6.1.2.1. Note that while home page panelsare full width panels, editor side panel width is restricted. Dual-purpose panels must thereforebe made to display nicely in both contexts.
homeScreenSet to true.
metadataNot used. Should be specified as an empty array – [].
activeSet to false.
orderDetermines the position of this panel button in the column of side panel/home page buttons.The buttons are arranged in numerical order from lowest to highest.
All the properties must be entered as a list item belonging to a sidePanels property. They must beindented correctly and the id property must be preceded by a hyphen (-) to indicate the start of a newlist item. The following example shows the required format:
sidePanels: - id: "twitter-home-panel" name: "Twitter Timelines" directive: "cf-custom-panel-loader" webComponent: modulePath: "http://www.example.com/webcomponents/twitter/twitter-home-panel.js" icon: "twitter-home-panel-icon" mimeTypes: [] homeScreen: true metadata: [] active: false order: 801
6.1.6.2 Home Page Panel cueInterface Properties
A cueInterface object is passed to both the main home page panel component and to the iconcomponent. In addition to the basic properties described in section 6.1.1, this cueInterface objecthas the following properties in each case:
For the home page panel component
activeA boolean property that indicates whether or not the panel is currently active.
addActiveWatcher(watcher: Function)A function that adds a watcher that will be notified when the active state of the home page panelchanges. The watcher will be invoked with the new state.
Copyright © 2015-2019 Escenic AS Page 65

CUE User Guide
removeActiveWatcher(watcher: Function)A function that removes a previously added watcher.
For the icon component
activeA boolean property that indicates whether or not the panel is currently active.
addActiveWatcher(watcher: Function)A function that adds a watcher that will be notified when the active state of the home page panelchanges. The watcher will be invoked with the new state.
removeActiveWatcher(watcher: Function)A function that removes a previously added watcher.
6.1.6.3 Home Page Panel Example
This example displays a Twitter timeline:
window.twttr = (function(d, s, id) { var js, fjs = d.getElementsByTagName(s)[0], t = window.twttr || {}; if (d.getElementById(id)) return t; js = d.createElement(s); js.id = id; js.src = "https://platform.twitter.com/widgets.js"; fjs.parentNode.insertBefore(js, fjs);
t._e = []; t.ready = function(f) { t._e.push(f); };
return t;}(document, "script", "twitter-wjs"));
/** * Twitter Timeline */var TwitterTimelineProto = Object.create(HTMLElement.prototype); var timelineShadowRoot;
this.attachShadow({ mode: 'open' }); this.shadowRoot.innerHTML = ` <style> :host { margin: 0 20px 0 20px; padding: 0; width: 100%; display: block; } </style> <h1>Twitter Timelines</h1> <div id="timeline"></div> `; }
TwitterTimelineProto.attachedCallback = function() { twttr.ready(function () { twttr.widgets.load(); twttr.widgets.createTimeline( { sourceType: 'profile', screenName: 'escenic'
Copyright © 2015-2019 Escenic AS Page 66

CUE User Guide
}, timelineShadowRoot.querySelector('#timeline'), { height: 1000 } ); }); };
document.registerElement('twitter-home-panel', { prototype: TwitterTimelineProto });
/** * Twitter icon */var TwitterIconProto = Object.create(HTMLElement.prototype); var iconShadowRoot;
this.attachShadow({ mode: 'open' }); this.shadowRoot.innerHTML = ` <style> :host { margin: 0 0px 0 0px; width: 26px; display: inline; float: left; margin-right: 18px; } img { width: 20px; position: relative; top: 4px; left: 10px; } </style> <img class="icon"> `;
TwitterIconProto.createdCallback = function () { var template = thisDoc.querySelector('template#icon').content; iconShadowRoot = this.attachShadow({ mode: 'open' }); iconShadowRoot.appendChild(template.cloneNode(true)); };
TwitterIconProto.attachedCallback = function() { this.activeStateChanged(this.cueInterface.isActive()); this.cueInterface.addActiveWatcher(function (active) { this.activeStateChanged(active); }.bind(this)); };
TwitterIconProto.activeStateChanged = function(active) { var img = iconShadowRoot.querySelector('img.icon'); if (active) { img.src = this.getAbsolutePath(this.activeIconPath); } else { img.src = this.getAbsolutePath(this.inactiveIconPath); } };
TwitterIconProto.getAbsolutePath = function(path) { var baseURI = import.meta.url; return baseURI.substring(0, baseURI.lastIndexOf('/') + 1) + path; };
customElements.define('twitter-home-panel-icon', TwitterIcon);
Copyright © 2015-2019 Escenic AS Page 67

CUE User Guide
6.1.7 Home Page Metadata Section
A home page metadata section is displayed in the pop-out attributes panel on the right side of a CUEeditor window (similar to the Pages and Lists sections). A metadata section works in the same way asthe standard attributes sections: a new button is added to the column on the right side of the display,and selecting this button opens and closes the panel, focused on the appropriate section.
A home page metadata section is used to display information about whatever object is currentlyselected in the home page – the example supplied in section 6.1.7.3 displays a preview of the currentlyselected image or video.
6.1.7.1 Home Page Metadata Section Configuration
The following properties must be defined to configure an editor metadata section:
- homePanelsAn array of directive names of the home screen panel on which the metadata should be madeavailable. The following directive names may be specified:
cf-escenic-search-sidepanel
Escenic home screen search panel
cf-latest-opened-leftpanel
Escenic home screen latest-opened panel
cf-sections-sidepanel Escenic home screen sections panel
cf-lists-sidepanel Escenic home screen lists panel
Remember also that the homePanels property name must be preceded by a hyphen (-).
directiveThe tag name of the web component. The name you specify must contain a hyphen.
nameThe display name of the component. The name is only actually displayed when the mouse is heldover the metadata section button.
webComponentInformation about the web component:
modulePathThe URL of the web component
iconThe tag name of the web component's icon. The name you specify must contain ahyphen.
orderDetermines the position of this section in the attributes panel (and the position of the button).The sections are arranged in numerical order from lowest to highest.
All the properties must be entered as a list item belonging to a homeScreenMetadata property.They must be indented correctly and the homePanels property must be preceded by a hyphen (-) toindicate the start of a new list item. The following example shows the required format:
homeScreenMetadata:
Copyright © 2015-2019 Escenic AS Page 68

CUE User Guide
- homePanels: ["cf-escenic-search-sidepanel", "cf-latest-opened-leftpanel"] directive: "content-preview" name: "Preview" webComponent: modulePath: "http://www.example.com/webcomponents/preview/preview.js" icon: "content-preview-icon" order: 804
6.1.7.2 Home Page Metadata Section cueInterface Properties
A cueInterface object is passed to both the main metadata section component and to the iconcomponent. In addition to the basic properties described in section 6.1.1, this cueInterface objecthas the following properties in each case:
For the home page metadata section component
homePanelAn object representing the current home screen panel. The properties and functions exposed bythis object vary according to the type of panel as follows:
Search panelThe following functions are exposed:
addFocusedResultWatcher(watcher: Function)Adds a watcher that will be notified whenever the focus moves to a new searchresult. The watcher will be invoked with the currently selected result.
Latest openedThe following functions are exposed:
addFocusedResultWatcher(watcher: Function)Adds a watcher that will be notified whenever the focus moves to a new item.
Section editorThe following functions are exposed:
addFocusedSectionWatcher(watcher: Function)Adds a watcher that will be notified whenever the focus moves to a section.
For the icon component
activeA boolean property that indicates whether or not the metadata section is currently active.
addActiveWatcher(watcher: Function)A function that adds a watcher that will be notified when the active state of the home pagemetadata section changes. The watcher will be invoked with the new state.
removeActiveWatcher(watcher: Function)A function that removes a previously added watcher.
6.1.7.3 Home Page Metadata Section Example
This example displays a preview of the currently selected image or video.
class PreviewPanel extends HTMLElement { constructor() { super();
Copyright © 2015-2019 Escenic AS Page 69

CUE User Guide
this.attachShadow({ mode: 'open' }); this.shadowRoot.innerHTML = ` <style> :host { margin: 0; padding: 0; width: 100% } h1 { color: #9c9c9c; font-size: 24px; font-weight: 300; } img, video { max-width: 100%; } </style>
<h1>Preview</h1> <div id="preview-wrapper"></div> `;
PreviewPanelProto.attachedCallback = function () { this.cueInterface.homePanel.addFocusedResultWatcher(function (result) { this.focusedResultChanged(result); }.bind(this)); };
PreviewPanelProto.blobUrl = undefined;
PreviewPanelProto.focusedResultChanged = function (result) { if (this.blobUrl) { window.URL.revokeObjectURL(this.blobUrl); } var hide = true; if ( result && result.link.mimeType) { hide = !_.includes(['x-ece/picture', 'x-ece/video'], result.link.mimeType.format()); } this.info.hidden = hide; if (!hide) { this.fetchPreview(result); } };
PreviewPanelProto.fetchPreview = function (result) { var addCredentials = function (xhr) { xhr.setRequestHeader('Authorization', this.cueInterface.escenic.credentials); }.bind(this);
$.ajax({ url: result.link.uri.toString(), type: 'GET', beforeSend: addCredentials }) .done(function (document) { var binaryLink = this.getBinaryLinkFromDocument(document); this.showPreview(binaryLink, result.link.mimeType.format()); }.bind(this))
Copyright © 2015-2019 Escenic AS Page 70

CUE User Guide
.fail(function (error) { console.error(error); }); };
PreviewPanelProto.getBinaryLinkFromDocument = function (document) { var resolver = function (namespace) { if (namespace === 'atom') { return 'http://www.w3.org/2005/Atom'; } };
return document .evaluate('./atom:entry/atom:link[@rel="edit-media"]', document, resolver).iterateNext() .attributes.getNamedItem('href').value; };
PreviewPanelProto.showPreview = function(binaryLink, mimeType) { var xhr = new XMLHttpRequest(); xhr.open('GET', binaryLink, true); xhr.setRequestHeader('Authorization', this.cueInterface.escenic.credentials); xhr.responseType = 'blob'; xhr.onload = function () { if (xhr.readyState === 4) { if (xhr.status === 200) { this.blobUrl = window.URL.createObjectURL(xhr.response); this.updatePreview(mimeType); } else { console.error(xhr.statusText); } } }.bind(this);
xhr.onerror = function () { console.error(xhr.statusText); };
xhr.send(null); };
PreviewPanelProto.updatePreview = function(mimeType) { var wrapper = panelShadowRoot.querySelector('#preview-wrapper'); if (mimeType === 'x-ece/video') { wrapper.innerHTML = '<video controls preload="metadata" src="' + this.blobUrl + '">'; } else { wrapper.innerHTML = '<img src="' + this.blobUrl + '">'; } };
document.registerElement('content-preview', { prototype: PreviewPanelProto });/** * Creating the icon (if required) */var PreviewIconProto = Object.create(HTMLElement.prototype);
Copyright © 2015-2019 Escenic AS Page 71

CUE User Guide
var iconShadowRoot;
this.attachShadow({ mode: 'open' }); this.shadowRoot.innerHTML = ` <style> :host { margin: 0; display: block; } .icon:before { font: 16px 'cf'; font-style: normal; font-weight: normal; color: #444444; content: '\\e879'; -webkit-font-smoothing: antialiased; -moz-osx-font-smoothing: grayscale; } .icon.active:before { color: #09ab00; } </style> <span class="icon"></span> `; }
PreviewIconProto.attachedCallback = function() { this.activeStateChanged(this.cueInterface.isActive()); this.cueInterface.addActiveWatcher(function (active) { this.activeStateChanged(active); }.bind(this)); };
PreviewIconProto.activeStateChanged = function(active) { var icon = iconShadowRoot.querySelector('.icon'); if (active) { $(icon).addClass('active'); } else { $(icon).removeClass('active'); } };
document.registerElement('content-preview-icon', { prototype: PreviewIconProto });
6.2 Enrichment ServicesIt is not feasible for CUE to meet every user's requirements out of the box – particularly when it comesto integration with external systems. Such integrations are increasingly important as organizationsadapt their workflows to make use of popular online productivity tools, publish content to social mediaand so on. When you publish a story in CUE, for example, you might also want to:
• Connect it to a Slack channel
• Create a card in Trello
Copyright © 2015-2019 Escenic AS Page 72

CUE User Guide
• Push it to a Wordpress site
• Share it on one or more social media
• Send it to a legacy print system
CUE's enrichment services provide the means for you to satisfy such requirements for yourself, in asurprisingly straightforward way.
An enrichment service is a simple HTTP service that has a defined workflow. When it receives arequest it recognizes from CUE, it responds in such a way as to guide CUE through the workflow,providing CUE with explicit instructions on what it should do next. You can, for example, configureCUE so that when the user clicks on Publish to publish a story, the story is not immediatelypublished, but instead sent to an enrichment service you have created. The enrichment service canthen perform some check on the story – count the related links, for example – and return a responseto CUE. In this case the response could either be an "OK, continue", allowing the story to be published,or an instruction to display a message saying "please add 3 related links" and cancel the publishoperation.
It is also possible to define much more complex interactions though: you can instruct CUE to displaya sequence of dialogs for the user to fill in, and use the supplied data to modify the content of thesubmitted story. You can also trigger enrichment services in different ways, not only when thePublish button is pressed.
Here is an example workflow for publishing to social media that could be implemented using anenrichment service:
1. The user selects Publish.
2. CUE displays a dialog containing:
• A Title text field (max 140 characters). It is pre-filled with either the story's title or the first140 characters of its lead text field if available, but the user can edit it if required.
• A Social media drop-down field, containing the names of supported social media.
• Three buttons:
• Share: publishes the story and then shares it on the selected medium, using the specifiedtitle.
• Don't share: publishes the story without sharing it.
• Cancel: cancels both operations – the story is neither published nor shared.
If the user selects Share, then the enrichment service will make an appropriate HTTP request to aback-end server that will take care of sharing a link to the published story, using the specified Title.
Despite the fact that this additional functionality is implemented in an enrichment service completelyoutside CUE, it appears to be fully integrated from the user's point of view: the dialog is constructedand displayed by CUE and looks just like any other CUE dialog.
To create an enrichment service you need to:
• Configure CUE to access a service
• Create the service. It must be an HTTP service that accepts specific kinds of requests from CUE,and supplies specific kinds of response.
Copyright © 2015-2019 Escenic AS Page 73

CUE User Guide
6.2.1 Configuring Enrichment Services in CUE
Configuring CUE to access an enrichment service is very straightforward – all you need to do is add afew entries to the CUE configuration file, /etc/escenic/cue-web-2.8/config.yml. Open thisfile for editing. If it does not already contain an enrichmentServices entry, then add one:
enrichmentServices:
Underneath this entry, you can add sub-entries for all the enrichment services you want to define. Anenrichment service configuration contains the following entries:
- name: service-name href: http://host:port/service-url title: service-title triggers: - name: trigger-name
where:
nameIs the name of the enrichment service. The name must be unique since CUE identifies theservices by their name. Any service definition with a duplicate name will be ignored.
hrefIs the URI of the enrichment service. CUE will POST the current content item to this URI as anAtom entry.
titleIs the title of the enrichment service. This title is displayed by CUE in headers and labels asappropriate.
triggersIs a list of one or more triggers defining when CUE is to POST the content item to theenrichment service.
Optionally, a trigger may include a mimeType setting. This is a list of MIME type for which thetrigger is to fire. If you specify this property, then the trigger will only fire for the MIME typesspecified in the list. The possible MIME types that may appear are:
x-ece/story Escenic story-type content item
x-ece/image Escenic image content item
x-ece/video Escenic video content item
x-ece/gallery Escenic gallery content item
x-ece/event Escenic event content item
x-ece/new-content New Escenic content that has not yet been saved
x-ece/section Escenic section
x-ece/section-page Escenic section page
x-ece/list Escenic list
x-ece/* All kinds of Escenic content
Copyright © 2015-2019 Escenic AS Page 74

CUE User Guide
x-cci/assignment Newsgate assignment
x-cci/storyfolder Newsgate story folder
x-cci/* All kinds of Newsgate content
*/* All kinds of CUE content
Some triggers may have properties that need to be specified, in which case the serviceconfiguration will also include a properties value consisting of a sequence of one or moreproperty settings.
Here is an example trigger definition with both a mimeType setting and a list of properties.
triggers: - name: trigger-name mimeType: [mimetype-list] properties: property-name: property-value property-name: property-value
See section 6.2.1.1 for further information.
6.2.1.1 Enrichment Service Triggers
CUE supports a number of different triggers that make it possible to call enrichment services atdifferent points in the editing/publishing process. There is also a timer-based trigger that will call anenrichment service repeatedly at a specified interval.
The triggers are:
before-saveBefore saving, when the user presses the Save button. No properties required.
after-saveAfter saving, when the user presses the Save button. No properties required.
before-save-state-draftBefore saving, when the user changes the state to Draft. No properties required.
after-save-state-draftAfter saving, when the user changes the state to Draft. No properties required.
before-save-state-submittedBefore saving, when the user changes the state to Submitted. No properties required.
after-save-state-submittedAfter saving, when the user changes the state to Submitted. No properties required.
before-save-state-approvedBefore saving, when the user changes the state to Approved. No properties required.
after-save-state-approvedAfter saving, when the user changes the state to Approved. No properties required.
before-save-state-publishedBefore saving, when the user changes the state to Published. No properties required.
after-save-state-publishedAfter saving, when the user changes the state to Published. No properties required.
Copyright © 2015-2019 Escenic AS Page 75

CUE User Guide
before-save-state-deletedBefore saving, when the user changes the state to Deleted. No properties required.
after-save-state-deletedAfter saving, when the user changes the state to Deleted. No properties required.
editor-openedA specified number of seconds after the content item is opened for editing. You must specify thenumber of seconds to wait as a property: delay: n.
editor-recurringAt specified intervals for as long as the content item is open for editing. You must specify thelength of the interval (in seconds) as a property: interval: n.
on-clickWhen the user clicks a button in the content item. No properties required. For more informationabout this kind of trigger see the last example in section 6.2.1.3.
6.2.1.2 Enrichment Service Authentication
In order for an enrichment service to be able to make Content Engine web service calls on behalf ofthe user, it must be able to authenticate itself. You can make this possible by defining authorizedendpoints.
Any enrichment service deployed on an authorized endpoint (or on the same origin as CUE) is giventhe user's credentials. This enables the enrichment service to make requests to the web service onthe user's behalf and thereby perform tasks such as publishing related content items or creating newcontent items.
To define authorized endpoints, add an authorizedEndpoints entry to your config.yml file. Thisentry can contain an array of authorized endpoint URLs (each preceded by a hyphen). For example:
authorizedEndpoints: - "http://my-enrichment-service.info:1234/" - "http://some-other-enrichment-service.info:1234/"
6.2.1.3 Configuration Examples
Here are a few example enrichment service configurations:
• Check that a content item has at least three tags before it is saved:
- name: check-minimum-tag href: http://host:port/checkMinimumTag title: Minimum Tags triggers: - name: before-save
• Check that a content item has no unpublished relations before it is published:
- name: check-unpublished-related-content href: http://host:port/checkUnpublishedContent title: Unpublished Related Content triggers: - name: before-save-state-published
• Check a content item's spelling at regular intervals:
- name: check-spelling href: http://host:port/spellChecker
Copyright © 2015-2019 Escenic AS Page 76

CUE User Guide
title: Spell Checker triggers: - name: editor-recurring properties: interval: 20
• Print a content item:
- name: print-article href: http://host:port/printArticle title: Print Article triggers: - name: on-click
In order for this configuration to work there must not only be an enrichment service to printthe content item at http://host:port/printArticle, the content item being edited mustalso contain a Print button for the user to click. Such buttons must be defined in content typedefinitions in the publication content-type resource. An enrichment service trigger button isdefined by a content item field element with a ui:editor child element. The ui:editor childelement must have a type attribute with the value enrichment-service and a name attributethat matches the name of the CUE enrichment service. For example:
<field name="enrichmentbutton" type="basic" mime-type="text/plain"> <ui:label>Print</ui:label> <ui:editor type="enrichment-service" name="print-article"/></field>
6.2.1.4 Enrichment Service Context Menu Entries
In some cases you may want users to be able to send a content item to an enrichment service byselecting a menu entry. You can achieve this by adding menu entries to content item context menus.A context menu can be displayed by right clicking on the content cards displayed in search resultsand other lists of content item, or by clicking on the "hamburger" button displayed in the top rightcorner of a content editor. To add an enrichment service to the context menus, you need to adda configuration like this to /etc/escenic/cue-web-2.8/config.yml, as well as the mainenrichment service configuration:
extendedContextMenuItems: - name: "print-service" title: "Print" trigger: "on-print-menu-item-click" publication: "tomorrow-online" mimeTypes: ["x-ece/story"]
The extendedContextMenuItems property can contain any number of children, each defininga menu entry for a different enrichment service. Each menu entry definition should consist of thefollowing properties:
nameA name for the menu entry definition.
titleThe label to appear on the menu entry.
triggerA trigger name for the menu item. The name you specify here must also appear in theenrichment service's list of triggers. For example:
- name: print-article
Copyright © 2015-2019 Escenic AS Page 77

CUE User Guide
href: http://host:port/printArticle title: Print Article triggers: - name: on-click - name: on-print-menu-item-click
publicationThe publication with which the menu entry is to be associated. The menu entry will only appearin the context menu of content items that belong to the specified publication. This property isoptional: if you omit it then the menu entry will appear in the context menu of content itemsbelonging to any publication.
mimeTypesThe MIME types with which the menu entry is to be associated. The menu entry will only appearin the context menu of content items of the specified types. This property is optional: if you omitit then the menu entry will appear in the context menu of content items of all types.
6.2.2 Creating an Enrichment Service
An enrichment service is a standard web service that accepts HTTP POST requests from CUE, andresponds with a specific subset of HTTP responses understood by CUE. You can create an enrichmentservice using any web technology or platform you like so long as it conforms to CUE's enrichmentservice protocol requirements.
When an enrichment service is triggered, CUE sends an HTTP POST request to the enrichment serviceURL, with an Atom entry in the body of the request. The Atom entry will contain the content itemcurrently being edited in CUE, packaged as a VDF payload document. This is the same packaging thatis used to send content items to the Content Engine web service - for details, see the Content EngineIntegration Guide.
The enrichment service can then examine the supplied content item, apply tests to it, modify it, modifyother content in the Content Engine (via the Content Engine's web service), make use of external webservices such as spelling or grammar checkers, publish the content item in external channels and soon. It must, however, finally send one of the following HTTP responses back to CUE:
400 (Bad Request)The enrichment service can give this response to indicate that the POSTed content item hasfailed some test or other, and the response can contain an explanatory message that is displayedby CUE. A service that checks for unpublished relations, for example, could send a 400 responseif it found any unpublished relations. CUE would then cancel the trigger operation (publish,presumably) and display an error dialog containing the response message – "Cannot publish.There are unpublished related articles."
204 (No Content)The enrichment service can give this response to indicate that CUE should just carry on asnormal. A service that checks for unpublished relations, for example, could send a 204 responseif it did not find any unpublished relations: CUE would then simply complete the publishoperation that triggered the enrichment service call, and take no further action.
200 (OK)The enrichment service can give this response in a number of different circumstances. Exactlywhat it means, and how it is used by CUE depends on the content returned in the body of theresponse. This can be one of the following types:
Copyright © 2015-2019 Escenic AS Page 78

CUE User Guide
text/plainThis response is functionally the same as a 204 (No Content) response from CUE'spoint of view: the only difference is that CUE displays the text content of the response inan information dialog. An enrichment service that automatically adds the content item toan automatically selected list might, for example, return information about which list thecontent item has been added to: "Item added to list 'urgent'".
text/htmlThis response is similar to a 200 response with text/plain content except that theinformation dialog displayed by CUE will contain formatted HTML.
application/atom+xmlThe Atom entry is expected to contain a content item. How the content item is handleddepends on the entry's <link rel="self"/> element:
• If the link element contains the same self URL as the Atom entry originally POSTedby CUE, then it is assumed to be a modified version of the POSTed content item(returned, for example, from a grammar correction service). If the Atom entry containsall the fields originally POSTed by CUE, CUE overwrites the current content itemwith the returned version and then continues with the operation that triggered theenrichment service call (saving or publishing, for example). If, on the other hand,the Atom entry only contains some of the fields originally POSTed by CUE, thenCUE only updates these fields before continuing with the operation that triggered theenrichment service call.
• If the link element contains a different self URL from the original Atom entry, thenCUE opens the referenced content item in a new editor and completes the operationthat triggered the enrichment service call (saving or publishing the original contentitem, for example).
application/vnd.vizrt.payload+xmlThis response is a VDF payload document (described in Content Engine IntegrationGuide). It is expected to contain a sequence of field definitions. CUE constructs anddisplays a dialog box containing the fields specified in the VDF document, plus an OKand Cancel button. The expectation is that the user will fill in the form and click OK, orelse click Cancel.
If the user clicks OK, then the content of the filled form is submitted to the enrichmentservice URL. The enrichment service can then process the content of the form andrespond again in any of the ways listed above. It could, for example, return a 204 (NoContent) response, or it could get CUE to display another dialog by returning another200 (OK) response with a different application/vnd.vizrt.payload+xml. Inthis way the enrichment service can, if necessary, force CUE to display a long sequenceof dialogs before finally performing some operation and terminating the operation thatinitially triggered the enrichment service.
If the user clicks Cancel, then the operation that triggered the enrichment service iscancelled.
6.2.3 Some Examples
This provides a couple of examples of how enrichment services can be used:
• A "text analysis" enrichment service that makes use of the "update content" action triggered by anapplication/atom+xml response.
Copyright © 2015-2019 Escenic AS Page 79

CUE User Guide
• A "post to Slack" enrichment service that makes use of the dialog sequence triggered by anapplication/vnd.vizrt.payload+xml response.
Both example descriptions assume that an Atom entry like this is POSTed to the enrichment service:
<entry xmlns="http://www.w3.org/2005/Atom" xmlns:app="http://www.w3.org/2007/app" xmlns:metadata="http://xmlns.escenic.com/2010/atom-metadata" xmlns:dcterms="http://purl.org/dc/terms/"> <id>http://host-ip-address/webservice/escenic/content/43</id> <title type="text">Test</title> <app:edited>2010-06-23T09:09:50.654Z</app:edited> <dcterms:created>2010-06-22T10:22:20.000Z</dcterms:created> <author> <name>demo Administrator</name> <uri>http://host-ip-address/webservice/escenic/person/2</uri> </author> <dcterms:identifier>4</dcterms:identifier> <metadata:reference source="ece-auto-gen" sourceid="6d7203c9-27d5-4fce-b14a-a466ead83875"/> <link rel="http://www.vizrt.com/types/relation/home-section" href="http://host-ip-address/webservice/escenic/section/4" title="New Articles" type="application/atom+xml; type=entry"/> <link href="http://wrk-ermo:12345/publication-id/incoming/article4.ece" rel="alternate"/> <link href="http://host-ip-address/webservice/escenic/lock/article/43" rel="http://www.vizrt.com/types/relation/lock"/> <link rel="http://www.vizrt.com/types/relation/publication" href="http://host-ip-address/webservice/escenic/publication/demo" title="demo" type="application/atom+xml; type=entry"/> <metadata:creator> <name>demo Administrator</name> </metadata:creator> <metadata:publication href="http://host-ip-address/webservice/escenic/publication/demo"> <link rel="http://www.vizrt.com/types/relation/home-section" href="http://host-ip-address/webservice/escenic/section/4" title="New Articles" type="application/atom+xml; type=entry"/> <link rel="http://www.vizrt.com/types/relation/section" href="http://host-ip-address/webservice/escenic/section/4" title="New Articles" type="application/atom+xml; type=entry"/> </metadata:publication> <link href="http://host-ip-address/webservice/escenic/content/43" rel="edit"/> <link href="http://host-ip-address/webservice/escenic/content/43" rel="self"/> <content type="application/vnd.vizrt.payload+xml"> <vdf:payload xmlns:vdf="http://www.vizrt.com/types" model="http://host-ip-address/webservice/escenic/model/another"> <vdf:field name="TITLE"> <vdf:value>Test</vdf:value> </vdf:field> <vdf:field name="BODY"> <vdf:value> <div xmlns="http://www.w3.org/1999/xhtml"> <p>This is a test</p> </div>
Copyright © 2015-2019 Escenic AS Page 80

CUE User Guide
</vdf:value> </vdf:field> <vdf:field name="ANALYSIS"></vdf:field> </vdf:payload> </content></entry>
6.2.3.1 A "Text Analysis" Enrichment Service
This service sends the content of a story to an external text analysis service which returns some kindof results (a list of keywords, for example). One way of handling this would be to include a hidden"analysis" field in all the content types you want to be analyzed, to be used as a container for thekeywords. Your enrichment service could then forward the content of all the visible fields to theanalysis service, and add the keywords returned from the service to the hidden "analysis" field.
Here are the configuration settings for such a service:
enrichmentServices: - name: "Analyze text" href: http://my-web-service-host/analysis-service title: "Analyze text" triggers: - name: after-save-state-published properties: {} mimeTypes: ["x-ece/story"]
This configuration specifies that any "story-type" content items (content items that don't contain anybinary fields such as video or images, and aren't live events or Newsgate stories) will be posted to theenrichment service at http://my-web-service-host/analysis-service when they are published.
When the enrichment service receives such a content item, it forwards the content from all the visiblefields to a text analysis service. When it gets the results back from the text analysis service, it sendsan HTTP 200 response back to CUE with an application/atom+xml body containing a copy ofthe original Atom entry posted by CUE. The only part of the Atom entry that is modified is the VDFpayload. All the fields except the ANALYSIS field have been removed, and the ANALYSIS field nowcontains the keywords returned from the text analysis service:
<vdf:payload xmlns:vdf="http://www.vizrt.com/types" model="http://host-ip-address/webservice/escenic/model/another"> <vdf:field name="ANALYSIS"></vdf:field> <vdf:value>sport,football,brazil</vdf:value> </vdf:field> </vdf:payload>
When CUE receives this response from the enrichment service, it overwrites the ANALYSIS field ofthe content item with the value supplied by the enrichment service and publishes the content item. Noother fields are modified.
6.2.3.2 A "Post to Slack" Enrichment Service
This enrichment service posts a link to the Slack messaging service whenever a story is published.Before it posts the link, however, it needs to prompt the CUE user to enter a short name for the story,and the name of the Slack channel in which it is to be posted.
Here are the configuration settings for such a service:
Copyright © 2015-2019 Escenic AS Page 81

CUE User Guide
enrichmentServices: - name: "Post to Slack" href: http://my-web-service-host/slack-service title: "Post to Slack" triggers: - name: after-save-state-published properties: {} mimeTypes: ["x-ece/story"]
This configuration specifies that any "story-type" content items (content items that don't contain anybinary fields such as video or images, and aren't live events or Newsgate stories) will be posted to theenrichment service at http://my-web-service-host/slack-service when they are published.
When the Slack enrichment service receives such a content item, it returns an HTTP 200 responsewith an application/vnd.vizrt.payload+xml body containing a VDF payload document. TheVDF document contains the prompts to be displayed in the dialog, for example:
<vdf:payload xmlns:vdf="http://www.vizrt.com/types" model=”http://web-service-host/slack-channel-description.xml”> <vdf:field name=”slack-name”> <vdf:value>red-herring</vdf:value> </vdf:field> <vdf:field name=”channel”> <vdf:value>#sports</vdf:value> </vdf:field></vdf:payload>
Note the following about this document:
• The vdf:payload element's model attribute must contain the URI of a VDF model documentdefining the structure of the payload. You must create this model document yourself and make itavailable somewhere (most likely on the same host as the enrichment service itself).The VDF modeldocument for the example payload shown above might look like this:
<model xmlns:vdf="http://www.vizrt.com/types"> <schema> <fielddef name="slack-name" label="Story name in Slack" xsdtype="string"/> <fielddef name="channel" label="Slack channel" xsdtype="string"/> </schema></model>
For a description of the VDF model document format, see here.
• The values in the fields are defaults. If you do not want to supply defaults to the fields in the form,you can omit the values.
When CUE receives the payload document, it looks up the referenced model document and usesthe information to construct and display a dialog containing the specified fields. The user can thenenter the required values. When the user selects OK, CUE will POST the payload document (with anychanges made by the user) back to the enrichment service. The enrichment service can then post thestory to Slack and return HTTP 204 (No Content) to CUE, allowing CUE to complete the operationthat initiated the enrichment service call. Alternatively, the enrichment service could return HTTP 200(OK) with a text/plain Content-Type header in order for CUE to display a message indicating thatthe story has been posted to Slack. If the user selects Cancel instead of OK, then nothing is sent to theenrichment service and CUE just carries on and completes the operation that initiated the enrichmentservice call.
Copyright © 2015-2019 Escenic AS Page 82

CUE User Guide
6.2.4 Learning More About Enrichment Services
If you want to learn more about CUE enrichment services, take a look at this series of articles onhttp://blogs.escenic.com:
Diving into enrichment services
6.3 Drop ResolversA drop resolver is an HTTP service that reacts to objects dropped into CUE relation drop zones.A drop resolver is invoked when an object that matches a specified MIME type or URL pattern isdropped in a drop zone. The drop resolver is passed a drop context containing the informationneeded to be able to upload content to the Escenic Content Engine or the CCI Newsgate back end. Adrop resolver can therefore be used to seamlessly import external objects dropped into CUE.
A typical use of a drop resolver would be to handle the import of images dragged into CUE from aDigital Asset Management (DAM) system. When such an image is dropped into a story relation inCUE, CUE checks the dropped image's MIME type or URI and calls the appropriate drop resolver. Thedrop resolver then uploads the dropped image in the background to the appropriate back end, andreturn the URI of the uploaded content to CUE. This allows CUE to continue with the drop operationusing the URL of the uploaded copy rather than the object that was originally dropped.
Drop resolvers can also be used to customize what happens when relations are created by droppingexisting content items into other content items' relation drop zones. You can use a drop resolver, forexample, to copy an image dragged from a foreign publication into the publication where it is beingdropped, so that the resulting dropped image is not cross-published.
6.3.1 Configuring Drop Resolvers in CUE
All you need to do make CUE call a drop resolver is add a few entries to the CUE configuration file, /etc/escenic/cue-web-2.8/config.yml. Open this file for editing. If it does not already containa dropTriggers entry, then add one:
dropTriggers:
Underneath this entry, you can add sub-entries for all the drop resolvers you want to define. A dropresolver configuration contains the following entries:
- name: resolver-name href: http://host:port/service-url resultMimeType: mime-type attributes: custom-resolver-attribute ... triggers: trigger-specification
where:
nameIs the name of the resolver. The name must be unique since CUE identifies the resolvers by theirnames. Any resolver definition with a duplicate name will be ignored.
Copyright © 2015-2019 Escenic AS Page 83

CUE User Guide
hrefIs the URI of the resolver service. The resolver service can run in a different domain from CUE,but will then need to be specified as an authorized endpoint in order to be granted access toCUE's endpoints (see section 6.2.1.2).
resultMimeTypeIs a CUE MIME type, identifying the type of the content returned from the drop resolver.
attributesIs an optional property that you can use to send custom parameters to the drop resolver. Forexample:
attributes: my-resolver-param-1: "value1" my-resolver-param-2: "value2"
triggersA specification of the conditions that will trigger CUE to send a dropped object to the dropresolver. The specification can either consist of an array of MIME types or an array of URIpatterns (but not both). For example:
triggers: mimeTypes: [mime-type,...]
or:
triggers: urlPatterns: [url-pattern,...]
If mimeTypes is specified, then the drop resolver will be called whenever an object with aMIME type that matches one of the specified MIME types is dropped into CUE.
If urlPatterns is specified, then the drop resolver will be called whenever an object with aURL that matches one of the specified URL patterns is dropped into CUE.
Here is an example configuration for a Google image import drop resolver:
dropTriggers: - name: "GoogleImageImport" href: "http://my-server/GoogleImageImport" resultMimeType: "x-ece/picture" triggers: urlPatterns: ['^https?:\/\/www\.google\..*\/imgres\?.*']
This configuration will cause CUE to forward any dropped object with a URL that matches the regularexpression ^https?:\/\/www\.google\..*\/imgres\?.* to the drop resolver http://my-server/GoogleImageImport.
6.3.2 Drop Resolver Parameters
When CUE triggers a drop resolver, it passes an object to the resolver containing the followingparameters:
uriThe URI of the dropped object.
endpointsCUE's configured endpoints (one or more of Content Engine, CCI Newsgate and the bridge).
Copyright © 2015-2019 Escenic AS Page 84

CUE User Guide
attributesAny parameters supplied in the attributes object of the drop resolver configuration (seesection 6.3.1).
accessTokensAccess tokens that can be used to authenticate any requests the drop resolver sends to CUE'sendpoints. These access tokens will only be passed to the drop resolver if it:
• Either belongs to the same domain as CUE
• Or is listed as an authorized endpoint (see section 6.3.1).
contextThe context of the drop operation. For an Escenic publication, this consists of the followingstructure:
publication: name: publication-name uri: publication-uri
where:
• publication-name is the name of the Escenic publication in which the drop operationoccurred.
• publication-uri is the URI of the Escenic publication in which the drop operation occurred.
For a Newsgate publication, the context is:
storyId: story-folder-id
where story-folder-id is the ID of the story folder in which the drop operation occurred.
6.3.3 Drop Resolver Return Values
A drop resolver must return one of the following HTTP responses on termination:
HTTP 200 (OK)The drop resolver has terminated successfully. The body of the HTTP response must containthe URI of a resource in the Content Engine or CCI Newsgate back end (usually this will be animported version of the object that was dropped by the user). CUE will then complete the dropoperation using the supplied URI.
HTTP 204 (No Content)The drop resolver has terminated successfully, but does not have a URI to return. CUE will then:
• If the dropped object was external, abandon the drop operation.
• If the dropped object was an Escenic content item, complete the drop operation with theoriginal content item.
HTTP 4xx or 5xxAn error of some kind has occurred. The body of the HTTP response must contain an errormessage text. CUE will then abandon the drop operation and display the supplied error messagein a dialog box.
Copyright © 2015-2019 Escenic AS Page 85

CUE User Guide
6.4 URL-based Content CreationCUE lets you create a draft content item by simply passing a URL to a browser. A script runningin some other application such as Trello, Google Sheets or Slack can simply construct a CUE URLcontaining the details of a new content item and pass the URL to a browser. CUE will then start in thebrowser and create the requested content item, ready for the user to continue editing (if required), saveand publish.
If the user is currently logged in to CUE then the new content item is created immediately. If the useris not logged in, then the CUE login screen is displayed in the browser. Once the user has logged in, thecontent item is created.
6.4.1 Content Creation URL Structure
A content creation URL must have the following overall structure:
http://your-cue-host/cue-web/#/main?parameter-list"
where your-cue-host is the host name (and possibly the port number) of your CUE host andparameter-list is a sequence of three URL parameters separated by & characters:
uri=source-id&mimetype=mime-type&extra=content-definition
These parameters must contain the following values:
uri=source-idA source ID is a unique string used to identify a content item. The example script generates anID from the current date and time, but you can use whatever method you choose to supply aunique string.
mimetype=mime-typeYou must specify the MIME type x-ece/new-content; type=story.
extra=content-definitioncontent-definition is a JSON value with the following structure:
{ "modelURI": { "string": "model-uri", "$class":"URI" }, "homeSectionUri":"home-section-uri", "values": "content-item-field-values"}
where:
model-uriIs the web service URI of the content model for the content item you want to create. Formore about this, see ??
home-section-uriIs the web service URI of the section to which you want to add the new content item. Formore about this, see ??
Copyright © 2015-2019 Escenic AS Page 86

CUE User Guide
valuesIs an array of field values defining the content you want to add to the new content item.You can leave this array empty if you don't want any of the fields in the new content itemto be predefined, for example:
"values": {}
The fields must be identified by their names as specified in the Escenic content-typeresource, not by the labels displayed in CUE. To predefine values for the title and bodyfields of a content item, you would need to specify:
"values": { "title": "This is the title", "body": "<p>This is the body.</p>"}
Note that all the field names and values in the JSON structure must be enclosed in quotes,otherwise the URL will not be accepted by CUE.
The values of the three URL parameters must all be URL-encoded.
6.4.2 Example Script
The following example bash script shows how to construct a content creation URL and submit it toCUE.
#!/bin/bash
urlencode() { # urlencode <string> old_lc_collate=$LC_COLLATE LC_COLLATE=C
local length="${#1}" for (( i = 0; i < length; i++ )); do local c="${1:i:1}" case $c in [a-zA-Z0-9.~_-]) printf "$c" ;; *) printf '%%%02X' "'$c" ;; esac done LC_COLLATE=$old_lc_collate}
cue="http://your-cue-host/cue-web"webservice="http://your-escenic-webservice-host/webservice"homesection="$webservice/escenic/section/section-id"modeluri="$webservice/escenic/publication/demopub/model/content-type/story"relations=("Content_ID1|group1" "Content_ID2|group2") # eg. ("2015|images" "2016|images")
mimetype="x-ece/new-content; type=story"sourceid=`date '+%y%m%d-%H%M%S'`title="My Title"body="<p>My first paragraph.</p><p>My second paragraph.</p>"
relationsJSON="["for i in "${relations[@]}"
Copyright © 2015-2019 Escenic AS Page 87

CUE User Guide
do : contentUri=`echo $i | cut -d'|' -f1` contentUri="$webservice/escenic/content/$contentUri" group=`echo $i | cut -d'|' -f2` relationsJSON="$relationsJSON{\"group\":\"${group}\",\"contentUri\":\"${contentUri}\"},"doneif [ ${#relationsJSON} -gt 1 ]then relationsJSON="${relationsJSON%?}]"else relationsJSON="$relationsJSON]"fiextra="{\"modelURI\":{\"string\":\"${modeluri}\",\"\$class\":\"URI\"},\"homeSectionUri\":\"${homesection}\",\"values\":{\"title\":\"${title}\",\"body\":\"${body}\"},\"relations\":${relationsJSON}}"
url=$cue/#/main?uri=$(urlencode "$sourceid")\&mimetype=$(urlencode "$mimetype")\&extra=$(urlencode "$extra")
google-chrome $url &
If you edit this script to match your installation, then running it should start the Chrome browserand create a draft content item with the title "My Title". You would need to replace your-cue-hostand your-escenic-webservice-host with the correct host names and replace section-id with the ID ofa section in one of your publications before running it. Otherwise, as long as you have a content typecalled story, it should work.
6.5 Logout TriggersA logout trigger is a simple HTTP GET request that is sent to a specified URL when the user logs outfrom CUE. It provides a mechanism for integrators to automatically perform other actions (such aslogging out of a VPN) on logout from CUE. You can define multiple logout triggers. In this case, a GETrequest will be sent to each specified URL when the user logs out.
The CUE logout process does not wait for any response from the defined trigger URLs – it simplymakes the requests and then performs the logout operation.
To define logout triggers:
1. If necessary, switch user to root.
$ sudo su
2. Open /etc/escenic/cue-web-2.8/config.yml for editing. For example:
# nano /etc/escenic/cue-web-2.8/config.yml
3. Add a logoutTriggers property containing a list of trigger URLs to which GET requests are tobe sent:
logoutTriggers: - http://my-vpn-service/logout - http://my-other-service/logout
4. Save the file.
Copyright © 2015-2019 Escenic AS Page 88

CUE User Guide
5. Enter:
# dpkg-reconfigure cue-web-2.8
This reconfigures CUE with the changes you have made.
Copyright © 2015-2019 Escenic AS Page 89