cuda getting started linux
DESCRIPTION
CUDA_Getting_Started_LinuxTRANSCRIPT
NVIDIA CUDA GETTING STARTED GUIDEFOR LINUX
DU-05347-001_v6.0 | February 2014
Installation and Verification on Linux Systems
www.nvidia.comNVIDIA CUDA Getting Started Guide for Linux DU-05347-001_v6.0 | ii
TABLE OF CONTENTS
Chapter 1. Introduction.........................................................................................11.1. System Requirements.................................................................................... 11.2. About This Document.................................................................................... 2
Chapter 2. Pre-installation Actions...........................................................................32.1. Verify You Have a CUDA-Capable GPU................................................................ 32.2. Verify You Have a Supported Version of Linux.......................................................32.3. Verify the System Has gcc Installed................................................................... 42.4. Choose an Installation Method......................................................................... 42.5. Download the NVIDIA CUDA Toolkit....................................................................5
Chapter 3. Package Manager Installation....................................................................63.1. Prerequisites............................................................................................... 63.2. Redhat/CentOS............................................................................................ 63.3. Fedora...................................................................................................... 73.4. SLES......................................................................................................... 83.5. OpenSUSE...................................................................................................83.6. Ubuntu...................................................................................................... 93.7. L4T......................................................................................................... 103.8. Additional Package Manager Capabilities............................................................10
3.8.1. Available Packages................................................................................. 103.8.2. Package Upgrades..................................................................................11
Chapter 4. Runfile Installation...............................................................................124.1. Pre-installation Setup...................................................................................124.2. Prerequisites..............................................................................................124.3. Contents.................................................................................................. 124.4. Graphical Interface Shutdown.........................................................................134.5. NVIDIA Driver RPM/Deb package uninstallation.................................................... 134.6. Installation................................................................................................134.7. Interaction with Nouveau.............................................................................. 144.8. Extra Libraries........................................................................................... 144.9. Verifications.............................................................................................. 144.10. Graphical Interface Restart.......................................................................... 154.11. Post-installation Setup................................................................................ 15
Chapter 5. Post-installation Actions........................................................................ 165.1. Environment Setup...................................................................................... 165.2. (Optional) Install Writable Samples.................................................................. 165.3. Verify the Installation.................................................................................. 17
5.3.1. Verify the Driver Version......................................................................... 175.3.2. Compiling the Examples.......................................................................... 175.3.3. Running the Binaries.............................................................................. 17
Chapter 6. Additional Considerations...................................................................... 20
www.nvidia.comNVIDIA CUDA Getting Started Guide for Linux DU-05347-001_v6.0 | 1
Chapter 1.INTRODUCTION
CUDA™ is a parallel computing platform and programming model invented byNVIDIA. It enables dramatic increases in computing performance by harnessing thepower of the graphics processing unit (GPU).
CUDA was developed with several design goals in mind:
‣ Provide a small set of extensions to standard programming languages, like C, thatenable a straightforward implementation of parallel algorithms. With CUDA C/C++,programmers can focus on the task of parallelization of the algorithms rather thanspending time on their implementation.
‣ Support heterogeneous computation where applications use both the CPU andGPU. Serial portions of applications are run on the CPU, and parallel portions areoffloaded to the GPU. As such, CUDA can be incrementally applied to existingapplications. The CPU and GPU are treated as separate devices that have their ownmemory spaces. This configuration also allows simultaneous computation on theCPU and GPU without contention for memory resources.
CUDA-capable GPUs have hundreds of cores that can collectively run thousands ofcomputing threads. These cores have shared resources including a register file and ashared memory. The on-chip shared memory allows parallel tasks running on thesecores to share data without sending it over the system memory bus.
This guide will show you how to install and check the correct operation of the CUDAdevelopment tools.
1.1. System RequirementsTo use CUDA on your system, you will need the following installed:
‣ CUDA-capable GPU‣ A supported version of Linux with a gcc compiler and toolchain‣ NVIDIA CUDA Toolkit (available at http://developer.nvidia.com/cuda-downloads)
The CUDA development environment relies on tight integration with the hostdevelopment environment, including the host compiler and C runtime libraries, and
Introduction
www.nvidia.comNVIDIA CUDA Getting Started Guide for Linux DU-05347-001_v6.0 | 2
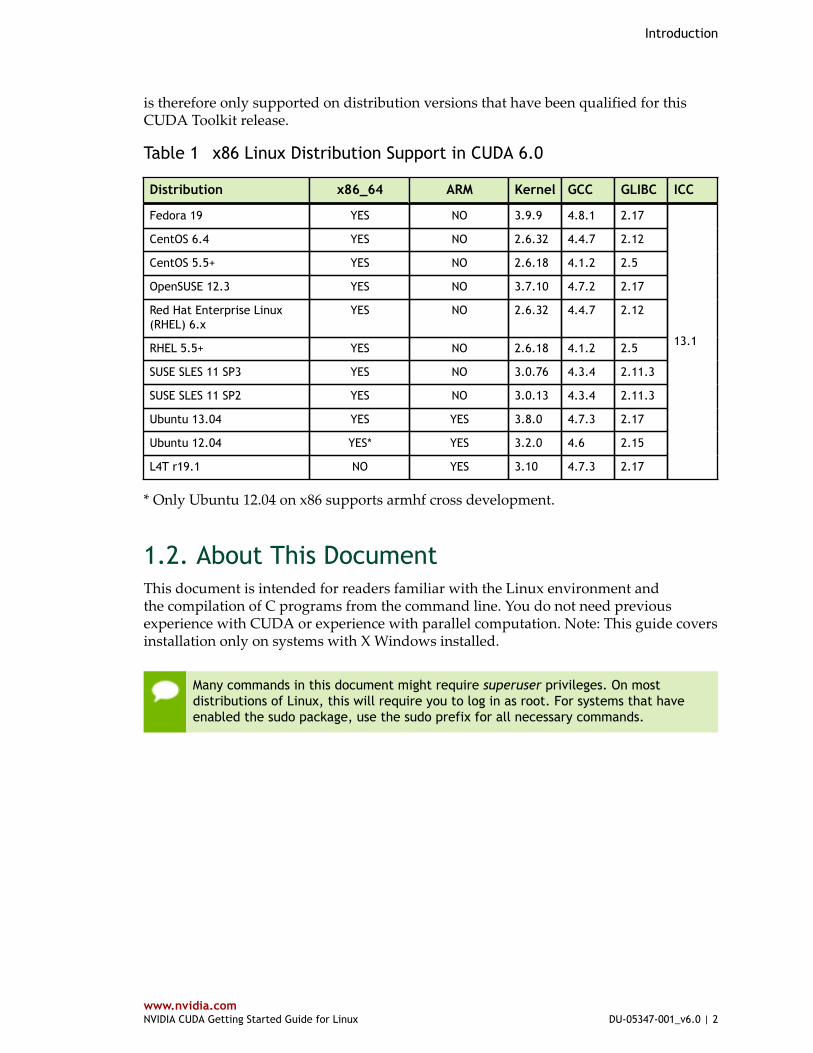
is therefore only supported on distribution versions that have been qualified for thisCUDA Toolkit release.
Table 1 x86 Linux Distribution Support in CUDA 6.0
Distribution x86_64 ARM Kernel GCC GLIBC ICC
Fedora 19 YES NO 3.9.9 4.8.1 2.17
CentOS 6.4 YES NO 2.6.32 4.4.7 2.12
CentOS 5.5+ YES NO 2.6.18 4.1.2 2.5
OpenSUSE 12.3 YES NO 3.7.10 4.7.2 2.17
Red Hat Enterprise Linux(RHEL) 6.x
YES NO 2.6.32 4.4.7 2.12
RHEL 5.5+ YES NO 2.6.18 4.1.2 2.5
SUSE SLES 11 SP3 YES NO 3.0.76 4.3.4 2.11.3
SUSE SLES 11 SP2 YES NO 3.0.13 4.3.4 2.11.3
Ubuntu 13.04 YES YES 3.8.0 4.7.3 2.17
Ubuntu 12.04 YES* YES 3.2.0 4.6 2.15
L4T r19.1 NO YES 3.10 4.7.3 2.17
13.1
* Only Ubuntu 12.04 on x86 supports armhf cross development.
1.2. About This DocumentThis document is intended for readers familiar with the Linux environment andthe compilation of C programs from the command line. You do not need previousexperience with CUDA or experience with parallel computation. Note: This guide coversinstallation only on systems with X Windows installed.
Many commands in this document might require superuser privileges. On mostdistributions of Linux, this will require you to log in as root. For systems that haveenabled the sudo package, use the sudo prefix for all necessary commands.
www.nvidia.comNVIDIA CUDA Getting Started Guide for Linux DU-05347-001_v6.0 | 3
Chapter 2.PRE-INSTALLATION ACTIONS
Some actions must be taken before the CUDA Toolkit and Driver can be installed onLinux:
‣ Verify the system has a CUDA-capable GPU.‣ Verify the system is running a supported version of Linux.‣ Verify the system has gcc installed.‣ Download the NVIDIA CUDA Toolkit.
You can override the install-time prerequisite checks by running the installer withthe -override flag. Remember that the prerequisites will still be required to use theNVIDIA CUDA Toolkit.
2.1. Verify You Have a CUDA-Capable GPUTo verify that your GPU is CUDA-capable, go to your distribution's equivalent of SystemProperties, or, from the command line, enter:
lspci | grep -i nvidia
If you do not see any settings, update the PCI hardware database that Linux maintainsby entering update-pciids (generally found in /sbin) at the command line and rerunthe previous lspci command.
If your graphics card is from NVIDIA and it is listed in http://developer.nvidia.com/cuda-gpus, your GPU is CUDA-capable.
The Release Notes for the CUDA Toolkit also contain a list of supported products.
2.2. Verify You Have a Supported Version of LinuxThe CUDA Development Tools are only supported on some specific distributions ofLinux. These are listed in the CUDA Toolkit release notes.
Pre-installation Actions
www.nvidia.comNVIDIA CUDA Getting Started Guide for Linux DU-05347-001_v6.0 | 4
To determine which distribution and release number you're running, type the followingat the command line:
uname -m && cat /etc/*release
You should see output similar to the following, modified for your particular system:
i386 Red Hat Enterprise Linux WS release 4 (Nahant Update 6)
The i386 line indicates you are running on a 32-bit system. On 64-bit systems runningin 64-bit mode, this line will generally read: x86_64. The second line gives the versionnumber of the operating system.
2.3. Verify the System Has gcc InstalledThe gcc compiler and toolchain generally are installed as part of the Linux installation,and in most cases the version of gcc installed with a supported version of Linux willwork correctly.
To verify the version of gcc installed on your system, type the following on thecommand line:
gcc --version
If an error message displays, you need to install the development tools from your Linuxdistribution or obtain a version of gcc and its accompanying toolchain from the Web.
For ARMv7 cross development, a suitable cross compiler is required. For example,performing the following on Ubuntu 12.04:
sudo apt-get install g++-4.6-arm-linux-gnueabihf
will install the gcc 4.6 cross compiler on your system which will be used by nvcc.Please refer to th NVCC manual on how to use nvcc to cross compile to the ARMv7architecture
2.4. Choose an Installation MethodThe CUDA Toolkit can be installed using either of two different installation mechanisms:distribution-specific packages, or a distribution-independent package. The distribution-independent package has the advantage of working across a wider set of Linuxdistributions, but does not update the distribution's native package management system.The distribution-specific packages interface with the distribution's native package
Pre-installation Actions
www.nvidia.comNVIDIA CUDA Getting Started Guide for Linux DU-05347-001_v6.0 | 5
management system. It is recommended to use the distribution-specific packages, wherepossible.
Distribution-specific packages and repositories are not provided for Redhat 5 andUbuntu 10.04. For those two Linux distributions, the stand-alone installer must beused.
Standalone installers are not provided for the ARMv7 release. For both native ARMv7as well as cross developent, the toolkit must be installed using the distribution-specific installer.
2.5. Download the NVIDIA CUDA ToolkitThe NVIDIA CUDA Toolkit is available at http://developer.nvidia.com/cuda-downloads.
Choose the platform you are using and download the NVIDIA CUDA Toolkit
The CUDA Toolkit contains the CUDA driver and tools needed to create, build and runa CUDA application as well as libraries, header files, CUDA samples source code, andother resources.
Download Verification
The download can be verified by comparing the MD5 checksum posted at http://developer.nvidia.com/cuda-downloads/checksums with that of the downloadedfile. If either of the checksums differ, the downloaded file is corrupt and needs to bedownloaded again.
To calculate the MD5 checksum of the downloaded file, run the following:
$ md5sum <file>

www.nvidia.comNVIDIA CUDA Getting Started Guide for Linux DU-05347-001_v6.0 | 6
Chapter 3.PACKAGE MANAGER INSTALLATION
The installation is a two-step process. First the small repository configuration packagemust be downloaded from the NVIDIA CUDA download page, and installed manually.The package sets the package manager database to include the CUDA repository. Thenthe CUDA Toolkit is installed using the package manager software.
3.1. Prerequisites‣ The package manager installations (RPM/DEB packages) and the stand-alone
installer installations (.run file) of the NVIDIA driver are incompatible. Before usingthe distribution-specific packages, uninstall the NVIDIA driver with the followingcommand:
sudo /usr/bin/nvidia-uninstall
‣ For x86 to ARMv7 cross development, the host system must be an Ubuntu 12.04system.
3.2. Redhat/CentOS 1. Perform the pre-installation actions. 2. Satisfy DKMS dependency
The NVIDIA driver RPM packages depend on other external packages, such asDKMS and libvdpau. Those packages are only available on third-party repositories,such as EPEL. Any such third-party repositories must be added to the packagemanager repository database before installing the NVIDIA driver RPM packages, ormissing dependencies will prevent the installation from proceeding.
3. Address custom xorg.conf, if applicable
The driver relies on an automatically generated xorg.conf file at /etc/X11/xorg.conf.If a custom-built xorg.conf file is present, this functionality will be disabled and thedriver may not work. You can try removing the existing xorg.conf file, or adding thecontents of /etc/X11/xorg.conf.d/00-nvidia.conf to the xorg.conf file. The xorg.conf

Package Manager Installation
www.nvidia.comNVIDIA CUDA Getting Started Guide for Linux DU-05347-001_v6.0 | 7
file will most likely need manual tweaking for systems with a non-trivial GPUconfiguration.
4. Install repository meta-data
$ sudo rpm --install cuda-repo-<distro>-<version>.<architecture>.rpm
5. Clean Yum repository cache
$ sudo yum clean expire-cache
6. Install CUDA
$ sudo yum install cuda
If the i686 libvdpau package dependency fails to install, try using the followingsteps to fix the issue:
$ yumdownloader libvdpau.i686$ sudo rpm -U --oldpackage libvdpau*.rpm
7. Add libcuda.so symbolic link, if necessary
The libcuda.so library is installed in the /usr/lib{,64}/nvidia directory. For pre-existing projects which use libcuda.so, it may be useful to add a symbolic link fromlibcuda.so in the /usr/lib{,64} directory.
8. Perform the post-installation actions.
3.3. Fedora 1. Perform the pre-installation actions. 2. Address custom xorg.conf, if applicable
The driver relies on an automatically generated xorg.conf file at /etc/X11/xorg.conf.If a custom-built xorg.conf file is present, this functionality will be disabled and thedriver may not work. You can try removing the existing xorg.conf file, or adding thecontents of /etc/X11/xorg.conf.d/00-nvidia.conf to the xorg.conf file. The xorg.conffile will most likely need manual tweaking for systems with a non-trivial GPUconfiguration.
3. Install repository meta-data
$ sudo rpm --install cuda-repo-<distro>-<version>.<architecture>.rpm
4. Clean Yum repository cache
$ sudo yum clean expire-cache
5. Install CUDA
$ sudo yum install cuda
If the i686 libvdpau package dependency fails to install, try using the followingsteps to fix the issue:
$ yumdownloader libvdpau.i686$ sudo rpm -U --oldpackage libvdpau*.rpm
6. Add libcuda.so symbolic link, if necessary
Package Manager Installation
www.nvidia.comNVIDIA CUDA Getting Started Guide for Linux DU-05347-001_v6.0 | 8
The libcuda.so library is installed in the /usr/lib{,64}/nvidia directory. For pre-existing projects which use libcuda.so, it may be useful to add a symbolic link fromlibcuda.so in the /usr/lib{,64} directory.
7. Perform the post-installation actions.
3.4. SLES 1. Perform the pre-installation actions. 2. Install repository meta-data
$ sudo rpm --install cuda-repo-<distro>-<version>.<architecture>.rpm
3. Refresh Zypper repository cache
$ sudo zypper refresh
4. Install CUDA
$ sudo zypper install cuda
The driver is provided in multiple packages, nvidia-gfxG03-kmp-desktop, nvidia-gfxG03-kmp-default, nvidia-gfxG03-kmp-trace, and their Unified Memory variants.When installing cuda, the correct driver packages should also be specified. Withoutdoing this, zypper will select packages that may not work on the system. Run thefollowing to detect the flavor of kernel and install cuda with the appropriate driverpackages:
$ uname -r 3.4.6-2.10-<flavor>$ sudo zypper install cuda nvidia-gfxG03-kmp-<flavor> \ nvidia-uvm-gfxG03-kmp-<flavor>
5. Add the user to the video group
$ sudo usermod -a -G video <username>
6. Install CUDA Samples GL dependencies
The CUDA Samples package on SLES does not include dependencies on GL and X11libraries as these are provided in the SLES SDK. These packages must be installedseparately, depending on which samples you want to use.
7. Perform the post-installation actions.
3.5. OpenSUSE 1. Perform the pre-installation actions. 2. Install repository meta-data
$ sudo rpm --install cuda-repo-<distro>-<version>.<architecture>.rpm
3. Refresh Zypper repository cache
$ sudo zypper refresh
4. Install CUDA
Package Manager Installation
www.nvidia.comNVIDIA CUDA Getting Started Guide for Linux DU-05347-001_v6.0 | 9
$ sudo zypper install cuda
The driver is provided in multiple packages, nvidia-gfxG03-kmp-desktop, nvidia-gfxG03-kmp-default, nvidia-gfxG03-kmp-trace, and their Unified Memory variants.When installing cuda, the correct driver packages should also be specified. Withoutdoing this, zypper will select packages that may not work on the system. Run thefollowing to detect the flavor of kernel and install cuda with the appropriate driverpackages:
$ uname -r 3.4.6-2.10-<flavor>$ sudo zypper install cuda nvidia-gfxG03-kmp-<flavor> \ nvidia-uvm-gfxG03-kmp-<flavor>
5. Add the user to the video group
$ sudo usermod -a -G video <username>
6. Perform the post-installation actions.
3.6. Ubuntu 1. Perform the pre-installation actions. 2. Enable armhf foreign architecture, if necessary
The armhf foreign architecture must be enabled in order to install the cross-armhftoolkit. To enable armhf as a foreign architecture, the following commands must beexecuted:
On Ubuntu 12.04,
$ sudo sh -c \ 'echo "foreign-architecture armhf" >> /etc/dpkg/dpkg.cfg.d/multiarch'$ sudo apt-get update
On Ubuntu 12.10 or greater,
$ sudo dpkg --add-architecture armhf$ sudo apt-get update
3. Install repository meta-data
When using a proxy server with aptitude, ensure that wget is set up to use the sameproxy settings before installing the cuda-repo package.
$ sudo dpkg -i cuda-repo-<distro>_<version>_<architecture>.deb
4. Update the Apt repository cache
$ sudo apt-get update
5. Install CUDA
$ sudo apt-get install cuda
6. Add libcuda.so symbolic link, if necessary
The libcuda.so library is installed in the /usr/lib/nvidia-331 directory. For pre-existing projects which use libcuda.so, it may be useful to add a symbolic link fromlibcuda.so in the /usr/lib directory.
Package Manager Installation
www.nvidia.comNVIDIA CUDA Getting Started Guide for Linux DU-05347-001_v6.0 | 10
7. Perform the post-installation actions.
3.7. L4T 1. Perform the pre-installation actions. 2. Install repository meta-data
$ sudo dpkg -i cuda-repo-<distro>_<version>_<architecture>.deb
3. Update the Apt repository cache
$ sudo apt-get update
4. Install CUDA Toolkit
$ sudo apt-get install cuda-toolkit-6-0
5. Add the user to the video group
$ sudo usermod -a -G video <username>
6. Perform the post-installation actions.
3.8. Additional Package Manager CapabilitiesBelow are some additional capabilities of the package manager that users can takeadvantage of.
3.8.1. Available PackagesThe recommended installation packages are cuda and cuda-cross. Those two packageswill install the full set of other CUDA packages required for development and shouldcover most scenarios
The cuda package installs all the available packages for native developments. Thatincludes the compiler, the debugger, the profiler, the math libraries,... For x86 patforms,this also include NSight Eclipse Edition and the visual profiler It also includes theNVIDIA driver package.
The cuda-cross package installs all the packages required for cross-platformdevelopments, such as the i386 and x86_64 CUDA libraries. On supported platforms,the cuda-cross-armhf package installs all the packages required for cross-platformdevelopment on ARMv7. The libraries and header files of the ARMv7 display driverpackage are also installed to enable the cross compilation of ARMv7 applications. Thecuda-cross and cuda-cross-armhf packages do not install the native display driver.
The packages installed by the packages above can also be installed individually byspecifying their names explicitly. The list of available packages be can obtained with:
$ yum --disablerepo="*" --enablerepo="cuda*" list available # RedHat & Fedora$ zypper packages -r cuda # OpenSUSE & SLES$ cat /var/lib/apt/lists/*cuda*Packages | grep "Package:" # Ubuntu
Package Manager Installation
www.nvidia.comNVIDIA CUDA Getting Started Guide for Linux DU-05347-001_v6.0 | 11
3.8.2. Package UpgradesThe cuda package points to the latest stable release of the CUDA Toolkit. When a newversion is available, use the following commands to upgrade the toolkit:
$ sudo yum install cuda # RedHat & Fedora$ sudo zypper install cuda # OpenSUSE & SLES$ sudo apt-get install cuda # Ubuntu
The cuda-cross and cuda-cross-armhf packages can also be upgraded in the samemanner.
The cuda-drivers package points to the latest driver release available in the CUDArepository. When a new version is available, use the following commands to upgrade thedriver:
$ sudo yum install cuda-drivers # RedHat & Fedora$ sudo zypper install cuda-drivers \ nvidia-gfxG03-kmp-<flavor> \ nvidia-uvm-gfxG03-kmp-<flavor> # OpenSUSE & SLES$ sudo apt-get install cuda-drivers # Ubuntu
Some desktop environments, such as GNOME or KDE, will display an notification alertwhen new packages are available.
To avoid any automatic upgrade, and lock down the toolkit installation to the X.Yrelease, install the cuda-X-Y or cuda-cross-X-Y.
Side-by-side installations are supported. For instance, to install both the X.Y CUDAToolkit and the X.Y+1 CUDA Toolkit, install the cuda-X.Y and cuda-X.Y+1 packages.
www.nvidia.comNVIDIA CUDA Getting Started Guide for Linux DU-05347-001_v6.0 | 12
Chapter 4.RUNFILE INSTALLATION
This section describes the installation and configuration of CUDA when using thestandalone installer.
4.1. Pre-installation SetupBefore the stand-alone installation can be run, perform the pre-installation actions.
4.2. PrerequisitesIf you have already installed a standalone CUDA driver and desire to keep using it,you need to make sure it meets the minimum version requirement for the toolkit. Thisrequirement can be found in the CUDA Toolkit release notes. With many distributions,the driver version number can be found in the graphical interface menus underApplications > System Tools > NVIDIA X Server Settings.. On thecommand line, the driver version number can be found by running /usr/bin/nvidia-settings.
The package manager installations (RPM/DEB packages) and the stand-alone installerinstallations (.run file) are incompatible. See below about how to uninstall any previousRPM/DEB installation.
4.3. ContentsThe standalone installer can install any combination of the NVIDIA Driver (that includesthe CUDA Driver), the CUDA Toolkit, or the CUDA Samples. If needed, each individualinstaller can be extracted by using the -extract=/absolute/path/to/extract/location/. The extraction path must be an absolute path.
The CUDA Toolkit installation includes a read-only copy of the CUDA Samples. Theread-only copy is used to create a writable copy of the CUDA Samples at some otherlocation at any point in time. To create this writable copy, use the cuda-install-
Runfile Installation
www.nvidia.comNVIDIA CUDA Getting Started Guide for Linux DU-05347-001_v6.0 | 13
samples-6.0.sh script provided with the toolkit. It is equivalent to installing theCUDA Samples with the standalone installer.
4.4. Graphical Interface ShutdownExit the GUI if you are in a GUI environment by pressing Ctrl-Alt-Backspace. Somedistributions require you to press this sequence twice in a row; others have disabled italtogether in favor of a command such as sudo service ligthdm stop. Still othersrequire changing the system runlevel using a command such as /sbin/init 3 Consultyour distribution's documentation to find out how to properly exit the GUI. This step isonly required in the event that you want to install the NVIDIA Display Driver includedin the standalone installer.
4.5. NVIDIA Driver RPM/Deb packageuninstallationIf you want to install the NVIDIA Display Driver included in the standalone installer,any previous driver installed through RPM or DEB packages MUST be uninstalledfirst. Such installation may be part of the default installation of your Linux distribution.Or it could have been installed as part of the package installation described in theprevious section. To uninstall a DEB package, use sudo apt-get --purge removepackage_name or equivalent. To uninstall a RPM package, use sudo yum removepackage_name or equivalent.
4.6. InstallationTo install any combination of the driver, toolkit, and the samples, simply executethe .run script. The installation of the driver requires the script to be run with rootprivileges. Depending on the target location, the toolkit and samples installations mayalso require root privileges.
By default, the toolkit and the samples will install under /usr/local/cuda-6.0 and$(HOME)/NVIDIA_CUDA-6.0_Samples, respectively. In addition, a symbolic linkis created from /usr/local/cuda to /usr/local/cuda-6.0. The symbolic link iscreated in order for existing projects to automatically make use of the newly installedCUDA Toolkit.
If the target system includes both an integrated GPU (iGPU) and a discrete GPU(dGPU), the --no-opengl-libs option must be used. Otherwise, the openGL library usedby the graphics driver of the iGPU will be overwritten and the GUI will not work. Inaddition, the xorg.conf update at the end of the installation must be declined.
Installing Mesa may overwrite the /usr/lib/libGL.so that was previously installedby the NVIDIA driver, so a reinstallation of the NVIDIA driver might be required afterinstalling these libraries.

Runfile Installation
www.nvidia.comNVIDIA CUDA Getting Started Guide for Linux DU-05347-001_v6.0 | 14
4.7. Interaction with NouveauThe Nouveau drivers may be installed into your root filesystem (initramfs) and maycause the Display Driver installation to fail. To fix the situation, the initramfs image mustbe rebuilt with:
sudo mv /boot/initramfs-$(uname -r).img /boot/initramfs-$(uname -r)-nouveau.imgsudo dracut /boot/initramfs-$(uname -r).img $(uname -r)
if Grub2 is used as the bootloader, the rdblacklist=nouveau nouveau.modeset=0line must be added at the end of the GRUB_CMDLINE_LINUX entry in /etc/default/grub. Then, the Grub configuration must be remade by running:
sudo grub2-mkconfig -o /boot/grub2/grub.cfg
Once this is done, the machine must be rebooted and the installation attempted again.
4.8. Extra LibrariesIf you wish to build all the samples, including those with graphical rather thancommand-line interfaces, additional system libraries or headers may be required.While every Linux distribution is slightly different with respect to package names andpackage installation procedures, the libraries and headers most likely to be necessary areOpenGL (e.g., Mesa), GLU, GLUT, and X11 (including Xi, Xmu, and GLX).
On Ubuntu, those can be installed as follows:
sudo apt-get install freeglut3-dev build-essential libx11-dev libxmu-dev libxi-dev libgl1-mesa-glx libglu1-mesa libglu1-mesa-dev
4.9. VerificationsCheck that the device files/dev/nvidia* exist and have the correct (0666) filepermissions. These files are used by the CUDA Driver to communicate with the kernel-mode portion of the NVIDIA Driver. Applications that use the NVIDIA driver, such asa CUDA application or the X server (if any), will normally automatically create thesefiles if they are missing using the setuid nvidia-modprobe tool that is bundled with theNVIDIA Driver. Some systems disallow setuid binaries, however, so if these files do not
Runfile Installation
www.nvidia.comNVIDIA CUDA Getting Started Guide for Linux DU-05347-001_v6.0 | 15
exist, you can create them manually either by running the command nvidia-smi asroot at boot time or by using a startup script such as the one below:#!/bin/bash
/sbin/modprobe nvidia
if [ "$?" -eq 0 ]; then # Count the number of NVIDIA controllers found. NVDEVS=`lspci | grep -i NVIDIA` N3D=`echo "$NVDEVS" | grep "3D controller" | wc -l` NVGA=`echo "$NVDEVS" | grep "VGA compatible controller" | wc -l`
N=`expr $N3D + $NVGA - 1` for i in `seq 0 $N`; do mknod -m 666 /dev/nvidia$i c 195 $i done
mknod -m 666 /dev/nvidiactl c 195 255
else exit 1fi
/sbin/modprobe nvidia-uvm
if [ "$?" -eq 0 ]; then # Find out the major device number used by the nvidia-uvm driver D=`grep nvidia-uvm /proc/devices | awk '{print $1}'`
mknod -m 666 /dev/nvidia-uvm c $D 0else exit 1fi
4.10. Graphical Interface RestartRestart the GUI environment using the command startx, init 5, sudo servicelightdm start, or the equivalent command on your system.
4.11. Post-installation SetupOnce the stand-alone installation is complete, be sure to perform the post-installationactions.

www.nvidia.comNVIDIA CUDA Getting Started Guide for Linux DU-05347-001_v6.0 | 16
Chapter 5.POST-INSTALLATION ACTIONS
Some actions must be taken after installing the CUDA Toolkit and Driver before they canbe completely used:
‣ Setup evironment variables.‣ Install a writable copy of the CUDA Samples.‣ Verify the installation.
5.1. Environment SetupThe PATH variable needs to include /usr/local/cuda-6.0/bin
The LD_LIBRARY_PATH variable needs to contain /usr/local/cuda-6.0/lib on a 32-bit system, and /usr/local/cuda-6.0/lib64 on a 64-bit system
‣ To change the environment variables for 32-bit operating systems:
$ export PATH=/usr/local/cuda-6.0/bin:$PATH$ export LD_LIBRARY_PATH=/usr/local/cuda-6.0/lib:$LD_LIBRARY_PATH
‣ To change the environment variables for 64-bit operating systems:
$ export PATH=/usr/local/cuda-6.0/bin:$PATH$ export LD_LIBRARY_PATH=/usr/local/cuda-6.0/lib64:$LD_LIBRARY_PATH
5.2. (Optional) Install Writable SamplesIn order to modify, compile, and run the samples, the samples must be installed withwrite permissions. A convenience installation script is provided:
$ cuda-install-samples-6.0.sh <dir>
This script is installed with the cuda-samples-6-0 package. The cuda-samples-6-0package installs only a read-only copy in /usr/local/cuda-6.0/samples.
Post-installation Actions
www.nvidia.comNVIDIA CUDA Getting Started Guide for Linux DU-05347-001_v6.0 | 17
5.3. Verify the InstallationBefore continuing, it is important to verify that the CUDA toolkit can find andcommunicate correctly with the CUDA-capable hardware. To do this, you need tocompile and run some of the included sample programs.
Ensure the PATH and LD_LIBRARY_PATH variables are set correctly.
5.3.1. Verify the Driver VersionIf you installed the driver, verify that the correct version of it is installed.
This can be done through your System Properties (or equivalent) or by executing thecommand
cat /proc/driver/nvidia/version
Note that this command will not work on an iGPU/dGPU system.
5.3.2. Compiling the ExamplesThe version of the CUDA Toolkit can be checked by running nvcc -V in a terminalwindow. The nvcc command runs the compiler driver that compiles CUDA programs. Itcalls the gcc compiler for C code and the NVIDIA PTX compiler for the CUDA code.
The NVIDIA CUDA Toolkit includes sample programs in source form. You shouldcompile them by changing to ~/NVIDIA_CUDA-6.0_Samples and typing make. Theresulting binaries will be placed under ~/NVIDIA_CUDA-6.0_Samples/bin.
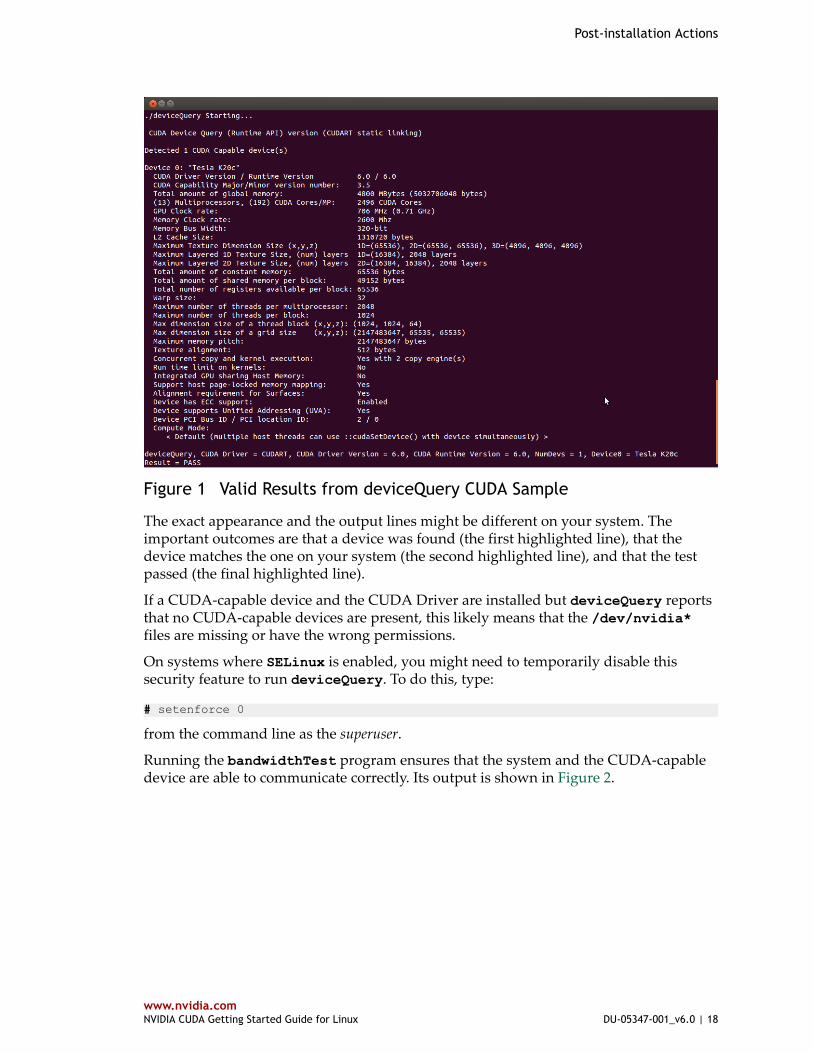
5.3.3. Running the BinariesAfter compilation, find and run deviceQuery under ~/NVIDIA_CUDA-6.0_Samples.If the CUDA software is installed and configured correctly, the output for deviceQueryshould look similar to that shown in Figure 1.
Post-installation Actions
www.nvidia.comNVIDIA CUDA Getting Started Guide for Linux DU-05347-001_v6.0 | 18
Figure 1 Valid Results from deviceQuery CUDA Sample
The exact appearance and the output lines might be different on your system. Theimportant outcomes are that a device was found (the first highlighted line), that thedevice matches the one on your system (the second highlighted line), and that the testpassed (the final highlighted line).
If a CUDA-capable device and the CUDA Driver are installed but deviceQuery reportsthat no CUDA-capable devices are present, this likely means that the /dev/nvidia*files are missing or have the wrong permissions.
On systems where SELinux is enabled, you might need to temporarily disable thissecurity feature to run deviceQuery. To do this, type:
# setenforce 0
from the command line as the superuser.
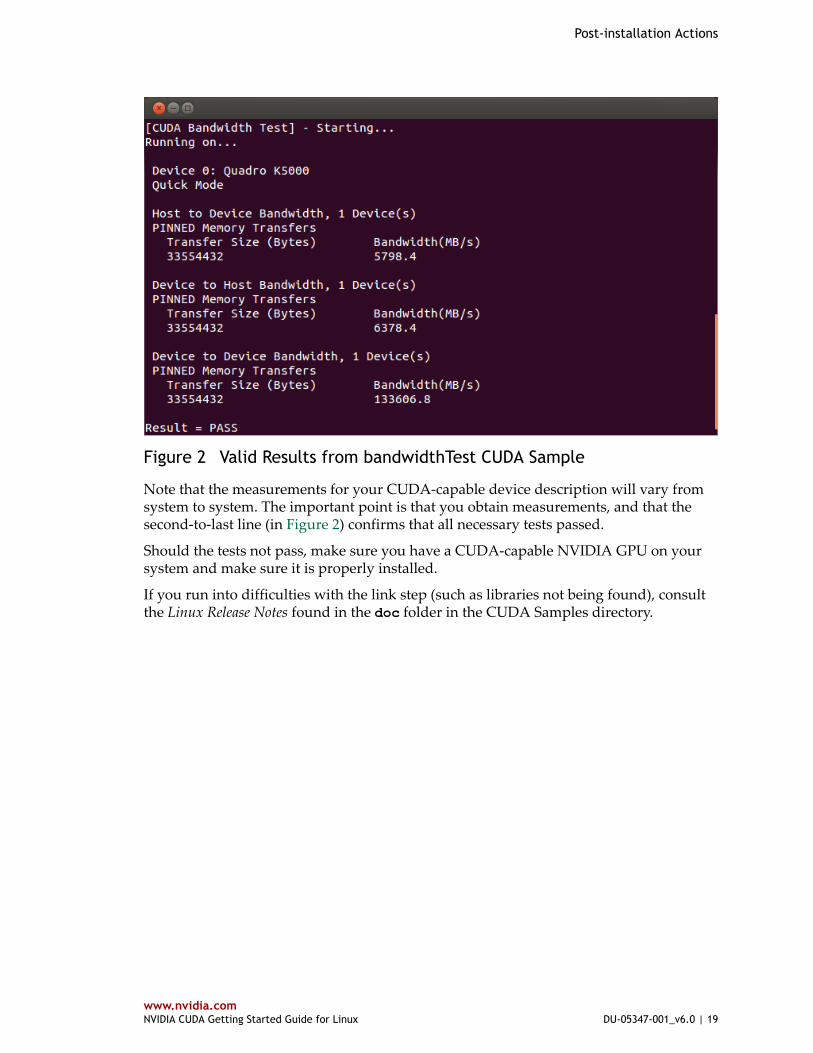
Running the bandwidthTest program ensures that the system and the CUDA-capabledevice are able to communicate correctly. Its output is shown in Figure 2.
Post-installation Actions
www.nvidia.comNVIDIA CUDA Getting Started Guide for Linux DU-05347-001_v6.0 | 19
Figure 2 Valid Results from bandwidthTest CUDA Sample
Note that the measurements for your CUDA-capable device description will vary fromsystem to system. The important point is that you obtain measurements, and that thesecond-to-last line (in Figure 2) confirms that all necessary tests passed.
Should the tests not pass, make sure you have a CUDA-capable NVIDIA GPU on yoursystem and make sure it is properly installed.
If you run into difficulties with the link step (such as libraries not being found), consultthe Linux Release Notes found in the doc folder in the CUDA Samples directory.
www.nvidia.comNVIDIA CUDA Getting Started Guide for Linux DU-05347-001_v6.0 | 20
Chapter 6.ADDITIONAL CONSIDERATIONS
Now that you have CUDA-capable hardware and the NVIDIA CUDA Toolkit installed,you can examine and enjoy the numerous included programs. To begin using CUDA toaccelerate the performance of your own applications, consult the CUDA C ProgrammingGuide, located in /usr/local/cuda-6.0/doc.
A number of helpful development tools are included in the CUDA Toolkit to assistyou as you develop your CUDA programs, such as NVIDIA® Nsight™ Eclipse Edition,NVIDIA Visual Profiler, cuda-gdb, and cuda-memcheck.
For technical support on programming questions, consult and participate in thedeveloper forums at http://developer.nvidia.com/cuda/.
Notice
ALL NVIDIA DESIGN SPECIFICATIONS, REFERENCE BOARDS, FILES, DRAWINGS,DIAGNOSTICS, LISTS, AND OTHER DOCUMENTS (TOGETHER AND SEPARATELY,"MATERIALS") ARE BEING PROVIDED "AS IS." NVIDIA MAKES NO WARRANTIES,EXPRESSED, IMPLIED, STATUTORY, OR OTHERWISE WITH RESPECT TO THEMATERIALS, AND EXPRESSLY DISCLAIMS ALL IMPLIED WARRANTIES OFNONINFRINGEMENT, MERCHANTABILITY, AND FITNESS FOR A PARTICULARPURPOSE.
Information furnished is believed to be accurate and reliable. However, NVIDIACorporation assumes no responsibility for the consequences of use of suchinformation or for any infringement of patents or other rights of third partiesthat may result from its use. No license is granted by implication of otherwiseunder any patent rights of NVIDIA Corporation. Specifications mentioned in thispublication are subject to change without notice. This publication supersedes andreplaces all other information previously supplied. NVIDIA Corporation productsare not authorized as critical components in life support devices or systemswithout express written approval of NVIDIA Corporation.
Trademarks
NVIDIA and the NVIDIA logo are trademarks or registered trademarks of NVIDIACorporation in the U.S. and other countries. Other company and product namesmay be trademarks of the respective companies with which they are associated.
Copyright
© 2009-2014 NVIDIA Corporation. All rights reserved.
www.nvidia.com