creating resourse in cpm schedule 1
DESCRIPTION
Primavera P6TRANSCRIPT
1
Enterprise Resources (Dictionary) – Creating Resources in the CPM Schedule
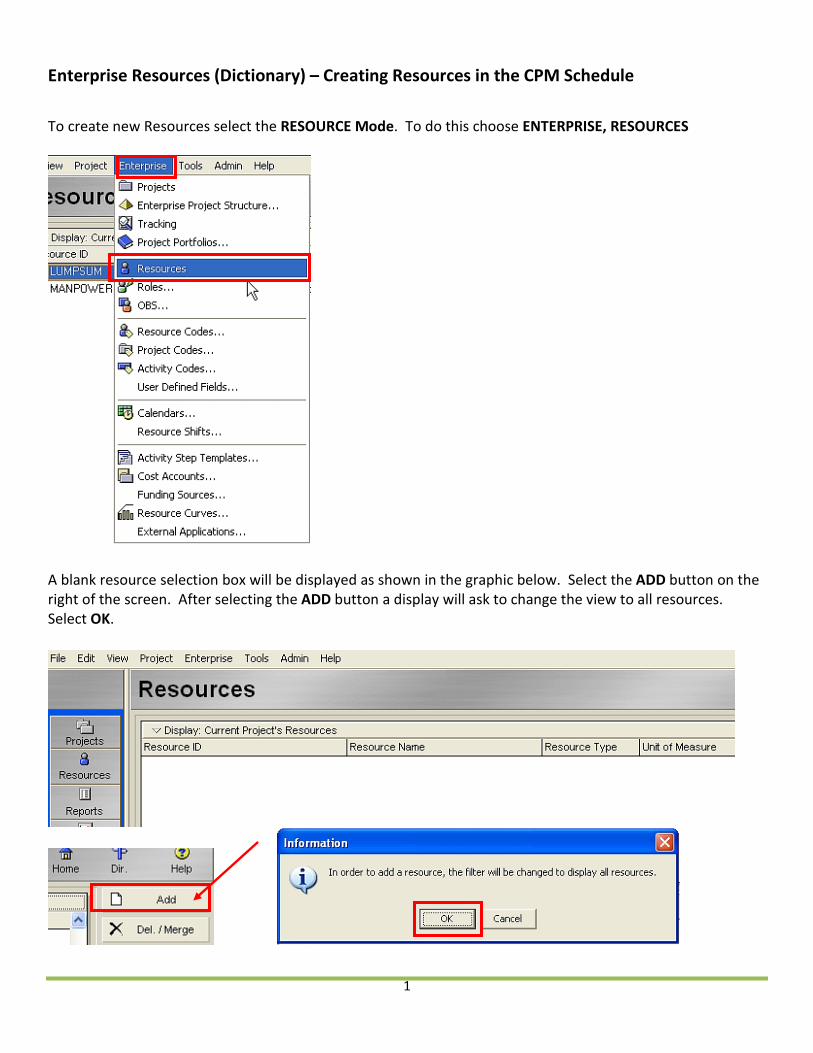
To create new Resources select the RESOURCE Mode. To do this choose ENTERPRISE, RESOURCES
A blank resource selection box will be displayed as shown in the graphic below. Select the ADD button on the right of the screen. After selecting the ADD button a display will ask to change the view to all resources. Select OK.
2
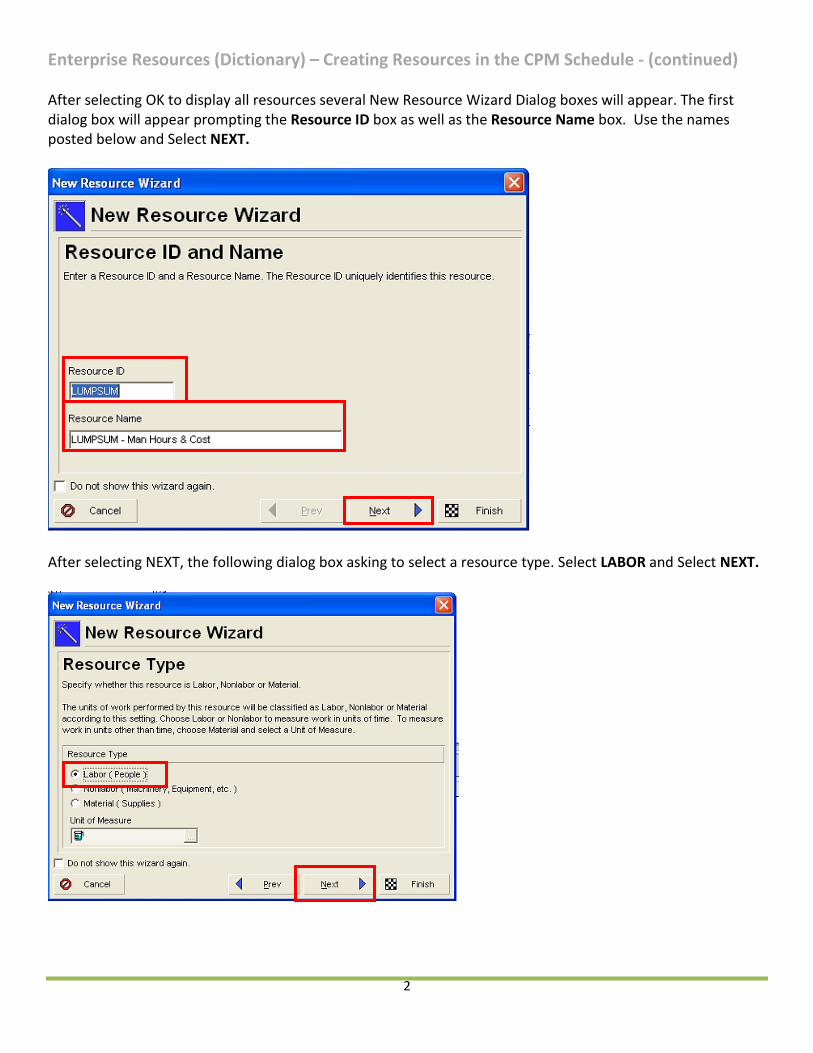
Enterprise Resources (Dictionary) – Creating Resources in the CPM Schedule ‐ (continued) After selecting OK to display all resources several New Resource Wizard Dialog boxes will appear. The first dialog box will appear prompting the Resource ID box as well as the Resource Name box. Use the names posted below and Select NEXT.
After selecting NEXT, the following dialog box asking to select a resource type. Select LABOR and Select NEXT.
3
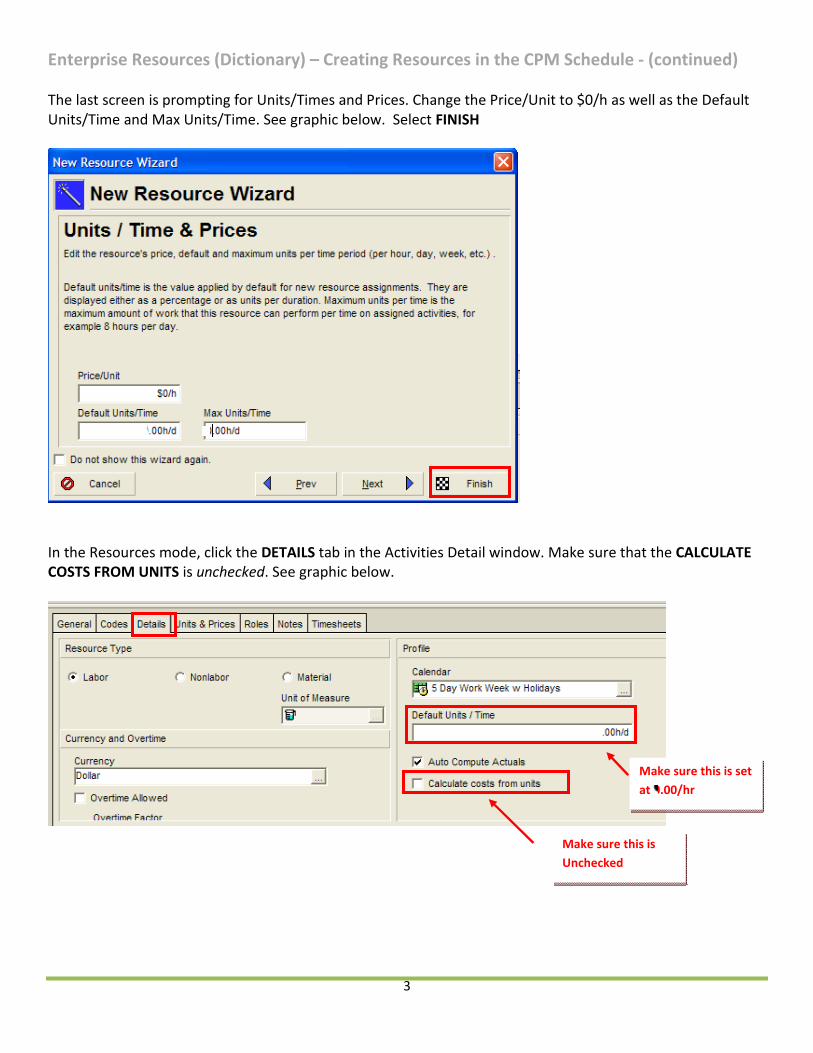
Enterprise Resources (Dictionary) – Creating Resources in the CPM Schedule ‐ (continued) The last screen is prompting for Units/Times and Prices. Change the Price/Unit to $0/h as well as the Default Units/Time and Max Units/Time. See graphic below. Select FINISH
In the Resources mode, click the DETAILS tab in the Activities Detail window. Make sure that the CALCULATE COSTS FROM UNITS is unchecked. See graphic below.
Make sure this is Unchecked
Make sure this is set at 0.00/hr
4
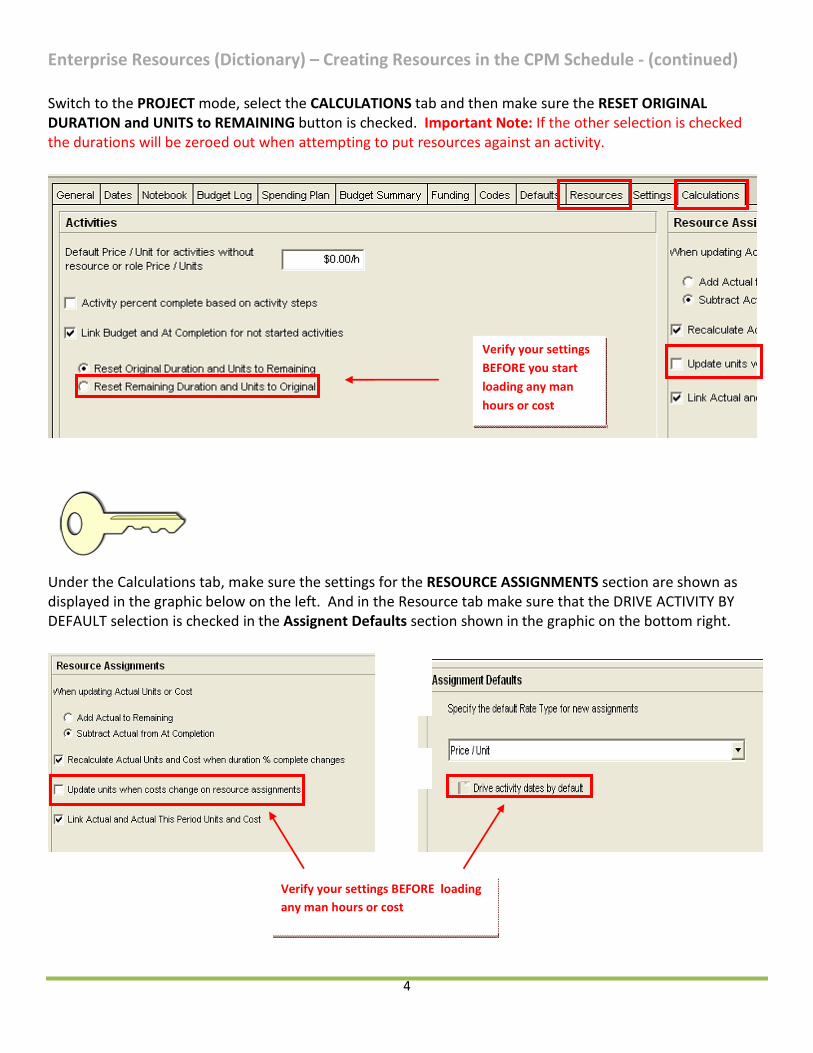
Enterprise Resources (Dictionary) – Creating Resources in the CPM Schedule ‐ (continued) Switch to the PROJECT mode, select the CALCULATIONS tab and then make sure the RESET ORIGINAL DURATION and UNITS to REMAINING button is checked. Important Note: If the other selection is checked the durations will be zeroed out when attempting to put resources against an activity.
Under the Calculations tab, make sure the settings for the RESOURCE ASSIGNMENTS section are shown as displayed in the graphic below on the left. And in the Resource tab make sure that the DRIVE ACTIVITY BY DEFAULT selection is checked in the Assignent Defaults section shown in the graphic on the bottom right.
Verify your settings BEFORE loading any man hours or cost
Verify your settings BEFORE you start loading any man hours or cost
5
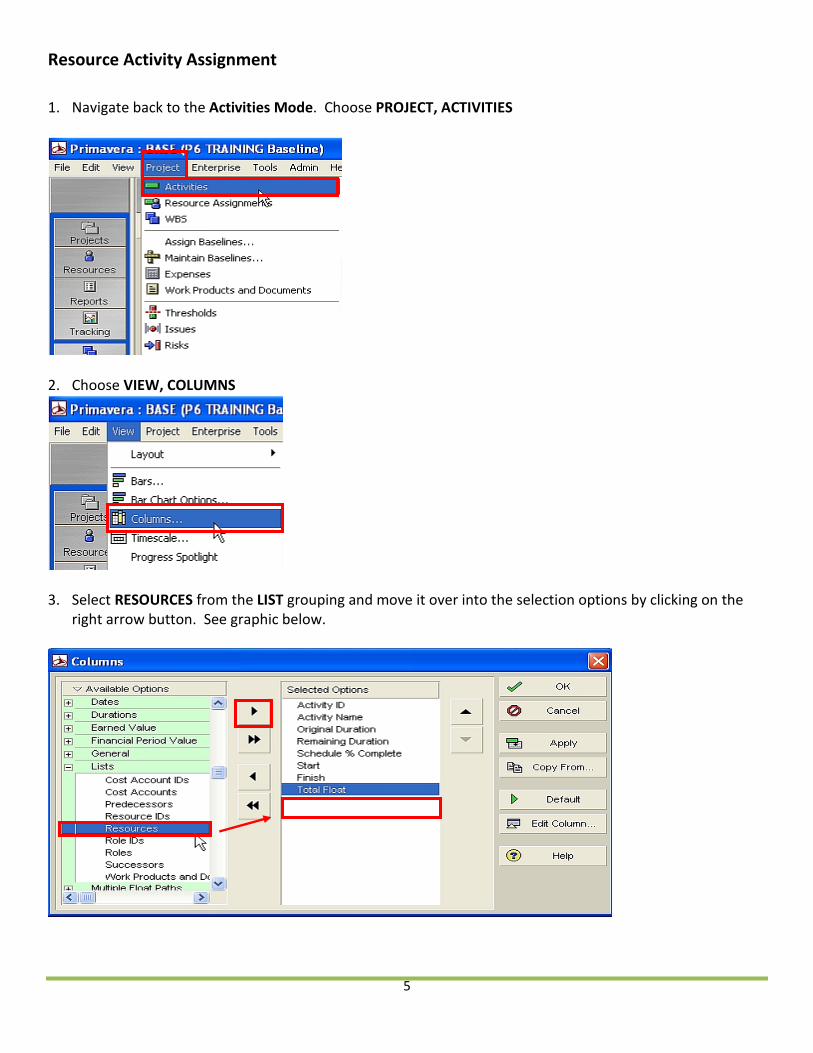
Resource Activity Assignment
1. Navigate back to the Activities Mode. Choose PROJECT, ACTIVITIES
2. Choose VIEW, COLUMNS
3. Select RESOURCES from the LIST grouping and move it over into the selection options by clicking on the
right arrow button. See graphic below.
6
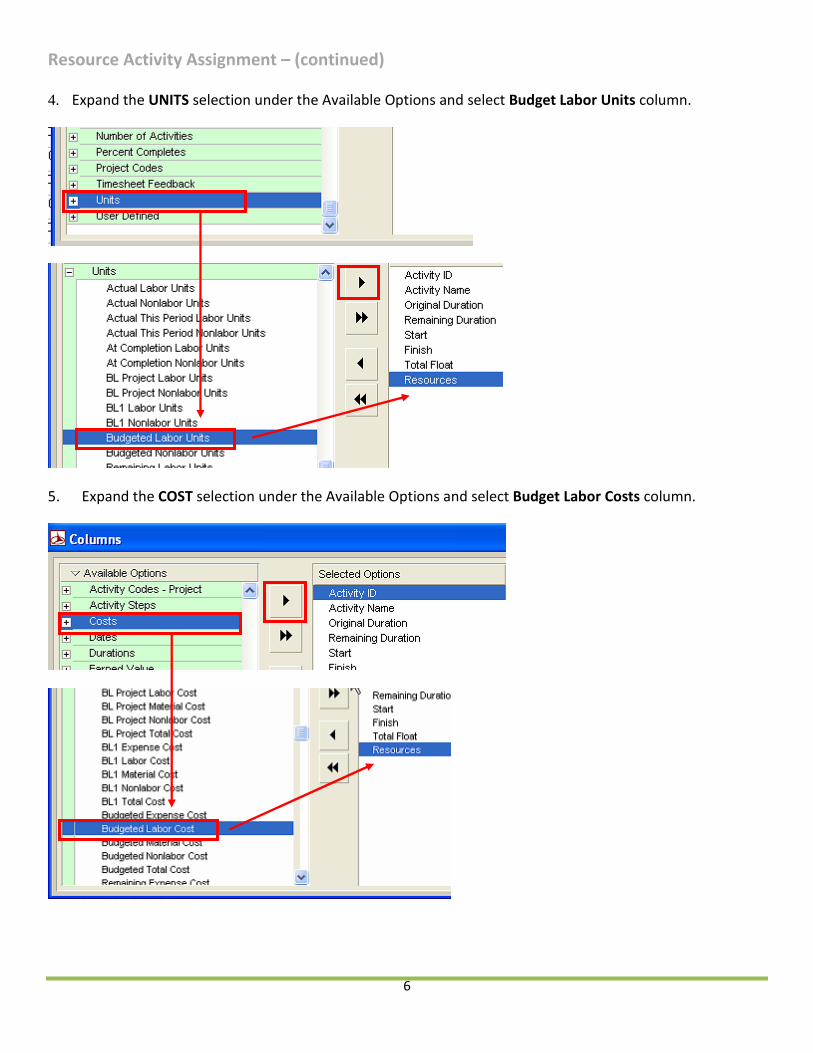
Resource Activity Assignment – (continued) 4. Expand the UNITS selection under the Available Options and select Budget Labor Units column.
5. Expand the COST selection under the Available Options and select Budget Labor Costs column.
7
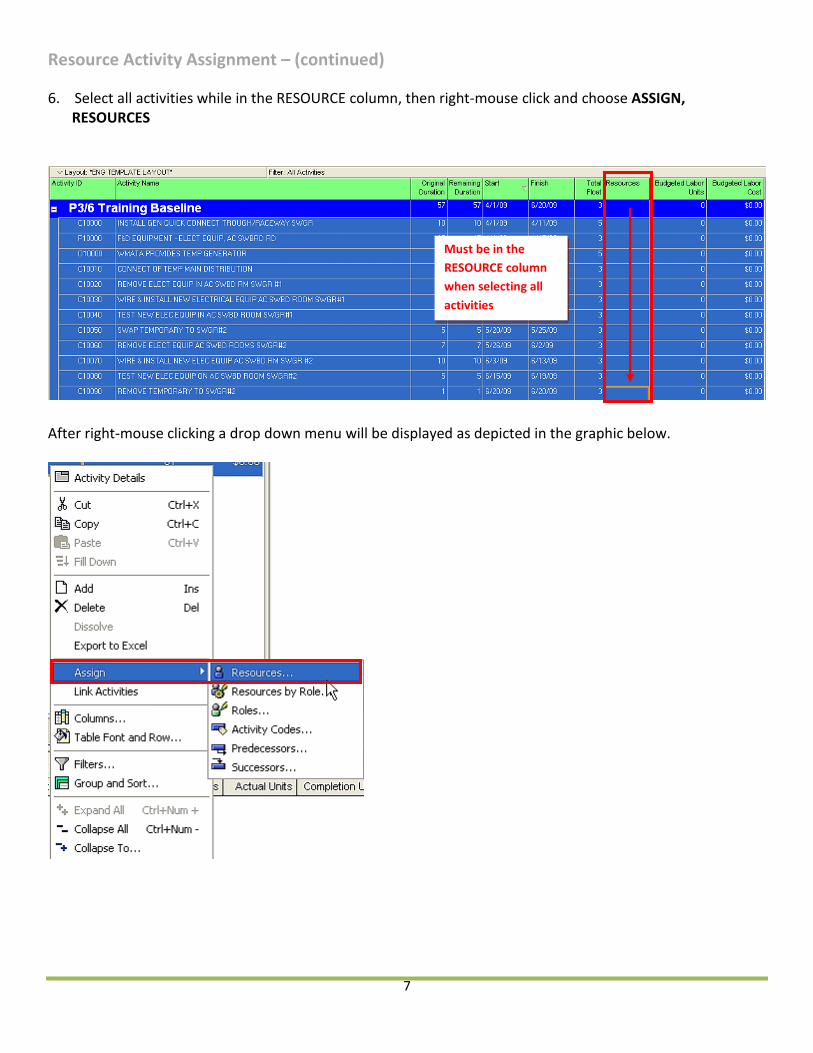
Resource Activity Assignment – (continued) 6. Select all activities while in the RESOURCE column, then right‐mouse click and choose ASSIGN,
RESOURCES
After right‐mouse clicking a drop down menu will be displayed as depicted in the graphic below.
Must be in the RESOURCE column when selecting all activities
8
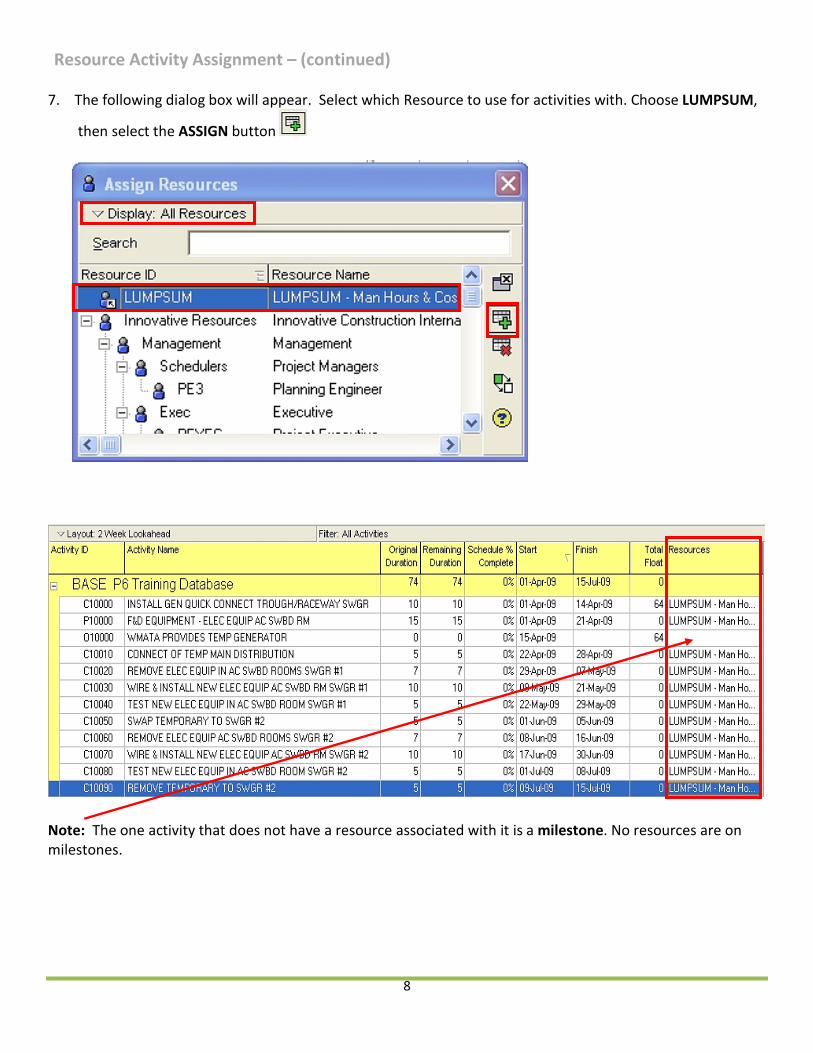
Resource Activity Assignment – (continued) 7. The following dialog box will appear. Select which Resource to use for activities with. Choose LUMPSUM,
then select the ASSIGN button
Note: The one activity that does not have a resource associated with it is a milestone. No resources are on milestones.
9
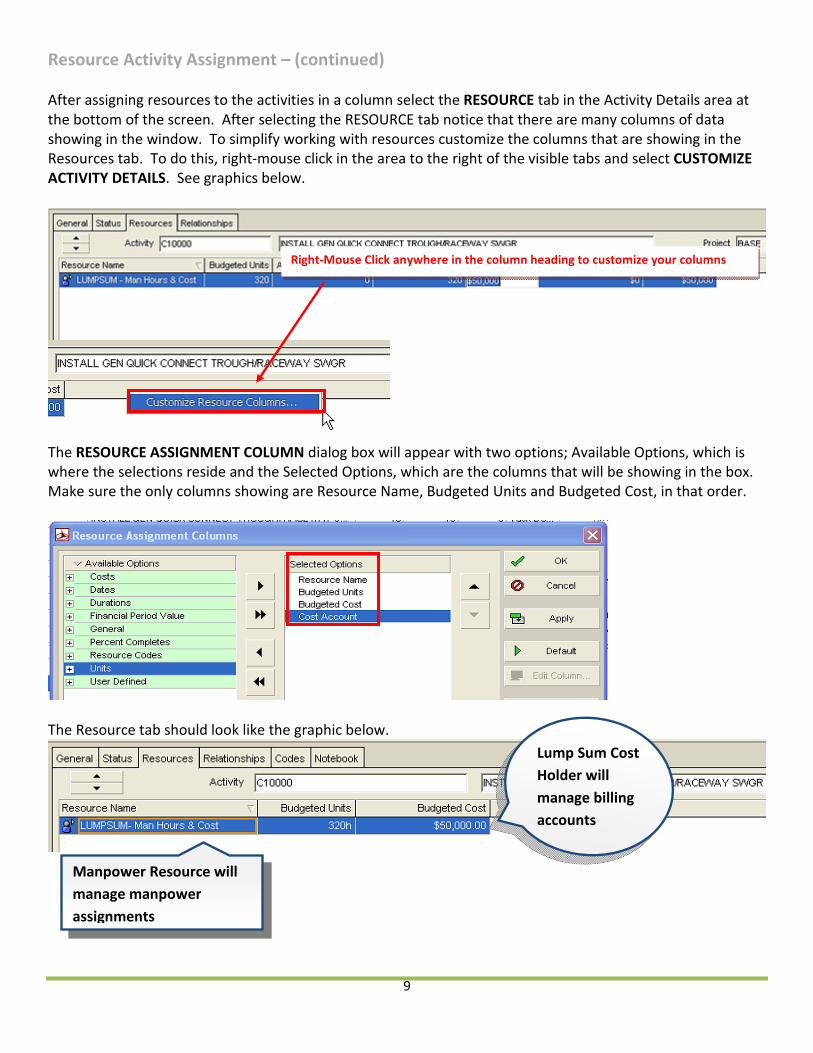
Resource Activity Assignment – (continued) After assigning resources to the activities in a column select the RESOURCE tab in the Activity Details area at the bottom of the screen. After selecting the RESOURCE tab notice that there are many columns of data showing in the window. To simplify working with resources customize the columns that are showing in the Resources tab. To do this, right‐mouse click in the area to the right of the visible tabs and select CUSTOMIZE ACTIVITY DETAILS. See graphics below.
The RESOURCE ASSIGNMENT COLUMN dialog box will appear with two options; Available Options, which is where the selections reside and the Selected Options, which are the columns that will be showing in the box. Make sure the only columns showing are Resource Name, Budgeted Units and Budgeted Cost, in that order.
The Resource tab should look like the graphic below.
Manpower Resource will manage manpower assignments
Lump Sum Cost Holder will manage billing accounts
Right‐Mouse Click anywhere in the column heading to customize your columns
10
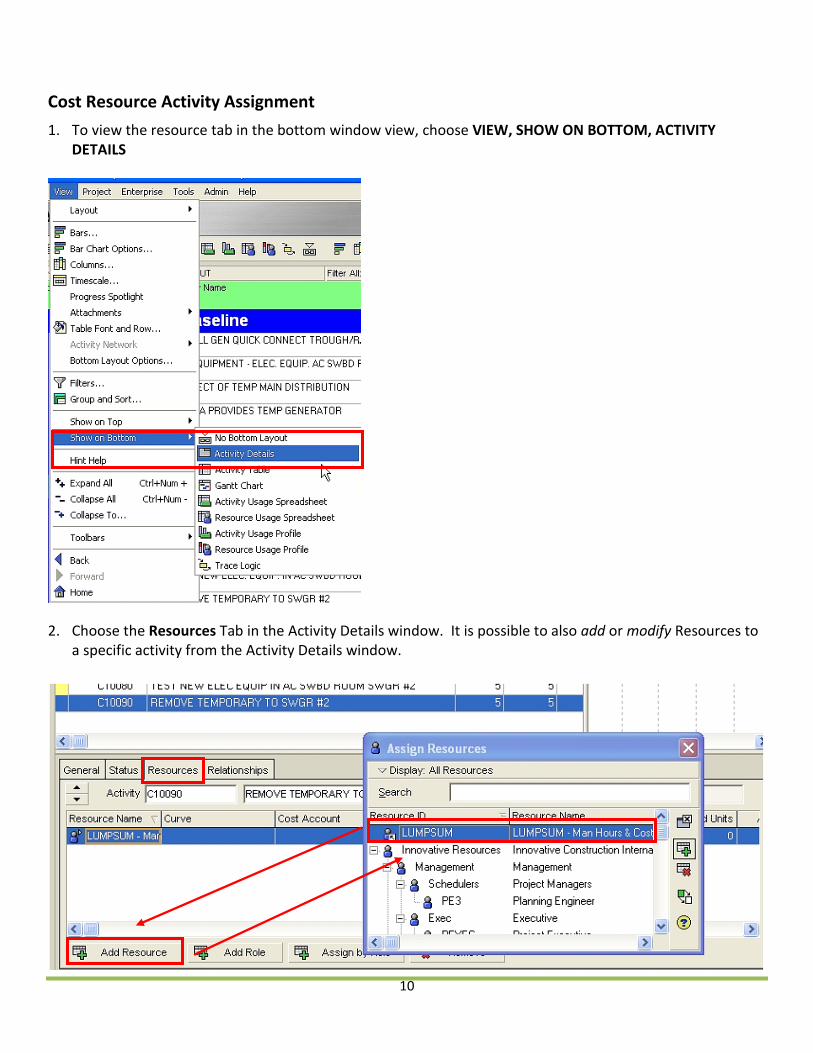
Cost Resource Activity Assignment
1. To view the resource tab in the bottom window view, choose VIEW, SHOW ON BOTTOM, ACTIVITY DETAILS
2. Choose the Resources Tab in the Activity Details window. It is possible to also add or modify Resources to a specific activity from the Activity Details window.
11
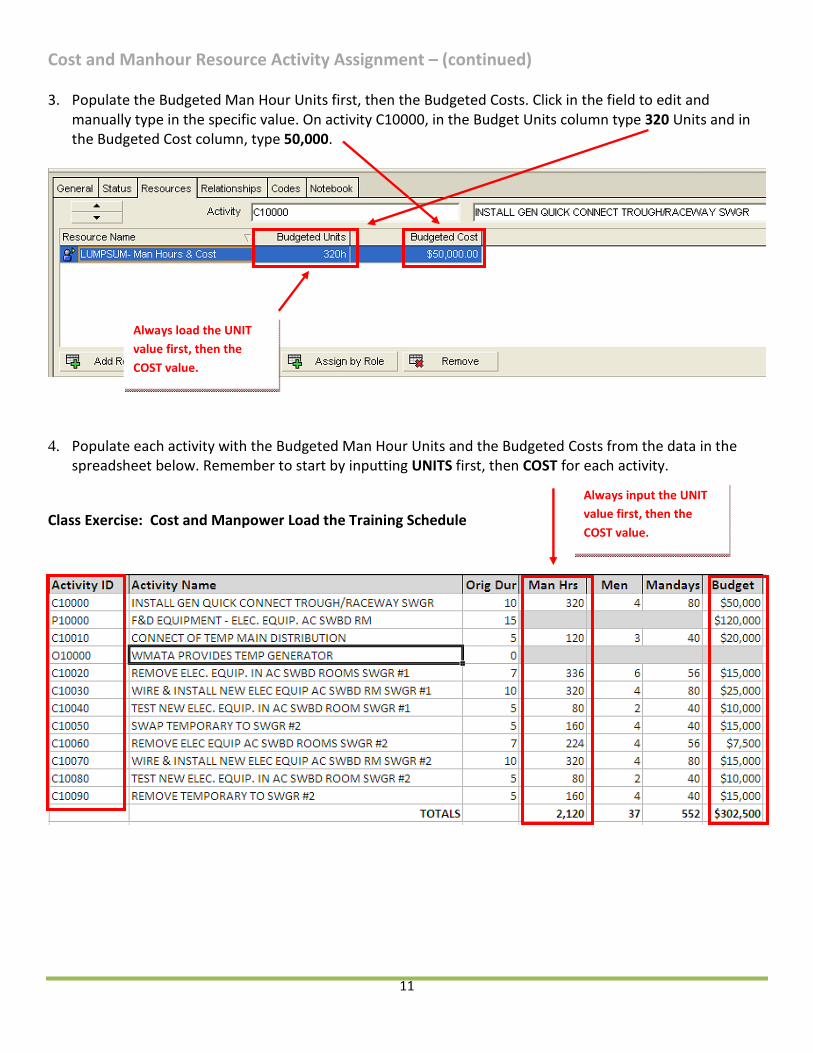
Cost and Manhour Resource Activity Assignment – (continued) 3. Populate the Budgeted Man Hour Units first, then the Budgeted Costs. Click in the field to edit and
manually type in the specific value. On activity C10000, in the Budget Units column type 320 Units and in the Budgeted Cost column, type 50,000.
4. Populate each activity with the Budgeted Man Hour Units and the Budgeted Costs from the data in the
spreadsheet below. Remember to start by inputting UNITS first, then COST for each activity.
Class Exercise: Cost and Manpower Load the Training Schedule
Always load the UNIT value first, then the COST value.
Always input the UNIT value first, then the COST value.

12
Resource Spreadsheet
1. Choose the Group and Sort Icon
2. Clear the Indent Check Box and set the Group By to PROJECT only.
NOTE: To remove the project number and the Station No. group by fields, select the DELETE button.
Uncheck any indent if checked
Take off the all but the PROJECT selection
Make sure SHOW GROUP TOTALS is checked
13
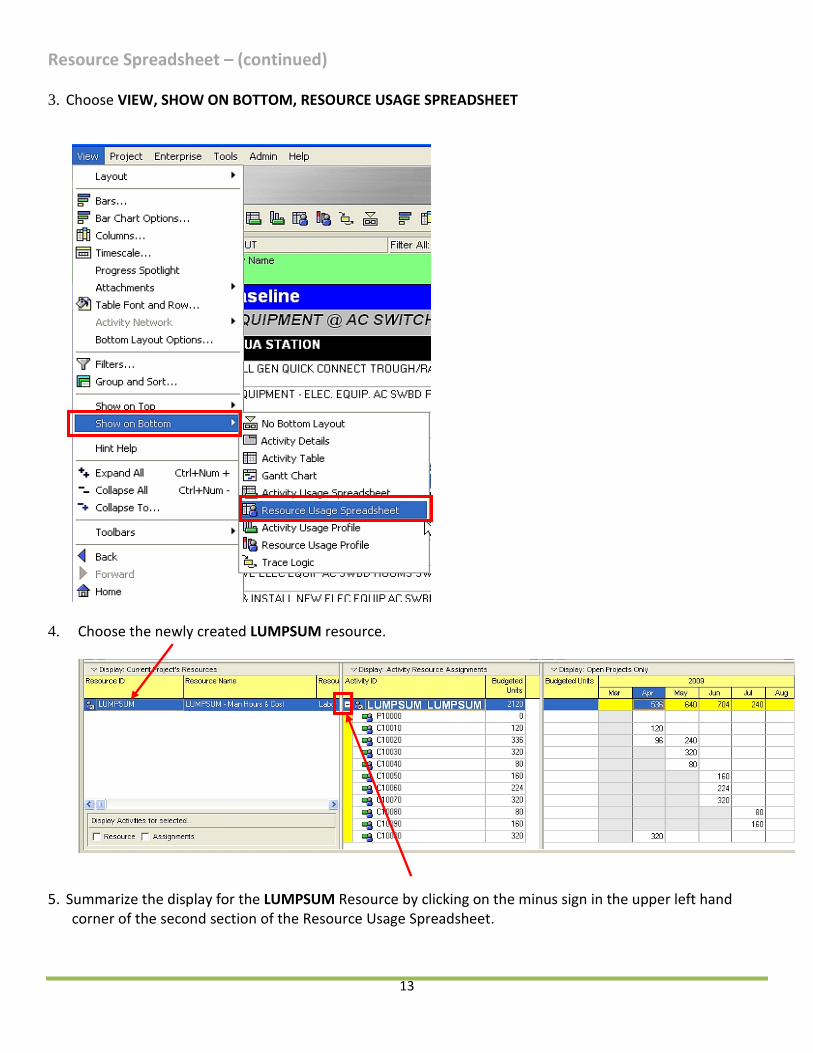
Resource Spreadsheet – (continued) 3. Choose VIEW, SHOW ON BOTTOM, RESOURCE USAGE SPREADSHEET
4. Choose the newly created LUMPSUM resource.
5. Summarize the display for the LUMPSUM Resource by clicking on the minus sign in the upper left hand corner of the second section of the Resource Usage Spreadsheet.

14
Resource Spreadsheet – (continued) 6. Modify the columns and add a column for Budgeted Units. See graphic below.
6a. In the UNITS section of the Available Options select the BUDGETED UNITS and select the right arrow button to move over into the Selected Options area. Then select APPLY and if it looks correct click OK.
Right Mouse Click in the column heading
15
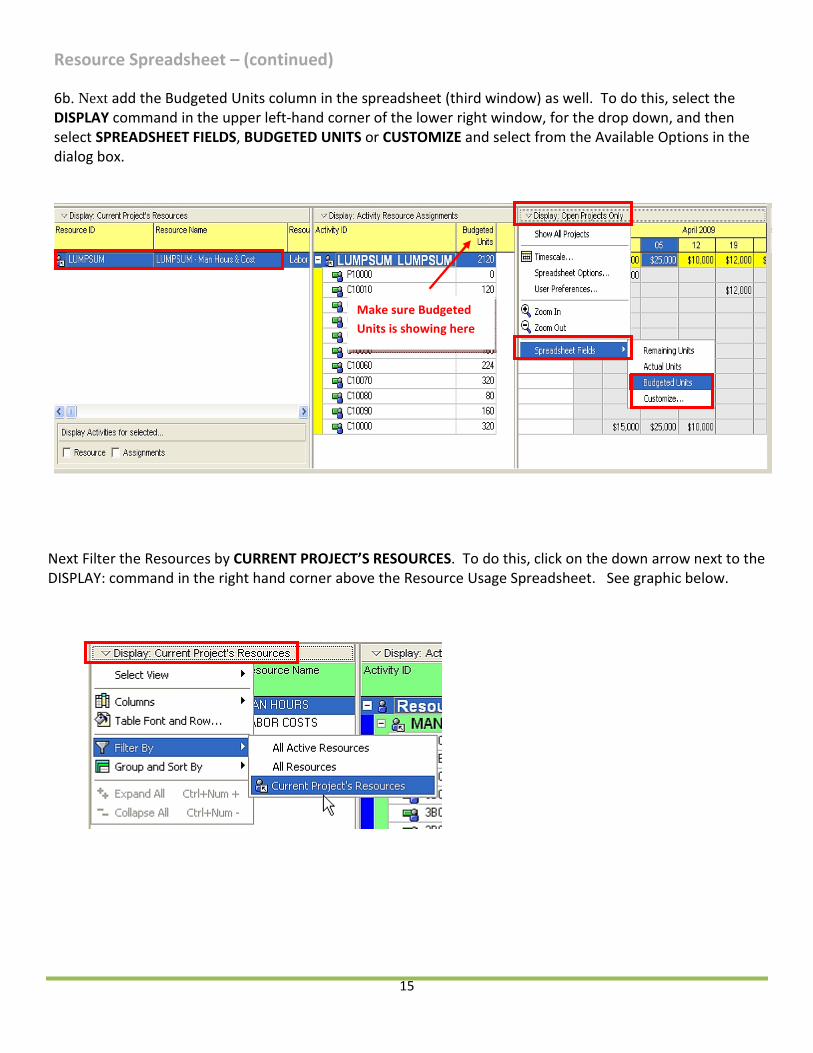
Resource Spreadsheet – (continued) 6b. Next add the Budgeted Units column in the spreadsheet (third window) as well. To do this, select the DISPLAY command in the upper left‐hand corner of the lower right window, for the drop down, and then select SPREADSHEET FIELDS, BUDGETED UNITS or CUSTOMIZE and select from the Available Options in the dialog box.
Next Filter the Resources by CURRENT PROJECT’S RESOURCES. To do this, click on the down arrow next to the DISPLAY: command in the right hand corner above the Resource Usage Spreadsheet. See graphic below.
Make sure Budgeted Units is showing here
16
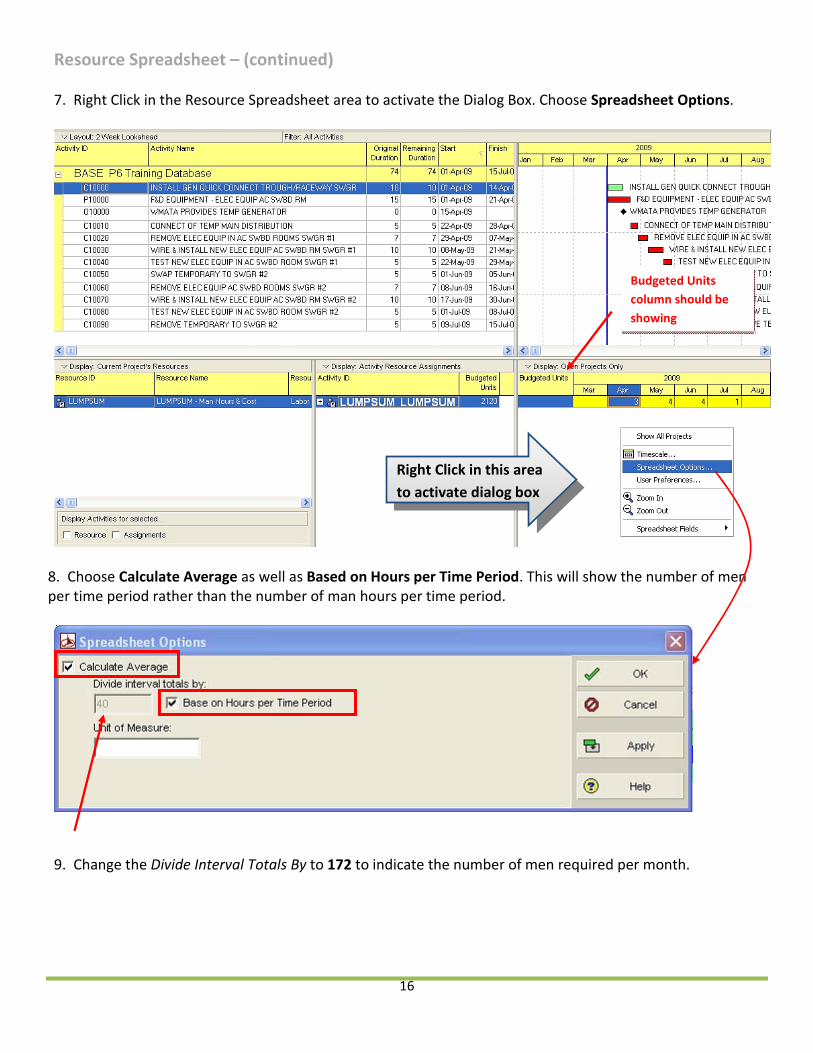
Resource Spreadsheet – (continued) 7. Right Click in the Resource Spreadsheet area to activate the Dialog Box. Choose Spreadsheet Options.
8. Choose Calculate Average as well as Based on Hours per Time Period. This will show the number of men per time period rather than the number of man hours per time period.
9. Change the Divide Interval Totals By to 172 to indicate the number of men required per month.
Right Click in this area to activate dialog box
Budgeted Units column should be showing

17
Resource Spreadsheet – (continued) NOTE: To check the resource preferences, select EDIT, USER PREFERENCES and then click on the TIME UNITS tab. This tab will set units of time, duration format, units per time and hours per time period. The standard defaults are listed in the graphic below.
There are other various tabs that control various aspects of the Users Preferences and should be reviewed and or consulted with the MC Dean Scheduling Group before any changes are made.
18
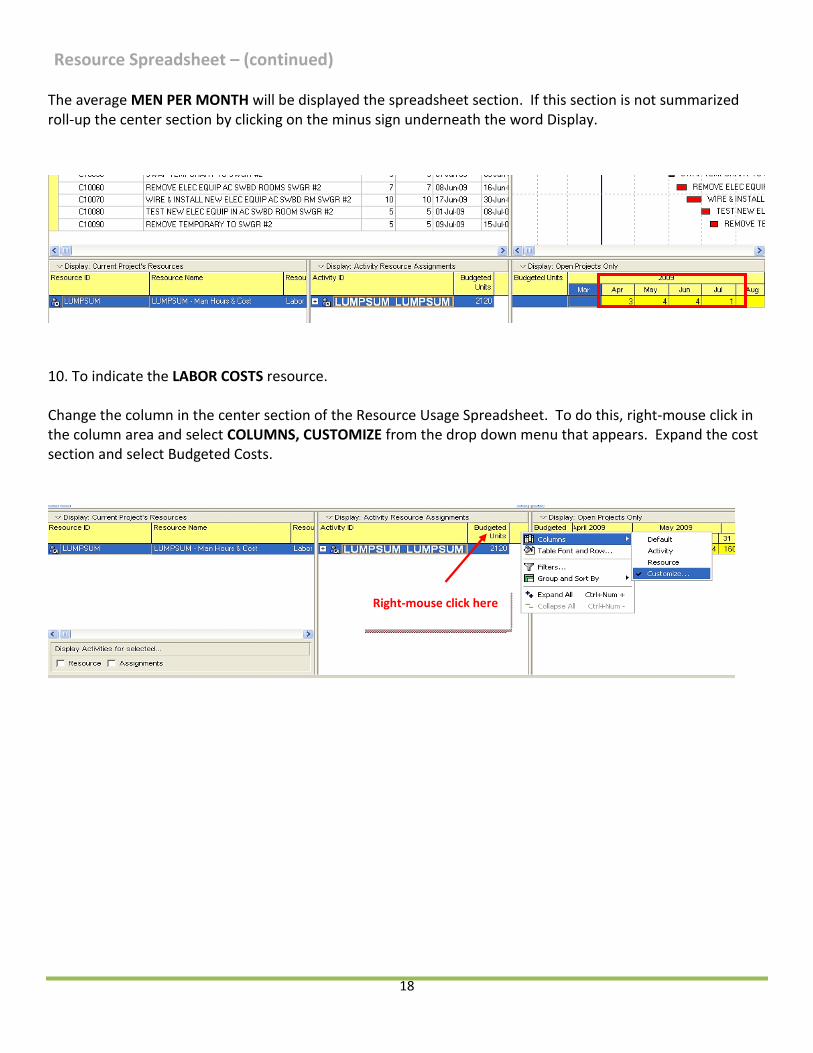
Resource Spreadsheet – (continued) The average MEN PER MONTH will be displayed the spreadsheet section. If this section is not summarized roll‐up the center section by clicking on the minus sign underneath the word Display.
10. To indicate the LABOR COSTS resource. Change the column in the center section of the Resource Usage Spreadsheet. To do this, right‐mouse click in the column area and select COLUMNS, CUSTOMIZE from the drop down menu that appears. Expand the cost section and select Budgeted Costs.
Right‐mouse click here
19
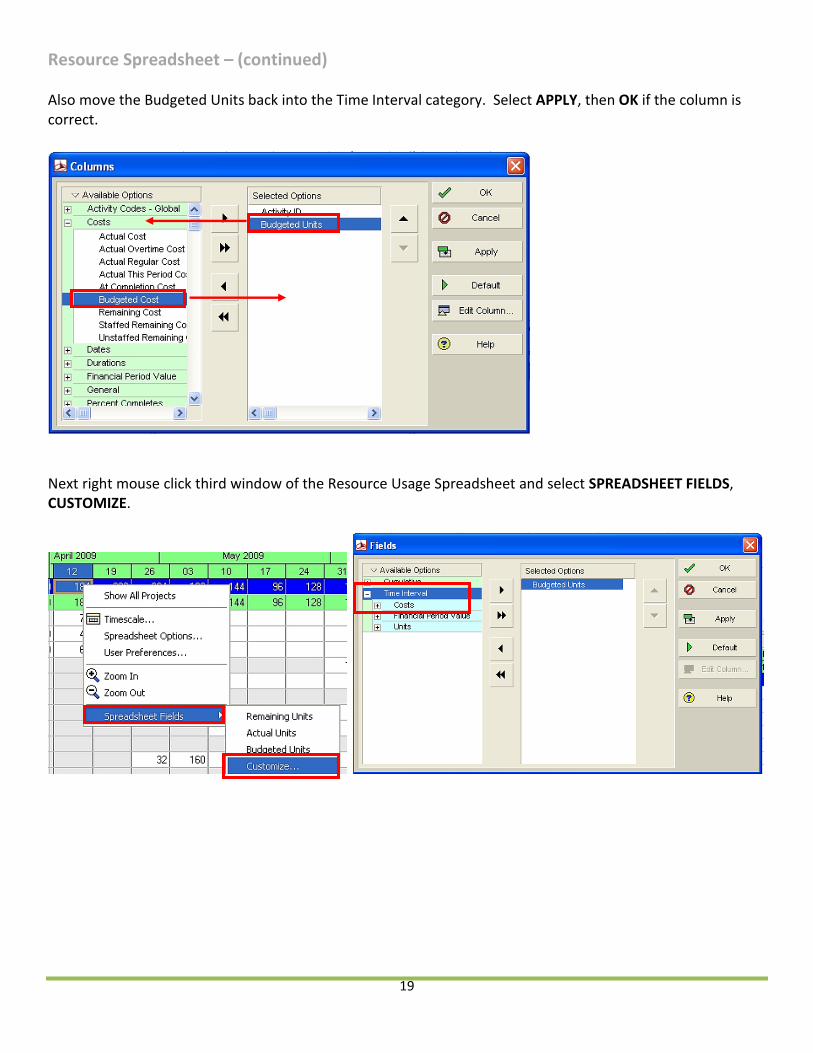
Resource Spreadsheet – (continued) Also move the Budgeted Units back into the Time Interval category. Select APPLY, then OK if the column is correct.
Next right mouse click third window of the Resource Usage Spreadsheet and select SPREADSHEET FIELDS, CUSTOMIZE.
20
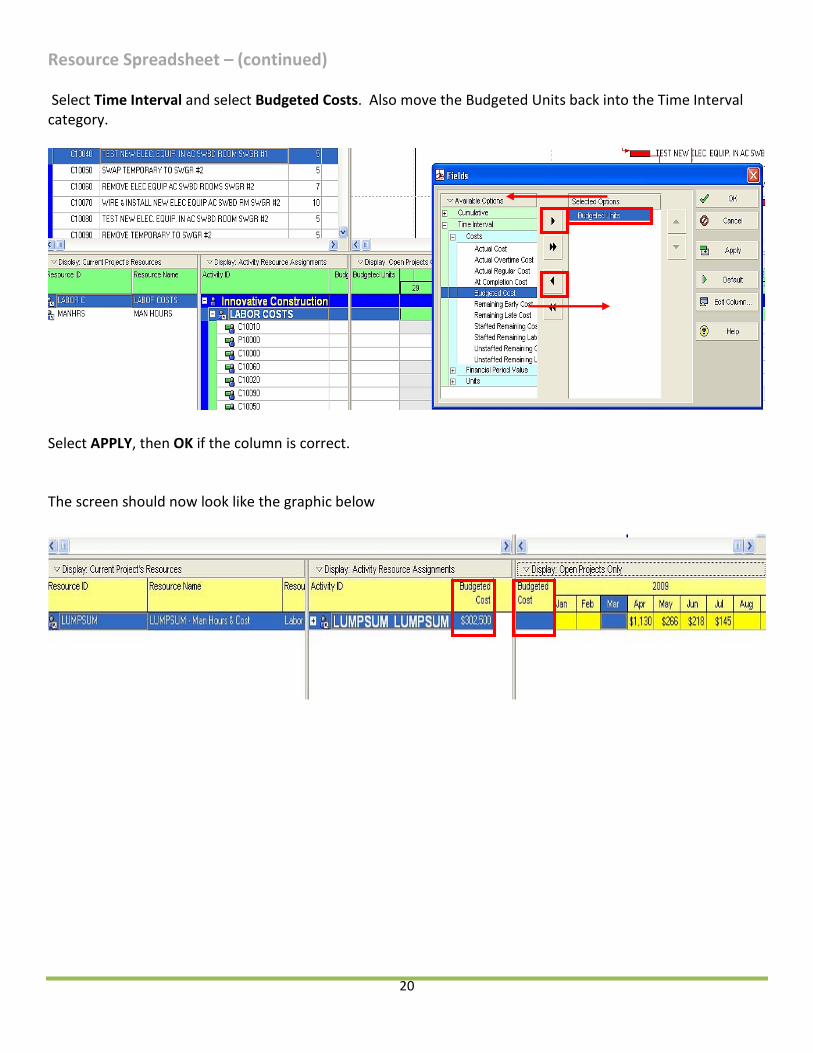
Resource Spreadsheet – (continued) Select Time Interval and select Budgeted Costs. Also move the Budgeted Units back into the Time Interval category.
Select APPLY, then OK if the column is correct. The screen should now look like the graphic below