creating art (3rd grade) proof2 - memoria press · pdf filelesson 7: mesopotamian art ......
TRANSCRIPT
Contents
Notes to the Teacher ............................................... 4Materials Needed .................................................... 5
Lesson 1: Introduction to Color Theory ............... 6Project 1: Color Wheel ............................................ 7Project 1A: Painted Color Wheel........................... 8Lesson 2: Color Theory Continued ....................... 9Project 2: Color Schemes ...................................... 12Lesson 3: Line Direction, Texture, and Value .... 14Project 3: Value Scales ........................................... 15Project 3A: Value Scales........................................ 16Special Project 1: Monochromatic Pumpkins.... 17Lesson 4: Portraits ................................................. 19Project 4: Portraits ................................................. 21Project 4A: Line, Texture, and Color Portrait .... 22Lesson 5: Landscapes ........................................... 23Project 5: Landscapes ............................................ 24Lesson 6: Prehistoric Art – Cave Painting ......... 26Project 6: Prehistoric Art – Cave Drawing ......... 28Lesson 7: Mesopotamian Art ............................... 29Project 7: Mesopotamian Art – Mosaics ............. 32Special Project 2: Valentine’s Day Hearts .......... 33Lesson 8: Egyptian Art ......................................... 34Project 8: Egyptian Art — Pectorals ................... 36Project 9: Charlotte’s Web Wax Relief ................ 37Project 10: Astronomy .......................................... 38Project 11: The Moffats – The Yellow House ..... 39Special Project 3: Decoupage Easter Eggs ......... 40Project 12: Still Life Study – Pencil Drawing ..... 41Project 13: Still Life Study – Monochromatic .... 42Project 14: Still Life Study – Abstract ................. 43
GLoSSARY 44
TEMPLATES Color Wheel Template .......................................... 49Project 4A: Scarecrow Template .......................... 51Project 6: Cave Drawing Animals & Hand ........ 53Project 7: Sample Animals ................................... 59
QuIzzES Color and Line Quiz ............................................. 64Portrait and Landscape Quiz .............................. 65Pre-Historic Art Quiz ........................................... 67Mesopotamian Quiz ............................................. 68Egyptian Quiz ........................................................ 69
Color and Line Quiz – Answer Key ................... 70Portrait and Landscape Quiz – Answer Key ..... 71Pre-Historic Art Quiz – Answer Key .................. 73Mesopotamian Quiz – Answer Key ................... 74Egyptian Quiz – Answer Key .............................. 75
3
lesson 1: Introduction to Color Theory
terMs to KnowVisual spectrum — The range of wavelengths the human eye can see
Primary Colors — Colors that cannot be made by mixing other colors: red, yellow, and blue
secondary Colors — Colors that are made by mixing two primary colors: orange, green, and violet (purple)
General faCts1. The colors we see with our eyes are part of the visible spectrum. The visible spectrum is made up of
waves of reflected light, which vary in length.
2. Each wavelength allows us to see a different color.
3. The longest wavelength is red.
4. The shortest wavelength is violet (purple).
5. When referring to the visible spectrum, black is not a color because black is the absence of light.
aCtiVities1. Turn out all the lights and ask the students: “If the visible spectrum is made up of wavelengths of light,
and I take away all the light, what can you see?” Nothing, or blackness; therefore, black is the absence of color (or light).
2. Using a prism and natural light, show a rainbow of light and have the children identify the colors they see.
Questions1. Where can we see the entire visible spectrum all at once?
A rainbow
2. What are the primary colors? Red, yellow, and blue
3. Why are they called primary colors? Because they cannot be made by mixing other colors.
4. What are the secondary colors? Orange, green, and purple
5. How are secondary colors made? By mixing two primary colors together.
6 Lesson 1: Introduction to Color Theory
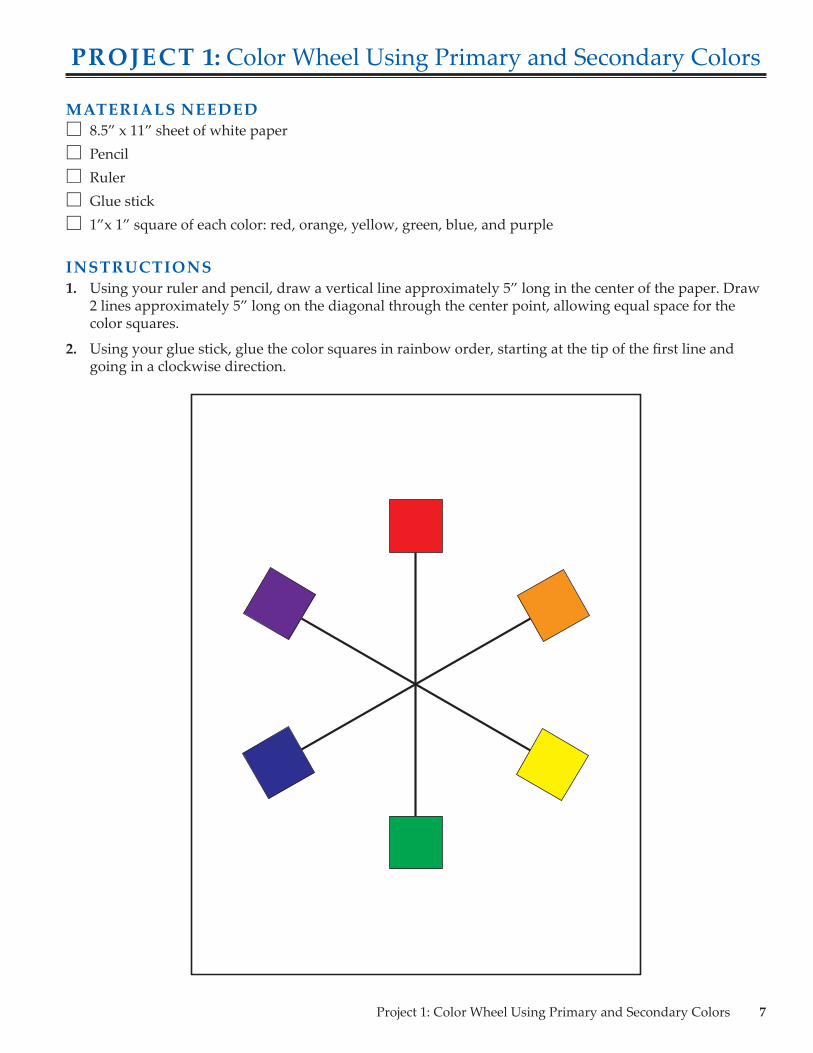
ProjeCt 1: Color Wheel using Primary and Secondary Colors
Materials needed □ 8.5” x 11” sheet of white paper □ Pencil □ Ruler □ Glue stick □ 1”x 1” square of each color: red, orange, yellow, green, blue, and purple
instruCtions1. Using your ruler and pencil, draw a vertical line approximately 5” long in the center of the paper. Draw
2 lines approximately 5” long on the diagonal through the center point, allowing equal space for the color squares.
2. Using your glue stick, glue the color squares in rainbow order, starting at the tip of the first line and going in a clockwise direction.
7Project 1: Color Wheel using Primary and Secondary Colors

sPeCial ProjeCt 1: Monochromatic Pumpkins
reViewanalogous Color scheme — A color scheme that uses a minimum of two, but no more than five, colors that are adjacent (in a row) on the color wheel
Materials needed □ Orange paint □ Black paint
□ White paint □ 8.5” x 11” white card stock
□ Paintbrushes
instruCtions1. Have the students use orange paint to paint a
pumpkin shape in the center of the piece of card stock. You may describe it as an oval with two small horizontal bumps near the top.
2. Next, have students mix a small amount of black paint with some orange paint to create a shade. Instruct them to use the shade to paint the soft texture of the pumpkin surface. They will be painting over the original orange pumpkin shape. This technique is called a wet-on-wet technique; the paint will blend and create new shades. Be sure the students do not cover up the entire original orange pumpkin shape and are following the contour of the pumpkin, painting in a vertical direction.
3. Have the students use black paint to make a thin outline, starting at the top of the pumpkin, around the edge, that fades out toward the bottom. Next, have them draw three black lines that are short and fade, following the contour of the pumpkin, on the left and right sides to give the pumpkin a three-dimensional appearance. Last, have them make one very short vertical black line in the center. Next, with a clean brush, using white paint, have them outline the three black lines on the right. These are highlights, reflections created by a light source, and should go above the black lines.
17Special Project 1: Monochromatic Pumpkins
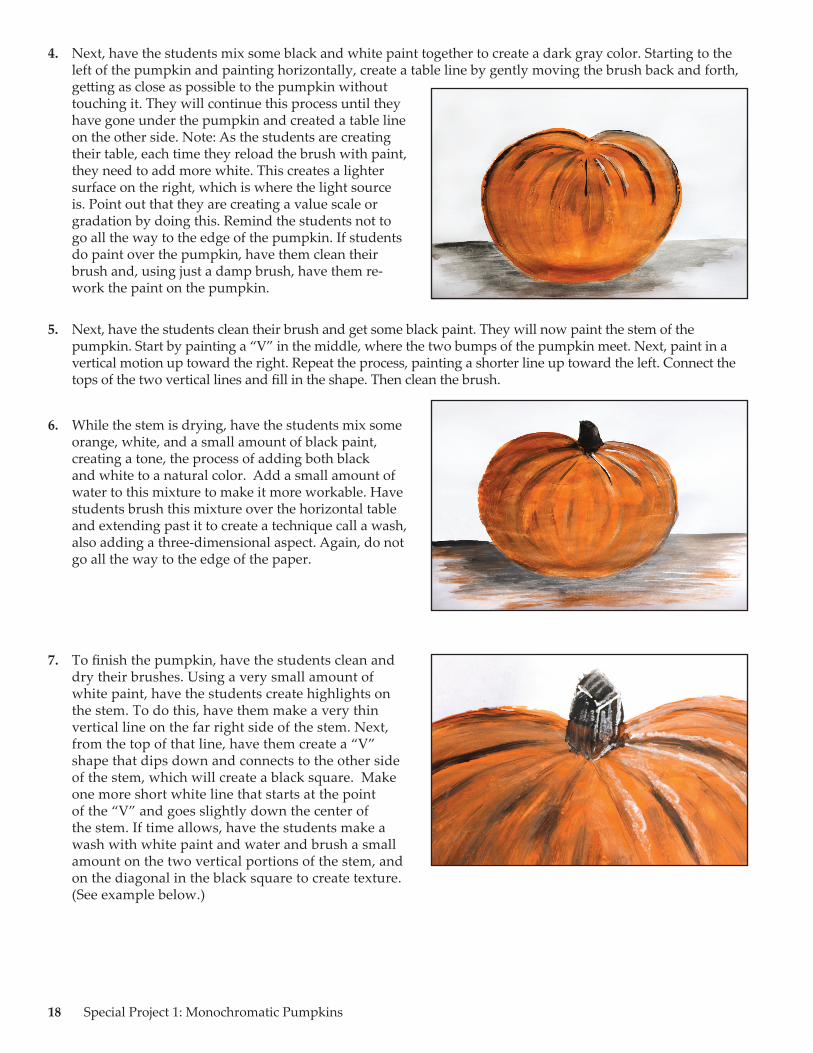
4. Next, have the students mix some black and white paint together to create a dark gray color. Starting to the left of the pumpkin and painting horizontally, create a table line by gently moving the brush back and forth, getting as close as possible to the pumpkin without touching it. They will continue this process until they have gone under the pumpkin and created a table line on the other side. Note: As the students are creating their table, each time they reload the brush with paint, they need to add more white. This creates a lighter surface on the right, which is where the light source is. Point out that they are creating a value scale or gradation by doing this. Remind the students not to go all the way to the edge of the pumpkin. If students do paint over the pumpkin, have them clean their brush and, using just a damp brush, have them re-work the paint on the pumpkin.
5. Next, have the students clean their brush and get some black paint. They will now paint the stem of the pumpkin. Start by painting a “V” in the middle, where the two bumps of the pumpkin meet. Next, paint in a vertical motion up toward the right. Repeat the process, painting a shorter line up toward the left. Connect the tops of the two vertical lines and fill in the shape. Then clean the brush.
6. While the stem is drying, have the students mix some orange, white, and a small amount of black paint, creating a tone, the process of adding both black and white to a natural color. Add a small amount of water to this mixture to make it more workable. Have students brush this mixture over the horizontal table and extending past it to create a technique call a wash, also adding a three-dimensional aspect. Again, do not go all the way to the edge of the paper.
7. To finish the pumpkin, have the students clean and dry their brushes. Using a very small amount of white paint, have the students create highlights on the stem. To do this, have them make a very thin vertical line on the far right side of the stem. Next, from the top of that line, have them create a “V” shape that dips down and connects to the other side of the stem, which will create a black square. Make one more short white line that starts at the point of the “V” and goes slightly down the center of the stem. If time allows, have the students make a wash with white paint and water and brush a small amount on the two vertical portions of the stem, and on the diagonal in the black square to create texture. (See example below.)
18 Special Project 1: Monochromatic Pumpkins