creating a php framework
TRANSCRIPT

Creating a PHP5 Framework – Part 1 With websites becoming more and more dynamic and interactive, developers often look to frameworks to help build websites and web apps rapidly. While there are a number of great frameworks available, a custom framework gives you the ability to easily customize the framework as you need, and to build with it even quicker – as you would already know the ins and outs of it before working with it. In this series of tutorials, we are going to build our very own PHP5 Development Framework! Let’s start with planning our framework and put the basic structure into place.*Note – Running the demo should display “PCA Framework version 0.1 the HTML output” – which demonstrates the first stage of our framework.
Step 1: This Series
In this series, we will create our own PHP5 Framework from scratch. The Framework will include basic content management features, and we will use it to build a web-based directory for a small organization.
Hopefully, as we go along, you will improve, build up and optimize this framework to suite your needs better, however in these tutorials we are aiming to get a simple framework up and running and powering a website.
Over the next few weeks, during these tutorials we will cover:
• Creating authentication handler, database abstraction layer and template manager • Bringing these objects together • Using the framework to manage content, and power our site • Creating a fantastic front end design. • Designing for the login process by storyboarding • How the Framework can be extended and expanded
Step 2: Design Patterns and their use within our Framework
When creating any large computer-based system, be it a desktop application, a distributed network system, or a web application there will always be architectural challenges associated with its implementation.
Design patterns address some of these common problems, and we will make use of a number of design patterns as we create our Framework, to ensure that we have a quality, flexible, robust and usable framework, fit for any purpose! In particular, in this tutorial we are going to look at the Singleton pattern and the Registry pattern.
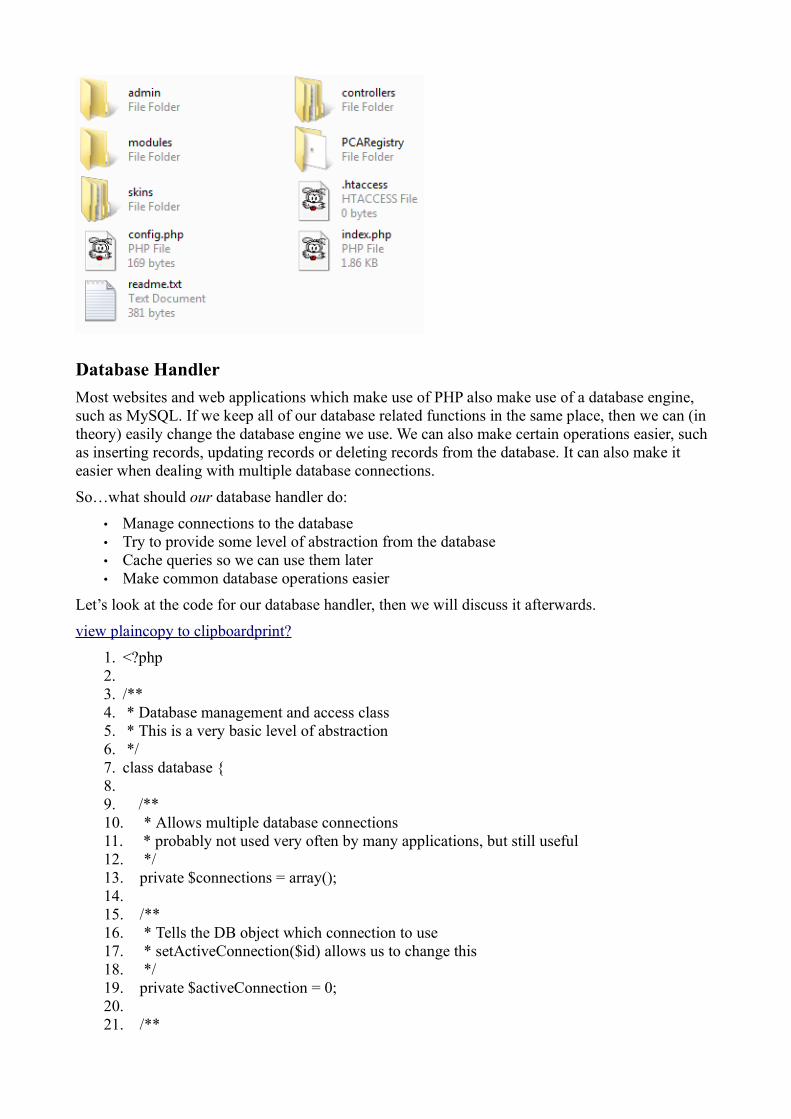
Step 3: Files and Folders
The first thing to get started creating our Framework, is to create a suitable file structure, such that everything has its place. As well as the files powering the framework, we also need to make provisions for files relating to the website we are going to create with our framework. Most

websites and web applications have:
• Some commonly used functions / objects. • Business logic. • A design
This gives us a great starting point, files relating to each of those three categories should be grouped together in their own section. Take a look at the directory structure below, we will then discuss the reasons for the structure.
Note that the .settings folder and the .project file were created by the IDE I use, and don’t need to be present in your application
Core functions and objects, such as database access, authentication, template handling, email sending objects, email parsing objects, should be stored within a folder called objects, within the PCARegistry folder. This allows us to separate the logic from the Registry (which we will look at shortly) from the objects stored within the Registry.
Next, we need somewhere to store our business logic which is the files we will create which make use of our framework. We should keep these files in a folder called controllers. Each major function that our website or web application does (e.g. business directory listing, providing and managing content, providing an image gallery, etc) would be a separate controller, stored within its own folder within the controllers folder. We are not going to use these in this tutorial, but it is important to have our directory structure in place, so we know how it will work.
The sites design and templates, should be stored within the skins folder. Since we may want different designs (either so users of the application/website we create with our framework can chose from a number of designs, or to change the design depending on season or special event), each skin will be contained within its own folder.
Step 4: The Registry
At the heart of our framework we will have the core functions, such as database access, user authentication, etc. By implementing the Registry design pattern, we can keep these objects stored centrally, within the Registry, making it easy for our Framework and any applications which utilize our framework to access.
The registry design pattern stores and retrieves references to objects, and works in a similar way to

a telephone directory: storing and retrieving contacts. We will use it to store these core objects, system-wide settings, and later, any other data or information which needs to be shared across the system.
Because we are storing this information centrally, we only ever want one instance of this registry object to be available within our framework, if more than one were available, then we would have problems where we were expecting a certain piece of data, or a certain object to be in the registry, when it was in fact stored within another instance of the Registry object. To solve this problem, our Registry object will also implement the Singleton design pattern, which prevents more than a single instance of the object being available.
Below is the PHP code for the registry.class.php file, we will look into how it works shortly.
view plain copy to clipboard print ?
1. <?php 2. /** 3. * The PCARegistry object 4. * Implements the Registry and Singleton design patterns 5. * 6. * @version 0.1 7. * @author Michael Peacock 8. */ 9. class PCARegistry { 10. 11. /** 12. * Our array of objects 13. * @access private 14. */ 15. private static $objects = array(); 16. 17. /** 18. * Our array of settings 19. * @access private 20. */ 21. private static $settings = array(); 22. 23. /** 24. * The frameworks human readable name 25. * @access private 26. */ 27. private static $frameworkName = 'PCA Framework version 0.1'; 28. 29. /** 30. * The instance of the registry 31. * @access private 32. */ 33. private static $instance; 34. 35. /** 36. * Private constructor to prevent it being created directly 37. * @access private 38. */ 39. private function __construct() 40. {

41. 42. } 43. 44. /** 45. * singleton method used to access the object 46. * @access public 47. * @return 48. */ 49. public static function singleton() 50. { 51. if( !isset( self::$instance ) ) 52. { 53. $obj = __CLASS__; 54. self::$instance = new $obj; 55. } 56. 57. return self::$instance; 58. } 59. 60. /** 61. * prevent cloning of the object: issues an E_USER_ERROR if this is attempted 62. */ 63. public function __clone() 64. { 65. trigger_error( 'Cloning the registry is not permitted', E_USER_ERROR ); 66. } 67. 68. /** 69. * Stores an object in the registry 70. * @param String $object the name of the object 71. * @param String $key the key for the array 72. * @return void 73. */ 74. public function storeObject( $object, $key ) 75. { 76. require_once('objects/' . $object . '.class.php'); 77. self::$objects[ $key ] = new $object( self::$instance ); 78. } 79. 80. /** 81. * Gets an object from the registry 82. * @param String $key the array key 83. * @return object 84. */ 85. public function getObject( $key ) 86. { 87. if( is_object ( self::$objects[ $key ] ) ) 88. { 89. return self::$objects[ $key ]; 90. } 91. } 92.

93. /** 94. * Stores settings in the registry 95. * @param String $data 96. * @param String $key the key for the array 97. * @return void 98. */ 99. public function storeSetting( $data, $key ) 100. { 101. self::$settings[ $key ] = $data; 102. 103. } 104. 105. /** 106. * Gets a setting from the registry 107. * @param String $key the key in the array 108. * @return void 109. */ 110. public function getSetting( $key ) 111. { 112. return self::$settings[ $key ]; 113. } 114. 115. /** 116. * Gets the frameworks name 117. * @return String 118. */ 119. public function getFrameworkName() 120. { 121. return self::$frameworkName; 122. } 123. 124.} 125. 126.?>
So, how does the Registry object work, and how does it keep our objects stored nicely?
• Objects are stored within an array. • When a new object is stored within the Registry, the class file is included, the object is
instantiated and then it is stored in the array. • Objects are retrived by passing the objects “key” to the getObject method.
How does it prevent another copy of the Registry object being created?
• The constructor is private, preventing the object from being created directly. • Cloning the object triggers an error. • If we need to access the object from within our Framework, and it is not directly available to
the file we are working in, we can call the static method singleton ( PCARegistry::singleton() ) to get the instance of the Registry.
Step 5: index.php
With the structure in place ready for the core functionality which we will add in a further tutorial, let’s look at how we will access the Registry, and start work on our Frameworks single point of access, our index.php file.

Friendly URLs are commonly available in all forms of dynamic websites and web applications, and one of the simplest ways to do this (and to manage the control of information through our Framework) is to ensure all of our page requests go through the index.php file. In a later tutorial, we will create a .htaccess file to redirect requests from a nice, friendly format, into a format that our index.php file can understand.
The index.php file’s code is below. It doesn’t do a lot at the moment, but it allows us to get things in place.
view plain copy to clipboard print ?
1. <?php 2. /** 3. * PCAFramework 4. * Framework loader - acts as a single point of access to the Framework 5. * 6. * @version 0.1 7. * @author Michael Peacock 8. */ 9. 10.// first and foremost, start our sessions 11.session_start(); 12. 13.// setup some definitions 14.// The applications root path, so we can easily get this path from files located in other folders
15.define( "APP_PATH", dirname( __FILE__ ) ."/" ); 16.// We will use this to ensure scripts are not called from outside of the framework 17.define( "PCAFW", true ); 18. 19./** 20. * Magic autoload function 21. * used to include the appropriate -controller- files when they are needed 22. * @param String the name of the class 23. */ 24.function __autoload( $class_name ) 25.{ 26. require_once('controllers/' . $class_name . '/' . $class_name . '.php' ); 27.} 28. 29.// require our registry 30.require_once('PCARegistry/pcaregistry.class.php'); 31.$registry = PCARegistry::singleton(); 32. 33.// print out the frameworks name - just to check everything is working 34.print $registry->getFrameworkName(); 35. 36.exit(); 37. 38.?>
So…what does our index.php file do at the moment? It:
• Calls start_session right away, to ensure we can use sessions throughout the Framework (this must be called before any output.

• It creates a definition of the current file path, so we can reference the frameworks root directory from elsewhere, and it creates a definition that we will use to ensure all of the Frameworks files are being called from the Framework itself, and that someone isn’t trying to call one of the files directly
• It uses the autoload function to determine where any classes may be located. In this case, it points to the controllers directory, as this is where our business logic will be stored.
• It includes the registry class (this is needed as the class is not within the controllers folder where the autoload function would find it, and references the instance of the Registry to the variable $registry.
• Finally, it prints out the name of the framework, to demonstrate a simple function from within the Registry.
We can see in more detail how the Registry will work within our Framework – by creating some dummy class files for it to use. With a template class in a new template.class.php file in the PCARegsitry/objects folder, we can demonstrate this, by adding some additional code to our index.php file.
On the line after we first reference $registry, we could add:
view plain copy to clipboard print ?
1. $registry->storeObject('template','template');
If our template class had a method contained within it, such as generateOutput, we could call this method from index.php like so:
view plain copy to clipboard print ?
1. $registry->getObject('template')->generateOutput();
Our Framework now has a basic structure to it, and we have a Registry in place for our core functionality, in the next tutorial, we will look at creating the objects which our Registry will store, starting with a basic database abstraction layer and a security manager.
Create a PHP5 Framework – Part 2 With the basic structure for our Framework in place, it is time to start adding functionality to it. In this tutorial we will create a template manager and database handler, bringing us a step closer to a powerful Framework fit for use for almost any project. If you haven’t already, be sure to review Part 1 of this series first!
MVC: Tweak the structure
In the first part of this tutorial, we created a folder called controllers to store the business logic for our applications. As daok pointed out in a comment, this isn’t the best place for all of the business logic, and that a model should be used to store this logic. Previously, I have always used the database itself as the model in the majority of my applications, however, seperating this out a little more will make our framework even more powerful, and easier to extend.
So, what is MVC? MVC is a design pattern (as was the Singleton and Registry patterns we looked at in part 1), and it stands for Model View Controller, and the aim of this pattern is to seperate the business logic, user interface actions and the user interface from one another. Although we are not going to do anything with our models and controllers just yet, let’s update our frameworks folder structure to include the “models” folder. The model will contain the main business logic, and the controller will deal with user interaction (e.g. submitting data, such as a comment). NB: Our __autoload function does not need to be changed.
Database Handler
Most websites and web applications which make use of PHP also make use of a database engine, such as MySQL. If we keep all of our database related functions in the same place, then we can (in theory) easily change the database engine we use. We can also make certain operations easier, such as inserting records, updating records or deleting records from the database. It can also make it easier when dealing with multiple database connections.
So…what should our database handler do:
• Manage connections to the database • Try to provide some level of abstraction from the database • Cache queries so we can use them later • Make common database operations easier
Let’s look at the code for our database handler, then we will discuss it afterwards.
view plain copy to clipboard print ?
1. <?php 2. 3. /** 4. * Database management and access class 5. * This is a very basic level of abstraction 6. */ 7. class database { 8. 9. /** 10. * Allows multiple database connections 11. * probably not used very often by many applications, but still useful 12. */ 13. private $connections = array(); 14. 15. /** 16. * Tells the DB object which connection to use 17. * setActiveConnection($id) allows us to change this 18. */ 19. private $activeConnection = 0; 20. 21. /**

22. * Queries which have been executed and then "saved for later" 23. */ 24. private $queryCache = array(); 25. 26. /** 27. * Data which has been prepared and then "saved for later" 28. */ 29. private $dataCache = array(); 30. 31. /** 32. * Record of the last query 33. */ 34. private $last; 35. 36. /** 37. * Hello 38. */ 39. public function __construct() 40. { 41. 42. } 43. 44. /** 45. * Create a new database connection 46. * @param String database hostname 47. * @param String database username 48. * @param String database password 49. * @param String database we are using 50. * @return int the id of the new connection 51. */ 52. public function newConnection( $host, $user, $password, $database ) 53. { 54. $this->connections[] = new mysqli( $host, $user, $password, $database ); 55. $connection_id = count( $this->connections )-1; 56. if( mysqli_connect_errno() ) 57. { 58. trigger_error('Error connecting to host. '.$this->connections[$connection_id]->error,
E_USER_ERROR); 59. } 60. 61. return $connection_id; 62. } 63. 64. /** 65. * Close the active connection 66. * @return void 67. */ 68. public function closeConnection() 69. { 70. $this->connections[$this->activeConnection]->close(); 71. } 72.

73. /** 74. * Change which database connection is actively used for the next operation 75. * @param int the new connection id 76. * @return void 77. */ 78. public function setActiveConnection( int $new ) 79. { 80. $this->activeConnection = $new; 81. } 82. 83. /** 84. * Store a query in the query cache for processing later 85. * @param String the query string 86. * @return the pointed to the query in the cache 87. */ 88. public function cacheQuery( $queryStr ) 89. { 90. if( !$result = $this->connections[$this->activeConnection]->query( $queryStr ) ) 91. { 92. trigger_error('Error executing and caching query: '.$this->connections[$this-
>activeConnection]->error, E_USER_ERROR); 93. return -1; 94. } 95. else 96. { 97. $this->queryCache[] = $result; 98. return count($this->queryCache)-1; 99. } 100. } 101. 102. /** 103. * Get the number of rows from the cache 104. * @param int the query cache pointer 105. * @return int the number of rows 106. */ 107. public function numRowsFromCache( $cache_id ) 108. { 109. return $this->queryCache[$cache_id]->num_rows; 110. } 111. 112. /** 113. * Get the rows from a cached query 114. * @param int the query cache pointer 115. * @return array the row 116. */ 117. public function resultsFromCache( $cache_id ) 118. { 119. return $this->queryCache[$cache_id]->fetch_array(MYSQLI_ASSOC); 120. } 121. 122. /** 123. * Store some data in a cache for later

124. * @param array the data 125. * @return int the pointed to the array in the data cache 126. */ 127. public function cacheData( $data ) 128. { 129. $this->dataCache[] = $data; 130. return count( $this->dataCache )-1; 131. } 132. 133. /** 134. * Get data from the data cache 135. * @param int data cache pointed 136. * @return array the data 137. */ 138. public function dataFromCache( $cache_id ) 139. { 140. return $this->dataCache[$cache_id]; 141. } 142. 143. /** 144. * Delete records from the database 145. * @param String the table to remove rows from 146. * @param String the condition for which rows are to be removed 147. * @param int the number of rows to be removed 148. * @return void 149. */ 150. public function deleteRecords( $table, $condition, $limit ) 151. { 152. $limit = ( $limit == '' ) ? '' : ' LIMIT ' . $limit; 153. $delete = "DELETE FROM {$table} WHERE {$condition} {$limit}"; 154. $this->executeQuery( $delete ); 155. } 156. 157. /** 158. * Update records in the database 159. * @param String the table 160. * @param array of changes field => value 161. * @param String the condition 162. * @return bool 163. */ 164. public function updateRecords( $table, $changes, $condition ) 165. { 166. $update = "UPDATE " . $table . " SET "; 167. foreach( $changes as $field => $value ) 168. { 169. $update .= "`" . $field . "`='{$value}',"; 170. } 171. 172. // remove our trailing , 173. $update = substr($update, 0, -1); 174. if( $condition != '' ) 175. {

176. $update .= "WHERE " . $condition; 177. } 178. 179. $this->executeQuery( $update ); 180. 181. return true; 182. 183. } 184. 185. /** 186. * Insert records into the database 187. * @param String the database table 188. * @param array data to insert field => value 189. * @return bool 190. */ 191. public function insertRecords( $table, $data ) 192. { 193. // setup some variables for fields and values 194. $fields = ""; 195. $values = ""; 196. 197. // populate them 198. foreach ($data as $f => $v) 199. { 200. 201. $fields .= "`$f`,"; 202. $values .= ( is_numeric( $v ) && ( intval( $v ) == $v ) ) ? $v."," : "'$v',"; 203. 204. } 205. 206. // remove our trailing , 207. $fields = substr($fields, 0, -1); 208. // remove our trailing , 209. $values = substr($values, 0, -1); 210. 211. $insert = "INSERT INTO $table ({$fields}) VALUES({$values})"; 212. $this->executeQuery( $insert ); 213. return true; 214. } 215. 216. /** 217. * Execute a query string 218. * @param String the query 219. * @return void 220. */ 221. public function executeQuery( $queryStr ) 222. { 223. if( !$result = $this->connections[$this->activeConnection]->query( $queryStr ) ) 224. { 225. trigger_error('Error executing query: '.$this->connections[$this-
>activeConnection]->error, E_USER_ERROR); 226. }

227. else 228. { 229. $this->last = $result; 230. } 231. 232. } 233. 234. /** 235. * Get the rows from the most recently executed query, excluding cached queries 236. * @return array 237. */ 238. public function getRows() 239. { 240. return $this->last->fetch_array(MYSQLI_ASSOC); 241. } 242. 243. /** 244. * Gets the number of affected rows from the previous query 245. * @return int the number of affected rows 246. */ 247. public function affectedRows() 248. { 249. return $this->$this->connections[$this->activeConnection]->affected_rows; 250. } 251. 252. /** 253. * Sanitize data 254. * @param String the data to be sanitized 255. * @return String the sanitized data 256. */ 257. public function sanitizeData( $data ) 258. { 259. return $this->connections[$this->activeConnection]->real_escape_string( $data ); 260. } 261. 262. /** 263. * Deconstruct the object 264. * close all of the database connections 265. */ 266. public function __deconstruct() 267. { 268. foreach( $this->connections as $connection ) 269. { 270. $connection->close(); 271. } 272. } 273.} 274.?>
Before discussing this in more detail, I should point out that this database handler is very basic. We could provide complete abstraction by not executing queries directly, but instead constructing queries based on paramaters to a query function, and then executing it.
Our delete, insert and update record methods make it easier to perform some common tasks (as I mentioned above we could extend this to do much much more), by only providing information such as the table name, an array of fields and coresponding values, limit values and conditions. Queries can also be “cached” so that we can do things with them later. I find this feature (as well as the ability to “cache” arrays of data) is very handy when combined with a template manager, as we can easily iterate through rows of data and populate it into our templates with little fuss, as you will see when we look at the template manager.
view plain copy to clipboard print ?
1. // insert record 2. $registry->getObject('db')->insertRecords( 'testTable', array('name'=>'Michael' ) ); 3. // update a record 4. $registry->getObject('db')->updateRecords( 'testTable', array('name'=>'MichaelP' ), 'ID=2' ); 5. // delete a record (well, upto 5 in this case) 6. $registry->getObject('db')->deleteRecords( 'testTable', "name='MichaelP'", 5 );
We can also work with multiple database connections relatively easily, so long as we switch between the appropriate connections when we need to (although this won’t work when caching queries and retrieving them via our template manager without further work), for example, the code snippet below would allow us to delete records from two databases.
view plain copy to clipboard print ?
1. // our second database connection (let's assume we already have a connection to our main DB)
2. $newConnection = $registry->getObject('db')->newConnection('localhost', 'root', 'password', 'secondDB');
3. // delete from the primary db connection 4. $registry->getObject('db')->deleteRecords( 'testTable', "name='MichaelP'", 5 ); 5. // change our active db connection, to allow future queries to be on the second connection 6. $registry->getObject('db')->setActiveConnection( $newConnection ); 7. // delete from the secondary db connection 8. $registry->getObject('db')->deleteRecords( 'testTable', "name='MichaelP'", 5 ); 9. // revert the active connection so future queries are on the primary db connection 10.$registry->getObject('db')->setActiveConnection( 0 );
How might we want to extend this class?
• Full abstraction • Make use of inheritance, create an interface and have database classes inherit from it, each
for different database engines • Store the connection ID’s along with the query when caching queries • Improve data sanitizing, depending on the type of data we wish to sanitize
Template Manager
The template manager will handle all of the output, it needs to be able to work with various different template files, replace placeholders (I call them tags) with data and iterate through parts of the template with multiple rows of data from the database.
To make things easier, we will make use of a page class to contain the content related to the page, this also makes it easier for us to extend this and add features to it later. The template manager will manage this object.
view plain copy to clipboard print ?
1. <?php

2. 3. // prevent this file being called directly 4. if ( ! defined( 'PCAFW' ) ) 5. { 6. echo 'This file can only be called via the main index.php file, and not directly'; 7. exit(); 8. } 9. 10./** 11. * Template manager class 12. */ 13.class template { 14. 15. private $page; 16. 17. /** 18. * Hello! 19. */ 20. public function __construct() 21. { 22. include( APP_PATH . '/PCARegistry/objects/page.class.php'); 23. $this->page = new Page(); 24. 25. } 26. 27. /** 28. * Add a template bit onto our page 29. * @param String $tag the tag where we insert the template e.g. {hello} 30. * @param String $bit the template bit (path to file, or just the filename) 31. * @return void 32. */ 33. public function addTemplateBit( $tag, $bit ) 34. { 35. if( strpos( $bit, 'skins/' ) === false ) 36. { 37. $bit = 'skins/' . PCARegistry::getSetting('skin') . '/templates/' . $bit; 38. } 39. $this->page->addTemplateBit( $tag, $bit ); 40. } 41. 42. /** 43. * Put the template bits into our page content 44. * Updates the pages content 45. * @return void 46. */ 47. private function replaceBits() 48. { 49. $bits = $this->page->getBits(); 50. foreach( $bits as $tag => $template ) 51. { 52. $templateContent = file_get_contents( $bit ); 53. $newContent = str_replace( '{' . $tag . '}', $templateContent, $this->page-

>getContent() ); 54. $this->page->setContent( $newContent ); 55. } 56. } 57. 58. /** 59. * Replace tags in our page with content 60. * @return void 61. */ 62. private function replaceTags() 63. { 64. // get the tags 65. $tags = $this->page->getTags(); 66. // go through them all 67. foreach( $tags as $tag => $data ) 68. { 69. if( is_array( $data ) ) 70. { 71. 72. if( $data[0] == 'SQL' ) 73. { 74. // it is a cached query...replace DB tags 75. $this->replaceDBTags( $tag, $data[1] ); 76. } 77. elseif( $data[0] == 'DATA' ) 78. { 79. // it is some cached data...replace data tags 80. $this->replaceDataTags( $tag, $data[1] ); 81. } 82. } 83. else 84. { 85. // replace the content 86. $newContent = str_replace( '{' . $tag . '}', $data, $this->page->getContent() ); 87. // update the pages content 88. $this->page->setContent( $newContent ); 89. } 90. } 91. } 92. 93. /** 94. * Replace content on the page with data from the DB 95. * @param String $tag the tag defining the area of content 96. * @param int $cacheId the queries ID in the query cache 97. * @return void 98. */ 99. private function replaceDBTags( $tag, $cacheId ) 100. { 101. $block = ''; 102. $blockOld = $this->page->getBlock( $tag ); 103. 104. // foreach record relating to the query...

105. while ($tags = PCARegistry::getObject('db')->resultsFromCache( $cacheId ) ) 106. { 107. $blockNew = $blockOld; 108. // create a new block of content with the results replaced into it 109. foreach ($tags as $ntag => $data) 110. { 111. $blockNew = str_replace("{" . $ntag . "}", $data, $blockNew); 112. } 113. $block .= $blockNew; 114. } 115. $pageContent = $this->page->getContent(); 116. // remove the seperator in the template, cleaner HTML 117. $newContent = str_replace( '<!-- START ' . $tag . ' -->' . $blockOld . '<!-- END ' . $tag
. ' -->', $block, $pageContent ); 118. // update the page content 119. $this->page->setContent( $newContent ); 120. } 121. 122. /** 123. * Replace content on the page with data from the cache 124. * @param String $tag the tag defining the area of content 125. * @param int $cacheId the datas ID in the data cache 126. * @return void 127. */ 128. private function replaceDataTags( $tag, $cacheId ) 129. { 130. $block = $this->page->getBlock( $tag ); 131. $blockOld = $block; 132. while ($tags = PCARegistry::getObject('db')->dataFromCache( $cacheId ) ) 133. { 134. foreach ($tags as $tag => $data) 135. { 136. $blockNew = $blockOld; 137. $blockNew = str_replace("{" . $tag . "}", $data, $blockNew); 138. } 139. $block .= $blockNew; 140. } 141. $pageContent = $this->page->getContent(); 142. $newContent = str_replace( $blockOld, $block, $pageContent ); 143. $this->page->setContent( $newContent ); 144. } 145. 146. /** 147. * Get the page object 148. * @return Object 149. */ 150. public function getPage() 151. { 152. return $this->page; 153. } 154. 155. /**

156. * Set the content of the page based on a number of templates 157. * pass template file locations as individual arguments 158. * @return void 159. */ 160. public function buildFromTemplates() 161. { 162. $bits = func_get_args(); 163. $content = ""; 164. foreach( $bits as $bit ) 165. { 166. 167. if( strpos( $bit, 'skins/' ) === false ) 168. { 169. $bit = 'skins/' . PCARegistry::getSetting('skin') . '/templates/' . $bit; 170. } 171. if( file_exists( $bit ) == true ) 172. { 173. $content .= file_get_contents( $bit ); 174. } 175. 176. } 177. $this->page->setContent( $content ); 178. } 179. 180. /** 181. * Convert an array of data (i.e. a db row?) to some tags 182. * @param array the data 183. * @param string a prefix which is added to field name to create the tag name 184. * @return void 185. */ 186. public function dataToTags( $data, $prefix ) 187. { 188. foreach( $data as $key => $content ) 189. { 190. $this->page->addTag( $key.$prefix, $content); 191. } 192. } 193. 194. public function parseTitle() 195. { 196. $newContent = str_replace('<title>', '<title>'. $page->getTitle(), $this->page-
>getContent() ); 197. $this->page->setContent( $newContent ); 198. } 199. 200. /** 201. * Parse the page object into some output 202. * @return void 203. */ 204. public function parseOutput() 205. { 206. $this->replaceBits();

207. $this->replaceTags(); 208. $this->parseTitle(); 209. } 210. 211.} 212.?>
So, what exactly does this class do?
Creates our page object, and bases it from template files, the page object contains the content and information which is needed to make-up the HTML of the page. We then buildFromTemplate(‘templatefile.tpl.php’, ‘templatefile2.tpl.php’) to get the initial content for our page, this method takes any number of template files as its arguments, and stitches them together in order, useful for header, content and footer templates.
Manages the content associated with the page by helping the page object maintain a record of data to be replaced into the page, and also additional template bits which need to be incorporated into the page (addTemplateBit(‘userbar’,'usertoolsbar.tpl.php’)).
Adds data and content to the page by performing various replace operations on the page content, including retrieving results from a cached query and adding them to the page.
The template file needs to mark within itself where a cached query needs to be retrieved and the data from the query replaced. When the template manager encounters a tag to replace which is a query, it gets the chunk of the page where it needs to iterate through by calling getBlock(‘block’) on the page object. This chunk of content is then copied for each record in the query, and has tags within it replaced with the results from the query. We will take a look at how this looks in the template later in this tutorial.
Template Manager: Page
The page object is managed by the template manager, and it used to contain all of the details related to the page. This leaves the template manager free to manage, while making it easier for us to extend the functionality of this at a later date.
view plain copy to clipboard print ?
1. <?php 2. 3. /** 4. * This is our page object 5. * It is a seperate object to allow some interesting extra functionality to be added 6. * Some ideas: passwording pages, adding page specific css/js files, etc 7. */ 8. class page { 9. 10. // room to grow later? 11. private $css = array(); 12. private $js = array(); 13. private $bodyTag = ''; 14. private $bodyTagInsert = ''; 15. 16. // future functionality? 17. private $authorised = true; 18. private $password = ''; 19.

20. // page elements 21. private $title = ''; 22. private $tags = array(); 23. private $postParseTags = array(); 24. private $bits = array(); 25. private $content = ""; 26. 27. /** 28. * Constructor... 29. */ 30. function __construct() { } 31. 32. public function getTitle() 33. { 34. return $this->title; 35. } 36. 37. public function setPassword( $password ) 38. { 39. $this->password = $password; 40. } 41. 42. public function setTitle( $title ) 43. { 44. $this->title = $title; 45. } 46. 47. public function setContent( $content ) 48. { 49. $this->content = $content; 50. } 51. 52. public function addTag( $key, $data ) 53. { 54. $this->tags[$key] = $data; 55. } 56. 57. public function getTags() 58. { 59. return $this->tags; 60. } 61. 62. public function addPPTag( $key, $data ) 63. { 64. $this->postParseTags[$key] = $data; 65. } 66. 67. /** 68. * Get tags to be parsed after the first batch have been parsed 69. * @return array 70. */ 71. public function getPPTags()

72. { 73. return $this->postParseTags; 74. } 75. 76. /** 77. * Add a template bit to the page, doesnt actually add the content just yet 78. * @param String the tag where the template is added 79. * @param String the template file name 80. * @return void 81. */ 82. public function addTemplateBit( $tag, $bit ) 83. { 84. $this->bits[ $tag ] = $bit; 85. } 86. 87. /** 88. * Get the template bits to be entered into the page 89. * @return array the array of template tags and template file names 90. */ 91. public function getBits() 92. { 93. return $this->bits; 94. } 95. 96. /** 97. * Gets a chunk of page content 98. * @param String the tag wrapping the block ( <!-- START tag --> block <!-- END tag --
> ) 99. * @return String the block of content 100. */ 101. public function getBlock( $tag ) 102. { 103. preg_match ('#<!-- START '. $tag . ' -->(.+?)<!-- END '. $tag . ' -->#si', $this->content,
$tor); 104. 105. $tor = str_replace ('<!-- START '. $tag . ' -->', "", $tor[0]); 106. $tor = str_replace ('<!-- END ' . $tag . ' -->', "", $tor); 107. 108. return $tor; 109. } 110. 111. public function getContent() 112. { 113. return $this->content; 114. } 115. 116.} 117.?>
How can this class be extended and improved?
• PostParseTags: You may wish to have tags replaced after most of the page has been parsed, maybe content in the database contains tags which need to be parsed.

• Passworded pages: Assign a password to a page, check to see if the user has the password in a cookie or a session to allow them to see the page.
• Restricted pages (although we need our authentication components first!) • Altering the • Dynamically adding references to javascript and css files based on the page or application.
Load core objects
Now that we have some objects which our registry is going to store for us, we need to tell the registry which objects these are. I’ve created a method in the PCARegistry object called loadCoreObjects which (as it says) loads the core objects. This means can can just call this from our index.php file to load the registry with these objects.
view plain copy to clipboard print ?
1. public function storeCoreObjects() 2. { 3. $this->storeObject('database', 'db' ); 4. $this->storeObject('template', 'template' ); 5. }
This method can be altered later to encorporate the other core objects the registry should load, of course there may be objects which we want our registry to manage, but only depending on the application the framework is used for. These objects would be loaded outside of this method.
Some Data
So that we can demonstrate the new features added to our framework, we need a database to make use of the database handler, and some of the template management functions (where we replace a block of content with the rows in the database).
The demonstration site we will make with our framework by the end of this series of tutorials is a website with a members directory, so let’s make a very basic database table for members profiles, containing an ID, name, and email address.
Obviously, we need a few rows of data in this table!
A quick template
In order for anything to be displayed, we need a basic template, where we will list the data from our members table.
view plain copy to clipboard print ?
1. <html> 2. <head> 3. <title> Powered by PCA Framework</title> 4. </head> 5. <body> 6. <h1>Our Members</h1> 7. <p>Below is a list of our members:</p> 8. <ul> 9. <!-- START members --> 10.<li>{name} {email}</li>

11.<!-- END members --> 12.</ul> 13.</body> 14.</html>
The START members and END members HTML comments denote the members block (which is obtained via the getBlock() method on the page), this is where the template manager will iterate through the records in the database and display them.
Framework in use
Now, we need to bring this all together, with our index.php file:
view plain copy to clipboard print ?
1. // require our registry 2. require_once('PCARegistry/pcaregistry.class.php'); 3. $registry = PCARegistry::singleton(); 4. 5. // store those core objects 6. $registry->storeCoreObjects(); 7. 8. // create a database connection 9. $registry->getObject('db')->newConnection('localhost', 'root', '', 'pcaframework'); 10. 11.// set the default skin setting (we will store these in the database later...) 12.$registry->storeSetting('default', 'skin'); 13. 14.// populate our page object from a template file 15.$registry->getObject('template')->buildFromTemplates('main.tpl.php'); 16. 17.// cache a query of our members table 18.$cache = $registry->getObject('db')->cacheQuery('SELECT * FROM members'); 19. 20.// assign this to the members tag 21.$registry->getObject('template')->getPage()->addTag('members', array('SQL', $cache) ); 22. 23.// set the page title 24.$registry->getObject('template')->getPage()->setTitle('Our members'); 25. 26.// parse it all, and spit it out 27.$registry->getObject('template')->parseOutput(); 28.print $registry->getObject('template')->getPage()->getContent();
If we now view this page in our web browser, the results of the query are displayed on the page:

Create a PHP5 Framework – Part 3Now that we’ve got a basic framework (see part 1 and part 2 of this series), we can start thinking about integrating designs with our PHP framework. For now, we’ll concentrate on the front-end design, including how we can make it easy to ‘skin’ our new framework.
How everything fits together
So far, we have our core files, in a logical structure and a core set of objects which are accessed by our registry. One of these objects is our template handler, which lets us easily build and generate HTML output. The output is built from a series of files including images, css and templates which make up ‘the skin’.
Step 1: what’s needed for our framework’s front end design
Generic front-end designs for the template can be difficult to think through properly. It’s useful if the design’s basic HTML template contains everything that any website you’re likely to create using the framework. The bare minimum I consider is:
• A primary content area, which we’ll call
#content
.
• A column or two for content which isn’t as important as that in
#content
.
• Some tabular data. • Unordered and ordered lists (definition lists too, if you’re likely to use them). • Images. I find it useful to include a separate styling for photographs, which I identify with
the class ‘photo’ in HTML; for example <img class=”photo” src=”images/photo.jpg” alt=”Photograph” />.
• A form for data capture.
The <head>
We’ll start with creating a basic XHTML structure for our pages. We’ll start with the section first:
view plain copy to clipboard print ?
1. <!DOCTYPE html PUBLIC "-//W3C//DTD XHTML 1.0 Strict//EN" "http://www.w3.org/TR/xhtml1/DTD/xhtml1-strict.dtd">
2. <html xmlns="http://www.w3.org/1999/xhtml" xml:lang="en" lang="en"> 3. <head> 4. <title>{pagetitle}</title> 5. <meta name="description" content="{metadesc}" /> 6. <meta name="keywords" content="{metakey}" /> 7. <style type="text/css" title="Default page style" media="screen"><!--@import "skins/fmwk
/style.css";--></style> 8. <link rel="icon" href="favicon.ico" type="image/x-icon" /> 9. <link rel="shortcut icon" href="favicon.ico" type="image/x-icon" />

10.</head> 11.<body>
You can change the doctype to match, or even have provision to be able to define it within the settings for each website you create with your framework, and it would also be useful to be able to change the
lang
. It’d be useful to have the stylesheet also defined as a setting, which we’ll cover in future tutorials.
Additionally, the meta description and meta key attributes can be hard-coded in to each website’s skin that you create, but it’s wise to give each page a different description and set of keywords to prevent pages appearing in Google’s supplementary index.
The {pagetitle} placeholder will be used to insert the title of the current page in to the template.
The <body>
We can now move on to the body of our template XHTML file for a generic front-end design for our framework. We’ll keep the layout simple for now, assuming that most websites we’ll be creating with the framework will use the traditional header, content, column and footer scheme.
view plain copy to clipboard print ?
1. <div id="wrapper"> 2. <div id="header"> 3. 4. </div> 5. <div id="content"> 6. 7. </div><!--/content--> 8. <div id="column"> 9. 10.</div><!--/column--> 11. 12.<div id="footer"> 13. 14.</div><!--/footer--> 15. 16.</div><!--/wrapper--> 17.</body> 18.</html>
Step 2: basic content
As promised, we’ll fill in some basic content so we can style that we have at least most of the tags that are likely to occur in a page ready-styled:
view plain copy to clipboard print ?
1. <!DOCTYPE html PUBLIC "-//W3C//DTD XHTML 1.0 Strict//EN" "http://www.w3.org/TR/xhtml1/DTD/xhtml1-strict.dtd">
2. <html xmlns="http://www.w3.org/1999/xhtml" xml:lang="en" lang="en"> 3. <head> 4. <title>{pagetitle}</title> 5. <meta name="description" content="{metadesc}" />

6. <meta name="keywords" content="{metakey}" /> 7. <style type="text/css" title="Default page style" media="screen"><!--@import "skins/fmwk
/style.css";--></style> 8. <link rel="icon" href="favicon.ico" type="image/x-icon" /> 9. <link rel="shortcut icon" href="favicon.ico" type="image/x-icon" /> 10.</head> 11.<body> 12.<div id="wrapper"> 13.<div id="header"> 14.<h2><a href="#" title="Website name">Website name</a></h2> 15.</div> 16.<div id="content"> 17.<h1>{pagetitle}</h1> 18.<img class="photo" src="photo.jpg" alt="Photo test" /> 19.<p> 20.Lorem ipsum dolor sit amet, <strong>consectetuer adipiscing elit</strong>. Quisque urna au
gue, fringilla quis, pulvinar non, feugiat in, pede. Curabitur vitae pede. Cras vehicula varius tellus. Sed consequat, enim tristique euismod volutpat, <em>tellus magna aliquet risus</em>, id aliquet eros metus at purus.
21.</p> 22.<h2>Secondary heading</h2> 23.<p> 24.Aliquam dictum, nibh eget <a href="#" title="Test link">ullamcorper condimentum</a>, ma
gna turpis placerat pede, tempor facilisis tortor urna commodo turpis. Class aptent taciti sociosqu ad litora torquent per conubia nostra, per inceptos himenaeos. Cras luctus cursus velit. Nullam imperdiet turpis.
25.</p> 26.<h3>Tertiary heading</h3> 27.<table> 28.<tr> 29.<th>Heading</th> 30.<td>Data</td> 31.</tr> 32.<tr> 33.<th>Heading</th> 34.<td>Data</td> 35.</tr> 36.</table> 37.<p> 38.<img src="image.jpg" alt="Generic image" /> 39.Cras a eros eget lorem fermentum malesuada. Phasellus condimentum libero vel lacus. Done
c lectus nisl, adipiscing malesuada, sodales tincidunt, sagittis vitae, lacus. Proin nec pede. Maecenas adipiscing adipiscing risus.
40.</p> 41.</div><!--/content--> 42.<div id="column"> 43. 44.<ul> 45.<li>List item</li> 46.<li>List item</li> 47.<li>List item</li> 48.</ul>

49. 50.<ol> 51.<li>List item</li> 52.<li>List item</li> 53.<li>List item</li> 54.<li>List item</li> 55.</ol> 56. 57.</div><!--/column--> 58. 59.<div id="footer"> 60.<p> 61.© Website name, 2008. 62.</p> 63.</div><!--/footer--> 64. 65.</div><!--/wrapper--> 66.</body> 67.</html>
The content is now ready for some simple styling.
Step 3: basic styling
We’ll start by resetting the margin and padding of elements in our XHTML document with CSS:
view plain copy to clipboard print ?
1. body, * { 2. margin: 0; 3. padding 0; 4. }
We’ll take some time to assign style to the body element and ensure that links within the document are appropriately highlighted:
view plain copy to clipboard print ?
1. body { 2. background: #FFF; 3. color: #000; 4. font-family: "helvetica", "arial", "verdana", sans-serif; 5. font-size: 62.5%; 6. } 7. 8. a, a:active, a:link { 9. color: #1A64AC; 10.text-decoration: underline; 11.} 12. 13.a:visited { 14.color: #0D2F4F; 15.}
Next, we’ll go about centering our design in the #wrapper div, and assigning a faint border to each of the divs so that we’ll be able to see them as we style.

view plain copy to clipboard print ?
1. #wrapper { 2. margin: 0 auto; 3. width: 950px; 4. } 5. 6. #wrapper, #header, #content, #column, #footer { 7. border: 1px #DDD solid; 8. }
Whilst the above CSS won’t centre this design in Internet Explorer 6, the CSS has been kept basic to enable maximum flexibility. With a little more CSS, we nearly have a complete skeleton design for our framework’s front-end – all that remains is a little simple positioning:
view plain copy to clipboard print ?
1. #column, #content { 2. float: left; 3. font-size: 125%; 4. padding: 5px; 5. } 6. 7. #column { 8. width: 200px; 9. } 10. 11.#content { 12.margin-left 5px; 13.width: 725px; 14.} 15. 16.#header, #footer { 17.clear: both; 18.}
All that’s left to style for us now are images:
view plain copy to clipboard print ?
1. #column img, #content img { 2. border: 2px #DDD solid; 3. float: left; 4. margin: 0 5px 0 10px; 5. } 6. img.photo { 7. background: #DDD; 8. float: rightright !important; 9. padding: 25px 2px; 10.}
What we’re left with at this stage is a simple website layout which we can use as the basis of the front-end of our PHP framework:
Of course, for extra flexibility, it may become useful to allow 2 columns of content by default,

which can be done with the addition of a little more XHTML and CSS. If you’re unfamiliar with how to do that, try Blue Robot’s Layour Reservoir.
Step 4: templates from XHTML
The next step is transferring the XHTML, CSS and images in to a skin suitable for our PHP framework. To do this, we need to split the XHTML in to three templates: header, main and footer. Because of the way the template system is structured, a page can be generated from any number of templates, however at least a header, footer and main template are recommended this means, generally speaking, we should only really need to copy-and-alter the main template file if we were to create a new page which had a slightly different structure.
Header template for the PHP framework (skins/default/templates/header.tpl.php)
The header template for the PHP framework should contain the section of our XHTML, as well as the
section of the :
view plain copy to clipboard print ?
1. <!DOCTYPE html PUBLIC "-//W3C//DTD XHTML 1.0 Strict//EN" "http://www.w3.org/TR/xhtml1/DTD/xhtml1-strict.dtd">
2. <html xmlns="http://www.w3.org/1999/xhtml" xml:lang="en" lang="en"> 3. <head> 4. <title>{pagetitle}</title> 5. <meta name="description" content="{metadesc}" /> 6. <meta name="keywords" content="{metakey}" /> 7. <style type="text/css" title="Default page style" media="screen"><!--@import "style.css";--
></style> 8. <link rel="icon" href="favicon.ico" type="image/x-icon" /> 9. <link rel="shortcut icon" href="favicon.ico" type="image/x-icon" /> 10.</head> 11.<body> 12.<div id="wrapper"> 13.<div id="header"> 14.<h2><a href="#" title="Website name">Website name</a></h2> 15.</div>
Main template for the PHP framework (skins/default/templates/main.tpl.php)
The main template should include the divs which will contain both the primary content, and any content in columns. Rather than copy the dummy text we used to style elements such as paragraphs, ordered lists and tables, we can now insert placeholders for this content, which will be updated depending on where the content is.
The placeholder content is:
• {pagetitle} the title of the page. • {maincontent} the main content of the page. • {btitle} and {bcontent} heading and content for blocks of content. This is enclosed within a
rcolumn loop so several blocks can be placed in the column.
view plain copy to clipboard print ?
1. <div id="content"> 2. <h1>{pagetitle}</h1>

3. {maincontent} 4. </div><!--/content--> 5. 6. <div id="column"> 7. <!-- START rcolumn --> 8. <h2>{btitle}</h2> 9. {bcontent} 10.<!-- END rcolumn --> 11.</div><!--/column-->
Footer template for the PHP framework (skins/default/templates/footer.tpl.php)
Lastly, the remaining XHTML goes in the footer file, which closes the XHTML document and the body section. We typically use this to include a copyright notice and a ‘web design by’ link on our websites.
view plain copy to clipboard print ?
1. <div id="footer"> 2. <p> 3. © Website name, 2008. 4. </p> 5. </div><!--/footer--> 6. 7. </div><!--/wrapper--> 8. </body> 9. </html>
Apologies for the break from PHP in our series, but it is important to construct the relevant templates in skin format for our framework and the applications that utilise it. Part 4 in this PHP5 framework development series will cover basic security considerations and a basic authentication handler, before we move onto creating our Content Management model, and looking into how models fit together in Part 5. Also coming up in the series: Sending emails, extending our framework and logging a stream of user events in an innovative way.