creating a eportfolio using - a leading uk university · creating a eportfolio using ... there are...
TRANSCRIPT
Creating an ePortfolio using wordpress.com
http://www2.le.ac.uk/Members/mjm33 1
Creating a ePortfolio using
A key part of the process of personal development is the recording of and reflection upon time in the workplace and any development activities undertaken. There are many platforms that can be use to do this but one of the best is a blog.
Why a blog makes a good ePortfolio: Blogs can store and organise content in several dynamic ways including chronologically (like a diary)
or personalised tagging systems.
Blogs also have the capability to present a personal profile to the world (like a website).
Blogs also enable people who are interested in your development to follow your activities easily using RSS feeds (like subscribing to a newspaper).
These features make blogs the perfect platform to create an ePortfolio. An ePortfolio is an electronic collection of personal achievements, developments and reflections that can be sent to potential employers to supplement any CV. Having researched blogs over many years of my personal favourite blogging platforms is Wordpress.com. This short guide describes the steps of setting and creating an ePortfolio on wordpress.com.
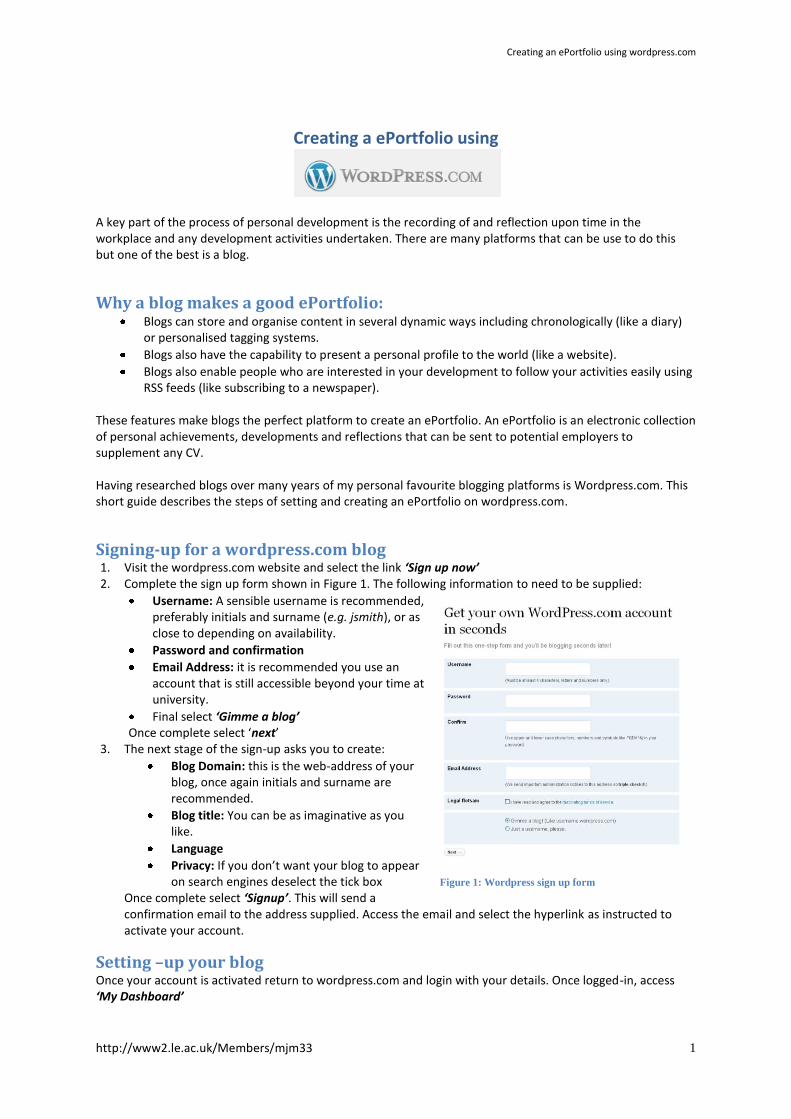
Signing-up for a wordpress.com blog 1. Visit the wordpress.com website and select the link ‘Sign up now’ 2. Complete the sign up form shown in Figure 1. The following information to need to be supplied:
Username: A sensible username is recommended, preferably initials and surname (e.g. jsmith), or as close to depending on availability.
Password and confirmation
Email Address: it is recommended you use an account that is still accessible beyond your time at university.
Final select ‘Gimme a blog’ Once complete select ‘next’
3. The next stage of the sign-up asks you to create:
Blog Domain: this is the web-address of your blog, once again initials and surname are recommended.
Blog title: You can be as imaginative as you like.
Language
Privacy: If you don’t want your blog to appear on search engines deselect the tick box
Once complete select ‘Signup’. This will send a confirmation email to the address supplied. Access the email and select the hyperlink as instructed to activate your account.
Setting –up your blog Once your account is activated return to wordpress.com and login with your details. Once logged-in, access ‘My Dashboard’
Figure 1: Wordpress sign up form

Creating an ePortfolio using wordpress.com
http://www2.le.ac.uk/Members/mjm33 2
My Dashboard The Dashboard is the control platform for your blog. Several features of the Dashboard will be used in this tutorial, but here is an overview:
Navigation and settings menu Use this menu to browse posts, upload media and links. There are also options to personalise your blogs appearance and settings.
Add a blog post A blog post can be written using the ‘Quickpress’ directly from the Dashboard or by using the full editor by selecting the link
At a glance View and edit old posts, comments and tags
Track your popularity These stats tell display how many times the blog has been viewed.
Figure 2: My Dashboard

Creating an ePortfolio using wordpress.com
http://www2.le.ac.uk/Members/mjm33 3
Personalising your blog
The appearance of the blog can be personalised in several ways including: The Theme, this will be how external visitors view the blog. To change the Theme:
1. From the Dashboard navigation select ‘Appearance’ followed ‘Themes’. 2. This will present a series of templates to choose from. 3. Select a preferred style and click ‘Activate’
The Theme can be changed at any time. The Widgets; these enable extra features to be added to a blog. To add Widgets:
1. From the Dashboard navigation select ‘Appearance’ followed by ‘Widgets’ 2. To add a Widget, hover the mouse cursor over a selected Widget. left click and whilst hold the mouse
button down drag it to the ‘Sidebar’ as shown in Figure 3
Figure 3: Add Widgets
The Widgets most highly recommend for an ePortfolio are:
‘Tag Cloud’, a great way to organise blog posts described below.
‘Recent posts’ this will list the most recent blog posts.
‘RSS Links’ this will enable people to subscribe to your blog (described below). For this widget use the setting shown in Figure 4.
Starting to write your ePortfolio
About you Page The first piece of content to write is an introductory page for your ePortfolio. Pages are used as static items of content within a blog. These
can be used as introduction or navigation pages. To do this: 1. From the Dashboard navigation select ‘Pages’ 2. There is a default page called ‘About’, open this.
Figure 4: RSS Links widget

Creating an ePortfolio using wordpress.com
http://www2.le.ac.uk/Members/mjm33 4
Figure 5: Editing a page
3. The page will appear as shown in Figure 5, with a default blurb. 4. On this page write a short biography. The editor has many of the same functionalities as a Word
Processor. 5. An option is to insert an image of yourself by selecting the icon circled in a red ring in Figure 5. 6. If you wish you can re-title the page. 7. Once you are happy with you page, select ‘Update Page’, from the ‘Publish’ box on the right of the
screen. Other options you may consider for pages: On the page edit screen there is a section on ‘Discussion’. As the page created previously is to be used for introductory and navigation purposes, consider turning off ‘Comments’. This will stop visitors commenting on the static pages of your ePortfolio.
The next step is to make sure your Profile page is the first thing seen when people visit your ePortfolio, to do this:
1. Go to the ‘Settings’ section from your Dashboard navigation. This section enables the personalisation of the setting of the blog including the Title and Tagline.
2. To setup the ePortfolio go to the ‘Reading’ section of the Settings as seen in Figure 6.
3. In the ‘Front page displays’ section select ‘A static page’ and then from the ‘Front page’ drop down menu select your profile page.
4. Scroll to the bottom of the page and select ‘save changes’
Figure 6: Reading Settings

Creating an ePortfolio using wordpress.com
http://www2.le.ac.uk/Members/mjm33 5
Start Reflecting This is the main purpose of your ePortfolio, to reflect upon any development activities or anything you care to share with potential employers. To do this we use ‘Blog Posts’, the reason for this is Blog Posts can be tagged and categorised, plus other users can comment upon them. To add a ‘Blog Post’ reflection:
1. From the Dashboard select ‘New Post’, this can be done from the navigation or the link in the top bar of the Dashboard.
2. This will bring up the editor seen in Figure 7. Give the post a title and write the entry, hyperlink or media can be inserted as required.
3. Next, add some ‘Post Tags’ in the box on the right of the screen. Tags are key-terms that summarise the subject matter of the post. These will appear in the Tag Cloud Widget added previously. Using tags enables similarly themed posts to be grouped. Multiple tags can be assigned to a post as required.
4. Posts can also be categorised, these are similar to Tags but give a much broader summery of the theme of the post. It is recommended that only a select few categories are used on a blog. For an ePortfolio example categories could include “Key Skills” or “Work Experience”.
5. The ‘Discussion’ features of a post can be changed. If you do not wish for people to be able to comment upon your post the option can be turned off that option in the ‘Discussion’ section.
6. Not all posts have to be available to the public, the ‘Visibility’ for a post can be changed to remain private in the ‘Publish’ options.
7. When finished there are two options for the post, either; ‘Save Draft’, this is used if your post is not ready for public eyes. If your post is complete you can ‘publish’ your post.
Figure 7: New Blog Post
You can revisit and edit a post at anytime via the ‘Posts’ link on the Dashboard Navigation. Once any changes have been made to a post select ‘update post’ on the edit screen.
Uploading Files to your ePortfolio Many types of media can be uploaded to your ePortfolio including documents (.doc, .docx, .pdf), presentations (ppt), images (.jpg, jpeg, png, gif) and video/audio (mp3, m4a, wav, ogg, mpeg). Once uploaded these media can be linked to or embedded in Pages and Blog Posts. An example of media you may want to include in your ePortfolio is a CV. To upload media:
1. Select the ‘Media’ link from the Dashboard Navigation. 2. Select ‘Add New’ 3. Then choose the ‘Select File’ option. 4. Browse to the locate the file locally on your computer and the press ‘Open’ 5. Complete the details and select ‘Save all changes’
Once uploaded the Media remains in your ‘Media Library’ and can be used as many time as you wish.

Creating an ePortfolio using wordpress.com
http://www2.le.ac.uk/Members/mjm33 6
Viewing your ePortfolio From the your Dashboard if select ‘View Site’ and this will show you what the public will see when they visit your ePortfolio, it will look something like this.
About page with biography and photo will be the first thing people see
Tag Cloud Widget displays all the tags you have assigned to your blog posts
RSS Link Widget invites people to subscribe to your blog
Recent Post Widget list your recent blog activities
Blog Title and Tagline appear at the top of the page
Figure 8: Example ePortfolio

Creating an ePortfolio using wordpress.com
http://www2.le.ac.uk/Members/mjm33 7
Following your blog
In the ‘RSS Link’ Widget you will see the symbol shown in Figure 9, this is a symbol you may be familiar with or have seen around the web. The symbol means there are RSS feeds availabe. RSS feeds enable people who are interested in your site to subscribe to it. The RSS automatically informs any subscribers of any updates made in the site, including every time a new blog post is created.
A word of caution Do remember the ePortfolio created on wordpress.com can be viewed by the public, therefore do not write
anything that may be damaging to yourself or other, especially if you want to show your ePortfolio to potential
employers.
Furthermore, don’t reveal personal data, this includes contact detail like telephone numbers, address etc, any
detail you wouldn’t want the public to see. Remember also to remove these details from any uploaded media
such as your CV.
Further Information For further information and help with Wordpress there is an official support site available here:
http://en.support.wordpress.com/
Figure 9: RSS
Symbol