corneal topography – why a little tlc makes for successful ... · corneal topographer in clinical...
TRANSCRIPT
18/1
0/13
CET
48
My AcademyA unique online resource, offering personalised education to meet individual needs and interests.
CET CONTINUING EDUCATION & TRAINING
1 CET POINT
Sponsored by
Historically, the eye care professional (ECP) has used a keratometer to determine the shape of the anterior corneal surface, deriving an arbitrary radius of curvature, based upon measuring the central 3mm zone. While baseline measures of the corneal surface are useful for the preliminary selection of contact lenses, supplementary uses of the keratometer, such as tear film assessment, are somewhat limited. This article considers the benefits of using a corneal topographer in clinical practice.
Corneal topography – why a little TLC makes for successful map readingNick Howard FBDO (Hons) CL FBCLA
About the author Nick Howard is a contact lens optician with almost 30 years of clinical experience. He was formerly a practice academy consultant for Ciba Vision, a
professional affairs consultant with Johnson & Johnson, and is an experienced presenter at national and international conferences. He was a finalist
for the AOP Awards Contact Lens Practitioner of the Year 2012, obtaining his BCLA fellowship in the same year. He is currently the clinical support
manager at No.7 Contact Lenses in addition to working part time in an award winning practice, specialising in complex contact lenses fitting and
contact lens training.
Course code: C-33602 | Deadline: November 15, 2013Learning objectives To understand the use of corneal topographers to determine accurate measures of corneal curvature (Group 3.1.1) To understand how to use a corneal topographer to assess the integrity of the tear film (Group 3.1.7)
Learning objectives To understand the use of corneal topographers to determine accurate measures of corneal curvature (Group 3.1.1)
Learning objectives To understand the use of corneal topographers to determine accurate measures of corneal curvature (Group 3.1.1)
For the latest CET visit www.optometry.co.uk/cet
18/1
0/13
CET
49
Introduction The growing popularity of corneal topographers in mainstream practice has revolutionised the eye care professional’s (ECP’s) ability to analyse corneal shape. Three widely-used corneal mapping instruments – the Oculus Keratograph, Keratron Scout, and Medmont E300 – are all capable of capturing images of interest to the ECP. While the corneal topographer is most commonly used for establishing baseline measurements for contact lens fitting, undertaking orthokeratology and the detection and management of corneal abnormalities, these instruments also have ancillary functions. Here, an overview of topographical maps will be given, along with an insight into some of the instruments’ more abstract uses in clinical practice, specifically in relation to the tears, lids and curves (TLC).
TearsThe anterior corneal surface is permanently covered in a thin film of tears. Whenever images or measurements are taken, it is in fact an image of the tear film itself that has been captured. Significant inter- and intra-subject variability while capturing these images provides the ECP with a useful clinical insight into tear quality comparison. A simple experiment on tear film analysis can be undertaken by capturing images immediately after a blink, or a few seconds after an extended pause between blinks. A broad, flat image with few ‘blotches’ at one and three seconds suggests not only a stable tear film, but also indicates that the measurements are accurate and reliable. Broken, irregular or apparent ‘high zones’ can indicate corneal irregularities, but may also simply be anomalies of the tear film.1
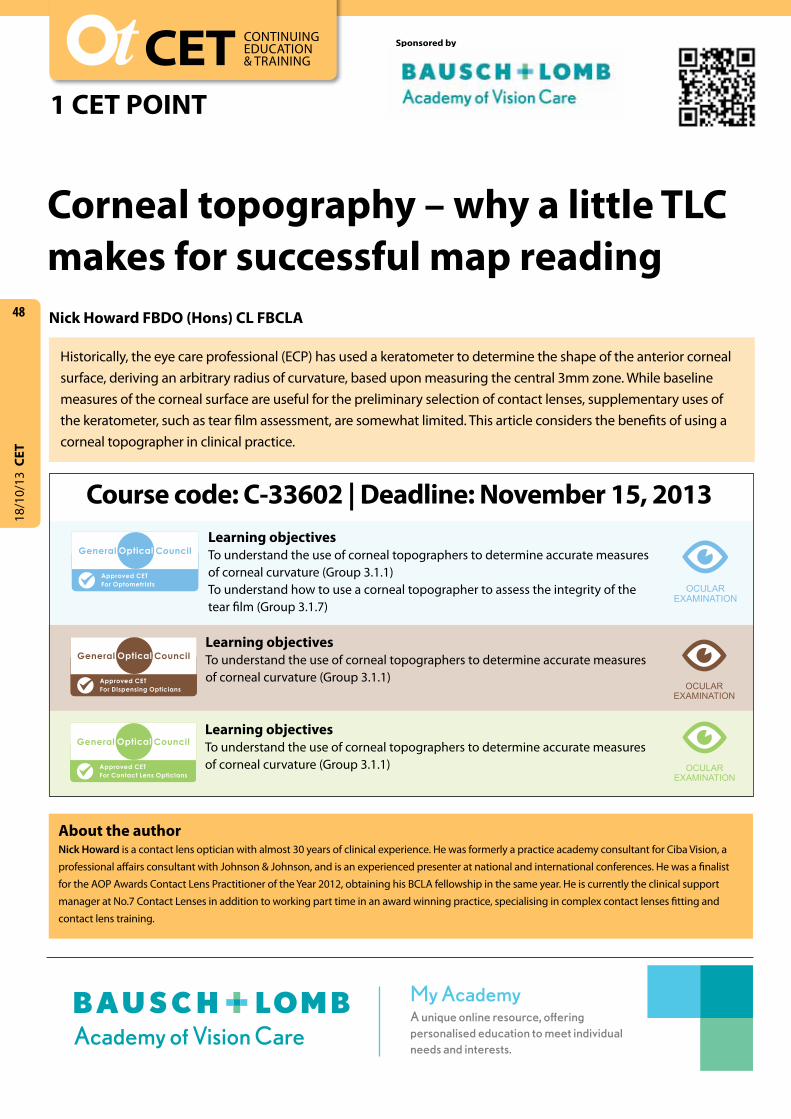
Figure 1 shows a typical, inferior arcuate ‘high zone’ in the lower third of the cornea; at first glance this appears to be a corneal shape irregularity, but slit lamp examination confirms a tear film problem caused by inadequate, incomplete blinking, in this case due to excessive computer use in an air-conditioned environment. Further investigation with fluorescein showed a less than Grade 1 inferior arcuate punctate stain, with the patient indicating only a very mild level of irritation. For this patient, the irregularity was eradicated almost completely by the use of warm compresses, advice on careful removal of make-up, as well as ensuring regular breaks from the workstation.
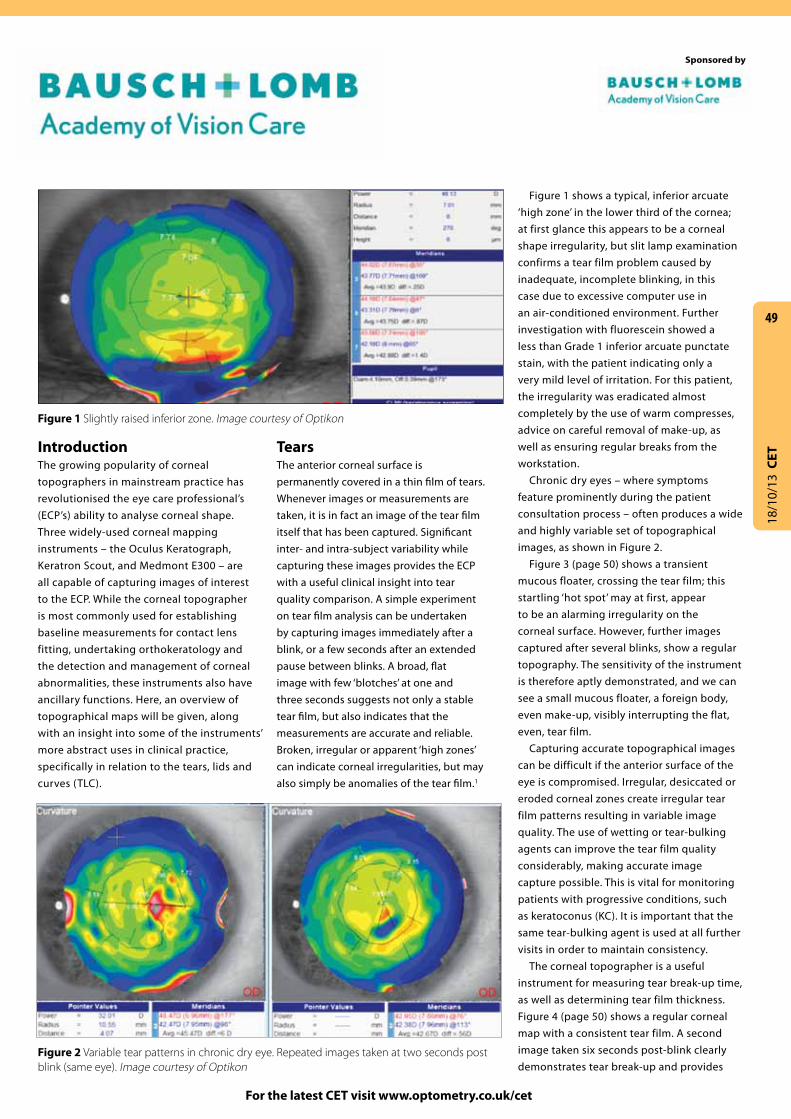
Chronic dry eyes – where symptoms feature prominently during the patient consultation process – often produces a wide and highly variable set of topographical images, as shown in Figure 2.
Figure 3 (page 50) shows a transient mucous floater, crossing the tear film; this startling ‘hot spot’ may at first, appear to be an alarming irregularity on the corneal surface. However, further images captured after several blinks, show a regular topography. The sensitivity of the instrument is therefore aptly demonstrated, and we can see a small mucous floater, a foreign body, even make-up, visibly interrupting the flat, even, tear film.
Capturing accurate topographical images can be difficult if the anterior surface of the eye is compromised. Irregular, desiccated or eroded corneal zones create irregular tear film patterns resulting in variable image quality. The use of wetting or tear-bulking agents can improve the tear film quality considerably, making accurate image capture possible. This is vital for monitoring patients with progressive conditions, such as keratoconus (KC). It is important that the same tear-bulking agent is used at all further visits in order to maintain consistency.
The corneal topographer is a useful instrument for measuring tear break-up time, as well as determining tear film thickness. Figure 4 (page 50) shows a regular corneal map with a consistent tear film. A second image taken six seconds post-blink clearly demonstrates tear break-up and provides
Figure 1 Slightly raised inferior zone. Image courtesy of Optikon
Sponsored by
Figure 2 Variable tear patterns in chronic dry eye. Repeated images taken at two seconds post blink (same eye). Image courtesy of Optikon

18/1
0/13
CET
50
CET CONTINUING EDUCATION & TRAINING
1 CET POINT
Manipulating the lids out of the way with a cotton bud in order to get a decent image may be the only option for achieving satisfactory corneal map capture. However, this inevitably puts some pressure on the cornea, causing subtle shape changes and this procedure should only be considered as a last resort. In practice, unless topography is being used specifically for orthokeratology evaluation, lid positions are constant factors for recording and observation and would not require any manipulation. It is worth noting that a wide stare, which will aid good map taking, may have an impact on non-invasive tear break-up time, decreasing tear thickness
and increasing evaporation rates. An early image capture (around 1 to 1.5 seconds post-blink) is likely to produce the most accurate map.
CurvesThe appropriate interpretation of curves, or contours as they are otherwise referred to, is the key objective for any ECP using a corneal topographer. For those unfamiliar with using a corneal topographer, an elementary guide to contours is as follows: the scale running from pink through to red, indicates areas of steep curve, with greens running down to blues, indicating flatter curves. The scales can be changed if the ECP wants very fine detail in a specific area, but a normalised scale is usually adequate.
What do the curves tell us? Sometimes the very obvious; at other times careful interpretation is required. The full complement of options on curve analysis, offered by corneal topographers, is beyond the scope of this article. A brief
overview of the some of the basic outputs from the instrument are given below.
Simulated keratometry readings give corneal curvatures at 3mm, allowing a direct comparison with the traditional keratometer. The topographer will also take curvature readings at 5mm and 7mm and a ‘pointer’ value will give a single ‘point’ radius measurement at any chosen location.
Eccentricity figures simply translate as ‘the rate of flattening’, measured as a value against 1. A standard cornea will demonstrate an even, gradual flattening from the centre to the limbus, whereas an atypical corneal profile resulting from eye disease, such as
My AcademyA unique online resource, offering personalised education to meet individual needs and interests.
a simple method of assessing non-invasive tear break-up time.2 Tear film thickness can also be observed in Figure 4 by referring to the section profile and observing height differences between the high and low points, giving an implied thickness of ~11 microns.
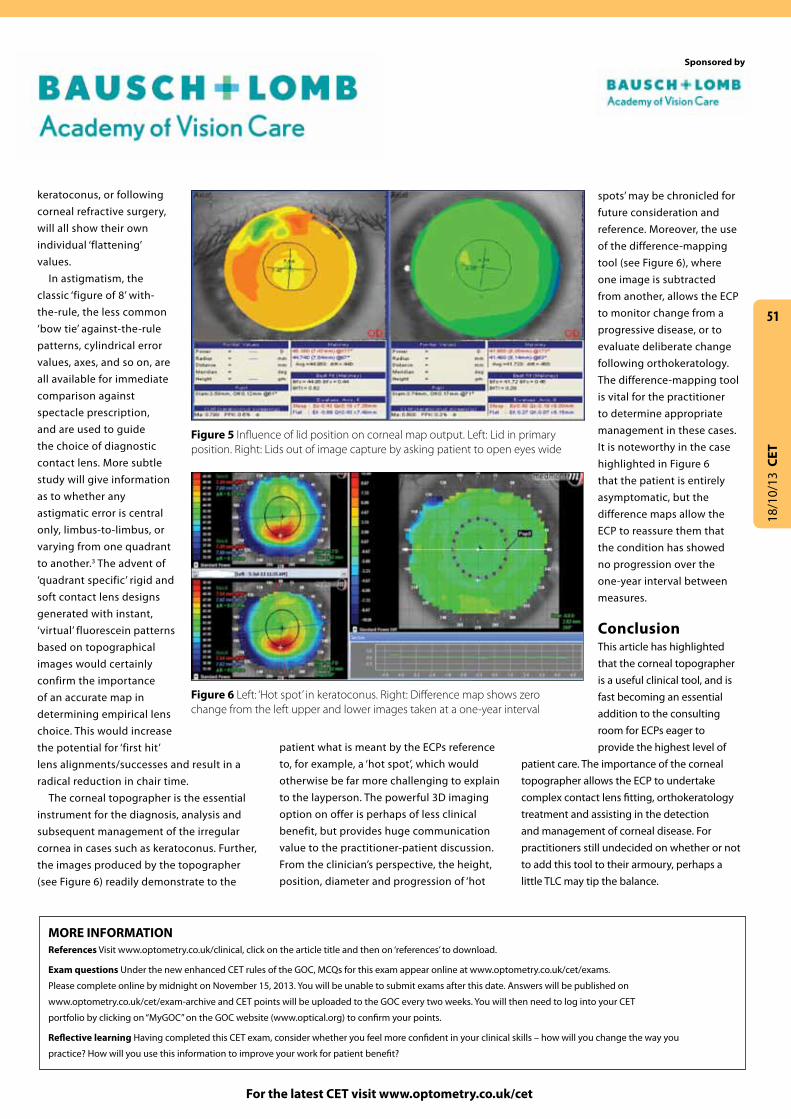
LidsImages of the lids, and of course the lashes, are captured almost by default while undertaking corneal topography. Primary positioning of the lids is one of the most important baseline recordings to consider when fitting all lens types, but in particular rigid gas permeable lenses, and multifocal designs. The corneal topographer offers a simple ruler function, providing accurate measures of horizontal visible iris diameter, vertical visible iris diameter and pupil size, to 0.01mm. The topographer can also record lid position, which is useful for monitoring of ptosis, ectropion and lesions. It is important for the ECP to account for the impact of lid position on corneal curvature measures. Figure 5 clearly demonstrates the influence of lid position on the topographical map output. In practice, the upper lid is reasonably easy to get out of the way, simply by asking the patient to open their eyes as wide as they can. Highly positioned lower lids are more problematic and the lower tear meniscus – worthy of measuring and observing – may, depending on height and volume, skew results slightly.
Figure 3 Left: transient mucus floater. Right: same eye, after three blinks. Image courtesy of Optikon
Figure 4 Left: 1 second post-blink. Right: six seconds post-blink
18/1
0/13
CET
For the latest CET visit www.optometry.co.uk/cet
patient what is meant by the ECPs reference to, for example, a ‘hot spot’, which would otherwise be far more challenging to explain to the layperson. The powerful 3D imaging option on offer is perhaps of less clinical benefit, but provides huge communication value to the practitioner-patient discussion. From the clinician’s perspective, the height, position, diameter and progression of ‘hot
51
keratoconus, or following corneal refractive surgery, will all show their own individual ‘flattening’ values.
In astigmatism, the classic ‘figure of 8’ with-the-rule, the less common ‘bow tie’ against-the-rule patterns, cylindrical error values, axes, and so on, are all available for immediate comparison against spectacle prescription, and are used to guide the choice of diagnostic contact lens. More subtle study will give information as to whether any astigmatic error is central only, limbus-to-limbus, or varying from one quadrant to another.3 The advent of ‘quadrant specific’ rigid and soft contact lens designs generated with instant, ‘virtual’ fluorescein patterns based on topographical images would certainly confirm the importance of an accurate map in determining empirical lens choice. This would increase the potential for ‘first hit’ lens alignments/successes and result in a radical reduction in chair time.
The corneal topographer is the essential instrument for the diagnosis, analysis and subsequent management of the irregular cornea in cases such as keratoconus. Further, the images produced by the topographer (see Figure 6) readily demonstrate to the
spots’ may be chronicled for future consideration and reference. Moreover, the use of the difference-mapping tool (see Figure 6), where one image is subtracted from another, allows the ECP to monitor change from a progressive disease, or to evaluate deliberate change following orthokeratology. The difference-mapping tool is vital for the practitioner to determine appropriate management in these cases. It is noteworthy in the case highlighted in Figure 6 that the patient is entirely asymptomatic, but the difference maps allow the ECP to reassure them that the condition has showed no progression over the one-year interval between measures.
ConclusionThis article has highlighted that the corneal topographer is a useful clinical tool, and is fast becoming an essential addition to the consulting room for ECPs eager to provide the highest level of
patient care. The importance of the corneal topographer allows the ECP to undertake complex contact lens fitting, orthokeratology treatment and assisting in the detection and management of corneal disease. For practitioners still undecided on whether or not to add this tool to their armoury, perhaps a little TLC may tip the balance.
Sponsored by
MORE INFORMATION References Visit www.optometry.co.uk/clinical, click on the article title and then on ‘references’ to download.
Exam questions Under the new enhanced CET rules of the GOC, MCQs for this exam appear online at www.optometry.co.uk/cet/exams.
Please complete online by midnight on November 15, 2013. You will be unable to submit exams after this date. Answers will be published on
www.optometry.co.uk/cet/exam-archive and CET points will be uploaded to the GOC every two weeks. You will then need to log into your CET
portfolio by clicking on “MyGOC” on the GOC website (www.optical.org) to confirm your points.
Reflective learning Having completed this CET exam, consider whether you feel more confident in your clinical skills – how will you change the way you
practice? How will you use this information to improve your work for patient benefit?
Figure 5 Influence of lid position on corneal map output. Left: Lid in primary position. Right: Lids out of image capture by asking patient to open eyes wide
Figure 6 Left: ‘Hot spot’ in keratoconus. Right: Difference map shows zero change from the left upper and lower images taken at a one-year interval