contents inhalt sommaire contenido - produktinfo.conrad.com · note hinweis remarque nota because...
TRANSCRIPT
GB
F
D
E
Contents Inhalt Sommaire Contenido
Technical Information 2Technische Informationen Caractéristiques techniques Datos técnicos
Features 3Eigenschaften PropriétésPropriedades
ReelBox Avantgarde 6
Remote Control 8Fernbedienung Télécommande Control remoto
Connections 10Anschlüsse ConnexionsConnexiónes
Inside view 12Innenansicht Vue en dedans Vista adentro
CI module 13CI Modul
Extensions 14Erweiterungen Extensions Ampliaciones
TV socket 21Switching the ReelBox on and off 22Setup and main menu 23Operation 24Initial installation 26
TV-Anschluss 28ReelBox ein-/ausschalten 29Setup- und Hauptmenü 30Bedienung 31Erstinbetriebnahme 33
Connexion TV 35Mise en marche et arrêt de la ReelBox 36Menu de configuration et menu principal 37Utilisation 38Première mise en service 40
Conexión para TV 42Encendido y apagado del Reelbox 43Menu principal y de configuración 44Manejo 45Puesta en marcha 47
Codes for remote control 49Codes für Fernbedienung Codes de la télécommande Códigos de control remoto
Safety 53Sicherheit Sécurité Seguridad
Warranty 54GewährleistungGarantieGarantia
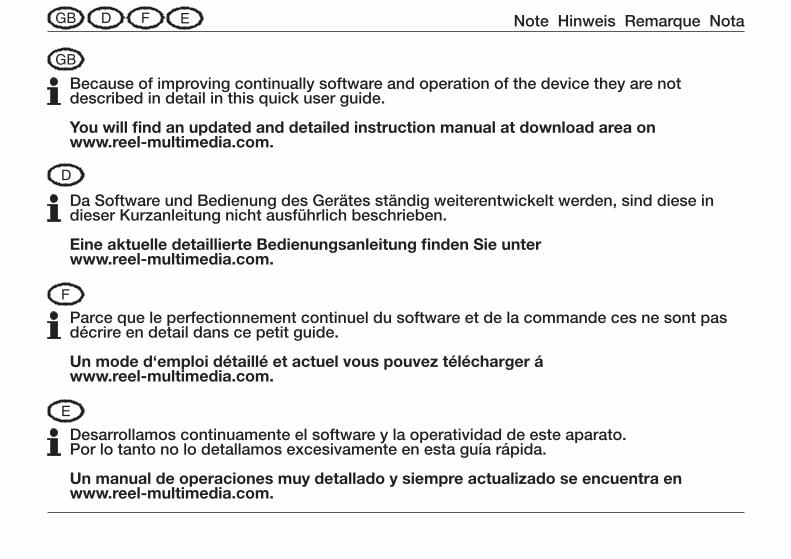
Note Hinweis Remarque Nota
Because of improving continually software and operation of the device they are not described in detail in this quick user guide.
You will find an updated and detailed instruction manual at download area on www.reel-multimedia.com.
Da Software und Bedienung des Gerätes ständig weiterentwickelt werden, sind diese in dieser Kurzanleitung nicht ausführlich beschrieben.
Eine aktuelle detaillierte Bedienungsanleitung finden Sie unter www.reel-multimedia.com.
Parce que le perfectionnement continuel du software et de la commande ces ne sont pas décrire en detail dans ce petit guide.
Un mode d‘emploi détaillé et actuel vous pouvez télécharger á www.reel-multimedia.com.
Desarrollamos continuamente el software y la operatividad de este aparato.Por lo tanto no lo detallamos excesivamente en esta guía rápida.
Un manual de operaciones muy detallado y siempre actualizado se encuentra en www.reel-multimedia.com.
2
Technical Information Technische Informationen Caractéristiques techniques Datos técnicos
GB
D
F
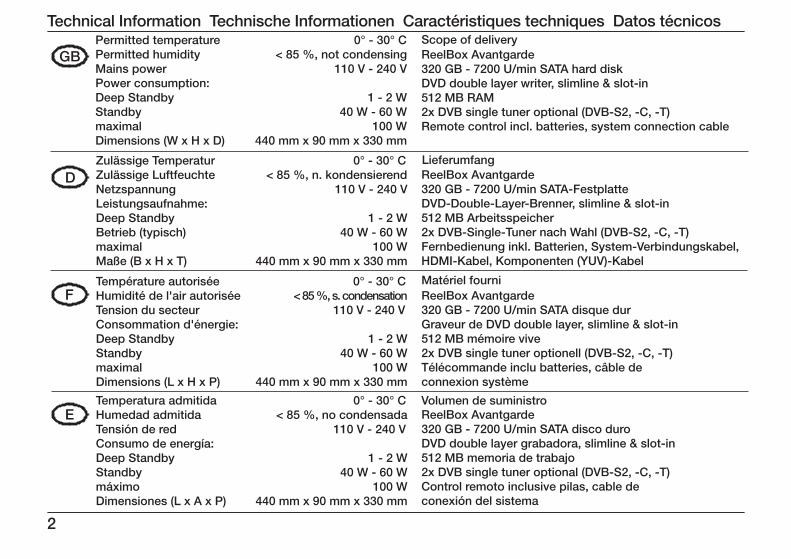
E Temperatura admitida 0° - 30° C Humedad admitida < 85 %, no condensada Tensión de red 110 V - 240 V Consumo de energía: Deep Standby 1 - 2 W Standby 40 W - 60 W máximo 100 W Dimensiones (L x A x P) 440 mm x 90 mm x 330 mm
Température autorisée 0° - 30° C Humidité de l'air autorisée < 85 %, s. condensation Tension du secteur 110 V - 240 V Consommation d'énergie: Deep Standby 1 - 2 W Standby 40 W - 60 W maximal 100 W Dimensions (L x H x P) 440 mm x 90 mm x 330 mm
Zulässige Temperatur 0° - 30° C Zulässige Luftfeuchte < 85 %, n. kondensierend Netzspannung 110 V - 240 V Leistungsaufnahme: Deep Standby 1 - 2 W Betrieb (typisch) 40 W - 60 W maximal 100 W Maße (B x H x T) 440 mm x 90 mm x 330 mm
Permitted temperature 0° - 30° C Permitted humidity < 85 %, not condensing Mains power 110 V - 240 V Power consumption: Deep Standby 1 - 2 W Standby 40 W - 60 W maximal 100 W Dimensions (W x H x D) 440 mm x 90 mm x 330 mm
Lieferumfang
ReelBox Avantgarde 320 GB - 7200 U/min SATA hard disk DVD double layer writer, slimline & slot-in 512 MB RAM 2x DVB single tuner optional (DVB-S2, -C, -T) Remote control incl. batteries, system connection cable
ReelBox Avantgarde320 GB - 7200 U/min SATA-FestplatteDVD-Double-Layer-Brenner, slimline & slot-in512 MB Arbeitsspeicher2x DVB-Single-Tuner nach Wahl (DVB-S2, -C, -T)Fernbedienung inkl. Batterien, System-Verbindungskabel,HDMI-Kabel, Komponenten (YUV)-Kabel
ReelBox Avantgarde320 GB - 7200 U/min SATA disque durGraveur de DVD double layer, slimline & slot-in512 MB mémoire vive2x DVB single tuner optionell (DVB-S2, -C, -T)Télécommande inclu batteries, câble de connexion système
ReelBox Avantgarde320 GB - 7200 U/min SATA disco duroDVD double layer grabadora, slimline & slot-in512 MB memoria de trabajo2x DVB single tuner optional (DVB-S2, -C, -T)Control remoto inclusive pilas, cable de conexión del sistema
Scope of delivery
Matériel fourni
Volumen de suministro
3
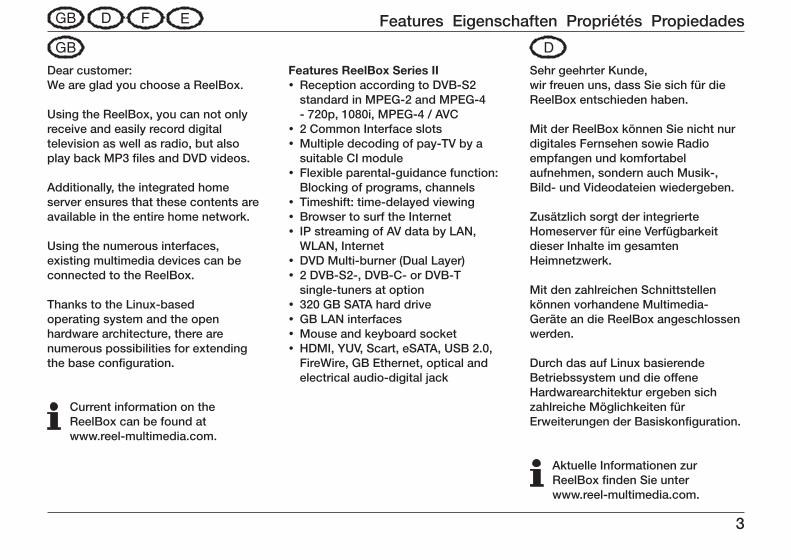
Sehr geehrter Kunde,wir freuen uns, dass Sie sich für die ReelBox entschieden haben.
Mit der ReelBox können Sie nicht nur digitales Fernsehen sowie Radio empfangen und komfortabel aufnehmen, sondern auch Musik-, Bild- und Videodateien wiedergeben.
Zusätzlich sorgt der integrierte Homeserver für eine Verfügbarkeit dieser Inhalte im gesamten Heimnetzwerk.
Mit den zahlreichen Schnittstellen können vorhandene Multimedia- Geräte an die ReelBox angeschlossen werden.
Durch das auf Linux basierende Betriebssystem und die offene Hardwarearchitektur ergeben sich zahlreiche Möglichkeiten für Erweiterungen der Basiskonfiguration.
Aktuelle Informationen zur ReelBox finden Sie unter www.reel-multimedia.com.
Features Eigenschaften Propriétés Propiedades
Dear customer: We are glad you choose a ReelBox.
Using the ReelBox, you can not only receive and easily record digital television as well as radio, but also play back MP3 files and DVD videos.
Additionally, the integrated home server ensures that these contents are available in the entire home network.
Using the numerous interfaces, existing multimedia devices can be connected to the ReelBox.
Thanks to the Linux-based operating system and the open hardware architecture, there are numerous possibilities for extending the base configuration.
Current information on the ReelBox can be found at www.reel-multimedia.com.
Features ReelBox Series II Reception according to DVB-S2 ystandard in MPEG-2 and MPEG-4 - 720p, 1080i, MPEG-4 / AVC2 Common Interface slots yMultiple decoding of pay-TV by a ysuitable CI moduleFlexible parental-guidance function: yBlocking of programs, channelsTimeshift: time-delayed viewing yBrowser to surf the Internet yIP streaming of AV data by LAN, yWLAN, InternetDVD Multi-burner (Dual Layer) y2 DVB-S2-, DVB-C- or DVB-T ysingle-tuners at option320 GB SATA hard drive yGB LAN interfaces yMouse and keyboard socket yHDMI, YUV, Scart, eSATA, USB 2.0, yFireWire, GB Ethernet, optical and electrical audio-digital jack
4
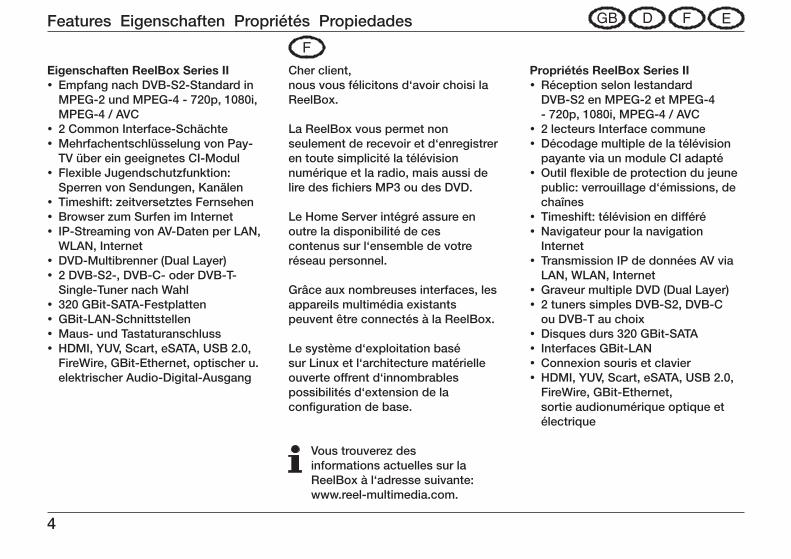
Eigenschaften ReelBox Series IIEmpfang nach DVB-S2-Standard in yMPEG-2 und MPEG-4 - 720p, 1080i, MPEG-4 / AVC2 Common Interface-Schächte yMehrfachentschlüsselung von Pay- yTV über ein geeignetes CI-ModulFlexible Jugendschutzfunktion: ySperren von Sendungen, KanälenTimeshift: zeitversetztes Fernsehen yBrowser zum Surfen im Internet yIP-Streaming von AV-Daten per LAN, yWLAN, InternetDVD-Multibrenner (Dual Layer) y2 DVB-S2-, DVB-C- oder DVB-T- ySingle-Tuner nach Wahl320 GBit-SATA-Festplatten yGBit-LAN-Schnittstellen yMaus- und Tastaturanschluss yHDMI, YUV, Scart, eSATA, USB 2.0, yFireWire, GBit-Ethernet, optischer u. elektrischer Audio-Digital-Ausgang
Cher client,nous vous félicitons d‘avoir choisi la ReelBox.
La ReelBox vous permet non seulement de recevoir et d‘enregistrer en toute simplicité la télévision numérique et la radio, mais aussi de lire des fichiers MP3 ou des DVD.
Le Home Server intégré assure en outre la disponibilité de ces contenus sur l‘ensemble de votre réseau personnel.
Grâce aux nombreuses interfaces, les appareils multimédia existants peuvent être connectés à la ReelBox.
Le système d‘exploitation basé sur Linux et l‘architecture matérielle ouverte offrent d‘innombrables possibilités d‘extension de la configuration de base.
Vous trouverez des informations actuelles sur la ReelBox à l‘adresse suivante: www.reel-multimedia.com.
Propriétés ReelBox Series IIRéception selon lestandard yDVB-S2 en MPEG-2 et MPEG-4 - 720p, 1080i, MPEG-4 / AVC2 lecteurs Interface commune yDécodage multiple de la télévision ypayante via un module CI adaptéOutil flexible de protection du jeune ypublic: verrouillage d‘émissions, de chaînesTimeshift: télévision en différé yNavigateur pour la navigation yInternetTransmission IP de données AV via yLAN, WLAN, InternetGraveur multiple DVD (Dual Layer) y2 tuners simples DVB-S2, DVB-C you DVB-T au choixDisques durs 320 GBit-SATA yInterfaces GBit-LAN yConnexion souris et clavier yHDMI, YUV, Scart, eSATA, USB 2.0, yFireWire, GBit-Ethernet, sortie audionumérique optique et électrique
Features Eigenschaften Propriétés Propiedades

5
Estimado cliente:Muchas gracias por haber elegido nuestro ReelBox.
Con el ReelBox podrá, además de ver TV digital y sintonizar canales de radio y grabar los programas que desee, también reproducir archivos MP3 y videos DVD.
El servidor Home integrado le permitirá por otra parte disponer de dichos contenidos en toda su red doméstica.
A las numerosas interfaces del ReelBox podrá conectar sus equipos multimedia.
Su sistema operativo basado en Linux y la estructura de hardware abierta ofrecen varias posibilidades de ampliar la configuración básica.
Podrá consultar información actualizada del ReelBox en www.reel-multimedia.com.
Propiedades ReelBox Series IIRecepción según estándar DVB-S2 yen MPEG-2 y MPEG-4 - 720p, 1080i, MPEG-4 / AVC2 ranuras Common Interface yDecodificación múltiple de TV de ypago mediante un módulo CI apto para elloFlexible función de protección yde menores: bloqueo de ciertos programas y canalesTimeshift: pausas, avanzar, yretroceder con TV en directoExplorador para navegar en Internet yStreaming IP de datos AV por LAN, yWLAN, InternetMultigrabador DVD (Dual Layer) y2 DVB-S2, DVB-C o yDVB-T sintonizador simple a elegirDiscos duros de 320 GBit SATA yInterfaces de GBit LAN yConector para ratón y teclado yHDMI, YUV, Scart, eSATA, USB 2.0, yFireWire, GBit-Ethernet, salida digi-tal de audio óptica y eléctrica
Features Eigenschaften Propriétés Propriedades
6
ReelBox Series

7
ReelBox Series
DigitalCinch
DigitalTOSLINK
I / OIN
OUT
Audio
Power supply
YUV480i/576i/720p/1080i
ExpansionSlotStereo
MouseKeyboard
SystemIN - OUT
WLAN10/100/1000 Mbit
HDMI480i/576i/
720p/1080i
eSATA
Tuner 1Tuner 2TunerSlot 3
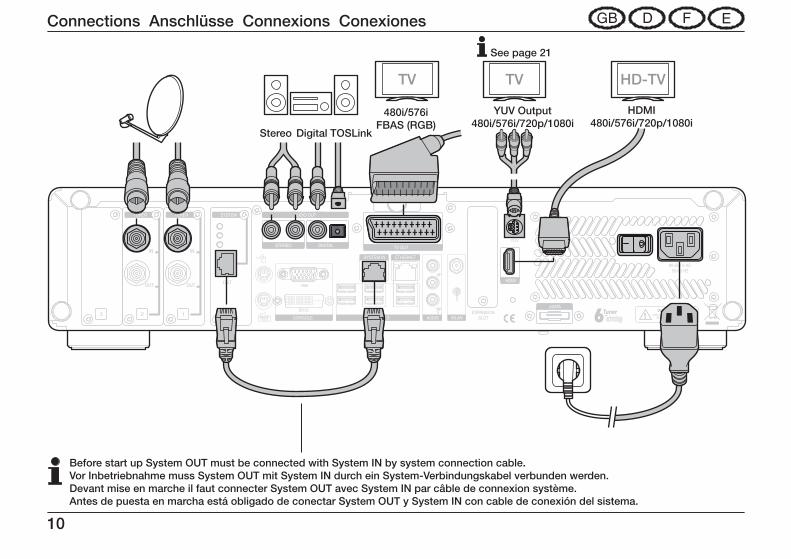
Before start up System OUT must be connected with System IN by system connection cable.Vor Inbetriebnahme muss System OUT mit System IN durch ein System-Verbindungskabel verbunden werden.Devant mise en marche il faut connecter System OUT avec System IN par câble de connexion système.Antes de puesta en marcha está obligado de conectar System OUT y System IN con cable de conexión del sistema.
SCART
CONSOLE
VGA
DVI-D
ETHERNETSYSTEM IN
DVI-D
VGA
WLAN module and antenna not in scope of deliveryWLAN Modul und Antenne nicht im LieferumfangModule et antenne WLAN ne pas en matériel fourniMódulo y antena WLAN no en volumen de suministro
8
Remote Control Fernbedienung Télécommande Control remoto
TV
PVR
DVD
2ABC
5JKL4GHI
7
A B C D
?
PQRS
< >
8TUV
0 @+
AV
Setup
OK
Menu
Exit
1 3 DEF
Code
6MNO
9WXYZ
REEL
IR-Emitter
TV Code
Quick Switch
Mode
1 2 3 / A B C add channel to Favourites
Setup On / Off
Volume +/ - Programm + / - Audio On / Off
Menu Exit
Navigation OK
Teletext
List of recordings Electronic Program
Guide (EPG) Favourites menu Multi Feed
Channel Info // EPG Info // Menu Help
Playback Control
Record Timer//Search timer
PiP // Screenshot
a / A // Audio Mode // Control Aspect Ratio
Stop // Eject
Power / Standby
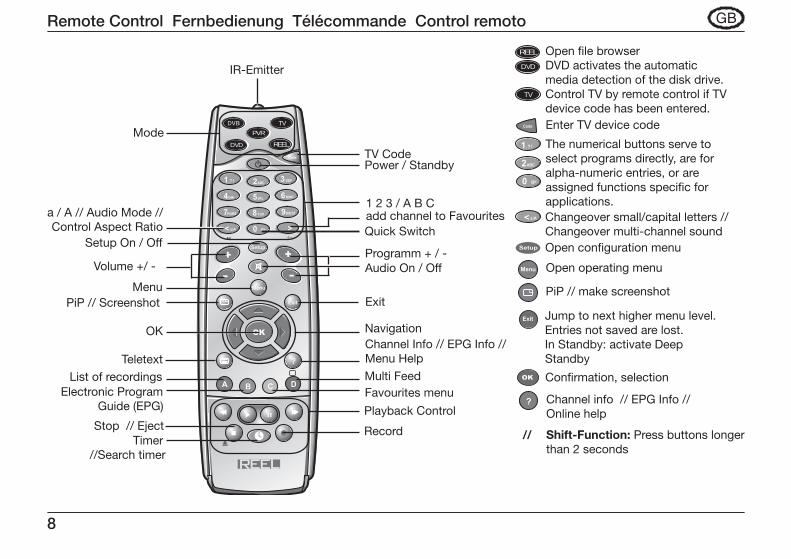
The numerical buttons serve to select programs directly, are for alpha-numeric entries, or are assigned functions specific for applications.
2ABC
0 @+
1
Open configuration menu Setup
Open operating menu Menu
Jump to next higher menu level. Entries not saved are lost. In Standby: activate Deep Standby
Exit
Confirmation, selection OK
Channel info // EPG Info // Online help
?
Shift-Function: Press buttons longerthan 2 seconds
//
PiP // make screenshot
Open file browserDVD activates the automatic media detection of the disk drive. Control TV by remote control if TV device code has been entered.
TV
DVD
REEL
Enter TV device code Code
Changeover small/capital letters // Changeover multi-channel sound
<
9
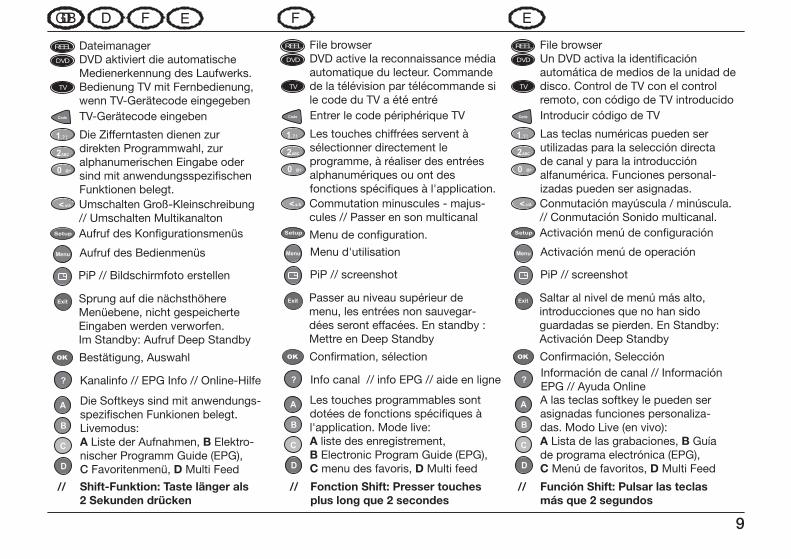
Die Zifferntasten dienen zur direkten Programmwahl, zur alphanumerischen Eingabe oder sind mit anwendungsspezifischen Funktionen belegt.
2ABC
0 @+
1
Aufruf des Konfigurationsmenüs Setup
Aufruf des Bedienmenüs Menu
Sprung auf die nächsthöhere Menüebene, nicht gespeicherte Eingaben werden verworfen. Im Standby: Aufruf Deep Standby
Exit
Bestätigung, Auswahl OK
Kanalinfo // EPG Info // Online-Hilfe ?
PiP // Bildschirmfoto erstellen
Die Softkeys sind mit anwendungs-spezifischen Funkionen belegt. Livemodus:A Liste der Aufnahmen, B Elektro-nischer Programm Guide (EPG), C Favoritenmenü, D Multi Feed
B
C
D
A
DateimanagerDVD aktiviert die automatische Medienerkennung des Laufwerks.Bedienung TV mit Fernbedienung, wenn TV-Gerätecode eingegeben
TV
DVD
REEL
TV-Gerätecode eingeben Code
Umschalten Groß-Kleinschreibung // Umschalten Multikanalton
<
Les touches chiffrées servent à sélectionner directement le programme, à réaliser des entrées alphanumériques ou ont des fonctions spécifiques à l'application.
2ABC
0 @+
1
Menu de configuration. Setup
Menu d'utilisation Menu
Passer au niveau supérieur de menu, les entrées non sauvegar-dées seront effacées. En standby : Mettre en Deep Standby
Exit
Confirmation, sélection OK
Info canal // info EPG // aide en ligne ?
PiP // screenshot
Les touches programmables sont dotées de fonctions spécifiques à l'application. Mode live: A liste des enregistrement, B Electronic Program Guide (EPG), C menu des favoris, D Multi feed
B
C
D
A
File browserDVD active la reconnaissance média automatique du lecteur. Commande de la télévision par télécommande si le code du TV a été entré
TV
DVD
REEL
Entrer le code périphérique TV Code
Commutation minuscules - majus- cules // Passer en son multicanal
<
Las teclas numéricas pueden ser utilizadas para la selección directa de canal y para la introducción alfanumérica. Funciones personal-izadas pueden ser asignadas.
2ABC
0 @+
1
Activación menú de configuración Setup
Activación menú de operación Menu
Saltar al nivel de menú más alto, introducciones que no han sido guardadas se pierden. En Standby: Activación Deep Standby
Exit
Confirmación, Selección OK
Información de canal // Información EPG // Ayuda Online
?
PiP // screenshot
A las teclas softkey le pueden ser asignadas funciones personaliza-das. Modo Live (en vivo): A Lista de las grabaciones, B Guía de programa electrónica (EPG), C Menú de favoritos, D Multi Feed
B
C
D
A
File browserUn DVD activa la identificación automática de medios de la unidad de disco. Control de TV con el control remoto, con código de TV introducido
TV
DVD
REEL
Introducir código de TV Code
Conmutación mayúscula / minúscula. // Conmutación Sonido multicanal.
<
Shift-Funktion: Taste länger als 2 Sekunden drücken
// Fonction Shift: Presser touches plus long que 2 secondes
// Función Shift: Pulsar las teclasmás que 2 segundos
//
10
Connections Anschlüsse Connexions Conexiones
11
Connections Anschlüsse Connexions Conexiones
12
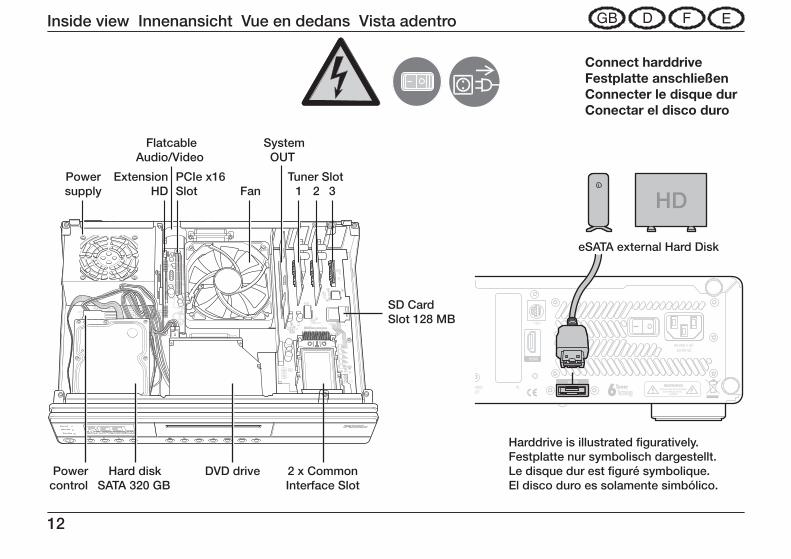
Inside view Innenansicht Vue en dedans Vista adentro
Connect harddrive Festplatte anschließen Connecter le disque dur Conectar el disco duro
Harddrive is illustrated figuratively.Festplatte nur symbolisch dargestellt.Le disque dur est figuré symbolique.El disco duro es solamente simbólico.
eSATA external Hard Disk
Record
Rem to e
Standby
Power supply
Extension HD
PCIe x16 Slot
Flatcable Audio/Video
System OUT
Hard disk SATA 320 GB
Power control
DVD drive 2 x Common Interface Slot
Fan 1 2 3 Tuner Slot
SD Card Slot 128 MB
HD
13
Insert CI module CI Modul einstecken Insérer le CI module Insertar CI module
Record
Rem to e
Standby
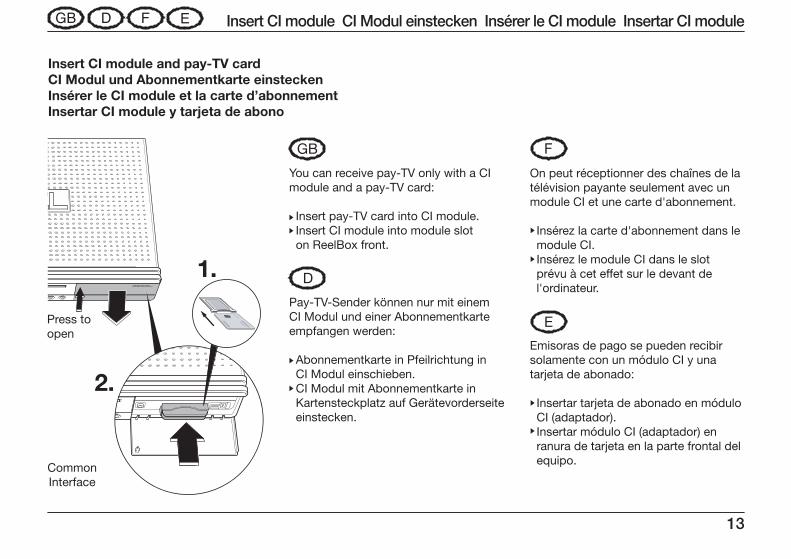
Common Interface
Press toopen
Insert CI module and pay-TV card CI Modul und Abonnementkarte einstecken Insérer le CI module et la carte d’abonnement Insertar CI module y tarjeta de abono
Record
Rem to e
Standby
You can receive pay-TV only with a CI module and a pay-TV card: Insert pay-TV card into CI module. Insert CI module into module slot on ReelBox front. Pay-TV-Sender können nur mit einem CI Modul und einer Abonnementkarte empfangen werden: Abonnementkarte in Pfeilrichtung in CI Modul einschieben. CI Modul mit Abonnementkarte in Kartensteckplatz auf Gerätevorderseite einstecken.
GB
D
On peut réceptionner des chaînes de la télévision payante seulement avec un module CI et une carte d'abonnement. Insérez la carte d'abonnement dans le module CI. Insérez le module CI dans le slot prévu à cet effet sur le devant de l'ordinateur. Emisoras de pago se pueden recibir solamente con un módulo CI y una tarjeta de abonado: Insertar tarjeta de abonado en módulo CI (adaptador). Insertar módulo CI (adaptador) en ranura de tarjeta en la parte frontal del equipo.
F
E
1.
2.
14
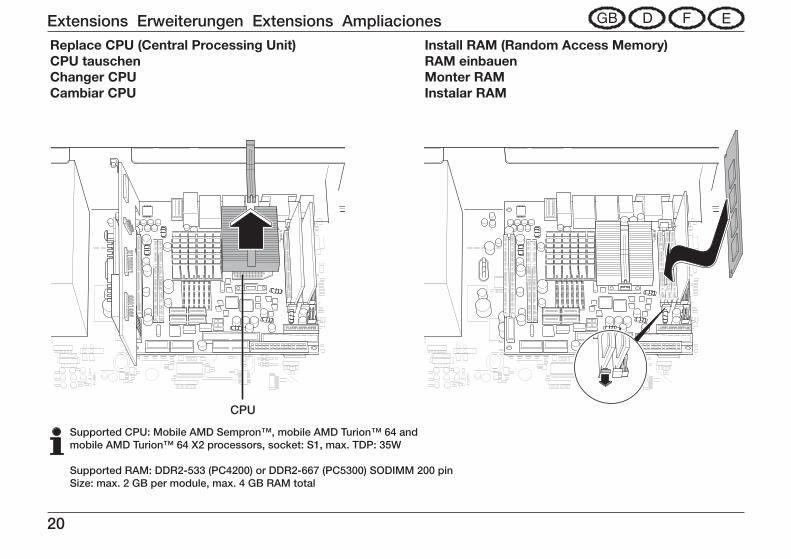
Extensions Erweiterungen Extensions Ampliaciones
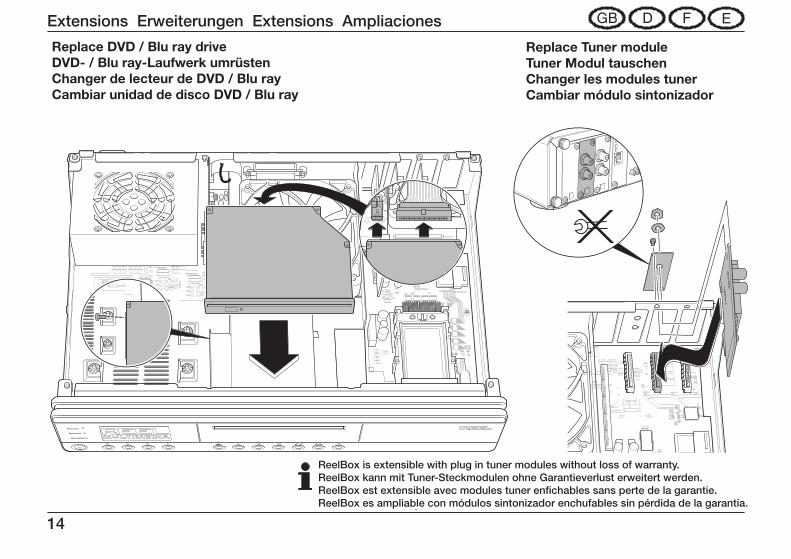
Replace DVD / Blu ray driveDVD- / Blu ray-Laufwerk umrüstenChanger de lecteur de DVD / Blu rayCambiar unidad de disco DVD / Blu ray
Replace Tuner module Tuner Modul tauschen Changer les modules tuner Cambiar módulo sintonizador
Record
Rem to e
Standby
Record
Rem to e
Standby
ReelBox is extensible with plug in tuner modules without loss of warranty.ReelBox kann mit Tuner-Steckmodulen ohne Garantieverlust erweitert werden.ReelBox est extensible avec modules tuner enfichables sans perte de la garantie.ReelBox es ampliable con módulos sintonizador enchufables sin pérdida de la garantía.
15
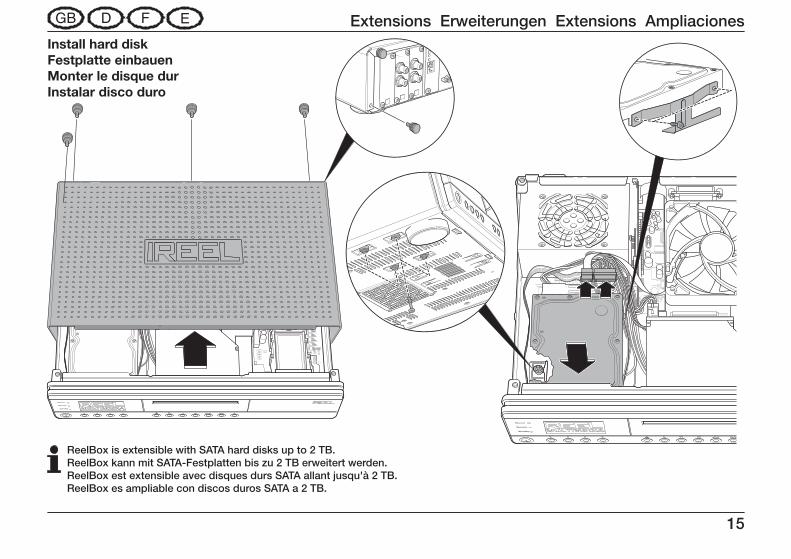
Extensions Erweiterungen Extensions AmpliacionesInstall hard disk Festplatte einbauen Monter le disque dur Instalar disco duro
Record
Rem to e
Standby
Record
Rem to e
Standby
ReelBox is extensible with SATA hard disks up to 2 TB.ReelBox kann mit SATA-Festplatten bis zu 2 TB erweitert werden.ReelBox est extensible avec disques durs SATA allant jusqu'à 2 TB.ReelBox es ampliable con discos duros SATA a 2 TB.
Extensions Erweiterungen Extensions Ampliaciones
16 17
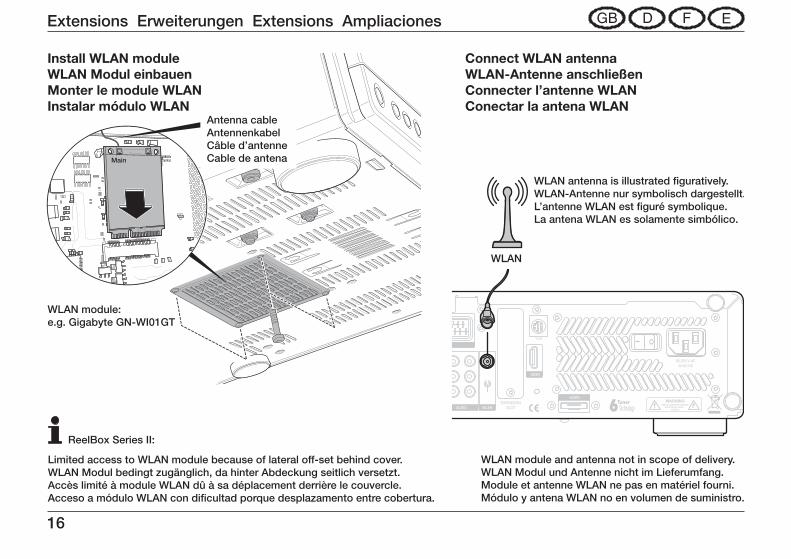
Connect WLAN antenna WLAN-Antenne anschließen Connecter l’antenne WLAN Conectar la antena WLAN
WLAN antenna is illustrated figuratively. WLAN-Antenne nur symbolisch dargestellt. L’antenne WLAN est figuré symbolique. La antena WLAN es solamente simbólico.
WLAN
Mini PCI express slot
WLAN module and antenna not in scope of delivery.WLAN Modul und Antenne nicht im Lieferumfang.Module et antenne WLAN ne pas en matériel fourni.Módulo y antena WLAN no en volumen de suministro.
Limited access to WLAN module because of lateral off-set behind cover.WLAN Modul bedingt zugänglich, da hinter Abdeckung seitlich versetzt.Accès limité à module WLAN dû à sa déplacement derrière le couvercle.Acceso a módulo WLAN con dificultad porque desplazamento entre cobertura.
ReelBox Series II:
Install WLAN module WLAN Modul einbauen Monter le module WLAN Instalar módulo WLAN
WLAN module: e.g. Gigabyte GN-WI01GT
Main
Antenna cable Antennenkabel Câble d’antenne Cable de antena
Extensions Erweiterungen Extensions Ampliaciones
16 17
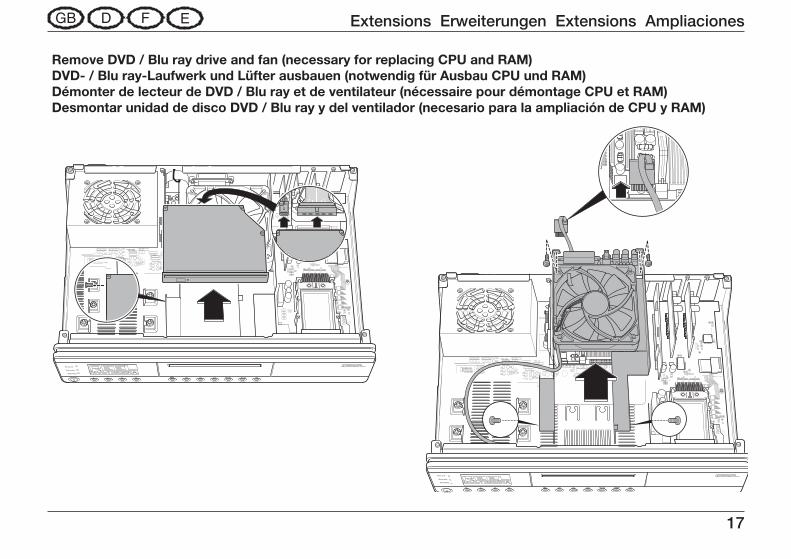
Remove DVD / Blu ray drive and fan (necessary for replacing CPU and RAM)DVD- / Blu ray-Laufwerk und Lüfter ausbauen (notwendig für Ausbau CPU und RAM)Démonter de lecteur de DVD / Blu ray et de ventilateur (nécessaire pour démontage CPU et RAM)Desmontar unidad de disco DVD / Blu ray y del ventilador (necesario para la ampliación de CPU y RAM)
Record
Rem to e
Standby
Record
Rem to e
Standby
Record
Rem to e
Standby
Extensions Erweiterungen Extensions Ampliaciones
18 19
Record
Rem to e
Standby
Extensions Erweiterungen Extensions Ampliaciones
18 19
Record
Rem to e
Standby
Extensions Erweiterungen Extensions Ampliaciones
20 21
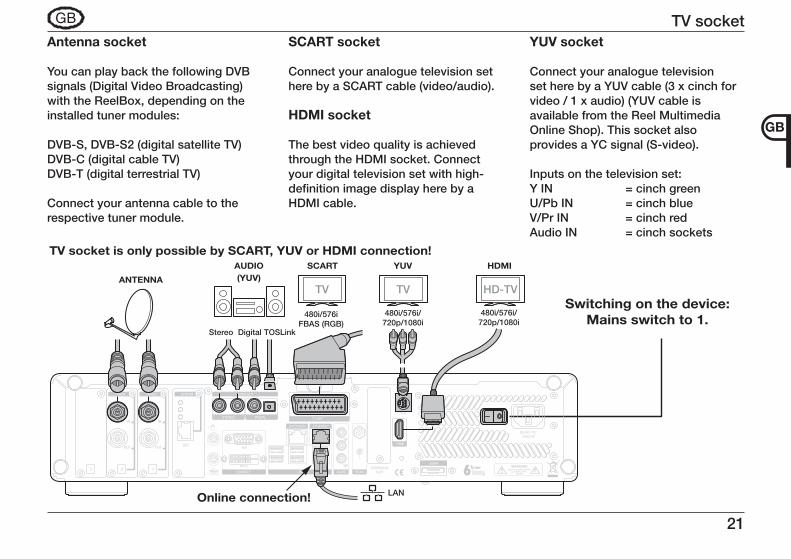
Antenna socket
You can play back the following DVB signals (Digital Video Broadcasting) with the ReelBox, depending on the installed tuner modules:
DVB-S, DVB-S2 (digital satellite TV)DVB-C (digital cable TV)DVB-T (digital terrestrial TV)
Connect your antenna cable to the respective tuner module.
SCART socket
Connect your analogue television set here by a SCART cable (video/audio).
HDMI socket
The best video quality is achieved through the HDMI socket. Connect your digital television set with high- definition image display here by a HDMI cable.
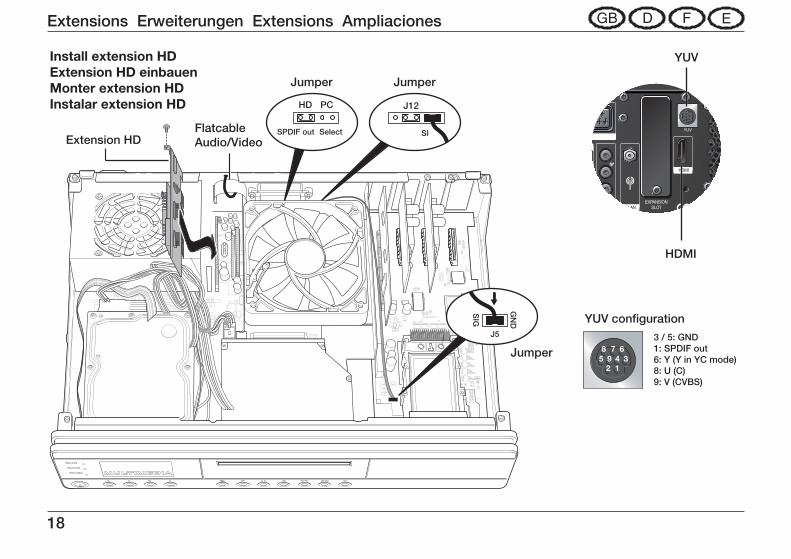
YUV socket
Connect your analogue television set here by a YUV cable (3 x cinch for video / 1 x audio) (YUV cable is available from the Reel Multimedia Online Shop). This socket also provides a YC signal (S-video).
Inputs on the television set:Y IN = cinch greenU/Pb IN = cinch blueV/Pr IN = cinch redAudio IN = cinch sockets
TV socket
20 21
GB
22
GB
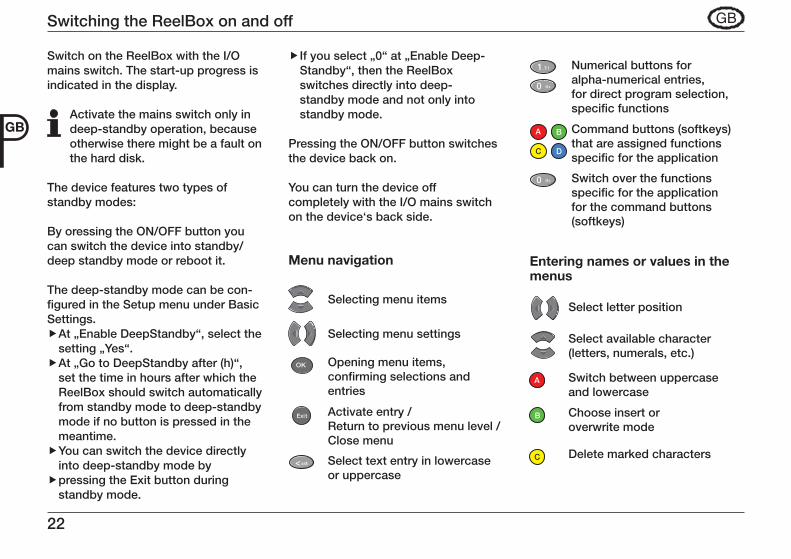
Switch on the ReelBox with the I/O mains switch. The start-up progress is indicated in the display.
Activate the mains switch only in deep-standby operation, because otherwise there might be a fault on the hard disk.
The device features two types of standby modes:
By oressing the ON/OFF button you can switch the device into standby/deep standby mode or reboot it.
The deep-standby mode can be con-figured in the Setup menu under Basic Settings.
At „Enable DeepStandby“, select the fsetting „Yes“.At „Go to DeepStandby after (h)“, fset the time in hours after which the ReelBox should switch automatically from standby mode to deep-standby mode if no button is pressed in the meantime.You can switch the device directly finto deep-standby mode by pressing the Exit button during fstandby mode.
If you select „0“ at „Enable Deep- fStandby“, then the ReelBox switches directly into deep- standby mode and not only into standby mode.
Pressing the ON/OFF button switches the device back on.
You can turn the device off completely with the I/O mains switch on the device‘s back side.
Menu navigation Entering names or values in the menus
Selecting menu items
Selecting menu settings
OK Opening menu items, confirming selections and entries
Exit Activate entry / Return to previous menu level / Close menu
< Select text entry in lowercase or uppercase
Switching the ReelBox on and off
23
GB
TV
PVR
DVD
2ABC
5JKL4GHI
7
A B C D
?
PQRS
< >
8TUV
0 @+
AV
Setup
OK
Menu
Exit
1 3 DEF
Code
6MNO
9WXYZ
REEL
A B C D
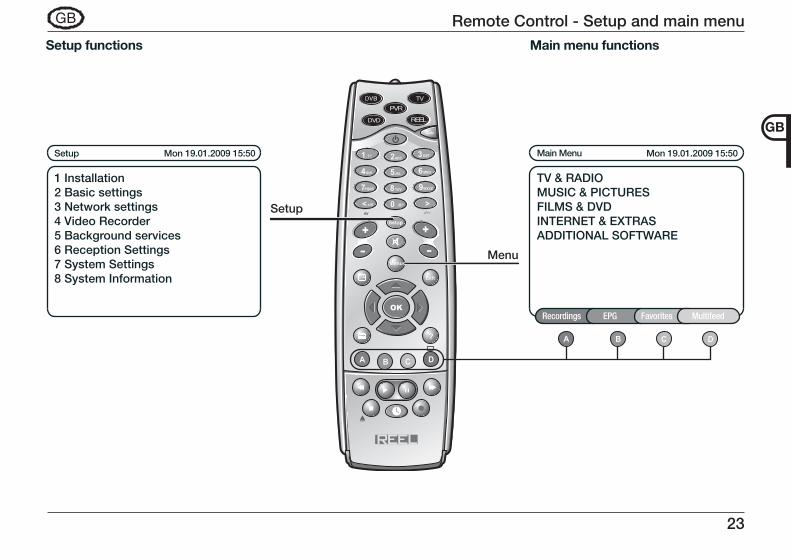
Remote Control - Setup and main menu
24
GB
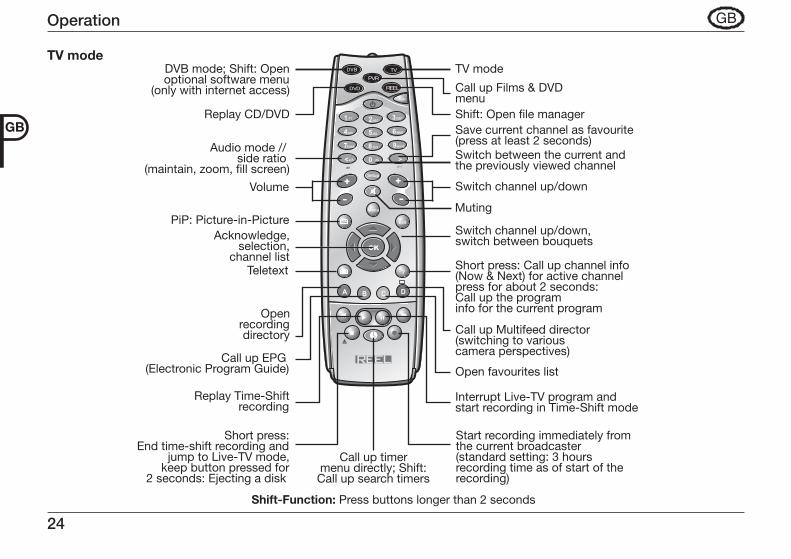
Operation
TV modeTV
PVR
DVD
2ABC
5JKL4GHI
7
A B C D
?
PQRS
< >
8TUV
0 @+
AV
Setup
OK
Menu
Exit
1 3 DEF
Code
6MNO
9WXYZ
REEL
Switch between the current and the previously viewed channel
Shift: Open file manager Save current channel as favourite (press at least 2 seconds)
Call up Films & DVD menu
TV mode
Switch channel up/down, switch between bouquets
Switch channel up/down
Call up Multifeed director (switching to various camera perspectives)
Interrupt Live-TV program and start recording in Time-Shift mode
Open favourites list
Short press: Call up channel info (Now & Next) for active channel press for about 2 seconds: Call up the program info for the current program Open
recording directory
Call up timer menu directly; Shift: Call up search timers
Call up EPG (Electronic Program Guide)
Replay Time-Shift recording
Short press: End time-shift recording and
jump to Live-TV mode, keep button pressed for
2 seconds: Ejecting a disk
Start recording immediately from the current broadcaster (standard setting: 3 hours recording time as of start of the recording)
Acknowledge, selection,
channel list Teletext
Volume
PiP: Picture-in-Picture
Audio mode // side ratio
(maintain, zoom, fill screen)
Replay CD/DVD
DVB mode; Shift: Open optional software menu
(only with internet access)
Muting
Shift-Function: Press buttons longer than 2 seconds
25
GB
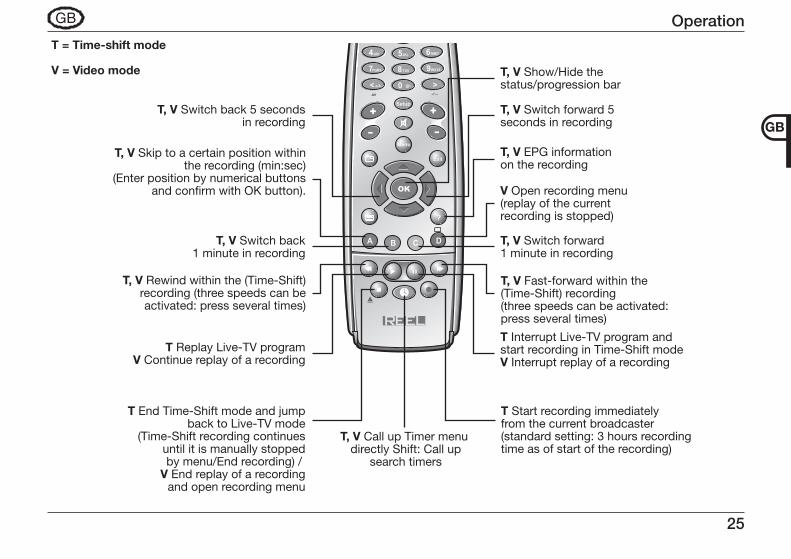
T Interrupt Live-TV program and start recording in Time-Shift mode V Interrupt replay of a recording
V Open recording menu (replay of the current recording is stopped)
T, V EPG information on the recording
T, V Switch forward 1 minute in recording
T, V Rewind within the (Time-Shift) recording (three speeds can be activated: press several times)
T, V Skip to a certain position within the recording (min:sec)
(Enter position by numerical buttons and confirm with OK button).
T, V Fast-forward within the (Time-Shift) recording (three speeds can be activated: press several times)
T, V Call up Timer menu directly Shift: Call up
search timers
T Replay Live-TV programV Continue replay of a recording
T, V Switch back 1 minute in recording
T, V Switch forward 5 seconds in recording
T, V Show/Hide thestatus/progression bar
T, V Switch back 5 seconds in recording
T = Time-shift mode
V = Video mode
T End Time-Shift mode and jump back to Live-TV mode
(Time-Shift recording continues until it is manually stopped by menu/End recording) / V End replay of a recording and open recording menu
T Start recording immediately from the current broadcaster (standard setting: 3 hours recording time as of start of the recording)
2ABC
5JKL4GHI
7
A B C D
?
PQRS
< >
8TUV
0 @+
AV
Setup
OK
Menu
Exit
1 3 DEF
6MNO
9WXYZ
Operation
26
GB
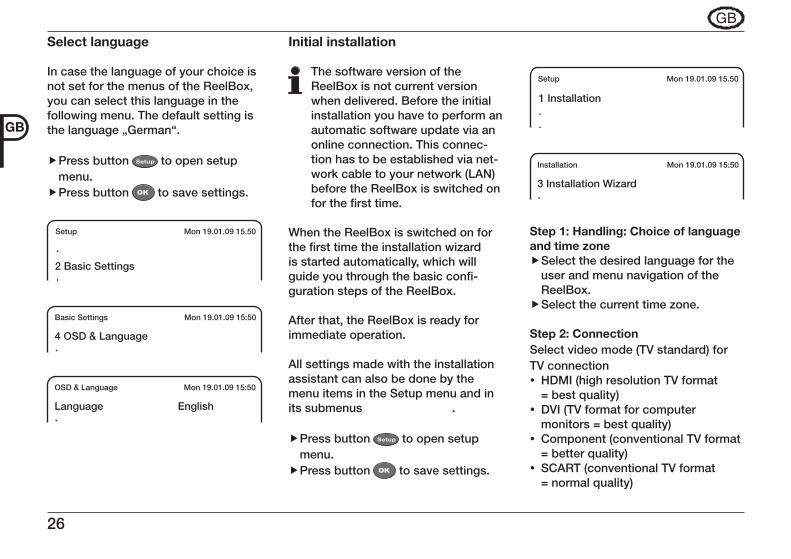
Select language
In case the language of your choice isnot set for the menus of the ReelBox,you can select this language in thefollowing menu. The default setting is the language „German“.
Press button f Setup to open setup menu.Press button f OK to save settings.
Initial installation
The software version of the ReelBox is not current version when delivered. Before the initial installation you have to perform an automatic software update via an online connection. This connec-tion has to be established via net-work cable to your network (LAN) before the ReelBox is switched on for the first time.
When the ReelBox is switched on forthe first time the installation wizardis started automatically, which willguide you through the basic confi- guration steps of the ReelBox.
After that, the ReelBox is ready forimmediate operation.
All settings made with the installationassistant can also be done by themenu items in the Setup menu and in its submenus .
Press button f Setup to open setup menu.Press button f OK to save settings.
·
·
Setup Mon 19.01.09 15.50
2 Basic Settings
Basic Settings Mon 19.01.09 15:50
4 OSD & Language·
OSD & Language Mon 19.01.09 15:50
Language English·
1 Installation
··
Setup Mon 19.01.09 15.50
Installation Mon 19.01.09 15:50
3 Installation Wizard·
Step 1: Handling: Choice of language and time zone
Select the desired language for the fuser and menu navigation of the ReelBox.Select the current time zone. f
Step 2: ConnectionSelect video mode (TV standard) for TV connection
HDMI (high resolution TV format y= best quality)DVI (TV format for computer ymonitors = best quality) Component (conventional TV format y= better quality)SCART (conventional TV format y= normal quality)
27
GB
Set width-to-height ratio4:3 (standard) y16:9 (wide-screen format) y
Step 3: Reception: Set number of tuner modules
Set number of mounted tuner mo- fdules (DVB-S, DVB-T, DVB-C).
Step 4: ChannelscanPress button f OK to start automatic channelscan.
Step 5: Network
DHCP (Dynamic Host Configuration Protocol) will assign automatically an IP address and further network set-tings to the ReelBox (e.g. from a router or server in your network).
If you do not want to make use ofDHCP, then you need to manuallyconfigure the network connectionof the ReelBox by the followingsettings: IP address, network, gate-way, nameserver, ReelBox name and workgroup.
The IP address for gateway andname server corresponds as a ruleto the IP address of your router.Please use an address that hasnot yet been used in the networkas the IP address of the ReelBox(except those ending with 0, 1 or255).If there are problems, pleasecontact your network administra-tor to get the appropriate data.button.
Step 6: Software
The ReelBox is checking via online connection a potential software update and listing all software packages to be updated.
Press button f A „Upgrade“ to up-date all software packages.In case you want to check your fentries once more or make some changes, then you can return to the individual installation steps by pres-sing the button B .
Reboot ReelBox
After completing changes press fbutton A „Reboot ?“ to reboot the system.After rebooting the system with all fsettings for initial installation end the installation wizard by pressing button C .
The ReelBox is now ready for operation.

28
D
Antennen-Anschluss
Sie können mit der ReelBox je nach eingebauten Tuner-Modulen folgende DVB-Signale (Digital Video Broadcasting) wiedergeben:
DVB-S, DVB-S2 (Digital-Satelliten-TV)DVB-C (Digital-Kabel-TV)DVB-T (Digital-Terrestrisch-TV)
Schließen Sie Ihr Antennenkabel an das jeweilige Tuner-Modul an.
SCART-Anschluss
Schließen Sie hier Ihr analoges Fernsehgerät durch ein SCART-Kabel (Video/Audio) an.
HDMI-Anschluss
Mit dem HDMI-Anschluss erzielen Sie die beste Videoqualität. Schließen Sie hier Ihr digitales Fernsehgerät mit hochauflösender Bildwiedergabe durch ein HDMI-Kabel (Video/Audio) an.
YUV-Anschluss
Schließen Sie hier Ihr analoges Fern-sehgerät durch ein YUV-Kabel (3 x Cinch für Video / 1 x Audio) an (YUV-Kabel über Reel Multimedia Online Shop erhältlich). Dieser Anschluss bietet auch ein YC-Signal (S-Video).
Eingänge am Fernsehgerät:Y IN = Cinch grünU/Pb IN = Cinch blauV/Pr IN = Cinch rotAudio IN = Cinch-Anschlüsse
TV-Anschluss
29
D
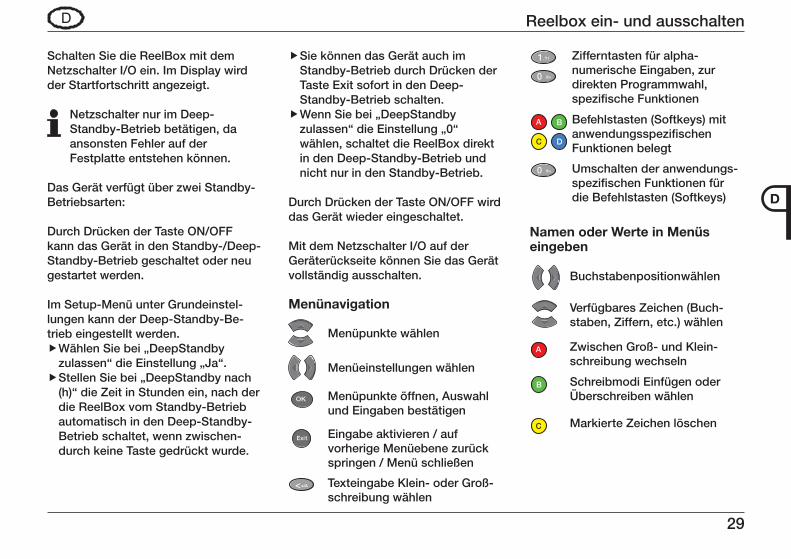
Schalten Sie die ReelBox mit dem Netzschalter I/O ein. Im Display wird der Startfortschritt angezeigt.
Netzschalter nur im Deep- Standby-Betrieb betätigen, da ansonsten Fehler auf der Festplatte entstehen können.
Das Gerät verfügt über zwei Standby-Betriebsarten:
Durch Drücken der Taste ON/OFF kann das Gerät in den Standby-/Deep-Standby-Betrieb geschaltet oder neu gestartet werden.
Im Setup-Menü unter Grundeinstel-lungen kann der Deep-Standby-Be-trieb eingestellt werden.
Wählen Sie bei „DeepStandby fzulassen“ die Einstellung „Ja“.Stellen Sie bei „DeepStandby nach f(h)“ die Zeit in Stunden ein, nach der die ReelBox vom Standby-Betrieb automatisch in den Deep-Standby-Betrieb schaltet, wenn zwischen-durch keine Taste gedrückt wurde.
Sie können das Gerät auch im fStandby-Betrieb durch Drücken der Taste Exit sofort in den Deep- Standby-Betrieb schalten. Wenn Sie bei „DeepStandby fzulassen“ die Einstellung „0“ wählen, schaltet die ReelBox direkt in den Deep-Standby-Betrieb und nicht nur in den Standby-Betrieb.
Durch Drücken der Taste ON/OFF wird das Gerät wieder eingeschaltet.
Mit dem Netzschalter I/O auf der Geräterückseite können Sie das Gerät vollständig ausschalten.
Menünavigation
Namen oder Werte in Menüs eingeben
Menüpunkte wählen
Menüeinstellungen wählen
OK Menüpunkte öffnen, Auswahl und Eingaben bestätigen
Exi t Eingabe aktivieren / auf vorherige Menüebene zurückspringen / Menü schließen
< Texteingabe Klein- oder Groß-schreibung wählen
Reelbox ein- und ausschalten
30
D
TV
PVR
DVD
2ABC
5JKL4GHI
7
A B C D
?
PQRS
< >
8TUV
0 @+
AV
Setup
OK
Menu
Exit
1 3 DEF
Code
6MNO
9WXYZ
REEL
A B C D
Setup- und Hauptmenü
31
D
Bedienung
TV-Betrieb TV
PVR
DVD
2ABC
5JKL4GHI
7
A B C D
?
PQRS
< >
8TUV
0 @+
AV
Setup
OK
Menu
Exit
1 3 DEF
Code
6MNO
9WXYZ
REEL
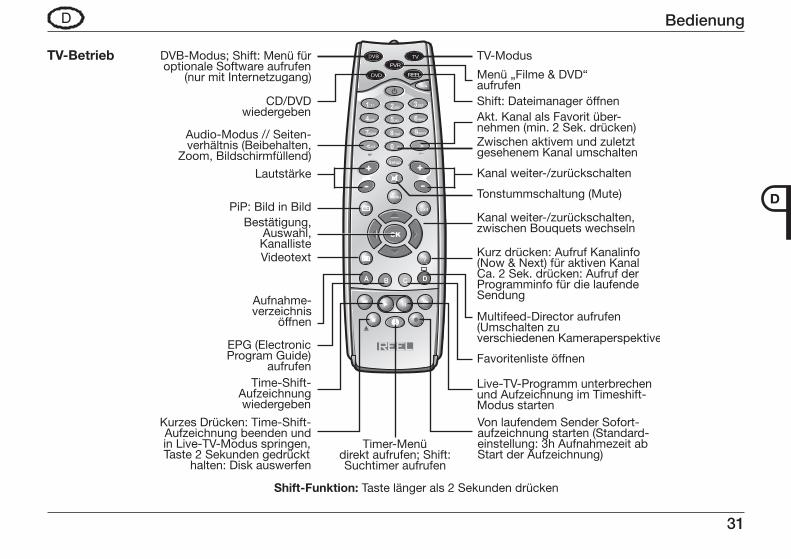
Zwischen aktivem und zuletzt gesehenem Kanal umschalten
Shift: Dateimanager öffnen Akt. Kanal als Favorit über- nehmen (min. 2 Sek. drücken)
Menü „Filme & DVD“aufrufen
TV-Modus
Kanal weiter-/zurückschalten, zwischen Bouquets wechseln
Kanal weiter-/zurückschalten
Tonstummschaltung (Mute)
Multifeed-Director aufrufen (Umschalten zu verschiedenen Kameraperspektiven)
Live-TV-Programm unterbrechen und Aufzeichnung im Timeshift- Modus starten
Favoritenliste öffnen
Kurz drücken: Aufruf Kanalinfo (Now & Next) für aktiven Kanal Ca. 2 Sek. drücken: Aufruf der Programminfo für die laufende Sendung Aufnahme-
verzeichnis öffnen
Timer-Menü direkt aufrufen; Shift: Suchtimer aufrufen
Shift-Funktion: Taste länger als 2 Sekunden drücken
EPG (Electronic Program Guide)
aufrufen Time-Shift-
Aufzeichnung wiedergeben
Kurzes Drücken: Time-Shift- Aufzeichnung beenden und in Live-TV-Modus springen, Taste 2 Sekunden gedrückt
halten: Disk auswerfen
Von laufendem Sender Sofort- aufzeichnung starten (Standard- einstellung: 3h Aufnahmezeit ab Start der Aufzeichnung)
Bestätigung, Auswahl, Kanalliste Videotext
Lautstärke
PiP: Bild in Bild
Audio-Modus // Seiten- verhältnis (Beibehalten,
Zoom, Bildschirmfüllend)
CD/DVD wiedergeben
DVB-Modus; Shift: Menü für optionale Software aufrufen
(nur mit Internetzugang)
32
D
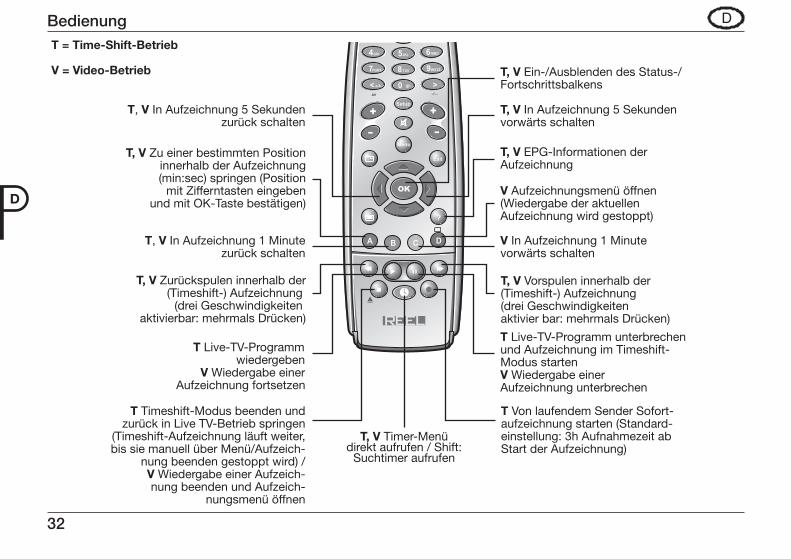
T Live-TV-Programm unterbrechen und Aufzeichnung im Timeshift- Modus starten V Wiedergabe einer Aufzeichnung unterbrechen
V Aufzeichnungsmenü öffnen (Wiedergabe der aktuellen Aufzeichnung wird gestoppt)
T, V EPG-Informationen derAufzeichnung
V In Aufzeichnung 1 Minute vorwärts schalten
T, V Zurückspulen innerhalb der(Timeshift-) Aufzeichnung
(drei Geschwindigkeiten aktivierbar: mehrmals Drücken)
T, V Zu einer bestimmten Positioninnerhalb der Aufzeichnung(min:sec) springen (Position
mit Zifferntasten eingebenund mit OK-Taste bestätigen)
T, V Vorspulen innerhalb der(Timeshift-) Aufzeichnung (drei Geschwindigkeiten aktivier bar: mehrmals Drücken)
T, V Timer-Menüdirekt aufrufen / Shift:
Suchtimer aufrufen
T Live-TV-Programm wiedergeben
V Wiedergabe einer Aufzeichnung fortsetzen
T, V In Aufzeichnung 1 Minutezurück schalten
T, V In Aufzeichnung 5 Sekundenvorwärts schalten
T, V Ein-/Ausblenden des Status-/Fortschrittsbalkens
T, V In Aufzeichnung 5 Sekundenzurück schalten
T = Time-Shift-Betrieb V = Video-Betrieb
T Timeshift-Modus beenden undzurück in Live TV-Betrieb springen
(Timeshift-Aufzeichnung läuft weiter,bis sie manuell über Menü/Aufzeich-
nung beenden gestoppt wird) /V Wiedergabe einer Aufzeich-nung beenden und Aufzeich-
nungsmenü öffnen
T Von laufendem Sender Sofort- aufzeichnung starten (Standard- einstellung: 3h Aufnahmezeit ab Start der Aufzeichnung)
2ABC
5JKL4GHI
7
A B C D
?
PQRS
< >
8TUV
0 @+
AV
Setup
OK
Menu
Exit
1 3 DEF
6MNO
9WXYZ
Bedienung
33
D
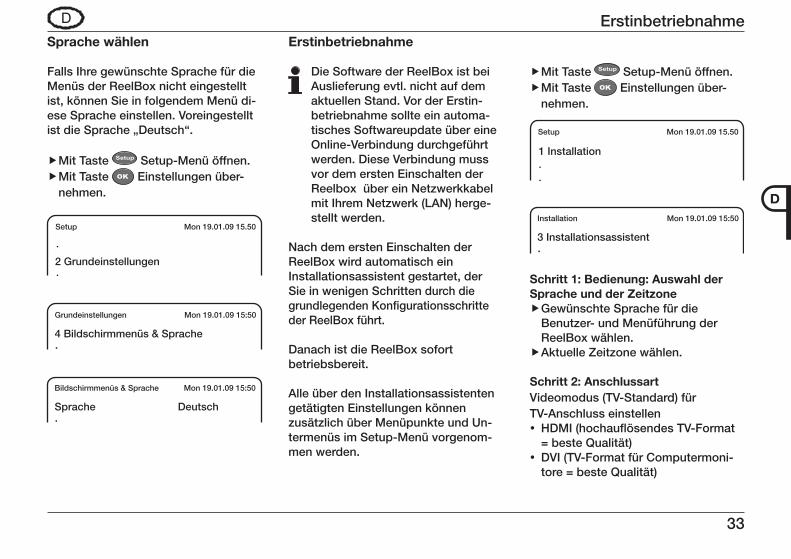
Sprache wählen
Falls Ihre gewünschte Sprache für die Menüs der ReelBox nicht eingestellt ist, können Sie in folgendem Menü di-ese Sprache einstellen. Voreingestellt ist die Sprache „Deutsch“.
Mit Taste f Setup Setup-Menü öffnen.Mit Taste f OK Einstellungen über-nehmen.
Erstinbetriebnahme
Die Software der ReelBox ist bei Auslieferung evtl. nicht auf dem aktuellen Stand. Vor der Erstin-betriebnahme sollte ein automa-tisches Softwareupdate über eine Online-Verbindung durchgeführt werden. Diese Verbindung muss vor dem ersten Einschalten der Reelbox über ein Netzwerkkabel mit Ihrem Netzwerk (LAN) herge-stellt werden.
Nach dem ersten Einschalten der ReelBox wird automatisch ein Installationsassistent gestartet, der Sie in wenigen Schritten durch die grundlegenden Konfigurationsschritte der ReelBox führt.
Danach ist die ReelBox sofort betriebsbereit.
Alle über den Installationsassistenten getätigten Einstellungen können zusätzlich über Menüpunkte und Un-termenüs im Setup-Menü vorgenom-men werden.
Erstinbetriebnahme
·
·
Setup Mon 19.01.09 15.50
2 Grundeinstellungen
Grundeinstellungen Mon 19.01.09 15:50
4 Bildschirmmenüs & Sprache·
Bildschirmmenüs & Sprache Mon 19.01.09 15:50
Sprache Deutsch·
Mit Taste f Setup Setup-Menü öffnen.Mit Taste f OK Einstellungen über-nehmen.
1 Installation
··
Setup Mon 19.01.09 15.50
Installation Mon 19.01.09 15:50
3 Installationsassistent·
Schritt 1: Bedienung: Auswahl der Sprache und der Zeitzone
Gewünschte Sprache für die fBenutzer- und Menüführung der ReelBox wählen.Aktuelle Zeitzone wählen. f
Schritt 2: AnschlussartVideomodus (TV-Standard) für TV-Anschluss einstellen
HDMI (hochauflösendes TV-Format y= beste Qualität)DVI (TV-Format für Computermoni- ytore = beste Qualität)
34
D
Erstinbetriebnahme
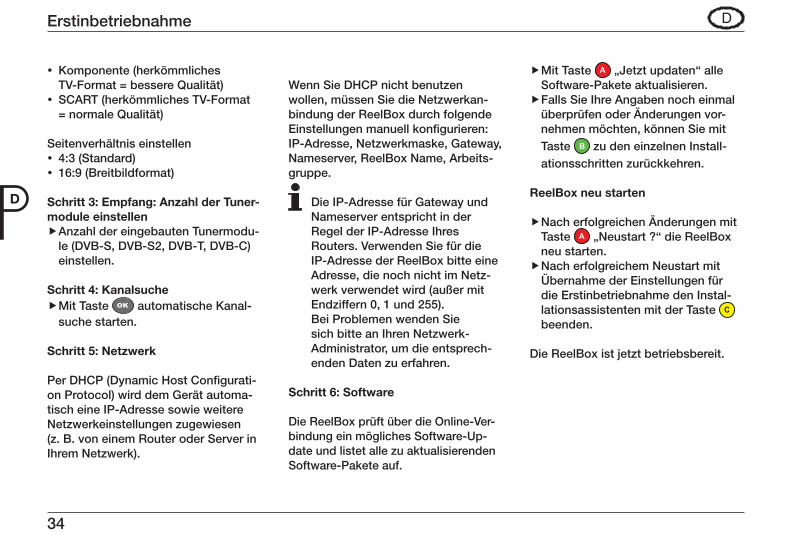
Komponente (herkömmliches yTV-Format = bessere Qualität)SCART (herkömmliches TV-Format y= normale Qualität)
Seitenverhältnis einstellen4:3 (Standard) y16:9 (Breitbildformat) y
Schritt 3: Empfang: Anzahl der Tuner-module einstellen
Anzahl der eingebauten Tunermodu- fle (DVB-S, DVB-S2, DVB-T, DVB-C) einstellen.
Schritt 4: KanalsucheMit Taste f OK automatische Kanal-suche starten.
Schritt 5: Netzwerk
Per DHCP (Dynamic Host Configurati-on Protocol) wird dem Gerät automa-tisch eine IP-Adresse sowie weitere Netzwerkeinstellungen zugewiesen (z. B. von einem Router oder Server in Ihrem Netzwerk).
Wenn Sie DHCP nicht benutzen wollen, müssen Sie die Netzwerkan-bindung der ReelBox durch folgende Einstellungen manuell konfigurieren: IP-Adresse, Netzwerkmaske, Gateway, Nameserver, ReelBox Name, Arbeits-gruppe.
Die IP-Adresse für Gateway und Nameserver entspricht in der Regel der IP-Adresse Ihres Routers. Verwenden Sie für die IP-Adresse der ReelBox bitte eine Adresse, die noch nicht im Netz-werk verwendet wird (außer mit Endziffern 0, 1 und 255).Bei Problemen wenden Sie sich bitte an Ihren Netzwerk- Administrator, um die entsprech-enden Daten zu erfahren.
Schritt 6: Software
Die ReelBox prüft über die Online-Ver-bindung ein mögliches Software-Up-date und listet alle zu aktualisierenden Software-Pakete auf.
Mit Taste f A „Jetzt updaten“ alle Software-Pakete aktualisieren.Falls Sie Ihre Angaben noch einmal füberprüfen oder Änderungen vor- nehmen möchten, können Sie mit Taste B zu den einzelnen Install- ationsschritten zurückkehren.
ReelBox neu starten
Nach erfolgreichen Änderungen mit fTaste A „Neustart ?“ die ReelBox neu starten.Nach erfolgreichem Neustart mit fÜbernahme der Einstellungen für die Erstinbetriebnahme den Instal-lationsassistenten mit der Taste C beenden.
Die ReelBox ist jetzt betriebsbereit.
35
F
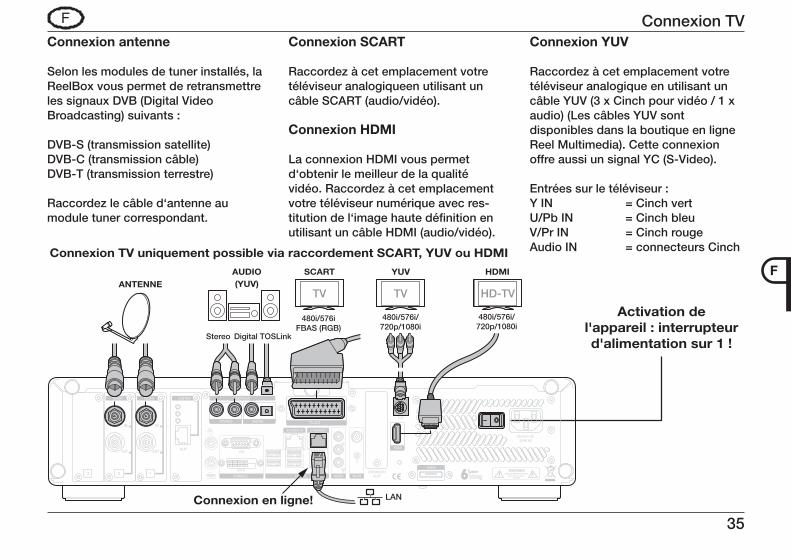
Connexion antenne
Selon les modules de tuner installés, la ReelBox vous permet de retransmettre les signaux DVB (Digital Video Broadcasting) suivants :
DVB-S (transmission satellite)DVB-C (transmission câble)DVB-T (transmission terrestre)
Raccordez le câble d‘antenne au module tuner correspondant.
Connexion SCART
Raccordez à cet emplacement votre téléviseur analogiqueen utilisant un câble SCART (audio/vidéo).
Connexion HDMI
La connexion HDMI vous permet d‘obtenir le meilleur de la qualité vidéo. Raccordez à cet emplacement votre téléviseur numérique avec res-titution de l‘image haute définition en utilisant un câble HDMI (audio/vidéo).
Connexion YUV
Raccordez à cet emplacement votre téléviseur analogique en utilisant un câble YUV (3 x Cinch pour vidéo / 1 x audio) (Les câbles YUV sont disponibles dans la boutique en ligne Reel Multimedia). Cette connexion offre aussi un signal YC (S-Video).
Entrées sur le téléviseur :Y IN = Cinch vertU/Pb IN = Cinch bleuV/Pr IN = Cinch rougeAudio IN = connecteurs Cinch
Connexion TV
36
F
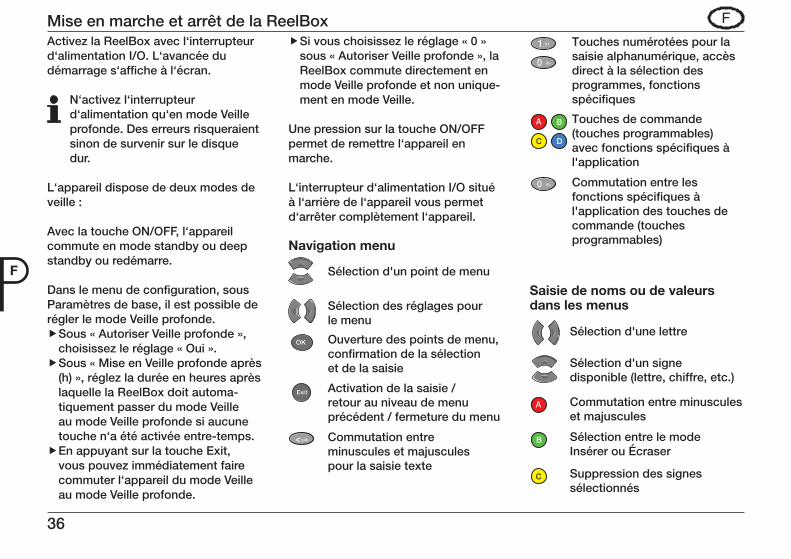
Activez la ReelBox avec l‘interrupteur d‘alimentation I/O. L‘avancée du démarrage s‘affiche à l‘écran.
N‘activez l‘interrupteur d‘alimentation qu‘en mode Veille profonde. Des erreurs risqueraient sinon de survenir sur le disque dur.
L‘appareil dispose de deux modes de veille :
Avec la touche ON/OFF, l‘appareil commute en mode standby ou deep standby ou redémarre. Dans le menu de configuration, sous Paramètres de base, il est possible de régler le mode Veille profonde.
Sous « Autoriser Veille profonde », fchoisissez le réglage « Oui ».Sous « Mise en Veille profonde après f(h) », réglez la durée en heures après laquelle la ReelBox doit automa-tiquement passer du mode Veille au mode Veille profonde si aucune touche n‘a été activée entre-temps.En appuyant sur la touche Exit, fvous pouvez immédiatement faire commuter l‘appareil du mode Veille au mode Veille profonde.
Si vous choisissez le réglage « 0 » fsous « Autoriser Veille profonde », la ReelBox commute directement en mode Veille profonde et non unique-ment en mode Veille.
Une pression sur la touche ON/OFF permet de remettre l‘appareil en marche.
L‘interrupteur d‘alimentation I/O situé à l‘arrière de l‘appareil vous permet d‘arrêter complètement l‘appareil.
Navigation menu
Saisie de noms ou de valeurs dans les menus
Sélection d'un point de menu
Sélection des réglages pour le menu
OK Ouverture des points de menu, confirmation de la sélection et de la saisie
Exit Activation de la saisie / retour au niveau de menu précédent / fermeture du menu
< Commutation entre minuscules et majuscules pour la saisie texte
Mise en marche et arrêt de la ReelBox
37
F
TV
PVR
DVD
2ABC
5JKL4GHI
7
A B C D
?
PQRS
< >
8TUV
0 @+
AV
Setup
OK
Menu
Exit
1 3 DEF
Code
6MNO
9WXYZ
REEL
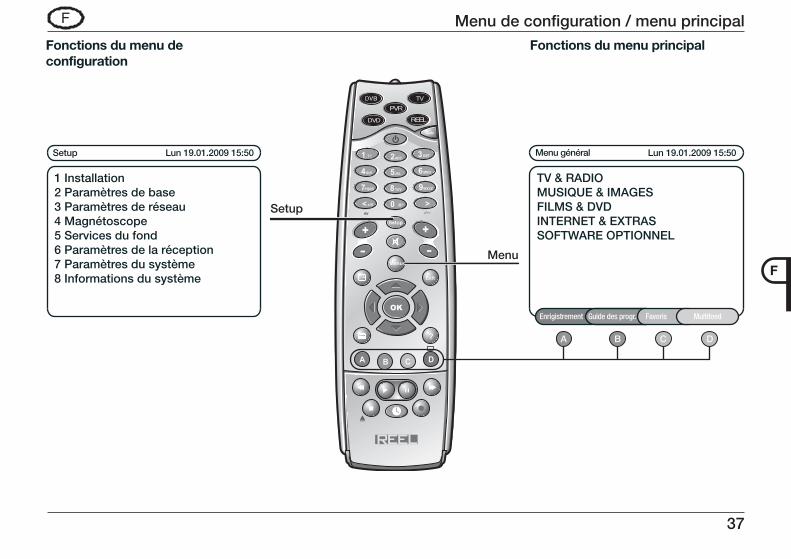
Menu de configuration / menu principal
38
F
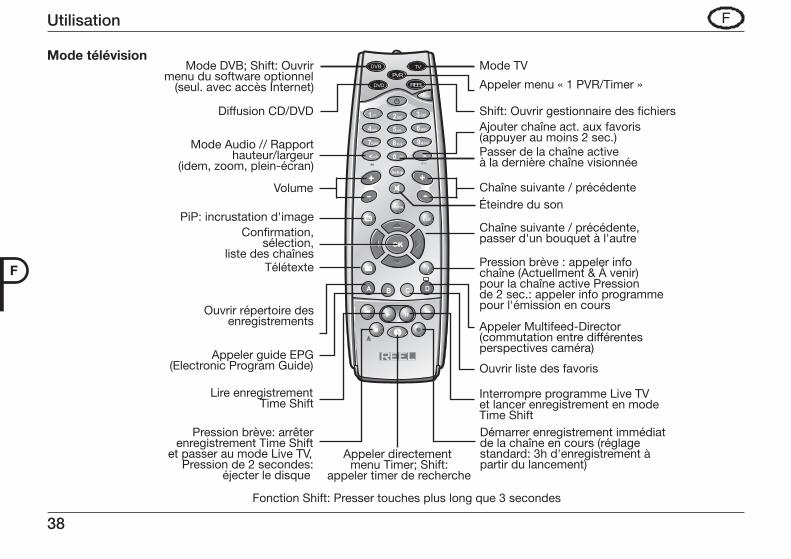
Utilisation
Mode télévisionTV
PVR
DVD
2ABC
5JKL4GHI
7
A B C D
?
PQRS
< >
8TUV
0 @+
AV
Setup
OK
Menu
Exit
1 3 DEF
Code
6MNO
9WXYZ
REEL
39
F
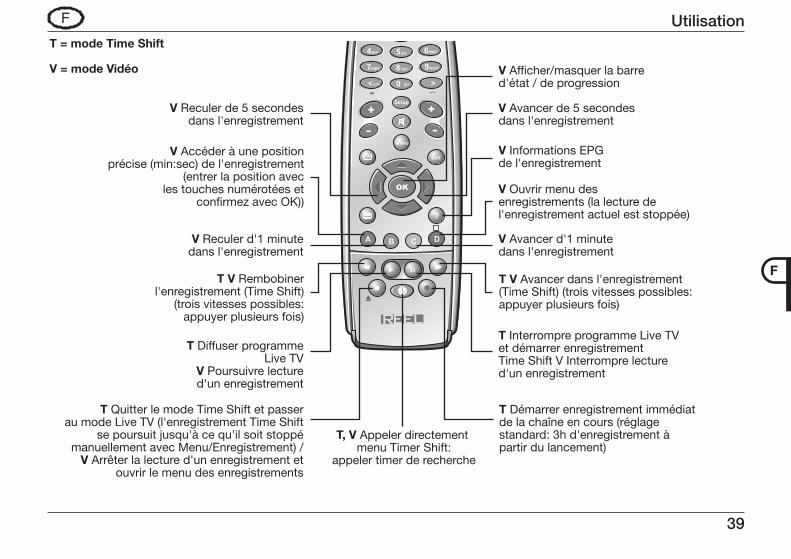
T Interrompre programme Live TV et démarrer enregistrement Time Shift V Interrompre lecture d'un enregistrement
V Ouvrir menu des enregistrements (la lecture de l'enregistrement actuel est stoppée)
V Informations EPG de l'enregistrement
V Avancer d'1 minute dans l'enregistrement
T V Rembobiner l'enregistrement (Time Shift)
(trois vitesses possibles: appuyer plusieurs fois)
V Accéder à une position précise (min:sec) de l'enregistrement
(entrer la position avec les touches numérotées et
confirmez avec OK))
T V Avancer dans l'enregistrement (Time Shift) (trois vitesses possibles: appuyer plusieurs fois)
T, V Appeler directement menu Timer Shift:
appeler timer de recherche
T Diffuser programme Live TV
V Poursuivre lecture d'un enregistrement
V Reculer d'1 minute dans l'enregistrement
V Avancer de 5 secondesdans l'enregistrement
V Afficher/masquer la barred'état / de progression
V Reculer de 5 secondes dans l'enregistrement
T = mode Time Shift
V = mode Vidéo
T Quitter le mode Time Shift et passer au mode Live TV (l'enregistrement Time Shift
se poursuit jusqu'à ce qu'il soit stoppé manuellement avec Menu/Enregistrement) /
V Arrêter la lecture d'un enregistrement et ouvrir le menu des enregistrements
T Démarrer enregistrement immédiat de la chaîne en cours (réglage standard: 3h d'enregistrement à partir du lancement)
2ABC
5JKL4GHI
7
A B C D
?
PQRS
< >
8TUV
0 @+
AV
Setup
OK
Menu
Exit
1 3 DEF
6MNO
9WXYZ
Utilisation
40
F
Menus d’écran & Langue Lun 19.01.09 15:50
Langue Francais·
Installation Lun 19.01.09 15:50
3 Assistant d'installation ·
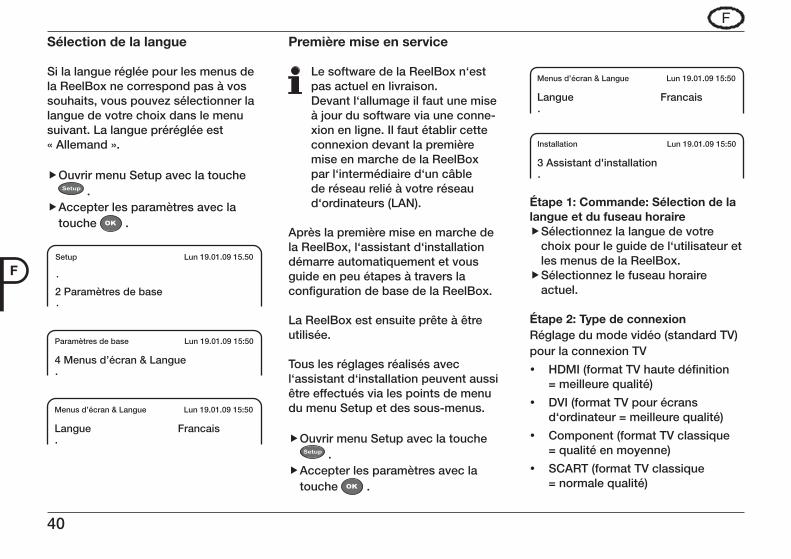
Étape 1: Commande: Sélection de la langue et du fuseau horaire
Sélectionnez la langue de votre fchoix pour le guide de l‘utilisateur et les menus de la ReelBox.Sélectionnez le fuseau horaire factuel.
Étape 2: Type de connexionRéglage du mode vidéo (standard TV)pour la connexion TV
HDMI (format TV haute définition y= meilleure qualité)
DVI (format TV pour écrans yd‘ordinateur = meilleure qualité)
Component (format TV classique y= qualité en moyenne)
SCART (format TV classique y= normale qualité)
Sélection de la langue
Si la langue réglée pour les menus dela ReelBox ne correspond pas à vossouhaits, vous pouvez sélectionner lalangue de votre choix dans le menusuivant. La langue préréglée est « Allemand ».
Ouvrir menu Setup avec la touche fSetup .
Accepter les paramètres avec la ftouche OK .
Première mise en service
Le software de la ReelBox n‘est pas actuel en livraison.Devant l‘allumage il faut une mise à jour du software via une conne-xion en ligne. Il faut établir cette connexion devant la première mise en marche de la ReelBox par l‘intermédiaire d‘un câble de réseau relié à votre réseau d‘ordinateurs (LAN).
Après la première mise en marche dela ReelBox, l‘assistant d‘installationdémarre automatiquement et vousguide en peu étapes à travers laconfiguration de base de la ReelBox.
La ReelBox est ensuite prête à êtreutilisée.
Tous les réglages réalisés avecl‘assistant d‘installation peuvent aussiêtre effectués via les points de menudu menu Setup et des sous-menus.
Ouvrir menu Setup avec la touche fSetup .
Accepter les paramètres avec la ftouche OK .
·
·
Setup Lun 19.01.09 15.50
2 Paramètres de base
Paramètres de base Lun 19.01.09 15:50
4 Menus d’écran & Langue·
Menus d’écran & Langue Lun 19.01.09 15:50
Langue Francais·
41
F
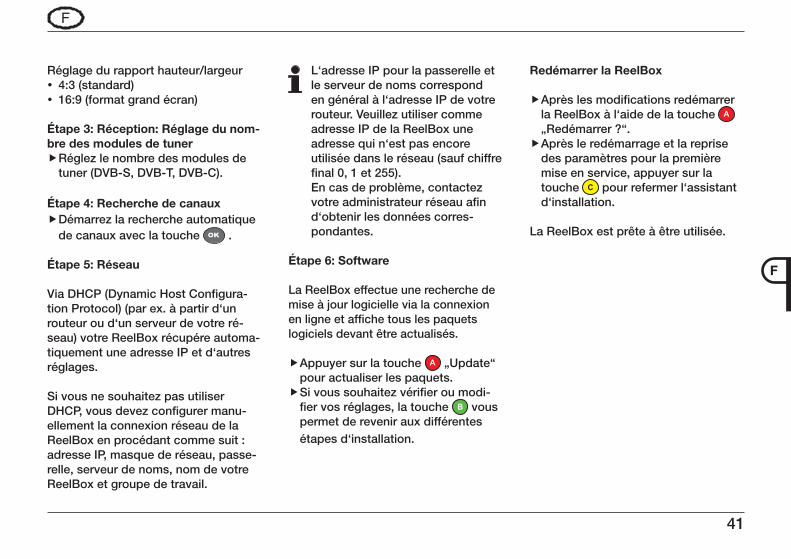
Réglage du rapport hauteur/largeur
4:3 (standard) y16:9 (format grand écran) y
Étape 3: Réception: Réglage du nom-bre des modules de tuner
Réglez le nombre des modules de ftuner (DVB-S, DVB-T, DVB-C).
Étape 4: Recherche de canauxDémarrez la recherche automatique fde canaux avec la touche OK .
Étape 5: Réseau
Via DHCP (Dynamic Host Configura-tion Protocol) (par ex. à partir d‘un routeur ou d‘un serveur de votre ré-seau) votre ReelBox récupére automa-tiquement une adresse IP et d‘autres réglages.
Si vous ne souhaitez pas utiliser DHCP, vous devez configurer manu-ellement la connexion réseau de la ReelBox en procédant comme suit :adresse IP, masque de réseau, passe-relle, serveur de noms, nom de votre ReelBox et groupe de travail.
L‘adresse IP pour la passerelle etle serveur de noms corresponden général à l‘adresse IP de votrerouteur. Veuillez utiliser commeadresse IP de la ReelBox uneadresse qui n‘est pas encoreutilisée dans le réseau (sauf chiffrefinal 0, 1 et 255).En cas de problème, contactezvotre administrateur réseau afind‘obtenir les données corres- pondantes.
Étape 6: Software
La ReelBox effectue une recherche de mise à jour logicielle via la connexion en ligne et affiche tous les paquets logiciels devant être actualisés.
Appuyer sur la touche f A „Update“ pour actualiser les paquets.Si vous souhaitez vérifier ou modi- ffier vos réglages, la touche B vous permet de revenir aux différentes étapes d‘installation.
Redémarrer la ReelBox
Après les modifications redémarrer fla ReelBox à l‘aide de la touche A „Redémarrer ?“.Après le redémarrage et la reprise fdes paramètres pour la première mise en service, appuyer sur la touche C pour refermer l‘assistant d‘installation.
La ReelBox est prête à être utilisée.
42
E
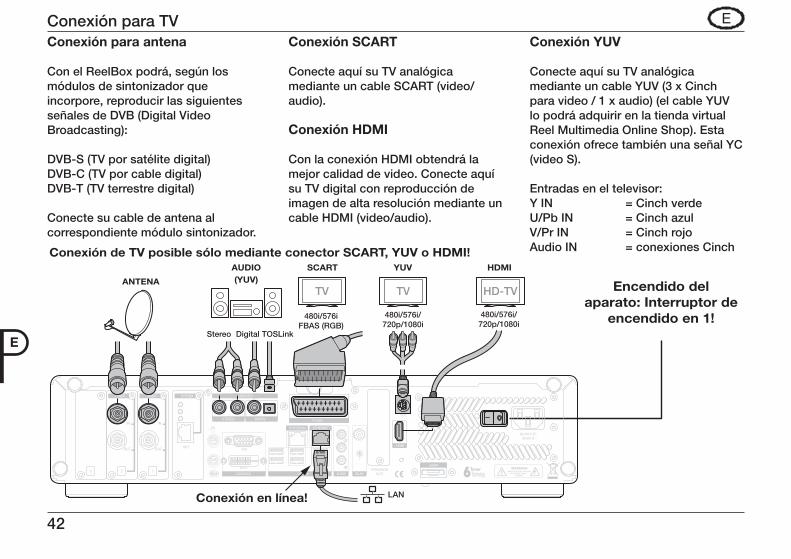
Conexión para antena
Con el ReelBox podrá, según los módulos de sintonizador que incorpore, reproducir las siguientes señales de DVB (Digital Video Broadcasting):
DVB-S (TV por satélite digital) DVB-C (TV por cable digital) DVB-T (TV terrestre digital)
Conecte su cable de antena al correspondiente módulo sintonizador.
Conexión SCART
Conecte aquí su TV analógica mediante un cable SCART (video/ audio).
Conexión HDMI
Con la conexión HDMI obtendrá la mejor calidad de video. Conecte aquí su TV digital con reproducción de imagen de alta resolución mediante un cable HDMI (video/audio).
Conexión YUV
Conecte aquí su TV analógica mediante un cable YUV (3 x Cinch para video / 1 x audio) (el cable YUV lo podrá adquirir en la tienda virtual Reel Multimedia Online Shop). Esta conexión ofrece también una señal YC (video S).
Entradas en el televisor:Y IN = Cinch verdeU/Pb IN = Cinch azulV/Pr IN = Cinch rojoAudio IN = conexiones Cinch
Conexión para TV

43
E
Para encender el ReelBox use el interruptor I/O. En el display se mostrará cómo progresa el encendido.
Accione este interruptor sólo en el modo Deep-Standby, ya que de lo contrario pueden producirse fallos en el disco duro.
El aparato tiene dos modos operativos de stand-by:
Pulsando el botón ON/OFF el aparato adoptará el modo de stand-by o deep standby o un arranque del sistema.
En el menú de configuración o „Se-tup“, en „Ajustes normales“, podrá Ud. configurar el modo Deep-Standby.
En la opción de admitir fDeepStandby seleccione „Sí“.En la opción de DeepStandby tras f(h) defina el tiempo, en horas, tras el cual el ReelBox cambiará automáticamente del modo Standby al modo Deep-Standby, si entre tanto no se pulsa ningún botón.
También podrá poner el aparato en fel modo Deep-Standby directamente si pulsa a tal fin el botón „Exit“.Si en la opción de admitir fDeepStandby elige „0“, el ReelBox adoptará directamente el modo Deep-Standby sin pasar por el Standby.
Pulsando el botón ON/OFF volverá a encenderse el aparato.
Con el interruptor I/O de la cara trasera del aparato podrá Ud. apagarlo por completo.
Navegación por menús
Escribir nombres o valores en los menús
Encendido y apagado del Reelbox
Seleccionar puntos de menú
Seleccionar ajustes de menú
OK Abrir, seleccionar y confirmar puntos de menú
Exi t Activar entrada de datos /retroceder al plano de menú anterior / cerrar menú
< Seleccionar mayúsculas / minúsculas para entrada de texto
44
E
TV
PVR
DVD
2ABC
5JKL4GHI
7
A B C D
?
PQRS
< >
8TUV
0 @+
AV
Setup
OK
Menu
Exit
1 3 DEF
Code
6MNO
9WXYZ
REEL
A B C D
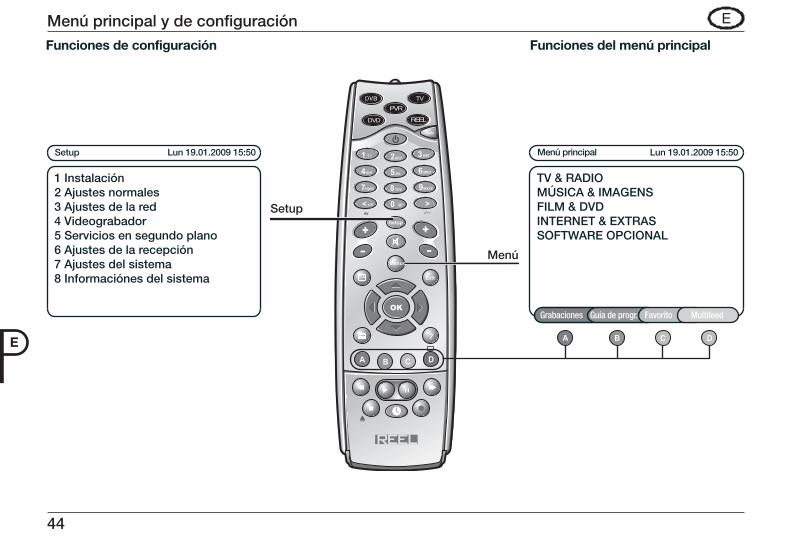
Menú principal y de configuración
45
E
Manejo
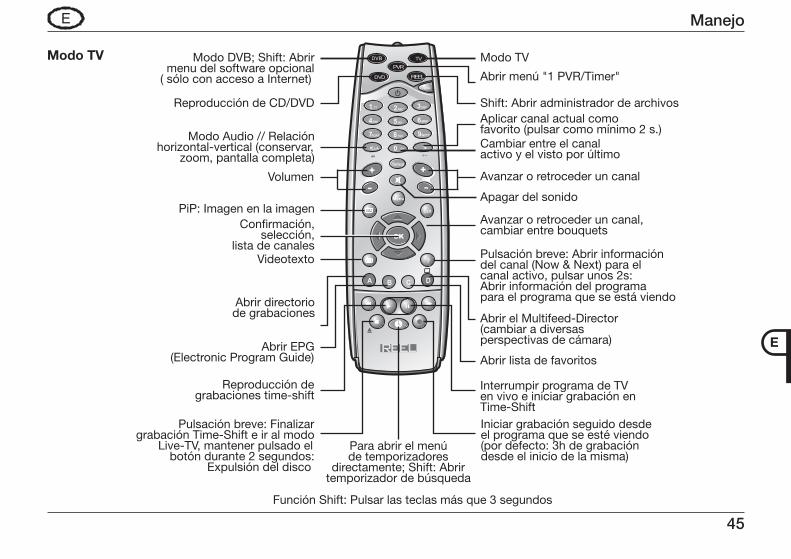
Modo TV TV
PVR
DVD
2ABC
5JKL4GHI
7
A B C D
?
PQRS
< >
8TUV
0 @+
AV
Setup
OK
Menu
Exit
1 3 DEF
Code
6MNO
9WXYZ
REEL
46
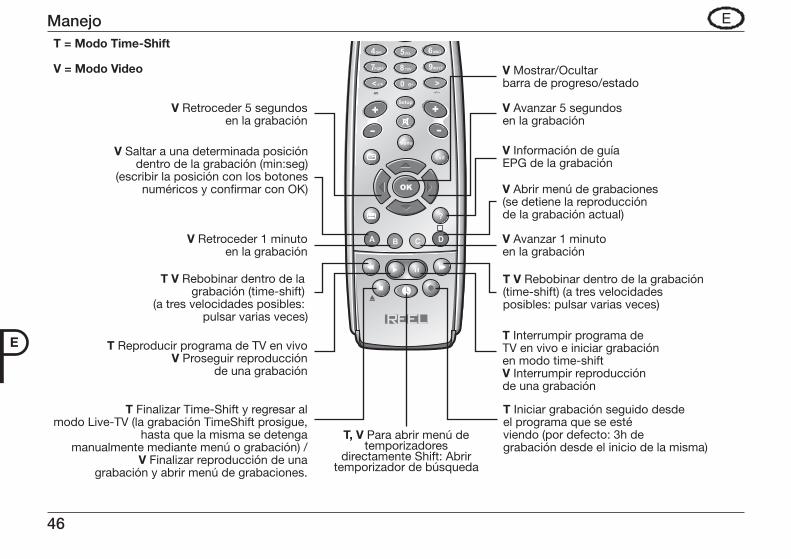
E T Interrumpir programa de TV en vivo e iniciar grabación en modo time-shiftV Interrumpir reproducción de una grabación
V Abrir menú de grabaciones (se detiene la reproducción de la grabación actual)
V Información de guía EPG de la grabación
V Avanzar 1 minuto en la grabación
T V Rebobinar dentro de la grabación (time-shift)
(a tres velocidades posibles: pulsar varias veces)
V Saltar a una determinada posición dentro de la grabación (min:seg)
(escribir la posición con los botones numéricos y confirmar con OK)
T V Rebobinar dentro de la grabación (time-shift) (a tres velocidades posibles: pulsar varias veces)
T, V Para abrir menú de temporizadores
directamente Shift: Abrirtemporizador de búsqueda
T Reproducir programa de TV en vivoV Proseguir reproducción
de una grabación
V Retroceder 1 minuto en la grabación
V Avanzar 5 segundosen la grabación
V Mostrar/Ocultar barra de progreso/estado
V Retroceder 5 segundos en la grabación
T = Modo Time-Shift
V = Modo Video
T Finalizar Time-Shift y regresar al modo Live-TV (la grabación TimeShift prosigue,
hasta que la misma se detenga manualmente mediante menú o grabación) /
V Finalizar reproducción de una grabación y abrir menú de grabaciones.
T Iniciar grabación seguido desde el programa que se esté viendo (por defecto: 3h de grabación desde el inicio de la misma)
2ABC
5JKL4GHI
7
A B C D
?
PQRS
< >
8TUV
0 @+
AV
Setup
OK
Menu
Exit
1 3 DEF
6MNO
9WXYZ
Manejo
47
E
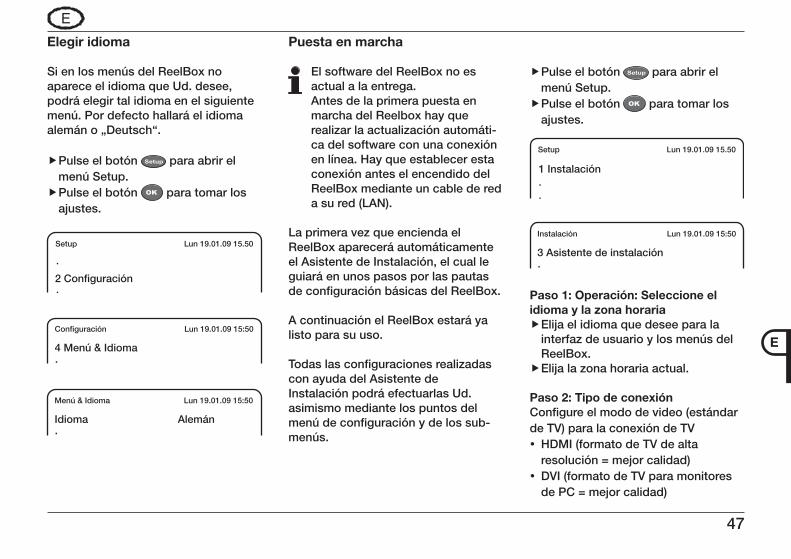
Elegir idioma
Si en los menús del ReelBox noaparece el idioma que Ud. desee,podrá elegir tal idioma en el siguientemenú. Por defecto hallará el idioma alemán o „Deutsch“.
Pulse el botón f Setup para abrir el menú Setup.Pulse el botón f OK para tomar los ajustes.
Puesta en marcha
El software del ReelBox no es actual a la entrega.Antes de la primera puesta en marcha del Reelbox hay que realizar la actualización automáti-ca del software con una conexión en línea. Hay que establecer esta conexión antes el encendido del ReelBox mediante un cable de red a su red (LAN).
La primera vez que encienda elReelBox aparecerá automáticamenteel Asistente de Instalación, el cual leguiará en unos pasos por las pautas de configuración básicas del ReelBox.
A continuación el ReelBox estará yalisto para su uso.
Todas las configuraciones realizadascon ayuda del Asistente deInstalación podrá efectuarlas Ud.asimismo mediante los puntos delmenú de configuración y de los sub-menús.
Pulse el botón f Setup para abrir el menú Setup.Pulse el botón f OK para tomar los ajustes.
1 Instalación
··
Setup Lun 19.01.09 15.50
Instalación Lun 19.01.09 15:50
3 Asistente de instalación·
Paso 1: Operación: Seleccione el idioma y la zona horaria
Elija el idioma que desee para la finterfaz de usuario y los menús del ReelBox.Elija la zona horaria actual. f
Paso 2: Tipo de conexiónConfigure el modo de video (estándar de TV) para la conexión de TV
HDMI (formato de TV de alta yresolución = mejor calidad)DVI (formato de TV para monitores yde PC = mejor calidad)
·
·
Setup Lun 19.01.09 15.50
2 Configuración
Configuración Lun 19.01.09 15:50
4 Menú & Idioma·
Menú & Idioma Lun 19.01.09 15:50
Idioma Alemán·
48
E
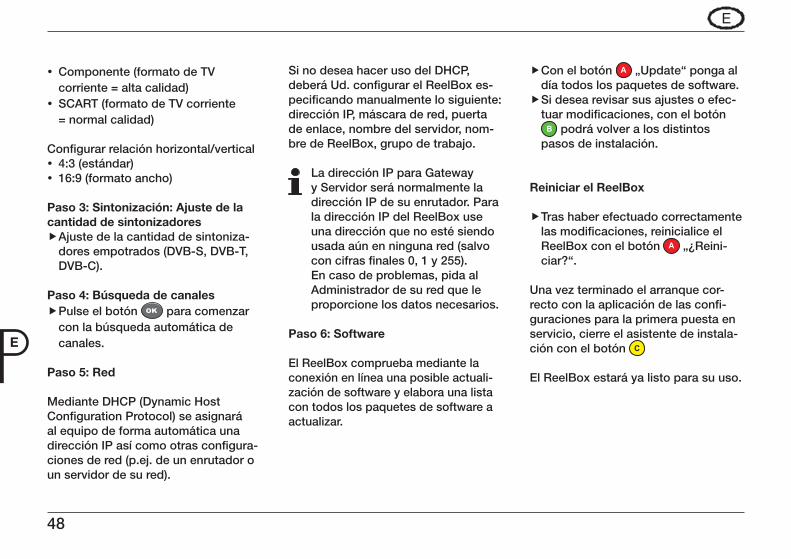
Componente (formato de TV ycorriente = alta calidad)SCART (formato de TV corriente y= normal calidad)
Configurar relación horizontal/vertical4:3 (estándar) y16:9 (formato ancho) y
Paso 3: Sintonización: Ajuste de la cantidad de sintonizadores
Ajuste de la cantidad de sintoniza- fdores empotrados (DVB-S, DVB-T, DVB-C).
Paso 4: Búsqueda de canalesPulse el botón f OK para comenzar con la búsqueda automática de canales.
Paso 5: Red
Mediante DHCP (Dynamic Host Configuration Protocol) se asignará al equipo de forma automática una dirección IP así como otras configura-ciones de red (p.ej. de un enrutador o un servidor de su red).
Si no desea hacer uso del DHCP, deberá Ud. configurar el ReelBox es-pecificando manualmente lo siguiente: dirección IP, máscara de red, puerta de enlace, nombre del servidor, nom-bre de ReelBox, grupo de trabajo.
La dirección IP para Gatewayy Servidor será normalmente ladirección IP de su enrutador. Parala dirección IP del ReelBox useuna dirección que no esté siendousada aún en ninguna red (salvocon cifras finales 0, 1 y 255).En caso de problemas, pida alAdministrador de su red que leproporcione los datos necesarios.
Paso 6: Software
El ReelBox comprueba mediante la conexión en línea una posible actuali-zación de software y elabora una lista con todos los paquetes de software a actualizar.
Con el botón f A „Update“ ponga al día todos los paquetes de software.Si desea revisar sus ajustes o efec- ftuar modificaciones, con el botón
B podrá volver a los distintos pasos de instalación.
Reiniciar el ReelBox
Tras haber efectuado correctamente flas modificaciones, reinicialice el ReelBox con el botón A „¿Reini-ciar?“.
Una vez terminado el arranque cor-recto con la aplicación de las confi-guraciones para la primera puesta en servicio, cierre el asistente de instala-ción con el botón C
El ReelBox estará ya listo para su uso.
49
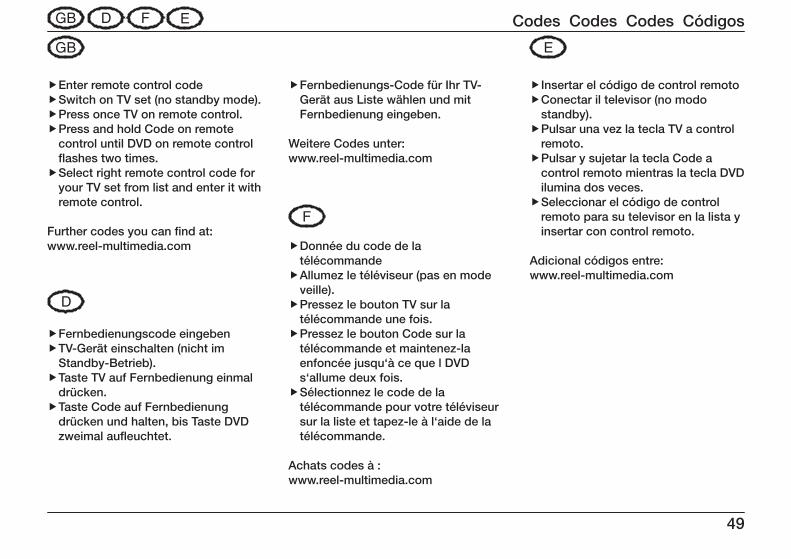
Enter remote control code fSwitch on TV set (no standby mode). fPress once TV on remote control. fPress and hold Code on remote fcontrol until DVD on remote control flashes two times.Select right remote control code for fyour TV set from list and enter it with remote control.
Further codes you can find at: www.reel-multimedia.com
Fernbedienungscode eingeben fTV-Gerät einschalten (nicht im fStandby-Betrieb).Taste TV auf Fernbedienung einmal fdrücken.Taste Code auf Fernbedienung fdrücken und halten, bis Taste DVD zweimal aufleuchtet.
Fernbedienungs-Code für Ihr TV- fGerät aus Liste wählen und mit Fernbedienung eingeben.
Weitere Codes unter: www.reel-multimedia.com
Donnée du code de la ftélécommandeAllumez le téléviseur (pas en mode fveille).Pressez le bouton TV sur la ftélécommande une fois.Pressez le bouton Code sur la ftélécommande et maintenez-la enfoncée jusqu‘à ce que l DVD s‘allume deux fois.Sélectionnez le code de la ftélécommande pour votre téléviseur sur la liste et tapez-le à l‘aide de la télécommande.
Achats codes à : www.reel-multimedia.com
Insertar el código de control remoto fConectar il televisor (no modo fstandby).Pulsar una vez la tecla TV a control fremoto.Pulsar y sujetar la tecla Code a fcontrol remoto mientras la tecla DVD ilumina dos veces.Seleccionar el código de control fremoto para su televisor en la lista y insertar con control remoto.
Adicional códigos entre: www.reel-multimedia.com
Codes Codes Codes Códigos
50
AEG1586 0636
Aiwa1940 0731 1934 1946 1938 1944 1985
Akai0039 0238 0586 0067 0401 0463 0248 0324 0702 0102 0193 0836 0442 0759 0478 0744 0546 0745 0632 0842 0611 0510 0247 0661 0246 0294 0208 0407 0636 0738 1067 1938 0503 0678
Alba0039 0067 0448 0400 0586 0066 0265 0248 0401 0698 1698 1067 0385 0246 0277 0193 0517 0611 0707 0609 1934 1938 0744 0473
Audiosonic0039 0067 0404 0139 0586 0744 0745 0247 0400 0367 0294 0248 0516 0458
Barco0410 0193
Bang & Olufsen0595 0117
Beko0400 0516 0458 0744 0745 0448 0067 1067 0586 0636
Blaupunkt0225 0230 0357 0478 0485 0200 0066
Casio0067 0586 0193 0379 1934
Clatronic0067 0277 0400 0401 0744 0248 0294 0586 0247 0039 0132 0350 0609 0678 1934 0636
Daewoo0664 0691 0404 1939 0067 1951 0586 0039 0246 0248 0247 1167 0208 0200 1932 1938 0871 0138 0702
Denon0175
Dual0379 0247 0067 0586 0289 0424 0429 0333 0193 1934 1167 0661
Durabrand1467 0208
Emerson0207 0208 0744 0117 0209 0277 0067 0586 0401 0100 0312 0350 1939 0516 0400 0193 1934
Ferguson0067 0103 0139 0655 0220 0222 0365 0590 0268 0223 0586 0134 0138 1934 0473
Firstline0039 0067 0246 0586 0247 0404 0277 0698 0744 0193 1698 0324 0415 1939 0132 0441 0379 0268 0102 0265 0238 1067 0838
Fujitsu0209 0236 0713 0102 0132 0883 0247 0193 0039 0067 0586 0289
Galaxis0400 0448 0067 0132 0586
GoldStar0067 0039 0208 0400 0320 0407 0247 0277 0586 0246 0193 0139 0636 0074 1940 1964 1956 0744 0745
Codes Codes Codes Códigos
51
Emerson0207 0208 0744 0117 0209 0277 0067 0586 0401 0100 0312 0350 1939 0516 0400 0193 1934
Ferguson0067 0103 0139 0655 0220 0222 0365 0590 0268 0223 0586 0134 0138 1934 0473
Firstline0039 0067 0246 0586 0247 0404 0277 0698 0744 0193 1698 0324 0415 1939 0132 0441 0379 0268 0102 0265 0238 1067 0838
Fujitsu0209 0236 0713 0102 0132 0883 0247 0193 0039 0067 0586 0289
Galaxis0400 0448 0067 0132 0586
GoldStar0067 0039 0208 0400 0320 0407 0247 0277 0586 0246 0193 0139 0636 0074 1940 1964 1956 0744 0745
Kathrein0586 0067
Kenwood0135
LaSAT0516 0400
Lenco0067 0039 0193 0404 0586 0134
LG0067 0400 0039 0407 0586 0247 0744 0246 0320 0193 0674 0208 0138 0636 0139 1964 1956 0728 0745 0853 0859 1667
Loewe0542 0663 0820 0067 0586 0400 0117 0322 0546
Manhattan0067 0586 0698 1067 0193 0808 1698
Marantz0067 0586 0442
Medion0067 0698 1067 1698 0542 0586 1167 0728 0838 1938 1467 1930 0275
Metz0225 0477 0397 0418 0776 0067 0117 0586 0617 0698 1067 1698
NEC0200 0617 0208 0039 0066 0350 0485 0404 0247 0067 0586 0041 0294 0734 0442 0275 0538 1734 0691
Neckermann0067 0400 0586 1535 1040 0230 0193 0357 0448 0379 0117 0277 0247 0441 0350 0542
Nordmende0139 0744 0429 0590 0226 0225 0067 0586 0365 0193
Orion0067 0209 0207 0385 0586 0265 1984 0744 0350 0473 0324 0041 0546 0039 0132 0294 0442 1946 1938 0063
Otto Versand0066 1535 0067 0247 1040 0350 0123 0542 0586 0225 0379 0265 0139 0324 0256 0277 0333 0039 0312 0458 0546
Codes Codes Codes Códigos
Palladium0400 0448 0067 1535 1040 0230 0586 0277 0357 0379 0117 0193 0247 0441 0744 1167
Pionier0400 0516
Panasonic0680 0256 0138 0280 0067 0586 0193 0238 0397 0538 0546 1340 1960 0880 0883 1971 1976
Philips0067 0586 0268 0042 0073 0117 0223 0453 0208 0138 0404 0039 0230
Pioneer0196 0041 0067 0139 0200 0586 0193 0453 0458 0400 0516 0542REEL Mul-timedia1454
Quelle0041 0067 1535 0100 0104 1040 0134 0442 0139 0542 0379 0066 0247 0277 0357 0135 0698 0586 0187 0225 0230 0294 0320 0324 0376 0451 0039 1698
Revox0067 0586 0400
RFT0458 0117 0322 0400 0102 0294 0067 0586
Saba0139 0655 0193 0365 0117 0429 0546 0528 0226 0590 0280 0744
Sagem0640 0485 0312
Samsung0648 0674 0617 0067 0208 0586 0039 0123 0247 0478 0400 0294 0246 0320 0102 0209 0238 0712 0193 0655 0256 0842
Sanyo0238 0187 0322 0041 0066 0075 0400 0369 0102 0246 0134 0247 0175 0442 0039 0538 0193 0067 0138 0586 0516 0765
Schaub Lorenz0379 0744 0636 0516 0404
Schneider0067 1167 0248 0277 0586 0401 0042 0698 0333 1698 0379 0424 0289 0247 1067 0193
SEG0066 0067 0247 0586 0294 1067 0698 1467 1698 0517 0039 0379 0193 0664 0132 0277 0246 0248 1939
Sharp0123 0039 1223 0187 0066 0324 0683 0223 0680 0546 0230 1947
Siemens0067 0187 0225 0230 0357 0586
Sony1535 1681 0041 1040 0066 0680 1955 0132 0383 0067 0586 0187
Tatung1586 0039 0066 0067 0586 0102 0546 0247 0041 0063 1938
Teac0039 0728 0067 0542 0294 0312 1467 0442 1067 0448 0586 0485 0742 0698 0247 1939 0208 0379 0200 0744 1962 0922 1698 1943 1979
TEC0247 0277 0039 0365 0367 0289 0067 0586 0193
Codes Codes Codes Códigos
52
Technics0280 0680
TechniSat0067 0586 0193 0678 0744 1939 1938
Telefunken0655 0104 0590 0139 0617 0365 0728 0742 0528 0429 0292 0103 0226 0067 0586 05160744 0520
Tevion0067 0586 0797 0678 0698 1167 0744 1067 1698
Thomson0139 0655 0590 0429 0365 0226 0067 0586 0520 0379
Uher0350 0067 0586 0236 0333 0404 0448 0516 0400 0289 0510
Universum0067 0376 0104 0135 0134 0225 0294 0400 0503 0277 0510 0230 0448 0041 0542 0324 0066 0187 0100 0193 0586 0451 0441 0320 0357 1535 1040 0698 0379 0247 0139 0367 0207 0661 0039 1067 1467 0200 1698
Waltham0247 0448 0415 0067 0586 0698 0139 1067 0520 1698
Watson0067 0350 0586 0193 0248 0609 0424 0039 0698 1067 1938 1467 1698
Wega0066 0067 0586 0117
Weltblick0067 0586 0350 0247
Vestel0067 0193 0247 0586 0698 1067 1698
Yamaha0680 0827
Yoko0067 0247 0294 0586 0248 0039 0451 0400 0369 0246 0277
Zanussi0236 0247
Zenith0208 1939
Record
Remote
Standby
Record
Remote
Standby
Record
Remote
Standby
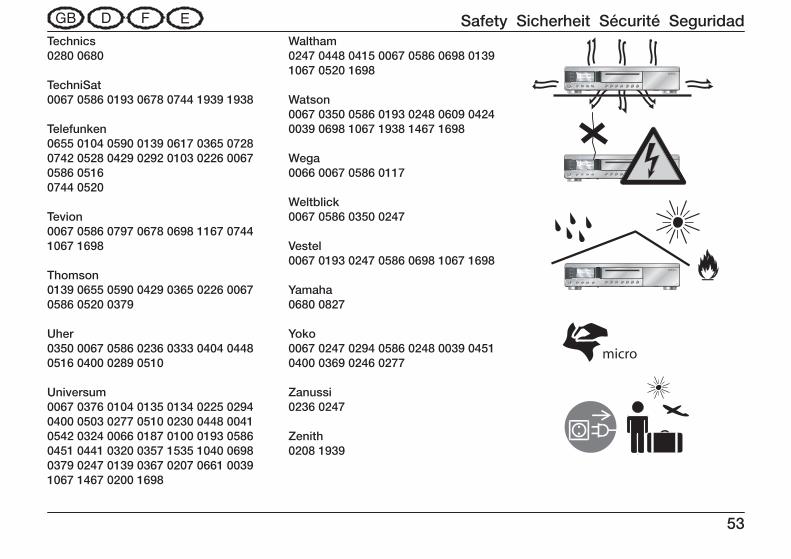
Safety Sicherheit Sécurité Seguridad
53
Warranty Gewährleistung Garantie Garantia
54
55
Notices Notizen Notes Notas